tutorial »powerpoint presentation on cd/dvd/usb stick« · tutorial »powerpoint presentation on...
TRANSCRIPT
IT | Tutorial »PowerPoint Presentation on CD/DVD/USB Stick« Author: MK | Version: 25.09.2015 | Page 1 of 9
ASIA AND EUROPE | KARL JASPERS CENTRE | VOSSSTRASSE 2 | D-69117 HEIDELBERG | WWW.ASIA-EUROPE.UNI-HEIDELBERG.DE
Tutorial »PowerPoint Presentation on CD/DVD/USB Stick«
Problem: You want to copy your PowerPoint presentation on a CD/DVD/USB stick to show it on another computer. If you only copy the presentation file (.ppt/.pptx) and
open this file on another computer, you will miss special fonts, pictures, videos or sounds that were embedded in your presentation on your own computer. This is because copying a PowerPoint file does not mean copying the presenta-tion and the embedded fonts and files, but only the presentation file.
Solution: 1. You can use the function “Embed fonts in the file” to embed the fonts. 2. You can use the function „Package Presentation for CD“ to create a copy of your presentation and all other embedded graphic/sound/video files. Brief instruction: A) Embed fonts (see page 2)
1. Click on “File” / “Save As” / “Tools” / Save Options”. 2. Enable “Embed fonts in this file” and “Embed all characters”. 3. Click on “OK” and “Save” => PowerPoint will embed all fonts in your file.
B) Embed fonts / images / videos / sounds via “Package presentation for CD” (see page 4)
1. Click on “File” / “Save”. 1. Click on “File” / “Save & Send” / “Package Presentation for CD”. 2. Type a name for your presentation under “Name the CD”. 2. Click on “Options”, enable “Linked files” and “Embedded TrueType Fonts” 3. Click on “Copy to Folder…” (=USB stick) or “Copy to CD” (=CD/DVD). 4. Click on “Browse…”, select your USB stick, click on “Select” and on “OK”. 5. Click on „Yes“ to include all files. Finished. C) Transfer your presentation as a compressed .zip file via e-mail/internet (see page 8)
1. Start the Windows Explorer 2. Right-click on your presentation file or folder and click on “Send to / Compressed (zipped) folder”.
3. Windows will create a compressed .zip file that be sent via e-mail/internet. 4. Find additional notes to transfer large files via internet on page 8.
A detailed instruction including screenshots can be found on the following pages.
This tutorial is for Windows 7 / PowerPoint 2010.
For PowerPoint 2003 and 2007 please see:
http://support.microsoft.com/kb/828504
For PowerPoint 2013 please see:
https://support.office.com/en-us/article/Save-your-presentation-to-a-CD-ac1ae03e-c5f2-4a0d-8bcb-3c48741117c9
IT | Tutorial »PowerPoint Presentation on CD/DVD/USB Stick« Author: MK | Version: 25.09.2015 | Page 2 of 9
ASIA AND EUROPE | KARL JASPERS CENTRE | VOSSSTRASSE 2 | D-69117 HEIDELBERG | WWW.ASIA-EUROPE.UNI-HEIDELBERG.DE
A) Embed fonts
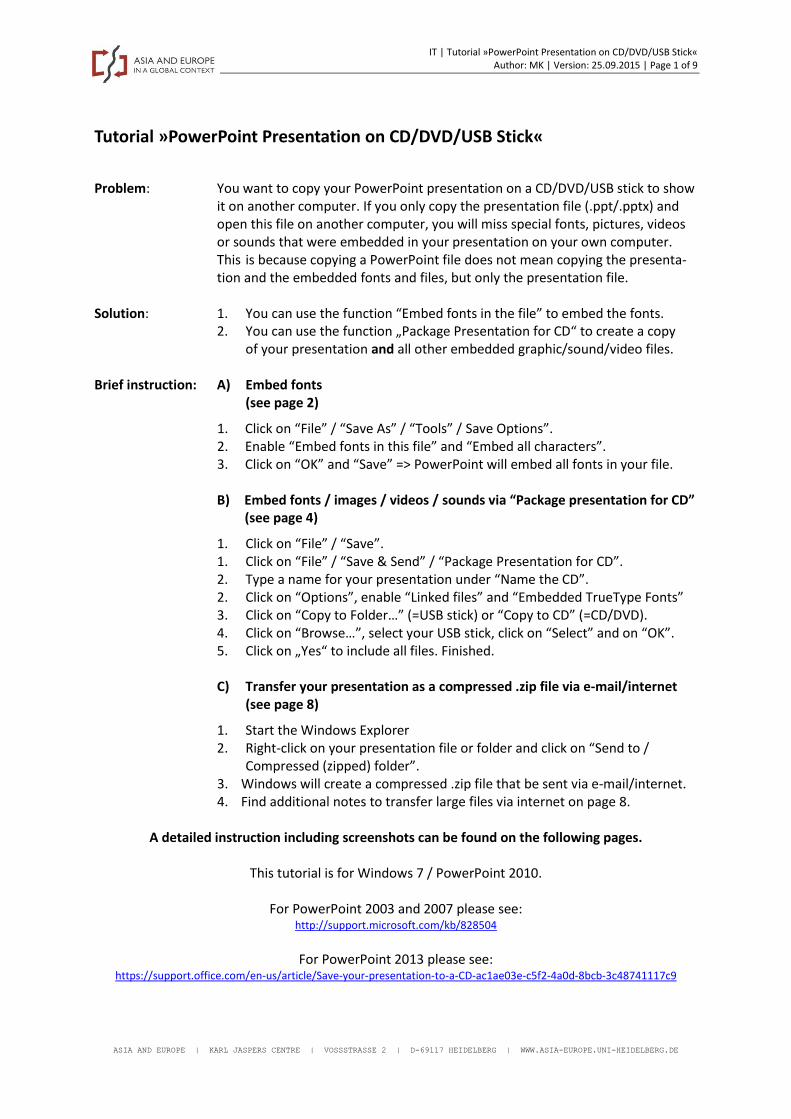
Figure 1: Click on “File”.
Figure 2: Click on „Save As“.
Figure 3: Click on „Tools / Save Options…“.
IT | Tutorial »PowerPoint Presentation on CD/DVD/USB Stick« Author: MK | Version: 25.09.2015 | Page 3 of 9
ASIA AND EUROPE | KARL JASPERS CENTRE | VOSSSTRASSE 2 | D-69117 HEIDELBERG | WWW.ASIA-EUROPE.UNI-HEIDELBERG.DE
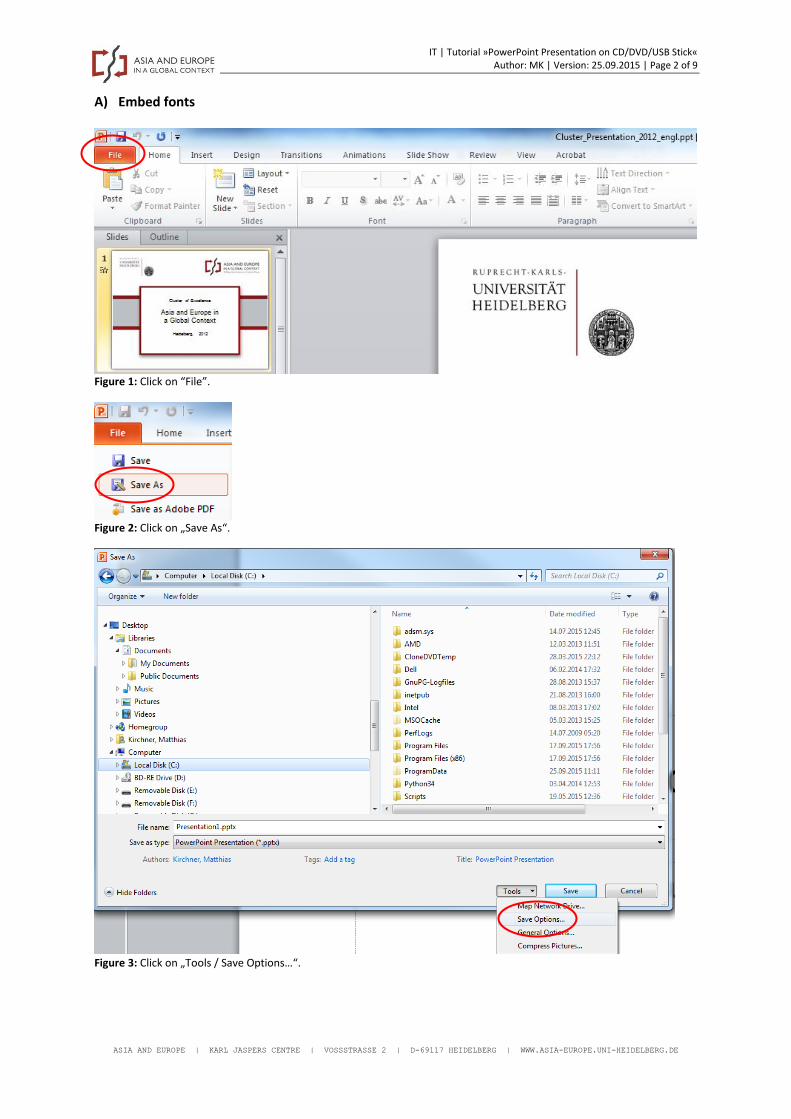
Figure 4: Enable „Embed fonts“ and „Embed all characters“. Click on “OK”.
Figure 5: Insert a „File name“ for your presentation and click on “Save”. Finished. All fonts are now embedded in you .ppptx presentation file and can be seen on every other computer you want to use to show your presentation.

IT | Tutorial »PowerPoint Presentation on CD/DVD/USB Stick« Author: MK | Version: 25.09.2015 | Page 4 of 9
ASIA AND EUROPE | KARL JASPERS CENTRE | VOSSSTRASSE 2 | D-69117 HEIDELBERG | WWW.ASIA-EUROPE.UNI-HEIDELBERG.DE
B) Embed fonts / images / videos / sounds via “Package presentation for CD”
PowerPoint presentations often contain additional files that are inserted or linked to the original .pptx presentation file. These files may be images, audio, pdfs, video, etc. In addition, the presenta-tion may be viewed on a computer that does not store the same fonts that are used in the Power-Point presentation or that may not have PowerPoint installed. The “Package presentation for CD” function bundles everything together, makes sure that the associated files can be viewed or played and that the text displays in the appropriate font. In addition to your presentation file and the embedded image / video / audio files, the package will include the “PowerPoint Viewer” (pptview.exe). This ensures that your presentation will work even on computer where PowerPoint is not installed or where a different version of PowerPoint is in-stalled, because the “PowerPoint Viewer” includes all PowerPoint functions that are necessary to show (but not to edit) a presentation directly from a USB stick or a CD. The function is labeled “Package presentation for CD” but it is also possible to store the bundled presentation files on a DVD, a USB stick or a USB hard drive.
Figure 6: After you have completely finished your presentation including your texts, pictures, videos and music files, click on “File”.
Figure 7: Click on „Save“. This will save your presentation to a .pptx file that can be used for the „Package presentation“. The original .pptx file will remain on your computer, the “Package presentation” will create a copy of this file.

IT | Tutorial »PowerPoint Presentation on CD/DVD/USB Stick« Author: MK | Version: 25.09.2015 | Page 5 of 9
ASIA AND EUROPE | KARL JASPERS CENTRE | VOSSSTRASSE 2 | D-69117 HEIDELBERG | WWW.ASIA-EUROPE.UNI-HEIDELBERG.DE
Figure 8: Click on „Save & Send“ => „Package Presentation for CD“ => „Package for CD“. This function is not only intended for CDs, but also for DVDs and USB sticks or USB hard drives.
Figure 9: Click on „Options…“ and make sure that the two options „Linked files“ and „Embedded TrueType fonts“ are ena-bled.
Figure 10: If you want to copy your presentation to a CD/DVD, click on „Copy to CD“. If you want to copy your presentation to a USB stick or USB hard drive, click on “Copy to Folder…”. In this example we use “Copy to folder…”.

IT | Tutorial »PowerPoint Presentation on CD/DVD/USB Stick« Author: MK | Version: 25.09.2015 | Page 6 of 9
ASIA AND EUROPE | KARL JASPERS CENTRE | VOSSSTRASSE 2 | D-69117 HEIDELBERG | WWW.ASIA-EUROPE.UNI-HEIDELBERG.DE
Figure 11: Click on „Browse…“.
Figure 12: Select your USB stick (in this example: “TrueCrypt Traveler Disk (E:)”) and click on “Select”.
Figure 13: Click on „OK“.
Figure 14: Click on „Yes“ to include all files that are linked to your presentation (videos, music, pictures etc.).
IT | Tutorial »PowerPoint Presentation on CD/DVD/USB Stick« Author: MK | Version: 25.09.2015 | Page 7 of 9
ASIA AND EUROPE | KARL JASPERS CENTRE | VOSSSTRASSE 2 | D-69117 HEIDELBERG | WWW.ASIA-EUROPE.UNI-HEIDELBERG.DE
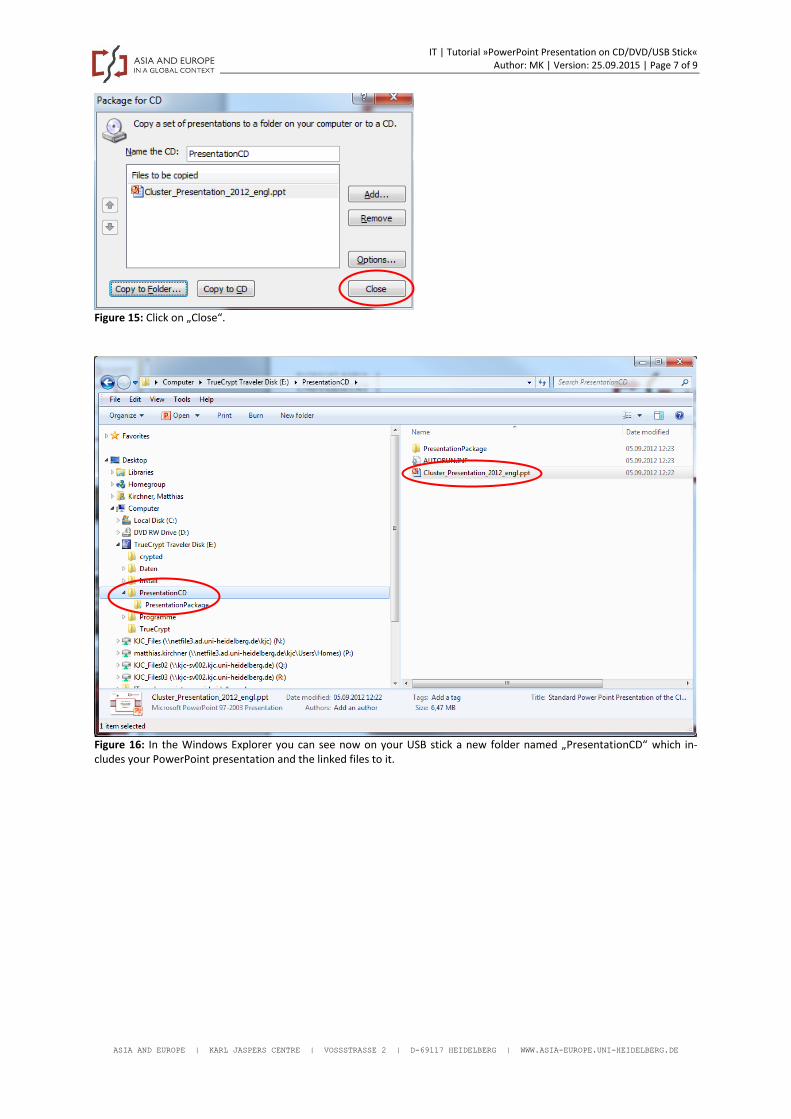
Figure 15: Click on „Close“.
Figure 16: In the Windows Explorer you can see now on your USB stick a new folder named „PresentationCD“ which in-cludes your PowerPoint presentation and the linked files to it.

IT | Tutorial »PowerPoint Presentation on CD/DVD/USB Stick« Author: MK | Version: 25.09.2015 | Page 8 of 9
ASIA AND EUROPE | KARL JASPERS CENTRE | VOSSSTRASSE 2 | D-69117 HEIDELBERG | WWW.ASIA-EUROPE.UNI-HEIDELBERG.DE
C) Transfer your presentation as a compressed .zip file via e-mail/internet
If you want to send your presentation via e-mail to the organization team before the conference starts, it is necessary to create a compressed ZIP file of your presentation. Otherwise large files oder presentation packages that have been created by using the “Package presentation for CD” function cannot be send via e-mail.
Figure 17: Your folder “PresentationCD” with your presentation created with „Package presentation for CD“ on a USB stick.
Figure 18: To create a compressed .zip file to send it via e-mail/internet, click on the folder “PresentationCD” with the right mouse button, click on “Send to…” and “Compressed (zipped) folder.

IT | Tutorial »PowerPoint Presentation on CD/DVD/USB Stick« Author: MK | Version: 25.09.2015 | Page 9 of 9
ASIA AND EUROPE | KARL JASPERS CENTRE | VOSSSTRASSE 2 | D-69117 HEIDELBERG | WWW.ASIA-EUROPE.UNI-HEIDELBERG.DE
Figure 19: Now a file „PresentationCD.zip“ will be created that can be sent via e-mail/internet.
Additional note to transfer large files via the internet:
If the .zip file is too large to be sent via e-mail (ca. over 20MB), you can use services to transfer large files via the internet. In general, your university should provide such a service which is consistent with the privacy policy of your university. For universities in Germany/Baden-Württemberg, the ser-vice “FEX” is used to transfer large files via the internet:
http://fex.belwue.de/fup If you do not have such a service at your university, the following private services can be recom-mended:
https://www.mydrive.ch/
https://tresorit.com/de/