transfer student guidance cbt - dc assessments · transfer student guidance 4 step directions 3. is...
TRANSCRIPT

Transfer Student Guidance Version 1.0 February 8, 2019
Student Guidance
1
Document Overview
The purpose of this document is to provide information on how to use PearsonAccessnext to successfully manage students who transfer schools. The following sections provide step-by-step directions on how to move students through the use of the PearsonAccessnext user interface or import/export process. These directions apply to both computer and paper-based formats.
What is taking place?
A new student has moved to my district/school. Go to page 2
A student has moved away from my district school. Go to page 10

Transfer Student Guidance 2
Directions for the Transfer-To District/School: How to Register Students through the User Interface
The purpose of this section is to provide information on how to use PearsonAccessnext to successfully register students who move to your organization. Users
assigned the LEA Test Coordinator Role and School Test Coordinator Role can manually create/locate, enroll, register, and assign a test to a student record. Users assigned the LEA Test Coordinator Role can request a student transfer through the “Work Request” screen. For information about Registering Students via SR/PNP go to page 20. For information about Requesting Transfers through the File Import go to page 21. Steps to add Students to your Organization through the PearsonAccessnext User Interface.
Enter student demographic information
on the Create/Edit Student Screen.
Was the Student Found?
Is the Organization field populated?
Is the field populated with
your organization?
The student is already enrolled to your org. Verify
administration data and test assignment data.
The student does not exist within the system.
Continue by enrolling, registering, and assigning a
test to the student.
The student exists within the system but is not
enrolled under the current administration. Continue by enrolling, registering, and assigning a test to a
student.
The student is currently enrolled to another
organization. Use the work request feature to transfer
the student.
Yes Yes Yes
No No NoGo to Steps Go to Steps
Go to Steps Go to Steps Go to Steps

Transfer Student Guidance 3
Searching for a Student Record
Step Directions 1. Enter student demographic
information on the Create/Edit Student Screen.
Choose the administration from the dropdown in the top banner in PearsonAccessnext.
Go to Setup > Students.
Select Create/Edit Students, Register Students, and Manage Student Tests under the Tasks dropdown menu and click Start.
On the Create/Edit Students screen, enter the student’s demographic information. Make sure to correctly enter all information, especially the State Student ID.
Click Create.
2. Was the Student Found? A. Yes - If a student record is matched, then the user will get the following banner message: "Success: Matching student has been located in the system and has been added to your selected students list. New student has not been created." Go to Step 3.
B. No - If a student was not found, then a "Success" banner message will appear. Continue to the Registering and Assigning a Test to a Student Record steps. Note: PearsonAccessnext uses matching criteria to locate existing student records. You will receive an error stating value(s) entered did not match the value in the database if the State Student Identifier and at least two of the following fields did not match exactly what is currently recorded in PearsonAccessnext: First Name (full), Last Name (full), Birthdate (YYYY-MM-DD format), Local Student Identifier, and Sex.

Transfer Student Guidance 4
Step Directions 3. Is the Organization Field
Populated? A. Yes - Go to Step 4. B. No - The student exists within the system but is not enrolled under the current administration.
a. Select the student record from the left side of screen. b. Populate the organization field again and click Save. c. Continue to the Registering and Assigning a Test to a Student Record steps.
4. Is the Organization Field Populated with your Organization?
A. Yes - Go to Step 5. B. No - The student is currently enrolled to another organization. Exit the task and continue to the requesting a
Transfer “Work Request” steps. Note: If you are a district user, and a student is transferring between two schools within your district, there are additional options to update the student record. This would involve removing the student’s test assignments, replacing the organization enrollment, then reassigning the test assignments. If you are comfortable with the system and know how to do this, please proceed. However, due to different variables that and timing, it is recommended to use the Transfer “Work Request” step to ensure students are registered and enrolled correctly.
5. The Student Record is currently enrolled to your Organization.
The student is already enrolled to your org. You should verify administration data and test assignment data. For more information, view the Registering and Assigning a Test to a Student Record steps. If all data is correct, no further action is required.

Transfer Student Guidance 5
Registering and Assigning a Test to a Student Record
Step Directions Register Student On the Register Students screen, select the student to register and check the Registered option. The student’s Grade
Level and Responsible School Code will also need to be entered.
Manage Student Tests On the Manage Student Tests screen click Create Student Tests and enter the required information to create a new test. Click Save.
o Note: Students will still need to be placed in to a test session once the test assignment is created.

Transfer Student Guidance 6
How to Create a “Work Request” for Transfer Students Only users assigned the State Role or LEA Role can create a transfer “Work Request”.
Step Directions 1. Search for the Student Record Choose the administration from the dropdown in the top banner in PearsonAccessnext.
Go to Setup > “Work Request” s, click the Select Tasks dropdown menu and select Request/Edit Enrollment Transfer. Click Start.
To search for the student to be transferred, enter the student details and click Search.
2. Was a record found? A. Yes - Go to Step 3. B. No – Double-check the demographic information that you entered is correct. PearsonAccessnext uses matching
criteria to locate existing student records. You will receive an error stating the student wasn’t found if the values entered did not match the values in the database. The State Student Identifier First Name (full), Last Name (full), and Birthdate (YYYY-MM-DD format must all match for the record to be found. If you verified all information is correct, go to the Searching for a Student Record step to see if the student is enrolled under the current administration. Note: If you still experience difficulties, please contact Pearson Customer Support.

Transfer Student Guidance 7
3. Request the Transfer If a match is located, under the Change Enrollment To dropdown menu, select the organization where the student is to be transferred.
Click Send Request.
Note: The student will be transferred after the request is approved by the transfer-from organization, as described in Locating and Approving a Transfer “Work Request.” Note: If the Change Enrollment From field is blank, the student is not currently enrolled to the administration. Go to Step 1 of the Searching for a Student Record.
Check the status of your transfer “Work Request”
Go to Setup > “Work Request” s, and use the Status Filters found on the left side of the screen to view the status of your transfer “Work Request.” Once approved, go to Step 4. Contact the transfer-from district or your state if the student transfer request is not approved or rejected within a reasonable amount of time.

Transfer Student Guidance 8
Step Directions 4. Verify Registration and Test
Assignment Information. Once the student is transferred your organization, you should verify student registration data and test assignments.
Go to Setup > Students.
Search and select the student record, select Register Students and Manage Student Tests under the Tasks dropdown menu and click Start.
On the Register Student screen, verify the responsible school code and demographic fields. Make any updates and click Save.
o Important: Make sure to update the Responsible School Code. The Responsible School Code is auto-populated with the Testing School Code when a student is initially registered via a SR/PNP import and that value is remains when the student transfer request is approved. . Please review the Operational Report “Students where Responsible District/School is different from Testing District/School” to confirm all students’ Responsible School Codes are correct.
Toggle to Manage Student Test Screen and verify all test assignment data is correct. Make any updates and click Save.

Transfer Student Guidance 9
Step Directions 5. Transfer student test
assignment from Transferred session.
If the student was assigned to a test session under their previous organization, then a new test session will automatically be created in the Transfer-To School and transferred student test assignments will be automatically assigned to these sessions. The test sessions under the Transfer-To School will be named “Transfer” followed by the test subject and grade level (e.g., Transfer-Grade 3 Mathematics). Important: The transfer sessions cannot be prepared or started. Students will need to be moved from these sessions to other test sessions to test.
Go to Testing > Students in Sessions and add the transfer sessions you need to manage to the Session List.
Select the students to move from the list at the bottom of the screen.
Select the Move Students between Sessions under the Tasks dropdown menu and click Start.
On the Move Students between Sessions screen, select the Sessions search box to move the student to an existing session or click Create to move the student to a new session. o If creating a new session, complete the session details in the pop-up window and click Create.
Click the check box for the session to move the student(s) to and click Move.
Important: The transfer sessions cannot be prepared or started. Students will need to be moved from these sessions to other test sessions to test.

Transfer Student Guidance 10
Directions for the Transfer-From District/School: How to Unregister Students through the User Interface
The purpose of this section is to provide information on how to use PearsonAccessnext to successfully unregister students who move from your organization. Users
assigned the LEA Test Coordinator Role and School Test Coordinator Role can manually create/locate, enroll, register, and assign a test to a student record. Users assigned the LEA Test Coordinator Role can request a student transfer through the “Work Request” screen. For information about Unregistering Students via SR/PNP go to page 18. For information about Approving/Rejecting Transfers through the File Import go to page 19.

Transfer Student Guidance 11
Steps to remove Students from your Organization through the PearsonAccessnext User Interface.
Has another organization requested
a student transfer on the work request
screen?
Yes
Yes
No
No
The student is not enrolled under another administration and therefore cannot have the
current organization enrollment removed. The
student’s new school should request a transfer request or the student record should be
deleted.
Yes
Go to Setup>Work Requests.
Approve the work request. The student will be automatically transferred to their new organization.
On the Register Students screen, can you
uncheck Registered?
On the Enroll Students screen, can you uncheck the enrollment
box and successfully save?
Uncheck Registered (Note: any test
assignments will be automatically deleted).
The student is successfully unenrolled
and registered from your organization.
Does the student have all test units showing a
status of ready?
The student is in a prepared or started session. Remove the
student from the session.
The student has started a test and cannot be un-enrolled/
registered. The student’s new school should request a
transfer request.
No
No
Yes
Go to Steps Go to Steps
Go to Steps
Go to Steps
Go to Steps
Go to Steps
Go to Steps

Transfer Student Guidance 12
Locating and Approving a Transfer “Work Request” Only users assigned the State Role or LEA Role can create a transfer “Work Request.”
Step Directions 1. Look for a Transfer Request Choose the administration from the dropdown in the top banner in PearsonAccessnext.
Select the Bell Icon, check to see if there is a Transfer Request. If so, click Transfer Requests. (This will automatically take you to the Setup > “Work Request” s screen).
2. Has another organization requested a student transfer?
A. Yes - Go to Step 3. B. No – Go Manually Removing Student Enrollment and Registration Steps.

Transfer Student Guidance 13
Step Directions 3. Approve /Reject the Transfer
“Work Request” Selected the record, select Approve/Rejected Enrollment Transfer from the Tasks dropdown menu and then click
Start.
On the Approve/ Reject Enrollment Transfer screen, click Approve.
Transfer Student Guidance 14
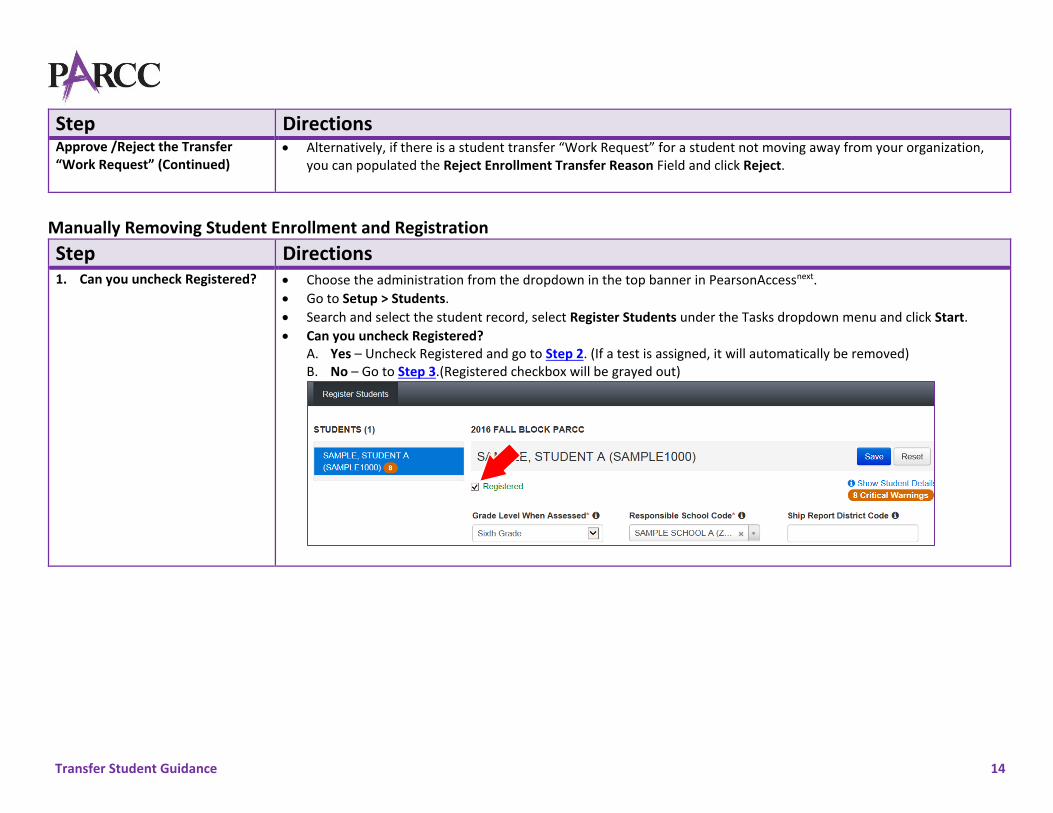
Step Directions Approve /Reject the Transfer “Work Request” (Continued)
Alternatively, if there is a student transfer “Work Request” for a student not moving away from your organization, you can populated the Reject Enrollment Transfer Reason Field and click Reject.
Manually Removing Student Enrollment and Registration
Step Directions 1. Can you uncheck Registered? Choose the administration from the dropdown in the top banner in PearsonAccessnext.
Go to Setup > Students.
Search and select the student record, select Register Students under the Tasks dropdown menu and click Start.
Can you uncheck Registered? A. Yes – Uncheck Registered and go to Step 2. (If a test is assigned, it will automatically be removed) B. No – Go to Step 3.(Registered checkbox will be grayed out)

Transfer Student Guidance 15
Step Directions 2. Can you uncheck the
Enrollment Box and Successfully Save?
C. Select Enroll Students under the Add Task dropdown menu and click Add.
Uncheck the organization enrollment and click Save. Note: Make sure to uncheck the organization check box to the right of the student record, not the organization name in the Organizations field.
Were you able to successfully save?
A. Yes – A success message appeared. The student enrollment and registration has been successfully removed from your organization. No further action is required.
B. No – An error message appeared. Go to Manually Deleting a Student Record Steps.

Transfer Student Guidance 16
Step Directions 3. Does the student have all test
units showing a status of ready*?
You will not be able to uncheck Registered on the Register Students screen if the student currently has a test assignment in a prepared or started session. Go to Testing/Students in Session and verify the status of the student’s test units. Does the student have all test units showing a status of ready*?
A. Yes – Remove the student from the session(s) and go to Step 1. B. No – The student has a test unit in a status of resumed, resumed upload, active, exited, completed, or marked
complete. PearsonAccessnext prevents the deletion of started tests. If the student transferred to another organization within your state, the new organization will need to request a “Work Request” transfer. Contact your state for further direction.
* (Rare) Students that have a unit of the test voided automatically get reassigned the same unit of the test. The original unit that was voided is not deleted but instead is saved as a completed test. Contact Pearson Customer Support if you show all students in a ready status but are unable to uncheck Registered.

Transfer Student Guidance 17
Manually Deleting a Student Record PearsonAccessnext requires a student record to have an organization association under at least one administration. You will be unable to remove the Organization Enrollment if the student has not be enrolled under another administration. Instead, the student record will need to be deleted.
Step Directions 1. Manually Deleting a Student
Record (for users assigned the Delete Student add-on user role).
Choose the administration from the dropdown in the top banner in PearsonAccessnext.
Go to Setup > Students.
Search and select the student record, select Register Students under the Tasks dropdown menu and click Start.
On the Delete Students task screen, select the student record and click Delete.

Transfer Student Guidance 18
Directions for the Transfer-From District/School: How to Unregister Students through the File Import/Export Process
Note: These steps apply to students who have not started testing. If a student leaves a district/school they will need to be unregistered for current/upcoming administration. The user who completes this task will need to have a role of the LEA Test Coordinator or School Test Coordinator.
Step Directions 1. Export SR/PNP File Choose the administration from the dropdown in the top banner in PearsonAccessnext.
From Setup > Import/Export Data, open the task list and select Import Export Data. Click Start.
Select Student Registration Export. Set the File Layout Type to CSV and clear the Test Status Filters. Click Process.
After the file is exported, it will be listed at Setup > Import / Export Data.
2. Update the SR/PNP File to Unregister the Student
Once the file is processed and downloaded, filter the file to include only the student registrations that are to be removed.
Ensure that the custom formatting is correct for the appropriate columns (e.g., birthdate, grade level).
Save the file locally.
3. Import the file as a Student Registration Delete File
From Setup > Import/Export Data, open the task list and select Import Export Data. Click Start.
Select Student Registration Delete. Set the File Layout Type to CSV. Choose the file and click Process.
4. Troubleshooting Errors An error stating “The test: <Test Name> for student <Student Name> is complete. It cannot be deleted.” is received when a student is already started at least one unit of the test. If you receive this error, see the directions on submitting a “Work Request”.
Tip: Use Microsoft Excel’s Text Import Wizard to retain source formatting when opening an exported csv file. (Directions apply to: Excel 2016, Excel 2013, Excel 2010, and Excel 2007. 1. Open a blank Excel spreadsheet and select cell A1. 2. On the Data tab, in the Get External Data group, click From Text. 3. Locate and double-click the text file that you want to import. 4. On Step 1 of the Text Import Wizard, select Delimited and then click Next. 5. On Step 2 of the Text Import Wizard, check Comma as delimiter and then click Next. 6. On Step 3 of the Text Import Wizard, scroll horizontally in the Data preview until you see the last field. Hold down your control & shift keys and select the last
column title. This will select all columns in the file. Select Text from the Column Data Format option list and then click Finish.

Transfer Student Guidance 19
Directions for the Transfer-From District/School: How to Approve/Reject Transfers through the File Import/Export Process
Step Directions 1. Export Enrollment Transfer
File Choose the administration from the dropdown in the top banner in PearsonAccessnext.
From Setup > Import/Export Data, open the task list and select Import Export Data. Click Start.
Select Transfer Enrollment Export. Click Process.
After the file is exported, it will be listed at Setup > Import / Export Data.
2. Create a new Transfer Work Request Import File
Download the Transfer Enrollment Export File.
Populate Column M – Action Field with “A” to approve or “R” to reject the enrollment transfer request. a. If rejecting the request, populate Column L – Reject Reason.
Ensure that the custom formatting is correct for the appropriate columns (e.g., birthdate, grade level).
Save the file locally. Note: For additional information, view the Enrollment Transfer File Field Definitions.
3. Import Enrollment Transfer File
Go to Setup > Import/Export Data.
Select Import / Export Data under the Tasks dropdown and click Start.
Under Type, select Enrollment Transfer Import.
Click Choose File and select the Enrollment Transfer Import file.
Click Process.
Tip: Use Microsoft Excel’s Text Import Wizard to retain source formatting when opening an exported csv file. (Directions apply to: Excel 2016, Excel 2013, Excel 2010, and Excel 2007. 7. Open a blank Excel spreadsheet and select cell A1. 8. On the Data tab, in the Get External Data group, click From Text. 9. Locate and double-click the text file that you want to import. 10. On Step 1 of the Text Import Wizard, select Delimited and then click Next. 11. On Step 2 of the Text Import Wizard, check Comma as delimiter and then click Next. 12. On Step 3 of the Text Import Wizard, scroll horizontally in the Data preview until you see the last field. Hold down your control & shift keys and select the last
column title. This will select all columns in the file. Select Text from the Column Data Format option list and then click Finish.

Transfer Student Guidance 20
Directions for the Transfer-To District/School: How to Register Students through the File Import/Export Process
Note: These steps apply to students who have not started testing and are not enrolled to another organization. The purpose of this section is to provide information on how to use PearsonAccessnext to successfully manage students who move prior to the start of the test administration but after the initial SR/PNP import. This can be completed by users assigned the LEA Test Coordinator Role or School Test Coordinator Role.
Step Directions 1. Create a new Student
Registration/Personal Needs Profile Import
Choose the administration from the dropdown in the top banner of PearsonAccessnext.
Refer to the Student Registration/Personal Needs Profile Training Module.
Refer to the Student Registration/Personal Needs Profile layout documents found on the Support Page of PearsonAccessnext.
2. Import SR/PNP File Go to Setup > Import/Export Data.
Select Import / Export Data under the Tasks dropdown and click Start.
Under Type, select Student Registration Import.
Click Choose File and select the new Student Registration/Personal Needs Profile Import file.
Click Process.
If completed without error, student will now be assigned a test in the new school.
3. Troubleshooting Errors An error stating “The student can only be enrolled in 1 organization” is received when a student is already enrolled in a separate district/school. If you receive this error, see the directions on submitting a Transfer “Work Request” through the user interface or importing an Enrollment Transfer File.
An error stating “The student <attribute> did not match the value of the student <attribute> in the database” is received when a student SSID or PARCC ID is matched to an existing student record in PearsonAccessnext but at least two fields used for matching did not. Matching fields include: First Name (full), Last Name (full), Birthdate (YYYY-MM-DD format), Local Student Identifier, and Sex. If you have verified all data is entered correctly and still receive this error, please contact your state.

Transfer Student Guidance 21
Directions for the Transfer-To District/School: How to Requests Transfers through the File Import/Export Process
Step Directions 1. Create a new Transfer Work
Request Import File Choose the administration from the dropdown in the top banner of PearsonAccessnext.
Download the Enrollment Transfer Template File found on the Support Page of PearsonAccessnext.
Populate Enrollment Transfer File Template using the Enrollment Transfer File Field Definitions. Note: If a SR/PNP file was imported and “The student can only be enrolled in 1 organization” error message was received, download the Records in Error file from the View files Details task screen to help populate required fields in an Enrollment Transfer File. Use the following table as a field crosswalk.
Enrollment Transfer File SR/PNP
Column A – State Student Identifier Column F – State Student Identifier
Column C – Last or Surname Column I – Last or Surname
Column D – First Name Column J – First Name
Column F – Birthdate Column L – Birthdate
Column J – Transfer To Organization Code Concatenated the values from Column A – State Abbreviation, Column B - Testing District Code, and Column C - Testing School Code with a hyphen separating the values.
2. Import Enrollment Transfer File
Go to Setup > Import/Export Data.
Select Import / Export Data under the Tasks dropdown and click Start.
Under Type, select Enrollment Transfer Import.
Click Choose File and select the Enrollment Transfer Import File.
Click Process. Note: The student will be transferred after the request is approved by the transfer-from organization. Fields are used for matching data only, no updates to student data field are made from the Enrollment Transfer Import File. Check the status of your transfer “Work Request”
Go to Setup > “Work Request”, and use the Status Filters found on the left side of the screen to view the status of your transfer “Work Request.” Once approved, go to Step 4. Contact the transfer-from district or your state if the student transfer request is not approved or rejected within a reasonable amount of time.

Transfer Student Guidance 22
Enrollment Transfer File Field Definitions
Column Letter
Field Name Required Field Length
Field Definitions and Notes Expected Values
A State Student Identifier Y 50 A unique number or alphanumeric code assigned to a student by a state or any other entity.
A-Z 0-9 No embedded spaces 10 min/max
B Local Student Identifier 50 A unique number or alphanumeric code assigned to a student by a school system or any other entity.
A-Z 0-9 No embedded spaces Blank
C Last or Surname Y 100 The full legal last name borne in common by members of a family.
A-Z 0-9 . - ' (Standard Apostrophe) Embedded Spaces
D First Name Y 100 The full legal first name given to a person at birth, baptism, or through legal change.
A-Z 0-9 . - ' (Standard Apostrophe) Embedded Spaces
E Middle Name 100 A full legal middle name given to a person at birth, baptism, or through legal change.
A-Z 0-9 . - ' (Standard Apostrophe) Embedded Spaces Blank
F Student Date Of Birth Y 50 The year, month and day on which a person was born.
YYYY-MM-DD
G Sex (Gender) 1 The concept describing the biological traits that distinguish the males and females of a species.
F = Female M = Male
H Transfer From Organization Code 100 The testing organization (school) code the student is moving from.

Transfer Student Guidance 23
Column Letter
Field Name Required Field Length
Field Definitions and Notes Expected Values
I Transfer From Organization Name 200 The testing organization (school) name the student is moving from.
J Transfer To Organization Code Y 100 The testing organization (school) code the student is moving to and responsible for administering the test for a student. Note: To obtain the correct format, concatenate the State Abbreviation, Testing District Code, and Testing School Code fields. If using Excel, use formula: =CONCATENATE(State Abbreviation Field,"-",TEXT(District Code Field ,"0000"),"-",TEXT(School Code Field,"0000")). The number of zeros for the district and school codes should match the state format. Example: State Abbreviation = DC, District Code = 0001, & School Code = 1111. Formula =CONCATENATE(A1,"-",TEXT(B1,"0000"),"-",TEXT(C1,"0000")) will result with NM-0001-1111.
A-Z 0-9 - Format: DC = DC-XXXX-XXXX
K Transfer To Organization Name 200 The testing organization (school) name the student is moving to and responsible for administering the test for a student.
A-Z 0-9 . - ' (Standard Apostrophe) Embedded Spaces Blank
L Reject Reason *Y 3000 Required if Action = R A-Z 0-9 . - ' (Standard Apostrophe) Embedded Spaces Blank
M Action Y 1 C = Create A = Approve R = Reject

Transfer Student Guidance 24
Resources
Resource Information Pearson Customer Support If assistance is needed, contact the Pearson Support Center at 866-688-9555 or visit
dc.mypearsonsupport.com/support/ and select Contact Customer Support. Monday - Friday 6:00 am - 7:30 pm (EST)