training manual sap supply network collaboration snc … · on the left side of the sap snc menu,...
TRANSCRIPT

Training Manual SAP Supply Network Collaboration
SNC Version 1.1
2 / 47 Daikin Europe N.V. (Naamloze Vennootschap) - Zandvoordestraat 300 - 8400 Oostende (Belgium)
T: (+32) 59 55 81 11, F: (+32) 59 55 88 99, E: [email protected] BTW BE 0412 120 336 - RPR Oostende - http://www.daikineurope.com
13-Mar-17
1 History
Content Author Document Date Version
Initial version created after upgrade from SAP ICH 5.0 to SNC 7
Steve Pierre 12/11/2013 1.0
Updated version with forecast Amanda Morina 13/03/2017 1.1
3 / 47 Daikin Europe N.V. (Naamloze Vennootschap) - Zandvoordestraat 300 - 8400 Oostende (Belgium)
T: (+32) 59 55 81 11, F: (+32) 59 55 88 99, E: [email protected] BTW BE 0412 120 336 - RPR Oostende - http://www.daikineurope.com
13-Mar-17
2 Table of Contents 1 History ............................................................................................................................................. 2 2 Table of Contents ............................................................................................................................ 3 3 General ............................................................................................................................................ 5
3.1 Introduction ................................................................................................................................. 5 3.2 Log on......................................................................................................................................... 5 3.3 Main Menu – Overview ............................................................................................................... 7 3.4 General Functions ...................................................................................................................... 8
3.4.1 Screen history navigation .................................................................................................... 8 3.4.2 Message Log ....................................................................................................................... 8 3.4.3 Help function – possible entries .......................................................................................... 8 3.4.4 Log off ................................................................................................................................. 8 3.4.5 Choose Entry Screen .......................................................................................................... 8
4 Exceptions Menu ............................................................................................................................. 9 4.1 General ....................................................................................................................................... 9 4.2 Alert Monitor ............................................................................................................................... 9
4.2.1 Alert Monitor – Acknowledge an alert ............................................................................... 10 4.3 Quick View ............................................................................................................................... 11
4.3.1 Microblog Tab .................................................................................................................... 11 4.3.2 Purchase Orders Tab ........................................................................................................ 14 4.3.3 Scheduling Agreement Releases Tab............................................................................... 15 4.3.4 Advanced Shipping Notifications Tab ............................................................................... 16
5 Forecast Monitor............................................................................................................................ 16 5.1 Initial set up .............................................................................................................................. 16
5.1.1 Time bucket profile set-up ................................................................................................. 17 5.1.2 Data selection .................................................................................................................... 18
5.2 Demand menu .......................................................................................................................... 20 5.2.1 Order Forecast Details ...................................................................................................... 20
6 Purchasing documents .................................................................................................................. 22 6.1 Release Menu: Schedule Agreements ..................................................................................... 22
6.1.1 Schedule Agreements: Release – Overview and Details ................................................. 22 6.1.2 Release – Comparison ...................................................................................................... 23
6.2 Purchase Orders Menu ............................................................................................................ 23 6.2.1 Purchase Orders - Overview and Details .......................................................................... 23 6.2.2 Purchase Orders – PO History (Supplier) ......................................................................... 24
7 Delivery Menu................................................................................................................................ 25 7.1 Due list as Open Orderlist ........................................................................................................ 25
7.1.1 Download the due list ........................................................................................................ 26 7.2 Due List for Creation of ASN .................................................................................................... 27
7.2.1 Create ASN - Selecting items for delivery ......................................................................... 27 7.2.2 Create ASN – Add Packaging information (=Mandatory !!!) ............................................. 28 7.2.3 Create ASN - Save ASN as draft ...................................................................................... 32 7.2.4 Create ASN - Print labels .................................................................................................. 33 7.2.5 Create ASN - Publish ASN = final confirmation! ............................................................... 34
8 ASN Maintenance ......................................................................................................................... 35 8.1 ASN Overview .......................................................................................................................... 35 8.2 ASN History .............................................................................................................................. 36
9 Master Data ................................................................................................................................... 38 9.1 Packaging Specifications ......................................................................................................... 38
9.1.1 Create packaging specification ......................................................................................... 39 9.1.2 Assign packaging instruction to vendor ............................................................................ 42 9.1.3 Change an existing packaging specification ..................................................................... 43
9.2 Partner-Dependent Product Data ............................................................................................. 45 10 FAQ ............................................................................................................................................... 46 11 Technical Requirements ................................................................................................................ 47
11.1 Internet connection ................................................................................................................... 47
4 / 47 Daikin Europe N.V. (Naamloze Vennootschap) - Zandvoordestraat 300 - 8400 Oostende (Belgium)
T: (+32) 59 55 81 11, F: (+32) 59 55 88 99, E: [email protected] BTW BE 0412 120 336 - RPR Oostende - http://www.daikineurope.com
13-Mar-17
11.2 Browser Requirements ............................................................................................................. 47 11.3 Testing SAP SNC functionalities .............................................................................................. 47 11.4 Agreement - Packaging information per product for start up ................................................... 47 11.5 Agreement – Rounding values ................................................................................................. 47 11.6 Contact persons ....................................................................................................................... 47 11.7 Questions – suggestions about this SAP SNC manual ........................................................... 47
5 / 47 Daikin Europe N.V. (Naamloze Vennootschap) - Zandvoordestraat 300 - 8400 Oostende (Belgium)
T: (+32) 59 55 81 11, F: (+32) 59 55 88 99, E: [email protected] BTW BE 0412 120 336 - RPR Oostende - http://www.daikineurope.com
13-Mar-17
3 General
3.1 Introduction The purpose of this training manual is to describe how a supplier of Daikin Europe can use Web EDI for making deliveries to different premises within the organization of Daikin Europe NV. As Web EDI software, a standard platform of SAP is used: SAP SNC which stands for SAP Supply Network Collaboration. Within this manual, only following relevant business processes are explained: Release Process and Purchase Order Collaboration.
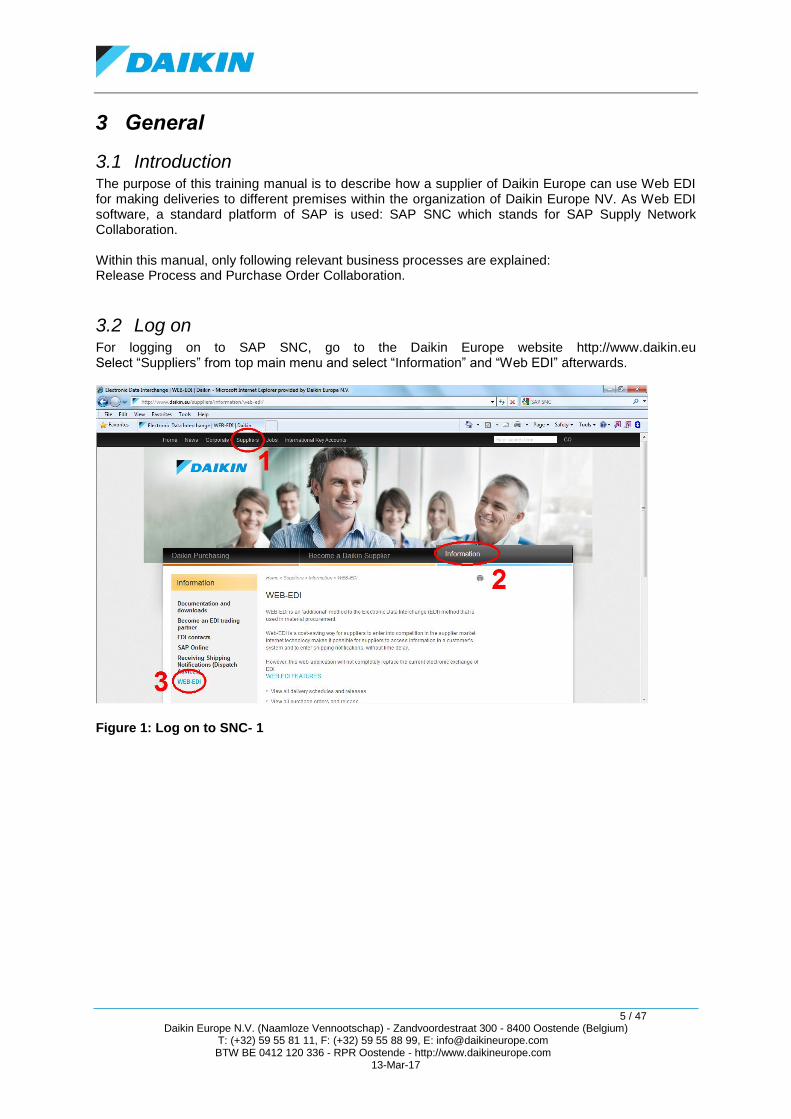
3.2 Log on For logging on to SAP SNC, go to the Daikin Europe website http://www.daikin.eu Select “Suppliers” from top main menu and select “Information” and “Web EDI” afterwards.
Figure 1: Log on to SNC- 1

6 / 47 Daikin Europe N.V. (Naamloze Vennootschap) - Zandvoordestraat 300 - 8400 Oostende (Belgium)
T: (+32) 59 55 81 11, F: (+32) 59 55 88 99, E: [email protected] BTW BE 0412 120 336 - RPR Oostende - http://www.daikineurope.com
13-Mar-17
Following screens appears:
Figure 2: Log on to SNC- 2
Click on “Download WEB EDI manual”, to download the latest version of this manual. Click on “WEB EDI Productive Environment”, to work on the ‘live’ SNC system. Click on “WEB EDI Test Environment”, to work on the test system of SNC. Fill in the User and Password that you received from Daikin Europe for the first log on. After the first log on, you will be requested to change your Password. Always choose English as language.
Figure 3: Log on to SNC- 3
7 / 47 Daikin Europe N.V. (Naamloze Vennootschap) - Zandvoordestraat 300 - 8400 Oostende (Belgium)
T: (+32) 59 55 81 11, F: (+32) 59 55 88 99, E: [email protected] BTW BE 0412 120 336 - RPR Oostende - http://www.daikineurope.com
13-Mar-17
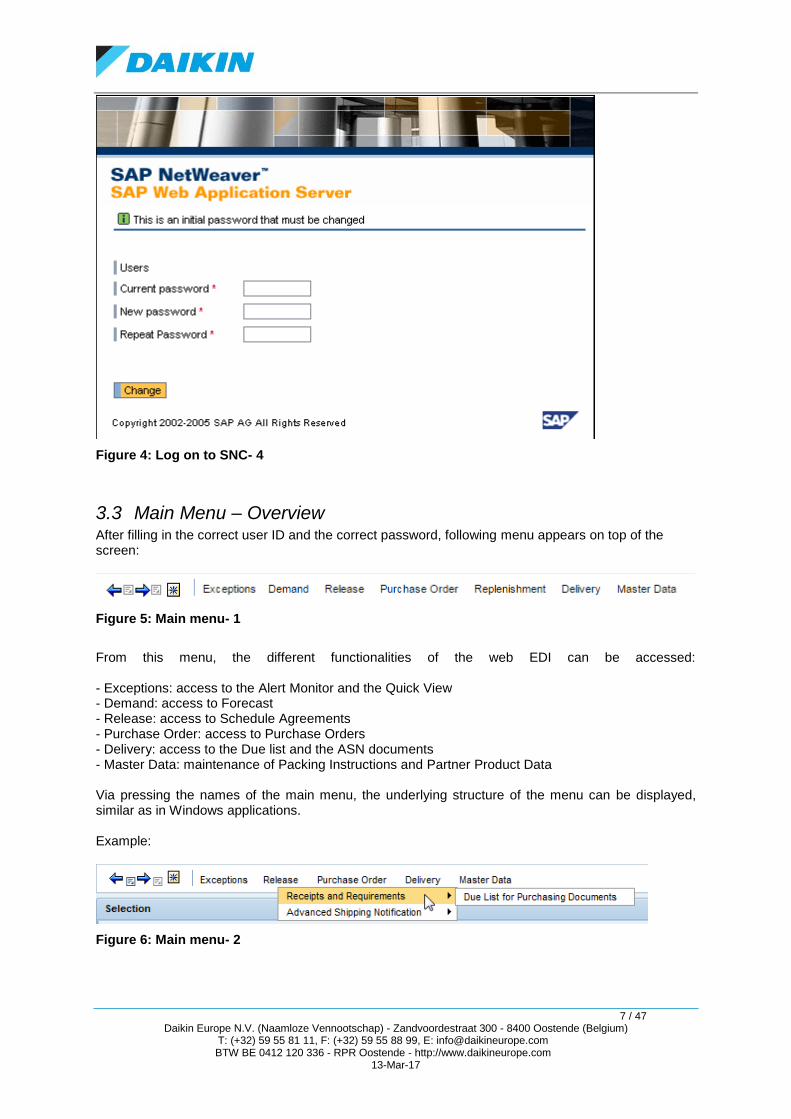
Figure 4: Log on to SNC- 4
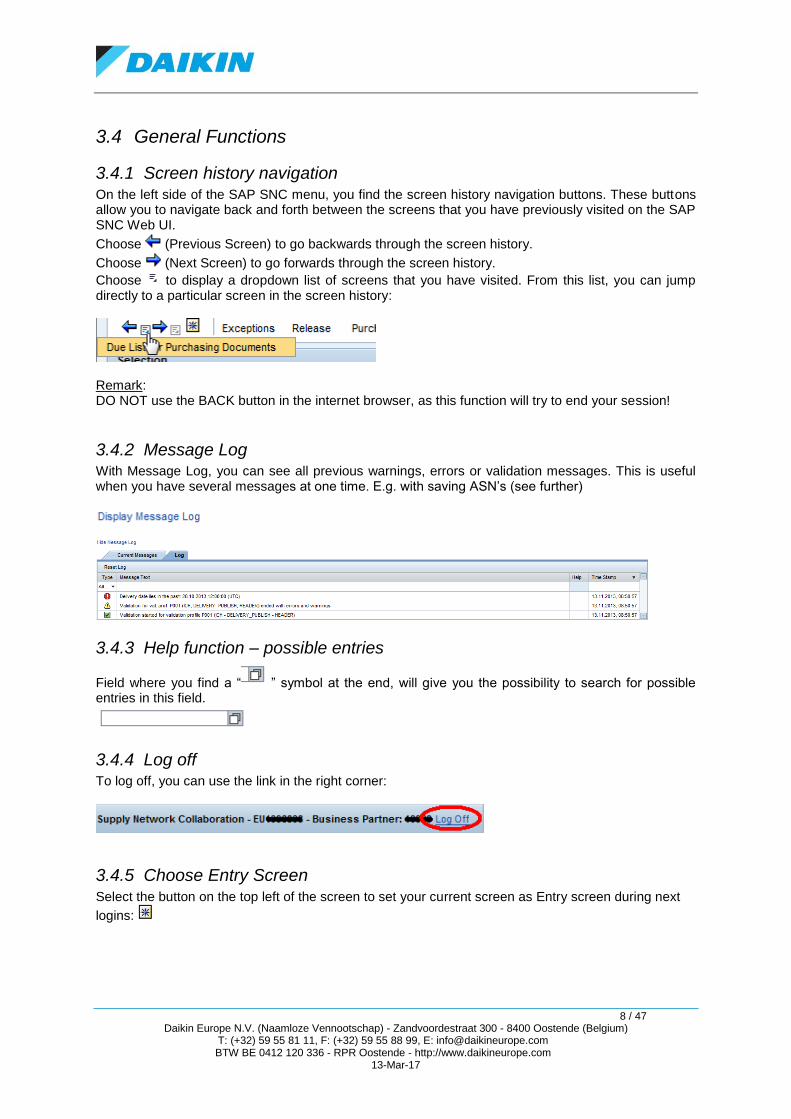
3.3 Main Menu – Overview After filling in the correct user ID and the correct password, following menu appears on top of the screen:
Figure 5: Main menu- 1
From this menu, the different functionalities of the web EDI can be accessed: - Exceptions: access to the Alert Monitor and the Quick View - Demand: access to Forecast - Release: access to Schedule Agreements - Purchase Order: access to Purchase Orders - Delivery: access to the Due list and the ASN documents - Master Data: maintenance of Packing Instructions and Partner Product Data Via pressing the names of the main menu, the underlying structure of the menu can be displayed, similar as in Windows applications. Example:
Figure 6: Main menu- 2
8 / 47 Daikin Europe N.V. (Naamloze Vennootschap) - Zandvoordestraat 300 - 8400 Oostende (Belgium)
T: (+32) 59 55 81 11, F: (+32) 59 55 88 99, E: [email protected] BTW BE 0412 120 336 - RPR Oostende - http://www.daikineurope.com
13-Mar-17
3.4 General Functions
3.4.1 Screen history navigation On the left side of the SAP SNC menu, you find the screen history navigation buttons. These buttons allow you to navigate back and forth between the screens that you have previously visited on the SAP SNC Web UI.
Choose (Previous Screen) to go backwards through the screen history.
Choose (Next Screen) to go forwards through the screen history.
Choose to display a dropdown list of screens that you have visited. From this list, you can jump directly to a particular screen in the screen history:
Remark: DO NOT use the BACK button in the internet browser, as this function will try to end your session!
3.4.2 Message Log With Message Log, you can see all previous warnings, errors or validation messages. This is useful when you have several messages at one time. E.g. with saving ASN’s (see further)
3.4.3 Help function – possible entries
Field where you find a “ ” symbol at the end, will give you the possibility to search for possible entries in this field.
3.4.4 Log off To log off, you can use the link in the right corner:
3.4.5 Choose Entry Screen Select the button on the top left of the screen to set your current screen as Entry screen during next
logins:
9 / 47 Daikin Europe N.V. (Naamloze Vennootschap) - Zandvoordestraat 300 - 8400 Oostende (Belgium)
T: (+32) 59 55 81 11, F: (+32) 59 55 88 99, E: [email protected] BTW BE 0412 120 336 - RPR Oostende - http://www.daikineurope.com
13-Mar-17
4 Exceptions Menu
4.1 General The exceptions menu contains 2 items: the Alert Monitor and the Quick View.
4.2 Alert Monitor The Alert Monitor is a tool you can use to follow up or check the status of the system. Alerts are automatically generated by the DENV system and the Web-EDI system itself. The alerts are messages to inform you that data (PO, SA, ASN, …) has changed or has been added. Alerts can be acknowledged when you processed the data. Then your next selection in the alert monitor can be made with the alerts that are not acknowledged yet. By filling in your selection, you can filter the Alerts according to your own needs. The possible parameters where you can filter are described in the table below:
Table 1: Alert parameters
Parameter Description Possible values
Location Location where goods should be delivered
Enter the destination plant: 1000, 1800, …
Product Material number
My Product No. Supplier’s material number
Material should be maintained in the Partner Product Data (masterdata)
Alert Type Number referring to kind of Alert
0023 New Release 0031 Overdue ASN 0032 GR Quantity differs from ASN Quantity 7034 Validation Check for Release 7035 Validation Check for Purchase Order item 7051 New Purchase Order item 7052 Changed Purchase Order item 7101 Release Overdue 7103 Purchase order item over due
Acknowledged Status of alert Y, N
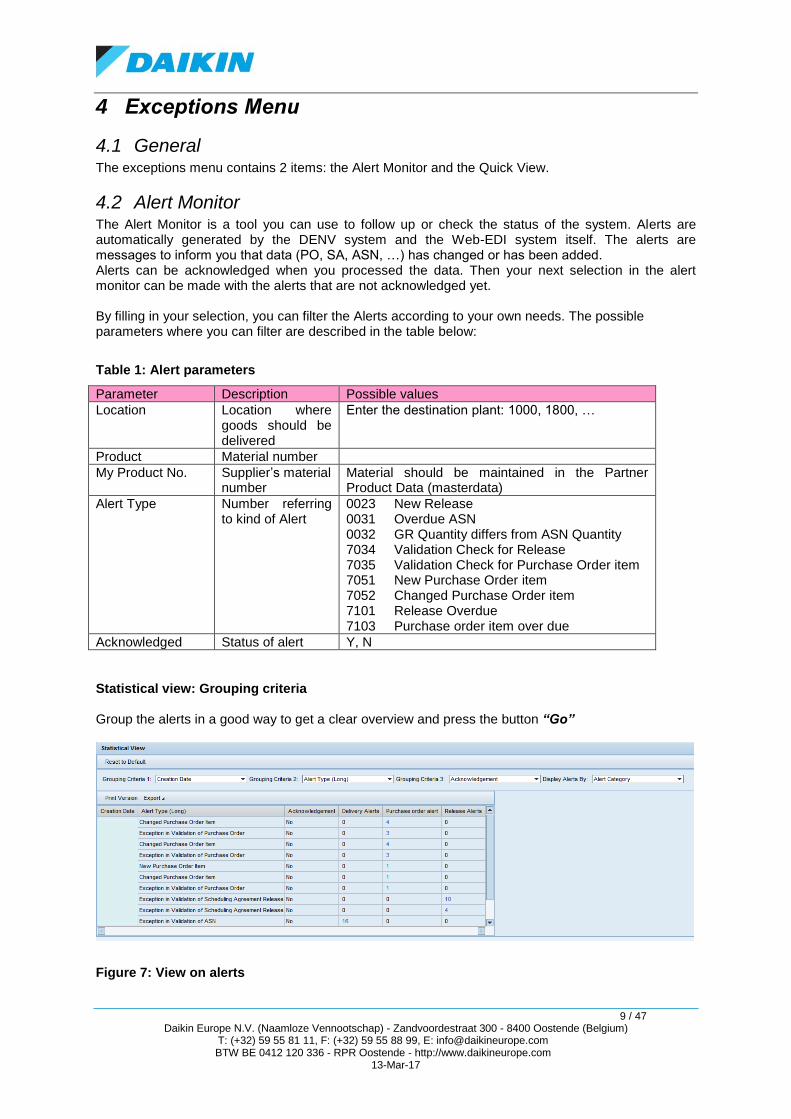
Statistical view: Grouping criteria Group the alerts in a good way to get a clear overview and press the button “Go”
Figure 7: View on alerts
10 / 47 Daikin Europe N.V. (Naamloze Vennootschap) - Zandvoordestraat 300 - 8400 Oostende (Belgium)
T: (+32) 59 55 81 11, F: (+32) 59 55 88 99, E: [email protected] BTW BE 0412 120 336 - RPR Oostende - http://www.daikineurope.com
13-Mar-17
By clicking on the number, you can see the details of the alerts with the contents of the involved documents. The alerts can be subdivided into following categories:
Table 2: Alert Categories
Alert Category Alert Type
Delivery Alerts - GR Quantity differs from ASN Quantity - Overdue ASN
Purchase order alert - New Purchase Order item - Changed Purchase Order item - Purchase order item overdue - Exception in Validation of Purchase Order
Release Alerts - New Release - Release Overdue - Exception in Validation of SA Release
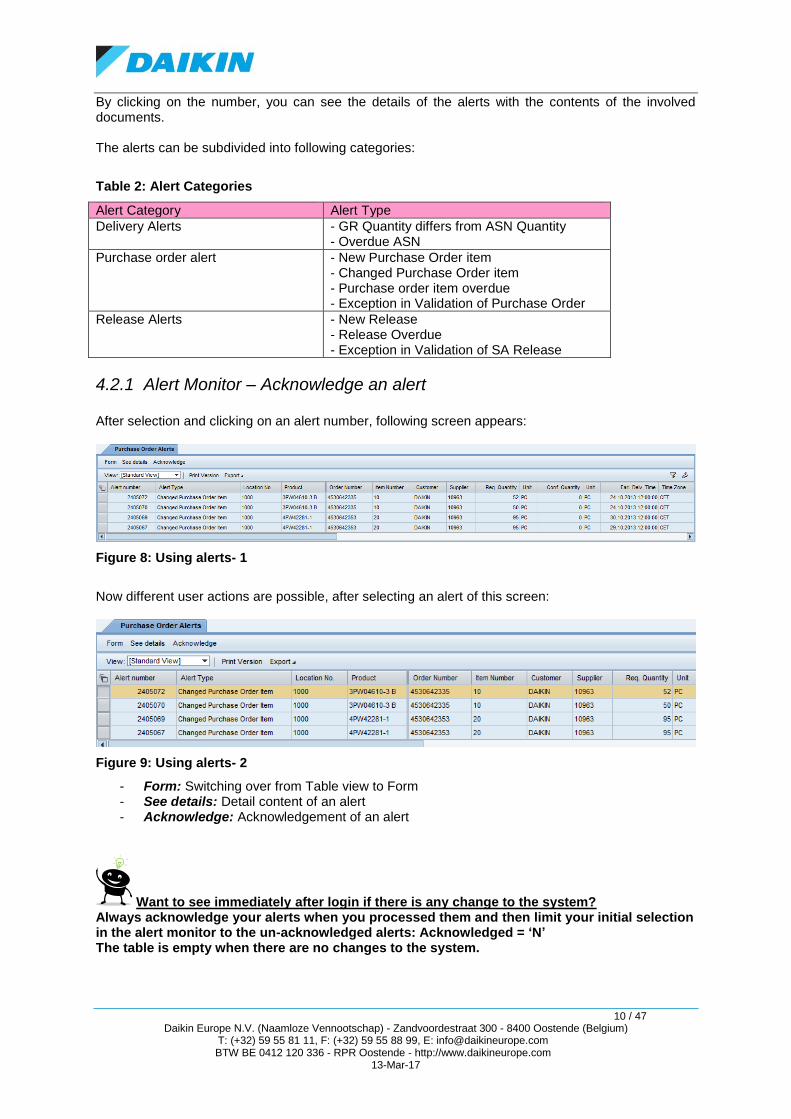
4.2.1 Alert Monitor – Acknowledge an alert After selection and clicking on an alert number, following screen appears:
Figure 8: Using alerts- 1
Now different user actions are possible, after selecting an alert of this screen:
Figure 9: Using alerts- 2
- Form: Switching over from Table view to Form - See details: Detail content of an alert - Acknowledge: Acknowledgement of an alert
Want to see immediately after login if there is any change to the system?
Always acknowledge your alerts when you processed them and then limit your initial selection in the alert monitor to the un-acknowledged alerts: Acknowledged = ‘N’ The table is empty when there are no changes to the system.
11 / 47 Daikin Europe N.V. (Naamloze Vennootschap) - Zandvoordestraat 300 - 8400 Oostende (Belgium)
T: (+32) 59 55 81 11, F: (+32) 59 55 88 99, E: [email protected] BTW BE 0412 120 336 - RPR Oostende - http://www.daikineurope.com
13-Mar-17
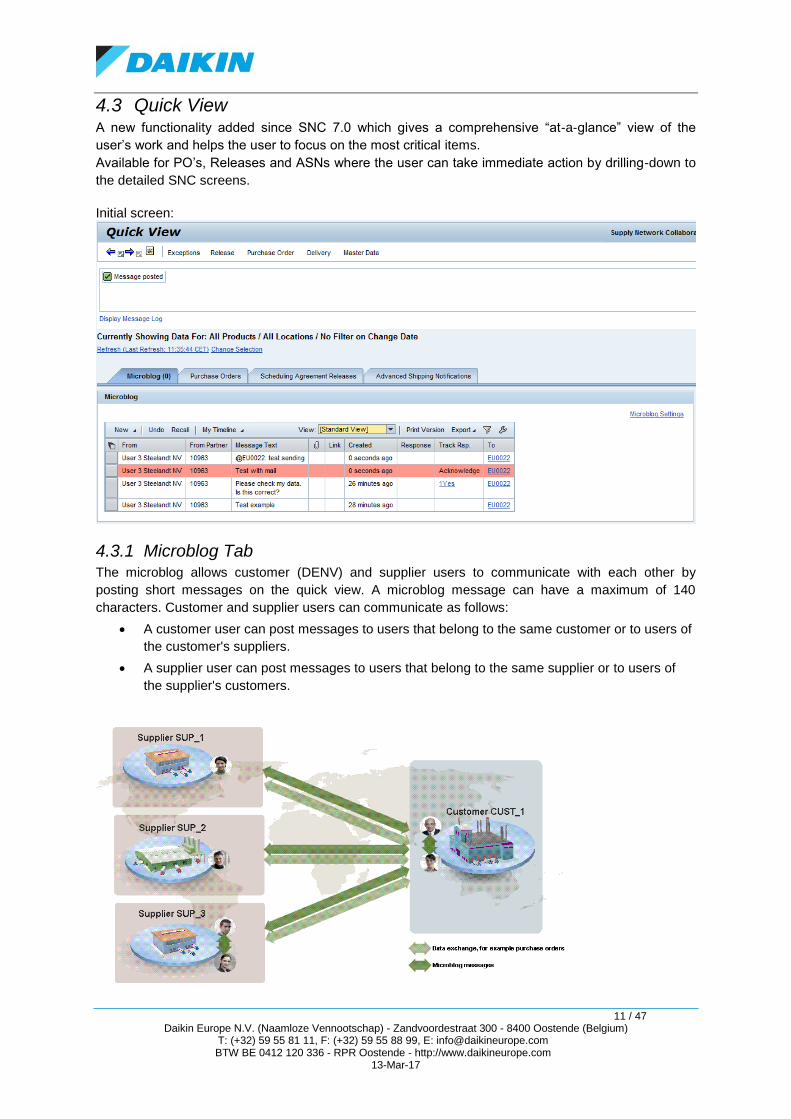
4.3 Quick View A new functionality added since SNC 7.0 which gives a comprehensive “at-a-glance” view of the
user’s work and helps the user to focus on the most critical items.
Available for PO’s, Releases and ASNs where the user can take immediate action by drilling-down to
the detailed SNC screens.
Initial screen:
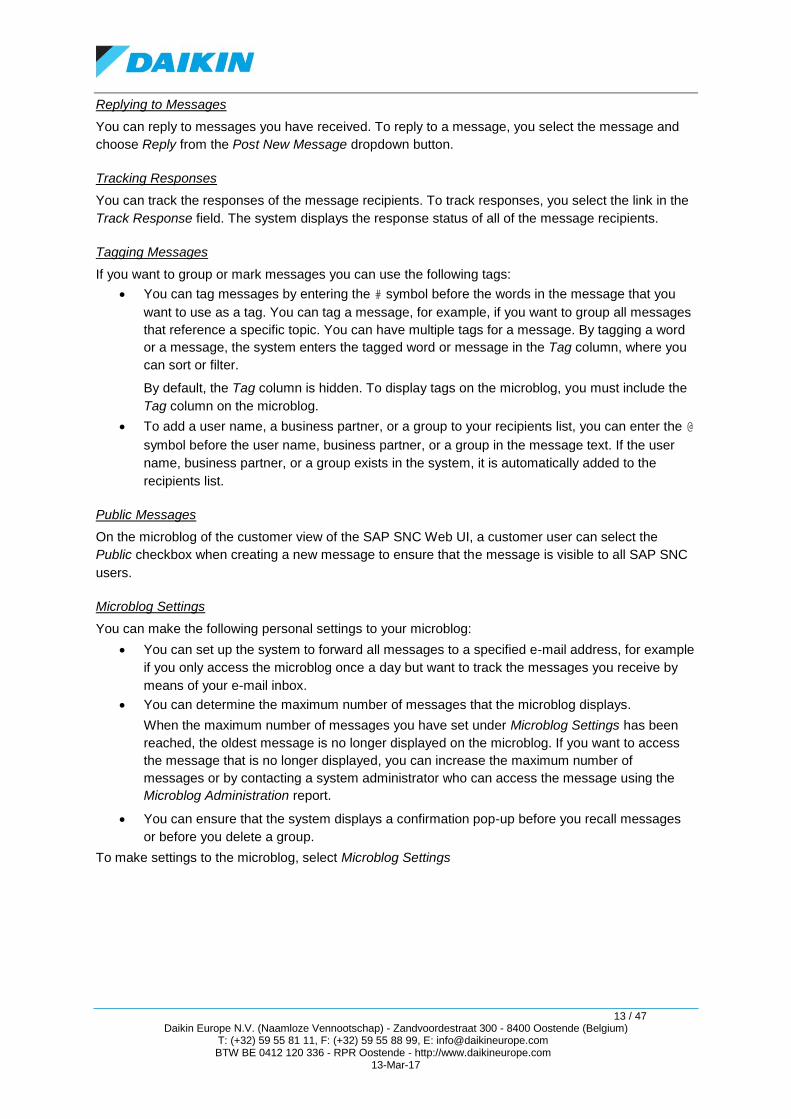
4.3.1 Microblog Tab The microblog allows customer (DENV) and supplier users to communicate with each other by
posting short messages on the quick view. A microblog message can have a maximum of 140
characters. Customer and supplier users can communicate as follows:
A customer user can post messages to users that belong to the same customer or to users of
the customer's suppliers.
A supplier user can post messages to users that belong to the same supplier or to users of
the supplier's customers.
12 / 47 Daikin Europe N.V. (Naamloze Vennootschap) - Zandvoordestraat 300 - 8400 Oostende (Belgium)
T: (+32) 59 55 81 11, F: (+32) 59 55 88 99, E: [email protected] BTW BE 0412 120 336 - RPR Oostende - http://www.daikineurope.com
13-Mar-17
Microblog users can post messages on the microblog for information purposes, for example business-
specific announcements such as location closures. If the user requires a response from the recipient,
he or she can post messages that require an acknowledgment, for example if you want the recipient
to acknowledge the location closure, or messages that ask questions requiring the recipient to answer
with yes or no.
FEATURES
Microblog Views
You can use the following views on the microblog:
My Timeline
In this view, the microblog displays all messages you have created and received.
Posted by My Partner
In this view, the microblog displays all messages that users who belong to the same business
partner as you have created and received.
Creating New Messages
You can create a message by choosing New from the Post New Message dropdown button. When
you create a new message, you can determine the following:
How to send your message
You can determine if the message carries a high priority and if you want to additionally send
the message by means of an e-mail. High-priority messages are highlighted in red on the
microblog.
The type of response you expect
You can determine if the message requires a response in the form of an acknowledgment or
a yes or no answer to a question.
Attachments and links
You can attach a file or add a link to the message
The recipients of the message
You can send the message to the following recipients:
o Specific users
o Business partners, in which case all users assigned to the business partner receive
the message
o Groups that contain different users, business partners, or other groups.
Making a message public
Only a customer user can make a message public to all users belonging to his/her business
partners by selecting the Public checkbox.
If you want to reuse an existing message, for example you want to send an existing message to a
different recipient, you can copy the message. If you copy a message, any attachments that the
original message contained are not copied. You copy a message by choosing Copy from the Post
New Message dropdown button.
Marking a Message as Read
If you select a message, the system automatically considers it as read. The system no longer displays
the message in bold font if it is read.
13 / 47 Daikin Europe N.V. (Naamloze Vennootschap) - Zandvoordestraat 300 - 8400 Oostende (Belgium)
T: (+32) 59 55 81 11, F: (+32) 59 55 88 99, E: [email protected] BTW BE 0412 120 336 - RPR Oostende - http://www.daikineurope.com
13-Mar-17
Replying to Messages
You can reply to messages you have received. To reply to a message, you select the message and
choose Reply from the Post New Message dropdown button.
Tracking Responses
You can track the responses of the message recipients. To track responses, you select the link in the
Track Response field. The system displays the response status of all of the message recipients.
Tagging Messages
If you want to group or mark messages you can use the following tags:
You can tag messages by entering the # symbol before the words in the message that you
want to use as a tag. You can tag a message, for example, if you want to group all messages
that reference a specific topic. You can have multiple tags for a message. By tagging a word
or a message, the system enters the tagged word or message in the Tag column, where you
can sort or filter.
By default, the Tag column is hidden. To display tags on the microblog, you must include the
Tag column on the microblog.
To add a user name, a business partner, or a group to your recipients list, you can enter the @
symbol before the user name, business partner, or a group in the message text. If the user
name, business partner, or a group exists in the system, it is automatically added to the
recipients list.
Public Messages
On the microblog of the customer view of the SAP SNC Web UI, a customer user can select the
Public checkbox when creating a new message to ensure that the message is visible to all SAP SNC
users.
Microblog Settings
You can make the following personal settings to your microblog:
You can set up the system to forward all messages to a specified e-mail address, for example
if you only access the microblog once a day but want to track the messages you receive by
means of your e-mail inbox.
You can determine the maximum number of messages that the microblog displays.
When the maximum number of messages you have set under Microblog Settings has been
reached, the oldest message is no longer displayed on the microblog. If you want to access
the message that is no longer displayed, you can increase the maximum number of
messages or by contacting a system administrator who can access the message using the
Microblog Administration report.
You can ensure that the system displays a confirmation pop-up before you recall messages
or before you delete a group.
To make settings to the microblog, select Microblog Settings
14 / 47 Daikin Europe N.V. (Naamloze Vennootschap) - Zandvoordestraat 300 - 8400 Oostende (Belgium)
T: (+32) 59 55 81 11, F: (+32) 59 55 88 99, E: [email protected] BTW BE 0412 120 336 - RPR Oostende - http://www.daikineurope.com
13-Mar-17
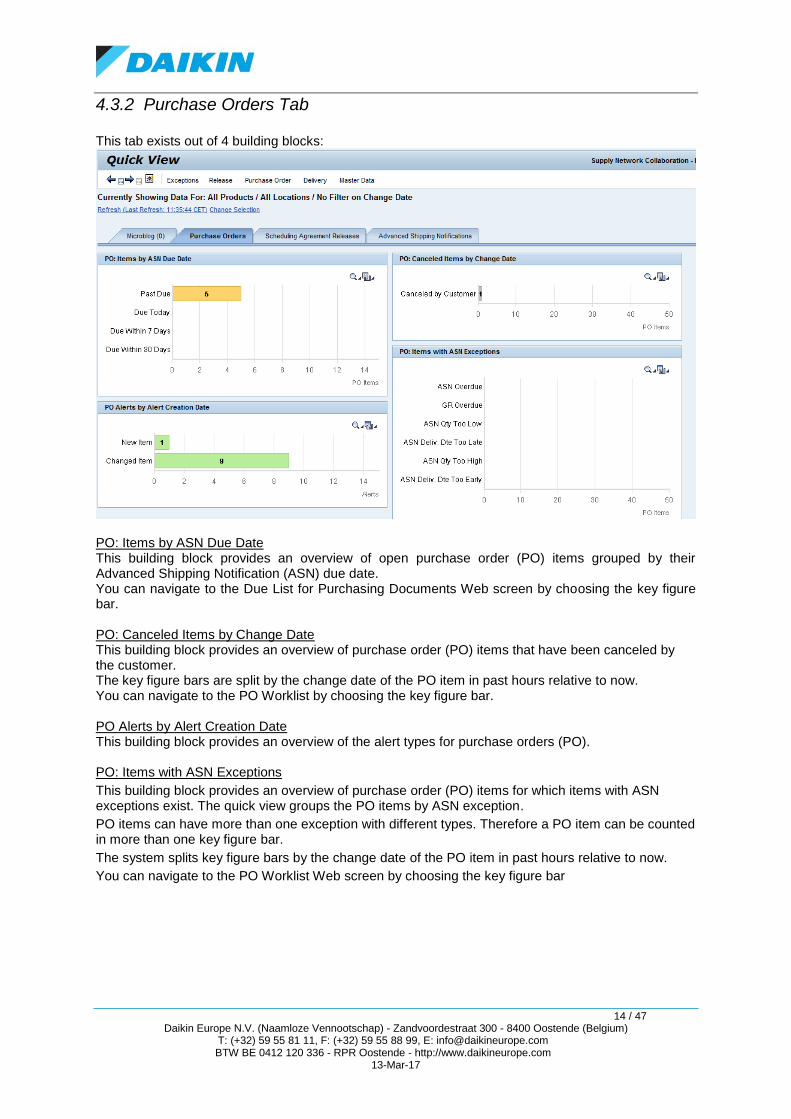
4.3.2 Purchase Orders Tab This tab exists out of 4 building blocks:
PO: Items by ASN Due Date This building block provides an overview of open purchase order (PO) items grouped by their Advanced Shipping Notification (ASN) due date. You can navigate to the Due List for Purchasing Documents Web screen by choosing the key figure bar. PO: Canceled Items by Change Date This building block provides an overview of purchase order (PO) items that have been canceled by the customer. The key figure bars are split by the change date of the PO item in past hours relative to now. You can navigate to the PO Worklist by choosing the key figure bar. PO Alerts by Alert Creation Date This building block provides an overview of the alert types for purchase orders (PO). PO: Items with ASN Exceptions
This building block provides an overview of purchase order (PO) items for which items with ASN exceptions exist. The quick view groups the PO items by ASN exception.
PO items can have more than one exception with different types. Therefore a PO item can be counted in more than one key figure bar.
The system splits key figure bars by the change date of the PO item in past hours relative to now.
You can navigate to the PO Worklist Web screen by choosing the key figure bar
15 / 47 Daikin Europe N.V. (Naamloze Vennootschap) - Zandvoordestraat 300 - 8400 Oostende (Belgium)
T: (+32) 59 55 81 11, F: (+32) 59 55 88 99, E: [email protected] BTW BE 0412 120 336 - RPR Oostende - http://www.daikineurope.com
13-Mar-17
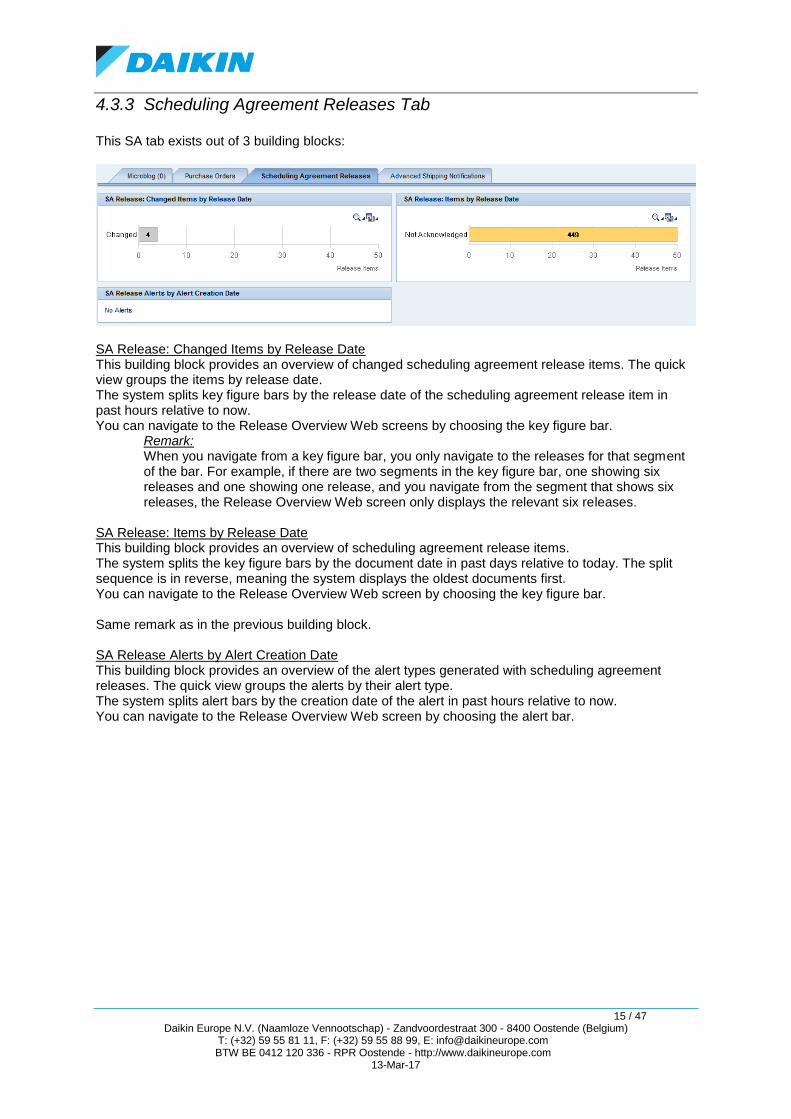
4.3.3 Scheduling Agreement Releases Tab This SA tab exists out of 3 building blocks:
SA Release: Changed Items by Release Date This building block provides an overview of changed scheduling agreement release items. The quick view groups the items by release date. The system splits key figure bars by the release date of the scheduling agreement release item in past hours relative to now. You can navigate to the Release Overview Web screens by choosing the key figure bar.
Remark: When you navigate from a key figure bar, you only navigate to the releases for that segment of the bar. For example, if there are two segments in the key figure bar, one showing six releases and one showing one release, and you navigate from the segment that shows six releases, the Release Overview Web screen only displays the relevant six releases.
SA Release: Items by Release Date This building block provides an overview of scheduling agreement release items. The system splits the key figure bars by the document date in past days relative to today. The split sequence is in reverse, meaning the system displays the oldest documents first. You can navigate to the Release Overview Web screen by choosing the key figure bar. Same remark as in the previous building block. SA Release Alerts by Alert Creation Date This building block provides an overview of the alert types generated with scheduling agreement releases. The quick view groups the alerts by their alert type. The system splits alert bars by the creation date of the alert in past hours relative to now. You can navigate to the Release Overview Web screen by choosing the alert bar.
16 / 47 Daikin Europe N.V. (Naamloze Vennootschap) - Zandvoordestraat 300 - 8400 Oostende (Belgium)
T: (+32) 59 55 81 11, F: (+32) 59 55 88 99, E: [email protected] BTW BE 0412 120 336 - RPR Oostende - http://www.daikineurope.com
13-Mar-17
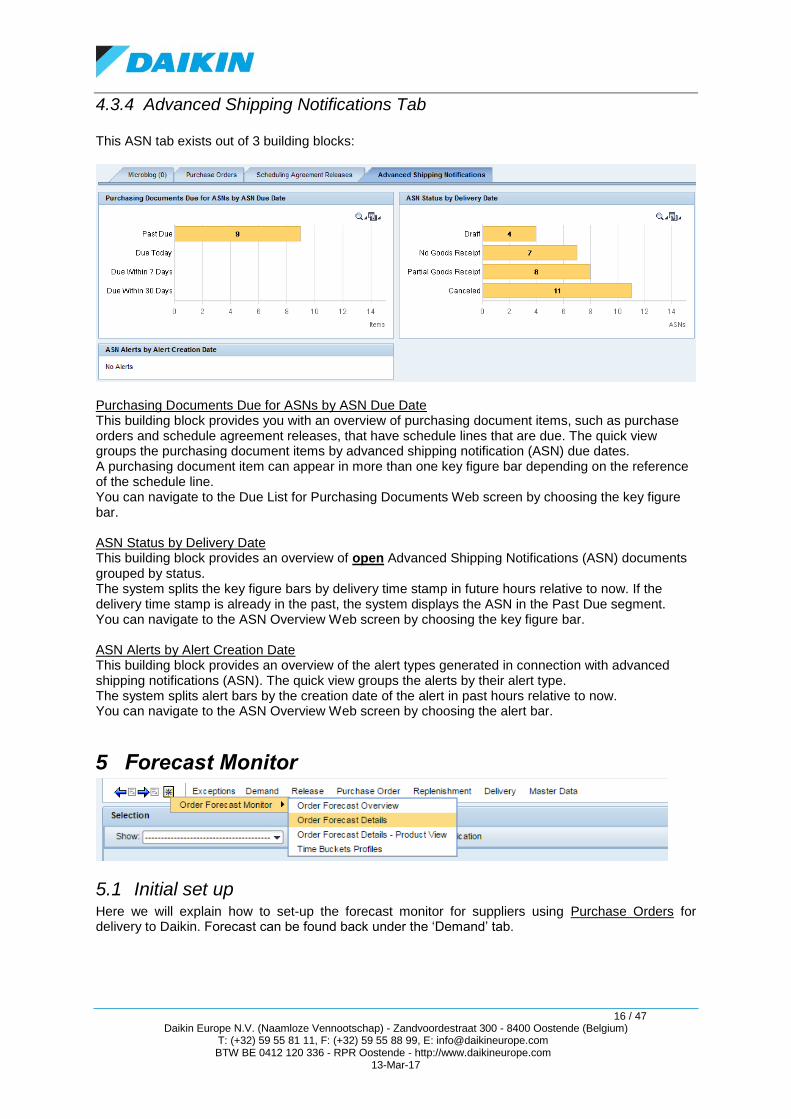
4.3.4 Advanced Shipping Notifications Tab This ASN tab exists out of 3 building blocks:
Purchasing Documents Due for ASNs by ASN Due Date This building block provides you with an overview of purchasing document items, such as purchase orders and schedule agreement releases, that have schedule lines that are due. The quick view groups the purchasing document items by advanced shipping notification (ASN) due dates. A purchasing document item can appear in more than one key figure bar depending on the reference of the schedule line. You can navigate to the Due List for Purchasing Documents Web screen by choosing the key figure bar. ASN Status by Delivery Date This building block provides an overview of open Advanced Shipping Notifications (ASN) documents grouped by status. The system splits the key figure bars by delivery time stamp in future hours relative to now. If the delivery time stamp is already in the past, the system displays the ASN in the Past Due segment. You can navigate to the ASN Overview Web screen by choosing the key figure bar. ASN Alerts by Alert Creation Date This building block provides an overview of the alert types generated in connection with advanced shipping notifications (ASN). The quick view groups the alerts by their alert type. The system splits alert bars by the creation date of the alert in past hours relative to now. You can navigate to the ASN Overview Web screen by choosing the alert bar.
5 Forecast Monitor
5.1 Initial set up Here we will explain how to set-up the forecast monitor for suppliers using Purchase Orders for delivery to Daikin. Forecast can be found back under the ‘Demand’ tab.
17 / 47 Daikin Europe N.V. (Naamloze Vennootschap) - Zandvoordestraat 300 - 8400 Oostende (Belgium)
T: (+32) 59 55 81 11, F: (+32) 59 55 88 99, E: [email protected] BTW BE 0412 120 336 - RPR Oostende - http://www.daikineurope.com
13-Mar-17
In order to have a better display of the forecast, first some initial set up needs to be done. Usually, this is already done at Daikin side. But if you want to adapt according to your preferences, below you can find how to. Following two items have to be adjusted: 1) Time bucket profile: defines how you want to see the forecast; which period you want to see in weeks, which period you want to see in months. This set-up has to be done once. 2) Re-arrange the view of the forecast to display only the relevant data
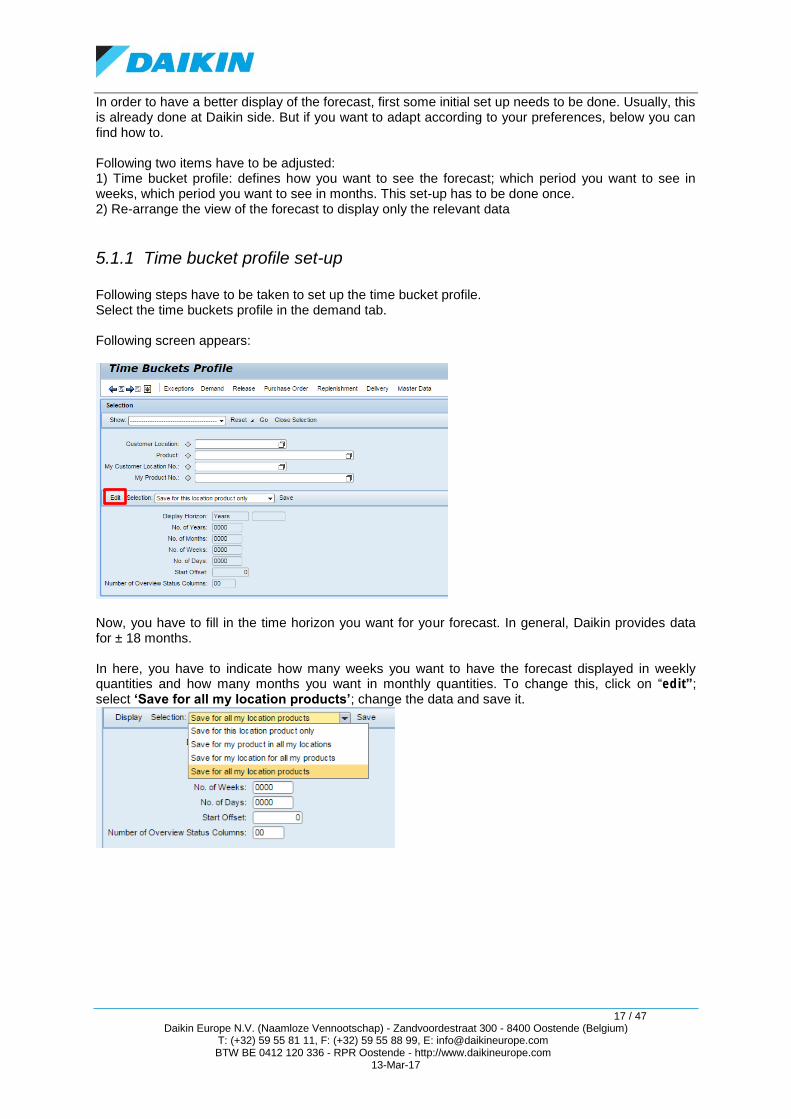
5.1.1 Time bucket profile set-up Following steps have to be taken to set up the time bucket profile. Select the time buckets profile in the demand tab. Following screen appears:
Now, you have to fill in the time horizon you want for your forecast. In general, Daikin provides data for ± 18 months. In here, you have to indicate how many weeks you want to have the forecast displayed in weekly quantities and how many months you want in monthly quantities. To change this, click on “edit”; select ‘Save for all my location products’; change the data and save it.

18 / 47 Daikin Europe N.V. (Naamloze Vennootschap) - Zandvoordestraat 300 - 8400 Oostende (Belgium)
T: (+32) 59 55 81 11, F: (+32) 59 55 88 99, E: [email protected] BTW BE 0412 120 336 - RPR Oostende - http://www.daikineurope.com
13-Mar-17
To change following parameters have to be filled in: - Display Horizon: the maximum horizon for how long you need the forecast.
→ Should be “Months” and the number of months, or “years” and the number of years. As the planning horizon in Daikin is generally 18 months, it is best to select “Months” and fill in 18.
- No. of Years: the number of years you want to see on month level. This is only selectable if you have put in the display horizon “Years” - No. of Weeks: the number of months you want to see on week level. - No. of Days: the number of weeks you want to see on day level. - Start Offset: always ‘0’ - Number of overview status columns: always ‘0’ After filling above mentioned data, press “Save”
Recommended settings are the following and are usually already implemented:
Forecast for the next 18 months, with the first 4 months on week level and 14 months on month
level.
5.1.2 Data selection To have a workable forecast, only the relevant data should be displayed. Following steps need to be done to select the relevant data. First select ‘Order Forecast Details’ in the Demand tab as below:
On the next screen you have to input the customer location and click on ‘Go’.
19 / 47 Daikin Europe N.V. (Naamloze Vennootschap) - Zandvoordestraat 300 - 8400 Oostende (Belgium)
T: (+32) 59 55 81 11, F: (+32) 59 55 88 99, E: [email protected] BTW BE 0412 120 336 - RPR Oostende - http://www.daikineurope.com
13-Mar-17
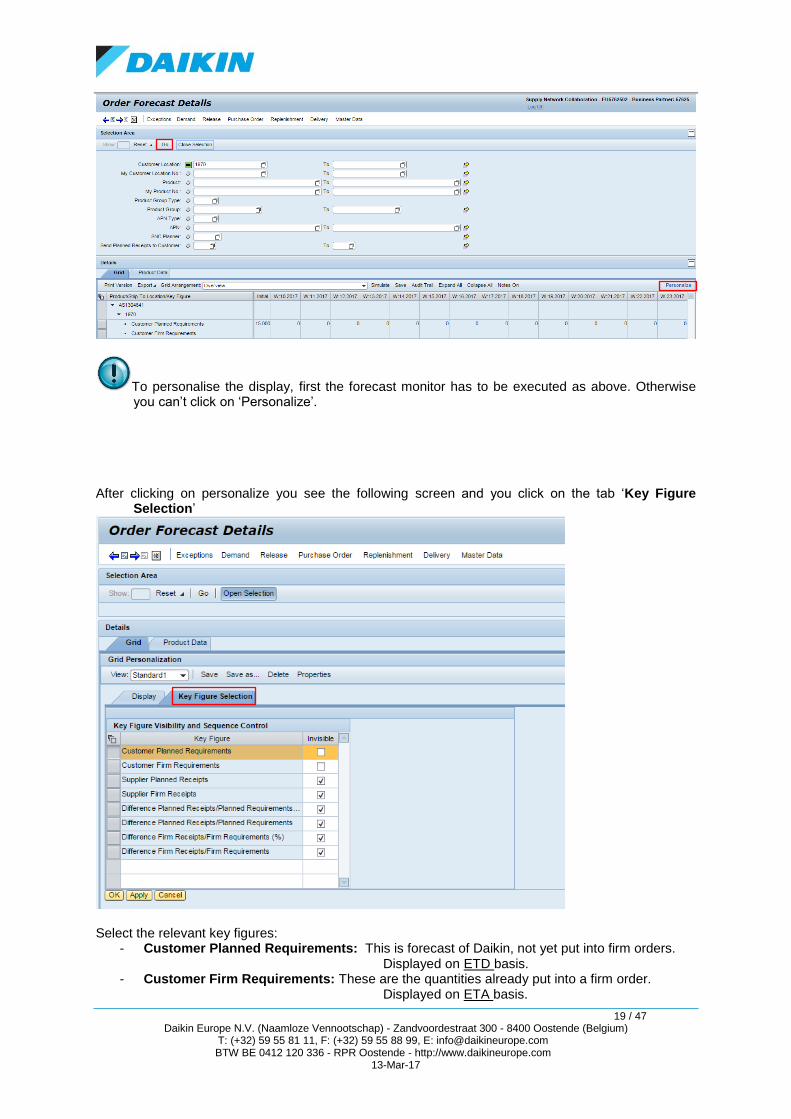
To personalise the display, first the forecast monitor has to be executed as above. Otherwise you can’t click on ‘Personalize’.
After clicking on personalize you see the following screen and you click on the tab ‘Key Figure
Selection’
Select the relevant key figures:
- Customer Planned Requirements: This is forecast of Daikin, not yet put into firm orders. Displayed on ETD basis.
- Customer Firm Requirements: These are the quantities already put into a firm order. Displayed on ETA basis.
20 / 47 Daikin Europe N.V. (Naamloze Vennootschap) - Zandvoordestraat 300 - 8400 Oostende (Belgium)
T: (+32) 59 55 81 11, F: (+32) 59 55 88 99, E: [email protected] BTW BE 0412 120 336 - RPR Oostende - http://www.daikineurope.com
13-Mar-17
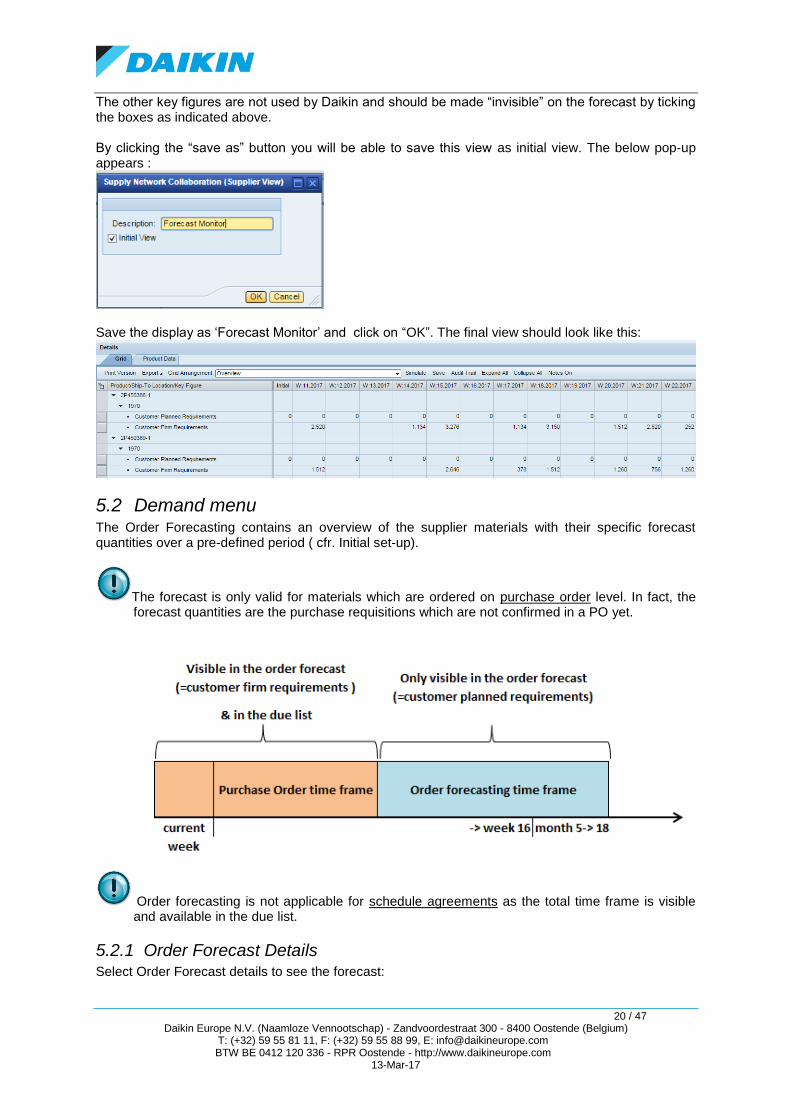
The other key figures are not used by Daikin and should be made “invisible” on the forecast by ticking the boxes as indicated above. By clicking the “save as” button you will be able to save this view as initial view. The below pop-up appears :
Save the display as ‘Forecast Monitor’ and click on “OK”. The final view should look like this:
5.2 Demand menu The Order Forecasting contains an overview of the supplier materials with their specific forecast quantities over a pre-defined period ( cfr. Initial set-up).
The forecast is only valid for materials which are ordered on purchase order level. In fact, the forecast quantities are the purchase requisitions which are not confirmed in a PO yet.
Order forecasting is not applicable for schedule agreements as the total time frame is visible and available in the due list.
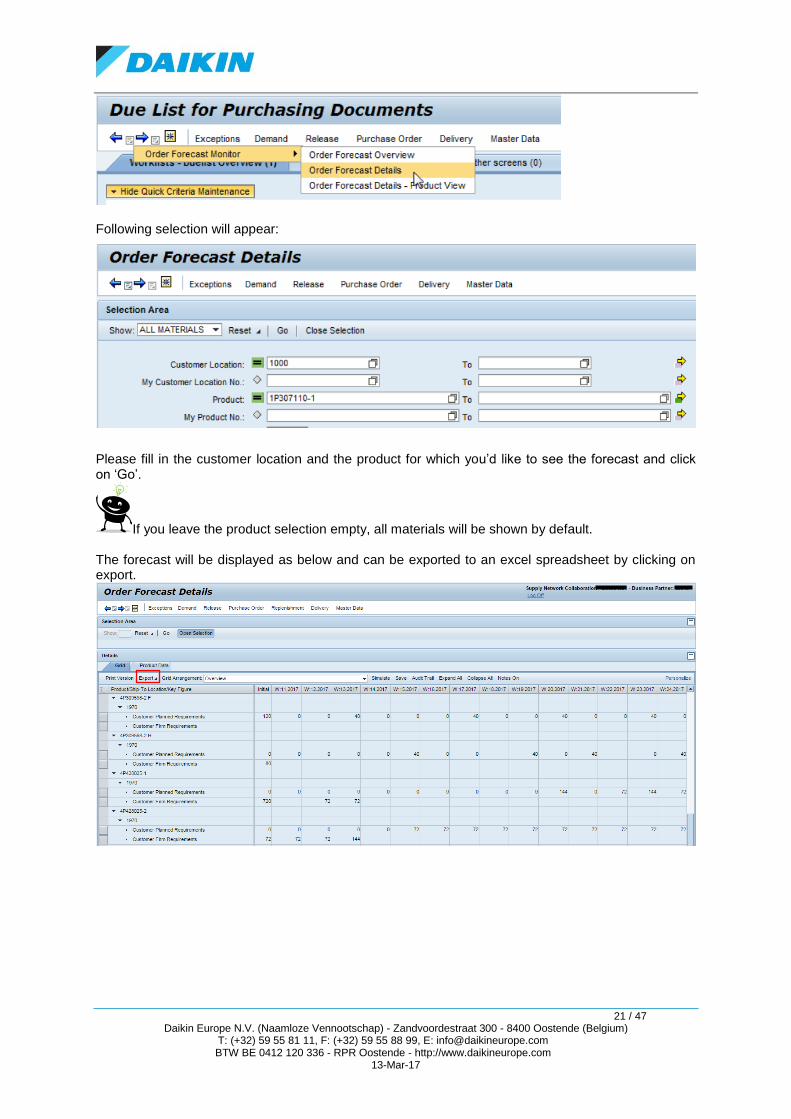
5.2.1 Order Forecast Details Select Order Forecast details to see the forecast:
21 / 47 Daikin Europe N.V. (Naamloze Vennootschap) - Zandvoordestraat 300 - 8400 Oostende (Belgium)
T: (+32) 59 55 81 11, F: (+32) 59 55 88 99, E: [email protected] BTW BE 0412 120 336 - RPR Oostende - http://www.daikineurope.com
13-Mar-17
Following selection will appear:
Please fill in the customer location and the product for which you’d like to see the forecast and click on ‘Go’.
If you leave the product selection empty, all materials will be shown by default. The forecast will be displayed as below and can be exported to an excel spreadsheet by clicking on export.
22 / 47 Daikin Europe N.V. (Naamloze Vennootschap) - Zandvoordestraat 300 - 8400 Oostende (Belgium)
T: (+32) 59 55 81 11, F: (+32) 59 55 88 99, E: [email protected] BTW BE 0412 120 336 - RPR Oostende - http://www.daikineurope.com
13-Mar-17
6 Purchasing documents
6.1 Release Menu: Schedule Agreements
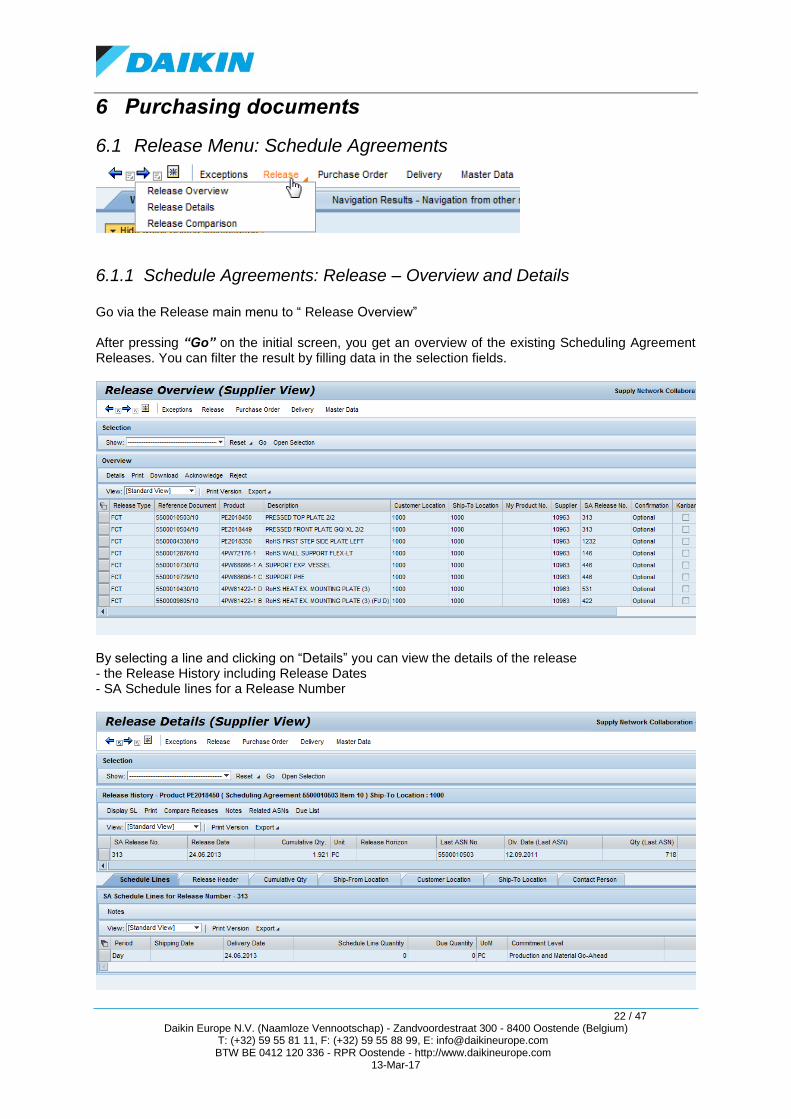
6.1.1 Schedule Agreements: Release – Overview and Details Go via the Release main menu to “ Release Overview” After pressing “Go” on the initial screen, you get an overview of the existing Scheduling Agreement Releases. You can filter the result by filling data in the selection fields.
By selecting a line and clicking on “Details” you can view the details of the release - the Release History including Release Dates - SA Schedule lines for a Release Number
23 / 47 Daikin Europe N.V. (Naamloze Vennootschap) - Zandvoordestraat 300 - 8400 Oostende (Belgium)
T: (+32) 59 55 81 11, F: (+32) 59 55 88 99, E: [email protected] BTW BE 0412 120 336 - RPR Oostende - http://www.daikineurope.com
13-Mar-17
Via the “Display SL” button, you can see the status of the SA Schedule line - Production and Material Go-Ahead - Material Go-Ahead - Forecast Remark: You can also go directly to the details of a Release by selecting “Release Details“ in the Release main menu.
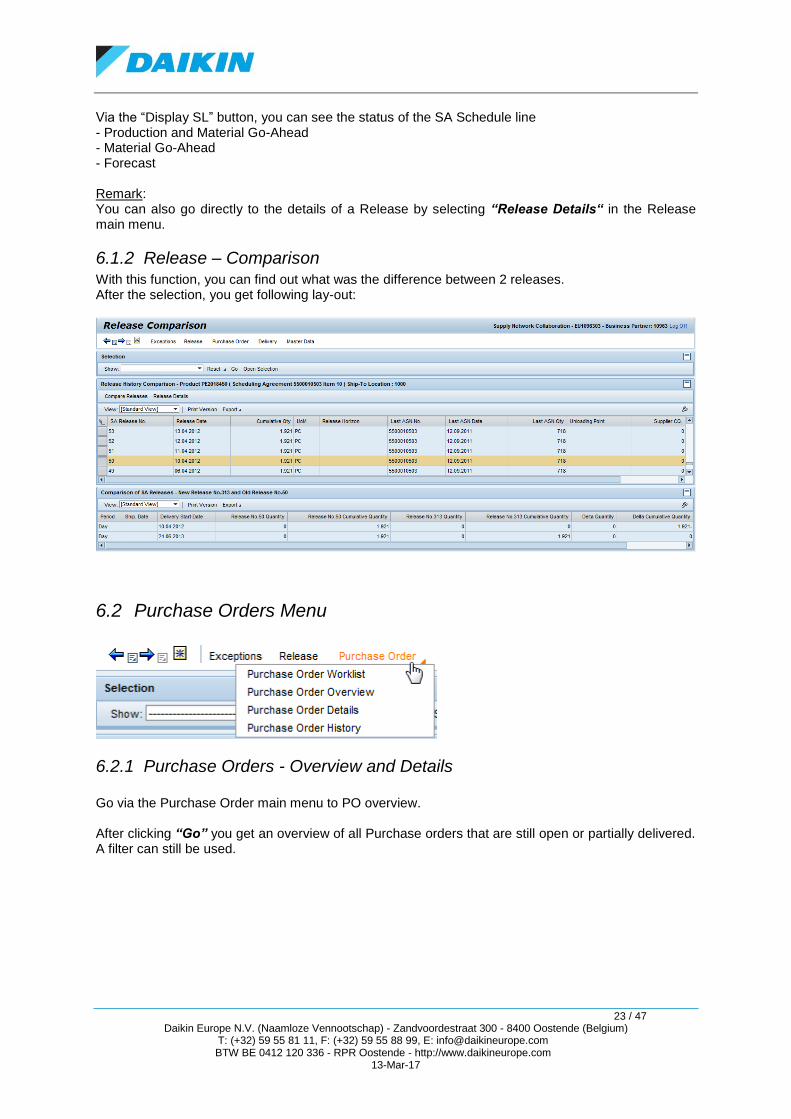
6.1.2 Release – Comparison With this function, you can find out what was the difference between 2 releases. After the selection, you get following lay-out:
6.2 Purchase Orders Menu
6.2.1 Purchase Orders - Overview and Details Go via the Purchase Order main menu to PO overview. After clicking “Go” you get an overview of all Purchase orders that are still open or partially delivered. A filter can still be used.
24 / 47 Daikin Europe N.V. (Naamloze Vennootschap) - Zandvoordestraat 300 - 8400 Oostende (Belgium)
T: (+32) 59 55 81 11, F: (+32) 59 55 88 99, E: [email protected] BTW BE 0412 120 336 - RPR Oostende - http://www.daikineurope.com
13-Mar-17
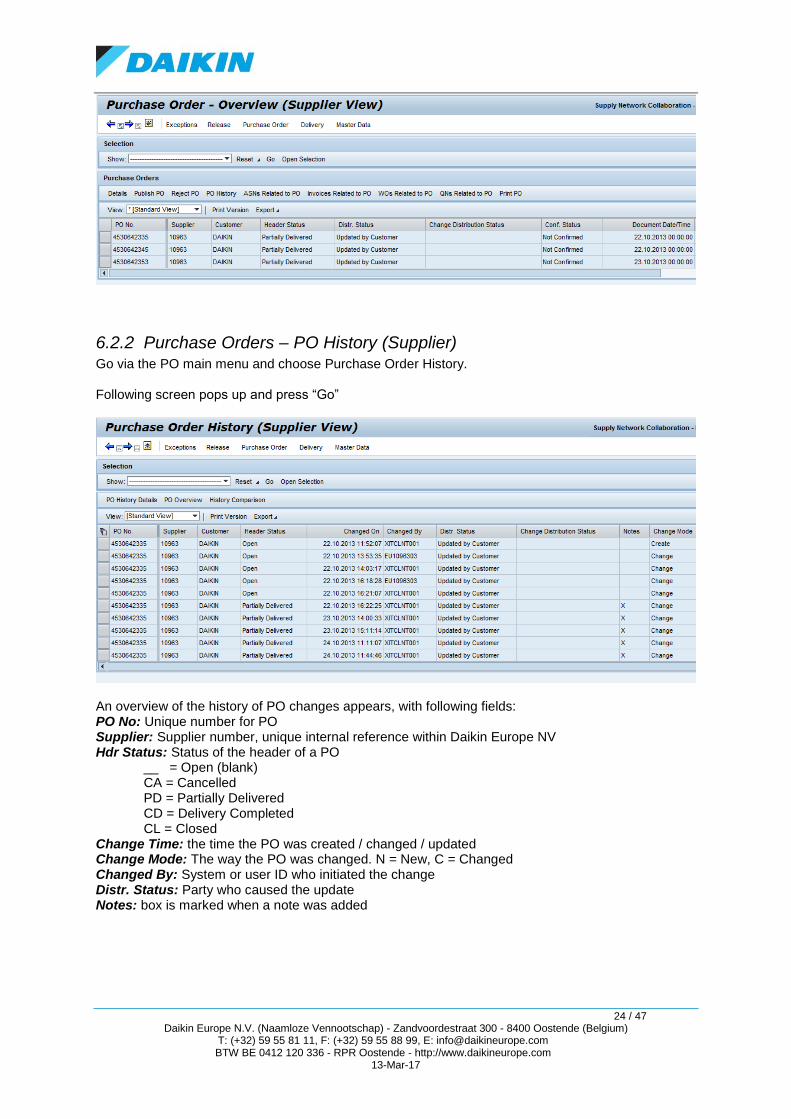
6.2.2 Purchase Orders – PO History (Supplier) Go via the PO main menu and choose Purchase Order History. Following screen pops up and press “Go”
An overview of the history of PO changes appears, with following fields: PO No: Unique number for PO Supplier: Supplier number, unique internal reference within Daikin Europe NV Hdr Status: Status of the header of a PO __ = Open (blank) CA = Cancelled PD = Partially Delivered CD = Delivery Completed CL = Closed Change Time: the time the PO was created / changed / updated Change Mode: The way the PO was changed. N = New, C = Changed Changed By: System or user ID who initiated the change Distr. Status: Party who caused the update Notes: box is marked when a note was added
25 / 47 Daikin Europe N.V. (Naamloze Vennootschap) - Zandvoordestraat 300 - 8400 Oostende (Belgium)
T: (+32) 59 55 81 11, F: (+32) 59 55 88 99, E: [email protected] BTW BE 0412 120 336 - RPR Oostende - http://www.daikineurope.com
13-Mar-17
7 Delivery Menu
7.1 Due list as Open Orderlist
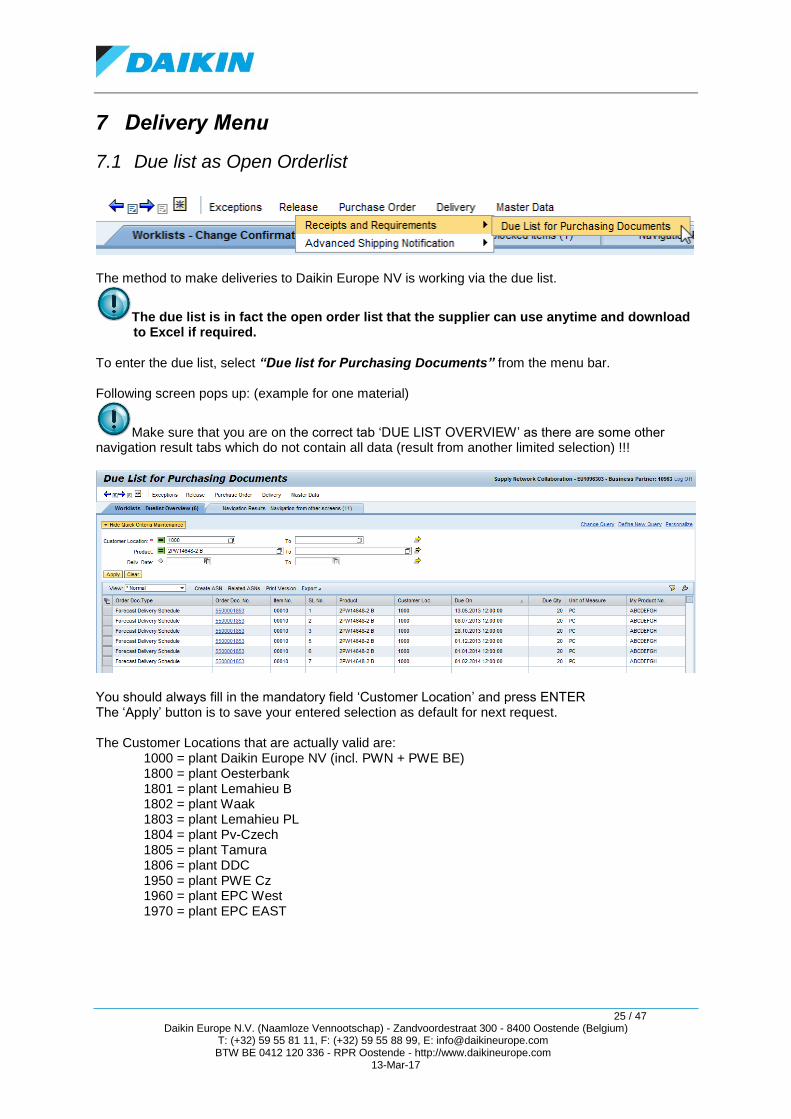
The method to make deliveries to Daikin Europe NV is working via the due list.
The due list is in fact the open order list that the supplier can use anytime and download to Excel if required.
To enter the due list, select “Due list for Purchasing Documents” from the menu bar. Following screen pops up: (example for one material)
Make sure that you are on the correct tab ‘DUE LIST OVERVIEW’ as there are some other navigation result tabs which do not contain all data (result from another limited selection) !!!
You should always fill in the mandatory field ‘Customer Location’ and press ENTER The ‘Apply’ button is to save your entered selection as default for next request. The Customer Locations that are actually valid are: 1000 = plant Daikin Europe NV (incl. PWN + PWE BE) 1800 = plant Oesterbank 1801 = plant Lemahieu B 1802 = plant Waak 1803 = plant Lemahieu PL 1804 = plant Pv-Czech 1805 = plant Tamura 1806 = plant DDC 1950 = plant PWE Cz 1960 = plant EPC West 1970 = plant EPC EAST
26 / 47 Daikin Europe N.V. (Naamloze Vennootschap) - Zandvoordestraat 300 - 8400 Oostende (Belgium)
T: (+32) 59 55 81 11, F: (+32) 59 55 88 99, E: [email protected] BTW BE 0412 120 336 - RPR Oostende - http://www.daikineurope.com
13-Mar-17
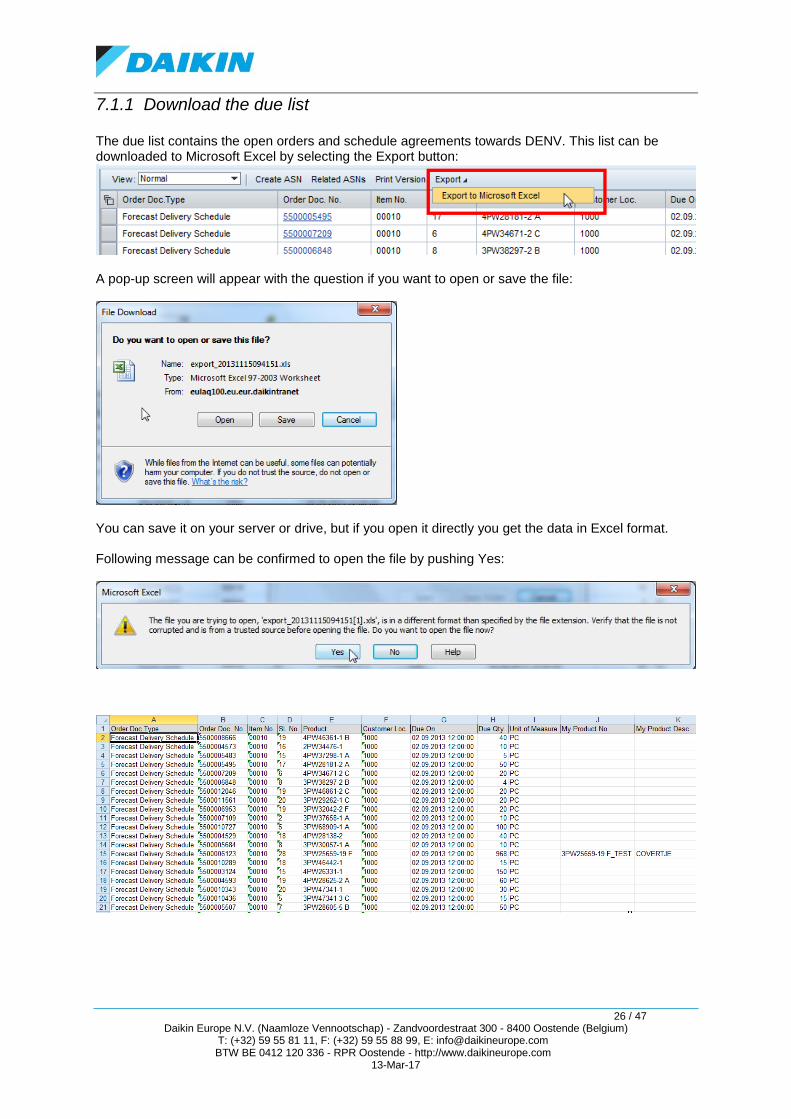
7.1.1 Download the due list The due list contains the open orders and schedule agreements towards DENV. This list can be downloaded to Microsoft Excel by selecting the Export button:
A pop-up screen will appear with the question if you want to open or save the file:
You can save it on your server or drive, but if you open it directly you get the data in Excel format. Following message can be confirmed to open the file by pushing Yes:
27 / 47 Daikin Europe N.V. (Naamloze Vennootschap) - Zandvoordestraat 300 - 8400 Oostende (Belgium)
T: (+32) 59 55 81 11, F: (+32) 59 55 88 99, E: [email protected] BTW BE 0412 120 336 - RPR Oostende - http://www.daikineurope.com
13-Mar-17
7.2 Due List for Creation of ASN
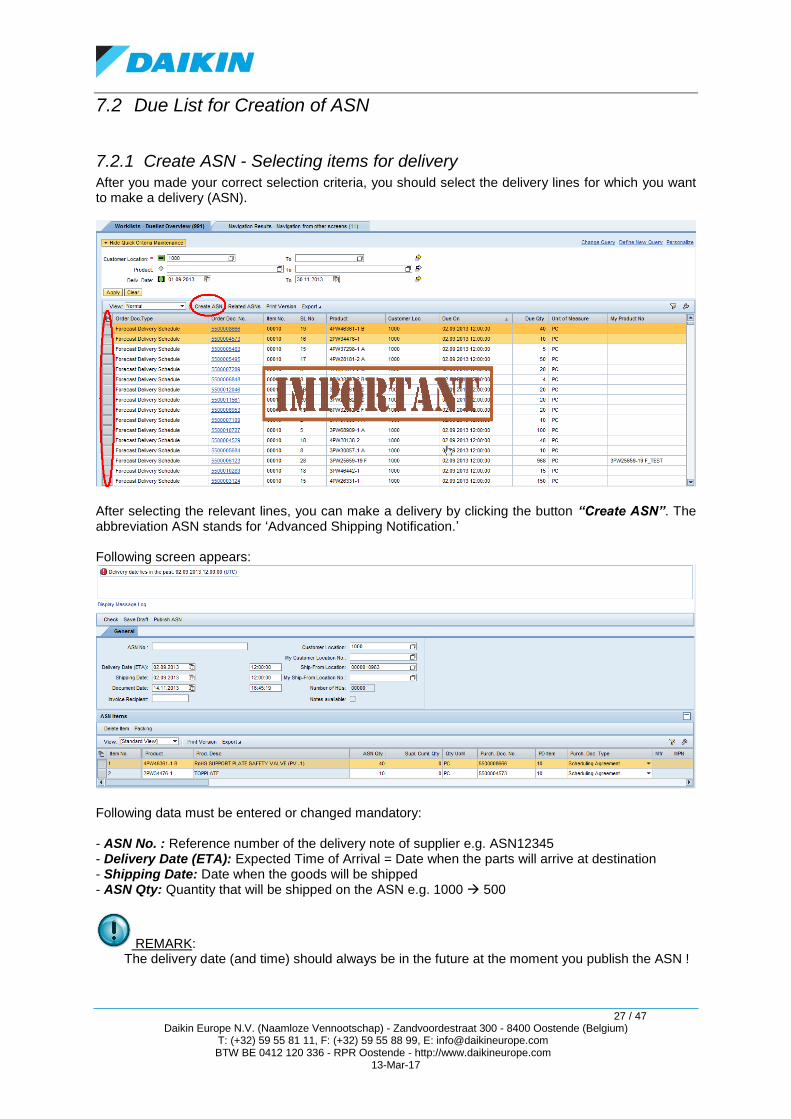
7.2.1 Create ASN - Selecting items for delivery After you made your correct selection criteria, you should select the delivery lines for which you want to make a delivery (ASN).
After selecting the relevant lines, you can make a delivery by clicking the button “Create ASN”. The abbreviation ASN stands for ‘Advanced Shipping Notification.’ Following screen appears:
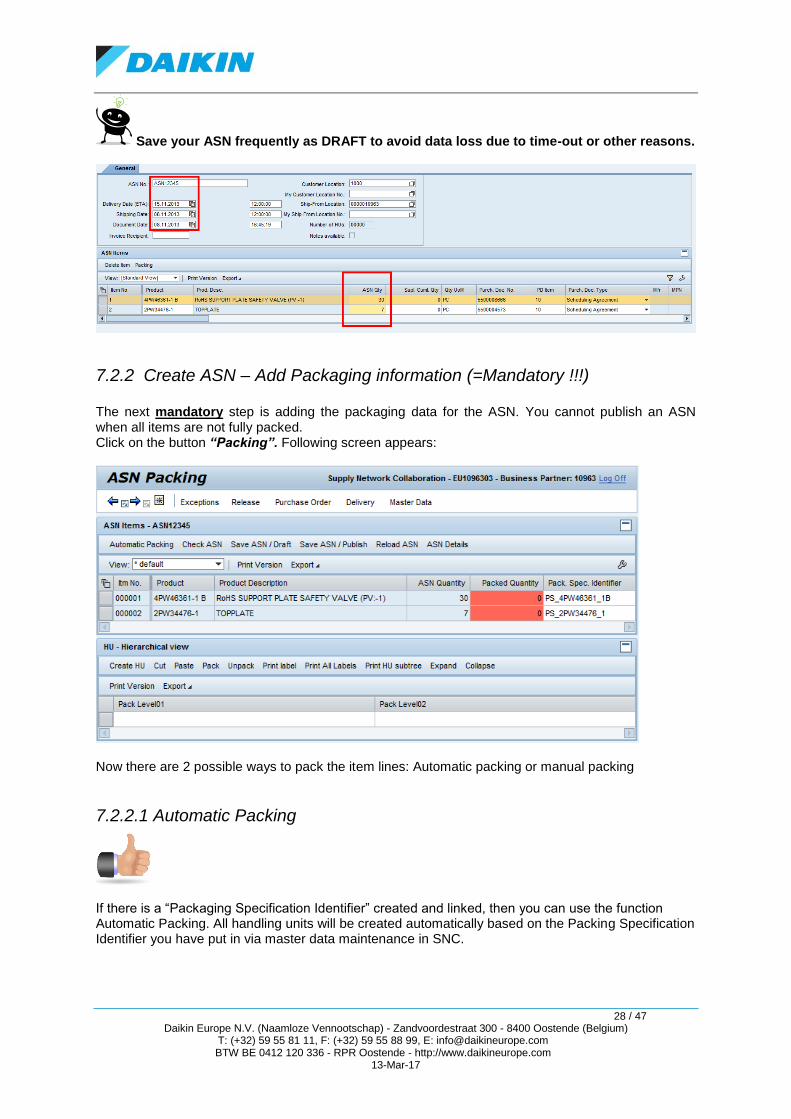
Following data must be entered or changed mandatory: - ASN No. : Reference number of the delivery note of supplier e.g. ASN12345 - Delivery Date (ETA): Expected Time of Arrival = Date when the parts will arrive at destination - Shipping Date: Date when the goods will be shipped - ASN Qty: Quantity that will be shipped on the ASN e.g. 1000 500
REMARK: The delivery date (and time) should always be in the future at the moment you publish the ASN !
28 / 47 Daikin Europe N.V. (Naamloze Vennootschap) - Zandvoordestraat 300 - 8400 Oostende (Belgium)
T: (+32) 59 55 81 11, F: (+32) 59 55 88 99, E: [email protected] BTW BE 0412 120 336 - RPR Oostende - http://www.daikineurope.com
13-Mar-17
Save your ASN frequently as DRAFT to avoid data loss due to time-out or other reasons.
7.2.2 Create ASN – Add Packaging information (=Mandatory !!!) The next mandatory step is adding the packaging data for the ASN. You cannot publish an ASN when all items are not fully packed. Click on the button “Packing”. Following screen appears:
Now there are 2 possible ways to pack the item lines: Automatic packing or manual packing
7.2.2.1 Automatic Packing
If there is a “Packaging Specification Identifier” created and linked, then you can use the function Automatic Packing. All handling units will be created automatically based on the Packing Specification Identifier you have put in via master data maintenance in SNC.
29 / 47 Daikin Europe N.V. (Naamloze Vennootschap) - Zandvoordestraat 300 - 8400 Oostende (Belgium)
T: (+32) 59 55 81 11, F: (+32) 59 55 88 99, E: [email protected] BTW BE 0412 120 336 - RPR Oostende - http://www.daikineurope.com
13-Mar-17
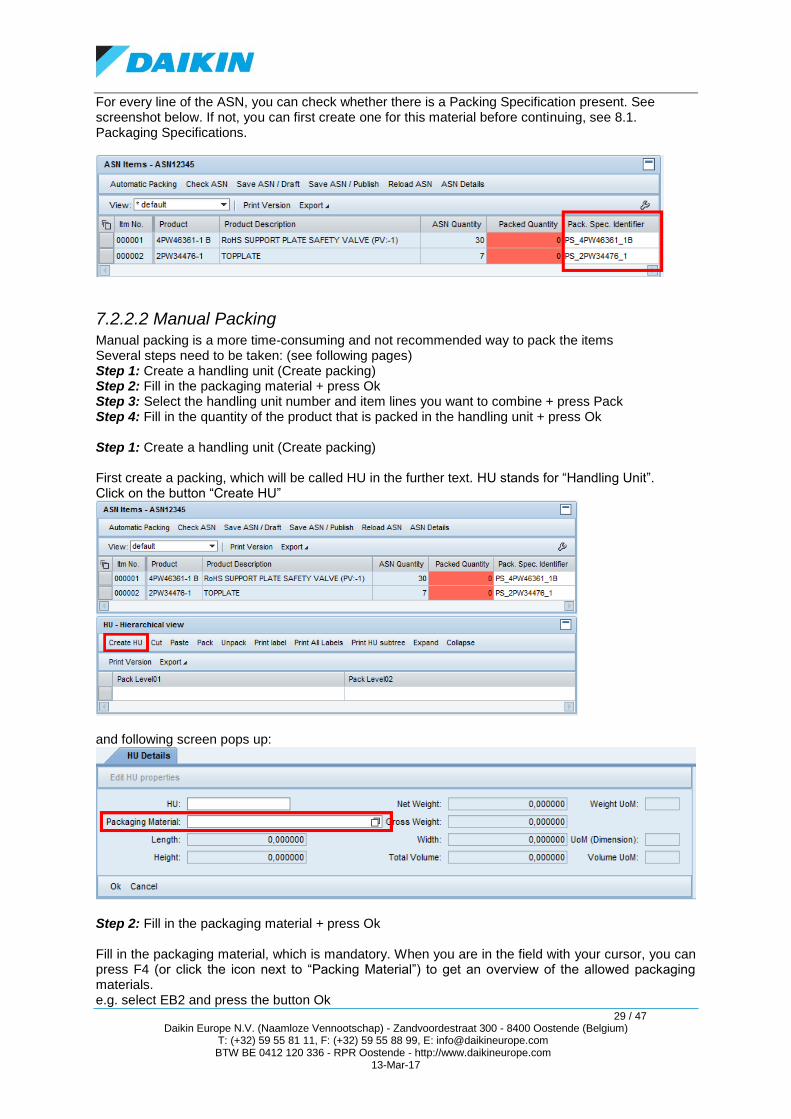
For every line of the ASN, you can check whether there is a Packing Specification present. See screenshot below. If not, you can first create one for this material before continuing, see 8.1. Packaging Specifications.
7.2.2.2 Manual Packing Manual packing is a more time-consuming and not recommended way to pack the items Several steps need to be taken: (see following pages) Step 1: Create a handling unit (Create packing) Step 2: Fill in the packaging material + press Ok Step 3: Select the handling unit number and item lines you want to combine + press Pack Step 4: Fill in the quantity of the product that is packed in the handling unit + press Ok Step 1: Create a handling unit (Create packing) First create a packing, which will be called HU in the further text. HU stands for “Handling Unit”. Click on the button “Create HU”
and following screen pops up:
Step 2: Fill in the packaging material + press Ok Fill in the packaging material, which is mandatory. When you are in the field with your cursor, you can press F4 (or click the icon next to “Packing Material”) to get an overview of the allowed packaging materials. e.g. select EB2 and press the button Ok
30 / 47 Daikin Europe N.V. (Naamloze Vennootschap) - Zandvoordestraat 300 - 8400 Oostende (Belgium)
T: (+32) 59 55 81 11, F: (+32) 59 55 88 99, E: [email protected] BTW BE 0412 120 336 - RPR Oostende - http://www.daikineurope.com
13-Mar-17
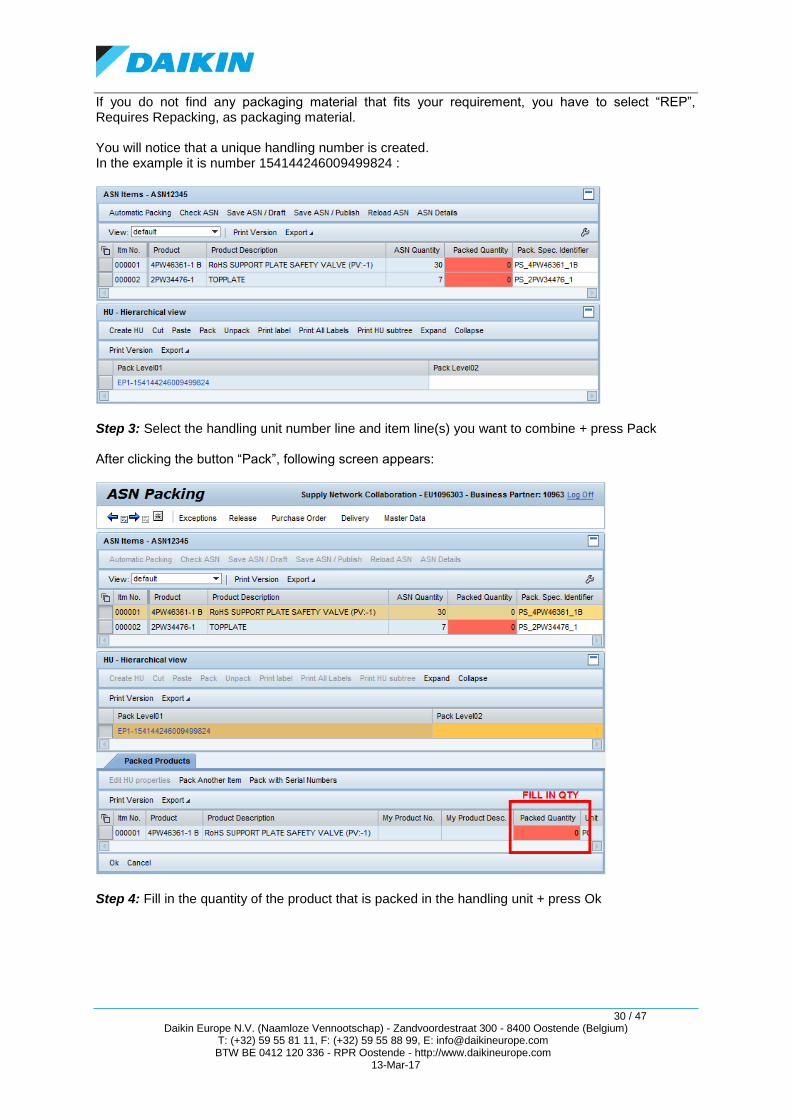
If you do not find any packaging material that fits your requirement, you have to select “REP”, Requires Repacking, as packaging material. You will notice that a unique handling number is created. In the example it is number 154144246009499824 :
Step 3: Select the handling unit number line and item line(s) you want to combine + press Pack After clicking the button “Pack”, following screen appears:
Step 4: Fill in the quantity of the product that is packed in the handling unit + press Ok
31 / 47 Daikin Europe N.V. (Naamloze Vennootschap) - Zandvoordestraat 300 - 8400 Oostende (Belgium)
T: (+32) 59 55 81 11, F: (+32) 59 55 88 99, E: [email protected] BTW BE 0412 120 336 - RPR Oostende - http://www.daikineurope.com
13-Mar-17
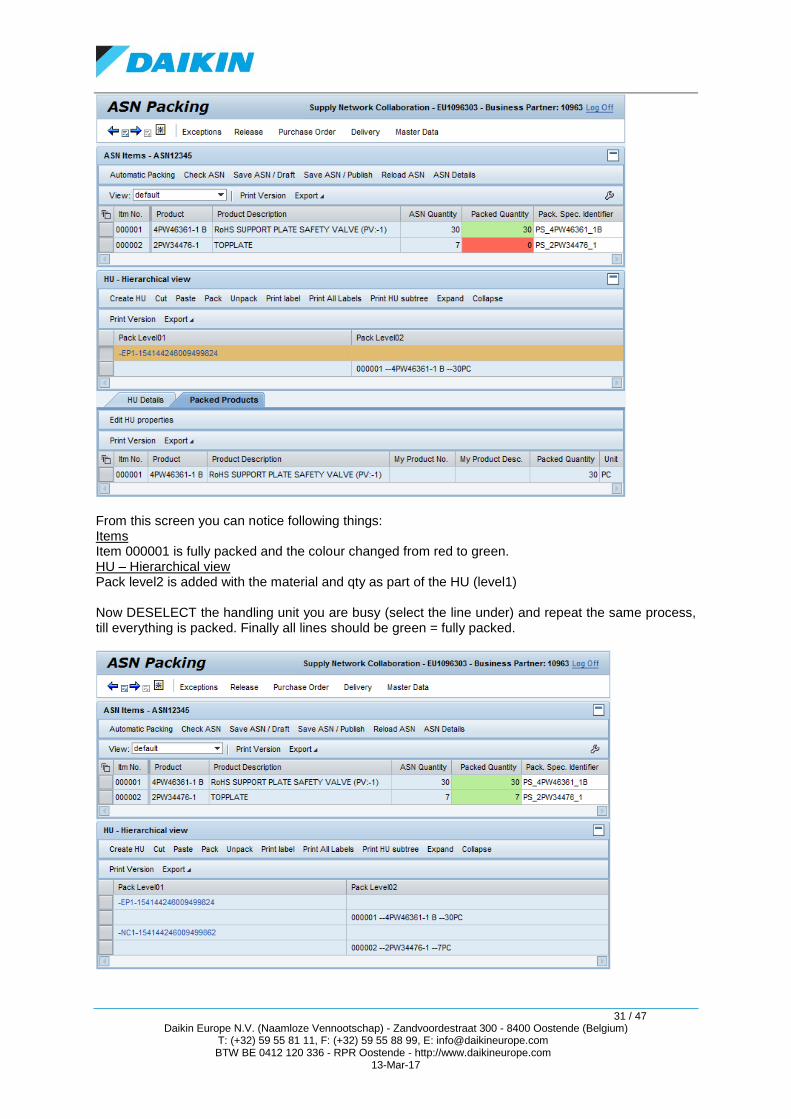
From this screen you can notice following things: Items Item 000001 is fully packed and the colour changed from red to green. HU – Hierarchical view Pack level2 is added with the material and qty as part of the HU (level1) Now DESELECT the handling unit you are busy (select the line under) and repeat the same process, till everything is packed. Finally all lines should be green = fully packed.
32 / 47 Daikin Europe N.V. (Naamloze Vennootschap) - Zandvoordestraat 300 - 8400 Oostende (Belgium)
T: (+32) 59 55 81 11, F: (+32) 59 55 88 99, E: [email protected] BTW BE 0412 120 336 - RPR Oostende - http://www.daikineurope.com
13-Mar-17
REMARK: You can select more than 1 item line for packing in a handling unit, but this is business wise only allowed when the Products of the selected lines are the same. Different products in one handling unit are not allowed.
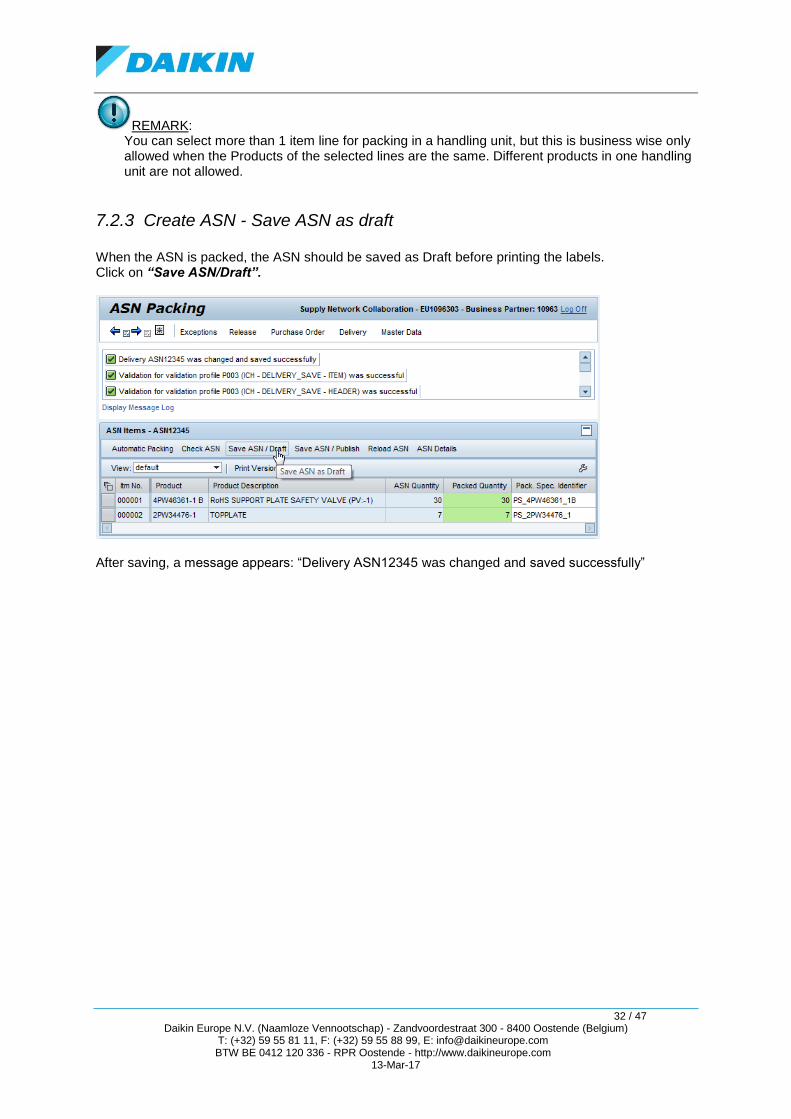
7.2.3 Create ASN - Save ASN as draft When the ASN is packed, the ASN should be saved as Draft before printing the labels. Click on “Save ASN/Draft”.
After saving, a message appears: “Delivery ASN12345 was changed and saved successfully”
33 / 47 Daikin Europe N.V. (Naamloze Vennootschap) - Zandvoordestraat 300 - 8400 Oostende (Belgium)
T: (+32) 59 55 81 11, F: (+32) 59 55 88 99, E: [email protected] BTW BE 0412 120 336 - RPR Oostende - http://www.daikineurope.com
13-Mar-17
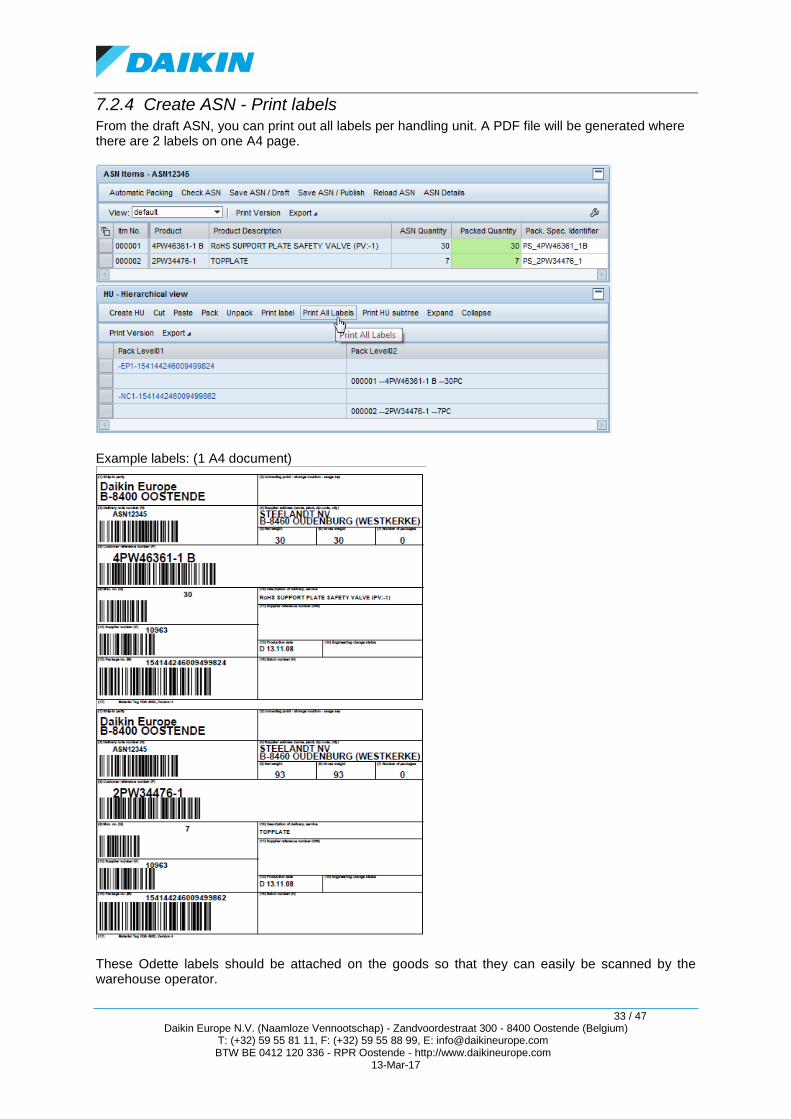
7.2.4 Create ASN - Print labels From the draft ASN, you can print out all labels per handling unit. A PDF file will be generated where there are 2 labels on one A4 page.
Example labels: (1 A4 document)
These Odette labels should be attached on the goods so that they can easily be scanned by the warehouse operator.

34 / 47 Daikin Europe N.V. (Naamloze Vennootschap) - Zandvoordestraat 300 - 8400 Oostende (Belgium)
T: (+32) 59 55 81 11, F: (+32) 59 55 88 99, E: [email protected] BTW BE 0412 120 336 - RPR Oostende - http://www.daikineurope.com
13-Mar-17
7.2.5 Create ASN - Publish ASN = final confirmation! After you have attached the labels to the packages, you can send the ASN to Daikin Europe NV by “Publishing the ASN”
Following message appears:
This is the final step of creating an ASN. After you published, you cannot change the ASN anymore. REMARK: Exceptionally, you can CANCEL an ASN and start over again to make a new ASN. (the due qty is re-opened) Be aware that when you published the ASN, the system sended a message to DENV SAP and created an inbound delivery.
=> ALWAYS inform DENV when you cancelled an ASN !!!
35 / 47 Daikin Europe N.V. (Naamloze Vennootschap) - Zandvoordestraat 300 - 8400 Oostende (Belgium)
T: (+32) 59 55 81 11, F: (+32) 59 55 88 99, E: [email protected] BTW BE 0412 120 336 - RPR Oostende - http://www.daikineurope.com
13-Mar-17
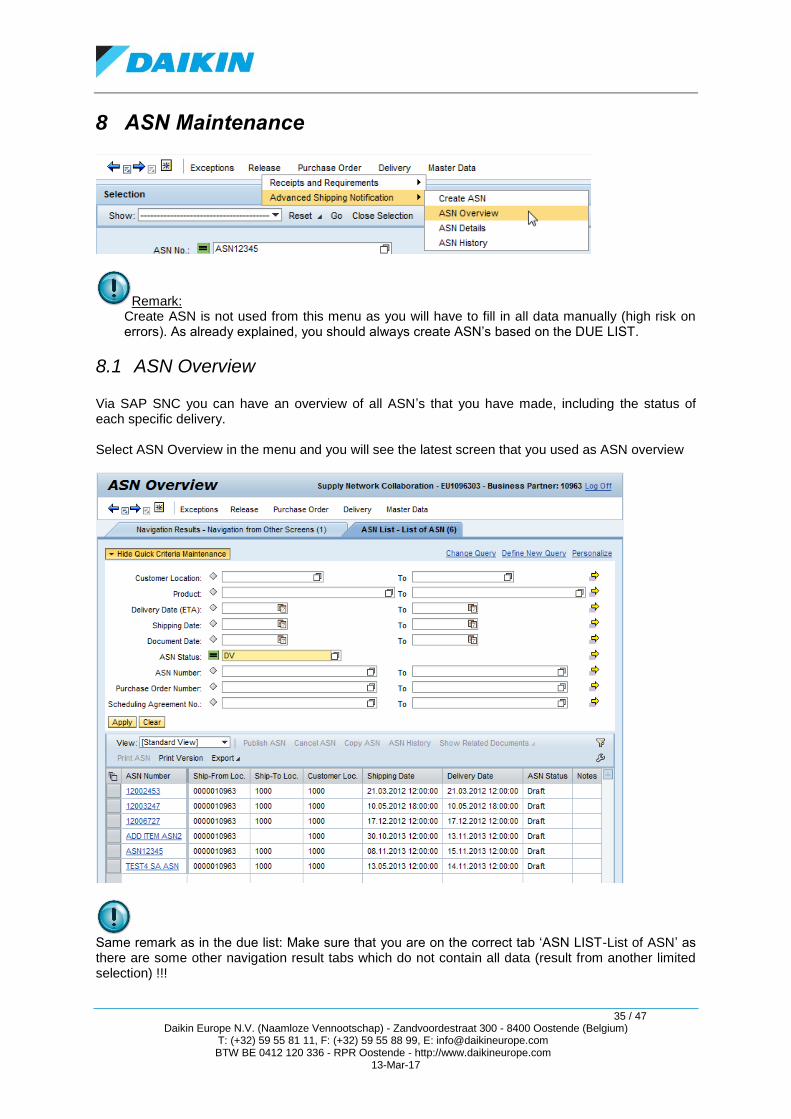
8 ASN Maintenance
Remark: Create ASN is not used from this menu as you will have to fill in all data manually (high risk on errors). As already explained, you should always create ASN’s based on the DUE LIST.
8.1 ASN Overview Via SAP SNC you can have an overview of all ASN’s that you have made, including the status of each specific delivery. Select ASN Overview in the menu and you will see the latest screen that you used as ASN overview
Same remark as in the due list: Make sure that you are on the correct tab ‘ASN LIST-List of ASN’ as there are some other navigation result tabs which do not contain all data (result from another limited selection) !!!
36 / 47 Daikin Europe N.V. (Naamloze Vennootschap) - Zandvoordestraat 300 - 8400 Oostende (Belgium)
T: (+32) 59 55 81 11, F: (+32) 59 55 88 99, E: [email protected] BTW BE 0412 120 336 - RPR Oostende - http://www.daikineurope.com
13-Mar-17
Customer Location: Plant within Daikin Europe organization where you have to deliver Product: Material included in ASN Delivery Date (ETA): date of arrival of goods Shipping Date: date of shipping of goods Document Date: date when the ASN was created ASN Status: status about the delivery – possible entries DV = Draft PB = Published GC = Goods Receipt Complete GP = Partial Goods Receipt CA = Cancelled ASN ASN No.: Reference delivery note of supplier PO number: PO relevant to the requested ASN(‘s) SA number: SA relevant to the requested ASN(‘s) By selecting a line, you can choose to publish, cancel, copy or see the history details of the ASN. Click on the ASN number itself to go to the ASN details from which you can change it when the status is draft. This can also be used to reprint labels.
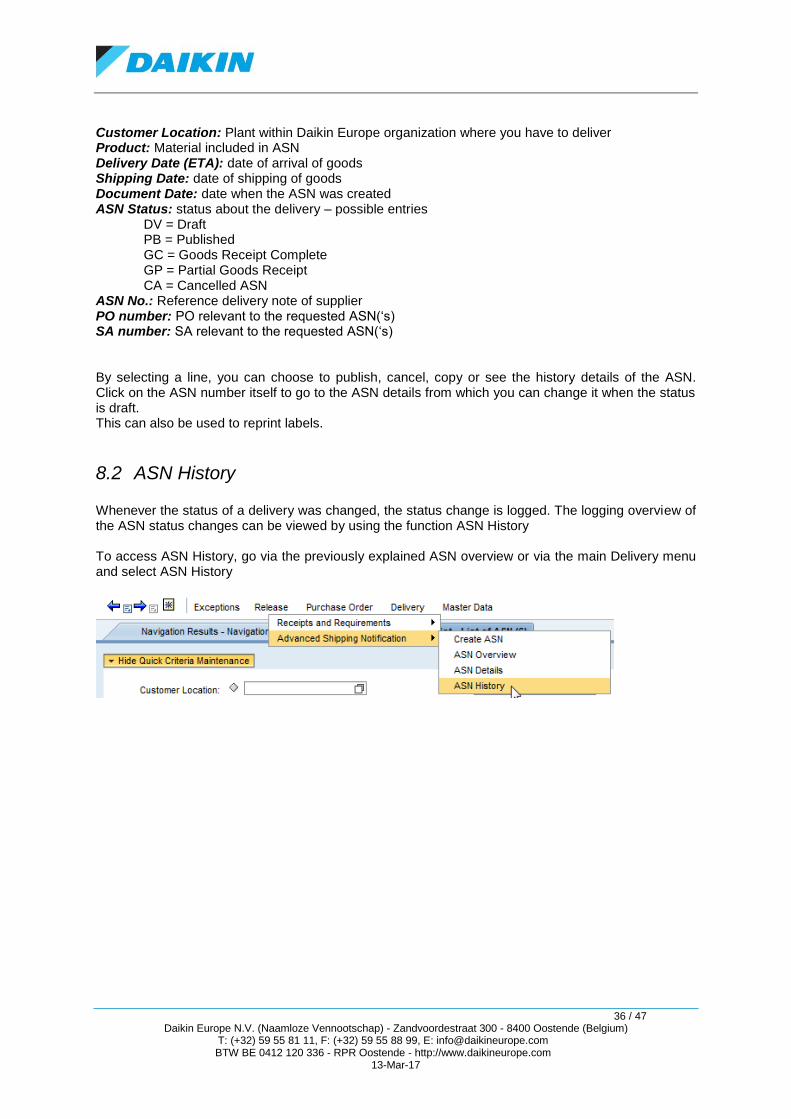
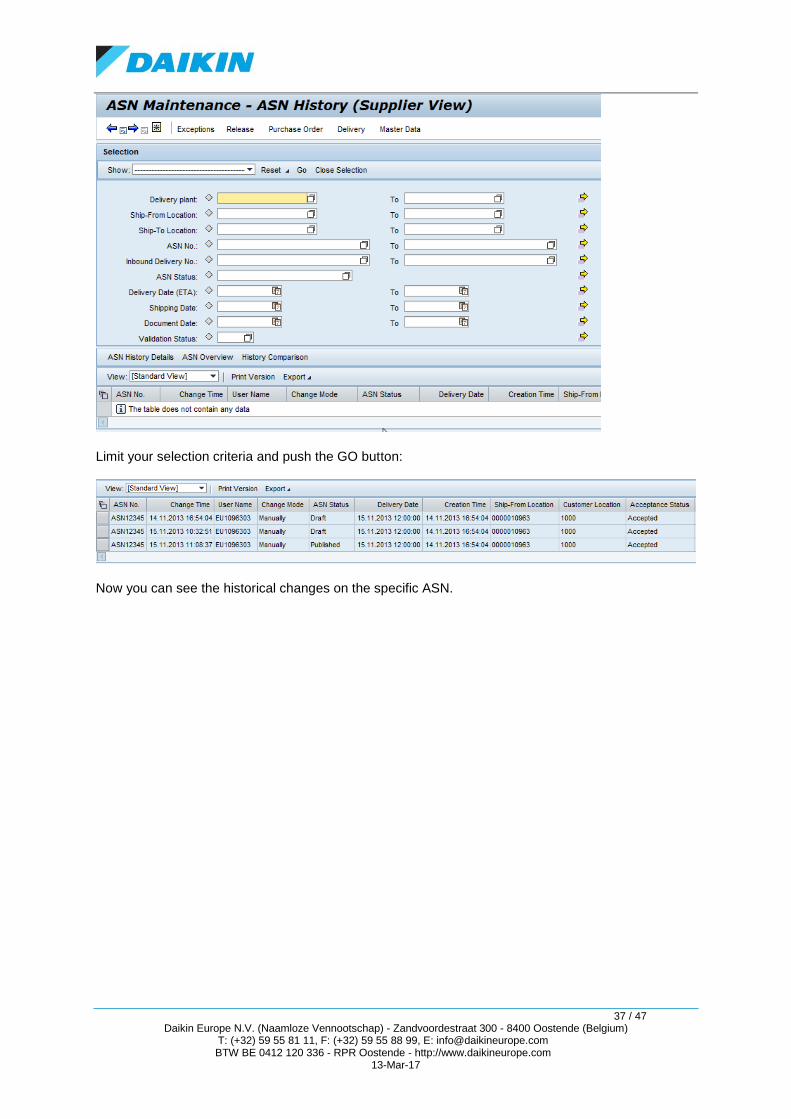
8.2 ASN History Whenever the status of a delivery was changed, the status change is logged. The logging overview of the ASN status changes can be viewed by using the function ASN History To access ASN History, go via the previously explained ASN overview or via the main Delivery menu and select ASN History
37 / 47 Daikin Europe N.V. (Naamloze Vennootschap) - Zandvoordestraat 300 - 8400 Oostende (Belgium)
T: (+32) 59 55 81 11, F: (+32) 59 55 88 99, E: [email protected] BTW BE 0412 120 336 - RPR Oostende - http://www.daikineurope.com
13-Mar-17
Limit your selection criteria and push the GO button:
Now you can see the historical changes on the specific ASN.
38 / 47 Daikin Europe N.V. (Naamloze Vennootschap) - Zandvoordestraat 300 - 8400 Oostende (Belgium)
T: (+32) 59 55 81 11, F: (+32) 59 55 88 99, E: [email protected] BTW BE 0412 120 336 - RPR Oostende - http://www.daikineurope.com
13-Mar-17
9 Master Data
9.1 Packaging Specifications
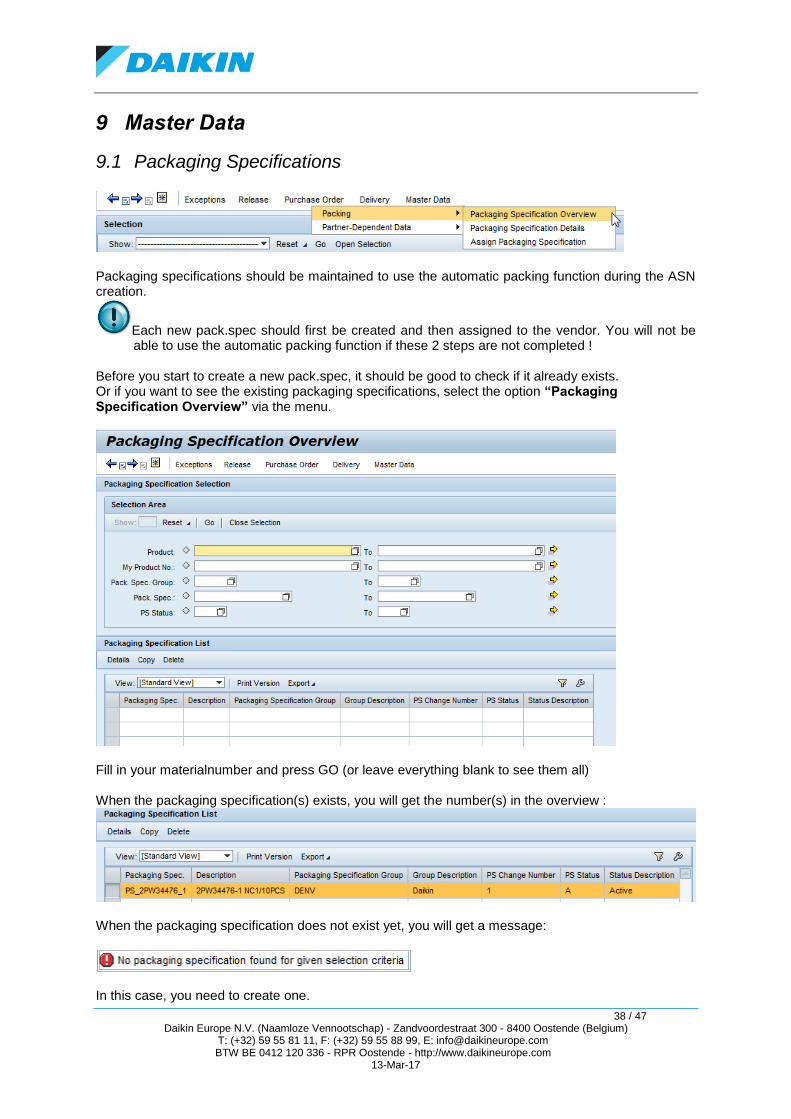
Packaging specifications should be maintained to use the automatic packing function during the ASN creation.
Each new pack.spec should first be created and then assigned to the vendor. You will not be able to use the automatic packing function if these 2 steps are not completed !
Before you start to create a new pack.spec, it should be good to check if it already exists. Or if you want to see the existing packaging specifications, select the option “Packaging Specification Overview” via the menu.
Fill in your materialnumber and press GO (or leave everything blank to see them all) When the packaging specification(s) exists, you will get the number(s) in the overview :
When the packaging specification does not exist yet, you will get a message:
In this case, you need to create one.
39 / 47 Daikin Europe N.V. (Naamloze Vennootschap) - Zandvoordestraat 300 - 8400 Oostende (Belgium)
T: (+32) 59 55 81 11, F: (+32) 59 55 88 99, E: [email protected] BTW BE 0412 120 336 - RPR Oostende - http://www.daikineurope.com
13-Mar-17
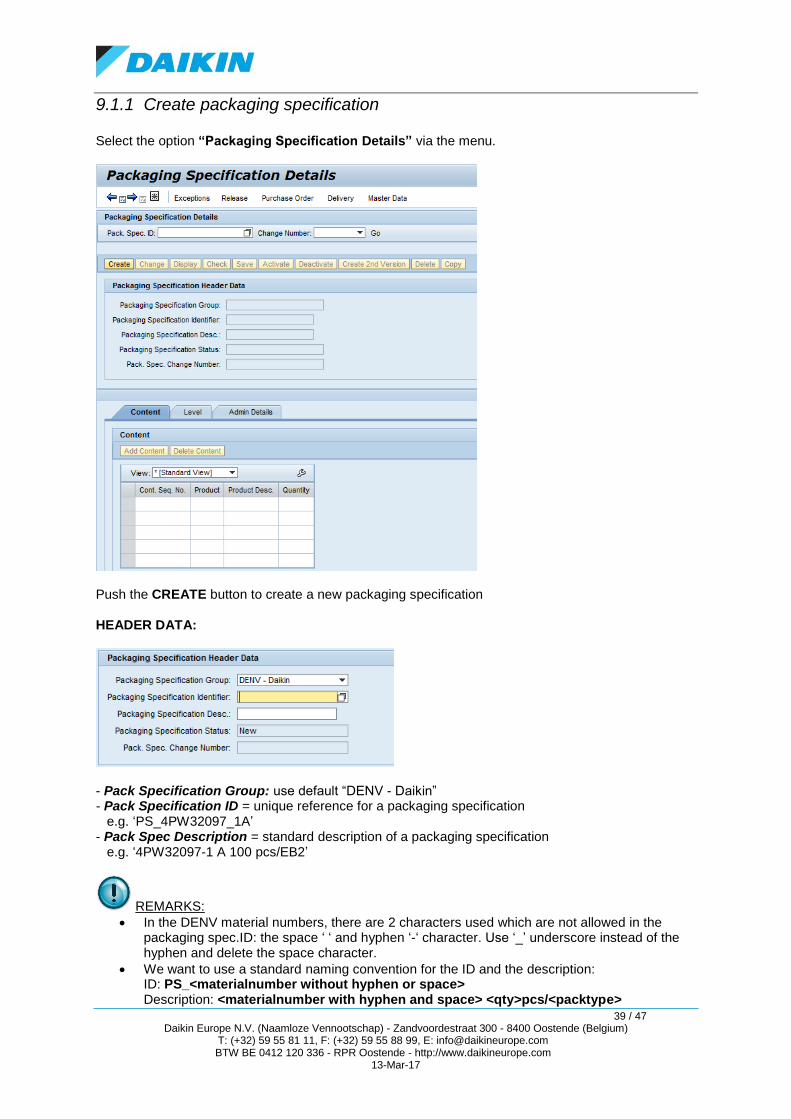
9.1.1 Create packaging specification Select the option “Packaging Specification Details” via the menu.
Push the CREATE button to create a new packaging specification HEADER DATA:
- Pack Specification Group: use default “DENV - Daikin” - Pack Specification ID = unique reference for a packaging specification e.g. ‘PS_4PW32097_1A’ - Pack Spec Description = standard description of a packaging specification e.g. ‘4PW32097-1 A 100 pcs/EB2’
REMARKS:
In the DENV material numbers, there are 2 characters used which are not allowed in the packaging spec.ID: the space ‘ ‘ and hyphen ‘-‘ character. Use ‘_’ underscore instead of the hyphen and delete the space character.
We want to use a standard naming convention for the ID and the description: ID: PS_<materialnumber without hyphen or space> Description: <materialnumber with hyphen and space> <qty>pcs/<packtype>
40 / 47 Daikin Europe N.V. (Naamloze Vennootschap) - Zandvoordestraat 300 - 8400 Oostende (Belgium)
T: (+32) 59 55 81 11, F: (+32) 59 55 88 99, E: [email protected] BTW BE 0412 120 336 - RPR Oostende - http://www.daikineurope.com
13-Mar-17
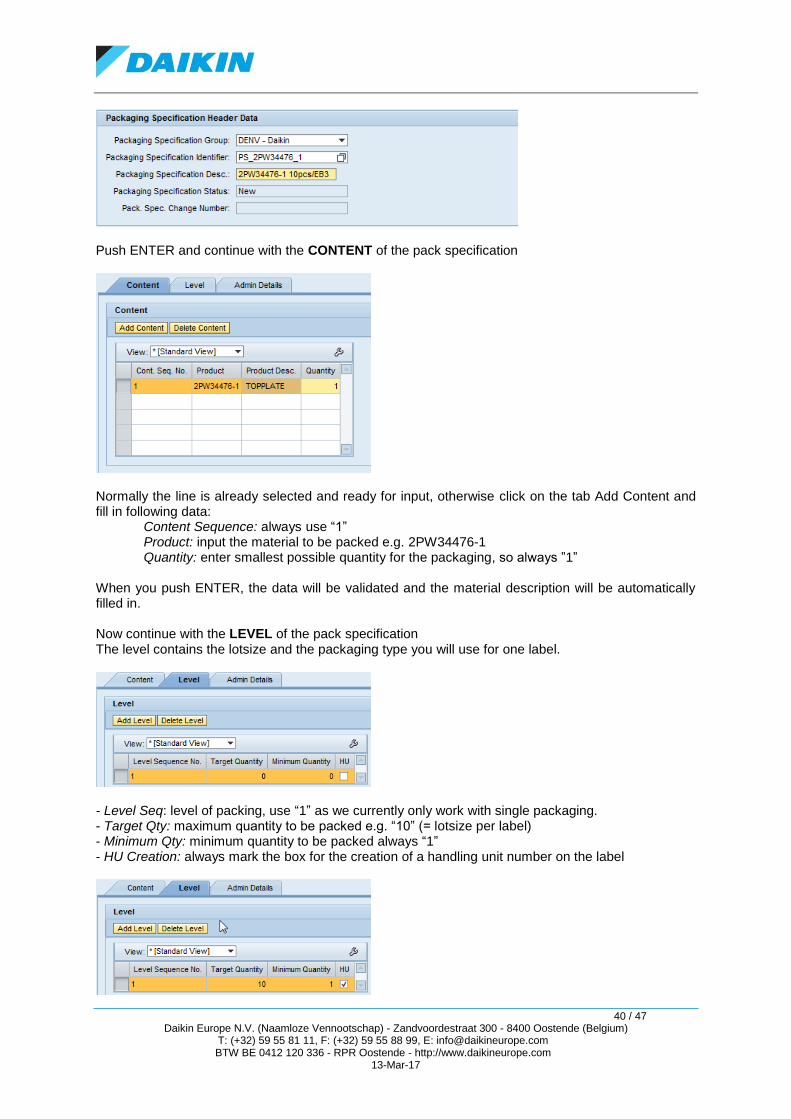
Push ENTER and continue with the CONTENT of the pack specification
Normally the line is already selected and ready for input, otherwise click on the tab Add Content and fill in following data:
Content Sequence: always use “1” Product: input the material to be packed e.g. 2PW34476-1 Quantity: enter smallest possible quantity for the packaging, so always ”1”
When you push ENTER, the data will be validated and the material description will be automatically filled in. Now continue with the LEVEL of the pack specification The level contains the lotsize and the packaging type you will use for one label.
- Level Seq: level of packing, use “1” as we currently only work with single packaging. - Target Qty: maximum quantity to be packed e.g. “10” (= lotsize per label) - Minimum Qty: minimum quantity to be packed always “1” - HU Creation: always mark the box for the creation of a handling unit number on the label
41 / 47 Daikin Europe N.V. (Naamloze Vennootschap) - Zandvoordestraat 300 - 8400 Oostende (Belgium)
T: (+32) 59 55 81 11, F: (+32) 59 55 88 99, E: [email protected] BTW BE 0412 120 336 - RPR Oostende - http://www.daikineurope.com
13-Mar-17
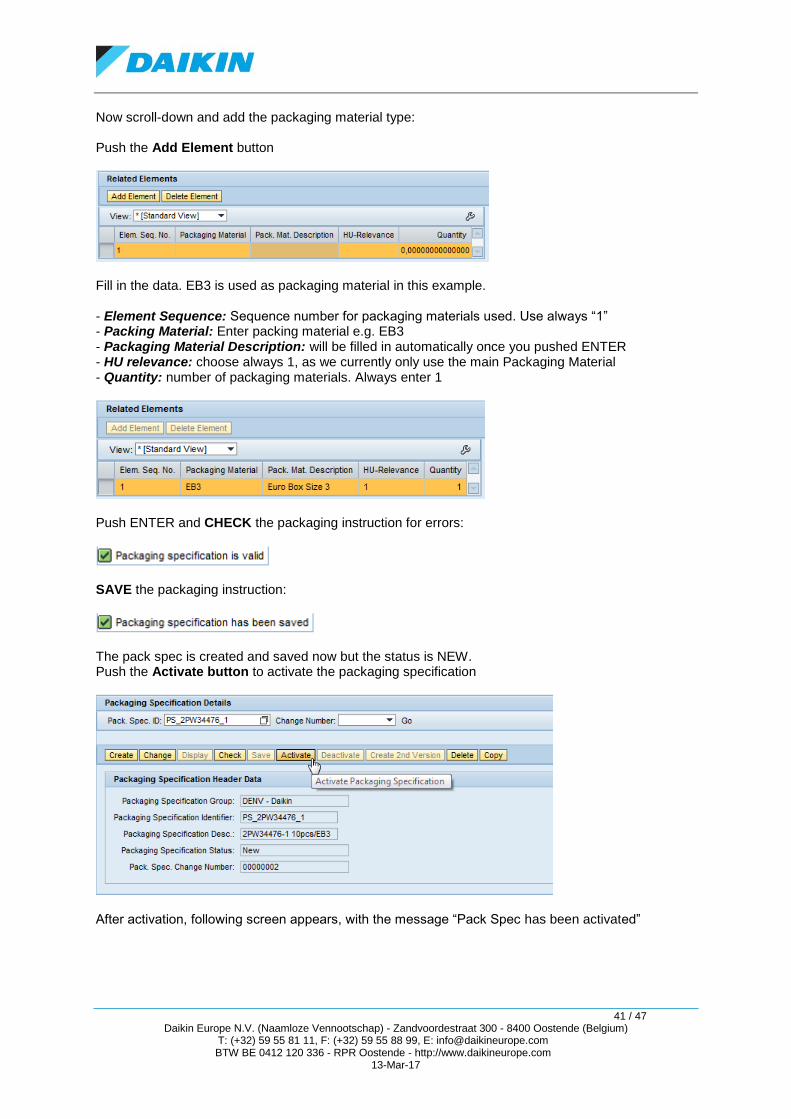
Now scroll-down and add the packaging material type: Push the Add Element button
Fill in the data. EB3 is used as packaging material in this example. - Element Sequence: Sequence number for packaging materials used. Use always “1” - Packing Material: Enter packing material e.g. EB3 - Packaging Material Description: will be filled in automatically once you pushed ENTER - HU relevance: choose always 1, as we currently only use the main Packaging Material - Quantity: number of packaging materials. Always enter 1
Push ENTER and CHECK the packaging instruction for errors:
SAVE the packaging instruction:
The pack spec is created and saved now but the status is NEW. Push the Activate button to activate the packaging specification
After activation, following screen appears, with the message “Pack Spec has been activated”
42 / 47 Daikin Europe N.V. (Naamloze Vennootschap) - Zandvoordestraat 300 - 8400 Oostende (Belgium)
T: (+32) 59 55 81 11, F: (+32) 59 55 88 99, E: [email protected] BTW BE 0412 120 336 - RPR Oostende - http://www.daikineurope.com
13-Mar-17
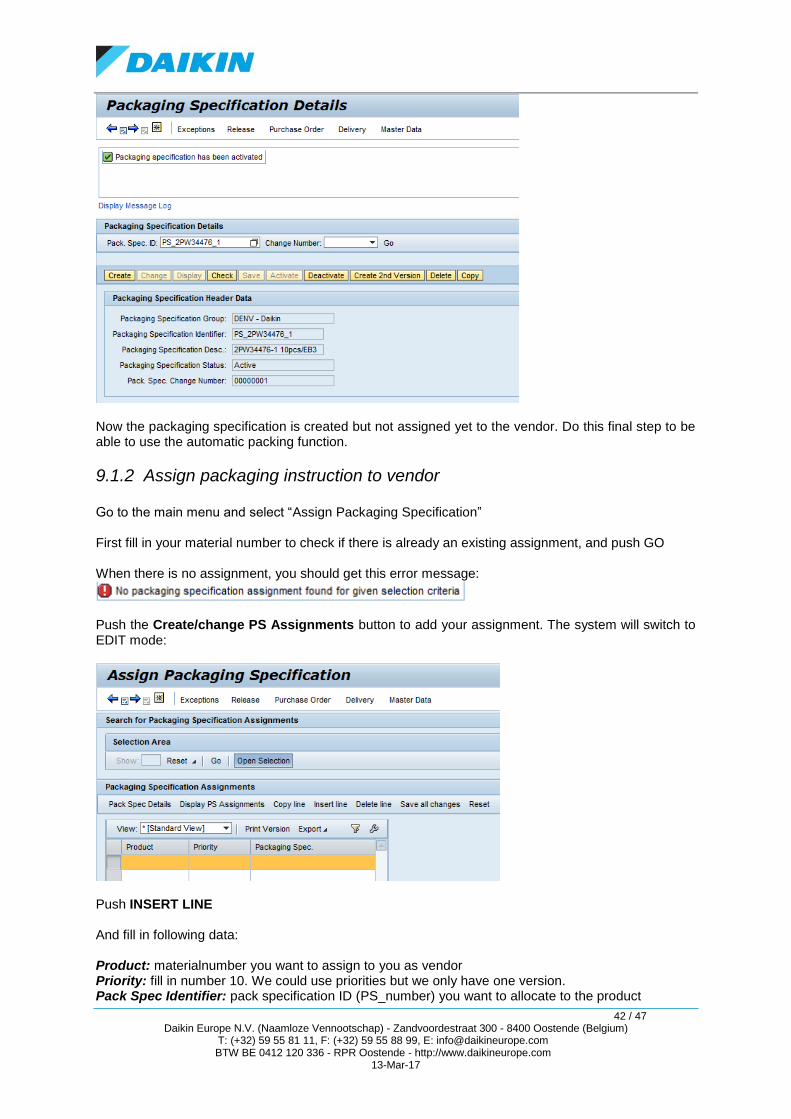
Now the packaging specification is created but not assigned yet to the vendor. Do this final step to be able to use the automatic packing function.
9.1.2 Assign packaging instruction to vendor Go to the main menu and select “Assign Packaging Specification” First fill in your material number to check if there is already an existing assignment, and push GO When there is no assignment, you should get this error message:
Push the Create/change PS Assignments button to add your assignment. The system will switch to EDIT mode:
Push INSERT LINE And fill in following data: Product: materialnumber you want to assign to you as vendor Priority: fill in number 10. We could use priorities but we only have one version. Pack Spec Identifier: pack specification ID (PS_number) you want to allocate to the product
43 / 47 Daikin Europe N.V. (Naamloze Vennootschap) - Zandvoordestraat 300 - 8400 Oostende (Belgium)
T: (+32) 59 55 81 11, F: (+32) 59 55 88 99, E: [email protected] BTW BE 0412 120 336 - RPR Oostende - http://www.daikineurope.com
13-Mar-17
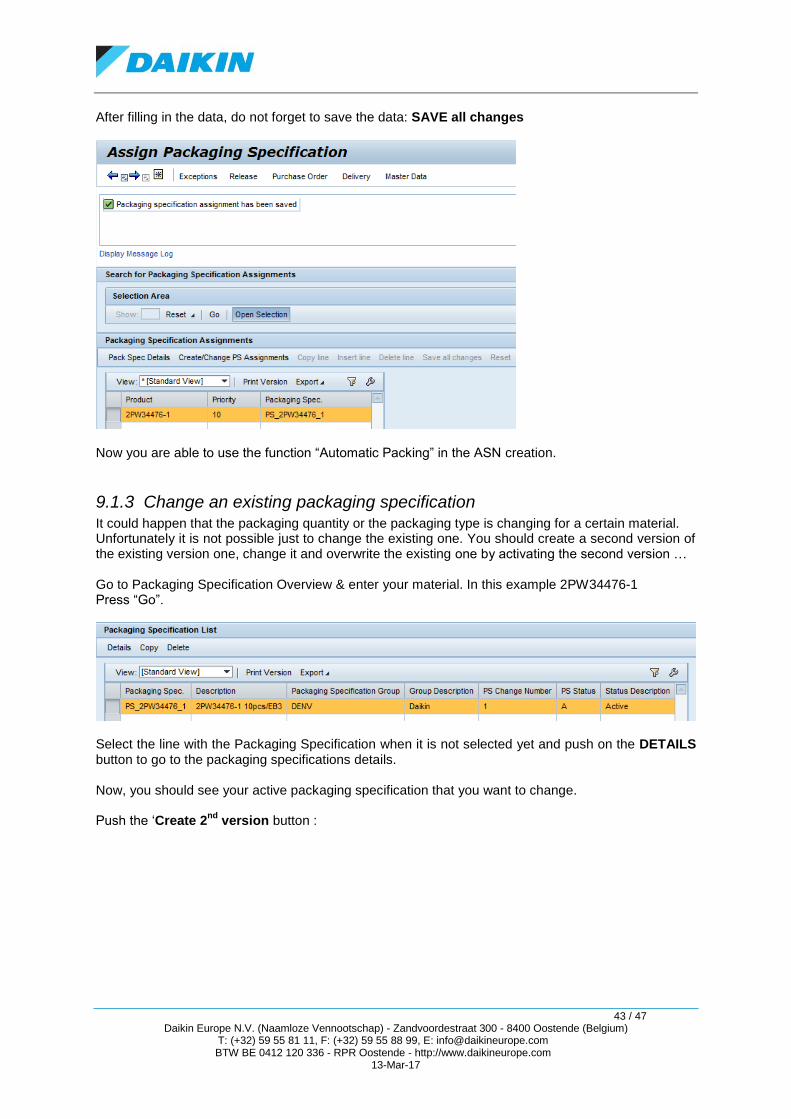
After filling in the data, do not forget to save the data: SAVE all changes
Now you are able to use the function “Automatic Packing” in the ASN creation.
9.1.3 Change an existing packaging specification It could happen that the packaging quantity or the packaging type is changing for a certain material. Unfortunately it is not possible just to change the existing one. You should create a second version of the existing version one, change it and overwrite the existing one by activating the second version … Go to Packaging Specification Overview & enter your material. In this example 2PW34476-1 Press “Go”.
Select the line with the Packaging Specification when it is not selected yet and push on the DETAILS button to go to the packaging specifications details. Now, you should see your active packaging specification that you want to change. Push the ‘Create 2
nd version button :
44 / 47 Daikin Europe N.V. (Naamloze Vennootschap) - Zandvoordestraat 300 - 8400 Oostende (Belgium)
T: (+32) 59 55 81 11, F: (+32) 59 55 88 99, E: [email protected] BTW BE 0412 120 336 - RPR Oostende - http://www.daikineurope.com
13-Mar-17
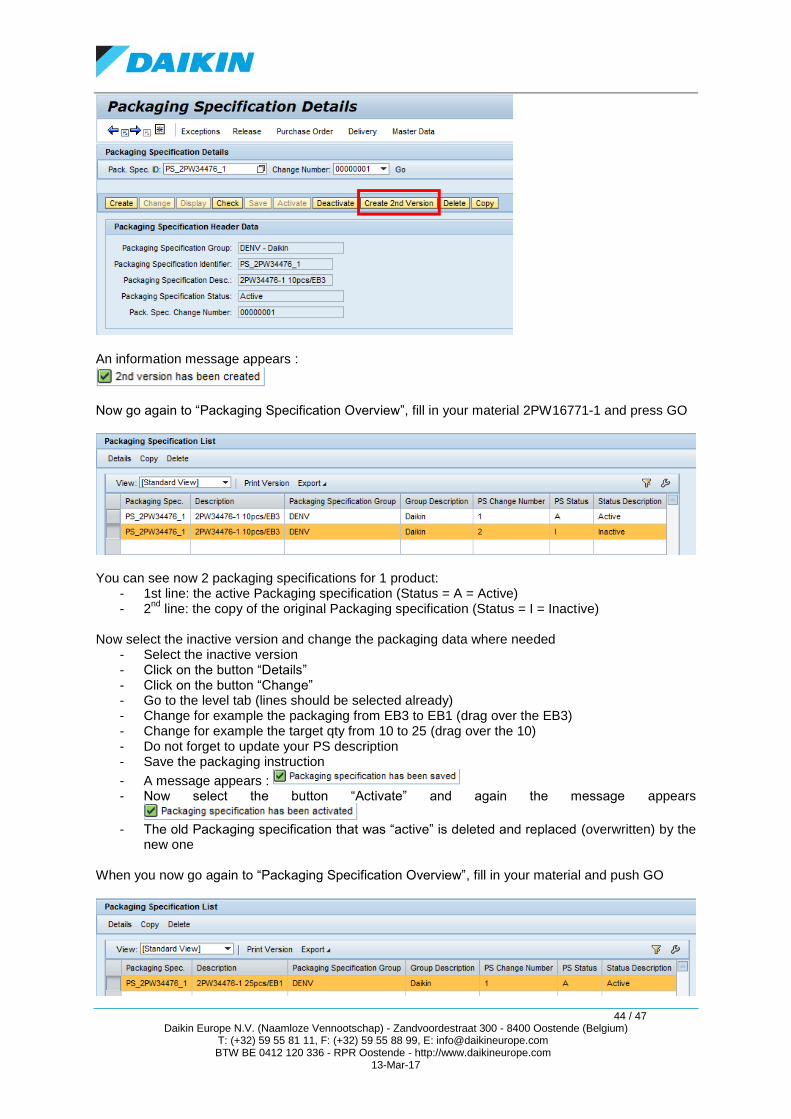
An information message appears :
Now go again to “Packaging Specification Overview”, fill in your material 2PW16771-1 and press GO
You can see now 2 packaging specifications for 1 product:
- 1st line: the active Packaging specification (Status = A = Active) - 2
nd line: the copy of the original Packaging specification (Status = I = Inactive)
Now select the inactive version and change the packaging data where needed
- Select the inactive version - Click on the button “Details” - Click on the button “Change” - Go to the level tab (lines should be selected already) - Change for example the packaging from EB3 to EB1 (drag over the EB3) - Change for example the target qty from 10 to 25 (drag over the 10) - Do not forget to update your PS description - Save the packaging instruction
- A message appears : - Now select the button “Activate” and again the message appears
- The old Packaging specification that was “active” is deleted and replaced (overwritten) by the
new one When you now go again to “Packaging Specification Overview”, fill in your material and push GO
45 / 47 Daikin Europe N.V. (Naamloze Vennootschap) - Zandvoordestraat 300 - 8400 Oostende (Belgium)
T: (+32) 59 55 81 11, F: (+32) 59 55 88 99, E: [email protected] BTW BE 0412 120 336 - RPR Oostende - http://www.daikineurope.com
13-Mar-17
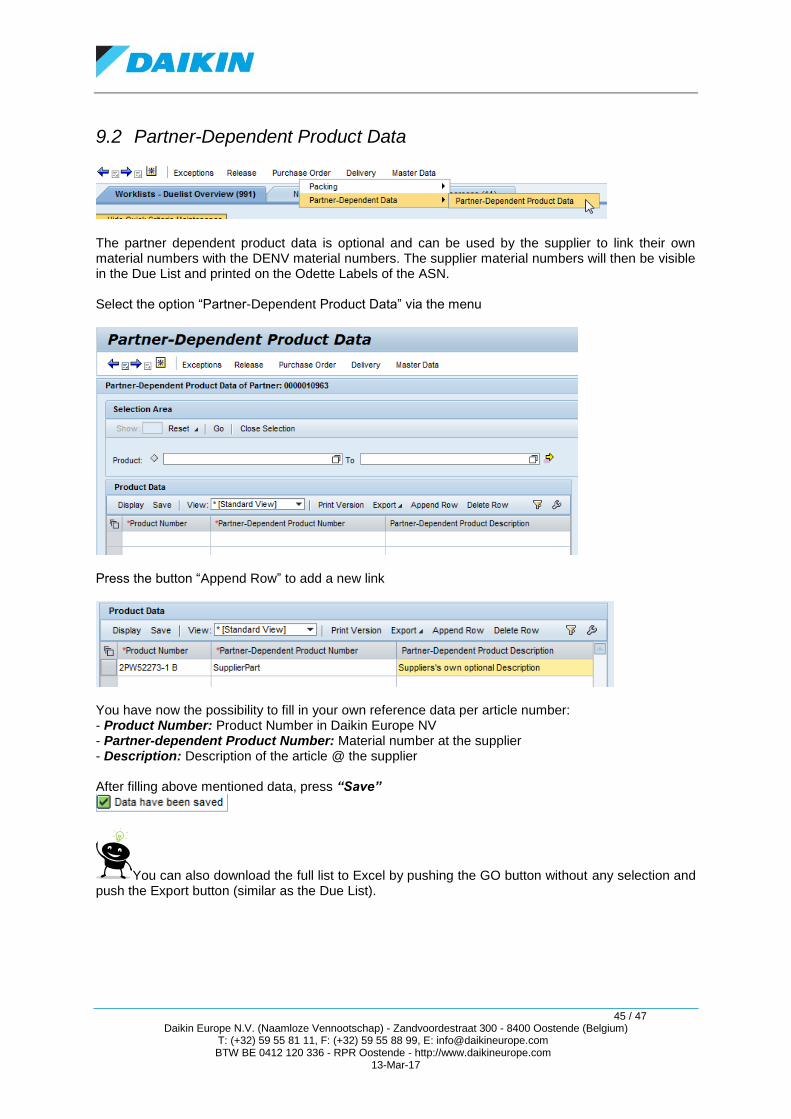
9.2 Partner-Dependent Product Data
The partner dependent product data is optional and can be used by the supplier to link their own material numbers with the DENV material numbers. The supplier material numbers will then be visible in the Due List and printed on the Odette Labels of the ASN. Select the option “Partner-Dependent Product Data” via the menu
Press the button “Append Row” to add a new link
You have now the possibility to fill in your own reference data per article number: - Product Number: Product Number in Daikin Europe NV - Partner-dependent Product Number: Material number at the supplier - Description: Description of the article @ the supplier After filling above mentioned data, press “Save”
You can also download the full list to Excel by pushing the GO button without any selection and push the Export button (similar as the Due List).
46 / 47 Daikin Europe N.V. (Naamloze Vennootschap) - Zandvoordestraat 300 - 8400 Oostende (Belgium)
T: (+32) 59 55 81 11, F: (+32) 59 55 88 99, E: [email protected] BTW BE 0412 120 336 - RPR Oostende - http://www.daikineurope.com
13-Mar-17
10 FAQ
Q: My ASN is saved as draft but I cannot publish it. A: Check your delivery date and time. It could be that the date is correct but the time is already in the past (default 12:00 noon)
Q: I created an ASN and finally it seems there is a packaging specification missing to publish it. Should I start over again? A: No, you can save the ASN as draft, go to the packaging specification masterdata to create it and recall your ASN in the ASN overview. You will notice that the pack.spec is filled in now.
Q: I was creating an ASN, waited for a while and now there is a system time-out. Is my data lost? A: It depends if you saved your ASN as draft. Check in the ASN overview if you find back your ASN. If not, you have to start over again.
Q: My password is locked. How can I continue? A: Call Amanda Morina (+32 (0)59 55 47 95) or send a mail to [email protected] and give your user-ID. She will ask the helpdesk to reset it.
Q: I created an ASN, saved it as draft but while attaching the labels it seems there are some extra parts that should be loaded. Can I add them to the existing ASN? A: Yes, but it is recommended and easier to create an additional ASN with the extra parts. You cannot use the same ASN number but just add ‘A’ or similar after the ASN number.
Q: I created an ASN and it seems that one material cannot be loaded on truck anymore on the truck. What should I do? A: It depends on the ASN status. When your ASN is still in draft mode, you can remove the item or reduce the quantity and should delete the packlabels (select it and CUT) for the same qty. When your ASN is already published, you can cancel and start over with a new ASN but you have to inform DENV to delete the inbound in SAP.
Q: There has been a shipment without ASN to DENV. Will the due list be updated automatically? A: Not for Purchase Orders. You ALWAYS have to create an ASN and should contact your MRP controller to see if the inbound at DENV was not created manually yet. The due list will be updated the next day (after the release in SAP) in case of schedule agreements.
Q: Can I reprint some labels? A: Yes. Go to the ASN overview, enter your ASN and go to the packing. There you select again to print all (or selection of) labels.
47 / 47 Daikin Europe N.V. (Naamloze Vennootschap) - Zandvoordestraat 300 - 8400 Oostende (Belgium)
T: (+32) 59 55 81 11, F: (+32) 59 55 88 99, E: [email protected] BTW BE 0412 120 336 - RPR Oostende - http://www.daikineurope.com
13-Mar-17
11 Technical Requirements
11.1 Internet connection Before going live, check if the connection is working properly. If the connection is not working, please take contact with your local IT administrator / internet provider.
11.2 Browser Requirements o Internet Explorer o Or Mozilla Firefox o Or Google Chrome o Or Netscape Navigator o And Printer Requirements o And Acrobat Reader (version 6.0 or higher) is needed to open / print the generated
labels.
11.3 Testing SAP SNC functionalities Please test SAP SNC all functionalities you need before going live. If something is not working, please contact Purchase department (Amanda Morina ( [email protected]))
11.4 Agreement - Packaging information per product for start up Before starting up, please agree upon the packaging specification that will be used in SAP SNC. This should be transparent and clear for both parties before a go-live can be given.
11.5 Agreement – Rounding values Check if rounding values are correct and check if they are in correlation with the packaging quantity.
11.6 Contact persons For support (during set-up or in case of problems):
Daikin Europe Purchase Department Amanda Morina [email protected]
Technical Related Questions:
Daikin Europe Information Systems Department David Longueville [email protected]
11.7 Questions – suggestions about this SAP SNC manual Contact person: Amanda Morina – [email protected]