traditional workbench this is page 1. -...
TRANSCRIPT

Traditional Workbench - Jeff Greef Woodworking
Tell Your Friendsabout this page. Click here to send an email.
Thank You!
Hope Chest
Order Print PlansClick photo for details.
More printed plans.
Wood Tips To see another tip- hit
"Refresh" or "F5"
#1- TABLE SAW EXTENSION
TABLES. In a shop where space is tight, permanent extension
tables on the table saw are inconvenient. Attach hinged tables on the rear and/or at the sides, with
hinged support legs
Home | Free Plans | Links | Newsletters | Tool Store | Book Store | Interviews | Contact & About | Safety
Jeff Greef WoodworkingSee more Project Plans | Sign up for Email Notices of new projects
To see more Shop Plans on this site, go to:Printed Shop Plans or Downloadable Shop Plans or Shop Plan Books
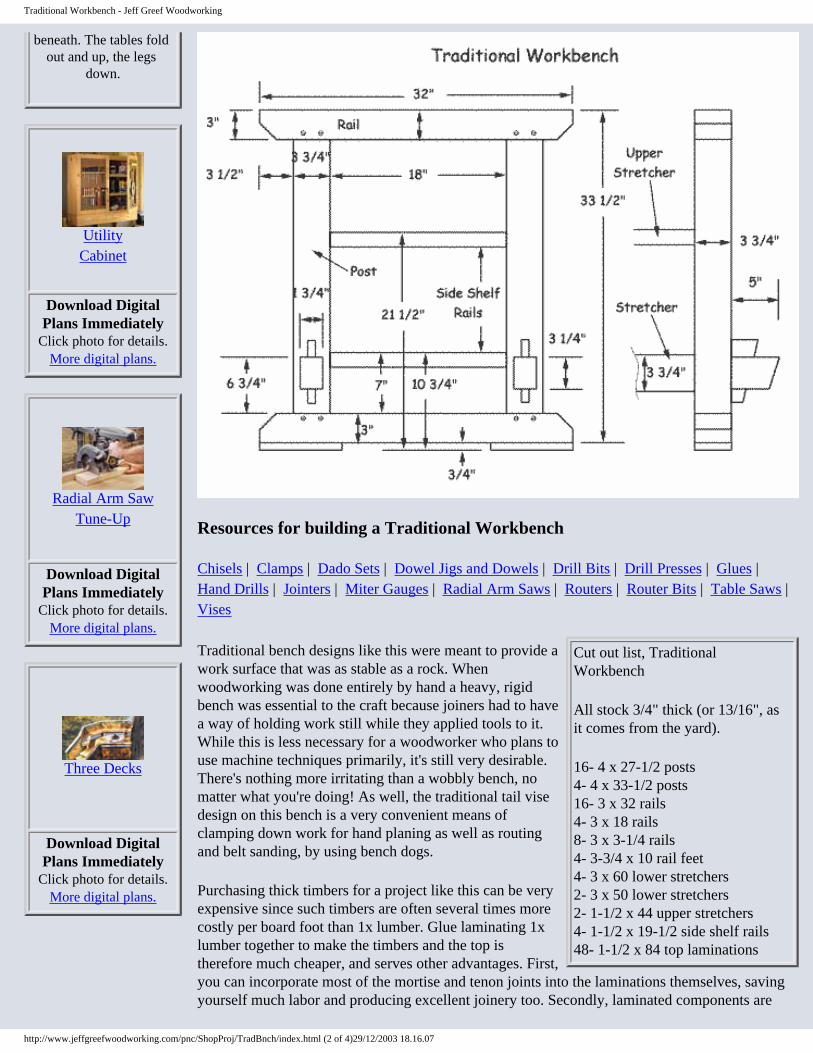
Traditional Workbench
This project has 3 pages.This is Page 1.Go to Page 2.Go to Page 3.
http://www.jeffgreefwoodworking.com/pnc/ShopProj/TradBnch/index.html (1 of 4)29/12/2003 18.16.07
Traditional Workbench - Jeff Greef Woodworking
beneath. The tables fold out and up, the legs
down.
UtilityCabinet
Download DigitalPlans Immediately
Click photo for details.More digital plans.
Radial Arm SawTune-Up
Download DigitalPlans Immediately
Click photo for details.More digital plans.
Three Decks
Download DigitalPlans Immediately
Click photo for details.More digital plans.
Resources for building a Traditional Workbench
Chisels | Clamps | Dado Sets | Dowel Jigs and Dowels | Drill Bits | Drill Presses | Glues | Hand Drills | Jointers | Miter Gauges | Radial Arm Saws | Routers | Router Bits | Table Saws | Vises
Cut out list, Traditional Workbench
All stock 3/4" thick (or 13/16", as it comes from the yard).
16- 4 x 27-1/2 posts4- 4 x 33-1/2 posts16- 3 x 32 rails4- 3 x 18 rails8- 3 x 3-1/4 rails 4- 3-3/4 x 10 rail feet4- 3 x 60 lower stretchers2- 3 x 50 lower stretchers2- 1-1/2 x 44 upper stretchers4- 1-1/2 x 19-1/2 side shelf rails48- 1-1/2 x 84 top laminations
Traditional bench designs like this were meant to provide a work surface that was as stable as a rock. When woodworking was done entirely by hand a heavy, rigid bench was essential to the craft because joiners had to have a way of holding work still while they applied tools to it. While this is less necessary for a woodworker who plans to use machine techniques primarily, it's still very desirable. There's nothing more irritating than a wobbly bench, no matter what you're doing! As well, the traditional tail vise design on this bench is a very convenient means of clamping down work for hand planing as well as routing and belt sanding, by using bench dogs.
Purchasing thick timbers for a project like this can be very expensive since such timbers are often several times more costly per board foot than 1x lumber. Glue laminating 1x lumber together to make the timbers and the top is therefore much cheaper, and serves other advantages. First, you can incorporate most of the mortise and tenon joints into the laminations themselves, saving yourself much labor and producing excellent joinery too. Secondly, laminated components are
http://www.jeffgreefwoodworking.com/pnc/ShopProj/TradBnch/index.html (2 of 4)29/12/2003 18.16.07
Traditional Workbench - Jeff Greef Woodworking
more stable than their solid counterparts since forces of wood movement in the boards tend to cancel each other in laminations.
This is the best place to use up your most knotted, ugly, and twisted stock. Even if a piece has a knot or defect large enough that it would break if you stressed it at all, it will be fine inside a lamination so long as adjoining areas on adjacent boards are good. There are knots the size of your fist inside my laminations. You can't see them because they are located between layers, and the whole laminated timber is plenty strong because of its large size. As well, twisted pieces straighten out when clamped up as all the parts are pulled together. But, I suppose, you should avoid the very worst of your twisted stock.
In order to create accurate joinery within the laminations, and to ensure that the edges of the laminations will line up fairly close, it's important to prepare the stock carefully. Look ahead and you'll see how the layers are held in alignment with each other with dowels placed within alignment holes. These holes must be located accurately on all pieces so that they will line up well, and you can't locate the holes well unless your stock is consistent. Therefore ripping to width and cutting to length must be done accurately. Here’s another reason to avoid the most twisted of your stock. Choose pieces that you can put a straight edge onto and rip to width consistently.
Get out the parts as shown on the cutting list. Use knots and defects as mentioned before, but try to locate them away from joinery areas, and also try to have enough clear pieces to use on the outer laminations so that they will look nice. Use a straight edge jig on the table saw to straighten one edge on all your pieces, if you don’t have a jointer. This is very important and if you haven't built such a jig, and don't have a jointer, now is the time to build it.
For jointers, click here.For table saws, click here.
Once you have a straight edge on all parts, rip them to width on your table saw, and cut them off square at the radial arm or with a table saw cutoff box.
For radial arm saws, click here.
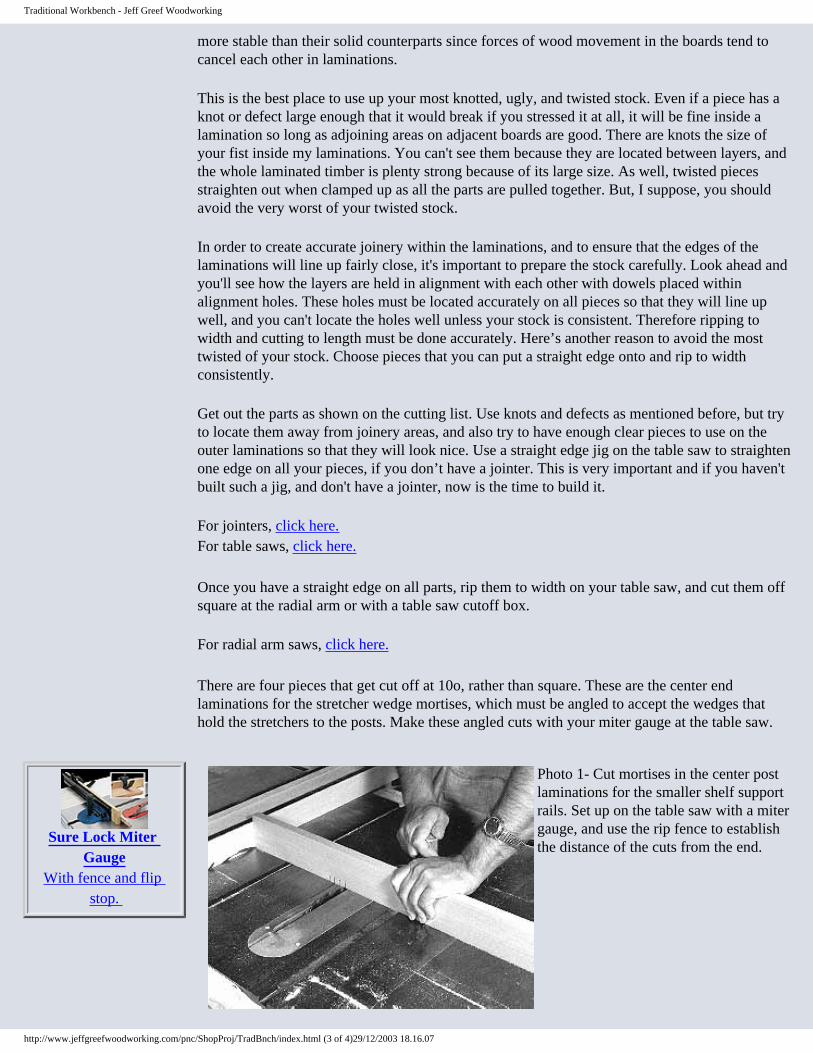
There are four pieces that get cut off at 10o, rather than square. These are the center end laminations for the stretcher wedge mortises, which must be angled to accept the wedges that hold the stretchers to the posts. Make these angled cuts with your miter gauge at the table saw.
Sure Lock Miter Gauge
With fence and flip stop.
Photo 1- Cut mortises in the center post laminations for the smaller shelf support rails. Set up on the table saw with a miter gauge, and use the rip fence to establish the distance of the cuts from the end.
http://www.jeffgreefwoodworking.com/pnc/ShopProj/TradBnch/index.html (3 of 4)29/12/2003 18.16.07
Traditional Workbench - Jeff Greef Woodworking
Right Angle Miter Gauge
Delta Miter JigRigid, precise tool.
For miter gauges, click here.
Cut notches in the middle layers of the post laminations for the small shelf rails that run between the posts. Use your miter gauge at the table saw as shown in photo 1 to cut kerfs within the area of the notch, and use the rip fence as a guide to locate the outer two cuts. Make these 3/4" deep, and clean out the waste with a chisel.
Delta 12" Drill Press
Search from over 9000 products!
Panel Saw
Order Print PlansClick photo for details.
More printed plans.
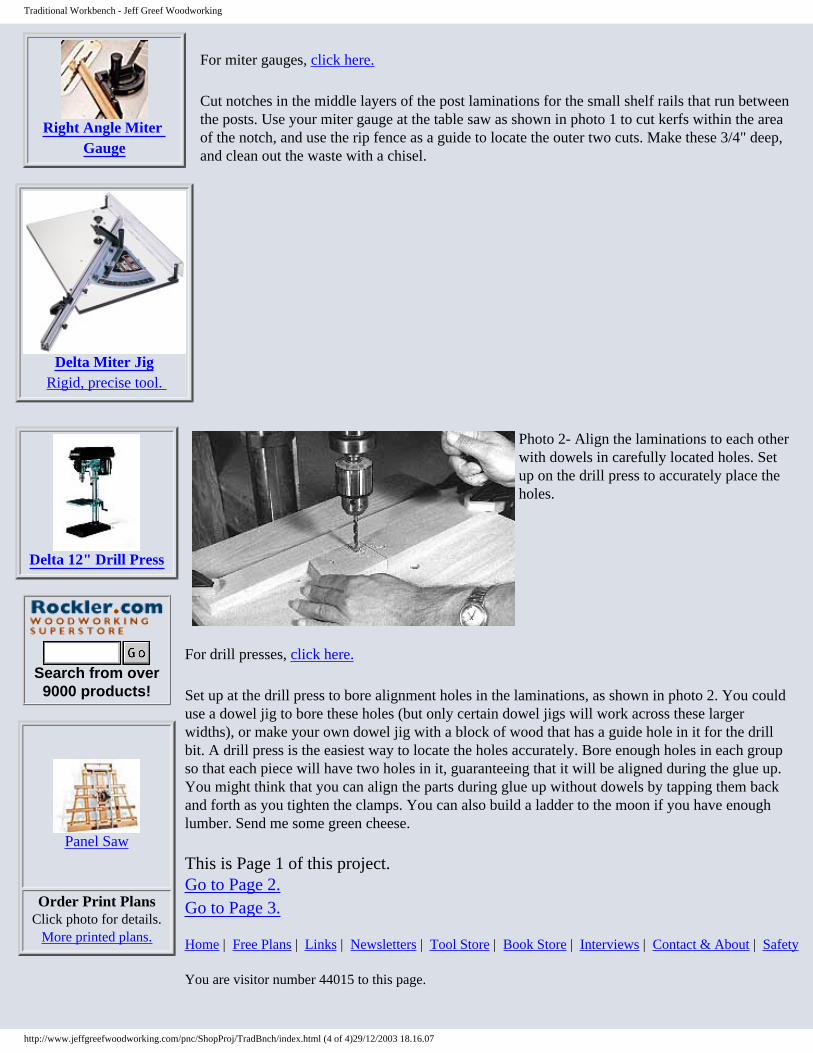
Photo 2- Align the laminations to each other with dowels in carefully located holes. Set up on the drill press to accurately place the holes.
For drill presses, click here.
Set up at the drill press to bore alignment holes in the laminations, as shown in photo 2. You could use a dowel jig to bore these holes (but only certain dowel jigs will work across these larger widths), or make your own dowel jig with a block of wood that has a guide hole in it for the drill bit. A drill press is the easiest way to locate the holes accurately. Bore enough holes in each group so that each piece will have two holes in it, guaranteeing that it will be aligned during the glue up. You might think that you can align the parts during glue up without dowels by tapping them back and forth as you tighten the clamps. You can also build a ladder to the moon if you have enough lumber. Send me some green cheese.
This is Page 1 of this project.Go to Page 2.Go to Page 3.
Home | Free Plans | Links | Newsletters | Tool Store | Book Store | Interviews | Contact & About | Safety
You are visitor number 44015 to this page.
http://www.jeffgreefwoodworking.com/pnc/ShopProj/TradBnch/index.html (4 of 4)29/12/2003 18.16.07
Jeff Greef Woodworking
Birch Dowel Rods
Tell Your Friendsabout this page. Click here to send an email.
Thank You!
Home | Free Plans | Links | Newsletters | Tool Store | Book Store | Interviews | Contact & About | Safety
Jeff Greef WoodworkingSee more Project Plans | Sign up for Email Notices of new projects
To see more Shop Plans on this site, go to:Printed Shop Plans or Downloadable Shop Plans or Shop Plan
Books
Page 2, Traditional WorkbenchGo back to Page 1.Go to Page 3.
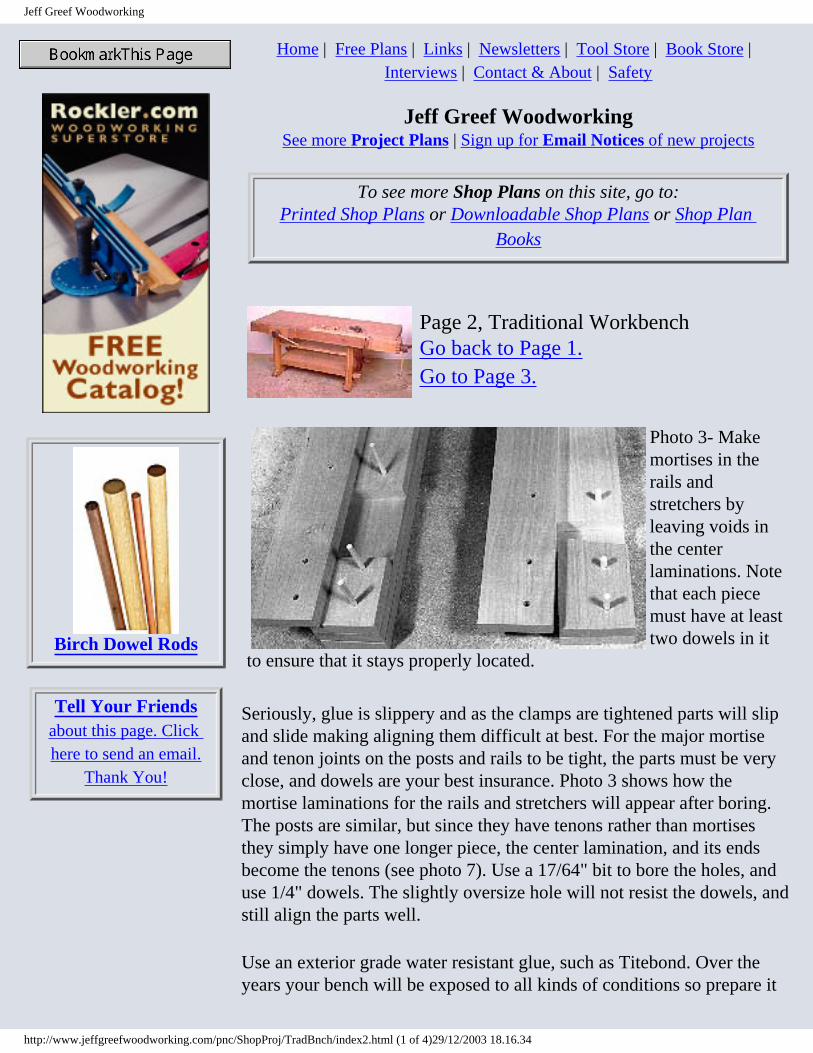
Photo 3- Make mortises in the rails and stretchers by leaving voids in the center laminations. Note that each piece must have at least two dowels in it
to ensure that it stays properly located.
Seriously, glue is slippery and as the clamps are tightened parts will slip and slide making aligning them difficult at best. For the major mortise and tenon joints on the posts and rails to be tight, the parts must be very close, and dowels are your best insurance. Photo 3 shows how the mortise laminations for the rails and stretchers will appear after boring. The posts are similar, but since they have tenons rather than mortises they simply have one longer piece, the center lamination, and its ends become the tenons (see photo 7). Use a 17/64" bit to bore the holes, and use 1/4" dowels. The slightly oversize hole will not resist the dowels, and still align the parts well.
Use an exterior grade water resistant glue, such as Titebond. Over the years your bench will be exposed to all kinds of conditions so prepare it
http://www.jeffgreefwoodworking.com/pnc/ShopProj/TradBnch/index2.html (1 of 4)29/12/2003 18.16.34
Jeff Greef Woodworking
for the worst. You'll probably go through a gallon of glue for the whole project.
Titebond Exterior Grade Glue
3" Roller
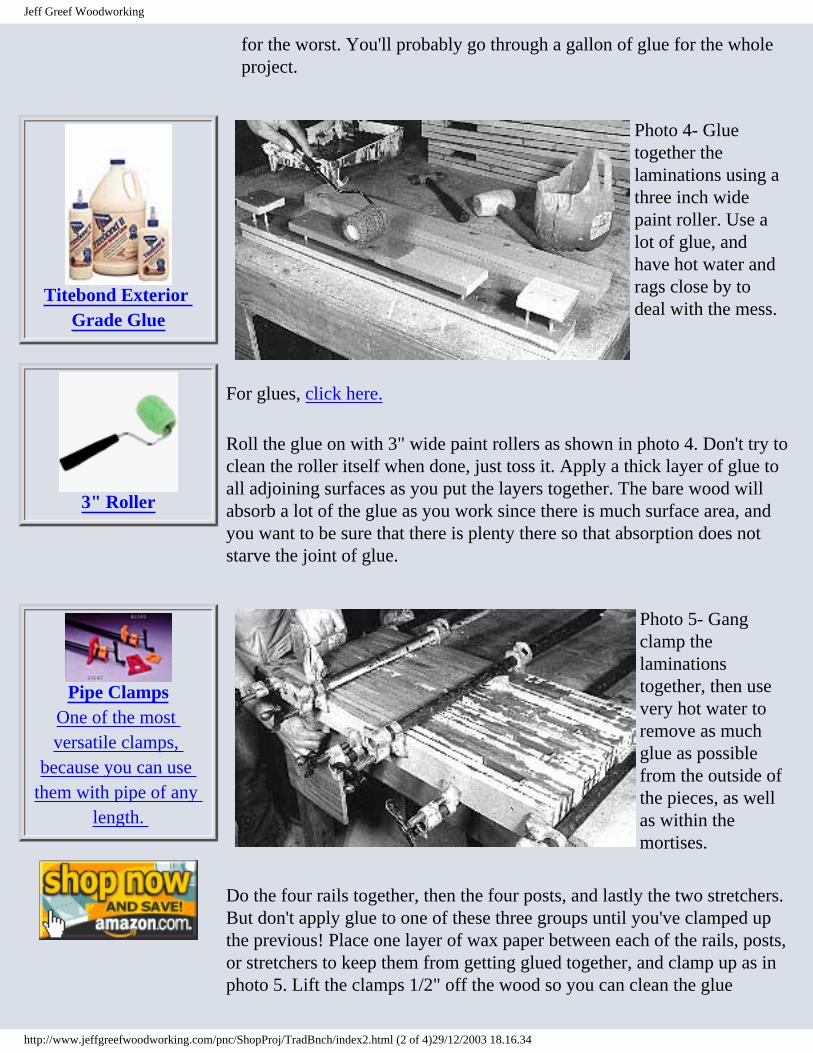
Photo 4- Glue together the laminations using a three inch wide paint roller. Use a lot of glue, and have hot water and rags close by to deal with the mess.
For glues, click here.
Roll the glue on with 3" wide paint rollers as shown in photo 4. Don't try to clean the roller itself when done, just toss it. Apply a thick layer of glue to all adjoining surfaces as you put the layers together. The bare wood will absorb a lot of the glue as you work since there is much surface area, and you want to be sure that there is plenty there so that absorption does not starve the joint of glue.
Pipe ClampsOne of the most versatile clamps,
because you can use them with pipe of any
length.
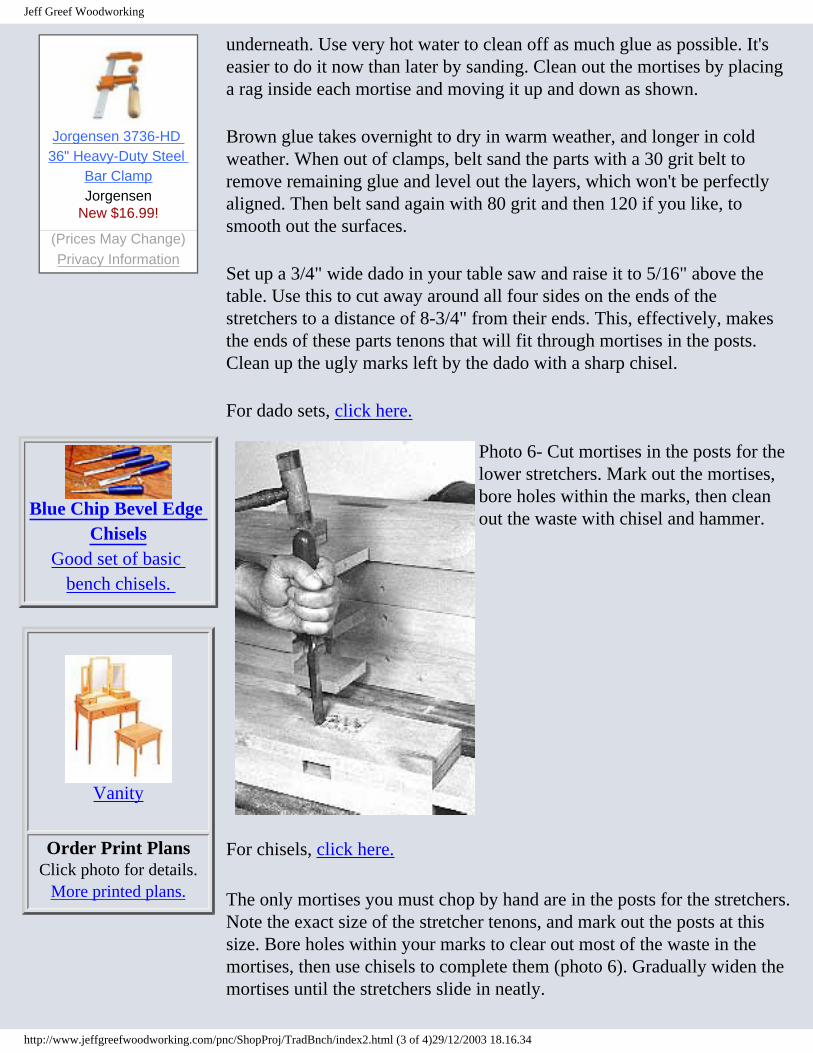
Photo 5- Gang clamp the laminations together, then use very hot water to remove as much glue as possible from the outside of the pieces, as well as within the mortises.
Do the four rails together, then the four posts, and lastly the two stretchers. But don't apply glue to one of these three groups until you've clamped up the previous! Place one layer of wax paper between each of the rails, posts, or stretchers to keep them from getting glued together, and clamp up as in photo 5. Lift the clamps 1/2" off the wood so you can clean the glue
http://www.jeffgreefwoodworking.com/pnc/ShopProj/TradBnch/index2.html (2 of 4)29/12/2003 18.16.34
Jeff Greef Woodworking
Jorgensen 3736-HD 36" Heavy-Duty Steel
Bar ClampJorgensen
New $16.99!
(Prices May Change)Privacy Information
underneath. Use very hot water to clean off as much glue as possible. It's easier to do it now than later by sanding. Clean out the mortises by placing a rag inside each mortise and moving it up and down as shown.
Brown glue takes overnight to dry in warm weather, and longer in cold weather. When out of clamps, belt sand the parts with a 30 grit belt to remove remaining glue and level out the layers, which won't be perfectly aligned. Then belt sand again with 80 grit and then 120 if you like, to smooth out the surfaces.
Set up a 3/4" wide dado in your table saw and raise it to 5/16" above the table. Use this to cut away around all four sides on the ends of the stretchers to a distance of 8-3/4" from their ends. This, effectively, makes the ends of these parts tenons that will fit through mortises in the posts. Clean up the ugly marks left by the dado with a sharp chisel.
For dado sets, click here.
Blue Chip Bevel Edge Chisels
Good set of basic bench chisels.
Vanity
Order Print PlansClick photo for details.
More printed plans.
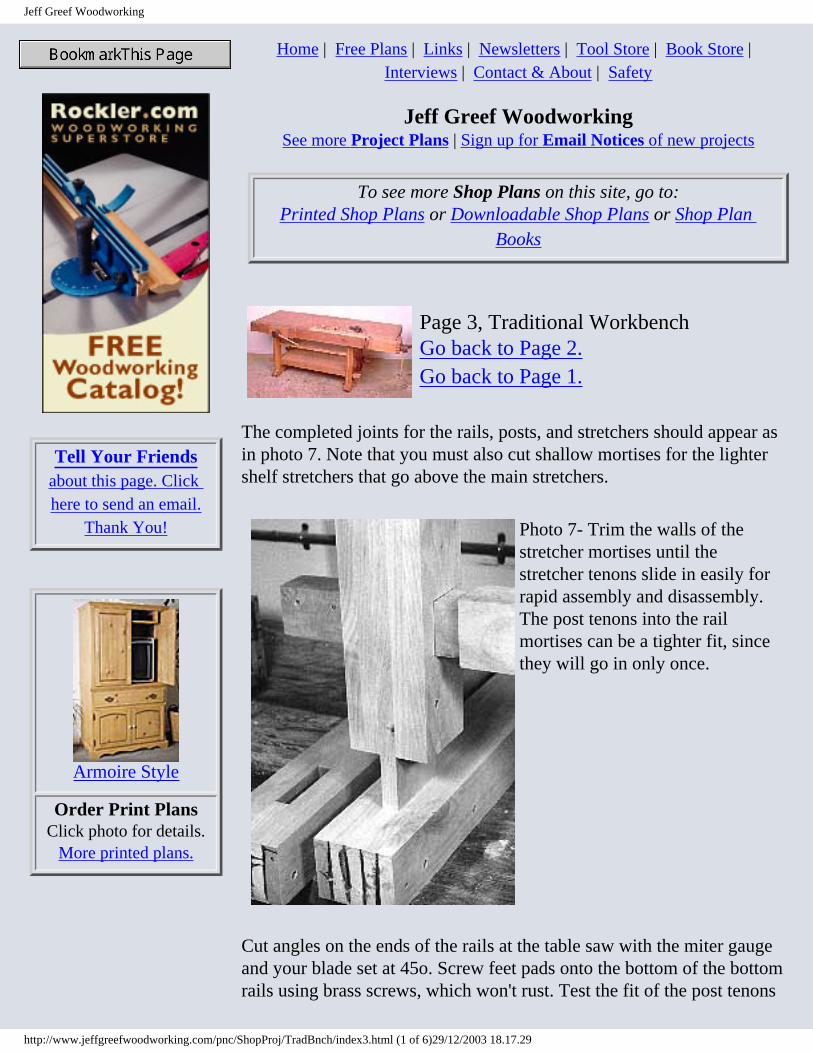
Photo 6- Cut mortises in the posts for the lower stretchers. Mark out the mortises, bore holes within the marks, then clean out the waste with chisel and hammer.
For chisels, click here.
The only mortises you must chop by hand are in the posts for the stretchers. Note the exact size of the stretcher tenons, and mark out the posts at this size. Bore holes within your marks to clear out most of the waste in the mortises, then use chisels to complete them (photo 6). Gradually widen the mortises until the stretchers slide in neatly.
http://www.jeffgreefwoodworking.com/pnc/ShopProj/TradBnch/index2.html (3 of 4)29/12/2003 18.16.34

Jeff Greef Woodworking
Search from over 9000 products!
This is Page 2 of this project.Go to Page 3.Go to Page 1.
Home | Free Plans | Links | Newsletters | Tool Store | Book Store | Interviews | Contact & About | Safety
You are visitor number 15009 to this page.
http://www.jeffgreefwoodworking.com/pnc/ShopProj/TradBnch/index2.html (4 of 4)29/12/2003 18.16.34
Jeff Greef Woodworking
Tell Your Friendsabout this page. Click here to send an email.
Thank You!
Armoire Style
Order Print PlansClick photo for details.
More printed plans.
Home | Free Plans | Links | Newsletters | Tool Store | Book Store | Interviews | Contact & About | Safety
Jeff Greef WoodworkingSee more Project Plans | Sign up for Email Notices of new projects
To see more Shop Plans on this site, go to:Printed Shop Plans or Downloadable Shop Plans or Shop Plan
Books
Page 3, Traditional WorkbenchGo back to Page 2.Go back to Page 1.
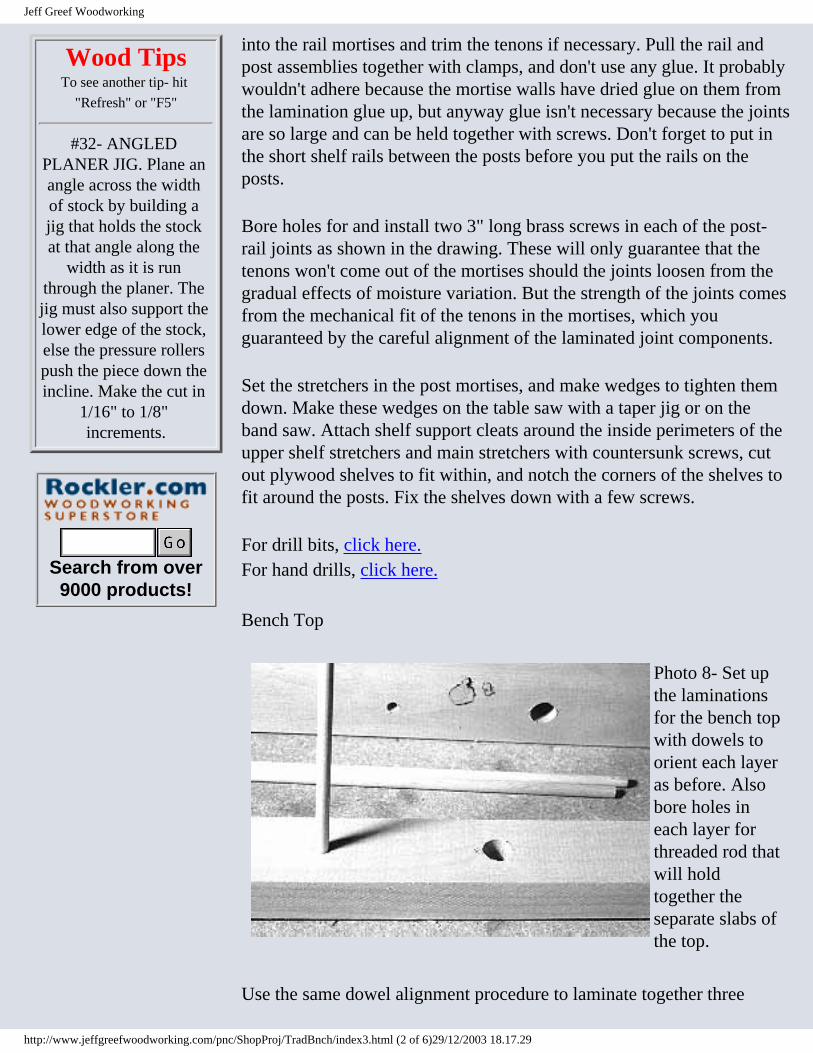
The completed joints for the rails, posts, and stretchers should appear as in photo 7. Note that you must also cut shallow mortises for the lighter shelf stretchers that go above the main stretchers.
Photo 7- Trim the walls of the stretcher mortises until the stretcher tenons slide in easily for rapid assembly and disassembly. The post tenons into the rail mortises can be a tighter fit, since they will go in only once.
Cut angles on the ends of the rails at the table saw with the miter gauge and your blade set at 45o. Screw feet pads onto the bottom of the bottom rails using brass screws, which won't rust. Test the fit of the post tenons
http://www.jeffgreefwoodworking.com/pnc/ShopProj/TradBnch/index3.html (1 of 6)29/12/2003 18.17.29
Jeff Greef Woodworking
Wood Tips To see another tip- hit
"Refresh" or "F5"
#32- ANGLED PLANER JIG. Plane an angle across the width of stock by building a jig that holds the stock at that angle along the
width as it is run through the planer. The jig must also support the lower edge of the stock, else the pressure rollers push the piece down the incline. Make the cut in
1/16" to 1/8" increments.
Search from over 9000 products!
into the rail mortises and trim the tenons if necessary. Pull the rail and post assemblies together with clamps, and don't use any glue. It probably wouldn't adhere because the mortise walls have dried glue on them from the lamination glue up, but anyway glue isn't necessary because the joints are so large and can be held together with screws. Don't forget to put in the short shelf rails between the posts before you put the rails on the posts.
Bore holes for and install two 3" long brass screws in each of the post-rail joints as shown in the drawing. These will only guarantee that the tenons won't come out of the mortises should the joints loosen from the gradual effects of moisture variation. But the strength of the joints comes from the mechanical fit of the tenons in the mortises, which you guaranteed by the careful alignment of the laminated joint components.
Set the stretchers in the post mortises, and make wedges to tighten them down. Make these wedges on the table saw with a taper jig or on the band saw. Attach shelf support cleats around the inside perimeters of the upper shelf stretchers and main stretchers with countersunk screws, cut out plywood shelves to fit within, and notch the corners of the shelves to fit around the posts. Fix the shelves down with a few screws.
For drill bits, click here.For hand drills, click here.
Bench Top
Photo 8- Set up the laminations for the bench top with dowels to orient each layer as before. Also bore holes in each layer for threaded rod that will hold together the separate slabs of the top.
Use the same dowel alignment procedure to laminate together three
http://www.jeffgreefwoodworking.com/pnc/ShopProj/TradBnch/index3.html (2 of 6)29/12/2003 18.17.29

Jeff Greef Woodworking
plates for the bench top. But, also bore four sets of 9/16" holes in the layers for threaded rod to run through. This rod will hold all three plates together. Your bench top layers will appear as in photo 8 prior to gluing up. Again, you can use stock with knots and other defects, but turn those defects down toward the underside of the top, and try to get one clean edge on each layer. Straightening the edges of the layers is, as before, very important.
Pipe ClampsOne of the most versatile clamps,
because you can use them with pipe of any
length.
Bessey Tradesman Bar Clamps
CraftsmanTool Chest
Download DigitalPlans Immediately
Click photo for details.More digital plans.
Photo 9- When you glue and clamp the slabs, you must ensure that they stay reasonably flat. The layers can "wind" like an oriental fan, producing an interesting sculpture that is useless as a bench top.
For clamps, click here.
Glue up each of the plates as in photo 9. There is a serious danger present when gluing up a long lamination like this, that being that it will not be flat. The clamping pressure can tend to twist it, like an Oriental fan opening. To guarantee against this, place winding sticks on either end of the glue up to check the alignment. These are simply straight boards that show you if both ends of the lamination are parallel or not. Place the sticks perpendicular to the laminations. Align your sight along the tops of the two winding sticks, and you will quickly see if the two tops are not parallel. If not, the lamination is "unwinding" and you need to loosen the clamps, tweak the layers, and clamp up again. You won't be able to get it perfect, but you need to get it fairly close. The router planing jig will flatten minor twisting, but it won't make a silk purse out of a sow's ear.
http://www.jeffgreefwoodworking.com/pnc/ShopProj/TradBnch/index3.html (3 of 6)29/12/2003 18.17.29
Jeff Greef Woodworking
Porter Cable 1-3/4 HP Lever Release 690
RouterThe PC 690 line
routers are standard woodshop workhorses.
Porter-Cable 895PK 2-1/4...Porter-CableNew $229.99!
Bosch 1617EVSPK 2-1/4-Ho...BoschNew $229.99!
DeWalt DW618B3 2-1/4 HP ...DeWaltNew $279.99!
Porter-Cable 7518 3-1/4...Porter-CableNew Sale!
Porter-Cable 894PK 2-1/4...Porter-CableNew $229.99!
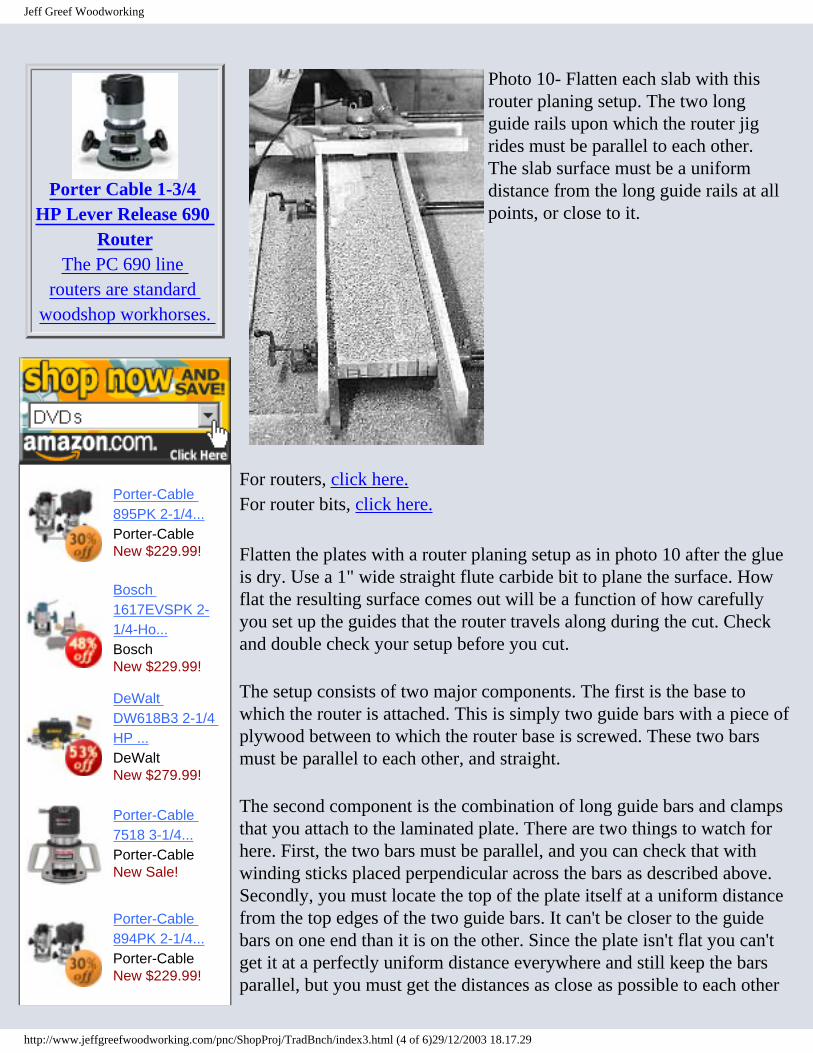
Photo 10- Flatten each slab with this router planing setup. The two long guide rails upon which the router jig rides must be parallel to each other. The slab surface must be a uniform distance from the long guide rails at all points, or close to it.
For routers, click here.For router bits, click here.
Flatten the plates with a router planing setup as in photo 10 after the glue is dry. Use a 1" wide straight flute carbide bit to plane the surface. How flat the resulting surface comes out will be a function of how carefully you set up the guides that the router travels along during the cut. Check and double check your setup before you cut.
The setup consists of two major components. The first is the base to which the router is attached. This is simply two guide bars with a piece of plywood between to which the router base is screwed. These two bars must be parallel to each other, and straight.
The second component is the combination of long guide bars and clamps that you attach to the laminated plate. There are two things to watch for here. First, the two bars must be parallel, and you can check that with winding sticks placed perpendicular across the bars as described above. Secondly, you must locate the top of the plate itself at a uniform distance from the top edges of the two guide bars. It can't be closer to the guide bars on one end than it is on the other. Since the plate isn't flat you can't get it at a perfectly uniform distance everywhere and still keep the bars parallel, but you must get the distances as close as possible to each other
http://www.jeffgreefwoodworking.com/pnc/ShopProj/TradBnch/index3.html (4 of 6)29/12/2003 18.17.29
Jeff Greef Woodworking
DeWalt DW618PKV 2-1/4 HP...DeWaltNew $239.99!
(Prices May Change)Privacy Information
Armoire Style
Order Print PlansClick photo for details.
More printed plans.
given the amount of out-of-flat you are dealing with.
Set the router depth to cut below the area of the plate that is farthest from the long guide bars. Put on your ear plugs and dust mask and plow forth. Then flip the plate, and again align the long guide bars. But this time align the plate so that there is a uniform distance from the bottom side of the plate to the top of the guide bars. This ensures that the planing done on the second side will be parallel to that done on the first. As well, by adjusting the depth of the router on the cut on the second side, you can adjust the final thickness of the plate.
No, it's not 100% precise. My slabs came out fairly flat and straight but not perfect. If you want a perfectly flat top, get out your handplanes after the top is all assembled and get crackin'. Use winding sticks to show you where to reduce the surface. Or, find a 16" face jointer and large planer, but be prepared for the owner’s grimace when you tell them you want to push glue lams through their knives. Glue dullens steel knives fast.
Align the top surfaces of the plates with dowels, located with a dowel jig. Use four or five dowels along each joint, and glue the dowels into only one of the two holes, so the plates can be disassembled.
For a dowel jig or dowels, click here.
Use a 1" Forstner bit to enlarge the holes for the threaded rod at the front and rear of the whole slab. Start these holes using a guide block that has a hole cut in it with the same bit. These larger holes allow the nuts and washers on the rod to be recessed within the top.
For drill bits, click here.
Tapered Drill Bits With Countersinks
Brad Point BitsBuy a set of 7 or individual bits.
http://www.jeffgreefwoodworking.com/pnc/ShopProj/TradBnch/index3.html (5 of 6)29/12/2003 18.17.29

Jeff Greef Woodworking
Wood Tips To see another tip- hit
"Refresh" or "F5"
#32- ANGLED PLANER JIG. Plane an angle across the width of stock by building a jig that holds the stock at that angle along the
width as it is run through the planer. The jig must also support the lower edge of the stock, else the pressure rollers push the piece down the incline. Make the cut in
1/16" to 1/8" increments.
Photo 11- Attach the rear of the top to the rails with cleats that have small tongues fitted in grooves in the rails. This will allow the top to move with moisture variations.
Secure the top to the top rails with two lag bolts at the front of the rails, and a sliding keeper cleat at the rear. The sliding keeper allows the top to expand and contract with moisture variations through the year. Which raises an interesting question- what will happen to the threaded rod as the wood expands? The wood by the washers will crush, and the rod itself may stretch. Check the nuts from time to time and tighten them as necessary.
This is Page 3 of this project.Go to Page 2.Go to Page 1.
Resources for building a Traditional Workbench
Chisels | Clamps | Dado Sets | Dowel Jigs and Dowels | Drill Bits | Drill Presses | Glues | Hand Drills | Jointers | Miter Gauges | Radial Arm Saws | Routers | Router Bits | Table Saws | Vises
Home | Free Plans | Links | Newsletters | Tool Store | Book Store | Interviews | Contact & About | Safety
You are visitor number 10585 to this page.
http://www.jeffgreefwoodworking.com/pnc/ShopProj/TradBnch/index3.html (6 of 6)29/12/2003 18.17.29