tk 1660 duct beader · tk 1660 duct beader 1. keep the work area well lighted, clean, neat, and...
TRANSCRIPT
1
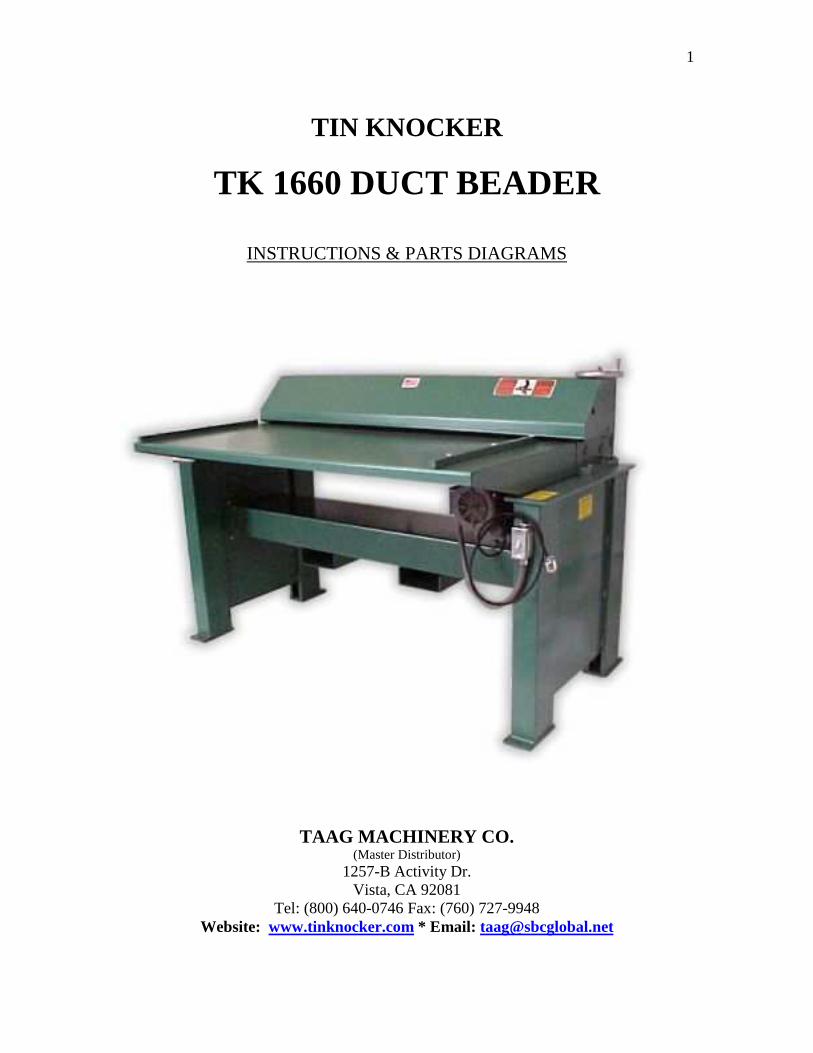
TIN KNOCKER
TK 1660 DUCT BEADER
INSTRUCTIONS & PARTS DIAGRAMS
TAAG MACHINERY CO. (Master Distributor)
1257-B Activity Dr. Vista, CA 92081
Tel: (800) 640-0746 Fax: (760) 727-9948 Website: www.tinknocker.com * Email: [email protected]
2
122006 mod 1
TIN KNOCKER SAFETY RULES
TK 1660 Duct Beader
1. Keep the work area well lighted, clean, neat, and orderly to avoid accidents. Do not use compressed air for cleaning debris or grit from yourself or the machine. Remove debris and grit from machine with a rake or brush – not your hands.
2. Machine to be operated by authorized personnel who have been trained by their supervisor with the working and safety features of the machine, and by reading and understanding the operator’s Manual as well as the warnings and instructions mounted on the machine.
3. Use safety glasses and required protective tools. 4. Do not wear loose, hanging clothing or jewelry while operating or servicing the
machine. Gloves, if worn, should be snug fitting so they won’t be snagged by moving equipment.
5. Notify your supervisor whenever you feel there is a hazard involving the equipment or the performance of your job.
6. Report all injuries or illness, regardless of severity, to your supervisor. 7. Do not place speed above safety. 8. Never use a machine or tool for anything other than its intended purpose. Use the
proper tool and equipment for the task. 9. Do not remove, paint over, alter, or deface any machine-mounted warning and
instruction plates and signs. 10. Do not override the safety features of the equipment. 11. Do not operate the machine in excess of its rated capacity. 12. Inspect the machine before each use to ensure that it is in proper working
condition. Check for cracks, chips, burrs, and other evidence of failure. 13. Report any damage to the machine to your supervisor. 14. Use only approved cleaning fluids. WARNING:
Electrical Danger---Misuse or improper installation of machinery connected to a source of electricity may result in accidental shock that could cause injury or death. Installation must conform to National Electric Code (Article 250-Grounding, etc.) A trained and qualified electrician must make electrical connections. Electrical characteristics shown on motor plate and control panel must match the power source; and all electrically powered equipment must be grounded.

3

4
1. WARNING: Mechanical Danger- The power driven forming rolls rotate at all times when power is supplied to the motor. Never place any part of the body including loose clothing near or onto the rotating rolls. (KEEP HANDS AWAY). Failure to comply will lead to personal body injury.
2. Never clean forming rolls while rolls are rotating—turn power off to clean rolls. 3. Do not operate roll bender without reading operator’s Manual and without proper
supervisory instructions.
4. Perform all installation and set-up operations before applying power for electrical start-up.
5. Never leave machine running unattended. When not in use, turn off electrical
power. 6. Never adjust machine with power on. 7. Avoid accidental start-up. 8. Do not use machine if servicing is required. 9. Be alert to all potential hazards. Notify your supervisor whenever you feel there is
a hazard involving the equipment or the performance of your job.
WARRANTY All new machines are sold with a one-year limited warranty, on factory defective parts. The warranty is limited to the original user. TAAG Machinery Co. at its option, will repair, replace or refund the purchase price of any part, tool or machine that fails during the warranty period. TAAG Machinery Co. will pay normal shipping charges for replacement parts. After 90 days from date of purchase, all express or overnight delivery charges are the responsibility of the customer. Purchaser must deliver to TAAG Machinery Co., at the address below, any written claim, with proof of original purchase. Replacement parts will be invoiced to purchaser and credit issued when the failed part is delivered to TAAG Machinery Co. Removal, reinstallation or replacement parts shall be at purchasers’ / user’s expense. Failure due to improper use of the machine voids the warranty. NOTE: 1. This machine has been tested and adjusted prior to shipment, but can and often does require readjustment due to vibration and bouncing during transport. Following the procedures described within can easily do readjustment. These are procedures with which you, as a user, should be familiar, as you will use them repeatedly over the life use of the machine. If you have difficulty in performing these procedures, we are here to support you. Call us at: (800) 640-0746.

5
2. Opening rolls (for Philipsburg Lock) are consumable items and not subject to warranty.
TAAG MACHINERY CO. (Master Distributor)
1257-B Activity Dr. Vista, CA 92081
Tel: (800) 640-0746 Fax: (760) 727-9948 Website: www.tinknocker.com * Email: [email protected]
Operating Instructions for TK 1660 Duct Beader
1. Plug machine in to 110 volt, single phase, 60 cycle grounded outlet. (For electricals other than standard, wire accordingly.)
2. Turn machine on and feed material against right or left hand gauge bar
into rolls. Standard 6" from edge and on 12" beaded centers apply from either gauge bar, to adhere to smacna standards.
3. Adjust bead depth according to requirement. When bead depth is too
great, down bow will result.
Note: Front feed rolls are present and spring loaded to accommodate all gauge materials, 16 gauge and lighter. Reference hold down stud setting; tighten all four studs and loosen 1 1/2 to 2 turns. If, on light gauge material, a stretch occurs in the sheet, loosen studs to remove stretch. Bead rolls are heat treated and firmly affixed to support rolls by recessed dog point set screws.
4. Check lubrication in speed reducer and grease roll shaft bearings
periodically. Suggest every 3 months.

6
TK 1660 Duct Beader Bead Tooling Inversion Instructions
Step 1: Top Roller Assembly Removal Remove cover. Remove (4) nuts affixing spreader to guide posts. (See Sketch 1) Pillow blocks and upper roll assembly may now be lifted off guide
posts. (See Sketch 2) Step 2: Bottom Roller Removal Remove (6) screws inside side plate (3) each plate on both sides of
machine. Lower roll assembly may now be removed from stand. (See Sketch 3) To ease bottom roller disassembly remove top feed roll by loosening (4 ) screws in pillow blocks and lift feed roll assembly out of way. (See Sketch 4)
Step 3: Top and Bottom Roller Disassembly Remove retaining rings on lower roll shafts extending outside side
plates. Rolls may now be separated from side plates, and bead tooling may be removed.
Step 4: Collar Removal and Inversion Procedure Loosen set screws and slide all top bead tooling off top roller
replacing them with bottom bead tooling. Put top bead tooling on bottom shaft and re-assemble machine. Note: Due to differences in dimensions between upper
and lower bead tooling, mating set screw holes in rollers will not align properly. After determining proper bead tooling position, it will be necessary to re-drill new holes to accept "dog" point of set screws. (See Sketch 5)

7

8

9

10

11
NOTE: Due to differences in dimensions between upper and lower bead tooling, mating set screw holes in rollers will not align properly. After determining proper bead tooling position, it will be necessary to re-drill new holes to accept "dog" point of set screws.

12
13

14

15
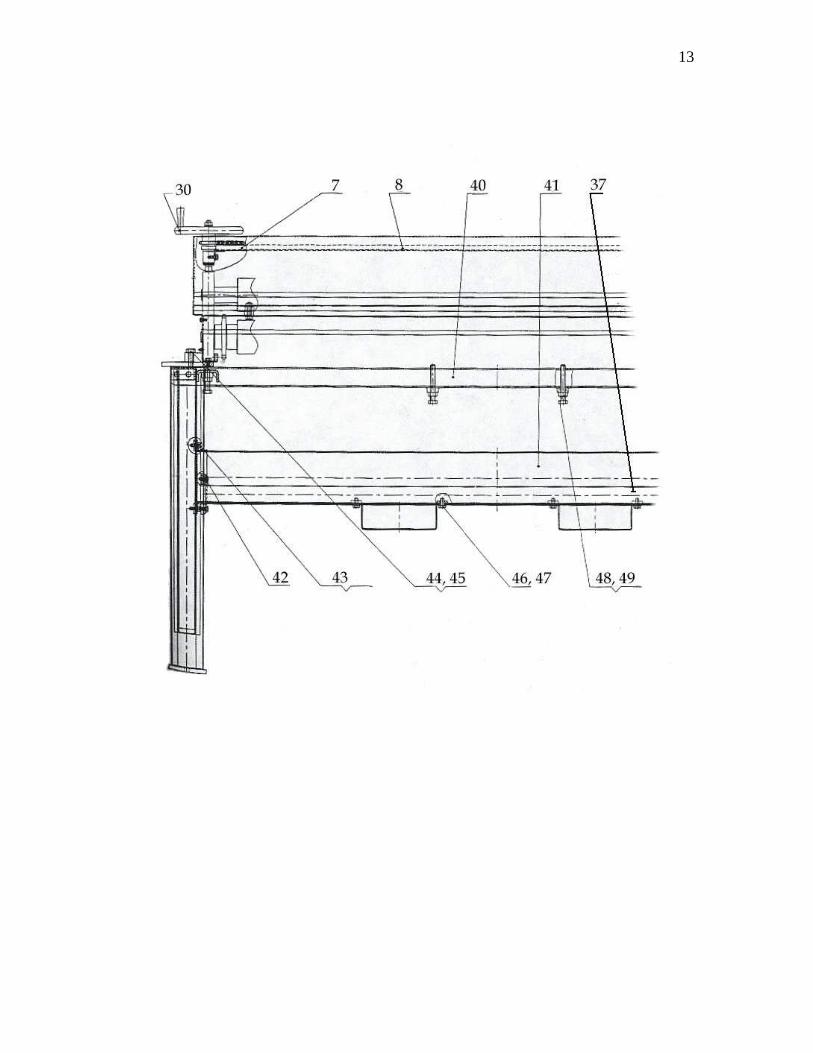
Parts For 1660 Duct Beader
Fine No. Part No. Description No. REQ"D. 2 BEADER0002 LEFT & RIGHT STAND LEGS 1
3 BEADER0003 16T SPROCKET 1
4 BEADER0004 PLATE 2
5 BEADER0005 DRIVE ADJUSTING SCREW 1
6 BEADER0006 12T SPROCKET 2
7 BEADER0007 CHAIN GUARD 1
8 BEADER0008 HOOD 1
9 BEADER0009 ROLL COLLAR, MALE 5
10 BEADER0010 TOP & 2ND FEED ROLLS 2
11 BEADER0011 ROLL COLLAR, FEMALE 5
12 BEADER0012 BOTTOM & 2ND FEED ROLL 2
13 BEADER0013 EXIT ROLL 1
14 BEADER0014 SPREADER 2
15 BEADER0015 DRIVEN ADJUSTMENT SCREW 1
16 BEADER0016 PILLOW BLOCK 2
18 BEADER0018 22T SPROCKET 1
19 BEADER0019 13T SPROCKET 1
22 BEADER0022 TABLE TOP 1
23 BEADER0023 PILLOW BLOCK SCREW 4
24 BEADER0024 SPRING 4
25 BEADER0025 PILLOW BLOCK 2
26 BEADER0026 GUIDE POST 4
27 BEADER0027 ADJUSTING BLOCK 2
29 BEADER0029 LEFT & RIGHT SIDE PLATE 2
30 BEADER0030 HAND WHEEL 1
31 BEADER0031 CHAIN 19,05 1
32 BEADER0032 CHAIN 12,7 1
33 BEADER0033 IDLER ROLL CROSSMEMBER 1
34 BEADER0034 MOTOR DRIVE GEAR 1
35 BEADER0035 IDLER ROLL 1
36 BEADER0036 MOTOR MOUNTING PLATE 1
37 BEADER0037 BACK SUPPORT BAR 1
38 BEADER0070 H352525 WT CHS 70 25.1 1
39 BEADER1800 H660011 MOTOR, 1HP, 1800RPM 1
40 BEADER0040 UPPER SUPPORT BAR 1
41 BEADER0041 MAIN SUPPORT BAR 1
42 BEADER0042 BACK SUPPORT BAR BOLTS 4
43 BEADER0043 MAIN SUPPORT BAR BOLTS 12
44 BEADER0044 PLATE BOLTS 6
45 BEADER0045 PLATE BOLTS LOCK WASHERS 6

16
46 BEADER0046 STIRRUP BOLTS 8
47 BEADER0047 STIRRUP BOLTS LOCK WASHERS 8
48 BEADER0048 UPPER SUPPORT BAR BOLTS 2
49 BEADER0049 Upper Support Bar Bolts Lock Nut 2 50 BEADER6006 Bearing for Beader 6006-2ZSKF