the tomb: ancient egyptian burial teacher/adult helper notes introduction · · 2017-04-20the...
TRANSCRIPT

1
The Tomb – Teacher/Adult Helper Notes
The Tomb: Ancient Egyptian Burial Teacher/Adult Helper Notes
Introduction About the Exhibition This is the extraordinary story of one tomb, carved into the desert cliffs opposite the Egyptian city of Thebes shortly after the reign of Tutankhamun in around 1290 BC. It was intended to be the final resting place for the Chief of Police and his wife. But as Egypt’s wealth and power declined, it was looted and reused several times over a period of 1,000 years. The Tomb’s final use occurred around 9 BC, shortly after the Roman conquest of Egypt, when it was sealed intact with the remarkable burial of an entire family. The Tomb was excavated in 1857, but was lost again as a village grew up over it. Today we are still learning about the Tomb from the objects found there, most of which are now in the Museum’s collections and are displayed here together for the first time in probably almost 100 years. Visiting with a school group This exhibition includes 12 labels written for children. To make them easy to find, each has the figure of Osiris next to it. Osiris is the King of the Afterlife. Each label has a question which the children need to think about and look more closely at an object to answer. To help capture some of their learning, we’ve created a trail which allows pupils to write down six of their answers. We’ll provide printed copies of the trail on the day of your visit. This guide provides you with practical information for planning your visit, plus the text from all 12 of the labels so you can discuss back in class.
Before your visit Please could you:
Introduce the trail you’ll be using to the pupils. You can download this here: http://www.nms.ac.uk/media/1154337/tombschoolstrail_web.pdf
Osiris as he can be found on the
labels in the exhibition
2
The Tomb – Teacher/Adult Helper Notes
Watch the introduction film. The area to watch this film in the exhibition will not fit your full class and by watching it beforehand this will give you more time to explore the objects. (Please note this is only for school groups to use in class and should not be shared more widely) Click on this link below to access the film and type in the password https://vimeo.com/ntlmuseumsscot/thetombschools Password: Osiris
Read your confirmation email to check what time you will be entering the exhibition. As bookings are very busy, we will need to ensure you keep to this time as there will be other classes before and after you. Spilt your class into three groups. The exhibition is split into three sections looking at the different time periods that people were buried in the Tomb. When you enter, please send one group to each section and then rotate them around the three sections to make best use of your time.
On the day
The exhibition is on Level 3 of the Scotland galleries. The exhibition can be accessed via lifts or stairs from Hawthornden Court. Please ask staff for directions if you need assistance.
Please be outside the exhibition at the start of your timeslot. Please line your class up outside the exhibition and a member of museum staff will provide clipboards, pencils and trails.
Upon entering the space spilt your class into the three groups and send one group to each area: Building the Tomb, Reusing the Tomb, Sealing the Tomb
We would suggest roughly 6 minutes in each area, but you can judge this depending on your class.
You will exit the exhibition via a different door, at the end of the Sealing the Tomb area. Please hand back your clipboards and pencils.
There is a small shop as you exit. The same items are available in the larger shop downstairs in the Entrance Hall, next to the lunch space.

3
The Tomb – Teacher/Adult Helper Notes
Visiting the Exhibition
(You might like to print these two pages for your adult helpers)
Important information
Food and drink is not permitted
Photography is allowed (without a flash)
When completing the trail, ensure pupils use a pencil and lean on a clipboard rather than the cases to avoid any damage to the objects or glass. We will provide clipboards, pencils and printed trails. Please hand these back in before you leave.
The exhibition is divided into three areas, plus an introduction space.
Pupils have two questions to answer on their trail sheet in each area and will have additional labels to find featuring Osiris. In each area there is also an ‘interactive’ which the pupils can try.
Osiris is the pupil’s guide around the exhibition – you can meet him in the introduction section. You pronounce his name O-sire-us. He is king of the afterlife.
You will enter and exit via different doors. The next class will be waiting outside to enter, so please exit via the door at the other end of the exhibition to assist with visitor flow.
What to find in each area: Introduction The first section as you enter is an introduction – the class will have watched the film already (see page 1 for the link), but you might like to look at the large map of where the Tomb is located, and to see the Osiris figure before your groups start their trail.
Building the Tomb You will find:
An interactive in the centre where pupils can choose a god to stamp onto a protective spell which they can keep.
Three children’s labels – two of which they have to write the answers on their trail
Osiris statue in the
exhibition
4
The Tomb – Teacher/Adult Helper Notes
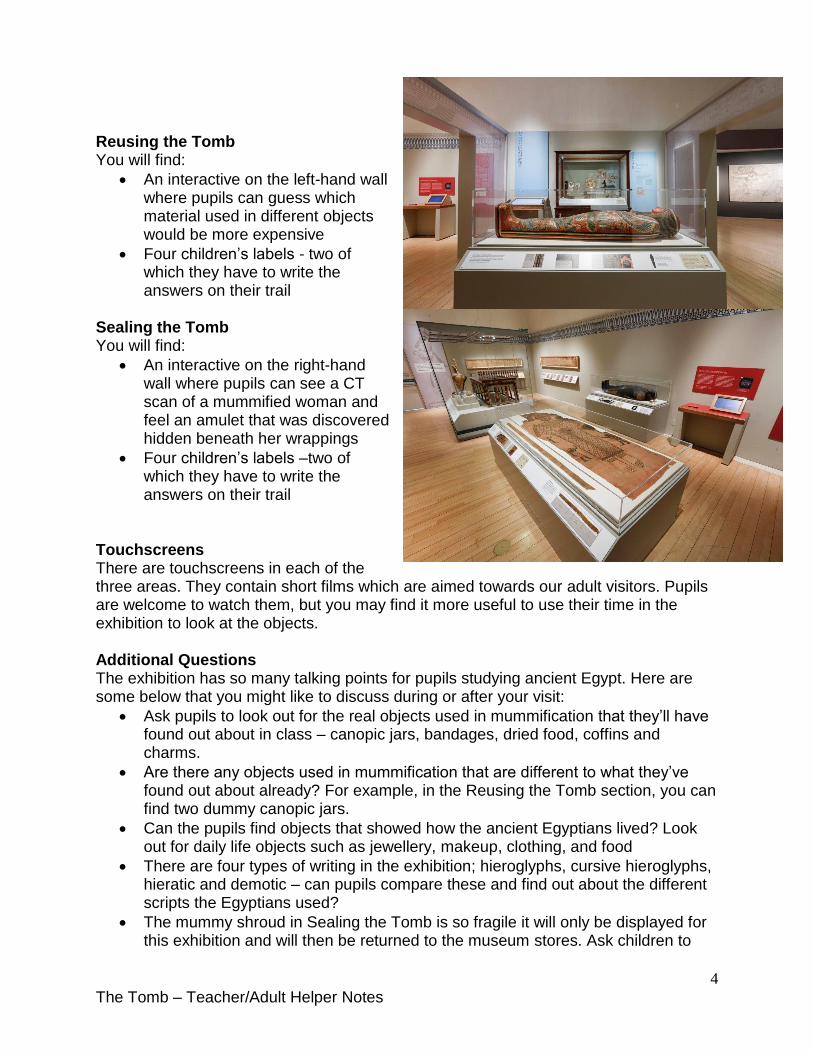
Reusing the Tomb You will find:
An interactive on the left-hand wall where pupils can guess which material used in different objects would be more expensive
Four children’s labels - two of which they have to write the answers on their trail
Sealing the Tomb You will find:
An interactive on the right-hand wall where pupils can see a CT scan of a mummified woman and feel an amulet that was discovered hidden beneath her wrappings
Four children’s labels –two of which they have to write the answers on their trail
Touchscreens There are touchscreens in each of the three areas. They contain short films which are aimed towards our adult visitors. Pupils are welcome to watch them, but you may find it more useful to use their time in the exhibition to look at the objects. Additional Questions The exhibition has so many talking points for pupils studying ancient Egypt. Here are some below that you might like to discuss during or after your visit:
Ask pupils to look out for the real objects used in mummification that they’ll have found out about in class – canopic jars, bandages, dried food, coffins and charms.
Are there any objects used in mummification that are different to what they’ve found out about already? For example, in the Reusing the Tomb section, you can find two dummy canopic jars.
Can the pupils find objects that showed how the ancient Egyptians lived? Look out for daily life objects such as jewellery, makeup, clothing, and food
There are four types of writing in the exhibition; hieroglyphs, cursive hieroglyphs, hieratic and demotic – can pupils compare these and find out about the different scripts the Egyptians used?
The mummy shroud in Sealing the Tomb is so fragile it will only be displayed for this exhibition and will then be returned to the museum stores. Ask children to
5
The Tomb – Teacher/Adult Helper Notes
think about how museum staff might care for some of the other objects in the exhibition and why it’s important to do this.
Children’s Labels - text and answers Below is the full text you can find throughout the exhibition for children. In red are the answers to the questions. Those which are on the trail are highlighted in bold italics.
Introduction Osiris will set you challenges and be your guide. Will he admit you to the afterlife? Egyptians believed when Osiris died, his wife Isis and sister Nephthys mummified him and brought him back to life with magic. What tells you Osiris is the king of the afterlife? He is wearing a crown and he’s shown as mummified.
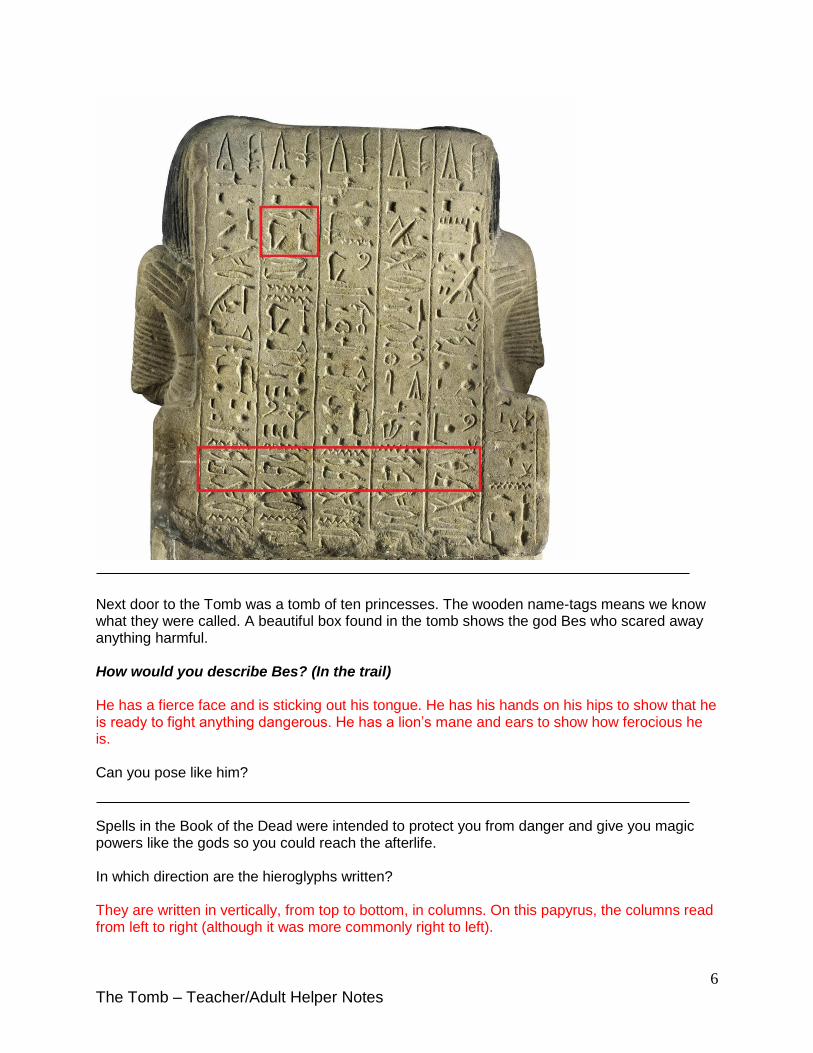
Building the Tomb The Tomb was built for the Chief of Police and his wife. This statue shows how they wanted to be remembered. How do you think they felt about each other? They have their arms around each other, which shows that they loved and looked after each other. Can you find Osiris’ name written in hieroglyphs in two different ways on the back of the statue? (In the trail)
6
The Tomb – Teacher/Adult Helper Notes
Next door to the Tomb was a tomb of ten princesses. The wooden name-tags means we know what they were called. A beautiful box found in the tomb shows the god Bes who scared away anything harmful. How would you describe Bes? (In the trail) He has a fierce face and is sticking out his tongue. He has his hands on his hips to show that he is ready to fight anything dangerous. He has a lion’s mane and ears to show how ferocious he is. Can you pose like him?
Spells in the Book of the Dead were intended to protect you from danger and give you magic powers like the gods so you could reach the afterlife. In which direction are the hieroglyphs written? They are written in vertically, from top to bottom, in columns. On this papyrus, the columns read from left to right (although it was more commonly right to left).
7
The Tomb – Teacher/Adult Helper Notes
What magic power would you like to have?
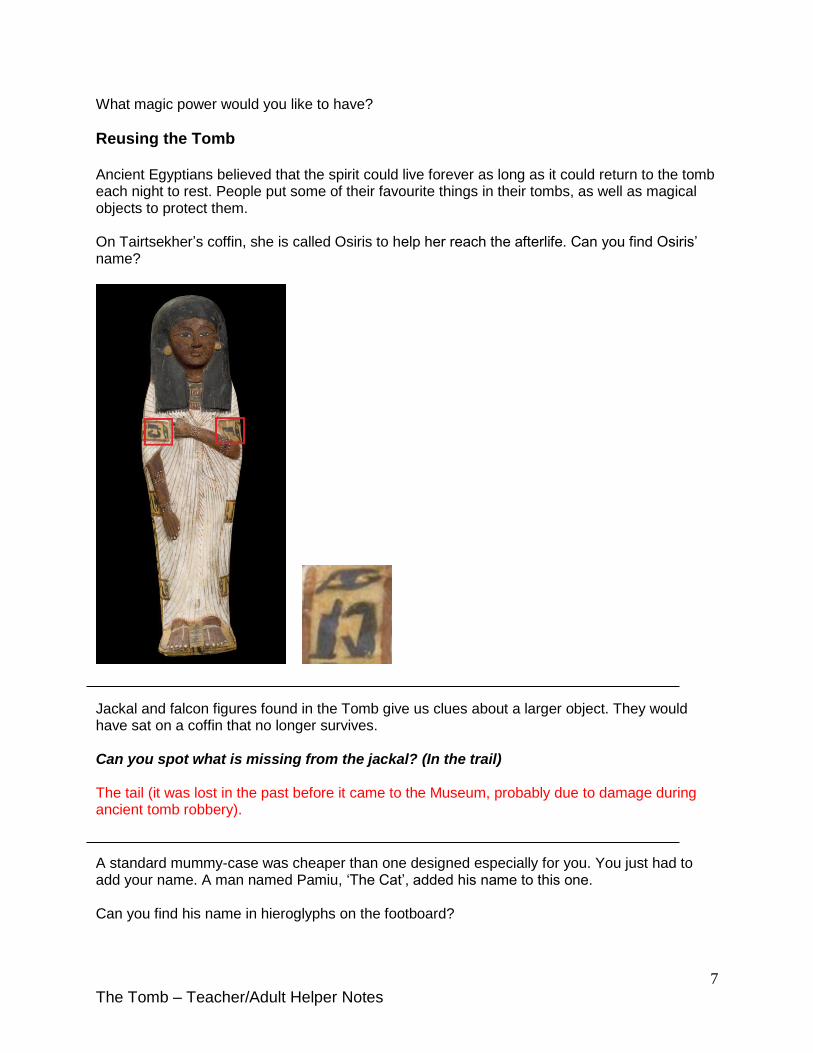
Reusing the Tomb Ancient Egyptians believed that the spirit could live forever as long as it could return to the tomb each night to rest. People put some of their favourite things in their tombs, as well as magical objects to protect them. On Tairtsekher’s coffin, she is called Osiris to help her reach the afterlife. Can you find Osiris’ name?
Jackal and falcon figures found in the Tomb give us clues about a larger object. They would have sat on a coffin that no longer survives. Can you spot what is missing from the jackal? (In the trail) The tail (it was lost in the past before it came to the Museum, probably due to damage during ancient tomb robbery).
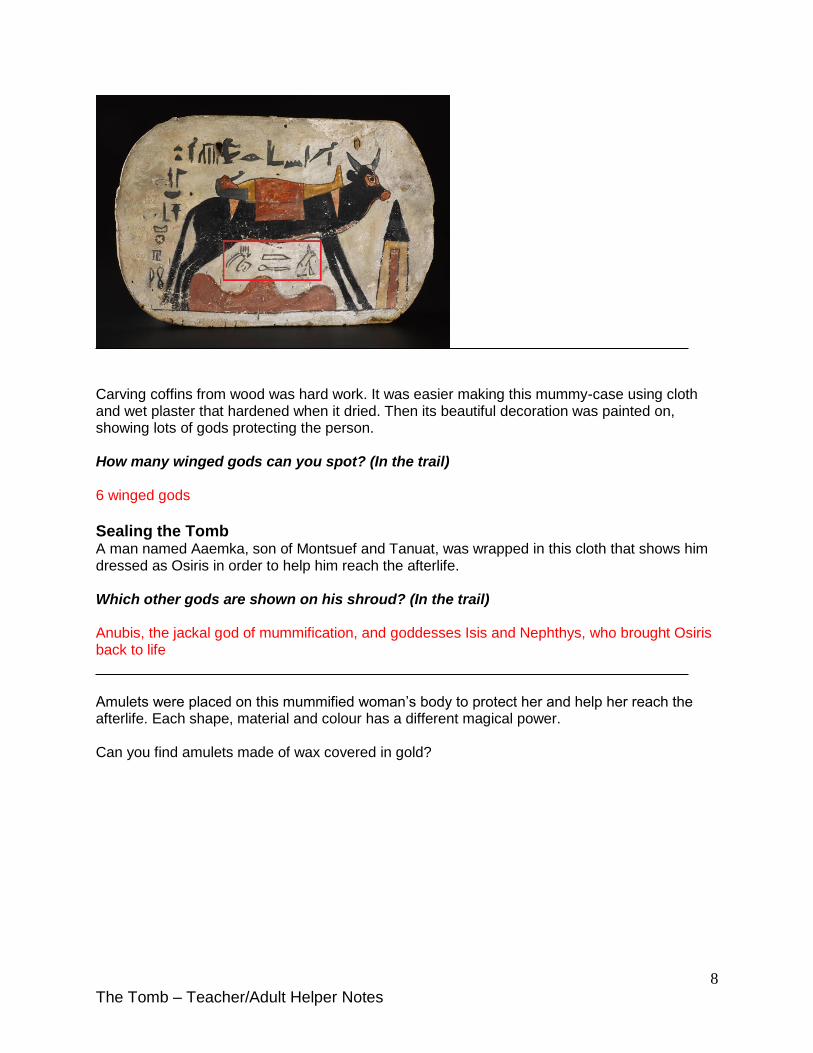
A standard mummy-case was cheaper than one designed especially for you. You just had to add your name. A man named Pamiu, ‘The Cat’, added his name to this one. Can you find his name in hieroglyphs on the footboard?
8
The Tomb – Teacher/Adult Helper Notes
Carving coffins from wood was hard work. It was easier making this mummy-case using cloth and wet plaster that hardened when it dried. Then its beautiful decoration was painted on, showing lots of gods protecting the person. How many winged gods can you spot? (In the trail) 6 winged gods
Sealing the Tomb A man named Aaemka, son of Montsuef and Tanuat, was wrapped in this cloth that shows him dressed as Osiris in order to help him reach the afterlife. Which other gods are shown on his shroud? (In the trail) Anubis, the jackal god of mummification, and goddesses Isis and Nephthys, who brought Osiris back to life
Amulets were placed on this mummified woman’s body to protect her and help her reach the afterlife. Each shape, material and colour has a different magical power. Can you find amulets made of wax covered in gold?
9
The Tomb – Teacher/Adult Helper Notes
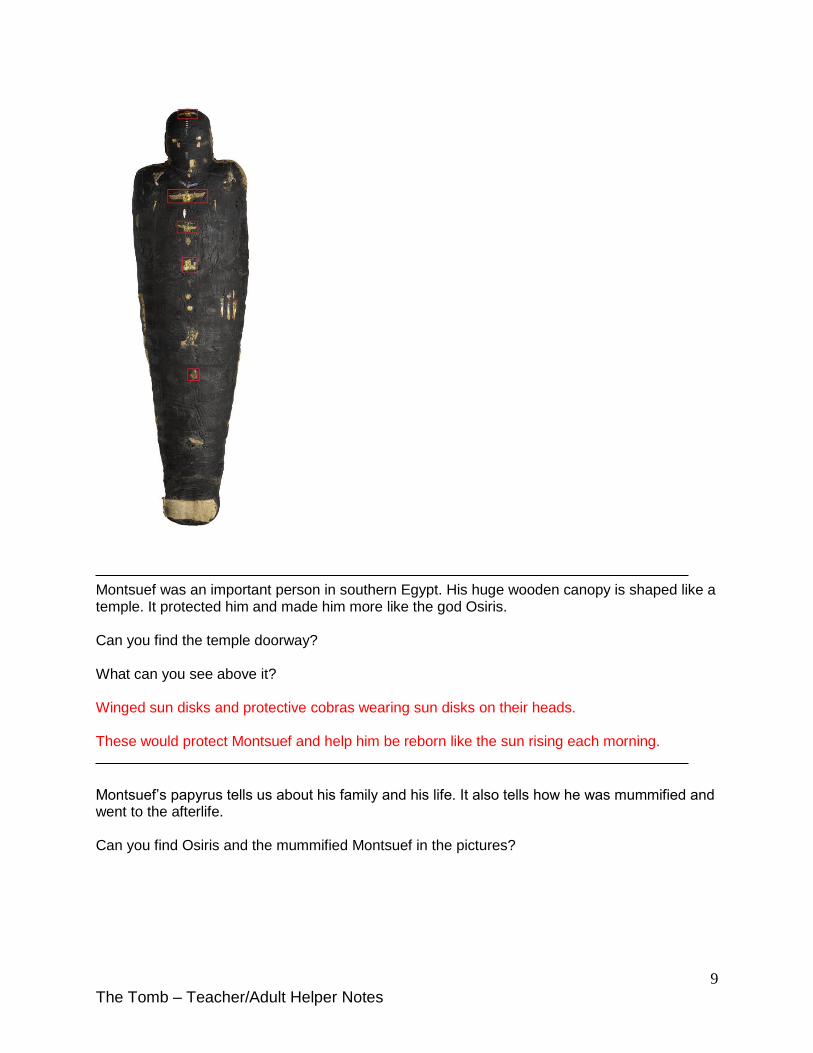
Montsuef was an important person in southern Egypt. His huge wooden canopy is shaped like a temple. It protected him and made him more like the god Osiris. Can you find the temple doorway? What can you see above it? Winged sun disks and protective cobras wearing sun disks on their heads. These would protect Montsuef and help him be reborn like the sun rising each morning.
Montsuef’s papyrus tells us about his family and his life. It also tells how he was mummified and went to the afterlife. Can you find Osiris and the mummified Montsuef in the pictures?
10
The Tomb – Teacher/Adult Helper Notes
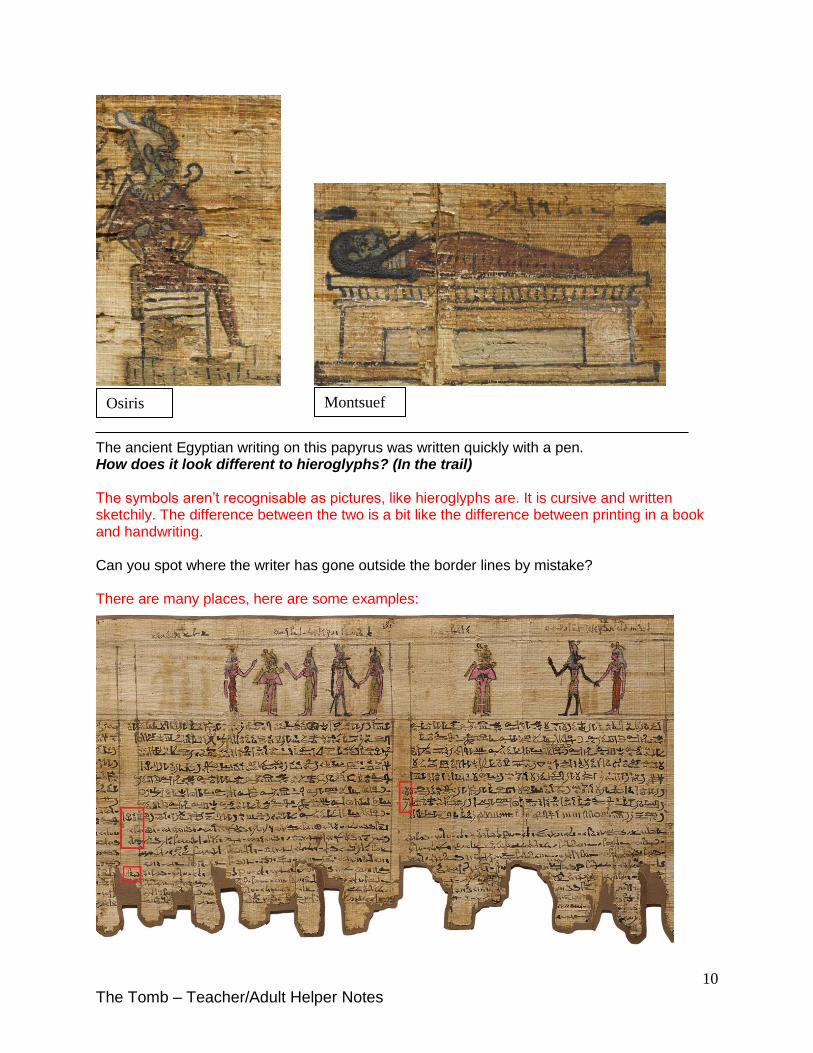
The ancient Egyptian writing on this papyrus was written quickly with a pen. How does it look different to hieroglyphs? (In the trail) The symbols aren’t recognisable as pictures, like hieroglyphs are. It is cursive and written sketchily. The difference between the two is a bit like the difference between printing in a book and handwriting. Can you spot where the writer has gone outside the border lines by mistake? There are many places, here are some examples:
Osiris Montsuef
11
The Tomb – Teacher/Adult Helper Notes
As you exit You have reached the end of Osiris’ challenges. How many of the 12 did you complete? Do you think you have earned his protection for eternity? You can find the answers to the challenges on the website www.nms.ac.uk/thetomb
After your visit We hope you enjoyed your visit to the exhibition.
Before you leave the museum, you could try our ancient Egyptian trail around the rest of the museum: http://www.nms.ac.uk/trails
You can also explore some of the resources on our website www.nms.ac.uk/thetomb including:
Images of objects in the exhibition
Stories behind some of the key objects like the Mummy Shroud As a follow up activity, ask each group to choose their three favourite objects in the exhibition. Ask them to discuss why these are their favourites. Back in class why not try and recreate them? If you have any questions, comments or feedback, please get in touch with us. We’d also love to see any work your class produces after visiting the exhibition: [email protected]