the pickle bucket telescope · it is this reasoning that has let to the hobby of amateur telescope...
TRANSCRIPT

The Pickle Bucket Telescope
Written by Rico Tyler; Modified by Ritter Planetarium
Introduction
It is almost impossible to think about astronomy without envisioning telescopes. They are as much a symbol of the discipline as a hammer is to carpentry or a gradebook is to teaching. But this fascination has its price in a very literal sense. Even small telescopes can have very large pricetags. Yet telescopes are not very complicated devices to understand. And surely anything that can be understood can be made.
It is this reasoning that has let to the hobby of amateur telescope making, or ATM. The practitioners of this art and science take great pride in the skill, thought, and craftsmanship that go into their creations. Commonly, the work exceeds the quality that can be found on the commercial market. One look at these telescopes is enough to convince most people that telescope making is beyond the skills and tools of the average stargazer. But making small telescopes does not have to be a task that taxes one's skill, toolbox, or budget.
These instructions will show how you can put together an excellent small telescope without having a fully equipped woodshop or a metalworking facilities. Instead of grinding a mirror, we will use lenses, many of them surplus, available by mail order. Thus our telescopes will be refractors instead of the reflectors made by most amateurs. Refractors are rugged, require little -- if any -- upkeep, and are easy to set-up and transport. Our mechanical parts and mountings will be made from assorted pieces of hardware, plastic pipe, and even cardboard. The only tools we will need are common hand tools (of course, power tools are always welcome). The results will compare very favorable with equipment costing hundreds of dollars.
Using surplus optics can drastically reduce the cost of a telescope. The price one pays for this is the threat of a supplier running out of that wonderful lens you heard about. For this reason, we will begin by looking at telescope making in general terms. While lenses come and go on the market, the ways to make mountings and other parts stay constant. After you are familiar with these parts, we will move on to some specific plans. If you are more interested in specific optical designs, you may want to skip over the first part of these instructions. As you read through the instructions, feel free to modify and adapt the plans according to your own needs and resources. That is the heart of projects of this kind.

How a Telescope Works
Anyone who has shopped for a telescope in a department store knows that magnification is the great selling point of some telescope makers. But true astronomical telescopes are designed to accomplish three goals, the least important of which is magnification. In fact, the "power" of a telescope comes from its eyepiece, not the actual scope. By changing eyepieces, an observer can get almost any power they want out of almost any telescope. The real test of a telescope is how well it is able to show detail, known as resolution, and how much light it collects.
Objective Lens
The key to resolution and light gathering ability comes from the objective lense. This is the large lens in the front of a refracting telescope or binoculars. While this image is small, it is much brighter than an image made by your eye. This is because the objective lens has a diameter, or aperture, much greater than the human eye. This allows more light to enter a telescope than can enter the eye.
Aperture is also what gives the telescope its resolution. For this reason, the most important measurement given about a telescope is the diameter of the objective. When an astronomer speaks about an "80 millimeter" refractor, or a "6 inch" telescope, they are speaking about aperture. Aperture is the best way -- in almost all cases -- of judging a telescope. The lenses available through surplus dealers have apertures between 50 and 80 millimeters.
Eyepiece
The eyepiece, or ocular, is simply a magnifier. In fact, an ordinary pocket magnifier will do a creditable job as an eyepiece. While magnifiers are usually magnifying real objects, in a telescope they magnify the image made by the objective. Magnifying brings out the detail in an image. By switching eyepieces, it is possible to increase or decrease magnification at will.
While it is possible to magnify the image in the smallest telescope by huge factors, even novice users quickly discover the folly of over-magnification. Magnifying the image also magnifies the blurring due to air turbulence, the shaking of the mount, and any slight flaws in the objective. To make matters worse, the more you magnify, the dimmer the image gets. Telescope users try to magnify an image only as much as needed to bring out all the detail in an image.
Operation of a Telescope
A completed telescope pairs an objective and an eyepiece. The tube merely holds the pieces in place. It is possible to simply hold the objective and eyepiece to get a view. The tube needs to be long enough so that the eyepiece is just behind the location of the image made by the objective. For distant objects, the image is at the objective's focal point. As

you try to focus on nearby objects, the eyepiece will need to be pulled further away. The position of the eyepiece also needs adjusting when switching from one eyepiece to another. For this reason, most telescopes have some means to adjust or focus the eyepiece.
The magnification of a telescope is found by dividing the focal length of the objective by the focal length of the eyepiece. Magnification = fobjective/feyepiece. It is easy to see that an objective needs a long focal length while the eyepiece needs a short focal length. For the telescopes illustrated here, the objectives have focal lengths of about 200 to 900mm, while the eyepieces should have focal lengths in the 10 to 25mm range.
General Parts Information
This section will give you an overview of telescope parts that are common to most or all designs. These parts can be used with the designs in these instructions, or with your own designs. This section also has some hints about sources for parts.
Objectives
Our source of many of our objective lenses is surplus. Actual made-for-astronomy objectives are rare in surplus, yet many surplus catalogues are full of lenses meant for other purposes that make excellent objectives. Most of these lenses were made for photocopiers. They have apertures of various sizes, and focal lengths of 200mm or higher. They are of excellent quality, and have prices in the $5 to $25 range.
Two companies that deal in such lenses are Jerryco and C & H Sales Company. They will put you on their mailing lists upon request.
Jerryco Inc. 601 Linden Place
Evanston, Illinois 60202 (708) 475-8440
FAX: (708) 864-1589
C & H Sales Inc. P.O. Box 5356
Pasadena, California 91110 - 9988 1-800-825-9485
FAX: (818) 796-4875
A second source of objectives is the traditional astronomy dealer. See Sky & Telescope and Astronomy magazines for adds. Sky Instruments of Canada offers 60mm diameter objectives in both 700 and 900mm focal lengths for $29.95 (prices may vary). While this is higher than most surplus objectives, they may offer discounts of around 50% for orders of $20 or more. One of the designs in these instructions uses a Sky Instruments objective. Even at the list price, this is an inexpensive lens that makes a wonderful telescope.
Sky Instruments MPO Box 3164
Vancouver, B.C. Canada V6B 3Y6 (604) 270-2813
Once you get a catalog, you can begin your search for a lens. Good objective lenses come and go, so it is necessary to search for a copier lens with the focal length you want and a diameter that matches a tube you wish to use. At the time of writing, C & H had a 3 1/8in. diameter copy lens (#OL3301) with a 210mm focal length, along with a 63mm diameter lens with a 400 mm focal length (#OL8756). Jerryco has a 3 1/16in. diameter lens with a 230mm focal length (#20650), and a 2in. diameter lens with a 203mm focal length (#6878). These will eventually be gone, and others will take their place. The Sky
Instruments 60mm objective mentioned above is item #6F12 for the 700mm version, and #6F15 for the 900mm version.
Eyepieces
The simplest way to acquire eyepieces is to purchase them commercially. Of course that is also the most expensive method. But you may want to purchase one for a favorite telescope. Check in magazines such as Astronomy or Sky & Telescope for details. Make sure to buy an eyepiece that has a diameter of 1¼in. That is the American standard, and is the standard for the homemade lenses described below.
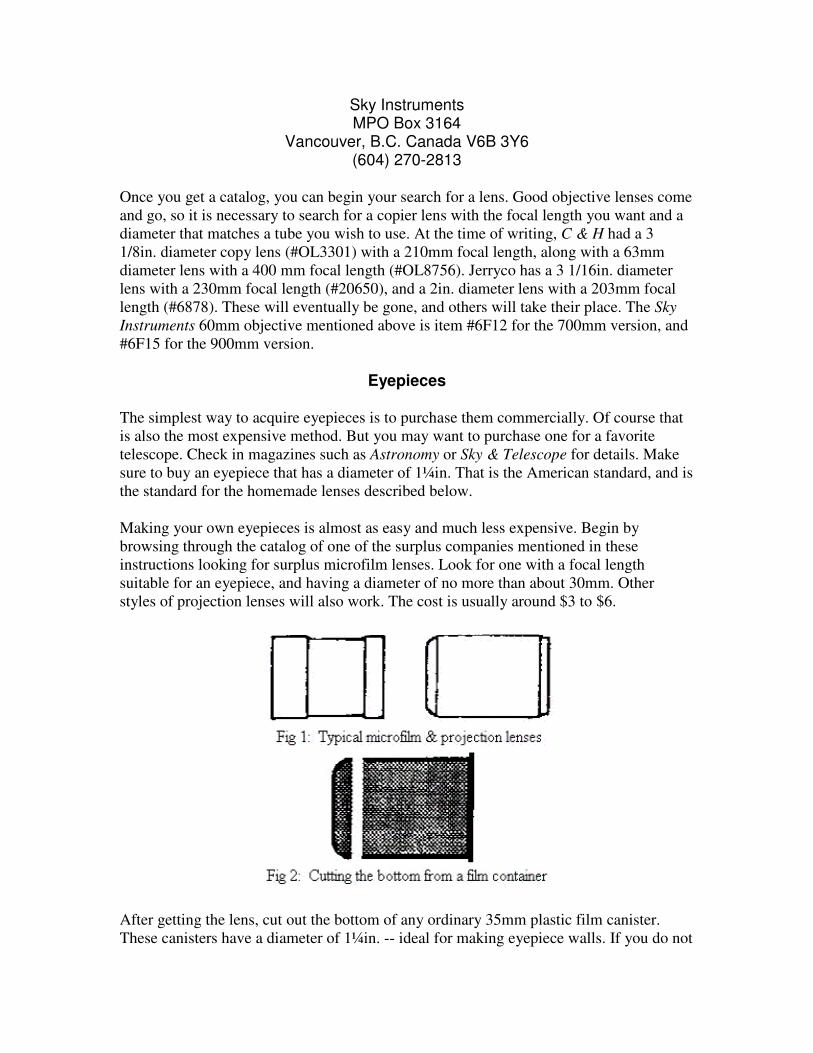
Making your own eyepieces is almost as easy and much less expensive. Begin by browsing through the catalog of one of the surplus companies mentioned in these instructions looking for surplus microfilm lenses. Look for one with a focal length suitable for an eyepiece, and having a diameter of no more than about 30mm. Other styles of projection lenses will also work. The cost is usually around $3 to $6.
After getting the lens, cut out the bottom of any ordinary 35mm plastic film canister. These canisters have a diameter of 1¼in. -- ideal for making eyepiece walls. If you do not

have one, most photo stores will be glad to give away bags of them. Otherwise they will end up in a landfill somewhere.
Wrap some tape around the lens until you make a bushing large enough to hold the lens in the canister. Insert the lens into the canister and you have an eyepiece. It will even fit in a commercial telescope!
One of the real secrets of making a surplus optics telescope is to find appropriate tubing. Ideally, you would like to find a tube that has the same inside diameter as the diameter of the objective you wish to use. Then the lens would simply slide into the tube. If friction alone does not hold the lens, tape can be used to get a tight fit. On occasion, you may need to do some sanding. Hopefully, this tubing is also inexpensive and easy to cut, drill, and paint. Several good candidates exist for the role.
PVC plastic pipe is one of the best choices. It is easy to find in most hardware and plumbing stores, can be cut and drilled like wood, and can be glued with PVC cement. Many home construction sites are littered with small pieces available for the asking. Along with the pipe, a wide array of fittings and couplers are available. These give additional tube sizes. The most commonly used sizes for telescope making are 2 and 3 inches.
Aside from plastic pipe, heavy gauge cardboard mailing tubes are also good choices. The 2in. diameter size can even be used with 2in. PVC fittings. A free source of cardboard tube is at the same photo shops that are a source of film canisters. Photographic paper comes in large diameter, heavy duty tubes that are usually thrown away after use. They are also excellent telescope tubes.
The back of your telescope tube should have a means of holding an eyepiece and adjusting its location. This is best done with a PVC plastic fitting called a compression fitting or trap adapter. One side of these fittings has a ring that, when screwed in, will hold a piece of pipe in place. For telescope making, this needs to be 1¼in. in diameter to accept and hold eyepieces. The other end of the fitting usually has a diameter of 1½in., and will fit into a variety of reducer fittings that, in turn, will fit over any size PVC pipe. The 1¼in. side of the fitting can hold eyepieces directly, with focusing accomplished by moving the eyepiece and then tightening the ring, or a piece of 1¼in. thinwall sink pipe can be inserted. These sink pipes are made to fit into trap adapters and will allow a greater range of travel for the eyepiece. One side of the sink pipe expands to accept 1¼in.
fittings (or eyepieces). These usually come in long lengths that need to be cut down to about 4 inches in length.
Fork Mount
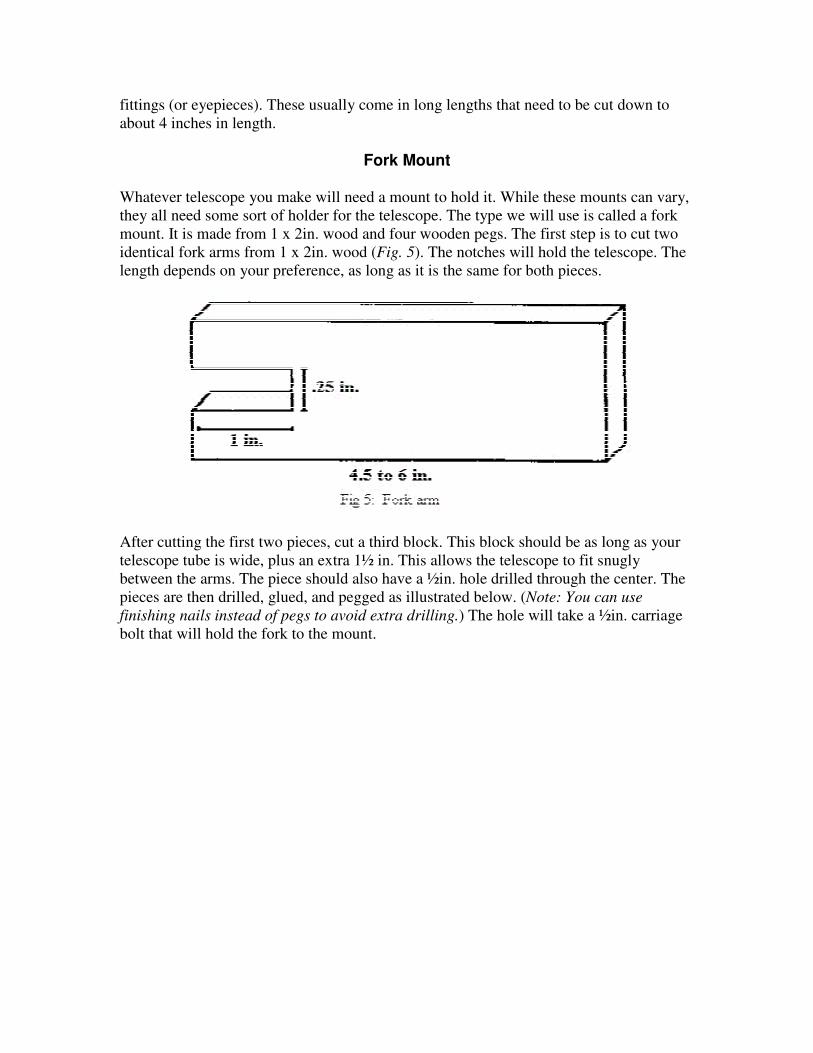
Whatever telescope you make will need a mount to hold it. While these mounts can vary, they all need some sort of holder for the telescope. The type we will use is called a fork mount. It is made from 1 x 2in. wood and four wooden pegs. The first step is to cut two identical fork arms from 1 x 2in. wood (Fig. 5). The notches will hold the telescope. The length depends on your preference, as long as it is the same for both pieces.
After cutting the first two pieces, cut a third block. This block should be as long as your telescope tube is wide, plus an extra 1½ in. This allows the telescope to fit snugly between the arms. The piece should also have a ½in. hole drilled through the center. The pieces are then drilled, glued, and pegged as illustrated below. (Note: You can use
finishing nails instead of pegs to avoid extra drilling.) The hole will take a ½in. carriage bolt that will hold the fork to the mount.

Be sure that the space between the arms is just wide enough for the width of the telescope tube. The tube is held by a pair of ¼in. carriage bolts (1½ to 2in. long). These bolts are placed, from the inside, into holes drilled into the telescope. These bolts then fit into the slots cut into each fork arm. A washer and wingnut on each bolt serves to hold it all in place.
Mountings for Telescopes
This section will describe two different types of telescope mounts. The first, called a "bucket mount," is a light-duty mount that is extremeny portable and easy to make. The second mount is known as the "PVC mount," and is a very rugged, heavyweight mounting desiged to accommodate even the largest surplus telescope.
Bucket Mount
The first step in making a bucket mount is, of course, to find a bucket. This should be a 5 gallon heavy-guage bucket with a lid. They are commonly used to store pickles (hence the name -- Pickle Bucket Telescope), icing, and other food stuffs. Similar buckets are

used for drywall compound, floor wax, paint, and other bulk products. While any of these will do, the best buckets are those that have smooth tops lacking any kind of spout.
Aside from some ¼in. carriage bolts, the rest of the mounting is made from PVC pipe and fittings. The diagram (Fig. 7) shows the needed parts and how they fit together.
Each piece of pipe is glued to the fitting above. This makes three sections that, in turn, are held together by friction. The closet flange is attached to the bucket top by carriage bolts. To store the mount, simply pull each section apart. They will then store inside each other and can be placed into the bucket.
The telescope is attached to the mount with a modified version of the fork mount described earlier. The modification is to replace the ½in. bolt, washer, and wingnut along with a film canister bottom. The canister has a ¼in. hole in its bottom. The film canister will slide into the trap adapter at the top of the bucket mount. Epoxy can be used between the film case and the fork arm to strengthen the mount.

PVC Mount
The PVC Mount is a heavy-duty mount that requires more materials than the simple bucket mount. Parts List: PVC MOUNT
• Piece of 1 x 10in. wood (or similar size) • 12 2ft. pieces of ¾in. PVC pipe • 6 1 - 2in. pieces of ¾in. PVC pipe • 6 hose clamps • 3 2 or 3in. mending plates • 6 ¾in. PVC "elbow" fittings • 6 ¾in. PVC "tee" fittings • 3 1½in. PVC "caps" • 3 screw eyes or screw hooks • 4ft. of strong cord or tape
The wood is used to cut a triangle that serves as the mount's base. The ends are trimmed and a centered ½in. hole is drilled. The smaller the base, the better, so long as enough room is left for attaching the legs.

After making the legs, use the mending plates to attach the hose clamps in pairs to the wooden base. Mounting the mending plates too close to the base's edge can cause the tripod to wobble when finished.
The legs then attach to the clamps. The screw eyes should face inward. The rope is then threaded through each screw eye and the ends are tied together. The rope keeps the legs from extending too far. Adjusting the hose clamps allows the mount to be folded for travel and storage, or tightened for use.

The fork is attached to the mount using a ½in. carriage bolt, a wingnut and washer, and a film canister top with a hole. The top serves as a bearing. But adjusting the wingnut, the telescope can be fixed in place or allowed to move.

Telescope Tubes

Up to this point, we have focused on everything but the actual telescope. This section will describe how to make several different types of these surplus wonders. While looking over this section, remember that any surplus part is subject to availability. Don't be afraid to experiment with new lenses.
2.5inch Refractor
This design will use C & H's 64mm diameter lense with a 400mm focal length (#OL8756). It is priced at about $19.95 (at time of writing). It is not a copier lens, but a real objective. You will also need a 12in. section of 2in. PVC pipe, a 2in. coupling, a 1¼ to 1½in. trap adapter, and a 1½ to 2in. reducing fitting.
Construction begins with placing the objective into the coupling. The lens has a rim that keeps it from fitting into the coupling. By sanding the inside of the coupling, the lens can be made to fit tight to the rim. While the lens will hold in place after being forced into the coupling, epoxy or some other glue is highly recommended.
Before the lens is glued into place, all interior surfaces of the telescope should be painted black to prevent stray reflections. The PVC pipe should also be drilled for the ¼in. carriage bolts that will hold the telescope to the fork. These bolts will be tricky to install due to the pipe's length.
The entire telescope is assembled by simply pushing it together. If friction does not hold the coupling and reducer on the pipe, try small pieces of tape on the pipe as shims. A film canister eyepiece is placed in the trap adapter, and the entire telescope is put on a fork arm (see previous section) and mount. Both the bucket mount and the PVC mount will do nicely.

The most important test for your new telescope is how well it will focus on distant objects. If you are unable to get a proper focus, the problem is not having enough travel for the eyepiece. This problem may also occur when switching eyepieces. Remember that you only have about 1 inch of travel for focusing. The answer to this problem is a slightly longer, or shorter, PVC pipe. Experiment by holding your eyepiece in front of the objective to decide which solution will work.
One way to eliminate the focusing problem entirely is to replace the 2in. PVC with sections cut from a telescoping 2in. mailing tube. These tubes have an inner piece of tube that fits snugly inside the 2in. outer section. They can be purchased from the post office for about $1.
Cut a 10in. section of the outer tube and drill it for attachment to the fork (see below). A 6in. section of the inner tube should be placed into one end. With the help of some tape around the tube, the 2in. coupling and 2in. reducer will fit nicely. This new tube can focus the objective without the limitations of the trab apdapter focuser. If the inner tube is too loose, a few bits of tape will tighten the assembly.
Once the telescope is finished, it can be mounted on either the bucket or PVC mount. The fork arm pieces should be 5½in. long, and the base piece should be about 1 13/16in. long (check before cutting).
The Pickle-Bucket Telescope
This design is based on the 2¼in. diameter copier lens from Jerryco (6867). The name comes from its use of the bucket mount. Together they form a simple, compact, yet inexpensive telescope costing around $20. The simplicity of this telescope makes it a good choice for student and class projects. While the 203mm focal length and small aperture are not suitable for high magnification, this scope is ideal for Moon viewing and wide-angle viewing of deep space objects.

The actual tube requires a 2in. PVC coupler, a 1¼ to 1½in. trap adapter, a piece of 1¼in. thinwall sink pipe with the "neck" cut down to a length of 2in., and a piece of regular 2in. PVC pipe about 2in. long. Arrange the pieces as in Figure 16.
All of the PVC pieces are pushed together. Make sure that the coupling and the reducer meet with no gap separating them. Drill two ¼in. holes on opposite sides of the coupling. Each should be ½in. from where the coupling meets the reducer. These holes are for the ¼in. carriage bolts that hold the telescope to the fork. Make sure they are well aligned. You should be able to view through one hole and see out the other. At this point, paint the interior black.
The objective is placed into the open end of the coupling. It should go into the coupling as far as the inside rim. Since the objective has a smaller diameter than the inside diameter of the couplding, tape will be needed to shim the lens. After the lens is in place, an eyepiece can be placed in the sink pipe and the telescope tested.
Once the optical tube is finished, all that is needed is to make a fork and bucket mount. The entire telescope will easily fit into the bucket with plenty of room to spare. This design can also be used with the PVC mount.
PVC Telescope
This is by far the best performer of the group. It will give good views of the Moon, Jupiter, and Saturn for a cost that is little more than the telescopes mentioned earlier. It uses the Sky Instruments' 60mm objective mentioned in the section on objectives. Both the 700mm and 900mm versions work and share the same basic design. The 900mm telescope gives a bit more magnification, while the 700mm design is a bit more portable.
The design requires one 2in. coupler, a 1¼ to 1½in. female trap adapter, a 9 to 12in. section of 1½in. PVC pipe, and three pieces of 2in. PVC pipe. One of the three sections is a dew cap and needs to be about 2in. long. The other two sections will be the telescope body, and must be cut to suit the objective. For the 900mm objective, the forward section needs to be 17in., and the aft section 12in. For the 700mm objective, the forward section

needs to be 12in., and the aft section 11in. The interior of each piece should be painted black before assembly.
Both objectives are airspaced and unmounted. In commom terms, this means the two elements, convex and concave, are not mounted and are separated by a thin plastic ring. Be careful not to lose the rung or drop either lens of the pair. A loose set such as this requires a different method of mounting.
Construction begins with the forward piece of 2in. PVC. Carefully wrap electrical tape around on the lip of the pipe to make a bushing with the same outside diameter as the lens. Place the objective, convex element facing the front, on the forward piece of pipe and wind tape around the lens and tube. The objective should stay in place with one or two windings. Place the dew cap on the top of the objective, bushing side down, and tape it to the objective and tube with a winding or two of tape.
The 1½in. pipe acts as a drawtube to focus the telescope. The telescope should focus with no more than about one half of the drawtube exposed. You can put an eyepiece into the

trap adapter and test focus the telescope. The 1½in. section of PVC will be very loose in the larger tube, but you can still focus with care. After this check, cut a piece of thin cardboard about 2in. wide and long enough to encircle the inside of the piece of 2in. pipe. Wrap this cardboard around the inside of the aft section of 2in. PVC to tighten the fit of the drawtube. Then cut some strips of cardboard about 1in. wide and 4in. long, and tape them lengthwise into the tube. Add as many of these shims as needed to give a snug, but sliding, fit.
At this point, the telescope is finished. Make a fork mount to hold the telescope at the coupling. A telescope of this weight and size needs the PVC mount. A bucket mount is too weak.
Conclusion
Hopefully, these instructions will get you started in "bare bones" telescope making. All you need is a willingness to experiment with the wonderful variety of copier lenses, binocular objectives, and other optics that show up in surplus catalogs.
Pickle Bucket Telescope Mount and Assembly


Resources for Telescope Parts
Jerryco Inc. 601 Linden Place
Evanston, IL 60202 PH: 708-475-8440
FAX: 708-864-1589
Orion Telescope & Binocular Center 2450 17th Ave. P.O. Box 1158
Santa Cruz, CA 95061 PH: 1-800-447-1001 www.oriontel.com
C & H Sales Inc. P.O. Box 5356
Pasedena, CA 91117-9988 PH: 1-800-325-9465 FAX: 818-796-4875
Teleview 100 Route 59
Suffern, NY 10901 PH: 914-357-9552</TD< TR>
Sky Instruments MPO Box 3164 Vancouver, B.C. Canada V6B 3Y6 PH: 604-270-2813
University Optics P.O. Box 1205
Ann Arbor, MI 48106 PH: 1-800-521-2828
www.universityoptics.com
Apogee Inc. P.O. Box 136
Union, IL 60180-0136 PH: 815-932-1602
American Precision Glass Corp. Duryea, PA 18642 PH: 717-457-9786
FAX: 717-475-9664
Mountain Instruments 9004 Pinfield Ct.
Elk Grove, CA 96758 PH: 916-422-0962
FAX: 916-422-9331 www.mountaininstruments.com
Astronomically Xenogenic Enterprizes 1665 E. 18th St., #118
Tuscon, AZ 85719 PH: 520-882-4924
FAX: 520-882-8972
Atlantic Optical Moulding Co. Webster, MA 01570 PH: 508-943-1746
Useful WWW Addresses
Astronomy Magazine www.astronomy.com
Sky & Telescope Magazine skyandtelescope.com
Amateur Telescope Making Forum

www.astronomy.net/forums/atm