the mpik operating room -...
TRANSCRIPT
The MPIK Operating Room
Furniture and Equipment Some of the more common pieces of furniture and equipment found in a procedure room include:
OR table The table is fully adjustable in all directions to create the positions needed for various surgical procedures, and all personnel should be totally familiar with its operation and its corresponding accessories. The table should be positioned directly under the overhead light fixture, and once in position, should be locked for animal and staff safety.
Instrument (back) table Once it is draped with a bacterial barrier, the instrument table provides a set‐up areas for sterile supplies to be used during the procedure. The table is made of a noncorrosive metal, and has a top and bottom shelf. The bottom shelf can be used for storage of extra supplies not immediately needed. The table is on wheels, and can be positioned wherever necessary to provide maximum efficiency during the procedure.
Ring Stand The ring stand is round or square, and is used to hold basin sets and/or instrument trays. The ring stand, once draped, should be placed close to the instrument table, since it will become part of the sterile field during surgery.
Mayo Stand The Mayo stand is used to hold instruments that will be used frequently during the procedure. It is draped with a bacterial barrier, and then placed directly over, but not in contact with, the monkey once the drapes have been applied. It is adjustable in height, and is totally portable, since it moves on wheels. During the setup period, the stand should remain close to the other furniture to avoid possible contamination or accidental bumping of the stand.
Waste Containers Prior to opening any packages the properly lined waste containers should be available and placed well away from the sterile field to avoid possible contamination during the set‐up phase. The three types of waste containers are for washable cloth items, uncontaminated waste, and contaminated waste. The use of kick buckets (a bucket on wheels) is restricted to soiled sponges during surgery. It is lined with a disposable liner which can be removed and exchanged as required during the procedure without jeopardizing the sterility of the surgical field. All other trash should be placed in a larger trash receptacle. Once a procedure has started, no trash may leave the room.
Additional Furniture and Equipment In addition, anesthesia machines, electrosurgical units (E.S.U.), Monopolar coagulation unit, Bipolar Coagulation Unit, light source with headlight, heating pad, suction canisters/tubing, IV. poles, linen receptacles for nondisposable linen, and adjustable stools should all be in their proper positions before opening and creating the sterile field to avoid possible contamination of the field during

moving activities. Safety glasses also belong to the category of standard OR equipment and should be available for all members of the team before the procedure begins.
Standard and Accessory Supplies Surgical supplies can be divided into two major categories: sterile supplies and nonsterile supplies. Each category can then be subdivided into those items that are considered essential, or standard supplies, and those that are not required for every case (accessory supplies).
Standard Sterile Supplie
Sterile Packs and Drapes
s
The packs and drape sheets are made of disposable fluid‐resistant material, which acts as a bacterial barrier against microbial infiltration. Sterile drape sheets come in various sized and forms, with or without fenestrations, and are usually used as an added bacterial barrier for specific draping needs. Our standard pack consists of:
Back Table Cover
Mayo Stand Covers
Barrier-Flex Transparent Drape (Mud flaps)
Incision Drapes
♦ Adherent window w/ fenestration
♦ Adherent window w/o fenestration
♦ Fenestration
Fanfold Sheet
Utility Drapes All drapes will be used for all procedures in the laboratory, namely the Headpost, Eye Coil, Chamber Implantation, Permanent Electrode Implantation, Lesion, and for Acute/Recovery Experiments.
Basin Sets Basin sets contain the pots and pans necessary for a procedure. We use a Minor Basin Set composed of 4 basins, a pan, and 2 medicine cups. The largest basin fits in the ring stand while the other 3, each smaller than the last (so they fit inside each other with sticking), are placed on the back table.
Prep Kit The prep kit contains a pair of gloves, two towels, two types of sponges for scrubbing, betadine scrub solution, and betadine paint. The contents are sterile and must always be handles appropriately.
Syringes/Needles Syringes - 1cc, 3cc, 10cc, 30cc
Needles 25ga 5/8”, 23ga x 1”, 21ga x 1”, 20ga x 1”
Catheter 22ga, 24ga
Blades Scalpel Blade
Sutures/Staplers
s #10, #11, #12, #15
Stapler 35 Regular
Chromic 4-0
Vicryl 3-0 P-1
Opthalmic 6-0
Opthalmic 5-0
Opthalmic 8-0
Chro
Sponges
mic 5-0
4”x4” sponges and 2”x2” sponges – sterile – general usage in every procedure
Cottonoids – range in size from ¼” x ¼” to 3”x3” – soft, lint free, absorbent material that won’t scratch delicate tissue.
Cottonoid ½
Cottonoid ¼
Cottonoid 1/8
Dissecting Sponges (Cherry, Peanut, and Triangle Dissectors) used to “push” away delicate tissue.
Surgicel
Eye Spears
Standard Nonsterile Supplies
Suction Tubing
Suction Canister
Bovie Grounding pad
Medical Adhesive spray
Silk Tape 3 in.
Tape – 1”, ½”
Positioning Equipment in the OR The first step in creating a suitable surgical environment is related to the preparation of the
procedure room, including the physical layout of furniture and equipment, and the placement of supplies in a convenient location, since wasted motion is not only time‐consuming but also can add to physical and mental fatigue. The circulator, scrub person and nurse anesthetist are all responsible for the appropriate placement of equipment prior to starting a procedure. The operating room is prepared before the animal is restrained with Ketamine.
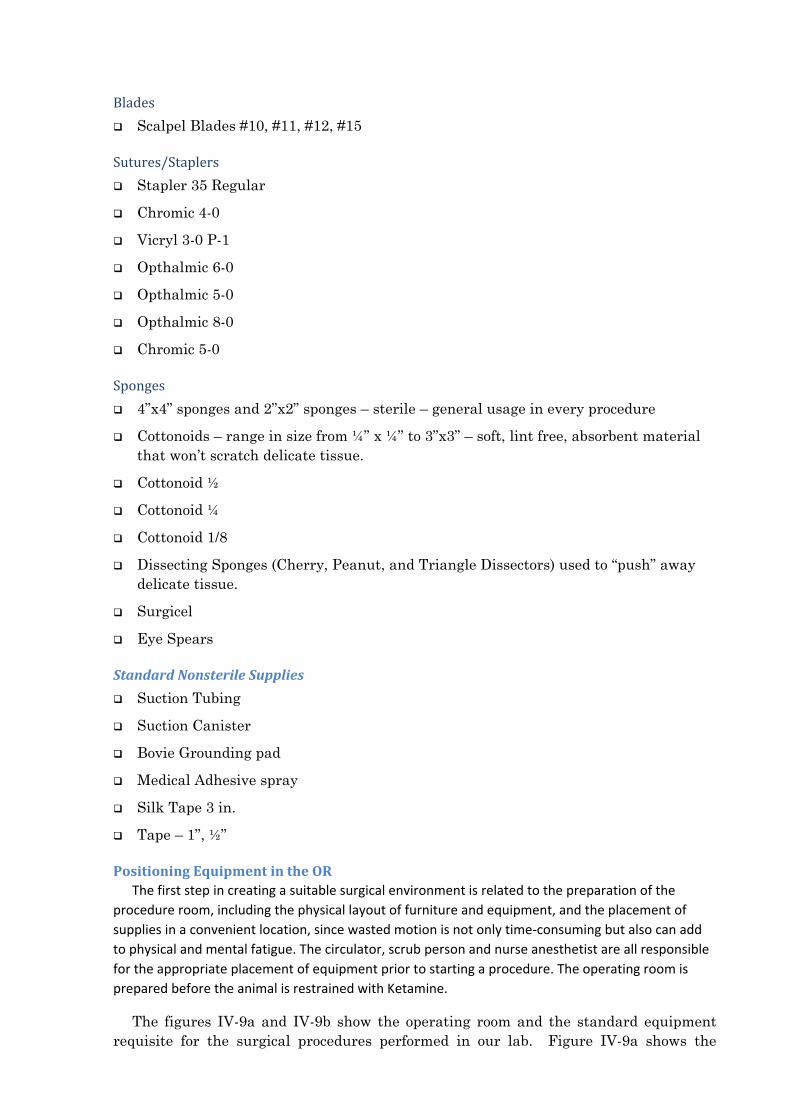
The figures IV-9a and IV-9b show the operating room and the standard equipment requisite for the surgical procedures performed in our lab. Figure IV-9a shows the
Figure IV‐9a : The operating theatre
anesthesia machine, IV stand (foreground), infusion pump stand (beside anesthesia machine), and bed positioned for a procedure. Figure IV-9b shows the ring stand, back table, and Mayo stands, against the wall, as they would be positioned just prior to setting up. Figure IV-10 shows an overhead view of the surgical suite indicating the position of each piece of equipment prior to setting up for a procedure.
Figure IV‐9b : Ring stand, back table and Mayo stands

Preliminary Preparation SUPPLIES SUPPLIES
Microscope Microscope w/ camera Monitor
Scrub kit Irrig. Coagulator
Drill system Surg Generator prep
Animal prep room Operating table
Instrument trays
C-arm digital radio- Monitor graphy and video B
and Anesthesia flouros- machine Monitor copy machine
Mayo Mayo Back table
SUPPLIES
Figure IV‐10 : Overview of the placement of items and devices in the OR while preparing an operation
Before bringing in the selected surgical supplies for the case, horizontal surfaces should be damp dusted with disinfectant solution. This includes the bed, light covers, Mayo stands, back table, and prep tables. Damp‐dusting reduces viable microbial contamination from air and other sources by 90 to 99 percent. After dusting, the sterile items to be used during setup are brought into the room and placed either on the bed or the prep tables, leaving the back table and Mayo stands free.
The Surgical Team The surgical team at MPI is composed of five people: surgeon, surgical assistant, scrub person, circulator, and nurse anesthetist.
Aside from performing the actual operation, the surgeon and surgical assistant, with the assistance of the nurse anesthetist, are responsible for the preparation of the animal. Their involvement in the preparation phase begins with the initial restraint of the monkey and ends after the animal has been started on gas anesthesia, at which point the circulator takes over.
The circulating person performs those functions associated with the management of the room before, during, and after the procedure. The circulator assists the scrub person during setup and performs the initial scrub of the animal. The circulator remains nonsterile throughout the procedure.
The scrub person performs all tasks related to the creation and maintenance of the sterile field before and during surgery, in addition to the care of the instruments when surgery is completed. Before any sterile items are opened in the operating room or accepted onto a sterile field, the scrub person must be confident about their condition. If the sterility of any item is in question, it is considered unsterile and must be immediately removed from the field. The role of the nurse anesthetist will be explained in detail in the Anesthesia section.
Traffic Patterns All personnel entering the surgical suite should follow a well‐delineated traffic pattern. Movement of animals, supplies and/or equipment should be along the most direct route that prevents cross‐contamination and/or undue exposure by either space or time. Traffic flow within the surgical suite is based on the principles of asepsis and infection control. In general, traffic flows both in and out of the surgical suite, depending upon the surgical suite design, but within a specific area the flow must be established according to principles that maintain an aseptic environment. Ideally, each pattern is unidirectional; that is, the flow of traffic is from entry to exit and from clean to dirty. However, this concept is ideal, and flexibility, based on acceptable principles, is required to achieve the ultimate goal: the prevention of cross‐contamination from one area to another.
The Concept of the Sterile Field The use of a sterile field is composed of three distinct phases: (1) creation of the sterile field, (2) maintenance of the sterile field, and (3) termination of the sterile field.
Creating Sterile Fields Much of the general preparation for a surgery is done by the scrub person, who is responsible not only for the selection of instrument packs and items that will be needed during the procedure, but also for the setup of the sterile fields and laying out of the instruments just prior to beginning a procedure. The sterile fields are prepared by the scrub person just prior to the start of a procedure. Preparation is divided into two phases: a nonsterile phase and a sterile phase. The purpose of the

nonsterile phase is to prepare the procedure room and position the supplies in such a way that, once the scrub person is sterile, setup can be completed unassisted and without compromising sterility.
Sterile fields will be created first on the back table, the ring stand, and the Mayo stands, in that order. Two of these sterile fields (back table and ring stand) are created before the scrub person is sterile. The sterile fields on the Mayo stands are created after the scrub person has scrubbed and is dressed in an appropriate, sterile surgical outfit.
When a nonsterile person drapes an area they do so away from themselves first, then towards them, avoiding reaching over a sterile field. Sterile persons drape an unsterile surface first toward themselves, protecting their gown and gloves at all times.
The following is a brief description of the creation of the various sterile fields. (Prior to setup of the sterile fields, however, it is important that all the requisite equipment be appropriately positioned in the OR and that the proper waste containers are present for the disposal of paper and contaminated goods.)
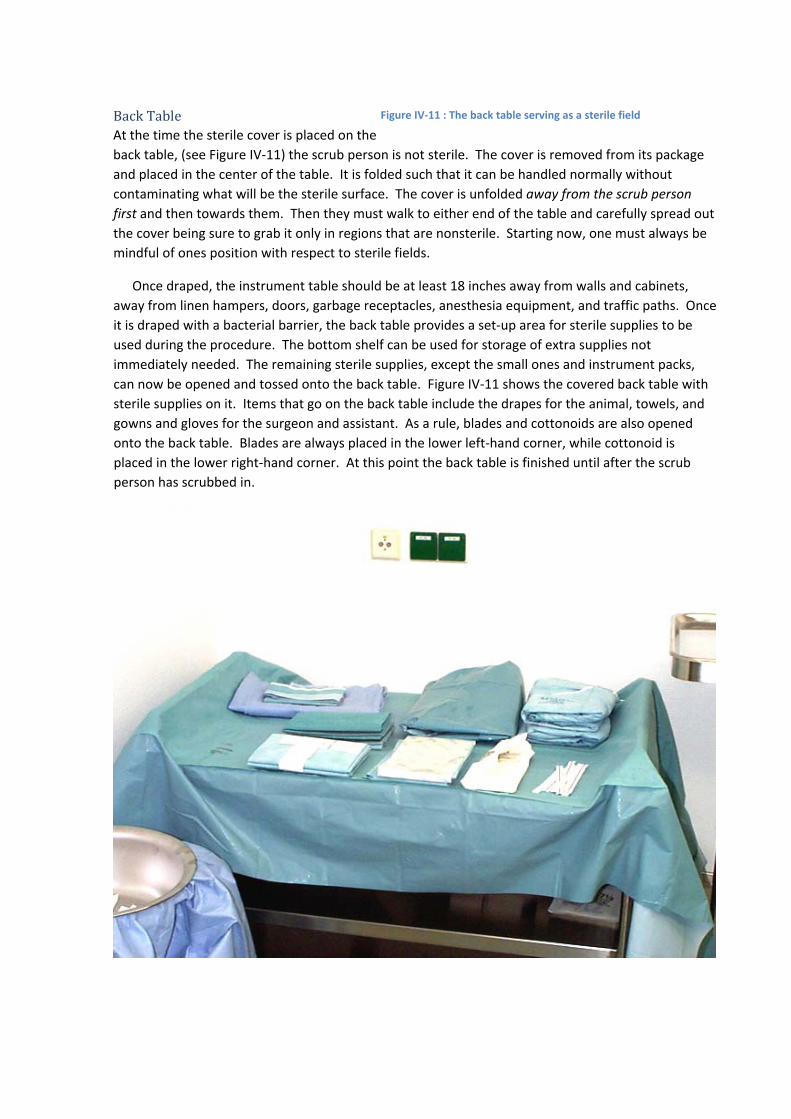
Back Table Figure IV‐11 : The back table serving as a sterile field
At the time the sterile cover is placed on the back table, (see Figure IV‐11) the scrub person is not sterile. The cover is removed from its package and placed in the center of the table. It is folded such that it can be handled normally without contaminating what will be the sterile surface. The cover is unfolded away from the scrub person first and then towards them. Then they must walk to either end of the table and carefully spread out the cover being sure to grab it only in regions that are nonsterile. Starting now, one must always be mindful of ones position with respect to sterile fields.
Once draped, the instrument table should be at least 18 inches away from walls and cabinets, away from linen hampers, doors, garbage receptacles, anesthesia equipment, and traffic paths. Once it is draped with a bacterial barrier, the back table provides a set‐up area for sterile supplies to be used during the procedure. The bottom shelf can be used for storage of extra supplies not immediately needed. The remaining sterile supplies, except the small ones and instrument packs, can now be opened and tossed onto the back table. Figure IV‐11 shows the covered back table with sterile supplies on it. Items that go on the back table include the drapes for the animal, towels, and gowns and gloves for the surgeon and assistant. As a rule, blades and cottonoids are also opened onto the back table. Blades are always placed in the lower left‐hand corner, while cottonoid is placed in the lower right‐hand corner. At this point the back table is finished until after the scrub person has scrubbed in.

Figure IV‐12 : The ring stand as a sterile field
Ring Stand
The next sterile field to be established is the ring stand (Figure IV‐12). The basin is placed in the ring stand. The wrap is undone completely, in a manner similar to the back table, being careful that the sterile internal surface remains sterile. One must always be careful that a nonsterile part of the wrap does not fall back onto the exposed bowl. At this point the insides and contents of the bowl should be visually inspected. If any condensation is seen, the bowl and its contents are considered unsterile and a new basin must be used.
Figure IV‐13 : Mayo stands prior to scrubbing in
Once appropriately placed, the small, nonsterile items collected into the miscellaneous, nonsterile bags can be opened into the bowl (Figure IV‐12), in preparation for placement onto the back table. With the exception of the blades and cottonoids, all items in the bag should be opened into the basin.
Mayo stand Prior to scrubbing in, one of the Mayo stands is used to hold the gown and gloves of the scrub person. The scrub person opens their gown package on one of the Mayos and tosses their sterile gloves (unpacked out of the external container, but still inside the internal packing paper) onto the open gown pack (see Figure IV‐13). This creates a temporary sterile field which must be treated as all others. Once the scrub person has gowned and gloved and the waste paper has been removed, the Mayo stands are prepared for the actual procedure.
The Mayo stand cover is unfolded on the back table,
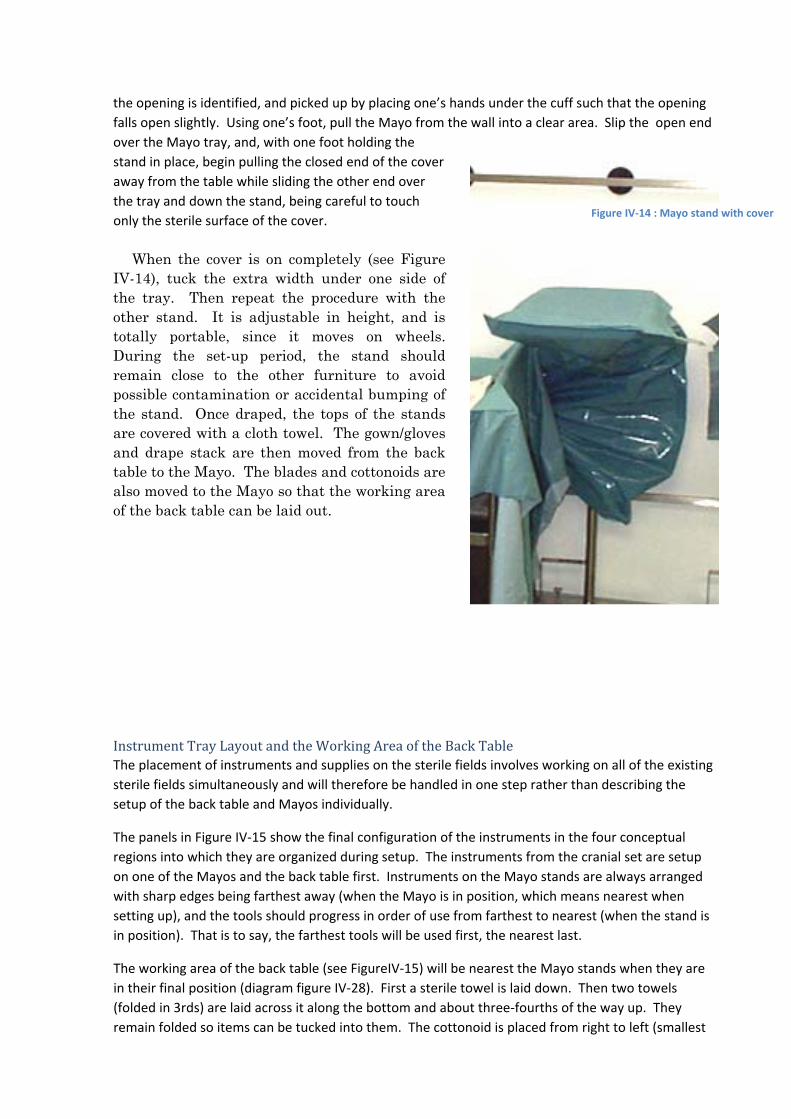
the opening is identified, and picked up by placing one’s hands under the cuff such that the opening falls open slightly. Using one’s foot, pull the Mayo from the wall into a clear area. Slip the open end over the Mayo tray, and, with one foot holding the stand in place, begin pulling the closed end of the cover away from the table while sliding the other end over the tray and down the stand, being careful to touch only the sterile surface of the cover.
Figure IV‐14 : Mayo stand with cover
When the cover is on completely (see Figure IV-14), tuck the extra width under one side of the tray. Then repeat the procedure with the other stand. It is adjustable in height, and is totally portable, since it moves on wheels. During the set-up period, the stand should remain close to the other furniture to avoid possible contamination or accidental bumping of the stand. Once draped, the tops of the stands are covered with a cloth towel. The gown/gloves and drape stack are then moved from the back table to the Mayo. The blades and cottonoids are also moved to the Mayo so that the working area of the back table can be laid out.
Instrument Tray Layout and the Working Area of the Back Table The placement of instruments and supplies on the sterile fields involves working on all of the existing sterile fields simultaneously and will therefore be handled in one step rather than describing the setup of the back table and Mayos individually.
The panels in Figure IV‐15 show the final configuration of the instruments in the four conceptual regions into which they are organized during setup. The instruments from the cranial set are setup on one of the Mayos and the back table first. Instruments on the Mayo stands are always arranged with sharp edges being farthest away (when the Mayo is in position, which means nearest when setting up), and the tools should progress in order of use from farthest to nearest (when the stand is in position). That is to say, the farthest tools will be used first, the nearest last.
The working area of the back table (see FigureIV‐15) will be nearest the Mayo stands when they are in their final position (diagram figure IV‐28). First a sterile towel is laid down. Then two towels (folded in 3rds) are laid across it along the bottom and about three‐fourths of the way up. They remain folded so items can be tucked into them. The cottonoid is placed from right to left (smallest

to largest) in the bottom fold of the upper towel. The bowls in the basin in the ring stand are placed right to left (largest to smallest) at the back of the table, on the towel. The pan in the basin set is placed in the lower left corner of the back table (29) where the blades were. An instrument role is made by tightly rolling up a towel and placing it lengthwise between the square pan and the working area along the front edge of the table (34). At this point, the drapes and gowns are moved from the Mayo to the basin in the ring stand, and one is ready to begin laying out the instruments.
Figure IV‐15 : Placement of the surgical inbstruments on the Mayo stands and the back table
The Cranial Set The upper right panel in Figure IV‐15 shows the layout of the cranial Mayo. The upper tray in the cranial set contains the stringer of forceps, a number of items for opening and closing, and a role of heavy tools. The upper tray is removed and placed in the back left‐hand corner of the back table. The stringer of forceps (35) is placed on the instrument role (34) and the stringer is removed. One must be careful while removing tools from the row so as not to knock them off the table. All forceps should be closed (locked) when handed to the surgeon, so it is a good idea to lock them, after removing the from the stringer, before placing them on the field. Select one large (46) and one small (47) needle holder and place them in a fold of the lower towel (49) on the working field. The suture scissors (48) are placed in the lower left corner of the working field, the curved scissors (17) are

placed in the near right corner of the Mayo, and the towel clips (43) are placed in the center of the working field. The Raney skin‐clip holders (36) are placed in the smallest bowl, along with the medicine cup. The remaining loose instruments in the tray that will be needed, for example the small suction tips (45) and the ruler (38), are removed and placed on the field. The roll of tools is then unrolled and the heavy tools are placed on the field. This includes the #3 scalpel handles (27), with the appropriate blades on them, the Langenbeck (26), Love‐Adson (24), and the raspatories (25), and the larger suction tips (45). There are also several heavy tissue forceps in the role. The two Adson without teeth will be used during opening and should be placed with the Cushing (16). The Adson with teeth (42) will be used during closing. When the needed tools from the upper tray have been placed, the drapes, gowns and gloves on the other Mayo are placed in the tray and the tray is placed on the ring stand over the basin in the ring stand.
The Ophthalmic Set Now the instruments from the ophthalmic set are placed on the sterile field of the ophthalmic Mayo (Figure IV‐15, upper left panel). If the procedure does not involve the placement of an eyecoil the upper tray will not be needed, however, the lower tray will always be needed as it contains the tools for manipulating and placing both headposts and chambers. The upper tray is again placed in the back left corner of the back table. All of tools needed from the upper tray are placed on the empty Mayo. The #7 scalpel handle with its blade, and other cutting instruments, are again placed in what will be the farthest position away from the scrub person, and then the instruments are arranged in order of use. The tenotomy, Metzenbaum, and Steven’s scissors (2) are placed together with the curved conjunctival scissors (5), one left, one right, and one straight. Bipolar forceps (4) are placed in the center of the tray. The specula (9a and 9b) and Castroviejo calipers (8) are placed near the front as they will be used first. The tissue forceps (.12 Castroviejo (1) and curved jewelers and half angle (3)) and the needle holders (6) are placed in the back. The baby mosquito (7) forceps are placed on this Mayo as are the carpet needles (11). The remaining instruments are left in the tray and the tray is left in the back left corner of the back table. The ophthalmic Mayo is now finished and a close‐up of it can be seen in the upper left panel of Figure 1‐7. The ophthalmic irrigation bulbs and tips are assembled, filled and left in the largest saline bowl (39). The lower tray in the ophthalmic set contains the Synthes instruments, bending tools, and the bipolar cord. This tray is removed from the pan and placed temporarily on top of the first ophthalmic tray. It is later moved onto the basin in the ring stand where it will remain for the duration of the procedure.
The Synthes tools (the screwdrivers (18), the taps (19), the countersink (20), the depth gauge (21), the drills with bits (22), and the drill guides (23)) are placed on the cranial Mayo. The bipolar cord (33) is placed in the extra tool area of the back table, and an Alice forceps (32), used to hold the cords on the field, is placed nearby. The rest of the tools remain in the tray.
The second tray is removed from the cranial pan, placed in the space previously occupied by the upper tray, and the needed tools are placed on the sterile field. The Cone scalp retractors (12), the hand‐held muscle retractors (13), and the hand‐held muscle/tendon hook retractors (14) are placed together. If a craniotomy is to be made, the trephine is place in the center of the cranial Mayo. When all of the tools from this tray have been selected, place the upper tray on top of it and place both on the basin of the ring stand, leaving the second Mayo clear.
Draping the Animal The final sterile field to be created is over the animal on the OR bed itself. Three types of sterile drapes are used to cover the animal completely, providing adequate protection against

contamination, while also allowing appropriate access to the incision site. The body of the animal, from its feet up to and around its neck is covered with a fanfold sheet. This is secured in front with a towel clip. The head is then draped with the appropriate window drape. The window of this drape, which is laid down by the surgeon before starting, goes directly over the incision site. This provides a complete bacterial barrier between the animal and the rest of the sterile field while allowing visual identification and inspection of the surgical site prior to opening.
Maintaining a Sterile Field According to the principles of basic aseptic technique mentioned earlier, a sterile field, once established, must be constantly monitored and maintained. This monitoring process is the responsibility of every member of the surgical team, and each must watch for events that may compromise the sterility of the field, and take appropriate corrective action.
Once the animal is placed on the operating table, prepped and draped, it becomes the center of the sterile field, and all movement and activities in and around the field must be performed without compromise to that field.
All sterile supplies and equipment should be grouped around the sterile field on the OR table, and must be kept in view at all times by both the sterile and nonsterile members of the team. All items used within the sterile field must be sterile. Sterile persons and items may touch only sterile areas, while unsterile persons and items may touch only unsterile areas.
Sterile items should be presented to the scrub person or placed securely on the sterile field without reaching over the field, which would cause immediate contamination. Sharp or heavy objects should be opened on a separate surface to avoid injury or possible contamination of the objects during transfer.
Some materials appear resistant to moisture but should liquid be spilled, creating strike‐through, the area must be reinforced with a sterile towel or drape, since strike‐through of fluids constitutes contamination of that sterile surface.
As always, if the sterility of an item, be it a towel, instrument, or needle, is in doubt it must be considered contaminated, removed from the field, and replaced by another sterile item.
All personnel entering the area of the surgical suite should be in proper O.R. attire. Operating room attire is an important factor in controlling the potential spread of infection to the surgical animal and to the population outside the protected area. By restricting the clothing worn within the suite, the first barrier to infection has been established, and it is an essential component for the maintenance of an aseptic environment.
Air currents can become a source of contamination; thus, movement within or around a sterile field should be minimal to avoid contamination of the field. Sterile persons (in gown and gloves) should not wander in and out of the sterile area while in sterile attire, since the gown is considered contaminated below waist level. Nor should sterile persons sit while in sterile attire, unless the entire procedures is performed in a sitting position, or leave the procedure room/sterile area in gown and gloves (either during or after the procedure).
Unsterile equipment, furniture, and personnel should remain a safe distance from the sterile field (at least 12 inches) to avoid accidental contact with the field. Unsterile personnel should approach the field facing it and never walk between two sterile fields. The general rule is never turn your back

on a sterile field, always maneuver in such a way as to face it. Tables are sterile at table level (on the upper surface) only.
Sterile supplies should never be opened and then covered or left unguarded during the preliminary phase of the sterile field’s creation. Chances for contamination of an unguarded sterile field are numerous, and without direct observation, there is no way to ensure sterility.
Termination of the Sterile Field It is important to terminate the sterile field in a safe and logical manner, and at the proper time. Until the animal has been prepared for transfer to the postoperative area, the environment must be maintained in an aseptic manner, in case an unforeseen emergency occurs that necessitates immediate action. Therefore, all members of the surgical team should keep their masks in place during the transition period.
After the last stitch is in place, and the area cleaned, the sterile dressing is applied by the scrub nurse and held in place while the drape sheets are removed with assistance from the circulator, rolling the drape sheet inside out toward the foot of the table. The scrub nurse, with the equipment, should then step back to a position away from the operating table, where the actual termination procedure will take place.
It is a good idea to leave the sterile fields on the Mayo stands and back table intact until the animal has left the room and been placed in the recovery area in case an emergency requiring sterile instruments arises.
All instruments, whether used or not, are considered contaminated and must be decontaminated according to protocol. However, instruments that have been used during the procedure should be cleaned using a basin of sterile water and a sponge or brush before terminal decontamination. This action provides safety for those persons handling the instruments during the cleaning phase. Before disposing of drape material, it should be checked for instruments, since they may be still attached to the drapes during the dismantling phase. Disposable linen and cloth items are then placed in their respective bags for disposal. Gloves must be worn during this process, even by the circulating nurse, since blood and fluids may still be present on the drape sheet. All sharps, including cautery tips, blades, and hypodermic needles should be placed in a container and disposed of according to protocol.
The last step is the removal of the scrub person’s gown and gloves. The scrub person should remain sterile to the end in case emergency intervention is required. By following the process of creating, maintaining, and terminating the sterile field, the patient and personnel working in and around the sterile field can be assured of a safe and therapeutic environment, before, during and after the surgical procedure.