the complete guide for setting up usenet, sabnzbd+, … · presents . the complete guide for...
TRANSCRIPT
Presents
The Complete Guide for Setting Up Usenet, SABnzbd+, Sonarr and Couch
Potato
"The most comprehensive HTPC site out there. Keep up the good work"
"This revolutionized the way I watch TV."
"This site is amazing."
TABLE OF CONTENTS
Introduction _____________________________________________________ 3 Objective ___________________________________________________________ 3
Getting started with Usenet _____________________________________________ 3
Usenet: The First Piece of the Puzzle ________________________________ 4 Usenet Introduction ___________________________________________________ 4
TotalHTPC.com Usenet Recommendation _________________________________ 4
Usenet Block Account _________________________________________________ 4
Usenet Frequently Asked Questions ____________________________________ 6-7
NZB Search Engines __________________________________________________ 7
SABnzbd+ ______________________________________________________ 8 What is SABnzbd+? __________________________________________________ 8
Installing SABnzbd+ _______________________________________________ 8-15
Sonarr _________________________________________________________ 16 What is Sonarr? _____________________________________________________ 16
Installing Sonarr _________________________________________________ 16-19
Couch Potato ___________________________________________________ 20 What is Couch Potato ________________________________________________ 20
Installing Couch Potato ____________________________________________ 20-26
TOTALHTPC.com _______________________________________________ 33
Usenet: The First Piece of the Puzzle Usenet Introduction If you haven’t heard of Usenet it’s best that you read through the next few pages to get a good understand of how it works. We’ll go over two components that need to be understood before any setup of the applications can begin.
1.) Select a quality Usenet Provider 2.) Get access to a NZB Search Engine
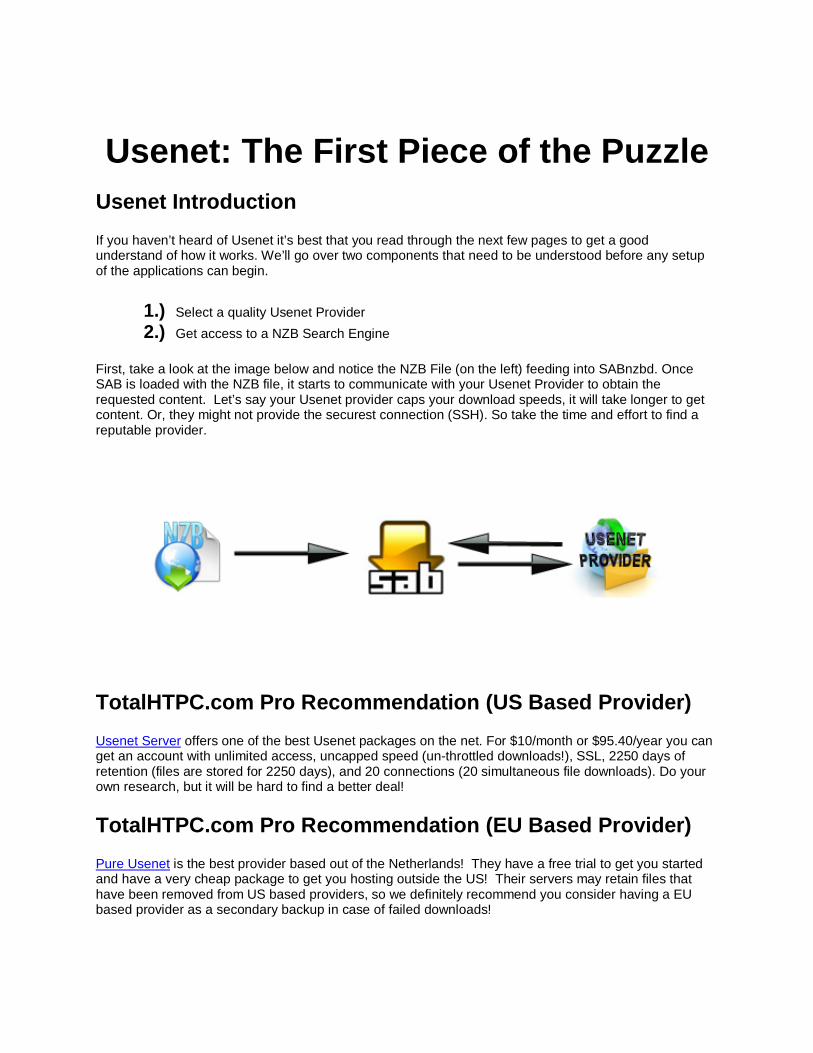
First, take a look at the image below and notice the NZB File (on the left) feeding into SABnzbd. Once SAB is loaded with the NZB file, it starts to communicate with your Usenet Provider to obtain the requested content. Let’s say your Usenet provider caps your download speeds, it will take longer to get content. Or, they might not provide the securest connection (SSH). So take the time and effort to find a reputable provider.
TotalHTPC.com Pro Recommendation (US Based Provider) Usenet Server offers one of the best Usenet packages on the net. For $10/month or $95.40/year you can get an account with unlimited access, uncapped speed (un-throttled downloads!), SSL, 2250 days of retention (files are stored for 2250 days), and 20 connections (20 simultaneous file downloads). Do your own research, but it will be hard to find a better deal!
TotalHTPC.com Pro Recommendation (EU Based Provider) Pure Usenet is the best provider based out of the Netherlands! They have a free trial to get you started and have a very cheap package to get you hosting outside the US! Their servers may retain files that have been removed from US based providers, so we definitely recommend you consider having a EU based provider as a secondary backup in case of failed downloads!
Usenet Block Account (added March 1, 2014) What does it mean when something is out of my server’s retention? This means that the post or a piece of the post you’re trying to download is not available on your Usenet providers’ server. This might be because the post is older than your server’s retention capacity (retention is the amount of time posts are held by a Usenet provider. UsenetServer has an industry leading 2250 day retention policy), or a specific piece of the post has been removed by the server’s administrator.
To combat server retention errors, we highly recommend buying a “Block” account. If you have a block account and one of these errors occurs, SABnzbd will dip into your block to try to find the full post or missing piece. The best thing about these accounts is that you pay for a fixed amount of data, and not a month-to-month subscription.
TotalHTPC.com recommends XLNed– a Dutch based Usenet provider. For starters, grab the 50 GB or 100 GB Block Subscription. After a couple months, if you notice that you’re heavily relying on your block account, then bump it up to a larger block subscription, but 50GB/100GB should be plenty!
• Why should I buy both? I’ll just use Pure Usenet instead.
This is not recommended. Since Pure Usenet is located in the Netherlands, you won’t be getting the fastest possible download speeds. Also, XLNed only has 1100 days of retention vs. the 2250 days offered by UsenetServer.
Usenet Frequently Asked Questions
• What is Usenet?
Usenet intimidates many people, if they have even heard of it. It has always been known the first rule of Usenet is you don’t talk about Usenet, but the cats out of the bag now and it’s time to get involved. Usenet is an online service that is in a sense a massive message board system. There are thousands of different message boards discussing a vast array of topics on Usenet and also boards that supports binary (file) posts. This means there are EXABYTES of data available on Usenet, with the content base growing by Terabytes A DAY! Even with all this Usenet has never really garnered mainstream attention the way that other file sharing services have, and that is in a way a good thing; but I’m going to make you want into the club!
• What does a massive message board have to do with a media center?
That’s the golden question! The great thing about Usenet is that for each post on these message boards, you can attach files. And as you guessed it, people post all kinds of files on these message boards, including movies, music, pictures, books, and pretty much any other kind of file you are looking for.
• How can I get into this content party?
Funny you asked, there are a few ways you can get access to Usenet. The first way is to check and see if your current Internet service provider offers you with a free Usenet account. I would stay away from these, however, as they almost all have restrictions on what boards you can access, how many connections you can have, and the amount of bandwidth that is usable. The best way to access Usenet is through a 3rd party Usenet provider. I am going to provide you with a short list of a few that I thoroughly recommend as I have tested and used these myself.
• What things should I care about when evaluating Usenet providers?
1. Retention: This is basically how long your provider stores the files on their server. This is one of the most important factors because you want a lot of retention to be able to snag older, maybe less popular content.
2. Connections: Connections basically means how many files you can download at a given
moment. One connection equals one file, so if you have twenty connections, you can grab twenty files at the same time.
3. Monthly limits: You don’t want a limit in most cases. If you are only planning on grabbing a few items
here and there, a cheaper limited package may be for you, but if you are a media junky, you want to go unlimited.
4. Security: Most of the major Usenet providers offer SSL security, and I would definitely pick one that
does, just in case. 5. Support: In most cases, there will be little to no reason to contact support, but it’s always good to
know it’s available to you.
• It sounds like a hassle to look through board posts for files that I want, what else can I do?
That’s where this site comes in. I am going to provide you with a setup that is 100% foolproof once in place. I can almost guarantee that you will be amazed at how easy it is once all the pieces are in place.
• Why do we have to pay to be able to obtain this content?
Let me answer that in short SPEED, SECURITY, and EASE OF USE… Now let me elaborate a little. Usenet does unfortunately cost a few dollars per month to have access to it, but with this system, you can nearly cut cable with the exception of Sports lovers and other live broadcast items. Not to mention, Usenet is FAST! Unlike Bittorent which relies on other users to share their upload bandwidth with you, Usenet relies on server farms to house the data, which is what you are paying for. You can max out your Internet Service Providers bandwidth with ANY file you download from Usenet, not just the most recent movie that has 1,000,000 other users sharing. Couple this with the ease of using applications such as Sickbeard and CouchPotato, add to this the speed and the fact that Usenet is also VERY secure…

• Am I safe downloading from Usenet?
Unlike Bittorent, which has garnered itself negative attention over the last few years with many lawsuits out against its users with P2P allegations. Usenet doesn’t have these problems! The way Usenet is setup; there is no peer-to-peer file activity so you are never liable for sharing a file with another human being, it’s all downloaded from Usenet servers, which is why you pay the provider. Also, most Usenet providers are also SSL secure, adding an extra layer of protection onto your transfers for those who are still worried.
• Ok I have my provider now what?
There is a multitude of ways that you can now access your Usenet account and start exploring. The way that I will be discussing the most is a nearly hands off approach, meaning that you wont ever need to manually search for a file on a board and waste countless amounts of time browsing through all the “scene” mumbo jumbo. This will be the simplistic approach to Usenet. For reference I will include
information in another post about access Usenet manually on a Windows and Mac client.
NZB Search Engines (updated March 1, 2014)
Now that we have our Usenet Provider, we’ll need a place to find content. For that we will have to use a NZB Search Engine also known as a Usenet Search Engine. We used to recommend NZBMatrix, but that was voluntarily shut down in December 2012. There are a number of new options available, but we’ll need to find a search engine that is built on newznab (at this point, don’t worry too much about what newznab actually is). Finding one isn’t too difficult, the problem is that some are private, a few cost money, and public sites can be hit or miss. Here’s a list of some of the best NZB sites.
Name Link Website Type Comment Nzb.su Private/Closed Elite Private NZB Site. Highly sought after. Nzbs.org Private/Closed Elite Private NZB Site. Highly sought after. Dognzb Private/Closed Elite Private NZB Site. Highly sought after. Nzbs.in Private/Closed Fantastic site. Current users earn invites by
donating. nMatrix Private/Closed Solid up and coming private site. Check daily to
see if registration opens. NZBFinder Public/Open Good site that is open to public. Unlimited access
for one year costs 35 EUR (48 USD). NZBNDX Public/Open Great free site that is open to public. Upgraded
accounts cost 12 USD for one year.
• Private/Closed – Private, invite only NZB Site. Public registration opens up, but rarely and often unannounced. We consider these the crème de la crème – the very best.
• Public/Open – Registration is open to the public. There might be a cost or fee for full access. Sometimes these sites close registration and turn into private communities, so register and create an account while you have the chance.
Ultimately, you want to get on a Private site, but since that might take some time, we recommend NZBNDX or NZBFinder
What is an NZB file?
A NZB file is a xml-file that points to a specific post on Usenet. The NZB protocol was developed by the team over at N Newzbin. These files are similiar to torrents, they point to the location of a particular file. For example, if I added a binary file onto Usenet, it would upload in a number of different pieces. The bigger the file, the more parts or articles upload. So if NZB files didn't exists, you would have to locate and download all the parts. A huge headache. Imagine all the time wasted if you missed one piece. But we don't have to worry about that since we have NZB files. They point to all the parts and instruct your newsreaders on where to find them. It automates the process and eliminates any human error.
What is SABnzbd?
SABnzbd is multi-platform open source news reader that retrieves Usenet binary posts. The application is highly automated and is managed and accessed through a web browser, making it user friendly and accessible to any computer on your local network. NZB files, obtained from indexing sites, are loaded into the client. SABnzbd will then download and extract the data for you. The application offers a ton of automation so there’s less work for you to do. Prefect for the objective at hand!
Installing SABnzbd+
On a Mac:
• 1. Download the .DMG file from Mac OS X Universal Binary. • 2. Drag the SABnzbd application to your Applications folder and launch it. • 3. You then probably want to add it to your startup items by going to System Preferences, and
then the Accounts pane (Users & Groups if on Lion). Then select the profile you will use when the media center logs in, and drag the application into the “Login Items” field, it is not necessary to hide it.
On a PC:
• 1. Download the SABnzbd executable from Windows Installer. • 2. Run the executable. • 3. Select if you want it to launch when you start up your PC (most likely yes if this is a dedicated
HTPC) • 4. Select if you want SAB to associate itself with .NZB files. • 5. That’s it!
On Ubuntu:
• 1. Open a new terminal window and run the following command • 2. sudo add-apt-repository ppa:jcfp/ppa • 3. Then do a “sudo apt-get update” to update your available packages. • 4. sudo apt-get install sabnzbdplus • 5. Then you can edit your init.d file or simply run it by executing “sabnzbdplus”
After installing on your favorite platform, it will launch a browser window and give you the following: Select your language and Start Wizard

First we need to enter our Usenet Server details, here are the settings for Newshosting:
• Host: news.newshosting.com • Port: 563 • Username: <Your NewsHosting username> • Password: <Your NewsHosting password> • Connections: 20 • SSL: Check
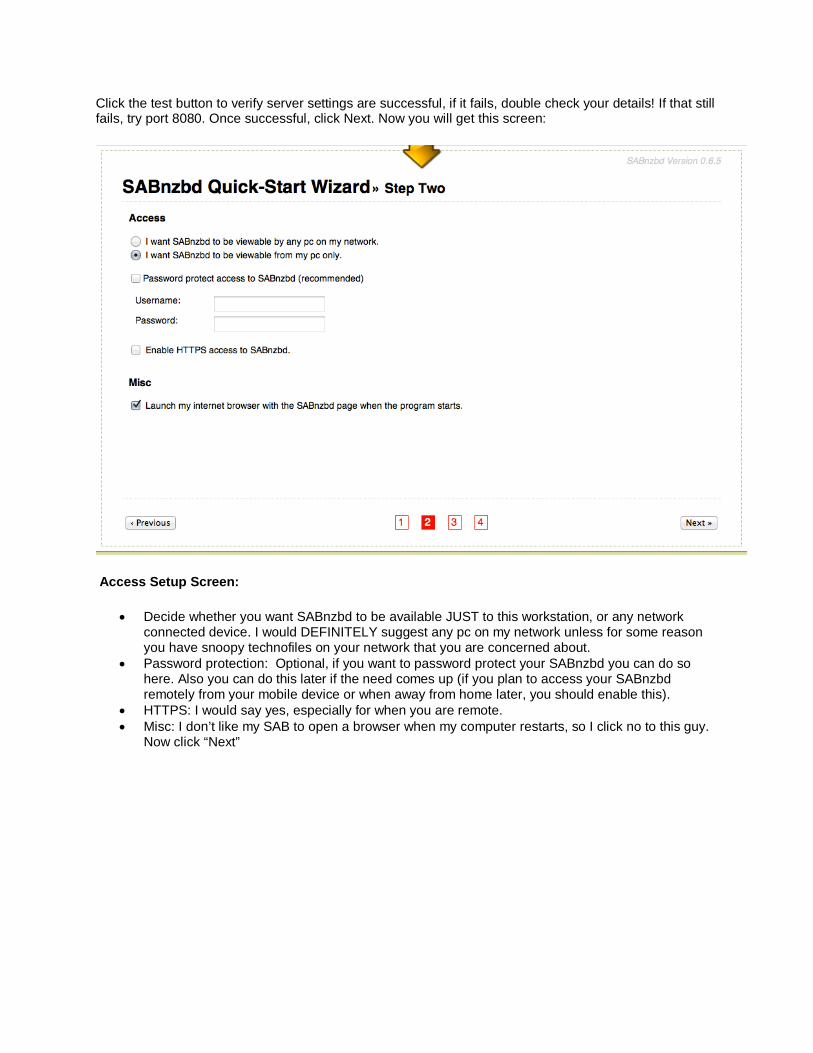
Click the test button to verify server settings are successful, if it fails, double check your details! If that still fails, try port 8080. Once successful, click Next. Now you will get this screen:
Access Setup Screen:
• Decide whether you want SABnzbd to be available JUST to this workstation, or any network connected device. I would DEFINITELY suggest any pc on my network unless for some reason you have snoopy technofiles on your network that you are concerned about.
• Password protection: Optional, if you want to password protect your SABnzbd you can do so here. Also you can do this later if the need comes up (if you plan to access your SABnzbd remotely from your mobile device or when away from home later, you should enable this).
• HTTPS: I would say yes, especially for when you are remote. • Misc: I don’t like my SAB to open a browser when my computer restarts, so I click no to this guy.
Now click “Next”
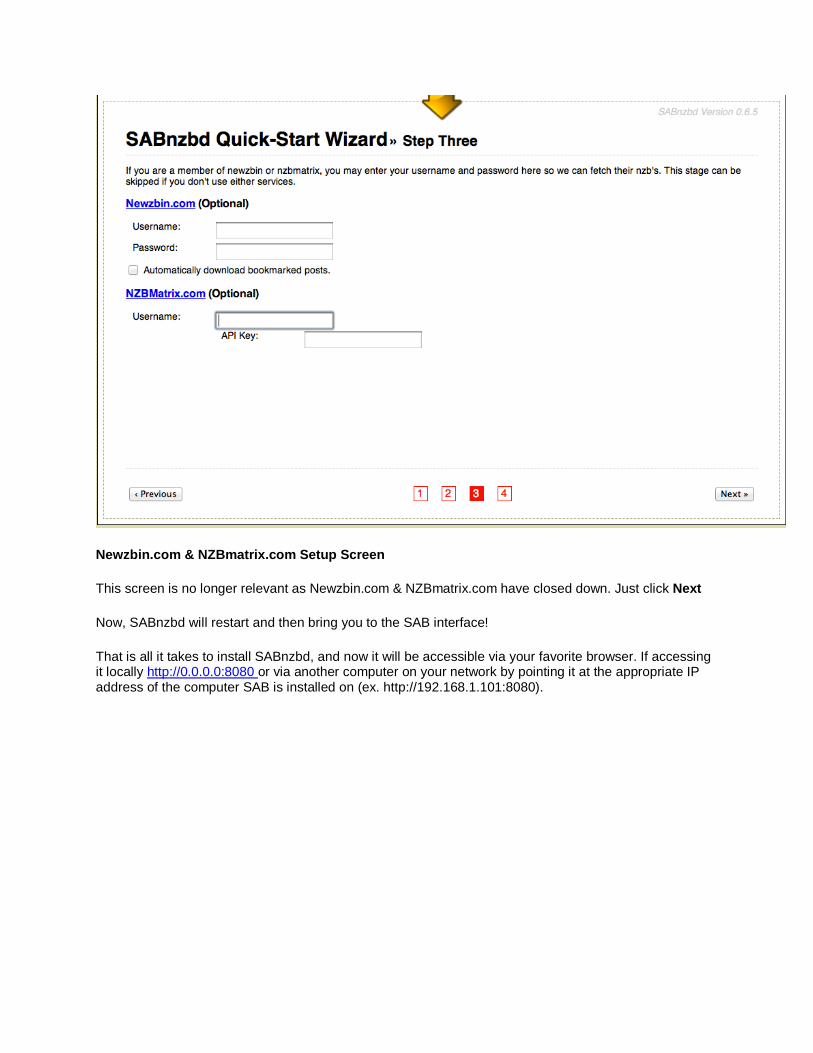
Newzbin.com & NZBmatrix.com Setup Screen
This screen is no longer relevant as Newzbin.com & NZBmatrix.com have closed down. Just click Next
Now, SABnzbd will restart and then bring you to the SAB interface!
That is all it takes to install SABnzbd, and now it will be accessible via your favorite browser. If accessing it locally http://0.0.0.0:8080 or via another computer on your network by pointing it at the appropriate IP address of the computer SAB is installed on (ex. http://192.168.1.101:8080).
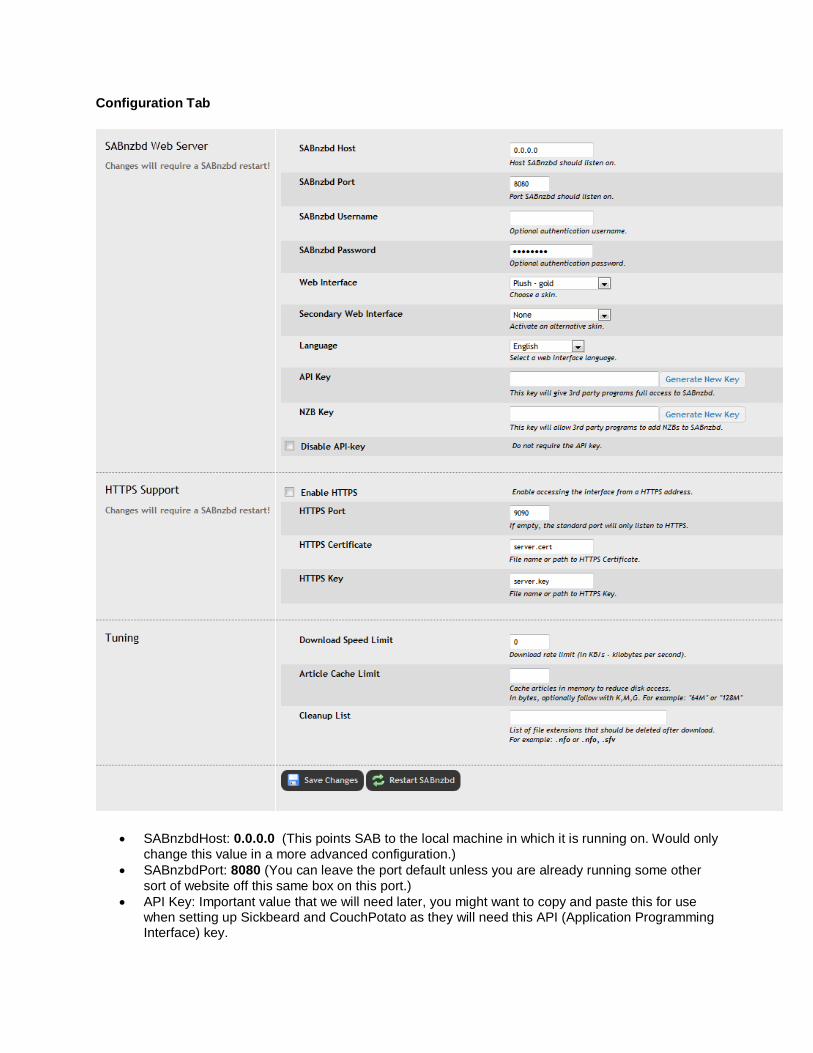
Configuration Tab
• SABnzbdHost: 0.0.0.0 (This points SAB to the local machine in which it is running on. Would only change this value in a more advanced configuration.)
• SABnzbdPort: 8080 (You can leave the port default unless you are already running some other sort of website off this same box on this port.)
• API Key: Important value that we will need later, you might want to copy and paste this for use when setting up Sickbeard and CouchPotato as they will need this API (Application Programming Interface) key.
• SABnzbd username & password: This was setup during the installation, if you need to change it, this is where you find it.
The rest of the values on this page can remain default for our purposes. On to Folder configuration.
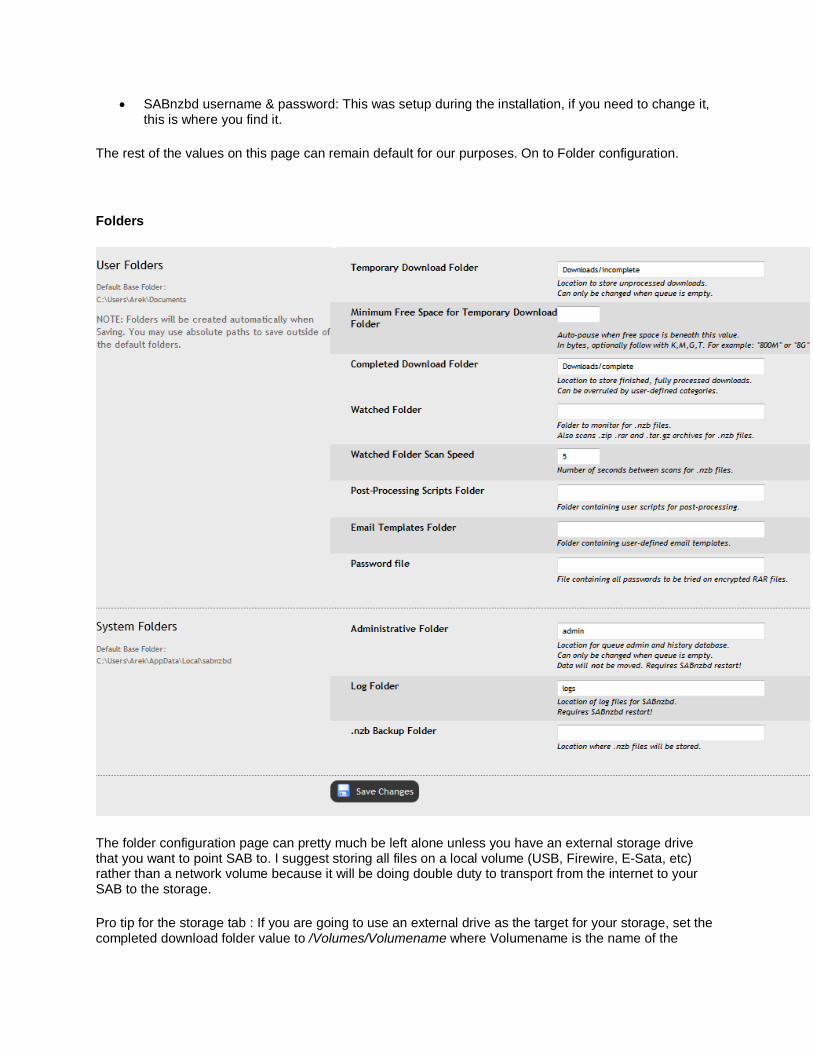
Folders
The folder configuration page can pretty much be left alone unless you have an external storage drive that you want to point SAB to. I suggest storing all files on a local volume (USB, Firewire, E-Sata, etc) rather than a network volume because it will be doing double duty to transport from the internet to your SAB to the storage.
Pro tip for the storage tab : If you are going to use an external drive as the target for your storage, set the completed download folder value to /Volumes/Volumename where Volumename is the name of the
drive. You can also drive down to sub folders, just make sure to type the path EXACTLY how it is or it won’t save.
Switches Tab
No changes required. This tab can be left as default, unless you want to change how the files are handled after they are completely downloaded. By default they will be joined and unrared so you will be left with the actual file rather than 100 zip files.
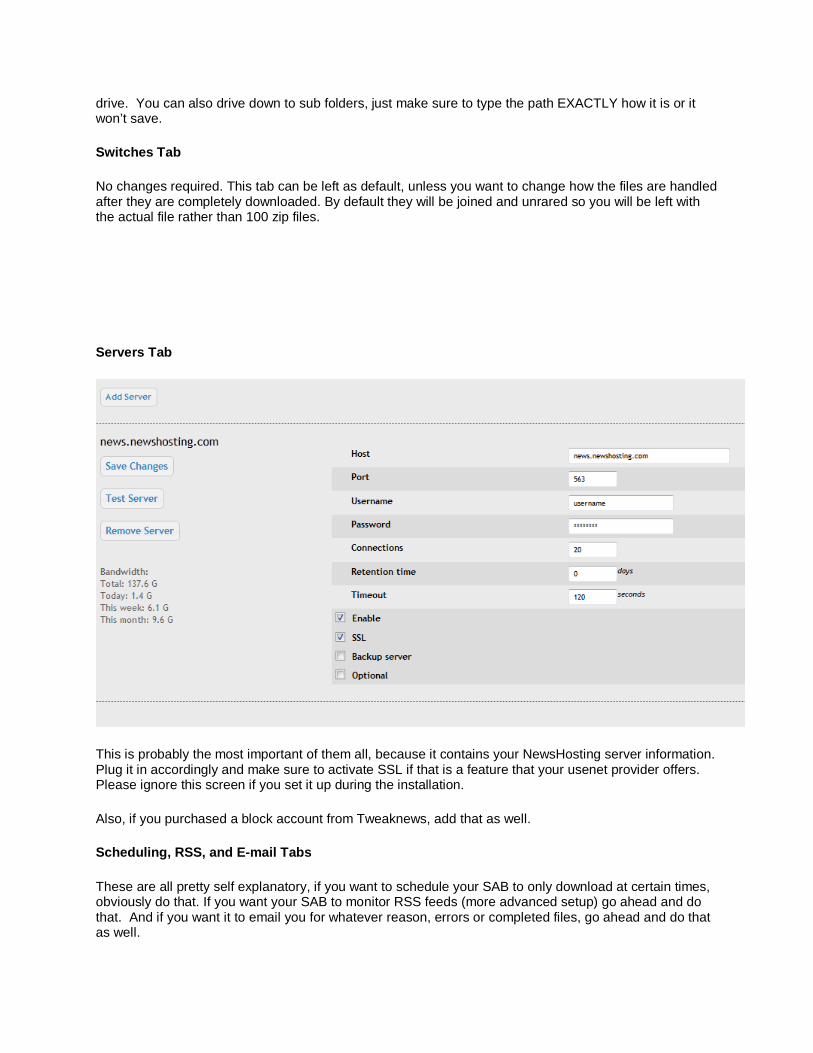
Servers Tab
This is probably the most important of them all, because it contains your NewsHosting server information. Plug it in accordingly and make sure to activate SSL if that is a feature that your usenet provider offers. Please ignore this screen if you set it up during the installation.
Also, if you purchased a block account from Tweaknews, add that as well.
Scheduling, RSS, and E-mail Tabs
These are all pretty self explanatory, if you want to schedule your SAB to only download at certain times, obviously do that. If you want your SAB to monitor RSS feeds (more advanced setup) go ahead and do that. And if you want it to email you for whatever reason, errors or completed files, go ahead and do that as well.
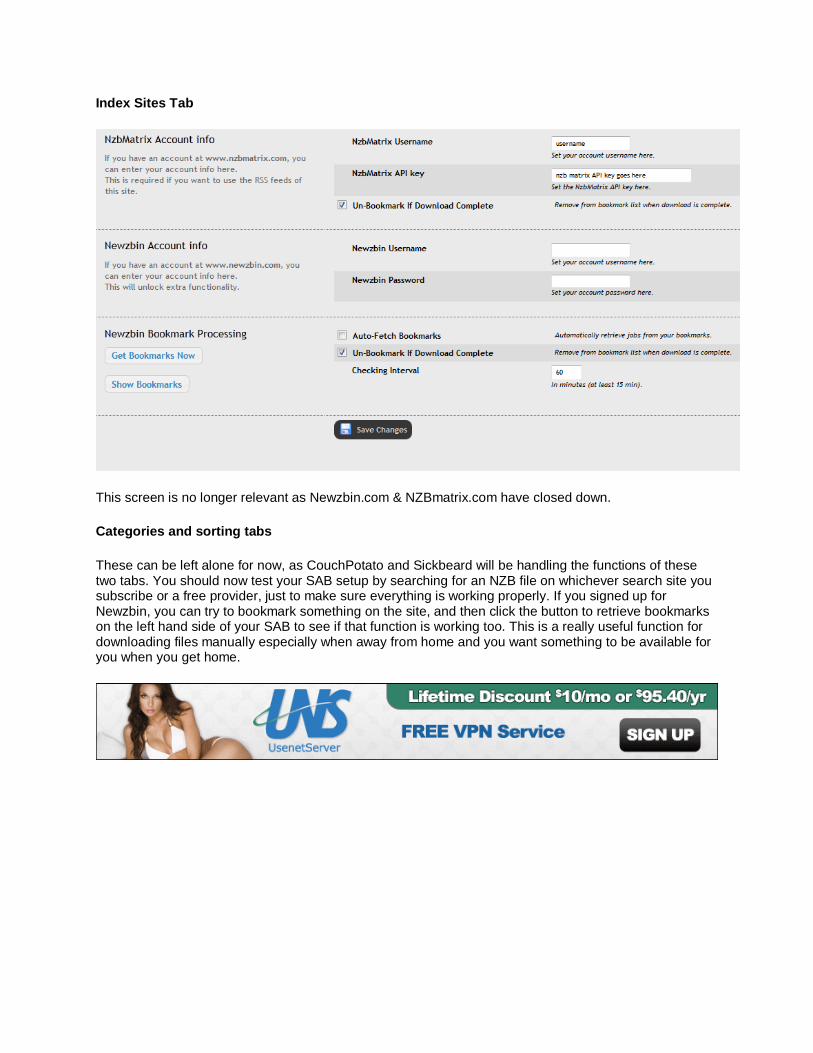
Index Sites Tab
This screen is no longer relevant as Newzbin.com & NZBmatrix.com have closed down.
Categories and sorting tabs
These can be left alone for now, as CouchPotato and Sickbeard will be handling the functions of these two tabs. You should now test your SAB setup by searching for an NZB file on whichever search site you subscribe or a free provider, just to make sure everything is working properly. If you signed up for Newzbin, you can try to bookmark something on the site, and then click the button to retrieve bookmarks on the left hand side of your SAB to see if that function is working too. This is a really useful function for downloading files manually especially when away from home and you want something to be available for you when you get home.
What is Sonarr? Sonarr is described as an “Internet PVR”. Basically what that means is you tell it what shows you want to see, and it goes ahead and downloads new episodes of that show for you as they are released, and typically that is immensely fast! It will even go ahead and pull old episodes, if you want to download the whole back catalog of all your favorite classics. As long as they are on Usenet, Sonarr will find them. Sonarr automatically searches for the requested content in the form of NZB files from Usenet indexing sites. Once found, Sonarr will forward to the file into SABnzbd for processing.
Installing Sonarr
On Mac:
1. Download Sonarr. 2. Unzip the Sonarr Master zip file. 3. Drag Sonarr.app to your /Applications folder. 4. Double click the Sonar app. (You may need to download and install the Mono MDK, Sonarr will
let you know) 5. Open your favorite web browser and navigate over to http://localhost:8989 or replace localhost
with the LAN IP address of the server that Sonarr is running! 6. You may want to set Sonarr to run at startup so you don’t manually have to start each boot!
On PC:
1. Download Sonarr 2. Extract the zip file to wherever you want Sonarr to be installed 3. Run NzbDrone.exe as administrator, 4. Open your favorite web browser and navigate over to http://localhost:8989 or replace localhost
with the LAN IP address of the server that Sonarr is running! 5. Right click on NZBdrone.exe and create a shortcut to it. 6. Drag that shortcut to C:\Documents and Settings\Your Username\Start Menu\Programs\Startup 7. Try to access Sonarr in a new browser window via http://localhost:8081
Configuring Sonarr
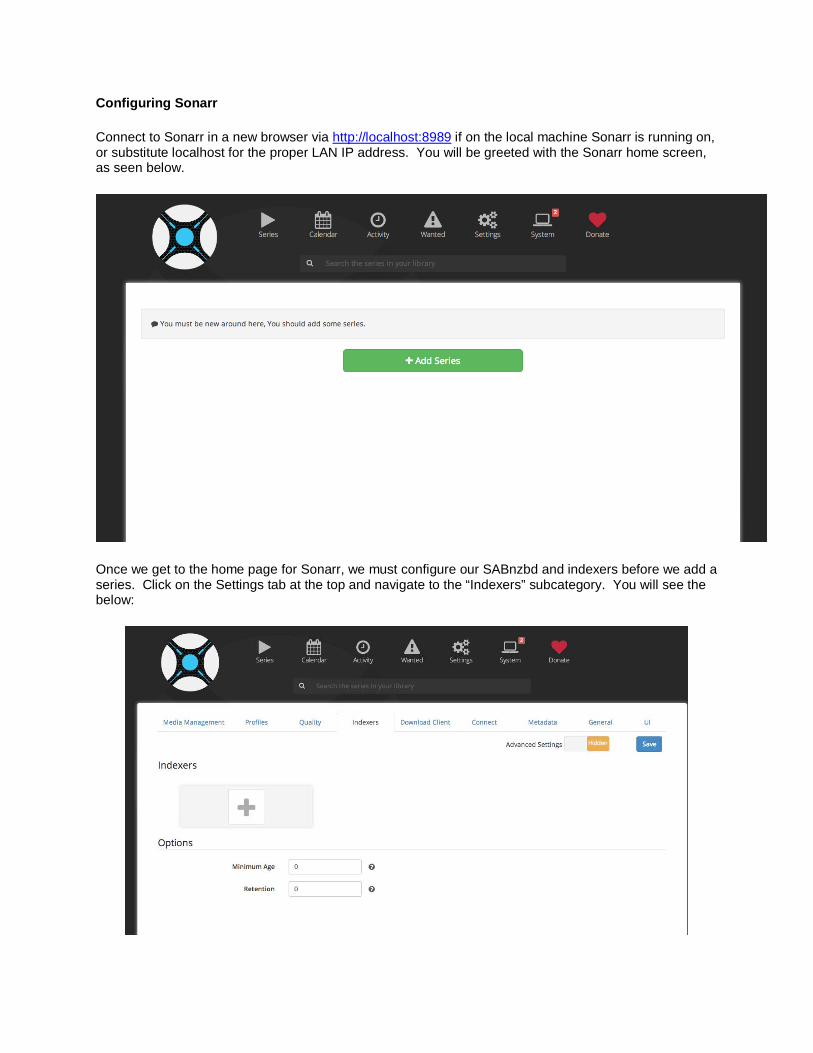
Connect to Sonarr in a new browser via http://localhost:8989 if on the local machine Sonarr is running on, or substitute localhost for the proper LAN IP address. You will be greeted with the Sonarr home screen, as seen below.
Once we get to the home page for Sonarr, we must configure our SABnzbd and indexers before we add a series. Click on the Settings tab at the top and navigate to the “Indexers” subcategory. You will see the below:
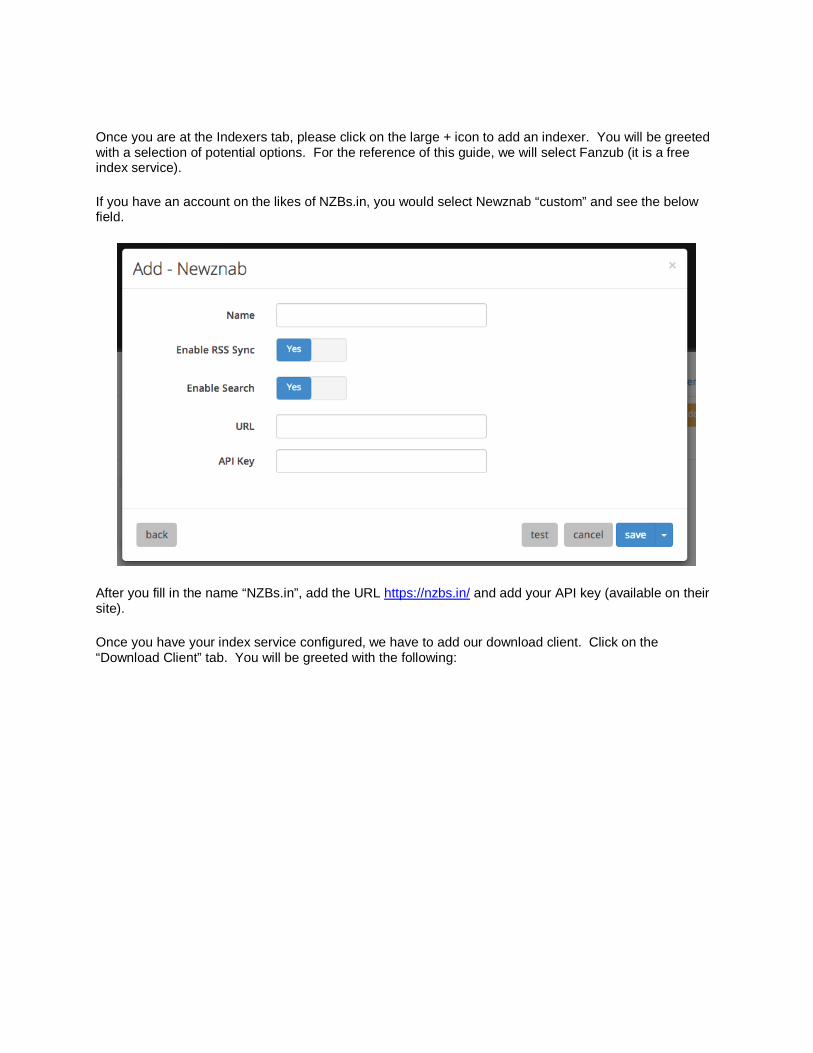
Once you are at the Indexers tab, please click on the large + icon to add an indexer. You will be greeted with a selection of potential options. For the reference of this guide, we will select Fanzub (it is a free index service).
If you have an account on the likes of NZBs.in, you would select Newznab “custom” and see the below field.
After you fill in the name “NZBs.in”, add the URL https://nzbs.in/ and add your API key (available on their site).
Once you have your index service configured, we have to add our download client. Click on the “Download Client” tab. You will be greeted with the following:
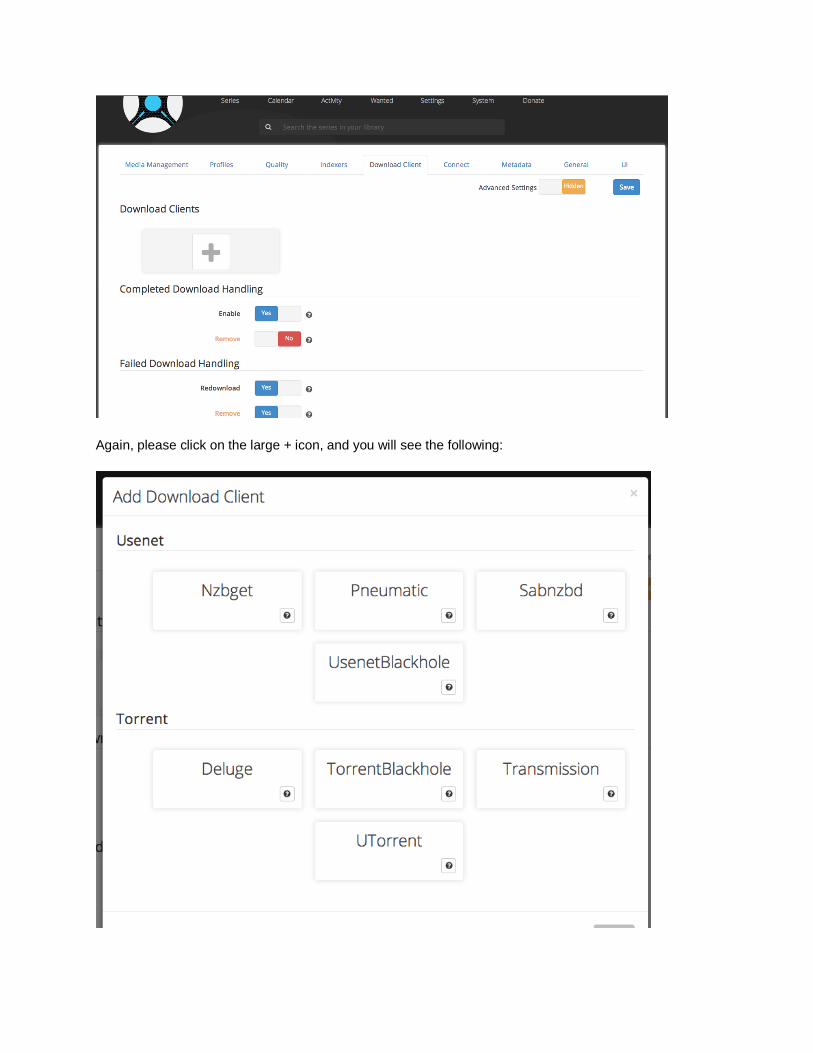
Again, please click on the large + icon, and you will see the following:
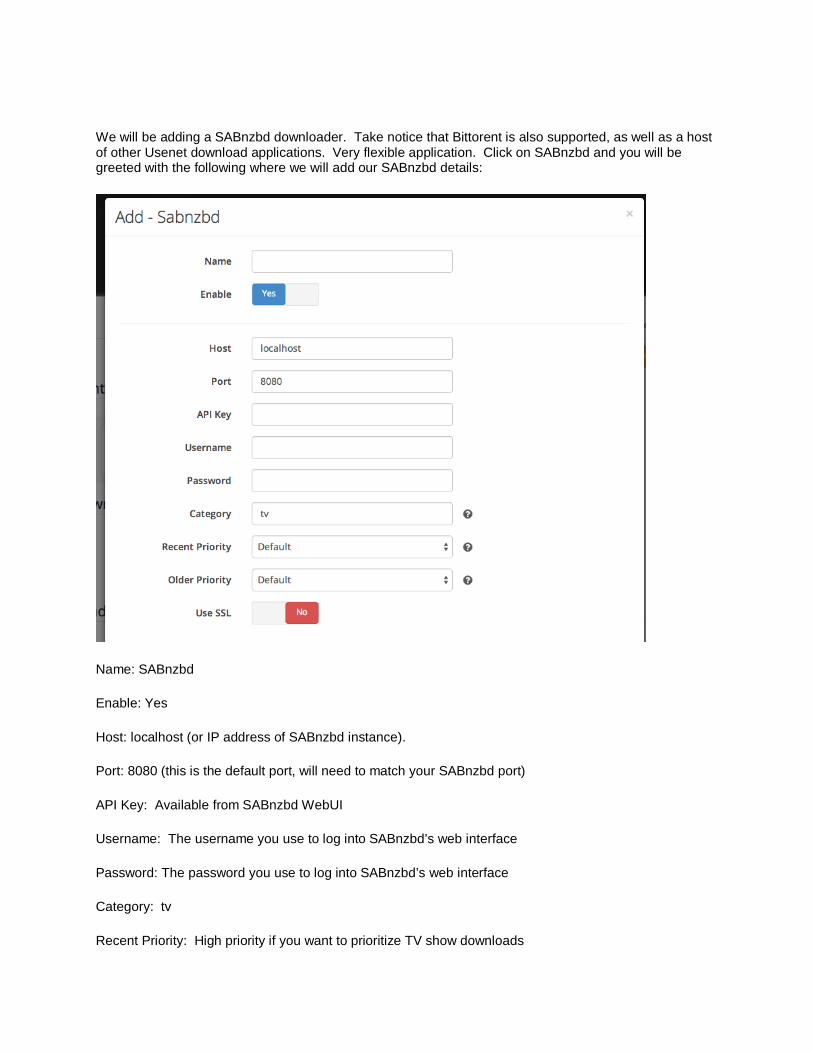
We will be adding a SABnzbd downloader. Take notice that Bittorent is also supported, as well as a host of other Usenet download applications. Very flexible application. Click on SABnzbd and you will be greeted with the following where we will add our SABnzbd details:
Name: SABnzbd
Enable: Yes
Host: localhost (or IP address of SABnzbd instance).
Port: 8080 (this is the default port, will need to match your SABnzbd port)
API Key: Available from SABnzbd WebUI
Username: The username you use to log into SABnzbd’s web interface
Password: The password you use to log into SABnzbd’s web interface
Category: tv
Recent Priority: High priority if you want to prioritize TV show downloads

Older priority: Default
Use SSL: Only check this if your SABnzbd is configured to use SSL (default port would be different as well).
Once we have all of these settings configured, I suggest you browse through the rest of the available settings, including “Quality” etc, to configure to your liking. I prefer to download only HDRips (720p, 1080i).
What is Couch Potato? Couch Potato is the equivalent of Sick Beard, except for movies. You put movies in your “Wanted List” and Couchpotato checks for releases in your desired quality. Once found, it will send the data over to SABnzbd for download. If not found, the movie sits in your “Wanted List” until it fills your request.
Installing Couch Potato On a Mac:
• 1. Download the current version here. • 2. Extract the folder if not done so automatically (gotta love Apple, auto-extracting without being
directed to do so) • 3. Drag Couch Potato folder to your Applications folder. • 4. Start Couch Potato app • 5. You might want to take this time to go to your System preferences & Accounts pane and drag
CouchPotato into your startup items and hide it.
• 6. Now that we have the App installed, go ahead and launch your browser (if Couch Potato didn’t do it automatically) and go to http://0.0.0.0:5000.
• 7. You will be greeted with your new Couch Potato interface. • 8. We are going to go to the settings tab, which is the little Cog at the top.
Windows Users:
• 1. Download the current version here. • 2. Run the executable and start with the installation.
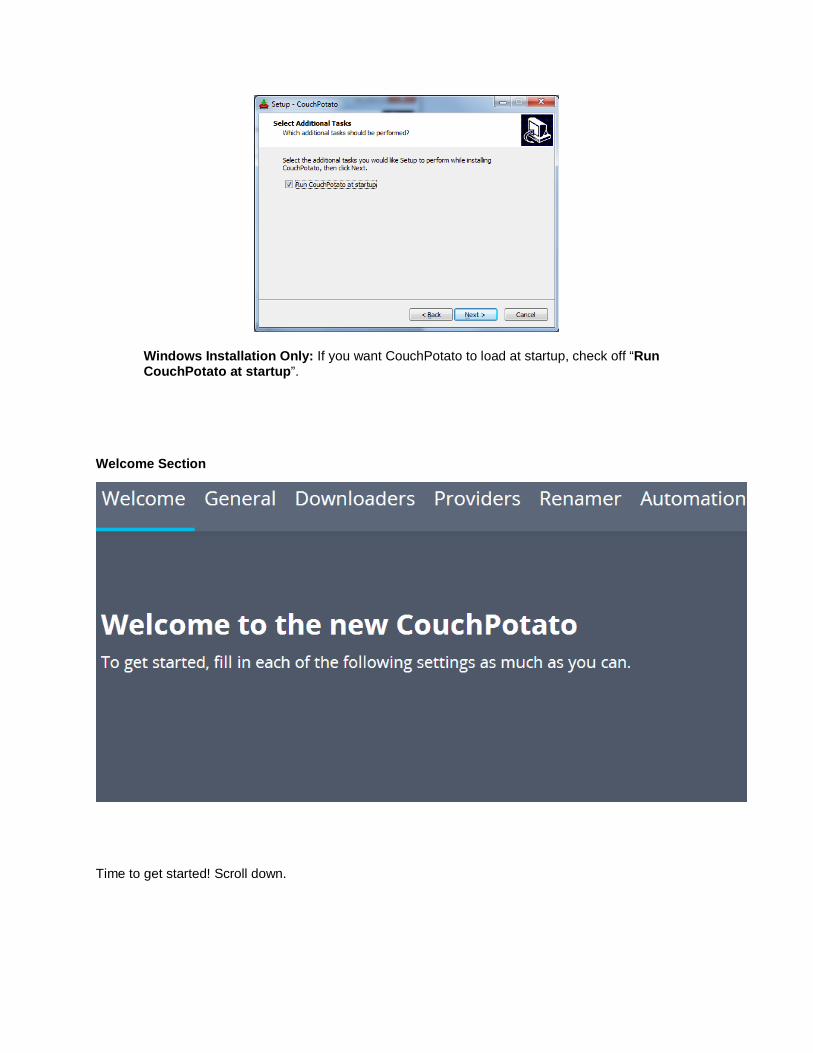
Windows Installation Only: If you want CouchPotato to load at startup, check off “Run CouchPotato at startup”.
Welcome Section
Time to get started! Scroll down.
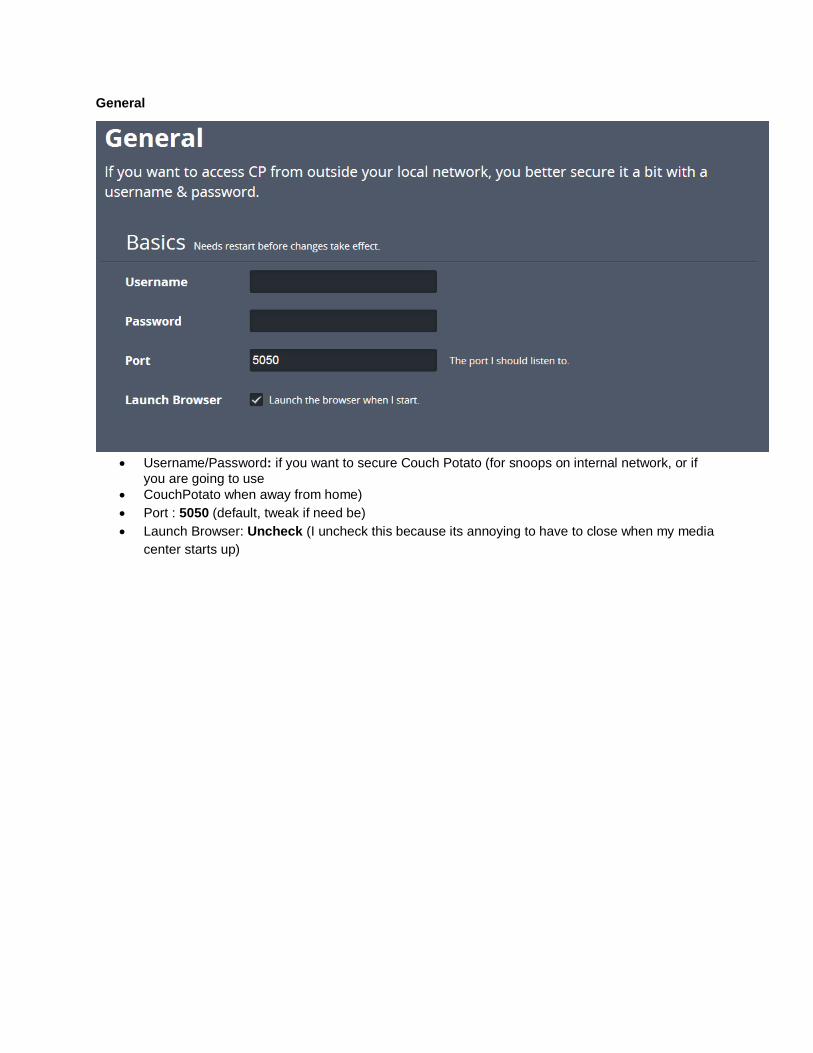
General
• Username/Password: if you want to secure Couch Potato (for snoops on internal network, or if
you are going to use • CouchPotato when away from home) • Port : 5050 (default, tweak if need be) • Launch Browser: Uncheck (I uncheck this because its annoying to have to close when my media
center starts up)
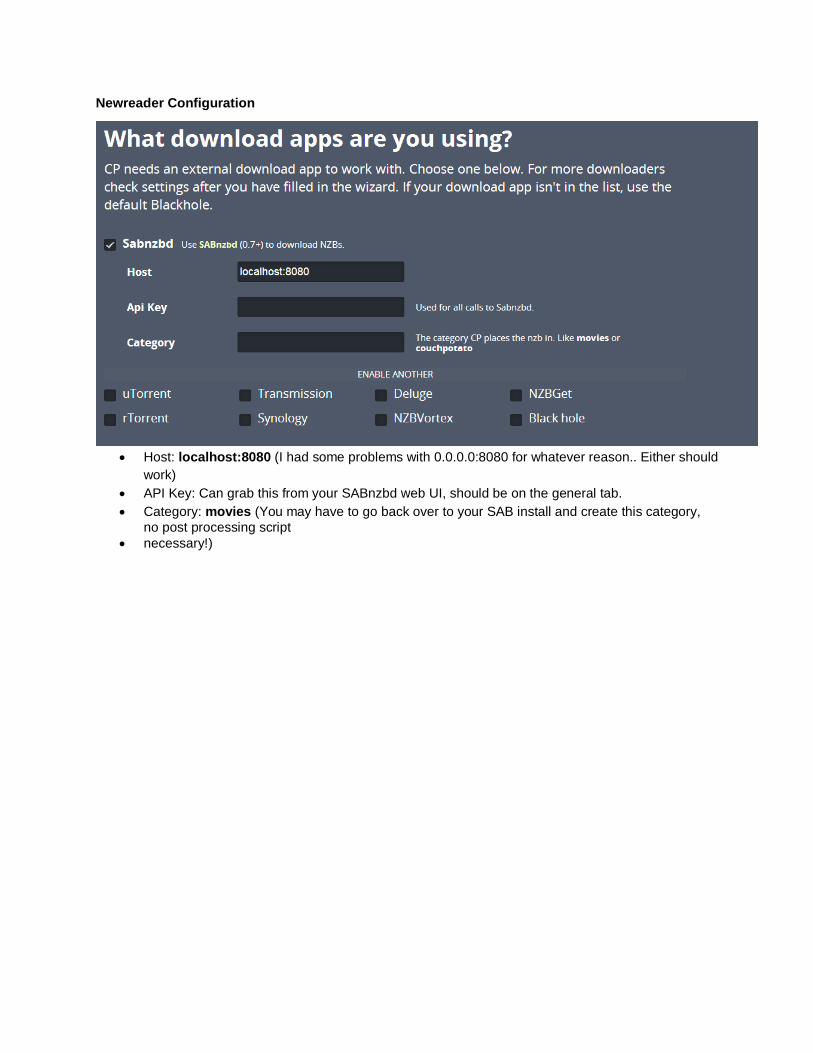
Newreader Configuration
• Host: localhost:8080 (I had some problems with 0.0.0.0:8080 for whatever reason.. Either should
work) • API Key: Can grab this from your SABnzbd web UI, should be on the general tab. • Category: movies (You may have to go back over to your SAB install and create this category,
no post processing script • necessary!)
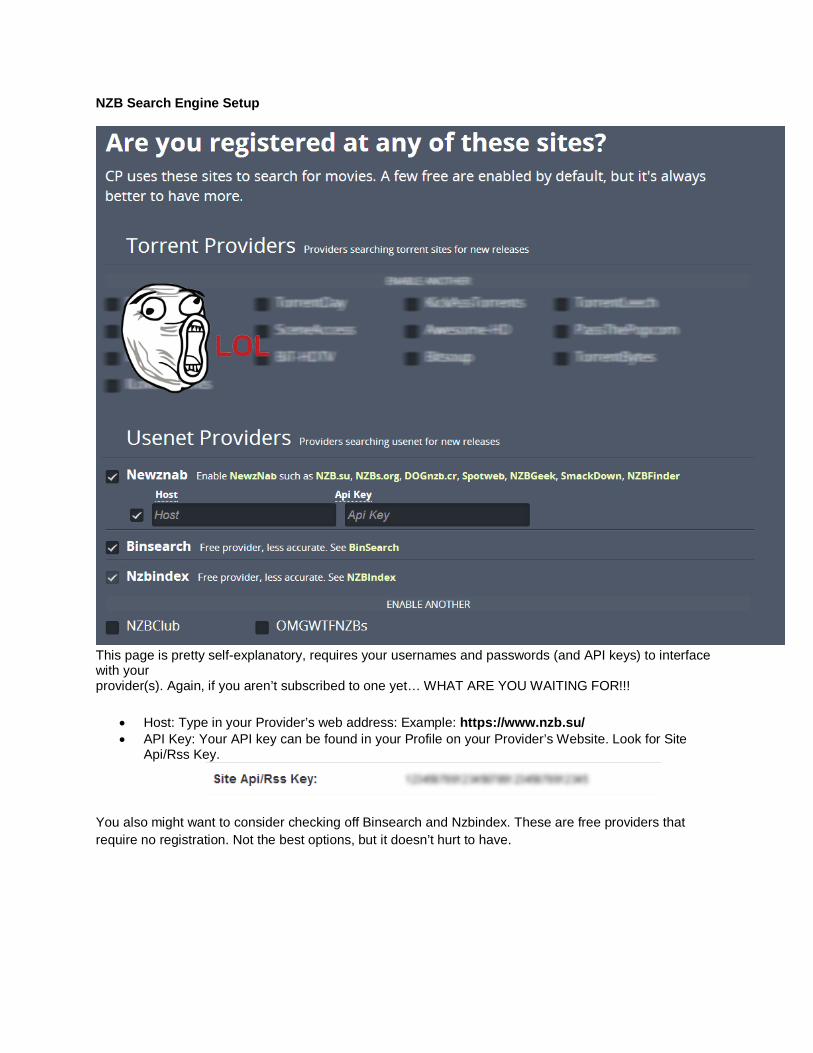
NZB Search Engine Setup
This page is pretty self-explanatory, requires your usernames and passwords (and API keys) to interface with your provider(s). Again, if you aren’t subscribed to one yet… WHAT ARE YOU WAITING FOR!!!
• Host: Type in your Provider’s web address: Example: https://www.nzb.su/ • API Key: Your API key can be found in your Profile on your Provider’s Website. Look for Site
Api/Rss Key.
You also might want to consider checking off Binsearch and Nzbindex. These are free providers that require no registration. Not the best options, but it doesn’t hurt to have.
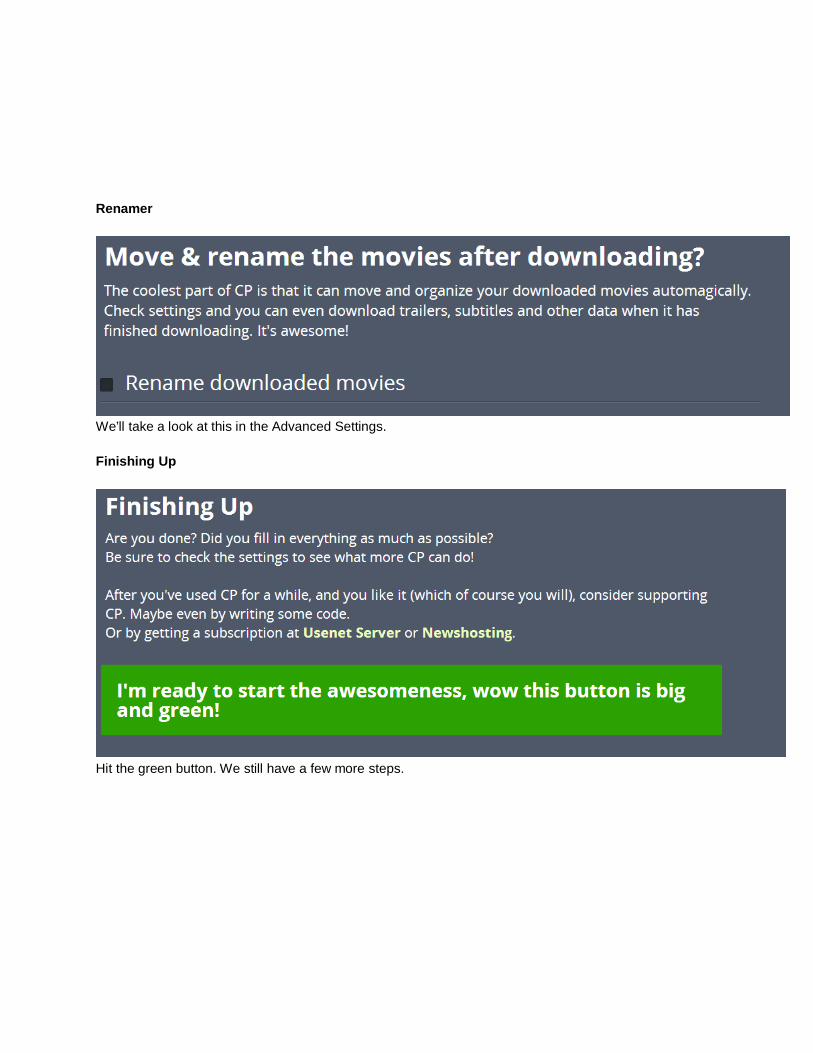
Renamer
We’ll take a look at this in the Advanced Settings. Finishing Up
Hit the green button. We still have a few more steps.
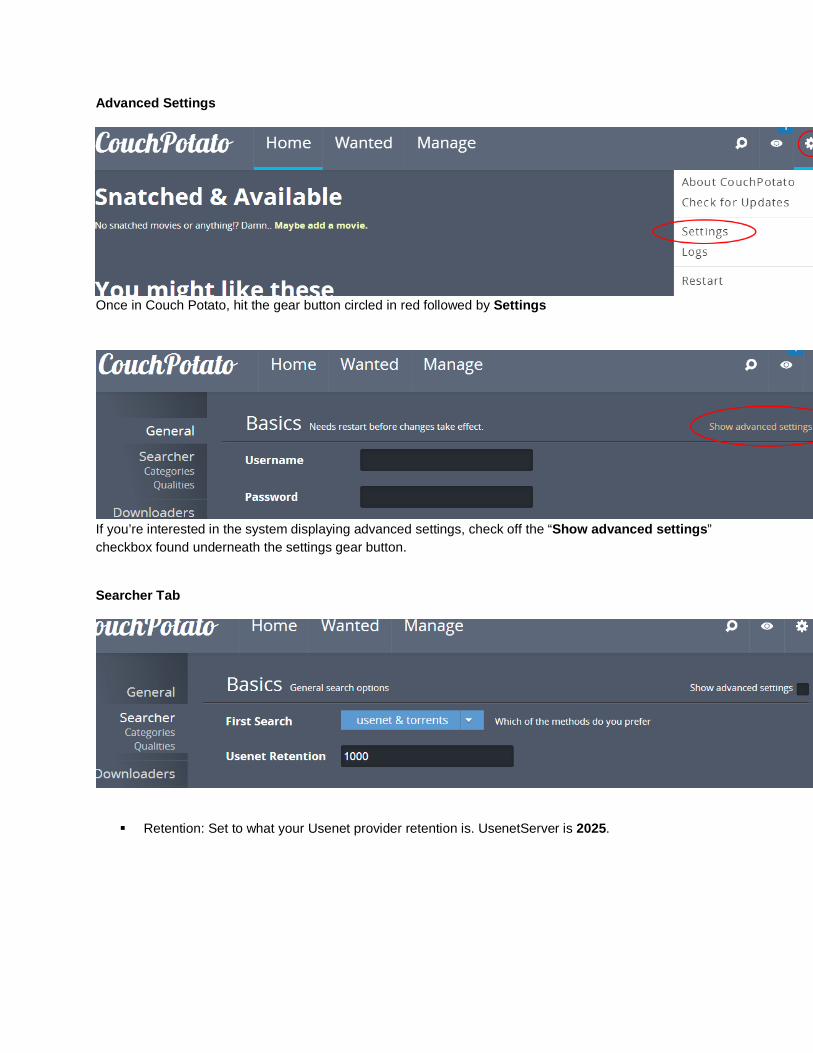
Advanced Settings
Once in Couch Potato, hit the gear button circled in red followed by Settings
If you’re interested in the system displaying advanced settings, check off the “Show advanced settings” checkbox found underneath the settings gear button.
Searcher Tab
Retention: Set to what your Usenet provider retention is. UsenetServer is 2025.
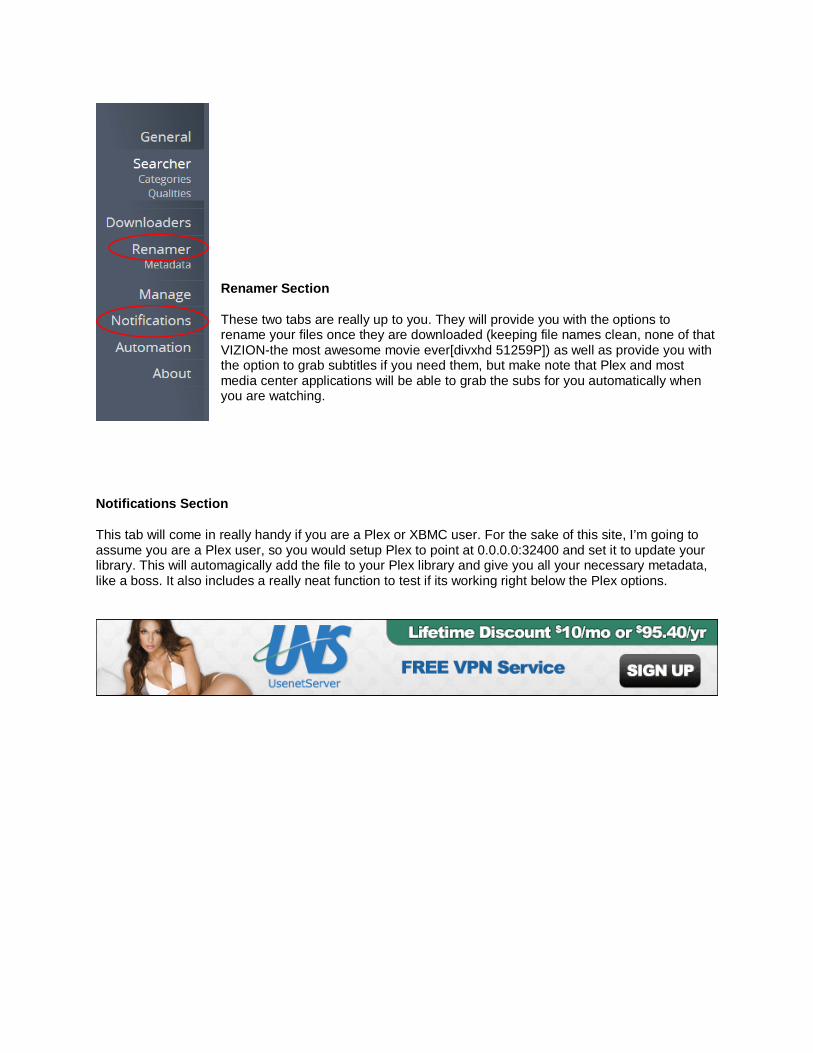
Renamer Section
These two tabs are really up to you. They will provide you with the options to rename your files once they are downloaded (keeping file names clean, none of that VIZION-the most awesome movie ever[divxhd 51259P]) as well as provide you with the option to grab subtitles if you need them, but make note that Plex and most media center applications will be able to grab the subs for you automatically when you are watching.
Notifications Section
This tab will come in really handy if you are a Plex or XBMC user. For the sake of this site, I’m going to assume you are a Plex user, so you would setup Plex to point at 0.0.0.0:32400 and set it to update your library. This will automagically add the file to your Plex library and give you all your necessary metadata, like a boss. It also includes a really neat function to test if its working right below the Plex options.