teaching aids: advanced film-tv production techniques. part i, lighting
TRANSCRIPT
W. ROBERT BARNARD The Ohio State University
Colvmbvs, 43201 AND
GEORGE TRESSEL Banelle Memorial Institute Columbus. Ohio 43210
Despite the availability of high-speed film and sensitive TV camera tubes, the lighting of an aver- age laboratory is usually not appropriate for making motion pictures or TV t,apes. Overhead lights cast distracting, odd shadows, and fluorescent lamps photo- graph as green. Much has been written about the a ~ t of lighting, hut in the laboratory we are concerned with lighting arid photographing for infovmation. Here the principles are straightforward, and a small investment in time and equipment can produce excellent results.
Achieving the necessary.quality of lighting is difficult even for professionals of long experience. The human eye has an ability to adapt to variations in light and contrast far exceeding the capacity of any photographic material, and one must learn to judge the appearance of a scene in terms of the finished picture.
Perhaps the most useful device to assist in making this appraisal is a Polaroid camera. Poor lighting dis- tribution, shadows, and excessive contrast are all im- mediately apparent.
Light Sources
A variety of lighting equipment is available. 1,arge light sources should be avoided; several small fixtures will generally provide a better light distribution when working in a restricted area.
Light sources are either "hard" or "soft," depending upon their intended use (see Fig. 1). A small, open light source with a highly polished reflector or a photo spot lamp is usually a hard light source because of the small size and parallel beam of light. Hard light sources are excellent for key and hack lights. This type of light source tends to throw sharp, hard shadows. Because of this, it is excellent for revealing texture. It also tends to create minute reflections on the surface of any shiny material.
In contrast, soft light sources are usually large and have a white or pebbled reflector so as to throw a soft, even, diffuse light. Soft light sources are useful for lighting broad areas where an even illumination is de- sired, excellent for the fill light where shadows are not desired, and are particularly useful for illuminating the background. Hard light sources may he modified to serve as soft light sources by taping a sheet of fiberglass cloth in front of the lamp.
Generally, the "light bars" or "movie lights" which fasten directly to a camera or the tripod support can be considered good lights when positioned correctly, but
teaching
Advanced Film-TV Production Techniques
I, Lighting
when they are on or close to the camera they tend to introduce unsatisfactory front lighting (flat,) character- istics.
Color
Color is an illusive phenomenon. Our perception and impression of color photographs are affected by both physical and psychological factors. The color of the light source, the characteristics of the film, t,he sur- rounding colors, reflect,ions from surrounding arcas, all contrihut,e to our final impression. A color t,hat. appears ', natural" in one situation can appear completely dis- torted in another environmcnt or when t,hc eye has adapted to a different light source.
Each light source has its own characteristic color which contributes to the appearance of the final picture.
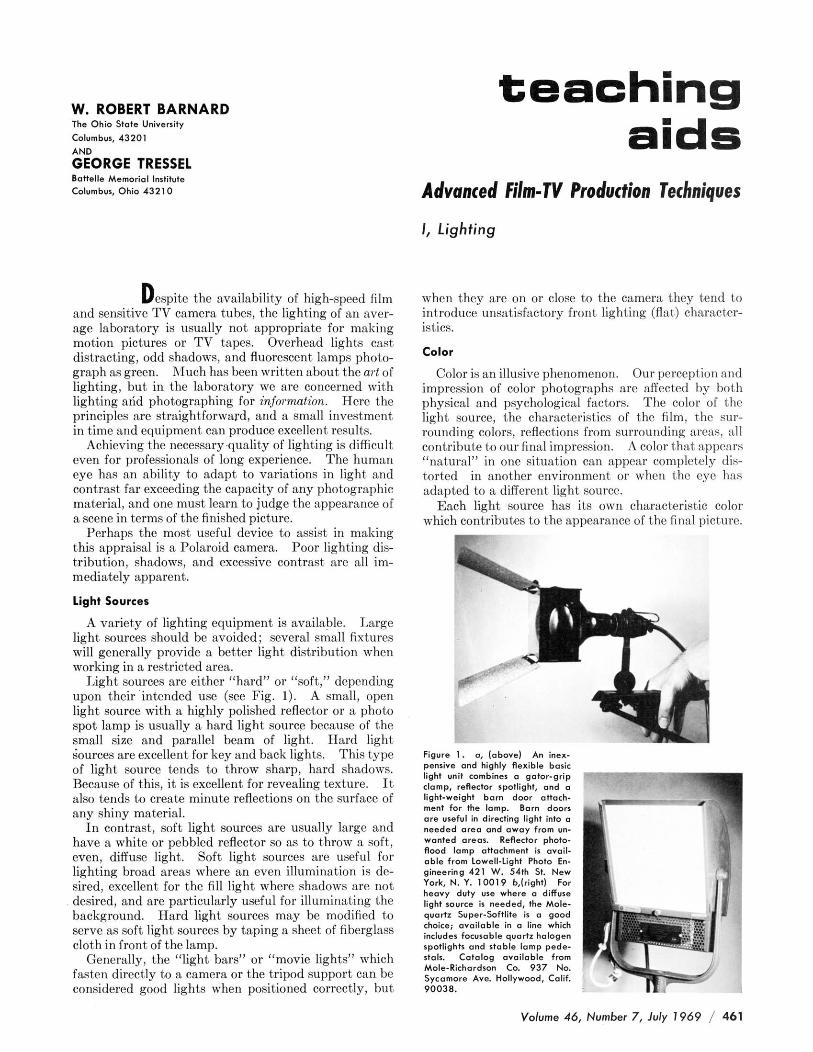
Figure 1. o, lobovel An inex- pensive and highly Rexible basic light unit combiner 0 gotor-grip I
clamp, reRectar spotlight, and o light-weight born door onoch. ment for the lamp. Born d w m ore useful in directing light into a needed ore0 and away from un- wonted areas. Reflector photo- flood lamp attmhment is orail- able from Lowell-Light Photo En- gineering 421 W. 54lh St. New York, N. Y. 10019 b.Iright1 For heovy duty use where o diffuse light source is needed, the Mole- quartz Super-Softlite is a good choice; ovoilable in a line which includes focusable quartz halogen spotlights and rtoble lamp pede- ~tols. Catalog aroiloble from Mole-Richardson Co. 937 No. Sycamore Ave. Hollywood, Calif. 90038.
Volume 46, Number 7, July 1969 / 461
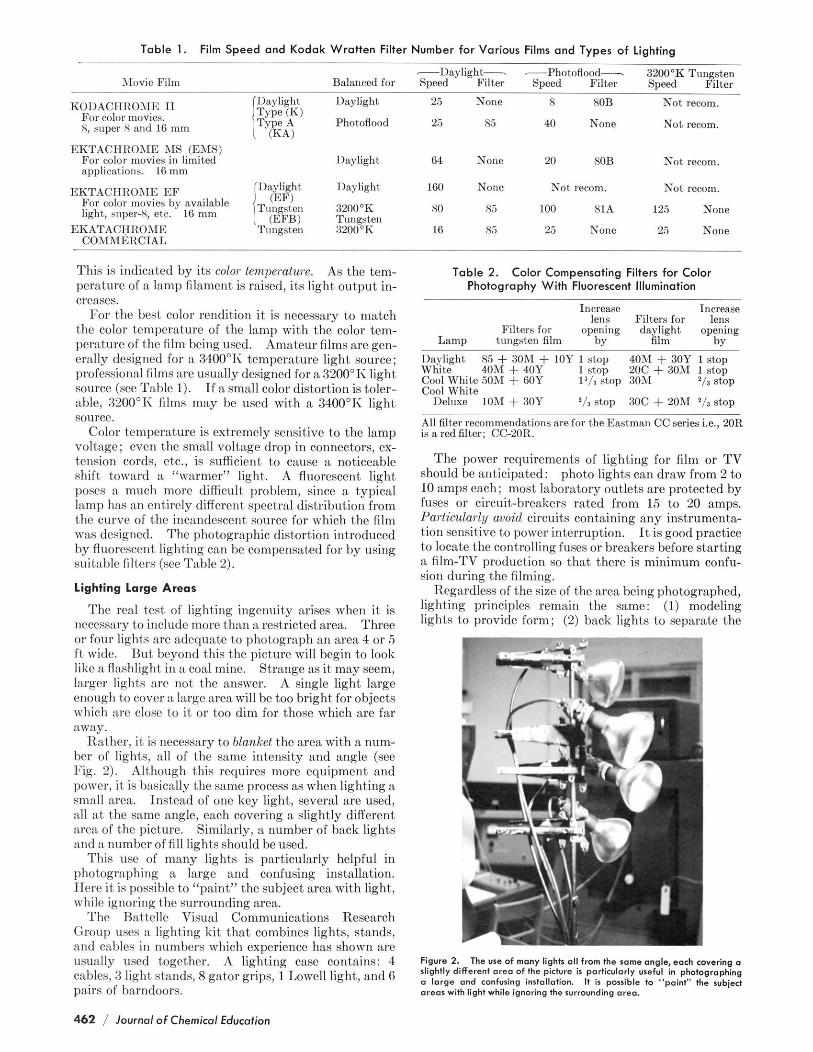
Table 1. Film Speed and Kodak Wratten Filter Number for Various Films and Types of Lighting - .
~ D a y l i g h h -Photoflood- 3200°K Tungsten Movie Film Balanced for S ~ e e d Filter S ~ e e d Filter Sneed Filter .~ ~ ~ ~~
--~...
KOUACHROME I1 Daylight, Daylight
For color movies. Type (Kl S, super x and 16 mm Type A
WAJ Photoflood
23 None 8 ROB Not reoom.
2.5 8.5 40 None Not recom.
EKTACHROME &IS (E-MS) For color movies in limited Daylight amlicationu. 16 mm . .
EKTACHROME E F (Daylight, Daylight (EFJ For color movies by available T,lngsten light, soper-8, etc. 16 mm I @FBI
3200°K Tungsten
EKATACHROME Tungsten 3200°K COMMERCIAL
This is indicated by its color temperature. As the tem- perature of a lamp filament is raised, its light output in- creases.
For the best color rendition i t is necessary to match the color temperature of the lamp with the color tem- perature of the film being used. Amateur films are gen- erally designed for a 3400°1< temperature light source; professional films are usually designed for a 3200°1i light, source (see Table 1). If a small color distortion is toler- able, 3200°1i films may be used with a 3400"Ii light, source.
Color temperature is extremely senskive to the lamp voltage; even the small voltage drop in connectors, ex- tension cords, etc., is sufficient to cause a noticeable shift toward a "warmer" light,. A fluorescent light. poses a much more difficult problem, since a typical lamp has an ent,irely different spectral distribut,ion from t,hc curve of t,hc incandescent source for which the film was designed. The photographic distortion introduced by fluorescent, light,irig can be compensated for by using suitable filters (see Table 2).
Lighting Large Areas
The real t,est of lighting ingenuity arises when it is necessary to include more than a restricted area. Three or four light,s are adequate to photograph an area 4 or 5 ft wide. But beyond this t,he picture will begin to look like a flashlight in a coal mine. %range as it may seem, larger lights are not the answer. A single light large enough to covcr a large area will be too bright for objects which are close to it or too dim for those which are far away.
Rather, it is necessary to blanket the area with a num- ber of lights, all of t,he same intensity and angle (see Fig. 2). Although this requires more equipment and power, it is bapically the same process as when lighting a small area. Instead of one key light, several are used, all a t t,he same angle, each covering a slightly different area of t,he picture. Similarly, a number of hack lights and a number of fill light,s should be used.
This use of many lights is particularly helpful in photographing a large and confusing installation. Here i t is possible to "paint" the subject area with light, while ignoring t,he surrounding area.
Thc Batt,elle Visual Communications Research Group uses a lighting kit that combines lights, stands, and cables in numbers which experience has shown are usually used together. A lighting case contains: 4 cables, 3 light stands, 8 gator grips, 1 Lowell light, and 6 pairs of barndoors.
64 None 20 80B Not reeom.
160 None Not recom. Not recorn.
80 8.5 100 81A 125 None
16 85 25 None 25 None
Table 2. Color Compensating Filters for Color Photography With Fluorescent Illumination
Increase Increase lens Filters for lens
Filters for openmg daylight opening Lam0 tunesten film bv film hv
Daylight 85 + 301N + 10Y 1 stop 40M + 30Y 1 stop Whit,e 40M + 40Y 1 stop 20C + 30M 1 stop Cool White 50bI + GOY l L / r stop 30M s /a Stop Cool White
Deluxe 10M + 30Y */x stop 30C + 20M '/, stop
All filter recommendations are for the Eastman CC series i.e., 20R is a red filter; CC20R.
The power requirements of lighting for film or TV should be anticipated: photo lights can draw from 2 to 10 amps each; most laboratory outlets are protected by fuses or circuit-breakers rated from 15 to 20 amps. Particularly avoid circuits containing any instrumenta- tion sensitive to power interruption. It is good practice to locate the controlling fuses or breakers before starting a film-TV production so that there is minimum confu- sion during the filming.
Regardless of the size of the area being photographed, lighting principles remain the same: (1) modeling lights to provide form; (2) back lights to separate the
D
Figure 2. The use of many lights all from the someangle, each covering o slightly different ore- of the picture ir particularly useful in photographing a large and confusing inrtollotion. It is possible to "point" the ~ ~ b j ~ d orem with light while ignoring the surrounding area.
462 / Journal of Chemical Edumtion

Figure 3. Boric lighting. o, Information lighting i s rtraightfomord 0% long os the area being photographed is not too large. If possible, the rvbiect should be seporoted'some- what from the background so that it may be illvminated conveniently. The flrrt light should be at approximately 0 45' on& so that it throws shadows which deRne the form of the rub- iect. Thh ir called the "key" light ond helps to model the subiect.
b, Next, the subject must be seporoted from the c, At this point, the picture is likely to have deep, background. This i s done by a second light black shadows which con be softened by a third pointing ot the bock of the rvbject *a or to create light very close to the camera. By varying the a rim of light on the ride opposik from the key intensity of this "RII" light, we c ~ n control the light. This "back" light gives the picture o crisp overall contrast of the pictvre. You might like
to add one or two lights to illvrninote the bock- gmvnd, i f i t appears too dark, but most boric loborotorv ~ h o t a o r ~ ~ h v reouiresonlv this simole
appearance.
. . - setup.
ohject from the background; (3) fill lights to control the contrast. The use of these three types of lighting is il- lustrated in Figure 3. Where larger areas are involved, only time and more equipment are needed.
Special Problems
Two types of subjects-glass and metal-pose particularly difficult lighting problems. Any shiny metal surface acts like a mirror. The easiest solution to this problem is a can of Krylon dulling spray which will temporarily fog the surface of an ohject and can later he wiped off. An alternative, hut far more difficult, ap- proach is to turn the lights around and light the wall which is being reflected in the subject rather than the subject itself. Sometimes it is helpful to add sheets of white paper or cardboard immediately outside of the area being photographed.
Occasionally, it is desirable to light small objects with a "shadowless" flood of soft light. This can be achieved by enclosing the suhject in a cloth or plastic "tent" which is lit from the outside. Background shadows can be eliminated entirely by supporting the object on a piece of glass.
Glassware is also difficult to photograph, hut the solu- tion is quite simple. Simply light the background and photograph the glass silhouette, rather than attempting to light the glass itself. A strip of white paper or fluorescent lamp alongside the camera can provide an interesting highlight.
Exposure
Most 8 mm and some 16 mm cameras have automatic exposure control, so that this is not a serious problem. However, unusual subject matter or more sophisticated equipment may require the use of an exposure meter. Small automatic exposure cameras operate on the basis of a reflected light reading, that is to say, the meter measures the amount of light being reflected by the
suhject. This is a good indication of the light actually reaching the film, hut it necessarily integrates the light over the film area to a greater or lesser extent. Thus, the picture would tend to darken as a person wearing a white shirt enters the scene, or lighten when a person wearing a dark suit enters the picture. To avoid this, some cameras integrate only the central area of the picture where the important part of the subject is most likely to be located. Usually the problem is not serious, and automatic,exposure cameras work quite well.
To use an exposure meter to measure reflected light, simply take a light reading from the position of the camera looking at the scene. However, it is difficult to use a reflected reading if the suhject matter is especially light or dark, or if the lighting has a great deal of con- trast. Most professionals prefer to begin with an incident light reading. This is a measure of the amount of light falling on the suhject instead of the amount reflected. To make an incident light measurement the meter is held a t the subject location and pointed toward the camera. A good exposure meter is able to make both kinds of measurements (Fig. 4).
Figure 4. In toking reReded light expowre reading. from scientiRc apporotw which may give rpecular reflections, it i, o good practice to use a rvrfoce such ar the Kodok Neutral Test Cord or even o clinched hand to produce a neutral rvrfoce of consirtont reRectonce values. The Gosen Luno-Pro light meter used here is an eromple of a compact, reliable, ond sensitive reRected or incident light meter.
Volume 46, Number 7, July 1069 / 463
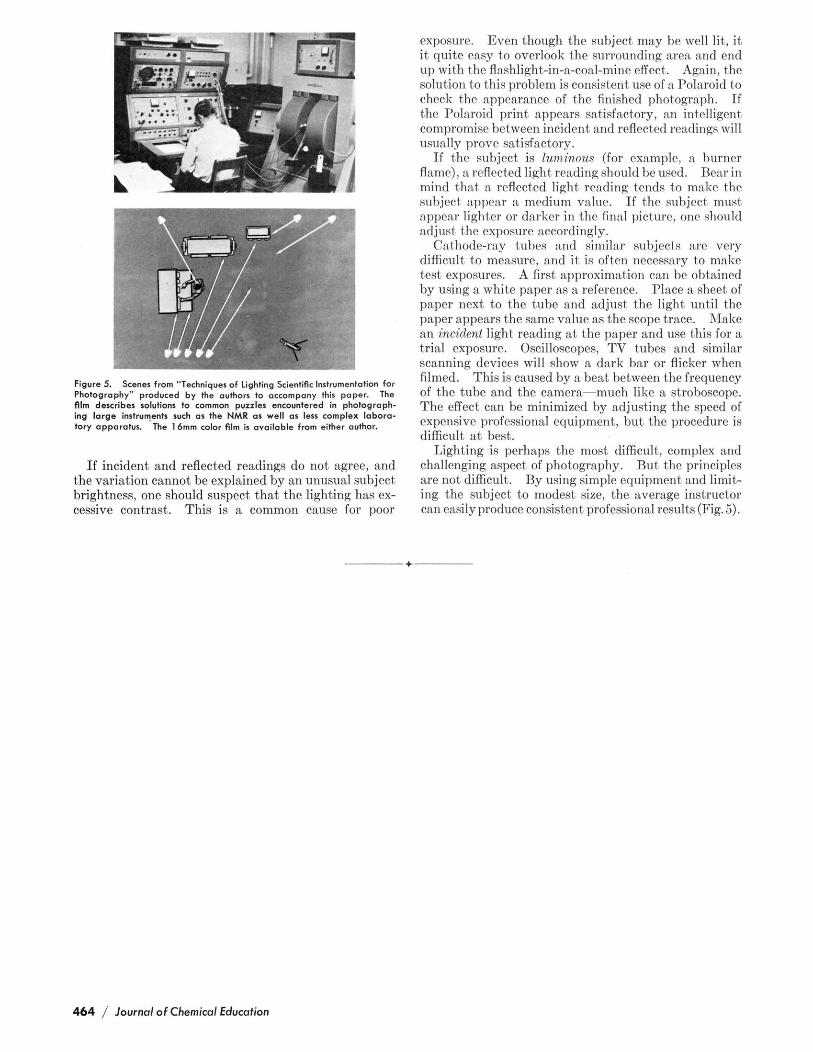
Figure 5. Scenes from "Techniques of Lighting Scientific Instrumentation for Photography" produced by the authors to accompany thi. paper. The fllm describer solution, to common puzzle> encountered in photograph- ing large instruments such os the NMR as well as less complex lobora- tory opporotw. The 16mm color film ir available from either author.
If incident and reflected readings do not agree, and the variation cannot he explained by an unusual subject brightness, one should suspect that the light,ing has ex- cessive contrast. This is a common cause for poor
+-
464 / Journal of Chemical Education
exposure. Even though the subject may be well lit, it i t quite easy to overlook the surrounding area and end up with the flashlight-in-a-coal-minc effect,. Again, the solution to this problem is consistent use of a Polaroid to check the appearance of the finished phot,ogmph. If t,hc Polaroid print appears sat,isfactory, an intelligent, compromise between incident and reflected readings will usually prove satisfactory.
If t,hc suhject is luminous (for examplc, a hurner flame), a reflected light reading should he used. Rcnr in mind t,hnt a reflect,ed light reading t,ends to make t,hr suhject appear a medium vduc. If the subject must, appear lighter or darker in t.he final picturc, one should adjust the cxposure accordingly.
Cathode-ray tuhes and similar subjects nrc very difficult to measure, and i t is oftcn necessary t,o malw test, exposures. A first approximat,ion can hc obtained by using a white paper as a reference. Place a sheet of paper next to the tube and adjust the light until the paper appears the same value as the scope trace. R4ake an incident light reading at. the paper and use t,his for a trial exposure. Oscilloscopes, TV tubes and similar scanning devices will show a dark bar or flicker when filmed. This is caused by a beat het,ween the frequency of the tube and the camera-much like a stroboscope. The effect can be minimized by adjust,ing the speed of expensive professional equipment, but the procedure is difficult a t best.
Lighting is perhaps the most difficult,, complex and challenging aspect of photography. But the principles are not difficult. By using simple equipment and limit- ing the subject to modest size, the average instructor can easily produce consistent professional results (Fig. 5).