tasman district small site - … · tasman district small site erosion and sediment control...
TRANSCRIPT
Tasman District
Small Site Erosion and Sediment
Control Guidelines June 2014 FINAL DRAFT


CONTENTS
1 WHY DO SMALL SITES NEED EROSION AND SEDIMENT CONTROL? .......................................................... 5
1.1 WHAT ARE THE PROJECT BENEFITS OF GOOD WATER AND SOIL MANAGEMENT ON SMALL SITES? ................................. 5 1.2 WHAT ARE THE EFFECTS OF UNCONTROLLED EROSION ON SMALL SITES? ................................................................ 6 1.3 THE LAW .................................................................................................................................................. 6
2 PRINCIPLES FOR SMALL SITE EROSION AND SEDIMENT CONTROL ........................................................... 7
2.1 PRE-CONSTRUCTION PLANNING .................................................................................................................... 7 2.2 MAKE SURE ALL CONTRACTORS UNDERSTAND THE ESCP AND THEIR RESPONSIBILITIES ............................................. 8
3 INSTALL EROSION AND SEDIMENT CONTROLS ......................................................................................... 9
3.1 CONTROL SURFACE DRAINAGE – CLEAN WATER DIVERSION ............................................................................... 9 3.2 STABILISED CONSTRUCTION ENTRANCE ......................................................................................................... 10 3.3 SILT FENCE .............................................................................................................................................. 11 3.4 DECANTING EARTH BUND .......................................................................................................................... 13 3.5 STORMWATER CATCHPIT PROTECTION ......................................................................................................... 14 3.6 CHECK AND MAINTAIN EROSION AND SEDIMENT CONTROLS AND REVIEW YOUR ESCP ............................................ 14 3.7 DEWATERING .......................................................................................................................................... 15 3.8 TEMPORARY STABILISATION ....................................................................................................................... 15 3.9 CONNECT DOWNPIPES EARLY AND PROTECT ONSITE STORMWATER INLETS ........................................................... 16
4 MANAGE LITTER, CHEMICALS AND BUILDING WASTES .......................................................................... 16
5 STABILISE THE SITE ................................................................................................................................ 18
6 DECOMMISSION CONTROL MEASURES ................................................................................................. 19
7 FURTHER INFORMATION AND ADVICE .................................................................................................. 19
8 SMALL SITE BASIC EROSION AND SEDIMENT CONTROL PLAN EXAMPLE ................................................ 20
Acknowledgements
These small site guidelines are adapted from the Tauranga City Council and Environment Canterbury guidelines, who support its broader use. The Tasman District Council would like to acknowledge the Tauranga City Council and Environment Canterbury for use of photographs, figures and text. Their assistance is most appreciated.
File name:Small Site Erosion and Sediment Control Guide V10 24 June 2014.docx

5
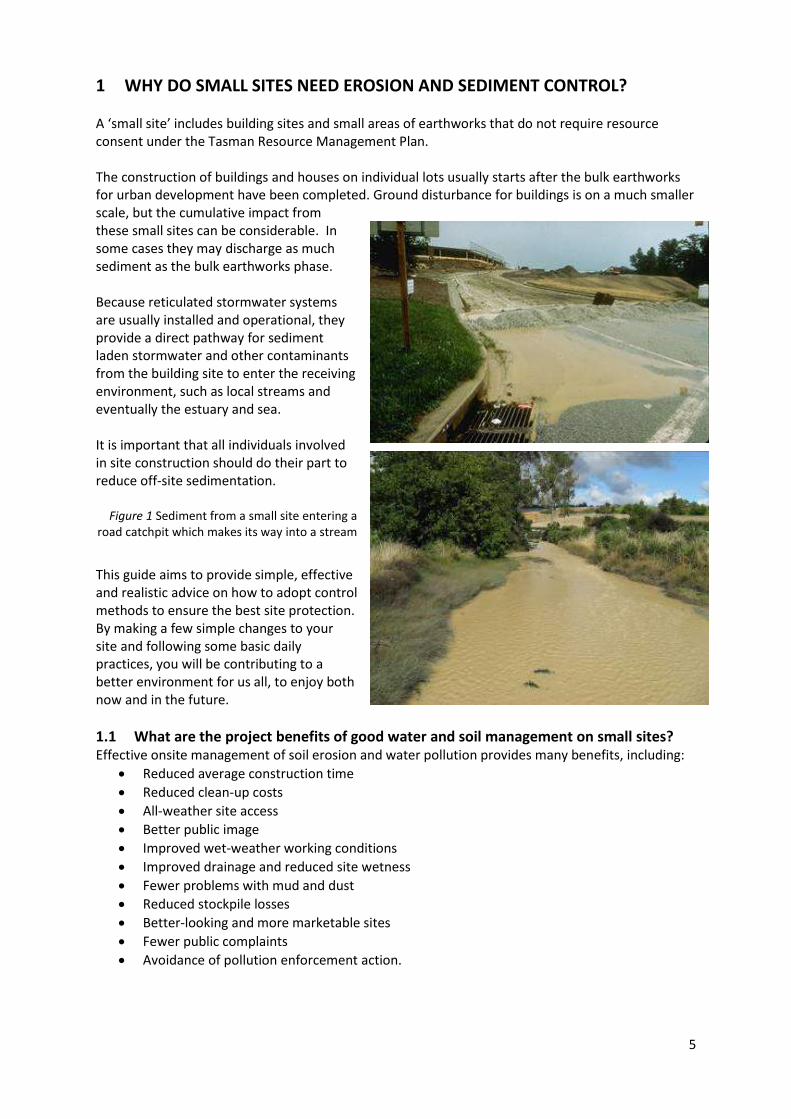
1 WHY DO SMALL SITES NEED EROSION AND SEDIMENT CONTROL? A ‘small site’ includes building sites and small areas of earthworks that do not require resource consent under the Tasman Resource Management Plan. The construction of buildings and houses on individual lots usually starts after the bulk earthworks for urban development have been completed. Ground disturbance for buildings is on a much smaller scale, but the cumulative impact from these small sites can be considerable. In some cases they may discharge as much sediment as the bulk earthworks phase. Because reticulated stormwater systems are usually installed and operational, they provide a direct pathway for sediment laden stormwater and other contaminants from the building site to enter the receiving environment, such as local streams and eventually the estuary and sea. It is important that all individuals involved in site construction should do their part to reduce off-site sedimentation.
Figure 1 Sediment from a small site entering a
road catchpit which makes its way into a stream
This guide aims to provide simple, effective and realistic advice on how to adopt control methods to ensure the best site protection. By making a few simple changes to your site and following some basic daily practices, you will be contributing to a better environment for us all, to enjoy both now and in the future.
1.1 What are the project benefits of good water and soil management on small sites? Effective onsite management of soil erosion and water pollution provides many benefits, including:
Reduced average construction time
Reduced clean-up costs
All-weather site access
Better public image
Improved wet-weather working conditions
Improved drainage and reduced site wetness
Fewer problems with mud and dust
Reduced stockpile losses
Better-looking and more marketable sites
Fewer public complaints
Avoidance of pollution enforcement action.

6
1.2 What are the effects of uncontrolled erosion on small sites? The effects of uncontrolled erosion and sediment runoff from small sites can include:
Damage to the building site and structural damage to retaining walls, building foundations, underground services and other structures
Road Safety problems when soil, litter and debris are washed onto roads and intersections
Blocked gutters and blockage of stormwater reticulation, soakage and treatment systems, creating flooding and increased council maintenance costs and local rates
Loss of good topsoil
Pollution of local streams, estuaries and beaches resulting in loss of aquatic habitat and reduced biodiversity, as well as affecting recreation, such as swimming and fishing.
Increased Health and Safety risks.
In addition to sediment, chemicals and waste materials from building sites can also be transported by the stormwater system directly into rivers and streams from incorrect operation or clean-up of:
Concreting
Concrete or brick cutting
Materials storage
Bricklaying
Brick cleaning
Plastering
Tiling
Painting
Portable toilets.
1.3 The Law In New Zealand, the Resource Management Act (1991) is one of the main pieces of legislation that seeks to protect our environment. It clearly states that every person is responsible for ensuring that their activities do not contribute to pollution of our environment. This may include everyone from the construction workers and managers of the site, to companies and their directors. In Tasman and Nelson this law is administered by the Tasman District and Nelson City Councils. It is illegal to allow any substance to enter water either directly, through the stormwater system or through the contamination of land unless approved by either the Tasman District or Nelson City Council. Breaches of the Resource Management Act 1991 may result in formal directives or punitive action from the Council or Environment Court in the form of:
Abatement Notices and Enforcement Orders which often result in work stoppages
Infringement fines ( up to $1000 for each person), and for serious offences:
The prosecution of individuals and/or companies, which could result in imprisonment of up to 2 years or fines into the many thousands of dollars.
In addition, as Building Consent Authorities, the Tasman District and Nelson City Councils enforce the Building Act 2004, along with the New Zealand Building Code. The Building Code (B1 and E1) requires site works (including earthworks), buildings and surface water to be managed to avoid damage or nuisance to people, other properties (including roads) and outfalls (including natural waterways, kerb and channel or soakage systems). It is best practice to submit an Erosion and Sediment Control Plan (ESCP) as part of any building or resource consent application involving disturbance of soil or earthworks. Failure to comply with Council requirements may result in failed building inspections, which means time delays with the inspection process and additional costs as a result of follow-up visits from compliance officers and building inspectors. Ongoing non-compliance could result in enforcement action being taken by the Council.
7
2 PRINCIPLES FOR SMALL SITE EROSION AND SEDIMENT CONTROL Following the simple steps below will help developers, builders and tradesmen protect the environment and themselves as they do their work:
1. Pre-construction planning – a. Evaluate the site layout and design b. Develop an Erosion and Sediment Control Plan (ESCP)
2. Make sure all sub-contractors understand the ESCP and their responsibilities 3. Install erosion and sediment controls before clearing the site and starting any building work 4. Check and maintain erosion and sediment controls throughout the build process, amending
your ESCP as necessary to improve controls or adapt to site changes 5. Manage litter, chemicals and building wastes – especially concrete washings 6. Connect all downpipes to the stormwater network as soon as possible to minimize site
runoff and protect onsite stormwater inlets from muddy surface water runoff 7. Stabilise the site and carefully decommission control measures. Do this as soon as possible.
An attractive site has a higher sale potential.
2.1 Pre-Construction Planning
2.1.1 Evaluate the Site Design and Layout When planning the site layout, think about the need for earthworks and recontouring and the building type and location. Minimising earthworks will minimise the number of erosion and sediment controls required on each lot and their interference with the building process.
2.1.2 Develop an Erosion and Sediment Control Plan (ESCP) Erosion and Sediment Control Plans don’t need to be big and flashy, but they should be easily understood by everyone on your site. The detail and scope should match the nature and scale of your activity. If you are on a relatively flat site, in low erodible soils then your risk of erosion and sediment transport will be less and only a basic plan may be required. However if you are on a steep site or in an area with readily eroded soils you will need to put greater thought into developing a plan to ensure sediment is not transported off your site. An example of a basic Erosion and Sediment Control Plan (and template) is provided in Section 8. Key points to consider when developing your ESCP include:
1. Identify the site slope, runoff flow direction, erosion risk areas and low points 2. Identify pathways where sediment could be transported off your site, such as pipe
reticulation, streams and gullies, overland to neighbouring properties or to the footpath and road, or by wind if in an exposed area
3. Identify any features to be protected from construction traffic and activities, such as existing on-site infrastructure, including rain gardens
4. Identify existing vegetation that can be retained without being disturbed to act as a buffer and filter strip and use temporary fences to define ‘no go’ areas to protect any buffer
5. Determine the specific erosion and sediment controls needed and allow sufficient room for these so they can be maintained easily a. Control water at the top of the site and direct stormwater flows around the building
area and any exposed soils. Where possible- KEEP CLEAN WATER CLEAN b. Control erosion of the site, especially from steep areas or erodible soils c. Provide for stabilised all-weather access and identify areas where you want to limit
construction traffic d. Control sediment movement at the boundaries and low points of the site
6. Identify wash down or trade activity zones within the sediment control area for onsite activities (eg equipment cleaning)
7. Arrange all stockpiles and building material storage areas within the sediment control zone

8
8. Include signage to inform subcontractors of the presence and purpose of erosion and sediment controls. Make sure all subcontractors and tradesmen are fully aware of their requirements and individual responsibilities under the ESCP: this may also help you in the event of any pollution complaints.
9. Identify an erosion and sediment control maintenance programme and nominate someone responsible for checking and maintaining the controls. Maintenance of all controls is essential for them to function properly. They should be inspected daily, and before and after each rainfall event. Where a problem is identified, repairs must be undertaken immediately.
In addition to the basic points above there are some site specific activities which need special consideration:
Long, steep, unstable driveways: plan to implement controls to reduce the velocity of stormwater during construction and stabilise as soon as possible, preferably before starting to build.
Exposed aggregate concrete: Consider this technique very carefully as the wash-off is lethal to stream environments and fish even in tiny concentrations. Any discharge of this type to water or the stormwater system - which includes a road side catchpit - would not be permitted by the Council and could result in formal enforcement action. All runoff should be collected and taken to an appropriate disposal facility. (See http://www.bpg.co.nz/working-concrete.html for further advice)
Stockpiling: Try to keep top soil stockpiles separate from sub soils and ensure both have controls placed around their perimeter. Where possible they should remain within the sediment control area. Aim to locate stockpiles away from any steep slopes, streams or drainage flow paths. Consider temporarily stabilising the stockpiles by establishing grass cover or use artificial covering (eg geotextile cloth) (refer section 3.8)
Dewatering: if dewatering is likely to be required on site consider an off-the-shelf (proprietary) device, such as a dewatering bag or sock, particularly where there is limited land space available or soakage to land is insufficient (refer Section 3.7). Dewatering activities should never be discharged directly to areas where runoff may enter streams, the stormwater reticulation or the road network.
Equipment washdown and spills: Identify in the ESCP places (eg Trade Activity Zones) where activities such as tool and paint washdowns, brick, tile or masonry cutting and watercooling activities can be done where they will not cause dirty water runoff to get into stormwater systems or contaminate groundwater. Always aim to contain all wash-down wastewater and waste materials within the site boundaries and dispose of dirty water and materials appropriately (refer section 4).
Site Parking: Tell staff and subcontractors not to park on the footpath, grass verge or swale, where they will damage services and track dirt onto the road.
Low impact stormwater systems: before beginning construction, identify any high risk areas such as low impact stormwater systems (eg raingardens, swales, wetlands etc) and ensure these systems are protected from sedimentation during the site construction phase. These systems are typically designed for treating stormwater from fully stabilised areas and excessive sedimentation may require their repair or complete replacement. The asset owner (the subdivider or the Council) may seek compensation for damaged systems.
2.2 Make sure all contractors understand the ESCP and their responsibilities Make sure all subcontractors and tradesmen are fully aware of their requirements and individual responsibilities under the ESCP. This could assist you in the event of any pollution complaints.
Include signage to inform subcontractors of the presence and purpose of erosion and sediment controls.
Advise all site workers, subcontractors and delivery drivers of their responsibilities for responsible placement and management of building materials and stockpiles and make them aware that they will have to pay for any damage they do to site controls.

9
3 Install Erosion and Sediment Controls Below is a more in depth look at the methodology and design of some of the basic controls considered appropriate for a small site. Further information on a wider range of controls for use on larger or higher risk sites is available in the Tasman Erosion and Sediment Control Guide. Table 1 Small Site Erosion and Sediment Controls
Erosion Controls Sediment Controls
Clean Water Diversion
Stabilised Construction Entrance
Temporary and permanent stabilisation
Silt Fence
Decanting Earth Bund
Catchpit Protection
Dewatering systems
3.1 Control Surface Drainage – Clean Water Diversion Keeping water out of your works is a cost-effective site-management tool. The best time to provide for adequate site drainage is before construction begins. With proper planning, most drainage problems can be avoided and erosion and sedimentation minimised. If surface water can flow across the site and onto the area where construction will occur then a clean water diversion should be used to divert this water around the build site. This reduces the potential for erosion and reduces the volume of water your sediment controls will need to treat. Key design points:
Size clean water diversion channels to the contributing catchment. Large channels require specific design
Consider lining the channel to keep the clean water clean - steep diversion drains may require a lining of geotextile fabric
Discharge diverted stormwater onto stable areas; for example, well-vegetated lawn or berms
Ensure diverted water does not cause a problem to neighbouring properties - don’t divert it onto neighbouring properties unless you have the landowner’s written permission
Direct water away from the site entry/exit point, to prevent it from eroding and becoming a source of sediment runoff.
Figure 2 Standard Detail for a Clean Water Diversion
For surface water within the construction area, ensure that drainage is away from the proposed building structure. When the site is being graded it is important to avoid filling in existing drainage channels and roadside ditches. This could result in drainage problems onsite and damage to road surfaces.
10
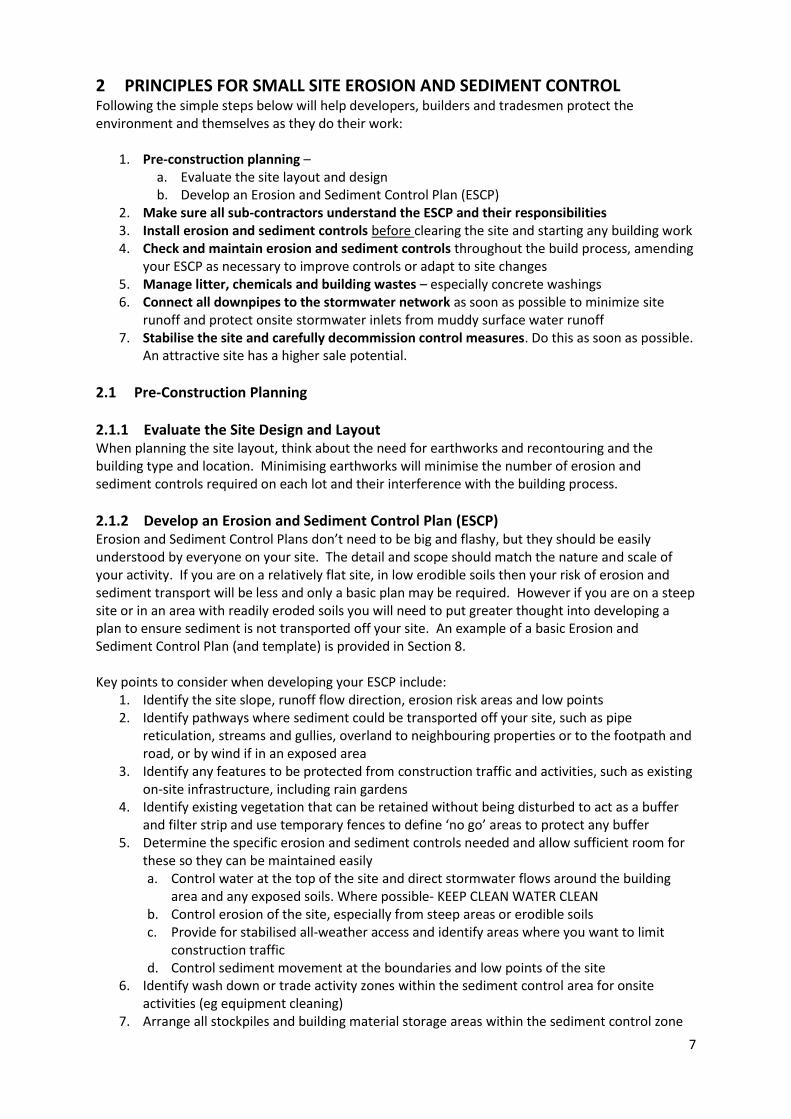
3.2 Stabilised Construction Entrance Local residents often complain about muddy roads when builders start work. Sediments on roads also enter the local stormwater pipe network affecting their function and requiring expensive maintenance. Protect your site and stop these issues by:
Restricting entry/exit to one stabilised location - this may not be where the final driveway will ultimately be.
Wherever practical, extend the stabilised entry right up to the building footprint.
Manage the entry/exit point so that sediment is not tracked offsite - use an aggregate, recycled concrete or rock apron placed over a needle-punched geotextile fabric membrane.
Where the entry/exit area slopes towards the road, install a small diversion bund across the stabilized area to direct stormwater runoff to the side for treatment by a sediment fence.
If sediment does get tracked onto road and footpath areas, sweep these clear at the end of each working day and before rain. Place sediments back within the sediment control area. Do not use water to wash sediments away or into stormwater systems.
Figure 3 Stabilised Construction Entrance- Note the Underlying Fabric (left photo)
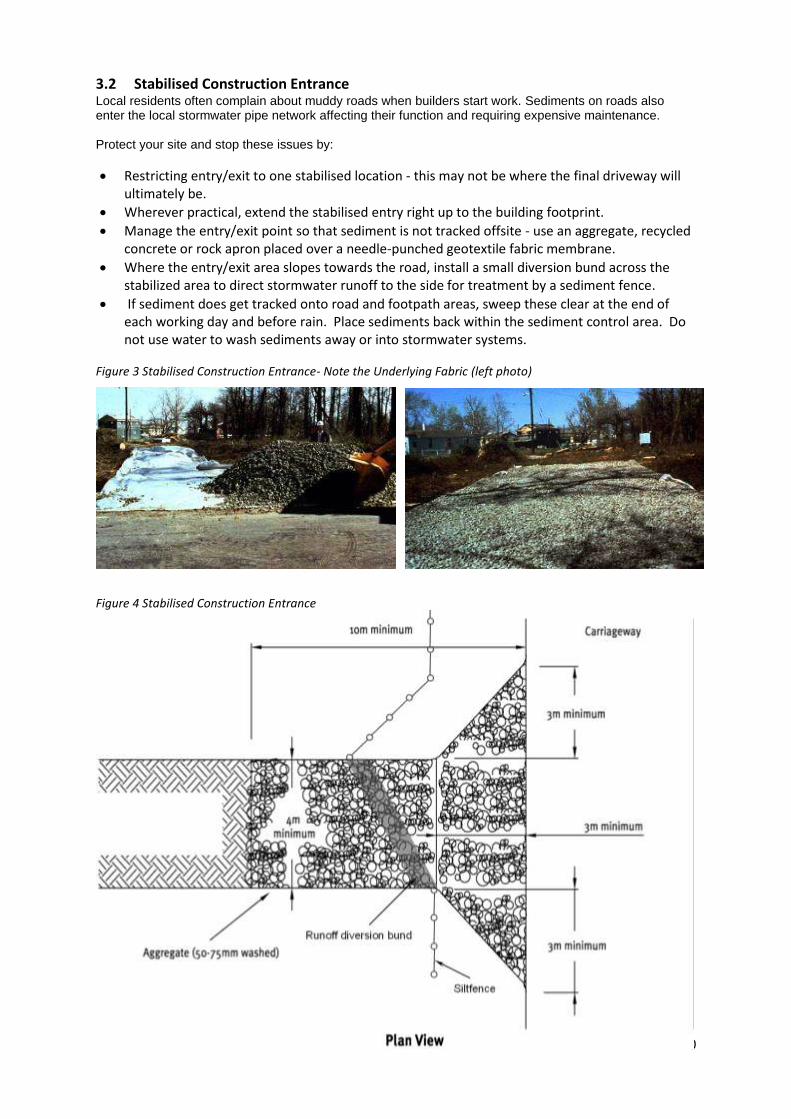
Figure 4 Stabilised Construction Entrance
11
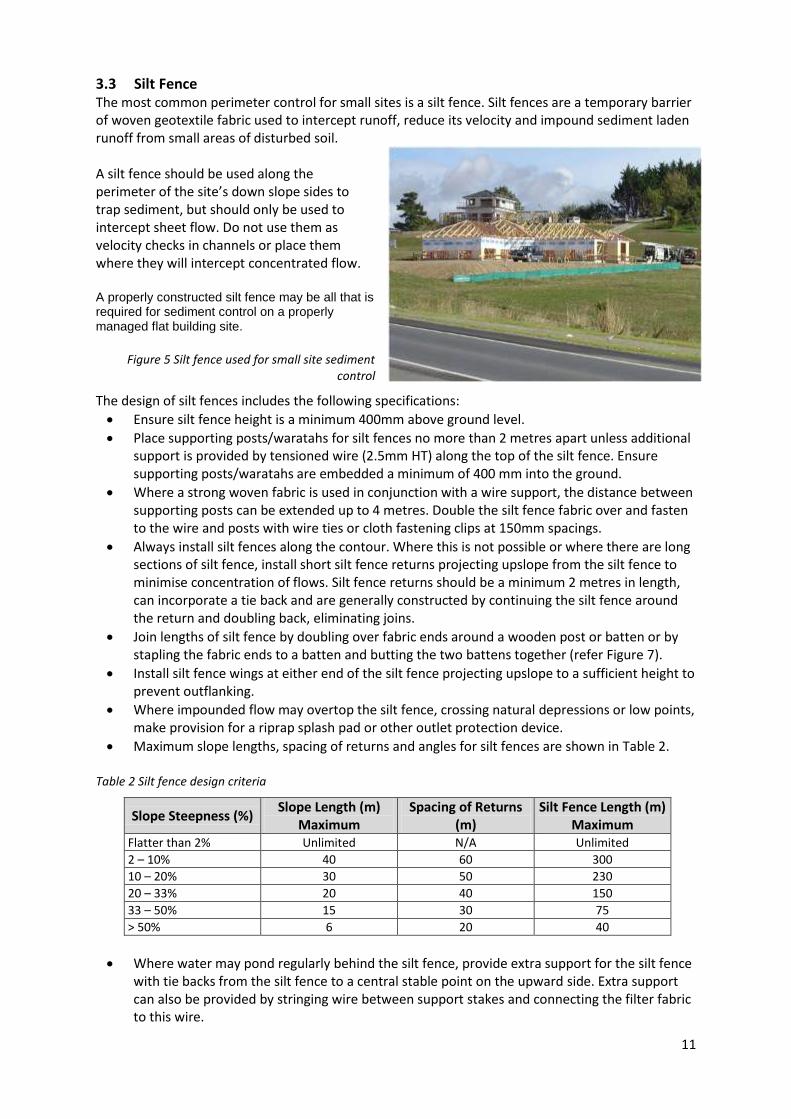
3.3 Silt Fence The most common perimeter control for small sites is a silt fence. Silt fences are a temporary barrier of woven geotextile fabric used to intercept runoff, reduce its velocity and impound sediment laden runoff from small areas of disturbed soil. A silt fence should be used along the perimeter of the site’s down slope sides to trap sediment, but should only be used to intercept sheet flow. Do not use them as velocity checks in channels or place them where they will intercept concentrated flow. A properly constructed silt fence may be all that is required for sediment control on a properly managed flat building site.
Figure 5 Silt fence used for small site sediment control
The design of silt fences includes the following specifications:
Ensure silt fence height is a minimum 400mm above ground level.
Place supporting posts/waratahs for silt fences no more than 2 metres apart unless additional support is provided by tensioned wire (2.5mm HT) along the top of the silt fence. Ensure supporting posts/waratahs are embedded a minimum of 400 mm into the ground.
Where a strong woven fabric is used in conjunction with a wire support, the distance between supporting posts can be extended up to 4 metres. Double the silt fence fabric over and fasten to the wire and posts with wire ties or cloth fastening clips at 150mm spacings.
Always install silt fences along the contour. Where this is not possible or where there are long sections of silt fence, install short silt fence returns projecting upslope from the silt fence to minimise concentration of flows. Silt fence returns should be a minimum 2 metres in length, can incorporate a tie back and are generally constructed by continuing the silt fence around the return and doubling back, eliminating joins.
Join lengths of silt fence by doubling over fabric ends around a wooden post or batten or by stapling the fabric ends to a batten and butting the two battens together (refer Figure 7).
Install silt fence wings at either end of the silt fence projecting upslope to a sufficient height to prevent outflanking.
Where impounded flow may overtop the silt fence, crossing natural depressions or low points, make provision for a riprap splash pad or other outlet protection device.
Maximum slope lengths, spacing of returns and angles for silt fences are shown in Table 2.
Table 2 Silt fence design criteria
Slope Steepness (%) Slope Length (m)
Maximum Spacing of Returns
(m) Silt Fence Length (m)
Maximum Flatter than 2% Unlimited N/A Unlimited
2 – 10% 40 60 300
10 – 20% 30 50 230
20 – 33% 20 40 150
33 – 50% 15 30 75
> 50% 6 20 40
Where water may pond regularly behind the silt fence, provide extra support for the silt fence with tie backs from the silt fence to a central stable point on the upward side. Extra support can also be provided by stringing wire between support stakes and connecting the filter fabric to this wire.
12
The geotextile fabric cloth must be appropriate for purpose (including strength and opening size) and installed following the manufacturers specifications.
Keep silt fences within the property boundaries, unless you have landowner approval (including Council approval for use of public land).
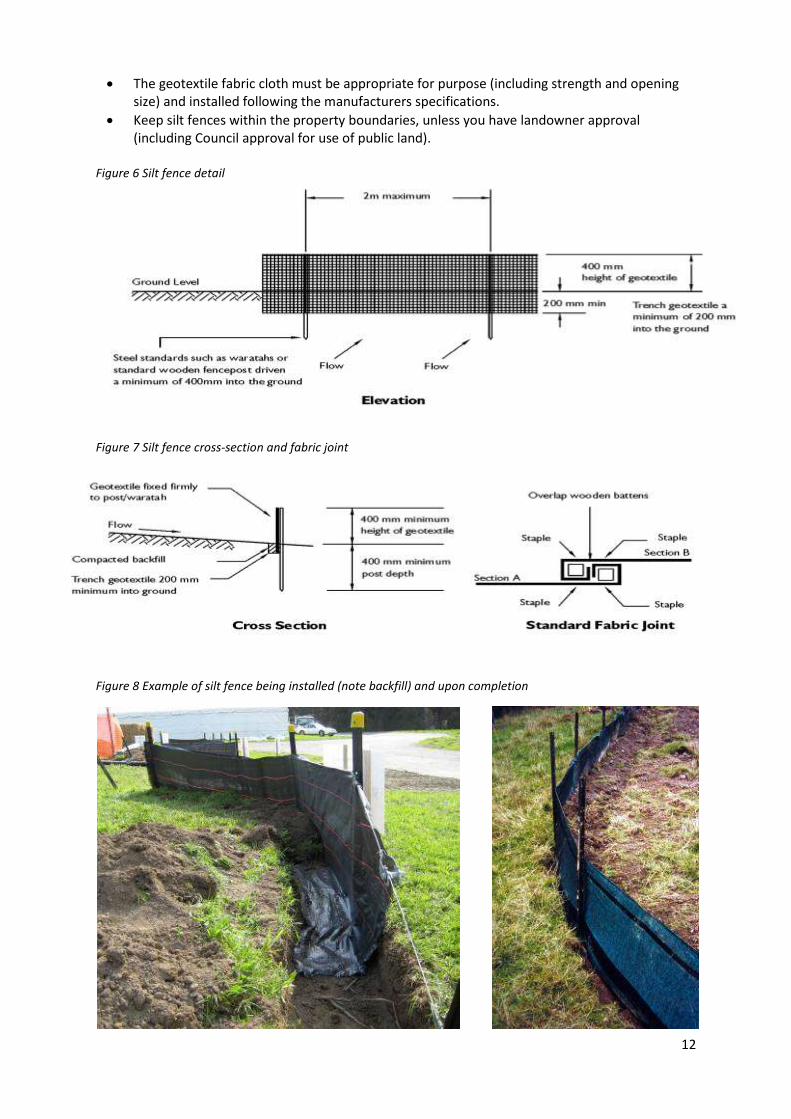
Figure 6 Silt fence detail
Figure 7 Silt fence cross-section and fabric joint
Figure 8 Example of silt fence being installed (note backfill) and upon completion

13
3.4 Decanting Earth Bund Decanting Earth Bunds (DEB) allow for the capture of slightly finer soil particles than sediment fences, as the earth bund controls and retains dirty water runoff, allowing detention time for sediment to settle out before the water is discharged from the site. However, they can be outflanked unless well constructed.
Construct DEBs across slopes and near the edges of the site. The bund can be constructed using soils from the site if suitable, but must be well compacted and impermeable.
Key the DEB into the existing ground to a minimum depth of 0.3 metres
An emergency spillway must be incorporated into the design and be covered with geo cloth or similar to minimise erosion.
Use a T-Bar decant - a 100mm diameter PVC pipe, 0.5 metres long with 20 equally spaced holes of 10mm diameter to achieve a discharge rate of 3 litres/sec/ha of contributing catchment. A sealed PVC pipe is placed on top of the decant to provide buoyancy.
Figure 9 Floating Decant in DEB
Install a 150 mm diameter non-perforated outlet pipe through the bund. This is to discharge to a stable erosion-proofed area or stormwater system.
Use a flexible thick rubber coupling to provide a connection between the decant arm and the discharge pipe. To provide sufficient flexibility where needed, install two couplings. Fasten the flexible coupling using strap clamps, glue and screws.
The decant is fastened to two waratahs by way of a nylon cord to the correct height.
Do not discharge to bare land, or install them above unstable slopes as seepage may exacerbate land instability.
DEBs may be suitable for contributing catchments of a maximum of 0.3ha. Best Practice design for small sites should use 2m3 of volume per 100m2 of contributing catchment.
Figure 10 Decanting Earth Bund cross-section

14
3.5 Stormwater Catchpit Protection As a last line of defence, place control measures around stormwater sump and catchpit inlets to keep
sediment out of the stormwater network and receiving environment. It is not necessary to use catchpit protection if the construction site is fully under control, but it may be required if there are continuing compliance problems or there are unique aspects to the site being developed that would warrant its use. Catchpit inlet protection is provided by the placement of a barrier across or around a catchpit to intercept and filter sediment-laden runoff before it enters a reticulated stormwater system. Barriers can include:
Geotextile and aggregate
Straw bales or mulch socks
Sandbags
Geotextile filter socks Figure 11 Catchpit protected with geotextile and aggregate covering
Figure 12 Catchpit protection cross-section
3.6 Check and maintain erosion and sediment controls and review your ESCP Maintain all erosion and sediment control practices until construction is completed and the site is permanently stabilised. During construction, ensure the following is done:
Inspect the controls daily (or at least twice weekly) and after each storm, making any needed repairs immediately.
At the end of each work day, sweep or scrape up any soil tracked onto roads. Do not use water to wash sediments away or into stormwater systems.
Clean up the site after every storm event. If your controls are not keeping up and sediment is getting on to roads or into stormwater you will need to review your ESCP and may need to look at enhancing your controls. If you are unsure how to resolve ongoing sedimentation issues from your site, contact the Council immediately and ask for advice on how to ensure you are meeting your responsibilities.
15
3.7 Dewatering Dewatering may be required where groundwater levels are very close to the surface and underground works are required or when rainfall fills up excavated areas. Sediment laden water from dewatered areas should never be discharged directly to drains, waterways, roads, stormwater catchpits or areas where it may flow into these. Such practice could attract Council enforcement action. Sediment laden water should be retained onsite to allow for the settling of sediment and treated through an appropriate control. Options include:
Sediment retention pond if space is available
Decanting Earth Bund
Portable settlement tank (eg a modified skip bin)
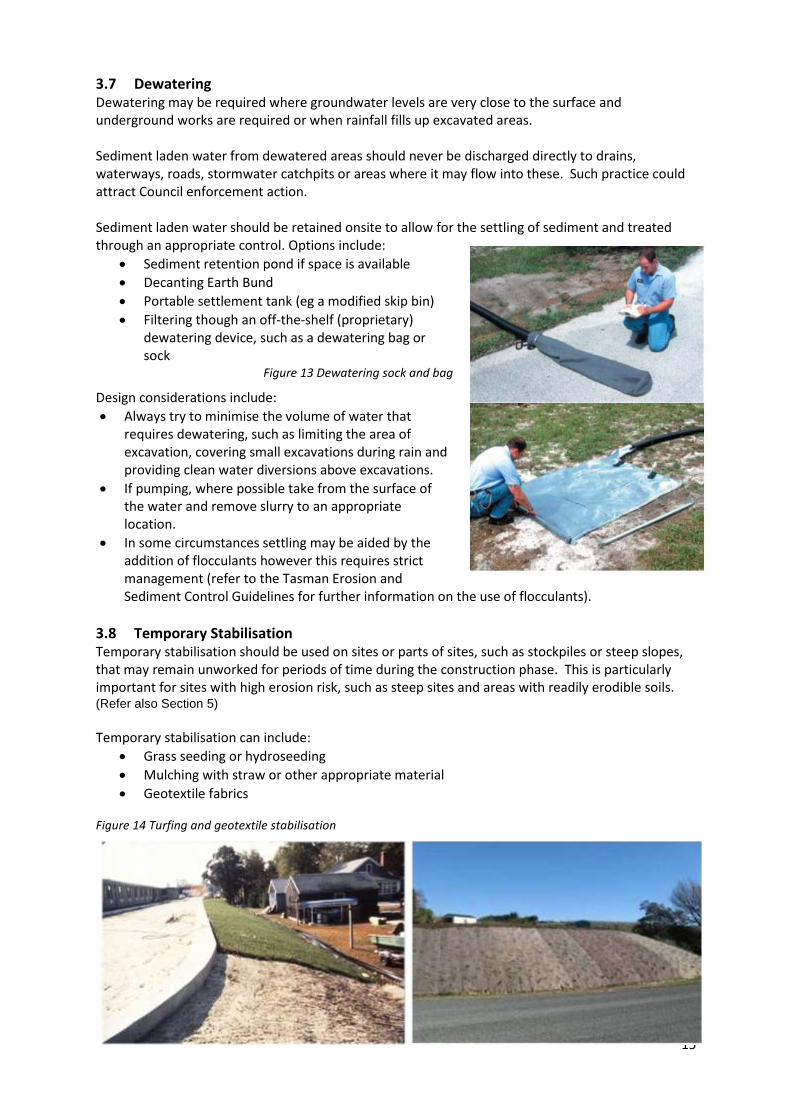
Filtering though an off-the-shelf (proprietary) dewatering device, such as a dewatering bag or sock
Figure 13 Dewatering sock and bag
Design considerations include:
Always try to minimise the volume of water that requires dewatering, such as limiting the area of excavation, covering small excavations during rain and providing clean water diversions above excavations.
If pumping, where possible take from the surface of the water and remove slurry to an appropriate location.
In some circumstances settling may be aided by the addition of flocculants however this requires strict management (refer to the Tasman Erosion and Sediment Control Guidelines for further information on the use of flocculants).
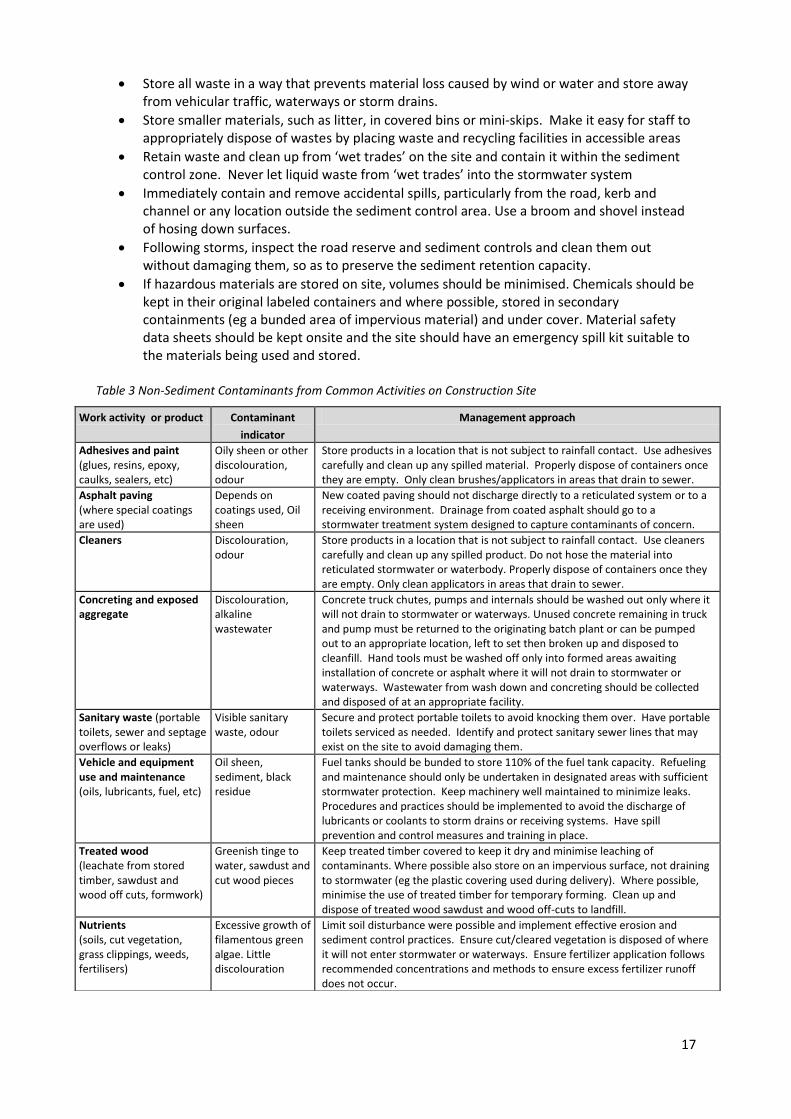
3.8 Temporary Stabilisation Temporary stabilisation should be used on sites or parts of sites, such as stockpiles or steep slopes, that may remain unworked for periods of time during the construction phase. This is particularly important for sites with high erosion risk, such as steep sites and areas with readily erodible soils. (Refer also Section 5)
Temporary stabilisation can include:
Grass seeding or hydroseeding
Mulching with straw or other appropriate material
Geotextile fabrics
Figure 14 Turfing and geotextile stabilisation

16
3.9 Connect downpipes early and protect onsite stormwater inlets Early connection of roof water to the stormwater system will reduce site wetness, erosion and sediment runoff. This reduces downtime after storms and shortens the building construction period. Take advantage of these benefits by:
• Installing temporary or permanent downpipes as soon as gutters are put up • Connect downpipes into the stormwater system before putting the roof on. • Ensure downpipe stormwater inlets are protected at ground level from sediment laden
surface water
Figure 15 Temporary and permanent downpipes connected into the stormwater system
4 Manage litter, chemicals and building wastes Non-sediment contaminants consist of chemicals and materials used on site that may directly or indirectly discharge into receiving environments from site activities. Some non-sediment contaminants can have significant adverse impacts on stream and marine ecosystems, causing death or longer term health problems in aquatic species. Some also pose a risk to human health leading to bans on fishing, shellfish gathering and recreation. While the volumes discharged from a single site may seem small, within a catchment these discharges can accumulate to cause serious issues. Make sure your site doesn’t add to these problems. Table 3 lists a variety of contaminants produced by some common construction activities and ways to manage these to avoid contamination. Options for disposing of contaminants are:
General sediments, brick, tile and concrete wash down dirty water should be allowed to discharge to the ground so long as not near water.
Paint and oily dirty wash down water should be disposed of to sewer (inside sinks or outside gully traps that take inside drainage and toilet waste, not those that take roof downpipes) or
If possible and depending on the toxicity of the waste, the contaminants should be labeled and sent to the Council refuse station with other wastes.
If in doubt as to which method of disposal is appropriate contact Council for advice. In addition, follow the steps below to reduce litter and prevent pollutants getting into stormwater and water bodies:
Follow manufacturers’ instructions for use and storage of materials
17
Store all waste in a way that prevents material loss caused by wind or water and store away from vehicular traffic, waterways or storm drains.
Store smaller materials, such as litter, in covered bins or mini-skips. Make it easy for staff to appropriately dispose of wastes by placing waste and recycling facilities in accessible areas
Retain waste and clean up from ‘wet trades’ on the site and contain it within the sediment control zone. Never let liquid waste from ‘wet trades’ into the stormwater system
Immediately contain and remove accidental spills, particularly from the road, kerb and channel or any location outside the sediment control area. Use a broom and shovel instead of hosing down surfaces.
Following storms, inspect the road reserve and sediment controls and clean them out without damaging them, so as to preserve the sediment retention capacity.
If hazardous materials are stored on site, volumes should be minimised. Chemicals should be kept in their original labeled containers and where possible, stored in secondary containments (eg a bunded area of impervious material) and under cover. Material safety data sheets should be kept onsite and the site should have an emergency spill kit suitable to the materials being used and stored.
Table 3 Non-Sediment Contaminants from Common Activities on Construction Site
Work activity or product Contaminant
indicator
Management approach
Adhesives and paint (glues, resins, epoxy, caulks, sealers, etc)
Oily sheen or other discolouration, odour
Store products in a location that is not subject to rainfall contact. Use adhesives carefully and clean up any spilled material. Properly dispose of containers once they are empty. Only clean brushes/applicators in areas that drain to sewer.
Asphalt paving (where special coatings are used)
Depends on coatings used, Oil sheen
New coated paving should not discharge directly to a reticulated system or to a receiving environment. Drainage from coated asphalt should go to a stormwater treatment system designed to capture contaminants of concern.
Cleaners Discolouration, odour
Store products in a location that is not subject to rainfall contact. Use cleaners carefully and clean up any spilled product. Do not hose the material into reticulated stormwater or waterbody. Properly dispose of containers once they are empty. Only clean applicators in areas that drain to sewer.
Concreting and exposed aggregate
Discolouration, alkaline wastewater
Concrete truck chutes, pumps and internals should be washed out only where it will not drain to stormwater or waterways. Unused concrete remaining in truck and pump must be returned to the originating batch plant or can be pumped out to an appropriate location, left to set then broken up and disposed to cleanfill. Hand tools must be washed off only into formed areas awaiting installation of concrete or asphalt where it will not drain to stormwater or waterways. Wastewater from wash down and concreting should be collected and disposed of at an appropriate facility.
Sanitary waste (portable toilets, sewer and septage overflows or leaks)
Visible sanitary waste, odour
Secure and protect portable toilets to avoid knocking them over. Have portable toilets serviced as needed. Identify and protect sanitary sewer lines that may exist on the site to avoid damaging them.
Vehicle and equipment use and maintenance (oils, lubricants, fuel, etc)
Oil sheen, sediment, black residue
Fuel tanks should be bunded to store 110% of the fuel tank capacity. Refueling and maintenance should only be undertaken in designated areas with sufficient stormwater protection. Keep machinery well maintained to minimize leaks. Procedures and practices should be implemented to avoid the discharge of lubricants or coolants to storm drains or receiving systems. Have spill prevention and control measures and training in place.
Treated wood (leachate from stored timber, sawdust and wood off cuts, formwork)
Greenish tinge to water, sawdust and cut wood pieces
Keep treated timber covered to keep it dry and minimise leaching of contaminants. Where possible also store on an impervious surface, not draining to stormwater (eg the plastic covering used during delivery). Where possible, minimise the use of treated timber for temporary forming. Clean up and dispose of treated wood sawdust and wood off-cuts to landfill.
Nutrients (soils, cut vegetation, grass clippings, weeds, fertilisers)
Excessive growth of filamentous green algae. Little discolouration
Limit soil disturbance were possible and implement effective erosion and sediment control practices. Ensure cut/cleared vegetation is disposed of where it will not enter stormwater or waterways. Ensure fertilizer application follows recommended concentrations and methods to ensure excess fertilizer runoff does not occur.

18
5 Stabilise the site Immediately after all outside construction activities have been completed, stabilise remaining exposed soils with turf, grass seed or mulch.
Topsoiling and grassing o Redistribute stockpiled subsoil to rough grade o Spread the stockpiled topsoil to a depth of 100 – 150 mm o Provide fertiliser as needed and sow or turf the area
Mulch o Ensure mulch is free of any noxious weeds o Readily decomposable mulches, such as straw, are only suitable for temporary stabilisation o Do not use woodchips around watercourses or where water can pond as it tends to float
away causing blockage issues downstream. Prevent any further vehicle movement onto stabilised areas to avoid compaction of soil, as this may hinder future plant growth and rainfall infiltration. Keep sediment controls – in particular boundary controls such as silt fences, in place until all exposed areas are permanently stabilised. Table 4 outlines the criteria for determining when stabilisation has been achieved. Table 4 Criteria for achieving stabilisation
Stabilisation method
When area is considered stabilised
Temporary / Short term Permanent / Long term
Sown grass Once areas have at least 80% coverage of healthy 100mm tall grass.
At least 80% grass cover has been achieved and is self-sustaining on an annual basis (not requiring intensive management or irrigation).
Turf (instant lawn)
Immediately - once turf is properly laid
Turf has firmly rooted to the ground surface AND at least 80% grass cover has survived and is self-sustaining on an annual basis (not requiring intensive management or irrigation).
Straw Mulch Immediately - once 30 mm (loose thickness) is laid
Not applicable – the use of decomposable mulches, such as hay and straw, are not suitable for long term stabilisation and must be replaced by another method to achieve permanent stabilisation.
Bark Mulch, aggregate or pebbles
Immediately once no soil exposed
Area will be considered stabilised while sufficient depth of coverage of underlying soils is maintained.
Figure 16 Grass strike densities -percent coverage

19
6 Decommission Control Measures Once the site is fully stabilised, remove any remaining temporary erosion and sediment control practices, such as:
Storm drain inlet protection
Silt fences
Clean water diversions
Decanting earth bunds Removal of these practices should ensure that any sediment trapped within them is disposed of appropriately and does not discharge into the waterways or stormwater networks. Any disturbed areas left by the controls should be appropriately stabilised.
7 Further information and advice It is important to recognise that every building site is unique and poses its own restraints, potential erosion hazards and sediment transport pathways. In some cases, additional or modified erosion and sediment controls may be necessary if your site is:
adjacent to a stream, lake or wetland
has steep slopes
is in an area with readily erodible soils
receives large amounts of runoff from adjacent areas, or
disturbs a large proportion of the site making fitting in standard controls difficult. Further information is available in the Tasman Erosion and Sediment Control Guidelines accessible on Tasman District Council’s website www.tasman.govt.nz. Alternatively for specialist advice for your site, contact Council on phone 03 543 8400.
Get it right and enjoy the benefits.
Figure 17 Photo credit R.Scherer

20
8 Small Site Basic Erosion and Sediment Control Plan Example An example of a basic small site Erosion and Sediment Control Plan is provided in Figure 19 using the scenario illustrated in Figure 18. A template for a basic ESCP is provided at the end of the document. Figure 18 Typical small scale building site with basic erosion and sediment controls
The ESCP involves:
A clean water diversion around the upslope side of the site to minimise runoff
A perimeter silt fence on the down slope side to intercept any sediment laden runoff - which also helps define the site boundaries
A stabilised accessway - including a dirty water diversion bund across the entrance way to redirect any runoff into areas bounded by silt fence
Designated areas within the silt fenced areas for storage of materials and stockpiles
Designated areas for trade activities to occur such as waste management and washing down of equipment
Protection of the roadside stormwater catchpit adjoining the site down slope from the accessway.

21
Figure 19 Small Site Basic ESCP example
