sustainable vegetable gardening slide 1 - washington …€¦ · · 2014-08-05sustainable...
TRANSCRIPT

Sustainable Vegetable Gardening Slide 1
Hi, this is Carol Miles. I’m the Vegetable Extension Specialist at the Washington State University, Mount Vernon, Northwest Washington Research and Extension Center. I’m here today to talk to you about sustainable gardening and vegetable production.
Slide 2
This is an overview of the class that we’ll discuss today. What I’ve done is I’ve divided your chapter into three sections: Garden Preparation, Planting the Garden, and Fall and Winter Gardening. And then I’ve highlighted within each section the main points that we’ll discuss. Your chapter includes a lot more information than this, but frankly there’s not enough time for us to cover everything, and so I’ve selected those points that I think would be most useful to you in today’s lecture. What I encourage you to do is to read your chapter (if you haven’t done so already) and to pick up the other points that we’re not going to discuss today.
Slide 3
The first point we’re going to discuss is garden preparation. There are three things you need to consider when selecting a garden site: light, water, and wind protection. For light you need full sunlight exposure for as many hours as possible each day in which you’ll be gardening. For water, you need easy access to water for summer irrigation. All vegetable crops require summer irrigation for the most part in our region. Wind protection is needed, especially if you're in an area where you know you receive heavy winds through the growing season.
While these points may seem very basic to you, I want you to keep a couple of things in mind. The first thing is that when you leave this class – when you graduate at the end – you’ll become Master Gardener volunteers. And as a volunteer you're going to be in the position where you will get questions from the general public about things that go wrong in the garden. I think I can guarantee you that you will almost never get a question about what went right in the garden. So you need to be prepared to try to determine what went wrong. These three basic requirements are essentials for good garden production and you’ll need to recognize when a plant does not have sufficient light, sufficient water, or when it has been exposed to heavy winds.
Slide 4
This is an example of a pea trellis, a structure that many of you may already have or a structure that you may want to consider putting in your garden if you are in a heavy wind area. This way where your garden structure itself serves as a windbreak. So while the peas will take the brunt of the wind and your yield will likely be reduced because of the wind, it’s a good way for you to use your garden to protect the other vegetable crops from the heavy winds.
Page 27 of 34
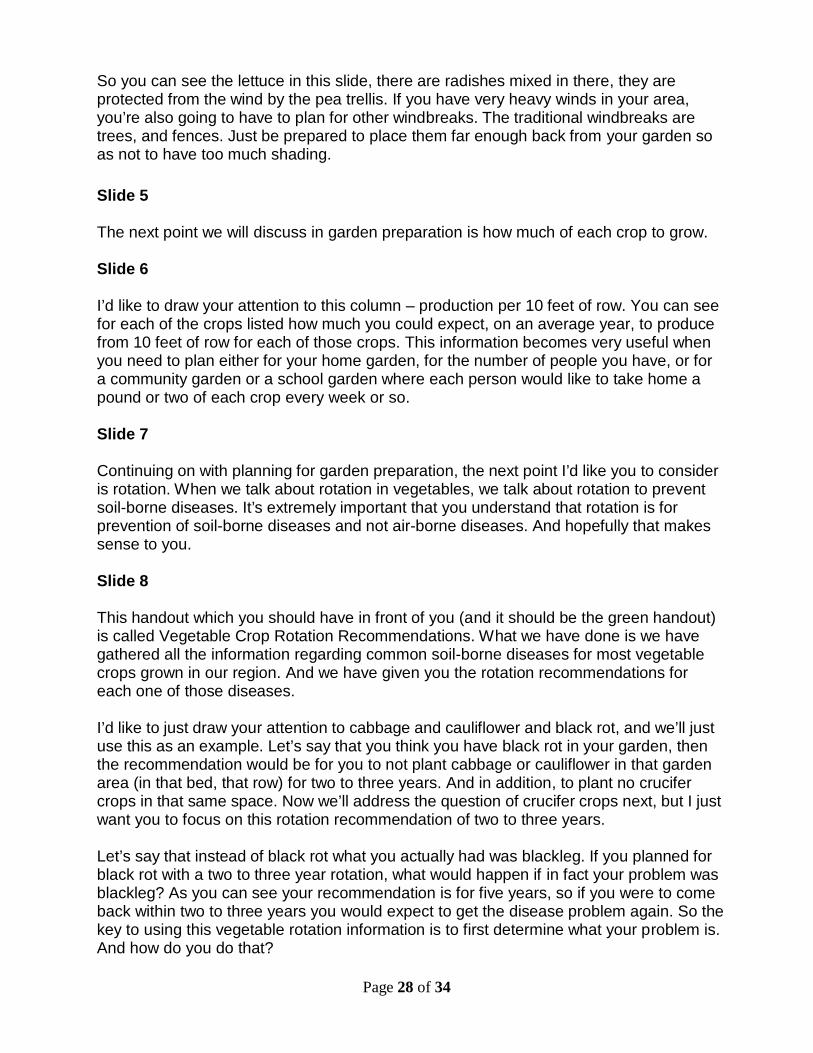
So you can see the lettuce in this slide, there are radishes mixed in there, they are protected from the wind by the pea trellis. If you have very heavy winds in your area, you’re also going to have to plan for other windbreaks. The traditional windbreaks are trees, and fences. Just be prepared to place them far enough back from your garden so as not to have too much shading. Slide 5
The next point we will discuss in garden preparation is how much of each crop to grow.
Slide 6
I’d like to draw your attention to this column – production per 10 feet of row. You can see for each of the crops listed how much you could expect, on an average year, to produce from 10 feet of row for each of those crops. This information becomes very useful when you need to plan either for your home garden, for the number of people you have, or for a community garden or a school garden where each person would like to take home a pound or two of each crop every week or so.
Slide 7
Continuing on with planning for garden preparation, the next point I’d like you to consider is rotation. When we talk about rotation in vegetables, we talk about rotation to prevent soil-borne diseases. It’s extremely important that you understand that rotation is for prevention of soil-borne diseases and not air-borne diseases. And hopefully that makes sense to you.
Slide 8
This handout which you should have in front of you (and it should be the green handout) is called Vegetable Crop Rotation Recommendations. What we have done is we have gathered all the information regarding common soil-borne diseases for most vegetable crops grown in our region. And we have given you the rotation recommendations for each one of those diseases.
I’d like to just draw your attention to cabbage and cauliflower and black rot, and we’ll just use this as an example. Let’s say that you think you have black rot in your garden, then the recommendation would be for you to not plant cabbage or cauliflower in that garden area (in that bed, that row) for two to three years. And in addition, to plant no crucifer crops in that same space. Now we’ll address the question of crucifer crops next, but I just want you to focus on this rotation recommendation of two to three years.
Let’s say that instead of black rot what you actually had was blackleg. If you planned for black rot with a two to three year rotation, what would happen if in fact your problem was blackleg? As you can see your recommendation is for five years, so if you were to come back within two to three years you would expect to get the disease problem again. So the key to using this vegetable rotation information is to first determine what your problem is. And how do you do that?
Page 28 of 34

Well, the obvious answer (which I hope you all know) is to take your plant samples to the Master Gardener clinic. And I sincerely hope that many of you will be working in that clinic and you will learn through your volunteer hours how to recognize diseases. And then you can use that information in your own gardens. So let’s get back to that crucifer crop.
Slide 9
This handout here, which I hope you have in front of you and should be pink, is a table of Vegetable Crop Classification. And what I’ve done is I've just given you the main families. So those names in bold, starting with New Zealand spinach, and the family name would be Aizoaceae, are your family names. And if we go down and you look in the left column what you’ll see is the family names Brassicaceae and Cruciferaceae. Those two names are used equivalently and interchangeably. So the Brassica family or the Crucifer family are one and the same. And if you look at the crops included in that family I’m sure you’ll recognize many crops (broccoli, Brussels sprouts, cabbage, cauliflower, etc.) So when you’re rotating for vegetable diseases and it says, “no crucifer crops in the same area,” in Crucifers you can see all these various vegetables that you should not plant when you get a disease that can be transmitted within the family. So a general rule of rotation would be to rotate by family. And this would be just a way to prevent any disease buildups in your garden and I think it’s a good rule to follow. And certainly what I do in my garden is I rotate by bed. So I have my Brassicas in one bed one year and I move them to the next bed the next year. And I try not to put too many Brassicas in the garden at one time. That’s one of the biggest challenges we have, I think, in our area. But it’s something for you to plan for and hopefully this information will help you to do that.
Slide 10
So the next point on planning that we’re going to talk about is irrigation. When you plan to put in your irrigation system in your garden I hope you will be thinking about water efficient systems because not only do they conserve water but they also help prevent diseases.
When you use your irrigation system, your timing should be such that you apply in the early morning and mid-afternoon so to avoid wet plants going into the night. This is especially true if you are overhead watering. And I know this contradicts some of the information that you’re going to be reading elsewhere, especially from other parts of the country where they recommend that you irrigate in the evening or even going into the early night. The difference between us and every other area of the country essentially is that we have cool wet nights. Most of the diseases we have in our area thrive in cool wet environments. So watering in the evening or late afternoon and having a wet plant going into the night you are creating a very good disease environment. So in order to limit disease, I recommend that you irrigate early in the morning or in the mid-afternoon so your plants have the opportunity to dry off before going into the night. Of course your other option is to not overhead irrigate and we’ll talk about that in the next set of slides.
In terms of amount of water, in general the recommendation is for one inch of water a week. There are various ways that you can calculate that and I have a few slides here to
Page 29 of 34
show you how you can measure it visually. It’s not completely scientifically accurate, but it will give you some idea of what you’re working with.
Slide 11
These next slides will show you some different watering techniques, and although this first slide is from our commercial spinach field, it should be equivalent to your overhead sprinkler in your garden. I wanted to show you this slide because I took this slide two years ago, now, at our research station down in Vancouver. This is a masters student project and what the masters student was doing was investigating spinach disease. And the best way for us to get spinach disease in western WA was to overhead irrigate. So, one of the best ways that you can prevent disease in your garden is to get away from overhead irrigation.
Slide 12
Some options for you... this is the first one. This would be a soaker hose. This is commonly available in many garden stores. I’m not completely satisfied with this technique because if you’re familiar with soaker hoses then you know that the water sprays up into the plants as well as down on the ground. It’s definitely better than the overhead watering, but it’s not as good as you can get. In terms of water use efficiency, this system is as efficient as any drip system, so your water use is generally cut in half as compared to overhead irrigation. But you still end up with some wet plants and I think that in an optimum garden you really want to get away from the wet plants.
Slide 13
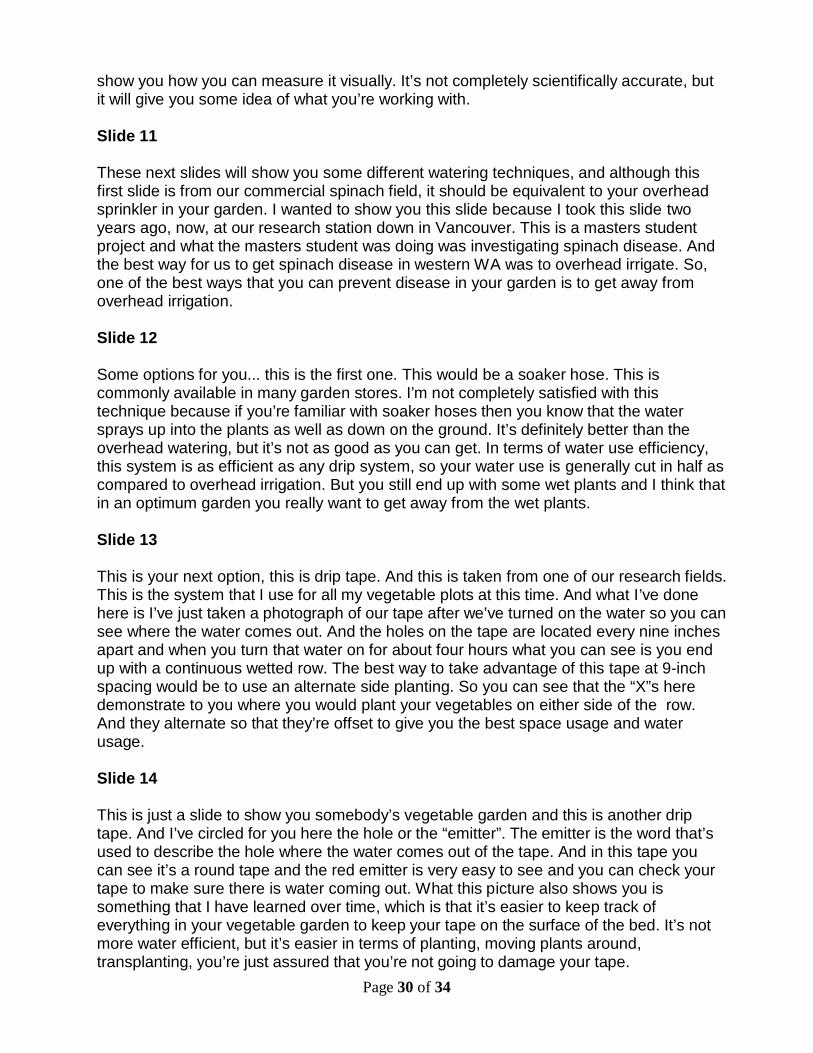
This is your next option, this is drip tape. And this is taken from one of our research fields. This is the system that I use for all my vegetable plots at this time. And what I’ve done here is I’ve just taken a photograph of our tape after we’ve turned on the water so you can see where the water comes out. And the holes on the tape are located every nine inches apart and when you turn that water on for about four hours what you can see is you end up with a continuous wetted row. The best way to take advantage of this tape at 9-inch spacing would be to use an alternate side planting. So you can see that the “X”s here demonstrate to you where you would plant your vegetables on either side of the row. And they alternate so that they’re offset to give you the best space usage and water usage.
Slide 14
This is just a slide to show you somebody’s vegetable garden and this is another drip tape. And I’ve circled for you here the hole or the “emitter”. The emitter is the word that’s used to describe the hole where the water comes out of the tape. And in this tape you can see it’s a round tape and the red emitter is very easy to see and you can check your tape to make sure there is water coming out. What this picture also shows you is something that I have learned over time, which is that it’s easier to keep track of everything in your vegetable garden to keep your tape on the surface of the bed. It’s not more water efficient, but it’s easier in terms of planting, moving plants around, transplanting, you’re just assured that you’re not going to damage your tape.
Page 30 of 34
Slide 15
This is an example from one of our plantings. This happens to be in a hoop house. It’s a winter production of Asian greens and lettuce. And when we started this research study what we did is we started with one tape per row but we quickly learned in our first season that that wasn’t necessary so we decreased that to two tapes per row. But what I wanted to show you with this set of slides was the way that we hook up that drip irrigation tape.
Slide 16
You see where the tape comes to the end it’s connected to a hard plastic hose which we purchased from an irrigation supply store. There’s a shut on and off valve at every line and the black plastic hose is connected to a garden hose. Slide 17
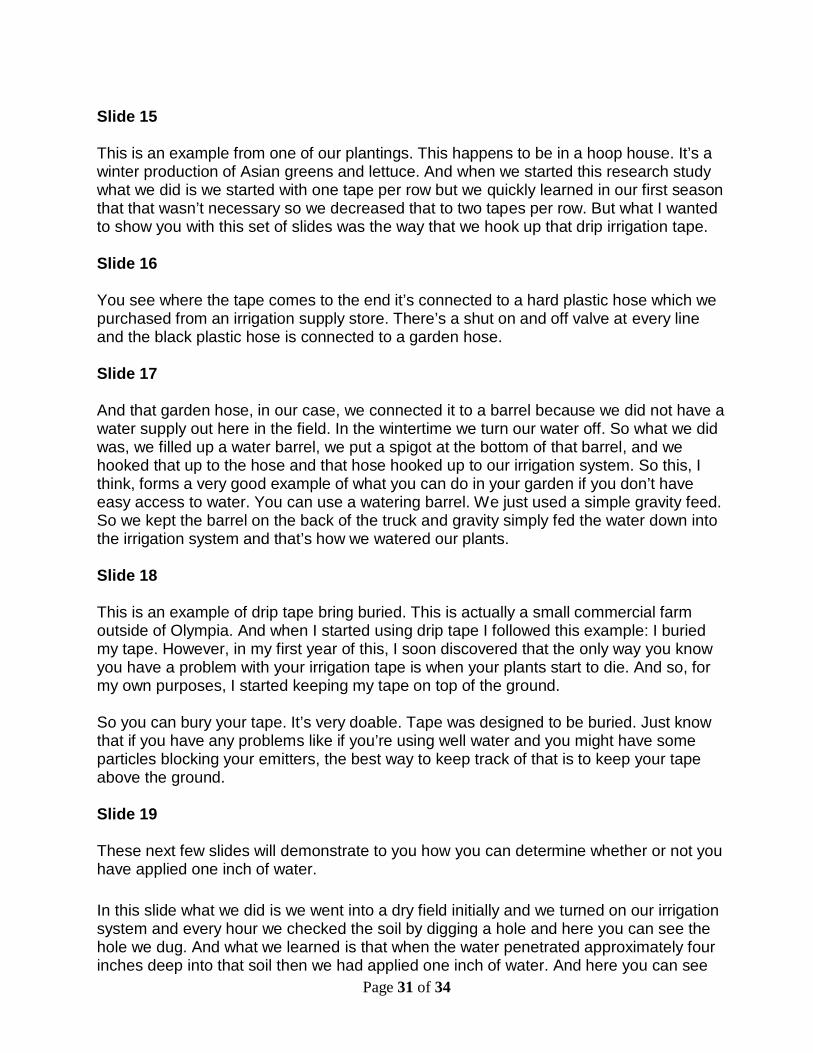
And that garden hose, in our case, we connected it to a barrel because we did not have a water supply out here in the field. In the wintertime we turn our water off. So what we did was, we filled up a water barrel, we put a spigot at the bottom of that barrel, and we hooked that up to the hose and that hose hooked up to our irrigation system. So this, I think, forms a very good example of what you can do in your garden if you don’t have easy access to water. You can use a watering barrel. We just used a simple gravity feed. So we kept the barrel on the back of the truck and gravity simply fed the water down into the irrigation system and that’s how we watered our plants.
Slide 18
This is an example of drip tape bring buried. This is actually a small commercial farm outside of Olympia. And when I started using drip tape I followed this example: I buried my tape. However, in my first year of this, I soon discovered that the only way you know you have a problem with your irrigation tape is when your plants start to die. And so, for my own purposes, I started keeping my tape on top of the ground.
So you can bury your tape. It’s very doable. Tape was designed to be buried. Just know that if you have any problems like if you’re using well water and you might have some particles blocking your emitters, the best way to keep track of that is to keep your tape above the ground.
Slide 19
These next few slides will demonstrate to you how you can determine whether or not you have applied one inch of water.
In this slide what we did is we went into a dry field initially and we turned on our irrigation system and every hour we checked the soil by digging a hole and here you can see the hole we dug. And what we learned is that when the water penetrated approximately four inches deep into that soil then we had applied one inch of water. And here you can see
Page 31 of 34
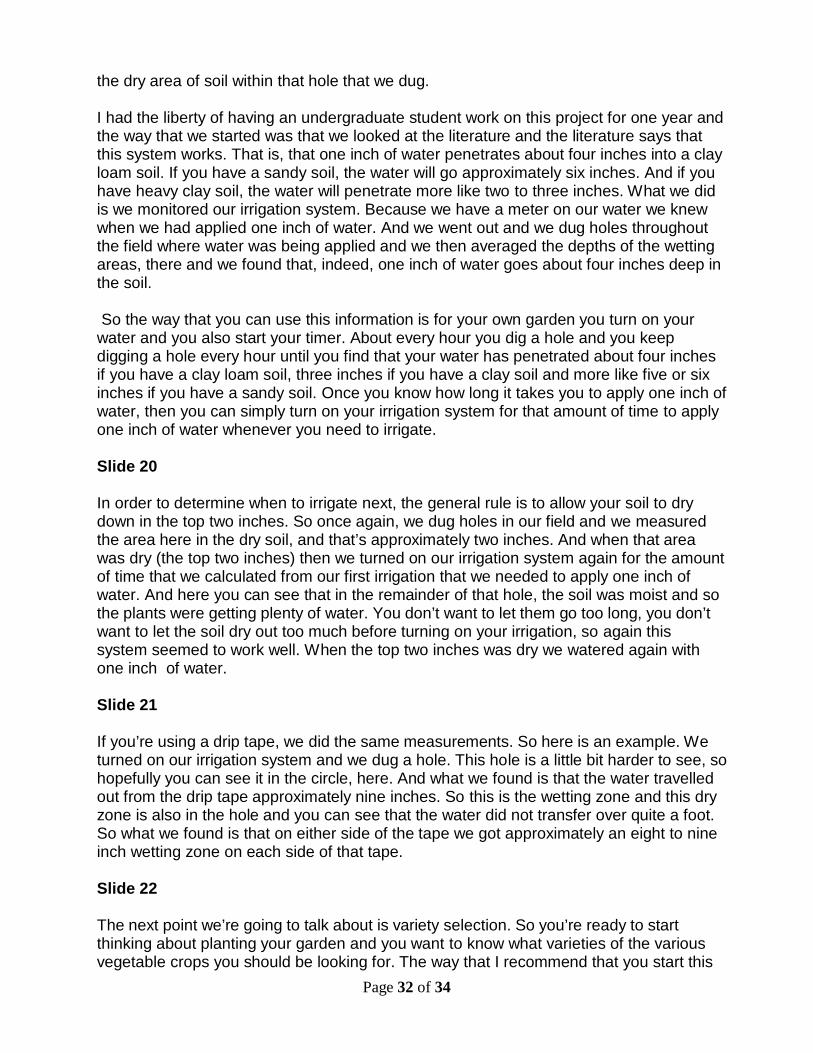
the dry area of soil within that hole that we dug. I had the liberty of having an undergraduate student work on this project for one year and the way that we started was that we looked at the literature and the literature says that this system works. That is, that one inch of water penetrates about four inches into a clay loam soil. If you have a sandy soil, the water will go approximately six inches. And if you have heavy clay soil, the water will penetrate more like two to three inches. What we did is we monitored our irrigation system. Because we have a meter on our water we knew when we had applied one inch of water. And we went out and we dug holes throughout the field where water was being applied and we then averaged the depths of the wetting areas, there and we found that, indeed, one inch of water goes about four inches deep in the soil.
So the way that you can use this information is for your own garden you turn on your
water and you also start your timer. About every hour you dig a hole and you keep digging a hole every hour until you find that your water has penetrated about four inches if you have a clay loam soil, three inches if you have a clay soil and more like five or six inches if you have a sandy soil. Once you know how long it takes you to apply one inch of water, then you can simply turn on your irrigation system for that amount of time to apply one inch of water whenever you need to irrigate.
Slide 20
In order to determine when to irrigate next, the general rule is to allow your soil to dry down in the top two inches. So once again, we dug holes in our field and we measured the area here in the dry soil, and that’s approximately two inches. And when that area was dry (the top two inches) then we turned on our irrigation system again for the amount of time that we calculated from our first irrigation that we needed to apply one inch of water. And here you can see that in the remainder of that hole, the soil was moist and so the plants were getting plenty of water. You don’t want to let them go too long, you don’t want to let the soil dry out too much before turning on your irrigation, so again this system seemed to work well. When the top two inches was dry we watered again with one inch of water.
Slide 21
If you’re using a drip tape, we did the same measurements. So here is an example. We turned on our irrigation system and we dug a hole. This hole is a little bit harder to see, so hopefully you can see it in the circle, here. And what we found is that the water travelled out from the drip tape approximately nine inches. So this is the wetting zone and this dry zone is also in the hole and you can see that the water did not transfer over quite a foot. So what we found is that on either side of the tape we got approximately an eight to nine inch wetting zone on each side of that tape.
Slide 22
The next point we’re going to talk about is variety selection. So you’re ready to start thinking about planting your garden and you want to know what varieties of the various vegetable crops you should be looking for. The way that I recommend that you start this
Page 32 of 34
search is by looking for varieties that are resistant to the problems we have in our region. One of the ways to start identifying what our problems are is if you back to that green handout that has the common soil-borne diseases.
Slide 23
And here’s that handout, right here. These are the soil-borne diseases, so you know that these are common diseases in our area. But you also need to know about foliar diseases or problems that are going to come in through other means than just your soil system.
Slide 24
You use plant catalogs (vegetable catalogs) and a lot of those vegetable catalogues provide information about disease resistant varieties and this blue handout is a handout of seed and plant catalog sources. I think it’s relatively current, but you can certainly let me know if you find any addresses or web addresses or phone numbers that aren’t correct and I’ll certainly try to update this for you. Slide 25
Here’s an example for you. This is snap peas and if you look at this variety of snap peas (I think this is from the Territorial catalogue) what you can see is that this snap pea variety is pea enation resistant. What I can tell you is that pea enation virus is a major problem that we have in our area and if you’re going to grow peas here, you definitely want to be selecting a variety that is resistant to pea enation virus. So this is a way that you can use your catalogs to give you a better idea of what varieties you should be looking for and then you can certainly buy those varieties either locally or through catalogs or however you get them. But this is just a way for you to identify which varieties you should be looking for.
Slide 26
And this is just a slide to show you what pea enation virus symptoms look like on your peas. Hopefully you can see this slide… that it comes clearly across on the screen in front of you. What you see are the classic virus symptoms in the leaves, where those leaves have a yellow striation pattern to them. That should automatically tell you that you think there might be a virus going on. But the other major issue is on the pea pods themselves. Where the pea pods have an uneven surface to them. Pea pods should be smooth and these are somewhat bubbly. And that bubbliness is due to the virus. So if you see these kinds of symptoms on your plant you more than likely have pea enation virus.
Slide 27 The second factor you should be selecting for is short season. That is, varieties that will produce a crop in a relatively short amount of time. I wanted to give you some background information on why short season is so important, so as Master Gardeners you can have a better understanding of why some crops and some varieties are considered short season
Page 33 of 34
Plants grow in response to heat, so often short season is described by growing degree days, also called heat units. In order to understand what the growing degree days are in your area, you need to understand what the weather conditions are in your area. I’ve provided a website for you here, where you can go and see the historical weather data for your area. It’s not a website where you’ll get the current weather information, but it is a website where you’ll see the historic information for your area for the maximum temperatures, the minimum temperatures, and a lot of other information you might also find useful.
But for the growing degree days discussion we’re going to have now, the important information is maximum temperature and minimum temperature. You can see from this equation here that growing degree days is equal to the maximum temperature plus the minimum temperature, divided by two; then you subtract the base temperature. The base temperature I’ll provide for you for some crops in the next several slides. For a better understanding of what growing degree days is, I encourage you to refer to Chapter 6, pages 12-13. But the next slides will give you an example of weather conditions in one area of Washington and then we’ll talk about the base temperatures for some of those crops.
Slide 28
So if you pull up the pink handout and you look at the weather data…. and I just included an example here from Centralia, Washington, but you pull out the weather data for your area. And I want to bring to you attention two pieces of information. So the first one is right here: the average maximum temperature. And the second one is the average minimum temperature. These are the two numbers you’re going to be looking at for calculating the growing degree days in your area. So if you were to go to June, for example, you would write down the maximum temperature for June, plus the minimum temperature for June and then you add that up and divide by two. That will give you the average daily temperature for any day in June. You can follow through with that equation and you can calculate the average daily temperature for the month of June. And frankly I wouldn’t worry about this equation more than that. Just know that if you come back to wanting to calculate growing degree days for your area, you can do it with this information.
The other thing I want to bring to your attention on this handout is this bullet down here. If you go to the website, you can actually click on growing degree days and you can enter the base temperature. We’re going to talk about base temperature next. And this website will give you growing degree days on a base temperature for your area. So this website will do all these calculations for you but I just wanted to give you an idea of how the calculations were made.
Slide 29
So now let’s talk about base temperature. For every crop there is a temperature below which that crop doesn’t grow. Now, this is not the temperature by which the crop dies, it’s the temperature by which it's just not actively growing. So here you have your yellow
Page 34 of 34
handout, there’s a table there and I have given you the base temperatures for a good number of crops (certainly not all of them, but a good number.) And if we just look at the crops with a base temperature of forty (this is a very common base temperature crop for our cool season crops) then you can see all crops with a base temperature of forty. These are crops that would be well suited for fall production, spring production, and some of them even for winter production. Now if we look at the crops with a base temperature of fifty, these are our summer crops for our area. So, beans, peppers, etcetera. Now you know peppers are a little bit challenging, but you can see that they have a base temperature of fifty so theoretically we can grow them in our area.
Now if we look at the crops that have a higher base temperature (this would be a base temperature of sixty…) Cucumber… cucumber we can actually grow here pretty well just because we have some varieties that do well for our region, but you can see these other crops: eggplant okra, sweet potatoes… they are difficult for us in general. You definitely have to take a little bit more care with them. Watermelon, again, with a fifty-five degree base temperature along with cucumbers… with the right varieties you can grow these crops in our area without a problem.
Slide 30
If you look at this table (this is Table 9 in your chapter) and it includes the minimum temperatures, the optimum temperatures, and the maximum temperatures for some key vegetable crops. I’d like to draw your attention to corn and musk melon, and what you’ll see is that the minimum temperatures are temperatures that we have in our area throughout the summers, but if you look at the maximum temperatures, you’ll see that those are temperatures that we don’t often reach here in western Washington.
That’s why these two crops are a challenge for us to grow here. But if you look at peas, what you can see is that the minimum temperatures and the optimum temperatures are both temperatures that we have in western Washington for the most part through the early summer. However, you can see the maximum temperature for many areas in western Washington is a little lower than what our high summer temperatures are, and this is why peas don’t do so well here in the summertime.
Slide 31
Now when you go to select varieties, the way that I recommend you do it is you look at your seed catalogues, you look at your seed packs and what you’ll see is they’ll tell you how many days to maturity. And you want to be looking for varieties that will mature relatively early, so certainly 70 days… the packet on the left there is 75 to 80 days. I’m sorry about that, that 75 got erased a little bit. But the one on the right is 68 days. These are the type of varieties you want to be looking at. Anything above 100 days more than likely you’re not going to be getting to maturity in our area unless you have a greenhouse or that kind of thing.
Slide 32 So the next thing in garden preparation we’re going to talk very briefly about because you will have already had your soil class or you will be having it very shortly, is preparing the
Page 35 of 34

soil for your garden. The general recommendation is to conduct a soil test every 3 to 5 years. So this means looking at the nutrient level of your soil. But just as important as looking at the nutrient level is you want to be looking at the pH level in your soil. And I use the word “ambient” here, the ambient pH for soil in our region is 5.2 to 5.5 and what I mean by that is that if you have a soil and don’t add anything to it, this is what you can expect in terms of pH. Now vegetables need a pH of 6.0 to 6.5, so you’re going to have to increase that pH by at least one unit for most of you. So what can you do to increase the soil pH? What are some things you can add to your soil?
Hopefully you said “lime” and hopefully you also said “compost.” I think probably most of you are already familiar with lime, but you need to know that compost is an organic matter that then leads to the increase of soil pH, so if you have an annual composting regime, you can actually bring your soil pH up quite well.
Slide 33
In terms of preparing the soil, the next thing to consider is tilling the soil. And tilling simply refers to turning the soil over. And I wanted to point out something that your chapter talks about. It’s something that I don’t quite agree with but I wanted to bring it to your attention. And that is fall versus spring tillage. So in your chapter (chapter 7 on page 162) it recommends cleaning up the garden at the end of the year and it suggests that you remove all your vegetable crops and you leave your soil bare going into the winter. And this is not something I recommend, especially for us in western Washington where we get quite a bit of rain. The soils are open to leeching, they’re open to compaction, to erosion… I really recommend that as much as possible, you cover your soils going into the winter and you can use your vegetable plants to do that. So, winter gardening (and we’ll be talking about that near the end of this presentation), use winter vegetables to cover your garden area (your soil area.) You can also use cover crops, you can use mulch. There are many things you can do to not have a bare soil going into the winter.
I did want to mention that one of the things I do in my garden is instead of pulling out my vegetable plants I actually cut them off at the soil surface and I leave the roots in place. So I’m not turning my soil over. This enables me to either have another crop already planted or to be able to transplant right into my summer crops that I’ve just removed. I put my winter crops (my fall crops) right in the ground with them. It also leaves the roots in place and what this accomplishes is those roots will degrade right in the soil as deep down as they go. That puts the organic matter right where you need it. When those roots degrade you get channels. Those channels allow water to percolate through faster and they also leave area for worms to migrate through easier. So I think this is a healthy approach to building up a healthy soil that can be beneficial to you in your gardens.
Slide 34
Most of you are likely going to be adding nutrient amendments (fertilizers) to your ground and your chapter talks about three different methods of application. So there’s broadcast, there’s band, and there’s a split application. A broadcast band is simply sprinkling that fertilizer over the entire are and then tilling it in. So whatever fertilizer you apply, you should always incorporate it. It always should be covered in soil and this should prevent it from being volatilized (that is, the nutrients going up into the air.) Banding your fertilizer is
Page 36 of 34
a more efficient way to apply your fertilizer. You use less fertilizer, you apply it directly to the crop. So if you have a row crop (beans, for example, or corn) what you do is you put that band of fertilizer just to the side of the crop. Two, four, six inches… it all depends on whether you’re doing this at planting. If you’re doing this at planting, then two inches to the side. If you’re doing it when the crop is up, you want to do it at the edge of the drip zone for that crop (and we’ll talk about that a little bit later.) And so it allows you to reduce the amount of fertilizer going on to your crop.
Now, split application refers to putting fertilizer on at several different times. So you put a starter fertilizer on as you seed the crop or transplant. And then you apply smaller amounts of fertilizer over the season. Just know that if you do this, the total amount of fertilizer you apply should be the same as if you were to apply all the fertilizer at once. So you should not be applying more fertilizer if you do a split application.
There are three different ways which you’re likely going to get fertilizer. So the first common way would be through a chemical fertilizer product. And that fertilizer product likely has nitrogen, phosphorus, potassium in it. And perhaps it has some other nutrients as well. And those are abbreviated as N-P-K. So N is nitrogen, P is phosphorus , and K is potassium. And the bag of fertilizer will tell you (and this will be our next slide, so we’ll get there next) but the bag of fertilizer will tell you what the percent of N-P-K is. Even if there is no N-P-K in that fertilizer, by law, they must tell you what the percent of N-P-K of the fertilizer is.
The second way that most people may be getting fertilizer into the garden… so I’m not sure how many of you use manure. But if you do use manure, in a couple of slides here I’ll show you our handout that we have about manure applications. And then the third way would be compost. So, hopefully you’ve already had your composting class and if not, I’m sure you will be getting that soon. But compost is a great way for you to recycle plant material from your garden and put it back into the soil and it’s a good source of nutrients and as I said earlier it also enables you to increase pH. Slide 35
So, looking at a bag of fertilizer, here’s just an example of a product that we use in our vegetable research trials up at WSU Mount Vernon. And the name of the product happens to be “Par4” and if you look at this number right here, that’s the percent of N-P- K, nitrogen, phosphorous, and potassium that’s in that fertilizer. And as I mentioned, all bagged fertilizers must tell you what percentage of N-P-K is in that product. This bag also happens to have an application rate for vegetable gardens. It recommends ten pounds per one thousand square feet. So this is very helpful to you if you’re not sure where to start with fertilizers and how much to apply. This at least gives you some kind of a guidance, but of course you should always use your soil test results to fine tune your fertilizer application rates.
Slide 36
Now hopefully you have this handout. This should be on a brown colored piece of paper. This is the manure management guide that we’ve developed for vegetable gardens. It’s
Page 37 of 34

based on the national recommendations for vegetable gardens using manure. And I just want to bring your attention to this section right here. It says, “Do not harvest vegetables or fruits within 120 days of manure application.” So, if you’re familiar with when you plant vegetables (most vegetables, certainly summer vegetables in our area) and when you harvest them, you know that we don’t usually have 120 days between planting and harvesting, so what this essentially means is no fresh manure application within the cropping season. And indeed, for those of you interested in organic production, organic production by law prohibits the use of fresh manure in vegetable crops, so everything has to be composted.
So this is just for your information and reference and hopefully it’s useful to you if you have a chance to read it over later.
Slide 37
This slide just shows you some examples of composting, garden composting. I took this slide at a Master Gardener demonstration garden at one of the fairs. And they’re all different ways that you can construct a compost bin. And hopefully by now all of you have a composting bin in your gardens and you’re composting all of your garden waste and hopefully your kitchen waste as well. Slide 38
So, in terms of garden preparation, the next thing we’re going to talk about is when to start digging. And the biggest issue we have in western Washington is not digging in a wet soil. So usually by February or March we’re anxious to go, but in many cases our soils can still be too wet. If you dig in a wet soil, just know that you physically can destroy your soil structure. So you just want to wait for that saturated condition to eliminate itself. A well moistened soil is good, but a saturated soil is not.
One of the ways that by adding compost back into your ground you can get an earlier start is that compost, which is a great source of organic matter, improves your soil drainage, it increases soil temperature. At the same time, it increases water holding capacity so it gives you better drought tolerance going into the summer. And as we already discussed, it’s a good source of plant nutrition and it also will raise your pH.
Slide 39
Raised beds are another really effective way of increasing your drainage, which then again allows you to get into your garden earlier. So, by simple gravity, the water is drained out of your soil. By having less water that increases heating. Those two things, less water and greater temperatures, enable you to get into your ground earlier.
I also wanted to point out this benefit because in our area this matters quite a bit, is that those two factors (increased drainage, increased heating) then reduce the amount of root rot we have. And root rot is a primary disease we have in our area and it thrives in a cold wet soil.
Slide 40
Page 38 of 34
This is just an example of a raised bed. This happens to be surrounded by a wooden frame. There’s no reason why you have to use a wooden frame for your raised beds but this is just an example. There’s no general rule about how high a bed has to be. I guess, if I was to make a recommendation, I would suggest you’d probably want a raised bed of about six inches. Just know that its height is probably going to sink over time. So by the end of the year you probably want to be building it up again and by the spring you want to be building up again as well.
Slide 41
This is just an example of a raised bed in our research trials. This happens to be tomatoes. This bed is again about six inches high and it’s covered in black plastic. With our tomatoes we found that this combination of raised bed with black plastic increases our tomato production because of the reasons already stated earlier. It improves drainage and thereby improves heating.
Slide 42
This is another example of a raised bed. This is somebody’s garden. This one happens to be up on Lopez island. And you can see that they used railroad ties to frame their bed. So, again, those railroad ties are about six inches high. So the bed is about six inches high and it just gets refilled with compost or maybe moving some new soil in as the bed gets depleted every year to keep it up elevated. And really, raised beds are definitely a wise choice for us in our area.
Slide 43
Now your chapter discusses this technique “double digging,” and I wanted to go over this with you if you’re not familiar with it because it’s something you see periodically and I just wanted you to be familiar with it so you can decide whether or not this is a system you want to use either in your garden or also if you’re going to become a volunteer working with school gardens or community garden projects. Many times a lot of the literature you get talks about double digging and you need to know what it requires to double dig a bed and whether or not that’s a good choice for you.
So first off, I want you to know that this is a very old gardening technique. It was publicized in the United States by Organic Gardening (Bob Rodale). It came into the US in the early 1900s. It comes out of Europe and it’s probably hundreds of years old, I just don’t have the documentation to show that one way or the other but it’s a very old technique and it’s used to create a raised bed. What it does is it loosens the soil below the top of that bed to 12 or 18 inches. What that means is that you need to be able to dig 12 to 18 inches deep in order to get a raised bed formed in your garden. So if you can’t dig 12 to 18 inches deep in your garden you probably don’t want to be thinking about doing double digging.
One of the primary functions double digging does is that it gives you that loosened soil and then the second function is that it provides a layer of compost at the bottom of that dug bed. So now I’m going to show you what the process of double digging is.
Page 39 of 34
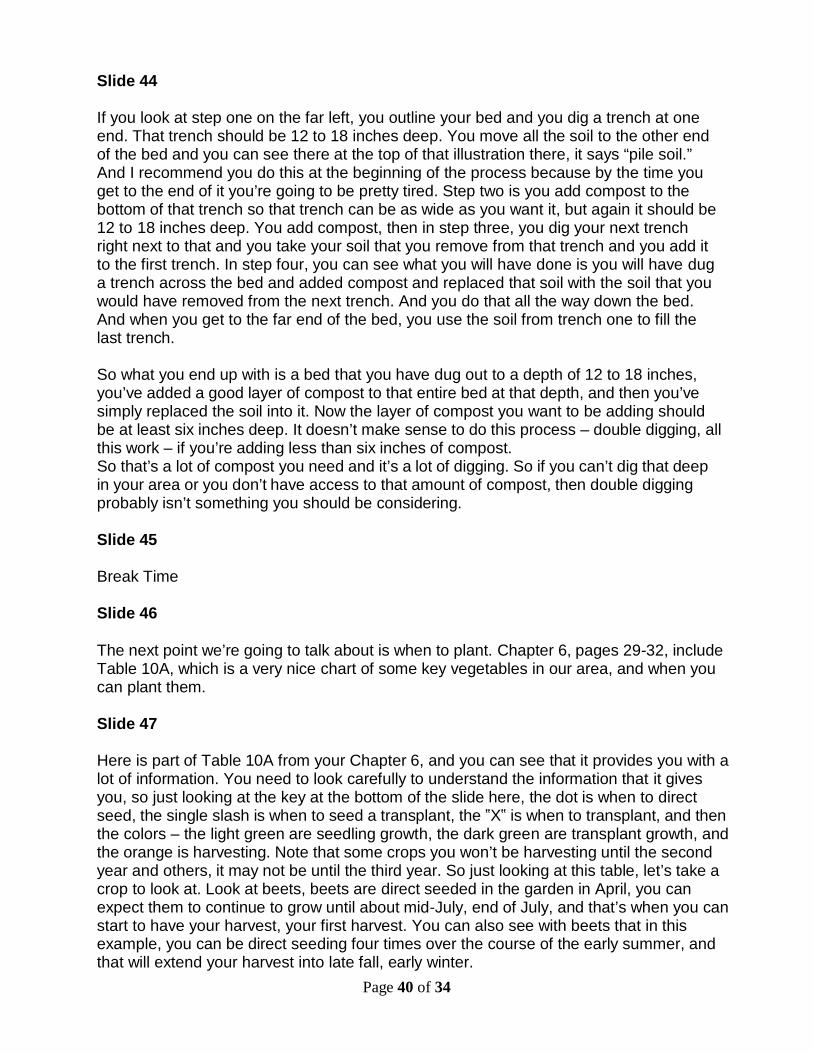
Slide 44 If you look at step one on the far left, you outline your bed and you dig a trench at one end. That trench should be 12 to 18 inches deep. You move all the soil to the other end of the bed and you can see there at the top of that illustration there, it says “pile soil.” And I recommend you do this at the beginning of the process because by the time you get to the end of it you’re going to be pretty tired. Step two is you add compost to the bottom of that trench so that trench can be as wide as you want it, but again it should be 12 to 18 inches deep. You add compost, then in step three, you dig your next trench right next to that and you take your soil that you remove from that trench and you add it to the first trench. In step four, you can see what you will have done is you will have dug a trench across the bed and added compost and replaced that soil with the soil that you would have removed from the next trench. And you do that all the way down the bed. And when you get to the far end of the bed, you use the soil from trench one to fill the last trench.
So what you end up with is a bed that you have dug out to a depth of 12 to 18 inches, you’ve added a good layer of compost to that entire bed at that depth, and then you’ve simply replaced the soil into it. Now the layer of compost you want to be adding should be at least six inches deep. It doesn’t make sense to do this process – double digging, all this work – if you’re adding less than six inches of compost. So that’s a lot of compost you need and it’s a lot of digging. So if you can’t dig that deep in your area or you don’t have access to that amount of compost, then double digging probably isn’t something you should be considering.
Slide 45
Break Time
Slide 46
The next point we’re going to talk about is when to plant. Chapter 6, pages 29-32, include Table 10A, which is a very nice chart of some key vegetables in our area, and when you can plant them.
Slide 47
Here is part of Table 10A from your Chapter 6, and you can see that it provides you with a lot of information. You need to look carefully to understand the information that it gives you, so just looking at the key at the bottom of the slide here, the dot is when to direct seed, the single slash is when to seed a transplant, the ‟X‟ is when to transplant, and then the colors – the light green are seedling growth, the dark green are transplant growth, and the orange is harvesting. Note that some crops you won’t be harvesting until the second year and others, it may not be until the third year. So just looking at this table, let’s take a crop to look at. Look at beets, beets are direct seeded in the garden in April, you can expect them to continue to grow until about mid-July, end of July, and that’s when you can start to have your harvest, your first harvest. You can also see with beets that in this example, you can be direct seeding four times over the course of the early summer, and that will extend your harvest into late fall, early winter.
Page 40 of 34
Slide 48
One of the primary factors to consider when trying to decide when to start planting is soil temperature. Seeds germinate best when temperatures are 76 to 80 degrees. However, you know that in our area we don’t get temperatures of 76-80 until mid or late summer, which is too late for planting most of our summer vegetable crops. So what you really need to consider is the minimum temperature for germination, which is 60 degrees. When soil temperatures are below 60 degrees, germination is slow and disease problems tend to be high. For spring and fall crops, refer to the minimum temperatures for growth of those crops for the soil temperatures and when to plant. Refer to PNW 170, Propagating Plants from Seed, pages 9-10, for more information on temperatures for germination and (missing word).
Slide 49
The next point I want to discuss with you is succession planting. Succession planting is planting the same crop every few weeks to ensure a wide harvest period. This is discussed in your chapter, 6, on pages 9-10, and out next slide will be Table 10A, again, and we’ll look again at some of the planting dates and harvest times for various crops.
Slide 50
Here is Table 10A again, and as you can see, again referring down to the key, with the dot being direct seeded, for those crops where we have multiple dots, let’s just look at carrots, so carrots are direct seeded beginning in April and then every three or four weeks you seed them again, and what that does, is that enables you to harvest carrots all the way through the following January. So by having succession planting, seeding the same crop every two, three, four weeks, you can extend your harvest period by several months.
Slide 51
Intensive gardening is a technique used to maximize your space. It’s very useful if you have a small garden or you have a high demand for vegetables. Raised beds are most commonly used in intensive gardening because they enable you to plant the highest number of plants possible in a small amount of area. You use the very close plant spacing that is provided in Table 2, pages 3-4 of PNW 170, and we’ll look at that table next.
Slide 52
Here is Table 2 from PNW 170. I’d like to draw your attention to this column, which is the distance between plants in the row in inches. In intensive gardening, you use this distance for plants in the row, but also you use it for plants between the rows. Use an offset planting technique or the diamond to get the maximum number of plants possible in your bed.
Slide 53
Page 41 of 34
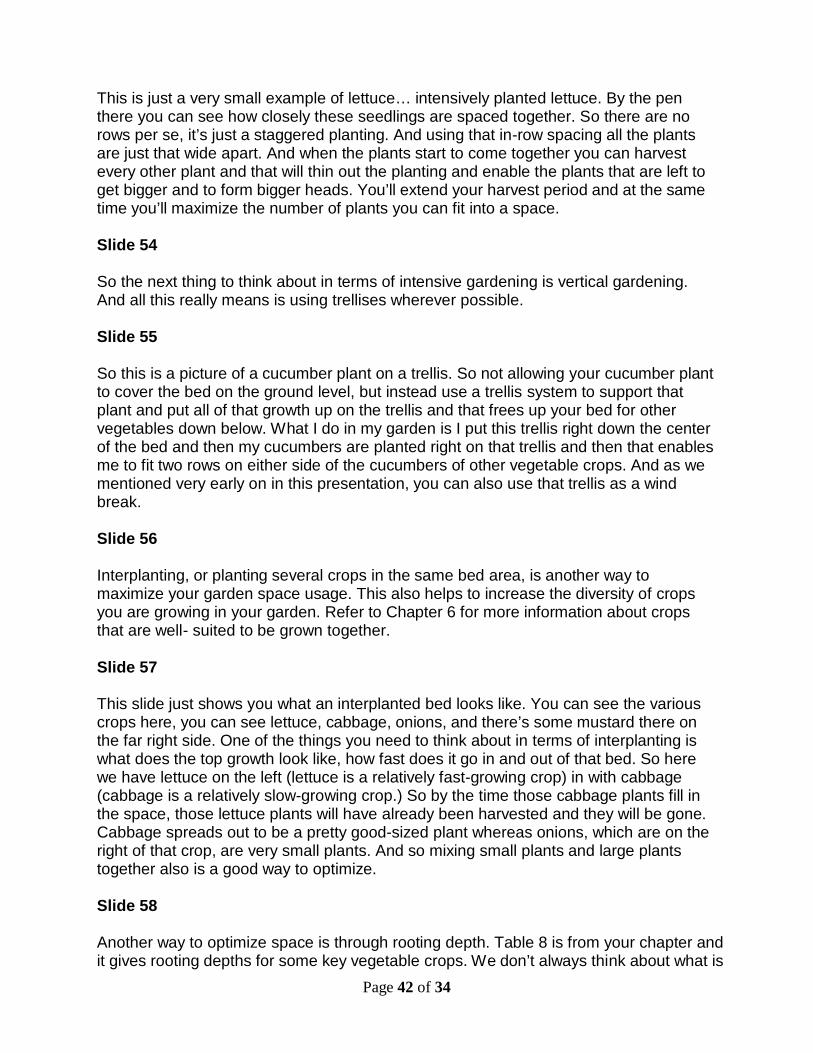
This is just a very small example of lettuce… intensively planted lettuce. By the pen there you can see how closely these seedlings are spaced together. So there are no rows per se, it’s just a staggered planting. And using that in-row spacing all the plants are just that wide apart. And when the plants start to come together you can harvest every other plant and that will thin out the planting and enable the plants that are left to get bigger and to form bigger heads. You’ll extend your harvest period and at the same time you’ll maximize the number of plants you can fit into a space.
Slide 54
So the next thing to think about in terms of intensive gardening is vertical gardening. And all this really means is using trellises wherever possible.
Slide 55
So this is a picture of a cucumber plant on a trellis. So not allowing your cucumber plant to cover the bed on the ground level, but instead use a trellis system to support that plant and put all of that growth up on the trellis and that frees up your bed for other vegetables down below. What I do in my garden is I put this trellis right down the center of the bed and then my cucumbers are planted right on that trellis and then that enables me to fit two rows on either side of the cucumbers of other vegetable crops. And as we mentioned very early on in this presentation, you can also use that trellis as a wind break. Slide 56
Interplanting, or planting several crops in the same bed area, is another way to maximize your garden space usage. This also helps to increase the diversity of crops you are growing in your garden. Refer to Chapter 6 for more information about crops that are well- suited to be grown together.
Slide 57
This slide just shows you what an interplanted bed looks like. You can see the various crops here, you can see lettuce, cabbage, onions, and there’s some mustard there on the far right side. One of the things you need to think about in terms of interplanting is what does the top growth look like, how fast does it go in and out of that bed. So here we have lettuce on the left (lettuce is a relatively fast-growing crop) in with cabbage (cabbage is a relatively slow-growing crop.) So by the time those cabbage plants fill in the space, those lettuce plants will have already been harvested and they will be gone. Cabbage spreads out to be a pretty good-sized plant whereas onions, which are on the right of that crop, are very small plants. And so mixing small plants and large plants together also is a good way to optimize.
Slide 58
Another way to optimize space is through rooting depth. Table 8 is from your chapter and it gives rooting depths for some key vegetable crops. We don’t always think about what is
Page 42 of 34

going on below the soil, but if you think about mixing shallow rooting crops with medium or deeper rooting crops, you can see that you’ll get a better usage of water and nutrients in the soil.
Slide 59 The last thing to think about in terms of intensive gardening is succession planting and again, this just refers to planting a crop several times a week or two apart to extend the harvest period. We talked about this earlier, so refer back to your Table 10A to see what crops to plant over specific time periods.
Slide 60
Starting plants from seed… I don’t know how many of you start your own plants versus buying transplants (and we’ll talk about transplants a little bit later) but an advantage to starting from seed is that you’ll have many variety choices available to you. When you buy transplants, your choices tend to be somewhat limited.
One of the key factors to being successful when planting seed is not planting those seeds too deeply. A general rule for planting seed is that the depth should be equal to twice the seed size. PNW 170, Table 2, gives you planting depths for most vegetable crops.
Slide 61
Here is Table 2 from PNW170. This first column is “Depth to Plant” and this table gives you this information for most vegetable crops you’ll likely grow in western Washington. Slide 62
In terms of starting vegetable seeds, this is the technique that I use. This is a little mini conservatory. As you can see it’s simply a plastic bag and I seed my seeds into those pots, I label them, I put them in this bag, and I allow them to germinate. Once they’re germinated, then I remove that pot from the bag and it goes into a growing area.
Slide 63
And here’s what some of those look like. There are tomatoes for example. This is not my garden by the way. I don’t this kind of area but this is somebody else’s market garden. And these are their tomato transplants that they’ve started and they’ve transplanted up into these little pots and then they allow them to get a little bit bigger before they put them out into the ground.
Slide 64
In terms of spacing, once you go into the garden, you have several choices. You can plant in rows, or hills, or you can broadcast seed. Broadcasting is effective for small crops such
Page 43 of 34
as lettuce, radishes and onions. For lettuce, you can cut leaves from very young plants, keeping plants small, or thin plants as leaves begin to touch, as we discussed earlier.
Row planting is a system most people are probably familiar with and is used for crops such as beans, broccoli and sweet corn. Hill planting is used for crops that are spread wide apart, every three feet or so, such as pumpkins and melons. All that information is available to you in PNW 170, and also in your chapter.
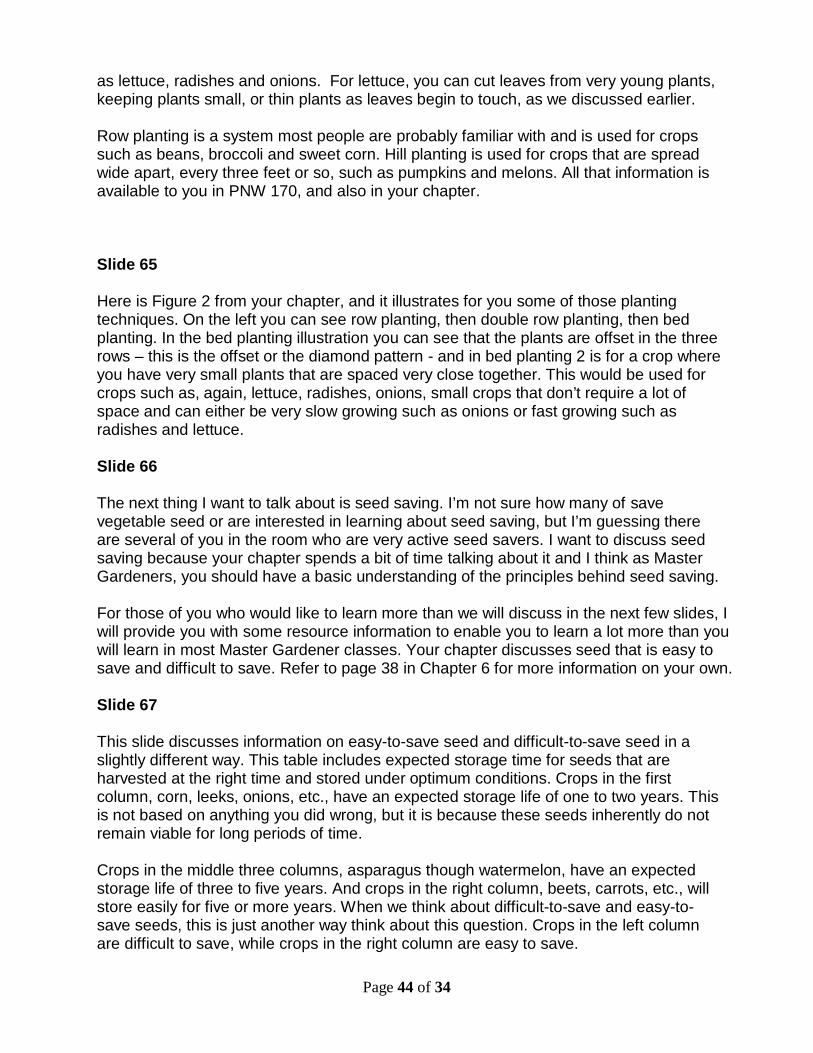
Slide 65
Here is Figure 2 from your chapter, and it illustrates for you some of those planting techniques. On the left you can see row planting, then double row planting, then bed planting. In the bed planting illustration you can see that the plants are offset in the three rows – this is the offset or the diamond pattern - and in bed planting 2 is for a crop where you have very small plants that are spaced very close together. This would be used for crops such as, again, lettuce, radishes, onions, small crops that don’t require a lot of space and can either be very slow growing such as onions or fast growing such as radishes and lettuce.
Slide 66
The next thing I want to talk about is seed saving. I’m not sure how many of save vegetable seed or are interested in learning about seed saving, but I’m guessing there are several of you in the room who are very active seed savers. I want to discuss seed saving because your chapter spends a bit of time talking about it and I think as Master Gardeners, you should have a basic understanding of the principles behind seed saving.
For those of you who would like to learn more than we will discuss in the next few slides, I will provide you with some resource information to enable you to learn a lot more than you will learn in most Master Gardener classes. Your chapter discusses seed that is easy to save and difficult to save. Refer to page 38 in Chapter 6 for more information on your own.
Slide 67
This slide discusses information on easy-to-save seed and difficult-to-save seed in a slightly different way. This table includes expected storage time for seeds that are harvested at the right time and stored under optimum conditions. Crops in the first column, corn, leeks, onions, etc., have an expected storage life of one to two years. This is not based on anything you did wrong, but it is because these seeds inherently do not remain viable for long periods of time.
Crops in the middle three columns, asparagus though watermelon, have an expected storage life of three to five years. And crops in the right column, beets, carrots, etc., will store easily for five or more years. When we think about difficult-to-save and easy-to-save seeds, this is just another way think about this question. Crops in the left column are difficult to save, while crops in the right column are easy to save.
Page 44 of 34
Slide 68 The two factors you need to think about for seed storage are storage temperature and moisture. Those are the two most critical factors that will impact your ability to store seed for any length of time. Seed moisture is greatly impacted by humidity. If you live in western Washington, then you know that the outside humidity during the winter months is around one hundred percent. If you live in eastern Washington, then you know that in the summer time your temperatures can be up to one hundred for several days or perhaps even weeks at one time.
A general rule of seed saving is that the temperature plus humidity should not be greater than 100, so you’ll need to change the storage environment of your seed so it is not impacted by the high humidity of the winter months or the high temperatures of the summer months, depending on where you live. The best way to save seed is to dry that seed to 12 percent moisture and maintain it in an airtight container.
Slide 69
I’m not going to talk any more about those aspects of seed storage. For those of you who are interested in it, this is probably the single best book on the market. It’s called Seed to Seed. It’s on the market with Seed Savers Exchange and they’re listed on your list of plant suppliers… that blue handout you should have. If you just look up under “S” it’s Seed Savers Exchange. I think you can now order it on the web. If you’re interested in seed saving, this is written for gardeners. It's written for people who just have an avid interest in seed saving and it’s where I would definitely recommend you start.
Slide 70
I do want to talk about one other aspect of seed saving in that easy-to-save and difficult- to-save aspect and that is whether a plant is self-pollinated or cross-pollinated. Plants that are self-pollinated are very easy to save seed from and this includes plants from the family Fabaceae. Plants that are cross-pollinated can be very difficult to save seed from because you get pollen contamination from other plants in the same family. And cross-pollinated families here include brassicas, cucurbits, and alliums. And cucurbits are probably one of the easiest things for most people to relate to. I'm sure most people have probably had a squash plant coming out of their compost pile, and it produces a fruit and that fruit is nothing like any plant you had in your garden last year. And the reason for that is because it was cross pollinated by another plant in the cucurbit family.
I also want to introduce you to this term “open-pollinated.” It refers to a plant that is either cross-pollinated or self-pollinated. It’s used in your catalogs a lot more today than it was in the past and it can be a little confusing because it implies that you can save seed from it. But what you need to know is that open-pollinated plants that are self-pollinated are easy to save seed from and open-pollinated plants that are cross-pollinated are difficult to save seed from because of the pollen contamination issue.
Slide 71
So, looking at your family handout… I just want to bring that back to your attention
Page 45 of 34

because I named various families there and you can see some of those families here on this slide. And I just bring your attention to Fabaceae. You can see the various crops in this family. There are beans, peas, soybeans, etc. They’re all in the Fabaceae family and these are all self pollinated crops and they’re very easy to save seed from.
Slide 72
This table just gives you an example of some of the major vegetable crops that I could find for you that are self-pollinated: beans, peas, soybeans… I already mentioned those. Those are in the Fabaceae family, but tomato is also in there. So if you look at your Solanaceous crops, many of those are also self-pollinated crops.
Under your cross-pollinated crops you have cabbage, carrots, etc. And again, if you look by family, it’s cucurbit family. And again, that information is there. We’ve already discussed that.
So these are again some easy guidelines for you to determine what seeds are easy to save. Seeds from self pollinated crops are easy to save, but if you intend to save seeds from cross pollinated crops then you need to do something about preventing pollen contamination.
Slide 73
I also want to introduce this term to you… I’m sure you’ve heard of it. It’s the “hybrid” term. In your catalogs and your seed packets you’ll often see it being referred to as an F1. So if you see F1, what you know is that’s a hybrid. And that’s the first generation coming from a cross. A hybrid simply means it’s a cross between two plants and F1 just means that it’s the first generation following that cross. And if you save seed from a hybrid and you plant it out that second generation, that F2 generation, is not going to be equivalent to the F1 generation. So it’s very difficult to save seed from hybrid plants.
I wanted to introduce this term to you as well… I’m not sure how many of you are familiar with this term but it’s “heirloom.” Heirloom (oftentimes abbreviated as “H”) in some seed catalogs and on some seed packs are basically self pollinated crops (although they can include some cross pollinated crops like corn varieties for example. But essentially an heirloom has a cultural heritage and that variety is recognized to be 50 years old or more. And that designates it as an heirloom.
Slide 74
So now, looking at your seed catalogs… looking at the information that is in some of your seed catalogs, let’s just turn back to this pea page. You saw this slide a little bit earlier. And now I want you to look at this right here. This tells you that this pea variety is an “OP” variety. So what you know is OP stands for open-pollinated. This is a pea plant, it’s in the family Fabaceae, so what you know is that this is a self-pollinated variety. If you grow these peas and you allow some pods to set all the way through maturity, you can harvest that seed and you can plant it out the next year and you will get the same pea plant as you had the preceding year.
Page 46 of 34
Slide 75
And here’s just a picture of that flower. This actually happens to be a fava bean flower but it’s in the same family (Fabaceae) and it looks just like pea flower, a bean flower, etc. And the structure of this flower is actually a guide to you as to whether or not this is a self- pollinated plant. And the way that I want you to look at this is next time you’re in the garden look at how closed that flower is. You don’t see the stamen or the pistil. They don’t stick out of the flower. They’re inside the flower. And that’s actually a good guide. Looking at your flower structure is a good guide in trying to determine (if you don’t have any printed information) as to whether that plant is likely self-pollinated or open-pollinated. Open- pollinated plants or a cross-pollinated plant will have a more open flower structure so that either the wind or the insects can get to it more readily.
Slide 76
So here is another image from a catalog. This one happens to be tomatoes. And just drawing your attention to the guide along the bottom. This is from Johnny’s Selected Seed, and at the bottom of every page they tell you what their abbreviations mean. So you can see at the bottom of this page that F1 mans hybrid. And when you look at that variety name it says, “Big Beef”, “Pink Beauty” and immediately after that it says F1. So that F1 tells you that these are hybrid varieties and, by law, the seed company must tell you whether or not a variety is a hybrid. Now, it doesn't have to tell you what that variety is if it is not a hybrid. So if you just see a variety name and no notation after it, all you know is that it's not a hybrid. You don’t know if it’s an open-pollinated plant, a self-pollinated plant, or an heirloom. All you know is that it’s not a hybrid. But hopefully this information can get you started in trying to figure out what varieties you’re working with, which ones you like, and whether or not you can save seed from them.
Slide 77
In my garden, I take a slightly different approach. I don’t actually collect my seed, I simply allow it to fall back into the ground and then I replant it immediately. So this is just an example of lettuce that came off of a lettuce plant that was grown at the end of the summer. I allow so many plants to go to seed in my garden. So my lettuce plants… I allow 2 or 3 to go to seed. When those seed are fully mature on the plant in the garden I simply bend them over, between my hands I just rub the seed heads together, the seed falls to the ground, I just lightly rake it in, and I allow that seed to germinate. So here the lettuce has germinated right next to what had been the mother plant from my summer crop. Slide 78
And then I transplant that out. And I know you’ve seen this slide before earlier on, but then I move that lettuce to another area. And here’s that lettuce just being separated out and transplanted to another area of the garden.
Slide 79
Page 47 of 34
So the next thing we’re going to talk about in terms of planting the garden is using transplants because I’m sure a lot of you use transplants. Certainly in my production I use a lot of transplants, the main reason being because this enables me to gain 4 to 6 weeks on the season. So I can increase the number of crops I’m growing and I can increase the number of varieties within any crop that I’m growing because I automatically have a 4 to 6 week jump on the planting season.
When you’re using transplants you want to avoid putting them out into the garden during the heat of the day. For us we’re probably transplanting the end of May, maybe early June. At least that’s when I’m transplanting in my garden. So in May our days don’t tend to be too hot but even so I recommend that you choose the end of the day period. This avoids too much transpiration, which avoids wilting, and really if you can transplant on a misty day this is really the best way to reduce transplant shock. Starter fertilizer… you can either apply your fertilizer in the form of compost in the bottom of your transplant hole (and I’ll show you a picture of that next, here). Or if you’re using a chemical fertilizer, you apply it around the plant along what’s called the drip line. Frost protection is simply a way of covering your plants to make sure that they’re protected from any cold temperatures we may get. It seems that every year I lose something to unanticipated cold temperatures so it might be nice to just cover your plant with a material – a fabric – to keep it safe out there in case your temperatures dip down into the 40s and you weren’t ready for that.
Slide 80
So here’s just a brief illustration of a transplanting hole. I’m getting ready to put out a tomato plant or a pepper plant. You dig your transplanting hole slightly deeper than the depth of your transplant pot. At the bottom you can lay your compost in and you might want to just put a thin layer of soil above that compost. And you lay your transplant on top of that and you fill in that hole with more soil and that can be sufficient for you in terms of all the nutrients you need for your transplant. But if you decide to also use a starter fertilizer we recommend that you put that fertilizer in the ground at about a two inch depth right at the drip line. The drip line is that area just beyond where the leaf extends above the soil. Just draw a vertical line down and that is referred to as the drip line. So you can put your fertilizer in a semi-arc or an arc around that plant following the drip line at about a two inch depth.
Slide 81
This is an illustration of a row cover. This happens to be a research trial we were doing down in Gray’s Harbor many years ago. It's a sweet corn crop and we were really looking at another production issue but one of the things we learned in this process was by covering our sweet corn with this row cover, what we ended up doing was boosting germination and plant growth significantly. So if you see the rows of corn that we just lifted off the cover… you can see those two rows of corn that are exposed there. And hopefully you can see the row of corn just to the right of those rows. Those were all planted in the ground with seed at exactly the same time. The row on the right did not go under the row cover. That’s the only difference between those rows of corn. We left this row cover on for six weeks after planting. We then took it off and we harvested that
Page 48 of 34
sweet corn more than two weeks earlier than the corn that was not covered at planting. So row covers can really significantly increase your days to germination, your days to early plant establishment and then your days to harvest.
Slide 82
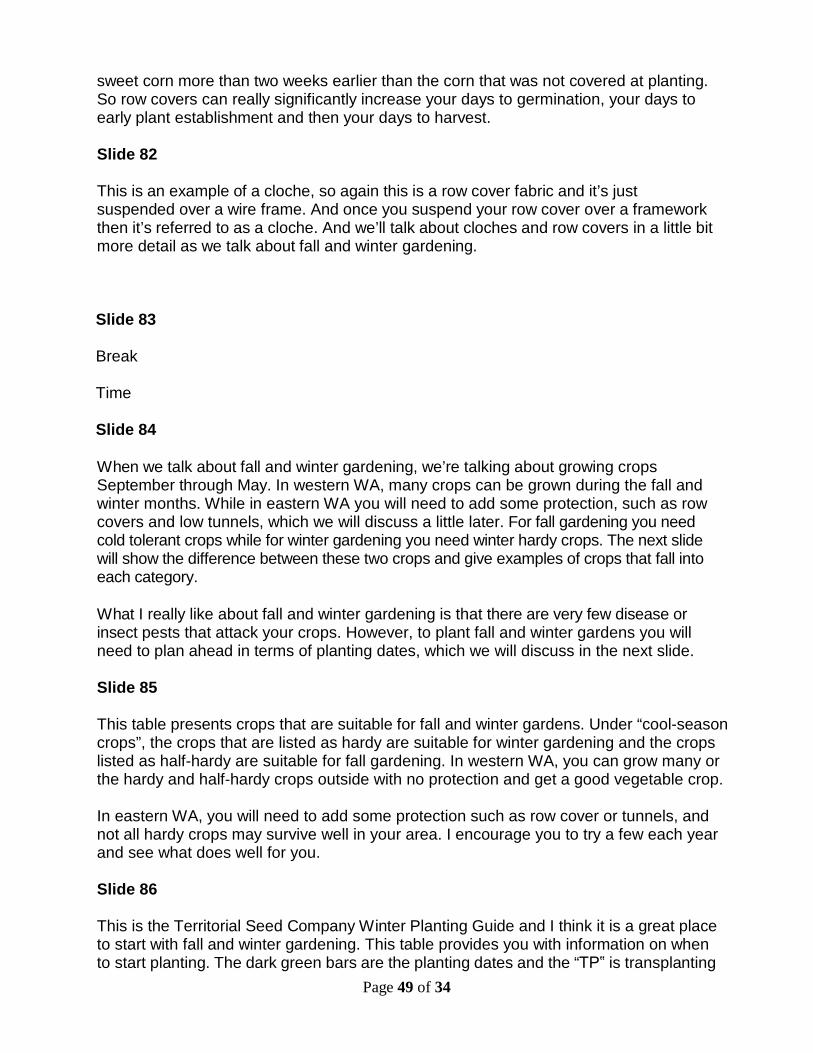
This is an example of a cloche, so again this is a row cover fabric and it’s just suspended over a wire frame. And once you suspend your row cover over a framework then it’s referred to as a cloche. And we’ll talk about cloches and row covers in a little bit more detail as we talk about fall and winter gardening.
Slide 83
Break
Time
Slide 84
When we talk about fall and winter gardening, we’re talking about growing crops September through May. In western WA, many crops can be grown during the fall and winter months. While in eastern WA you will need to add some protection, such as row covers and low tunnels, which we will discuss a little later. For fall gardening you need cold tolerant crops while for winter gardening you need winter hardy crops. The next slide will show the difference between these two crops and give examples of crops that fall into each category. What I really like about fall and winter gardening is that there are very few disease or insect pests that attack your crops. However, to plant fall and winter gardens you will need to plan ahead in terms of planting dates, which we will discuss in the next slide.
Slide 85
This table presents crops that are suitable for fall and winter gardens. Under “cool-season crops”, the crops that are listed as hardy are suitable for winter gardening and the crops listed as half-hardy are suitable for fall gardening. In western WA, you can grow many or the hardy and half-hardy crops outside with no protection and get a good vegetable crop. In eastern WA, you will need to add some protection such as row cover or tunnels, and not all hardy crops may survive well in your area. I encourage you to try a few each year and see what does well for you. Slide 86
This is the Territorial Seed Company Winter Planting Guide and I think it is a great place to start with fall and winter gardening. This table provides you with information on when to start planting. The dark green bars are the planting dates and the “TP‟ is transplanting
Page 49 of 34
dates and the little structure there under October is to cover those crops because they won’t survive without a cover through the hard winter months. Some key winter vegetable crops such as cabbage and leeks are slow growing, and so need to be seeded in mid- summer for a winter vegetable crop. It’s important to remember that many winter and fall crops are actually planted in the late summer, so you need to plan ahead in terms of seed purchases and planting dates.
Slide 87
There are various things you can do through season extension to protect your crop from winter weather. This will provide you with a higher quality crop because the crop will not be beaten up by rain or other bad weather. Hail and snow can lead to freeze damage which will lead to rot and crop loss. Even for those crops that don’t need protection to survive or to give you good quality, protection will increase crop growth and speed up your time to harvest. Here is a list of some simple crop protection structures: cold frames, cloche, row covers, and low tunnels. And my next slides will show you photographs of each one of these structures.
Slide 88
So here’s the row cover, you saw this in the corn field. And this is just a row cover in a bed and this happens to be over a planting of cabbage. And as you can see, the row cover is just laid directly over the crop in the field. The row cover is just laid directly over the crop in the vegetable garden. However, if you have rain and if that rain freezes, this can lead to problems.
Slide 89
What happens is that row cover freezes to your crop (and this is that cabbage under that row cover) and hopefully you can see all the dead tissue on this cabbage plant. That was caused by the row cover freezing to the plant tissue. We got a thaw. That freezing rain thawed out. The row cover separated from the crop, but that damage stayed. And within two weeks that head began to rot all the way down to the head and it started from those frozen leaf tips.
Slide 90
So to prevent that kind of damage I recommend you use the cloche. And again, the cloche is simply providing a wire frame or a plastic frame (hoop frame) and then you set your row cover over that frame.
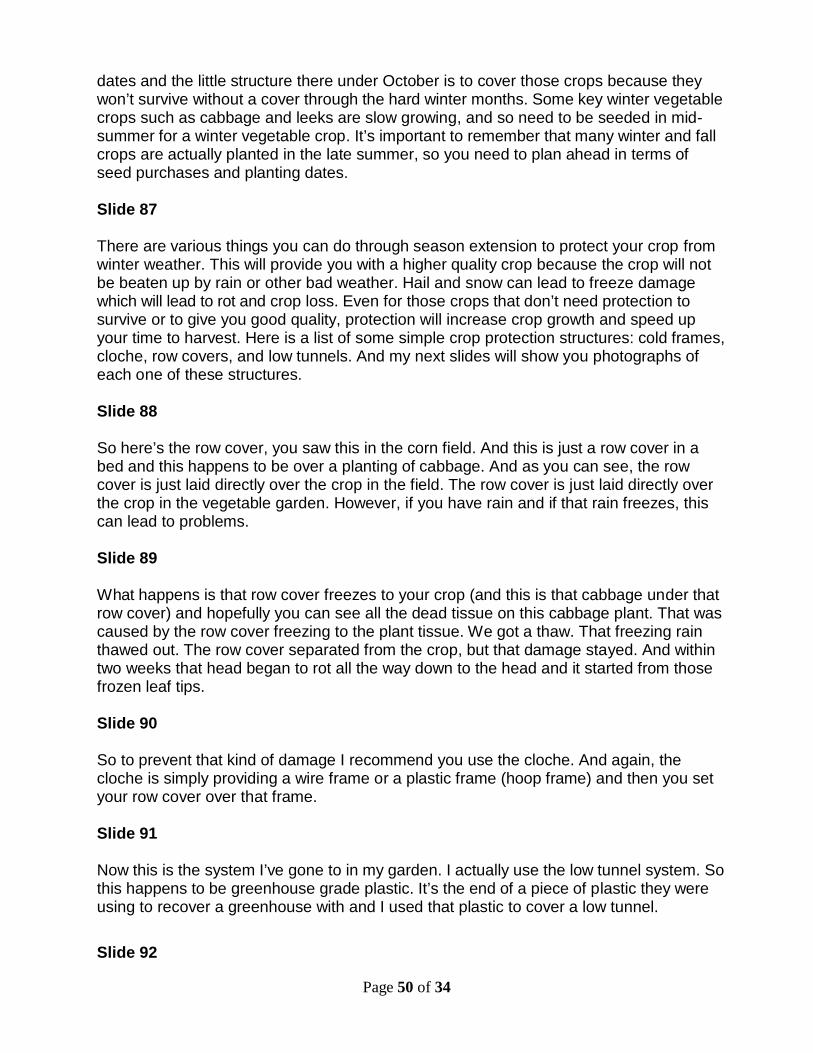
Slide 91
Now this is the system I’ve gone to in my garden. I actually use the low tunnel system. So this happens to be greenhouse grade plastic. It’s the end of a piece of plastic they were using to recover a greenhouse with and I used that plastic to cover a low tunnel. Slide 92
Page 50 of 34
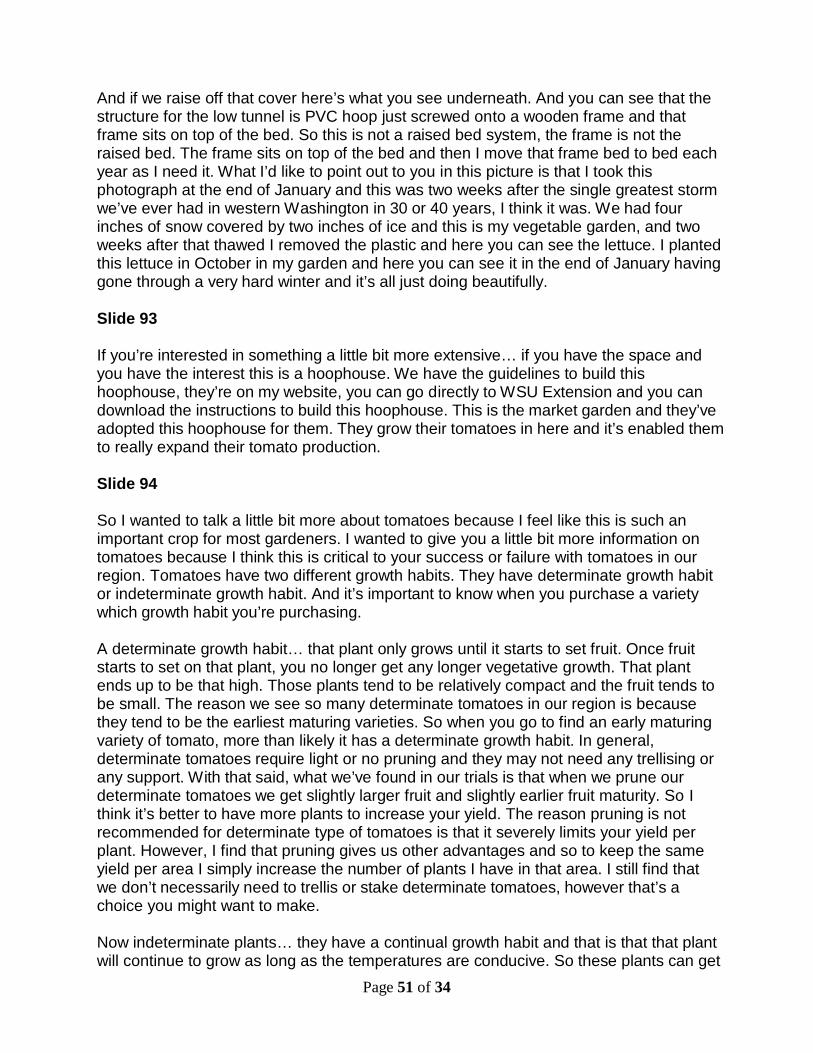
And if we raise off that cover here’s what you see underneath. And you can see that the structure for the low tunnel is PVC hoop just screwed onto a wooden frame and that frame sits on top of the bed. So this is not a raised bed system, the frame is not the raised bed. The frame sits on top of the bed and then I move that frame bed to bed each year as I need it. What I’d like to point out to you in this picture is that I took this photograph at the end of January and this was two weeks after the single greatest storm we’ve ever had in western Washington in 30 or 40 years, I think it was. We had four inches of snow covered by two inches of ice and this is my vegetable garden, and two weeks after that thawed I removed the plastic and here you can see the lettuce. I planted this lettuce in October in my garden and here you can see it in the end of January having gone through a very hard winter and it’s all just doing beautifully.
Slide 93
If you’re interested in something a little bit more extensive… if you have the space and you have the interest this is a hoophouse. We have the guidelines to build this hoophouse, they’re on my website, you can go directly to WSU Extension and you can download the instructions to build this hoophouse. This is the market garden and they’ve adopted this hoophouse for them. They grow their tomatoes in here and it’s enabled them to really expand their tomato production.
Slide 94
So I wanted to talk a little bit more about tomatoes because I feel like this is such an important crop for most gardeners. I wanted to give you a little bit more information on tomatoes because I think this is critical to your success or failure with tomatoes in our region. Tomatoes have two different growth habits. They have determinate growth habit or indeterminate growth habit. And it’s important to know when you purchase a variety which growth habit you’re purchasing.
A determinate growth habit… that plant only grows until it starts to set fruit. Once fruit starts to set on that plant, you no longer get any longer vegetative growth. That plant ends up to be that high. Those plants tend to be relatively compact and the fruit tends to be small. The reason we see so many determinate tomatoes in our region is because they tend to be the earliest maturing varieties. So when you go to find an early maturing variety of tomato, more than likely it has a determinate growth habit. In general, determinate tomatoes require light or no pruning and they may not need any trellising or any support. With that said, what we’ve found in our trials is that when we prune our determinate tomatoes we get slightly larger fruit and slightly earlier fruit maturity. So I think it’s better to have more plants to increase your yield. The reason pruning is not recommended for determinate type of tomatoes is that it severely limits your yield per plant. However, I find that pruning gives us other advantages and so to keep the same yield per area I simply increase the number of plants I have in that area. I still find that we don’t necessarily need to trellis or stake determinate tomatoes, however that’s a choice you might want to make. Now indeterminate plants… they have a continual growth habit and that is that that plant will continue to grow as long as the temperatures are conducive. So these plants can get
Page 51 of 34
very tall. If you’ve seen any plants grown in a greenhouse and they’re all the way up to the ceiling and around the walls, then that is a good example of an indeterminate growth habit. These fruit tend to be much larger but the downside for us is that the maturity tend to be quite a bit later. These do require extensive pruning and they also require trellising. If you have any questions about this information I suggest you simply look at the Johnny’s Selected Seed catalog. They have a great deal of information on all their vegetable crops, including tomatoes. They have a nice page (a nice description) of determinate versus indeterminate tomatoes and all the tomato varieties that they list they tell you whether they are determinate or indeterminate.
Slide 95
This table just gives you some information based on the varieties we’ve been testing in Mount Vernon at the Washington State University Research Center. And if you just look at that last column, “days to harvest,” what you can see is the numbers in black are the numbers we got here at Washington State University (the Mount Vernon Research Center) in one year and the numbers in blue are the numbers in blue are the numbers that Territorial advertizes in their catalog and the number in green is the number advertized in the Johnny’s catalog. And really briefly what you can see is that our days to maturity in Mount Vernon are generally longer than the days to maturity that you’re going to see in seed catalogues. And so, once again, in western Washington we’re challenged by the lack of heat we have here, so choosing early maturing varieties is very important for us.
Slide 96
In the next two slides what I want to show you is the importance of tomato pruning. This happens to be that tomato crop in the tunnel. If you cast your mind back to that slide I showed you of the field hoophouse, this is the tomato crop that’s actually inside that hoophouse. I took this slide at about eight o'clock in the morning. And again this is the market garden planting. And these are the tomatoes and you can see basil right next to them. Tomatoes and basil make a very nice companion crop not only in terms of growth but also in terms of use.
Slide 97
And I came back to this greenhouse and this is what that crop looked like. So you can see that the farmer (the market gardener) did a very severe job of pruning. But this is the only way to keep that tomato crop healthy in this growing environment. When you use a covered structure like a hoophouse or if you’re covering your tomatoes in any way, the humidity is going to go up in that planting extensively. And the only way to prevent diseases that are very common to tomatoes is to really open up that foliage. You need to eliminate quite a bit of that foliage. It’s been our experience that tomatoes grow like weeds and so we prune our tomatoes every week. I like to get our tomatoes down to a single or a double main stem and that’s all I allow them to have. This enables us to get larger fruit per plant and it really increases our time to maturity per plant. And then as I mentioned a little bit earlier, what I do is I simply put more plants in my area, so I get the total amount of fruit that I’m hoping to get from that tomato crop. Slide 98
Page 52 of 34
This next slide is just to show you a technique that a market gardener is using to prevent cutworm damage. This happens to be an eggplant crop and cutworms are a big problem in western Washington, certainly in the King County through Whatcom County areas, I’m hearing more and more. This is a very simple technique. What this gardener has done is simply taken a gallon pot and cut it about halfway down the pot and then put that pot around the plant in the garden. So there is no bottom to the pot. It’s just inserted into the soil and it extends above the soil level about two inches. And this seems to be pretty effective for preventing cutworm damage to transplants in the garden.
Slide 99
This slide I just wanted to present to you to discuss a problem with overwintering onions. So this is an onion crop that was planted in a garden and it was planted in July, as is recommended for overwintering onions. What I wanted to tell you, however, is that an issue you may encounter is that if your onion plant is too large going into the winter. So by too large, I mean about the size of that pencil. So if the stem of the onion is equivalent to the size of that pencil, you go into the winter, and you get cold temperatures that are down at 40 degrees for about two weeks or longer, what you end up with come summer is onion flowers.
Slide 100
And I’m guessing that most of you are not growing your onion plants for flowers. So if you’re overwintering onions and you intend to get bulbs, please know that you have to pay very particular attention to the size of the transplant going into the winter. It can be smaller than a pencil, it can be quite a bit larger than a pencil, but it cannot be around the same size as a pencil. Otherwise you’ll get flower initiation.
Slide 101
And this is just a small test for you. I’m going to assume that all of you are going to graduate from this class and you’re all going to become Master Gardener volunteers and you’re going to work. One of the things you’re going to do is become a volunteer in the plant clinic. And let’s say that somebody brings in this plant root. This is a vegetable plant root system and they ask you, “What’s wrong with my plant?” So what I want you to think about are what are the first basic questions you need to ask this person about this plant. So if they just brought you the root system with no top I’m guessing that you’re not going to know intuitively what type of plant this is. So what’s the first question you would need to ask?
So the first question you would ask is, “What kind of plant is this?” And if I say to you (this is my plant), “This is a bean plant. What’s wrong with it?” What are you going to tell me? What’s wrong with my bean plant? Is there anything wrong with it?
Page 53 of 34

Hopefully you said, “No. There’s nothing wrong with it.” What you’re seeing here is nodules on the root system. And nodules on the root system on beans (or any plant in the Fabaceae family)… one would expect to see nodules on the root system because that is where nitrogen fixation happens. Nitrogen fixation happens in root nodules in the root system of plants in the Fabaceae family. So this is actually probably a very healthy plant. And there are actually other things you can do to determine that.
However, if you ask me your question again, “What kind of plant is this?” and I tell you “A tomato”, then we’re in trouble. So it’s very important for you to start your question period with your clients when they come in with problems with your very simple questions like, “What kind of plant is this?” And then you can get into questions of “How did you grow it?”, “What did you add?” etc. to try to determine what may be wrong with it. Or to tell them what’s actually good about it. So hopefully that little exercise made sense to you and hopefully you’re familiar with root nodules and if you’re not then that’s a topic for another discussion that hopefully you might have with your Master Gardener class later when you become a volunteer.
Slide 102
The next set of slides I’m going to show you are just slides based on our research program… my vegetable research program here at Washington State University. I just want to give you an idea of what I do in my position and where you might come across information that we generate. In my position I don’t actually work directly with gardeners other than teaching the Master Gardener classes. I do not handle Master Gardener questions. Those all go through your Master Gardener Volunteer Coordinator at your Extension office. But I do provide the Extension office with information when needed. And one of the things that we do in my program is we generate information about new vegetable crops. I do that for commercial producers but what I realize is that many home gardeners use this information just as much. So I want to go over the various crops that I’ve worked with in my last 14 years here at Washington State. I’m going to show you just a few of them (not all of them) and some of the information that we have available on them.
Slide 103
So the first crop I want to introduce you to is pea shoots. Pea shoots are the top four inches of a pea vine and you can see us harvesting pea shoots here from our research trial. This is down in King County and we did this experiment with growers with the Pike Place Market. They were having problems getting the quality of pea shoots that they wanted for their market. So what we did is we evaluated peas… lots and lots of different varieties, dozens of different varieties, and we generated recommendations on varieties for pea shoot production as well as harvesting and marketing techniques and certainly the growing techniques as well. And what you should know as home gardeners is that if you grow a pea crop like a snap pea or a snow pea, you can eat the top vine of those… the top 4 to 6 inches of those vines as a vegetable.
In America we’ve adopted this vegetable in our salad mixes. So what I’m seeing is that commercial growers are putting the top two inches of that pea vine into a salad mix. Culturally, as a vegetable in southeast Asia, the whole four inches of pea vine is the
Page 28 of 34
vegetable and that is used in stir fry. If you use this pea shoots in stir fry I recommend that you do not add it to your stir fry pot on the stove but instead you add it after you’ve turned the heat off. And you just toss in your pea vines because really all you want is a very slight wilting. You don’t want to cook these overmuch because otherwise you lose the flavor and the texture.
All of this information is on our website. My website is vegetables.wsu.edu - that’s on all your handouts as well. So if any of this information is of interest to you… the growing information, recipe information… you can find that all on our website.
Slide 104
The second crop I want to introduce to you is edamame. Edamame is a vegetable soybean. These are specialty varieties that have been developed over about 2000 years in Asia. Most of the varieties that we grow here in my research program come out of Japan. But these are soybeans that are harvested and used as a vegetable crop. So these are edamame that were grown in southwest Washington, you can see them here on the plant. You pick those pods off, you put them directly into boiling water and in about five minutes you can serve them. So what I really like about edamame is that this is the only soybean crop that you can grow and serve. So it goes from your vegetable garden or your field to your table in less than five minutes. All your other soybean crops have to go through a quite extensive period of processing and it’s quite complicated and it requires a lot of equipment. But with edamame you just boil them and eat them. I’d like to emphasize that they’re not an edible pod. So if you’re not familiar with edamame, do not eat the pod. It’s just an edible bean. If you’re interested in edamame, again the production guidelines, recipe information… all the information we’ve generated from my program is on my website.
Slide 105
This next crop I want to show you are dry beans. These are dry beans that we have been working with here in western Washington for the last seven years. Growing them in western Washington, taking them all the way to dry bean maturity and all these photos here are of dry beans that we harvested in our plots in southwest Washington. We are saving our seed. It’s a very easy seed to save if you cast your mind back to easy to save seed… this is in the family Fabaceae, it’s a self-pollinated plant, and it’s just very easy to save seed from.
The beans that we’ve been working with in our program are all these colored and patterned beans and I call them niche market beans. They’re not beans that you’re going to find very easily in grocery stores. In fact, I’ll challenge you to find them in grocery stores. You can certainly find them in coops and in mail order catalogs but probably not in any local grocery store in the United States. So the way I look at these beans is these give our farmers an opportunity to grow a crop, a commercial crop, and sell it locally. It’s a very high value crop. They’re beautiful to look at and certainly highly nutritious.
The variety in the center – Orca – I wanted to point out to you because this is actually a result of our variety trials. I work with breeders… for all these crops I work with, we work
Page 29 of 34
with breeders. And this was actually a breeding line that we evaluated. The breeder was going to throw this one away because he was actually breeding for small white beans – Navy beans. And as you can tell, this is not a small white bean, it’s a black and white bean.
So when I contact breeders for all the vegetable crops that I work with I like the obscure types: the patterns, the colors, things that are not commonly available. And so I was sent this bean as a breeding line. We evaluated it here in western Washington. It did very well for us and the breeder released it and named it “Orca” in recognition of western Washington.
The bean on the far right bottom, Rockwell, that’s a bean that a farmer has given me a handful of seed from. That has been grown up on Island County outside of Coupeville for 100-plus years. This came across with a pioneering family and has been kept alive in the market garden at the Farmstead for more than 100 years and it’s called Rockwell. And the interesting thing in my mind is that it seems to be very well adapted to northwest Washington and I cannot find any other type of bean that is similar to it, either commercially available or in the germplasm banks. So to me personally this is a very interesting bean that we want to explore a little bit more and see if there isn’t a way to commercialize them.
Slide 106
Another way to eat beans is to harvest them before they’re fully dry and when you do that they’re called fresh shell beans. These fresh shell beans are used quite a bit in Italian cooking and that bean on the top left there, cannellini and right next to it on the top, Vermont cranberry, the cranberry bean. Those are both very popular beans in European cooking. Those are the two most popular beans. But in our trials what we did is we evaluated numerous varieties to see which beans would be highest yielding and most productive for us and more than twenty types of beans we can easily grow in our area. Certainly when we look at bean size, if you look at red hawk, that red bean there at the bottom, it’s a lot larger than the cranberry bean so you get a greater yield. For our market farmers this is important because they usually sell by pound so it’s an important quality to know about.
So if you’re growing dry beans just know that you can eat them at this stage here, it’s called the fresh shell bean. Very tasty, you just boil them. It takes a little bit longer to boil than certainly a green bean but a lot less time to boil than a dry bean. Then you can add them to your soup recipes or just eat them as you might eat a lima bean, if you eat lima beans, it’s a really easy way to eat shell beans. Certainly lots of recipe ideas out there for using shell beans if that’s something that you’re interested in.
Slide 107
This next crop I wanted to show you is a project again that we were working on with a breeder. The breeder was actually out of New York – Cornell University – and she was developing some butternut new varieties and in that group of breeding lines that she had, she had two varieties that were rather small. I know it’s hard to look at scale, here, but you can imagine that these are butternut fruit that we harvested in our research trials
Page 30 of 34

here in western Washington and each one of those fruit are about a pound in size. And they are just a little bit larger than the palm of your hand. So that’s the size that they are.
When we just started this work these were just breeding lines; they were not ready for release. We tested these here in western Washington. We provided all of that data back to the breeder and we asked for variety release because we found that these were very productive for us. I felt that these had a very good niche with our CSA farmers (our farm stands and our farm markets.) To me these were just a really good opportunity for our farmers to take advantage of. So in 2008 the breeder released this variety and it’s called Honey Nut.
In 2008 seed was made available to two seed companies, and so in 2009 you’ll start to see this variety available. The two seed companies were High Mowing Seed (they’re back on the east coast) and Territorial Seed here on the west coast. So if you’re interested in a mini-butternut squash variety that at least in our trials is very well suited to western Washington, I encourage you to look for Honey Nut in your seed catalogues and give it a try.
Slide 108
The next crop I’m going to talk to you about is baby corn. I’m not sure how many of you eat baby corn, I’m guessing quite a few of you eat it. I’m not sure how many of you have grown it but this is a crop that we work with. We did research trials in Gray's Harbor County. We did two years of trials because we had a farmer who had a market contract for baby corn but he had never grown baby corn and there was no information in the United States about how to grow baby corn. So in our program we conducted the research trials with that farmer and we developed the production guidelines for baby corn.
In this photo what I want to demonstrate to you is that baby corn is grown on regular- sized corn plants. So when we started this work what we anticipated and what most people we talked to anticipated was that baby corn would be grown on baby corn plants and that is not true. Baby corn is grown on full-sized corn plants and in fact we used regular corn varieties to produce baby corn. So if you’re growing sweet corn and you’re interested in baby corn what I suggest you do is you pick the ears… not the top ear because you want that for your sweet corn ear. I’m guessing that you should be able to harvest the second ear down also for sweet corn. But if you get that third ear down… if it’s just starting to form, take a look at that and see if that’s suitable for you for baby corn.
The right time to harvest that ear is just within three days after the silks appear. So this is about what that ear looks like when it’s ready to be harvested for baby corn. You really have to look on the stem to find it. If you let it go for too much longer it gets too tough and doesn’t make for an enjoyable eating experience.
When you shell that ear this is what you get. You get very small perfectly shaped ears of baby corn, and you eat the whole cob of ear. And again if you let it get to big then that cob just becomes too fibrous and too tough and just becomes a difficult thing to eat. But this is how you get baby corn and if you’re already growing sweet corn and you want to try baby corn, simply harvest the second or third ear down and use that as baby corn.
Page 31 of 34

Slide 109
This crop is icebox watermelon. It's a crop that we worked on quite a bit in my program here in western Washington. When I started working on this crop five years ago everybody said, "You can't grow watermelons in western Washington." This slide was taken at our watermelon field day in the middle of August and we had approximately seventy-five varieties of watermelon on our table in western Washington. Grown in western Washington and eating those in western Washington. So it's very clear to me that you can absolutely grow watermelon in western Washington. What it all comes down to is selecting the right varieties. Just as in everything else we've been talking about from the beginning of this class, making the right choices of varieties to grow is really going to determine whether or not you're going to be a successful gardener.
So in terms of watermelon there are many varieties you can grow. You just need to be selecting the correct ones for our environment. As you know, we're heat challenged. You need to be selecting early varieties of watermelon. If you're interested in this information it's all on my website. And again that website is vegetables.wsu.edu. If you go to "watermelon" we have lists of varieties that we have tested and it gives you the color of the flesh. You can see from this photograph there are red flesh varieties and yellow flesh varieties. There are also white, orange, and pink varieties that are on this table but you can't see them so clearly in this photo. They all taste really good, just like watermelon. So if you haven't had a yellow flesh watermelon or an orange flesh, I encourage you to try them. And just pay attention to how you grow those watermelons. I recommend you use transplants to get a jump on the season.
Slide 110
And the other thing you have to pay attention to is pollination. Watermelon plants, like all plants in the cucurbit family (Cucurbitaceae.) Again, going back to that pink sheet and your family names, it's important to know what families you're working with. Like all crops in the cucurbit family, they produce female and male flowers. So if you're going to get fruit set on a watermelon, just like all other cucurbits, you have to have pollinators.
In this photograph what you can see is that bee going into the female flower. The way that you know that's the yellow flower is you see the yellow petals and they are connected to a bulb which is actually going to be your fruit. Now, pollination has not happened yet. That flower, when it emerges from the vine, it automatically has that bulb structure there. No pollination is required to get that bulb structure. It’s innate to the plant. If you look down toward the left part of your screen what you’ll see is a flower. You see those yellow petals and you’ll see it connected to the plant and there’s no bulb structure there. That is a male flower. So this next year, when you go out into your vegetable garden and you look at your cucurbit plants and you look at their flowers, you will see this type of flowering structure: a female flower and a male flower. And in order to get fruit set you have to have pollen movement from the male to the female and you do that through insects.
Page 32 of 34

Slide 111
This is our watermelon testing area. This was down in Vancouver. We had about two acres of watermelons where we conducted all of our variety trials. And it was a challenge for us to get pollinators (bees) into our fields so what we did is we planted wildflower pollinator mix in every row. And that’s the flowers you see here. This is just a commercial packet that we buy and it’s called “pollinator wildflower mix.” And you can just search for that up on the web or you can include your own flowers. But in my mind, this is a really important reason why you want to diversify your plantings. When we look at our gardens, when you decide what to put in those gardens, keeping flowers in the gardens and having vegetables that produce flowers are really important ways of attracting our pollinator insects. So think of vegetables as pollinator habitat.
Slide 112
This is an example of a barrel used next to a house. You can see that there’s a downspout coming next to the barrel and I inserted a diverter that diverts the water from the downspout into the barrel. And so the barrel is used as a water catchment and to water the garden. There are a couple of things I want you to notice about this barrel. This is my barrel. This is my garden 14 years ago here in western Washington. And several things have changed that make this not a recommended situation anymore.
One thing hasn’t changed, so let’s start with that. When you look at this barrel, what do you see that makes you very concerned about using this water for watering vegetables? So hopefully you said “the rust in the barrel” and that would be correct. So applying rusty water to vegetables that you’re going to eat is not a recommended practice. I have to say again, this is my barrel and my garden and so this is what I used to water my flowers. This was in a flower bed and I just used the water to water a flower garden, trying to conserve my use of tap water. Now, in general, when you are applying water to vegetables, what’s recommended… certainly if you’re a commercial producer you’re only allowed to use potable water. Potable water is water that you can drink. So that is a recommendation I would make for you as a vegetable gardener as well. If you can’t drink the water I would be a little bit concerned about applying that water to vegetables that you are going to eat.
Now one of the things that’s changed in western Washington in the last ten years is a disease that we have that’s carried by an insect and that insect would thrive in open water like this. So I’m not sure if you’re familiar with the problem but it would be carried in a mosquito and it would be a virus. And so one of the ways to prevent that disease is to prevent the insect. The way to prevent the insect is to not have open water sources around your garden area. So you can certainly use water captured from your roof. The recommendation would be to have that water go into a non-open barrel and there are many ways that you can do that. So just something for you to think about if you’re interested in water capture. Certainly doable, just don’t do it in this way. Use a closed barrel, use a filter, and make sure that your water is clean if you’re applying it to vegetables.
Page 33 of 34

Slide 113 This last slide I’m going to show you is just our winter-grown greens program. And this slide is taken inside a hoophouse so I introduced you to hoophouses early on. And what you see is our various vegetable crops growing. We have lettuce in here, Asian greens, spinach… and I took this slide in about February, so we’re in the middle of winter and we planted these crops in October of the preceding year and we’re getting ready to harvest. There’s no light or heat in this hoophouse, it’s all just the plastic over the frame and outside in the field. And as you can see we’re able to grow very nice salad green crops. So once again it all comes down to choosing the right varieties and if you’re interested in any of that information you can get that on my website.
So with that I’d like to say, “thank you very much for attention.” Certainly if you have other questions I’ll be happy to try to answer those for you through your Master Gardener Coordinator and I hope that this class has stimulated your interest in vegetable production and that you’re going to just go home and start reading those seed catalogs and start planning your vegetable garden for the next year. So thank you very much for your attention.
Page 34 of 34