stpba storyboarding allows a business analyst or analyst … storyboarding qui… · double-click...
TRANSCRIPT
- 1 -
Copyright © 2007 stpsoft limited. All rights reserved
stpsoft and stpBA are trademarks of stpsoft limited in the United Kingdom and/or other countries.
Microsoft, Word, Excel, Visio, Office and Visual Studio are trademarks or registered trademarks of
Microsoft Corporation in the United States and/or other countries.
stpBA Storyboarding allows a business analyst or analyst developer to storyboard and validate requirements through GUI Storyboarding. The tool generates screen flow diagrams, HTML
storyboards, specifications and test scripts.
This tutorial provides a ‘quick start’ guide to using stpBA Storyboarding. The tutorial requires a basic
knowledge of working with Microsoft Visio®. Note that the screenshots in this tutorial have been taken from
the Visio 2003 version of the software, but the principles apply equally to the Visio 2007 and Visio 2002 versions.
Once you have completed this tutorial, if you would like an in-depth guide on using stpBA Storyboarding,
from the Start menu please select ‘All Programs / stpBA / Help / stpBA Storyboarding Tutorial’.
For support please go to www.stpsoft.co.uk/support
The information contained in this guide is subject to change without notice. stpsoft limited shall not be liable for errors contained herein, or for consequential damages in connection with the performance or use of this guide.
CONTENTS
stpBA Storyboarding
Starting stpBA Storyboarding
Getting to Know the Task List
Storyboarding a Simple Screen
Adding Screen Navigation
Linking Tasks to Functionality
Generating Documentation
stpBA Storyboarding
- 2 -
Copyright © 2007 stpsoft limited. All rights reserved
stpsoft and stpBA are trademarks of stpsoft limited in the United Kingdom and/or other countries.
Microsoft, Word, Excel, Visio, Office and Visual Studio are trademarks or registered trademarks of
Microsoft Corporation in the United States and/or other countries.
1. Start stpBA Storyboarding 2. Open a New Document 3. Dock the Custom Properties and Size & Position Windows
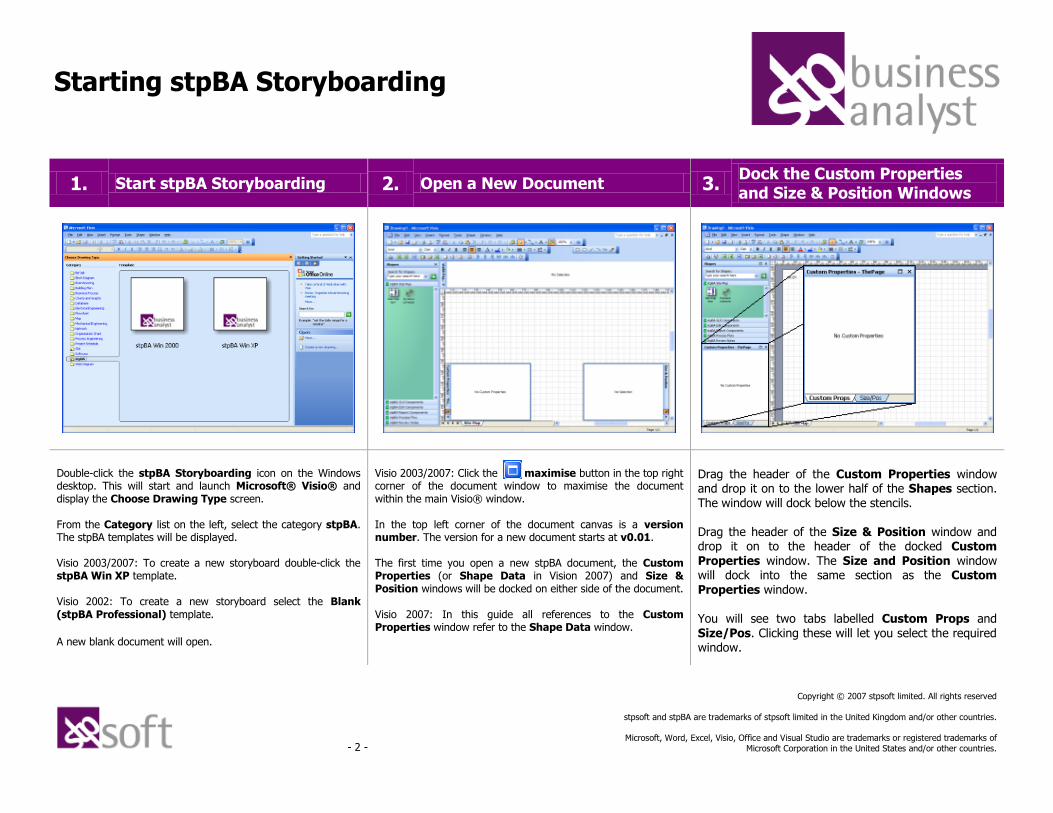
Double-click the stpBA Storyboarding icon on the Windows desktop. This will start and launch Microsoft® Visio® and display the Choose Drawing Type screen. From the Category list on the left, select the category stpBA. The stpBA templates will be displayed. Visio 2003/2007: To create a new storyboard double-click the stpBA Win XP template. Visio 2002: To create a new storyboard select the Blank (stpBA Professional) template. A new blank document will open.
Visio 2003/2007: Click the maximise button in the top right corner of the document window to maximise the document within the main Visio® window. In the top left corner of the document canvas is a version number. The version for a new document starts at v0.01. The first time you open a new stpBA document, the Custom Properties (or Shape Data in Vision 2007) and Size & Position windows will be docked on either side of the document. Visio 2007: In this guide all references to the Custom Properties window refer to the Shape Data window.
Drag the header of the Custom Properties window and drop it on to the lower half of the Shapes section. The window will dock below the stencils. Drag the header of the Size & Position window and drop it on to the header of the docked Custom Properties window. The Size and Position window will dock into the same section as the Custom Properties window. You will see two tabs labelled Custom Props and Size/Pos. Clicking these will let you select the required window.
Scenarios and Quality of Service Requirements Getting Started Starting stpBA Storyboarding
- 3 -
Copyright © 2007 stpsoft limited. All rights reserved
stpsoft and stpBA are trademarks of stpsoft limited in the United Kingdom and/or other countries.
Microsoft, Word, Excel, Visio, Office and Visual Studio are trademarks or registered trademarks of
Microsoft Corporation in the United States and/or other countries.
1. Open the Task List 2. Task List Toolbar
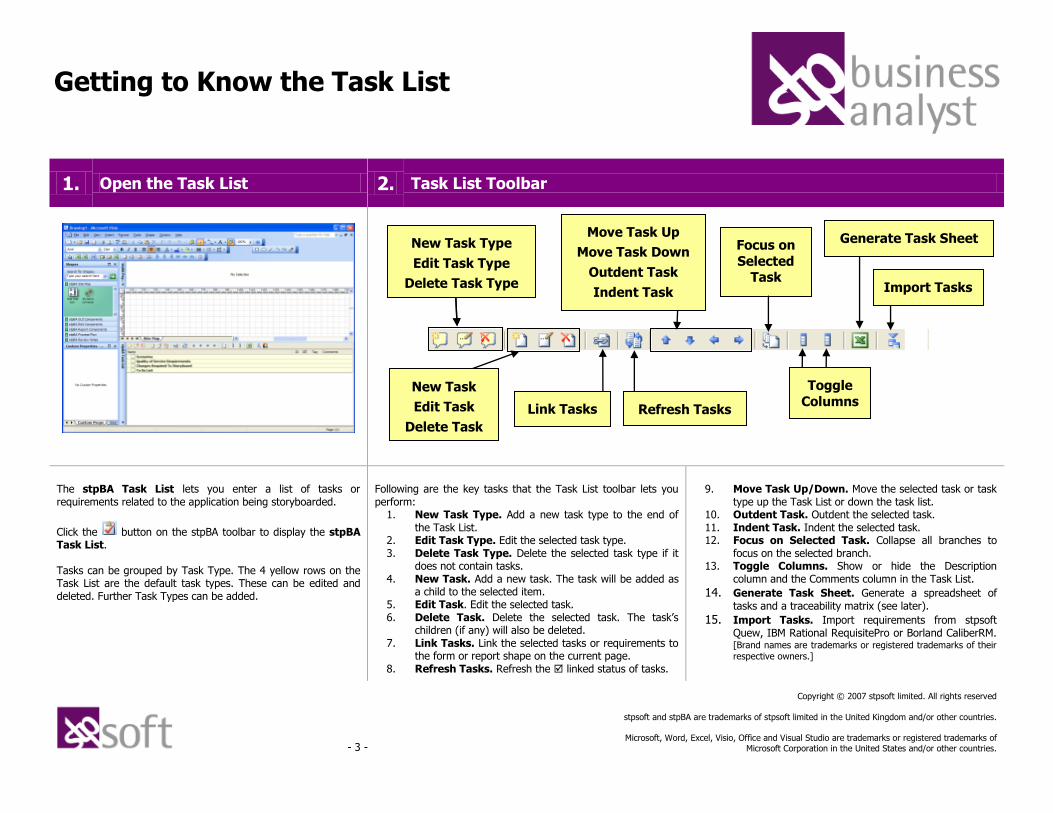
The stpBA Task List lets you enter a list of tasks or requirements related to the application being storyboarded.
Click the button on the stpBA toolbar to display the stpBA Task List. Tasks can be grouped by Task Type. The 4 yellow rows on the Task List are the default task types. These can be edited and deleted. Further Task Types can be added.
Following are the key tasks that the Task List toolbar lets you perform:
1. New Task Type. Add a new task type to the end of the Task List.
2. Edit Task Type. Edit the selected task type. 3. Delete Task Type. Delete the selected task type if it
does not contain tasks. 4. New Task. Add a new task. The task will be added as
a child to the selected item. 5. Edit Task. Edit the selected task. 6. Delete Task. Delete the selected task. The task’s
children (if any) will also be deleted. 7. Link Tasks. Link the selected tasks or requirements to
the form or report shape on the current page. 8. Refresh Tasks. Refresh the linked status of tasks.
9. Move Task Up/Down. Move the selected task or task type up the Task List or down the task list.
10. Outdent Task. Outdent the selected task. 11. Indent Task. Indent the selected task. 12. Focus on Selected Task. Collapse all branches to
focus on the selected branch. 13. Toggle Columns. Show or hide the Description
column and the Comments column in the Task List.
14. Generate Task Sheet. Generate a spreadsheet of tasks and a traceability matrix (see later).
15. Import Tasks. Import requirements from stpsoft Quew, IBM Rational RequisitePro or Borland CaliberRM. [Brand names are trademarks or registered trademarks of their respective owners.]
Getting to Know the Task List
New Task
Edit Task
Delete Task
Refresh Tasks
Toggle
Columns
Focus on
Selected Task
Link Tasks
New Task Type
Edit Task Type
Delete Task Type
Move Task Up
Move Task Down
Outdent Task
Indent Task
Generate Task Sheet
Import Tasks
- 4 -
Copyright © 2007 stpsoft limited. All rights reserved
stpsoft and stpBA are trademarks of stpsoft limited in the United Kingdom and/or other countries.
Microsoft, Word, Excel, Visio, Office and Visual Studio are trademarks or registered trademarks of
Microsoft Corporation in the United States and/or other countries.
1. Add a New Scenario 2. Add Child Items 3. Add Child Items
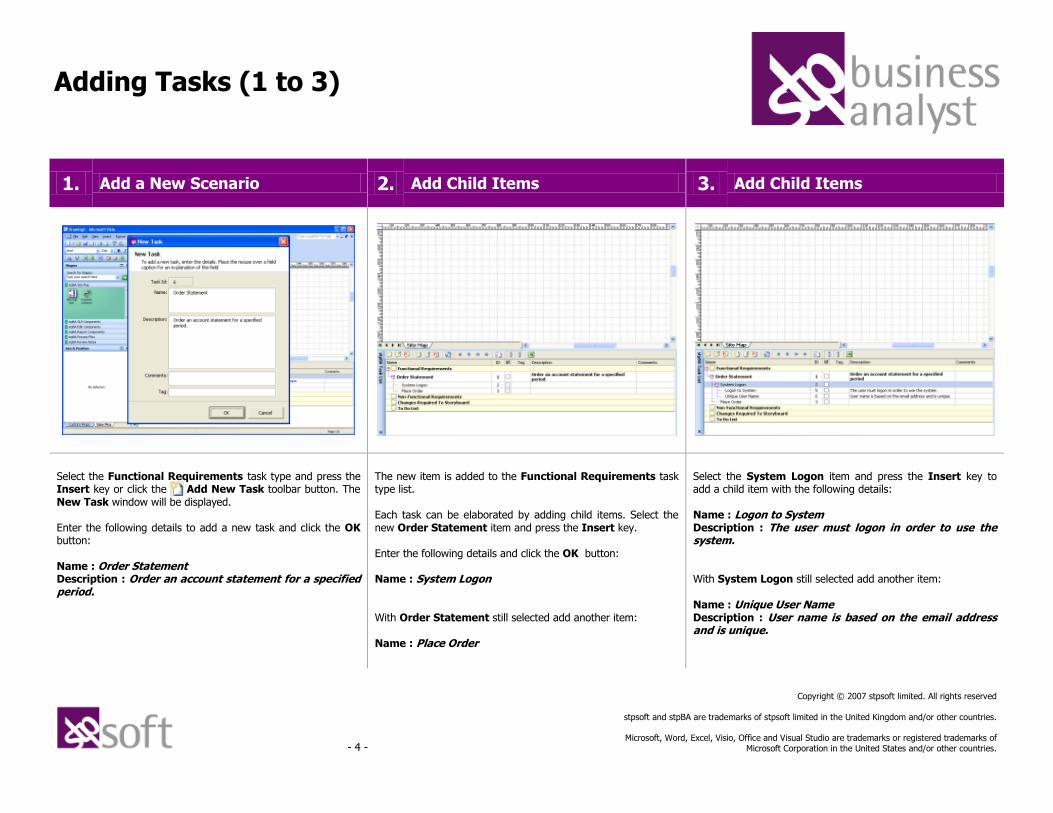
Select the Functional Requirements task type and press the Insert key or click the Add New Task toolbar button. The New Task window will be displayed. Enter the following details to add a new task and click the OK button: Name : Order Statement Description : Order an account statement for a specified period.
The new item is added to the Functional Requirements task type list. Each task can be elaborated by adding child items. Select the new Order Statement item and press the Insert key. Enter the following details and click the OK button: Name : System Logon With Order Statement still selected add another item: Name : Place Order
Select the System Logon item and press the Insert key to add a child item with the following details: Name : Logon to System Description : The user must logon in order to use the system. With System Logon still selected add another item: Name : Unique User Name Description : User name is based on the email address and is unique.
Adding Tasks (1 to 3)
- 5 -
Copyright © 2007 stpsoft limited. All rights reserved
stpsoft and stpBA are trademarks of stpsoft limited in the United Kingdom and/or other countries.
Microsoft, Word, Excel, Visio, Office and Visual Studio are trademarks or registered trademarks of
Microsoft Corporation in the United States and/or other countries.
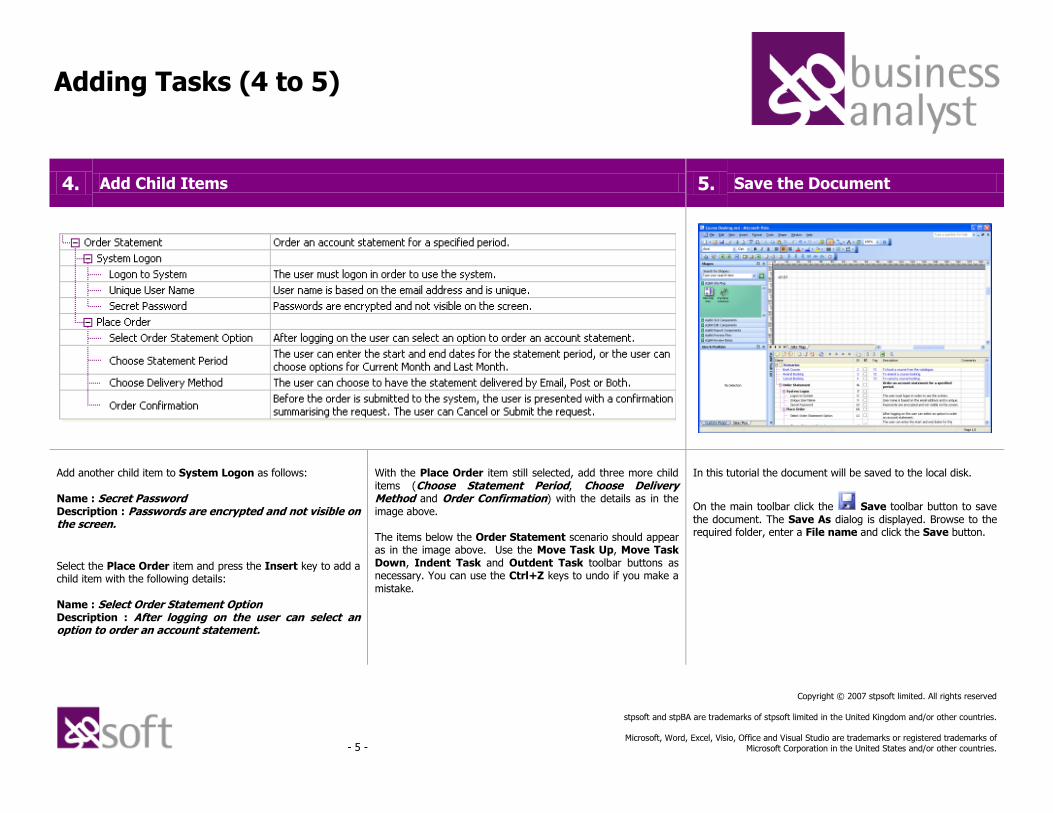
4. Add Child Items 5. Save the Document
Add another child item to System Logon as follows: Name : Secret Password Description : Passwords are encrypted and not visible on the screen.
Select the Place Order item and press the Insert key to add a child item with the following details: Name : Select Order Statement Option Description : After logging on the user can select an option to order an account statement.
With the Place Order item still selected, add three more child items (Choose Statement Period, Choose Delivery Method and Order Confirmation) with the details as in the image above. The items below the Order Statement scenario should appear as in the image above. Use the Move Task Up, Move Task Down, Indent Task and Outdent Task toolbar buttons as necessary. You can use the Ctrl+Z keys to undo if you make a mistake.
In this tutorial the document will be saved to the local disk.
On the main toolbar click the Save toolbar button to save the document. The Save As dialog is displayed. Browse to the required folder, enter a File name and click the Save button.
Adding Tasks (4 to 5)
- 6 -
Copyright © 2007 stpsoft limited. All rights reserved
stpsoft and stpBA are trademarks of stpsoft limited in the United Kingdom and/or other countries.
Microsoft, Word, Excel, Visio, Office and Visual Studio are trademarks or registered trademarks of
Microsoft Corporation in the United States and/or other countries.
1. Rename the Page 2. Add a Site Map Item 3. Step in to the Site Map Item
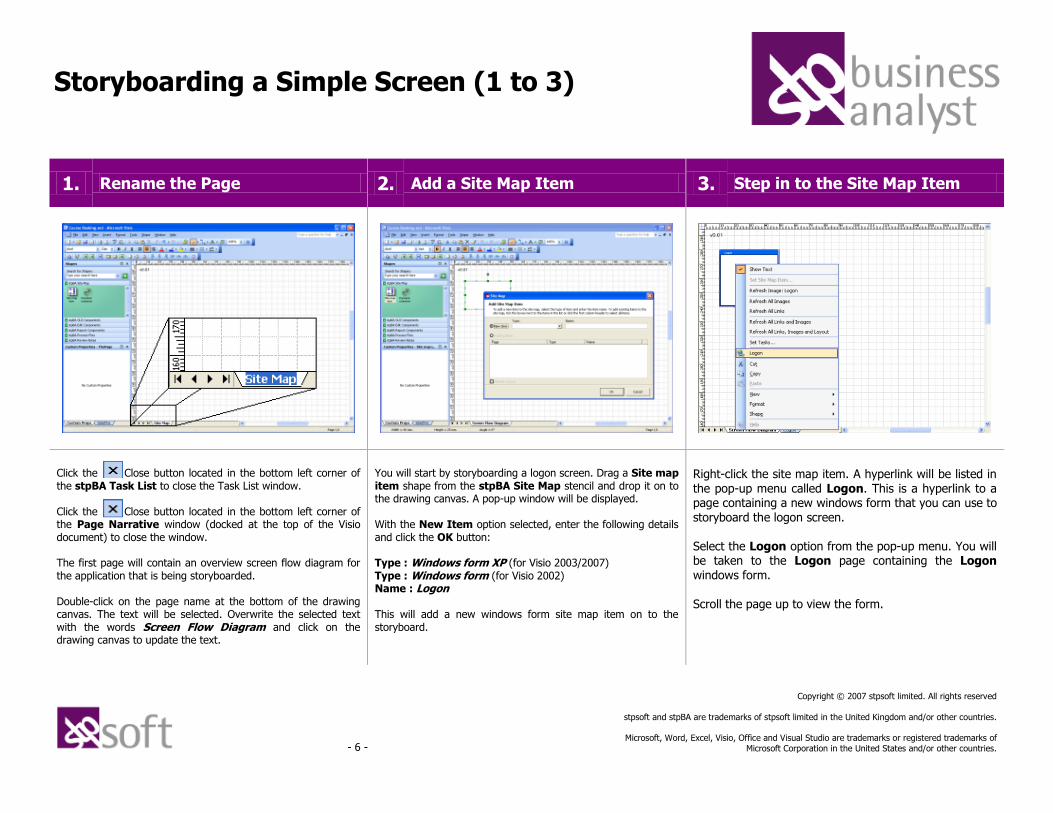
Click the Close button located in the bottom left corner of the stpBA Task List to close the Task List window. Click the Close button located in the bottom left corner of the Page Narrative window (docked at the top of the Visio document) to close the window. The first page will contain an overview screen flow diagram for the application that is being storyboarded. Double-click on the page name at the bottom of the drawing canvas. The text will be selected. Overwrite the selected text with the words Screen Flow Diagram and click on the drawing canvas to update the text.
You will start by storyboarding a logon screen. Drag a Site map item shape from the stpBA Site Map stencil and drop it on to the drawing canvas. A pop-up window will be displayed. With the New Item option selected, enter the following details and click the OK button: Type : Windows form XP (for Visio 2003/2007) Type : Windows form (for Visio 2002) Name : Logon This will add a new windows form site map item on to the storyboard.
Right-click the site map item. A hyperlink will be listed in the pop-up menu called Logon. This is a hyperlink to a page containing a new windows form that you can use to storyboard the logon screen. Select the Logon option from the pop-up menu. You will be taken to the Logon page containing the Logon windows form.
Scroll the page up to view the form.
Storyboarding a Simple Screen (1 to 3) Storyboarding a Simple Screen (1 to 3)
- 7 -
Copyright © 2007 stpsoft limited. All rights reserved
stpsoft and stpBA are trademarks of stpsoft limited in the United Kingdom and/or other countries.
Microsoft, Word, Excel, Visio, Office and Visual Studio are trademarks or registered trademarks of
Microsoft Corporation in the United States and/or other countries.
4. Set the Page Narrative 5. Add the Field Captions 6. Add the User Name Field
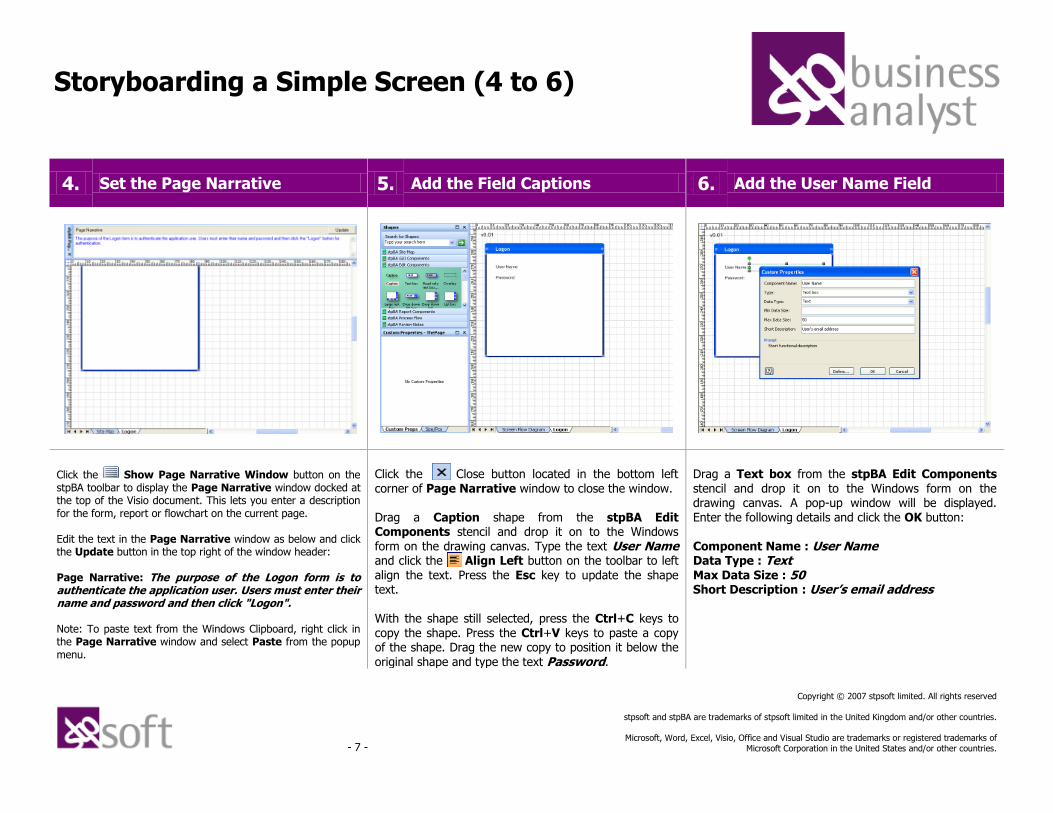
Click the Show Page Narrative Window button on the stpBA toolbar to display the Page Narrative window docked at the top of the Visio document. This lets you enter a description for the form, report or flowchart on the current page. Edit the text in the Page Narrative window as below and click the Update button in the top right of the window header: Page Narrative: The purpose of the Logon form is to authenticate the application user. Users must enter their name and password and then click "Logon". Note: To paste text from the Windows Clipboard, right click in the Page Narrative window and select Paste from the popup menu.
Click the Close button located in the bottom left corner of Page Narrative window to close the window. Drag a Caption shape from the stpBA Edit Components stencil and drop it on to the Windows form on the drawing canvas. Type the text User Name and click the Align Left button on the toolbar to left align the text. Press the Esc key to update the shape text.
With the shape still selected, press the Ctrl+C keys to copy the shape. Press the Ctrl+V keys to paste a copy of the shape. Drag the new copy to position it below the original shape and type the text Password.
Drag a Text box from the stpBA Edit Components stencil and drop it on to the Windows form on the drawing canvas. A pop-up window will be displayed. Enter the following details and click the OK button: Component Name : User Name Data Type : Text Max Data Size : 50 Short Description : User’s email address
Storyboarding a Simple Screen (4 to 6)
- 8 -
Copyright © 2007 stpsoft limited. All rights reserved
stpsoft and stpBA are trademarks of stpsoft limited in the United Kingdom and/or other countries.
Microsoft, Word, Excel, Visio, Office and Visual Studio are trademarks or registered trademarks of
Microsoft Corporation in the United States and/or other countries.
7. Add the Password Field 8. Add the Logon Button 9. Set the Tab Indexes
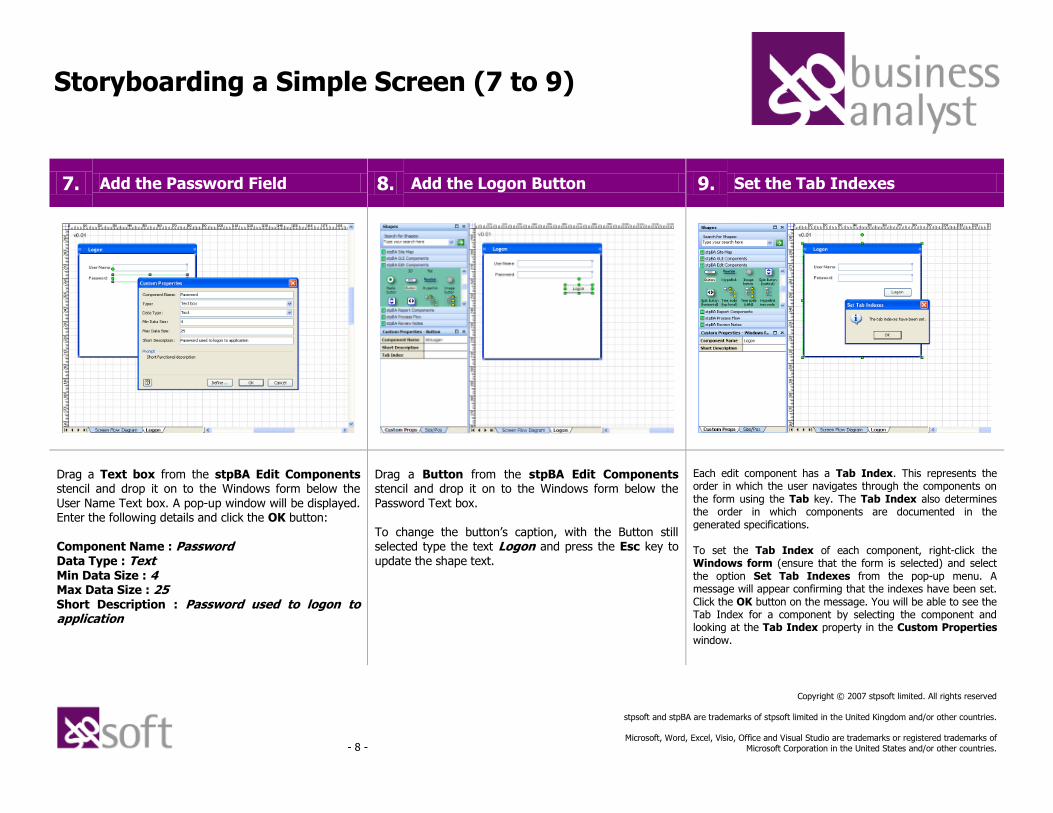
Drag a Text box from the stpBA Edit Components stencil and drop it on to the Windows form below the User Name Text box. A pop-up window will be displayed. Enter the following details and click the OK button: Component Name : Password Data Type : Text Min Data Size : 4 Max Data Size : 25
Short Description : Password used to logon to application
Drag a Button from the stpBA Edit Components stencil and drop it on to the Windows form below the Password Text box. To change the button’s caption, with the Button still selected type the text Logon and press the Esc key to update the shape text.
Each edit component has a Tab Index. This represents the order in which the user navigates through the components on the form using the Tab key. The Tab Index also determines the order in which components are documented in the generated specifications. To set the Tab Index of each component, right-click the Windows form (ensure that the form is selected) and select the option Set Tab Indexes from the pop-up menu. A message will appear confirming that the indexes have been set. Click the OK button on the message. You will be able to see the Tab Index for a component by selecting the component and looking at the Tab Index property in the Custom Properties window.
Storyboarding a Simple Screen (7 to 9)
- 9 -
Copyright © 2007 stpsoft limited. All rights reserved
stpsoft and stpBA are trademarks of stpsoft limited in the United Kingdom and/or other countries.
Microsoft, Word, Excel, Visio, Office and Visual Studio are trademarks or registered trademarks of
Microsoft Corporation in the United States and/or other countries.
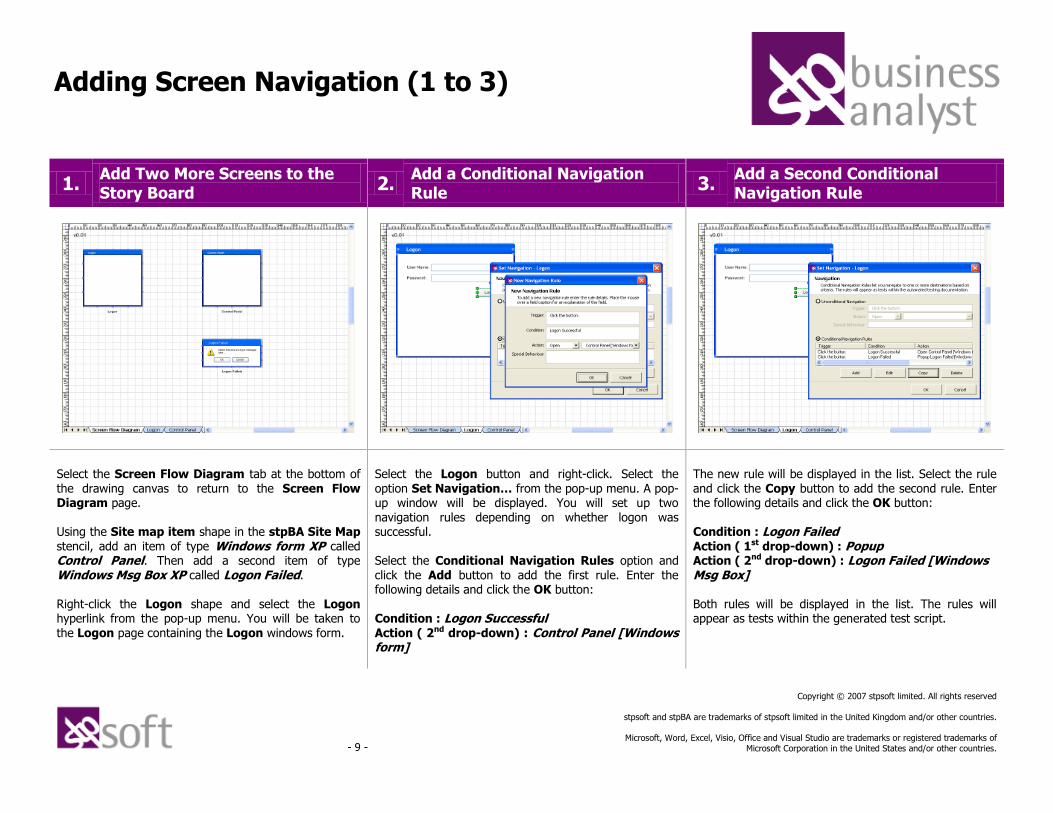
1. Add Two More Screens to the Story Board
2. Add a Conditional Navigation Rule
3. Add a Second Conditional Navigation Rule
Select the Screen Flow Diagram tab at the bottom of the drawing canvas to return to the Screen Flow Diagram page. Using the Site map item shape in the stpBA Site Map stencil, add an item of type Windows form XP called Control Panel. Then add a second item of type Windows Msg Box XP called Logon Failed.
Right-click the Logon shape and select the Logon hyperlink from the pop-up menu. You will be taken to the Logon page containing the Logon windows form.
Select the Logon button and right-click. Select the option Set Navigation… from the pop-up menu. A pop-up window will be displayed. You will set up two navigation rules depending on whether logon was successful. Select the Conditional Navigation Rules option and click the Add button to add the first rule. Enter the following details and click the OK button:
Condition : Logon Successful Action ( 2nd drop-down) : Control Panel [Windows form]
The new rule will be displayed in the list. Select the rule and click the Copy button to add the second rule. Enter the following details and click the OK button: Condition : Logon Failed Action ( 1st drop-down) : Popup Action ( 2nd drop-down) : Logon Failed [Windows Msg Box]
Both rules will be displayed in the list. The rules will appear as tests within the generated test script.
Adding Screen Navigation (1 to 3)
- 10 -
Copyright © 2007 stpsoft limited. All rights reserved
stpsoft and stpBA are trademarks of stpsoft limited in the United Kingdom and/or other countries.
Microsoft, Word, Excel, Visio, Office and Visual Studio are trademarks or registered trademarks of
Microsoft Corporation in the United States and/or other countries.
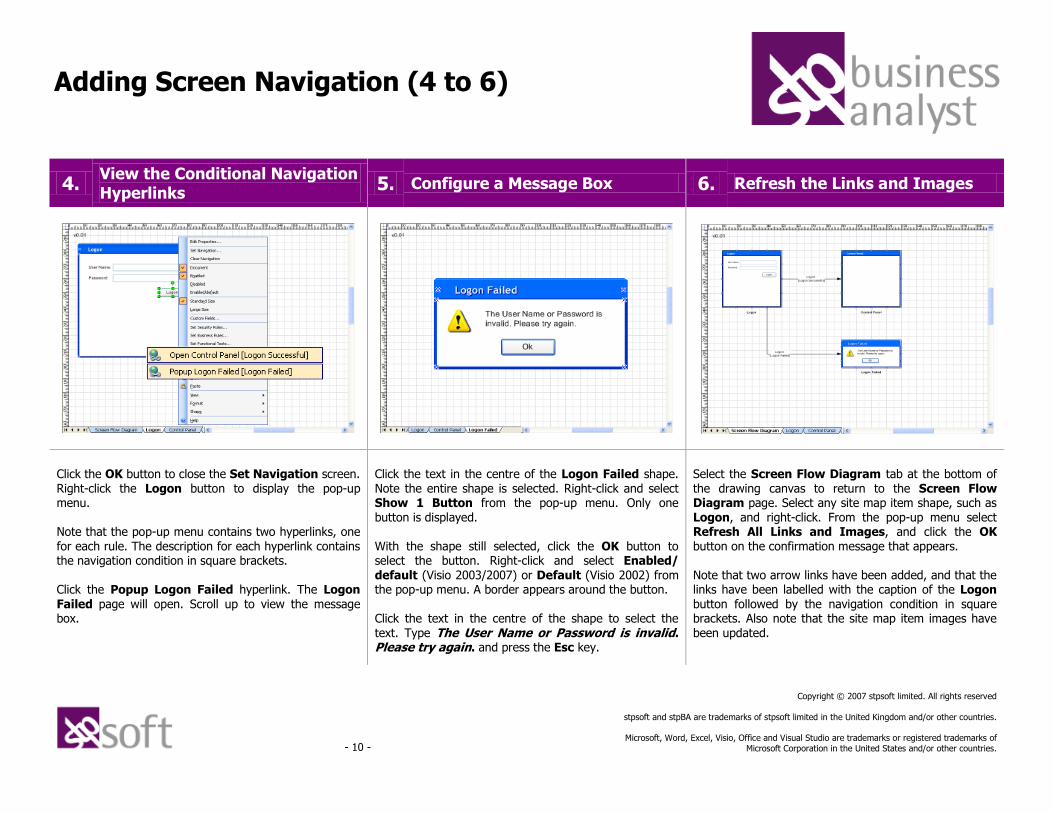
4. View the Conditional Navigation Hyperlinks
5. Configure a Message Box 6. Refresh the Links and Images
Click the OK button to close the Set Navigation screen. Right-click the Logon button to display the pop-up menu. Note that the pop-up menu contains two hyperlinks, one for each rule. The description for each hyperlink contains the navigation condition in square brackets. Click the Popup Logon Failed hyperlink. The Logon
Failed page will open. Scroll up to view the message box.
Click the text in the centre of the Logon Failed shape. Note the entire shape is selected. Right-click and select Show 1 Button from the pop-up menu. Only one button is displayed. With the shape still selected, click the OK button to select the button. Right-click and select Enabled/ default (Visio 2003/2007) or Default (Visio 2002) from the pop-up menu. A border appears around the button.
Click the text in the centre of the shape to select the text. Type The User Name or Password is invalid. Please try again. and press the Esc key.
Select the Screen Flow Diagram tab at the bottom of the drawing canvas to return to the Screen Flow Diagram page. Select any site map item shape, such as Logon, and right-click. From the pop-up menu select Refresh All Links and Images, and click the OK button on the confirmation message that appears. Note that two arrow links have been added, and that the links have been labelled with the caption of the Logon
button followed by the navigation condition in square brackets. Also note that the site map item images have been updated.
Adding Screen Navigation (4 to 6)
- 11 -
Copyright © 2007 stpsoft limited. All rights reserved
stpsoft and stpBA are trademarks of stpsoft limited in the United Kingdom and/or other countries.
Microsoft, Word, Excel, Visio, Office and Visual Studio are trademarks or registered trademarks of
Microsoft Corporation in the United States and/or other countries.
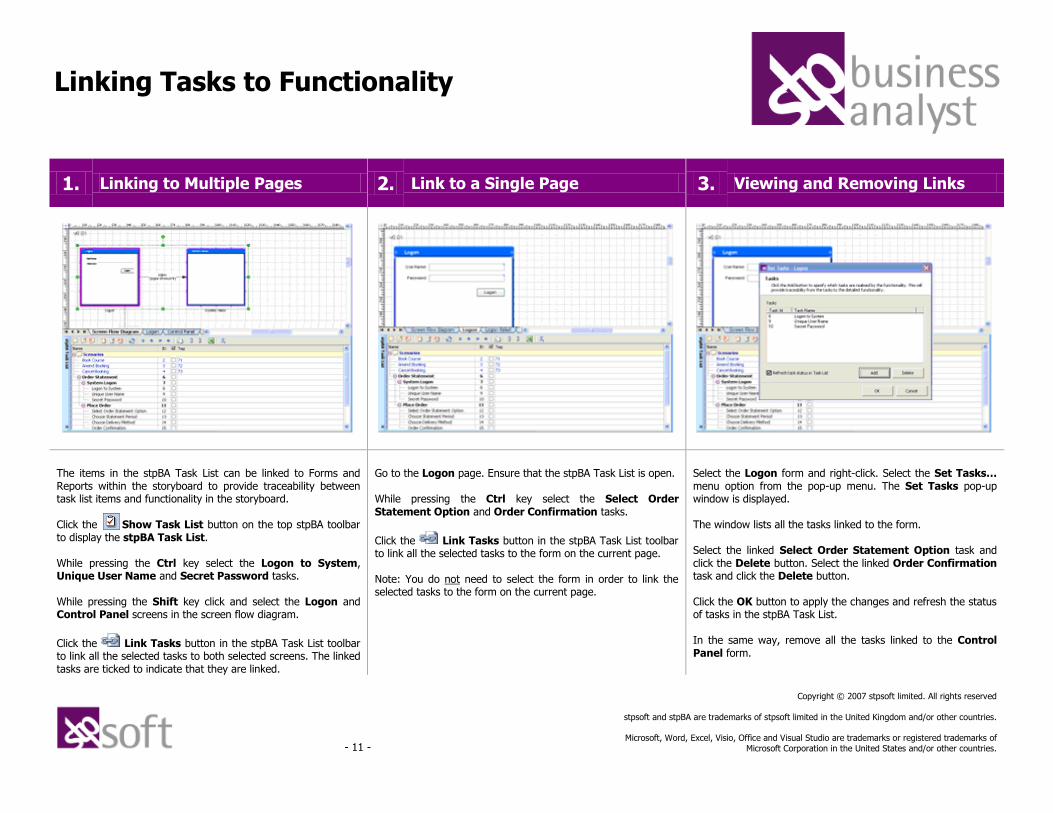
1. Linking to Multiple Pages 2. Link to a Single Page 3. Viewing and Removing Links
The items in the stpBA Task List can be linked to Forms and Reports within the storyboard to provide traceability between task list items and functionality in the storyboard. Click the Show Task List button on the top stpBA toolbar to display the stpBA Task List. While pressing the Ctrl key select the Logon to System, Unique User Name and Secret Password tasks. While pressing the Shift key click and select the Logon and Control Panel screens in the screen flow diagram.
Click the Link Tasks button in the stpBA Task List toolbar to link all the selected tasks to both selected screens. The linked tasks are ticked to indicate that they are linked.
Go to the Logon page. Ensure that the stpBA Task List is open. While pressing the Ctrl key select the Select Order Statement Option and Order Confirmation tasks.
Click the Link Tasks button in the stpBA Task List toolbar to link all the selected tasks to the form on the current page. Note: You do not need to select the form in order to link the selected tasks to the form on the current page.
Select the Logon form and right-click. Select the Set Tasks… menu option from the pop-up menu. The Set Tasks pop-up window is displayed. The window lists all the tasks linked to the form. Select the linked Select Order Statement Option task and click the Delete button. Select the linked Order Confirmation task and click the Delete button. Click the OK button to apply the changes and refresh the status of tasks in the stpBA Task List. In the same way, remove all the tasks linked to the Control Panel form.
Linking Tasks to Functionality
- 12 -
Copyright © 2007 stpsoft limited. All rights reserved
stpsoft and stpBA are trademarks of stpsoft limited in the United Kingdom and/or other countries.
Microsoft, Word, Excel, Visio, Office and Visual Studio are trademarks or registered trademarks of
Microsoft Corporation in the United States and/or other countries.
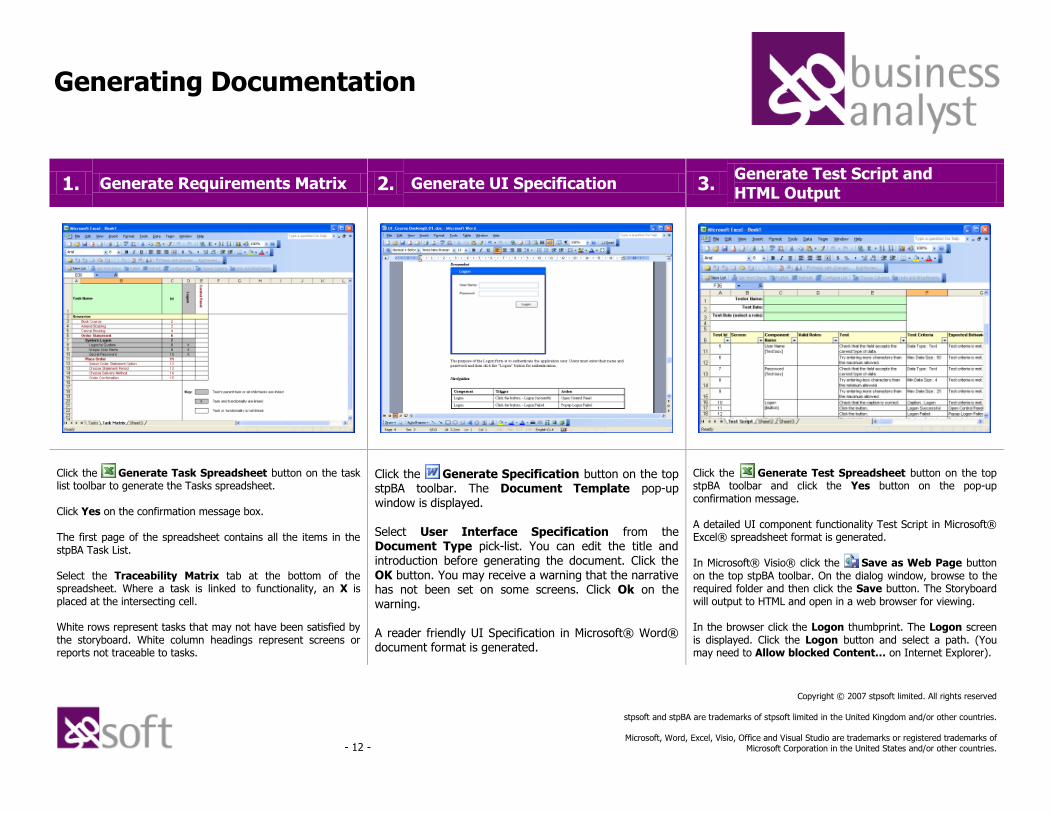
1. Generate Requirements Matrix 2. Generate UI Specification 3. Generate Test Script and HTML Output
Click the Generate Task Spreadsheet button on the task list toolbar to generate the Tasks spreadsheet. Click Yes on the confirmation message box. The first page of the spreadsheet contains all the items in the stpBA Task List. Select the Traceability Matrix tab at the bottom of the spreadsheet. Where a task is linked to functionality, an X is placed at the intersecting cell. White rows represent tasks that may not have been satisfied by the storyboard. White column headings represent screens or reports not traceable to tasks.
Click the Generate Specification button on the top stpBA toolbar. The Document Template pop-up window is displayed. Select User Interface Specification from the Document Type pick-list. You can edit the title and introduction before generating the document. Click the OK button. You may receive a warning that the narrative has not been set on some screens. Click Ok on the
warning. A reader friendly UI Specification in Microsoft® Word® document format is generated.
Click the Generate Test Spreadsheet button on the top stpBA toolbar and click the Yes button on the pop-up confirmation message. A detailed UI component functionality Test Script in Microsoft® Excel® spreadsheet format is generated. In Microsoft® Visio® click the Save as Web Page button on the top stpBA toolbar. On the dialog window, browse to the required folder and then click the Save button. The Storyboard will output to HTML and open in a web browser for viewing. In the browser click the Logon thumbprint. The Logon screen is displayed. Click the Logon button and select a path. (You may need to Allow blocked Content… on Internet Explorer).
Viewing and Assigning Work Items
DELETE Storyboarding a Back-End Process (1 to 3) Generating Documentation