step-back cupboard - fine · pdf filestep-back cupboard build this elegant 18th-century...
TRANSCRIPT
54 F I N E W O O D W O R K I N G Photos: Matt Berger
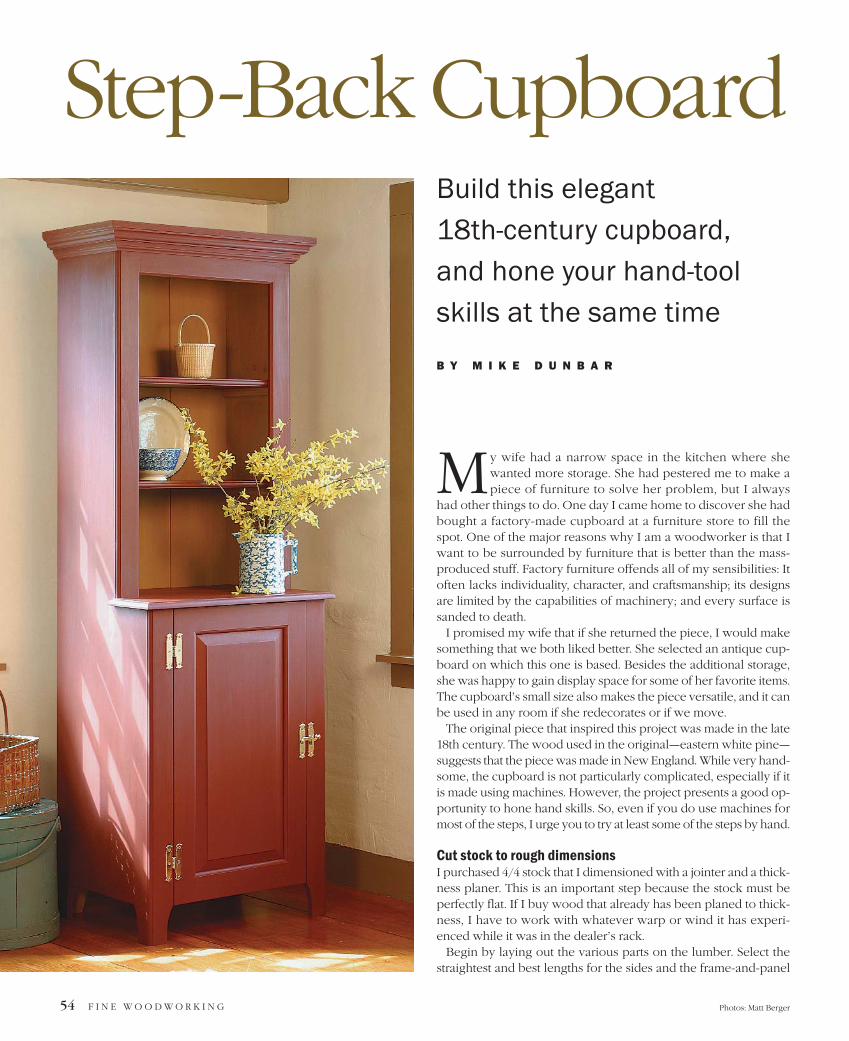
y wife had a narrow space in the kitchen where shewanted more storage. She had pestered me to make apiece of furniture to solve her problem, but I always
had other things to do. One day I came home to discover she hadbought a factory-made cupboard at a furniture store to fill thespot. One of the major reasons why I am a woodworker is that Iwant to be surrounded by furniture that is better than the mass-produced stuff. Factory furniture offends all of my sensibilities: Itoften lacks individuality, character, and craftsmanship; its designsare limited by the capabilities of machinery; and every surface issanded to death.
I promised my wife that if she returned the piece, I would makesomething that we both liked better. She selected an antique cup-board on which this one is based. Besides the additional storage,she was happy to gain display space for some of her favorite items.The cupboard’s small size also makes the piece versatile, and it canbe used in any room if she redecorates or if we move.
The original piece that inspired this project was made in the late18th century. The wood used in the original—eastern white pine—suggests that the piece was made in New England. While very hand-some, the cupboard is not particularly complicated, especially if itis made using machines. However, the project presents a good op-portunity to hone hand skills. So, even if you do use machines formost of the steps, I urge you to try at least some of the steps by hand.
Cut stock to rough dimensionsI purchased 4/4 stock that I dimensioned with a jointer and a thick-ness planer. This is an important step because the stock must beperfectly flat. If I buy wood that already has been planed to thick-ness, I have to work with whatever warp or wind it has experi-enced while it was in the dealer’s rack.
Begin by laying out the various parts on the lumber. Select thestraightest and best lengths for the sides and the frame-and-panel
Step-Back CupboardBuild this elegant 18th-century cupboard, and hone your hand-toolskills at the same time
B Y M I K E D U N B A R
M
S E P T E M B E R / O C T O B E R 2 0 0 3 55
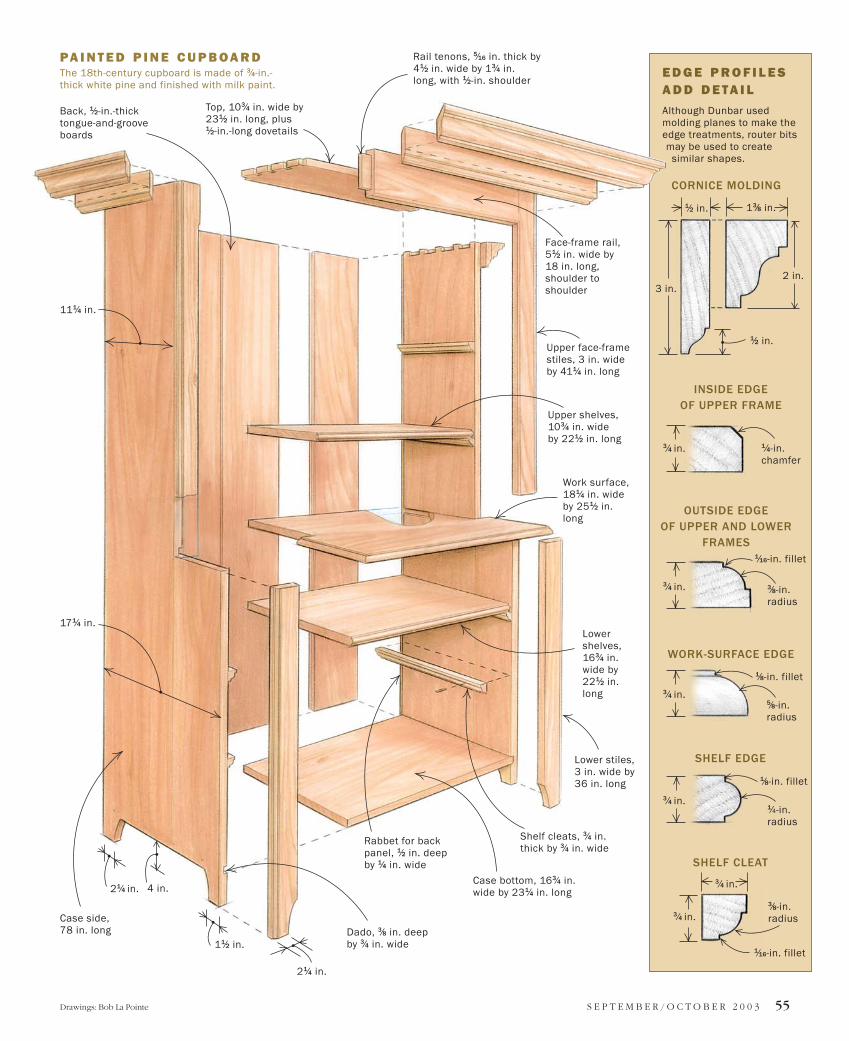
E D G E P R O F I L E SA D D D E TA I L
Although Dunbar usedmolding planes to make theedge treatments, router bitsmay be used to create
similar shapes.
CORNICE MOLDING
INSIDE EDGE OF UPPER FRAME
OUTSIDE EDGE OF UPPER AND LOWER
FRAMES
WORK-SURFACE EDGE
SHELF EDGE
SHELF CLEAT
PA I N T E D P I N E C U P B O A R DThe 18th-century cupboard is made of 3⁄4-in.-thick white pine and finished with milk paint.
Case side, 78 in. long
Rabbet for backpanel, 1⁄2 in. deepby 1⁄4 in. wide
Top, 103⁄4 in. wide by231⁄2 in. long, plus 1⁄2-in.-long dovetails
Face-frame rail,51⁄2 in. wide by18 in. long,shoulder toshoulder
Rail tenons, 5⁄16 in. thick by41⁄2 in. wide by 13⁄4 in.long, with 1⁄2-in. shoulder
Upper face-framestiles, 3 in. wideby 411⁄4 in. long
Upper shelves,103⁄4 in. wideby 221⁄2 in. long
Shelf cleats, 3⁄4 in.thick by 3⁄4 in. wide
Work surface,181⁄4 in. wideby 251⁄2 in.long
Lower stiles, 3 in. wide by36 in. long
Lowershelves,163⁄4 in.wide by221⁄2 in.long
Case bottom, 163⁄4 in.wide by 231⁄4 in. long
Dado, 3⁄8 in. deep by 3⁄4 in. wide
Back, 1⁄2-in.-thicktongue-and-grooveboards
3 in.
1⁄2 in.
3⁄4 in.
13⁄8 in.
2 in.
1⁄2 in.
1⁄4-in.chamfer
3⁄8-in.radius
1⁄16-in. fillet
3⁄4 in.
111⁄4 in.
171⁄4 in.
21⁄4 in. 4 in.
11⁄2 in.
21⁄4 in.
3
3
3⁄4 in.
3⁄4 in.
5⁄8-in.radius
1⁄8-in. fillet
1
radius
1⁄8-in. fillet
3⁄8-in.radius
1⁄16-in. fillet
Drawings: Bob La Pointe
⁄4 in.
⁄4 in.
⁄4-in.
56 F I N E W O O D W O R K I N G
door. You don’t want any warp or twist in these most visible sec-tions of the cabinet.
Cut out the various parts to oversize dimensions. You will cutthem to their final dimensions later. Finally, joint one surface ofeach board and plane them all to thickness. Use a handplane oneach part to remove the planer marks as well as any dings orscratches that have occurred along the way.
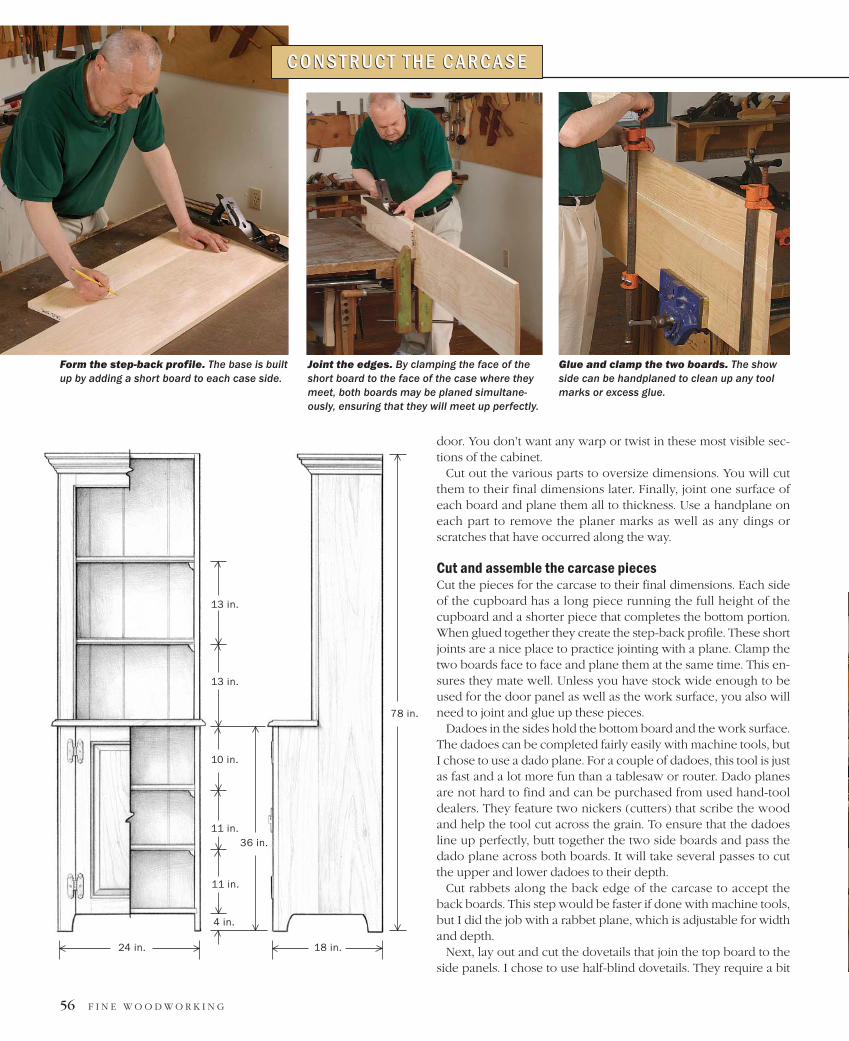
Cut and assemble the carcase piecesCut the pieces for the carcase to their final dimensions. Each sideof the cupboard has a long piece running the full height of thecupboard and a shorter piece that completes the bottom portion.When glued together they create the step-back profile. These shortjoints are a nice place to practice jointing with a plane. Clamp thetwo boards face to face and plane them at the same time. This en-sures they mate well. Unless you have stock wide enough to beused for the door panel as well as the work surface, you also willneed to joint and glue up these pieces.
Dadoes in the sides hold the bottom board and the work surface.The dadoes can be completed fairly easily with machine tools, butI chose to use a dado plane. For a couple of dadoes, this tool is justas fast and a lot more fun than a tablesaw or router. Dado planesare not hard to find and can be purchased from used hand-tooldealers. They feature two nickers (cutters) that scribe the woodand help the tool cut across the grain. To ensure that the dadoesline up perfectly, butt together the two side boards and pass thedado plane across both boards. It will take several passes to cut the upper and lower dadoes to their depth.
Cut rabbets along the back edge of the carcase to accept theback boards. This step would be faster if done with machine tools,but I did the job with a rabbet plane, which is adjustable for widthand depth.
Next, lay out and cut the dovetails that join the top board to theside panels. I chose to use half-blind dovetails. They require a bit
Form the step-back profile. The base is builtup by adding a short board to each case side.
Joint the edges. By clamping the face of theshort board to the face of the case where theymeet, both boards may be planed simultane-ously, ensuring that they will meet up perfectly.
Glue and clamp the two boards. The showside can be handplaned to clean up any toolmarks or excess glue.
C O N S T R U C T T H E C A R C A S EC O N S T R U C T T H E C A R C A S E
24 in. 18 in.
36 in.
78 in.
4 in.
11 in.
11 in.
10 in.
13 in.
13 in.
S E P T E M B E R / O C T O B E R 2 0 0 3 57
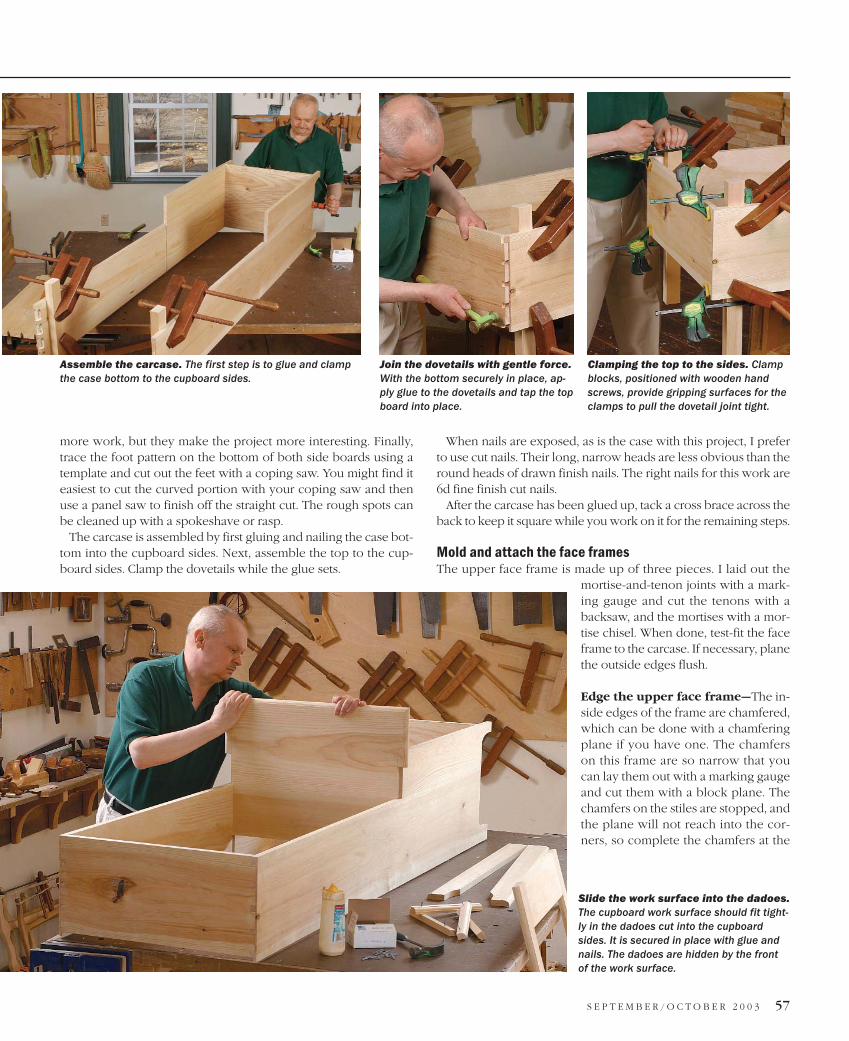
more work, but they make the project more interesting. Finally,trace the foot pattern on the bottom of both side boards using atemplate and cut out the feet with a coping saw. You might find iteasiest to cut the curved portion with your coping saw and thenuse a panel saw to finish off the straight cut. The rough spots canbe cleaned up with a spokeshave or rasp.
The carcase is assembled by first gluing and nailing the case bot-tom into the cupboard sides. Next, assemble the top to the cup-board sides. Clamp the dovetails while the glue sets.
When nails are exposed, as is the case with this project, I preferto use cut nails. Their long, narrow heads are less obvious than theround heads of drawn finish nails. The right nails for this work are6d fine finish cut nails.
After the carcase has been glued up, tack a cross brace across theback to keep it square while you work on it for the remaining steps.
Mold and attach the face framesThe upper face frame is made up of three pieces. I laid out the
mortise-and-tenon joints with a mark-ing gauge and cut the tenons with abacksaw, and the mortises with a mor-tise chisel. When done, test-fit the faceframe to the carcase. If necessary, planethe outside edges flush.
Edge the upper face frame—The in-side edges of the frame are chamfered,which can be done with a chamferingplane if you have one. The chamferson this frame are so narrow that youcan lay them out with a marking gaugeand cut them with a block plane. Thechamfers on the stiles are stopped, andthe plane will not reach into the cor-ners, so complete the chamfers at the
Assemble the carcase. The first step is to glue and clampthe case bottom to the cupboard sides.
Join the dovetails with gentle force.With the bottom securely in place, ap-ply glue to the dovetails and tap the topboard into place.
Clamping the top to the sides. Clampblocks, positioned with wooden handscrews, provide gripping surfaces for theclamps to pull the dovetail joint tight.
Slide the work surface into the dadoes.The cupboard work surface should fit tight-ly in the dadoes cut into the cupboardsides. It is secured in place with glue andnails. The dadoes are hidden by the frontof the work surface.

58 F I N E W O O D W O R K I N G
corners with a drawknife. A drawknife typically is used for coarsework, but with a steady hand, the tool can take fine shavings. Usea sharp chisel to complete the mitered corners where the cham-fers meet.
Cut the ovolo profile on the outside of the stiles. This is an im-portant detail. Although small, this profile softens the cupboard’svertical corners while giving them definition. Used above and be-low, the ovolo also ties together the open top and closed bottom.
Because I had to nail through the molding profile to attach thestiles to the carcase, I used 4d headless cut brads (11⁄2 in.), whichare less visible than the larger 6d cut nails.
Thumbnail edge completes the work surfaceThe work surface separates the open top section of the cupboardfrom the lower, enclosed portion. Before cutting and fitting thework surface into the cupboard, add a thumbnail profile to its ex-posed edges. The thumbnail profile was common on 18th-centuryfurniture. I made mine with a molding plane. Cut the molding onthe end grain first. A waste strip on the far corner keeps the wood
from chipping out on the exposed front cor-ners. Now cut the thumbnail on the front, inthe direction of the grain.
Attach the lower face-frame stiles—Thelower face frame has only two stiles and norails. Like the stiles on the upper face frame,the outside edges of the lower stiles aremolded with an ovolo profile. Before secur-ing the stiles to the carcase, cut out the feetto the same pattern as the sides. To protectthe molding, I again used headless brads,but I used 6d nails to secure the stiles to the
A D D T H E FA C E F R A M E S A N D C O R N I C EA D D T H E FA C E F R A M E S A N D C O R N I C E
The upper face frame gets a chamfer on its inside edge. Scribe thewidth with a marking gauge and use a block plane to bevel the insideedge of the top rail.
The upper face-frame stiles require a stopped chamfer. Dry-fit the frame and mark theend of the chamfer (left), then plane the chamfer to within an inch or two of the stop mark. Adrawknife will give you a smooth edge (center) as you cut away the remainder of the chamfer.Dry-fit again and finish the corner with a chisel (right).
Attach the faceframe. Once the up-per face frame hasbeen assembled,glue and nail it ontothe cupboard.
S E P T E M B E R / O C T O B E R 2 0 0 3 59
bottom board. A nail through the work surface also strengthensthe stile-to-case connection. I don’t use any glue.
Locate and cut the shelf cleatsThe placement of the shelves is determined by what you plan toput in each section of the cupboard. The shelves are held in placewithin the cupboard by cleats.
Because some of the cleats in the open portion of the cupboardare visible, they are decorated with the same ovolo profile as theface-frame stiles. The easiest way to make these cleats is to cutthe molding on the edge of a board. Rip off a strip to the widthgiven in the drawing, and then cut the cleats to length. If you donot have stock long enough for all 10 cleats, run multiple strips.
Cut the cleats to length and nail them into the cupboard’s upperand lower sections. Because the carcase sides are only 3⁄4 in. thickand don’t provide a lot of material for nailing, I also added a spotof glue in the middle of each cleat. The cleats run across the sides,but the nails are forgiving enough to accom-modate seasonal movement. Also, gluing only in the center allows movement. Theshelves are not secured to the cleats; gravityholds them in place.
Make an edge on the shelves—The mold-ing profile on the front edges of the shelves iscalled an astragal and was a common 18th-century treatment for shelves. Its similarity tothe ovolos on the carcase and the thumbnailon the work surface help tie together thepiece’s design.
You also can cut a groove in each shelf witha shoulder plane to prop up plates for display.
Clamp a straightedge to the shelf and use this as a fence to guidethe shoulder plane. Holding the plane at an angle will cut the V-shaped groove.
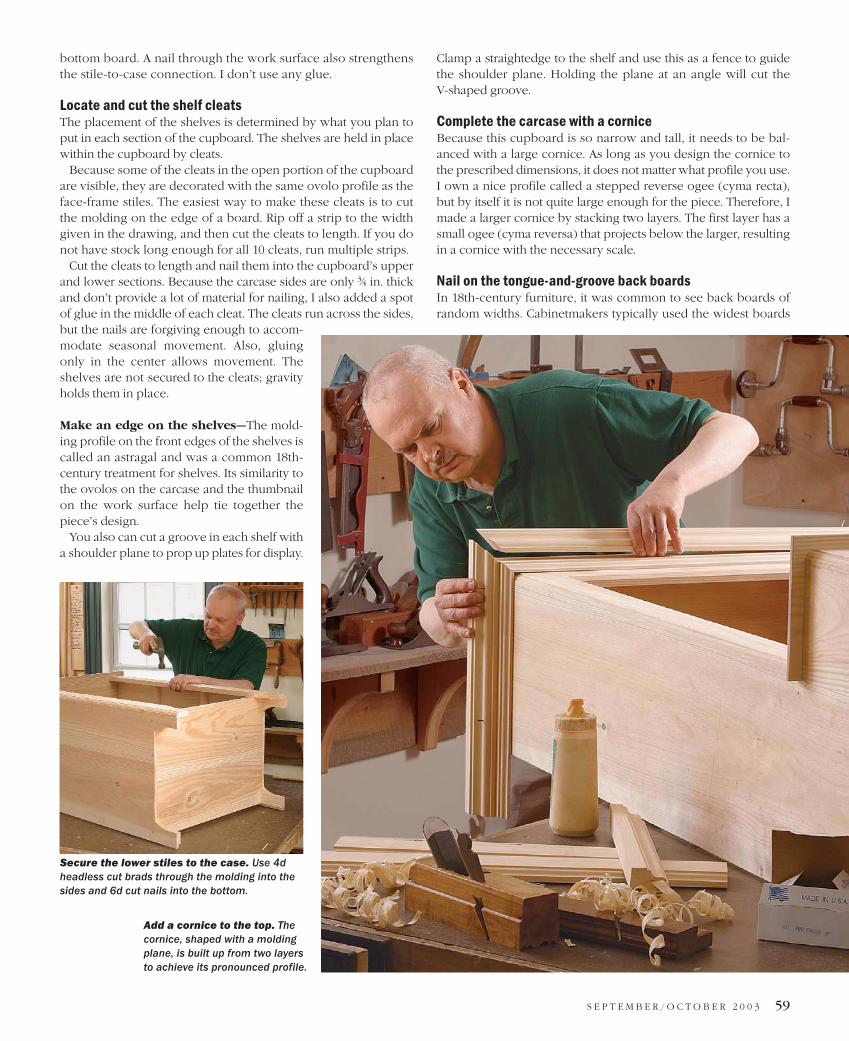
Complete the carcase with a corniceBecause this cupboard is so narrow and tall, it needs to be bal-anced with a large cornice. As long as you design the cornice tothe prescribed dimensions, it does not matter what profile you use.I own a nice profile called a stepped reverse ogee (cyma recta),but by itself it is not quite large enough for the piece. Therefore, Imade a larger cornice by stacking two layers. The first layer has asmall ogee (cyma reversa) that projects below the larger, resultingin a cornice with the necessary scale.
Nail on the tongue-and-groove back boardsIn 18th-century furniture, it was common to see back boards ofrandom widths. Cabinetmakers typically used the widest boards
Secure the lower stiles to the case. Use 4dheadless cut brads through the molding into thesides and 6d cut nails into the bottom.
Add a cornice to the top. Thecornice, shaped with a moldingplane, is built up from two layersto achieve its pronounced profile.
60 F I N E W O O D W O R K I N G
on hand and the fewest needed to fill the space. To achieve thisfeel I used two wider boards on the sides and a narrow one in themiddle. For these I used 1⁄2-in.-thick pine.
To avoid gaps in the back boards caused by seasonal movement,I cut tongues and grooves into their edges. I have a pair of planesthat make this joint, called match planes. Like most hand tools,they are quick and easy for a small job like this.
The back boards are nailed into the rabbets in the cupboardsides. They also are nailed into the top and bottom boards and thework surface. Once again, pay attention to seasonal movement. Inthe winter, fit the back boards loosely. In the summer, you shouldsnug them up, as they will shrink in the winter.
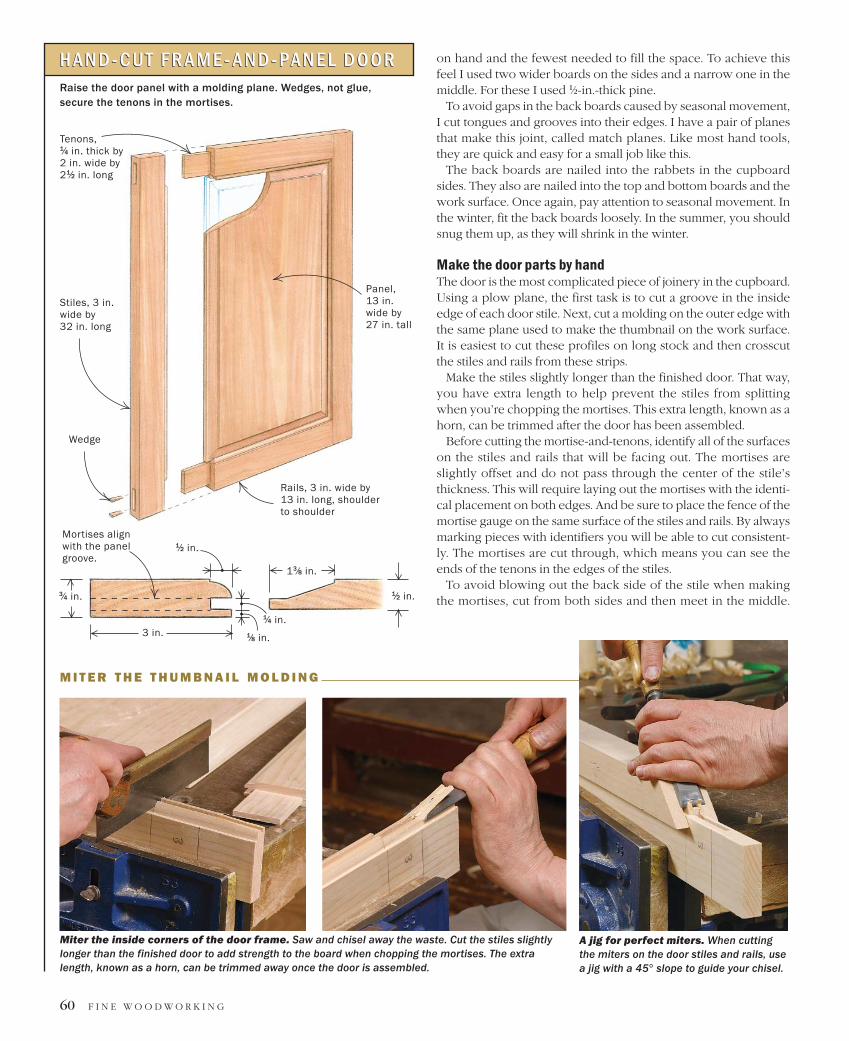
Make the door parts by handThe door is the most complicated piece of joinery in the cupboard.Using a plow plane, the first task is to cut a groove in the insideedge of each door stile. Next, cut a molding on the outer edge withthe same plane used to make the thumbnail on the work surface.It is easiest to cut these profiles on long stock and then crosscutthe stiles and rails from these strips.
Make the stiles slightly longer than the finished door. That way,you have extra length to help prevent the stiles from splittingwhen you’re chopping the mortises. This extra length, known as ahorn, can be trimmed after the door has been assembled.
Before cutting the mortise-and-tenons, identify all of the surfaceson the stiles and rails that will be facing out. The mortises areslightly offset and do not pass through the center of the stile’sthickness. This will require laying out the mortises with the identi-cal placement on both edges. And be sure to place the fence of themortise gauge on the same surface of the stiles and rails. By alwaysmarking pieces with identifiers you will be able to cut consistent-ly. The mortises are cut through, which means you can see theends of the tenons in the edges of the stiles.
To avoid blowing out the back side of the stile when makingthe mortises, cut from both sides and then meet in the middle.
Miter the inside corners of the door frame. Saw and chisel away the waste. Cut the stiles slightlylonger than the finished door to add strength to the board when chopping the mortises. The extralength, known as a horn, can be trimmed away once the door is assembled.
A jig for perfect miters. When cuttingthe miters on the door stiles and rails, usea jig with a 45° slope to guide your chisel.
Raise the door panel with a molding plane. Wedges, not glue,secure the tenons in the mortises.
M I T E R T H E T H U M B N A I L M O L D I N G
3⁄4 in. 1⁄2 in.
13⁄8 in.
3 in.
1⁄2 in.
Stiles, 3 in.wide by 32 in. long
Wedge
Rails, 3 in. wide by13 in. long, shoulderto shoulder
Mortises alignwith the panelgroove.
Tenons, 1⁄4 in. thick by2 in. wide by21⁄2 in. long
Panel, 13 in.wide by27 in. tall
1⁄4 in.1⁄8 in.
H A N D - C U T F R A M E - A N D - PA N E L D O O RH A N D - C U T F R A M E - A N D - PA N E L D O O R

S E P T E M B E R / O C T O B E R 2 0 0 3 61
You will have to trim away the thumbnail to jointhe mortise and tenons.
Raise the door panel—I have a very nice panel-raising plane that I enjoy using, so I made thepanel by hand. When making only one panel, theplane is about as fast as the tablesaw or router,which also will make this cut. Measure the pan-el’s length and width from the bottom of thegrooves in the stiles and rails. If you live in anarea of the country with cold winters and humidsummers, you will want to accommodate thepanel’s seasonal shrinkage and expansion across its grain by ad-justing the width accordingly. If you are making the cupboard inthe summer, you should create a snug fit. If you’re making it inwinter, fit the panel loosely, as it will swell in the humid summer.
After testing the panel’s fit, complete the door assembly. In the18th century, doors usually were not glued, and over the centuries
these doors have not sagged, so I followed suitand did not use any glue. Two wedges are driveninto the ends of each tenon to tighten it in itsmortise. You can strengthen the joint further bypinning the tenons.
After trimming the horns, plane the door’s stilesto fit the opening. Your door’s fit also will dependon the season. If you make a snug door in thewinter, it will bind in the summer.
Finish with fine hardware and milk paintThe original cupboard’s door was mounted with
wrought-iron hinges and held shut with a wooden turn button. Ispruced up mine with cast brass ornamental H-hinges and amatching catch. These items cost about $80, but after all the workI put into the piece and the cost of the lumber, it seems only fitting.
Once the piece was complete, I finished it with milk paint (formore on milk-paint application, see FWW #136, pp. 64-67). To
match the color scheme of our home,I finished the outside surfaces of thecupboard with barn red. For the ex-posed inside walls and back boards, Iused mustard. �
Mike Dunbar is a contributing editor. Thisarticle is the fourth in a series of hand-tool-oriented projects (see FWW #134, #142,and #151).
Assemble the door and wedge thetenons. Drive wedges into the tenons to secure them tightly in the offset mor-tises. Typical 18th-century tenoned doorswere left unglued. Pinning the tenons willadd even more strength.
MOLDING PLANESTod Herrli, 765-664-3325
HARDWAREHorton Brasses, 800-754-9127
Ball and Ball, 800-257-3711
CUT NAILSTremont Nail, 800-842-0560
S O U R C E S O F S U P P L Y