static calc
TRANSCRIPT
STATIC PRESSURE CALCULATION SHEET
Disclaimer!!
USE THIS AT YOUR OWN RISK! HIRE A PROFESSIONAL ENGINEER to design, specify, test, and certify performance of any dust
collection system if you have a commercial or an industrial application, allergies, other medical problems, people working for you, a
large shop, work with hazardous materials, or are subject to regulatory oversight. Brian Sudy, Bill Pentz, American Air Filter, and all
other references and links cannot be held liable for this calculation's applicability to your specific situation.
WARNING, this is only an approximation!
This information provides small shop woodworkers with a better sense of what they need to collect the wood dust in their shops. These
calculations are approximations based upon values from industrial fittings, pipes, and dust hoods which may be significantly different than what
you may use. Moreover, these calculations also require you to add in other known large losses such as those that occur with the use of
separators (trashcan or cyclone) and filters. Version 10 is a complete rewrite of the previous version.
Dust Collection Air Flow Requirements: The major dust collection suppliers also did the testing to determine what was needed for good fine
dust collection. We need enough airspeed to move the dust and enough air volume to carry the dust. Air engineers long ago learned that it
takes an air speed of roughly 3800 feet per minute (FPM) to move the chips and heavier sawdust up vertical ducting. The fine airborne dust
only required moving about 50 FPM, so no additional air speed was needed for good fine dust collection. Most suspected the air volume would
be small as well, so existing systems would work just fine. The testing showed a totally different story. If a tool was built from the ground up
with good fine dust collection engineered in to protect and control the fine dust until it can be collected, a good shop vacuum that only moves
50 cubic feet per minute (CFM) provides good fine dust collection. Unfortunately, in our real world, most small shop owners buy tools that have
little to no fine dust collection built in. Our larger tools are identical to the smaller commercial tools that air engineers found almost all need their
hoods and ports modifyied and then supplied with 1000 CFM air volume to provide good fine dust collection.
At first it does not seem to make sense that it takes almost double the volume of air to collect fine dust (compared to collecting chips) when it
only takes a fraction as much airspeed to move it. We already know this is true if we think about using our shop vacuums. They only pick up
right next to the inlet. This is because sucked air comes from all directions at once, causing airspeed to decrease quickly. A monster 1000
CFM dust collector blower that moves 4000 FPM right next to the inlet moves less than the 50 FPM we need to overcome the room air currents
and collect the fine dust just a few inches away! To keep commercial shops from being closed due to poor indoor air quality, air engineers must
ensure they collect the fine dust at the source. To do so, they found we must nearly triple the total air volume (CFM) over what it takes to just
collect sawdust, plus must redo most machine hoods, ports, and internal ducting. Small shop owners must do the same if we want good fine
dust collection. Although 800 CFM will provide minimum fine dust protection at most small shop tools, we really need to move a real 1000 CFM
at these same stationary tools to meet EPA and medical recommended air quality protection.
Introduction: We built and shared this calculator because most small shop woodworkers don't realize how much their duct size and layout
impacts dust collection. Most wrongly think of their dust collector as a huge shop vacuum, and that causes all kinds of problems. Unlike a shop
vacuum that can lift a column of water 35" or more, the blowers used in dust collection generate only a tiny fraction of that suction. Air at dust
collector blower pressures will barely compress at all, so almost any small pipe, bend, wye fitting, small port, restriction, or other obstruction will
act just like a partially opened water valve and kill our airflow. This leaves us with two choices. We can add horsepower and a larger blower
until we overcome all that resistance, or design a system with minimal resistance to permit us to use the smallest, most cost efficient blower.
Tool Modifications: To meet government air quality mandates that went into effect in the late eighties, the major suppliers of dust collection
equipment had to take a fresh look at dust collection. Until then, dust collection meant keeping shop floors clear of the dust and chips that
would otherwise be swept up with a broom. These firms found that to also ensure collecting the fine airborne dust, they had to collect the dust
right at the source, meaning at each tool as the dust was made. If they let the fine airborne dust escape into the air, it took hours for a good
exhaust fan or air cleaner to bring the dust levels down low enough to meet government standards. They found that to keep the air streams
from our tool blades, bits, cutters, belts, motor fans, etc. from spraying this fine dust all over, they had to redo the dust collecting design of
almost every stationary tool. Almost all required a new hood, larger ports, internal ducting, and sometimes new pannels. Small shop owners
must make similar changes to our tools if we want good fine dust collection.

Return Duct: If there will be return duct moving the cleaned air back inside your shop from an outside cyclone, it only needs to provide 2000
FPM speed. To determine that return duct size, simply select the size to run at 2000 FPM or less with your max CFM machine. Leave it in
each branch calc. The same applies when sizing the return for a cyclone or muffler.
1) Commercial: Size your ducting/DC for the total requirements of the entire shop with NO BLAST GATES. Air engineers design commercial
dust collection systems with all ducting runs open at once to collect the dust from all machines running at the same time. All ductwork drops
are sized to provide the minimum CFM requirements for each machine. The main becomes a collection of ever bigger sized pipes sized to
meet the CFM of all downstream ductwork. The Air Laws show us that to double the airflow we need three times the power. Just a two person
shop running a couple of runs at the same time requires a 10 hp motor turning a huge 18" diameter blower impeller. Motors this big normally
only work with three-phase power, require commercial instead of residential incoming power, and require much heavier wiring than found in
most residences.
Blast Gates: Normally we put a blast gate as close as we can to the main for each machine to leave the least possible pipe to build up piles
when their runs are not open. Putting the blast gate down low lets lots of debris build up in the pipe. When the gate gets opened, this material
can slam around, potentially ruining blowers and especially filters.
Basic System Design:
There are two practical ways to design your DC system in order to get optimum results.
2) Small Shop: Most small shop owners cannot build dust collection systems similar to commercial systems because we lack the power
service, wiring, and don't want to pay the cost to buy or run a huge motor. As a result, our systems are designed to use the smaller, much
more efficient blowers that can only collect from one machine at a time. All other ducting runs are closed off with blast gates. This lets us
use a blower just big enough to meet the airflow needed for fine dust collection at our largest machine using our highest resistance ducting run.
We should size our ducting and dust collector for the maximum CFM requirements of our largest machine, and size the ductwork for the longest
possible run. This will allow only one machine at a time, but it lets you move machines around without needing to buy a bigger blower and
motor.
Down Drops: Commercial dust collection systems size each down drop to carry just the air needed for good collection for each specific tool.
They also use many different sized ducting runs for the mains to keep the airspeed ample to avoid plugging and piles. This ends up being so
complex that most ducting engineers use commercial programs to compute all the ducting sizes, parts, etc. Sadly, a number of firms now offer
similar services to small shop users that use these same commercial programs. The results are a nightmare because any time we use a down
drop smaller than our main in a one ducting run open at a time small shop system, the small down drop strangles our needed airflow. A 4"
down drop connected to a 6" main looks pretty and appears to work well, but drops the main airspeed to under 2500 FPM, immediately building
up dangerous dust piles that can grow huge. These piles pose a serious fire hazard, and when the airflow gets restored, these piles break
loose and slam into things, potentially ruining motor bearings, impellers, and your filters.
Main Duct: If you want the most possible CFM, you need the biggest duct you can get that keeps the air velocity ample to keep the dust
moving instead of clogging your ducting. Most small shop vendors sell 4" dust collection duct and flex hose as their standard. This works well
to collect chips, but strangles the airflow needed for good fine dust collection. A typical 2 HP small shop dust collector with a 12" diameter
impeller moves a maximum of about 1200 CFM, but a 4" duct drops that airflow to only about 450 CFM. It takes a 4 HP motor turning an 16"
diameter impeller to force a 4" duct to carry 800 CFM and an 18" diameter impeller turned by a 5 hp motor to produce the 1000 CFM we need.
The result is too noisy to use. Most prefer a less expensive solution. In addition to maintaining that airflow, our blowers must keep the duct
airspeed high enough so we don't get plugging or piles of wood dust. Dust piles in ducts pose a fire hazard and ruin both blowers and filters
when they break loose and go slamming around. Air engineers found designing for a duct speed of 4000 FPM keeps the ducting clear.
Because FPM = CFM / duct area, a little math shows we need 6" diameter ducting to move 800 CFM at 4000 FPM. Most small shops need all
6" hoods, 6" main ducting lines, and 6" down drops.
Tool Ports: It takes one 6" port to support the 800 CFM and a 7" port to support the 1000 CFM required for good fine dust collection at most
larger stationary small shop tools. I get around this by using an oversized blower which permits a 6" duct to carry more than our needed 1000
CFM. For machines with two pickups, small shop users should generally use a wye that splits their 6" ducting into two runs. The smaller should
use 3.5" diameter ducting and port. The larger should use 5" ducting connected to a 5" port. This combination maintains the same area as the
6" main to prevent airflow restrictions, plugging, dust piles, and poor dust collection. Generally, we have to modify our small shop tools to add
the 3.5", 5", and 6" ports. Dust collectors do not have enough pressure to provide good fine dust collection for tools that cannot be modified to
have ports equivalent to a 6" diameter duct. Tools with 3" and smaller ports require use of a shop vacuum that generates at least 60" of
pressure to force the air collection needed, plus often a movable hood and downdraft table.

Assumptions, comments, and notes:
1
2
3
4
5
6
Instructions: READ THE EXAMPLE PROBLEM! THIS IS REQUIRED!!!
Square edge Round edge
Enter the number of pipe 90's. Count 0.5 for each 45 degree bend and 1.0 for each full 90.
Input 1 for the number of hoods under the correct duct diameter column for the type of hood you have (square or round/taper edge).
Run the calculation for only your longest, most complex branch from the hood to the collector.
THIS SHEET WILL TELL YOU WHAT THE LOSSES ARE; IT WILL NOT TELL YOU WHAT IS REASONABLE!!! For example, if
you input 10000 CFM, the 4" velocity goes to 114592 FPM, which is 1302 MPH. The hood entry alone in a 4" branch goes to
637" water, which is about 23 PSI.
Resistance Calculation: Small shop owners only use one ducting run open at a time, so we size our systems based upon what it takes to
power our largest need. Knowing that most will move their machines around over time, it is best to figure what it takes to power our largest
machine overhead using our longest ducting run. The longer the hose and the more bends and fittings we use in our ducting runs and machine
collection, the higher the pressure drop and bigger the blower it will take. Small shop owners should calculate the the resistance of the tool with
the most hoods and ducting overhead, add to that the resistance of all the pipe and fittings in the longest ducting run, and then add the other
overhead resistance including cyclone, muffler, and filters. That total resistance gives the worst pressure drop in our system. We use that total
worst case resistance with a standard engineering fan table to size our blower motor and impeller diameter. This simple resistance calculator
helps you work through what you need for your own shop.
The system is made of 3.5", 4", 5", 6", 7" or 8" standard galvanized metal dust collection ducting. Nothing smaller than 3.5"
duct will be used anywhere because we know that would kill the airflow needed from our blower for fine dust collection.
From the CFM Requirements Table in the link above, input the CFM Required for our largest tool (normally 1000 to meet
recommended air quality). Input the target air velocity in FPM for your ducting. The air speed needs to convey whatever material
you want to move. For example, we need about 2000 FPM to carry clean air but need about 4000 FPM to carry sawdust and
chips without plugging vertical runs. This immediately calculates the most efficient optimum duct diameter. Using smaller duct
will kill our needed total air volume unless we use an oversized impeller to increase pressure and air velocity, e.g. we need 5000
FPM to move 1000 CFM through 6" duct.
The 8", 10", and 12" losses are for furnace pipe used on the RETURN LINE ONLY.
Duct size should remain constant from the tool to the dust collector. It should NEVER get smaller as it gets closer to the dust
collector. It is usually okay if the pipe gets one size bigger.
The total area of the duct/hose below the blast gate should roughly equal the area of the main duct. Use of a smaller duct or
hose can increase the overall resistance three-fold or more. You should not go from a 4" hood or port to a 6" duct! You will
have a much better system if you can install 6" ports on your tools.
Click here to see the CFM Requirements Table
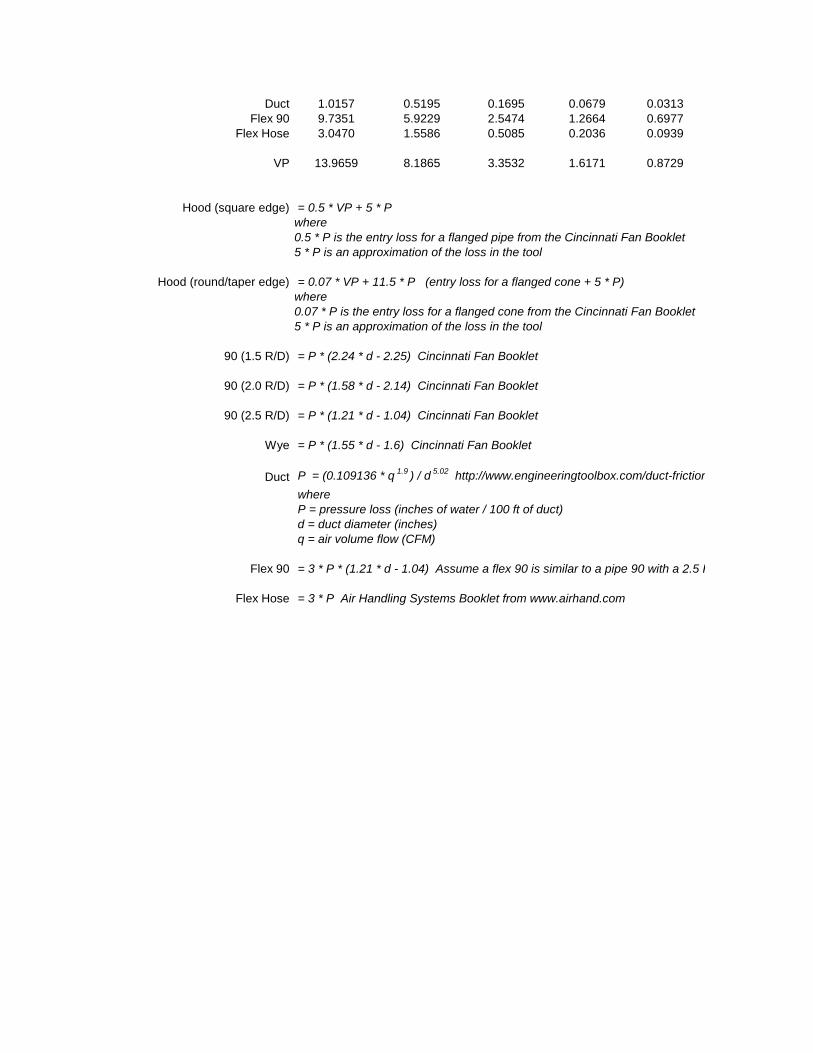
The hood loss is a combination of the pipe entry loss (either 0.5 * VP or 0.07 * P) from the Cincinnati Fan Booklet, and an
approximation of the loss (5 * P) due to a well-designed tool. The impact from the tool can vary widely. If the tool is just on open-
ended dust sweep or open-mouthed dust hood, then the (5 * P) term could theoretically be set to zero, leaving just the pipe entry
loss. On the other hand, if you are hooking up, for example, to a table saw cabinet whose only opening is the clearance around
the blade in the throat plate, you would starve the cyclone and have almost no flow. It is important to ensure that there are
sufficient openings in the tool to provide a flow path for the air. Ideally, the area of the opening(s) should add up to at least the
area of the hose connecting to the tool.
R/D is the ratio of the bend's centerline radius divided by the pipe diameter.
You are not limited to one type, but can enter a mix of different radius bends.
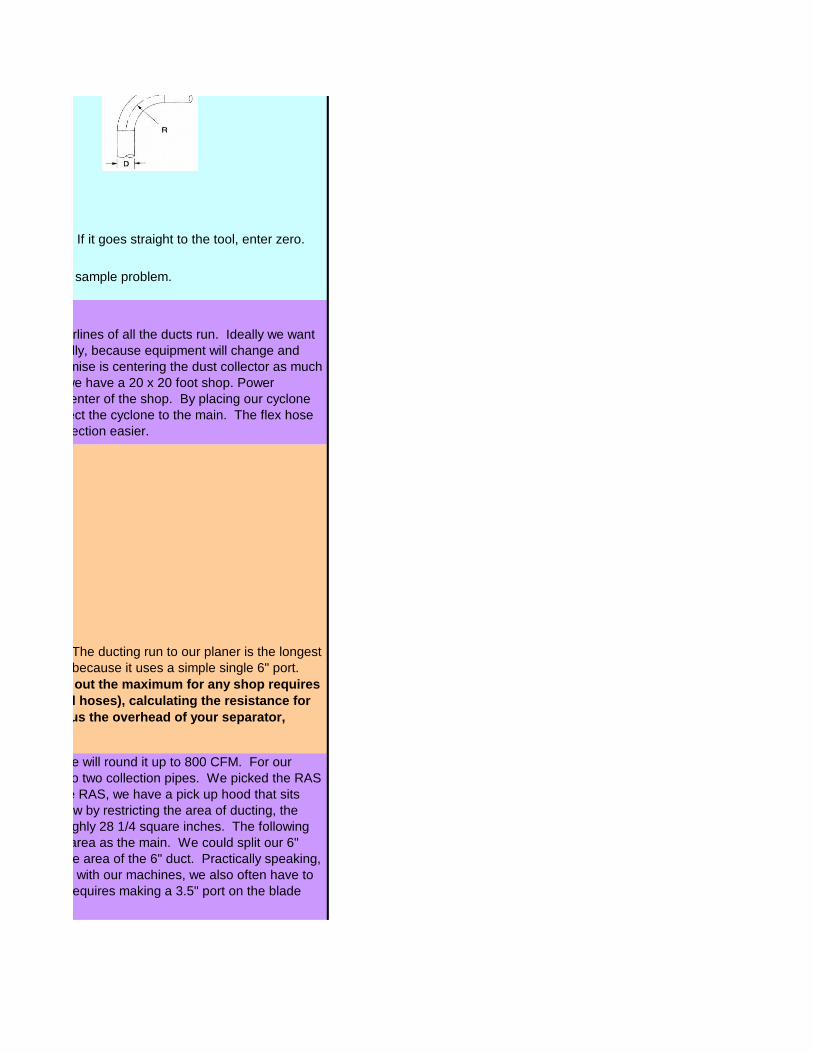
Enter the number of flex 90's. This is an estimate of how much your flex hose is bent. If it goes straight to the tool, enter zero.
Enter the number of feet of flex hose.
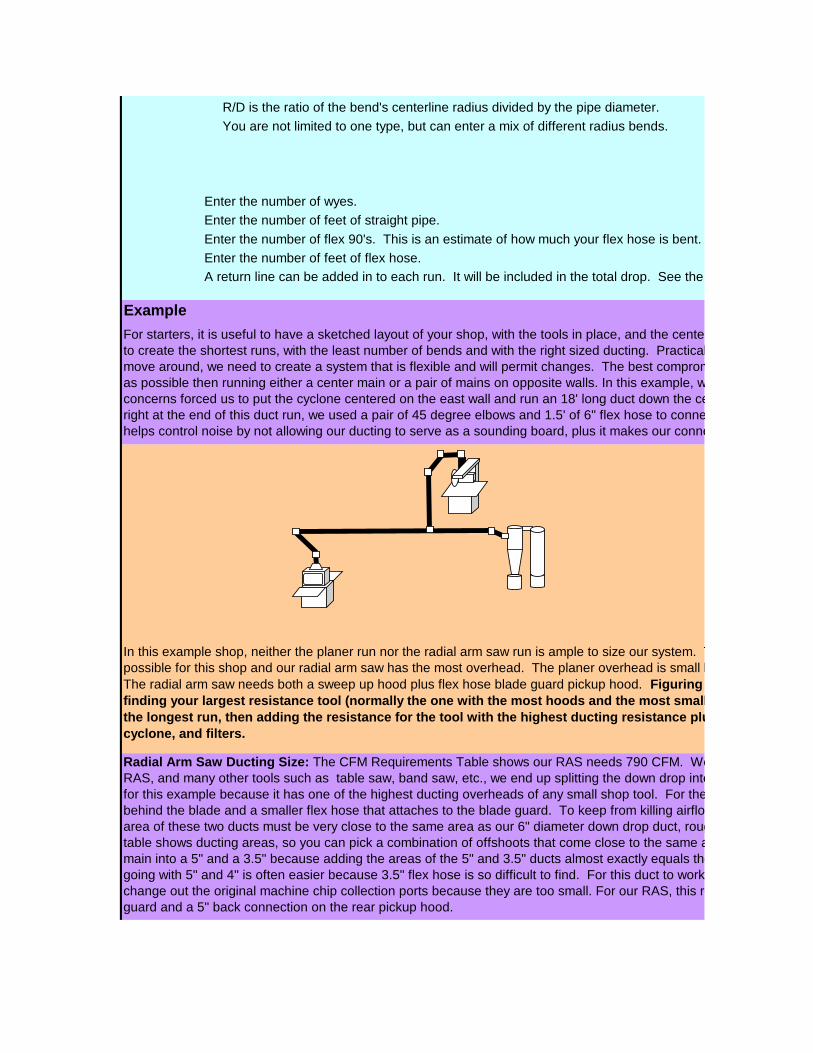
In this example shop, neither the planer run nor the radial arm saw run is ample to size our system. The ducting run to our planer is the longest
possible for this shop and our radial arm saw has the most overhead. The planer overhead is small because it uses a simple single 6" port.
The radial arm saw needs both a sweep up hood plus flex hose blade guard pickup hood. Figuring out the maximum for any shop requires
finding your largest resistance tool (normally the one with the most hoods and the most small hoses), calculating the resistance for
the longest run, then adding the resistance for the tool with the highest ducting resistance plus the overhead of your separator,
cyclone, and filters.
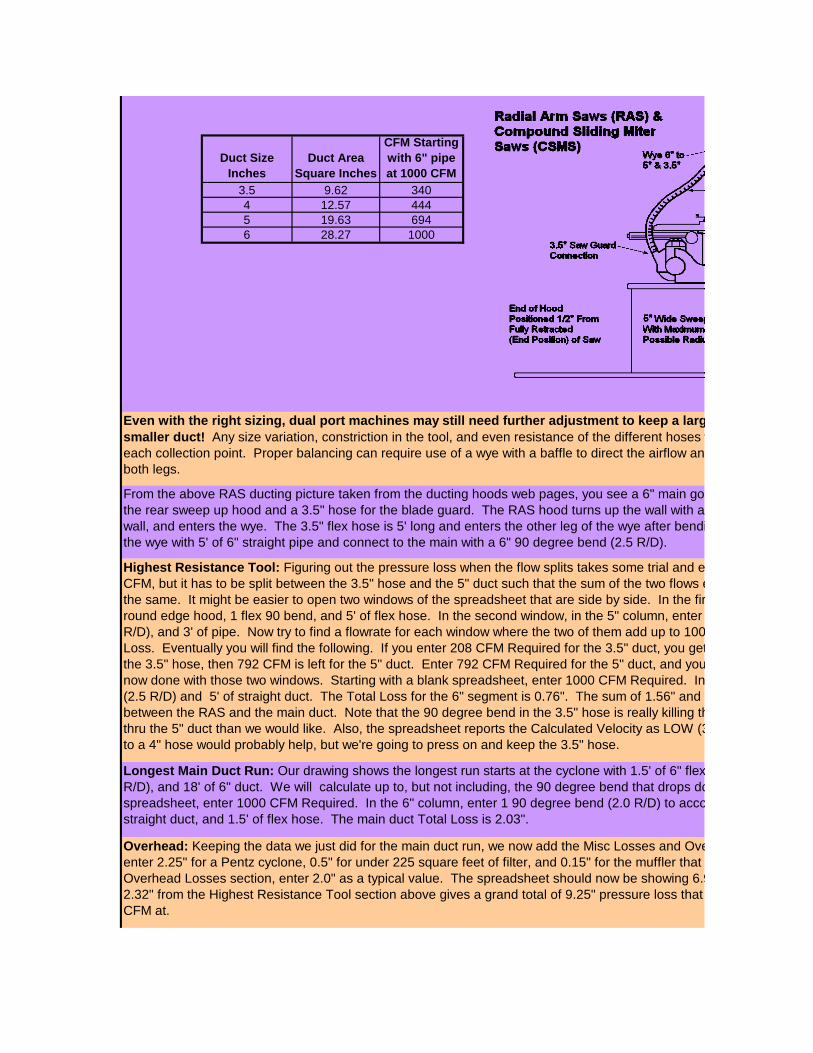
Radial Arm Saw Ducting Size: The CFM Requirements Table shows our RAS needs 790 CFM. We will round it up to 800 CFM. For our
RAS, and many other tools such as table saw, band saw, etc., we end up splitting the down drop into two collection pipes. We picked the RAS
for this example because it has one of the highest ducting overheads of any small shop tool. For the RAS, we have a pick up hood that sits
behind the blade and a smaller flex hose that attaches to the blade guard. To keep from killing airflow by restricting the area of ducting, the
area of these two ducts must be very close to the same area as our 6" diameter down drop duct, roughly 28 1/4 square inches. The following
table shows ducting areas, so you can pick a combination of offshoots that come close to the same area as the main. We could split our 6"
main into a 5" and a 3.5" because adding the areas of the 5" and 3.5" ducts almost exactly equals the area of the 6" duct. Practically speaking,
going with 5" and 4" is often easier because 3.5" flex hose is so difficult to find. For this duct to work with our machines, we also often have to
change out the original machine chip collection ports because they are too small. For our RAS, this requires making a 3.5" port on the blade
guard and a 5" back connection on the rear pickup hood.
Enter the number of wyes.
Enter the number of feet of straight pipe.
A return line can be added in to each run. It will be included in the total drop. See the sample problem.
Example
For starters, it is useful to have a sketched layout of your shop, with the tools in place, and the centerlines of all the ducts run. Ideally we want
to create the shortest runs, with the least number of bends and with the right sized ducting. Practically, because equipment will change and
move around, we need to create a system that is flexible and will permit changes. The best compromise is centering the dust collector as much
as possible then running either a center main or a pair of mains on opposite walls. In this example, we have a 20 x 20 foot shop. Power
concerns forced us to put the cyclone centered on the east wall and run an 18' long duct down the center of the shop. By placing our cyclone
right at the end of this duct run, we used a pair of 45 degree elbows and 1.5' of 6" flex hose to connect the cyclone to the main. The flex hose
helps control noise by not allowing our ducting to serve as a sounding board, plus it makes our connection easier.
Duct Size
Inches
Duct Area
Square Inches
CFM Starting
with 6" pipe
at 1000 CFM
3.5 9.62 340
4 12.57 444
5 19.63 694
6 28.27 1000
Longest Main Duct Run: Our drawing shows the longest run starts at the cyclone with 1.5' of 6" flex hose, a pair of 45 degree 6" bends (2.0
R/D), and 18' of 6" duct. We will calculate up to, but not including, the 90 degree bend that drops down to the planer. Starting with a blank
spreadsheet, enter 1000 CFM Required. In the 6" column, enter 1 90 degree bend (2.0 R/D) to account for two 45 degree bends, 18' of
straight duct, and 1.5' of flex hose. The main duct Total Loss is 2.03".
Highest Resistance Tool: Figuring out the pressure loss when the flow splits takes some trial and error. We have a total flow rate of 1000
CFM, but it has to be split between the 3.5" hose and the 5" duct such that the sum of the two flows equals 1000 CFM, and the pressure loss is
the same. It might be easier to open two windows of the spreadsheet that are side by side. In the first window, in the 3.5" column, enter 1
round edge hood, 1 flex 90 bend, and 5' of flex hose. In the second window, in the 5" column, enter 1 round edge hood, 1 90 degree bend (2.5
R/D), and 3' of pipe. Now try to find a flowrate for each window where the two of them add up to 1000 CFM, and that results in the same Total
Loss. Eventually you will find the following. If you enter 208 CFM Required for the 3.5" duct, you get 1.56" of loss. If 208 CFM is flowing thru
the 3.5" hose, then 792 CFM is left for the 5" duct. Enter 792 CFM Required for the 5" duct, and you get about the same loss, 1.56". We are
now done with those two windows. Starting with a blank spreadsheet, enter 1000 CFM Required. In the 6" column, enter 1 90 degree bend
(2.5 R/D) and 5' of straight duct. The Total Loss for the 6" segment is 0.76". The sum of 1.56" and 0.76", which is 2.32", is the total loss
between the RAS and the main duct. Note that the 90 degree bend in the 3.5" hose is really killing the air flow, and causing more flow to go
thru the 5" duct than we would like. Also, the spreadsheet reports the Calculated Velocity as LOW (3113 FPM) for the 3.5" hose. Stepping up
to a 4" hose would probably help, but we're going to press on and keep the 3.5" hose.
Even with the right sizing, dual port machines may still need further adjustment to keep a larger duct from stealing all the flow from a
smaller duct! Any size variation, constriction in the tool, and even resistance of the different hoses will significantly alter how much air goes to
each collection point. Proper balancing can require use of a wye with a baffle to direct the airflow and dual gauges to ensure ample airflow to
both legs.
Overhead: Keeping the data we just did for the main duct run, we now add the Misc Losses and Overhead Losses. In the Misc Losses section,
enter 2.25" for a Pentz cyclone, 0.5" for under 225 square feet of filter, and 0.15" for the muffler that sits between the blower and filters. In the
Overhead Losses section, enter 2.0" as a typical value. The spreadsheet should now be showing 6.93" for the Total Loss. Manually adding the
2.32" from the Highest Resistance Tool section above gives a grand total of 9.25" pressure loss that our dust collector has to provide 1000
CFM at.
From the above RAS ducting picture taken from the ducting hoods web pages, you see a 6" main going into a wye that splits off a 5" hose for
the rear sweep up hood and a 3.5" hose for the blade guard. The RAS hood turns up the wall with a 90 degree bend (2.5 R/D), goes 3' up the
wall, and enters the wye. The 3.5" flex hose is 5' long and enters the other leg of the wye after bending about 90 degrees. We then go up from
the wye with 5' of 6" straight pipe and connect to the main with a 6" 90 degree bend (2.5 R/D).
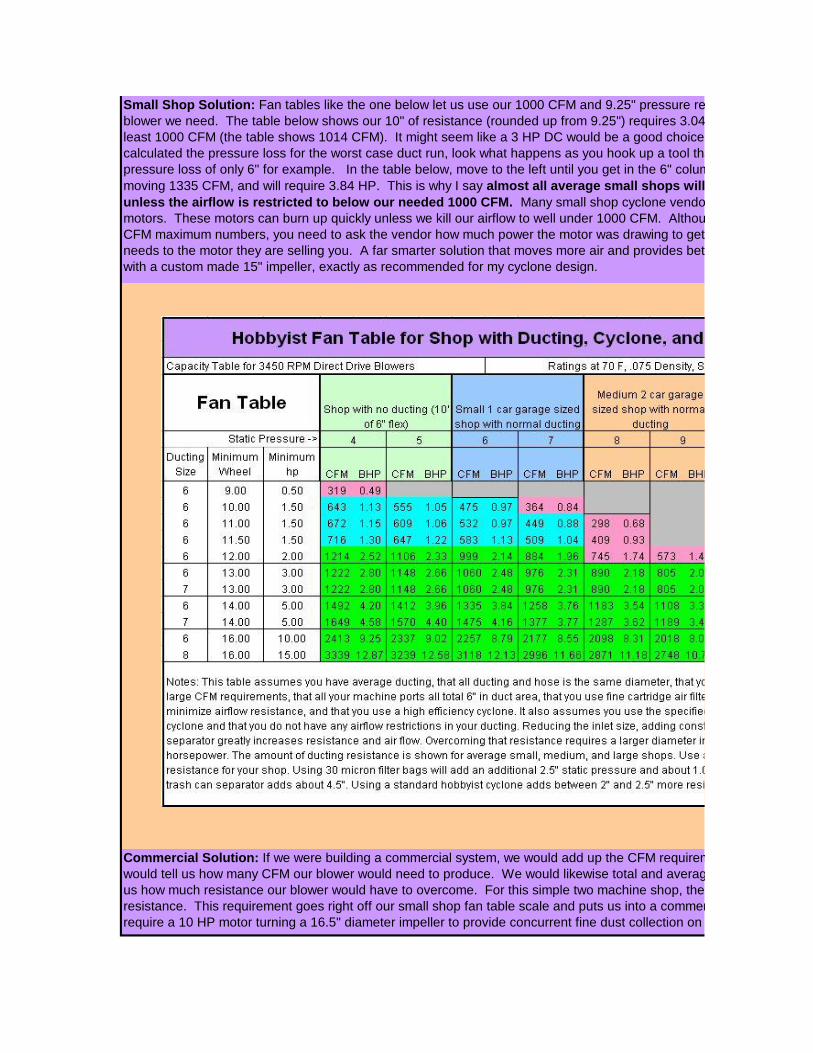
Small Shop Solution: Fan tables like the one below let us use our 1000 CFM and 9.25" pressure requirement to pick the minimum sized
blower we need. The table below shows our 10" of resistance (rounded up from 9.25") requires 3.04 HP with a 14" diameter impeller to get at
least 1000 CFM (the table shows 1014 CFM). It might seem like a 3 HP DC would be a good choice for this shop. Remembering that we
calculated the pressure loss for the worst case duct run, look what happens as you hook up a tool that's closer to the DC, resulting in a
pressure loss of only 6" for example. In the table below, move to the left until you get in the 6" column. The table shows the fan will now be
moving 1335 CFM, and will require 3.84 HP. This is why I say almost all average small shops will burn up 2 HP, and even 3 HP, motors
unless the airflow is restricted to below our needed 1000 CFM. Many small shop cyclone vendors offer 7" mains powered by 2 and 3 HP
motors. These motors can burn up quickly unless we kill our airflow to well under 1000 CFM. Although a nice advertising ploy shows very high
CFM maximum numbers, you need to ask the vendor how much power the motor was drawing to get that high number, and compare the power
needs to the motor they are selling you. A far smarter solution that moves more air and provides better separation is to use a real 5 HP motor
with a custom made 15" impeller, exactly as recommended for my cyclone design.
Commercial Solution: If we were building a commercial system, we would add up the CFM requirements for every machine, and that total
would tell us how many CFM our blower would need to produce. We would likewise total and average the resistance of every ducting run to tell
us how much resistance our blower would have to overcome. For this simple two machine shop, the total comes out to 2000 CFM at 15" of
resistance. This requirement goes right off our small shop fan table scale and puts us into a commercial table. This situation would probably
require a 10 HP motor turning a 16.5" diameter impeller to provide concurrent fine dust collection on these two tools at once.
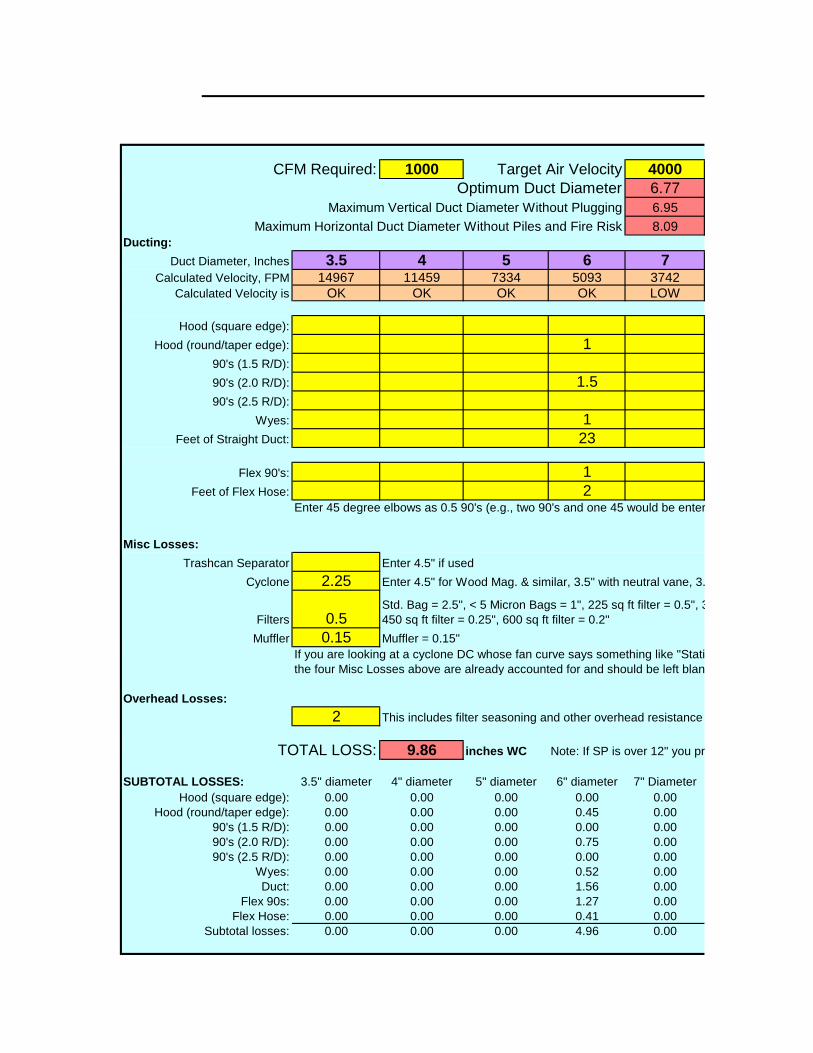
CFM Required: 1000 Target Air Velocity 4000
Optimum Duct Diameter 6.77
Maximum Vertical Duct Diameter Without Plugging 6.95
Maximum Horizontal Duct Diameter Without Piles and Fire Risk 8.09
Ducting:
3.5 4 5 6 714967 11459 7334 5093 3742
OK OK OK OK LOW
Hood (square edge):
Hood (round/taper edge): 1
90's (1.5 R/D):
90's (2.0 R/D): 1.5
90's (2.5 R/D):
Wyes: 1
23
Flex 90's: 1
2Enter 45 degree elbows as 0.5 90's (e.g., two 90's and one 45 would be entered as 2.5)
Misc Losses:
Trashcan Separator Enter 4.5" if used
Cyclone 2.25
Filters 0.5
Muffler 0.15If you are looking at a cyclone DC whose fan curve says something like "Static Pressure at Cyclone Inlet", then
the four Misc Losses above are already accounted for and should be left blank or set to zero.
Overhead Losses:
2
TOTAL LOSS: 9.86 inches WC
SUBTOTAL LOSSES: 3.5" diameter 4" diameter 5" diameter 6" diameter 7" Diameter
Hood (square edge): 0.00 0.00 0.00 0.00 0.00
Hood (round/taper edge): 0.00 0.00 0.00 0.45 0.00
90's (1.5 R/D): 0.00 0.00 0.00 0.00 0.00
90's (2.0 R/D): 0.00 0.00 0.00 0.75 0.00
90's (2.5 R/D): 0.00 0.00 0.00 0.00 0.00
Wyes: 0.00 0.00 0.00 0.52 0.00
Duct: 0.00 0.00 0.00 1.56 0.00
Flex 90s: 0.00 0.00 0.00 1.27 0.00
Flex Hose: 0.00 0.00 0.00 0.41 0.00
Subtotal losses: 0.00 0.00 0.00 4.96 0.00
Enter 4.5" for Wood Mag. & similar, 3.5" with neutral vane, 3.0" with air ramp, and 2.25" for Pentz cyclone
Std. Bag = 2.5", < 5 Micron Bags = 1", 225 sq ft filter = 0.5", 300 sq ft filter = 0.3",
450 sq ft filter = 0.25", 600 sq ft filter = 0.2"
Muffler = 0.15"
This includes filter seasoning and other overhead resistance typical for a small shop.
Note: If SP is over 12" you probably need to use a bigger diameter pipe!
Feet of Straight Duct:
Duct Diameter, Inches
Feet of Flex Hose:
Calculated Velocity, FPM
Calculated Velocity is

Diameter 3.5 4 5 6 7
Hood (square edge) 12.0612 6.6910 2.5240 1.1479 0.5929
Hood (round/taper edge) 6.0559 3.1708 1.0822 0.4525 0.2176
90 (1.5 R/D) 5.6775 3.4862 1.5169 0.7594 0.4204
90 (2.0 R/D) 3.4431 2.1717 0.9763 0.4981 0.2792
90 (2.5 R/D) 3.2450 1.9743 0.8491 0.4221 0.2326
Wye 3.8849 2.3899 1.0424 0.5226 0.2895
DO NOT CHANGE ANY OF THE CELLS BELOW THIS POINT
THIS INFORMATION IS BEING MADE AVAILABLE SO THAT YOU CAN SEE HOW THE SPREADSHEET IS CALCULATING ITS
INFORMATION AND TO GIVE YOU AN OPPORTUNITY TO CHECK OUR WORK. ADDITIONAL INFORMATION IS ALSO ON SHEET2.
IF YOU FIND SOMETHING THAT YOU THINK IS WRONG, PLEASE DON'T HESITATE TO LET US KNOW.
!!! WARNING !!!
Duct 1.0157 0.5195 0.1695 0.0679 0.0313
Flex 90 9.7351 5.9229 2.5474 1.2664 0.6977
Flex Hose 3.0470 1.5586 0.5085 0.2036 0.0939
VP 13.9659 8.1865 3.3532 1.6171 0.8729
Hood (square edge) = 0.5 * VP + 5 * P
where
0.5 * P is the entry loss for a flanged pipe from the Cincinnati Fan Booklet
5 * P is an approximation of the loss in the tool
Hood (round/taper edge) = 0.07 * VP + 11.5 * P (entry loss for a flanged cone + 5 * P)
where
0.07 * P is the entry loss for a flanged cone from the Cincinnati Fan Booklet
5 * P is an approximation of the loss in the tool
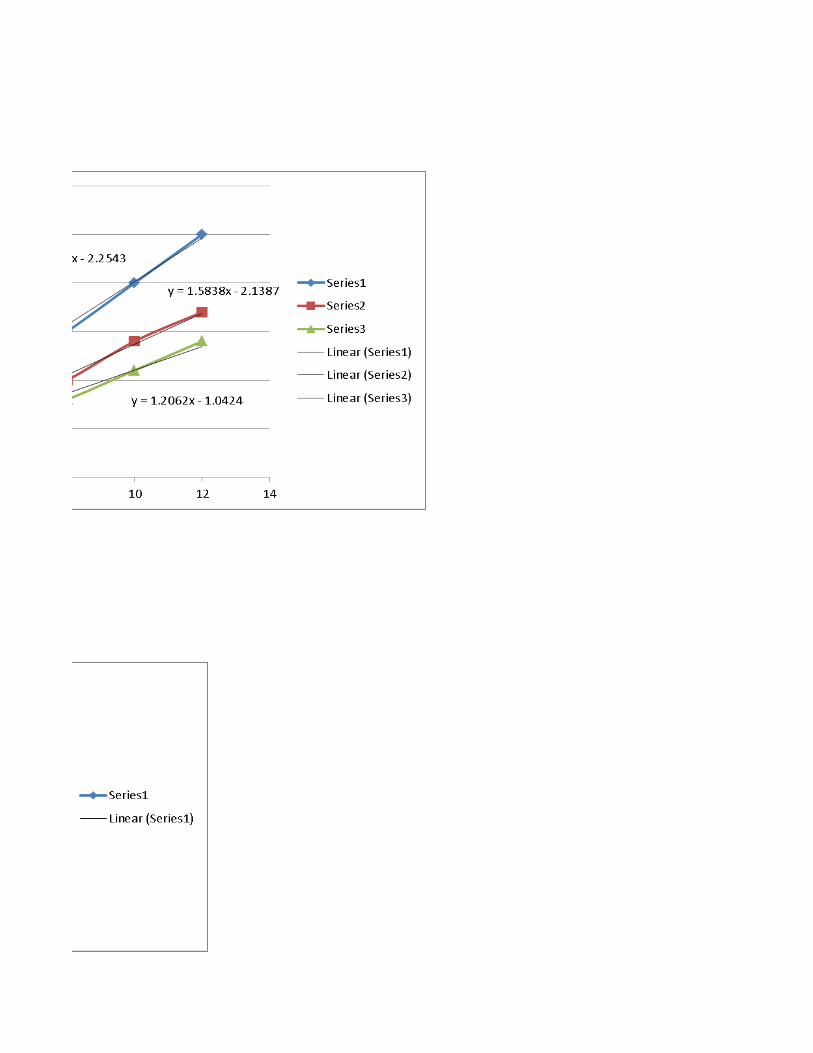
90 (1.5 R/D) = P * (2.24 * d - 2.25) Cincinnati Fan Booklet
90 (2.0 R/D) = P * (1.58 * d - 2.14) Cincinnati Fan Booklet
90 (2.5 R/D) = P * (1.21 * d - 1.04) Cincinnati Fan Booklet
Wye = P * (1.55 * d - 1.6) Cincinnati Fan Booklet
Duct P = (0.109136 * q1.9
) / d5.02
http://www.engineeringtoolbox.com/duct-friction-pressure-loss-d_444.html
where
P = pressure loss (inches of water / 100 ft of duct)
d = duct diameter (inches)
q = air volume flow (CFM)
Flex 90 = 3 * P * (1.21 * d - 1.04) Assume a flex 90 is similar to a pipe 90 with a 2.5 R/D
Flex Hose = 3 * P Air Handling Systems Booklet from www.airhand.com

B. Sudy / B. Pentz
Version 10 -- 10/15/11
STATIC PRESSURE CALCULATION SHEET
Disclaimer!!
USE THIS AT YOUR OWN RISK! HIRE A PROFESSIONAL ENGINEER to design, specify, test, and certify performance of any dust
collection system if you have a commercial or an industrial application, allergies, other medical problems, people working for you, a
large shop, work with hazardous materials, or are subject to regulatory oversight. Brian Sudy, Bill Pentz, American Air Filter, and all
other references and links cannot be held liable for this calculation's applicability to your specific situation.
WARNING, this is only an approximation!
This information provides small shop woodworkers with a better sense of what they need to collect the wood dust in their shops. These
calculations are approximations based upon values from industrial fittings, pipes, and dust hoods which may be significantly different than what
you may use. Moreover, these calculations also require you to add in other known large losses such as those that occur with the use of
separators (trashcan or cyclone) and filters. Version 10 is a complete rewrite of the previous version.
Dust Collection Air Flow Requirements: The major dust collection suppliers also did the testing to determine what was needed for good fine
dust collection. We need enough airspeed to move the dust and enough air volume to carry the dust. Air engineers long ago learned that it
takes an air speed of roughly 3800 feet per minute (FPM) to move the chips and heavier sawdust up vertical ducting. The fine airborne dust
only required moving about 50 FPM, so no additional air speed was needed for good fine dust collection. Most suspected the air volume would
be small as well, so existing systems would work just fine. The testing showed a totally different story. If a tool was built from the ground up
with good fine dust collection engineered in to protect and control the fine dust until it can be collected, a good shop vacuum that only moves
50 cubic feet per minute (CFM) provides good fine dust collection. Unfortunately, in our real world, most small shop owners buy tools that have
little to no fine dust collection built in. Our larger tools are identical to the smaller commercial tools that air engineers found almost all need their
hoods and ports modifyied and then supplied with 1000 CFM air volume to provide good fine dust collection.
At first it does not seem to make sense that it takes almost double the volume of air to collect fine dust (compared to collecting chips) when it
only takes a fraction as much airspeed to move it. We already know this is true if we think about using our shop vacuums. They only pick up
right next to the inlet. This is because sucked air comes from all directions at once, causing airspeed to decrease quickly. A monster 1000
CFM dust collector blower that moves 4000 FPM right next to the inlet moves less than the 50 FPM we need to overcome the room air currents
and collect the fine dust just a few inches away! To keep commercial shops from being closed due to poor indoor air quality, air engineers must
ensure they collect the fine dust at the source. To do so, they found we must nearly triple the total air volume (CFM) over what it takes to just
collect sawdust, plus must redo most machine hoods, ports, and internal ducting. Small shop owners must do the same if we want good fine
dust collection. Although 800 CFM will provide minimum fine dust protection at most small shop tools, we really need to move a real 1000 CFM
at these same stationary tools to meet EPA and medical recommended air quality protection.
May 5, 2014
Introduction: We built and shared this calculator because most small shop woodworkers don't realize how much their duct size and layout
impacts dust collection. Most wrongly think of their dust collector as a huge shop vacuum, and that causes all kinds of problems. Unlike a shop
vacuum that can lift a column of water 35" or more, the blowers used in dust collection generate only a tiny fraction of that suction. Air at dust
collector blower pressures will barely compress at all, so almost any small pipe, bend, wye fitting, small port, restriction, or other obstruction will
act just like a partially opened water valve and kill our airflow. This leaves us with two choices. We can add horsepower and a larger blower
until we overcome all that resistance, or design a system with minimal resistance to permit us to use the smallest, most cost efficient blower.
Tool Modifications: To meet government air quality mandates that went into effect in the late eighties, the major suppliers of dust collection
equipment had to take a fresh look at dust collection. Until then, dust collection meant keeping shop floors clear of the dust and chips that
would otherwise be swept up with a broom. These firms found that to also ensure collecting the fine airborne dust, they had to collect the dust
right at the source, meaning at each tool as the dust was made. If they let the fine airborne dust escape into the air, it took hours for a good
exhaust fan or air cleaner to bring the dust levels down low enough to meet government standards. They found that to keep the air streams
from our tool blades, bits, cutters, belts, motor fans, etc. from spraying this fine dust all over, they had to redo the dust collecting design of
almost every stationary tool. Almost all required a new hood, larger ports, internal ducting, and sometimes new pannels. Small shop owners
must make similar changes to our tools if we want good fine dust collection.

Return Duct: If there will be return duct moving the cleaned air back inside your shop from an outside cyclone, it only needs to provide 2000
FPM speed. To determine that return duct size, simply select the size to run at 2000 FPM or less with your max CFM machine. Leave it in
each branch calc. The same applies when sizing the return for a cyclone or muffler.
1) Commercial: Size your ducting/DC for the total requirements of the entire shop with NO BLAST GATES. Air engineers design commercial
dust collection systems with all ducting runs open at once to collect the dust from all machines running at the same time. All ductwork drops
are sized to provide the minimum CFM requirements for each machine. The main becomes a collection of ever bigger sized pipes sized to
meet the CFM of all downstream ductwork. The Air Laws show us that to double the airflow we need three times the power. Just a two person
shop running a couple of runs at the same time requires a 10 hp motor turning a huge 18" diameter blower impeller. Motors this big normally
only work with three-phase power, require commercial instead of residential incoming power, and require much heavier wiring than found in
most residences.
Blast Gates: Normally we put a blast gate as close as we can to the main for each machine to leave the least possible pipe to build up piles
when their runs are not open. Putting the blast gate down low lets lots of debris build up in the pipe. When the gate gets opened, this material
can slam around, potentially ruining blowers and especially filters.
Basic System Design:
There are two practical ways to design your DC system in order to get optimum results.
2) Small Shop: Most small shop owners cannot build dust collection systems similar to commercial systems because we lack the power
service, wiring, and don't want to pay the cost to buy or run a huge motor. As a result, our systems are designed to use the smaller, much
more efficient blowers that can only collect from one machine at a time. All other ducting runs are closed off with blast gates. This lets us
use a blower just big enough to meet the airflow needed for fine dust collection at our largest machine using our highest resistance ducting run.
We should size our ducting and dust collector for the maximum CFM requirements of our largest machine, and size the ductwork for the longest
possible run. This will allow only one machine at a time, but it lets you move machines around without needing to buy a bigger blower and
motor.
Down Drops: Commercial dust collection systems size each down drop to carry just the air needed for good collection for each specific tool.
They also use many different sized ducting runs for the mains to keep the airspeed ample to avoid plugging and piles. This ends up being so
complex that most ducting engineers use commercial programs to compute all the ducting sizes, parts, etc. Sadly, a number of firms now offer
similar services to small shop users that use these same commercial programs. The results are a nightmare because any time we use a down
drop smaller than our main in a one ducting run open at a time small shop system, the small down drop strangles our needed airflow. A 4"
down drop connected to a 6" main looks pretty and appears to work well, but drops the main airspeed to under 2500 FPM, immediately building
up dangerous dust piles that can grow huge. These piles pose a serious fire hazard, and when the airflow gets restored, these piles break
loose and slam into things, potentially ruining motor bearings, impellers, and your filters.
Main Duct: If you want the most possible CFM, you need the biggest duct you can get that keeps the air velocity ample to keep the dust
moving instead of clogging your ducting. Most small shop vendors sell 4" dust collection duct and flex hose as their standard. This works well
to collect chips, but strangles the airflow needed for good fine dust collection. A typical 2 HP small shop dust collector with a 12" diameter
impeller moves a maximum of about 1200 CFM, but a 4" duct drops that airflow to only about 450 CFM. It takes a 4 HP motor turning an 16"
diameter impeller to force a 4" duct to carry 800 CFM and an 18" diameter impeller turned by a 5 hp motor to produce the 1000 CFM we need.
The result is too noisy to use. Most prefer a less expensive solution. In addition to maintaining that airflow, our blowers must keep the duct
airspeed high enough so we don't get plugging or piles of wood dust. Dust piles in ducts pose a fire hazard and ruin both blowers and filters
when they break loose and go slamming around. Air engineers found designing for a duct speed of 4000 FPM keeps the ducting clear.
Because FPM = CFM / duct area, a little math shows we need 6" diameter ducting to move 800 CFM at 4000 FPM. Most small shops need all
6" hoods, 6" main ducting lines, and 6" down drops.
Tool Ports: It takes one 6" port to support the 800 CFM and a 7" port to support the 1000 CFM required for good fine dust collection at most
larger stationary small shop tools. I get around this by using an oversized blower which permits a 6" duct to carry more than our needed 1000
CFM. For machines with two pickups, small shop users should generally use a wye that splits their 6" ducting into two runs. The smaller should
use 3.5" diameter ducting and port. The larger should use 5" ducting connected to a 5" port. This combination maintains the same area as the
6" main to prevent airflow restrictions, plugging, dust piles, and poor dust collection. Generally, we have to modify our small shop tools to add
the 3.5", 5", and 6" ports. Dust collectors do not have enough pressure to provide good fine dust collection for tools that cannot be modified to
have ports equivalent to a 6" diameter duct. Tools with 3" and smaller ports require use of a shop vacuum that generates at least 60" of
pressure to force the air collection needed, plus often a movable hood and downdraft table.

Taper edge
Enter the number of pipe 90's. Count 0.5 for each 45 degree bend and 1.0 for each full 90.
Input 1 for the number of hoods under the correct duct diameter column for the type of hood you have (square or round/taper edge).
Run the calculation for only your longest, most complex branch from the hood to the collector.
THIS SHEET WILL TELL YOU WHAT THE LOSSES ARE; IT WILL NOT TELL YOU WHAT IS REASONABLE!!! For example, if
you input 10000 CFM, the 4" velocity goes to 114592 FPM, which is 1302 MPH. The hood entry alone in a 4" branch goes to
637" water, which is about 23 PSI.
Resistance Calculation: Small shop owners only use one ducting run open at a time, so we size our systems based upon what it takes to
power our largest need. Knowing that most will move their machines around over time, it is best to figure what it takes to power our largest
machine overhead using our longest ducting run. The longer the hose and the more bends and fittings we use in our ducting runs and machine
collection, the higher the pressure drop and bigger the blower it will take. Small shop owners should calculate the the resistance of the tool with
the most hoods and ducting overhead, add to that the resistance of all the pipe and fittings in the longest ducting run, and then add the other
overhead resistance including cyclone, muffler, and filters. That total resistance gives the worst pressure drop in our system. We use that total
worst case resistance with a standard engineering fan table to size our blower motor and impeller diameter. This simple resistance calculator
helps you work through what you need for your own shop.
The system is made of 3.5", 4", 5", 6", 7" or 8" standard galvanized metal dust collection ducting. Nothing smaller than 3.5"
duct will be used anywhere because we know that would kill the airflow needed from our blower for fine dust collection.
From the CFM Requirements Table in the link above, input the CFM Required for our largest tool (normally 1000 to meet
recommended air quality). Input the target air velocity in FPM for your ducting. The air speed needs to convey whatever material
you want to move. For example, we need about 2000 FPM to carry clean air but need about 4000 FPM to carry sawdust and
chips without plugging vertical runs. This immediately calculates the most efficient optimum duct diameter. Using smaller duct
will kill our needed total air volume unless we use an oversized impeller to increase pressure and air velocity, e.g. we need 5000
FPM to move 1000 CFM through 6" duct.
The 8", 10", and 12" losses are for furnace pipe used on the RETURN LINE ONLY.
Duct size should remain constant from the tool to the dust collector. It should NEVER get smaller as it gets closer to the dust
collector. It is usually okay if the pipe gets one size bigger.
The total area of the duct/hose below the blast gate should roughly equal the area of the main duct. Use of a smaller duct or
hose can increase the overall resistance three-fold or more. You should not go from a 4" hood or port to a 6" duct! You will
have a much better system if you can install 6" ports on your tools.
Click here to see the CFM Requirements Table
The hood loss is a combination of the pipe entry loss (either 0.5 * VP or 0.07 * P) from the Cincinnati Fan Booklet, and an
approximation of the loss (5 * P) due to a well-designed tool. The impact from the tool can vary widely. If the tool is just on open-
ended dust sweep or open-mouthed dust hood, then the (5 * P) term could theoretically be set to zero, leaving just the pipe entry
loss. On the other hand, if you are hooking up, for example, to a table saw cabinet whose only opening is the clearance around
the blade in the throat plate, you would starve the cyclone and have almost no flow. It is important to ensure that there are
sufficient openings in the tool to provide a flow path for the air. Ideally, the area of the opening(s) should add up to at least the
area of the hose connecting to the tool.
Enter the number of flex 90's. This is an estimate of how much your flex hose is bent. If it goes straight to the tool, enter zero.
In this example shop, neither the planer run nor the radial arm saw run is ample to size our system. The ducting run to our planer is the longest
possible for this shop and our radial arm saw has the most overhead. The planer overhead is small because it uses a simple single 6" port.
The radial arm saw needs both a sweep up hood plus flex hose blade guard pickup hood. Figuring out the maximum for any shop requires
finding your largest resistance tool (normally the one with the most hoods and the most small hoses), calculating the resistance for
the longest run, then adding the resistance for the tool with the highest ducting resistance plus the overhead of your separator,
cyclone, and filters.
Radial Arm Saw Ducting Size: The CFM Requirements Table shows our RAS needs 790 CFM. We will round it up to 800 CFM. For our
RAS, and many other tools such as table saw, band saw, etc., we end up splitting the down drop into two collection pipes. We picked the RAS
for this example because it has one of the highest ducting overheads of any small shop tool. For the RAS, we have a pick up hood that sits
behind the blade and a smaller flex hose that attaches to the blade guard. To keep from killing airflow by restricting the area of ducting, the
area of these two ducts must be very close to the same area as our 6" diameter down drop duct, roughly 28 1/4 square inches. The following
table shows ducting areas, so you can pick a combination of offshoots that come close to the same area as the main. We could split our 6"
main into a 5" and a 3.5" because adding the areas of the 5" and 3.5" ducts almost exactly equals the area of the 6" duct. Practically speaking,
going with 5" and 4" is often easier because 3.5" flex hose is so difficult to find. For this duct to work with our machines, we also often have to
change out the original machine chip collection ports because they are too small. For our RAS, this requires making a 3.5" port on the blade
guard and a 5" back connection on the rear pickup hood.
Enter the number of wyes.
Enter the number of feet of straight pipe.
A return line can be added in to each run. It will be included in the total drop. See the sample problem.
Example
For starters, it is useful to have a sketched layout of your shop, with the tools in place, and the centerlines of all the ducts run. Ideally we want
to create the shortest runs, with the least number of bends and with the right sized ducting. Practically, because equipment will change and
move around, we need to create a system that is flexible and will permit changes. The best compromise is centering the dust collector as much
as possible then running either a center main or a pair of mains on opposite walls. In this example, we have a 20 x 20 foot shop. Power
concerns forced us to put the cyclone centered on the east wall and run an 18' long duct down the center of the shop. By placing our cyclone
right at the end of this duct run, we used a pair of 45 degree elbows and 1.5' of 6" flex hose to connect the cyclone to the main. The flex hose
helps control noise by not allowing our ducting to serve as a sounding board, plus it makes our connection easier.

Longest Main Duct Run: Our drawing shows the longest run starts at the cyclone with 1.5' of 6" flex hose, a pair of 45 degree 6" bends (2.0
R/D), and 18' of 6" duct. We will calculate up to, but not including, the 90 degree bend that drops down to the planer. Starting with a blank
spreadsheet, enter 1000 CFM Required. In the 6" column, enter 1 90 degree bend (2.0 R/D) to account for two 45 degree bends, 18' of
straight duct, and 1.5' of flex hose. The main duct Total Loss is 2.03".
Highest Resistance Tool: Figuring out the pressure loss when the flow splits takes some trial and error. We have a total flow rate of 1000
CFM, but it has to be split between the 3.5" hose and the 5" duct such that the sum of the two flows equals 1000 CFM, and the pressure loss is
the same. It might be easier to open two windows of the spreadsheet that are side by side. In the first window, in the 3.5" column, enter 1
round edge hood, 1 flex 90 bend, and 5' of flex hose. In the second window, in the 5" column, enter 1 round edge hood, 1 90 degree bend (2.5
R/D), and 3' of pipe. Now try to find a flowrate for each window where the two of them add up to 1000 CFM, and that results in the same Total
Loss. Eventually you will find the following. If you enter 208 CFM Required for the 3.5" duct, you get 1.56" of loss. If 208 CFM is flowing thru
the 3.5" hose, then 792 CFM is left for the 5" duct. Enter 792 CFM Required for the 5" duct, and you get about the same loss, 1.56". We are
now done with those two windows. Starting with a blank spreadsheet, enter 1000 CFM Required. In the 6" column, enter 1 90 degree bend
(2.5 R/D) and 5' of straight duct. The Total Loss for the 6" segment is 0.76". The sum of 1.56" and 0.76", which is 2.32", is the total loss
between the RAS and the main duct. Note that the 90 degree bend in the 3.5" hose is really killing the air flow, and causing more flow to go
thru the 5" duct than we would like. Also, the spreadsheet reports the Calculated Velocity as LOW (3113 FPM) for the 3.5" hose. Stepping up
to a 4" hose would probably help, but we're going to press on and keep the 3.5" hose.
Even with the right sizing, dual port machines may still need further adjustment to keep a larger duct from stealing all the flow from a
smaller duct! Any size variation, constriction in the tool, and even resistance of the different hoses will significantly alter how much air goes to
each collection point. Proper balancing can require use of a wye with a baffle to direct the airflow and dual gauges to ensure ample airflow to
both legs.
Overhead: Keeping the data we just did for the main duct run, we now add the Misc Losses and Overhead Losses. In the Misc Losses section,
enter 2.25" for a Pentz cyclone, 0.5" for under 225 square feet of filter, and 0.15" for the muffler that sits between the blower and filters. In the
Overhead Losses section, enter 2.0" as a typical value. The spreadsheet should now be showing 6.93" for the Total Loss. Manually adding the
2.32" from the Highest Resistance Tool section above gives a grand total of 9.25" pressure loss that our dust collector has to provide 1000
CFM at.
From the above RAS ducting picture taken from the ducting hoods web pages, you see a 6" main going into a wye that splits off a 5" hose for
the rear sweep up hood and a 3.5" hose for the blade guard. The RAS hood turns up the wall with a 90 degree bend (2.5 R/D), goes 3' up the
wall, and enters the wye. The 3.5" flex hose is 5' long and enters the other leg of the wye after bending about 90 degrees. We then go up from
the wye with 5' of 6" straight pipe and connect to the main with a 6" 90 degree bend (2.5 R/D).

Small Shop Solution: Fan tables like the one below let us use our 1000 CFM and 9.25" pressure requirement to pick the minimum sized
blower we need. The table below shows our 10" of resistance (rounded up from 9.25") requires 3.04 HP with a 14" diameter impeller to get at
least 1000 CFM (the table shows 1014 CFM). It might seem like a 3 HP DC would be a good choice for this shop. Remembering that we
calculated the pressure loss for the worst case duct run, look what happens as you hook up a tool that's closer to the DC, resulting in a
pressure loss of only 6" for example. In the table below, move to the left until you get in the 6" column. The table shows the fan will now be
moving 1335 CFM, and will require 3.84 HP. This is why I say almost all average small shops will burn up 2 HP, and even 3 HP, motors
unless the airflow is restricted to below our needed 1000 CFM. Many small shop cyclone vendors offer 7" mains powered by 2 and 3 HP
motors. These motors can burn up quickly unless we kill our airflow to well under 1000 CFM. Although a nice advertising ploy shows very high
CFM maximum numbers, you need to ask the vendor how much power the motor was drawing to get that high number, and compare the power
needs to the motor they are selling you. A far smarter solution that moves more air and provides better separation is to use a real 5 HP motor
with a custom made 15" impeller, exactly as recommended for my cyclone design.
Commercial Solution: If we were building a commercial system, we would add up the CFM requirements for every machine, and that total
would tell us how many CFM our blower would need to produce. We would likewise total and average the resistance of every ducting run to tell
us how much resistance our blower would have to overcome. For this simple two machine shop, the total comes out to 2000 CFM at 15" of
resistance. This requirement goes right off our small shop fan table scale and puts us into a commercial table. This situation would probably
require a 10 HP motor turning a 16.5" diameter impeller to provide concurrent fine dust collection on these two tools at once.
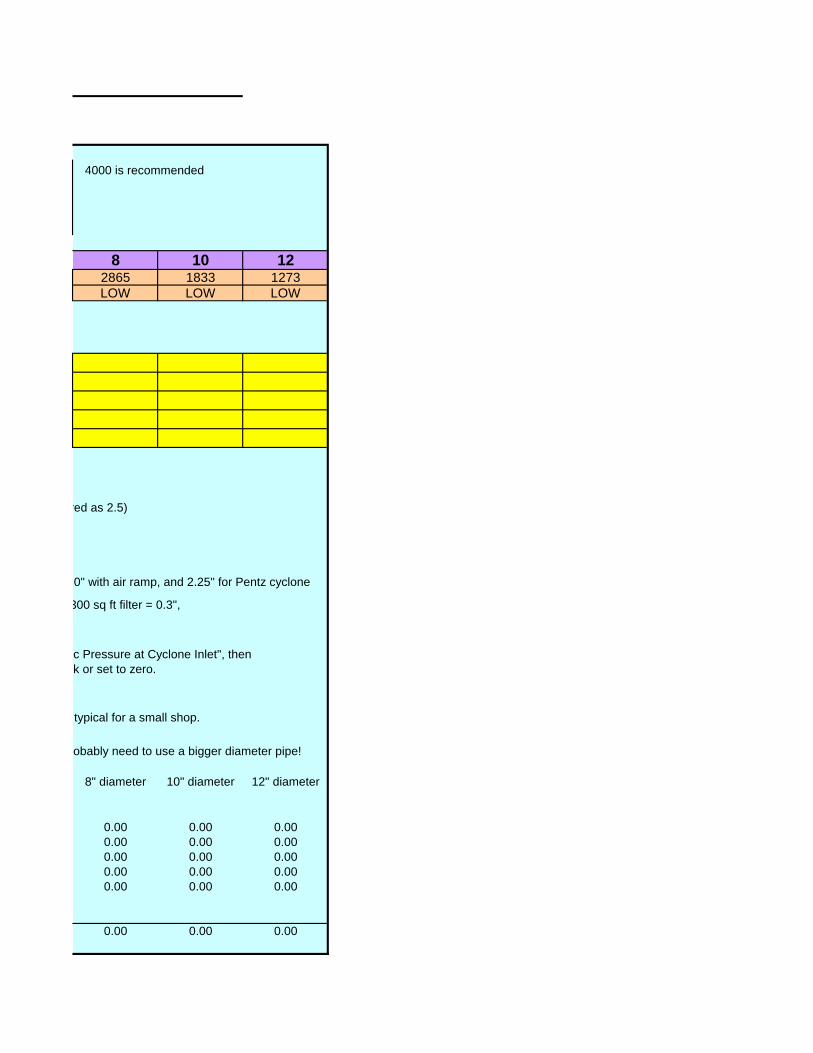
4000 is recommended
8 10 122865 1833 1273
LOW LOW LOW
0
Enter 45 degree elbows as 0.5 90's (e.g., two 90's and one 45 would be entered as 2.5)
If you are looking at a cyclone DC whose fan curve says something like "Static Pressure at Cyclone Inlet", then
the four Misc Losses above are already accounted for and should be left blank or set to zero.
8" diameter 10" diameter 12" diameter
0.00 0.00 0.00
0.00 0.00 0.00
0.00 0.00 0.00
0.00 0.00 0.00
0.00 0.00 0.00
0.00 0.00 0.00
Enter 4.5" for Wood Mag. & similar, 3.5" with neutral vane, 3.0" with air ramp, and 2.25" for Pentz cyclone
Std. Bag = 2.5", < 5 Micron Bags = 1", 225 sq ft filter = 0.5", 300 sq ft filter = 0.3",
450 sq ft filter = 0.25", 600 sq ft filter = 0.2"
Muffler = 0.15"
This includes filter seasoning and other overhead resistance typical for a small shop.
Note: If SP is over 12" you probably need to use a bigger diameter pipe!

8 10 12
0.2509 0.1053 0.0515
0.1681 0.0714 0.0352
0.1383 0.0578 0.0282
0.1729 0.0726 0.0356
DO NOT CHANGE ANY OF THE CELLS BELOW THIS POINT
THIS INFORMATION IS BEING MADE AVAILABLE SO THAT YOU CAN SEE HOW THE SPREADSHEET IS CALCULATING ITS
INFORMATION AND TO GIVE YOU AN OPPORTUNITY TO CHECK OUR WORK. ADDITIONAL INFORMATION IS ALSO ON SHEET2.
IF YOU FIND SOMETHING THAT YOU THINK IS WRONG, PLEASE DON'T HESITATE TO LET US KNOW.
!!! WARNING !!!

0.0160 0.0052 0.0021
0.5117 0.2096 0.1011
P = (0.109136 * q1.9
) / d5.02
http://www.engineeringtoolbox.com/duct-friction-pressure-loss-d_444.html
= 3 * P * (1.21 * d - 1.04) Assume a flex 90 is similar to a pipe 90 with a 2.5 R/D
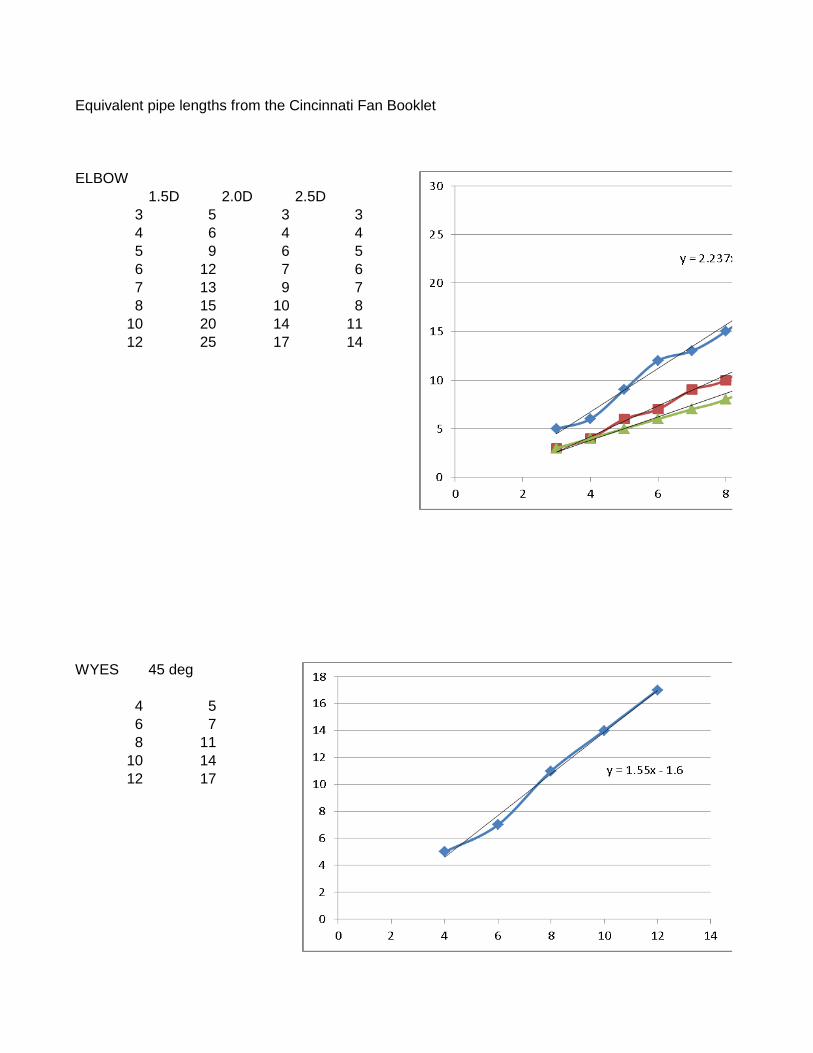
Equivalent pipe lengths from the Cincinnati Fan Booklet
ELBOW
1.5D 2.0D 2.5D
3 5 3 3
4 6 4 4
5 9 6 5
6 12 7 6
7 13 9 7
8 15 10 8
10 20 14 11
12 25 17 14
WYES 45 deg
4 5
6 7
8 11
10 14
12 17