stair tread riser installation guide -...
TRANSCRIPT


Copyright © 2007-2009 Artistic Finishes, Inc. All rights reserved. Rev. 1_01/2009 Page 2 of 12
STAIR TREAD & RISER INSTALLATION GUIDELINES ARTISTIC FINISHES DOES NOT WARRANTY THE COMPLETENESS OR ACCURACY OF ANY INSTALLATION. THE INSTALLATION CONTRACTER MUST HAVE THE EXPERIENCE AND KNOWLEDGE TO COMPLETE THE PROJECT IN AN ACCEPTABLE MANNER, FOLLOWING ALL CODES AND REGULATIONS. THE INSTALLATION GUIDELINES DOCUMENT AND ITS INSTRUCTIONS ARE TO BE USED AT THE USERS OWN RISK AND THE USER ASSUMES ALL RISKS ASSOCIATED WITH THE TREAD AND/OR RISER INSTALLATION. ARTISTIC FINISHES, INC. IS NOT RESPONSIBLE FOR ANY AND ALL INJURIES FROM IMPROPERLY INSTALLED ARTISTIC FINISHES’ PRODUCTS. CAREFULLY EXAMINE ALL MATERIALS FOR THE CORRECT SIZE, COLOR, QUALITY, AND COMPLETENESS OF ORDER BEFORE INSTALLING MOLDINGS, TREADS AND RISERS. ARTISTIC FINISHES WILL NOT ASSUME ANY RESPONSIBILITY FOR PRODUCT COLOR OR BLENDING ONCE THE MATERIAL HAS BEEN INSTALLED. WOOD IS A NATURAL PRODUCT THAT VARIES IN GRAIN, NATURAL CHARACTERISTICS, AND COLOR. STAIR TREADS, RISERS AND MOLDINGS ARE MADE TO BLEND TOGETHER AND NOT TO “MATCH”. THERE ARE MANY INSTALLATION SITUATIONS AND THESE ARE GUIDELINES ONLY. THE USER OF THESE WRITTEN GUIDELINES ASSUMES ALL LIABILITY AND RESPONSIBILITY. BUILDING CODES
Building Codes vary or change from locality to locality. The installation contractor is responsible for complying with local Building Codes, American Disabilities Act, or any other jobsite requirement. The installation contractor accepts responsibility for the structure of the existing stairs to meet code requirements. The environment of the jobsite needs to be within normal living conditions.
SAFETY
Woodworking has an inherent danger. Learn the safe operation of your tools by following the tool manufacturer safety instructions. Improper use of power tools can result in serious injury. Use appropriate safety equipment. Artistic Finishes assumes no responsibility for injury or damages for the use of material supplied or instruction guidelines.

Copyright © 2007-2009 Artistic Finishes, Inc. All rights reserved. Rev. 1_01/2009 Page 3 of 12
WOOD – A NATURAL PRODUCT
We, at Artistic Finishes, accept and appreciate the natural beauty that comes from real wood. Because no two trees produce the same color or grain pattern, the hardwood accessories that you receive will exhibit this same variety.
In addition, exotic woods inherently display a very wide range of color which deepens with time and light exposure (artificial and natural). Within a single Artistic tread or riser, you may see both light and dark color variability. This contrast is not a defect, rather an assurance you’re receiving true exotic species.
Carpets, runners or mats placed on Artistic Finishes’ treads and risers after installation, may cause a variation in the color of the exposed area versus the covered area. This is due to the natural aging process of the wood material and exposure or non-exposure to artificial or natural lighting. Artistic Finishes is not responsible for this color change and it is not covered under the Residential Warranty.
RECOMMENDED INSTALLATION TOOL Artistic Finishes recommends the use of Wheaton Tools’ STAIR WIZARD as the tool of
choice for the most efficient installation of Artistic Stair Treads and Risers. According to the manufacturer, The STAIR WIZARD is the finest stair tread and riser gauge available for the installation of wall-to-wall type treads in half the time of traditional methods.
The STAIR WIZARD is referenced throughout Artistic Finishes’ Tread and Riser Installation Guidelines documentation. This tool can be purchased directly from Wheaton Tools by calling (707) 829-1180.
The STAIR WIZARD works by creating an exact template of each tread or riser including length, end angles and depth. Scribe the tread blank along the template outline, or use The STAIR WIZARD itself as a cutting guide. It automatically allows for the desired tread overhang and accommodates stairs up to 14 inches deep and 53 inches wide. Extensions are available.
OTHER TOOLS REQUIRED
Nail gun and air compressor Table saw with a new blade Sliding power miter saw Non-water based construction adhesive Carpet knife Drill and drill bits
Hammer Wood putty Measuring tape Level Crow bar Broom and dust pan
The STAIR WIZARD
Copyright © 2007-2009 Artistic Finishes, Inc. All rights reserved. Rev. 1_01/2009 Page 4 of 12
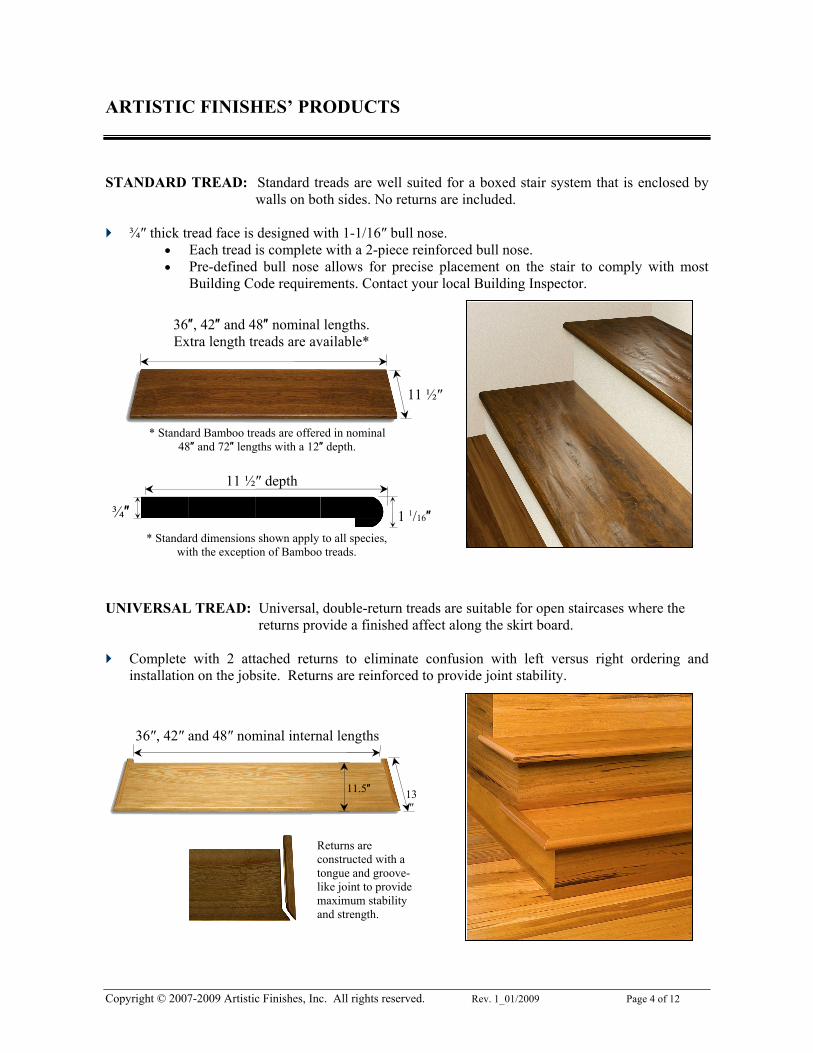
ARTISTIC FINISHES’ PRODUCTS STANDARD TREAD: Standard treads are well suited for a boxed stair system that is enclosed by
walls on both sides. No returns are included.
¾″ thick tread face is designed with 1-1/16″ bull nose. • Each tread is complete with a 2-piece reinforced bull nose. • Pre-defined bull nose allows for precise placement on the stair to comply with most
Building Code requirements. Contact your local Building Inspector.
UNIVERSAL TREAD: Universal, double-return treads are suitable for open staircases where the returns provide a finished affect along the skirt board.
Complete with 2 attached returns to eliminate confusion with left versus right ordering and
installation on the jobsite. Returns are reinforced to provide joint stability.
1 1/16″
11 ½″ depth
11 ½″
36″, 42″ and 48″ nominal internal lengths
Returns are constructed with a tongue and groove-like joint to provide maximum stability and strength.
36″, 42″ and 48″ nominal lengths. Extra length treads are available*
* Standard Bamboo treads are offered in nominal 48″ and 72″ lengths with a 12″ depth.
¾″ * Standard dimensions shown apply to all species,
with the exception of Bamboo treads.
13″
11.5″
Copyright © 2007-2009 Artistic Finishes, Inc. All rights reserved. Rev. 1_01/2009 Page 5 of 12
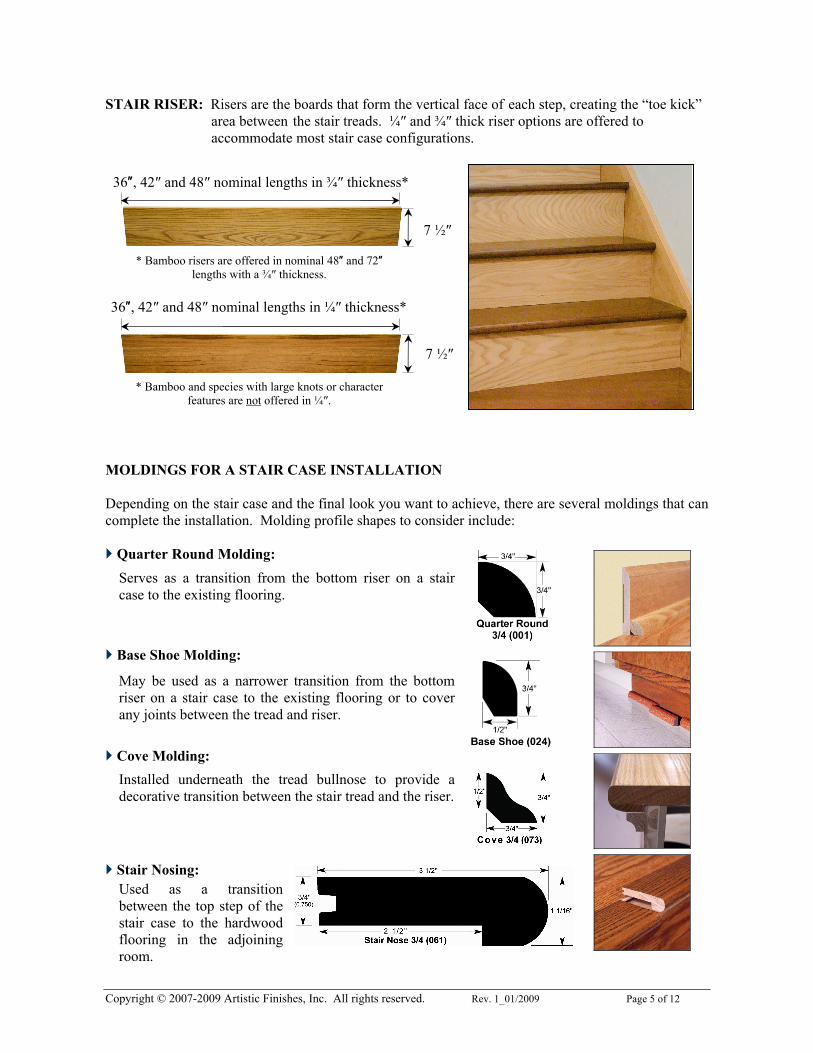
STAIR RISER: Risers are the boards that form the vertical face of each step, creating the “toe kick” area between the stair treads. ¼″ and ¾″ thick riser options are offered to accommodate most stair case configurations.
MOLDINGS FOR A STAIR CASE INSTALLATION Depending on the stair case and the final look you want to achieve, there are several moldings that can complete the installation. Molding profile shapes to consider include:
Quarter Round Molding:
Base Shoe Molding:
Cove Molding:
Stair Nosing:
7 ½″
* Bamboo risers are offered in nominal 48″ and 72″ lengths with a ¾″ thickness.
* Bamboo and species with large knots or character features are not offered in ¼″.
7 ½″
36″, 42″ and 48″ nominal lengths in ¾″ thickness*
36″, 42″ and 48″ nominal lengths in ¼″ thickness*
Serves as a transition from the bottom riser on a stair case to the existing flooring.
May be used as a narrower transition from the bottom riser on a stair case to the existing flooring or to cover any joints between the tread and riser.
Installed underneath the tread bullnose to provide a decorative transition between the stair tread and the riser.
Used as a transition between the top step of the stair case to the hardwood flooring in the adjoining room.
Copyright © 2007-2009 Artistic Finishes, Inc. All rights reserved. Rev. 1_01/2009 Page 6 of 12
INSTALLATION INSTRUCTIONS
1. PLAN AND VISUALIZE THE FINISHED PROJECT Review the tread and riser materials to ensure you have all of the necessary components. Open
each box and lay out the treads and risers before cutting to achieve the best visual appearance of their placement. Each individual tread and riser has a unique grain variation and color.
Determine the trim moldings needed to enhance the beauty and functionality of the installation. Lay the moldings out before cutting to blend in with the over all appearance of the finished project.
2. PREPARING THE PROJECT The proper environment must be maintained prior to, during, and after the installation.
The sub-structure of the stairs must be clean, dry, and free of paint and debris to allow for the bonding of the adhesive used in the installation of the treads.
The rough staircase must be structurally sound and free of squeaks or movement.
NOTE: The installation method is determined by the professional installer and may be dictated by jobsite conditions.
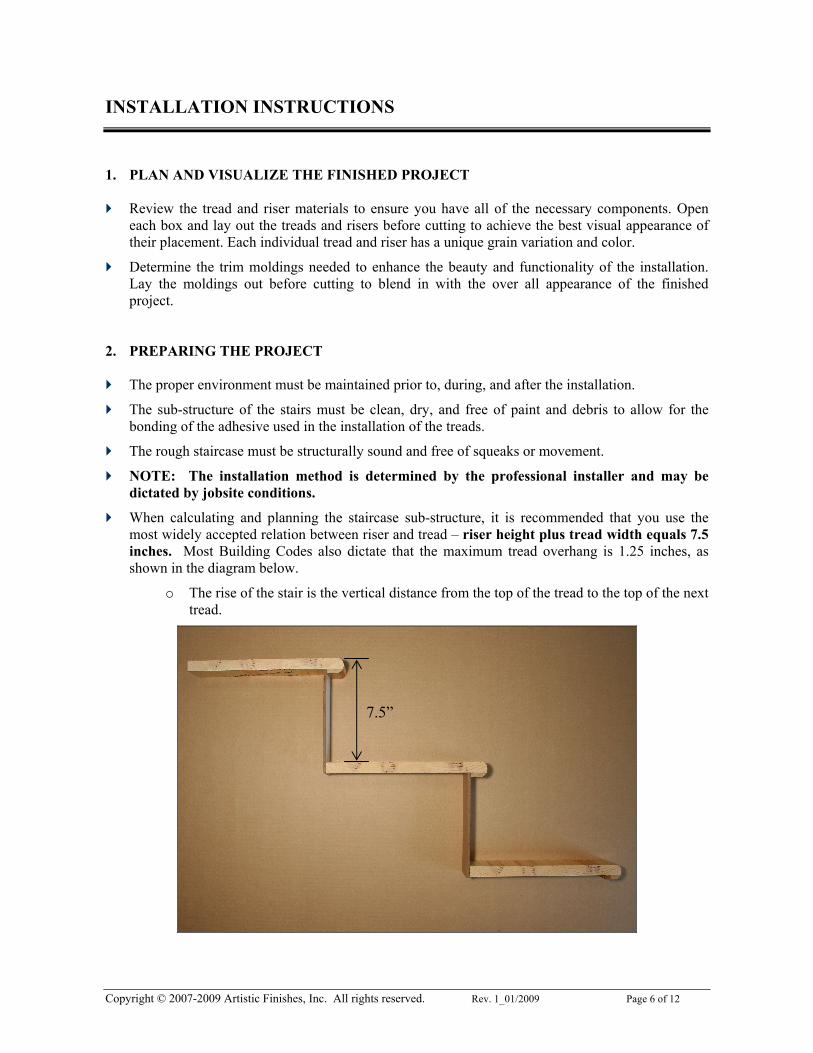
When calculating and planning the staircase sub-structure, it is recommended that you use the most widely accepted relation between riser and tread – riser height plus tread width equals 7.5 inches. Most Building Codes also dictate that the maximum tread overhang is 1.25 inches, as shown in the diagram below.
o The rise of the stair is the vertical distance from the top of the tread to the top of the next tread.
7.5”
Copyright © 2007-2009 Artistic Finishes, Inc. All rights reserved. Rev. 1_01/2009 Page 7 of 12
Based on the installer’s preference, the staircase configuration and local Building Codes, there are generally 3 options when determining how to build the substructure of the staircase prior to installing the treads and risers:
OPTION 1: The sub-treads can be kept in place after carpet removal; however you must make the front edge of the tread flush with the sub-riser. Remove any over hang as shown in the diagram below.
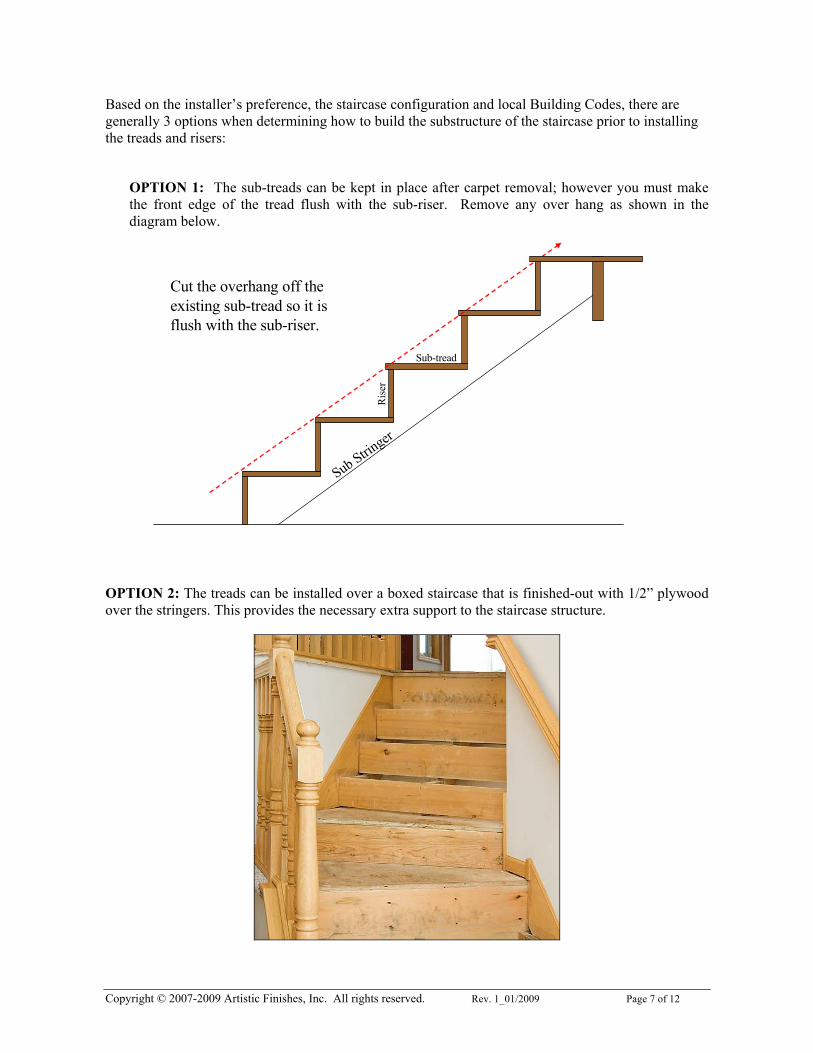
OPTION 2: The treads can be installed over a boxed staircase that is finished-out with 1/2” plywood over the stringers. This provides the necessary extra support to the staircase structure.
Cut the overhang off the existing sub-tread so it is flush with the sub-riser.
Sub Stringer
Sub-tread
Ris
er
Copyright © 2007-2009 Artistic Finishes, Inc. All rights reserved. Rev. 1_01/2009 Page 8 of 12
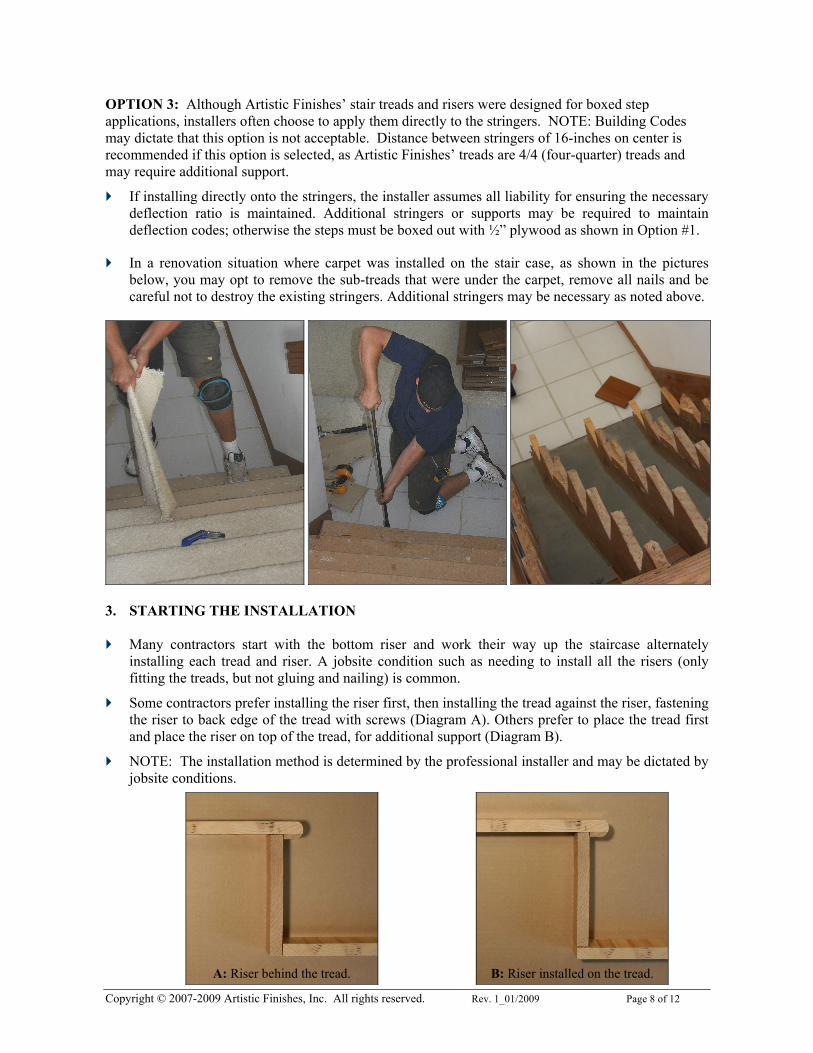
OPTION 3: Although Artistic Finishes’ stair treads and risers were designed for boxed step applications, installers often choose to apply them directly to the stringers. NOTE: Building Codes may dictate that this option is not acceptable. Distance between stringers of 16-inches on center is recommended if this option is selected, as Artistic Finishes’ treads are 4/4 (four-quarter) treads and may require additional support.
If installing directly onto the stringers, the installer assumes all liability for ensuring the necessary deflection ratio is maintained. Additional stringers or supports may be required to maintain deflection codes; otherwise the steps must be boxed out with ½” plywood as shown in Option #1.
In a renovation situation where carpet was installed on the stair case, as shown in the pictures below, you may opt to remove the sub-treads that were under the carpet, remove all nails and be careful not to destroy the existing stringers. Additional stringers may be necessary as noted above.
3. STARTING THE INSTALLATION Many contractors start with the bottom riser and work their way up the staircase alternately
installing each tread and riser. A jobsite condition such as needing to install all the risers (only fitting the treads, but not gluing and nailing) is common.
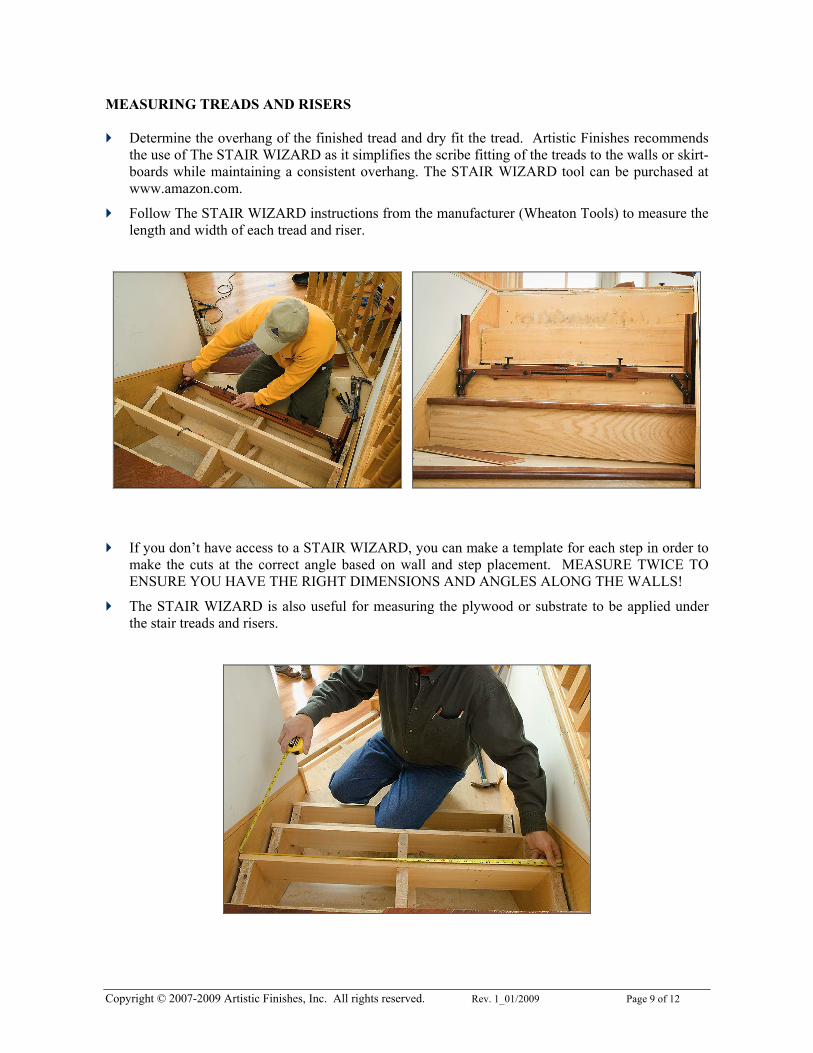
Some contractors prefer installing the riser first, then installing the tread against the riser, fastening the riser to back edge of the tread with screws (Diagram A). Others prefer to place the tread first and place the riser on top of the tread, for additional support (Diagram B).
NOTE: The installation method is determined by the professional installer and may be dictated by jobsite conditions.
A: Riser behind the tread. B: Riser installed on the tread.
Copyright © 2007-2009 Artistic Finishes, Inc. All rights reserved. Rev. 1_01/2009 Page 9 of 12
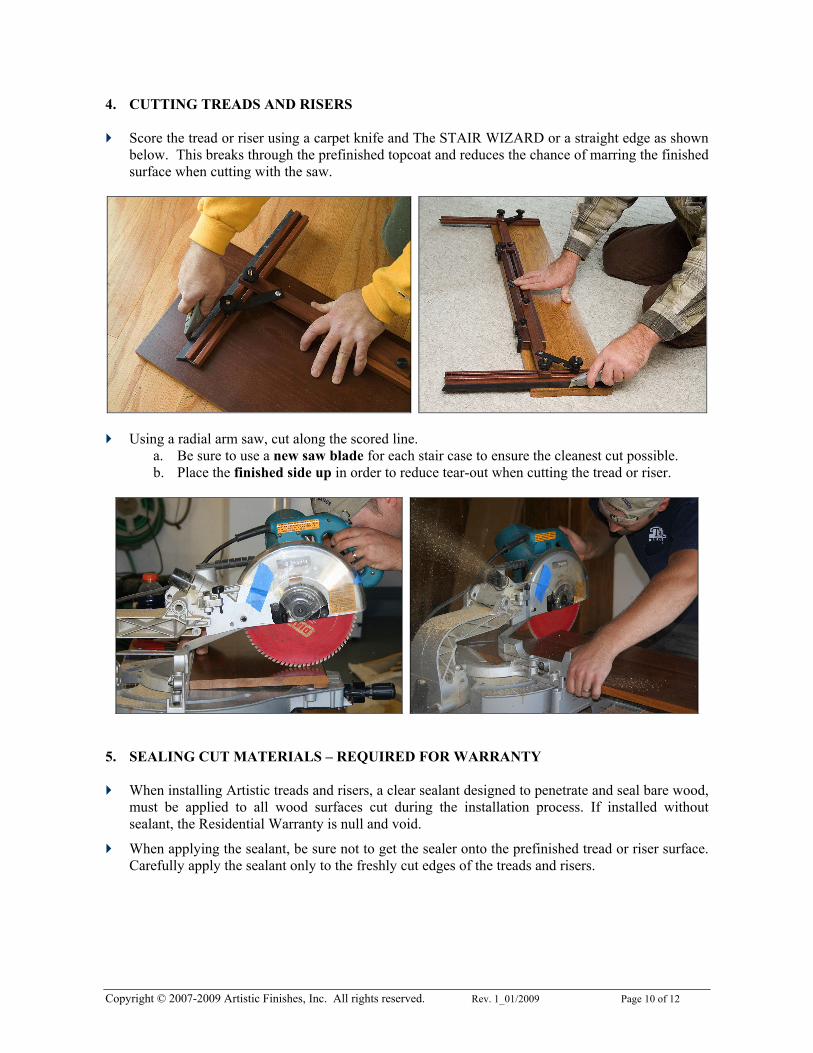
MEASURING TREADS AND RISERS Determine the overhang of the finished tread and dry fit the tread. Artistic Finishes recommends
the use of The STAIR WIZARD as it simplifies the scribe fitting of the treads to the walls or skirt-boards while maintaining a consistent overhang. The STAIR WIZARD tool can be purchased at www.amazon.com.
Follow The STAIR WIZARD instructions from the manufacturer (Wheaton Tools) to measure the length and width of each tread and riser.
If you don’t have access to a STAIR WIZARD, you can make a template for each step in order to
make the cuts at the correct angle based on wall and step placement. MEASURE TWICE TO ENSURE YOU HAVE THE RIGHT DIMENSIONS AND ANGLES ALONG THE WALLS!
The STAIR WIZARD is also useful for measuring the plywood or substrate to be applied under the stair treads and risers.
Copyright © 2007-2009 Artistic Finishes, Inc. All rights reserved. Rev. 1_01/2009 Page 10 of 12
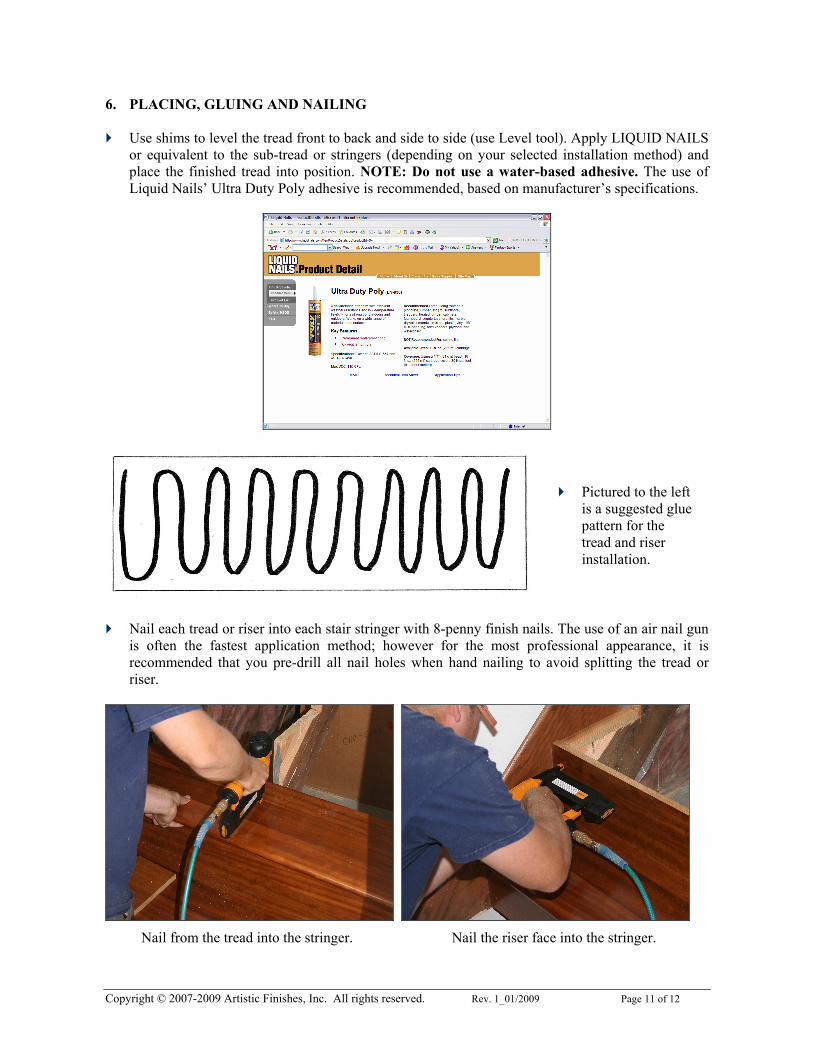
4. CUTTING TREADS AND RISERS Score the tread or riser using a carpet knife and The STAIR WIZARD or a straight edge as shown
below. This breaks through the prefinished topcoat and reduces the chance of marring the finished surface when cutting with the saw.
Using a radial arm saw, cut along the scored line.
a. Be sure to use a new saw blade for each stair case to ensure the cleanest cut possible. b. Place the finished side up in order to reduce tear-out when cutting the tread or riser.
5. SEALING CUT MATERIALS – REQUIRED FOR WARRANTY When installing Artistic treads and risers, a clear sealant designed to penetrate and seal bare wood,
must be applied to all wood surfaces cut during the installation process. If installed without sealant, the Residential Warranty is null and void.
When applying the sealant, be sure not to get the sealer onto the prefinished tread or riser surface. Carefully apply the sealant only to the freshly cut edges of the treads and risers.
Copyright © 2007-2009 Artistic Finishes, Inc. All rights reserved. Rev. 1_01/2009 Page 11 of 12
6. PLACING, GLUING AND NAILING Use shims to level the tread front to back and side to side (use Level tool). Apply LIQUID NAILS
or equivalent to the sub-tread or stringers (depending on your selected installation method) and place the finished tread into position. NOTE: Do not use a water-based adhesive. The use of Liquid Nails’ Ultra Duty Poly adhesive is recommended, based on manufacturer’s specifications.
Nail each tread or riser into each stair stringer with 8-penny finish nails. The use of an air nail gun
is often the fastest application method; however for the most professional appearance, it is recommended that you pre-drill all nail holes when hand nailing to avoid splitting the tread or riser.
Nail from the tread into the stringer. Nail the riser face into the stringer.
Pictured to the left is a suggested glue pattern for the tread and riser installation.
Copyright © 2007-2009 Artistic Finishes, Inc. All rights reserved. Rev. 1_01/2009 Page 12 of 12
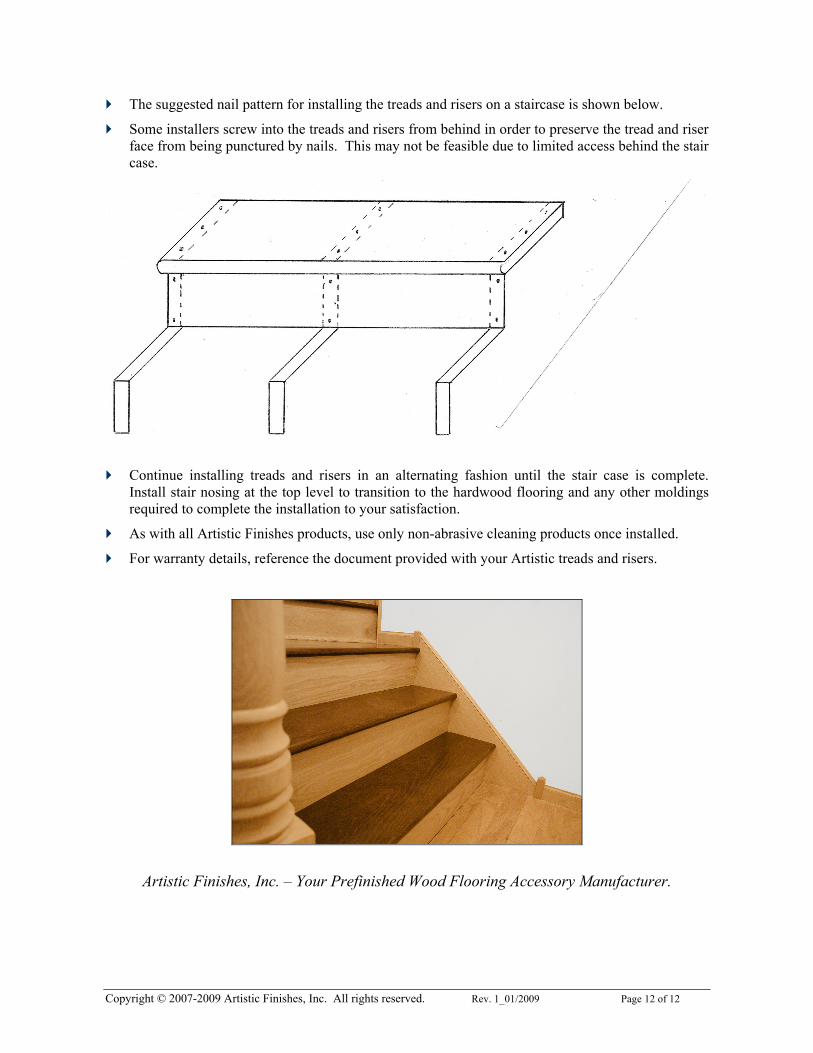
The suggested nail pattern for installing the treads and risers on a staircase is shown below.
Some installers screw into the treads and risers from behind in order to preserve the tread and riser face from being punctured by nails. This may not be feasible due to limited access behind the stair case.
Continue installing treads and risers in an alternating fashion until the stair case is complete.
Install stair nosing at the top level to transition to the hardwood flooring and any other moldings required to complete the installation to your satisfaction.
As with all Artistic Finishes products, use only non-abrasive cleaning products once installed.
For warranty details, reference the document provided with your Artistic treads and risers.
Artistic Finishes, Inc. – Your Prefinished Wood Flooring Accessory Manufacturer.