speedy spiral christmas tree skirt - sulky.com · speedy spiral christmas tree skirt ... in...
TRANSCRIPT
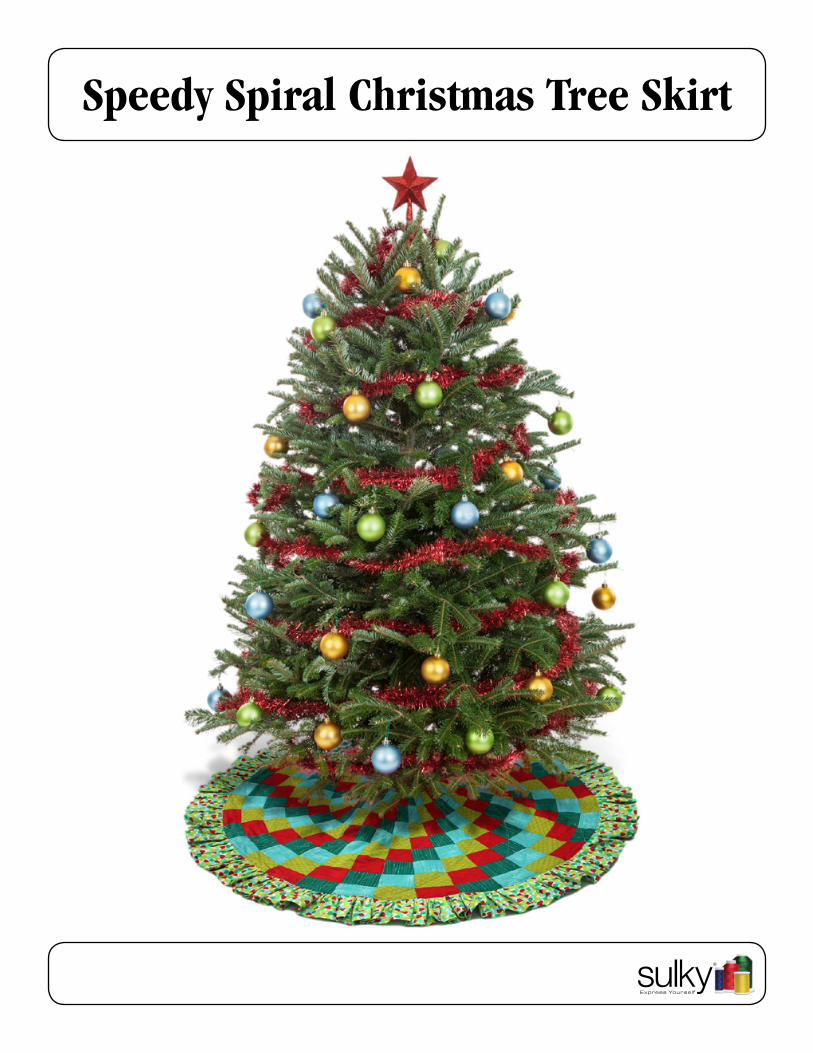
Speedy Spiral Christmas Tree Skirt
Speedy Spiral Christmas Tree Skirtndash2ndash
What I Used
Your FabricsA
B
C
D
Others
Project OverviewSulky Metallic Thread is a ldquomust haverdquo at Christmas for sewing everything bright and shiny Try using them in this wonderful design by Cheryl Phillips from her book Quilt Without Cornerscopy
Suppliesbull Fabric 45rdquo Wide
raquo Color A - 34 yd raquo Color B - 34 yd raquo Color C - 34 yd raquo Color D - 34 yd raquo Ruffle - 2 yds raquo Batting - 46rdquo x 46rdquo raquo Backing - 1 58 yd x 45rdquo 60rdquo or 90rdquo wide
bull Straight Stitch Sewing Machine with size 1490 top-stitching machine needlebull Sulky Metallic Threadbull 9deg OR 10deg Wedge Rulerbull 12rdquo Square and 6rdquo x 24rdquo Rulerbull Rotary Cutter and Matbull 1 Safety Pinsbull Wide Transparent tape
Special Notes9deg Wedge Ruler available from Marilyn Doheny and marketed by Cutting Edge Quilt Designs and should be available in most well-stocked quilt shops
10deg Wedge Ruler available from Phillips Fiber Art phillipsfiberartcom and should be available in most well-stocked quilt shops Enjoy other 9deg or 10deg wedge ruler projects by Cheryl Phillips in her book Quilts Without Corners
CuttingColors A B C D
Cut 8 strips each - 2-34rdquo wideSince all strips are the same width you may layer your fabric and cut all four colors at the same time Pin and label color groups together
RuffleCut 8 strips - 8-12rdquo wide
WHAT FABRICS I USED Fabric A Blue Painterrsquos Canvas by Laura Gunn for Michael Miller Fabric B Green Nordic Diamond by Patty Young for Michael Miller Fabric C Red Aboriginal Dot by Kaffe Fassett Fabric D Green Dazzle by Patrick Lose for Robert Kauffman
Ruffle Tiny Guitar Picks by Michael Miller
WHAT THREAD I USED Sulky Sliver Metallic in Silver 8001 and Peacock Blue 8017
Sulky Holoshimmer Metallic in Christmas Red 6014 Peacock 6017 and Lime Green 6032
Sulky 60 Wt PolyLite in Christmas Red 1147 for the bobbin
HINT These spaces are for you to paste swatches of the fabrics you use
Speedy Spiral Christmas Tree Skirtndash3ndash
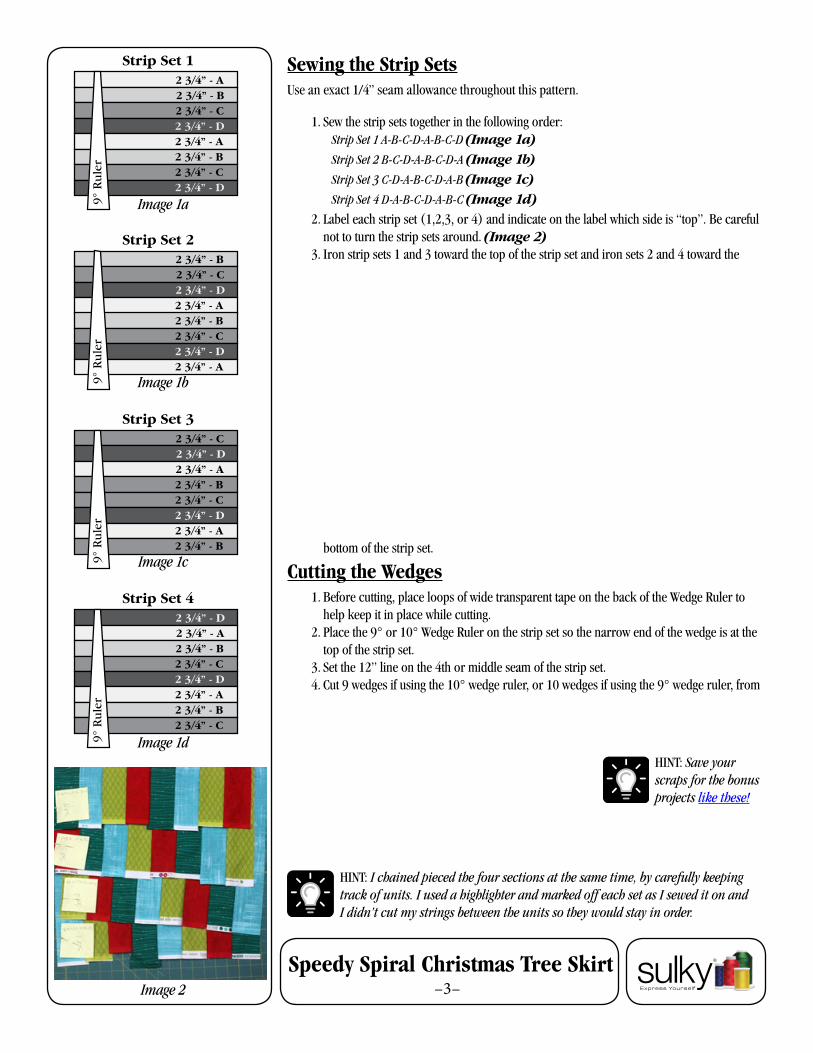
Sewing the Strip SetsUse an exact 14rdquo seam allowance throughout this pattern
1 Sew the strip sets together in the following orderStrip Set 1 A-B-C-D-A-B-C-D (Image 1a)Strip Set 2 B-C-D-A-B-C-D-A (Image 1b)Strip Set 3 C-D-A-B-C-D-A-B (Image 1c)Strip Set 4 D-A-B-C-D-A-B-C (Image 1d)
2 Label each strip set (123 or 4) and indicate on the label which side is ldquotoprdquo Be careful not to turn the strip sets around (Image 2)
3 Iron strip sets 1 and 3 toward the top of the strip set and iron sets 2 and 4 toward the
2 34rdquo - A
Strip Set 1
2 34rdquo - B2 34rdquo - C2 34rdquo - D2 34rdquo - A2 34rdquo - B2 34rdquo - C2 34rdquo - D
9deg
Ru
ler
2 34rdquo - B
Strip Set 2
2 34rdquo - C2 34rdquo - D2 34rdquo - A2 34rdquo - B2 34rdquo - C2 34rdquo - D2 34rdquo - A
9deg
Ru
ler
2 34rdquo - C
Strip Set 3
2 34rdquo - D2 34rdquo - A2 34rdquo - B2 34rdquo - C2 34rdquo - D2 34rdquo - A2 34rdquo - B
9deg
Ru
ler
2 34rdquo - D
Strip Set 4
2 34rdquo - A2 34rdquo - B2 34rdquo - C2 34rdquo - D2 34rdquo - A2 34rdquo - B2 34rdquo - C
9deg
Ru
ler
Image 2
Image 1a
Image 1b
Image 1c
Image 1dHINT Save your scraps for the bonus projects like these
HINT I chained pieced the four sections at the same time by carefully keeping track of units I used a highlighter and marked off each set as I sewed it on and I didnrsquot cut my strings between the units so they would stay in order
bottom of the strip set
Cutting the Wedges1 Before cutting place loops of wide transparent tape on the back of the Wedge Ruler to
help keep it in place while cutting2 Place the 9deg or 10deg Wedge Ruler on the strip set so the narrow end of the wedge is at the
top of the strip set3 Set the 12rdquo line on the 4th or middle seam of the strip set4 Cut 9 wedges if using the 10deg wedge ruler or 10 wedges if using the 9deg wedge ruler from
Speedy Spiral Christmas Tree Skirtndash4ndash
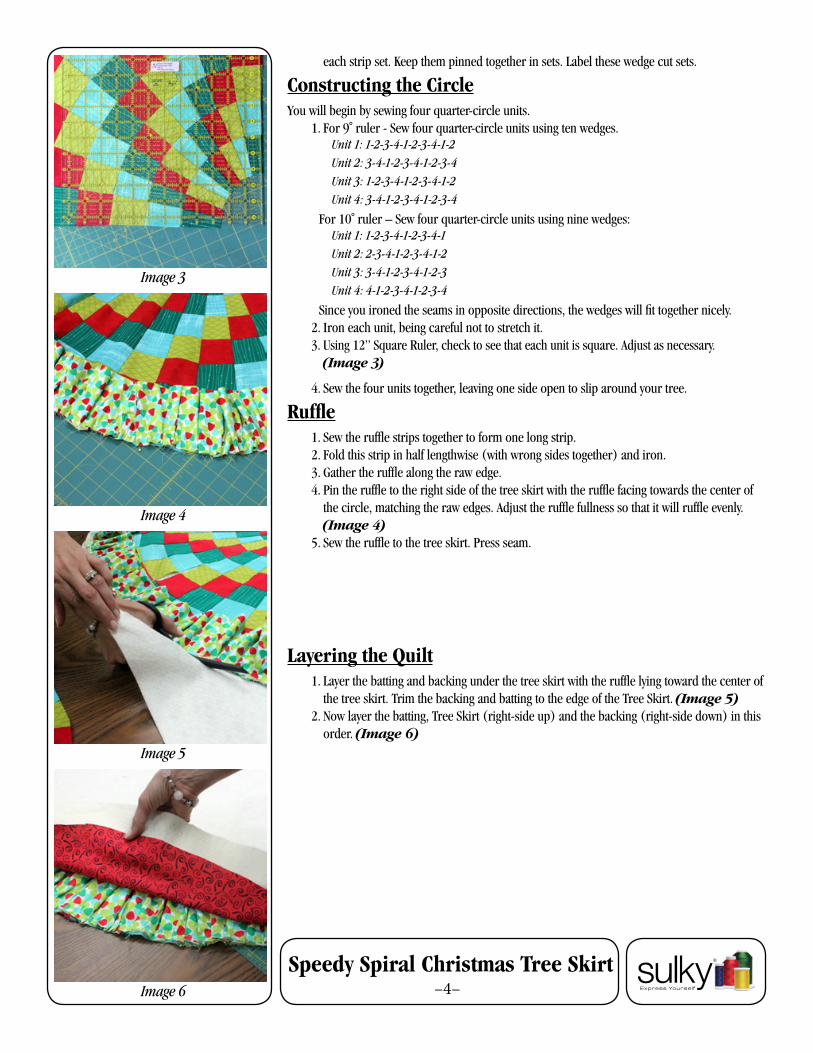
each strip set Keep them pinned together in sets Label these wedge cut sets
Constructing the CircleYou will begin by sewing four quarter-circle units
1 For 9˚ ruler - Sew four quarter-circle units using ten wedges Unit 1 1-2-3-4-1-2-3-4-1-2Unit 2 3-4-1-2-3-4-1-2-3-4Unit 3 1-2-3-4-1-2-3-4-1-2Unit 4 3-4-1-2-3-4-1-2-3-4
For 10˚ ruler ndash Sew four quarter-circle units using nine wedgesUnit 1 1-2-3-4-1-2-3-4-1Unit 2 2-3-4-1-2-3-4-1-2Unit 3 3-4-1-2-3-4-1-2-3Unit 4 4-1-2-3-4-1-2-3-4
Since you ironed the seams in opposite directions the wedges will fit together nicely2 Iron each unit being careful not to stretch it3 Using 12rdquo Square Ruler check to see that each unit is square Adjust as necessary
(Image 3)
4 Sew the four units together leaving one side open to slip around your tree
Ruffle1 Sew the ruffle strips together to form one long strip2 Fold this strip in half lengthwise (with wrong sides together) and iron3 Gather the ruffle along the raw edge 4 Pin the ruffle to the right side of the tree skirt with the ruffle facing towards the center of
the circle matching the raw edges Adjust the ruffle fullness so that it will ruffle evenly (Image 4)
5 Sew the ruffle to the tree skirt Press seam
Layering the Quilt1 Layer the batting and backing under the tree skirt with the ruffle lying toward the center of
the tree skirt Trim the backing and batting to the edge of the Tree Skirt (Image 5)2 Now layer the batting Tree Skirt (right-side up) and the backing (right-side down) in this
order (Image 6)
Image 3
Image 4
Image 5
Image 6
Speedy Spiral Christmas Tree Skirtndash5ndash
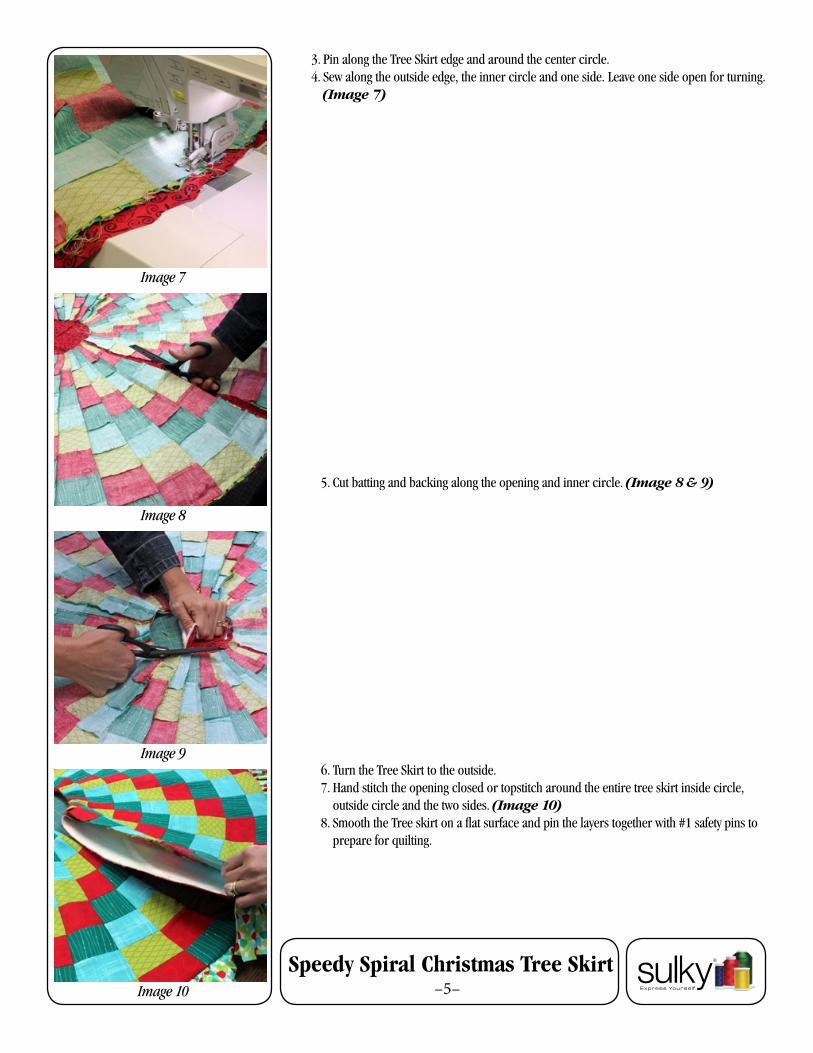
3 Pin along the Tree Skirt edge and around the center circle4 Sew along the outside edge the inner circle and one side Leave one side open for turning
(Image 7)
Image 7
Image 8
Image 9
Image 10
5 Cut batting and backing along the opening and inner circle (Image 8 amp 9)
6 Turn the Tree Skirt to the outside7 Hand stitch the opening closed or topstitch around the entire tree skirt inside circle
outside circle and the two sides (Image 10)8 Smooth the Tree skirt on a flat surface and pin the layers together with 1 safety pins to
prepare for quilting
Speedy Spiral Christmas Tree Skirtndash6ndash
Quilting1 Set up machine for quilting
For quilting with metallics put the thread on the vertical spool pin and use Sulky 60 wt PolyLite in the bobbin in a color that matches the backing fabric
Top Stitch Needle size 1490Reduce tension slightlyUse Sewerrsquos Aid or Tri-Flo
Method I - Machine FeedAttach a Walking Foot if availableSet machine for normal straight stitch (12 stitches per inch)
Method II - Free Motion feedingAttach a Darning Foot and reduce foot pressureSet machine for zero widthCover or lower feed dogs
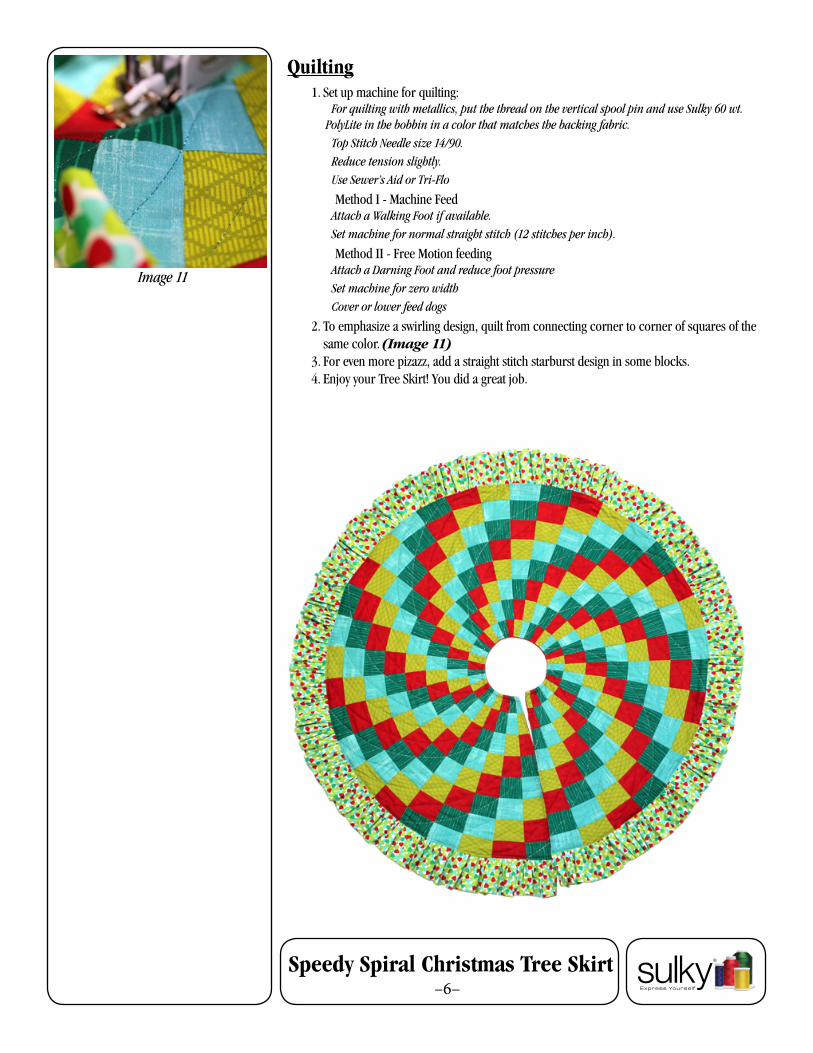
2 To emphasize a swirling design quilt from connecting corner to corner of squares of the same color (Image 11)
3 For even more pizazz add a straight stitch starburst design in some blocks4 Enjoy your Tree Skirt You did a great job
Image 11
Speedy Spiral Christmas Tree Skirtndash2ndash
What I Used
Your FabricsA
B
C
D
Others
Project OverviewSulky Metallic Thread is a ldquomust haverdquo at Christmas for sewing everything bright and shiny Try using them in this wonderful design by Cheryl Phillips from her book Quilt Without Cornerscopy
Suppliesbull Fabric 45rdquo Wide
raquo Color A - 34 yd raquo Color B - 34 yd raquo Color C - 34 yd raquo Color D - 34 yd raquo Ruffle - 2 yds raquo Batting - 46rdquo x 46rdquo raquo Backing - 1 58 yd x 45rdquo 60rdquo or 90rdquo wide
bull Straight Stitch Sewing Machine with size 1490 top-stitching machine needlebull Sulky Metallic Threadbull 9deg OR 10deg Wedge Rulerbull 12rdquo Square and 6rdquo x 24rdquo Rulerbull Rotary Cutter and Matbull 1 Safety Pinsbull Wide Transparent tape
Special Notes9deg Wedge Ruler available from Marilyn Doheny and marketed by Cutting Edge Quilt Designs and should be available in most well-stocked quilt shops
10deg Wedge Ruler available from Phillips Fiber Art phillipsfiberartcom and should be available in most well-stocked quilt shops Enjoy other 9deg or 10deg wedge ruler projects by Cheryl Phillips in her book Quilts Without Corners
CuttingColors A B C D
Cut 8 strips each - 2-34rdquo wideSince all strips are the same width you may layer your fabric and cut all four colors at the same time Pin and label color groups together
RuffleCut 8 strips - 8-12rdquo wide
WHAT FABRICS I USED Fabric A Blue Painterrsquos Canvas by Laura Gunn for Michael Miller Fabric B Green Nordic Diamond by Patty Young for Michael Miller Fabric C Red Aboriginal Dot by Kaffe Fassett Fabric D Green Dazzle by Patrick Lose for Robert Kauffman
Ruffle Tiny Guitar Picks by Michael Miller
WHAT THREAD I USED Sulky Sliver Metallic in Silver 8001 and Peacock Blue 8017
Sulky Holoshimmer Metallic in Christmas Red 6014 Peacock 6017 and Lime Green 6032
Sulky 60 Wt PolyLite in Christmas Red 1147 for the bobbin
HINT These spaces are for you to paste swatches of the fabrics you use
Speedy Spiral Christmas Tree Skirtndash3ndash
Sewing the Strip SetsUse an exact 14rdquo seam allowance throughout this pattern
1 Sew the strip sets together in the following orderStrip Set 1 A-B-C-D-A-B-C-D (Image 1a)Strip Set 2 B-C-D-A-B-C-D-A (Image 1b)Strip Set 3 C-D-A-B-C-D-A-B (Image 1c)Strip Set 4 D-A-B-C-D-A-B-C (Image 1d)
2 Label each strip set (123 or 4) and indicate on the label which side is ldquotoprdquo Be careful not to turn the strip sets around (Image 2)
3 Iron strip sets 1 and 3 toward the top of the strip set and iron sets 2 and 4 toward the
2 34rdquo - A
Strip Set 1
2 34rdquo - B2 34rdquo - C2 34rdquo - D2 34rdquo - A2 34rdquo - B2 34rdquo - C2 34rdquo - D
9deg
Ru
ler
2 34rdquo - B
Strip Set 2
2 34rdquo - C2 34rdquo - D2 34rdquo - A2 34rdquo - B2 34rdquo - C2 34rdquo - D2 34rdquo - A
9deg
Ru
ler
2 34rdquo - C
Strip Set 3
2 34rdquo - D2 34rdquo - A2 34rdquo - B2 34rdquo - C2 34rdquo - D2 34rdquo - A2 34rdquo - B
9deg
Ru
ler
2 34rdquo - D
Strip Set 4
2 34rdquo - A2 34rdquo - B2 34rdquo - C2 34rdquo - D2 34rdquo - A2 34rdquo - B2 34rdquo - C
9deg
Ru
ler
Image 2
Image 1a
Image 1b
Image 1c
Image 1dHINT Save your scraps for the bonus projects like these
HINT I chained pieced the four sections at the same time by carefully keeping track of units I used a highlighter and marked off each set as I sewed it on and I didnrsquot cut my strings between the units so they would stay in order
bottom of the strip set
Cutting the Wedges1 Before cutting place loops of wide transparent tape on the back of the Wedge Ruler to
help keep it in place while cutting2 Place the 9deg or 10deg Wedge Ruler on the strip set so the narrow end of the wedge is at the
top of the strip set3 Set the 12rdquo line on the 4th or middle seam of the strip set4 Cut 9 wedges if using the 10deg wedge ruler or 10 wedges if using the 9deg wedge ruler from
Speedy Spiral Christmas Tree Skirtndash4ndash
each strip set Keep them pinned together in sets Label these wedge cut sets
Constructing the CircleYou will begin by sewing four quarter-circle units
1 For 9˚ ruler - Sew four quarter-circle units using ten wedges Unit 1 1-2-3-4-1-2-3-4-1-2Unit 2 3-4-1-2-3-4-1-2-3-4Unit 3 1-2-3-4-1-2-3-4-1-2Unit 4 3-4-1-2-3-4-1-2-3-4
For 10˚ ruler ndash Sew four quarter-circle units using nine wedgesUnit 1 1-2-3-4-1-2-3-4-1Unit 2 2-3-4-1-2-3-4-1-2Unit 3 3-4-1-2-3-4-1-2-3Unit 4 4-1-2-3-4-1-2-3-4
Since you ironed the seams in opposite directions the wedges will fit together nicely2 Iron each unit being careful not to stretch it3 Using 12rdquo Square Ruler check to see that each unit is square Adjust as necessary
(Image 3)
4 Sew the four units together leaving one side open to slip around your tree
Ruffle1 Sew the ruffle strips together to form one long strip2 Fold this strip in half lengthwise (with wrong sides together) and iron3 Gather the ruffle along the raw edge 4 Pin the ruffle to the right side of the tree skirt with the ruffle facing towards the center of
the circle matching the raw edges Adjust the ruffle fullness so that it will ruffle evenly (Image 4)
5 Sew the ruffle to the tree skirt Press seam
Layering the Quilt1 Layer the batting and backing under the tree skirt with the ruffle lying toward the center of
the tree skirt Trim the backing and batting to the edge of the Tree Skirt (Image 5)2 Now layer the batting Tree Skirt (right-side up) and the backing (right-side down) in this
order (Image 6)
Image 3
Image 4
Image 5
Image 6
Speedy Spiral Christmas Tree Skirtndash5ndash
3 Pin along the Tree Skirt edge and around the center circle4 Sew along the outside edge the inner circle and one side Leave one side open for turning
(Image 7)
Image 7
Image 8
Image 9
Image 10
5 Cut batting and backing along the opening and inner circle (Image 8 amp 9)
6 Turn the Tree Skirt to the outside7 Hand stitch the opening closed or topstitch around the entire tree skirt inside circle
outside circle and the two sides (Image 10)8 Smooth the Tree skirt on a flat surface and pin the layers together with 1 safety pins to
prepare for quilting
Speedy Spiral Christmas Tree Skirtndash6ndash
Quilting1 Set up machine for quilting
For quilting with metallics put the thread on the vertical spool pin and use Sulky 60 wt PolyLite in the bobbin in a color that matches the backing fabric
Top Stitch Needle size 1490Reduce tension slightlyUse Sewerrsquos Aid or Tri-Flo
Method I - Machine FeedAttach a Walking Foot if availableSet machine for normal straight stitch (12 stitches per inch)
Method II - Free Motion feedingAttach a Darning Foot and reduce foot pressureSet machine for zero widthCover or lower feed dogs
2 To emphasize a swirling design quilt from connecting corner to corner of squares of the same color (Image 11)
3 For even more pizazz add a straight stitch starburst design in some blocks4 Enjoy your Tree Skirt You did a great job
Image 11