special 20th anniversary edition
DESCRIPTION
Drapery & Design PROFESSIONAL is a bimonthly trade publication specifically for those who sell, design or create custom window treatments, upholstery, slipcovers and related services. Published by Custom Home Furnishings Academy.TRANSCRIPT

Drapery & Design Professional Special 20th-Anniversary Edition 1
Drapery & Design PROFESSIONALSpecial 20th-Anniversary Edition
Ser ving the Custom Home Fur nishings Industr y s ince 1993
Drapery & Design Professional - 2013 Anniversary Issue Orion, Tiffany Wardzinski - (818) 752-0688 x108
ORION ORNAMENTAL IRON, INC.
[email protected] | www.ironartbyorion.com | 877.476.6278
Quality and Elegance Shipped Faster
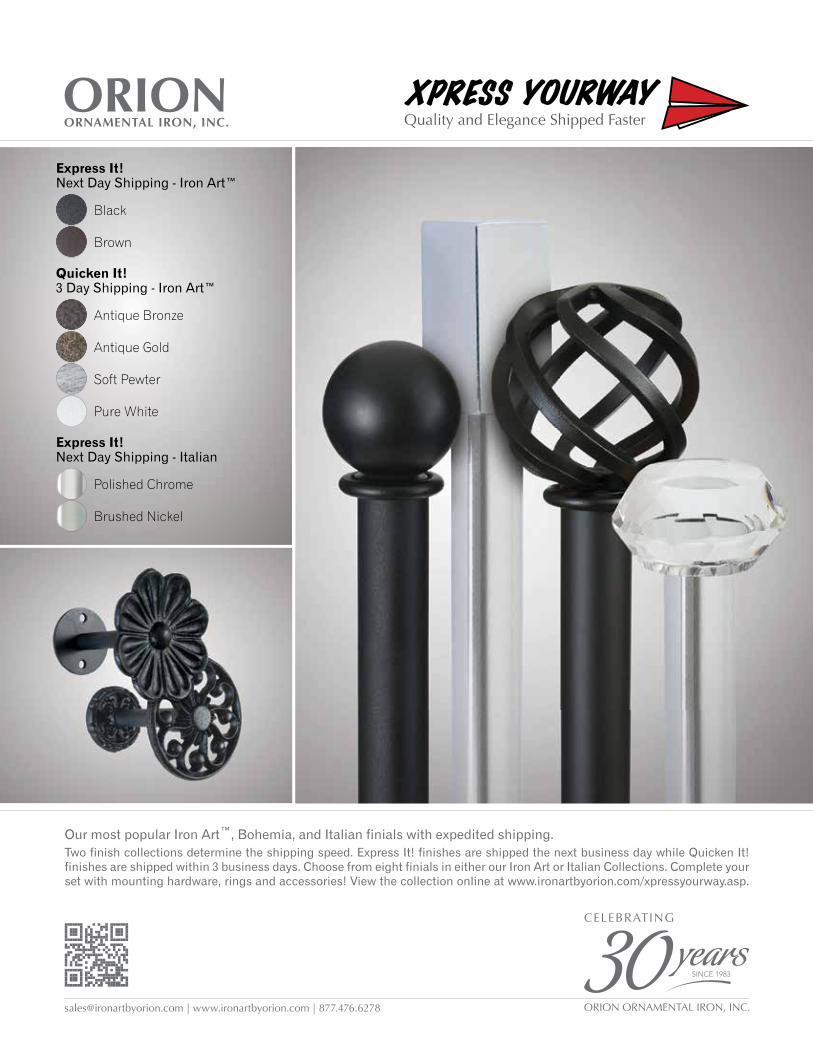
Our most popular Iron Art™, Bohemia, and Italian finials with expedited shipping.Two finish collections determine the shipping speed. Express It! finishes are shipped the next business day while Quicken It! finishes are shipped within 3 business days. Choose from eight finials in either our Iron Art or Italian Collections. Complete your set with mounting hardware, rings and accessories! View the collection online at www.ironartbyorion.com/xpressyourway.asp.
Express It!Next Day Shipping - Italian
Express It!Next Day Shipping - Iron Art™
Black
Brown
Quicken It!3 Day Shipping - Iron Art™
Antique Bronze
Antique Gold
Soft Pewter
Pure White
Polished Chrome
Brushed Nickel

Drapery & Design Professional Special 20th-Anniversary Edition 3
We’re celebrating our 20th anniversary and I’m delighted to share this special edition with you. Included in this issue are some of my favorite past articles representing the drapery and uphol-
stery workroom, professional installer, and decorator. It’s a true example of the type of information you’ll find in each issue throughout the year. What makes our magazine unique is that the articles are submitted by our readers, industry leaders, home decorating professionals, business owners and creative-minded people like you!
Be sure to see the article from Terri Booser, executive director of Custom Home Furnishings Academy to learn more about our history and how Cheryl Strickland, the founder of the school and magazine, influenced so many people like Terri and me with a legacy of education and sharing.
Drapery & Design Professional is more than a trade magazine: It’s a culture of sharing and support, continued education and growth. In-cluded in the subscription price is the CHFA Forum, which boasts thou-sands of users and a searchable database, and our monthly webinars, which allow you to take a live, interactive class with our CHFA in-
structors … without leaving home!
If you’d like to submit an article proposal or advertise in Drapery & Design Professional, I would love to hear from you. Please call 704-889-4636 or email [email protected].
With Warmest Regards,
Message From the Editor-in-Chief
Welcome to DRAPERY & DESIGN PROFESSIONAL
Susan WoodcockEditor-in-Chief and Network Manager
DRAPERY & DESIGN PROFESSIONAL

4 Drapery & Design Professional Special 20th-Anniversary Edition
Troubleshooting Checklist for
Sewing Machines
Cammie Berger has owned Cammie Berger Interiors in Charlotte, NC, since 2001. She prides herself in pro-viding fine quality drapery craftsmanship to the Interi-or Design industry. Her goal is to exceed the client’s ex-pectations with meticulous detail and the highest level of customer service possi-ble. Cammie is a member of the WCAA as well as the Greater Charlotte Workroom Association, where she served as president for two years.
Inspired at the
CHF Academy
Drapery & Design PROFESSIONAL MagazineA publication of the Custom Home Furnishings Academy
Table of Contents
Living With Leather
Learn ShareProsper
Beth Hodges is the owner of Soft Furnishings, a retail/wholesale workroom located in Elberton, GA. In business for more than twenty years, Soft Furnishings provides wholesale workroom services to higher end designers both locally and around the country. Beth is a popular presenter of seminars and classes covering workroom construction and installation to customer service and communication.
8 17 20 22Share
From the Bookshelf
Ann K. Johnson has owned her home-based wholesale/retail workroom since 1992. She is the author of two books on drawing swag patterns: The Professional Workroom Handbook of Swags, Volumes 1 & 2. Ann is a specialty instructor at the CHF Academy, and a representative for Evan Marsh Designs, creators of creators of dreamDraper and Quick Quote.
Kristine Gregory is principal of Bedeckers Interior Effects Inc. Kristine is an Allied Member of American Society of Interior Designers, past president of the Richmond Chapter of WCAA and a WFCP Specialist. She is the only designer in the Richmond area who is an expert on both the psychology of color and personal organization. Visit her website at www.bedeckers.com.
Drapery & Design Professional Special 20th-Anniversary Edition 5
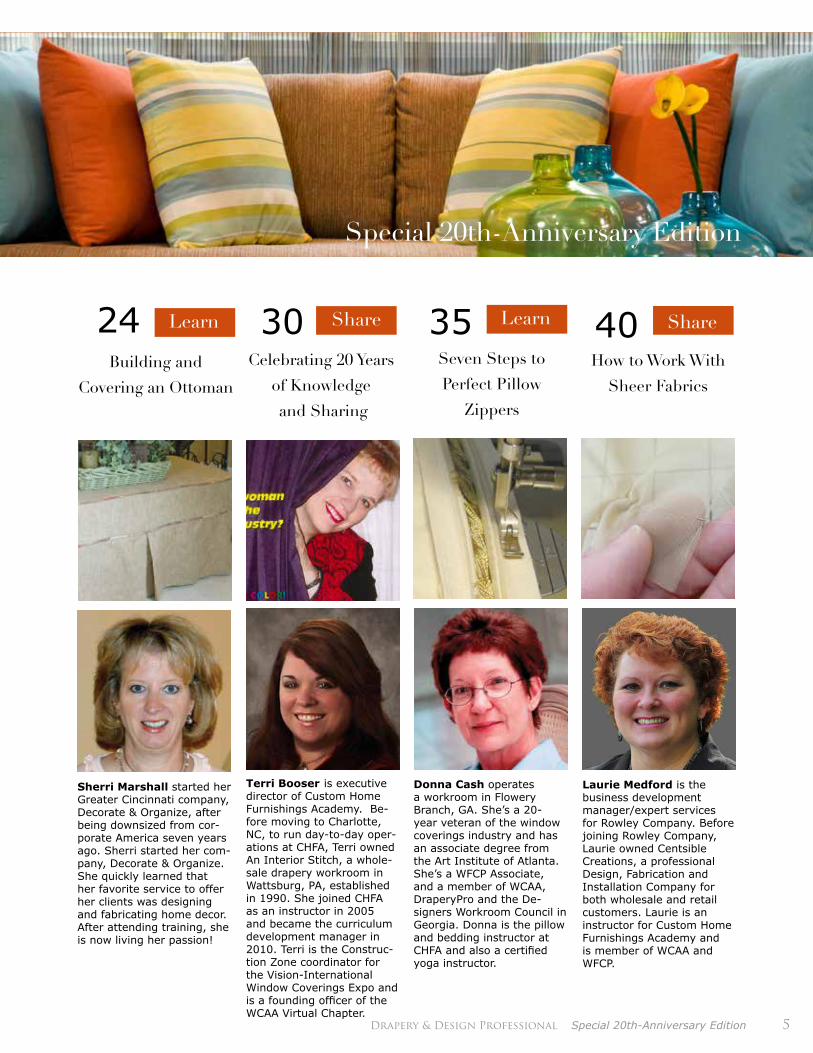
Building and
Covering an Ottoman
Learn
Seven Steps to
Perfect Pillow
Zippers
Learn
Special 20th-Anniversary Edition
24 30 35Share
Celebrating 20 Years
of Knowledge
and Sharing
Terri Booser is executive director of Custom Home Furnishings Academy. Be-fore moving to Charlotte, NC, to run day-to-day oper-ations at CHFA, Terri owned An Interior Stitch, a whole-sale drapery workroom in Wattsburg, PA, established in 1990. She joined CHFA as an instructor in 2005 and became the curriculum development manager in 2010. Terri is the Construc-tion Zone coordinator for the Vision-International Window Coverings Expo and is a founding officer of the WCAA Virtual Chapter.
Sherri Marshall started her Greater Cincinnati company, Decorate & Organize, after being downsized from cor-porate America seven years ago. Sherri started her com-pany, Decorate & Organize. She quickly learned that her favorite service to offer her clients was designing and fabricating home decor. After attending training, she is now living her passion!
Donna Cash operates a workroom in Flowery Branch, GA. She’s a 20-year veteran of the window coverings industry and has an associate degree from the Art Institute of Atlanta. She’s a WFCP Associate, and a member of WCAA, DraperyPro and the De- signers Workroom Council in Georgia. Donna is the pillow and bedding instructor at CHFA and also a certified yoga instructor.
Laurie Medford is the business development manager/expert services for Rowley Company. Before joining Rowley Company, Laurie owned Centsible Creations, a professional Design, Fabrication and Installation Company for both wholesale and retail customers. Laurie is an instructor for Custom Home Furnishings Academy and is member of WCAA and WFCP.
How to Work With
Sheer Fabrics
Share40
6 Drapery & Design Professional Special 20th-Anniversary Edition
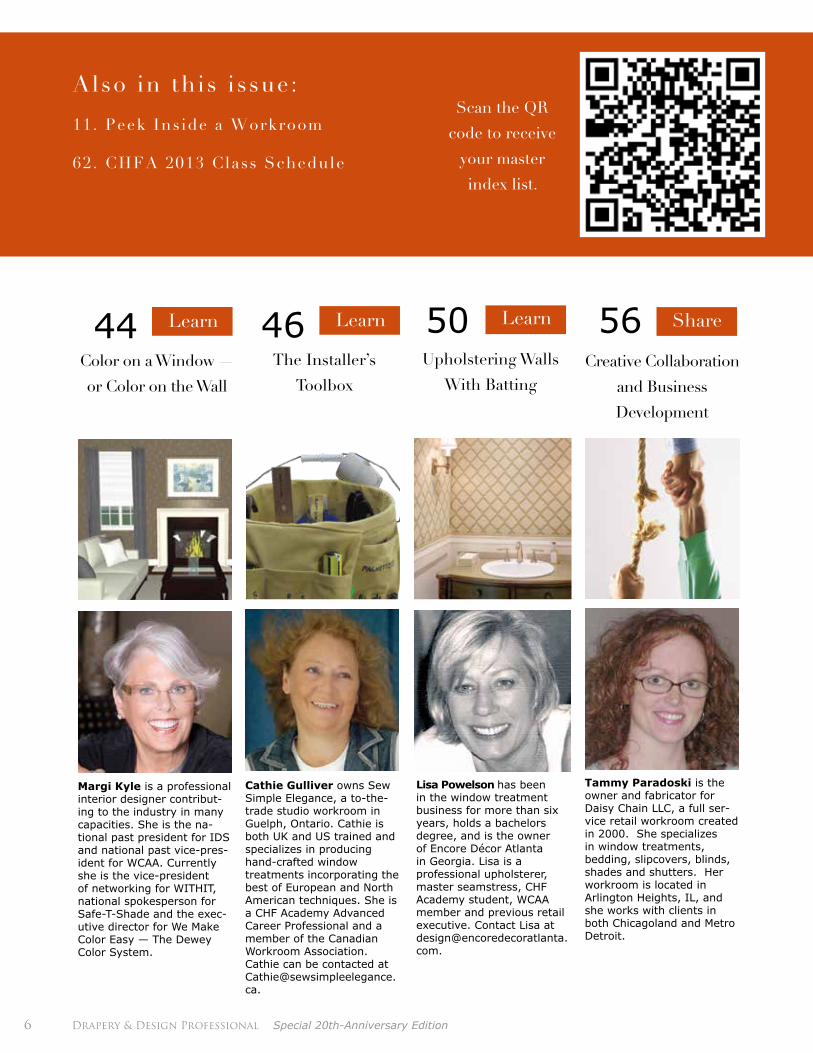
Also in this issue:
11. Peek Inside a Workroom
62. CHFA 2013 Class Schedule
Scan the QR
code to receive
your master
index list.
LearnLearn Share
Creative Collaboration
and Business
Development
The Installer’s
ToolboxColor on a Window —
or Color on the Wall
4644 50Upholstering Walls
With Batting
Lisa Powelson has been in the window treatment business for more than six years, holds a bachelors degree, and is the owner of Encore Décor Atlanta in Georgia. Lisa is a professional upholsterer, master seamstress, CHF Academy student, WCAA member and previous retail executive. Contact Lisa at [email protected].
Learn 56
Cathie Gulliver owns Sew Simple Elegance, a to-the-trade studio workroom in Guelph, Ontario. Cathie is both UK and US trained and specializes in producing hand-crafted window treatments incorporating the best of European and North American techniques. She is a CHF Academy Advanced Career Professional and a member of the Canadian Workroom Association. Cathie can be contacted at [email protected].
Margi Kyle is a professional interior designer contribut-ing to the industry in many capacities. She is the na-tional past president for IDS and national past vice-pres-ident for WCAA. Currently she is the vice-president of networking for WITHIT, national spokesperson for Safe-T-Shade and the exec-utive director for We Make Color Easy — The Dewey Color System.
Tammy Paradoski is the owner and fabricator for Daisy Chain LLC, a full ser-vice retail workroom created in 2000. She specializes in window treatments, bedding, slipcovers, blinds, shades and shutters. Her workroom is located in Arlington Heights, IL, and she works with clients in both Chicagoland and Metro Detroit.
Share Share
Dressing the Pentagonal Windows
How I Added 17
Days to My Year
Drapery & Design
PROFESSIONALa publication of the
Custom Home Furnishings Academy
Drapery & Design PROFESSIONAL is a bimonthly trade publication specifically for those who sell, design or create custom window treatments, upholstery, slipcovers and related services. Contributions from readers are wel-comed. We look for articles that teach new techniques, inspire readers to tackle new projects, and inform readers
of current trends in fabrication and design.
To request submission guidelines or a media kit email [email protected]
CHF Academy13900-F South Lakes Dr.
Charlotte, NC 28273704-333-4636 phone
704-333-4639 fax
Magazine Advisory Board
Judy Peters, Karen Barnes, Liz Hawkes, Susan Scholl, Greg Mohr, Chrystal Younger
Executive DirectorTerri Booser
Editor-in-ChiefNetwork Manager
Susan [email protected]
Graphic DesignSteven Nance Graphic Design
Copy EditorJo Moore
58 64
Vitalia (Vita) Vygovska is the award-winning owner of Vitalia Inc. Fine Window Treatments & Interiors, an author, a window treatment designer, and a business coach to the design trade. Her company is devoted to giving design professionals productivity resources that help them make more money, save time, and run a productive and profitable business.
Penny Bruce is the ownerof Denton Drapes, whichspecializes in handmadecurtains using traditionalmethods, serving both tradeand retail customers. Her workroom has been inMilton Keynes, UK, since1997. A member of theAssociation of MasterUpholsterers and SoftFurnishers, Penny’s workcan be seen at www.dentondrapes.co.uk
8 Drapery & Design Professional Special 20th-Anniversary Edition
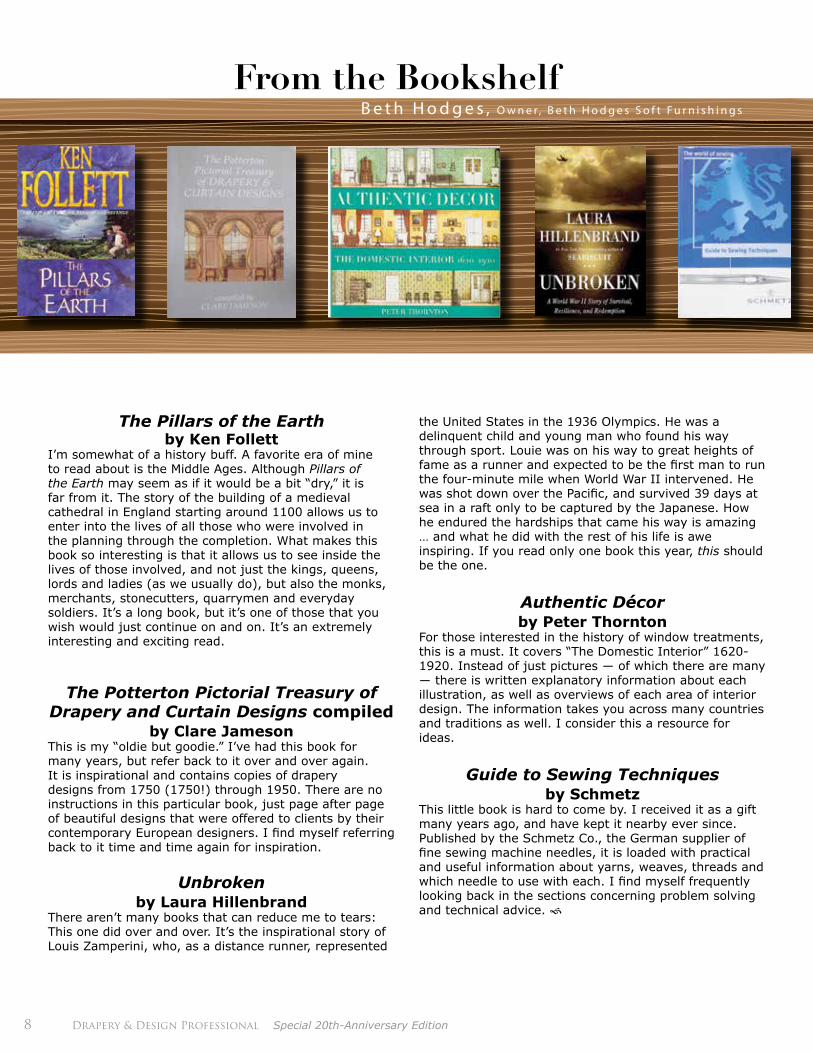
From the Bookshelf B e t h H o d g e s , O w n e r , B e t h H o d g e s S o f t F u r n i s h i n g s
The Pillars of the Earth by Ken Follett
I’m somewhat of a history buff. A favorite era of mine to read about is the Middle Ages. Although Pillars of the Earth may seem as if it would be a bit “dry,” it is far from it. The story of the building of a medieval cathedral in England starting around 1100 allows us to enter into the lives of all those who were involved in the planning through the completion. What makes this book so interesting is that it allows us to see inside the lives of those involved, and not just the kings, queens, lords and ladies (as we usually do), but also the monks, merchants, stonecutters, quarrymen and everyday soldiers. It’s a long book, but it’s one of those that you wish would just continue on and on. It’s an extremely interesting and exciting read.
The Potterton Pictorial Treasury of Drapery and Curtain Designs compiled
by Clare JamesonThis is my “oldie but goodie.” I’ve had this book for many years, but refer back to it over and over again. It is inspirational and contains copies of drapery designs from 1750 (1750!) through 1950. There are no instructions in this particular book, just page after page of beautiful designs that were offered to clients by their contemporary European designers. I find myself referring back to it time and time again for inspiration.
Unbroken by Laura Hillenbrand
There aren’t many books that can reduce me to tears: This one did over and over. It’s the inspirational story of Louis Zamperini, who, as a distance runner, represented
the United States in the 1936 Olympics. He was a delinquent child and young man who found his way through sport. Louie was on his way to great heights of fame as a runner and expected to be the first man to run the four-minute mile when World War II intervened. He was shot down over the Pacific, and survived 39 days at sea in a raft only to be captured by the Japanese. How he endured the hardships that came his way is amazing … and what he did with the rest of his life is awe inspiring. If you read only one book this year, this should be the one.
Authentic Décor by Peter Thornton
For those interested in the history of window treatments, this is a must. It covers “The Domestic Interior” 1620-1920. Instead of just pictures ― of which there are many ― there is written explanatory information about each illustration, as well as overviews of each area of interior design. The information takes you across many countries and traditions as well. I consider this a resource for ideas.
Guide to Sewing Techniques by Schmetz
This little book is hard to come by. I received it as a gift many years ago, and have kept it nearby ever since. Published by the Schmetz Co., the German supplier of fine sewing machine needles, it is loaded with practical and useful information about yarns, weaves, threads and which needle to use with each. I find myself frequently looking back in the sections concerning problem solving and technical advice.

Drapery & Design Professional Special 20th-Anniversary Edition 9

10 Drapery & Design Professional Special 20th-Anniversary Edition
Drapery & Design Professional Special 20th-Anniversary Edition 11
1. Describe your business.
Seams-at-Home LLC was started in 1993 as a retail drapery workroom based out of my home. We are now a full-service workroom focusing primarily on oppor-tunities with interior designers and occasionally work with retail customers by referral.
When it comes to window coverings, Seams-at-Home does it all. We measure, consult on the use of fabrics and design, fabricate and install. Our customers get personal attention. Their projects are our projects. This means we do what it takes to get their job right.
Seams-at-Home offers Kasmir, Maxwell and J.F. Fab-rics, along with an extended collection of hardware. Our company has been a Hunter Douglas Priority Dealer for several years. We also carry Fashion Tech Woven Woods and Wood blinds. Pillow forms are al-ways in stock, but we will also custom order if needed.
2. How did you get started?
I have an associate degree in commercial art and en-joy being involved in creative endeavors. As it turns out, sewing was the perfect way to exercise my artis-tic talent, and it’s somewhat of a family tradition. My grandmother was a sewer for a mattress company, and my mother was a fearless home sewer. My moth-er was the one who introduced me to sewing at an early age.
After we moved to Minnesota, I naturally made all the window treatments for our new home. That quickly turned into sewing for my neighbors, then the neigh-borhood, and finally a full-fledged home business. Five years ago I moved Seams-at-Home to a commercial location. Just two years ago we had grown so much that we moved again to our current showroom loca-tion. When I first started, everything I learned about window treatments was self-taught. After I joined the Custom Home Furnishings Drapery Forum, I started going to conferences and trade shows. Taking part in these learning opportunities was the key to making my business and sewing more professional.
3. Tell me about your workroom.
We are now in a 2,300-square-foot workroom with five worktables that can be moved and put together
Peek Inside a Workroom
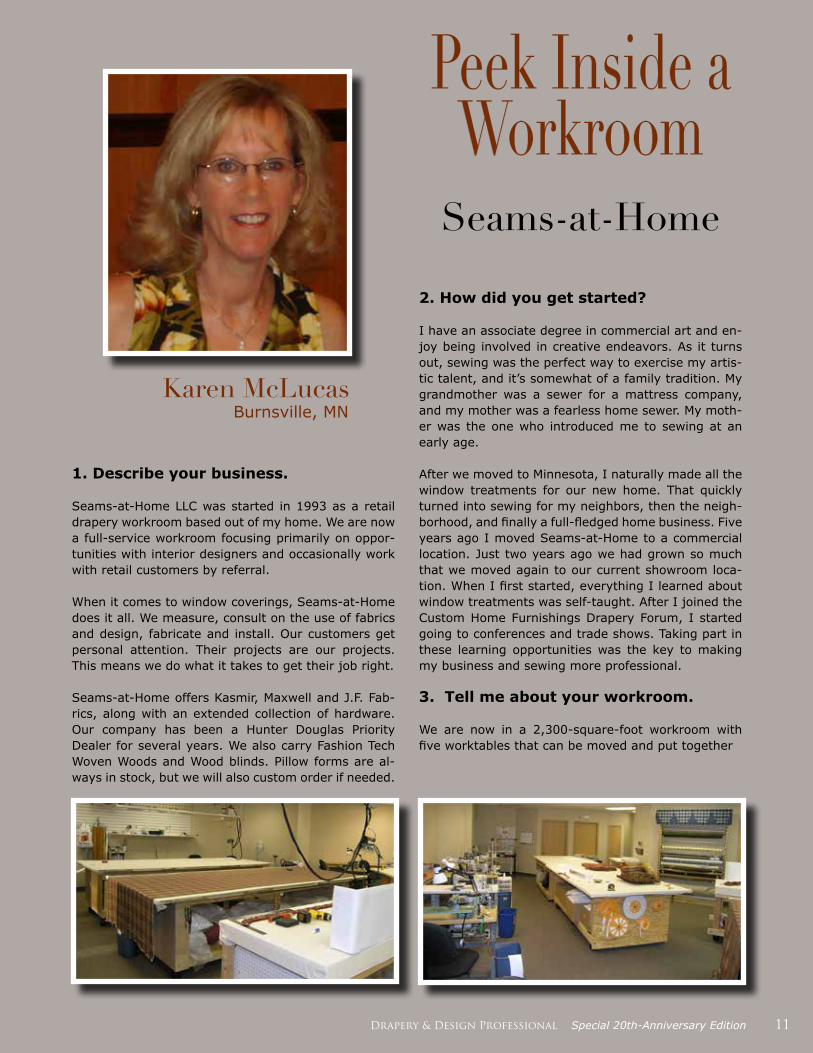
Karen McLucasBurnsville, MN
Seams-at-Home
Drapery & Design Professional Special 20th-Anniversary Edition 11
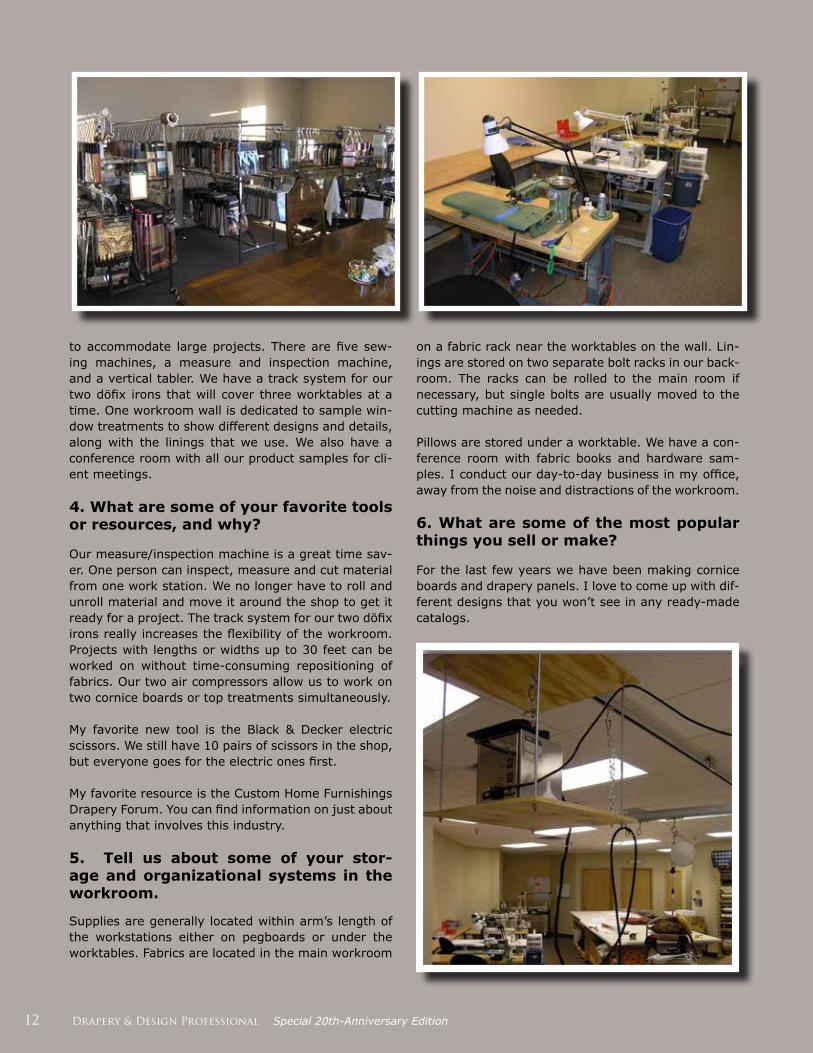
to accommodate large projects. There are five sew-ing machines, a measure and inspection machine, and a vertical tabler. We have a track system for our two döfix irons that will cover three worktables at a time. One workroom wall is dedicated to sample win-dow treatments to show different designs and details, along with the linings that we use. We also have a conference room with all our product samples for cli-ent meetings.
4. What are some of your favorite tools or resources, and why?
Our measure/inspection machine is a great time sav-er. One person can inspect, measure and cut material from one work station. We no longer have to roll and unroll material and move it around the shop to get it ready for a project. The track system for our two döfix irons really increases the flexibility of the workroom. Projects with lengths or widths up to 30 feet can be worked on without time-consuming repositioning of fabrics. Our two air compressors allow us to work on two cornice boards or top treatments simultaneously.
My favorite new tool is the Black & Decker electric scissors. We still have 10 pairs of scissors in the shop, but everyone goes for the electric ones first.
My favorite resource is the Custom Home Furnishings Drapery Forum. You can find information on just about anything that involves this industry.
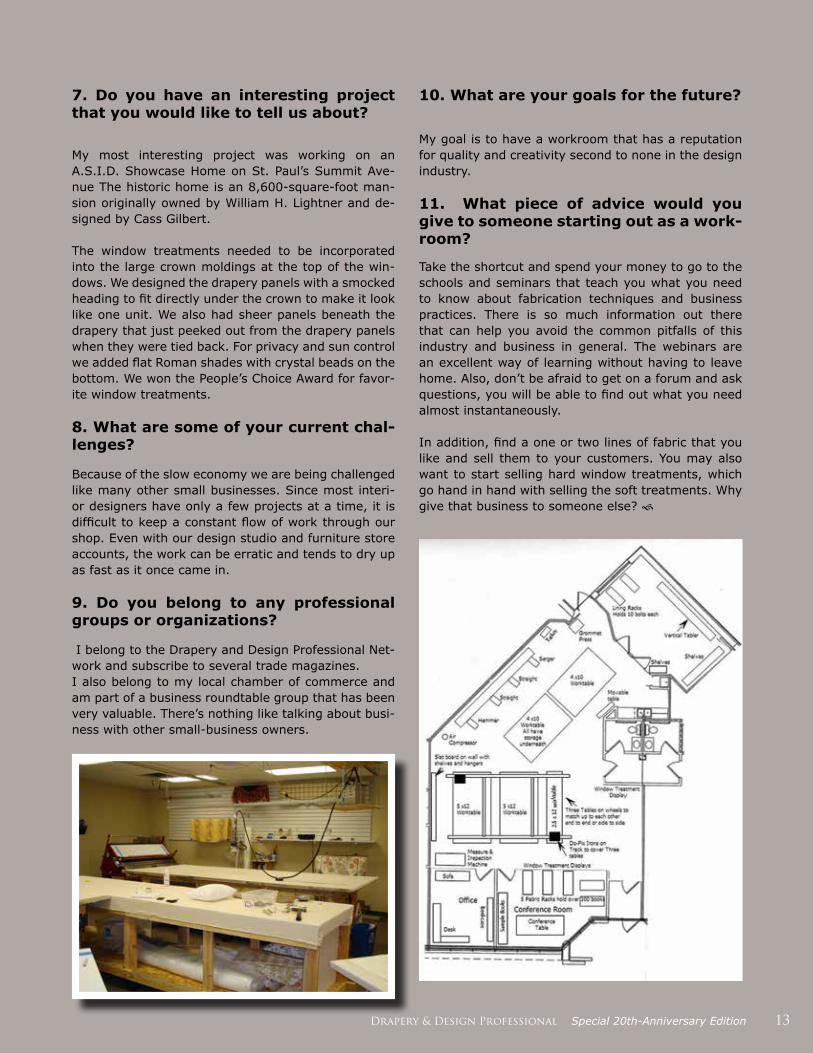
5. Tell us about some of your stor-age and organizational systems in the workroom.
Supplies are generally located within arm’s length of the workstations either on pegboards or under the worktables. Fabrics are located in the main workroom
on a fabric rack near the worktables on the wall. Lin-ings are stored on two separate bolt racks in our back-room. The racks can be rolled to the main room if necessary, but single bolts are usually moved to the cutting machine as needed.
Pillows are stored under a worktable. We have a con-ference room with fabric books and hardware sam-ples. I conduct our day-to-day business in my office, away from the noise and distractions of the workroom.
6. What are some of the most popular things you sell or make?
For the last few years we have been making cornice boards and drapery panels. I love to come up with dif-ferent designs that you won’t see in any ready-made catalogs.
12 Drapery & Design Professional Special 20th-Anniversary Edition
10. What are your goals for the future?
My goal is to have a workroom that has a reputation for quality and creativity second to none in the design industry.
11. What piece of advice would you give to someone starting out as a work-room?
Take the shortcut and spend your money to go to the schools and seminars that teach you what you need to know about fabrication techniques and business practices. There is so much information out there that can help you avoid the common pitfalls of this industry and business in general. The webinars are an excellent way of learning without having to leave home. Also, don’t be afraid to get on a forum and ask questions, you will be able to find out what you need almost instantaneously.
In addition, find a one or two lines of fabric that you like and sell them to your customers. You may also want to start selling hard window treatments, which go hand in hand with selling the soft treatments. Why give that business to someone else?
7. Do you have an interesting project that you would like to tell us about?
My most interesting project was working on an A.S.I.D. Showcase Home on St. Paul’s Summit Ave-nue The historic home is an 8,600-square-foot man-sion originally owned by William H. Lightner and de-signed by Cass Gilbert.
The window treatments needed to be incorporated into the large crown moldings at the top of the win-dows. We designed the drapery panels with a smocked heading to fit directly under the crown to make it look like one unit. We also had sheer panels beneath the drapery that just peeked out from the drapery panels when they were tied back. For privacy and sun control we added flat Roman shades with crystal beads on the bottom. We won the People’s Choice Award for favor-ite window treatments.
8. What are some of your current chal-lenges?
Because of the slow economy we are being challenged like many other small businesses. Since most interi-or designers have only a few projects at a time, it is difficult to keep a constant flow of work through our shop. Even with our design studio and furniture store accounts, the work can be erratic and tends to dry up as fast as it once came in.
9. Do you belong to any professional groups or organizations?
I belong to the Drapery and Design Professional Net-work and subscribe to several trade magazines.I also belong to my local chamber of commerce and am part of a business roundtable group that has been very valuable. There’s nothing like talking about busi-ness with other small-business owners.
Drapery & Design Professional Special 20th-Anniversary Edition 13
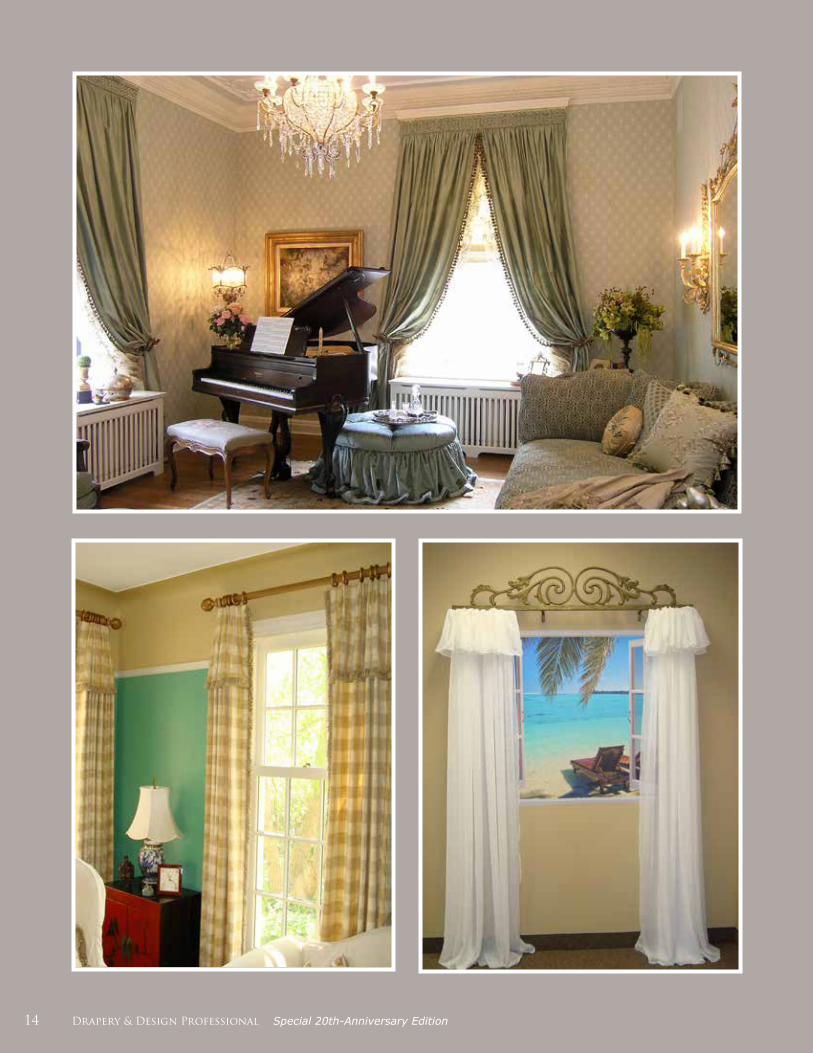
14 Drapery & Design Professional Special 20th-Anniversary Edition14 Drapery & Design Professional Special 20th-Anniversary Edition
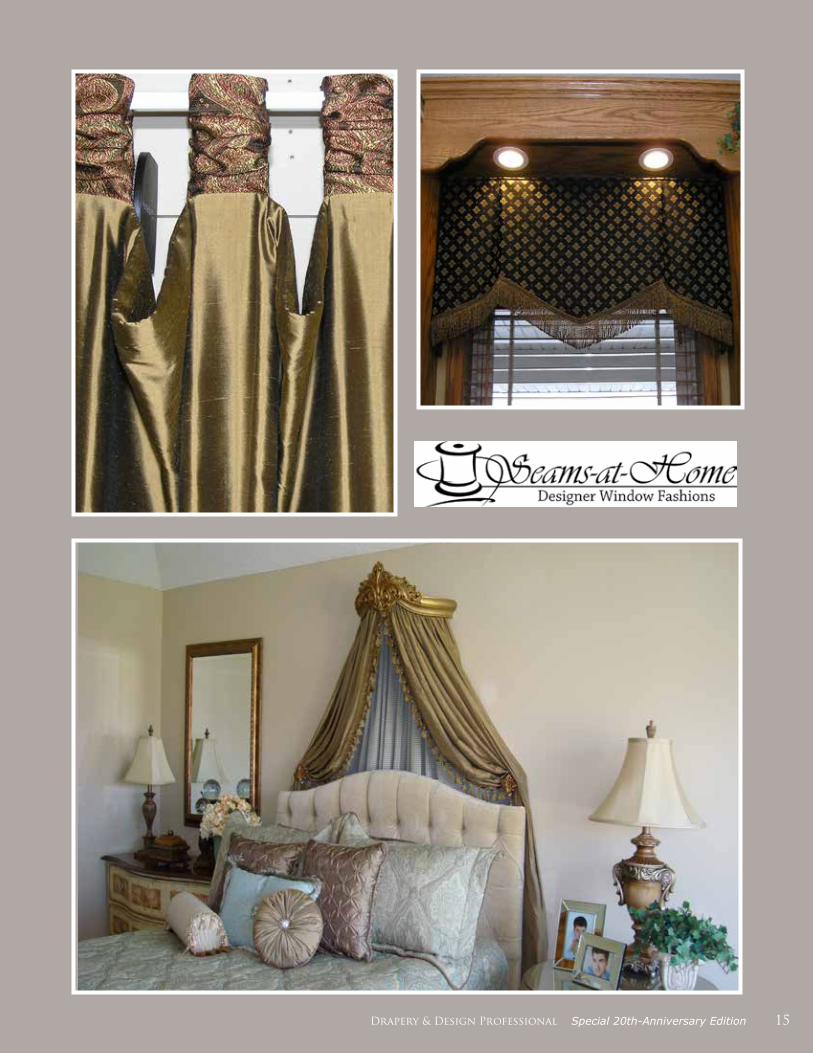
Drapery & Design Professional Special 20th-Anniversary Edition 15Drapery & Design Professional Special 20th-Anniversary Edition 15

16 Drapery & Design Professional Special 20th-Anniversary Edition
Drapery & Design Professional Special 20th-Anniversary Edition 17
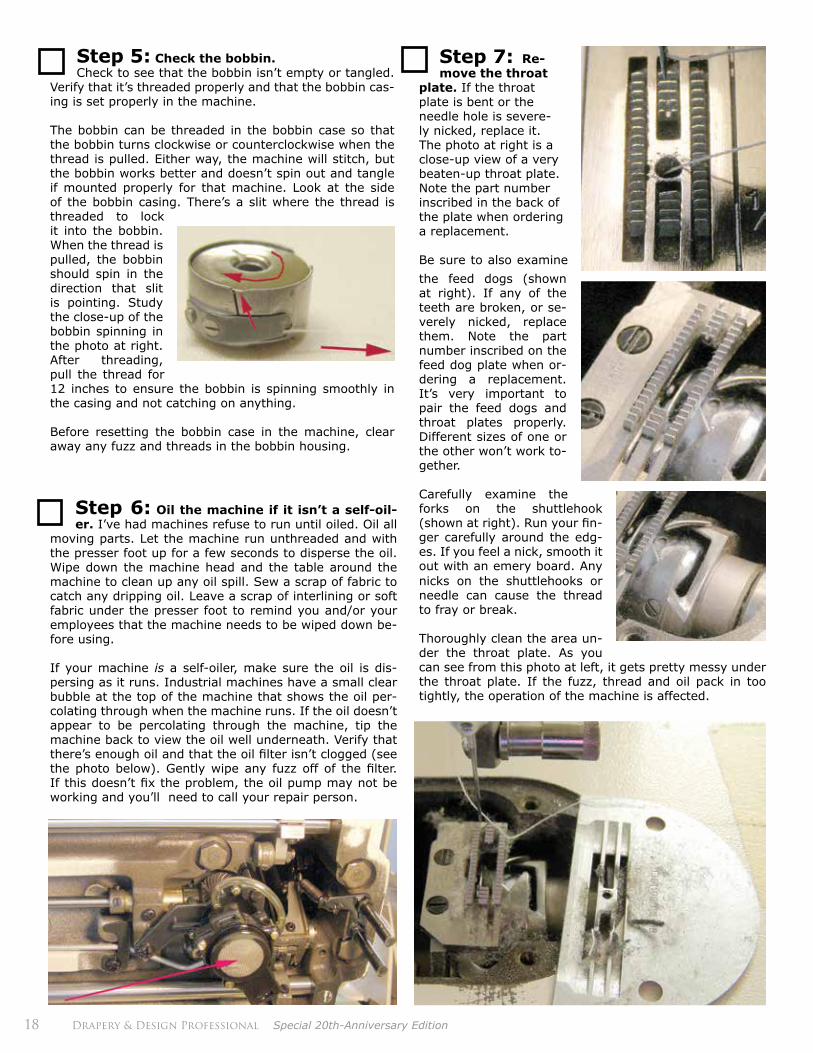
Step 3: Clean all of the
tension disks. Fuzz and dirt build up between the disks, pushing them apart and preventing them from exerting pres-sure on the thread as it passes through. (See the photo at right.)
Don’t forget the ten-sion disk that feeds your bobbin winder. If it fills with gunk, your bobbin won’t be wound with the correct tension.
Did you know that tension disks collect gunk quicker with monofilament thread than with standard polyester and cotton threads? Polyester and cotton threads are fuzzy and they grab and clean fuzz as they pass through the tension disks. Monofilament thread is slick and it doesn’t grab and carry fuzz out of the disks.
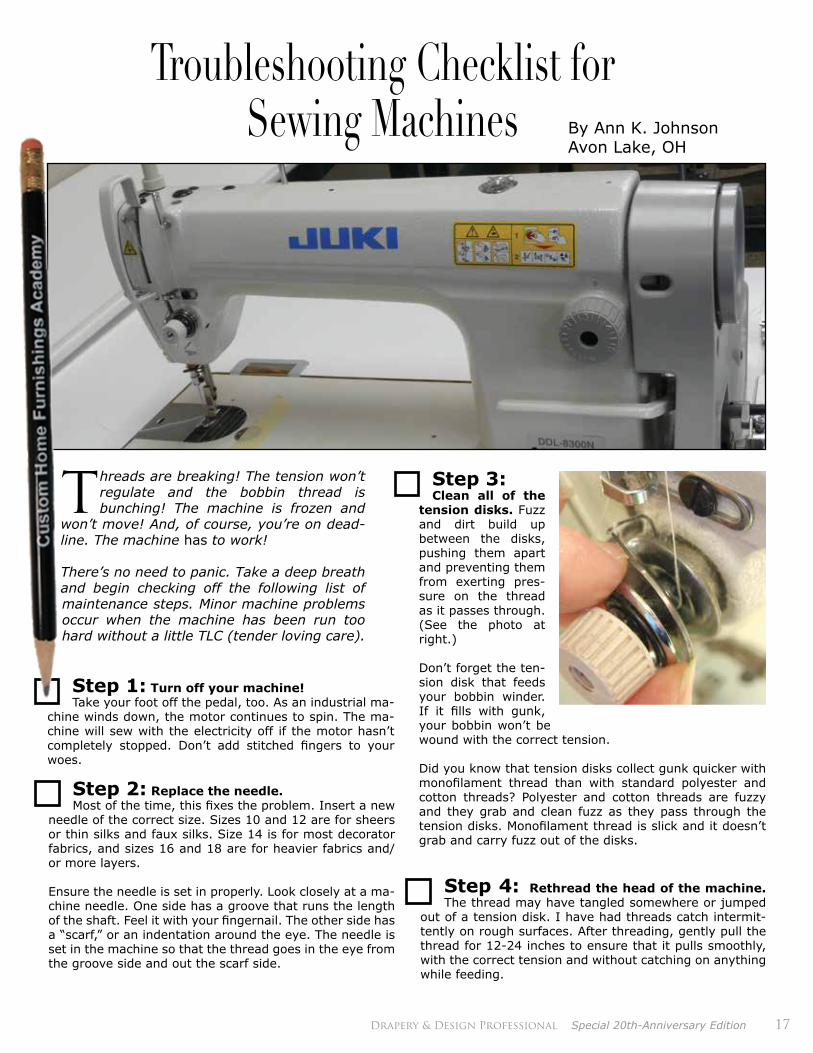
Troubleshooting Checklist for Sewing Machines
Step 1: Turn off your machine! Take your foot off the pedal, too. As an industrial ma-
chine winds down, the motor continues to spin. The ma-chine will sew with the electricity off if the motor hasn’t completely stopped. Don’t add stitched fingers to your woes.
Step 2: Replace the needle. Most of the time, this fixes the problem. Insert a new
needle of the correct size. Sizes 10 and 12 are for sheers or thin silks and faux silks. Size 14 is for most decorator fabrics, and sizes 16 and 18 are for heavier fabrics and/or more layers.
Ensure the needle is set in properly. Look closely at a ma-chine needle. One side has a groove that runs the length of the shaft. Feel it with your fingernail. The other side has a “scarf,” or an indentation around the eye. The needle is set in the machine so that the thread goes in the eye from the groove side and out the scarf side.
Step 4: Rethread the head of the machine. The thread may have tangled somewhere or jumped
out of a tension disk. I have had threads catch intermit-tently on rough surfaces. After threading, gently pull the thread for 12-24 inches to ensure that it pulls smoothly, with the correct tension and without catching on anything while feeding.
Threads are breaking! The tension won’t regulate and the bobbin thread is bunching! The machine is frozen and
won’t move! And, of course, you’re on dead-line. The machine has to work!
There’s no need to panic. Take a deep breath and begin checking off the following list of maintenance steps. Minor machine problems occur when the machine has been run too hard without a little TLC (tender loving care).
By Ann K. JohnsonAvon Lake, OH
18 Drapery & Design Professional Special 20th-Anniversary Edition
nicks on the shuttlehooks or needle can cause the thread to fray or break.
Thoroughly clean the area un-der the throat plate. As you can see from this photo at left, it gets pretty messy under the throat plate. If the fuzz, thread and oil pack in too tightly, the operation of the machine is affected.
Step 5: Check the bobbin. Check to see that the bobbin isn’t empty or tangled.
Verify that it’s threaded properly and that the bobbin cas-ing is set properly in the machine.
The bobbin can be threaded in the bobbin case so that the bobbin turns clockwise or counterclockwise when the thread is pulled. Either way, the machine will stitch, but the bobbin works better and doesn’t spin out and tangle if mounted properly for that machine. Look at the side of the bobbin casing. There’s a slit where the thread is threaded to lock it into the bobbin. When the thread is pulled, the bobbin should spin in the direction that slit is pointing. Study the close-up of the bobbin spinning in the photo at right. After threading, pull the thread for 12 inches to ensure the bobbin is spinning smoothly in the casing and not catching on anything.
Before resetting the bobbin case in the machine, clear away any fuzz and threads in the bobbin housing.
Step 6: Oil the machine if it isn’t a self-oil-er. I’ve had machines refuse to run until oiled. Oil all
moving parts. Let the machine run unthreaded and with the presser foot up for a few seconds to disperse the oil. Wipe down the machine head and the table around the machine to clean up any oil spill. Sew a scrap of fabric to catch any dripping oil. Leave a scrap of interlining or soft fabric under the presser foot to remind you and/or your employees that the machine needs to be wiped down be-fore using.
If your machine is a self-oiler, make sure the oil is dis-persing as it runs. Industrial machines have a small clear bubble at the top of the machine that shows the oil per-colating through when the machine runs. If the oil doesn’t appear to be percolating through the machine, tip the machine back to view the oil well underneath. Verify that there’s enough oil and that the oil filter isn’t clogged (see the photo below). Gently wipe any fuzz off of the filter. If this doesn’t fix the problem, the oil pump may not be working and you’ll need to call your repair person.
Step 7: Re-move the throat
plate. If the throat plate is bent or the needle hole is severe-ly nicked, replace it. The photo at right is a close-up view of a very beaten-up throat plate. Note the part number inscribed in the back of the plate when ordering a replacement.
Be sure to also examine the feed dogs (shown at right). If any of the teeth are broken, or se-verely nicked, replace them. Note the part number inscribed on the feed dog plate when or-dering a replacement. It’s very important to pair the feed dogs and throat plates properly. Different sizes of one or the other won’t work to-gether.
Carefully examine the forks on the shuttlehook (shown at right). Run your fin-ger carefully around the edg-es. If you feel a nick, smooth it out with an emery board. Any
Drapery & Design Professional Special 20th-Anniversary Edition 19
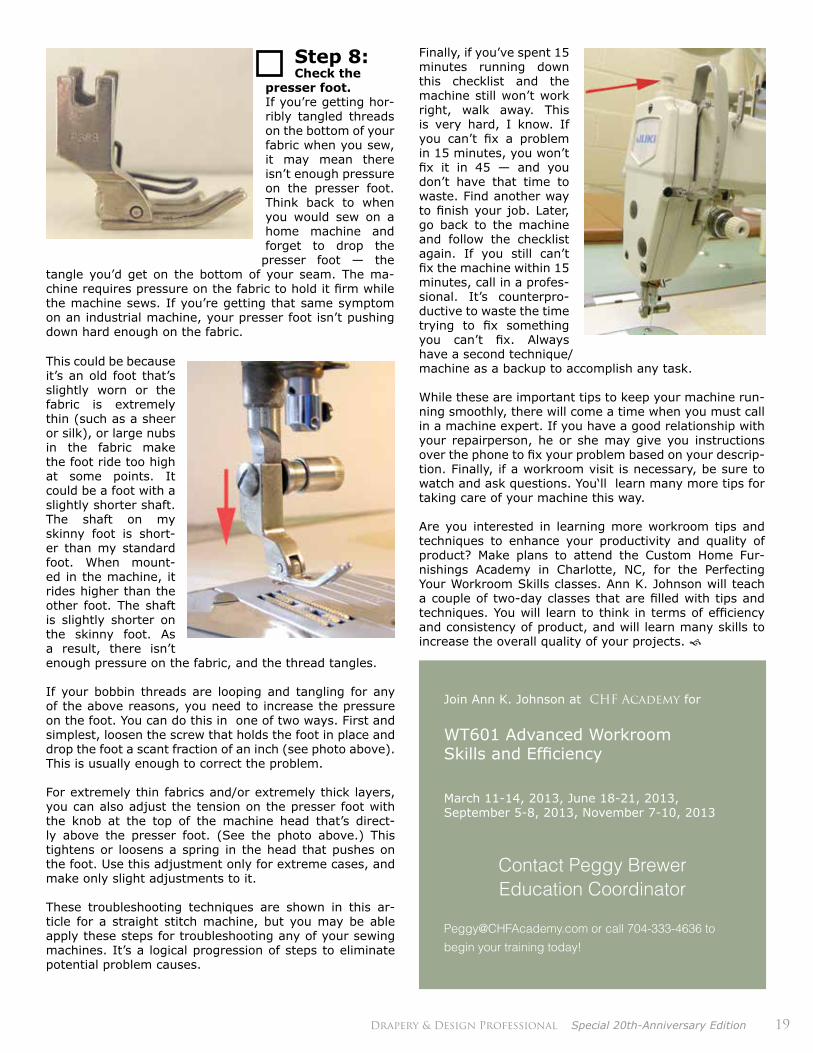
Step 8: Check the
presser foot. If you’re getting hor-ribly tangled threads on the bottom of your fabric when you sew, it may mean there isn’t enough pressure on the presser foot. Think back to when you would sew on a home machine and forget to drop the presser foot — the
tangle you’d get on the bottom of your seam. The ma-chine requires pressure on the fabric to hold it firm while the machine sews. If you’re getting that same symptom on an industrial machine, your presser foot isn’t pushing down hard enough on the fabric.
This could be because it’s an old foot that’s slightly worn or the fabric is extremely thin (such as a sheer or silk), or large nubs in the fabric make the foot ride too high at some points. It could be a foot with a slightly shorter shaft. The shaft on my skinny foot is short-er than my standard foot. When mount-ed in the machine, it rides higher than the other foot. The shaft is slightly shorter on the skinny foot. As a result, there isn’t enough pressure on the fabric, and the thread tangles.
If your bobbin threads are looping and tangling for any of the above reasons, you need to increase the pressure on the foot. You can do this in one of two ways. First and simplest, loosen the screw that holds the foot in place and drop the foot a scant fraction of an inch (see photo above). This is usually enough to correct the problem.
For extremely thin fabrics and/or extremely thick layers, you can also adjust the tension on the presser foot with the knob at the top of the machine head that’s direct-ly above the presser foot. (See the photo above.) This tightens or loosens a spring in the head that pushes on the foot. Use this adjustment only for extreme cases, and make only slight adjustments to it.
These troubleshooting techniques are shown in this ar-ticle for a straight stitch machine, but you may be able apply these steps for troubleshooting any of your sewing machines. It’s a logical progression of steps to eliminate potential problem causes.
Finally, if you’ve spent 15 minutes running down this checklist and the machine still won’t work right, walk away. This is very hard, I know. If you can’t fix a problem in 15 minutes, you won’t fix it in 45 — and you don’t have that time to waste. Find another way to finish your job. Later, go back to the machine and follow the checklist again. If you still can’t fix the machine within 15 minutes, call in a profes-sional. It’s counterpro-ductive to waste the time trying to fix something you can’t fix. Always have a second technique/machine as a backup to accomplish any task.
While these are important tips to keep your machine run-ning smoothly, there will come a time when you must call in a machine expert. If you have a good relationship with your repairperson, he or she may give you instructions over the phone to fix your problem based on your descrip-tion. Finally, if a workroom visit is necessary, be sure to watch and ask questions. You‘ll learn many more tips for taking care of your machine this way.
Are you interested in learning more workroom tips and techniques to enhance your productivity and quality of product? Make plans to attend the Custom Home Fur-nishings Academy in Charlotte, NC, for the Perfecting Your Workroom Skills classes. Ann K. Johnson will teach a couple of two-day classes that are filled with tips and techniques. You will learn to think in terms of efficiency and consistency of product, and will learn many skills to increase the overall quality of your projects.
Join Ann K. Johnson at CHF Academy for WT601 Advanced Workroom Skills and Efficiency
March 11-14, 2013, June 18-21, 2013, September 5-8, 2013, November 7-10, 2013
Contact Peggy Brewer Education Coordinator
[email protected] or call 704-333-4636 to begin your training today!
20 Drapery & Design Professional Special 20th-Anniversary Edition
A natural product that holds up well for everyday use, leather furniture can be a great investment. There are several things that determine the quality and, therefore, the cost of leather.
Hides are split into two or more layers during processing. Top grain leather comes from the natural top surface or fur side of the hide. It has a dense cell structure and is best for furniture. Bottom layers or split leather, often identified only as real leather or pure leather, are not as strong and are heavily processed with resins and applied texture. Split leather is used for clothing and accessories like purses and wallets.
If top grain leather doesn’t have damage such as brand marks, insect bites, or cuts, it can be sold untreated and is called full grain. Undamaged hides are rarer to acquire and are, as a result, the most expensive. All the markings on full grain leather are natural. Buffed full grain creates suede. Cooler climates in Northern Europe where animals are kept in pens or enclosed pastures produce the finest leather with the fewest imperfections. Fewer than 5 percent of hides on the market are considered premium select, the very top grade. The cost of leather is determined by the origin of the animal and by supply and demand, and not by the location of the tannery. Processed top grain leather is most common and still excellent quality. More cattle roam open ranges all over the world, so their hides are more weathered and have more scarring. To make them attractive for furniture, the imperfections are buffed out and sanded. Aniline dye is used to color the smoothed surface. Color can be applied by spraying on, hand rubbing or immersion. Most quality leathers also receive a clear top coat that encases the leather fibers and offers Scotchgard-like protection. With no protective coating, leather shows wear more quickly. Embossed leather has texture pressed into the surface by a machine. Embossing can offer a more uniform texture or even some unique design effects like pebble, crocodile and ostrich. Leather can be tumbled to soften the hand. Some scarred leathers are left unpro-cessed with the branding and imperfections visible. These work well in rustic or western design applications.
Living With LeatherKristine Gregory
Midlothian, VA
Drapery & Design Professional Special 20th-Anniversary Edition 21
Shopping for LeatherHere are a few things to notice when shopping for leather furniture. Leather seat cushions are upholstered with denim or canvas on the underside to allow the cushion to breathe and to let air escape when you sit down. Since leather is a natural product, small imperfections, even in processed leathers, are to be expected and are not considered defects.
Color and grain patterns will vary from hide to hide as well as on parts of individual hides. Quality furniture makers work hard to match the color of hides on an individual piece of furniture and to position any visible imperfections in inconspic-uous places. If there’s a specific color desired, a color swatch sent to the manufacturer when the order is placed can be used to match the hides they plan to use. In lower end furniture, a coordinating vinyl is often placed on the back and even the sides to cut material costs and to make the piece more affordable. These pieces are called leather match or leather plus. Caring for LeatherKeeping your leather looking great really isn’t complicated. Regular vacuuming and dusting with a dry cloth will keep furniture in good shape. Apply a quality leather conditioner at least once a year — more often if the piece is used daily — to maintain the leather’s suppleness. Leather, like any upholstery fabric, will fade if it’s exposed to direct sunlight. Take precautions by properly covering windows with treatments or solar film. Keep leather at least 2 feet away from heat sources like radiators, fireplaces and wood stoves. Dry heat causes leather to crack. Cigarette and cigar smoke and other air pollutants can cause color changes and fading.
Sharp objects should not be placed on leather furniture; durable does not mean puncture-proof. Cat’s claws are not a friend of leather. Also, use as little water as possible to blot spills. Household cleaners, soaps and soaking with water may ruin leather. For serious spills and stains, seek out a professional leather cleaning specialist. Minor scratches can often be rubbed out with a moist chamois or the oil from your fingers.
Attention to these details will keep leather furniture looking its best and will improve its longevity.
22 Drapery & Design Professional Special 20th-Anniversary Edition
Many months ago, CHFA was gracious enough to let our local workroom group hold a meeting at the Academy. If you haven’t been there in person
to see the “eye candy” on the walls, put it on your bucket list! It’s such a treat just to stroll through the rooms and see the plethora of creative treatments donning the walls!
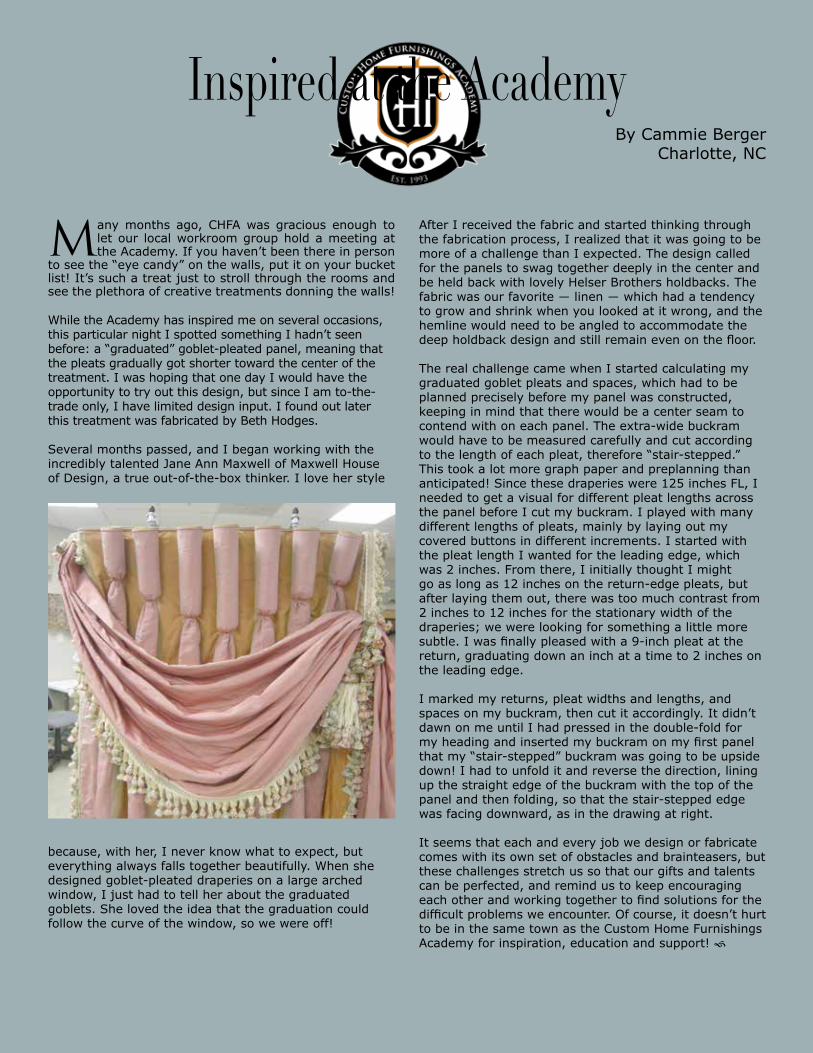
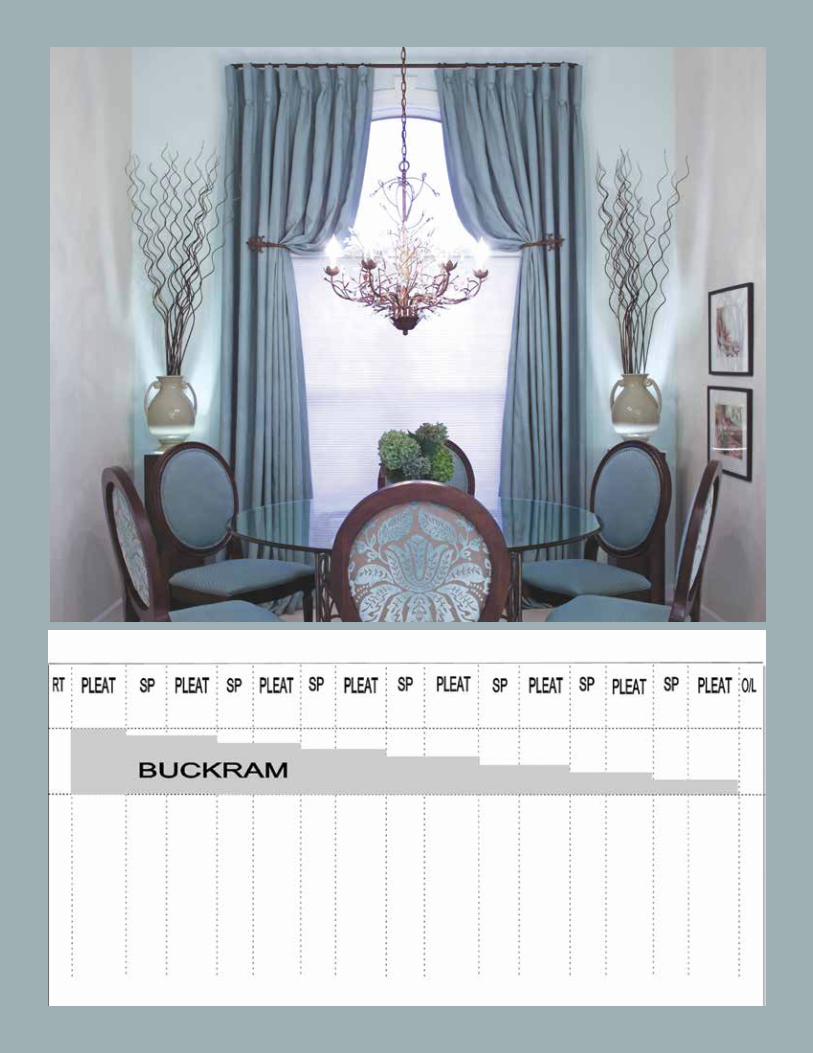
While the Academy has inspired me on several occasions, this particular night I spotted something I hadn’t seen before: a “graduated” goblet-pleated panel, meaning that the pleats gradually got shorter toward the center of the treatment. I was hoping that one day I would have the opportunity to try out this design, but since I am to-the-trade only, I have limited design input. I found out later this treatment was fabricated by Beth Hodges.
Several months passed, and I began working with the incredibly talented Jane Ann Maxwell of Maxwell House of Design, a true out-of-the-box thinker. I love her style
because, with her, I never know what to expect, but everything always falls together beautifully. When she designed goblet-pleated draperies on a large arched window, I just had to tell her about the graduated goblets. She loved the idea that the graduation could follow the curve of the window, so we were off!
After I received the fabric and started thinking through the fabrication process, I realized that it was going to be more of a challenge than I expected. The design called for the panels to swag together deeply in the center and be held back with lovely Helser Brothers holdbacks. The fabric was our favorite ― linen ― which had a tendency to grow and shrink when you looked at it wrong, and the hemline would need to be angled to accommodate the deep holdback design and still remain even on the floor.
The real challenge came when I started calculating my graduated goblet pleats and spaces, which had to be planned precisely before my panel was constructed, keeping in mind that there would be a center seam to contend with on each panel. The extra-wide buckram would have to be measured carefully and cut according to the length of each pleat, therefore “stair-stepped.” This took a lot more graph paper and preplanning than anticipated! Since these draperies were 125 inches FL, I needed to get a visual for different pleat lengths across the panel before I cut my buckram. I played with many different lengths of pleats, mainly by laying out my covered buttons in different increments. I started with the pleat length I wanted for the leading edge, which was 2 inches. From there, I initially thought I might go as long as 12 inches on the return-edge pleats, but after laying them out, there was too much contrast from 2 inches to 12 inches for the stationary width of the draperies; we were looking for something a little more subtle. I was finally pleased with a 9-inch pleat at the return, graduating down an inch at a time to 2 inches on the leading edge.
I marked my returns, pleat widths and lengths, and spaces on my buckram, then cut it accordingly. It didn’t dawn on me until I had pressed in the double-fold for my heading and inserted my buckram on my first panel that my “stair-stepped” buckram was going to be upside down! I had to unfold it and reverse the direction, lining up the straight edge of the buckram with the top of the panel and then folding, so that the stair-stepped edge was facing downward, as in the drawing at right.
It seems that each and every job we design or fabricate comes with its own set of obstacles and brainteasers, but these challenges stretch us so that our gifts and talents can be perfected, and remind us to keep encouraging each other and working together to find solutions for the difficult problems we encounter. Of course, it doesn’t hurt to be in the same town as the Custom Home Furnishings Academy for inspiration, education and support!
Inspired at the AcademyBy Cammie Berger
Charlotte, NC
Drapery & Design Professional Special 20th-Anniversary Edition 23
24 Drapery & Design Professional Special 20th-Anniversary Edition
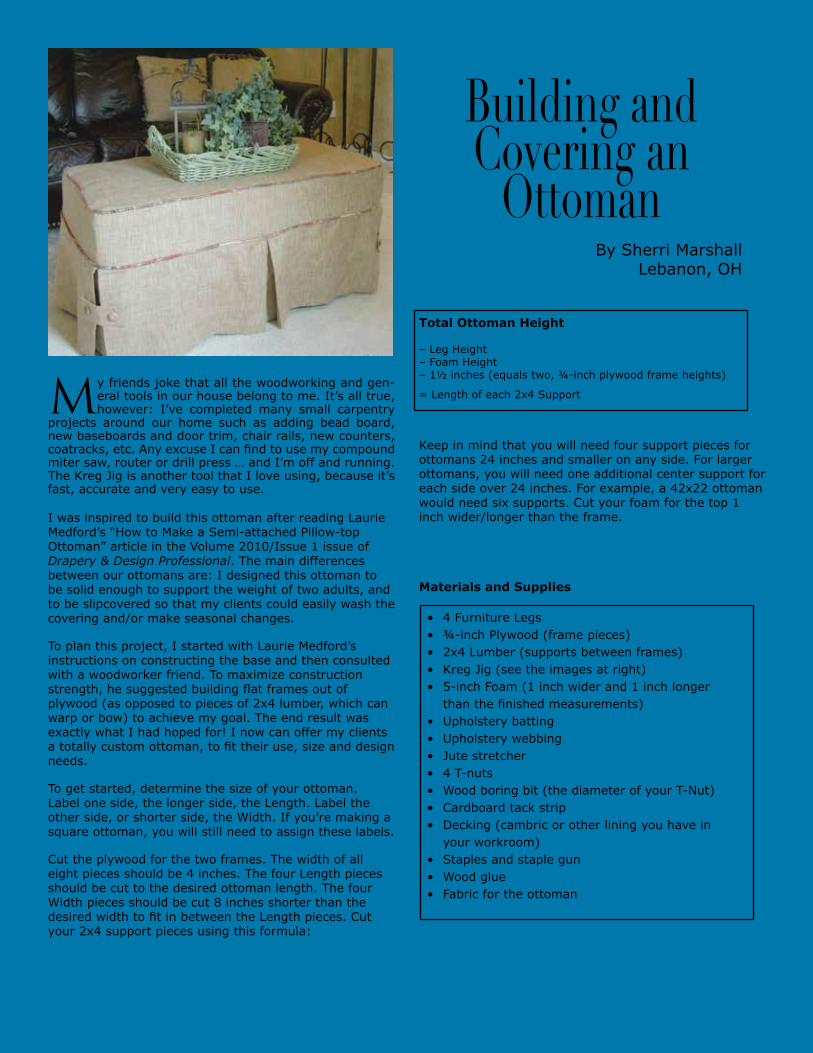
My friends joke that all the woodworking and gen-eral tools in our house belong to me. It’s all true, however: I’ve completed many small carpentry
projects around our home such as adding bead board, new baseboards and door trim, chair rails, new counters, coatracks, etc. Any excuse I can find to use my compound miter saw, router or drill press … and I’m off and running. The Kreg Jig is another tool that I love using, because it’s fast, accurate and very easy to use.
I was inspired to build this ottoman after reading Laurie Medford’s “How to Make a Semi-attached Pillow-top Ottoman” article in the Volume 2010/Issue 1 issue of Drapery & Design Professional. The main differences between our ottomans are: I designed this ottoman to be solid enough to support the weight of two adults, and to be slipcovered so that my clients could easily wash the covering and/or make seasonal changes.
To plan this project, I started with Laurie Medford’s instructions on constructing the base and then consulted with a woodworker friend. To maximize construction strength, he suggested building flat frames out of plywood (as opposed to pieces of 2x4 lumber, which can warp or bow) to achieve my goal. The end result was exactly what I had hoped for! I now can offer my clients a totally custom ottoman, to fit their use, size and design needs.
To get started, determine the size of your ottoman. Label one side, the longer side, the Length. Label the other side, or shorter side, the Width. If you’re making a square ottoman, you will still need to assign these labels.
Cut the plywood for the two frames. The width of all eight pieces should be 4 inches. The four Length pieces should be cut to the desired ottoman length. The four Width pieces should be cut 8 inches shorter than the desired width to fit in between the Length pieces. Cut your 2x4 support pieces using this formula:
Total Ottoman Height
– Leg Height – Foam Height – 1½ inches (equals two, ¾-inch plywood frame heights)
= Length of each 2x4 Support
Keep in mind that you will need four support pieces for ottomans 24 inches and smaller on any side. For larger ottomans, you will need one additional center support for each side over 24 inches. For example, a 42x22 ottoman would need six supports. Cut your foam for the top 1 inch wider/longer than the frame.
Materials and Supplies
• 4 Furniture Legs• ¾-inch Plywood (frame pieces)• 2x4 Lumber (supports between frames)• Kreg Jig (see the images at right)• 5-inch Foam (1 inch wider and 1 inch longer
than the finished measurements)• Upholstery batting • Upholstery webbing• Jute stretcher• 4 T-nuts• Wood boring bit (the diameter of your T-Nut)• Cardboard tack strip• Decking (cambric or other lining you have in
your workroom)• Staples and staple gun• Wood glue• Fabric for the ottoman
Building and Covering an
OttomanBy Sherri Marshall
Lebanon, OH

Drapery & Design Professional Special 20th-Anniversary Edition 25
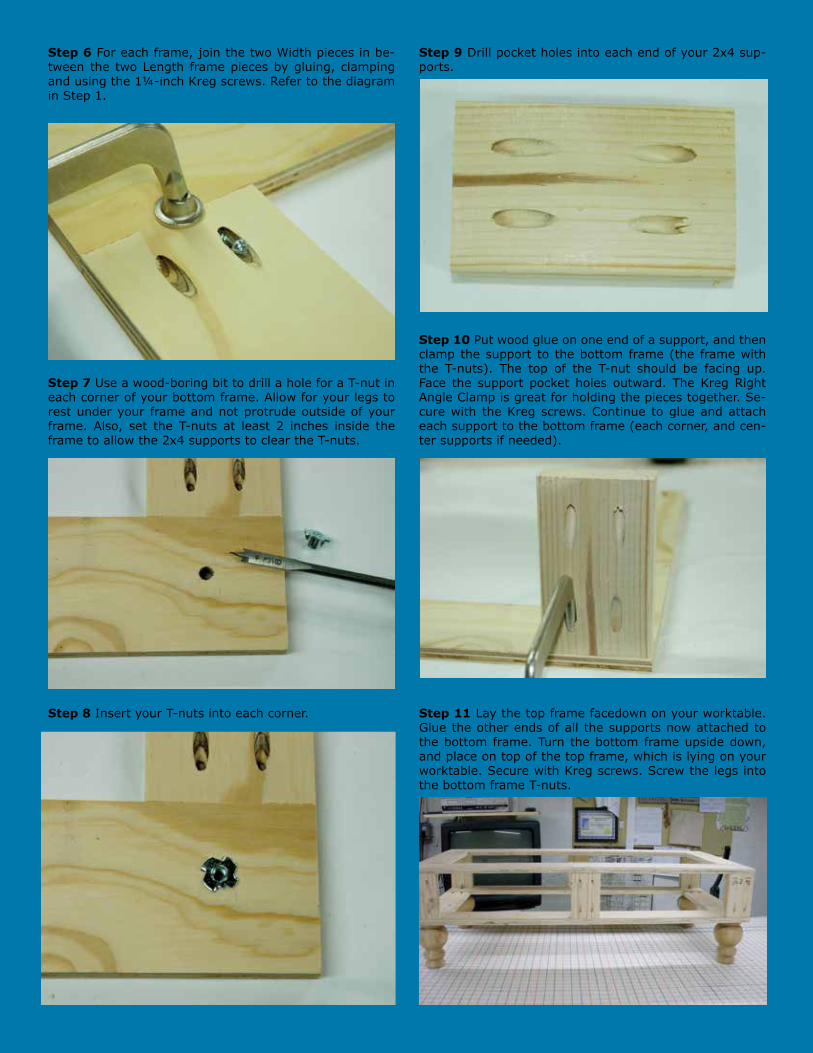
Part I Construction of the OttomanThe Kreg JigA Kreg Jig is a pocket-hole drilling system … made easy! I purchased my Kreg Jig, in the Kreg Pocket Hole Jig Sys-tem, for about $100 at a local box store. The kit I use contained all the parts necessary to make pocket holes. For ease of use, I secured my jig to a board, which I can then clamp to my worktable. You will also need a supply of 1¼-inch coarse-threaded Kreg Screws. The clamps are optional, but I found the Kreg Right Angle Clamp to be very helpful.
Step 1 Begin to build two frames out of the ¾-inch ply-wood. The frame pieces should be laid out as in this dia-gram, with the shorter-width pieces sandwiched between the two longer pieces.
Step 2 Set up your Kreg Jig to the proper drill depth by setting the Drill Guide Adjustment to ¾ inch.
Step 3 Set the drill bit collar to the proper adjustment of ¾ inch.
Step 4 Clamp one of the four Width pieces of plywood into the jig. Drill two pocket holes into each end of the Width pieces, on the same side.
Step 5 Do the same for the other three Width pieces.
· Drill Bit With Driver · Bit Driver · Kreg Screws
Kreg Jig ― mounted to board and clamped to table
3/4
3/4
26 Drapery & Design Professional Special 20th-Anniversary Edition
Step 6 For each frame, join the two Width pieces in be-tween the two Length frame pieces by gluing, clamping and using the 1¼-inch Kreg screws. Refer to the diagram in Step 1.
Step 7 Use a wood-boring bit to drill a hole for a T-nut in each corner of your bottom frame. Allow for your legs to rest under your frame and not protrude outside of your frame. Also, set the T-nuts at least 2 inches inside the frame to allow the 2x4 supports to clear the T-nuts.
Step 8 Insert your T-nuts into each corner.
Step 9 Drill pocket holes into each end of your 2x4 sup-ports.
Step 10 Put wood glue on one end of a support, and then clamp the support to the bottom frame (the frame with the T-nuts). The top of the T-nut should be facing up. Face the support pocket holes outward. The Kreg Right Angle Clamp is great for holding the pieces together. Se-cure with the Kreg screws. Continue to glue and attach each support to the bottom frame (each corner, and cen-ter supports if needed).
Step 11 Lay the top frame facedown on your worktable. Glue the other ends of all the supports now attached to the bottom frame. Turn the bottom frame upside down, and place on top of the top frame, which is lying on your worktable. Secure with Kreg screws. Screw the legs into the bottom frame T-nuts.
Drapery & Design Professional Special 20th-Anniversary Edition 27
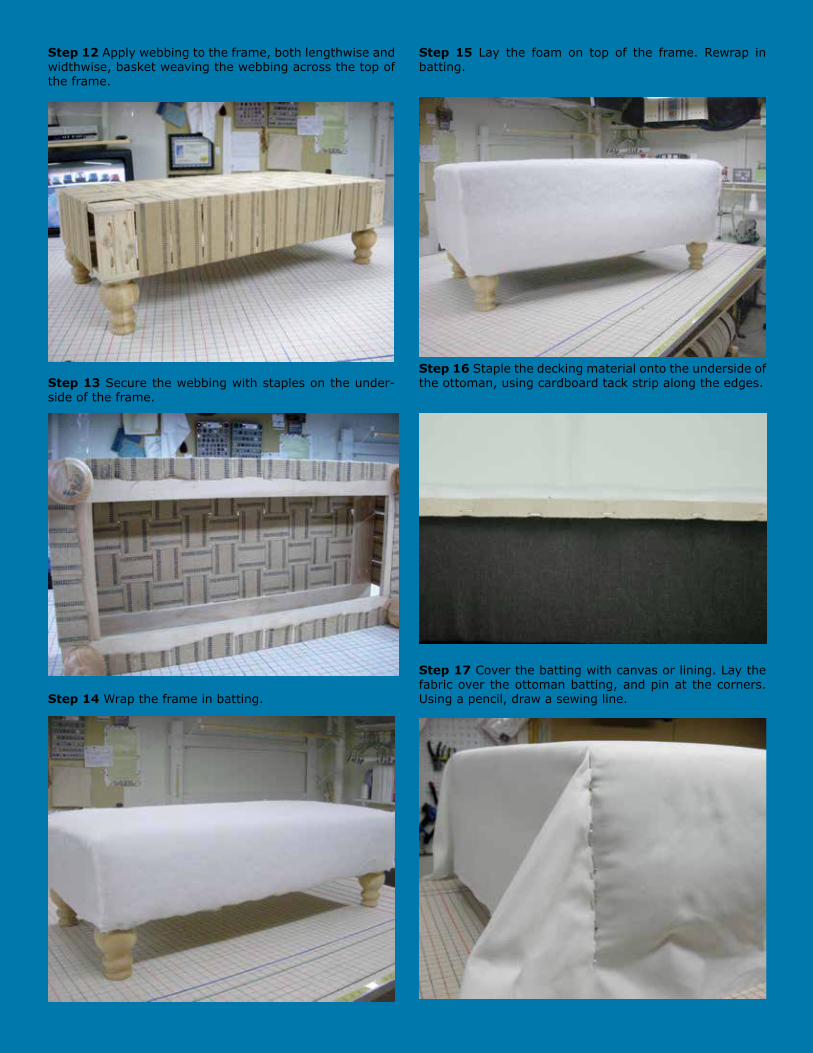
Step 12 Apply webbing to the frame, both lengthwise and widthwise, basket weaving the webbing across the top of the frame.
Step 13 Secure the webbing with staples on the under-side of the frame.
Step 14 Wrap the frame in batting.
Step 15 Lay the foam on top of the frame. Rewrap in batting.
Step 16 Staple the decking material onto the underside of the ottoman, using cardboard tack strip along the edges.
Step 17 Cover the batting with canvas or lining. Lay the fabric over the ottoman batting, and pin at the corners. Using a pencil, draw a sewing line.
28 Drapery & Design Professional Special 20th-Anniversary Edition
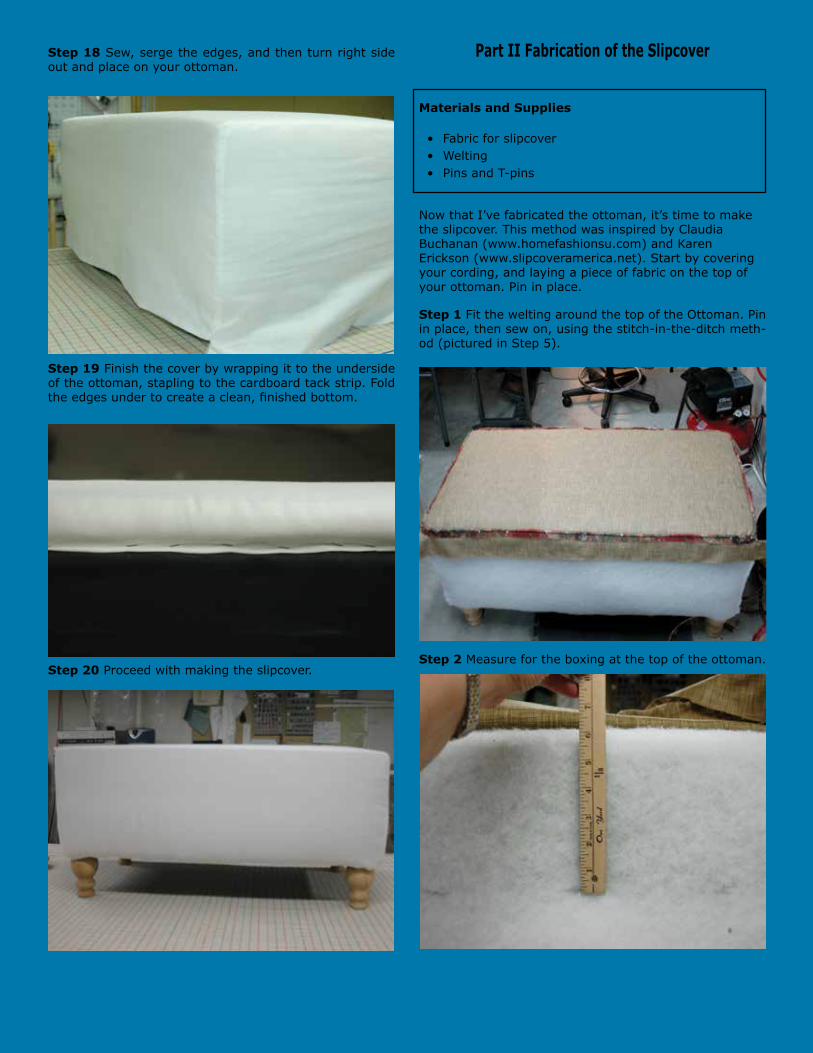
Step 18 Sew, serge the edges, and then turn right side out and place on your ottoman.
Step 19 Finish the cover by wrapping it to the underside of the ottoman, stapling to the cardboard tack strip. Fold the edges under to create a clean, finished bottom.
Step 20 Proceed with making the slipcover.
Part II Fabrication of the Slipcover
Materials and Supplies
• Fabric for slipcover• Welting• Pins and T-pins
Now that I’ve fabricated the ottoman, it’s time to make the slipcover. This method was inspired by Claudia Buchanan (www.homefashionsu.com) and Karen Erickson (www.slipcoveramerica.net). Start by covering your cording, and laying a piece of fabric on the top of your ottoman. Pin in place.
Step 1 Fit the welting around the top of the Ottoman. Pin in place, then sew on, using the stitch-in-the-ditch meth-od (pictured in Step 5).
Step 2 Measure for the boxing at the top of the ottoman.
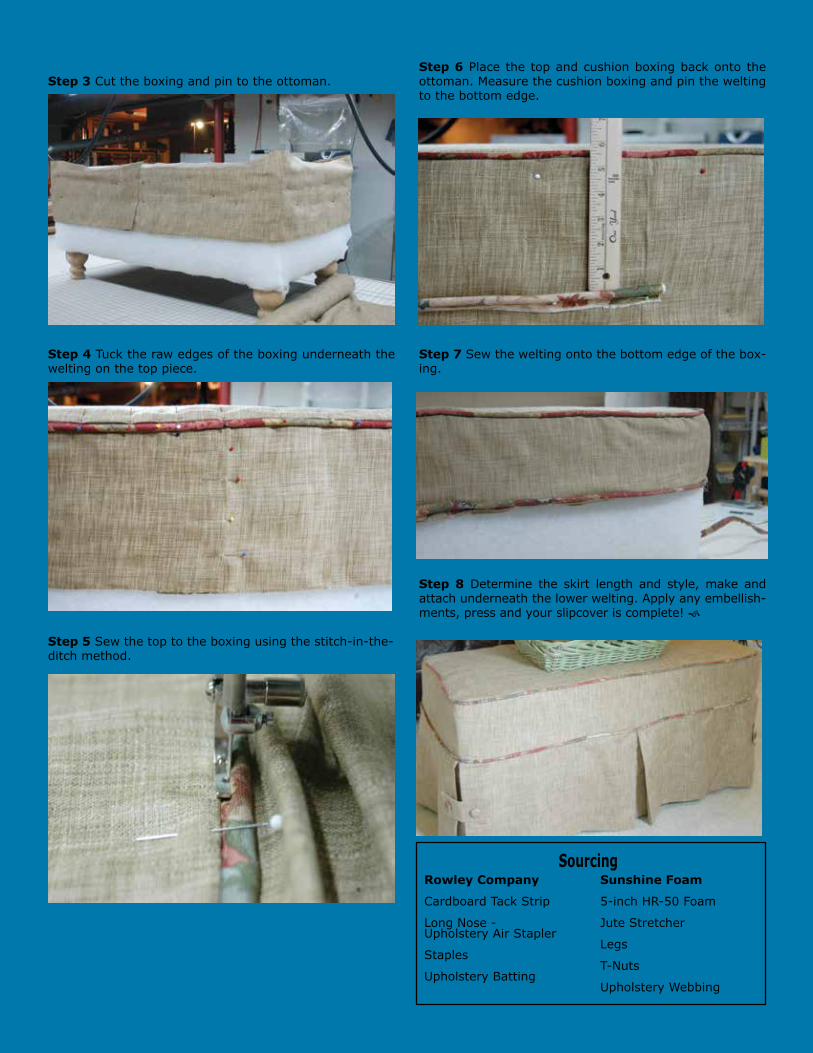
Drapery & Design Professional Special 20th-Anniversary Edition 29
Step 3 Cut the boxing and pin to the ottoman.
Step 4 Tuck the raw edges of the boxing underneath the welting on the top piece.
Step 5 Sew the top to the boxing using the stitch-in-the-ditch method.
Rowley Company
Cardboard Tack Strip
Long Nose - Upholstery Air Stapler
Staples
Upholstery Batting
Sunshine Foam
5-inch HR-50 Foam
Jute Stretcher
Legs
T-Nuts
Upholstery Webbing
Step 6 Place the top and cushion boxing back onto the ottoman. Measure the cushion boxing and pin the welting to the bottom edge.
Step 7 Sew the welting onto the bottom edge of the box-ing.
Step 8 Determine the skirt length and style, make and attach underneath the lower welting. Apply any embellish-ments, press and your slipcover is complete!
Sourcing

30 Drapery & Design Professional Special 20th-Anniversary Edition
Twenty Years! It’s hard to believe that Custom Home Furnishings Academy and Drapery & Design Pro-fessional magazine have been serving the industry for
two decades. It all began when Cheryl Strickland, a talented workroom owner and savvy businesswoman, began a lifelong mission of educating and elevating the professionalism of an isolated and secretive industry. Her first task was to publish the first SewWhat? newsletter. Shortly thereafter she estab-lished the Professional Drapery School and online drapery fo-rum. With hard work and determination, Cheryl fulfilled and exceeded this mission. By 2000, because of expansion and growth, the newsletter, drapery school and online forum were respectively renamed Custom Home Furnishings magazine, Custom Home Furnishings Trade School (CHF) and the CHF Forum.
In 2005 Cheryl sold the school, magazine and forum to Margie and Andy Nance, who moved the business to Charlotte, NC, and renamed the school Custom Home Furnishings Academy. With the new facility, the Nances
continued Cheryl’s vision of education and elevating profes-sionalism in the industry.
Sadly, in 2008 the industry lost Cheryl to cancer, but her legacy continues. She’ll forever be known and respected as an industry expert, educator and leader. In 2008, the magazine was renamed Drapery & Design Professional to honor Cheryl and her mantra, ”I am a Professional!” ― which she insisted every class or conference participant stand and repeat loud and proud!
In 2009, to fulfill the growing needs of the academy and support daily operations and future development, CHF Academy LLC, a separate management company, was formed by the Nances and CHFA instructors Jeanelle Dech and Michele Williams. In 2010 fellow instructors Terri Boos-er and Jill Robson, and former social networking manager Cheri Mulhare joined the team.
CHF Academy continues today as a strong and steadfast
Celebrating 20 Years of Knowledge and Sharing
By Terri Booser, Executive Director,
Custom Home Furnishings Academy
Drapery & Design Professional Special 20th-Anniversary Edition 31
educational facility and support network for workroom and design professionals. Past and present owners, directors and instructors share a powerful dedication to education, as well as an unyielding desire to empower CHF Academy students and every member of the Drapery & Design Professional network.
Addressing you today as the executive director of CHF Academy is surreal. It’s part of an unexpected, yet reward-ing, journey that continues to challenge and surprise me. If someone would have asked me back when I graduated college in 1990 what I’d be doing 23 years later, I certain-ly couldn’t have dreamed of saying I’d be the executive director of the only school of its kind in the world! I’m so honored to be working daily with the most dedicated staff, talented instructors and our students, who are industrious, creative and dedicated to learning.
It doesn’t seem that long ago that I was a timid new busi-ness owner. (Yes, really.) In 1997, I attended my first trade show, International Window Coverings Expo, and found my-self on the massive trade show floor feeling overwhelmed and insignificant. So insignificant in fact, that when I discovered I was standing at the same vendor booth as
Cheryl Strickland and well-known industry professional Kitty Stein, I turned and ran. I was so intimidated to be in their presence. Later I attended a networking dinner where expo instructor Beth Hodges made me feel as if I truly belonged. Had I had the courage to speak to either Cheryl or Kitty, I’m sure they would have also shown me the same friendliness. I was standing in my own way. Now, 16 years later, it’s my goal to help new business owners have the confidence to pursue a career where every day can be rewarding and uplifting. That’s why our motto for this special anniversary year is “Educating and Empowering”!
As executive director of CHF Academy, my goal is to keep the tradition of doing what we do best, by offering core classes in window treatments, upholstery, slipcovers, installation and decorating, while expanding our program offerings to keep our curriculum updated and relevant. I hope you’ll attend a class ―or two! ― to experience the unique magic of CHF Academy. My office door and email will always be open for your questions, comments or concerns.
November/December 2008 1
Custom Home FurnishingsW i n d o w T r e a t m e n t s - D e s i g n - P i l l o w s - S l i p c o v e r s - U p h o l s t e r y - I n s t a l l a t i o n
November/December 2008Volume 3 Number 6
F o r t h e P r o f e s s i o n a l
Plantation Shutters
Drapery Panel Sales Tool
CHF Success Story:Cathie Gulliver
Rosette Banding
1
Drapery & Design PROFESSIONAL
Volume 2009, Issue 3
Meet a D&D PRO: Jacque Hranica
Understanding Pillow Forms
Step-By-Step: Panel with Inverted Pleat Leading Edge
Nail Spacing on a Shaped Cornice
Serving the Custom Home Furnishings Industry since 1993
Best Wishes,Terri Booser
educating And Empowering


Drapery & Design Professional Special 20th-Anniversary Edition 33
Your Future Starts Here!
Franchises now available!Ultrasonic Blind Cleaning franchising is now at your fingertips.
Start your business off with proven, money making ideas. Our staff, owners and managers are here to help you be successful.
The franchise includes: Training on Ultrasonic Blind Cleaning and on site drapery cleaning. Blind Wizard Mobile Cleanings Trailer with state-of-the-art equipment. Customer Call Center support 7 days a week. Technical support 7 days a week. Use of the Blind Wizard website, Logos, and marketing material layouts. Training and advice on starting up and running your own business. And so much more…
From the owner: “We have been cleaning blinds ultrasonically since 1992 and can show you how to get into this virtually untapped market resulting in minimal investment and maximum income. I am extremely proud of everyone in our organization. We have accomplished yet another
milestone by being able to bring the Blind Wizard Franchise offering to the public.” -Steve
Blind Wizard Headquarters 2808 Putnam Ave Hurricane, WV 25526 (304) 397-6733 Office (304) 397-6653 Fax [email protected] www.blindwizard.biz
Start your business off right! Start your business off with a proven brand!
Start your business off with Blind Wizard!
CHF
STUDENT
DISCOUNT
Additional Hard Window Treatment training
available through CHF…

34 Drapery & Design Professional Special 20th-Anniversary Edition
Drapery & Design Professional Special 20th-Anniversary Edition 35
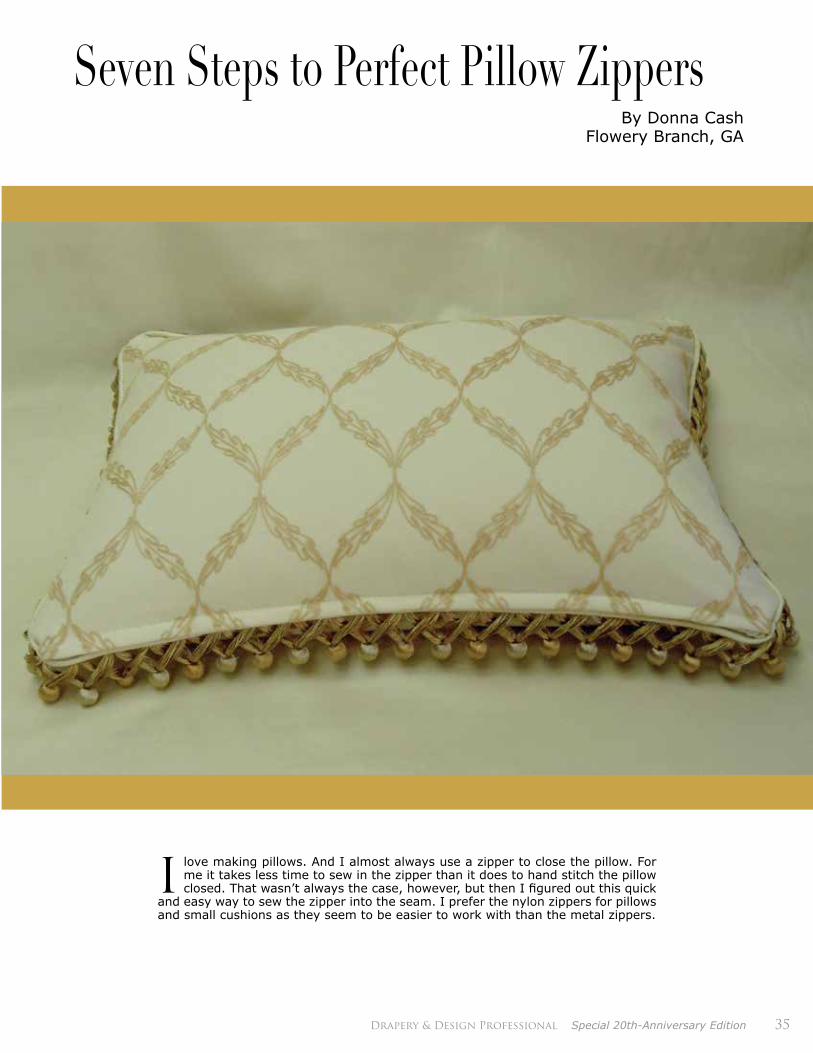
Seven Steps to Perfect Pillow ZippersBy Donna Cash
Flowery Branch, GA
I love making pillows. And I almost always use a zipper to close the pillow. For me it takes less time to sew in the zipper than it does to hand stitch the pillow closed. That wasn’t always the case, however, but then I figured out this quick
and easy way to sew the zipper into the seam. I prefer the nylon zippers for pillows and small cushions as they seem to be easier to work with than the metal zippers.
36 Drapery & Design Professional Special 20th-Anniversary Edition
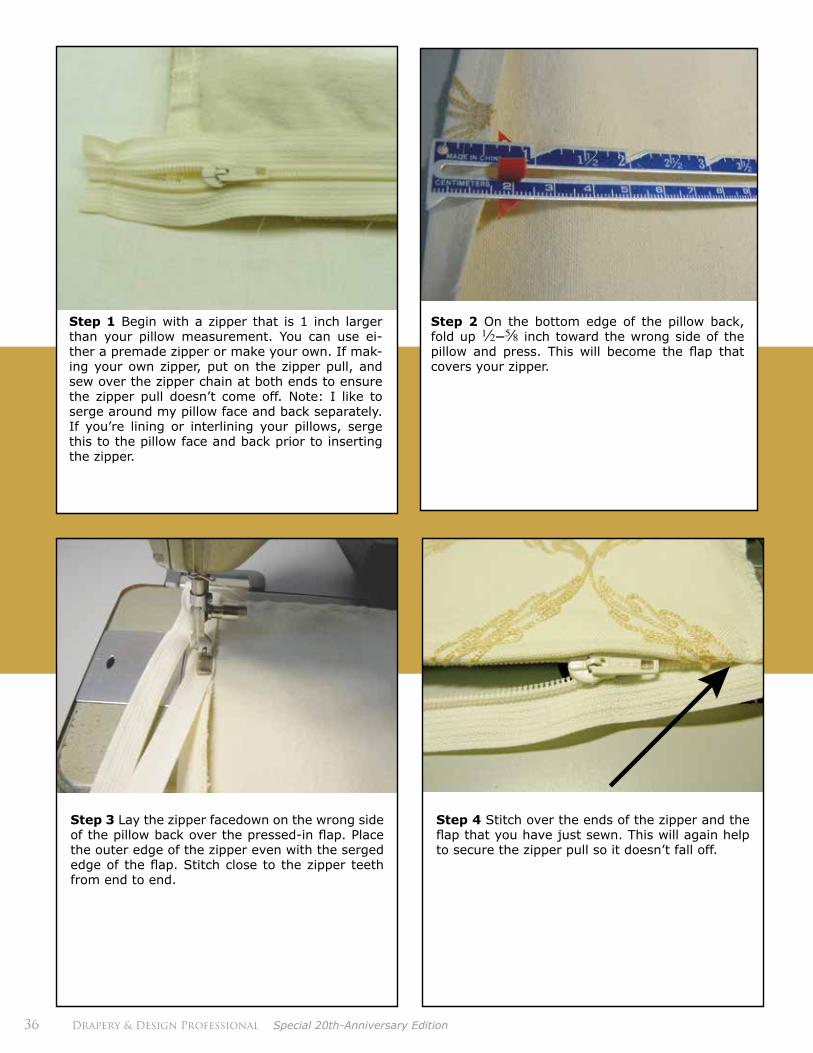
Step 1 Begin with a zipper that is 1 inch larger than your pillow measurement. You can use ei-ther a premade zipper or make your own. If mak-ing your own zipper, put on the zipper pull, and sew over the zipper chain at both ends to ensure the zipper pull doesn’t come off. Note: I like to serge around my pillow face and back separately. If you’re lining or interlining your pillows, serge this to the pillow face and back prior to inserting the zipper.
Step 2 On the bottom edge of the pillow back, fold up 2-s inch toward the wrong side of the pillow and press. This will become the flap that covers your zipper.
Step 3 Lay the zipper facedown on the wrong side of the pillow back over the pressed-in flap. Place the outer edge of the zipper even with the serged edge of the flap. Stitch close to the zipper teeth from end to end.
Step 4 Stitch over the ends of the zipper and the flap that you have just sewn. This will again help to secure the zipper pull so it doesn’t fall off.
Drapery & Design Professional Special 20th-Anniversary Edition 37
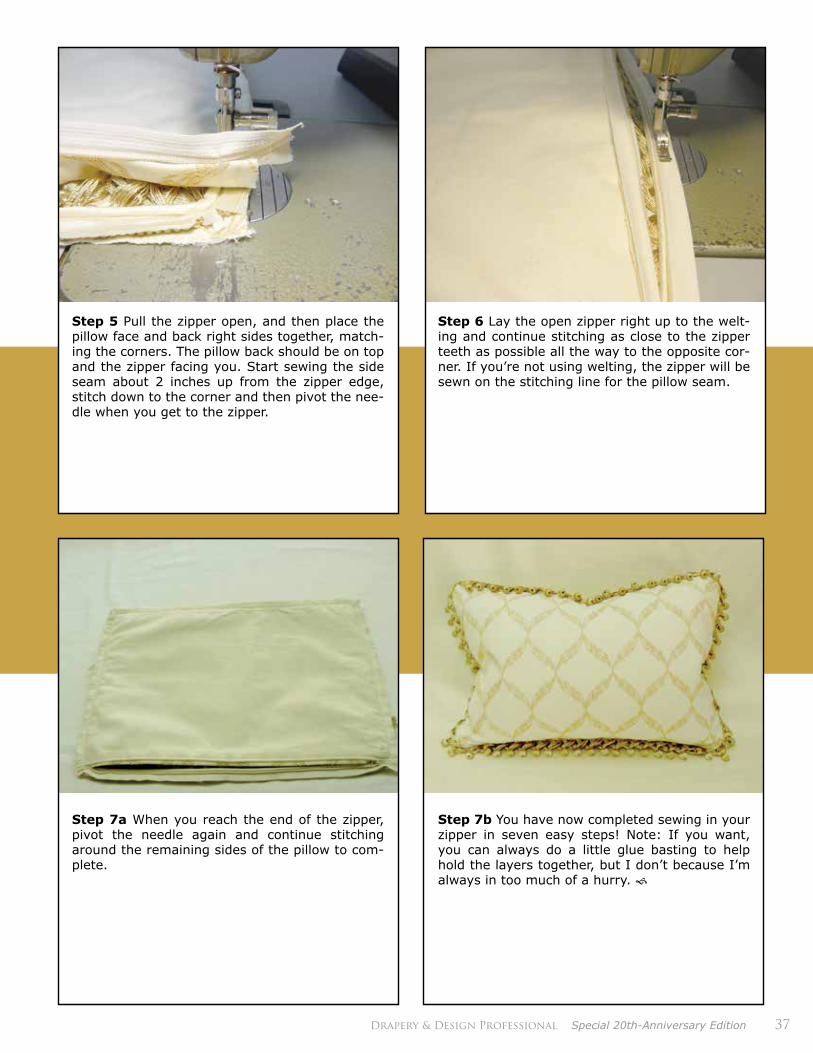
Step 5 Pull the zipper open, and then place the pillow face and back right sides together, match-ing the corners. The pillow back should be on top and the zipper facing you. Start sewing the side seam about 2 inches up from the zipper edge, stitch down to the corner and then pivot the nee-dle when you get to the zipper.
Step 7a When you reach the end of the zipper, pivot the needle again and continue stitching around the remaining sides of the pillow to com-plete.
Step 6 Lay the open zipper right up to the welt-ing and continue stitching as close to the zipper teeth as possible all the way to the opposite cor-ner. If you’re not using welting, the zipper will be sewn on the stitching line for the pillow seam.
Step 7b You have now completed sewing in your zipper in seven easy steps! Note: If you want, you can always do a little glue basting to help hold the layers together, but I don’t because I’m always in too much of a hurry.

38 Drapery & Design Professional Special 20th-Anniversary Edition
For over 50 years the Rowley Company has helped support drapery and upholstery workrooms, installers and designers with the tools and supplies they need to transform their businesses. So whether you’re just starting out or a longtime professional, we have the products you need, when you need them.
Visit www.RowleyCompany.com or call 800-343-4542 to learn more about the more than 15,000 Rowley products that can help you transform your business.
Transforming our business...
to help you transform yours.
For a copy of the new Rowley 2013 catalog, go to www.rowleycompany.com/2013catalog
©2013 Rowley Company LLC. All rights reserved.

Lundy’sDrapery
Hardware
800-468-6040www.lundysiron.com
®
The Leading Interior Design & Quoting Programs for Window Treatments
DreamDraper G5 GoldQuick Quote
® for QuickBooks
®
• The most beautiful designs• Fastest and easiest to use• Most accessible—install on your
computer or design online in the clouds• Most affordable
Programs to grow your business and repay your investment
many times over.
www.dreamdraper.com • 1–866–56–DREAM
40 Drapery & Design Professional Special 20th-Anniversary Edition
D o you have nightmares about selling a sheer job? Do your sheers pucker at the seams or end up crooked? Do they slide around on you when you’re cutting? Take a deep breath and read on for some helpful hints that will put you at ease and maybe motivate you to sell more sheers!
One of the keys to getting great results when working with sheer fabrics is having the right tools: in this case, sharp scissors. You may be able to use a rotary cutter and mat on some sheers, especially when cutting ruffles or welt. Be sure the cutting surface is free of sharp corners that will snag the sheer as you roll it out.
How to Work With Sheer FabricsBy Laurie Medford
Gastonia, NC
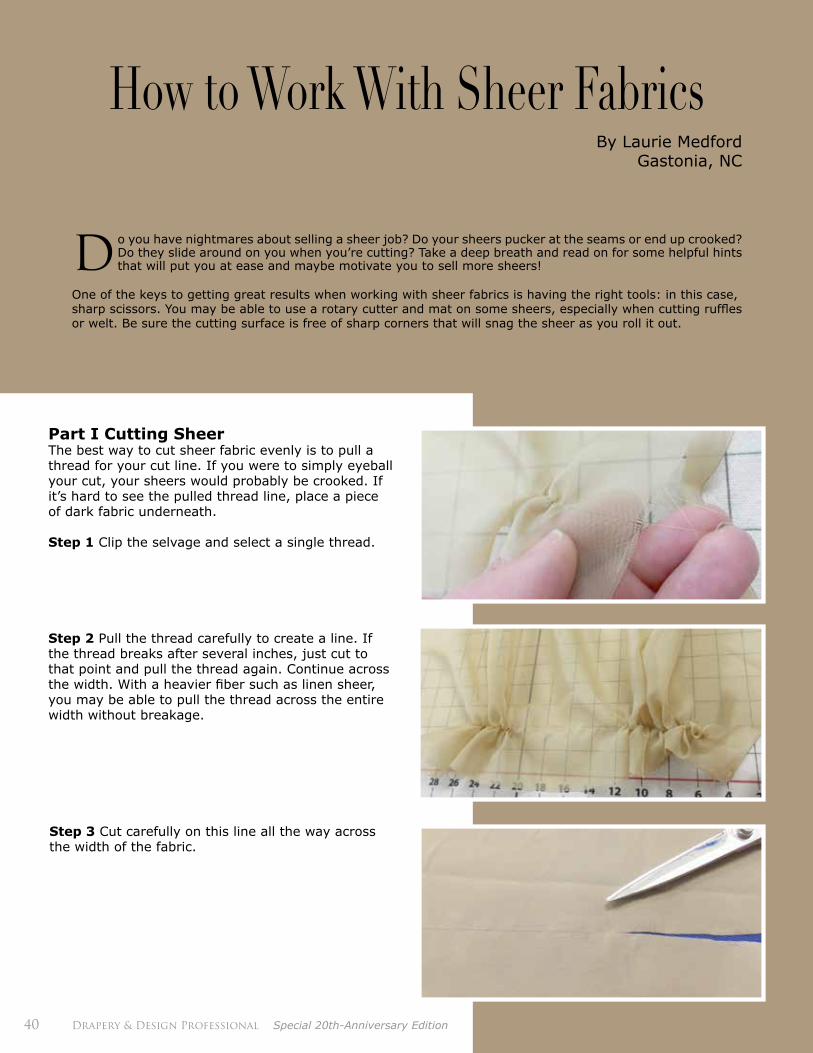
Part I Cutting SheerThe best way to cut sheer fabric evenly is to pull a thread for your cut line. If you were to simply eyeball your cut, your sheers would probably be crooked. If it’s hard to see the pulled thread line, place a piece of dark fabric underneath.
Step 1 Clip the selvage and select a single thread.
Step 2 Pull the thread carefully to create a line. If the thread breaks after several inches, just cut to that point and pull the thread again. Continue across the width. With a heavier fiber such as linen sheer, you may be able to pull the thread across the entire width without breakage.
Step 3 Cut carefully on this line all the way across the width of the fabric.
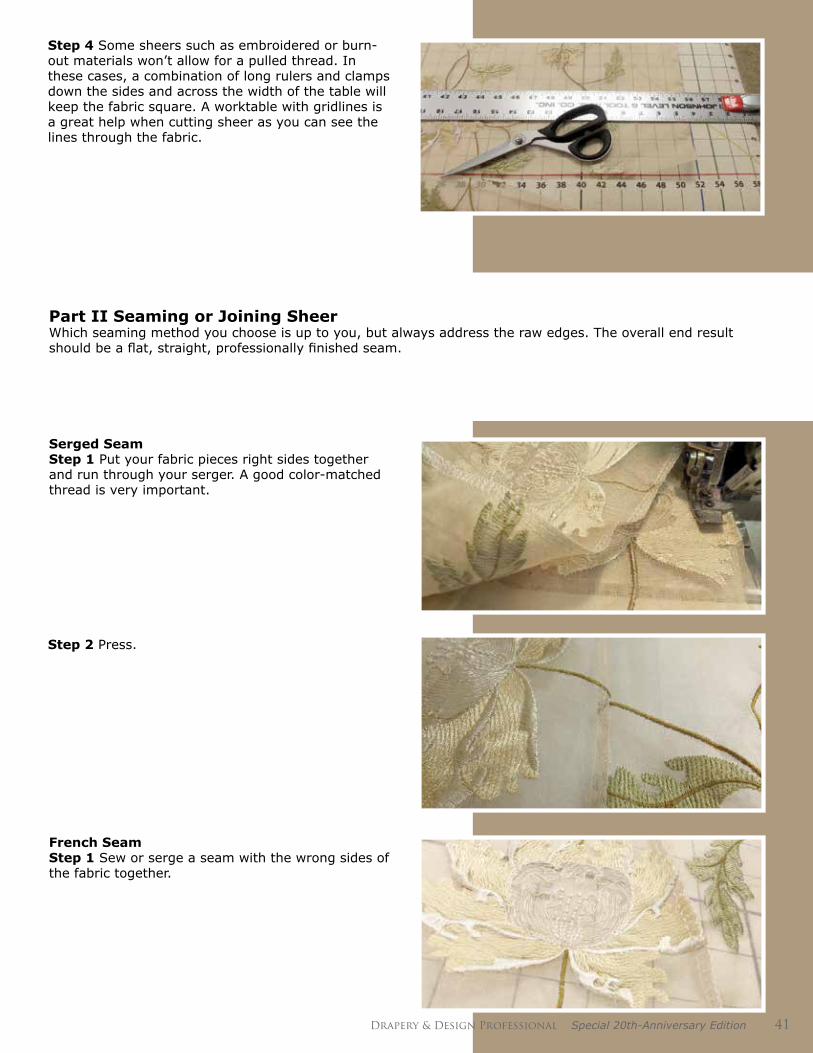
Step 4 Some sheers such as embroidered or burn-out materials won’t allow for a pulled thread. In these cases, a combination of long rulers and clamps down the sides and across the width of the table will keep the fabric square. A worktable with gridlines is a great help when cutting sheer as you can see the lines through the fabric.
Part II Seaming or Joining SheerWhich seaming method you choose is up to you, but always address the raw edges. The overall end result should be a flat, straight, professionally finished seam.
Step 2 Press.
Serged Seam Step 1 Put your fabric pieces right sides together and run through your serger. A good color-matched thread is very important.
French Seam Step 1 Sew or serge a seam with the wrong sides of the fabric together.
Drapery & Design Professional Special 20th-Anniversary Edition 41
42 Drapery & Design Professional Special 20th-Anniversary Edition
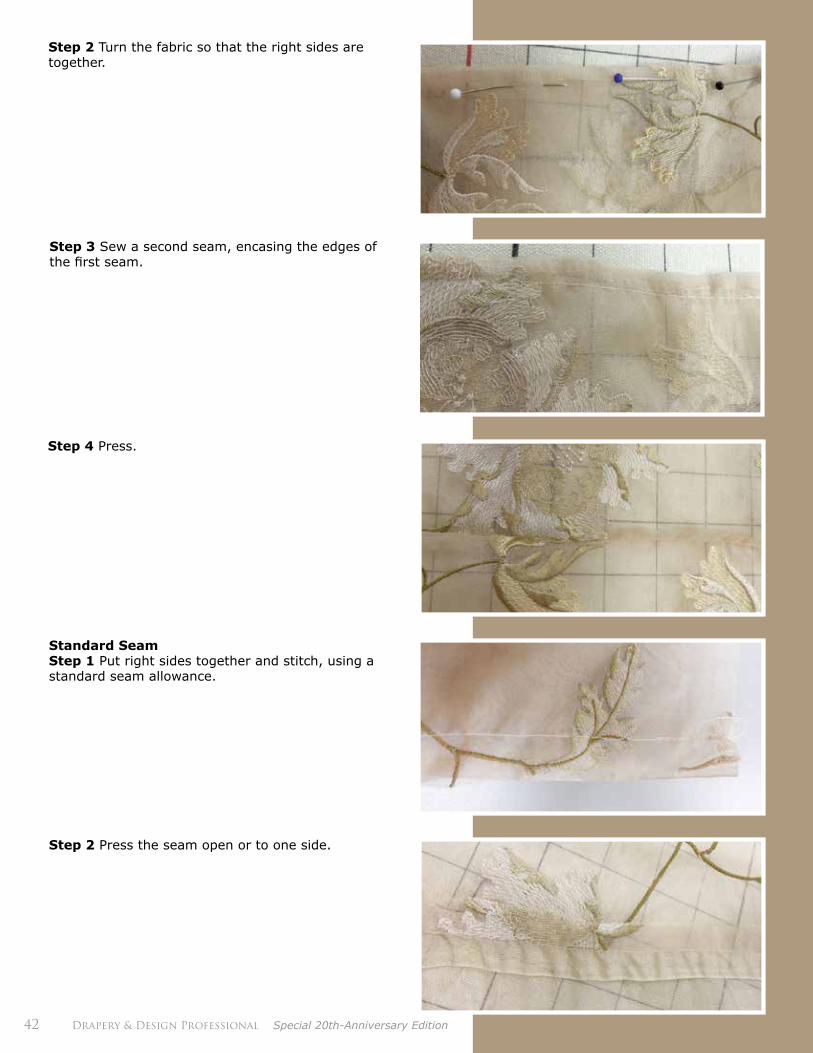
Step 4 Press.
Step 2 Turn the fabric so that the right sides are together.
Standard Seam Step 1 Put right sides together and stitch, using a standard seam allowance.
Step 3 Sew a second seam, encasing the edges of the first seam.
Step 2 Press the seam open or to one side.
Part III Hemming SheerHemming sheers can be taxing. Hems tend to roll or move as they are put through the hemming process. To lessen this effect, try a small sample for each method listed below to see which one works best for your spe-cific sheer fabric.
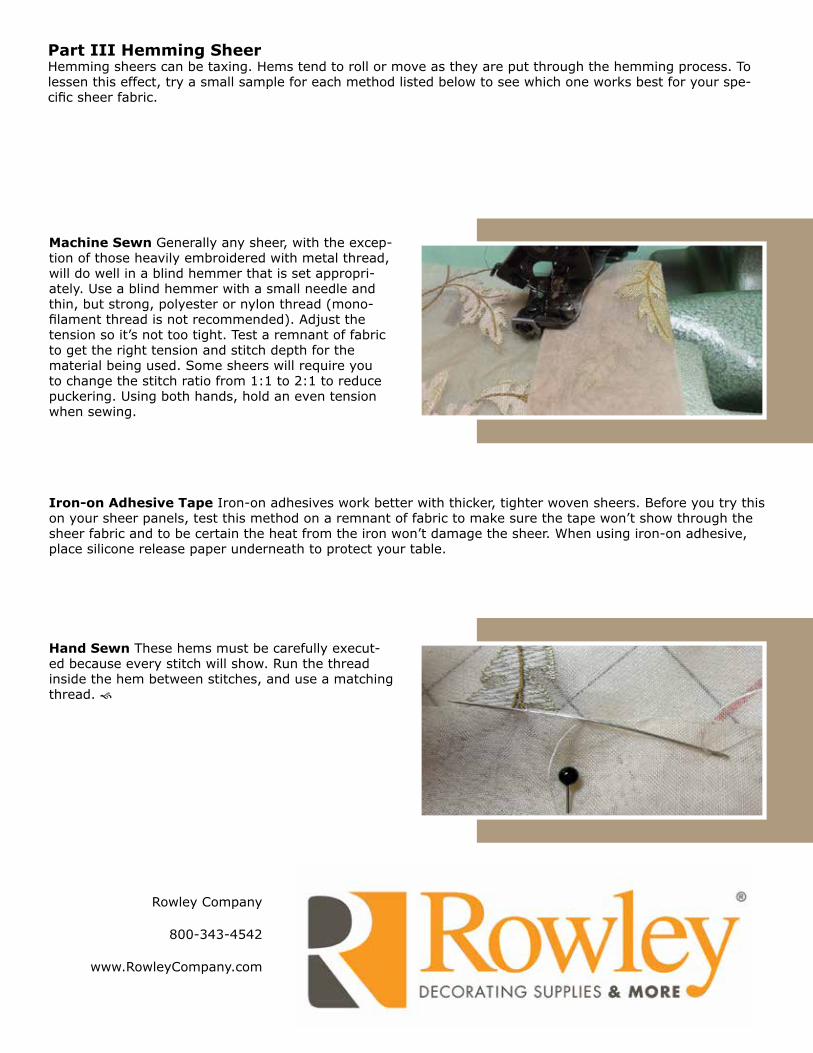
Machine Sewn Generally any sheer, with the excep-tion of those heavily embroidered with metal thread, will do well in a blind hemmer that is set appropri-ately. Use a blind hemmer with a small needle and thin, but strong, polyester or nylon thread (mono-filament thread is not recommended). Adjust the tension so it’s not too tight. Test a remnant of fabric to get the right tension and stitch depth for the material being used. Some sheers will require you to change the stitch ratio from 1:1 to 2:1 to reduce puckering. Using both hands, hold an even tension when sewing.
Hand Sewn These hems must be carefully execut-ed because every stitch will show. Run the thread inside the hem between stitches, and use a matching thread.
Iron-on Adhesive Tape Iron-on adhesives work better with thicker, tighter woven sheers. Before you try this on your sheer panels, test this method on a remnant of fabric to make sure the tape won’t show through the sheer fabric and to be certain the heat from the iron won’t damage the sheer. When using iron-on adhesive, place silicone release paper underneath to protect your table.
Rowley Company
800-343-4542
www.RowleyCompany.com
44 Drapery & Design Professional Special 20th-Anniversary Edition
In each of these three categories, a window can do one of two things in a space: 1. Advance or recede
2. Carry a vertical or horizontal line3. Diffuse or deflect light
This issue will be dedicated to windows that either advance or recede in a room. As a designer, the first problem I see when working with clients is that they want to treat the window first and, in reality, it should be treated last. When you treat the window before all the other elements of design are placed in the room, you end up overtreating the window. You’re not getting or seeing the entire picture. Win-dows should be treated last!
When the industry came out with the temporary disposable pleated shades, it was wonderful because it gave clients time to figure out where they wanted the energy in their space to be. But then I had one client who wanted me to design and make draperies to go over the disposable shades. (I’ve since gone back to the old black plastic garbage bag ― some-times we have to create pain before they see the problem.)
Ask your clients:• Do they want their eyes to go to the window, fire-
place, picture grouping or picture, TV, wall unit, or the view outside their window?
• Are the window treatments the first thing they want to see when they enter the space?
Color on a Window ― Or Color on the Wall?
By Margi KyleCharlotte, NC
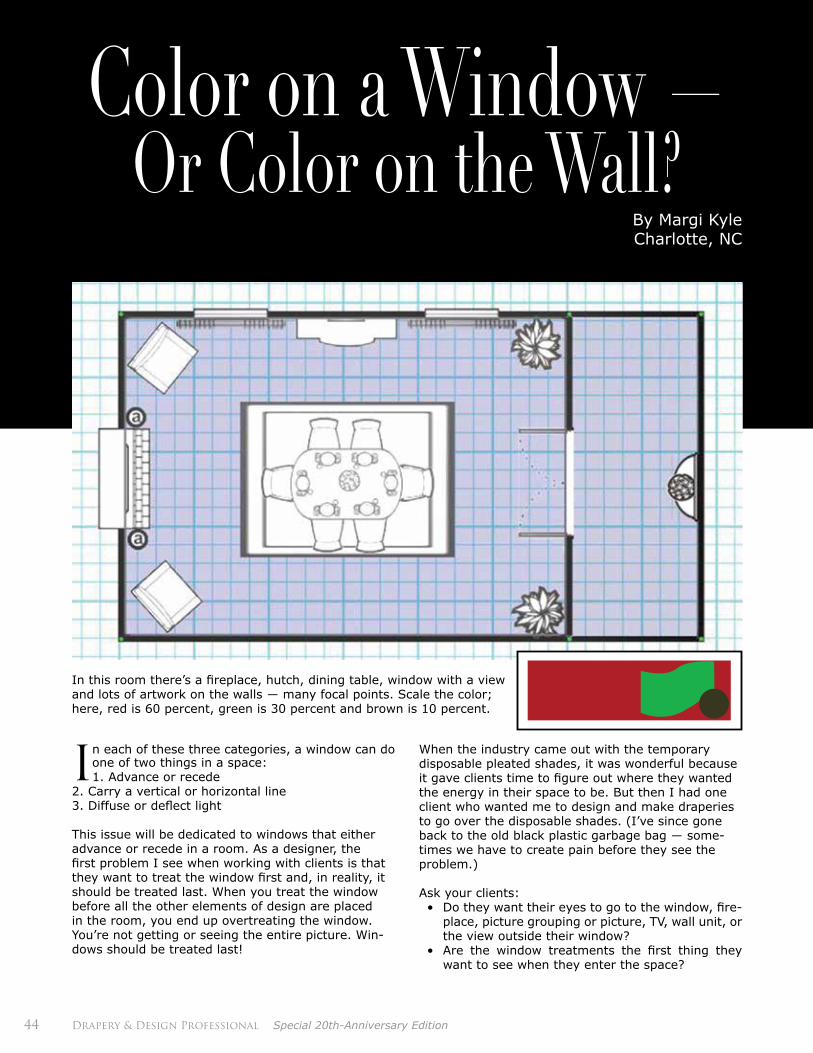
In this room there’s a fireplace, hutch, dining table, window with a view and lots of artwork on the walls ― many focal points. Scale the color; here, red is 60 percent, green is 30 percent and brown is 10 percent.
Drapery & Design Professional Special 20th-Anniversary Edition 45
• Are they afraid to put color on the wall and feel it’s safer to put color on the window? In their mind the window won’t be noticed as much ― when in fact it will be magnified. Because the window in a room usually lets in light, carries a strong verti-cal line or is the focal point in the space, it draws more attention to itself when it’s overtreated.
There’s no other element of design that will ruin the look of a space faster than an incorrect window treatment. You can have a picture that isn’t just right, or an unattractive portrait of Aunt or Uncle hanging over your fireplace, a leather couch with not much style, outdated carpeting or just plain hard woods, and some strange accessories in the space. But if you have put too much emphasis on your window treatments, that’s all you’ll see. Nothing else you’ve done in that space will matter; your eyes will go straight to The Window Treatment. Many rooms have several focal points: a fireplace, hutch, dining table, window with a view and lots of artwork on the wall, piano, wall unit, TV, fountains, etc. The best way to help your clients decide where the color and energy should go is to create a floor plan ― even if it’s a basic one ― and identify the focal points. Once that’s decided, all the furniture should be grouped around it. Focal points can change as the seasons change. In the summer it could be the window; in the winter, the fireplace.
Follow these steps to help your clients decide where the color and energy should go:
• Get a floor plan ― even if it’s a basic one ― and identify the focal points. Keep in mind that a room can have several.
• Identify their colors and divide them into 60 per-cent in the wall colors or primary color; 30 per-cent is the secondary color, and 10 percent is the accent. You never want competition of color. (See the red, green and brown graphic in the floor plan.)
• Grab your colored pencils or go to www.3Dream.net to create a floor plan and color it in. (Using the code 307-66 will get you one free month.)
• Encourage your clients to wait until all their fur-nishings are in the room before treating the win-dows. That way they’ll be treated properly and not overtreated.
There’s no right or wrong; it’s about what you want to see when you enter a room. Window treatments finish a space. Determine whether you want a dra-matic look or a soft and finished look.
Wondering where the latest styles in window treat-ments are coming from? Home furnishings and window treatments take the lead from fashion. Then it goes to home furnishings. When long skirts are in, full draperies are in vogue. When shorts and short skirts are in ― so are valances. To keep up with win-dow fashion, read any of the clothing fashion maga-zines. You’ll be surprised at what’s in style today for tomorrow’s window treatments.
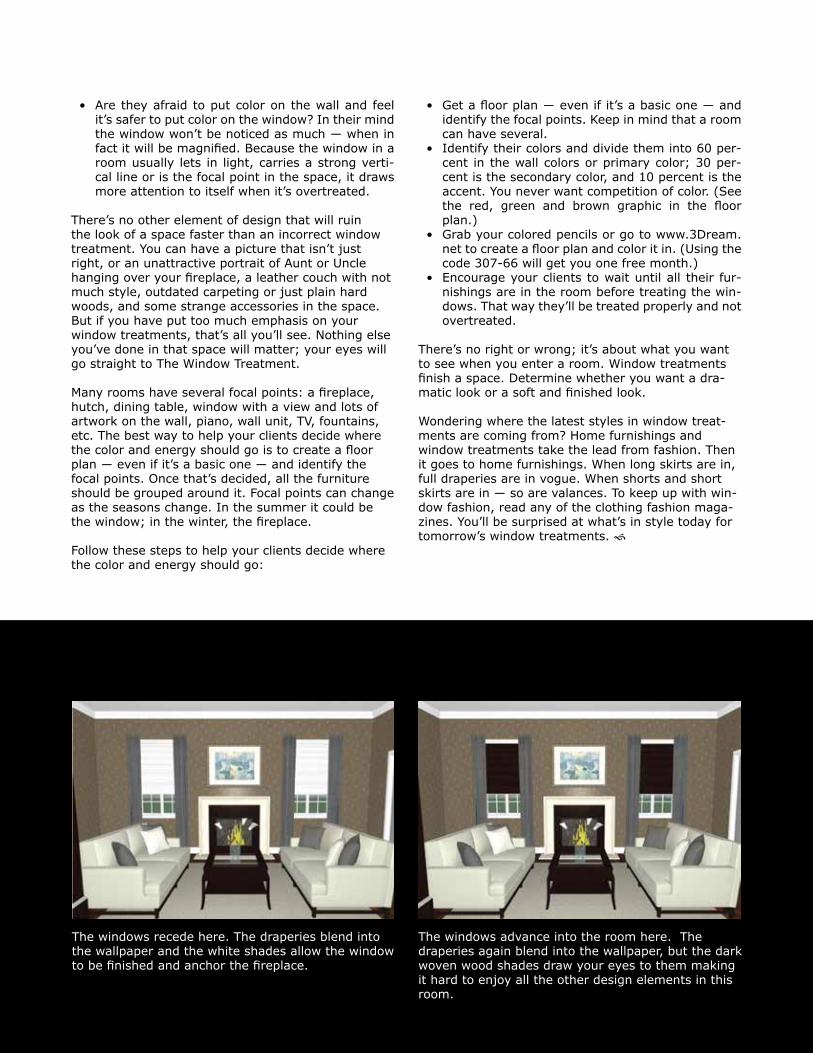
The windows advance into the room here. The draperies again blend into the wallpaper, but the dark woven wood shades draw your eyes to them making it hard to enjoy all the other design elements in this room.
The windows recede here. The draperies blend into the wallpaper and the white shades allow the window to be finished and anchor the fireplace.

The Installer’s Toolbox
I once read an article that said the best installer’s toolbox was a pail. Unfortunately, I haven’t been able to find the article since, as I would like to credit the author. On my return from the Custom Home Furnishings Academy In-stallation course in July 2008, I knew I had to figure out how to have a toolbox where I wouldn’t forget anything.
The problem is, I constantly “borrow” from the toolbox; and typing out a checklist just wasn’t going to work for me (I probably wouldn’t be able to find that either). Inspired by that article, I came up with the installer pail with labeled pockets. Before leaving home I can check that all the pockets contain what they should. And, as a bonus, I can do the same before leaving the job site to ensure I haven’t left anything behind.
• Seam ripper• Pencil sharpener• Soft measuring
Tape • Magnetizer• Lacing hook• Sharpie permanent
Marker• Pencils• Erasable marker• Pen• Calculator• Knife• Cordless/Corded
drill• Long-shaft screw
Bits (Robertson, Phillips, Hex Head)
• Phillips screw-drivers (different sizes)
• Flat head screw-driver
• Awl• Pliers (regular,
needle nose and cutting)
• Rubber mallet• Tag gun• Spare tags• Spare drapery pins• Rowley nail holder• Large ruler• Small ruler• Blue tape• Measuring tape• Stud finder• Small scissors• Large scissors• Trim square• Laser level• Hammer• Mounting squares• Spare cleats• Tenter hooks• Cup hooks• Tie-back ring
hooks• Fray check• Needles and thread• Drill bits• Screw bits
What’s in My Toolbox
By Cathie GulliverOntario, Canada
46 Drapery & Design Professional Special 20th-Anniversary Edition
If you want, you can sew pockets on the pockets, repeating Step 3.
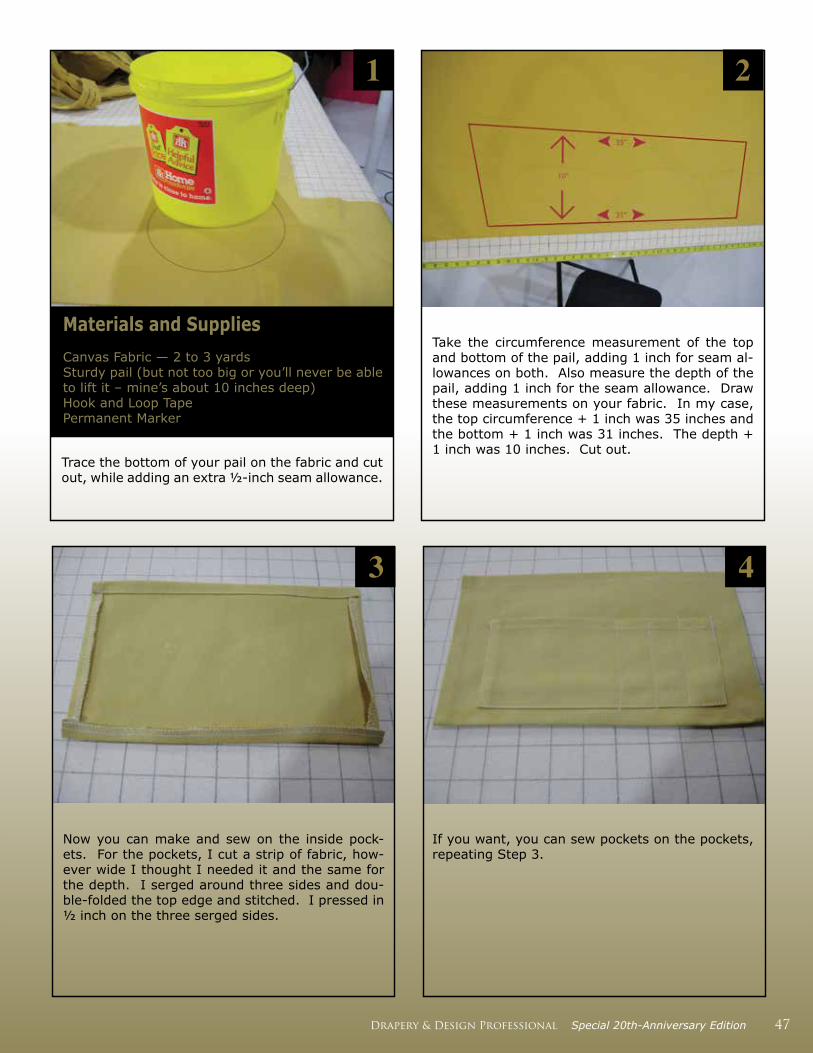
Now you can make and sew on the inside pock-ets. For the pockets, I cut a strip of fabric, how-ever wide I thought I needed it and the same for the depth. I serged around three sides and dou-ble-folded the top edge and stitched. I pressed in ½ inch on the three serged sides.
Trace the bottom of your pail on the fabric and cut out, while adding an extra ½-inch seam allowance.
Take the circumference measurement of the top and bottom of the pail, adding 1 inch for seam al-lowances on both. Also measure the depth of the pail, adding 1 inch for the seam allowance. Draw these measurements on your fabric. In my case, the top circumference + 1 inch was 35 inches and the bottom + 1 inch was 31 inches. The depth + 1 inch was 10 inches. Cut out.
43
21
Materials and SuppliesCanvas Fabric — 2 to 3 yardsSturdy pail (but not too big or you’ll never be able to lift it – mine’s about 10 inches deep) Hook and Loop TapePermanent Marker
Drapery & Design Professional Special 20th-Anniversary Edition 47
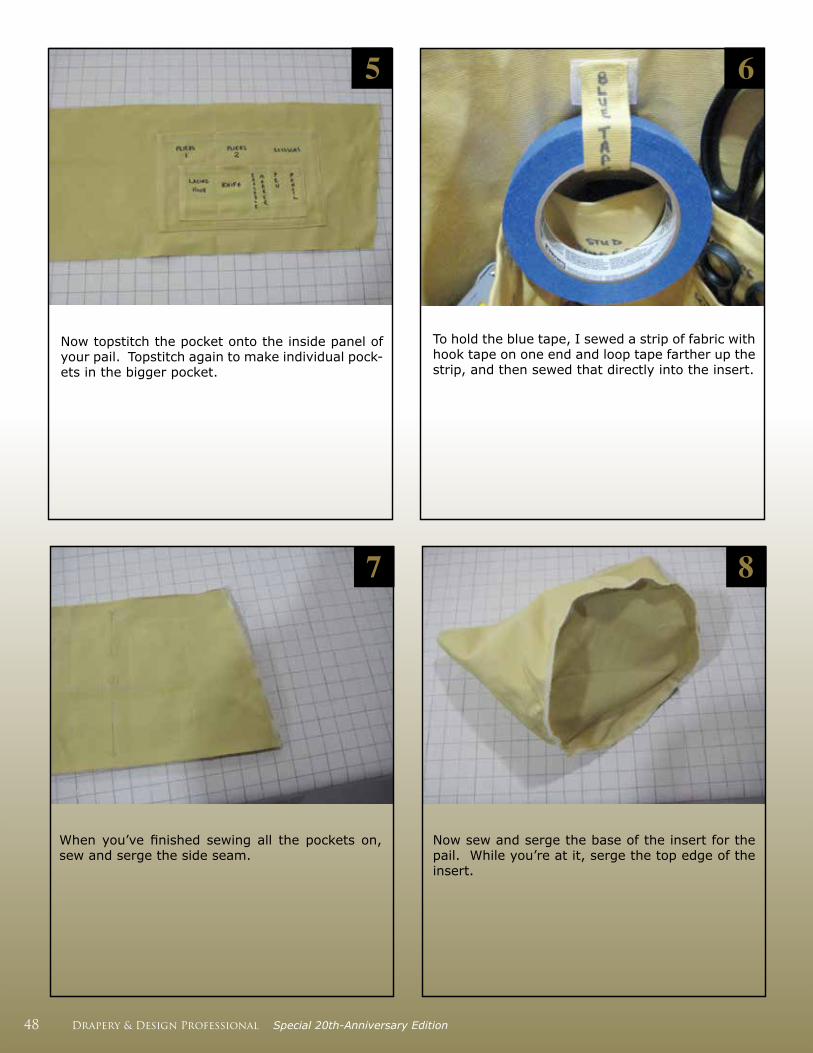
Now topstitch the pocket onto the inside panel of your pail. Topstitch again to make individual pock-ets in the bigger pocket.
To hold the blue tape, I sewed a strip of fabric with hook tape on one end and loop tape farther up the strip, and then sewed that directly into the insert.
Now sew and serge the base of the insert for the pail. While you’re at it, serge the top edge of the insert.
When you’ve finished sewing all the pockets on, sew and serge the side seam.
87
65
48 Drapery & Design Professional Special 20th-Anniversary Edition
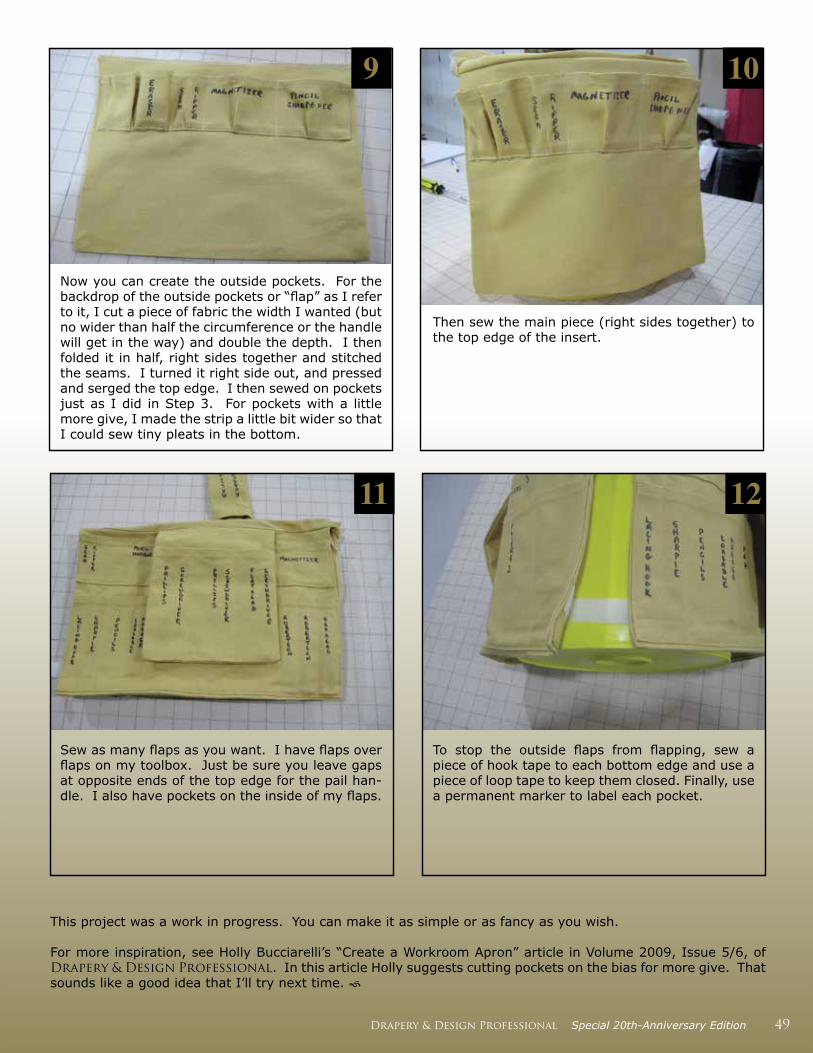
Now you can create the outside pockets. For the backdrop of the outside pockets or “flap” as I refer to it, I cut a piece of fabric the width I wanted (but no wider than half the circumference or the handle will get in the way) and double the depth. I then folded it in half, right sides together and stitched the seams. I turned it right side out, and pressed and serged the top edge. I then sewed on pockets just as I did in Step 3. For pockets with a little more give, I made the strip a little bit wider so that I could sew tiny pleats in the bottom.
Then sew the main piece (right sides together) to the top edge of the insert.
To stop the outside flaps from flapping, sew a piece of hook tape to each bottom edge and use a piece of loop tape to keep them closed. Finally, use a permanent marker to label each pocket.
Sew as many flaps as you want. I have flaps over flaps on my toolbox. Just be sure you leave gaps at opposite ends of the top edge for the pail han-dle. I also have pockets on the inside of my flaps.
This project was a work in progress. You can make it as simple or as fancy as you wish.
For more inspiration, see Holly Bucciarelli’s “Create a Workroom Apron” article in Volume 2009, Issue 5/6, of Drapery & Design Professional. In this article Holly suggests cutting pockets on the bias for more give. That sounds like a good idea that I’ll try next time.
1211
109
Drapery & Design Professional Special 20th-Anniversary Edition 49

50 Drapery & Design Professional Special 20th-Anniversary Edition
Upholstering Walls With Batting
By Lisa PowelsonAtlanta, GA
Drapery & Design Professional Special 20th-Anniversary Edition 51
I enjoy an upholstery challenge, and upholstering walls was one experience that was high on my “projects I’d like to do” list. I took a class at Vision 2009 and also
participated in CHFA’s webinar with Laurie Medford. I was ready for the challenge! So when a client asked whether I would upholster walls in a powder room, how could I say no?
There are numerous processes for upholstering walls, which can include: stapling directly to the wall, apply-ing the fabric with starch (much like wallpapering) and applying the fabric to a separate surface (e.g., plywood) and then installing to a wall. For this project, I stapled the fabric directly to the wall over batting.
Overall the experience was challenging and rewarding! I estimated it would take me four to five hours for a small powder room (six widths of fabric and trim). With help, it took all of eight hours with no break! But the result is beautiful! Here’s how I did it.
Part I Measure for Fabric and Trim Step 1 Measure your walls (height and width) ― do not subtract for windows or doors. Keep these measure-ments in mind as you consider pattern and wall size when deciding on your fabric and layout.
Step 2 Determine your fabric requirements by first tak-ing your height measurement. Divide the fabric’s pattern repeat (inches) into the total wall height measurement. The results will determine the total number of repeats (you have to round up to a whole number, then add one additional repeat.
For example:108 inches high / 5-inch pattern repeat = 21.6 repeats, rounded to 22 repeats + 1 additional = 23 repeats need-ed. 23 repeats x 5-inch repeat = 115 inches cut length.
Step 3 Determine your width requirements. Total width divided by fabric width = number of widths required. For example:Total width of room is 432 inches / 54 inches (fabric width) = 8 widths
Step 4 Calculate your yardage. Cut length multiplied by number of widths divided by 36 inches = total yardage required. For example:115 inches CL x 8 (widths) = 920 inches / 36 inches = 25.5 yards (rounded up to 26 yards).
Step 5 Measure for trim. The edges and staples can be trimmed with decorative gimp, fabric trim, self-welt or decorative molding, to name a few. If you decide to use decorative fabric trim, determine your yardage based on the linear inches of the areas to be trimmed (e.g., around windows, doors, ceiling, floor molding, corners, etc.).
Part II Cut Fabric, Seam and SergeCut your panels to the required length based on your measurements above, making sure to pattern match your top edge of each panel to the next panel (if pat-terned fabric). If your width of walls requires more than one width, then seam together (be sure to remove selvage and pattern match) the necessary number of widths just for that wall. Iron the seams flat. If you want, you can serge the raw edges or the selvage of the panels to reduce fraying and pulling during handling and installation.
Part III Prep walls and Apply BattingI used a w-oz. batting on the walls, which gave it a nice loft. Based on what you’re trying to achieve, you can either increase or decrease the weight of the batting.
• Fabric, I suggest solid or a small repeat for first timers
• Trim or gimp to cover staples• Batting, 2 oz. or ¾ oz. weight, the same
yardage as fabric• Staple gun, one that allows you to get close
to corners• Staples, a inch• Air compressor, if you have a pneumatic
stapler• Cardboard tack strip, smaller width than
your trim• Pushpins• Staple puller/needle nose pliers
• Scissors, small and large• Razor blades for trimming• Tape measure• Ladder • Screwdrivers for removing outlets, Phillips
and standard • Laser level or level• Fringe adhesive or hot glue• Extension cord• Markers, walls and fabric• Trash bag• Shop vac• Camera
Materials and Supplies
52 Drapery & Design Professional Special 20th-Anniversary Edition
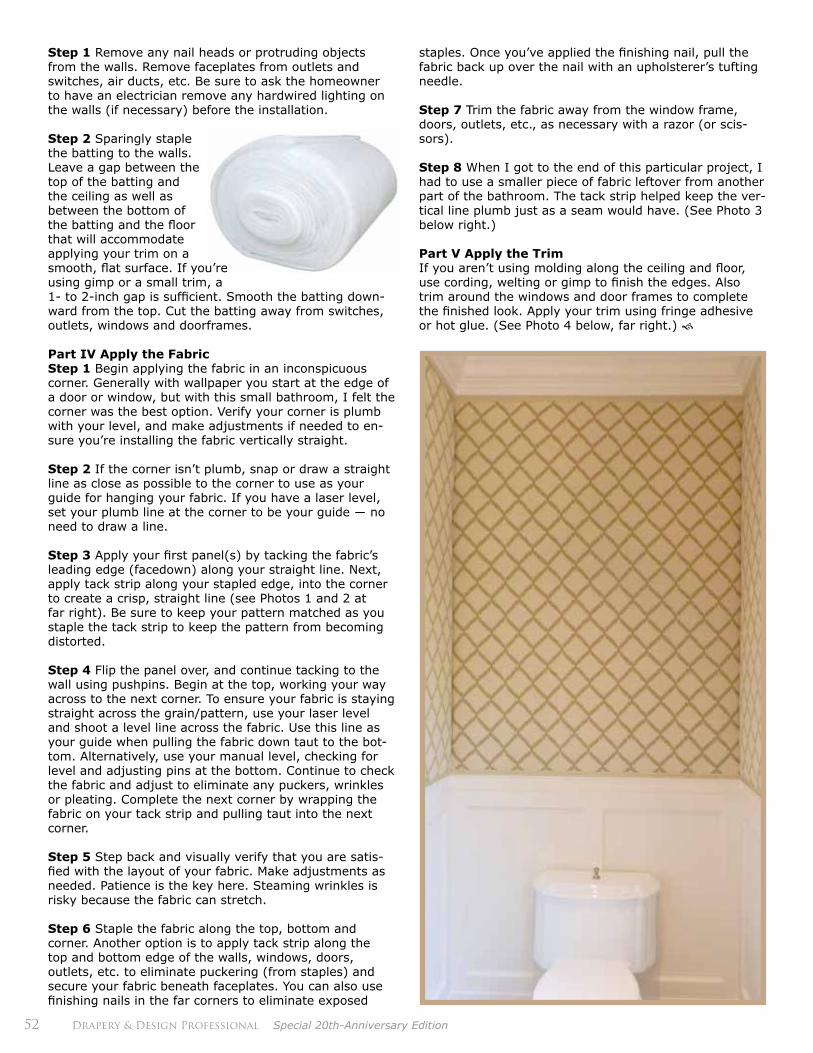
Step 1 Remove any nail heads or protruding objects from the walls. Remove faceplates from outlets and switches, air ducts, etc. Be sure to ask the homeowner to have an electrician remove any hardwired lighting on the walls (if necessary) before the installation.
Step 2 Sparingly staple the batting to the walls. Leave a gap between the top of the batting and the ceiling as well as between the bottom of the batting and the floor that will accommodate applying your trim on a smooth, flat surface. If you’re using gimp or a small trim, a 1- to 2-inch gap is sufficient. Smooth the batting down-ward from the top. Cut the batting away from switches, outlets, windows and doorframes.
Part IV Apply the FabricStep 1 Begin applying the fabric in an inconspicuous corner. Generally with wallpaper you start at the edge of a door or window, but with this small bathroom, I felt the corner was the best option. Verify your corner is plumb with your level, and make adjustments if needed to en-sure you’re installing the fabric vertically straight.
Step 2 If the corner isn’t plumb, snap or draw a straight line as close as possible to the corner to use as your guide for hanging your fabric. If you have a laser level, set your plumb line at the corner to be your guide ― no need to draw a line.
Step 3 Apply your first panel(s) by tacking the fabric’s leading edge (facedown) along your straight line. Next, apply tack strip along your stapled edge, into the corner to create a crisp, straight line (see Photos 1 and 2 at far right). Be sure to keep your pattern matched as you staple the tack strip to keep the pattern from becoming distorted.
Step 4 Flip the panel over, and continue tacking to the wall using pushpins. Begin at the top, working your way across to the next corner. To ensure your fabric is staying straight across the grain/pattern, use your laser level and shoot a level line across the fabric. Use this line as your guide when pulling the fabric down taut to the bot-tom. Alternatively, use your manual level, checking for level and adjusting pins at the bottom. Continue to check the fabric and adjust to eliminate any puckers, wrinkles or pleating. Complete the next corner by wrapping the fabric on your tack strip and pulling taut into the next corner.
Step 5 Step back and visually verify that you are satis-fied with the layout of your fabric. Make adjustments as needed. Patience is the key here. Steaming wrinkles is risky because the fabric can stretch.
Step 6 Staple the fabric along the top, bottom and corner. Another option is to apply tack strip along the top and bottom edge of the walls, windows, doors, outlets, etc. to eliminate puckering (from staples) and secure your fabric beneath faceplates. You can also use finishing nails in the far corners to eliminate exposed
staples. Once you’ve applied the finishing nail, pull the fabric back up over the nail with an upholsterer’s tufting needle.
Step 7 Trim the fabric away from the window frame, doors, outlets, etc., as necessary with a razor (or scis-sors).
Step 8 When I got to the end of this particular project, I had to use a smaller piece of fabric leftover from another part of the bathroom. The tack strip helped keep the ver-tical line plumb just as a seam would have. (See Photo 3 below right.)
Part V Apply the TrimIf you aren’t using molding along the ceiling and floor, use cording, welting or gimp to finish the edges. Also trim around the windows and door frames to complete the finished look. Apply your trim using fringe adhesive or hot glue. (See Photo 4 below, far right.)
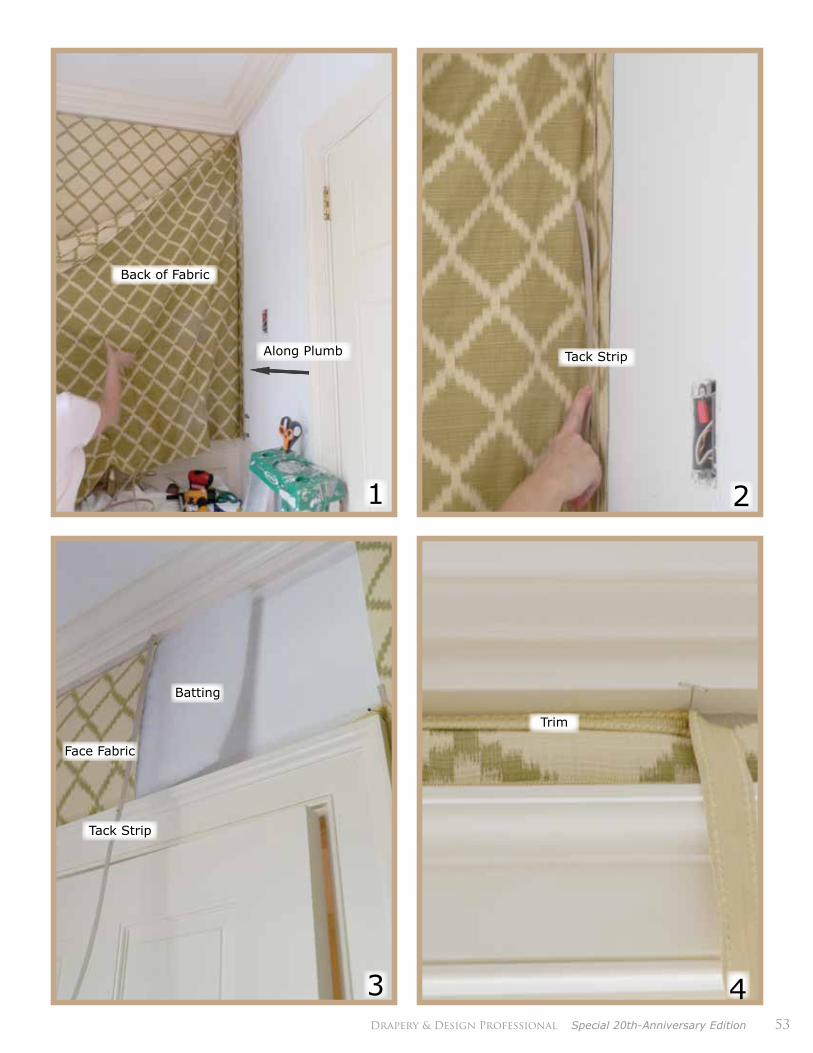
Drapery & Design Professional Special 20th-Anniversary Edition 53
1 2
3 4
Face Fabric
Batting
Tack Strip
Trim
Tack StripAlong Plumb
Back of Fabric
Visit our web site www.mfay.com (704-847-1464)
· Professional Workroom Patterns · Books and Software
· Workroom Aids
M’FayPatterns
For wide windows, consider adding more half pleats. Buttons give even more interest.
For simple elegance, repeat the long jabot
Use the pleat end of the pattern at both sides.Extend the depth of the short jabot.
These designs are accomplished using pattern 9328 Mandolin Valance

Glydea™
Motorization for DraperiesA Discreet, Flexible and Robust Solution to Serve Your Imagination and Broaden Your Horizons.
© Copyright Somfy Systems, Inc. 1/2013
CompetitiveDesigned for residential, commercial and hospitality markets, the Glydea™ motor range provides a convenient solution for glare reduction and privacy while also reducing energy costs and protecting interiors from damaging UV rays.
AdaptableGlydea™ motors are available for all drapery types including Pinch Pleat, RippleFold® and Accordia®. Additionally, it has been designed to easily adapt to various control technologies including infrared, dry contact, Radio Technology Somfy® (RTS), RS485, Z-Wave® and ZigBee®.
To learn more and request a copy of Somfy’s new Glydea™ Databook, please visit www.somfypro.com/dd or call 1-877-43-SOMFY
Z-Wave® is a registered trademark of Zensys, Inc. and its subsidiaries. ZigBee® is a registered trademark of ZigBee® Alliance. RippleFold® and Accordia® are registered trademarks of Kirsch.

56 Drapery & Design Professional Special 20th-Anniversary Edition
Gone are the days of referrals without business de-velopment. For most, the frequency of new cli-ents simply walking through the door or calling
has dropped. This has caused small businesses to stop and evaluate their marketing and advertising strategies. The way to survive and even thrive in a slow economy is through creative collaboration and business development.
While there may be many innovative ways to develop business, you need to consider your demographics, social networking and the changing economy. The following are just a handful of ideas that have been successful in this market. For some, business development may push you out of your comfort zone. Don’t get discouraged; you will succeed through hard work, practice and consistency. Parallel PartnersThink about businesses in your area with the same target clientele with which you can cross-promote. Some may be in the home-décor industry but not necessarily be your competition, such as art galleries, painters, real estate agents, interior designers, and furniture or cabinet stores. Other businesses may be in completely unrelated fields, such as hair salons, spas, boutiques, wine shops and restaurants. Once you have made a list, think about ways to collaborate. Is there something you can do together that will help each of you increase sales?
If your business does not have a storefront, consider approaching one that does. Make sure it also shares your business model and approach to customer service. Come up with an agreement that is mutually beneficial and may even include a display of your services. What about renting a vacant display window in an area where your target clientele live? With so many available retail spaces, landlords are willing to rent any vacant space.
Consider hosting a joint open house with another business, such as an art gallery. Invite previous and current clients, and cross-promote with your partnering business. Obviously a storefront will already have its product on display but is always looking for new and innovative ways to bring customers back. Bring samples of your work ― such as pillows, tablecloths or drapery samples ― to display. This approach is relatively low risk but has the potential for reaping great rewards with only a nominal investment. Remember, though, consistency is key, so plan on a long-term strategy rather than a one-time event.
Worthy CausesAnother option is to become more active with a charity you are passionate about. You can do this by advertising for the organization’s fundraising events. While helping out the cause, you are also building relationships with people of similar passions. Do not, however, join only for the purpose of increasing sales ― doing so is disingenuous. Your business is about relationships and trust, as well as about the talent you have to deliver a beautiful product. Without your clients’ trust, you have nothing. Once the relationship is established with your clients, they will entrust you with their home beautification needs. After all, welcoming you into their homes is a very personal experience.
Creative Collaboration
andBusiness
DevelopmentBy Tammy ParadoskiArlington Heights, Il

Drapery & Design Professional Special 20th-Anniversary Edition 57
School fundraisers are another great way to help a good cause while advertising your business. Many private schools have silent auction fundraisers to help raise money throughout the year. You can offer an item or service to be auctioned at events like these. A couple of years ago I was working with a client who was hosting a “what not to wear” party at her house for her children’s school fundraiser. In fact, she wanted me to finish her window treatments in time for the party. As a part of the event, two ladies who owned a clothing store donated their time for the evening by giving an educational fashion show. This was a great way for them to get publicity and to establish themselves as fashion experts. This made me ask myself, What if I were to present a “what not to wear” for the home? Together with an art gallery owner and an interior designer, we could discuss art, room colors and soft furnishings. Each of us would offer valuable information to the guests from our areas of expertise. If productive and fun, this could turn into an annual event.
Do not hesitate to collaborate with other workrooms or designers. Join forces and brainstorm. Are you active in any associations? Our local group of workrooms meets bimonthly to discuss relevant issues. Recently we have discussed the topic of creative collaboration quite a bit and doing so has been helpful to all of our businesses. Another way to gain exposure in your community as a group is to volunteer together for a charity function. There are many nonprofit organizations that can use our services, but are unable to afford them. Various WCAA chapters have participated in a number of ventures like this; the Chicagoland chapter, for example, most recently furnished a women’s shelter with all new window treatments. Some suppliers are even willing to donate the necessary items. This is just one idea of many for group collaboration.
Creative CollaborationAs we are all learning in this ever-changing economy, clients are still spending money, but just not as readily as in the past. Therefore, we have to consider creative ways to find and keep new clients. We are not just selling a product, but building relationships and providing an experience. So how are you going to make your experience different from all the rest? It starts with meeting your potential clients. We must each discover the creative collaboration and business development that is effective in our area.
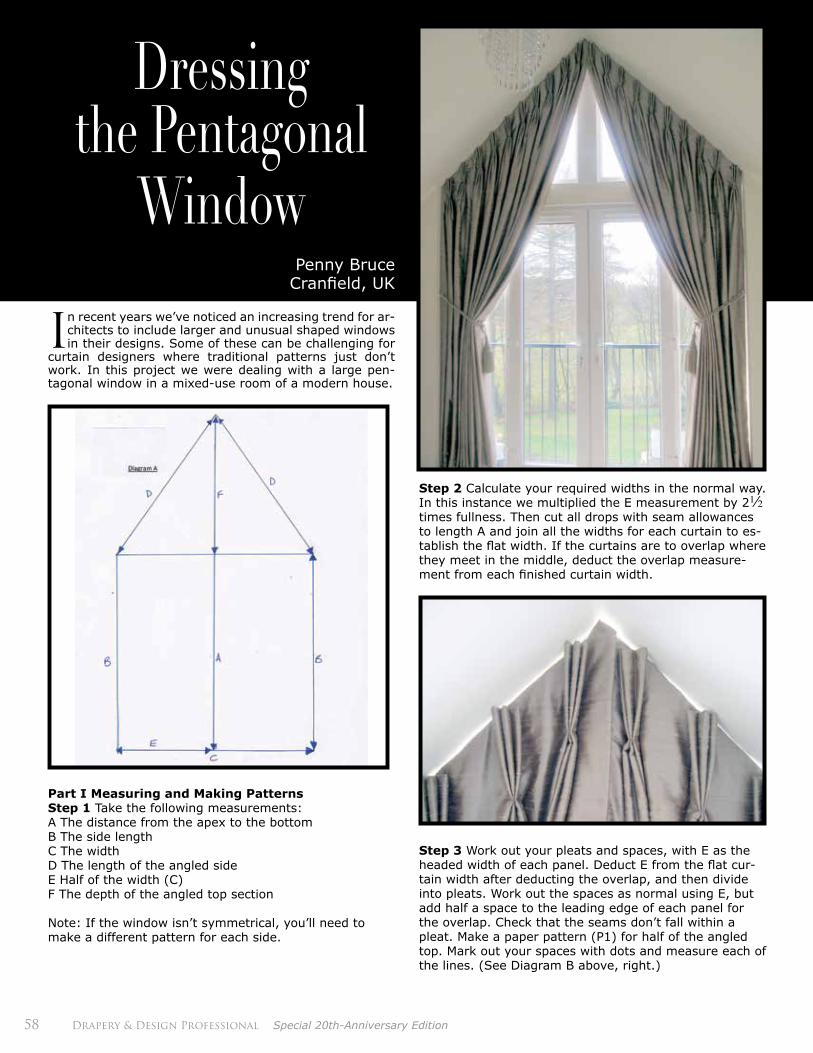
58 Drapery & Design Professional Special 20th-Anniversary Edition
In recent years we’ve noticed an increasing trend for ar-chitects to include larger and unusual shaped windows in their designs. Some of these can be challenging for
curtain designers where traditional patterns just don’t work. In this project we were dealing with a large pen-tagonal window in a mixed-use room of a modern house.
Part I Measuring and Making PatternsStep 1 Take the following measurements:A The distance from the apex to the bottomB The side lengthC The width D The length of the angled sideE Half of the width (C)F The depth of the angled top section
Note: If the window isn’t symmetrical, you’ll need to make a different pattern for each side.
Step 2 Calculate your required widths in the normal way. In this instance we multiplied the E measurement by 22 times fullness. Then cut all drops with seam allowances to length A and join all the widths for each curtain to es-tablish the flat width. If the curtains are to overlap where they meet in the middle, deduct the overlap measure-ment from each finished curtain width.
Step 3 Work out your pleats and spaces, with E as the headed width of each panel. Deduct E from the flat cur-tain width after deducting the overlap, and then divide into pleats. Work out the spaces as normal using E, but add half a space to the leading edge of each panel for the overlap. Check that the seams don’t fall within a pleat. Make a paper pattern (P1) for half of the angled top. Mark out your spaces with dots and measure each of the lines. (See Diagram B above, right.)
Dressing the Pentagonal
WindowPenny Bruce
Cranfield, UK
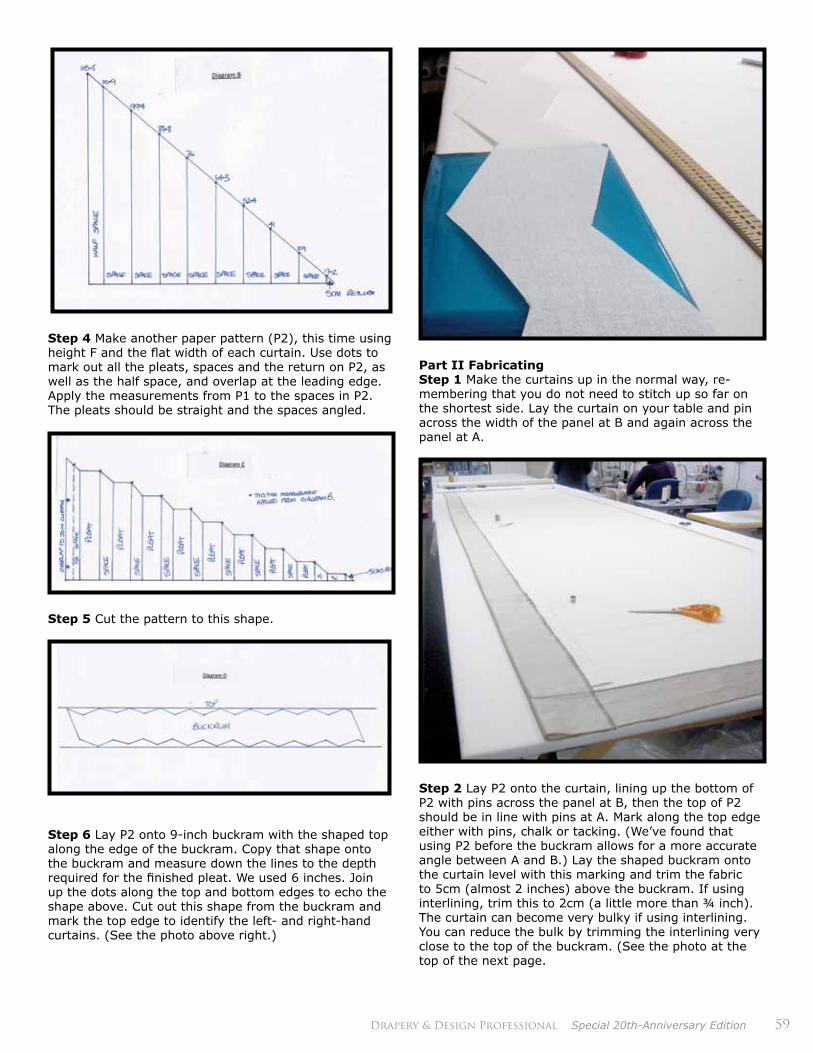
Drapery & Design Professional Special 20th-Anniversary Edition 59
Step 4 Make another paper pattern (P2), this time using height F and the flat width of each curtain. Use dots to mark out all the pleats, spaces and the return on P2, as well as the half space, and overlap at the leading edge. Apply the measurements from P1 to the spaces in P2. The pleats should be straight and the spaces angled.
Step 5 Cut the pattern to this shape.
Step 6 Lay P2 onto 9-inch buckram with the shaped top along the edge of the buckram. Copy that shape onto the buckram and measure down the lines to the depth required for the finished pleat. We used 6 inches. Join up the dots along the top and bottom edges to echo the shape above. Cut out this shape from the buckram and mark the top edge to identify the left- and right-hand curtains. (See the photo above right.)
Part II FabricatingStep 1 Make the curtains up in the normal way, re-membering that you do not need to stitch up so far on the shortest side. Lay the curtain on your table and pin across the width of the panel at B and again across the panel at A.
Step 2 Lay P2 onto the curtain, lining up the bottom of P2 with pins across the panel at B, then the top of P2 should be in line with pins at A. Mark along the top edge either with pins, chalk or tacking. (We’ve found that using P2 before the buckram allows for a more accurate angle between A and B.) Lay the shaped buckram onto the curtain level with this marking and trim the fabric to 5cm (almost 2 inches) above the buckram. If using interlining, trim this to 2cm (a little more than ¾ inch). The curtain can become very bulky if using interlining. You can reduce the bulk by trimming the interlining very close to the top of the buckram. (See the photo at the top of the next page.
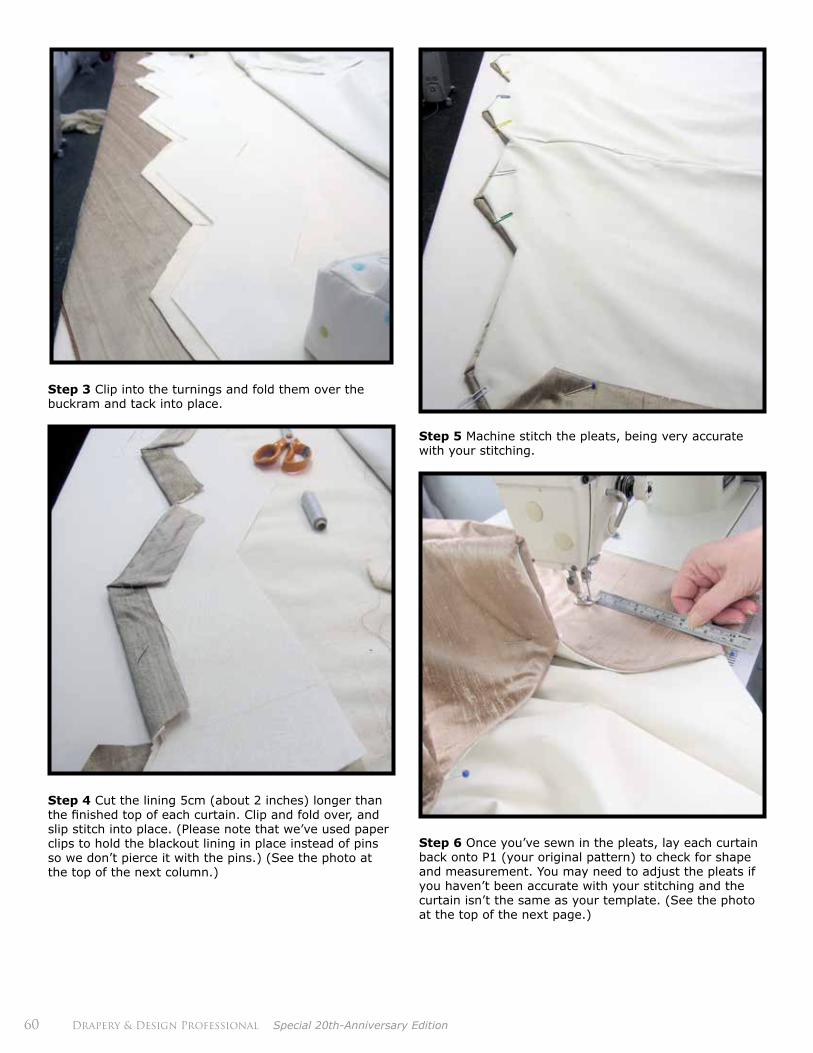
60 Drapery & Design Professional Special 20th-Anniversary Edition
Step 3 Clip into the turnings and fold them over the buckram and tack into place.
Step 4 Cut the lining 5cm (about 2 inches) longer than the finished top of each curtain. Clip and fold over, and slip stitch into place. (Please note that we’ve used paper clips to hold the blackout lining in place instead of pins so we don’t pierce it with the pins.) (See the photo at the top of the next column.)
Step 5 Machine stitch the pleats, being very accurate with your stitching.
Step 6 Once you’ve sewn in the pleats, lay each curtain back onto P1 (your original pattern) to check for shape and measurement. You may need to adjust the pleats if you haven’t been accurate with your stitching and the curtain isn’t the same as your template. (See the photo at the top of the next page.)
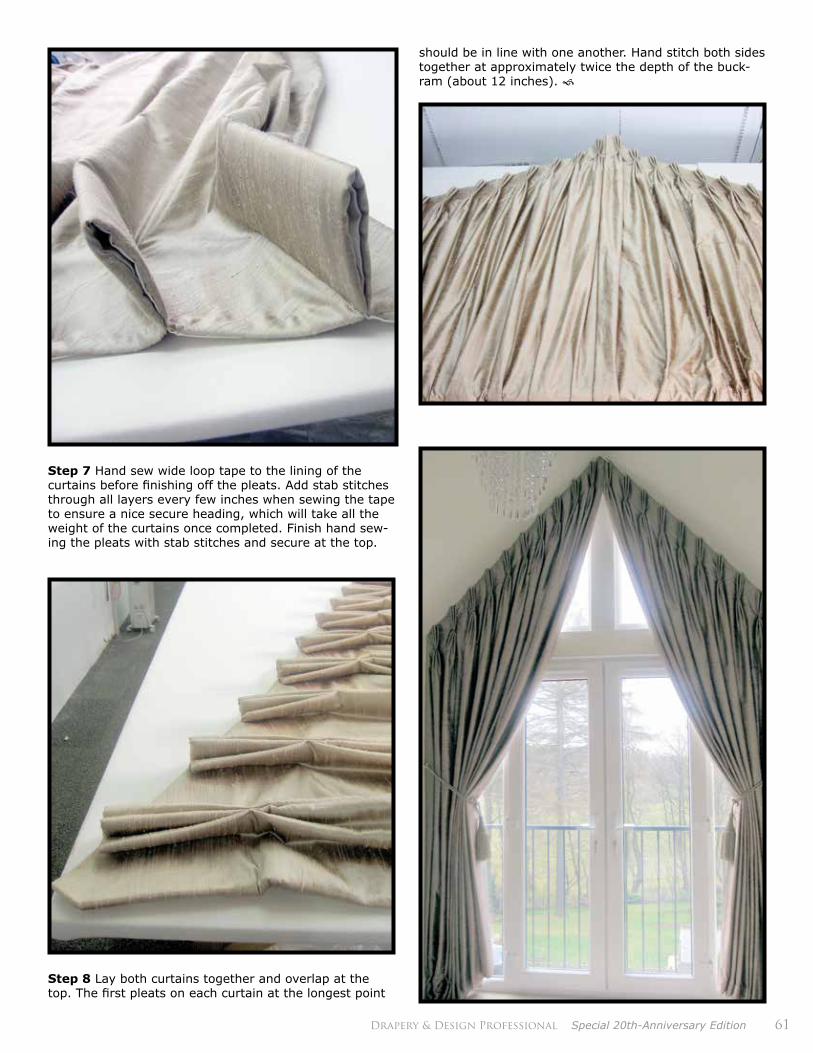
Drapery & Design Professional Special 20th-Anniversary Edition 61
Step 7 Hand sew wide loop tape to the lining of the curtains before finishing off the pleats. Add stab stitches through all layers every few inches when sewing the tape to ensure a nice secure heading, which will take all the weight of the curtains once completed. Finish hand sew-ing the pleats with stab stitches and secure at the top.
Step 8 Lay both curtains together and overlap at the top. The first pleats on each curtain at the longest point
should be in line with one another. Hand stitch both sides together at approximately twice the depth of the buck-ram (about 12 inches).

62 Drapery & Design Professional Special 20th-Anniversary Edition
CUSTOM HOME FURNISHINGS ACADEMY is the pre-mier destination for hands-on training. Our state-of-the-art facility includes classrooms outfitted with professional equipment, industrial machines and a design studio. The instructors are experts in their field, dedicated to empowering students with the pro-fessional skills necessary to thrive in the custom home décor industry.
Thinking of starting a drapery workroom business?
Learn how to set up a professional drapery workroom business with core classes such as BU100–Starting a Workroom Business, WT101–Window Treatment Fabrication I and WT201–Window Treatment Fabrication II. Proper installation of window treat-ments is essential to a successful finished project, so we highly recom-mend new workroom owners take IN101B–Professional Drapery Instal-lation to develop an understanding of how window coverings are installed and dressed in the home.
Mastered the basics but feel intimidated by more advanced styles?
Moving forward with your training is the best way to build confidence and continue toward a successful busi-ness. Add to your core education by taking advanced classes such as WT301–Advanced Top Treatments, WT401–Advanced Drapery Panels and WT511–Advanced Soft Shades.
Interested in learning the craft of custom furniture upholstery?
With our hands-on program you will learn how to up-holster furniture from the frame up! Begin with UP101–Professional Upholstery I, the essential beginning for all professional upholsterers. Continue your education with UP201-Professional Upholstery II and UP301–Profession-al Upholstery III to master all the techniques.
Want to grow your business?
Both new and experienced business owners can bene-fit from continued education. At CHF ACADEMY the curriculum is created by and for workrooms and design professionals, offering a true-life example of what works in this unique industry. Start with BU201–Business Plan Workshop to gain a comprehensive understanding of the financial side of your business and how to achieve your goals. BU301–Pricing Without Emotion takes the fear
and mystery out of setting prices, and will give you the confidence and knowledge to price properly for a profit-able business.
Looking for a specialty?
Specialty products and skills can set you apart from the competition. CHF ACADEMY has an extensive of-fering of classes that will inspire your creativity and teach you advanced level techniques. Classes such as WT411–Arched Panels and WT421–Extraordinary Panels will take your panel designs over the top! Learn how to make trend-setting slipcovers with SL101/201–Professional Slipcov-er Fabrication I & II, and SL301–Pro-fessional Slipcover Fabrication III.
Classes such as WT521–Draping and Drafting Workshop, WT531–Pelmet Top Treatments Workshop, WT541–Advanced Top Treatments With Cor-nice Crowns, WT551–Mastering Bay and Corner Windows, and WT611–Advanced Swag Engineering will take your skills to the next level.
Upholstery offers a great opportuni-ty for learning specialty techniques, which are valuable to drapery and upholstery workrooms alike. If you want to expand your upholstery busi-ness consider attending UP641–Deep
Tufting for Upholstery, UP601–Upholstered Ottomans and UP701–Fabricating for Outdoor Living.
Need help deciding on classes?
Please call our offices to learn more about which class-es are right for you. We are eager to hear about your goals, and to help you select a curriculum that will devel-op the skills you need to succeed.
Call today! 704-333-4636
Kick-start your Careerat CHF Academy
View the complete 2013 schedule here
Terri BooserExecutive [email protected]
Peggy BrewerEducation [email protected]

Drapery & DesignPROFESSIONAL
Drapery & Design Professional Volume 2012, Issue 5 1
Drapery & Design
PROFESSIONALVolume 2012, Issue 5
Ser ving the Custom Home Fur nishings Industr y s ince 1993
Vol_12_Iss_5.indd 1
9/18/12 8:17 PM
Drapery & Design Professional Volume 2012, Issue 1 1
Drapery & Design
PROFESSIONAL
Volume 2012, Issue 1
Ser ving the Custom Home Furnishings Industr y s ince 1993
NETWORKMagazine - Forum - Webinars
$42 Online Only MembershipUSA, Canada, and International
CHF Online ForumDrapery & Design PROFESSIONAL magazine downloads
$68 Basic MembershipUSA only
CHF Online ForumDrapery & Design PROFESSIONALmagazines delivered to your mailbox
$95 Premium MembershipUSA, Canada, and International
CHF Online ForumDrapery & Design PROFESSIONALmagazines delivered to your mailbox
Monthly Educational Webinarslive and on-demand
Use of D&D PRO logo and linkfor your website
$125 Premium PLUS MembershipUSA, Canada, and InternationalAll benefits of Premium Membership listed above
Join Today!Annual Membership
Name:_____________________________________________
Business Name:_____________________________________
Address:____________________________________________
___________________________________________________
City/State/Zip:_______________________________________
Phone:_____________________________________________
Fax:_______________________________________________
E-mail:_____________________________________________
Forum Screen Name:________________________________
Payment Information
Cardholder:_________________________________________
Card #:_____________________________________________
Exp Date:________________________CID #:_____________
Signature:___________________________________________
• Drapery & Design PROFESSIONAL magazine online or delivered to your mailbox six times per year
• 24/7 access to the CHF Forum to post ques-tions and answers, share photos and connect to other custom home furnishings professionals, and search a database of over 450,000 posts to find solutions to every challenge
• Monthly LIVE educational webinars with on-de-mand viewing on the most relevant and inspiring topics
• Plus free access to viewing of A Day in the Life video series and CHF AH HA Moments
Drapery & Design PROFESSIONAL magazine, CHF Online Forum and CHF Webinars are published by the Custom Home Furnishings Academy
Phone: 704-333-4636FAX: 704-333-4639 WWW.CHFACADEMY.COM [email protected]

64 Drapery & Design Professional Special 20th-Anniversary Edition
You would agree that this business, perhaps like no other, is laced with details, nuances and intricacies. Often, to take care of them, we find ourselves run-
ning around from the client to the workroom, designer, marketplace, showroom, store, and all the other places that play a role in making any design a reality. In plain English, we do more driving than we care for.
I finally came to this conclusion one day five years ago when, at the end of the day, I reflected on my day: I went to the workroom to answer questions, stopped by the post office, went to the furniture store to match a color, drove to a client’s home to pick up pillows and to a different workroom to drop them off, went home to answer e-mails, and straightened my car. I was exhausted and really had nothing to show for myself: I really didn’t do any “money-making” activities. The desire to use my time to its peak productivity was the reason I left my corporate job. When I realized that I was falling into the same trap, I knew things needed to change.
Starting in 2007 and every year after, I track my time for an entire month. The first time I did it, I discovered that 15 percent of my time was spent driving around from one stop to the next. Granted, some of it was necessary ― driving to client appointments and installations ―
but some of it wasn’t. So I vowed to find a way to cut that number down. In 2011, when I went through the exercise again, that number was 10 percent. That’s a 5 percent difference ― or, a whole day for every three weeks that I worked. A whole day! What can you do with an extra 17 days per year?
Aside from wasting time driving around, what are some other things that suck our time? Unexpected phone calls? Yes. Clients and prospects wanting to see us immediately? Yes. E-mail? Yes. Hopping from one task to the next without a system in place? Yes. I can go on. Invariably, we look at the list of things accomplished at the end of the day, and wonder: What did I do all day? I was busy. I’m tired. But what do I have to show for myself?
There is another, often overlooked, aspect of time management. And that is how long it takes to go from task to task. Picture this scenario: You’re in the middle of doing an estimate, the phone rings, you answer, have the conversation, then go back to doing the estimate. How much time is taken away from doing the estimate? Besides the time that it actually took to have that conversation, there is also lost time in collecting your thoughts and regaining the momentum lost during that interruption. Maybe it’s a minute, maybe it’s three
How I Added 17 Days to My Year By Vita Vygovska
Newtown, PA

Drapery & Design Professional Special 20th-Anniversary Edition 65
minutes. But there is definitely additional time lost. It may sound insignificant individually, but add all the minutes lost and you would find yourself losing whole days.
The SolutionThe great news is that it’s all solvable. It’s all changeable. And you’re in the position to effect this change. All you need to do is use one simple technique that will change your life.
It’s most commonly referred to as batching.
Batching simply means doing similar things at the same time. It means that all like activities should be done during the same period of time without delay or interruption.
For example, one of the biggest changes I made to my business was to dedicate one single and consistent day per week for installations. There was no more doing an installation on any given day, then running to a workroom, then running home, then running to a networking event. I decided that Wednesday was going to be my one and only day per week when all of my installations would take place. It is Wednesday to this day. And it works great.
The Benefits The advantages of batching your tasks are numerous. Here are just three:
• Save money. Just the sheer savings on gas alone is worth it! Plus, as the saying goes, “Time is money.” Think about how much money you’d save ― or could make ― if you batched your activities.
• Save time. Since I decided to go to the one-day-per-week installation schedule, I save time by preparing for installations only once, communicating a single due date to workrooms, not having to go back and forth with clients, loading my truck only once, etc.
• Save energy. There is a lot to be said about “working in the flow.” Also commonly referred to as “being in the zone,” “riding the wave” or “using the momen-tum.” Whichever words you use to describe it, you know the feeling of being consumed by the work and therefore being able to produce faster and better re-sults. I had one client who was struggling to stay in the flow because of frequent phone interruptions. So because she didn’t have the willpower to ignore the phone, we decided that the best course of action was to turn it off completely. From 9 a.m.–2 p.m., she was in fabricating heaven.
Now it’s your turn to look at your business practices and find areas that you can improve through batching of your tasks. This productivity technique changed my life five years ago and still changes the lives of many decorators I coach.

66 Drapery & Design Professional Special 20th-Anniversary Edition
www.adaptivetextiles.com

68 Drapery & Design Professional Special 20th-Anniversary Edition
Boiler steam irons and
tracking system
- Proven dependability
Unique anti drip hand iron
Continuous steam flow
Extraordinary amount of steam
Very low iron sole temperature
Optional steam hose length up to 16ft
Heavy duty stainless steel construction
Cutting edge technology
Easy to use / operate
The ideal solution for larger tables:
Movable track system supports the hand iron and
steam hose over any location on the table.
döfix No Sew, Inc. • 1947 Ironway Dr • Sanford, MI 48657 • Tel 800-962-8983; 989-687-7999 • www.dofix.com
Call 800-962-8983 for more information
Ideal for the smaller workroom or
as portable unit.
The choice for the professional
workroom
D50
D90
- Maximum capacity
- ultimate versatility
- allows 2 hand irons to be attached
D25