sparkhome modem - mobile phones, plans & broadband · pdf file2 1 x huawei hg630b gateway...
TRANSCRIPT


SPARK
HOME MODEM
Ultra Broadband
ready
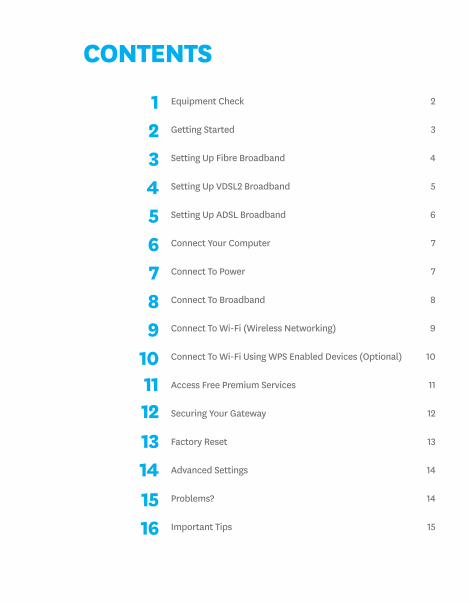
Equipment Check 2
Getting Started 3
Setting Up Fibre Broadband 4
Setting Up VDSL2 Broadband 5
Setting Up ADSL Broadband 6
Connect Your Computer 7
Connect To Power 7
Connect To Broadband 8
Connect To Wi-Fi (Wireless Networking) 9
Connect To Wi-Fi Using WPS Enabled Devices (Optional) 10
Access Free Premium Services 11
Securing Your Gateway 12
Factory Reset 13
Advanced Settings 14
Problems? 14
Important Tips 15
CONTENTS
123456789
10111213141516

2
1 x Huawei HG630B Gateway
1 x ADSL Cable (grey)
1 x VDSL2 Cable (black)
1 x LAN Ethernet Cable (Yellow)
1 x Fibre Ethernet Cable (blue)
1 x Power Supply
1 x User Guide
1 x Safety Information
Let’s check everything is here. You should have:
1. EQUIPMENT CHECK
3
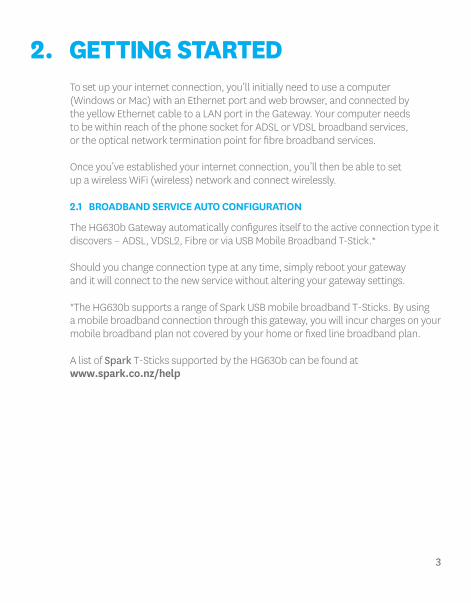
To set up your internet connection, you’ll initially need to use a computer (Windows or Mac) with an Ethernet port and web browser, and connected by the yellow Ethernet cable to a LAN port in the Gateway. Your computer needs to be within reach of the phone socket for ADSL or VDSL broadband services, or the optical network termination point for fibre broadband services.
Once you’ve established your internet connection, you’ll then be able to set up a wireless WiFi (wireless) network and connect wirelessly.
2.1 BROADBAND SERVICE AUTO CONFIGURATION
The HG630b Gateway automatically configures itself to the active connection type it discovers – ADSL, VDSL2, Fibre or via USB Mobile Broadband T-Stick.*
Should you change connection type at any time, simply reboot your gateway and it will connect to the new service without altering your gateway settings.
* The HG630b supports a range of Spark USB mobile broadband T-Sticks. By using a mobile broadband connection through this gateway, you will incur charges on your mobile broadband plan not covered by your home or fixed line broadband plan.
A list of Spark T-Sticks supported by the HG630b can be found at www.spark.co.nz/help
2. GETTING STARTED

4
If you have an ADSL or VDSL broadband connection, skip this step.
To receive a fibre broadband service, your premises must have a fibre cable connection.
To set up your fibre broadband connection you must use a computer with an ethernet port and a web browser. Due to the length of the cables supplied, you must set up close to the fibre optical network termination (or ONT) point. Once your fibre broadband is working, you can unplug the ethernet cable and use the Gateway’s wireless (Wi-Fi) network.
Connect one end of the blue tipped Fibre Ethernet Cable into the blue WAN port in the Gateway and the other end into the port labelled GE1 in the Fibre ONT (Chorus Fibre ONT illustrated).
When complete, skip to step 6.
Fibre Company ONT
Fibre Ethernet Cable
3. SETTING UP FIBRE BROADBAND
GE2POTS1 POTS2 RESET GE1 GE3 GE4 POWER
5
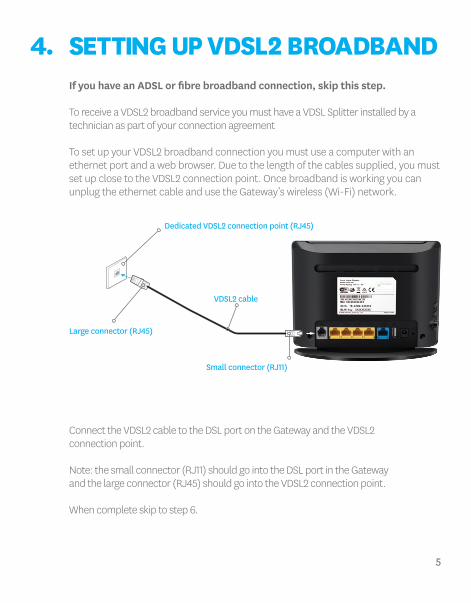
If you have an ADSL or fibre broadband connection, skip this step.
To receive a VDSL2 broadband service you must have a VDSL Splitter installed by a technician as part of your connection agreement
To set up your VDSL2 broadband connection you must use a computer with an ethernet port and a web browser. Due to the length of the cables supplied, you must set up close to the VDSL2 connection point. Once broadband is working you can unplug the ethernet cable and use the Gateway’s wireless (Wi-Fi) network.
Connect the VDSL2 cable to the DSL port on the Gateway and the VDSL2 connection point.
Note: the small connector (RJ11) should go into the DSL port in the Gateway and the large connector (RJ45) should go into the VDSL2 connection point.
When complete skip to step 6.
Dedicated VDSL2 connection point (RJ45)
VDSL2 cable
Large connector (RJ45)
Small connector (RJ11)
4. SETTING UP VDSL2 BROADBAND
6
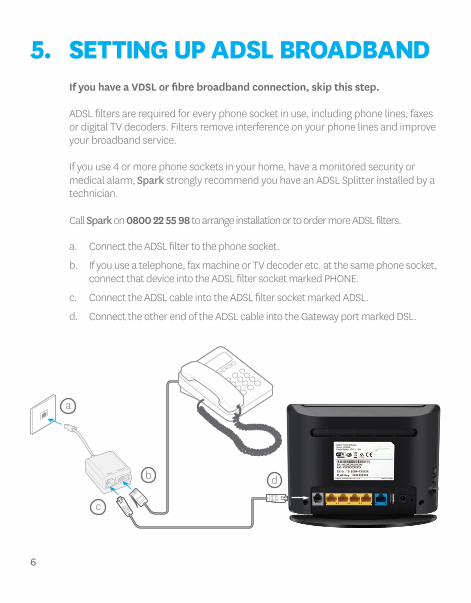
If you have a VDSL or fibre broadband connection, skip this step.
ADSL filters are required for every phone socket in use, including phone lines, faxes or digital TV decoders. Filters remove interference on your phone lines and improve your broadband service.
If you use 4 or more phone sockets in your home, have a monitored security or medical alarm, Spark strongly recommend you have an ADSL Splitter installed by a technician.
Call Spark on 0800 22 55 98 to arrange installation or to order more ADSL filters.
a. Connect the ADSL filter to the phone socket.
b. If you use a telephone, fax machine or TV decoder etc. at the same phone socket,connect that device into the ADSL filter socket marked PHONE.
c. Connect the ADSL cable into the ADSL filter socket marked ADSL.
d. Connect the other end of the ADSL cable into the Gateway port marked DSL.
a
b d
c
5. SETTING UP ADSL BROADBAND
7
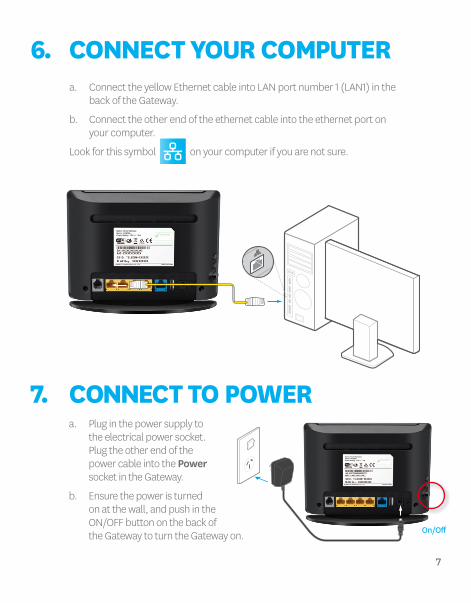
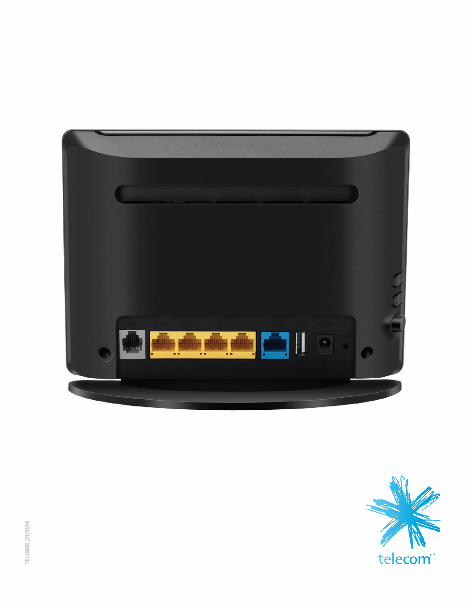
a. Connect the yellow Ethernet cable into LAN port number 1 (LAN1) in the back of the Gateway.
b. Connect the other end of the ethernet cable into the ethernet port on your computer.
Look for this symbol on your computer if you are not sure.
a. Plug in the power supply to the electrical power socket. Plug the other end of the power cable into the Power socket in the Gateway.
b. Ensure the power is turned on at the wall, and push in the ON/OFF button on the back of the Gateway to turn the Gateway on.
6. CONNECT YOUR COMPUTER
7. CONNECT TO POWER
On/Off
8
Please wait up to 5 minutes for the Gateway to establish a broadband connection. Your Gateway lights will tell you when the connection is working correctly. If the Power light is off – check Step 7.
For ADSL and VDSL2 connections, the lights should be as follows: The Power and DSL lights should be solid GREEN and not blinking. The Internet and LAN1 lights should be GREEN and blinking.
For a Fibre connection, the lights should be as follows: The Power and WAN lights should be solid GREEN and not blinking. The Internet and LAN1 lights should be GREEN and blinking.
When the Gateway lights are correct, open a web browser on your computer such as Internet Explorer, Safari, Firefox or Chrome. If your connection is working you will see a valid web page and be able to surf the internet.
If not, restart your computer, open an internet browser and try again.
If after 5 minutes the DSL light is off or flashing: y Check Step 3 if you have a fibre connection y Check Step 4 if you have a VDSL2 connection y Check Step 5 if you have an ADSL connection. If the DSL light remains off or
flashing, you may have a faulty phone socket. Try connecting using another phone socket.
If the LAN1 light is off – check Step 6. Ensure the ethernet cable is correctly connected to the ethernet port of your computer, and a LAN port on your Gateway.If the DSL light (for ADSL or VDSL2) or WAN light (for fibre) remains off or flashing, or if you continue to experience problems, call our Broadband Helpdesk on 0800 22 55 98.
8.1 NEW SPARK ACCOUNTS
If you are an existing Spark customer skip this step.
When you are successfully connected to the Internet, you should activate your Spark broadband account. In the browser address bar type www.spark.co.nz/broadbandsetup press enter and follow the online activation steps.
8. CONNECT TO BROADBAND
9
Before you begin, ensure you can connect to the internet using the Ethernet connection.
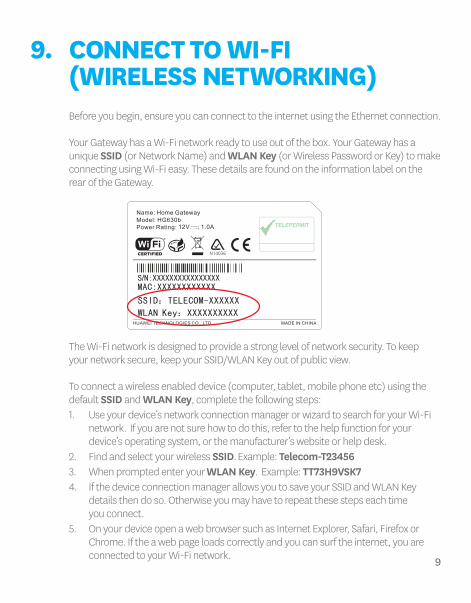
Your Gateway has a Wi-Fi network ready to use out of the box. Your Gateway has a unique SSID (or Network Name) and WLAN Key (or Wireless Password or Key) to make connecting using Wi-Fi easy. These details are found on the information label on the rear of the Gateway.
The Wi-Fi network is designed to provide a strong level of network security. To keep your network secure, keep your SSID/WLAN Key out of public view.
To connect a wireless enabled device (computer, tablet, mobile phone etc) using the default SSID and WLAN Key, complete the following steps:1. Use your device’s network connection manager or wizard to search for your Wi-Fi
network. If you are not sure how to do this, refer to the help function for your device’s operating system, or the manufacturer’s website or help desk.
2. Find and select your wireless SSID. Example: Telecom-T234563. When prompted enter your WLAN Key. Example: TT73H9VSK74. If the device connection manager allows you to save your SSID and WLAN Key
details then do so. Otherwise you may have to repeat these steps each time you connect.
5. On your device open a web browser such as Internet Explorer, Safari, Firefox or Chrome. If the a web page loads correctly and you can surf the internet, you are connected to your Wi-Fi network.
0979
GEYAHUI
YANGNING
ZHONGGANG
HG630b
Pantone Black C
物料底纸必须满足打印要求红色框中内容由产线打印
DKBA8.807.XXXX
9665XXXX
HG630b铭牌_英文版本
DK
BA
8807
XX
XX
.CD
R
丝印内容
示意图
7.0
mm
6.0 mm
C
0.2
PET哑白(White)
6.4
mm
ALUOXUANYU
红框不打印,红框中内容仅作示意,实际内容由产线打印
产线打印区域44x21mm
0979
5.0
mm
2013-07-02
2013-07-02
2013-07-022013-07-02
Power Rating:
Power Rating:
Name: Home Gateway
Name: Home Gateway
12V ; 1.0A
12V ; 1.0A
HUAWEI TECHNOLOGIES CO., LTD.
HUAWEI TECHNOLOGIES CO., LTD.
MADE IN CHINA
MADE IN CHINA
0979
0979
Model: HG630b
Model: HG630b
XX
4.0
mm
This Vodafone HuaweiHG556a HW.C HomeGateway may be connectedto the Telecom Network.
This Vodafone HuaweiHG556a HW.C HomeGateway may be connectedto the Telecom Network.
Pantone PMS 375
Pantone Black CPantone PMS 375
9. CONNECT TO WI-FI(WIRELESS NETWORKING)
10
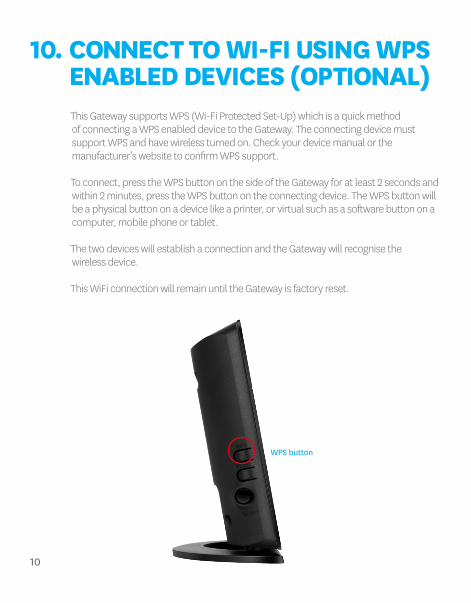
10. CONNECT TO WI-FI USING WPS ENABLED DEVICES (OPTIONAL)This Gateway supports WPS (Wi-Fi Protected Set-Up) which is a quick method of connecting a WPS enabled device to the Gateway. The connecting device must support WPS and have wireless turned on. Check your device manual or the manufacturer’s website to confirm WPS support.
To connect, press the WPS button on the side of the Gateway for at least 2 seconds and within 2 minutes, press the WPS button on the connecting device. The WPS button will be a physical button on a device like a printer, or virtual such as a software button on a computer, mobile phone or tablet.
The two devices will establish a connection and the Gateway will recognise the wireless device.
This WiFi connection will remain until the Gateway is factory reset.
WPS button

11
11. ACCESS FREEPREMIUM SERVICESAs a valued Spark customer, you can access a range of free and exclusive premium services including:
1. Security Suite powered by McAfee to protect your computer from Internet threats (worth over $95 a year). Available for Microsoft Windows computers only. Your free licence allows you to install McAfee on up to 5 Windows computers.
2. Flickr Pro Account so you can get more than just a standard account. Store, organise and share your photos and videos securely.
3. Up to 10 free sub-accounts so everyone in the family can have their ownsuite of free services from Yahoo! including their very own Flickr Pro account.
Visit www.spark.co.nz/premiumservices to find out more.
Don’t forget to register for the Broadband Usage Meter so you can keep track
of how much data you’ve used at any time during the month.
Visit www.spark.co.nz/myaccount to find out more.
12
12. SECURING YOUR GATEWAYThe most effective method to keep your Gateway secure is to keep your Gateway and Wi-Fi password details in a safe place and protect against unauthorised physical access to your Gateway.
Your Gateway settings are password protected with an administrator login. The default username = admin The default password = admin
Spark recommends you create a unique password to protect access to your Gateway. To do this, you need to use the Gateway’s User Interface:
1. Open a web browser, type 192.168.1.254 into the address bar and press enter.This will take you to the User Interface.
2. Enter the Username and Password and click on Login.
3. Click on the Maintenance tab on left side menu to access the Account menu; then click on Account.
4. When prompted, enter the current Gateway Username (by default admin) and Password (by default admin); then enter your new password and confirm it,then click Submit. Your password is changed.
The next time you want to change your Gateway settings you must log in using your unique password.
Note: If you forget your Administrator password you will need to reset the Gateway to factory default, (see step 13).
13
13. FACTORY RESETWARNING! A factory reset restores the Gateway to the default settings – all remembered Wi-Fi connections and any user customisations are erased.
Most users should only perform a factory reset when you are directed to by the broadband helpdesk.
To factory reset your Gateway, do the following:
1. While the Gateway is turned on, insert a paper clip into the Reset hole in the back, press down for 8 to 10 seconds, then release.
2. The Gateway will reset and then restart. This can take up to 5 minutes.
3. After a factory reset, you must manually reconnect each Wi-Fi device and redo any customisations.
14
If you have any difficulties you can:
Visit our website www.spark.co.nz/help for a wide range of help topics
including step-by-step tutorials.
Call our Broadband Helpdesk on 0800 22 55 98
15. PROBLEMS?
To access advanced features or to customise the Gateway, open a web browser and type 192.168.1.254 into the address bar and press enter to access the Gateway interface.
For specific help on advanced settings, visit our website www.spark.co.nz/help for a wide range of help topics and information including step-by-step tutorials.
14. ADVANCED SETTINGS
15
16. IMPORTANT TIPS y When starting up the Gateway do not press any buttons. Wait for a broadband
connection to be established first.
y Many issues with a broadband connection can be resolved by turning the Gateway off for 30 seconds, then on again. It can take up to 5 minutes for the connection to re-establish.
y Customers with computers running Microsoft Windows should reboot their computers at the same time they reboot their Gateway.
y Operate the Gateway on a flat surface and ensure the Gateway is not covered by anything and has adequate ventilation at all times.
y ADSL broadband customers should: y Not use telephone extension cables with the Gateway as these cause speed
and stability problems. y Use the ADSL filters supplied with this Gateway when setting up as old filters
can cause speed and stability problems.
y If you want to network additional devices using the ethernet LAN ports, you will require one ethernet cable for each device.
y Wi-Fi signal strength and range is dependent on physical and environmental factors outside of Telecom’s control. The following tips will help you optimise your Wi-Fi signal:
y Dense obstacles such as walls, floors, ceilings, hot water cylinders, aquariums etc. limit Wi-Fi performance and range.
y Do not place the Gateway near electronic devices such as microwave ovens, cordless phones or wireless transmitters like baby or room monitors.
y Do not place the Gateway in an enclosed space such as a cupboard, under or behind a desk or large item of furniture.
y To benefit from the speed offered by the 802.11n standard, it is recommended to connect using 802.11n wireless devices only. Connecting older 802.11b or 802.11g wireless devices may slow down the speed of your whole Wi-Fi network.
y If you have Wi-Fi coverage issues, you can opt to purchase products such as Wi-Fi range extenders.
y Where possible place your Gateway up high for better Wi-Fi performance.
TEL0
886_
01/2
014