sound control kit for indian chieftain, roadmaster & …€¦ · sound control kit for indian...
TRANSCRIPT

SOUND CONTROL KIT FOR INDIAN CHIEFTAIN, ROADMASTER & DARKHORSE
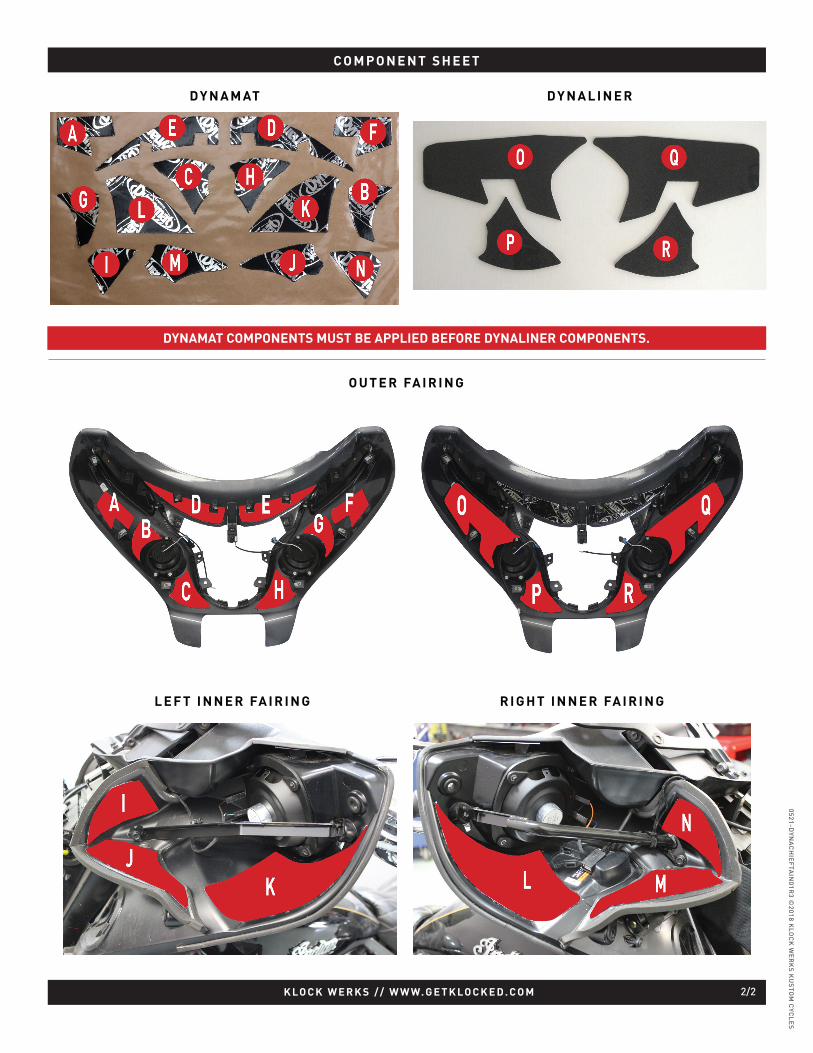
- Pre-cut Dynamat Xtreme (14)- Pre-cut Dynaliner (4)
- Gloves- Utility Knife
INCLUDED COMPONENTS: HELPFUL FOR INSTALLATION:
CAUTION: Klock Werks cannot be held responsible for any damage to painted surfaces during removal or addition of Klock Werks parts.
1. Remove outer fairing and rest on a soft cloth.2. Clean any dust and debris from inside the outer fairing.3. Test fit Dynamat Xtreme to check for alignment and position with paper backing still
attached. (1)4. Remove paper backing to expose butyl layer.5. Apply Dynamat Xtreme to designated area using light pressure at first, to aide in
adjustment. (2, 3 and 4)6. Smooth from center outward to prevent air pockets. Use a rag or gloves and work into
contours of the fairing. If an air pocket develops, simply puncture with a knife or pin and roll smooth.
7. Test fit Dynaliner to check alignment with paper backing still attached.8. Peel the release liner, and apply Dynaliner (Components 0, P, Q, and R) directly to the
Dynamat Xtreme, pressing it firmly into place. (5 and 6)
21
4
3
5 6
These two pieces WILL NOT fi t models equipped with an
infotainment system.
0521-DYN
AC
HIE
FTA
IN01R
3 ©2018 K
LOC
K W
ER
KS
KU
STO
M C
YCL
ES
I N S T R U CT I O N S H E E T
K LO C K W E R K S / / W W W. G E T K LO C K E D . C O M 1/2
QUESTIONS?
CALL: (605) 996.3700
P O W E R E D B YP O W E R E D B Y
K LO C K W E R K S / / W W W. G E T K LO C K E D . C O M 2/2
C O M P O N E N T S H E E T
DY N A M AT
O U T E R FA I R I N G
R I G H T I N N E R FA I R I N GL E F T I N N E R FA I R I N G
DY N A L I N E R
DYNAMAT COMPONENTS MUST BE APPLIED BEFORE DYNALINER COMPONENTS.
0521-DYN
AC
HIE
FTA
IN01R
3 ©2018 K
LOC
K W
ER
KS
KU
STO
M C
YCL
ES