soil layers (horizons) rhode island soils principal components of all soils are mineral material,...
TRANSCRIPT
20Rhode Island Sustainable Gardening Manual
Soil is formed from bedrock and other rock debris as they are acted upon by climate and vegetation over time. Soil is a combination of weathered rock fragments, newly-formed clay minerals, and the synthesized remains of plants and
animals (called organic matter). Approximaely 50% of the soil is spaces holding varying proportions of air and water. Soil furnishes mechanical support, water, and nutrients for growing plants.
Mineral soils are those containing less than 20 percent (by weight) organic matter; values ranging from 1 to 5 percent are most common in surface soils. Organic soils are those having 20 percent or more organic matter, and the organic matter dominates the soil properties. Muck and peat soils are organic soils.
SOIL LAYERS (HORIZONS)Most soils have three distinct principal layers, or horizons (Figure 2-1); and each layer can have two or more subho-rizons. The principal horizons (collectively called the soil profile) are: A (surface soil), E (leached subsurface layer), B (subsoil), and C (parent material). Beneath residual soil profiles lies rock, frequently similar to that from which the soil developed and usually referred to as the R layer. Hori-zons usually differ in color, texture, consistency, and struc-ture. They also vary in chemical, physical and mineralogical characteristics and/or composition.
Surface soil contains more organic matter than the other layers. Organic matter gives the surface horizon a distinctive generally dark-brown color; the darkness depending on the amount of organic matter present. This layer is biologically active, thus usually more fertile and has the greatest concen-tration of plant roots of any horizon. Plants obtain most of their nutrients and water from the surface soil.
Subsoil is firmer and often of a finer texture; and its organic matter content is generally much lower than the surface soil. Subsoil colors are shades of red, brown, yellow and gray. The subsoil layer provides storage space for water and plant nutrients; and it aids in regulating soil temperature and air supply for plant roots.
The bottom horizon,frequenly called parent material, may be made up of decomposing rock or transported materials from glaciers that has acquired characteristics of the subsoil and retained characteristics of the rock from which it weath-
ered. It may be fractured rock and may show the form or structure of the original layering. Parent materials influence the soil’s texture, natural fertility, rate of formation, acidity, and depth, as well as the surrounding topography.
RHODE ISLAND SOILSIowa boasts of some of the richest, deepest topsoil in the United States. Rhode Island and most all states in between are greatly different from Iowa. The last glacier to move across present-day New England transformed our landscape. By geological standards, soils in Rhode Island are quite young; they began forming approximately 12,000 years ago from minerals deposited by the last glacier. Soil that was present prior to the last glacier was, sadly, scraped away and deposited elsewhere. Rhode Island soils are generally acidic, resulting from a relatively high average rainfall (42 to 54 inches per year), coupled with the chemistry of depos-ited minerals and underlying bedrock. The notable excep-tion is the area around Lincoln, RI that lies above a natural limestone deposit and benefits from its pH-buffering effect. Rhode Island soils exhibit a light or sandy texture since they contain high proportions of sand and silt. Excluding some areas on Block Island, most soils in Rhode Island are gener-ally low or no clay particle sizes. Soils in the southern re-gions of Rhode Island are considered to be among the best in that they are relatively deep and comparatively free of stone and gravel. Gardeners in western Rhode Island contend with soils that exhibit a generally sandier, stonier texture. Because of a long history of human use, there are relatively few virgin

21Rhode Island Sustainable Gardening Manual
soils in the state.
The unofficial state soil is Narragansett Silt Loam; it occurs on approximately 12,000 acres in Rhode Island as well as in neighboring areas of Connecticut and Massachusetts. Narragansett Silt Loam is a well drained soil that supports agricultural crops as well as forest species such as oaks, white pine and beech.
Rhode Island’s coastal areas often contain soils that are brackish or saline because of a high water table and /or periodic inundation by high tides. Soils from marshy areas may also contain a thick layer of partially decomposed or-ganic matter (peat) that formed under anaerobic conditions. Despite an appealing dark appearance, these sediments are not a good choice for amending the upland garden because of their salinity and propensity to lower soil pH (trapped hydrogen sulfide oxidizes to form sulfuric acid.)
SOIL COMPONENTSThe principal components of all soils are mineral material, organic matter, water and air.
Mineral MaterialMineral material, which makes up the bulk of soil solids, has its origin in parent materials. It is usually made up of many different kinds and sizes of particles, ranging from those visible to the unaided eye, like gravel and sand, to clay which can only be seen through a very powerful (electron) micro-scope.
Organic MatterOrganic matter in soil consists of the remains of plants and animals. When soil temperature and moisture conditions are favorable, earthworms, insects, bacteria, fungi, and other types of plants and animals use the organic matter as food. The breakdown products are humus and soil nutrients. Through this process, nutrients are made available for use by growing plants.
The digested and decomposing organic material also helps develop good air-water relationships. In sand, organic mate-rial occupies some of the space between sand grains, thus increasing the water-holding capacity. In clay soil, organic material creates aggregates, allowing water to move more rapidly through the large pores between aggregates. This grouping of soil particles into aggregates is beneficial for seedbed preparation and other tillage.
Organic matter content depends primarily on the kinds of plants that have been growing on a soil, long-term manage-ment practices, temperature, and drainage. Soils that had grass cover for long periods have a relatively high content of organic matter. If the plants have been grown on a soil that is poorly drained, organic matter content is usually higher than if the same plants are grown on a well-drained soil.
22Rhode Island Sustainable Gardening Manual
This is because of differences in available oxygen and other substances needed by the organisms that attack and decom-pose the organic material. Soils in a cool climate have more organic matter than those in a warm climate.
Water and AirWater in soil comes from precipitation (rain, snow, hail or sleet), irrigation or condensation. Falling rain enters the soil through cracks, holes and openings between soil particles. As water enters, it pushes out air; if air is not available to plant roots for too long, the plant will not have the oxygen that it needs for growth.
Some water is used by plants, some is lost by evaporation, and some moves so deep into the soil that plant roots cannot reach it. If rainfall is intense or goes on for a long time, some water may be lost to runoff.
When organic matter decomposes in soil, it gives off carbon dioxide which replaces some of the oxygen in the soil. As a result, soil air contains less oxygen and more carbon dioxide than the air above the surface. Carbon dioxide is dissolved by water in the soil to form a solution of weak carbonic acid. This solution reacts with soil minerals to release nutrients that can be taken up and used by plants.
A surface soil that is best for plant growth contains approxi-mately 50 percent solid material, that is, mineral materials and organic matter, and 50 percent open, or pore, space. Under ideal or near-ideal moisture conditions for growing plants, soil openings, or pore space, contain about 25 percent air and 25 percent water, based on total volume of soil.
The percentage of mineral matter and organic matter in a cubic foot of surface soil varies from one soil to another, and within the same soil, depending on the kinds of crops grown, frequency of tillage, and wetness or drainage char-acteristics. Organic matter is usually high in soils that have not been cultivated for a long time. Frequently tilled soils and those with relatively small amounts of plant residues are generally low in organic matter. Plowing and other tillage increases the air in soil, which raises the rate of organic mat-ter decomposition. Soils with poor drainage or high water tables usually have higher organic matter content than well-drained soils, because water excludes air from the soil.
Since either air or water fills pore spaces, the amount of air in a soil depends on the amount of water present in the pore spaces. Immediately after a rain there is more water and less air in the pore spaces. Conversely, in dry periods a soil con-tains more air and less water. Increasing the organic matter content usually increases the soil’s water-holding capacity, but adding large amounts of undecomposed organic materi-al, such as crop residues, coarse sawdust or wood chips, will change water-holding capacity until the material has partly decomposed.
PHYSICAL PROPERTIESA soil’s physical properties are those characteristics that can generally be seen with the eye or felt between the thumb and fingers. These properties evolve over time as climatic factors, such as rainfall and temperature, act on the soil. They are also affected by the slope and direction of the land surface and especially by the kind and amount of vegetation, such as forest or grass. A change in any of these influences usually produces a difference in the soil formed.
Important physical properties of soil are color, texture, struc-ture, internal drainage, and depth. Characteristics such as texture, structure, chemical composition, internal drainage, depth, stoniness, slope, and susceptibility to erosion deter-mine how well the soil is suited for a particular use and how it should be managed. Physical properties usually dictate the soil’s suitability as a growth medium.
Soil fertility is more easily changed to improve soil produc-tivity than are a soil’s physical properties. It can be altered by adding fertilizers and changing the pH with lime applica-tions. Improving physical properties may involve cultivating to relieve compaction or adding physical amendments, such as peat or sand, to improve air and water relationships.
ColorWhen you examine soil, color is one of the first things to notice. In itself, color is of minor importance, but it indicates or reflects soil conditions that are extremely important. In general, color is produced by (1) organic matter content, (2) drainage conditions, and (3) degree of oxidation or extent of weathering (including flooding).
Surface soil colors vary from almost white, through shades of brown and gray, to black. Light colors indicate low organic matter content, while dark colors can indicate a high con-tent. Light colors are frequently associated with a relatively coarse texture and highly leached conditions; light colors occur in southern areas that have high annual temperature. Dark surface soil may result from a high water table (poor drainage), low annual temperatures, or other influences that induce high organic matter generation while slowing the oxidation of organic materials. Dark colors may originate from the parent material. Shades of red or yellow, particu-larly those associated with clay textures, usually indicate that subsoil material has been incorporated into the surface or plow layer.
Dark soils absorb heat more rapidly than light soils, but they also lose heat faster at night. This produces a greater variation in daily temperatures. Dark soils are warmer than light soils during warm seasons. Measured differences in soil temperature induced by surface soil color decrease with increasing soil depth.
Subsoil colors, in general, are indicative of air, water and soil
23Rhode Island Sustainable Gardening Manual
relationships and show the degree of iron oxidation in the soil. Red and brown shows that the soil allows relatively free movement of air and water. If these or other bright colors persist throughout the subsoil, it is indicative of aeration. Soils with gray and yellow subsoils usually have slow internal drainage. Soils that exhibit mottling in the subsoil, especially where gray predominates, are saturated with water and so have too little air much of the time. The red to brown color of subsoils comes from iron coating under well-aerated con-ditions. In wet soils with low oxygen levels, the iron coatings have been chemically and biologically removed; and the gray color of background soil minerals shows.
TextureThe relative distribution of different-sized soil mineral par-ticles less than 2.0 mm in diameter is referred to as texture. Soil texture depends on the amounts of sand, silt and clay present. In each textural class there is a range in the amounts of sand, silt and clay that can be present.
Mineral particles of soil between 0.05 mm and 2.0 mm in diameter are called sand. Most sand particles can be seen without a magnifying glass; all feel rough when rubbed between the thumb and fingers.
1. Soil particles 0.002 mm to 0.05 mm in diameter feel smooth and floury, and are called silt. When wet, silt feels smooth but is not slick or sticky. When dry, it is smooth, and if pressed between the thumb and finger it will retain an imprint. Silt particles cannot usually be seen by the unaided eye.
2. Clays are soil particles less than 0.002 mm in diam-eter. Clay can be seen only with the aid of an electron microscope. They are hard when dry and become slick and sticky when wet. Clay can be molded and it will hold its form.
3. Sand and silt retain the same chemical composition as the mother rock from which they were derived. Clay particles are different in that they are chemically reac-tive. They take up (absorb) and give back (desorb) soil cations, such as Ca+2, K+, and Mg +2. Clay particles also provide soil with a valuable property known as cation exchange capacity (CEC). (See Chapter 3 Plant Nutrients and Fertilizer for full explanation of Cation Exchange).
Other textural designations of soils are sands, loamy sands, sandy clay loams, and clays. The composition of each textural class does not allow for overlap from one class to another. Figure 2-2 shows the textural classes for the various percentages of sand, silt and clay.
Soil texture influences many other soil characteristics. For example, sandy soils allow water to enter at a faster rate than clay soils; and the water can move more freely in the sand. In addition, the relatively low water-holding capacity and the
large amount of air present in sand allows it to warm faster than clay. Sand is also more easily tilled.
Although some textures can be grouped into about 12 class-es, most surface soils in Rhode Island fall into five general textural classes. Each class name indicates relative amounts of sand, silt, and clay in the soil. Texture is determined in the field by rubbing or feeling moist-to-wet soil between the thumb and fingers; it can be verified by laboratory particle-size analysis. Regardless of textural class, all soils in Rhode Island contain sand, silt, and clay, although the amount of a particular size may be small.
1. Silt loam. Silt is the dominant sized particle in silt loam, which feels quite smooth or floury when rubbed between the thumb and fingers.
2. Loam. When rubbed between the thumb and fingers an approximately equal influence of sand, silt, and clay is felt.
3. Silty clay loam. When moist, it becomes somewhat slick or sticky, or both. Noticeable amounts of both silt and clay are present in silty clay loam, but silt is a dominant part of the soil.
4. Sandy loam. Feels quite sandy or rough but contains some silt and a small amount of clay. The amount of silt and clay is sufficient to hold the soil together when moist.
5. Clay loam. Clay dominates a clay loam, which is hard when dry and slick and sticky when wet. It is a loam with a dominant contribution of clay.
StructureSoil particles are grouped together during soil formation processes to create structural pieces called peds, or ag-gregates. In surface soil, the structure is usually granular unless it becomes disrupted. Soil aggregates are rounded and vary in size from that of very small shot to large peas. If the organic matter content is low and the soil has been under continuous cultivation, the soil structure may be quite indistinct. If the soil is silty clay loam, it may have a blocky structure.
Soil structure largely dictates air and water movement: strong structure allows favorable movement of air and water, while poor or no structure slows it down. Water can enter a surface soil that has a strong granular structure more rapidly than one with a weak structure. Since plant roots grow in the same channels and along these edges through which air and water move, a strong structure allows for extensive root development, while a weak structure discourages it. Water, air and plant roots move more freely through subsoils with a blocky structure than they do through those with a platy structure (aggregates are thin and closely packed together). A strong structure in surface soil is promoted by an adequate supply of organic matter and by working the soil when it is

24Rhode Island Sustainable Gardening Manual
not too wet or too dry.
Plant roots enhance soil structure. As they grow, roots tend to enlarge the openings in the soil. When roots die and de-cay, they leave channels for the movement of air and water. Humus formed from decaying roots serves as a cementing agent and provides stable granular aggregates.
Internal DrainageInternal drainage is the rate and extent of water movement in soil. Water movement includes movement across the sur-face as well as downward through the soil. Therefore, slope (or lack of slope), along with soil structure, are important factors in soil drainage (Figure 2-3). Other important fac-tors are texture, structure and physical condition of surface and subsoil layers.
Soil drainage is often indicated by soil color. Red and yellowish-red indicate well-drained soils. Mixed, drab, and dominantly gray indicate wetness. Depressions within the landscape receive runoff water along with water that falls on them. Frequently, the water from these areas must escape by moving laterally through the soil or by evaporation from the surface, as a weak soil structure and other physical factors do
not allow drainage through the soil.
Too much or too little water in soil is equally undesirable. With too much water, most plant roots lack oxygen. With too little water, plants wilt and die. The most desirable de-gree of soil moisture is when approximately one-half of the soil’s pore space is occupied by water.
DepthThe effective soil depth for plant growth is the vertical dis-tance from the surface to a layer or a condition that essen-tially stops the downward growth of plant roots. This layer may be rock, sand, gravel, heavy clay, wet clay, or a partly cemented layer. Terms used to express effective soil depth are:
1. Very shallow - soil is less than 10 inches to a layer that restricts root development.
2. Shallow - soil is 10-20 inches to a layer that restricts root development.
3. Moderately deep - soil is 20-36 inches to a layer that restricts root development.
4. Deep - soil is 36-60 inches to a layer that restricts root development.

25Rhode Island Sustainable Gardening Manual
5. Very deep - soil is 60 inches or more to a layer that restricts root development.
Soils that are deep, well drained, and have a silt loam texture and a strong granular structure are suitable for producing most crops. Deep soils can hold much more plant food and water than shallow soils with similar textures. Depth of soil and its capacities frequently determine yields, particularly of annual crops grown through the summer months.
Susceptibility to ErosionSoils that have lost part of their surface horizon through past erosion are usually harder to till and are not as productive as those with thick surface horizons. While erosion is a natural process, the principal reasons for soil erosion in developed landscapes are lack of sufficient vegetative cover and the cultivation of crops on steep soils. Soil erosion can be mini-mized by breaking slopes into shorter distances and manag-ing water collection, but also producing crops that the soil is suited for, using adequate fertilizer and lime to promote vigorous plant growth, and using proper tillage methods and/or mulch. Increasing the organic matter content of an eroded soil often improves its tillage characteristics, as well as its water and nutrient retention capacities.
IMPROVING SOIL STRUCTUREIn special cases, coarse sand, vermiculite, pearlite, and calcined clay are added to heavy clays to improve the soil’s physical conditions. These materials can be expensive, how-ever, and large quantities are needed to do any good. For ex-ample, if sand is added, a minimum of 50 percent by volume is needed to improve drainage and aeration in a medium, or fine-textured, soil. Sometimes, coarse material can make the situation worse by causing clays to “set up” like concrete so the authors do not recommend this as a reasonable practice. Compost, manures and other organic amendments are usu-ally more effective and economical for modifying soil condi-tions in the home garden.
Organic matter is excellent for improving all soils. Good sources include peats (moss, reed-sedge), manures, leaf mold, sawdust, and straw. These materials are decomposed
in the soil by soil organisms; but factors such as moisture, aeration, pH, temperature, and nitrogen availability deter-mine the rate of decomposition through their effects on these organisms. Adequate water must be present. Warm temperatures will increase the rate at which the microbes work.
CompostProper compost practices are necessary to avoid creation of nutrient imbalances especially with nitrogen. Composting can produce a nutrient-rich source of humus for the garden. The process involves microbial decomposition of mixed raw organic materials to form humus, a dark, fluffy product re-sembling rich soil, which is then spread on and incorporated into garden soil.
Finished compost is dark and crumbly, like good soil, with a pleasant, earthy smell. Only a few leftover corncobs or stalks or other coarse materials would likely remain undecayed and these can be sifted out and added to the next batch. For use in potting mixtures, a relatively fine sieve (1/4 inch hard-ware cloth) will remove the larger chunks. Otherwise, the compost can be spread in the garden as it is and then dug or tilled under.
Addition of humus from compost or other sources yields soil with more than a desirable earthy smell and an appealing dark appearance. Humus, like clay, exhibits an overall nega-tive charge and, therefore, provides valuable cation exchange capacity. Humus is not a fertilizer, per se, but conditions the soil to prevent loss of nutrients (especially those that are cationic) when fertilizer is applied.
Cover CropsCover crops provide another inexpensive soil improvement method. Green manures, or cover crops, such as annual rye or oats are planted in the garden in the fall for incorpora-tion in spring. For best results, seed should be sown shortly before the first killing frost. In a fall garden, plant cover crops between the rows and in any cleared areas. Cover cropping provides additional organic matter, holds nutrients that might have been lost over the winter, and helps reduce

26Rhode Island Sustainable Gardening Manual
erosion and loss of topsoil. Legume cover crops can increase the amount of nitrogen in the soil, thereby reducing fertil-izer needs. A deep-rooted cover crop allowed to grow for a season in problem soil can help loosen compacted soil and greatly improve tilth. Incorporate green manures at least two weeks before planting vegetables.
Regularly adding manures, compost, cover crops, and other organic materials can raise the soil’s nutrient level and physi-cal quality, thus reducing the need of synthetic fertilizers. A desirable soil quality does not come about with a single addi-tion of organic material, or even several additions; it requires a serious soil building program.
SOIL pHSoil pH is a measure of the hydrogen (acid-forming) ion ac-tivity of soil or growth media. The scale of measuring acidity or alkalinity contains 14 divisions known as pH units. A pH of 7 is neutral (hydrogen ions equal to hydroxyl ions). Values below 7 constitute the acid range of the scale, and values above 7 make up the alkaline range. The measurement scale is logarithmic not linear. That is, a soil with a pH of 8.5 is ten times more alkaline than a soil with a pH of 7.5. A soil with a pH of 4.5 is ten times more acid than a soil with a pH of 5.5.
The pH condition of soil is one of a number of environ-mental conditions that affects the quality of plant growth. Although some plants adapt to a relatively wide range of pH values, a few require a narrow range and it must be main-tained for optimal growth – sometimes for survival. For example, lilacs and delphiniums perform best in neutral to
slightly alkaline soil. However, most garden species (includ-ing vegetables) grow best under slightly acidic conditions, generally in a pH range between 6.1 and 6.9. Acid-loving plants such as rhododendrons, azaleas, mountain laurels, and blueberries prefer a lower pH soil as do many conifers.
The major impact of extremes in pH on plant growth is relat-ed to availability of plant nutrients and to soil concentration of plant-toxic minerals. In highly acidic soils, aluminum and manganese can be present at toxic levels. Also, at these low pH values, calcium, phosphorus, and magnesium become tied up and unavailable. At pH values of 7 and above, phos-phorus, iron, copper, zinc, boron, and manganese become less available. The thickness of the bar in Figure 2-4 indicates availability of the element at different pH values. Availability of both nutritive and toxic elements is directly related to solubility of the respective anions and cations.
By applying certain materials to the soil, adjustments can be made in pH values. To make soils less acidic, apply a mate-rial that contains some form of lime. Ground agricultural limestone is the most frequently used material. Dolomitic limestone adds calcium and magnesium as it increases pH. The finer the grind, the more rapidly it becomes effective. Different soils will require a different amount of lime to adjust the reaction to the proper range. Ashes can be used to increase soil pH; but it is very easy to be excessive, causing a dramatic increace in pH. Ashes are also a source of concen-trated metals which can further challenge your soil’s produc-tivity. If using ashes, be very cautious and always follow with a soil test.
27Rhode Island Sustainable Gardening Manual
The texture of soil, organic matter content, crop to be grown, and soil type are all factors to consider in adjusting pH. For example, soils low in organic matter require much less lime than soils high in organic matter to make the same pH change. Laboratory tests for lime requirement take these factors into consideration and can be used to determine the amounts of lime needed for particular pH change. SOIL TESTINGA soil test provides an excellent measure of soil health and may be obtained with minimal expense or effort. Soil is a dynamic medium; its fertility changes with the seasons, with use, and with the care that it has been given. Since plants de-rive their mineral nutrition from soil, reserves may become depleted under conditions of rapid growth. Thus, testing provides an assessment of a soil’s nutritional status and al-lows the gardener to replace what has been removed.
SamplingSoil samples should be obtained from specific areas based on their actual or proposed use, along with a separate sample when past practices have shown some different plant behav-ior. For example, the perennial bed, the vegetable garden, and an area being considered for a specimen tree should be sampled separately. Soil samples must be obtained using a clean plastic or metal digging tool. Relatively small areas, such as a raised flower or perennial bed, may be sampled sparingly (three or four sites); while larger areas like a vege-table garden should be sampled at up to a dozen sites. Lawns are best sampled in a manner that reflects their unique microenvironment. For example, samples from a shady side lawn should be taken separately from those collected in a broad, open and sunny section of lawn, or the compacted area surrounding a well-used playscape.
Soil samples should be obtained to a depth of 3-4 inches for lawns, 6-8 inches for flower beds or vegetable gardens, and up to 10-12 inches for areas around trees and shrubs. The samples should be collected in a clean, non-reactive con-tainer and mixed thoroughly and a minimus of a cup kept for each use environment. Screening through a clean, coarse sieve (2 mm opening) is beneficial in that rocks, roots and other plant matter will be removed. Dry the soils before put-ting in plastic bags or other container.
pH TestingRegular soil pH testing removes the uncertainty from liming and reduces the potential for over-application. Armed with accurate test results you will likely spend less, not more at the garden center. Sampling may be performed at any time of the year, but is generally best in fall after the growing season is complete. Sampling should not be done immedi-ately after application of lime or fertilizer. Obtaining an ac-curate pH measurement while the weather is still conducive
to outside work allows the savvy gardener to initiate a soil improvement plan long before the spring growing season commences. Lime, applied in fall, slowly reacts throughout winter months to increase the soil’s pH so that a desirable reading may be reached in time for spring planting.
Testing soil pH involves suspending a small soil sample in deionized water, stirring for a minute or so, and measuring the pH of the resultant slurry. Analyses are performed using a glass pH electrode which is attached to a digital pH meter. Test results obtained using a calibrated, professional meter are more accurate than those obtained using a homeowner grade meter or a colorimetric test kit. Sieved soil samples for pH analysis need not be large; a half cup is more than sufficient. Samples should be stored in porous containers (such as small paper bags if the samples are reasonably dry) or uncovered in non-porous containers. Samples should be dried and should be kept at room temperature out of direct sunlight.
Advanced TestingAdvanced soil testing that includes nutrient levels, textural class analysis, cation exchange capacity, and levels of toxic metals is performed for a fee at many university and private laboratories. Their specific instructions for sample prepa-ration and packaging for shipping should be followed to ensure valid results. Analyses that include precise nutrient levels are of great use to commercial growers, especially when they are selecting fertilizers and determining applica-tion rates. Because of the intensity of their soil use, annual or even semi-annual soil analyses may be required. A typical rural or suburban homeowner can also benefit from ad-vanced soil testing, especially to establish a baseline reading when preparing new areas for use. Additional advanced tests may be performed on an as-needed basis, either after a few years have elapsed, when yields are less than desired, or when soil use changes. Gardeners in urban areas or other locales that have experienced extensive human activity rep-resent a special group. Soils in these areas may have been in-advertently contaminated by lead, cadmium or other heavy metals. These gardeners are strongly encouraged to obtain professional soil testing, especially if vegetables or other ed-ible food crops are being grown or even considered.
SOIL ORGANISMSSoil is much more than sterile dust – it abounds with life and it is the ‘life’ that gives each soil character. Besides plant roots, earthworms, and insects, soil is home to an abundant and diverse population of microorganisms. All of these organisms participate in a complex soil food web. Even mammals such as moles and voles are part of the food web because they feed on insects and earthworms. A single gram of topsoil (about 1/4 teaspoon) can contain as many as a billion microorganisms. Microorganisms are most abundant
28Rhode Island Sustainable Gardening Manual
in the rhizosphere, which is a thin layer of soil surrounding plant roots.
The main function of soil organisms that we relay on is to break down the remains of plants and other organisms, a process that releases energy, nutrients and carbon dioxide, and creates soil organic matter. Some soil organisms play other beneficial roles. For example, mycorrhizae are fungi that attach to plant roots and increase their ability to take up nutrients from the soil. Rhizobia bacteria are responsible for converting atmospheric nitrogen into plant-available forms of nitrogen through a process known as nitrogen fixation. Earthworms mix large volumes of soil and create macropore channels that improve permeability and aeration. However, not all soil organisms are beneficial; some microorganisms are pathogens, which cause disease.
The activity of soil organisms depends on soil moisture and temperature as well as on the soil’s proportion of organic matter. Microorganisms are most active between 70 and 100oF, while earthworms are most active and abundant at about 50oF. Most organisms prefer moist soil. Also, because organic matter is at the base of the soil food web, soils with more organic matter tend to have more organisms.The relationship between gardening practices, microbial populations, and soil quality are complex and often poorly understood. Almost all gardening activities – including till-age; the use of fertilizers, manures, and pesticides; and the choice of crop rotations affect the population and diversity of soil organisms. For example, amending soils with organic matter, returning crop residues to the soil, and rotating plantings, and practices that tend to increase the number and diversity of beneficial organisms.
INTRODUCTION TO COMPOSTINGComposting is a biological process that, when done cor-rectly, transforms organic waste into a soil-like material. Compost enrichs the soil used for gardens, lawns, and house plants. by increasing organic matter and nutriend and water holding capabilities. The quantity, composition, and source of the waste describe the waste stream. Composting yard, garden, and some food wastes where they occur reduces the waste stream and creates a valuable soil amendment. By encouraging home composting, communities can reduce the costs and environmental problems associated with municipal garbage collection and processing. Reducing the waste stream is part of the solution for solid-waste disposal problems.
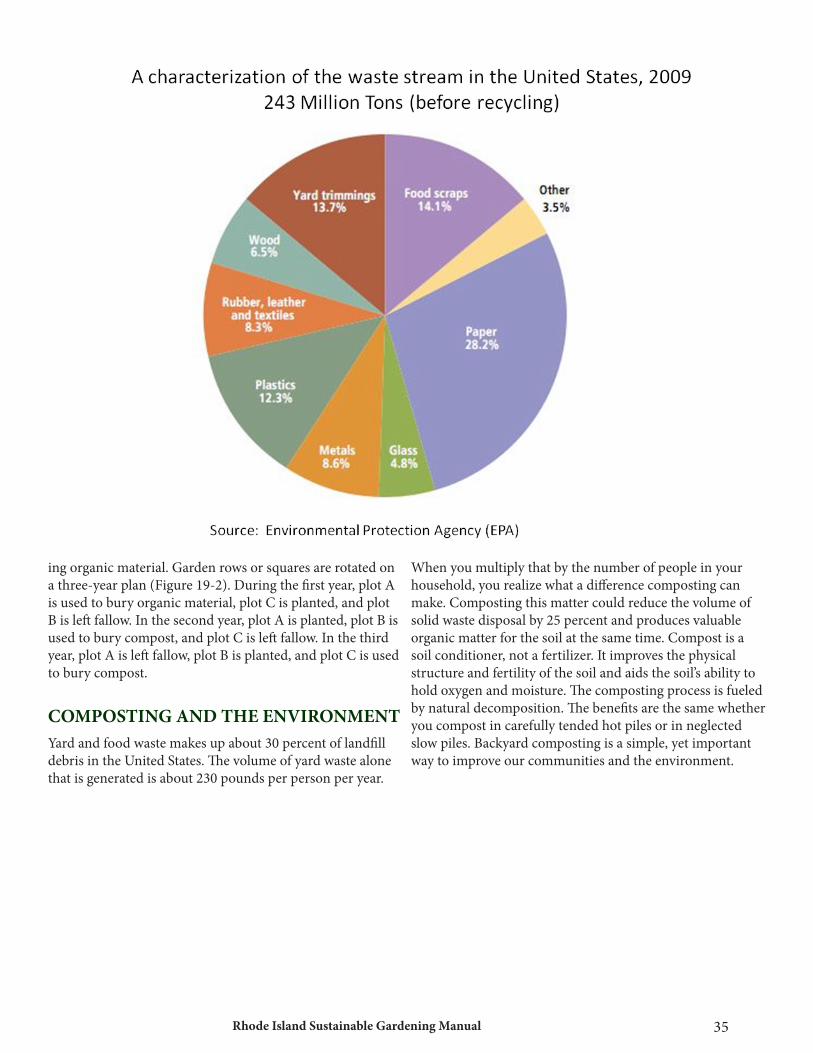
Yard waste is a prime candidate for composting. It is shown in Figure 1 that, on a nationwide basis, yard wastes fill approximately 20 percent of the residential waste stream, which work out to about 230 pounds per person per year. Food wastes contribute another 100 pounds per person per year. Yard wastes are abundant at particular seasons, and be-
cause they are usually kept separate from other home wastes, they are accessible for compost.
Traditional yard waste disposal methods have long been environmentally unsound and are becoming increasingly expensive. Yard wastes placed in landfills can result in meth-ane gas production, acidic-liquid drainage from the land-fills, and other problems. Incineration is no better, because burning generates air pollution. Composting at home saves transportation and disposal costs, and provides an environ-mentally sound way to manage wastes. Composting offers people an opportunity to contribute to, and benefit from, part of both yard and food solid-waste solutions.
Potential benefits to households include lower waste-dispos-al costs, a convenient way to handle wastes, and a free and valuable soil amendment that will increase the health, pro-ductivity, and beauty of the landscape. Home composting could be an important part of every community’s solid-waste solution.
SCIENCE AND ART OF COMPOSTINGComposting carries out part of the earth’s biological cycle of growth and decay to produce. Plants grow by capturing energy from the sun, carbon dioxide from the air, and nutri-ents and water from the soil. When plants die, they become raw materials for the composting (decay) process.
Microorganisms, fungi, insects, worms, mites, and other creatures convert the carbon from dead plants into energy for their own growth, releasing carbon dioxide into the air. Similarly, they recycle nutrients from decaying plants into their own bodies and eventually back into the soil. Next plants and microorganisms use the carbon and nutrients released by the composting process, and the cycle begins again.
The material that remains from the composting process is similar to soil organic matter. It holds water and nutrients in the soil and makes the soil more porous and easier to dig.
You can manipulate the compost process to make it proceed quickly. The key is to balance food, water and air in the com-post pile to favor the growth of thermophilic (heat-loving) microorganisms. One by product of microbial activity is heat. When conditions are favorable for high-temperature microorganisms, compost piles heat rapidly to 120o to 150o F. The high temperature kills most weed seeds and pathogens, but does not kill mycorrhizae, the beneficial fungi that help plant roots absorb nutrients. Once the hot phase is complete, lower-temperature microorganisms, worms, insects and other invertebrates complete the decay process.If you do not maintain ideal conditions for true compost-ing, microorganisms will still break down wastes. However, decay is a process cooler, and less effective at killing weed seeds and pathogens.
29Rhode Island Sustainable Gardening Manual
FACTORS AFFECTING THE COMPOSTING PROCESSThe length of the composting process depends on our man-agement of a number of factors:
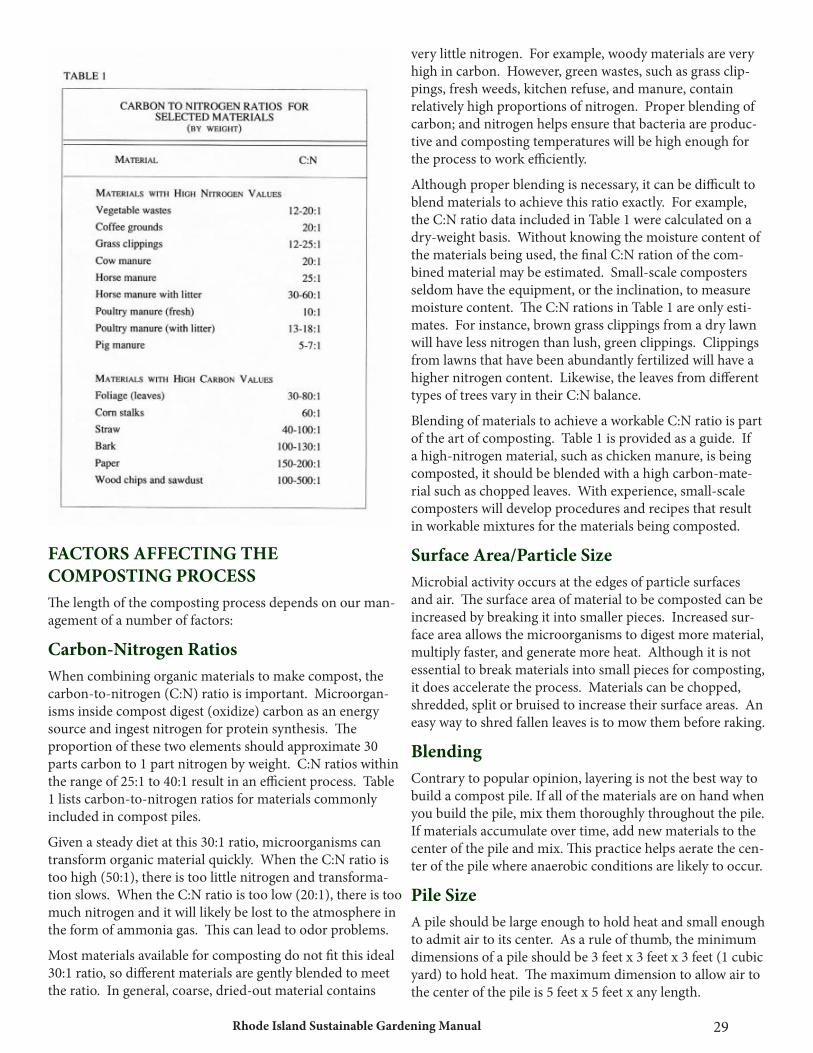
Carbon-Nitrogen RatiosWhen combining organic materials to make compost, the carbon-to-nitrogen (C:N) ratio is important. Microorgan-isms inside compost digest (oxidize) carbon as an energy source and ingest nitrogen for protein synthesis. The proportion of these two elements should approximate 30 parts carbon to 1 part nitrogen by weight. C:N ratios within the range of 25:1 to 40:1 result in an efficient process. Table 1 lists carbon-to-nitrogen ratios for materials commonly included in compost piles.
Given a steady diet at this 30:1 ratio, microorganisms can transform organic material quickly. When the C:N ratio is too high (50:1), there is too little nitrogen and transforma-tion slows. When the C:N ratio is too low (20:1), there is too much nitrogen and it will likely be lost to the atmosphere in the form of ammonia gas. This can lead to odor problems.
Most materials available for composting do not fit this ideal 30:1 ratio, so different materials are gently blended to meet the ratio. In general, coarse, dried-out material contains
very little nitrogen. For example, woody materials are very high in carbon. However, green wastes, such as grass clip-pings, fresh weeds, kitchen refuse, and manure, contain relatively high proportions of nitrogen. Proper blending of carbon; and nitrogen helps ensure that bacteria are produc-tive and composting temperatures will be high enough for the process to work efficiently.
Although proper blending is necessary, it can be difficult to blend materials to achieve this ratio exactly. For example, the C:N ratio data included in Table 1 were calculated on a dry-weight basis. Without knowing the moisture content of the materials being used, the final C:N ration of the com-bined material may be estimated. Small-scale composters seldom have the equipment, or the inclination, to measure moisture content. The C:N rations in Table 1 are only esti-mates. For instance, brown grass clippings from a dry lawn will have less nitrogen than lush, green clippings. Clippings from lawns that have been abundantly fertilized will have a higher nitrogen content. Likewise, the leaves from different types of trees vary in their C:N balance.
Blending of materials to achieve a workable C:N ratio is part of the art of composting. Table 1 is provided as a guide. If a high-nitrogen material, such as chicken manure, is being composted, it should be blended with a high carbon-mate-rial such as chopped leaves. With experience, small-scale composters will develop procedures and recipes that result in workable mixtures for the materials being composted.
Surface Area/Particle SizeMicrobial activity occurs at the edges of particle surfaces and air. The surface area of material to be composted can be increased by breaking it into smaller pieces. Increased sur-face area allows the microorganisms to digest more material, multiply faster, and generate more heat. Although it is not essential to break materials into small pieces for composting, it does accelerate the process. Materials can be chopped, shredded, split or bruised to increase their surface areas. An easy way to shred fallen leaves is to mow them before raking.
BlendingContrary to popular opinion, layering is not the best way to build a compost pile. If all of the materials are on hand when you build the pile, mix them thoroughly throughout the pile. If materials accumulate over time, add new materials to the center of the pile and mix. This practice helps aerate the cen-ter of the pile where anaerobic conditions are likely to occur.
Pile SizeA pile should be large enough to hold heat and small enough to admit air to its center. As a rule of thumb, the minimum dimensions of a pile should be 3 feet x 3 feet x 3 feet (1 cubic yard) to hold heat. The maximum dimension to allow air to the center of the pile is 5 feet x 5 feet x any length.
30Rhode Island Sustainable Gardening Manual
If space is a limited factor, the pile sides should be insulated so that higher temperatures can be maintained in a much smaller volume. Smaller, commercially available units can be insulated with a foam board. Piles larger than 5 feet tall and wide may need to be turned to prevent their centers from becoming anaerobic. As the material composts, the pile will become smaller. Good compost will have an attrac-tive earth smell while poor compost will smell like ammonia or rotten eggs. A yard stick can be used to keep track of, or demonstrate, volume reduction.
MoistureMicrobial decomposition occurs most rapidly in thin liquid films on the surfaces of particles. A moisture content of 40-60 percent provides adequate moisture without limit-ing aeration. If the moisture content falls below 40 percent, the bacteria will slow down and may become dormant. When the moisture content exceeds 60 percent, nutrients are leached, air volume is reduced, odors are produced (due to anaerobic conditions), and progression is slowed. The “squeeze” test is an easy way to gauge the moisture content of composting materials. The material should feel damp to the touch, with just a drop or two of liquid expelled when the material is tightly squeezed in the hand. If the pile becomes too wet, it should be turned and restacked. This allows air to circulate back into the pile and loosens the materials for better draining and air drying. Adding dry material, such as straw or sawdust can also remedy an excess moisture prob-lem.
If the pile is too dry, it can be watered with a trickling hose. A more effective practice is to turn the pile and rewet ma-terials in the process. Certain materials will shed water or adsorb it only on their surface. Dead leaves, sawdust, hay, straw, dried weeds, and vegetables must gradually be moist-ened until they glisten. Then the squeeze test should be used to evaluate the moisture content.
AerationAeration keeps oxygen-enriched air in the center of the com-post pile. Aeration occurs naturally when air warmed by the compost process rises through the pile, drawing in fresh air from the surroundings. Wind also stimulates aeration. Air movement through the compost pile is affected by porosity and moisture content.
Porosity refers to the spaces that allow air or water to pass between particles in the compost pile and is calculated as the volume of spaces, or pores, divided by the total volume of the pile. If the material is not saturated with water, these spaces are partially filled with air that can supply oxygen to decomposers and provide a path for air circulation. As the material becomes water saturated, the space available for air decreases.
Compacting the compost pile reduces its porosity. Excessive
shredding can also impede air circulation by creating smaller particles and easily plugged pores. Adding coarse materi-als, such as leaves, straw or cornstalks, can increase the pile porosity, although some coarse materials will be slow to decompose. As the compost process proceeds, the porosity decreases, restricting aeration. Regular mixing of the pile, referred to as turning, fluffs up the materials and increases its porosity. Turning enhances aeration in a compost pile. In small-scale composting, turning is usually accomplished using a pitchfork or shovel.
A special compost-aeration tool is available from many garden supply companies offers another way to help get air into the pile. The tool is pushed into the pile and turned as it is pulled out. The propeller at the end folds out on the upstroke, loosening materials and admitting more air.
TemperatureHeat generated by microorganisms as they consume organic material increases compost pile temperatures. In order to heat up, piles need to be of adequate size (usually about 1 cubic yard) to be insulated from cool ambient temperatures. Pile temperatures between 90 degrees and 140 degrees Fahrenheit indicate rapid composting. Temperatures greater than 140 degrees Fahrenheit reduce the activity of many of the most active organisms. A temperature probe or a soil thermometer can be used to keep track of pile temperatures. While backyard composters may not be interested in moni-toring pile temperature, a temperature probe is excellent for demonstration and useful for serious composters.
SummaryThe compost process depends on all the factors discussed. The art of small-scale composting is balancing these factors to achieve the final product in the desired time frame.
Under optimum conditions and with frequent turning, us-able compost might be produced in as little as one month.
However, composting can survive most forms of benign neglect, especially if a one-to two-year wait for finished com-post is acceptable. The composting method chosen will be influenced by when the finished compost is needed.
MAKING COMPOSTYou do not need a bin or other container to make compost – piles work just as well. However, some people prefer contain-ers because they look neater, or because it is easier to shield them from pests. Containers can be simple or fancy, and can be made from materials such as old pallets, lumber, mesh fencing or cinder blocks.
Slow (Cold) CompostingEmploying slow composting is an easy and convenient way to turn yard wastes into a useful soil amendment. It often is
31Rhode Island Sustainable Gardening Manual
the best method for people who do not have the time to tend a hot compost pile. Simply mix non-woody yard wastes into a pile and let them sit for a year or so. Microorganisms, in-sects, earthworms, and other decomposers will slowly break down the wastes. A mixture of energy materials and bulking agents provides the best food source and environment for decomposition. Add fresh wastes by opening the pile, plac-ing the wastes in the center, and covering them. This helps aerate the pile and also buries the fresh wastes so they do not attract pests, such as flies, rats and raccoons. Fruit and veg-etable wastes are particularly appealing to pests, so be sure to bury these wastes inside the pile. If pests are a concern or still a problem, you may need to screen the pile or use another method of composting these wastes. Three of these are discussed below under “Food Waste.”
Slow composting does not produce the heat needed to kill many weed seeds. It is best to pull and compost weeds before they go to seed. If you put seeds in the compost pile, be pre-pared for more weeding.
Fast (Hot) CompostingIf you create and maintain a balance of air, moisture, and energy for compost microorganisms, they produce a hot pile that breaks down quickly. The heat kills many weed seeds and disease organisms (pathogens). Making hot compost takes extra effort, but it produces a high-quality product quickly. One method for making hot compost is described below:
Building the Pile1. Collect enough material to make a pile at least 1 cubic
yard in volume. (An open pile 5 feet wide at the base by 3 feet high holds about a cubic yard). Use roughly two parts bulking agent to one part energy material. Chop, shred, mow or smash coarse materials so they will break down faster.
2. Start the pile by adding energy material and bulking agent. Then mix with a pitchfork.
3. Squeeze a handful of the mixed material to check its moisture level. If you can barely squeeze out a drop of water, the moisture level is ideal. If the pile is too dry, add water and check the moisture again. If it is too wet, mix in some drier material.
4. Continue adding energy material and bulking agent, mixing, and checking moisture until the pile is built.
Turning the pileUse a pitchfork to turn the pile weekly, and add water when needed. Turning improves the porosity of the pile and speeds decay. It also mixes material from the outside of the pile into the hot center. Cover the pile during rainy periods so it will not get too wet.
Curing
After initial mixing, a regularly turned pile usually stays hot (120o to 150oF) for several weeks to a month. It will shrink to about half its original volume by the end of this time. The pile then needs to sit another four to eight weeks to cure. Curing affects the availability of nitrogen and the microbial activity of the compost. Uncured compost may harm some plants, especially when compost is used in potting soil or to start seeds. Curing is less critical when small amounts of compost are worked into soil. With two compost piles, you can let one batch cure while you start another batch in the second pile.
Temperatures during curing are 80° to 110°F. The compost is ready to use when (at least) eight weeks have passed since initial mixing. The pile no longer heats when turned, and the material looks dark and crumbly.
What if Hot Compost isn’t Hot?If your pile isn’t hot, do the following:• If the pile is dry, add more moisture.• If the pile is mostly bulking agent, add energy materials
or nitrogen fertilizer.• If the pile is too wet, add more bulking agent; cover the
pile or build a larger pile during the rainy season.• If the pile has a foul smell, try turning it more often or
adding more bulking agent to increase the amount of air.• If the pile is too small, try building a larger pile to hold
heat better.Sometimes you may have several problems to overcome. If you cannot get the pile to heat, all is not lost. The pile even-tually will break down by the slow method.
USING COMPOSTThe best thing about compost is the benefit it provides your garden. Mix compost with soil to add organic matter or use it as mulch.1. Amending soil. Well-decomposed, earthy composts are
good soil amendments. They make soil easier to work with and create a better medium for plant growth. You can mix 1 to 2 inches of compost into your soil before you plant a vegetable garden, lawn, flower bed or cover crop.
2. Mulching. Composts applied to the soil surface help control weeds, conserve water, and protect soil from erosion. The best time to apply compost mulches is in early summer, after plants are established and the soil has warmed. Later, the mulch can be dug or tilled into the soil. When mulching perennial plantings, choose compost made from woody bulking agents; it decom-poses slowly, resists compaction and slows weed estab-lishment.
FOOD WASTEComposting kitchen scraps in an open outdoor bin has the
32Rhode Island Sustainable Gardening Manual
potential to produce odors and attract pests if not handled properly. Alternative methods include using worm compost-ing, an in-soil digester (green cone) or trench composting.
Worm BinsMany food wastes, including fruit and vegetable peels, grains, pasta, baked goods, coffee grounds, and even coffee filters, can be composted in worm bins. Do not add meat or dairy products.
Place worm bins where temperature and moisture can be controlled; an ideal temperature range for worms is from 55° to 77°F. Worms also need a moist environment, and air circulation is a must in and around a worm box. Choose a location that is convenient for maintaining the box.
The size depends on how much waste you generate per week: a box measuring 1 foot by 2 feet by 3 feet can handle 6 pounds of kitchen wastes per week, which is about average for a family of four to six.
Starting Most worm bins are made from plywood. Worms avoid light, so the container should be dark inside and have a good lid. The lid should cover the top but does not need to attach securely to the container. There should be air holes some-where on the container – either on the lid, sides or bottom (if the container is not sitting directly on the ground). If you use a plastic bin, be sure to add both drainage and aeration holes. Never use a container that has been used for storing toxic chemicals. Worm bin construction plans are available from many Extension Offices or county solid waste depart-ments.
Start by putting bedding in the worm box. Corrugated card-board, newsprint and newspaper shredded in 1-inch-wide strips make excellent bedding. Worms need some grit for breaking down their food; add a little topsoil for this pur-pose. Put the worms in the bedding with their first feeding.
MoistureIn order to survive, worms require 75 to 90 percent moisture content in both their bodies and their bedding. To achieve this percentage, add 3 pounds of water for each pound of dry bedding (a ratio of 3:1). An easy way to check the moisture content of bedding is to squeeze some in your hand. If a few drops of moisture are released by squeezing, the bedding is sufficiently moist. If five or more drops are produced, the bedding probably is too wet.
Kinds and Number of Worms Two varieties of red worms adapt to a box environment: Lumbricus rubellus and Eisenia foetida. These red worms feed on the surface of organic matter. Nightcrawlers and other garden earthworms are very important for soil im-provement but won’t survive in a worm box. Earthworms
live only in furrows in the soil.
The number of worms required depends on the daily weight of food waste added. Since worms can eat their own weight in food in 24 hours, measure worms by weight rather than number. Two pounds of worms are needed for each pound of kitchen waste added per day (a ratio of 2:1). For example, if you produce 3 ½ pounds of kitchen waste per week (½ lb per day), use 1 pound of worms. Calculate as follows: • 3 ½ lbs kitchen waste per week for 7 days = ½ lb waste
per day (average) • ½ lb per day waste per day at 2 lbs of worms for each
pound of daily waste = 1 lb of worms
Management 1. Adding waste. It is a good practice to vary the loca-
tion where you bury wastes in the worm box. A worm box measuring 2 feet by 2 feet has approximately nine locations where you can bury kitchen wastes. That gives you nine feedings before you have to bury again at the first location. Grinding is not necessary because kitchen wastes break down very quickly, but do pulverize egg shells.
2. Leaving the box untended. If you need to be away from home, just feed the worms a little extra and leave them undisturbed. They can go three weeks or a month without feeding. If you go away for a longer time, make arrangements with someone to feed your worms.
3. Changing the bedding. After many weeks, you will notice that the bedding is disappearing as worms and microorganisms decompose the material. The color of the bedding also becomes darker. As these things hap-pen, the favorable environment for the worms decreases. Large amounts of accumulated castings might become harmful to the worms since castings of one worm are toxic to other worms. Decide when to change the bed-ding based on the condition of the bedding and the quantity of worms in the box.
4. Population control. Worms multiply fast. Avoid over-population; use extra worms to start a new worm box or give them to someone else who is starting a worm composting box.
5. Odor and pest control. Control odors by not overload-ing the box with waste, keeping out inappropriate waste, and providing adequate fresh bedding. Do not fill the bin with a lot of food waste until the worm population is established. Never add dairy or meat products to any type of composting system.
Fruit flies are more of a nuisance than a serious problem. Minimize fruit flies in a worm bin by completely cover-ing fresh food waste with several inches of bedding and by covering the bedding with a sheet of newspaper, cardboard or plastic tucked in around the edges.
Rodents can be a problem. The easiest way to keep animals

33Rhode Island Sustainable Gardening Manual
from entering a worm bin is to keep the lid shut and meat wastes out. If there are signs of animals around the worm bin, place a sheet of wire mesh over the bottom of the bin or raise the bin 12 to 18 inches off the ground.
Keep the worm bin lid latched or well secured if possums or raccoons are a problem.
Commonly Asked Questions About WormsQ: Can a worm see?A: No, worms don’t have eyes. However, they are very sensi-tive to light, and they try to hide as soon as they are exposed to light.
Q: Where is the worm’s mouth?A: The worm’s mouth is in the first anterior segment. There is a small protruding lip just over the mouth which stretches out to sense food when the worm is foraging.
Q: Does a worm have teeth?A: Worms have no teeth for chewing their food. They grind food in their gizzard by muscle action.
Q: How does a worm grind its food?A: A worm can take only a small particle of soft, moistened food in its mouth. It ingests the food along with a grinding material such as sand, topsoil or limestone. Contractions from muscles in the gizzard compress the particles against each other, thus mixing them with fluid and grinding them into smaller pieces.
Q: Do worms need air?A: Worms need a constant supply of oxygen from the air. The oxygen diffuses across the moist tissue of their skin, from the region of greater oxygen concentration (air) to that of lower concentration (inside the worm).
Q: How do I use worm compost?A: Use worm compost like any other compost. Sterilizing is not necessary.
In-soil DigesterIn-soil digesters allow you to bury organic waste without having to dig a new hole in the ground each time. They uti-
34Rhode Island Sustainable Gardening Manual
lize anaerobic decomposition to break down the fibers and fats of kitchen refuse. A digester is like a modified trash can: Holes are drilled into the bottom of a fairly large container. Then a hole is dug and the container is placed into the hole with about one-third to one-half of the container above the ground. Food scraps are thrown into the container which is covered with a tight-fitting or locking lid to keep out pests. The digester can hold several months’ worth of food scraps, depending on what kind of scraps are generated.
There are manufactured systems on the market: the Green Cone (Figure 19-1) is the most readily available commercial product. It is a plastic, rodent-proof composting unit with an attached underground basket that provides a conve-nient, ready-to-install unit that incorporates technology to promote the circulation of air via a double-wall system and results in a more rapid aerobic decomposition process.Check with your local health department or solid waste management department to determine whether Green Cones can be used in your area. Some local municipalities may not allow their use, while others may have specific rules regarding siting or installation. Some areas may require a minimum of two units to handle a typical family’s food waste.
Installation and UseProper installation is essential to keep Green Cones rodent-proof. Make sure the unit you purchase has complete installation and use directions. Select a convenient, sunny location, preferably away from your home on well-drained soil. Although Green Cones are most successful in sandy or loamy soils, they can be used on heavy or shallow soils as well. Remove enough soil to create a hole for the under-ground basket. In heavy or shallow soils, remove an addi-tional 4 to 6 inches of soil and replace it with rocks or sand to improve drainage. Place the Green Cone basket in the hole, replace the soil around the basket, and screw the cone to the basket.
Add food scraps to the unit through the top. Be sure to close the lid to reduce odors and keep flies out. You can remove the plastic bar across the opening to allow easier access. Add a thin layer of leaves or sawdust if odors or flies become a problem. No additives are required to speed up the compost-ing process.
Over time, the Green Cone basket should contain dark, moist compost. The speed at which compost is produced depends on the kind of food waste added, soil drainage, soil texture and time of year. On average, a Green Cone used by two people should be harvested after six to twelve months. Spring and fall are the best times to harvest the compost. To harvest, unscrew the cone section from the basket and take the compost, and any food that has not decomposed, out of the basket. Bury the compost in the garden at least 8 inches deep as a soil enhancer. The compost may be smelly, but this
is a quick and easy way to harvest. After harvest, replace the cone section on the basket.
Occasionally, food may rise into the cone section. However, the food waste volume will decrease with time. If the cone section is constantly full, consider using two Green Cones or burying a portion of the waste. Using two Green Cones makes composting even easier. Simply use the first cone until the cone section is about half full. Then switch to the second unit and let the first one sit idle to allow the food to decompose and settle back into the underground basket. By the time the second cone is half full, the first one should be ready to harvest. Because this method allows food scraps to be composted more efficiently and completely than with one cone, you can use the harvested compost directly in the garden as a mulch or top dressing, or dig it into the soil.
Troubleshooting • Control odors by removing excess or inappropriate
waste and adding a thin layer of leaves or dried grass.• Fruit flies are more of a nuisance than a serious problem;
minimize fruit flies by adding a thin layer of leaves or sawdust.
• Rodents can be a problem. The easiest way to keep ani-mals from entering a green cone is to keep the lid shut. You also can cover the underground basket with wire mesh hardware cloth to prevent pests from entering.
Trench CompostingBurying organic material is one of the oldest methods of composting. You can simply dig a hole and drop in food scraps; but they should be covered with at least 8 inches of soil to prevent animals from detecting them and digging them up. Depending on your soil conditions and the mate-rial buried, it can take from two weeks to one year for the material to decompose. The decomposition time will be shorter if the material buried is chopped into small pieces and if the soil has a healthy population of microorganisms. Trench composting is a more methodical variation of bury-
35Rhode Island Sustainable Gardening Manual
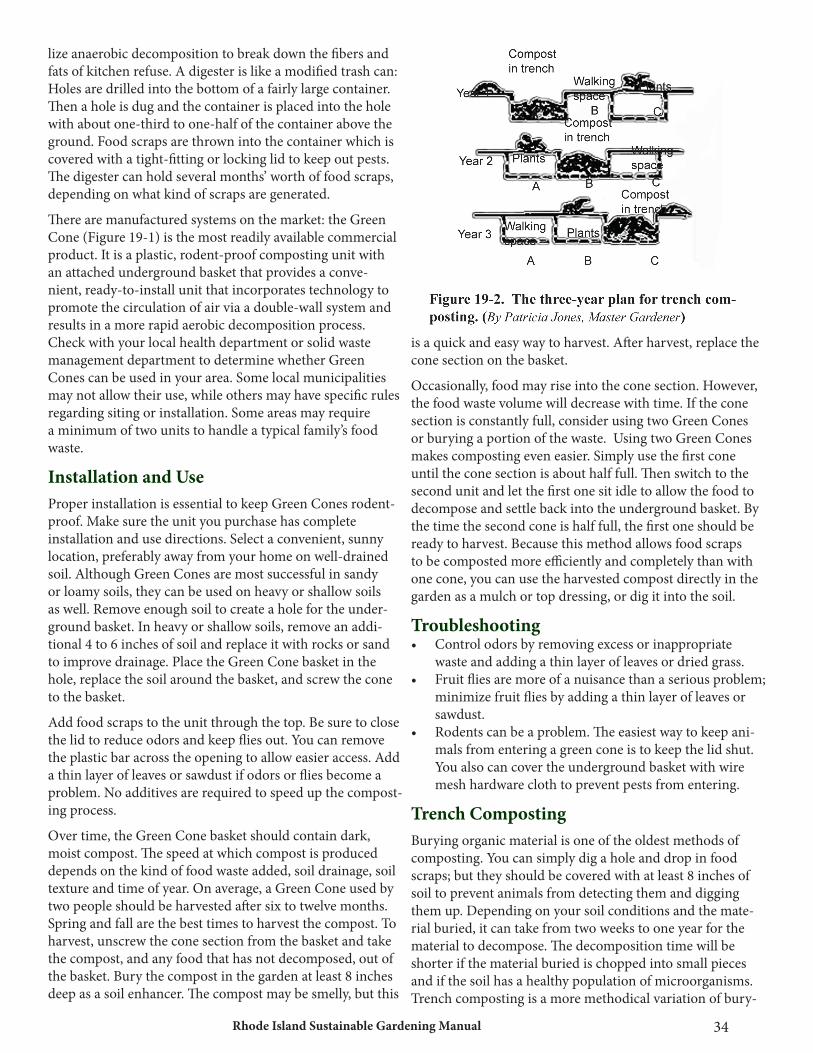
ing organic material. Garden rows or squares are rotated on a three-year plan (Figure 19-2). During the first year, plot A is used to bury organic material, plot C is planted, and plot B is left fallow. In the second year, plot A is planted, plot B is used to bury compost, and plot C is left fallow. In the third year, plot A is left fallow, plot B is planted, and plot C is used to bury compost.
COMPOSTING AND THE ENVIRONMENTYard and food waste makes up about 30 percent of landfill debris in the United States. The volume of yard waste alone that is generated is about 230 pounds per person per year.
When you multiply that by the number of people in your household, you realize what a difference composting can make. Composting this matter could reduce the volume of solid waste disposal by 25 percent and produces valuable organic matter for the soil at the same time. Compost is a soil conditioner, not a fertilizer. It improves the physical structure and fertility of the soil and aids the soil’s ability to hold oxygen and moisture. The composting process is fueled by natural decomposition. The benefits are the same whether you compost in carefully tended hot piles or in neglected slow piles. Backyard composting is a simple, yet important way to improve our communities and the environment.

36Rhode Island Sustainable Gardening Manual
References
Books:
Ball, Liz, Composting, Smith and Hawken: The Hands-on Gardener Series, Workman Publishing, New York, NY, 1997
Beck, Malcolm, The Secret Life of Compost: A How To and Why Guide to Composting, Acres USA, Metairie, LA, 1997
Campbell, Stu, Let It Rot! The Gardener’s Guide to Composting, 3d Ed., Storey Books, Pownal, VT, 1998
Minnick, Jerry and Marjory Hunt, The Rodale Guide to Composting, Rodale Press, Emmaus, PA, 1979
Rodale, J.I., Pay Dirt: Farming and Gardening with Compost, Devin Adair Co., New York, NY, 1945
Websites:
Green Cone: Complete company and product information on the Green Cone in-soil digester. www.greencone.comNature Mill: Indoor composting system that runs on electricity and beneficial bacteria to break down kitchen wastes.http://www.naturemill.com
The New York City Compost Project: The NYC Department of Sanitation set up programs to recycle organic material through composting. This site describes those programs, and tells you everything needed to start composting today, right in the backyard or apartment. www.nyccompost.org
Urban Agriculture Notes by City Farmer – Canada’s Office of Urban Agriculture: A resource for learning to grow your own vegetables in an urban environment. www.cityfarmer.org
www.mastercomposter.com: A comprehensive website with information on compost piles, composting equipment, worm composting and other methods, and a wealth of educational and reference material. www.mastercomposter.com
Video:
“Home Composting: Turning Your Spoils into Soils,” The Connecticut Department of Environmental Protection Recycling Program, Hartford, CT