softpro essential user guide · softpro – essential user guide 1/27/2016 5 overview this chapter...
TRANSCRIPT

SoftPro Essential User Guide
SoftPro Essential | January 27, 2016
4800 Falls of Neuse Road, Suite 400 | Raleigh, NC 27609
p (800) 848-0143 | f (919) 755-8350 | www.softprocorp.com

Copyright and Licensing Information Copyright © 1987-2016 by SoftPro, Raleigh, North Carolina.
No part of this publication may be reproduced in any form without prior written permission of SoftPro. For
additional information, contact SoftPro, 4800 Falls of Neuse Road, Raleigh, NC 27609, or contact your authorized
dealer.
Microsoft, Windows, and MS-DOS are registered trademarks of Microsoft Corporation in the United States and/or
other countries. WordPerfect is a registered trademark of Corel Corporation. Crystal Reports is a registered
trademark of SAP AG. HP LaserJet is a registered trademark of Hewlett Packard Development Company, L.P.
GreatDocs is a registered trademark of Harland Financial Solutions Incorporated. RealEC Technologies, Inc. is
majority owned by Lender Processing Services. All other brand and product names are trademarks or registered
trademarks of their respective companies.
IMPORTANT NOTICE – READ CAREFULLY
Use of this software and related materials is provided under the terms of the SoftPro Software License Agreement.
By accepting the License, you acknowledge that the materials and programs furnished are the exclusive property
of SoftPro. You do not become the owner of the program, but have the right to use it only as outlined in the
SoftPro Software License Agreement.
All SoftPro software products are designed to ASSIST in maintaining data and/or producing documents and reports
based upon information provided by the user and logic, rules, and principles that are incorporated within the
program(s). Accordingly, the documents and/or reports produced may or may not be valid, adequate, or sufficient
under various circumstances at the time of production. UNDER NO CIRCUMSTANCES SHOULD ANY DOCUMENTS
AND/OR REPORTS PRODUCED BE USED FOR ANY PURPOSE UNTIL THEY HAVE BEEN REVIEWED FOR VALIDITY,
ADEQUACY AND SUFFICIENCY, AND REVISED WHERE APPROPRIATE, BY A COMPETENT PROFESSIONAL.

Table of Contents
Copyright and Licensing Information ...................................................................................... 2
Chapter 1: ProForm Basics ..................................................................................................... 4
Chapter 2: Starting a New Order .......................................................................................... 14
Chapter 3: ProForm A to Z ................................................................................................... 84
Chapter 4: ProForm HUD A to Z ......................................................................................... 161
Chapter 5: Requirements and Exceptions - Standard .......................................................... 230
Chapter 6: ProForm Data Entry Tools ................................................................................. 233
Chapter 7: Printing Documents .......................................................................................... 243
Chapter 8: DocChek ........................................................................................................... 255
Chapter 9: Microsoft Word Merge ..................................................................................... 261
Getting Help ...................................................................................................................... 267
SOFTPRO – ESSENTIAL USER GUIDE 1/27/2016
4
Chapter 1: ProForm Basics Overview ............................................................................................................................... 5
Getting Around A ProForm File .............................................................................................. 5
Tabs ...................................................................................................................................... 5
ReadyDocs ............................................................................................................................ 6
Data Entry Basics ................................................................................................................... 6
Accessing A Screen .................................................................................................................................................... 6
Moving The Cursor .................................................................................................................................................... 7
<F1> Help................................................................................................................................................................... 7
<F2> Erase ................................................................................................................................................................. 7
Moving From Screen To Screen ................................................................................................................................. 8
User-Entered Data And Typelite ................................................................................................................................ 8
Changing The Typelite Color ...................................................................................................................................... 8
Data Entry Keys ......................................................................................................................................................... 8
ProForm Menus ..................................................................................................................... 9
Using Keyboard Shortcuts ....................................................................................................................................... 10
Toolbar ............................................................................................................................... 10
Saving Your ProForm File ..................................................................................................... 10
Searching For A File ............................................................................................................. 11
Using Wildcards ....................................................................................................................................................... 12
ProForm: Search On Policy Number ........................................................................................................................ 12
Help ............................................................................................ Error! Bookmark not defined.
Buttons On The Help Toolbar ..................................................................................... Error! Bookmark not defined.
How To Use ProForm Help ......................................................................................... Error! Bookmark not defined.
Contents Tab .............................................................................................................. Error! Bookmark not defined.
Index Tab .................................................................................................................... Error! Bookmark not defined.
Search Tab .................................................................................................................. Error! Bookmark not defined.
Finding And Printing Help ........................................................................................... Error! Bookmark not defined.
File Balance ......................................................................................................................... 13
Status Bar ................................................................................................................................................................ 13
File Balance Button .................................................................................................................................................. 13
File Balance Information Screen .............................................................................................................................. 13
SOFTPRO – ESSENTIAL USER GUIDE 1/27/2016
5
Overview
This chapter will introduce the ProForm desktop, and describe the basics of how to get around a file. Important
information about saving your work, getting on-line help, and other unique ProForm features like File Balance
feedback are also explained.
Getting Around A ProForm File
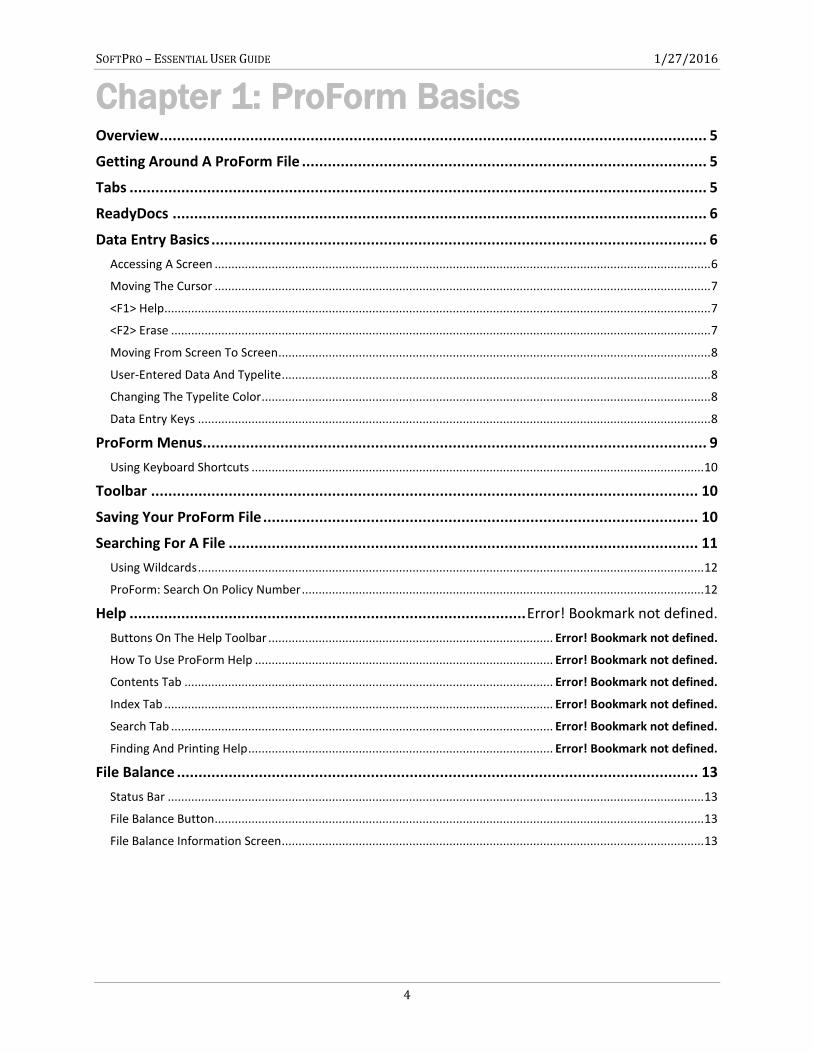
ProForm files are designed like tabbed file folders.
You can have multiple files open at the same time.
You can minimize, maximize, or close a file using the buttons on the file’s title bar.
Tabs
The General tab contains screens for:
o Up-front order information
o Settlement date
o Settlement agent
o Underwriter
o Buyer and seller data
o Lender, Attorneys, Brokers
o Loan information
o Property data
The HUD-1 & Closing tab has all of the screens you need to complete the HUD-1 Settlement Statement
and many other closing documents.
o Taxes
o Commissions
o Loan Charges
SOFTPRO – ESSENTIAL USER GUIDE 1/27/2016
6
o Title Charges
o Recording Fees
o Payoffs
o Escrows
o File Balance
The Title Insurance tab contains screens for preparing commitments, policies, and other types of title
documents.
The optional Order Tracking Add-On includes the Order Tracking tab. It contains tracking tools and
management reports to stay ahead of deadlines and monitor progress. See Chapter 15 “Tracking Your
Business” for more information.
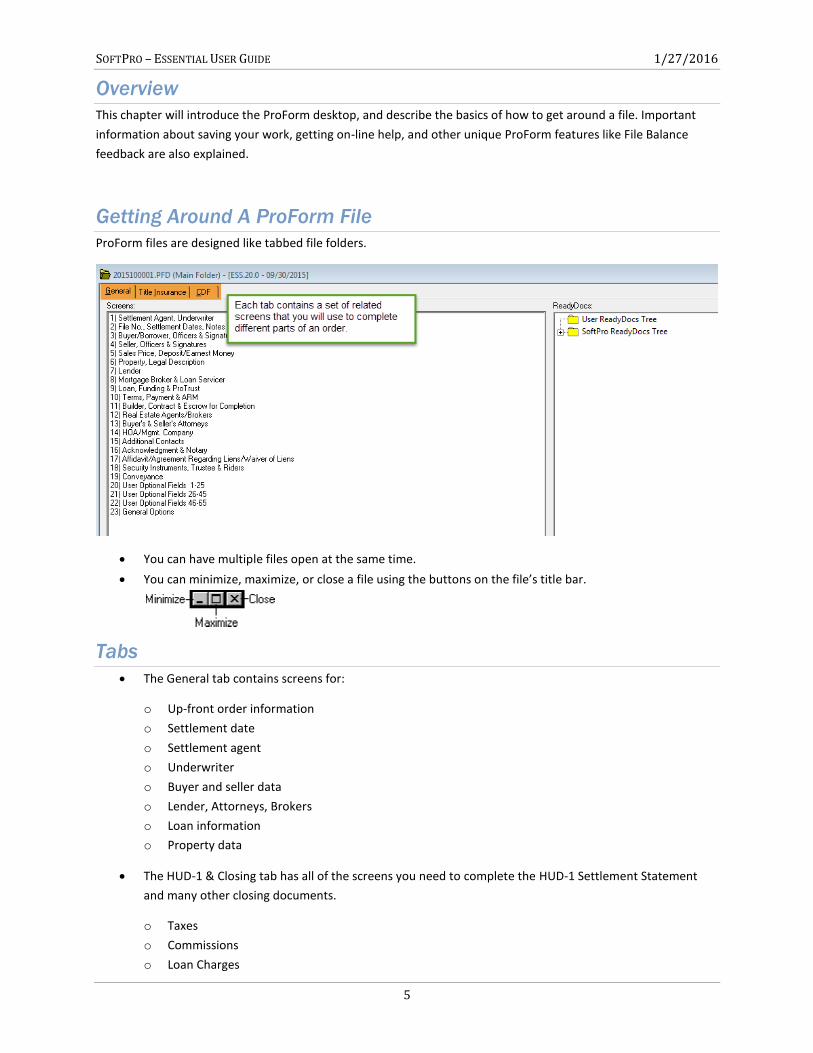
ReadyDocs
SEE ALSO:
1. Chapter 10, “DocChek” to learn how to view and edit documents on screen.
2. Chapter 9, “Printing Documents” to learn how to print documents from ProForm.
Data Entry Basics
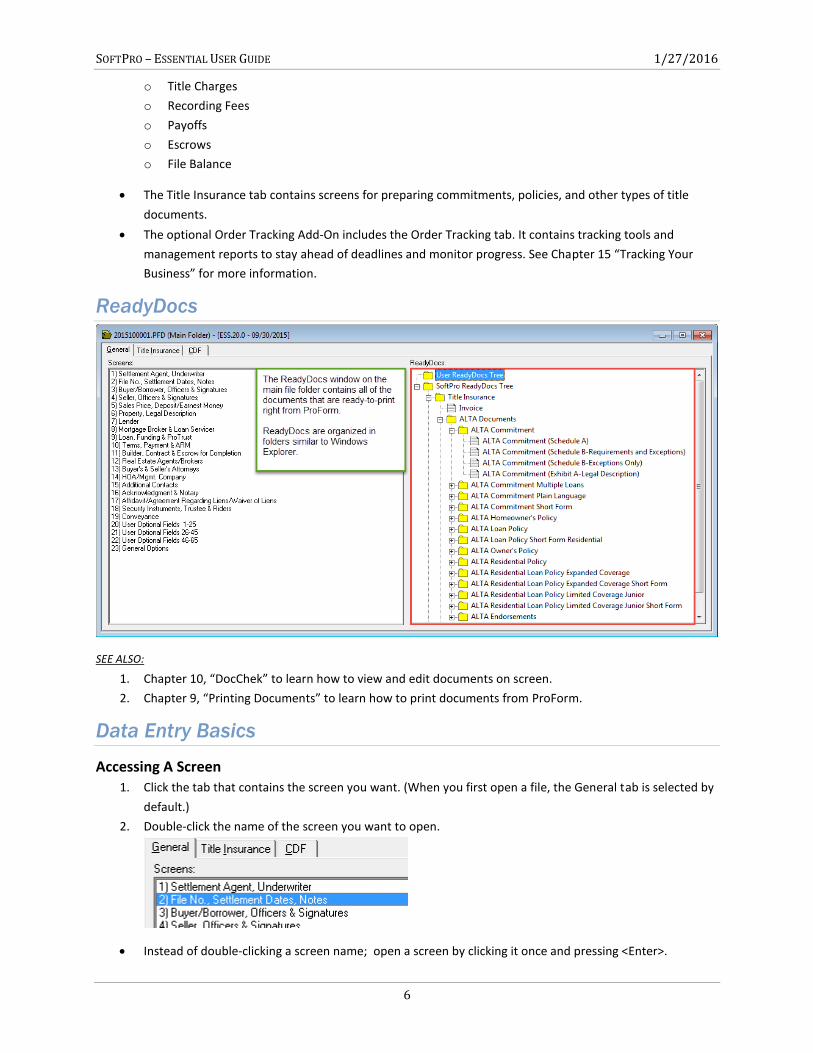
Accessing A Screen 1. Click the tab that contains the screen you want. (When you first open a file, the General tab is selected by
default.)
2. Double-click the name of the screen you want to open.
Instead of double-clicking a screen name; open a screen by clicking it once and pressing <Enter>.
SOFTPRO – ESSENTIAL USER GUIDE 1/27/2016
7
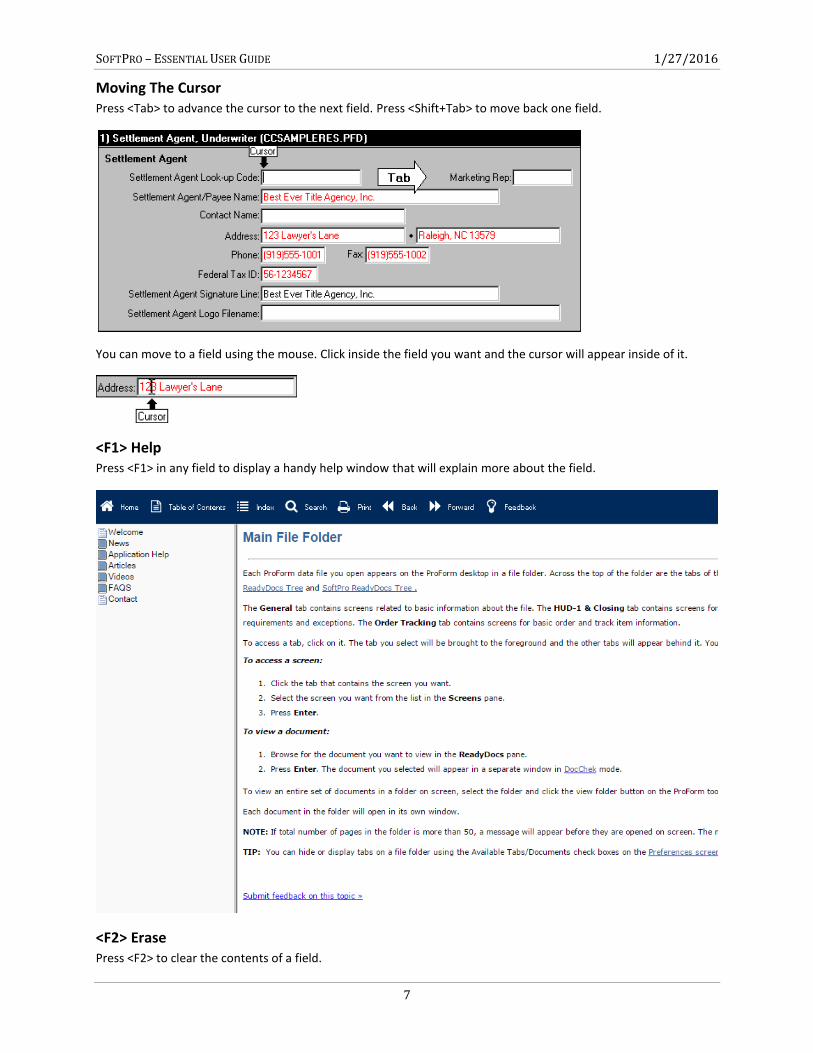
Moving The Cursor Press <Tab> to advance the cursor to the next field. Press <Shift+Tab> to move back one field.
You can move to a field using the mouse. Click inside the field you want and the cursor will appear inside of it.
<F1> Help Press <F1> in any field to display a handy help window that will explain more about the field.
<F2> Erase Press <F2> to clear the contents of a field.

SOFTPRO – ESSENTIAL USER GUIDE 1/27/2016
8
Moving From Screen To Screen To jump to the next screen in a tab press <Page Down>. Press <Page Up> to jump to the previous screen.
To open a screen on another tab, you must close the current screen first (press <Esc> or click the Close button in
the upper right-hand corner). Then select the tab you want to go to on the main folder and double-click the screen
you want to open.
User-Entered Data And Typelite User-entered data appears in the TypeLite color. The default TypeLite color is red. You can change the color by
selecting Tools/Preferences in ProForm. (See “Changing the TypeLite Color” below) Data that is entered for you
automatically by ProForm will appear black.
You can edit any information that ProForm enters for you. However, be aware that by editing automatic
calculations, you can alter the file balance.
Changing The Typelite Color 1. Choose Tools/Preferences.
2. Select the TypeLite Color button.
3. Select a color from the Windows Color palette that appears.
4. Click OK.
Tips:
Pastel colors do not show well on screen.
Do not use white as the TypeLite color.
If you select black as the TypeLite color, you will not be able to distinguish between manual data and data
that is entered automatically by ProForm.
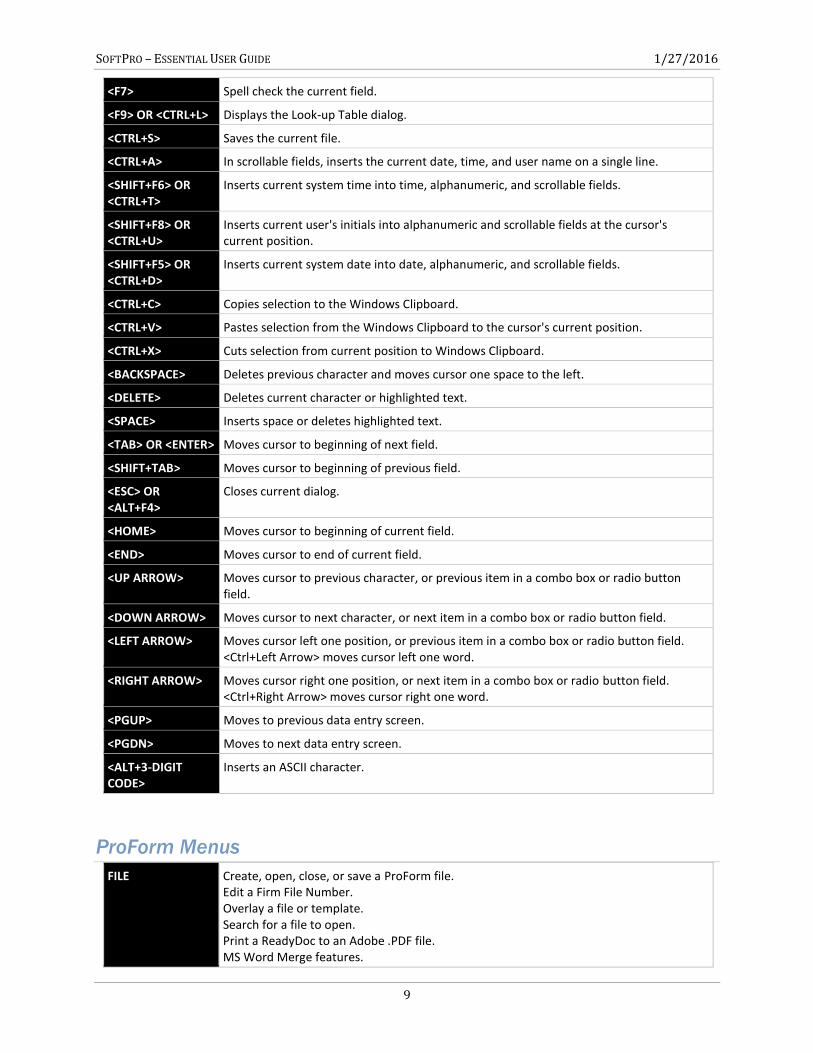
Data Entry Keys On any ProForm screen, use the following keys to access SoftPro features, enter data, or move around:
<F1> Displays context-sensitive help for the current field or dialog.
<F2> Erases contents of a field.
<F8> Displays the SoftPro Calculator.
<F6> OR <CTRL+G> Displays the GoTo dialog.
SOFTPRO – ESSENTIAL USER GUIDE 1/27/2016
9
ProForm Menus
<F7> Spell check the current field.
<F9> OR <CTRL+L> Displays the Look-up Table dialog.
<CTRL+S> Saves the current file.
<CTRL+A> In scrollable fields, inserts the current date, time, and user name on a single line.
<SHIFT+F6> OR <CTRL+T>
Inserts current system time into time, alphanumeric, and scrollable fields.
<SHIFT+F8> OR <CTRL+U>
Inserts current user's initials into alphanumeric and scrollable fields at the cursor's current position.
<SHIFT+F5> OR <CTRL+D>
Inserts current system date into date, alphanumeric, and scrollable fields.
<CTRL+C> Copies selection to the Windows Clipboard.
<CTRL+V> Pastes selection from the Windows Clipboard to the cursor's current position.
<CTRL+X> Cuts selection from current position to Windows Clipboard.
<BACKSPACE> Deletes previous character and moves cursor one space to the left.
<DELETE> Deletes current character or highlighted text.
<SPACE> Inserts space or deletes highlighted text.
<TAB> OR <ENTER> Moves cursor to beginning of next field.
<SHIFT+TAB> Moves cursor to beginning of previous field.
<ESC> OR <ALT+F4>
Closes current dialog.
<HOME> Moves cursor to beginning of current field.
<END> Moves cursor to end of current field.
<UP ARROW> Moves cursor to previous character, or previous item in a combo box or radio button field.
<DOWN ARROW> Moves cursor to next character, or next item in a combo box or radio button field.
<LEFT ARROW> Moves cursor left one position, or previous item in a combo box or radio button field. <Ctrl+Left Arrow> moves cursor left one word.
<RIGHT ARROW> Moves cursor right one position, or next item in a combo box or radio button field. <Ctrl+Right Arrow> moves cursor right one word.
<PGUP> Moves to previous data entry screen.
<PGDN> Moves to next data entry screen.
<ALT+3-DIGIT CODE>
Inserts an ASCII character.
FILE Create, open, close, or save a ProForm file. Edit a Firm File Number. Overlay a file or template. Search for a file to open. Print a ReadyDoc to an Adobe .PDF file. MS Word Merge features.
SOFTPRO – ESSENTIAL USER GUIDE 1/27/2016
10
Using Keyboard Shortcuts Pressing the <Alt> key in combination with the underlined letter can access any menu bar item or command. For
instance, to access the File menu without using your mouse, press <Alt> and <F>.
Toolbar
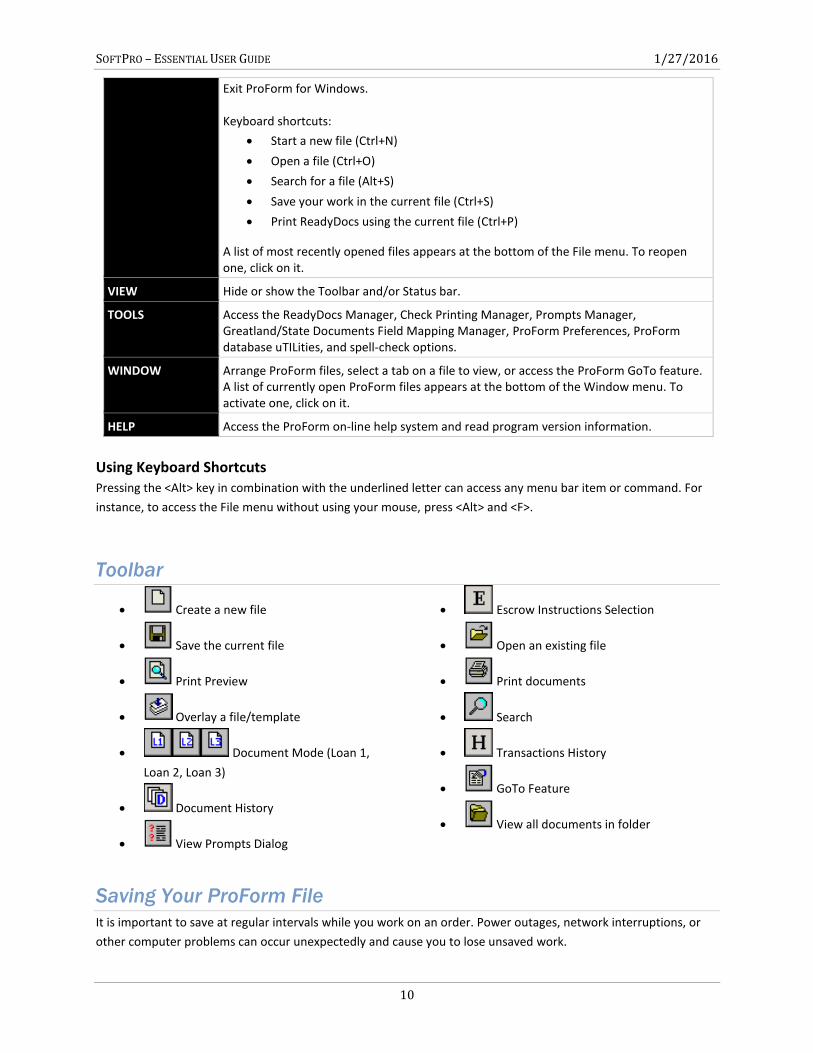
Create a new file
Save the current file
Print Preview
Overlay a file/template
Document Mode (Loan 1,
Loan 2, Loan 3)
Document History
View Prompts Dialog
Escrow Instructions Selection
Open an existing file
Print documents
Search
Transactions History
GoTo Feature
View all documents in folder
Saving Your ProForm File
It is important to save at regular intervals while you work on an order. Power outages, network interruptions, or
other computer problems can occur unexpectedly and cause you to lose unsaved work.
Exit ProForm for Windows. Keyboard shortcuts:
Start a new file (Ctrl+N)
Open a file (Ctrl+O)
Search for a file (Alt+S)
Save your work in the current file (Ctrl+S)
Print ReadyDocs using the current file (Ctrl+P)
A list of most recently opened files appears at the bottom of the File menu. To reopen one, click on it.
VIEW Hide or show the Toolbar and/or Status bar.
TOOLS Access the ReadyDocs Manager, Check Printing Manager, Prompts Manager, Greatland/State Documents Field Mapping Manager, ProForm Preferences, ProForm database uTILities, and spell-check options.
WINDOW Arrange ProForm files, select a tab on a file to view, or access the ProForm GoTo feature. A list of currently open ProForm files appears at the bottom of the Window menu. To activate one, click on it.
HELP Access the ProForm on-line help system and read program version information.
SOFTPRO – ESSENTIAL USER GUIDE 1/27/2016
11
To save your work:
Select File/Save or click on the ProForm toolbar.
The shortcut keystroke for File/Save is <Ctrl+S>. Press <Ctrl+S> at regular intervals while working with a file to save
your work. This is the only save option you can access while a ProForm screen is open.
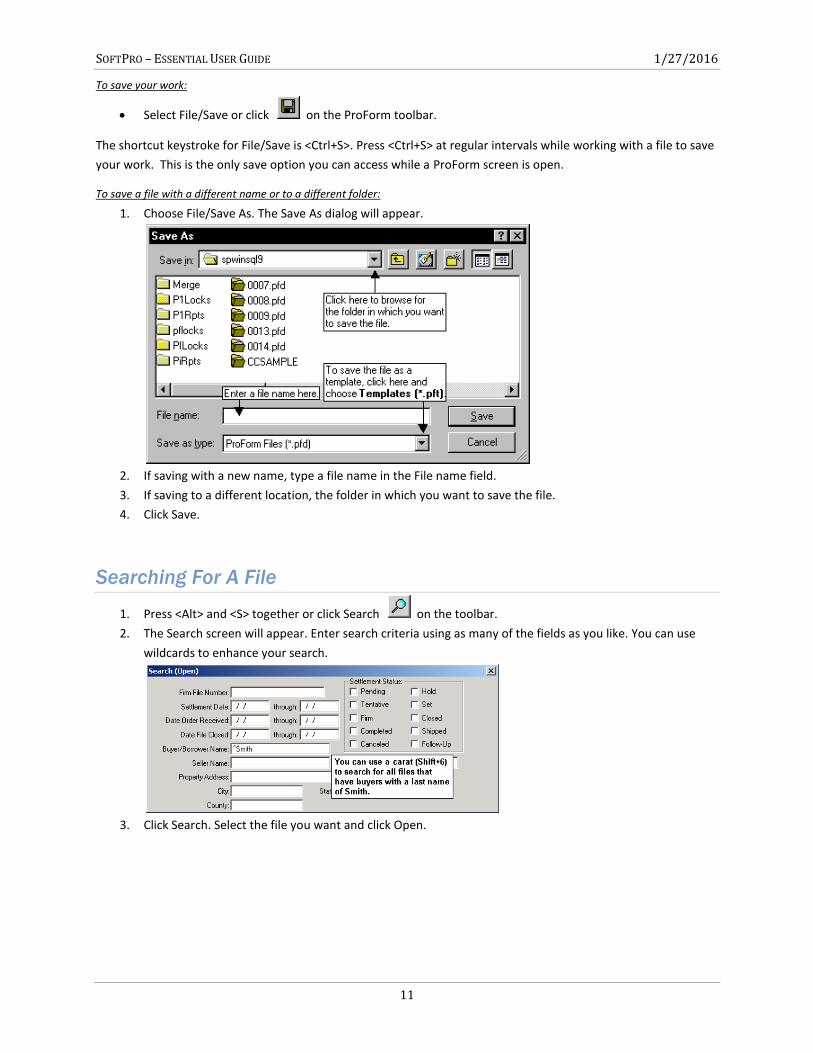
To save a file with a different name or to a different folder:
1. Choose File/Save As. The Save As dialog will appear.
2. If saving with a new name, type a file name in the File name field.
3. If saving to a different location, the folder in which you want to save the file.
4. Click Save.
Searching For A File
1. Press <Alt> and <S> together or click Search on the toolbar.
2. The Search screen will appear. Enter search criteria using as many of the fields as you like. You can use
wildcards to enhance your search.
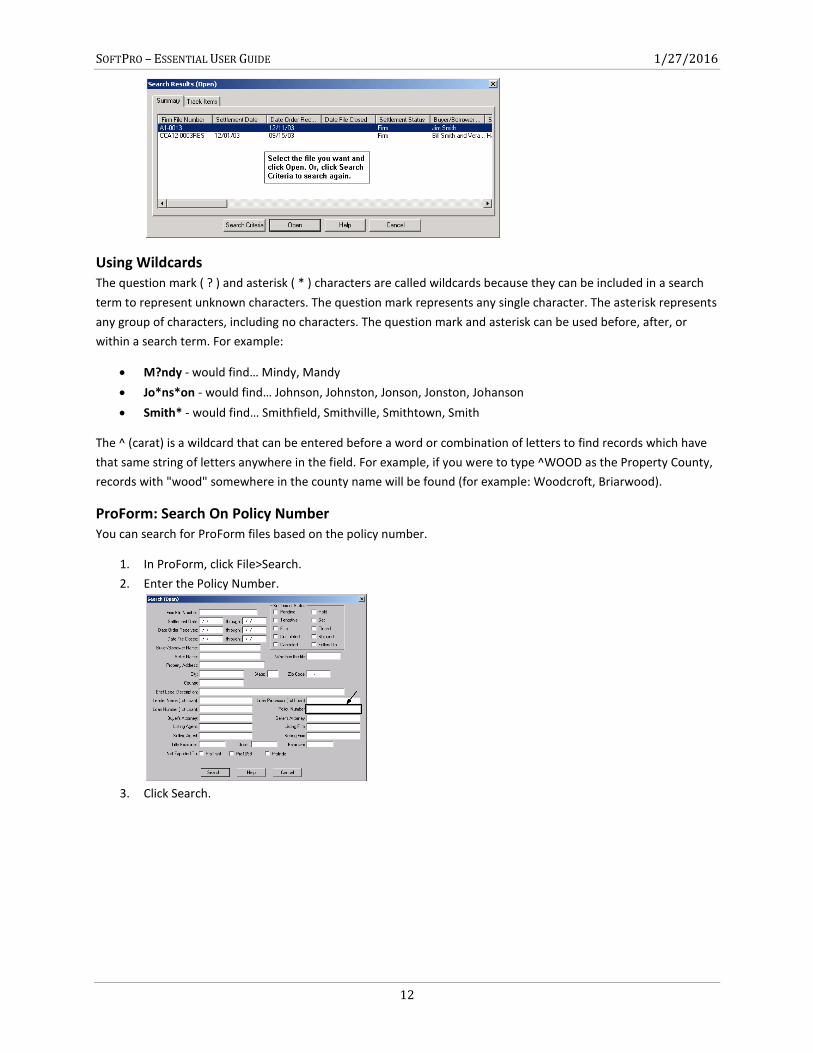
3. Click Search. Select the file you want and click Open.
SOFTPRO – ESSENTIAL USER GUIDE 1/27/2016
12
Using Wildcards The question mark ( ? ) and asterisk ( * ) characters are called wildcards because they can be included in a search
term to represent unknown characters. The question mark represents any single character. The asterisk represents
any group of characters, including no characters. The question mark and asterisk can be used before, after, or
within a search term. For example:
M?ndy - would find… Mindy, Mandy
Jo*ns*on - would find… Johnson, Johnston, Jonson, Jonston, Johanson
Smith* - would find… Smithfield, Smithville, Smithtown, Smith
The ^ (carat) is a wildcard that can be entered before a word or combination of letters to find records which have
that same string of letters anywhere in the field. For example, if you were to type ^WOOD as the Property County,
records with "wood" somewhere in the county name will be found (for example: Woodcroft, Briarwood).
ProForm: Search On Policy Number You can search for ProForm files based on the policy number.
1. In ProForm, click File>Search.
2. Enter the Policy Number.
3. Click Search.
SOFTPRO – ESSENTIAL USER GUIDE 1/27/2016
13
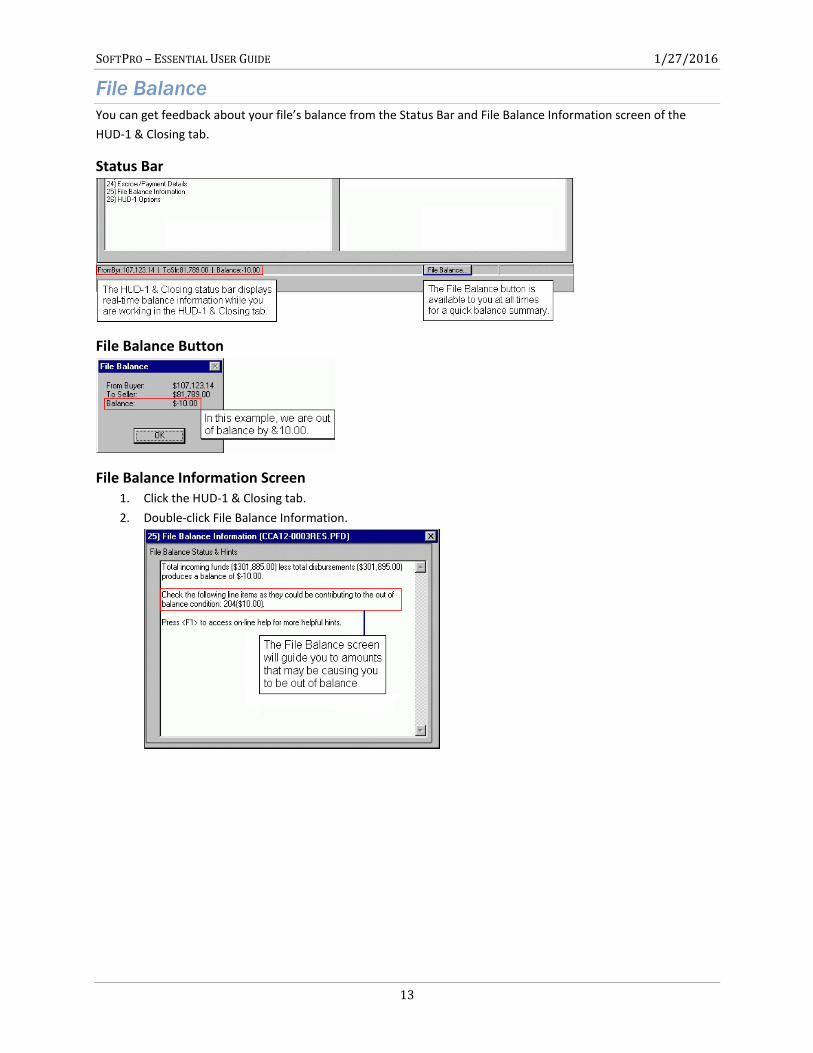
File Balance
You can get feedback about your file’s balance from the Status Bar and File Balance Information screen of the
HUD-1 & Closing tab.
Status Bar
File Balance Button
File Balance Information Screen 1. Click the HUD-1 & Closing tab.
2. Double-click File Balance Information.
SOFTPRO – ESSENTIAL USER GUIDE 1/27/2016
14
Chapter 2: Starting a New Order Creating a New CDF Order or Template ................................................................................ 15
CDF Tab ................................................................................................................................................................... 15
CDF Page 1 .......................................................................................................................... 16
Closing Information ................................................................................................................................................. 16
Transaction Information .......................................................................................................................................... 16
Loan Information ..................................................................................................................................................... 17
Loan Terms .............................................................................................................................................................. 19
Loan Terms (Continued) .......................................................................................................................................... 21
Projected Payments ................................................................................................................................................ 21
Costs at Closing ....................................................................................................................................................... 23
CDF Page 2 .......................................................................................................................... 25
Section Grids ........................................................................................................................................................... 25
Line Detail Dialogs ................................................................................................................................................... 27
Sections A-J Details .................................................................................................................................................. 32
CDF Page 3 .......................................................................................................................... 35
Calculating Cash to Close ......................................................................................................................................... 35
Summaries of Transactions ..................................................................................................................................... 36
Line Detail Dialogs ................................................................................................................................................... 37
Calculations ............................................................................................................................................................. 42
Transactions without a Seller .................................................................................................................................. 43
CDF Page 4 .......................................................................................................................... 45
Loan Disclosures ...................................................................................................................................................... 45
Adjustable Payment (AP) Table ............................................................................................................................... 47
Adjustable Payment (AP) Table Dialog .................................................................................................................... 48
Adjustable Interest Rate (AIR) Table ....................................................................................................................... 48
Adjustable Interest Rate (AIR) Table Dialog ............................................................................................................ 49
CDF Page 5 .......................................................................................................................... 50
Loan Calculations ..................................................................................................................................................... 50
Other Disclosures .................................................................................................................................................... 50
Contact Information ................................................................................................................................................ 51
Confirm Receipt ....................................................................................................................................................... 53
Other Changes ..................................................................................................................... 54
Utilities .................................................................................................................................................................... 54
ProDesign ................................................................................................................................................................ 54
ProForm ................................................................................................................................................................... 54
CDF Options ............................................................................................................................................................. 73
Title Insurance ......................................................................................................................................................... 78
SOFTPRO – ESSENTIAL USER GUIDE 1/27/2016
15
Overview
Your work requires you to enter many types of closings or title insurance orders. Some are standard types you see
everyday. These can be entered in ProForm using a similar approach. However, others may be unique and require
that you take advantage of all of the special features and flexibility that ProForm has to offer. Whatever an order
demands, you will be able to complete it with ProForm.
This chapter contains tips that you can use when starting several types of orders. After entering the basics, refer to
Chapter 3, “ProForm A to Z” to learn how to enter other items that make each file unique.
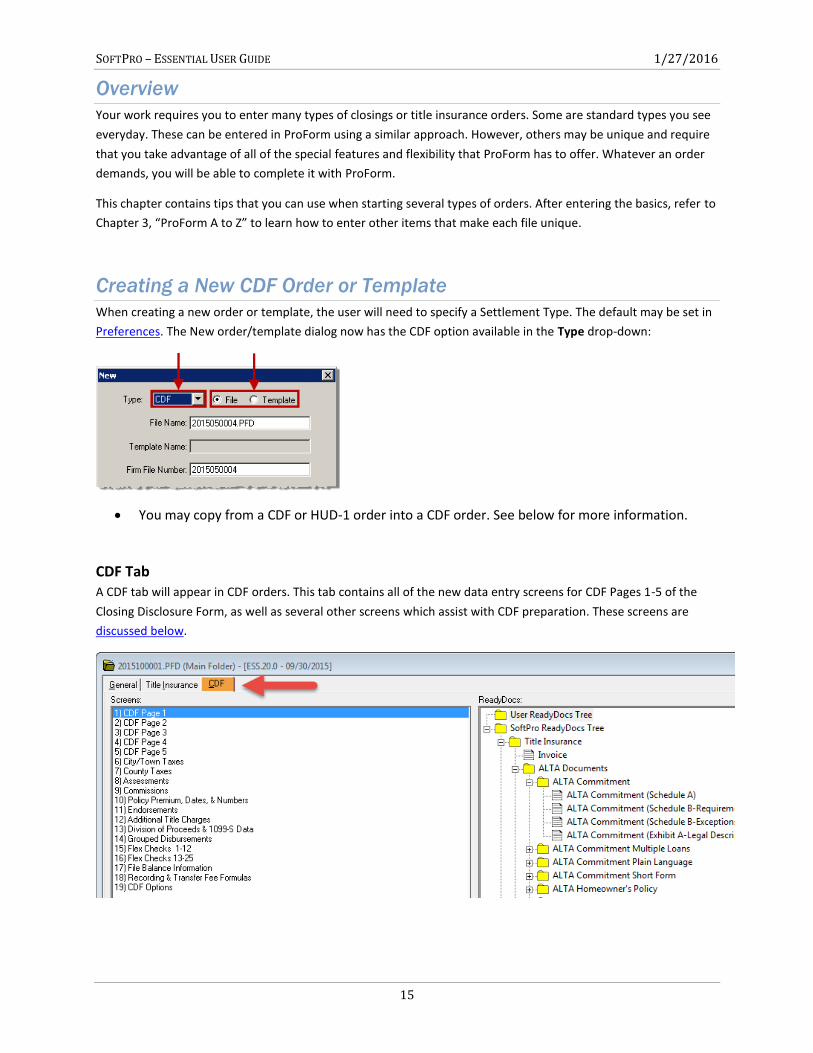
Creating a New CDF Order or Template
When creating a new order or template, the user will need to specify a Settlement Type. The default may be set in
Preferences. The New order/template dialog now has the CDF option available in the Type drop-down:
You may copy from a CDF or HUD-1 order into a CDF order. See below for more information.
CDF Tab A CDF tab will appear in CDF orders. This tab contains all of the new data entry screens for CDF Pages 1-5 of the
Closing Disclosure Form, as well as several other screens which assist with CDF preparation. These screens are
discussed below.
SOFTPRO – ESSENTIAL USER GUIDE 1/27/2016
16
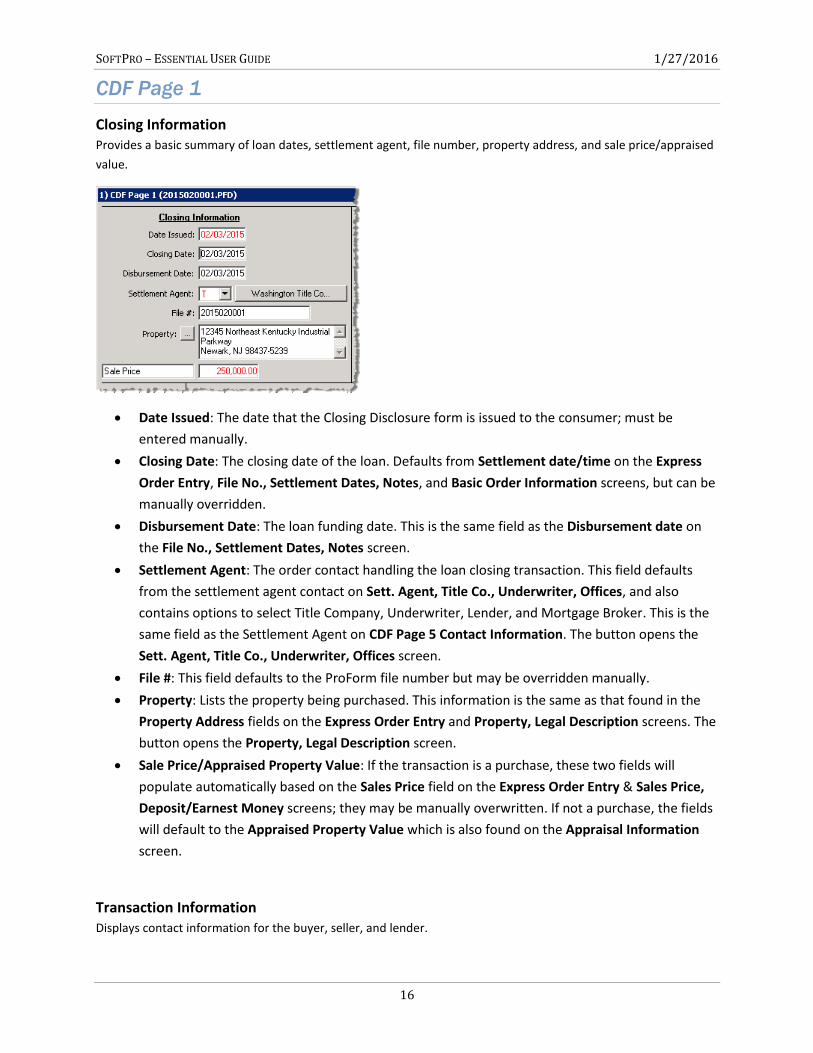
CDF Page 1
Closing Information Provides a basic summary of loan dates, settlement agent, file number, property address, and sale price/appraised
value.
Date Issued: The date that the Closing Disclosure form is issued to the consumer; must be
entered manually.
Closing Date: The closing date of the loan. Defaults from Settlement date/time on the Express
Order Entry, File No., Settlement Dates, Notes, and Basic Order Information screens, but can be
manually overridden.
Disbursement Date: The loan funding date. This is the same field as the Disbursement date on
the File No., Settlement Dates, Notes screen.
Settlement Agent: The order contact handling the loan closing transaction. This field defaults
from the settlement agent contact on Sett. Agent, Title Co., Underwriter, Offices, and also
contains options to select Title Company, Underwriter, Lender, and Mortgage Broker. This is the
same field as the Settlement Agent on CDF Page 5 Contact Information. The button opens the
Sett. Agent, Title Co., Underwriter, Offices screen.
File #: This field defaults to the ProForm file number but may be overridden manually.
Property: Lists the property being purchased. This information is the same as that found in the
Property Address fields on the Express Order Entry and Property, Legal Description screens. The
button opens the Property, Legal Description screen.
Sale Price/Appraised Property Value: If the transaction is a purchase, these two fields will
populate automatically based on the Sales Price field on the Express Order Entry & Sales Price,
Deposit/Earnest Money screens; they may be manually overwritten. If not a purchase, the fields
will default to the Appraised Property Value which is also found on the Appraisal Information
screen.
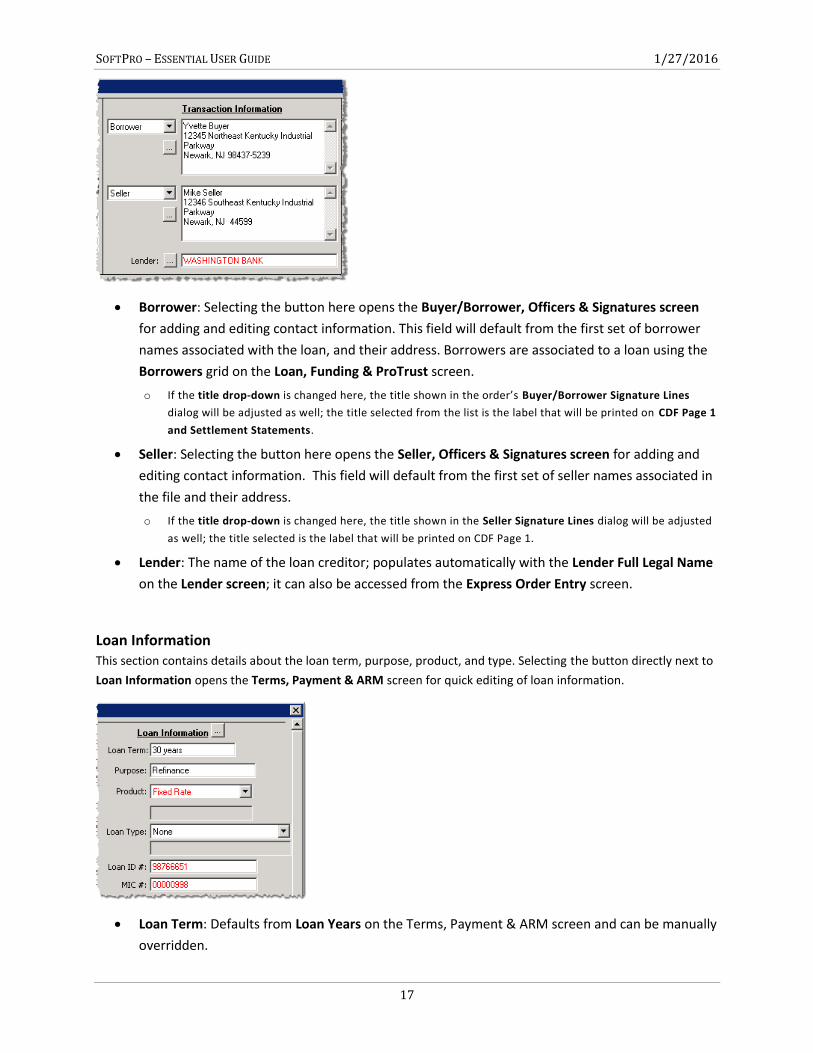
Transaction Information Displays contact information for the buyer, seller, and lender.
SOFTPRO – ESSENTIAL USER GUIDE 1/27/2016
17
Borrower: Selecting the button here opens the Buyer/Borrower, Officers & Signatures screen
for adding and editing contact information. This field will default from the first set of borrower
names associated with the loan, and their address. Borrowers are associated to a loan using the
Borrowers grid on the Loan, Funding & ProTrust screen.
o If the title drop-down is changed here, the title shown in the order’s Buyer/Borrower Signature Lines
dialog will be adjusted as well; the title selected from the list is the label that will be printed on CDF Page 1
and Settlement Statements.
Seller: Selecting the button here opens the Seller, Officers & Signatures screen for adding and
editing contact information. This field will default from the first set of seller names associated in
the file and their address.
o If the title drop-down is changed here, the title shown in the Seller Signature Lines dialog will be adjusted
as well; the title selected is the label that will be printed on CDF Page 1.
Lender: The name of the loan creditor; populates automatically with the Lender Full Legal Name
on the Lender screen; it can also be accessed from the Express Order Entry screen.
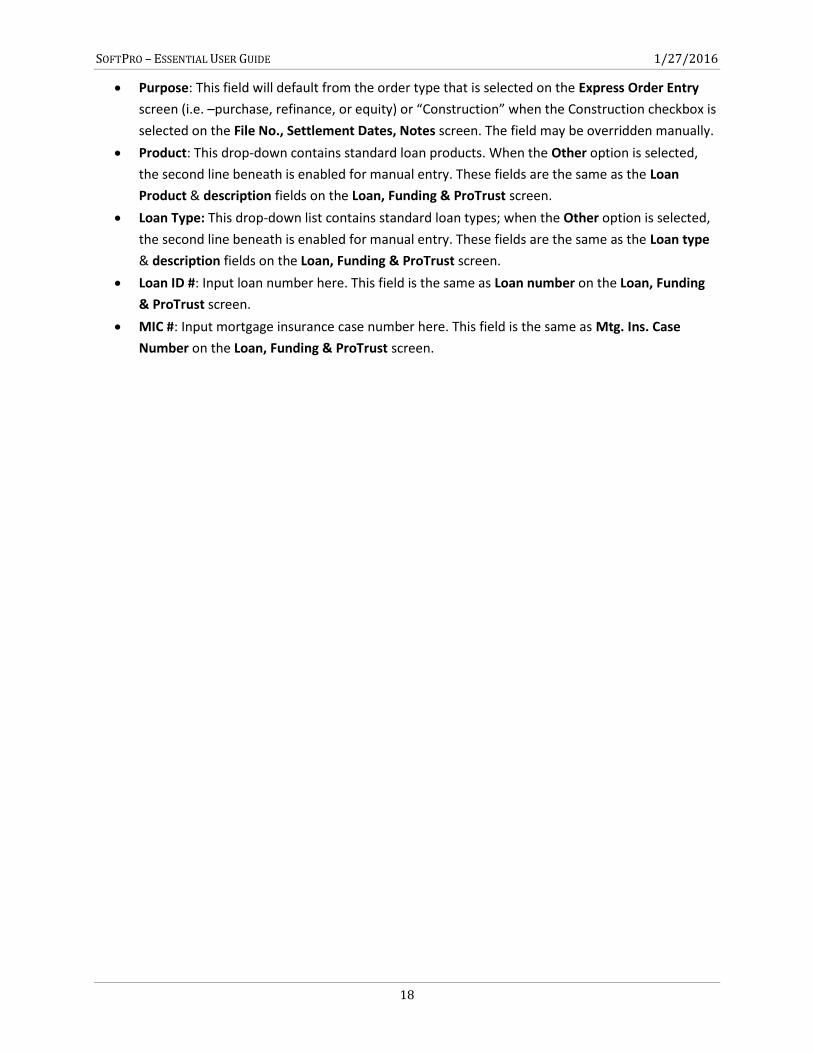
Loan Information This section contains details about the loan term, purpose, product, and type. Selecting the button directly next to
Loan Information opens the Terms, Payment & ARM screen for quick editing of loan information.
Loan Term: Defaults from Loan Years on the Terms, Payment & ARM screen and can be manually
overridden.
SOFTPRO – ESSENTIAL USER GUIDE 1/27/2016
18
Purpose: This field will default from the order type that is selected on the Express Order Entry
screen (i.e. –purchase, refinance, or equity) or “Construction” when the Construction checkbox is
selected on the File No., Settlement Dates, Notes screen. The field may be overridden manually.
Product: This drop-down contains standard loan products. When the Other option is selected,
the second line beneath is enabled for manual entry. These fields are the same as the Loan
Product & description fields on the Loan, Funding & ProTrust screen.
Loan Type: This drop-down list contains standard loan types; when the Other option is selected,
the second line beneath is enabled for manual entry. These fields are the same as the Loan type
& description fields on the Loan, Funding & ProTrust screen.
Loan ID #: Input loan number here. This field is the same as Loan number on the Loan, Funding
& ProTrust screen.
MIC #: Input mortgage insurance case number here. This field is the same as Mtg. Ins. Case
Number on the Loan, Funding & ProTrust screen.
SOFTPRO – ESSENTIAL USER GUIDE 1/27/2016
19
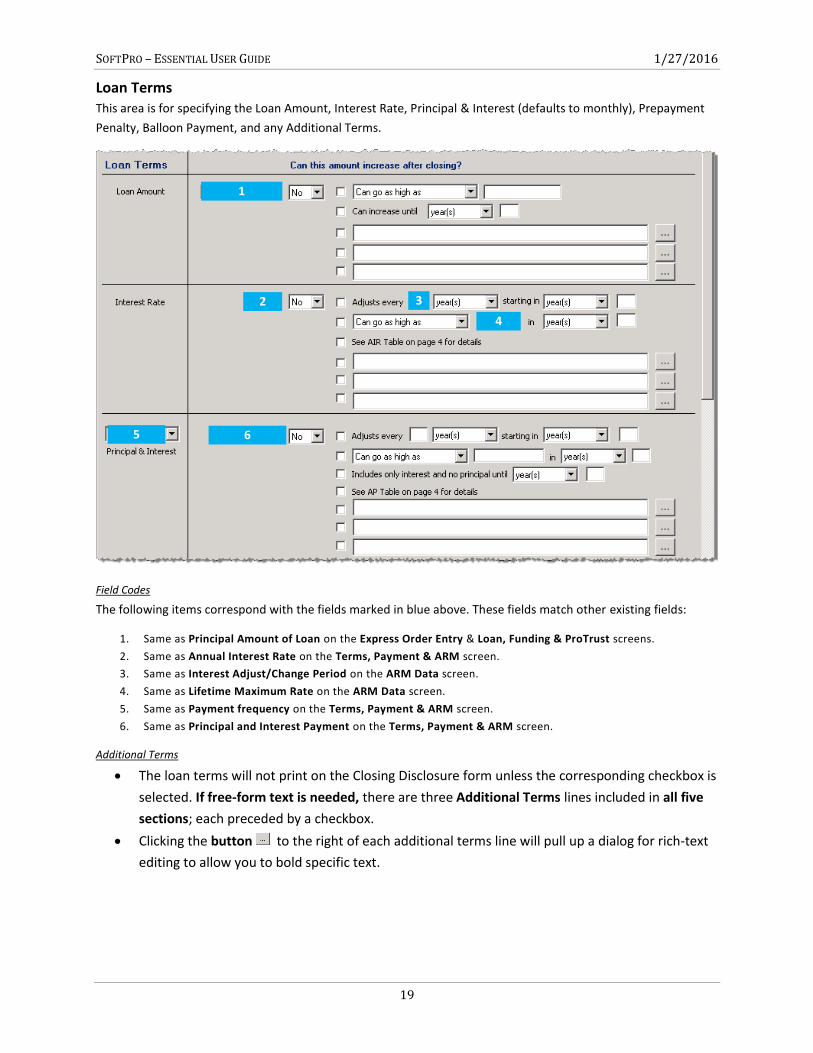
Loan Terms This area is for specifying the Loan Amount, Interest Rate, Principal & Interest (defaults to monthly), Prepayment
Penalty, Balloon Payment, and any Additional Terms.
Field Codes
The following items correspond with the fields marked in blue above. These fields match other existing fields:
1. Same as Principal Amount of Loan on the Express Order Entry & Loan, Funding & ProTrust screens.
2. Same as Annual Interest Rate on the Terms, Payment & ARM screen.
3. Same as Interest Adjust/Change Period on the ARM Data screen.
4. Same as Lifetime Maximum Rate on the ARM Data screen.
5. Same as Payment frequency on the Terms, Payment & ARM screen.
6. Same as Principal and Interest Payment on the Terms, Payment & ARM screen.
Additional Terms
The loan terms will not print on the Closing Disclosure form unless the corresponding checkbox is
selected. If free-form text is needed, there are three Additional Terms lines included in all five
sections; each preceded by a checkbox.
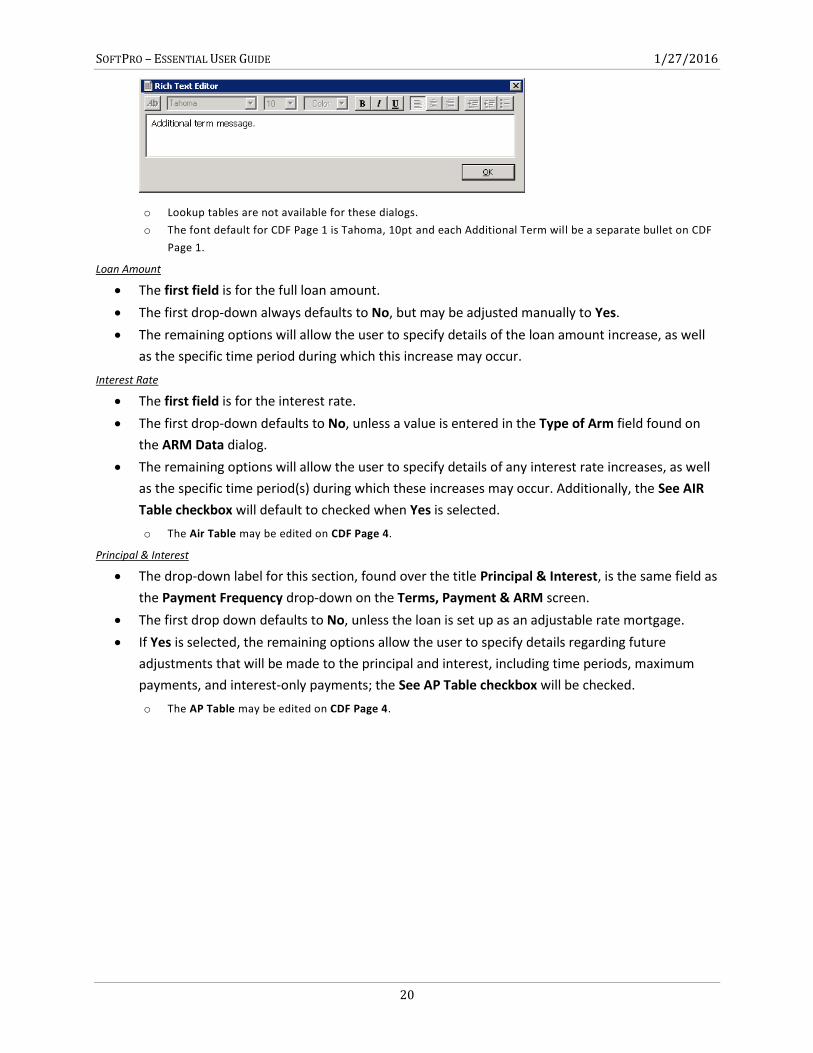
Clicking the button to the right of each additional terms line will pull up a dialog for rich-text
editing to allow you to bold specific text.
1
2 3
4
6 5
1
2 3
4
6 5
SOFTPRO – ESSENTIAL USER GUIDE 1/27/2016
20
o Lookup tables are not available for these dialogs.
o The font default for CDF Page 1 is Tahoma, 10pt and each Additional Term will be a separate bullet on CDF
Page 1.
Loan Amount
The first field is for the full loan amount.
The first drop-down always defaults to No, but may be adjusted manually to Yes.
The remaining options will allow the user to specify details of the loan amount increase, as well
as the specific time period during which this increase may occur.
Interest Rate
The first field is for the interest rate.
The first drop-down defaults to No, unless a value is entered in the Type of Arm field found on
the ARM Data dialog.
The remaining options will allow the user to specify details of any interest rate increases, as well
as the specific time period(s) during which these increases may occur. Additionally, the See AIR
Table checkbox will default to checked when Yes is selected.
o The Air Table may be edited on CDF Page 4.
Principal & Interest
The drop-down label for this section, found over the title Principal & Interest, is the same field as
the Payment Frequency drop-down on the Terms, Payment & ARM screen.
The first drop down defaults to No, unless the loan is set up as an adjustable rate mortgage.
If Yes is selected, the remaining options allow the user to specify details regarding future
adjustments that will be made to the principal and interest, including time periods, maximum
payments, and interest-only payments; the See AP Table checkbox will be checked.
o The AP Table may be edited on CDF Page 4.
SOFTPRO – ESSENTIAL USER GUIDE 1/27/2016
21
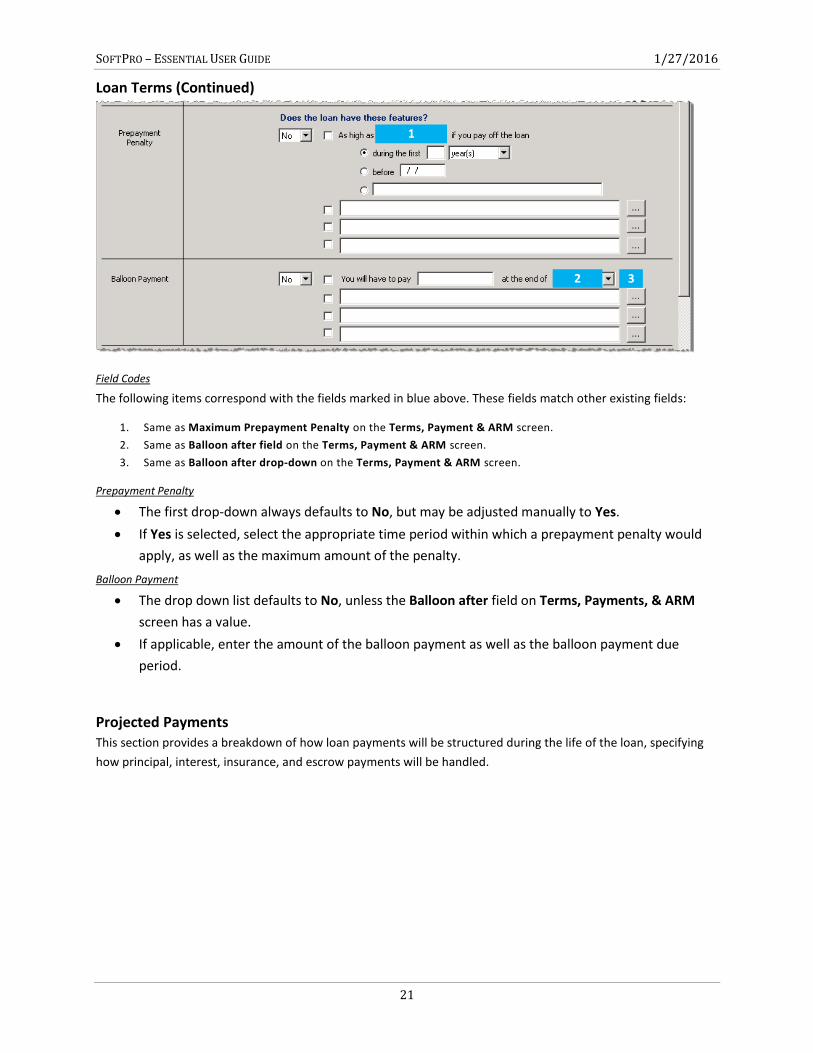
Loan Terms (Continued)
Field Codes
The following items correspond with the fields marked in blue above. These fields match other existing fields:
1. Same as Maximum Prepayment Penalty on the Terms, Payment & ARM screen.
2. Same as Balloon after field on the Terms, Payment & ARM screen.
3. Same as Balloon after drop-down on the Terms, Payment & ARM screen.
Prepayment Penalty
The first drop-down always defaults to No, but may be adjusted manually to Yes.
If Yes is selected, select the appropriate time period within which a prepayment penalty would
apply, as well as the maximum amount of the penalty.
Balloon Payment
The drop down list defaults to No, unless the Balloon after field on Terms, Payments, & ARM
screen has a value.
If applicable, enter the amount of the balloon payment as well as the balloon payment due
period.
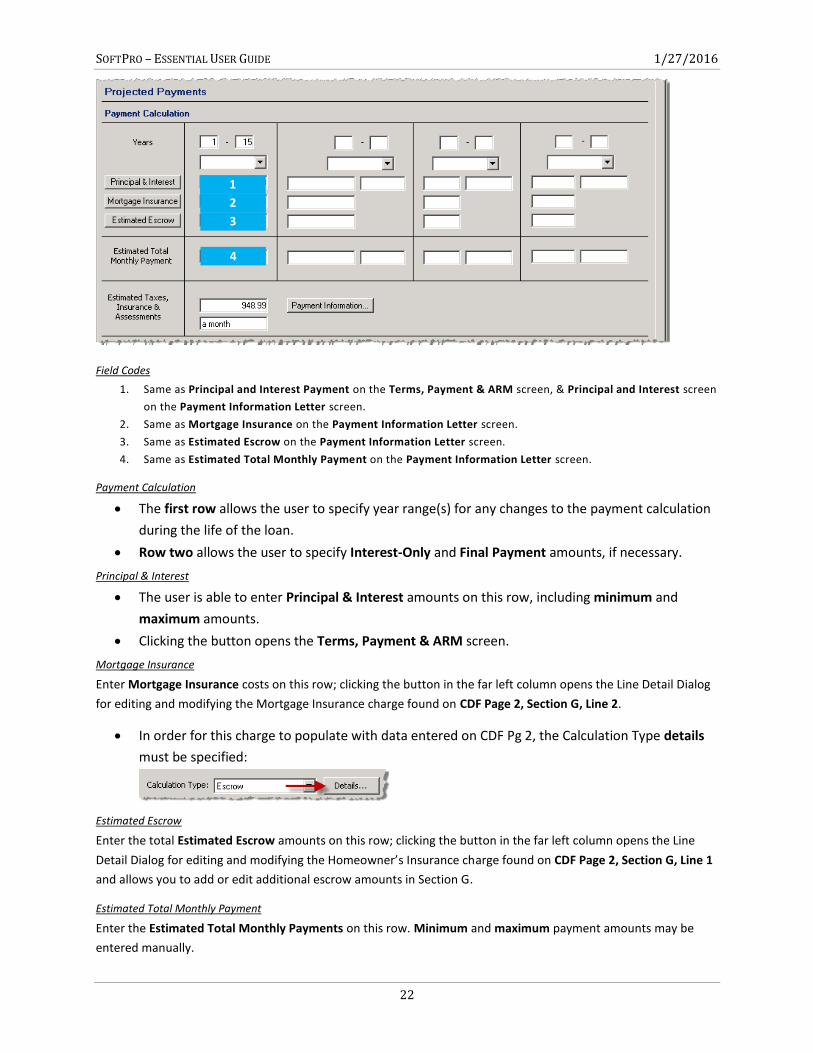
Projected Payments This section provides a breakdown of how loan payments will be structured during the life of the loan, specifying
how principal, interest, insurance, and escrow payments will be handled.
1
2 3
SOFTPRO – ESSENTIAL USER GUIDE 1/27/2016
22
Field Codes
1. Same as Principal and Interest Payment on the Terms, Payment & ARM screen, & Principal and Interest screen
on the Payment Information Letter screen.
2. Same as Mortgage Insurance on the Payment Information Letter screen.
3. Same as Estimated Escrow on the Payment Information Letter screen.
4. Same as Estimated Total Monthly Payment on the Payment Information Letter screen.
Payment Calculation
The first row allows the user to specify year range(s) for any changes to the payment calculation
during the life of the loan.
Row two allows the user to specify Interest-Only and Final Payment amounts, if necessary.
Principal & Interest
The user is able to enter Principal & Interest amounts on this row, including minimum and
maximum amounts.
Clicking the button opens the Terms, Payment & ARM screen.
Mortgage Insurance
Enter Mortgage Insurance costs on this row; clicking the button in the far left column opens the Line Detail Dialog
for editing and modifying the Mortgage Insurance charge found on CDF Page 2, Section G, Line 2.
In order for this charge to populate with data entered on CDF Pg 2, the Calculation Type details
must be specified:
Estimated Escrow
Enter the total Estimated Escrow amounts on this row; clicking the button in the far left column opens the Line
Detail Dialog for editing and modifying the Homeowner’s Insurance charge found on CDF Page 2, Section G, Line 1
and allows you to add or edit additional escrow amounts in Section G.
Estimated Total Monthly Payment
Enter the Estimated Total Monthly Payments on this row. Minimum and maximum payment amounts may be
entered manually.
1
2
3
4
SOFTPRO – ESSENTIAL USER GUIDE 1/27/2016
23
These amounts will calculate/populate automatically based on the information in the Principal &
Interest, Mortgage Insurance, and Estimated Escrow fields above.
Estimated Taxes, Insurance & Assessments
The Estimated Taxes, Insurance & Assessments field will display an amount calculated from information entered
into the Payment Information Letter screen (see below).
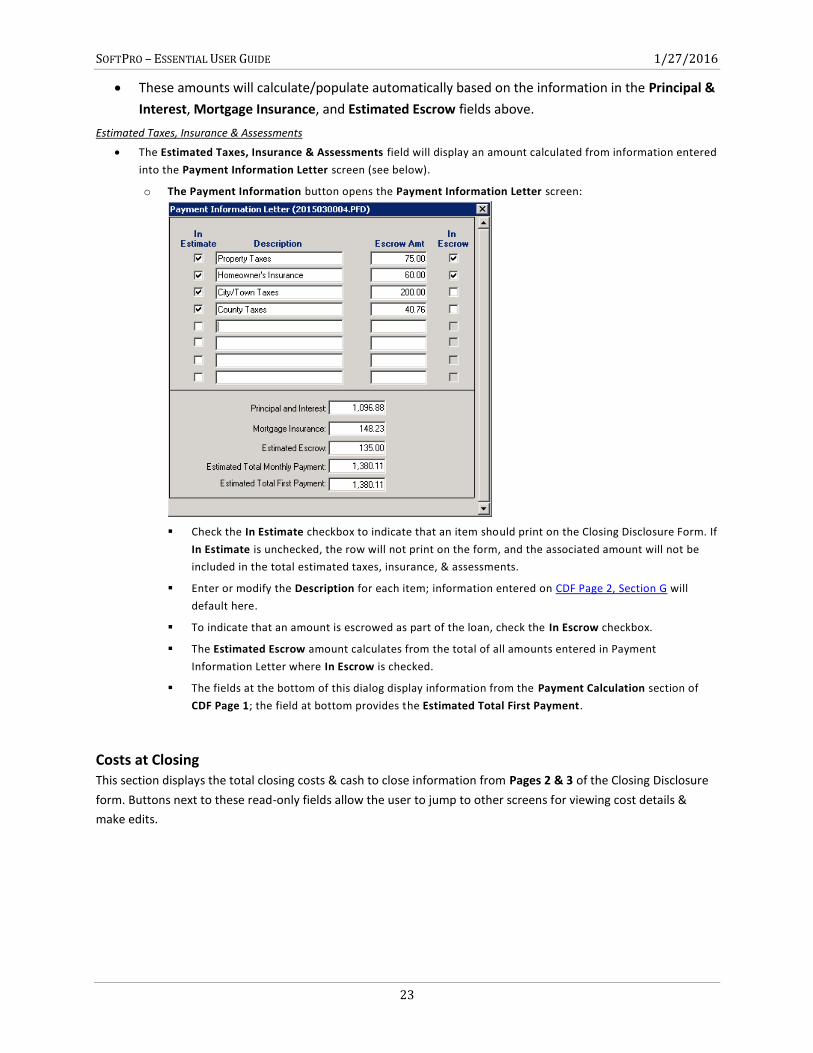
o The Payment Information button opens the Payment Information Letter screen:
Check the In Estimate checkbox to indicate that an item should print on the Closing Disclosure Form. If
In Estimate is unchecked, the row will not print on the form, and the associated amount will not be
included in the total estimated taxes, insurance, & assessments.
Enter or modify the Description for each item; information entered on CDF Page 2, Section G will
default here.
To indicate that an amount is escrowed as part of the loan, check the In Escrow checkbox.
The Estimated Escrow amount calculates from the total of all amounts entered in Payment
Information Letter where In Escrow is checked.
The fields at the bottom of this dialog display information from the Payment Calculation section of
CDF Page 1; the field at bottom provides the Estimated Total First Payment.
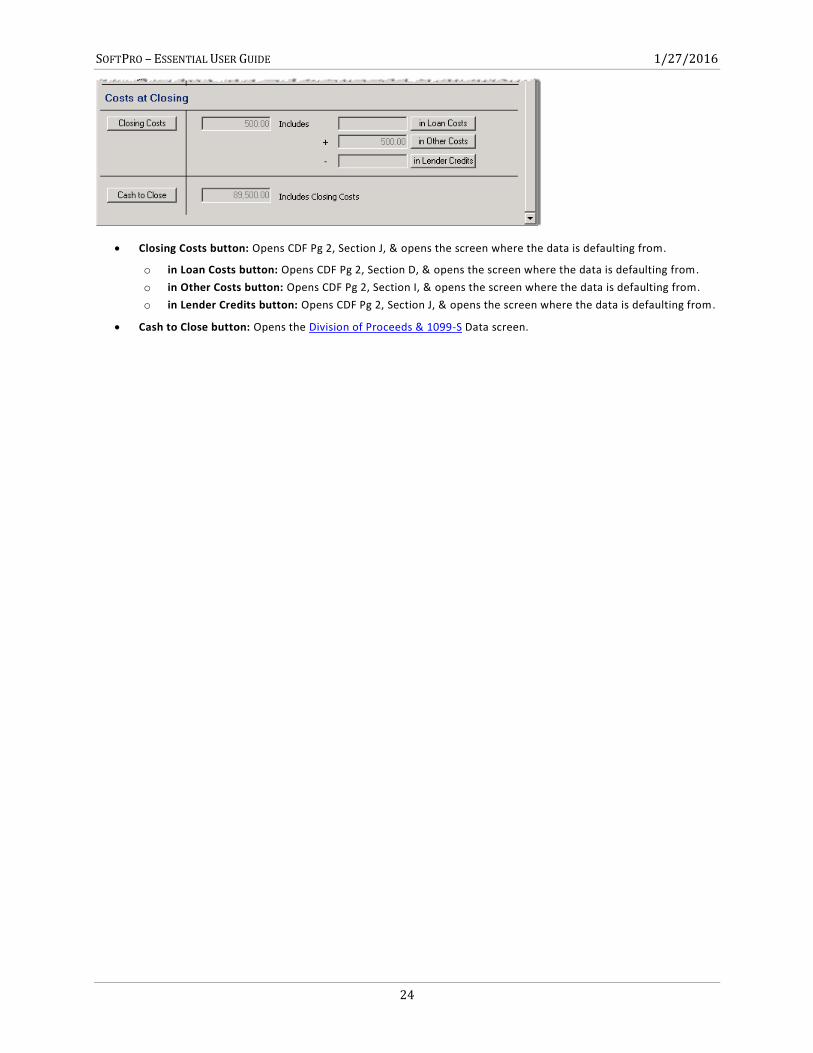
Costs at Closing This section displays the total closing costs & cash to close information from Pages 2 & 3 of the Closing Disclosure
form. Buttons next to these read-only fields allow the user to jump to other screens for viewing cost details &
make edits.
SOFTPRO – ESSENTIAL USER GUIDE 1/27/2016
24
Closing Costs button: Opens CDF Pg 2, Section J, & opens the screen where the data is defaulting from.
o in Loan Costs button: Opens CDF Pg 2, Section D, & opens the screen where the data is defaulting from.
o in Other Costs button: Opens CDF Pg 2, Section I, & opens the screen where the data is defaulting from.
o in Lender Credits button: Opens CDF Pg 2, Section J, & opens the screen where the data is defaulting from.
Cash to Close button: Opens the Division of Proceeds & 1099-S Data screen.

SOFTPRO – ESSENTIAL USER GUIDE 1/27/2016
25
CDF Page 2
Use this page to detail closing costs that are associated with the transaction.
Section Grids CDF Page 2 is presented in a grid and allows data to be entered directly within the grid cells unless they are grayed
out. Use the Enter or arrow keys to move from one cell to another in a grid. Use Tab to move from one grid to the
next.
Grid Columns
Description: Enter a description of the line item; functions the same as the HUD lines. The
contents of the description field will print in the memo field on a receipt/disbursement
transaction once exported to ProTrust.
o The section and line number will be displayed in the extended memo details.
Ex. – “Settlement or closing fee - (B.01) $500.00”
o The breakdown of the charges pulls into the Extended Memo field. For example:
A single item check would appear similarly to the following:
A Grouped Disbursement Check would reflect all fees collected:
Re: Enter a memo or other note about this item; functions the same as the HUD lines.
DS: Select a disbursement status code from this drop-down list; functions the same as the HUD
lines.

SOFTPRO – ESSENTIAL USER GUIDE 1/27/2016
26
To: Enter the name of the payee for this item; functions the same as the HUD lines.
Borrower-Paid: The two Borrower-Paid columns allow the user to list items that will be paid by
the buyer/borrower:
o At Closing: Indicates the amount listed is to be paid at the closing.
o Before Closing: Indicates the amount is to be paid prior to the closing.
Seller-Paid: The two Seller-Paid columns allow the user to list items that must be paid by the
seller.
o At Closing: Indicates the amount listed is to be paid at the closing.
o Before Closing: Indicates the amount is to be paid prior to the closing.
Paid by Others: Indicates the amount is paid by a party other than the borrower or seller.
Grid Lines
Headers: Each section has a header row which contains bold, black text and lists the
corresponding Section letter, Title, and Borrower-Paid Total:
Sorting: Each section’s lines are sorted alphabetically by description when the screen is closed;
capitalized items are sorted before lowercase items.
o This sorting does not apply to any default, reserved lines in each section.
o Alphabetic sorting can be turned off by unchecking option 6) Sort CDF page 2 lines descriptions
alphabetically on the CDF Options screen.
Line numbers: Sections A-C & E-H have black hyperlinked line numbers at the left side of the
grid.
o These numbers may be clicked to view and edit information in the Line Detail Dialogs for those items.
o Sections A-C & E-H can each contain up to 99 lines; only 55 total lines will be printed on CDF Page 3. Any
lines that exceed this number will be included on an addendum page.
Lines may be added by choosing the <Click here to add a row> option at the bottom of a given
section.
Lines may be deleted by clicking in the column to the left of the line numbers to select an entire
row and pressing the Delete key.
o Each section must have at least one line.
o The Aggregate Adjustment line in Section G cannot be deleted, & always shows as the last line in the grid.
o All charges associated with that line must be eligible for deletion.
Default lines in each section cannot be deleted.
Enterprise users: If a line contains a charge already posted in ProTrust (i.e., not pending or voided),
you will not be able to delete the charge or line until you void the existing transaction.
If the charge is being “sent” from another location you must remove the CDF line value from the Line
drop-down so the charge is no longer on the CDF line.
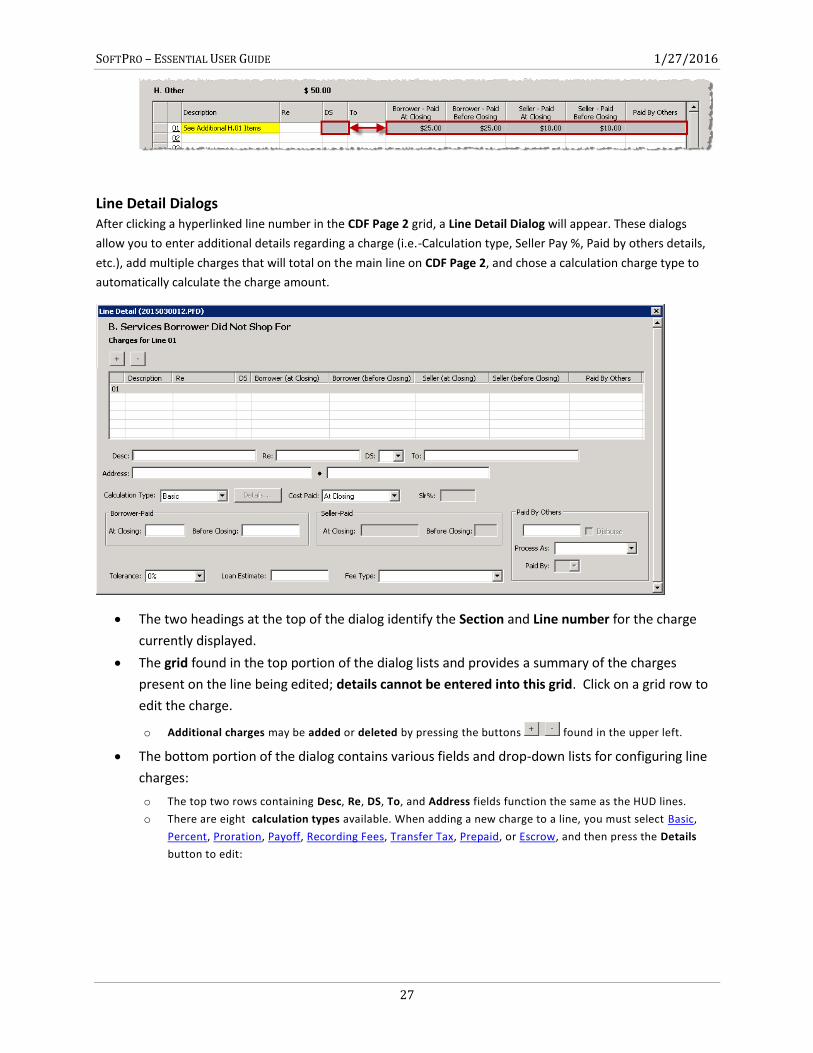
Multiple charge lines: Lines containing multiple charges have “grayed out” DS and amounts
fields since they contain a total of all the charges that are associated with this line:
SOFTPRO – ESSENTIAL USER GUIDE 1/27/2016
27
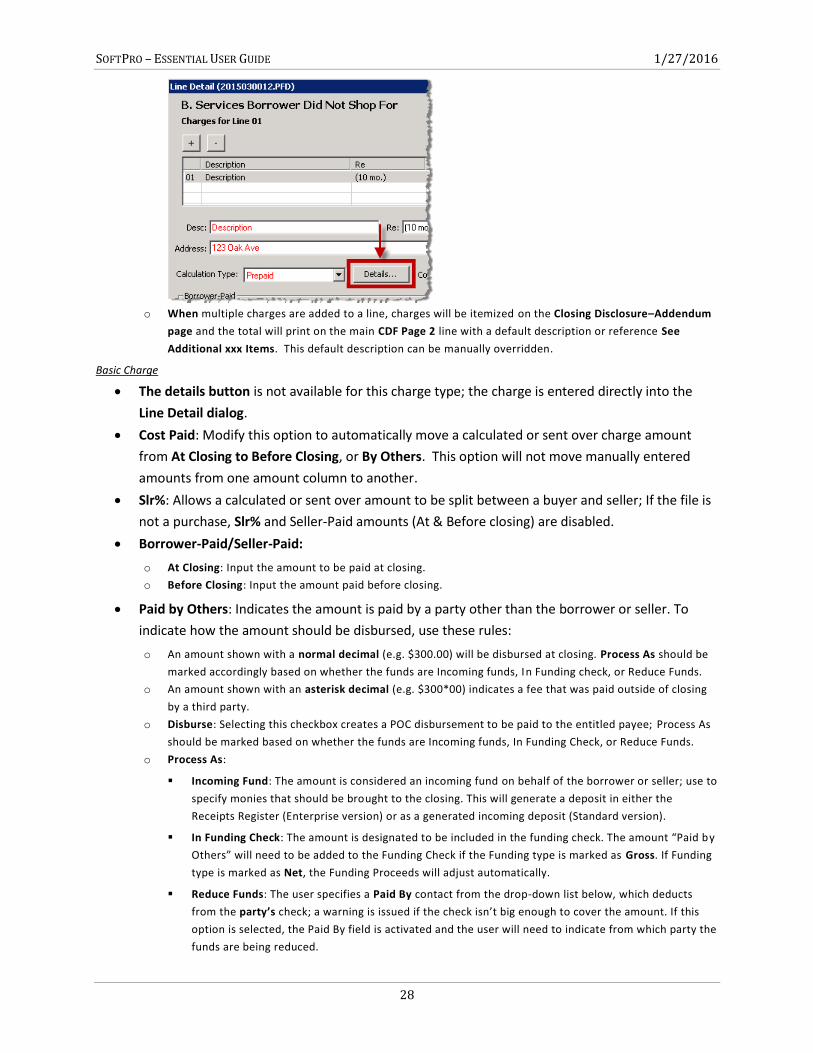
Line Detail Dialogs After clicking a hyperlinked line number in the CDF Page 2 grid, a Line Detail Dialog will appear. These dialogs
allow you to enter additional details regarding a charge (i.e.-Calculation type, Seller Pay %, Paid by others details,
etc.), add multiple charges that will total on the main line on CDF Page 2, and chose a calculation charge type to
automatically calculate the charge amount.
The two headings at the top of the dialog identify the Section and Line number for the charge
currently displayed.
The grid found in the top portion of the dialog lists and provides a summary of the charges
present on the line being edited; details cannot be entered into this grid. Click on a grid row to
edit the charge.
o Additional charges may be added or deleted by pressing the buttons found in the upper left.
The bottom portion of the dialog contains various fields and drop-down lists for configuring line
charges:
o The top two rows containing Desc, Re, DS, To, and Address fields function the same as the HUD lines.
o There are eight calculation types available. When adding a new charge to a line, you must select Basic,
Percent, Proration, Payoff, Recording Fees, Transfer Tax, Prepaid, or Escrow, and then press the Details
button to edit:
SOFTPRO – ESSENTIAL USER GUIDE 1/27/2016
28
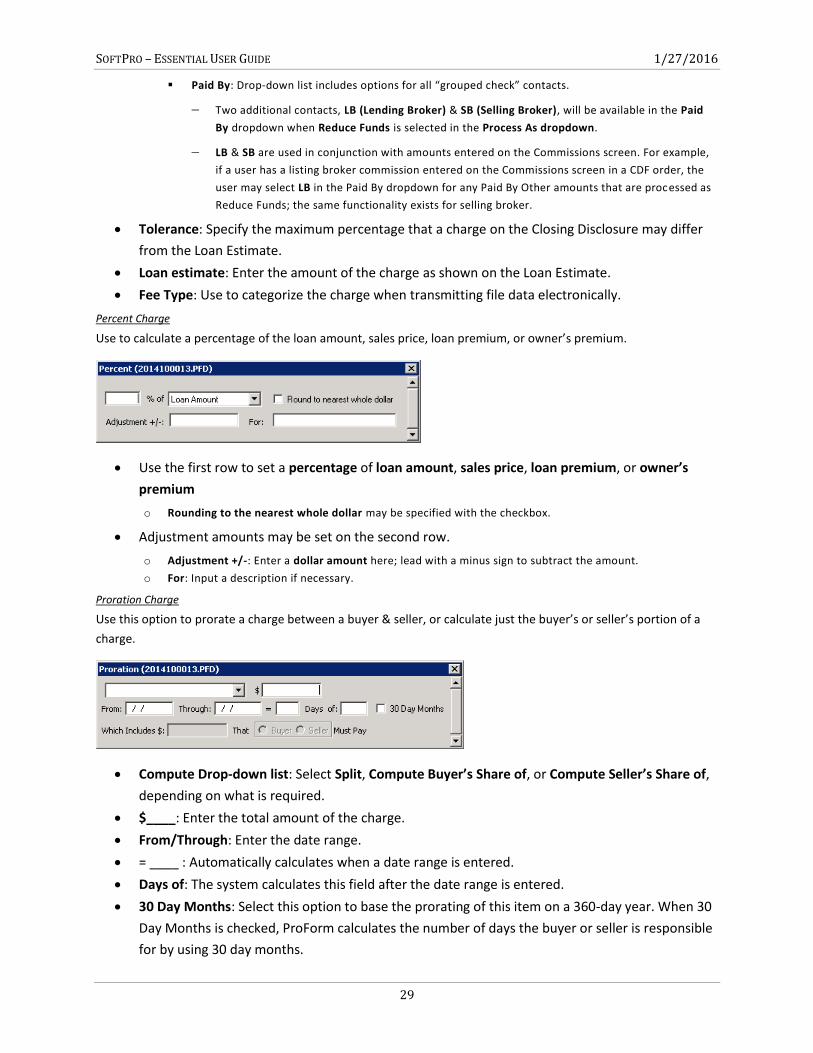
o When multiple charges are added to a line, charges will be itemized on the Closing Disclosure–Addendum
page and the total will print on the main CDF Page 2 line with a default description or reference See
Additional xxx Items. This default description can be manually overridden.
Basic Charge
The details button is not available for this charge type; the charge is entered directly into the
Line Detail dialog.
Cost Paid: Modify this option to automatically move a calculated or sent over charge amount
from At Closing to Before Closing, or By Others. This option will not move manually entered
amounts from one amount column to another.
Slr%: Allows a calculated or sent over amount to be split between a buyer and seller; If the file is
not a purchase, Slr% and Seller-Paid amounts (At & Before closing) are disabled.
Borrower-Paid/Seller-Paid:
o At Closing: Input the amount to be paid at closing.
o Before Closing: Input the amount paid before closing.
Paid by Others: Indicates the amount is paid by a party other than the borrower or seller. To
indicate how the amount should be disbursed, use these rules:
o An amount shown with a normal decimal (e.g. $300.00) will be disbursed at closing. Process As should be
marked accordingly based on whether the funds are Incoming funds, In Funding check, or Reduce Funds.
o An amount shown with an asterisk decimal (e.g. $300*00) indicates a fee that was paid outside of closing
by a third party.
o Disburse: Selecting this checkbox creates a POC disbursement to be paid to the entitled payee; Process As
should be marked based on whether the funds are Incoming funds, In Funding Check, or Reduce Funds.
o Process As:
Incoming Fund: The amount is considered an incoming fund on behalf of the borrower or seller; use to
specify monies that should be brought to the closing. This will generate a deposit in either the
Receipts Register (Enterprise version) or as a generated incoming deposit (Standard version).
In Funding Check: The amount is designated to be included in the funding check. The amount “Paid by
Others” will need to be added to the Funding Check if the Funding type is marked as Gross. If Funding
type is marked as Net, the Funding Proceeds will adjust automatically.
Reduce Funds: The user specifies a Paid By contact from the drop-down list below, which deducts
from the party’s check; a warning is issued if the check isn’t big enough to cover the amount. If this
option is selected, the Paid By field is activated and the user will need to indicate from which party the
funds are being reduced.
SOFTPRO – ESSENTIAL USER GUIDE 1/27/2016
29
Paid By: Drop-down list includes options for all “grouped check” contacts.
Two additional contacts, LB (Lending Broker) & SB (Selling Broker), will be available in the Paid
By dropdown when Reduce Funds is selected in the Process As dropdown.
LB & SB are used in conjunction with amounts entered on the Commissions screen. For example,
if a user has a listing broker commission entered on the Commissions screen in a CDF order, the
user may select LB in the Paid By dropdown for any Paid By Other amounts that are processed as
Reduce Funds; the same functionality exists for selling broker.
Tolerance: Specify the maximum percentage that a charge on the Closing Disclosure may differ
from the Loan Estimate.
Loan estimate: Enter the amount of the charge as shown on the Loan Estimate.
Fee Type: Use to categorize the charge when transmitting file data electronically.
Percent Charge
Use to calculate a percentage of the loan amount, sales price, loan premium, or owner’s premium.
Use the first row to set a percentage of loan amount, sales price, loan premium, or owner’s
premium
o Rounding to the nearest whole dollar may be specified with the checkbox.
Adjustment amounts may be set on the second row.
o Adjustment +/-: Enter a dollar amount here; lead with a minus sign to subtract the amount.
o For: Input a description if necessary.
Proration Charge
Use this option to prorate a charge between a buyer & seller, or calculate just the buyer’s or seller’s portion of a
charge.
Compute Drop-down list: Select Split, Compute Buyer’s Share of, or Compute Seller’s Share of,
depending on what is required.
$____: Enter the total amount of the charge.
From/Through: Enter the date range.
= ____ : Automatically calculates when a date range is entered.
Days of: The system calculates this field after the date range is entered.
30 Day Months: Select this option to base the prorating of this item on a 360-day year. When 30
Day Months is checked, ProForm calculates the number of days the buyer or seller is responsible
for by using 30 day months.
SOFTPRO – ESSENTIAL USER GUIDE 1/27/2016
30
Which Includes $ _____ That _____ Must Pay: Only available when a Split calculations is
selected.
o Defaults to Buyer; this line may be used to add an additional charge for either the Buyer or Seller.
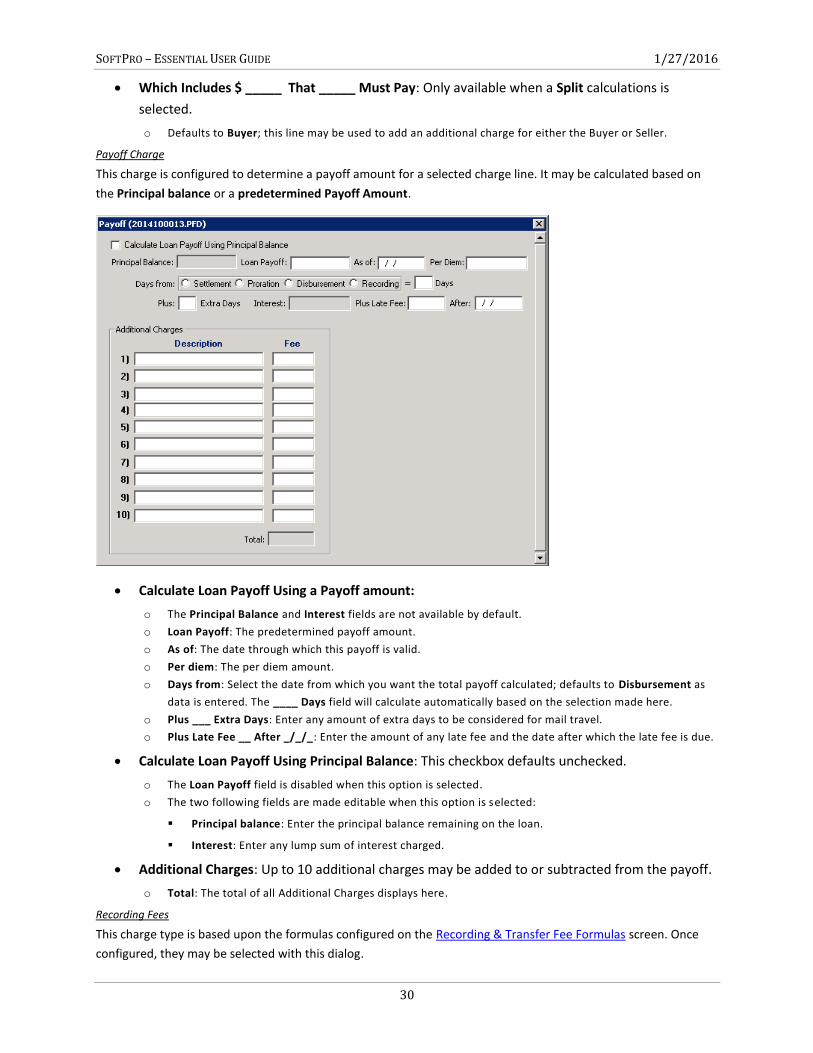
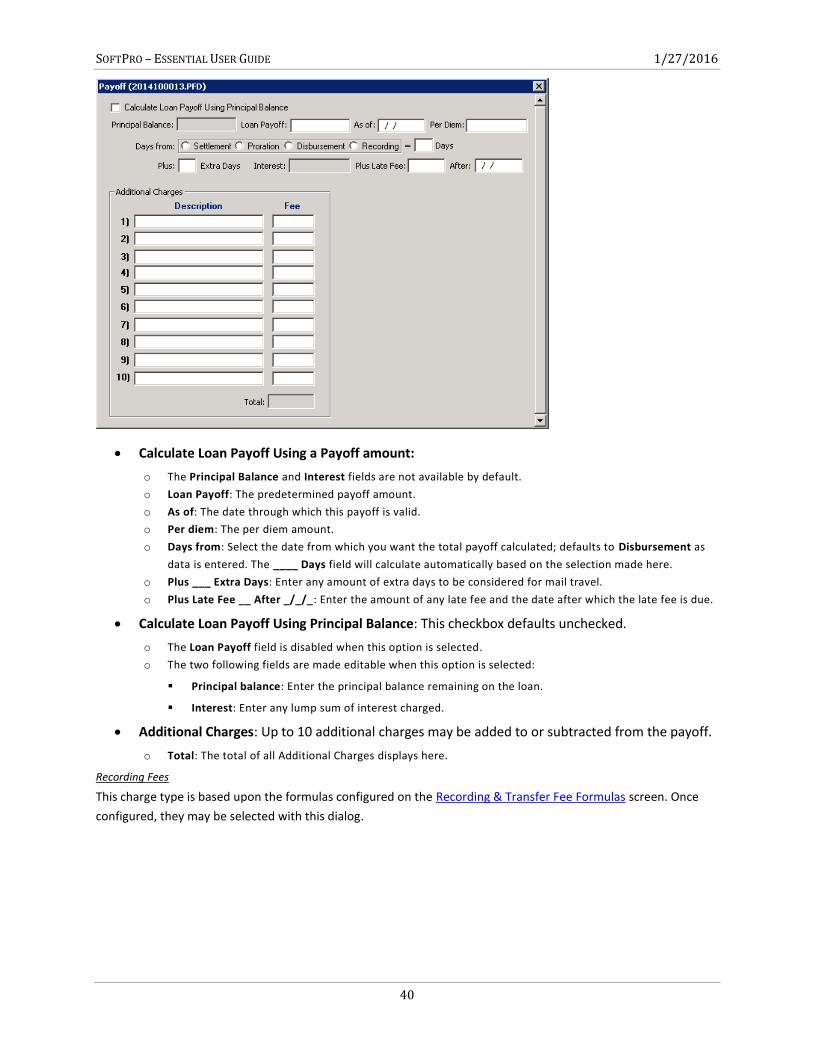
Payoff Charge
This charge is configured to determine a payoff amount for a selected charge line. It may be calculated based on
the Principal balance or a predetermined Payoff Amount.
Calculate Loan Payoff Using a Payoff amount:
o The Principal Balance and Interest fields are not available by default.
o Loan Payoff: The predetermined payoff amount.
o As of: The date through which this payoff is valid.
o Per diem: The per diem amount.
o Days from: Select the date from which you want the total payoff calculated; defaults to Disbursement as
data is entered. The ____ Days field will calculate automatically based on the selection made here.
o Plus ___ Extra Days: Enter any amount of extra days to be considered for mail travel.
o Plus Late Fee __ After _/_/_: Enter the amount of any late fee and the date after which the late fee is due.
Calculate Loan Payoff Using Principal Balance: This checkbox defaults unchecked.
o The Loan Payoff field is disabled when this option is selected.
o The two following fields are made editable when this option is selected:
Principal balance: Enter the principal balance remaining on the loan.
Interest: Enter any lump sum of interest charged.
Additional Charges: Up to 10 additional charges may be added to or subtracted from the payoff.
o Total: The total of all Additional Charges displays here.
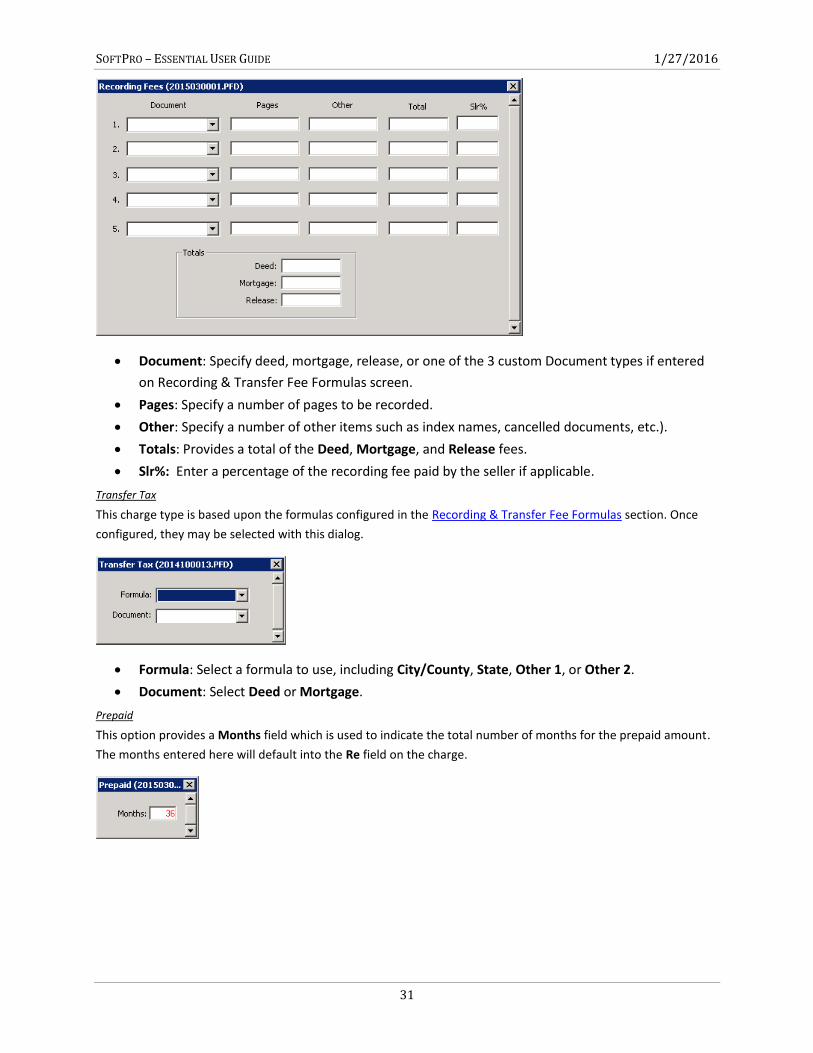
Recording Fees
This charge type is based upon the formulas configured on the Recording & Transfer Fee Formulas screen. Once
configured, they may be selected with this dialog.
SOFTPRO – ESSENTIAL USER GUIDE 1/27/2016
31
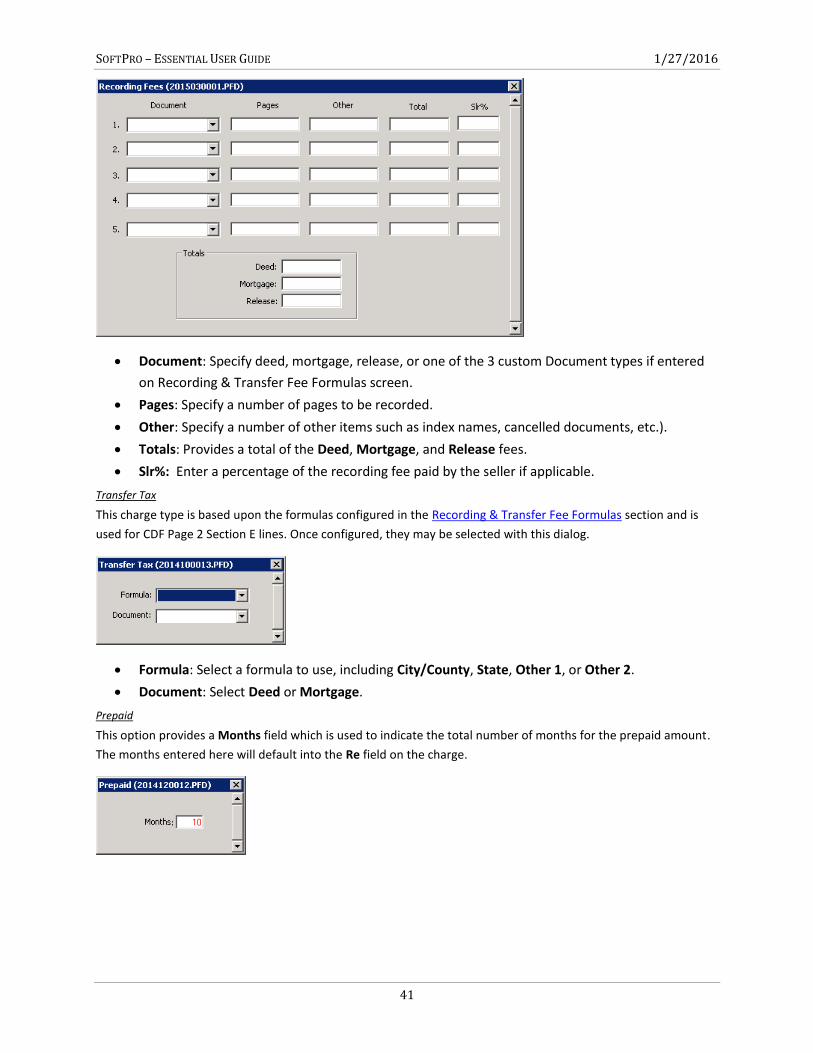
Document: Specify deed, mortgage, release, or one of the 3 custom Document types if entered
on Recording & Transfer Fee Formulas screen.
Pages: Specify a number of pages to be recorded.
Other: Specify a number of other items such as index names, cancelled documents, etc.).
Totals: Provides a total of the Deed, Mortgage, and Release fees.
Slr%: Enter a percentage of the recording fee paid by the seller if applicable.
Transfer Tax
This charge type is based upon the formulas configured in the Recording & Transfer Fee Formulas section. Once
configured, they may be selected with this dialog.
Formula: Select a formula to use, including City/County, State, Other 1, or Other 2.
Document: Select Deed or Mortgage.
Prepaid
This option provides a Months field which is used to indicate the total number of months for the prepaid amount.
The months entered here will default into the Re field on the charge.
SOFTPRO – ESSENTIAL USER GUIDE 1/27/2016
32
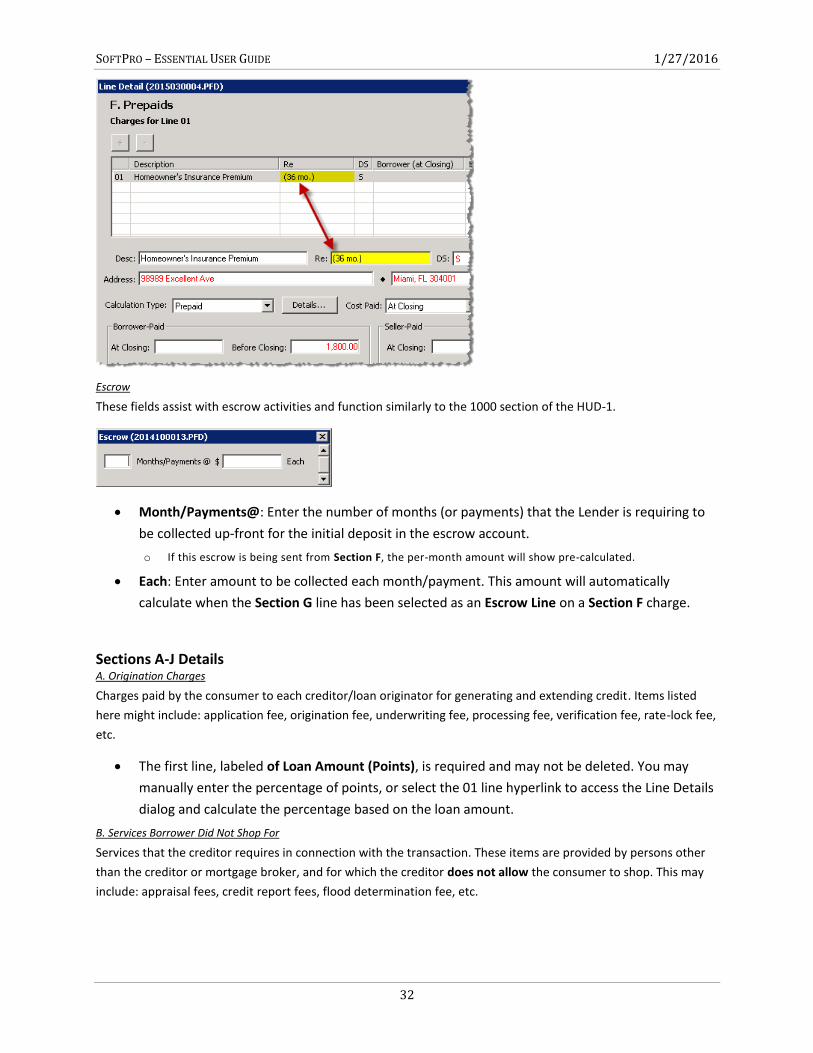
Escrow
These fields assist with escrow activities and function similarly to the 1000 section of the HUD-1.
Month/Payments@: Enter the number of months (or payments) that the Lender is requiring to
be collected up-front for the initial deposit in the escrow account.
o If this escrow is being sent from Section F, the per-month amount will show pre-calculated.
Each: Enter amount to be collected each month/payment. This amount will automatically
calculate when the Section G line has been selected as an Escrow Line on a Section F charge.
Sections A-J Details A. Origination Charges
Charges paid by the consumer to each creditor/loan originator for generating and extending credit. Items listed
here might include: application fee, origination fee, underwriting fee, processing fee, verification fee, rate-lock fee,
etc.
The first line, labeled of Loan Amount (Points), is required and may not be deleted. You may
manually enter the percentage of points, or select the 01 line hyperlink to access the Line Details
dialog and calculate the percentage based on the loan amount.
B. Services Borrower Did Not Shop For
Services that the creditor requires in connection with the transaction. These items are provided by persons other
than the creditor or mortgage broker, and for which the creditor does not allow the consumer to shop. This may
include: appraisal fees, credit report fees, flood determination fee, etc.
SOFTPRO – ESSENTIAL USER GUIDE 1/27/2016
33
C. Services Borrower Did Shop For
Services that the creditor requires in connection with the transaction. These items are provided by persons other
than the creditor or mortgage broker, and for which the creditor does allow the consumer to shop. These items
may include: pest inspection fees, survey fees, title insurance-related fees.
D. TOTAL LOAN COSTS (Borrower-Paid)
Provides a sum of the Borrower-Paid subtotals of Sections A-C. This total generally represents all costs that the
creditor and mortgage broker require of the borrower in connection with the loan transaction. These lines may not
be deleted.
E. Taxes and Other Government Fees
This section details the fees paid to state and local governments, particularly taxes and other government fees for
recording documents, and transfer taxes assessed against the purchase price of a real estate contract or the loan
amount.
Lines in this section may only contain one charge per line.
F. Prepaids
Includes prepaid charges for real estate property taxes, insurance premiums, or other items that must be paid to
insure the property or satisfy real estate tax obligations before completion of the credit transaction and the real
estate closing. Line F.03 is reserved for prepaid interest and must show $0.00 if interest is not collected in advance.
Line F.03 is pulled from the Terms, Payment & Arm screen under the General Tab.
The first four lines default to Homeowner’s Insurance Premium, Mortgage Insurance Premium,
Prepaid Interest, and Property Taxes. These lines may not be deleted.
Lines 1-3 may not contain multiple charges.
G. Initial Escrow Payment at Closing
This is the amount that the borrower is expected to set aside for the establishment of an escrow account. The first
three lines default to Homeowner’s Insurance, Mortgage Insurance, and Property Taxes. These lines may not be
deleted.
Lines 1-2 may not contain multiple charges.
The Aggregate Adjustment will automatically sort to the last line in Section G and may not be
deleted; enter information into the amount fields just like any other fees received from the
lender.
Property Taxes collected with different time periods may be disclosed on separate lines in this
section or as separate charges under line G.03.
H. Other
This section is used to disclose any items that are part of the real estate closing, but not required by the creditor or
disclosed elsewhere. These may include all real estate brokerage fees, homeowner's or condominium association
charges paid at consummation, home warranties, inspection fees, and any owner’s title insurance premiums.
Real estate commissions must be the total amount paid, regardless of the retention of any
earnest money deposit.
Owner’s title insurance must include “Title -“ at the beginning of the label, as well as the
parenthetical “(optional)” at the end of the label when designated borrower-paid at or before
closing.

SOFTPRO – ESSENTIAL USER GUIDE 1/27/2016
34
I. TOTAL OTHER COSTS (Borrower-Paid)
Displays a sum of the Borrower-Paid subtotals of Sections E-H. These lines may not be deleted.
J. TOTAL CLOSING COSTS (Borrower-Paid)
Displays a sum of the Borrower-Paid subtotals of Sections D (Total Loan Costs) & I (Total Other Costs), totals for all
amounts under all Borrower-Paid, Seller-Paid, and Paid by Others, and any general credits provided by the lender.
These lines may not be deleted. The Lender Credits description is editable if additional statements are required by
the creditor on this line.
Lender credits is used to specify a general credit amount from the lender to the borrower and
must be input manually as a negative amount.
Process as may be specified here. See details above for explanation.

SOFTPRO – ESSENTIAL USER GUIDE 1/27/2016
35
CDF Page 3
This page provides more detail regarding closing costs associated with the transaction.
Calculating Cash to Close This section allows the user to list any differences in the totals between what was included in the Loan Estimate
and on the Final Closing Disclosure Form.
COLUMNS
Loan Estimate: Most fields in this column are manual-entry and are designated for amounts from
the loan estimate provided by the lender. The Loan Estimate Total Closing Costs (J) amount will
be the sum of all Loan Estimate amounts and can be manually overwritten.
Final: All fields in this column are explained in the Lines section below.
Did this change?: The drop-down list will default to Yes or No based upon any difference
between what is in the Loan Estimate column and the Final column. The user may manually
input a reason for this difference in the field to the right.
o Clicking the button at the far right pulls up a dialog for rich-text editing.
o The CDF requires that certain text included in this section be formatted in bold; you can use the Field
Editor dialog which provides a formatting toolbar:
o Lookup tables are not available for these dialogs.
o The default font set for CDF Page 3 is Tahoma, 7pt.
Lines
The following items correspond with the fields that are in the Final column:
SOFTPRO – ESSENTIAL USER GUIDE 1/27/2016
36
1. Total Closing Costs (J): Same as the Total Borrower-Paid Closing Costs on CDF Page 2, Section J.
2. Closing Costs Paid Before Closing: The sum of all Borrower closing costs “paid before closing” amounts.
3. Closing Costs Financed (Paid from your Loan Amount): This is a manual entry field.
4. Down Payment/Funds from Borrower: When the order is a purchase, this field contains the sum of lines K.01-
L.02 minus any Closing Costs Financed. When the order is not a purchase, this field contains the sum of all
Section K Payoff charges, minus L.02 and any Closing Costs Financed. An amount is displayed if the total of
Section K is greater than the total of Section L , otherwise the field displays $0.00.
5. Deposit: Sum of all Deposit/Earnest money entered on the Sales Price, Deposit/Earnest Money screen.
6. Funds for Borrower: When the order is a purchase, this field contains the sum of K.01-L.02 minus any Closing
Costs Financed. When the order is not a purchase, this field contains the sum of all Section K Payoff charges,
minus L.02 and any Closing Costs Financed. An amount is displayed if the total of Section K is less than the
total of Section L, otherwise it displays as $0.00.
7. Seller Credits: This field is the same as the L.05 Borrower Amount field on CDF Page 3.
8. Adjustments and Other Credits: When the order is a purchase, this field contains the sum of lines K.02, K.04-
K.15 on CDF Page 3 and subtracts the sum of all non-payoff charges on lines L.03, L.04 & L.06-L.17 on CDF
Page 3. When the order is not a purchase, this field contains the sum of all non-deposit lines K.02, K.04-K.15
on CDF Page 3 and subtracts the sum of all non-payoff charges on lines L.03, L.04 & L.06-L.17.
9. Cash to Close: This line displays the totals of the Loan Estimate and Final columns.
Summaries of Transactions This section of CDF Page 3 contains Sections K, L, M, and N. Unlike CDF Page 2, these sections are not sorted
alphabetically; lines may not be added or deleted.
Section Grids
The four grids in this section contain manual-input grids.
You are able to specify the various credits and debits associated with the borrower and seller.
o The Credit/Debit Column found in Sections K and L may be used to specify which items should appear in
both borrower and seller amount columns as a debit to one and a credit to the other. Single-sided debits
and credit amounts may be specified on certain rows; some rows are always single-sided.
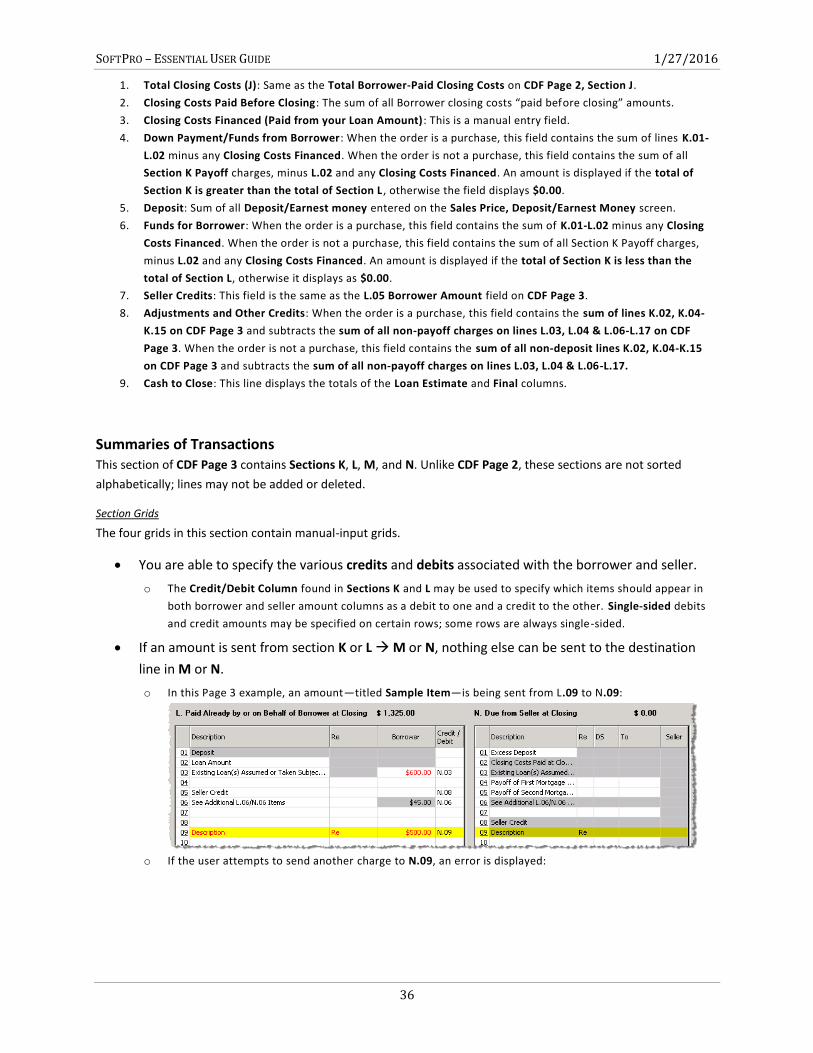
If an amount is sent from section K or L M or N, nothing else can be sent to the destination
line in M or N.
o In this Page 3 example, an amount—titled Sample Item—is being sent from L.09 to N.09:
o If the user attempts to send another charge to N.09, an error is displayed:
SOFTPRO – ESSENTIAL USER GUIDE 1/27/2016
37
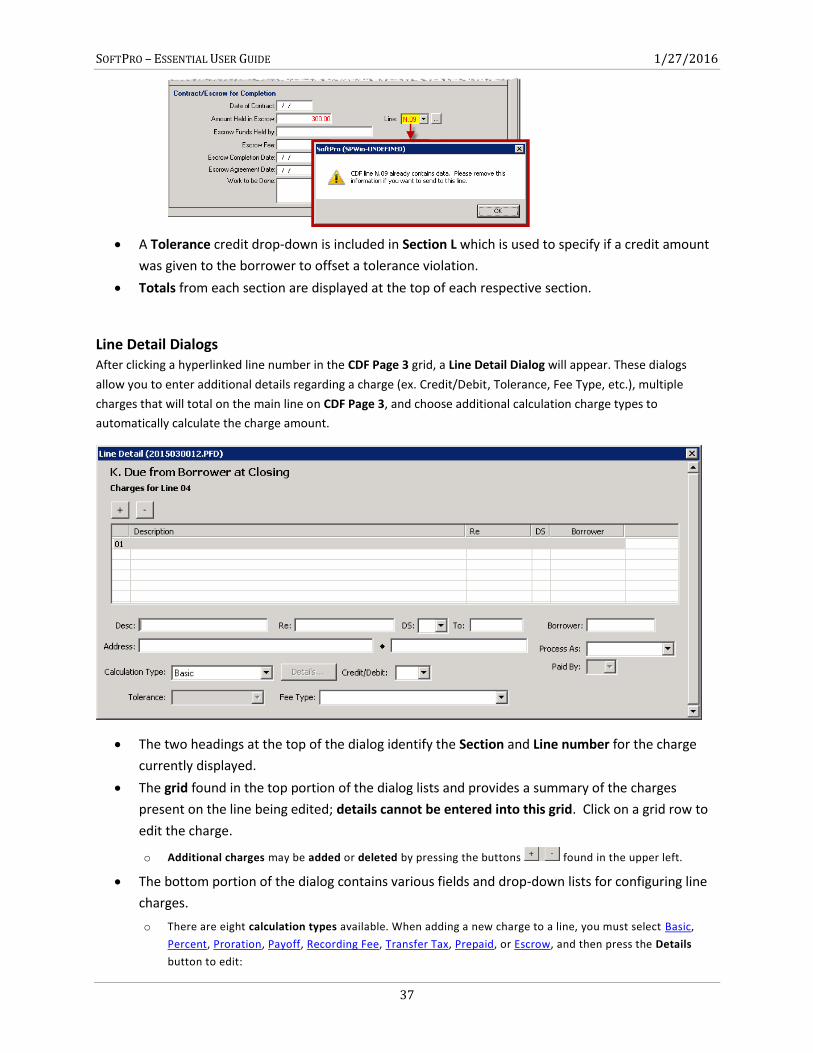
A Tolerance credit drop-down is included in Section L which is used to specify if a credit amount
was given to the borrower to offset a tolerance violation.
Totals from each section are displayed at the top of each respective section.
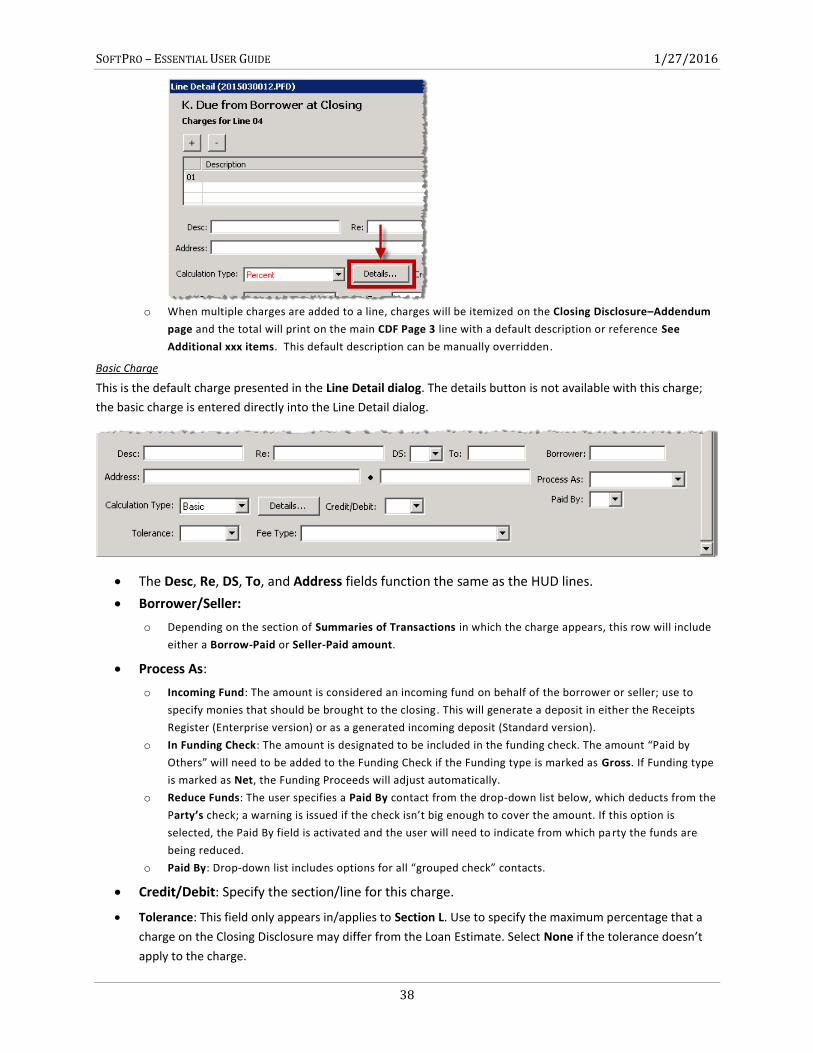
Line Detail Dialogs After clicking a hyperlinked line number in the CDF Page 3 grid, a Line Detail Dialog will appear. These dialogs
allow you to enter additional details regarding a charge (ex. Credit/Debit, Tolerance, Fee Type, etc.), multiple
charges that will total on the main line on CDF Page 3, and choose additional calculation charge types to
automatically calculate the charge amount.
The two headings at the top of the dialog identify the Section and Line number for the charge
currently displayed.
The grid found in the top portion of the dialog lists and provides a summary of the charges
present on the line being edited; details cannot be entered into this grid. Click on a grid row to
edit the charge.
o Additional charges may be added or deleted by pressing the buttons found in the upper left.
The bottom portion of the dialog contains various fields and drop-down lists for configuring line
charges.
o There are eight calculation types available. When adding a new charge to a line, you must select Basic,
Percent, Proration, Payoff, Recording Fee, Transfer Tax, Prepaid, or Escrow, and then press the Details
button to edit:
SOFTPRO – ESSENTIAL USER GUIDE 1/27/2016
38
o When multiple charges are added to a line, charges will be itemized on the Closing Disclosure–Addendum
page and the total will print on the main CDF Page 3 line with a default description or reference See
Additional xxx items. This default description can be manually overridden.
Basic Charge
This is the default charge presented in the Line Detail dialog. The details button is not available with this charge;
the basic charge is entered directly into the Line Detail dialog.
The Desc, Re, DS, To, and Address fields function the same as the HUD lines.
Borrower/Seller:
o Depending on the section of Summaries of Transactions in which the charge appears, this row will include
either a Borrow-Paid or Seller-Paid amount.
Process As:
o Incoming Fund: The amount is considered an incoming fund on behalf of the borrower or seller; use to
specify monies that should be brought to the closing. This will generate a deposit in either the Receipts
Register (Enterprise version) or as a generated incoming deposit (Standard version).
o In Funding Check: The amount is designated to be included in the funding check. The amount “Paid by
Others” will need to be added to the Funding Check if the Funding type is marked as Gross. If Funding type
is marked as Net, the Funding Proceeds will adjust automatically.
o Reduce Funds: The user specifies a Paid By contact from the drop-down list below, which deducts from the
Party’s check; a warning is issued if the check isn’t big enough to cover the amount. If this option is
selected, the Paid By field is activated and the user will need to indicate from which pa rty the funds are
being reduced.
o Paid By: Drop-down list includes options for all “grouped check” contacts.
Credit/Debit: Specify the section/line for this charge.
Tolerance: This field only appears in/applies to Section L. Use to specify the maximum percentage that a
charge on the Closing Disclosure may differ from the Loan Estimate. Select None if the tolerance doesn’t
apply to the charge.
SOFTPRO – ESSENTIAL USER GUIDE 1/27/2016
39
Fee Type: Use to categorize the charge when transmitting file data electronically.
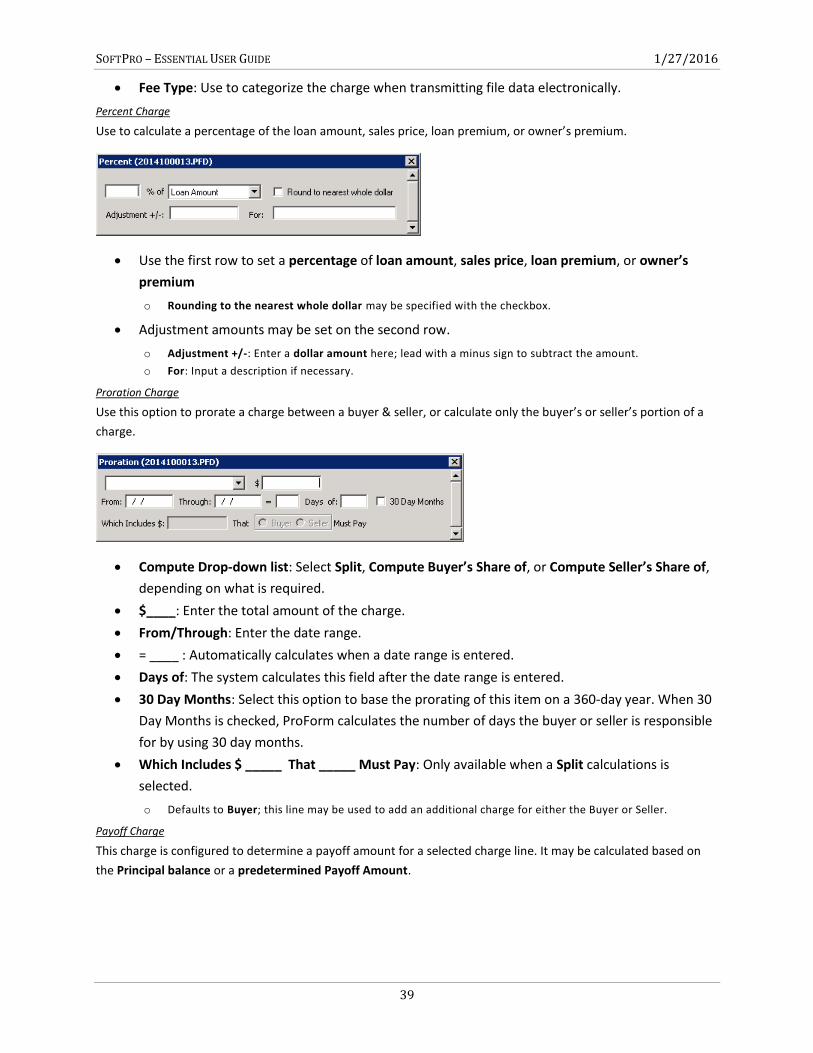
Percent Charge
Use to calculate a percentage of the loan amount, sales price, loan premium, or owner’s premium.
Use the first row to set a percentage of loan amount, sales price, loan premium, or owner’s
premium
o Rounding to the nearest whole dollar may be specified with the checkbox.
Adjustment amounts may be set on the second row.
o Adjustment +/-: Enter a dollar amount here; lead with a minus sign to subtract the amount.
o For: Input a description if necessary.
Proration Charge
Use this option to prorate a charge between a buyer & seller, or calculate only the buyer’s or seller’s portion of a
charge.
Compute Drop-down list: Select Split, Compute Buyer’s Share of, or Compute Seller’s Share of,
depending on what is required.
$____: Enter the total amount of the charge.
From/Through: Enter the date range.
= ____ : Automatically calculates when a date range is entered.
Days of: The system calculates this field after the date range is entered.
30 Day Months: Select this option to base the prorating of this item on a 360-day year. When 30
Day Months is checked, ProForm calculates the number of days the buyer or seller is responsible
for by using 30 day months.
Which Includes $ _____ That _____ Must Pay: Only available when a Split calculations is
selected.
o Defaults to Buyer; this line may be used to add an additional charge for either the Buyer or Seller.
Payoff Charge
This charge is configured to determine a payoff amount for a selected charge line. It may be calculated based on
the Principal balance or a predetermined Payoff Amount.
SOFTPRO – ESSENTIAL USER GUIDE 1/27/2016
40
Calculate Loan Payoff Using a Payoff amount:
o The Principal Balance and Interest fields are not available by default.
o Loan Payoff: The predetermined payoff amount.
o As of: The date through which this payoff is valid.
o Per diem: The per diem amount.
o Days from: Select the date from which you want the total payoff calculated; defaults to Disbursement as
data is entered. The ____ Days field will calculate automatically based on the selection made here.
o Plus ___ Extra Days: Enter any amount of extra days to be considered for mail travel.
o Plus Late Fee __ After _/_/_: Enter the amount of any late fee and the date after which the late fee is due.
Calculate Loan Payoff Using Principal Balance: This checkbox defaults unchecked.
o The Loan Payoff field is disabled when this option is selected.
o The two following fields are made editable when this option is selected:
Principal balance: Enter the principal balance remaining on the loan.
Interest: Enter any lump sum of interest charged.
Additional Charges: Up to 10 additional charges may be added to or subtracted from the payoff.
o Total: The total of all Additional Charges displays here.
Recording Fees
This charge type is based upon the formulas configured on the Recording & Transfer Fee Formulas screen. Once
configured, they may be selected with this dialog.
SOFTPRO – ESSENTIAL USER GUIDE 1/27/2016
41
Document: Specify deed, mortgage, release, or one of the 3 custom Document types if entered
on Recording & Transfer Fee Formulas screen.
Pages: Specify a number of pages to be recorded.
Other: Specify a number of other items such as index names, cancelled documents, etc.).
Totals: Provides a total of the Deed, Mortgage, and Release fees.
Slr%: Enter a percentage of the recording fee paid by the seller if applicable.
Transfer Tax
This charge type is based upon the formulas configured in the Recording & Transfer Fee Formulas section and is
used for CDF Page 2 Section E lines. Once configured, they may be selected with this dialog.
Formula: Select a formula to use, including City/County, State, Other 1, or Other 2.
Document: Select Deed or Mortgage.
Prepaid
This option provides a Months field which is used to indicate the total number of months for the prepaid amount.
The months entered here will default into the Re field on the charge.
SOFTPRO – ESSENTIAL USER GUIDE 1/27/2016
42
Escrow
These fields assist with escrow activities and is used for CDF Page 2 Section G lines.
___ Months/Payments@ $ ___ Each: Enter the number of months (or payments) that the Lender
is requiring to be collected up-front for the initial deposit in the escrow account.
o If this escrow is being sent from Section F, the per-month amount will show pre-calculated.
Each: Enter amount to be collected each month/payment. This amount will automatically
calculate when the Section G line has been selected as an Escrow Line on a Section F charge.
Calculations
The calculation section underneath sections (K) and (L) contains three lines:
Section K total: Total Due from Borrower at Closing.
Section L total: Total Already Paid by/on Behalf of Borrower at Closing.
Cash to Close:
o The button opens the Division of Proceeds & 1099-S Data dialog.
o From: Checked automatically when cash is due FROM the borrower and a receipt is generated.
o To Borrower: Checked automatically when cash is due TO the borrower and a disbursement is generated.
o Amount: Displays the difference between Section K and Section L as a positive amount.
The calculation section underneath (M) and (N) contains three lines:
Section M total: Total Due to Seller at Closing.
Section N total: Total Due from Seller at Closing.
Cash to Close:
SOFTPRO – ESSENTIAL USER GUIDE 1/27/2016
43
o The button opens the Division of Proceeds & 1099-S Data dialog.
o From: Checked automatically when cash is due FROM the seller and a receipt is generated.
o To Seller: Checked automatically when cash is due TO the seller and a disbursement is generated.
o Amount: Displays the difference between Section M and Section N as a positive amount.
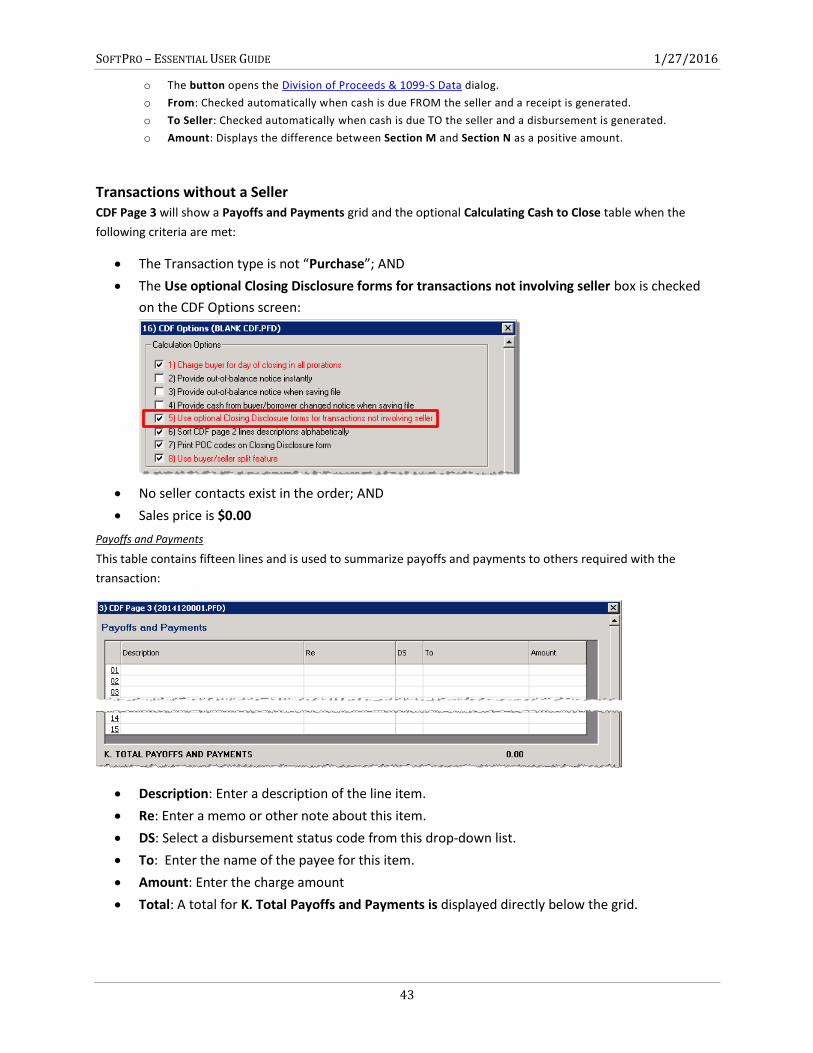
Transactions without a Seller CDF Page 3 will show a Payoffs and Payments grid and the optional Calculating Cash to Close table when the
following criteria are met:
The Transaction type is not “Purchase”; AND
The Use optional Closing Disclosure forms for transactions not involving seller box is checked
on the CDF Options screen:
No seller contacts exist in the order; AND
Sales price is $0.00
Payoffs and Payments
This table contains fifteen lines and is used to summarize payoffs and payments to others required with the
transaction:
Description: Enter a description of the line item.
Re: Enter a memo or other note about this item.
DS: Select a disbursement status code from this drop-down list.
To: Enter the name of the payee for this item.
Amount: Enter the charge amount
Total: A total for K. Total Payoffs and Payments is displayed directly below the grid.
SOFTPRO – ESSENTIAL USER GUIDE 1/27/2016
44
Charge Detail dialogs
Clicking a hyperlinked number on the left side of the Payoffs and Payments grid will display the charge detail
dialog for that line. Multiple charges may be added on each line as explained above.
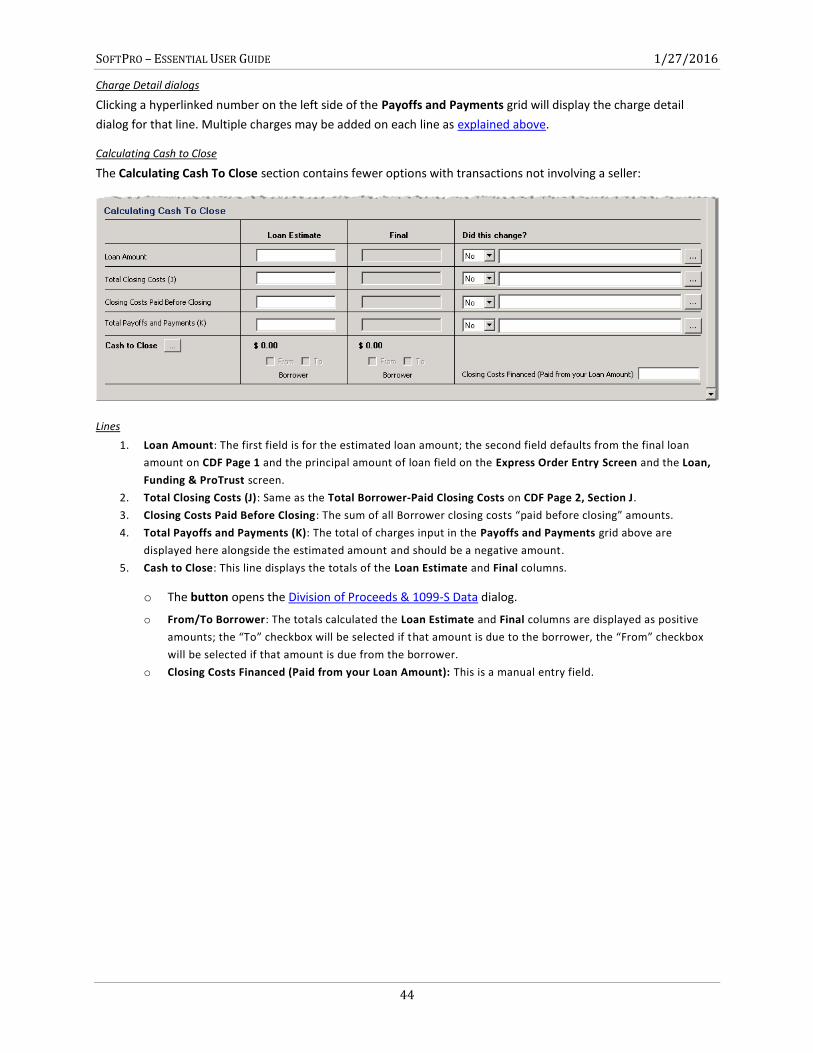
Calculating Cash to Close
The Calculating Cash To Close section contains fewer options with transactions not involving a seller:
Lines
1. Loan Amount: The first field is for the estimated loan amount; the second field defaults from the final loan
amount on CDF Page 1 and the principal amount of loan field on the Express Order Entry Screen and the Loan,
Funding & ProTrust screen.
2. Total Closing Costs (J): Same as the Total Borrower-Paid Closing Costs on CDF Page 2, Section J.
3. Closing Costs Paid Before Closing: The sum of all Borrower closing costs “paid before closing” amounts.
4. Total Payoffs and Payments (K): The total of charges input in the Payoffs and Payments grid above are
displayed here alongside the estimated amount and should be a negative amount.
5. Cash to Close: This line displays the totals of the Loan Estimate and Final columns.
o The button opens the Division of Proceeds & 1099-S Data dialog.
o From/To Borrower: The totals calculated the Loan Estimate and Final columns are displayed as positive
amounts; the “To” checkbox will be selected if that amount is due to the borrower, the “From” checkbox
will be selected if that amount is due from the borrower.
o Closing Costs Financed (Paid from your Loan Amount): This is a manual entry field.
SOFTPRO – ESSENTIAL USER GUIDE 1/27/2016
45
CDF Page 4
Loan Disclosures This section shows additional information regarding the loan.
Assumption
Select will allow if the property is sold or transferred to another person and the lender allows assumption of the
loan on the original terms, otherwise check will not allow.
Demand Feature
Select has a demand feature if the lender is permitted to require early repayment of the loan, otherwise check
does not have a demand feature.
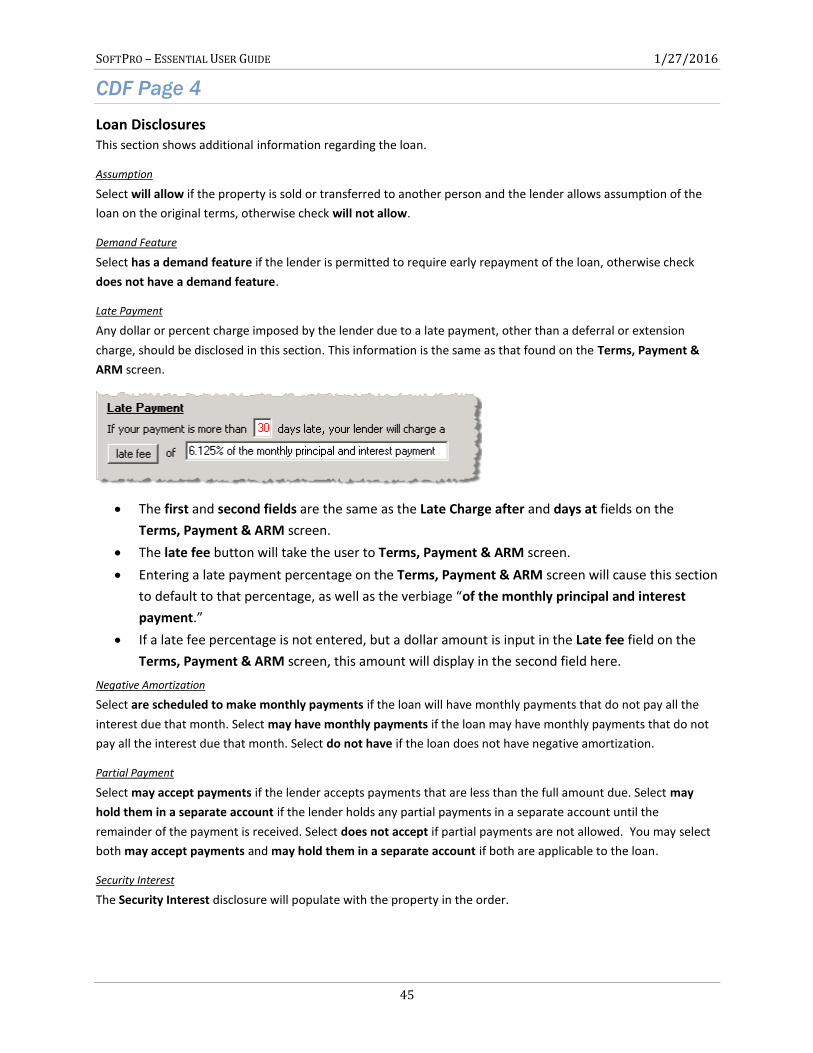
Late Payment
Any dollar or percent charge imposed by the lender due to a late payment, other than a deferral or extension
charge, should be disclosed in this section. This information is the same as that found on the Terms, Payment &
ARM screen.
The first and second fields are the same as the Late Charge after and days at fields on the
Terms, Payment & ARM screen.
The late fee button will take the user to Terms, Payment & ARM screen.
Entering a late payment percentage on the Terms, Payment & ARM screen will cause this section
to default to that percentage, as well as the verbiage “of the monthly principal and interest
payment.”
If a late fee percentage is not entered, but a dollar amount is input in the Late fee field on the
Terms, Payment & ARM screen, this amount will display in the second field here.
Negative Amortization
Select are scheduled to make monthly payments if the loan will have monthly payments that do not pay all the
interest due that month. Select may have monthly payments if the loan may have monthly payments that do not
pay all the interest due that month. Select do not have if the loan does not have negative amortization.
Partial Payment
Select may accept payments if the lender accepts payments that are less than the full amount due. Select may
hold them in a separate account if the lender holds any partial payments in a separate account until the
remainder of the payment is received. Select does not accept if partial payments are not allowed. You may select
both may accept payments and may hold them in a separate account if both are applicable to the loan.
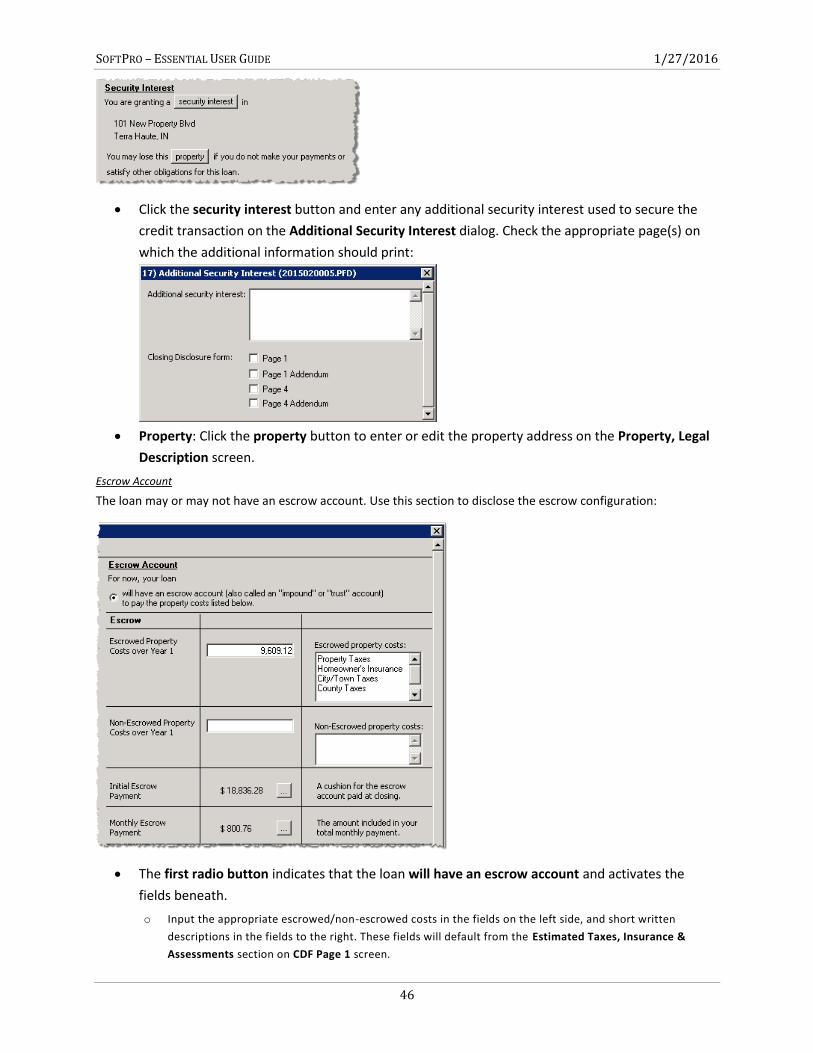
Security Interest
The Security Interest disclosure will populate with the property in the order.
SOFTPRO – ESSENTIAL USER GUIDE 1/27/2016
46
Click the security interest button and enter any additional security interest used to secure the
credit transaction on the Additional Security Interest dialog. Check the appropriate page(s) on
which the additional information should print:
Property: Click the property button to enter or edit the property address on the Property, Legal
Description screen.
Escrow Account
The loan may or may not have an escrow account. Use this section to disclose the escrow configuration:
The first radio button indicates that the loan will have an escrow account and activates the
fields beneath.
o Input the appropriate escrowed/non-escrowed costs in the fields on the left side, and short written
descriptions in the fields to the right. These fields will default from the Estimated Taxes, Insurance &
Assessments section on CDF Page 1 screen.
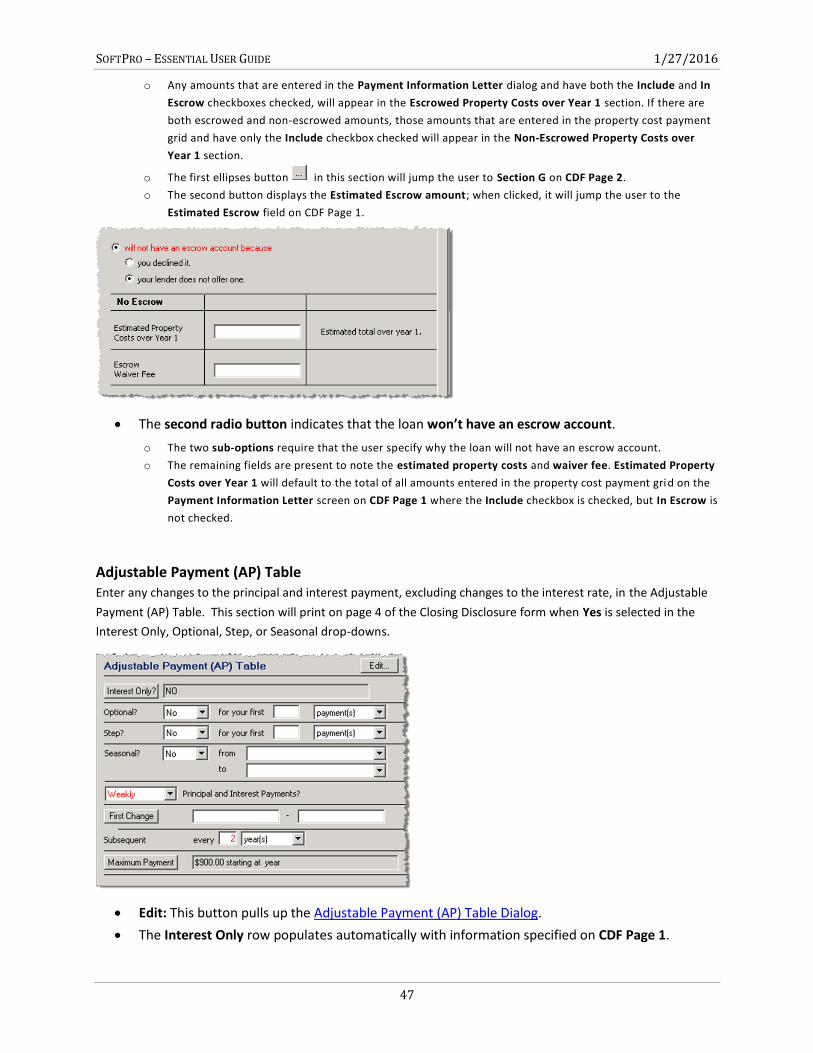
SOFTPRO – ESSENTIAL USER GUIDE 1/27/2016
47
o Any amounts that are entered in the Payment Information Letter dialog and have both the Include and In
Escrow checkboxes checked, will appear in the Escrowed Property Costs over Year 1 section. If there are
both escrowed and non-escrowed amounts, those amounts that are entered in the property cost payment
grid and have only the Include checkbox checked will appear in the Non-Escrowed Property Costs over
Year 1 section.
o The first ellipses button in this section will jump the user to Section G on CDF Page 2.
o The second button displays the Estimated Escrow amount; when clicked, it will jump the user to the
Estimated Escrow field on CDF Page 1.
The second radio button indicates that the loan won’t have an escrow account.
o The two sub-options require that the user specify why the loan will not have an escrow account.
o The remaining fields are present to note the estimated property costs and waiver fee. Estimated Property
Costs over Year 1 will default to the total of all amounts entered in the property cost payment grid on the
Payment Information Letter screen on CDF Page 1 where the Include checkbox is checked, but In Escrow is
not checked.
Adjustable Payment (AP) Table Enter any changes to the principal and interest payment, excluding changes to the interest rate, in the Adjustable
Payment (AP) Table. This section will print on page 4 of the Closing Disclosure form when Yes is selected in the
Interest Only, Optional, Step, or Seasonal drop-downs.
Edit: This button pulls up the Adjustable Payment (AP) Table Dialog.
The Interest Only row populates automatically with information specified on CDF Page 1.
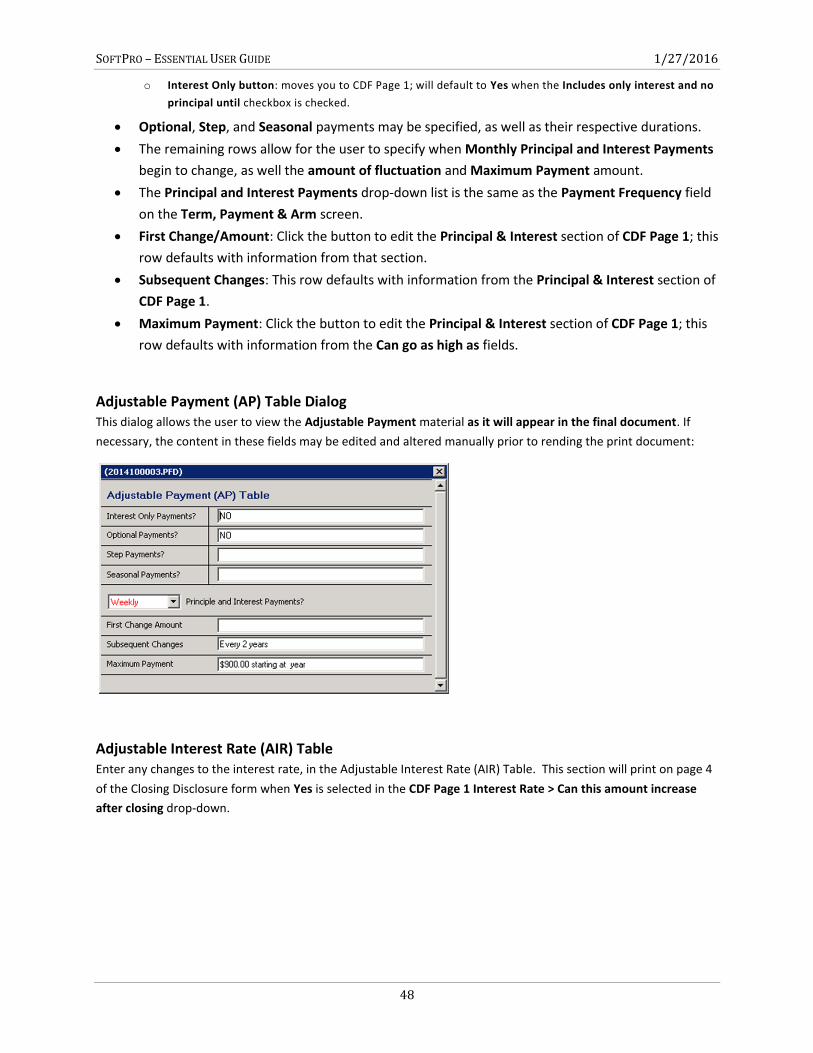
SOFTPRO – ESSENTIAL USER GUIDE 1/27/2016
48
o Interest Only button: moves you to CDF Page 1; will default to Yes when the Includes only interest and no
principal until checkbox is checked.
Optional, Step, and Seasonal payments may be specified, as well as their respective durations.
The remaining rows allow for the user to specify when Monthly Principal and Interest Payments
begin to change, as well the amount of fluctuation and Maximum Payment amount.
The Principal and Interest Payments drop-down list is the same as the Payment Frequency field
on the Term, Payment & Arm screen.
First Change/Amount: Click the button to edit the Principal & Interest section of CDF Page 1; this
row defaults with information from that section.
Subsequent Changes: This row defaults with information from the Principal & Interest section of
CDF Page 1.
Maximum Payment: Click the button to edit the Principal & Interest section of CDF Page 1; this
row defaults with information from the Can go as high as fields.
Adjustable Payment (AP) Table Dialog This dialog allows the user to view the Adjustable Payment material as it will appear in the final document. If
necessary, the content in these fields may be edited and altered manually prior to rending the print document:
Adjustable Interest Rate (AIR) Table Enter any changes to the interest rate, in the Adjustable Interest Rate (AIR) Table. This section will print on page 4
of the Closing Disclosure form when Yes is selected in the CDF Page 1 Interest Rate > Can this amount increase
after closing drop-down.
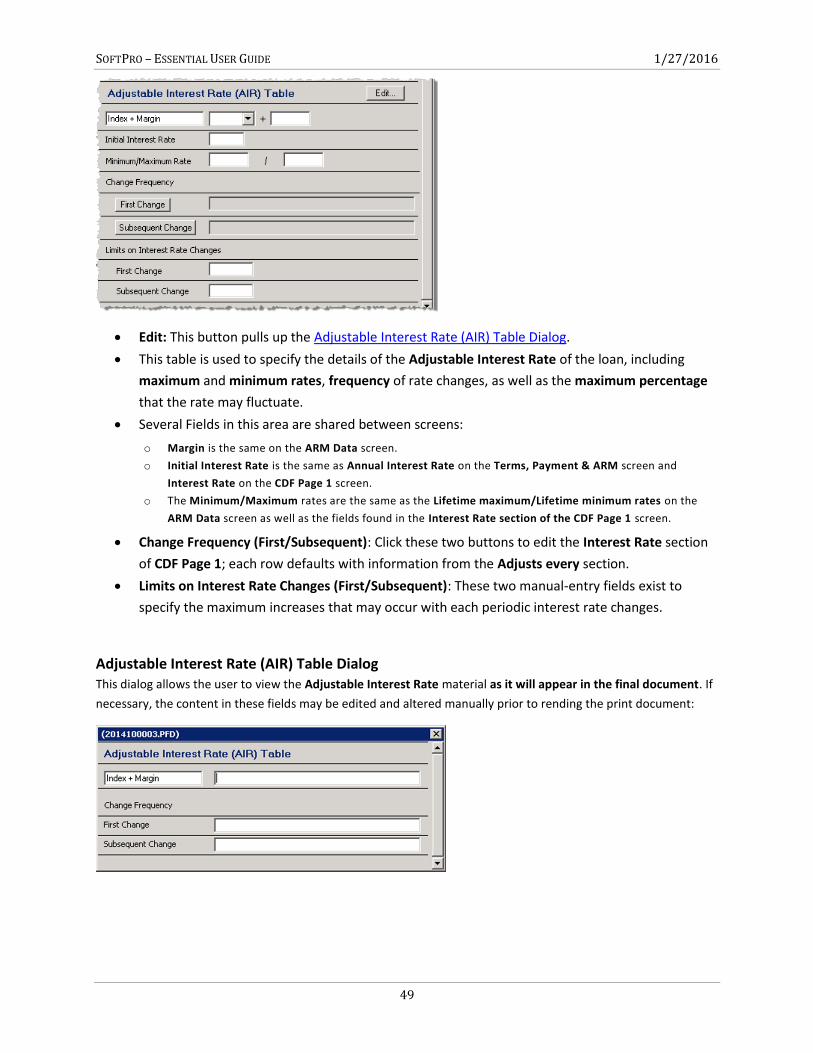
SOFTPRO – ESSENTIAL USER GUIDE 1/27/2016
49
Edit: This button pulls up the Adjustable Interest Rate (AIR) Table Dialog.
This table is used to specify the details of the Adjustable Interest Rate of the loan, including
maximum and minimum rates, frequency of rate changes, as well as the maximum percentage
that the rate may fluctuate.
Several Fields in this area are shared between screens:
o Margin is the same on the ARM Data screen.
o Initial Interest Rate is the same as Annual Interest Rate on the Terms, Payment & ARM screen and
Interest Rate on the CDF Page 1 screen.
o The Minimum/Maximum rates are the same as the Lifetime maximum/Lifetime minimum rates on the
ARM Data screen as well as the fields found in the Interest Rate section of the CDF Page 1 screen.
Change Frequency (First/Subsequent): Click these two buttons to edit the Interest Rate section
of CDF Page 1; each row defaults with information from the Adjusts every section.
Limits on Interest Rate Changes (First/Subsequent): These two manual-entry fields exist to
specify the maximum increases that may occur with each periodic interest rate changes.
Adjustable Interest Rate (AIR) Table Dialog This dialog allows the user to view the Adjustable Interest Rate material as it will appear in the final document. If
necessary, the content in these fields may be edited and altered manually prior to rending the print document:
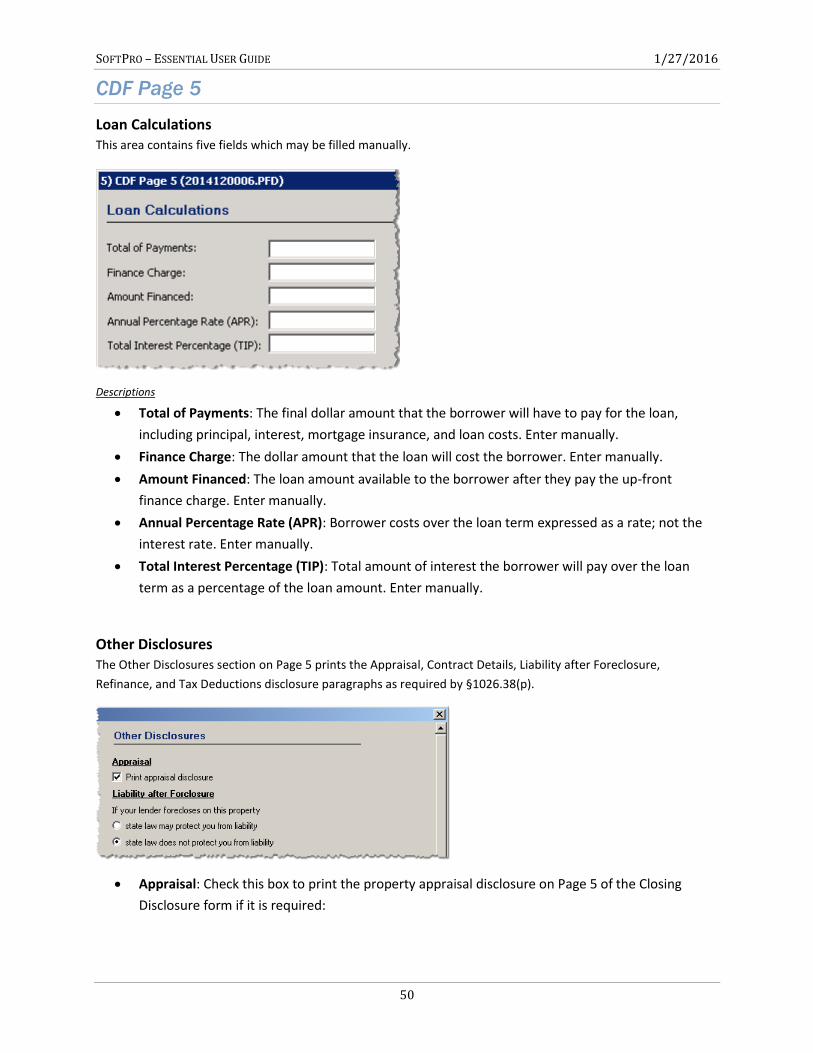
SOFTPRO – ESSENTIAL USER GUIDE 1/27/2016
50
CDF Page 5
Loan Calculations This area contains five fields which may be filled manually.
Descriptions
Total of Payments: The final dollar amount that the borrower will have to pay for the loan,
including principal, interest, mortgage insurance, and loan costs. Enter manually.
Finance Charge: The dollar amount that the loan will cost the borrower. Enter manually.
Amount Financed: The loan amount available to the borrower after they pay the up-front
finance charge. Enter manually.
Annual Percentage Rate (APR): Borrower costs over the loan term expressed as a rate; not the
interest rate. Enter manually.
Total Interest Percentage (TIP): Total amount of interest the borrower will pay over the loan
term as a percentage of the loan amount. Enter manually.
Other Disclosures The Other Disclosures section on Page 5 prints the Appraisal, Contract Details, Liability after Foreclosure,
Refinance, and Tax Deductions disclosure paragraphs as required by §1026.38(p).
Appraisal: Check this box to print the property appraisal disclosure on Page 5 of the Closing
Disclosure form if it is required:
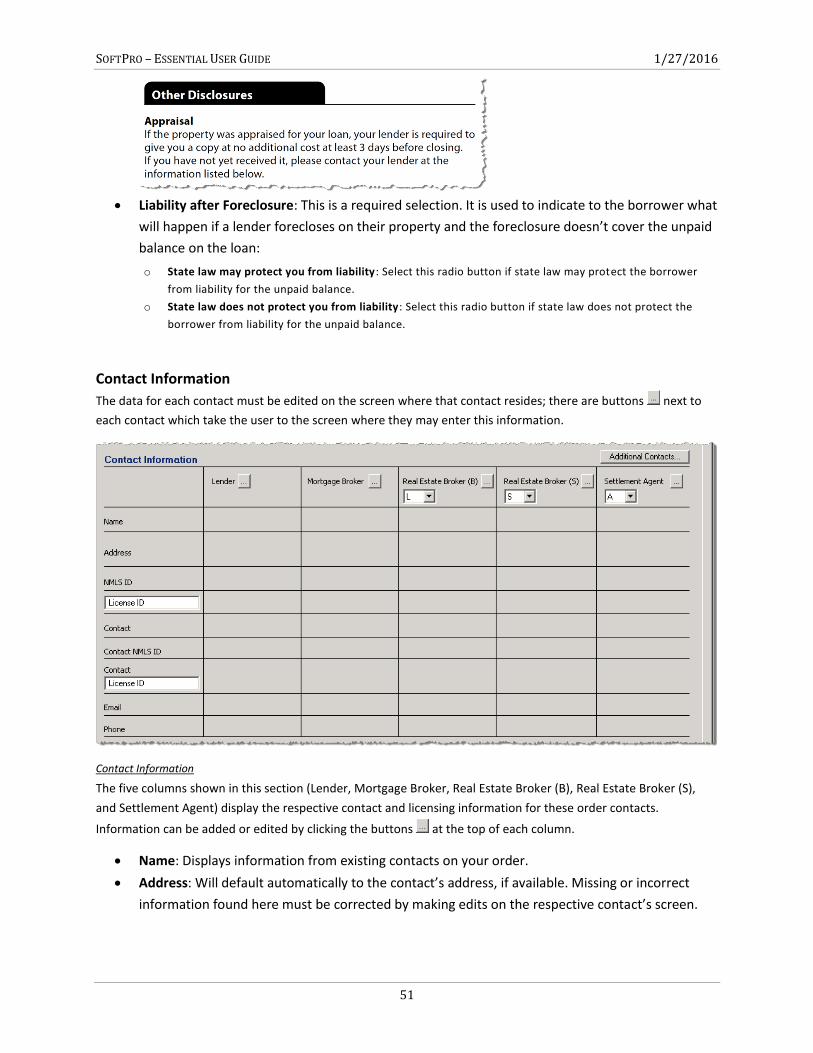
SOFTPRO – ESSENTIAL USER GUIDE 1/27/2016
51
Liability after Foreclosure: This is a required selection. It is used to indicate to the borrower what
will happen if a lender forecloses on their property and the foreclosure doesn’t cover the unpaid
balance on the loan:
o State law may protect you from liability: Select this radio button if state law may protect the borrower
from liability for the unpaid balance.
o State law does not protect you from liability: Select this radio button if state law does not protect the
borrower from liability for the unpaid balance.
Contact Information
The data for each contact must be edited on the screen where that contact resides; there are buttons next to
each contact which take the user to the screen where they may enter this information.
Contact Information
The five columns shown in this section (Lender, Mortgage Broker, Real Estate Broker (B), Real Estate Broker (S),
and Settlement Agent) display the respective contact and licensing information for these order contacts.
Information can be added or edited by clicking the buttons at the top of each column.
Name: Displays information from existing contacts on your order.
Address: Will default automatically to the contact’s address, if available. Missing or incorrect
information found here must be corrected by making edits on the respective contact’s screen.
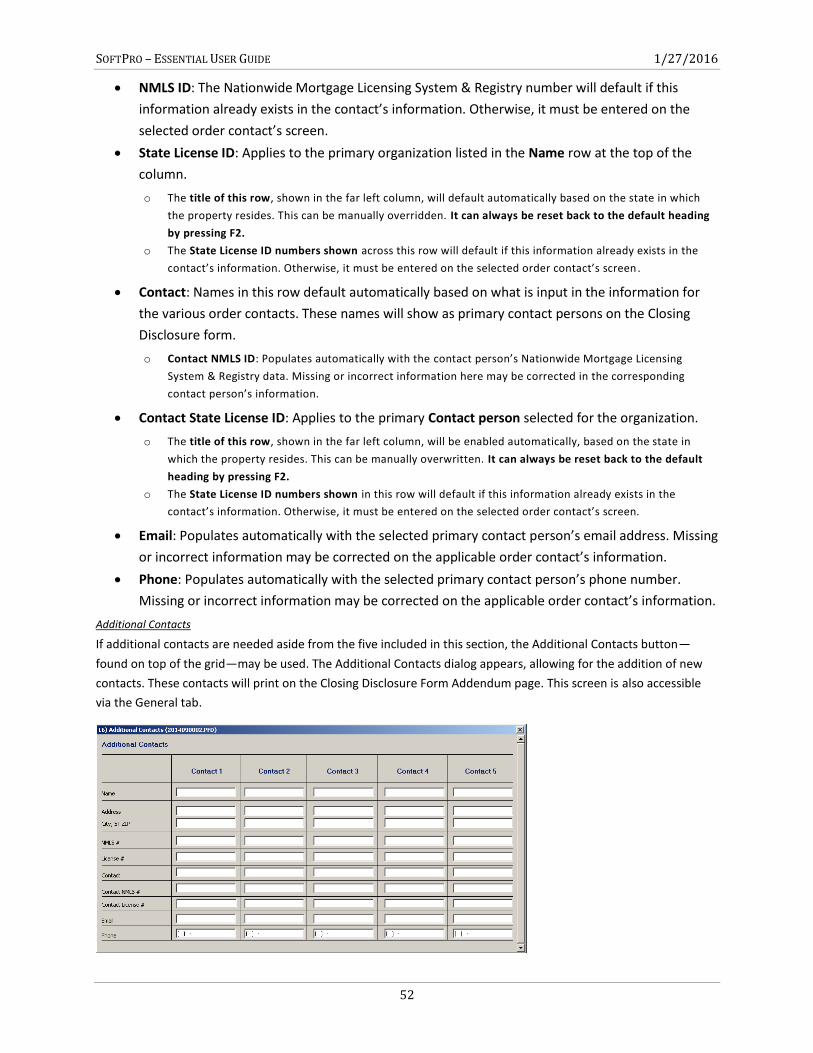
SOFTPRO – ESSENTIAL USER GUIDE 1/27/2016
52
NMLS ID: The Nationwide Mortgage Licensing System & Registry number will default if this
information already exists in the contact’s information. Otherwise, it must be entered on the
selected order contact’s screen.
State License ID: Applies to the primary organization listed in the Name row at the top of the
column.
o The title of this row, shown in the far left column, will default automatically based on the state in which
the property resides. This can be manually overridden. It can always be reset back to the default heading
by pressing F2.
o The State License ID numbers shown across this row will default if this information already exists in the
contact’s information. Otherwise, it must be entered on the selected order contact’s screen .
Contact: Names in this row default automatically based on what is input in the information for
the various order contacts. These names will show as primary contact persons on the Closing
Disclosure form.
o Contact NMLS ID: Populates automatically with the contact person’s Nationwide Mortgage Licensing
System & Registry data. Missing or incorrect information here may be corrected in the corresponding
contact person’s information.
Contact State License ID: Applies to the primary Contact person selected for the organization.
o The title of this row, shown in the far left column, will be enabled automatically, based on the state in
which the property resides. This can be manually overwritten. It can always be reset back to the default
heading by pressing F2.
o The State License ID numbers shown in this row will default if this information already exists in the
contact’s information. Otherwise, it must be entered on the selected order contact’s screen.
Email: Populates automatically with the selected primary contact person’s email address. Missing
or incorrect information may be corrected on the applicable order contact’s information.
Phone: Populates automatically with the selected primary contact person’s phone number.
Missing or incorrect information may be corrected on the applicable order contact’s information.
Additional Contacts
If additional contacts are needed aside from the five included in this section, the Additional Contacts button—
found on top of the grid—may be used. The Additional Contacts dialog appears, allowing for the addition of new
contacts. These contacts will print on the Closing Disclosure Form Addendum page. This screen is also accessible
via the General tab.
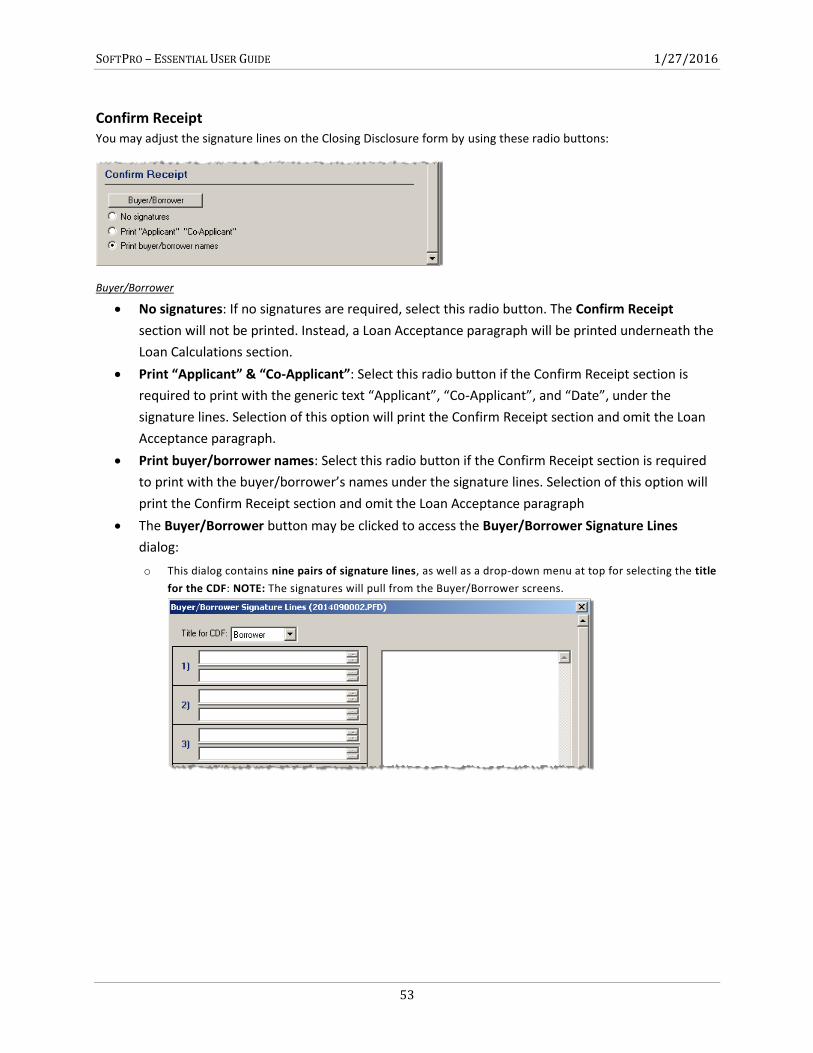
SOFTPRO – ESSENTIAL USER GUIDE 1/27/2016
53
Confirm Receipt You may adjust the signature lines on the Closing Disclosure form by using these radio buttons:
Buyer/Borrower
No signatures: If no signatures are required, select this radio button. The Confirm Receipt
section will not be printed. Instead, a Loan Acceptance paragraph will be printed underneath the
Loan Calculations section.
Print “Applicant” & “Co-Applicant”: Select this radio button if the Confirm Receipt section is
required to print with the generic text “Applicant”, “Co-Applicant”, and “Date”, under the
signature lines. Selection of this option will print the Confirm Receipt section and omit the Loan
Acceptance paragraph.
Print buyer/borrower names: Select this radio button if the Confirm Receipt section is required
to print with the buyer/borrower’s names under the signature lines. Selection of this option will
print the Confirm Receipt section and omit the Loan Acceptance paragraph
The Buyer/Borrower button may be clicked to access the Buyer/Borrower Signature Lines
dialog:
o This dialog contains nine pairs of signature lines, as well as a drop-down menu at top for selecting the title
for the CDF: NOTE: The signatures will pull from the Buyer/Borrower screens.
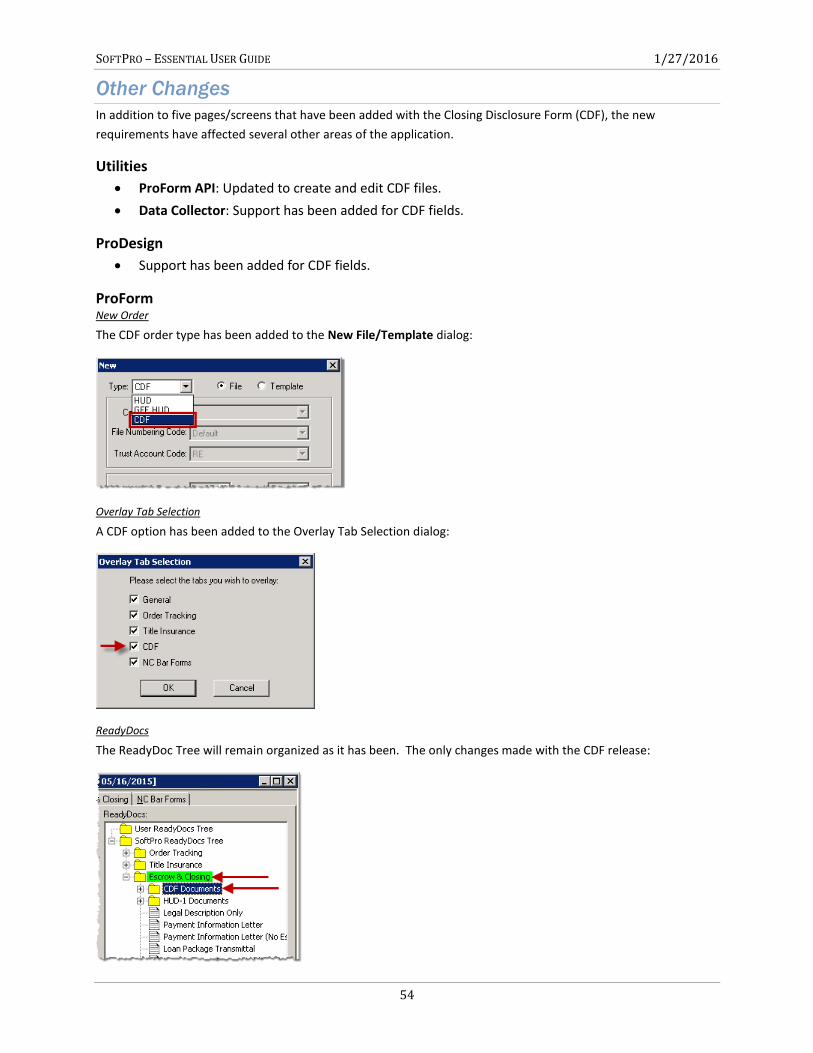
SOFTPRO – ESSENTIAL USER GUIDE 1/27/2016
54
Other Changes
In addition to five pages/screens that have been added with the Closing Disclosure Form (CDF), the new
requirements have affected several other areas of the application.
Utilities
ProForm API: Updated to create and edit CDF files.
Data Collector: Support has been added for CDF fields.
ProDesign
Support has been added for CDF fields.
ProForm New Order
The CDF order type has been added to the New File/Template dialog:
Overlay Tab Selection
A CDF option has been added to the Overlay Tab Selection dialog:
ReadyDocs
The ReadyDoc Tree will remain organized as it has been. The only changes made with the CDF release:
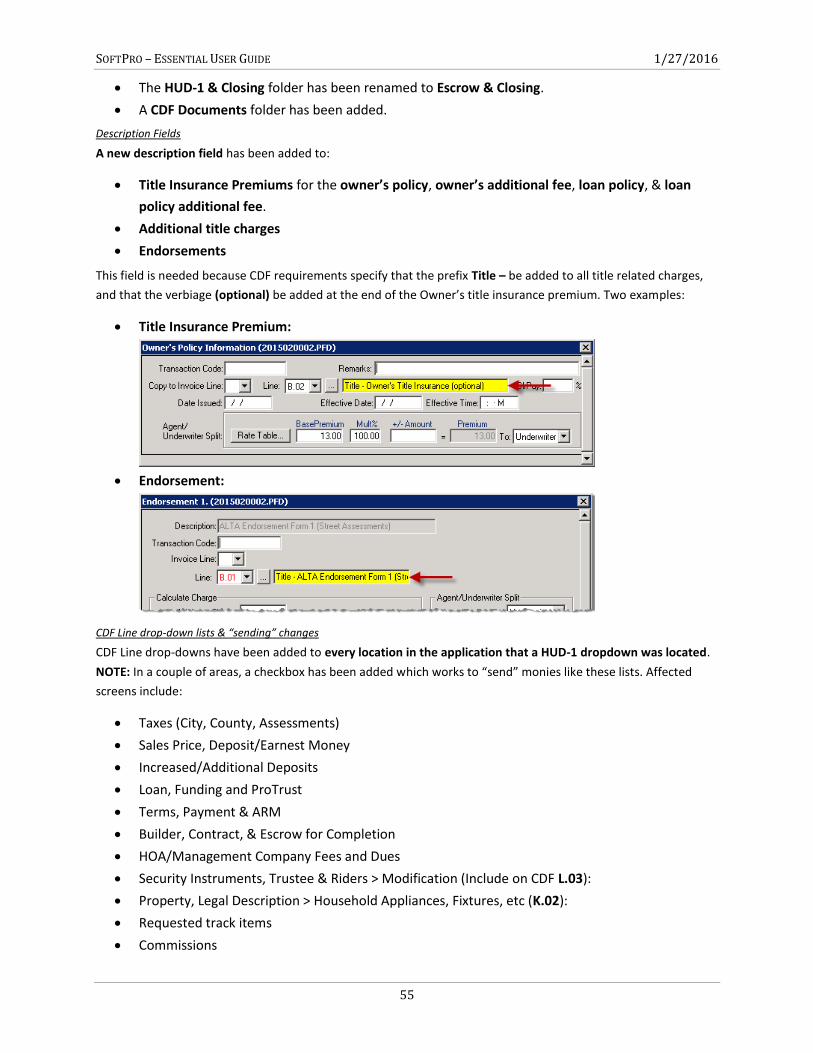
SOFTPRO – ESSENTIAL USER GUIDE 1/27/2016
55
The HUD-1 & Closing folder has been renamed to Escrow & Closing.
A CDF Documents folder has been added.
Description Fields
A new description field has been added to:
Title Insurance Premiums for the owner’s policy, owner’s additional fee, loan policy, & loan
policy additional fee.
Additional title charges
Endorsements
This field is needed because CDF requirements specify that the prefix Title – be added to all title related charges,
and that the verbiage (optional) be added at the end of the Owner’s title insurance premium. Two examples:
Title Insurance Premium:
Endorsement:
CDF Line drop-down lists & “sending” changes
CDF Line drop-downs have been added to every location in the application that a HUD-1 dropdown was located.
NOTE: In a couple of areas, a checkbox has been added which works to “send” monies like these lists. Affected
screens include:
Taxes (City, County, Assessments)
Sales Price, Deposit/Earnest Money
Increased/Additional Deposits
Loan, Funding and ProTrust
Terms, Payment & ARM
Builder, Contract, & Escrow for Completion
HOA/Management Company Fees and Dues
Security Instruments, Trustee & Riders > Modification (Include on CDF L.03):
Property, Legal Description > Household Appliances, Fixtures, etc (K.02):
Requested track items
Commissions
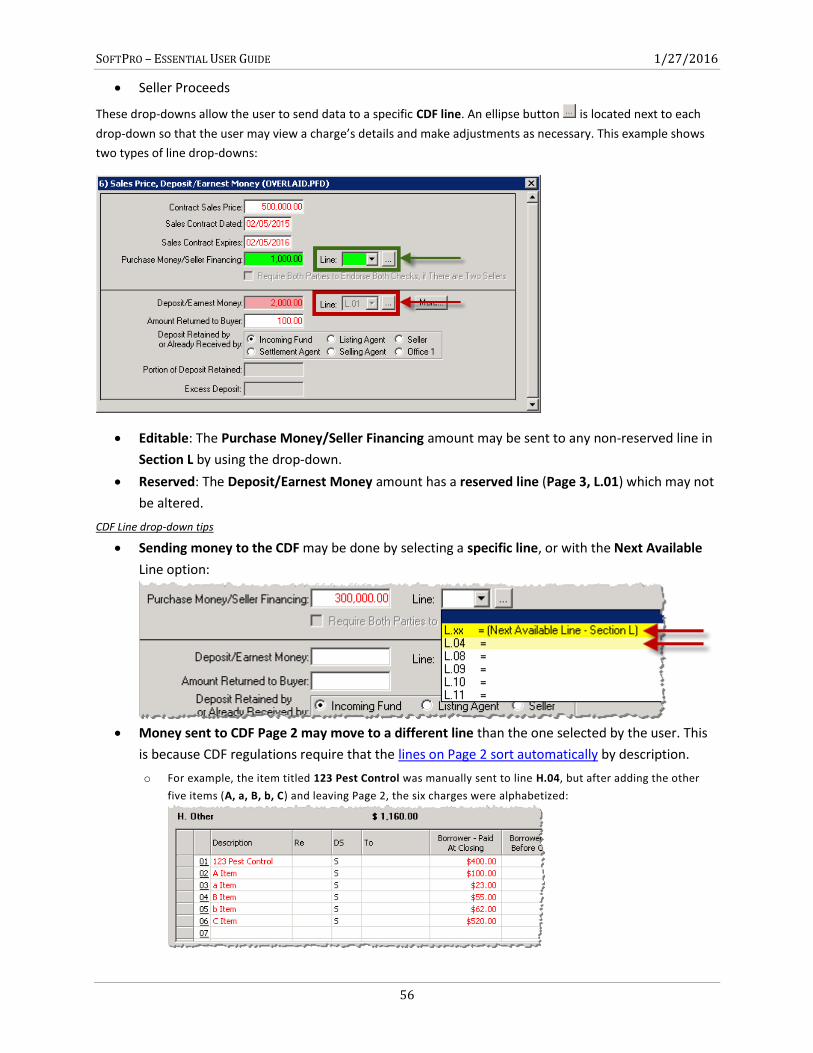
SOFTPRO – ESSENTIAL USER GUIDE 1/27/2016
56
Seller Proceeds
These drop-downs allow the user to send data to a specific CDF line. An ellipse button is located next to each
drop-down so that the user may view a charge’s details and make adjustments as necessary. This example shows
two types of line drop-downs:
Editable: The Purchase Money/Seller Financing amount may be sent to any non-reserved line in
Section L by using the drop-down.
Reserved: The Deposit/Earnest Money amount has a reserved line (Page 3, L.01) which may not
be altered.
CDF Line drop-down tips
Sending money to the CDF may be done by selecting a specific line, or with the Next Available
Line option:
Money sent to CDF Page 2 may move to a different line than the one selected by the user. This
is because CDF regulations require that the lines on Page 2 sort automatically by description.
o For example, the item titled 123 Pest Control was manually sent to line H.04, but after adding the other
five items (A, a, B, b, C) and leaving Page 2, the six charges were alphabetized:
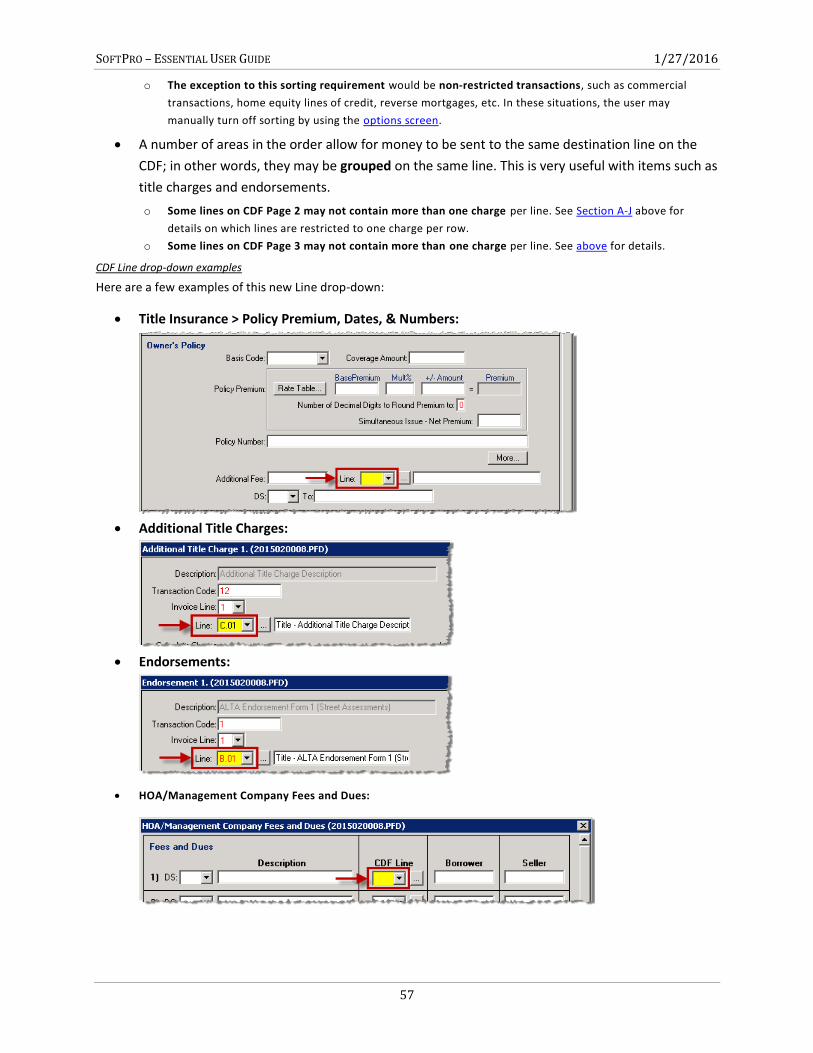
SOFTPRO – ESSENTIAL USER GUIDE 1/27/2016
57
o The exception to this sorting requirement would be non-restricted transactions, such as commercial
transactions, home equity lines of credit, reverse mortgages, etc. In these situations, the user may
manually turn off sorting by using the options screen.
A number of areas in the order allow for money to be sent to the same destination line on the
CDF; in other words, they may be grouped on the same line. This is very useful with items such as
title charges and endorsements.
o Some lines on CDF Page 2 may not contain more than one charge per line. See Section A-J above for
details on which lines are restricted to one charge per row.
o Some lines on CDF Page 3 may not contain more than one charge per line. See above for details.
CDF Line drop-down examples
Here are a few examples of this new Line drop-down:
Title Insurance > Policy Premium, Dates, & Numbers:
Additional Title Charges:
Endorsements:
HOA/Management Company Fees and Dues:
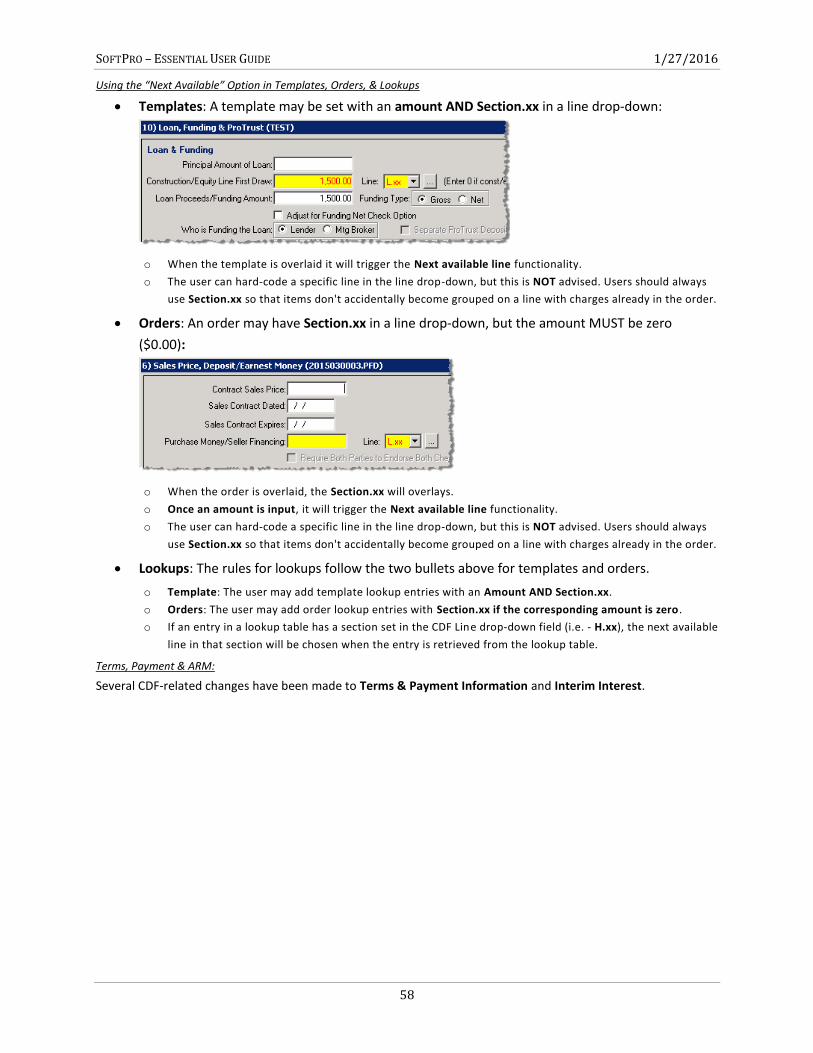
SOFTPRO – ESSENTIAL USER GUIDE 1/27/2016
58
Using the “Next Available” Option in Templates, Orders, & Lookups
Templates: A template may be set with an amount AND Section.xx in a line drop-down:
o When the template is overlaid it will trigger the Next available line functionality.
o The user can hard-code a specific line in the line drop-down, but this is NOT advised. Users should always
use Section.xx so that items don't accidentally become grouped on a line with charges already in the order.
Orders: An order may have Section.xx in a line drop-down, but the amount MUST be zero
($0.00):
o When the order is overlaid, the Section.xx will overlays.
o Once an amount is input, it will trigger the Next available line functionality.
o The user can hard-code a specific line in the line drop-down, but this is NOT advised. Users should always
use Section.xx so that items don't accidentally become grouped on a line with charges already in the order.
Lookups: The rules for lookups follow the two bullets above for templates and orders.
o Template: The user may add template lookup entries with an Amount AND Section.xx.
o Orders: The user may add order lookup entries with Section.xx if the corresponding amount is zero.
o If an entry in a lookup table has a section set in the CDF Line drop-down field (i.e. - H.xx), the next available
line in that section will be chosen when the entry is retrieved from the lookup table.
Terms, Payment & ARM:
Several CDF-related changes have been made to Terms & Payment Information and Interim Interest.
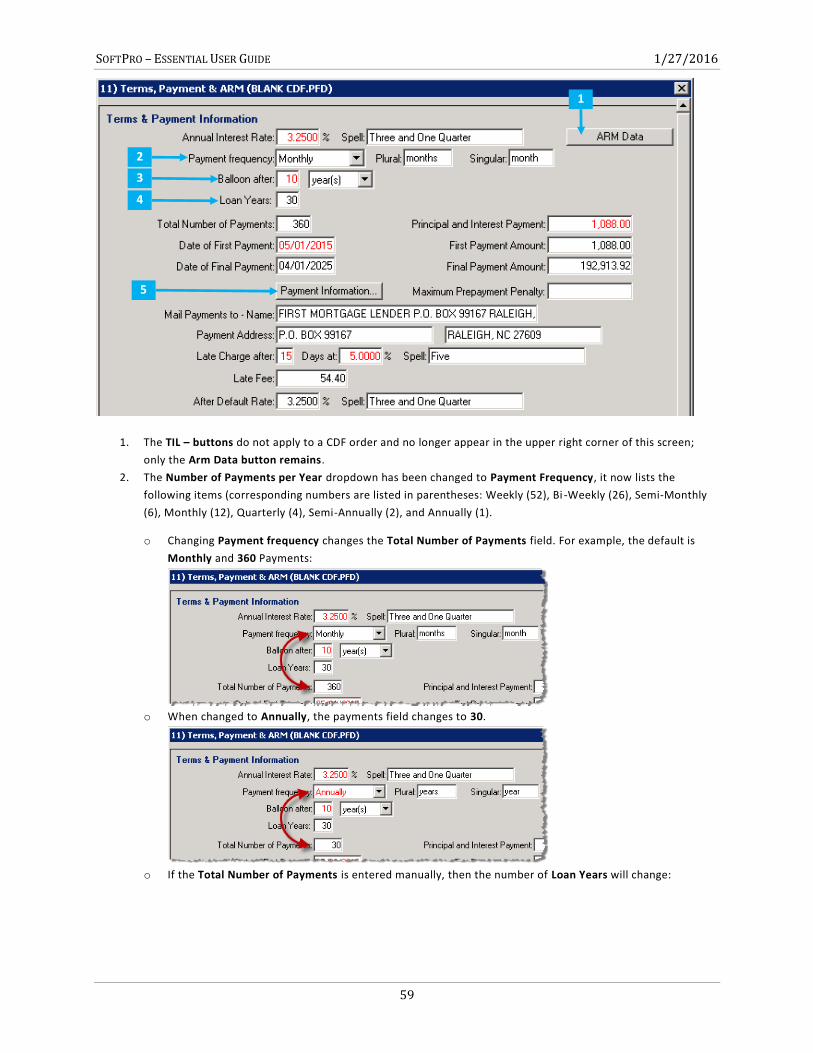
SOFTPRO – ESSENTIAL USER GUIDE 1/27/2016
59
1. The TIL – buttons do not apply to a CDF order and no longer appear in the upper right corner of this screen;
only the Arm Data button remains.
2. The Number of Payments per Year dropdown has been changed to Payment Frequency, it now lists the
following items (corresponding numbers are listed in parentheses: Weekly (52), Bi -Weekly (26), Semi-Monthly
(6), Monthly (12), Quarterly (4), Semi-Annually (2), and Annually (1).
o Changing Payment frequency changes the Total Number of Payments field. For example, the default is
Monthly and 360 Payments:
o When changed to Annually, the payments field changes to 30.
o If the Total Number of Payments is entered manually, then the number of Loan Years will change:
1
2
3
4
5
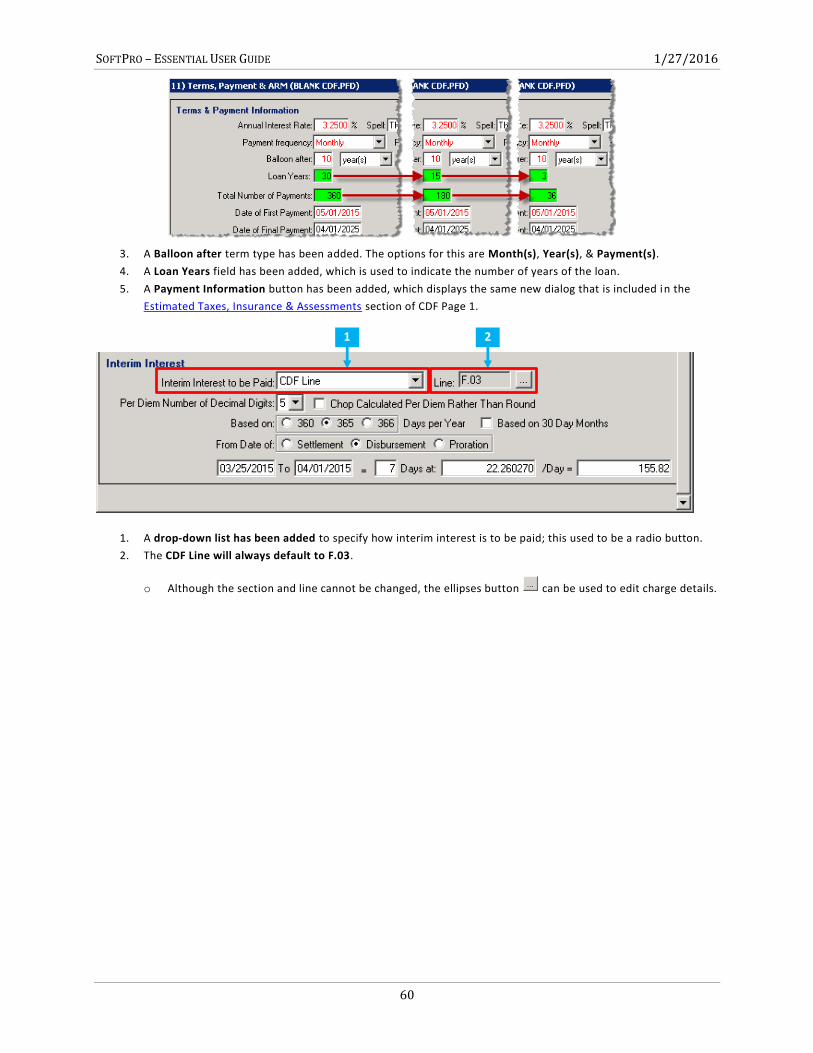
SOFTPRO – ESSENTIAL USER GUIDE 1/27/2016
60
3. A Balloon after term type has been added. The options for this are Month(s), Year(s), & Payment(s).
4. A Loan Years field has been added, which is used to indicate the number of years of the loan.
5. A Payment Information button has been added, which displays the same new dialog that is included in the
Estimated Taxes, Insurance & Assessments section of CDF Page 1.
1. A drop-down list has been added to specify how interim interest is to be paid; this used to be a radio button.
2. The CDF Line will always default to F.03.
o Although the section and line cannot be changed, the ellipses button can be used to edit charge details.
1 2
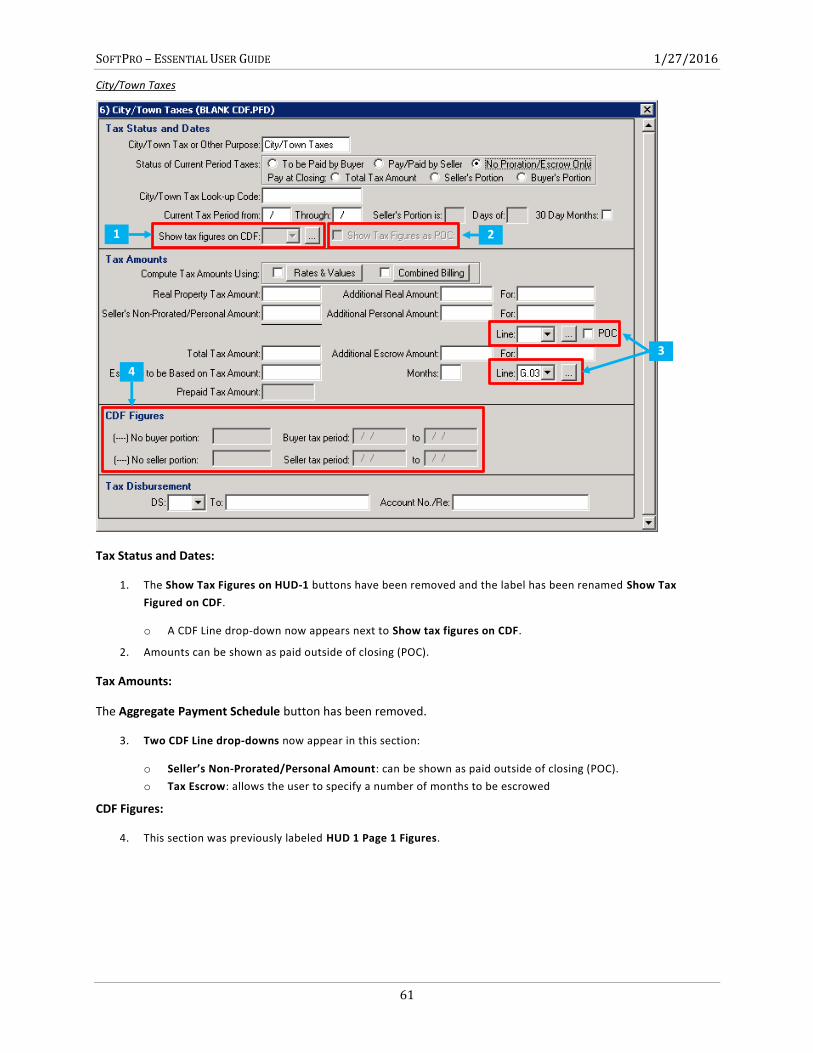
SOFTPRO – ESSENTIAL USER GUIDE 1/27/2016
61
City/Town Taxes
Tax Status and Dates:
1. The Show Tax Figures on HUD-1 buttons have been removed and the label has been renamed Show Tax
Figured on CDF.
o A CDF Line drop-down now appears next to Show tax figures on CDF.
2. Amounts can be shown as paid outside of closing (POC).
Tax Amounts:
The Aggregate Payment Schedule button has been removed.
3. Two CDF Line drop-downs now appear in this section:
o Seller’s Non-Prorated/Personal Amount: can be shown as paid outside of closing (POC).
o Tax Escrow: allows the user to specify a number of months to be escrowed
CDF Figures:
4. This section was previously labeled HUD 1 Page 1 Figures.
3
1
4
2
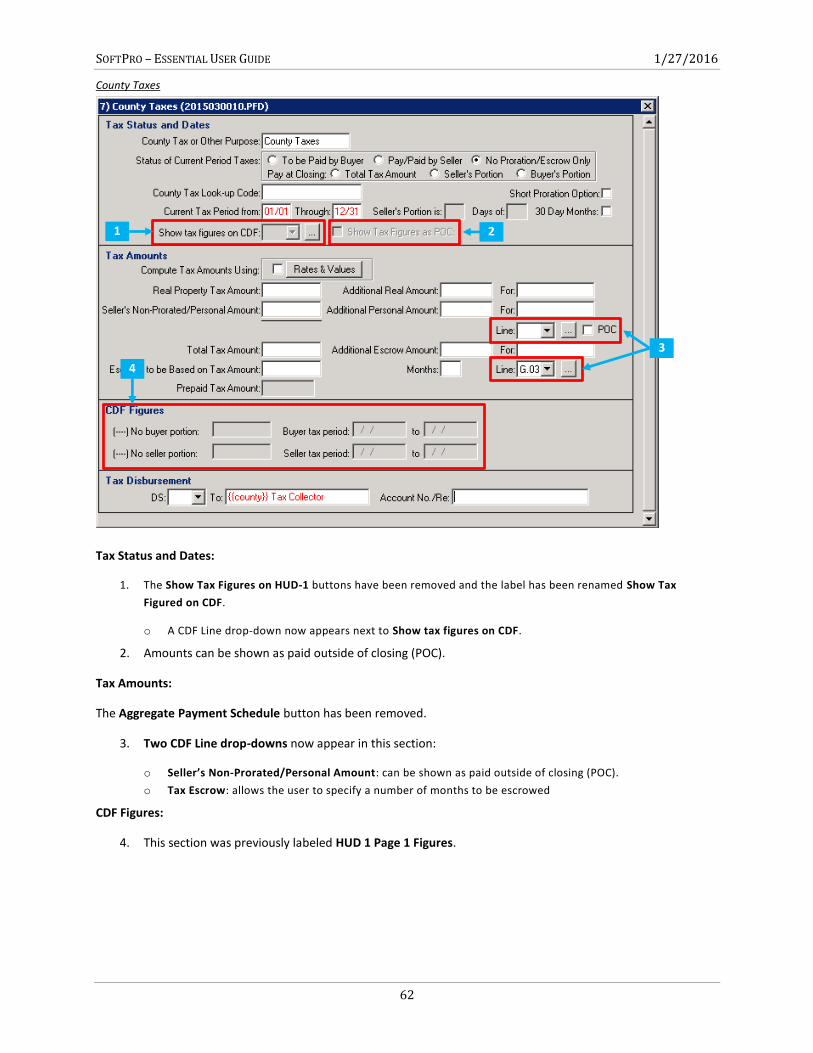
SOFTPRO – ESSENTIAL USER GUIDE 1/27/2016
62
County Taxes
Tax Status and Dates:
1. The Show Tax Figures on HUD-1 buttons have been removed and the label has been renamed Show Tax
Figured on CDF.
o A CDF Line drop-down now appears next to Show tax figures on CDF.
2. Amounts can be shown as paid outside of closing (POC).
Tax Amounts:
The Aggregate Payment Schedule button has been removed.
3. Two CDF Line drop-downs now appear in this section:
o Seller’s Non-Prorated/Personal Amount: can be shown as paid outside of closing (POC).
o Tax Escrow: allows the user to specify a number of months to be escrowed
CDF Figures:
4. This section was previously labeled HUD 1 Page 1 Figures.
3
1
4
2
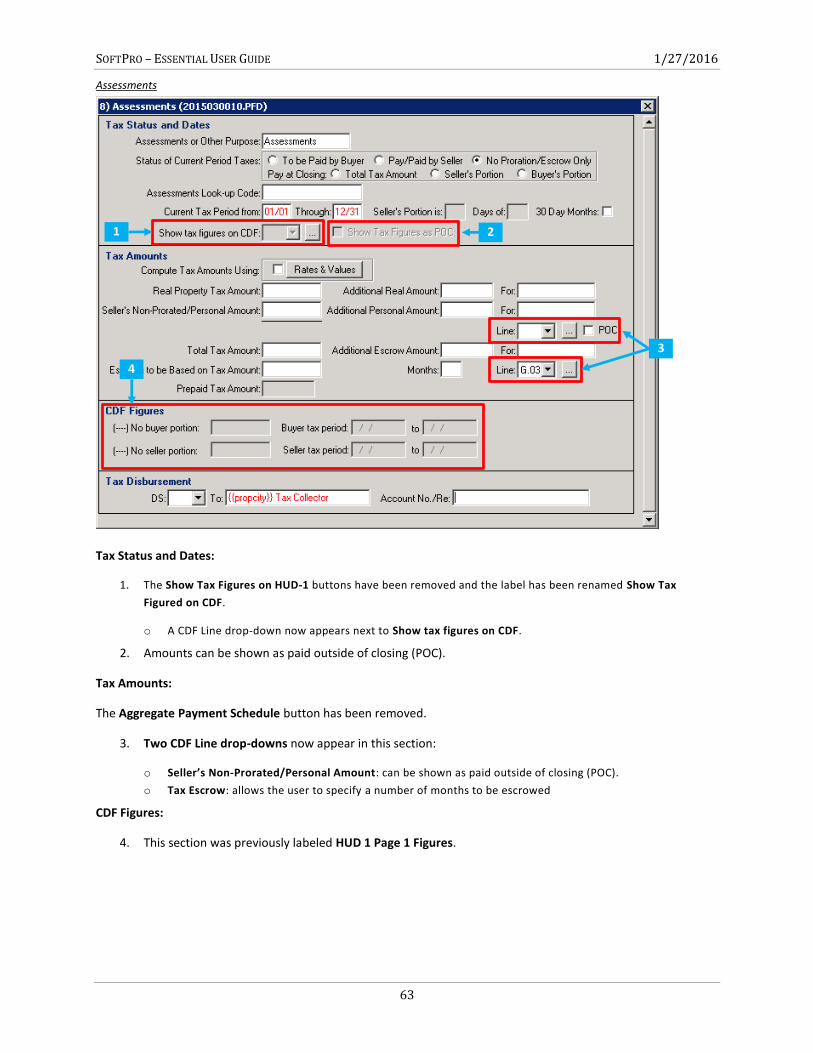
SOFTPRO – ESSENTIAL USER GUIDE 1/27/2016
63
Assessments
Tax Status and Dates:
1. The Show Tax Figures on HUD-1 buttons have been removed and the label has been renamed Show Tax
Figured on CDF.
o A CDF Line drop-down now appears next to Show tax figures on CDF.
2. Amounts can be shown as paid outside of closing (POC).
Tax Amounts:
The Aggregate Payment Schedule button has been removed.
3. Two CDF Line drop-downs now appear in this section:
o Seller’s Non-Prorated/Personal Amount: can be shown as paid outside of closing (POC).
o Tax Escrow: allows the user to specify a number of months to be escrowed
CDF Figures:
4. This section was previously labeled HUD 1 Page 1 Figures.
3
1
4
2
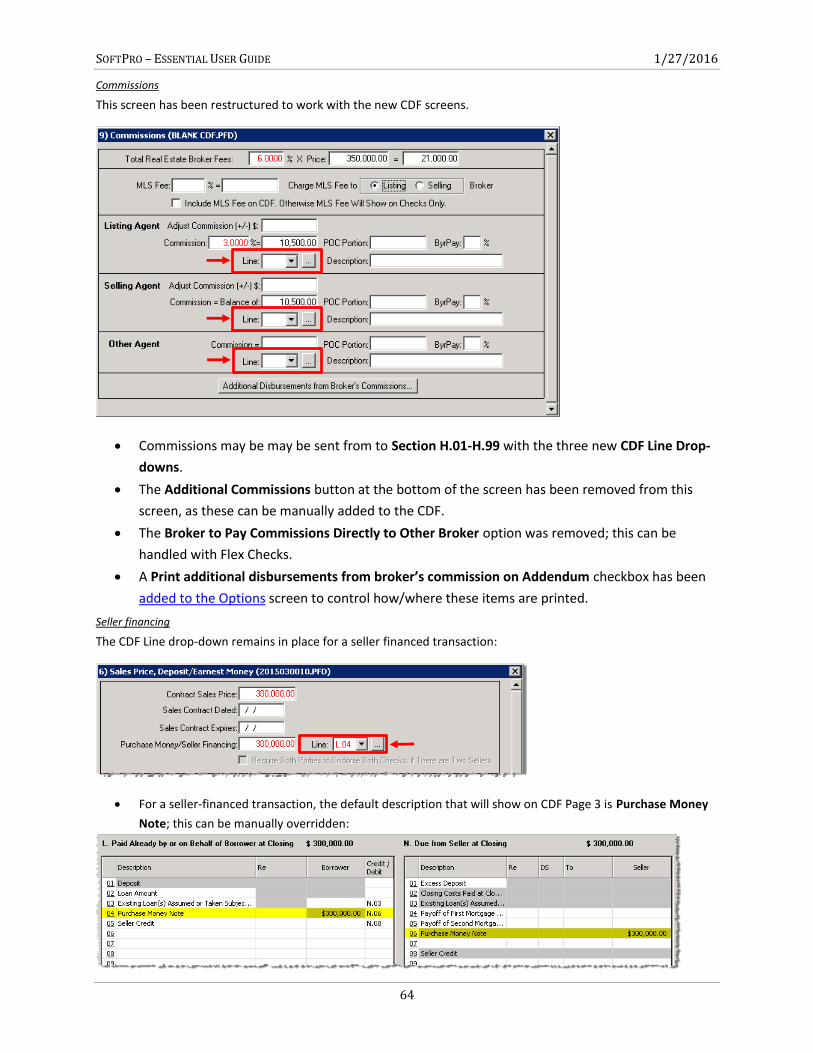
SOFTPRO – ESSENTIAL USER GUIDE 1/27/2016
64
Commissions
This screen has been restructured to work with the new CDF screens.
Commissions may be may be sent from to Section H.01-H.99 with the three new CDF Line Drop-
downs.
The Additional Commissions button at the bottom of the screen has been removed from this
screen, as these can be manually added to the CDF.
The Broker to Pay Commissions Directly to Other Broker option was removed; this can be
handled with Flex Checks.
A Print additional disbursements from broker’s commission on Addendum checkbox has been
added to the Options screen to control how/where these items are printed.
Seller financing
The CDF Line drop-down remains in place for a seller financed transaction:
For a seller-financed transaction, the default description that will show on CDF Page 3 is Purchase Money
Note; this can be manually overridden:
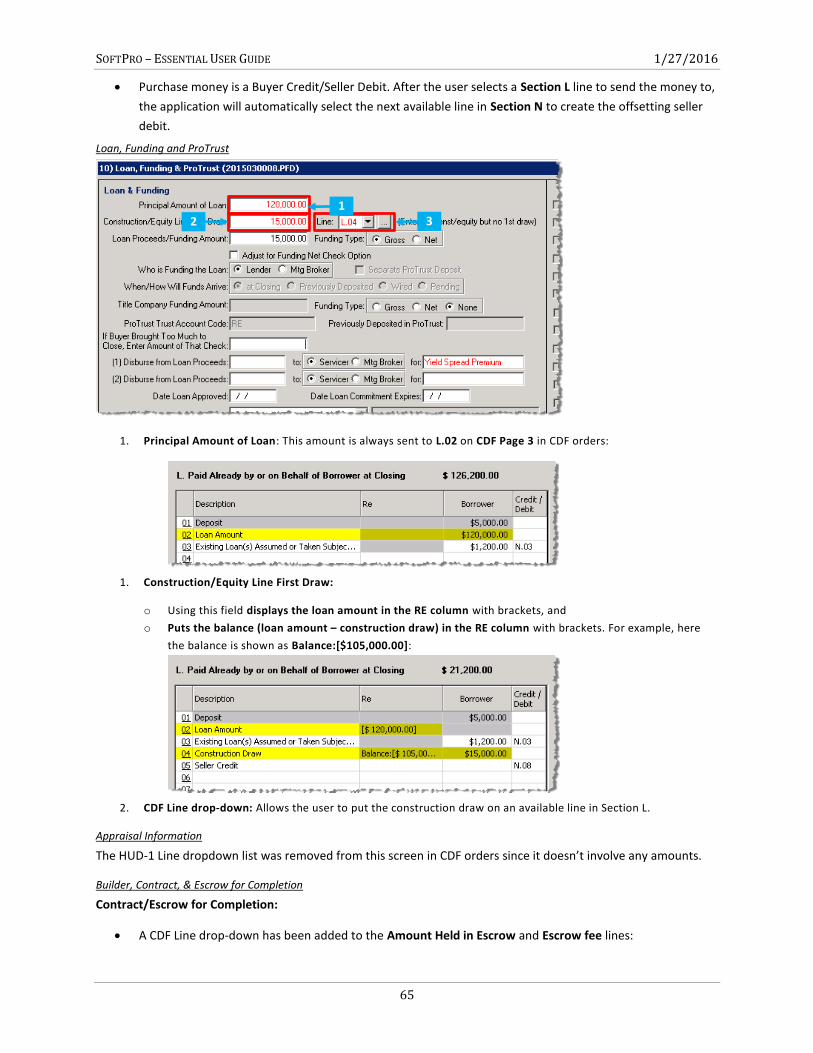
SOFTPRO – ESSENTIAL USER GUIDE 1/27/2016
65
Purchase money is a Buyer Credit/Seller Debit. After the user selects a Section L line to send the money to,
the application will automatically select the next available line in Section N to create the offsetting seller
debit.
Loan, Funding and ProTrust
1. Principal Amount of Loan: This amount is always sent to L.02 on CDF Page 3 in CDF orders:
1. Construction/Equity Line First Draw:
o Using this field displays the loan amount in the RE column with brackets, and
o Puts the balance (loan amount – construction draw) in the RE column with brackets. For example, here
the balance is shown as Balance:[$105,000.00]:
2. CDF Line drop-down: Allows the user to put the construction draw on an available line in Section L.
Appraisal Information
The HUD-1 Line dropdown list was removed from this screen in CDF orders since it doesn’t involve any amounts.
Builder, Contract, & Escrow for Completion
Contract/Escrow for Completion:
A CDF Line drop-down has been added to the Amount Held in Escrow and Escrow fee lines:
2
3
1
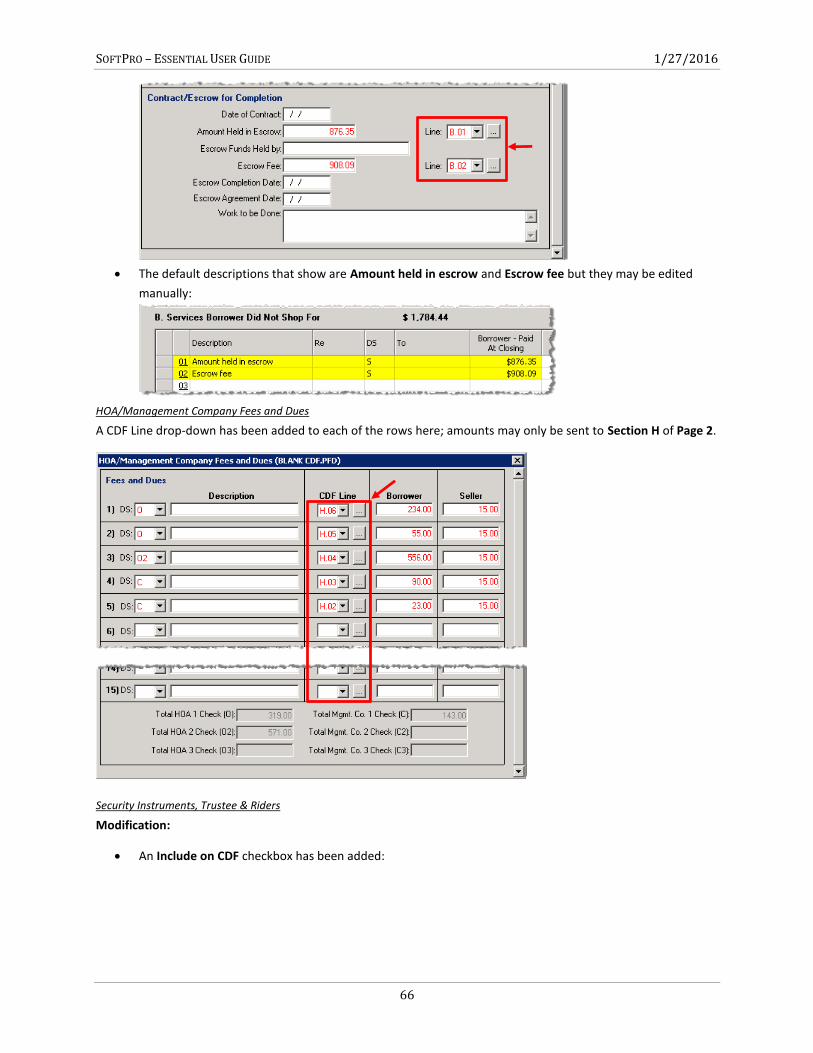
SOFTPRO – ESSENTIAL USER GUIDE 1/27/2016
66
The default descriptions that show are Amount held in escrow and Escrow fee but they may be edited
manually:
HOA/Management Company Fees and Dues
A CDF Line drop-down has been added to each of the rows here; amounts may only be sent to Section H of Page 2.
Security Instruments, Trustee & Riders
Modification:
An Include on CDF checkbox has been added:
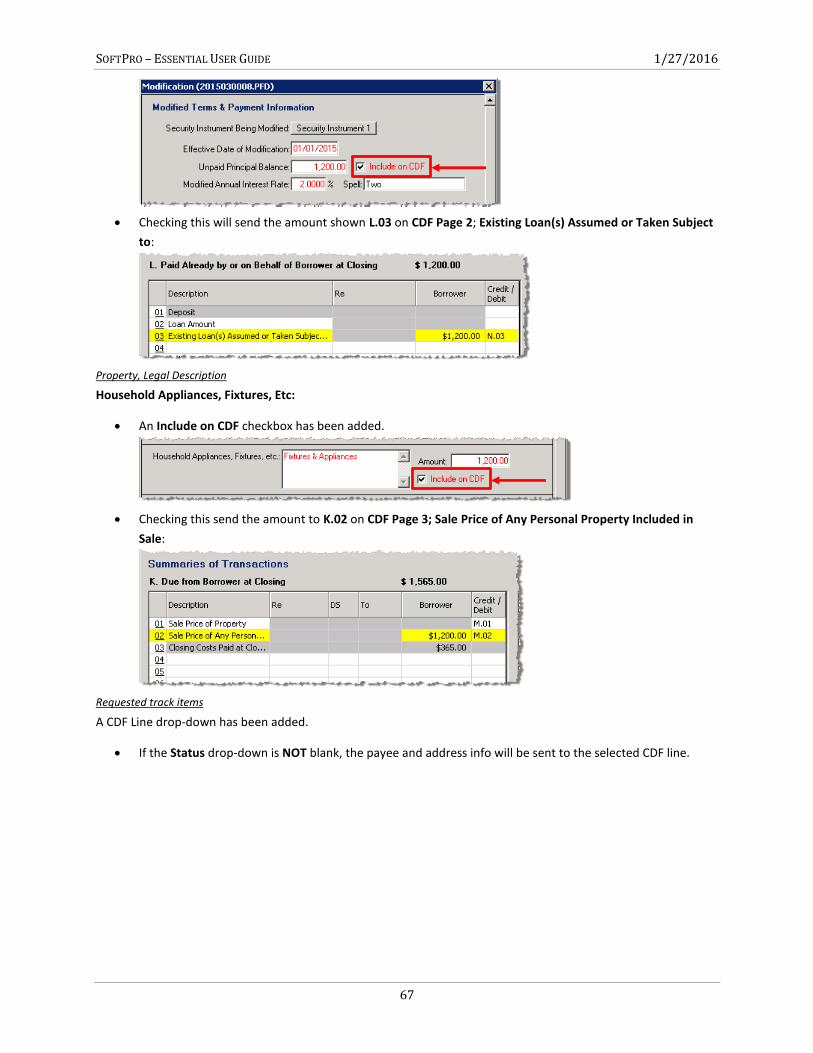
SOFTPRO – ESSENTIAL USER GUIDE 1/27/2016
67
Checking this will send the amount shown L.03 on CDF Page 2; Existing Loan(s) Assumed or Taken Subject
to:
Property, Legal Description
Household Appliances, Fixtures, Etc:
An Include on CDF checkbox has been added.
Checking this send the amount to K.02 on CDF Page 3; Sale Price of Any Personal Property Included in
Sale:
Requested track items
A CDF Line drop-down has been added.
If the Status drop-down is NOT blank, the payee and address info will be sent to the selected CDF line.
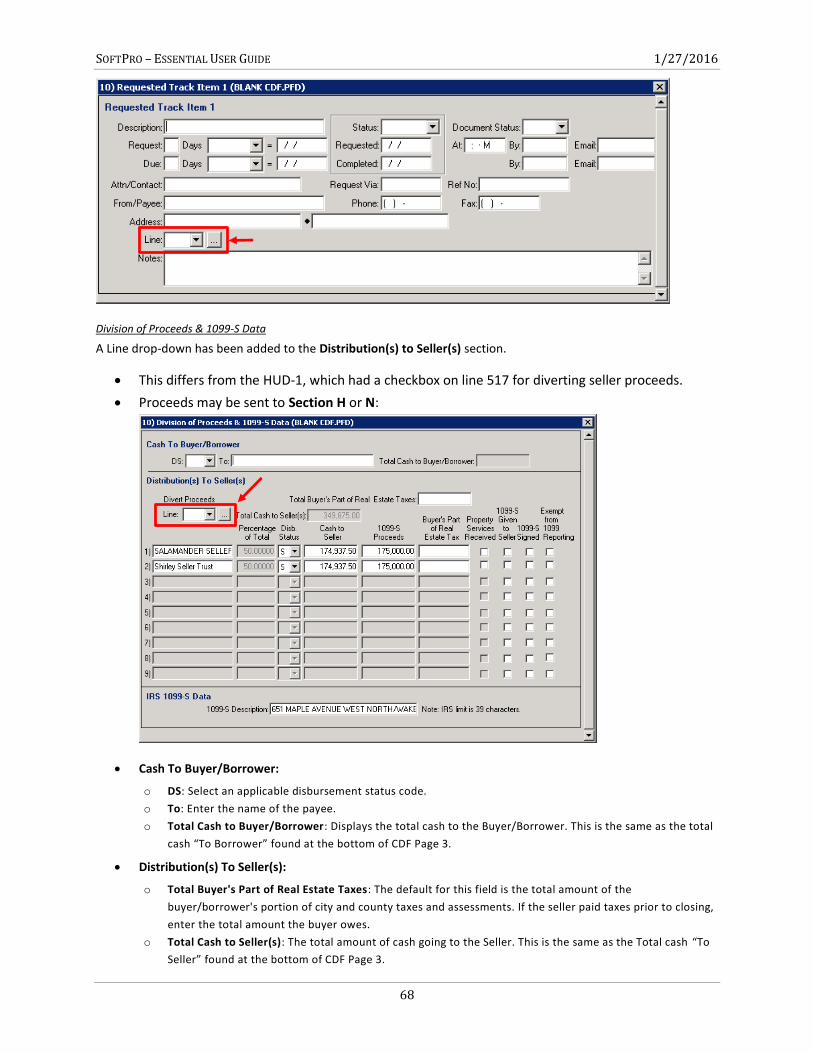
SOFTPRO – ESSENTIAL USER GUIDE 1/27/2016
68
Division of Proceeds & 1099-S Data
A Line drop-down has been added to the Distribution(s) to Seller(s) section.
This differs from the HUD-1, which had a checkbox on line 517 for diverting seller proceeds.
Proceeds may be sent to Section H or N:
Cash To Buyer/Borrower:
o DS: Select an applicable disbursement status code.
o To: Enter the name of the payee.
o Total Cash to Buyer/Borrower: Displays the total cash to the Buyer/Borrower. This is the same as the total
cash “To Borrower” found at the bottom of CDF Page 3.
Distribution(s) To Seller(s):
o Total Buyer's Part of Real Estate Taxes: The default for this field is the total amount of the
buyer/borrower's portion of city and county taxes and assessments. If the seller paid taxes prior to closing,
enter the total amount the buyer owes.
o Total Cash to Seller(s): The total amount of cash going to the Seller. This is the same as the Total cash “To
Seller” found at the bottom of CDF Page 3.
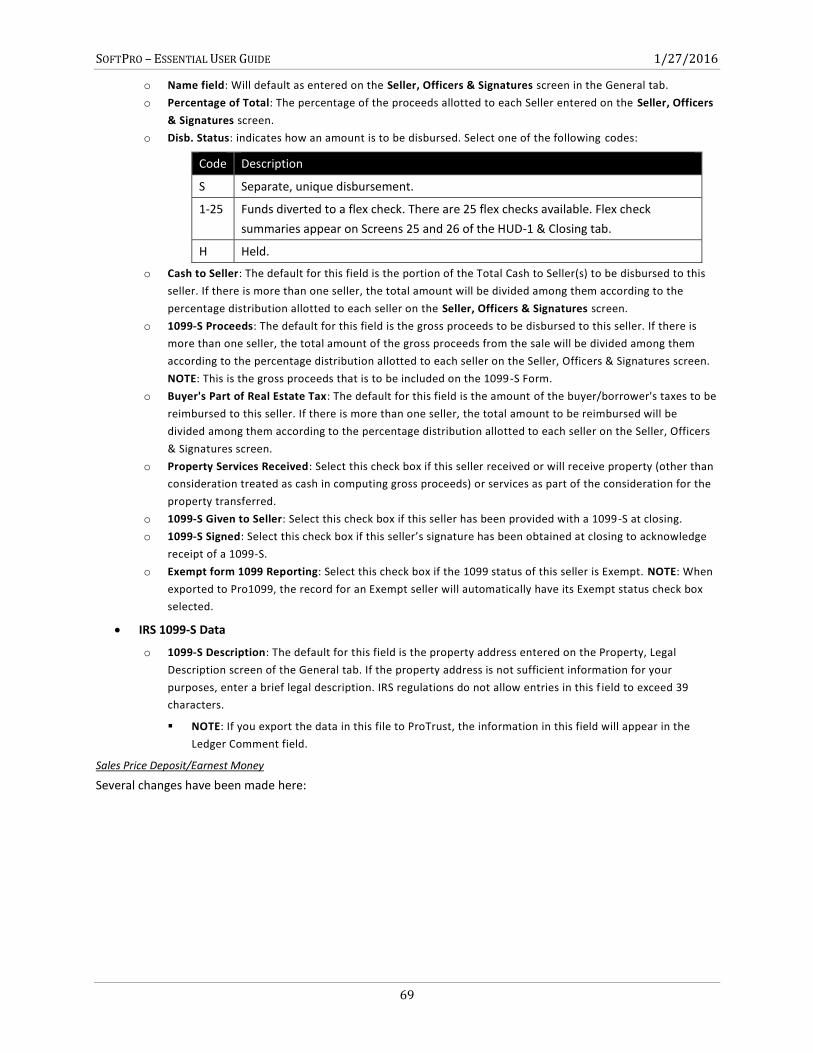
SOFTPRO – ESSENTIAL USER GUIDE 1/27/2016
69
o Name field: Will default as entered on the Seller, Officers & Signatures screen in the General tab.
o Percentage of Total: The percentage of the proceeds allotted to each Seller entered on the Seller, Officers
& Signatures screen.
o Disb. Status: indicates how an amount is to be disbursed. Select one of the following codes:
Code Description
S Separate, unique disbursement.
1-25 Funds diverted to a flex check. There are 25 flex checks available. Flex check
summaries appear on Screens 25 and 26 of the HUD-1 & Closing tab.
H Held.
o Cash to Seller: The default for this field is the portion of the Total Cash to Seller(s) to be disbursed to this
seller. If there is more than one seller, the total amount will be divided among them according to the
percentage distribution allotted to each seller on the Seller, Officers & Signatures screen.
o 1099-S Proceeds: The default for this field is the gross proceeds to be disbursed to this seller. If there is
more than one seller, the total amount of the gross proceeds from the sale will be divided among them
according to the percentage distribution allotted to each seller on the Seller, Officers & Signatures screen.
NOTE: This is the gross proceeds that is to be included on the 1099-S Form.
o Buyer's Part of Real Estate Tax: The default for this field is the amount of the buyer/borrower's taxes to be
reimbursed to this seller. If there is more than one seller, the total amount to be reimbursed will be
divided among them according to the percentage distribution allotted to each seller on the Seller, Officers
& Signatures screen.
o Property Services Received: Select this check box if this seller received or will receive property (other than
consideration treated as cash in computing gross proceeds) or services as part of the consideration for the
property transferred.
o 1099-S Given to Seller: Select this check box if this seller has been provided with a 1099-S at closing.
o 1099-S Signed: Select this check box if this seller’s signature has been obtained at closing to acknowledge
receipt of a 1099-S.
o Exempt form 1099 Reporting: Select this check box if the 1099 status of this seller is Exempt. NOTE: When
exported to Pro1099, the record for an Exempt seller will automatically have its Exempt status check box
selected.
IRS 1099-S Data
o 1099-S Description: The default for this field is the property address entered on the Property, Legal
Description screen of the General tab. If the property address is not sufficient information for your
purposes, enter a brief legal description. IRS regulations do not allow entries in this f ield to exceed 39
characters.
NOTE: If you export the data in this file to ProTrust, the information in this field will appear in the
Ledger Comment field.
Sales Price Deposit/Earnest Money
Several changes have been made here:
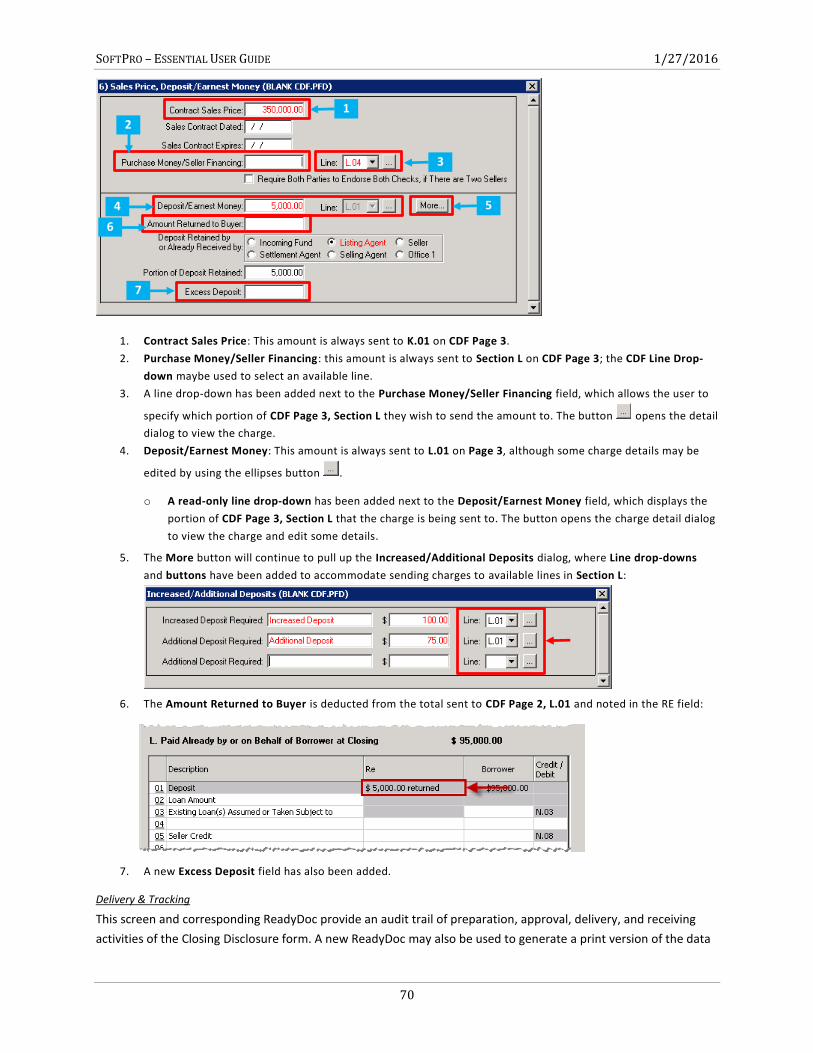
SOFTPRO – ESSENTIAL USER GUIDE 1/27/2016
70
1. Contract Sales Price: This amount is always sent to K.01 on CDF Page 3.
2. Purchase Money/Seller Financing: this amount is always sent to Section L on CDF Page 3; the CDF Line Drop-
down maybe used to select an available line.
3. A line drop-down has been added next to the Purchase Money/Seller Financing field, which allows the user to
specify which portion of CDF Page 3, Section L they wish to send the amount to. The button opens the detail
dialog to view the charge.
4. Deposit/Earnest Money: This amount is always sent to L.01 on Page 3, although some charge details may be
edited by using the ellipses button .
o A read-only line drop-down has been added next to the Deposit/Earnest Money field, which displays the
portion of CDF Page 3, Section L that the charge is being sent to. The button opens the charge detail dialog
to view the charge and edit some details.
5. The More button will continue to pull up the Increased/Additional Deposits dialog, where Line drop-downs
and buttons have been added to accommodate sending charges to available lines in Section L:
6. The Amount Returned to Buyer is deducted from the total sent to CDF Page 2, L.01 and noted in the RE field:
7. A new Excess Deposit field has also been added.
Delivery & Tracking
This screen and corresponding ReadyDoc provide an audit trail of preparation, approval, delivery, and receiving
activities of the Closing Disclosure form. A new ReadyDoc may also be used to generate a print version of the data
3
1
4 5
7
6
2
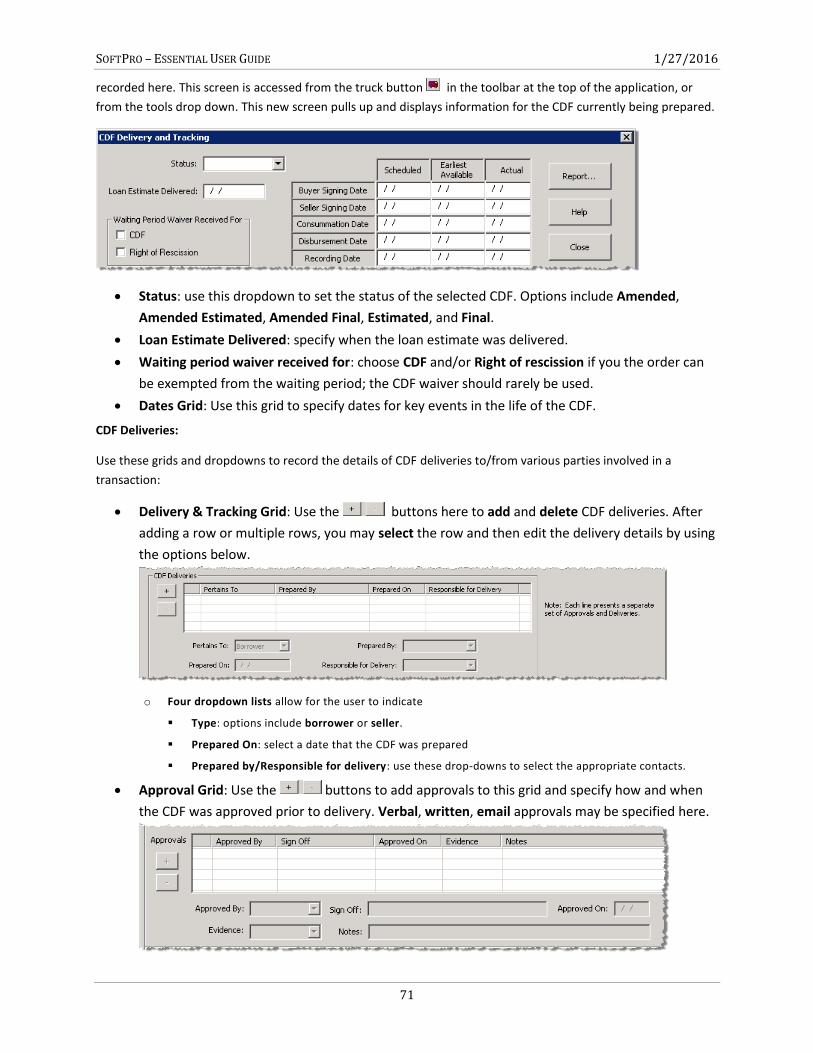
SOFTPRO – ESSENTIAL USER GUIDE 1/27/2016
71
recorded here. This screen is accessed from the truck button in the toolbar at the top of the application, or
from the tools drop down. This new screen pulls up and displays information for the CDF currently being prepared.
Status: use this dropdown to set the status of the selected CDF. Options include Amended,
Amended Estimated, Amended Final, Estimated, and Final.
Loan Estimate Delivered: specify when the loan estimate was delivered.
Waiting period waiver received for: choose CDF and/or Right of rescission if you the order can
be exempted from the waiting period; the CDF waiver should rarely be used.
Dates Grid: Use this grid to specify dates for key events in the life of the CDF.
CDF Deliveries:
Use these grids and dropdowns to record the details of CDF deliveries to/from various parties involved in a
transaction:
Delivery & Tracking Grid: Use the buttons here to add and delete CDF deliveries. After
adding a row or multiple rows, you may select the row and then edit the delivery details by using
the options below.
o Four dropdown lists allow for the user to indicate
Type: options include borrower or seller.
Prepared On: select a date that the CDF was prepared
Prepared by/Responsible for delivery: use these drop-downs to select the appropriate contacts.
Approval Grid: Use the buttons to add approvals to this grid and specify how and when
the CDF was approved prior to delivery. Verbal, written, email approvals may be specified here.
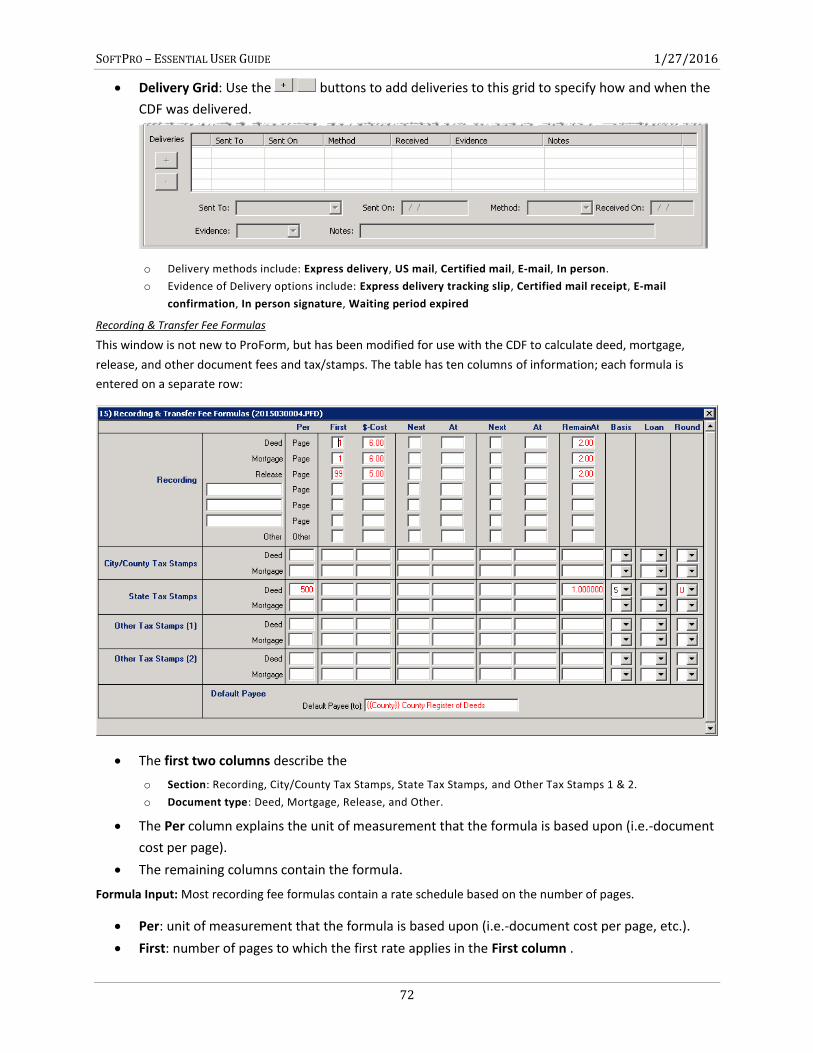
SOFTPRO – ESSENTIAL USER GUIDE 1/27/2016
72
Delivery Grid: Use the buttons to add deliveries to this grid to specify how and when the
CDF was delivered.
o Delivery methods include: Express delivery, US mail, Certified mail, E-mail, In person.
o Evidence of Delivery options include: Express delivery tracking slip, Certified mail receipt, E-mail
confirmation, In person signature, Waiting period expired
Recording & Transfer Fee Formulas
This window is not new to ProForm, but has been modified for use with the CDF to calculate deed, mortgage,
release, and other document fees and tax/stamps. The table has ten columns of information; each formula is
entered on a separate row:
The first two columns describe the
o Section: Recording, City/County Tax Stamps, State Tax Stamps, and Other Tax Stamps 1 & 2.
o Document type: Deed, Mortgage, Release, and Other.
The Per column explains the unit of measurement that the formula is based upon (i.e.-document
cost per page).
The remaining columns contain the formula.
Formula Input: Most recording fee formulas contain a rate schedule based on the number of pages.
Per: unit of measurement that the formula is based upon (i.e.-document cost per page, etc.).
First: number of pages to which the first rate applies in the First column .
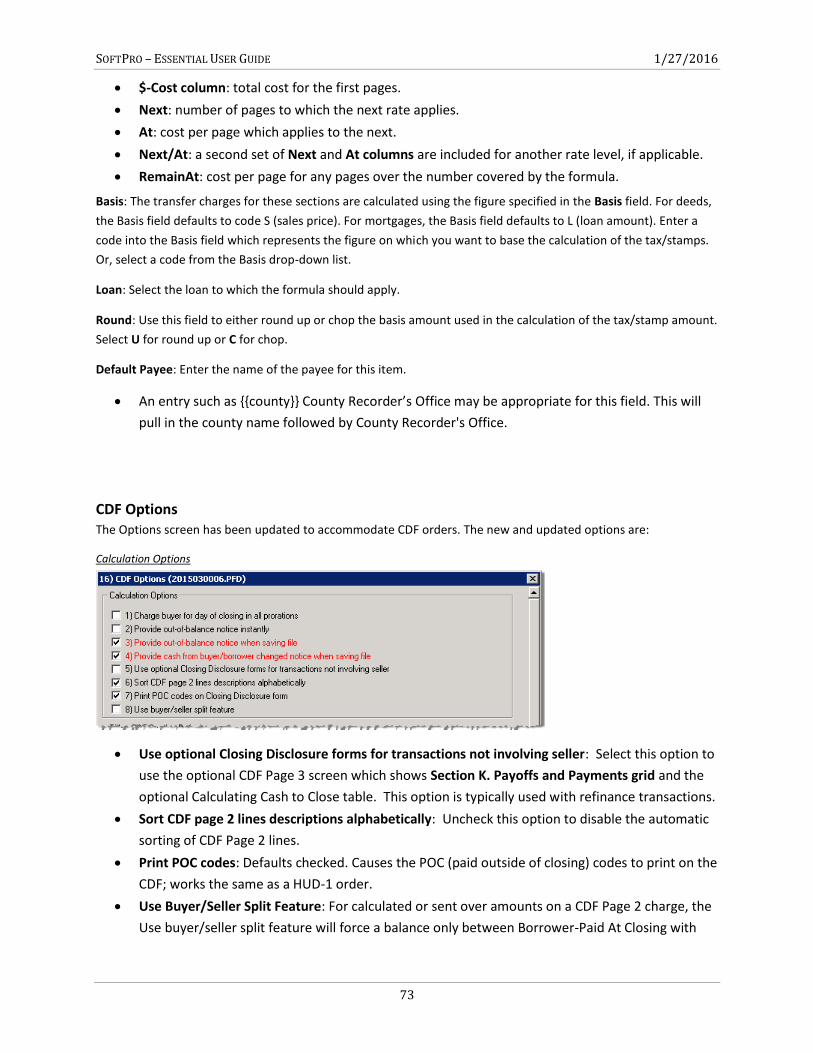
SOFTPRO – ESSENTIAL USER GUIDE 1/27/2016
73
$-Cost column: total cost for the first pages.
Next: number of pages to which the next rate applies.
At: cost per page which applies to the next.
Next/At: a second set of Next and At columns are included for another rate level, if applicable.
RemainAt: cost per page for any pages over the number covered by the formula.
Basis: The transfer charges for these sections are calculated using the figure specified in the Basis field. For deeds,
the Basis field defaults to code S (sales price). For mortgages, the Basis field defaults to L (loan amount). Enter a
code into the Basis field which represents the figure on which you want to base the calculation of the tax/stamps.
Or, select a code from the Basis drop-down list.
Loan: Select the loan to which the formula should apply.
Round: Use this field to either round up or chop the basis amount used in the calculation of the tax/stamp amount.
Select U for round up or C for chop.
Default Payee: Enter the name of the payee for this item.
An entry such as {{county}} County Recorder’s Office may be appropriate for this field. This will
pull in the county name followed by County Recorder's Office.
CDF Options The Options screen has been updated to accommodate CDF orders. The new and updated options are:
Calculation Options
Use optional Closing Disclosure forms for transactions not involving seller: Select this option to
use the optional CDF Page 3 screen which shows Section K. Payoffs and Payments grid and the
optional Calculating Cash to Close table. This option is typically used with refinance transactions.
Sort CDF page 2 lines descriptions alphabetically: Uncheck this option to disable the automatic
sorting of CDF Page 2 lines.
Print POC codes: Defaults checked. Causes the POC (paid outside of closing) codes to print on the
CDF; works the same as a HUD-1 order.
Use Buyer/Seller Split Feature: For calculated or sent over amounts on a CDF Page 2 charge, the
Use buyer/seller split feature will force a balance only between Borrower-Paid At Closing with
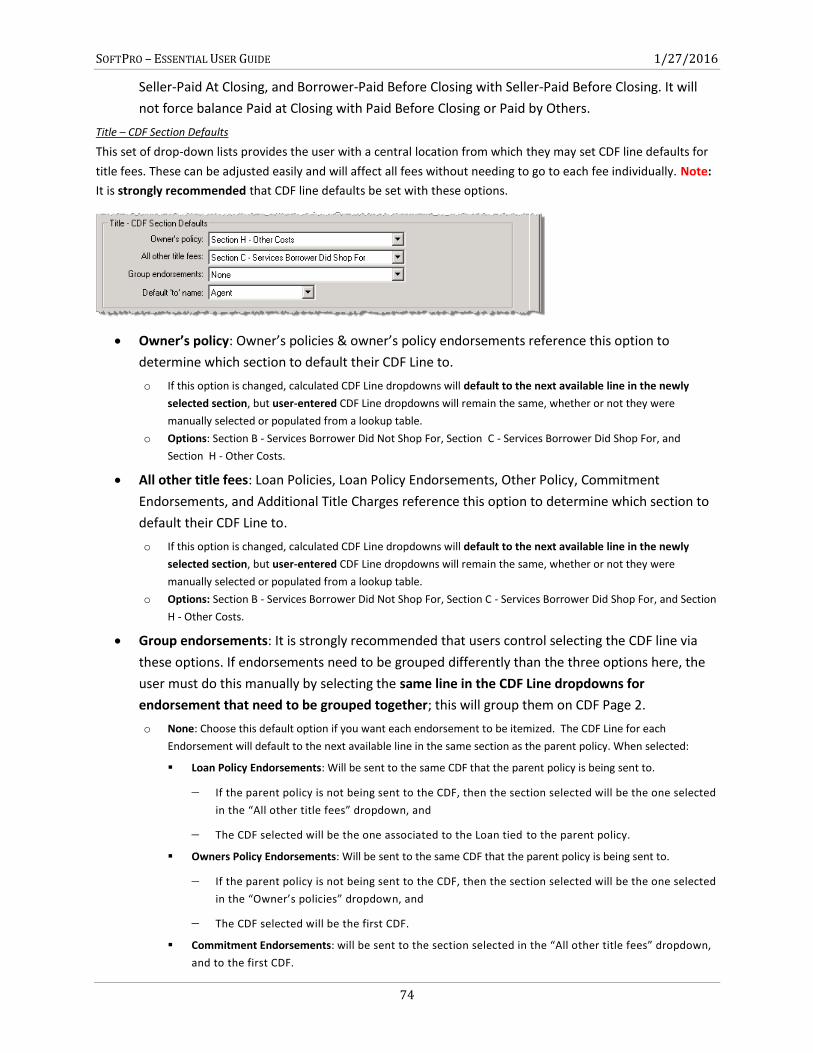
SOFTPRO – ESSENTIAL USER GUIDE 1/27/2016
74
Seller-Paid At Closing, and Borrower-Paid Before Closing with Seller-Paid Before Closing. It will
not force balance Paid at Closing with Paid Before Closing or Paid by Others.
Title – CDF Section Defaults
This set of drop-down lists provides the user with a central location from which they may set CDF line defaults for
title fees. These can be adjusted easily and will affect all fees without needing to go to each fee individually. Note:
It is strongly recommended that CDF line defaults be set with these options.
Owner’s policy: Owner’s policies & owner’s policy endorsements reference this option to
determine which section to default their CDF Line to.
o If this option is changed, calculated CDF Line dropdowns will default to the next available line in the newly
selected section, but user-entered CDF Line dropdowns will remain the same, whether or not they were
manually selected or populated from a lookup table.
o Options: Section B - Services Borrower Did Not Shop For, Section C - Services Borrower Did Shop For, and
Section H - Other Costs.
All other title fees: Loan Policies, Loan Policy Endorsements, Other Policy, Commitment
Endorsements, and Additional Title Charges reference this option to determine which section to
default their CDF Line to.
o If this option is changed, calculated CDF Line dropdowns will default to the next available line in the newly
selected section, but user-entered CDF Line dropdowns will remain the same, whether or not they were
manually selected or populated from a lookup table.
o Options: Section B - Services Borrower Did Not Shop For, Section C - Services Borrower Did Shop For, and Section
H - Other Costs.
Group endorsements: It is strongly recommended that users control selecting the CDF line via
these options. If endorsements need to be grouped differently than the three options here, the
user must do this manually by selecting the same line in the CDF Line dropdowns for
endorsement that need to be grouped together; this will group them on CDF Page 2.
o None: Choose this default option if you want each endorsement to be itemized. The CDF Line for each
Endorsement will default to the next available line in the same section as the parent policy. When selected:
Loan Policy Endorsements: Will be sent to the same CDF that the parent policy is being sent to.
If the parent policy is not being sent to the CDF, then the section selected will be the one selected
in the “All other title fees” dropdown, and
The CDF selected will be the one associated to the Loan tied to the parent policy.
Owners Policy Endorsements: Will be sent to the same CDF that the parent policy is being sent to.
If the parent policy is not being sent to the CDF, then the section selected will be the one selected
in the “Owner’s policies” dropdown, and
The CDF selected will be the first CDF.
Commitment Endorsements: will be sent to the section selected in the “All other title fees” dropdown,
and to the first CDF.
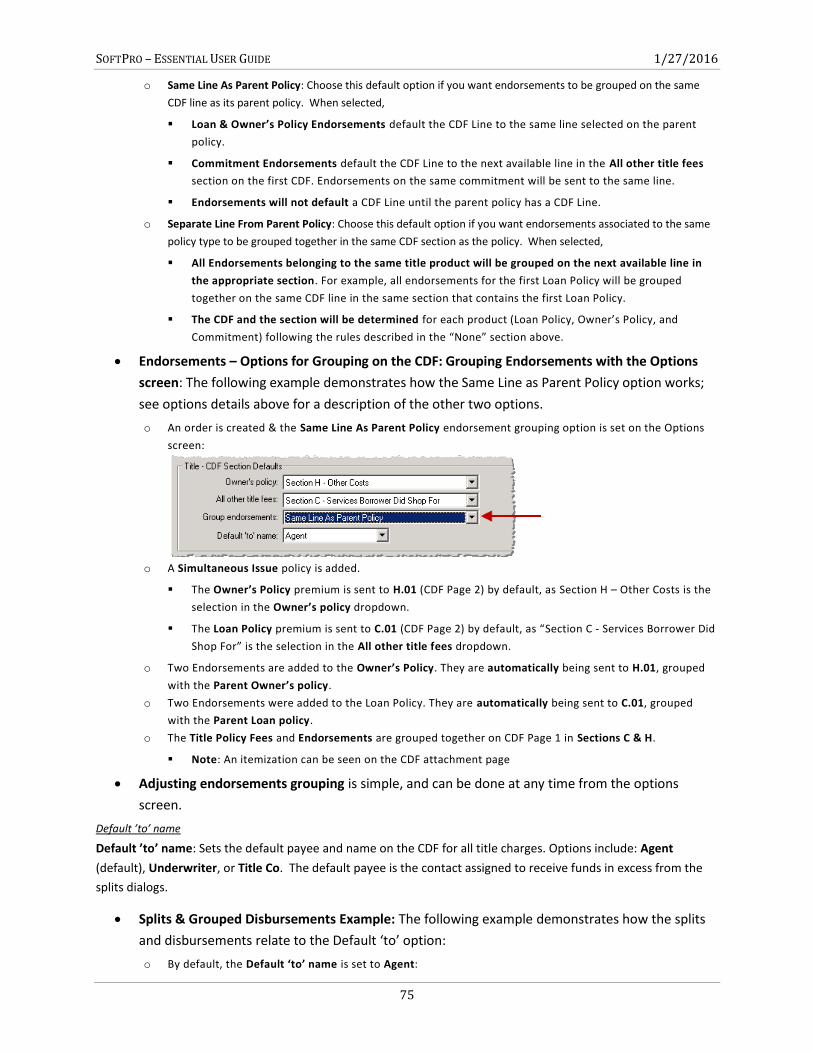
SOFTPRO – ESSENTIAL USER GUIDE 1/27/2016
75
o Same Line As Parent Policy: Choose this default option if you want endorsements to be grouped on the same
CDF line as its parent policy. When selected,
Loan & Owner’s Policy Endorsements default the CDF Line to the same line selected on the parent
policy.
Commitment Endorsements default the CDF Line to the next available line in the All other title fees
section on the first CDF. Endorsements on the same commitment will be sent to the same line.
Endorsements will not default a CDF Line until the parent policy has a CDF Line.
o Separate Line From Parent Policy: Choose this default option if you want endorsements associated to the same
policy type to be grouped together in the same CDF section as the policy. When selected,
All Endorsements belonging to the same title product will be grouped on the next available line in
the appropriate section. For example, all endorsements for the first Loan Policy will be grouped
together on the same CDF line in the same section that contains the first Loan Policy.
The CDF and the section will be determined for each product (Loan Policy, Owner’s Policy, and
Commitment) following the rules described in the “None” section above.
Endorsements – Options for Grouping on the CDF: Grouping Endorsements with the Options
screen: The following example demonstrates how the Same Line as Parent Policy option works;
see options details above for a description of the other two options.
o An order is created & the Same Line As Parent Policy endorsement grouping option is set on the Options
screen:
o A Simultaneous Issue policy is added.
The Owner’s Policy premium is sent to H.01 (CDF Page 2) by default, as Section H – Other Costs is the
selection in the Owner’s policy dropdown.
The Loan Policy premium is sent to C.01 (CDF Page 2) by default, as “Section C - Services Borrower Did
Shop For” is the selection in the All other title fees dropdown.
o Two Endorsements are added to the Owner’s Policy. They are automatically being sent to H.01, grouped
with the Parent Owner’s policy.
o Two Endorsements were added to the Loan Policy. They are automatically being sent to C.01, grouped
with the Parent Loan policy.
o The Title Policy Fees and Endorsements are grouped together on CDF Page 1 in Sections C & H.
Note: An itemization can be seen on the CDF attachment page
Adjusting endorsements grouping is simple, and can be done at any time from the options
screen.
Default ’to’ name
Default ’to’ name: Sets the default payee and name on the CDF for all title charges. Options include: Agent
(default), Underwriter, or Title Co. The default payee is the contact assigned to receive funds in excess from the
splits dialogs.
Splits & Grouped Disbursements Example: The following example demonstrates how the splits
and disbursements relate to the Default ‘to’ option:
o By default, the Default ‘to’ name is set to Agent:
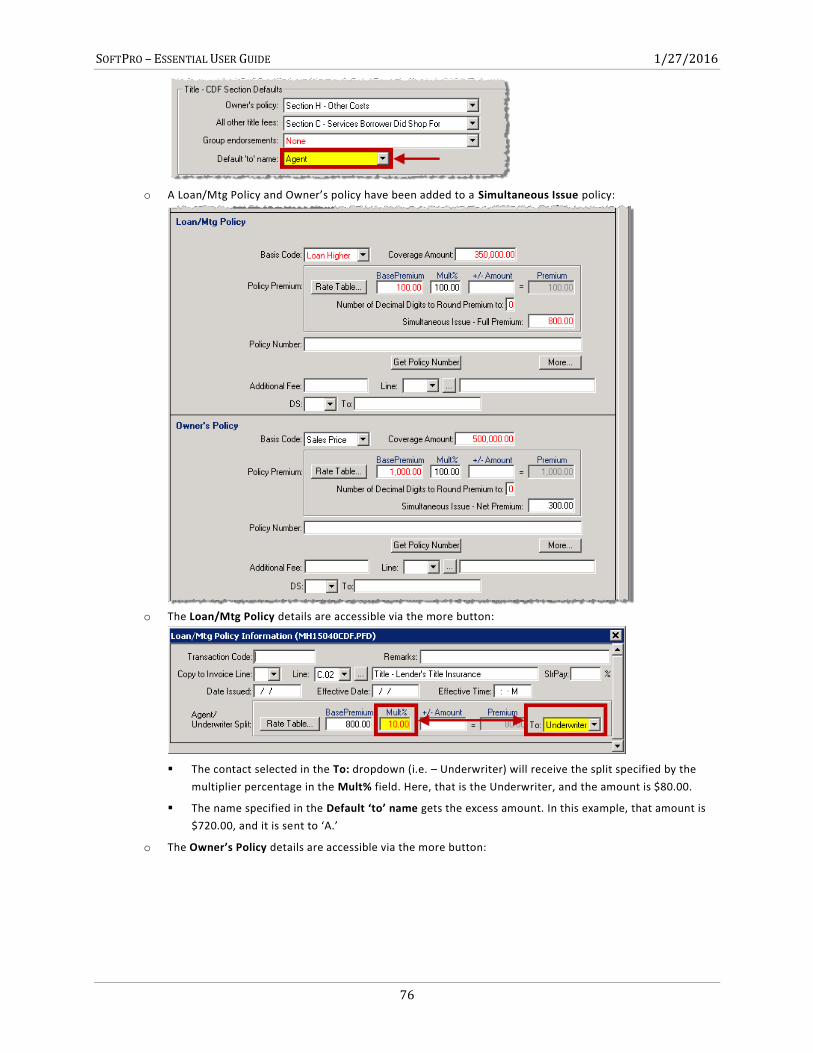
SOFTPRO – ESSENTIAL USER GUIDE 1/27/2016
76
o A Loan/Mtg Policy and Owner’s policy have been added to a Simultaneous Issue policy:
o The Loan/Mtg Policy details are accessible via the more button:
The contact selected in the To: dropdown (i.e. – Underwriter) will receive the split specified by the
multiplier percentage in the Mult% field. Here, that is the Underwriter, and the amount is $80.00.
The name specified in the Default ‘to’ name gets the excess amount. In this example, that amount is
$720.00, and it is sent to ‘A.’
o The Owner’s Policy details are accessible via the more button:
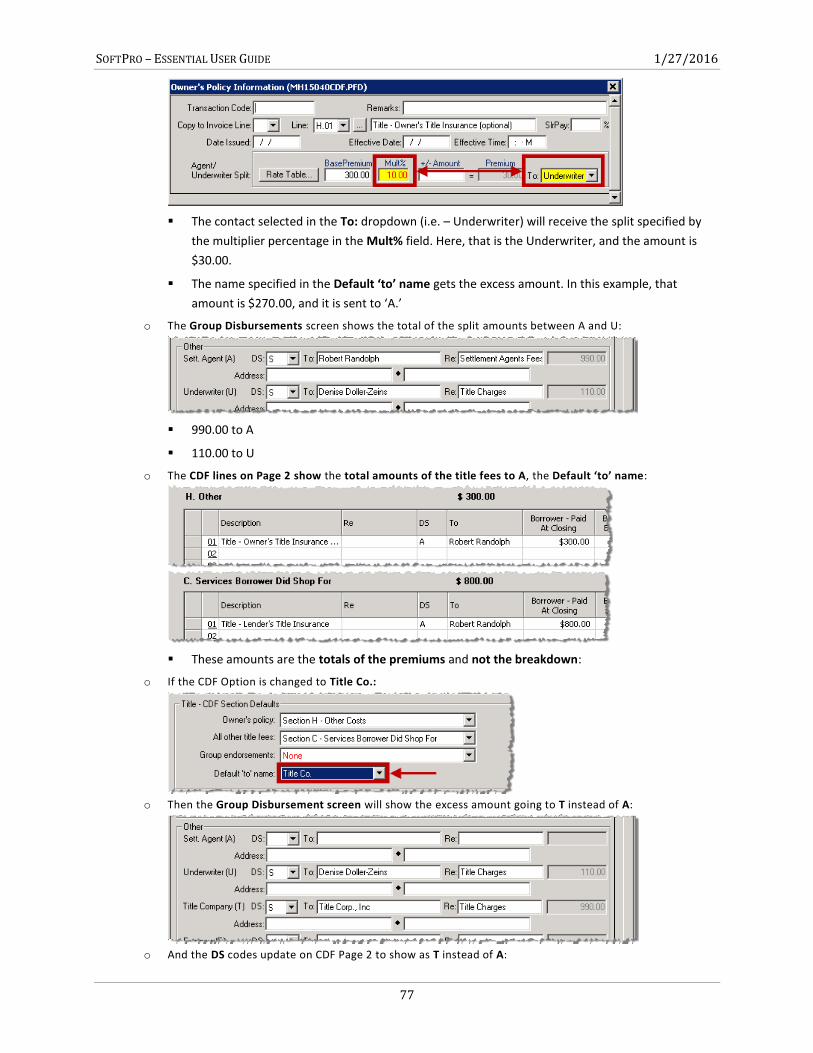
SOFTPRO – ESSENTIAL USER GUIDE 1/27/2016
77
The contact selected in the To: dropdown (i.e. – Underwriter) will receive the split specified by
the multiplier percentage in the Mult% field. Here, that is the Underwriter, and the amount is
$30.00.
The name specified in the Default ‘to’ name gets the excess amount. In this example, that
amount is $270.00, and it is sent to ‘A.’
o The Group Disbursements screen shows the total of the split amounts between A and U:
990.00 to A
110.00 to U
o The CDF lines on Page 2 show the total amounts of the title fees to A, the Default ‘to’ name:
These amounts are the totals of the premiums and not the breakdown:
o If the CDF Option is changed to Title Co.:
o Then the Group Disbursement screen will show the excess amount going to T instead of A:
o And the DS codes update on CDF Page 2 to show as T instead of A:
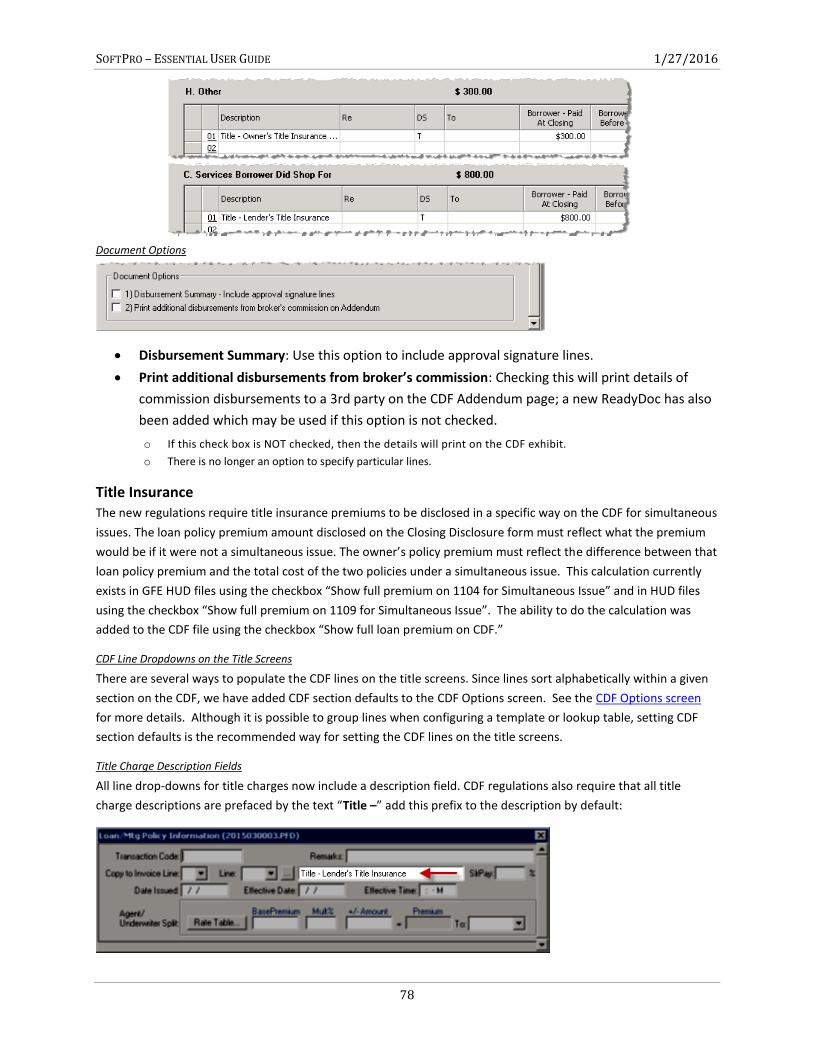
SOFTPRO – ESSENTIAL USER GUIDE 1/27/2016
78
Document Options
Disbursement Summary: Use this option to include approval signature lines.
Print additional disbursements from broker’s commission: Checking this will print details of
commission disbursements to a 3rd party on the CDF Addendum page; a new ReadyDoc has also
been added which may be used if this option is not checked.
o If this check box is NOT checked, then the details will print on the CDF exhibit.
o There is no longer an option to specify particular lines.
Title Insurance The new regulations require title insurance premiums to be disclosed in a specific way on the CDF for simultaneous
issues. The loan policy premium amount disclosed on the Closing Disclosure form must reflect what the premium
would be if it were not a simultaneous issue. The owner’s policy premium must reflect the difference between that
loan policy premium and the total cost of the two policies under a simultaneous issue. This calculation currently
exists in GFE HUD files using the checkbox “Show full premium on 1104 for Simultaneous Issue” and in HUD files
using the checkbox “Show full premium on 1109 for Simultaneous Issue”. The ability to do the calculation was
added to the CDF file using the checkbox “Show full loan premium on CDF.”
CDF Line Dropdowns on the Title Screens
There are several ways to populate the CDF lines on the title screens. Since lines sort alphabetically within a given
section on the CDF, we have added CDF section defaults to the CDF Options screen. See the CDF Options screen
for more details. Although it is possible to group lines when configuring a template or lookup table, setting CDF
section defaults is the recommended way for setting the CDF lines on the title screens.
Title Charge Description Fields
All line drop-downs for title charges now include a description field. CDF regulations also require that all title
charge descriptions are prefaced by the text “Title –” add this prefix to the description by default:
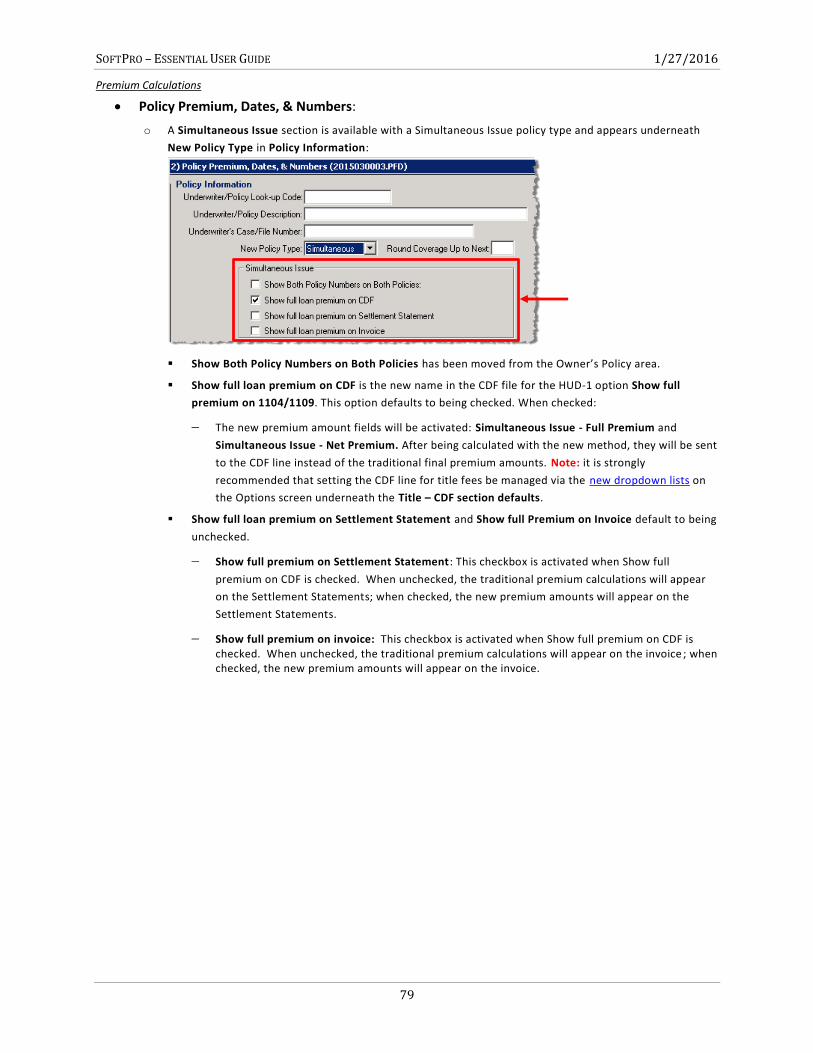
SOFTPRO – ESSENTIAL USER GUIDE 1/27/2016
79
Premium Calculations
Policy Premium, Dates, & Numbers:
o A Simultaneous Issue section is available with a Simultaneous Issue policy type and appears underneath
New Policy Type in Policy Information:
Show Both Policy Numbers on Both Policies has been moved from the Owner’s Policy area.
Show full loan premium on CDF is the new name in the CDF file for the HUD-1 option Show full
premium on 1104/1109. This option defaults to being checked. When checked:
The new premium amount fields will be activated: Simultaneous Issue - Full Premium and
Simultaneous Issue - Net Premium. After being calculated with the new method, they will be sent
to the CDF line instead of the traditional final premium amounts. Note: it is strongly
recommended that setting the CDF line for title fees be managed via the new dropdown lists on
the Options screen underneath the Title – CDF section defaults.
Show full loan premium on Settlement Statement and Show full Premium on Invoice default to being
unchecked.
Show full premium on Settlement Statement: This checkbox is activated when Show full
premium on CDF is checked. When unchecked, the traditional premium calculations will appear
on the Settlement Statements; when checked, the new premium amounts will appear on the
Settlement Statements.
Show full premium on invoice: This checkbox is activated when Show full premium on CDF is checked. When unchecked, the traditional premium calculations will appear on the invoice ; when checked, the new premium amounts will appear on the invoice.
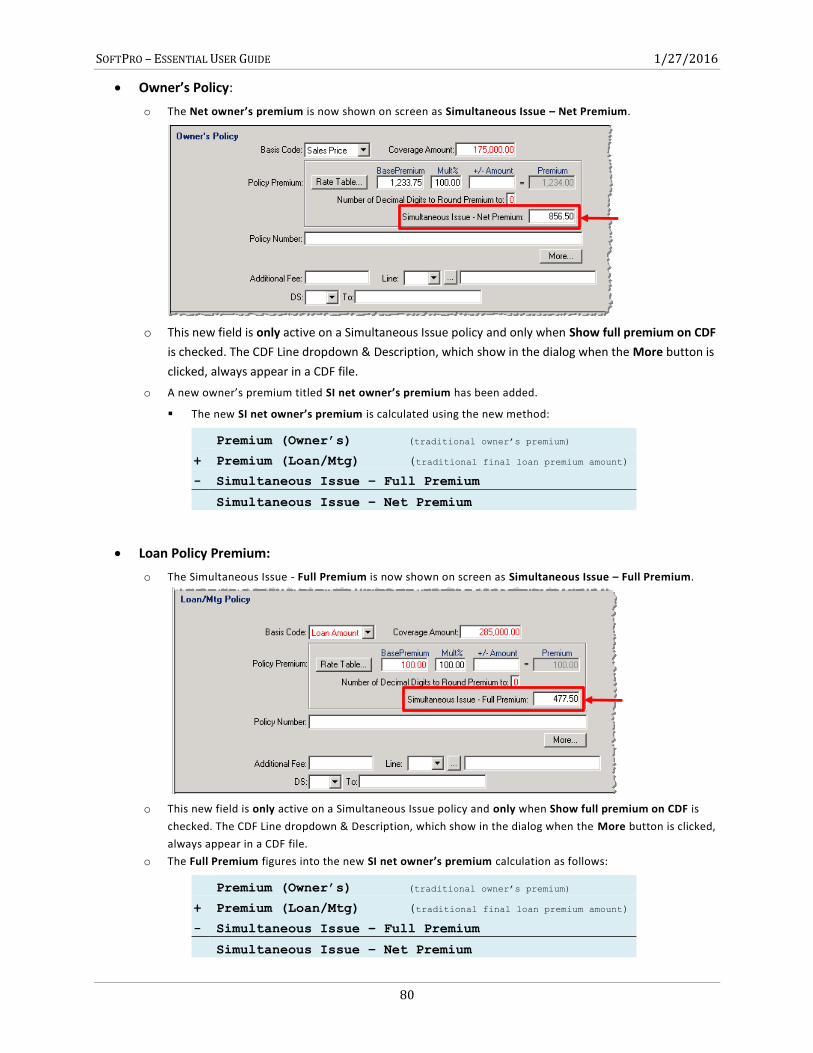
SOFTPRO – ESSENTIAL USER GUIDE 1/27/2016
80
Owner’s Policy:
o The Net owner’s premium is now shown on screen as Simultaneous Issue – Net Premium.
o This new field is only active on a Simultaneous Issue policy and only when Show full premium on CDF
is checked. The CDF Line dropdown & Description, which show in the dialog when the More button is
clicked, always appear in a CDF file.
o A new owner’s premium titled SI net owner’s premium has been added.
The new SI net owner’s premium is calculated using the new method:
Premium (Owner’s) (traditional owner’s premium)
+ Premium (Loan/Mtg) (traditional final loan premium amount)
- Simultaneous Issue – Full Premium
Simultaneous Issue – Net Premium
Loan Policy Premium:
o The Simultaneous Issue - Full Premium is now shown on screen as Simultaneous Issue – Full Premium.
o This new field is only active on a Simultaneous Issue policy and only when Show full premium on CDF is
checked. The CDF Line dropdown & Description, which show in the dialog when the More button is clicked,
always appear in a CDF file.
o The Full Premium figures into the new SI net owner’s premium calculation as follows:
Premium (Owner’s) (traditional owner’s premium)
+ Premium (Loan/Mtg) (traditional final loan premium amount)
- Simultaneous Issue – Full Premium
Simultaneous Issue – Net Premium
SOFTPRO – ESSENTIAL USER GUIDE 1/27/2016
81
Agent/Underwriter Splits
Agent and Underwriter splits are not shown on the CDF like they were shown on the HUD-1. These splits work the
same as they have on the HUD-1 if the resulting charge is paid to an Agent or Underwriter. The Agent &
Underwriter grouped disbursement total takes into account splits. The following example shows how an additional
title charge may be added, split, and disbursed to an Underwriter or Agent.
An Additional Title Charge created:
The charge is divided in half (50% multiplier) between the Underwriter and the contact in the
Default ‘to’ name option, which is Agent by default) and sent to C.01:
The DS code is changed on the Charge Detail Dialog to A Agent:
The resulting disbursements will include $50 to the Agent and $50 to the Underwriter.
Loan, Owner’s, & Other Policy Information
These three dialogs work the same as they have with HUD-1 orders. The main difference with the CDF is that they
now have the CDF Line drop-down and description options. Additionally, the Show full premium on 1104/1109
SOFTPRO – ESSENTIAL USER GUIDE 1/27/2016
82
for Simultaneous Issue checkbox has been removed. This screenshot of the Loan/Mtg Policy Information dialog
shows these changes:
Endorsements & Additional Title Charges
Endorsements and Additional Title Charges dialogs work the same as they have with HUD-1 orders. The main
difference with the CDF is that they now have the Line drop-down option and description fields. To see how the
default behavior is set, see the CDF Options section. This example shows an endorsement with these new items,
but this is how an additional title charge would appear:
Preliminary Title Search
This screen works the same as it has with HUD-1 orders. The main difference with the CDF is that it now has a CDF
Line drop-down and description field. Note: the field which displays “Title –” will append whatever the user enters
in the Type of Search field above:
SOFTPRO – ESSENTIAL USER GUIDE 1/27/2016
83
Additional Fee
An Additional Fee option has been added to the loan and owner’s policies. It may be used for items like Guaranty
fees, State surcharges, etc.
The CDF Line drop-down defaults from the CDF Options screen.
The DS line defaults using the Default ‘to’ name option on the CDF Options screen. However, the
DS code may be manually set if necessary.
Once an Additional Fee is input, the description will populate & include the default “Title –”
prefix; it may be manually edited if necessary:
Data Overlay Rules
All data will overlay between the same file/overlay types; overlaying between different file types will
transfer non-CDF, non-GFE, user-entered data. A few examples:
Same file type:
o GFE GFE: All data will be overlaid.
o CDF CDF: All data will be overlaid.
Differing file types:
o GFE CDF: HUD-specific and CDF-Specific data will be IGNORED; it will not overlay.
o All user-entered data on non-HUD/non-CDF tabs will overlay.
SOFTPRO – ESSENTIAL USER GUIDE 1/27/2016
84
Chapter 3: ProForm A to Z Overview ............................................................................................................................. 90
1099-S Data ......................................................................................................................... 90
Seller Proceeds ........................................................................................................................................................ 90
Adjusting Seller Proceeds ........................................................................................................................................ 90
Abstractor Title Search ................................................................ Error! Bookmark not defined.
Underwriter Portion Of Title Charges ........................................................................ Error! Bookmark not defined.
Acknowledgments ....................................................................... Error! Bookmark not defined.
Adjustable Rate Mortgage (Arm) Data ................................................................................. 91
Type Of ARM ........................................................................................................................................................... 92
Round Adjusted Rate ............................................................................................................................................... 92
Truth-In-Lending (TIL) .......................................................................................................... 92
Additional Title Charges ....................................................................................................... 92
Assigning A Title Charge To A HUD-1 Line ............................................................................................................... 93
Slrpay% Feature ....................................................................................................................................................... 93
Splitting A Charge Between The Agent And Underwriter ....................................................................................... 93
Auto Calculation Of Endorsements And Additional Title Charges ........................................................................... 94
Appraisal Information, Appraised Value, Appraiser .............................................................. 95
Assigning The Appraisal Fee To A HUD-1 Line Number ........................................................................................... 95
Attorneys ............................................................................................................................ 96
Attorney’s Fees ................................................................................................................... 96
Express HUD ........................................................................................................................ 96
Buyer / Borrower ................................................................................................................ 96
Type ......................................................................................................................................................................... 97
Vesting ..................................................................................................................................................................... 97
To Add A New Entry To The Vesting Look-Up Table ................................................................................................ 98
Interest % ................................................................................................................................................................ 98
Default Buyer And Seller Relationships ................................................................................................................... 98
Buyer / Borrower Additional Information ............................................................................................................... 99
Buyer’s Portion Of Real Estate Taxes .................................................................................. 100
Closer ................................................................................................................................ 100
Commissions ..................................................................................................................... 100
Changing The Commission Rate ............................................................................................................................ 101
Entering Commission Manually ............................................................................................................................. 101
Splitting The Commission Between Two Brokers .................................................................................................. 101
Splitting The Cost Of Commission Between Buyer And Seller .............................................................................. 102
SOFTPRO – ESSENTIAL USER GUIDE 1/27/2016
85
Additional Disbursements From Broker’s Commissions ....................................................................................... 103
Printing The Additional Disbursements From Broker’s Commissions Exhibit ....................................................... 103
Additional Disbursements From Broker’s Commissions Disclosure ...................................................................... 103
Commissions With The Express HUD Option ...................................................................... 104
Adjusting The Commission Amount (Express HUD) .............................................................................................. 104
Charging The Buyer A Percentage Of Commissions (Express HUD) ...................................................................... 104
Charging The Buyer A Dollar Amount Of Commissions (Express HUD) ................................................................. 104
Commitment Data ............................................................................................................. 105
Corporate Officers ............................................................................................................. 105
Credit Card Payoff ............................................................................................................. 106
Payoff Details ........................................................................................................................................................ 106
Debits And Credits ............................................................................................................. 107
Buyer Credit / Seller Debit ..................................................................................................................................... 107
Seller Pays A Portion Of Closing Costs ................................................................................................................... 107
Seller Credit / Buyer Debit ..................................................................................................................................... 107
Disbursement Date ............................................................................................................ 108
Discount Points ................................................................................................................. 108
Document Preparation Fee ................................................................................................ 108
Document Recording Fees ................................................................................................. 109
1200 Section Formulas .......................................................................................................................................... 109
ProForm: VA Calculation Rounding ....................................................................................................................... 110
Basis ....................................................................................................................................................................... 111
Loan ....................................................................................................................................................................... 111
Round .................................................................................................................................................................... 111
Earnest Money Deposit ..................................................................................................... 111
Deposit/Earnest Money Scenarios ........................................................................................................................ 112
A Broker Is Retaining The Deposit: ........................................................................................................................ 112
Increased Or Additional Deposits .......................................................................................................................... 112
Endorsements ................................................................................................................... 112
Combining The Endorsement Amounts To A Single Additional Charge ................................................................ 113
Escrower ........................................................................................................................... 113
Escrows ............................................................................................................................. 114
Exceptions ......................................................................................................................... 114
Excess Deposit ................................................................................................................... 114
FNMA/FHA/VA Riders ....................................................................................................... 115
Gift Money ........................................................................................................................ 115
Express HUD .......................................................................................................................................................... 115

SOFTPRO – ESSENTIAL USER GUIDE 1/27/2016
86
Grantor/Grantee ............................................................................................................... 115
Hazard Insurance ............................................................................................................... 116
Homeowner’s Association ................................................................................................. 116
Entering A Homeowner’s Association Fee ............................................................................................................ 117
Interest Rate ..................................................................................................................... 117
Interim Interest ................................................................................................................. 118
Per Diem Number Of Decimal Digits ..................................................................................................................... 118
Based On ............................................................................................................................................................... 118
Total Interim Interest ............................................................................................................................................ 119
Legal Description ............................................................................................................... 119
Importing A Legal Description ............................................................................................................................... 119
Spell Checking A Legal Description ........................................................................................................................ 120
Lender ............................................................................................................................... 121
Entering A Lender From The Look-Up Table ......................................................................................................... 122
Listing Agent ..................................................................................................................... 123
Loan Amount ..................................................................................................................... 124
Construction/Equity Line First Draw .................................................................................. 124
Adjust For Funding Net Check Option ................................................................................................................... 124
Loan Proceeds/Funding Amount ........................................................................................................................... 125
Loan Funding ..................................................................................................................... 125
Loan Funding Scenarios ......................................................................................................................................... 125
A Note About Net Funding .................................................................................................................................... 127
Loan Funding Summary ......................................................................................................................................... 128
Including Loan Credits In The Funding Check ........................................................................................................ 129
Loan Discount .................................................................................................................... 130
Splitting Between The Borrower And Seller .......................................................................................................... 130
Loan Number .................................................................................................................... 130
Loan Officer And Loan Processor........................................................................................ 131
Loan Origination Fee ......................................................................................................... 131
Splitting Between The Borrower And Seller .......................................................................................................... 132
Turning On The Buyer/Seller Split Feature ............................................................................................................ 132
Loan Servicer ..................................................................................................................... 132
Loan Type .......................................................................................................................... 133
Management Company ..................................................................................................... 133
Marketing Source .............................................................................................................. 133
MLS Fee ............................................................................................................................ 133
MLS Fee (Express HUD) ...................................................................................................... 134
SOFTPRO – ESSENTIAL USER GUIDE 1/27/2016
87
Mortgage Broker And Loan Servicer ................................................................................... 134
Mortgage Insurance .......................................................................................................... 135
Slrpay% .................................................................................................................................................................. 136
TIL .......................................................................................................................................................................... 136
Mortgage Payoffs .............................................................................................................. 136
Notary ............................................................................................................................... 136
Notary Fees ....................................................................................................................... 136
Express HUD .......................................................................................................................................................... 137
Notes ................................................................................................................................ 137
Parcel ID ............................................................................................................................ 138
Payment Schedule (Truth-In-Lending) ................................................................................ 138
Payoffs .............................................................................................................................. 138
Per Diem ................................................................................................................................................................ 139
Late Fees ................................................................................................................................................................ 139
HUD-1 Settlement Statement Page 3 .................................................................................................................... 139
Pest Inspection .................................................................................................................. 139
Property Address ............................................................................................................... 140
Setting The Property Address Default ................................................................................................................... 140
Property Derivation ........................................................................................................... 140
Proration Date ................................................................................................................... 141
Prorations ......................................................................................................................... 141
Tax Proration ......................................................................................................................................................... 141
Prorating Rents And Other Amounts .................................................................................................................... 141
Purchase Money ................................................................................................................ 142
Recording Date .................................................................................................................. 142
Referral Fee ....................................................................................................................... 143
Refinance Payoffs .............................................................................................................. 143
Restrictions ....................................................................................................................... 143
Restrictive Covenants ........................................................................................................ 143
Requirements .................................................................................................................... 143
Right To Cancel (Rescind) Date........................................................................................... 144
Sales Price ......................................................................................................................... 144
Second And Third Loans ..................................................................................................... 144
Entering 2nd And 3rd Loan Data ........................................................................................................................... 144
Seller Financing ................................................................................................................. 145
Seller ................................................................................................................................. 145
SOFTPRO – ESSENTIAL USER GUIDE 1/27/2016
88
Proceeds ................................................................................................................................................................ 146
Selling Agent ..................................................................................................................... 146
Servicer ............................................................................................................................. 146
Settlement Agent .............................................................................................................. 147
Settlement Date ................................................................................................................ 147
Settlement Or Closing Fee ................................................................................................. 148
Signature Lines .................................................................................................................. 148
Survey ............................................................................................................................... 148
Tax/Map Id ....................................................................................................................... 149
Taxes And Assessments ..................................................................................................... 149
Status Of Current Period Taxes ............................................................................................................................. 149
Tax Amounts .......................................................................................................................................................... 150
Additional Real Amount ........................................................................................................................................ 150
Seller’s Non-Prorated/Personal Amount ............................................................................................................... 150
Additional Personal Amount ................................................................................................................................. 150
Total Tax Amount .................................................................................................................................................. 150
Additional Escrow Amount .................................................................................................................................... 150
Prepaid Tax Amount .............................................................................................................................................. 151
Combined City & County Billing ............................................................................................................................ 152
Tax Disbursement .................................................................................................................................................. 152
HUD-1 Page 1 Figures ............................................................................................................................................ 152
Buyer’s Portion Of Real Estate Taxes .................................................................................................................... 153
30-Day Month Tax Proration Option ..................................................................................................................... 153
Title Company ................................................................................................................... 153
To Retrieve A Title Company From The Look-Up Table ......................................................................................... 153
To Add A New Entry To A Table ............................................................................................................................. 154
Title Examiner ................................................................................................................... 154
Title Examination .............................................................................................................. 154
Title Insurance Binder ........................................................................................................ 155
Express HUD .......................................................................................................................................................... 155
Transaction Type ............................................................................................................... 155
Trustee, Trustee Fee And Commission ............................................................................... 155
Type Of Business ............................................................................................................... 156
Creating A Type Of Business Look-Up Table .......................................................................................................... 156
Adding A New Type Of Business Code To The Look-Up Table ............................................................................... 157
Retrieve A Code From The Look-Up Table ............................................................................................................ 157
Underwriter ...................................................................................................................... 157
SOFTPRO – ESSENTIAL USER GUIDE 1/27/2016
89
Use Of Property ................................................................................................................. 158
User Optional Fields .......................................................................................................... 158
Defining User Optional Fields ................................................................................................................................ 158
Yield Spread Premium ....................................................................................................... 159
Zoning ............................................................................................................................... 159
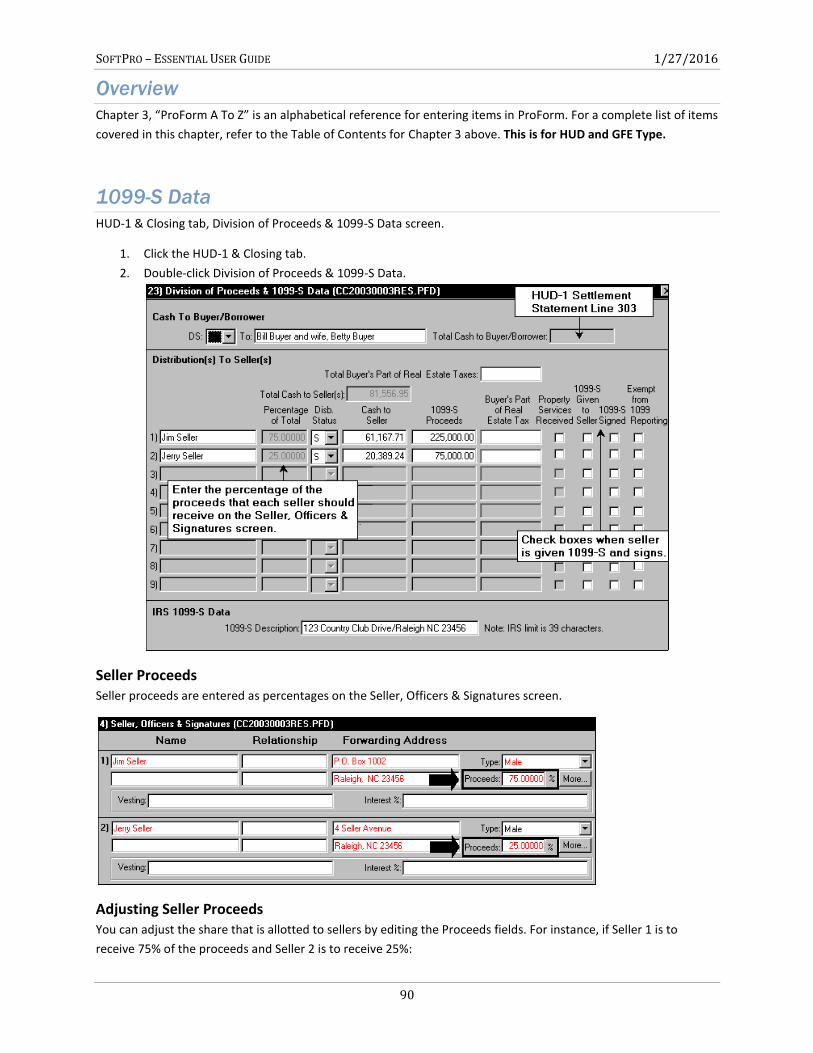
SOFTPRO – ESSENTIAL USER GUIDE 1/27/2016
90
Overview
Chapter 3, “ProForm A To Z” is an alphabetical reference for entering items in ProForm. For a complete list of items
covered in this chapter, refer to the Table of Contents for Chapter 3 above. This is for HUD and GFE Type.
1099-S Data
HUD-1 & Closing tab, Division of Proceeds & 1099-S Data screen.
1. Click the HUD-1 & Closing tab.
2. Double-click Division of Proceeds & 1099-S Data.
Seller Proceeds Seller proceeds are entered as percentages on the Seller, Officers & Signatures screen.
Adjusting Seller Proceeds You can adjust the share that is allotted to sellers by editing the Proceeds fields. For instance, if Seller 1 is to
receive 75% of the proceeds and Seller 2 is to receive 25%:
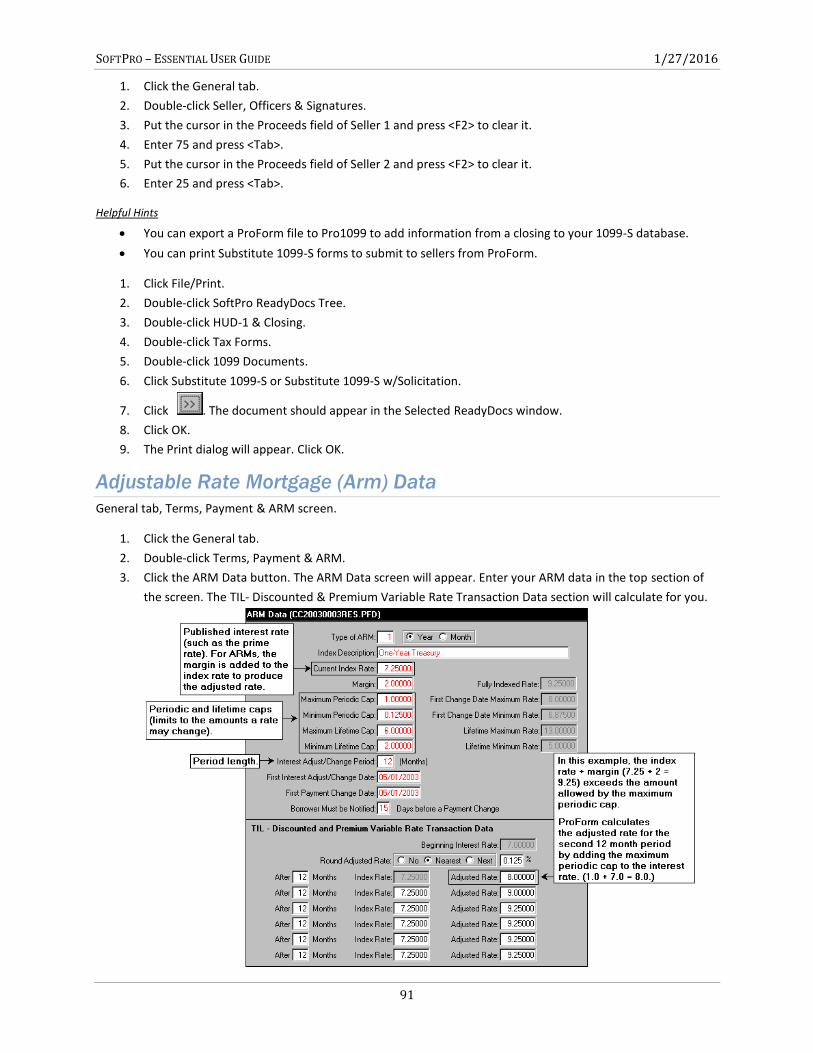
SOFTPRO – ESSENTIAL USER GUIDE 1/27/2016
91
1. Click the General tab.
2. Double-click Seller, Officers & Signatures.
3. Put the cursor in the Proceeds field of Seller 1 and press <F2> to clear it.
4. Enter 75 and press <Tab>.
5. Put the cursor in the Proceeds field of Seller 2 and press <F2> to clear it.
6. Enter 25 and press <Tab>.
Helpful Hints
You can export a ProForm file to Pro1099 to add information from a closing to your 1099-S database.
You can print Substitute 1099-S forms to submit to sellers from ProForm.
1. Click File/Print.
2. Double-click SoftPro ReadyDocs Tree.
3. Double-click HUD-1 & Closing.
4. Double-click Tax Forms.
5. Double-click 1099 Documents.
6. Click Substitute 1099-S or Substitute 1099-S w/Solicitation.
7. Click . The document should appear in the Selected ReadyDocs window.
8. Click OK.
9. The Print dialog will appear. Click OK.
Adjustable Rate Mortgage (Arm) Data
General tab, Terms, Payment & ARM screen.
1. Click the General tab.
2. Double-click Terms, Payment & ARM.
3. Click the ARM Data button. The ARM Data screen will appear. Enter your ARM data in the top section of
the screen. The TIL- Discounted & Premium Variable Rate Transaction Data section will calculate for you.
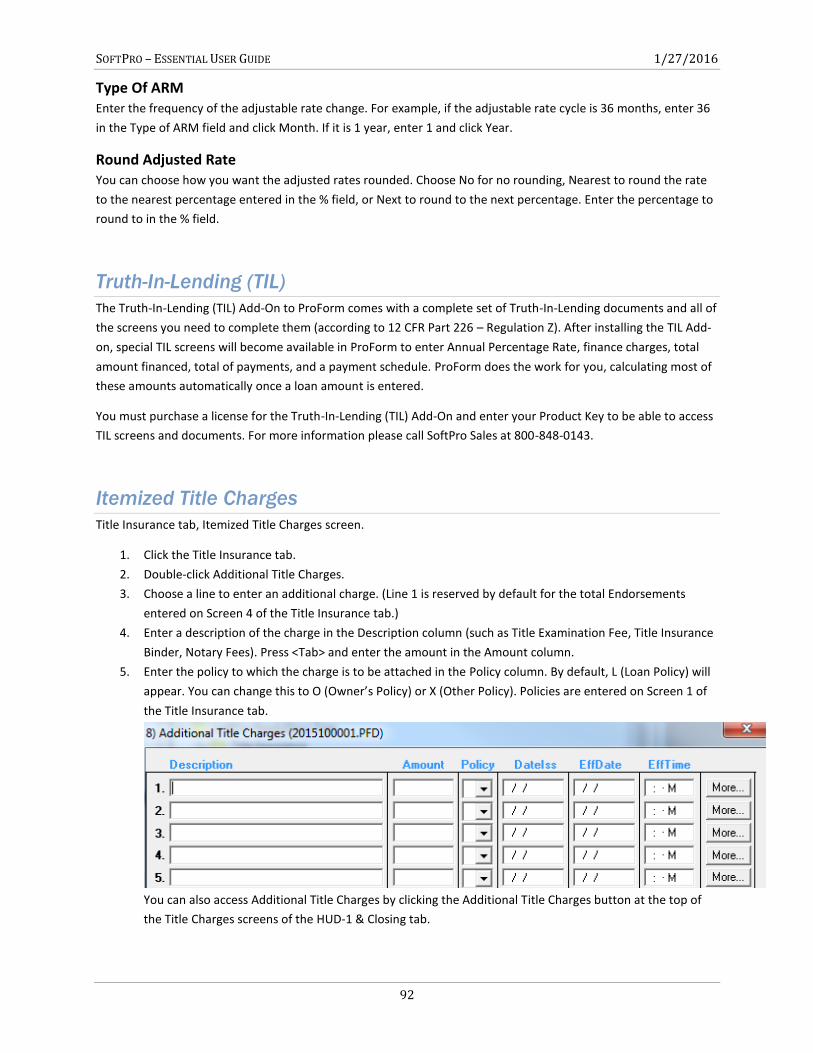
SOFTPRO – ESSENTIAL USER GUIDE 1/27/2016
92
Type Of ARM Enter the frequency of the adjustable rate change. For example, if the adjustable rate cycle is 36 months, enter 36
in the Type of ARM field and click Month. If it is 1 year, enter 1 and click Year.
Round Adjusted Rate You can choose how you want the adjusted rates rounded. Choose No for no rounding, Nearest to round the rate
to the nearest percentage entered in the % field, or Next to round to the next percentage. Enter the percentage to
round to in the % field.
Truth-In-Lending (TIL)
The Truth-In-Lending (TIL) Add-On to ProForm comes with a complete set of Truth-In-Lending documents and all of
the screens you need to complete them (according to 12 CFR Part 226 – Regulation Z). After installing the TIL Add-
on, special TIL screens will become available in ProForm to enter Annual Percentage Rate, finance charges, total
amount financed, total of payments, and a payment schedule. ProForm does the work for you, calculating most of
these amounts automatically once a loan amount is entered.
You must purchase a license for the Truth-In-Lending (TIL) Add-On and enter your Product Key to be able to access
TIL screens and documents. For more information please call SoftPro Sales at 800-848-0143.
Itemized Title Charges
Title Insurance tab, Itemized Title Charges screen.
1. Click the Title Insurance tab.
2. Double-click Additional Title Charges.
3. Choose a line to enter an additional charge. (Line 1 is reserved by default for the total Endorsements
entered on Screen 4 of the Title Insurance tab.)
4. Enter a description of the charge in the Description column (such as Title Examination Fee, Title Insurance
Binder, Notary Fees). Press <Tab> and enter the amount in the Amount column.
5. Enter the policy to which the charge is to be attached in the Policy column. By default, L (Loan Policy) will
appear. You can change this to O (Owner’s Policy) or X (Other Policy). Policies are entered on Screen 1 of
the Title Insurance tab.
You can also access Additional Title Charges by clicking the Additional Title Charges button at the top of
the Title Charges screens of the HUD-1 & Closing tab.
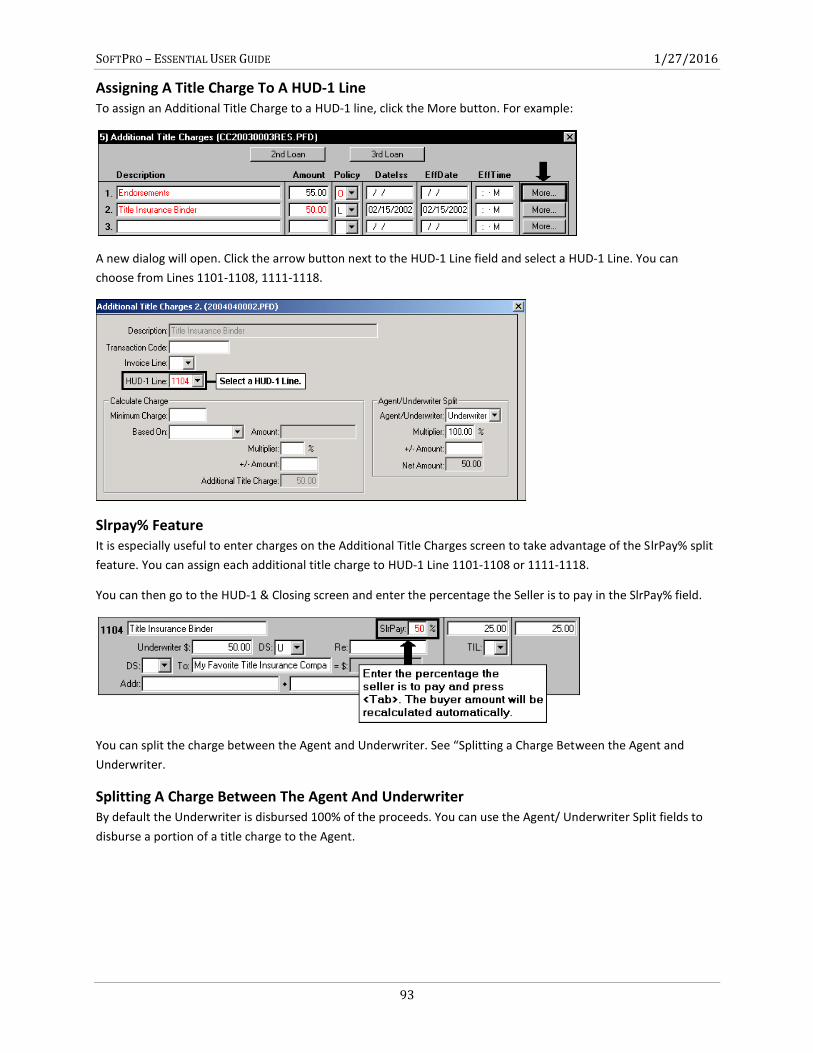
SOFTPRO – ESSENTIAL USER GUIDE 1/27/2016
93
Assigning A Title Charge To A HUD-1 Line To assign an Additional Title Charge to a HUD-1 line, click the More button. For example:
A new dialog will open. Click the arrow button next to the HUD-1 Line field and select a HUD-1 Line. You can
choose from Lines 1101-1108, 1111-1118.
Slrpay% Feature It is especially useful to enter charges on the Additional Title Charges screen to take advantage of the SlrPay% split
feature. You can assign each additional title charge to HUD-1 Line 1101-1108 or 1111-1118.
You can then go to the HUD-1 & Closing screen and enter the percentage the Seller is to pay in the SlrPay% field.
You can split the charge between the Agent and Underwriter. See “Splitting a Charge Between the Agent and
Underwriter.
Splitting A Charge Between The Agent And Underwriter By default the Underwriter is disbursed 100% of the proceeds. You can use the Agent/ Underwriter Split fields to
disburse a portion of a title charge to the Agent.
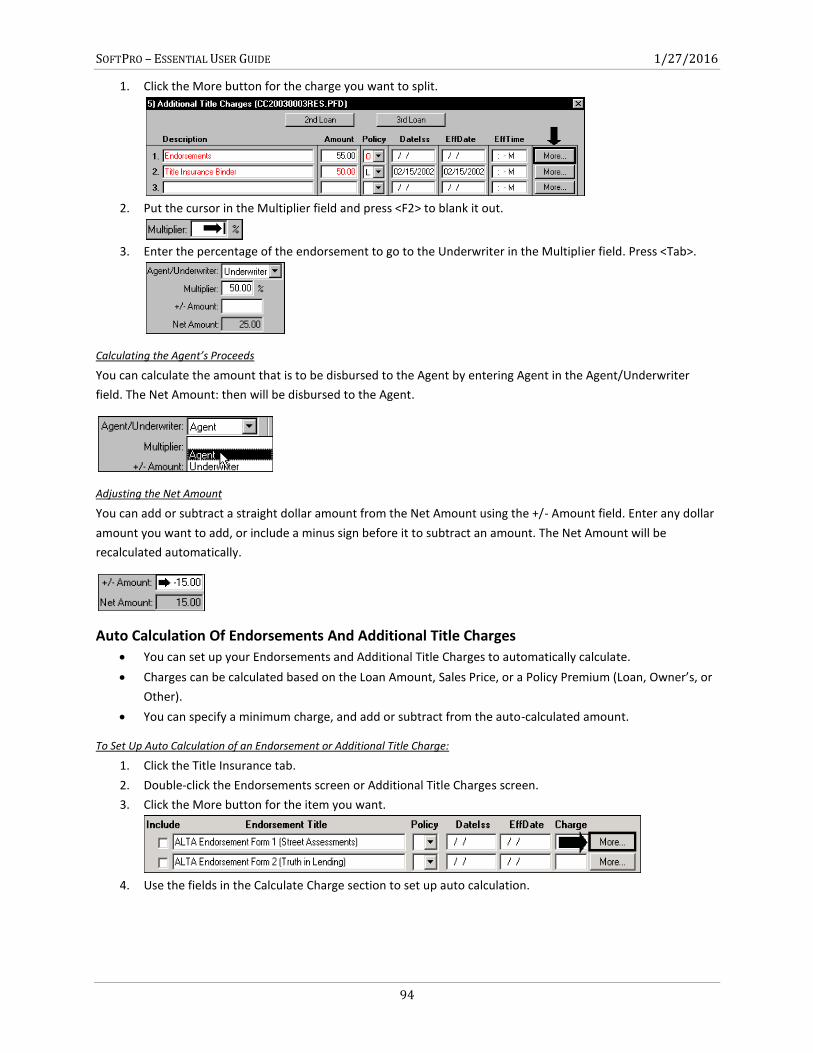
SOFTPRO – ESSENTIAL USER GUIDE 1/27/2016
94
1. Click the More button for the charge you want to split.
2. Put the cursor in the Multiplier field and press <F2> to blank it out.
3. Enter the percentage of the endorsement to go to the Underwriter in the Multiplier field. Press <Tab>.
Calculating the Agent’s Proceeds
You can calculate the amount that is to be disbursed to the Agent by entering Agent in the Agent/Underwriter
field. The Net Amount: then will be disbursed to the Agent.
Adjusting the Net Amount
You can add or subtract a straight dollar amount from the Net Amount using the +/- Amount field. Enter any dollar
amount you want to add, or include a minus sign before it to subtract an amount. The Net Amount will be
recalculated automatically.
Auto Calculation Of Endorsements And Additional Title Charges
You can set up your Endorsements and Additional Title Charges to automatically calculate.
Charges can be calculated based on the Loan Amount, Sales Price, or a Policy Premium (Loan, Owner’s, or
Other).
You can specify a minimum charge, and add or subtract from the auto-calculated amount.
To Set Up Auto Calculation of an Endorsement or Additional Title Charge:
1. Click the Title Insurance tab.
2. Double-click the Endorsements screen or Additional Title Charges screen.
3. Click the More button for the item you want.
4. Use the fields in the Calculate Charge section to set up auto calculation.
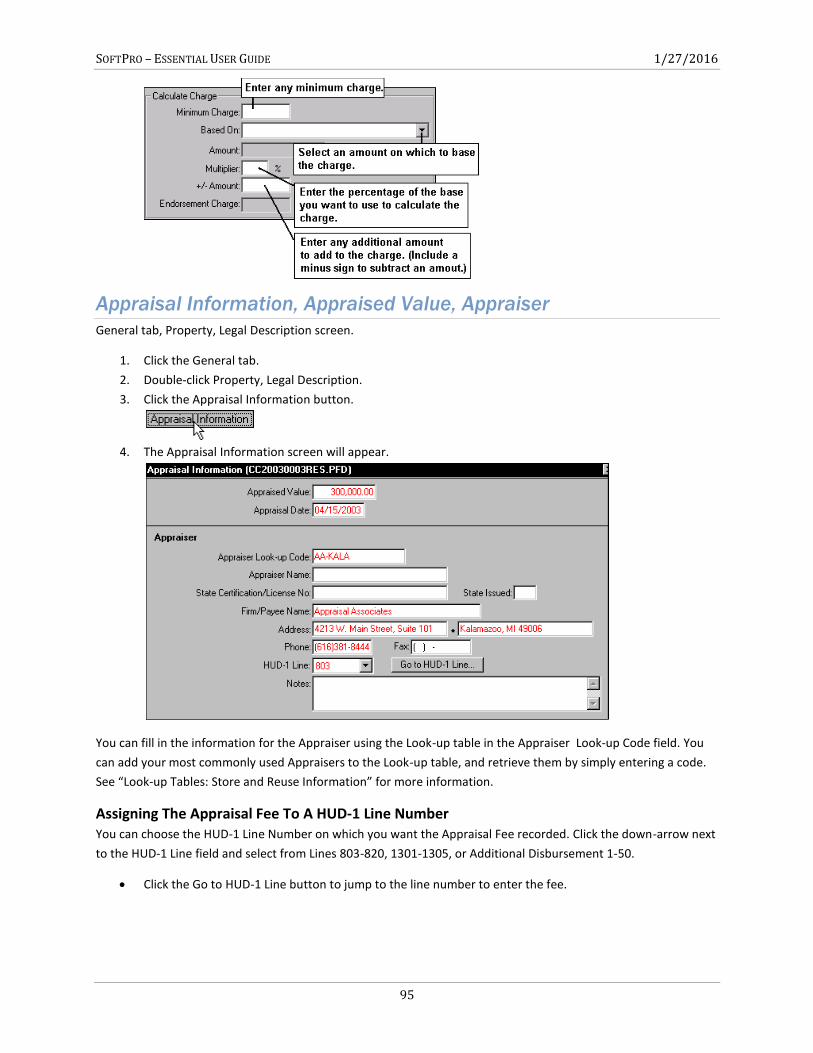
SOFTPRO – ESSENTIAL USER GUIDE 1/27/2016
95
Appraisal Information, Appraised Value, Appraiser
General tab, Property, Legal Description screen.
1. Click the General tab.
2. Double-click Property, Legal Description.
3. Click the Appraisal Information button.
4. The Appraisal Information screen will appear.
You can fill in the information for the Appraiser using the Look-up table in the Appraiser Look-up Code field. You
can add your most commonly used Appraisers to the Look-up table, and retrieve them by simply entering a code.
See “Look-up Tables: Store and Reuse Information” for more information.
Assigning The Appraisal Fee To A HUD-1 Line Number You can choose the HUD-1 Line Number on which you want the Appraisal Fee recorded. Click the down-arrow next
to the HUD-1 Line field and select from Lines 803-820, 1301-1305, or Additional Disbursement 1-50.
Click the Go to HUD-1 Line button to jump to the line number to enter the fee.
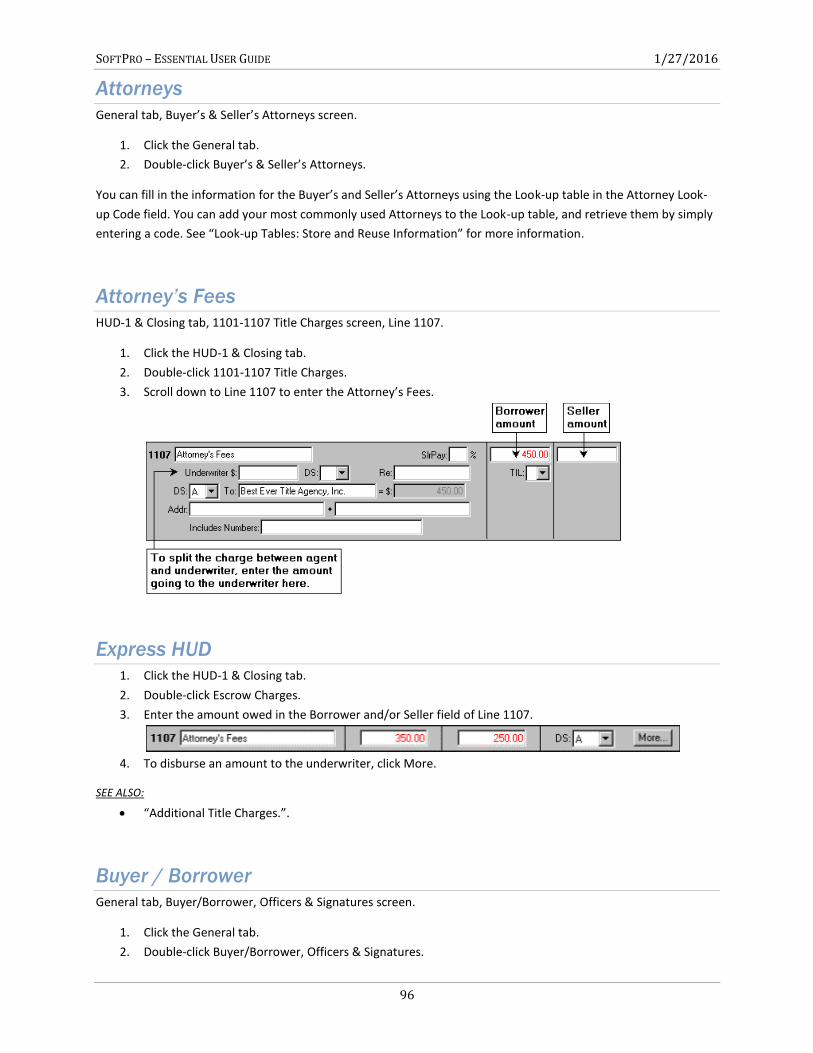
SOFTPRO – ESSENTIAL USER GUIDE 1/27/2016
96
Attorneys
General tab, Buyer’s & Seller’s Attorneys screen.
1. Click the General tab.
2. Double-click Buyer’s & Seller’s Attorneys.
You can fill in the information for the Buyer’s and Seller’s Attorneys using the Look-up table in the Attorney Look-
up Code field. You can add your most commonly used Attorneys to the Look-up table, and retrieve them by simply
entering a code. See “Look-up Tables: Store and Reuse Information” for more information.
Attorney’s Fees
HUD-1 & Closing tab, 1101-1107 Title Charges screen, Line 1107.
1. Click the HUD-1 & Closing tab.
2. Double-click 1101-1107 Title Charges.
3. Scroll down to Line 1107 to enter the Attorney’s Fees.
Express HUD
1. Click the HUD-1 & Closing tab.
2. Double-click Escrow Charges.
3. Enter the amount owed in the Borrower and/or Seller field of Line 1107.
4. To disburse an amount to the underwriter, click More.
SEE ALSO:
“Additional Title Charges.”.
Buyer / Borrower
General tab, Buyer/Borrower, Officers & Signatures screen.
1. Click the General tab.
2. Double-click Buyer/Borrower, Officers & Signatures.
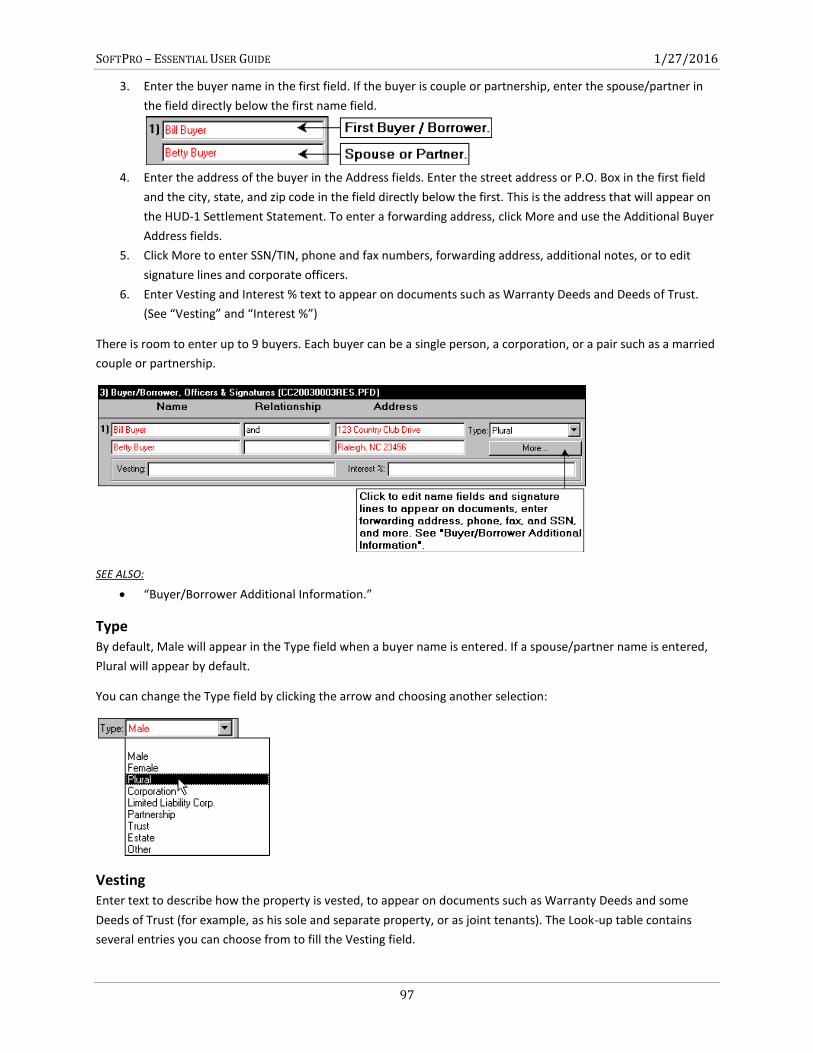
SOFTPRO – ESSENTIAL USER GUIDE 1/27/2016
97
3. Enter the buyer name in the first field. If the buyer is couple or partnership, enter the spouse/partner in
the field directly below the first name field.
4. Enter the address of the buyer in the Address fields. Enter the street address or P.O. Box in the first field
and the city, state, and zip code in the field directly below the first. This is the address that will appear on
the HUD-1 Settlement Statement. To enter a forwarding address, click More and use the Additional Buyer
Address fields.
5. Click More to enter SSN/TIN, phone and fax numbers, forwarding address, additional notes, or to edit
signature lines and corporate officers.
6. Enter Vesting and Interest % text to appear on documents such as Warranty Deeds and Deeds of Trust.
(See “Vesting” and “Interest %”)
There is room to enter up to 9 buyers. Each buyer can be a single person, a corporation, or a pair such as a married
couple or partnership.
SEE ALSO:
“Buyer/Borrower Additional Information.”
Type By default, Male will appear in the Type field when a buyer name is entered. If a spouse/partner name is entered,
Plural will appear by default.
You can change the Type field by clicking the arrow and choosing another selection:
Vesting Enter text to describe how the property is vested, to appear on documents such as Warranty Deeds and some
Deeds of Trust (for example, as his sole and separate property, or as joint tenants). The Look-up table contains
several entries you can choose from to fill the Vesting field.
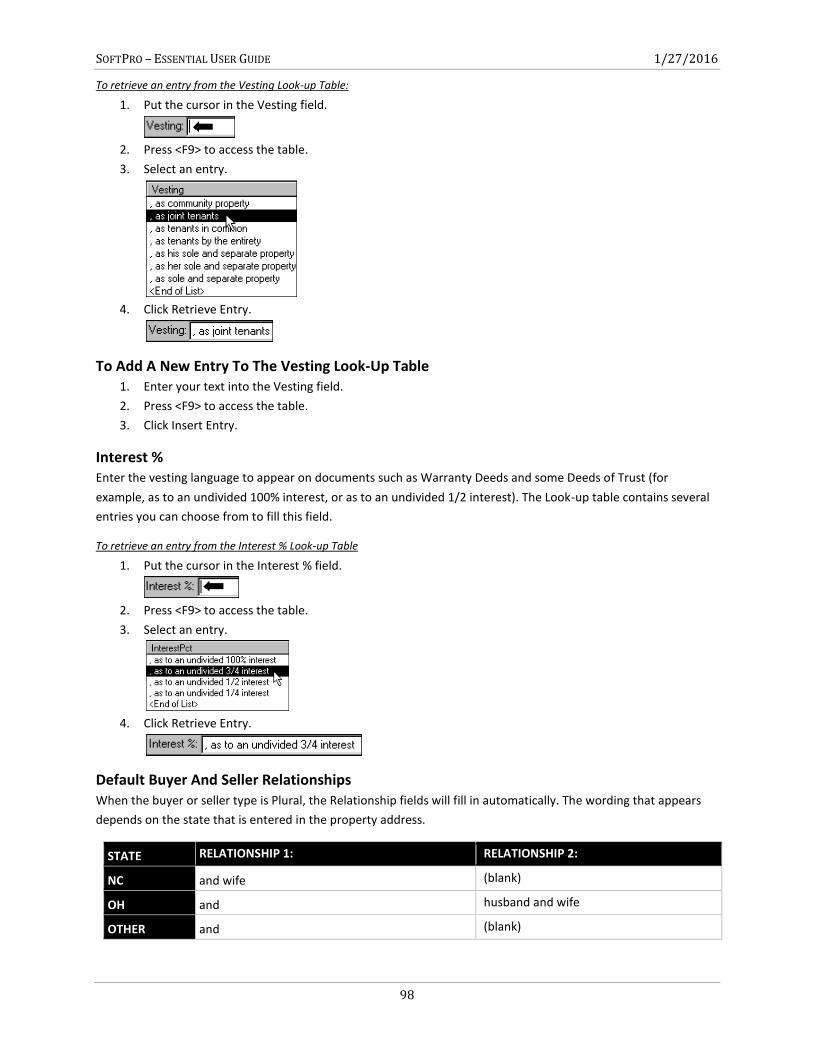
SOFTPRO – ESSENTIAL USER GUIDE 1/27/2016
98
To retrieve an entry from the Vesting Look-up Table:
1. Put the cursor in the Vesting field.
2. Press <F9> to access the table.
3. Select an entry.
4. Click Retrieve Entry.
To Add A New Entry To The Vesting Look-Up Table 1. Enter your text into the Vesting field.
2. Press <F9> to access the table.
3. Click Insert Entry.
Interest % Enter the vesting language to appear on documents such as Warranty Deeds and some Deeds of Trust (for
example, as to an undivided 100% interest, or as to an undivided 1/2 interest). The Look-up table contains several
entries you can choose from to fill this field.
To retrieve an entry from the Interest % Look-up Table
1. Put the cursor in the Interest % field.
2. Press <F9> to access the table.
3. Select an entry.
4. Click Retrieve Entry.
Default Buyer And Seller Relationships When the buyer or seller type is Plural, the Relationship fields will fill in automatically. The wording that appears
depends on the state that is entered in the property address.
STATE RELATIONSHIP 1: RELATIONSHIP 2:
NC and wife (blank)
OH and husband and wife
OTHER and (blank)
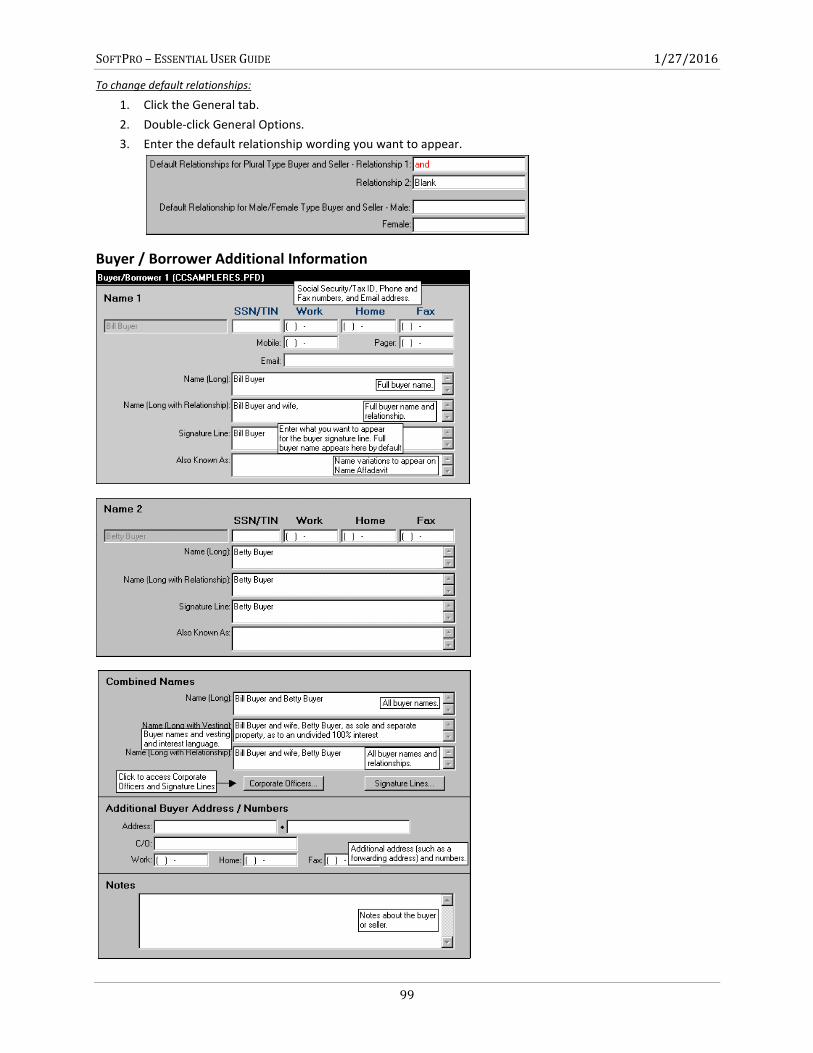
SOFTPRO – ESSENTIAL USER GUIDE 1/27/2016
99
To change default relationships:
1. Click the General tab.
2. Double-click General Options.
3. Enter the default relationship wording you want to appear.
Buyer / Borrower Additional Information
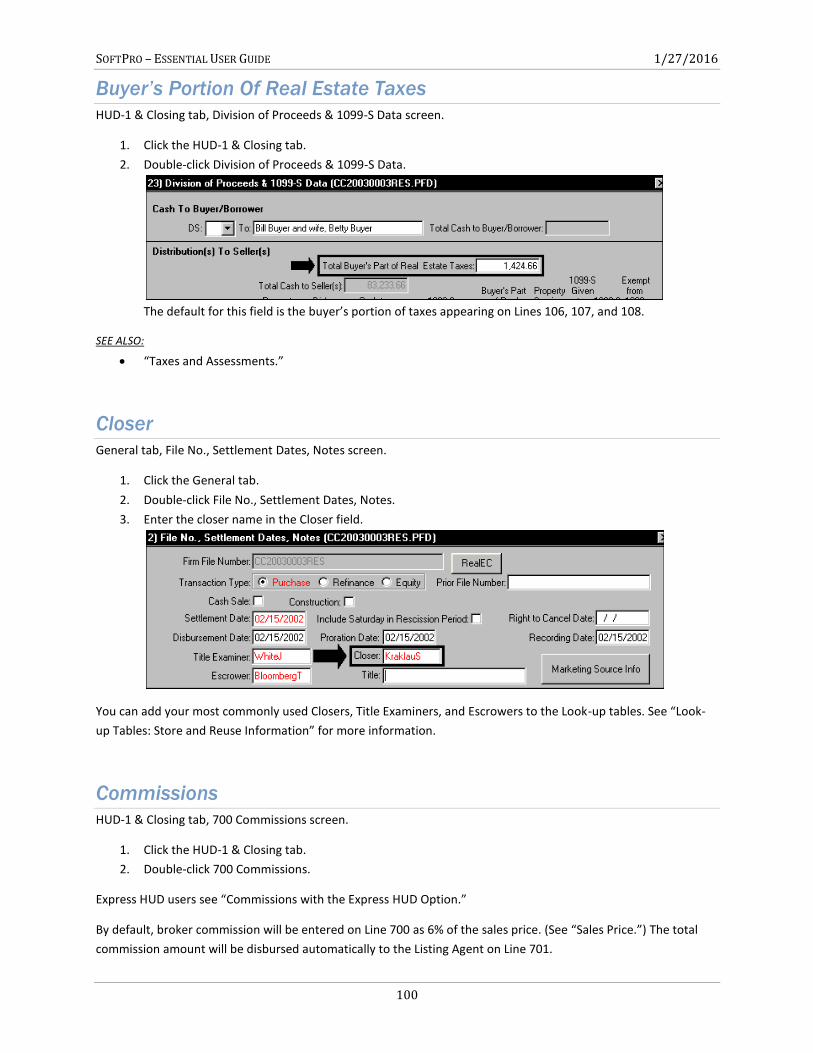
SOFTPRO – ESSENTIAL USER GUIDE 1/27/2016
100
Buyer’s Portion Of Real Estate Taxes
HUD-1 & Closing tab, Division of Proceeds & 1099-S Data screen.
1. Click the HUD-1 & Closing tab.
2. Double-click Division of Proceeds & 1099-S Data.
The default for this field is the buyer’s portion of taxes appearing on Lines 106, 107, and 108.
SEE ALSO:
“Taxes and Assessments.”
Closer
General tab, File No., Settlement Dates, Notes screen.
1. Click the General tab.
2. Double-click File No., Settlement Dates, Notes.
3. Enter the closer name in the Closer field.
You can add your most commonly used Closers, Title Examiners, and Escrowers to the Look-up tables. See “Look-
up Tables: Store and Reuse Information” for more information.
Commissions
HUD-1 & Closing tab, 700 Commissions screen.
1. Click the HUD-1 & Closing tab.
2. Double-click 700 Commissions.
Express HUD users see “Commissions with the Express HUD Option.”
By default, broker commission will be entered on Line 700 as 6% of the sales price. (See “Sales Price.”) The total
commission amount will be disbursed automatically to the Listing Agent on Line 701.
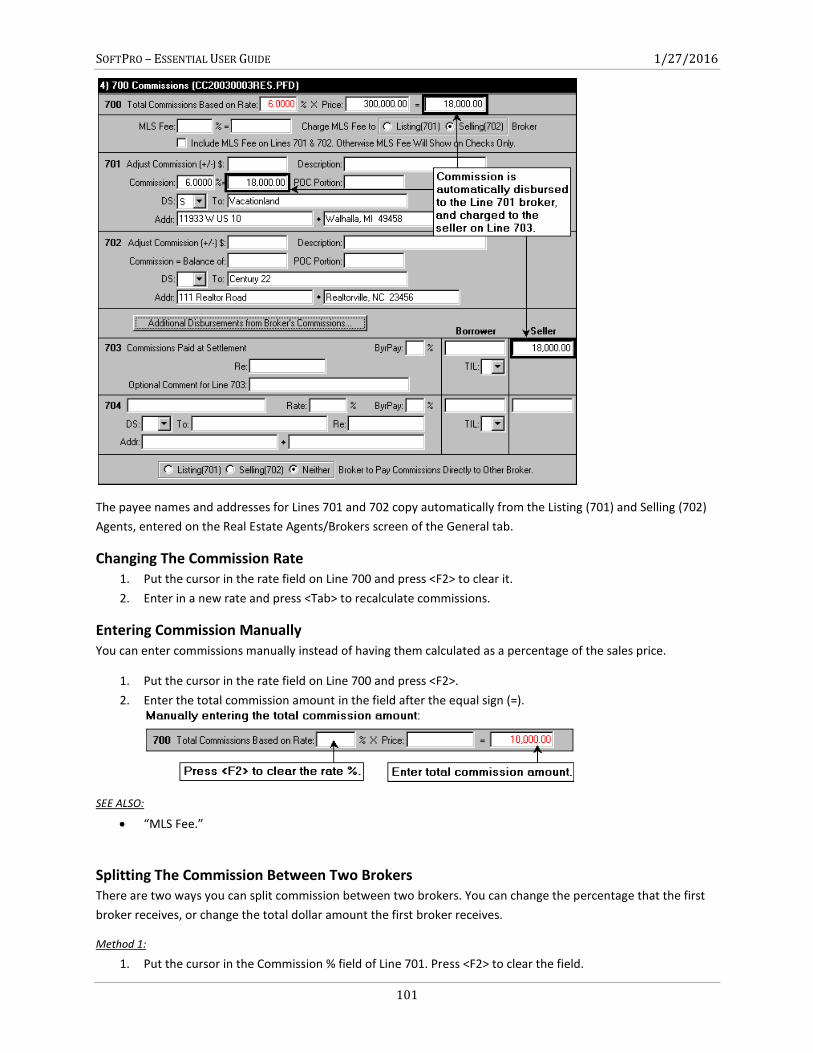
SOFTPRO – ESSENTIAL USER GUIDE 1/27/2016
101
The payee names and addresses for Lines 701 and 702 copy automatically from the Listing (701) and Selling (702)
Agents, entered on the Real Estate Agents/Brokers screen of the General tab.
Changing The Commission Rate 1. Put the cursor in the rate field on Line 700 and press <F2> to clear it.
2. Enter in a new rate and press <Tab> to recalculate commissions.
Entering Commission Manually You can enter commissions manually instead of having them calculated as a percentage of the sales price.
1. Put the cursor in the rate field on Line 700 and press <F2>.
2. Enter the total commission amount in the field after the equal sign (=).
SEE ALSO:
“MLS Fee.”
Splitting The Commission Between Two Brokers There are two ways you can split commission between two brokers. You can change the percentage that the first
broker receives, or change the total dollar amount the first broker receives.
Method 1:
1. Put the cursor in the Commission % field of Line 701. Press <F2> to clear the field.
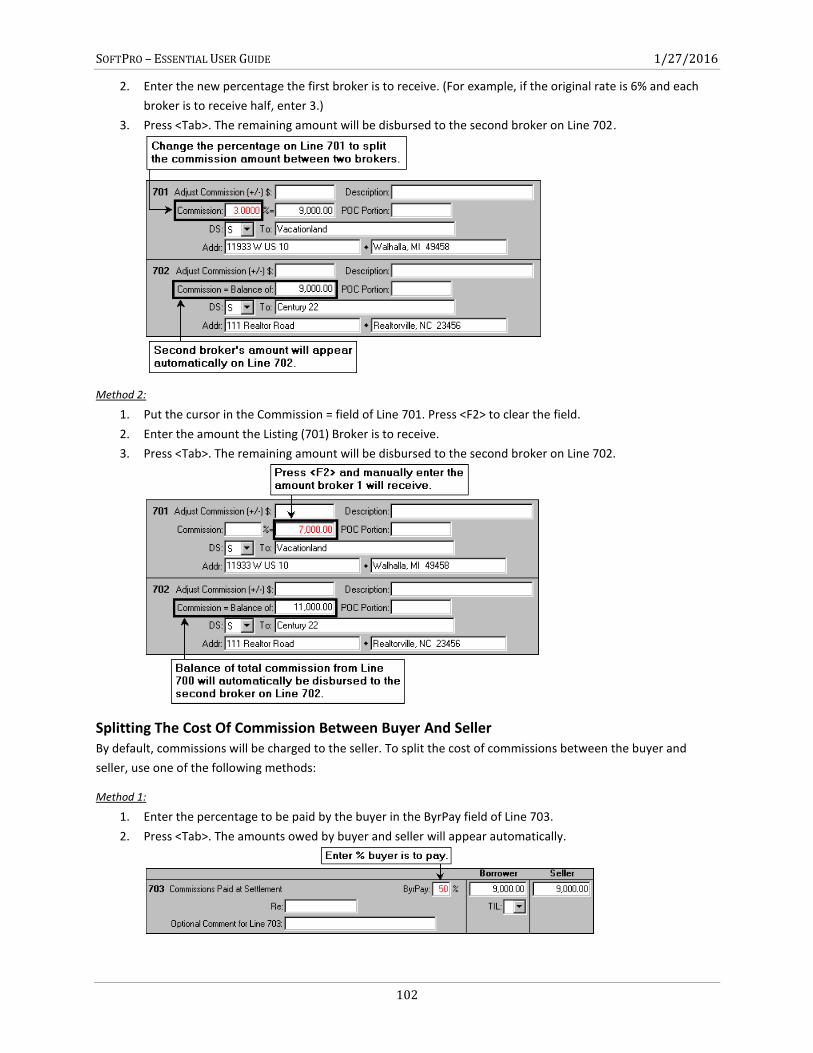
SOFTPRO – ESSENTIAL USER GUIDE 1/27/2016
102
2. Enter the new percentage the first broker is to receive. (For example, if the original rate is 6% and each
broker is to receive half, enter 3.)
3. Press <Tab>. The remaining amount will be disbursed to the second broker on Line 702.
Method 2:
1. Put the cursor in the Commission = field of Line 701. Press <F2> to clear the field.
2. Enter the amount the Listing (701) Broker is to receive.
3. Press <Tab>. The remaining amount will be disbursed to the second broker on Line 702.
Splitting The Cost Of Commission Between Buyer And Seller By default, commissions will be charged to the seller. To split the cost of commissions between the buyer and
seller, use one of the following methods:
Method 1:
1. Enter the percentage to be paid by the buyer in the ByrPay field of Line 703.
2. Press <Tab>. The amounts owed by buyer and seller will appear automatically.
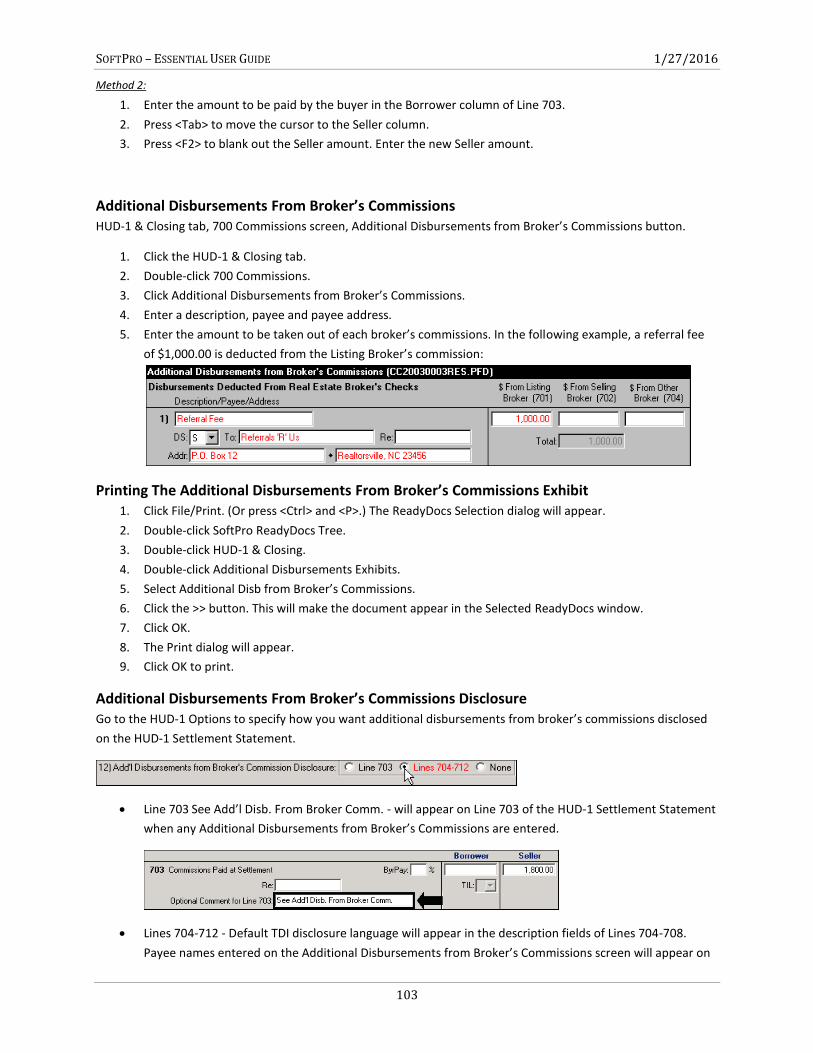
SOFTPRO – ESSENTIAL USER GUIDE 1/27/2016
103
Method 2:
1. Enter the amount to be paid by the buyer in the Borrower column of Line 703.
2. Press <Tab> to move the cursor to the Seller column.
3. Press <F2> to blank out the Seller amount. Enter the new Seller amount.
Additional Disbursements From Broker’s Commissions HUD-1 & Closing tab, 700 Commissions screen, Additional Disbursements from Broker’s Commissions button.
1. Click the HUD-1 & Closing tab.
2. Double-click 700 Commissions.
3. Click Additional Disbursements from Broker’s Commissions.
4. Enter a description, payee and payee address.
5. Enter the amount to be taken out of each broker’s commissions. In the following example, a referral fee
of $1,000.00 is deducted from the Listing Broker’s commission:
Printing The Additional Disbursements From Broker’s Commissions Exhibit 1. Click File/Print. (Or press <Ctrl> and <P>.) The ReadyDocs Selection dialog will appear.
2. Double-click SoftPro ReadyDocs Tree.
3. Double-click HUD-1 & Closing.
4. Double-click Additional Disbursements Exhibits.
5. Select Additional Disb from Broker’s Commissions.
6. Click the >> button. This will make the document appear in the Selected ReadyDocs window.
7. Click OK.
8. The Print dialog will appear.
9. Click OK to print.
Additional Disbursements From Broker’s Commissions Disclosure Go to the HUD-1 Options to specify how you want additional disbursements from broker’s commissions disclosed
on the HUD-1 Settlement Statement.
Line 703 See Add’l Disb. From Broker Comm. - will appear on Line 703 of the HUD-1 Settlement Statement
when any Additional Disbursements from Broker’s Commissions are entered.
Lines 704-712 - Default TDI disclosure language will appear in the description fields of Lines 704-708.
Payee names entered on the Additional Disbursements from Broker’s Commissions screen will appear on
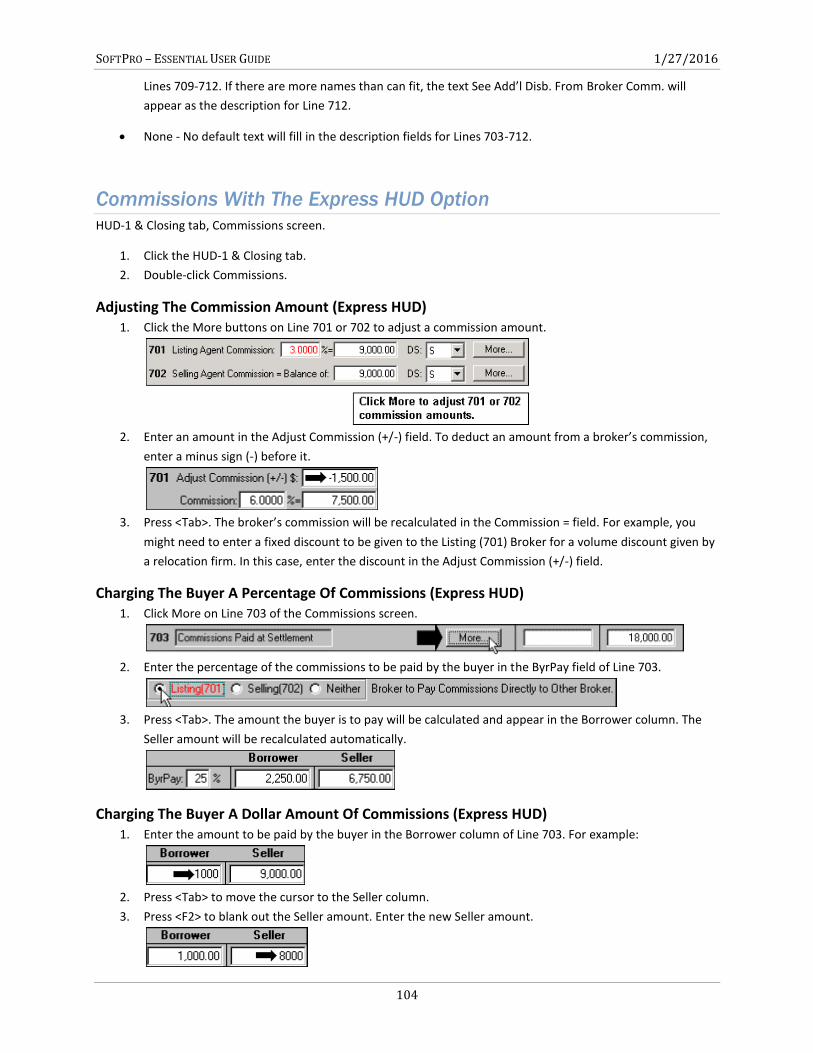
SOFTPRO – ESSENTIAL USER GUIDE 1/27/2016
104
Lines 709-712. If there are more names than can fit, the text See Add’l Disb. From Broker Comm. will
appear as the description for Line 712.
None - No default text will fill in the description fields for Lines 703-712.
Commissions With The Express HUD Option
HUD-1 & Closing tab, Commissions screen.
1. Click the HUD-1 & Closing tab.
2. Double-click Commissions.
Adjusting The Commission Amount (Express HUD) 1. Click the More buttons on Line 701 or 702 to adjust a commission amount.
2. Enter an amount in the Adjust Commission (+/-) field. To deduct an amount from a broker’s commission,
enter a minus sign (-) before it.
3. Press <Tab>. The broker’s commission will be recalculated in the Commission = field. For example, you
might need to enter a fixed discount to be given to the Listing (701) Broker for a volume discount given by
a relocation firm. In this case, enter the discount in the Adjust Commission (+/-) field.
Charging The Buyer A Percentage Of Commissions (Express HUD) 1. Click More on Line 703 of the Commissions screen.
2. Enter the percentage of the commissions to be paid by the buyer in the ByrPay field of Line 703.
3. Press <Tab>. The amount the buyer is to pay will be calculated and appear in the Borrower column. The
Seller amount will be recalculated automatically.
Charging The Buyer A Dollar Amount Of Commissions (Express HUD) 1. Enter the amount to be paid by the buyer in the Borrower column of Line 703. For example:
2. Press <Tab> to move the cursor to the Seller column.
3. Press <F2> to blank out the Seller amount. Enter the new Seller amount.
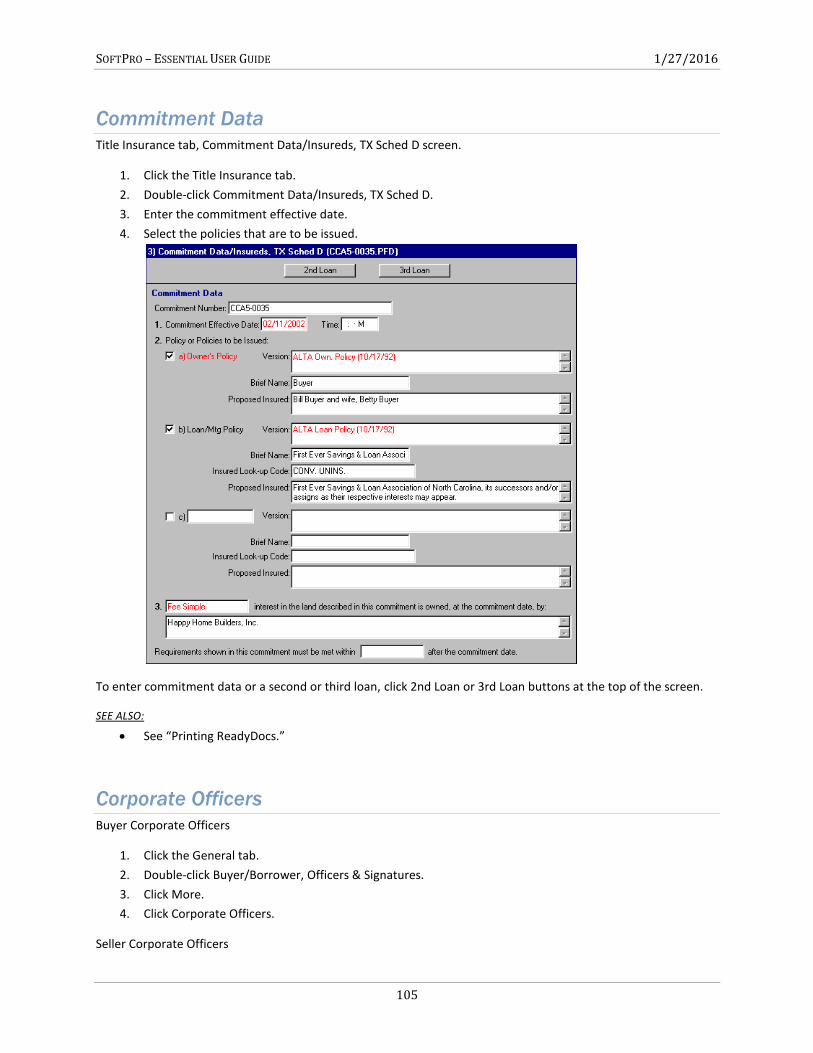
SOFTPRO – ESSENTIAL USER GUIDE 1/27/2016
105
Commitment Data
Title Insurance tab, Commitment Data/Insureds, TX Sched D screen.
1. Click the Title Insurance tab.
2. Double-click Commitment Data/Insureds, TX Sched D.
3. Enter the commitment effective date.
4. Select the policies that are to be issued.
To enter commitment data or a second or third loan, click 2nd Loan or 3rd Loan buttons at the top of the screen.
SEE ALSO:
See “Printing ReadyDocs.”
Corporate Officers
Buyer Corporate Officers
1. Click the General tab.
2. Double-click Buyer/Borrower, Officers & Signatures.
3. Click More.
4. Click Corporate Officers.
Seller Corporate Officers

SOFTPRO – ESSENTIAL USER GUIDE 1/27/2016
106
1. Click the General tab.
2. Double-click Seller, Officers & Signatures.
3. Click More.
4. Click Corporate Officers.
Credit Card Payoff
You can enter a credit card payoff as an additional disbursement.
1. Click the HUD-1 & Closing tab.
2. Double-click Additional Disbursements 1-12.
3. Select a disbursement line to use. Enter Credit Card Payoff in the Description field.
4. Enter the payee name in the To field and the payee address. For example:
If you want ProForm to calculate the total payoff amount and add per diem or late fees, or split the
amount between the buyer and seller, click Payoff Details. Otherwise, enter the amount of the payoff to
be paid in the Borrower and/or Seller fields.
SEE ALSO:
“Payoff Details.”
Payoff Details
Per Diem
If there is a per diem fee on top of the payoff amount, enter it in the Per Diem field. The per diem total will be
added automatically to the final payoff amount.
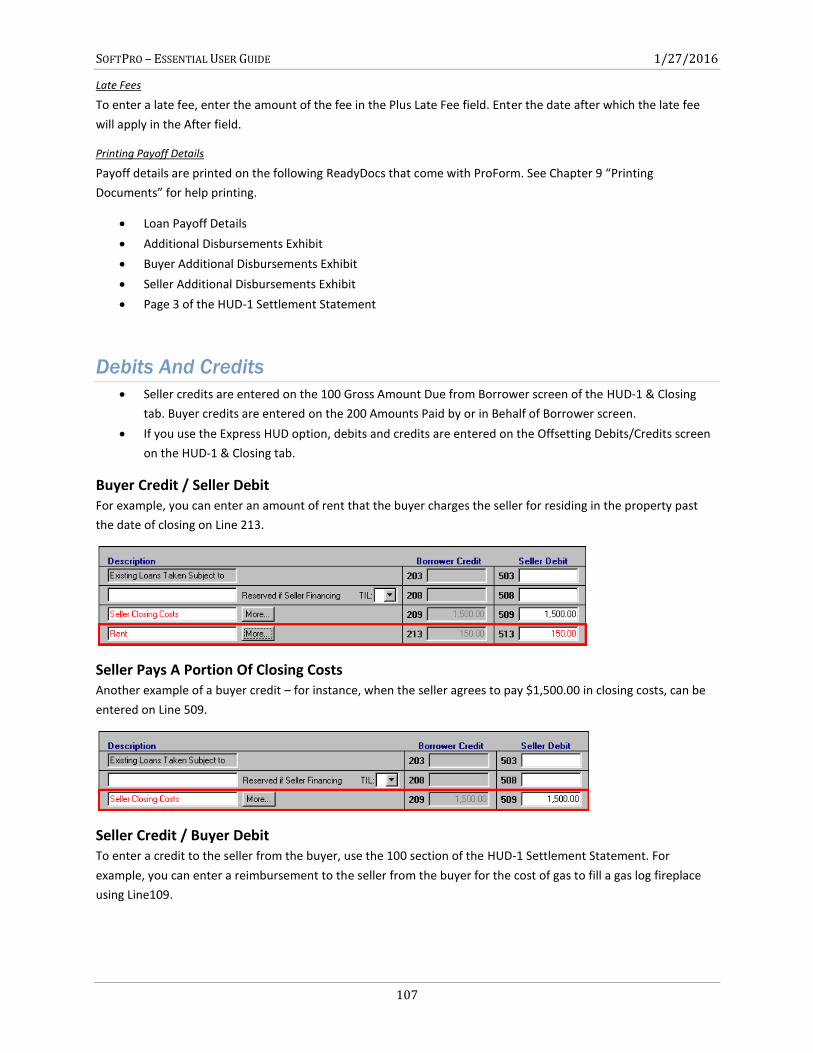
SOFTPRO – ESSENTIAL USER GUIDE 1/27/2016
107
Late Fees
To enter a late fee, enter the amount of the fee in the Plus Late Fee field. Enter the date after which the late fee
will apply in the After field.
Printing Payoff Details
Payoff details are printed on the following ReadyDocs that come with ProForm. See Chapter 9 “Printing
Documents” for help printing.
Loan Payoff Details
Additional Disbursements Exhibit
Buyer Additional Disbursements Exhibit
Seller Additional Disbursements Exhibit
Page 3 of the HUD-1 Settlement Statement
Debits And Credits
Seller credits are entered on the 100 Gross Amount Due from Borrower screen of the HUD-1 & Closing
tab. Buyer credits are entered on the 200 Amounts Paid by or in Behalf of Borrower screen.
If you use the Express HUD option, debits and credits are entered on the Offsetting Debits/Credits screen
on the HUD-1 & Closing tab.
Buyer Credit / Seller Debit For example, you can enter an amount of rent that the buyer charges the seller for residing in the property past
the date of closing on Line 213.
Seller Pays A Portion Of Closing Costs Another example of a buyer credit – for instance, when the seller agrees to pay $1,500.00 in closing costs, can be
entered on Line 509.
Seller Credit / Buyer Debit To enter a credit to the seller from the buyer, use the 100 section of the HUD-1 Settlement Statement. For
example, you can enter a reimbursement to the seller from the buyer for the cost of gas to fill a gas log fireplace
using Line109.
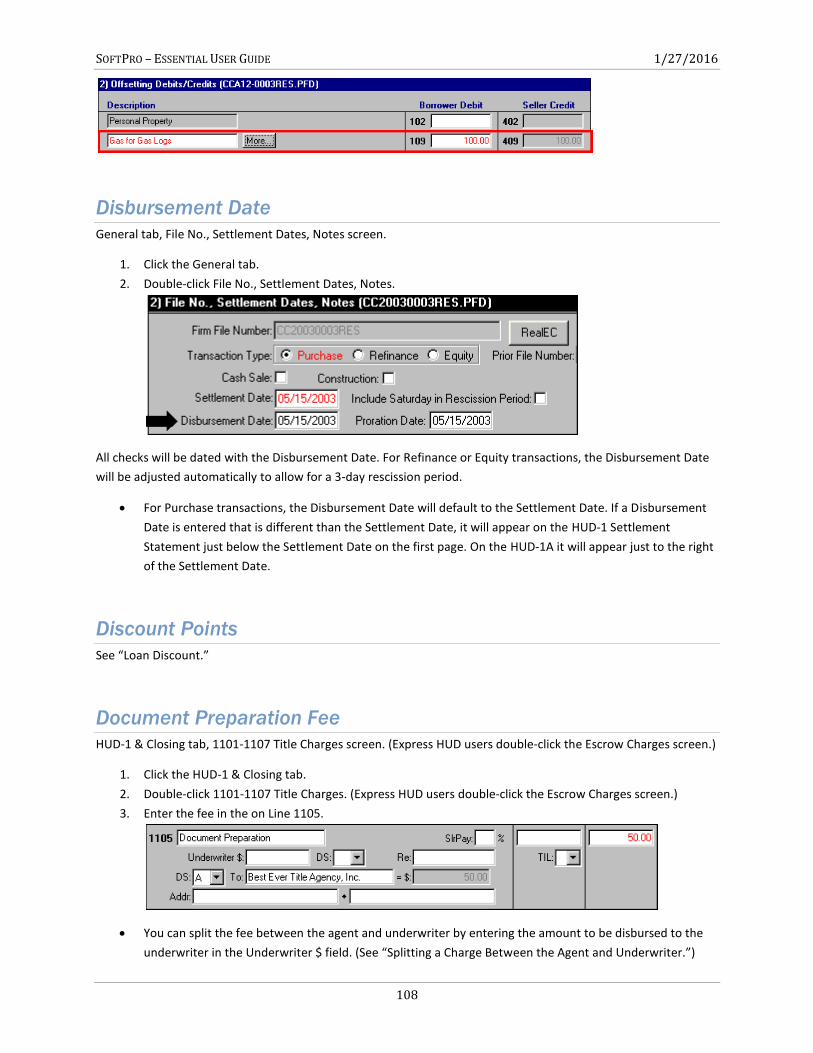
SOFTPRO – ESSENTIAL USER GUIDE 1/27/2016
108
Disbursement Date
General tab, File No., Settlement Dates, Notes screen.
1. Click the General tab.
2. Double-click File No., Settlement Dates, Notes.
All checks will be dated with the Disbursement Date. For Refinance or Equity transactions, the Disbursement Date
will be adjusted automatically to allow for a 3-day rescission period.
For Purchase transactions, the Disbursement Date will default to the Settlement Date. If a Disbursement
Date is entered that is different than the Settlement Date, it will appear on the HUD-1 Settlement
Statement just below the Settlement Date on the first page. On the HUD-1A it will appear just to the right
of the Settlement Date.
Discount Points
See “Loan Discount.”
Document Preparation Fee
HUD-1 & Closing tab, 1101-1107 Title Charges screen. (Express HUD users double-click the Escrow Charges screen.)
1. Click the HUD-1 & Closing tab.
2. Double-click 1101-1107 Title Charges. (Express HUD users double-click the Escrow Charges screen.)
3. Enter the fee in the on Line 1105.
You can split the fee between the agent and underwriter by entering the amount to be disbursed to the
underwriter in the Underwriter $ field. (See “Splitting a Charge Between the Agent and Underwriter.”)
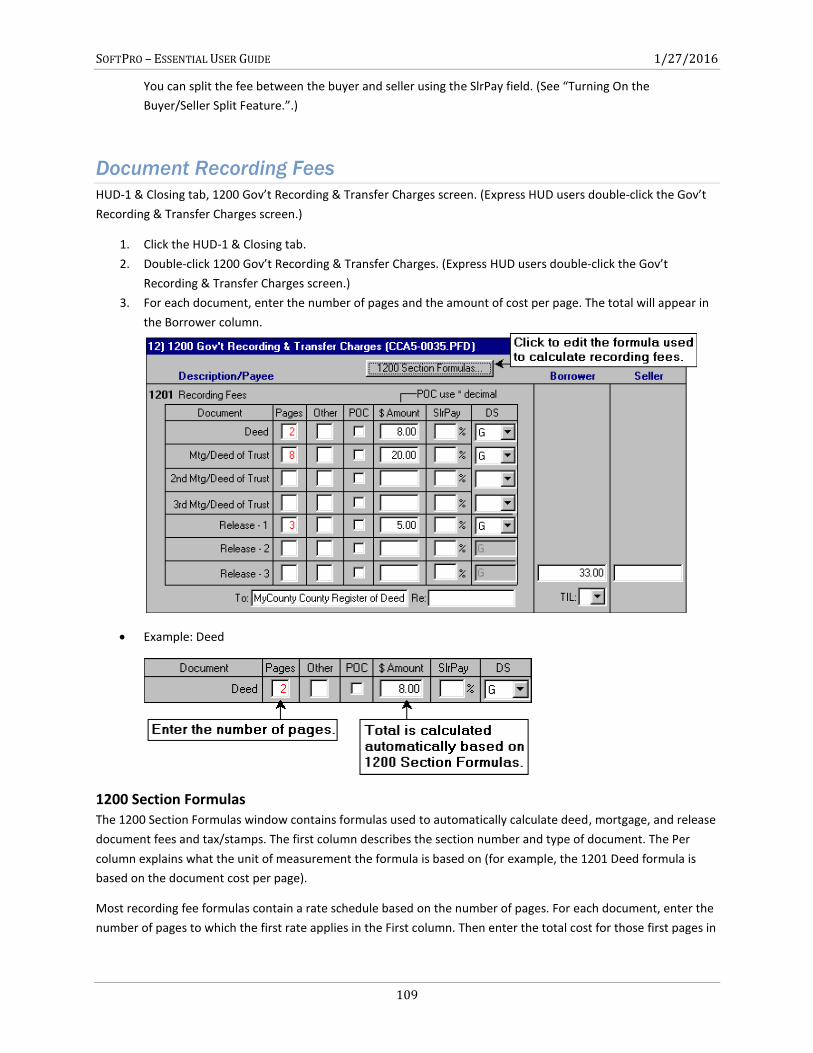
SOFTPRO – ESSENTIAL USER GUIDE 1/27/2016
109
You can split the fee between the buyer and seller using the SlrPay field. (See “Turning On the
Buyer/Seller Split Feature.”.)
Document Recording Fees
HUD-1 & Closing tab, 1200 Gov’t Recording & Transfer Charges screen. (Express HUD users double-click the Gov’t
Recording & Transfer Charges screen.)
1. Click the HUD-1 & Closing tab.
2. Double-click 1200 Gov’t Recording & Transfer Charges. (Express HUD users double-click the Gov’t
Recording & Transfer Charges screen.)
3. For each document, enter the number of pages and the amount of cost per page. The total will appear in
the Borrower column.
Example: Deed
1200 Section Formulas The 1200 Section Formulas window contains formulas used to automatically calculate deed, mortgage, and release
document fees and tax/stamps. The first column describes the section number and type of document. The Per
column explains what the unit of measurement the formula is based on (for example, the 1201 Deed formula is
based on the document cost per page).
Most recording fee formulas contain a rate schedule based on the number of pages. For each document, enter the
number of pages to which the first rate applies in the First column. Then enter the total cost for those first pages in
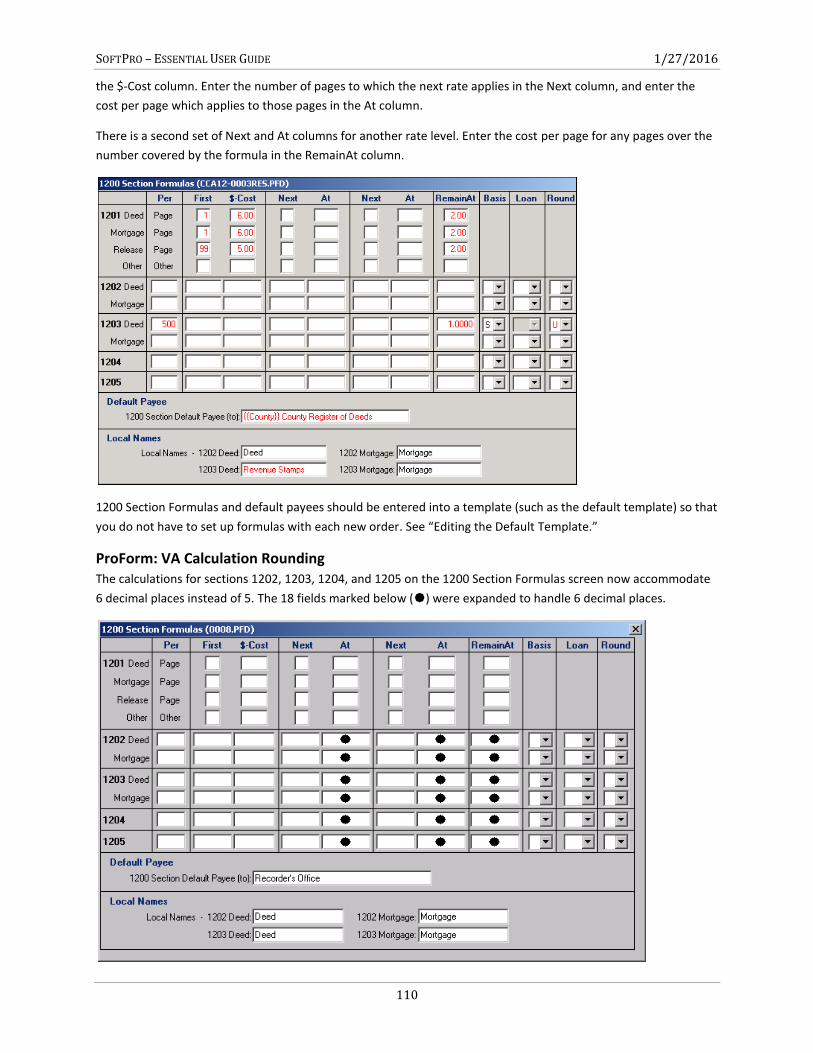
SOFTPRO – ESSENTIAL USER GUIDE 1/27/2016
110
the $-Cost column. Enter the number of pages to which the next rate applies in the Next column, and enter the
cost per page which applies to those pages in the At column.
There is a second set of Next and At columns for another rate level. Enter the cost per page for any pages over the
number covered by the formula in the RemainAt column.
1200 Section Formulas and default payees should be entered into a template (such as the default template) so that
you do not have to set up formulas with each new order. See “Editing the Default Template.”
ProForm: VA Calculation Rounding The calculations for sections 1202, 1203, 1204, and 1205 on the 1200 Section Formulas screen now accommodate
6 decimal places instead of 5. The 18 fields marked below () were expanded to handle 6 decimal places.
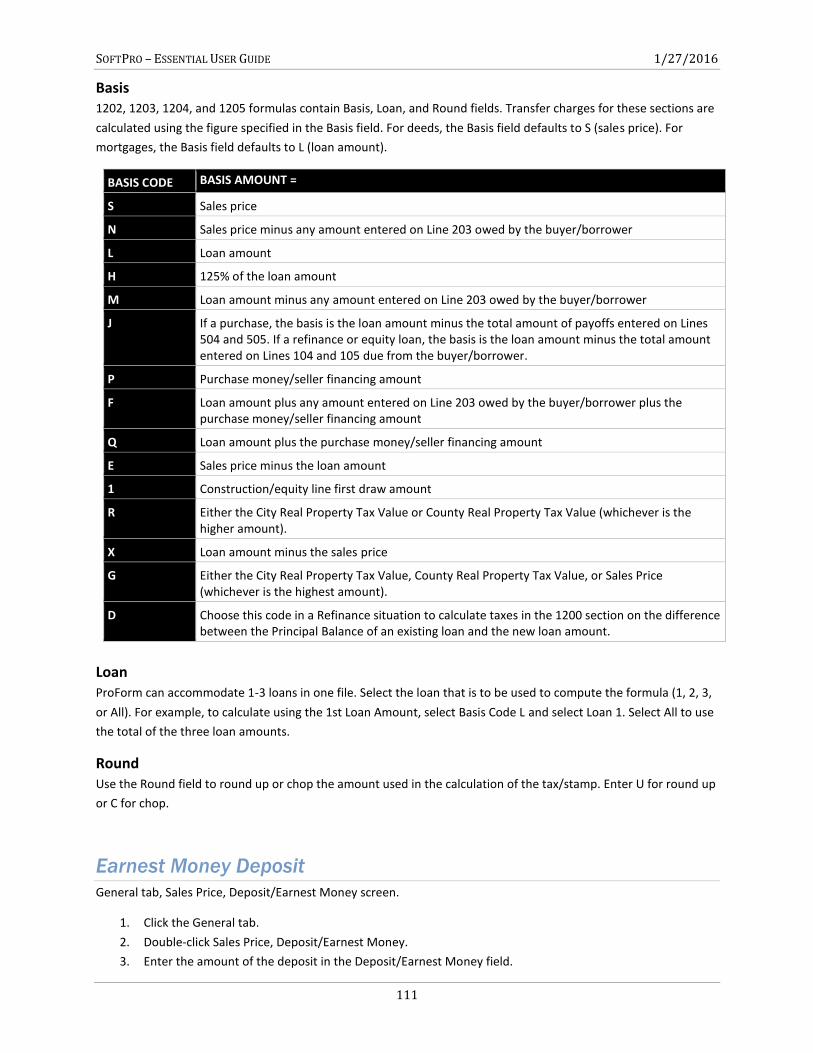
SOFTPRO – ESSENTIAL USER GUIDE 1/27/2016
111
Basis 1202, 1203, 1204, and 1205 formulas contain Basis, Loan, and Round fields. Transfer charges for these sections are
calculated using the figure specified in the Basis field. For deeds, the Basis field defaults to S (sales price). For
mortgages, the Basis field defaults to L (loan amount).
Loan ProForm can accommodate 1-3 loans in one file. Select the loan that is to be used to compute the formula (1, 2, 3,
or All). For example, to calculate using the 1st Loan Amount, select Basis Code L and select Loan 1. Select All to use
the total of the three loan amounts.
Round Use the Round field to round up or chop the amount used in the calculation of the tax/stamp. Enter U for round up
or C for chop.
Earnest Money Deposit
General tab, Sales Price, Deposit/Earnest Money screen.
1. Click the General tab.
2. Double-click Sales Price, Deposit/Earnest Money.
3. Enter the amount of the deposit in the Deposit/Earnest Money field.
BASIS CODE BASIS AMOUNT =
S Sales price
N Sales price minus any amount entered on Line 203 owed by the buyer/borrower
L Loan amount
H 125% of the loan amount
M Loan amount minus any amount entered on Line 203 owed by the buyer/borrower
J If a purchase, the basis is the loan amount minus the total amount of payoffs entered on Lines 504 and 505. If a refinance or equity loan, the basis is the loan amount minus the total amount entered on Lines 104 and 105 due from the buyer/borrower.
P Purchase money/seller financing amount
F Loan amount plus any amount entered on Line 203 owed by the buyer/borrower plus the purchase money/seller financing amount
Q Loan amount plus the purchase money/seller financing amount
E Sales price minus the loan amount
1 Construction/equity line first draw amount
R Either the City Real Property Tax Value or County Real Property Tax Value (whichever is the higher amount).
X Loan amount minus the sales price
G Either the City Real Property Tax Value, County Real Property Tax Value, or Sales Price (whichever is the highest amount).
D Choose this code in a Refinance situation to calculate taxes in the 1200 section on the difference between the Principal Balance of an existing loan and the new loan amount.
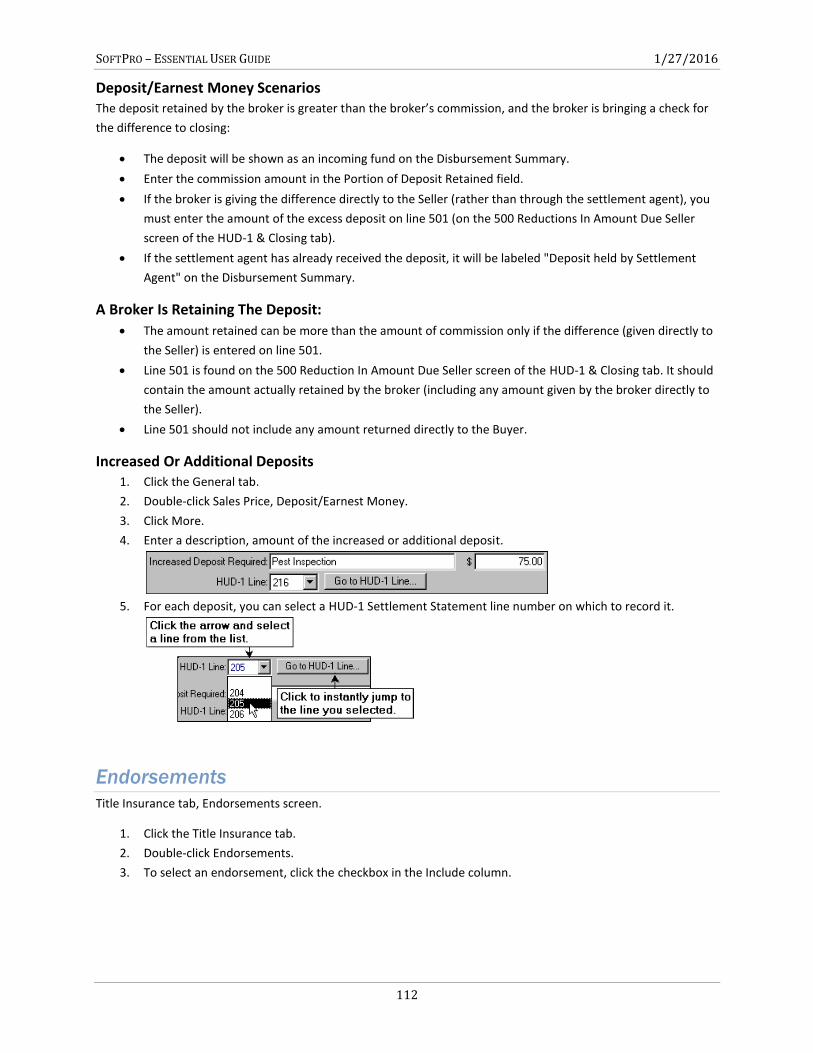
SOFTPRO – ESSENTIAL USER GUIDE 1/27/2016
112
Deposit/Earnest Money Scenarios The deposit retained by the broker is greater than the broker’s commission, and the broker is bringing a check for
the difference to closing:
The deposit will be shown as an incoming fund on the Disbursement Summary.
Enter the commission amount in the Portion of Deposit Retained field.
If the broker is giving the difference directly to the Seller (rather than through the settlement agent), you
must enter the amount of the excess deposit on line 501 (on the 500 Reductions In Amount Due Seller
screen of the HUD-1 & Closing tab).
If the settlement agent has already received the deposit, it will be labeled "Deposit held by Settlement
Agent" on the Disbursement Summary.
A Broker Is Retaining The Deposit:
The amount retained can be more than the amount of commission only if the difference (given directly to
the Seller) is entered on line 501.
Line 501 is found on the 500 Reduction In Amount Due Seller screen of the HUD-1 & Closing tab. It should
contain the amount actually retained by the broker (including any amount given by the broker directly to
the Seller).
Line 501 should not include any amount returned directly to the Buyer.
Increased Or Additional Deposits 1. Click the General tab.
2. Double-click Sales Price, Deposit/Earnest Money.
3. Click More.
4. Enter a description, amount of the increased or additional deposit.
5. For each deposit, you can select a HUD-1 Settlement Statement line number on which to record it.
Endorsements
Title Insurance tab, Endorsements screen.
1. Click the Title Insurance tab.
2. Double-click Endorsements.
3. To select an endorsement, click the checkbox in the Include column.
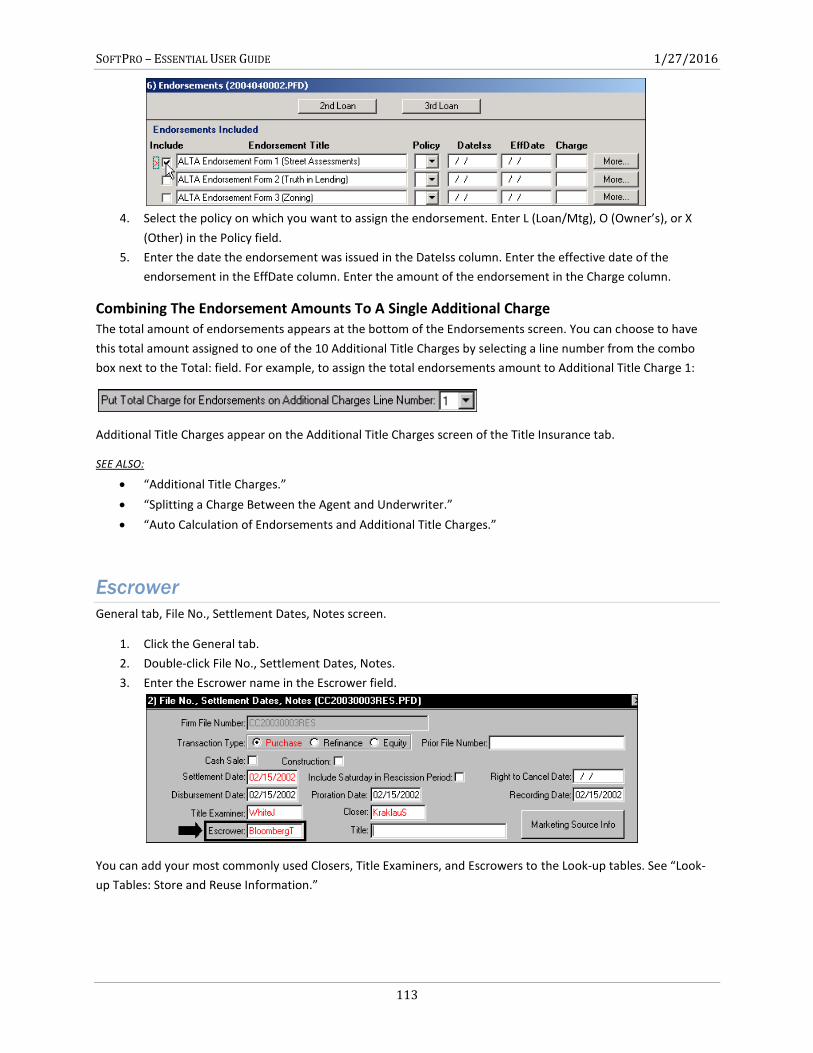
SOFTPRO – ESSENTIAL USER GUIDE 1/27/2016
113
4. Select the policy on which you want to assign the endorsement. Enter L (Loan/Mtg), O (Owner’s), or X
(Other) in the Policy field.
5. Enter the date the endorsement was issued in the DateIss column. Enter the effective date of the
endorsement in the EffDate column. Enter the amount of the endorsement in the Charge column.
Combining The Endorsement Amounts To A Single Additional Charge The total amount of endorsements appears at the bottom of the Endorsements screen. You can choose to have
this total amount assigned to one of the 10 Additional Title Charges by selecting a line number from the combo
box next to the Total: field. For example, to assign the total endorsements amount to Additional Title Charge 1:
Additional Title Charges appear on the Additional Title Charges screen of the Title Insurance tab.
SEE ALSO:
“Additional Title Charges.”
“Splitting a Charge Between the Agent and Underwriter.”
“Auto Calculation of Endorsements and Additional Title Charges.”
Escrower
General tab, File No., Settlement Dates, Notes screen.
1. Click the General tab.
2. Double-click File No., Settlement Dates, Notes.
3. Enter the Escrower name in the Escrower field.
You can add your most commonly used Closers, Title Examiners, and Escrowers to the Look-up tables. See “Look-
up Tables: Store and Reuse Information.”
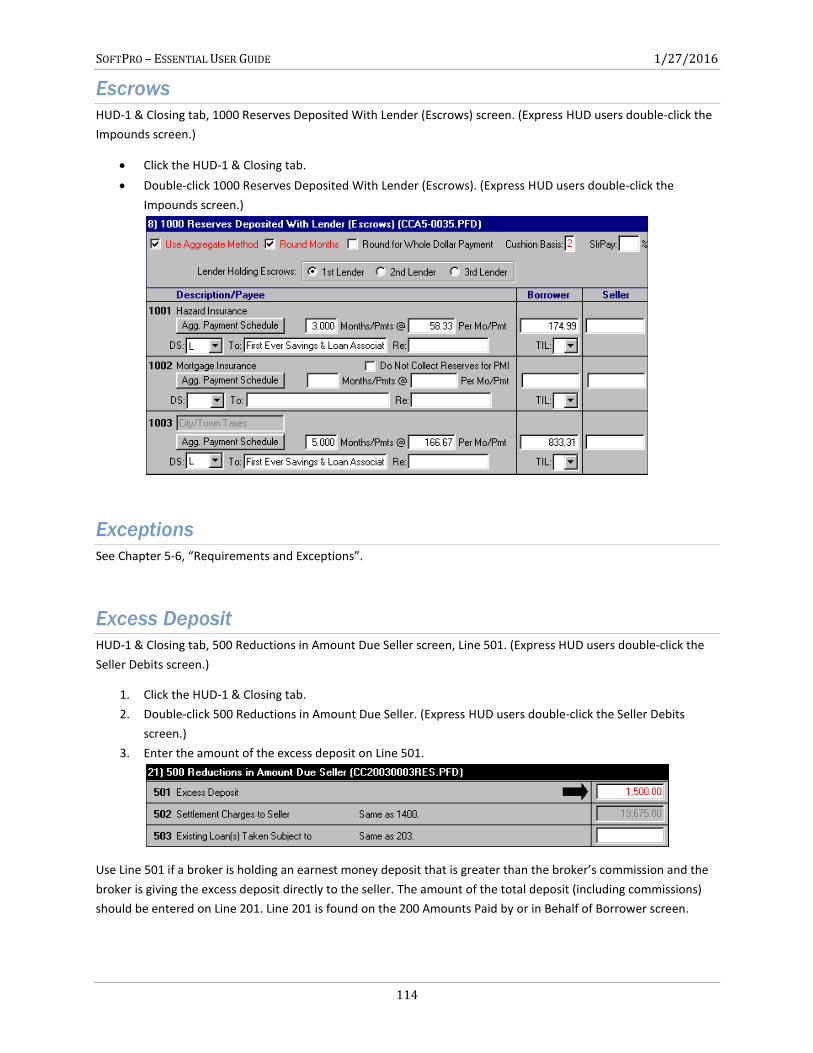
SOFTPRO – ESSENTIAL USER GUIDE 1/27/2016
114
Escrows
HUD-1 & Closing tab, 1000 Reserves Deposited With Lender (Escrows) screen. (Express HUD users double-click the
Impounds screen.)
Click the HUD-1 & Closing tab.
Double-click 1000 Reserves Deposited With Lender (Escrows). (Express HUD users double-click the
Impounds screen.)
Exceptions
See Chapter 5-6, “Requirements and Exceptions”.
Excess Deposit
HUD-1 & Closing tab, 500 Reductions in Amount Due Seller screen, Line 501. (Express HUD users double-click the
Seller Debits screen.)
1. Click the HUD-1 & Closing tab.
2. Double-click 500 Reductions in Amount Due Seller. (Express HUD users double-click the Seller Debits
screen.)
3. Enter the amount of the excess deposit on Line 501.
Use Line 501 if a broker is holding an earnest money deposit that is greater than the broker’s commission and the
broker is giving the excess deposit directly to the seller. The amount of the total deposit (including commissions)
should be entered on Line 201. Line 201 is found on the 200 Amounts Paid by or in Behalf of Borrower screen.
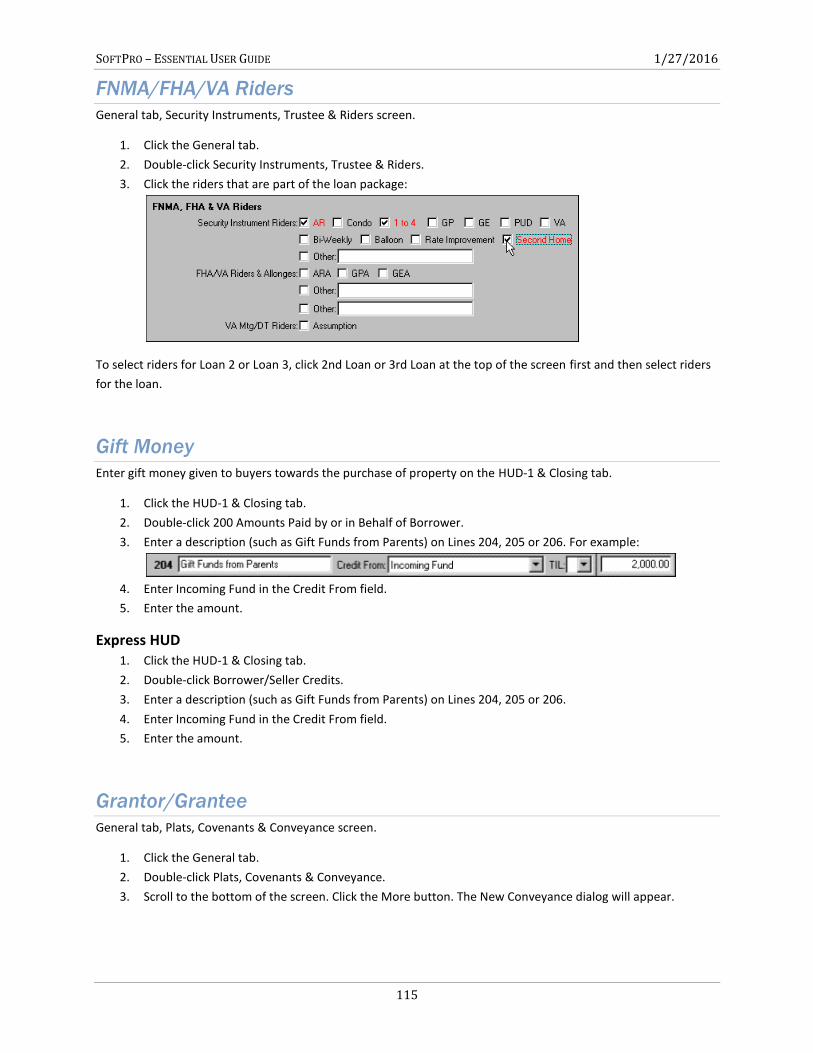
SOFTPRO – ESSENTIAL USER GUIDE 1/27/2016
115
FNMA/FHA/VA Riders
General tab, Security Instruments, Trustee & Riders screen.
1. Click the General tab.
2. Double-click Security Instruments, Trustee & Riders.
3. Click the riders that are part of the loan package:
To select riders for Loan 2 or Loan 3, click 2nd Loan or 3rd Loan at the top of the screen first and then select riders
for the loan.
Gift Money
Enter gift money given to buyers towards the purchase of property on the HUD-1 & Closing tab.
1. Click the HUD-1 & Closing tab.
2. Double-click 200 Amounts Paid by or in Behalf of Borrower.
3. Enter a description (such as Gift Funds from Parents) on Lines 204, 205 or 206. For example:
4. Enter Incoming Fund in the Credit From field.
5. Enter the amount.
Express HUD 1. Click the HUD-1 & Closing tab.
2. Double-click Borrower/Seller Credits.
3. Enter a description (such as Gift Funds from Parents) on Lines 204, 205 or 206.
4. Enter Incoming Fund in the Credit From field.
5. Enter the amount.
Grantor/Grantee
General tab, Plats, Covenants & Conveyance screen.
1. Click the General tab.
2. Double-click Plats, Covenants & Conveyance.
3. Scroll to the bottom of the screen. Click the More button. The New Conveyance dialog will appear.

SOFTPRO – ESSENTIAL USER GUIDE 1/27/2016
116
Hazard Insurance
HUD-1 & Closing tab, 900 Items Required by Lender to be Paid in Advance screen, Line 903. (Express HUD users
double-click the Prepaid Loan Charges screen.)
1. Click the HUD-1 & Closing tab.
2. Double-click 900 Items Required by Lender to be Paid in Advance. (Express HUD users double-click the
Prepaid Loan Charges screen.)
3. Enter the Hazard Insurance Premium on Line 903.
Homeowner’s Association
General tab, HOA/Management Company screen.
1. Click the General tab.
2. Double-click HOA/Management Company.
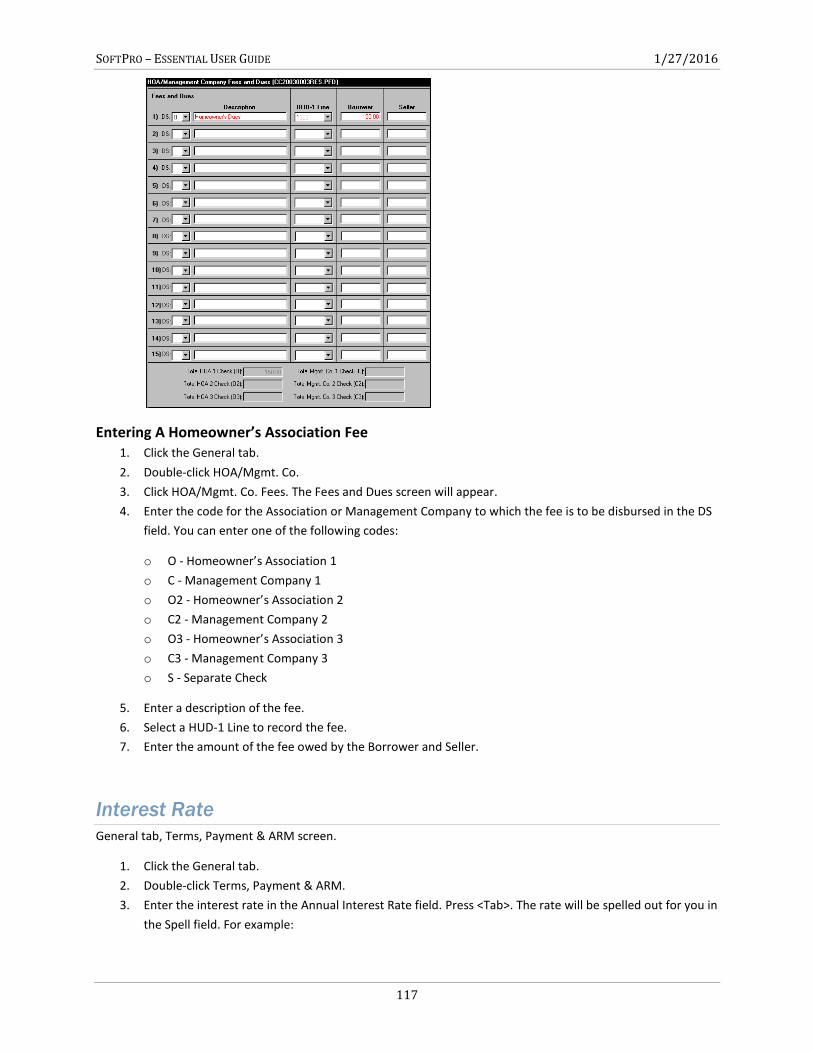
SOFTPRO – ESSENTIAL USER GUIDE 1/27/2016
117
Entering A Homeowner’s Association Fee 1. Click the General tab.
2. Double-click HOA/Mgmt. Co.
3. Click HOA/Mgmt. Co. Fees. The Fees and Dues screen will appear.
4. Enter the code for the Association or Management Company to which the fee is to be disbursed in the DS
field. You can enter one of the following codes:
o O - Homeowner’s Association 1
o C - Management Company 1
o O2 - Homeowner’s Association 2
o C2 - Management Company 2
o O3 - Homeowner’s Association 3
o C3 - Management Company 3
o S - Separate Check
5. Enter a description of the fee.
6. Select a HUD-1 Line to record the fee.
7. Enter the amount of the fee owed by the Borrower and Seller.
Interest Rate
General tab, Terms, Payment & ARM screen.
1. Click the General tab.
2. Double-click Terms, Payment & ARM.
3. Enter the interest rate in the Annual Interest Rate field. Press <Tab>. The rate will be spelled out for you in
the Spell field. For example:
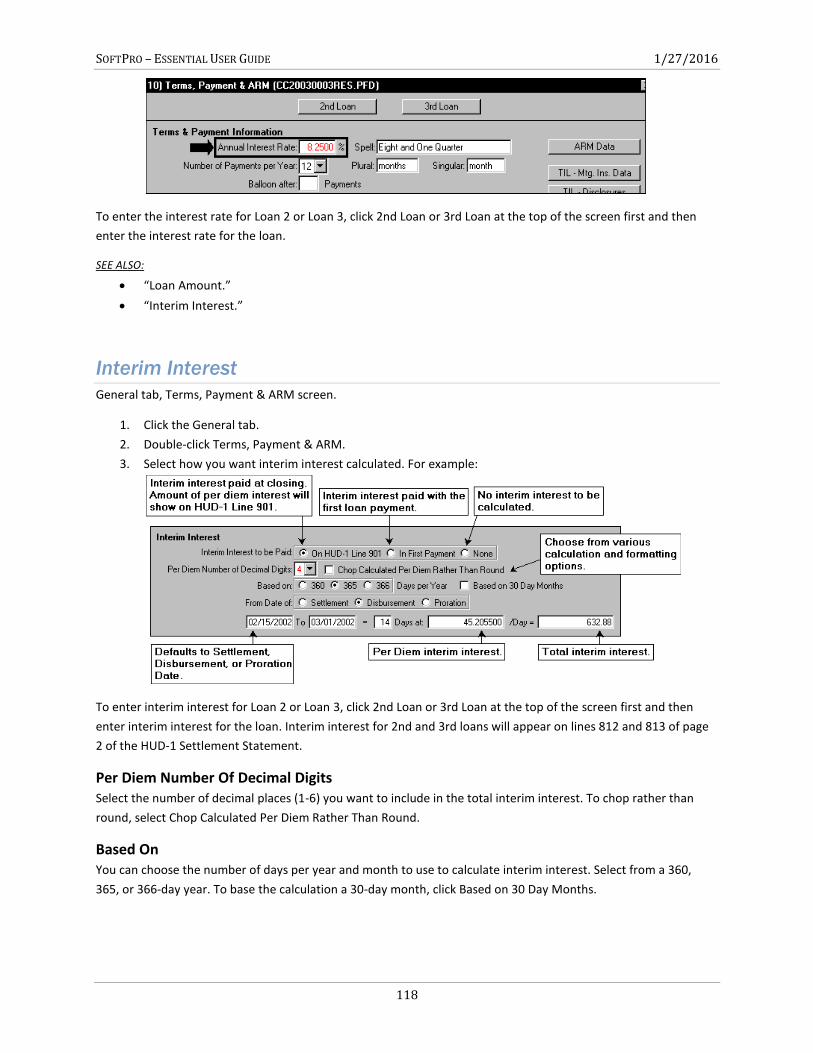
SOFTPRO – ESSENTIAL USER GUIDE 1/27/2016
118
To enter the interest rate for Loan 2 or Loan 3, click 2nd Loan or 3rd Loan at the top of the screen first and then
enter the interest rate for the loan.
SEE ALSO:
“Loan Amount.”
“Interim Interest.”
Interim Interest
General tab, Terms, Payment & ARM screen.
1. Click the General tab.
2. Double-click Terms, Payment & ARM.
3. Select how you want interim interest calculated. For example:
To enter interim interest for Loan 2 or Loan 3, click 2nd Loan or 3rd Loan at the top of the screen first and then
enter interim interest for the loan. Interim interest for 2nd and 3rd loans will appear on lines 812 and 813 of page
2 of the HUD-1 Settlement Statement.
Per Diem Number Of Decimal Digits Select the number of decimal places (1-6) you want to include in the total interim interest. To chop rather than
round, select Chop Calculated Per Diem Rather Than Round.
Based On You can choose the number of days per year and month to use to calculate interim interest. Select from a 360,
365, or 366-day year. To base the calculation a 30-day month, click Based on 30 Day Months.
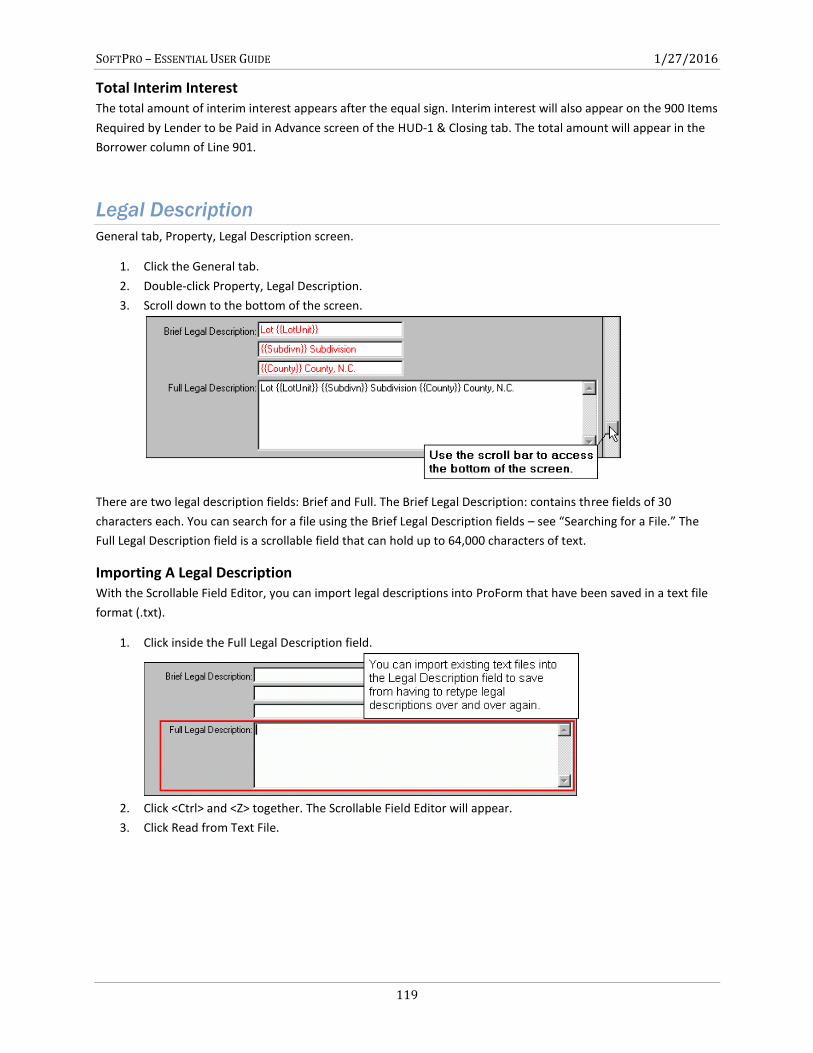
SOFTPRO – ESSENTIAL USER GUIDE 1/27/2016
119
Total Interim Interest The total amount of interim interest appears after the equal sign. Interim interest will also appear on the 900 Items
Required by Lender to be Paid in Advance screen of the HUD-1 & Closing tab. The total amount will appear in the
Borrower column of Line 901.
Legal Description
General tab, Property, Legal Description screen.
1. Click the General tab.
2. Double-click Property, Legal Description.
3. Scroll down to the bottom of the screen.
There are two legal description fields: Brief and Full. The Brief Legal Description: contains three fields of 30
characters each. You can search for a file using the Brief Legal Description fields – see “Searching for a File.” The
Full Legal Description field is a scrollable field that can hold up to 64,000 characters of text.
Importing A Legal Description With the Scrollable Field Editor, you can import legal descriptions into ProForm that have been saved in a text file
format (.txt).
1. Click inside the Full Legal Description field.
2. Click <Ctrl> and <Z> together. The Scrollable Field Editor will appear.
3. Click Read from Text File.
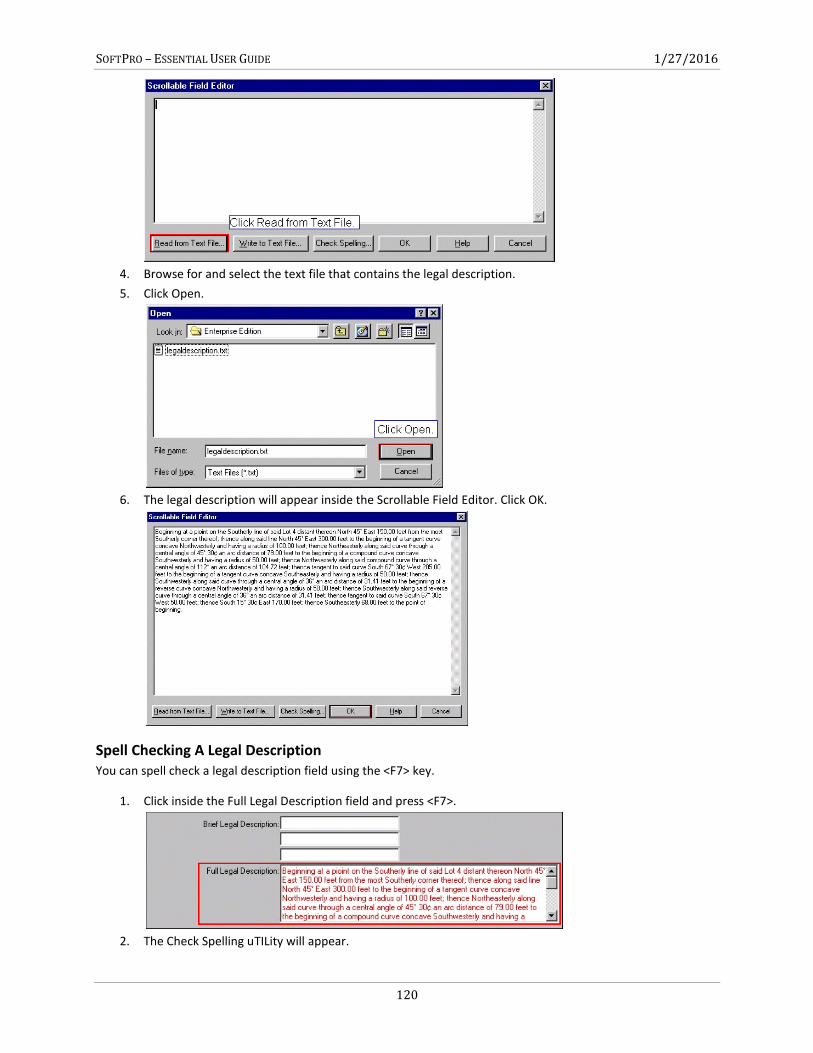
SOFTPRO – ESSENTIAL USER GUIDE 1/27/2016
120
4. Browse for and select the text file that contains the legal description.
5. Click Open.
6. The legal description will appear inside the Scrollable Field Editor. Click OK.
Spell Checking A Legal Description You can spell check a legal description field using the <F7> key.
1. Click inside the Full Legal Description field and press <F7>.
2. The Check Spelling uTILity will appear.
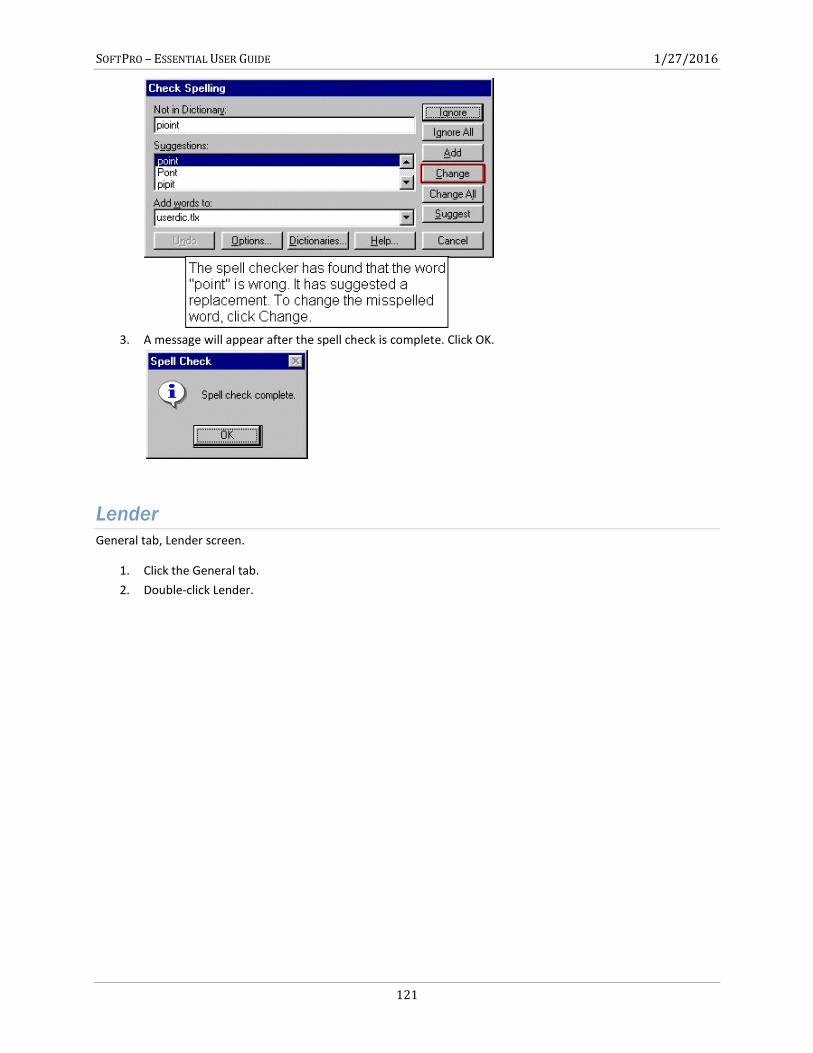
SOFTPRO – ESSENTIAL USER GUIDE 1/27/2016
121
3. A message will appear after the spell check is complete. Click OK.
Lender
General tab, Lender screen.
1. Click the General tab.
2. Double-click Lender.
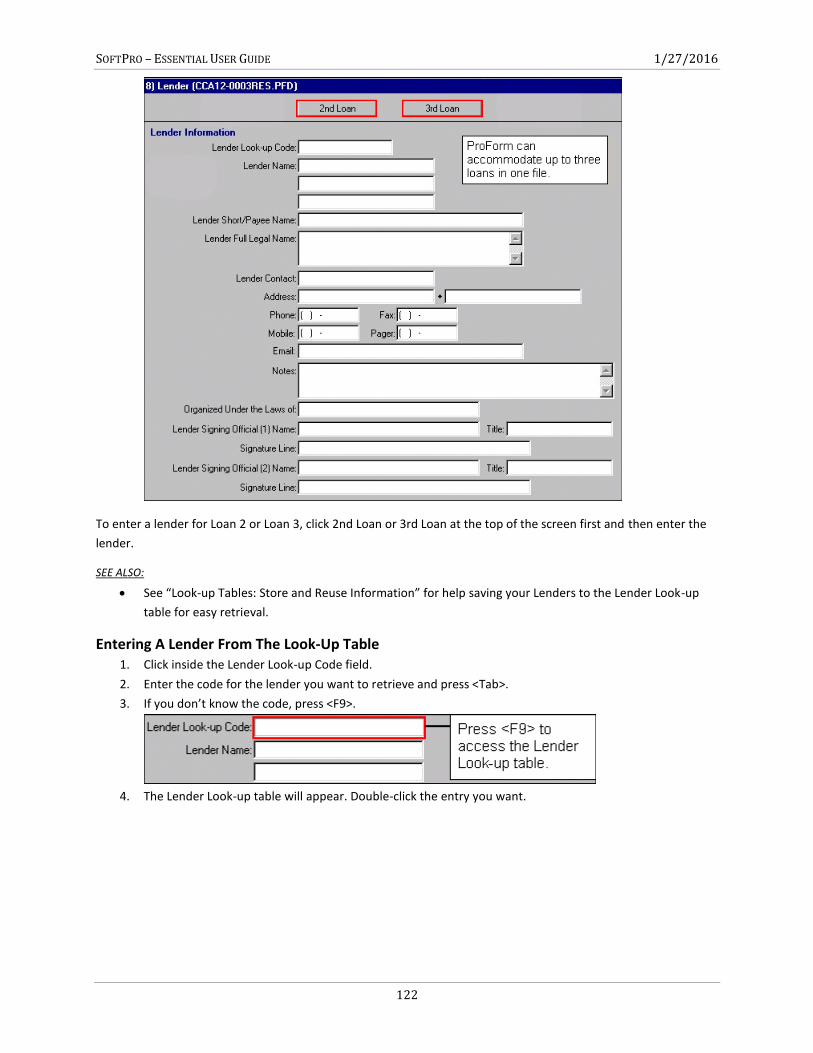
SOFTPRO – ESSENTIAL USER GUIDE 1/27/2016
122
To enter a lender for Loan 2 or Loan 3, click 2nd Loan or 3rd Loan at the top of the screen first and then enter the
lender.
SEE ALSO:
See “Look-up Tables: Store and Reuse Information” for help saving your Lenders to the Lender Look-up
table for easy retrieval.
Entering A Lender From The Look-Up Table 1. Click inside the Lender Look-up Code field.
2. Enter the code for the lender you want to retrieve and press <Tab>.
3. If you don’t know the code, press <F9>.
4. The Lender Look-up table will appear. Double-click the entry you want.
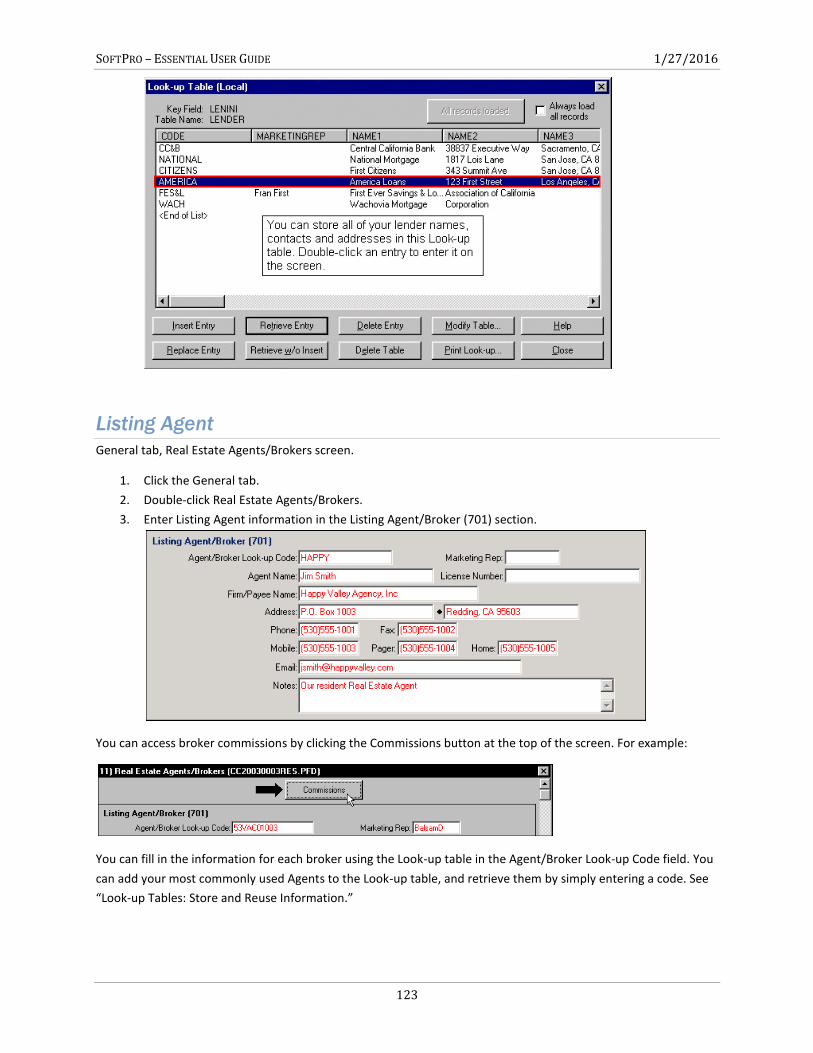
SOFTPRO – ESSENTIAL USER GUIDE 1/27/2016
123
Listing Agent
General tab, Real Estate Agents/Brokers screen.
1. Click the General tab.
2. Double-click Real Estate Agents/Brokers.
3. Enter Listing Agent information in the Listing Agent/Broker (701) section.
You can access broker commissions by clicking the Commissions button at the top of the screen. For example:
You can fill in the information for each broker using the Look-up table in the Agent/Broker Look-up Code field. You
can add your most commonly used Agents to the Look-up table, and retrieve them by simply entering a code. See
“Look-up Tables: Store and Reuse Information.”
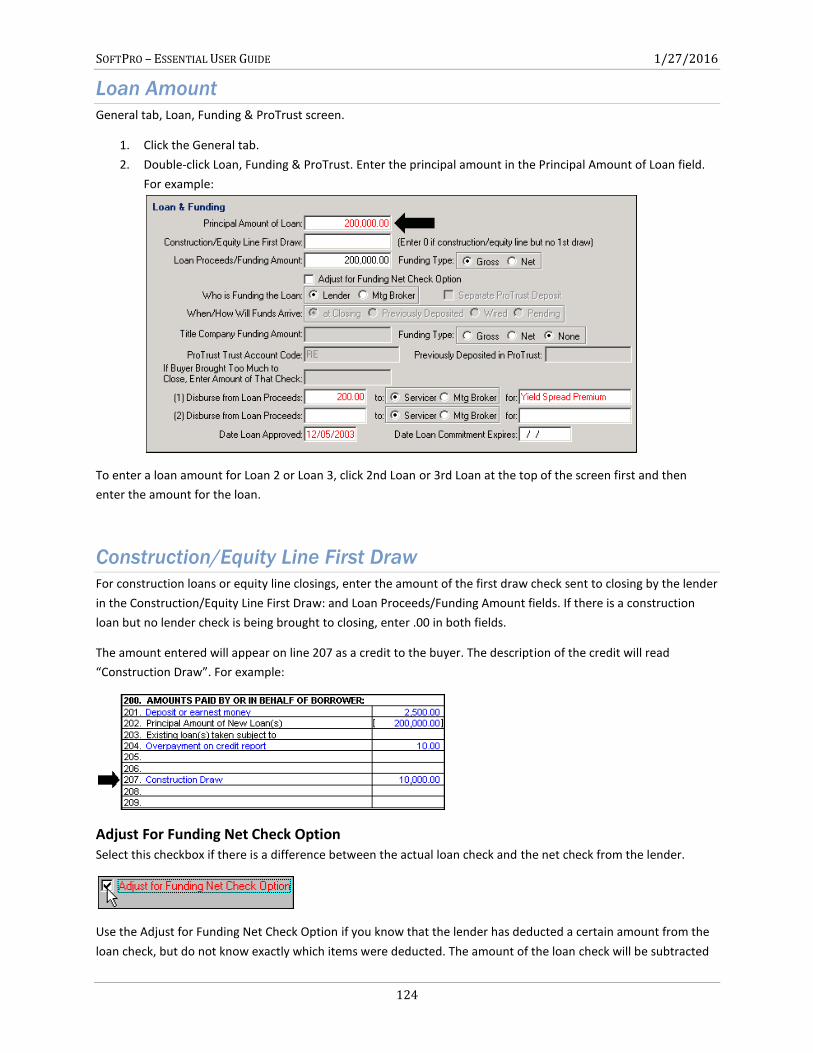
SOFTPRO – ESSENTIAL USER GUIDE 1/27/2016
124
Loan Amount
General tab, Loan, Funding & ProTrust screen.
1. Click the General tab.
2. Double-click Loan, Funding & ProTrust. Enter the principal amount in the Principal Amount of Loan field.
For example:
To enter a loan amount for Loan 2 or Loan 3, click 2nd Loan or 3rd Loan at the top of the screen first and then
enter the amount for the loan.
Construction/Equity Line First Draw
For construction loans or equity line closings, enter the amount of the first draw check sent to closing by the lender
in the Construction/Equity Line First Draw: and Loan Proceeds/Funding Amount fields. If there is a construction
loan but no lender check is being brought to closing, enter .00 in both fields.
The amount entered will appear on line 207 as a credit to the buyer. The description of the credit will read
“Construction Draw”. For example:
Adjust For Funding Net Check Option Select this checkbox if there is a difference between the actual loan check and the net check from the lender.
Use the Adjust for Funding Net Check Option if you know that the lender has deducted a certain amount from the
loan check, but do not know exactly which items were deducted. The amount of the loan check will be subtracted
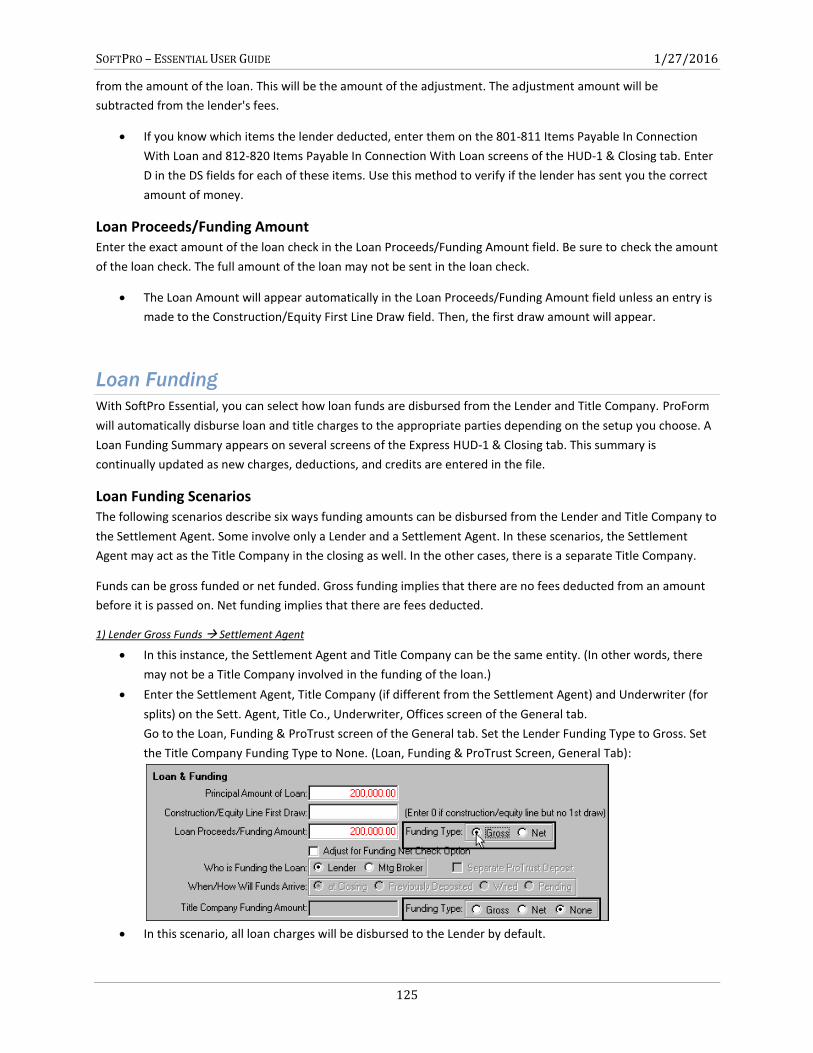
SOFTPRO – ESSENTIAL USER GUIDE 1/27/2016
125
from the amount of the loan. This will be the amount of the adjustment. The adjustment amount will be
subtracted from the lender's fees.
If you know which items the lender deducted, enter them on the 801-811 Items Payable In Connection
With Loan and 812-820 Items Payable In Connection With Loan screens of the HUD-1 & Closing tab. Enter
D in the DS fields for each of these items. Use this method to verify if the lender has sent you the correct
amount of money.
Loan Proceeds/Funding Amount Enter the exact amount of the loan check in the Loan Proceeds/Funding Amount field. Be sure to check the amount
of the loan check. The full amount of the loan may not be sent in the loan check.
The Loan Amount will appear automatically in the Loan Proceeds/Funding Amount field unless an entry is
made to the Construction/Equity First Line Draw field. Then, the first draw amount will appear.
Loan Funding
With SoftPro Essential, you can select how loan funds are disbursed from the Lender and Title Company. ProForm
will automatically disburse loan and title charges to the appropriate parties depending on the setup you choose. A
Loan Funding Summary appears on several screens of the Express HUD-1 & Closing tab. This summary is
continually updated as new charges, deductions, and credits are entered in the file.
Loan Funding Scenarios The following scenarios describe six ways funding amounts can be disbursed from the Lender and Title Company to
the Settlement Agent. Some involve only a Lender and a Settlement Agent. In these scenarios, the Settlement
Agent may act as the Title Company in the closing as well. In the other cases, there is a separate Title Company.
Funds can be gross funded or net funded. Gross funding implies that there are no fees deducted from an amount
before it is passed on. Net funding implies that there are fees deducted.
1) Lender Gross Funds Settlement Agent
In this instance, the Settlement Agent and Title Company can be the same entity. (In other words, there
may not be a Title Company involved in the funding of the loan.)
Enter the Settlement Agent, Title Company (if different from the Settlement Agent) and Underwriter (for
splits) on the Sett. Agent, Title Co., Underwriter, Offices screen of the General tab.
Go to the Loan, Funding & ProTrust screen of the General tab. Set the Lender Funding Type to Gross. Set
the Title Company Funding Type to None. (Loan, Funding & ProTrust Screen, General Tab):
In this scenario, all loan charges will be disbursed to the Lender by default.
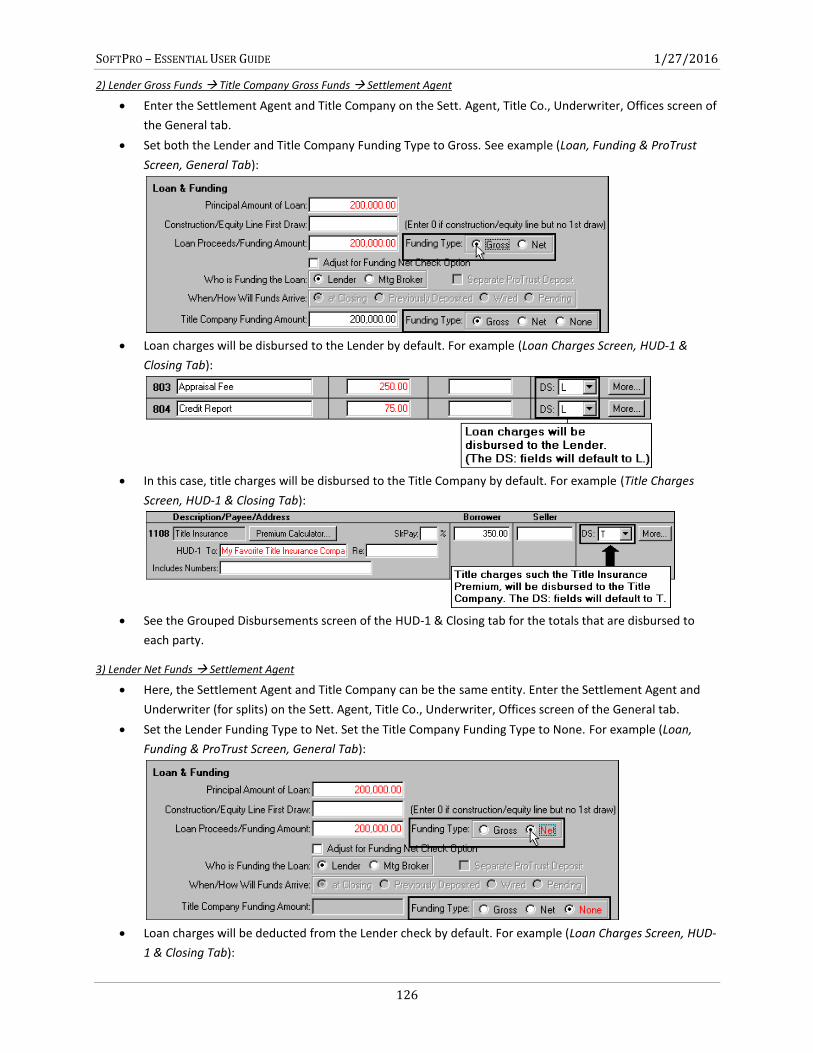
SOFTPRO – ESSENTIAL USER GUIDE 1/27/2016
126
2) Lender Gross Funds Title Company Gross Funds Settlement Agent
Enter the Settlement Agent and Title Company on the Sett. Agent, Title Co., Underwriter, Offices screen of
the General tab.
Set both the Lender and Title Company Funding Type to Gross. See example (Loan, Funding & ProTrust
Screen, General Tab):
Loan charges will be disbursed to the Lender by default. For example (Loan Charges Screen, HUD-1 &
Closing Tab):
In this case, title charges will be disbursed to the Title Company by default. For example (Title Charges
Screen, HUD-1 & Closing Tab):
See the Grouped Disbursements screen of the HUD-1 & Closing tab for the totals that are disbursed to
each party.
3) Lender Net Funds Settlement Agent
Here, the Settlement Agent and Title Company can be the same entity. Enter the Settlement Agent and
Underwriter (for splits) on the Sett. Agent, Title Co., Underwriter, Offices screen of the General tab.
Set the Lender Funding Type to Net. Set the Title Company Funding Type to None. For example (Loan,
Funding & ProTrust Screen, General Tab):
Loan charges will be deducted from the Lender check by default. For example (Loan Charges Screen, HUD-
1 & Closing Tab):
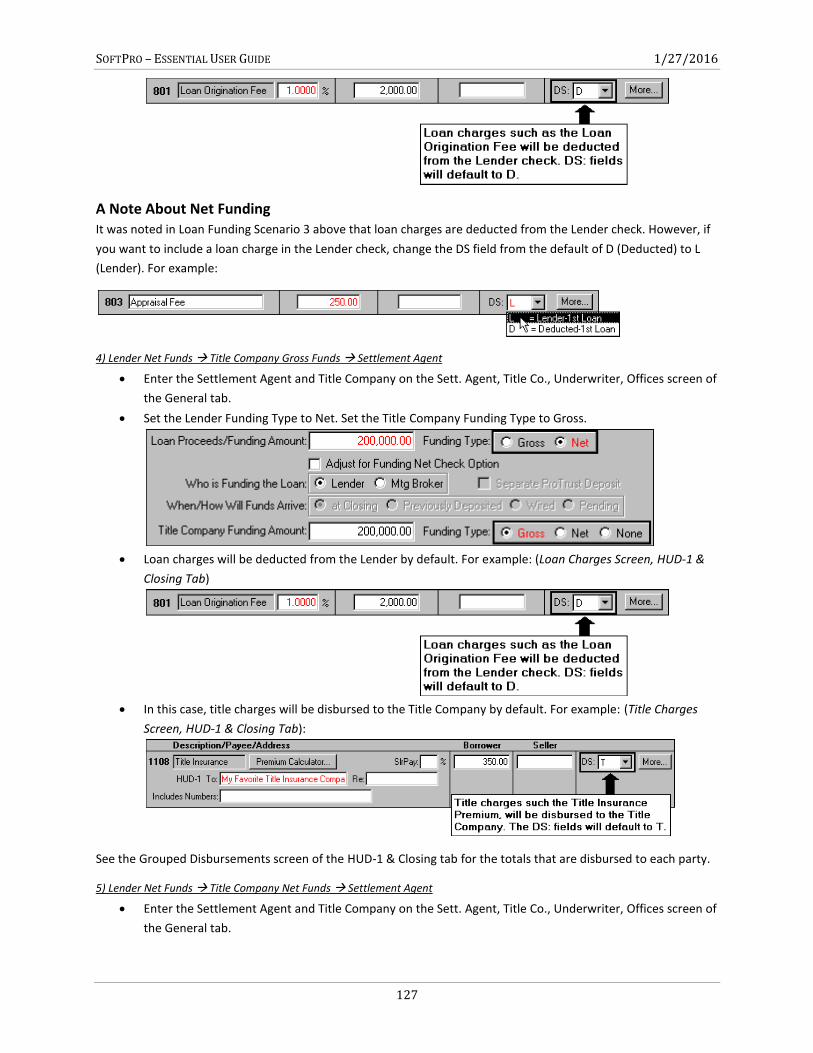
SOFTPRO – ESSENTIAL USER GUIDE 1/27/2016
127
A Note About Net Funding It was noted in Loan Funding Scenario 3 above that loan charges are deducted from the Lender check. However, if
you want to include a loan charge in the Lender check, change the DS field from the default of D (Deducted) to L
(Lender). For example:
4) Lender Net Funds Title Company Gross Funds Settlement Agent
Enter the Settlement Agent and Title Company on the Sett. Agent, Title Co., Underwriter, Offices screen of
the General tab.
Set the Lender Funding Type to Net. Set the Title Company Funding Type to Gross.
Loan charges will be deducted from the Lender by default. For example: (Loan Charges Screen, HUD-1 &
Closing Tab)
In this case, title charges will be disbursed to the Title Company by default. For example: (Title Charges
Screen, HUD-1 & Closing Tab):
See the Grouped Disbursements screen of the HUD-1 & Closing tab for the totals that are disbursed to each party.
5) Lender Net Funds Title Company Net Funds Settlement Agent
Enter the Settlement Agent and Title Company on the Sett. Agent, Title Co., Underwriter, Offices screen of
the General tab.
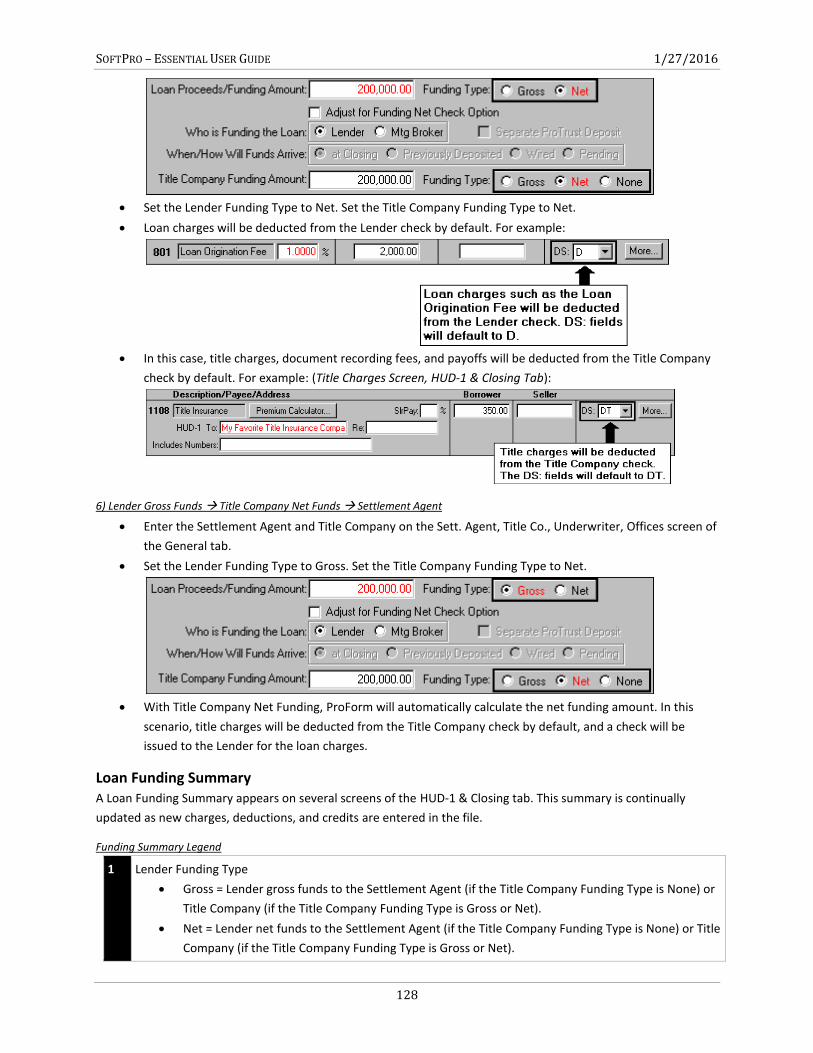
SOFTPRO – ESSENTIAL USER GUIDE 1/27/2016
128
Set the Lender Funding Type to Net. Set the Title Company Funding Type to Net.
Loan charges will be deducted from the Lender check by default. For example:
In this case, title charges, document recording fees, and payoffs will be deducted from the Title Company
check by default. For example: (Title Charges Screen, HUD-1 & Closing Tab):
6) Lender Gross Funds Title Company Net Funds Settlement Agent
Enter the Settlement Agent and Title Company on the Sett. Agent, Title Co., Underwriter, Offices screen of
the General tab.
Set the Lender Funding Type to Gross. Set the Title Company Funding Type to Net.
With Title Company Net Funding, ProForm will automatically calculate the net funding amount. In this
scenario, title charges will be deducted from the Title Company check by default, and a check will be
issued to the Lender for the loan charges.
Loan Funding Summary A Loan Funding Summary appears on several screens of the HUD-1 & Closing tab. This summary is continually
updated as new charges, deductions, and credits are entered in the file.
Funding Summary Legend
1 Lender Funding Type
Gross = Lender gross funds to the Settlement Agent (if the Title Company Funding Type is None) or
Title Company (if the Title Company Funding Type is Gross or Net).
Net = Lender net funds to the Settlement Agent (if the Title Company Funding Type is None) or Title
Company (if the Title Company Funding Type is Gross or Net).
SOFTPRO – ESSENTIAL USER GUIDE 1/27/2016
129
Including Loan Credits In The Funding Check
Click the HUD-1 & Closing tab.
Double-click 200 Amounts Paid by or in Behalf of Borrower. (Express HUD users double-click Loan Credits.)
Note: Select the Funding Type on the Loan, Funding & ProTrust screen of the General tab.
2 Loan Amount/Draw Amount
Loan Amount entered on the Loan, Funding, & ProTrust screen of the General tab. In construction
loans or equity line closings, the first draw amount entered in the Construction/Equity Line First
Draw field will appear instead (1st Loan only).
3 Deductions (-)
Total of all amounts in the file deducted from the lender check.
4 Credits (+)
Total amount of Loan Credits included in the funding check. (See “Including Loan Credits in the
Funding Check.”)
5 Loan Funding Amount
Loan Proceeds/Funding Amount entered on the Loan, Funding, & ProTrust screen of the General
tab.
6 Title Company Funding
Type Gross = Title Company gross funds to the Settlement Agent.
Net = Title Company net funds to the Settlement Agent.
None = No Title Company involved in the loan funding transaction (or, the Settlement Agent and
Title Company are the same).
Note: Select the Funding Type on the Loan, Funding & ProTrust screen of the General tab.
7 Loan Funding Amount
Loan Proceeds/Funding Amount entered on the Loan, Funding, & ProTrust screen of the General
tab.
8 Deductions (-)
Total amount of all items deducted by the Title Company (except payoffs).
9 Payoff Deductions (-)
Total amount of Lines 104, 105, 504, and 505 that are deducted from the Title Company check, plus
any payoffs deducted from the Title Company check that are entered on the Additional
Disbursements screens.
10 Funding Amount
Loan Proceeds/Funding Amount minus any deductions and payoff deductions.
11 Click to access the Loan Funding Summary for the 2nd Loan.
12 Click to access the Loan Funding Summary for the 3rd Loan.
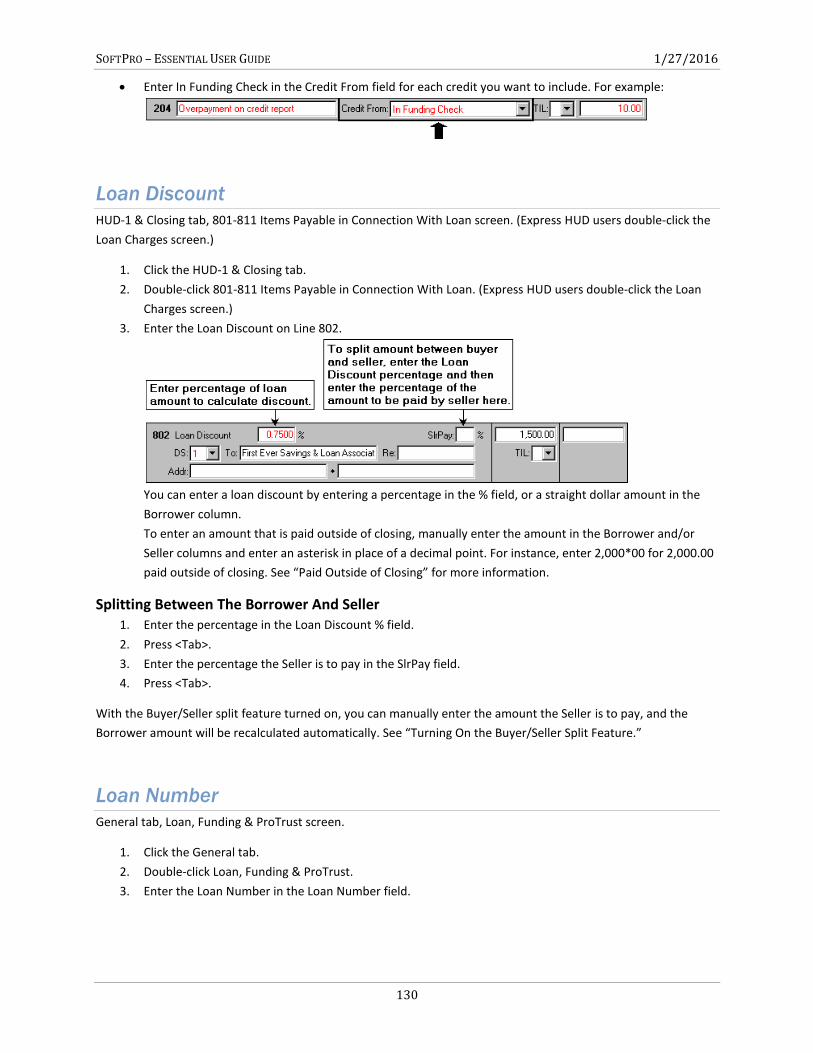
SOFTPRO – ESSENTIAL USER GUIDE 1/27/2016
130
Enter In Funding Check in the Credit From field for each credit you want to include. For example:
Loan Discount
HUD-1 & Closing tab, 801-811 Items Payable in Connection With Loan screen. (Express HUD users double-click the
Loan Charges screen.)
1. Click the HUD-1 & Closing tab.
2. Double-click 801-811 Items Payable in Connection With Loan. (Express HUD users double-click the Loan
Charges screen.)
3. Enter the Loan Discount on Line 802.
You can enter a loan discount by entering a percentage in the % field, or a straight dollar amount in the
Borrower column.
To enter an amount that is paid outside of closing, manually enter the amount in the Borrower and/or
Seller columns and enter an asterisk in place of a decimal point. For instance, enter 2,000*00 for 2,000.00
paid outside of closing. See “Paid Outside of Closing” for more information.
Splitting Between The Borrower And Seller 1. Enter the percentage in the Loan Discount % field.
2. Press <Tab>.
3. Enter the percentage the Seller is to pay in the SlrPay field.
4. Press <Tab>.
With the Buyer/Seller split feature turned on, you can manually enter the amount the Seller is to pay, and the
Borrower amount will be recalculated automatically. See “Turning On the Buyer/Seller Split Feature.”
Loan Number
General tab, Loan, Funding & ProTrust screen.
1. Click the General tab.
2. Double-click Loan, Funding & ProTrust.
3. Enter the Loan Number in the Loan Number field.

SOFTPRO – ESSENTIAL USER GUIDE 1/27/2016
131
To enter a loan number for Loan 2 or Loan 3, click 2nd Loan or 3rd Loan at the top of the screen first and
then enter the loan number.
Loan Officer And Loan Processor
General tab, Lender screen.
1. Click the General tab.
2. Double-click Lender. Scroll down to the Loan Officer & Processor section.
Loan Origination Fee
HUD-1 & Closing tab, 801-811 Items Payable in Connection With Loan screen. (Express HUD users double-click the
Loan Charges screen.)
1. Click the HUD-1 & Closing tab.
2. Double-click 801-811 Items Payable in Connection With Loan. (Express HUD users double-click the Loan
Charges screen.)
You can enter a loan origination fee by entering a percentage in the % field, or a straight dollar amount in the
Borrower column. For example:
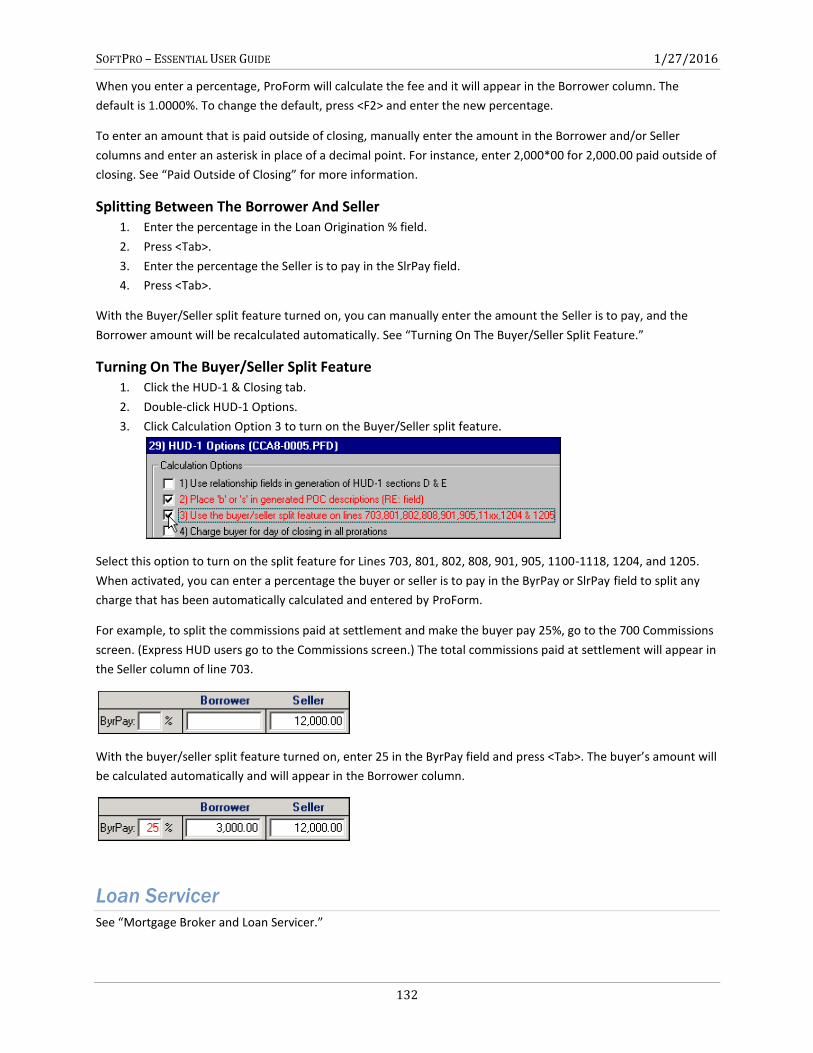
SOFTPRO – ESSENTIAL USER GUIDE 1/27/2016
132
When you enter a percentage, ProForm will calculate the fee and it will appear in the Borrower column. The
default is 1.0000%. To change the default, press <F2> and enter the new percentage.
To enter an amount that is paid outside of closing, manually enter the amount in the Borrower and/or Seller
columns and enter an asterisk in place of a decimal point. For instance, enter 2,000*00 for 2,000.00 paid outside of
closing. See “Paid Outside of Closing” for more information.
Splitting Between The Borrower And Seller 1. Enter the percentage in the Loan Origination % field.
2. Press <Tab>.
3. Enter the percentage the Seller is to pay in the SlrPay field.
4. Press <Tab>.
With the Buyer/Seller split feature turned on, you can manually enter the amount the Seller is to pay, and the
Borrower amount will be recalculated automatically. See “Turning On The Buyer/Seller Split Feature.”
Turning On The Buyer/Seller Split Feature 1. Click the HUD-1 & Closing tab.
2. Double-click HUD-1 Options.
3. Click Calculation Option 3 to turn on the Buyer/Seller split feature.
Select this option to turn on the split feature for Lines 703, 801, 802, 808, 901, 905, 1100-1118, 1204, and 1205.
When activated, you can enter a percentage the buyer or seller is to pay in the ByrPay or SlrPay field to split any
charge that has been automatically calculated and entered by ProForm.
For example, to split the commissions paid at settlement and make the buyer pay 25%, go to the 700 Commissions
screen. (Express HUD users go to the Commissions screen.) The total commissions paid at settlement will appear in
the Seller column of line 703.
With the buyer/seller split feature turned on, enter 25 in the ByrPay field and press <Tab>. The buyer’s amount will
be calculated automatically and will appear in the Borrower column.
Loan Servicer
See “Mortgage Broker and Loan Servicer.”
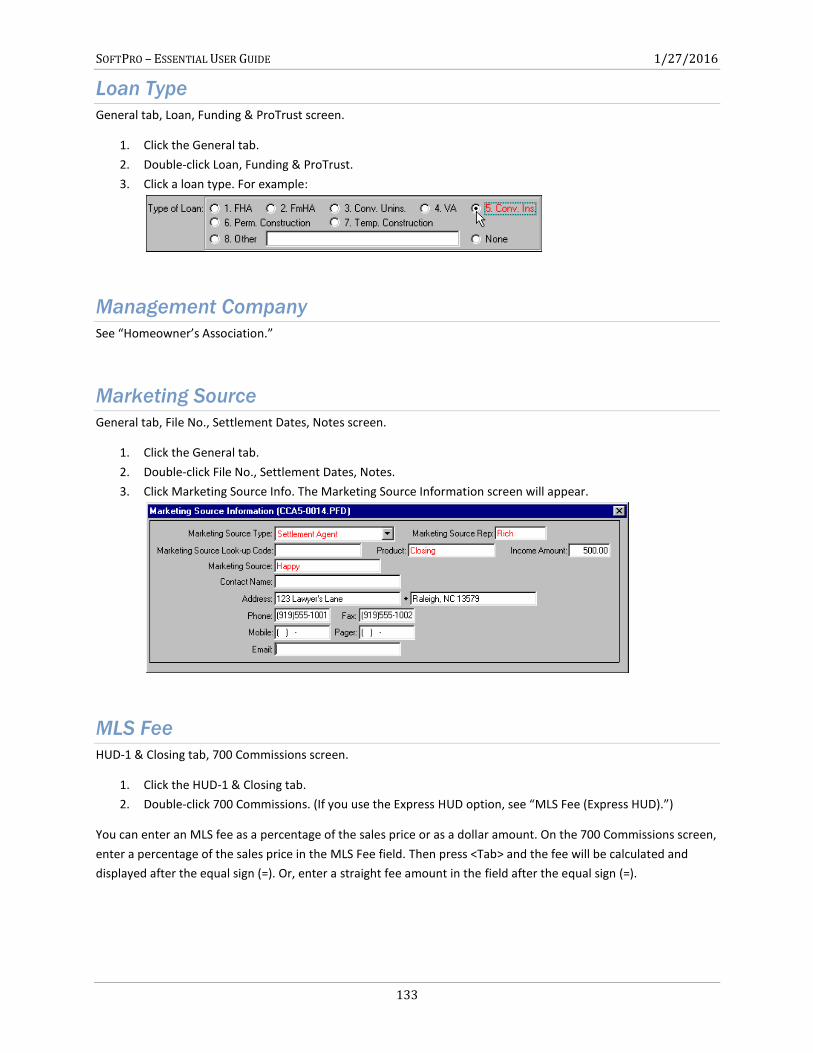
SOFTPRO – ESSENTIAL USER GUIDE 1/27/2016
133
Loan Type
General tab, Loan, Funding & ProTrust screen.
1. Click the General tab.
2. Double-click Loan, Funding & ProTrust.
3. Click a loan type. For example:
Management Company
See “Homeowner’s Association.”
Marketing Source
General tab, File No., Settlement Dates, Notes screen.
1. Click the General tab.
2. Double-click File No., Settlement Dates, Notes.
3. Click Marketing Source Info. The Marketing Source Information screen will appear.
MLS Fee
HUD-1 & Closing tab, 700 Commissions screen.
1. Click the HUD-1 & Closing tab.
2. Double-click 700 Commissions. (If you use the Express HUD option, see “MLS Fee (Express HUD).”)
You can enter an MLS fee as a percentage of the sales price or as a dollar amount. On the 700 Commissions screen,
enter a percentage of the sales price in the MLS Fee field. Then press <Tab> and the fee will be calculated and
displayed after the equal sign (=). Or, enter a straight fee amount in the field after the equal sign (=).
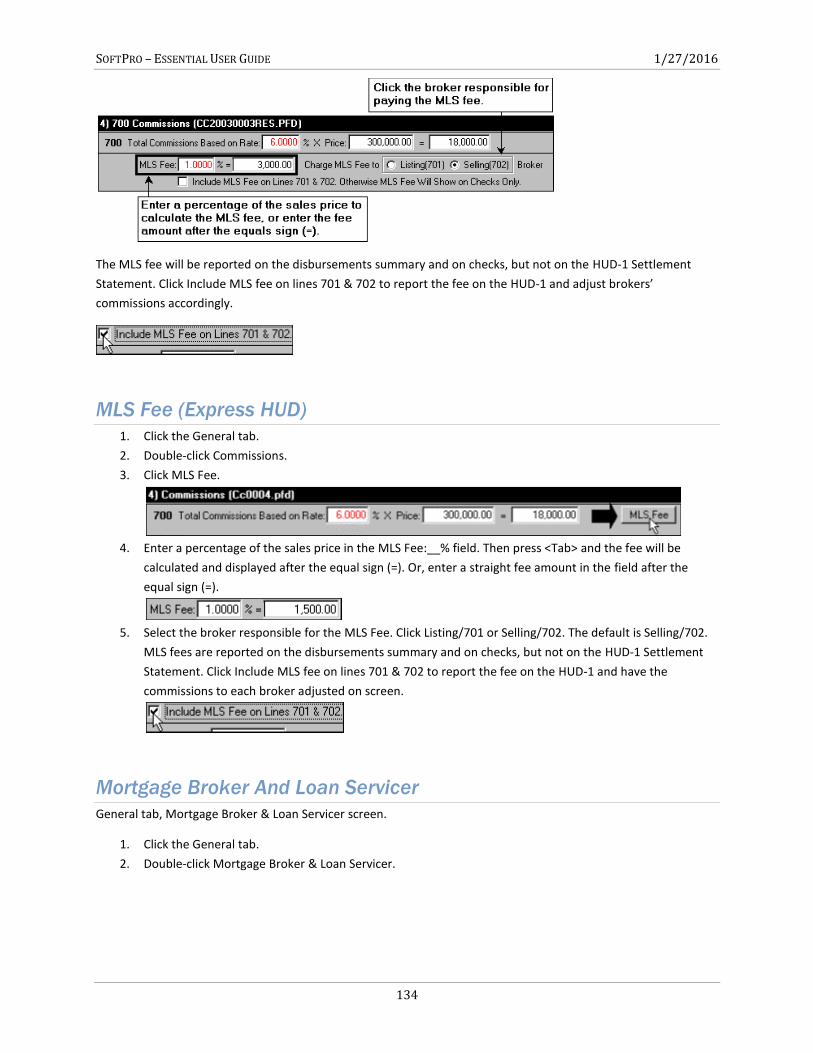
SOFTPRO – ESSENTIAL USER GUIDE 1/27/2016
134
The MLS fee will be reported on the disbursements summary and on checks, but not on the HUD-1 Settlement
Statement. Click Include MLS fee on lines 701 & 702 to report the fee on the HUD-1 and adjust brokers’
commissions accordingly.
MLS Fee (Express HUD)
1. Click the General tab.
2. Double-click Commissions.
3. Click MLS Fee.
4. Enter a percentage of the sales price in the MLS Fee:__% field. Then press <Tab> and the fee will be
calculated and displayed after the equal sign (=). Or, enter a straight fee amount in the field after the
equal sign (=).
5. Select the broker responsible for the MLS Fee. Click Listing/701 or Selling/702. The default is Selling/702.
MLS fees are reported on the disbursements summary and on checks, but not on the HUD-1 Settlement
Statement. Click Include MLS fee on lines 701 & 702 to report the fee on the HUD-1 and have the
commissions to each broker adjusted on screen.
Mortgage Broker And Loan Servicer
General tab, Mortgage Broker & Loan Servicer screen.
1. Click the General tab.
2. Double-click Mortgage Broker & Loan Servicer.
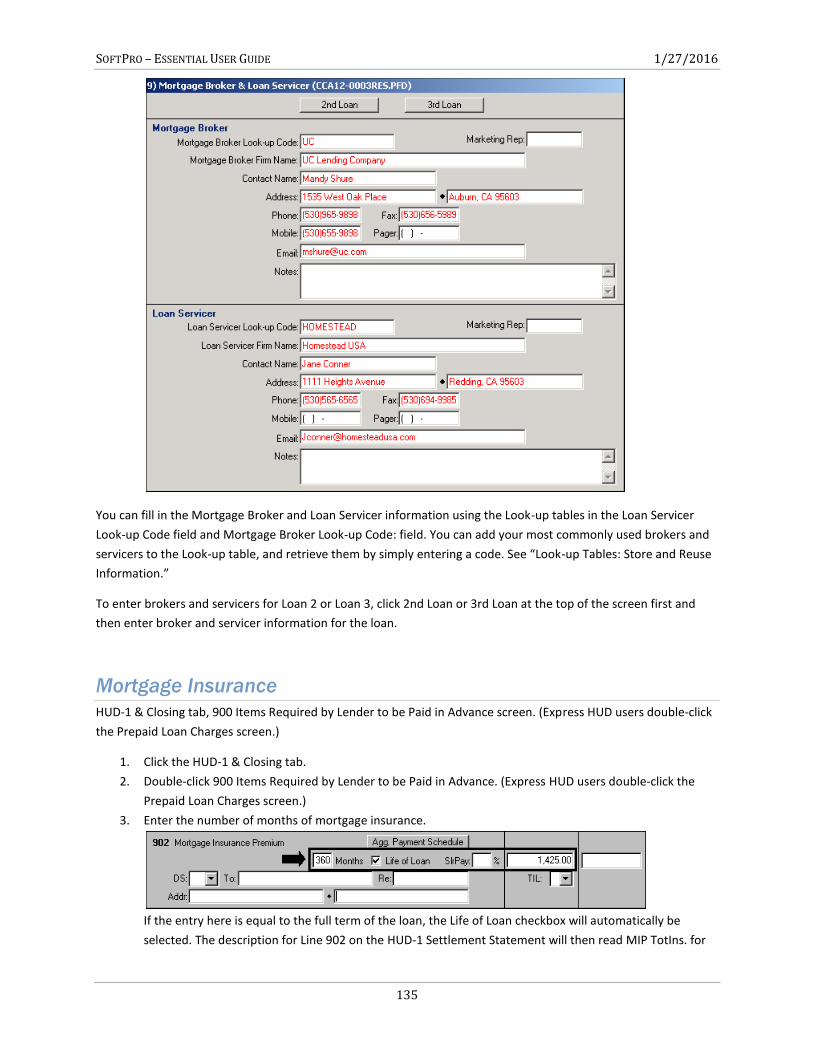
SOFTPRO – ESSENTIAL USER GUIDE 1/27/2016
135
You can fill in the Mortgage Broker and Loan Servicer information using the Look-up tables in the Loan Servicer
Look-up Code field and Mortgage Broker Look-up Code: field. You can add your most commonly used brokers and
servicers to the Look-up table, and retrieve them by simply entering a code. See “Look-up Tables: Store and Reuse
Information.”
To enter brokers and servicers for Loan 2 or Loan 3, click 2nd Loan or 3rd Loan at the top of the screen first and
then enter broker and servicer information for the loan.
Mortgage Insurance
HUD-1 & Closing tab, 900 Items Required by Lender to be Paid in Advance screen. (Express HUD users double-click
the Prepaid Loan Charges screen.)
1. Click the HUD-1 & Closing tab.
2. Double-click 900 Items Required by Lender to be Paid in Advance. (Express HUD users double-click the
Prepaid Loan Charges screen.)
3. Enter the number of months of mortgage insurance.
If the entry here is equal to the full term of the loan, the Life of Loan checkbox will automatically be
selected. The description for Line 902 on the HUD-1 Settlement Statement will then read MIP TotIns. for
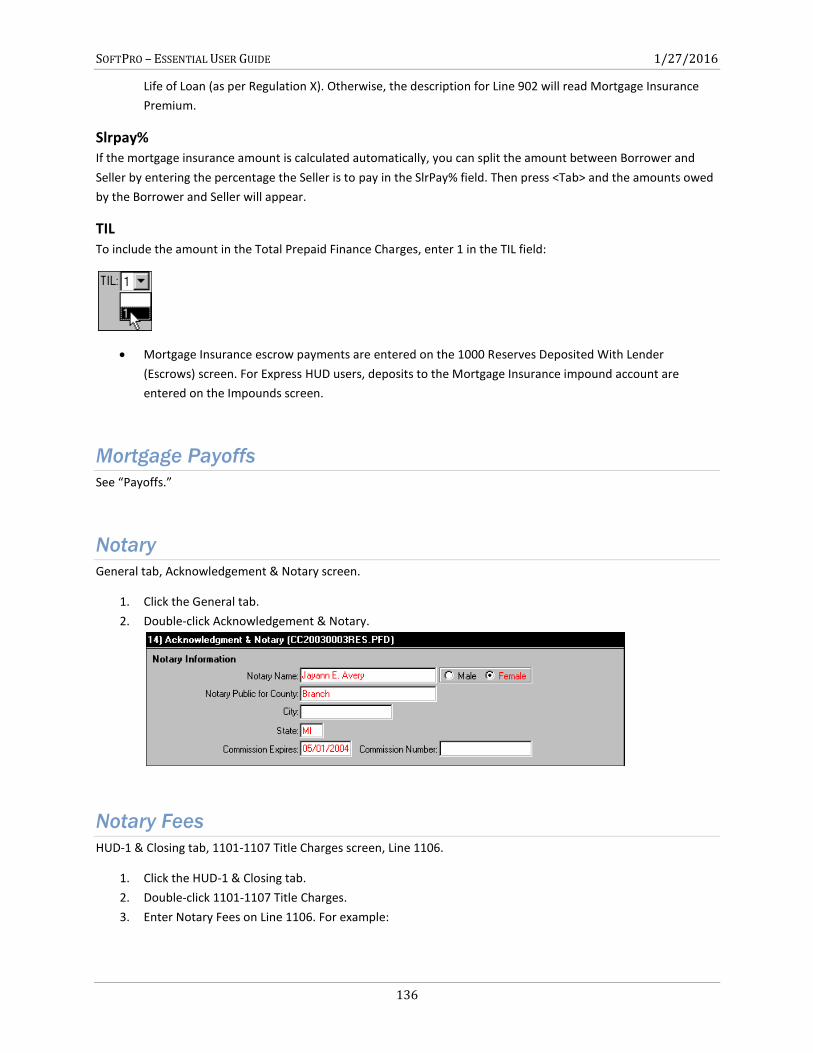
SOFTPRO – ESSENTIAL USER GUIDE 1/27/2016
136
Life of Loan (as per Regulation X). Otherwise, the description for Line 902 will read Mortgage Insurance
Premium.
Slrpay% If the mortgage insurance amount is calculated automatically, you can split the amount between Borrower and
Seller by entering the percentage the Seller is to pay in the SlrPay% field. Then press <Tab> and the amounts owed
by the Borrower and Seller will appear.
TIL To include the amount in the Total Prepaid Finance Charges, enter 1 in the TIL field:
Mortgage Insurance escrow payments are entered on the 1000 Reserves Deposited With Lender
(Escrows) screen. For Express HUD users, deposits to the Mortgage Insurance impound account are
entered on the Impounds screen.
Mortgage Payoffs
See “Payoffs.”
Notary
General tab, Acknowledgement & Notary screen.
1. Click the General tab.
2. Double-click Acknowledgement & Notary.
Notary Fees
HUD-1 & Closing tab, 1101-1107 Title Charges screen, Line 1106.
1. Click the HUD-1 & Closing tab.
2. Double-click 1101-1107 Title Charges.
3. Enter Notary Fees on Line 1106. For example:
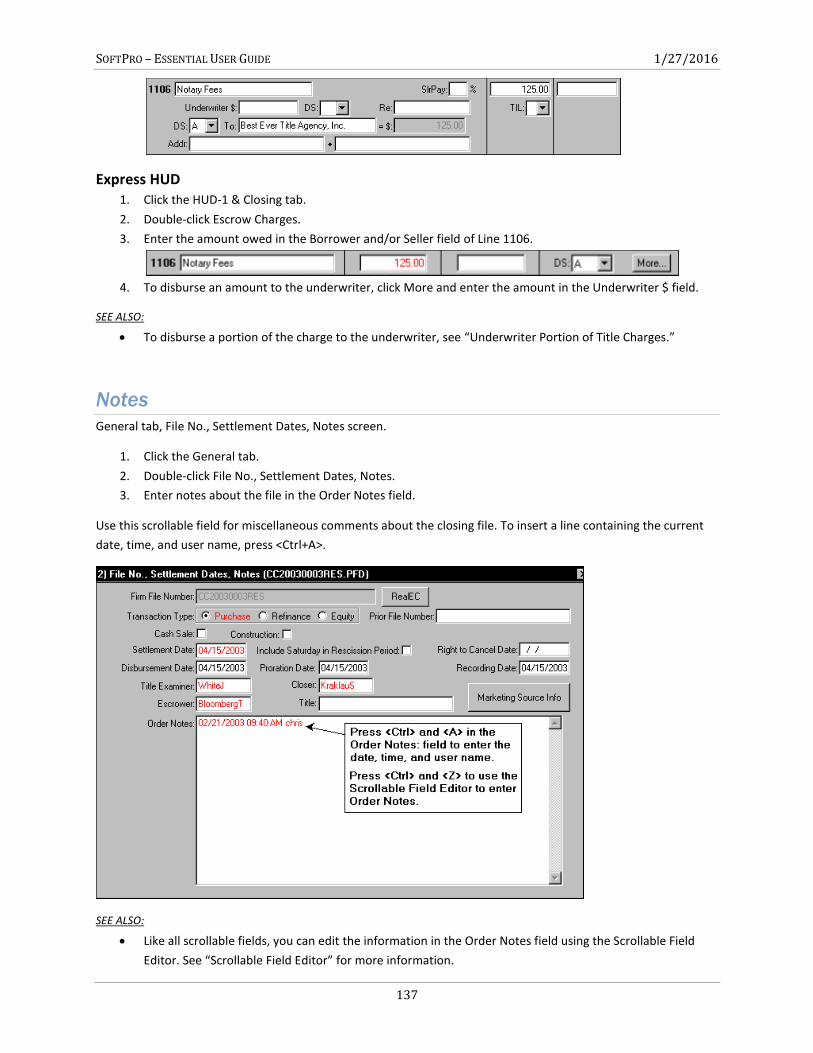
SOFTPRO – ESSENTIAL USER GUIDE 1/27/2016
137
Express HUD 1. Click the HUD-1 & Closing tab.
2. Double-click Escrow Charges.
3. Enter the amount owed in the Borrower and/or Seller field of Line 1106.
4. To disburse an amount to the underwriter, click More and enter the amount in the Underwriter $ field.
SEE ALSO:
To disburse a portion of the charge to the underwriter, see “Underwriter Portion of Title Charges.”
Notes
General tab, File No., Settlement Dates, Notes screen.
1. Click the General tab.
2. Double-click File No., Settlement Dates, Notes.
3. Enter notes about the file in the Order Notes field.
Use this scrollable field for miscellaneous comments about the closing file. To insert a line containing the current
date, time, and user name, press <Ctrl+A>.
SEE ALSO:
Like all scrollable fields, you can edit the information in the Order Notes field using the Scrollable Field
Editor. See “Scrollable Field Editor” for more information.
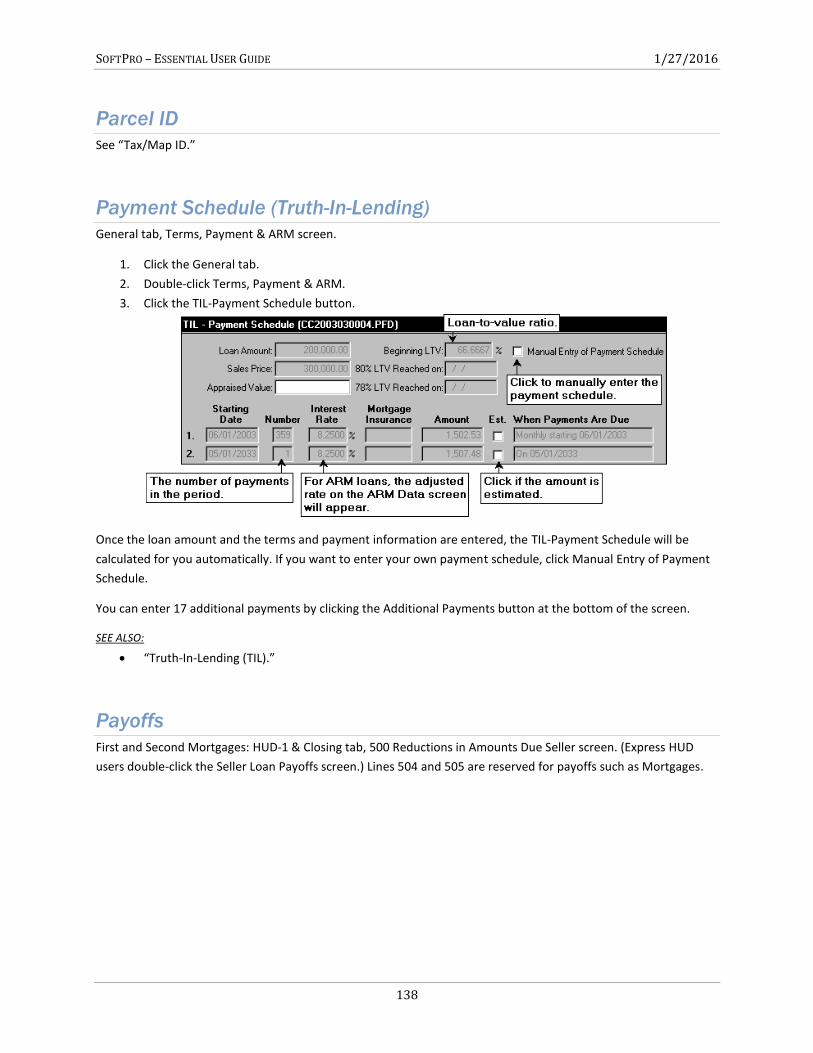
SOFTPRO – ESSENTIAL USER GUIDE 1/27/2016
138
Parcel ID
See “Tax/Map ID.”
Payment Schedule (Truth-In-Lending)
General tab, Terms, Payment & ARM screen.
1. Click the General tab.
2. Double-click Terms, Payment & ARM.
3. Click the TIL-Payment Schedule button.
Once the loan amount and the terms and payment information are entered, the TIL-Payment Schedule will be
calculated for you automatically. If you want to enter your own payment schedule, click Manual Entry of Payment
Schedule.
You can enter 17 additional payments by clicking the Additional Payments button at the bottom of the screen.
SEE ALSO:
“Truth-In-Lending (TIL).”
Payoffs
First and Second Mortgages: HUD-1 & Closing tab, 500 Reductions in Amounts Due Seller screen. (Express HUD
users double-click the Seller Loan Payoffs screen.) Lines 504 and 505 are reserved for payoffs such as Mortgages.
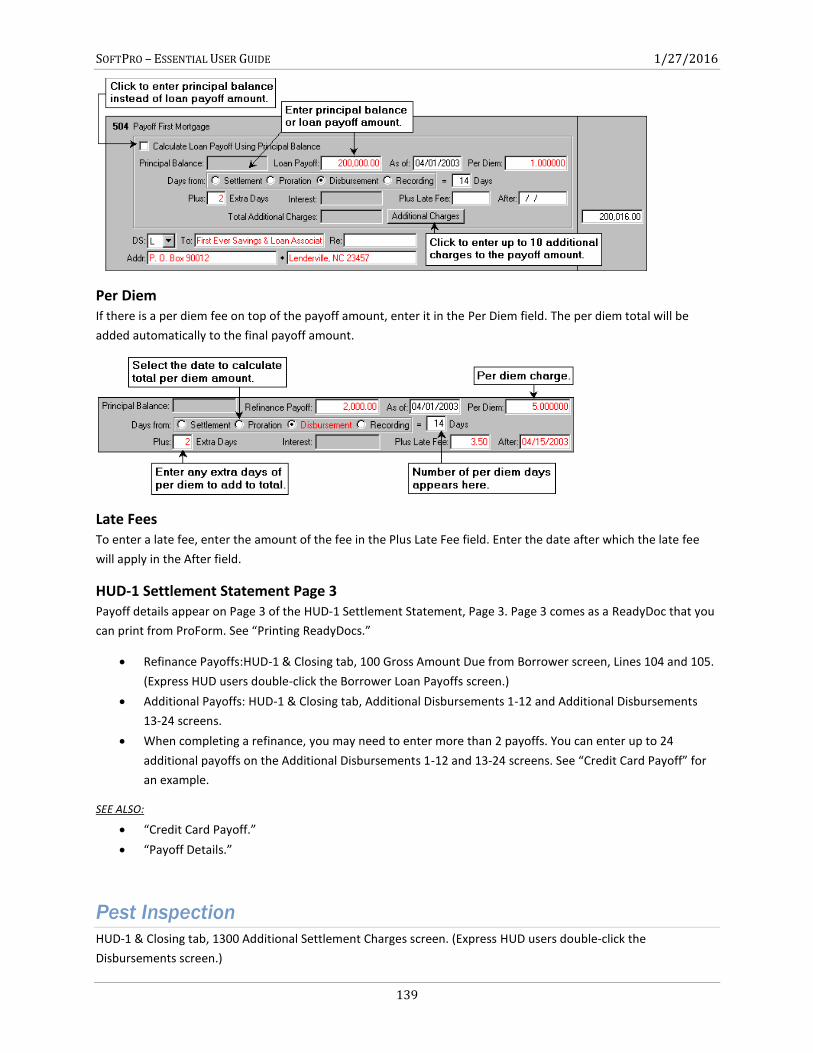
SOFTPRO – ESSENTIAL USER GUIDE 1/27/2016
139
Per Diem If there is a per diem fee on top of the payoff amount, enter it in the Per Diem field. The per diem total will be
added automatically to the final payoff amount.
Late Fees To enter a late fee, enter the amount of the fee in the Plus Late Fee field. Enter the date after which the late fee
will apply in the After field.
HUD-1 Settlement Statement Page 3 Payoff details appear on Page 3 of the HUD-1 Settlement Statement, Page 3. Page 3 comes as a ReadyDoc that you
can print from ProForm. See “Printing ReadyDocs.”
Refinance Payoffs:HUD-1 & Closing tab, 100 Gross Amount Due from Borrower screen, Lines 104 and 105.
(Express HUD users double-click the Borrower Loan Payoffs screen.)
Additional Payoffs: HUD-1 & Closing tab, Additional Disbursements 1-12 and Additional Disbursements
13-24 screens.
When completing a refinance, you may need to enter more than 2 payoffs. You can enter up to 24
additional payoffs on the Additional Disbursements 1-12 and 13-24 screens. See “Credit Card Payoff” for
an example.
SEE ALSO:
“Credit Card Payoff.”
“Payoff Details.”
Pest Inspection
HUD-1 & Closing tab, 1300 Additional Settlement Charges screen. (Express HUD users double-click the
Disbursements screen.)
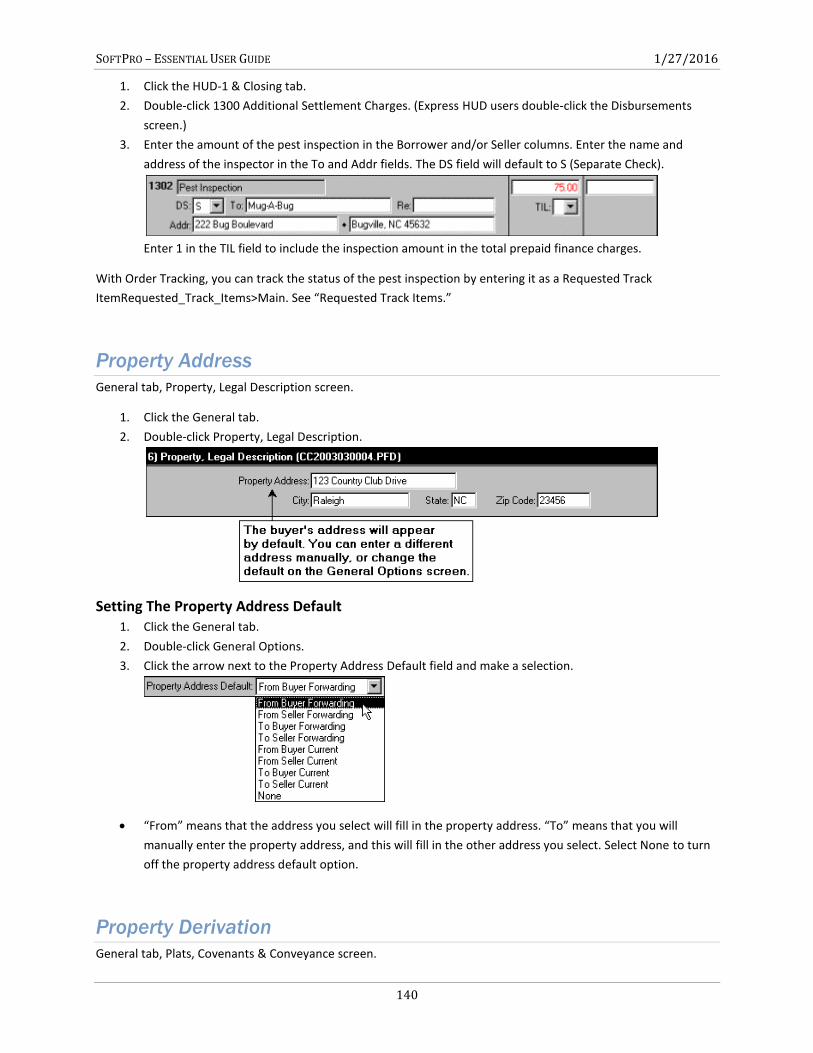
SOFTPRO – ESSENTIAL USER GUIDE 1/27/2016
140
1. Click the HUD-1 & Closing tab.
2. Double-click 1300 Additional Settlement Charges. (Express HUD users double-click the Disbursements
screen.)
3. Enter the amount of the pest inspection in the Borrower and/or Seller columns. Enter the name and
address of the inspector in the To and Addr fields. The DS field will default to S (Separate Check).
Enter 1 in the TIL field to include the inspection amount in the total prepaid finance charges.
With Order Tracking, you can track the status of the pest inspection by entering it as a Requested Track
ItemRequested_Track_Items>Main. See “Requested Track Items.”
Property Address
General tab, Property, Legal Description screen.
1. Click the General tab.
2. Double-click Property, Legal Description.
Setting The Property Address Default 1. Click the General tab.
2. Double-click General Options.
3. Click the arrow next to the Property Address Default field and make a selection.
“From” means that the address you select will fill in the property address. “To” means that you will
manually enter the property address, and this will fill in the other address you select. Select None to turn
off the property address default option.
Property Derivation
General tab, Plats, Covenants & Conveyance screen.
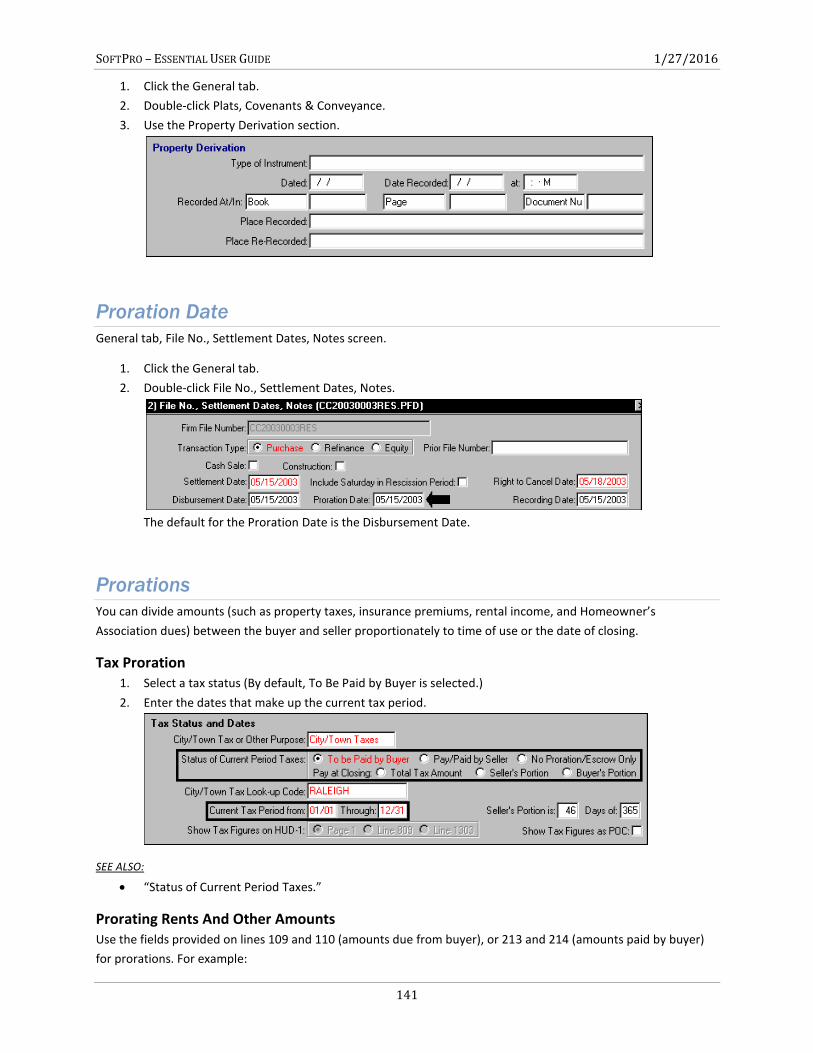
SOFTPRO – ESSENTIAL USER GUIDE 1/27/2016
141
1. Click the General tab.
2. Double-click Plats, Covenants & Conveyance.
3. Use the Property Derivation section.
Proration Date
General tab, File No., Settlement Dates, Notes screen.
1. Click the General tab.
2. Double-click File No., Settlement Dates, Notes.
The default for the Proration Date is the Disbursement Date.
Prorations
You can divide amounts (such as property taxes, insurance premiums, rental income, and Homeowner’s
Association dues) between the buyer and seller proportionately to time of use or the date of closing.
Tax Proration 1. Select a tax status (By default, To Be Paid by Buyer is selected.)
2. Enter the dates that make up the current tax period.
SEE ALSO:
“Status of Current Period Taxes.”
Prorating Rents And Other Amounts Use the fields provided on lines 109 and 110 (amounts due from buyer), or 213 and 214 (amounts paid by buyer)
for prorations. For example:
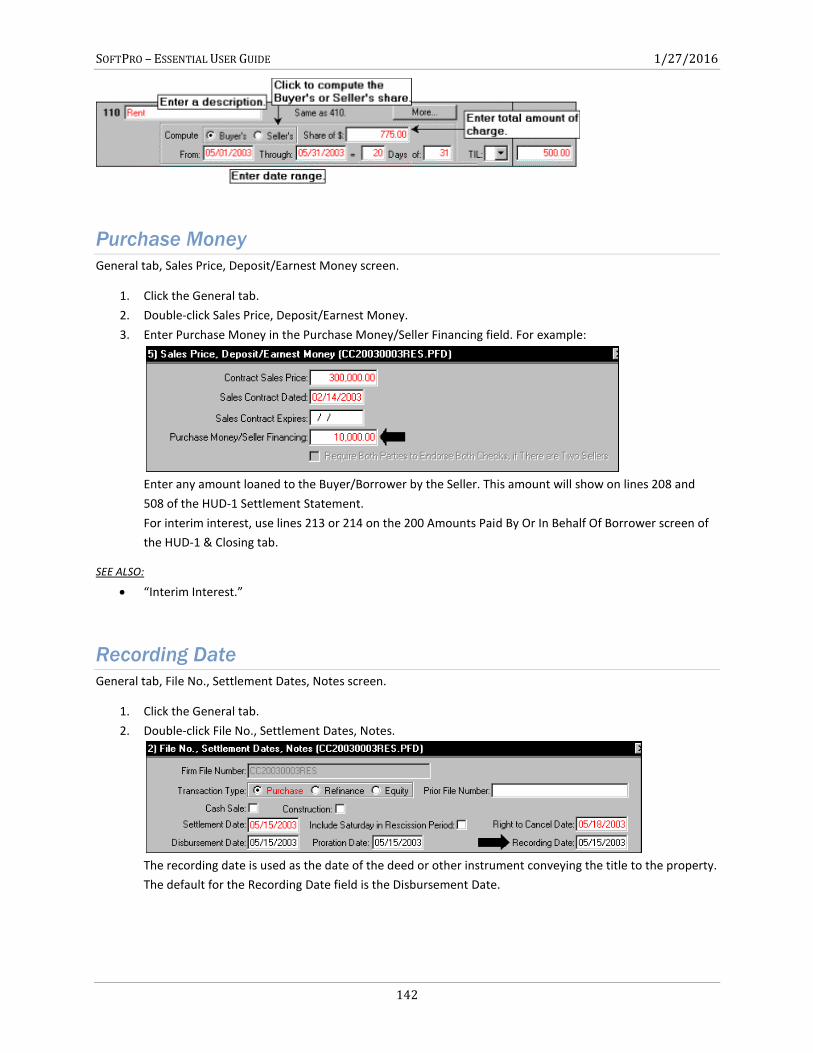
SOFTPRO – ESSENTIAL USER GUIDE 1/27/2016
142
Purchase Money
General tab, Sales Price, Deposit/Earnest Money screen.
1. Click the General tab.
2. Double-click Sales Price, Deposit/Earnest Money.
3. Enter Purchase Money in the Purchase Money/Seller Financing field. For example:
Enter any amount loaned to the Buyer/Borrower by the Seller. This amount will show on lines 208 and
508 of the HUD-1 Settlement Statement.
For interim interest, use lines 213 or 214 on the 200 Amounts Paid By Or In Behalf Of Borrower screen of
the HUD-1 & Closing tab.
SEE ALSO:
“Interim Interest.”
Recording Date
General tab, File No., Settlement Dates, Notes screen.
1. Click the General tab.
2. Double-click File No., Settlement Dates, Notes.
The recording date is used as the date of the deed or other instrument conveying the title to the property.
The default for the Recording Date field is the Disbursement Date.

SOFTPRO – ESSENTIAL USER GUIDE 1/27/2016
143
Referral Fee
See “Additional Disbursements from Broker’s Commissions.”
Refinance Payoffs
See “Payoffs.”
Restrictions
General tab, Plats, Covenants & Conveyance screen.
1. Click the General tab.
2. Double-click Plats, Covenants & Conveyance.
3. Scroll to the bottom of the screen. Click the More button.
4. Use the Restrictions field on the New Conveyance dialog that appears.
Restrictive Covenants
General tab, Plats, Covenants & Conveyance screen.
1. Click the General tab.
2. Double-click Plats, Covenants & Conveyance.
3. Use the Restrictive Covenants section.
Requirements
See Chapter 5, “Requirements and Exceptions”.
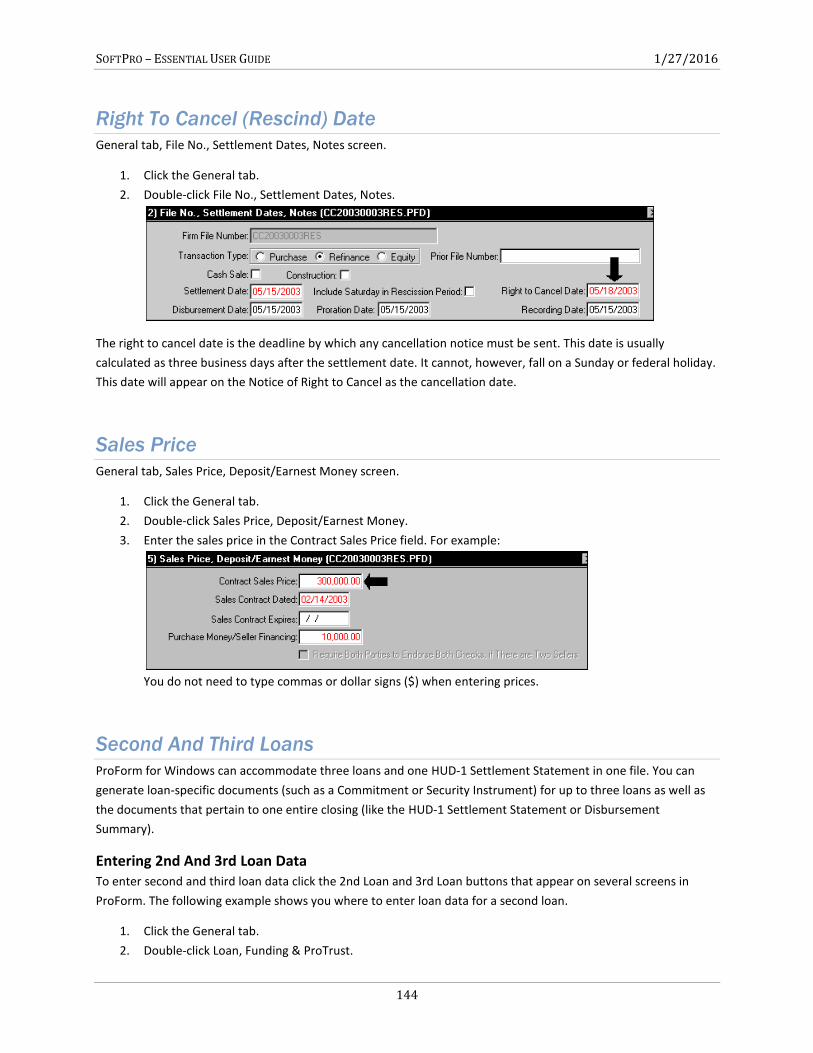
SOFTPRO – ESSENTIAL USER GUIDE 1/27/2016
144
Right To Cancel (Rescind) Date
General tab, File No., Settlement Dates, Notes screen.
1. Click the General tab.
2. Double-click File No., Settlement Dates, Notes.
The right to cancel date is the deadline by which any cancellation notice must be sent. This date is usually
calculated as three business days after the settlement date. It cannot, however, fall on a Sunday or federal holiday.
This date will appear on the Notice of Right to Cancel as the cancellation date.
Sales Price
General tab, Sales Price, Deposit/Earnest Money screen.
1. Click the General tab.
2. Double-click Sales Price, Deposit/Earnest Money.
3. Enter the sales price in the Contract Sales Price field. For example:
You do not need to type commas or dollar signs ($) when entering prices.
Second And Third Loans
ProForm for Windows can accommodate three loans and one HUD-1 Settlement Statement in one file. You can
generate loan-specific documents (such as a Commitment or Security Instrument) for up to three loans as well as
the documents that pertain to one entire closing (like the HUD-1 Settlement Statement or Disbursement
Summary).
Entering 2nd And 3rd Loan Data To enter second and third loan data click the 2nd Loan and 3rd Loan buttons that appear on several screens in
ProForm. The following example shows you where to enter loan data for a second loan.
1. Click the General tab.
2. Double-click Loan, Funding & ProTrust.
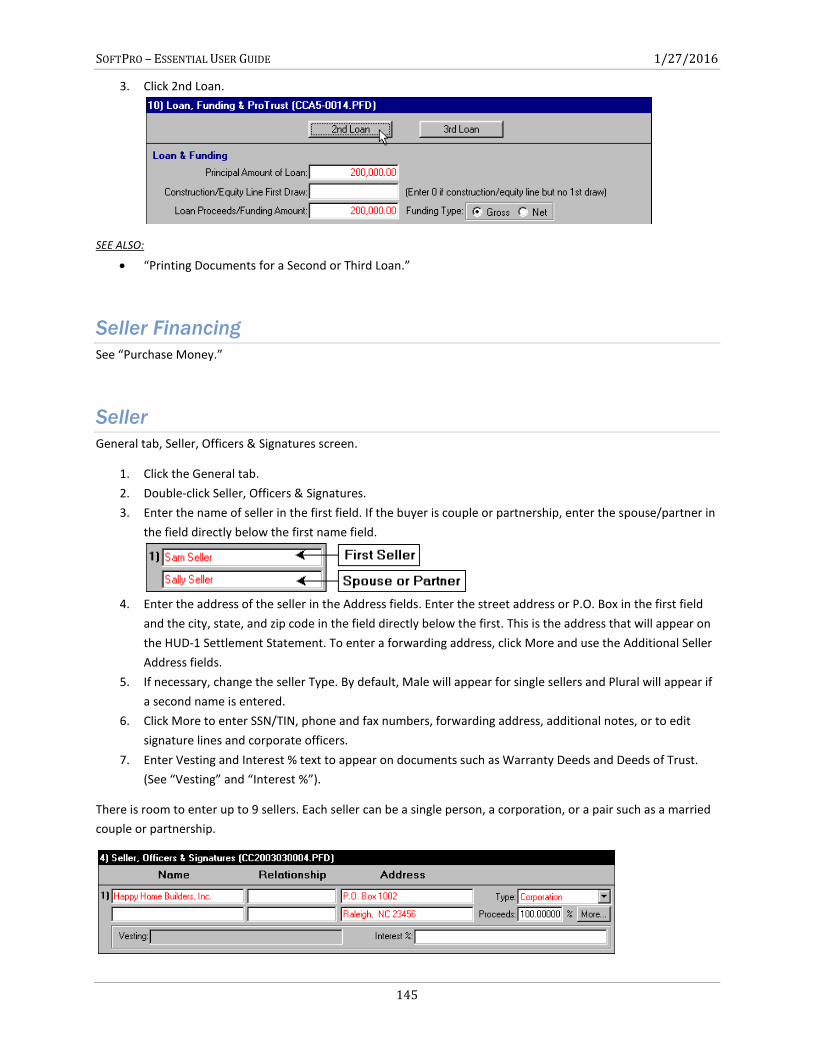
SOFTPRO – ESSENTIAL USER GUIDE 1/27/2016
145
3. Click 2nd Loan.
SEE ALSO:
“Printing Documents for a Second or Third Loan.”
Seller Financing
See “Purchase Money.”
Seller
General tab, Seller, Officers & Signatures screen.
1. Click the General tab.
2. Double-click Seller, Officers & Signatures.
3. Enter the name of seller in the first field. If the buyer is couple or partnership, enter the spouse/partner in
the field directly below the first name field.
4. Enter the address of the seller in the Address fields. Enter the street address or P.O. Box in the first field
and the city, state, and zip code in the field directly below the first. This is the address that will appear on
the HUD-1 Settlement Statement. To enter a forwarding address, click More and use the Additional Seller
Address fields.
5. If necessary, change the seller Type. By default, Male will appear for single sellers and Plural will appear if
a second name is entered.
6. Click More to enter SSN/TIN, phone and fax numbers, forwarding address, additional notes, or to edit
signature lines and corporate officers.
7. Enter Vesting and Interest % text to appear on documents such as Warranty Deeds and Deeds of Trust.
(See “Vesting” and “Interest %”).
There is room to enter up to 9 sellers. Each seller can be a single person, a corporation, or a pair such as a married
couple or partnership.
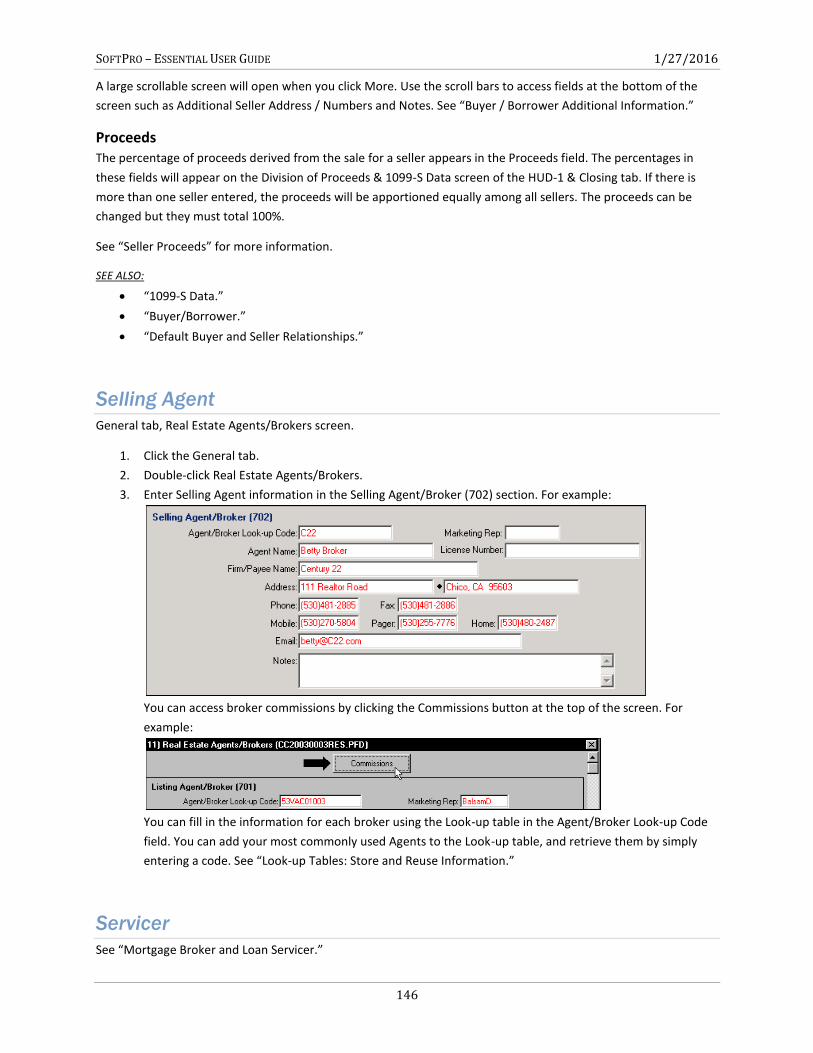
SOFTPRO – ESSENTIAL USER GUIDE 1/27/2016
146
A large scrollable screen will open when you click More. Use the scroll bars to access fields at the bottom of the
screen such as Additional Seller Address / Numbers and Notes. See “Buyer / Borrower Additional Information.”
Proceeds The percentage of proceeds derived from the sale for a seller appears in the Proceeds field. The percentages in
these fields will appear on the Division of Proceeds & 1099-S Data screen of the HUD-1 & Closing tab. If there is
more than one seller entered, the proceeds will be apportioned equally among all sellers. The proceeds can be
changed but they must total 100%.
See “Seller Proceeds” for more information.
SEE ALSO:
“1099-S Data.”
“Buyer/Borrower.”
“Default Buyer and Seller Relationships.”
Selling Agent
General tab, Real Estate Agents/Brokers screen.
1. Click the General tab.
2. Double-click Real Estate Agents/Brokers.
3. Enter Selling Agent information in the Selling Agent/Broker (702) section. For example:
You can access broker commissions by clicking the Commissions button at the top of the screen. For
example:
You can fill in the information for each broker using the Look-up table in the Agent/Broker Look-up Code
field. You can add your most commonly used Agents to the Look-up table, and retrieve them by simply
entering a code. See “Look-up Tables: Store and Reuse Information.”
Servicer
See “Mortgage Broker and Loan Servicer.”
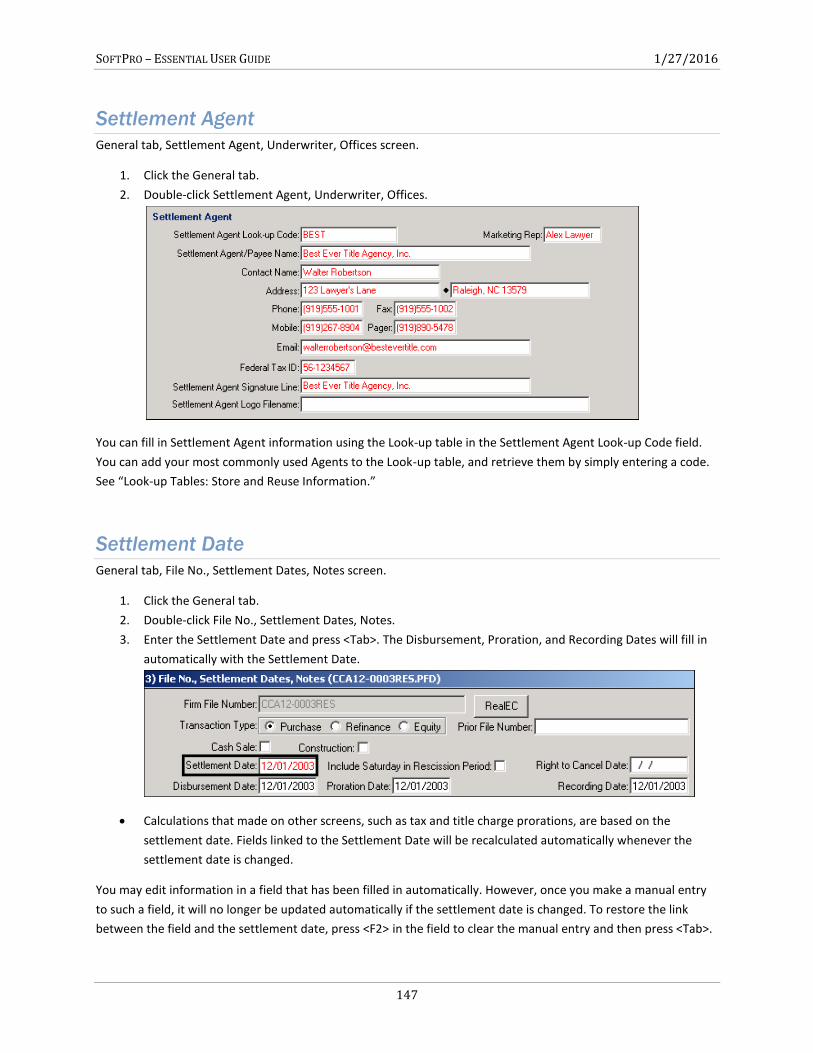
SOFTPRO – ESSENTIAL USER GUIDE 1/27/2016
147
Settlement Agent
General tab, Settlement Agent, Underwriter, Offices screen.
1. Click the General tab.
2. Double-click Settlement Agent, Underwriter, Offices.
You can fill in Settlement Agent information using the Look-up table in the Settlement Agent Look-up Code field.
You can add your most commonly used Agents to the Look-up table, and retrieve them by simply entering a code.
See “Look-up Tables: Store and Reuse Information.”
Settlement Date
General tab, File No., Settlement Dates, Notes screen.
1. Click the General tab.
2. Double-click File No., Settlement Dates, Notes.
3. Enter the Settlement Date and press <Tab>. The Disbursement, Proration, and Recording Dates will fill in
automatically with the Settlement Date.
Calculations that made on other screens, such as tax and title charge prorations, are based on the
settlement date. Fields linked to the Settlement Date will be recalculated automatically whenever the
settlement date is changed.
You may edit information in a field that has been filled in automatically. However, once you make a manual entry
to such a field, it will no longer be updated automatically if the settlement date is changed. To restore the link
between the field and the settlement date, press <F2> in the field to clear the manual entry and then press <Tab>.
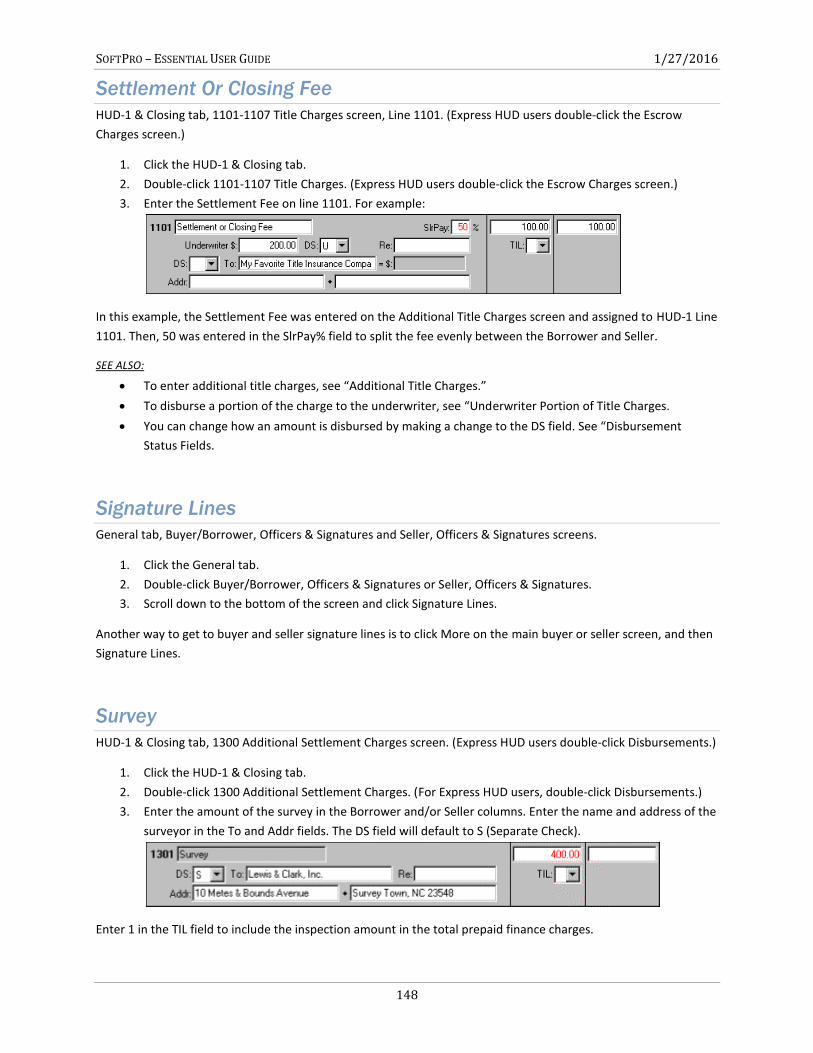
SOFTPRO – ESSENTIAL USER GUIDE 1/27/2016
148
Settlement Or Closing Fee
HUD-1 & Closing tab, 1101-1107 Title Charges screen, Line 1101. (Express HUD users double-click the Escrow
Charges screen.)
1. Click the HUD-1 & Closing tab.
2. Double-click 1101-1107 Title Charges. (Express HUD users double-click the Escrow Charges screen.)
3. Enter the Settlement Fee on line 1101. For example:
In this example, the Settlement Fee was entered on the Additional Title Charges screen and assigned to HUD-1 Line
1101. Then, 50 was entered in the SlrPay% field to split the fee evenly between the Borrower and Seller.
SEE ALSO:
To enter additional title charges, see “Additional Title Charges.”
To disburse a portion of the charge to the underwriter, see “Underwriter Portion of Title Charges.
You can change how an amount is disbursed by making a change to the DS field. See “Disbursement
Status Fields.
Signature Lines
General tab, Buyer/Borrower, Officers & Signatures and Seller, Officers & Signatures screens.
1. Click the General tab.
2. Double-click Buyer/Borrower, Officers & Signatures or Seller, Officers & Signatures.
3. Scroll down to the bottom of the screen and click Signature Lines.
Another way to get to buyer and seller signature lines is to click More on the main buyer or seller screen, and then
Signature Lines.
Survey
HUD-1 & Closing tab, 1300 Additional Settlement Charges screen. (Express HUD users double-click Disbursements.)
1. Click the HUD-1 & Closing tab.
2. Double-click 1300 Additional Settlement Charges. (For Express HUD users, double-click Disbursements.)
3. Enter the amount of the survey in the Borrower and/or Seller columns. Enter the name and address of the
surveyor in the To and Addr fields. The DS field will default to S (Separate Check).
Enter 1 in the TIL field to include the inspection amount in the total prepaid finance charges.
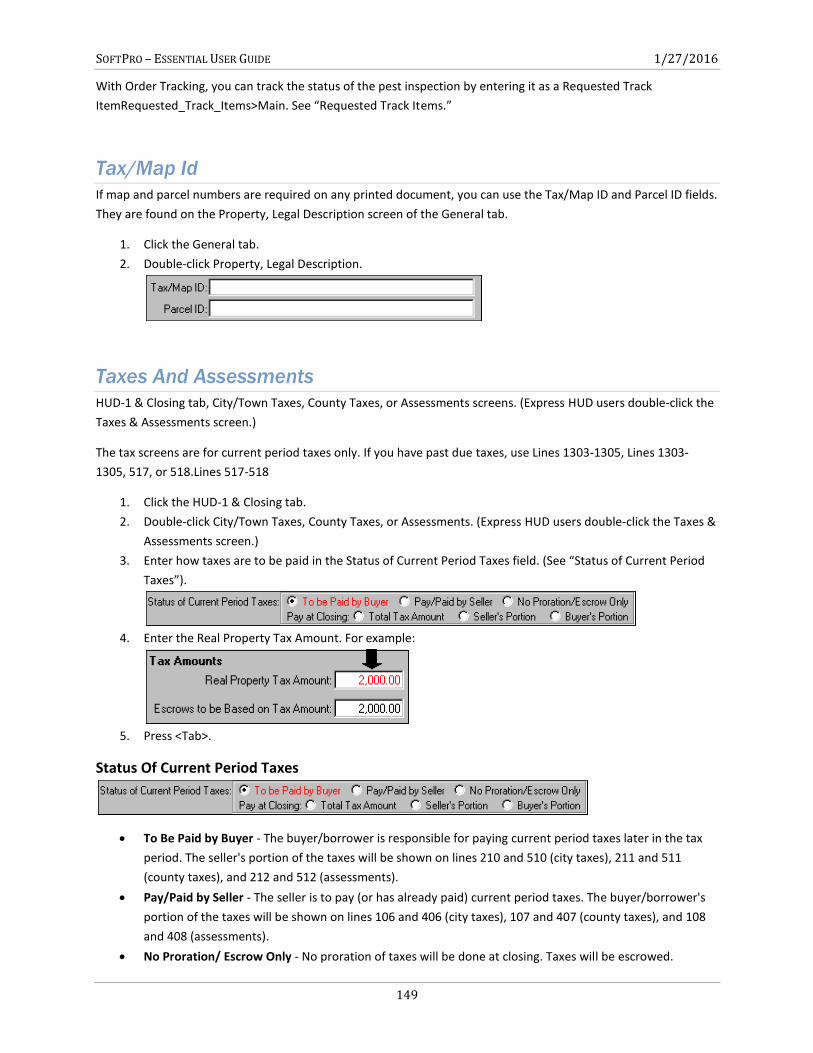
SOFTPRO – ESSENTIAL USER GUIDE 1/27/2016
149
With Order Tracking, you can track the status of the pest inspection by entering it as a Requested Track
ItemRequested_Track_Items>Main. See “Requested Track Items.”
Tax/Map Id
If map and parcel numbers are required on any printed document, you can use the Tax/Map ID and Parcel ID fields.
They are found on the Property, Legal Description screen of the General tab.
1. Click the General tab.
2. Double-click Property, Legal Description.
Taxes And Assessments
HUD-1 & Closing tab, City/Town Taxes, County Taxes, or Assessments screens. (Express HUD users double-click the
Taxes & Assessments screen.)
The tax screens are for current period taxes only. If you have past due taxes, use Lines 1303-1305, Lines 1303-
1305, 517, or 518.Lines 517-518
1. Click the HUD-1 & Closing tab.
2. Double-click City/Town Taxes, County Taxes, or Assessments. (Express HUD users double-click the Taxes &
Assessments screen.)
3. Enter how taxes are to be paid in the Status of Current Period Taxes field. (See “Status of Current Period
Taxes”).
4. Enter the Real Property Tax Amount. For example:
5. Press <Tab>.
Status Of Current Period Taxes
To Be Paid by Buyer - The buyer/borrower is responsible for paying current period taxes later in the tax
period. The seller's portion of the taxes will be shown on lines 210 and 510 (city taxes), 211 and 511
(county taxes), and 212 and 512 (assessments).
Pay/Paid by Seller - The seller is to pay (or has already paid) current period taxes. The buyer/borrower's
portion of the taxes will be shown on lines 106 and 406 (city taxes), 107 and 407 (county taxes), and 108
and 408 (assessments).
No Proration/ Escrow Only - No proration of taxes will be done at closing. Taxes will be escrowed.
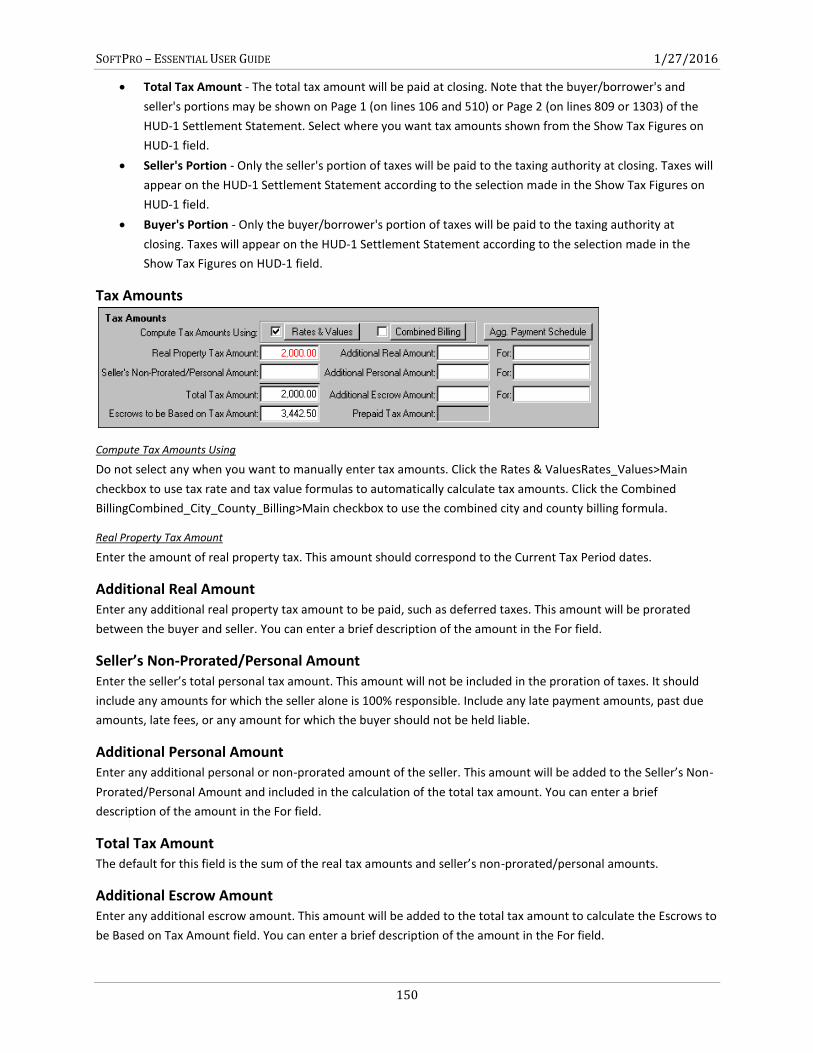
SOFTPRO – ESSENTIAL USER GUIDE 1/27/2016
150
Total Tax Amount - The total tax amount will be paid at closing. Note that the buyer/borrower's and
seller's portions may be shown on Page 1 (on lines 106 and 510) or Page 2 (on lines 809 or 1303) of the
HUD-1 Settlement Statement. Select where you want tax amounts shown from the Show Tax Figures on
HUD-1 field.
Seller's Portion - Only the seller's portion of taxes will be paid to the taxing authority at closing. Taxes will
appear on the HUD-1 Settlement Statement according to the selection made in the Show Tax Figures on
HUD-1 field.
Buyer's Portion - Only the buyer/borrower's portion of taxes will be paid to the taxing authority at
closing. Taxes will appear on the HUD-1 Settlement Statement according to the selection made in the
Show Tax Figures on HUD-1 field.
Tax Amounts
Compute Tax Amounts Using
Do not select any when you want to manually enter tax amounts. Click the Rates & ValuesRates_Values>Main
checkbox to use tax rate and tax value formulas to automatically calculate tax amounts. Click the Combined
BillingCombined_City_County_Billing>Main checkbox to use the combined city and county billing formula.
Real Property Tax Amount
Enter the amount of real property tax. This amount should correspond to the Current Tax Period dates.
Additional Real Amount Enter any additional real property tax amount to be paid, such as deferred taxes. This amount will be prorated
between the buyer and seller. You can enter a brief description of the amount in the For field.
Seller’s Non-Prorated/Personal Amount Enter the seller’s total personal tax amount. This amount will not be included in the proration of taxes. It should
include any amounts for which the seller alone is 100% responsible. Include any late payment amounts, past due
amounts, late fees, or any amount for which the buyer should not be held liable.
Additional Personal Amount Enter any additional personal or non-prorated amount of the seller. This amount will be added to the Seller’s Non-
Prorated/Personal Amount and included in the calculation of the total tax amount. You can enter a brief
description of the amount in the For field.
Total Tax Amount The default for this field is the sum of the real tax amounts and seller’s non-prorated/personal amounts.
Additional Escrow Amount Enter any additional escrow amount. This amount will be added to the total tax amount to calculate the Escrows to
be Based on Tax Amount field. You can enter a brief description of the amount in the For field.
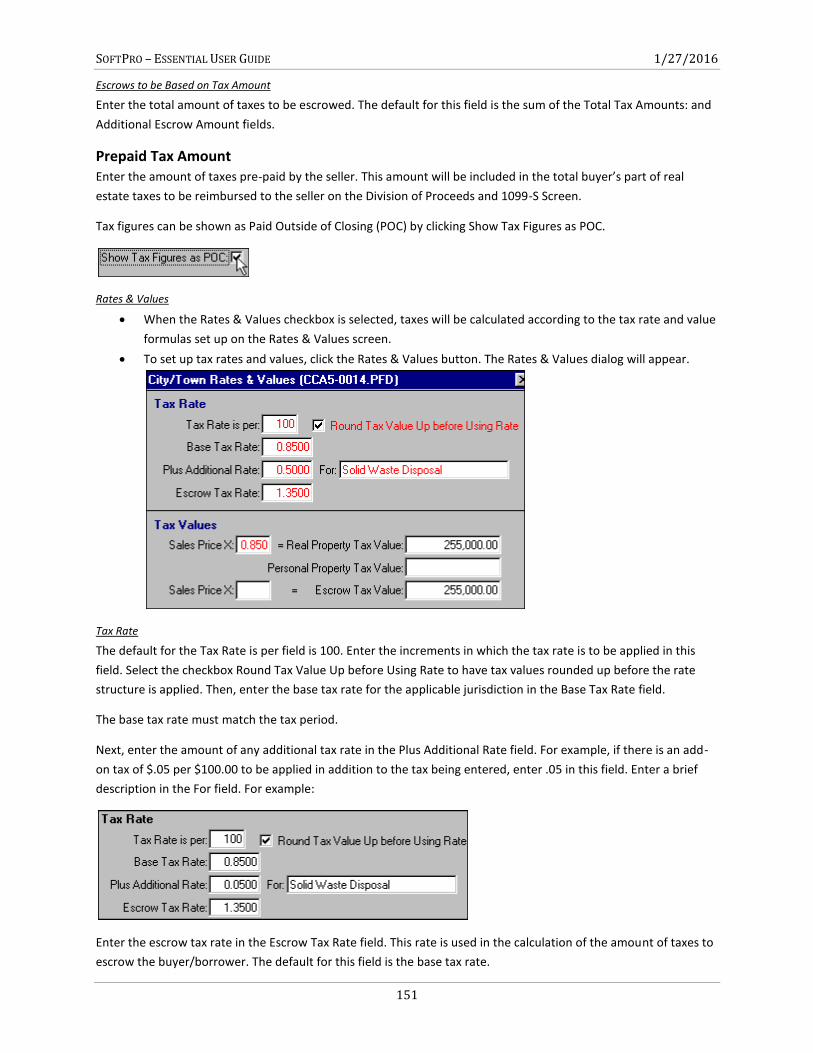
SOFTPRO – ESSENTIAL USER GUIDE 1/27/2016
151
Escrows to be Based on Tax Amount
Enter the total amount of taxes to be escrowed. The default for this field is the sum of the Total Tax Amounts: and
Additional Escrow Amount fields.
Prepaid Tax Amount Enter the amount of taxes pre-paid by the seller. This amount will be included in the total buyer’s part of real
estate taxes to be reimbursed to the seller on the Division of Proceeds and 1099-S Screen.
Tax figures can be shown as Paid Outside of Closing (POC) by clicking Show Tax Figures as POC.
Rates & Values
When the Rates & Values checkbox is selected, taxes will be calculated according to the tax rate and value
formulas set up on the Rates & Values screen.
To set up tax rates and values, click the Rates & Values button. The Rates & Values dialog will appear.
Tax Rate
The default for the Tax Rate is per field is 100. Enter the increments in which the tax rate is to be applied in this
field. Select the checkbox Round Tax Value Up before Using Rate to have tax values rounded up before the rate
structure is applied. Then, enter the base tax rate for the applicable jurisdiction in the Base Tax Rate field.
The base tax rate must match the tax period.
Next, enter the amount of any additional tax rate in the Plus Additional Rate field. For example, if there is an add-
on tax of $.05 per $100.00 to be applied in addition to the tax being entered, enter .05 in this field. Enter a brief
description in the For field. For example:
Enter the escrow tax rate in the Escrow Tax Rate field. This rate is used in the calculation of the amount of taxes to
escrow the buyer/borrower. The default for this field is the base tax rate.
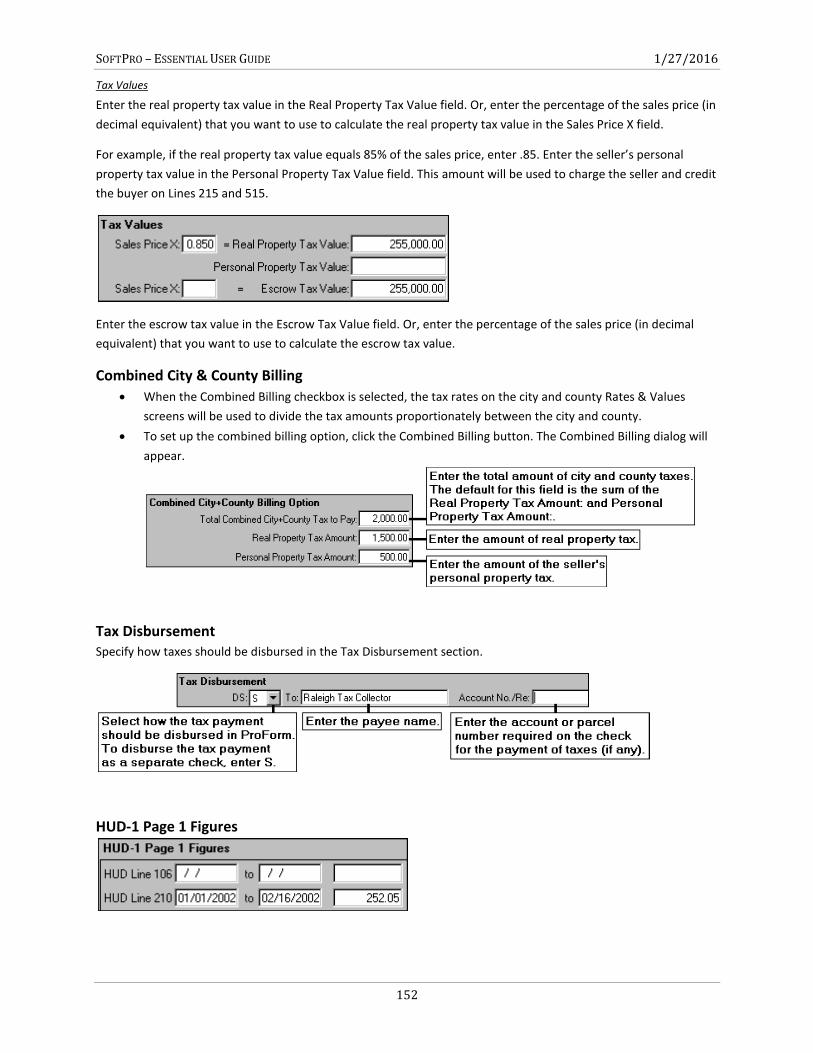
SOFTPRO – ESSENTIAL USER GUIDE 1/27/2016
152
Tax Values
Enter the real property tax value in the Real Property Tax Value field. Or, enter the percentage of the sales price (in
decimal equivalent) that you want to use to calculate the real property tax value in the Sales Price X field.
For example, if the real property tax value equals 85% of the sales price, enter .85. Enter the seller’s personal
property tax value in the Personal Property Tax Value field. This amount will be used to charge the seller and credit
the buyer on Lines 215 and 515.
Enter the escrow tax value in the Escrow Tax Value field. Or, enter the percentage of the sales price (in decimal
equivalent) that you want to use to calculate the escrow tax value.
Combined City & County Billing
When the Combined Billing checkbox is selected, the tax rates on the city and county Rates & Values
screens will be used to divide the tax amounts proportionately between the city and county.
To set up the combined billing option, click the Combined Billing button. The Combined Billing dialog will
appear.
Tax Disbursement Specify how taxes should be disbursed in the Tax Disbursement section.
HUD-1 Page 1 Figures
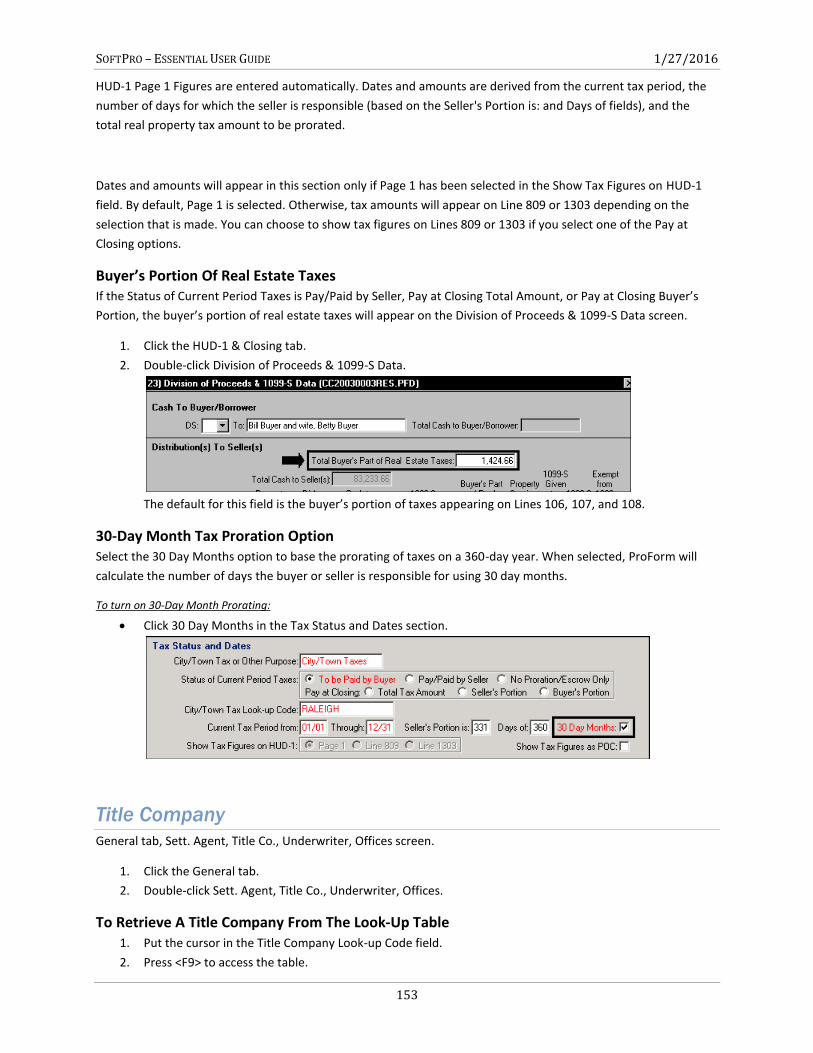
SOFTPRO – ESSENTIAL USER GUIDE 1/27/2016
153
HUD-1 Page 1 Figures are entered automatically. Dates and amounts are derived from the current tax period, the
number of days for which the seller is responsible (based on the Seller's Portion is: and Days of fields), and the
total real property tax amount to be prorated.
Dates and amounts will appear in this section only if Page 1 has been selected in the Show Tax Figures on HUD-1
field. By default, Page 1 is selected. Otherwise, tax amounts will appear on Line 809 or 1303 depending on the
selection that is made. You can choose to show tax figures on Lines 809 or 1303 if you select one of the Pay at
Closing options.
Buyer’s Portion Of Real Estate Taxes If the Status of Current Period Taxes is Pay/Paid by Seller, Pay at Closing Total Amount, or Pay at Closing Buyer’s
Portion, the buyer’s portion of real estate taxes will appear on the Division of Proceeds & 1099-S Data screen.
1. Click the HUD-1 & Closing tab.
2. Double-click Division of Proceeds & 1099-S Data.
The default for this field is the buyer’s portion of taxes appearing on Lines 106, 107, and 108.
30-Day Month Tax Proration Option Select the 30 Day Months option to base the prorating of taxes on a 360-day year. When selected, ProForm will
calculate the number of days the buyer or seller is responsible for using 30 day months.
To turn on 30-Day Month Prorating:
Click 30 Day Months in the Tax Status and Dates section.
Title Company
General tab, Sett. Agent, Title Co., Underwriter, Offices screen.
1. Click the General tab.
2. Double-click Sett. Agent, Title Co., Underwriter, Offices.
To Retrieve A Title Company From The Look-Up Table 1. Put the cursor in the Title Company Look-up Code field.
2. Press <F9> to access the table.
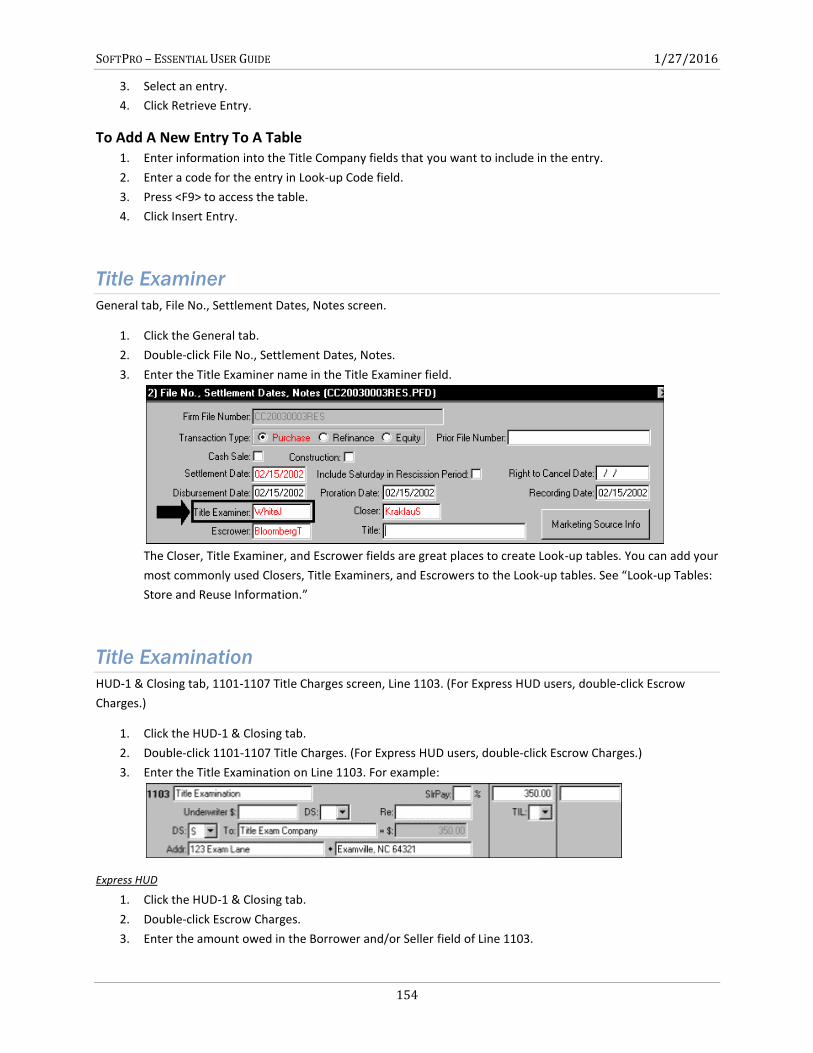
SOFTPRO – ESSENTIAL USER GUIDE 1/27/2016
154
3. Select an entry.
4. Click Retrieve Entry.
To Add A New Entry To A Table 1. Enter information into the Title Company fields that you want to include in the entry.
2. Enter a code for the entry in Look-up Code field.
3. Press <F9> to access the table.
4. Click Insert Entry.
Title Examiner
General tab, File No., Settlement Dates, Notes screen.
1. Click the General tab.
2. Double-click File No., Settlement Dates, Notes.
3. Enter the Title Examiner name in the Title Examiner field.
The Closer, Title Examiner, and Escrower fields are great places to create Look-up tables. You can add your
most commonly used Closers, Title Examiners, and Escrowers to the Look-up tables. See “Look-up Tables:
Store and Reuse Information.”
Title Examination
HUD-1 & Closing tab, 1101-1107 Title Charges screen, Line 1103. (For Express HUD users, double-click Escrow
Charges.)
1. Click the HUD-1 & Closing tab.
2. Double-click 1101-1107 Title Charges. (For Express HUD users, double-click Escrow Charges.)
3. Enter the Title Examination on Line 1103. For example:
Express HUD
1. Click the HUD-1 & Closing tab.
2. Double-click Escrow Charges.
3. Enter the amount owed in the Borrower and/or Seller field of Line 1103.
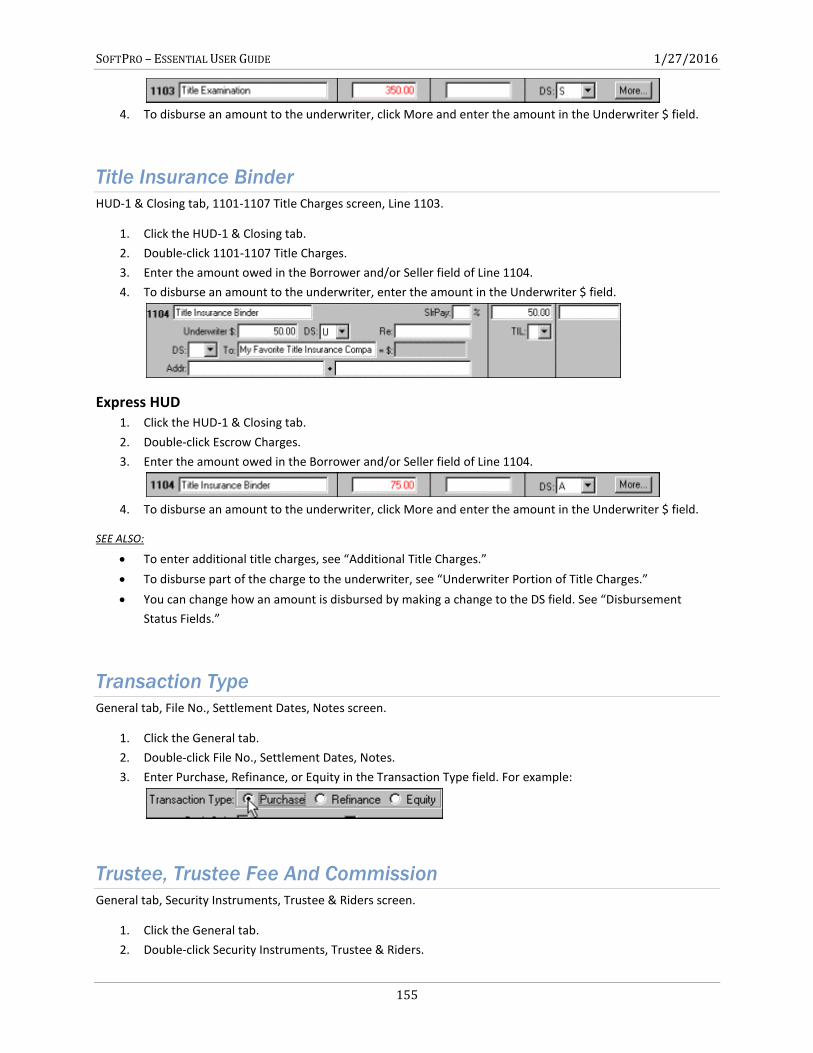
SOFTPRO – ESSENTIAL USER GUIDE 1/27/2016
155
4. To disburse an amount to the underwriter, click More and enter the amount in the Underwriter $ field.
Title Insurance Binder
HUD-1 & Closing tab, 1101-1107 Title Charges screen, Line 1103.
1. Click the HUD-1 & Closing tab.
2. Double-click 1101-1107 Title Charges.
3. Enter the amount owed in the Borrower and/or Seller field of Line 1104.
4. To disburse an amount to the underwriter, enter the amount in the Underwriter $ field.
Express HUD 1. Click the HUD-1 & Closing tab.
2. Double-click Escrow Charges.
3. Enter the amount owed in the Borrower and/or Seller field of Line 1104.
4. To disburse an amount to the underwriter, click More and enter the amount in the Underwriter $ field.
SEE ALSO:
To enter additional title charges, see “Additional Title Charges.”
To disburse part of the charge to the underwriter, see “Underwriter Portion of Title Charges.”
You can change how an amount is disbursed by making a change to the DS field. See “Disbursement
Status Fields.”
Transaction Type
General tab, File No., Settlement Dates, Notes screen.
1. Click the General tab.
2. Double-click File No., Settlement Dates, Notes.
3. Enter Purchase, Refinance, or Equity in the Transaction Type field. For example:
Trustee, Trustee Fee And Commission
General tab, Security Instruments, Trustee & Riders screen.
1. Click the General tab.
2. Double-click Security Instruments, Trustee & Riders.
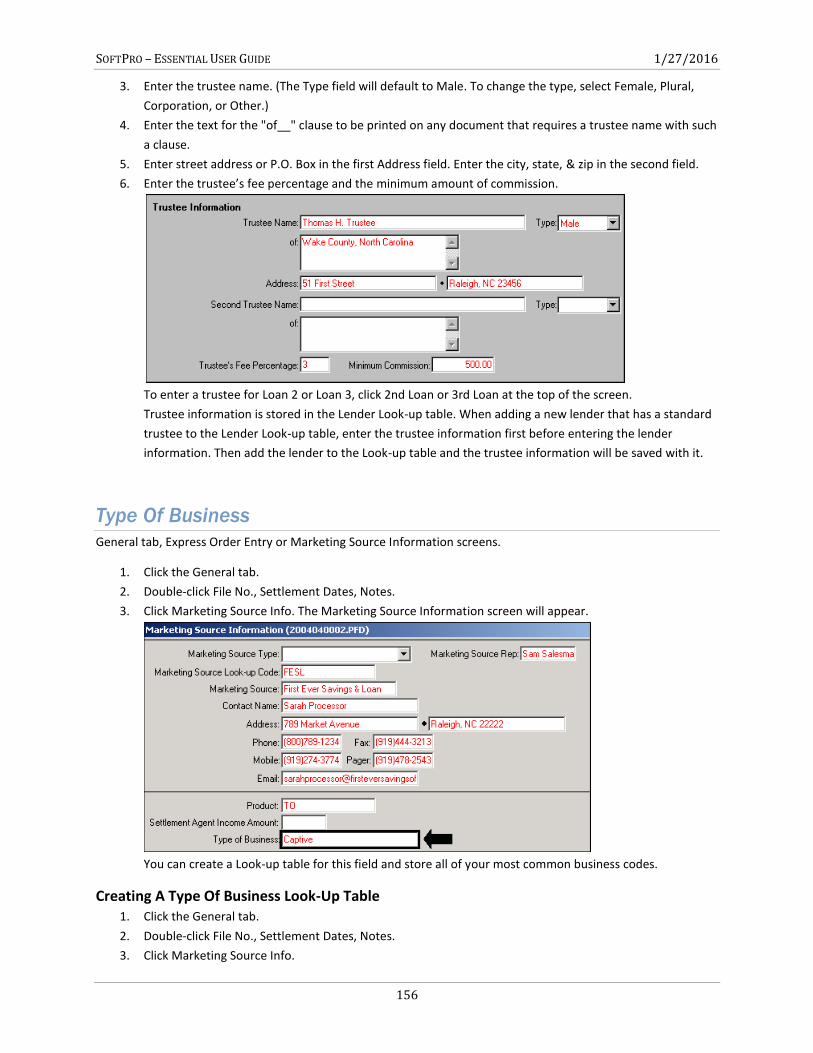
SOFTPRO – ESSENTIAL USER GUIDE 1/27/2016
156
3. Enter the trustee name. (The Type field will default to Male. To change the type, select Female, Plural,
Corporation, or Other.)
4. Enter the text for the "of__" clause to be printed on any document that requires a trustee name with such
a clause.
5. Enter street address or P.O. Box in the first Address field. Enter the city, state, & zip in the second field.
6. Enter the trustee’s fee percentage and the minimum amount of commission.
To enter a trustee for Loan 2 or Loan 3, click 2nd Loan or 3rd Loan at the top of the screen.
Trustee information is stored in the Lender Look-up table. When adding a new lender that has a standard
trustee to the Lender Look-up table, enter the trustee information first before entering the lender
information. Then add the lender to the Look-up table and the trustee information will be saved with it.
Type Of Business
General tab, Express Order Entry or Marketing Source Information screens.
1. Click the General tab.
2. Double-click File No., Settlement Dates, Notes.
3. Click Marketing Source Info. The Marketing Source Information screen will appear.
You can create a Look-up table for this field and store all of your most common business codes.
Creating A Type Of Business Look-Up Table 1. Click the General tab.
2. Double-click File No., Settlement Dates, Notes.
3. Click Marketing Source Info.
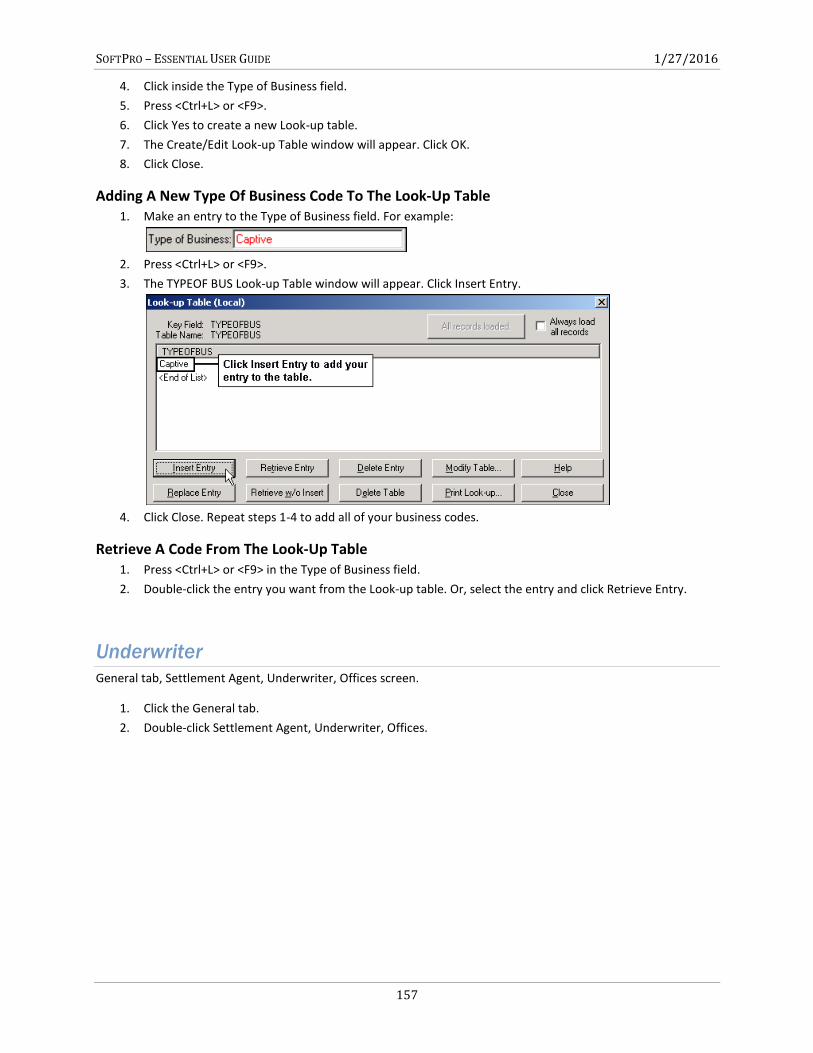
SOFTPRO – ESSENTIAL USER GUIDE 1/27/2016
157
4. Click inside the Type of Business field.
5. Press <Ctrl+L> or <F9>.
6. Click Yes to create a new Look-up table.
7. The Create/Edit Look-up Table window will appear. Click OK.
8. Click Close.
Adding A New Type Of Business Code To The Look-Up Table 1. Make an entry to the Type of Business field. For example:
2. Press <Ctrl+L> or <F9>.
3. The TYPEOF BUS Look-up Table window will appear. Click Insert Entry.
4. Click Close. Repeat steps 1-4 to add all of your business codes.
Retrieve A Code From The Look-Up Table 1. Press <Ctrl+L> or <F9> in the Type of Business field.
2. Double-click the entry you want from the Look-up table. Or, select the entry and click Retrieve Entry.
Underwriter
General tab, Settlement Agent, Underwriter, Offices screen.
1. Click the General tab.
2. Double-click Settlement Agent, Underwriter, Offices.
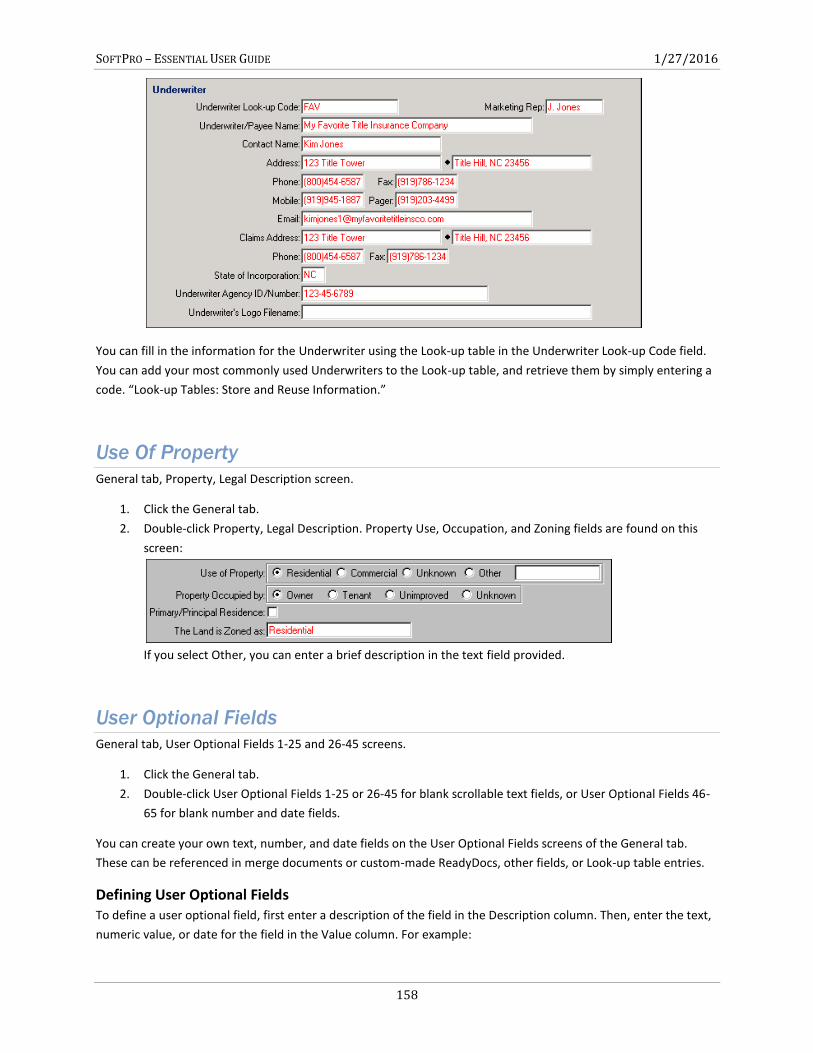
SOFTPRO – ESSENTIAL USER GUIDE 1/27/2016
158
You can fill in the information for the Underwriter using the Look-up table in the Underwriter Look-up Code field.
You can add your most commonly used Underwriters to the Look-up table, and retrieve them by simply entering a
code. “Look-up Tables: Store and Reuse Information.”
Use Of Property
General tab, Property, Legal Description screen.
1. Click the General tab.
2. Double-click Property, Legal Description. Property Use, Occupation, and Zoning fields are found on this
screen:
If you select Other, you can enter a brief description in the text field provided.
User Optional Fields
General tab, User Optional Fields 1-25 and 26-45 screens.
1. Click the General tab.
2. Double-click User Optional Fields 1-25 or 26-45 for blank scrollable text fields, or User Optional Fields 46-
65 for blank number and date fields.
You can create your own text, number, and date fields on the User Optional Fields screens of the General tab.
These can be referenced in merge documents or custom-made ReadyDocs, other fields, or Look-up table entries.
Defining User Optional Fields To define a user optional field, first enter a description of the field in the Description column. Then, enter the text,
numeric value, or date for the field in the Value column. For example:
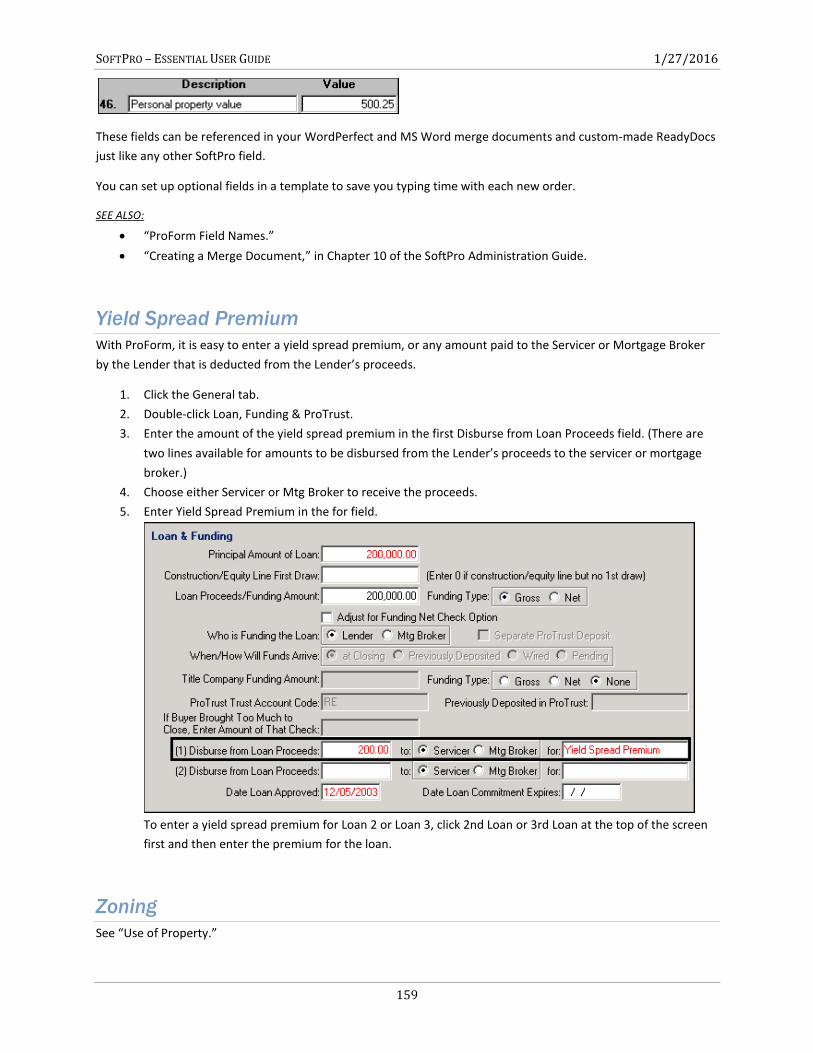
SOFTPRO – ESSENTIAL USER GUIDE 1/27/2016
159
These fields can be referenced in your WordPerfect and MS Word merge documents and custom-made ReadyDocs
just like any other SoftPro field.
You can set up optional fields in a template to save you typing time with each new order.
SEE ALSO:
“ProForm Field Names.”
“Creating a Merge Document,” in Chapter 10 of the SoftPro Administration Guide.
Yield Spread Premium
With ProForm, it is easy to enter a yield spread premium, or any amount paid to the Servicer or Mortgage Broker
by the Lender that is deducted from the Lender’s proceeds.
1. Click the General tab.
2. Double-click Loan, Funding & ProTrust.
3. Enter the amount of the yield spread premium in the first Disburse from Loan Proceeds field. (There are
two lines available for amounts to be disbursed from the Lender’s proceeds to the servicer or mortgage
broker.)
4. Choose either Servicer or Mtg Broker to receive the proceeds.
5. Enter Yield Spread Premium in the for field.
To enter a yield spread premium for Loan 2 or Loan 3, click 2nd Loan or 3rd Loan at the top of the screen
first and then enter the premium for the loan.
Zoning
See “Use of Property.”

SOFTPRO – ESSENTIAL USER GUIDE 1/27/2016
160
SOFTPRO – ESSENTIAL USER GUIDE 1/27/2016
161
Chapter 4: ProForm HUD A to Z Overview ........................................................................................................................... 166
200 Amounts Paid By Or In Behalf Of The Borrower ........................................................... 166
Tolerance Cure ...................................................................................................................................................... 166
Loan Credits ........................................................................................................................................................... 166
1099-S Data ....................................................................................................................... 166
Seller Proceeds ...................................................................................................................................................... 167
Adjusting Seller Proceeds ...................................................................................................................................... 167
800’s Items Payable In Connection With Loan .................................................................... 168
Line 801: Our Origination Charge .......................................................................................................................... 168
Line 802: Your Credit Or Charge (Points) For The Specific Rate Chosen ............................................................... 168
Line 803: Your Adjusted Origination Charges ........................................................................................................ 169
GFE Column For 800’s ........................................................................................................................................... 169
Lines 804 - 820....................................................................................................................................................... 169
1000 Reserves Deposited With Lender (Escrows) ............................................................... 169
GFE Column For 1000’s ......................................................................................................................................... 169
Taxes ...................................................................................................................................................................... 169
Slrpay Checkbox .................................................................................................................................................... 170
Homeowner’s And Mortgage Insurance ............................................................................................................... 170
Escrows .................................................................................................................................................................. 170
Aggregate Method ................................................................................................................................................ 170
1100 Title Charges Screen .................................................................................................. 171
Title Services .......................................................................................................................................................... 171
Slrpay% Feature ..................................................................................................................................................... 171
Slrpay Checkbox .................................................................................................................................................... 171
Underwriter Portion Of Title Charges ................................................................................................................... 172
Itemized Title Charges ........................................................................................................................................... 172
Assigning A Title Charge To A HUD-1 Line ............................................................................................................. 173
Splitting A Charge Between The Agent And Underwriter ..................................................................................... 173
Auto Calculation Of Endorsements And Itemized Title Charges ........................................................................... 174
Settlement Or Closing Fees ................................................................................................................................... 174
GFE Column For 1100’s ......................................................................................................................................... 175
Owner’s And Lender’s Title Insurance ................................................................................................................... 175
1200 Gov’t Recording & Transfer Charges .......................................................................... 176
1200 Section Formulas .......................................................................................................................................... 176
ProForm: VA Calculation Rounding ....................................................................................................................... 177
1300 Additional Settlement Charges .................................................................................. 178
Acknowledgments ............................................................................................................. 178
SOFTPRO – ESSENTIAL USER GUIDE 1/27/2016
162
Adjustable Rate Mortgage (Arm) Data ............................................................................... 179
Type Of ARM ......................................................................................................................................................... 179
Round Adjusted Rate ............................................................................................................................................. 179
Truth-In-Lending (TIL) ............................................................................................................................................ 179
Appraisal Information, Appraised Value, Appraiser ............................................................ 180
Assigning The Appraisal Fee To A HUD-1 Line Number ......................................................................................... 180
Attorneys .......................................................................................................................... 180
Buyer / Borrower .............................................................................................................. 181
Type ....................................................................................................................................................................... 181
Vesting ................................................................................................................................................................... 181
Interest % .............................................................................................................................................................. 182
Default Buyer And Seller Relationships ................................................................................................................. 182
Buyer/Borrower Additional Information ............................................................................ 183
Buyer’s Portion Of Real Estate Taxes .................................................................................. 184
Closer ................................................................................................................................ 184
Commissions ..................................................................................................................... 185
Changing The Commission Rate ............................................................................................................................ 185
Entering Commission Manually ............................................................................................................................. 185
Splitting The Commission Between Two Brokers .................................................................................................. 186
Splitting The Cost Of Commission Between Buyer And Seller .............................................................................. 187
Additional Disbursements From Broker’s Commissions ...................................................... 187
Printing The Additional Disbursements From Broker’s Commissions Exhibit ....................................................... 188
Additional Disbursements From Broker’s Commissions Disclosure ...................................................................... 188
Commitment Data ............................................................................................................. 188
Comparison Of Good Faith Estimate (GFE) & HUD-1 Charges .............................................. 189
Tolerance ............................................................................................................................................................... 189
Corporate Officers ............................................................................................................. 189
Credit Card Payoff ............................................................................................................. 189
Payoff Details ........................................................................................................................................................ 190
Debits And Credits ............................................................................................................. 191
Buyer Credit / Seller Debit ..................................................................................................................................... 191
Seller Pays A Portion Of Closing Costs ................................................................................................................... 191
Seller Credit / Buyer Debit ..................................................................................................................................... 191
Disbursement Date ............................................................................................................ 191
Discount Points ................................................................................................................. 192
Earnest Money Deposit ..................................................................................................... 192
Deposit/Earnest Money Scenarios ........................................................................................................................ 192
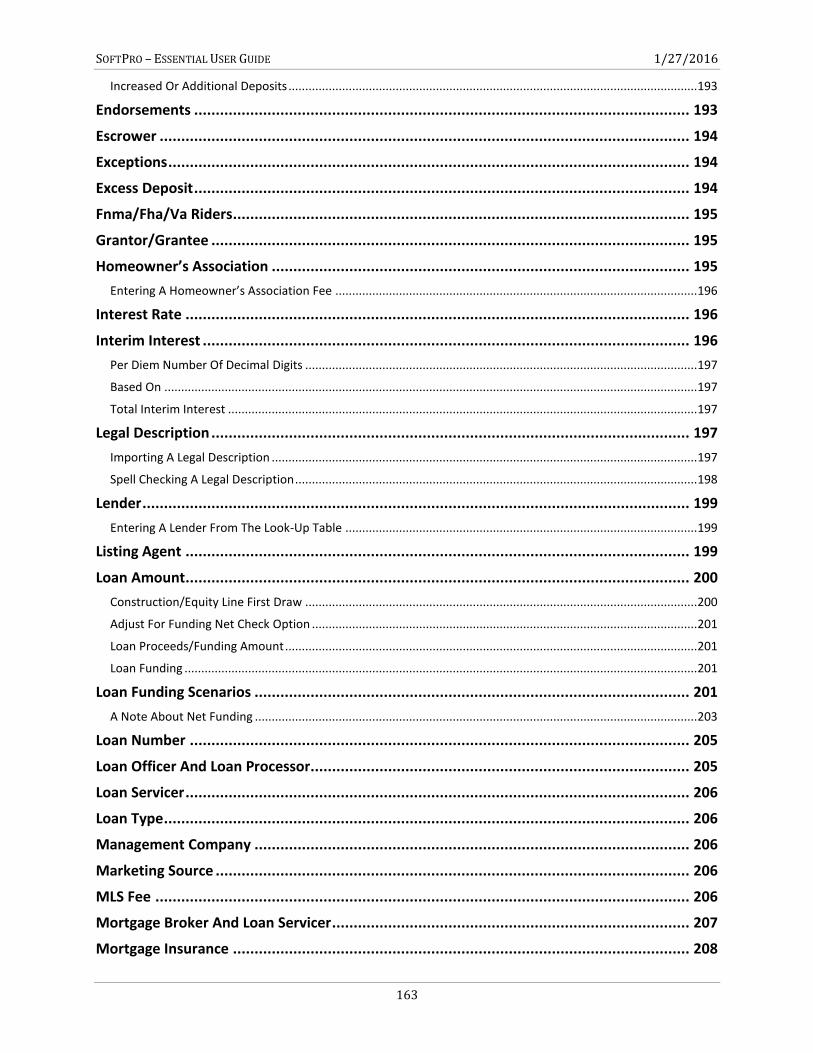
SOFTPRO – ESSENTIAL USER GUIDE 1/27/2016
163
Increased Or Additional Deposits .......................................................................................................................... 193
Endorsements ................................................................................................................... 193
Escrower ........................................................................................................................... 194
Exceptions ......................................................................................................................... 194
Excess Deposit ................................................................................................................... 194
Fnma/Fha/Va Riders .......................................................................................................... 195
Grantor/Grantee ............................................................................................................... 195
Homeowner’s Association ................................................................................................. 195
Entering A Homeowner’s Association Fee ............................................................................................................ 196
Interest Rate ..................................................................................................................... 196
Interim Interest ................................................................................................................. 196
Per Diem Number Of Decimal Digits ..................................................................................................................... 197
Based On ............................................................................................................................................................... 197
Total Interim Interest ............................................................................................................................................ 197
Legal Description ............................................................................................................... 197
Importing A Legal Description ............................................................................................................................... 197
Spell Checking A Legal Description ........................................................................................................................ 198
Lender ............................................................................................................................... 199
Entering A Lender From The Look-Up Table ......................................................................................................... 199
Listing Agent ..................................................................................................................... 199
Loan Amount ..................................................................................................................... 200
Construction/Equity Line First Draw ..................................................................................................................... 200
Adjust For Funding Net Check Option ................................................................................................................... 201
Loan Proceeds/Funding Amount ........................................................................................................................... 201
Loan Funding ......................................................................................................................................................... 201
Loan Funding Scenarios ..................................................................................................... 201
A Note About Net Funding .................................................................................................................................... 203
Loan Number .................................................................................................................... 205
Loan Officer And Loan Processor........................................................................................ 205
Loan Servicer ..................................................................................................................... 206
Loan Type .......................................................................................................................... 206
Management Company ..................................................................................................... 206
Marketing Source .............................................................................................................. 206
MLS Fee ............................................................................................................................ 206
Mortgage Broker And Loan Servicer ................................................................................... 207
Mortgage Insurance .......................................................................................................... 208
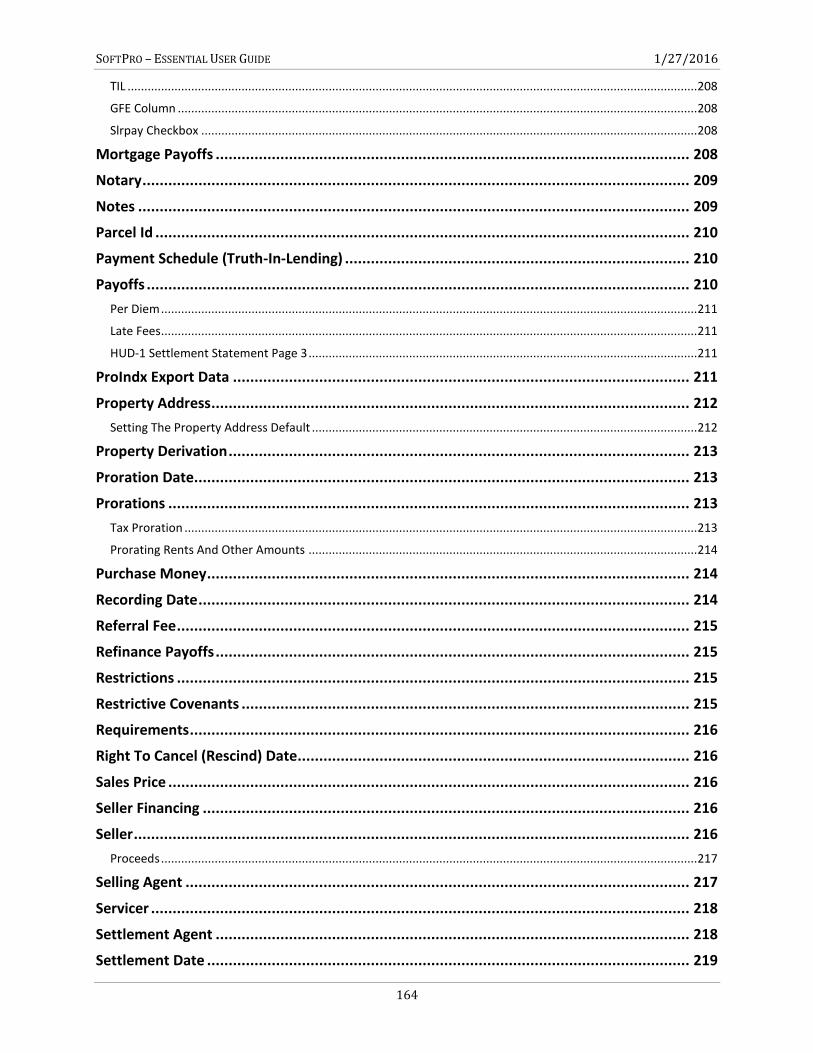
SOFTPRO – ESSENTIAL USER GUIDE 1/27/2016
164
TIL .......................................................................................................................................................................... 208
GFE Column ........................................................................................................................................................... 208
Slrpay Checkbox .................................................................................................................................................... 208
Mortgage Payoffs .............................................................................................................. 208
Notary ............................................................................................................................... 209
Notes ................................................................................................................................ 209
Parcel Id ............................................................................................................................ 210
Payment Schedule (Truth-In-Lending) ................................................................................ 210
Payoffs .............................................................................................................................. 210
Per Diem ................................................................................................................................................................ 211
Late Fees ................................................................................................................................................................ 211
HUD-1 Settlement Statement Page 3 .................................................................................................................... 211
ProIndx Export Data .......................................................................................................... 211
Property Address ............................................................................................................... 212
Setting The Property Address Default ................................................................................................................... 212
Property Derivation ........................................................................................................... 213
Proration Date ................................................................................................................... 213
Prorations ......................................................................................................................... 213
Tax Proration ......................................................................................................................................................... 213
Prorating Rents And Other Amounts .................................................................................................................... 214
Purchase Money ................................................................................................................ 214
Recording Date .................................................................................................................. 214
Referral Fee ....................................................................................................................... 215
Refinance Payoffs .............................................................................................................. 215
Restrictions ....................................................................................................................... 215
Restrictive Covenants ........................................................................................................ 215
Requirements .................................................................................................................... 216
Right To Cancel (Rescind) Date........................................................................................... 216
Sales Price ......................................................................................................................... 216
Seller Financing ................................................................................................................. 216
Seller ................................................................................................................................. 216
Proceeds ................................................................................................................................................................ 217
Selling Agent ..................................................................................................................... 217
Servicer ............................................................................................................................. 218
Settlement Agent .............................................................................................................. 218
Settlement Date ................................................................................................................ 219
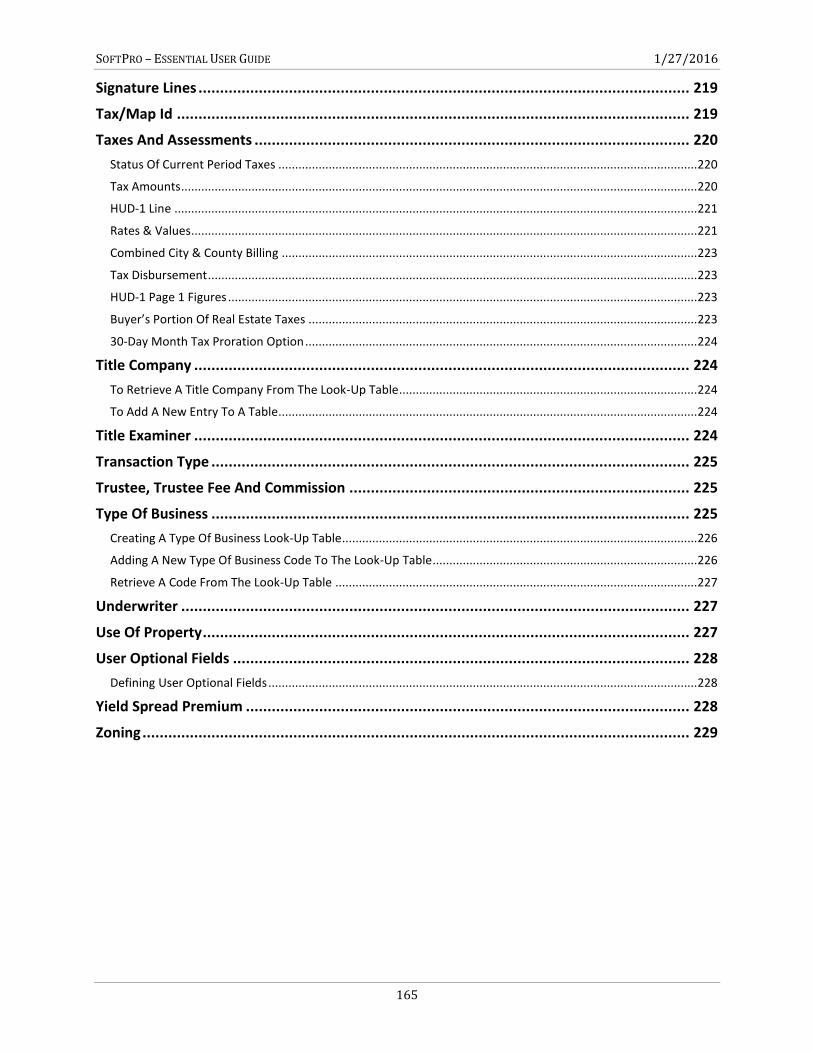
SOFTPRO – ESSENTIAL USER GUIDE 1/27/2016
165
Signature Lines .................................................................................................................. 219
Tax/Map Id ....................................................................................................................... 219
Taxes And Assessments ..................................................................................................... 220
Status Of Current Period Taxes ............................................................................................................................. 220
Tax Amounts .......................................................................................................................................................... 220
HUD-1 Line ............................................................................................................................................................ 221
Rates & Values ....................................................................................................................................................... 221
Combined City & County Billing ............................................................................................................................ 223
Tax Disbursement .................................................................................................................................................. 223
HUD-1 Page 1 Figures ............................................................................................................................................ 223
Buyer’s Portion Of Real Estate Taxes .................................................................................................................... 223
30-Day Month Tax Proration Option ..................................................................................................................... 224
Title Company ................................................................................................................... 224
To Retrieve A Title Company From The Look-Up Table ......................................................................................... 224
To Add A New Entry To A Table ............................................................................................................................. 224
Title Examiner ................................................................................................................... 224
Transaction Type ............................................................................................................... 225
Trustee, Trustee Fee And Commission ............................................................................... 225
Type Of Business ............................................................................................................... 225
Creating A Type Of Business Look-Up Table .......................................................................................................... 226
Adding A New Type Of Business Code To The Look-Up Table ............................................................................... 226
Retrieve A Code From The Look-Up Table ............................................................................................................ 227
Underwriter ...................................................................................................................... 227
Use Of Property ................................................................................................................. 227
User Optional Fields .......................................................................................................... 228
Defining User Optional Fields ................................................................................................................................ 228
Yield Spread Premium ....................................................................................................... 228
Zoning ............................................................................................................................... 229
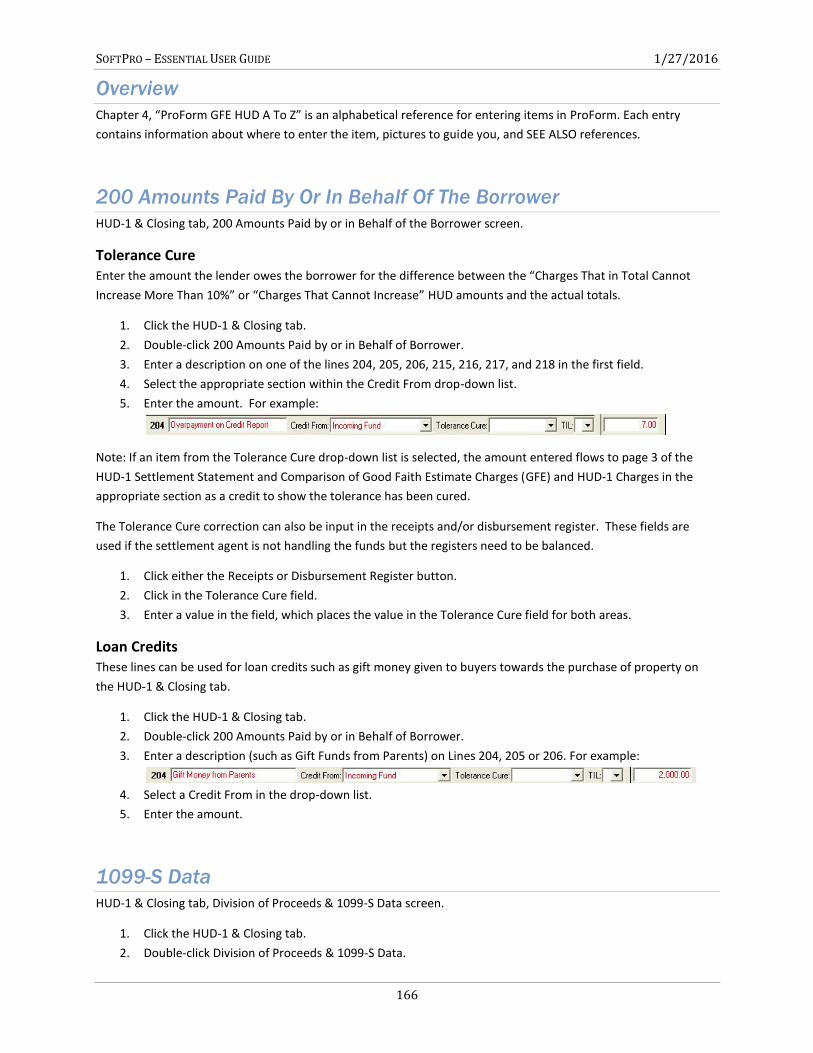
SOFTPRO – ESSENTIAL USER GUIDE 1/27/2016
166
Overview
Chapter 4, “ProForm GFE HUD A To Z” is an alphabetical reference for entering items in ProForm. Each entry
contains information about where to enter the item, pictures to guide you, and SEE ALSO references.
200 Amounts Paid By Or In Behalf Of The Borrower
HUD-1 & Closing tab, 200 Amounts Paid by or in Behalf of the Borrower screen.
Tolerance Cure Enter the amount the lender owes the borrower for the difference between the “Charges That in Total Cannot
Increase More Than 10%” or “Charges That Cannot Increase” HUD amounts and the actual totals.
1. Click the HUD-1 & Closing tab.
2. Double-click 200 Amounts Paid by or in Behalf of Borrower.
3. Enter a description on one of the lines 204, 205, 206, 215, 216, 217, and 218 in the first field.
4. Select the appropriate section within the Credit From drop-down list.
5. Enter the amount. For example:
Note: If an item from the Tolerance Cure drop-down list is selected, the amount entered flows to page 3 of the
HUD-1 Settlement Statement and Comparison of Good Faith Estimate Charges (GFE) and HUD-1 Charges in the
appropriate section as a credit to show the tolerance has been cured.
The Tolerance Cure correction can also be input in the receipts and/or disbursement register. These fields are
used if the settlement agent is not handling the funds but the registers need to be balanced.
1. Click either the Receipts or Disbursement Register button.
2. Click in the Tolerance Cure field.
3. Enter a value in the field, which places the value in the Tolerance Cure field for both areas.
Loan Credits These lines can be used for loan credits such as gift money given to buyers towards the purchase of property on
the HUD-1 & Closing tab.
1. Click the HUD-1 & Closing tab.
2. Double-click 200 Amounts Paid by or in Behalf of Borrower.
3. Enter a description (such as Gift Funds from Parents) on Lines 204, 205 or 206. For example:
4. Select a Credit From in the drop-down list.
5. Enter the amount.
1099-S Data
HUD-1 & Closing tab, Division of Proceeds & 1099-S Data screen.
1. Click the HUD-1 & Closing tab.
2. Double-click Division of Proceeds & 1099-S Data.
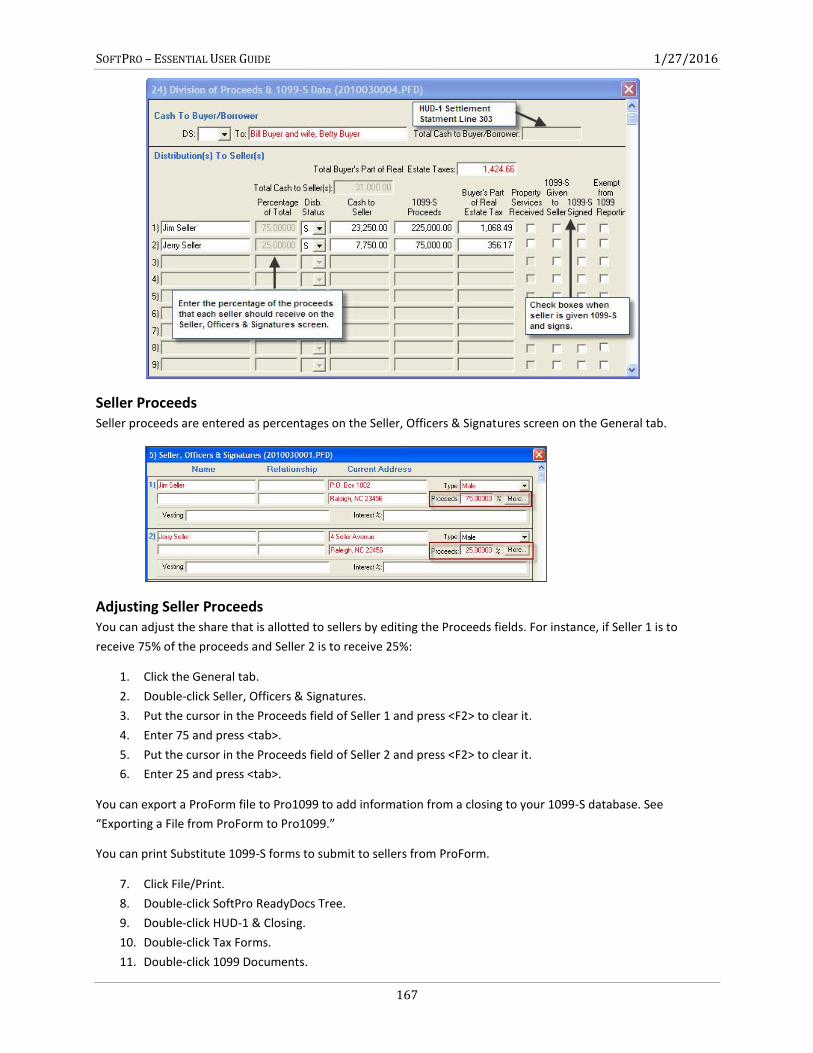
SOFTPRO – ESSENTIAL USER GUIDE 1/27/2016
167
Seller Proceeds Seller proceeds are entered as percentages on the Seller, Officers & Signatures screen on the General tab.
Adjusting Seller Proceeds You can adjust the share that is allotted to sellers by editing the Proceeds fields. For instance, if Seller 1 is to
receive 75% of the proceeds and Seller 2 is to receive 25%:
1. Click the General tab.
2. Double-click Seller, Officers & Signatures.
3. Put the cursor in the Proceeds field of Seller 1 and press <F2> to clear it.
4. Enter 75 and press <tab>.
5. Put the cursor in the Proceeds field of Seller 2 and press <F2> to clear it.
6. Enter 25 and press <tab>.
You can export a ProForm file to Pro1099 to add information from a closing to your 1099-S database. See
“Exporting a File from ProForm to Pro1099.”
You can print Substitute 1099-S forms to submit to sellers from ProForm.
7. Click File/Print.
8. Double-click SoftPro ReadyDocs Tree.
9. Double-click HUD-1 & Closing.
10. Double-click Tax Forms.
11. Double-click 1099 Documents.
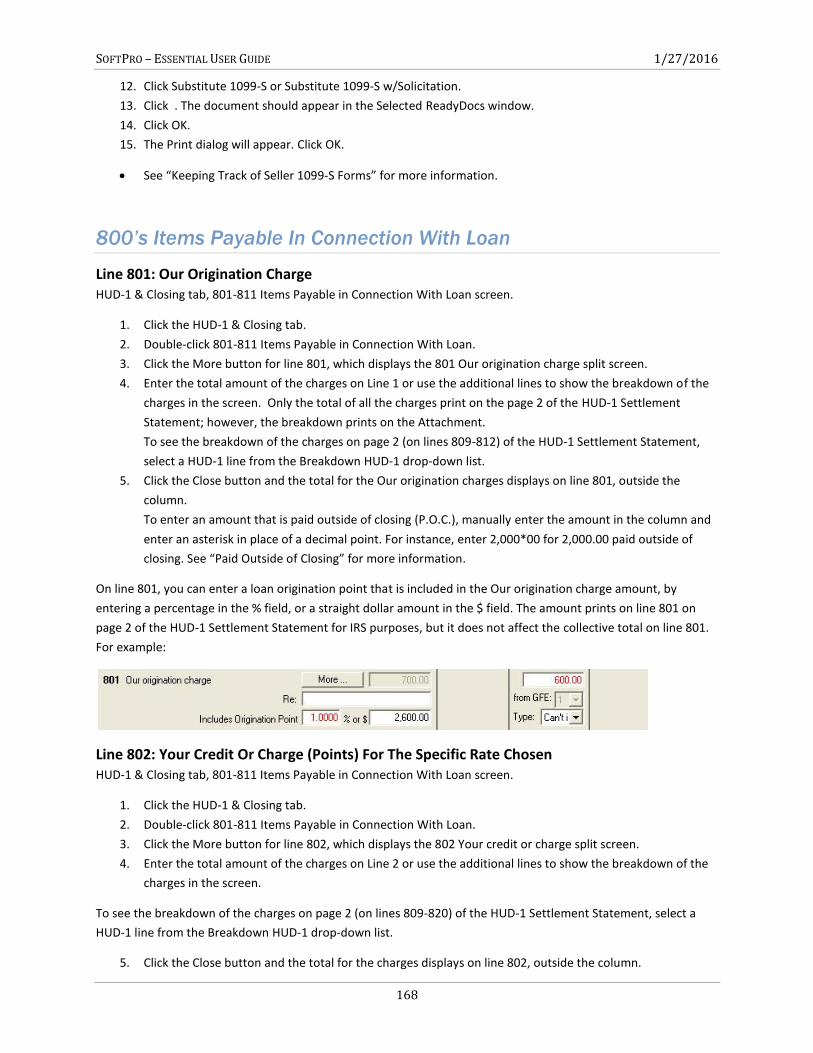
SOFTPRO – ESSENTIAL USER GUIDE 1/27/2016
168
12. Click Substitute 1099-S or Substitute 1099-S w/Solicitation.
13. Click . The document should appear in the Selected ReadyDocs window.
14. Click OK.
15. The Print dialog will appear. Click OK.
See “Keeping Track of Seller 1099-S Forms” for more information.
800’s Items Payable In Connection With Loan
Line 801: Our Origination Charge HUD-1 & Closing tab, 801-811 Items Payable in Connection With Loan screen.
1. Click the HUD-1 & Closing tab.
2. Double-click 801-811 Items Payable in Connection With Loan.
3. Click the More button for line 801, which displays the 801 Our origination charge split screen.
4. Enter the total amount of the charges on Line 1 or use the additional lines to show the breakdown of the
charges in the screen. Only the total of all the charges print on the page 2 of the HUD-1 Settlement
Statement; however, the breakdown prints on the Attachment.
To see the breakdown of the charges on page 2 (on lines 809-812) of the HUD-1 Settlement Statement,
select a HUD-1 line from the Breakdown HUD-1 drop-down list.
5. Click the Close button and the total for the Our origination charges displays on line 801, outside the
column.
To enter an amount that is paid outside of closing (P.O.C.), manually enter the amount in the column and
enter an asterisk in place of a decimal point. For instance, enter 2,000*00 for 2,000.00 paid outside of
closing. See “Paid Outside of Closing” for more information.
On line 801, you can enter a loan origination point that is included in the Our origination charge amount, by
entering a percentage in the % field, or a straight dollar amount in the $ field. The amount prints on line 801 on
page 2 of the HUD-1 Settlement Statement for IRS purposes, but it does not affect the collective total on line 801.
For example:
Line 802: Your Credit Or Charge (Points) For The Specific Rate Chosen HUD-1 & Closing tab, 801-811 Items Payable in Connection With Loan screen.
1. Click the HUD-1 & Closing tab.
2. Double-click 801-811 Items Payable in Connection With Loan.
3. Click the More button for line 802, which displays the 802 Your credit or charge split screen.
4. Enter the total amount of the charges on Line 2 or use the additional lines to show the breakdown of the
charges in the screen.
To see the breakdown of the charges on page 2 (on lines 809-820) of the HUD-1 Settlement Statement, select a
HUD-1 line from the Breakdown HUD-1 drop-down list.
5. Click the Close button and the total for the charges displays on line 802, outside the column.
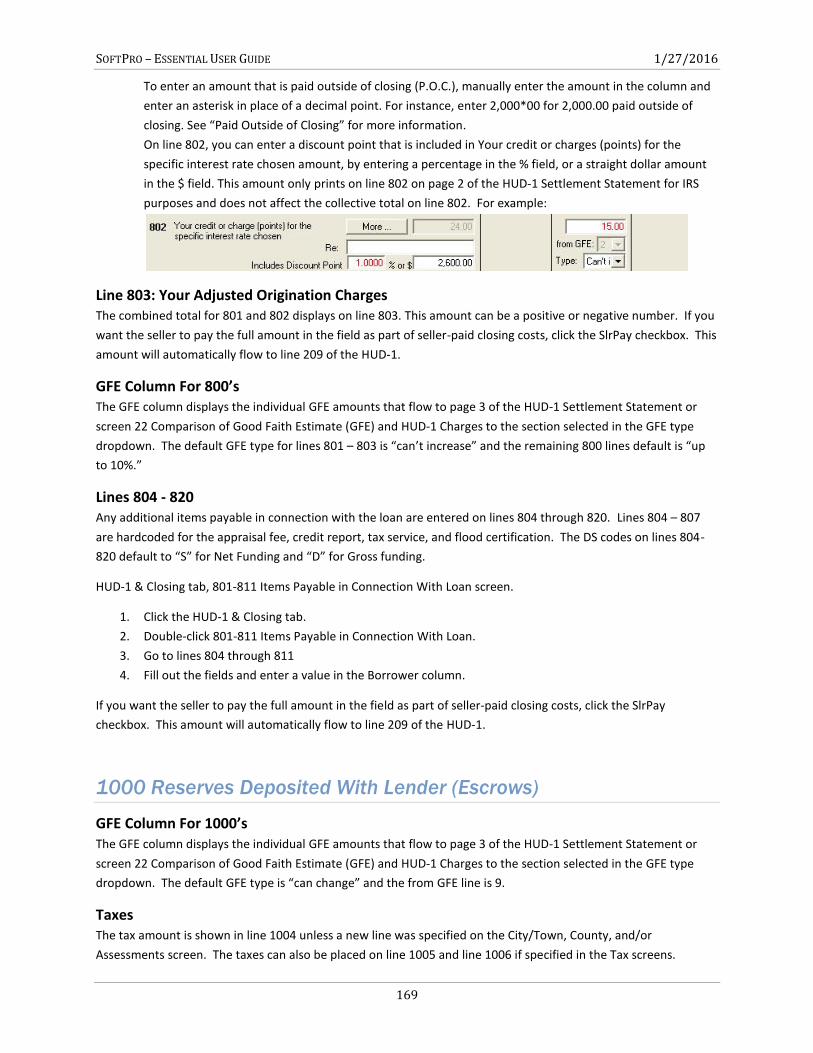
SOFTPRO – ESSENTIAL USER GUIDE 1/27/2016
169
To enter an amount that is paid outside of closing (P.O.C.), manually enter the amount in the column and
enter an asterisk in place of a decimal point. For instance, enter 2,000*00 for 2,000.00 paid outside of
closing. See “Paid Outside of Closing” for more information.
On line 802, you can enter a discount point that is included in Your credit or charges (points) for the
specific interest rate chosen amount, by entering a percentage in the % field, or a straight dollar amount
in the $ field. This amount only prints on line 802 on page 2 of the HUD-1 Settlement Statement for IRS
purposes and does not affect the collective total on line 802. For example:
Line 803: Your Adjusted Origination Charges The combined total for 801 and 802 displays on line 803. This amount can be a positive or negative number. If you
want the seller to pay the full amount in the field as part of seller-paid closing costs, click the SlrPay checkbox. This
amount will automatically flow to line 209 of the HUD-1.
GFE Column For 800’s The GFE column displays the individual GFE amounts that flow to page 3 of the HUD-1 Settlement Statement or
screen 22 Comparison of Good Faith Estimate (GFE) and HUD-1 Charges to the section selected in the GFE type
dropdown. The default GFE type for lines 801 – 803 is “can’t increase” and the remaining 800 lines default is “up
to 10%.”
Lines 804 - 820 Any additional items payable in connection with the loan are entered on lines 804 through 820. Lines 804 – 807
are hardcoded for the appraisal fee, credit report, tax service, and flood certification. The DS codes on lines 804-
820 default to “S” for Net Funding and “D” for Gross funding.
HUD-1 & Closing tab, 801-811 Items Payable in Connection With Loan screen.
1. Click the HUD-1 & Closing tab.
2. Double-click 801-811 Items Payable in Connection With Loan.
3. Go to lines 804 through 811
4. Fill out the fields and enter a value in the Borrower column.
If you want the seller to pay the full amount in the field as part of seller-paid closing costs, click the SlrPay
checkbox. This amount will automatically flow to line 209 of the HUD-1.
1000 Reserves Deposited With Lender (Escrows)
GFE Column For 1000’s The GFE column displays the individual GFE amounts that flow to page 3 of the HUD-1 Settlement Statement or
screen 22 Comparison of Good Faith Estimate (GFE) and HUD-1 Charges to the section selected in the GFE type
dropdown. The default GFE type is “can change” and the from GFE line is 9.
Taxes The tax amount is shown in line 1004 unless a new line was specified on the City/Town, County, and/or
Assessments screen. The taxes can also be placed on line 1005 and line 1006 if specified in the Tax screens.
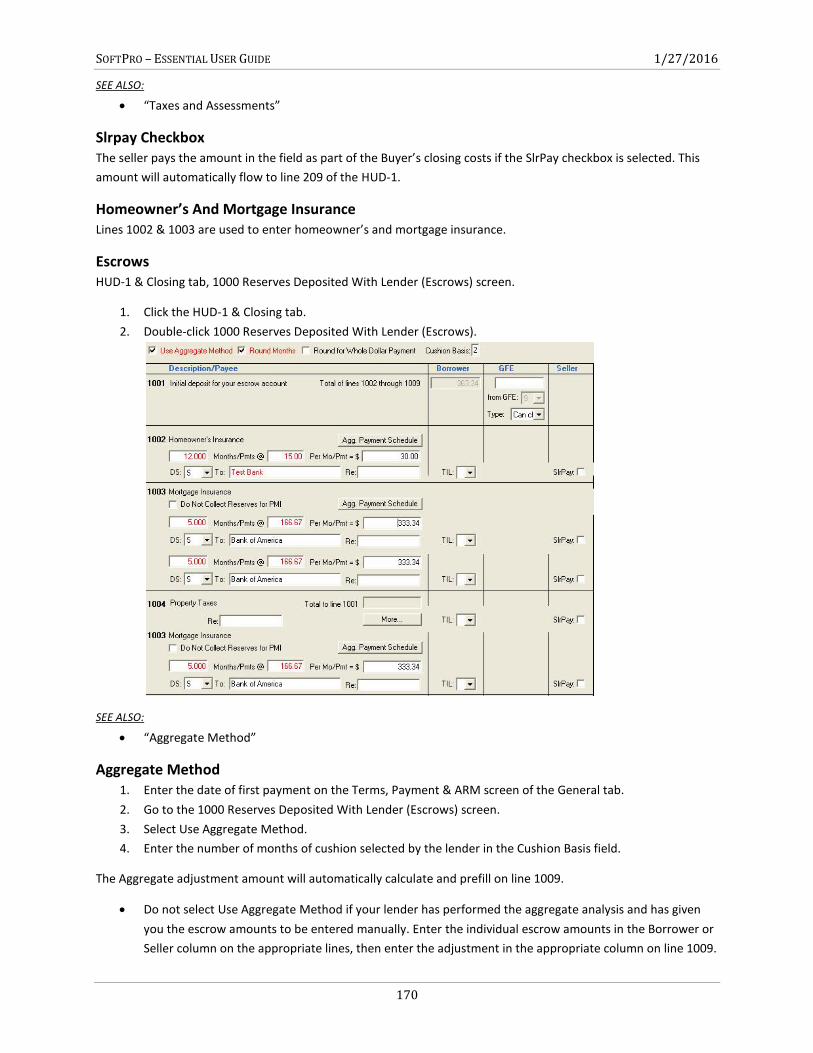
SOFTPRO – ESSENTIAL USER GUIDE 1/27/2016
170
SEE ALSO:
“Taxes and Assessments”
Slrpay Checkbox The seller pays the amount in the field as part of the Buyer’s closing costs if the SlrPay checkbox is selected. This
amount will automatically flow to line 209 of the HUD-1.
Homeowner’s And Mortgage Insurance Lines 1002 & 1003 are used to enter homeowner’s and mortgage insurance.
Escrows HUD-1 & Closing tab, 1000 Reserves Deposited With Lender (Escrows) screen.
1. Click the HUD-1 & Closing tab.
2. Double-click 1000 Reserves Deposited With Lender (Escrows).
SEE ALSO:
“Aggregate Method”
Aggregate Method 1. Enter the date of first payment on the Terms, Payment & ARM screen of the General tab.
2. Go to the 1000 Reserves Deposited With Lender (Escrows) screen.
3. Select Use Aggregate Method.
4. Enter the number of months of cushion selected by the lender in the Cushion Basis field.
The Aggregate adjustment amount will automatically calculate and prefill on line 1009.
Do not select Use Aggregate Method if your lender has performed the aggregate analysis and has given
you the escrow amounts to be entered manually. Enter the individual escrow amounts in the Borrower or
Seller column on the appropriate lines, then enter the adjustment in the appropriate column on line 1009.
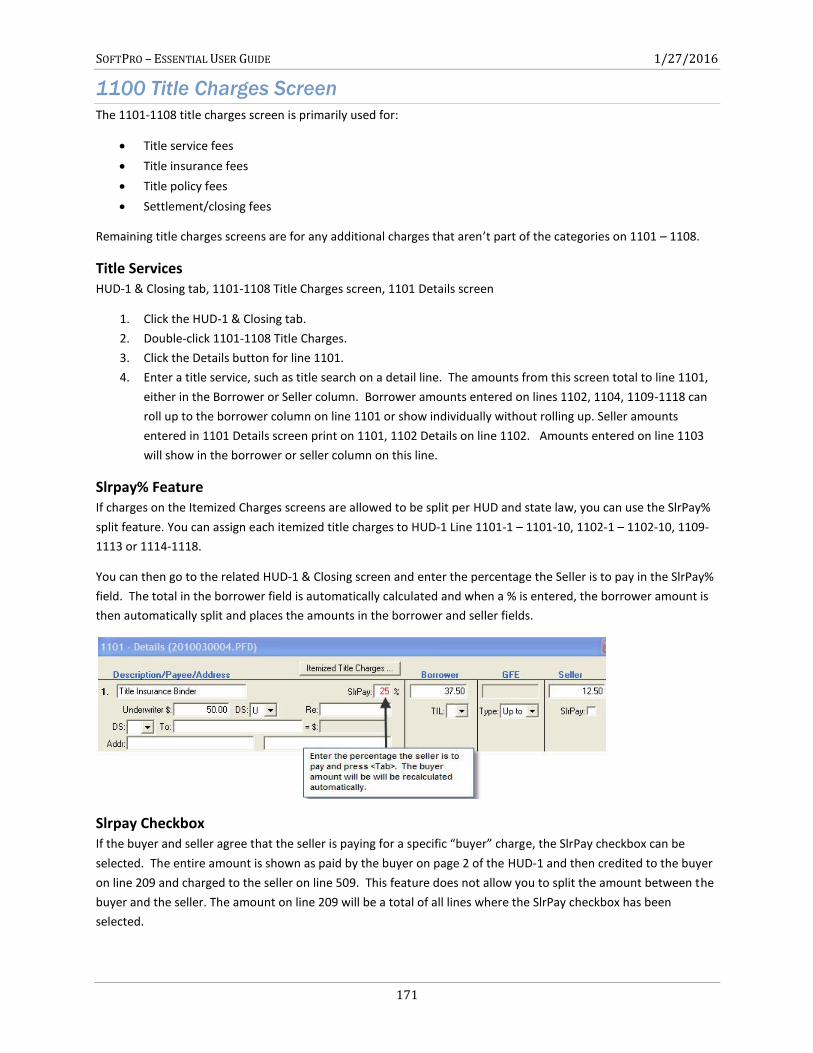
SOFTPRO – ESSENTIAL USER GUIDE 1/27/2016
171
1100 Title Charges Screen
The 1101-1108 title charges screen is primarily used for:
Title service fees
Title insurance fees
Title policy fees
Settlement/closing fees
Remaining title charges screens are for any additional charges that aren’t part of the categories on 1101 – 1108.
Title Services HUD-1 & Closing tab, 1101-1108 Title Charges screen, 1101 Details screen
1. Click the HUD-1 & Closing tab.
2. Double-click 1101-1108 Title Charges.
3. Click the Details button for line 1101.
4. Enter a title service, such as title search on a detail line. The amounts from this screen total to line 1101,
either in the Borrower or Seller column. Borrower amounts entered on lines 1102, 1104, 1109-1118 can
roll up to the borrower column on line 1101 or show individually without rolling up. Seller amounts
entered in 1101 Details screen print on 1101, 1102 Details on line 1102. Amounts entered on line 1103
will show in the borrower or seller column on this line.
Slrpay% Feature If charges on the Itemized Charges screens are allowed to be split per HUD and state law, you can use the SlrPay%
split feature. You can assign each itemized title charges to HUD-1 Line 1101-1 – 1101-10, 1102-1 – 1102-10, 1109-
1113 or 1114-1118.
You can then go to the related HUD-1 & Closing screen and enter the percentage the Seller is to pay in the SlrPay%
field. The total in the borrower field is automatically calculated and when a % is entered, the borrower amount is
then automatically split and places the amounts in the borrower and seller fields.
Slrpay Checkbox If the buyer and seller agree that the seller is paying for a specific “buyer” charge, the SlrPay checkbox can be
selected. The entire amount is shown as paid by the buyer on page 2 of the HUD-1 and then credited to the buyer
on line 209 and charged to the seller on line 509. This feature does not allow you to split the amount between the
buyer and the seller. The amount on line 209 will be a total of all lines where the SlrPay checkbox has been
selected.
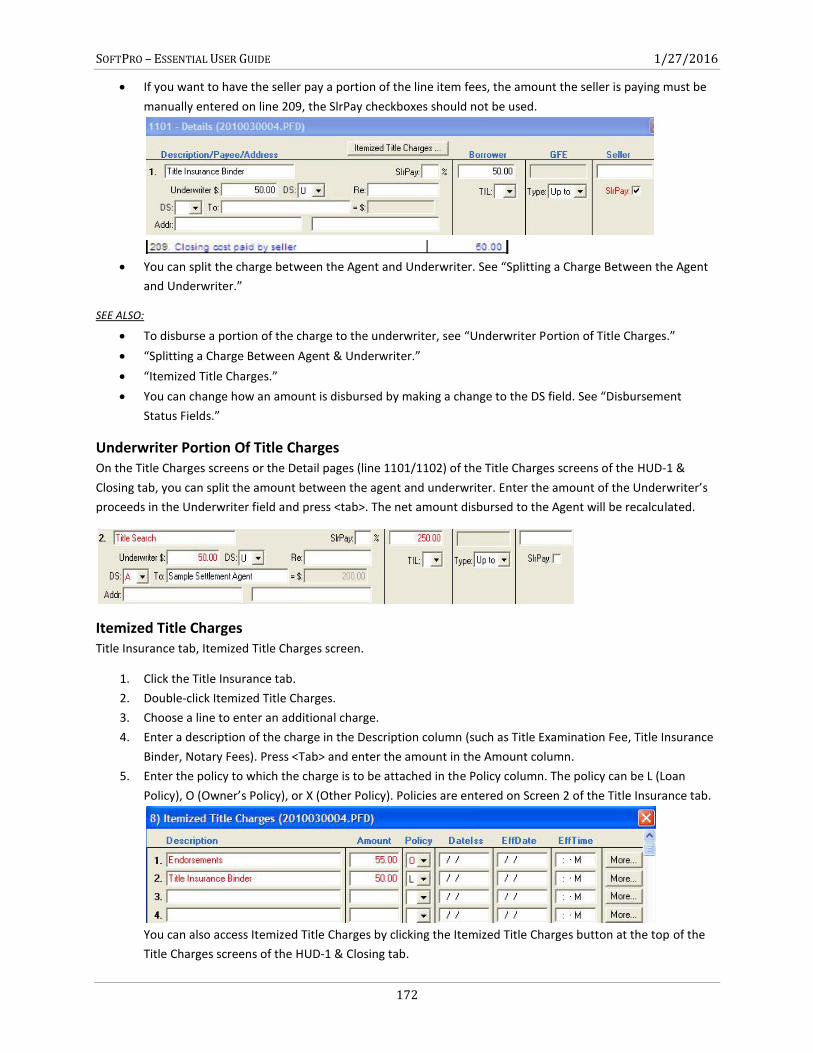
SOFTPRO – ESSENTIAL USER GUIDE 1/27/2016
172
If you want to have the seller pay a portion of the line item fees, the amount the seller is paying must be
manually entered on line 209, the SlrPay checkboxes should not be used.
You can split the charge between the Agent and Underwriter. See “Splitting a Charge Between the Agent
and Underwriter.”
SEE ALSO:
To disburse a portion of the charge to the underwriter, see “Underwriter Portion of Title Charges.”
“Splitting a Charge Between Agent & Underwriter.”
“Itemized Title Charges.”
You can change how an amount is disbursed by making a change to the DS field. See “Disbursement
Status Fields.”
Underwriter Portion Of Title Charges On the Title Charges screens or the Detail pages (line 1101/1102) of the Title Charges screens of the HUD-1 &
Closing tab, you can split the amount between the agent and underwriter. Enter the amount of the Underwriter’s
proceeds in the Underwriter field and press <tab>. The net amount disbursed to the Agent will be recalculated.
Itemized Title Charges Title Insurance tab, Itemized Title Charges screen.
1. Click the Title Insurance tab.
2. Double-click Itemized Title Charges.
3. Choose a line to enter an additional charge.
4. Enter a description of the charge in the Description column (such as Title Examination Fee, Title Insurance
Binder, Notary Fees). Press <Tab> and enter the amount in the Amount column.
5. Enter the policy to which the charge is to be attached in the Policy column. The policy can be L (Loan
Policy), O (Owner’s Policy), or X (Other Policy). Policies are entered on Screen 2 of the Title Insurance tab.
You can also access Itemized Title Charges by clicking the Itemized Title Charges button at the top of the
Title Charges screens of the HUD-1 & Closing tab.
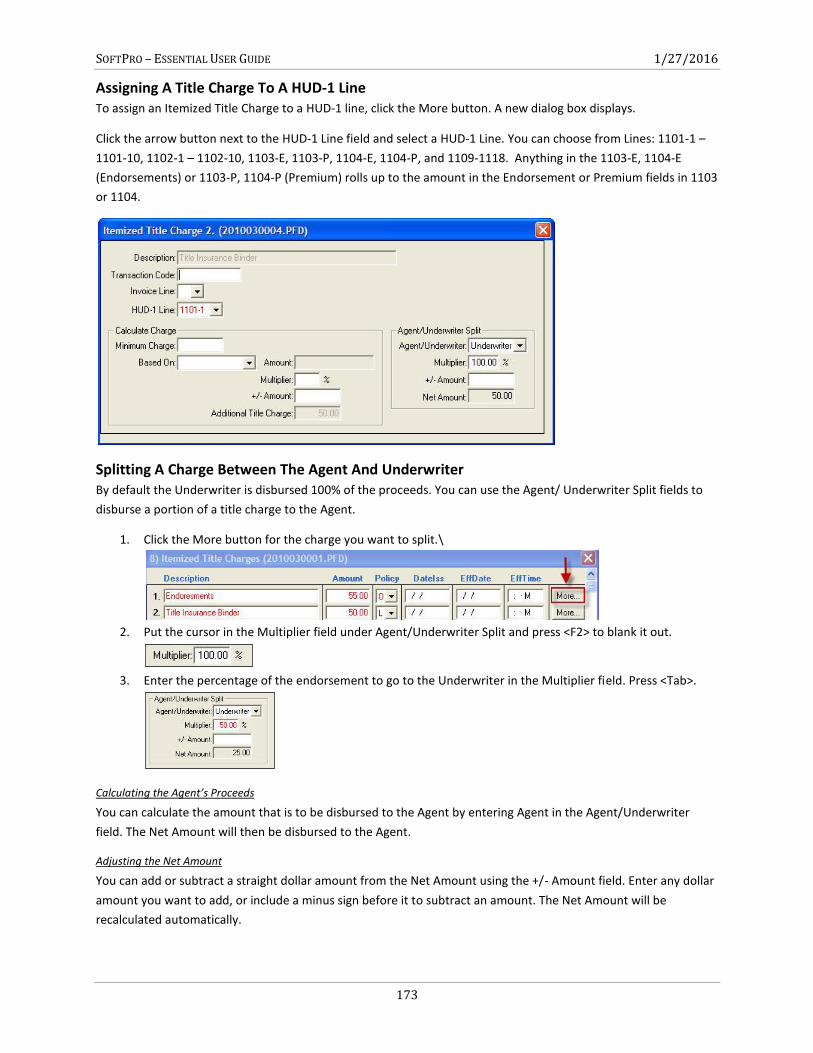
SOFTPRO – ESSENTIAL USER GUIDE 1/27/2016
173
Assigning A Title Charge To A HUD-1 Line To assign an Itemized Title Charge to a HUD-1 line, click the More button. A new dialog box displays.
Click the arrow button next to the HUD-1 Line field and select a HUD-1 Line. You can choose from Lines: 1101-1 –
1101-10, 1102-1 – 1102-10, 1103-E, 1103-P, 1104-E, 1104-P, and 1109-1118. Anything in the 1103-E, 1104-E
(Endorsements) or 1103-P, 1104-P (Premium) rolls up to the amount in the Endorsement or Premium fields in 1103
or 1104.
Splitting A Charge Between The Agent And Underwriter By default the Underwriter is disbursed 100% of the proceeds. You can use the Agent/ Underwriter Split fields to
disburse a portion of a title charge to the Agent.
1. Click the More button for the charge you want to split.\
2. Put the cursor in the Multiplier field under Agent/Underwriter Split and press <F2> to blank it out.
3. Enter the percentage of the endorsement to go to the Underwriter in the Multiplier field. Press <Tab>.
Calculating the Agent’s Proceeds
You can calculate the amount that is to be disbursed to the Agent by entering Agent in the Agent/Underwriter
field. The Net Amount will then be disbursed to the Agent.
Adjusting the Net Amount
You can add or subtract a straight dollar amount from the Net Amount using the +/- Amount field. Enter any dollar
amount you want to add, or include a minus sign before it to subtract an amount. The Net Amount will be
recalculated automatically.
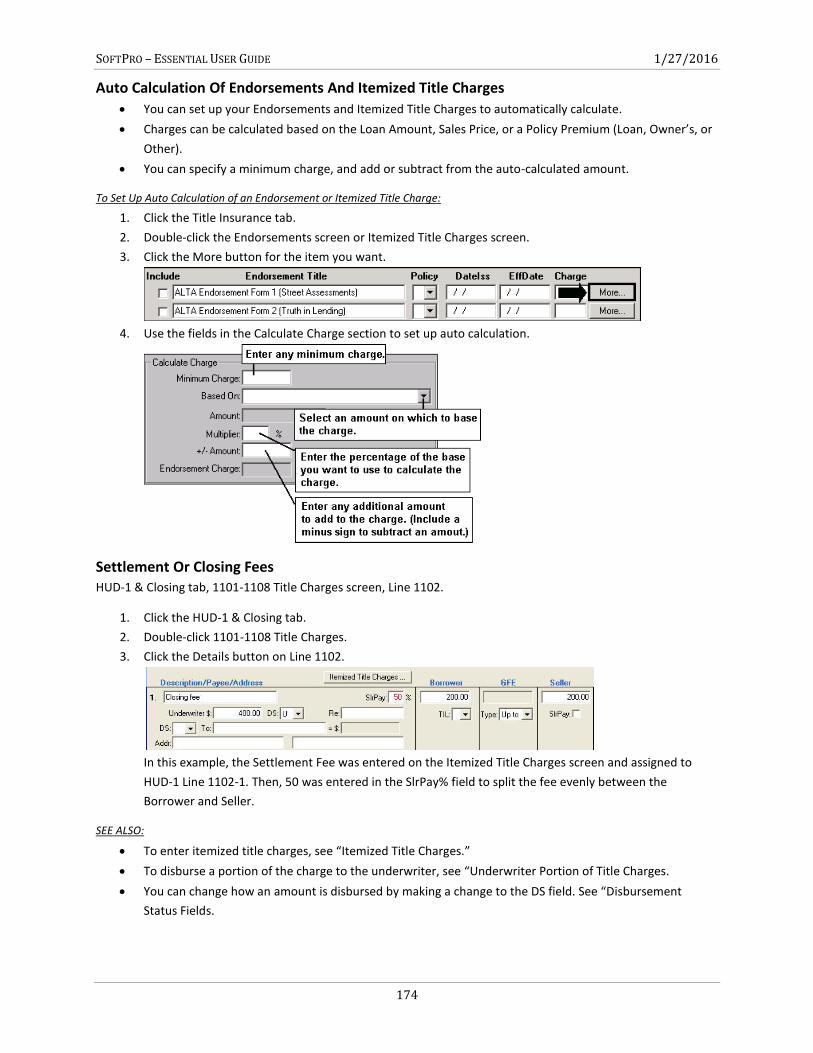
SOFTPRO – ESSENTIAL USER GUIDE 1/27/2016
174
Auto Calculation Of Endorsements And Itemized Title Charges
You can set up your Endorsements and Itemized Title Charges to automatically calculate.
Charges can be calculated based on the Loan Amount, Sales Price, or a Policy Premium (Loan, Owner’s, or
Other).
You can specify a minimum charge, and add or subtract from the auto-calculated amount.
To Set Up Auto Calculation of an Endorsement or Itemized Title Charge:
1. Click the Title Insurance tab.
2. Double-click the Endorsements screen or Itemized Title Charges screen.
3. Click the More button for the item you want.
4. Use the fields in the Calculate Charge section to set up auto calculation.
Settlement Or Closing Fees HUD-1 & Closing tab, 1101-1108 Title Charges screen, Line 1102.
1. Click the HUD-1 & Closing tab.
2. Double-click 1101-1108 Title Charges.
3. Click the Details button on Line 1102.
In this example, the Settlement Fee was entered on the Itemized Title Charges screen and assigned to
HUD-1 Line 1102-1. Then, 50 was entered in the SlrPay% field to split the fee evenly between the
Borrower and Seller.
SEE ALSO:
To enter itemized title charges, see “Itemized Title Charges.”
To disburse a portion of the charge to the underwriter, see “Underwriter Portion of Title Charges.
You can change how an amount is disbursed by making a change to the DS field. See “Disbursement
Status Fields.
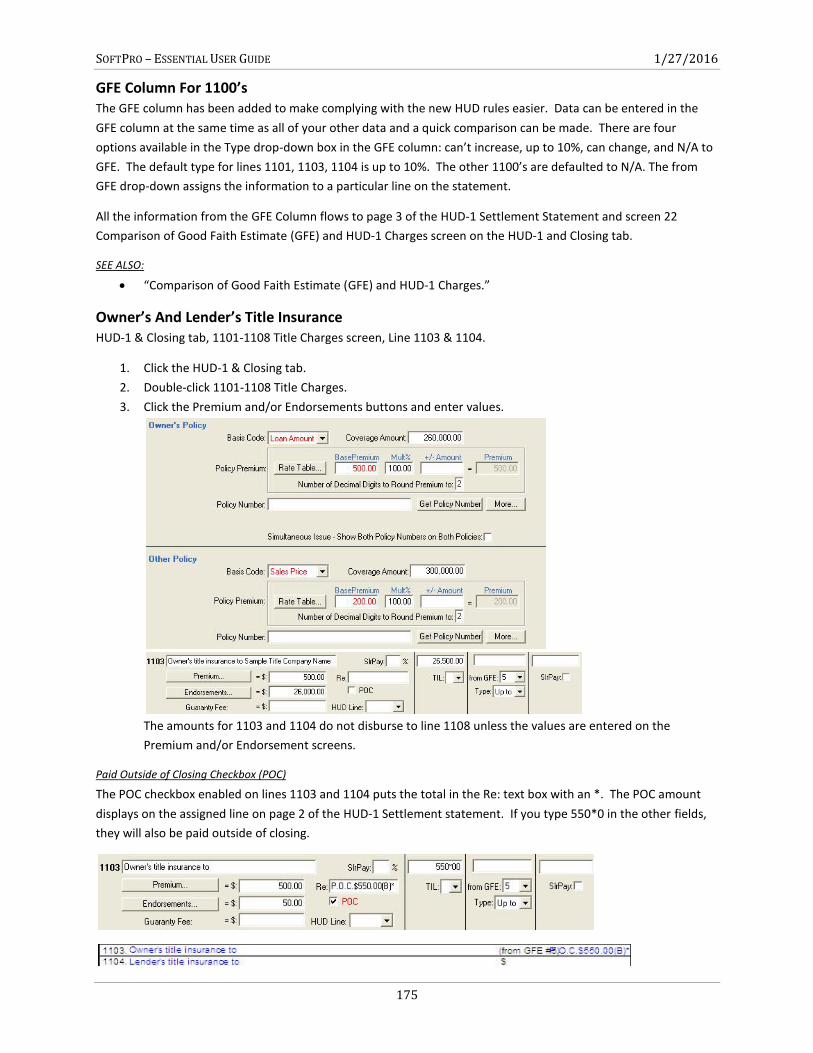
SOFTPRO – ESSENTIAL USER GUIDE 1/27/2016
175
GFE Column For 1100’s The GFE column has been added to make complying with the new HUD rules easier. Data can be entered in the
GFE column at the same time as all of your other data and a quick comparison can be made. There are four
options available in the Type drop-down box in the GFE column: can’t increase, up to 10%, can change, and N/A to
GFE. The default type for lines 1101, 1103, 1104 is up to 10%. The other 1100’s are defaulted to N/A. The from
GFE drop-down assigns the information to a particular line on the statement.
All the information from the GFE Column flows to page 3 of the HUD-1 Settlement Statement and screen 22
Comparison of Good Faith Estimate (GFE) and HUD-1 Charges screen on the HUD-1 and Closing tab.
SEE ALSO:
“Comparison of Good Faith Estimate (GFE) and HUD-1 Charges.”
Owner’s And Lender’s Title Insurance HUD-1 & Closing tab, 1101-1108 Title Charges screen, Line 1103 & 1104.
1. Click the HUD-1 & Closing tab.
2. Double-click 1101-1108 Title Charges.
3. Click the Premium and/or Endorsements buttons and enter values.
The amounts for 1103 and 1104 do not disburse to line 1108 unless the values are entered on the
Premium and/or Endorsement screens.
Paid Outside of Closing Checkbox (POC)
The POC checkbox enabled on lines 1103 and 1104 puts the total in the Re: text box with an *. The POC amount
displays on the assigned line on page 2 of the HUD-1 Settlement statement. If you type 550*0 in the other fields,
they will also be paid outside of closing.
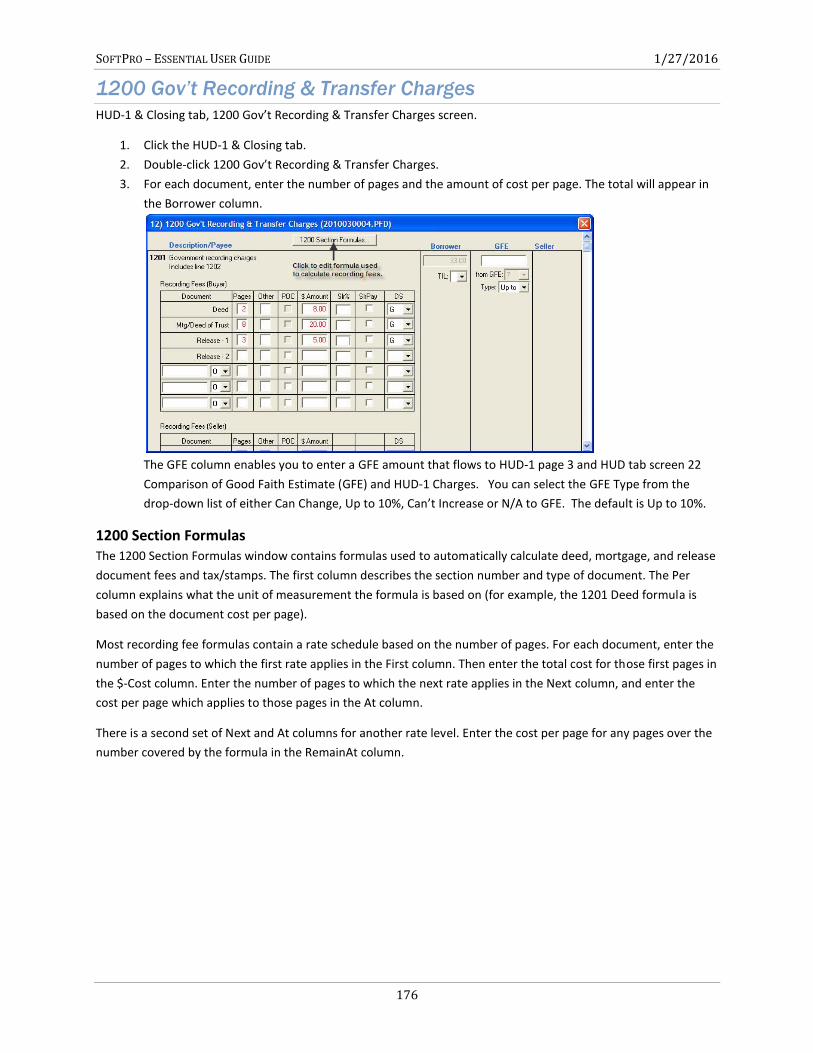
SOFTPRO – ESSENTIAL USER GUIDE 1/27/2016
176
1200 Gov’t Recording & Transfer Charges
HUD-1 & Closing tab, 1200 Gov’t Recording & Transfer Charges screen.
1. Click the HUD-1 & Closing tab.
2. Double-click 1200 Gov’t Recording & Transfer Charges.
3. For each document, enter the number of pages and the amount of cost per page. The total will appear in
the Borrower column.
The GFE column enables you to enter a GFE amount that flows to HUD-1 page 3 and HUD tab screen 22
Comparison of Good Faith Estimate (GFE) and HUD-1 Charges. You can select the GFE Type from the
drop-down list of either Can Change, Up to 10%, Can’t Increase or N/A to GFE. The default is Up to 10%.
1200 Section Formulas The 1200 Section Formulas window contains formulas used to automatically calculate deed, mortgage, and release
document fees and tax/stamps. The first column describes the section number and type of document. The Per
column explains what the unit of measurement the formula is based on (for example, the 1201 Deed formula is
based on the document cost per page).
Most recording fee formulas contain a rate schedule based on the number of pages. For each document, enter the
number of pages to which the first rate applies in the First column. Then enter the total cost for those first pages in
the $-Cost column. Enter the number of pages to which the next rate applies in the Next column, and enter the
cost per page which applies to those pages in the At column.
There is a second set of Next and At columns for another rate level. Enter the cost per page for any pages over the
number covered by the formula in the RemainAt column.
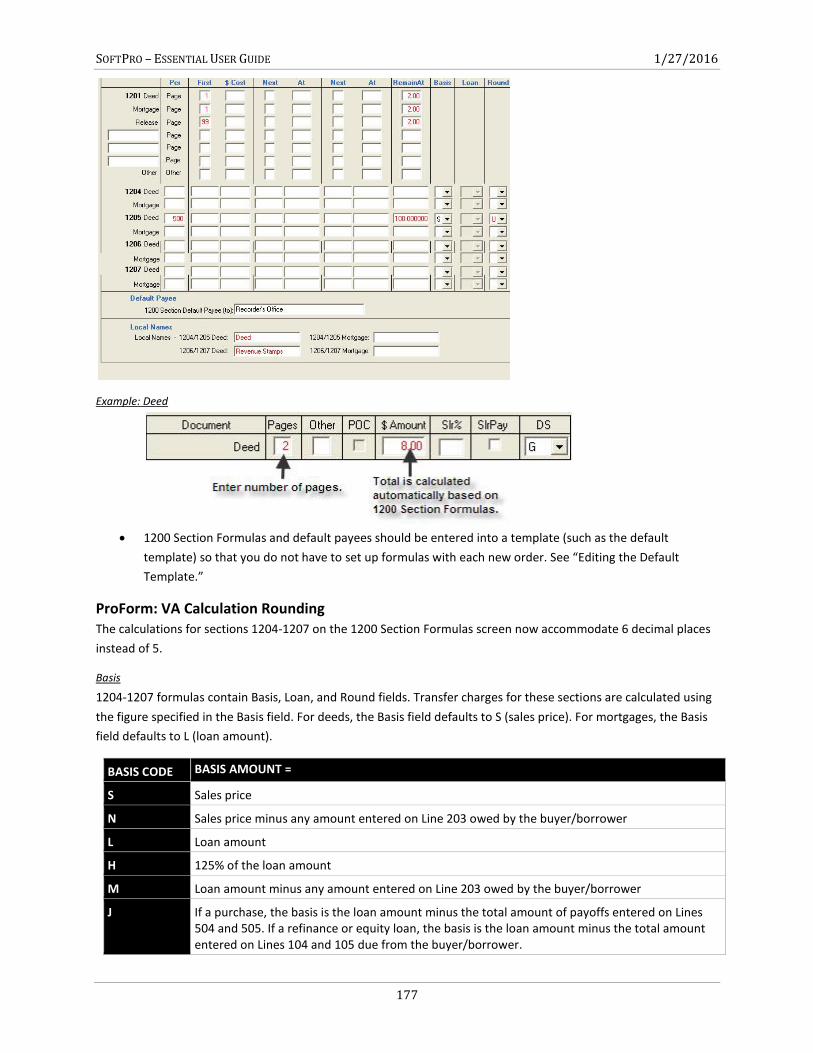
SOFTPRO – ESSENTIAL USER GUIDE 1/27/2016
177
Example: Deed
1200 Section Formulas and default payees should be entered into a template (such as the default
template) so that you do not have to set up formulas with each new order. See “Editing the Default
Template.”
ProForm: VA Calculation Rounding The calculations for sections 1204-1207 on the 1200 Section Formulas screen now accommodate 6 decimal places
instead of 5.
Basis
1204-1207 formulas contain Basis, Loan, and Round fields. Transfer charges for these sections are calculated using
the figure specified in the Basis field. For deeds, the Basis field defaults to S (sales price). For mortgages, the Basis
field defaults to L (loan amount).
BASIS CODE BASIS AMOUNT =
S Sales price
N Sales price minus any amount entered on Line 203 owed by the buyer/borrower
L Loan amount
H 125% of the loan amount
M Loan amount minus any amount entered on Line 203 owed by the buyer/borrower
J If a purchase, the basis is the loan amount minus the total amount of payoffs entered on Lines 504 and 505. If a refinance or equity loan, the basis is the loan amount minus the total amount entered on Lines 104 and 105 due from the buyer/borrower.
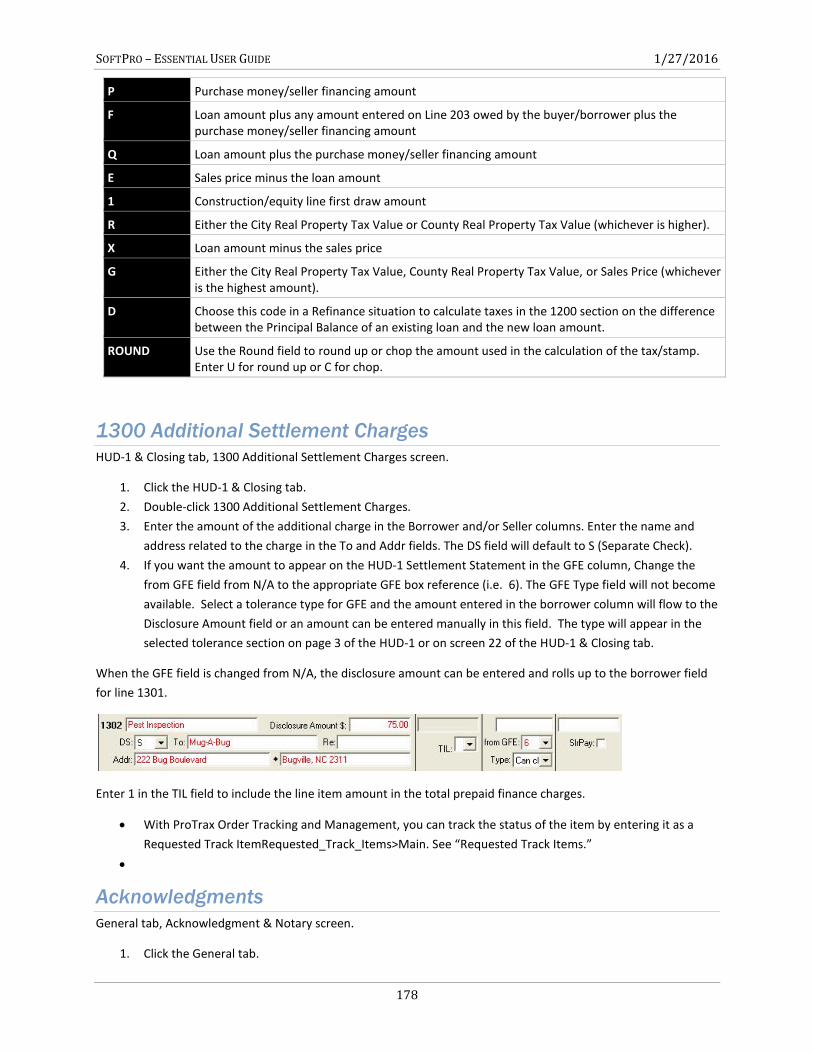
SOFTPRO – ESSENTIAL USER GUIDE 1/27/2016
178
1300 Additional Settlement Charges
HUD-1 & Closing tab, 1300 Additional Settlement Charges screen.
1. Click the HUD-1 & Closing tab.
2. Double-click 1300 Additional Settlement Charges.
3. Enter the amount of the additional charge in the Borrower and/or Seller columns. Enter the name and
address related to the charge in the To and Addr fields. The DS field will default to S (Separate Check).
4. If you want the amount to appear on the HUD-1 Settlement Statement in the GFE column, Change the
from GFE field from N/A to the appropriate GFE box reference (i.e. 6). The GFE Type field will not become
available. Select a tolerance type for GFE and the amount entered in the borrower column will flow to the
Disclosure Amount field or an amount can be entered manually in this field. The type will appear in the
selected tolerance section on page 3 of the HUD-1 or on screen 22 of the HUD-1 & Closing tab.
When the GFE field is changed from N/A, the disclosure amount can be entered and rolls up to the borrower field
for line 1301.
Enter 1 in the TIL field to include the line item amount in the total prepaid finance charges.
With ProTrax Order Tracking and Management, you can track the status of the item by entering it as a
Requested Track ItemRequested_Track_Items>Main. See “Requested Track Items.”
Acknowledgments
General tab, Acknowledgment & Notary screen.
1. Click the General tab.
P Purchase money/seller financing amount
F Loan amount plus any amount entered on Line 203 owed by the buyer/borrower plus the purchase money/seller financing amount
Q Loan amount plus the purchase money/seller financing amount
E Sales price minus the loan amount
1 Construction/equity line first draw amount
R Either the City Real Property Tax Value or County Real Property Tax Value (whichever is higher).
X Loan amount minus the sales price
G Either the City Real Property Tax Value, County Real Property Tax Value, or Sales Price (whichever is the highest amount).
D Choose this code in a Refinance situation to calculate taxes in the 1200 section on the difference between the Principal Balance of an existing loan and the new loan amount.
ROUND Use the Round field to round up or chop the amount used in the calculation of the tax/stamp. Enter U for round up or C for chop.
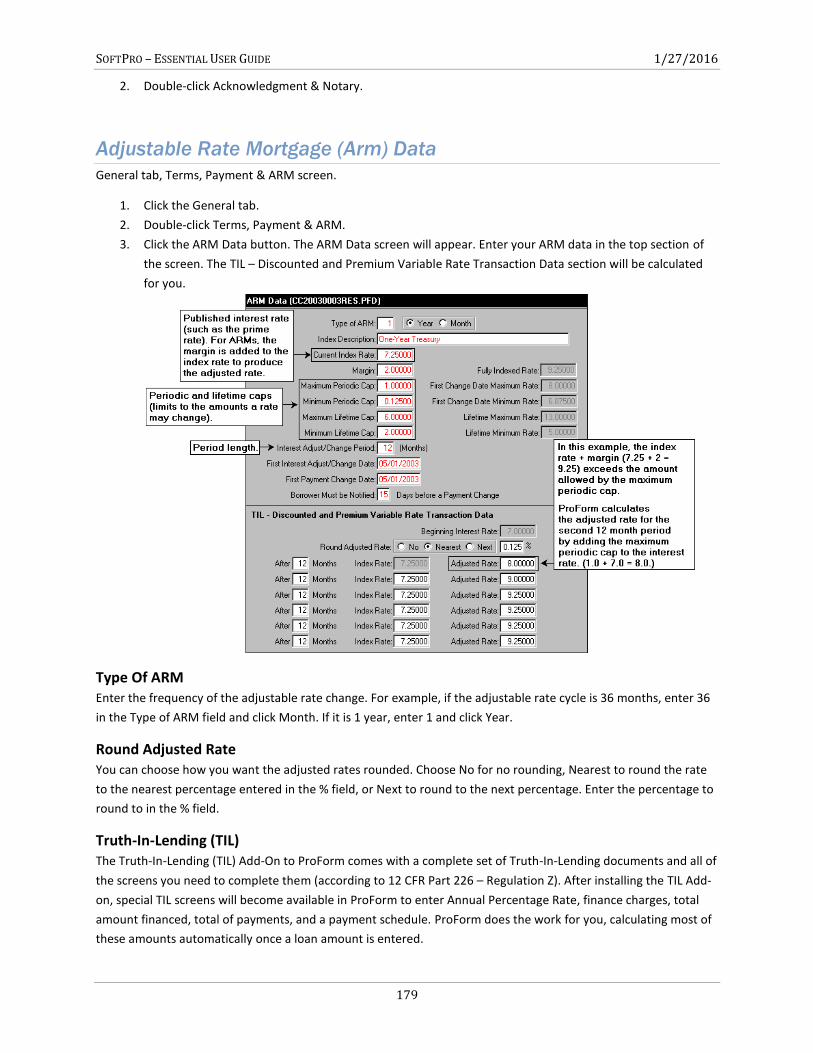
SOFTPRO – ESSENTIAL USER GUIDE 1/27/2016
179
2. Double-click Acknowledgment & Notary.
Adjustable Rate Mortgage (Arm) Data
General tab, Terms, Payment & ARM screen.
1. Click the General tab.
2. Double-click Terms, Payment & ARM.
3. Click the ARM Data button. The ARM Data screen will appear. Enter your ARM data in the top section of
the screen. The TIL – Discounted and Premium Variable Rate Transaction Data section will be calculated
for you.
Type Of ARM Enter the frequency of the adjustable rate change. For example, if the adjustable rate cycle is 36 months, enter 36
in the Type of ARM field and click Month. If it is 1 year, enter 1 and click Year.
Round Adjusted Rate You can choose how you want the adjusted rates rounded. Choose No for no rounding, Nearest to round the rate
to the nearest percentage entered in the % field, or Next to round to the next percentage. Enter the percentage to
round to in the % field.
Truth-In-Lending (TIL) The Truth-In-Lending (TIL) Add-On to ProForm comes with a complete set of Truth-In-Lending documents and all of
the screens you need to complete them (according to 12 CFR Part 226 – Regulation Z). After installing the TIL Add-
on, special TIL screens will become available in ProForm to enter Annual Percentage Rate, finance charges, total
amount financed, total of payments, and a payment schedule. ProForm does the work for you, calculating most of
these amounts automatically once a loan amount is entered.
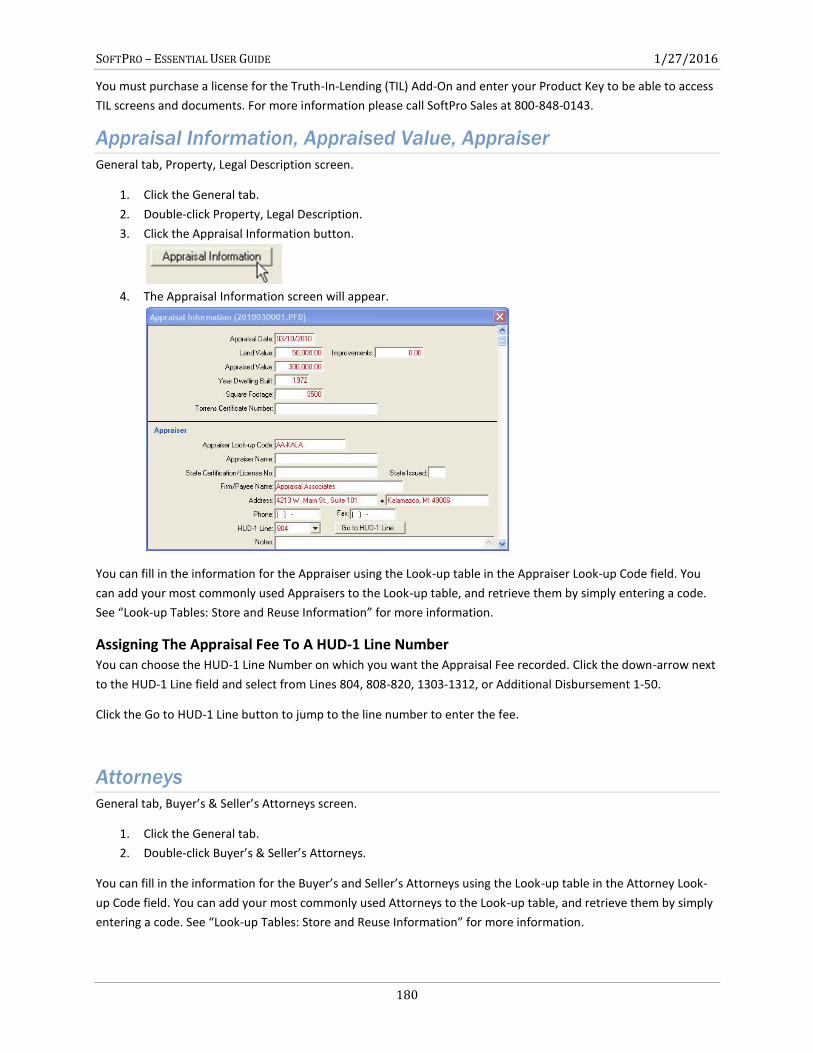
SOFTPRO – ESSENTIAL USER GUIDE 1/27/2016
180
You must purchase a license for the Truth-In-Lending (TIL) Add-On and enter your Product Key to be able to access
TIL screens and documents. For more information please call SoftPro Sales at 800-848-0143.
Appraisal Information, Appraised Value, Appraiser
General tab, Property, Legal Description screen.
1. Click the General tab.
2. Double-click Property, Legal Description.
3. Click the Appraisal Information button.
4. The Appraisal Information screen will appear.
You can fill in the information for the Appraiser using the Look-up table in the Appraiser Look-up Code field. You
can add your most commonly used Appraisers to the Look-up table, and retrieve them by simply entering a code.
See “Look-up Tables: Store and Reuse Information” for more information.
Assigning The Appraisal Fee To A HUD-1 Line Number You can choose the HUD-1 Line Number on which you want the Appraisal Fee recorded. Click the down-arrow next
to the HUD-1 Line field and select from Lines 804, 808-820, 1303-1312, or Additional Disbursement 1-50.
Click the Go to HUD-1 Line button to jump to the line number to enter the fee.
Attorneys
General tab, Buyer’s & Seller’s Attorneys screen.
1. Click the General tab.
2. Double-click Buyer’s & Seller’s Attorneys.
You can fill in the information for the Buyer’s and Seller’s Attorneys using the Look-up table in the Attorney Look-
up Code field. You can add your most commonly used Attorneys to the Look-up table, and retrieve them by simply
entering a code. See “Look-up Tables: Store and Reuse Information” for more information.

SOFTPRO – ESSENTIAL USER GUIDE 1/27/2016
181
Buyer / Borrower
General tab, Buyer/Borrower, Officers & Signatures screen.
1. Click the General tab.
2. Double-click Buyer/Borrower, Officers & Signatures.
3. Enter the buyer name in the first field. If the buyer is couple or partnership, enter the spouse/partner in
the field directly below the first name field.
4. Enter the address of the buyer in the Address fields. Enter the street address or P.O. Box in the first field
and the city, state, and zip code in the field directly below the first. This is the address that will appear on
the HUD-1 Settlement Statement. To enter a forwarding address, click More and use the Forwarding
Address/Numbers fields.
5. Click More to enter SSN/TIN, phone and fax numbers, forwarding address, additional notes, or to edit
signature lines and corporate officers.
6. Enter Vesting and Interest % text to appear on documents such as Warranty Deeds and Deeds of Trust.
(See “Vesting” and “Interest %”)
There is room to enter up to 9 buyers. Each buyer can be a single person, a corporation, or a pair such as a married
couple or partnership.
SEE ALSO:
“Buyer/Borrower Additional Information.”
Type By default, Male will appear in the Type field when a buyer name is entered. If a spouse/partner name is entered,
Plural will appear by default.
You can change the Type field by clicking the arrow and choosing another selection:
Vesting Enter text to describe how the property is vested, which appears on documents such as Warranty Deeds and some
Deeds of Trust (for example, as his sole and separate property, or as joint tenants). The Look-up table contains
several entries you can choose from to fill the Vesting field.
To retrieve an entry from the Vesting Look-up Table:
1. Put the cursor in the Vesting field.
2. Press <F9> to access the table.
3. Select an entry.
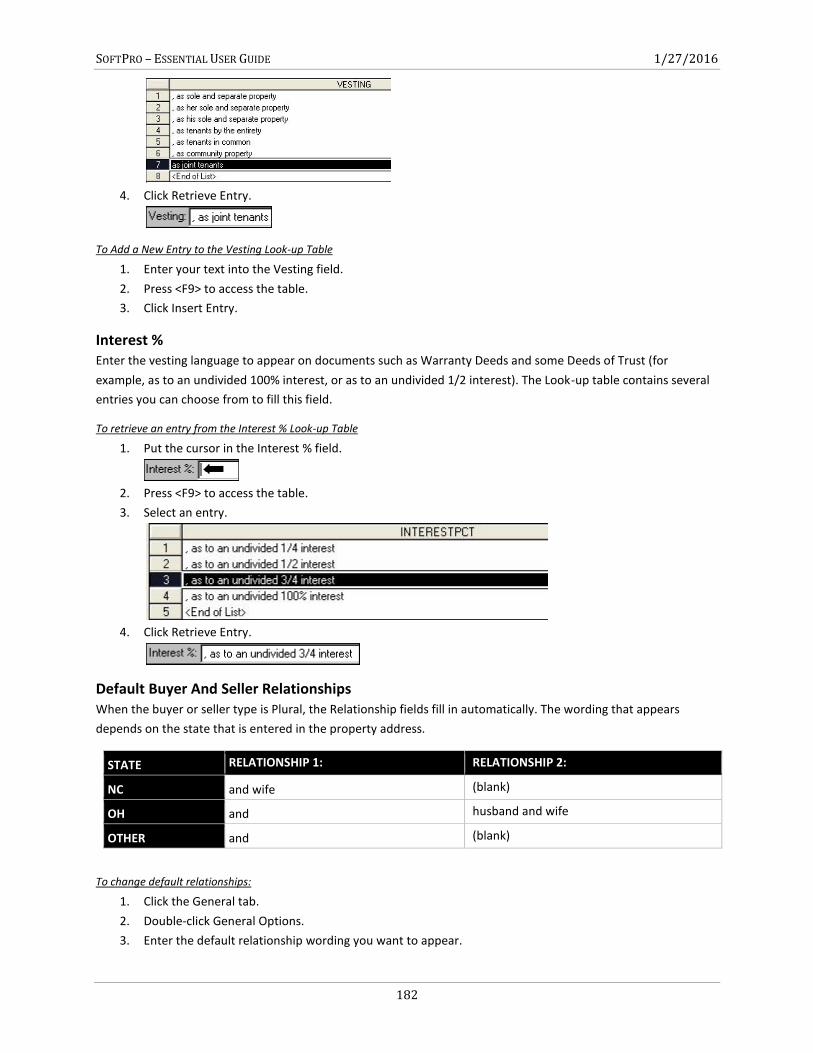
SOFTPRO – ESSENTIAL USER GUIDE 1/27/2016
182
4. Click Retrieve Entry.
To Add a New Entry to the Vesting Look-up Table
1. Enter your text into the Vesting field.
2. Press <F9> to access the table.
3. Click Insert Entry.
Interest % Enter the vesting language to appear on documents such as Warranty Deeds and some Deeds of Trust (for
example, as to an undivided 100% interest, or as to an undivided 1/2 interest). The Look-up table contains several
entries you can choose from to fill this field.
To retrieve an entry from the Interest % Look-up Table
1. Put the cursor in the Interest % field.
2. Press <F9> to access the table.
3. Select an entry.
4. Click Retrieve Entry.
Default Buyer And Seller Relationships When the buyer or seller type is Plural, the Relationship fields fill in automatically. The wording that appears
depends on the state that is entered in the property address.
To change default relationships:
1. Click the General tab.
2. Double-click General Options.
3. Enter the default relationship wording you want to appear.
STATE RELATIONSHIP 1: RELATIONSHIP 2:
NC and wife (blank)
OH and husband and wife
OTHER and (blank)
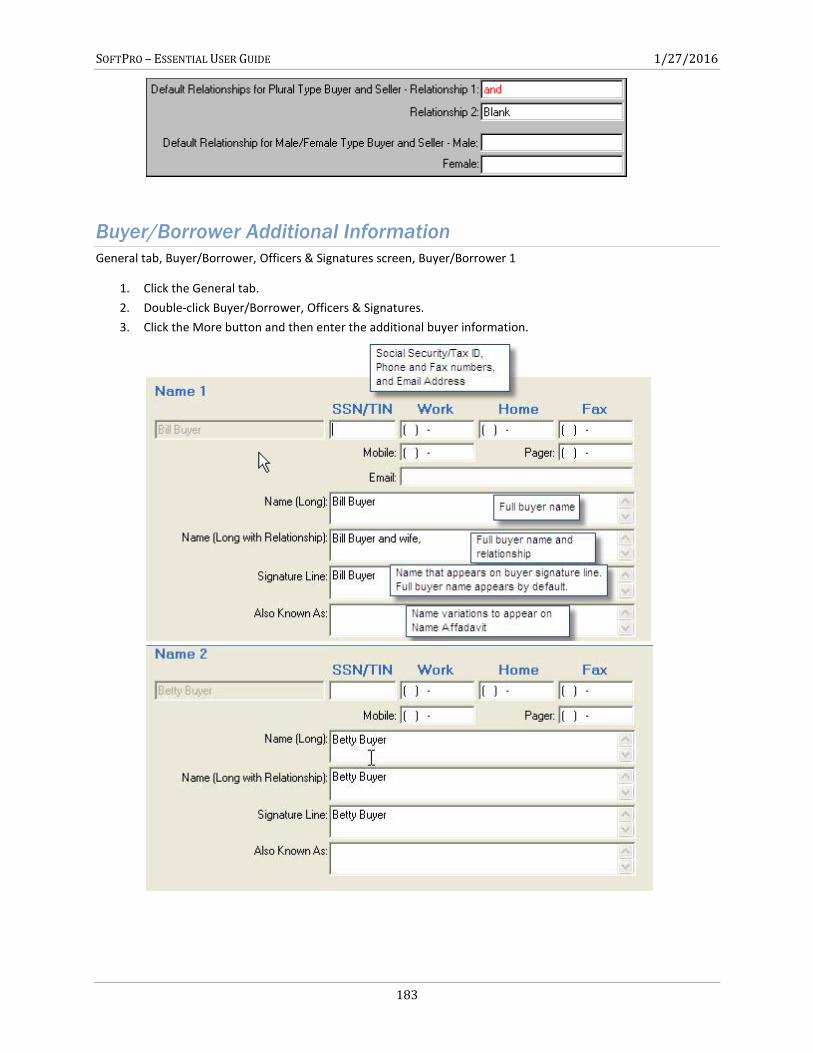
SOFTPRO – ESSENTIAL USER GUIDE 1/27/2016
183
Buyer/Borrower Additional Information
General tab, Buyer/Borrower, Officers & Signatures screen, Buyer/Borrower 1
1. Click the General tab.
2. Double-click Buyer/Borrower, Officers & Signatures.
3. Click the More button and then enter the additional buyer information.
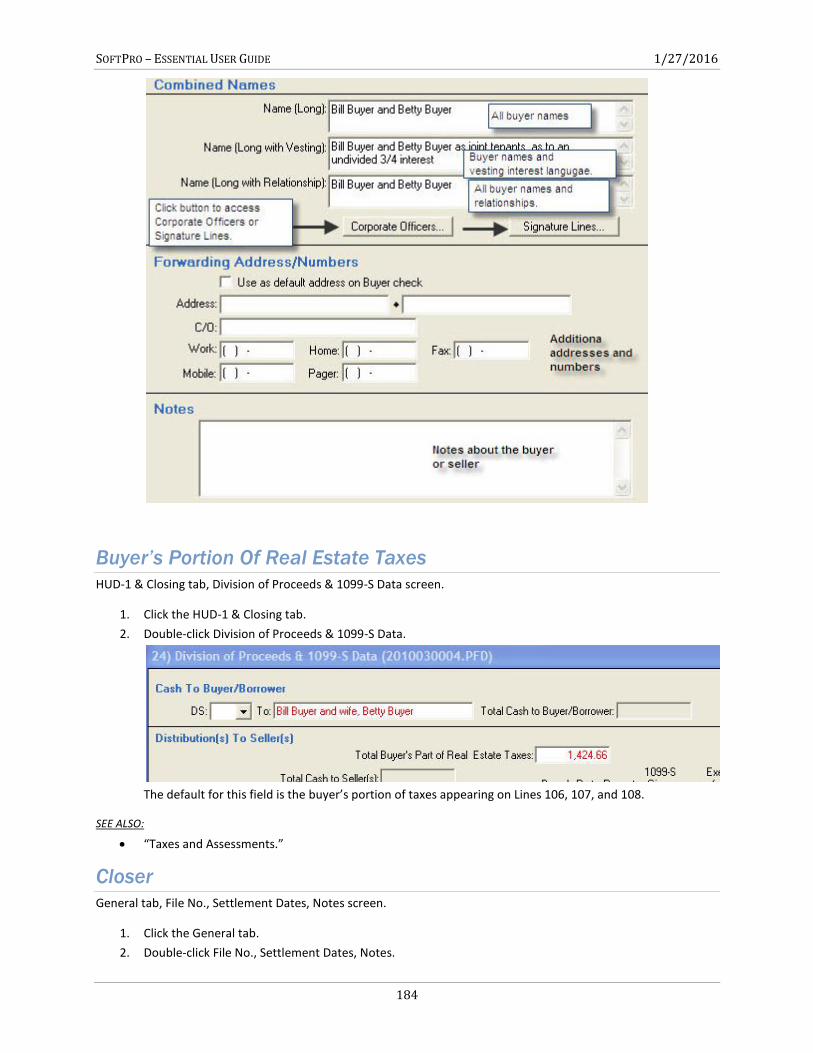
SOFTPRO – ESSENTIAL USER GUIDE 1/27/2016
184
Buyer’s Portion Of Real Estate Taxes
HUD-1 & Closing tab, Division of Proceeds & 1099-S Data screen.
1. Click the HUD-1 & Closing tab.
2. Double-click Division of Proceeds & 1099-S Data.
The default for this field is the buyer’s portion of taxes appearing on Lines 106, 107, and 108.
SEE ALSO:
“Taxes and Assessments.”
Closer
General tab, File No., Settlement Dates, Notes screen.
1. Click the General tab.
2. Double-click File No., Settlement Dates, Notes.
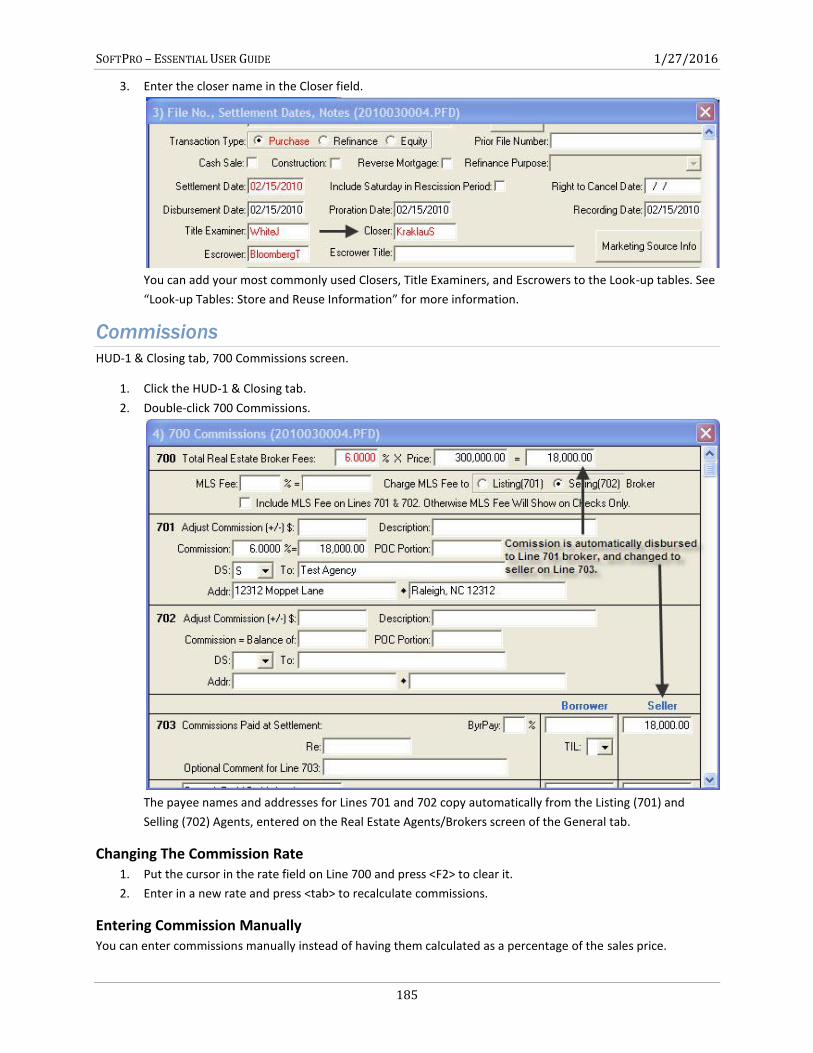
SOFTPRO – ESSENTIAL USER GUIDE 1/27/2016
185
3. Enter the closer name in the Closer field.
You can add your most commonly used Closers, Title Examiners, and Escrowers to the Look-up tables. See
“Look-up Tables: Store and Reuse Information” for more information.
Commissions
HUD-1 & Closing tab, 700 Commissions screen.
1. Click the HUD-1 & Closing tab.
2. Double-click 700 Commissions.
The payee names and addresses for Lines 701 and 702 copy automatically from the Listing (701) and
Selling (702) Agents, entered on the Real Estate Agents/Brokers screen of the General tab.
Changing The Commission Rate 1. Put the cursor in the rate field on Line 700 and press <F2> to clear it.
2. Enter in a new rate and press <tab> to recalculate commissions.
Entering Commission Manually You can enter commissions manually instead of having them calculated as a percentage of the sales price.
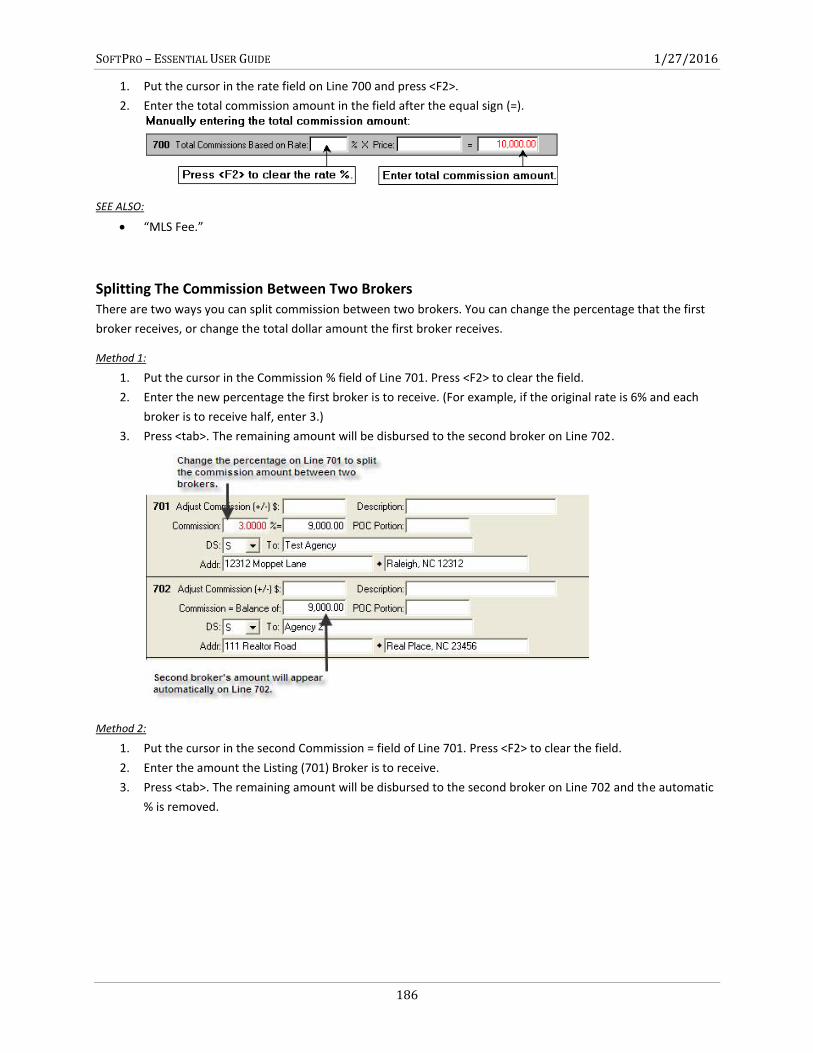
SOFTPRO – ESSENTIAL USER GUIDE 1/27/2016
186
1. Put the cursor in the rate field on Line 700 and press <F2>.
2. Enter the total commission amount in the field after the equal sign (=).
SEE ALSO:
“MLS Fee.”
Splitting The Commission Between Two Brokers There are two ways you can split commission between two brokers. You can change the percentage that the first
broker receives, or change the total dollar amount the first broker receives.
Method 1:
1. Put the cursor in the Commission % field of Line 701. Press <F2> to clear the field.
2. Enter the new percentage the first broker is to receive. (For example, if the original rate is 6% and each
broker is to receive half, enter 3.)
3. Press <tab>. The remaining amount will be disbursed to the second broker on Line 702.
Method 2:
1. Put the cursor in the second Commission = field of Line 701. Press <F2> to clear the field.
2. Enter the amount the Listing (701) Broker is to receive.
3. Press <tab>. The remaining amount will be disbursed to the second broker on Line 702 and the automatic
% is removed.
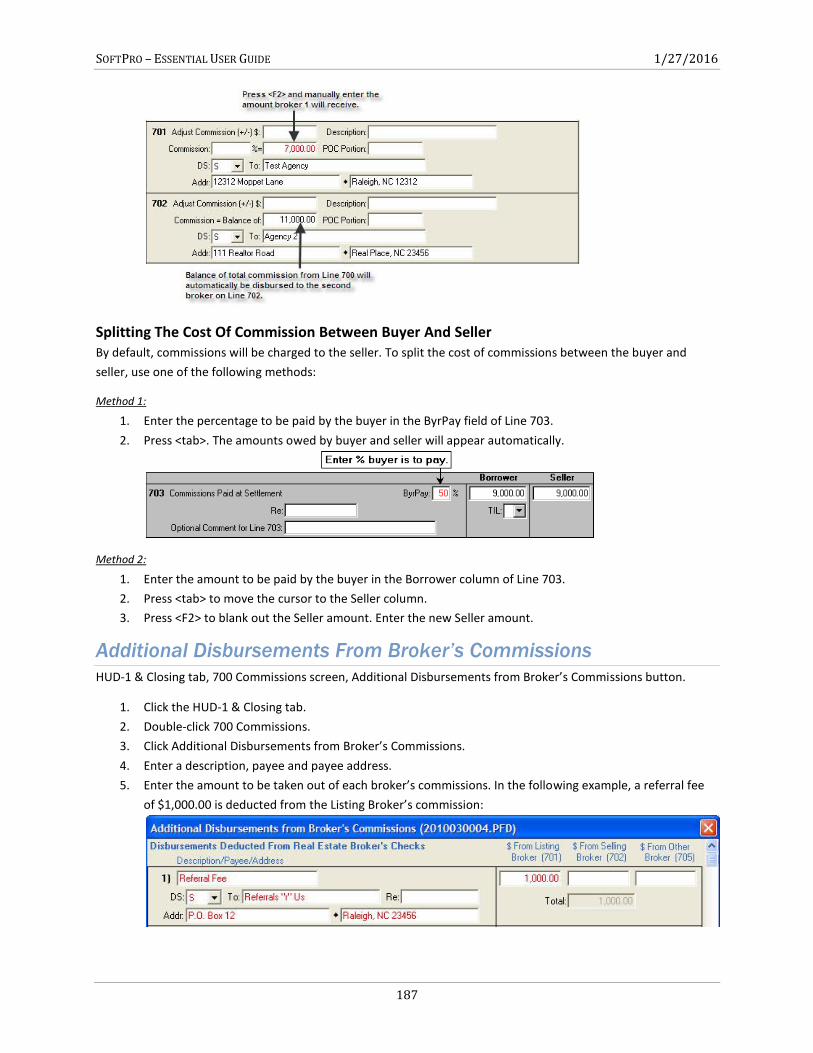
SOFTPRO – ESSENTIAL USER GUIDE 1/27/2016
187
Splitting The Cost Of Commission Between Buyer And Seller By default, commissions will be charged to the seller. To split the cost of commissions between the buyer and
seller, use one of the following methods:
Method 1:
1. Enter the percentage to be paid by the buyer in the ByrPay field of Line 703.
2. Press <tab>. The amounts owed by buyer and seller will appear automatically.
Method 2:
1. Enter the amount to be paid by the buyer in the Borrower column of Line 703.
2. Press <tab> to move the cursor to the Seller column.
3. Press <F2> to blank out the Seller amount. Enter the new Seller amount.
Additional Disbursements From Broker’s Commissions
HUD-1 & Closing tab, 700 Commissions screen, Additional Disbursements from Broker’s Commissions button.
1. Click the HUD-1 & Closing tab.
2. Double-click 700 Commissions.
3. Click Additional Disbursements from Broker’s Commissions.
4. Enter a description, payee and payee address.
5. Enter the amount to be taken out of each broker’s commissions. In the following example, a referral fee
of $1,000.00 is deducted from the Listing Broker’s commission:
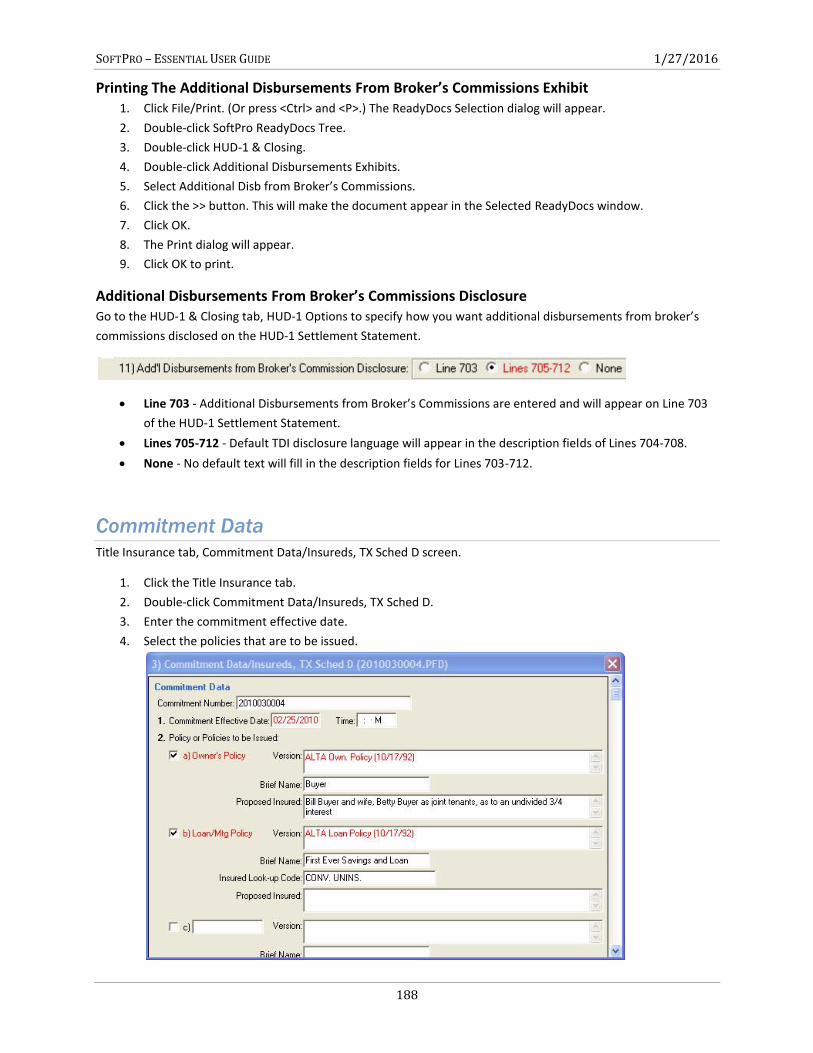
SOFTPRO – ESSENTIAL USER GUIDE 1/27/2016
188
Printing The Additional Disbursements From Broker’s Commissions Exhibit 1. Click File/Print. (Or press <Ctrl> and <P>.) The ReadyDocs Selection dialog will appear.
2. Double-click SoftPro ReadyDocs Tree.
3. Double-click HUD-1 & Closing.
4. Double-click Additional Disbursements Exhibits.
5. Select Additional Disb from Broker’s Commissions.
6. Click the >> button. This will make the document appear in the Selected ReadyDocs window.
7. Click OK.
8. The Print dialog will appear.
9. Click OK to print.
Additional Disbursements From Broker’s Commissions Disclosure Go to the HUD-1 & Closing tab, HUD-1 Options to specify how you want additional disbursements from broker’s
commissions disclosed on the HUD-1 Settlement Statement.
Line 703 - Additional Disbursements from Broker’s Commissions are entered and will appear on Line 703
of the HUD-1 Settlement Statement.
Lines 705-712 - Default TDI disclosure language will appear in the description fields of Lines 704-708.
None - No default text will fill in the description fields for Lines 703-712.
Commitment Data
Title Insurance tab, Commitment Data/Insureds, TX Sched D screen.
1. Click the Title Insurance tab.
2. Double-click Commitment Data/Insureds, TX Sched D.
3. Enter the commitment effective date.
4. Select the policies that are to be issued.
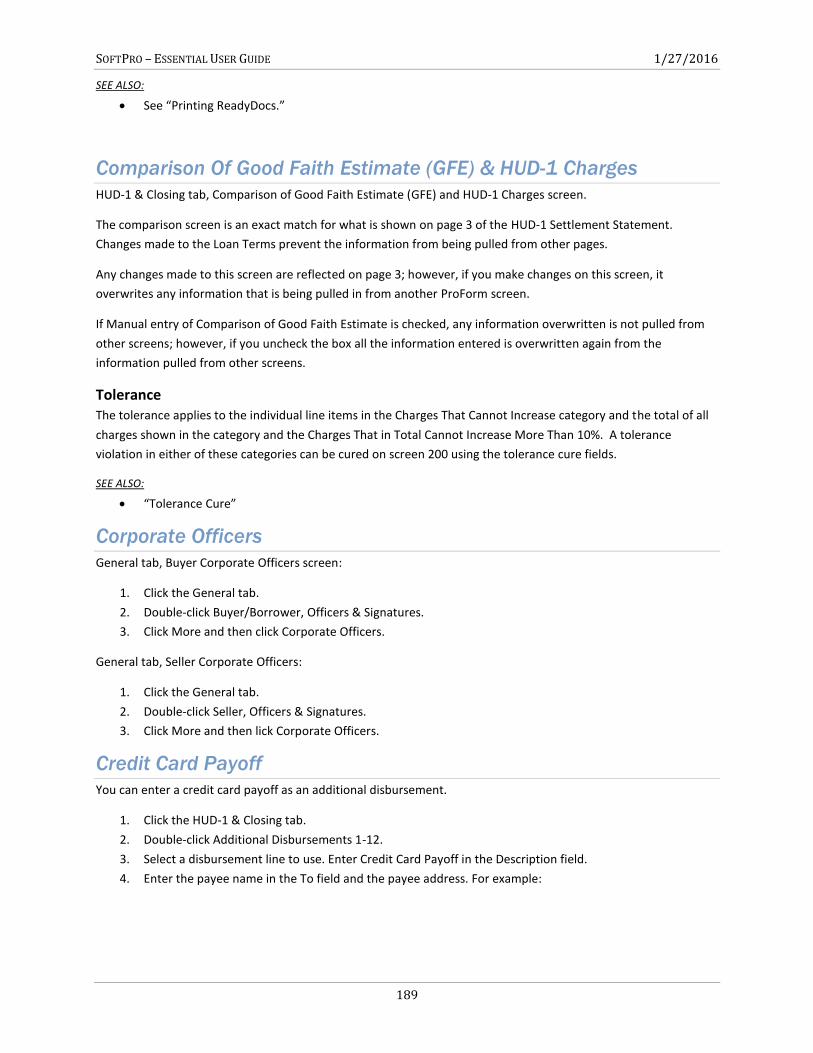
SOFTPRO – ESSENTIAL USER GUIDE 1/27/2016
189
SEE ALSO:
See “Printing ReadyDocs.”
Comparison Of Good Faith Estimate (GFE) & HUD-1 Charges
HUD-1 & Closing tab, Comparison of Good Faith Estimate (GFE) and HUD-1 Charges screen.
The comparison screen is an exact match for what is shown on page 3 of the HUD-1 Settlement Statement.
Changes made to the Loan Terms prevent the information from being pulled from other pages.
Any changes made to this screen are reflected on page 3; however, if you make changes on this screen, it
overwrites any information that is being pulled in from another ProForm screen.
If Manual entry of Comparison of Good Faith Estimate is checked, any information overwritten is not pulled from
other screens; however, if you uncheck the box all the information entered is overwritten again from the
information pulled from other screens.
Tolerance The tolerance applies to the individual line items in the Charges That Cannot Increase category and the total of all
charges shown in the category and the Charges That in Total Cannot Increase More Than 10%. A tolerance
violation in either of these categories can be cured on screen 200 using the tolerance cure fields.
SEE ALSO:
“Tolerance Cure”
Corporate Officers
General tab, Buyer Corporate Officers screen:
1. Click the General tab.
2. Double-click Buyer/Borrower, Officers & Signatures.
3. Click More and then click Corporate Officers.
General tab, Seller Corporate Officers:
1. Click the General tab.
2. Double-click Seller, Officers & Signatures.
3. Click More and then lick Corporate Officers.
Credit Card Payoff
You can enter a credit card payoff as an additional disbursement.
1. Click the HUD-1 & Closing tab.
2. Double-click Additional Disbursements 1-12.
3. Select a disbursement line to use. Enter Credit Card Payoff in the Description field.
4. Enter the payee name in the To field and the payee address. For example:
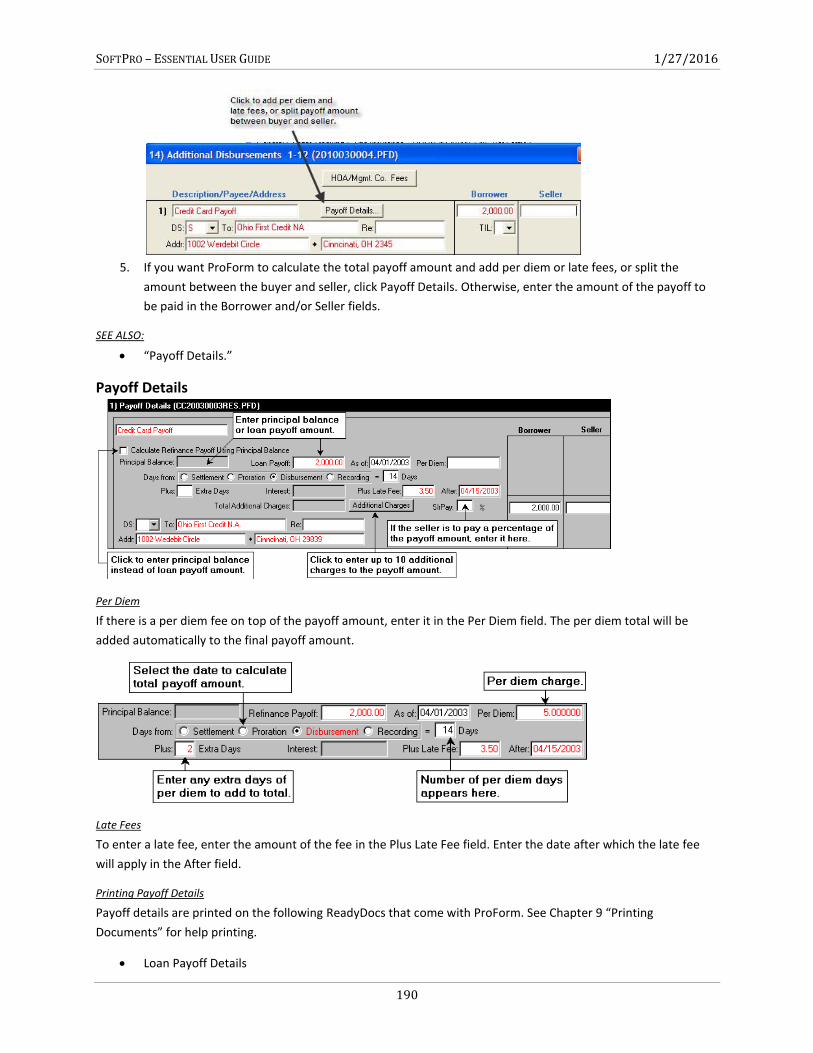
SOFTPRO – ESSENTIAL USER GUIDE 1/27/2016
190
5. If you want ProForm to calculate the total payoff amount and add per diem or late fees, or split the
amount between the buyer and seller, click Payoff Details. Otherwise, enter the amount of the payoff to
be paid in the Borrower and/or Seller fields.
SEE ALSO:
“Payoff Details.”
Payoff Details
Per Diem
If there is a per diem fee on top of the payoff amount, enter it in the Per Diem field. The per diem total will be
added automatically to the final payoff amount.
Late Fees
To enter a late fee, enter the amount of the fee in the Plus Late Fee field. Enter the date after which the late fee
will apply in the After field.
Printing Payoff Details
Payoff details are printed on the following ReadyDocs that come with ProForm. See Chapter 9 “Printing
Documents” for help printing.
Loan Payoff Details
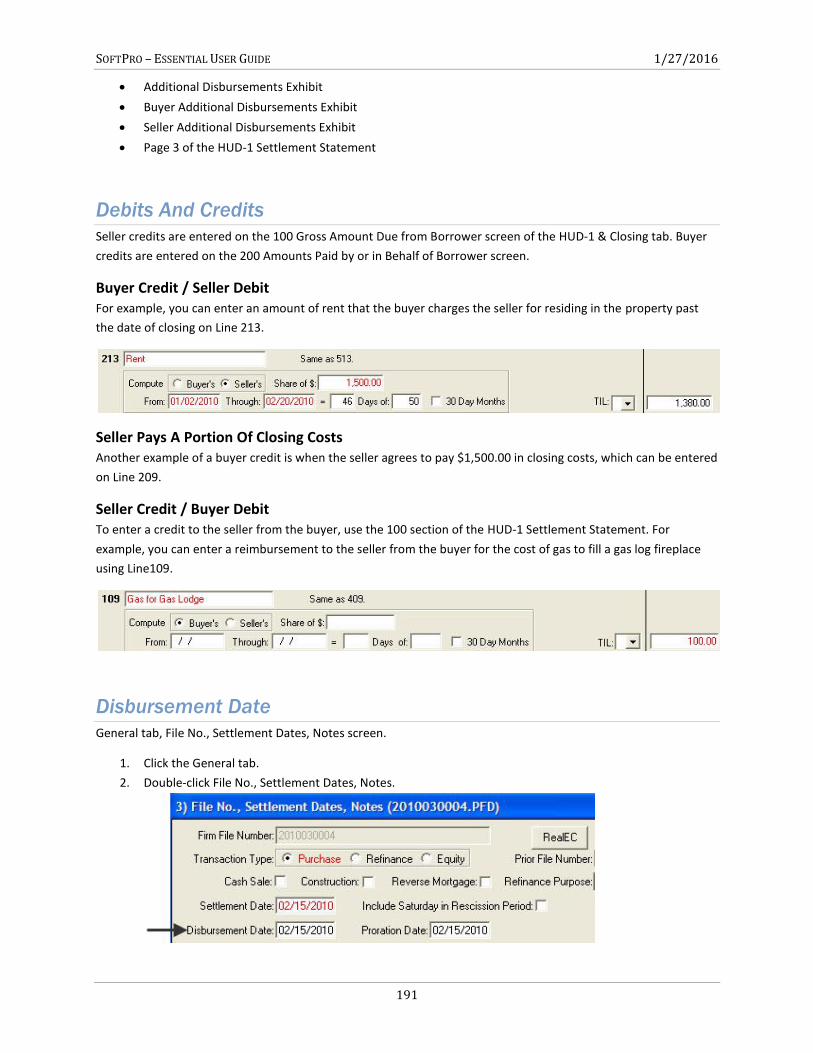
SOFTPRO – ESSENTIAL USER GUIDE 1/27/2016
191
Additional Disbursements Exhibit
Buyer Additional Disbursements Exhibit
Seller Additional Disbursements Exhibit
Page 3 of the HUD-1 Settlement Statement
Debits And Credits
Seller credits are entered on the 100 Gross Amount Due from Borrower screen of the HUD-1 & Closing tab. Buyer
credits are entered on the 200 Amounts Paid by or in Behalf of Borrower screen.
Buyer Credit / Seller Debit For example, you can enter an amount of rent that the buyer charges the seller for residing in the property past
the date of closing on Line 213.
Seller Pays A Portion Of Closing Costs Another example of a buyer credit is when the seller agrees to pay $1,500.00 in closing costs, which can be entered
on Line 209.
Seller Credit / Buyer Debit To enter a credit to the seller from the buyer, use the 100 section of the HUD-1 Settlement Statement. For
example, you can enter a reimbursement to the seller from the buyer for the cost of gas to fill a gas log fireplace
using Line109.
Disbursement Date
General tab, File No., Settlement Dates, Notes screen.
1. Click the General tab.
2. Double-click File No., Settlement Dates, Notes.
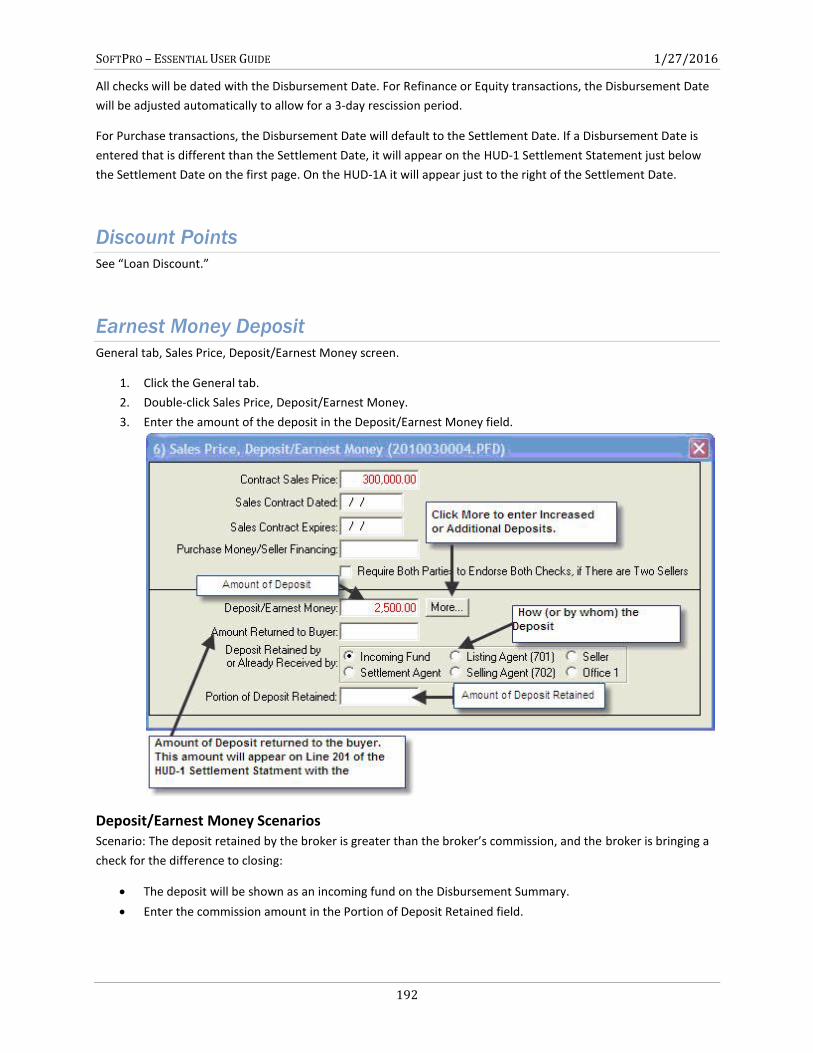
SOFTPRO – ESSENTIAL USER GUIDE 1/27/2016
192
All checks will be dated with the Disbursement Date. For Refinance or Equity transactions, the Disbursement Date
will be adjusted automatically to allow for a 3-day rescission period.
For Purchase transactions, the Disbursement Date will default to the Settlement Date. If a Disbursement Date is
entered that is different than the Settlement Date, it will appear on the HUD-1 Settlement Statement just below
the Settlement Date on the first page. On the HUD-1A it will appear just to the right of the Settlement Date.
Discount Points
See “Loan Discount.”
Earnest Money Deposit
General tab, Sales Price, Deposit/Earnest Money screen.
1. Click the General tab.
2. Double-click Sales Price, Deposit/Earnest Money.
3. Enter the amount of the deposit in the Deposit/Earnest Money field.
Deposit/Earnest Money Scenarios Scenario: The deposit retained by the broker is greater than the broker’s commission, and the broker is bringing a
check for the difference to closing:
The deposit will be shown as an incoming fund on the Disbursement Summary.
Enter the commission amount in the Portion of Deposit Retained field.
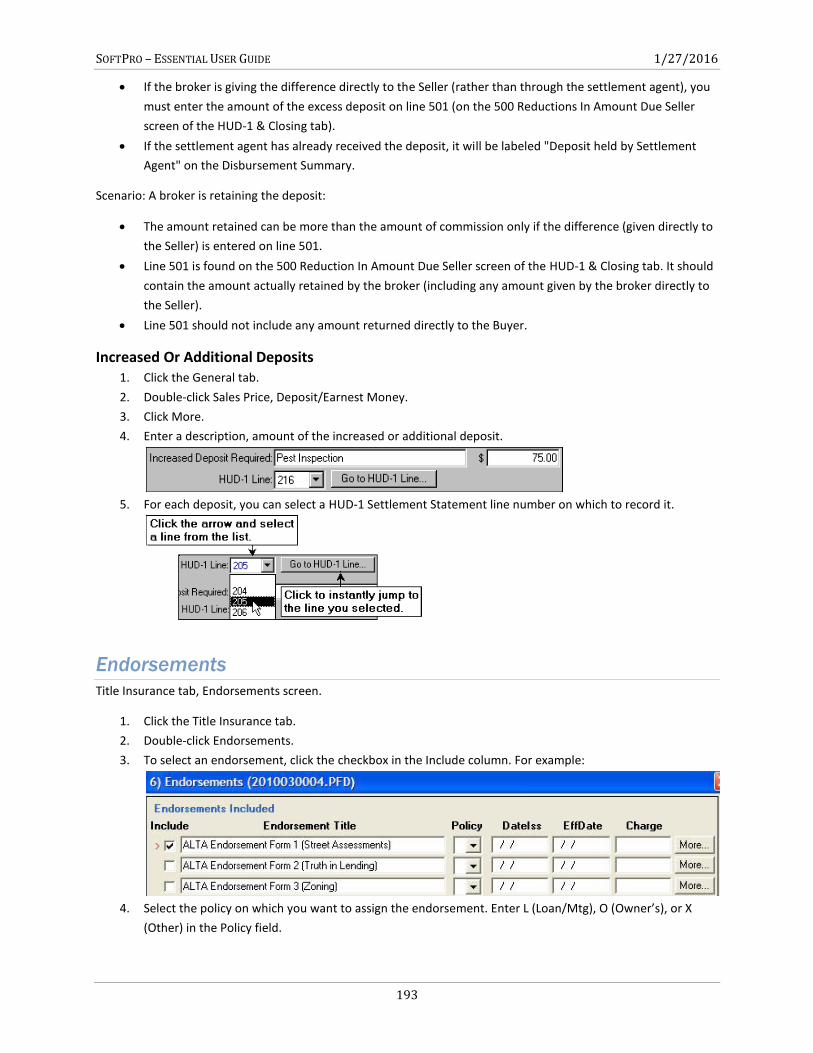
SOFTPRO – ESSENTIAL USER GUIDE 1/27/2016
193
If the broker is giving the difference directly to the Seller (rather than through the settlement agent), you
must enter the amount of the excess deposit on line 501 (on the 500 Reductions In Amount Due Seller
screen of the HUD-1 & Closing tab).
If the settlement agent has already received the deposit, it will be labeled "Deposit held by Settlement
Agent" on the Disbursement Summary.
Scenario: A broker is retaining the deposit:
The amount retained can be more than the amount of commission only if the difference (given directly to
the Seller) is entered on line 501.
Line 501 is found on the 500 Reduction In Amount Due Seller screen of the HUD-1 & Closing tab. It should
contain the amount actually retained by the broker (including any amount given by the broker directly to
the Seller).
Line 501 should not include any amount returned directly to the Buyer.
Increased Or Additional Deposits 1. Click the General tab.
2. Double-click Sales Price, Deposit/Earnest Money.
3. Click More.
4. Enter a description, amount of the increased or additional deposit.
5. For each deposit, you can select a HUD-1 Settlement Statement line number on which to record it.
Endorsements
Title Insurance tab, Endorsements screen.
1. Click the Title Insurance tab.
2. Double-click Endorsements.
3. To select an endorsement, click the checkbox in the Include column. For example:
4. Select the policy on which you want to assign the endorsement. Enter L (Loan/Mtg), O (Owner’s), or X
(Other) in the Policy field.
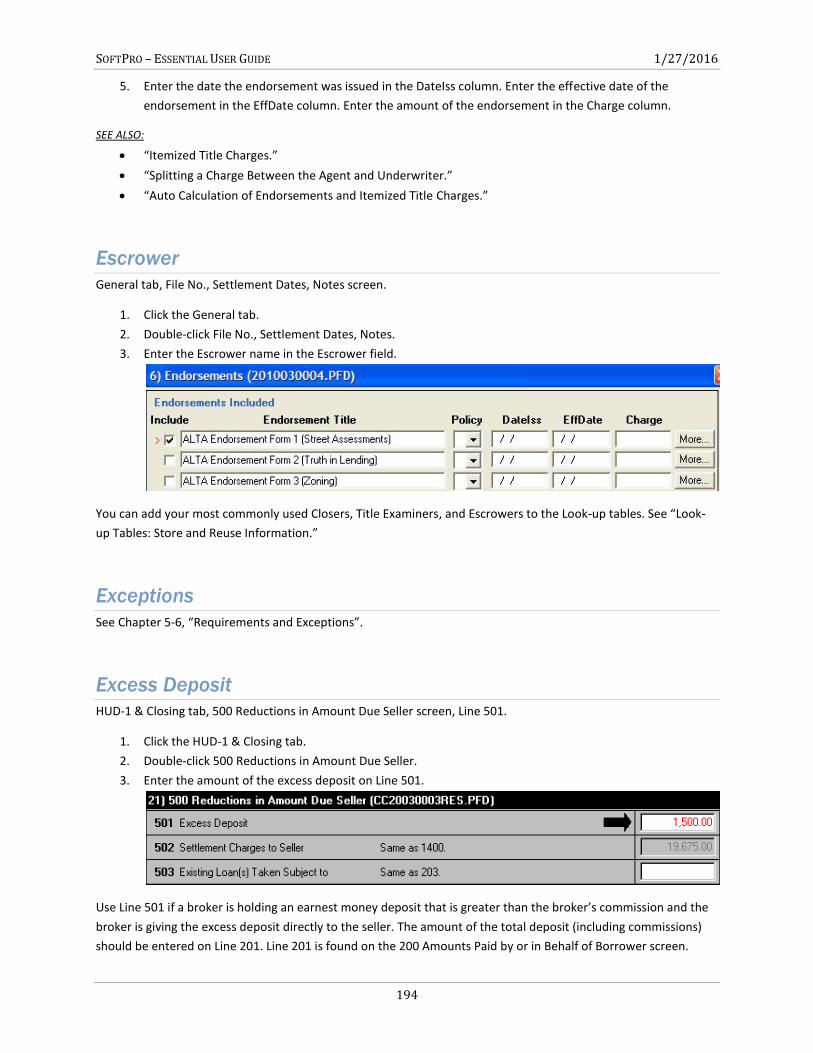
SOFTPRO – ESSENTIAL USER GUIDE 1/27/2016
194
5. Enter the date the endorsement was issued in the DateIss column. Enter the effective date of the
endorsement in the EffDate column. Enter the amount of the endorsement in the Charge column.
SEE ALSO:
“Itemized Title Charges.”
“Splitting a Charge Between the Agent and Underwriter.”
“Auto Calculation of Endorsements and Itemized Title Charges.”
Escrower
General tab, File No., Settlement Dates, Notes screen.
1. Click the General tab.
2. Double-click File No., Settlement Dates, Notes.
3. Enter the Escrower name in the Escrower field.
You can add your most commonly used Closers, Title Examiners, and Escrowers to the Look-up tables. See “Look-
up Tables: Store and Reuse Information.”
Exceptions
See Chapter 5-6, “Requirements and Exceptions”.
Excess Deposit
HUD-1 & Closing tab, 500 Reductions in Amount Due Seller screen, Line 501.
1. Click the HUD-1 & Closing tab.
2. Double-click 500 Reductions in Amount Due Seller.
3. Enter the amount of the excess deposit on Line 501.
Use Line 501 if a broker is holding an earnest money deposit that is greater than the broker’s commission and the
broker is giving the excess deposit directly to the seller. The amount of the total deposit (including commissions)
should be entered on Line 201. Line 201 is found on the 200 Amounts Paid by or in Behalf of Borrower screen.
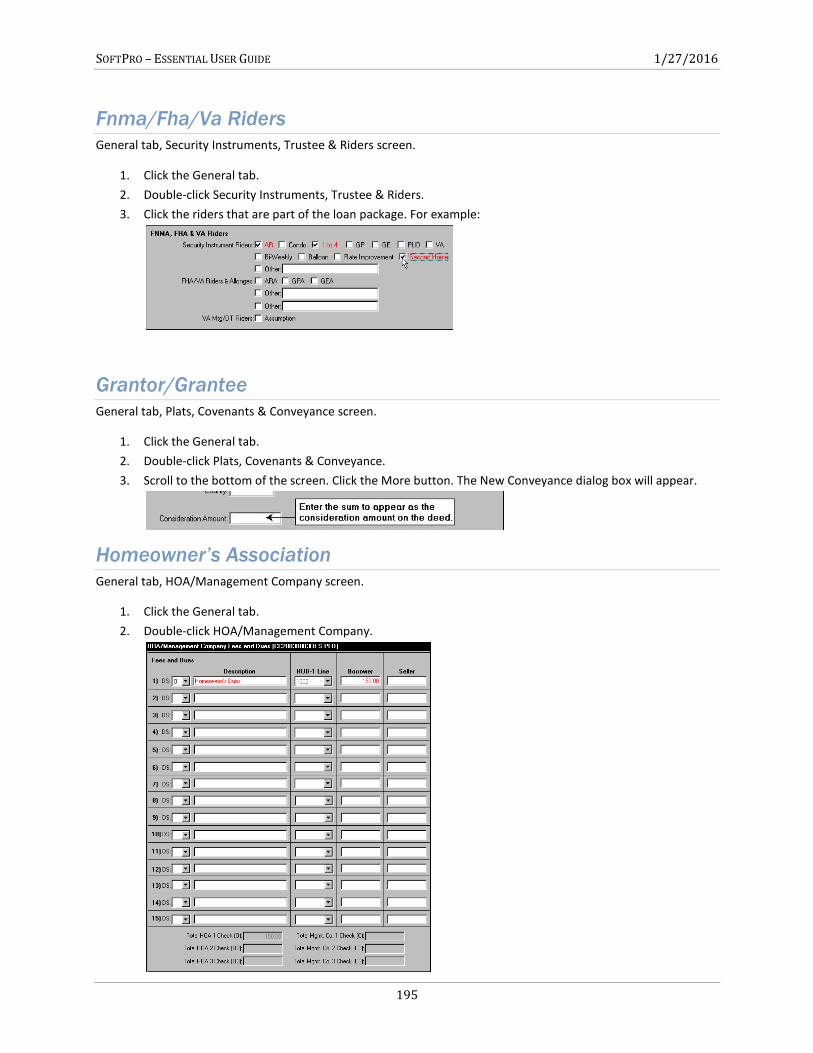
SOFTPRO – ESSENTIAL USER GUIDE 1/27/2016
195
Fnma/Fha/Va Riders
General tab, Security Instruments, Trustee & Riders screen.
1. Click the General tab.
2. Double-click Security Instruments, Trustee & Riders.
3. Click the riders that are part of the loan package. For example:
Grantor/Grantee
General tab, Plats, Covenants & Conveyance screen.
1. Click the General tab.
2. Double-click Plats, Covenants & Conveyance.
3. Scroll to the bottom of the screen. Click the More button. The New Conveyance dialog box will appear.
Homeowner’s Association
General tab, HOA/Management Company screen.
1. Click the General tab.
2. Double-click HOA/Management Company.
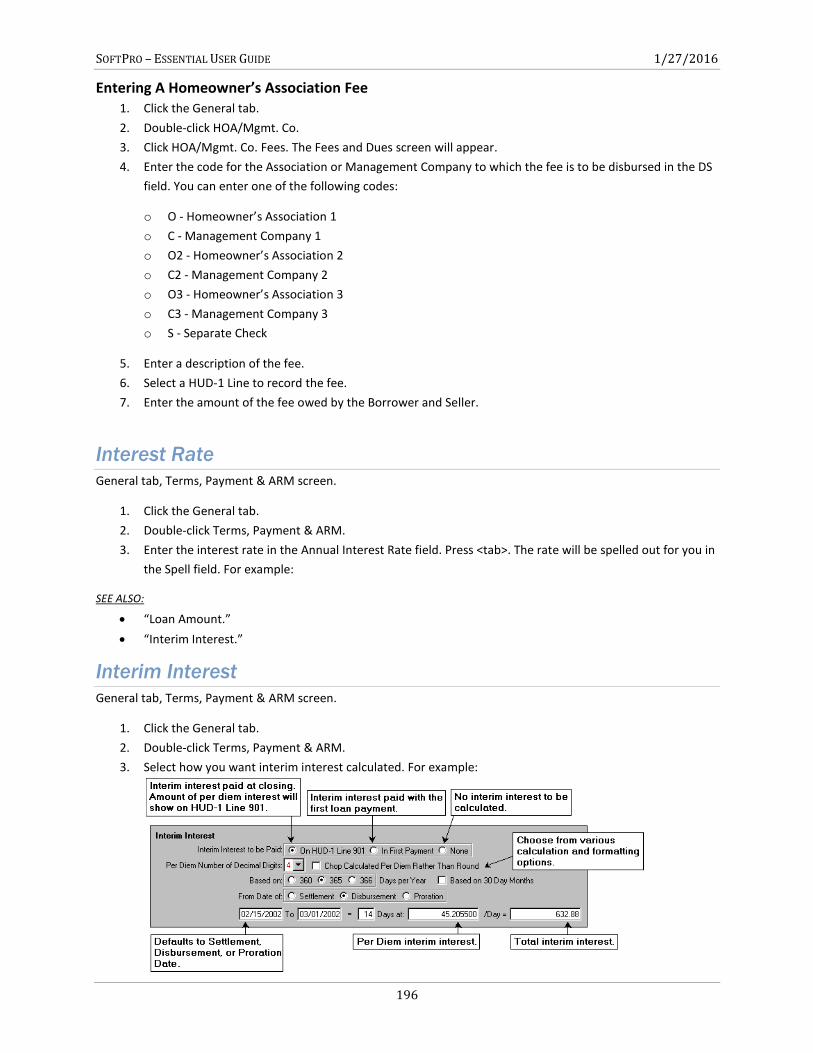
SOFTPRO – ESSENTIAL USER GUIDE 1/27/2016
196
Entering A Homeowner’s Association Fee 1. Click the General tab.
2. Double-click HOA/Mgmt. Co.
3. Click HOA/Mgmt. Co. Fees. The Fees and Dues screen will appear.
4. Enter the code for the Association or Management Company to which the fee is to be disbursed in the DS
field. You can enter one of the following codes:
o O - Homeowner’s Association 1
o C - Management Company 1
o O2 - Homeowner’s Association 2
o C2 - Management Company 2
o O3 - Homeowner’s Association 3
o C3 - Management Company 3
o S - Separate Check
5. Enter a description of the fee.
6. Select a HUD-1 Line to record the fee.
7. Enter the amount of the fee owed by the Borrower and Seller.
Interest Rate
General tab, Terms, Payment & ARM screen.
1. Click the General tab.
2. Double-click Terms, Payment & ARM.
3. Enter the interest rate in the Annual Interest Rate field. Press <tab>. The rate will be spelled out for you in
the Spell field. For example:
SEE ALSO:
“Loan Amount.”
“Interim Interest.”
Interim Interest
General tab, Terms, Payment & ARM screen.
1. Click the General tab.
2. Double-click Terms, Payment & ARM.
3. Select how you want interim interest calculated. For example:
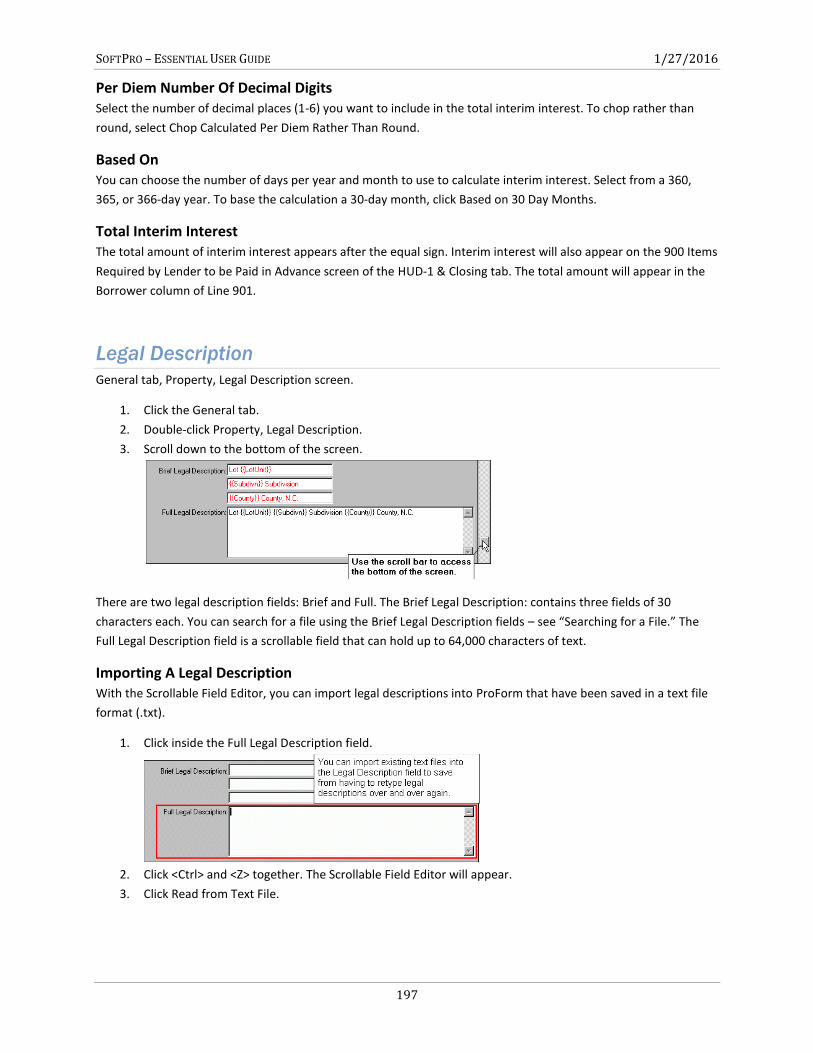
SOFTPRO – ESSENTIAL USER GUIDE 1/27/2016
197
Per Diem Number Of Decimal Digits Select the number of decimal places (1-6) you want to include in the total interim interest. To chop rather than
round, select Chop Calculated Per Diem Rather Than Round.
Based On You can choose the number of days per year and month to use to calculate interim interest. Select from a 360,
365, or 366-day year. To base the calculation a 30-day month, click Based on 30 Day Months.
Total Interim Interest The total amount of interim interest appears after the equal sign. Interim interest will also appear on the 900 Items
Required by Lender to be Paid in Advance screen of the HUD-1 & Closing tab. The total amount will appear in the
Borrower column of Line 901.
Legal Description
General tab, Property, Legal Description screen.
1. Click the General tab.
2. Double-click Property, Legal Description.
3. Scroll down to the bottom of the screen.
There are two legal description fields: Brief and Full. The Brief Legal Description: contains three fields of 30
characters each. You can search for a file using the Brief Legal Description fields – see “Searching for a File.” The
Full Legal Description field is a scrollable field that can hold up to 64,000 characters of text.
Importing A Legal Description With the Scrollable Field Editor, you can import legal descriptions into ProForm that have been saved in a text file
format (.txt).
1. Click inside the Full Legal Description field.
2. Click <Ctrl> and <Z> together. The Scrollable Field Editor will appear.
3. Click Read from Text File.
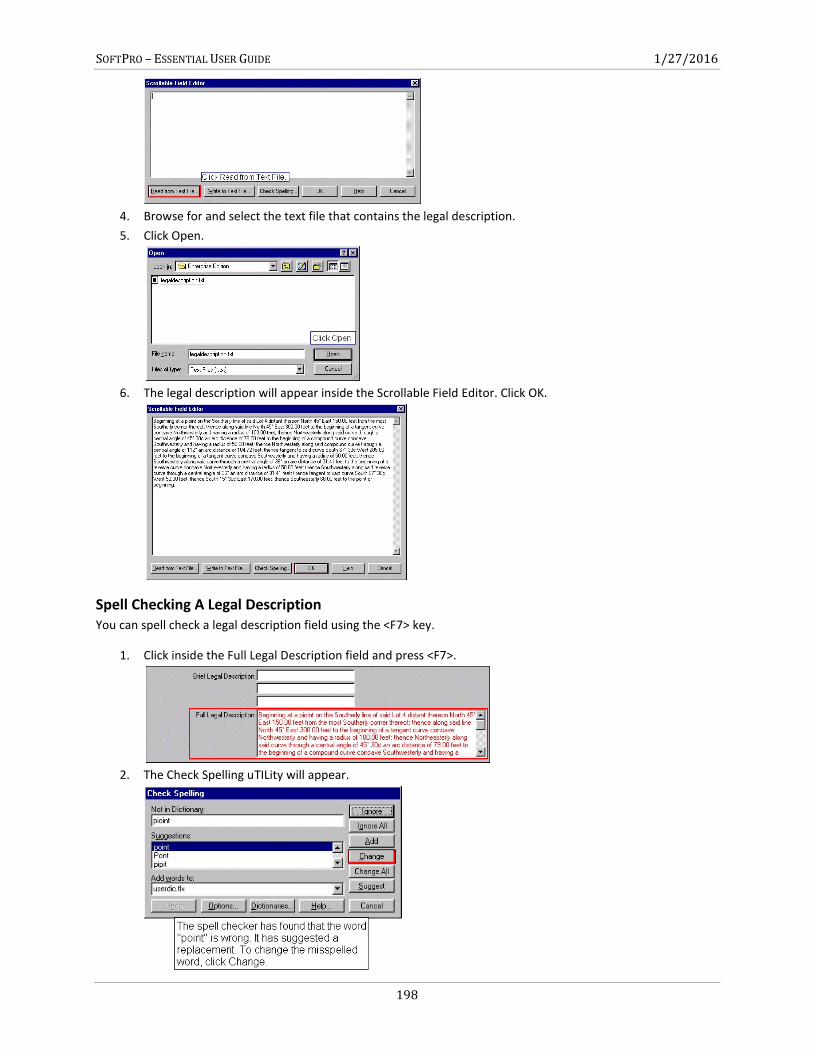
SOFTPRO – ESSENTIAL USER GUIDE 1/27/2016
198
4. Browse for and select the text file that contains the legal description.
5. Click Open.
6. The legal description will appear inside the Scrollable Field Editor. Click OK.
Spell Checking A Legal Description You can spell check a legal description field using the <F7> key.
1. Click inside the Full Legal Description field and press <F7>.
2. The Check Spelling uTILity will appear.
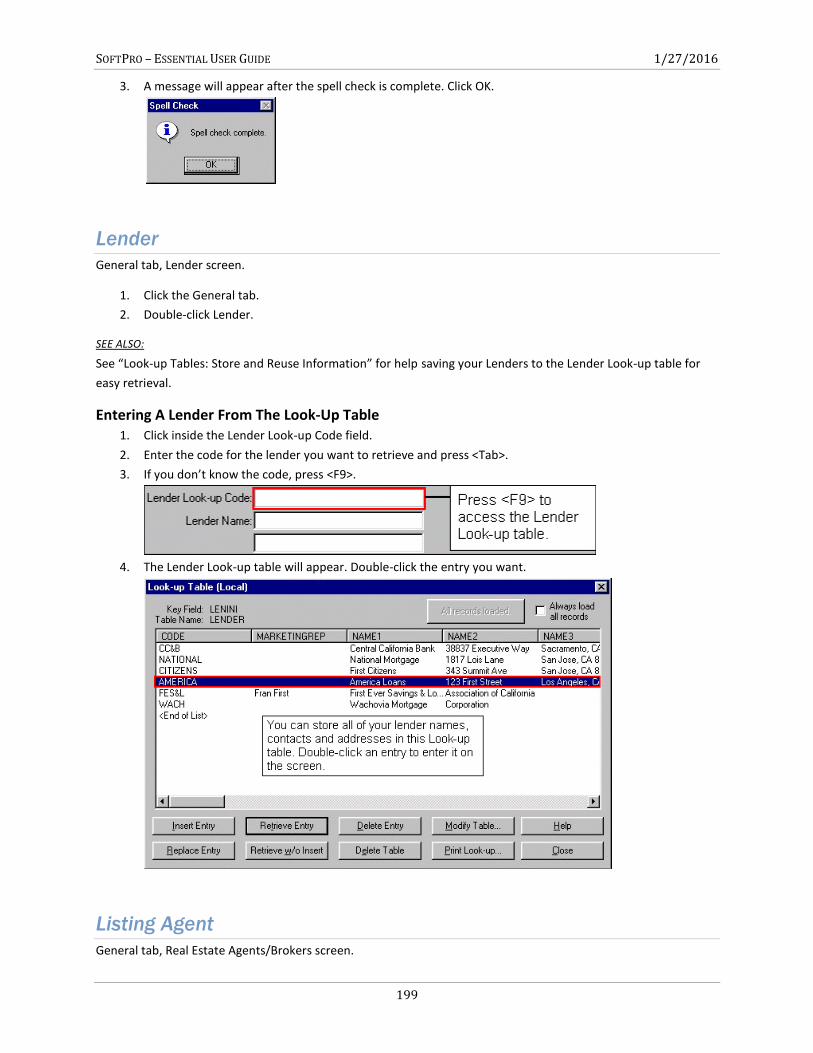
SOFTPRO – ESSENTIAL USER GUIDE 1/27/2016
199
3. A message will appear after the spell check is complete. Click OK.
Lender
General tab, Lender screen.
1. Click the General tab.
2. Double-click Lender.
SEE ALSO:
See “Look-up Tables: Store and Reuse Information” for help saving your Lenders to the Lender Look-up table for
easy retrieval.
Entering A Lender From The Look-Up Table 1. Click inside the Lender Look-up Code field.
2. Enter the code for the lender you want to retrieve and press <Tab>.
3. If you don’t know the code, press <F9>.
4. The Lender Look-up table will appear. Double-click the entry you want.
Listing Agent
General tab, Real Estate Agents/Brokers screen.
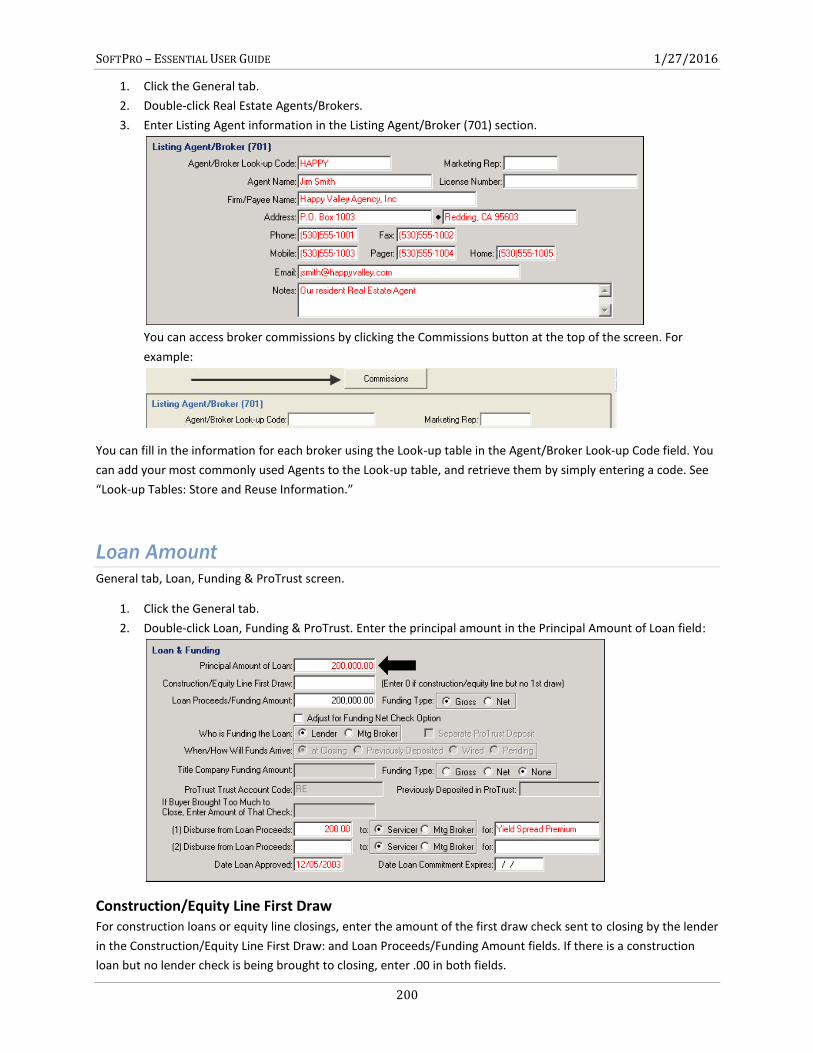
SOFTPRO – ESSENTIAL USER GUIDE 1/27/2016
200
1. Click the General tab.
2. Double-click Real Estate Agents/Brokers.
3. Enter Listing Agent information in the Listing Agent/Broker (701) section.
You can access broker commissions by clicking the Commissions button at the top of the screen. For
example:
You can fill in the information for each broker using the Look-up table in the Agent/Broker Look-up Code field. You
can add your most commonly used Agents to the Look-up table, and retrieve them by simply entering a code. See
“Look-up Tables: Store and Reuse Information.”
Loan Amount
General tab, Loan, Funding & ProTrust screen.
1. Click the General tab.
2. Double-click Loan, Funding & ProTrust. Enter the principal amount in the Principal Amount of Loan field:
Construction/Equity Line First Draw For construction loans or equity line closings, enter the amount of the first draw check sent to closing by the lender
in the Construction/Equity Line First Draw: and Loan Proceeds/Funding Amount fields. If there is a construction
loan but no lender check is being brought to closing, enter .00 in both fields.
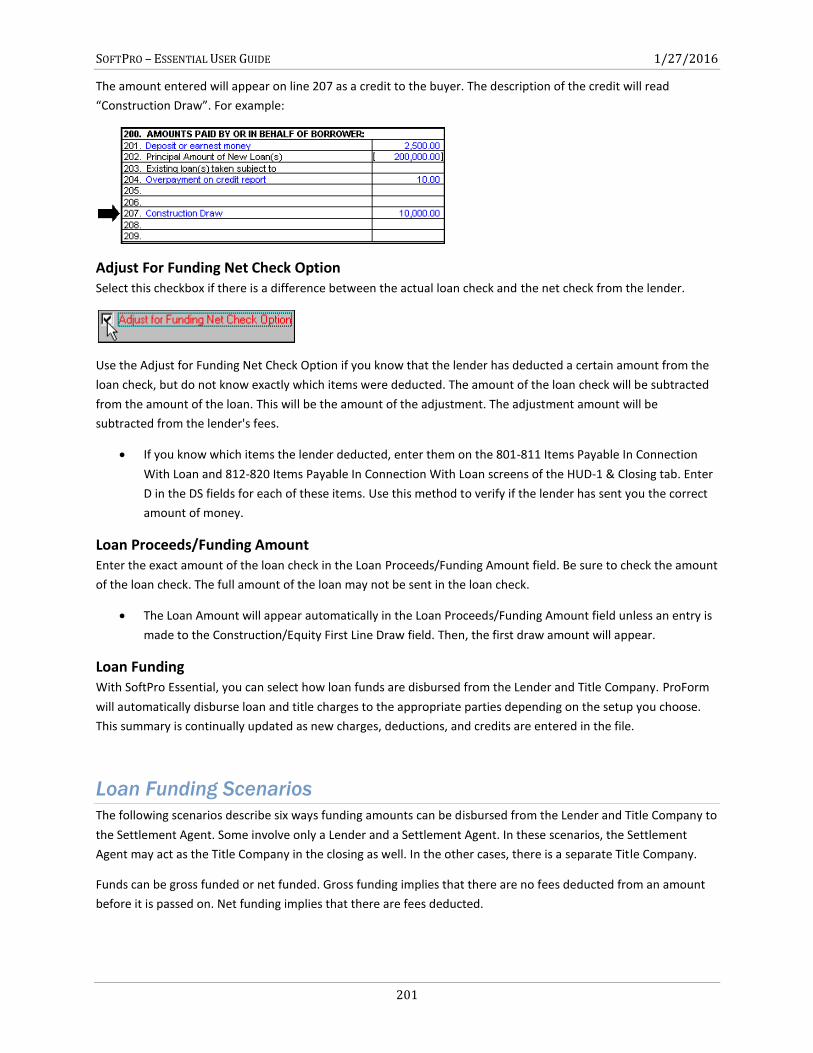
SOFTPRO – ESSENTIAL USER GUIDE 1/27/2016
201
The amount entered will appear on line 207 as a credit to the buyer. The description of the credit will read
“Construction Draw”. For example:
Adjust For Funding Net Check Option Select this checkbox if there is a difference between the actual loan check and the net check from the lender.
Use the Adjust for Funding Net Check Option if you know that the lender has deducted a certain amount from the
loan check, but do not know exactly which items were deducted. The amount of the loan check will be subtracted
from the amount of the loan. This will be the amount of the adjustment. The adjustment amount will be
subtracted from the lender's fees.
If you know which items the lender deducted, enter them on the 801-811 Items Payable In Connection
With Loan and 812-820 Items Payable In Connection With Loan screens of the HUD-1 & Closing tab. Enter
D in the DS fields for each of these items. Use this method to verify if the lender has sent you the correct
amount of money.
Loan Proceeds/Funding Amount Enter the exact amount of the loan check in the Loan Proceeds/Funding Amount field. Be sure to check the amount
of the loan check. The full amount of the loan may not be sent in the loan check.
The Loan Amount will appear automatically in the Loan Proceeds/Funding Amount field unless an entry is
made to the Construction/Equity First Line Draw field. Then, the first draw amount will appear.
Loan Funding With SoftPro Essential, you can select how loan funds are disbursed from the Lender and Title Company. ProForm
will automatically disburse loan and title charges to the appropriate parties depending on the setup you choose.
This summary is continually updated as new charges, deductions, and credits are entered in the file.
Loan Funding Scenarios
The following scenarios describe six ways funding amounts can be disbursed from the Lender and Title Company to
the Settlement Agent. Some involve only a Lender and a Settlement Agent. In these scenarios, the Settlement
Agent may act as the Title Company in the closing as well. In the other cases, there is a separate Title Company.
Funds can be gross funded or net funded. Gross funding implies that there are no fees deducted from an amount
before it is passed on. Net funding implies that there are fees deducted.
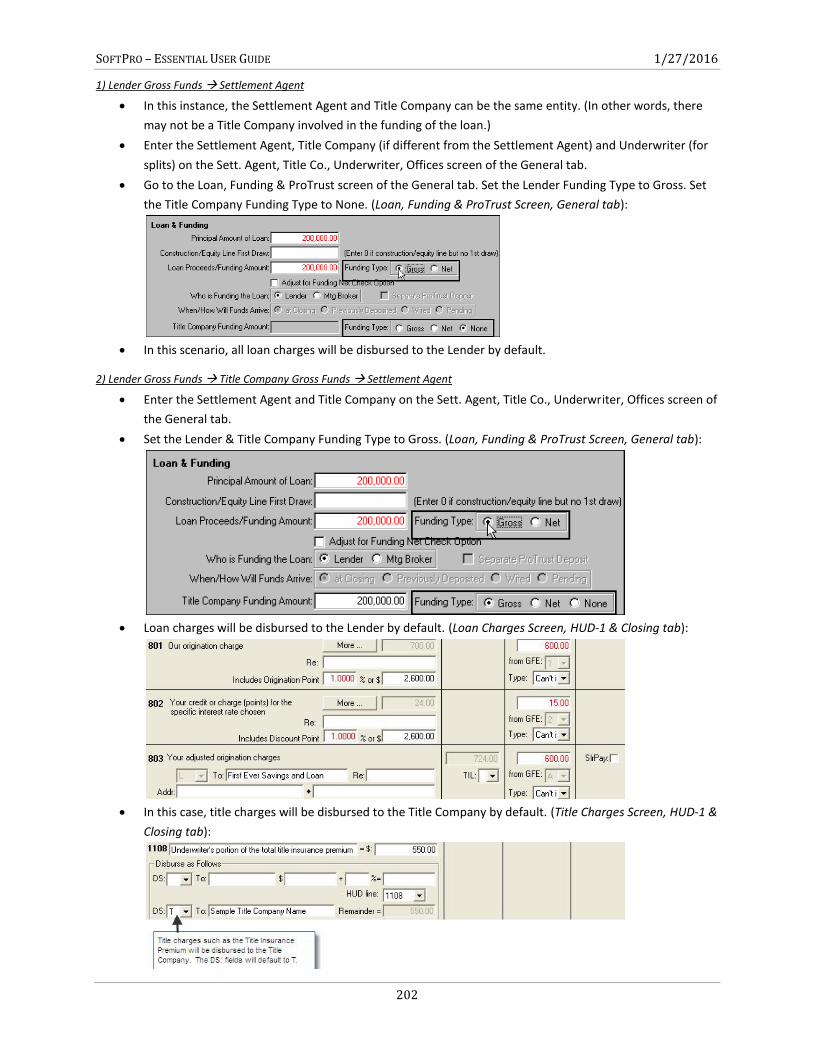
SOFTPRO – ESSENTIAL USER GUIDE 1/27/2016
202
1) Lender Gross Funds Settlement Agent
In this instance, the Settlement Agent and Title Company can be the same entity. (In other words, there
may not be a Title Company involved in the funding of the loan.)
Enter the Settlement Agent, Title Company (if different from the Settlement Agent) and Underwriter (for
splits) on the Sett. Agent, Title Co., Underwriter, Offices screen of the General tab.
Go to the Loan, Funding & ProTrust screen of the General tab. Set the Lender Funding Type to Gross. Set
the Title Company Funding Type to None. (Loan, Funding & ProTrust Screen, General tab):
In this scenario, all loan charges will be disbursed to the Lender by default.
2) Lender Gross Funds Title Company Gross Funds Settlement Agent
Enter the Settlement Agent and Title Company on the Sett. Agent, Title Co., Underwriter, Offices screen of
the General tab.
Set the Lender & Title Company Funding Type to Gross. (Loan, Funding & ProTrust Screen, General tab):
Loan charges will be disbursed to the Lender by default. (Loan Charges Screen, HUD-1 & Closing tab):
In this case, title charges will be disbursed to the Title Company by default. (Title Charges Screen, HUD-1 &
Closing tab):
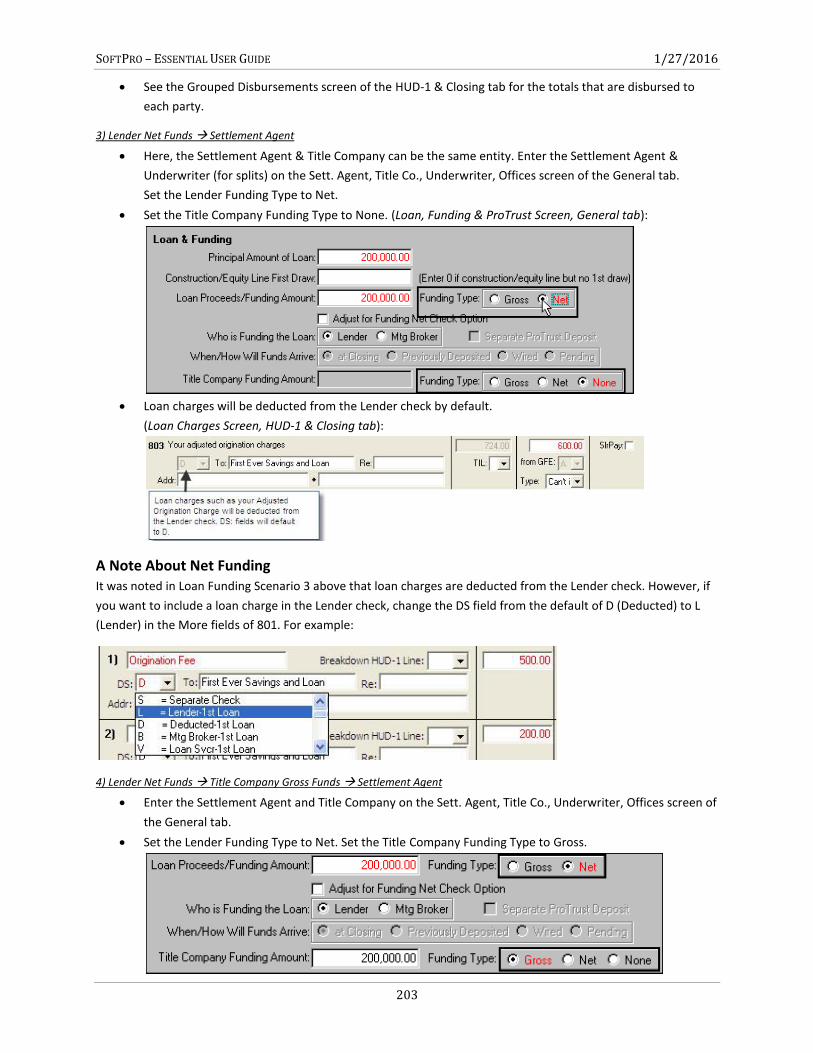
SOFTPRO – ESSENTIAL USER GUIDE 1/27/2016
203
See the Grouped Disbursements screen of the HUD-1 & Closing tab for the totals that are disbursed to
each party.
3) Lender Net Funds Settlement Agent
Here, the Settlement Agent & Title Company can be the same entity. Enter the Settlement Agent &
Underwriter (for splits) on the Sett. Agent, Title Co., Underwriter, Offices screen of the General tab.
Set the Lender Funding Type to Net.
Set the Title Company Funding Type to None. (Loan, Funding & ProTrust Screen, General tab):
Loan charges will be deducted from the Lender check by default.
(Loan Charges Screen, HUD-1 & Closing tab):
A Note About Net Funding It was noted in Loan Funding Scenario 3 above that loan charges are deducted from the Lender check. However, if
you want to include a loan charge in the Lender check, change the DS field from the default of D (Deducted) to L
(Lender) in the More fields of 801. For example:
4) Lender Net Funds Title Company Gross Funds Settlement Agent
Enter the Settlement Agent and Title Company on the Sett. Agent, Title Co., Underwriter, Offices screen of
the General tab.
Set the Lender Funding Type to Net. Set the Title Company Funding Type to Gross.
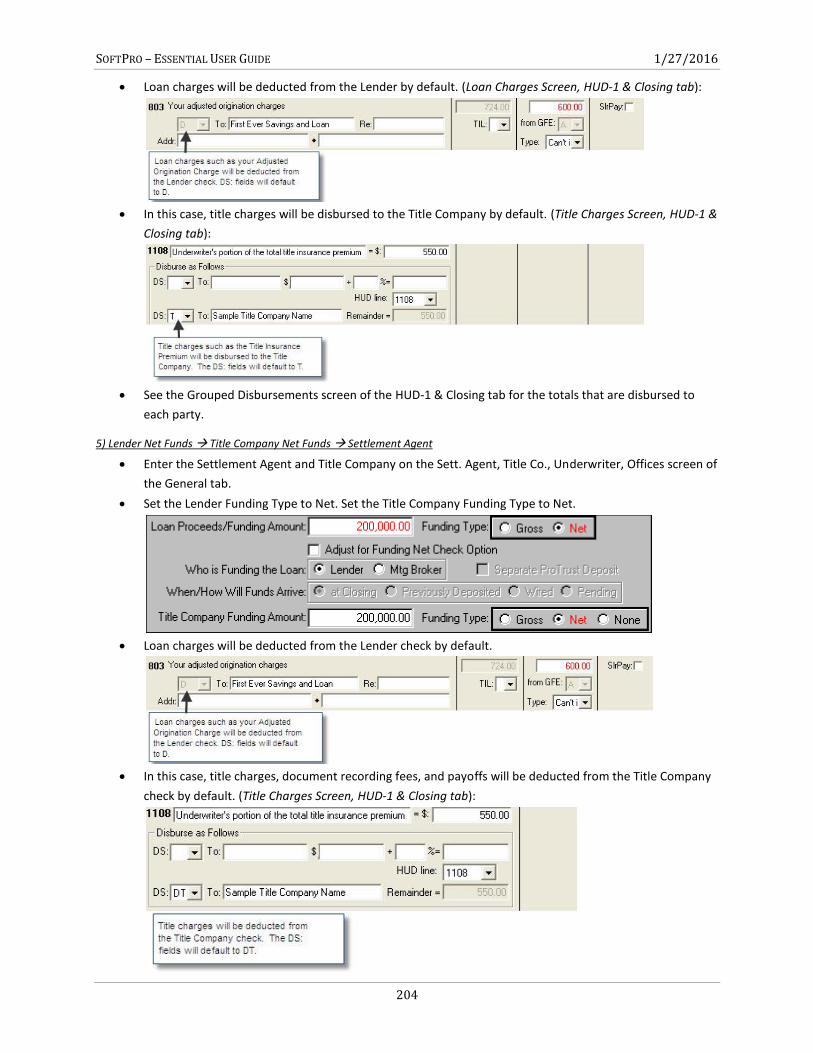
SOFTPRO – ESSENTIAL USER GUIDE 1/27/2016
204
Loan charges will be deducted from the Lender by default. (Loan Charges Screen, HUD-1 & Closing tab):
In this case, title charges will be disbursed to the Title Company by default. (Title Charges Screen, HUD-1 &
Closing tab):
See the Grouped Disbursements screen of the HUD-1 & Closing tab for the totals that are disbursed to
each party.
5) Lender Net Funds Title Company Net Funds Settlement Agent
Enter the Settlement Agent and Title Company on the Sett. Agent, Title Co., Underwriter, Offices screen of
the General tab.
Set the Lender Funding Type to Net. Set the Title Company Funding Type to Net.
Loan charges will be deducted from the Lender check by default.
In this case, title charges, document recording fees, and payoffs will be deducted from the Title Company
check by default. (Title Charges Screen, HUD-1 & Closing tab):
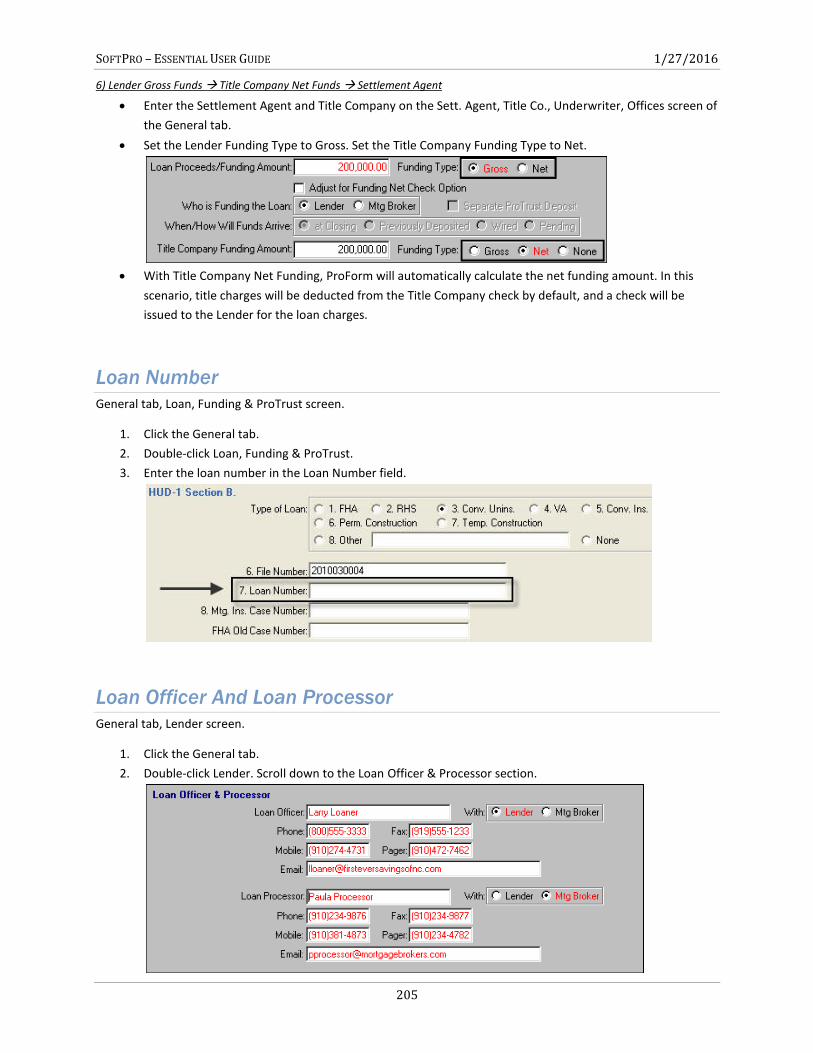
SOFTPRO – ESSENTIAL USER GUIDE 1/27/2016
205
6) Lender Gross Funds Title Company Net Funds Settlement Agent
Enter the Settlement Agent and Title Company on the Sett. Agent, Title Co., Underwriter, Offices screen of
the General tab.
Set the Lender Funding Type to Gross. Set the Title Company Funding Type to Net.
With Title Company Net Funding, ProForm will automatically calculate the net funding amount. In this
scenario, title charges will be deducted from the Title Company check by default, and a check will be
issued to the Lender for the loan charges.
Loan Number
General tab, Loan, Funding & ProTrust screen.
1. Click the General tab.
2. Double-click Loan, Funding & ProTrust.
3. Enter the loan number in the Loan Number field.
Loan Officer And Loan Processor
General tab, Lender screen.
1. Click the General tab.
2. Double-click Lender. Scroll down to the Loan Officer & Processor section.
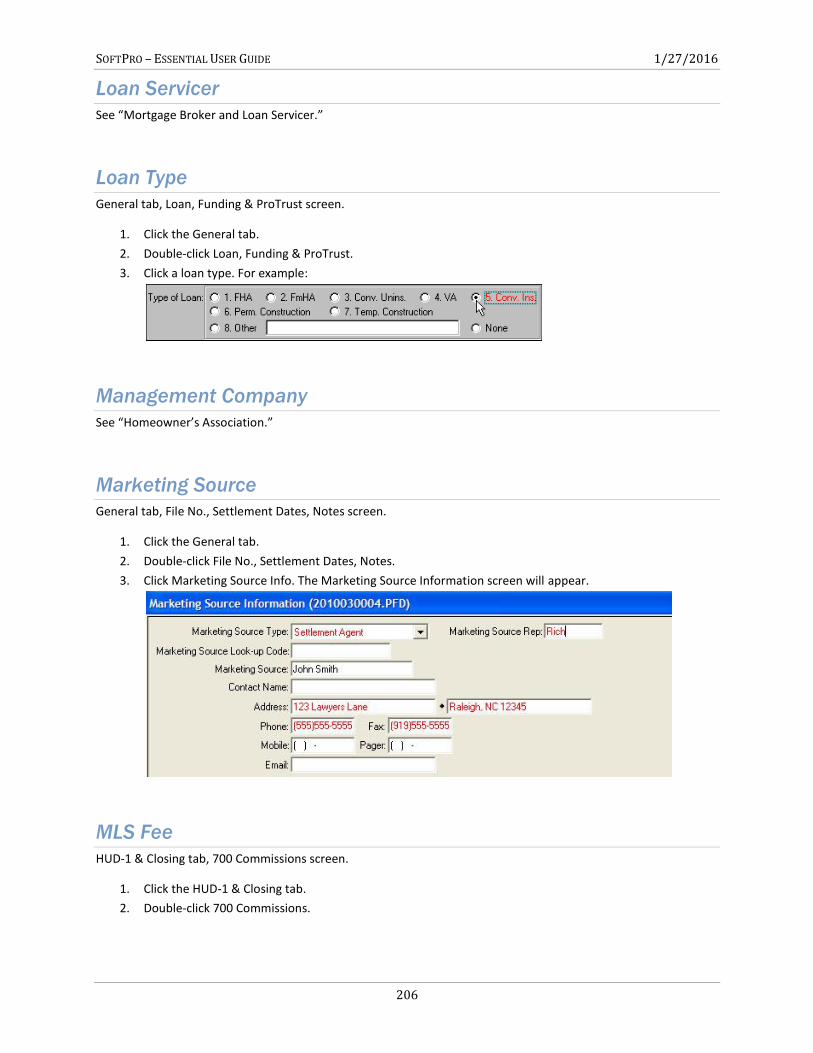
SOFTPRO – ESSENTIAL USER GUIDE 1/27/2016
206
Loan Servicer
See “Mortgage Broker and Loan Servicer.”
Loan Type
General tab, Loan, Funding & ProTrust screen.
1. Click the General tab.
2. Double-click Loan, Funding & ProTrust.
3. Click a loan type. For example:
Management Company
See “Homeowner’s Association.”
Marketing Source
General tab, File No., Settlement Dates, Notes screen.
1. Click the General tab.
2. Double-click File No., Settlement Dates, Notes.
3. Click Marketing Source Info. The Marketing Source Information screen will appear.
MLS Fee
HUD-1 & Closing tab, 700 Commissions screen.
1. Click the HUD-1 & Closing tab.
2. Double-click 700 Commissions.
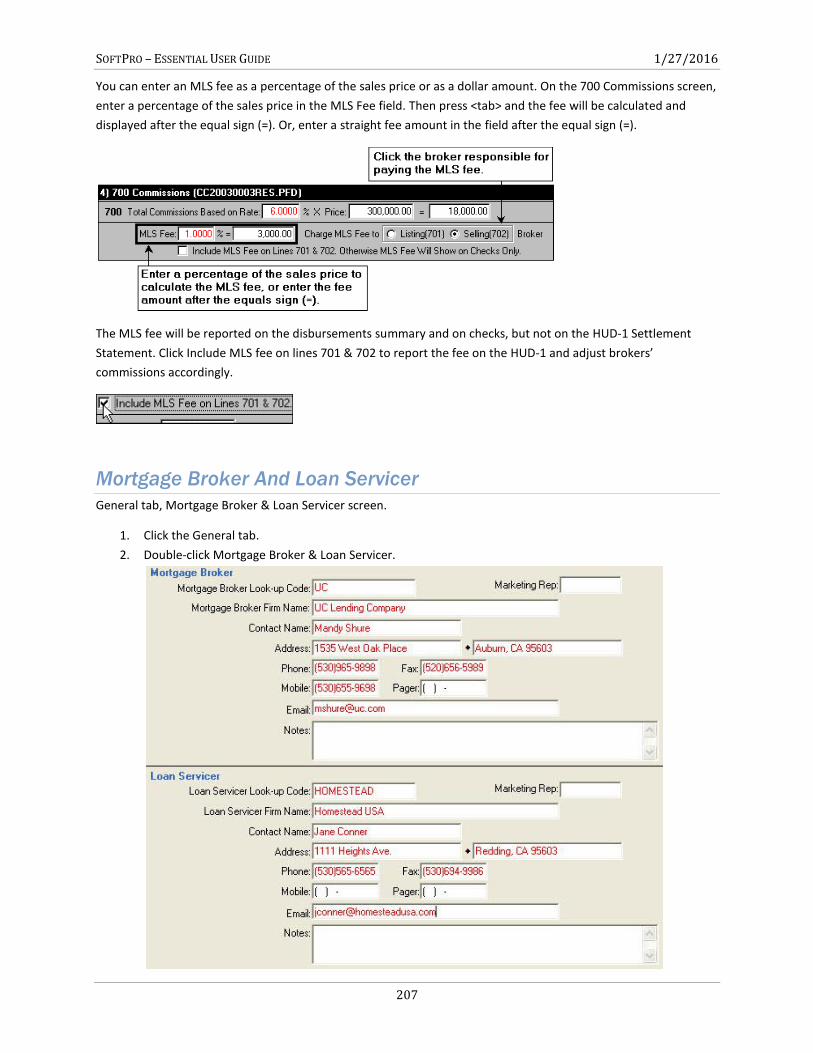
SOFTPRO – ESSENTIAL USER GUIDE 1/27/2016
207
You can enter an MLS fee as a percentage of the sales price or as a dollar amount. On the 700 Commissions screen,
enter a percentage of the sales price in the MLS Fee field. Then press <tab> and the fee will be calculated and
displayed after the equal sign (=). Or, enter a straight fee amount in the field after the equal sign (=).
The MLS fee will be reported on the disbursements summary and on checks, but not on the HUD-1 Settlement
Statement. Click Include MLS fee on lines 701 & 702 to report the fee on the HUD-1 and adjust brokers’
commissions accordingly.
Mortgage Broker And Loan Servicer
General tab, Mortgage Broker & Loan Servicer screen.
1. Click the General tab.
2. Double-click Mortgage Broker & Loan Servicer.

SOFTPRO – ESSENTIAL USER GUIDE 1/27/2016
208
You can fill in the Mortgage Broker and Loan Servicer information using the Look-up tables in the Loan Servicer
Look-up Code field and Mortgage Broker Look-up Code: field. You can add your most commonly used brokers and
servicers to the Look-up table, and retrieve them by simply entering a code. See “Look-up Tables: Store and Reuse
Information.”
Mortgage Insurance
HUD-1 & Closing tab, 900 Items Required by Lender to be Paid in Advance screen.
1. Click the HUD-1 & Closing tab.
2. Double-click 900 Items Required by Lender to be Paid in Advance.
3. Enter the number of months of mortgage insurance.
If the entry here is equal to the full term of the loan, the Life of Loan checkbox will automatically be selected. The
description for Line 902 on the HUD-1 Settlement Statement will then read MIP TotIns. for Life of Loan (as per
Regulation X). Otherwise, the description for Line 902 will read Mortgage Insurance Premium.
TIL To include the amount in the Total Prepaid Finance Charges, enter 1 in the TIL field:
Mortgage Insurance escrow payments are entered on the 1000 Reserves Deposited With Lender (Escrows) screen
and they will automatically calculate from this screen.
GFE Column The GFE column enables you to enter a GFE amount that flows to HUD-1 page 3 and HUD tab screen 22
Comparison of Good Faith Estimate (GFE) and HUD-1 Charges. You can select the GFE Type from the drop-down
list of either Can Change, Up to 10%, Can’t Increase or N/A to GFE. The default is Up to 10%.
Slrpay Checkbox If the SlrPay checkbox is checked, the amount in the borrower column will show as a credit from the seller to the
buyer on HUD line 209 as part of the Seller-paid closing costs.
Mortgage Payoffs
See “Payoffs.”
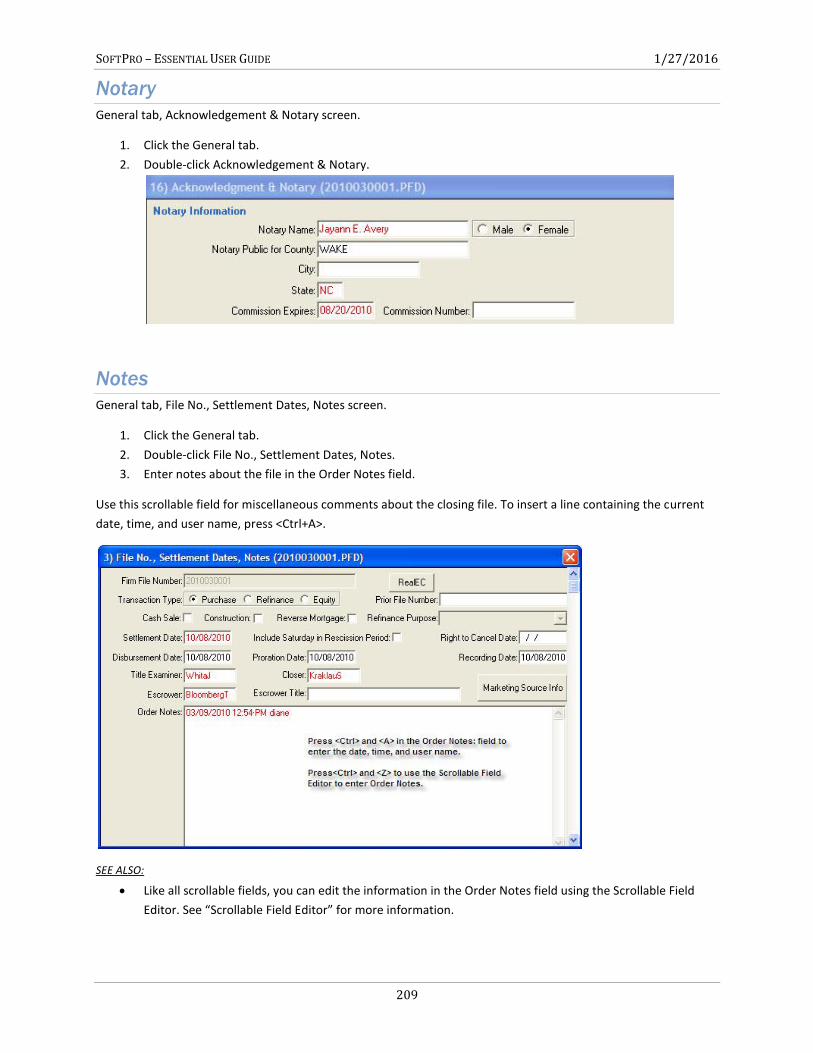
SOFTPRO – ESSENTIAL USER GUIDE 1/27/2016
209
Notary
General tab, Acknowledgement & Notary screen.
1. Click the General tab.
2. Double-click Acknowledgement & Notary.
Notes
General tab, File No., Settlement Dates, Notes screen.
1. Click the General tab.
2. Double-click File No., Settlement Dates, Notes.
3. Enter notes about the file in the Order Notes field.
Use this scrollable field for miscellaneous comments about the closing file. To insert a line containing the current
date, time, and user name, press <Ctrl+A>.
SEE ALSO:
Like all scrollable fields, you can edit the information in the Order Notes field using the Scrollable Field
Editor. See “Scrollable Field Editor” for more information.
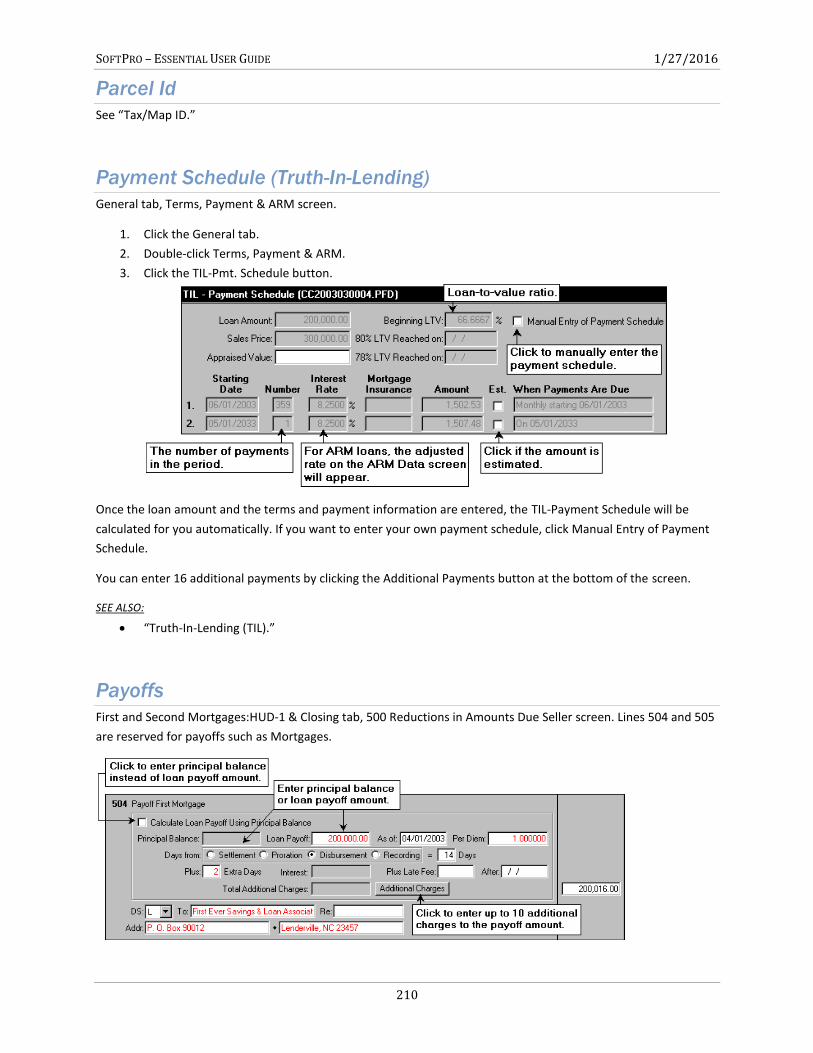
SOFTPRO – ESSENTIAL USER GUIDE 1/27/2016
210
Parcel Id
See “Tax/Map ID.”
Payment Schedule (Truth-In-Lending)
General tab, Terms, Payment & ARM screen.
1. Click the General tab.
2. Double-click Terms, Payment & ARM.
3. Click the TIL-Pmt. Schedule button.
Once the loan amount and the terms and payment information are entered, the TIL-Payment Schedule will be
calculated for you automatically. If you want to enter your own payment schedule, click Manual Entry of Payment
Schedule.
You can enter 16 additional payments by clicking the Additional Payments button at the bottom of the screen.
SEE ALSO:
“Truth-In-Lending (TIL).”
Payoffs
First and Second Mortgages:HUD-1 & Closing tab, 500 Reductions in Amounts Due Seller screen. Lines 504 and 505
are reserved for payoffs such as Mortgages.
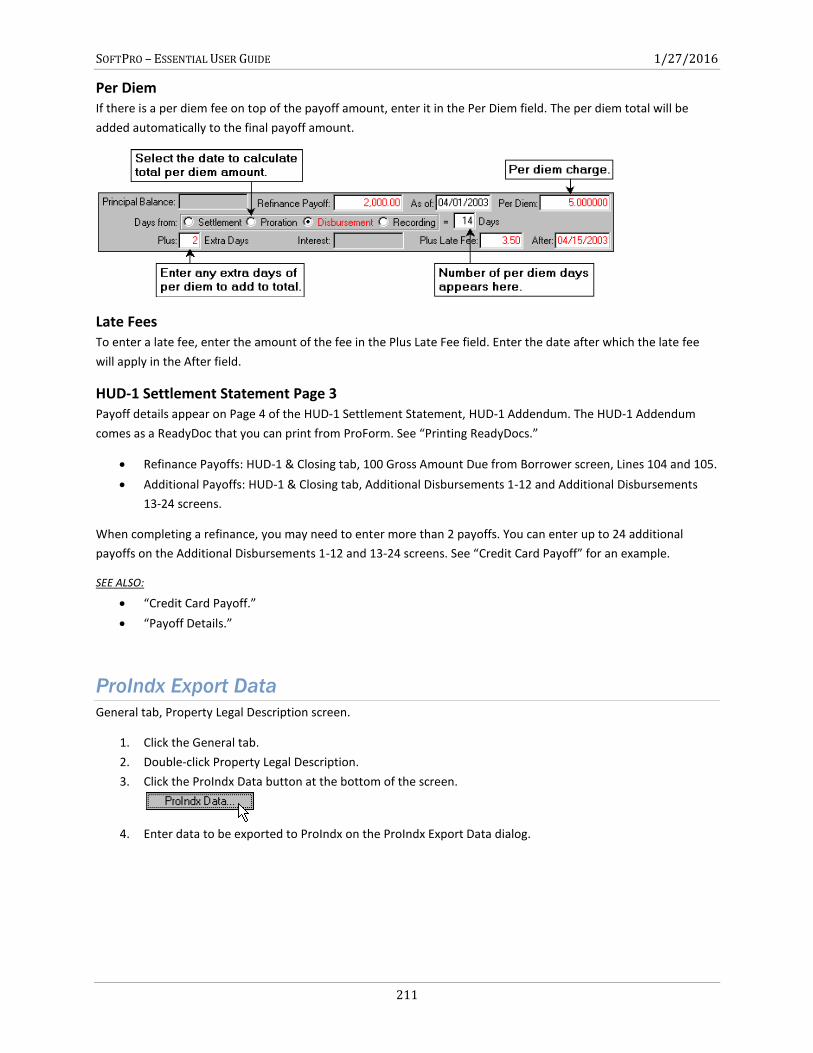
SOFTPRO – ESSENTIAL USER GUIDE 1/27/2016
211
Per Diem If there is a per diem fee on top of the payoff amount, enter it in the Per Diem field. The per diem total will be
added automatically to the final payoff amount.
Late Fees To enter a late fee, enter the amount of the fee in the Plus Late Fee field. Enter the date after which the late fee
will apply in the After field.
HUD-1 Settlement Statement Page 3 Payoff details appear on Page 4 of the HUD-1 Settlement Statement, HUD-1 Addendum. The HUD-1 Addendum
comes as a ReadyDoc that you can print from ProForm. See “Printing ReadyDocs.”
Refinance Payoffs: HUD-1 & Closing tab, 100 Gross Amount Due from Borrower screen, Lines 104 and 105.
Additional Payoffs: HUD-1 & Closing tab, Additional Disbursements 1-12 and Additional Disbursements
13-24 screens.
When completing a refinance, you may need to enter more than 2 payoffs. You can enter up to 24 additional
payoffs on the Additional Disbursements 1-12 and 13-24 screens. See “Credit Card Payoff” for an example.
SEE ALSO:
“Credit Card Payoff.”
“Payoff Details.”
ProIndx Export Data
General tab, Property Legal Description screen.
1. Click the General tab.
2. Double-click Property Legal Description.
3. Click the ProIndx Data button at the bottom of the screen.
4. Enter data to be exported to ProIndx on the ProIndx Export Data dialog.
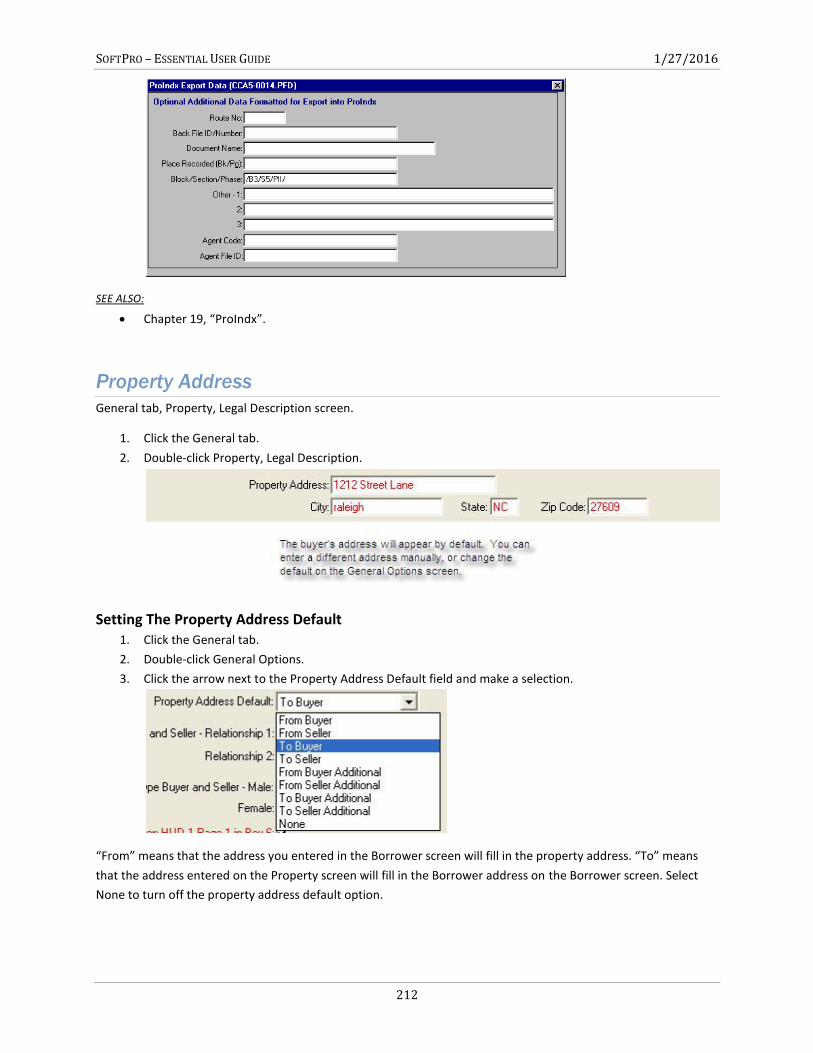
SOFTPRO – ESSENTIAL USER GUIDE 1/27/2016
212
SEE ALSO:
Chapter 19, “ProIndx”.
Property Address
General tab, Property, Legal Description screen.
1. Click the General tab.
2. Double-click Property, Legal Description.
Setting The Property Address Default 1. Click the General tab.
2. Double-click General Options.
3. Click the arrow next to the Property Address Default field and make a selection.
“From” means that the address you entered in the Borrower screen will fill in the property address. “To” means
that the address entered on the Property screen will fill in the Borrower address on the Borrower screen. Select
None to turn off the property address default option.
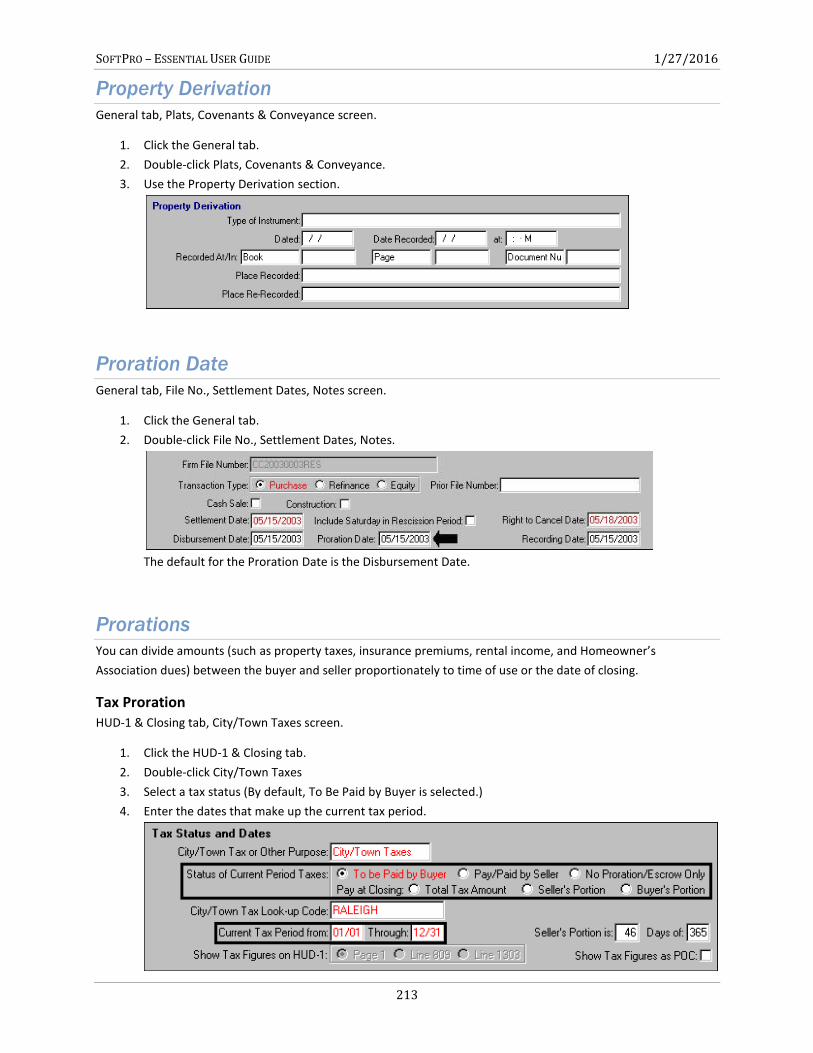
SOFTPRO – ESSENTIAL USER GUIDE 1/27/2016
213
Property Derivation
General tab, Plats, Covenants & Conveyance screen.
1. Click the General tab.
2. Double-click Plats, Covenants & Conveyance.
3. Use the Property Derivation section.
Proration Date
General tab, File No., Settlement Dates, Notes screen.
1. Click the General tab.
2. Double-click File No., Settlement Dates, Notes.
The default for the Proration Date is the Disbursement Date.
Prorations
You can divide amounts (such as property taxes, insurance premiums, rental income, and Homeowner’s
Association dues) between the buyer and seller proportionately to time of use or the date of closing.
Tax Proration HUD-1 & Closing tab, City/Town Taxes screen.
1. Click the HUD-1 & Closing tab.
2. Double-click City/Town Taxes
3. Select a tax status (By default, To Be Paid by Buyer is selected.)
4. Enter the dates that make up the current tax period.
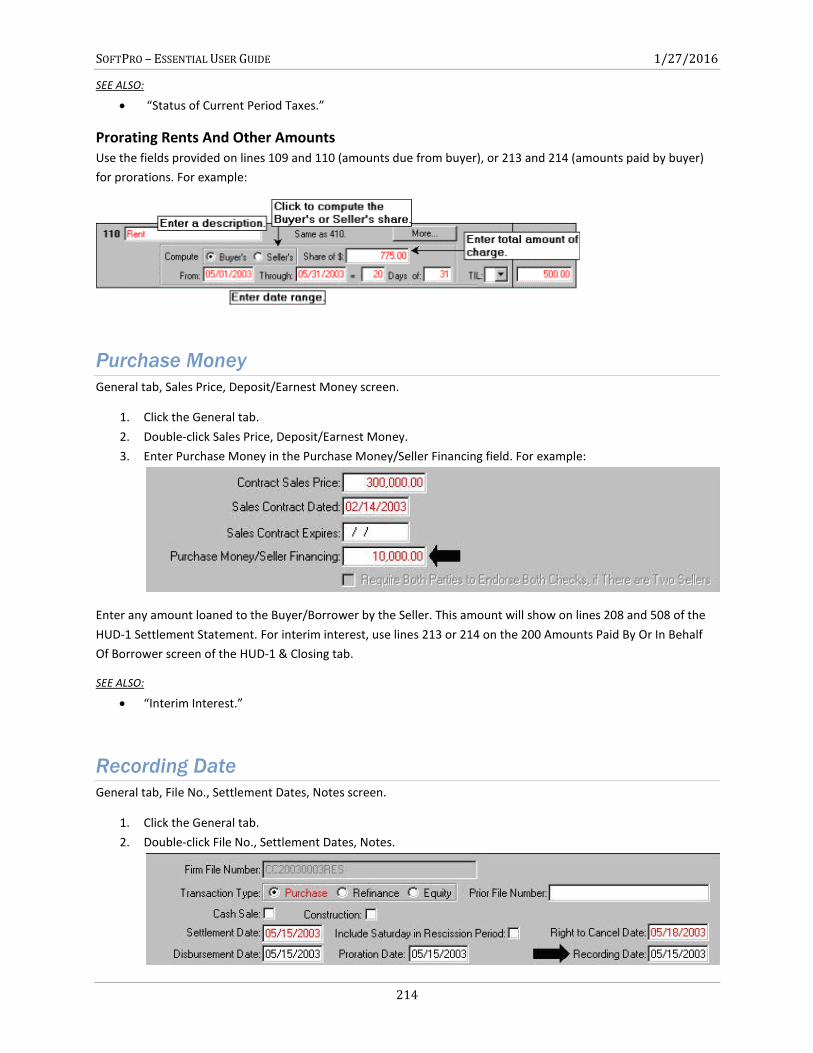
SOFTPRO – ESSENTIAL USER GUIDE 1/27/2016
214
SEE ALSO:
“Status of Current Period Taxes.”
Prorating Rents And Other Amounts Use the fields provided on lines 109 and 110 (amounts due from buyer), or 213 and 214 (amounts paid by buyer)
for prorations. For example:
Purchase Money
General tab, Sales Price, Deposit/Earnest Money screen.
1. Click the General tab.
2. Double-click Sales Price, Deposit/Earnest Money.
3. Enter Purchase Money in the Purchase Money/Seller Financing field. For example:
Enter any amount loaned to the Buyer/Borrower by the Seller. This amount will show on lines 208 and 508 of the
HUD-1 Settlement Statement. For interim interest, use lines 213 or 214 on the 200 Amounts Paid By Or In Behalf
Of Borrower screen of the HUD-1 & Closing tab.
SEE ALSO:
“Interim Interest.”
Recording Date
General tab, File No., Settlement Dates, Notes screen.
1. Click the General tab.
2. Double-click File No., Settlement Dates, Notes.
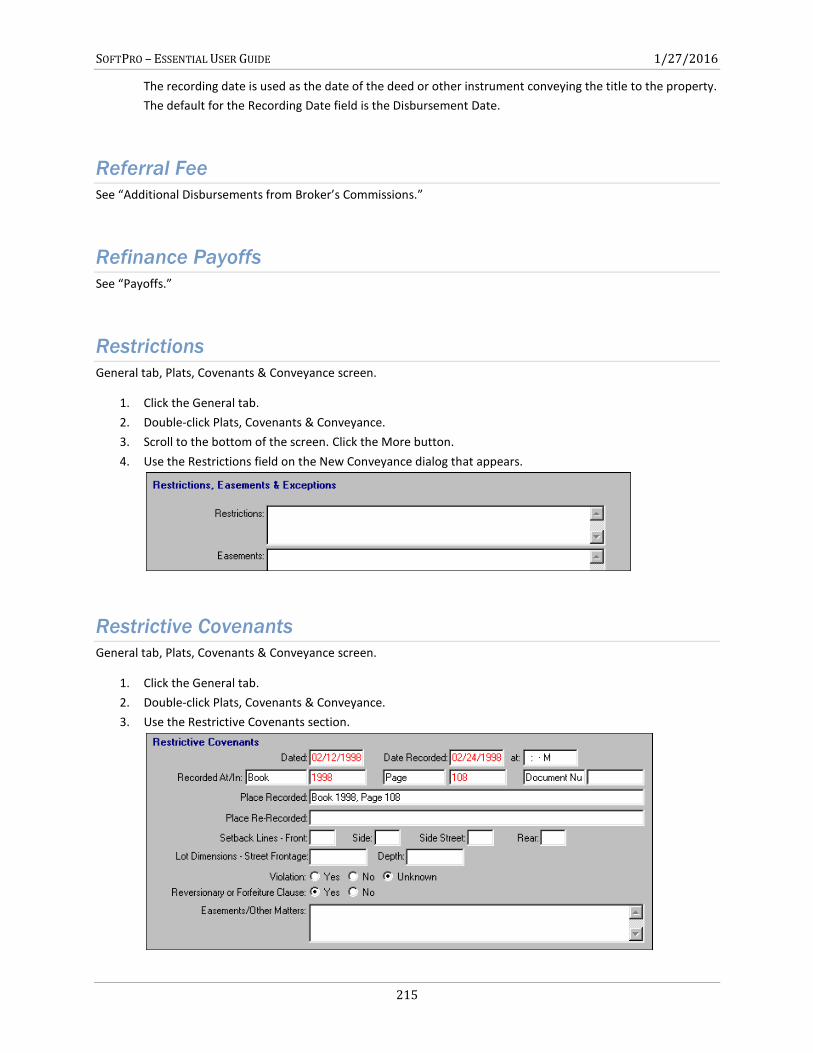
SOFTPRO – ESSENTIAL USER GUIDE 1/27/2016
215
The recording date is used as the date of the deed or other instrument conveying the title to the property.
The default for the Recording Date field is the Disbursement Date.
Referral Fee
See “Additional Disbursements from Broker’s Commissions.”
Refinance Payoffs
See “Payoffs.”
Restrictions
General tab, Plats, Covenants & Conveyance screen.
1. Click the General tab.
2. Double-click Plats, Covenants & Conveyance.
3. Scroll to the bottom of the screen. Click the More button.
4. Use the Restrictions field on the New Conveyance dialog that appears.
Restrictive Covenants
General tab, Plats, Covenants & Conveyance screen.
1. Click the General tab.
2. Double-click Plats, Covenants & Conveyance.
3. Use the Restrictive Covenants section.
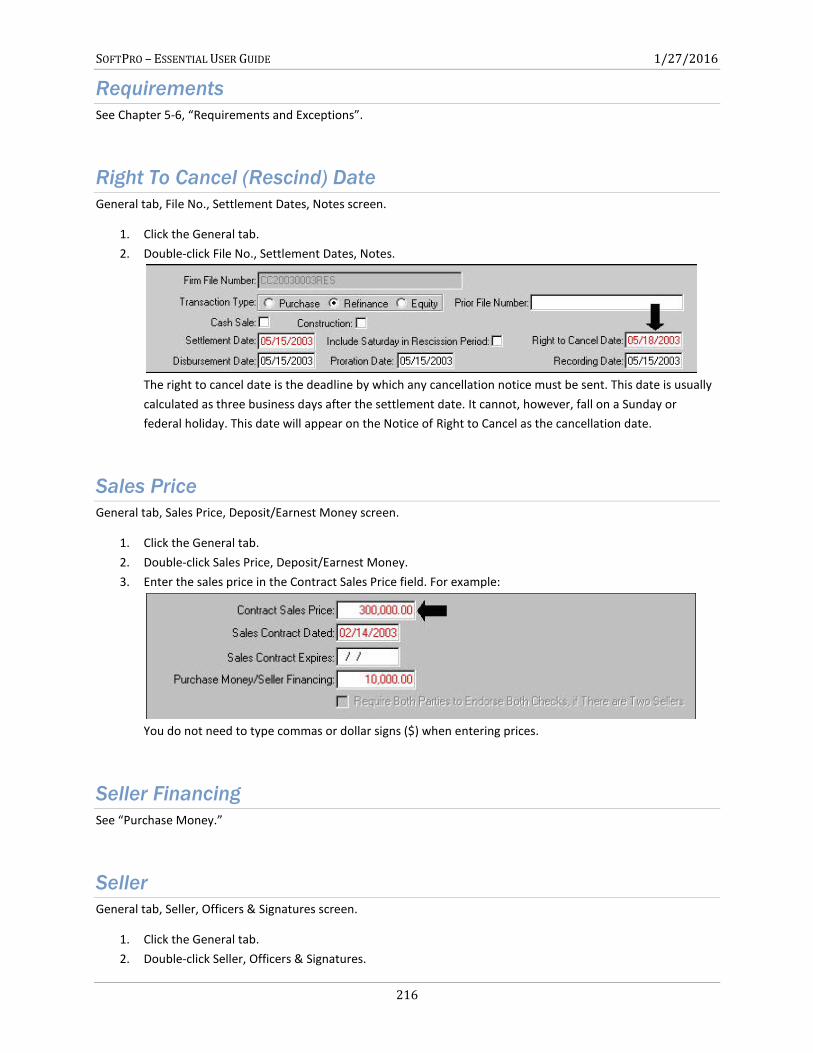
SOFTPRO – ESSENTIAL USER GUIDE 1/27/2016
216
Requirements
See Chapter 5-6, “Requirements and Exceptions”.
Right To Cancel (Rescind) Date
General tab, File No., Settlement Dates, Notes screen.
1. Click the General tab.
2. Double-click File No., Settlement Dates, Notes.
The right to cancel date is the deadline by which any cancellation notice must be sent. This date is usually
calculated as three business days after the settlement date. It cannot, however, fall on a Sunday or
federal holiday. This date will appear on the Notice of Right to Cancel as the cancellation date.
Sales Price
General tab, Sales Price, Deposit/Earnest Money screen.
1. Click the General tab.
2. Double-click Sales Price, Deposit/Earnest Money.
3. Enter the sales price in the Contract Sales Price field. For example:
You do not need to type commas or dollar signs ($) when entering prices.
Seller Financing
See “Purchase Money.”
Seller
General tab, Seller, Officers & Signatures screen.
1. Click the General tab.
2. Double-click Seller, Officers & Signatures.
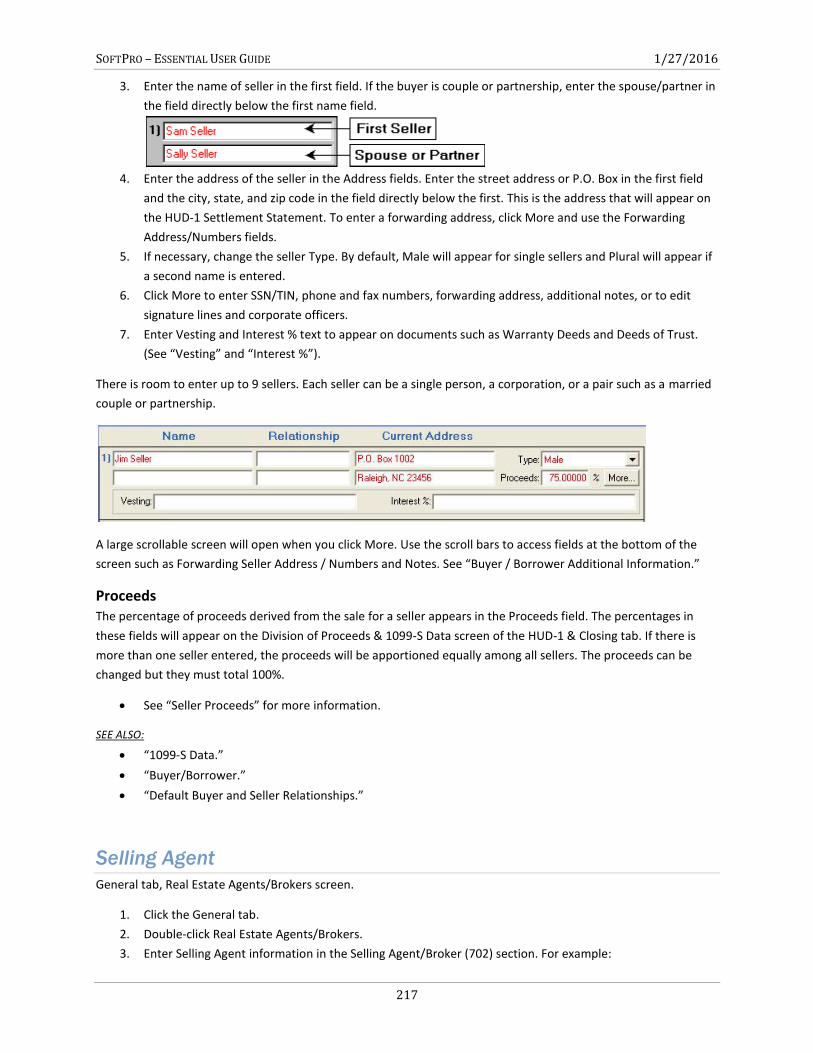
SOFTPRO – ESSENTIAL USER GUIDE 1/27/2016
217
3. Enter the name of seller in the first field. If the buyer is couple or partnership, enter the spouse/partner in
the field directly below the first name field.
4. Enter the address of the seller in the Address fields. Enter the street address or P.O. Box in the first field
and the city, state, and zip code in the field directly below the first. This is the address that will appear on
the HUD-1 Settlement Statement. To enter a forwarding address, click More and use the Forwarding
Address/Numbers fields.
5. If necessary, change the seller Type. By default, Male will appear for single sellers and Plural will appear if
a second name is entered.
6. Click More to enter SSN/TIN, phone and fax numbers, forwarding address, additional notes, or to edit
signature lines and corporate officers.
7. Enter Vesting and Interest % text to appear on documents such as Warranty Deeds and Deeds of Trust.
(See “Vesting” and “Interest %”).
There is room to enter up to 9 sellers. Each seller can be a single person, a corporation, or a pair such as a married
couple or partnership.
A large scrollable screen will open when you click More. Use the scroll bars to access fields at the bottom of the
screen such as Forwarding Seller Address / Numbers and Notes. See “Buyer / Borrower Additional Information.”
Proceeds The percentage of proceeds derived from the sale for a seller appears in the Proceeds field. The percentages in
these fields will appear on the Division of Proceeds & 1099-S Data screen of the HUD-1 & Closing tab. If there is
more than one seller entered, the proceeds will be apportioned equally among all sellers. The proceeds can be
changed but they must total 100%.
See “Seller Proceeds” for more information.
SEE ALSO:
“1099-S Data.”
“Buyer/Borrower.”
“Default Buyer and Seller Relationships.”
Selling Agent
General tab, Real Estate Agents/Brokers screen.
1. Click the General tab.
2. Double-click Real Estate Agents/Brokers.
3. Enter Selling Agent information in the Selling Agent/Broker (702) section. For example:
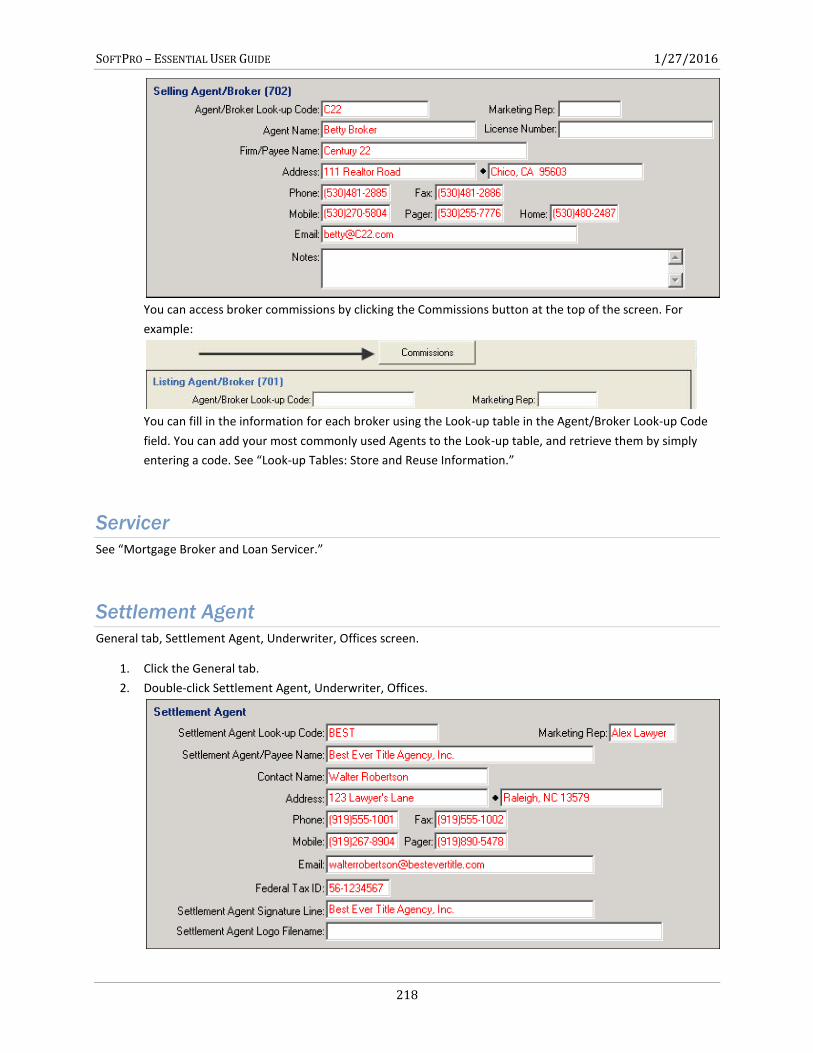
SOFTPRO – ESSENTIAL USER GUIDE 1/27/2016
218
You can access broker commissions by clicking the Commissions button at the top of the screen. For
example:
You can fill in the information for each broker using the Look-up table in the Agent/Broker Look-up Code
field. You can add your most commonly used Agents to the Look-up table, and retrieve them by simply
entering a code. See “Look-up Tables: Store and Reuse Information.”
Servicer
See “Mortgage Broker and Loan Servicer.”
Settlement Agent
General tab, Settlement Agent, Underwriter, Offices screen.
1. Click the General tab.
2. Double-click Settlement Agent, Underwriter, Offices.
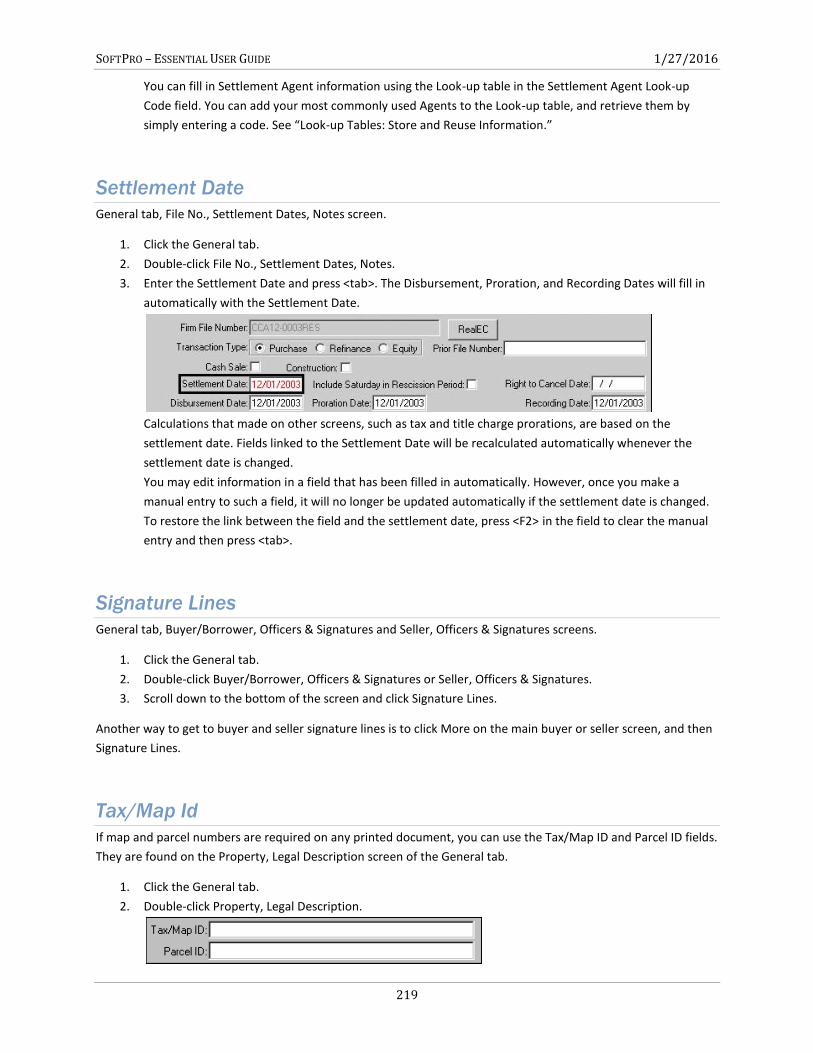
SOFTPRO – ESSENTIAL USER GUIDE 1/27/2016
219
You can fill in Settlement Agent information using the Look-up table in the Settlement Agent Look-up
Code field. You can add your most commonly used Agents to the Look-up table, and retrieve them by
simply entering a code. See “Look-up Tables: Store and Reuse Information.”
Settlement Date
General tab, File No., Settlement Dates, Notes screen.
1. Click the General tab.
2. Double-click File No., Settlement Dates, Notes.
3. Enter the Settlement Date and press <tab>. The Disbursement, Proration, and Recording Dates will fill in
automatically with the Settlement Date.
Calculations that made on other screens, such as tax and title charge prorations, are based on the
settlement date. Fields linked to the Settlement Date will be recalculated automatically whenever the
settlement date is changed.
You may edit information in a field that has been filled in automatically. However, once you make a
manual entry to such a field, it will no longer be updated automatically if the settlement date is changed.
To restore the link between the field and the settlement date, press <F2> in the field to clear the manual
entry and then press <tab>.
Signature Lines
General tab, Buyer/Borrower, Officers & Signatures and Seller, Officers & Signatures screens.
1. Click the General tab.
2. Double-click Buyer/Borrower, Officers & Signatures or Seller, Officers & Signatures.
3. Scroll down to the bottom of the screen and click Signature Lines.
Another way to get to buyer and seller signature lines is to click More on the main buyer or seller screen, and then
Signature Lines.
Tax/Map Id
If map and parcel numbers are required on any printed document, you can use the Tax/Map ID and Parcel ID fields.
They are found on the Property, Legal Description screen of the General tab.
1. Click the General tab.
2. Double-click Property, Legal Description.
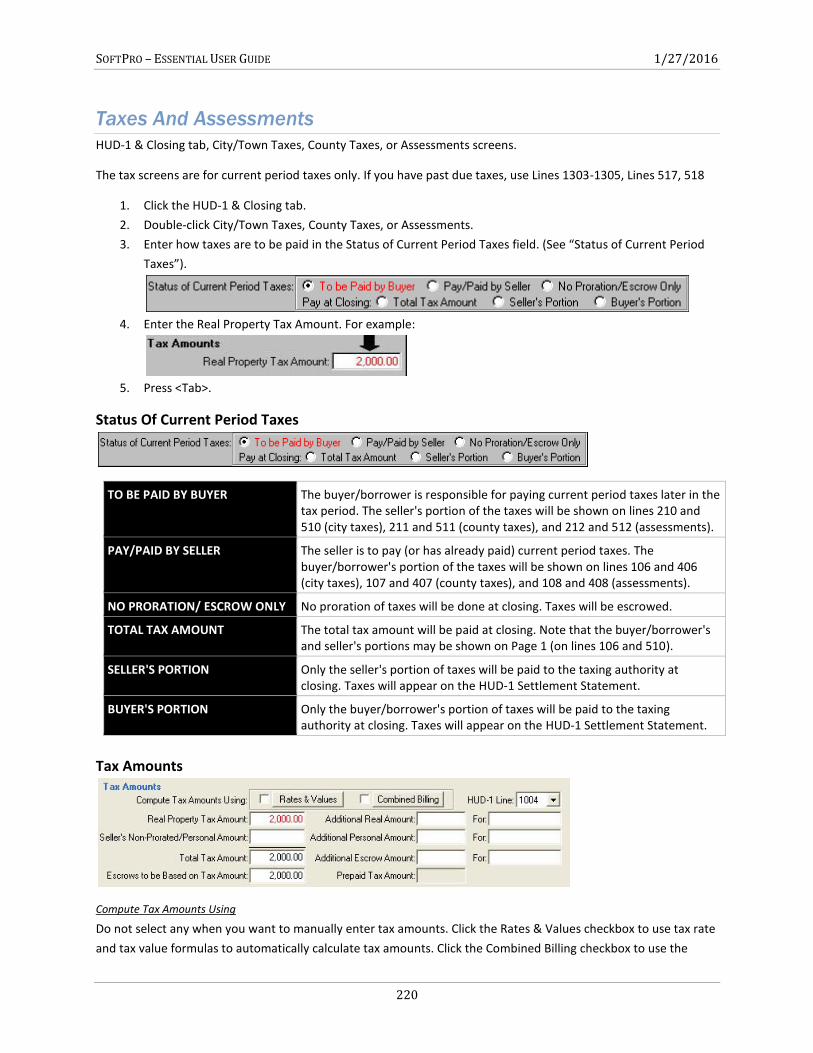
SOFTPRO – ESSENTIAL USER GUIDE 1/27/2016
220
Taxes And Assessments
HUD-1 & Closing tab, City/Town Taxes, County Taxes, or Assessments screens.
The tax screens are for current period taxes only. If you have past due taxes, use Lines 1303-1305, Lines 517, 518
1. Click the HUD-1 & Closing tab.
2. Double-click City/Town Taxes, County Taxes, or Assessments.
3. Enter how taxes are to be paid in the Status of Current Period Taxes field. (See “Status of Current Period
Taxes”).
4. Enter the Real Property Tax Amount. For example:
5. Press <Tab>.
Status Of Current Period Taxes
Tax Amounts
Compute Tax Amounts Using
Do not select any when you want to manually enter tax amounts. Click the Rates & Values checkbox to use tax rate
and tax value formulas to automatically calculate tax amounts. Click the Combined Billing checkbox to use the
TO BE PAID BY BUYER The buyer/borrower is responsible for paying current period taxes later in the tax period. The seller's portion of the taxes will be shown on lines 210 and 510 (city taxes), 211 and 511 (county taxes), and 212 and 512 (assessments).
PAY/PAID BY SELLER The seller is to pay (or has already paid) current period taxes. The buyer/borrower's portion of the taxes will be shown on lines 106 and 406 (city taxes), 107 and 407 (county taxes), and 108 and 408 (assessments).
NO PRORATION/ ESCROW ONLY No proration of taxes will be done at closing. Taxes will be escrowed.
TOTAL TAX AMOUNT The total tax amount will be paid at closing. Note that the buyer/borrower's and seller's portions may be shown on Page 1 (on lines 106 and 510).
SELLER'S PORTION Only the seller's portion of taxes will be paid to the taxing authority at closing. Taxes will appear on the HUD-1 Settlement Statement.
BUYER'S PORTION Only the buyer/borrower's portion of taxes will be paid to the taxing authority at closing. Taxes will appear on the HUD-1 Settlement Statement.
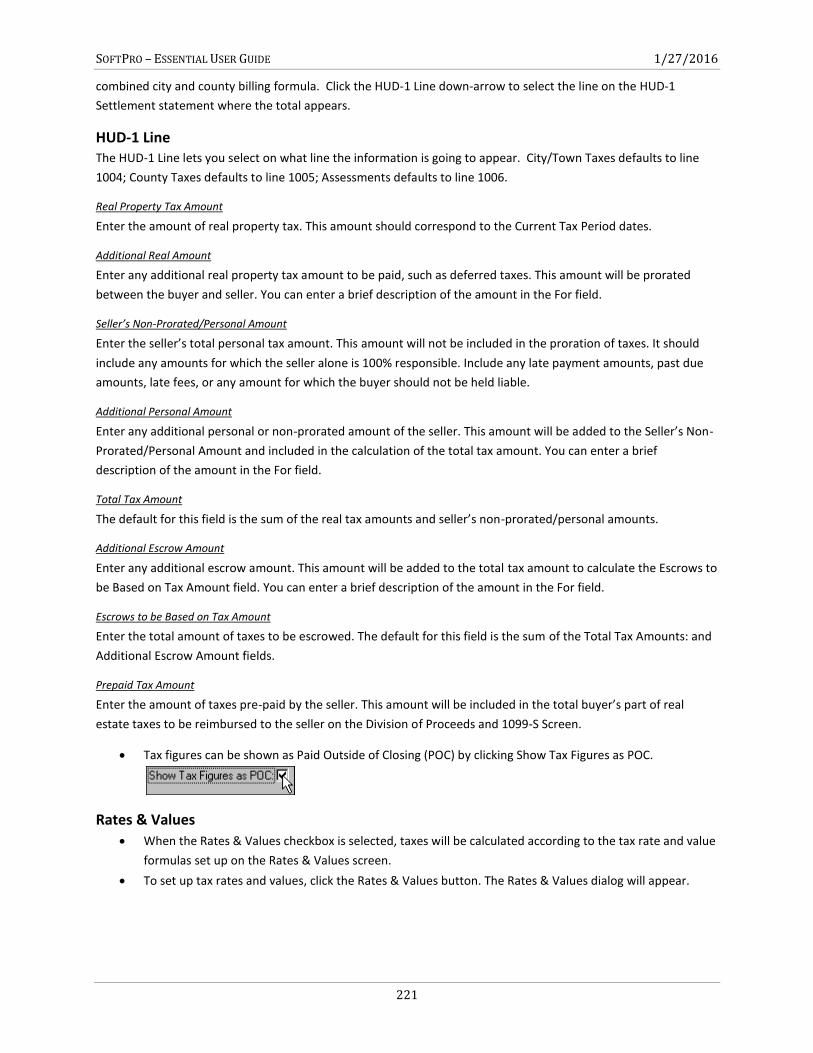
SOFTPRO – ESSENTIAL USER GUIDE 1/27/2016
221
combined city and county billing formula. Click the HUD-1 Line down-arrow to select the line on the HUD-1
Settlement statement where the total appears.
HUD-1 Line The HUD-1 Line lets you select on what line the information is going to appear. City/Town Taxes defaults to line
1004; County Taxes defaults to line 1005; Assessments defaults to line 1006.
Real Property Tax Amount
Enter the amount of real property tax. This amount should correspond to the Current Tax Period dates.
Additional Real Amount
Enter any additional real property tax amount to be paid, such as deferred taxes. This amount will be prorated
between the buyer and seller. You can enter a brief description of the amount in the For field.
Seller’s Non-Prorated/Personal Amount
Enter the seller’s total personal tax amount. This amount will not be included in the proration of taxes. It should
include any amounts for which the seller alone is 100% responsible. Include any late payment amounts, past due
amounts, late fees, or any amount for which the buyer should not be held liable.
Additional Personal Amount
Enter any additional personal or non-prorated amount of the seller. This amount will be added to the Seller’s Non-
Prorated/Personal Amount and included in the calculation of the total tax amount. You can enter a brief
description of the amount in the For field.
Total Tax Amount
The default for this field is the sum of the real tax amounts and seller’s non-prorated/personal amounts.
Additional Escrow Amount
Enter any additional escrow amount. This amount will be added to the total tax amount to calculate the Escrows to
be Based on Tax Amount field. You can enter a brief description of the amount in the For field.
Escrows to be Based on Tax Amount
Enter the total amount of taxes to be escrowed. The default for this field is the sum of the Total Tax Amounts: and
Additional Escrow Amount fields.
Prepaid Tax Amount
Enter the amount of taxes pre-paid by the seller. This amount will be included in the total buyer’s part of real
estate taxes to be reimbursed to the seller on the Division of Proceeds and 1099-S Screen.
Tax figures can be shown as Paid Outside of Closing (POC) by clicking Show Tax Figures as POC.
Rates & Values
When the Rates & Values checkbox is selected, taxes will be calculated according to the tax rate and value
formulas set up on the Rates & Values screen.
To set up tax rates and values, click the Rates & Values button. The Rates & Values dialog will appear.
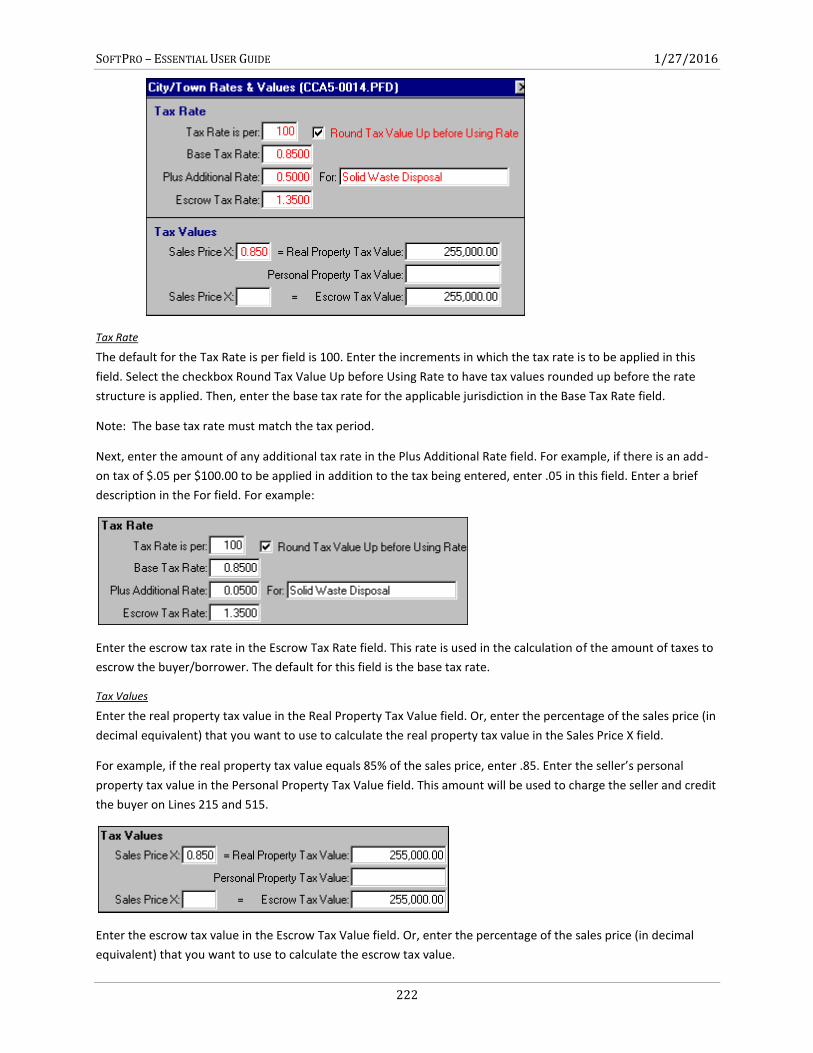
SOFTPRO – ESSENTIAL USER GUIDE 1/27/2016
222
Tax Rate
The default for the Tax Rate is per field is 100. Enter the increments in which the tax rate is to be applied in this
field. Select the checkbox Round Tax Value Up before Using Rate to have tax values rounded up before the rate
structure is applied. Then, enter the base tax rate for the applicable jurisdiction in the Base Tax Rate field.
Note: The base tax rate must match the tax period.
Next, enter the amount of any additional tax rate in the Plus Additional Rate field. For example, if there is an add-
on tax of $.05 per $100.00 to be applied in addition to the tax being entered, enter .05 in this field. Enter a brief
description in the For field. For example:
Enter the escrow tax rate in the Escrow Tax Rate field. This rate is used in the calculation of the amount of taxes to
escrow the buyer/borrower. The default for this field is the base tax rate.
Tax Values
Enter the real property tax value in the Real Property Tax Value field. Or, enter the percentage of the sales price (in
decimal equivalent) that you want to use to calculate the real property tax value in the Sales Price X field.
For example, if the real property tax value equals 85% of the sales price, enter .85. Enter the seller’s personal
property tax value in the Personal Property Tax Value field. This amount will be used to charge the seller and credit
the buyer on Lines 215 and 515.
Enter the escrow tax value in the Escrow Tax Value field. Or, enter the percentage of the sales price (in decimal
equivalent) that you want to use to calculate the escrow tax value.
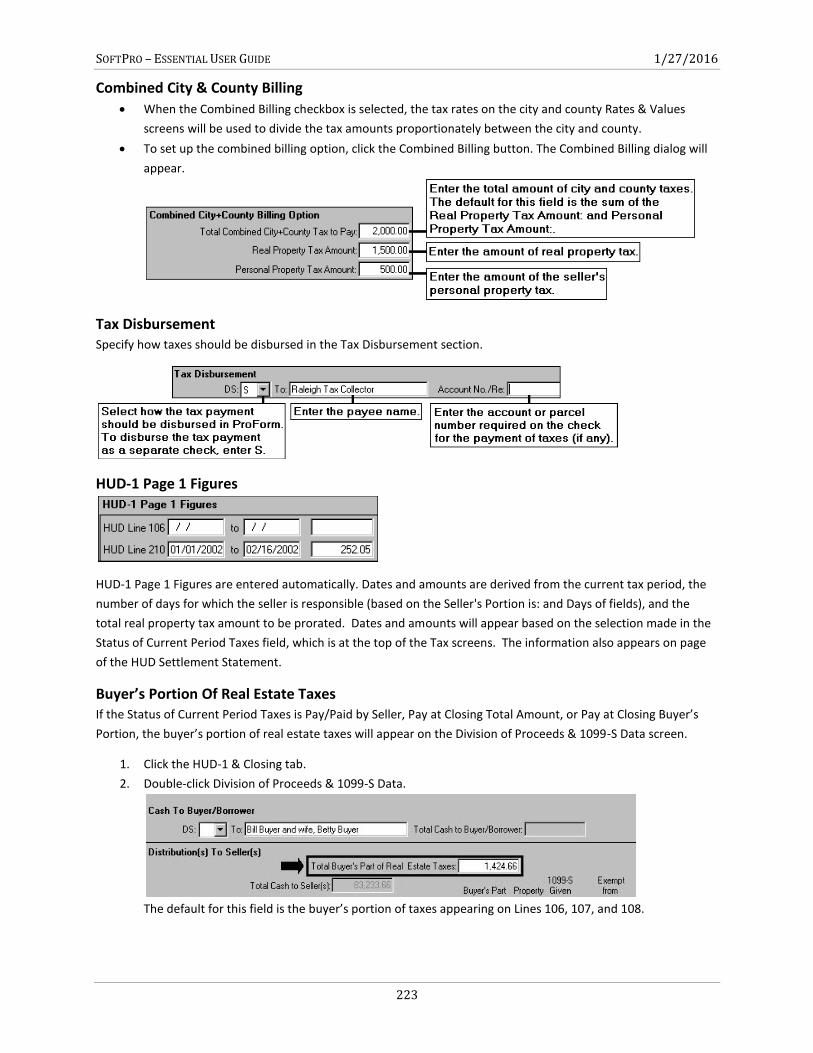
SOFTPRO – ESSENTIAL USER GUIDE 1/27/2016
223
Combined City & County Billing
When the Combined Billing checkbox is selected, the tax rates on the city and county Rates & Values
screens will be used to divide the tax amounts proportionately between the city and county.
To set up the combined billing option, click the Combined Billing button. The Combined Billing dialog will
appear.
Tax Disbursement Specify how taxes should be disbursed in the Tax Disbursement section.
HUD-1 Page 1 Figures
HUD-1 Page 1 Figures are entered automatically. Dates and amounts are derived from the current tax period, the
number of days for which the seller is responsible (based on the Seller's Portion is: and Days of fields), and the
total real property tax amount to be prorated. Dates and amounts will appear based on the selection made in the
Status of Current Period Taxes field, which is at the top of the Tax screens. The information also appears on page
of the HUD Settlement Statement.
Buyer’s Portion Of Real Estate Taxes If the Status of Current Period Taxes is Pay/Paid by Seller, Pay at Closing Total Amount, or Pay at Closing Buyer’s
Portion, the buyer’s portion of real estate taxes will appear on the Division of Proceeds & 1099-S Data screen.
1. Click the HUD-1 & Closing tab.
2. Double-click Division of Proceeds & 1099-S Data.
The default for this field is the buyer’s portion of taxes appearing on Lines 106, 107, and 108.
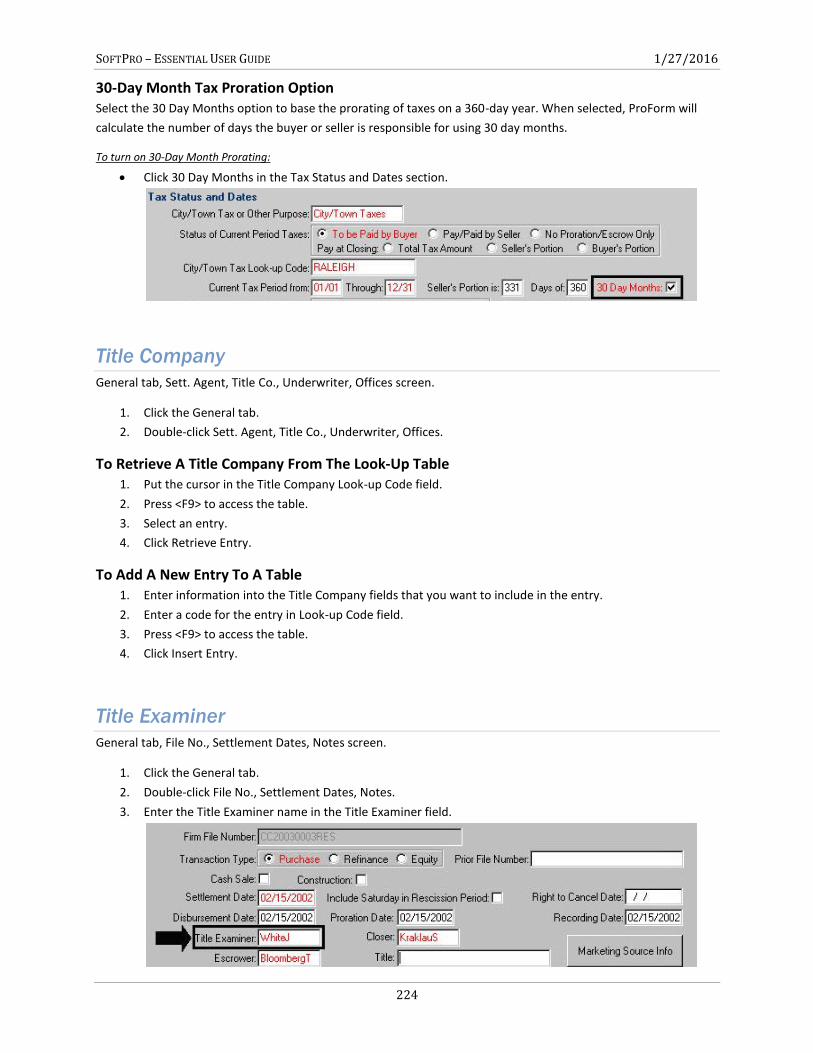
SOFTPRO – ESSENTIAL USER GUIDE 1/27/2016
224
30-Day Month Tax Proration Option Select the 30 Day Months option to base the prorating of taxes on a 360-day year. When selected, ProForm will
calculate the number of days the buyer or seller is responsible for using 30 day months.
To turn on 30-Day Month Prorating:
Click 30 Day Months in the Tax Status and Dates section.
Title Company
General tab, Sett. Agent, Title Co., Underwriter, Offices screen.
1. Click the General tab.
2. Double-click Sett. Agent, Title Co., Underwriter, Offices.
To Retrieve A Title Company From The Look-Up Table 1. Put the cursor in the Title Company Look-up Code field.
2. Press <F9> to access the table.
3. Select an entry.
4. Click Retrieve Entry.
To Add A New Entry To A Table 1. Enter information into the Title Company fields that you want to include in the entry.
2. Enter a code for the entry in Look-up Code field.
3. Press <F9> to access the table.
4. Click Insert Entry.
Title Examiner
General tab, File No., Settlement Dates, Notes screen.
1. Click the General tab.
2. Double-click File No., Settlement Dates, Notes.
3. Enter the Title Examiner name in the Title Examiner field.
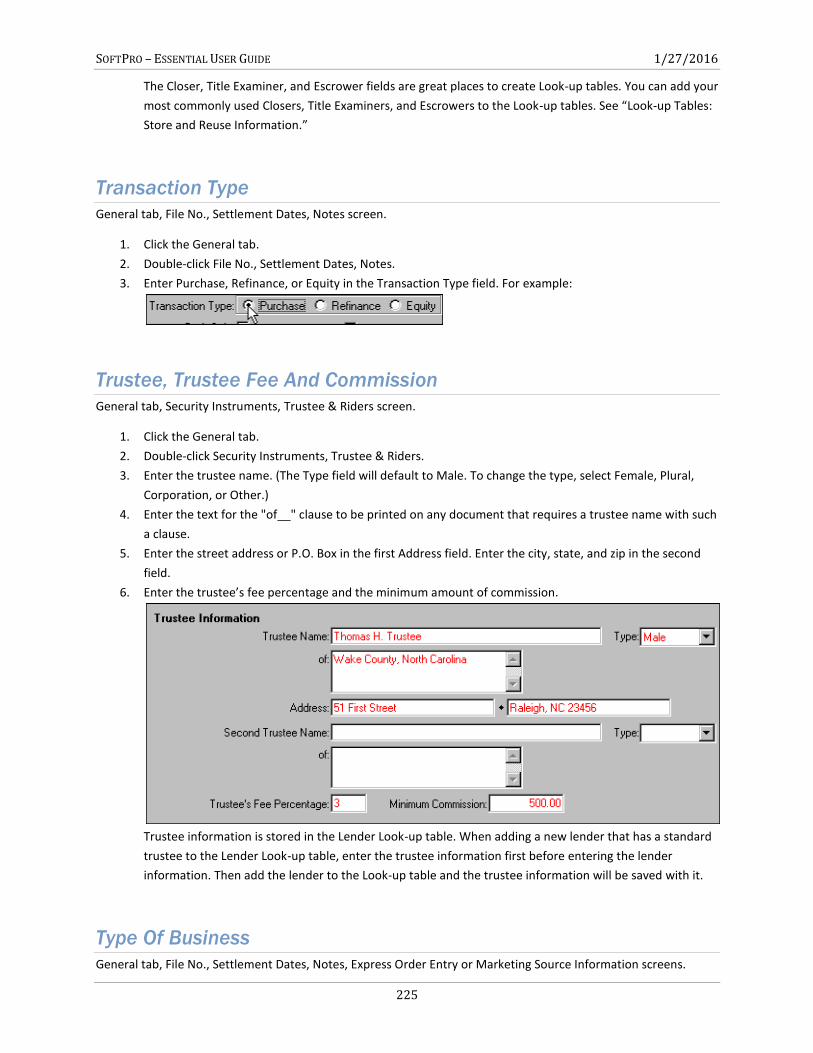
SOFTPRO – ESSENTIAL USER GUIDE 1/27/2016
225
The Closer, Title Examiner, and Escrower fields are great places to create Look-up tables. You can add your
most commonly used Closers, Title Examiners, and Escrowers to the Look-up tables. See “Look-up Tables:
Store and Reuse Information.”
Transaction Type
General tab, File No., Settlement Dates, Notes screen.
1. Click the General tab.
2. Double-click File No., Settlement Dates, Notes.
3. Enter Purchase, Refinance, or Equity in the Transaction Type field. For example:
Trustee, Trustee Fee And Commission
General tab, Security Instruments, Trustee & Riders screen.
1. Click the General tab.
2. Double-click Security Instruments, Trustee & Riders.
3. Enter the trustee name. (The Type field will default to Male. To change the type, select Female, Plural,
Corporation, or Other.)
4. Enter the text for the "of__" clause to be printed on any document that requires a trustee name with such
a clause.
5. Enter the street address or P.O. Box in the first Address field. Enter the city, state, and zip in the second
field.
6. Enter the trustee’s fee percentage and the minimum amount of commission.
Trustee information is stored in the Lender Look-up table. When adding a new lender that has a standard
trustee to the Lender Look-up table, enter the trustee information first before entering the lender
information. Then add the lender to the Look-up table and the trustee information will be saved with it.
Type Of Business
General tab, File No., Settlement Dates, Notes, Express Order Entry or Marketing Source Information screens.
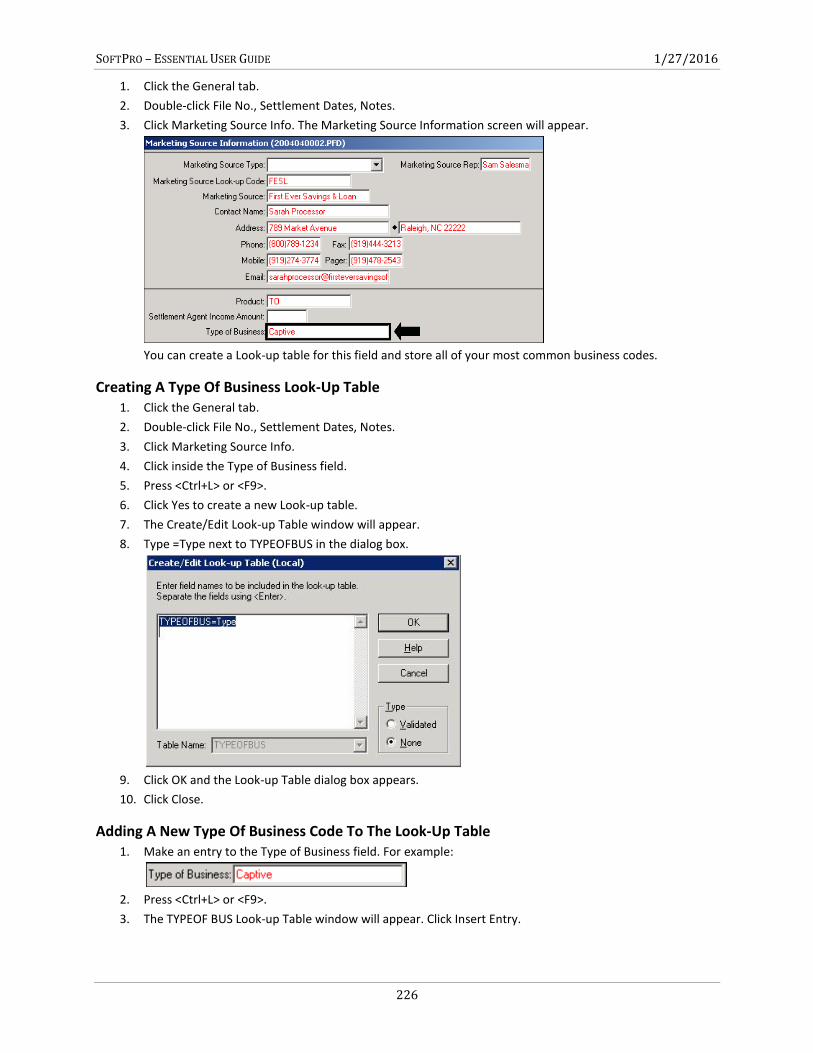
SOFTPRO – ESSENTIAL USER GUIDE 1/27/2016
226
1. Click the General tab.
2. Double-click File No., Settlement Dates, Notes.
3. Click Marketing Source Info. The Marketing Source Information screen will appear.
You can create a Look-up table for this field and store all of your most common business codes.
Creating A Type Of Business Look-Up Table 1. Click the General tab.
2. Double-click File No., Settlement Dates, Notes.
3. Click Marketing Source Info.
4. Click inside the Type of Business field.
5. Press <Ctrl+L> or <F9>.
6. Click Yes to create a new Look-up table.
7. The Create/Edit Look-up Table window will appear.
8. Type =Type next to TYPEOFBUS in the dialog box.
9. Click OK and the Look-up Table dialog box appears.
10. Click Close.
Adding A New Type Of Business Code To The Look-Up Table 1. Make an entry to the Type of Business field. For example:
2. Press <Ctrl+L> or <F9>.
3. The TYPEOF BUS Look-up Table window will appear. Click Insert Entry.
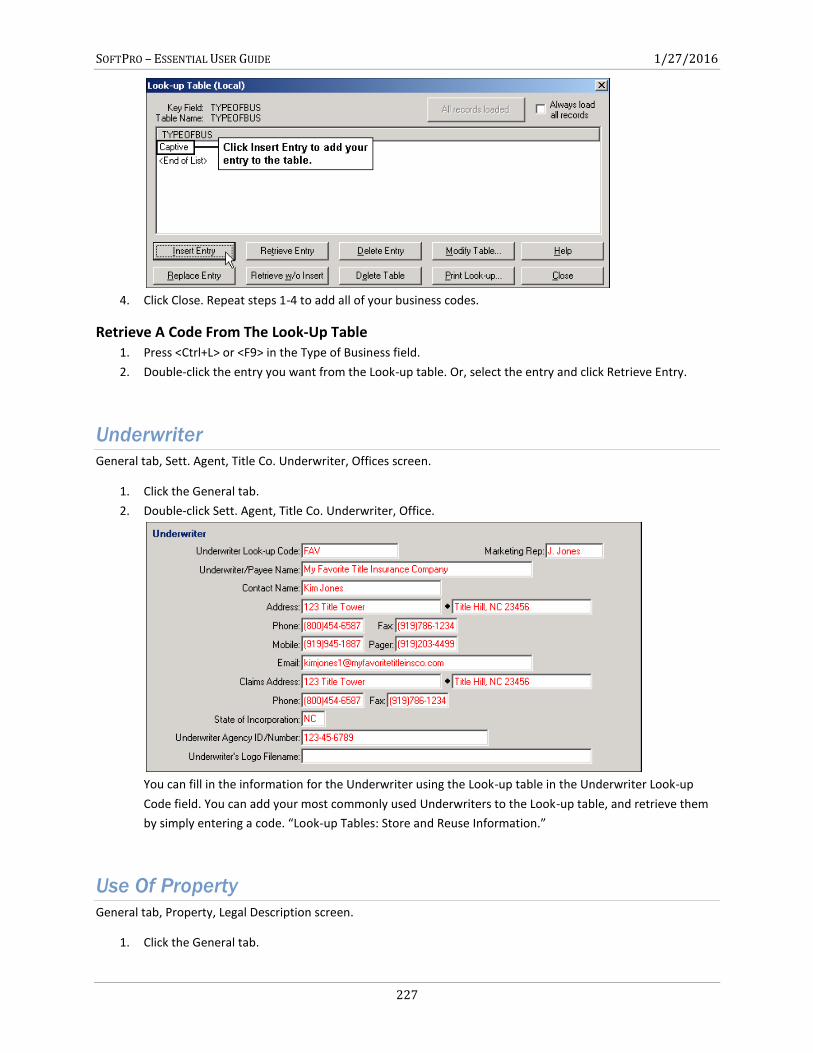
SOFTPRO – ESSENTIAL USER GUIDE 1/27/2016
227
4. Click Close. Repeat steps 1-4 to add all of your business codes.
Retrieve A Code From The Look-Up Table 1. Press <Ctrl+L> or <F9> in the Type of Business field.
2. Double-click the entry you want from the Look-up table. Or, select the entry and click Retrieve Entry.
Underwriter
General tab, Sett. Agent, Title Co. Underwriter, Offices screen.
1. Click the General tab.
2. Double-click Sett. Agent, Title Co. Underwriter, Office.
You can fill in the information for the Underwriter using the Look-up table in the Underwriter Look-up
Code field. You can add your most commonly used Underwriters to the Look-up table, and retrieve them
by simply entering a code. “Look-up Tables: Store and Reuse Information.”
Use Of Property
General tab, Property, Legal Description screen.
1. Click the General tab.
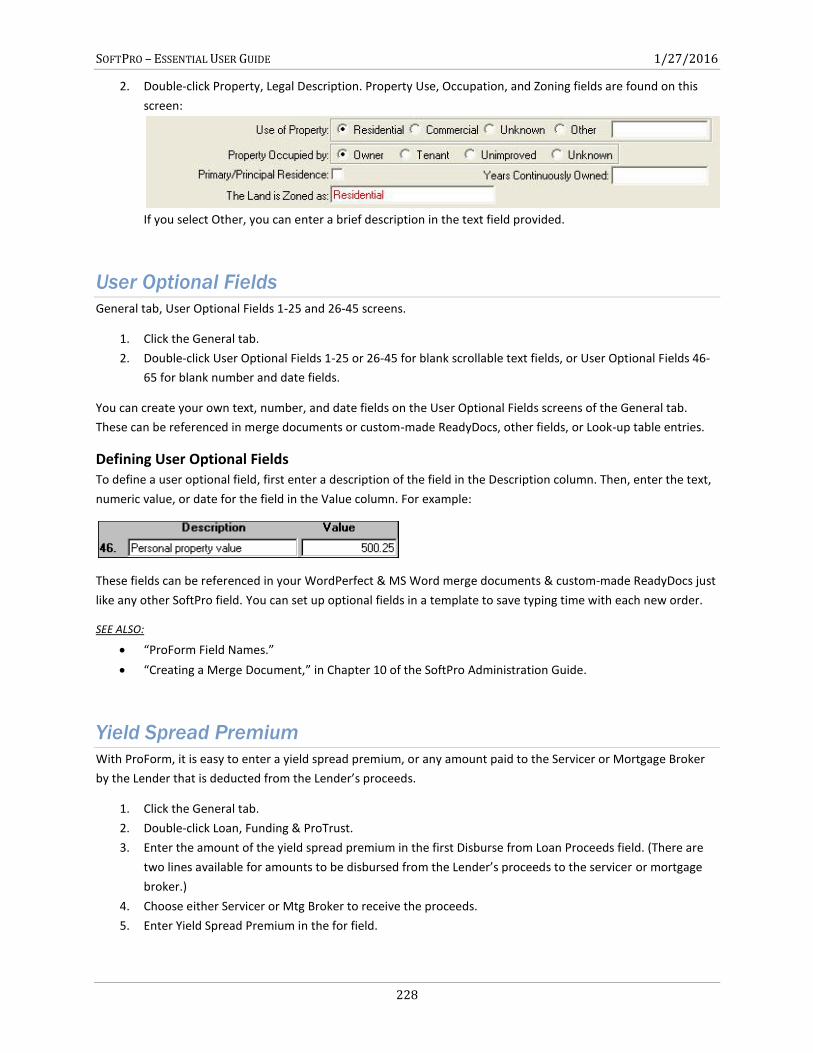
SOFTPRO – ESSENTIAL USER GUIDE 1/27/2016
228
2. Double-click Property, Legal Description. Property Use, Occupation, and Zoning fields are found on this
screen:
If you select Other, you can enter a brief description in the text field provided.
User Optional Fields
General tab, User Optional Fields 1-25 and 26-45 screens.
1. Click the General tab.
2. Double-click User Optional Fields 1-25 or 26-45 for blank scrollable text fields, or User Optional Fields 46-
65 for blank number and date fields.
You can create your own text, number, and date fields on the User Optional Fields screens of the General tab.
These can be referenced in merge documents or custom-made ReadyDocs, other fields, or Look-up table entries.
Defining User Optional Fields To define a user optional field, first enter a description of the field in the Description column. Then, enter the text,
numeric value, or date for the field in the Value column. For example:
These fields can be referenced in your WordPerfect & MS Word merge documents & custom-made ReadyDocs just
like any other SoftPro field. You can set up optional fields in a template to save typing time with each new order.
SEE ALSO:
“ProForm Field Names.”
“Creating a Merge Document,” in Chapter 10 of the SoftPro Administration Guide.
Yield Spread Premium
With ProForm, it is easy to enter a yield spread premium, or any amount paid to the Servicer or Mortgage Broker
by the Lender that is deducted from the Lender’s proceeds.
1. Click the General tab.
2. Double-click Loan, Funding & ProTrust.
3. Enter the amount of the yield spread premium in the first Disburse from Loan Proceeds field. (There are
two lines available for amounts to be disbursed from the Lender’s proceeds to the servicer or mortgage
broker.)
4. Choose either Servicer or Mtg Broker to receive the proceeds.
5. Enter Yield Spread Premium in the for field.
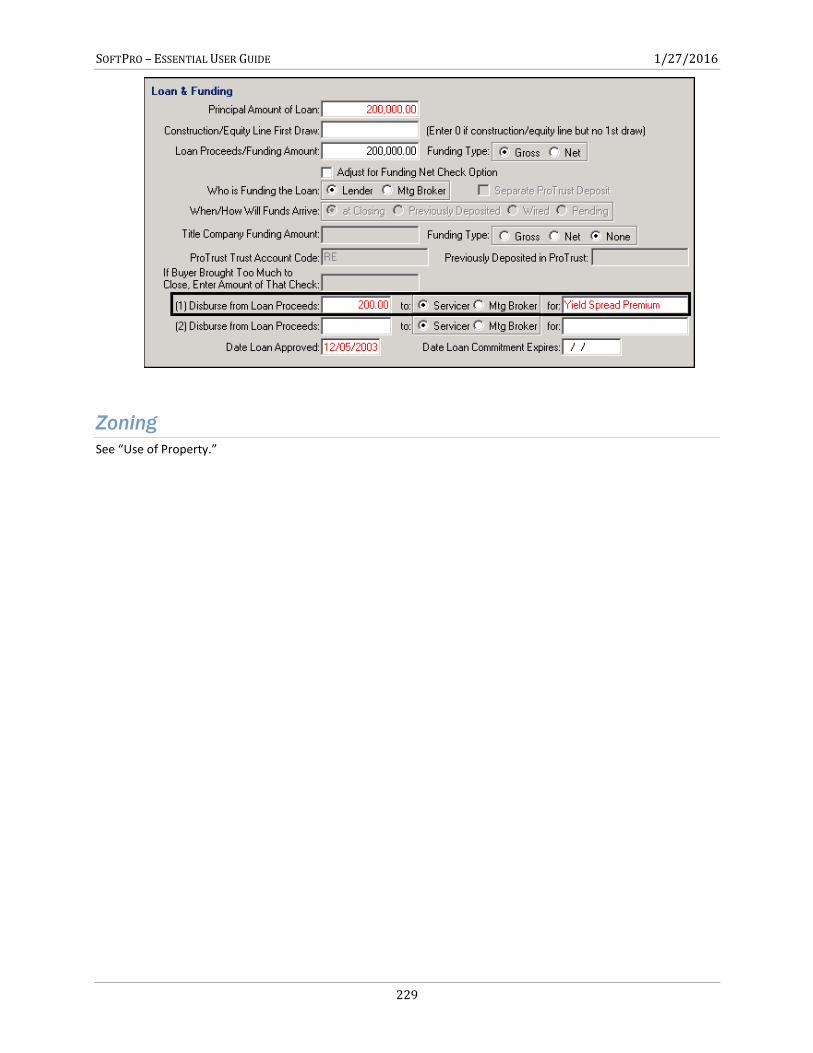
SOFTPRO – ESSENTIAL USER GUIDE 1/27/2016
229
Zoning
See “Use of Property.”
SOFTPRO – ESSENTIAL USER GUIDE 1/27/2016
230
Chapter 5: Requirements and
Exceptions - Standard Overview ........................................................................................................................... 231
Entering a Requirement or Exception From a Look-up Table ............................................... 231
Entering a Requirement Manually ..................................................................................... 231
Entering An Exception Manually ........................................................................................ 232
Adding a New Requirement or Exception to a Look-up Table ............................................. 232
Importing Text to Fill In a Requirement or Exception .......................................................... 232
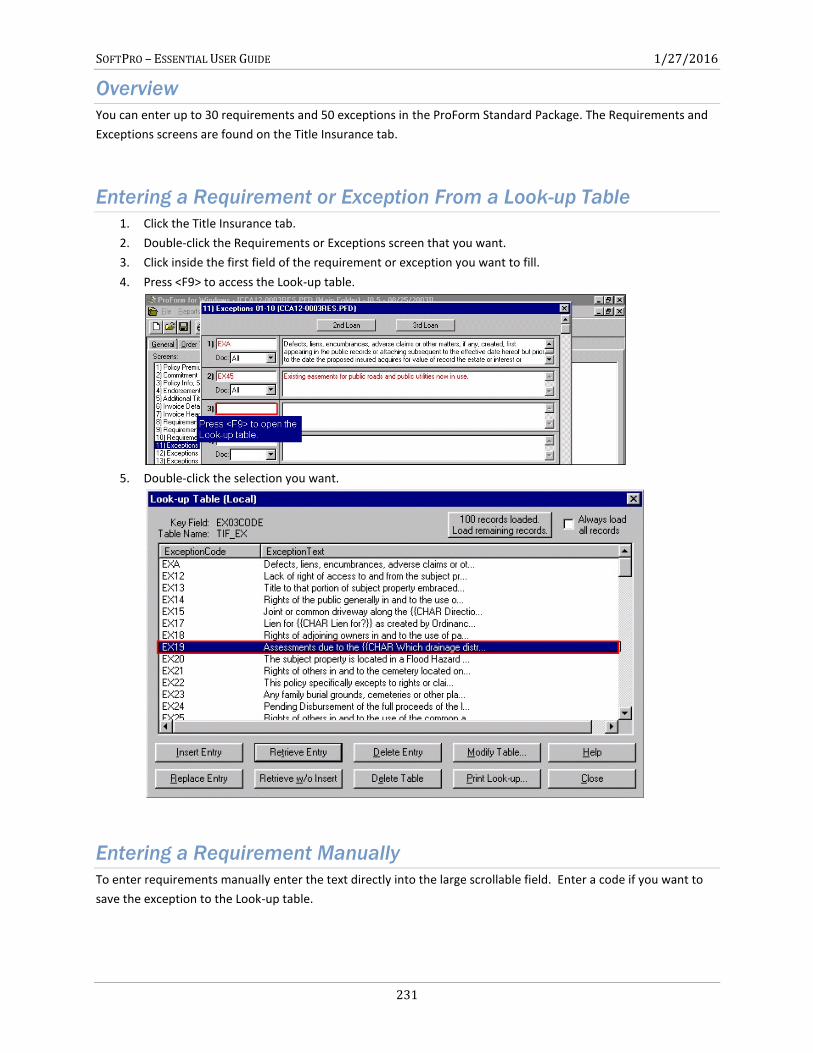
SOFTPRO – ESSENTIAL USER GUIDE 1/27/2016
231
Overview
You can enter up to 30 requirements and 50 exceptions in the ProForm Standard Package. The Requirements and
Exceptions screens are found on the Title Insurance tab.
Entering a Requirement or Exception From a Look-up Table
1. Click the Title Insurance tab.
2. Double-click the Requirements or Exceptions screen that you want.
3. Click inside the first field of the requirement or exception you want to fill.
4. Press <F9> to access the Look-up table.
5. Double-click the selection you want.
Entering a Requirement Manually
To enter requirements manually enter the text directly into the large scrollable field. Enter a code if you want to
save the exception to the Look-up table.
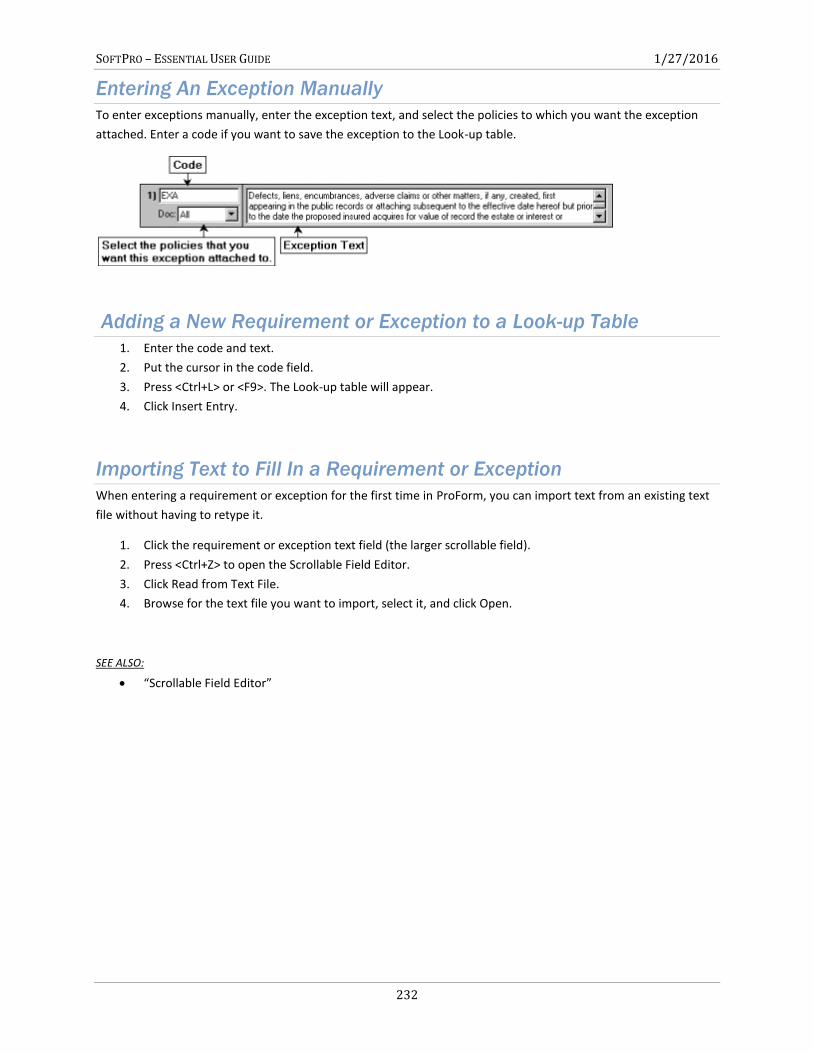
SOFTPRO – ESSENTIAL USER GUIDE 1/27/2016
232
Entering An Exception Manually
To enter exceptions manually, enter the exception text, and select the policies to which you want the exception
attached. Enter a code if you want to save the exception to the Look-up table.
Adding a New Requirement or Exception to a Look-up Table
1. Enter the code and text.
2. Put the cursor in the code field.
3. Press <Ctrl+L> or <F9>. The Look-up table will appear.
4. Click Insert Entry.
Importing Text to Fill In a Requirement or Exception
When entering a requirement or exception for the first time in ProForm, you can import text from an existing text
file without having to retype it.
1. Click the requirement or exception text field (the larger scrollable field).
2. Press <Ctrl+Z> to open the Scrollable Field Editor.
3. Click Read from Text File.
4. Browse for the text file you want to import, select it, and click Open.
SEE ALSO:
“Scrollable Field Editor”
SOFTPRO – ESSENTIAL USER GUIDE 1/27/2016
233
Chapter 6: ProForm Data Entry Tools Overview ........................................................................................................................... 234
Look-Up Tables: Store And Reuse Information .................................................................. 234
Saving Information To A Look-Up Table ................................................................................................................ 234
What Fields Can Be Saved To A Look-Up Table ..................................................................................................... 235
Retrieving Information From A Look-Up Table ..................................................................................................... 235
Look-Up Table Codes ............................................................................................................................................. 236
Spell Check ........................................................................................................................ 237
Right Mouse Button Menu: Single-Click Access To Common Features ................................. 237
Go To Feature .................................................................................................................... 238
Customizing Your Go To List .................................................................................................................................. 239
ProForm Field Names ........................................................................................................ 239
Finding A Field Name ............................................................................................................................................. 240
Paid Outside Of Closing (Poc) ............................................................................................. 240
Partial POC Amounts ............................................................................................................................................. 241
Scrollable Field Editor ........................................................................................................ 241
Read From Text File ............................................................................................................................................... 241
Write To Text File .................................................................................................................................................. 242
SOFTPRO – ESSENTIAL USER GUIDE 1/27/2016
234
Overview
ProForm keeps you focused on finishing the order, not repeating keystrokes. ProForm has several built-in features
that take work out of your hands and give you more options to complete orders with efficiency.
Some of the features, such as Look-up tables and the Go To feature will drastically reduce the amount of time you
spend entering data. Others, like Disbursement Status and Flex Checks, make ProForm the most adaptable real
estate program on the market. You will find that ProForm has the features built-in to handle any situation.
Look-Up Tables: Store And Reuse Information
Look-up tables are important ProForm time-savers that let you save information you want to reuse from
file to file.
You can save all of your Settlement Agents, Underwriters, Title Companies, Lenders, Attorneys, and more
to Look-up tables.
When you want to fill in data to a field that has a Look-up table, press <F9> or <Ctrl> and <L> to open the
Look-up table and double-click the entry that you want. Or, enter the Look-up table code for the entry
you want and press <Tab>.
If a field has a Look-up table associated with it, the LKUP indicator will appear in the ProForm status bar.
Many fields in ProForm come with Look-up tables created for them. All you have to do is add your entries
to existing tables to customize them. You can, however, create new Look-up tables for any other text
field.
SEE ALSO:
Chapter 9 “Look-up Tables” in the SoftPro Administration Guide.
Saving Information To A Look-Up Table 1. Enter the information that you want to save as an entry to the table. For example:
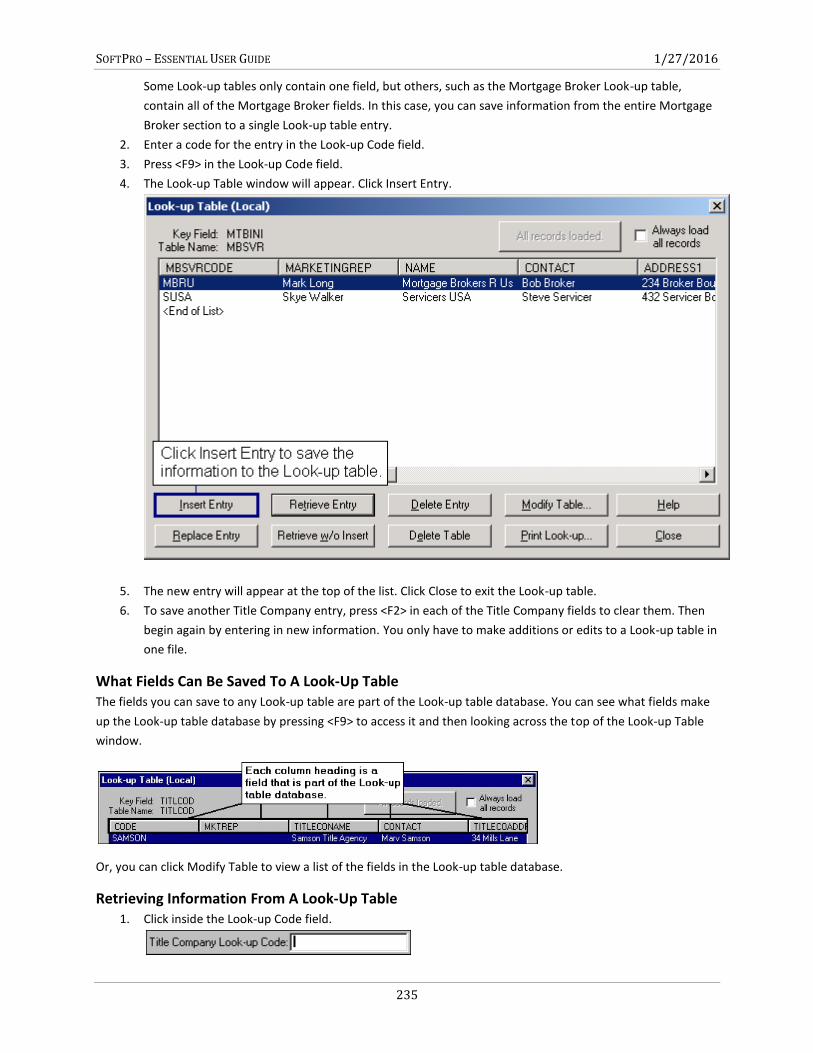
SOFTPRO – ESSENTIAL USER GUIDE 1/27/2016
235
Some Look-up tables only contain one field, but others, such as the Mortgage Broker Look-up table,
contain all of the Mortgage Broker fields. In this case, you can save information from the entire Mortgage
Broker section to a single Look-up table entry.
2. Enter a code for the entry in the Look-up Code field.
3. Press <F9> in the Look-up Code field.
4. The Look-up Table window will appear. Click Insert Entry.
5. The new entry will appear at the top of the list. Click Close to exit the Look-up table.
6. To save another Title Company entry, press <F2> in each of the Title Company fields to clear them. Then
begin again by entering in new information. You only have to make additions or edits to a Look-up table in
one file.
What Fields Can Be Saved To A Look-Up Table The fields you can save to any Look-up table are part of the Look-up table database. You can see what fields make
up the Look-up table database by pressing <F9> to access it and then looking across the top of the Look-up Table
window.
Or, you can click Modify Table to view a list of the fields in the Look-up table database.
Retrieving Information From A Look-Up Table 1. Click inside the Look-up Code field.
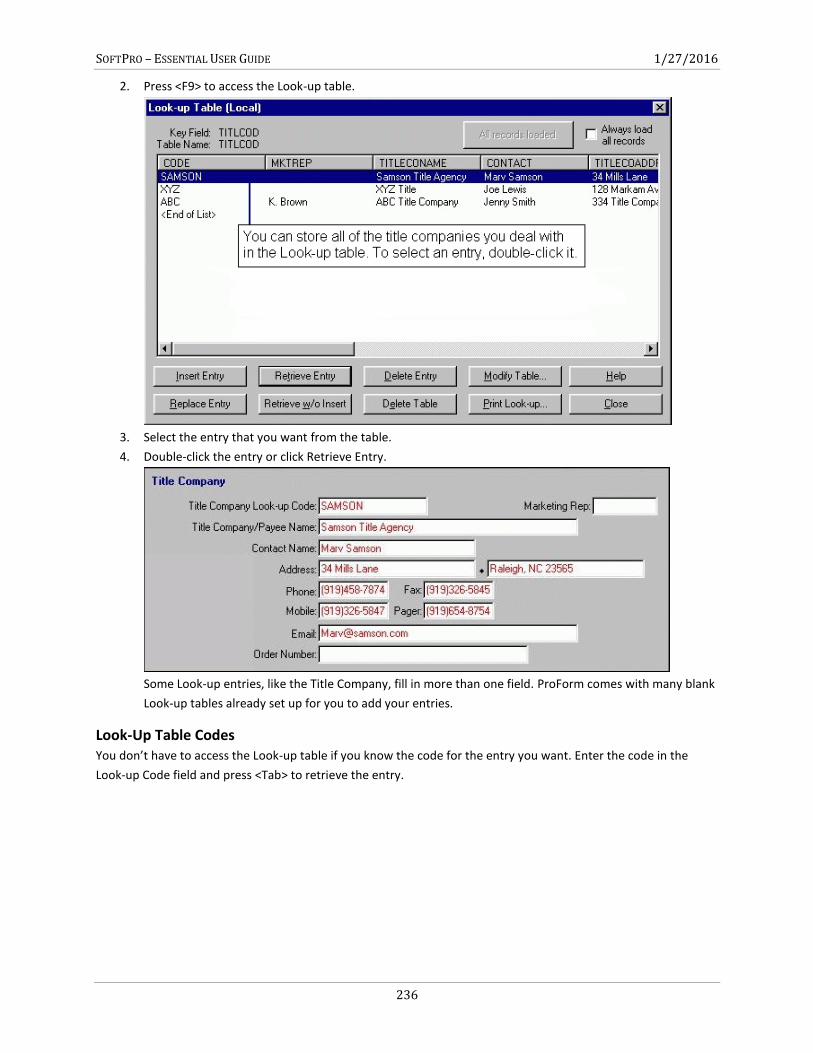
SOFTPRO – ESSENTIAL USER GUIDE 1/27/2016
236
2. Press <F9> to access the Look-up table.
3. Select the entry that you want from the table.
4. Double-click the entry or click Retrieve Entry.
Some Look-up entries, like the Title Company, fill in more than one field. ProForm comes with many blank
Look-up tables already set up for you to add your entries.
Look-Up Table Codes You don’t have to access the Look-up table if you know the code for the entry you want. Enter the code in the
Look-up Code field and press <Tab> to retrieve the entry.
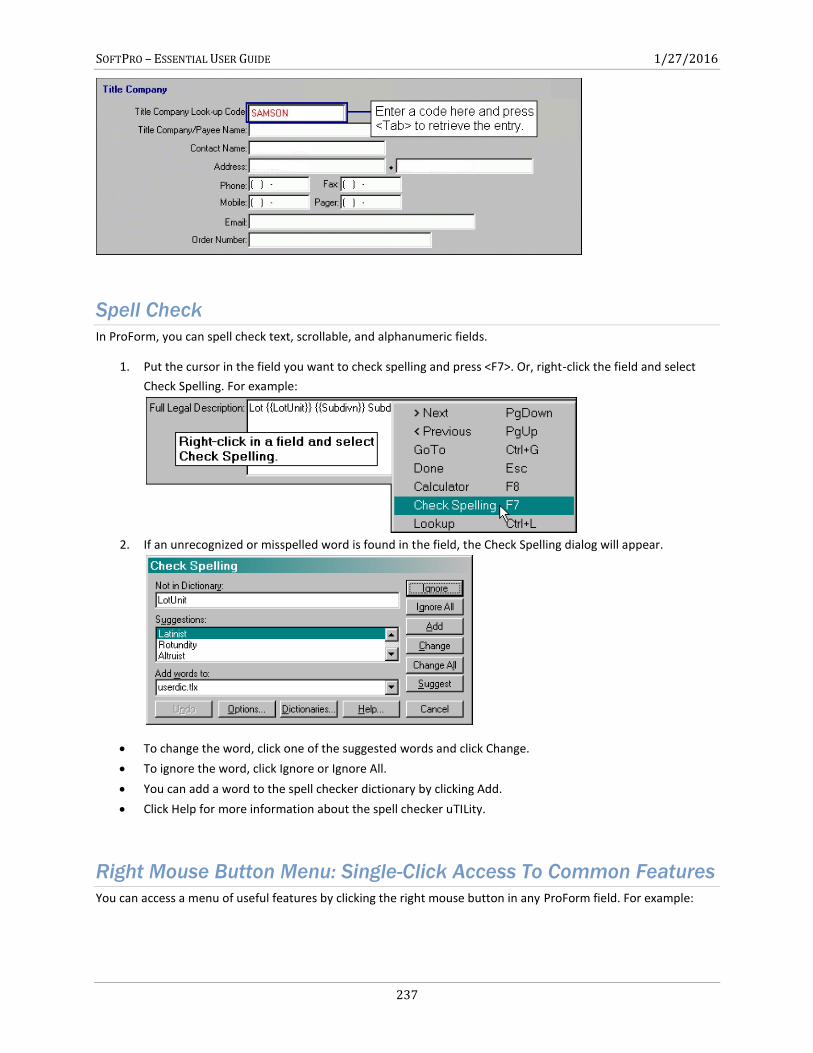
SOFTPRO – ESSENTIAL USER GUIDE 1/27/2016
237
Spell Check
In ProForm, you can spell check text, scrollable, and alphanumeric fields.
1. Put the cursor in the field you want to check spelling and press <F7>. Or, right-click the field and select
Check Spelling. For example:
2. If an unrecognized or misspelled word is found in the field, the Check Spelling dialog will appear.
To change the word, click one of the suggested words and click Change.
To ignore the word, click Ignore or Ignore All.
You can add a word to the spell checker dictionary by clicking Add.
Click Help for more information about the spell checker uTILity.
Right Mouse Button Menu: Single-Click Access To Common Features
You can access a menu of useful features by clicking the right mouse button in any ProForm field. For example:
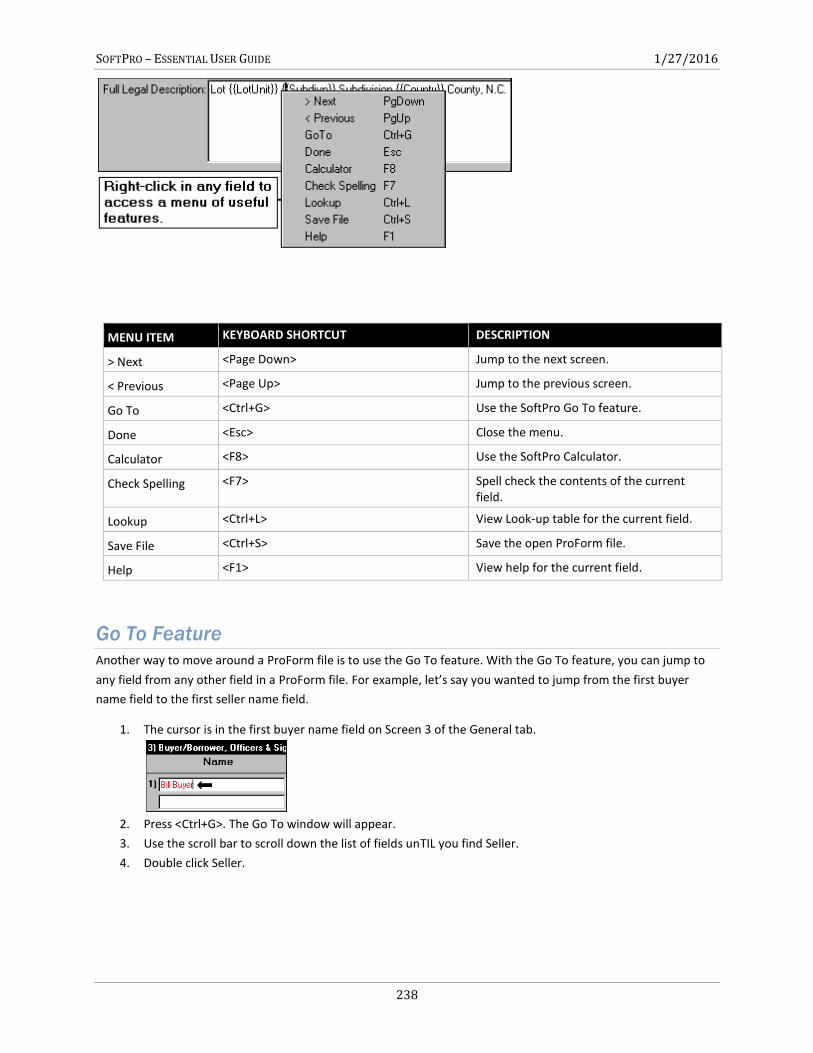
SOFTPRO – ESSENTIAL USER GUIDE 1/27/2016
238
Go To Feature
Another way to move around a ProForm file is to use the Go To feature. With the Go To feature, you can jump to
any field from any other field in a ProForm file. For example, let’s say you wanted to jump from the first buyer
name field to the first seller name field.
1. The cursor is in the first buyer name field on Screen 3 of the General tab.
2. Press <Ctrl+G>. The Go To window will appear.
3. Use the scroll bar to scroll down the list of fields unTIL you find Seller.
4. Double click Seller.
MENU ITEM KEYBOARD SHORTCUT DESCRIPTION
> Next <Page Down> Jump to the next screen.
< Previous <Page Up> Jump to the previous screen.
Go To <Ctrl+G> Use the SoftPro Go To feature.
Done <Esc> Close the menu.
Calculator <F8> Use the SoftPro Calculator.
Check Spelling <F7> Spell check the contents of the current field.
Lookup <Ctrl+L> View Look-up table for the current field.
Save File <Ctrl+S> Save the open ProForm file.
Help <F1> View help for the current field.
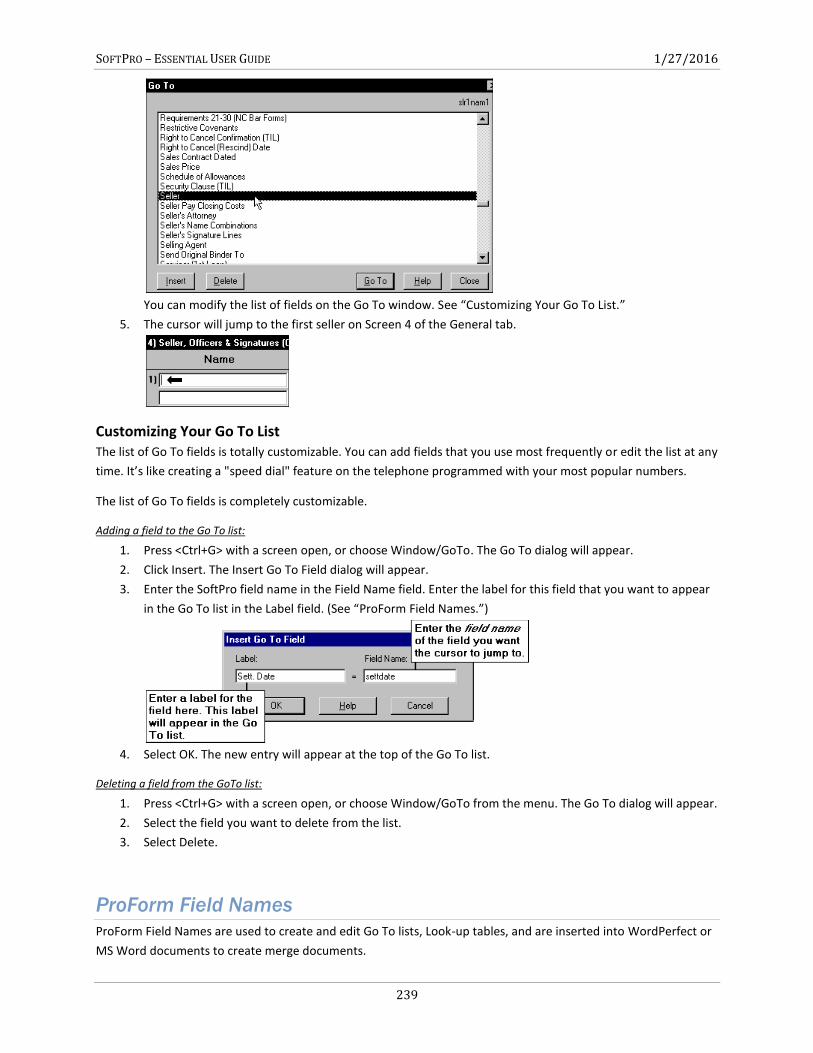
SOFTPRO – ESSENTIAL USER GUIDE 1/27/2016
239
You can modify the list of fields on the Go To window. See “Customizing Your Go To List.”
5. The cursor will jump to the first seller on Screen 4 of the General tab.
Customizing Your Go To List The list of Go To fields is totally customizable. You can add fields that you use most frequently or edit the list at any
time. It’s like creating a "speed dial" feature on the telephone programmed with your most popular numbers.
The list of Go To fields is completely customizable.
Adding a field to the Go To list:
1. Press <Ctrl+G> with a screen open, or choose Window/GoTo. The Go To dialog will appear.
2. Click Insert. The Insert Go To Field dialog will appear.
3. Enter the SoftPro field name in the Field Name field. Enter the label for this field that you want to appear
in the Go To list in the Label field. (See “ProForm Field Names.”)
4. Select OK. The new entry will appear at the top of the Go To list.
Deleting a field from the GoTo list:
1. Press <Ctrl+G> with a screen open, or choose Window/GoTo from the menu. The Go To dialog will appear.
2. Select the field you want to delete from the list.
3. Select Delete.
ProForm Field Names
ProForm Field Names are used to create and edit Go To lists, Look-up tables, and are inserted into WordPerfect or
MS Word documents to create merge documents.
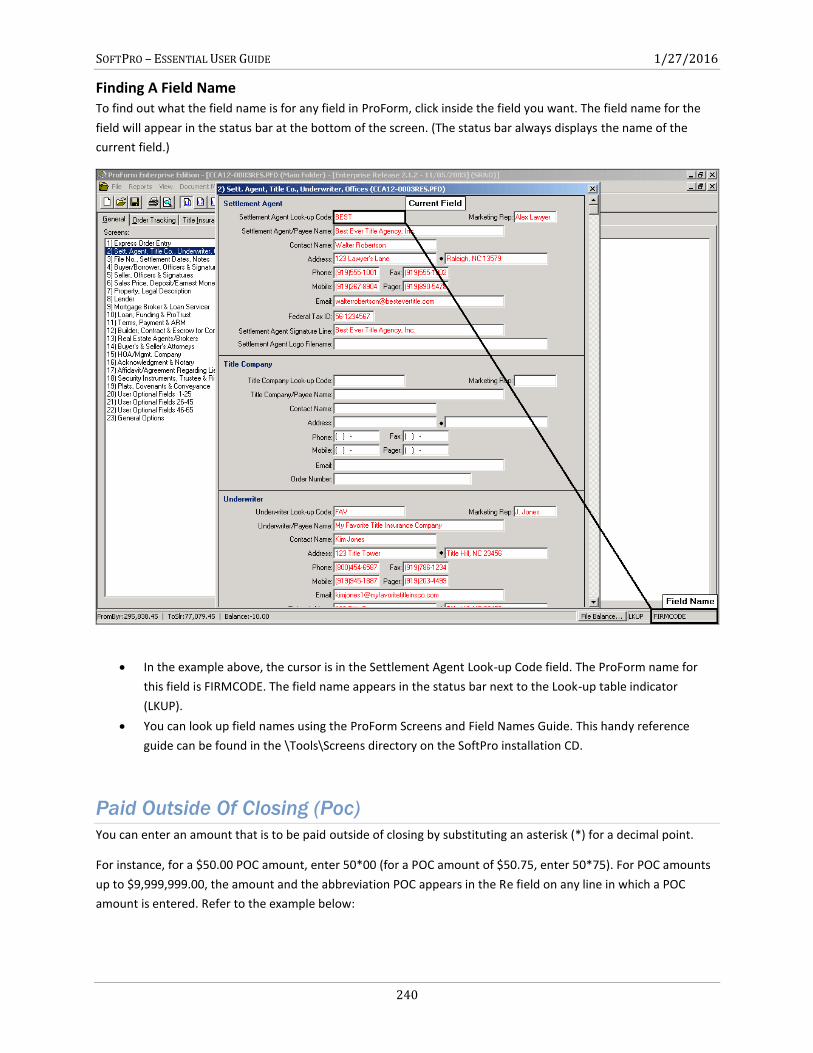
SOFTPRO – ESSENTIAL USER GUIDE 1/27/2016
240
Finding A Field Name To find out what the field name is for any field in ProForm, click inside the field you want. The field name for the
field will appear in the status bar at the bottom of the screen. (The status bar always displays the name of the
current field.)
In the example above, the cursor is in the Settlement Agent Look-up Code field. The ProForm name for
this field is FIRMCODE. The field name appears in the status bar next to the Look-up table indicator
(LKUP).
You can look up field names using the ProForm Screens and Field Names Guide. This handy reference
guide can be found in the \Tools\Screens directory on the SoftPro installation CD.
Paid Outside Of Closing (Poc)
You can enter an amount that is to be paid outside of closing by substituting an asterisk (*) for a decimal point.
For instance, for a $50.00 POC amount, enter 50*00 (for a POC amount of $50.75, enter 50*75). For POC amounts
up to $9,999,999.00, the amount and the abbreviation POC appears in the Re field on any line in which a POC
amount is entered. Refer to the example below:

SOFTPRO – ESSENTIAL USER GUIDE 1/27/2016
241
Select Calculation Option 2 on the HUD-1 Options screen to have a b (for buyer/borrower) or s (for seller) entered
along with the amount in the Re field. This can help you identify which party paid the amount.
Partial POC Amounts If an amount is partially POC and the balance due is being collected at closing, enter the amount to be collected at
closing in the Borrower or Seller column (using decimal points). Then manually enter the POC amount (with the
abbreviation POC before it) in the Re field.
The information in a Re field is printed on the HUD-1 Settlement Statement to the left of the Borrower column.
Scrollable Field Editor
Press <Ctrl+Z> in any scrollable field to open the Scrollable Field Editor. With the Scrollable Field Editor you can
import existing text files to fill the field, save text to a file, or spell check the field.
Read From Text File Use Read from Text File to import text from an existing text file (*.txt) into a scrollable field.
1. Click Read from Text File.
2. Put the cursor in a scrollable field.
3. Press <Ctrl> and <Z> together. The Scrollable Field Editor will open.
4. Click Read from Text File. The Open dialog will appear.
5. Browse for and select the text file you want to import.
6. Click Open.
SOFTPRO – ESSENTIAL USER GUIDE 1/27/2016
242
Write To Text File Click Write to Text File to save the contents of a scrollable field to a text file. In the future, you can import the
information from the saved text file to fill in data for other orders.
1. Put the cursor in a scrollable field.
2. Press <Ctrl> and <Z> together. The Scrollable Field Editor will open.
3. Click Write to Text File. The Save As dialog will appear.
4. Select the folder in which you want to save your text file.
5. Enter a name in the File name field. By default the file will be saved with the extension .txt.
6. Click Save.
SOFTPRO – ESSENTIAL USER GUIDE 1/27/2016
243
Chapter 7: Printing Documents Overview ........................................................................................................................... 244
Printer Requirements ............................................................................................................................................ 244
Document Modes .............................................................................................................. 244
Printing ReadyDocs ........................................................................................................... 244
Printing A HUD-1 Settlement Statement ............................................................................................................... 245
Creating Your Own ReadyDoc Folder ................................................................................. 247
Printing Documents In Your Folder .................................................................................... 249
Printing All Documents In A Folder At Once ....................................................................... 250
Document History ............................................................................................................. 250
Faxing ReadyDocs From ProForm ....................................................................................... 251
Print To .PDF In ProForm ................................................................................................... 251
System Requirements For ProForm Print To .PDF................................................................................................. 252
Printing A .PDF File From ProForm ........................................................................................................................ 252
Email PDF Documents From ProForm ................................................................................. 253
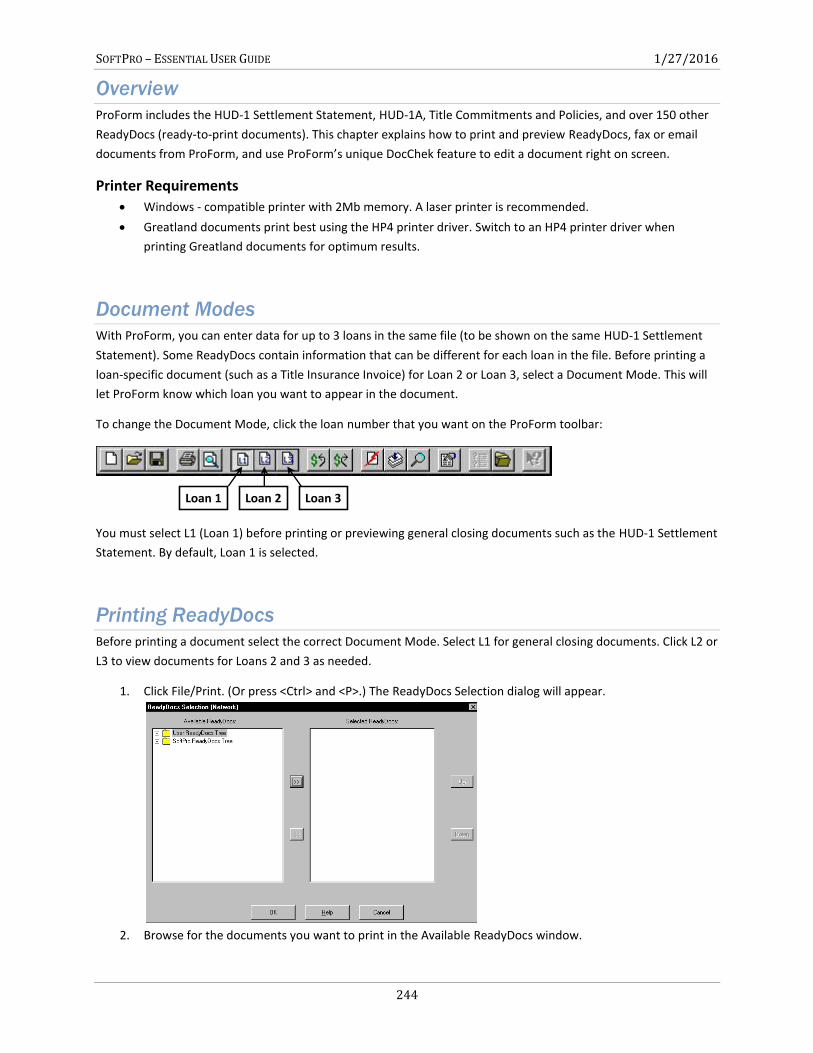
SOFTPRO – ESSENTIAL USER GUIDE 1/27/2016
244
Overview
ProForm includes the HUD-1 Settlement Statement, HUD-1A, Title Commitments and Policies, and over 150 other
ReadyDocs (ready-to-print documents). This chapter explains how to print and preview ReadyDocs, fax or email
documents from ProForm, and use ProForm’s unique DocChek feature to edit a document right on screen.
Printer Requirements
Windows - compatible printer with 2Mb memory. A laser printer is recommended.
Greatland documents print best using the HP4 printer driver. Switch to an HP4 printer driver when
printing Greatland documents for optimum results.
Document Modes
With ProForm, you can enter data for up to 3 loans in the same file (to be shown on the same HUD-1 Settlement
Statement). Some ReadyDocs contain information that can be different for each loan in the file. Before printing a
loan-specific document (such as a Title Insurance Invoice) for Loan 2 or Loan 3, select a Document Mode. This will
let ProForm know which loan you want to appear in the document.
To change the Document Mode, click the loan number that you want on the ProForm toolbar:
You must select L1 (Loan 1) before printing or previewing general closing documents such as the HUD-1 Settlement
Statement. By default, Loan 1 is selected.
Printing ReadyDocs
Before printing a document select the correct Document Mode. Select L1 for general closing documents. Click L2 or
L3 to view documents for Loans 2 and 3 as needed.
1. Click File/Print. (Or press <Ctrl> and <P>.) The ReadyDocs Selection dialog will appear.
2. Browse for the documents you want to print in the Available ReadyDocs window.
Loan 1 Loan 2 Loan 3
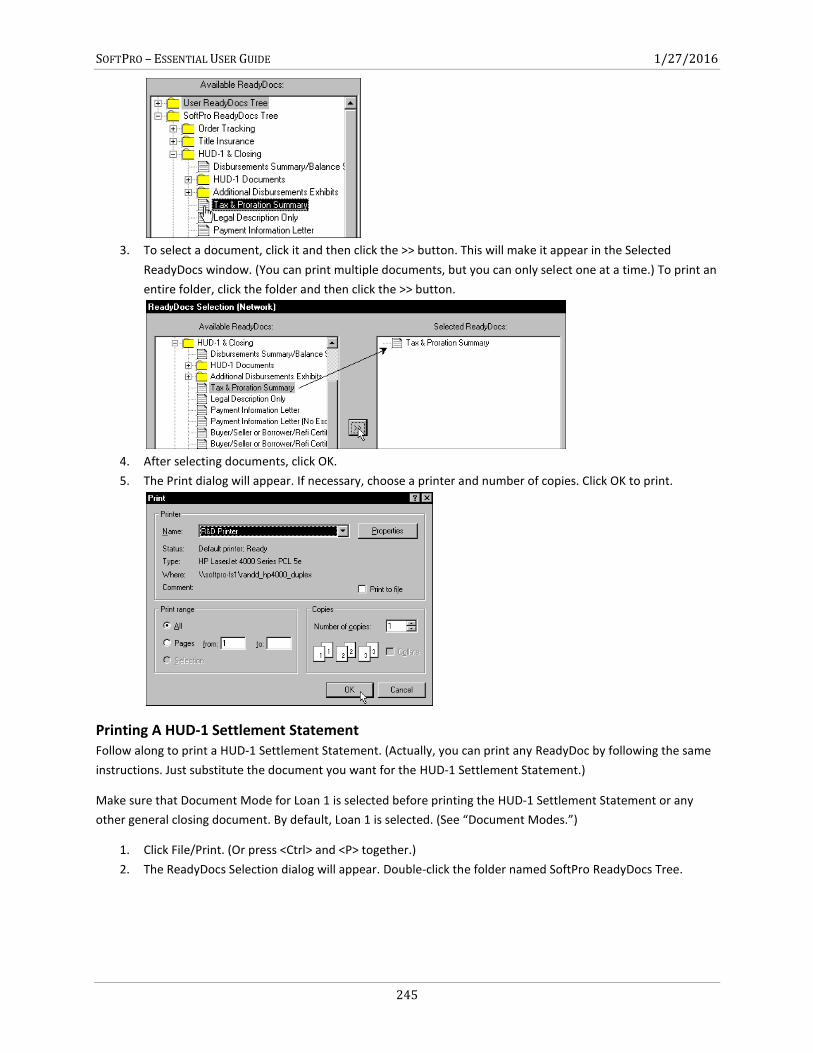
SOFTPRO – ESSENTIAL USER GUIDE 1/27/2016
245
3. To select a document, click it and then click the >> button. This will make it appear in the Selected
ReadyDocs window. (You can print multiple documents, but you can only select one at a time.) To print an
entire folder, click the folder and then click the >> button.
4. After selecting documents, click OK.
5. The Print dialog will appear. If necessary, choose a printer and number of copies. Click OK to print.
Printing A HUD-1 Settlement Statement Follow along to print a HUD-1 Settlement Statement. (Actually, you can print any ReadyDoc by following the same
instructions. Just substitute the document you want for the HUD-1 Settlement Statement.)
Make sure that Document Mode for Loan 1 is selected before printing the HUD-1 Settlement Statement or any
other general closing document. By default, Loan 1 is selected. (See “Document Modes.”)
1. Click File/Print. (Or press <Ctrl> and <P> together.)
2. The ReadyDocs Selection dialog will appear. Double-click the folder named SoftPro ReadyDocs Tree.
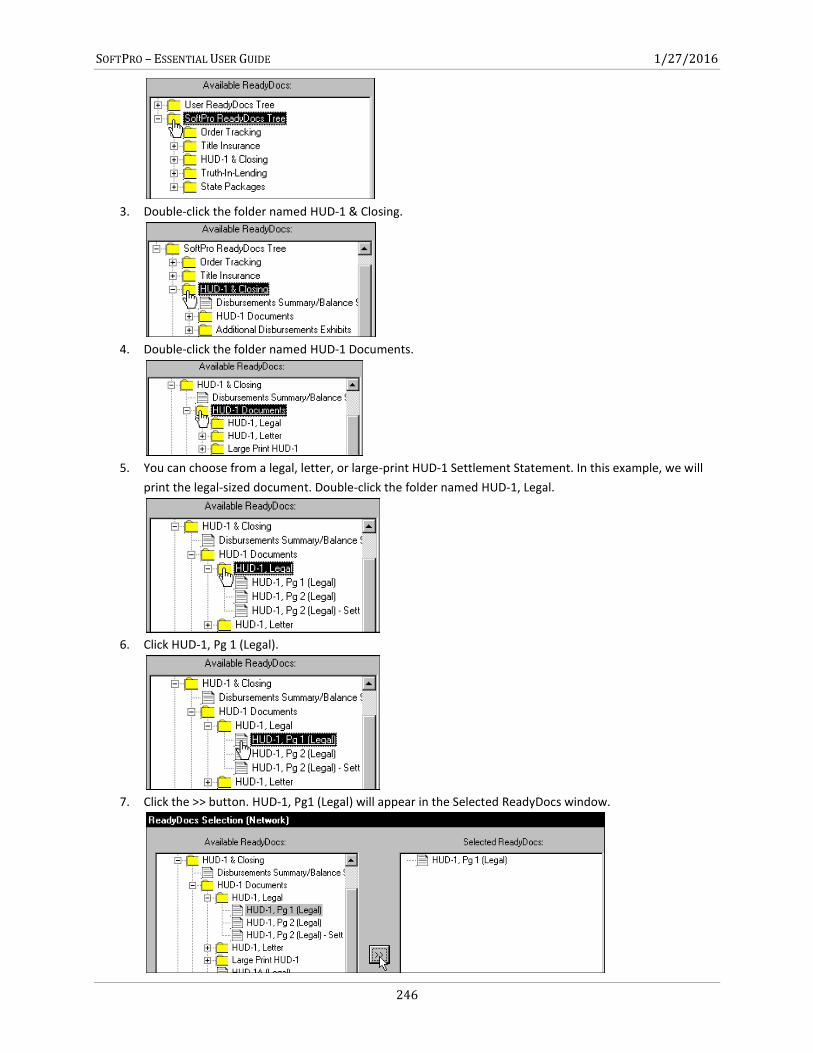
SOFTPRO – ESSENTIAL USER GUIDE 1/27/2016
246
3. Double-click the folder named HUD-1 & Closing.
4. Double-click the folder named HUD-1 Documents.
5. You can choose from a legal, letter, or large-print HUD-1 Settlement Statement. In this example, we will
print the legal-sized document. Double-click the folder named HUD-1, Legal.
6. Click HUD-1, Pg 1 (Legal).
7. Click the >> button. HUD-1, Pg1 (Legal) will appear in the Selected ReadyDocs window.
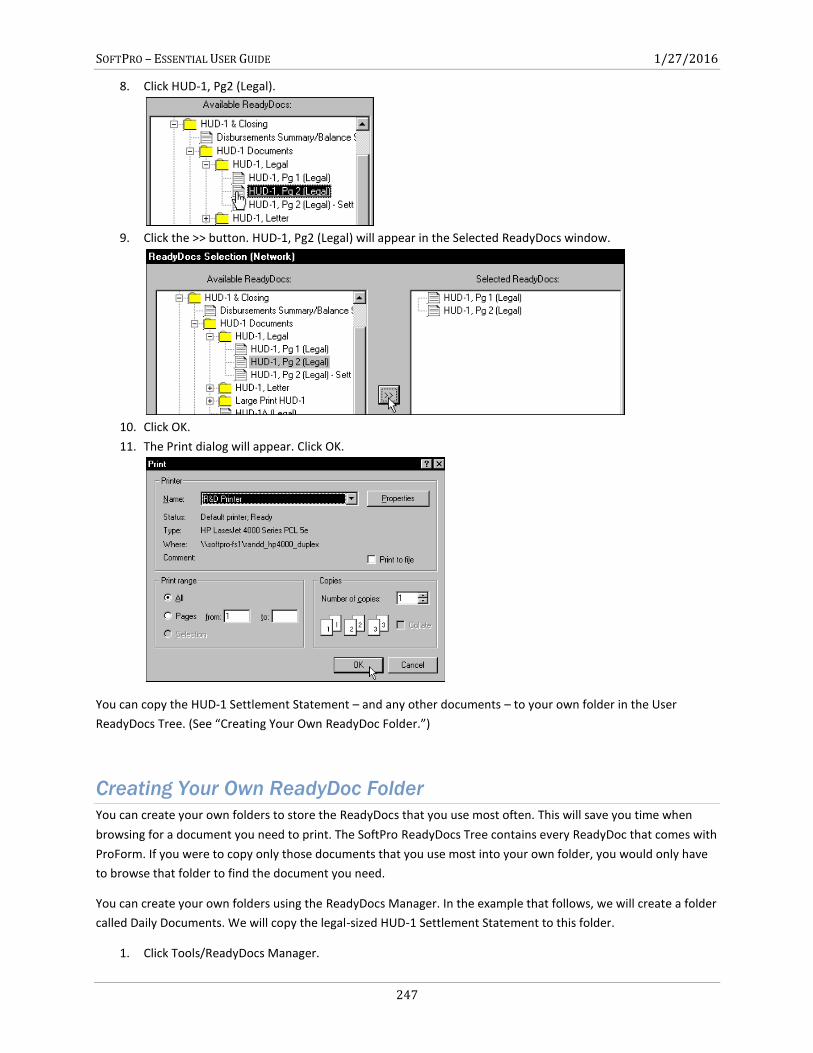
SOFTPRO – ESSENTIAL USER GUIDE 1/27/2016
247
8. Click HUD-1, Pg2 (Legal).
9. Click the >> button. HUD-1, Pg2 (Legal) will appear in the Selected ReadyDocs window.
10. Click OK.
11. The Print dialog will appear. Click OK.
You can copy the HUD-1 Settlement Statement – and any other documents – to your own folder in the User
ReadyDocs Tree. (See “Creating Your Own ReadyDoc Folder.”)
Creating Your Own ReadyDoc Folder
You can create your own folders to store the ReadyDocs that you use most often. This will save you time when
browsing for a document you need to print. The SoftPro ReadyDocs Tree contains every ReadyDoc that comes with
ProForm. If you were to copy only those documents that you use most into your own folder, you would only have
to browse that folder to find the document you need.
You can create your own folders using the ReadyDocs Manager. In the example that follows, we will create a folder
called Daily Documents. We will copy the legal-sized HUD-1 Settlement Statement to this folder.
1. Click Tools/ReadyDocs Manager.
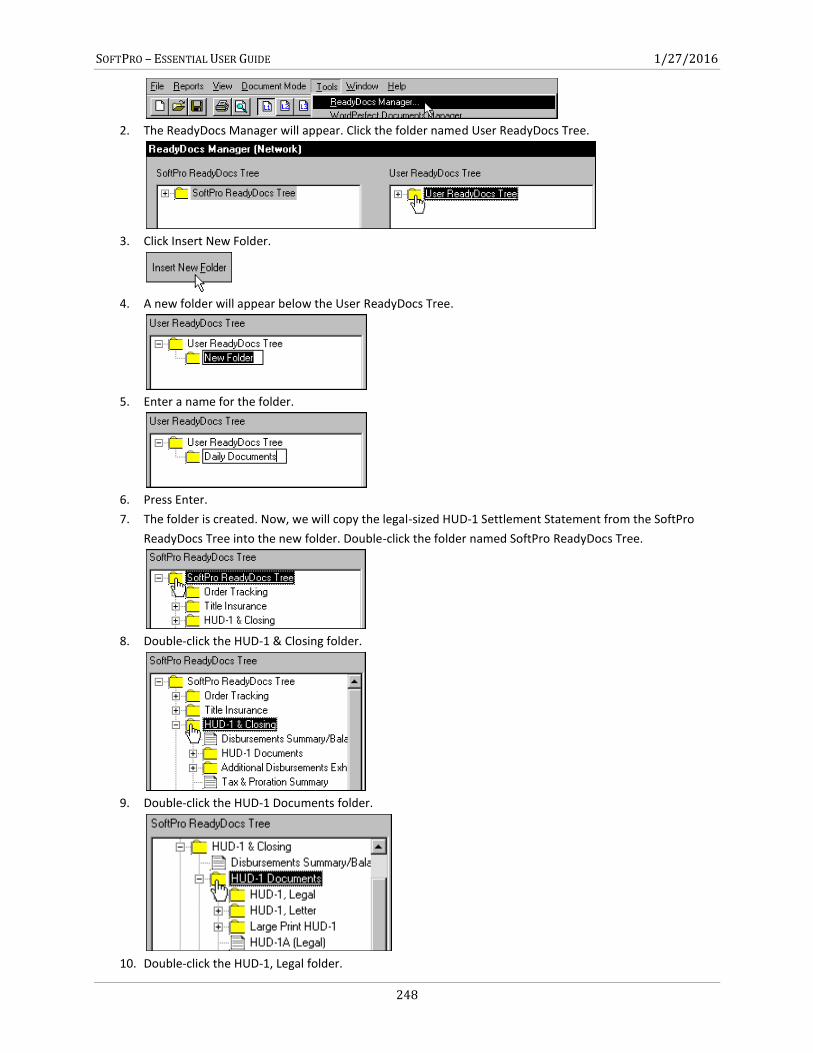
SOFTPRO – ESSENTIAL USER GUIDE 1/27/2016
248
2. The ReadyDocs Manager will appear. Click the folder named User ReadyDocs Tree.
3. Click Insert New Folder.
4. A new folder will appear below the User ReadyDocs Tree.
5. Enter a name for the folder.
6. Press Enter.
7. The folder is created. Now, we will copy the legal-sized HUD-1 Settlement Statement from the SoftPro
ReadyDocs Tree into the new folder. Double-click the folder named SoftPro ReadyDocs Tree.
8. Double-click the HUD-1 & Closing folder.
9. Double-click the HUD-1 Documents folder.
10. Double-click the HUD-1, Legal folder.
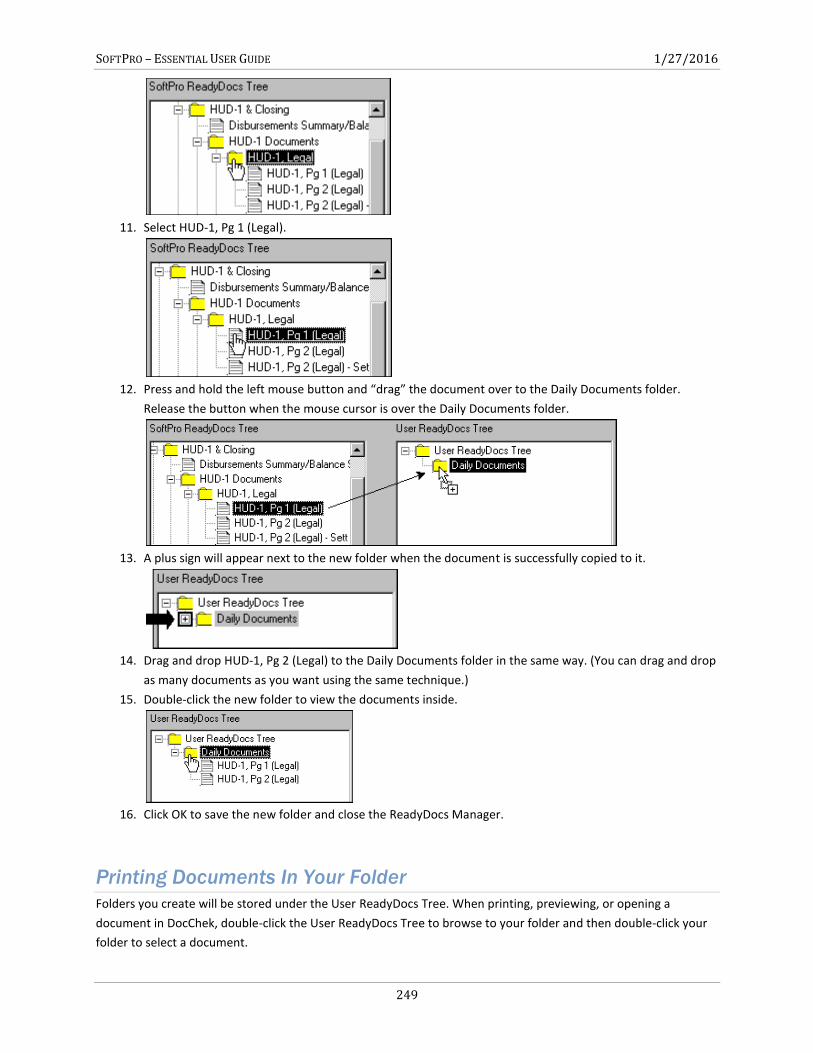
SOFTPRO – ESSENTIAL USER GUIDE 1/27/2016
249
11. Select HUD-1, Pg 1 (Legal).
12. Press and hold the left mouse button and “drag” the document over to the Daily Documents folder.
Release the button when the mouse cursor is over the Daily Documents folder.
13. A plus sign will appear next to the new folder when the document is successfully copied to it.
14. Drag and drop HUD-1, Pg 2 (Legal) to the Daily Documents folder in the same way. (You can drag and drop
as many documents as you want using the same technique.)
15. Double-click the new folder to view the documents inside.
16. Click OK to save the new folder and close the ReadyDocs Manager.
Printing Documents In Your Folder
Folders you create will be stored under the User ReadyDocs Tree. When printing, previewing, or opening a
document in DocChek, double-click the User ReadyDocs Tree to browse to your folder and then double-click your
folder to select a document.
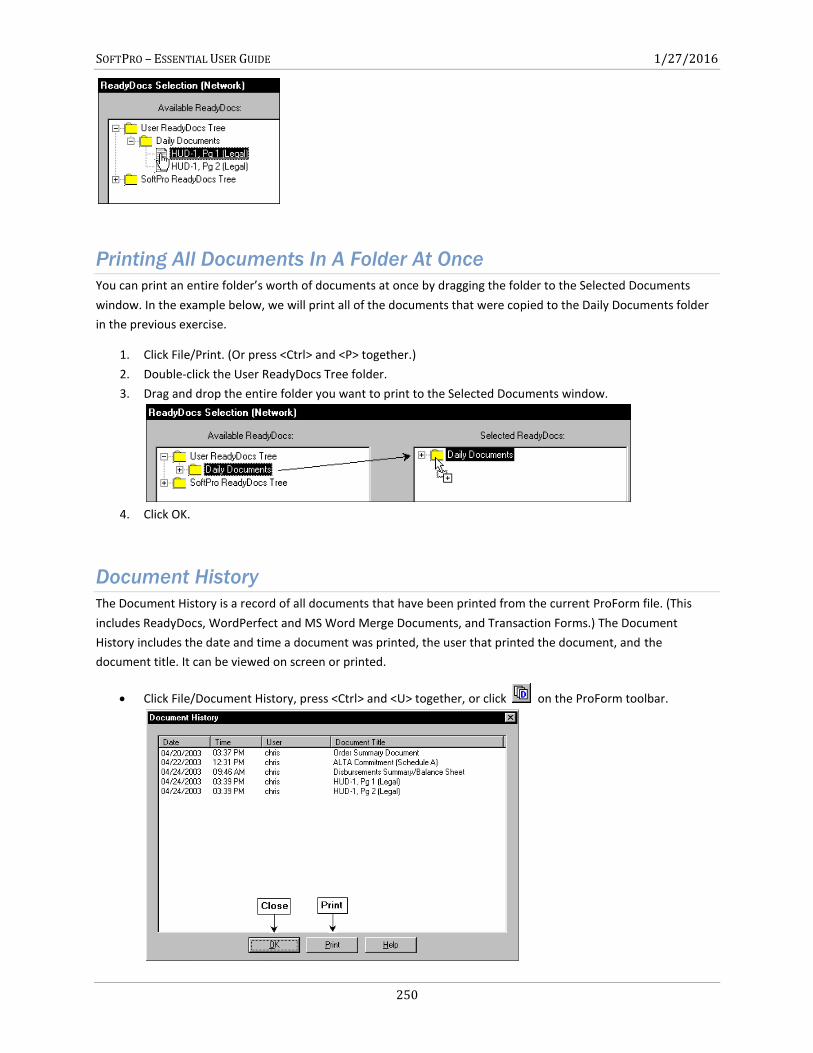
SOFTPRO – ESSENTIAL USER GUIDE 1/27/2016
250
Printing All Documents In A Folder At Once
You can print an entire folder’s worth of documents at once by dragging the folder to the Selected Documents
window. In the example below, we will print all of the documents that were copied to the Daily Documents folder
in the previous exercise.
1. Click File/Print. (Or press <Ctrl> and <P> together.)
2. Double-click the User ReadyDocs Tree folder.
3. Drag and drop the entire folder you want to print to the Selected Documents window.
4. Click OK.
Document History
The Document History is a record of all documents that have been printed from the current ProForm file. (This
includes ReadyDocs, WordPerfect and MS Word Merge Documents, and Transaction Forms.) The Document
History includes the date and time a document was printed, the user that printed the document, and the
document title. It can be viewed on screen or printed.
Click File/Document History, press <Ctrl> and <U> together, or click on the ProForm toolbar.
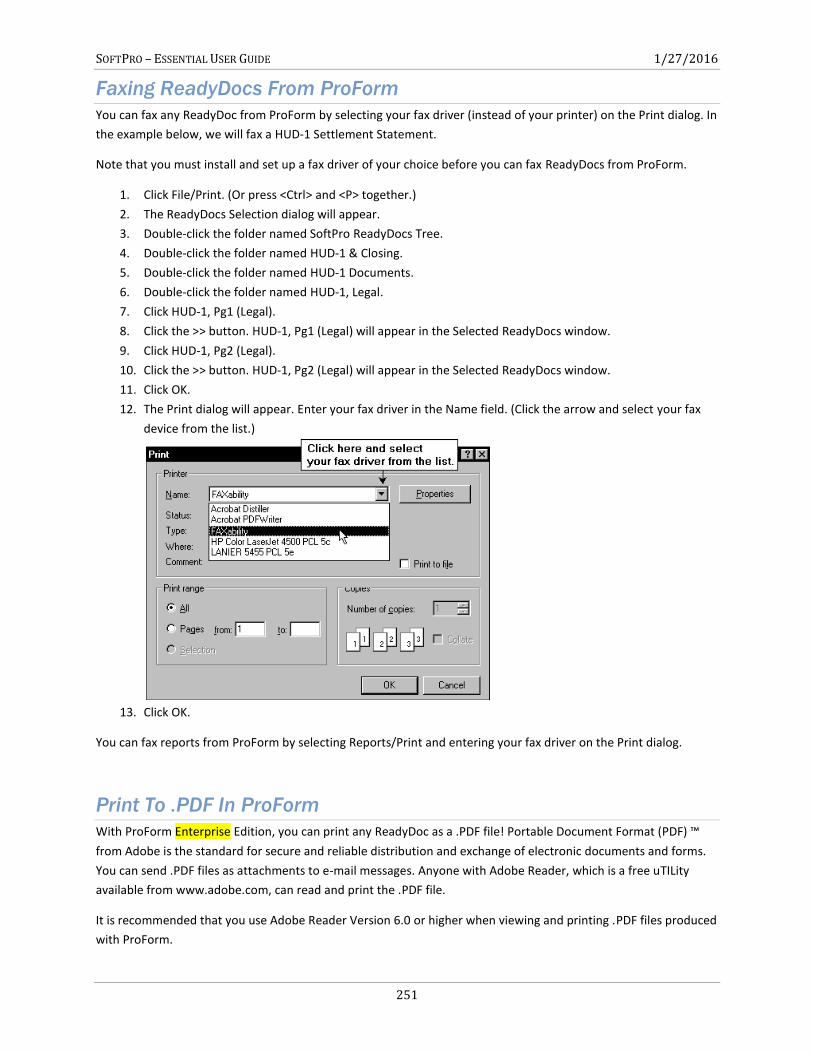
SOFTPRO – ESSENTIAL USER GUIDE 1/27/2016
251
Faxing ReadyDocs From ProForm
You can fax any ReadyDoc from ProForm by selecting your fax driver (instead of your printer) on the Print dialog. In
the example below, we will fax a HUD-1 Settlement Statement.
Note that you must install and set up a fax driver of your choice before you can fax ReadyDocs from ProForm.
1. Click File/Print. (Or press <Ctrl> and <P> together.)
2. The ReadyDocs Selection dialog will appear.
3. Double-click the folder named SoftPro ReadyDocs Tree.
4. Double-click the folder named HUD-1 & Closing.
5. Double-click the folder named HUD-1 Documents.
6. Double-click the folder named HUD-1, Legal.
7. Click HUD-1, Pg1 (Legal).
8. Click the >> button. HUD-1, Pg1 (Legal) will appear in the Selected ReadyDocs window.
9. Click HUD-1, Pg2 (Legal).
10. Click the >> button. HUD-1, Pg2 (Legal) will appear in the Selected ReadyDocs window.
11. Click OK.
12. The Print dialog will appear. Enter your fax driver in the Name field. (Click the arrow and select your fax
device from the list.)
13. Click OK.
You can fax reports from ProForm by selecting Reports/Print and entering your fax driver on the Print dialog.
Print To .PDF In ProForm
With ProForm Enterprise Edition, you can print any ReadyDoc as a .PDF file! Portable Document Format (PDF) ™
from Adobe is the standard for secure and reliable distribution and exchange of electronic documents and forms.
You can send .PDF files as attachments to e-mail messages. Anyone with Adobe Reader, which is a free uTILity
available from www.adobe.com, can read and print the .PDF file.
It is recommended that you use Adobe Reader Version 6.0 or higher when viewing and printing .PDF files produced
with ProForm.
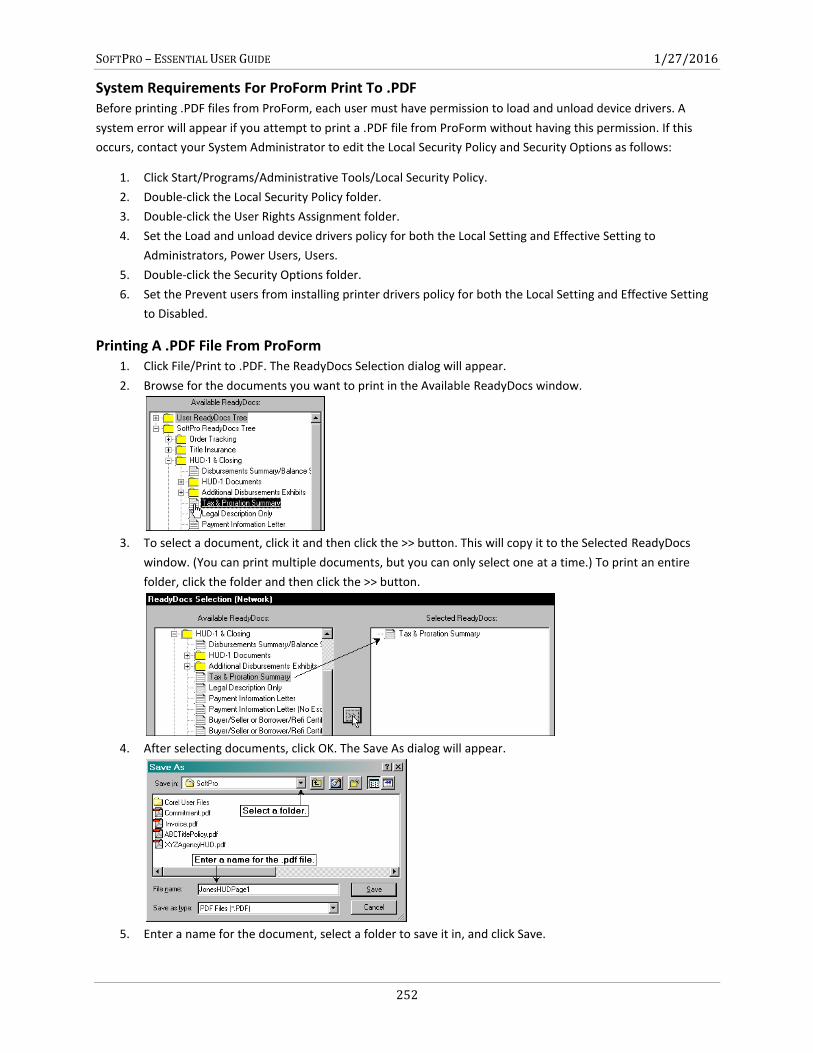
SOFTPRO – ESSENTIAL USER GUIDE 1/27/2016
252
System Requirements For ProForm Print To .PDF Before printing .PDF files from ProForm, each user must have permission to load and unload device drivers. A
system error will appear if you attempt to print a .PDF file from ProForm without having this permission. If this
occurs, contact your System Administrator to edit the Local Security Policy and Security Options as follows:
1. Click Start/Programs/Administrative Tools/Local Security Policy.
2. Double-click the Local Security Policy folder.
3. Double-click the User Rights Assignment folder.
4. Set the Load and unload device drivers policy for both the Local Setting and Effective Setting to
Administrators, Power Users, Users.
5. Double-click the Security Options folder.
6. Set the Prevent users from installing printer drivers policy for both the Local Setting and Effective Setting
to Disabled.
Printing A .PDF File From ProForm 1. Click File/Print to .PDF. The ReadyDocs Selection dialog will appear.
2. Browse for the documents you want to print in the Available ReadyDocs window.
3. To select a document, click it and then click the >> button. This will copy it to the Selected ReadyDocs
window. (You can print multiple documents, but you can only select one at a time.) To print an entire
folder, click the folder and then click the >> button.
4. After selecting documents, click OK. The Save As dialog will appear.
5. Enter a name for the document, select a folder to save it in, and click Save.
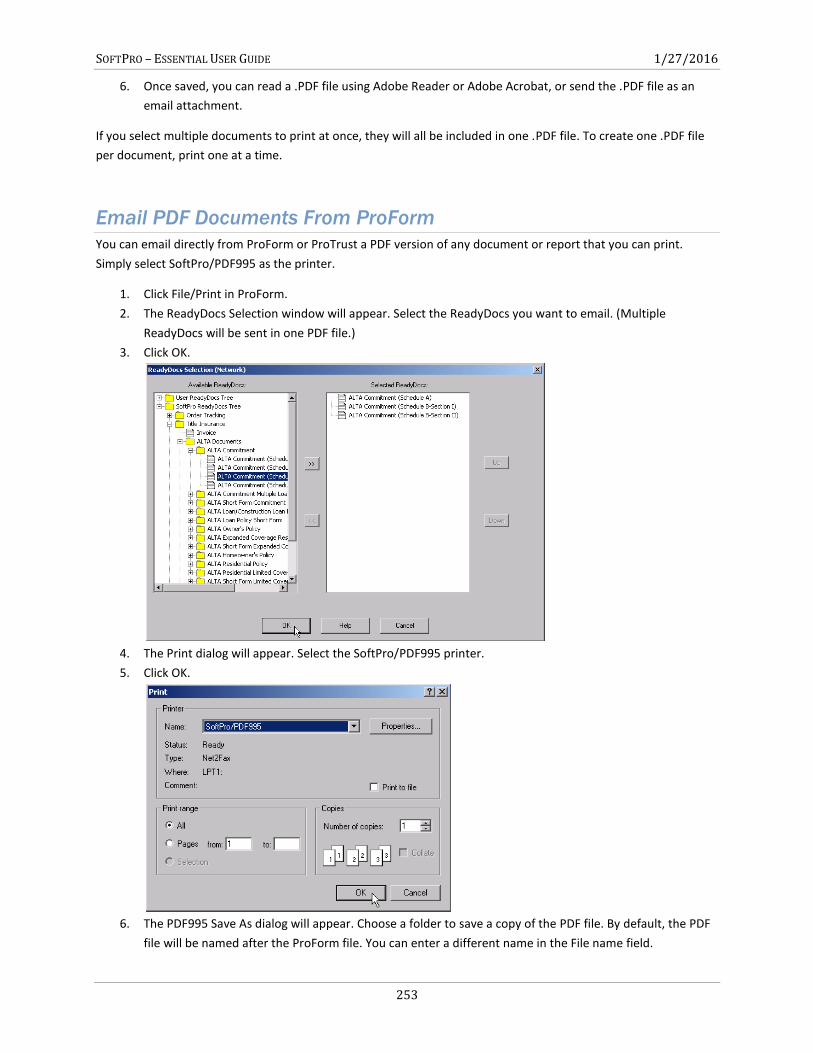
SOFTPRO – ESSENTIAL USER GUIDE 1/27/2016
253
6. Once saved, you can read a .PDF file using Adobe Reader or Adobe Acrobat, or send the .PDF file as an
email attachment.
If you select multiple documents to print at once, they will all be included in one .PDF file. To create one .PDF file
per document, print one at a time.
Email PDF Documents From ProForm
You can email directly from ProForm or ProTrust a PDF version of any document or report that you can print.
Simply select SoftPro/PDF995 as the printer.
1. Click File/Print in ProForm.
2. The ReadyDocs Selection window will appear. Select the ReadyDocs you want to email. (Multiple
ReadyDocs will be sent in one PDF file.)
3. Click OK.
4. The Print dialog will appear. Select the SoftPro/PDF995 printer.
5. Click OK.
6. The PDF995 Save As dialog will appear. Choose a folder to save a copy of the PDF file. By default, the PDF
file will be named after the ProForm file. You can enter a different name in the File name field.
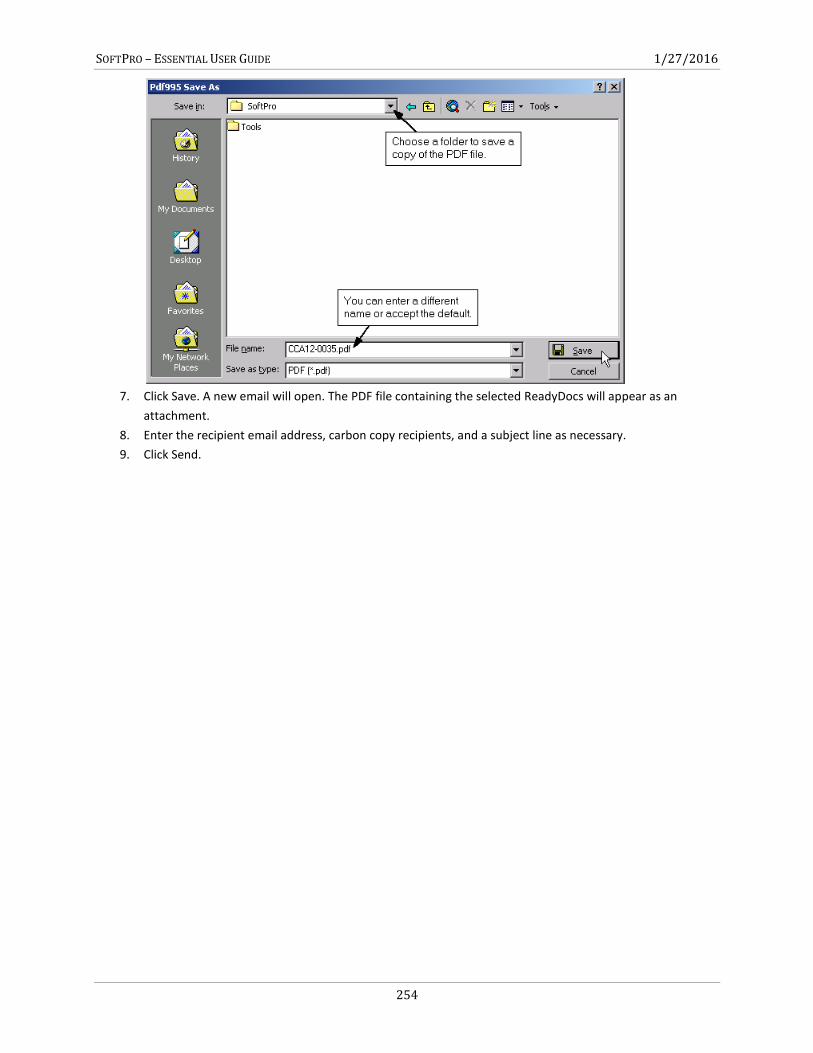
SOFTPRO – ESSENTIAL USER GUIDE 1/27/2016
254
7. Click Save. A new email will open. The PDF file containing the selected ReadyDocs will appear as an
attachment.
8. Enter the recipient email address, carbon copy recipients, and a subject line as necessary.
9. Click Send.

SOFTPRO – ESSENTIAL USER GUIDE 1/27/2016
255
Chapter 8: DocChek Overview ........................................................................................................................... 256
DocChek: Edit A Document On Screen ................................................................................ 256
Viewing A Document In DocChek .......................................................................................................................... 256
Using DocChek To Edit A File ................................................................................................................................. 257
Editing A HUD-1 Settlement Statement With DocChek ........................................................................................ 258
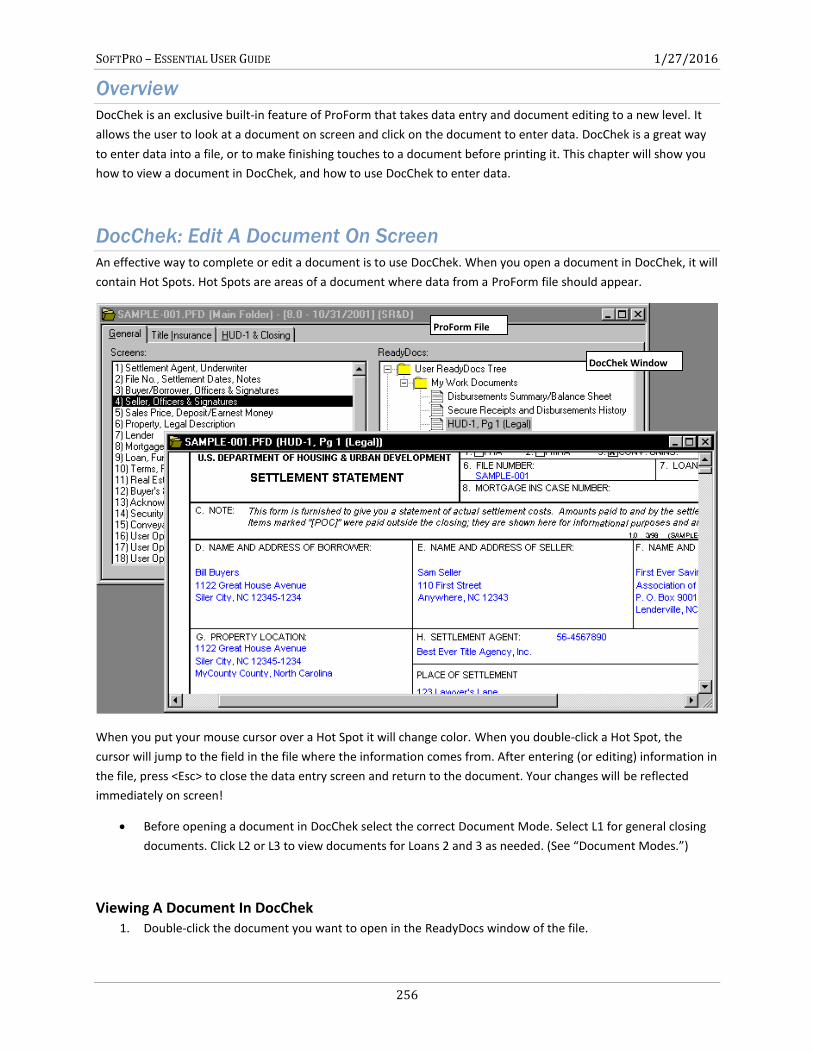
SOFTPRO – ESSENTIAL USER GUIDE 1/27/2016
256
Overview
DocChek is an exclusive built-in feature of ProForm that takes data entry and document editing to a new level. It
allows the user to look at a document on screen and click on the document to enter data. DocChek is a great way
to enter data into a file, or to make finishing touches to a document before printing it. This chapter will show you
how to view a document in DocChek, and how to use DocChek to enter data.
DocChek: Edit A Document On Screen
An effective way to complete or edit a document is to use DocChek. When you open a document in DocChek, it will
contain Hot Spots. Hot Spots are areas of a document where data from a ProForm file should appear.
When you put your mouse cursor over a Hot Spot it will change color. When you double-click a Hot Spot, the
cursor will jump to the field in the file where the information comes from. After entering (or editing) information in
the file, press <Esc> to close the data entry screen and return to the document. Your changes will be reflected
immediately on screen!
Before opening a document in DocChek select the correct Document Mode. Select L1 for general closing
documents. Click L2 or L3 to view documents for Loans 2 and 3 as needed. (See “Document Modes.”)
Viewing A Document In DocChek 1. Double-click the document you want to open in the ReadyDocs window of the file.
ProForm File
DocChek Window
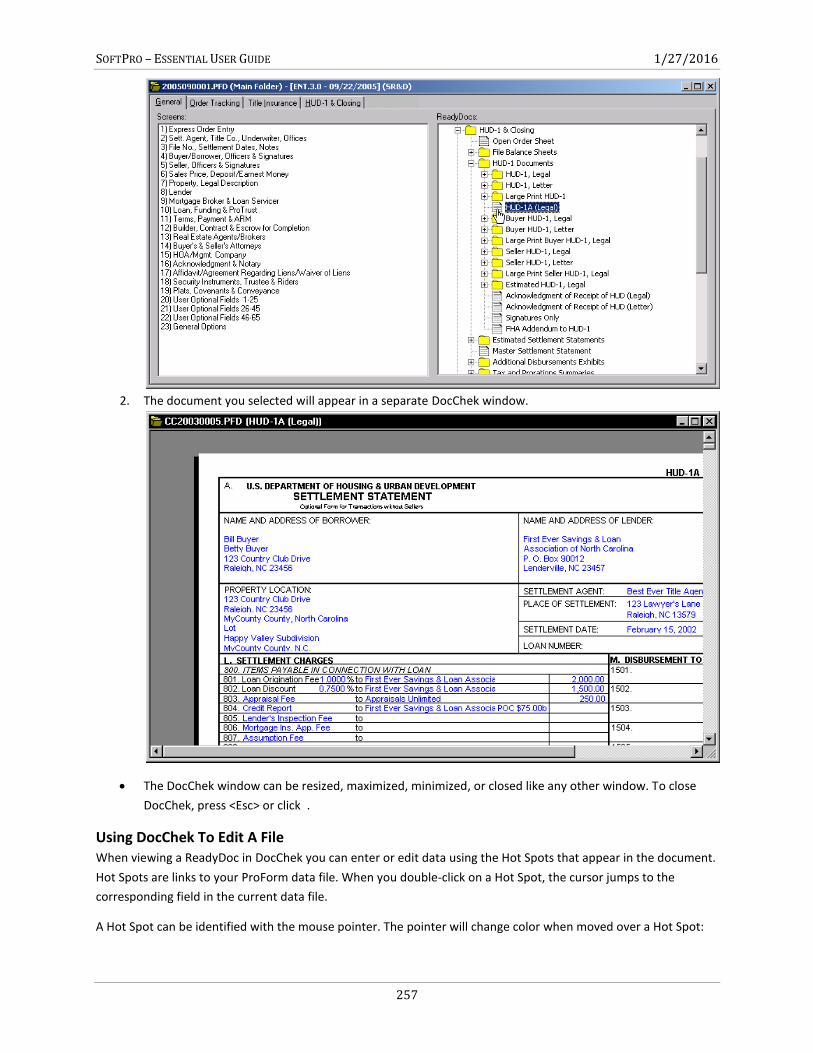
SOFTPRO – ESSENTIAL USER GUIDE 1/27/2016
257
2. The document you selected will appear in a separate DocChek window.
The DocChek window can be resized, maximized, minimized, or closed like any other window. To close
DocChek, press <Esc> or click .
Using DocChek To Edit A File When viewing a ReadyDoc in DocChek you can enter or edit data using the Hot Spots that appear in the document.
Hot Spots are links to your ProForm data file. When you double-click on a Hot Spot, the cursor jumps to the
corresponding field in the current data file.
A Hot Spot can be identified with the mouse pointer. The pointer will change color when moved over a Hot Spot:
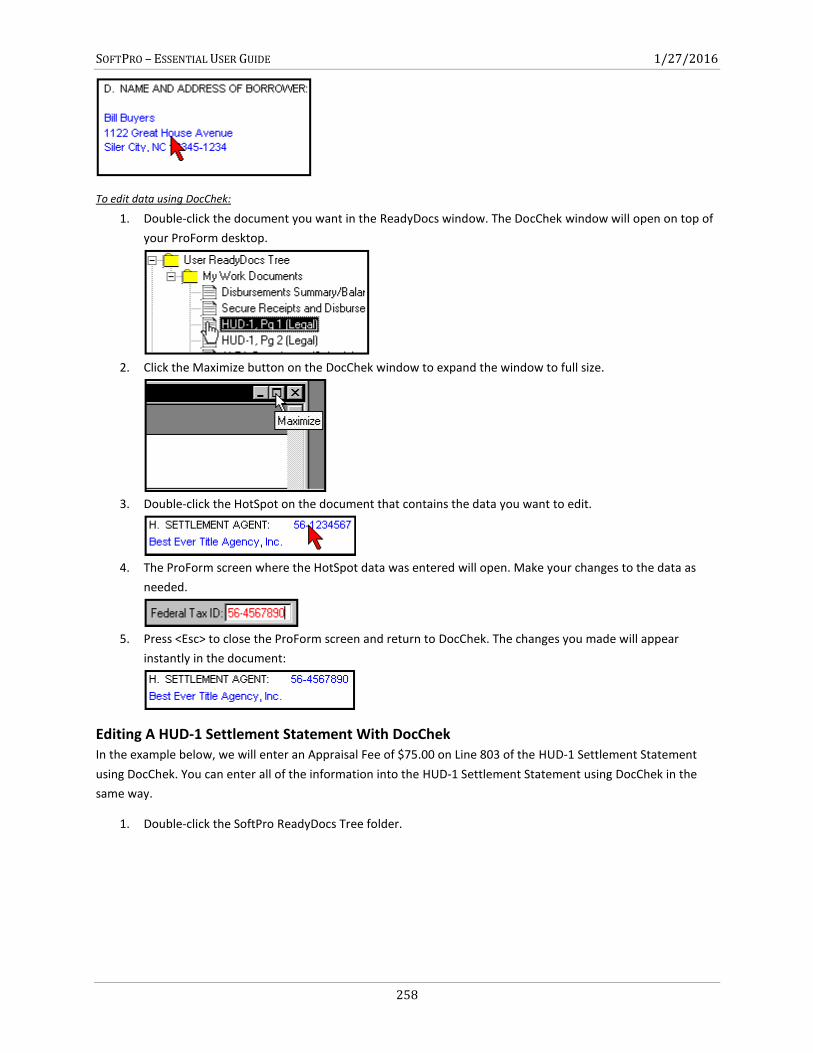
SOFTPRO – ESSENTIAL USER GUIDE 1/27/2016
258
To edit data using DocChek:
1. Double-click the document you want in the ReadyDocs window. The DocChek window will open on top of
your ProForm desktop.
2. Click the Maximize button on the DocChek window to expand the window to full size.
3. Double-click the HotSpot on the document that contains the data you want to edit.
4. The ProForm screen where the HotSpot data was entered will open. Make your changes to the data as
needed.
5. Press <Esc> to close the ProForm screen and return to DocChek. The changes you made will appear
instantly in the document:
Editing A HUD-1 Settlement Statement With DocChek In the example below, we will enter an Appraisal Fee of $75.00 on Line 803 of the HUD-1 Settlement Statement
using DocChek. You can enter all of the information into the HUD-1 Settlement Statement using DocChek in the
same way.
1. Double-click the SoftPro ReadyDocs Tree folder.
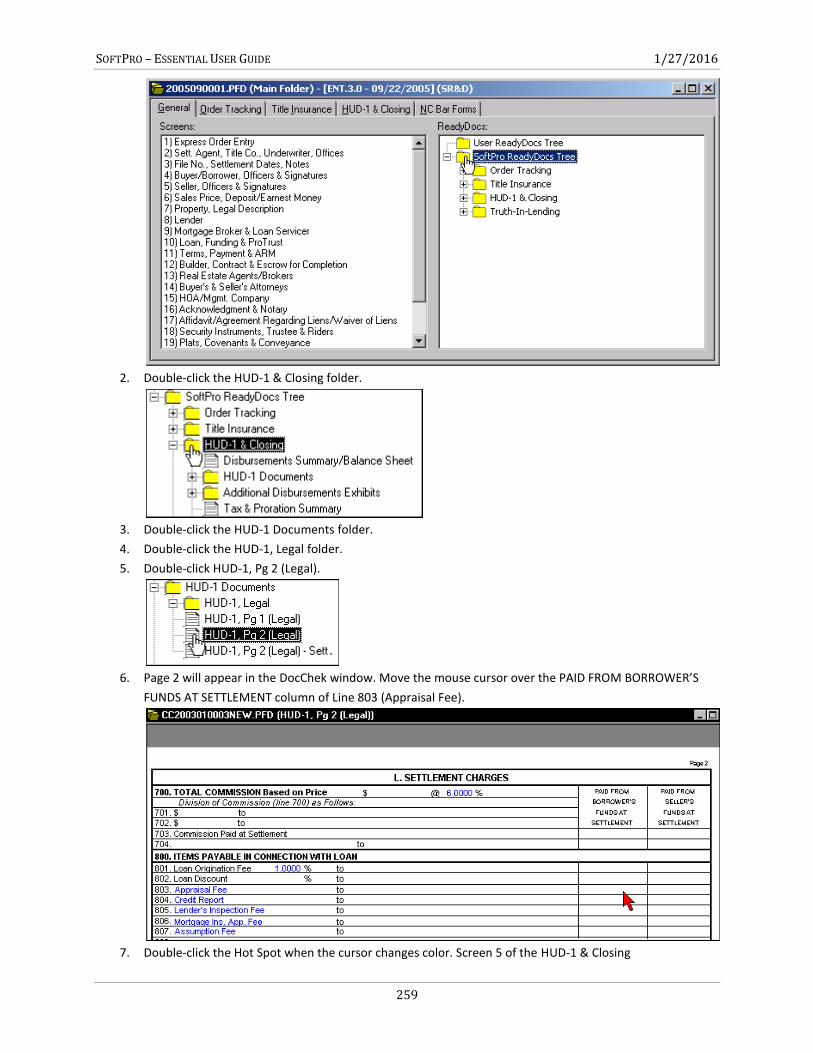
SOFTPRO – ESSENTIAL USER GUIDE 1/27/2016
259
2. Double-click the HUD-1 & Closing folder.
3. Double-click the HUD-1 Documents folder.
4. Double-click the HUD-1, Legal folder.
5. Double-click HUD-1, Pg 2 (Legal).
6. Page 2 will appear in the DocChek window. Move the mouse cursor over the PAID FROM BORROWER’S
FUNDS AT SETTLEMENT column of Line 803 (Appraisal Fee).
7. Double-click the Hot Spot when the cursor changes color. Screen 5 of the HUD-1 & Closing
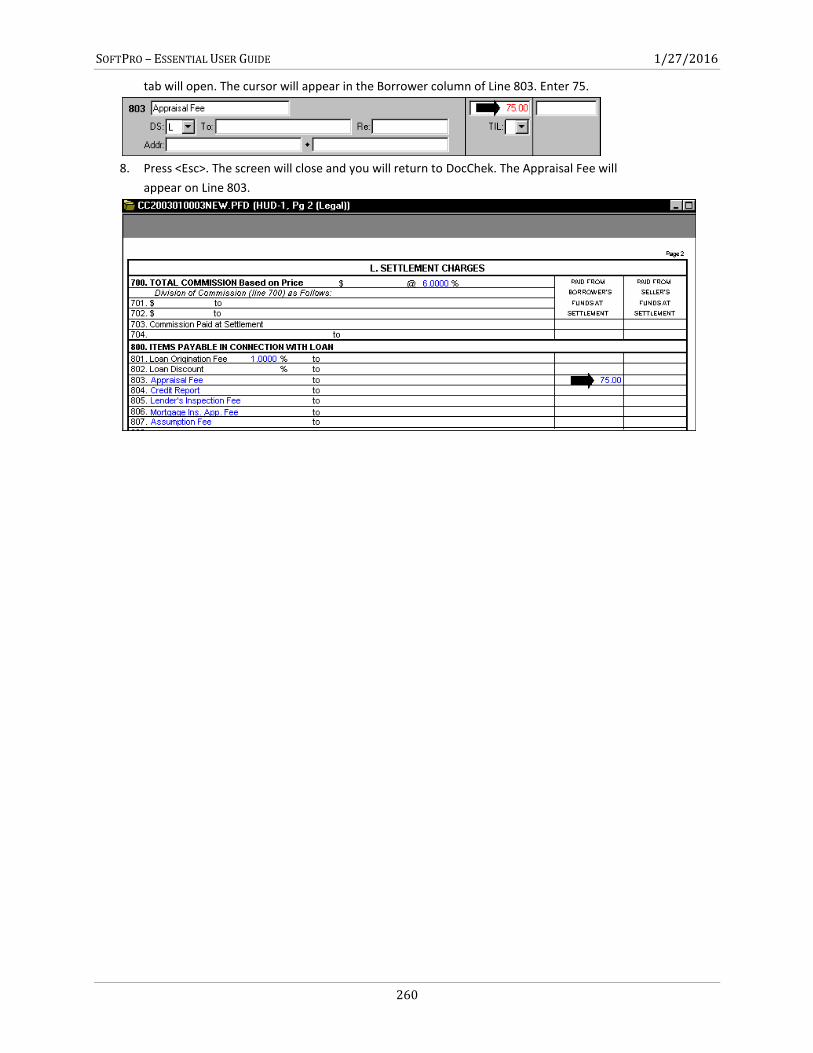
SOFTPRO – ESSENTIAL USER GUIDE 1/27/2016
260
tab will open. The cursor will appear in the Borrower column of Line 803. Enter 75.
8. Press <Esc>. The screen will close and you will return to DocChek. The Appraisal Fee will
appear on Line 803.

SOFTPRO – ESSENTIAL USER GUIDE 1/27/2016
261
Chapter 9: Microsoft Word Merge Overview ........................................................................................................................... 262
Printing Microsoft Word Merge Documents ....................................................................... 262
Printing A Buyer’s Transmittal (Microsoft Word) ................................................................ 263
Setting Up Your Own Merge Document Folders ................................................................. 265
Printing All Documents In A Folder At Once ....................................................................... 266
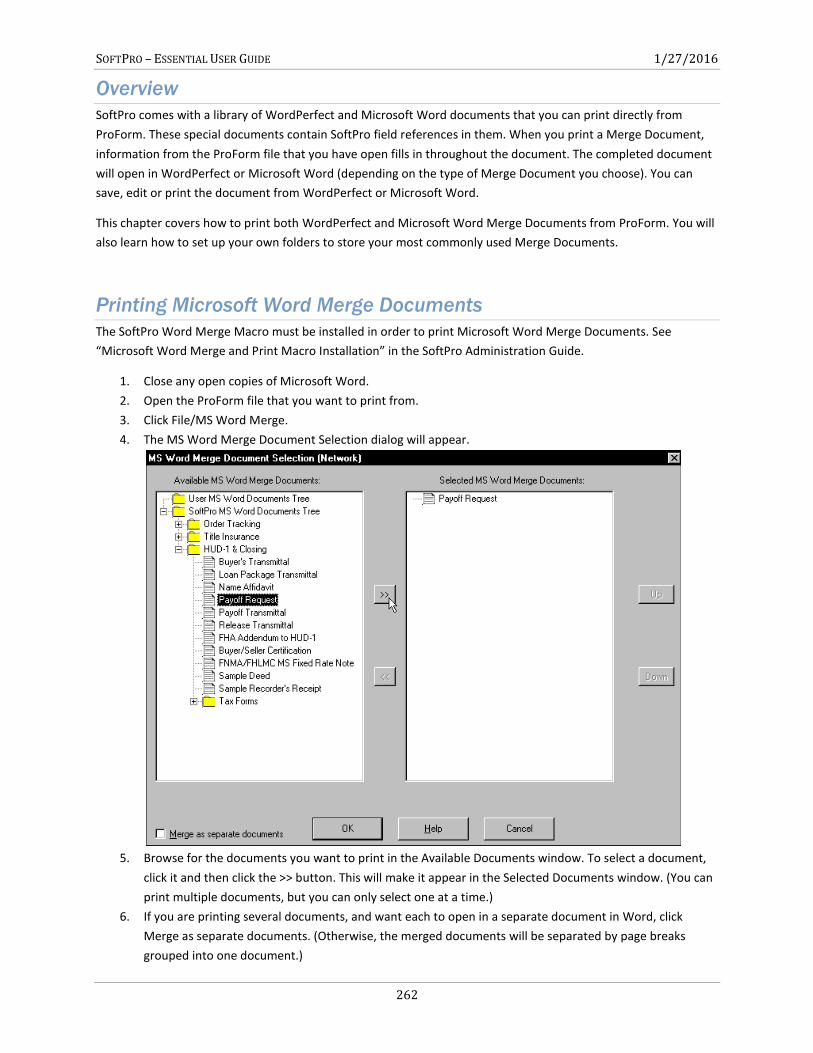
SOFTPRO – ESSENTIAL USER GUIDE 1/27/2016
262
Overview
SoftPro comes with a library of WordPerfect and Microsoft Word documents that you can print directly from
ProForm. These special documents contain SoftPro field references in them. When you print a Merge Document,
information from the ProForm file that you have open fills in throughout the document. The completed document
will open in WordPerfect or Microsoft Word (depending on the type of Merge Document you choose). You can
save, edit or print the document from WordPerfect or Microsoft Word.
This chapter covers how to print both WordPerfect and Microsoft Word Merge Documents from ProForm. You will
also learn how to set up your own folders to store your most commonly used Merge Documents.
Printing Microsoft Word Merge Documents
The SoftPro Word Merge Macro must be installed in order to print Microsoft Word Merge Documents. See
“Microsoft Word Merge and Print Macro Installation” in the SoftPro Administration Guide.
1. Close any open copies of Microsoft Word.
2. Open the ProForm file that you want to print from.
3. Click File/MS Word Merge.
4. The MS Word Merge Document Selection dialog will appear.
5. Browse for the documents you want to print in the Available Documents window. To select a document,
click it and then click the >> button. This will make it appear in the Selected Documents window. (You can
print multiple documents, but you can only select one at a time.)
6. If you are printing several documents, and want each to open in a separate document in Word, click
Merge as separate documents. (Otherwise, the merged documents will be separated by page breaks
grouped into one document.)
SOFTPRO – ESSENTIAL USER GUIDE 1/27/2016
263
7. After selecting documents, click OK.
8. If the document you selected contains a prompt, the Prompts Dialog will appear. Enter the required
information for each prompt and click OK to continue. (If you are printing several documents, a separate
Prompts Dialog will appear for each document.)
9. Click OK to continue. Your Microsoft Word program will open and the document will appear. Click
File/Save to save the document, or File/Print to print it.
If you want to print more MS Word Merge Documents from ProForm, be sure to save or print the completed
documents first and close Microsoft Word.
Printing A Buyer’s Transmittal (Microsoft Word)
Follow along with the exercise below to print a Buyer’s Transmittal in Microsoft Word format. You can print any
Word Merge Document by following the same instructions. (Substitute WordPerfect for Microsoft Word to print
any WordPerfect Merge Document.)
1. Click File/MS Word Merge.
2. The MS Word Merge Documents Selection dialog will appear.
3. Double-click the folder named SoftPro MS Word Documents Tree.
4. Double-click the folder named HUD-1 & Closing.
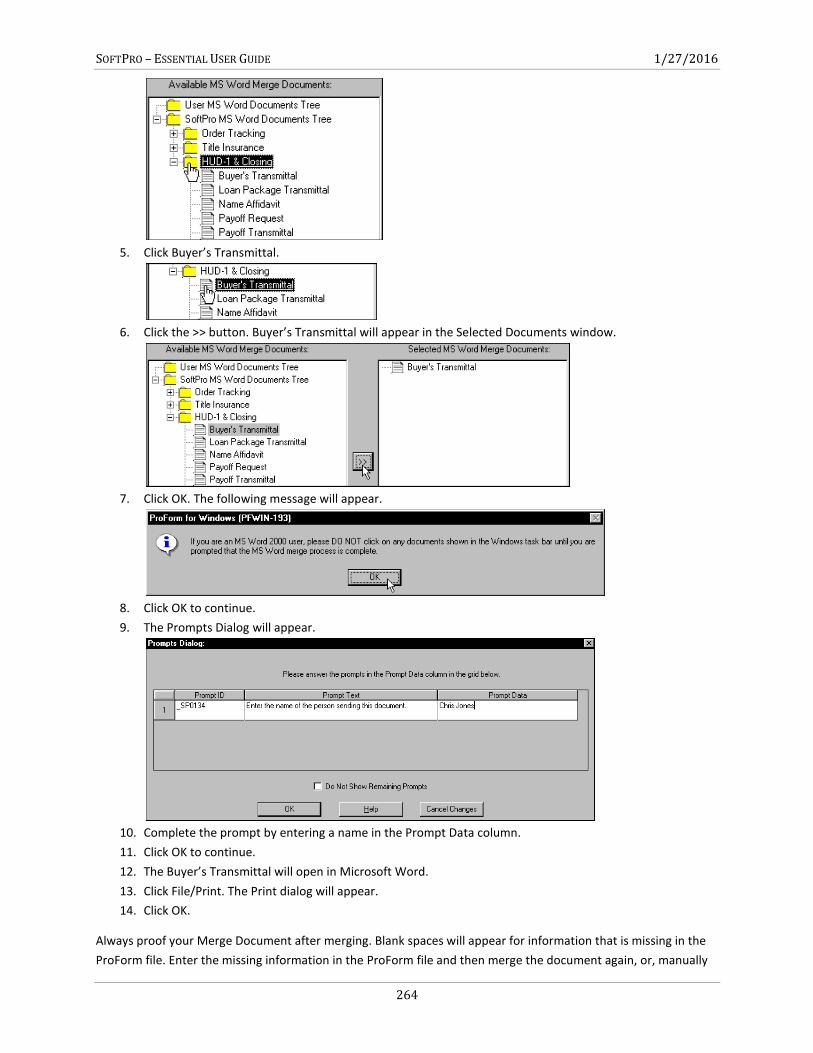
SOFTPRO – ESSENTIAL USER GUIDE 1/27/2016
264
5. Click Buyer’s Transmittal.
6. Click the >> button. Buyer’s Transmittal will appear in the Selected Documents window.
7. Click OK. The following message will appear.
8. Click OK to continue.
9. The Prompts Dialog will appear.
10. Complete the prompt by entering a name in the Prompt Data column.
11. Click OK to continue.
12. The Buyer’s Transmittal will open in Microsoft Word.
13. Click File/Print. The Print dialog will appear.
14. Click OK.
Always proof your Merge Document after merging. Blank spaces will appear for information that is missing in the
ProForm file. Enter the missing information in the ProForm file and then merge the document again, or, manually
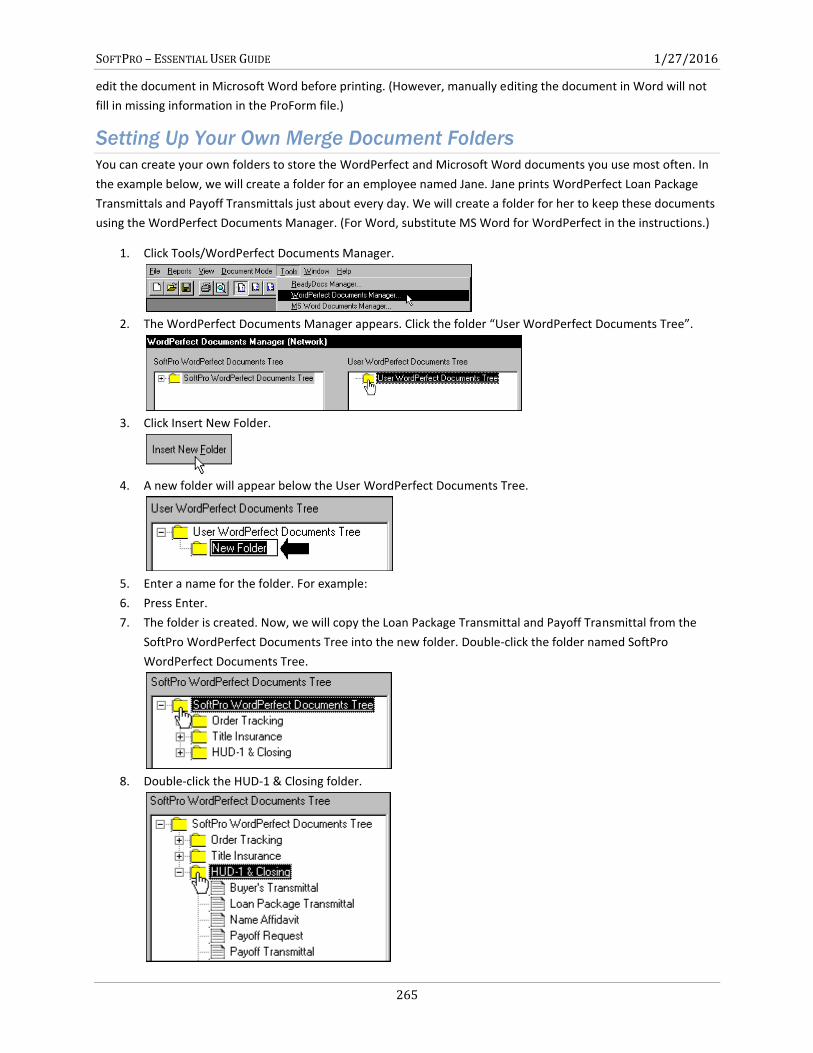
SOFTPRO – ESSENTIAL USER GUIDE 1/27/2016
265
edit the document in Microsoft Word before printing. (However, manually editing the document in Word will not
fill in missing information in the ProForm file.)
Setting Up Your Own Merge Document Folders
You can create your own folders to store the WordPerfect and Microsoft Word documents you use most often. In
the example below, we will create a folder for an employee named Jane. Jane prints WordPerfect Loan Package
Transmittals and Payoff Transmittals just about every day. We will create a folder for her to keep these documents
using the WordPerfect Documents Manager. (For Word, substitute MS Word for WordPerfect in the instructions.)
1. Click Tools/WordPerfect Documents Manager.
2. The WordPerfect Documents Manager appears. Click the folder “User WordPerfect Documents Tree”.
3. Click Insert New Folder.
4. A new folder will appear below the User WordPerfect Documents Tree.
5. Enter a name for the folder. For example:
6. Press Enter.
7. The folder is created. Now, we will copy the Loan Package Transmittal and Payoff Transmittal from the
SoftPro WordPerfect Documents Tree into the new folder. Double-click the folder named SoftPro
WordPerfect Documents Tree.
8. Double-click the HUD-1 & Closing folder.
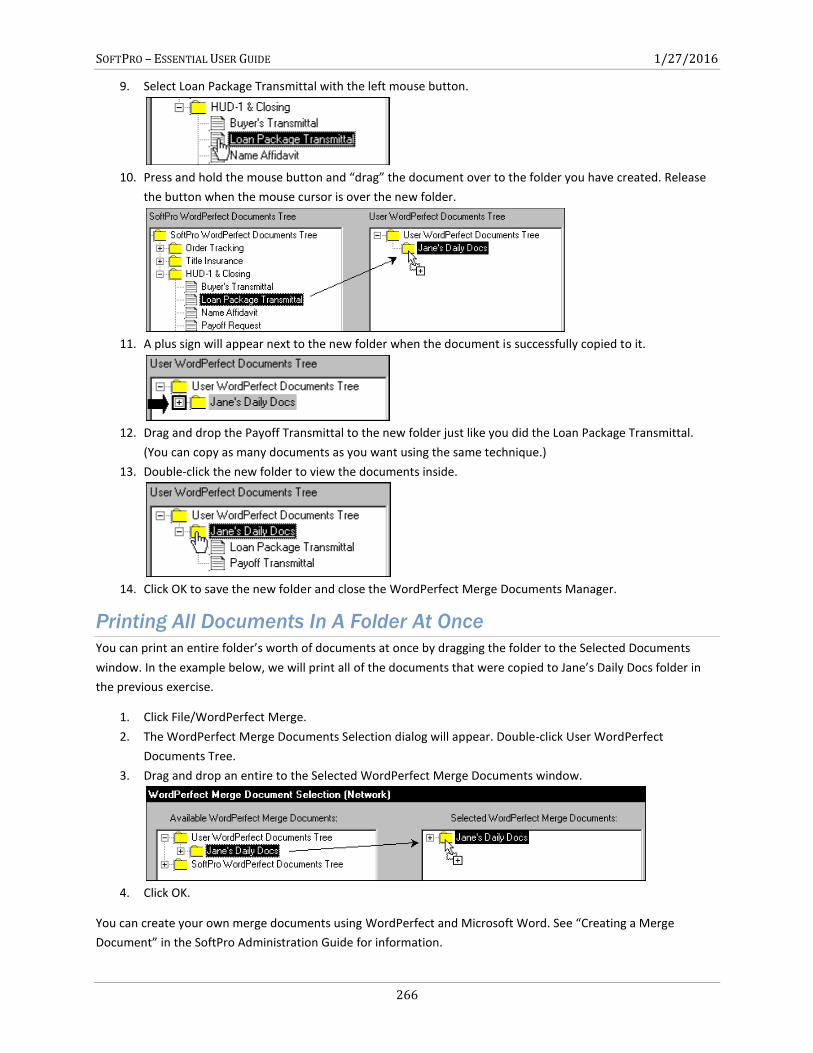
SOFTPRO – ESSENTIAL USER GUIDE 1/27/2016
266
9. Select Loan Package Transmittal with the left mouse button.
10. Press and hold the mouse button and “drag” the document over to the folder you have created. Release
the button when the mouse cursor is over the new folder.
11. A plus sign will appear next to the new folder when the document is successfully copied to it.
12. Drag and drop the Payoff Transmittal to the new folder just like you did the Loan Package Transmittal.
(You can copy as many documents as you want using the same technique.)
13. Double-click the new folder to view the documents inside.
14. Click OK to save the new folder and close the WordPerfect Merge Documents Manager.
Printing All Documents In A Folder At Once
You can print an entire folder’s worth of documents at once by dragging the folder to the Selected Documents
window. In the example below, we will print all of the documents that were copied to Jane’s Daily Docs folder in
the previous exercise.
1. Click File/WordPerfect Merge.
2. The WordPerfect Merge Documents Selection dialog will appear. Double-click User WordPerfect
Documents Tree.
3. Drag and drop an entire to the Selected WordPerfect Merge Documents window.
4. Click OK.
You can create your own merge documents using WordPerfect and Microsoft Word. See “Creating a Merge
Document” in the SoftPro Administration Guide for information.

SOFTPRO – ESSENTIAL USER GUIDE 1/27/2016
267
Getting Help Accessing Help
The help system is designed to answer most of the questions you will have as you use the program. Select Help >
Help Topics from the menu bar to access this information. You may also use the F1 key at any time to view help
topics that are related to your location in the program.
The installation CD and downloadable installation files both contain a variety of supporting documentation to
assist with setting up and using this software.
Downloads, updates, online support, and questions and answers can all be accessed at www.softprocorp.com.
Technical Support
The SoftPro Solution Center is available to you by telephone at (800) 848-0143 and is open from 8:00 A.M to 5:00
P.M. Monday–Friday during your local time. Platinum level support hours are from 8:00 A.M to 10:00 P.M. EST
Monday–Friday and 11:00 A.M. to 2:00 P.M. EST on Saturday.
You can extend technical support service by subscribing to SoftPro’s Annual Maintenance Service program.
Subscribing to Platinum Maintenance Service gives you access to technical support for longer hours Monday–
Saturday. For more information, call SoftPro Sales at (800) 848-0143. You can email SoftPro Sales at