soccer rulebook
DESCRIPTION
soccer boardgame rulebookTRANSCRIPT
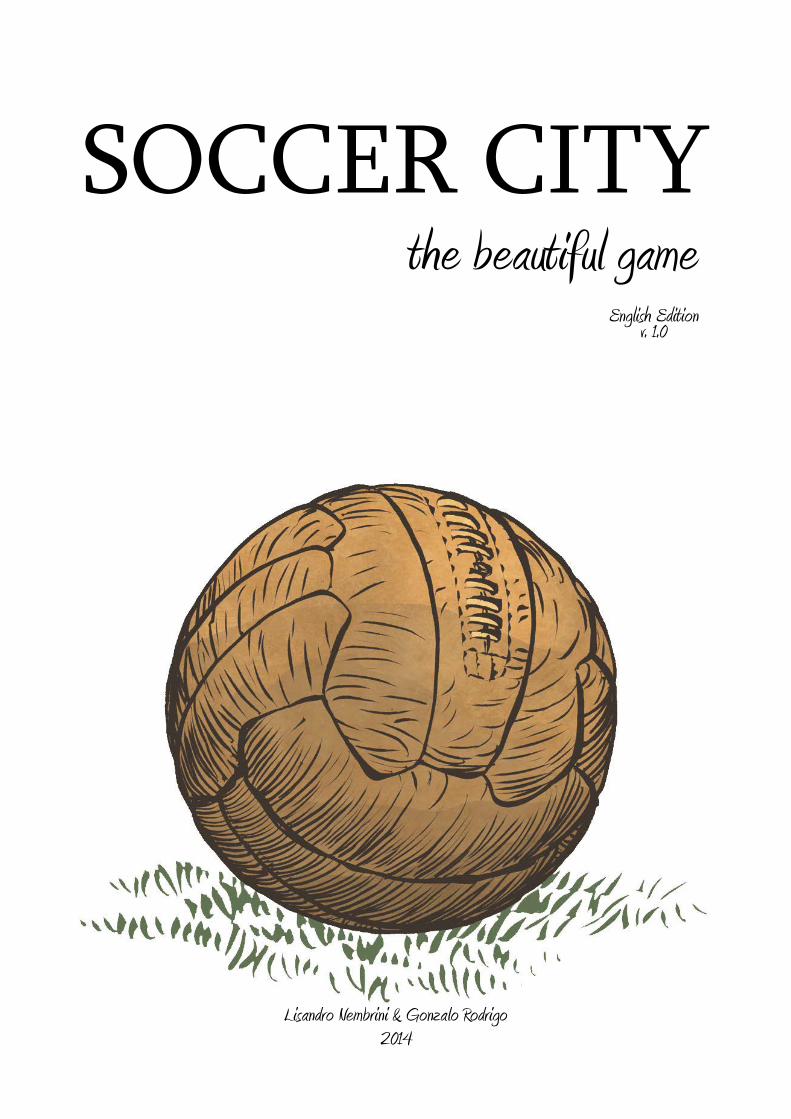
SOCCER CITY the beautiful game
Lisandro Nembrini & Gonzalo Rodrigo 2014
©
English Edition v. 1.0
Index
First Recommendations 3
Game Components 3
Match Settings 3 Starting Line up 3 Initial Hand 4 Discards 4 Match Length 4
The Board 5
Game Mechanics 6 Attacking Turn 6 Defensive Turn 6
Play Your Cards 7 Ball Cards 7
Passes 7 Square Pass 8 Advances 8 Ball Fight 8 Marking 8 Close Pass 9
Defensive & Offensive Actions 10 Dribbles & Tackles 10
Face-off 10 Refferee Dice 11 Tactical Actions 11
Dribbles & Tackles Schemes 12 Shot-on-Goal 14
Shot-on-Goal Area 14 One on One 14 Assist 14
Goalkeeper Save 15 Goalkeeper Pass (after blocking) 15 Goalkeeper Influence Area 15
Team Repositioning phase 16
Tactical Pads 16 Offensive Tactical Actions 17 Defensive Tactical Actions 19
Match Progress 21 Kickoff 21 Game stopped - Repositioning 21 Foul 21 Yellow card 21 Red card 21 Penalty shot 22 Free kick 22 Corner kick 22 Goal kick 22 Throw in 22 Offside 23 Subtitutions 23 Goal 23 Half time / Full time 23 Injury time 23 Extra time 23 Penalty shootout 23
External Events 24
Game Modes 26 Striker mode 26 Ace mode 26 4 Player mode 26 Quick Match mode 26
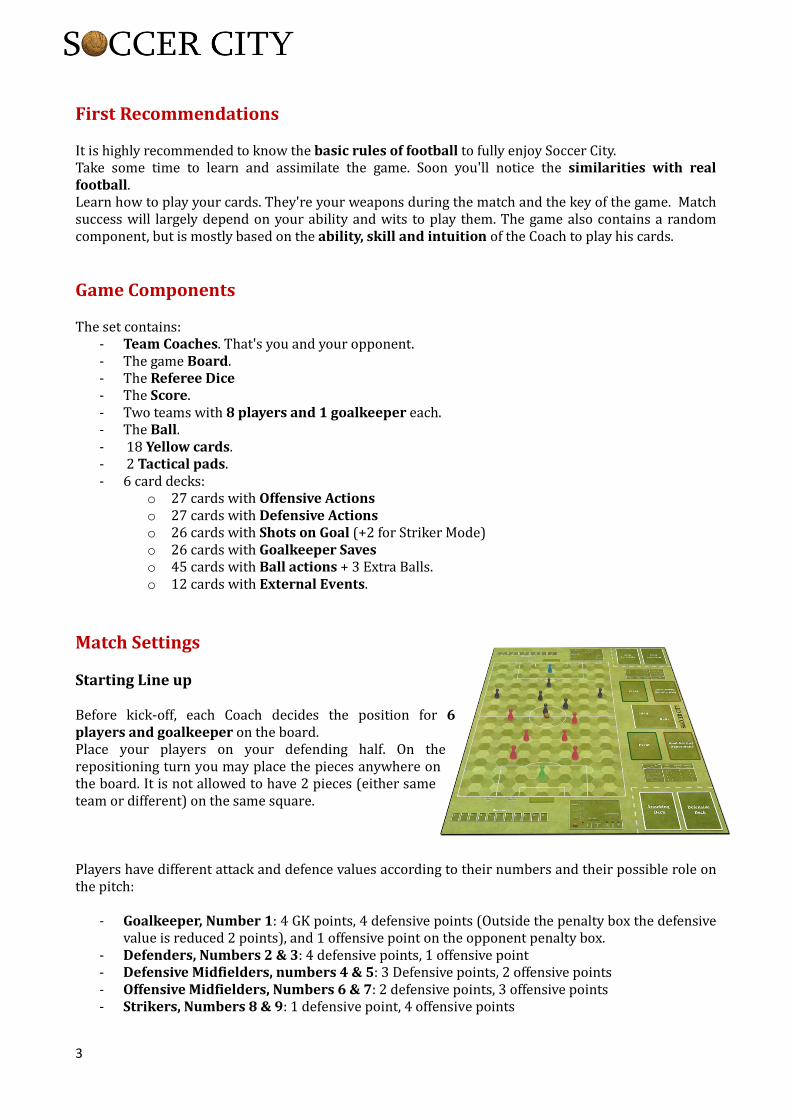
First Recommendations
It is highly recommended to know the basic rules of football to fully enjoy Soccer City. Take some time to learn and assimilate the game. Soon you'll notice the similarities with real football. Learn how to play your cards. They're your weapons during the match and the key of the game. Match success will largely depend on your ability and wits to play them. The game also contains a random component, but is mostly based on the ability, skill and intuition of the Coach to play his cards.
Game Components
The set contains: - Team Coaches. That's you and your opponent. - The game Board. - The Referee Dice - The Score. - Two teams with 8 players and 1 goalkeeper each. - The Ball. - 18 Yellow cards. - 2 Tactical pads. - 6 card decks:
o 27 cards with Offensive Actionso 27 cards with Defensive Actionso 26 cards with Shots on Goal (+2 for Striker Mode)o 26 cards with Goalkeeper Saveso 45 cards with Ball actions + 3 Extra Balls.o 12 cards with External Events.
Match Settings
Starting Line up
Before kick-off, each Coach decides the position for 6 players and goalkeeper on the board. Place your players on your defending half. On the repositioning turn you may place the pieces anywhere on the board. It is not allowed to have 2 pieces (either same team or different) on the same square.
Players have different attack and defence values according to their numbers and their possible role on the pitch:
- Goalkeeper, Number 1: 4 GK points, 4 defensive points (Outside the penalty box the defensive value is reduced 2 points), and 1 offensive point on the opponent penalty box.
- Defenders, Numbers 2 & 3: 4 defensive points, 1 offensive point - Defensive Midfielders, numbers 4 & 5: 3 Defensive points, 2 offensive points - Offensive Midfielders, Numbers 6 & 7: 2 defensive points, 3 offensive points - Strikers, Numbers 8 & 9: 1 defensive point, 4 offensive points
3
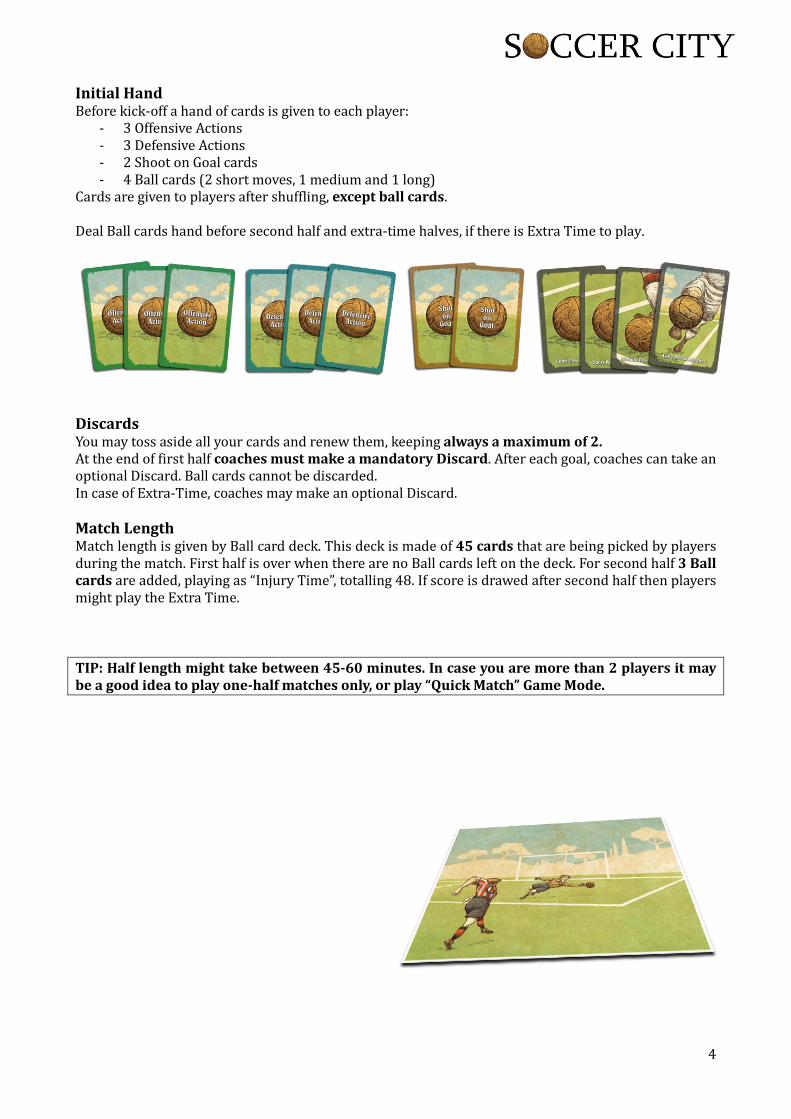
Initial Hand Before kick-off a hand of cards is given to each player:
- 3 Offensive Actions - 3 Defensive Actions - 2 Shoot on Goal cards - 4 Ball cards (2 short moves, 1 medium and 1 long)
Cards are given to players after shuffling, except ball cards.
Deal Ball cards hand before second half and extra-time halves, if there is Extra Time to play.
Discards You may toss aside all your cards and renew them, keeping always a maximum of 2. At the end of first half coaches must make a mandatory Discard. After each goal, coaches can take an optional Discard. Ball cards cannot be discarded. In case of Extra-Time, coaches may make an optional Discard.
Match Length Match length is given by Ball card deck. This deck is made of 45 cards that are being picked by players during the match. First half is over when there are no Ball cards left on the deck. For second half 3 Ball cards are added, playing as “Injury Time”, totalling 48. If score is drawed after second half then players might play the Extra Time.
TIP: Half length might take between 45-60 minutes. In case you are more than 2 players it may be a good idea to play one-half matches only, or play “Quick Match” Game Mode.
4
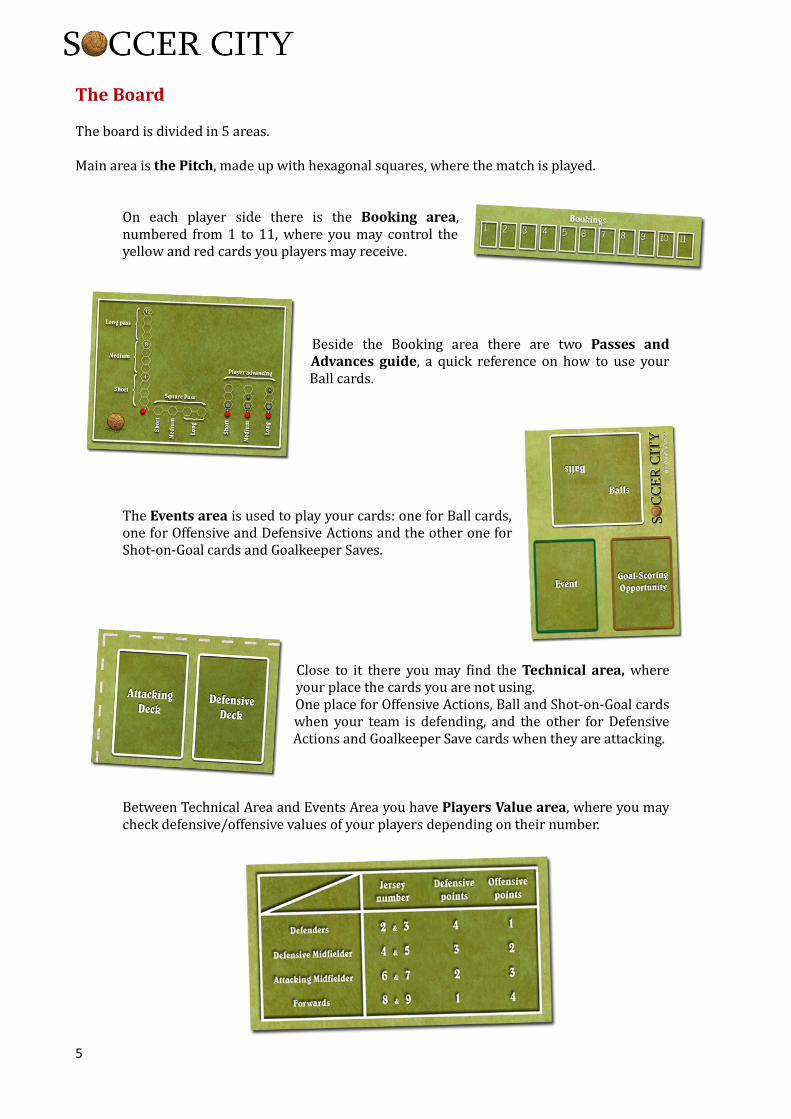
The Board The board is divided in 5 areas. Main area is the Pitch, made up with hexagonal squares, where the match is played.
On each player side there is the Booking area, numbered from 1 to 11, where you may control the yellow and red cards you players may receive.
Beside the Booking area there are two Passes and Advances guide, a quick reference on how to use your Ball cards.
The Events area is used to play your cards: one for Ball cards, one for Offensive and Defensive Actions and the other one for Shot-on-Goal cards and Goalkeeper Saves.
Close to it there you may find the Technical area, where your place the cards you are not using. One place for Offensive Actions, Ball and Shot-on-Goal cards when your team is defending, and the other for Defensive Actions and Goalkeeper Save cards when they are attacking.
Between Technical Area and Events Area you have Players Value area, where you may check defensive/offensive values of your players depending on their number.
5
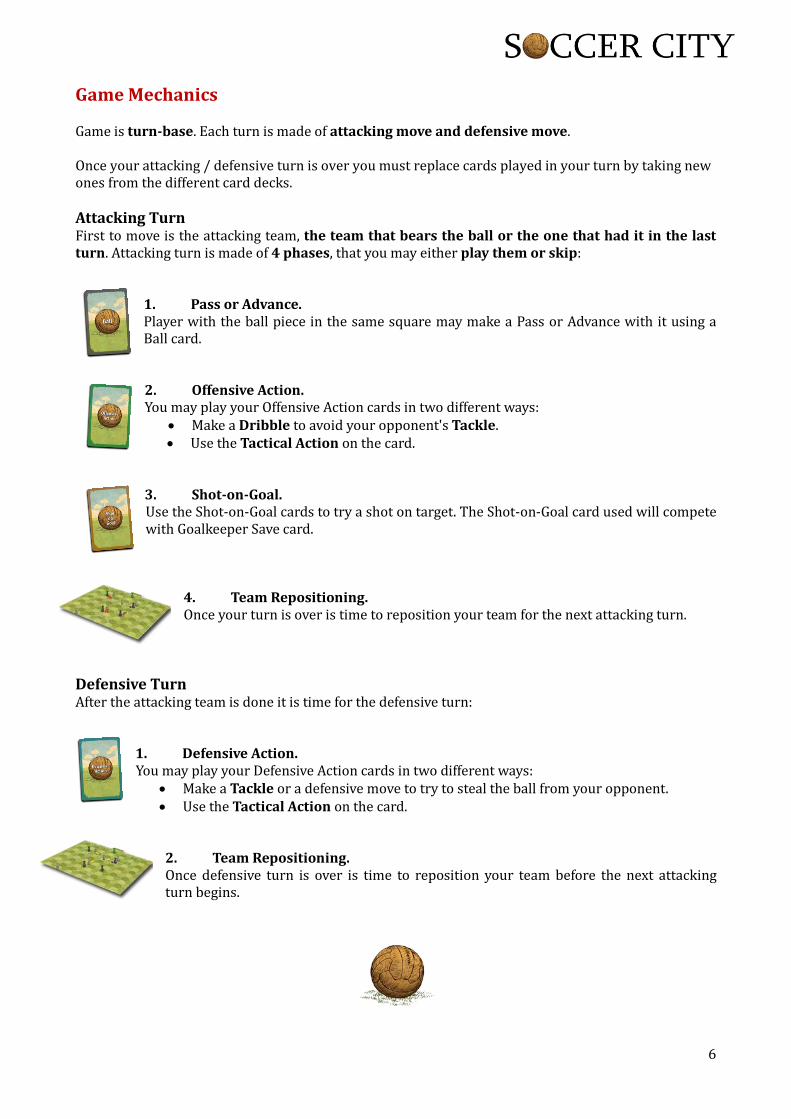
Game Mechanics Game is turn-base. Each turn is made of attacking move and defensive move. Once your attacking / defensive turn is over you must replace cards played in your turn by taking new ones from the different card decks. Attacking Turn First to move is the attacking team, the team that bears the ball or the one that had it in the last turn. Attacking turn is made of 4 phases, that you may either play them or skip:
1. Pass or Advance. Player with the ball piece in the same square may make a Pass or Advance with it using a Ball card.
2. Offensive Action. You may play your Offensive Action cards in two different ways:
• Make a Dribble to avoid your opponent's Tackle. • Use the Tactical Action on the card.
3. Shot-on-Goal. Use the Shot-on-Goal cards to try a shot on target. The Shot-on-Goal card used will compete with Goalkeeper Save card.
4. Team Repositioning. Once your turn is over is time to reposition your team for the next attacking turn.
Defensive Turn After the attacking team is done it is time for the defensive turn:
1. Defensive Action. You may play your Defensive Action cards in two different ways:
• Make a Tackle or a defensive move to try to steal the ball from your opponent. • Use the Tactical Action on the card.
2. Team Repositioning. Once defensive turn is over is time to reposition your team before the next attacking turn begins.
6
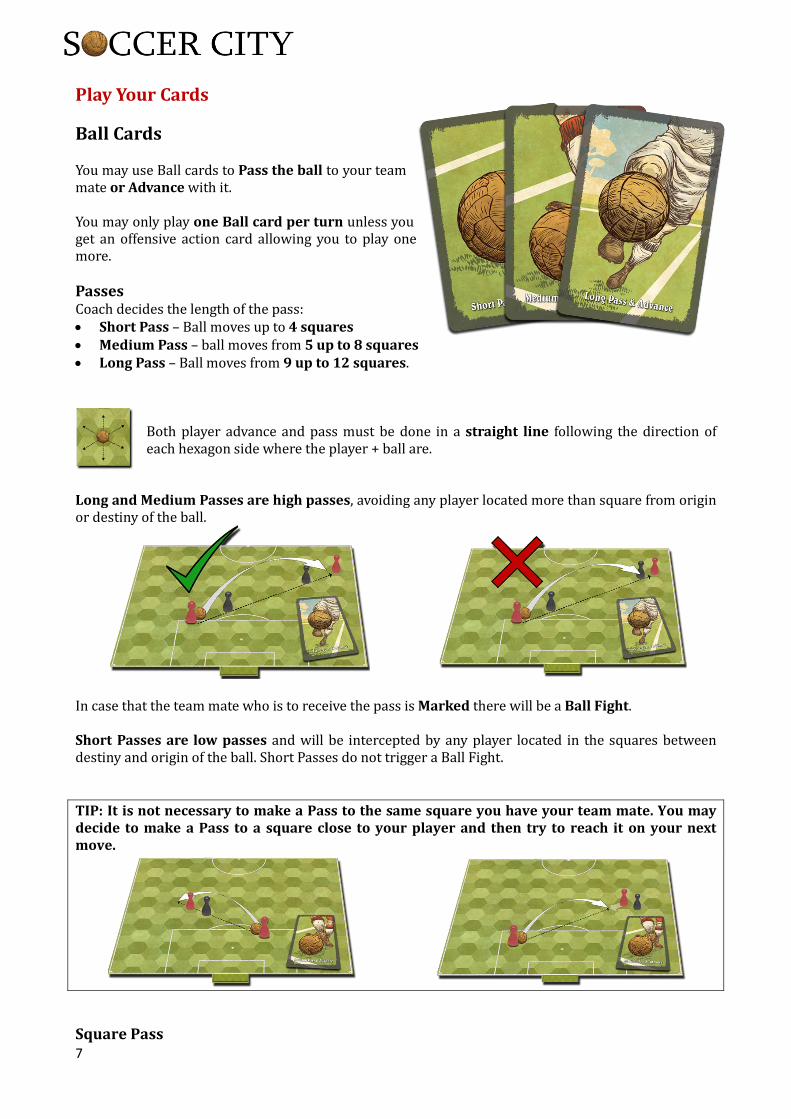
Play Your Cards Ball Cards You may use Ball cards to Pass the ball to your team mate or Advance with it. You may only play one Ball card per turn unless you get an offensive action card allowing you to play one more. Passes Coach decides the length of the pass: • Short Pass – Ball moves up to 4 squares • Medium Pass – ball moves from 5 up to 8 squares • Long Pass – Ball moves from 9 up to 12 squares.
Both player advance and pass must be done in a straight line following the direction of each hexagon side where the player + ball are.
Long and Medium Passes are high passes, avoiding any player located more than square from origin or destiny of the ball.
In case that the team mate who is to receive the pass is Marked there will be a Ball Fight. Short Passes are low passes and will be intercepted by any player located in the squares between destiny and origin of the ball. Short Passes do not trigger a Ball Fight. TIP: It is not necessary to make a Pass to the same square you have your team mate. You may decide to make a Pass to a square close to your player and then try to reach it on your next move.
Square Pass 7
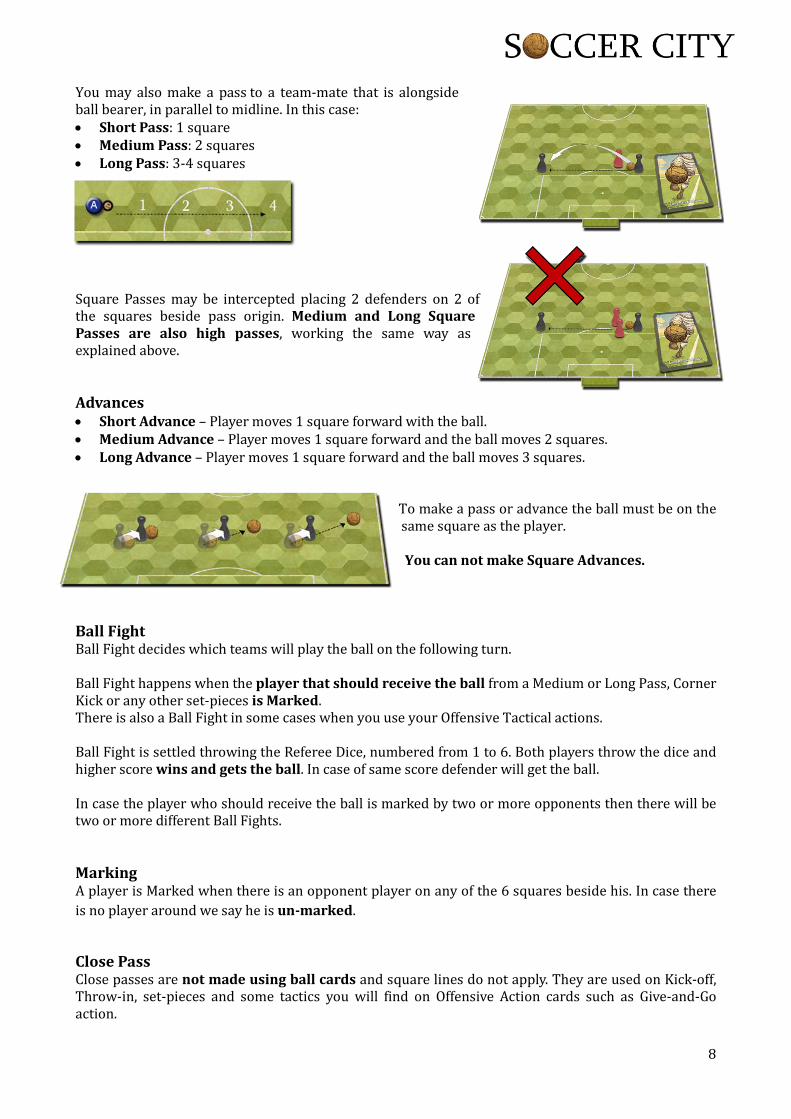
You may also make a pass to a team-mate that is alongside ball bearer, in parallel to midline. In this case: • Short Pass: 1 square • Medium Pass: 2 squares • Long Pass: 3-4 squares
Square Passes may be intercepted placing 2 defenders on 2 of the squares beside pass origin. Medium and Long Square Passes are also high passes, working the same way as explained above. Advances • Short Advance – Player moves 1 square forward with the ball. • Medium Advance – Player moves 1 square forward and the ball moves 2 squares. • Long Advance – Player moves 1 square forward and the ball moves 3 squares.
To make a pass or advance the ball must be on the same square as the player. You can not make Square Advances.
Ball Fight Ball Fight decides which teams will play the ball on the following turn. Ball Fight happens when the player that should receive the ball from a Medium or Long Pass, Corner Kick or any other set-pieces is Marked. There is also a Ball Fight in some cases when you use your Offensive Tactical actions. Ball Fight is settled throwing the Referee Dice, numbered from 1 to 6. Both players throw the dice and higher score wins and gets the ball. In case of same score defender will get the ball. In case the player who should receive the ball is marked by two or more opponents then there will be two or more different Ball Fights. Marking A player is Marked when there is an opponent player on any of the 6 squares beside his. In case there is no player around we say he is un-marked.
Close Pass Close passes are not made using ball cards and square lines do not apply. They are used on Kick-off, Throw-in, set-pieces and some tactics you will find on Offensive Action cards such as Give-and-Go action.
8
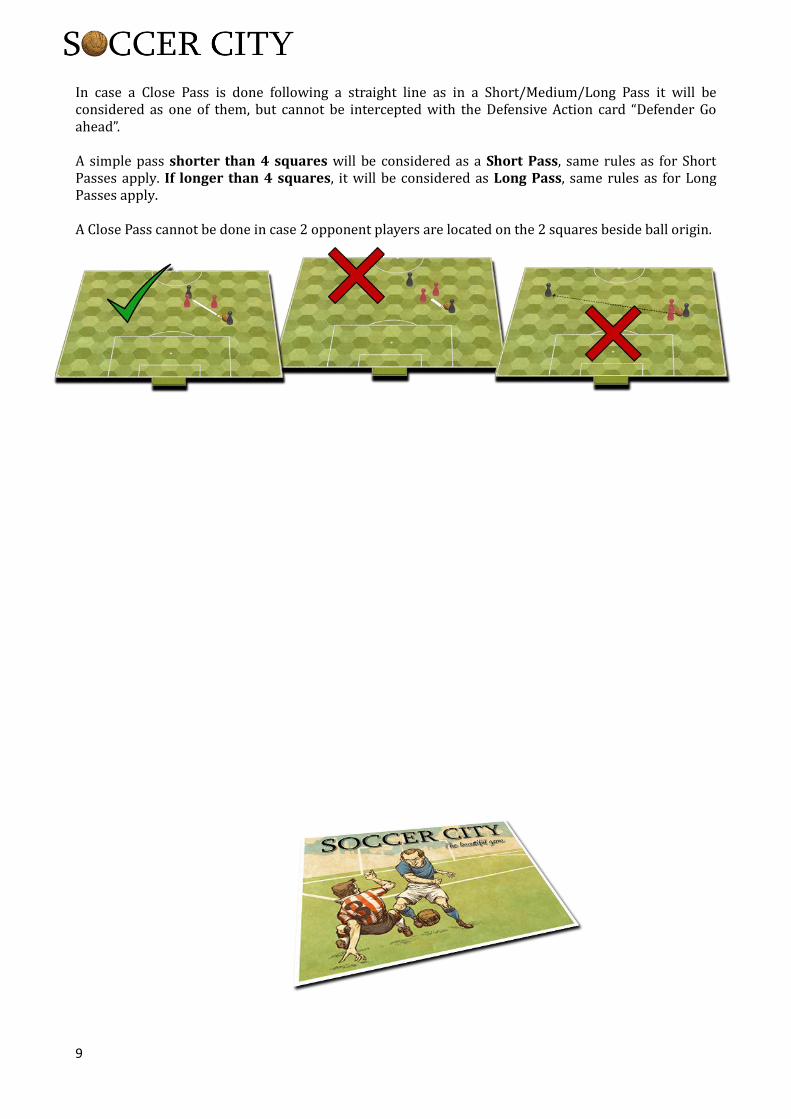
In case a Close Pass is done following a straight line as in a Short/Medium/Long Pass it will be considered as one of them, but cannot be intercepted with the Defensive Action card “Defender Go ahead”. A simple pass shorter than 4 squares will be considered as a Short Pass, same rules as for Short Passes apply. If longer than 4 squares, it will be considered as Long Pass, same rules as for Long Passes apply. A Close Pass cannot be done in case 2 opponent players are located on the 2 squares beside ball origin.
9
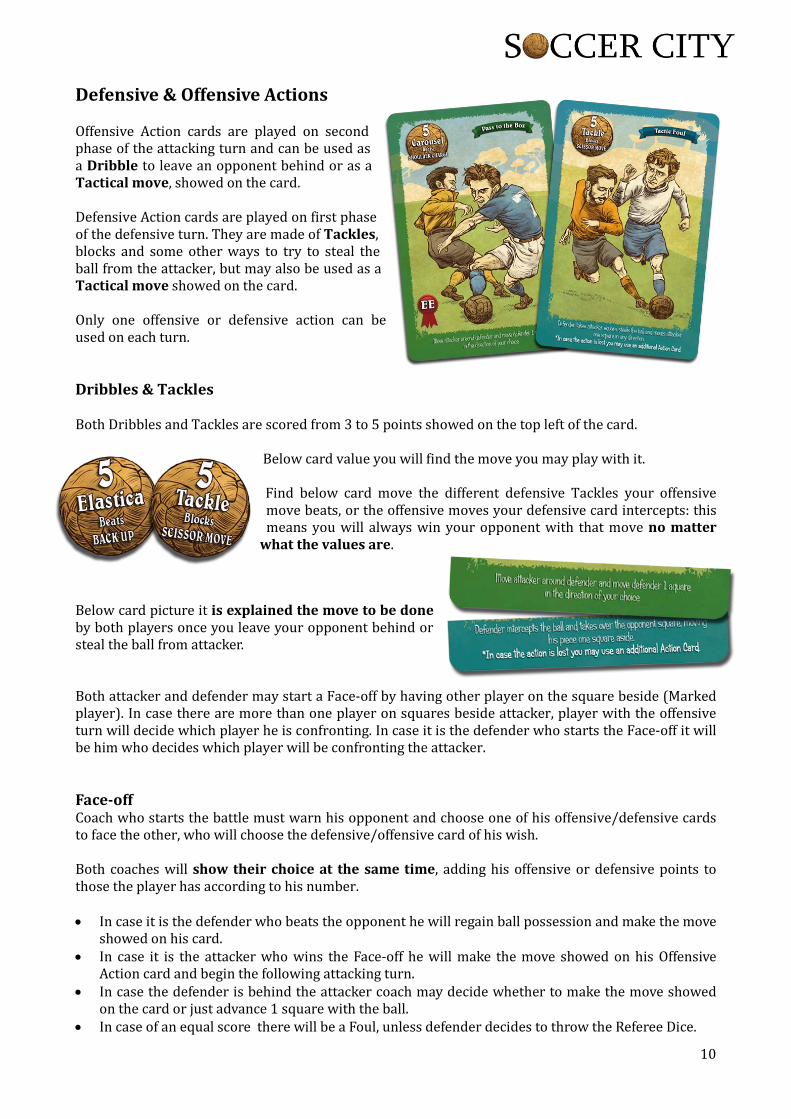
Defensive & Offensive Actions Offensive Action cards are played on second phase of the attacking turn and can be used as a Dribble to leave an opponent behind or as a Tactical move, showed on the card. Defensive Action cards are played on first phase of the defensive turn. They are made of Tackles, blocks and some other ways to try to steal the ball from the attacker, but may also be used as a Tactical move showed on the card. Only one offensive or defensive action can be used on each turn. Dribbles & Tackles Both Dribbles and Tackles are scored from 3 to 5 points showed on the top left of the card.
Below card value you will find the move you may play with it. Find below card move the different defensive Tackles your offensive move beats, or the offensive moves your defensive card intercepts: this means you will always win your opponent with that move no matter
what the values are.
Below card picture it is explained the move to be done by both players once you leave your opponent behind or steal the ball from attacker. Both attacker and defender may start a Face-off by having other player on the square beside (Marked player). In case there are more than one player on squares beside attacker, player with the offensive turn will decide which player he is confronting. In case it is the defender who starts the Face-off it will be him who decides which player will be confronting the attacker. Face-off Coach who starts the battle must warn his opponent and choose one of his offensive/defensive cards to face the other, who will choose the defensive/offensive card of his wish. Both coaches will show their choice at the same time, adding his offensive or defensive points to those the player has according to his number. • In case it is the defender who beats the opponent he will regain ball possession and make the move
showed on his card. • In case it is the attacker who wins the Face-off he will make the move showed on his Offensive
Action card and begin the following attacking turn. • In case the defender is behind the attacker coach may decide whether to make the move showed
on the card or just advance 1 square with the ball. • In case of an equal score there will be a Foul, unless defender decides to throw the Referee Dice.
10
When the player that wins the Face-off find an opponent player on his way doing the move the card shows it will be left just one square behind. If this second player is on the square of destination, the winning player will stay on the square just behind it. NOTICE that in case of a Face-off, whichever the outcome, a new attacking turn will begin for the team that gets the ball possession. Referee Dice Throw the dice to solve a dispute. Player that makes a Foul may decide to throw Referee Dice to avoid the Free-kick, but taking the risk of being booked by the Referee. In case the coach decides not to throw the Referee Dice there will be Foul and a Free-kick for the opponent on the square where the ball piece was placed. The possible decisions of the referee are:
• Whistle: Referee whistles the Foul. • Player Booked: Yellow card for the player that decided to throw the Dice. • Match Goes on! - Defender regains ball possession and performs the move showed
on his card.
In case the Foul is made inside the Penalty Box both “Whistle” and “Player booked” decision will mean a Yellow card for defender. Tactical Actions Tactical Actions are showed on the top right side of each card. You may choose to play this Tactical Actions instead of your Dribble or defensive Tackle. There are some Tactical Actions that could be played on different moments of your turn, before a Pass or Advance to leave your defender behind, or stealing the ball from attacker by leaving a player in offside position with Offside Trap. Tactical Actions are described on the Tactical Pads.
11
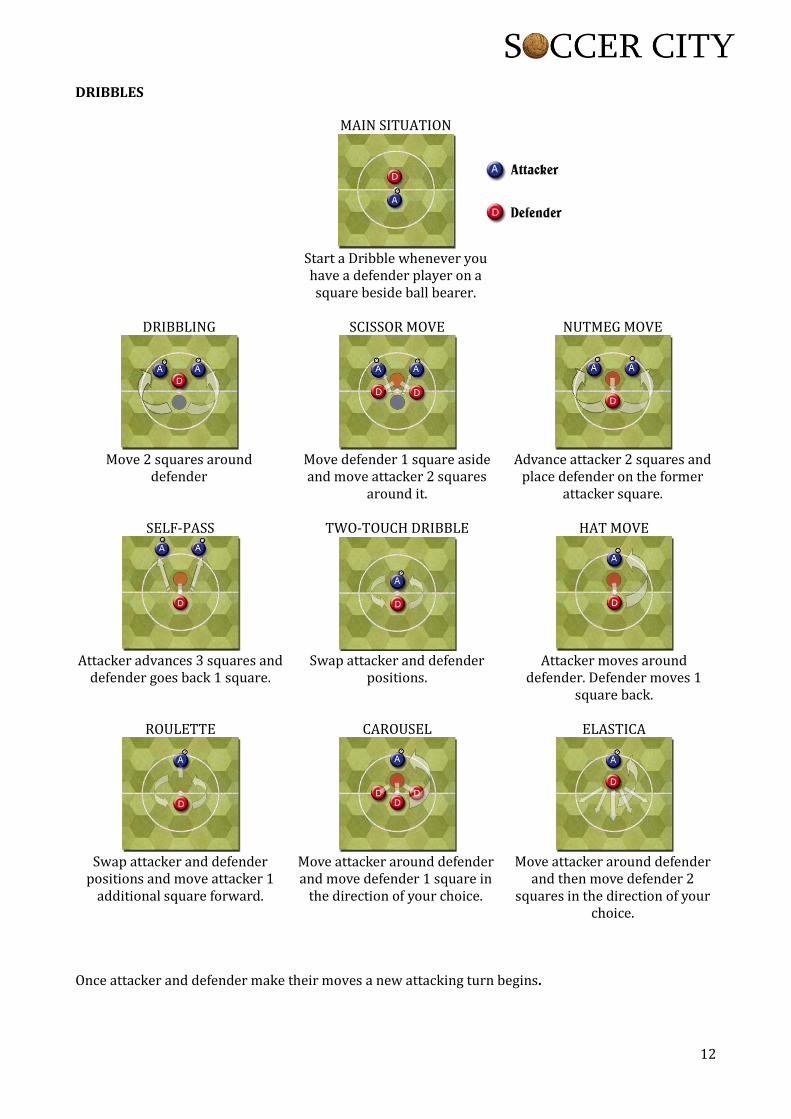
DRIBBLES
MAIN SITUATION
Start a Dribble whenever you have a defender player on a square beside ball bearer.
DRIBBLING
Move 2 squares around
defender
SCISSOR MOVE
Move defender 1 square aside and move attacker 2 squares
around it.
NUTMEG MOVE
Advance attacker 2 squares and
place defender on the former attacker square.
SELF-PASS
Attacker advances 3 squares and
defender goes back 1 square.
TWO-TOUCH DRIBBLE
Swap attacker and defender
positions.
HAT MOVE
Attacker moves around
defender. Defender moves 1 square back.
ROULETTE
Swap attacker and defender
positions and move attacker 1 additional square forward.
CAROUSEL
Move attacker around defender and move defender 1 square in
the direction of your choice.
ELASTICA
Move attacker around defender
and then move defender 2 squares in the direction of your
choice.
Once attacker and defender make their moves a new attacking turn begins.
12
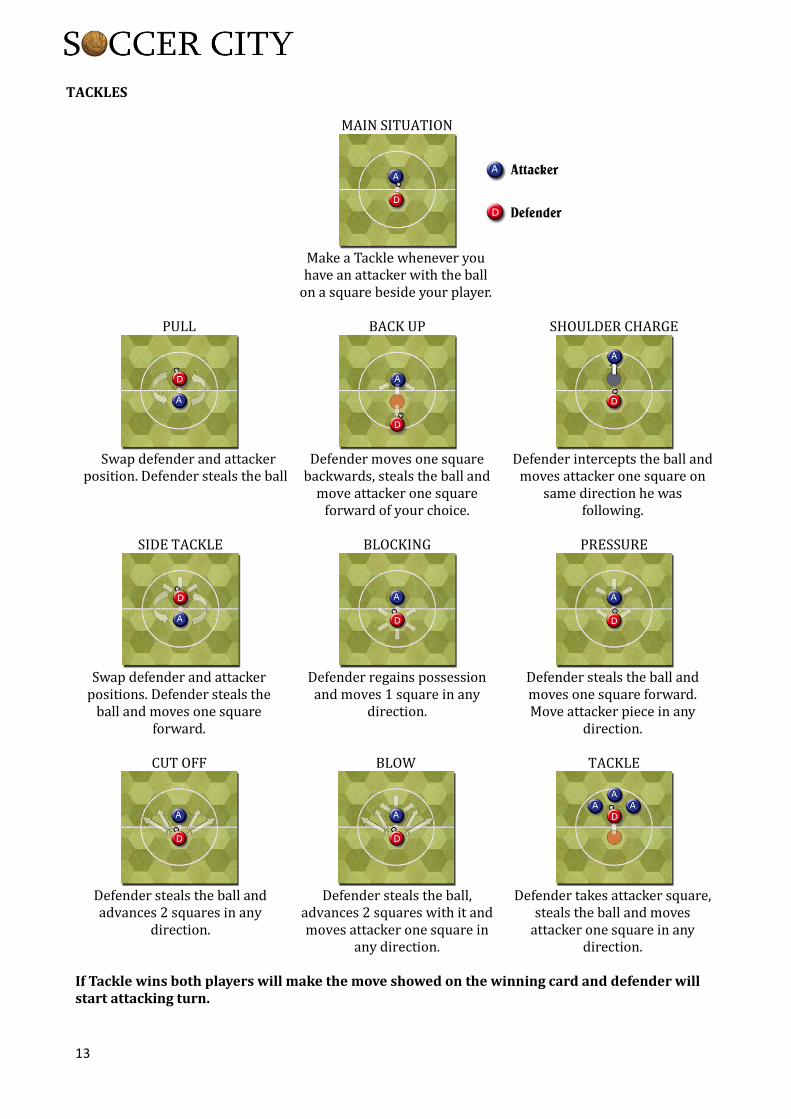
TACKLES
MAIN SITUATION
Make a Tackle whenever you have an attacker with the ball
on a square beside your player.
PULL
Swap defender and attacker
position. Defender steals the ball
BACK UP
Defender moves one square
backwards, steals the ball and move attacker one square
forward of your choice.
SHOULDER CHARGE
Defender intercepts the ball and
moves attacker one square on same direction he was
following.
SIDE TACKLE
Swap defender and attacker
positions. Defender steals the ball and moves one square
forward.
BLOCKING
Defender regains possession and moves 1 square in any
direction.
PRESSURE
Defender steals the ball and moves one square forward. Move attacker piece in any
direction.
CUT OFF
Defender steals the ball and advances 2 squares in any
direction.
BLOW
Defender steals the ball,
advances 2 squares with it and moves attacker one square in
any direction.
TACKLE
Defender takes attacker square,
steals the ball and moves attacker one square in any
direction.
If Tackle wins both players will make the move showed on the winning card and defender will start attacking turn.
13
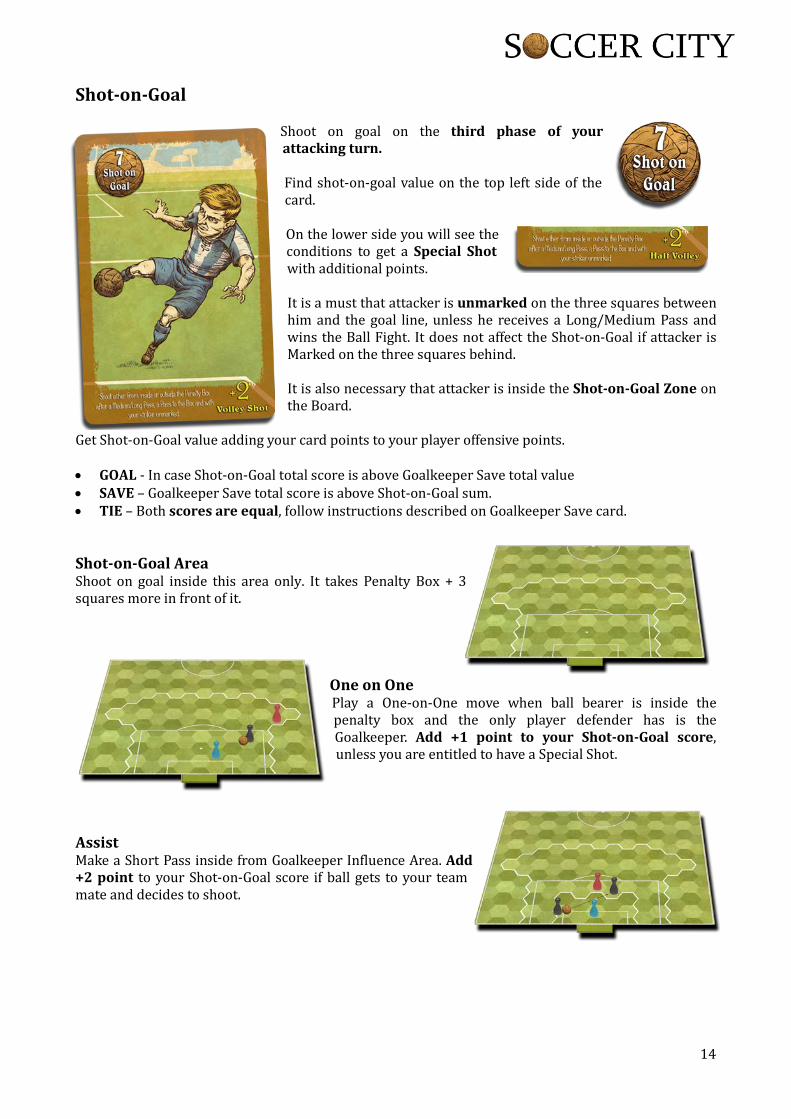
Shot-on-Goal
Shoot on goal on the third phase of your attacking turn. Find shot-on-goal value on the top left side of the card. On the lower side you will see the conditions to get a Special Shot with additional points. It is a must that attacker is unmarked on the three squares between him and the goal line, unless he receives a Long/Medium Pass and wins the Ball Fight. It does not affect the Shot-on-Goal if attacker is Marked on the three squares behind. It is also necessary that attacker is inside the Shot-on-Goal Zone on the Board.
Get Shot-on-Goal value adding your card points to your player offensive points. • GOAL - In case Shot-on-Goal total score is above Goalkeeper Save total value • SAVE – Goalkeeper Save total score is above Shot-on-Goal sum. • TIE – Both scores are equal, follow instructions described on Goalkeeper Save card. Shot-on-Goal Area Shoot on goal inside this area only. It takes Penalty Box + 3 squares more in front of it.
One on One Play a One-on-One move when ball bearer is inside the penalty box and the only player defender has is the Goalkeeper. Add +1 point to your Shot-on-Goal score, unless you are entitled to have a Special Shot.
Assist Make a Short Pass inside from Goalkeeper Influence Area. Add +2 point to your Shot-on-Goal score if ball gets to your team mate and decides to shoot.
14
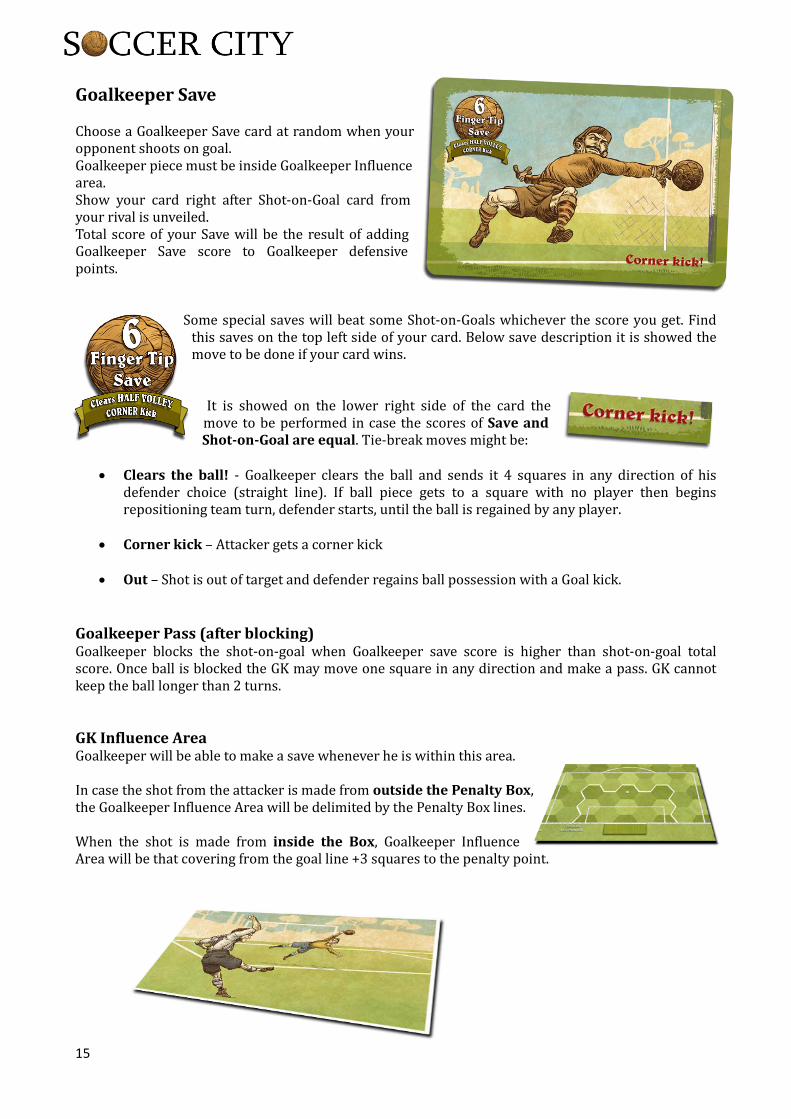
Goalkeeper Save
Choose a Goalkeeper Save card at random when your opponent shoots on goal. Goalkeeper piece must be inside Goalkeeper Influence area. Show your card right after Shot-on-Goal card from your rival is unveiled. Total score of your Save will be the result of adding Goalkeeper Save score to Goalkeeper defensive points.
Some special saves will beat some Shot-on-Goals whichever the score you get. Find this saves on the top left side of your card. Below save description it is showed the move to be done if your card wins.
It is showed on the lower right side of the card the move to be performed in case the scores of Save and Shot-on-Goal are equal. Tie-break moves might be:
• Clears the ball! - Goalkeeper clears the ball and sends it 4 squares in any direction of hisdefender choice (straight line). If ball piece gets to a square with no player then beginsrepositioning team turn, defender starts, until the ball is regained by any player.
• Corner kick – Attacker gets a corner kick
• Out – Shot is out of target and defender regains ball possession with a Goal kick.
Goalkeeper Pass (after blocking) Goalkeeper blocks the shot-on-goal when Goalkeeper save score is higher than shot-on-goal total score. Once ball is blocked the GK may move one square in any direction and make a pass. GK cannot keep the ball longer than 2 turns.
GK Influence Area Goalkeeper will be able to make a save whenever he is within this area.
In case the shot from the attacker is made from outside the Penalty Box, the Goalkeeper Influence Area will be delimited by the Penalty Box lines.
When the shot is made from inside the Box, Goalkeeper Influence Area will be that covering from the goal line +3 squares to the penalty point.
15
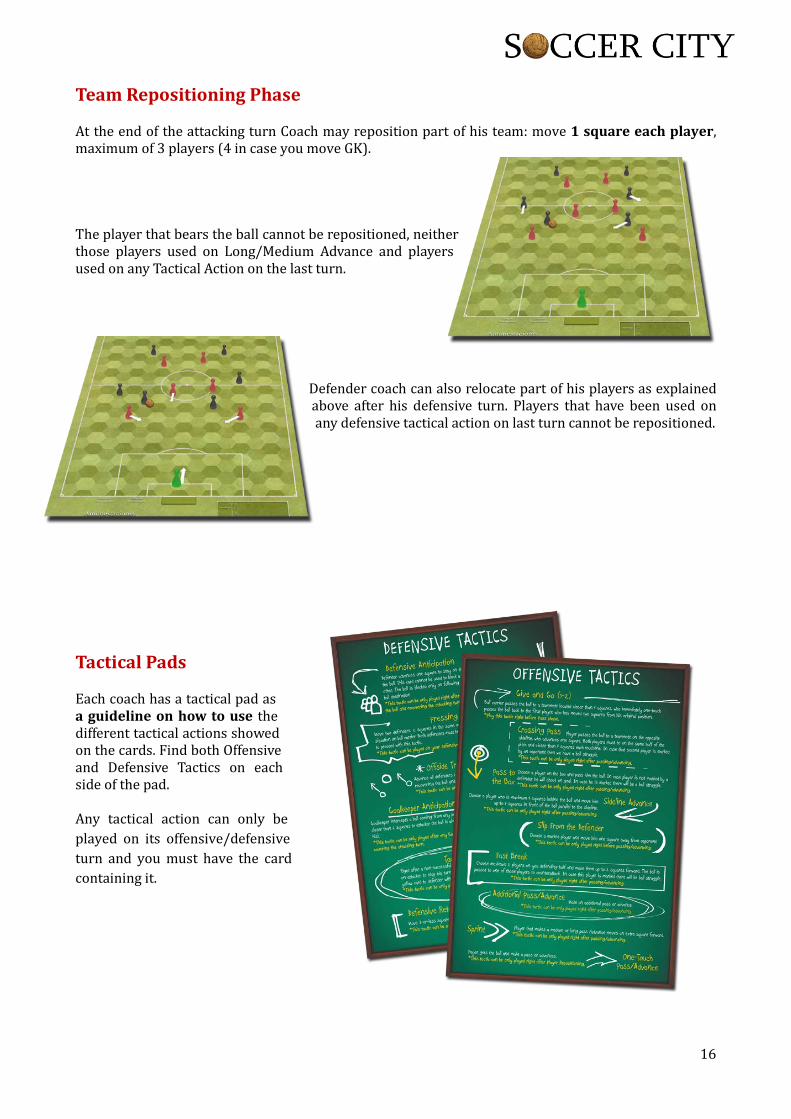
Team Repositioning Phase
At the end of the attacking turn Coach may reposition part of his team: move 1 square each player, maximum of 3 players (4 in case you move GK).
The player that bears the ball cannot be repositioned, neither those players used on Long/Medium Advance and players used on any Tactical Action on the last turn.
Defender coach can also relocate part of his players as explained above after his defensive turn. Players that have been used on any defensive tactical action on last turn cannot be repositioned.
Tactical Pads
Each coach has a tactical pad as a guideline on how to use the different tactical actions showed on the cards. Find both Offensive and Defensive Tactics on each side of the pad.
Any tactical action can only be played on its offensive/defensive turn and you must have the card containing it.
16

Offensive Tactical Actions
Give and go (1-2): Ball carrier passes the ball to a teammate located closer than 4 squares, who immediately one-touch passes the ball back to the first player, who has moved 2 squares from his original position. *Play this tactic right before Pass phase.
1 – Attacker makes a Short Close Pass to a team mate.
2- First attacker advances 2 squares.
3- Second attacker pass the ball back to the first player.
Fast Break: Choose maximum 2 players on you defending-half and move them up-to 2 squares forward. The ball is passed to one of those players to counterattack. In case this player is marked there will be Ball Fight. *This tactic can be only played right after Passing/Advancing.
1- Both players move forward up to 2 squares. 2- The ball goes to one of the two players.
Pass to the Box: Choose a player on the Box and pass him the ball. In case player is not marked by a defender he will shoot on goal. In case he is marked there will be a Ball Fight. *This tactic can be only played right afterPassing/Advancing.
*You can make a Pass to the Box from anywhere in thefield.
17
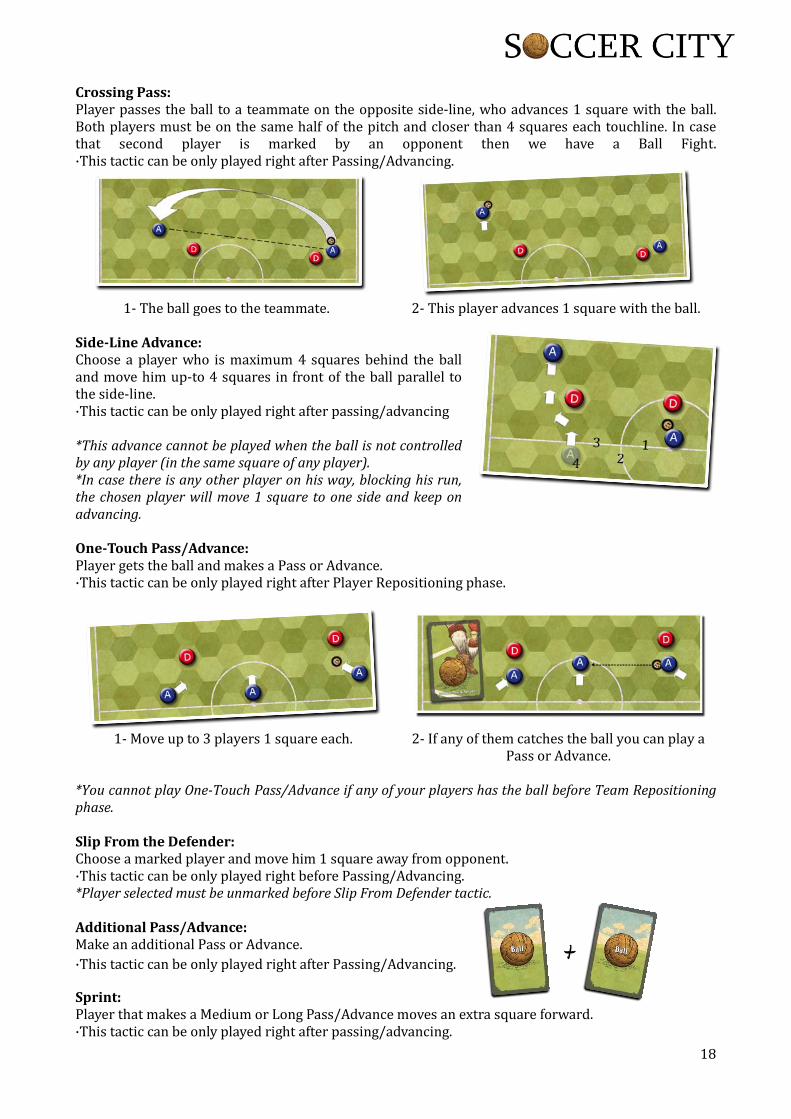
Crossing Pass: Player passes the ball to a teammate on the opposite side-line, who advances 1 square with the ball. Both players must be on the same half of the pitch and closer than 4 squares each touchline. In case that second player is marked by an opponent then we have a Ball Fight. ·This tactic can be only played right after Passing/Advancing.
1- The ball goes to the teammate. 2- This player advances 1 square with the ball.
Side-Line Advance: Choose a player who is maximum 4 squares behind the ball and move him up-to 4 squares in front of the ball parallel to the side-line. ·This tactic can be only played right after passing/advancing *This advance cannot be played when the ball is not controlled by any player (in the same square of any player). *In case there is any other player on his way, blocking his run, the chosen player will move 1 square to one side and keep on advancing. One-Touch Pass/Advance: Player gets the ball and makes a Pass or Advance. ·This tactic can be only played right after Player Repositioning phase.
1- Move up to 3 players 1 square each. 2- If any of them catches the ball you can play a
Pass or Advance. *You cannot play One-Touch Pass/Advance if any of your players has the ball before Team Repositioning phase. Slip From the Defender: Choose a marked player and move him 1 square away from opponent. ·This tactic can be only played right before Passing/Advancing. *Player selected must be unmarked before Slip From Defender tactic. Additional Pass/Advance: Make an additional Pass or Advance. ·This tactic can be only played right after Passing/Advancing.
Sprint: Player that makes a Medium or Long Pass/Advance moves an extra square forward. ·This tactic can be only played right after passing/advancing.
+
18
Defensive Tactical Actions
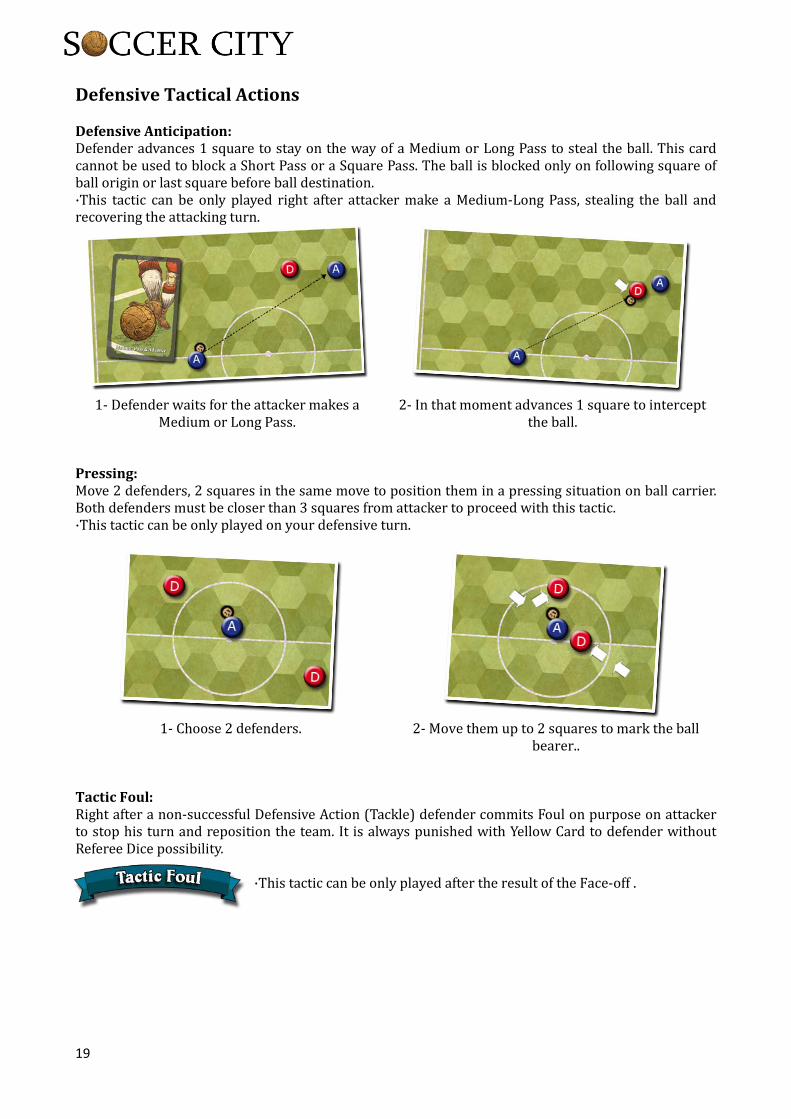
Defensive Anticipation: Defender advances 1 square to stay on the way of a Medium or Long Pass to steal the ball. This card cannot be used to block a Short Pass or a Square Pass. The ball is blocked only on following square of ball origin or last square before ball destination. ·This tactic can be only played right after attacker make a Medium-Long Pass, stealing the ball andrecovering the attacking turn.
1- Defender waits for the attacker makes a Medium or Long Pass.
2- In that moment advances 1 square to intercept the ball.
Pressing: Move 2 defenders, 2 squares in the same move to position them in a pressing situation on ball carrier. Both defenders must be closer than 3 squares from attacker to proceed with this tactic. ·This tactic can be only played on your defensive turn.
1- Choose 2 defenders. 2- Move them up to 2 squares to mark the ball bearer..
Tactic Foul: Right after a non-successful Defensive Action (Tackle) defender commits Foul on purpose on attacker to stop his turn and reposition the team. It is always punished with Yellow Card to defender without Referee Dice possibility.
·This tactic can be only played after the result of the Face-off .
19
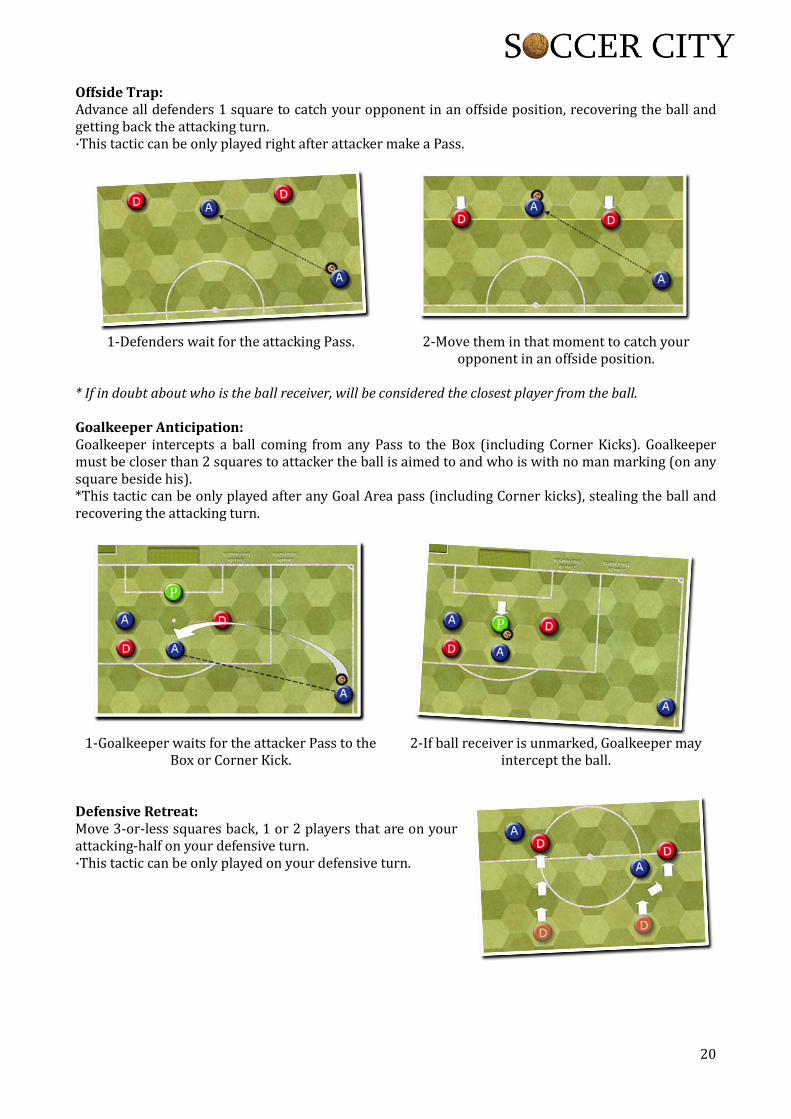
Offside Trap: Advance all defenders 1 square to catch your opponent in an offside position, recovering the ball and getting back the attacking turn. ·This tactic can be only played right after attacker make a Pass.
1-Defenders wait for the attacking Pass. 2-Move them in that moment to catch your opponent in an offside position.
* If in doubt about who is the ball receiver, will be considered the closest player from the ball.
Goalkeeper Anticipation: Goalkeeper intercepts a ball coming from any Pass to the Box (including Corner Kicks). Goalkeeper must be closer than 2 squares to attacker the ball is aimed to and who is with no man marking (on any square beside his). *This tactic can be only played after any Goal Area pass (including Corner kicks), stealing the ball andrecovering the attacking turn.
1-Goalkeeper waits for the attacker Pass to the Box or Corner Kick.
2-If ball receiver is unmarked, Goalkeeper may intercept the ball.
Defensive Retreat: Move 3-or-less squares back, 1 or 2 players that are on your attacking-half on your defensive turn. ·This tactic can be only played on your defensive turn.
20
Match Progress
Find below a range of possible events and situations you may find when playing your match.
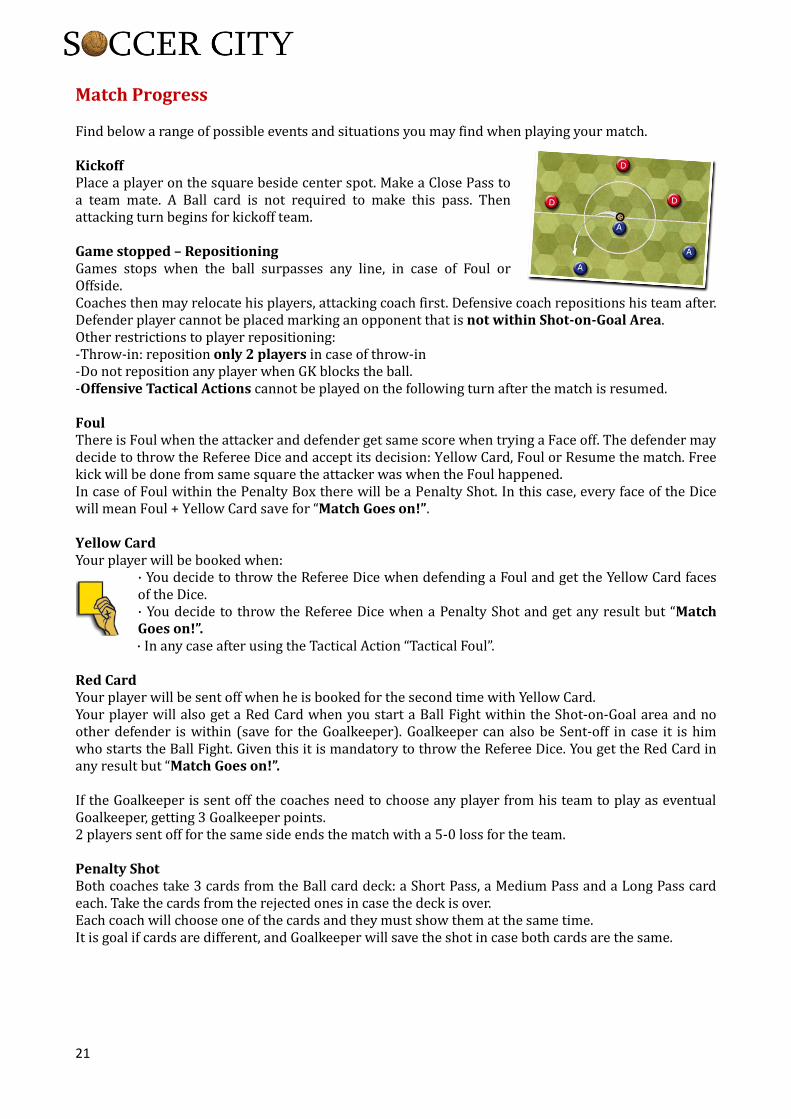
Kickoff Place a player on the square beside center spot. Make a Close Pass to a team mate. A Ball card is not required to make this pass. Then attacking turn begins for kickoff team.
Game stopped – Repositioning Games stops when the ball surpasses any line, in case of Foul or Offside. Coaches then may relocate his players, attacking coach first. Defensive coach repositions his team after. Defender player cannot be placed marking an opponent that is not within Shot-on-Goal Area. Other restrictions to player repositioning: -Throw-in: reposition only 2 players in case of throw-in -Do not reposition any player when GK blocks the ball. -Offensive Tactical Actions cannot be played on the following turn after the match is resumed.
Foul There is Foul when the attacker and defender get same score when trying a Face off. The defender may decide to throw the Referee Dice and accept its decision: Yellow Card, Foul or Resume the match. Free kick will be done from same square the attacker was when the Foul happened. In case of Foul within the Penalty Box there will be a Penalty Shot. In this case, every face of the Dice will mean Foul + Yellow Card save for “Match Goes on!”.
Yellow Card Your player will be booked when:
· You decide to throw the Referee Dice when defending a Foul and get the Yellow Card facesof the Dice. · You decide to throw the Referee Dice when a Penalty Shot and get any result but “MatchGoes on!”. · In any case after using the Tactical Action “Tactical Foul”.
Red Card Your player will be sent off when he is booked for the second time with Yellow Card. Your player will also get a Red Card when you start a Ball Fight within the Shot-on-Goal area and no other defender is within (save for the Goalkeeper). Goalkeeper can also be Sent-off in case it is him who starts the Ball Fight. Given this it is mandatory to throw the Referee Dice. You get the Red Card in any result but “Match Goes on!”.
If the Goalkeeper is sent off the coaches need to choose any player from his team to play as eventual Goalkeeper, getting 3 Goalkeeper points. 2 players sent off for the same side ends the match with a 5-0 loss for the team.
Penalty Shot Both coaches take 3 cards from the Ball card deck: a Short Pass, a Medium Pass and a Long Pass card each. Take the cards from the rejected ones in case the deck is over. Each coach will choose one of the cards and they must show them at the same time. It is goal if cards are different, and Goalkeeper will save the shot in case both cards are the same.
21
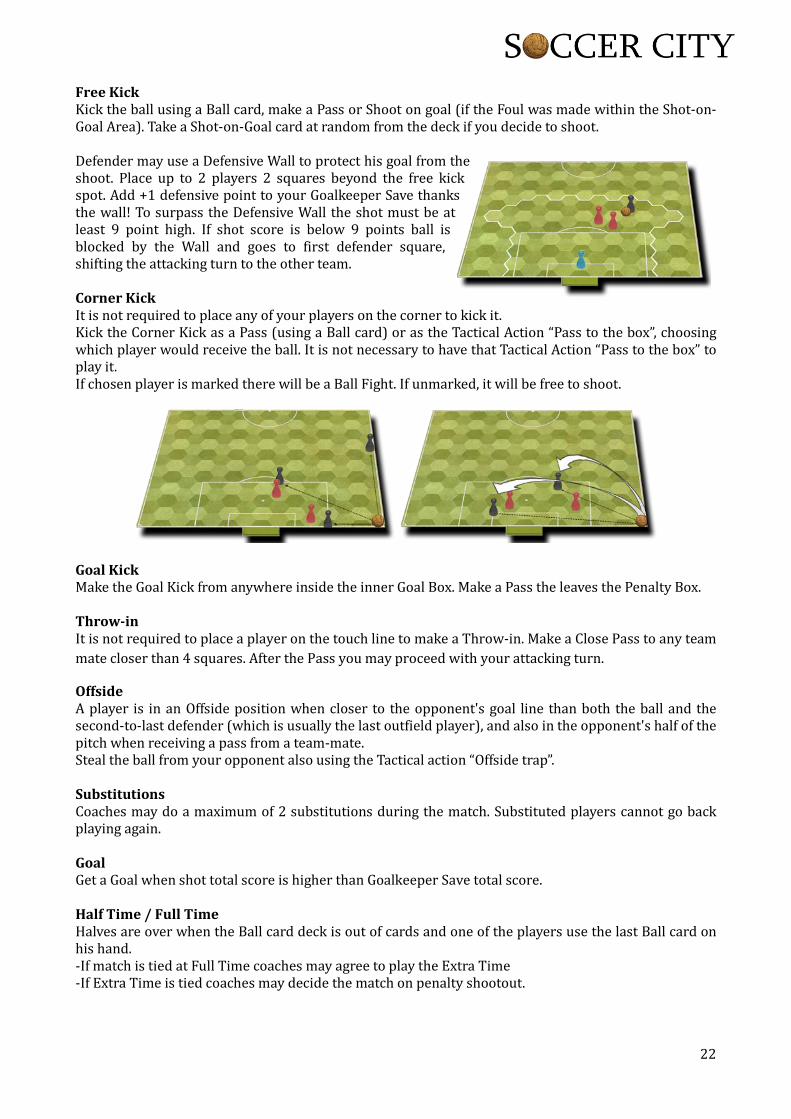
Free Kick Kick the ball using a Ball card, make a Pass or Shoot on goal (if the Foul was made within the Shot-on-Goal Area). Take a Shot-on-Goal card at random from the deck if you decide to shoot.
Defender may use a Defensive Wall to protect his goal from the shoot. Place up to 2 players 2 squares beyond the free kick spot. Add +1 defensive point to your Goalkeeper Save thanks the wall! To surpass the Defensive Wall the shot must be at least 9 point high. If shot score is below 9 points ball is blocked by the Wall and goes to first defender square, shifting the attacking turn to the other team.
Corner Kick It is not required to place any of your players on the corner to kick it. Kick the Corner Kick as a Pass (using a Ball card) or as the Tactical Action “Pass to the box”, choosing which player would receive the ball. It is not necessary to have that Tactical Action “Pass to the box” to play it. If chosen player is marked there will be a Ball Fight. If unmarked, it will be free to shoot.
Goal Kick Make the Goal Kick from anywhere inside the inner Goal Box. Make a Pass the leaves the Penalty Box.
Throw-in It is not required to place a player on the touch line to make a Throw-in. Make a Close Pass to any team mate closer than 4 squares. After the Pass you may proceed with your attacking turn.
Offside A player is in an Offside position when closer to the opponent's goal line than both the ball and the second-to-last defender (which is usually the last outfield player), and also in the opponent's half of the pitch when receiving a pass from a team-mate. Steal the ball from your opponent also using the Tactical action “Offside trap”.
Substitutions Coaches may do a maximum of 2 substitutions during the match. Substituted players cannot go back playing again.
Goal Get a Goal when shot total score is higher than Goalkeeper Save total score.
Half Time / Full Time Halves are over when the Ball card deck is out of cards and one of the players use the last Ball card on his hand. -If match is tied at Full Time coaches may agree to play the Extra Time -If Extra Time is tied coaches may decide the match on penalty shootout.
22
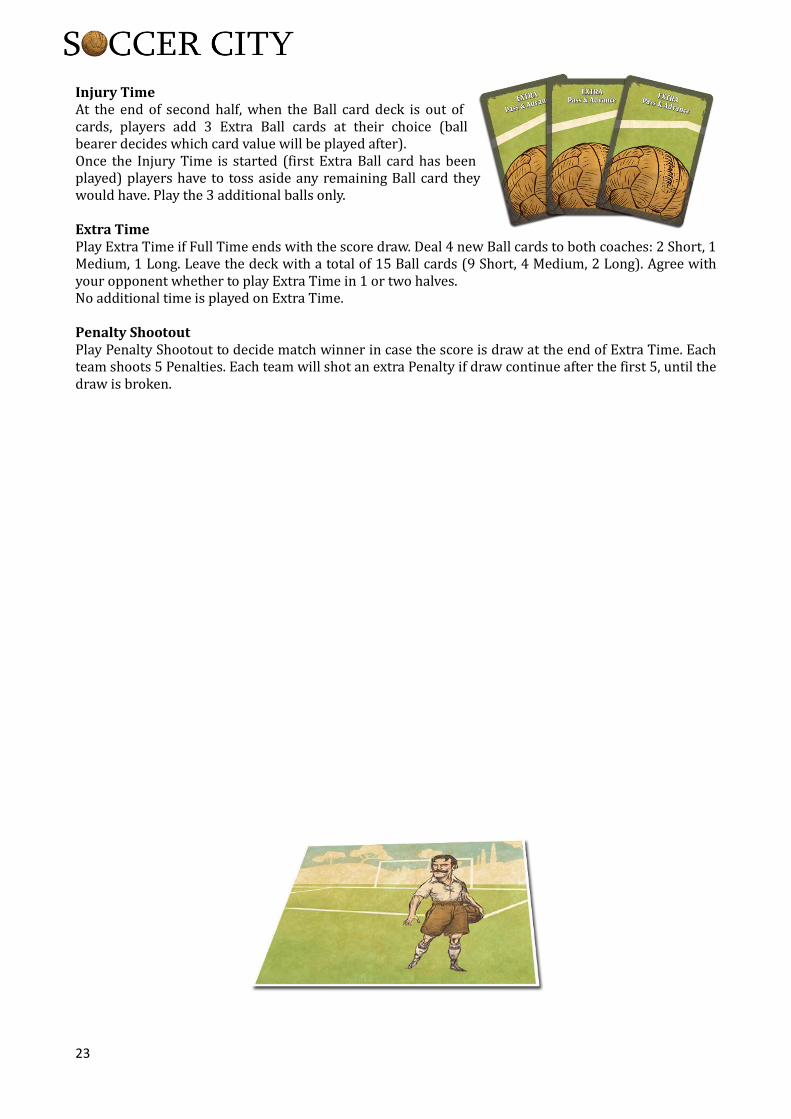
Injury Time At the end of second half, when the Ball card deck is out of cards, players add 3 Extra Ball cards at their choice (ball bearer decides which card value will be played after). Once the Injury Time is started (first Extra Ball card has been played) players have to toss aside any remaining Ball card they would have. Play the 3 additional balls only.
Extra Time Play Extra Time if Full Time ends with the score draw. Deal 4 new Ball cards to both coaches: 2 Short, 1 Medium, 1 Long. Leave the deck with a total of 15 Ball cards (9 Short, 4 Medium, 2 Long). Agree with your opponent whether to play Extra Time in 1 or two halves. No additional time is played on Extra Time.
Penalty Shootout Play Penalty Shootout to decide match winner in case the score is draw at the end of Extra Time. Each team shoots 5 Penalties. Each team will shot an extra Penalty if draw continue after the first 5, until the draw is broken.
23
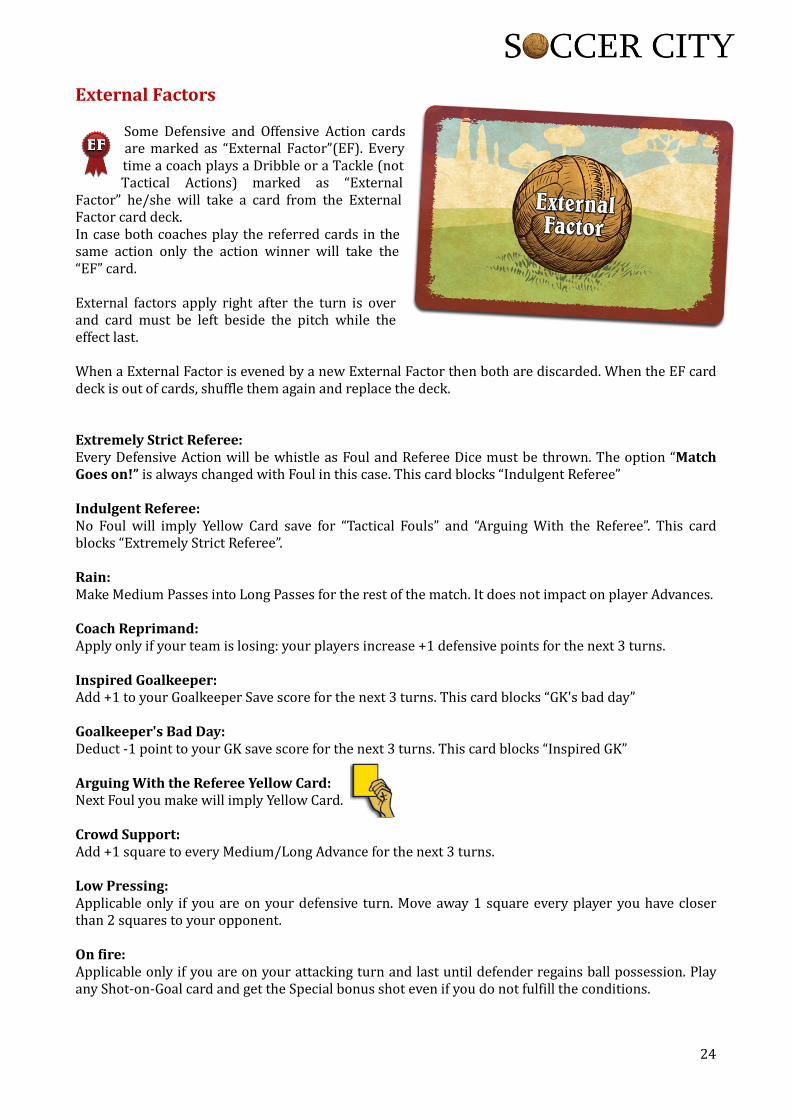
External Factors
Some Defensive and Offensive Action cards are marked as “External Factor”(EF). Every time a coach plays a Dribble or a Tackle (not Tactical Actions) marked as “External
Factor” he/she will take a card from the External Factor card deck. In case both coaches play the referred cards in the same action only the action winner will take the “EF” card.
External factors apply right after the turn is over and card must be left beside the pitch while the effect last.
When a External Factor is evened by a new External Factor then both are discarded. When the EF card deck is out of cards, shuffle them again and replace the deck.
Extremely Strict Referee: Every Defensive Action will be whistle as Foul and Referee Dice must be thrown. The option “Match Goes on!” is always changed with Foul in this case. This card blocks “Indulgent Referee”
Indulgent Referee: No Foul will imply Yellow Card save for “Tactical Fouls” and “Arguing With the Referee”. This card blocks “Extremely Strict Referee”.
Rain: Make Medium Passes into Long Passes for the rest of the match. It does not impact on player Advances.
Coach Reprimand: Apply only if your team is losing: your players increase +1 defensive points for the next 3 turns.
Inspired Goalkeeper: Add +1 to your Goalkeeper Save score for the next 3 turns. This card blocks “GK's bad day”
Goalkeeper's Bad Day: Deduct -1 point to your GK save score for the next 3 turns. This card blocks “Inspired GK”
Arguing With the Referee Yellow Card: Next Foul you make will imply Yellow Card.
Crowd Support: Add +1 square to every Medium/Long Advance for the next 3 turns.
Low Pressing: Applicable only if you are on your defensive turn. Move away 1 square every player you have closer than 2 squares to your opponent.
On fire: Applicable only if you are on your attacking turn and last until defender regains ball possession. Play any Shot-on-Goal card and get the Special bonus shot even if you do not fulfill the conditions.
24
The wall: Applicable only if you are on your defensive turn. Move all your players closer than 2 squares form your rivals to the square beside them.
Off form: Deduct -1 point to all your players’ defensive and offensive points for the next 3 turns.
25
Game Modes
All game modes are optional and mutually compatible.
Striker
Play without the Shot-on-Goal card deck. Use the Striker Mode Guide to check the conditions and points required to shoot. As for the ordinary match, player that shoots on goal must be within the Shot-on-Goal Area.
Ace Mode
Ball cards will have the value each player chooses at the time they are played. Decide which value suits you better either as a Pass or Advance. Tactical Actions that let you play more than 2 Ball cards apply all the same. Renew the Ball cards played after your turn. Each coach will have 2 Ball cards only. Match length will be the same, playing a total of 45 ball cards.
4-Player Mode
2 coaches per team. Each coach will get an Initial Hand. Turn alternate from one coach to other, first attacking team coach one, then defensive team coach one. Coaches do not show their cards to none of their “colleagues”. But they can organize together the following move or ask for advice.
At the end of first half and every time a Goal is scored coaches may make an Optional Discard or may trade their cards.
Time is out when there are no Ball cards on the deck and at least 2 coaches run out of them.
Quick Match
Match length is around 25-30 minutes, real time. Reduce the Ball card deck to 20 plus the initial hand of each coach:
13 Short Passes 5 Medium Passes 2 Long Passes
26
ELEGÉ Ibérica.
Design by Lisandro Nembrini & Gonzalo Rodrigo
Artwork by Jorge Consuegra
Translation by Carlos A. Rodrigo
www.SoccerCitythegame.com
© 2014 ELEGÉ Ibérica. All Rights reserved.
www.ElegeIberica.es