smart-o-scope portable microscope using...
TRANSCRIPT

1
SMART-O-SCOPE
Portable Microscope Using Smartphone
(RESEARCH PAPER)
ORLANDO V. TARAC JR. ALJOHN MARK S. REYES JOHN JEREMIAH B. LUNA
CAVITE NATIONAL HIGH SCHOOL DIVISION OF CAVITE CITY
REGION IV-A CALABARZON
AN OFFICIAL ENTRY TO THE REGIONAL SCIENCE AND TECHNOLOGY FAIR 2014 (SCIENCE INVESTIGATORY PROJECT)
TEAM CATEGORY (APPLIED SCIENCE)
OCTOBER 2014

2
TABLE OF CONTENTS
Page
ABSTRACT i
INTRODUCTION 1
Background of the Study 1
Statement of the Problem 3
Significance of the Study 3
Scope and Limitations 4
METHODOLOGY 5
Preparation of Materials 5
Creation of Improvised Microscope 6
Testing of the Device 7
Data Analysis 8
RESULTS AND DISCUSSION 10
Specification and Operation of the Improvised Microscope 10
Images Produced by the Improvised Microscope 13
Visual Quality of the Images Produced 14
Images Produced in the Improvised Microscope and Compound Light Microscope
16
Images Produced in Different Light Systems 17
Observing Opaque Materials in the Improvised Device 19
Images Captured Using Different Cellular Phones (Tablet) 22
SUMMARY, CONCLUSIONS AND RECOMMENDATIONS 24
BIBLIOGRAPHY 27
ACKNOWLEDGMENT 29

3
TARAC JR., O.V.; A.M.S. REYES AND J.J.B. LUNA. SMART-O-SCOPE: Portable Microscope Using Smartphone. Research paper for the Regional Science and Technology Fair 2014 (Team Category, Applied Science) Cavite National High School, Cavite City, Region IV-A CALABARZON
ABSTRACT
This study primarily aims to create an improvised microscope using a
cellular phone camera and laser lens. The device is composed of three parts—magnifying, illuminating and support. The magnifying part is composed of convex lens from unused laser while the support part of the device is composed of the base which holds the two stages—specimen and cellular phone stages. Two versions of the prototype were created with varying light systems—ambient and built-in. Based from the quality ratings on the images, image produced from the specimen positioned 2.5 cm between the two stages is very clear. It was observed that as the distance of the specimen from the cellular phone stage increases, the quality of the image produced deteriorates.
The improvised cellular phone microscope is comparable to the usual
compound light microscope used in biological observations. Test results from the prototype system showed that the improvised microscope was able to achieve the design requirements. It is capable of magnifying objects whether a prepared slide or an opaque specimen. The enclosed body and the installed light system facilitated the control of light that enters the specimen.
Students and teachers will be able to observe various minute specimens using this improvised microscope with ease and in maximized time. This project can provide a wider understanding of organisms that cannot be seen by the naked eye since simplicity and practicality of the equipment designed was considered for future replication and modification.
INTRODUCTION
Background of the Study
Microscope is a device used to magnify various microorganisms which can never
be seen by the naked eye. It is composed of three important parts. The magnifying parts
i

4
composed of objective and ocular lens functions in enlarging the image to be viewed. The
illuminating part provides light source for specimen viewing. Lastly, the mechanical parts
function in the adjustment of the stage and lenses to capture the sharpest image possible.
With this special function of magnifying minute materials, microscope is
commonly used in understanding physical and behavioral features of organisms in the
field of research. Microscope is also widely use in teaching biology and its branches. This
tool helps the students in appreciating diversity in living organisms.
One of the problems encountered in the current implementation of the K to 12
Basic Education Program is the lack of equipments that could enhance student’s
understanding of various concepts. It is a challenge to teach science, particularly topics
related to cell and microorganims, the absence of microscope for observation in class.
Some schools may have adequate amount of microscope but still not enough to have the
observation in a 1:1 ratio. Also, a problem with the existing microscopes in public
schools is the convenience in bringing it to the classroom since compound light
microscopes are too bulky and requires enough light provision in the working area.
Nowadays, cellular phone is part of daily livings. New models of cellular phones
have been built containing features like camera applications. Cameras of these cellular
phones work through the help of lens that magnifies image at a desired level. Qualities of
the image vary according to the installed specifications of the cellular phone. With this
increasing exploration of the features of cellular phones, cellular phone microscopy

5
become an interest to some. In the field of health, single lens off-chip cellphone
microscopy is already developed operated by a complex optical system (Arpa et al.,
2012).
Also, studies show that convex lens can magnify organism the same way as the
objectives of the microscope function (Morrison and Gardner, 2013). There is a
possibility that a cellular phone can capture an image of microorganism with the help of a
concave lens (Arpa et al., 2012).
With this prior information, the researchers focused in developing a cheap and
portable microscope operated by lens from old laser and cellular phones with built-in
camera. This project targets to develop an improvised microscope, from the
abovementioned material, that can display and capture image by taking advantage of
other cellular phone features.
Statement of the Problem
After conducting this study, it is expected that an improvised cellular phone
microscope will be developed. Furthermore, this study aims:
6
1. create an improvised microscope, with natural light system and with built-in light
system, using a cellular phone camera and laser lens;
2. determine the quality of the image produced from the improvised cellular phone
microscope;
3. compare the images produced in the improvised device to that of a compound
light microscope;
4. compare the images produced in devices with natural light system and with built-
in light system;
5. use the device in observing opaque materials like leaf external structures and
insect external morphology; and
6. test the device in different cellular phones and gadgets.
Significance of the Study
The primary concern of this study is to determine the feasibility of cellular phone
camera partnered with laser lens in magnifying specimens as in the function of a
microscope. This device will be of great help to different people in various fields, such
as:
Educational Sector. Students and teachers will be able to observe various minute
specimens using this improvised microscope with ease and in maximized time. Using the
image captured by the cellular phone and projected in its monitor can let three to five
observers view the specimen at the same time. Teachers can directly point out the
important parts of the specimen and even capture a photo for future reference.
7
Field of Biological Science. This project can provide a wider understanding of
organisms that cannot be seen by the naked eye since creation and operation of this
cellular phone microscope is accessible and low-cost.
Scope and Limitations
This study focuses on the creation of an improvised microscope using a cellular
phone combined with a laser lens. The development of the device was limited on the
usage of a cellular phone specifically Iphone 5s and concave lens from unused laser
lights.
The quality of the images produced by the improvised device was evaluated using
a visual quality rating assessed by three respondents. The study was conducted from
June until August 2014 at Cavite National High School, Cavite City.
METHODOLOGY
Preparation of Materials

8
The primary materials needed in the creation of the improvised microscope are
lens from unused laser light and a cellphone. These two materials will provide the
magnifying power for the improvised microscope. The support parts of the microscope
include a 4x6-in wood serving as a base; three pieces 4-in bold, nine round nuts, two
winged nuts and five washers for attachment. For the stage, a 4x6 in plexiglass was used
as stage for the cellphone and a 2x6 in plexiglass for the specimen. A power drill was
used in boring holes in the wood and glass support parts.
Figure 1. Materials used in the development of the improvised cellular phone microscope.
Creation of the Improvised Microscope
Following Kmyoshino (2013) and IFLScience (2014) method in creating a
viewing stage, three holes were bored into the wooden 4x6-in base. Bolts were inserted

9
into the holes to fit the two layers of plexiglass. 2x6 in plexiglass specimen stage and
above is the 4 x6 in plexiglass cellphone stage. Washers and nuts were used to secure the
attached support stages of the device. A yarn was attached to an unused lever of a
mechanical liquid eraser to facilitate the adjustment of the specimen stage. See Figure 2
for the diagrammatical sketch of the device.
Figure 2. Diagrammatical sketch of the improvised device using ambient light.
Two versions of the device were created. The first version uses the ambient light
in the observation area. The second version is enclosed in a box made of illustration
board. This enclosed device has a built-in light system using an unused LED torch with
modified circuitry (Figure 3).
Cellular phone Stage
Laser Lens
Specimen Stage
Control Knob
Base
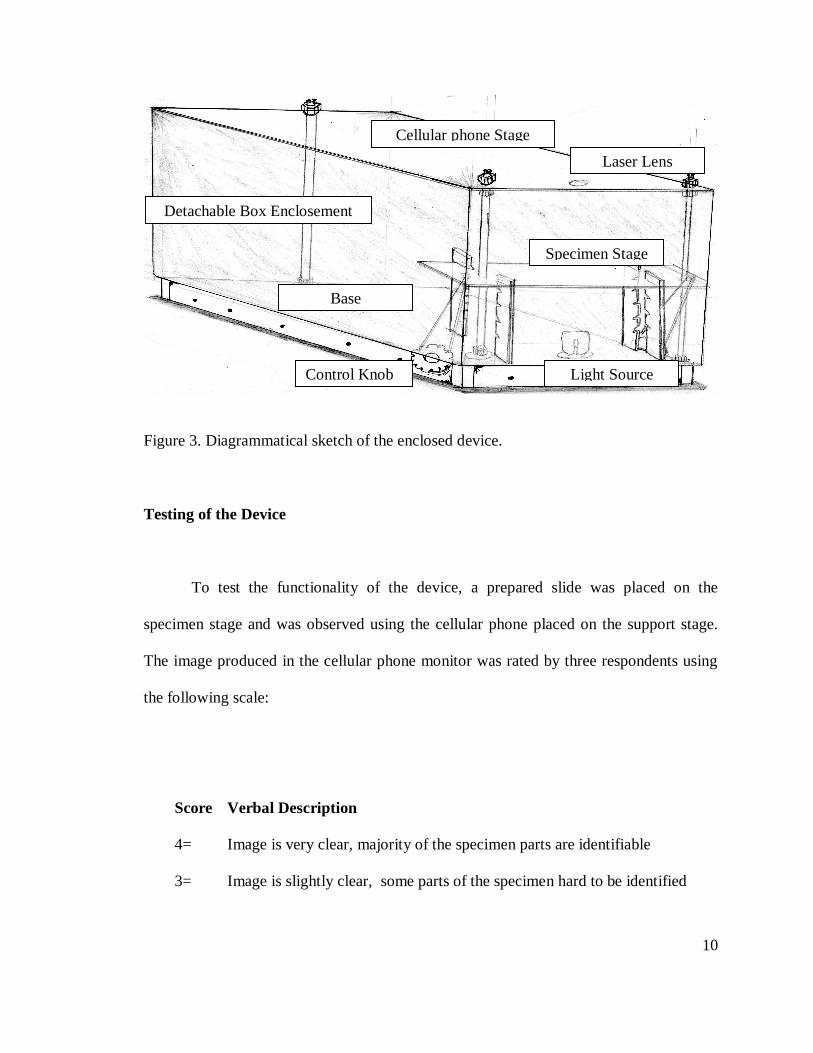
10
Figure 3. Diagrammatical sketch of the enclosed device.
Testing of the Device
To test the functionality of the device, a prepared slide was placed on the
specimen stage and was observed using the cellular phone placed on the support stage.
The image produced in the cellular phone monitor was rated by three respondents using
the following scale:
Score Verbal Description
4= Image is very clear, majority of the specimen parts are identifiable
3= Image is slightly clear, some parts of the specimen hard to be identified
Cellular phone Stage
Laser Lens
Specimen Stage
Control Knob
Base
Light Source
Detachable Box Enclosement
11
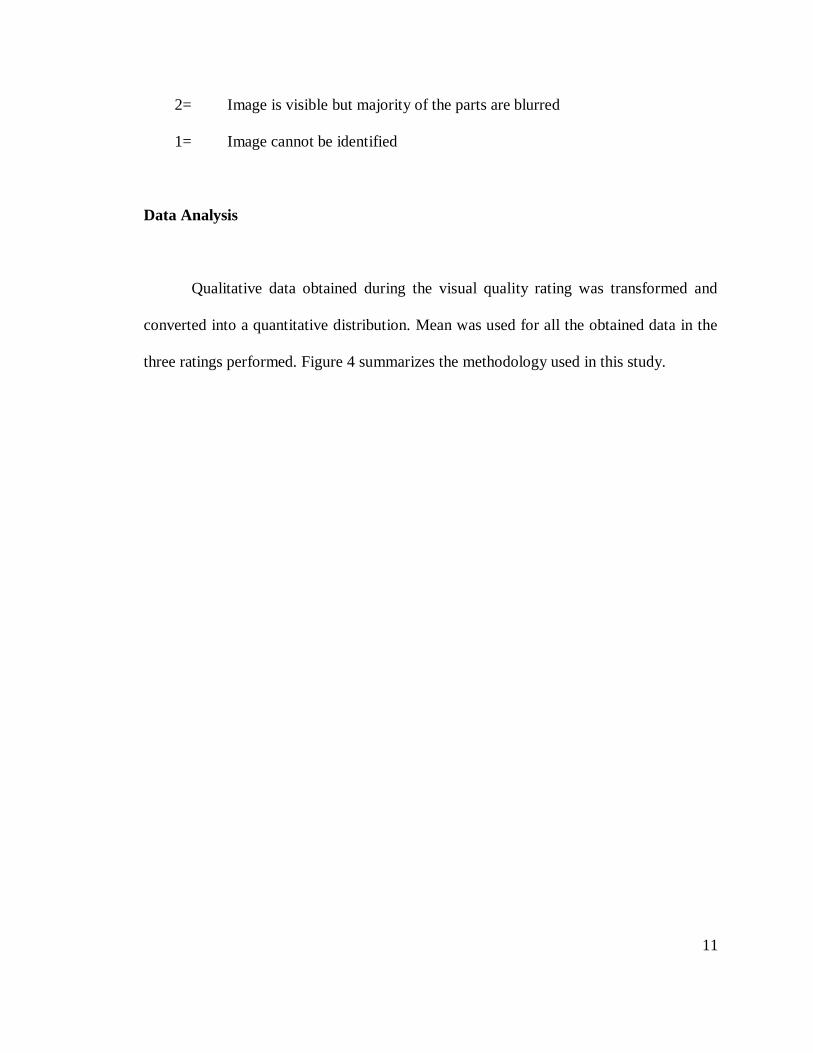
2= Image is visible but majority of the parts are blurred
1= Image cannot be identified
Data Analysis
Qualitative data obtained during the visual quality rating was transformed and
converted into a quantitative distribution. Mean was used for all the obtained data in the
three ratings performed. Figure 4 summarizes the methodology used in this study.

12
Figure 4. Assembly, testing, data gathering and analysis of the improvised microscope using smartphone.

13
RESULTS AND DISCUSSION
Specification and Operation of the Improvised Microscope
The created improvised microscope is composed of three parts—magnifying,
illuminating and support parts. The magnifying part is composed of convex lens form
unused laser light. To provide additional light source during the microscope observation,
an LED torch light was installed at the base of the device. Lastly, the support part of the
device is composed of the base which holds the two stages—specimen and cellular phone
stages. Below is the summary of the specification and operation of the device:
Table 1. Specification, installation and operation of the device.
Specification The base is made up of an 8x6 in wood, three 4 in bolts supported by
three round nuts and washer. This stage serves as the feet of the device
that holds the other stages. This also serves as the carrier of the light
source.
The specimen stage is a 2x6 in. plexi glass that can be adjusted using the
built-in lever made from strings and unused mechanical dispenser for
correction tape. This stage can be adjusted up and down by moving the
knob on the sides. This allows the focusing of specimen based on the size
of it.
The cellular phone stage is an 8x6 in. plexi glass locked by six round
nuts. This stage holds the lens and serves to hold the cellular phone

14
Figure 5. Created improvised microscope powered by cellular phone and laser lens.
during the experiment. In this stage the removed laser lens is installed.
A box enclosure can be placed to the device. This box enclosure can
cover the sides of the device for a more concentrated light system.
Installation Assembling is done by fixing the plexi glasses and locking it with the
nuts and washers.
Operation The distance of the specimen stage is adjusted based from the size of the
specimen used. The camera of the smartphone to be used is placed on top
of the lens in the cellular phone stage. Initial focusing can be done by
moving the knob in the specimen stage up and down.

15
Figure 6. Components of the created improvised microscope powered by cellular phone.
16
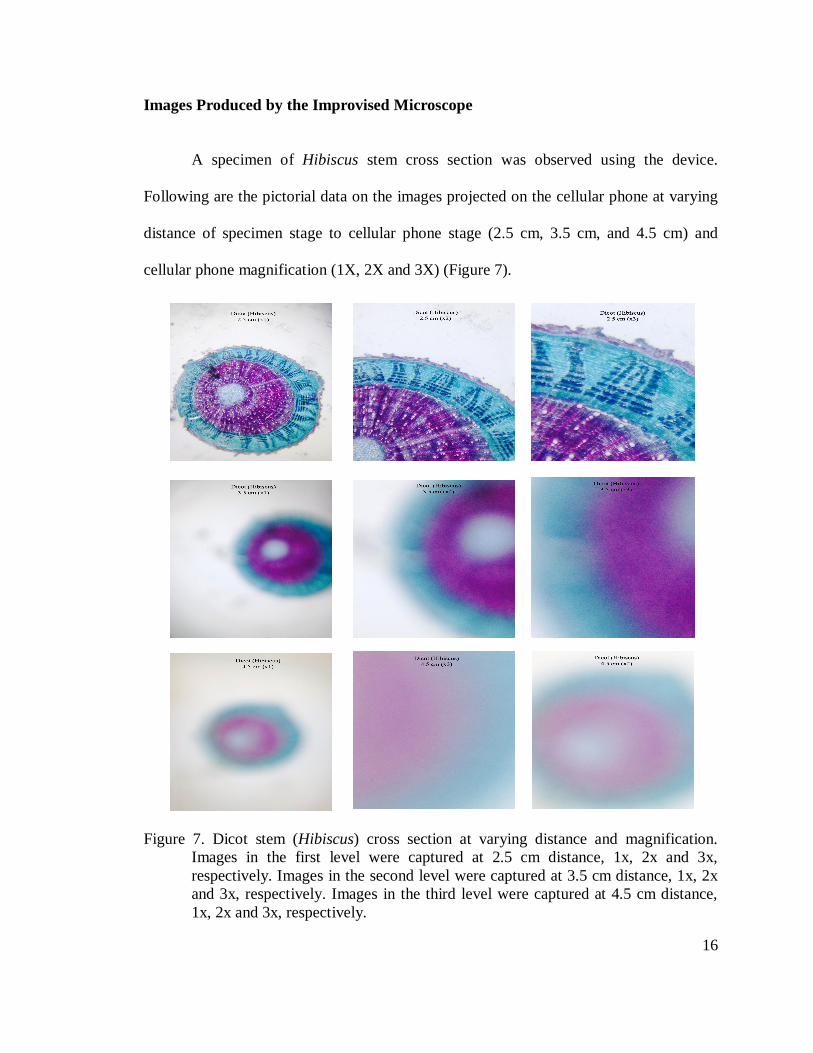
Images Produced by the Improvised Microscope
A specimen of Hibiscus stem cross section was observed using the device.
Following are the pictorial data on the images projected on the cellular phone at varying
distance of specimen stage to cellular phone stage (2.5 cm, 3.5 cm, and 4.5 cm) and
cellular phone magnification (1X, 2X and 3X) (Figure 7).
Figure 7. Dicot stem (Hibiscus) cross section at varying distance and magnification.
Images in the first level were captured at 2.5 cm distance, 1x, 2x and 3x, respectively. Images in the second level were captured at 3.5 cm distance, 1x, 2x and 3x, respectively. Images in the third level were captured at 4.5 cm distance, 1x, 2x and 3x, respectively.
17
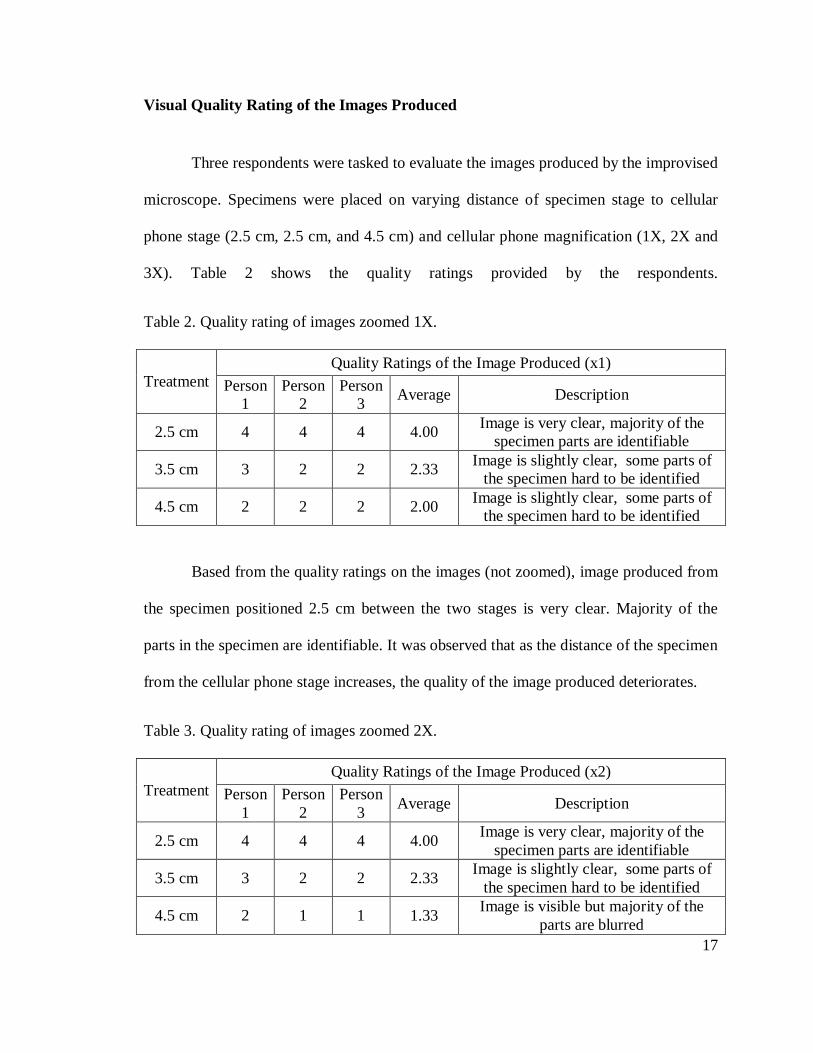
Visual Quality Rating of the Images Produced
Three respondents were tasked to evaluate the images produced by the improvised
microscope. Specimens were placed on varying distance of specimen stage to cellular
phone stage (2.5 cm, 2.5 cm, and 4.5 cm) and cellular phone magnification (1X, 2X and
3X). Table 2 shows the quality ratings provided by the respondents.
Table 2. Quality rating of images zoomed 1X.
Treatment Quality Ratings of the Image Produced (x1)
Person 1
Person 2
Person 3 Average Description
2.5 cm 4 4 4 4.00 Image is very clear, majority of the specimen parts are identifiable
3.5 cm 3 2 2 2.33 Image is slightly clear, some parts of the specimen hard to be identified
4.5 cm 2 2 2 2.00 Image is slightly clear, some parts of the specimen hard to be identified
Based from the quality ratings on the images (not zoomed), image produced from
the specimen positioned 2.5 cm between the two stages is very clear. Majority of the
parts in the specimen are identifiable. It was observed that as the distance of the specimen
from the cellular phone stage increases, the quality of the image produced deteriorates.
Table 3. Quality rating of images zoomed 2X.
Treatment Quality Ratings of the Image Produced (x2)
Person 1
Person 2
Person 3 Average Description
2.5 cm 4 4 4 4.00 Image is very clear, majority of the specimen parts are identifiable
3.5 cm 3 2 2 2.33 Image is slightly clear, some parts of the specimen hard to be identified
4.5 cm 2 1 1 1.33 Image is visible but majority of the parts are blurred

18
Based from the quality ratings on the images zoomed two times, image produced
from the specimen positioned 2.5 cm between the two stages is very clear. Majority of
the parts in the specimen are identifiable. It was observed that as the distance of the
specimen from the cellular phone stage increases, the quality of the image produced
deteriorates.
Table 4. Quality rating of images zoomed 3X.
Treatment Quality Ratings of the Image Produced (x3)
Person 1
Person 2
Person 3 Average Description
2.5 cm 4 4 4 4.00 Image is very clear, majority of the specimen parts are identifiable
3.5 cm 3 2 2 2.33 Image is very clear, majority of the specimen parts are identifiable
4.5 cm 2 1 1 1.33 Image is visible but majority of the parts are blurred
Based from the quality ratings on the images zoomed two times, image produced
from the specimen positioned 2.5 cm between the two stages is very clear. Majority of
the parts in the specimen are identifiable. It was observed that as the distance of the
specimen from the cellular phone stage increases, the quality of the image produced
deteriorates.
As a summary, the distance between the specimen stage and cellular phone stage
that produces the best quality of image is 2.5 cm. The image quality does not vary as the
image is being magnified using the zoom feature of the cellular phone.

19
Images Produced in the Improvised Microscope and Compound Light Microscope
Figure 8 shows the images produced in the improvised device (left side) and the
images from a compound microscope (right side).
Figure 8. Images captured from the improvised microscope (left) and compound light microscope (right). (First level: Ascaris cross-section; Second level: Hibiscus stem cross-section; Third level: Fern prothallia sporophyte)
20
Based from the images captured, it can be inferred that components of the image
can be seen at a larger scope or greater area in the improvised device. Vividness of the
image in the improvised device is also evident. This can be attributed to the auto-focus
function of cellular phone cameras that makes the image clear. One of the advantages that
can be obtained from the usage of the improvised device is the ease in observation. One
of the problems encountered in microscope viewing is the high risk of experiencing eye.
With the improvised device, viewing can be done at a farther distance and maximized
number of viewers.
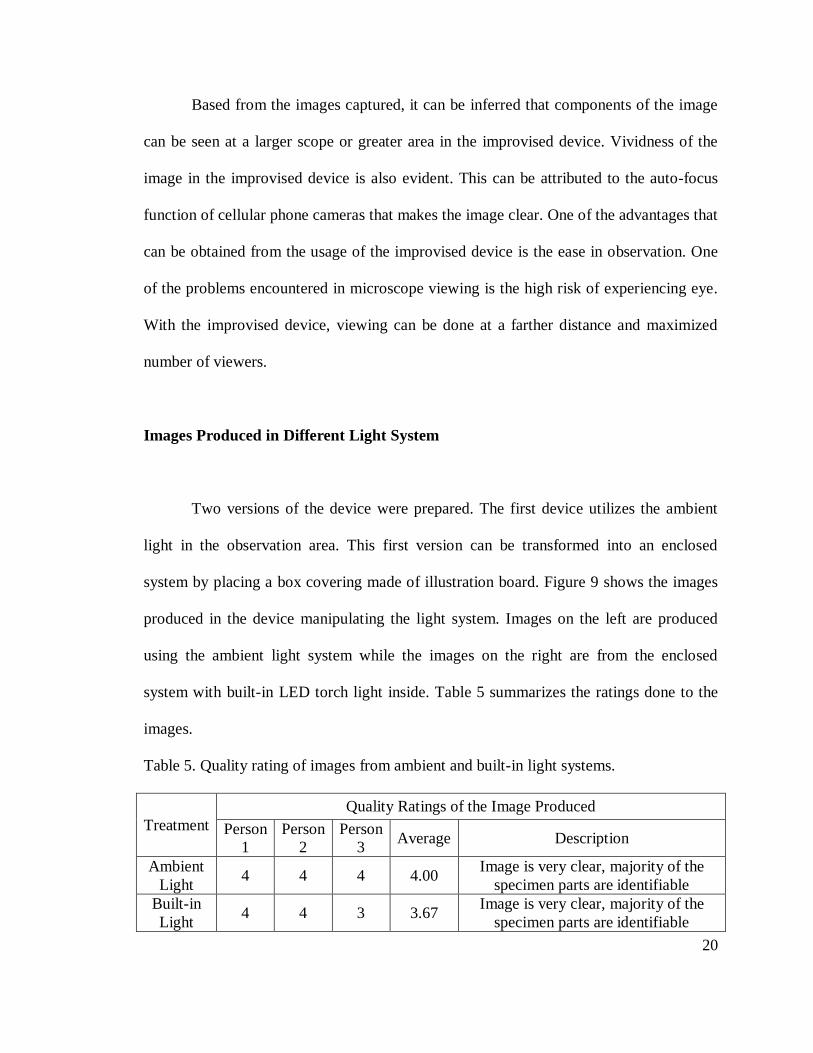
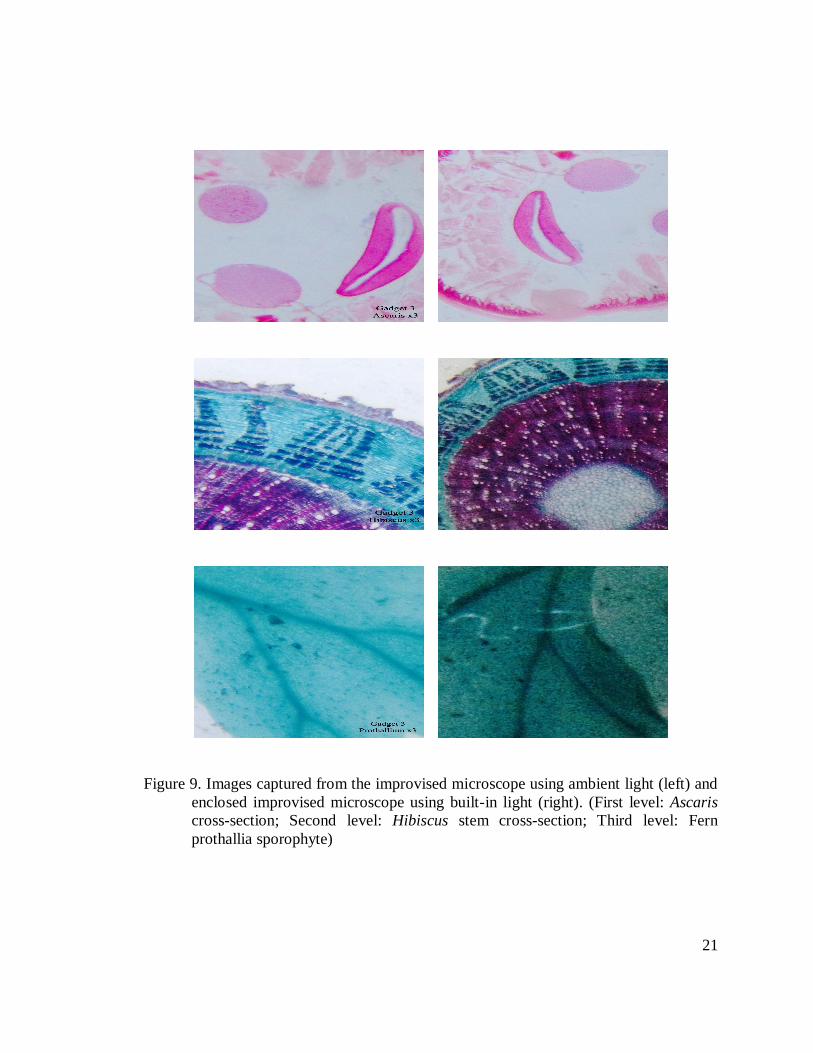
Images Produced in Different Light System
Two versions of the device were prepared. The first device utilizes the ambient
light in the observation area. This first version can be transformed into an enclosed
system by placing a box covering made of illustration board. Figure 9 shows the images
produced in the device manipulating the light system. Images on the left are produced
using the ambient light system while the images on the right are from the enclosed
system with built-in LED torch light inside. Table 5 summarizes the ratings done to the
images.
Table 5. Quality rating of images from ambient and built-in light systems.
Treatment Quality Ratings of the Image Produced
Person 1
Person 2
Person 3 Average Description
Ambient Light 4 4 4 4.00 Image is very clear, majority of the
specimen parts are identifiable Built-in Light 4 4 3 3.67 Image is very clear, majority of the
specimen parts are identifiable
21
Uncovered (3x) ascaris
Covered (3x) ascaris
Uncovered (3x) hibiscus
Covered (3x) hibiscus
Uncovered (3x) fern
Covered (3x) fern
Figure 9. Images captured from the improvised microscope using ambient light (left) and
enclosed improvised microscope using built-in light (right). (First level: Ascaris cross-section; Second level: Hibiscus stem cross-section; Third level: Fern prothallia sporophyte)

22
Both of the images were rated to be clear and identifiable, in the average. One
conspicuous feature of the images in the ambient light system is that the contrast between
the background and the specimen itself is not the evident. This can be attributed to the
uncontrolled amount of light that enters the system; light can enter in any direction. In
contrast with the enclosed system, brightness of the image is darkened making some parts
of the specimen to be sharpened. However, it can also be observed that there will be
times that the image will be to dark or too light depending on the slide preparation. This
scenario suggests that the built-in light source inside can be modified by adding an
adjustor to the brightness of light.
Observing Opaque Materials in the Improvised Device
In studying Biology, particularly diversity in organisms, morphological structures
of multicellular individuals are of great importance. These multicellular individuals vary
in morphology both in the external and internal features. Thus, the use of magnifying
devices is necessary to put details on their morphology. Using the improvised
microscope, observation of various opaque materials was done using the abaxial side of
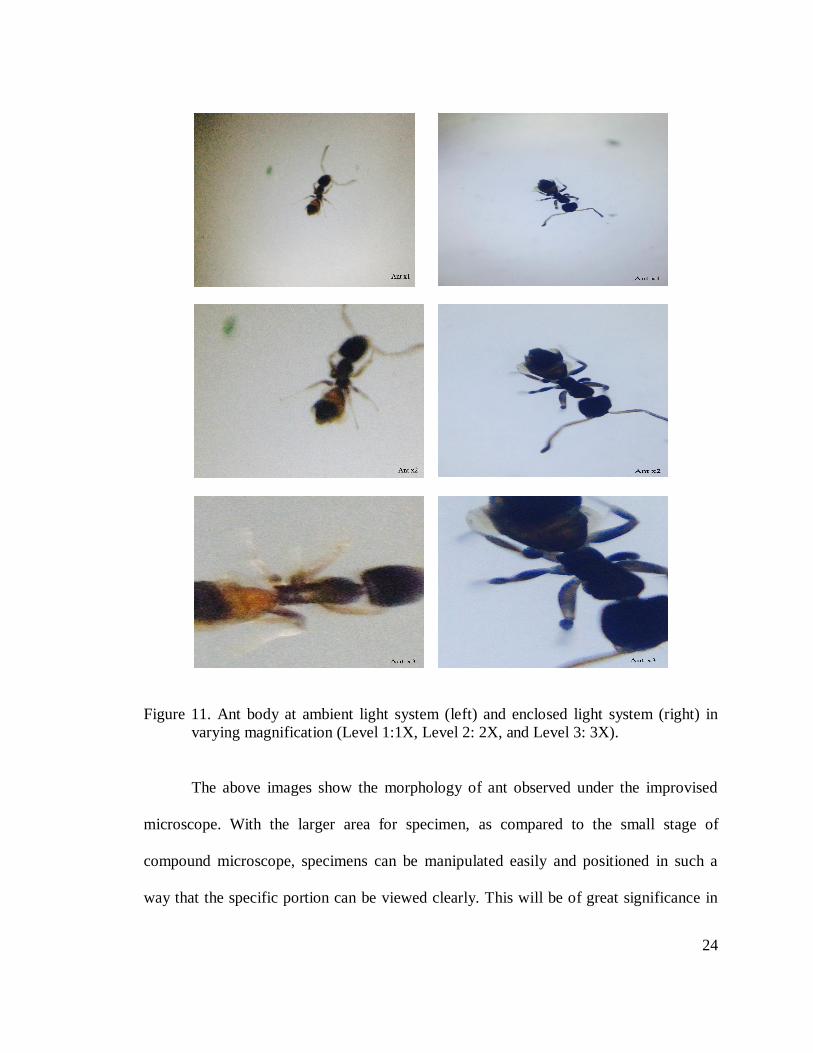
the leaf and ant body. Figure 10 and 11 show the images of the leaf abaxial and ant body.
Table 6 includes the quality ratings of the images produced.
Table 6. Quality rating of images from ambient and built-in light systems.
Treatment Quality Ratings of the Image Produced Person 1 Person 2 Person 3 Ave Description
Ambient Light 4 4 4 4.00 Image is very clear, parts are identifiable
Built-in Light 4 4 3 3.67 Image is very clear, parts are identifiable

23
Uncovered (1x) specimen 2
Covered (1x) specimen 2
Uncovered (2x) specimen 2
Covered (2x) specimen 2
Uncovered (3x) specimen 2
Covered (3x) specimen 2
Figure 10. Leaf abaxial side at ambient light system (left) and enclosed light system (right) in varying magnification (Level 1:1X, Level 2: 2X, and Level 3: 3X).
Venation pattern of the leaf, up to the tertiary level can be observed clearly. This
capability of the device to observe opaque materials increases its functionality in
observing specimens in the field with ease in bringing a portable microscope.
24
Uncovered (1x) specimen 1
Covered (1x) specimen 1
Uncovered (2x) specimen 1
Covered (2x) specimen 1
Uncovered (3x) specimen 1
Covered (3x) specimen 1
Figure 11. Ant body at ambient light system (left) and enclosed light system (right) in varying magnification (Level 1:1X, Level 2: 2X, and Level 3: 3X).
The above images show the morphology of ant observed under the improvised
microscope. With the larger area for specimen, as compared to the small stage of
compound microscope, specimens can be manipulated easily and positioned in such a
way that the specific portion can be viewed clearly. This will be of great significance in

25
understanding behavior of various organisms by observing live movements of the
organism or even taking a video or directly connecting the smart phone to a larger screen
like television screen, computer screen or even LED projectors.
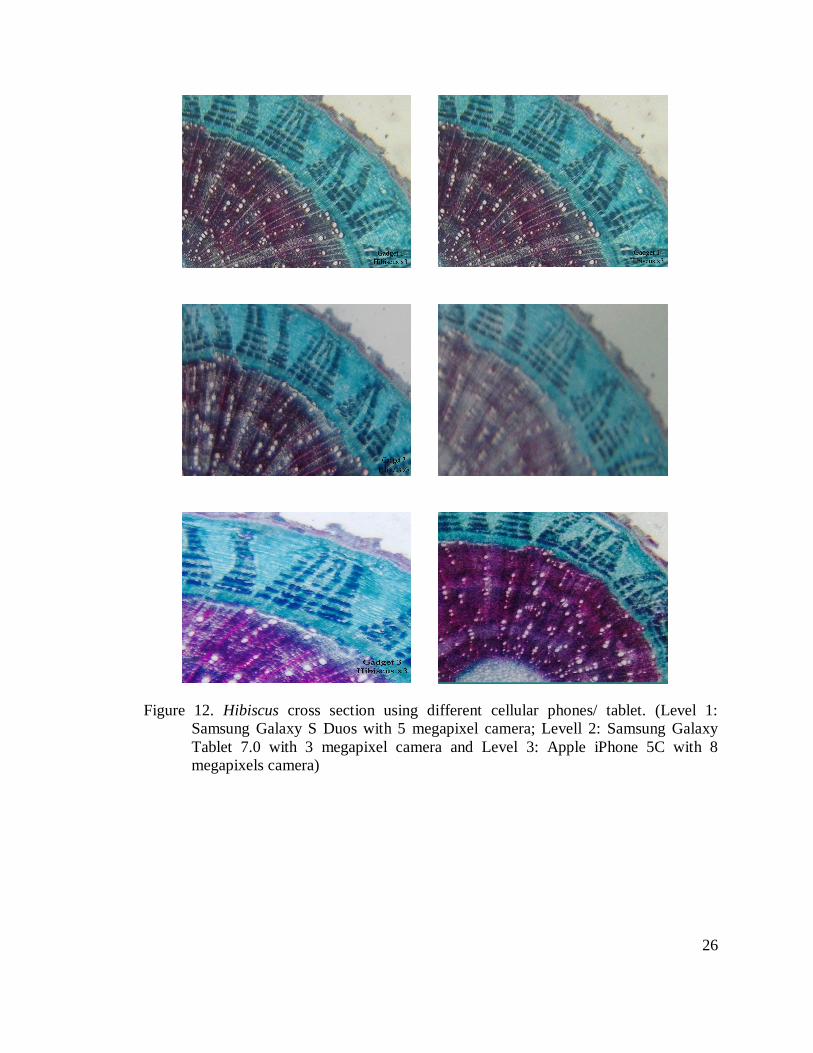
Images Captured Using Different Cellular Phones (Tablet)
Compatibility of the device in varying gadgets was also tested. Three different
devices were fit into the stage and the images seen were captured (Figure 12). The
following devices were used in capturing the images:
1. Samsung Galaxy S Duos with 5 megapixel camera
2. Samsung Galaxy Tablet 7.0 with 3 megapixel camera
3. Apple iPhone 5C with 8 megapixels camera
The captured images suggest that the improvised microscope is compatible to any
kind of cellular phone or tablet that has a rear camera. The quality of images varies with
the specifications of the built-in camera. Nonetheless, the parts of the specimen are still
identifiable but if the observation requires a more detailed examination of the specimen
parts then it is best to use the cellular phone with the greatest quality of image that can be
produced.
26
Figure 12. Hibiscus cross section using different cellular phones/ tablet. (Level 1: Samsung Galaxy S Duos with 5 megapixel camera; Levell 2: Samsung Galaxy Tablet 7.0 with 3 megapixel camera and Level 3: Apple iPhone 5C with 8 megapixels camera)

27
SUMMARY, CONCLUSIONS AND RECOMMENDATIONS
This study primarily aims to create an improvised microscope using a cellular
phone camera and laser lens. The created improvised microscope is composed of three
parts—magnifying, illuminating and support parts. The magnifying part is composed of
convex lens form unused laser light. To provide additional light source during the
microscope observation, an LED torch light was installed at the base of the device.
Lastly, the support part of the device is composed of the base which holds the two
stages—specimen and cellular phone stages. The device can be operated by adjusting the
distance of the specimen stage based from the size of the specimen used. The camera of
the cellular phone to be used is placed on top of the lens in the cellular phone stage.
Initial focusing can be done by moving the knob in the specimen stage up and down.
Three specimens were observed under the microscope specifically dicot stem
(Hibiscus), ascaris cross section and fern prothallia. Based from the quality ratings on the
images, image produced from the specimen positioned 2.5 cm between the two stages is
very clear. Majority of the parts in the specimen are identifiable. It was observed that as
the distance of the specimen from the cellular phone stage increases, the quality of the
image produced deteriorates. As a summary, the distance between the specimen stage and
cellular phone stage that produces the best quality of image is 2.5 cm. The image quality
does not vary as the image is being magnified using the zoom feature of the cellular
phone.

28
The images captured from the improvised microscope were compared to images
captured from compound light microscope. Based from the observations done,
components of the image can be seen at a larger scope or greater area in the improvised
device. Vividness of the image in the improvised device is also evident. This can be
attributed to the auto-focus function of cellular phone cameras that makes the image
clear. One of the advantages that can be obtained from the usage of the improvised device
is the ease in observation. One of the problems encountered in microscope viewing is the
high risk of experiencing eye. With the improvised device, viewing can be done at a
farther distance and maximized number of viewers.
Two versions of the device were prepared. The first device utilizes the ambient
light in the observation area. This first version can be transformed into an enclosed
system by placing a box covering made of illustration board. Both of the images were
rated to be clear and identifiable, in the average. One conspicuous feature of the images
in the ambient light system is that the contrast between the background and the specimen
itself is not the evident. This can be attributed to the uncontrolled amount of light that
enters the system; light can enter in any direction. In contrast with the enclosed system,
brightness of the image is darkened making some parts of the specimen to be sharpened.
Various opaque materials were also subjected to observation under the improvised
microscope. Images captured were able to show the different morphological features of
leaf abaxial side and ant external morphology. This can provide an avenue for better
exploration of diversity in flora and fauna.

29
Lastly, the improvised microscope was tested in different cellular phones and
tablet to check for its compatibility. All of the tested devices were able to provide images
of the specimen. However, the quality of the images varies depending on the
specifications of the gadget. There is no single gadget is compatible to the improvised
microscope.
The improvised cellular phone microscope is comparable to the usual compound
light microscope used in biological observations. The device was developed using
inexpensive and simple in structure materials. Test results from the prototype system
showed that the improvised microscope was able to achieve the design requirements. The
simplicity and practicality of the equipment designed was considered for future
replication and modification.
It is suggested that further exploration of the lens usage be done to improve the
quality of the image under observation. Also, adding other light source or experimenting
on the position of the light source in the setup may increase the vividness and sharpness
of the images.

30
BIBLIOGRAPHY
Arpa, A. ; Wetzstein, G. ; Lanman, D. ; Raskar, R. 2012. Single Lens Off-Chip Cell
Microscopy. Computer Vision and Pattern Recognition Workshops (CVPRW),
2012 IEEE Computer Society Conference
Fletcher D. 2008. Cellscope could offer Low-Cost Protable Options for Disease
Diagnosis.Journal of Microscopy and Ultrastructure 1(1): 24-25
IFLScience. 2014. How to build a smartphone microscope stand for $10.
<http:;//www.iflscience.com/technology/how-build-smartphone-microscope-
stand-10> accessed July 15, 2014.
Kmyoshino. 2013, Octiber 16. Turn Your Smartphone Into a Digital Microscope. [Video
File] < http://www.youtube.com/watch?v=KpMTkr_aiYU> accessed June 4, 2014
Lee, S. 2014. Turning Smartphone into Mircoscope using droplet lens. Journal oAdvance
Mircroscopy Research 1(18) : 47-48
Morrison AS, Gardner JM. 2013.Smart phone microscopic photography: A novel tool for
physicians and trainees. Arch Pathol Lab Med

31
Zimic, M. 2008. Can the power of mobile phones be used to improve tuberculosis
diagnosis in developing countries.Transaction of the Royal Society of Medicine
and Hygiene. 1(103): 683-684

32
ACKNOWLEDGMENT
This project is made possible through the guidance of our teacher, the
encouragement from our friends and financial need from our family and especially God
who give granted our wish to submit all of the requirements. We dedicate our
acknowledgement of gratitude towards the following advisers and contributors.
Firstly, we would like to say thank you to our teacher, Mr. Joald Calpo for your
support and setting our mind for a new goal. He reads our paper and give us his time to
help in creating our research paper.
Secondly, Mr. Nestor Doñina in teaching us on how the testing process of our
device is done.
Finally we really thank our parents, family and friends who provided our financial
support and encourage us in finishing this project. We could not succeed with them.