skill 1: create a gmail account - university of houston by velvette laurence 2013 for assistance...
TRANSCRIPT

_____________________________________________________________________________________________ Created by Velvette Laurence 2013 For assistance visit the CITE Help Desk or call 713-743-9833
SKILL 1: Create a Gmail Account
Objective: Students will create a Gmail account. If a
Gmail account already exists skip to skill 2 to create a
GoogleSite.
Website: http://mail.google.com/
Video Tutorial: http://youtu.be/cfO_iRv9Jro
Suggestion: Create a Gmail address that is
professional in nature. Do not include your
birth year or inappropriate nicknames as your
Gmail address. Your Cougarnet ID is a good
option.

_____________________________________________________________________________________________ Created by Velvette Laurence 2013 For assistance visit the CITE Help Desk or call 713-743-9833
SKILL 2: Create a Google Site
Objective: After creating a Gmail address, students will visit https://sites.google.com/, log in with their Gmail
username/password, and begin steps to set up an electronic portfolio website based on a provided UH template.
Tutorial:
1. Visit https://sites.google.com/
2. Log in with your Gmail credentials.
3. Click on the "Create" button.
4. Click the "Browse the gallery for more"
link
5. Type "Velvette" in the search text field, click
on the “Search” icon, select the "Educator
Portfolio Template" thumbnail, and click on the "Select" button.
Velvette Laurence (Instructional Designer)
is the creator of our UH Google Sites
electronic portfolio template.
_____________________________________________________________________________________________ Created by Velvette Laurence 2013 For assistance visit the CITE Help Desk or call 713-743-9833
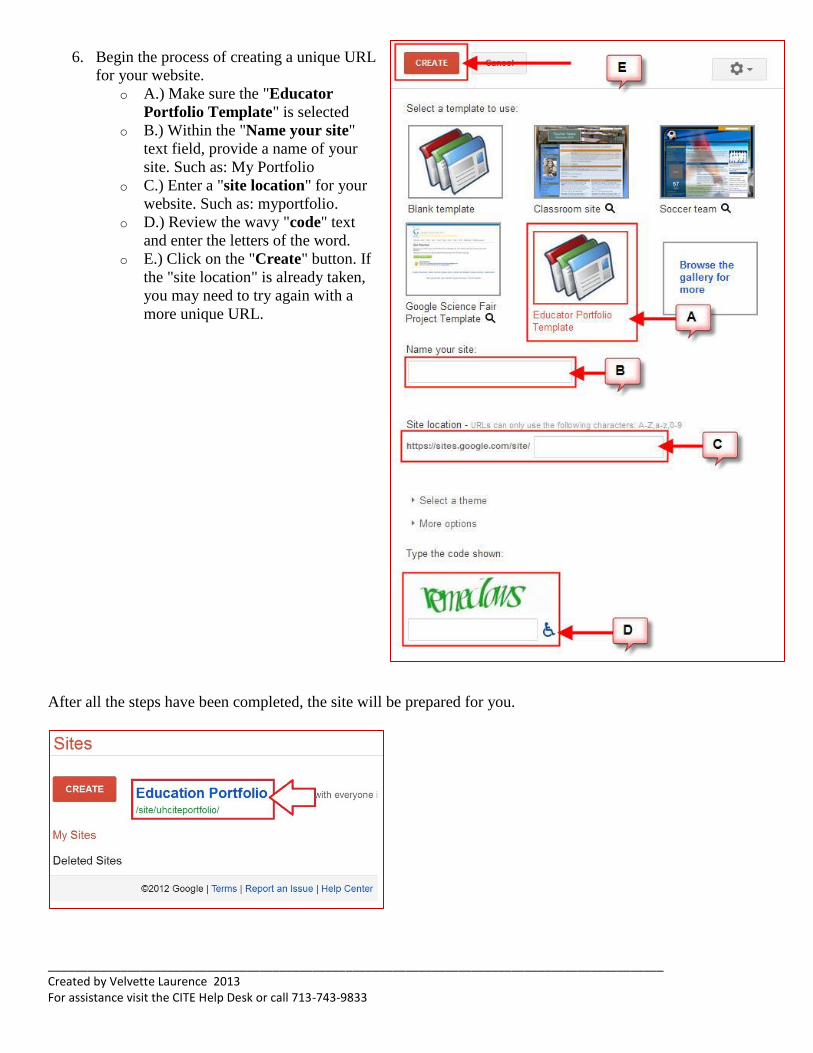
6. Begin the process of creating a unique URL
for your website.
o A.) Make sure the "Educator
Portfolio Template" is selected
o B.) Within the "Name your site"
text field, provide a name of your
site. Such as: My Portfolio
o C.) Enter a "site location" for your
website. Such as: myportfolio.
o D.) Review the wavy "code" text
and enter the letters of the word.
o E.) Click on the "Create" button. If
the "site location" is already taken,
you may need to try again with a
more unique URL.
After all the steps have been completed, the site will be prepared for you.
_____________________________________________________________________________________________ Created by Velvette Laurence 2013 For assistance visit the CITE Help Desk or call 713-743-9833
SKILL 3: Add/Edit Content
Objective: Students will add or edit content on their Google Site portfolio.
Tutorial:
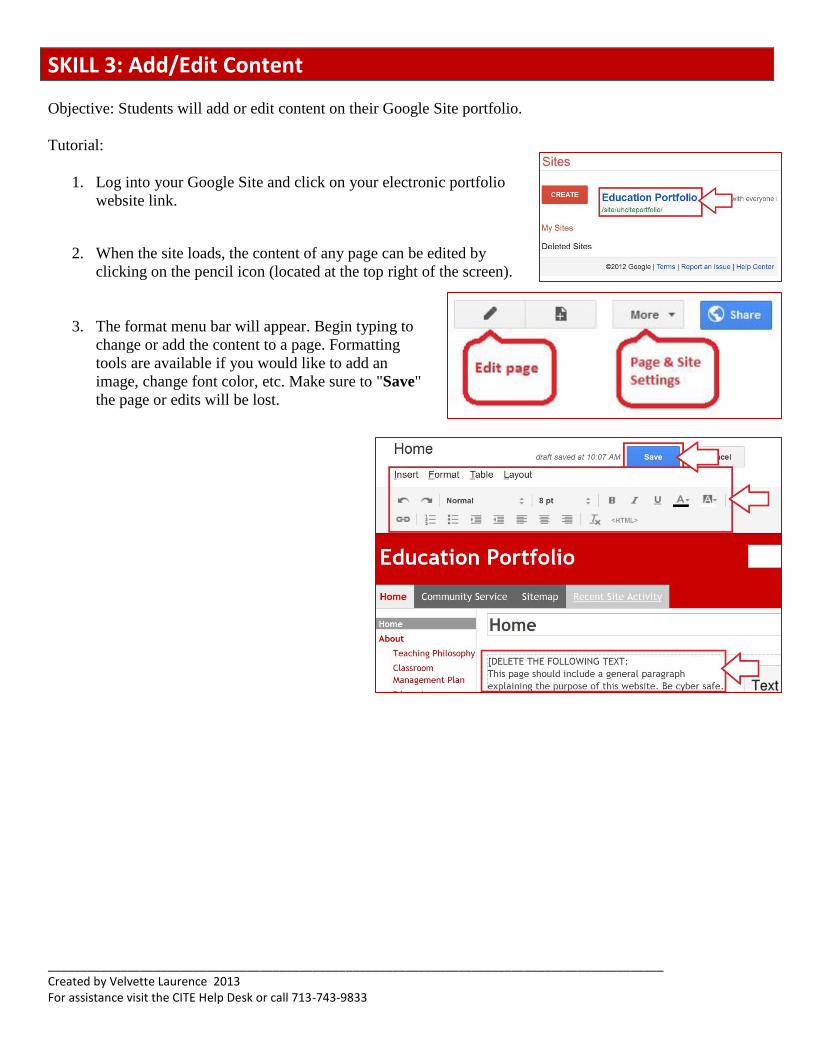
1. Log into your Google Site and click on your electronic portfolio
website link.
2. When the site loads, the content of any page can be edited by
clicking on the pencil icon (located at the top right of the screen).
3. The format menu bar will appear. Begin typing to
change or add the content to a page. Formatting
tools are available if you would like to add an
image, change font color, etc. Make sure to "Save"
the page or edits will be lost.

_____________________________________________________________________________________________ Created by Velvette Laurence 2013 For assistance visit the CITE Help Desk or call 713-743-9833
4. To edit a text gadget, click on it and choose
the "Properties" gear icon.
5. Edit the "Text Box Properties" as needed and
click on the "Save" button.

_____________________________________________________________________________________________ Created by Velvette Laurence 2013 For assistance visit the CITE Help Desk or call 713-743-9833
6. To change the footer of your site, click on the "More"
option (located at the top right of the page) and choose
"Edit Site Layout," and click in the footer area to edit.
7. An “Edit site footer” window will appear. Edit the text
as necessary, click “OK” and click “Close” (located at
the top right of the page) to exit the “Edit Site layout”
view.

_____________________________________________________________________________________________ Created by Velvette Laurence 2013 For assistance visit the CITE Help Desk or call 713-743-9833
SKILL 4: Attach PDF Files
Objective: Students will attach .PDF files to any the necessary pages.
Tutorial:
1. All documents must be saved
as a .PDF first. Visit a page on
your site that needs a
document to be attached. At
the bottom of the page click
the "Add Files" link.
2. Browse for the .PDF file on
your computer to attach.

_____________________________________________________________________________________________ Created by Velvette Laurence 2013 For assistance visit the CITE Help Desk or call 713-743-9833
SKILL 5: Add/Edit Screenshots
Objective: Students will take screen shots of their activities and use a free tool to take screenshots.
For MAC/Apple users, I would recommend using the following key strokes: Command+Shift+4.
MAC instructions to take a screenshot.
For PC/Windows users, I recommend using the “Snipping Tool.”
PC instructions to take a screenshot.
------------ The following steps use the Snipping Tool to take screenshot and save the image. ------------
Tutorial:
1. Open an activity document or visit an activity URL that has
been created at an earlier date.
2. Click on the windows start menu logo and locate “Snipping
Tool.”
3. When the program is open, the screen will gray out and a
hash mark/cross ( + ) will appear. Click and drag a box
around the area you would like to capture.

_____________________________________________________________________________________________ Created by Velvette Laurence 2013 For assistance visit the CITE Help Desk or call 713-743-9833
4. Save the screenshot to a familiar location
and rename it to something meaningful
(such as “GlogsterScreenshot”). The image
can be saved as a .PNG, .JPG, or .GIF file.
_____________________________________________________________________________________________ Created by Velvette Laurence 2013 For assistance visit the CITE Help Desk or call 713-743-9833
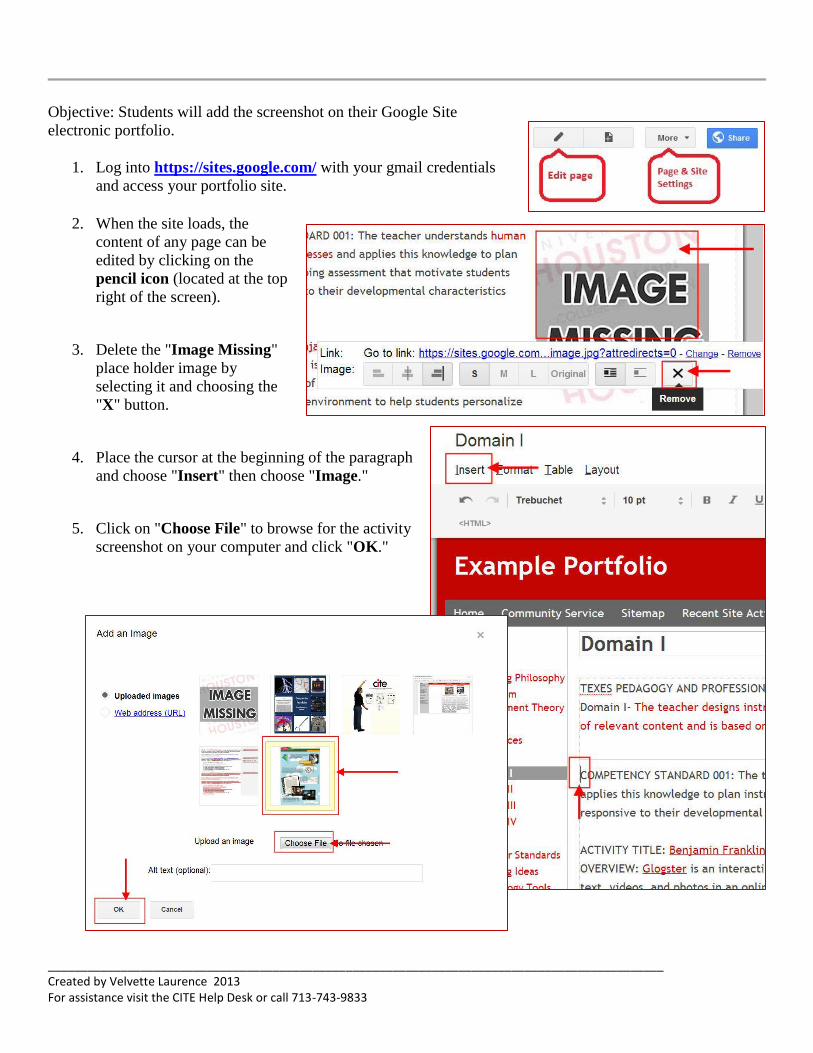
Objective: Students will add the screenshot on their Google Site
electronic portfolio.
1. Log into https://sites.google.com/ with your gmail credentials
and access your portfolio site.
2. When the site loads, the
content of any page can be
edited by clicking on the
pencil icon (located at the top
right of the screen).
3. Delete the "Image Missing"
place holder image by
selecting it and choosing the
"X" button.
4. Place the cursor at the beginning of the paragraph
and choose "Insert" then choose "Image."
5. Click on "Choose File" to browse for the activity
screenshot on your computer and click "OK."

_____________________________________________________________________________________________ Created by Velvette Laurence 2013 For assistance visit the CITE Help Desk or call 713-743-9833
Objective: Students will resize the screenshot to fit the portfolio.
1. The image may automatically be too large for the page. Select the image. A menu option will appear
directly below the image or above it.
2. Choose the right align icon, small icon, and wrap on icon.
_____________________________________________________________________________________________ Created by Velvette Laurence 2013 For assistance visit the CITE Help Desk or call 713-743-9833
SKILL 6: Hyperlinks
Objective: Students will hyperlink their activity titles to the actual class activity that was created. The following
tutorial will demonstrate how to hyperlink to an online assignment (such as Glogster).
Tutorial:
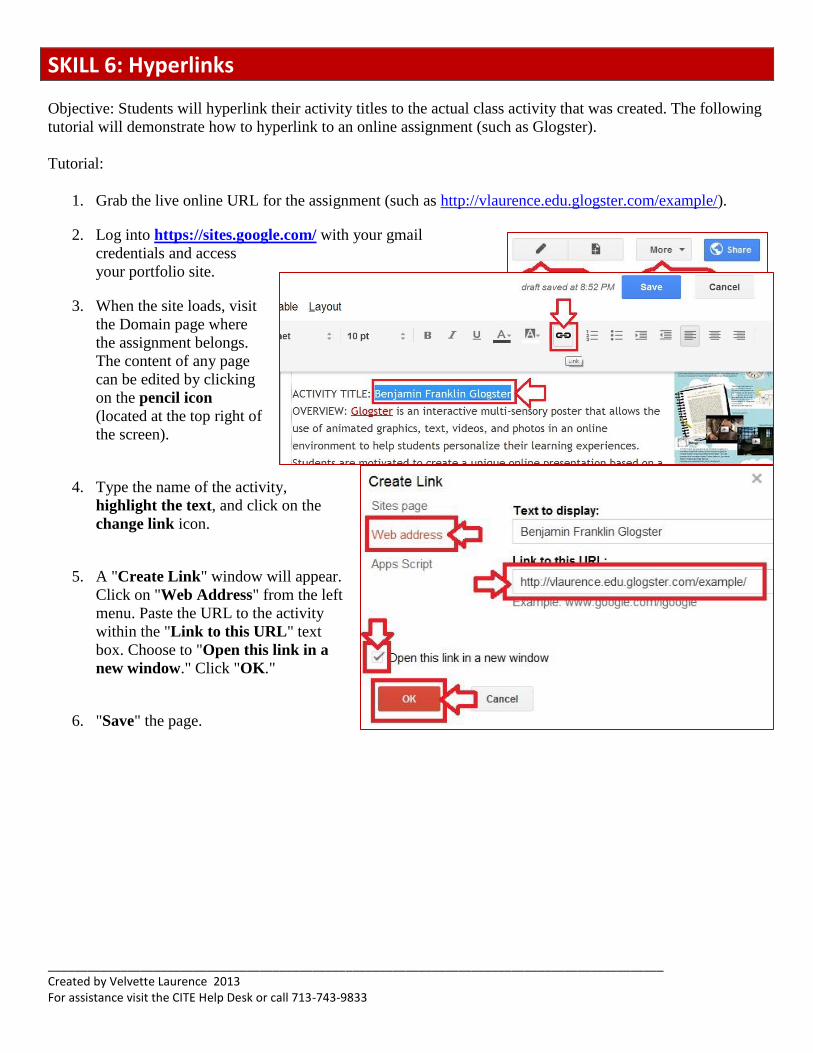
1. Grab the live online URL for the assignment (such as http://vlaurence.edu.glogster.com/example/).
2. Log into https://sites.google.com/ with your gmail
credentials and access
your portfolio site.
3. When the site loads, visit
the Domain page where
the assignment belongs.
The content of any page
can be edited by clicking
on the pencil icon
(located at the top right of
the screen).
4. Type the name of the activity,
highlight the text, and click on the
change link icon.
5. A "Create Link" window will appear.
Click on "Web Address" from the left
menu. Paste the URL to the activity
within the "Link to this URL" text
box. Choose to "Open this link in a
new window." Click "OK."
6. "Save" the page.
_____________________________________________________________________________________________ Created by Velvette Laurence 2013 For assistance visit the CITE Help Desk or call 713-743-9833
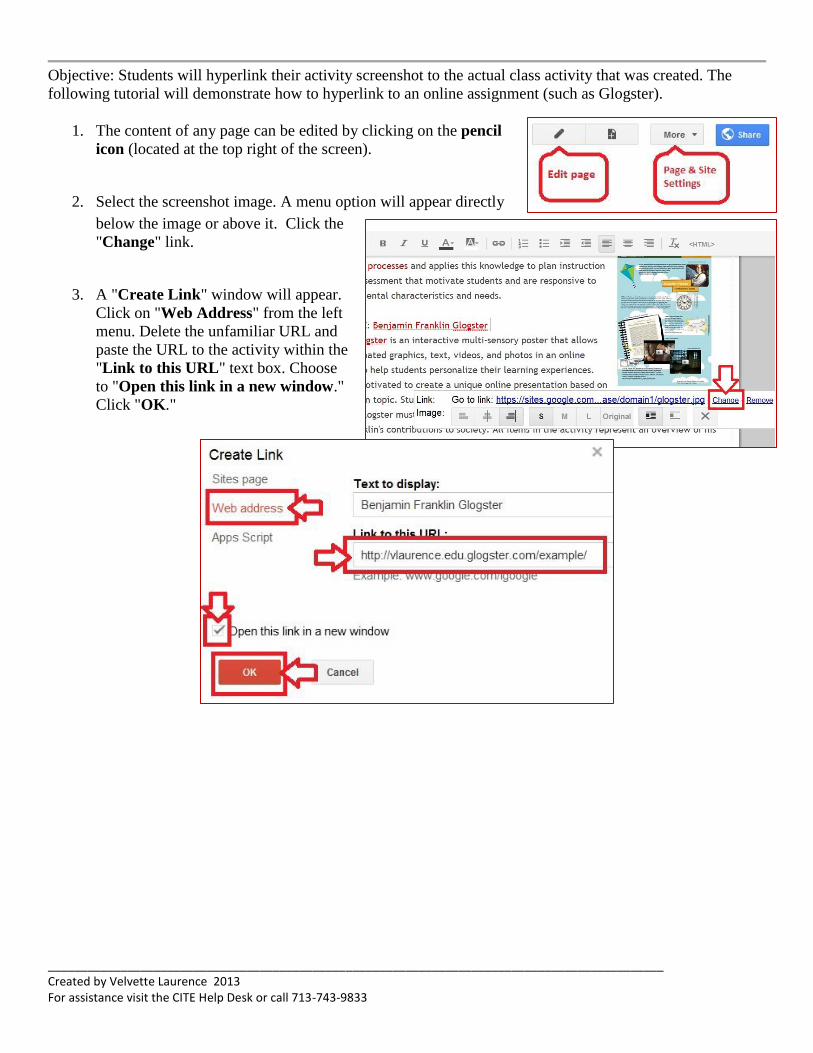
Objective: Students will hyperlink their activity screenshot to the actual class activity that was created. The
following tutorial will demonstrate how to hyperlink to an online assignment (such as Glogster).
1. The content of any page can be edited by clicking on the pencil
icon (located at the top right of the screen).
2. Select the screenshot image. A menu option will appear directly
below the image or above it. Click the
"Change" link.
3. A "Create Link" window will appear.
Click on "Web Address" from the left
menu. Delete the unfamiliar URL and
paste the URL to the activity within the
"Link to this URL" text box. Choose
to "Open this link in a new window."
Click "OK."

_____________________________________________________________________________________________ Created by Velvette Laurence 2013 For assistance visit the CITE Help Desk or call 713-743-9833
Objective: Students will hyperlink documents (such a Microsoft Publisher file) to the activity title and
screenshot.
1. Visit the Domain page for an assignment that was not
created using an online tool. The content of any page can
be edited by clicking on the pencil icon (located at the top
right of the screen).
2. Scroll down to the page that has a file
attached to it. Right-click on the title of
the file, choose "Copy link Address." If
the option is not available, click on the
title. The document will open in an
internet browser and copy the link.
3. Type the name of the activity in the
body of the page, highlight the text,
and click on the change link icon. A
"Create Link" window will appear.
Click on "Web Address" from the left
menu. Paste the long google doc URL
within the "Link to this URL" text box.
Choose to "Open this link in a new window." Click "OK."
4. Select the screenshot image. A menu option will appear directly below the image or above it. Click the
"Change" link. A "Create Link" window will appear. Click on "Web Address" from the left menu.
Delete the unfamiliar URL and paste the long google doc URL to the activity within the "Link to this
URL" text box. Choose to "Open this link in a new window." Click "OK."