single control bathroom faucet · leak from under handle damaged cartridge remove handle. replace...

1
Bathroom Faucet With Pop-Up Before You Begin Check to make sure you have the following: Troubleshooting Guide Minor problems often can be fixed without a plumber. Before doing any work on the faucet, shut off water supply and close stopper or drain to avoid losing small parts. n o i t u l o S e s u a C m e l b o r P Leak from spout Damaged or dirty seals Disassemble faucet, remove cartridge. Clean or replace cartridge if necessary. Reassembel. . Leak from under handle Damaged cartridge Remove handle. Replace cartridge. Uneven water spray Clogged aerator Remove aerator. Clean or replace aerator if necessary. Leak from around aerator Bad aerator seal Remove aerator. Check to see that seal is flat and undamaged. Replace aerator if necessary. Water drains slowly or not at all Clogged drain Remove stopper. Remove visible debris. If still clogged, remove and clean trap. Reassemble. Replacement Parts Keep this manual for ordering replacement parts. 10115LF 10116LF Tools and supplies that will help simplify the installation of your new faucet: adjustable wrench pipe joint tape 10" groove joint pliers clear silicone latex caulk sponge or rag utility knife basin wrench supply lines tube cutter pipe wrench hacksaw 1 Shut off hot and cold water supply to faucet or turn off main water supply. Removing Your Old Faucet 2 Remove old faucet. Clean sink surface. Faucet Installation Before doing any work on the faucet, shut off water supply and close drain to avoid losing small parts. Pop-Up Drain Installation 1 Handle Cap A206004 2 Handle Assembly A662472 3 Handle Adaptor A663502 4 Locking Nut A104001 5 Trim Cap A103022 6 Ball Valve Assembly A66D641N 7 Seat & Spring Set *2 A663002 8 Aerator A500871N 9 Putty Plate A011094 10 Mounting Hardware A504036 11 Pop-up Assembly A556801 12 Lift Rod A025526 Single Control 25 Year LIMITED WARRANTY 2 Place a ring of silicone sealant around drain opening of sink. Insert threaded drain body down through drain hole. 5 Place lift rod (1) through the faucet. From below the sink, place the lift rod strap (2) onto the end of the lift rod by pulling out on the knob and pushing the rod into place. Release knob. 6 With the ball rod all the way down, push the tip of the ball rod through the lift rod strap (2) until it is aligned with the lift rod (1). 3 Thread lock nut (6) from under- side of sink until rubber washer sits securely inside opening of sink. Tighten lock nut. 4 Insert main plunger (4) into drain with the long side toward the ball rod opening. Insert ball rod (3) into the hole in the main plunger. Turn ball rod nut1/4 turn to lock in place. 1 Remove old pop-up drain assembly. Lift rod Drain assembly Lift rod strap Ball rod Main plunger Lock nut 4 5 1 2 3 6 Place a silicon, acrylic, or latex based sealant around the drain opening. Warning: Avoid contact of plastic parts with plumber's putty , pipe dope, or any other oil based compound. 1. 2. 3. 4. 6. 5. 7. 8. 9. 12. 11. 10. Tools and Supplies You will need the following to install your new faucet: 1 Insert mounting rods, hand-tighten. Remove mounting nut. Attach base plate. 2 Position faucet. Apply clear silicone latex caulk to base plate. 3 Attach mounting nuts to mounting rods. Faucet Assembly Inlet Port Mounting Nut Mounting Rod 6 Remove aerator, test hot and cold flow. Replace aerator. Firmly tighten by hand. 4 Securely attach water supply hoses or tubes onto inlet ports. 5 Tighten the hose onto water supply.

Upload: others

Post on 14-Apr-2020

9 views

Category:

Documents


0 download

TRANSCRIPT

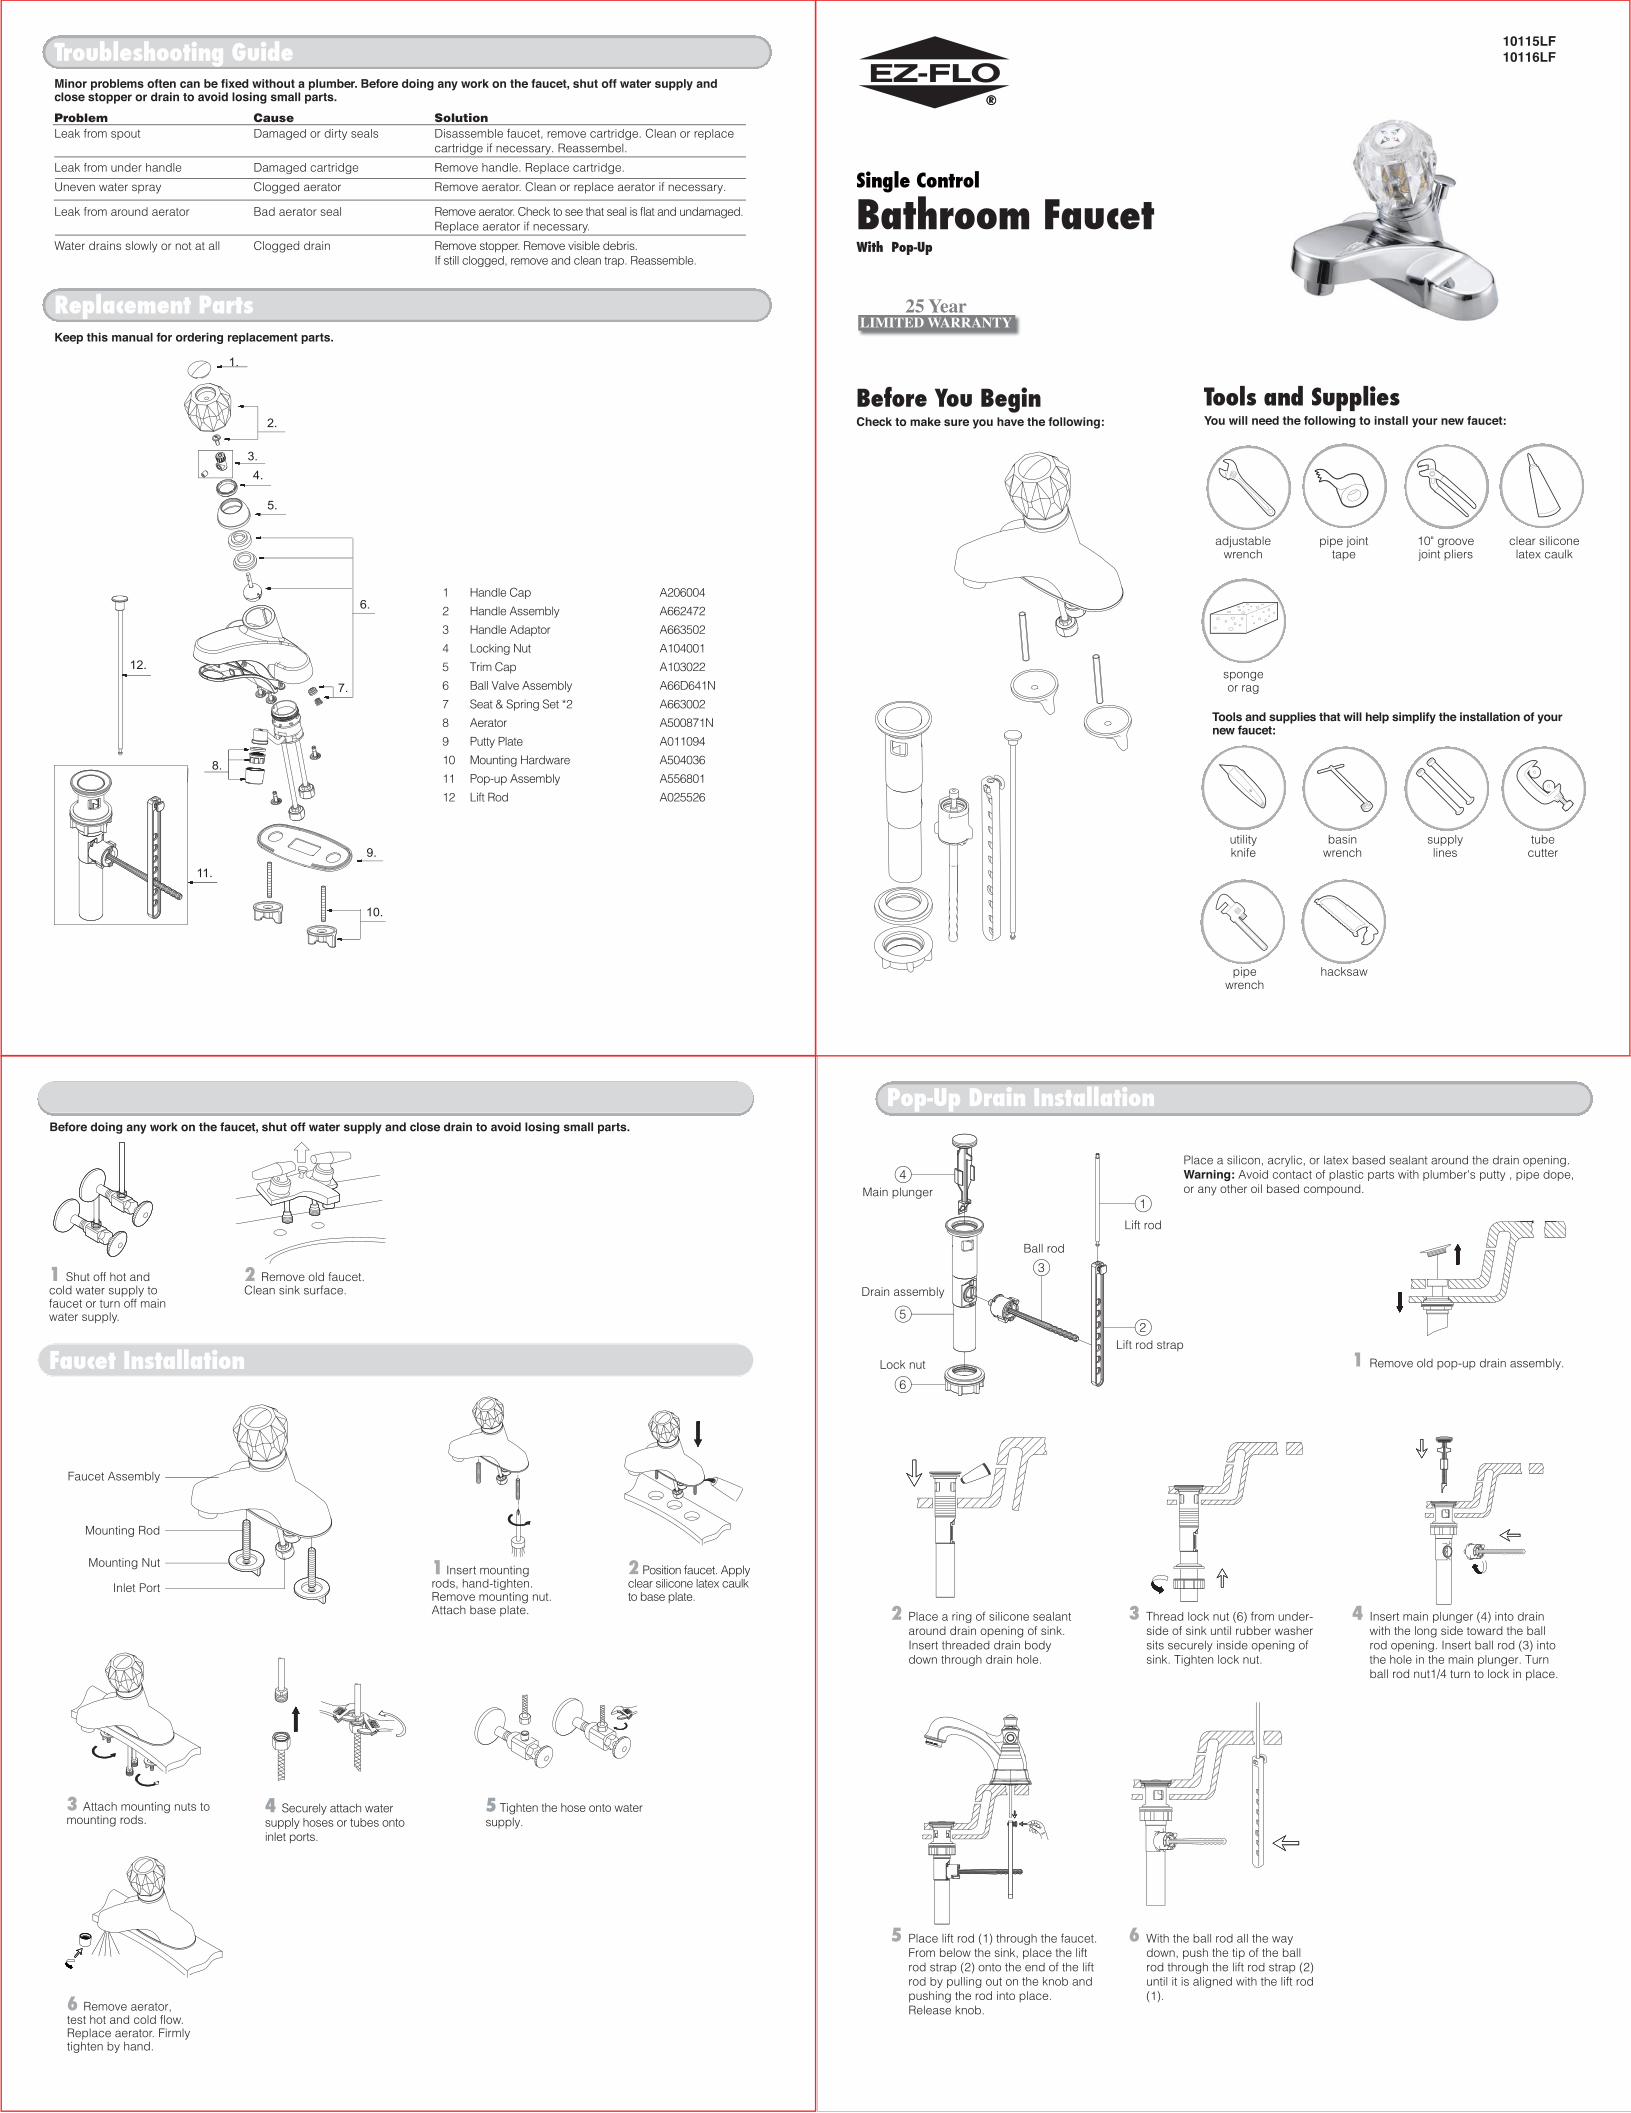
Bathroom FaucetWith Pop-Up

Before You BeginCheck to make sure you have the following:

Troubleshooting GuideMinor problems often can be fixed without a plumber. Before doing any work on the faucet, shut off water supply andclose stopper or drain to avoid losing small parts.

noituloSesuaCmelborPLeak from spout Damaged or dirty seals Disassemble faucet, remove cartridge. Clean or replace

cartridge if necessary. Reassembel..Leak from under handle Damaged cartridge Remove handle. Replace cartridge.

Uneven water spray Clogged aerator Remove aerator. Clean or replace aerator if necessary.

Leak from around aerator Bad aerator seal Remove aerator. Check to see that seal is flat and undamaged.Replace aerator if necessary.

Water drains slowly or not at all Clogged drain Remove stopper. Remove visible debris. If still clogged, remove and clean trap. Reassemble.

Replacement PartsKeep this manual for ordering replacement parts.

10115LF10116LF

Tools and supplies that will help simplify the installation of yournew faucet:

adjustablewrench

pipe jointtape

10" groovejoint pliers

clear siliconelatex caulk

sponge or rag

utilityknife

basinwrench

supplylines

tubecutter

pipewrench

hacksaw

1 Shut off hot andcold water supply tofaucet or turn off mainwater supply.

Removing Your Old Faucet

2 Remove old faucet.Clean sink surface.

Faucet Installation

Before doing any work on the faucet, shut off water supply and close drain to avoid losing small parts.

Pop-Up Drain Installation

1 Handle Cap A206004

2 Handle Assembly A662472

3 Handle Adaptor A663502

4 Locking Nut A104001

5 Trim Cap A103022

6 Ball Valve Assembly A66D641N

7 Seat & Spring Set *2 A663002

8 Aerator A500871N

9 Putty Plate A011094

10 Mounting Hardware A504036

11 Pop-up Assembly A556801

12 Lift Rod A025526

Single Control

25 YearLIMITED WARRANTY

2 Place a ring of silicone sealant around drain opening of sink. Insert threaded drain body down through drain hole.

5 Place lift rod (1) through the faucet. From below the sink, place the lift rod strap (2) onto the end of the lift rod by pulling out on the knob and pushing the rod into place. Release knob.

6 With the ball rod all the way down, push the tip of the ball rod through the lift rod strap (2) until it is aligned with the lift rod (1).

3 Thread lock nut (6) from under-side of sink until rubber washer sits securely inside opening of sink. Tighten lock nut.

4 Insert main plunger (4) into drain with the long side toward the ball rod opening. Insert ball rod (3) into the hole in the main plunger. Turn ball rod nut1/4 turn to lock in place.

1 Remove old pop-up drain assembly.

Lift rod

Drain assembly

Lift rod strap

Ball rod

Main plunger

Lock nut

4

5

1

2

3

6

Place a silicon, acrylic, or latex based sealant around the drain opening.Warning: Avoid contact of plastic parts with plumber's putty , pipe dope, or any other oil based compound.

1.

2.

3.4.

6.

5.

7.

8.

9.

12.

11.

10.

Tools and SuppliesYou will need the following to install your new faucet:

1 Insert mountingrods, hand-tighten.Remove mounting nut.Attach base plate.

2 Position faucet. Applyclear silicone latex caulkto base plate.

3 Attach mounting nuts tomounting rods.

Faucet Assembly

Inlet Port

Mounting Nut

Mounting Rod

6 Remove aerator,test hot and cold flow.Replace aerator. Firmlytighten by hand.

4 Securely attach water supply hoses or tubes ontoinlet ports.

5 Tighten the hose onto water supply.