silk performer 18 - micro focus...vuser type application type odbc add-on visual basic add-on...
TRANSCRIPT
Silk Performer 18.5
Installation Guide
Micro FocusThe Lawn22-30 Old Bath RoadNewbury, Berkshire RG14 1QNUKhttp://www.microfocus.com
Copyright © Micro Focus 2017. All rights reserved.
MICRO FOCUS, the Micro Focus logo and Silk Performer are trademarks or registeredtrademarks of Micro Focus IP Development Limited or its subsidiaries or affiliatedcompanies in the United States, United Kingdom and other countries.
All other marks are the property of their respective owners.
2017-10-24
ii

Contents
Introduction ........................................................................................................ 4System Requirements .........................................................................................................4Performance and Scalability Matrix .....................................................................................5
Silk Performer Licensing ................................................................................... 7On-Premise Licensing .........................................................................................................8
Generating a Silk Performer License Policy ............................................................. 8Finding the Host ID ...................................................................................................8Silk Meter Installation ............................................................................................... 9Modifying Your License Server Configuration ...........................................................9
Online Licensing ................................................................................................................10Installing Silk Performer .................................................................................. 11
Complete Installation .........................................................................................................11Agent-Only Installation ...................................................................................................... 13SOA Edition Installation .................................................................................................... 14Installing Silk Performer in Silent Mode .............................................................................15
Installing Optional Components ..................................................................... 18Installing TrueLog Explorer ................................................................................................18Installing TrueLog Explorer in Silent Mode ........................................................................18Installing the Network Emulation Driver ............................................................................ 18Installing the Visual Studio Extension .............................................................................. 19Installing the Eclipse Plug-In ............................................................................................. 19Installing ShopIt V 6.0 ....................................................................................................... 20
Installing Agent Software on Remote Computers .........................................21Remote Installation ........................................................................................................... 21Scenarios .......................................................................................................................... 23
Scenario 1: One Domain or Workgroup ................................................................. 23Scenario 2: Two Domains or Workgroups .............................................................. 24Scenario 3: User is Logged On Locally ..................................................................24Scenario 4: Two Local Area Networks Connected Using the Internet ....................25Scenario 5: Two Local Area Networks Connected Using HTTP Proxy ...................25Scenario 6: Two Local Area Networks Connected Using a SOCKS Proxy ............ 26
Troubleshooting .................................................................................................................26
Contents | 3
IntroductionThis Help provides all the information you need to install and uninstall Silk Performer and to prepare theload testing environment. It suggests hardware, software, and operating system requirements and offersalternative installation options.
During the installation, the setup wizard confirms that all the software you need for installation and use ofSilk Performer is available on your computer. If this is not the case, the setup wizard provides options forinstalling the missing software.
System RequirementsThe following sections describe the system requirements for installing and running Silk Performer.
To run the Silk Performer agent software, or both controller and agent software, and to use the full potentialof Silk Performer to run large-scale load tests, your system must meet the following minimum requirements:
Hardware Requirements
System Area Requirement
Processor Intel Core 2 Duo or equivalent CPU
RAM 4 GB
Hard disk space 2.2 GB for controller software installation
1 GB for agent-only installation
Depending on the size of your load tests, make sure youhave enough space on your hard disk for result files.
Network Network connectivity to the system under test and to allSilk Performer agent computers.
Operating System Requirements
• Both the Silk Performer controller and the Silk Performer agent can be installed on any Windows clientor server operating system of version 6.1 or newer. This means Silk Performer requires MicrosoftWindows 7 or newer, or Microsoft Windows Server 2008 R2 or newer.
• Installing the network emulation driver is currently not supported for Microsoft Windows 10 andMicrosoft Windows Server 2016.
Software Requirements
To install and run Silk Performer, your system requires a minimum set of software components.
The required components vary based on installation type. For example, to run Silk Performer JavaExplorer, your system must be equipped with the appropriate Java Development Kit. Downloadcomponents from the respective websites.
• Internet Explorer 10, 11 for browser-driven load testing• PDF viewer to view documentation• Citrix Receiver for Microsoft Windows 3.x, 4.x (except 4.4) to test Citrix applications. Citrix Receiver 4.4
does not work due to an issue in this Citrix version.
4 | Introduction

• Java Development Kit 7, 8 (32-bit) to test Java applications with Java Explorer• Visual Studio 2013, 2015, or 2017 for Visual Studio extension. To use Visual Studio 2012, Visual Studio
2013 needs to be installed as well.
Working with Silk Performer on a multi-user system
Silk Performer can be installed on a machine with terminal services enabled for multi-user access. Ingeneral, it is not recommended to work in multiple sessions simultaneously. If you want to do sonevertheless, keep the following in mind:
• Recording: The Silk Performer Recorder uses a system-wide hooking mechanism. If one user startsthe Recorder, the traffic of all other users might be recorded as well.
• Workbench: Multiple users can work on different projects simultaneously. Working on the same projectis not recommended. The project will be opened in read-only mode for the second and all further users.
• Executing tests: Multiple users can execute tests simultaneously from one machine. However, multiplesimultaneously running tests will influence each other as they share the same resources (CPU,memory, network bandwidth).
• Monitoring tests: Performance Explorer does not differentiate between test metrics of multiple runningtests. Therefore, real-time values of the wrong test might be displayed.
Performance and Scalability Matrix
Maximum VUsers per Agent Computer
The following table shows the recommended maximum number of virtual users per agent computer basedon the hardware resources of the agent computer and the type of tested web application.
Note: Testing of applications utilizing SSL reduces VUser capacity by 35%. Testing with TrueLog onError enabled reduces VUser capacity by 30%. Testing a web application using low-level APIs (WebLow Level) increases VUser capacity by 20%.
System OS
WebBusinessApp
Web BusinessApp with SSL(-35%)
TrueLog onError (-30%)
TrueLogon Errorwith SSL
Web Low Level(+20%)
Intel Xeon Quadcore3 GHz, 16 GB RAM
WindowsServer 2008R2
6500 4225 4550 2958 7800
Intel Core i7Quadcore 2.8 GHz, 8GB RAM
Windows 8.1 6500 4225 4550 2958 7800
Intel Core2 Duo 3GHz, 4 GB RAM
Windows 7Enterprise
4700 3055 3290 2139 5640
Intel Pentium 4 3.2GHz, 2 GB RAM
Windows XP 3900 2535 2730 1775 4680
Note: Web Business App uses page-level APIs (HTML/HTTP). Web Low Level uses low-level APIs(HTTP).
VUsers per Cloud Agent
Note: The maximum number of VUsers per cloud-based agent is 1,000 regardless of the type of thetested application.
The following table shows the number of VUsers that can typically be supported per cloud-based agent,based on the type of the tested application.
Introduction | 5

Application Under Test Supported VUsers per Cloud-Based Agent
Browser-Driven Load Testing 5
Java/.NET 250
Secure Web (SSL) 600
Web 800
Test Parameters
The numbers in the previous tables were determined by using a realistic workload with the followingcharacteristics:
• The page structure of all requested web pages corresponds to popular public web pages.• The average think time between page views for virtual users was 32 seconds.• A single virtual user was emulated with four concurrent connections.
As a result, the number of simulated virtual users corresponds to a realistic number of concurrent usersaccessing a popular web site, providing the following information:
• Average hits per page: 39• Average page size: 130 KB• Average think time between pages: 32 sec
Agent Capacity for Web Protocol Virtual Users
Silk Performer determines the capacity of a machine by using a formula that takes the following parametersinto consideration:
• Number of CPUs• Number of cores per CPU• CPU speed• Memory size
The result is the number of virtual users that can execute a web protocol script on an agent machine withthe corresponding parameters.
Agent Capacity for Other Virtual User Types
To determine the number of virtual users that can run on a particular agent machine, the number of webprotocol virtual users is weighted by a particular factor that depends on the used technology.
Note: For some technologies there is a maximum number of virtual users defined per machine,merely due to OS limitations rather than CPU or memory constraints.
6 | Introduction

Silk Performer LicensingThe Silk Performer licensing model is based on virtual users (VUsers).
Starting and using the Silk Performer Workbench does not require a license. You can model and customizescripts as well as adjust many other load test settings without a license. Also, executions that areperformed with only one virtual user (like try script or baseline executions) do not require a license.
Starting a load test run requires licenses for the virtual users employed in the execution.
Silk Performer offers two licensing models:
• on-premise licensing• online licensing
When you upgrade from an older Silk Performer version, new licenses are required for executing load testswith the new version. During the upgrade process, you can keep the old licenses for a period of 90 days.
Silk Performer works with three types of VUsers. Each type allows to simulate different application types:
• Web• Standard• Premium
VUser Type Application Type
Web Web Browser-Driven
GUI-level testing in single session mode with selectedweb browsers
HTTP(S) (Web browser low level)
HTTP(S)/HTML (Web browser high level)
HTTP(S)/XML (Web services, SOAP)
HTTP Live Streaming (HLS)
Silverlight
Mobile
SAP NetWeaver
WebDAV (MS Outlook Web Access)
Email (SMTP/POP)
FTP
TCP/IP
UDP
AMF0/AMF3/FLEX
DLL Interface
Standard All of Web, plus:
Visual Studio Extension
Java Add-On
DB2-CLI Add-On
OCI Add-On
Silk Performer Licensing | 7

VUser Type Application Type
ODBC Add-On
Visual Basic Add-On (Framework)
Directory server (LDAP)
CORBA Add-On
Premium All of Standard, plus:
GUI Level Testing (Silk4J, Silk4NET, Silk Test Classic)
Remedy Web ARS
SAPGUI Add-On for Silk Performer
Oracle Applications/Forms Add-On
PeopleSoft Add-On
Siebel Add-On
Citrix Add-On
Terminal Emulation (Green-Screen) Add-On
Tuxedo/ATMI Add-On
On-Premise LicensingFor on-premise licensing, Silk Performer provides two types of licenses:
• standalone licenses• floating licenses
The concept of floating licenses allows license sharing among users. It requires a Silk Meter installation.Silk Meter is the license server for all your Silk products.
Note the following:
• Silk Performer requires Silk Meter version 2008 or newer as well as a Silk Performer license policy file.• If you have multiple license servers, you need multiple license policy files, each one tied to a particular
license server.• If you have received a Silk Performer license policy file, install the file on your license server.• If you have not received a license policy file, generate one with the online license generator.
Generating a Silk Performer License PolicyTo run load tests with Silk Performer, you need a valid license. If you have purchased Silk Performer, youcan use our online license generator to generate a license policy file. The online license generator requiresan SSL-capable browser, such as Firefox or Internet Explorer. You will receive an email with instructions onhow to generate your license policy file. If you did not receive these instructions, contact customer care at http://support.microfocus.com.
Finding the Host IDTo obtain a license policy file, you need to know the host ID of the machine on which you want to install thelicenses. For floating licenses this is a license server with Silk Meter installed. For node-locked licenses thisis typically the controller machine.
1. On the machine, open a command prompt and enter the command ipconfig/all. The networkadapters and additional information is listed.
8 | Silk Performer Licensing

2. Note the host ID, which is the MAC Address or Physical Address of your LAN card, for example00-BF-00-1C-D3-3D.
Tip: Depending on your system setup, including virtual machines and VPN connections, yourcomputer might have several network adapters with different MAC addresses. Be sure to note thehost ID of your physical LAN card.
Silk Meter InstallationIf you already have a Silk Performer license policy file, you can install it when you install Silk Meter. If youdo not have a valid Silk Performer license, access the online License Generator to generate a licensepolicy file.
To install and run Silk Meter on your license server, no license policy file is required. However, you mustimport a license policy file before you can run load tests with Silk Performer. You can import a licensepolicy file using the Silk Meter Policy Administrator.
If you have multiple license servers, you need multiple license policy files, each one tied to a particularlicense server. A single Silk Meter license server can administer license policy files for multiple products.
Silk Meter License Server Requirements
Before installing Silk Meter, refer to the Release Notes to ensure that the license server meets therequirements.
Uninstalling a Previous Version of Silk MeterIf a previous version of Silk Meter is installed on your license server, you must uninstall it before the latestversion of Silk Meter can be installed.
1. Choose Start > Programs > Silk > Silk Meter > Uninstall .
2. Click Yes to uninstall Silk Meter. The Remove Settings dialog box opens.
3. Click No to keep your Silk Meter settings.
Attention: You must click No to preserve license policies that currently exist on your Silk Meterlicense server.
4. Reboot your computer.
Silk Meter is now uninstalled, and you can install the latest version of Silk Meter.
Installing Silk Meter on Your License ServerBefore installing Silk Meter, verify the following information:
• Your user account possesses administrator privileges.• An instance of Silk Meter is not installed on your license server.
1. Visit the product updates site and search for Silk Meter.
2. Download and save the latest Silk Meter Installation Files.
3. Navigate to the location where you saved the .exe file and double-click it. For a standard installation,follow the Silk Meter installation wizard by using the default options.
Important: If setup prompts you to restart the computer, make sure to do so.
Modifying Your License Server ConfigurationUse the Select Silk Meter License Server utility to modify or repair your license server configuration. Thisutility is installed with your Silk Performer installation.
Silk Performer Licensing | 9

1. Choose Start > Programs > Silk > Silk Performer 18.5 > Administration Tools > Change yourLicense Server Configuration . The Select Silk Meter License Server utility opens.
2. In the Application list box, select the product for which you want to configure the license server.
3. Click the Using local or remote server option button to configure a Silk Meter license server.
4. In the License Server Host field, type the computer name of the Silk Meter license server.
Unless your network administrator has defined a different port, do not change the Port Number.
5. Click Apply to activate the license server configuration.
6. Click Test Connection to verify that a Silk Meter server is accessible on the specified host and port. Ifthe connection is successful, the Status field displays a SUCCESS message.
Note: In some cases, specifying the simple name of the license server in the License server hostfield, such as licenseserver, might not work. A message box stating Connection to SilkMeter license server failed opens. To resolve this issue, specify the hostname by using afully qualified name, such as licenseserver.mycompany.com.
7. Click Close to complete the license server configuration.
Online LicensingBesides on-premise licenses, you can also acquire online licenses. This means that you can purchaselicenses with Micro Focus credits from your CloudBurst account.
For load test executions, you can either mix on-premise and online licenses, or you can instruct SilkPerformer to use just on-premise or just online licenses. Click Settings > System in the menu, click theLicensing tab, and select your preferred setting in the Licensing options.
To determine how many on-premise licenses you have, click Help in the menu and click About SilkPerformer. If, for example, you have 50 Virtual Users (Web) on-premise licenses available but you need60 VUsers for a planned load test, you can quickly fill up the gap of 10 VUsers with online licenses.
Online licensing can be especially useful if you need additional VUsers on short notice, or youunexpectedly require more VUsers for just a few load tests, or you require an unusually large amount ofVUsers for a limited period of time. Online licensing allows you to easily and quickly increase your amountof VUsers.
Online licenses are valid for 24 hours The time span starts when the licenses are first used. For moreinformation around fees for online licenses, see the section Virtual User License Fees in the topicCloudBurst Load Test Fees.
10 | Silk Performer Licensing

Installing Silk PerformerSilk Performer can be installed in three versions:
• Complete installation• Agent-only installation• SOA Edition installation
The standard installer comes with a graphical user interface (GUI) and offers all of these installationoptions. However, you can also install Silk Performer without a GUI and without any user interaction. Thisoption is called silent mode installation.
To perform load tests with Silk Performer, you must install the complete software on at least one computer.The complete installation includes the Workbench, documentation, and sample files. The Workbench is anintegrated script development environment including a load test controller and agent. To use othercomputers as load test agents, install the agent software on these computers.
Complete InstallationFeatures installed with a complete Silk Performer installation:
• Silk Performer Workbench• Silk Performer Agent• Performance Explorer• TrueLog Explorer• Java Explorer• .NET Explorer• all samples
Note: To avoid potential issues, make sure to run the installation with an administrator account thathas unrestricted rights.
1. Download and double-click the Silk Performer installer to start the setup wizard.
2. The Copyright Information page displays. Click Next to read the Introduction, then click Next again.
3. The License Agreement page displays. Read the license agreement carefully. If you accept the termsof the agreement, enable the I accept the terms of the License Agreement check box, then clickNext.
4. Click the Silk Performer 18.5 install set to install a complete Silk Performer environment and click Next.
5. The Customize Installation page displays. Select the components you want to install:
• Silk Performer 18.5 Workbench : Select this option to install a complete Silk Performerenvironment for load testing, Java and .NET applications.
• Advanced Installation: Select this option to select which optional tools you want to install togetherwith Silk Performer.
6. The Choose Silk Install Folder page displays. Specify the installation folder:
a) Click Choose.b) Specify the installation folder.c) Click OK.d) To restore the default installation directory, click Restore Default.
Installing Silk Performer | 11

Note: Product subfolders (for Silk Performer or TrueLog Explorer, for example) will be createdautomatically.
Note: Silk Performer must be installed on a local drive.
7. Select whether or not a desktop shortcut icon shall be created and click Next.
8. Review the information on the Pre-Installation Summary page.
• To change any settings, click Previous to return to the appropriate page.• If you are satisfied with the settings, click Install to start the installation process.
The status bar on the Installing page provides information about the installation process.
9. The Choose licensing mode page displays. Select one of the following options and click Next:
• Evaluation – Installs an evaluation version of Silk Performer, which grants you full productfunctionality for 45 days. The usage is limited to 10 virtual users. To upgrade to a full version at alater point in time, contact your sales representative.
• Licensed – Installs an unrestricted version of Silk Performer, which requires a Silk Performerlicense.
10.Depending on the components you have selected for installation, the Select Silk Meter License Serverpage displays. If you have not installed any of the components that require licensing and the page doesnot open, proceed to the next step. Select one of the following options and click Next:
• Using local or remote server: In the License server host field, type the name of the computer onwhich Silk Meter is installed. Do not change the default port number, 5461, unless your networkadministrator has defined a different port. Click Test Connection to verify that a Silk Meter server isaccessible on the specified host and port.
Note: In some cases, specifying the simple name of the license server in the License serverhost field, such as licenseserver, might not work. A message box stating Connection toSilk Meter license server failed opens. To resolve this issue, specify the hostnameby using a fully qualified name, such as licenseserver.mycompany.com.
• Using a standalone license: Runs Silk Meter standalone. Specify the location of your Silk Meterlicense file using the Choose button.
11.The Usage Data Collection page displays. Select the default setting to allow usage data to becollected. This information will help to improve the product by uncovering user experience issues. Selectone of the following options, then click Next:
• Allow to collect usage data• Do not allow to collect usage data
12.The Network Emulation Driver Installation page displays (this page does not display on MicrosoftWindows 10 and Microsoft Windows Server 2016). The network emulation driver is required for packetloss and latency simulation. It is not required for network bandwidth simulation. Select one of thefollowing options, then click Next:
• Install the network emulation driver• Skip network emulation driver installation.
Note: During installation and uninstallation of the network emulation driver, the network will bedisconnected for a moment.
Note: The network emulation driver is not compatible with all network adapters. In such a case,machines or network interfaces might no longer be accessible and the network might slow down.
Note: The network emulation driver does not support Microsoft Windows 10 and MicrosoftWindows Server 2016.
13.The Installation Complete page displays. Click Done to complete the installation.
12 | Installing Silk Performer

Note: If a file cannot be updated during the installation because a system library is locked byWindows, you are prompted to restart your computer. If you do not restart your computer, youmight experience problems when accessing Silk Performer.
Note: In case the installation fails, you can view the log file Install.log in the installation folder.
Agent-Only InstallationThe Silk Performer agent software needs to be installed on each computer that you want to use as a loadtest agent. The agent software is used to execute Silk Performer scripts on remote computers.
Note: To avoid potential issues, make sure to run the installation with an administrator account thathas unrestricted rights.
1. Download and double-click the Silk Performer installer to start the setup wizard.
2. The Copyright Information page displays. Click Next to read the Introduction, then click Next again.
3. The License Agreement page displays. Read the license agreement carefully. If you accept the termsof the agreement, enable the I accept the terms of the License Agreement check box, then clickNext.
4. Click the Silk Performer 18.5 Agent install set to install Silk Performer agent software only and clickNext.
5. The Choose Silk Install Folder page displays. Specify the installation folder:
a) Click Choose.b) Specify the installation folder.c) Click OK.d) To restore the default installation directory, click Restore Default.
Note: Product subfolders (for Silk Performer or TrueLog Explorer, for example) will be createdautomatically.
Note: Silk Performer must be installed on a local drive.
6. Select whether or not a desktop shortcut icon shall be created and click Next.
7. Review the information on the Pre-Installation Summary page.
• To change any settings, click Previous to return to the appropriate page.• If you are satisfied with the settings, click Install to start the installation process.
The status bar on the Installing page provides information about the installation process.
8. The Network Emulation Driver Installation page displays (this page does not display on MicrosoftWindows 10 and Microsoft Windows Server 2016). The network emulation driver is required for packetloss and latency simulation. It is not required for network bandwidth simulation. Select one of thefollowing options, then click Next:
• Install the network emulation driver• Skip network emulation driver installation.
Note: During installation and uninstallation of the network emulation driver, the network will bedisconnected for a moment.
Note: The network emulation driver is not compatible with all network adapters. In such a case,machines or network interfaces might no longer be accessible and the network might slow down.
Note: The network emulation driver does not support Microsoft Windows 10 and MicrosoftWindows Server 2016.
9. The Installation Complete page displays. Click Done to complete the installation.
Installing Silk Performer | 13
Note: If a file cannot be updated during the installation because a system library is locked byWindows, you are prompted to restart your computer. If you do not restart your computer, youmight experience problems when accessing Silk Performer.
Note: In case the installation fails, you can view the log file Install.log in the installation folder.
SOA Edition InstallationFeatures installed with the Silk Performer SOA Edition:
• SOA Workbench• Silk Performer Agent• Performance Explorer• TrueLog Explorer• Java Explorer• .NET Explorer• Java samples• .NET samples
Note: To avoid potential issues, make sure to run the installation with an administrator account thathas unrestricted rights.
1. Download and double-click the Silk Performer installer to start the setup wizard.
2. The Copyright Information page displays. Click Next to read the Introduction, then click Next again.
3. The License Agreement page displays. Read the license agreement carefully. If you accept the termsof the agreement, enable the I accept the terms of the License Agreement check box, then clickNext.
4. Click the Silk Performer 18.5 SOA Edition install set and click Next.
5. The Customize Installation page displays. Select the components you want to install and click Next:
• Silk Performer 18.5 SOA Edition: Select this option to install a complete Silk Performer SOAEdition environment for load testing Java and .NET applications.
• Advanced Installation: Select this option to choose between either installing the tools for loadtesting Java applications, or for testing .NET applications.
6. The Choose Silk Install Folder page displays. Specify the installation folder:
a) Click Choose.b) Specify the installation folder.c) Click OK.d) To restore the default installation directory, click Restore Default.
Note: Product subfolders (for Silk Performer or TrueLog Explorer, for example) will be createdautomatically.
Note: Silk Performer must be installed on a local drive.
7. Select whether or not a desktop shortcut icon shall be created and click Next.
8. Review the information on the Pre-Installation Summary page.
• To change any settings, click Previous to return to the appropriate page.• If you are satisfied with the settings, click Install to start the installation process.
The status bar on the Installing page provides information about the installation process.
9. The Choose licensing mode page displays. Select one of the following options and click Next:
14 | Installing Silk Performer

• Evaluation – Installs an evaluation version of Silk Performer, which grants you full productfunctionality for 45 days. The usage is limited to 10 virtual users. To upgrade to a full version at alater point in time, contact your sales representative.
• Licensed – Installs an unrestricted version of Silk Performer, which requires a Silk Performerlicense.
10.Depending on the components you have selected for installation, the Select Silk Meter License Serverpage displays. If you have not installed any of the components that require licensing and the page doesnot open, proceed to the next step. Select one of the following options and click Next:
• Using local or remote server: In the License server host field, type the name of the computer onwhich Silk Meter is installed. Do not change the default port number, 5461, unless your networkadministrator has defined a different port. Click Test Connection to verify that a Silk Meter server isaccessible on the specified host and port.
Note: In some cases, specifying the simple name of the license server in the License serverhost field, such as licenseserver, might not work. A message box stating Connection toSilk Meter license server failed opens. To resolve this issue, specify the hostnameby using a fully qualified name, such as licenseserver.mycompany.com.
• Using a standalone license: Runs Silk Meter standalone. Specify the location of your Silk Meterlicense file using the Choose button.
11.The Usage Data Collection page displays. Select the default setting to allow usage data to becollected. This information will help to improve the product by uncovering user experience issues. Selectone of the following options, then click Next:
• Allow to collect usage data• Do not allow to collect usage data
12.The Network Emulation Driver Installation page displays (this page does not display on MicrosoftWindows 10 and Microsoft Windows Server 2016). The network emulation driver is required for packetloss and latency simulation. It is not required for network bandwidth simulation. Select one of thefollowing options, then click Next:
• Install the network emulation driver• Skip network emulation driver installation.
Note: During installation and uninstallation of the network emulation driver, the network will bedisconnected for a moment.
Note: The network emulation driver is not compatible with all network adapters. In such a case,machines or network interfaces might no longer be accessible and the network might slow down.
Note: The network emulation driver does not support Microsoft Windows 10 and MicrosoftWindows Server 2016.
13.The Installation Complete page displays. Click Done to complete the installation.
Note: If a file cannot be updated during the installation because a system library is locked byWindows, you are prompted to restart your computer. If you do not restart your computer, youmight experience problems when accessing Silk Performer.
Note: In case the installation fails, you can view the log file Install.log in the installation folder.
Installing Silk Performer in Silent ModeThe setup provides the possibility to install Silk Performer without any user interaction. This option is calledsilent mode installation and it is especially useful if you want to distribute software over a LAN or theInternet through remote installation tools.
Installing Silk Performer | 15

Note: To avoid potential issues, make sure to run the installation with an administrator account thathas unrestricted rights.
1. Open the folder with the installation file in a file manager.
2. Create a new text file in this folder, rename it to silent.properties and open it in a text editor.
3. Copy the following text lines and paste them into the file. Make sure to replace <version> with theactual version number of the installer package.
INSTALLER_UI=silent
#Choose locale#-------------INSTALLER_LOCALE=en
#Choose installation set#-----------------------CHOSEN_INSTALL_SET=ENTERPRISE
#Choose installation folder#--------------------------USER_INSTALL_DIR=C:\\Program Files (x86)\\SilkCREATE_DESKTOP_ICON=1CREATE_QUICKLAUNCH_ICON=0
#Choose licensing mode#---------------------USER_INPUT_RESULT_EVAL=0USER_INPUT_RESULT_FULL=1
#SilkMeter server settings#-------------------------SILKMETER_RUN_STANDALONE=falseSILKMETER_LICENSESERVER_HOST=localhostSILKMETER_LICENSESERVER_PORT=5461
#User data collection#--------------------ALLOW_USER_DATA_COLLECTION=0
#Network emulation driver installation#-------------------------------------#Remove the comment in the following line to allow the driver installation#INSTALL_NETWORKEMULATION_DRIVER=true
4. Modify the parameters to your needs:
• INSTALLER_LOCALE: Specify a language:
• en: Installs the English version. This is the default setting.• ja: Installs the Japanese version.• zh_CN: Installs the Simplified Chinese version.
• CHOSEN_INSTALL_SET: Specify one of the following installation sets:
• ENTERPRISE: Installs a complete Silk Performer environment• SOA: Installs Silk Performer SOA edition• Agent: Installs Silk Performer agent software only
• USER_INSTALL_DIR: Specify a folder for your Silk installations. Make sure to use doublebackslashes (\\) as folder separators. The default configuration is C:\\Program Files\\Silk on32-bit operating systems and C:\\Program Files (x86)\\Silk on 64-bit operating systems.
• CREATE_DESKTOP_ICON: Set to 1 to create a desktop icon or set to 0 to not create a desktop icon.The default value is 1.
16 | Installing Silk Performer

• CREATE_QUICKLAUNCH_ICON: Set to 1 to create an icon on the Quick Launch bar or set to 0 to notcreate an icon. The default value is 1.
• USER_INPUT_RESULT_EVAL: Set to 1 to install an evaluation version of Silk Performer, whichgrants you full product functionality for 45 days.
• USER_INPUT_RESULT_FULL: Set to 1 to install an unrestricted version of Silk Performer (requires aSilk Performer license).
Note: Either USER_INPUT_RESULT_FULL or USER_INPUT_RESULT_EVAL must be set to 1.The other must be set to 0.
• SILKMETER_RUN_STANDALONE: Set to true if you want to use a standalone license. Set to falseif you want to use a Silk Meter license server.
• SILKMETER_LICENSESERVER_HOST: Specify the name of the computer that hosts your Silk Meterlicense server. This parameter will be ignored if SILKMETER_RUN_STANDALONE is set to true.
• SILKMETER_LICENSESERVER_PORT: Specify the port number on which your Silk Meter licenseserver listens. This parameter will be ignored if SILKMETER_RUN_STANDALONE is set to true.
• ALLOW_USER_DATA_COLLECTION: Set to 0 to disable collecting usage data. The default value is 1.• INSTALL_NETWORKEMULATION_DRIVER: Set to true to install the network emulation functionality.
You can skip this installation step, if issues with the network emulation occur and you do not needthe functionality. The default value is false.
Note: During installation and uninstallation of the network emulation driver, the network will bedisconnected for a moment.
Note: The network emulation driver is not compatible with all network adapters. In such a case,machines or network interfaces might no longer be accessible and the network might slowdown.
Note: The network emulation driver does not support Microsoft Windows 10 and MicrosoftWindows Server 2016.
5. Save the file and close it.
6. Open a command line prompt and navigate to the folder that holds the setup file and the properties file.
7. Enter the following command:
silkperformer<version>.exe -f c:\<your directory>\silent.properties
Note: Make sure to replace <version> with the actual version number of the installer package.
To check if the installation is complete, open the Windows Task Manager and click the Processes tab.When the Silk Performer installation process has disappeared, the installation is complete.
To uninstall Silk Performer in silent mode, open a command line prompt, navigate to the installation folder,and enter the following command:
"Change Silk Performer <version> Installation.exe" -i silent
Installing Silk Performer | 17

Installing Optional Components
Installing TrueLog ExplorerThe TrueLog Explorer installer is named silktruelogexplorer-<version>.exe. To install TrueLogExplorer, start the installer and follow the instructions provided by the setup wizard.
Installing TrueLog Explorer in Silent ModeThe setup provides silent mode installation for TrueLog Explorer as well.
Note: To avoid potential issues, make sure to run the installation with an administrator account thathas unrestricted rights.
1. Open the folder with the installation file in a file manager.
2. Create a new text file in this folder, rename it to silent.properties and open it in a text editor.
3. Copy the following text lines and paste them into the file.
INSTALLER_UI=silent
#USER_INSTALL_DIR=C:\\Silk#CREATE_DESKTOP_ICON=0
4. Modify the following parameters to your needs. If you remove a particular parameter or comment it byprepending a hash (#) character, its default value is used.
• USER_INSTALL_DIR: Specify a folder for your Silk installations. Make sure to use doublebackslashes (\\) as folder separators. The default configuration is C:\\Program Files\\Silk on32-bit operating systems and C:\\Program Files (x86)\\Silk on 64-bit operating systems.
• CREATE_DESKTOP_ICON: Set to 1 to create a desktop icon or set to 0 to not create a desktop icon.The default value is 1.
5. Save the file and close it.
6. Open a command line prompt and navigate to the folder that holds the setup file and the properties file.
7. Enter the following command:
silktruelogexplorer-<version>.exe -f silent.properties
Note: Make sure to replace <version> with the actual version number of the installer package.
To check if the installation is complete, open the Windows Task Manager and click the Processes tab.When the TrueLog Explorer installation process has disappeared, the installation is complete.
Installing the Network Emulation DriverThe network emulation driver is required for packet loss and latency simulation. It is not required fornetwork bandwidth simulation.
1. Open an elevated command prompt: right-click the command prompt and click Run as administrator.2. Navigate to the Silk Performer installation folder by entering a string that resembles the following: c:\>
cd "c:\Program Files (x86)\Silk\Silk Performer <version>\NetworkDriver"
18 | Installing Optional Components

3. Enter the following command ...
• to install the network emulation driver: installNetworkDriver.exe -i netipfw.inf
• to uninstall the network emulation driver: installNetworkDriver.exe -u
Note: During installation and uninstallation of the network emulation driver, the network will bedisconnected for a moment.
Note: The network emulation driver is not compatible with all network adapters. In such a case,machines or network interfaces might no longer be accessible and the network might slow down.
Note: The network emulation driver does not support Microsoft Windows 10 and Microsoft WindowsServer 2016.
Installing the Visual Studio ExtensionBy default, the Silk Performer Visual Studio Extension is not installed with the main Silk Performer installer.To create and run Silk Performer .NET Framework projects in Visual Studio, you have to install both the SilkPerformer Visual Studio Extension and the Silk Performer Visual Studio Templates.
1. In the Silk Performer installation directory, open Templates\DotNet.
2. To install the Silk Performer Visual Studio Extension, execute SpVsExtension.vsix.
3. To install the Silk Performer Visual Studio Templates, execute SilkPerformer.vsix.
Installing the Eclipse Plug-InYou can download the Eclipse Plug-In from the product updates site.
The Eclipse SDK and Silk Performer must be installed on your computer. Make sure to run Silk Performerat least once before you start the installation.
1. Use the standard procedure for installing Eclipse plug-ins from the Eclipse SDK ( Help > Install NewSoftware ).
If you are not sure how to install plug-ins in Eclipse, refer to the Eclipse documentation.
2. When asked for the site to add, specify the site that contains your Silk Performer Extras folder.
The Extras folder is located in the Silk Performer installation folder.
3. Browse to and select the Eclipse Plug-in directory in your Silk Performer Extras directory (.../Extras/eclipseplugin/).
4. Make sure that the Group items by category check box is not checked.
5. Once the Silk Performer Eclipse Plug-in is listed, click the plus sign of the new local site to expand itscontents.
6. Check the check box of the plug-in feature (Silk Performer Feature) and then click Install. The Installdialog opens.
7. Click Next. A license description appears on the Install dialog.
8. If you agree to the terms of the license agreement, check the I accept the terms of the licenseagreement check box and then click Finish.
9. Click Yes to restart the Eclipse Workbench. When the Eclipse Workbench is restarted, a Silk Performermenu entry appears in the Eclipse Workbench.
Installing Optional Components | 19

Installing ShopIt V 6.0The Silk Performer sample web application is ShopIt V 6.0. ShopIt V 6.0 simulates a simple e-commercewebsite with a catalog of camping merchandise that is available for simulated online purchase. Use thisapplication to experiment with Silk Performer's web application capabilities. ShopIt V 6.0 is designed togenerate errors, including missing links (due to merchandise being out of stock) and session errors.
Before you install ShopIt V 6.0, refer to the Release Notes to ensure that your system supports the use ofShopIt V 6.0.
You can download the ShopIt V 6.0 setup from the product updates site.
1. Double-click the file ShopItV60.exe
Note: IIS (Internet Information Server) must be installed on the computer. For IIS 7, also installRole Services ASP and ISAPI Extensions.
2. The Welcome page displays. Click Next.
3. The Choose Destination Location page displays. To change the default installation directory, clickBrowse, specify a folder, and click OK. Click Next.
4. Enter the name of the virtual directory for the web application. This is the name of the directory that willbe created on the web server. Click Next.
5. Setup installs the files and configures IIS to run the ShopIt V 6.0 web application.
6. The Installation Complete dialog displays. Click Finish.
7. For IIS 7: Add the virtual directory to IIS manually.
• Alias: ShopItV60• Physical path: Install directory of ShopIt.
Note: Make sure that ASP is available in IIS.
The ShopIt V 6.0 web application is now ready for use. You can access ShopIt V 6.0 with a browser of yourchoice by entering the following URL:
http://<computer name>/<virtual directory name>/
If the name of your computer is JohnSmith and you have not modified the default value ShopItV60 forthe virtual directory, the URL is:
http://JohnSmith/ShopItV60/
20 | Installing Optional Components
Installing Agent Software on RemoteComputers
Silk Performer provides a command-line tool that enables you to set up Silk Performer Agent software onremote machines within your Windows domain/workgroup.
For a smooth remote installation process, make sure that on the remote machine ...
• the Windows firewall is disabled, and• the User Account Control is turned off or the built-in administrator account is used for the remote
installation
Remote InstallationWith the Silk Performer command-line tool you can install and uninstall agent software on remote agentcomputers. Remote agent computers can be located anywhere on the Internet.
To get a list of all available parameters for the command-line tool, open a command-line, go to theinstallation directory and call perfRsManager.exe
Note: You must start the command-line tool from the Silk Performer installation subdirectory.
Parameters for perfRsManager
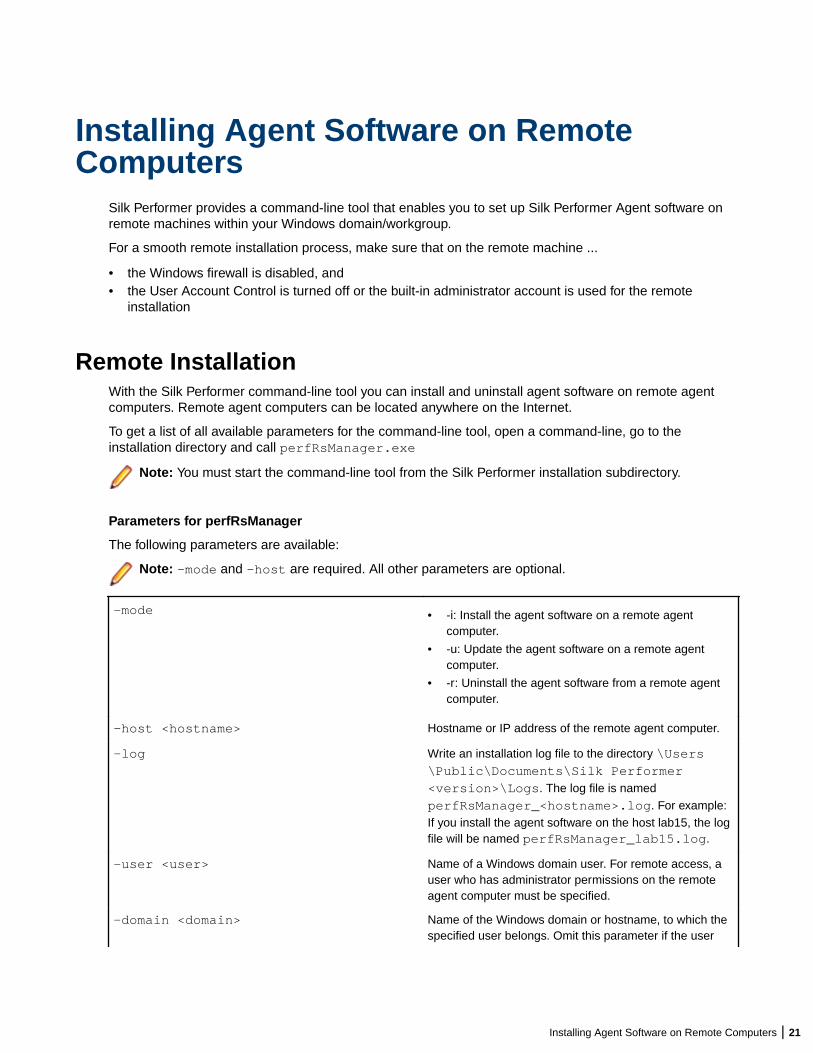
The following parameters are available:
Note: -mode and -host are required. All other parameters are optional.
-mode • -i: Install the agent software on a remote agentcomputer.
• -u: Update the agent software on a remote agentcomputer.
• -r: Uninstall the agent software from a remote agentcomputer.
-host <hostname> Hostname or IP address of the remote agent computer.
-log Write an installation log file to the directory \Users\Public\Documents\Silk Performer<version>\Logs. The log file is namedperfRsManager_<hostname>.log. For example:If you install the agent software on the host lab15, the logfile will be named perfRsManager_lab15.log.
-user <user> Name of a Windows domain user. For remote access, auser who has administrator permissions on the remoteagent computer must be specified.
-domain <domain> Name of the Windows domain or hostname, to which thespecified user belongs. Omit this parameter if the user
Installing Agent Software on Remote Computers | 21
belongs to the same domain as the computer from whichyou invoke the installation.
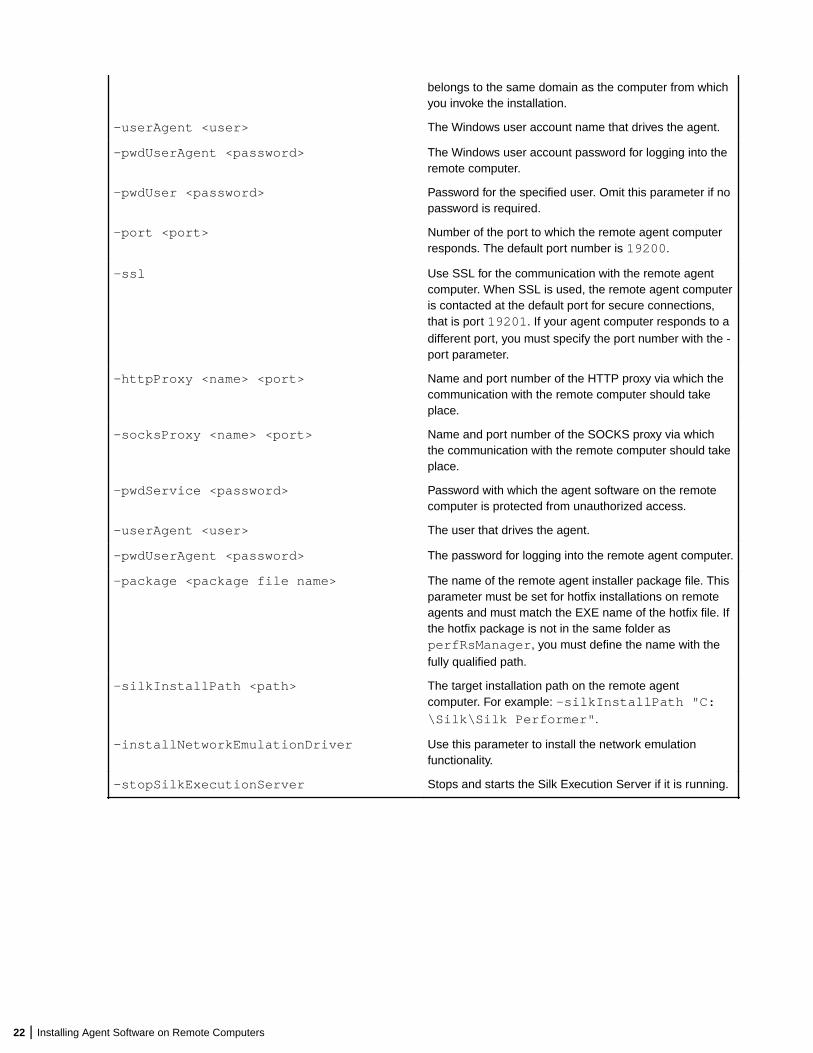
-userAgent <user> The Windows user account name that drives the agent.
-pwdUserAgent <password> The Windows user account password for logging into theremote computer.
-pwdUser <password> Password for the specified user. Omit this parameter if nopassword is required.
-port <port> Number of the port to which the remote agent computerresponds. The default port number is 19200.
-ssl Use SSL for the communication with the remote agentcomputer. When SSL is used, the remote agent computeris contacted at the default port for secure connections,that is port 19201. If your agent computer responds to adifferent port, you must specify the port number with the -port parameter.
-httpProxy <name> <port> Name and port number of the HTTP proxy via which thecommunication with the remote computer should takeplace.
-socksProxy <name> <port> Name and port number of the SOCKS proxy via whichthe communication with the remote computer should takeplace.
-pwdService <password> Password with which the agent software on the remotecomputer is protected from unauthorized access.
-userAgent <user> The user that drives the agent.
-pwdUserAgent <password> The password for logging into the remote agent computer.
-package <package file name> The name of the remote agent installer package file. Thisparameter must be set for hotfix installations on remoteagents and must match the EXE name of the hotfix file. Ifthe hotfix package is not in the same folder asperfRsManager, you must define the name with thefully qualified path.
-silkInstallPath <path> The target installation path on the remote agentcomputer. For example: -silkInstallPath "C:\Silk\Silk Performer".
-installNetworkEmulationDriver Use this parameter to install the network emulationfunctionality.
-stopSilkExecutionServer Stops and starts the Silk Execution Server if it is running.
22 | Installing Agent Software on Remote Computers

Examples
perfRsManager -i -host deepblue
perfRsManager -i -host deepblue -log -domain intra -user nobody -pwdUser 1234
perfRsManager -i -host deepblue -user alex -domain test -pwdUser 1234
perfRsManager -i -host 192.168.20.11
perfRsManager -i -host deepblue -log -ssl -port 19251 -socksproxy 192.168.20.111 1080 -pwdService 1rt34xy
perfRsManager -r -host deepblue -httpproxy proxy1 8080 -log
perfRSManager -u -host deepblue -user alex -pwdUser 1234 -domain test -package "c:\temp\silkperformer-18.5-hf1.exe"
ScenariosThis section illustrates how to use the Remote Agent Setup to install, re-install, and uninstall Silk PerformerAgent software on remote computers for several network environments.
• Scenario 1: The controller and agent computers are located in the same Windows domain orworkgroup.
• Scenario 2: The controller and agent computers are located in different Windows domains orworkgroups.
• Scenario 3: The user who works on the controller computer is logged onto the computer locally, and isnot logged onto a domain.
• Scenario 4: The controller and agent computers are located in different local area networks that areconnected using the Internet.
• Scenario 5: The controller and agent computers are located in different local area networks that areconnected using the Internet. At least one of the local area networks is protected by a firewall, so thecontroller and agent computers must communicate using an HTTP proxy.
• Scenario 6: The controller and agent computers are located in different local area networks that areconnected using the Internet. At least one of the local area networks is protected by a firewall, so thecontroller and agent computers must communicate using a SOCKS proxy.
Scenario 1: One Domain or WorkgroupIn Scenario 1, the controller and agent computers are located in the same Windows domain or workgroup.
Working on the controller computer, you can install, re-install, and uninstall the Silk Performer Agentsoftware on the remote agent computer (<agent name>).
To install the agent software, execute the following command:
PerfRsManager -i -host <agent name> -log
This command sets up the agent computer so that it can be configured and rebooted from remotecomputers.
To re-install or remove agent software, you must know the port to which the agent software responds(<port number>). By default, the agent uses port 19200. You must also know the password by which theagent software is protected from unauthorized access, if one is in use (<password>).
To upgrade agent software, execute the following command:
PerfRsManager -i -host <agent name> -port <port number> -pwdService <password> -log
Installing Agent Software on Remote Computers | 23
If the agent software responds to the default port, you can omit the -port parameter.
The preceding commands generate log files with detailed information about the installation or uninstallprocess. If you do not want to generate these log files, omit the -log parameter.
Scenario 2: Two Domains or WorkgroupsDescribes the scenario of the controller and agent computers being located in different Windows domainsor workgroups.
In Scenario 2, the controller and agent computers are located in different Windows domains or workgroups.
Working on the controller computer, you can install, re-install, and uninstall the Silk Performer Agentsoftware on the agent computer (<agent name>) in the remote domain or workgroup (<domain name>).To install the agent software, you must specify a user who has administrator rights in the domain orworkgroup where the agent computer is located and his or her password (<user name>, <password>).
To install the agent software, execute the following command:
PerfRsManager -i -host <agent name> -user <user name> -domain <domain name> -pwdUser <password> -log
This command sets up the agent computer so that it can be configured and rebooted from remotecomputers.
To re-install or remove agent software, you must know the port to which the agent software responds(<port number>). By default, the agent uses port 19200. You must also know the password by which theagent software is protected from unauthorized access, if one is in use (<password>).
To re-install agent software, execute the following command:
PerfRsManager -i -host <agent name> -port <port number> -pwdService <password> -log
If the agent software responds to the default port, you can omit the -port parameter.
To uninstall the agent software from the computer, execute the following command:
PerfRsManager -r -host <agent name> -port <port number> -pwdService <password> -log
If the agent software responds to the default port, you can omit the -port parameter.
The preceding commands generate log files with detailed information about the installation or uninstallprocess. If you do not want to generate these log files, omit the -log parameter.
Scenario 3: User is Logged On LocallyIn Scenario 3, the user logs onto the controller computer locally and is not logged onto a domain.
Working on the controller computer, you can install, re-install, and uninstall the Silk Performer Agentsoftware on the agent computer (<agent name>) in the remote domain or workgroup (<domain name>).To install the agent software, you must specify a user who has administrator rights in the domain orworkgroup where the agent computer is located (<user name>, <password>) and his or her password.
To install or re-install the agent software, execute the following command:
PerfRsManager -i -host <agent name> -user <user name> -domain <domain name> -log
This command sets up the agent computer so that it can be configured and rebooted from remotecomputers.
24 | Installing Agent Software on Remote Computers

To re-install or remove agent software, you must know the port to which the agent software responds(<port number>). By default, the agent uses port 19200. You must also know the password by which theagent software is protected from unauthorized access, if one is in use (<password>).
To uninstall the agent software, execute the following command:
PerfRsManager -r -host <agent name> -port <port number> -pwdService <password> -log
If the agent software responds to the default port, you can omit the -port parameter.
The preceding commands generate log files with detailed information about the installation or uninstallprocess. If you do not want to generate these log files, omit the -log parameter.
Scenario 4: Two Local Area Networks Connected Usingthe InternetIn Scenario 4, the controller and agent computers are located in different local area networks that areconnected using the Internet.
Working on the controller computer, you can install and uninstall the Silk Performer Agent software on theremote agent computer (<agent name>).
You must know the port to which the agent software responds (<port number>). By default, the agentuses port 19200 for non-secured communication, and port 19201 for secure communication. You must alsoknow the password by which the agent software is protected from unauthorized access, if one is in use(<password>).
To install or re-install agent software, execute the following command:
PerfRsManager -i -host <agent name> -port <port number> -pwdService <password> -ssl -log
To uninstall agent software, execute the following command:
PerfRsManager -r -host <agent name> -port <port number> -pwdService <password> -ssl -log
If the agent software responds to the default port, you can omit the -port parameter. Also, if you do notrequire communication over a secure communication channel, omit the -ssl option.
The preceding commands generate log files with detailed information about the installation or uninstallprocess. If you do not want to generate these log files, omit the -log parameter.
Scenario 5: Two Local Area Networks Connected UsingHTTP ProxyIn Scenario 5, the controller and agent computers are located in different local area networks that areconnected using the Internet. At least one of the local area networks is protected by a firewall, so thecontroller and agent computers must communicate using an HTTP proxy.
Working on the controller computer, you can install and uninstall the Silk Performer Agent software on theremote agent computer (<agent name>). The communication takes place by way of an HTTP proxy(<proxy name>, <proxy port>). To re-install or remove agent software, you must know the port towhich the agent software responds (<agent port>). By default, the agent uses port 19200 for non-secured communication, and port 19201 for secure communication. You must also know the password bywhich the agent software is protected from unauthorized access, if one is in use (<password>).
Installing Agent Software on Remote Computers | 25

To install or re-install the agent software, execute the following command:
PerfRsManager -i -host <agent name> -port <agent port> -pwdService <password> -ssl -log -httpProxy <proxy name> <proxy port>
To uninstall agent software, execute the following command:
PerfRsManager -r -host <agent name> -port <agent port> -pwdService <password> -ssl -log -httpProxy <proxy name> <proxy port>
If the agent software responds to the default port, you can omit the -port parameter. Also, if you do notrequire communication over a secure communication channel, omit the -ssl option.
The preceding commands generate log files with detailed information about the installation or uninstallprocess. If you do not want to generate these log files, omit the -log parameter.
Scenario 6: Two Local Area Networks Connected Usinga SOCKS ProxyIn Scenario 6, the controller and agent computers are located in different local area networks that areconnected using the Internet. At least one of the local area networks is protected by a firewall, so thecontroller and agent computers must communicate using a SOCKS proxy.
Working on the controller computer, you can install and uninstall Silk Performer Agent software on theremote agent computer (<agent name>). The communication thereby takes place by way of a SOCKSproxy (<proxy name>, <proxy port>). To re-install or remove agent software, you must know the portto which the agent software responds (<agent port>). By default, the agent uses port 19200 for non-secured communication, and port 19201 for secure communication. You must also know the password bywhich the agent software is protected from unauthorized access, if one is in use (<password>).
To install or re-install agent software, execute the following command:
PerfRsManager -u -host <agent name> -port <agent port> -pwdService <password> -ssl -log -socksProxy <proxy name> <proxy port>
To uninstall agent software, execute the following command:
PerfRsManager -r -host <agent name> -port <agent port> -pwdService <password> -ssl -log -socksProxy <proxy name> <proxy port>
If the agent software responds to the default port, you can omit the -port parameter. Also, if you do notrequire communication over a secure communication channel, omit the -ssl option.
The preceding commands generate log files with detailed information about the installation or uninstallprocess. If you do not want to generate these log files, omit the -log parameter.
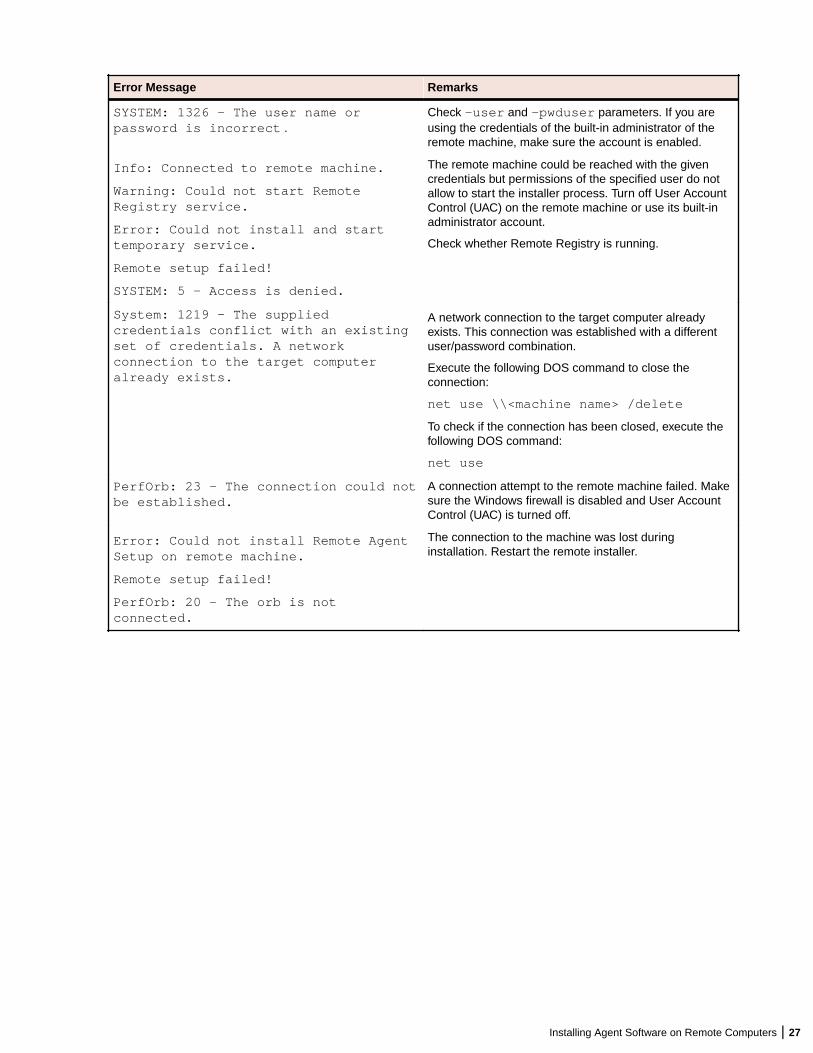
TroubleshootingThis section lists error messages that might display during setup and suggests ways of solving them:
Error Message Remarks
SYSTEM: 53 - The network path was notfound .
Invalid host name specified or host not reachable. Check-host parameter and make sure the machine isrunning.
26 | Installing Agent Software on Remote Computers
Error Message Remarks
SYSTEM: 1326 - The user name orpassword is incorrect .
Check -user and -pwduser parameters. If you areusing the credentials of the built-in administrator of theremote machine, make sure the account is enabled.
Info: Connected to remote machine.
Warning: Could not start RemoteRegistry service.
Error: Could not install and starttemporary service.
Remote setup failed!
SYSTEM: 5 - Access is denied.
The remote machine could be reached with the givencredentials but permissions of the specified user do notallow to start the installer process. Turn off User AccountControl (UAC) on the remote machine or use its built-inadministrator account.
Check whether Remote Registry is running.
System: 1219 - The suppliedcredentials conflict with an existingset of credentials. A networkconnection to the target computeralready exists.
A network connection to the target computer alreadyexists. This connection was established with a differentuser/password combination.
Execute the following DOS command to close theconnection:
net use \\<machine name> /delete
To check if the connection has been closed, execute thefollowing DOS command:
net use
PerfOrb: 23 - The connection could notbe established.
A connection attempt to the remote machine failed. Makesure the Windows firewall is disabled and User AccountControl (UAC) is turned off.
Error: Could not install Remote AgentSetup on remote machine.
Remote setup failed!
PerfOrb: 20 - The orb is notconnected.
The connection to the machine was lost duringinstallation. Restart the remote installer.
Installing Agent Software on Remote Computers | 27
IndexA
agent softwareinstallation environment scenarios 23installation via HTTP proxy 25installation via Internet 25installation via one domain or workgroup 23installation via SOCKS proxy 26installation via two domains or workgroups 24installing on remote agent computers 21installing on remote computers 21local installation 24
agent-only installationSilk Performer 13
C
completeinstallation 4, 11, 14, 15, 20, 26
E
Eclipse plug-ininstalling 19
G
generating license policies 8
H
host IDs 8HTTP proxy
installation scenario 25
I
installationSilk Performer 11agent software troubleshooting 26overview 4, 11ShopIt sample Web application 20silent mode 15SOA edition 14
installing TrueLog Explorersilent mode 18
L
license serverrequirements 9
licensesCloudBurst 10on-premise 8
licensinggenerating policies 8overview 7testing connection 9
N
network emulationmanual driver installation 18manual driver uninstallation 18
O
overviewinstalling Silk Performer 11introduction 4
P
performancescalability 5
S
ShopIt sample Web application 20silent mode
installation 15installing TrueLog Explorer 18
Silk Meterinstallation 9license server installation 9testing connection 9uninstalling 9
SOA editioninstallation 14
SOCKS proxyinstallation scenario 26
T
troubleshooting 26
U
uninstallingSilk Meter 9
V
virtual usersmaximum amount 5
Visual Studio Extensioninstalling 19
28 | Index