sibelius advance session 2 - midnight music · midnight music. playback of your ... it’s possible...
TRANSCRIPT

Online 2012
Sibelius Advanced Session 2Katie WardrobeMidnight Music

Playback of your score: the importance of text 4
Tempo markings 4
Creating tempo markings 4
Metronome markings 4
Creating metronome markings 4
Hiding metronome markings 4
Rall, rit, accel. 5
Adding lines 5
Rhythmic feel (swing) 5
Writing straight quavers that play back “swung” 5
Dynamics 6
Creating dynamics 6
Technique markings 6
Pizz, arco, mute and more 6
Repeats 6
Adding repeat barlines 6
Creating 1st and 2nd time endings 6
Playback of repeat barlines 7
Playback of a section more than twice 7
Codas 8
How to set up a coda that plays back correctly 8
Playback of notes 9
Play 1st time only 9
Playback sounds 9
Changing the playback sound of an instrument in Sibelius 6 9
Changing the playback sound of an instrument in Sibelius 7 9
Balance of individual staves 10
Muting or soloing instruments 10
Live Tempo 11
Recording your Live Tempo 11
Make backing/rehearsal tracks 11
Export your score as an audio !le 11

Homework 12
Tempo 12
Metronome mark 12
Explore the Playback Dictionary 12
Repeat barlines 12
Play on pass 12
Change an instrument sound 13
Dynamics 13
Technique text 13
Coda 13
3

Playback of your score: the importance of textIt’s important to understand that Sibelius “reads” and reacts accordingly to text objects in your score.
Things like tempo markings, repeat signs, technique indications like “pizz” and “arco”, and dynamics are all played back by Sibelius, provided that they are entered in the right way.
During this session, we’ll look at some of the important text instructions and how to enter them correctly.
Tempo markings
Creating tempo markings
Sibelius will obey tempo words such as Andante, Presto and Largo when it plays back your score.
• Sibelius 5 & 6: go to Create > Text > Tempo
• Sibelius 7: go to Text > Styles > Style gallery and choose Tempo from the Common group
• Click in the score where you’d like the tempo marking to appear and then type the word (or right-click and choose a word from the menu)
Metronome markings
Creating metronome markings
• Sibelius 5 & 6: go to Create > Text > Metronome Mark
• Sibelius 7: go to Text > Styles > Style gallery and choose Metronome Mark from the Common group. Click in the score where you want the marking to appear.
• Right-click on the "ashing cursor and choose a rhythmic value from the menu (ie. the crotchet).
Alternatively, you can hold down Ctrl (or ⌘) and type a rhythmic value using a number on the keypad (ie. 4 = crotchet; 5 = minim etc)
• Type space, =, space and then type the number (ie. 120)
Hiding metronome markings
It can be useful to know that you can enter metronome markings into your score and then hide them. They won’t print out on the score or parts, but they will affect the playback of the score.
To hide a metronome marking, select it and then go to
• Sibelius 5 & 6: Edit > Hide or Show > Hide
• Sibelius 7: Home > Edit > Hide or Show4
• You can also right-click on the metronome marking and choose Hide or Show > Hide or Show (just Hide in Sibelius 5 and 6)
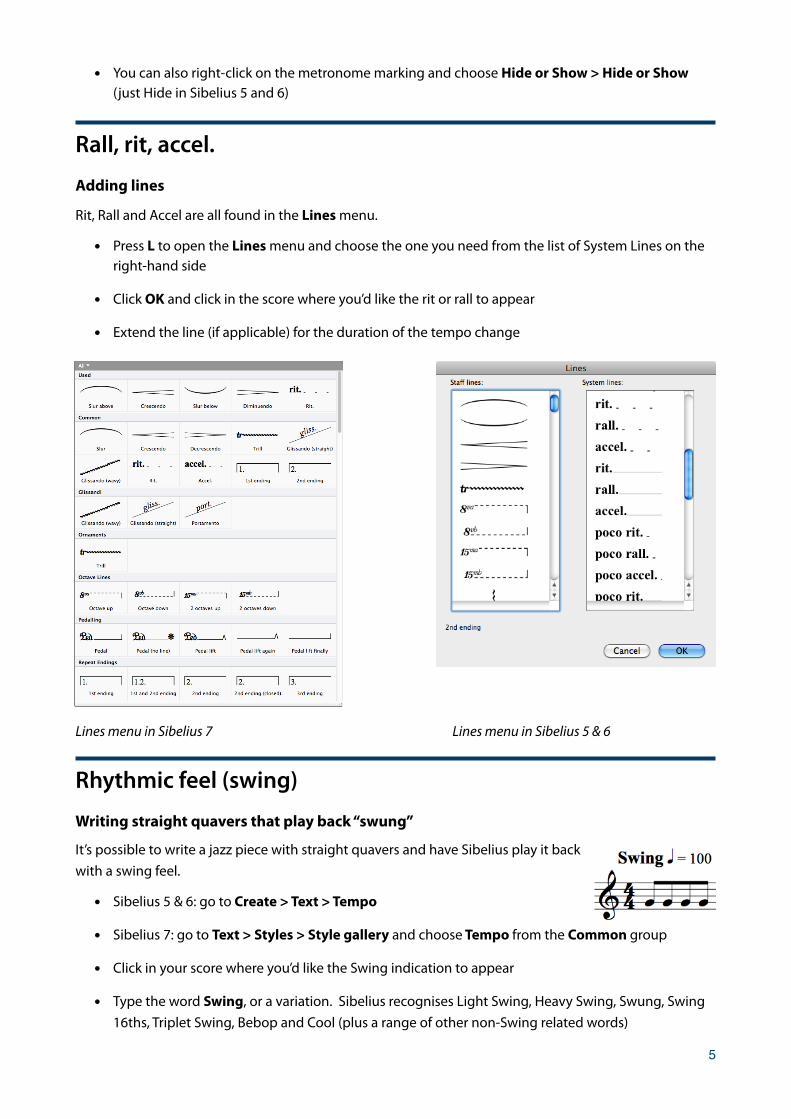
Rall, rit, accel.
Adding lines
Rit, Rall and Accel are all found in the Lines menu.
• Press L to open the Lines menu and choose the one you need from the list of System Lines on the right-hand side
• Click OK and click in the score where you’d like the rit or rall to appear
• Extend the line (if applicable) for the duration of the tempo change
Lines menu in Sibelius 7 Lines menu in Sibelius 5 & 6
Rhythmic feel (swing)
Writing straight quavers that play back “swung”
It’s possible to write a jazz piece with straight quavers and have Sibelius play it back with a swing feel.
• Sibelius 5 & 6: go to Create > Text > Tempo
• Sibelius 7: go to Text > Styles > Style gallery and choose Tempo from the Common group
• Click in your score where you’d like the Swing indication to appear
• Type the word Swing, or a variation. Sibelius recognises Light Swing, Heavy Swing, Swung, Swing 16ths, Triplet Swing, Bebop and Cool (plus a range of other non-Swing related words)
5

• Now when you record parts into your score, you can play them in with a swing feel. Sibelius will notate them as straight quavers and play them back with the swing feel
Dynamics
Creating dynamics
• Sibelius 5 & 6: select the note and go to Create > Text > Expression
• Sibelius 7: select the note and go to Text > Styles > Style gallery and choose Expression
• Shortcut for all versions: select the note and press Ctrl+E (⌘+E)
• A "ashing cursor will appear. Hold down Ctrl (or ⌘) and type the dynamic. Important: holding
down Ctrl (⌘) while you type the dynamic means that the dynamic will appear bold and in the correct font
Technique markings
Pizz, arco, mute and more
In Sibelius, Technique text is used to indicate performance instructions for a single instrument or voice. Adding Technique text in your score means that Sibelius can play back indications such as pizz, arco, mute (ie. for brass instruments) and other instrumental techniques.
• Sibelius 5 & 6: select the note and go to Create > Text > Technique
• Sibelius 7: select the note and go to Text > Styles > Style gallery and choose Technique
• A "ashing cursor appears and you can type the word you need (ie. pizz or pizzicato, arco, mute, solo). You can also right-click and choose a word from the menu
Repeats
Adding repeat barlines
• Select the barline
• Sibelius 5 & 6: go to Create > Barline > Start (or End) Repeat
• Sibelius 7: go to Notations > Common > Barline > Start (or End) Repeat
Creating 1st and 2nd time endings
• Press L to open the Lines menu
• Select the 1st time ending (or one of the other options)
• Click in the score where you’d like it to appear
6

• Adjust the position and the length using the handles (see image below)
Playback of repeat barlines
Playback of a section more than twice
Sometimes you might need a repeated section to play back more than twice. For instance, you might have a hymn that has 5 verses and you want Sibelius to play the verse section of the score all 5 times.
There are two aspects to achieving this in your score:
1. Making it look right on the page for the player, so that when the score is printed the player knows to play that section 5 times
2. Making the Sibelius play that section back 5 times in a row
The !rst aspect is straightforward: you can simply add some text above the repeat barline that instructs the player to “Repeat 4 times” (4 repeats, plus the original play through will be a total of 5 times).
You can use Technique text to write Repeat 4 times
• Sibelius 5 & 6: select the note and go to Create > Text > Technique
• Sibelius 7: select the note and go to Text > Styles > Style gallery and choose Technique
In order for Sibelius to playback that section 5 times, select the End Repeat barline in your score and then:
• Sibelius 5 & 6: go to Window > Properties and click on the Playback tab. Under Play on pass, check the !rst 4 boxes to make Sibelius play that section a total of 5 times
• Sibelius 7: go to Home > Edit > Inspector. Under Play on pass, check the !rst 4 boxes to make Sibelius play that section a total of 5 times
7

Codas
How to set up a coda that plays back correctly
Using the example below, here are the steps for setting up a Coda with a D.S. al Coda instruction.
Press Escape after each step to ensure you have nothing selected before moving on to the next step
1. Separate the Coda from the rest of the piece: - select the barline at the end of bar 6 and go to:
• Sibelius 5 & 6: Layout > Break > Split System
• Sibelius 7: Layout > Breaks > Split System
2. Add a double barline at the end of bar 6 - select the barline at the end of bar 6 and go to:
• Sibelius 5 & 6: Create > Barline > Double
• Sibelius 7: Notations > Common > Barline > Double
3. Add the Coda Symbol and the word Coda over the !rst bar of the Coda
• Sibelius 5 & 6: go to Create > Text > Other system text > Repeat (D.C., D.S., To Coda) and click above the start of bar 7. A "ashing cursor will appear. Right-click on the cursor and choose the Coda symbol, then type a space and the word Coda
• Sibelius 7: go to Text > Styles > Styles Gallery > Tempo > Repeat (D.C., D.S., To Coda) and click above the start of bar 7. A "ashing cursor will appear. Right-click on the cursor and choose the Coda symbol, then type a space and the word Coda
4. Add the D.S. al Coda text above the end of bar 6
• Sibelius 5 & 6: go to Create > Text > Other system text > Repeat (D.C., D.S., To Coda), click above the end of bar 6. Right-click on the "ashing cursor and choose D.S. al Coda
• Sibelius 7: go to Text > Styles > Styles Gallery > Tempo > Repeat (D.C., D.S., To Coda), click above the end of bar 6. Right-click on the "ashing cursor and choose D.S. al Coda
5. Add the To Coda text and coda symbol
• Sibelius 5 & 6: go to Create > Text > Other system text > Repeat (D.C., D.S., To Coda), click above the end of bar 4. Right-click on the "ashing cursor and choose To Coda. Right-click again and choose the coda sign
• Sibelius 7: go to Text > Styles > Styles Gallery > Tempo > Repeat (D.C., D.S., To Coda), click above the end of bar 4. Right-click on the "ashing cursor and choose To Coda. Right-click again and choose the coda sign
8

6. Add the segno
• Sibelius 5 & 6: go to Create > Text > Other system text > Repeat (D.C., D.S., To Coda), click above the double barline at the end of bar 1. Right-click on the "ashing cursor and choose the segno
• Sibelius 7: go to Text > Styles > Styles Gallery > Tempo > Repeat (D.C., D.S., To Coda), click above the double barline at the end of bar 1. Right-click on the "ashing cursor and choose the segno
Playback of notes
Play 1st time only
There are times when you might want a part of your score – say an instrumental solo – to be played the !rst time through a repeated section, but not during the subsequent passes.
• Use Technique text to write Solo 1st time in the relevant place in the score
To ensure the solo only plays on the second pass (play-through) of that section do the following:
• Sibelius 5 & 6: select the notes/bars of the solo and then go to Window > Properties. Click on the Playback tab. Under Play on pass, make sure the only !rst box is checked (uncheck the remaining boxes)
• Sibelius 7: go to Home > Edit > Inspector and then click on the Playback tab. Under Play on pass, make sure the only !rst box is checked (uncheck the remaining boxes)
Playback sounds
Changing the playback sound of an instrument in Sibelius 6
• Open the Mixer (press M)
• Click on the triangle to the left of the instrument name (1.)
• Click on the triangle to the right of the current instrument sound and choose a new sound from the available options (2.)
Changing the playback sound of an instrument in Sibelius 7
• Open the Mixer (press M)
• Click on the button that expands the Mixer (click on it twice)
9

• Click on the triangle to the right of the current instrument sound and choose a new sound from the available options
Balance of individual stavesChanging the levels of instruments in your score
One of the last things you should do before exporting your score as an audio !le is to make sure the balance (volume level) of instruments is OK throughout the score.
• You can change the balance by opening the Mixer (press M)
• Use the volume sliders for each instrument
• You can change the overall volume with the Master Volume slider at the bottom
• Turn on the Show/Hide groups button so you can alter the volume level of an entire instrumental family (ie. the Woodwinds) all at once
Muting or soloing instruments
• Use the Mute or Solo buttons if you want to, well, mute or solo an instrument. The mute button has two “levels”. The !rst time it is clicked, it will half-mute the instrument (and the button will appear half red and half black). The second time it is clicked, the instrument will be fully muted
• You can create karaoke-style backing tracks if you mute an instrument and then export your score as an audio !le (File > Export > Audio - see below for further instructions)
10

Live Tempo
In Sibelius 6 and 7, the Live Tempo feature allows you to “conduct” your score to create subtle changes in tempo.
• Sibelius 6: go to Play > Calibrate Live Tempo
• Sibelius 7: go to Play > Live Tempo > Calibrate
• Choose your input method – ie. computer keyboard
• Click Start Calibration
• Tap along with the beat using your space bar
• Then go to Play > Live Tempo and click on the dialogue launcher button to open Live Tempo Options (Sibelius 6: Play > Live Tempo Options). Choose your settings
Recording your Live Tempo
• Select a note in your score which is at the beginning of the section you’d like to “record” your conducting
• Press Y to ensure the playback line is at that location
• Click on the Record Live Tempo button on the Playback window
• Start tapping the space bar at the tempo you’d like your score to be played and continue on, speeding up or slowing down as necessary
• Whilst you’re recording, the playback will be quite “lumpy” sounding – don’t worry!
Make backing/rehearsal tracks
Export your score as an audio !le
When you’re happy with the way your score is sounding, you can export your score as an audio !le so that you can share it with the members of your ensemble (either in its entirety, so as a Karaoke-style backing track).
• Rewind the playback line to the beginning of your score
• If necessary, open the Mixer and mute any instruments you don’t want playing back in the backing track
• Go to File > Export Audio
• Give the !le a name a choose where to save it
• Click OK
• Sibelius will “play through” the !le and record it as an audio !le
11

The resulting !le will be a WAV (Windows) or AIFF (Mac) !le and it will be quite large in size. If you’d like to convert it to a smaller mp3 !le, you can do the following in iTunes:
• Open iTunes
• Locate the !le in Windows Explorer or the Mac Finder window
• Drag the song into the iTunes window
• Once it’s in iTunes, right-click on the title and choose Convert to mp3
Homework
For homework this week, you can use any score you like. Find something that you might have already in your Scores folder, or use the Scarborough Fair score from Session 1. You’ll be adding and changing tempo markings, repeat barlines and so on, so save a copy of the score before messing it up too much!
To experience the things we ran through during Session 2, open your chosen score and do the following:
Tempo
• Add or change the Tempo indication at the beginning of your score
• Add a Swing tempo marking a few bars later and play back the score to listen to the change in Sibelius’s performance of quavers in the score
Metronome mark
• Add a Metronome marking in your score
• Add a second metronome mark and then hide it
• Play the score back to hear the effect
Explore the Playback Dictionary
Open the Playback Dictionary and take a look at the list of words on the Staff Text tab, and then those on the System text tab
• Sibelius 5 & 6: go to Play > Playback dictionary
• Sibelius 7: Play > Interpretation > Dictionary
Repeat barlines
• Add repeat barlines
• Set up a section of a score so that it plays back 5 times
Play on pass
• In the repeat section of your score, select a bar or two in any instrument and set it to play on the !rst time through only
12

Change an instrument sound
Open the Mixer and change instrument playback sound. Alter the voloume levels of instruments and test out the solo and mute buttons
Dynamics
• Add some dynamics into your score (the correct way!)
Technique text
• Test out technique text. If your score doesn’t already have a string part, add one in and copy some notes across into it. Add a pizz indication and then an arco indication a few bars later
• If you have a brass part, add the word mute above the staff
Coda
• Set up a score with a treble staff and 8 empty bars and recreate the Coda as described above
• Play the score back and check that it plays correctly
13