shaping fraser fir christmas trees · 2012-04-04 · shaping fraser fir christmas trees jeffrey h....
TRANSCRIPT
Shaping Fraser Fir Christmas Trees Jeffrey H. Owen, Area Forestry Extension Specialist, Christmas Trees, July 2009 Introduction The beautiful shape and texture of a Fraser fir Christmas tree depends on careful pruning and shearing. The way a grower sets the leader, trims the sides, and corrects problems in a tree will determine its quality. Other cultural practices that go into producing a Fraser fir strive to add or improve foliage. Shearing removes it. Done properly, shearing accentuates the character of a well-grown tree. Done poorly, shearing strips away much of the potential the tree might have had.
Tools Protective Gear: Metal reinforced gloves to protect free hand from knife, leg guards, leather boots, wasp spray, & first aid kit. Clippers: are used to cut the top and lateral branches and remove problem braches. Specific buds can be selected using clippers.
This publication strives to integrate traditional shearing practices with the results of shearing research. Regardless of the amount of experience a grower has, an understanding of principles can improve the practice of shearing. Shearing research points to alternative strategies that improve tree quality and shorten the time it takes to produce good trees.
A Long Knife: is used to trim side branches extending outside the cone or taper of the tree. Sharpening Kit: Growers use fine Arkansas stones, steel sharpening rods, or ceramic rods to frequently sharpen their knives and clippers.
Proper shearing starts with a clear goal and an understanding of how to achieve it. Growers intentionally produce trees that are narrow or wide, dense or open – for their specific market. Their choices will determine how many years a tree stays in the field, the average weight of their trees, and even how many can fit on a truck load. Yet every grower has to work with the same basic principles to design their tree.
Cleaners: Alcohol, ammonia, or commercial cleaning solutions remove sap from tools. Hand cleansers remove sap from person and laundry. Top Straighteners: are used to brace crooked tops to vertical alignment with the main trunk. Manufactured wires, Velcro paper tape and sticks, or even flagging tape and a branch from the tree can be used.
Getting Started There is a lot to think about before you shear your first Christmas tree. You will need good quality hand clippers and shearing knives. You will need a sharpening stone, a steel, or ceramic stick to keep them sharp. You will have to clean your knives and clippers frequently while you work. You and your crew need to wear appropriate protective hand and leg gear. Also, you should probably have a basic first aid kit on hand equipped to dress minor cuts and relieve minor insect bites.
Two-cycle Engine Shearing Tools: are also used to trim side branches but are more popular for pines than true firs. Knives provide greater precision and cleaner cuts, especially on sloping land.
1
Just as important as the gear are the ideas that guide your knife and clippers. You need to have a plan that includes:
• the order in which different fields and different sizes of trees are to be sheared
• target leader length by tree size • guidelines for leader and terminal bud selection • optimum taper for different sizes of tree • corrective pruning that needs to be addressed in your trees • target start and end dates between which shearing will be completed
If you are doing your own work, you can evaluate your trees and adjust your practice as you go. If you are hiring the work done, you need to be able to communicate your goals to your crew or contractor. You may even decide that shearing tasks will be done by different crews such as an experienced topping crew and a less-experienced shearing crew. The last section of this website is designed to help you to develop a training program for your workers. Using this Website: There is a lot of information to learn about shaping Fraser fir Christmas trees. This publication has been organized into the following sections. While they were written to be read in order, you are welcome to start with whichever section applies to your current interest or need:
• Christmas tree attributes: Those characteristics and growth factors of a conifer which are influenced by shearing to produce a quality Christmas tree.
• How to shear: The practices and techniques used to produce a quality Fraser fir Christmas Tree including setting the leader and shearing the sides.
• When to shear: Influence of timing on tree response and the order by which trees should be sheared.
• What kind of tree: Comparison of conventional and accelerated growth shearing practices and the trees that result.
• Corrective pruning: Common tree problems or quality defects and the ways to fix them.
• Training your shearing crew: Management considerations and suggestions for effective training.
• Additional resources and links: for shearing and pruning information. Christmas Tree Attributes Influenced by Shearing The need to sort through tree-to-tree differences during shearing can overwhelm an inexperienced worker. Decisions become easier if a few attributes of Christmas trees and principles related to tree growth are kept in mind. Really, the
2
objective of each pruning and shearing practice is to optimize the following Christmas tree attributes:
Shearing Terminology: Shearing: As used in North Carolina, the term includes cutting the leader, selecting a new terminal bud, setting the taper of the tree, trimming side branches, and removing problematic growth. Taper: The angle of the side of a Christmas tree. Usually given as a percentage (width / height X 100 = %) Leader: The vertical branch at the top of the tree selected to be the central stem. Also referred to as a terminal. Lateral branches: The side branches of a tree, specifically the first whorl of branches below the terminal. Horn: A leader or vertical branch growing vigorously from a branch rather than the main stem; often able to compete hormonally with the leader of the tree. Crossovers: Strong diagonal branches that grow perpendicularly to normal branch growth. Whorls: A ring of buds on a terminal or the layer of branches that result when the buds grow. Whorls often occur at the end of the terminal from the natural crown of buds. Prolapsed buds: Buds on the current season’s leader that undergo a second flush to form a short branch of one to three inches. Whiskery buds: Buds on the current season’s leader that develop a cluster of needles around their base. Sessile buds: Buds on the current season’s leader that remain flush against the main stem and have no surrounding needles. Cat’s eyes: The cluster of branch stubs that remain at a branch junction
A Conical Shape: The structure of a Christmas tree consists of whorls of branches radiating out from a straight central stem to form a cone shape. As you move from top to bottom, each major whorl of braches is one year older and one flush of growth longer. The stem or trunk should be straight with no forks or double tops. The taper (cone shape) of the tree should be consistent from side to side and not change in angle from top to bottom. Viewed from above, a Christmas tree appear circular. Pruning and shearing should move a Christmas tree to a more uniform cone shape. Natural Branching: Major branches should naturally radiate out from the main stem, not veer off from another branch. Strong vertical branches (horns) or strong diagonal branches (crossovers) create problems such as multiple tops and disorderly branches that need to be pruned out. If close to the top of the tree, they can sap strength from the natural leader of the tree. Horns and crossover branches will shade any “natural” branches behind them that radiate out from the main stem. This suppresses the desirable growth in favor of problem growth. Horns and crossovers can twist or break during harvest and handling and degrade tree quality. The only reason to leave horns and crossovers in the tree is to fill a major hole or gap within a year or two of harvest. Plant Growth Regulation: Buds in Christmas trees release hormones or plant growth regulators (PGR’s) that control how the tree grows. Terminal buds release PGR’s into the sap that suppress any buds lower on the tree or closer to the main stem on branches. These PGR’s
3
balance the dominance of the leader with suppression of branches on the tree to produce a natural cone shape. The dominance of branches on the tree changes in response to the loss of buds either from natural injuries such as hail or spring freezes or to man-made injuries like shearing. Removal of dominant terminal buds release remaining buds for added growth. Top Dominance: The highest bud on a Fraser fir tree and the buds at the tips of branches are dominant over those below or behind them as just described in the discussion of PGR’s. The shoots that develop from those terminal buds will be more robust. The dominant buds on the leader of the tree are oriented to grow vertically. Almost all buds below those terminal buds are oriented to grow horizontally as branches. If the natural terminal bud cluster or crown (usually a terminal bud with 3 to 5 lateral buds) is removed, the highest buds on the remaining terminal will become dominant with vertical orientation. These buds are most likely to produce a true top next season. Turned-Up Branches: When trees lose terminal dominance early in the growing season, lateral branches can change orientation to grow vertically in the same season. This can affect one or two branches or the majority of shoots on last year’s leader. It can also involve terminal shoots on branches lower down on the tree. With a need for only one leader, most turned-up branches have to be pruned back or removed. Usually tipping strong lateral branches is enough to reduce their dominance and thus their vertical growth response. Delaying topping until later in August is another way to reduce the incidence of turned up branches next year. Competition: When a tree produces several vertical shoots, dominance will be divided among them with no shoot growing as strongly as it would alone. Competition occurs among buds at the same level on the terminal, among multiple tops in a tree, and even between the terminal of a tree and lateral branches. You can increase bud dominance by maintaining a slight height advantage over competing buds (at least two finger widths). Leader dominance can be maintained by removing all competing vertical shoots. Dominance of the top over strong lateral branches can be increased by selecting longer leader lengths and/or by tipping or removing the lateral branches. Traditionally, growers have maintained a 2-to-1 ratio in the lengths of tops to the first whorl of lateral branches. Density: Added branch density is a primary benefit of moderate pruning and shearing. When dominant terminal branches are removed, side and interior branches are released from hormonal suppression, exposed to more light, and allowed to grow larger. These branches help to fill the spaces and gaps between existing branches. Density is a function of budset as controlled by genetics, optimum nutrition, and years in the field. When growers shear “tight”, they sacrifice height to increase density and also add a year or two to their rotation length.
4
Stages of Bud Development: True fir buds go through three stages of development in the year before they become branches:
• The bud initiation phase occurs before bud-break when undifferentiated growing points develop at the base of needles on the tiny shoot inside the mature bud. This occurs in early spring when buds start to swell.
• The bud scale formation phase occurs in May, June, and early July when bud scales develop around the growing point. This is when buds become visible to the eye.
• The shoot development phase occurs from mid-summer to early fall when the growing point develops into a miniature shoot inside the bud scales.
Each phase occurs in its proper season. No buds catch up from one phase to the next. When buds appear after shearing in mid summer, visible bud scales are being added to an existing bud initial. While buds may grow larger during winter and early spring, no additional needles are added to the shoot inside the bud after early fall. For a bud to fully develop it must have achieved sufficient growth in each phase. How to Shear When shearing a Christmas tree, attention should first be given to selecting and cutting the leader. This is done best with hand clippers. Next, the first whorl of lateral branches is pruned to set the taper of the tree. Usually the cone, defined by the height of the leader and the width of these lateral branches, provides the taper for the entire tree. The sides of the tree can then be sheared with a knife following the line of taper already established in the top. Corrective pruning may occur at the same time or later by an expert crew.
Working the Leaders: There are several factors involved in setting the top of a Fraser fir Christmas tree. Choosing best leader from several competing vertical branches will provide the straightest leader and most uniform branching next year. The natural or cut length of the leader will determine the taper and density of the tree and influence the number of years until harvest. Terminal bud selection will determine the straightness and vigor of next year’s leader. And remember, all these developments are driven by changes in the balance of plant growth regulators (PGR’s) as determined by bud and shoot position on the tree. Selecting a True Leader: When a shoot emerges from the natural terminal bud of a Fraser fir, it is usually straight with needles and buds growing in all directions around its circumference. When a lateral bud turns up to make a leader, it often has a crook at the base and may not fully straighten. In cross-section, it is shaped like a branch with more needles and buds on the top and sides than on the bottom. Generally, the backside of a turned-up branch -- facing away from the center of the tree -- will have fewer buds especially toward the base (See figure 1). Turned-up branches can produce leaders that behave like branches for
5
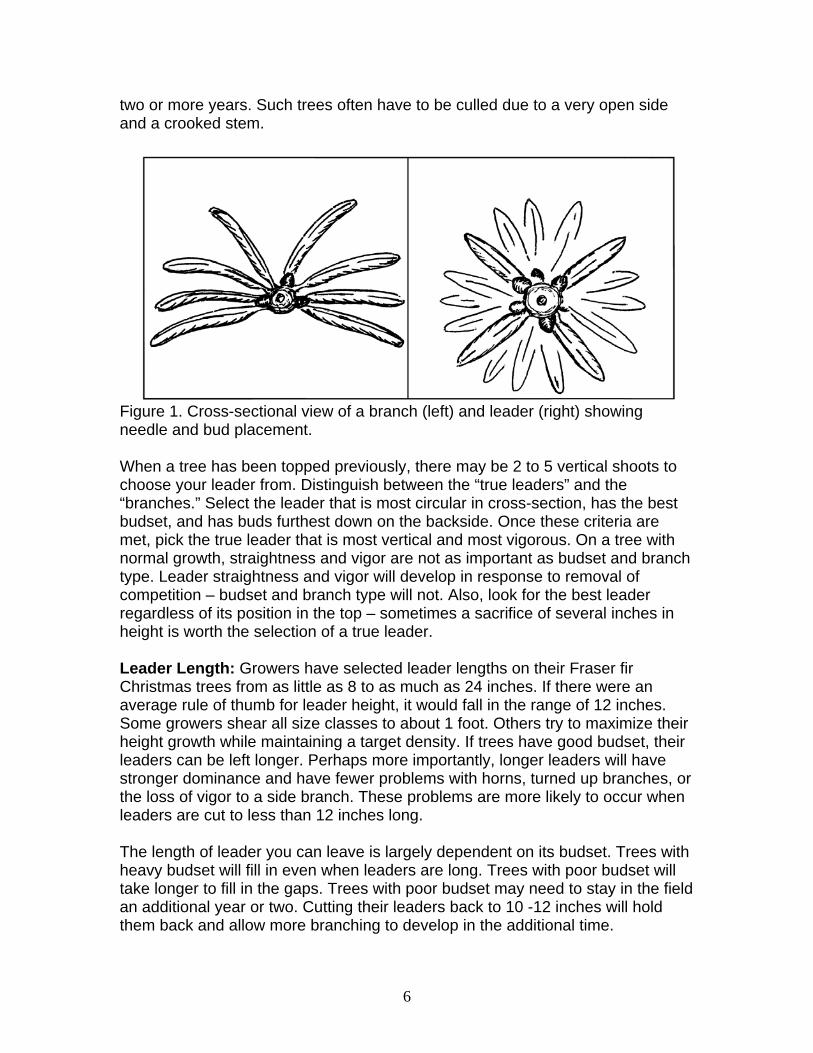
two or more years. Such trees often have to be culled due to a very open side and a crooked stem.
Figure 1. Cross-sectional view of a branch (left) and leader (right) showing needle and bud placement. When a tree has been topped previously, there may be 2 to 5 vertical shoots to choose your leader from. Distinguish between the “true leaders” and the “branches.” Select the leader that is most circular in cross-section, has the best budset, and has buds furthest down on the backside. Once these criteria are met, pick the true leader that is most vertical and most vigorous. On a tree with normal growth, straightness and vigor are not as important as budset and branch type. Leader straightness and vigor will develop in response to removal of competition – budset and branch type will not. Also, look for the best leader regardless of its position in the top – sometimes a sacrifice of several inches in height is worth the selection of a true leader. Leader Length: Growers have selected leader lengths on their Fraser fir Christmas trees from as little as 8 to as much as 24 inches. If there were an average rule of thumb for leader height, it would fall in the range of 12 inches. Some growers shear all size classes to about 1 foot. Others try to maximize their height growth while maintaining a target density. If trees have good budset, their leaders can be left longer. Perhaps more importantly, longer leaders will have stronger dominance and have fewer problems with horns, turned up branches, or the loss of vigor to a side branch. These problems are more likely to occur when leaders are cut to less than 12 inches long. The length of leader you can leave is largely dependent on its budset. Trees with heavy budset will fill in even when leaders are long. Trees with poor budset will take longer to fill in the gaps. Trees with poor budset may need to stay in the field an additional year or two. Cutting their leaders back to 10 -12 inches will hold them back and allow more branching to develop in the additional time.
6
Cutting the Leader: Avoid cutting the natural bud as far into the rotation as possible. It is the most dominant bud on the tree and is most likely to produce a straight leader. Many growers wait until the tree is close to breast-height or about four and a half feet tall before cutting the terminal bud. However, by the fourth year in the field, leaders can grow as much as 36 inches and need to be cut back to the target length (as determined by market goals and budset). Usually, once a tree becomes vigorous enough to be topped, it will be necessary every year thereafter. However, when older trees have short leaders, do not automatically cut the terminal bud off. As with younger trees, the natural terminal bud will maintain hormonal dominance of the leader over lateral branches and horns. Some growers begin cutting the leader on two-year-old trees based upon a 12 inch rule-of-thumb. Not only are trees kept short, but additional corrective pruning is often necessary. Once the natural terminal bud is removed from the tree, other buds are released from its inhibiting PGR’s. This allows formation of multiple leaders and horns. If the natural bud can be kept on the tree for an additional year or two, the need for corrective pruning can be delayed as well. Terminal Bud Selection: A number of different theories have been applied to selecting the right bud to make next year’s leader. Research has supported some and disproved others. Bud size can be important after August, but may not be significant in the summer. Bud type may not be important. Some theories apply only to trees with certain leader problems and relate to the position of a bud rather than the type of bud. The truth is – no single rule can apply all the time. The following points blend research with practicality: 1. To get a strong leader, select a single bud with a slight height advantage (1 or
2 fingers) over any neighboring buds. 2. Leave ¼ to ½ inch of stem above the selected bud using an angled cut. Do
not cut lower through the center of the shoot than the top of the selected bud. The cut should be highest directly above the selected bud and angle down toward the opposite side of the leader. As the wound heals and dries, the bud will be pulled to a more vertical orientation.
3. In the summer, isolating the selected bud with a height advantage (see # 1 above) is more important than either the bud size or type of bud.
4. In the fall, select large or prolapsed buds over any small bud that may be present at the right height. Late in the season, small buds cannot hormonally dominate larger buds nearby on the terminal. Large buds will produce a stronger leader next season.
5. Where leaders are crooked, pick a bud that faces the centerline of the tree. Next year, any crook to the leader will counterbalance this year’s off-center growth.
Leader to Lateral Branch Ratio: The imaginary line between the tips of the cut leader and cut lateral branches sets the taper of the tree. The line begun there should continue smoothly down the side angle of the tree to form the taper of the
7
tree. The choice in leader-to-lateral-branch ratio can have several consequences for next year’s growth. To insure that the terminal of the tree remains dominant next year, a careful balance must be maintained between the length of the cut leader and the top whorl of lateral branches. Traditionally, growers have used the “half-length rule” in which the laterals are maintained at one half the length of the terminal. An 18-inch leader would be matched with 9-inch laterals branches. A 12-inch leader would be matched with 6-inch lateral branches. Growers have adjusted the rule to their own tree style and field conditions (laterals are half length plus an inch, or laterals are half length minus an inch). When lateral branches are left too long in relation to a cut leader, the vigor can shift from the terminal to the branches in the following year. Long lateral branches contain more buds that produce more plant growth regulators. Collectively the branches out-compete the terminal shoot. Long laterals can also lead to a misshapened tree with long branches outside the taper of the tree. Growers often refer to heavy branching just below the terminal as “big shoulders.” If laterals are left too long repeatedly, the tree can become a “smokestack” with nearly vertical sides. Short lateral branches can also create dominance problems for a cut leader. Short branches have few buds. Those buds at the base of lateral branches that remain after a tight shearing often are positioned to grow vertically. Cut short, an increased number of horns can be expected. Where only one or two buds were left the previous year, both shoots often become horns that have to be removed, leaving the tree with a net loss in branching. The best solution is to leave the lateral branches longer (and possibly the leader as well). With lateral branches of at least 5 or 6 inches, growth is divided among 4 to 8 buds yielding more natural branching. With plant growth regulators divided among many buds, the vertical shoot that could become a horn merely develops into a 3-inch shoot with small buds that adds density to the tree without competing for dominance. Cutting Lateral Branches: To cut the lateral branches at the right length in relation to the leader, growers often bend the laterals up to the leader and prune them at one-half the length of the desired leader length (or modified rule). Some growers give their crew sticks that have color-coded marks for each combination of leader-to-lateral-branch length. Once the eye is calibrated, these aids become an occasional tool. It is better to be over-prepared with a seldom-used tool than to find a field of trees already sheared to 4-inch lateral branches that promise a crop of horns the following year. If you are leaving long leaders with natural buds intact, do not automatically cut your lateral branches. Under a long leader, lateral branch length will often remain inside or close to the taper of the tree. If cut, that whorl of branches will not keep pace with the rest of the tree next year, and leave an indentation in shape. The
8
tradition of always tipping lateral branches applies to any trees with cut leaders and therefore impaired dominance. Unless injured, uncut leaders will maintain vigorous dominance over the rest of the tree. In this case, terminal buds on the lateral branches pose no threat and actually provide an opportunity for more branching.
Working the Sides: Shearing the sides of your Fraser fir Christmas tree began with pruning the leader and lateral branches. As stated above, the line between the leader and the ends of the lateral branches should set the taper for the rest of the tree. Generally, any growth outside the taper is cut and any within it is left. The tree should approximate a cone when finished. The slope of the cut line should be consistent from top to bottom as well as around the tree. The USDA grade standards accept taper between 40 and 100 percent. With such a range of acceptable taper, it can be adjusted to the interests of the buyer. Fraser fir growers traditionally grew very wide, dense trees, but more buyers demand a narrow taper tree than in the past. Narrow trees fit into customers’ crowded living rooms, more fit on a tractor trailer, and generally weigh less than a wide tree. But if you have a market for wide trees, plant them with plenty of room in the field and shear accordingly. Ideal side-shearing should remove terminal buds on the strongest lateral branches and little more. There should still be plenty of lateral buds left on cut branches. There should also be plenty of interior branches that are not cut at all. If growth is cut too short, the remaining bud or two at the base of cut branches will become a source of horns and cross-over branches that eventually need to be removed. Yet, the worst symptom of tight shearing are “cats eyes” where shoots on the end of a branch are cut so short that no buds are left to hide the cut for next year or two. Using A Knife To Shear: Most North Carolina growers shear the sides of their Christmas trees with 16 inch long knives. In other parts of the country, growers may use two-handled hedge shears or power weed eaters with a special cutting blade and head. A knife cuts clean, but those using knives often over-shear. When using the knife, it is important to swing with the whole arm to get a straight cut from top laterals to bottom branches. The knife arm must be moving away from the side of the body to maintain the line of the taper as the worker leans into the cut. If a worker shears toward himself, the taper of the bottom of the tree will usually become vertical and break from the taper at the top of the tree. Good knife work involves many narrow cuts that leave the tree round in circumference with no noticeable flat cut faces. Excessive shearing on the sides creates "flat" areas with few residual buds on the remaining branch stubs. Nor should there be any “wild hairs” left between knife cuts or at the bottom of the tree.
9
It is tempting to use a knife to do the topwork as well as shearing the sides. It may be faster to just use the knife, but any precision is lost. Clippers provide the best control to carefully select buds. With clippers in hand, more attention can also be given to corrective pruning. Alternative Pruning Techniques There are a number of practices that have been developed to manage the growth of Christmas trees but are not used extensively in North Carolina. They have been included here as both a reminder and as an option. Bud rolling: European Nordmann fir Christmas tree growers have rolled buds after bud break in the spring as a way to prune dominant lateral branches that would grow outside of the desired taper of the tree. The swelling bud or small shoot is twisted from the tree by hand in May or early June. This has been used to remove lateral buds from the crown as well as terminal buds on lateral branches. A surprisingly few buds need to be rolled to maintain a conical shape. Fork pruning: Growers selectively remove the entire terminal shoot from a branch. On Fraser fir, there is usually a weak secondary terminal shoot underneath the one removed to provide a natural if less vigorous appearance. This can be done to single branches, a strong whorl of branches, or the entire tree. Growers have used fork pruning to groom individual trees for competitions. Top-stop nipper: A European Christmas tree grower, Lars Giel, developed a set of girdling clippers to stunt the terminals of Nordmann fir. Four thin blades gently crush alternating halves of the circumference of the bark on last year’s terminal. This stunts growth without sacrificing any buds. While it does work on Fraser fir, the heights of resulting leaders have been quite variable. Chemical growth suppression: Growers have experimented with different plant growth regulators over the years with the goal of inhibiting excessive terminal growth. Europeans have successfully used multiple applications of NAA on Nordmann fir. As with the Top-stop nipper, the height response of Fraser fir in studies has been too variable for wide scale use thus far. When to Shear Your Fraser Firs The time of year in which Fraser Fir Christmas trees are sheared has a great impact on bud development and tree response to shearing. Optimum growth occurs when trees are sheared in July and early August as measured by budset, foliage density, and the absence of problems. The number of buds on new growth has increased by 30% or more when comparing July shearing to other
10
times of the year. By shearing in midsummer, the remaining buds on the tree have the most time and the greatest allocation of water and nutrients to develop buds for the following season. Experience has taught most growers to wait until foliage is elongated about 80% and is beginning to stiffen (usually the last week of June or the first week in July). Research at NCSU showed the greatest response in bud development (bud-scale formation) to occur after June shearing. However, several negatives offset any gain on larger trees. Too much foliage and too many buds were sacrificed when partially elongated growth was cut. An inch cut in early June might equal two or three inches of growth in July. Also, when leaders were cut early, trees lost apical dominance. Immature lateral branches responded to the removal of inhibiting plant growth regulators (PGR’s) by turning up and becoming horns. The removal of undesirable horns the following year offset any gain in budset provided by the June shearing. Further, few trees have straight leaders in June making selection of the best leader difficult. Shearing in the fall yielded the poorest tree response in shearing research. Small lateral buds did not develop into strong terminal buds. Frequently when small buds were selected, shoots from larger buds by-passed the selected bud to become the dominant leader. In the fall, buds are fully developed, tree are going dormant, and conditions are often droughty. In comparison, trees responded to springtime shearing with stronger leaders, more vertical leaders, and more robust growth than in the fall. If you can not get all your shearing done in the summer, it would be better to avoid the fall and finish up the following spring. Timing for Bird Damage: Birds break off a percentage of leaders in almost every field and become serious problems in select locations. While prompt selection of a single leader benefits budset, leader straightness, and general vigor, there is no gain if a bird breaks it off. In known problem areas, growers will delay selecting leaders and topping until later in the summer with the hope that at least one leader will survive. By late July or August, leaders have hardened off to the point where they are less likely to break from the weight of a bird. If a leader has survived to that point, it will likely survive any additional landings. The need to delay topping is a judgment call that requires an estimate of potential damage. A discussion of what to do when all the leaders are broken by birds is provided in the corrective pruning section.
11
Order of Shearing by Size Class
Based on research on different shearing timings, growers can arrange the order in which their trees are sheared to maximize budset. Small Trees First: Small trees can be worked first if their leaders are not cut. Shearing can start as soon as tender growth straightens - often by mid-June. Because they still have their crown buds intact after shearing (still producing PGR’s), they will have few terminal dominance issues. Un-topped trees seldom have problems with horns. On small trees, only dominant lateral branches tend to be sheared. This reduces competition with the leader. Light shearing also leaves as much foliage on small trees as possible to maintain maximum vigor. Growers can begin shearing their small trees in mid-June, two weeks before other trees are ready. Keeper Trees Next: After un-topped trees are finished, larger trees are sheared that require topping. Most growers shear their “keeper” trees first, those trees that are not ready for market. These trees need the best possible budset to grow well next year, and thus, are sheared in the optimum window. By waiting until July in most years, lateral growth is harder and less likely to turn up when terminal buds are cut. Most leaders will be straight enough to cut by mid July if growers are trying to finish their trees in one pass through the field. However, many growers delay topping the trees they shear in July until later in the summer, but still go ahead with side shearing and removing the competing leaders. This is especially important in wet years when growth remains succulent well into July or with individual trees that have crooked leaders. Even this partial shearing takes advantage of summer budset. When topping is delayed, it should be completed by the end of August to allow at least some bud response on the leader to shearing. Topped too late in September, the tree is unable to re-allocate nutrients and growth among remaining buds. Market Trees Last: If increased budset is a primary shearing goal for your farm, the trees that will be harvested this year should be sheared last. Since they will be cut, there is no advantage to increasing their budset. Although generally larger, market trees usually require the least intensive shearing. Most corrections have been made in previous years and only a little topwork and light side shearing are needed. However, other issues besides budset may be important when preparing market trees. Early removal of competition from the tops of market trees can increase the likelihood of straight leaders and good lateral branch growth. This is especially important if the trees to be harvested exhibit dominance problems or already weak leaders. Some growers may send a topping crew through their big
12
trees early just to remove multiple leaders, horns, and crossovers. Additional topwork and side shearing is then completed after the keeper trees are worked. Others shear their market trees early in summer to reduce resin on cut branches that some buyers complain about. The resin that collects at the cut end of branches generally turns white but fades with time. Some growers shear market trees first to allow enough time for resin to become less noticeable. Other growers find that even on trees sheared in August and September the resin has weathered adequately by harvest. Ideally, growers should have a large enough crew to shear all their trees in the July / August timeframe. If a field of trees has excellent budset, timing may be less critical. But for those growers who struggle with trees with marginal or poor budset, proper timing can provide measurable improvements in structure and density the following year. Each grower must prioritize for themselves the importance of leader vigor in market trees, budset in keeper trees, and the visibility of resin on cut shoots.
What kind of tree: Conventional vs. Accelerated Shearing? Christmas trees may be sold by uniform size class, but different growers’ 6-7 foot products vary widely. A 6 to 7 foot Fraser maybe wide or narrow, light to heavy in density, and light to heavy in weight. The number of trees that fit on a semi-trailer can vary by more than 200. The same size tree could be five years old or seven or more at harvest. These differences represent a tradeoff between increasing tree density and reducing the cost of production. In terms of shearing, growers have a choice between conventional and accelerated practices or some point in between.
Conventional shearing places the highest priority on tree density. Leaders are held back to 12 inches or less throughout the rotation. Lateral branches are held to half the leader length. At the most conservative range of practice, some growers have held leaders back to as little as 8 inches with four inch lateral branches. These trees will take eight or more years to reach six and a half feet in height but they have plenty of time to fill in. Generally, the majority of trees in the field will achieve heavy density.
Accelerated growth balances tree density with height and branch structure to reach marketable quality sooner. If a tree has good genetic potential, it can be allowed to grow more each year. Normal to heavy budset will provide enough branches to fill in a long leader as it is covered by subsequent years of foliage. Under accelerated growth strategies, leaders are left longer (14 to 18 inches) through the middle of the rotation. Density becomes a top priority the last two years before market. With good budset and a good site, accelerated growth can yield marketable trees as early as year five in the field, but major harvests in years six and seven are more typical. By the eighth year, remaining trees will be in the 8 to 10 foot classes. Trees grown under this strategy will have smaller
13
trunks, less interior foliage, and weigh less than conventionally grown trees. A higher percentage of trees will be medium instead of heavy density with this strategy.
Staging Shearing Practices through the Rotation To shear trees conventionally, growers worked their trees in three stages through the rotation: 1) establish a vigorous leader, 2) add density, and 3) shear trees for market. In this approach leaders were generally cut to a uniform length throughout the rotation, and the only big shift occurred in the year of sale with a lighter shearing. However, as growers began stretching leaders, density failed to describe their shearing objectives. They really practiced a new stage of shearing that integrated tree vigor, leader height, and leader budset. Once transplants established vigorous leaders, a grower could focus on building structure – a combination of height and uniform budset to provide good branch structure the following year. Now they practiced four stages of shearing in their trees: 1) leader establishment, 2) building structure, 3) adding density, followed by 4) market shearing. By focusing on structure before density, growers could add height and shorten their rotation without sacrificing grade or price on their trees. These growers usually do not top their trees until they reach chest-height or about four and a half feet.
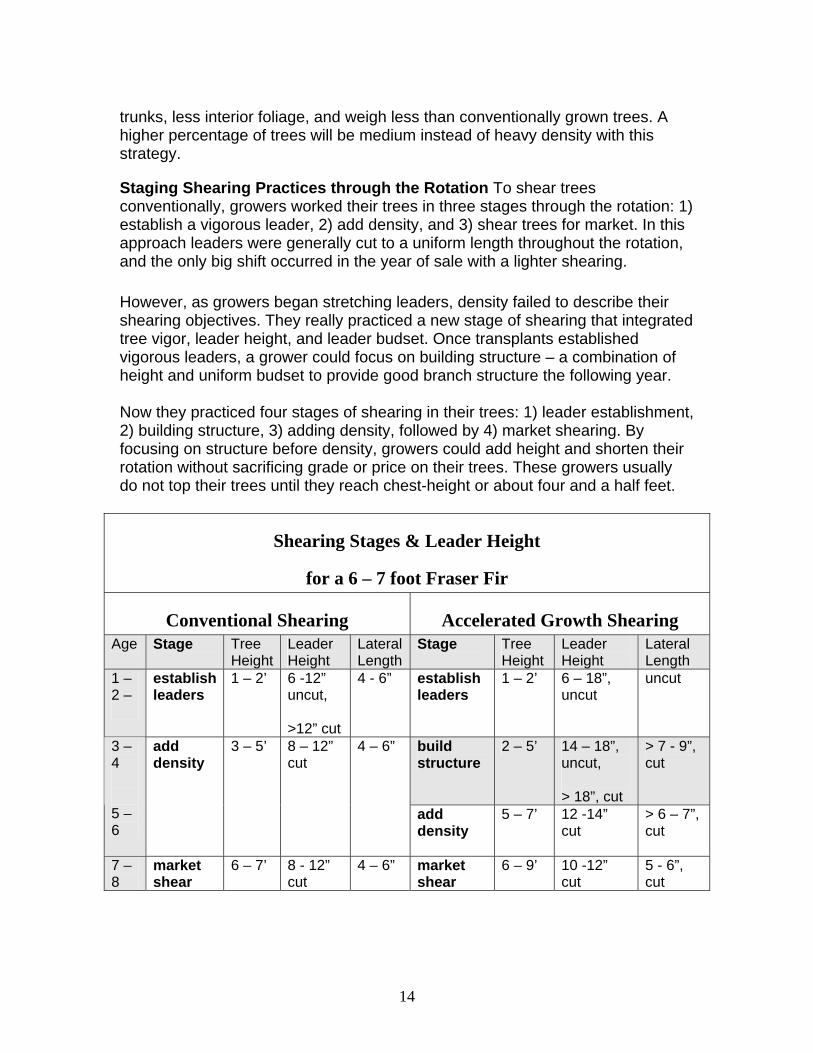
Shearing Stages & Leader Height
for a 6 – 7 foot Fraser Fir
Conventional Shearing Accelerated Growth Shearing Age Stage Tree
Height Leader Height
Lateral Length
Stage Tree Height
Leader Height
Lateral Length
1 – 2 –
establish leaders
1 – 2’ 6 -12” uncut, >12” cut
4 - 6” establish leaders
1 – 2’ 6 – 18”, uncut
uncut
build structure
2 – 5’ 14 – 18”, uncut, > 18”, cut
> 7 - 9”, cut
3 – 4 5 – 6
add density
3 – 5’
8 – 12” cut
4 – 6”
add density
5 – 7’ 12 -14” cut
> 6 – 7”, cut
7 – 8
market shear
6 – 7’ 8 - 12” cut
4 – 6” market shear
6 – 9’ 10 -12” cut
5 - 6”, cut
14
In managing for structure, growers work their trees to maximize budset (good branch structure in the following year) and height rather than emphasizing density and shape. Young trees are allowed to grow to their full genetic potential. Depending on the size of the tree to be harvested, growers could build structure in a field for two to as long as four years. Six-to-seven-foot tall trees might be sheared for structure for two years. Trees being managed for larger size, 10 to 12 feet, might be stretched for three or four years. Under a fairly cautious approach, growers have stretched leaders to 16 to 18 inches during the third and fourth year in the field. This has provided a gain of one size class or one year off the rotation. Under a more aggressive approach, growers have stretched their leaders to as much as 24 inches each year to produce a larger tree in the same rotation length. Imagination required! When trees are managed for structure and accelerated height, they don’t look like a salable tree while they are being “stretched.” In fact, they can seldom be sold before their intended size. Long leaders do not provide a good conical shape while immature. A two-year-old, 24-inch-tall tree can grow to 48 inches tall after the third year. It takes imagination to see that, given two years of shearing for density, it can make a medium-to-heavy density 6-7 foot Christmas tree with no defects in 5 total years in the field. Accelerated for an additional year (4th in the field), the tree could easily be marketed as a 7-8 foot tree in 6 years. It has been done. If a field has poor budset, trees will not have adequate structure to support accelerated growth. At such locations, growers have little choice but to cut leaders shorter to traditional lengths of 10 to 12 inches thereby increasing the length of time trees remain in the field.
Goals Associated with Shearing Growers follow a number of different goals simultaneously when shearing their trees or training their shearing crews. Often a balance must be struck between competing goals. Ultimately, the goals lead production toward the desired end: the sale of Christmas trees to a targeted market. Grade Standards: In general, Christmas trees are grown to conform to grade standards that reflect expectations in the marketplace. However, following current grade standards is voluntary and few trees are actually graded. Growers tend to use portions of both USDA Christmas tree grades and American Landscape and Nursery Association (ALNA) standards. Websites for each publication are listed below: http://www.ams.usda.gov/AMSv1.0/getfile?dDocName=STELPRDC5050490 http://www.anla.org/applications/Documents/Docs/ANLAStandard2004.pdf
15
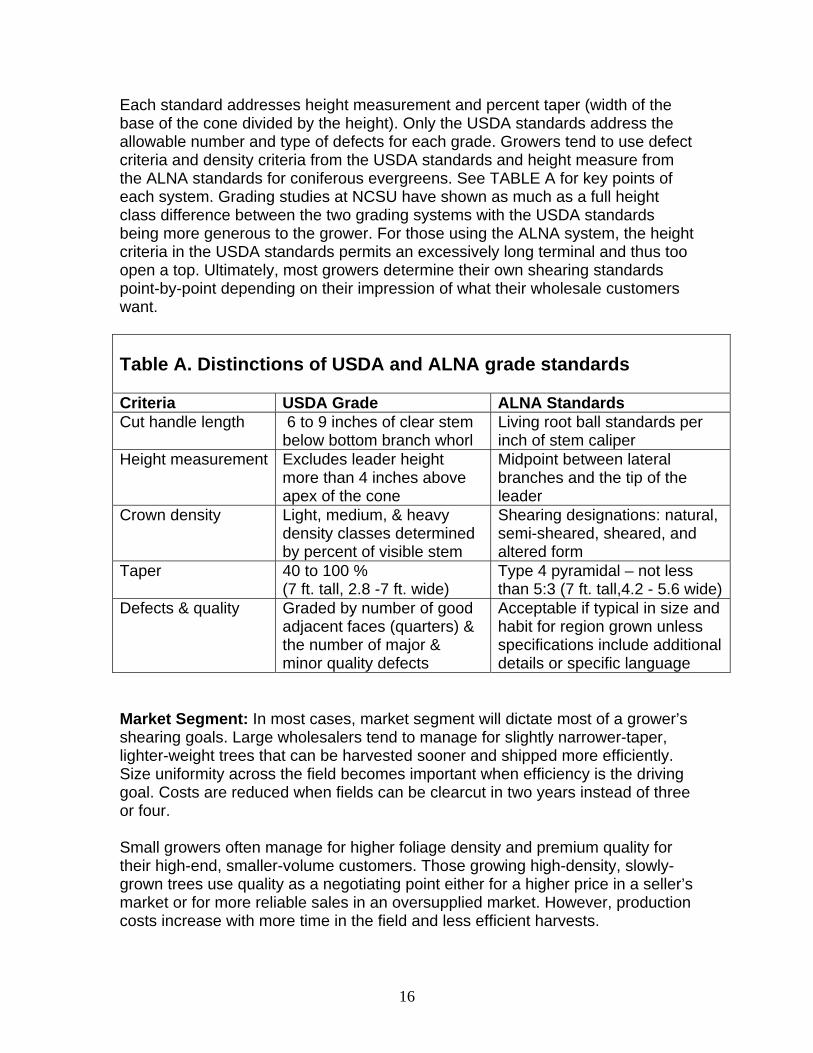
Each standard addresses height measurement and percent taper (width of the base of the cone divided by the height). Only the USDA standards address the allowable number and type of defects for each grade. Growers tend to use defect criteria and density criteria from the USDA standards and height measure from the ALNA standards for coniferous evergreens. See TABLE A for key points of each system. Grading studies at NCSU have shown as much as a full height class difference between the two grading systems with the USDA standards being more generous to the grower. For those using the ALNA system, the height criteria in the USDA standards permits an excessively long terminal and thus too open a top. Ultimately, most growers determine their own shearing standards point-by-point depending on their impression of what their wholesale customers want. Table A. Distinctions of USDA and ALNA grade standards Criteria USDA Grade ALNA Standards Cut handle length 6 to 9 inches of clear stem
below bottom branch whorl Living root ball standards per inch of stem caliper
Height measurement Excludes leader height more than 4 inches above apex of the cone
Midpoint between lateral branches and the tip of the leader
Crown density Light, medium, & heavy density classes determined by percent of visible stem
Shearing designations: natural, semi-sheared, sheared, and altered form
Taper 40 to 100 % (7 ft. tall, 2.8 -7 ft. wide)
Type 4 pyramidal – not less than 5:3 (7 ft. tall,4.2 - 5.6 wide)
Defects & quality Graded by number of good adjacent faces (quarters) & the number of major & minor quality defects
Acceptable if typical in size and habit for region grown unless specifications include additional details or specific language
Market Segment: In most cases, market segment will dictate most of a grower’s shearing goals. Large wholesalers tend to manage for slightly narrower-taper, lighter-weight trees that can be harvested sooner and shipped more efficiently. Size uniformity across the field becomes important when efficiency is the driving goal. Costs are reduced when fields can be clearcut in two years instead of three or four. Small growers often manage for higher foliage density and premium quality for their high-end, smaller-volume customers. Those growing high-density, slowly-grown trees use quality as a negotiating point either for a higher price in a seller’s market or for more reliable sales in an oversupplied market. However, production costs increase with more time in the field and less efficient harvests.
16
The rules of thumb that most growers use to guide their shearing crews are adjusted to these different markets. For instance, many growers will tell their shearing crew an optimum height at which to trim all the tops for their trees. Some growers use the same rule of thumb for all their trees. Other growers alter their rules by size class to maximize potential growth. While the shearing crew simply follows a rule of thumb, the product is being engineered for a specific market. Finally, it is important to remember the end goal is for a tree to be put up in a home, be decorated, and be valued by a consumer. A Christmas tree is not simply a commodity; it is a family tradition – the centerpiece for the holiday season. A Christmas tree is both a luxury and a necessity for many families as they strive to make the holiday special. If you remember that people buy and love their Christmas tree one at a time, it may be easier to carefully shear those long rows of trees on a hot summer day
17
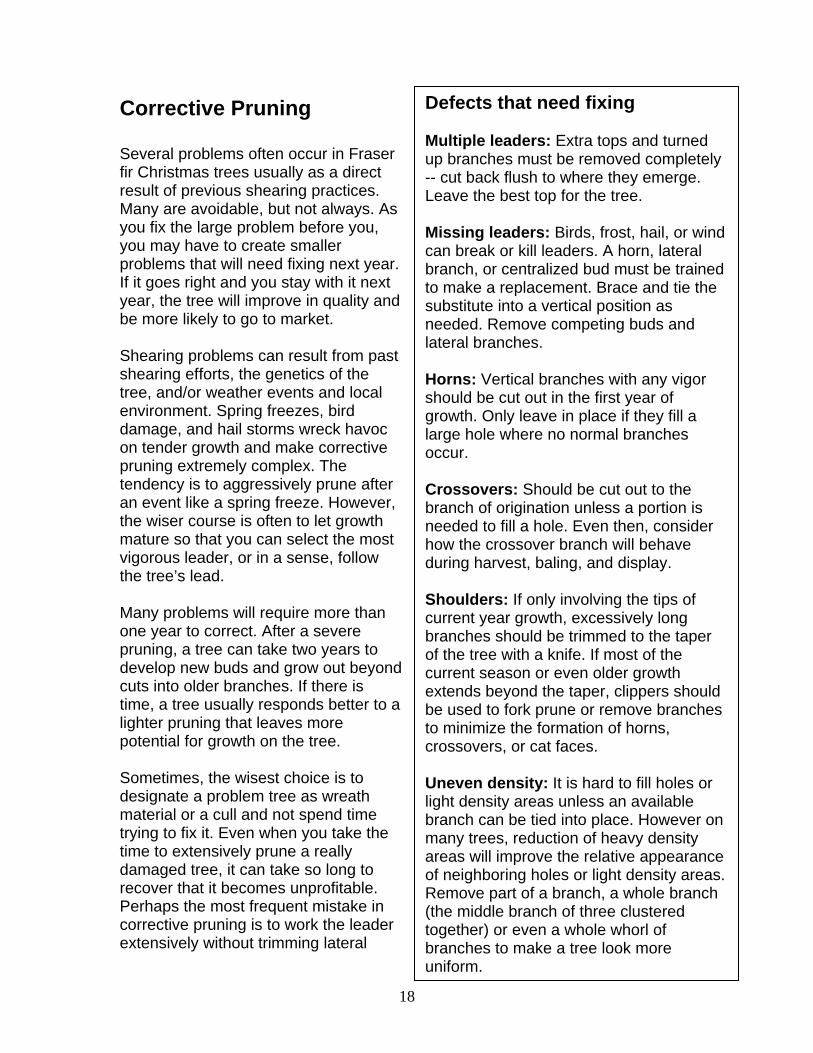
Defects that need fixing Multiple leaders: Extra tops and turned up branches must be removed completely -- cut back flush to where they emerge. Leave the best top for the tree. Missing leaders: Birds, frost, hail, or wind can break or kill leaders. A horn, lateral branch, or centralized bud must be trained to make a replacement. Brace and tie the substitute into a vertical position as needed. Remove competing buds and lateral branches. Horns: Vertical branches with any vigor should be cut out in the first year of growth. Only leave in place if they fill a large hole where no normal branches occur. Crossovers: Should be cut out to the branch of origination unless a portion is needed to fill a hole. Even then, consider how the crossover branch will behave during harvest, baling, and display. Shoulders: If only involving the tips of current year growth, excessively long branches should be trimmed to the taper of the tree with a knife. If most of the current season or even older growth extends beyond the taper, clippers should be used to fork prune or remove branches to minimize the formation of horns, crossovers, or cat faces. Uneven density: It is hard to fill holes or light density areas unless an available branch can be tied into place. However on many trees, reduction of heavy density areas will improve the relative appearance of neighboring holes or light density areas. Remove part of a branch, a whole branch (the middle branch of three clustered together) or even a whole whorl of branches to make a tree look more uniform.
Corrective Pruning Several problems often occur in Fraser fir Christmas trees usually as a direct result of previous shearing practices. Many are avoidable, but not always. As you fix the large problem before you, you may have to create smaller problems that will need fixing next year. If it goes right and you stay with it next year, the tree will improve in quality and be more likely to go to market. Shearing problems can result from past shearing efforts, the genetics of the tree, and/or weather events and local environment. Spring freezes, bird damage, and hail storms wreck havoc on tender growth and make corrective pruning extremely complex. The tendency is to aggressively prune after an event like a spring freeze. However, the wiser course is often to let growth mature so that you can select the most vigorous leader, or in a sense, follow the tree’s lead. Many problems will require more than one year to correct. After a severe pruning, a tree can take two years to develop new buds and grow out beyond cuts into older branches. If there is time, a tree usually responds better to a lighter pruning that leaves more potential for growth on the tree. Sometimes, the wisest choice is to designate a problem tree as wreath material or a cull and not spend time trying to fix it. Even when you take the time to extensively prune a really damaged tree, it can take so long to recover that it becomes unprofitable. Perhaps the most frequent mistake in corrective pruning is to work the leader extensively without trimming lateral
18
branches enough. If a leader is damaged, cut back, or removed completely, lateral growth will have to be cut back just as severely. A damaged leader or turned-up replacement branch has poor hormonal dominance over the rest of the tree. A nest of horns and crossover branches are likely to occur the following year unless lateral branches are at least tipped. However, tipping may not be enough if the weakened leader is surrounded by relatively long lateral branches. The laterals may need to be cut back by removing the dominant center fork, a full year’s growth from the branch, or even the entire branch. Thin and shorten the lateral branches that compete with the leader. This will bring the tree closer to the desired cone shape and will help the leader to regain dominance. Training up replacement or crooked leaders can be accomplished several ways. Some growers tie the desired leader to another branch with flagging tape with the intention of coming back to cut supporting branch out. Others use the wire straighteners sold at supply stores. Some tie replacement branches to sticks or bamboo stakes with flagging. The fastest technique is probably the wire straightener. Paper Velcro tape is faster to use than tying flagging tape. Any strategy needs to be removed before the stem can be girdled or weakened by the flagging tape or fastener. Leaders will hold their position in as little as 1-2 weeks. When possible, trees should be pruned with clippers rather than a knife. Clippers can be used to surgically remove problem shoots without losing neighboring growth. When used hard, a knife tends to leave branch stubs with no buds to cover it next year. Corrective pruning is possibly as time-sensitive as regular shearing, but may be accomplished throughout the year. While bud response would be greatest in the spring and summer, the old adage: “better late than never,” holds true. Corrective pruning is usually done by the topping crew or sandwiched among other tasks after the contract shearing crew has left. Corrective pruning can be a good way to keep skilled workers busy between seasonal activities. Training Your Shearing Crew Improvised field instructions may adequately train workers to spread fertilizer or apply a herbicide, but the lessons that underlie sound shearing practices require special planning and forethought. The art of shearing and pruning Christmas trees ultimately defines the product. Training workers to shear Christmas trees in the unique style of your own farm is the most important management activity in the life of a tree and even your farm. To approach the training of shearing crews casually is to risk losing quality control, not only for this year’s inventory, but also for years to come.
19
Your Signature: For those that grow or buy Christmas trees, different shapes and styles of tree can stand out like a signature or thumb print that represent different farms and growers. The ability to produce a certain tree density, taper, and appearance becomes a measure of the grower, not just the tree. Often the unique style has represented a distinct goal of the grower. It is unfortunate when the signature style happens by default or represents another grower – the last person to actively train the crew. If you don’t teach your shearing crew to produce your own style of Christmas tree and follow it up with ongoing supervision, you are quite likely to end up with a farm full of trees that look like someone else’s! Too often, unsupervised shearing crews have worked counter to the farmer’s own goals. Plan Your Training: Given its importance, training for your shearing crew should be carefully considered and planned in advance. Too often, we show a new worker a couple of practice swings, give him a knife, and then tell him what he is doing wrong until he gets it right. Make time to train workers thoroughly. Plan an in-depth introductory training session. Then reinforce it with brief daily sessions that address problems from the previous day and refocus shearing technique to new fields or different sizes of trees. Even if workers already know how to shear Christmas trees, make sure they know how to shear trees your way. Even “old hands” need to be reminded of what your goals are. Many growers have divided the tasks of shearing to be completed by two different crews. Topping and corrective pruning tasks are given to experienced workers who have a better understanding of the consequences of what they do. Side shearing is then given to less experienced workers who can follow the taper set up by the topping crew. If the work is divided this way, then there are really two lesson plans for your training: one for the topping crew and one for the shearing crew.
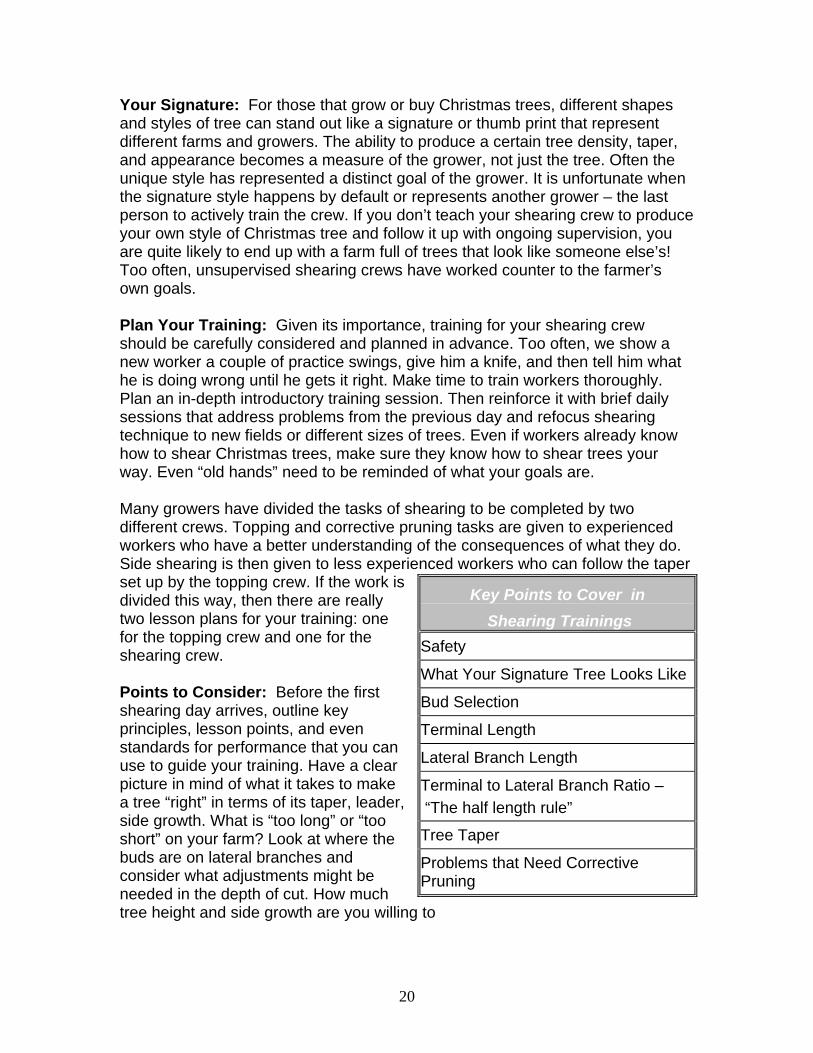
Key Points to Cover in Shearing Trainings
Safety
Points to Consider: Before the first shearing day arrives, outline key principles, lesson points, and even standards for performance that you can use to guide your training. Have a clear picture in mind of what it takes to make a tree “right” in terms of its taper, leader, side growth. What is “too long” or “too short” on your farm? Look at where the buds are on lateral branches and consider what adjustments might be needed in the depth of cut. How much tree height and side growth are you willing to
What Your Signature Tree Looks Like
Bud Selection
Terminal Length
Lateral Branch Length
Terminal to Lateral Branch Ratio – “The half length rule”
Tree Taper
Problems that Need Corrective Pruning
20
sacrifice to achieve greater density? You should also have a clear concept of how you want shearing technique to change with the size of a tree before crews are allowed to shear. A good manager should help the crew adjust shearing techniques to each field. At the very least, write down key points to teach from. Some growers have organized their thoughts into fully developed shearing plans that guide training and provide a standard by which to monitor results.
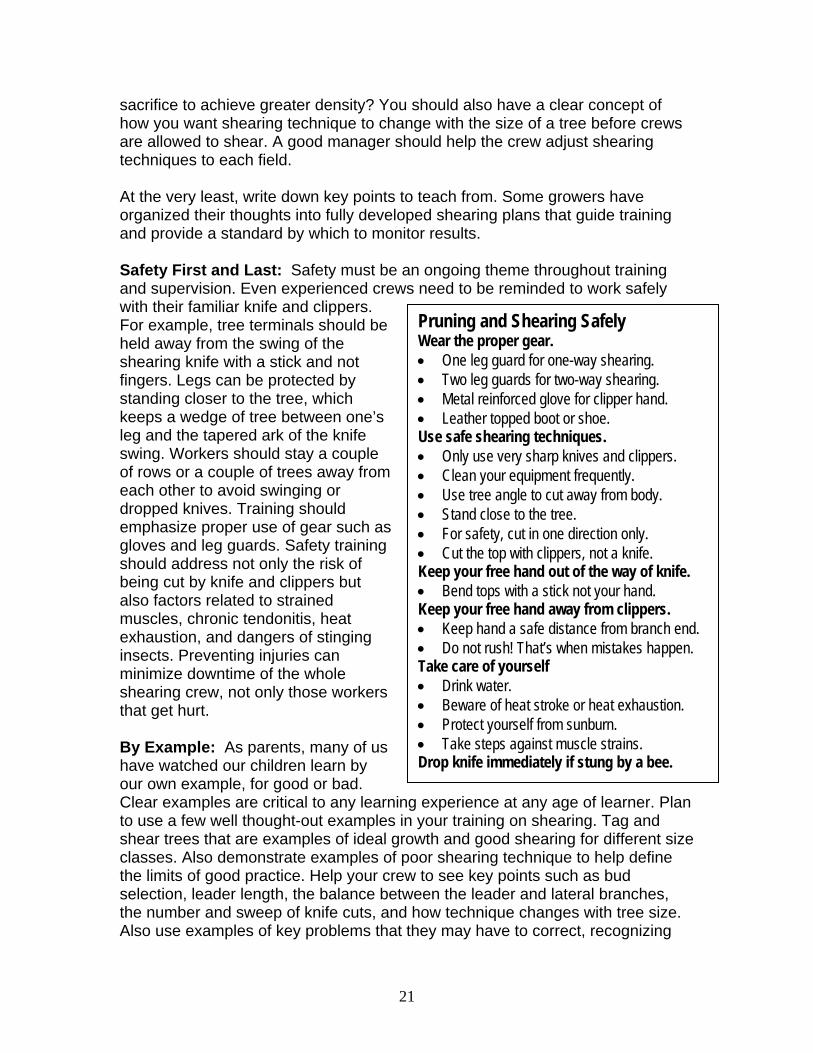
Pruning and Shearing Safely Wear the proper gear. • One leg guard for one-way shearing. • Two leg guards for two-way shearing. • Metal reinforced glove for clipper hand. • Leather topped boot or shoe. Use safe shearing techniques. • Only use very sharp knives and clippers. • Clean your equipment frequently. • Use tree angle to cut away from body. • Stand close to the tree. • For safety, cut in one direction only. • Cut the top with clippers, not a knife. Keep your free hand out of the way of knife. • Bend tops with a stick not your hand. Keep your free hand away from clippers. • Keep hand a safe distance from branch end. • Do not rush! That’s when mistakes happen. Take care of yourself • Drink water. • Beware of heat stroke or heat exhaustion. • Protect yourself from sunburn. • Take steps against muscle strains. Drop knife immediately if stung by a bee.
Safety First and Last: Safety must be an ongoing theme throughout training and supervision. Even experienced crews need to be reminded to work safely with their familiar knife and clippers. For example, tree terminals should be held away from the swing of the shearing knife with a stick and not fingers. Legs can be protected by standing closer to the tree, which keeps a wedge of tree between one’s leg and the tapered ark of the knife swing. Workers should stay a couple of rows or a couple of trees away from each other to avoid swinging or dropped knives. Training should emphasize proper use of gear such as gloves and leg guards. Safety training should address not only the risk of being cut by knife and clippers but also factors related to strained muscles, chronic tendonitis, heat exhaustion, and dangers of stinging insects. Preventing injuries can minimize downtime of the whole shearing crew, not only those workers that get hurt. By Example: As parents, many of us have watched our children learn by our own example, for good or bad. Clear examples are critical to any learning experience at any age of learner. Plan to use a few well thought-out examples in your training on shearing. Tag and shear trees that are examples of ideal growth and good shearing for different size classes. Also demonstrate examples of poor shearing technique to help define the limits of good practice. Help your crew to see key points such as bud selection, leader length, the balance between the leader and lateral branches, the number and sweep of knife cuts, and how technique changes with tree size. Also use examples of key problems that they may have to correct, recognizing
21
that those can change from field to field. Be sure to point out problems that arise from poor shearing the previous year such as turned-up branches and loss of leader dominance. Given clear examples of good and bad shearing and the problems that need to be corrected, your workers should have a better sense of the task at hand.
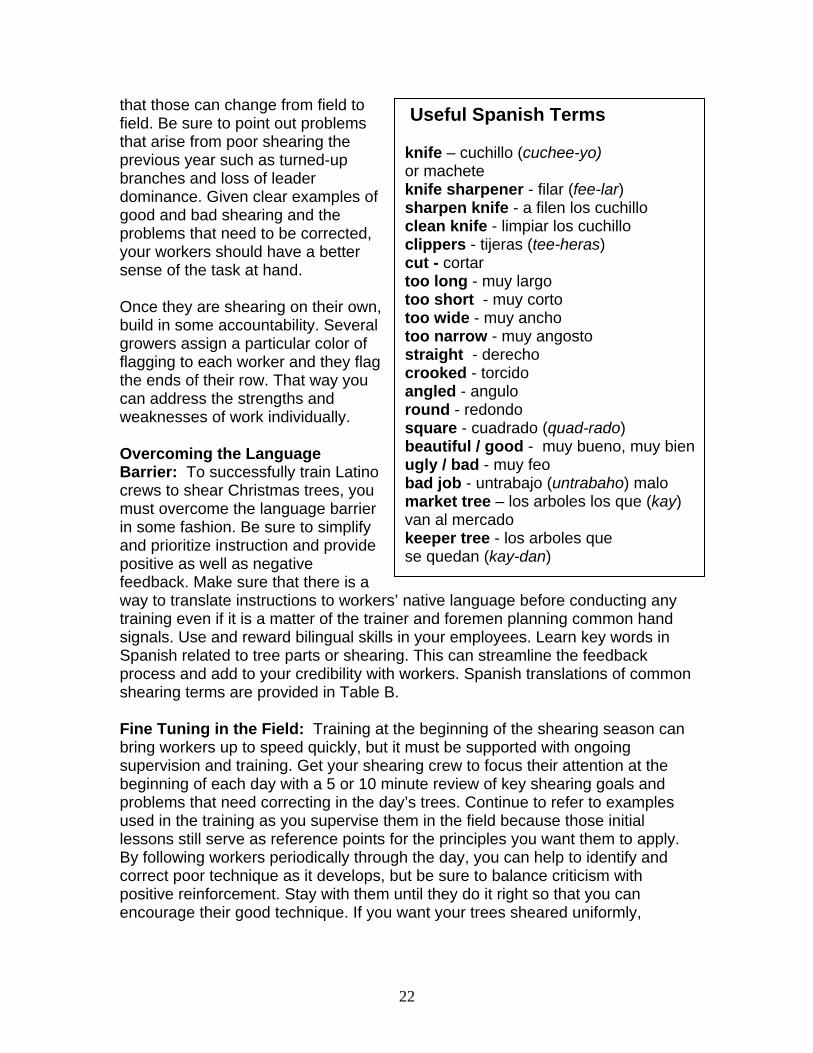
Useful Spanish Terms knife – cuchillo (cuchee-yo) or machete knife sharpener - filar (fee-lar) sharpen knife - a filen los cuchillo clean knife - limpiar los cuchillo clippers - tijeras (tee-heras) cut - cortar too long - muy largo too short - muy corto too wide - muy ancho too narrow - muy angosto straight - derecho crooked - torcido angled - angulo
Once they are shearing on their own, build in some accountability. Several growers assign a particular color of flagging to each worker and they flag the ends of their row. That way you can address the strengths and weaknesses of work individually. round - redondo
square - cuadrado (quad-rado) beautiful / good - muy bueno, muy bien ugly / bad - muy feo bad job - untrabajo (untrabaho) malo market tree – los arboles los que (kay) van al mercado keeper tree - los arboles que se quedan (kay-dan)
Overcoming the Language Barrier: To successfully train Latino crews to shear Christmas trees, you must overcome the language barrier in some fashion. Be sure to simplify and prioritize instruction and provide positive as well as negative feedback. Make sure that there is a way to translate instructions to workers’ native language before conducting any training even if it is a matter of the trainer and foremen planning common hand signals. Use and reward bilingual skills in your employees. Learn key words in Spanish related to tree parts or shearing. This can streamline the feedback process and add to your credibility with workers. Spanish translations of common shearing terms are provided in Table B. Fine Tuning in the Field: Training at the beginning of the shearing season can bring workers up to speed quickly, but it must be supported with ongoing supervision and training. Get your shearing crew to focus their attention at the beginning of each day with a 5 or 10 minute review of key shearing goals and problems that need correcting in the day’s trees. Continue to refer to examples used in the training as you supervise them in the field because those initial lessons still serve as reference points for the principles you want them to apply. By following workers periodically through the day, you can help to identify and correct poor technique as it develops, but be sure to balance criticism with positive reinforcement. Stay with them until they do it right so that you can encourage their good technique. If you want your trees sheared uniformly,
22

ongoing training and hands-on supervision are a necessity. Some growers assign a color of flagging tape to each worker to hold them accountable. The Training Payoff: A well-planned training session on shearing Christmas trees can take up valuable time for the farmer and the entire shearing crew. There is no question that such efforts are an expense. However, those growers who invest in training and supervision reap a big payoff. Their Christmas trees turned out right! They achieve greater shearing uniformity. For those whose goal it is to maximize height and budset in a short rotation, they get there faster. For those who emphasize density, a greater number of trees reach that higher standard. Proper training avoids the need for extensive corrective shearing later in the rotation. There are few actions you can take in the course of a year that have as great an impact on the quality of the crop as an investment in training your shearing crew. Resources and Additional Information If you are interested in additional reading information on shearing and pruning Fraser fir Christmas trees, you can go to the references listed below. For hands-on information regarding shearing, please contact your local North Carolina Cooperative Extension Service. In counties with major Christmas tree production, shearing workshops are periodically offered. The Extension Agent with Christmas tree responsibility may also be able to provide one-on-one training or schedule a meeting with the Extension Specialist. NCSU Christmas Tree Website: http://www.ces.ncsu.edu/fletcher/programs/xmas/ Brown, J. H. and R. B. Heiligmann. 2002. Shearing West Virginia balsam fir and Fraser fir for Christmas trees. Ohio State Univ. Ext. Bull. Special Circ. 188. Hinesley, L. E. and S. A. Derby. 2004. Shearing date affects growth and quality of Fraser fir Christmas trees. HortScience 39:1020-1024. Hinesley, L. E. and S. A. Derby. 2004. Growth of Fraser fir Christmas trees in response to annual shearing. HortScience 39:1644-1646. Powell, G. R. 1982. Shoot and bud development in balsam fir: implications for shearing Christmas trees. Forestry Chronicle 58: 168-172. Rutledge, E., J. Frampton, E. Hinesley, G. Blank. 2008. Top-Stop Nipper reduces leader growth of Fraser fir Christmas trees. HortTechnology 18: 256-260. Rutledge, E., J. Frampton, E. Hinesley, G. Blank. 2009. Naphthaleneacetic acid (NAA) reduces leader growth of Fraser fir Christmas trees. HortScience 19: 44: 345 - 348. Rutledge, E., J. Frampton, E. Hinesley, G. Blank. 2008. Using a bud volume index with the top-stop nipper to control leader growth of fraser fir Christmas trees. HortTechnology 18: 583-587.
23