shadows and highlightstitle goes here · shadows and highlightstitle goes here the new shadows and...
TRANSCRIPT
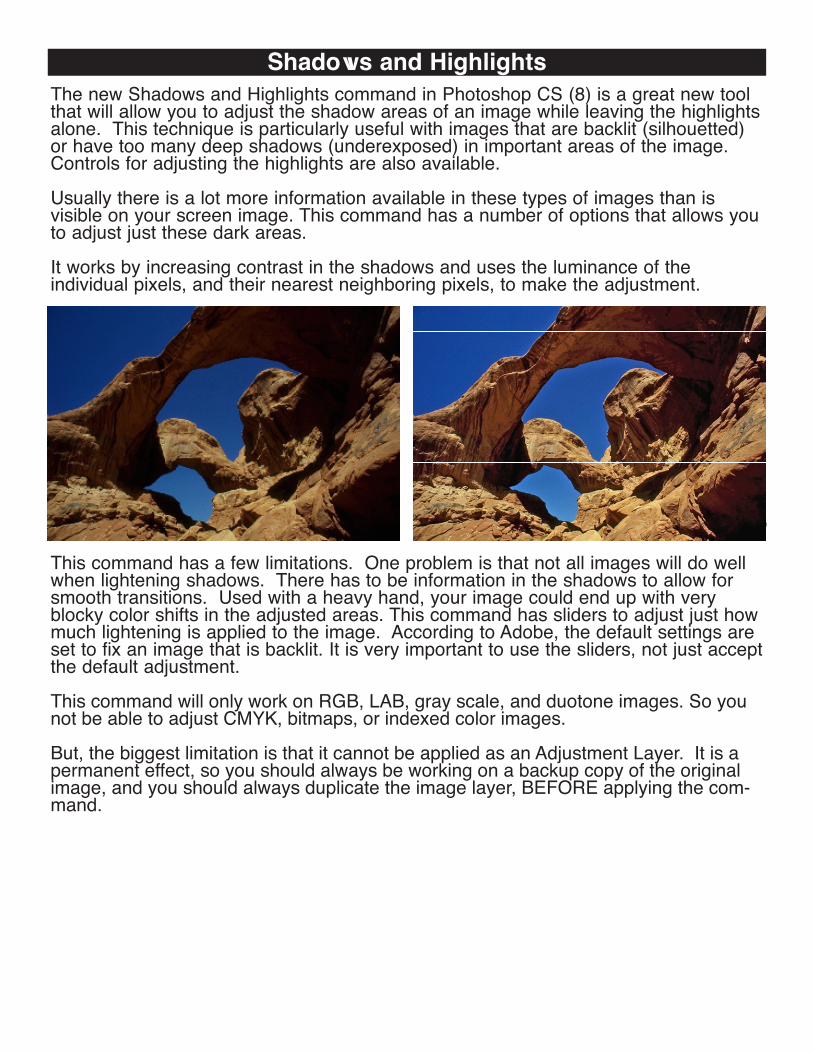
Title goes hereShadows and HighlightsThe new Shadows and Highlights command in Photoshop CS (8) is a great new tool that will allow you to adjust the shadow areas of an image while leaving the highlights alone. This technique is particularly useful with images that are backlit (silhouetted) or have too many deep shadows (underexposed) in important areas of the image. Controls for adjusting the highlights are also available.
Usually there is a lot more information available in these types of images than is visible on your screen image. This command has a number of options that allows you to adjust just these dark areas.
It works by increasing contrast in the shadows and uses the luminance of the individual pixels, and their nearest neighboring pixels, to make the adjustment.
This command has a few limitations. One problem is that not all images will do well when lightening shadows. There has to be information in the shadows to allow for smooth transitions. Used with a heavy hand, your image could end up with very blocky color shifts in the adjusted areas. This command has sliders to adjust just how much lightening is applied to the image. According to Adobe, the default settings are set to fix an image that is backlit. It is very important to use the sliders, not just accept the default adjustment.
This command will only work on RGB, LAB, gray scale, and duotone images. So you not be able to adjust CMYK, bitmaps, or indexed color images.
But, the biggest limitation is that it cannot be applied as an Adjustment Layer. It is a permanent effect, so you should always be working on a backup copy of the original image, and you should always duplicate the image layer, BEFORE applying the com-mand.
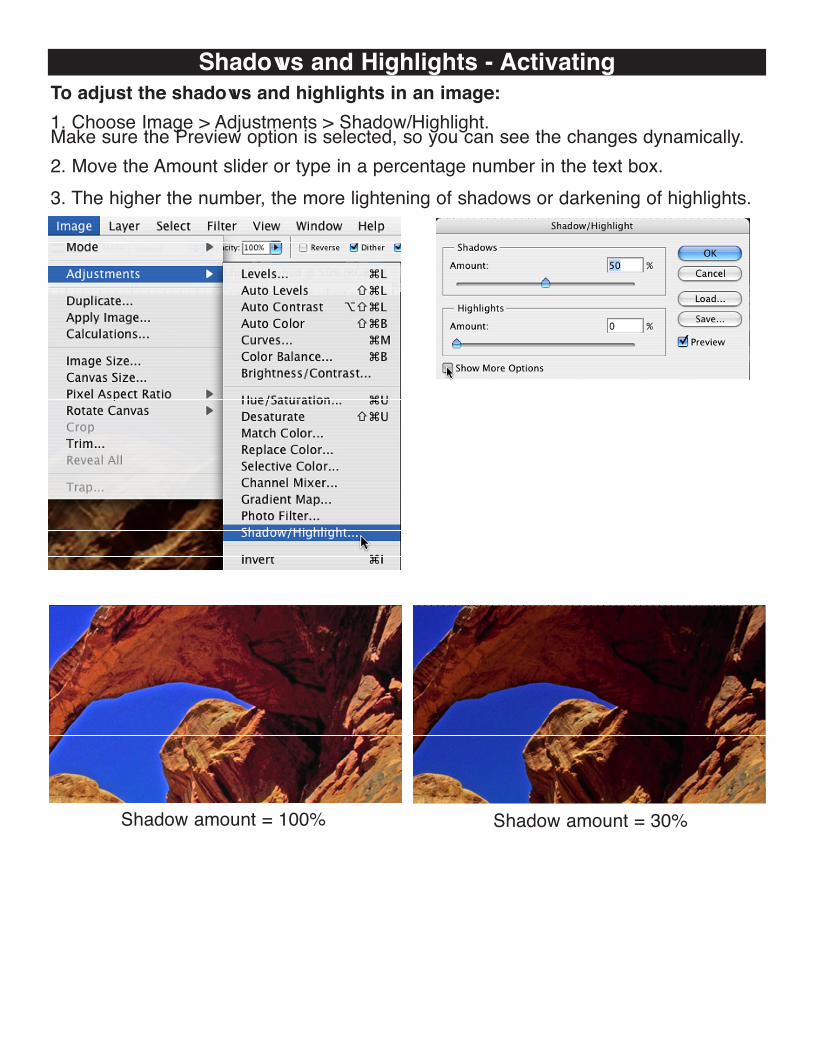
Shadows and Highlights - Activating To adjust the shadows and highlights in an image:1. Choose Image > Adjustments > Shadow/Highlight.Make sure the Preview option is selected, so you can see the changes dynamically.2. Move the Amount slider or type in a percentage number in the text box.3. The higher the number, the more lightening of shadows or darkening of highlights.
Shadow amount = 100% Shadow amount = 30%
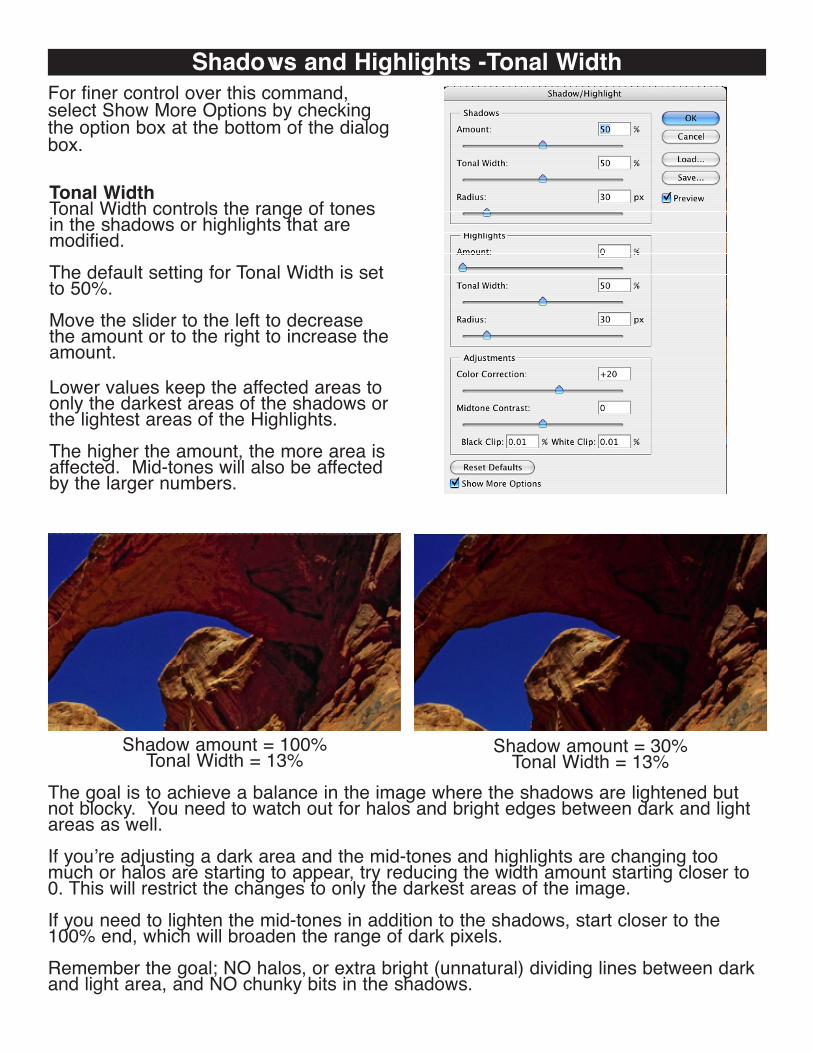
Tonal WidthTonal Width controls the range of tones in the shadows or highlights that are modified. The default setting for Tonal Width is set to 50%. Move the slider to the left to decrease the amount or to the right to increase the amount.
Lower values keep the affected areas to only the darkest areas of the shadows or the lightest areas of the Highlights.The higher the amount, the more area is affected. Mid-tones will also be affected by the larger numbers.
Shadows and Highlights -Tonal Width
The goal is to achieve a balance in the image where the shadows are lightened but not blocky. You need to watch out for halos and bright edges between dark and light areas as well.If youʼre adjusting a dark area and the mid-tones and highlights are changing too much or halos are starting to appear, try reducing the width amount starting closer to 0. This will restrict the changes to only the darkest areas of the image.If you need to lighten the mid-tones in addition to the shadows, start closer to the 100% end, which will broaden the range of dark pixels.Remember the goal; NO halos, or extra bright (unnatural) dividing lines between dark and light area, and NO chunky bits in the shadows.
For finer control over this command, select Show More Options by checking the option box at the bottom of the dialog box.
Shadow amount = 100%Tonal Width = 13%
Shadow amount = 30%Tonal Width = 13%
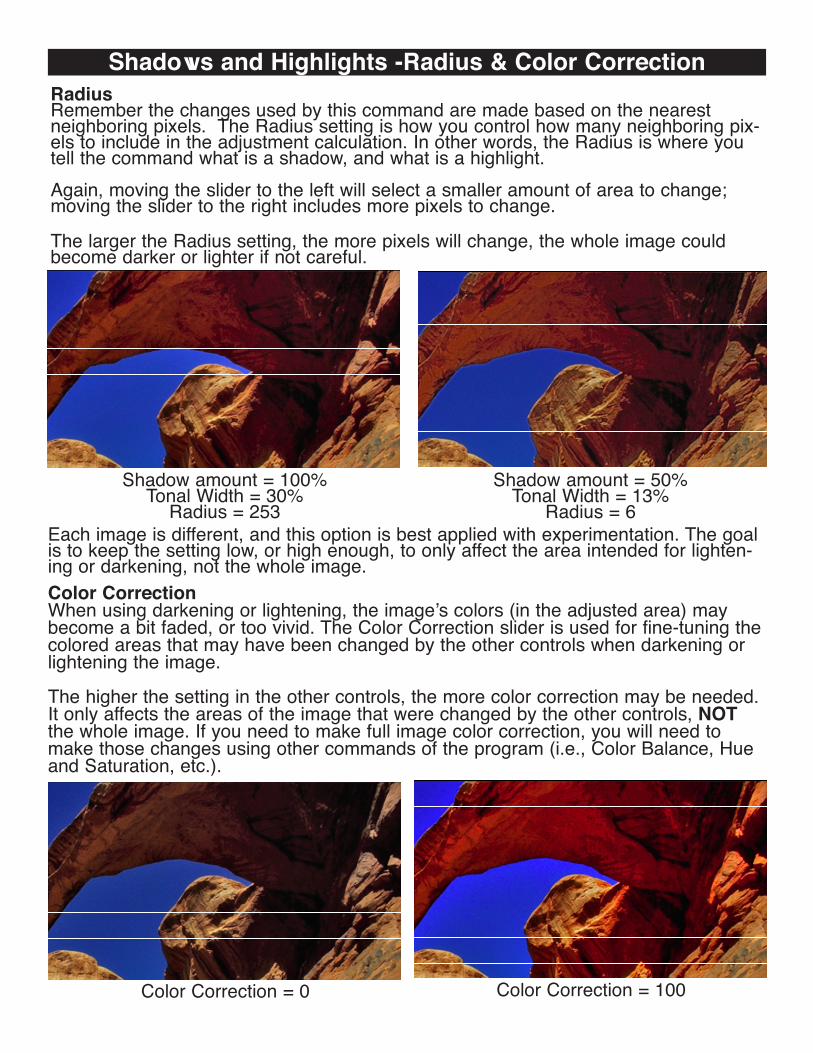
Shadows and Highlights -Radius & Color CorrectionRadiusRemember the changes used by this command are made based on the nearest neighboring pixels. The Radius setting is how you control how many neighboring pix-els to include in the adjustment calculation. In other words, the Radius is where you tell the command what is a shadow, and what is a highlight.Again, moving the slider to the left will select a smaller amount of area to change; moving the slider to the right includes more pixels to change.
The larger the Radius setting, the more pixels will change, the whole image could become darker or lighter if not careful.
Each image is different, and this option is best applied with experimentation. The goal is to keep the setting low, or high enough, to only affect the area intended for lighten-ing or darkening, not the whole image.
Shadow amount = 100%Tonal Width = 30%
Radius = 253Shadow amount = 50%
Tonal Width = 13%Radius = 6
Color CorrectionWhen using darkening or lightening, the imageʼs colors (in the adjusted area) may become a bit faded, or too vivid. The Color Correction slider is used for fine-tuning the colored areas that may have been changed by the other controls when darkening or lightening the image.
The higher the setting in the other controls, the more color correction may be needed. It only affects the areas of the image that were changed by the other controls, NOT the whole image. If you need to make full image color correction, you will need to make those changes using other commands of the program (i.e., Color Balance, Hue and Saturation, etc.).
Color Correction = 0 Color Correction = 100

Shadows and Highlights - Midtone Contrast & ClippingBrightnessThis adjustment is only available for gray scale images.This command does just what is says; it adjusts the brightness in the image. Moving the Brightness slider to the left darkens the image, and moving it to the right lightens it.Mid-tone ContrastThis adjustment adjusts the contrast in the mid-tones. When you use the other options, you are decreasing the color contrast between the selected areas. Mid-tone contrast will allow you to add some back.
While this option increases the contrast in the mid-tones, it may tend to darken the shadows and lighten the highlights again.So you should use this command with caution because you do not want to reverse your changes to the highlights and shadows. And you must watch out for glowing around contrasty edges.
Move the slider to the left to reduce contrast and to the right to increase it. You can also type a number in the text box.
Black Clip and White ClipSome printers cannot handle very small steps in the shadow and highlight areas. Pure black is 0, and the whitest highlight is 255. Any area on the printout with a value of 255 will be a negative space (no ink, only paper). When you adjust the black areas, you are basically telling Photoshop that you want the blackest black not to be 0, but to start at another value. This will shift all the dark points below the new setting based on the new value, which can work in two ways. One will give you a greater range of shadows on some printers, or it could give you a posterized effect in the shadows of your printed image. The same holds true of the highlights. In many cases, Photoshopʼs color management will compensate for these black and white points on some printers. It is always a good idea to test your printer by print-ing a graduated grayscale strip to find the limits of your specific printers shadows and highlights, and then adjust your image points as needed per your printer.
Mid-tone Contrast = -100 Mid-tone Contrast = +100