shading & texture. shading flat shading the process of assigning colors to pixels. smooth...
TRANSCRIPT

Shading & Texture

Shading
Flat Shading
• The process of assigning colors to pixels.
Smooth Shading
Gouraud Shading Phong Shading
Shading

Shading Model
•Flat Shading• Compute Phong lighting once for entire
polygon•Gouraud Shading• Compute Phong lighting at the vertices and
interpolate lighting values across polygon•Phong Shading• Interpolate normals across polygon and
perform Phong lighting across polygon

Flat Shading
• For each polygon– Determines a single intensity value at a chosen
point on the polygon.– Uses that value to shade the entire polygon.
• Assumptions– Light source at infinity– Viewer at infinity– Only ambient light is present

Problems of Flat Shading
• Specular highlights tends to get lost• If chosen point on polygon is at location of the
light soure, then color of the polygon will be significantly distortes.
Flat Shading

Smooth Shading• Introduce vertex normals at each
vertex– Usually different from facet normal– Used only for shading– Think of as a better approximation of the real surface that
the polygons approximate– Finds color value for each point in the polygon
individually.• Two types– Gouraud Shading– Phong Shading (do not confuse with Phong Lighting
Model)

Gouraud Shading• This is the most common approach– Perform Phong lighting at the vertices– Linearly interpolate the resulting colors over
faces• Along edges• Along scanline

Gouraud Shading
xright
ys
ytop
ybott
xleft
color1
color2
color3
color4y4
bott
bottsleft yy
yycolorcolorcolorcolor
4
141
bott
bottsright yy
yycolorcolorcolorcolor
2
121
rightleft
leftleftrightleftx xx
xxcolorcolorcolorcolor
leftcolorrightcolor
xcolor

Gouraud Shading
xright
ys
ytop
ybott
xleft
color1
color2
color3
color4y4
rightleft
leftleftrightleftx xx
xxcolorcolorcolorcolor
Calculate the surface normals along the scan line and the edge using
incremental approach
leftcolorrightcolor
'xcolor
xKcolorcolor xx '
'leftcolor
yKcolorcolor leftleft ''
Ys’

Flat vs Gouraud Shading
• Images in left column are shaded using Flat Shading• Images in right column are shaded using Gouraud Shading
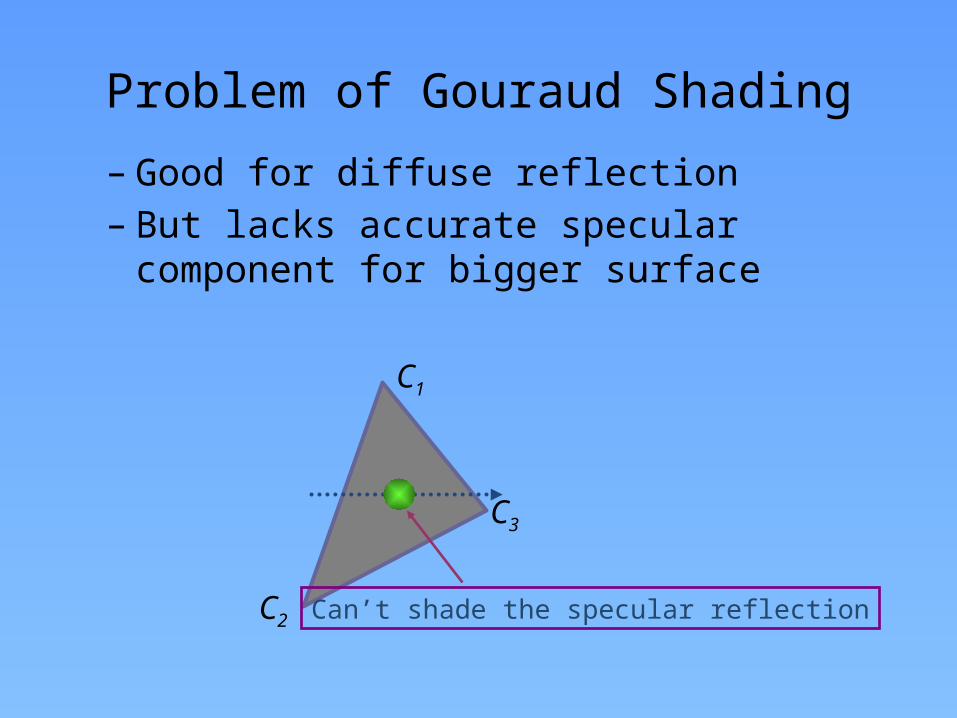
Problem of Gouraud Shading
– Good for diffuse reflection– But lacks accurate specular component for bigger
surface
C1
C2
C3
Can’t shade the specular reflection

Phong Shading
x
ys
m1
m2
m3
m4 mleft mrightmx
Interpolate normal vectors of face vertices at each pixel, then perform phong lighting at each pixel.
mleft = m1 + (m4-m1)ys - y1
Y4 - y1
mright = m1 + (m2-m1)ys - y1
Y2 - y1
mx= mleft + (mright -mleft)x - xleft
x right - xleft
Calculate the surface normals along the scan line and the edge using incremental approach

•If a highlight does not fall on a vertex Gouraud shading may miss it completely, but Phong shading does not.
Phong vs Gouraud Shading•Phong Shading is more smooth.
Texture

Texture
• Texture Types– Bitmap textures: Using some image file– Procedural textures: Changing pixel intensity in
some controlled fashion without using external image source
• Texture(s, t): produces a color or intensity value for each value of s and t between 0 and 1.

Texture
• Bitmap textures: Using some image file having dimension CxR presented as txtr[c][r] – 0<=c<=C-1 and 0<=r<=R-1
• Example: R= 400 and C= 600texture(0.261,0.783) evaluates to txtr[156][313]texture(1,1) evaluates to txtr[600][400]

Texture
• Procedural textures: Changing pixel intensity in some controlled fashion without using external image source
• Not used frequently
(We will mostly deal with bitmap textures that is image files)

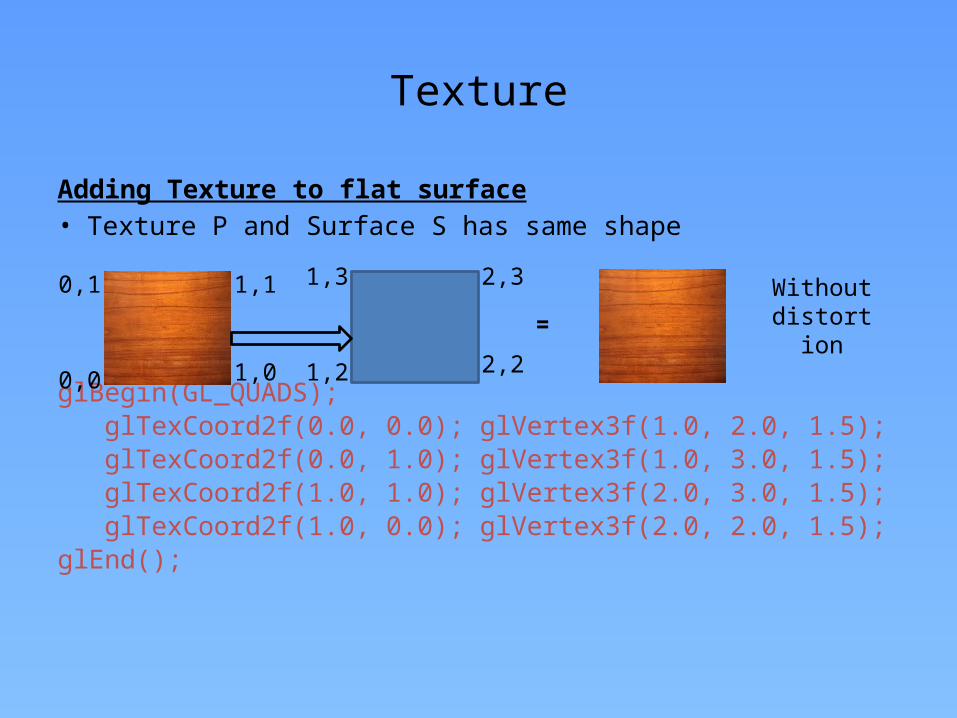
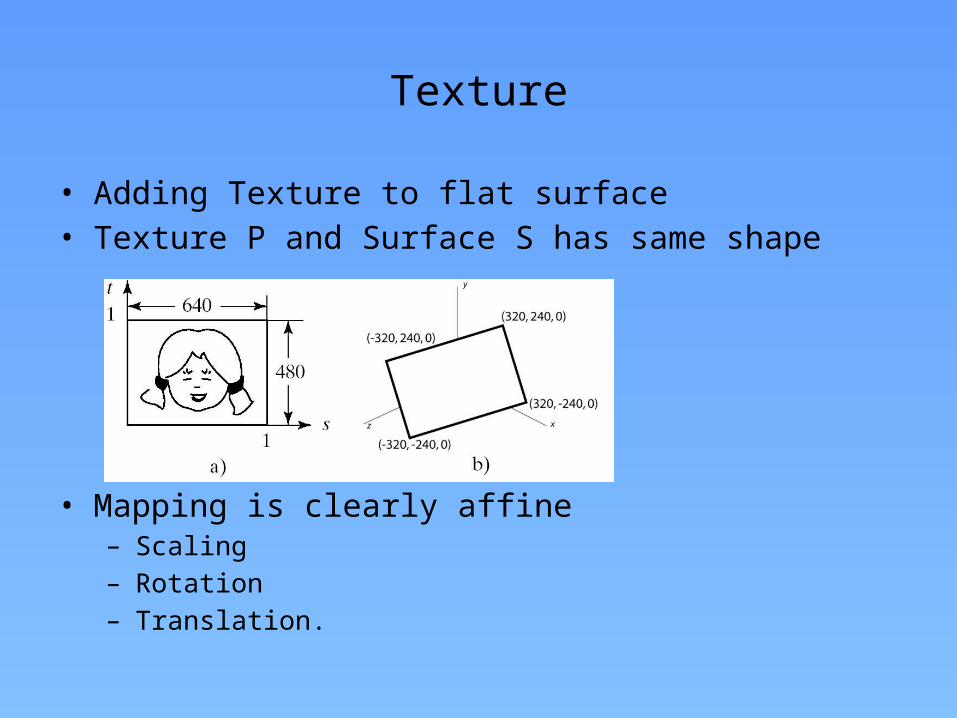
Texture
Adding Texture to flat surface • Texture P and Surface S has
– same shape– Same number of vertices
• Attaching a Pi to each Vi
P1=T(0,0)
P2=T(0,1) P3=T(1,1)
P4=T(1,0)
T(s,t)
V1
V2 V3
V4
Texture
Adding Texture to flat surface• Texture P and Surface S has same shape
glBegin(GL_QUADS); glTexCoord2f(0.0, 0.0); glVertex3f(1.0, 2.0, 1.5); glTexCoord2f(0.0, 1.0); glVertex3f(1.0, 3.0, 1.5); glTexCoord2f(1.0, 1.0); glVertex3f(2.0, 3.0, 1.5); glTexCoord2f(1.0, 0.0); glVertex3f(2.0, 2.0, 1.5);glEnd();
0,0
0,1 1,1
1,0
=Without
distortion
1,2
1,3 2,3
2,2

Texture
• Adding Texture to flat surface• Texture P and Surface S has same shape
glBegin(GL_QUADS); glTexCoord2f(0.0, 0.0); glVertex3f(1.0, 2.0, 1.5); glTexCoord2f(0.0, 0.5); glVertex3f(1.0, 3.0, 1.5); glTexCoord2f(0.5, 0.5); glVertex3f(2.0, 3.0, 1.5); glTexCoord2f(0.5, 0.0); glVertex3f(2.0, 2.0, 1.5);glEnd();
0,0
0,1 1,1
1,0
= stretched
1,2
1,3 2,3
2,2

Texture
• Adding Texture to flat surface• Texture P and Surface S has same shape
glBegin(GL_QUADS); glTexCoord2f(0.0, 0.0); glVertex3f(1.0, 2.0, 1.5); glTexCoord2f(0.0, 2.0); glVertex3f(1.0, 3.0, 1.5); glTexCoord2f(2.0, 2.0); glVertex3f(2.0, 3.0, 1.5); glTexCoord2f(2.0, 0.0); glVertex3f(2.0, 2.0, 1.5);glEnd();
0,0
0,1 1,1
1,0
= Tile1.5
2.0
Texture
• Adding Texture to flat surface• Texture P and Surface S has same shape
• Mapping is clearly affine– Scaling– Rotation– Translation.

1. Creating a glowing object• I = texture(s, t)
gl.glEnable(GL.GL_TEXTURE_2D); gl.glTexEnvf(GL.GL_TEXTURE_ENV, GL.GL_TEXTURE_ENV_MODE, GL.GL_REPLACE); gl.glBindTexture(GL.GL_TEXTURE_2D, texName);glBegin(GL_QUADS); glTexCoord2f(0.0, 0.0); glVertex3f(1.0, 2.0, 1.5); glTexCoord2f(0.0, 1.0); glVertex3f(1.0, 3.0, 1.5); glTexCoord2f(1.0, 1.0); glVertex3f(2.0, 3.0, 1.5); glTexCoord2f(1.0, 0.0); glVertex3f(2.0, 2.0, 1.5);glEnd();
Creating Visual effect using Texture
=
replaces colour and alpha with that of
the texture.

Creating Visual effect using Texture
2. Modulating the reflection coefficient
• Object is the color of – Reflected diffuse light component– Reflected ambient light component
gl.glEnable(GL.GL_TEXTURE_2D); glTexEnvf(GL_TEXTURE_ENV,GL_TEXTURE_ENV_MODE, GL_MODULATE);gl.glBindTexture(GL.GL_TEXTURE_2D, texName);glBegin(GL_QUADS); glTexCoord2f(0.0, 0.0); glVertex3f(1.0, 2.0, 1.5); glTexCoord2f(0.0, 1.0); glVertex3f(1.0, 3.0, 1.5); glTexCoord2f(1.0, 1.0); glVertex3f(2.0, 3.0, 1.5); glTexCoord2f(1.0, 0.0); glVertex3f(2.0, 2.0, 1.5);glEnd();

Creating Visual effect using Texture
3. Simulating Roughness by Bump Mapping– Technique to give surface wrinkled or dimpled appearance
without having to model each individual dimple
– Independent of the viewing angle and object orientation

Creating Visual effect using Texture
3. Simulating Roughness by Bump Mapping
• scalar function texture(u, v) perturb the normal vector at each spot in a controlled fashioncauses perturbations in amount of diffuse and specular light.
Actual Scenario
RequiredScenario

Creating Visual effect using Texture
3. Simulating Roughness by Bump Mapping
• P(u, v) is a parameterized function, representing the position vectors of points P on the surface
• Surface normal at any point is given by m(u,v)=N= Pu × Pv
• 3D point at (u, v) corresponds to the texture at (u, v)• New normal m’(u, v) =N' can be found by:
N’=N+D (D is the perturbation vector) =N+ {(N×Pv ) textureu - (N×Pu) texturev }
textureu , texturev = partial derivatives of the texture function with respect to u and v
Pu , Pv = partial derivatives of P(u, v) with respect to u and v

Adding Shadows of Objects

Adding Shadows of Objects
1. Shadows as Texture
2. Shadows using a shadow buffer
Adding Shadows of Objects
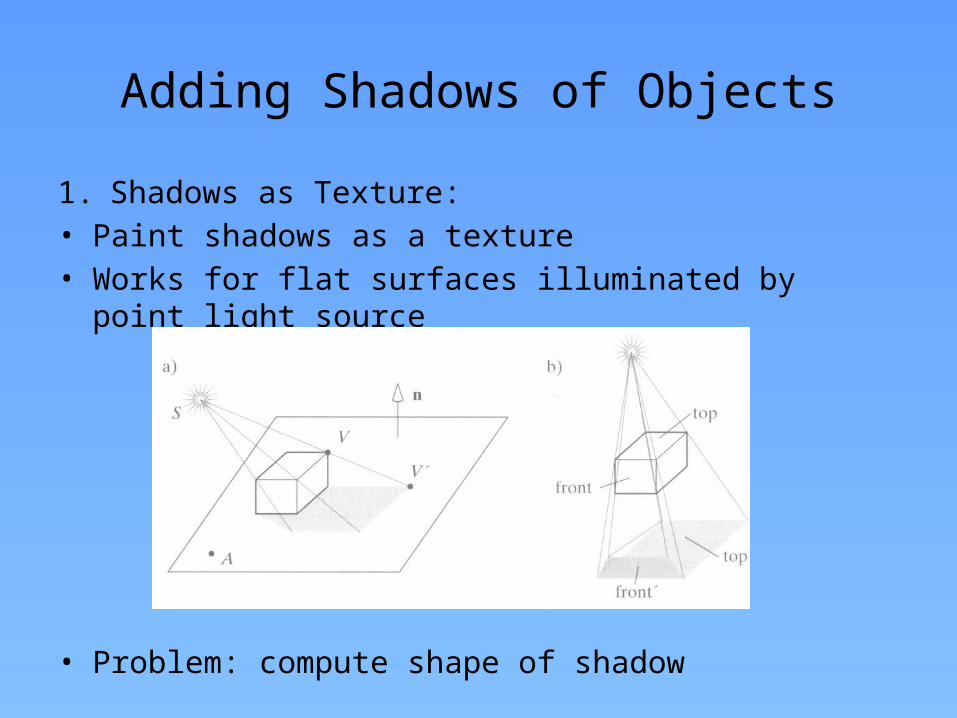
1. Shadows as Texture:• Paint shadows as a texture• Works for flat surfaces illuminated by point light source
• Problem: compute shape of shadow

Adding Shadows of Objects
union of projections of individual faces = projection of entire
Object
Algorithm:
1. First, draw plane using specular-diffuse-ambient components
2. Then, draw shadow projections (face by face) using only ambient component
Shadows using a shadow buffer
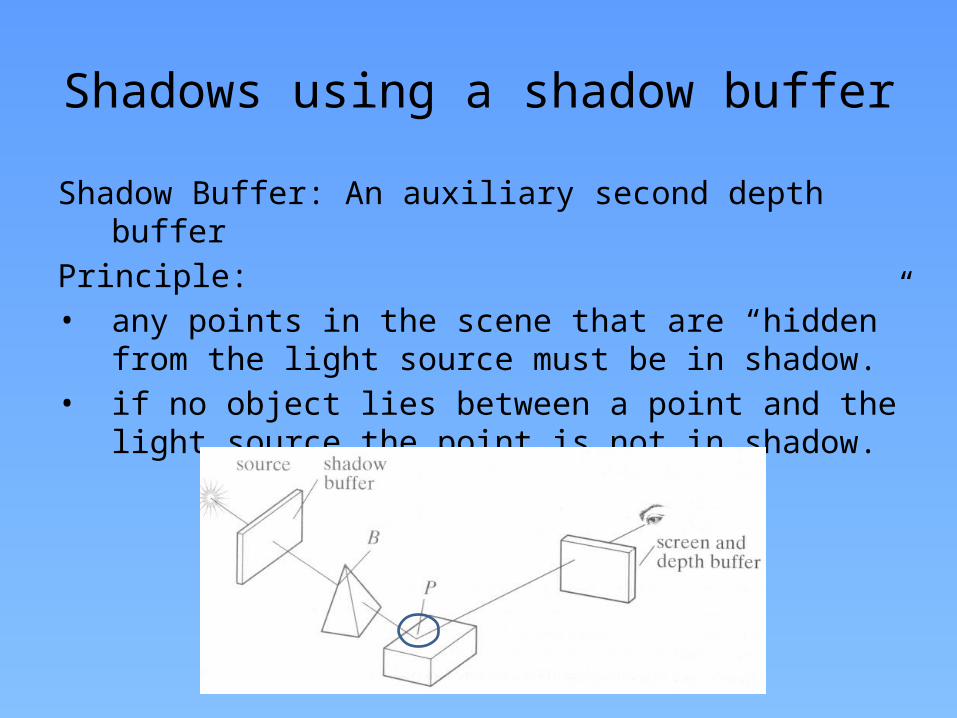
Shadow Buffer: An auxiliary second depth buffer
Principle: • any points in the scene that are “hidden” from the light
source must be in shadow. • if no object lies between a point and the light source the point
is not in shadow.

Shadows using a shadow buffer
Shadow buffer:
1. Contains a “depth picture” of the scene from the point of view of the light source
2. Each of its index (i, j) records the distance from the source to the closest object in the associated direction.

Shadows using a shadow buffer
Step 1: Loading Shadow Buffer:• Initialize each index value d[i][j] to 1.0• Position a camera at light source• Rasterize each face in scene updating pseudo-depth• Shadow buffer tracks smallest pseudo-depth so far

Shadows using a shadow buffer
Step 1: Loading Shadow Buffer:• Shadow buffer calculation is independent of eye position• In animations, shadow buffer loaded once • If eye moves, no need for recalculation• If objects move, recalculation required

Shadows using a shadow buffer
Step 2: Rendering Scene:• Render scene using camera as usual• While rendering a pixel find:
– pseudo-depth D from light source to P– Index location [i][j] in shadow buffer,
to be tested– Value d[i][j] stored in shadow buffer
• If d[i][j] < D (other object on this path closer to light)– point P is in shadow– set lighting using only ambient
• Otherwise, not in shadow

Reference
• Hill: sec: 8.3, 8.5.1, 8.5.3, 8.6