server emc avamar 7.2 for windows 9 11 introduction 15 architecture 16 avamar components 16 how...
TRANSCRIPT
EMC® Avamar® 7.2 for WindowsServer
User Guide301-001-812
REV 02

Copyright © 2001-2016 EMC Corporation. All rights reserved. Published in the USA.
Published March, 2016
EMC believes the information in this publication is accurate as of its publication date. The information is subject to changewithout notice.
The information in this publication is provided as is. EMC Corporation makes no representations or warranties of any kind withrespect to the information in this publication, and specifically disclaims implied warranties of merchantability or fitness for aparticular purpose. Use, copying, and distribution of any EMC software described in this publication requires an applicablesoftware license.
EMC², EMC, and the EMC logo are registered trademarks or trademarks of EMC Corporation in the United States and othercountries. All other trademarks used herein are the property of their respective owners.
For the most up-to-date regulatory document for your product line, go to EMC Online Support (https://support.emc.com).
EMC CorporationHopkinton, Massachusetts 01748-91031-508-435-1000 In North America 1-866-464-7381www.EMC.com
2 EMC Avamar 7.2 for Windows Server User Guide
7
9
11
Introduction 15
Architecture.................................................................................................. 16Avamar components........................................................................ 16How Avamar works in a Windows Server 2008/2012 cluster............ 18How Avamar works in a Windows Server 2012 cluster with SOFS orSMB.................................................................................................19Data Domain system support........................................................... 20Server virtualization......................................................................... 20
Backup..........................................................................................................20Available backup methods...............................................................20File system backups.........................................................................21Developing a backup strategy.......................................................... 22
File system restore........................................................................................ 25File overwrites during restore........................................................... 25Parent folder restore scenarios.........................................................25
Disaster recovery...........................................................................................25BMR of Windows to physical and virtual machines........................... 25Active Directory recovery.................................................................. 26Disaster recovery in a cluster............................................................27Application restores after BMR......................................................... 27Considerations for critical disks and dynamic disks......................... 27Considerations for HP ProLiant Systems........................................... 28
Installation 29
Preparing to install the Avamar client software.............................................. 30System requirements....................................................................... 30Windows Server 2008/2012 cluster requirements............................31Windows Server 2012 for SOFS or SMB cluster requirements........... 31Multi-homed cluster requirements................................................... 31VSS requirements............................................................................ 32Supported Windows features........................................................... 34Hardware requirements....................................................................35Networking requirements................................................................. 36Additional software requirements.................................................... 36Unsupported configurations and features........................................ 37Preparing a Windows Server 2012 for SOFS or SMB cluster...............37Downloading the software................................................................38Verifying the environment................................................................ 38
Installing the Avamar client software.............................................................39Installation road maps..................................................................... 40Installing the Avamar Client for Windows..........................................42
Figures
Tables
Preface
Chapter 1
Chapter 2
CONTENTS
EMC Avamar 7.2 for Windows Server User Guide 3

Registering the client....................................................................... 43Configuring the federated cluster client on Windows Server2008/2012...................................................................................... 44Configuring the proxy cluster client on Windows Server 2012 for SOFSor SMB clusters................................................................................46Adding permissions for hidden file access in a cluster .....................47Adding permissions for non-administrator user access in a cluster........................................................................................................ 47Viewing the cluster client configuration............................................48
Upgrading the Avamar client software........................................................... 48Upgrading on a stand-alone server...................................................48Upgrading in a Windows Server 2008/2012 cluster..........................49Upgrading in a Windows Server 2012 for SOFS or SMB cluster..........49
Uninstalling the Avamar client software.........................................................49Uninstall road map...........................................................................50Uninstalling the federated cluster client in a Windows Server2008/2012 cluster...........................................................................50Uninstalling the Avamar Client for Windows..................................... 51
Backup 53
Performing on-demand backups....................................................................54Performing file system backups on a stand-alone server.................. 54Performing file system backups in a Windows Server 2008/2012cluster..............................................................................................55Performing file system backups in a Windows Server 2012 for SOFS orSMB cluster......................................................................................56Backing up VHDs with the Windows File System plug-in................... 57Performing BMR backups................................................................. 58
Scheduling backups......................................................................................60Creating a dataset............................................................................61Creating a group...............................................................................66Enabling scheduled backups........................................................... 68
Monitoring backups...................................................................................... 68Canceling backups........................................................................................68
File System Restore 71
Restore requirements.................................................................................... 72Restoring in a cluster........................................................................72Restoring VHD files...........................................................................72Restoring SIS volumes on Windows Server 2008.............................. 72Restoring from backups of DFS shares..............................................72
Finding a backup...........................................................................................73Finding a backup by date................................................................. 73Finding a backup by content............................................................ 74
Restoring to the original location...................................................................76Restoring to the original location on a stand-alone server.................76Restoring to the original location in a Windows Server 2008/2012cluster..............................................................................................76Restoring to the original location in a Windows Server 2012 for SOFSor SMB cluster..................................................................................77
Restoring to a different location.....................................................................77Restoring to a different location on a stand-alone server.................. 77Restoring to a different location in a Windows Server 2008/2012cluster..............................................................................................79
Chapter 3
Chapter 4
CONTENTS
4 EMC Avamar 7.2 for Windows Server User Guide
Restoring to a different location in a Windows Server 2012 for SOFS orSMB cluster......................................................................................79
Restoring to multiple locations......................................................................80Monitoring restores.......................................................................................82Canceling restores.........................................................................................83
Bare Metal Recovery 85
BMR of Windows clients................................................................................ 86BMR requirements........................................................................... 86WinPE ISO image preparation...........................................................88Restoring the computer to its original System State..........................91Performing post-BMR tasks.............................................................. 95Viewing Avamar Bare Metal Recovery Wizard log files.......................97
Active Directory recovery............................................................................... 97Booting the client into Directory Services Restore Mode................... 98Restoring Active Directory.................................................................99Using the System State backup to restore Active Directory............. 101
BMR of Windows clusters............................................................................ 101Restoring a cluster node.................................................................101Restoring an entire cluster..............................................................102
Plug-in Options 103
How to set plug-in options...........................................................................104Windows File System plug-in backup options.............................................. 104Windows File System plug-in restore options...............................................108Windows VSS plug-in backup options......................................................... 110Windows VSS plug-in restore options.......................................................... 112Windows Cluster File Server plug-in backup options....................................112Windows Cluster File Server plug-in restore options.....................................113
Command Line Interface 115
Overview of the Windows VSS plug-in CLI.................................................... 116Command reference.................................................................................... 116
Synopsis........................................................................................116Operations.....................................................................................116Options..........................................................................................116Specifying command line options.................................................. 119
CLI examples...............................................................................................119
Troubleshooting 121
Log files...................................................................................................... 122Avamar log files............................................................................. 122Generating log files........................................................................ 123
Backup problems and solutions.................................................................. 123Restore problems and solutions.................................................................. 124Bare metal recovery problems and solutions............................................... 125
127
Chapter 5
Appendix A
Appendix B
Appendix C
Glossary
CONTENTS
EMC Avamar 7.2 for Windows Server User Guide 5

CONTENTS
6 EMC Avamar 7.2 for Windows Server User Guide

Avamar architecture on a stand-alone Windows server.................................................. 16Avamar architecture in a Windows Server 2008/2012 cluster........................................ 18Avamar architecture in a Windows Server 2012 for SOFS or SMB cluster........................ 19
123
FIGURES
EMC Avamar 7.2 for Windows Server User Guide 7

FIGURES
8 EMC Avamar 7.2 for Windows Server User Guide

Revision history............................................................................................................. 11Typographical conventions............................................................................................ 12Avamar plug-ins for file system backups........................................................................ 21Files skipped in Windows file system backups...............................................................22Windows Server names used in this guide..................................................................... 30Supported VSS providers for backups of file system data...............................................32Minimum hardware requirements.................................................................................. 36Unsupported configurations.......................................................................................... 37Windows versions and virtual machine environments supported for P2V BMR............... 87Windows File System plug-in backup options.............................................................. 104Windows File System plug-in restore options............................................................... 108Windows VSS plug-in backup options..........................................................................110Windows VSS plug-in restore options.......................................................................... 112Windows Cluster File Server plug-in backup options.................................................... 113Windows Cluster File Server plug-in restore options..................................................... 113Common options for the avvss command.................................................................... 116Account options for the avvss command......................................................................117Logging options for the avvss command...................................................................... 117Backup options for the avvss command.......................................................................118Avamar log files...........................................................................................................122
1234567891011121314151617181920
TABLES
EMC Avamar 7.2 for Windows Server User Guide 9

TABLES
10 EMC Avamar 7.2 for Windows Server User Guide

PREFACE
As part of an effort to improve its product lines, EMC periodically releases revisions of itssoftware and hardware. Some versions of the software or hardware currently in use donot support every function that this document describes. The product release notesprovide the most up-to-date information on product features.
If a product does not function correctly or does not function as described in thisdocument contact an EMC technical support professional.
Note
This document was accurate at publication time. Go to EMC Online Support (https://support.EMC.com) to find the latest version of this document.
PurposeThis guide describes how to install the Avamar Client for Windows, and how to back upand restore data on a Windows server in both stand-alone and cluster environments.
AudienceThe information in this document is primarily intended for system administrators who areresponsible for installing software and maintaining servers and clients on a network.
Persons using this document should have administrator permissions in the environment,and current practical experience with administrator functionality on Microsoft Windowsservers.
Revision historyThe following table presents the revision history of this document.
Table 1 Revision history
Revision Date Description
02 March 15, 2016 Updated topics throughout the guide to clarify the cluster supportfor Windows Server 2012.
01 June 2015 Initial release of Avamar 7.2.
Related documentationThe following EMC publications provide additional information:
l EMC Avamar Administration Guide
l EMC Avamar Backup Clients User Guide
l EMC Avamar Operational Best Practices
l EMC Avamar Product Security Guide
l EMC Avamar Release Notes
The Avamar Client for Windows described in this guide is required for Avamar operationsand operating system protection on Windows servers. Avamar offers plug-ins to provideprotection for the application data, databases, and settings. The following guides provideinformation on installing and using the application-specific plug-ins:
l EMC Avamar for Exchange VSS User Guide
EMC Avamar 7.2 for Windows Server User Guide 11

l EMC Avamar for Hyper-V VSS User Guide
l EMC Avamar for IBM DB2 User Guide
l EMC Avamar for Lotus Domino User Guide
l EMC Avamar for Oracle User Guide
l EMC Avamar for SAP with Oracle User Guide
l EMC Avamar for SharePoint VSS User Guide
l EMC Avamar for SQL Server User Guide
l EMC Avamar for Sybase ASE User Guide
Note
Some applications are available on multiple platforms and require the client for thespecific operating system. The EMC Avamar Backup Clients User Guide providesinformation about installing and using other operating system clients, such as AIX,FreeBSD, HP-UX, Linux, MacOS X, NetWare, SCO, and Solaris.
Special notice conventions used in this documentEMC uses the following conventions to alert the reader to particular information.
NOTICE
The Notice convention emphasizes important information about the current topic.
Note
The Note convention addresses specific information that is related to the current topic.
Typographical conventionsIn this document, EMC uses the typographical conventions that are shown in thefollowing table.
Table 2 Typographical conventions
Convention Example Description
Bold typeface Click More Options. Use for names of interface elements,such as names of windows, dialogboxes, buttons, fields, tab names, keynames, and menu paths (what a userspecifically selects or clicks).
Italic typeface EMC Avamar Administration Guide Use for full titles of publications thatare referenced in text.
Monospace font Event Type =INFORMATIONEvent Severity = OKEvent Summary = Newgroup created
Use for:
l System code
l System output, such as an errormessage or script
l Pathnames, file names, prompts,and syntax
l Commands and options
PREFACE
12 EMC Avamar 7.2 for Windows Server User Guide

Table 2 Typographical conventions (continued)
Convention Example Description
Monospace fontwith italictypeface
Type Avamar_server, where
Avamar_server is the DNS name or IPaddress of the Avamar server.
Use for variables.
Monospace fontwith bold typeface
Type yes. Use for user input.
Square brackets [--domain=String(/)] --name=String
Square brackets enclose optionalvalues.
Vertical bar [--domain=String(/)] | --name=String
Vertical bar indicates alternateselections - the bar means “or”.
Braces {[--domain=String(/)] | --name=String}
Braces enclose content that the usermust specify.
Ellipses valid hfs ... Ellipses indicate nonessentialinformation that is omitted from theexample.
Where to get helpThe Avamar support page provides access to licensing information, productdocumentation, advisories, and downloads, as well as how-to and troubleshootinginformation. This information may enable you to resolve a product issue before youcontact EMC Customer Support.
To access the Avamar support page:
1. Go to https://support.EMC.com/products.
2. Type a product name in the Find a Product box.
3. Select the product from the list that appears.
4. Click the arrow next to the Find a Product box.
5. (Optional) Add the product to the My Products list by clicking Add to my products inthe upper right corner of the Support by Product page.
DocumentationThe Avamar product documentation provides a comprehensive set of feature overview,operational task, and technical reference information. Review the following documents tosupplement the information in product administration and user guides:
l Release notes provide an overview of new features and known limitations for arelease.
l Technical notes provide technical details about specific product features, includingstep-by-step tasks, where necessary.
l White papers provide an in-depth technical perspective of a product or products asapplied to critical business issues or requirements.
KnowledgebaseThe EMC Knowledgebase contains applicable solutions that you can search for either bysolution number (for example, esgxxxxxx) or by keyword.
To search the EMC Knowledgebase:
PREFACE
EMC Avamar 7.2 for Windows Server User Guide 13

1. Click Search at the top of the page.
2. Type either the solution number or keywords in the search box.
3. (Optional) Limit the search to specific products by typing a product name in theScope by product box and then selecting the product from the list that appears.
4. Select Knowledgebase from the Scope by resource list.
5. (Optional) Specify advanced options by clicking Advanced options and specifyingvalues in the available fields.
6. Click Search.
Online communitiesGo to EMC Community Network at http://community.EMC.com for peer contacts,conversations, and content on product support and solutions. Interactively engage onlinewith customers, partners, and certified professionals for all EMC products.
Live chatTo engage EMC Customer Support by using live interactive chat, click Join Live Chat onthe Service Center panel of the Avamar support page.
Service RequestsFor in-depth help from EMC Customer Support, submit a service request by clickingCreate Service Requests on the Service Center panel of the Avamar support page.
Note
To open a service request, you must have a valid support agreement. Contact an EMCsales representative for details about obtaining a valid support agreement or withquestions about an account.
To review an open service request, click the Service Center link on the Service Centerpanel, and then click View and manage service requests.
Enhancing supportEMC recommends that you enable ConnectEMC and Email Home on all Avamar systems:
l ConnectEMC automatically generates service requests for high priority events.
l Email Home sends configuration, capacity, and general system information to EMCCustomer Support.
Comments and suggestionsComments and suggestions help EMC to continue to improve the accuracy, organization,and overall quality of the user publications. Send comments and suggestions about thisdocument to [email protected].
Please include the following information:
l Product name and version
l Document name, part number, and revision (for example, 01)
l Page numbers
l Other details to help address documentation issues
PREFACE
14 EMC Avamar 7.2 for Windows Server User Guide

CHAPTER 1
Introduction
This chapter contains the following topics:
l Architecture.......................................................................................................... 16l Backup..................................................................................................................20l File system restore................................................................................................ 25l Disaster recovery...................................................................................................25
Introduction 15

ArchitectureAvamar components integrate into the architecture of Microsoft Windows serverenvironments to provide backup and restore on stand-alone computers and clusters.
Avamar componentsThe following figure illustrates a basic system architecture when you use Avamar to backup a stand-alone Windows server.
Figure 1 Avamar architecture on a stand-alone Windows server
Avamar components in the environment include the Avamar server, the Avamar Client forWindows, and Avamar Administrator. Additional components are required in clusterenvironments.
Avamar serverThe Avamar server is the server component of the Avamar client/server system. TheAvamar server is a fault-tolerant, high-availability system that provides the followingservices:
l Efficient storage of backups from all protected clients
l Global deduplication across all client computers
l Essential processes and services required for data restores, client access, and remotesystem administration
Avamar Client for WindowsWhen you install the Avamar Client for Windows, the installation includes the Avamaragent, the Windows File System plug-in, and the Windows VSS plug-in. In a Windows
Introduction
16 EMC Avamar 7.2 for Windows Server User Guide

Server 2012 for SOFS or SMB cluster, the installation also includes the Windows ClusterFile Server plug-in.
Avamar agent
The Avamar agent is a Windows service that runs on the client computer andcommunicates with the Avamar server and any plug-ins installed on the client.
Windows File System plug-in
The Windows File System plug-in enables you to back up and restore file system data ona stand-alone Windows computer or on shared storage in a Windows Server 2008/2012cluster.
Windows VSS plug-in
The Windows VSS plug-in enables you to back up the system state and critical disks forbare metal recovery (BMR) of a Windows computer.
The Windows VSS plug-in uses the Microsoft Volume Shadow Copy Service (VSS)technology to create a point-in-time snapshot of a volume, including all open files.Avamar then backs up data from the snapshot instead of directly from the file system.VSS also enables you to back up a single, point-in-time capture of the system state of aWindows computer.
The time required to create a snapshot depends on several factors, including the writeractivity during the backup. Once the backup is complete, VSS deletes the snapshot.
Windows Cluster File Server plug-in
The Windows Cluster File Server plug-in enables you to back up and restore file systemdata on shared storage in a Windows Server 2012 for SOFS or SMB cluster.
You must manually select the option to install the Windows Cluster File Server plug-inwhen you install the Avamar Client for Windows on a Windows Server 2012 computer in acluster.
You install the Windows Cluster File Server plug-in on only the proxy node in the cluster.
Avamar AdministratorAvamar Administrator is a graphical management console software application forremote administration of an Avamar server from a supported Windows or Linux clientcomputer. You can configure, perform, monitor, and manage backups and restores byusing Avamar Administrator. The EMC Avamar Administration Guide provides completeinstructions for installing and using Avamar Administrator.
Application plug-insYou can install an Avamar application plug-in on a Windows server to protect a specificapplication, such as Microsoft Exchange, SharePoint, or SQL Server. The application plug-in backs up and restores the specific configuration settings and data types used by thatapplication.
A complete list of supported Windows application plug-ins is available in the EMC AvamarCompatibility and Interoperability Matrix on EMC Online Support at https://support.EMC.com.
Details on how to install each application plug-in and perform backups and restores ofapplication data are available in the user guide for each plug-in.
Introduction
Avamar components 17
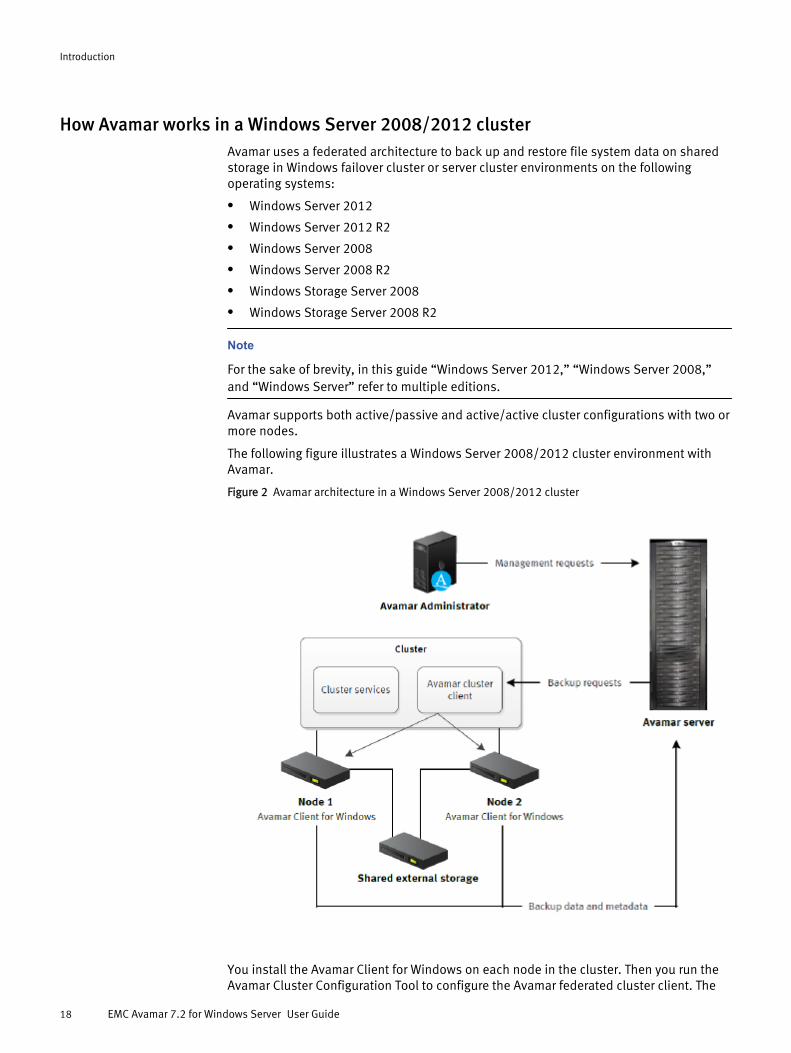
How Avamar works in a Windows Server 2008/2012 clusterAvamar uses a federated architecture to back up and restore file system data on sharedstorage in Windows failover cluster or server cluster environments on the followingoperating systems:
l Windows Server 2012
l Windows Server 2012 R2
l Windows Server 2008
l Windows Server 2008 R2
l Windows Storage Server 2008
l Windows Storage Server 2008 R2
Note
For the sake of brevity, in this guide “Windows Server 2012,” “Windows Server 2008,”and “Windows Server” refer to multiple editions.
Avamar supports both active/passive and active/active cluster configurations with two ormore nodes.
The following figure illustrates a Windows Server 2008/2012 cluster environment withAvamar.
Figure 2 Avamar architecture in a Windows Server 2008/2012 cluster
You install the Avamar Client for Windows on each node in the cluster. Then you run theAvamar Cluster Configuration Tool to configure the Avamar federated cluster client. The
Introduction
18 EMC Avamar 7.2 for Windows Server User Guide

Avamar federated cluster client serves as a client for the virtual server that providesaccess to the file system data on the shared failover cluster disk.
When you perform a backup, you select the Avamar federated cluster client as the clientto back up. The federated cluster client ensures that Avamar can access the dataregardless of which node is managing the data.
You use the Avamar Plug-in for the Windows File System to perform the backup. TheWindows File System plug-in is installed when you install the Avamar Client for Windows.
How Avamar works in a Windows Server 2012 cluster with SOFS or SMBAvamar uses a proxy architecture to back up and restore file system data on sharedstorage in a Windows Server 2012 for SOFS or SMB cluster. The shared storage can be aScale-Out File Server (SOFS) or a clustered file server for general use, or Server MessageBlock (SMB) 3.0 file shares on a file server.
Note
This topic describes a specialized implementation of a Windows Server 2012 cluster. How Avamar works in a Windows Server 2008/2012 cluster on page 18 describes thesupport of a standard Windows Server 2012 cluster.
The following figure illustrates a Windows Server 2012 for SOFS or SMB clusterenvironment with Avamar.
Figure 3 Avamar architecture in a Windows Server 2012 for SOFS or SMB cluster
You install the Avamar Client for Windows and the Windows Cluster File Server plug-in ona single node in the cluster. Then you run the Avamar Cluster Configuration Tool toconfigure the Avamar proxy cluster client on the node.
When you back up or restore file system data on shared storage, you select the Avamarproxy cluster client as the client to back up or restore from. You use the Windows ClusterFile Server plug-in to perform the backup or restore.
Introduction
How Avamar works in a Windows Server 2012 cluster with SOFS or SMB 19

The Avamar server communicates with the proxy cluster client on the proxy node to backup and restore file system data on shared storage in the cluster, regardless of which nodeis managing the data.
When you back up data with the Windows Cluster File Server plug-in, you can restore thedata either with the Windows Cluster File Server plug-in or the Windows File System plug-in.
Data Domain system supportYou can store backups on either the Avamar server or an EMC Data Domain® system.Backup metadata is stored on the Avamar server.
Before you can store backups on a Data Domain system, you must add the Data Domainsystem to the Avamar configuration by using Avamar Administrator. Then you select theData Domain system in the plug-in options when you perform an on-demand backup orwhen you create a dataset for a scheduled backup. You can also use the command lineinterface (CLI) to perform backups to a Data Domain system.
The steps to restore backups are the same whether you restore from the Avamar server ora Data Domain system. The restore process determines the location of the backup andrestores the backup.
The EMC Avamar and EMC Data Domain System Integration Guide provides more informationabout Data Domain systems in an Avamar environment, including detailed steps to add aData Domain system to the Avamar configuration.
Server virtualizationYou can install Microsoft Windows in a server virtualization environment, such as aVMware or Microsoft Hyper-V environment. There are multiple ways that you can installand use Avamar to back up and restore data in a server virtualization environment. Thefollowing guides provide details on additional system requirements, as well asinstallation and configuration procedures:
l EMC Avamar for Hyper-V VSS User Guide
l EMC Avamar for VMware User Guide
BackupA comprehensive backup strategy includes regular backups of all data in theenvironment. Avamar provides multiple ways to back up different types of data on aWindows server at different granularity levels, either on-demand or on a scheduled basis.The following topics provide details on how Avamar backs up data on a Windows server.
Available backup methodsYou can perform both on-demand backups and scheduled backups of file system data orthe system state and critical disks.
There are three ways to perform Avamar backups:
l Use Avamar Administrator to perform on-demand backups and scheduled backups offile system data or System State and critical disks. Backup on page 53 providesdetailed steps to perform backups with Avamar Administrator.
l Use the Avamar client interface on a Windows client computer to perform on-demandbackups of file system data. The EMC Avamar Backup Clients User Guide providesdetails on how to use the Avamar client interface to perform on-demand backups.
Introduction
20 EMC Avamar 7.2 for Windows Server User Guide
l Use the avvss command line interface on the Windows client computer to performan on-demand system state backup. Command Line Interface on page 115 providesdetails on performing backups with the avvss command.
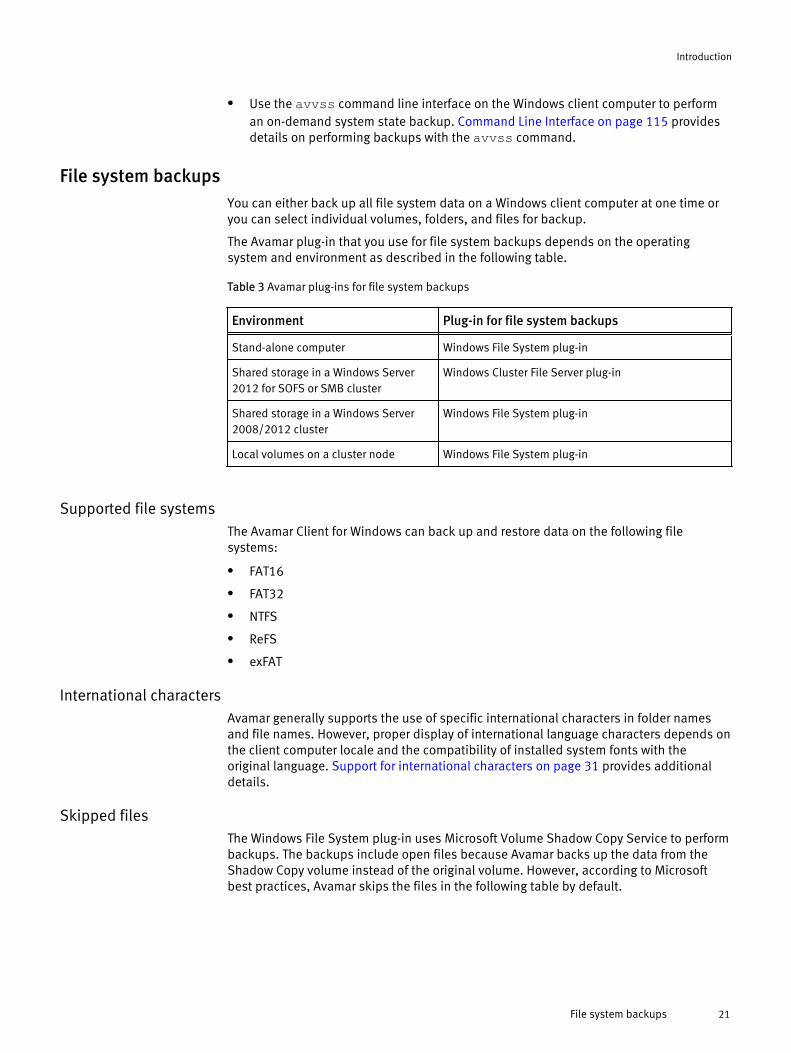
File system backupsYou can either back up all file system data on a Windows client computer at one time oryou can select individual volumes, folders, and files for backup.
The Avamar plug-in that you use for file system backups depends on the operatingsystem and environment as described in the following table.
Table 3 Avamar plug-ins for file system backups
Environment Plug-in for file system backups
Stand-alone computer Windows File System plug-in
Shared storage in a Windows Server2012 for SOFS or SMB cluster
Windows Cluster File Server plug-in
Shared storage in a Windows Server2008/2012 cluster
Windows File System plug-in
Local volumes on a cluster node Windows File System plug-in
Supported file systemsThe Avamar Client for Windows can back up and restore data on the following filesystems:
l FAT16
l FAT32
l NTFS
l ReFS
l exFAT
International charactersAvamar generally supports the use of specific international characters in folder namesand file names. However, proper display of international language characters depends onthe client computer locale and the compatibility of installed system fonts with theoriginal language. Support for international characters on page 31 provides additionaldetails.
Skipped filesThe Windows File System plug-in uses Microsoft Volume Shadow Copy Service to performbackups. The backups include open files because Avamar backs up the data from theShadow Copy volume instead of the original volume. However, according to Microsoftbest practices, Avamar skips the files in the following table by default.
Introduction
File system backups 21

Table 4 Files skipped in Windows file system backups
Operating system Files skipped by default Comments
All Windows Files listed in theFilesNotToBackup registry
for the system and currentuser
The skipped files include operatingsystem files that are necessary to restorethe system.
All Windows Temporary Internet Files You can enable backup of these filesthrough special flags.
All Windows Outlook 2003 temporary cachefiles
You can enable backup of these filesthrough special flags.
Windows 7 or later All Syscache.hve* files
under System Volumeinformation
These additional files do not appear inthe FilesNotToBackup registry, but
Microsoft indicates that backups shouldskip them.
Windows 7 or later All .vhd and .vhdx files for a
mounted Virtual Hard Disk(VHD)
Back up the VHD file system, notthe .vhd file.
Windows Server2012
All .vhd and .vhdx files on
file shares on clustered fileservers
Explicitly select the VHD file for backup,and use the Windows Cluster File Serverplug-in. If you select only the parentfolder or the file server for the VHD file,then the backup skips the VHD file.
Developing a backup strategyA comprehensive backup strategy includes ongoing backups of all data in theenvironment. The Avamar Client for Windows provides multiple ways to back up differenttypes of data at different granularity levels either on-demand or on a scheduled basis.
When to perform backupsYou can perform both on-demand and scheduled backups of file system data or theSystem State and critical disks.
A best practice is to perform an on-demand backup before a system upgrade,installation, or any major change to the server. You may also want to perform an on-demand backup immediately after you install and register the Avamar Client for Windows.
Perform scheduled backups to ensure that there are backups of data on an ongoingbasis. You can perform scheduled backups on a daily, weekly, or monthly basis. The EMCAvamar Operational Best Practices, available on EMC Online Support at https://support.EMC.com, provides guidance on scheduling backups with other systemactivities.
Introduction
22 EMC Avamar 7.2 for Windows Server User Guide

File system backupsThe Avamar plug-in that you use to back up file system data depends on the operatingsystem and environment.
File system backups on a stand-alone server
Use the Windows File System plug-in to back up file system data on a stand-alone server.You can back up all file system data on a stand-alone Windows client computer at onetime, or you can select individual volumes, folders, and files for backup.
File system backups in a Windows Server 2008/2012 cluster
Use the Windows File System plug-in to back up file system data on shared storage in aWindows Server 2008/2012 cluster. You can back up all file system data at one time, oryou can back up individual cluster disks, folders, and files.
To back up data on a local volume of a cluster node, select the physical node as the clientto back up, and use the Windows File System plug-in.
Back up shared cluster data separately from file system data on local volumes. You maynot be able to restore data from a backup that includes file system data from both sharedstorage and local volumes. A best practice is to exclude shared cluster data when youback up local file system data, and to exclude local file system data when you back upshared cluster data. Specify the exclusion on the Exclusions tab when you create adataset for scheduled backups.
Do not include the cluster quorum drive in file system backups. According to Microsoftguidelines, this cluster resource must always remain under exclusive control of thecluster. A best practice is to exclude the quorum drive from backups. To exclude thequorum drive, specify the drive on the Exclusions tab when you create a dataset forscheduled backups of the cluster.
File system backups in a Windows Server 2012 for SOFS or SMB cluster
Use the Windows Cluster File Server plug-in to back up file system data on shared storagein a Windows Server 2012 for SOFS or SMB cluster. You can back up all file system dataat one time, or you can back up individual clustered file servers, folders, and files.
You can back up both Scale-Out File Servers and clustered file servers for general use in asingle on-demand or scheduled backup. However, the backup process creates twodifferent shadow copy sets in the same backup, one for Scale-Out FIle Servers and one forthe general file servers.
To back up data on a local volume of a cluster node, select the physical node as the clientto back up, and use the Windows File System plug-in.
File system backups of deduplicated and SIS volumes
Use the Windows File System plug-in to back up Windows deduplicated volumes onWindows Server 2012. You can select whether to back up optimized files in either anoptimized or unoptimized state by using the Perform a Windows Optimized Backup of aWindows Deduplicated volume checkbox in the Backup Command Line Options. If youback up files in an optimized state, then you can restore the files in either an optimizedor unoptimized state. You must select the entire Windows deduplicated volume forbackup. However, you can restore individual folders and files from the volume backup.You can only restore files from a Windows deduplicated volume to the original location orto another Windows Server 2012 computer with Windows deduplicated volumes.
Use the Windows File System plug-in to back up SIS volumes on Windows Storage Server2008 and Windows Storage Server 2008 R2. Similar to Windows deduplicated volumes,
Introduction
Developing a backup strategy 23

you must select the entire SIS volume for backup. However, you can restore individualfolders and files from the volume backup.
VHD file backups
You can use the Avamar Client for Windows to back up and restore Virtual Hard Disk(VHD) files on a Windows server. You also can exclude attached VHDs when you back upa volume on a Windows server.
The Avamar Client for Windows does not support the backup of a VHD configured fornative boot.
NOTICE
A VHD does not automatically attach when you restart, and is not available after restartuntil you reattach the VHD. When you reattach the VHD, the previous drive lettermappings reset automatically, unless other drives are using the drive letters. BecauseWindows does not automatically reattach VHDs, you must manually keep track of VHDson the system, and use consistent drive letter mappings in all subsequent attach anddetach operations for backup data consistency.
Bare metal recovery backupsA backup for bare metal recovery (BMR) includes the system state and critical disks. BMRenables you to restore a server without having to rebuild the operating system, and toperform the restore offline. Use the Windows VSS plug-in to back up the system state andcritical disks for BMR. BMR is supported for Windows Server 2012 and 2008; Windows8.1, 8, and 7. BMR of Windows Vista computers is not supported. You can back up andrestore only file system data for Windows Vista computers.
To prepare for a full disaster recovery of a computer, perform regular backups of all filesystem data, noncritical disks, and application data.
You should also maintain a database or spreadsheet of computer names, FQDNs, and IPaddresses for each Windows client computer that Avamar backs up. The clientinformation is an important reference in any environment.
If any volume of a dynamic disk pack is critical, then all volumes in the dynamic disk packbecome critical. To avoid unnecessarily large System State backups, exclude non-criticaldynamic disks by using the --exclude-non-critical-dynamic-disks=trueoption during the backup.
The Windows VSS plug-in does not back up critical disks on shared storage in a cluster. Ifa shared volume is a critical disk, then use the Windows File System plug-in for thebackup.
When a Windows Server 2012 or Windows Server 2008 role uses SQL Server instancesinstead of the Windows Internal Database (WID), use the Avamar Plug-in for SQL Server toback up the SQL Server instances for disaster recovery. The EMC Avamar for SQL ServerUser Guide explains how to back up the SQL Server instances.
Active Directory data backupsTo back up Active Directory data in preparation for disaster recovery, perform regularSystem State backups of the domain controllers.
On a Windows Server 2012 or Windows Server 2008 computer, use the Windows VSSplug-in to perform the backup. When you perform the backup, clear the Create DisasterRecovery Backup checkbox on the Options tab. When you clear the checkbox, you canonly use the backup for online restore, not BMR.
These backups enable you to perform either authoritative or nonauthoritative restores.
Introduction
24 EMC Avamar 7.2 for Windows Server User Guide

Application data backupsTo back up application data, such as Microsoft Exchange, Microsoft SharePoint, MicrosoftSQL Server, or Microsoft Hyper-V, use an application-specific plug-in.
For example, back up Microsoft Exchange with the Avamar Plug-in for Exchange VSS. Theuser guide for each plug-in provides details on backup or restore of application data.
File system restoreYou can restore file system data from an Avamar backup to the original location or to adifferent location. If there are multiple items in the backup, you also can restore the itemsto different locations in the same restore operation.
In most cases, the Avamar plug-in that you use to restore file system data is the sameplug-in that you used to perform the backup. However, when you back up data with theWindows Cluster File Server plug-in, you can restore the data with either the WindowsCluster File Server plug-in or the Windows File System plug-in.
File overwrites during restoreIf a file with the same name already exists in the restore path, then you can specifywhether the restore overwrites the file, even when the file is open. Use the OverwriteExisting Files and Restoration of open files options on the Restore Command LineOptions dialog box to control this behavior.
Parent folder restore scenariosWhen you restore a single folder to a different location, Avamar restores only the contentsof the folder. Avamar does not restore the original parent folder. However, if you restoretwo or more folders to a different location, then Avamar restores the original parentfolders along with the contents of those folders.
Disaster recoveryThe process for disaster recovery of a Windows computer from Avamar backups dependson the operating system.
BMR of Windows to physical and virtual machinesAvamar supports BMR of Windows Server 2012 and 2008, and Windows 8.1, 8, and 7, tophysical and virtual machines:
l Physical machine to physical machinel Virtual machine to virtual machinel Physical machine to virtual machine (P2V): Windows Server 2012 R2, 2012, and 2008
R2 only
When a disaster occurs, ensure that the hardware on the target computer is operational,and that the target computer is similar in make, model, and hardware configuration asthe source computer to be recovered. You should also review the additional requirementsin BMR requirements on page 86.
After you prepare the target computer, download the customized WinPE ISO image forBMR from the Avamar server to a functional Windows computer. The image that youdownload depends on the operating system and hardware.
Introduction
File system restore 25

The customized WinPE ISO image enables you to recover to the target computer withoutinstalling an operating system. Because the local disks are not in use by the bootedoperating system, you can replace files without conflict.
WinPE enables you to boot with a minimal subset of Windows features. This functionalityincludes access to network resources, disks, and other features through a commandprompt.
You can burn the WinPE ISO image to a CD, DVD, or USB flash drive, and then boot thetarget computer locally from the media. You also can copy the WinPE ISO image to aWindows Deployment Services (WDS) server, which enables you to perform a networkboot of the target computer.
WinPE ISO image preparation on page 88 provides details on downloading andpreparing the image.
When you boot with the customized WinPE ISO image, the boot process automaticallystarts the Avamar Bare Metal Recovery Wizard. The Avamar Bare Metal Recovery Wizardprovides a VSS recovery solution that uses the Automated System Recovery (ASR) writerand the customized WinPE ISO image to restore critical volumes and other components ofthe bootable System State. Restoring the computer to its original System State on page91 provides details on using the wizard to perform the restore.
Additional steps to recover the computer may be necessary, depending on theenvironment. Perform the steps in Performing post-BMR tasks on page 95 to completethe restore.
Active Directory recoveryYou can perform system recovery of Active Directory of Windows Server 2012 or 2008.
Procedure
1. Configure the client to boot into Directory Services Restore Mode (DSRM).
2. Boot the computer in DSRM.
3. Restore Active Directory from the System State backup on the Avamar server from thenon-disaster recovery System State backup.
4. (Optional) Perform an authoritative restore of Active Directory.
Authoritative and nonauthoritative restoresYou can perform either a nonauthoritative or an authoritative restore of Active Directory:
l Use a nonauthoritative restore when Active Directory replication partners can return adomain controller to a known state. You restore the domain controller from a backup.When you restart the domain controller after the restore, other domain controllersreplicate changes made after the backup.
l Use an authoritative restore to return a domain controller to a known state as themaster copy. The data from the restored domain controller replicates to other domaincontrollers.
An authoritative restore also enables you to mark specific organizational units (OUs)so that Active Directory objects replicate to other domain controllers. In addition,replication partners do not overwrite the replicated objects.
The following Microsoft TechNet articles provide details on an authoritative restore:
l “Performing Authoritative Restore of Active Directory Objects” provides generaldetails on an authoritative restore.
l “Mark an Object or Objects as Authoritative” provides details on the command syntaxfor marking items for an authoritative restore.
Introduction
26 EMC Avamar 7.2 for Windows Server User Guide

NOTICE
Microsoft recommends using a nonauthoritative restore or reinstallation to restore adomain controller. The Microsoft TechNet article “Performing Nonauthoritative Restore ofActive Directory Domain Services” provides information about reinstating a domaincontroller with a nonauthoritative restore.
Disaster recovery in a clusterYou can restore an individual cluster node or an entire cluster from a system statebackup. BMR of Windows clusters on page 101 provides details.
Application restores after BMRIf you use the Windows VSS plug-in to perform the system state backups, then thebackups include binaries for applications that use a Windows service, such as MicrosoftExchange. However, the backups typically exclude application configuration, databases,and files.
When you restore the system state during BMR, these applications are restored to afunctional state. If the application binaries are not in the backup, then you must reinstallthe application.
If you install an application on a noncritical volume and the volume is destroyed, thenyou must either restore the noncritical volume from a Windows File System plug-inbackup or reinstall the application.
To restore application data, use the application plug-in.
Considerations for critical disks and dynamic disksA critical disk or volume can contain operating system files and application services.
If a disk contains a mount point for a critical disk, then the disk with the mount point isalso a critical disk. For example, if F:\ is a critical disk and is mounted on P:\MountPoint_For_F, then P:\ becomes a critical disk. Mount critical disks to C:\, oranother disk that is critical.
If any volume of a dynamic disk pack is critical, then all volumes in the dynamic disk packbecome critical. You can exclude noncritical dynamic disks from the system statebackups to avoid unnecessarily large the system state backups.
On Windows Server 2012 and Windows 8, an application or service may cause anoncritical disk to become critical if you install the application or service on the disk. Youcan exclude noncritical disks from the backup if the disks become critical from theseapplications or services.
The BMR process restores all critical disks except for critical disks on shared storage in acluster. Each critical disk is formatted during BMR, which destroys any existing data.Store application data, such as Exchange or SQL databases, on noncritical diskswhenever possible.
Generally, when you restore to the original system, the BMR process does not formatnoncritical disks. However, when you restore to a different system, BMR sometimes failsif the recovery process cannot format the noncritical disks.
Introduction
Disaster recovery in a cluster 27

Considerations for HP ProLiant SystemsYou cannot use an Avamar BMR backup of an HP ProLiant system for recovery when thesystem is configured with the HP Intelligent Provisioning Tool (IPT) and you configure thetool to use an entire disk for a critical volume, such as the system partition (drive).
Do not use the entire disk for critical volumes when using IPT version 1.4 or 1.5 toconfigure an HP blade system.
This issue applies to Windows Server 2012, Windows Server 2008, Windows 8, andWindows 7 BMR backups and recovery.
HP Support advisory ID c03927759, which is available on the HP Support website,addresses IPT, using a full disk for the system partition, and Windows Bare Metal Restorewith Windows Server Backup. The advisory also applies to Avamar BMR of criticalvolumes. Follow the resolution steps described in the HP advisory, which are simple anddo not require reconfiguration of existing systems except to shrink logical volumes. Afteryou complete the steps, you can use Avamar and the Windows VSS plug-in to performSystem State backups.
Introduction
28 EMC Avamar 7.2 for Windows Server User Guide

CHAPTER 2
Installation
This chapter contains the following topics:
l Preparing to install the Avamar client software...................................................... 30l Installing the Avamar client software..................................................................... 39l Upgrading the Avamar client software................................................................... 48l Uninstalling the Avamar client software.................................................................49
Installation 29

Preparing to install the Avamar client softwareReview the system requirements for the Avamar client software, and ensure that theenvironment meets the requirements before you install Avamar client software. TheAvamar Config Checker for Microsoft Windows provides an additional automatedverification of the environment. You also must download the Avamar Client for Windowsinstallation package from the Avamar server.
System requirementsThe environment must meet client compatibility requirements before you install Avamarclient software.
Client compatibility requirements are available in the EMC Avamar Compatibility andInteroperability Matrix on EMC Online Support at https://support.EMC.com. Therequirements in the matrix include supported operating systems and applicationversions. The Avamar Client for Windows supports most editions of Microsoft Windows.
The Avamar Client for Windows supports backup and restore of only file system data forWindows Vista computers. BMR of Windows Vista computers is not supported.
The Avamar file system client and the plug-ins that you install on the host must have thesame version number.
The environment must also meet other requirements, such as file system requirements,cluster requirements, hardware requirements, VSS requirements, networkingrequirements, Microsoft .NET Framework 4 requirements, and antivirus requirements.
For the sake of brevity, in this guide “Windows Server 2012,” “Windows Server 2008,”and “Windows Server” refer to multiple editions.
Table 5 Windows Server names used in this guide
Term in this guide Refers to these editions unless otherwise noted
Windows Server 2012 l Windows Server 2012
l Windows Server 2012 R2
l Windows Storage Server 2012
l Windows Storage Server 2012 R2
Windows Server 2008 l Windows Server 2008
l Windows Server 2008 R2
l Windows Storage Server 2008
l Windows Storage Server 2008 R2
Windows Server All supported versions of Windows Server and Windows StorageServer
Supported file systemsThe Avamar Client for Windows can back up and restore data on the following filesystems:
l FAT16
Installation
30 EMC Avamar 7.2 for Windows Server User Guide

l FAT32
l NTFS
l ReFS
l exFAT
Support for international charactersAvamar generally supports the use of specific international characters in folder namesand file names. However, correct display of international language characters dependson the client computer locale and compatibility of installed system fonts with the originallanguage. If you browse backups with international characters and a compatible font isnot installed on the system, then any characters that the system cannot resolve appearas rectangles. The appearance of the rectangle characters does not affect the ability torestore the folders or files. The EMC Avamar Release Notes provide additional informationabout international language support.
Windows Server 2008/2012 cluster requirementsThe Avamar Client for Windows supports failover cluster or server cluster environmentson Windows Server and Windows Storage Server 2008/2012 and 2008/2012 R2. Avamarcan back up and restore shared data on failover cluster disks.
Windows Server 2012 for SOFS or SMB cluster requirementsIn Windows Server 2012 for SOFS or SMB clusters, Avamar can back up and restore filesystem data on both a Scale-Out File Server (SOFS) and a clustered file server for generaluse.
If a cluster includes file system data on both a SOFS and a clustered file server for generaluse, then you can include both types of file servers in a single on-demand or scheduledbackup. However, the backup process creates two different shadow copy sets in thesame backup, one for the SOFS data and one for the general file server data.
NOTICE
Backup fails when there are encrypted files and folders on shares on a clustered fileserver for general use and the proxy node is not the owner node for the file server. Non-encrypted files and folders on the file server are backed up successfully. You can restorethe non-encrypted files and folders from the failed backup.
Multi-homed cluster requirementsPlug-ins connect to Avamar services by using the IP address to which the plug-in isbound. If a service is not configured to listen on that IP address, then the plug-in cannotconnect.
For example, if the Avamar backup agent on a multi-homed cluster is bound to one IPaddress, and Exchange or SQL Server is bound to a different IP address, then key Avamarfeatures like browsing, backup, and restore do not work.
Therefore, to correctly configure multi-homed cluster environments for use with Avamar,edit the primary network name to depend on both IP addresses.
Installation
Windows Server 2008/2012 cluster requirements 31
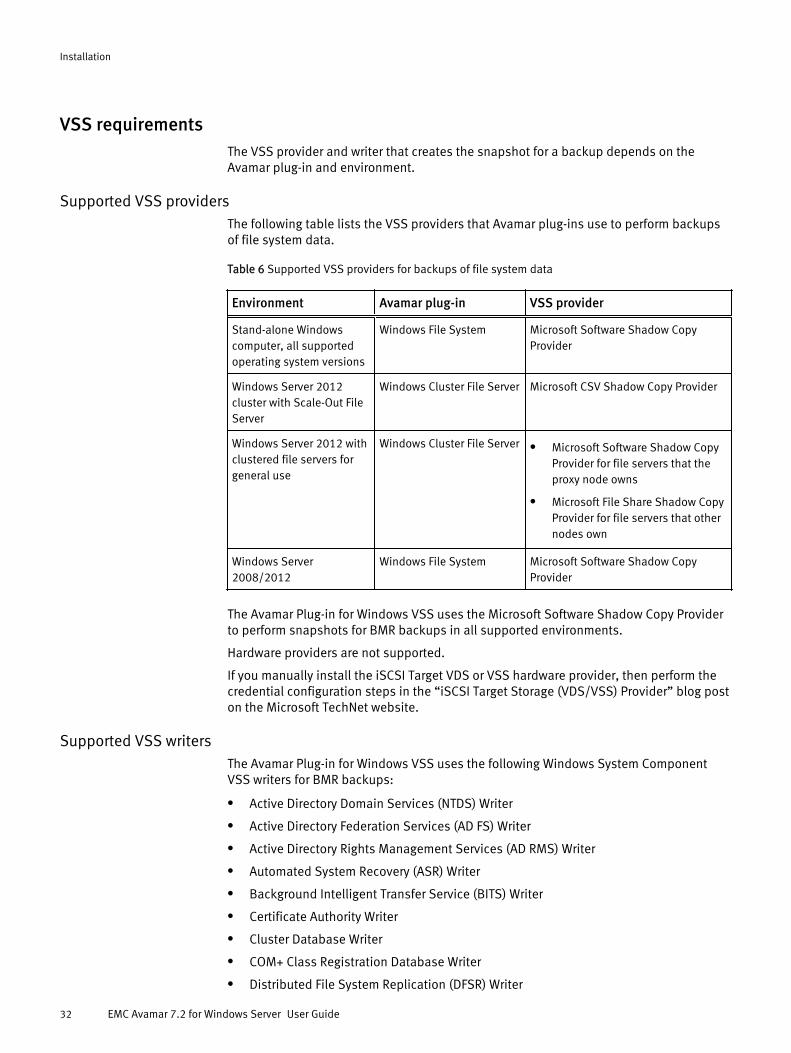
VSS requirementsThe VSS provider and writer that creates the snapshot for a backup depends on theAvamar plug-in and environment.
Supported VSS providersThe following table lists the VSS providers that Avamar plug-ins use to perform backupsof file system data.
Table 6 Supported VSS providers for backups of file system data
Environment Avamar plug-in VSS provider
Stand-alone Windowscomputer, all supportedoperating system versions
Windows File System Microsoft Software Shadow CopyProvider
Windows Server 2012cluster with Scale-Out FileServer
Windows Cluster File Server Microsoft CSV Shadow Copy Provider
Windows Server 2012 withclustered file servers forgeneral use
Windows Cluster File Server l Microsoft Software Shadow CopyProvider for file servers that theproxy node owns
l Microsoft File Share Shadow CopyProvider for file servers that othernodes own
Windows Server2008/2012
Windows File System Microsoft Software Shadow CopyProvider
The Avamar Plug-in for Windows VSS uses the Microsoft Software Shadow Copy Providerto perform snapshots for BMR backups in all supported environments.
Hardware providers are not supported.
If you manually install the iSCSI Target VDS or VSS hardware provider, then perform thecredential configuration steps in the “iSCSI Target Storage (VDS/VSS) Provider” blog poston the Microsoft TechNet website.
Supported VSS writersThe Avamar Plug-in for Windows VSS uses the following Windows System ComponentVSS writers for BMR backups:
l Active Directory Domain Services (NTDS) Writer
l Active Directory Federation Services (AD FS) Writer
l Active Directory Rights Management Services (AD RMS) Writer
l Automated System Recovery (ASR) Writer
l Background Intelligent Transfer Service (BITS) Writer
l Certificate Authority Writer
l Cluster Database Writer
l COM+ Class Registration Database Writer
l Distributed File System Replication (DFSR) Writer
Installation
32 EMC Avamar 7.2 for Windows Server User Guide

l Dynamic Host Configuration Protocol (DHCP) Writer
l File Replication Server (FRS) Writer
l File Server Resource Manager (FSRM) Writer
l IIS Configuration Writer
l IIS Metabase Writer
l MSSearch Service Writer
l Network Policy and Access Service (NPS) Writer
l Performance Counter Writer
l Registry Writer
l Remote Desktop Services (Terminal Services) Gateway VSS Writer
l Remote Desktop Services (Terminal Services) Licensing VSS Writer
l Removable Storage Manager (RSM) Writer
l System Writer
l Task Scheduler Writer
l VSS Metadata Store Writer
l WID Writer
l Windows Deployment Services (WDS) Writer
l WINS (Windows Internet Name Service) Writer
Backups of file system data do not require a VSS writer.
How Avamar works with supported VSS writersVSS writers provide metadata about what data to back up, and specific methods forcorrectly handling components and applications during backup and restore. VSS writersalso identify the type of application or service in the backup, such as System Boot orSystem Services.
Writers are only available for active services or applications. If a service or application ispresent but is not active, then information from its writer is not available. Consequently, awriter can appear or disappear from backup to backup.
During a backup, Avamar checks the following conditions:
l Whether the writer for the application is present and active.
l Whether the writer appears in the list of supported writers.
l Whether a user has disabled the writer.
If the writer is present, active, supported, and enabled, then Avamar backs up the data byusing VSS technology. Otherwise, the backup does not include the data that the writerserves.
VSS snapshot volume requirementsThe Microsoft VSS framework supports as many as 64 volumes in a VSS snapshot. Whenyou create a dataset or perform an on-demand backup, do not include more than 64volumes. If you include more than 64 volumes in a snapshot, then the backup fails andthe Avamar event log lists the following error:
VSS_E_MAXIMUM_NUMBER_OF_VOLUMES_REACHED.The VSS framework also limits the number of shadow copies to 64 per volume. If thenumber of shadow copies in a volume exceeds 64, then the backup fails and the Avamarevent log lists the following error:
Installation
VSS requirements 33

VSS_E_MAXIMUM_NUMBER_OF_SNAPSHOTS_REACHED.
Installing Windows updates for VSS issues
Backup files from VSS snapshots sometimes contain corrupted files when the size of thevolume in the backup is a multiple of 8 GB on one of the following operating systems:
l Windows Server 2008
l Windows Server 2008 R2
l Windows 7
l Windows Vista
Procedure
1. Install the Microsoft hotfix at http://support.microsoft.com/kb/2748349.
2. Rename the file cache from C:\Program Files\avs\var\f_cache.dat to C:\Program Files\avs\var\backup_f_cache.dat.
3. Run the next scheduled backup so that you have a good VSS snapshot.
The backup may take longer to complete because you removed the file cache and thebackup must process all files on the system.
Supported Windows featuresSome Windows features supported by Avamar have additional requirements orconditions.
Deduplication and Single Instance Storage supportThe Avamar Plug-in for the Windows File System supports backup and restore of bothoptimized and unoptimized files on Windows deduplicated volumes on MicrosoftWindows Server 2012. You can select whether to back up optimized files in either anoptimized or unoptimized state. If you back up files in an optimized state, then you canrestore the files in either an optimized or unoptimized state. You must select the entireWindows deduplicated volume for backup. However, you can restore individual foldersand files from the volume backup. You can only restore files from a Windowsdeduplicated volume to the original location or to another Windows Server 2012computer with Windows deduplicated volumes.
Do not perform a System State backup of Windows deduplicated volumes if the volumesare critical volumes. Microsoft does not recommend making a deduplicated volume acritical volume, and Avamar excludes deduplicated volumes from VSS backups.
The Avamar Plug-in for the Windows File System also supports Single Instance Storage(SIS) volumes on Windows Storage Server 2008 and Windows Storage Server 2008 R2.Similar to Windows deduplicated volumes, you must select the entire SIS volume forbackup. However, you can restore individual folders and files from the volume backup.
Windows Server Core installationIf you deploy Windows Server 2008 or Windows Server 2012 by using the CoreInstallation feature, you do not have access to the traditional full graphical user interface(GUI). Therefore, you must install and maintain the Avamar Client for Windows softwarefrom a DOS prompt by using the msiexec utility. The installation and registrationprocedures later in this chapter provide detailed instructions.
Installation
34 EMC Avamar 7.2 for Windows Server User Guide

User Account ControlThe User Account Control (UAC) feature limits application software to standard userprivileges. You must provide administrator privileges for certain tasks, such as installingsoftware. UAC is enabled by default.
If you start an Avamar client or plug-in installer without administrator privileges on acomputer with UAC enabled, then the software does not install correctly.
You can disable or bypass UAC. The installation procedures in this chapter provide onemethod to bypass UAC. Other methods and additional information are available in theMicrosoft documentation.
NTFS Last Access TimeTo correctly back up Windows access control list (ACL) changes, you must leave the NTFSLast Access Time feature enabled. The NTFS Last Access Time feature is enabled bydefault, but is sometimes disabled for performance purposes.
If you disable the NTFS Last Access Time feature on a Windows backup client and youhave already performed backups, then the Avamar Client for Windows software cannotdetect any further ACL changes. This means that the ACL setting for the file during theoriginal file backup is the ACL setting that applies on all future restores.Complete the following steps to reestablish proper ACL backup behavior.
Procedure
1. Enable the NTFS Last Access Time feature by using one of the following methods:
l Specify a value of 0 in the following registry entry:HKEY_LOCAL_MACHINE\SYSTEM\CurrentControlSet\Control\FileSystem\NtfsDisableLastAccessUpdate.A value of 0 enables Last Access Time, while a value of 1 disables Last AccessTime.
l On Windows 7, Windows Storage Server 2008, Windows Server 2008 R2, WindowsStorage Server 2008 R2, Windows Server 2008, and Vista platforms, type thefollowing command from a command prompt:
fsutil behavior set disablelastaccess 02. Delete the following local Avamar Client for Windows cache files:
l C:\Program Files\avs\var\f_cache.datl C:\Program Files\avs\var\p_cache.datThe next backup process for the client re-creates the files.
Symbolic links and directory junctionsFile system backups with the Windows File System plug-in or the Windows Cluster FileServer plug-in include file system data available through NTFS symbolic links (symlinks),mount points, and directory junctions.
System state backups with the Windows VSS plug-in fail if the path to the system statefiles includes symbolic links (symlinks) or directory junctions.
Hardware requirementsThe client computer on which you install the Avamar Client for Windows software mustmeet the minimum hardware requirements in the following table.
Installation
Hardware requirements 35

Table 7 Minimum hardware requirements
Requirement Minimum
RAM 512 MB
Hard drive space 250 MB permanent hard drive space is required for softwareinstallation. 1 GB is recommended.
The Avamar client software also requires an additional 12 MB ofpermanent hard drive space for each 64 MB of physical RAM.
Additional disk space might be required by snapshot technology.Backing up the Windows System State requires an additional 1 GB offree disk space.
Up-to-date client compatibility information is available in the EMC Avamar Compatibilityand Interoperability Matrix on EMC Online Support at https://support.EMC.com.
Networking requirementsEnsure that the environment meets the following networking requirements:
l The network interface must be 10BaseT or later, coax or optical cable, and configuredwith the latest drivers for the operating system.
l The Avamar server must be operational and present on the same network as theclient computer:
n To verify that the Avamar server is operational, log in to the Avamar server asadmin and run the dpnctl status command.
The EMC Avamar Administration Guide provides details on using dpnctlcommands.
n To verify that the Avamar server is present on the same network as the clientcomputer, open a command prompt on the client computer and type the followingcommand:
ping Avamar_serverwhere Avamar_server is the DNS name or IP address of the Avamar server.
Note the DNS names of the Avamar server and Avamar utility node.
Additional software requirementsEnsure that the environment meets the following additional software requirements forAvamar client software on Windows.
.Net Framework 4Install Microsoft .NET Framework 4 if you plan to install the Windows client in a cluster oryou plan to use the Windows VSS plug-in either on a stand-alone computer or in a cluster.
Microsoft .NET Framework 4 is preinstalled on Windows Server 2012.
For other operating system versions, you can download .NET Framework 4 from theMicrosoft Download Center.
Antivirus applicationsSome antivirus applications may reduce the performance of Avamar backup operations.Most antivirus applications scan a file for viruses when you open the file. If the antivirus
Installation
36 EMC Avamar 7.2 for Windows Server User Guide

application scans each file during a backup, then the disk and backup programperformance is slow.
To reduce backup times and prevent the antivirus application from scanning each file asAvamar backs it up, add the avtar.exe file to the exclusion or safe list for the antivirusapplication. The settings and steps to do this depend on the antivirus application. Forexample, McAfee refers to these exceptions as low-risk processes.
Unsupported configurations and featuresThe following table lists configurations that the Avamar 7.0 Client for Windows does notsupport.
Table 8 Unsupported configurations
Unsupported configuration Description
Microsoft Exchange Server andMicrosoft SharePoint Server onthe same server
Avamar does not support installation of Microsoft ExchangeServer and Microsoft SharePoint Server on the same server.Microsoft does not support this configuration, and Microsoftbest practices advise to install these roles on separate servers.
Windows XP Mode on Windows7
The Avamar Client for Windows does not support backup andrecovery of Windows XP Mode components on Windows 7.
Preparing a Windows Server 2012 for SOFS or SMB clusterTo ensure successful backup and restore in a Windows Server 2012 for SOFS or SMBcluster, you must correctly configure roles and permissions in the cluster before youinstall Avamar client software.
Procedure
1. Enable the Remote Management feature on each cluster node.
2. Install the File Server VSS Agent Service server role on each cluster node. Otherwise,backups of clustered file servers for general use fail when the proxy node is not theowner node.
3. To prevent access permissions errors during backup and restore, add the machineaccounts for each cluster node to the Backup Operators group on all nodes, and thenrestart all nodes.
If the cluster disks use a Scale-Out File Server, then do not manually edit thepermissions for a folder or file to remove the machine accounts. If you remove themachine accounts for a folder or file, then Access Denied errors occur for that folder orfile during the backup or restore.
4. If you create SMB file shares, then configure the shares so that the machine accountsfor each cluster node have access privileges for the shares.
5. Create an account for the EMC Avamar Plug-in Service for Windows, which is the plug-in service that the proxy cluster client uses for backup and restore. The account musthave the following privileges:
l Domain administrator privileges.
l Access privileges for all file servers and file shares that you plan to back up.
Installation
Unsupported configurations and features 37
Note
You can use the account for both the EMC Avamar Plug-in Service for Windows and theBackup Agent service, or you can create separate accounts for each service.
6. (Optional) Create a separate account for the Backup Agent service, which is theservice for the Avamar agent. The account must have the following privileges:
l Domain administrator privileges, or privileges to perform WMI queries and copyfiles to the shared cluster storage during a restore.
If you do not give domain administrator privileges to the account, then backupsinclude ACL and file attribute information only for file system data on file serversthat the proxy node owns. You cannot back up ACL and file attribute informationfor file system data on file servers that other nodes own.
l Access privileges for all file servers and file shares that you plan to back up.
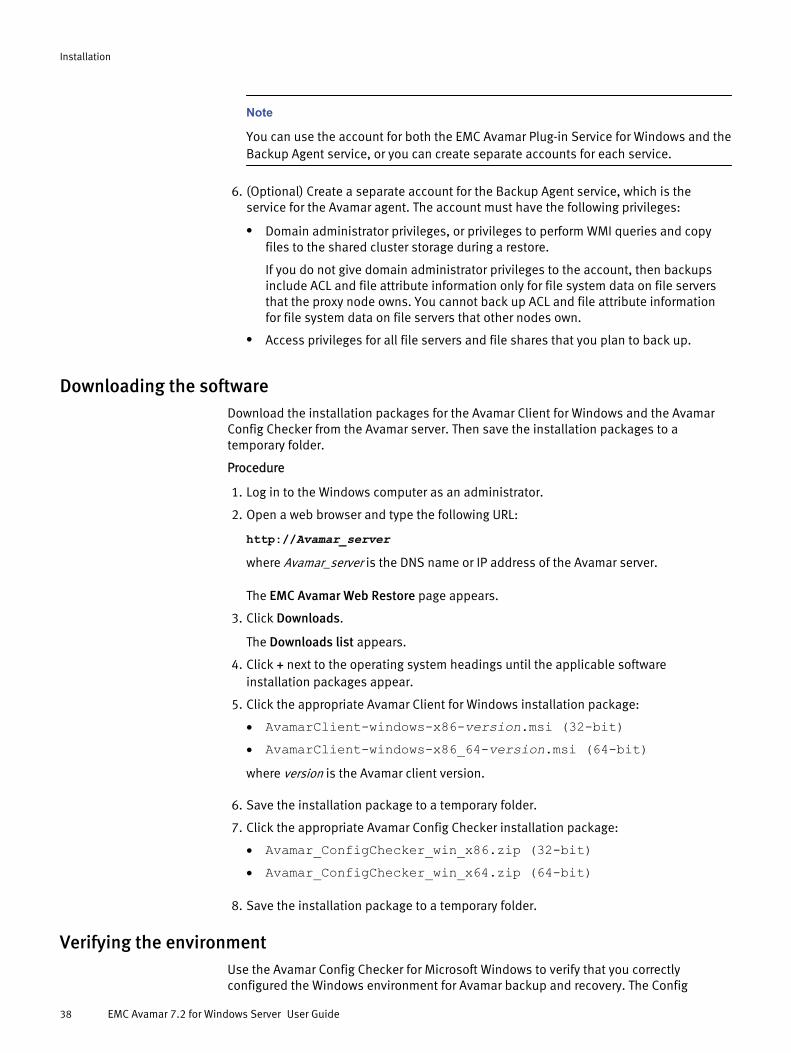
Downloading the softwareDownload the installation packages for the Avamar Client for Windows and the AvamarConfig Checker from the Avamar server. Then save the installation packages to atemporary folder.
Procedure
1. Log in to the Windows computer as an administrator.
2. Open a web browser and type the following URL:
http://Avamar_serverwhere Avamar_server is the DNS name or IP address of the Avamar server.
The EMC Avamar Web Restore page appears.
3. Click Downloads.
The Downloads list appears.
4. Click + next to the operating system headings until the applicable softwareinstallation packages appear.
5. Click the appropriate Avamar Client for Windows installation package:
l AvamarClient-windows-x86-version.msi (32-bit)l AvamarClient-windows-x86_64-version.msi (64-bit)where version is the Avamar client version.
6. Save the installation package to a temporary folder.
7. Click the appropriate Avamar Config Checker installation package:
l Avamar_ConfigChecker_win_x86.zip (32-bit)l Avamar_ConfigChecker_win_x64.zip (64-bit)
8. Save the installation package to a temporary folder.
Verifying the environmentUse the Avamar Config Checker for Microsoft Windows to verify that you correctlyconfigured the Windows environment for Avamar backup and recovery. The Config
Installation
38 EMC Avamar 7.2 for Windows Server User Guide

Checker checks the configuration for problems that can lead to installation, backup, orrecovery failures. These failures can affect the operating system for the application hostor the application itself.
You can run the Avamar Config Checker either before or after you install Avamar softwareon the client computer.
The Config Checker supports only English language operating systems.
Procedure
1. Unzip the Avamar Config Checker installation package, and run the setup program toinstall the software.
2. Start the Config Checker:
l On Windows Server 2012, open the Start screen and select Avamar ConfigChecker.
l On Windows Server 2008, open the Start menu and select Program Files > EMCConfig Checker > Avamar Config Checker.
3. Click Next on the welcome page.
The Avamar Application and User Settings page appears.
4. Select the version number from the Avamar version list.
5. In the application list, select the checkbox next to the applications on the clientcomputer, and specify credentials, if required.
6. Click Next.
7. Review the summary information.
8. Click Run Tests.
When the verification completes, the Config Check Results window appears.
9. Save or open the results in HTML format.
NOTICE
The Config Checker does not automatically save the results. If you do not save theresults, then you must rerun the Config Checker to view them.
10. Click Finish to exit the Config Checker.
11. Review the HTML result file, and correct all failed checks.
12. Rerun the Config Checker to ensure that all the checks are successful.
The EMC Avamar Config Checker for Microsoft Windows Technical Note, available on EMCOnline Support at https://support.EMC.com, provides troubleshooting informationand details about the results that appear for each application.
Installing the Avamar client softwareTo install the Avamar client software, install the Avamar Client for Windows on the clientcomputer. Then register the client with the Avamar server. In a cluster environment,perform these steps on each node, and then configure the cluster client.
Installation
Installing the Avamar client software 39

Installation road mapsThe steps to install the Avamar Client for Windows depend on whether the environment isa stand-alone server or a cluster.
Stand-alone installation road map
To install the Avamar Client for Windows on a stand-alone server, install the Windowsclient and then register the client with the Avamar server.
Procedure
1. Install the Avamar Client for Windows. Installing the Avamar Client for Windows onpage 42 provides instructions.
2. Register the Windows server as a client with the Avamar server. Registering theclient on page 43 provides instructions.
Installation road map for Windows Server 2008/2012 clusters
To install the Avamar client software in a cluster, install the Windows client on each node,register each node, and then configure the Avamar cluster client.
Procedure
1. Install the Avamar Client for Windows in the same folder on each node in the cluster. Installing the Avamar Client for Windows on page 42 provides instructions.
2. Register each node in the cluster as a client with the Avamar server. Registering theclient on page 43 provides instructions.
3. Use the Cluster Configuration Tool to configure the federated cluster client. Configuring the federated cluster client on Windows Server 2008/2012 on page 44provides instructions.
Installation road map for Windows Server 2008/2012 active/active clustersThis road map describes how to configure Windows Server 2008/2012 or 2008/2012 R2active/active clusters.
Before you begin
In this setup, two cluster groups (for example, G1 and G2) each have a cluster node (forexample, N1 and N2).
Procedure
1. Create more than one cluster group (for example, G1 and G2).
2. (Optional) Create file shares on the cluster groups.
3. Install the Avamar Client for Windows in the same folder on the cluster nodes, N1 andN2.Installing the Avamar Client for Windows on page 42 provides instructions.
Note
The cluster groups should be owned by a different cluster node. For example, G1 isowned by N1, and G2 is owned by N2.
4. Register each node as a client with the Avamar server. Registering the client on page43 provides instructions.
5. Run the Cluster Configuration Wizard on the first cluster node N1 to configure thecluster client on the cluster group that is owned by Node 1, G1. Configuring the
Installation
40 EMC Avamar 7.2 for Windows Server User Guide

federated cluster client on Windows Server 2008/2012 on page 44 providesinstructions.
6. Run the Cluster Configuration Wizard on the second cluster node N2 to configure thecluster client on the cluster group that is owned by Node 2, G2. Configuring thefederated cluster client on Windows Server 2008/2012 on page 44 providesinstructions.
Results
After running the Cluster Configuration Wizard, the network names of the cluster groupsshould be available in the client list in Avamar Administrator.Select the names of the cluster groups in the Avamar Administrator client list to performbackups and restores.
Installation road map for Windows Server 2012 clusters with SOFS or SMB
To install the Avamar client software in a cluster, install the Windows client on the proxynode, register the proxy node, and then configure the Avamar cluster client.
Procedure
1. Perform the steps in Preparing a Windows Server 2012 for SOFS or SMB cluster onpage 37.
2. Install the Avamar Client for Windows on only the proxy node. Installing the AvamarClient for Windows on page 42 provides instructions.
3. Register the proxy node as a client with the Avamar server. Registering the client onpage 43 provides instructions.
4. Use the Cluster Configuration Tool to configure the proxy cluster client. Configuringthe proxy cluster client on Windows Server 2012 for SOFS or SMB clusters on page46 provides instructions.
Installation road map for Windows Server 2012 active/active clusters with SOFS or SMBThis road map describes how to configure Windows Server 2012 and 2012 R2 active/active clusters with SOFS or SMB.
Before you begin
In this setup, two cluster roles (for example, R1 and R2) each have a cluster node (forexample, N1 and N2).
Procedure
1. Create more than one cluster role (for example, R1 and R2).
2. Create file shares on those cluster roles.
3. Install the Avamar Client for Windows in the same folder on the cluster nodes, N1 andN2. Installing the Avamar Client for Windows on page 42 provides instructions.
Note
The cluster roles can be owned by the same cluster node (N1 or N2), or by a differentcluster node (for example, R1 is owned by N1, and R2 is owned by N2.
4. Register each node as a client with the Avamar server. Registering the client on page43 provides instructions.
5. Run the Cluster Configuration Wizard on the two cluster nodes to create two clusterProxy nodes (N1 and N2). Configuring the proxy cluster client on Windows Server2012 on page 46 provides instructions.
Installation
Installation road maps 41

Results
Select the names of the proxy nodes in the Avamar Administrator client list to performbackups on different cluster servers (roles).
Installing the Avamar Client for WindowsThe Avamar Client for Windows includes the Avamar agent and the Avamar Plug-in forWindows File System. The Avamar agent is required for backups and restores withapplication plug-ins. You can use the Windows File System plug-in to back up operatingsystem and application binary files, which are required for disaster recovery.
In a Windows Server 2012 for SOFS or SMB cluster, install the Windows client on only theproxy node. In a Windows Server 2008/2012 cluster, install the Windows client on eachnode in the cluster.
Installing the Windows client on full Windows Server installations
A setup wizard leads you through the steps to install the Windows client. If the UserAccount Control (UAC) feature is enabled on the client computer, then you must start thesetup wizard by using administrator privileges. Otherwise, the software does not installcorrectly. This procedure provides one method to bypass UAC. The Microsoftdocumentation provides other methods and additional information.
Procedure
1. Log in to the Windows computer as an administrator.
2. Go to the temporary folder that contains the Avamar installation files that youdownloaded.
3. Start the setup wizard:
l If UAC is disabled, double-click the installation file to open it.
l If UAC is enabled, open a command prompt as an administrator, change directoryto the location of the installation package, and then type one of the followingcommands:msiexec /i AvamarClient-windows-x86-version.msimsiexec /i AvamarClient-windows-x86_64-version.msiwhere version is the Avamar client version.
The Welcome page appears.
4. Click Next.
The End-User License Agreement page appears.
5. Review the license agreement.
6. Select the checkbox to accept the terms in the license agreement, and click Next.
The Custom Setup page appears.
7. Ensure that Avamar Client User Interface is selected for installation.
8. If you are installing on a proxy node for a Windows Server 2012 for SOFS or SMBcluster, enable the Cluster File Server Plugin option for installation.
9. (Optional) To specify a folder for the Avamar client installation, click Browse andselect a location.
NOTICE
Do not rename client installation packages. The Avamar push upgrade mechanismsare incompatible with renamed packages.
Installation
42 EMC Avamar 7.2 for Windows Server User Guide
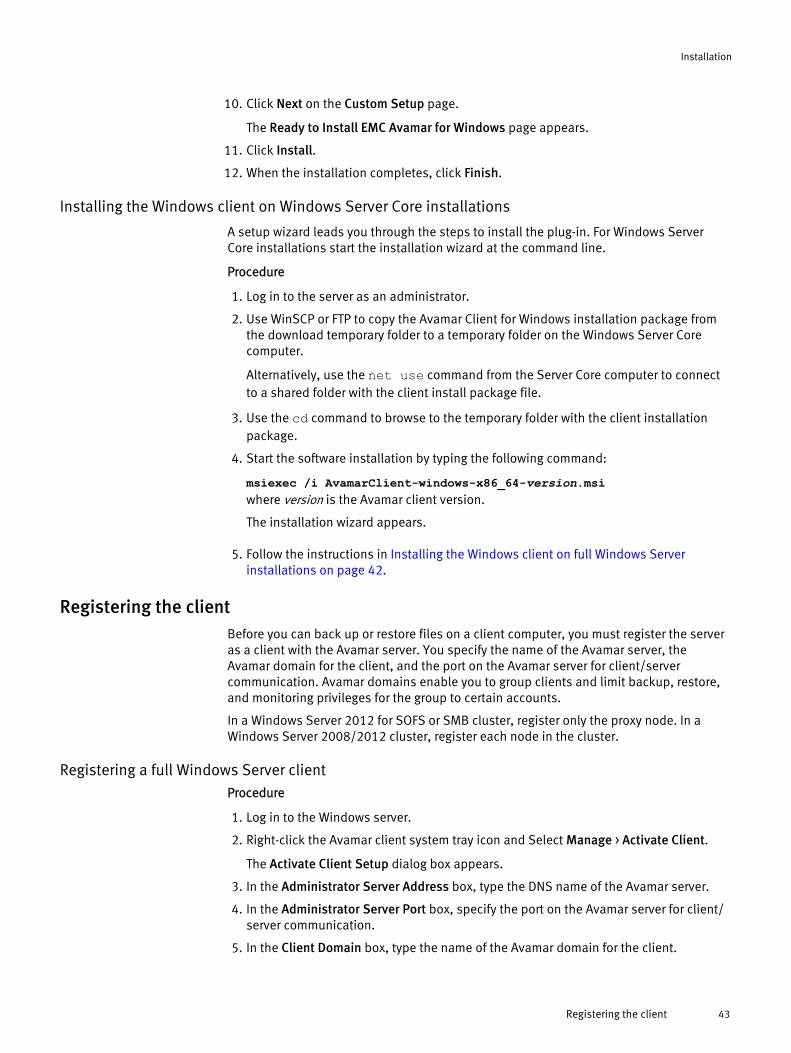
10. Click Next on the Custom Setup page.
The Ready to Install EMC Avamar for Windows page appears.
11. Click Install.
12. When the installation completes, click Finish.
Installing the Windows client on Windows Server Core installations
A setup wizard leads you through the steps to install the plug-in. For Windows ServerCore installations start the installation wizard at the command line.
Procedure
1. Log in to the server as an administrator.
2. Use WinSCP or FTP to copy the Avamar Client for Windows installation package fromthe download temporary folder to a temporary folder on the Windows Server Corecomputer.
Alternatively, use the net use command from the Server Core computer to connectto a shared folder with the client install package file.
3. Use the cd command to browse to the temporary folder with the client installationpackage.
4. Start the software installation by typing the following command:
msiexec /i AvamarClient-windows-x86_64-version.msiwhere version is the Avamar client version.
The installation wizard appears.
5. Follow the instructions in Installing the Windows client on full Windows Serverinstallations on page 42.
Registering the clientBefore you can back up or restore files on a client computer, you must register the serveras a client with the Avamar server. You specify the name of the Avamar server, theAvamar domain for the client, and the port on the Avamar server for client/servercommunication. Avamar domains enable you to group clients and limit backup, restore,and monitoring privileges for the group to certain accounts.
In a Windows Server 2012 for SOFS or SMB cluster, register only the proxy node. In aWindows Server 2008/2012 cluster, register each node in the cluster.
Registering a full Windows Server clientProcedure
1. Log in to the Windows server.
2. Right-click the Avamar client system tray icon and Select Manage > Activate Client.
The Activate Client Setup dialog box appears.
3. In the Administrator Server Address box, type the DNS name of the Avamar server.
4. In the Administrator Server Port box, specify the port on the Avamar server for client/server communication.
5. In the Client Domain box, type the name of the Avamar domain for the client.
Installation
Registering the client 43

The default location is clients. Do not use a slash (/) as the first character whenyou type a subdomain. If you use a slash, an error occurs and you cannot register theclient.
6. Click Activate.
A confirmation message appears.
7. Click OK.
Registering a Windows Server Core clientProcedure
1. Open a command prompt on the client computer.
2. Type the following command:
C:\Program Files\avs\bin\avregister.bat MCS_name domainwhere:
l C:\Program Files\avs\bin\ is the Avamar client installation path.
l MCS_name is the DNS name of the Avamar Management Console Server.
l domain is the Avamar domain for the client. The default domain is clients. Donot use a slash (/) as the first character when you type a subdomain. If you use aslash, an error occurs and you cannot register the client.
Configuring the federated cluster client on Windows Server 2008/2012The Avamar cluster client enables you to back up and restore Windows data on sharedstorage in a cluster, regardless of which node is managing the data at the time of thebackup or restore. The Cluster Configuration Tool walks you through the steps toconfigure the Avamar cluster client for the Windows client.
Procedure
1. Log in to an active node as a domain administrator. The account must also be amember of the local Administrators group on each cluster node.
2. Open the Cluster Configuration Tool:
l On a full Windows Server 2008 installation, from the Windows Desktop open theAvamar Windows Cluster Configuration Tool or Start > Cluster Configuration Tool.
l On a Windows Server 2008 Server Core installation, open a command prompt onthe proxy node, and then type the following command:
C:\Program Files\avs\bin\AvamarClusterConfiguration.exewhere C:\Program Files\avs\bin\ is the Avamar client installation path.
The wizard opens at the Welcome to Avamar Windows Cluster Configuration page.
Note
Windows Server 2008 full server only. This page does not appear on the WindowsServer 2008 Server Core installation.
3. Click Next.
The Plug-Ins page appears.
4. Select Windows Cluster, and click Next.
The Cluster Nodes page appears with a list of nodes and their status.
Installation
44 EMC Avamar 7.2 for Windows Server User Guide

5. Ensure that the environment meets the following requirements:
l All nodes have an Up status.
l The installation status of the Windows client on all nodes is Installed.
6. Click Next.
The Operations page appears.
7. Select Configure a new cluster client for all nodes, and click Next.
The Prerequisites page appears. A check mark next to a prerequisite indicates thatthe environment meets the prerequisite.
8. Ensure that the environment meets all prerequisites on the Prerequisites page.
If the environment does not meet a prerequisite, then exit the wizard, resolve theissue, and restart the wizard.
9. Select the Internet Protocol version that the environment uses, and then click Next.
The Attach to Service page appears.
10. Select the cluster service for the plug-in, and then click Next.
The Server Settings page appears.
11. Specify the settings for the Avamar server:
a. Type either the DNS name of the Avamar server in the Name box or the IP addressin the IPv4/IPv6 address box.
b. Type the name of the Avamar domain for the federated cluster client in the Clientdomain for cluster box.
c. Type the data port for Avamar client/server communication in the Port numberbox.
12. Click Next.
The Client Settings page appears.
13. Specify the settings for the Avamar cluster client:
a. Specify the cluster clients SYSDIR directory of the UNC formatted shared folder inthe SYSDIR box.
b. Type the name of the local/shared folder or volume in the Cluster client’s vardirectory box, or click Browse to navigate to a location.
The shared folder or volume stores the cluster client configuration and log files. Allnodes in the cluster must have write access to this folder or volume.
NOTICE
The best practice is to select a shared folder, so that all log files are available inone location.
14. Click Next.
The Summary page appears.
15. Review the settings that you specified in the wizard, and click Configure.
The Progress page provides the status of the configuration. When the configuration iscomplete, the Results page appears.
16. Click Close.
Installation
Configuring the federated cluster client on Windows Server 2008/2012 45

Configuring the proxy cluster client on Windows Server 2012 for SOFS or SMBclusters
The Avamar cluster client enables you to back up and restore Windows data on sharedstorage in a cluster, regardless of which node is managing the data at the time of thebackup or restore. The Cluster Configuration Tool walks you through the steps toconfigure the Avamar cluster client for the Windows client.
Procedure
1. Log in to the proxy node as a domain administrator. The account must also be amember of the local Administrators group on each cluster node.
2. Open the Cluster Configuration Tool:
l On a full Windows Server 2012 installation, from the Windows Desktop open theAvamar Windows Cluster Configuration Tool.
l On a Windows Server 2012 Server Core installation, open a command prompt onthe proxy node, and then type the following command:
C:\Program Files\avs\bin\av_cluster_config_wizard.exewhere C:\Program Files\avs\bin\ is the Avamar client installation path.
The Welcome page appears.
3. Click Next.
The Plug-Ins page appears.
4. Select Windows Proxy Cluster, and click Next.
The Operations page appears.
5. Select Configure a new proxy cluster client for the proxy node, and click Next.
The Prerequisites page appears. A check mark next to a prerequisite indicates thatthe environment meets the prerequisite.
6. Ensure that the environment meets all prerequisites on the Prerequisites page.
If the environment does not meet a prerequisite, then exit the wizard, resolve theissue, and restart the wizard.
7. Select the IP version that the environment uses, and then click Next.
The Summary page appears.
8. Review the settings that you specified in the wizard, and click Configure.
A dialog box prompts you for credentials.
9. Type the username and password for the service account for the EMC Avamar Plug-inService for Windows, which is the plug-in service that the proxy cluster client uses forbackup and restore.
The account must be a domain administrator or an account that can perform WMIqueries and copy files to the shared cluster storage during a restore. The accountmust also have access privileges for all file servers and file shares that you back up.
10. Click OK.
The Progress page provides the status of the configuration. When the configuration iscomplete, the Results page appears.
11. Click Close.
Installation
46 EMC Avamar 7.2 for Windows Server User Guide

Adding permissions for hidden file access in a clusterTo browse, back up, or restore hidden file shares, the machine accounts in a cluster mustbelong to each other's Backup Operators group. For remote access, the machineaccounts must belong to each other's Local Administrator's group.
Procedure
1. Add the M2 machine account to the Backup Operators group of machine M1.
2. Add the M1 machine account to the Backup Operators group of machine M2.
3. For remote access to the machines:
a. Add the M2 machine account to the Local Administrators group of machine M1.
b. Add the M1 machine account to the Local Administrators group of machine M2.
4. After adding the machine accounts, reboot the machines.
Results
If you get an error similar to the following during restore, add the flag --ignoreacls tothe plug-in command file, avwinclusterfs.cmd. This command file is located in the\var directory for the cluster client, in the location specified in the Cluster client's vardirectory when configuring the cluster. You can create this command file with a text editorif it does not already exist.Error message:
File '\\vm-fshv2k12SOHI\restore$\file2.txt' is unable to berestored due to Avamar having improper permissions to restorethe security information for that file. If you wish to restorethe file, either provide proper rights to Avamar or use the --ignoreacls flag.
Adding permissions for non-administrator user access in a clusterTo browse, back up, or restore cluster file shares, the user must be added to the BackupOperators and Administrators groups on each cluster node in the same cluster system.For remote access, add the user to the Remote Desktop User group.
Before you begin
The new user must be in the list of Users of the machine's Domain Controller.
Procedure
1. Log into a cluster node as a Domain Administrator.
2. Start Server Manager.
3. Select Tools > Computer Management.
4. Select Backup Operators > Properties > Add.
5. Add the new user.
6. Select Administrators > Properties > Add.
7. Add the new user.
8. To allow the new user remote access to the machine:
a. Select Remote Desktop User > Properties > Add.
b. Add the user.
Installation
Adding permissions for hidden file access in a cluster 47
9. Reboot the machine.
10. Repeat the steps for adding the new user to Backup Operators, Administrators, andRemote Desktop User groups on each cluster node in the same cluster.
11. Log in the cluster node using the new user's login account.
12. Uninstall the Avamar base client if it exists.
13. Install the Avamar base client.
14. Run the Cluster Configuration Tool to configure the cluster. Enter the new user nameand its password in the Windows Security dialog box.
15. Reactivate the client to the server.
Results
Once these permissions are set up, the user can do the following:
l Browse, back up, and restore the cluster machine with Avamar Administrator.
l Perform backups and restores from the command line, by right-clicking on thePowerShell icon and selecting Run as Administrator to open the PowerShellcommand prompt.
Viewing the cluster client configurationProcedure
1. Log in to the node with the cluster client as a domain administrator. The account mustalso be a member of the local Administrators group on each cluster node.
2. From the Windows Desktop open the Avamar Windows Cluster Configuration Tool.
The wizard opens at the Welcome to Avamar Windows Cluster Configuration page.
3. Click Next.
The Plug-Ins page appears.
4. Select Windows Cluster or Windows Proxy Cluster, and click Next.
l If you select Windows Proxy Cluster, then the Operations page appears. Skip thenext step and proceed to the following step.
l If you select Windows Cluster, then the Cluster Nodes page appears with a list ofnodes and their status.
5. On the Cluster Nodes page, ensure that all nodes are in an Up status, and click Next.
The Operations page appears.
6. On the Operations page, select View the existing cluster client configuration, andclick Next.
The Summary page appears with the cluster client configuration.
7. When you finish viewing the configuration, click Close.
Upgrading the Avamar client softwareThe steps to upgrade Avamar client software on a Windows client depend on whether theinstallation is on a stand-alone server or in a cluster.
Upgrading on a stand-alone serverWhen you upgrade Avamar client and plug-in software on a stand-alone server, you donot need to uninstall earlier versions before you install a new version. The installation
Installation
48 EMC Avamar 7.2 for Windows Server User Guide
determines that an earlier version is installed, and then prompts you to upgrade to thenew version or remove the current version.
Procedure
1. Ensure that the environment meets all system requirements for the new version.
2. Upgrade the Avamar Client for Windows by running the Windows client installationwizard for the new version on the Windows server.
Upgrading in a Windows Server 2008/2012 clusterWhen you upgrade Avamar client and plug-in software in a cluster, you must uninstall thecurrent Avamar clients and plug-ins from each node, and then install the new versions.
Procedure
1. Ensure that the environment meets all system requirements for the new version. Preparing to install the Avamar client software on page 30 provides information.
2. Use the earlier version of the Cluster Configuration Tool to uninstall the earlier versionof the Avamar cluster client.
The EMC Avamar for Windows Server User Guide for the earlier version providesinstructions.
3. Follow the steps in Installation road map for Windows Server 2008/2012 clusters onpage 40.
Upgrading in a Windows Server 2012 for SOFS or SMB clusterWhen you upgrade Avamar client and plug-in software in a cluster, you must uninstall thecurrent Avamar clients and plug-ins, and then install the new versions.
Procedure
1. Ensure that the environment meets all system requirements for the new version.
2. Uninstall the earlier version of the Avamar Client for Windows.
Note
You do not need to use the Cluster Configuration Tool to uninstall the proxy clusterclient in a Windows Server 2012 for SOFS or SMB cluster. The proxy cluster clientuninstalls automatically when you uninstall the Avamar Client for Windows.
3. Follow the steps in Installation road map for Windows Server 2012 clusters with SOFSor SMB on page 41.
Uninstalling the Avamar client softwareWhen you uninstall Avamar plug-in and client software from a client computer, scheduledbackups no longer occur for the client. You cannot restore backups to the client after youuninstall the software.
When you uninstall the Avamar client software, you can keep or delete the backups forthe client.
l To keep the backups for the client so that you can restore the backups to a differentclient, retire the client by using Avamar Administrator.
l To delete the backups for the client, delete the client by using Avamar Administrator.
Installation
Upgrading in a Windows Server 2008/2012 cluster 49
Retire or delete the client either before or after you uninstall the plug-in. The EMC AvamarAdministration Guide provides more information.
The steps to uninstall Avamar client software from a Windows client depend on whetherthe installation is on a stand-alone server or in a cluster, and on a full Windows Serverinstallation or a Windows Server Core installation.
Uninstall road mapTo uninstall Avamar client and plug-in software from a stand-alone server, uninstall theplug-in and Windows client by using standard Windows uninstall features. In a cluster,first uninstall the Avamar cluster client.
Procedure
1. (Windows Server 2008/2012 cluster only) Uninstall the Avamar cluster client.
Note
You do not need to uninstall the proxy cluster client in a Windows Server 2012 forSOFS or SMB cluster. The proxy cluster client uninstalls automatically when youuninstall the Avamar Client for Windows.
2. Uninstall the Avamar Client for Windows by using Programs and Features.
Uninstalling the federated cluster client in a Windows Server 2008/2012 clusterTo uninstall the Avamar cluster client from a full Windows Server installation, run theCluster Configuration Tool on an active node in the cluster, and select the removal option.
Procedure
1. Log in to the active node with the federated cluster client as a domain administrator.The account must also be a member of the local Administrators group on each clusternode.
2. Start the Cluster Configuration Tool:
l On Windows Server 2008/2012, on the Windows Desktop open the AvamarWindows Cluster Configuration Tool.
l On Windows Server 2008/2012 Server Core, open a command prompt on the nodewith the federated cluster client, and then type the following command:
C:\Program Files\avs\bin\AvamarClusterConfiguration.exewhere C:\Program Files\avs\bin\ is the Avamar client installation path.
The welcome page apears.
3. Click Next.
The Plug-Ins page appears.
4. Select Windows Cluster, and click Next.
The Cluster Nodes page appears with a list of nodes and their status.
5. Ensure that the status of each node is Up, and click Next.
The Operations page appears.
6. Select Remove the cluster client from all nodes, and click Next.
The Prerequisites page appears. A check mark next to a prerequisite indicates thatthe environment meets the prerequisite.
Installation
50 EMC Avamar 7.2 for Windows Server User Guide

7. Ensure that the environment meets all prerequisites on the page, and click Next.
The Select Service page appears.
8. Select the cluster service from which to detach the cluster plug-in, and click Next.
The Summary page appears.
9. Review the settings that you specified in the wizard, and click Uninstall.
The Progress page provides the status of the uninstall. When the uninstall iscomplete, the Results page appears.
10. Click Close.
Uninstalling the Avamar Client for WindowsUninstall the Avamar Client for Windows using Programs and Features for full servers, orwith the command line for Windows Server Core.
Procedure
1. On Windows Server 2008 or Windows Server 2012, use Programs and Features.
2. On Windows Server Core, open a command prompt, browse to the folder with theinstallation file, and type one of the following commands:
msiexec /uninstall AvamarClient-windows-x86-version.msimsiexec /uninstall AvamarClient-windows-x86_64-version.msiwhere version is the version number of the installation package.
If you do not have the installation file, then complete the following steps:
a. Download the installation file. Downloading the software on page 38 providesinstructions.
b. Copy the installation file to the client computer. Installing the Windows client onWindows Server Core installations on page 43 to download the file and copy it tothe client computer.
Installation
Uninstalling the Avamar Client for Windows 51

Installation
52 EMC Avamar 7.2 for Windows Server User Guide

CHAPTER 3
Backup
This chapter contains the following topics:
l Performing on-demand backups............................................................................54l Scheduling backups..............................................................................................60l Monitoring backups.............................................................................................. 68l Canceling backups................................................................................................68
Backup 53

Performing on-demand backupsYou can use Avamar Administrator to perform an on-demand file system backup or a BMRbackup. The steps to perform an on-demand file system backup or a BMR backup dependon the operating system and whether the environment is a stand-alone server or acluster.
Performing file system backups on a stand-alone serverComplete the following procedure to perform an on-demand backup of volumes, folders,and files on a stand-alone Windows server.
Procedure
1. In Avamar Administrator, click the Backup & Restore tab.
The Backup, Restore and Manage window appears.
2. In the domain tree, select the domain for the client.
3. From the list of clients, select the Windows computer.
You cannot view clients outside the domain for the login account. To view all clients,log in to the root domain.
4. Click the Backup tab.
The plug-ins installed on the Windows server appear in the left pane on the Backuptab.
5. Expand the node for the Windows File System plug-in.
A list of volumes on the selected client appears.
6. Browse to and select the checkboxes next to the folders and files to back up.
NOTICE
If you are backing up SIS-enabled volumes on Windows Storage Server 2008 or 2008R2, or deduplicated volumes on Windows Server 2012, then you must select theentire volume for backup. However, you can restore individual folders and files fromthe volume backup.
7. Select Actions > Back Up Now.
The On Demand Backup Options dialog box appears.
8. Select the backup retention setting:
l To automatically delete this backup from the Avamar server after a specific amountof time, select Retention period and then specify the number of days, weeks,months, or years for the retention period.
l To automatically delete this backup from the Avamar server on a specific calendardate, select End date and browse to that date on the calendar.
l To keep this backup for as long as this client remains active in the Avamar server,select No end date.
9. From the Avamar encryption method list, select the encryption method for datatransfer between the client and the Avamar server during the backup.
Backup
54 EMC Avamar 7.2 for Windows Server User Guide

The encryption technology and bit strength for a client/server connection depend onseveral factors, including the client operating system and Avamar server version. TheEMC Avamar Product Security Guide provides additional information.
10. Click More Options.
The Backup Command Line Options dialog box appears.
11. Set the plug-in options.
Windows File System plug-in backup options on page 104 provides details on each ofthe options.
12. Click OK on the Backup Command Line Options dialog box.
13. Click OK on the On Demand Backup Options dialog box.
The On Demand Backup Options dialog box closes and the following status messageappears: Backup initiated.
14. Click Close.
Performing file system backups in a Windows Server 2008/2012 clusterComplete the following procedure to perform an on-demand backup of file system dataon shared storage in a Windows Server 2008/2012 cluster.
Procedure
1. In Avamar Administrator, click the Backup & Restore tab.
The Backup, Restore and Manage window appears.
2. In the domain tree, select the domain for the federated cluster client.
3. From the list of clients, select the federated cluster client.
You cannot view clients outside the domain for the login account. To view all clients,log in to the root domain.
4. Click the Backup tab.
The plug-ins for the federated cluster client appear in the left pane on the Backup tab.
5. Expand the node for the Windows File System plug-in.
A list of shared disks on the selected cluster appears.
6. Browse to and select the checkboxes next to the disks, folders, and files to back up.
Keep the following points in mind when you select the data for backup:
l If you are backing up SIS-enabled volumes on Microsoft Windows Storage Server2008 or 2008 R2, you must select the entire volume for backup. However, you canrestore individual folders and files from the volume backup.
l Do not select the quorum drive. According to Microsoft guidelines, this clusterresource must always remain under exclusive control of the cluster.
l Do not select both shared and local file system data. You may not be able torestore data from a backup that includes file system data from both shared storageand local volumes.
7. Select Actions > Back Up Now.
The On Demand Backup Options dialog box appears.
8. Select the backup retention setting:
Backup
Performing file system backups in a Windows Server 2008/2012 cluster 55

l To automatically delete this backup from the Avamar server after a specific amountof time, select Retention period and then specify the number of days, weeks,months, or years for the retention period.
l To automatically delete this backup from the Avamar server on a specific calendardate, select End date and browse to that date on the calendar.
l To keep this backup for as long as this client remains active in the Avamar server,select No end date.
9. From the Avamar encryption method list, select the encryption method for datatransfer between the client and the Avamar server during the backup.
The encryption technology and bit strength for a client/server connection depend onseveral factors, including the client operating system and Avamar server version. TheEMC Avamar Product Security Guide provides additional information.
10. Click More Options.
The Backup Command Line Options dialog box appears.
11. Set the plug-in options.
Windows File System plug-in backup options on page 104 provides details on each ofthe options.
12. Click OK on the Backup Command Line Options dialog box.
13. Click OK on the On Demand Backup Options dialog box.
The On Demand Backup Request dialog box indicates that the backup started.
14. Click Close.
Performing file system backups in a Windows Server 2012 for SOFS or SMB clusterComplete the following procedure to perform an on-demand backup of file system dataon shared storage in a Windows Server 2012 for SOFS or SMB cluster.
Procedure
1. Ensure that you performed the steps to prepare the cluster in Preparing a WindowsServer 2012 for SOFS or SMB cluster on page 37.
2. In Avamar Administrator, click the Backup & Restore tab.
The Backup, Restore and Manage window appears.
3. In the domain tree, select the domain for the proxy cluster client.
4. From the list of clients, select the proxy cluster client.
You cannot view clients outside the domain for the login account. To view all clients,log in to the root domain.
5. Click the Backup tab.
6. Expand the node for the Windows Cluster File Server plug-in.
A list of clustered file servers on the selected cluster appears.
7. Browse to and select the checkboxes next to the clustered file servers, file shares,folders, or files to back up.
Backup
56 EMC Avamar 7.2 for Windows Server User Guide
Note
If you are backing up deduplicated volumes, then you must select the entire volumefor backup. However, you can restore individual folders and files from the volumebackup.
8. Select Actions > Back Up Now.
The On Demand Backup Options dialog box appears.
9. Select the backup retention setting:
l To automatically delete this backup from the Avamar server after a specific amountof time, select Retention period and then specify the number of days, weeks,months, or years for the retention period.
l To automatically delete this backup from the Avamar server on a specific calendardate, select End date and browse to that date on the calendar.
l To keep this backup for as long as this client remains active in the Avamar server,select No end date.
10. From the Avamar encryption method list, select the encryption method for datatransfer between the client and the Avamar server during the backup.
The encryption technology and bit strength for a client/server connection depend onseveral factors, including the client operating system and Avamar server version. TheEMC Avamar Product Security Guide provides additional information.
11. Click OK on the On Demand Backup Options dialog box.
The On Demand Backup Options dialog box closes and the following status messageappears: Backup initiated.
12. Click OK.
Backing up VHDs with the Windows File System plug-inUse the Windows File System plug-in to back up attached or detached VHDs in thefollowing environments:
l Stand-alone server, all operating system versions
l Windows Server 2008/2012 cluster
You must attach the VHD file in a Windows Server 2012 for SOFS or SMB cluster to backup the VHD file with the Windows File System plug-in.
If the VHD file is attached as a volume and you want to include the VHD in the backup,then select the Back up Natively Attached Virtual Hard Disks checkbox in the BackupCommand Line Options dialog box when you set the options for the backup.
To exclude an attached VHD file from the backup of a volume, clear the Back up NativelyAttached Virtual Hard Disks checkbox.
The Windows File System plug-in backs up the detached VHD file as a file in the filesystem with a .vhd file name extension. You must select the volume on which the VHDfile is located for the backup.
Backup
Backing up VHDs with the Windows File System plug-in 57
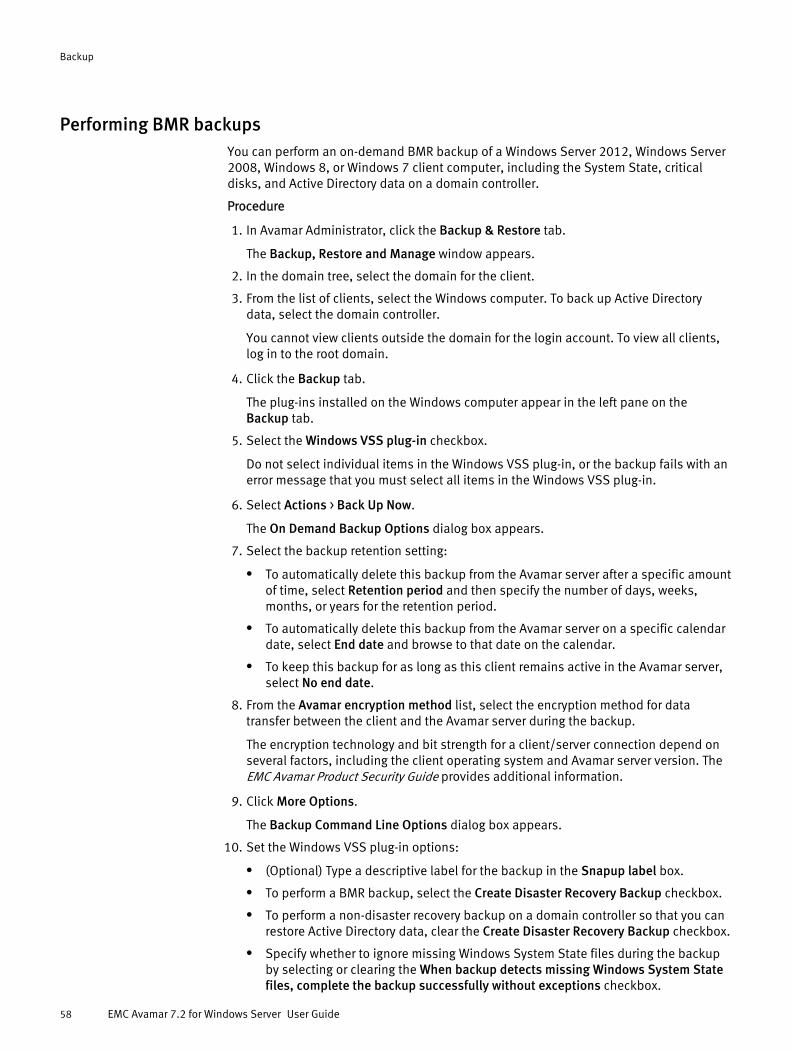
Performing BMR backupsYou can perform an on-demand BMR backup of a Windows Server 2012, Windows Server2008, Windows 8, or Windows 7 client computer, including the System State, criticaldisks, and Active Directory data on a domain controller.
Procedure
1. In Avamar Administrator, click the Backup & Restore tab.
The Backup, Restore and Manage window appears.
2. In the domain tree, select the domain for the client.
3. From the list of clients, select the Windows computer. To back up Active Directorydata, select the domain controller.
You cannot view clients outside the domain for the login account. To view all clients,log in to the root domain.
4. Click the Backup tab.
The plug-ins installed on the Windows computer appear in the left pane on theBackup tab.
5. Select the Windows VSS plug-in checkbox.
Do not select individual items in the Windows VSS plug-in, or the backup fails with anerror message that you must select all items in the Windows VSS plug-in.
6. Select Actions > Back Up Now.
The On Demand Backup Options dialog box appears.
7. Select the backup retention setting:
l To automatically delete this backup from the Avamar server after a specific amountof time, select Retention period and then specify the number of days, weeks,months, or years for the retention period.
l To automatically delete this backup from the Avamar server on a specific calendardate, select End date and browse to that date on the calendar.
l To keep this backup for as long as this client remains active in the Avamar server,select No end date.
8. From the Avamar encryption method list, select the encryption method for datatransfer between the client and the Avamar server during the backup.
The encryption technology and bit strength for a client/server connection depend onseveral factors, including the client operating system and Avamar server version. TheEMC Avamar Product Security Guide provides additional information.
9. Click More Options.
The Backup Command Line Options dialog box appears.
10. Set the Windows VSS plug-in options:
l (Optional) Type a descriptive label for the backup in the Snapup label box.
l To perform a BMR backup, select the Create Disaster Recovery Backup checkbox.
l To perform a non-disaster recovery backup on a domain controller so that you canrestore Active Directory data, clear the Create Disaster Recovery Backup checkbox.
l Specify whether to ignore missing Windows System State files during the backupby selecting or clearing the When backup detects missing Windows System Statefiles, complete the backup successfully without exceptions checkbox.
Backup
58 EMC Avamar 7.2 for Windows Server User Guide

When you select the checkbox, warnings appear for the missing files and thebackup completes successfully. When you clear the checkbox, errors appear forthe missing files and the backup completes with exceptions.
l On Windows Server 2012 or Windows 8, specify whether to include or exclude anon-critical disk when a service or application is installed on the disk and causesthe disk to become critical.
Select the Ignore third-party services when identifying critical volumes. Applies toWindows 8 (or later) checkbox to exclude the non-critical disk from the backup, orclear the checkbox to include the non-critical disk in the backup.
l To store the backup on a Data Domain system instead of the Avamar server, selectthe Store backup on Data Domain system checkbox, and then select the DataDomain system from the list.
l From the Encryption method to Data Domain system list, select the encryptionmethod for data transfer between the client and the Data Domain system duringthe backup.
Windows VSS plug-in backup options on page 110 provides details on each of theoptions.
11. To exclude non-critical dynamic disks from the backup, add the following attribute:
a. Click More.
b. In the Enter Attribute box, type --exclude-non-critical-dynamic-disks.
c. In the Enter Attribute Value box, type true.
d. Click +.
12. Click OK on the Backup Command Line Options dialog box.
13. Click OK on the On Demand Backup Options dialog box.
The On Demand Backup Options dialog box closes and the following status messageappears: Backup initiated.
14. Click OK.
Volumes that are considered critical and are included in a Windows BMR backupCertain volumes are considered critical and are included in a Windows BMR backup.
The following volumes are included in a Windows BMR backup:
l Any volume that contains operating system files.
l Any volume that contains a third-party service.
l A non-critical volume that has a critical volume mounted on it, or a non-criticalvolume that serves as a parent to a critical volume. In either case, both the parentvolume and mounted volume are treated as critical.
l If one of the volumes on a dynamic disk is critical, all volumes on a dynamic disk arecritical. Microsoft requires all dynamic disks to be included in the BMR backup ifanyone of the dynamic disks is critical.
Excluding a volume from a Windows BMR backupThere are several ways to exclude a volume from a Windows BMR backup depending onthe operating system, disk types, configuration, and installation practices.
l Install applications with third-party services on the system disk, or a disk that alreadyhas other services installed. Use the diskshadow utility command list writersdetailed to identify the disks that contain third-party services.
Backup
Performing BMR backups 59
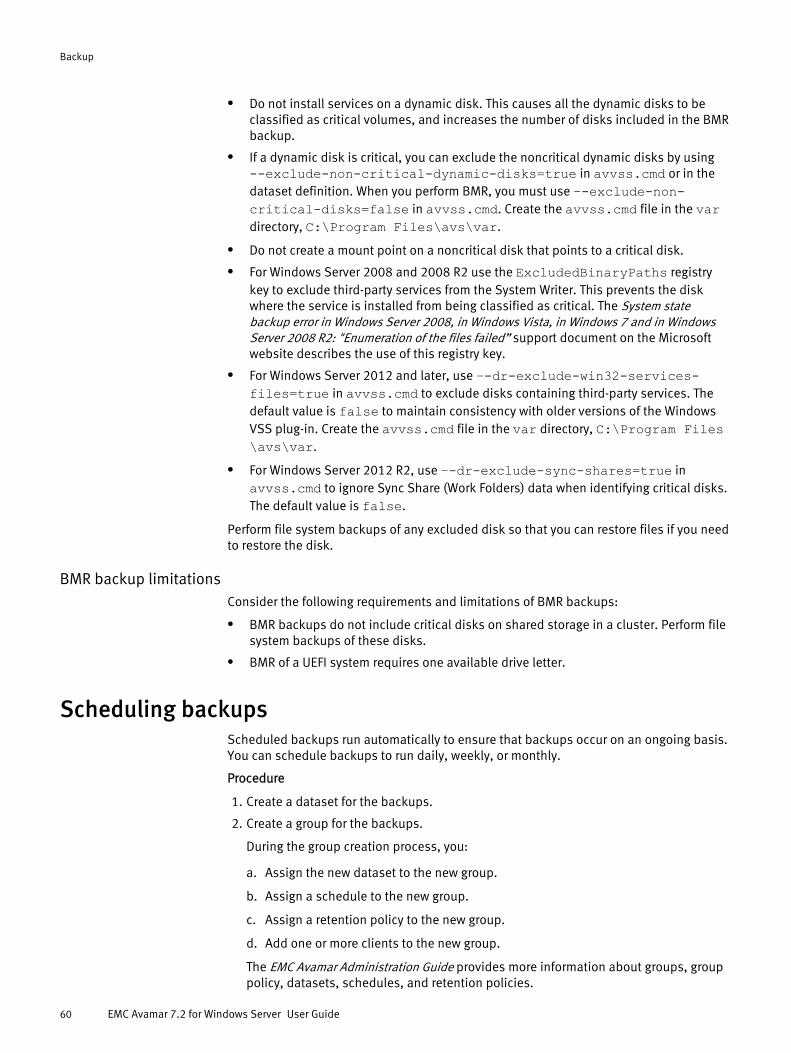
l Do not install services on a dynamic disk. This causes all the dynamic disks to beclassified as critical volumes, and increases the number of disks included in the BMRbackup.
l If a dynamic disk is critical, you can exclude the noncritical dynamic disks by using--exclude-non-critical-dynamic-disks=true in avvss.cmd or in thedataset definition. When you perform BMR, you must use –-exclude-non-critical-disks=false in avvss.cmd. Create the avvss.cmd file in the vardirectory, C:\Program Files\avs\var.
l Do not create a mount point on a noncritical disk that points to a critical disk.
l For Windows Server 2008 and 2008 R2 use the ExcludedBinaryPaths registrykey to exclude third-party services from the System Writer. This prevents the diskwhere the service is installed from being classified as critical. The System statebackup error in Windows Server 2008, in Windows Vista, in Windows 7 and in WindowsServer 2008 R2: "Enumeration of the files failed” support document on the Microsoftwebsite describes the use of this registry key.
l For Windows Server 2012 and later, use –-dr-exclude-win32-services-files=true in avvss.cmd to exclude disks containing third-party services. Thedefault value is false to maintain consistency with older versions of the WindowsVSS plug-in. Create the avvss.cmd file in the var directory, C:\Program Files\avs\var.
l For Windows Server 2012 R2, use –-dr-exclude-sync-shares=true inavvss.cmd to ignore Sync Share (Work Folders) data when identifying critical disks.The default value is false.
Perform file system backups of any excluded disk so that you can restore files if you needto restore the disk.
BMR backup limitationsConsider the following requirements and limitations of BMR backups:
l BMR backups do not include critical disks on shared storage in a cluster. Perform filesystem backups of these disks.
l BMR of a UEFI system requires one available drive letter.
Scheduling backupsScheduled backups run automatically to ensure that backups occur on an ongoing basis.You can schedule backups to run daily, weekly, or monthly.
Procedure
1. Create a dataset for the backups.
2. Create a group for the backups.
During the group creation process, you:
a. Assign the new dataset to the new group.
b. Assign a schedule to the new group.
c. Assign a retention policy to the new group.
d. Add one or more clients to the new group.
The EMC Avamar Administration Guide provides more information about groups, grouppolicy, datasets, schedules, and retention policies.
Backup
60 EMC Avamar 7.2 for Windows Server User Guide

3. Enable scheduling for the group.
Creating a datasetA dataset specifies the data to include in a scheduled backup and the options to use forthe backup. Create at least one dataset for scheduled backups on a client or group ofclients. Create multiple datasets to segregate client data.
Creating a dataset for file system backups on a stand-alone server
You can create a dataset for scheduled file system backups on a stand-alone server.
Procedure
1. In Avamar Administrator, select Tools > Manage Datasets.
The Manage All Datasets window appears.
2. Click New.
The New Dataset dialog box appears.
3. In the Name box, type a name for the dataset.
The name can include alphanumeric characters (A-Z, a-z, 0-9) and the followingspecial characters: period (.), hyphen (-), and underscore (_). Do not use Unicodecharacters or the following special characters: ` ~ ! @ # $ % ^ & * ( ) = + [ ] { } | \ / ; : ' "< > , ?
4. Select Enter Explicitly, and then select Windows File System from the Select Plug-InType list.
All local Windows filesystems is selected by default. This backs up all file systemdata.
5. To back up specific volumes, folders, and files:
a. Select Select Files and/or Folders, and then click the ... button.
The Select Files and/or Folders dialog box appears.
b. Select the client in the Clients list.
c. Expand the Windows File System node in the middle pane.
d. Browse to and select the checkboxes next to the volumes, folders, and files toback up.
If you are backing up SIS-enabled volumes on Windows Storage Server 2008 or2008 R2, or deduplicated volumes on Windows Server 2012, then you must selectthe entire volume for backup. However, you can restore individual folders and filesfrom the volume backup.
e. Click OK.
6. (Optional) Click the Exclusions tab and define volumes, folders, or files to excludefrom the dataset:
a. Select Windows File System from the Select Plug-In Type list.
b. Click the ... button.
The Select Files and/or Folders dialog box appears.
c. Select the client in the Clients list.
d. Expand the Windows File System node in the middle pane.
Backup
Creating a dataset 61

e. Browse to and select the checkboxes next to the volumes, folders, and files toexclude from the backup.
f. Click OK.
7. (Optional) Click the Inclusions tab and define volumes, folders, or files to include inthe dataset that otherwise would have been excluded based on the selections on theExclusions tab:
a. Select Windows File System from the Select Plug-In Type list.
b. Click the ... button.
The Select Files and/or Folders dialog box appears.
c. Select the client in the Clients list.
d. Expand the Windows File System node in the middle pane.
e. Browse to and select the checkboxes next to the volumes, folders, and files toinclude in the backup.
f. Click OK.
8. Click the Options tab.
9. Select Windows File System from the Select Plug-In Type list.
10. Set the plug-in options.
Windows File System plug-in backup options on page 104 provides details on each ofthe options.
11. Click OK on the New Dataset dialog box.
12. Click OK on the Manage All Datasets dialog box.
Creating a dataset for file system backups in a Windows Server 2008/2012 cluster
You can create a dataset for scheduled backups of file system data on shared storage ina Windows Server 2008/2012 cluster.
Procedure
1. The steps to create a dataset for scheduled file system backups on shared storage ina Windows Server 2008/2012 cluster are the same as the steps for a stand-aloneserver in Creating a dataset for file system backups on a stand-alone server on page61.
2. Perform the following tasks when you create the dataset for backups in a cluster:
a. Browse and select the data on the Avamar federated cluster client. Do not browseand select data on the physical node.
b. Exclude the cluster quorum drive from backup. According to Microsoft guidelines,this cluster resource must always remain under exclusive control of the cluster.
Creating a dataset for file system backups in a Windows Server 2012 for SOFS or SMB cluster
You can create a dataset for scheduled backups of file system data on shared storage ina Windows Server 2012 for SOFS or SMB cluster.
Procedure
1. Ensure that you performed the steps in Preparing a Windows Server 2012 for SOFS orSMB cluster on page 37.
2. In Avamar Administrator, select Tools > Manage Datasets.
Backup
62 EMC Avamar 7.2 for Windows Server User Guide

The Manage All Datasets window appears.
3. Click New.
The New Dataset dialog box appears.
4. In the Name box, type a name for the dataset.
The name can include alphanumeric characters (A-Z, a-z, 0-9) and the followingspecial characters: period (.), hyphen (-), and underscore (_). Do not use Unicodecharacters or the following special characters: ` ~ ! @ # $ % ^ & * ( ) = + [ ] { } | \ / ; : ' "< > , ?
5. Select Enter Explicitly.
6. Select Windows Cluster File Server from the Select Plug-In Type list.
All Windows Cluster Data is selected by default. This will back up all file system dataon shared storage in the cluster.
7. To back up specific clustered file servers, folders, and files, perform the followingsteps:
a. Select Select Files and/or Folders.
b. Click the ... button.
The Select Files and/or Folders dialog box appears.
c. Select the proxy cluster client in the Clients list.
d. Expand the Windows Cluster File Server node in the middle pane.
e. Browse to and select the checkboxes next to the clustered file servers, shares,folders, and files to back up.
f. Click OK.
8. Disregard the Exclusions and Inclusions tabs. You cannot exclude or include data inWindows Cluster File Server plug-in backups.
9. To store the backups on a Data Domain system instead of the Avamar server, click theOptions tab and then set the options:
a. Select the Store backup on Data Domain system checkbox, and then select theData Domain system from the list.
b. From the Encryption method to Data Domain system list, select the encryptionmethod for data transfer between the client and the Data Domain system duringthe backups.
10. Click OK to close the New Dataset dialog box, and then click OK to close the ManageAll Datasets dialog box.
Creating a dataset for BMR backupsYou can create a dataset for scheduled BMR backups of a Windows Server 2012,Windows Server 2008, Windows 8, or Windows 7 client computer.
Procedure
1. In Avamar Administrator, select Tools > Manage Datasets.
The Manage All Datasets window appears.
2. Click New.
The New Dataset dialog box appears.
3. In the Name box, type a name for the dataset.
Backup
Creating a dataset 63
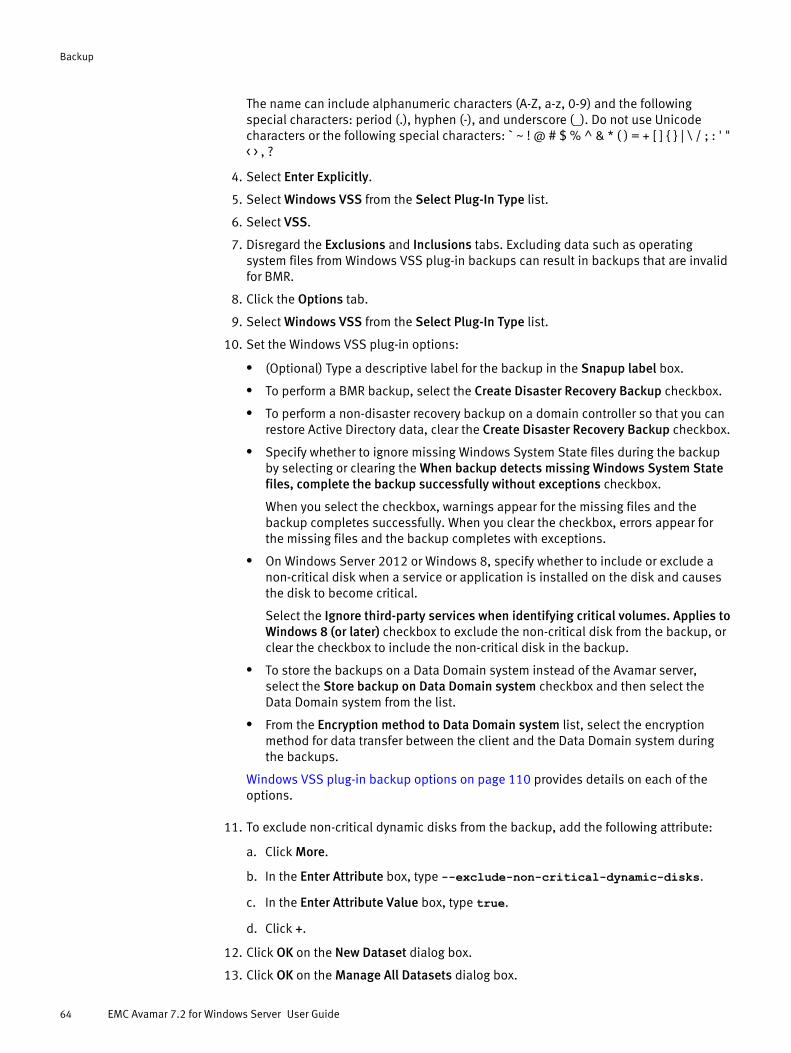
The name can include alphanumeric characters (A-Z, a-z, 0-9) and the followingspecial characters: period (.), hyphen (-), and underscore (_). Do not use Unicodecharacters or the following special characters: ` ~ ! @ # $ % ^ & * ( ) = + [ ] { } | \ / ; : ' "< > , ?
4. Select Enter Explicitly.
5. Select Windows VSS from the Select Plug-In Type list.
6. Select VSS.
7. Disregard the Exclusions and Inclusions tabs. Excluding data such as operatingsystem files from Windows VSS plug-in backups can result in backups that are invalidfor BMR.
8. Click the Options tab.
9. Select Windows VSS from the Select Plug-In Type list.
10. Set the Windows VSS plug-in options:
l (Optional) Type a descriptive label for the backup in the Snapup label box.
l To perform a BMR backup, select the Create Disaster Recovery Backup checkbox.
l To perform a non-disaster recovery backup on a domain controller so that you canrestore Active Directory data, clear the Create Disaster Recovery Backup checkbox.
l Specify whether to ignore missing Windows System State files during the backupby selecting or clearing the When backup detects missing Windows System Statefiles, complete the backup successfully without exceptions checkbox.
When you select the checkbox, warnings appear for the missing files and thebackup completes successfully. When you clear the checkbox, errors appear forthe missing files and the backup completes with exceptions.
l On Windows Server 2012 or Windows 8, specify whether to include or exclude anon-critical disk when a service or application is installed on the disk and causesthe disk to become critical.
Select the Ignore third-party services when identifying critical volumes. Applies toWindows 8 (or later) checkbox to exclude the non-critical disk from the backup, orclear the checkbox to include the non-critical disk in the backup.
l To store the backups on a Data Domain system instead of the Avamar server,select the Store backup on Data Domain system checkbox and then select theData Domain system from the list.
l From the Encryption method to Data Domain system list, select the encryptionmethod for data transfer between the client and the Data Domain system duringthe backups.
Windows VSS plug-in backup options on page 110 provides details on each of theoptions.
11. To exclude non-critical dynamic disks from the backup, add the following attribute:
a. Click More.
b. In the Enter Attribute box, type --exclude-non-critical-dynamic-disks.
c. In the Enter Attribute Value box, type true.
d. Click +.
12. Click OK on the New Dataset dialog box.
13. Click OK on the Manage All Datasets dialog box.
Backup
64 EMC Avamar 7.2 for Windows Server User Guide

Creating System State backup datasets for mixed Windows Server clientsThis release of the Avamar Client for Windows does not support Windows Server 2003Windows XP. However, an Avamar server may include Windows Server 2003 or WindowsXP clients with an older version of the Avamar Client for Windows.
Microsoft supports a different System State backup technology for Windows Server 2003and Windows XP than for Windows Server 2008, Windows Server 2012, Windows 7,Windows 8, and later:
l In Windows Server 2003 and Windows XP, System State backup is based on NTbackup.
l In newer Windows versions, System State backup is based on Microsoft VolumeShadow Copy Service (VSS).
To accommodate these different technologies, you must use different Avamar backupplug-ins for the System State backups:
l Use the Windows File System plug-in for Windows Server 2003 and Windows XP.
l Use the Windows VSS plug-in for Windows Server 2008, Windows Server 2012,Windows 7, and Windows 8.
Client compatibility requirements are available in the EMC Avamar Compatibility andInteroperability Matrix on EMC Online Support. The requirements in the matrix includesupported operating systems and application versions.
Use one of the following strategies to back up multiple clients that require System Statebackups with both plug-ins, for example, both Windows Server 2003 clients andWindows Server 2008 clients:
l (Recommended) Create two separate datasets for System State backups:
n Create one dataset for clients that require the Windows File System plug-in(Windows Server 2003 and Windows XP clients).
n Create one dataset for clients that require the Windows VSS plug-in (WindowsServer 2008, Windows Server 2012, Windows 7, and Windows 8, or later clients).
l (Not recommended) Create a single dataset that includes both types of clients, andspecify override options. Editing a dataset for mixed Windows server clients on page65 provides instructions.
If you do not specify the override options, then the default settings for the SystemState backup in the two plug-ins may conflict, and backups from one or both plug-insmay fail.
NOTICE
The Default Dataset and the Windows Dataset both include the Windows File Systemand Windows VSS plug-in by default. If you use either of these default datasets toback up multiple Windows clients, then you may need to edit the datasets to specifythe override options.
Editing a dataset for mixed Windows server clientsYou can edit a dataset so that it uses both the Windows File System and Windows VSSplug-ins for System State backups.
Procedure
1. In Avamar Administrator, select Tools > Manage Datasets.
The Manage All Datasets window appears.
Backup
Creating a dataset 65

2. Select the dataset that uses both the Windows File System and Windows VSS plug-insfor System State backups.
3. Click Edit.
The Edit Dataset dialog box appears.
4. Click the Options tab.
5. In the Select Plug-In Type list, select Windows File System.
6. Select Back up System State (Windows Server 2003 only).
7. Click More.
8. Add the --backupsystem-ignore-version-check override option:
a. In Enter Attribute, type --backupsystem-ignore-version-check.
b. In Enter Attribute value, type true.
c. Click +.
NOTICE
Use the --backupsystem-ignore-version-check option very carefully. This
flag overrides an important Avamar check, and if used incorrectly, can lead to dataloss.
9. Click OK.
10. In the Manage All Datasets dialog box, click Edit to edit the same dataset again.
11. In the Edit Dataset dialog box, click the Options tab.
12. In the Select Plug-in Type list, select Windows VSS.
13. Select the Create Disaster Recovery Backup checkbox.
14. Click OK.
The Manage All Datasets dialog box appears.
15. Click OK.
Creating a groupComplete the following procedure to create a group for scheduled backups.
Procedure
1. In Avamar Administrator, click the Policy tab.
The Policy window appears.
2. Select the Policy Management tab.
3. Select the Groups tab.
4. In the left pane, select the Avamar domain to which the group should belong.
5. Select Actions > Group > New > Backup Group.
The New Group wizard appears.
6. Type a name for the new group in the Name box.
The name can include alphanumeric characters (A-Z, a-z, 0-9) and the followingspecial characters: period (.), hyphen (-), and underscore (_). Do not use Unicodecharacters or the following special characters: ` ~ ! @ # $ % ^ & * ( ) = + [ ] { } | \ / ; : ' "< > , ?
Backup
66 EMC Avamar 7.2 for Windows Server User Guide

7. Clear the Disabled checkbox to use this group to perform scheduled client backups.
Selecting the checkbox disables backups for the group.
8. From the Avamar encryption method list, select the encryption method to use for datatransfer between the client and the Avamar server during the backup.
The encryption technology and bit strength for a client/server connection depend onseveral factors, including the client operating system and Avamar server version. TheEMC Avamar Product Security Guide provides additional information.
9. (Optional) Select Override Schedule to override the assigned schedule for this group:
l To skip the next scheduled backup, select Skip Next Backup.
l To perform the next scheduled backup one time only, select Run Next BackupOnce.
10. Click Next.
The next page of the New Group wizard appears with dataset information.
11. Select the dataset that you created for the group backups from the Select An ExistingDataset list.
12. Click Next.
The next page of the New Group wizard appears with schedule information.
13. Select a schedule from the Select An Existing Schedule list.
You cannot edit schedules from this page. Detailed schedule properties appear sothat you can review the properties when you make a selection. The EMC AvamarAdministration Guide provides additional information about editing scheduleproperties.
14. Click Next.
The next page of the New Group wizard appears with retention policy information.
15. Select a retention policy from the Select an Existing Retention Policy list.
You cannot edit schedules from this page. Detailed schedule properties appear sothat you can review the properties when you make a selection. The EMC AvamarAdministration Guide provides additional information about editing scheduleproperties.
16. Click Next.
The final page of the New Group wizard appears. A list of domains appears in theChoose Domain pane.
17. Select the domain for the Windows client.
A list of Avamar clients appears in the pane below the Choose Domain pane.
18. Select the checkboxes next to the clients to include in the group.
l If you are backing up data in a Windows Server 2012 for SOFS or SMB cluster, addthe proxy cluster client to the group.
l If you are backing up data in a Windows Server 2008/2012 cluster, add thefederated cluster client to the group.
The clients appear in the Members pane.
19. (Optional) To remove a client from the group, select the client from the Members list,and click the X button.
20. Click Finish.
Backup
Creating a group 67
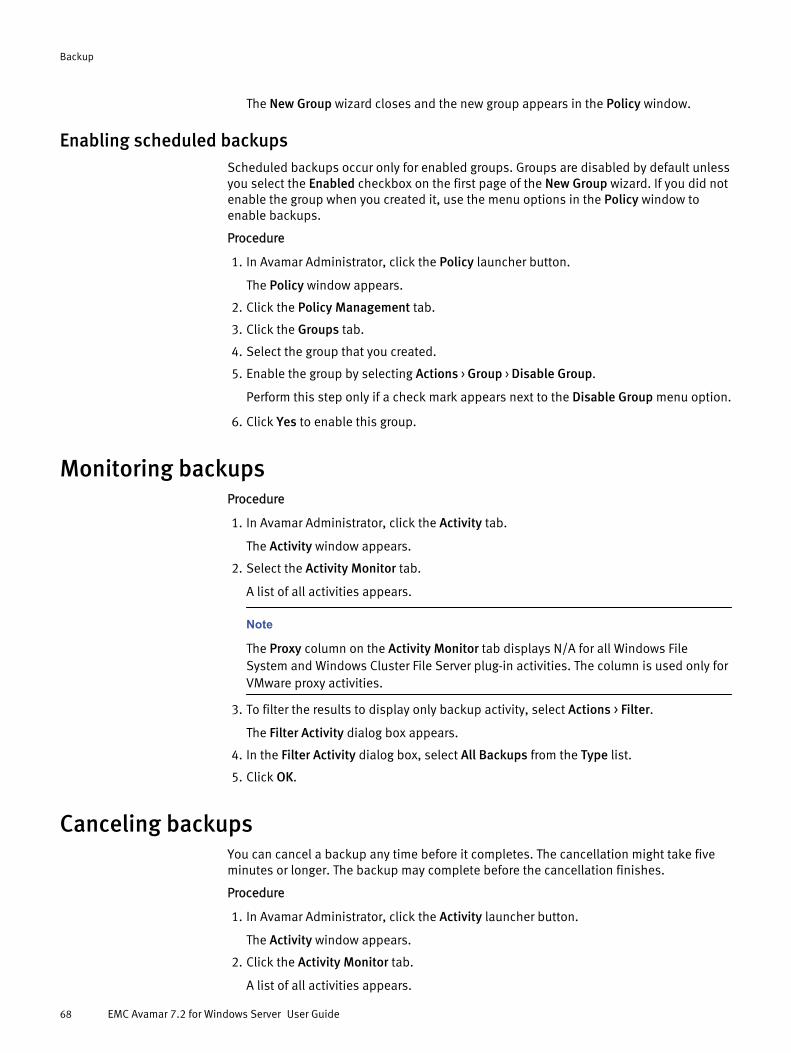
The New Group wizard closes and the new group appears in the Policy window.
Enabling scheduled backupsScheduled backups occur only for enabled groups. Groups are disabled by default unlessyou select the Enabled checkbox on the first page of the New Group wizard. If you did notenable the group when you created it, use the menu options in the Policy window toenable backups.
Procedure
1. In Avamar Administrator, click the Policy launcher button.
The Policy window appears.
2. Click the Policy Management tab.
3. Click the Groups tab.
4. Select the group that you created.
5. Enable the group by selecting Actions > Group > Disable Group.
Perform this step only if a check mark appears next to the Disable Group menu option.
6. Click Yes to enable this group.
Monitoring backupsProcedure
1. In Avamar Administrator, click the Activity tab.
The Activity window appears.
2. Select the Activity Monitor tab.
A list of all activities appears.
Note
The Proxy column on the Activity Monitor tab displays N/A for all Windows FileSystem and Windows Cluster File Server plug-in activities. The column is used only forVMware proxy activities.
3. To filter the results to display only backup activity, select Actions > Filter.
The Filter Activity dialog box appears.
4. In the Filter Activity dialog box, select All Backups from the Type list.
5. Click OK.
Canceling backupsYou can cancel a backup any time before it completes. The cancellation might take fiveminutes or longer. The backup may complete before the cancellation finishes.
Procedure
1. In Avamar Administrator, click the Activity launcher button.
The Activity window appears.
2. Click the Activity Monitor tab.
A list of all activities appears.
Backup
68 EMC Avamar 7.2 for Windows Server User Guide

3. Select the backup from the list.
4. Select Actions > Cancel Activity.
A confirmation message appears.
5. Click Yes.
Backup
Canceling backups 69

Backup
70 EMC Avamar 7.2 for Windows Server User Guide
CHAPTER 4
File System Restore
This chapter contains the following topics:
l Restore requirements............................................................................................ 72l Finding a backup...................................................................................................73l Restoring to the original location...........................................................................76l Restoring to a different location.............................................................................77l Restoring to multiple locations..............................................................................80l Monitoring restores............................................................................................... 82l Canceling restores.................................................................................................83
File System Restore 71
Restore requirementsReview the requirements for your environment before you restore Windows file systemdata from an Avamar backup.
Restoring in a clusterWhen you restore data from a backup of file system data on shared storage in a WindowsServer 2008/2012 cluster, select the federated cluster client as the client from which torestore. Use the Windows File System plug-in for the restore.
When you restore data from a backup of file system data on shared storage in a WindowsServer 2012 for SOFS or SMB cluster, select the proxy cluster client as the client fromwhich to restore. Use the Windows Cluster File Server plug-in for the restore.
When you restore data from a backup of file system data on a local volume of a node,select the node as the client from which to restore. Use the Windows File System plug-infor the restore.
Restoring VHD filesWhen you restore VHDs from an Avamar backup, ensure that you meet the followingadditional requirements:
l When you restore the parent partition and VHDs on a client computer, you mustrestore the parent partition before you can restore the VHDs on the parent partition.
l When you restore both VHDs and other file types simultaneously, Avamar restores theother file types before the VHDs.
l After you restore the VHDs, reattach the VHDs. Use the same drive letter settings toensure backup data consistency.
Restoring SIS volumes on Windows Server 2008When you restore an SIS volume on Windows Server 2008, the SIS Groveler serviceactivity may prevent the restore process from correctly restoring or overwriting some files. Restore problems and solutions on page 124 provides more information about this errorand how to correct it.
Restoring from backups of DFS sharesWhen you restore data from backups of DFS shares, the replication process automaticallyreplicates the restored data to the central DFS hub if the restored data has a newertimestamp.
NOTICE
File system backups include only DFS shares on local volumes on the client computer.
Perform the appropriate steps to prevent automatic replication after a restore:
l Restore specific folders or files from a backup of DFS shares by using the steps in Restoring to a different location on page 77 to restore the data to a location outsideof the DFS shared folders.
l Restore all data from a backup of DFS shares:
1. Disable DFS replication.
File System Restore
72 EMC Avamar 7.2 for Windows Server User Guide
The “Managing DFS Replication” article on the Microsoft TechNet website providesseveral methods to disable replication.
2. Follow the steps in Restoring to the original location on page 76 to restore thebackup.
3. Manually run replication to synchronize data with the replication server.
The “Managing DFS Replication” article on the Microsoft TechNet website providesseveral methods to synchronize data.
Finding a backupThe first step to restore data is to find the backup with the data that you want to restore.You can find Avamar client backups by searching either for a specific date or for specificcontent.
Locate backups by date when one or more of the following situations apply:
l You save all data for the client in a single backup set.
l The exact pathname or name of the data to restore is unknown.
l The backup you want to restore is before a specific date or event. For example, youknow the approximate date when data was lost or corrupted. You can search for abackup before that date.
l The specific types of backups are known. For example, you run scheduled disasterrecovery backups every Wednesday and Saturday night, and you run full volumebackups daily. When you need to rebuild a server, select the disaster recoverybackup with the date closest to the event that caused the loss of data.
Locate backups by the content of the backup when one or more of the followingsituations apply:
l You back up data on the client in separate backup sets.
l You want to view multiple versions of the same file so that you can decide the versionto restore.
l The date of the backup or the content of a backup is unknown, but you know thename of the data to restore.
NOTICE
Avamar generally supports the use of specific supported international characters indirectory, folder, and filenames. However, proper display of international languagecharacters is contingent on the client computer’s Java locale and installed system fontsbeing compatible with the original language. If you browse backups that were createdwith international characters and a compatible font is not installed, then any charactersthat cannot be resolved by the system appear as rectangles. This is a normal limitation ofthat particular situation and does not affect the ability to restore these directories,folders, or files. The EMC Avamar Release Notes provide additional international languagesupport information.
Finding a backup by dateProcedure
1. In Avamar Administrator, click the Backup & Restore launcher button.
The Backup, Restore and Manage window appears.
File System Restore
Finding a backup 73

2. In the domain tree, select the domain for the client.
3. From the list of clients, select the Windows server or client where the backupoccurred.
In a Windows Server 2012 for SOFS or SMB cluster, select the proxy cluster client. In aWindows Server 2008/2012 cluster, select the federated cluster client.
You cannot view clients outside the domain for the login account. To view all clients,log in to the root domain.
4. Click the Restore tab.
5. Click the By Date tab.
6. Select a backup from the calendar:
a. Use the year and month navigational arrows to browse to a backup.
A yellow highlight on a date indicates that a valid backup occurred on that date.
b. Click a date highlighted by yellow.
A list of backups on that date appears in the Backups table next to the calendar.
7. Select the backup from the Backups table.
8. In the two lower panes of the Backup, Restore and Manage window, select the data torestore:
l To restore the entire backup, select the checkbox next to the root folder in thelower-left pane.
l To restore individual file servers, file shares, volumes, or folders, select thecheckboxes next to the file servers, file shares, volumes, or folders in the lower-leftpane.
l To restore individual files, browse to the volume or folder that contains the files inthe lower-left pane, and then select the checkboxes next to the files in the lower-right pane.
9. Continue with the restore as described in the following topics:
l Restoring to the original location on page 76
l Restoring to a different location on page 77
l Restoring to multiple locations on page 80
Finding a backup by contentYou can find a backup by specific files or folders in that backup.
Procedure
1. In Avamar Administrator, click the Backup & Restore launcher button.
The Backup, Restore and Manage window appears.
2. In the domain tree, select the domain for the client.
3. From the list of clients, select the Windows server or client where the backupoccurred.
In a Windows Server 2012 for SOFS or SMB cluster, select the proxy cluster client. In aWindows Server 2008/2012 cluster, select the federated cluster client.
You cannot view clients outside the domain for the login account. To view all clients,log in to the root domain.
File System Restore
74 EMC Avamar 7.2 for Windows Server User Guide
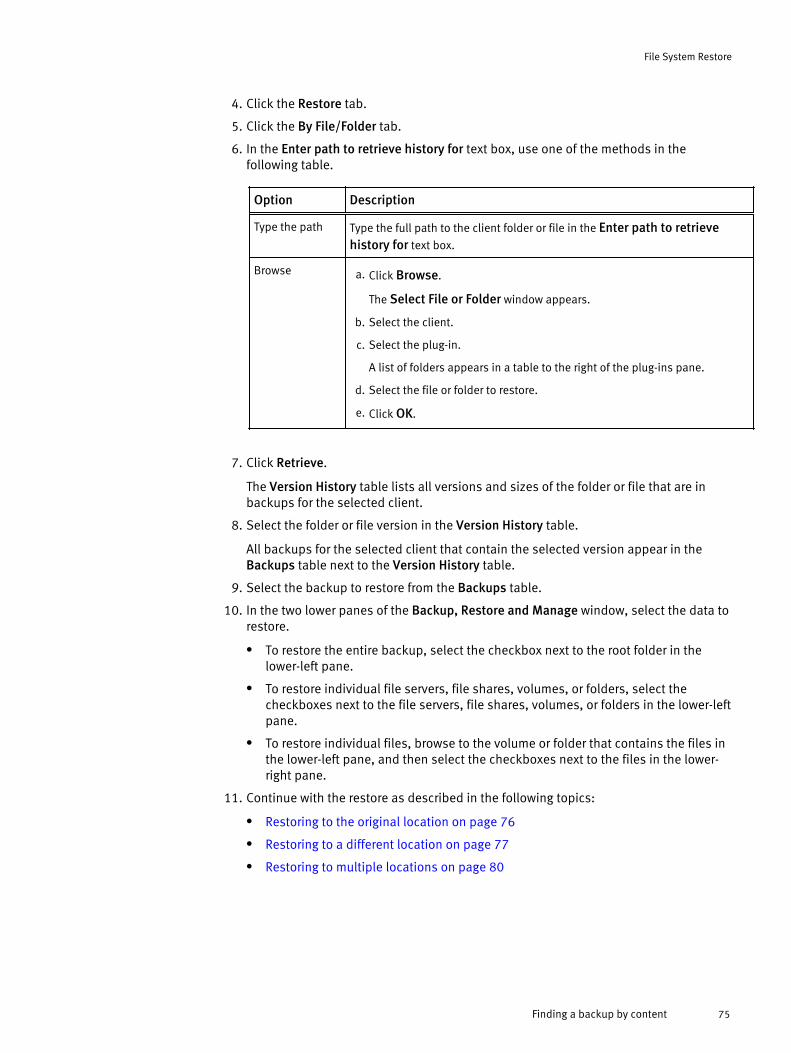
4. Click the Restore tab.
5. Click the By File/Folder tab.
6. In the Enter path to retrieve history for text box, use one of the methods in thefollowing table.
Option Description
Type the path Type the full path to the client folder or file in the Enter path to retrievehistory for text box.
Browse a. Click Browse.
The Select File or Folder window appears.
b. Select the client.
c. Select the plug-in.
A list of folders appears in a table to the right of the plug-ins pane.
d. Select the file or folder to restore.
e. Click OK.
7. Click Retrieve.
The Version History table lists all versions and sizes of the folder or file that are inbackups for the selected client.
8. Select the folder or file version in the Version History table.
All backups for the selected client that contain the selected version appear in theBackups table next to the Version History table.
9. Select the backup to restore from the Backups table.
10. In the two lower panes of the Backup, Restore and Manage window, select the data torestore.
l To restore the entire backup, select the checkbox next to the root folder in thelower-left pane.
l To restore individual file servers, file shares, volumes, or folders, select thecheckboxes next to the file servers, file shares, volumes, or folders in the lower-leftpane.
l To restore individual files, browse to the volume or folder that contains the files inthe lower-left pane, and then select the checkboxes next to the files in the lower-right pane.
11. Continue with the restore as described in the following topics:
l Restoring to the original location on page 76
l Restoring to a different location on page 77
l Restoring to multiple locations on page 80
File System Restore
Finding a backup by content 75

Restoring to the original locationThe steps to restore file system data to the original location depend on whether theenvironment is a stand-alone server or a cluster.
Restoring to the original location on a stand-alone serverYou can restore a volume, folder, or file to the original location on a stand-alone server.
Procedure
1. In Avamar Administrator, click the Backup & Restore launcher button.
The Backup, Restore and Manage window appears.
2. Use the following information to find the backup and select the volumes, folders, orfiles to restore:
l Finding a backup by date on page 73
l Finding a backup by content on page 74
3. Select Actions > Restore Now.
The Restore Options dialog box appears.
4. In the Restore Destination Client box, leave the default selection of the original client.
5. In the Restore Plug-in list, leave the default selection of the original backup plug-in.
6. From the Avamar encryption method list, select the encryption method for datatransfer between the Avamar server and the client during the restore.
The encryption technology and bit strength for a client/server connection depend onseveral factors, including the client operating system and Avamar server version. TheEMC Avamar Product Security Guide provides additional information.
7. In Restore Destination Choices, select Restore everything to its original location.
8. Click More Options.
The Restore Command Line Options dialog box appears.
9. Set the plug-in options.
Windows File System plug-in restore options on page 108 provides additionalinformation about the plug-in options.
10. Click OK on the Restore Command Line Options dialog box.
11. Click OK on the Restore Options dialog box.
The Restore Request dialog box indicates that the restore started.
12. Click Close.
Restoring to the original location in a Windows Server 2008/2012 clusterWhen you restore volumes, folders, or files to shared storage in a Windows Server2008/2012 cluster, select the federated cluster client as the client from which to restore.Use the Windows File System plug-in to perform the restore. Restoring to the originallocation on a stand-alone server on page 76 provides instructions.
File System Restore
76 EMC Avamar 7.2 for Windows Server User Guide

Restoring to the original location in a Windows Server 2012 for SOFS or SMB clusterYou can restore file system data to the original location on shared storage in a WindowsServer 2012 for SOFS or SMB cluster.
Procedure
1. In Avamar Administrator, click the Backup & Restore launcher button.
The Backup, Restore and Manage window appears.
2. Use the following information to find the backup and select the clustered file servers,folders, or files to restore:
l Finding a backup by date on page 73
l Finding a backup by content on page 74
3. Select Actions > Restore Now.
The Restore Options dialog box appears.
4. In the Restore Destination Client box, leave the default selection of the original client.
5. In the Restore Plug-in list, leave the default selection of the original backup plug-in.
6. From the Avamar encryption method list, select the encryption method for datatransfer between the Avamar server and the client during the restore.
The encryption technology and bit strength for a client/server connection depend onseveral factors, including the client operating system and Avamar server version. TheEMC Avamar Product Security Guide provides additional information.
7. In Restore Destination Choices, select Restore everything to its original location.
8. Click OK.
The Restore Request dialog box indicates that the restore started.
9. Click Close.
Restoring to a different locationThe steps to restore file system data to a different location either on the same client or ona different client depend on the environment:
l Stand-alone server
l Windows Server 2008/2012 cluster
l Windows Server 2012 for SOFS or SMB cluster
Restoring to a different location on a stand-alone serverYou can restore file system data to a single different location on the same stand-aloneserver, or to a single location on a different client.
Procedure
1. In Avamar Administrator, click the Backup & Restore launcher button.
The Backup, Restore and Manage window appears.
2. Use the following information to find the backup and select the volumes, folders, orfiles to restore:
File System Restore
Restoring to the original location in a Windows Server 2012 for SOFS or SMB cluster 77

l Finding a backup by date on page 73
l Finding a backup by content on page 74
3. Select Actions > Restore Now.
The Restore Options dialog box appears.
4. Select the destination client for the data to restore:
l To restore to a different location on the same client, leave the default selection ofthe original client in the Restore Destination Client box.
l To restore to a different client, click Browse and then browse to the destinationclient.
5. From the Restore Plug-in list, select the Windows File System plug-in. The defaultselection is the plug-in for the backup.
6. From the Avamar encryption method list, select the encryption method for datatransfer between the Avamar server and the client during the restore.
The encryption technology and bit strength for a client/server connection depend onseveral factors, including the client operating system and Avamar server version. TheEMC Avamar Product Security Guide provides additional information.
7. In Restore Destination Choices, select Restore everything to a different location.
NOTICE
When you restore to a different location, Avamar restores only the contents of thefolder. Avamar does not restore the original parent folder.
8. Click Set Destination below the Items Marked for Restore list.
The Set Destination dialog box appears.
9. Select the destination folder on the client for the data to restore by using one of themethods in the following table.
Option Description
Type the path Type the full path to the client folder or file in the Save Target(s) inDirectory box.
If you type a pathname and the folder does not already exist, then the restoreprocess creates the folder.
Browse a. Click Browse.
The Browse for File, Folder, or Directory dialog box appears.
b. Expand the Windows File System node in the left pane.
c. Browse to the destination folder.
d. Select the checkbox next to the target location.
e. Click OK on the Browse for File, Folder, or Directory dialog box.
The target location appears in the Save Target(s) in Directory box.
10. Click OK on the Set Destination dialog box.
11. To set plug-in options, click More Options.
The Restore Command Line Options dialog box appears.
File System Restore
78 EMC Avamar 7.2 for Windows Server User Guide

12. Set the plug-in options.
Windows File System plug-in restore options on page 108 provides additionalinformation about the plug-in options.
NOTICE
If a file with the same name already exists in the directory to which you are restoring afile, then use the Overwrite Existing Files option on the Restore Command LineOptions dialog box to control whether the restore process overwrites the file.
13. Click OK on the Restore Command Line Options dialog box.
14. Click OK on the Restore Options dialog box.
The following status message appears: Restore initiated.
15. Click OK.
Restoring to a different location in a Windows Server 2008/2012 clusterWhen you restore file system data to a single different location on the same WindowsServer 2008/2012 cluster, or to a single location on a different client, select thefederated cluster client as the client from which to restore. Use the Windows File Systemplug-in to perform the restore. Restoring to a different location on a stand-alone server onpage 77 provides instructions.
Restoring to a different location in a Windows Server 2012 for SOFS or SMB clusterYou can restore file system data to a single different location on shared storage in thesame Windows Server 2012 for SOFS or SMB cluster, or to a single location on a differentclient.
Procedure
1. In Avamar Administrator, click the Backup & Restore launcher button.
The Backup, Restore and Manage window appears.
2. Use the following information to find the backup and select the clustered file servers,folders, or files to restore:
l Finding a backup by date on page 73
l Finding a backup by content on page 74
3. Select Actions > Restore Now.
4. Select the destination client for the data to restore:
l To restore to a different location on the same client, leave the default selection ofthe original client in the Restore Destination Client box.
l To restore to a different client, click Browse and then browse to the destinationclient.
5. From the Restore Plug-in list, select the plug-in to use for the restore:
l To restore to shared storage in a cluster, select Windows Cluster File Server.
l To restore to a stand-alone computer, select Windows File System.
6. From the Avamar encryption method list, select the encryption method for datatransfer between the client and the Avamar server during the restore.
File System Restore
Restoring to a different location in a Windows Server 2008/2012 cluster 79

The encryption technology and bit strength for a client/server connection depend onseveral factors, including the client operating system and Avamar server version. TheEMC Avamar Product Security Guide provides additional information.
7. In Restore Destination Choices, select Restore everything to a different location.
NOTICE
When you restore to a different location, Avamar restores only the contents of thefolder. Avamar does not restore the original parent folder.
8. Click Set Destination below the Items Marked for Restore list.
The Set Destination dialog box appears.
9. Select the destination folder on the client for the data to restore by following one ofthe methods in the following table.
Option Description
Type the path Type the full path to the client folder or file in the Save Target(s) inDirectory box.
If you type a pathname and the folder does not already exist, then the restoreprocess creates the folder.
Browse a. Click Browse.
The Browse for File, Folder, or Directory dialog box appears.
b. Expand the Windows File System node in the left pane.
c. Browse to the destination folder.
d. Select the checkbox next to the target location.
e. Click OK on the Browse for File, Folder, or Directory dialog box.
The target location appears in the Save Target(s) in Directory box.
10. Click OK on the Set Destination dialog box.
11. Click OK on the Restore Command Line Options dialog box.
12. Click OK on the Restore Options dialog box.
The following status message appears: Restore initiated.
13. Click OK.
Restoring to multiple locationsYou can restore file system data to multiple locations from a backup of a stand-aloneserver or a Windows Server 2008/2012 cluster.
Note
When you perform file system backups of shared storage in a Windows Server 2012 forSOFS or SMB cluster, you can only restore to the original location or to a single differentlocation.
File System Restore
80 EMC Avamar 7.2 for Windows Server User Guide

Procedure
1. In Avamar Administrator, click the Backup & Restore tab.
The Backup, Restore and Manage window appears.
2. Use the following information to find the backup and select the volumes, folders, orfiles to restore:
l Finding a backup by date on page 73
l Finding a backup by content on page 74
3. Select Actions > Restore Now.
The Restore Options dialog box appears.
4. Select the destination client for the data to restore:
l To restore to multiple different locations on the same client, leave the defaultselection of the original client in the Restore Destination Client box.
l To restore to multiple locations on a different client, click Browse and then browseto the destination client.
5. From the Restore Plug-in list, select the Windows File System plug-in.
6. From the Avamar encryption method list, select the encryption method for datatransfer between the client and the Avamar server during the restore.
The encryption technology and bit strength for a client/server connection depend onseveral factors, including the client operating system and Avamar server version. TheEMC Avamar Product Security Guide provides additional information.
7. In Restore Destination Choices, select Restore everything to multiple locations.
NOTICE
When you restore to a different location, Avamar restores only the contents of thefolder. Avamar does not restore the original parent folder.
8. Click Set Destination below the Items Marked for Restore list.
The Set Destination dialog box appears.
9. Select a row in the list.
10. Select the destination folder on the client for the data to restore by following one ofthe methods in the following table.
Option Description
Type the path Type the full path to the client folder or file in the Destination (Save As)column in the list.
If you type a pathname and the folder does not already exist, then the restoreprocess creates the folder.
Browse a. Click Browse.
The Browse for File, Folder, or Directory dialog box appears.
b. Expand the Windows File System node in the left pane.
c. Browse to the destination folder.
d. Select the checkbox next to the target location.
File System Restore
Restoring to multiple locations 81
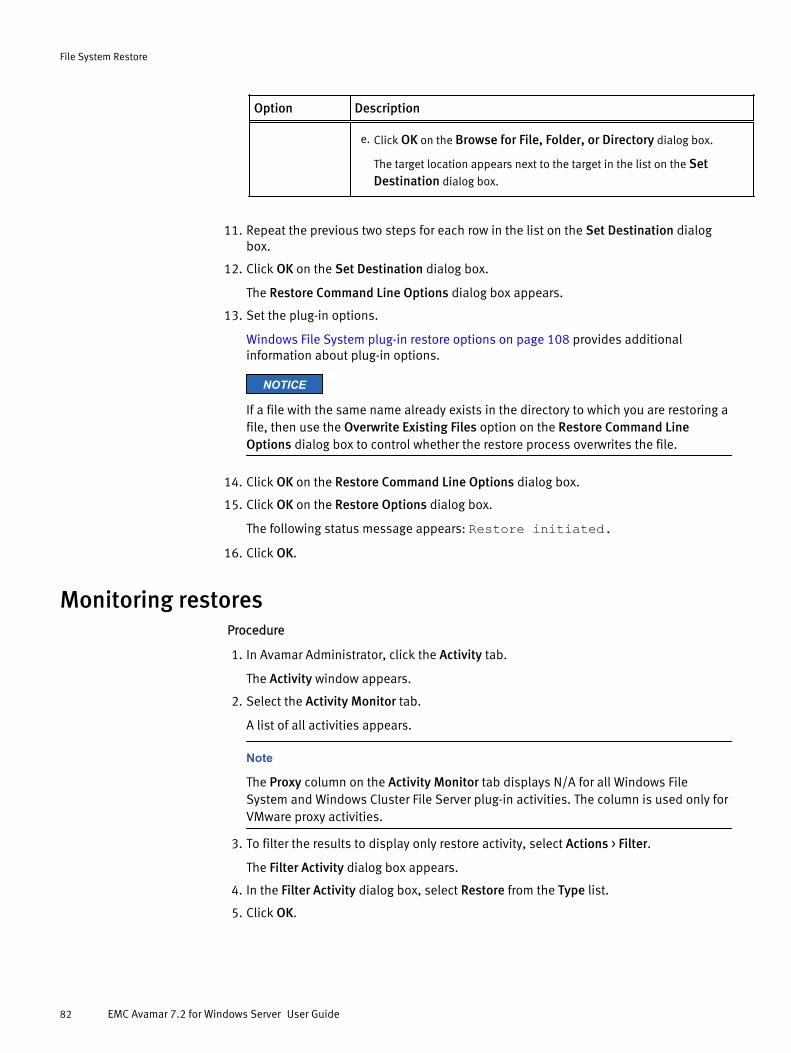
Option Description
e. Click OK on the Browse for File, Folder, or Directory dialog box.
The target location appears next to the target in the list on the SetDestination dialog box.
11. Repeat the previous two steps for each row in the list on the Set Destination dialogbox.
12. Click OK on the Set Destination dialog box.
The Restore Command Line Options dialog box appears.
13. Set the plug-in options.
Windows File System plug-in restore options on page 108 provides additionalinformation about plug-in options.
NOTICE
If a file with the same name already exists in the directory to which you are restoring afile, then use the Overwrite Existing Files option on the Restore Command LineOptions dialog box to control whether the restore process overwrites the file.
14. Click OK on the Restore Command Line Options dialog box.
15. Click OK on the Restore Options dialog box.
The following status message appears: Restore initiated.16. Click OK.
Monitoring restoresProcedure
1. In Avamar Administrator, click the Activity tab.
The Activity window appears.
2. Select the Activity Monitor tab.
A list of all activities appears.
Note
The Proxy column on the Activity Monitor tab displays N/A for all Windows FileSystem and Windows Cluster File Server plug-in activities. The column is used only forVMware proxy activities.
3. To filter the results to display only restore activity, select Actions > Filter.
The Filter Activity dialog box appears.
4. In the Filter Activity dialog box, select Restore from the Type list.
5. Click OK.
File System Restore
82 EMC Avamar 7.2 for Windows Server User Guide

Canceling restoresYou can cancel a restore any time before the restore completes. The cancellation mighttake five minutes or longer. The restore may complete before the cancellation finishes.
Procedure
1. In Avamar Administrator, click the Activity launcher button.
The Activity window appears.
2. Click the Activity Monitor tab.
A list of all activities appears.
3. Select the restore from the list.
4. Select Actions > Cancel Activity.
A confirmation message appears.
5. Click Yes.
File System Restore
Canceling restores 83

File System Restore
84 EMC Avamar 7.2 for Windows Server User Guide
CHAPTER 5
Bare Metal Recovery
This chapter contains the following topics:
l BMR of Windows clients........................................................................................ 86l Active Directory recovery....................................................................................... 97l BMR of Windows clusters.................................................................................... 101
Bare Metal Recovery 85
BMR of Windows clientsYou can perform BMR of client computers with the following operating systems:
l Windows Server 2012
l Windows Server 2008
l Windows 8.1
l Windows 8
l Windows 7
Procedure
1. Review the BMR requirements in BMR requirements on page 86.
2. Download and prepare the custom Avamar WinPE ISO image for BMR. WinPE ISOimage preparation on page 88 provides details.
3. Test the Avamar Bare Metal Recovery Wizard to ensure that the wizard can runsuccessfully and you have the required drivers:
a. Complete step 1 on page 91 to step 22 on page 95 in Restoring the computerto its original System State on page 91.
Verify the following requirements as you go through the wizard pages:
l You can see the network interface that is required to communicate with theAvamar server. If you cannot see the network interface, use the wizard to loadthe required NIC driver.
l If DNS is not available, the host can resolve the Avamar server name by somemethod, such as using a local hosts file.
l You can see the critical and non-critical local disks for the target host. If youcannot see all of the disks, use the wizard to load the required disk drivers.
b. When you reach the Summary page, click Exit to exit the wizard without performingthe restore.
The system automatically restarts.
4. Use the Avamar Bare Metal Recovery Wizard to restore the Windows computer to itsoriginal System State. Restoring the computer to its original System State on page91 provides details.
5. Perform the post-BMR steps in Performing post-BMR tasks on page 95.
BMR requirementsAvamar supports BMR to physical and virtual machines:
l Physical machine to physical machine
l Virtual machine to virtual machine
l Physical to virtual machine (P2V)
The following table lists the Windows versions and virtual machine environments that aresupported for P2V BMR.
Bare Metal Recovery
86 EMC Avamar 7.2 for Windows Server User Guide
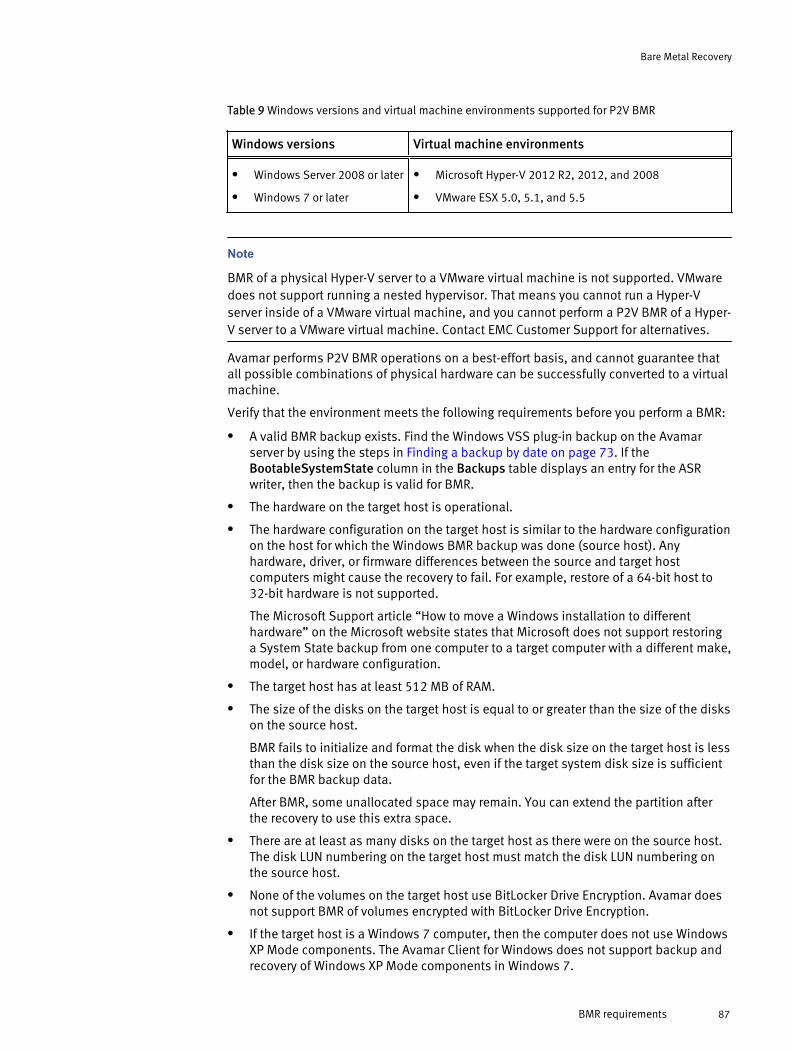
Table 9 Windows versions and virtual machine environments supported for P2V BMR
Windows versions Virtual machine environments
l Windows Server 2008 or later
l Windows 7 or later
l Microsoft Hyper-V 2012 R2, 2012, and 2008
l VMware ESX 5.0, 5.1, and 5.5
Note
BMR of a physical Hyper-V server to a VMware virtual machine is not supported. VMwaredoes not support running a nested hypervisor. That means you cannot run a Hyper-Vserver inside of a VMware virtual machine, and you cannot perform a P2V BMR of a Hyper-V server to a VMware virtual machine. Contact EMC Customer Support for alternatives.
Avamar performs P2V BMR operations on a best-effort basis, and cannot guarantee thatall possible combinations of physical hardware can be successfully converted to a virtualmachine.
Verify that the environment meets the following requirements before you perform a BMR:
l A valid BMR backup exists. Find the Windows VSS plug-in backup on the Avamarserver by using the steps in Finding a backup by date on page 73. If theBootableSystemState column in the Backups table displays an entry for the ASRwriter, then the backup is valid for BMR.
l The hardware on the target host is operational.
l The hardware configuration on the target host is similar to the hardware configurationon the host for which the Windows BMR backup was done (source host). Anyhardware, driver, or firmware differences between the source and target hostcomputers might cause the recovery to fail. For example, restore of a 64-bit host to32-bit hardware is not supported.
The Microsoft Support article “How to move a Windows installation to differenthardware” on the Microsoft website states that Microsoft does not support restoringa System State backup from one computer to a target computer with a different make,model, or hardware configuration.
l The target host has at least 512 MB of RAM.
l The size of the disks on the target host is equal to or greater than the size of the diskson the source host.
BMR fails to initialize and format the disk when the disk size on the target host is lessthan the disk size on the source host, even if the target system disk size is sufficientfor the BMR backup data.
After BMR, some unallocated space may remain. You can extend the partition afterthe recovery to use this extra space.
l There are at least as many disks on the target host as there were on the source host.The disk LUN numbering on the target host must match the disk LUN numbering onthe source host.
l None of the volumes on the target host use BitLocker Drive Encryption. Avamar doesnot support BMR of volumes encrypted with BitLocker Drive Encryption.
l If the target host is a Windows 7 computer, then the computer does not use WindowsXP Mode components. The Avamar Client for Windows does not support backup andrecovery of Windows XP Mode components in Windows 7.
Bare Metal Recovery
BMR requirements 87

l You have the following information available:n The IP address and network name of the target host, and the accounting system
pathname of the client computer, for example, /clients/mycomputer.mycompany.com.
n The network name or IP address of the Avamar server to use for the recovery.n Account credentials for an Avamar Administrator account on the Avamar server.
The credentials enable successful backup of BMR log files.
Note
Avamar Windows BMR has not been tested with third-party drive encryption productsother than Microsoft's BitLocker. If you use third-party drive encryption products, youshould perform a Windows BMR backup and recovery to ensure a good working system isavailable. Do the test using the original hardware and new hardware to confirm bothscenarios. You will need to determine if any steps are required to re-encrypt the drivesafter a successful restore.
WinPE ISO image preparationAvamar provides customized WinPE ISO images that enable you to recover the targetcomputer without installing an operating system. Because the local disks are not in useby the booted operating system, the recovery process can replace files without conflict.
NOTICE
The Microsoft Windows® Preinstallation Environment software included with thiscomputer or software may be used for boot, diagnostic, setup, restoration, installation,configuration, test, or disaster recovery purposes only. NOTE: THIS SOFTWARE CONTAINSA SECURITY FEATURE THAT WILL CAUSE YOUR COMPUTER SYSTEM TO REBOOT WITHOUTPRIOR NOTIFICATION AFTER 72 HOURS OF CONTINUOUS USE.
NOTICE
FOR AUSTRALIA ONLY. References to "Limited Warranty" are references to the warrantyprovided by the manufacturer or installer. This warranty is given in addition to other rightsand remedies you may have under law, including your rights and remedies in accordancewith the statutory guarantees under the Australian Consumer Law. Our goods come withguarantees that cannot be excluded under the Australian Consumer Law. You are entitledto a replacement or refund for a major failure and compensation for any other reasonablyforeseeable loss or damage. You are also entitled to have the goods repaired or replacedif the goods fail to be of acceptable quality and the failure does not amount to a majorfailure. Goods presented for repair may be replaced by refurbished goods of the sametype rather than being replaced. Refurbished parts may be used to repair the goods. Forfurther information regarding this warranty and to claim expenses in relation to thewarranty (if applicable), please contact the manufacturer or installer; see the contactinformation provided in the system packaging.
WinPE supports a minimal subset of Windows features. This functionality includes accessto network resources, disks, and other features through a command prompt.
The custom Avamar WinPE ISO image contains the NIC and disk drivers from Microsoft forthe Windows versions that the WinPE ISO supports. The custom Avamar WinPE ISO imageis based on Windows PE 5.0.
If the WinPE ISO image does not contain the drivers for the NIC or disk devices on theclient computer that you are recovering, you can perform one of the following tasks:
Bare Metal Recovery
88 EMC Avamar 7.2 for Windows Server User Guide

l Copy the drivers to a USB flash drive, and then attach the drive after booting with thecustom Avamar WinPE ISO image.
l Create a WinPE ISO image that includes the drivers, and reboot from that image. (Optional) Adding NIC or disk drivers to the WinPE ISO file on page 90 providesinstructions.
The drivers must meet the following requirements:
l Use 32-bit drivers with 32-bit ISO images and 64-bit drivers with 64-bit ISO images.
l Use drivers that do not require a restart during installation. The WinPE environmentloads only in memory, and changes are not persistent across a restart. If a restartprompt appears, you may be able to ignore the prompt. Most NIC drivers are generallyplug-and-play.
Preparing the WinPE ISO image for BMRDownload and prepare the WinPE ISO image for BMR of a Windows client computer.
Procedure
1. Download the customized WinPE ISO image from the Avamar server. Downloading thecustom WinPE ISO image from the Avamar server on page 89 provides instructions.
2. (Optional) If the WinPE ISO image does not contain the drivers for the NIC or diskdevices on the client computer that you are recovering, and you do not want to loadthe drivers from a separate disk during the BMR process, then add the drivers to theWinPE ISO file.
(Optional) Adding NIC or disk drivers to the WinPE ISO file on page 90 providesinstructions.
3. Use one of the following methods to create bootable media from the ISO image:
l To boot the target computer locally, burn the WinPE ISO image to a CD, DVD, orUSB flash drive.
l To enable a network boot of the target computer, copy the image to a WindowsDeployment Services (WDS) server. (Optional) Adding the WinPE ISO boot image toa Windows Deployment Services server on page 90 provides detailed steps.
Downloading the custom WinPE ISO image from the Avamar serverProcedure
1. Open a web browser and type the following URL:
http://Avamar_serverwhere Avamar_server is the DNS name or IP address of the Avamar server.
The EMC Avamar Web Restore page appears.
2. Click Downloads.
The Downloads list appears.
3. Click + next to the correct operating system heading, click + next to the Windows BareMetal Recovery (BMR) Wizard heading, and then click the .iso file link:
l Windows (32 bit) > Windows Bare Metal Recovery (BMR) Wizard >AvamarWindowsSystemRecover_x86-version_WinPE5.iso
This .iso file is for computers with a 32-bit version of Windows Server 2008,Windows 8.1, Windows 8, or Windows 7, and supports only BIOS-based systems.
Bare Metal Recovery
WinPE ISO image preparation 89

l Windows (64 bit) > Windows Bare Metal Recovery (BMR) Wizard >AvamarWindowsSystemRecover_x64-version_WinPE5.iso
This .iso file is for computers with a 64-bit version of Windows Server 2012 R2,Windows Server 2012, Windows Server 2008 R2, Windows Server 2008, Windows8, or Windows 7, and supports both BIOS-based and UEFI-based systems.
4. Download the file to a temporary folder.
(Optional) Adding NIC or disk drivers to the WinPE ISO fileCustomize the Avamar WinPE ISO image to add NIC or disk device drivers if you do notwant to load the drivers from a separate disk during the BMR process.
NOTICE
In general, EMC does not support changes to the custom Avamar WinPE ISO image.Modify the image at your own risk. One exception, however, is the addition of NIC or diskdevice drivers that the image does not include.
Procedure
1. Open the Avamar WinPE ISO file with a utility like UltraISO or MagicISO.
2. Create a folder for the drivers at the top level of the ISO image, such as Drivers inthe following example figure.
3. Copy the NIC or disk device drivers to the folder.
If you have several models of servers that require different NIC or disk device drivers,you can create subfolders for each device, model, or brand.
4. Save the ISO image with a different name.
(Optional) Adding the WinPE ISO boot image to a Windows Deployment Services server
You can add the WinPE ISO boot image to a Windows Deployment Services (WDS) serverto enable a network boot of the target computer. The Microsoft TechNet website providesdetailed steps to configure and use WDS.
Note
WDS is described here as a known example of how to boot from an ISO boot image over anetwork. Other network boot technologies may also work.
Bare Metal Recovery
90 EMC Avamar 7.2 for Windows Server User Guide

Procedure
1. Configure the WDS server.
2. Add the WinPE ISO boot image to the boot menu.
3. Ensure that PXE booting is enabled on the WDS client.
4. To use the image, perform a network boot of the WinPE ISO boot image, WindowsSystem Recovery, on the WDS client.
Restoring the computer to its original System StateUse the Avamar Bare Metal Recovery Wizard to restore the Windows Server 2012,Windows Server 2008 R2, Windows Server 2008, Windows 8, or Windows 7 computer toits original System State.
Procedure
1. Boot the target computer with the WinPE boot disk, or perform a network boot of theWinPE ISO image.
The Windows Deployment Services documentation on the Microsoft TechNet websiteprovides detailed steps to perform a network boot on the client.
The Avamar Bare Metal Recovery Wizard opens at the Welcome page.
2. Specify the date, time, and time zone for the computer. The default value is thesystem date and time of the local computer. You may need to change the date andtime if the system date and time are incorrect, or if you are restoring to a computer in adifferent time zone.
Bare Metal Recovery
Restoring the computer to its original System State 91
NOTICE
If you specify an invalid date or time, then the wizard attempts to correct the date ortime. For example, if you incorrectly specify November 31, then the wizard corrects thedate to December 1. Verify that the date and time are correct before you go to the nextpage of the wizard.
3. If a DNS server is not available on the network, manually edit the hosts file for theWinPE ISO to include the Avamar server:
a. Return to the WinPE command line.
b. Open the hosts file, for example X:\Windows\System32\Drivers\etc\hosts, and add the IP address and hostname for the Avamar server.
c. If you exit the wizard, restart the wizard from the drive:\Program Files\avs\wizard folder. For example:
X:\Program Files\avs\wizard> javaw -jar WinPEWizard.jar
d. When the Avamar Bare Metal Recovery Wizard appears, click Next.
4. On the Select Network Interface page, select the network interface for communicationwith the Avamar server during the restore.
If the required NIC driver is not in the list, click Load Driver to browse to the requireddriver.
NOTICE
The driver must not require a restart. The WinPE environment loads only in memory,and changes are not persistent across a restart. If a restart prompt appears, you maybe able to ignore the prompt. Most NIC drivers are plug-and-play.
5. Click Next.
The Configure Hostname and Network page appears.
6. Type the hostname of the target computer in the Host name box.
7. Type the domain name for the host in the DNS domain box.
If the host resides in a workgroup instead of a domain, leave the box blank.
8. Select the tab for IPv4 or IPv6 to configure the network to communicate with theAvamar server during BMR.
9. In the TCP/IP Address section, specify the IP address information using one of thefollowing methods:
l If host IP addresses are assigned automatically, then select Obtain an IP addressautomatically (DHCP). The network must be configured to support DHCP.
l If the IP address of the target host is static, select Use the following IP address,and then specify the IP address and subnet mask (IPv4) or subnet prefix length(IPv6).
l If the Avamar server is on a different subnet, then type the default gateway in theDefault gateway box. Otherwise, leave the box blank.
10. In the DNS Server section, specify the DNS server information:
l If you added the Avamar server hostname and IP address to the hosts file, thenleave the default values in the DNS Server section.
Bare Metal Recovery
92 EMC Avamar 7.2 for Windows Server User Guide
l If the DNS server name is assigned automatically, select Obtain DNS serveraddress automatically.
l If the DNS server IP address is static, select Use the following DNS serveraddresses, and then specify the IP address of the DNS server and the alternateDNS server, if the environment includes an alternate DNS server.
11. Click Next.
The Available Disks page appears with a list of all detected local disks. The listcontains all physical disks, but not all physical disks in the list may be critical disks.
NOTICE
If SAN disks appear twice in the list, then WinPE can see multiple paths to the LUN.Temporarily modify the switch configuration so there is only one path to the LUN. Youcan restore the multi-path configuration after the BMR.
12. If the wizard fails to detect a disk, click Load Driver to browse to the driver for thedisk, and then click Refresh List to update the list of disks.
13. Click Next.
14. On the Select Avamar Server page, specify the Avamar server settings:
a. In the Avamar Server box, type the fully qualified domain name (FQDN) or IPaddress for the Avamar server.
b. In the Avamar User Name box, type the name of an Avamar Administrator orBackup/Restore Operator account.
For an internal Avamar account, provide the account name. For an externalaccount, specify the account name in the formaccount@external_authentication_system, such [email protected].
Note
The Avamar Bare Metal Recovery Wizard does not support LDAP mapping to specifythe account.
c. In the Avamar Password box, type the password for the Avamar administratoraccount.
d. In the Avamar Domain box, type the domain for the Avamar administrator account.The default value of a forward slash (/) specifies the root domain.
e. In the Avamar Account box, type the pathname of the client on the Avamar server,including the domain and client name.
For example, if the hostname.example.com client is in the /clients/MyGroupdomain, then type:
/clients/MyGroup/hostname.example.com
If you are recovering from a computer in a replication domain, then specify the fullclient path in the /REPLICATE domain, such as:
/REPLICATE/orig_server/clients/hostname.example.com
15. Click Next.
16. On the Select System Recovery Backup page, select the system backup to restore tothe host. System backups appear in the list in descending order from the most recentto the oldest.
Bare Metal Recovery
Restoring the computer to its original System State 93

17. Click Next.
The Critical Volumes to Restore page lists volumes to restore to the host.
Note
Not all critical volumes appear with a drive letter. For example, the System Reservedpartition on Windows Server 2008 R2 and UEFI partitions do not appear with a driveletter. In the preceding figure of the Critical Volumes to Restore page, the secondvolume name, \\?\VOLUME..., indicates that a drive letter is not assigned to the
volume.
18. (Optional) To perform a quick format of the volumes instead of a full format, selectPerform a quick format of disks.
The restore process reformats critical volumes. This process formats non-criticalvolumes only if the disk signature is different, for example, if you replaced the disk. Aquick format is faster than a full format, but a quick format does not verify each sectoron the volume.
Note
The BMR process does not recover data on a non-critical volume even if the non-critical volume is reformatted. To recover non-critical volumes, use AvamarAdministrator to restore the file system after the wizard completes and the hostrestarts.
19. Click Next.
The System Recovery Summary page lists the selected recovery options.
20. If the original computer was a physical machine and you are restoring to a virtualmachine, select the Physical to Virtual (P2V) checkbox.
Bare Metal Recovery
94 EMC Avamar 7.2 for Windows Server User Guide

NOTICE
After the P2V restore completes and the machine restarts, you must manuallyreconfigure networking on the restored machine. The networking reconfiguration isnecessary because NIC cards on the new virtual machine are different than the NICcards on the original physical machine.
21. (Optional) Specify non-default recovery options, which are generally used fortroubleshooting with EMC Customer Service assistance:
a. Click Options.
The Non-Default Recover Options page appears.
b. Type the options and values in the Additional Options box.
c. Click OK.
22. Complete the wizard pages:
l If you are testing the wizard and do not want to perform a restore, click Exit on theSystem Recovery Summary page.
The wizard closes, and a command prompt appears. You can shut down thecomputer.
l To continue with the restore, click Restore on the System Recovery Summarypage.
A confirmation message appears.
NOTICE
All data is lost on volumes that are reformatted.
When the recovery completes, the System Recovery Results page appears.
23. (Optional) To view the Avamar Bare Metal Recovery Wizard log files fortroubleshooting, click View Logs.
The log files are also stored on the Avamar server. If required, you can restore the logfiles from the Avamar server after you close the wizard. Viewing Avamar Bare MetalRecovery Wizard log files on page 97 provides instructions.
24. Perform one of the following tasks:
l If this is an authoritative restore of Active Directory, click Exit to exit the wizard,and then perform the steps in Active Directory recovery on page 97.
l If you are restoring a Windows Server 2008 or Windows 7 client computer, restartthe computer to return to normal operation, and then review Performing post-BMRtasks on page 95.
Performing post-BMR tasksAfter the BMR completes and the system restarts, perform these required tasks:
l If a critical volume was compressed, then reenable compression.
l If you performed a P2V restore, then perform the following steps:
1. Install VMware tools.
2. Remove disabled devices.
Bare Metal Recovery
Performing post-BMR tasks 95
3. Configure the virtual NIC.
l Check the disk and volume configuration of the host. All disks and volumes likelyappear as they did on the original system. However, if disk signatures do not matchthe original disks, then non-critical disks may be offline or not mounted. UseMicrosoft Disk Manager to bring the disks online or mount the disks. After the disksare online, restart the host to reassign disk drive letters, or assign drive letters to non-critical disks as necessary. Non-critical volumes that are accessed by mount pointsmay have similar issues.
l If required, import disks so that they are known by Windows Storage Manager.
l If required, use the Avamar Plug-in for the Windows File System to restore applicationdata or non-critical disks. If you use an application plug-in, such as the Avamar Plug-in for Exchange VSS or the Avamar Plug-in for SQL Server, then use the applicationplug-in to restore the application data.
l When a Windows Server 2008 or Windows Server 2012 role uses SQL Serverinstances instead of the WID, then perform the SQL Server disaster recovery steps:
1. Complete the SQL Server disaster recovery procedure that Microsoft recommendsin the MSDN article “Recovering from a Disaster.”
2. Install the Avamar Plug-in for SQL Server.
3. Use the Avamar Plug-in for SQL Server to restore the system databases.
4. Use the Avamar Plug-in for SQL Server to restore the SQL Server instances.
The EMC Avamar for SQL Server User Guide provides instructions for installing andusing the SQL Server plug-in.
l The Active Directory RMS service depends on the Microsoft Message Queuing Service(MSMQ). If an Active Directory service does not restart after BMR, verify whetherMSMQ is a service on the system and determine if the service restarted correctly. Youcan also check the Windows Event Application Log to see if MSMQ recorded Event2078, The Message Queuing service cannot start.If MSMQ is enabled but did not start on reboot, then restart the service, as describedis the “Event ID 2078 -- Message Queuing Logging and Checkpoint Events” article onthe Microsoft TechNet website.
l When you mount a volume on a parent volume and the mounted volume becomes acritical volume, then the BMR restores only the critical volume. Use the Avamar Plug-in for the Windows File System to restore the parent volume after the BMR of thecritical volume. File System Restore on page 71 provides instructions.
Recovering encrypted files, folders, and volumesAvamar supports the backup, recovery, and BMR of files and folders encrypted withWindows Encrypting File System (EFS), and volumes encrypted with BitLocker.
BMR restores EFS encryption attributes on files, but not encryption attributes on folders.After BMR, additional steps are required to fully enable encryption:
l BitLocker services may be running but the BitLocker volumes must be re-encrypted
l EFS encryption attributes on folders must be re-enabled
Consult Microsoft documentation for steps to encrypt with EFS and BitLocker. For EFS,search Help and Support for “Encrypt or decrypt a folder or file.” For BitLocker, searchMicrosoft TechNet for “Windows BitLocker Drive Encryption Step-by-Step Guide.” Checkwith your IT department or Windows administrator for corporate policies governing theuse of encryption features on your computer.
Bare Metal Recovery
96 EMC Avamar 7.2 for Windows Server User Guide

Viewing Avamar Bare Metal Recovery Wizard log filesThe Avamar Bare Metal Recovery Wizard log files are stored on the Avamar server. Youcan view the log files when you run the wizard. If required, you also can restore the logfiles from the Avamar server after you close the wizard.
Complete the following procedure to restore the Avamar Bare Metal Recovery Wizard logfiles.
Procedure
1. In Avamar Administrator, click the Backup & Restore tab.
The Backup, Restore and Manage window appears.
2. In the domain tree, select the domain for the client.
3. In the clients tree, select the client that you used for the recovery.
4. Click the Restore tab.
5. Click the By Date tab.
6. Select the recovery date from the calendar. This recovery process saved the logs to theAvamar server on that date.
7. In the Backups table, select Offline Restore Logs.
8. In the Contents of Backup pane, expand the WinPE system drive to the location of theOffline Restore Logs backup, drive:\Program Files\avs\var.
9. Select the checkboxes next to the avvss.log, winpe_av_support.log, andWinPE_Wizard.log files.
10. Select Actions > Restore Now.
The Restore Options dialog box appears.
11. Follow the steps in Restoring to a different location on page 77 to restore the log filesto a location from which you can open them.
Active Directory recoveryComplete the following procedure to perform system recovery of Windows Server 2012 orWindows Server 2008 Active Directory.
NOTICE
If the last System State backup of the Windows Server 2008 client is more recent than thelast Active Directory backup, then you may want to use the System State backup for theBMR. Using the System State backup to restore Active Directory on page 101 providesdetails.
Procedure
1. Configure the client to boot into Directory Services Restore Mode (DSRM). Booting theclient into Directory Services Restore Mode on page 98 provides instructions.
2. Restore Active Directory from the System State backup. Restoring Active Directory onpage 99 provides instructions.
Bare Metal Recovery
Viewing Avamar Bare Metal Recovery Wizard log files 97

Booting the client into Directory Services Restore ModeUse one of the following methods to boot the client into Directory Services Restore Mode(DSRM) so that you can restore the Active Directory backup.
Manually booting into DSRM with System ConfigurationYou can use Microsoft Windows System Configuration to manually set the computer toboot directly into DSRM the next time that the computer boots.
Procedure
1. From the Start Menu, select Administrative Tools > System Configuration.
The System Configuration dialog box appears.
2. Click the Boot tab.
3. Select the Safe boot checkbox, and then select Active Directory repair.
4. Click OK.
5. Reboot the computer into DSRM.
Adding a Windows bootloader entry for DSRM
You can add an entry to the Windows bootloader so that the option to boot into DSRM isalways available when you start the computer.
Procedure
1. Open a command prompt.
2. Copy the DSRM entry from the Boot Configuration Data (BCD) to a GUID by typing thefollowing command:
bcdedit /copy {default} /d “Directory Services Restore Mode”
A message similar to the following example appears:
The entry was successfully copied to{00000000-0000-0000-0000-000000000000}where 00000000-0000-0000-0000-000000000000 is the GUID of the new entry.
Bare Metal Recovery
98 EMC Avamar 7.2 for Windows Server User Guide

3. Set the safeboot option for the bootloader entry in the BCD by typing the followingcommand:
bcdedit /set {00000000-0000-0000-0000-000000000000} safebootdsrepair
where 00000000-0000-0000-0000-000000000000 is the GUID.
4. Reboot the computer, and select the option to boot into DSRM.
Restoring Active DirectoryProcedure
1. In Avamar Administrator, click the Backup & Restore tab.
The Backup, Restore and Manage window appears.
2. In the domain tree, select the domain for the client.
3. From the list of clients, select the original client.
4. Click the Restore tab.
5. Click the By Date tab.
6. In the calendar, select the date on which the backup occurred.
7. Select the backup from the Backups table to the right of the calendar.
8. In the lower-left pane, expand the tree and select System State >BootableSystemState.
9. In the lower-right pane, select the checkbox next to Active Directory.
10. Select Actions > Restore Now.
The Restore Options dialog box appears.
11. If you are restoring from a replicate server, select the client for the restore:
a. Select Restore everything to a different location.
b. In the Restore Destination Client dialog box, select Browse.
c. In the Browse for Restore Client dialog box, select the client and click OK.
d. In the Items Marked for Restore dialog box, click Set Destination.
The Set Destination dialog box appears.
e. Click Browse.
f. In the Browse for File, Folder, or Directory dialog box, expand Windows VSS andselect System State as shown in the following figure.
g. Click OK to return to the Restore Options dialog box.
12. Click More Options.
The Restore Command Line Options dialog box appears.
13. Click More to view the attribute data entry fields.
14. In the Enter Attribute box, type the following value:
--[avvss]allow_partial_system_state
15. In the Enter Attribute Value box, type the following value:
true
Bare Metal Recovery
Restoring Active Directory 99

NOTICE
Use the --[avvss]allow_partial_system_state option only for an online
restore of Active Directory. Never use this option for an online restore of other SystemState components.
16. Click + to add the attribute.
17. Click OK on the Restore Command Line Options dialog box.
18. Click OK on the Restore Options dialog box.
The Restore Request dialog box indicates that the restore started.
19. Click Close.
20. Wait for the restore to complete.
21. Select whether to perform a nonauthoritative restore or an authoritative restore:
l To perform a nonauthoritative restore, restart the client normally after the ActiveDirectory restore completes. Other domain controllers replicate changes to theclient after the restart.
l To perform an authoritative restore, continue to the next step. In the authoritativerestore, the data from the restored domain controller replicates to other domaincontrollers.
22. For an authoritative restore only, open a command prompt window and use thentdsutil utility to mark objects for the authoritative restore.
The objects replicate to other domain controllers during the authoritative restore. Inaddition, replication partners do not overwrite the replicated objects.
You can mark a single user object, an entire user subtree, containers, or the entiredatabase.
You can use Microsoft ADSIEdit to display Distinguished Names for AD objects.
For example, the following series of commands marks a user with an OU of CN=TestUser,CN=Users,DC=svr1,DC=mydomain,DC=com for an authoritative restore:
ntdsutilactivate instance NTDSauthoritative restorerestore object“CN=Test User,CN=Users,DC=svr1,DC=mydomain,DC=com”quitquit
The Microsoft documentation provides details on using the ntdsutil utility for anauthoritative restore.
23. If you used Windows System Configuration to configure the system to boot into DSRM,use Windows System Configuration again and clear the Safe boot checkbox to enablethe system to return to normal booting.
24. Restart the client.
Bare Metal Recovery
100 EMC Avamar 7.2 for Windows Server User Guide

Using the System State backup to restore Active DirectoryIf the last System State backup of the Windows Server 2012 or Windows Server 2008client is more recent than the last Active Directory backup, then you may want to use theSystem State backup for the BMR.
Procedure
1. Perform the steps in BMR of Windows clients on page 86 to perform the BMR.
After you exit the Avamar Bare Metal Recovery Wizard, the WinPE command promptappears.
2. Perform the steps in Booting the client into Directory Services Restore Mode on page98 to boot into DSRM.
3. Open a command prompt window and use the ntdsutil utility to mark objects for anauthoritative restore. Restoring Active Directory on page 99 provides instructions.
4. If you used Windows System Configuration to configure the system to boot into DSRM,use Windows System Configuration again to configure the system to return to normalbooting.
5. Restart the client.
BMR of Windows clustersYou can restore individual nodes in a Windows Server 2012 or Windows Server 2008cluster, if the cluster is otherwise functional. This type of restore is a nonauthoritativerestore, because cluster replication updates the nodes with existing cluster settingswhen the nodes rejoin the cluster. Restoring a cluster node on page 101 providesinstructions.
To perform BMR of the full cluster, use the steps in Restoring an entire cluster on page102. This type of restore may be necessary if the entire cluster is down, or if there is aproblem with the cluster database.
Restoring a cluster nodeProcedure
1. Ensure that at least one node in the cluster is still functioning.
2. Shut down the damaged node.
3. Perform an offline BMR of the node. BMR of Windows clients on page 86 providesinstructions.
4. Reboot the node.
5. If you applied any Windows service packs or hotfixes to the cluster node after thebackup, then reapply the service packs or hotfixes to the restored cluster node tobring the node to the same service pack level as the other nodes in the cluster.
6. If required, rejoin the node to the cluster.
Note
BMR restores the System State and critical disks on cluster nodes. After BMR, use theWindows File System plug-in to restore file system data, non-critical disks, and criticaldisks on shared storage. Also, use application plug-ins to restore application data.
Bare Metal Recovery
Using the System State backup to restore Active Directory 101
Restoring an entire clusterProcedure
1. Shut down all cluster nodes.
2. Restore one node in the cluster:
a. Perform an offline BMR of the node. BMR of Windows clients on page 86 providesinstructions.
b. Reboot the node.
c. If required, restart the cluster service.
3. Restore the remaining nodes in the cluster:
NOTICE
You must perform an offline BMR of all nodes. If you reboot a node by using the oldsystem disk before you restore the node, then the cluster information from that nodereplaces the information on all nodes.
a. Perform an offline BMR of each node. BMR of Windows clients on page 86 providesinstructions.
b. Reboot each node.
c. If you applied any Windows service packs or hotfixes to the cluster nodes after thebackup, then reapply the service packs or hotfixes to the restored cluster nodes tobring them to the same service pack level.
d. If required, rejoin the nodes to the cluster.
Note
BMR restores the System State and critical disks on the cluster nodes. After BMR, usethe Windows File System plug-in to restore file system data, non-critical disks, andcritical disks on shared storage. Also, use application plug-ins to restore applicationdata.
Bare Metal Recovery
102 EMC Avamar 7.2 for Windows Server User Guide

APPENDIX A
Plug-in Options
This appendix contains the following topics:
l How to set plug-in options...................................................................................104l Windows File System plug-in backup options...................................................... 104l Windows File System plug-in restore options.......................................................108l Windows VSS plug-in backup options................................................................. 110l Windows VSS plug-in restore options.................................................................. 112l Windows Cluster File Server plug-in backup options............................................112l Windows Cluster File Server plug-in restore options.............................................113
Plug-in Options 103

How to set plug-in optionsPlug-in options enable you to control specific actions for on-demand backups, restores,and scheduled backups. The plug-in options that are available depend on the operationtype and plug-in type.
You specify plug-in options in Avamar Administrator for on-demand backup or restoreoperations, or when you create a dataset for a scheduled backup. You set plug-in optionswith the graphical user interface (GUI) controls (text boxes, checkboxes, radio buttons,and so forth). In addition to using the GUI controls for the options, you can type an optionand its value in the Enter Attribute and Enter Attribute Value fields.
NOTICE
The Avamar software does not check or validate the information that you type in the EnterAttribute and Enter Attribute Value fields. In addition, the values in the Enter Attributeand Enter Attribute Value fields override settings that you specify with the GUI controlsfor the options.
Windows File System plug-in backup optionsPlug-in options enable you to control backup functionality that is specific to the AvamarPlug-in for the Windows File System. You can specify plug-in options for on-demand andscheduled backups.
The following table lists options that are available for the Windows File System plug-inwhen you perform an on-demand backup or when you configure a dataset for scheduledbackups.
Table 10 Windows File System plug-in backup options
Option Description
Back up NativelyAttached Virtual HardDisks
Backs up natively attached virtual hard disks.
Avamar ServerRestore Option (HBE)
Creates a Windows system profile for inclusion in backup, for use withHomeBase Embedded (HBE) recoveries.
Note
This feature is unsupported in Avamar 6.1 or later.
Back up System State(Windows 2003 only)
For Windows Server 2003 and Windows XP clients, includes System Stateinformation in the backup for BMR.
Note
Windows Server 2003 and Windows XP are not supported in Avamar 7.1or later.
Perform a WindowsOptimized Backup ofa WindowsDeduplicated volume
Specifies whether to back up files in either optimized or unoptimizedstate on Windows deduplicated volumes on Windows Server 2012.
If you back up files in an optimized state, then you can restore the files ineither an optimized or unoptimized state.
Plug-in Options
104 EMC Avamar 7.2 for Windows Server User Guide

Table 10 Windows File System plug-in backup options (continued)
Option Description
You can only restore files from a Windows deduplicated volume to theoriginal location or to another Windows Server 2012 computer withWindows deduplicated volumes.
Store backup on DataDomain system
To store the backup on a Data Domain system instead of the Avamarserver, select the checkbox and then select the Data Domain system fromthe list.
Note
To enable this option, add a Data Domain system to the Avamarconfiguration. The EMC Avamar and EMC Data Domain System IntegrationGuide provides instructions.
Encryption method toData Domain system
Specifies the encryption method for data transfer between the client andthe Data Domain system during the backup.
Backup label Assigns this descriptive label to the backup.
Logging Options
List backup contents Specifies how much information about the backup contents to include inthe log files. Select one of the following values:
l No file listing
l List file names
l List files and dates
Informationalmessage level
Specifies how many informational messages to include in the log files.Select one of the following values:
l No informationals — Suppress all informational messages butinclude errors and warnings.
l Some informationals — Include some informational messages.
l Many informationals — Include additional status information.
l All informationals — Include all informational messages, errors, andwarnings.
Report advancedstatistics
Includes advanced timing and deduplication statistics in the log files.
Enable debuggingmessages
Writes maximum information to the log files. The backup processgenerates very large log files.
File System Traversal
Do not traverse anymounts
Prevents traversal of mount points during the backup.
Traverse fixed-diskmounts
The backup traverses only fixed-disk file system mount points.
Traverse fixed-diskand remote networkmounts
The backup traverses both fixed-disk and NFS network mount points.
Plug-in Options
Windows File System plug-in backup options 105

Table 10 Windows File System plug-in backup options (continued)
Option Description
File System Traversal Overrides
Force traversal ofspecified file systemtype(s)
Specifies the file system types to traverse during the backup. Use acomma-separated list to specify multiple file system types, for example,nfs, ext2, jfs, xfs.
Force non-traversal ofspecified file systemtype(s)
Specifies the file system types that the backup does not traverse. Use acomma-separated list to specify multiple file system types, for example,nfs, ext2, jfs, xfs.
Pre-Script
Run user-definedscript at beginning ofbackup
Runs a script at the beginning of the backup.
The script must be located in the C:\Program Files\avs\etc\scripts folder and must have a .bat, .js, or .vbs file name
extension.
Abort backup if scriptfails
Stops the backup if the script returns a non-zero status code.
Script After Freeze
Run user-definedscript after volumeshave been frozen
Runs a script after volumes have been frozen.
The script must be located in the C:\Program Files\avs\etc\scripts folder and must have a .bat, .js, or .vbs file name
extension.
Abort backup if scriptfails
Stops the backup if the script returns a non-zero status code.
Post-script
Run user-definedscript at end ofbackup
Runs a script at the end of the backup.
The script must be located in the C:\Program Files\avs\etc\scripts folder and must have a .bat, .js, or .vbs file name
extension.
Exit process withscript failure exitcode
If selected, avtar exits with the exit code of the script instead of a
standard avtar exit code.
Volume Freezing Options
Method to freezevolumes
Uses one of the following values:
l Best
l Microsoft VSS
l OTM
l None
OTM freezewait: Fileactivity quiescenttime
OTM only: Number of seconds that volumes must be quiescent toestablish a freeze.
Plug-in Options
106 EMC Avamar 7.2 for Windows Server User Guide

Table 10 Windows File System plug-in backup options (continued)
Option Description
OTM freezetimeout:Maximum time to waitwhen trying to freezevolume(s)
OTM only: Maximum number of seconds to wait for volumes to freeze.
OTM freezecachesize:Size in MBs of OTMtransaction cache
OTM only: Size of the disk transaction cache. A negative value is afraction of used disk space. For example, -50 is 1/50th or 2% of useddisk space.
OTM freezecachedir:Folder to use for theOTM transactioncache
OTM only: Pathname of the folder for the OTM transaction cache. Thedefault pathname is C:\Program Files\avs\var.
Freeze excludedevices
Comma-separated list of devices to exclude from volume freezing, forexample, \Device\mydevice\*.
Freeze excludevolumes
Comma-separated list of volume names to exclude from freezing, forexample, C:.
Client Cache Options
Check client-sidecaches and reportinconsistencies
Performs a validation check of the client-side cache with the Avamarserver instead of a backup.
Check and repairclient-side caches
Performs a validation check and repairs inconsistences with the client-side cache instead of performing a backup.
Maximum client filecache size (MBs)
Specifies the maximum client file cache size in MB. A negative valueindicates a fraction of RAM. For example, -8 specifies that no more than1/8th of the physical RAM will be allocated to the client file cache.
Maximum client hashcache size (MBs)
Specifies the maximum client hash cache size in MB. A negative valueindicates a fraction of RAM. For example, -8 specifies that no more than1/8th of the physical RAM will be allocated to the client hash cache.
Advanced Options
Client-side flag file Specifies the pathname of an option file on the client that containsadditional option settings.
Network rate throttle(Mbps)
Reduces network usage to a rate in megabits/second, for example, 0 =unrestricted, 50% of a T1 = 0.772.
Directly connect to allserver nodes
Establishes multiple connections to the server, which can improvebackup performance in certain circumstances.
Use Last Access Timeto detect ACL-onlychanges
Forces a rescan of any files in which the Access Time changed since theprevious backup.
Run as user name Specifies the username for running the plug-in on the client you arebacking up.
Plug-in Options
Windows File System plug-in backup options 107

Windows File System plug-in restore optionsPlug-in options enable you to control restore functionality that is specific to the AvamarPlug-in for the Windows File System. You set restore options manually from the RestoreCommand Line Options dialog box.
The following table lists restore options for the Avamar Plug-in for the Windows FileSystem.
Table 11 Windows File System plug-in restore options
Option Description
Overwrite existingfiles
If the file you are restoring already exists, this option specifies whetherthe restore overwrites the file. Select one of the following values:
l Never — Do not overwrite the file.
l Always — Overwrite the file.
l Generate New Name — Restore the file with a different name.
l If Modified — Restore the file if the existing file has a differenttimestamp.
l If Newer — Restore the file if the existing file is newer.
Restoration of openfiles
If the file you are restoring already exists and is open, this optionspecifies whether the restore overwrites the file. Select one of thefollowing values:
l Never — Never restore.
l Defer until reboot — Replace the open file after a restart.
l Generate New Name — Restore the file with a different name.
l If newer defer until reboot — Replace the open file after a restart ifthe restored file is newer than the open file.
Restore the systemprofile
Restores the Windows system profile.
Restore ReparsePoints as
Specifies how to restore reparse points. Select one of the followingvalues:
l Links and targets—Restore both the links and the targets for thelinks.
l Links only—Restore only the links, not the targets.
l Links as files and folders (don't create links)—Restore the links asfiles or folders, depending on the type of reparse point. If the reparsepoint points to a folder, then the reparse point restores as a folder. Ifthe reparse point points to a file, then the reparse point restores as afile
Encryption methodfrom Data Domainsystem
Specifies the encryption method for data transfer from the Data Domainsystem to the client during the restore.
Logging
Plug-in Options
108 EMC Avamar 7.2 for Windows Server User Guide

Table 11 Windows File System plug-in restore options (continued)
Option Description
List backup contents Specifies how much information about the backup contents to include inthe log files. Select one of the following values:
l No file listing
l List file names
l List files and dates
Informationalmessage level
Specifies how many informational messages to include in the log files.Select one of the following values:
l No informationals — Suppress all informational messages butinclude errors and warnings.
l Some informationals — Include some informational messages.
l Many informationals — Include additional status information.
l All informationals — Include all informational messages, errors, andwarnings.
Report advancedstatistics
Includes advanced timing and deduplication statistics in the log files.
Enable debuggingmessages
Writes maximum information to the log files. The restore processgenerates very large log files.
Pre-Script
Run user-definedscript at beginning ofrestore
Runs a script at the beginning of the restore.
The script must be located in the C:\Program Files\avs\etc\scripts folder and must have a .bat, .js, or .vbs file name
extension.
Abort restore if scriptfails
Stops the restore if the script returns a non-zero status code.
Post-Script
Run user-definedscript at end ofrestore
Runs a script at the end of the restore.
The script must be located in the C:\Program Files\avs\etc\scripts folder and must have a .bat, .js, or .vbs file name
extension.
Exit process withscript failure exitcode
If selected, avtar exits with the exit code of the script instead of a
standard avtar exit code.
Client Cache and Repair Options
Check client-sidecaches and reportinconsistencies
Performs a validation check of the client-side cache with the Avamarserver instead of a restore.
Check and repairclient-side caches
Performs a validation check and repairs inconsistences with the client-side cache instead of performing a restore.
Plug-in Options
Windows File System plug-in restore options 109

Table 11 Windows File System plug-in restore options (continued)
Option Description
Rebuild client-sidecaches from mostrecent backup
Re-creates the client-side file cache by using the contents of the lastbackup, but does not restore data.
Advanced Options
Do not descend intosubdirectories
Restores only the top-level folder, not any subfolders.
Recreate original pathbeneath targetdirectory
Re-creates the original path names of files and folders in the target folder.
For example, if you restore F:\Temp\MyFile.txt to C:\Temp and
you select this option, then the full path name of the restored file is C:\Temp\F\Temp\MyFile.txt.
Restore hiddenfolders and files
Restores folders and files with the HIDDEN attribute.
Restore folders andfiles with SYSTEMattribute
Restores folders and files with the SYSTEM attribute.
Directly connect to allserver nodes
Establishes multiple connections to the server, which can improve restoreperformance in certain circumstances.
Run as user name Specifies the username for running the plug-in on the client to which youare restoring.
Windows VSS plug-in backup optionsPlug-in options enable you to control backup functionality that is specific to the AvamarPlug-in for the Windows VSS. You can specify plug-in options for on-demand andscheduled backups.
The following table lists options that are available for the Avamar Plug-in for WindowsVSS when you perform an on-demand backup in Avamar Administrator or when youconfigure a dataset for scheduled backups.
Table 12 Windows VSS plug-in backup options
Option Description
Backup type Sets the backup level. Full is the only supported backup level for theAvamar Plug-in for Windows VSS.
Backup label Assigns this descriptive label to the backup.
Create Disaster RecoveryBackup
Specifies whether to perform a BMR backup with the System Statebackup.
Select the checkbox to perform a BMR backup except when you arebacking up Active Directory data. If you clear the checkbox, the backupis not valid for BMR.
Plug-in Options
110 EMC Avamar 7.2 for Windows Server User Guide
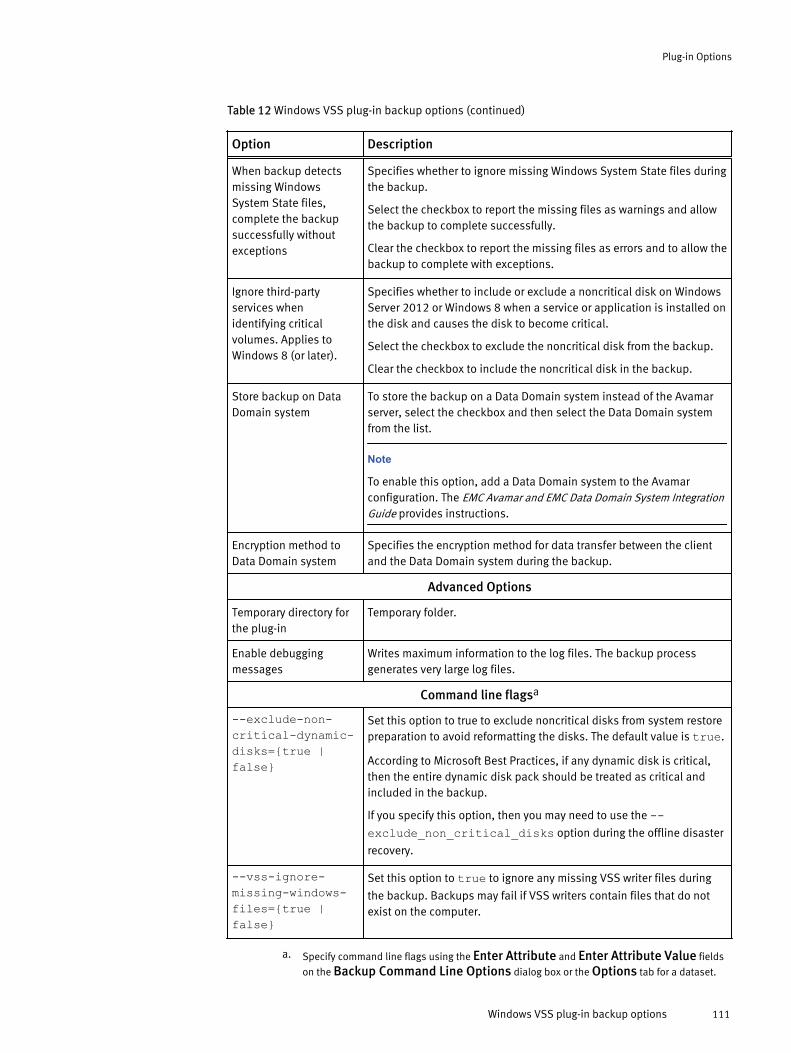
Table 12 Windows VSS plug-in backup options (continued)
Option Description
When backup detectsmissing WindowsSystem State files,complete the backupsuccessfully withoutexceptions
Specifies whether to ignore missing Windows System State files duringthe backup.
Select the checkbox to report the missing files as warnings and allowthe backup to complete successfully.
Clear the checkbox to report the missing files as errors and to allow thebackup to complete with exceptions.
Ignore third-partyservices whenidentifying criticalvolumes. Applies toWindows 8 (or later).
Specifies whether to include or exclude a noncritical disk on WindowsServer 2012 or Windows 8 when a service or application is installed onthe disk and causes the disk to become critical.
Select the checkbox to exclude the noncritical disk from the backup.
Clear the checkbox to include the noncritical disk in the backup.
Store backup on DataDomain system
To store the backup on a Data Domain system instead of the Avamarserver, select the checkbox and then select the Data Domain systemfrom the list.
Note
To enable this option, add a Data Domain system to the Avamarconfiguration. The EMC Avamar and EMC Data Domain System IntegrationGuide provides instructions.
Encryption method toData Domain system
Specifies the encryption method for data transfer between the clientand the Data Domain system during the backup.
Advanced Options
Temporary directory forthe plug-in
Temporary folder.
Enable debuggingmessages
Writes maximum information to the log files. The backup processgenerates very large log files.
Command line flagsa
--exclude-non-critical-dynamic-disks={true |false}
Set this option to true to exclude noncritical disks from system restorepreparation to avoid reformatting the disks. The default value is true.
According to Microsoft Best Practices, if any dynamic disk is critical,then the entire dynamic disk pack should be treated as critical andincluded in the backup.
If you specify this option, then you may need to use the --exclude_non_critical_disks option during the offline disaster
recovery.
--vss-ignore-missing-windows-files={true |false}
Set this option to true to ignore any missing VSS writer files during
the backup. Backups may fail if VSS writers contain files that do notexist on the computer.
a. Specify command line flags using the Enter Attribute and Enter Attribute Value fields
on the Backup Command Line Options dialog box or the Options tab for a dataset.
Plug-in Options
Windows VSS plug-in backup options 111
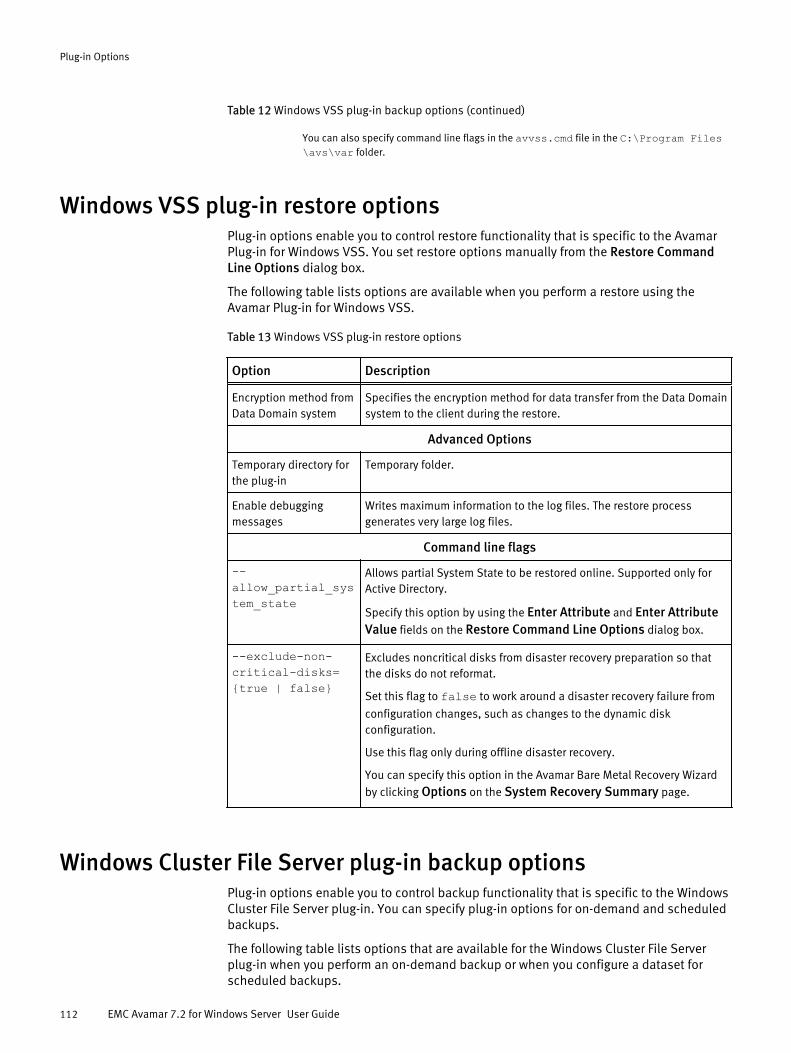
Table 12 Windows VSS plug-in backup options (continued)
You can also specify command line flags in the avvss.cmd file in the C:\Program Files\avs\var folder.
Windows VSS plug-in restore optionsPlug-in options enable you to control restore functionality that is specific to the AvamarPlug-in for Windows VSS. You set restore options manually from the Restore CommandLine Options dialog box.
The following table lists options are available when you perform a restore using theAvamar Plug-in for Windows VSS.
Table 13 Windows VSS plug-in restore options
Option Description
Encryption method fromData Domain system
Specifies the encryption method for data transfer from the Data Domainsystem to the client during the restore.
Advanced Options
Temporary directory forthe plug-in
Temporary folder.
Enable debuggingmessages
Writes maximum information to the log files. The restore processgenerates very large log files.
Command line flags
--allow_partial_system_state
Allows partial System State to be restored online. Supported only forActive Directory.
Specify this option by using the Enter Attribute and Enter AttributeValue fields on the Restore Command Line Options dialog box.
--exclude-non-critical-disks={true | false}
Excludes noncritical disks from disaster recovery preparation so thatthe disks do not reformat.
Set this flag to false to work around a disaster recovery failure from
configuration changes, such as changes to the dynamic diskconfiguration.
Use this flag only during offline disaster recovery.
You can specify this option in the Avamar Bare Metal Recovery Wizard
by clicking Options on the System Recovery Summary page.
Windows Cluster File Server plug-in backup optionsPlug-in options enable you to control backup functionality that is specific to the WindowsCluster File Server plug-in. You can specify plug-in options for on-demand and scheduledbackups.
The following table lists options that are available for the Windows Cluster File Serverplug-in when you perform an on-demand backup or when you configure a dataset forscheduled backups.
Plug-in Options
112 EMC Avamar 7.2 for Windows Server User Guide

Table 14 Windows Cluster File Server plug-in backup options
Option Description
Store backup on DataDomain system
To store the backup on a Data Domain system instead of the Avamarserver, select the checkbox and then select the Data Domain systemfrom the list.
Note
To enable this option, add a Data Domain system to the Avamarconfiguration. The EMC Avamar and EMC Data Domain SystemIntegration Guide provides instructions.
Encryption method toData Domain system
Specifies the encryption method for data transfer between the clientand the Data Domain system during the backup.
Advanced Options
Enable debuggingmessages
Writes maximum information to the log files. The backup processgenerates very large log files.
Windows Cluster File Server plug-in restore optionsPlug-in options enable you to control restore functionality that is specific to the WindowsCluster File Server plug-in. You set restore options manually from the Restore CommandLine Options dialog box.
The following table lists the options that are available when you perform a restore byusing the Windows Cluster File Server plug-in.
Table 15 Windows Cluster File Server plug-in restore options
Option Description
Encryption method fromData Domain system
Specifies the encryption method for data transfer from the DataDomain system to the client during the restore.
Advanced Options
Enable debuggingmessages
Writes maximum information to the log files. The restore processgenerates very large log files.
Plug-in Options
Windows Cluster File Server plug-in restore options 113

Plug-in Options
114 EMC Avamar 7.2 for Windows Server User Guide

APPENDIX B
Command Line Interface
This appendix contains the following topics:
l Overview of the Windows VSS plug-in CLI............................................................ 116l Command reference............................................................................................ 116l CLI examples.......................................................................................................119
Command Line Interface 115

Overview of the Windows VSS plug-in CLIThe Windows VSS plug-in enables you to use a command line interface (CLI) with theavvss command instead of Avamar Administrator to back up and restore Windows VSSdata. You can use the CLI from all operating systems that the plug-in_name supports.
When you use the CLI to perform a backup, you specify the options for the Windows VSSplug-in binary on the command line. The plug-in interacts with the avtar process towrite backup data to or read backup data from the Avamar server or a Data Domainsystem.
The avvss binary is available in the C:\Program Files\avs\bin folder, where C:\Program Files\avs is the Avamar client installation folder.
To use the CLI, open a command prompt and change directory to the bin folder of theAvamar client installation folder. Then type the command at the command prompt.
Command referenceThe avvss command enables you to perform a System State backup. You can specifycommand options to control the backup behavior.
Synopsisavvss --operation=backup [options]
OperationsThe only available operation for the avvss command is backup. The backup operationperforms an on-demand System State backup. To specify the operation, use the --operation=backup option on the avvss command line.
OptionsThe options that you specify with the avvss command control the backup behavior.
Common options
The following common options are available for the avvss command.
Table 16 Common options for the avvss command
Option Description
--label=label Specifies a label for the backup.
--version Displays the build version of the Windows VSS plug-in.
Account options
The following account options are available for the avvss command.
Command Line Interface
116 EMC Avamar 7.2 for Windows Server User Guide

Table 17 Account options for the avvss command
Option Description
--account=domain/client
–-path=domain/client
--acnt=domain/client
Specifies the Avamar domain and the client computer for thebackup.
--ap=password
--password=password
--pswd=password
Specifies the password for the account that you specify with the --id option.
--id=user@domain/client Required. Specifies the Avamar username for authentication, where:
l user is the username.
l domain is the Avamar domain for the user.
l client is the name of the client computer.
--server=Avamar_server Required. Specifies the hostname or IP address of the Avamarserver.
Logging options
The following logging options are available for the avvss command.
Table 18 Logging options for the avvss command
Option Description
--informationals=n Sets the informational level for status messages, where n is a number,such as 0, 1, 2, and so on.
--log--logfile=file
Specifies the full path name and file name of the avvss plug-in log
file.
NOTICE
The Activity Monitor in Avamar Administrator displays only avtar logs
for backups with the command line interface. To create a plug-in log forCLI activities, you must specify the --log or --logfile option on
the command line.
--noinformationals Disables all status messages.
--nostdout Disables output to standard output (stdout). However, if you supply--log or --logfile=file, then output still goes to the log file.
--nowarnings Disables warning messages.
--quiet Suppresses all debugging messages.
--verbose=n--v
Enables all messages, including status and warning messages. To setthe level of verbosity, specify --verbose=n, where n is the level of
verbosity.
Command Line Interface
Options 117

Backup options
The following avvss options are available for the backup operation.
Table 19 Backup options for the avvss command
Option Description
--ddr={true | false} Specify true to store the backup on a Data Domain
system instead of the Avamar server.
--ddr-index=n Specifies the index number of the Data Domain system.The index is the order in which the Data Domain systemswere added to the Avamar server configuration.
--dr-cluster-disk-warning={true | false}
Specify true to complete the backup with exceptions if
components are located on cluster disks.
Specify false to disable the warning. The default value is
true.
--dr-exclude-win32-services-files= {true |false}
Specify true to ignore third-party services when
identifying critical volumes. This feature is supported if theSystem Writer contains the Win32 Services Filescomponent.
--exclude-non-critical-dynamic-disks={true |false}
Specify true to exclude noncritical disks from system
restore preparation to avoid reformatting the disks. Thedefault value is true.
According to Microsoft Best Practices, if any dynamic diskis critical, then the entire dynamic disk pack should betreated as critical and included in the backup.
If you specify this option, then you may need to use the--exclude_non_critical_disks option during
the offline disaster recovery.
--expires={days | timestamp} Specifies backup expiration as a number of days fromtoday or an absolute timestamp.
--perform_dr_backup={true| false}
Specifies whether to create a BMR backup. The defaultvalue is true.
--retention-type=type
--retentiontype=type
Assigns advanced retention to the backup. Specify one ofthe following values:
l none — Do not explicitly assign any retention type to
this backup. That is, treat the backup as a normal on-demand backup.
l daily — Explicitly designate this backup as a daily
backup.
l weekly — Explicitly designate this backup as a
weekly backup.
l monthly — Explicitly designate this backup as a
monthly backup.
Command Line Interface
118 EMC Avamar 7.2 for Windows Server User Guide

Table 19 Backup options for the avvss command (continued)
Option Description
l yearly — Explicitly designate this backup as a yearly
backup.
--vss-ignore-missing-windows-files={true |false}
Set this option to true to ignore any missing VSS writer
files during the backup. Backups fail if VSS writers containfiles that do not exist on the computer.
Help option
To view command line help output, use the --help option. The --help option displaysa list of available operations and options for the avvss command. You can view all helpoutput for avvss, or only the options for a specific operation.
The following command displays all help output for the avvss command:
avvss --help
Specifying command line optionsThe method that you use to specify options for the avvss command depends on thecomplexity of the command value and the frequency with which you use the options.
Type options directly on the command line when you perform command line operationson an occasional basis or you are using a limited set of simple options. Use a commandfile, option file, or environment variables when you frequently perform command lineoperations or you are using a complex set of options.
The following methods are available for specifying options for the avvss command:
l Type the individual options on the command line.l List the options in the avvss.cmd file, which is located in the C:\Program Files
\avs\var folder, where C:\Program Files\avs is the Avamar clientinstallation folder. List each option on its own line, as shown in the followingexample:
--debug--logfile=avamarclient.log--verbose=5
CLI examplesThese command examples illustrate how to use options to perform different types ofbackups with the avvss command.
The following command performs a backup of System State and critical disks for BMR ofthe computer named Windows1 in the Clients domain, stores the backup on theAvamar server with an IP address of 12.34.56.78, and writes avvss logginginformation to the avvss.log file in the C:\Program Files\avs\var folder:
avvss --operation=backup –-server=12.34.56.78 –-id=AvamarAdmin–-password=password –path=/Clients/Windows1–-perform_dr_backup=true --log=C:\Program Files\avs\var\avvss.log
Command Line Interface
Specifying command line options 119

The following command performs a non-BMR backup for restoring Active Directory onlineof the computer named Windows1 in the Clients domain, stores the backup on theAvamar server with an IP address of 12.34.56.78, and writes avvss logginginformation to the avvss.log file in the C:\Program Files\avs\var folder:
avvss --operation=backup –-server=12.34.56.78 –-id=AvamarAdmin–-password=password –path=/Clients/Windows1–-perform_dr_backup=false --log=C:\Program Files\avs\var\avvss.log
The following command performs a Windows VSS backup of the computer namedWindows1 in the Clients domain, and stores the backup on the Data Domain systemindexed as 1 on the Avamar server with the path red-avsn100.corp.example.com:
avvss --server=red-avsn100.corp.example.com --id=MCUser@/ --ap=pwd--path=/clients/Windows1 --ddr=true --ddr-index=1--operation=backup
Command Line Interface
120 EMC Avamar 7.2 for Windows Server User Guide

APPENDIX C
Troubleshooting
This appendix contains the following topics:
l Log files.............................................................................................................. 122l Backup problems and solutions.......................................................................... 123l Restore problems and solutions.......................................................................... 124l Bare metal recovery problems and solutions....................................................... 125
Troubleshooting 121

Log filesDuring backup and restore operations, log files are created for troubleshooting problems.
There are log files in both Avamar and Windows that can be useful in troubleshootingrestores. An example of a useful Windows log file for monitoring Windows-relatedactivities is the Windows Application Event log. Check Windows documentation forinformation about viewing the Windows Application Event log.
Avamar log filesAvamar log files capture Avamar, VSS, and service events and are available in the vardirectory, whic h is typically C:\Program Files\avs\var. The following tabledescribes each log file.
Table 20 Avamar log files
Log file Description Command file Debuggingflags
avagent.log Avamar agent log avagent.cmd --debug
MOD-timestamp-3001-Windows.logMOD-1379109227779-3001-Windows.log
Contains information about the Windows FileSystem plug-in backup.
l On demand backups run from AvamarAdministrator are prefixed with MOD.
l Command line backups are prefixed withCOD.
l Scheduled backups are prefixed with thegroup name.
l 3001-Windows at the end of the file
name identifies it as a Windows VSS plug-in log file.
avtar.cmd --debug--verbose
COD-timestamp-3015-VSS.logMOD-timestamp-3015-VSS.loggroup-timestamp-3015-VSS.log
Contains information about the Windows VSSplug-in backup.
l On demand backups run from AvamarAdministrator are prefixed with MOD.
l Command line backups are prefixed withCOD.
l Scheduled backups are prefixed with thegroup name.
l 3015-VSS at the end of the file name
identifies it as a Windows VSS plug-in logfile.
avvss.cmd --debug--verbose
COD-group-3036-winclusterfs.logMOD-group-3036-winclusterfs.log
Contains information about the WindowsCluster File Server backup.
l On demand backups run from AvamarAdministrator are prefixed with MOD.
avwinclusterfs.cmdavtar.cmd
--debug--verbose
Troubleshooting
122 EMC Avamar 7.2 for Windows Server User Guide

Table 20 Avamar log files (continued)
Log file Description Command file Debuggingflags
group-group-3036-winclusterfs.log
l Command line backups are prefixed withCOD.
l Scheduled backups are prefixed with thegroup name.
l 3036-winclusterfs at the end of the
file name identifies it as a Windows ClusterFile Server plug-in log file.
WinPEWizard.log Contains information about the pages loadedor displayed by the wizard.
None
avvss.log Contains information about BMR operations. avvss.cmd --debug--verbose
winpe_av_support.log Contains information about Avamar-relateddata displayed in the wizard. For example, thelist of BMR backups.
None
winpe_os_support.log Contains information about the WinPEenvironment. For example, NIC settings,available disks, or registry values.
None
Generating log filesYou can generate log files by creating a command file with debugging flags before youperform a backup or restore operation.
1. Create the .cmd file in the var directory, which is typically C:\Program Files\avs\var.
2. In the .cmd file, add debugging flags as listed in Table 20 on page 122.
Backup problems and solutionsThe following sections describe common backup problems and solutions.
System State backups of offline dynamic critical disks fail in Windows Server 2008A known problem with the ASR writer on Windows Server 2008 may cause System Statebackups of offline dynamic critical disks to fail. The failure may occur with an ASR writererror code (0x800423f4). If this error occurs, set the dynamic critical disks online, andrerun the backup. The error does not occur on Windows Server 2008 R2, or WindowsServer 2012 or later.
Backup fails when Windows deletes the Shadow Volume during backupWindows sometimes deletes the Shadow Volume even though Avamar is running thebackup service. This is a known Microsoft issue that affects all backup products. Whenthis backup failure occurs, the Windows Event Viewer System log may contain an errorsimilar to the following:
The shadow copies of volume H: were deleted because the shadowcopy storage could not grow in time. Consider reducing the IO
Troubleshooting
Generating log files 123

load on the system or choose a shadow copy storage volume thatis not being shadow copied.If this occurs, try one or both of the following workarounds:
l Leave more space on the drive.
l Perform the backup when the drive is less busy.
System State backups of dynamic critical volumes on storage spaces are not supportedSystem State backups of dynamic critical volumes on storage spaces in Windows Server2012 fail. When storage spaces are on a dynamic critical disk, a System State backupcannot detect the storage spaces because of API incompatibility. The backup includesthe storage spaces because they contain critical volumes, but you cannot restore theconfiguration for the storage spaces during BMR.
Use the following guidelines to ensure that backups protect both storage spaces anddynamic critical volumes:
l Do not create storage spaces on dynamic disks.
l Place dynamic critical volumes on basic disks.
Windows Server Core 2012 backup completes with exceptionsAn exception may occur when backing up Windows Server Core 2012, with an errorsimilar to the following:
Unable to open directory "c:\Users\Default\PrintHood" (code 3:The system cannot find the path specified).To avoid the exception, add an exclude attribute and value in the plug-in options for thebackup. The following topics provide instructions:
l Performing BMR backups on page 58
l Creating a dataset for BMR backups on page 63
System State backups exclude Windows Server 2012 deduplicated volumesDo not perform a System State backup of Windows Server 2012 deduplicated volumes ifthe volumes are critical volumes. Microsoft does not recommend making a deduplicatedvolume a critical volume, and Avamar excludes deduplicated volumes from VSS backups.
Restore problems and solutionsThe following topics describe common restore problems and solutions.
Restoring over corrupted SIS linksAn SIS volume restore may fail because the SIS Groveler service is running and preventsthe restore process from correctly restoring some files. In the log file for the restore, theerror for the failed restore appears similar to the following example, and the size of therestored file is set to zero:
Error "avtar Error <5737>: I/O error: Unable to write(4) "pathto file" (code 38: Reached the end of the file)."To correct this error, delete the corrupted SIS links from the restored server, and then useAvamar to select and restore the links from the backup set.
Restore of folders or files with many Access Control Entries may failRestore of folders or files with 1,820 Access Control Entries ( ACEs ) may fail with one ofthe following error messages:
l File '%s' is unable to be restored due to Avamar havingimproper permissions to restore the security information for
Troubleshooting
124 EMC Avamar 7.2 for Windows Server User Guide

that file. If you wish to restore the file, either provideproper rights to Avamar or use the --ignoreacls flag.
l I/O error: Unable to BackupWrite(4) ...(code 87: Theparameter is incorrect).
Perform one of the following steps to resolve this issue:
l Add the --ignoreacls attribute to the Restore Command Line Options dialog boxbefore you restore.
l Remove ACEs from the folders and the files so that there are fewer than 1,820 entries.
Bare metal recovery problems and solutionsThe following topics describe common BMR problems and solutions.
UEFI machine fails to boot after BMRAfter a successful BMR, a UEFI machine may fail to boot. This can occur if the EFI bootmanager does not have a valid Boot Order entry. For example, if the Boot Order wasdeleted or the BMR was performed to different hardware. In those situations theoperating system recreates the Boot Order entry when the machine is rebooted, and itmay not use the same path.
To correct this issue, use the computer manufacturer instructions to set the EFI bootorder. Follow the instructions for setting the Boot from a file option. The target filepath is EFI\Microsoft\Boot\bootmgfw.efi.
Re-creating 8dot3 file names after BMR may failDuring BMR, 8dot3 names are temporarily enabled for all volumes. This allows 8dot3names to be created when files are restored. After the machine is rebooted, the systemuses the following registry value to determine where 8dot3 names are created:
HKLM\SYSTEM\CurrentControlSet\Control\FileSystem\NtfsDisable8dot3NameCreationThe default value of NtfsDisable8dot3NameCreation is per-volume for volumesthat have 8dot3 names enabled by fsutil. The “NtfsDisable8dot3NameCreation”article on the Microsoft TechNet website provides details.
After BMR, decide how to manage 8dot3 names.
Windows Server 2008, Windows 7, and later do not automatically create 8dot3 filenames. This is because it is increasingly unlikely that 8dot3 names are actually needed.The use of 8dot3 names also has significant performance penalties for the file system.Microsoft recommends using the fsutil program to strip 8dot3 names from the filesystem if they are not needed.
You can enable 8dot3 file names on all volumes or on a per volume basis using thefsutil program. The values to enable or disable 8dot3 for all volumes or on a pervolume basis are described in the “Fsutil 8dot3name” article on the Microsoft TechNetwebsite.
Troubleshooting
Bare metal recovery problems and solutions 125

Troubleshooting
126 EMC Avamar 7.2 for Windows Server User Guide
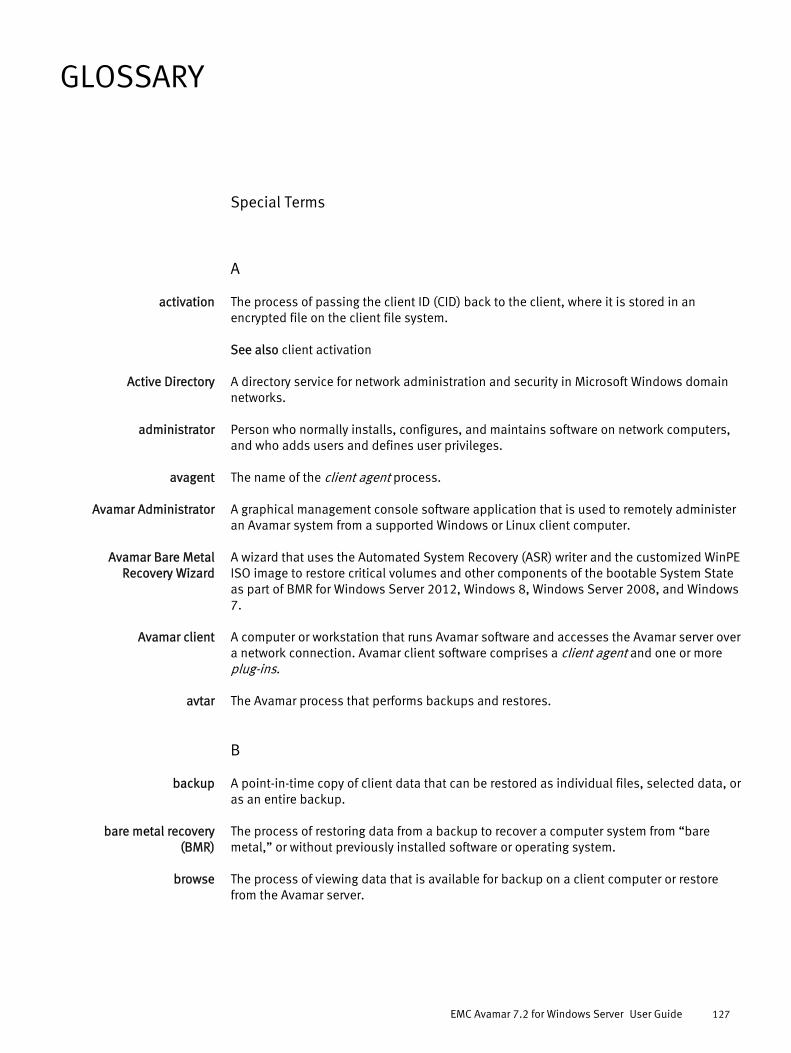
GLOSSARY
Special Terms
A
activation The process of passing the client ID (CID) back to the client, where it is stored in anencrypted file on the client file system. See also client activation
Active Directory A directory service for network administration and security in Microsoft Windows domainnetworks.
administrator Person who normally installs, configures, and maintains software on network computers,and who adds users and defines user privileges.
avagent The name of the client agent process.
Avamar Administrator A graphical management console software application that is used to remotely administeran Avamar system from a supported Windows or Linux client computer.
Avamar Bare MetalRecovery Wizard
A wizard that uses the Automated System Recovery (ASR) writer and the customized WinPEISO image to restore critical volumes and other components of the bootable System Stateas part of BMR for Windows Server 2012, Windows 8, Windows Server 2008, and Windows7.
Avamar client A computer or workstation that runs Avamar software and accesses the Avamar server overa network connection. Avamar client software comprises a client agent and one or moreplug-ins.
avtar The Avamar process that performs backups and restores.
B
backup A point-in-time copy of client data that can be restored as individual files, selected data, oras an entire backup.
bare metal recovery(BMR)
The process of restoring data from a backup to recover a computer system from “baremetal,” or without previously installed software or operating system.
browse The process of viewing data that is available for backup on a client computer or restorefrom the Avamar server.
EMC Avamar 7.2 for Windows Server User Guide 127
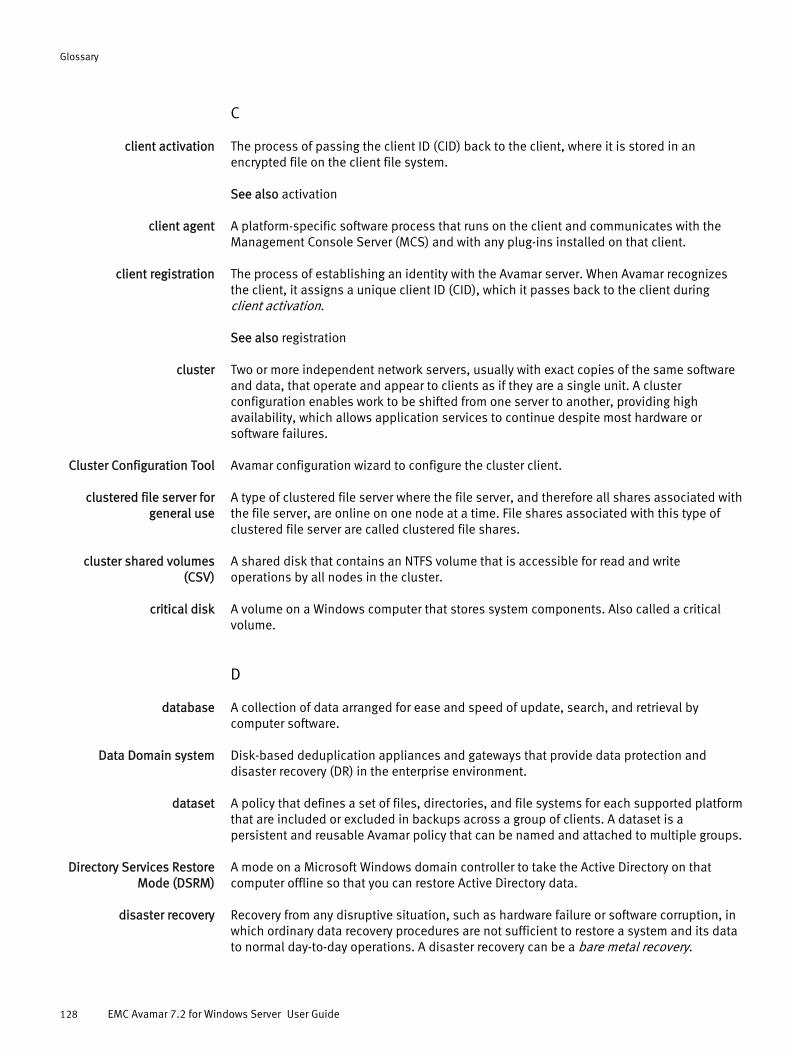
C
client activation The process of passing the client ID (CID) back to the client, where it is stored in anencrypted file on the client file system. See also activation
client agent A platform-specific software process that runs on the client and communicates with theManagement Console Server (MCS) and with any plug-ins installed on that client.
client registration The process of establishing an identity with the Avamar server. When Avamar recognizesthe client, it assigns a unique client ID (CID), which it passes back to the client duringclient activation. See also registration
cluster Two or more independent network servers, usually with exact copies of the same softwareand data, that operate and appear to clients as if they are a single unit. A clusterconfiguration enables work to be shifted from one server to another, providing highavailability, which allows application services to continue despite most hardware orsoftware failures.
Cluster Configuration Tool Avamar configuration wizard to configure the cluster client.
clustered file server forgeneral use
A type of clustered file server where the file server, and therefore all shares associated withthe file server, are online on one node at a time. File shares associated with this type ofclustered file server are called clustered file shares.
cluster shared volumes(CSV)
A shared disk that contains an NTFS volume that is accessible for read and writeoperations by all nodes in the cluster.
critical disk A volume on a Windows computer that stores system components. Also called a criticalvolume.
D
database A collection of data arranged for ease and speed of update, search, and retrieval bycomputer software.
Data Domain system Disk-based deduplication appliances and gateways that provide data protection anddisaster recovery (DR) in the enterprise environment.
dataset A policy that defines a set of files, directories, and file systems for each supported platformthat are included or excluded in backups across a group of clients. A dataset is apersistent and reusable Avamar policy that can be named and attached to multiple groups.
Directory Services RestoreMode (DSRM)
A mode on a Microsoft Windows domain controller to take the Active Directory on thatcomputer offline so that you can restore Active Directory data.
disaster recovery Recovery from any disruptive situation, such as hardware failure or software corruption, inwhich ordinary data recovery procedures are not sufficient to restore a system and its datato normal day-to-day operations. A disaster recovery can be a bare metal recovery.
Glossary
128 EMC Avamar 7.2 for Windows Server User Guide

DNS Domain Name Server. A dynamic and distributed directory service for assigning domainnames to specific IP addresses.
domain A feature in Avamar Administrator that is used to organize large numbers of clients intonamed areas of control and management.
F
federated cluster client A virtual client that runs on a cluster node in a Windows Server 2008/2012 cluster. Thefederated cluster client communicates with the Avamar server to perform backups andrestores of file system data in the cluster, regardless of which node is managing the data atthe time of the operation.
file system Software interface used to save, retrieve, and manage files on storage media by providingdirectory structures, data transfer methods, and file association.
G
group A level of organization in Avamar Administrator for one or more Avamar clients. All clientsin an Avamar group use the same group policies, which include the dataset, schedule, andretention policy.
group policy The dataset, schedule, and retention policy for all clients in an Avamar group.
L
LAN Local Area Network.
M
MCS Management console server. The server subsystem that provides centralizedadministration (scheduling, monitoring, and management) for the Avamar server. The MCSalso runs the server-side processes used by Avamar Administrator.
metadata Data about the backup, including information about the original database files, the backuptypes, the date and time of the backup, and other information necessary for restore.
N
nonauthoritative restore A type of Active Directory restore where Active Directory replication partners can return adomain controller to a known state. When you restart the domain controller after yourestore the computer from a backup, other domain controllers replicate changes madeafter the backup.
noncritical disk A volume on a Windows computer that stores only file system data. System componentsare not installed on the volume. Also called a noncritical volume.
Glossary
EMC Avamar 7.2 for Windows Server User Guide 129

P
plug-in Avamar client software that recognizes a particular kind of data resident on that client.
plug-in options Options that you specify during backup or restore to control backup or restorefunctionality.
policy A set of rules for client backups that can be named and applied to multiple groups. Groupshave dataset, schedule, and retention policies.
proxy cluster client A virtual client that runs on a single node (the proxy node) in a Windows Server 2012 forSOFS or SMB cluster. The proxy cluster client communicates with the Avamar server toperform backups and restores of file system data on shared storage in the cluster,regardless of which node is managing the file system data at the time of the operation.
proxy node The node with the proxy cluster client in a Windows Server 2012 cluster.
R
redirected restore The process of restoring a backup to a different location than the original location wherethe backup occurred.
registration The process of establishing an identity with the Avamar server. When Avamar recognizesthe client, it assigns a unique client ID (CID), which it passes back to the client duringclient activation. See also client registration
restore An operation that retrieves one or more file systems, directories, files, or data objects froma backup and writes the data to a designated location.
retention The time setting to automatically delete backups on an Avamar server. Retention can beset to permanent for backups that should not be deleted from an Avamar server. Retentionis a persistent and reusable Avamar policy that can be named and attached to multiplegroups.
S
Scale-Out File Server(SOFS)
A type of clustered file server in Windows Server 2012 that allows you to store serverapplication data, such as Hyper-V virtual machine files, on file shares. All file shares areonline on all nodes simultaneously. File shares associated with this type of clustered fileserver are called scale-out file shares.
schedule The ability to control the frequency and the start and end time each day for backups ofclients in a group. A schedule is a persistent and reusable Avamar policy that can benamed and attached to multiple groups.
Server Core A scaled-back version of Windows Server 2008, Windows Server 2008 R2, or WindowsServer 2012, where no Windows Explorer shell is installed. All configuration andmaintenance occurs by using a command prompt, or by connecting to the computerremotely through Microsoft Management Console.
Glossary
130 EMC Avamar 7.2 for Windows Server User Guide

Server Message Block(SMB) 3.0 file shares
File shares that use the SMB 3.0 protocol. You can store shared file system data on SMB3.0 file shares in a Windows Server 2012 cluster.
shadow copy volume A backup volume that VSS creates.
System State A term that refers to key configuration files for the Windows operating system, such asboot files and the Windows Registry.
V
virtual hard disk (VHD)files
The file format for a virtual hard disk, the storage medium for a virtual machine. VHD filescan reside on any storage topology that the management operating system can access,including external devices, storage area networks, and network-attached storage. The filename extension is .vhd.
virtual machine (VM) A computer that is a software implementation of a computer. Virtual machines are used torun different operating systems at the same time on one physical computer. Eachoperating system runs in its own isolated execution environment.
Volume Shadow CopyService (VSS)
A technology in Microsoft Windows that enables manual or automatic backup copies orsnapshots of data, even if there is a lock on the data, on a specific volume at a specificpoint-in-time over regular intervals. VSS is implemented as a Windows service called theVolume Shadow Copy service.
VSS provider A software or hardware-based process that links the VSS service to the storage hardwareand creates a snapshot for backup on the storage hardware. Avamar supports onlysoftware providers.
VSS requestor A backup application that uses the VSS API to request the services of VSS to create andmanage shadow copy volumes. The Avamar Plug-in for Windows VSS is a VSS requestor.
VSS writer A process that provides metadata about application data for backup, and specific methodsfor correctly handling components and applications during backup and restore. A VSSwriter also identifies the type of application or service in the backup, such as System Bootor System Services. A VSS writer does not play a role in backing up the file system.
W
Windows DeploymentServices (WDS)
A Microsoft technology for network-based installation of Windows operating systems.
WinPE ISO image A Windows Preinstallation Environment (WinPE) package with a lightweight version ofWindows used for the deployment of workstations and servers or troubleshooting anoperating system while it is offline. The Avamar WinPE ISO images are used for BMR.
Glossary
EMC Avamar 7.2 for Windows Server User Guide 131

Glossary
132 EMC Avamar 7.2 for Windows Server User Guide