self-guided instructional material · without violating the biologic width and a minimum of 1.0 mm...
TRANSCRIPT

Adarve and Seong @ 2010 University of Minnesota School of Dentistry
1
SELF-GUIDED INSTRUCTIONAL MATERIAL:
CAST POST AND CORE MODULE
Ranier M. Adarve, DMD, MS, MHPE Division of Prosthodontics
Department of Restorative Science University of Minnesota
and
Wook-Jin Seong, DDS, MS, PhD
Division of Prosthodontics Department of Restorative Science
University of Minnesota

Adarve and Seong @ 2010 University of Minnesota School of Dentistry
2
I. Module Information
In this module we are going to restore an endodontically treated tooth # 9 that has significant loss of tooth structure (Fig. 1 and 2). The tooth will be restored using a Cast Post and Core (CPC) and PFM crown (Fig. 3) on prepared tooth. The method of fabrication will be Direct Method (on the patient) where acrylic pattern (Fig. 4) of the CPC will be fabricated. The goals of this module are the following:
a. Recognize the indication and restorability of the tooth with CPC. b. Determine the length and width of the post. c. Prepare the root canal of the tooth to receive the CPC restoration. d. Fabricate an acrylic pattern of the CPC. e. Prepare the tooth to receive the crown restoration.
Cast Post and Core Module Foundation Restoration Method /Restoration / Tooth # Direct Technique -Cast Post and Core and PFM Crown #9 Extension: Indirect Technique -Cast Post and Core and PFM Crown #12
Estimated Set Up Time: 30 mins Estimated Completion Time: 2 hrs
Fig. 1. Badly broken down crown Fig. 2. Endodontically treated tooth
Fig. 3. Cast Post and Core and PFM preparation Fig. 4 .Acrylic Pattern

Adarve and Seong @ 2010 University of Minnesota School of Dentistry
3
In the extension part, we are going to apply the concepts we learned to restore tooth #12 with Cast Post and Core (CPC). However the variation, this time will be in method of fabrication of CPC pattern. We are going to use the Indirect Method (using working cast) to fabricate a Wax Pattern rather than using an Acrylic as a pattern material. II. Setting up of the Articulated Teeth Since this is a simulated exercise, tooth preparation should be done on a Frasaco ® Model mounted on the simulator.
1. Get typodont teeth #9 and #12 that are specifically designed for this exercise (Fig. 5 and 6). These teeth are designed to simulate a post-root canal situation. Each tooth’s crown is pre-prepared and the root canals are filled with gutta percha. (Frasaco® Product : AG-3 ZEE Post Pulpotomy Teeth)
2. Attach these typodont teeth on the articulator (Frasaco® Product : ANA-4 Standard Typodont)
3. You will also need the burn out post (Parapost System®) for your direct pattern fabrication and an impression post (Parapost System®) for your indirect pattern fabrication in the extension part of this module.
4. Prepare the following materials and instruments (Fig. 7). a. Small-tip brush b. Spoon excavator c. Endo Ruler d. Gates Glidden drills e. Endo File (K file) f. Rubber stopper g. Pattern Resin (Liquid and Powder) (GC America®)
Fig. 6. Broken down Tooth#12 Fig. 5. Broken down Tooth # 9

Adarve and Seong @ 2010 University of Minnesota School of Dentistry
4
III. Recognizing the Restorability and Indication of the Tooth for Cast Post and Core Restoration
5. Once the teeth are attached, evaluate tooth #9 for the following clinical parameters:
a. How much tooth structure has been lost? 20%? 50%? 80? b. Given the amount of tooth structures left, can the tooth be restored
with crown without compromising retention and resistance?
6. Using the probe instrument, measure the amount of tooth structure left. a. Determine if you have the minimum tooth wall height or otherwise
known as the Ferrule. A Ferrule is a 2 mm band of sound tooth structure to fit the crown. You should be able to establish a minimum axial wall height of 2 mm after you establish your margin of your full crown preparation. (Fig. 8)
Fig. 7c. Supplies and materials
Fig. 7b. Supplies and materials Fig. 7a. Supplies and materials

Adarve and Seong @ 2010 University of Minnesota School of Dentistry
5
b. Determined also if you have a minimum height of 2 mm of tooth structures all around the teeth. The Ferrule height of 2-3mm should be found more than 180 degrees around the teeth (Fig. 9).
c. There should be a minimum of 1.0 mm in the thickness of sound tooth structure.
7. Again, if you have the Ferrule, the tooth is said to be restorable. If none, the tooth is not restorable and may require crown lengthening procedure to gain Ferrule or axial wall height.
Instructor’s Note Go through the steps of using your probe to measure the amount of tooth structures left. You should be able to determine where your full crown margin is located and if you have the Ferrule height of 2 mm. In actual clinical cases, if there is no adequate Ferrule height, then the tooth is not restorable even with CPC.
Fig. 8. Tooth Height of 2mm at the most minimum tooth structure left.
Fig. 9. Tooth Height of 2mm all around the teeth.

Adarve and Seong @ 2010 University of Minnesota School of Dentistry
6
IV. Determining the Length and the Width of the Post The goal of this procedure is to determine the length of the post and its width. General Guidelines for Post Length
a. The longer the post, the better is its retention. b. The post should be extended up to the gutta percha. The gutta
percha on the RCT should be removed but leaving 4-5 mm to provide for the apical seal.
c. Post length should be equal to or longer to the height of the clinical crown (preferred guideline and used in this module)
d. Post length should be at 2/3 of the length of the roots. e. Post to extend by ½ the distance of root embedded in bone.
8. Using the guideline c, measure the clinical crown (Fig. 10).
Clinical Relevance Generally, teeth indicated for Cast Post and Core have been badly broken down by caries, trauma or by other iatrogenic factors.. These teeth are typically left with so little tooth structures that restoration with the full crown compromises the retention and resistance. Given the condition, cast post and core can “substitute” for the missing teeth structures needed to achieve retention and resistance. However, ‘substituting’ for the missing teeth structures does not always work well. A sound natural tooth structure height should still remain. This will provide the Ferrule Effect. The 2mm height and 1 mm thickness around the teeth act as wall height in conjunction with the CPC to be able to retain the crown. A clinician should therefore know at an initial stage of the treatment whether the tooth can be restored with CPC or not or if the tooth is restorable at all. Major parameters to consider are: a. Amount of tooth structures left b. A Ferrule height of 2 mm found around the teeth ( at least 180 degrees) c. 1.0 mm thickness of sound tooth structure d. root length in the bone in case crown lengthening is needed. These should be taken into consideration prior to the beginning of the restoration. Therefore, there may be a need to prepare the crown margin first to see if the ferrule can be established without violating the biologic width and a minimum of 1.0 mm thickness can be achieved. Also, margin can be placed subgingivally. Measuring the pocket dept to determine the existence of 2-3 mm ferrule is recommended.
Fig. 10 Measuring Clinical crown of 9-10 mm as post length

Adarve and Seong @ 2010 University of Minnesota School of Dentistry
7
General Guidelines for Post Width
a. The size of post is dependent on the root width and canal morphology.
b. The width of the post should not be larger than 1/3 of the root width at its narrowest dimension and post should be surrounded by at least 1.0 mm of sound dentin. This point is really critical in the apical area because this is where root narrows down and stresses concentrate.
9. Keep in your mind these guidelines as you proceed with the next steps. V. Preparing the Canal to receive the Cast Post and Core Restoration The goal of this procedure is to prepare the canal by:
a. Removing a significant portion of gutta percha up to your determined post length and leaving 4-5 mm for adequate seal.
b. Shaping the canal to achieve 1/3 of the width of the root. Gutta Percha Removal
10. Using your spoon excavator, heat the instrument (Fig. 12).
11. Gradually remove the gutta percha in the canal (Fig. 13)
Fig. 11 Measuring width of the post of not larger than 1/3 of root width

Adarve and Seong @ 2010 University of Minnesota School of Dentistry
8
12. Using your endo file (k-file) and stopper, establish your measurement (Fig. 14). Use the length of the post you determined in the previous step (9-10mm).
13. Continue removing the gutta percha up to the pre-determined length of you post. Verify the adequacy of gutta percha removal using your endo file (Fig. 15). In actual clinical case, you can take radiograph to determine how much gutta percha has been removed.
14. Use a reference point to measure the length from. In this case, the stopper is at the lowest tooth structure left. The amount of gutta perch removed (and also the length of the post) should be measured from this point of reference (Fig. 15).
Fig. 12. Heat the spoon excavator Fig. 13 Removing gutta percha inside the canal
Fig. 14 Measurement of the amount of gutta percha to be removed

Adarve and Seong @ 2010 University of Minnesota School of Dentistry
9
Shaping the Canal
15. Once the gutta percha is removed, use the gates-glidden drill to shape the canal to 1/3 of the width of the root. Care should be observed so as not to create undercut. Use of Peezo reamer to shape and finalize canal preparation is also recommended.
16. As always, use stopper as a reference, to shape the canal at pre-determined length (Fig. 16)
Fig. 15 Endo file with stopper to measure the length of the gutta percha removal
Fig. 16 Gates glidden drill with stopper used in shaping and establishing the canal width

Adarve and Seong @ 2010 University of Minnesota School of Dentistry
10
17. Endo file can also be used to shape the canal or finish up the shaping of the canal at a desired post length and width (Fig. 17).
Clinical Relevance This preceding process is actually called the preparation of the root canal for post space. Using the guidelines we discuss, a suggested technique was shown. However, there are different techniques used in achieving the same. Some use entirely rotary instruments to remove the gutta percha and shape the canal. You can use whatever technique that will fit you as long as you keep in mind the following:
a. If your using heated instrument, make sure that you be extra careful not the burn your patient.
b. Remove gutta percha gradually so you will not accidentally remove all gutta percha and break the apical seal. If this happen, the patient need to see an endodontist for re-treatment of the RCT.
c. Do not perforate / strip the sides of the canal with your instrumentation. Again, you need to know that a surrounding sound dentin is needed in the procedure.
d. Always know your measurements. You need to know the length of your post and the width of your post, for this will be your goal in preparing the canal to receive CPC.
Fig. 17. Endo file with stopper used in shaping and finalizing post length and width

Adarve and Seong @ 2010 University of Minnesota School of Dentistry
11
VI. Fabricating the Acrylic Pattern of Cast Post and Core The goal of this procedure is to fabricate an acrylic resin pattern of your cast post and core. This pattern will eventually be sprued, invested, casted, trimmed and finally cemented on the tooth.
18. Fit the burnout post in the canal. Make sure that the burnout post is loosely fitted in the canal (Fig. 18 and 19).
19. Lubricate the canal with Vaseline® with your brush (Fig. 20 and 21). The objective of this is to avoid the acrylic resin pattern binding in the canal. In real patient, lubrication can be achieved by wetting the canal with water and controlled use of the acrylic to avoid binding in the canal.
Fig. 18 and 19 . Burnout post is tried in the canal. It should be loosely fitted.
Fig. 20 and 21 .Apply lubricant inside the canal. Vaseline is used in this project
Adarve and Seong @ 2010 University of Minnesota School of Dentistry
12
20. Acrylic resin pattern can easily be fabricated following 2 stages. a. Stage 1 is the post pattern b. Stage 2 is the core pattern
Post Pattern
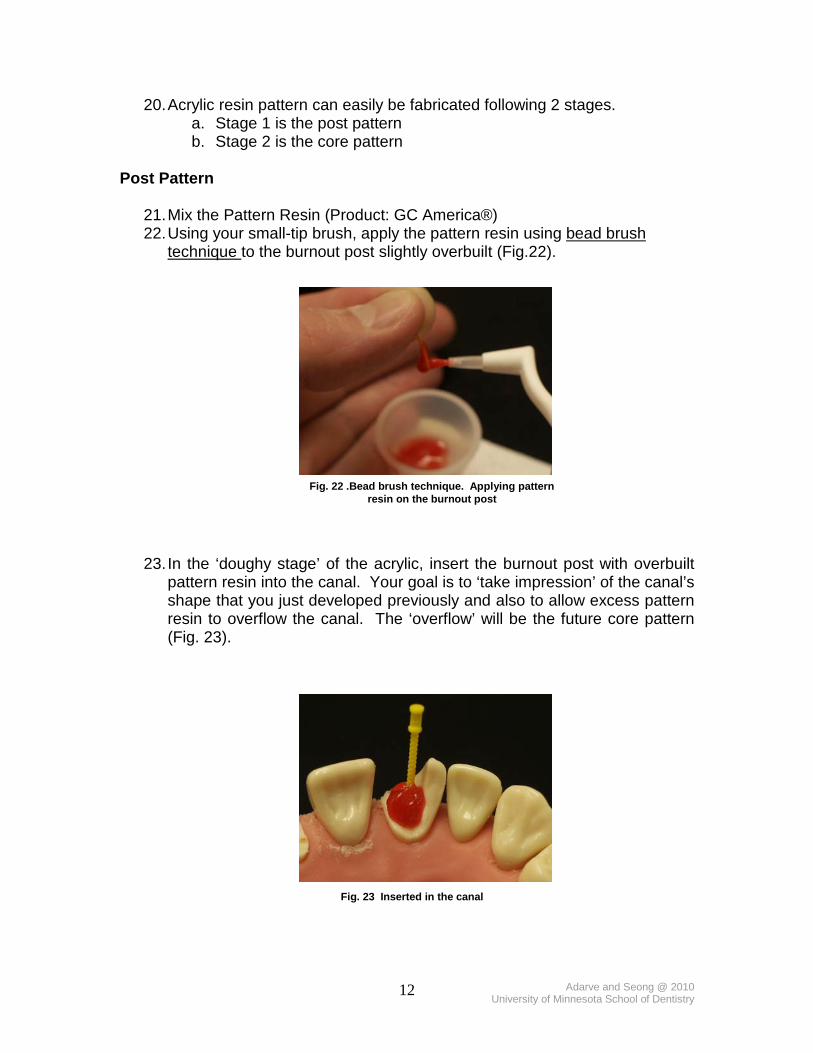
21. Mix the Pattern Resin (Product: GC America®) 22. Using your small-tip brush, apply the pattern resin using bead brush
technique to the burnout post slightly overbuilt (Fig.22).
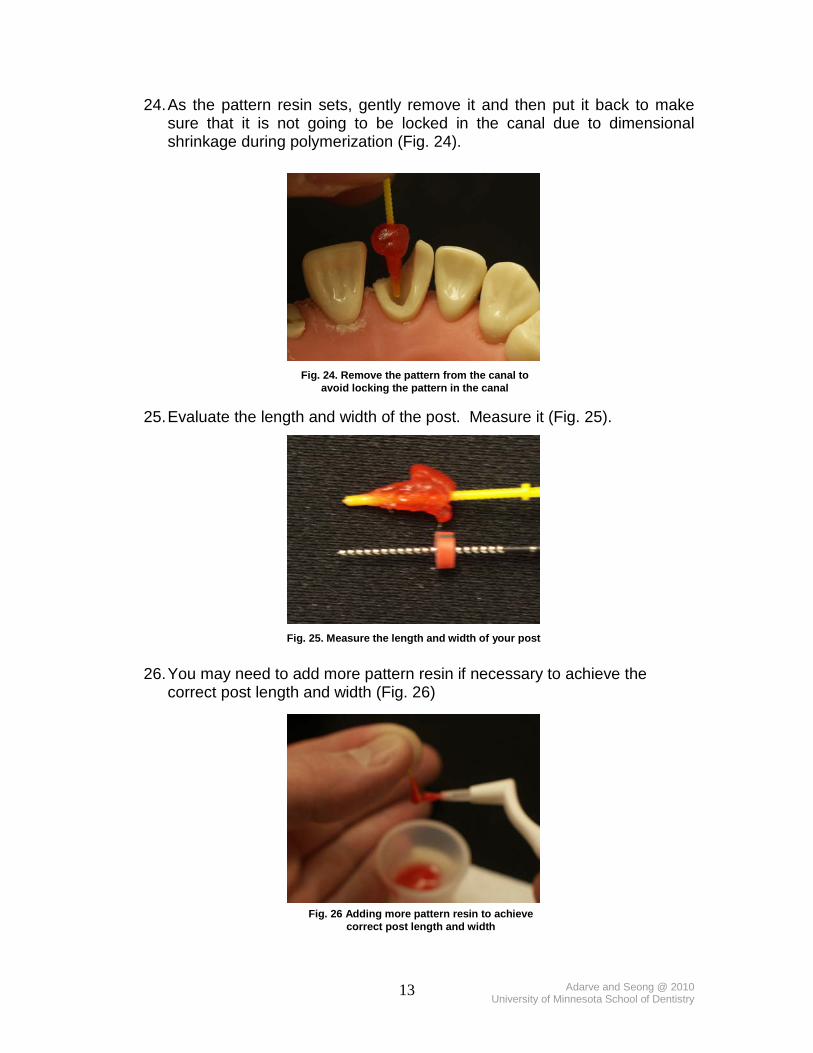
23. In the ‘doughy stage’ of the acrylic, insert the burnout post with overbuilt pattern resin into the canal. Your goal is to ‘take impression’ of the canal’s shape that you just developed previously and also to allow excess pattern resin to overflow the canal. The ‘overflow’ will be the future core pattern (Fig. 23).
Fig. 22 .Bead brush technique. Applying pattern resin on the burnout post
Fig. 23 Inserted in the canal
Adarve and Seong @ 2010 University of Minnesota School of Dentistry
13
24. As the pattern resin sets, gently remove it and then put it back to make sure that it is not going to be locked in the canal due to dimensional shrinkage during polymerization (Fig. 24).
25. Evaluate the length and width of the post. Measure it (Fig. 25).
26. You may need to add more pattern resin if necessary to achieve the correct post length and width (Fig. 26)
Fig. 24. Remove the pattern from the canal to avoid locking the pattern in the canal
Fig. 25. Measure the length and width of your post
Fig. 26 Adding more pattern resin to achieve correct post length and width

Adarve and Seong @ 2010 University of Minnesota School of Dentistry
14
27. Re-insert in the canal and repeat steps 23 to 25. 28. Once adequate post pattern is done (Fig. 27), proceed with the core
pattern.
Instructor’s Notes An alternative to the use of a pattern resin for post fabrication is the use of an EZ post system. The white cylindrical compound is heated and applied to the clear post. The EZ post then is inserted into the canal and allowed to set. Once set, you have the post pattern made.
Fig. 27. Completed post pattern

Adarve and Seong @ 2010 University of Minnesota School of Dentistry
15
Core Pattern
29. Add more pattern resin to build the ‘core part’ of the CPC (Fig. 28 and 29).
30. Keep in mind that as you build the core, you are building the height of your full crown preparation needed to have adequate retention and resistance.
31. Once the resin pattern has set, remove the pattern acrylic and make sure
that it did not lock in the canal (Fig. 30 and 31).
Fig. 28 and 29. Adding Pattern Resin on the core part of the CPC
Fig. 30 and 31. Core pattern

Adarve and Seong @ 2010 University of Minnesota School of Dentistry
16
VII. Preparation of the Tooth to receive Cast Post and Core
32. Put back the resin pattern acrylic into the tooth. 33. With your handpiece and bur, prepare the tooth with the pattern resin.
The pattern is a ‘substitute’ for the missing tooth structure and should be part of the crown preparation (Fig. 32).
34. Cut the excess of the burnout post so it will not interfere in your preparation (Fig. 33 and 34).
35. Continue preparing the tooth. If PFM is planned, the facial has a shoulder margin while the lingual has a chamfer margin. Preparation procedures are shown below: (Fig. 35-38)
Fig. 32. Preparing the tooth to receive a full crown
Fig. 33 and 34. Cut the excess burnout post

Adarve and Seong @ 2010 University of Minnesota School of Dentistry
17
36. The most important step in preparation is to measure if you have achieved the Ferrule height of 2 mm. Use your probe to measure it. If there is none, make sure to replace your margin at a more apical level without violating the biologic width to achieve the height your need for retention and resistance. Also to provide 1.0mm thickness of tooth structure around the post (see arrows). (Fig. 39 and 40).
Fig. 35 to 38. Finalizing the Preparing the tooth and shaping the CPC pattern resin
Fig. 39 and 40. Evaluating the Ferrule Height
1.0mm tooth structure around the post

Adarve and Seong @ 2010 University of Minnesota School of Dentistry
18
37. If there is no need to modify your preparation, remove the resin pattern
acrylic and put it in a container with water and it should be ready for the casting procedure (Fig. 41)
CONGRATULATIONS! You made it! You just had your first customized cast post and core acrylic resin pattern using the direct technique. Are you ready to apply what you have learned in this module in fabricating CPC pattern? In the extension you will fabricate a pattern out of wax and using indirect technique. This time it is going to be in the posterior tooth, typically multi-rooted! Carry on!
Clinical Relevance In the preceding module, direct technique of acrylic pattern fabrication followed the sequence below:
1. Recognize the indication and restorability of the tooth to receive cast post and core. 2. Determine the length and width of the post 3. Prepare the canal space to receive the post 4. Fabricate the acrylic pattern 5. Prepare the tooth to receive the crown
Notice that canal space is prepared first before tooth preparation. In several clinical situations, however, where determining the restorability of the tooth seems to be a challenge, preparing the tooth for final crown restoration should be done first before the canal space is prepared. By preparing the tooth in ideal way, one can see well whether ferrule is enough to do a cast post and core or not. It will help in recognizing the indication and restorability for CPC restoration. If the tooth, after tooth preparation, is left with little tooth structure, then one can conservatively prepare the canal space in order to still maintain the 1.0 mm thickness of the tooth structure.
Fig. 41. Completed CPC pattern resin

Adarve and Seong @ 2010 University of Minnesota School of Dentistry
19
INDIRECT FABRICATION OF CPC WAX PATTERN
1. Determine Restorability • Examine the broken down tooth #12. Notice that the lingual cusp has
been broken and missing. The only remaining tooth structure is the buccal cusp and has a large carious lesion that undermines the cusp. To simulate the tooth condition, draw a large carious lesion on your typodont tooth #12 (Fig. 42).
Instructor’s Notes on Module Extensions This module extension is application of the concepts and procedure you learned from this module. In this exercise, you will be asked to work on tooth # 12 and fabricate a Cast Post and Core pattern. The modifications are as follows:
a. You need to prepare the tooth first. Prepare a PFM restoration on a badly broken down #12. Remember Ferrule!
b. This time, we are using indirect technique. 1. You will be supplied with an impression post 2. Use this post to take the impression of the post space you have
prepared. 3. You need to apply adhesive on the post for the impression material to
stick. 4. Inject a wash impression on the canal and stick the impression post 5. Take impression of the arch including the post 6. Your goal is to take impression of the arch which includes the very
tooth you are restoring and its post space. 7. Pour the impression, to produce master cast the master cast 8. Once you have the master cast, you then develop the CPC Pattern
using inlay wax instead of acrylic resin pattern. c. Use inlay wax to shape your post and core d. Develop a wax pattern of your CPC
Fig. 42. Broke tooth #12
Large carious lesion undermining the buccal cusp

Adarve and Seong @ 2010 University of Minnesota School of Dentistry
20
• Does it have ferrule? Use your probe to measure. Determine if you can establish 2 mm height after tooth preparation. If not, prepare the tooth and establish the margin of the preparation subgingivally (Fig. 43 and 44).
2. Prepare the tooth for full crown to receive PFM restoration (Fig. 45).
3. Ask yourself after the preparation; were you able to establish 2 mm ferrule height and 1.0 mm thickness? Get the periodontal probe and measure for ferrule at the margin (Fig. 46,47 and 48)
Fig. 43 and 44. Measuring the Ferrule using the periodontal probe
Fig. 45. Preparing the tooth for full crown restoration
Fig. 46 and 47. Measuring Ferrule height

Adarve and Seong @ 2010 University of Minnesota School of Dentistry
21
4. Continue with your preparation, remove the unsupported cusp. (This might otherwise just break clinically and will weaken your restoration). Reduce the height of the tooth structure to gain ‘bulk’ for strength (Fig. 49,50 and 51).
Fig. 48. Measuring Ferrule height
Fig. 49, 50 and 51. Removal of the unsupported tooth structure that are otherwise weak
Adarve and Seong @ 2010 University of Minnesota School of Dentistry
22
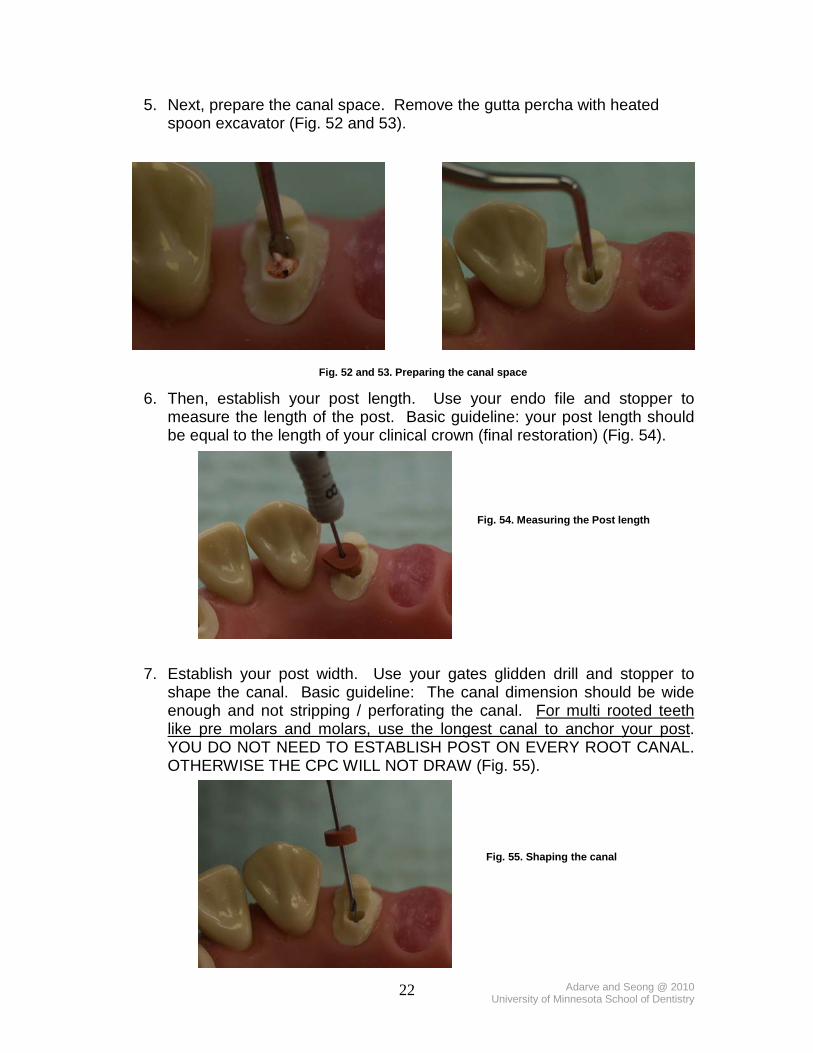
5. Next, prepare the canal space. Remove the gutta percha with heated spoon excavator (Fig. 52 and 53).
6. Then, establish your post length. Use your endo file and stopper to measure the length of the post. Basic guideline: your post length should be equal to the length of your clinical crown (final restoration) (Fig. 54).
7. Establish your post width. Use your gates glidden drill and stopper to shape the canal. Basic guideline: The canal dimension should be wide enough and not stripping / perforating the canal. For multi rooted teeth like pre molars and molars, use the longest canal to anchor your post. YOU DO NOT NEED TO ESTABLISH POST ON EVERY ROOT CANAL. OTHERWISE THE CPC WILL NOT DRAW (Fig. 55).
Fig. 52 and 53. Preparing the canal space
Fig. 54. Measuring the Post length
Fig. 55. Shaping the canal

Adarve and Seong @ 2010 University of Minnesota School of Dentistry
23
8. Try to fit in your impression post or burnout post. Make sure they are ‘loosely fitting’ the canal. You can use either of the two or any other plastic material. The purpose of this is just to support the impression material when you take impression of the canal (Fig. 56 and 57).
9. Take the impression. Fit the tray (Fig. 58). Dispense a light-body impression material into the canal (Fig. 59). Insert your burnout post or impression post (Fig. 60) and cover the post with the impression material (Fig. 61). With your heavy-bodied impression material loaded on tray, take the impression.
Fig. 60. Inserting the post
Fig. 58. Fitting the Tray Fig. 59. Dispensing impression material in canal
Fig. 56 and 57. Fitting the post inside the canal
Fig. 61. Cover the post with more impression material

Adarve and Seong @ 2010 University of Minnesota School of Dentistry
24
10. Once the impression material sets, remove the tray. Your impression should look like this (Fig. 62 and 63).
11. Pour the impression and make a master cast (Fig. 64). Verify that your master cast was able to capture the length and width of your canal.
12. Start fabricating your wax pattern from the master cast. First, fit the burnout post into the canal (Fig. 65).
Fig. 62 and 63. Final Impression
Fig. 64. Master cast
Fig. 65. Burnout Post should be loosely fitting the canal

Adarve and Seong @ 2010 University of Minnesota School of Dentistry
25
13. Then, lubricate the root canal of the tooth in the master cast with
Vaseline® (Fig. 66). With your inlay wax, develop the post pattern. Apply wax on the burnout post (Fig. 67) and insert it inside the canal (Fig. 68). The shape of the wax should be the shape of the canal
14. Proceed with building and developing the core part of the CPC wax pattern. Once the post pattern has been made, put more wax to develop the core part (Fig. 69).
Fig. 66. Lubircate canal Fig. 67. Put inlay wax on the burnout post
Fig. 68. Insert the post in the canal
Fig. 69. Building the core part of the CPC wax pattern

Adarve and Seong @ 2010 University of Minnesota School of Dentistry
26
15. With your wax carver, carve out the shape of your wax post and core pattern. Remember that the core shape of your pattern should be the same shape of the tooth preparation (Fig 70 and 71).
16. Cut the excess burnout post (Fig. 72 and 73).
17. Your Post and Core Wax pattern should appear like this (Fig. 74) and should be ready for spruing, investing and casting (Fig. 75).
Post
Core
Fig. 70. Carving the mesial apect Fig. 71. Carving the distal aspect
Fig. 72. Wax Pattern with burn out post Fig. 73. Finished wax pattern
Fig. 74. CPC Wax pattern Fig. 75. CPC Wax Pattern ready for spruing

Adarve and Seong @ 2010 University of Minnesota School of Dentistry
27
References:
• Goodacre CJ and Spolnik KJ. The Prosthodontic Management of Endodontically Treated Teeth: A Literature Review. Part I:Success and Failure Data, Treatment Concepts. Journal of Prosthodontics. 1994. Dec:3(4): 243-250
• Goodacre CJ and Spolnik KJ. The Prosthodontic Management of Endodontically Treated Teeth: A Literature Review. Part II:Maintaining Apical Seal. Journal of Prosthodontics. 1995. Mar:1(1): 51-53
• Goodacre CJ and Spolnik KJ. The Prosthodontic Management of Endodontically Treated Teeth: A Literature Review. Part III:Tooth Preparation Considerations. Journal of Prosthodontics. 1995. Jun:4(2): 122-128
• Schwartz and Robbins, Post Placement and Restoration of Endodontically Treated Teeth: A Literature Review
• Rosenstiel, et. al. Contemporary Fixed Prosthodontics. 4th Edition • Shillingburgh, Jr. et. al. Fundamentals of Fixed Prosthodontics. 3rd
Edition