scis.regis.edu ● [email protected] cis 206: business software applications week 6 dr. jesús borrego...
TRANSCRIPT

scis.regis.edu ● [email protected]
CIS 206: Business Software Applications
Week 6
Dr. Jesús BorregoRegis University
1
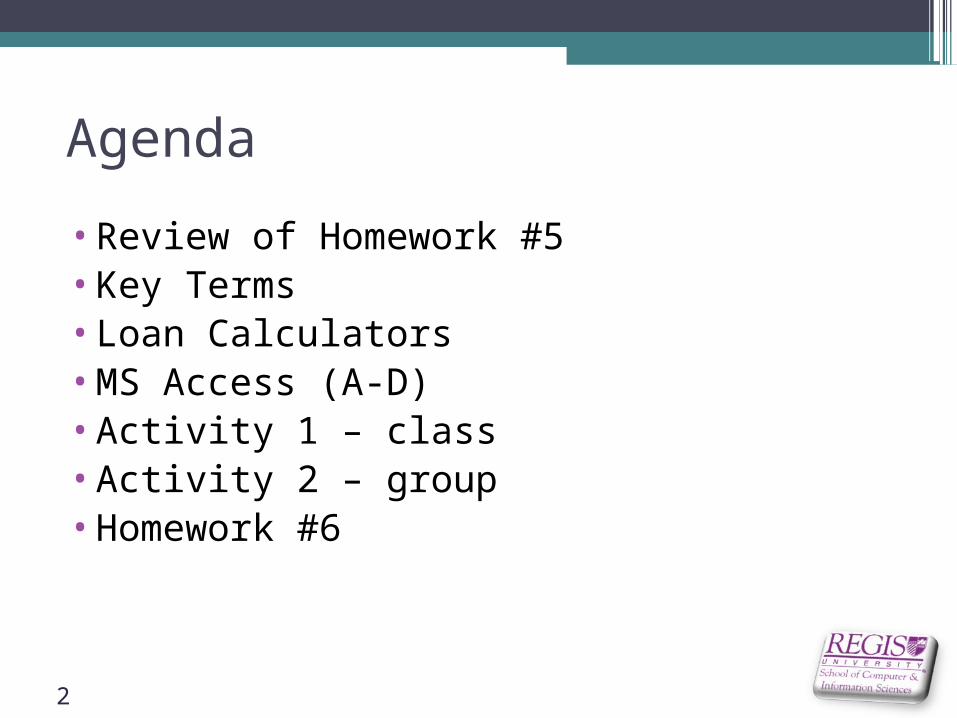
Agenda
•Review of Homework #5•Key Terms•Loan Calculators•MS Access (A-D)•Activity 1 – class•Activity 2 – group•Homework #6
2

Homework #5•Update the homework 4 Excel file•Include a different format with different
colors•Include a title centered with your name
and class, using 28 point font•Change the title color•Add a pie graph for expenses•Prepare in English without APA format•Submit to WorldClass week 5 before week
6
3
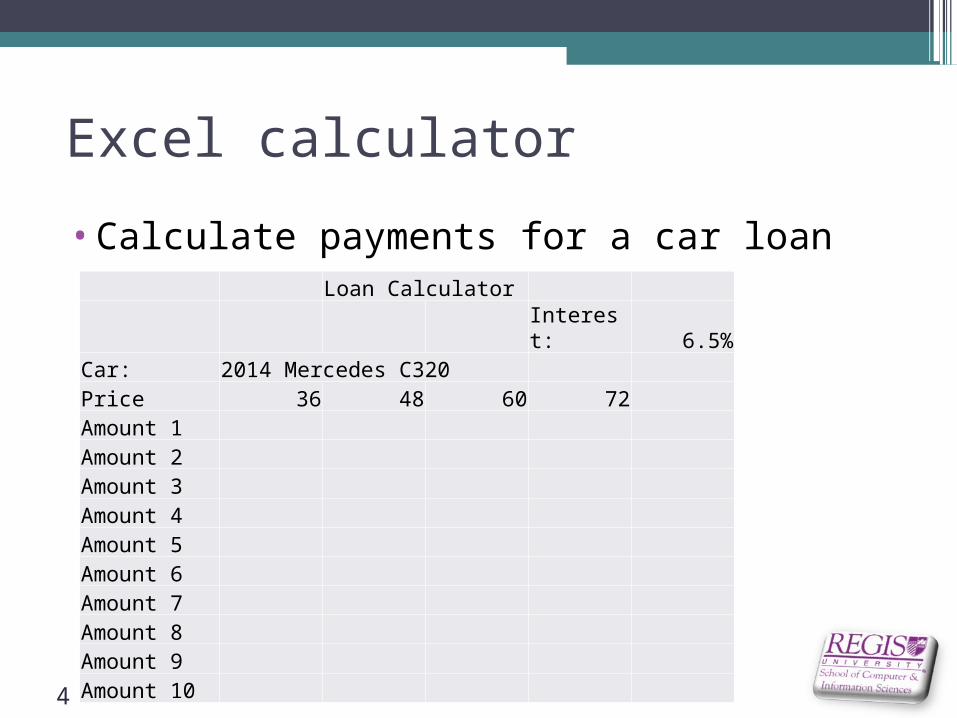
Excel calculator
•Calculate payments for a car loan
4
Loan CalculatorInterest: 6.5%
Car: 2014 Mercedes C320Price 36 48 60 72Amount 1 Amount 2 Amount 3 Amount 4 Amount 5 Amount 6 Amount 7 Amount 8 Amount 9 Amount 10

Payment function
5
Source: http://www.dummies.com/how-to/content/calculating-loan-payments-with-excel-2010s-pmt-fun.html

Key Terms•Database – base de datos•Field – Campo•Key – Clave•Primary Key – Clave primaria•Query - Consulta•Record – Registro•Relational database – Base de datos
relacional•Structured Query Language – Lenguaje
estructurado de consultas•Table - Tabla
6
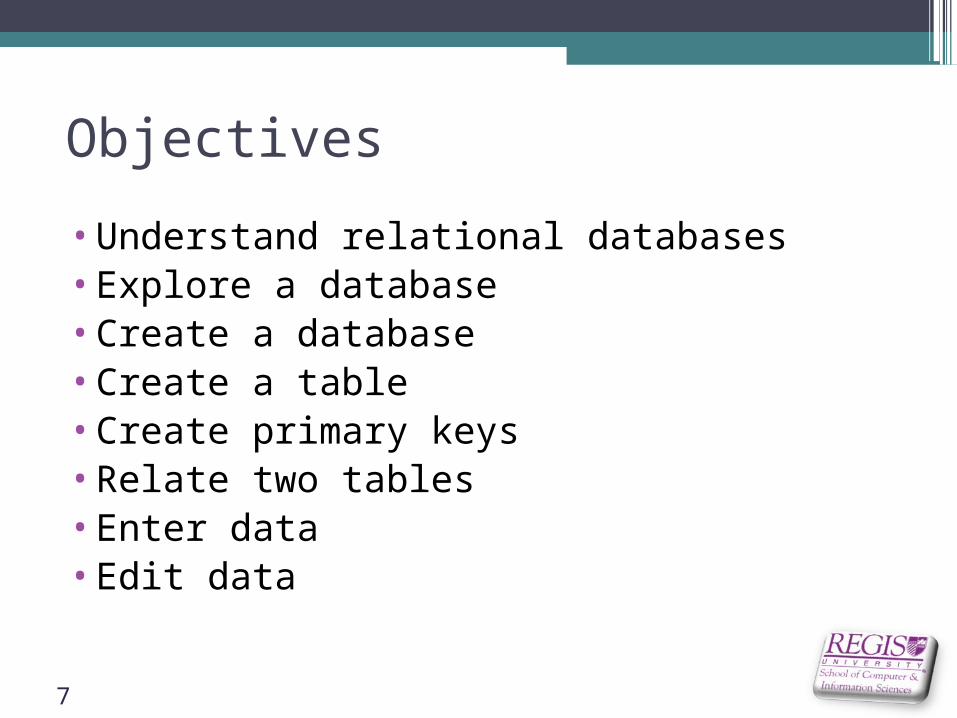
Objectives
•Understand relational databases•Explore a database•Create a database•Create a table•Create primary keys•Relate two tables•Enter data•Edit data
7

Understanding Relational Databases
•Lists of information are related to one another
•Access provides tools that allow sorting, grouping, analyzing and reporting data in many different ways
8
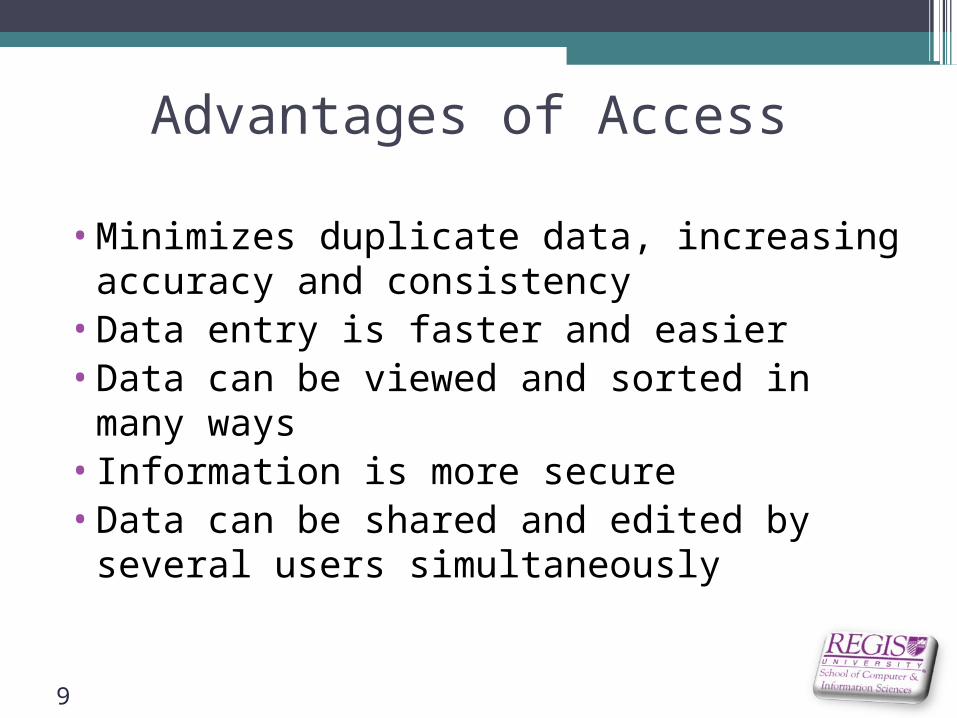
Advantages of Access
•Minimizes duplicate data, increasing accuracy and consistency
•Data entry is faster and easier•Data can be viewed and sorted in many
ways•Information is more secure•Data can be shared and edited by several
users simultaneously
9
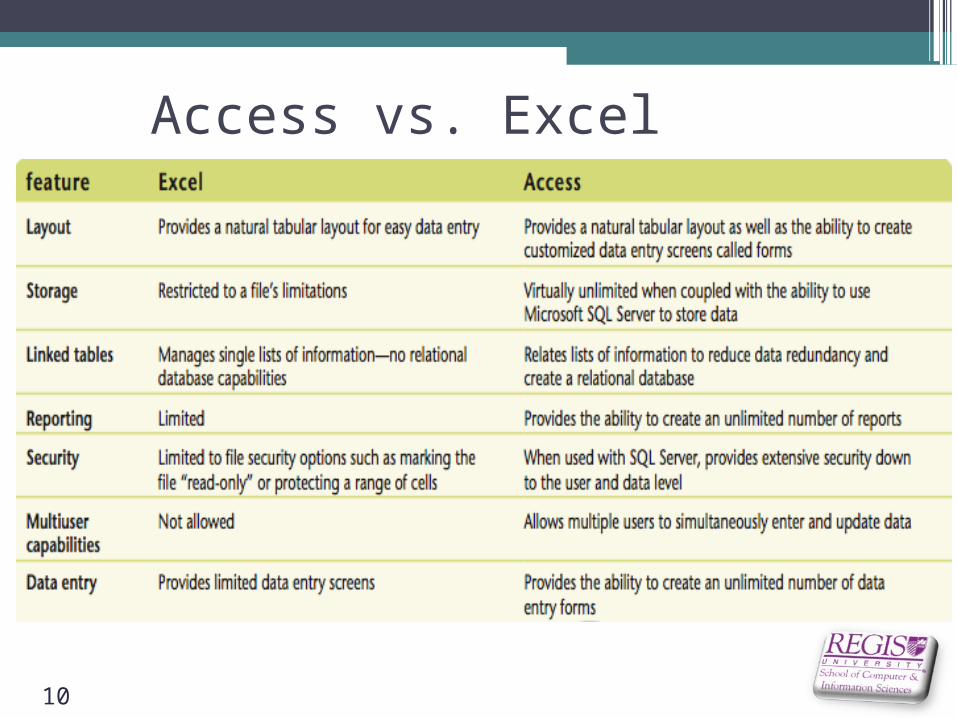
Access vs. Excel
10
Exploring a Database
•Access can be opened in the following ways:▫From the Start menu▫From an Access shortcut icon▫From a pinned program on the taskbar▫By double-clicking an Access database file
on your computer
11

Access Objects
12
Creating a Database
•Start by using an Access template or by opening a blank database
•Table Design View provides the most options for defining fields
•Datasheet View is a spreadsheet-like view of the data in a table
13
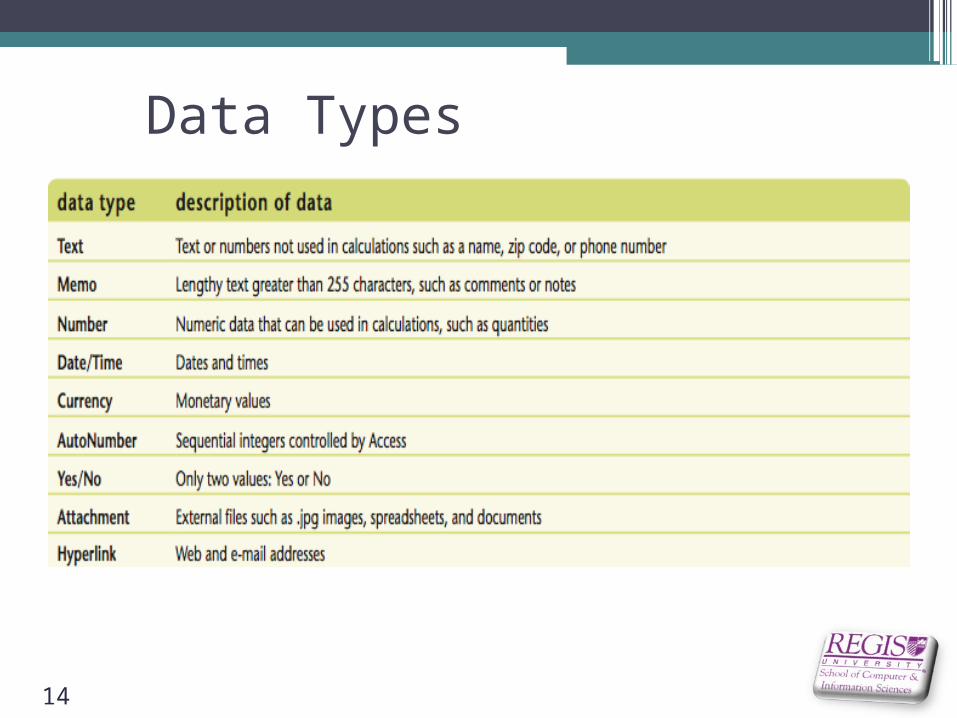
Data Types
14

Creating a Table
•3 essential tasks in creating a table:* Naming the table* Naming the fields* Selecting data type for each field (e.g., numbers, text, dates)
15
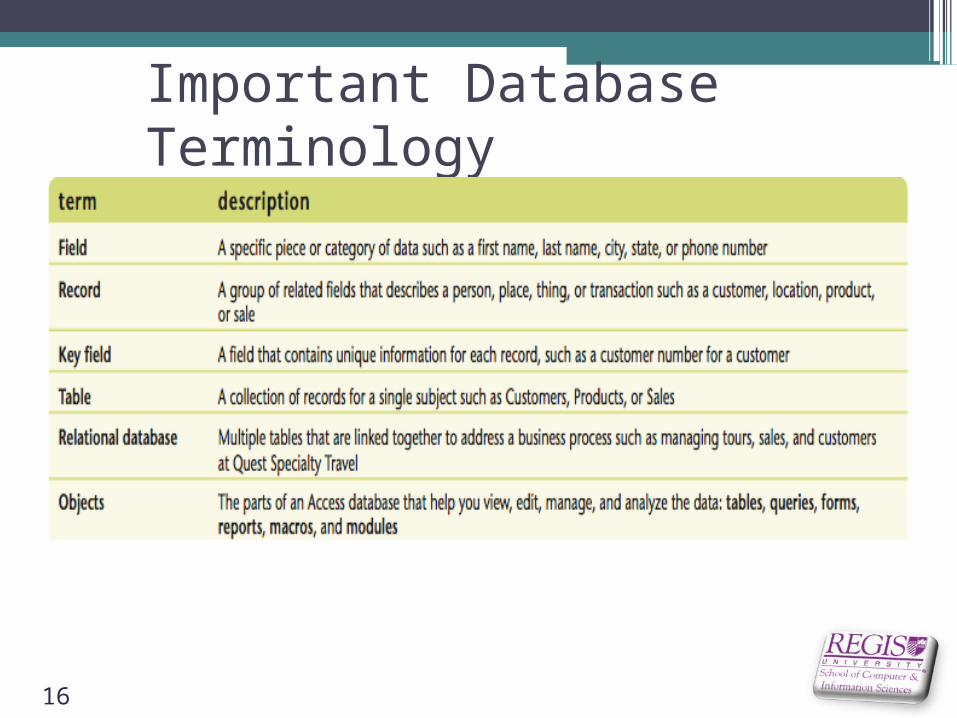
Important Database Terminology
16
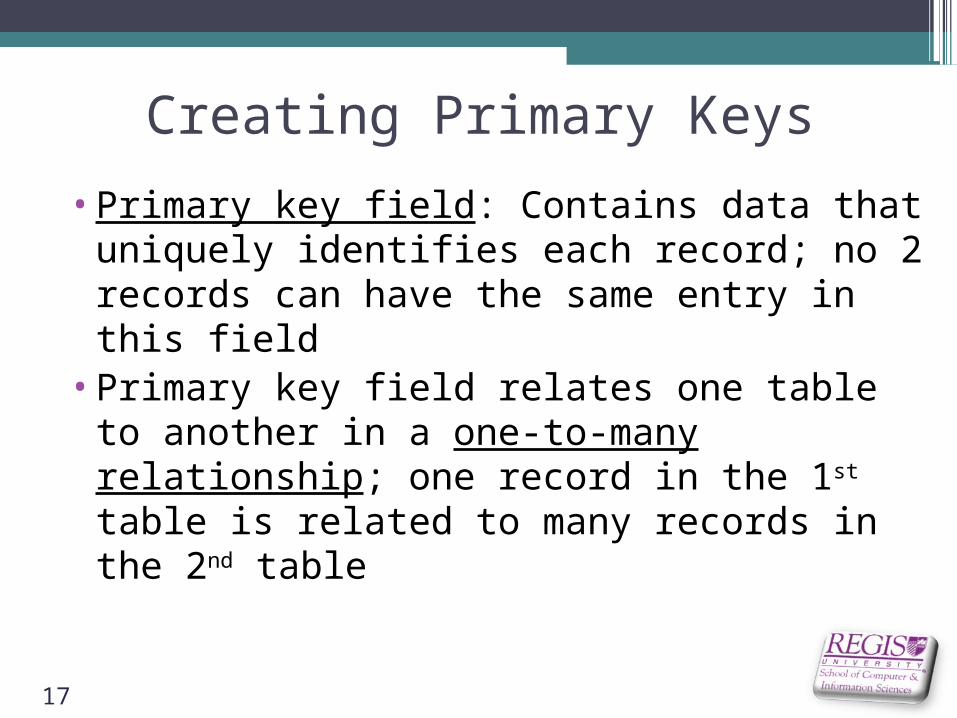
Creating Primary Keys
•Primary key field: Contains data that uniquely identifies each record; no 2 records can have the same entry in this field
•Primary key field relates one table to another in a one-to-many relationship; one record in the 1st table is related to many records in the 2nd table
17

Designating the Primary Key Field
18
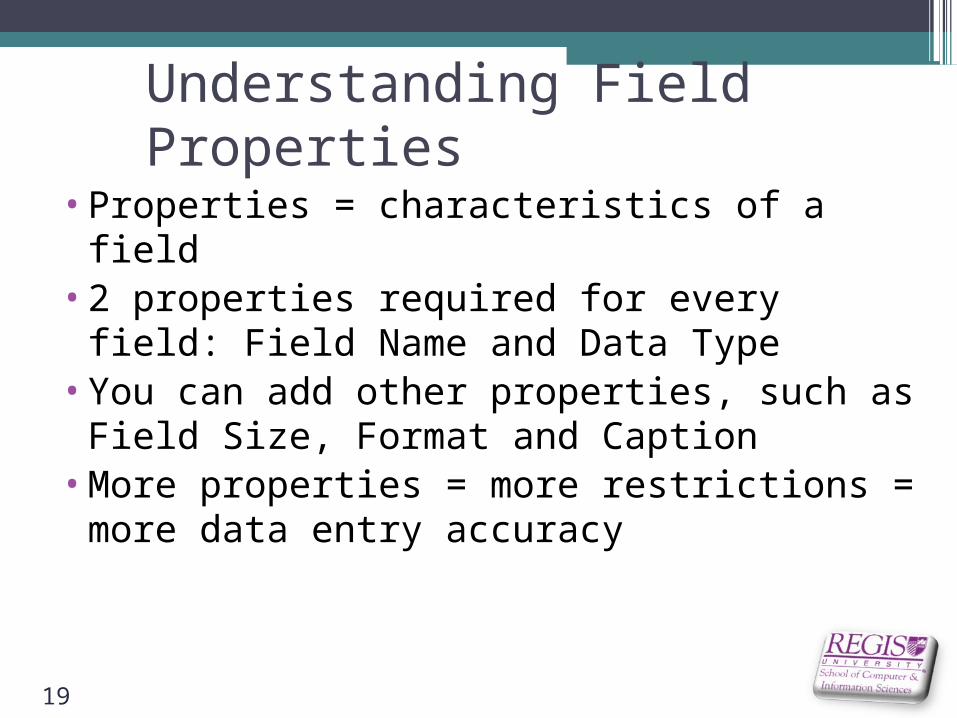
Understanding Field Properties
•Properties = characteristics of a field•2 properties required for every field: Field
Name and Data Type•You can add other properties, such as Field
Size, Format and Caption•More properties = more restrictions =
more data entry accuracy
19

Relating Two Tables
•Tables must be linked before queries, forms or reports can be created that utilize fields from more than one table
•Tables are linked in a one-to-many relationship
20
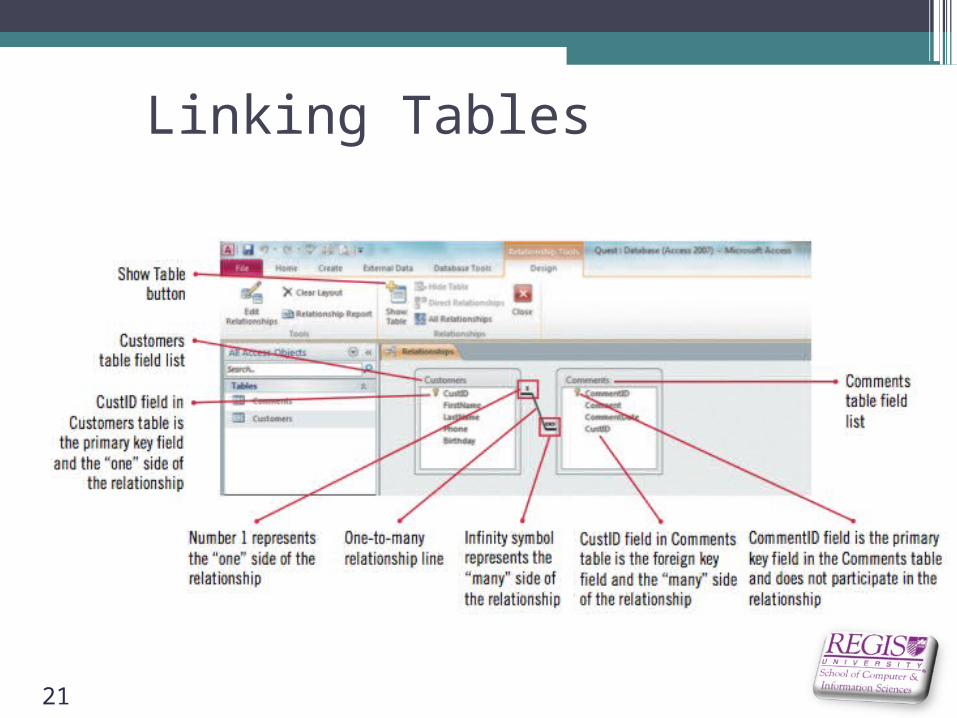
Linking Tables
21

Entering Data
•Focus: ▫ Always highlighted in a different color to
make it easier to find on the page▫ Refers to which data would be entered or
edited if you started typing
22
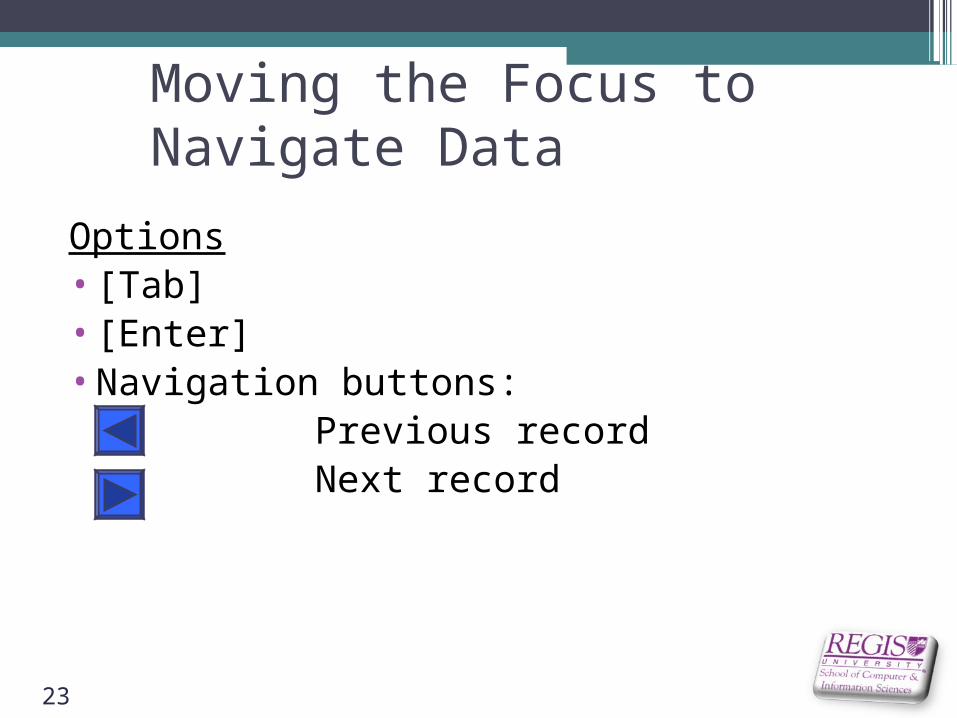
Moving the Focus to Navigate Data
Options•[Tab]•[Enter]•Navigation buttons: Previous record Next record
23
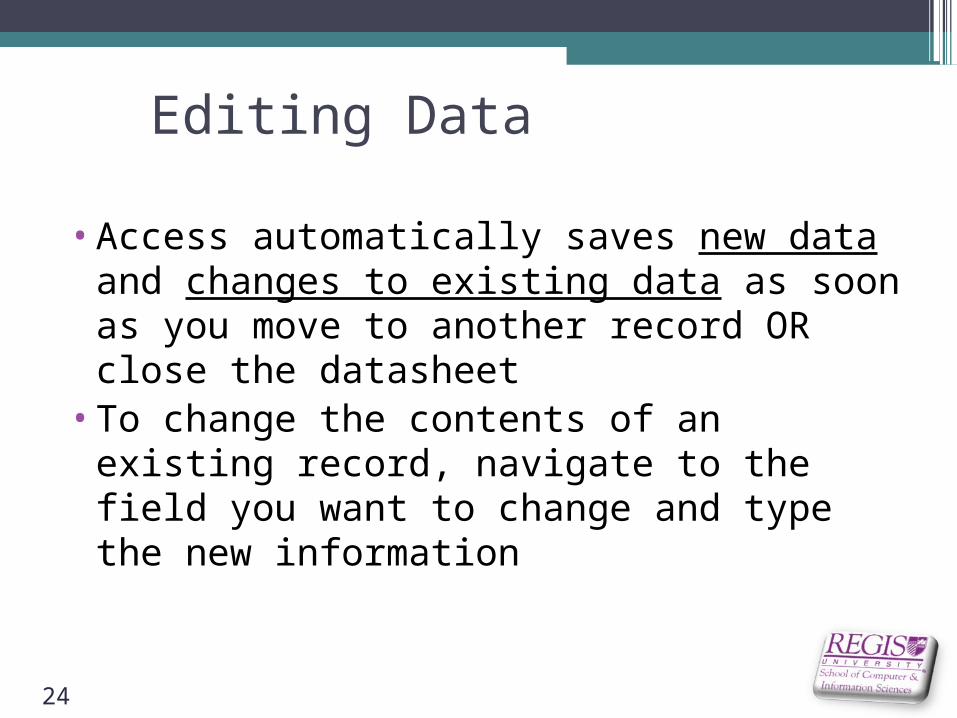
Editing Data
•Access automatically saves new data and changes to existing data as soon as you move to another record OR close the datasheet
•To change the contents of an existing record, navigate to the field you want to change and type the new information
24
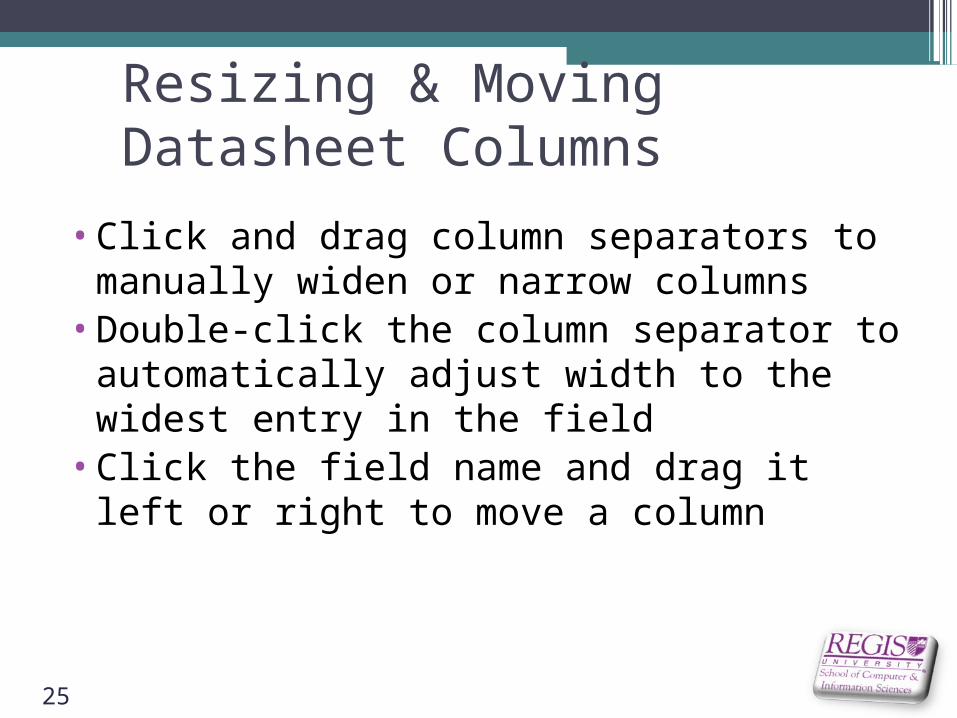
Resizing & Moving Datasheet Columns
•Click and drag column separators to manually widen or narrow columns
•Double-click the column separator to automatically adjust width to the widest entry in the field
•Click the field name and drag it left or right to move a column
25

Keyboard Shortcuts for Editing
26

Summary
•Understanding relational databases•Exploring databases•Creating databases•Creating tables•Creating primary keys•Relating two tables•Entering and editing data
27

Activity #1
•Agree on a database to create with 2-4 entities
•Create it using Access
28

Objectives
•Use the Query Wizard•Work with data in a query•Use Query Design View•Sort and find data•Filter data•Apply AND criteria•Apply OR criteria•Format a datasheet
29
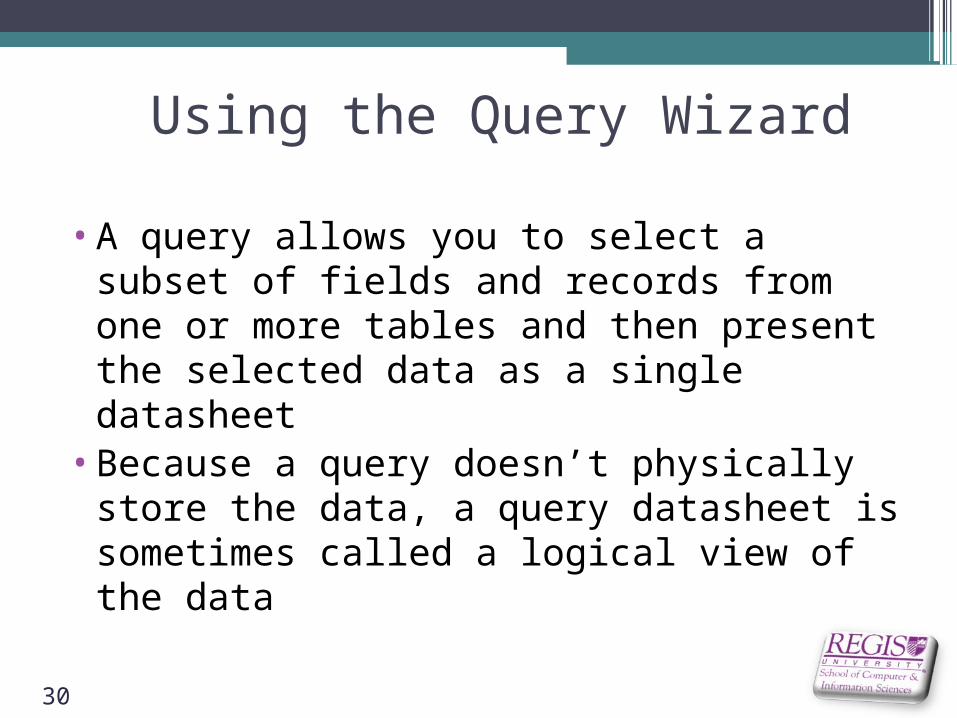
Using the Query Wizard
•A query allows you to select a subset of fields and records from one or more tables and then present the selected data as a single datasheet
•Because a query doesn’t physically store the data, a query datasheet is sometimes called a logical view of the data
30

Using the Query Wizard
• Technically, a query is a set of SQL Technically, a query is a set of SQL (Structured Query Language) (Structured Query Language) instructions, but because you can use instructions, but because you can use Access query tools such as Query Design Access query tools such as Query Design View, you are not required to know SQL to View, you are not required to know SQL to build or use Access queriesbuild or use Access queries
31

Using the Query Wizard
32
Working with Data in a Query
•You enter and edit data in a query datasheet the same way you do in a table datasheet
•Any edits you make in a query datasheet are permanently stored in the underlying tables, and are automatically updated in all views of the data in other queries, forms, and reports
33

Working with Data in a Query
34
Using Query Design View
•Use Query Design View to:▫Add, delete, or move the fields in an
existing query, to specify sort orders, or to add criteria to limit the number of records shown in the resulting datasheet
▫Create a new query from scratch
35

Using Query Design View
•Query Design View presents the fields you can use for that query in small windows called field lists
•If you use the fields of two or more related tables in the query, the relationship between two tables is displayed with a join or link line identifying which fields are used to establish the relationship
36

Using Query Design View
37
Sorting and Finding Data
•Works the same way for queries as it does for tables
•Data can be sorted by clicking the list arrow on a datasheet’s column heading, then click a sorting option
•Data can also be sorted by using the Sort and Find buttons on the Home tab
38

Sorting and Finding Data
39
Filtering Data• Filters provide a temporary way to Filters provide a temporary way to
display a subset of records that display a subset of records that match given criteriamatch given criteria
• Filters are not used to calculate Filters are not used to calculate sums, averages, counts, etc.sums, averages, counts, etc.
• Filters are removed when the Filters are removed when the datasheet datasheet is closed
• Filters can, however, be saved as Filters can, however, be saved as queriesqueries
40

Filtering Data•Filter By Selection: Filtering by a
given field value. Filters records for an exact match.
•Filter By Form: Filters by comparative data
41

Wildcards•Used to search for a pattern;
represents any character•Entered as criteria•? Used to search for a single
character•* Used to search for any number of
characters
42

Filters vs. Queries
43
Applying AND Criteria
•AND criteria means all criteria must be true for the record to be selected
•Created by entering 2 or more criteria in the same Criteria row of the query design grid
44

Criteria Syntax
•Quotation marks (“) around text criteria and pound signs (#) around date criteria are automatically added by Access
•Criteria in Number, Currency, and Yes/No fields are not surrounded by any characters
45
Searching for Blank Fields
•2 common criteria are Is Null and Is Not Null
•Is Null – Finds all records where no entry has been made
•Is Not Null – Finds all records where any entry has been made (even if zero)
46

Comparison Operators
47
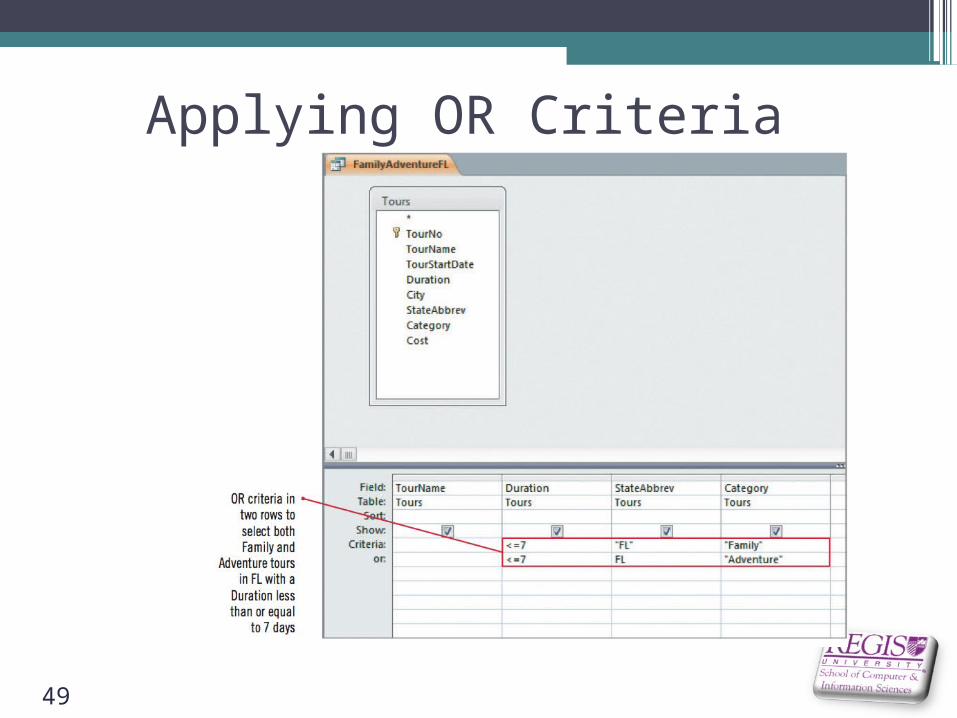
Applying OR Criteria
•OR criteria means any one criterion must be true for the record to be selected
•Created by entering 2 or more criteria on different Criteria rows of the query design grid
•Also created by entering 2 or more criteria in the same Criteria cell separated by OR
48
Applying OR Criteria
49
Formatting a Datasheet
•Can: Change font size, font face, colors, gridlines
•Cannot: Add custom headers, footers, images, subtotals
50
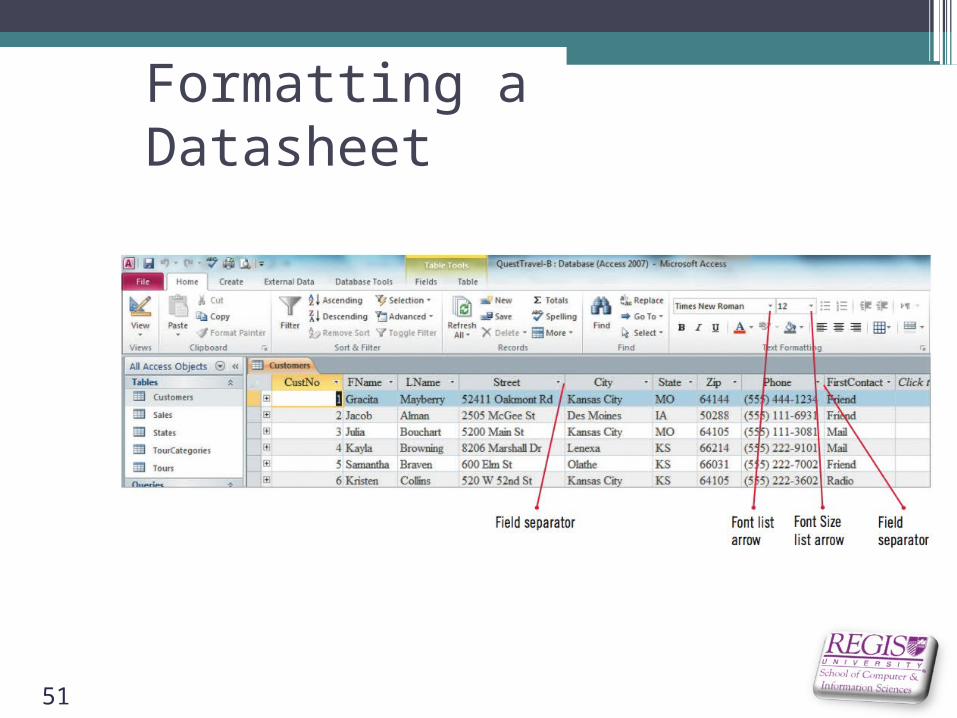
Formatting a Datasheet
51
Summary
•Using the Query Wizard•Working with data in a query•Using Query Design View•Sorting and finding data•Filtering data•Applying AND criteria•Applying OR criteria•Formatting a datasheet
52
Objectives
•Use the Form Wizard•Create a split form•Use Form Layout View•Add fields to a form•Modify form controls•Create calculations•Modify tab order•Insert an image
53

Using the Form Wizard
•A form is an Access database object that allows you to arrange the fields of a record in any layout so you can enter, edit, and delete records
•One way to create a form is by using the Form Wizard
•The Wizard asks you questions to determine the information you want
•
54
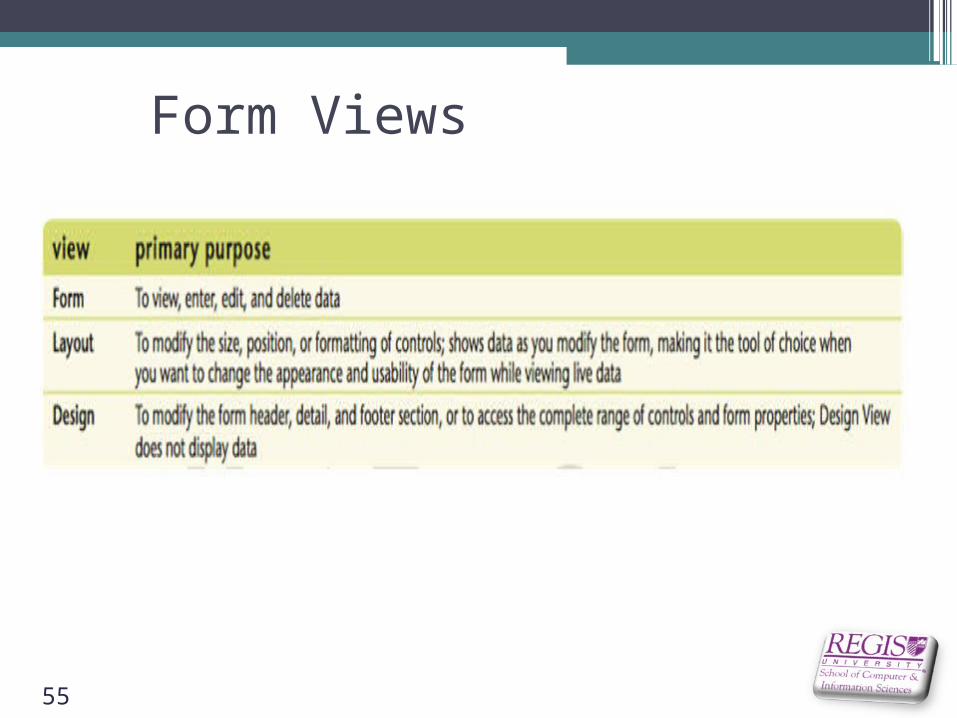
Form Views
55
Creating a Split Form
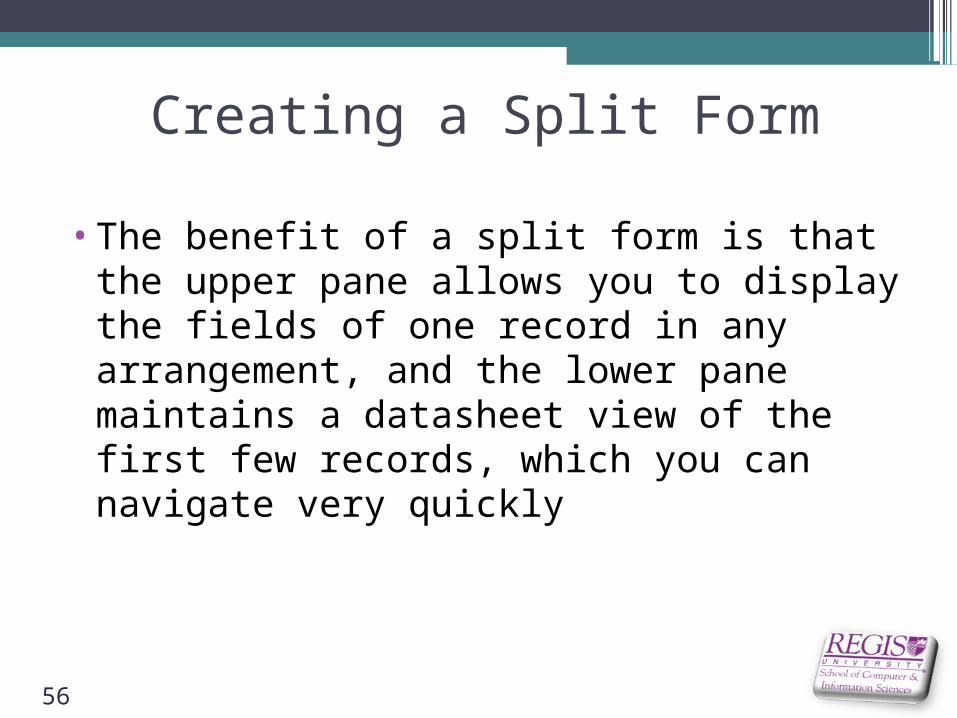
•The benefit of a split form is that the upper pane allows you to display the fields of one record in any arrangement, and the lower pane maintains a datasheet view of the first few records, which you can navigate very quickly
56
Form Creation Tools
57
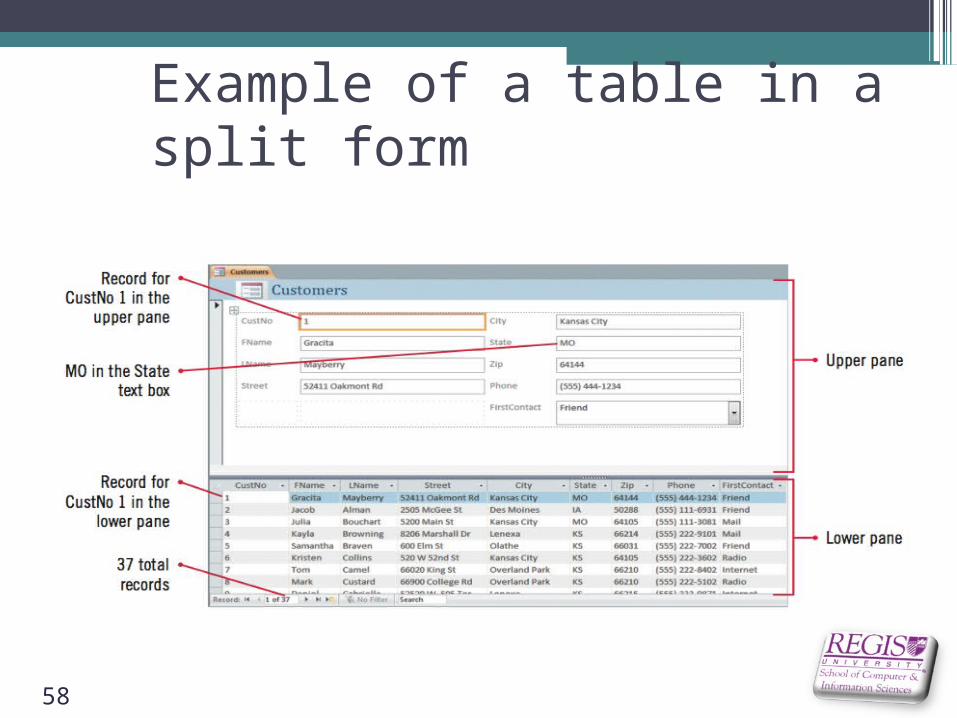
Example of a table in a split form
58
Using Form Layout View
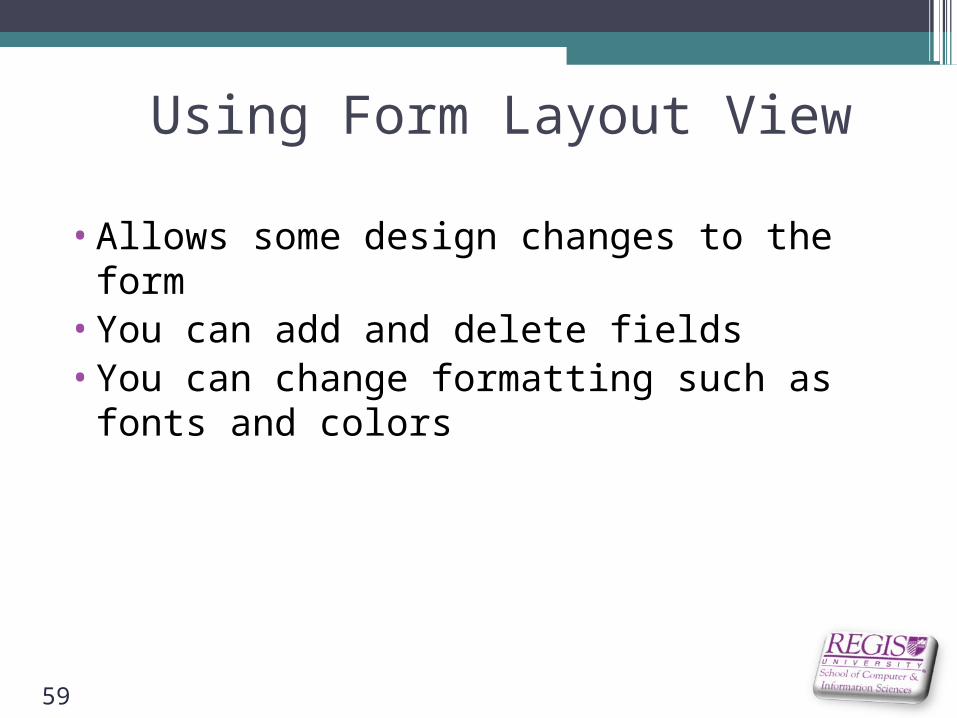
•Allows some design changes to the form•You can add and delete fields•You can change formatting such as fonts
and colors
59

Using Form Layout View
60
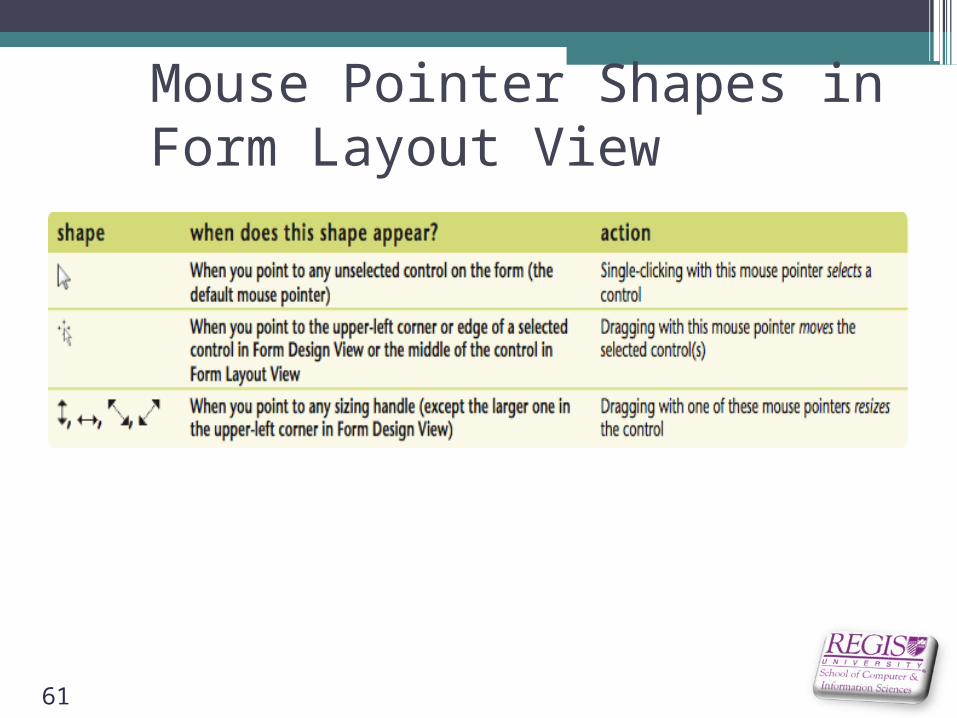
Mouse Pointer Shapes in Form Layout View
61
Adding Fields to a Form
•Can be done in Layout View or Design View using Field List window
•To add a field: drag it from the Field List to the location you want
•When you add a new field, 2 controls are created: label and text box
•To delete a field: click to select the field, then press [Delete]
62

Field List in Form Layout View
63
Bound vs. Unbound Controls
•Every item on a form is a control, such as text boxes and labels
•Bound controls display data•Unbound controls do not display data
64
Modifying Form Controls•Many common properties can be
modified in Form View or Layout View
•Some properties (such as Control Source) can only be viewed and changed on the Property Sheet
65
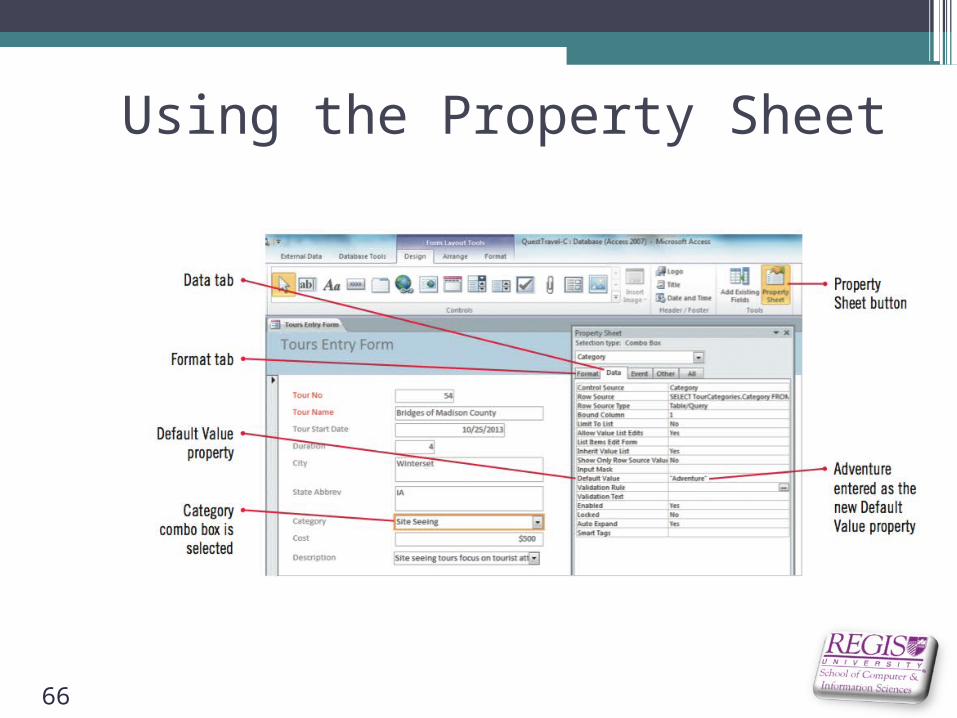
Using the Property Sheet
66
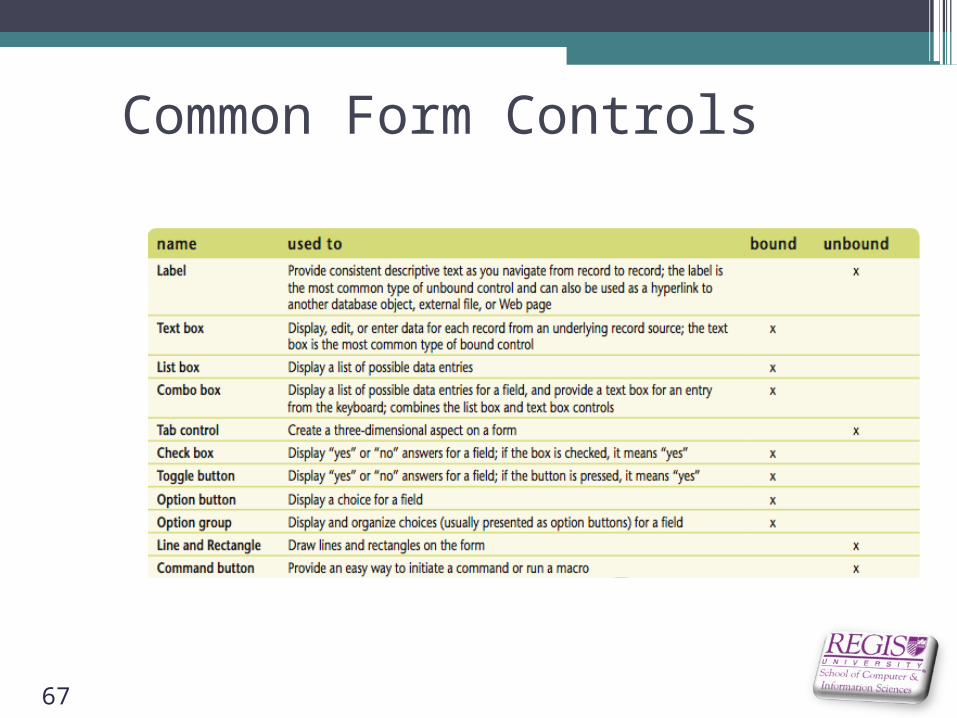
Common Form Controls
67
Creating Calculations•Calculations are used to add items
such as subtotals and counts to a form
•Expressions are needed to create a calculation
68
Creating Calculations•Expression: an equal sign and a
combination of symbols •Square brackets must surround a
field name in an expression•Field name must be typed exactly as
it was in Table Design View (except for capitalization)
69

Adding a Text Box to Calculate a Value
70

Sample Expressions
71

Modifying Tab Order
•Tab Stop: determines whether the field accepts the focus and therefore determines where the focus moves as you press [Tab]
•Tab Order: the order the focus moves as you press [Tab]
•All text boxes and combo boxes have a tab stop and are included in the tab order
72
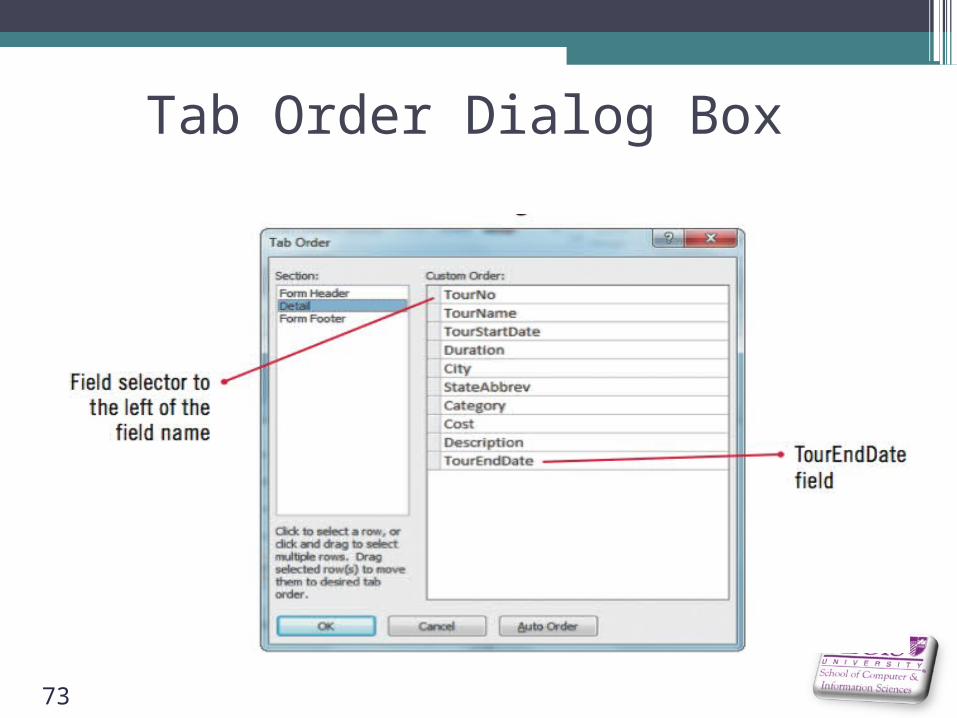
Tab Order Dialog Box
73

Inserting an Image
•Examples are pictures, logos, clip art•The form section you place it in
determines where it will appear on the form
•For example, determine whether you want the image at the top of the form or next to each record
74

Form Sections
75

Adding an Image to the Form Header Section
76
Summary
•Using the Form Wizard•Creating a split form•Using Form Layout View•Adding fields to a form•Modifying form controls•Creating calculations•Modifying tab order•Inserting an image
77
Objectives
•Use the Report Wizard•Use Report Layout View•Review report sections•Apply group and sort orders•Add subtotals and counts•Resize and align controls•Format a report•Create mailing labels
78
Using the Report Wizard
•Report Wizard is one way to create a report
•It is a tool that asks you questions to guide development of the report
•Your responses determine record source, style and layout
•The Wizard helps sort, group and analyze records
79
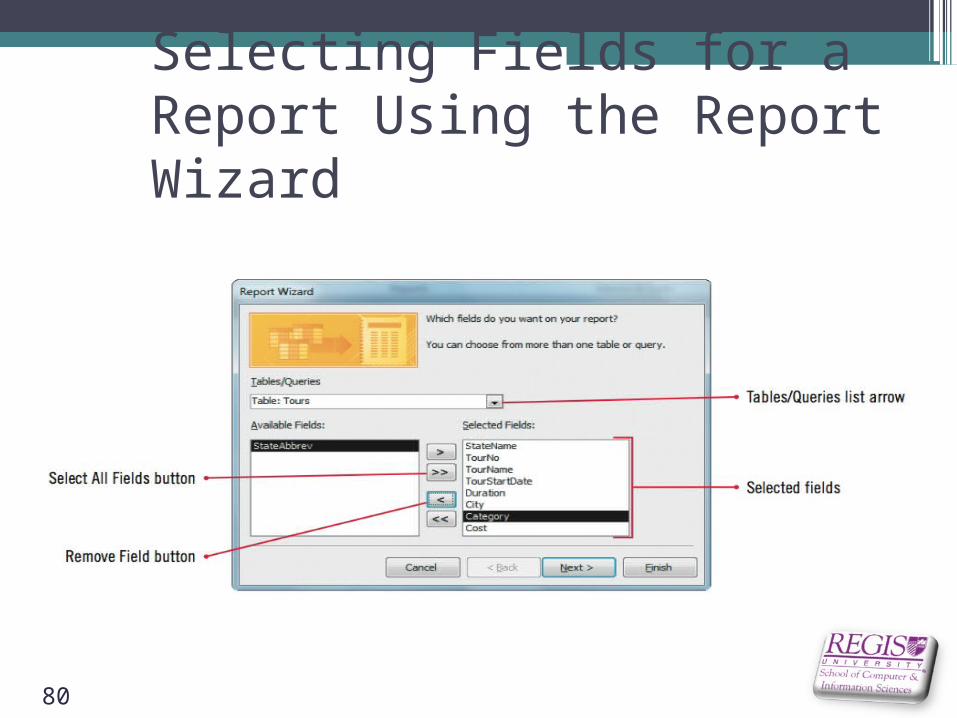
Selecting Fields for a Report Using the Report Wizard
80
Using Report Layout View
•Reports have multiple views that you use for various report-building and report-viewing activities
•Report Layout View applies a grid to the report that helps you resize, move, and position controls
81
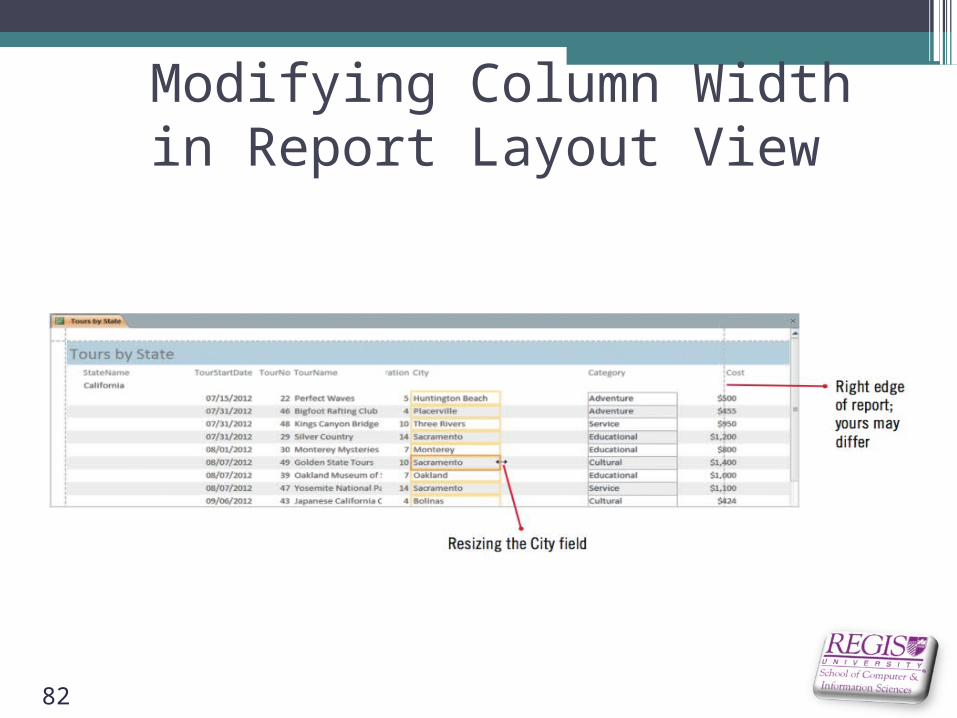
Modifying Column Width in Report Layout View
82
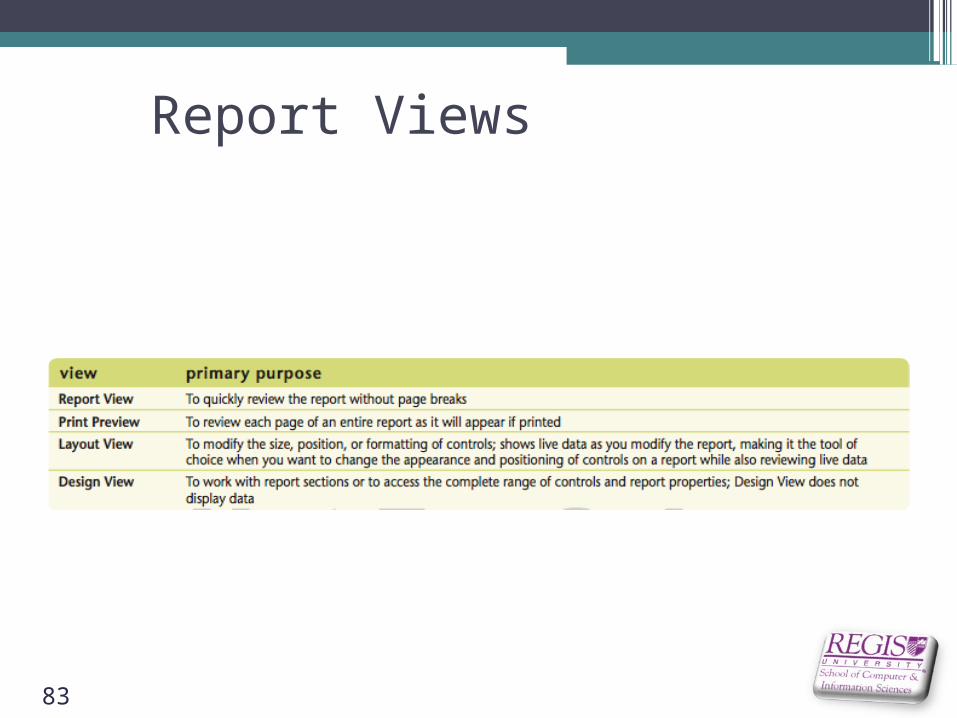
Report Views
83

Reviewing Report Sections
•Report sections determine where and how often controls in that section print in the final report
84
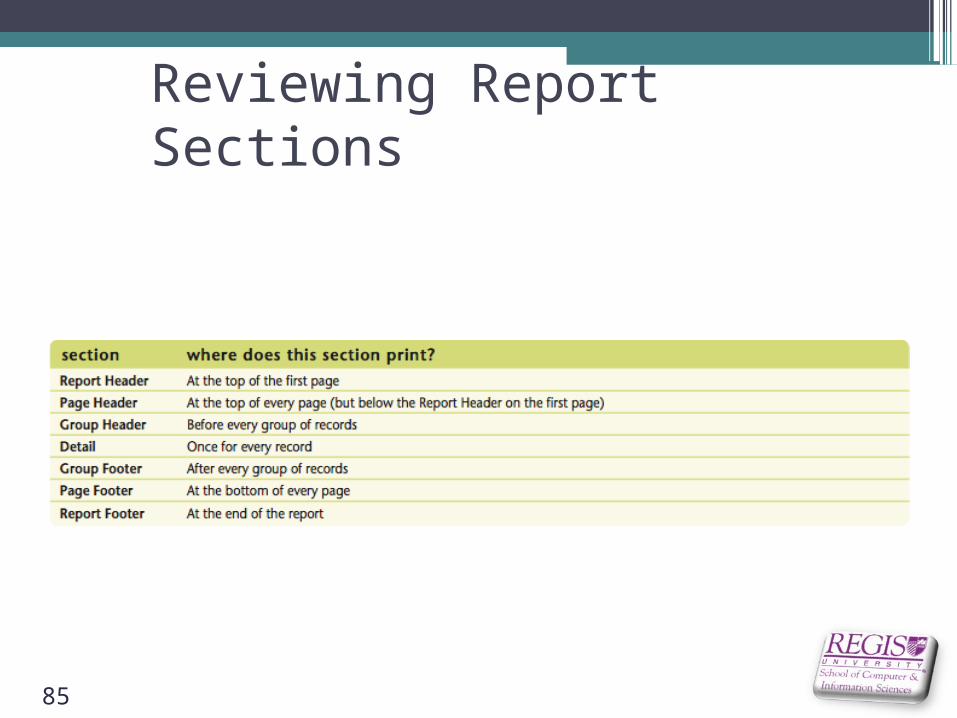
Reviewing Report Sections
85

Applying Group and Sort Orders
•Grouping means to sort records by a particular field plus provide a header and/or footer section before or after each group of sorted records
•To change sorting or grouping options for a report, you must work in Report Design View
86
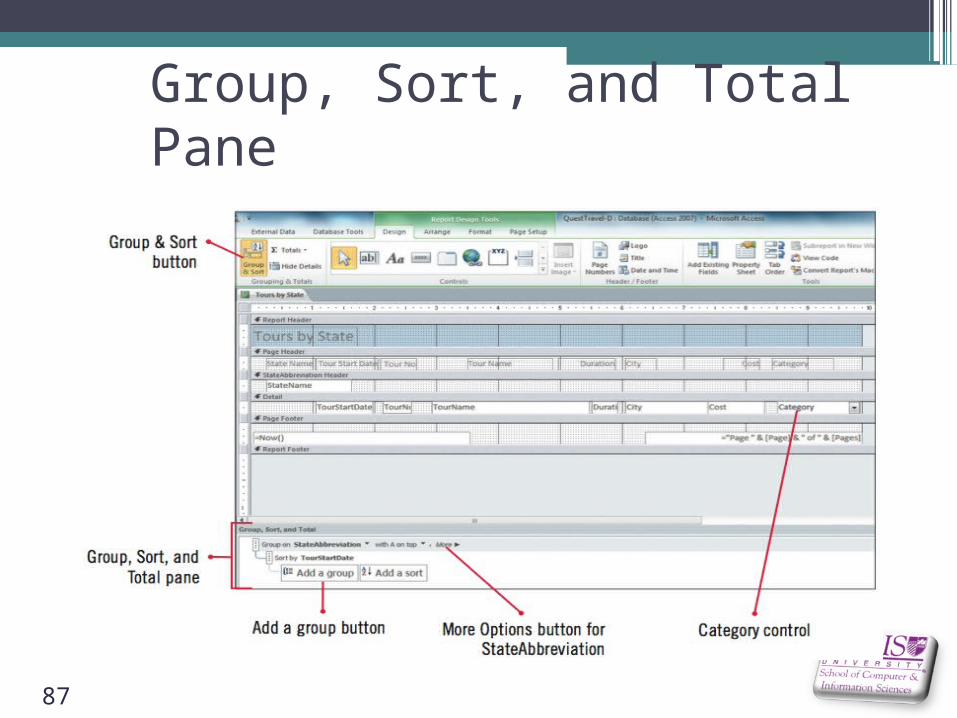
Group, Sort, and Total Pane
87
Adding Subtotals and Counts
•Calculations are used to add subtotals and counts to a report
•Expressions are needed to create a calculation
•Functions are built-in Access formulas•Arguments are information needed by a
function
88
Resizing and Aligning Controls
•You can resize a control by using the ↔ pointer
•After resizing a control, it may need to be realigned
•Two ways to align controls:* Within its own border* With respect to each other
89
Precise Resizing and Aligning•[Ctrl] + arrow key(s) move a control
one pixel at a time•[Shift] + arrow key(s) resize a control
one pixel at a time•Pixel:
* pix = picture* el = element
90
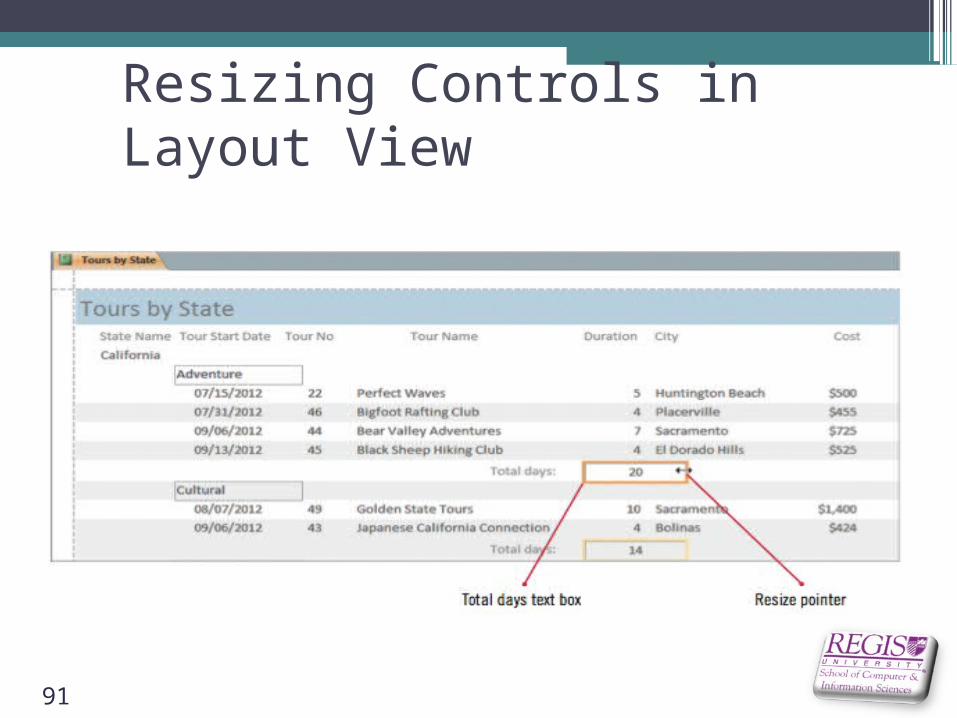
Resizing Controls in Layout View
91
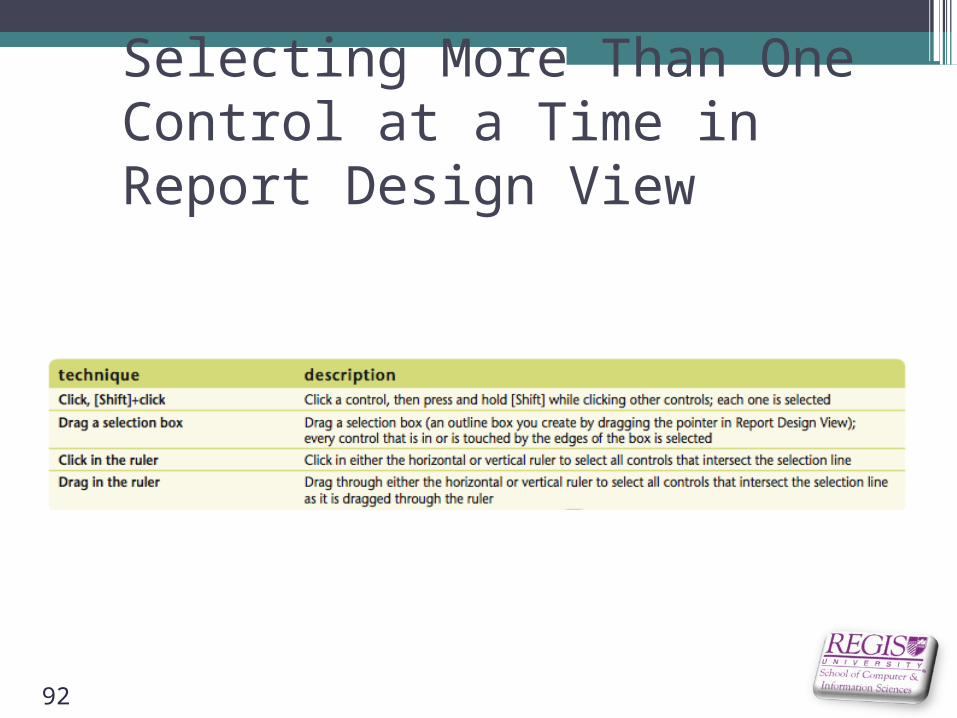
Selecting More Than One Control at a Time in Report Design View
92
Formatting a Report•Formatting can make a report look
more professional and easier to read•Formatting includes:
* Font style, size and color* Background colors* Line thickness and color* Alignment
93
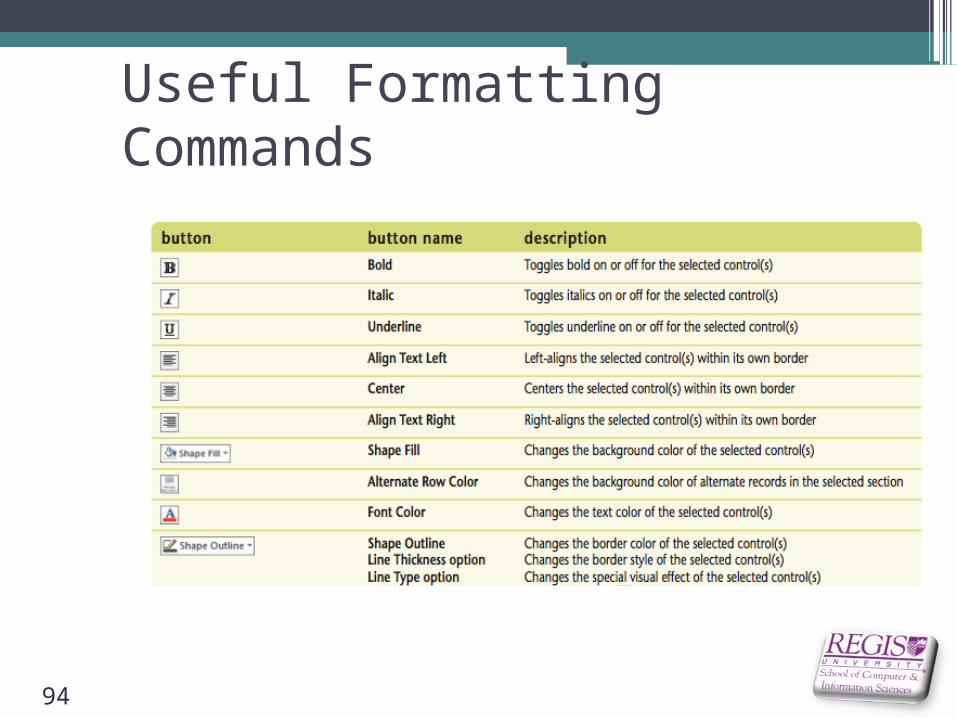
Useful Formatting Commands
94

Creating Mailing Labels
•Any data in your Access database can be converted into labels using the Label Wizard, a special report wizard that precisely positions and sizes information for hundreds of standard business labels
95

Label Wizard Dialog Box
96
Summary
•Using the Report Wizard•Using Report Layout View•Reviewing report sections•Applying group and sort orders•Adding subtotals and counts•Resizing and aligning controls•Formatting a report•Creating mailing labels
97
Homework #6
• You are to create a spreadsheet to calculate the payment for a car loan
• The loan will have 10 car prices, one per row• The loan will have 4 repayment periods (36, 48,
60, and 72 months), one in each column• The spreadsheet will calculate the payment for
each price and repayment period• The interest rate will be placed in a fixed cell and
will be used as a constant in the payment calculation
98
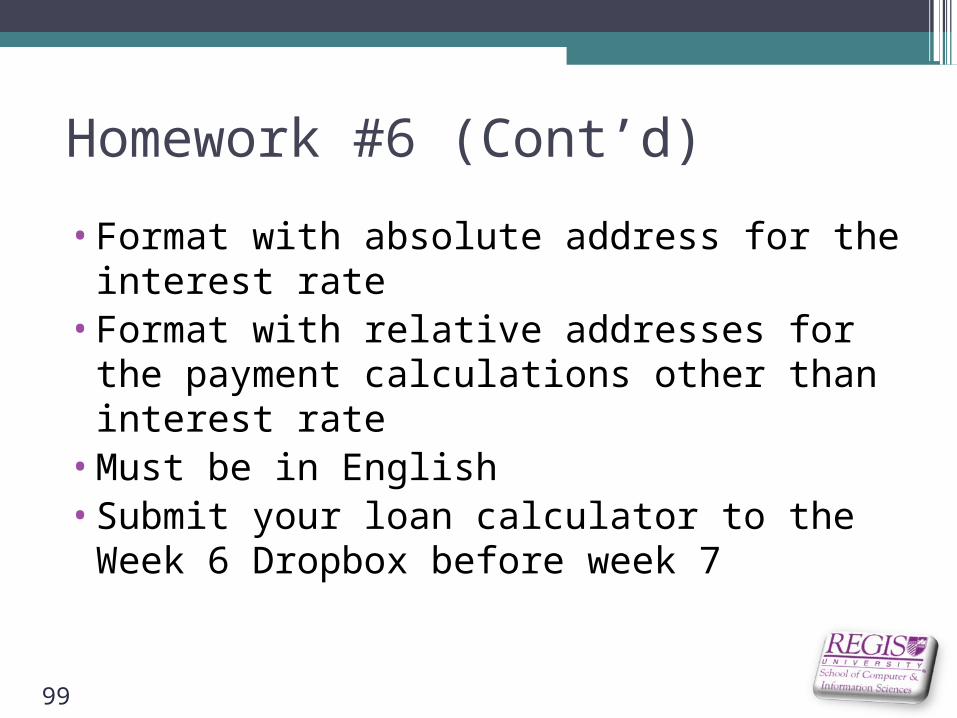
Homework #6 (Cont’d)
•Format with absolute address for the interest rate
•Format with relative addresses for the payment calculations other than interest rate
•Must be in English•Submit your loan calculator to the Week 6
Dropbox before week 7
99

Questions?
100