scheduling in sas 9.4
DESCRIPTION
The SAS scheduling tools enable you to automate the scheduling and execution of SAS jobs across your enterprise computing environment. Scheduling requires four main components:TRANSCRIPT
Scheduling in SAS® 9.4
SAS® Documentation
The correct bibliographic citation for this manual is as follows: SAS Institute Inc 2013. Scheduling in SAS® 9.4. Cary, NC: SAS Institute Inc.
Scheduling in SAS® 9.4
Copyright © 2013, SAS Institute Inc., Cary, NC, USA
All rights reserved. Produced in the United States of America.
Your use of this publication shall be governed by the terms established by the vendor at the time you acquire this publication.
The scanning, uploading, and distribution of this book via the Internet or any other means without the permission of the publisher is illegal and punishable by law. Please purchase only authorized electronic editions and do not participate in or encourage electronic piracy of copyrighted materials. Your support of others' rights is appreciated.
U.S. Government Restricted Rights Notice: Use, duplication, or disclosure of this software and related documentation by the U.S. government is subject to the Agreement with SAS Institute and the restrictions set forth in FAR 52.227–19 Commercial Computer Software-Restricted Rights (June 1987).
SAS Institute Inc., SAS Campus Drive, Cary, North Carolina 27513.
Electronic book 1, June 2013
SAS® Publishing provides a complete selection of books and electronic products to help customers use SAS software to its fullest potential. For more information about our e-books, e-learning products, CDs, and hard-copy books, visit the SAS Publishing Web site at support.sas.com/publishing or call 1-800-727-3228.
SAS® and all other SAS Institute Inc. product or service names are registered trademarks or trademarks of SAS Institute Inc. in the USA and other countries. ® indicates USA registration.
Other brand and product names are registered trademarks or trademarks of their respective companies.
ContentsChapter 1 • SAS Scheduling Overview . . . . . . . . . . . . . . . . . . . . . . . . . . . . . . . . . . . . . . . . . . . . . . 1
About SAS Scheduling . . . . . . . . . . . . . . . . . . . . . . . . . . . . . . . . . . . . . . . . . . . . . . . . . . . 1Overview of the Scheduling Process . . . . . . . . . . . . . . . . . . . . . . . . . . . . . . . . . . . . . . . . 2About Scheduling Servers . . . . . . . . . . . . . . . . . . . . . . . . . . . . . . . . . . . . . . . . . . . . . . . . 5About Schedule Manager in SAS Management Console . . . . . . . . . . . . . . . . . . . . . . . . . 6About Batch Servers . . . . . . . . . . . . . . . . . . . . . . . . . . . . . . . . . . . . . . . . . . . . . . . . . . . . . 7About Scheduling Metadata . . . . . . . . . . . . . . . . . . . . . . . . . . . . . . . . . . . . . . . . . . . . . . . 8
Chapter 2 • Setting Up Scheduling Using Platform Suite for SAS . . . . . . . . . . . . . . . . . . . . . . . 11About Platform Suite for SAS . . . . . . . . . . . . . . . . . . . . . . . . . . . . . . . . . . . . . . . . . . . . 11Summary of Platform Suite for SAS Installation and Configuration Tasks . . . . . . . . . . 12Determining Where to Install Platform Suite for SAS . . . . . . . . . . . . . . . . . . . . . . . . . . 12Defining Users . . . . . . . . . . . . . . . . . . . . . . . . . . . . . . . . . . . . . . . . . . . . . . . . . . . . . . . . 13Installation Considerations . . . . . . . . . . . . . . . . . . . . . . . . . . . . . . . . . . . . . . . . . . . . . . . 14Migration Considerations . . . . . . . . . . . . . . . . . . . . . . . . . . . . . . . . . . . . . . . . . . . . . . . . 14Resolving Issues Related to Scheduling with Platform Suite for SAS . . . . . . . . . . . . . . 15Using Platform Suite for SAS with z/OS . . . . . . . . . . . . . . . . . . . . . . . . . . . . . . . . . . . . 18Further Resources . . . . . . . . . . . . . . . . . . . . . . . . . . . . . . . . . . . . . . . . . . . . . . . . . . . . . . 19
Chapter 3 • Setting Up Scheduling Using Operating System Scheduling . . . . . . . . . . . . . . . . 21About Operating System Scheduling . . . . . . . . . . . . . . . . . . . . . . . . . . . . . . . . . . . . . . . 21Capabilities and Limitations of Operating System Scheduling Servers . . . . . . . . . . . . . 22Summary of Setup Tasks . . . . . . . . . . . . . . . . . . . . . . . . . . . . . . . . . . . . . . . . . . . . . . . . 22Step 1: Assign Local Administration Rights to Users (Windows Only) . . . . . . . . . . . . 22Step 2: Assign Directory and File Permissions . . . . . . . . . . . . . . . . . . . . . . . . . . . . . . . 23Step 3: Define an Operating System Scheduling Server . . . . . . . . . . . . . . . . . . . . . . . . 23Step 4: Assign the Operating System Scheduling Server to a Spawner . . . . . . . . . . . . . 24Using Operating System Scheduling on Windows Systems . . . . . . . . . . . . . . . . . . . . . 24Using Operating System Scheduling on UNIX Systems . . . . . . . . . . . . . . . . . . . . . . . . 26Using Operating System Scheduling on z/OS Systems . . . . . . . . . . . . . . . . . . . . . . . . . 27
Chapter 4 • Setting Up Scheduling Using SAS Distributed In-Process Scheduling . . . . . . . . 29About Distributed In-Process Scheduling . . . . . . . . . . . . . . . . . . . . . . . . . . . . . . . . . . . 29How Distributed In-Process Scheduling Works . . . . . . . . . . . . . . . . . . . . . . . . . . . . . . . 29Summary of Setup Tasks . . . . . . . . . . . . . . . . . . . . . . . . . . . . . . . . . . . . . . . . . . . . . . . . 30Tuning a Distributed In-Process Scheduling Server . . . . . . . . . . . . . . . . . . . . . . . . . . . . 30
Chapter 5 • Setting Up Scheduling Using SAS In-Process Scheduling . . . . . . . . . . . . . . . . . . 31About In-Process Scheduling Servers . . . . . . . . . . . . . . . . . . . . . . . . . . . . . . . . . . . . . . 31Limitations of In-Process Scheduling . . . . . . . . . . . . . . . . . . . . . . . . . . . . . . . . . . . . . . . 31Setup Tasks . . . . . . . . . . . . . . . . . . . . . . . . . . . . . . . . . . . . . . . . . . . . . . . . . . . . . . . . . . . 32Configuration Options in a Clustered Environment . . . . . . . . . . . . . . . . . . . . . . . . . . . . 32Using In-Process Scheduling . . . . . . . . . . . . . . . . . . . . . . . . . . . . . . . . . . . . . . . . . . . . . 33
Chapter 6 • Creating Batch Servers . . . . . . . . . . . . . . . . . . . . . . . . . . . . . . . . . . . . . . . . . . . . . . . 35Understanding Batch Servers . . . . . . . . . . . . . . . . . . . . . . . . . . . . . . . . . . . . . . . . . . . . . 35Defining a SAS Java Batch Server . . . . . . . . . . . . . . . . . . . . . . . . . . . . . . . . . . . . . . . . . 36Defining a SAS DATA Step Batch Server . . . . . . . . . . . . . . . . . . . . . . . . . . . . . . . . . . . 36Defining a Generic Batch Server . . . . . . . . . . . . . . . . . . . . . . . . . . . . . . . . . . . . . . . . . . 38
Chapter 7 • Scheduling Jobs Using Schedule Manager . . . . . . . . . . . . . . . . . . . . . . . . . . . . . . . 39
What Is the Schedule Manager? . . . . . . . . . . . . . . . . . . . . . . . . . . . . . . . . . . . . . . . . . . . 39Creating a Flow . . . . . . . . . . . . . . . . . . . . . . . . . . . . . . . . . . . . . . . . . . . . . . . . . . . . . . . . 40Specifying Dependencies . . . . . . . . . . . . . . . . . . . . . . . . . . . . . . . . . . . . . . . . . . . . . . . . 41Adding Jobs to a Deployed Flow . . . . . . . . . . . . . . . . . . . . . . . . . . . . . . . . . . . . . . . . . . 44Setting Deployed Flow Properties . . . . . . . . . . . . . . . . . . . . . . . . . . . . . . . . . . . . . . . . . 45Deleting Jobs and Flows . . . . . . . . . . . . . . . . . . . . . . . . . . . . . . . . . . . . . . . . . . . . . . . . . 47Scheduling Flows . . . . . . . . . . . . . . . . . . . . . . . . . . . . . . . . . . . . . . . . . . . . . . . . . . . . . . 48Unscheduling Flows . . . . . . . . . . . . . . . . . . . . . . . . . . . . . . . . . . . . . . . . . . . . . . . . . . . . 50
Chapter 8 • Scheduling Jobs from SAS Data Integration Studio . . . . . . . . . . . . . . . . . . . . . . . . 51Overview of Scheduling for SAS Data Integration Studio . . . . . . . . . . . . . . . . . . . . . . . 51Enabling the Scheduling of SAS Data Integration Studio Jobs . . . . . . . . . . . . . . . . . . . 52Deploying Data Integration Studio Jobs for Scheduling . . . . . . . . . . . . . . . . . . . . . . . . 52Troubleshooting the Scheduling of SAS Data Integration Studio Jobs . . . . . . . . . . . . . 53
Chapter 9 • Enabling the Scheduling of Reports . . . . . . . . . . . . . . . . . . . . . . . . . . . . . . . . . . . . . 55How Report Scheduling Works . . . . . . . . . . . . . . . . . . . . . . . . . . . . . . . . . . . . . . . . . . . 55Enabling Report Scheduling with In-Process Scheduling . . . . . . . . . . . . . . . . . . . . . . . 56Enabling Report Scheduling with Platform Suite for SAS . . . . . . . . . . . . . . . . . . . . . . . 59Rescheduling a Report . . . . . . . . . . . . . . . . . . . . . . . . . . . . . . . . . . . . . . . . . . . . . . . . . . 65Troubleshooting the Configuration . . . . . . . . . . . . . . . . . . . . . . . . . . . . . . . . . . . . . . . . . 65
Chapter 10 • Scheduling Jobs from SAS Marketing Automation . . . . . . . . . . . . . . . . . . . . . . . . 67Overview of Scheduling for SAS Marketing Automation . . . . . . . . . . . . . . . . . . . . . . . 67Enabling the Scheduling of SAS Marketing Automation Jobs . . . . . . . . . . . . . . . . . . . 68Deploying and Scheduling SAS Marketing Automation Jobs . . . . . . . . . . . . . . . . . . . . 69
Index . . . . . . . . . . . . . . . . . . . . . . . . . . . . . . . . . . . . . . . . . . . . . . . . . . . . . . . . . 71
iv Contents
Chapter 1
SAS Scheduling Overview
About SAS Scheduling . . . . . . . . . . . . . . . . . . . . . . . . . . . . . . . . . . . . . . . . . . . . . . . . . . 1
Overview of the Scheduling Process . . . . . . . . . . . . . . . . . . . . . . . . . . . . . . . . . . . . . . . 2
About Scheduling Servers . . . . . . . . . . . . . . . . . . . . . . . . . . . . . . . . . . . . . . . . . . . . . . . 5Types of Scheduling Servers . . . . . . . . . . . . . . . . . . . . . . . . . . . . . . . . . . . . . . . . . . . 5Platform Process Manager Server . . . . . . . . . . . . . . . . . . . . . . . . . . . . . . . . . . . . . . . 5Operating System Scheduling Server . . . . . . . . . . . . . . . . . . . . . . . . . . . . . . . . . . . . . 5Distributed In-Process Scheduling Server . . . . . . . . . . . . . . . . . . . . . . . . . . . . . . . . . 6In-Process Scheduling Server . . . . . . . . . . . . . . . . . . . . . . . . . . . . . . . . . . . . . . . . . . . 6
About Schedule Manager in SAS Management Console . . . . . . . . . . . . . . . . . . . . . . 6
About Batch Servers . . . . . . . . . . . . . . . . . . . . . . . . . . . . . . . . . . . . . . . . . . . . . . . . . . . . 7
About Scheduling Metadata . . . . . . . . . . . . . . . . . . . . . . . . . . . . . . . . . . . . . . . . . . . . . 8Overview of Scheduling Metadata . . . . . . . . . . . . . . . . . . . . . . . . . . . . . . . . . . . . . . . 8About Deployment Directory Definitions . . . . . . . . . . . . . . . . . . . . . . . . . . . . . . . . . 8About Job and Flow Metadata . . . . . . . . . . . . . . . . . . . . . . . . . . . . . . . . . . . . . . . . . . 8
About SAS SchedulingThe SAS scheduling tools enable you to automate the scheduling and execution of SAS jobs across your enterprise computing environment. Scheduling requires four main components:
SAS applicationSAS applications create the jobs to be scheduled. These applications include SAS Data Integration Studio, SAS Web Report Studio, and SAS Marketing Automation. In addition, you can schedule SAS programs that are not produced by a SAS application.
Schedule ManagerThis plug-in for SAS Management Console sets or enables you to edit the schedule and conditions for execution of the job, and specifies the scheduling server. Some applications (such as SAS Web Report Studio and SAS Marketing Automation) bypass the Schedule Manager to create jobs, but you can still use Schedule Manager to edit these jobs.
Scheduling serverThis server determines when a job's schedule (as specified in the Schedule Manager) has been met and runs the scheduled job. The scheduling server also determines
1
when other events specified by the Schedule Manager have occurred. The scheduling process can use any of these scheduling server types:
• Process Manager server (part of the Platform Suite for SAS)
• a server that uses the scheduling functions provided by the operating system
• a distributed in-process service, which runs as a process inside a SAS application or is sent to the operating system where the scheduler is installed
Batch serverThis server provides the application-specific command that is needed to run the scheduled job. The command is run by the scheduling server when the specified scheduling conditions are met. Several types of batch servers are supported (Java batch server, SAS DATA step batch server, and generic batch server), each of which runs jobs from a specific SAS application or solution.
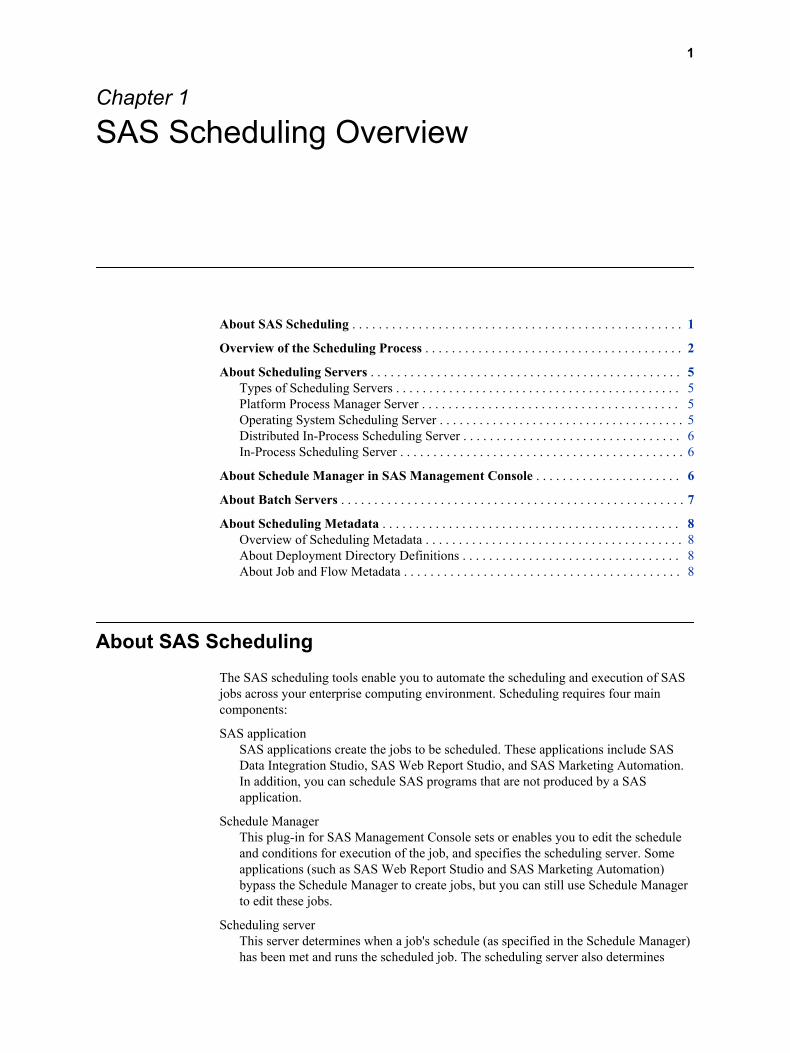
Overview of the Scheduling ProcessThe following example provides an overview of the scheduling process and how the components work together to generate, schedule, and run a job.
1. A SAS application (such as SAS Data Integration Studio) creates a job that needs to be scheduled. If the job was created by SAS Data Integration Studio, the job is placed in a deployment directory. If the job was created by SAS Marketing Automation, the job is sent either to the SAS Metadata Server (where the Schedule Manager can view it) or directly to the scheduling server (depending on the user's permissions). SAS programs and jobs from other applications are also sent to the SAS Metadata Server, where the Schedule Manager can access them.
2 Chapter 1 • SAS Scheduling Overview
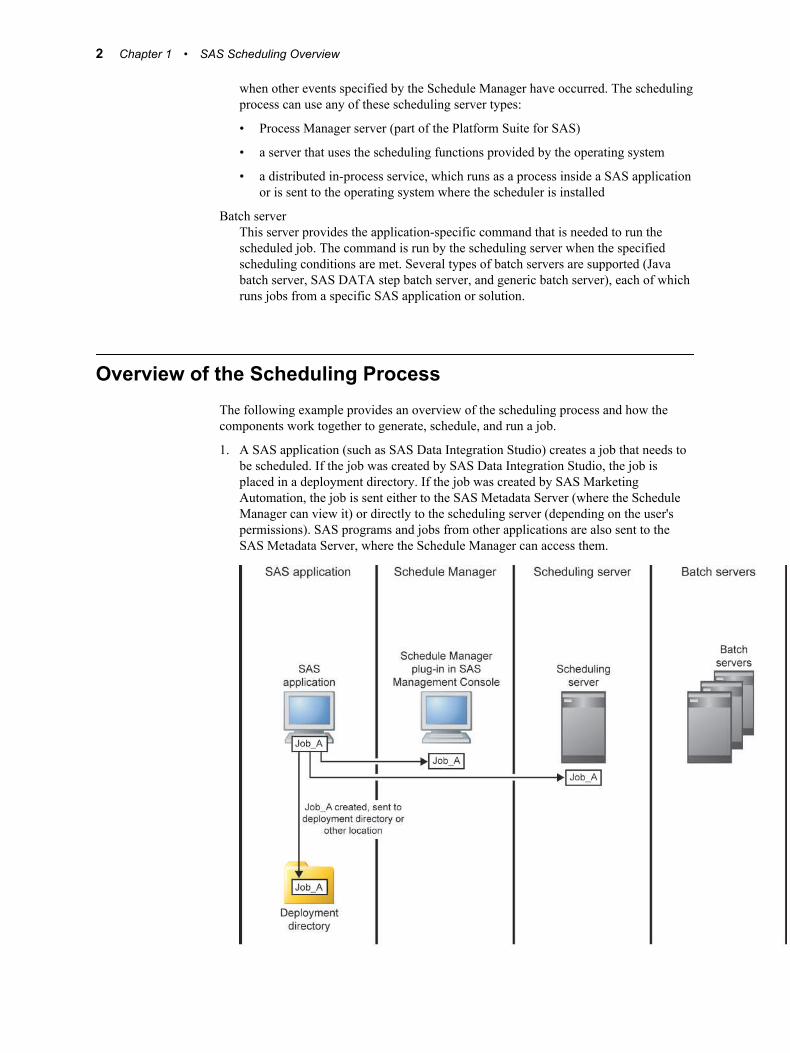
2. A user set up to administer scheduling can use the Schedule Manager plug-in in SAS Management Console to prepare the job for scheduling, or users can schedule jobs directly from other SAS applications. The job is added to a flow, which can include other jobs and events that must be met (such as the passage of a specific amount of time or the creation of a specified file). The Schedule Manager also specifies which scheduling server should be used to evaluate the conditions in the flow and which batch server should provide the command to run each job. The type of events that you can define depends on which type of scheduling server you choose. When the Schedule Manager has defined all the conditions for the flow, the flow is sent to the scheduling server, which retrieves the command that is needed to run each job from the designated batch server.
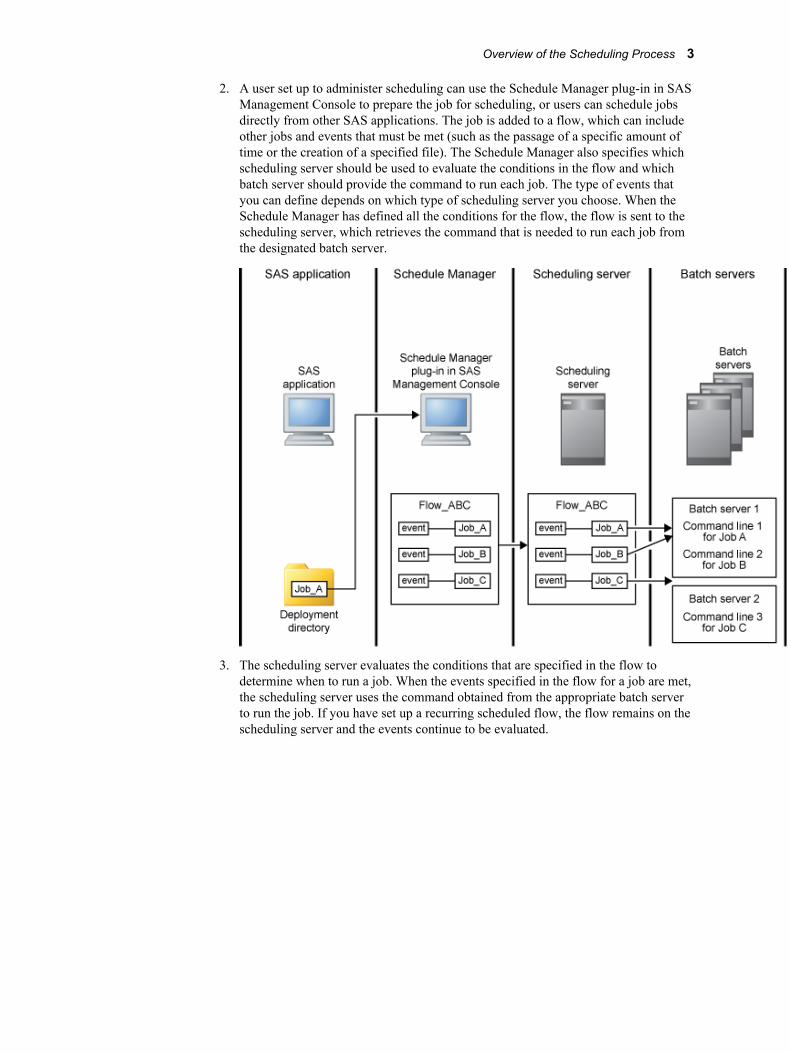
3. The scheduling server evaluates the conditions that are specified in the flow to determine when to run a job. When the events specified in the flow for a job are met, the scheduling server uses the command obtained from the appropriate batch server to run the job. If you have set up a recurring scheduled flow, the flow remains on the scheduling server and the events continue to be evaluated.
Overview of the Scheduling Process 3
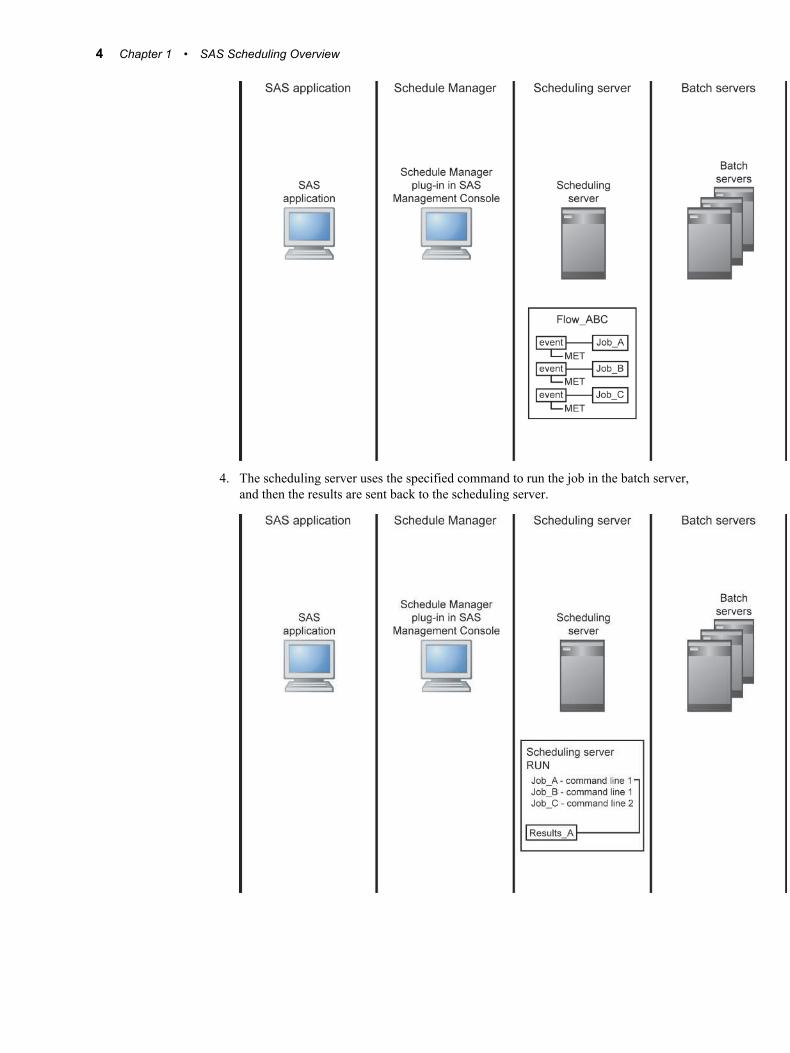
4. The scheduling server uses the specified command to run the job in the batch server, and then the results are sent back to the scheduling server.
4 Chapter 1 • SAS Scheduling Overview
About Scheduling Servers
Types of Scheduling ServersSAS supports scheduling through four different types of scheduling servers:
• Platform Process Manager server
• Operating system scheduling server
• Distributed In-Process scheduling server
• In-Process scheduling server
The type that you choose depends on the level of scheduling functions your organization requires, the budget and resources available to support a scheduling server, and the applications that will be creating jobs to be scheduled. When you create a flow in SAS Management Console's Schedule Manager, you specify which scheduling server the flow is to be associated with. Schedule Manager then passes the flow information to the appropriate scheduling server.
You can create a definition for a scheduling server by using the Server Manager plug-in in SAS Management Console or an application that directly schedules jobs.
The following topics contain an overview of each of the types of scheduling servers.
Platform Process Manager ServerThe Platform Process Manager server, which is part of Platform Suite for SAS, provides full-featured enterprise scheduling capabilities, including features such as workload prioritization and policy-based scheduling. The server enables you to schedule jobs using a variety of recurrence criteria and dependencies on other jobs, time events, or file events. You can use the Flow Manager application (also part of Platform Suite for SAS) to manage scheduled jobs, including deleting and stopping previously scheduled jobs.
Because Platform Suite for SAS is a separate application, it requires an additional license fee. It also requires you to perform additional tasks to install, configure, and maintain all components of the application. However, the components included with the application also provide functions such as load balancing and submission of jobs to a grid.
The metadata for a Process Manager Server includes the following information:
• the network address or host name of a machine
• the port number for the server
Operating System Scheduling ServerOperating system scheduling provides the ability to schedule jobs through the services provided through a server's operating system. Using operating system scheduling provides a basic level of scheduling at no additional cost, because the service is provided by software you already own. However, this type of scheduling does not support advanced scheduling capabilities, such as the use of many types of dependencies. The specific scheduling functions that are supported vary according to the operating system used, which can make it more difficult to set up consistent scheduling criteria on several
About Scheduling Servers 5
servers. Managing scheduled jobs requires you to issue operating system commands, rather than using a graphical user interface.
The metadata for an operating system scheduling server includes the following:
• the network address of a machine
• the port number for the server
• the directory on the server where scheduled flows should be stored (control directory)
• the command to start a SAS session on the server
Distributed In-Process Scheduling ServerDistributed in-process scheduling provides basic scheduling services for scheduling jobs directly from certain SAS applications. The scheduling server also has the capability to schedule flows from the Schedule Manager plug-in for SAS Management Console. This type of scheduling server does not provide the control that is provided by the Platform Process Manager server, and because it is not scalable, it is not suitable for use with a grid. However, it offers basic scheduling capabilities without incurring any additional cost or requiring many installation or configuration tasks
Note: SAS Web Report Studio also supports scheduling through in-process scheduling. This method of scheduling is deprecated and is replaced by distributed in-process scheduling.
In-Process Scheduling ServerIn-process scheduling provides the ability to schedule jobs from certain Web-based SAS applications without using a separate scheduling server. With in-process scheduling, the scheduling functions run as a process within the application. Although in-process scheduling is supported only for certain applications (such as SAS Web Report Studio), it offers basic scheduling capabilities without incurring any additional cost or requiring many installation or configuration tasks. Because an in-process scheduling server runs as part of the application, this type of scheduling also eliminates the need for the application to authenticate scheduled jobs to a separate server. However, the application must be running at the time the scheduled job attempts to run.
Note: In-process scheduling is being replaced by distributed in-process scheduling.
About Schedule Manager in SAS Management Console
The Schedule Manager plug-in for SAS Management Console is a user interface that enables you to create flows, which consist of one or more SAS jobs. A SAS job is any single command used to perform a batch task. Each job within a flow can be triggered to run based on criteria such as a date and time, the state of a file on the file system, or the status of another job within the flow. The available scheduling criteria depend on the type of scheduling server used.
The flows can include jobs that were created in SAS Data Integration Studio, SAS Marketing Automation, and SAS Web Report Studio. You can also use Schedule
6 Chapter 1 • SAS Scheduling Overview
Manager to deploy and schedule SAS jobs that are independent of a specific SAS application.
Schedule Manager is designed as a scheduler-neutral interface. When you create a flow, you specify which scheduling server that the flow is to be associated with. Schedule Manager converts the flow information to the appropriate format and submits it to the scheduling server (the Platform Computing server, an operating system scheduling server, or a distributed in-process scheduling server).
About Batch ServersBatch servers provide the command needed to run the programs that have been submitted for scheduling. Several batch server types are supported, each of which provides the command to run a scheduled SAS job from a specific application in a specific environment. This command is included in the metadata definition for each server. The batch server's commands are independent of the type of scheduling server used.
Batch server metadata objects are components of the SAS Application Server (for example, SASApp), and can be created by using the Server Manager plug-in in SAS Management Console. Each batch server object includes the following attributes:
• the network address of the associated machine
Note: This address is for documentation purposes only. The batch job executes on the machine that is specified in the scheduling server's metadata.
• a command that runs in batch mode on the machine that is specified in the scheduling server's metadata
The following types of batch servers are supported:
SAS Java Batch serveris used for scheduling Java applications that are supplied by SAS and that are invoked and launched by the standard java.exe shell. This server definition is used for reports that are created by applications such as SAS Web Report Studio and campaigns created by SAS Marketing Automation. The subtype of the server specifies which Java application is invoked (for example, the report subtype runs outputgen, and the marketing automation subtype runs malauncher). Each SAS Java Batch server instance provides the command for a single application, so if you need to schedule jobs from multiple applications, you must configure a SAS Java Batch server for each application (for example, one server for SAS Web Report Studio and one for SAS Marketing Automation).
SAS DATA Step Batch serveris used for scheduling SAS programs that contain DATA step and procedure statements. These programs include jobs that are created in and deployed from SAS Data Integration Studio.
The metadata definition for a SAS DATA Step Batch Server must include a SAS start command that will run in batch mode.
SAS Generic Batch serversupports scheduling jobs from SAS applications or solutions without requiring any knowledge of the command that is required to schedule the job. This type of server is use most often for scheduling jobs from SAS applications that are not specifically supported by the SAS Java Batch server types. If a SAS application adds support for scheduling jobs before a new type of SAS Java Batch server has been created, you
About Batch Servers 7
can use the SAS generic batch server to provide a command to run jobs from the application. Because the server does not have any knowledge about the command required by the application, the server cannot add command-line arguments (for example, to enable output logging).
About Scheduling Metadata
Overview of Scheduling MetadataThe SAS Metadata Server provides central storage and management of metadata about scheduling resources. Before you can use SAS scheduling, metadata must exist for the following resources:
• a scheduling server
• a batch server
• one or more deployment directories (required only for SAS DATA Step batch servers)
• one or more jobs that have been deployed for scheduling
Scheduling servers and batch servers have been discussed in previous topics. Metadata definitions for deployment directories, jobs, and flows are described in the following topics.
About Deployment Directory DefinitionsA deployment directory is a location on the file system of your SAS application server that contains a batch server. When a SAS Data Integration Studio user deploys a job for scheduling, a DATA step job is generated and placed in this directory. When the job is executed, the job information is read from this directory. The directory is also used when deploying SAS DATA step programs for scheduling from the Schedule Manager.
In order for SAS Data Integration Studio users to deploy jobs, a metadata definition for the deployment directory must exist in the metadata repository. The metadata definition includes the following information:
• the name of the SAS Application Server with which the directory is associated
• a name for the directory
• the path to the directory (either fully qualified or a relative path from the application server)
About Job and Flow MetadataJob metadata becomes available to the Schedule Manager when you use a SAS application such as SAS Data Integration Studio, SAS Web Report Studio, or the Schedule Manager plug-in in SAS Management Console to schedule a job. The job metadata includes the following information:
• the command that is to be used to execute the job
• the name of the SAS batch server that is associated with the job
8 Chapter 1 • SAS Scheduling Overview
• the deployment directory that is associated with the job (required only for SAS DATA Step Batch servers)
• the filename of the executable program (required only for SAS DATA Step batch servers)
Flow metadata is created when you use Schedule Manager to create a flow and when you use SAS Web Report Studio to schedule a report. The flow metadata includes the following information:
• the name of the scheduling server that is to execute the jobs in the flow
• the triggers and dependencies that are associated with the jobs in the flow
Depending on the scheduling server that the user specifies, Schedule Manager converts the flow metadata to the appropriate format and submits it to the scheduling server. Flows that are created by SAS Web Report Studio are automatically directed to the Process Manager Server or the in-process scheduling server.
About Scheduling Metadata 9

10 Chapter 1 • SAS Scheduling Overview
Chapter 2
Setting Up Scheduling Using Platform Suite for SAS
About Platform Suite for SAS . . . . . . . . . . . . . . . . . . . . . . . . . . . . . . . . . . . . . . . . . . . 11
Summary of Platform Suite for SAS Installation and Configuration Tasks . . . . . 12
Determining Where to Install Platform Suite for SAS . . . . . . . . . . . . . . . . . . . . . . . 12
Defining Users . . . . . . . . . . . . . . . . . . . . . . . . . . . . . . . . . . . . . . . . . . . . . . . . . . . . . . . . 13
Installation Considerations . . . . . . . . . . . . . . . . . . . . . . . . . . . . . . . . . . . . . . . . . . . . . 14
Migration Considerations . . . . . . . . . . . . . . . . . . . . . . . . . . . . . . . . . . . . . . . . . . . . . . 14
Resolving Issues Related to Scheduling with Platform Suite for SAS . . . . . . . . . . . 15Check Error Messages in Platform Flow Manager . . . . . . . . . . . . . . . . . . . . . . . . . . 15Resolving Windows-specific Issues Related to Scheduling
with Platform Suite for SAS . . . . . . . . . . . . . . . . . . . . . . . . . . . . . . . . . . . . . . . . . 15Resolving AIX Issues Related to Scheduling with Platform Suite for SAS . . . . . . . 16Resolving SAS Exit Behavior When Using Platform Suite for
SAS and SAS Data Integration Studio . . . . . . . . . . . . . . . . . . . . . . . . . . . . . . . . . 17
Using Platform Suite for SAS with z/OS . . . . . . . . . . . . . . . . . . . . . . . . . . . . . . . . . . 18Overview . . . . . . . . . . . . . . . . . . . . . . . . . . . . . . . . . . . . . . . . . . . . . . . . . . . . . . . . . . 18Configuring Scheduling on z/OS with Platform Suite for SAS . . . . . . . . . . . . . . . . 18Canceling Scheduled Jobs in z/OS Systems under Windows . . . . . . . . . . . . . . . . . 19
Further Resources . . . . . . . . . . . . . . . . . . . . . . . . . . . . . . . . . . . . . . . . . . . . . . . . . . . . 19
About Platform Suite for SASPlatform Suite for SAS is an integrated enterprise job scheduler from Platform Computing Corporation. Platform Suite for SAS is specifically designed to manage job flows that are generated by SAS software, and includes the following components:
Process Manager Servercontrols the submission of jobs to Platform Load Sharing Facility (LSF) and manages all dependencies among jobs.
Platform Flow Managerprovides a visual representation of flows that have been created for a Process Manager Server. These include flows that were created and scheduled in the SAS Management Console Schedule Manager, as well as reports that have been scheduled through SAS Web Report Studio.
11
Platform Flow Manager provides information about each flow's status and associated dependencies. You can view or update the status of jobs within a flow, and you can run or rerun a single job regardless of whether the job failed or completed successfully.
Platform Calendar Editoris a scheduling client for a Process Manager Server. This client enables you to create new calendar entries. You can use it to create custom versions of calendars that are used to create time dependencies for jobs that are scheduled to run on the server.
Platform Load Sharing Facility (LSF)handles the load balancing and execution of batch commands (which represent jobs). Platform LSF manages and accelerates batch workload processing for computer- and data-intensive applications. Process Manager Servers use Platform LSF for the execution of the jobs within a flow. You must install Platform LSF on all SAS batch servers as well as all other servers that will execute scheduled SAS jobs.
Summary of Platform Suite for SAS Installation and Configuration Tasks
To use the scheduling capabilities of Platform Suite for SAS, complete the following installation and configuration tasks:
1. Determine where to install Platform Suite for SAS.
2. Create the necessary users, groups, and logins.
3. Install Platform Suite for SAS.
4. Define the Process Manager Server (if it has not already been set up by the Configuration Wizard).
Determining Where to Install Platform Suite for SAS
The first consideration when configuring scheduling using Platform Suite for SAS is where to install the software. The location that you choose affects the availability of scheduling functions as well as the ability to schedule jobs.
For scheduling on a single machine, install Platform Suite for SAS on a single machine in your network.
If you install a Platform LSF on more than one machine in your network, you must use SAS Grid Manager to configure the other machines to use for scheduling. Refer to Grid Computing in SAS® 9.4 for more information about configuring scheduling in a grid environment.
If you are using a multi-tier configuration with SAS Data Integration Studio (consisting of a client tier, a middle tier running a Web application server, and a server tier) and you want to schedule jobs from SAS Data Integration Studio as well as reports from SAS Web Report Studio, you must install the Platform Process Manager server and SAS Business Intelligence Report Services on the server tier.
12 Chapter 2 • Setting Up Scheduling Using Platform Suite for SAS
If you are scheduling reports using SAS Web Report Studio, you must install the Platform Process Manager on the same system as SAS Business Intelligence Report Services. By default, SAS Business Intelligence Report Services is installed on the server tier. If you want to install it on a different machine, you must use a custom installation plan. If you use both SAS Web Report Studio and SAS Data Integration Studio, Platform Process Manager and SAS Business Report Services must always be installed on the SAS Application Server tier, which contains a SAS Workspace Server and an object spawner.
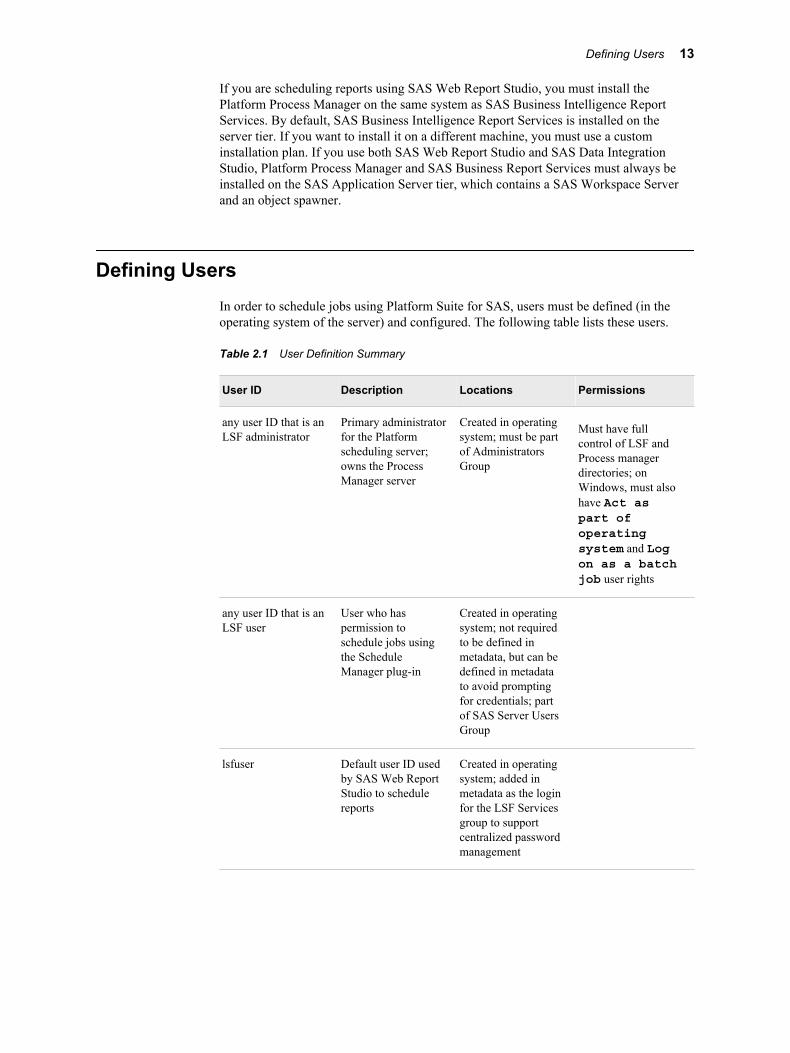
Defining UsersIn order to schedule jobs using Platform Suite for SAS, users must be defined (in the operating system of the server) and configured. The following table lists these users.
Table 2.1 User Definition Summary
User ID Description Locations Permissions
any user ID that is an LSF administrator
Primary administrator for the Platform scheduling server; owns the Process Manager server
Created in operating system; must be part of Administrators Group
Must have full control of LSF and Process manager directories; on Windows, must also have Act as part of operating system and Log on as a batch job user rights
any user ID that is an LSF user
User who has permission to schedule jobs using the Schedule Manager plug-in
Created in operating system; not required to be defined in metadata, but can be defined in metadata to avoid prompting for credentials; part of SAS Server Users Group
lsfuser Default user ID used by SAS Web Report Studio to schedule reports
Created in operating system; added in metadata as the login for the LSF Services group to support centralized password management
Defining Users 13
Installation ConsiderationsInstall Platform Suite for SAS on the scheduling server, using the installation documentation available from http://support.sas.com/rnd/scalability/platform. The following software will be installed:
• Platform Process Manager Server
• Platform Process Manager clients (Flow Manager and Calendar Editor)
• Platform LSF
Process Manager Server and Platform LSF must both be installed on the same machine. Platform LSF can also be installed on additional machines to support grid configurations. The Process Manager clients can be installed on any machine or machines.
When the Platform Process Manager Setup Wizard prompts for the owner of the Process Manager Server, specify the LSF administrative user. For Windows installations, be sure to specify the user's domain or, for local accounts, a dot (.) with the user ID.
When the installation process is complete, verify that the following services are running on the server, with the LSF administrative user as owner:
• LSF cluster name LIM
• LSF cluster name RES
• LSF cluster name SBD
• Process Manager
Note: For report scheduling to work, Platform LSF must be installed on the same machine as SAS Business Intelligence Report Services.
Migration ConsiderationsIf you install a version of Platform Suite for SAS on a different server than the previous version was installed on, you must manually copy the Process Manager calendar metadata to the new location. To copy the calendar metadata, install Platform Suite for SAS in the new location and then follow these steps:
1. Log on to the old Process Manager server.
2. Change to the JS_TOP/work/calendar directory. JS_TOP corresponds to the Platform Process Manager installation directory.
3. Copy all files except those ending in “sys” from this directory to the JS_TOP/work/calendar directory on the new server.
14 Chapter 2 • Setting Up Scheduling Using Platform Suite for SAS
Resolving Issues Related to Scheduling with Platform Suite for SAS
Check Error Messages in Platform Flow ManagerPlatform Flow Manager enables you to view status and other information about the jobs that have been scheduled on Platform scheduling servers. To view error messages in Platform Flow Manager, follow these steps:
1. Open Platform Flow Manager on the scheduling server. On Windows systems, click Start ð All Programs ð Platform Process Manager ð Flow Manager.
2. Log on as the scheduling user. You might need to include a domain name or machine name with the user ID.
3. On the left pane of Flow Manager, expand the folder for the scheduling user. If you selected Run Now when you scheduled the report, the job will be in a folder called adhoc. In the folder, look for the most recently scheduled flow. If the job failed, its name might include (Exit).
4. Double-click on the flow name (for example, 1(Done)). An icon for each job in the flow will appear in the right pane. A red icon indicates that errors occurred, and a blue icon indicates that the job was successful.
5. Right-click the icon in the right pane, and select View History.
Note: You can also examine the contents of logs in the LSF directory.
Resolving Windows-specific Issues Related to Scheduling with Platform Suite for SAS
To properly install Platform Suite for SAS on Windows systems, you must supply a valid user ID and password to run and administer the services. The user ID that is used to run the installation program must have Act as part of the operating system privileges. The user ID that you specify to run the services must have Log on as a batch job privileges. Issues can occur if this user does not have the required privileges, if the user's password has expired, or if the wrong domain name is provided.
One simple way to test the domain, user, and password is to do the following:
1. Bring up a DOS command prompt or select Start ð Run.
2. Enter the runas command using the following syntax to bring up a new DOS prompt running under the other user ID:
>runas /user:DOMAIN\userid cmd
3. Enter the password. If the user ID authenticates successfully, a new DOS command prompt appears.
From the new DOS command prompt, you can run the various scheduled commands that are failing. If the commands succeed when they are entered at the prompt, this indicates that there are some issues with the scheduling setup. If the commands fail, then additional information might appear in the DOS command window to help you determine the problem.
Resolving Issues Related to Scheduling with Platform Suite for SAS 15
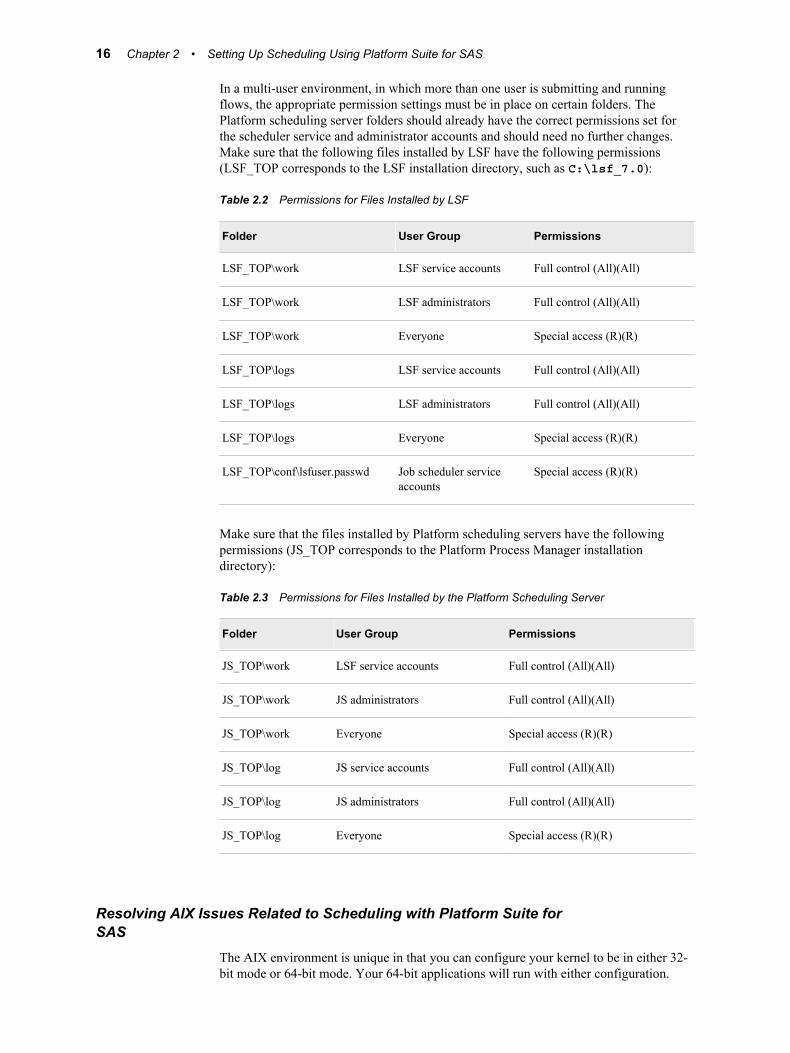
In a multi-user environment, in which more than one user is submitting and running flows, the appropriate permission settings must be in place on certain folders. The Platform scheduling server folders should already have the correct permissions set for the scheduler service and administrator accounts and should need no further changes. Make sure that the following files installed by LSF have the following permissions (LSF_TOP corresponds to the LSF installation directory, such as C:\lsf_7.0):
Table 2.2 Permissions for Files Installed by LSF
Folder User Group Permissions
LSF_TOP\work LSF service accounts Full control (All)(All)
LSF_TOP\work LSF administrators Full control (All)(All)
LSF_TOP\work Everyone Special access (R)(R)
LSF_TOP\logs LSF service accounts Full control (All)(All)
LSF_TOP\logs LSF administrators Full control (All)(All)
LSF_TOP\logs Everyone Special access (R)(R)
LSF_TOP\conf\lsfuser.passwd Job scheduler service accounts
Special access (R)(R)
Make sure that the files installed by Platform scheduling servers have the following permissions (JS_TOP corresponds to the Platform Process Manager installation directory):
Table 2.3 Permissions for Files Installed by the Platform Scheduling Server
Folder User Group Permissions
JS_TOP\work LSF service accounts Full control (All)(All)
JS_TOP\work JS administrators Full control (All)(All)
JS_TOP\work Everyone Special access (R)(R)
JS_TOP\log JS service accounts Full control (All)(All)
JS_TOP\log JS administrators Full control (All)(All)
JS_TOP\log Everyone Special access (R)(R)
Resolving AIX Issues Related to Scheduling with Platform Suite for SAS
The AIX environment is unique in that you can configure your kernel to be in either 32-bit mode or 64-bit mode. Your 64-bit applications will run with either configuration.
16 Chapter 2 • Setting Up Scheduling Using Platform Suite for SAS
Platform Suite for SAS requires that the kernel be in 64-bit mode for its 64-bit applications. Therefore, your kernel must be configured in 64-bit mode to use Platform scheduling servers and Platform LSF. To determine whether your kernel is in 64-bit mode, use the lsconf command. Here is an example of the command output that appears if your kernel is in 32-bit mode:
$ lsconf -k Kernel Type: 32-bit
To switch between the 32–bit and 64–bit kernels, an administrator must follow these steps:
1. Modify the /usr/lib/boot/unix directory and the /unix directory to be a symbolic link to the library for the desired kernel.
2. Run the bosboot command to write a new system boot image.
3. Reboot the system.
Resolving SAS Exit Behavior When Using Platform Suite for SAS and SAS Data Integration Studio
During the installation process, the SAS Deployment Wizard creates a script called sasbatch in the following path:
SAS-config-dir\Lev1\SASApp\BatchServer
As a default, jobs that are deployed from SAS Data Integration Studio are run using this script.
If you are not using this script, then the Platform scheduling server will report your SAS jobs as completing with a status of Exit instead of Done. This situation occurs because Platform scheduling servers treat any nonzero exit code as Exit instead of Done.
To resolve this issue, you can use the sasbatch script that was created by the SAS Deployment Wizard. If you are using a different script, you can modify the script to prevent the error in the following ways.
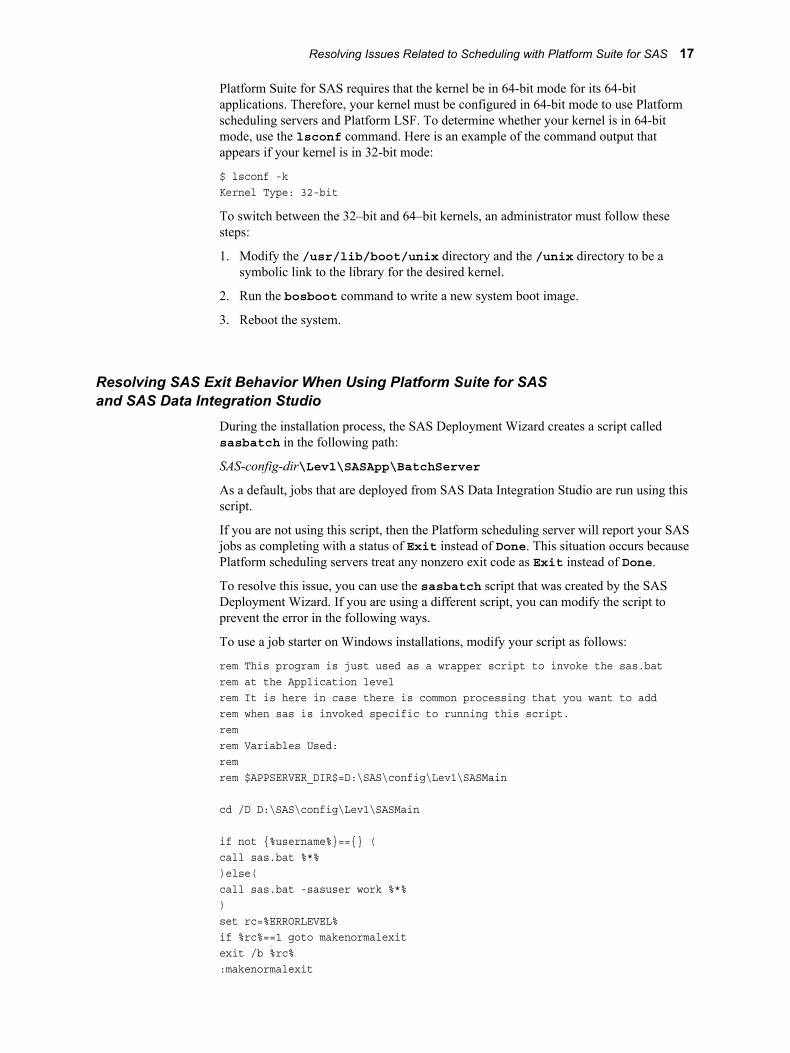
To use a job starter on Windows installations, modify your script as follows:
rem This program is just used as a wrapper script to invoke the sas.bat rem at the Application level rem It is here in case there is common processing that you want to add rem when sas is invoked specific to running this script. rem rem Variables Used: rem rem $APPSERVER_DIR$=D:\SAS\config\Lev1\SASMain
cd /D D:\SAS\config\Lev1\SASMain
if not {%username%}=={} (call sas.bat %*% )else( call sas.bat -sasuser work %*% ) set rc=%ERRORLEVEL% if %rc%==1 goto makenormalexit exit /b %rc%:makenormalexit
Resolving Issues Related to Scheduling with Platform Suite for SAS 17
exit /b 0
For UNIX installation you can edit the script as follows: # Comment out exec line to allow the return code to be captured# eval exec $cmd
# Add this code to capture exit=1 (SAS warning) and make it exit=0eval $cmdrc=$?if [ $rc -eq 1 ]; then exit 0else exit $rcfi
For UNIX installations, edit the script as follows:
# Comment out exec line to allow the return code to be captured# eval exec $cmd
# Add this code to capture exit=1 (SAS warning) and make it exit=0eval $cmdrc=$?if [ $rc -eq 1 ]; then exit 0else exit $rcfi
Using Platform Suite for SAS with z/OS
OverviewPlatform Process Manager works with IBM z/OS systems through file transfer protocol (FTP) technology. Platform Process Manager uses FTP to submit a proxy job to the z/OS system. You can then use FTP to monitor the progress of the job. To set up scheduling with a z/OS system, you must verify that the JCL that is submitted with each job is correct for your system.
You cannot suspend or resume jobs that run on z/OS systems.
Configuring Scheduling on z/OS with Platform Suite for SASTo configure your environment for using Platform Suite for SAS with a z/OS system, follow these steps:
1. If your z/OS configuration uses a configuration other than the default, you must modify the template file.
2. Copy the zOS_Template.xml file from the JS_TOP/7/examples directory to the JS_TOP/work/templates directory. JS_TOP corresponds to the Platform Process Manager installation directory.
3. Make any modifications to zOS_Template.xml to match your system configuration.
18 Chapter 2 • Setting Up Scheduling Using Platform Suite for SAS
4. Edit the zos.conf file, which is located in the JS_TOP/conf directory. This file contains configuration settings for your FTP environment.
5. Define a batch server, specifying z/OS as the subtype.
Canceling Scheduled Jobs in z/OS Systems under WindowsIf Platform Suite for SAS is installed on a Windows system, you must use a queue, rather than Flow Manager, to cancel a scheduled job on a z/OS system. An administrator creates a queue that contains the job to be canceled and submits the queue to the z/OS system using FTP. The queue must contain a TERMINATE job control and the path to the script that cancels the job. An example queue is as follows:
Begin QueueQUEUE_NAME=zos_jobsDESCRIPTION=Cancel zOS jobsJOB_CONTROL=TERMINATE[C:\pm\7\etc\zos —k]End Queue
Further ResourcesFor additional information about managing job submissions, see the white paper SAS Scheduling: Getting the Most Out of Your Time and Resources at http://support.sas.com/resources/papers/SASScheduling.pdf.
Further Resources 19

20 Chapter 2 • Setting Up Scheduling Using Platform Suite for SAS
Chapter 3
Setting Up Scheduling Using Operating System Scheduling
About Operating System Scheduling . . . . . . . . . . . . . . . . . . . . . . . . . . . . . . . . . . . . . 21
Capabilities and Limitations of Operating System Scheduling Servers . . . . . . . . . 22
Summary of Setup Tasks . . . . . . . . . . . . . . . . . . . . . . . . . . . . . . . . . . . . . . . . . . . . . . . 22
Step 1: Assign Local Administration Rights to Users (Windows Only) . . . . . . . . . 22
Step 2: Assign Directory and File Permissions . . . . . . . . . . . . . . . . . . . . . . . . . . . . . 23
Step 3: Define an Operating System Scheduling Server . . . . . . . . . . . . . . . . . . . . . . 23
Step 4: Assign the Operating System Scheduling Server to a Spawner . . . . . . . . . 24
Using Operating System Scheduling on Windows Systems . . . . . . . . . . . . . . . . . . . 24How Operating System Scheduling Works on Windows Systems . . . . . . . . . . . . . 24Manually Submitting a Flow for Execution on a Windows
Operating System Scheduling Server . . . . . . . . . . . . . . . . . . . . . . . . . . . . . . . . . . 25Manually Canceling a Scheduled Flow on a Windows
Operating System Scheduling Server . . . . . . . . . . . . . . . . . . . . . . . . . . . . . . . . . . 25Limitations of Windows Operating System Scheduling Servers . . . . . . . . . . . . . . . 25
Using Operating System Scheduling on UNIX Systems . . . . . . . . . . . . . . . . . . . . . . 26How Operating System Scheduling Works on UNIX Systems . . . . . . . . . . . . . . . . 26Manually Submitting a Flow for Execution on a UNIX
Operating System Scheduling Server . . . . . . . . . . . . . . . . . . . . . . . . . . . . . . . . . . 26Manually Canceling a Scheduled Flow on a UNIX Operating
System Scheduling Server . . . . . . . . . . . . . . . . . . . . . . . . . . . . . . . . . . . . . . . . . . . 26Limitations of UNIX Operating System Scheduling Servers . . . . . . . . . . . . . . . . . . 27
Using Operating System Scheduling on z/OS Systems . . . . . . . . . . . . . . . . . . . . . . . 27Limitations of z/OS Operating System Scheduling Servers . . . . . . . . . . . . . . . . . . . 27How Operating System Scheduling Works on z/OS Systems . . . . . . . . . . . . . . . . . 27Manually Submitting a Flow for Execution on a z/OS
Operating System Scheduling Server . . . . . . . . . . . . . . . . . . . . . . . . . . . . . . . . . . 28Canceling a Scheduled Flow on a z/OS Operating System Scheduling Server . . . . 28
About Operating System SchedulingAn operating system scheduling server provides a method for scheduling SAS jobs without licensing and installing Platform Suite for SAS. Flows that are sent to the server are run using the scheduling commands that are built into the server's operating system. The process of deploying and scheduling jobs and flows is the same whether you are
21
using an operating system scheduling server or a Platform Process Manager server, although the two servers use different processes when running scheduled flows.
However, there are some limitations in the capabilities of operating system scheduling servers as compared to a Process Manager server. You must use operating system commands instead of the Flow Manager for operations such as stopping or deleting a scheduled flow.
Note: SAS Web Report Studio does not support operating system scheduling.
Capabilities and Limitations of Operating System Scheduling Servers
For specific information about the scheduling capabilities and limitations for each operating system, see the following topics:
• “Limitations of Windows Operating System Scheduling Servers ” on page 25
• “Limitations of UNIX Operating System Scheduling Servers ” on page 27
• “Limitations of z/OS Operating System Scheduling Servers” on page 27
Summary of Setup TasksTo enable operating system scheduling, you must have a scheduling server. If you use the SAS Deployment Wizard to install and configure an operating system scheduling environment, all required items are automatically configured. You must include Operating System Services Scheduling Server 9.4 and SAS DATA Step Batch Server 9.4 in your plan file and select these two items in the SAS Deployment Wizard.
The setup tasks are as follows:
1. Assign local administration rights to users (Windows only).
2. Assign directory and file permissions.
3. Define an operating system scheduling server.
4. Assign a spawner to the operating system scheduling server.
Step 1: Assign Local Administration Rights to Users (Windows Only)
On Windows systems, the user ID under which the job will be run must have Local Administration rights on the scheduling server. To grant these rights, add the user to the Administrators Group.
This task is performed automatically by the SAS Deployment Wizard.
22 Chapter 3 • Setting Up Scheduling Using Operating System Scheduling
Step 2: Assign Directory and File PermissionsYou must assign operating system read and write permissions to the following directories:
Windows:
• sas-config-dir/Lev1/SchedulingServer
• sas-config-dir/Lev1/SchedulingServer/logs
• sas-config-dir/Lev1/SchedulingServer/sasuser
UNIX and z/OS:
• sas-config-dir/Lev1/SchedulingServer
• sas-config-dir/Lev1/SchedulingServer/logs
• sas-config-dir/Lev1/SchedulingServer/sasuser
Note: You can use either forward or backward slashes on Windows systems.
You must also assign execute permission to sas-config-dir/Lev1/SchedulingServer/SchedulingServer.bat (Windows) or sas-config-dir/Lev1/SchedulingServer/SchedulingServer.sh (UNIX and z/OS).
This task is performed automatically by the SAS Deployment Wizard.
Step 3: Define an Operating System Scheduling Server
Define an operating system scheduling server in the metadata repository, as follows:
1. In SAS Management Console, right-click Server Manager and select New Server.
2. On the first page of the New Server Wizard, under Scheduling Servers, select Operating System Services. Click Next.
3. On the next wizard page, enter a name (for example, OS Scheduling Server).
4. On the next wizard page, enter information in the following fields:
SubTypeSelect the appropriate operating system.
Control DirectoryEnter the path for the directory that will store the script for executing a flow. For a default installation, the directory is sas-config-dir/Lev1/SchedulingServer.
CommandEnter the appropriate SAS command, making any changes that are necessary for your installation. Sample commands are as follows:
• Windows:
"sas-config-dir\Lev1\SchedulingServer\Schedulingserver.bat"
• UNIX:
Step 3: Define an Operating System Scheduling Server 23
“sasc-config-server/Lev1/SchedulingServer/schedulingserver.sh”
• z/OS:
sas-config-dir/Lev1/SchedlingServer/SchedulingServer.sh
Object Server ParametersEnter applevel=2.
5. On the next wizard page, select DefaultAuth as the Authentication Domain. In the Host Name field, enter the name of the machine that hosts the scheduling server. Accept the default port number of 8451, or enter a different port number if this one is being used. Click Next.
6. On the next wizard page, review the settings, and click Finish.
This task is performed automatically by the SAS Deployment Wizard.
Step 4: Assign the Operating System Scheduling Server to a Spawner
Associate the operating system scheduling server with a spawner definition, as follows:
1. In SAS Management Console, right-click the spawner that is associated with the same application server on which you defined the scheduling server (for example, SASApp Spawner), and select Properties.
2. In the Spawner Properties dialog box, select the Servers tab.
3. From the Available Servers list, select the operating system scheduling server and move it to the Selected Servers list.
4. Restart the spawner.
5. Click OK.
This task is performed automatically by the SAS Deployment Wizard.
You can now use Schedule Manager in SAS Management Console to schedule flows. See the following topics:
• “Using Operating System Scheduling on Windows Systems” on page 24
• “Using Operating System Scheduling on UNIX Systems” on page 26
• “Using Operating System Scheduling on z/OS Systems” on page 27
Using Operating System Scheduling on Windows Systems
How Operating System Scheduling Works on Windows SystemsWhen you schedule a flow using a Windows operating system scheduling server, Schedule Manager creates a script file called flowname.vbs.
24 Chapter 3 • Setting Up Scheduling Using Operating System Scheduling
The script file and the job status information are written to the path outdir\user-name\flowname, where outdir is the value of the Control Directory attribute in the operating system scheduling server definition.
The path must be a valid Windows path. Valid Windows paths include relative paths, Universal Naming Convention (UNC) paths (for example \\server\volume\directory), and mapped paths. If the path is invalid, or if it points to a file instead of a directory, then an error message is written to the SAS log.
Manually Submitting a Flow for Execution on a Windows Operating System Scheduling Server
If you need to manually submit a flow that has been scheduled on a Windows operating system, you can do any of the following:
• Execute the generated script flowname.vbs. The file is located in the following path:
outdir\user-name\flowname
Either double-click the filename in Windows Explorer, or execute it from a command prompt.
• Use the Windows Task Scheduler to manually schedule the script. To access the Task Scheduler, select Scheduled Tasks on the Control Panel. You can also use the schtasks command line interface to surface many functions of the Task Scheduler.
• Use the at command to manually schedule the script. The capabilities of this command are more limited than those of the Task Scheduler. See your operating system documentation for details.
Manually Canceling a Scheduled Flow on a Windows Operating System Scheduling Server
If you need to manually cancel a flow that has been scheduled on Windows, you can do either of the following:
• Use the Windows Task Scheduler to cancel the job.
• Use the /del option of the at command. You can use this method only if the job was submitted manually with the at command.
After a scheduled flow has been canceled, you can remove the script that was created for the flow.
Limitations of Windows Operating System Scheduling ServersJobs in a flow are run sequentially so that the status of each job can be logged in the status file.
The following limitations apply to Windows operating system scheduling:
• The user ID under which the job will be run must have Local Administration rights. To grant these rights, you must add the user to the Administrators Group.
• The following types of trigger events are not supported on Windows:
• Skip interval is greater than 1 and the interval type is Monthly or Yearly.
• Last Day is selected and the interval type is Monthly or Yearly.
Using Operating System Scheduling on Windows Systems 25
If you specify one of these triggers, then a script is created. However, the script is not submitted for execution, and an error message similar to the following is written to the log:
ERROR: One or more flows were not successfully scheduled.ERROR: triggeroption is currently not supported for intervaltype events on Windows systems
• Always test the command that is contained in a job before you schedule the job.
Using Operating System Scheduling on UNIX Systems
How Operating System Scheduling Works on UNIX SystemsWhen you schedule a flow using a UNIX operating system scheduling server, Schedule Manager creates the following files:
• a flow command script called flowname.sh
• a log for the submitted script, called flowname.log
The files are written to the path outdir/username/flowname, where outdir is the value of the Control Directory attribute in the operating system scheduling server definition.
Since the scheduler does not delete either of these files, you must delete them manually when they are no longer needed. Any user that schedules a flow will need read and write permissions to both the outdir directory and the log.
Manually Submitting a Flow for Execution on a UNIX Operating System Scheduling Server
If you need to manually submit a flow that has been scheduled on a UNIX operating system scheduling server, follow these steps:
1. Change to the directory where the file flowname.sh is located.
2. Type sh flowname.sh now at the UNIX shell prompt.
The user that scheduled the flow is also permitted to submit the flow manually.
Manually Canceling a Scheduled Flow on a UNIX Operating System Scheduling Server
If you need to manually cancel a flow that has been scheduled on a UNIX operating system scheduling server, follow these steps:
1. Open the file flowname.log, and find the job identifier for the job that you want to cancel. The log will contain a separate job identifier for each date and time that the flow is scheduled. Here is an example:
05/04/20 14:57:30 Flow DailyTestFlow starting commands will be executed using /bin/ksh job 1114107300.a at Wed Jun 23 17:02:00 2008
26 Chapter 3 • Setting Up Scheduling Using Operating System Scheduling
2. At the UNIX shell prompt, type at -l.
Scheduled jobs will be displayed in the following format:
1114107300.a Wed Jun 23 17:02:00 2008
3. Enter the following command at the UNIX shell prompt, where job-id is the identifier of the job that you want to cancel: at -r job-id.
For example, if the job identifier is 1114107300.a, enter at -r 1114107300.a.
Limitations of UNIX Operating System Scheduling ServersOn UNIX operating system scheduling servers, SAS 9.4 supports the scheduling of flows that have a single time event as a trigger.
UNIX scheduling uses the at command to execute jobs. However this command might not be enabled for use by the scheduling server's user ID. To determine whether the command is enabled, run a test of the at command. The following is an example test:
echo touch /tmp/attest | at nowsleep 5ls /tmp/attest
Using Operating System Scheduling on z/OS Systems
Limitations of z/OS Operating System Scheduling ServersOn z/OS operating system scheduling servers, SAS 9.4 supports the scheduling of flows that have a single time event as a trigger. The jobs in a flow are submitted to the Job Entry Subsystem (JES) for execution in an asynchronous manner.
How Operating System Scheduling Works on z/OS SystemsWhen you schedule a flow, Schedule Manager creates the following files:
• a REXX program called RunFlow_yyymmddhhmmsssss.rex, which submits each batch job to run on the requested schedule.
• a file called jobname.status, which contains information about the status of the job.
• the following files, each of which invokes the REXX program to log the job status:
• logstart_jobname, which is executed as the first step of each job
• logend_jobname, which is executed as the last step of the job if all previous steps have a return code of 0
• logfail_jobname, which is executed as the last step of the job if any of the previous steps has a return code other than 0
• flowname.cmd, which contains the statements that execute the program for the flow. This file is passed to the at command to be executed when the time event trigger occurs.
Using Operating System Scheduling on z/OS Systems 27
• flowname.lck, which serializes the execution of the REXX exec by simultaneously executing jobs.
• flowname.log, which contains the log information for the flow.
• flowname.status, which contains the current status of the flow.
The files are written to a subdirectory called username/flowname in the Control Directory that was specified in the operating system scheduling server definition, where username is the identity that scheduled the flow.
Manually Submitting a Flow for Execution on a z/OS Operating System Scheduling Server
Note: On z/OS, unexpected results can occur if you manually submit a flow without having selected Manually Schedule when you scheduled the flow.
If you need to manually submit a flow that has been scheduled on a z/OS operating system scheduling server, follow these steps:
1. Change to the directory where the flow's files are located (/outdir/username/flowname), where outdir is the value of the Control Directory attribute in the operating system scheduling server definition.
2. At the prompt, type a command with the following syntax:
RunFlow_yyymmddhhmmsssss.rex <runonce|start>
Specify runonce if you want to run the flow just once, or specify start if you want to resume a recurrence that was specified for the flow.
Canceling a Scheduled Flow on a z/OS Operating System Scheduling Server
If you need to cancel a flow that has been scheduled on a z/OS operating system scheduling server, follow these steps:
1. At the prompt, type at -l.
Note: Type a lowercase L, not the numeral 1.
A list of jobs appears, as in the following example:
1116622800.a Fri May 20 17:00:00 20051116734400.a Sun May 22 00:00:00 20051116820800.a Mon May 23 00:00:00 20051116620801.a Mon May 23 00:00:00 20051117029000.a Wed May 25 09:50:00 2005
2. For each job that you want to cancel, type the following command at the USS prompt: at -r at-jobid, where jobid is the first part of each line of the list of jobs (for example, at -r 1116622800.a).
28 Chapter 3 • Setting Up Scheduling Using Operating System Scheduling
Chapter 4
Setting Up Scheduling Using SAS Distributed In-Process Scheduling
About Distributed In-Process Scheduling . . . . . . . . . . . . . . . . . . . . . . . . . . . . . . . . . 29
How Distributed In-Process Scheduling Works . . . . . . . . . . . . . . . . . . . . . . . . . . . . 29
Summary of Setup Tasks . . . . . . . . . . . . . . . . . . . . . . . . . . . . . . . . . . . . . . . . . . . . . . . 30
Tuning a Distributed In-Process Scheduling Server . . . . . . . . . . . . . . . . . . . . . . . . . 30
About Distributed In-Process SchedulingDistributed in-process scheduling provides basic scheduling services for scheduling jobs directly from certain SAS applications (such as the SAS Web Infrastructure Platform and SAS Web Report Studio). Communication with SAS applications takes place by posting messages and receiving results on Java Messaging Service (JMS) queues. The scheduling server also has the capability to run jobs from the Schedule Manager plug-in for SAS Management Console by using the appropriate Java command if the jobs are not scheduled by a SAS application.
How Distributed In-Process Scheduling WorksJobs that are scheduled by the distributed in-process scheduler fall into two groups:
• jobs that can be run by a normal SAS process
• jobs that can be run by a SAS application that works with distributed in-process scheduling
Jobs that are executed by a SAS process run like jobs in other types of schedulers. When the Distributed In-Process scheduler determines that it is time for the job to run, the scheduler uses a command-line job runner to issue the SAS command to run the job.
Certain SAS applications can tag a job that is sent to the scheduler to indicate that the job can be run by the application. When the Distributed In-Process scheduler determines that it is time for the job to run, it adds the job to the JMS queue. The middle tiers for the application, which are checking the jobs in the JMS queue, recognize the submitted job and perform the execution. The application that runs the job can be on any machine.
29
Summary of Setup TasksTo enable distributed in-process scheduling, you must have a distributed in-process scheduling server and JMS Queue Manager. If you use the SAS Deployment Wizard to install and configure the Job Execution Service, the scheduling server and the queue manager are automatically configured.
Tuning a Distributed In-Process Scheduling Server
Because the distributed in-process scheduling server and the JMS queue manager are automatically configured, the default configuration values are acceptable for most situations. However, you can use these tips to optimize the performance of distributed in-process scheduling:
• If flows are not completing because of competition with new flows, reduce the value of the Max running flows field on the Operation Options dialog box.
• If the distributed in-process scheduling server or the job runners cannot keep up with the number of jobs running, reduce the value of the Max running jobs field on the Options tab.
• If too much disk space is being taken up by flow histories, reduce the value of the Max histories per flow field on the Options tab. You also might want to reduce this value if users do not want to see a large number of histories.
• If your flows need to be highly responsive to file changes that are used as file events, reduce the value of the File trigger/condition check frequency field on the Operation Options dialog box. If your flows contain a large number of file events, you might want to increase the value in order to reduce the amount of time that the system takes to poll the file system for changes.
Use these tips to optimize processing of jobs that use the default job runner (jobs that are executed by a SAS process):
• If the jobs that are scheduled are CPU-intensive, lower the value of the Max simultaneous jobs field on the Options tab of the Properties dialog box.
• If you have defined multiple distributed in-process scheduling servers, decrease the value of the Max simultaneous jobs field on all server definitions.
• If you want the job runner to check more often for jobs that are waiting to be run, reduce the value of the Polling frequency field on the Renderer Options dialog box. Increase this value if you want to reduce the amount of overhead used by the job runner.
• If you want to increase the amount of time before getting a new job, increase the value of the Max wait time field on the Renderer options dialog box.
• If the jobs are not CPU-intensive, the job runner can start processing new jobs more quickly, so you can increase the value of the Job count before wait field on the Renderer options dialog box.
• If the jobs are CPU-intensive, increase the wait time for each job by increasing the value of the Base wait time field on the Renderer options dialog box.
30 Chapter 4 • Setting Up Scheduling Using SAS Distributed In-Process Scheduling

Chapter 5
Setting Up Scheduling Using SAS In-Process Scheduling
About In-Process Scheduling Servers . . . . . . . . . . . . . . . . . . . . . . . . . . . . . . . . . . . . . 31
Limitations of In-Process Scheduling . . . . . . . . . . . . . . . . . . . . . . . . . . . . . . . . . . . . . 31
Setup Tasks . . . . . . . . . . . . . . . . . . . . . . . . . . . . . . . . . . . . . . . . . . . . . . . . . . . . . . . . . . 32
Configuration Options in a Clustered Environment . . . . . . . . . . . . . . . . . . . . . . . . . 32
Using In-Process Scheduling . . . . . . . . . . . . . . . . . . . . . . . . . . . . . . . . . . . . . . . . . . . . 33
About In-Process Scheduling ServersIf you are scheduling jobs from applications such as SAS Web Report Studio, you can use in-process scheduling. An in-process scheduling server runs as a process inside SAS Web Report Studio, which eliminates the need to send the jobs to an external scheduling server. The in-process server is installed as part of the SAS Web Report Studio installation, which eliminates the need to install, maintain, and license separate scheduling servers. In addition, using an in-process scheduling server simplifies authentication, because scheduled jobs do not have to be authenticated to an external scheduling server. When using in-process scheduling, you schedule jobs from within your application, rather than using the Schedule Manager plug-in.
In-process scheduling servers are supported only in SAS Web Report Studio. After version 4.3 of SAS Web Report Studio, support for in-process scheduling is replaced by distributed in-process scheduling.
Limitations of In-Process SchedulingIf you are using a release of SAS Web Report Studio prior to version 4.3, in-process scheduling within SAS Web Report Studio works with a single execution instance of SAS Web Report Studio. It cannot be used in a Web cluster. If your environment includes multiple instances of SAS Web Report Studio, you should have only one instance of SAS Web Report Studio running in a cluster in order to use in-process scheduling.
If you are using version 4.3 or later of SAS Web Report Studio, in-process scheduling in a clustered environment is supported by default.
31
A maximum of five scheduled jobs can be simultaneously running when using in-process scheduling within SAS Web Report Studio. Any additional jobs are automatically placed in a queue and run when one of the running jobs completes. To change the number of scheduled jobs that can run simultaneously, specify the number in the SAS Web Report Studio property wrs.scheduling.inProcess.maxSimultaneousJobs.
Setup TasksTo set up an in-process scheduling server, install and deploy SAS Web Report Studio. The installation and configuration procedure automatically installs and configures the in-process server. While using the SAS Deployment Wizard, you must specify whether you will use an in-process server or a Platform Computing server to schedule reports.
After you have installed SAS Web Report Studio and the in-process server, you must create a metadata definition for the in-process server.
1. In SAS Management Console, right-click the Server Manager and select Actions ð New Server.
2. On the first page of the New Server Wizard, under Scheduling Servers, select SAS In-Process Services. Click Next.
3. In the following pages of the wizard, provide a name and description for the server and then verify the server version.
4. On the final page, review the settings and click Finish.
You must define only a single in-process scheduling server. Using multiple servers will cause errors when you attempt to schedule a report.
Configuration Options in a Clustered Environment
If you are using version 4.3 or later of SAS Web Report Studio, support for a clustered environment is provided by default. However, you might want to change configuration options if you have port conflicts or you are using a non-clustered environment. Follow these steps to change the configuration options:
1. In SAS Management Console, expand the Plug-ins ð Configuration Manager ð SAS Application Infrastructure folder. Right-click the Web Report Studio 4.3 folder and select Properties. The Web Report Studio 4.3 Properties window appears.
2. Click the Settings tab.
3. If you are using a clustered environment and have port conflicts, select different ports in the three Cluster Scheduling Port fields.
4. If you are using a non-clustered environment, you can improve performance by changing the value of the Web Container is Clustered field to No. However, a value of Yes is valid for both clustered and non-clustered environments.
Note: If you are using a clustered environment, the value of this field must be set to Yes.
32 Chapter 5 • Setting Up Scheduling Using SAS In-Process Scheduling
5. When you have finished making configuration changes, close the Web Report Studio 4.3 Properties window. The changes will take effect the next time SAS Web Report Studio is started.
Using In-Process SchedulingAfter you have defined the in-process scheduling server in SAS Management Console, SAS Web Report Studio users can start to schedule reports. If users are authorized to schedule reports inside SAS Web Report Studio, they can set up the report schedule and submit the report for scheduling. See SAS® Web Report Studio: User’s Guide for more information about scheduling reports.
Using In-Process Scheduling 33

34 Chapter 5 • Setting Up Scheduling Using SAS In-Process Scheduling
Chapter 6
Creating Batch Servers
Understanding Batch Servers . . . . . . . . . . . . . . . . . . . . . . . . . . . . . . . . . . . . . . . . . . . 35
Defining a SAS Java Batch Server . . . . . . . . . . . . . . . . . . . . . . . . . . . . . . . . . . . . . . . 36
Defining a SAS DATA Step Batch Server . . . . . . . . . . . . . . . . . . . . . . . . . . . . . . . . . 36Define the DATA Step Batch Server . . . . . . . . . . . . . . . . . . . . . . . . . . . . . . . . . . . . 36Define a Deployment Directory . . . . . . . . . . . . . . . . . . . . . . . . . . . . . . . . . . . . . . . . 37
Defining a Generic Batch Server . . . . . . . . . . . . . . . . . . . . . . . . . . . . . . . . . . . . . . . . . 38
Understanding Batch ServersA batch server is a component of a SAS application server that provides the command necessary for a scheduled job to be executed. When the job is submitted to the scheduling server, a specified batch server is queried to retrieve the command needed to run the job. The scheduling server then issues the command at the appropriate time to run the scheduled job.
Because the commands needed to run a job differ according to the application that was used to create the job, several types and subtypes of batch servers are provided. You must assign each scheduled job to the appropriate batch server as part of the scheduling process.
The following batch server types and subtypes are supported:
SAS Java batch serversupports jobs from a SAS application or solution. When you define a SAS Java batch server, you must specify the subtype to specify the specific application or solution that the server supports.
SAS DATA Step Batch serversupports SAS DATA step jobs that are submitted for scheduling.
SAS generic batch serversupports jobs from SAS applications or solutions without requiring any knowledge of the command that is required. This type of server is most often with SAS applications or solutions that are not listed as supported subtypes by the SAS Java batch server. The SAS generic batch server lets you work with jobs from applications or solutions that add support for scheduling but are not yet supported by the SAS Java batch server. Because the server does not have any knowledge about the command required by the application, the server cannot add command-line arguments (for example, to enable output logging).
35
Defining a SAS Java Batch ServerA SAS Java batch server is a component of a SAS application server definition that provides the command to run a job from a supported list of SAS applications and solutions. Only one logical SAS Java Batch server component is allowed in each SAS application server. If you need to define a batch server for more than one application, you must define each one either in a separate SAS application server or by adding a server to an existing logical Java batch server definition. Depending on your installation, a SAS Java batch server might already be defined by the software deployment wizard when SAS is installed. If you need to set it up manually, follow these steps:
1. In SAS Management Console, expand the Server Manager node.
2. Right-click the application server name with which the SAS Java Batch server is associated (for example, SASApp), and select Add Application Server Component.
3. On the first page of the New SAS Application Server Component Wizard, select SAS Java Batch Server and click Next.
4. On the next wizard page, enter a name (for example, SAS Java Batch Server), and click Next.
5. On the next wizard page, do the following:
• From the Associated Machine drop-down list, select the name of the machine that contains the SAS Application Server.
Note: The machine name attribute is for documentation purposes only. SAS scheduling does not use this machine name to set up or execute the job.
• From the SubType list, specify the type of jobs that will be processed by the server. This value corresponds to the SAS solution whose scheduled jobs will be run by the server.
• In the Command line box, enter the path to the command that runs the scheduled job.
• In the Target Host field, specify the operating system of the server machine.
• Click Next.
6. On the next wizard page, review the information that you have entered. If it is correct, click Finish.
When you finish the wizard, the server appears as a component under the selected SAS application server.
Defining a SAS DATA Step Batch Server
Define the DATA Step Batch ServerA SAS DATA Step Batch server is a component of a SAS application server that provides the command to run a SAS DATA step job or a job from SAS Data Integration Studio. Depending on your installation, a SAS DATA Step Batch server might already
36 Chapter 6 • Creating Batch Servers
be defined by the software deployment wizard when SAS is installed. If you need to set it up manually, follow these steps:
1. In SAS Management Console, expand the Server Manager node.
2. Right-click the application server name with which the SAS DATA Step Batch server is associated (for example, SASApp), and select Add Application Server Component.
3. On the first page of the New SAS Application Server Component Wizard, select SAS DATA Step Batch Server and click Next.
4. On the next wizard page, enter a name (for example, SAS DATA Step Batch Server), and click Next.
5. On the next wizard page, do the following:
• From the Associated Machine drop-down list, select the name of the machine that contains the SAS Application Server.
Note: The machine name attribute is for documentation purposes only. SAS scheduling does not use this machine name to set up or execute the job.
• From the SubType list, select the operating system of the associated machine.
• In the Command box, enter the path to the command that starts a SAS session on the scheduling server. Your initial configuration provides a command in the following path: SAS-config-dir/Lev1/SASApp/BatchServer/sasbatch.
• In the Logs Directory box, enter the path for the directory where the SAS log is to be stored. Your initial configuration provides a logs directory in the following path: SAS-config-dir/Lev1/SASApp/BatchServer/logs.
• If you want to change the rolling log options, click Advanced Options. For a list of the log options, see the information about the LOGPARM= system option in SAS® 9.4 Language Reference: Dictionary.
• Click Next.
6. On the next wizard page, review the information that you have entered. If it is correct, click Finish.
When you finish the wizard, the server appears as a component under the selected SAS application server.
Define a Deployment DirectoryIn addition to defining the SAS DATA Step Batch server, you must also define a deployment directory, which contains the jobs deployed for scheduling. The deployment directory definition and the corresponding physical directory should have been set up during your initial installation and configuration. If you need to set them up manually, follow these steps:
1. Create the physical deployment directory in the file system of the scheduling server machine. Assign Write permission to this directory to the users who will be deploying jobs for scheduling.
2. In SAS Management Console, right-click the Schedule Manager node and select Deployment Directories.
3. In the Deployment Directories dialog box, select the application server (for example, SASApp) that is associated with the scheduling server machine. Then click New.
4. In the New Directory dialog box:
Defining a SAS DATA Step Batch Server 37
a. Enter a name for the deployment directory (for example, Batch Jobs).
b. Enter the path for the deployment directory, or click Browse to navigate to the path. You can enter either a fully qualified path, or a path that is relative to the application server configuration directory (SAS-config-dir/Lev1/SASApp).
c. Click OK.
5. Click OK to exit the Deployment Directories dialog box.
Defining a Generic Batch ServerA generic batch server is a component of a SAS application server that provides the command to run jobs from SAS applications or solutions without requiring any knowledge of the command. This capability enables you to schedule jobs from SAS applications or solutions that are not specifically supported by the SAS Java Batch server subtypes, but it does not provide the ability to add command-line arguments for the SAS application. If a release of a SAS application or solution adds support for scheduling, you can schedule jobs using a generic batch server until the SAS Java Batch server subtypes are updated.
Follow these steps to define a SAS generic batch server:
1. In SAS Management Console, expand the Server Manager node.
2. Right-click the application server name with which the generic batch server is associated (for example, SASApp), and select Add Application Server Component.
3. On the first page of the New SAS Application Server Component Wizard, select SAS Generic Batch Server and click Next.
4. On the next wizard page, enter a name (for example, SAS Generic Batch Server), and click Next.
5. On the next wizard page, do the following:
• From the Associated Machine drop-down list, select the name of the machine that contains the SAS Application Server.
Note: The machine name attribute is for documentation purposes only. SAS scheduling does not use this machine name to set up or execute the job.
• In the Command box, enter the appropriate command for the scheduling server.
• Click Next.
6. On the next wizard page, review the information that you have entered. If it is correct, click Finish.
7. When you finish the wizard, the server appears as a component under the selected SAS application server.
38 Chapter 6 • Creating Batch Servers
Chapter 7
Scheduling Jobs Using Schedule Manager
What Is the Schedule Manager? . . . . . . . . . . . . . . . . . . . . . . . . . . . . . . . . . . . . . . . . . 39
Creating a Flow . . . . . . . . . . . . . . . . . . . . . . . . . . . . . . . . . . . . . . . . . . . . . . . . . . . . . . . 40
Specifying Dependencies . . . . . . . . . . . . . . . . . . . . . . . . . . . . . . . . . . . . . . . . . . . . . . . 41Overview of Dependencies . . . . . . . . . . . . . . . . . . . . . . . . . . . . . . . . . . . . . . . . . . . . 41Using the Visual Flow Editor . . . . . . . . . . . . . . . . . . . . . . . . . . . . . . . . . . . . . . . . . . 42
Adding Jobs to a Deployed Flow . . . . . . . . . . . . . . . . . . . . . . . . . . . . . . . . . . . . . . . . . 44
Setting Deployed Flow Properties . . . . . . . . . . . . . . . . . . . . . . . . . . . . . . . . . . . . . . . . 45
Deleting Jobs and Flows . . . . . . . . . . . . . . . . . . . . . . . . . . . . . . . . . . . . . . . . . . . . . . . . 47
Scheduling Flows . . . . . . . . . . . . . . . . . . . . . . . . . . . . . . . . . . . . . . . . . . . . . . . . . . . . . 48
Unscheduling Flows . . . . . . . . . . . . . . . . . . . . . . . . . . . . . . . . . . . . . . . . . . . . . . . . . . . 50
What Is the Schedule Manager?The Schedule Manager is a SAS Management Console plug-in that works with scheduling servers to schedule jobs that you create in other applications.
The scheduled flows are run on a defined scheduling server.
After you have defined the scheduling servers and batch servers and created and deployed jobs for scheduling, you can use the Schedule Manager to define or edit the schedule and submit the job for scheduling. Using the Schedule Manager, you can perform these tasks:
• create or edit deployed flows, which contain one or more deployed jobs for scheduling.
• create or edit dependencies for jobs in the flow, which are criteria that must be met in order for the job to run. Dependencies can be based on time, other jobs, or files.
• schedule or reschedule a flow to run based on specified conditions (run now, run manually, or run whenever a dependency is met).
To schedule a job using the Schedule Manager, follow these steps:
1. Create a flow, and then add one or more jobs to the flow. A flow is a group of jobs and dependencies.
2. Specify the scheduling server for the flow. The type of scheduling server that you select affects the dependencies that are available for the flow.
39
3. Specify dependencies for the jobs in the flow. Dependencies are events that must occur before the job runs. You can create these types of dependencies:
Time event dependenciesspecify that the job runs only when a time-related event occurs (such as a specific date and time being reached or a specified time interval passing)
File event dependenciesspecify that the job runs only when a file-related event occurs (such as a file being created or a file reaching a certain age or size)
Job event dependenciesspecify that the job runs only when an event related to another job in the flow occurs (such as a job starting or a job completing successfully)
4. Submit the flow to the scheduling server.
In order to use the Schedule Manager plug-in, your role must have the Schedule Manager capability assigned under Management Console 9.4 capabilities.
Creating a FlowIn order to schedule a job, you must first create a job object, and then add it to a flow or create a new flow. A deployed flow is a group of jobs and their dependencies that have been deployed for scheduling.
To create a new flow,
1. From the navigation tree, select the Schedule Manager plug-in, and then select New Flow from the Actions menu, the pop-up menu, or the toolbar. The New Flow window appears.
40 Chapter 7 • Scheduling Jobs Using Schedule Manager
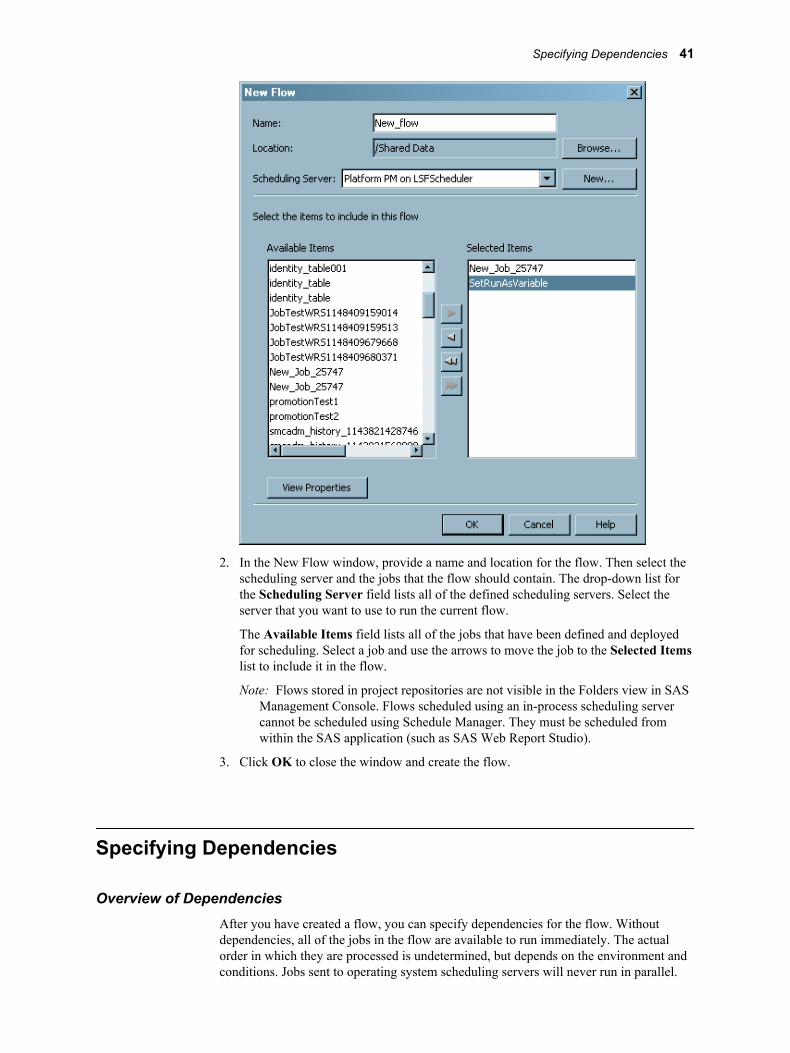
2. In the New Flow window, provide a name and location for the flow. Then select the scheduling server and the jobs that the flow should contain. The drop-down list for the Scheduling Server field lists all of the defined scheduling servers. Select the server that you want to use to run the current flow.
The Available Items field lists all of the jobs that have been defined and deployed for scheduling. Select a job and use the arrows to move the job to the Selected Items list to include it in the flow.
Note: Flows stored in project repositories are not visible in the Folders view in SAS Management Console. Flows scheduled using an in-process scheduling server cannot be scheduled using Schedule Manager. They must be scheduled from within the SAS application (such as SAS Web Report Studio).
3. Click OK to close the window and create the flow.
Specifying Dependencies
Overview of DependenciesAfter you have created a flow, you can specify dependencies for the flow. Without dependencies, all of the jobs in the flow are available to run immediately. The actual order in which they are processed is undetermined, but depends on the environment and conditions. Jobs sent to operating system scheduling servers will never run in parallel.
Specifying Dependencies 41

Dependencies let you specify the conditions that must be met before a job in a flow runs. The types of dependencies are:
• Time dependency, which specifies that the job runs on a specified day at a specified time. For example, you can specify that the job runs every weekday at a specified time
• Job dependency, which specifies that the current job runs if a specified event occurs with another job. For example, you can specify that the current job runs when Job A completes successfully, or you can specify that it runs when Job A ends with a specified exit code.
• File dependency, which specifies that the current job runs if a condition is met on a specified file. For example, you can specify that the current job runs whenever File B is created, or that it runs when File B becomes larger than a specified size.
Using the Visual Flow EditorAfter you have selected the jobs to be included in a flow, you can use the visual editor to graphically display the flow. The visual editor displays the dependencies and relationships between the jobs, enabling you to better understand the structure of complex flows. You can also add jobs and gate nodes to the flow.
To use the visual editor, follow these steps:
1. In the navigation area, select a defined flow and select Actions ð Edit Flow. The flow is displayed graphically in the display area.
The dashed lines identify the relationship between a job and a dependency. You can select and move any element in the window. To connect elements in the window, move the cursor to an open end of the element and drag the line to another element. Inputs are on the left side of an element and outputs are on the right side.
2. Add a file event, a time event, a deployed job, or a subflow to the flow by selecting the appropriate choice from the Actions menu, the toolbar, or the context menu. When file events and time events are added, they are not associated as a dependency with any job. You must incorporate the event into the flow in order for the event to function.
For example, when you select Actions ð Add File Event, the New File Event dialog box appears.
42 Chapter 7 • Scheduling Jobs Using Schedule Manager
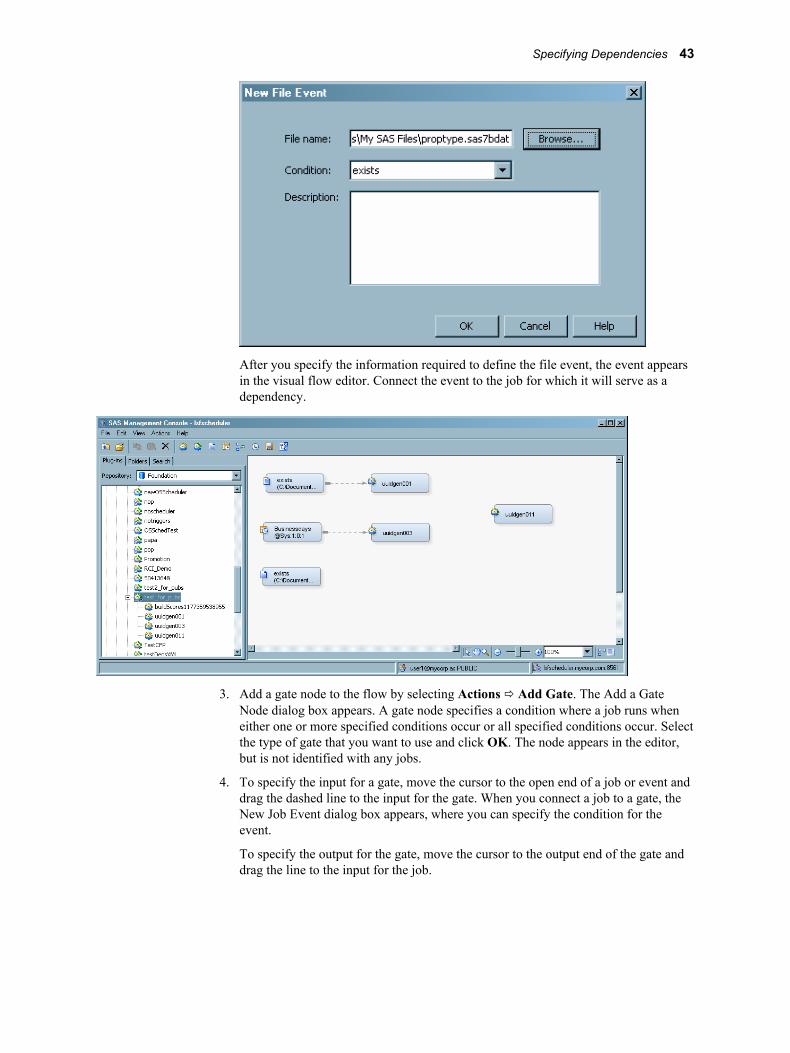
After you specify the information required to define the file event, the event appears in the visual flow editor. Connect the event to the job for which it will serve as a dependency.
3. Add a gate node to the flow by selecting Actions ð Add Gate. The Add a Gate Node dialog box appears. A gate node specifies a condition where a job runs when either one or more specified conditions occur or all specified conditions occur. Select the type of gate that you want to use and click OK. The node appears in the editor, but is not identified with any jobs.
4. To specify the input for a gate, move the cursor to the open end of a job or event and drag the dashed line to the input for the gate. When you connect a job to a gate, the New Job Event dialog box appears, where you can specify the condition for the event.
To specify the output for the gate, move the cursor to the output end of the gate and drag the line to the input for the job.
Specifying Dependencies 43
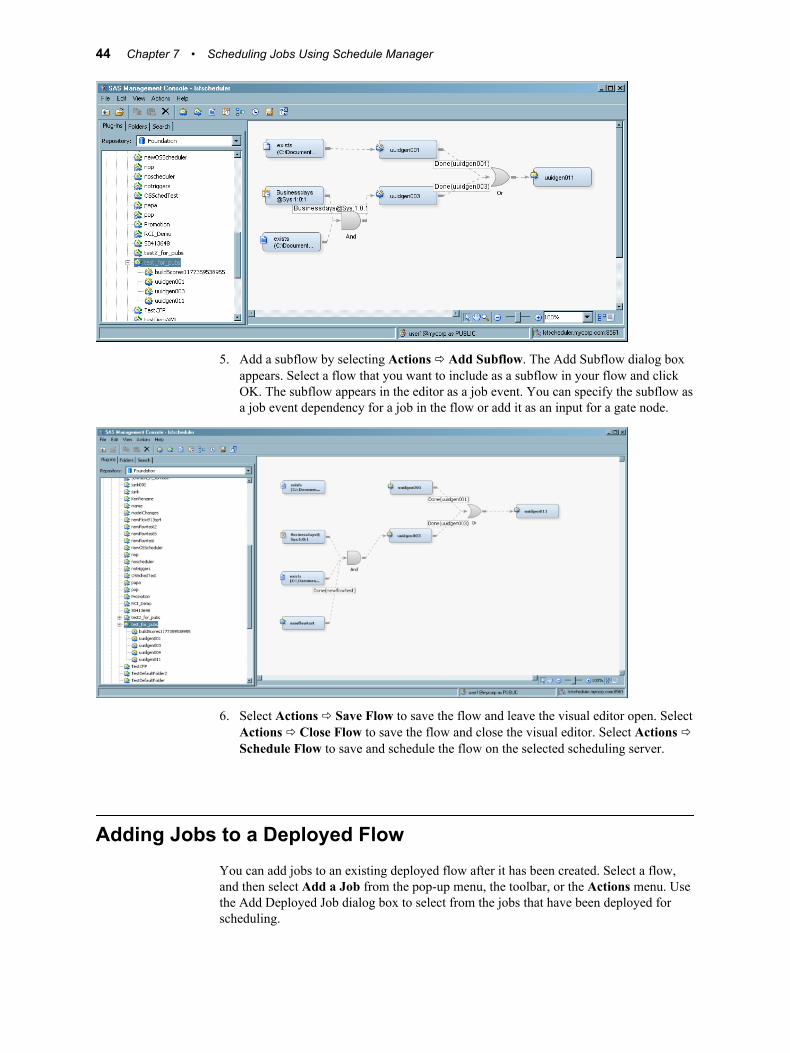
5. Add a subflow by selecting Actions ð Add Subflow. The Add Subflow dialog box appears. Select a flow that you want to include as a subflow in your flow and click OK. The subflow appears in the editor as a job event. You can specify the subflow as a job event dependency for a job in the flow or add it as an input for a gate node.
6. Select Actions ð Save Flow to save the flow and leave the visual editor open. Select Actions ð Close Flow to save the flow and close the visual editor. Select Actions ð Schedule Flow to save and schedule the flow on the selected scheduling server.
Adding Jobs to a Deployed FlowYou can add jobs to an existing deployed flow after it has been created. Select a flow, and then select Add a Job from the pop-up menu, the toolbar, or the Actions menu. Use the Add Deployed Job dialog box to select from the jobs that have been deployed for scheduling.
44 Chapter 7 • Scheduling Jobs Using Schedule Manager
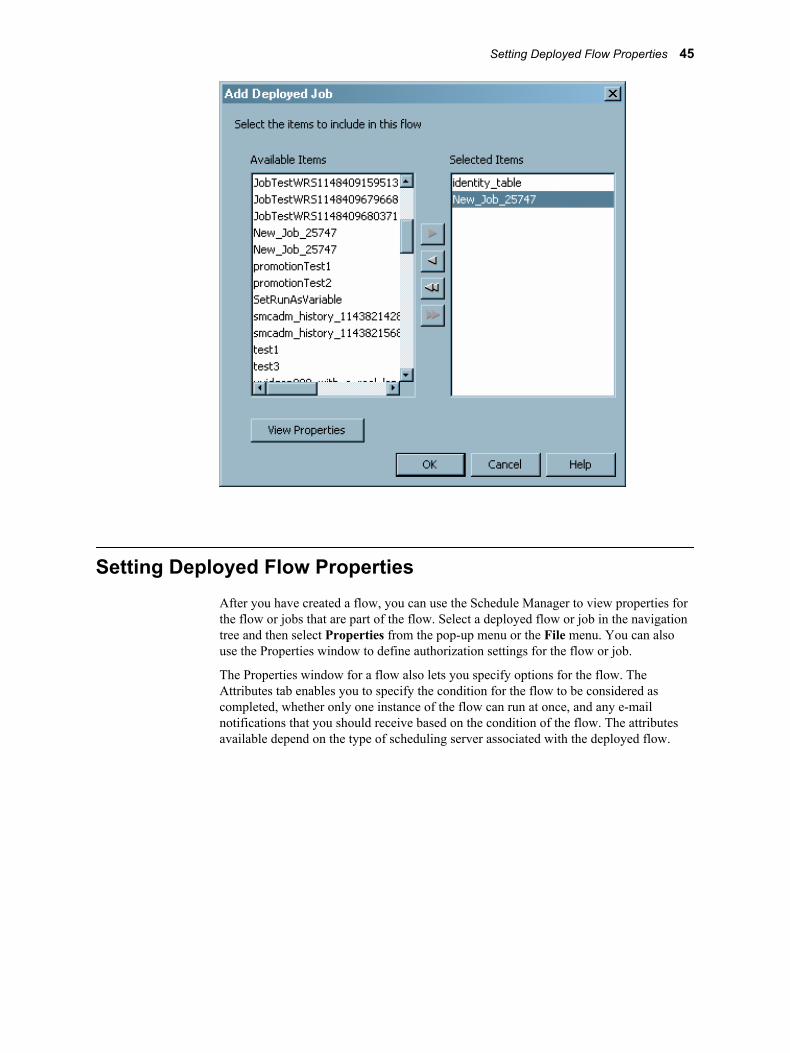
Setting Deployed Flow PropertiesAfter you have created a flow, you can use the Schedule Manager to view properties for the flow or jobs that are part of the flow. Select a deployed flow or job in the navigation tree and then select Properties from the pop-up menu or the File menu. You can also use the Properties window to define authorization settings for the flow or job.
The Properties window for a flow also lets you specify options for the flow. The Attributes tab enables you to specify the condition for the flow to be considered as completed, whether only one instance of the flow can run at once, and any e-mail notifications that you should receive based on the condition of the flow. The attributes available depend on the type of scheduling server associated with the deployed flow.
Setting Deployed Flow Properties 45
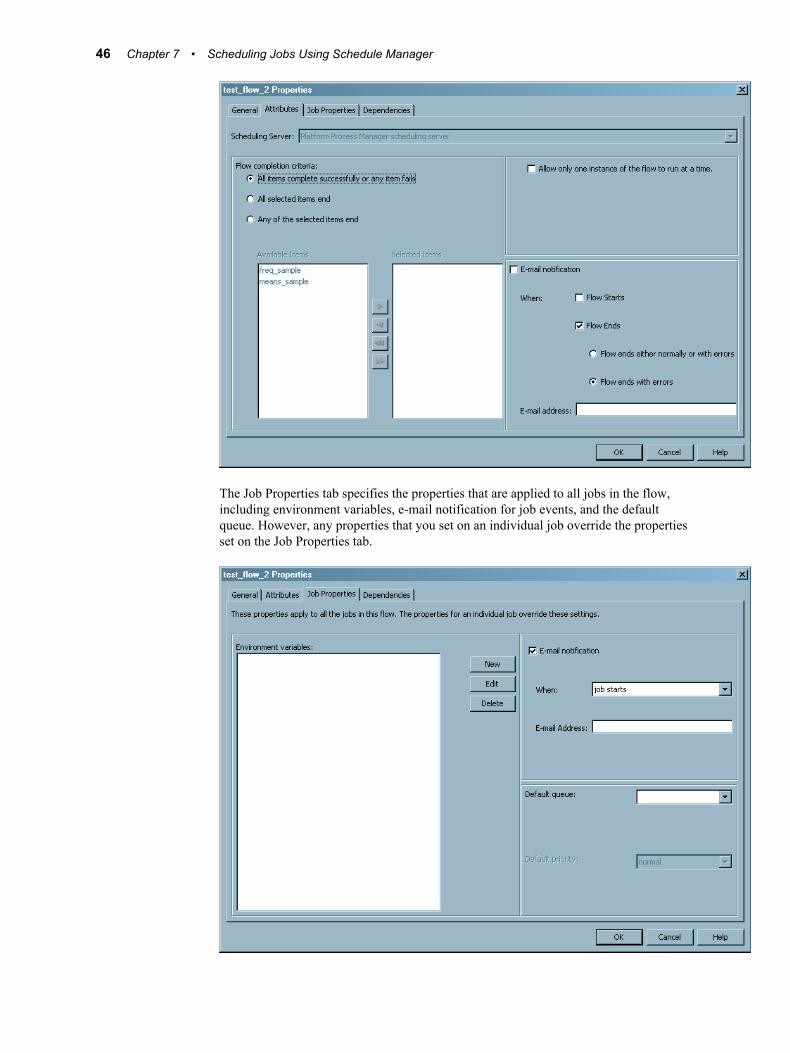
The Job Properties tab specifies the properties that are applied to all jobs in the flow, including environment variables, e-mail notification for job events, and the default queue. However, any properties that you set on an individual job override the properties set on the Job Properties tab.
46 Chapter 7 • Scheduling Jobs Using Schedule Manager
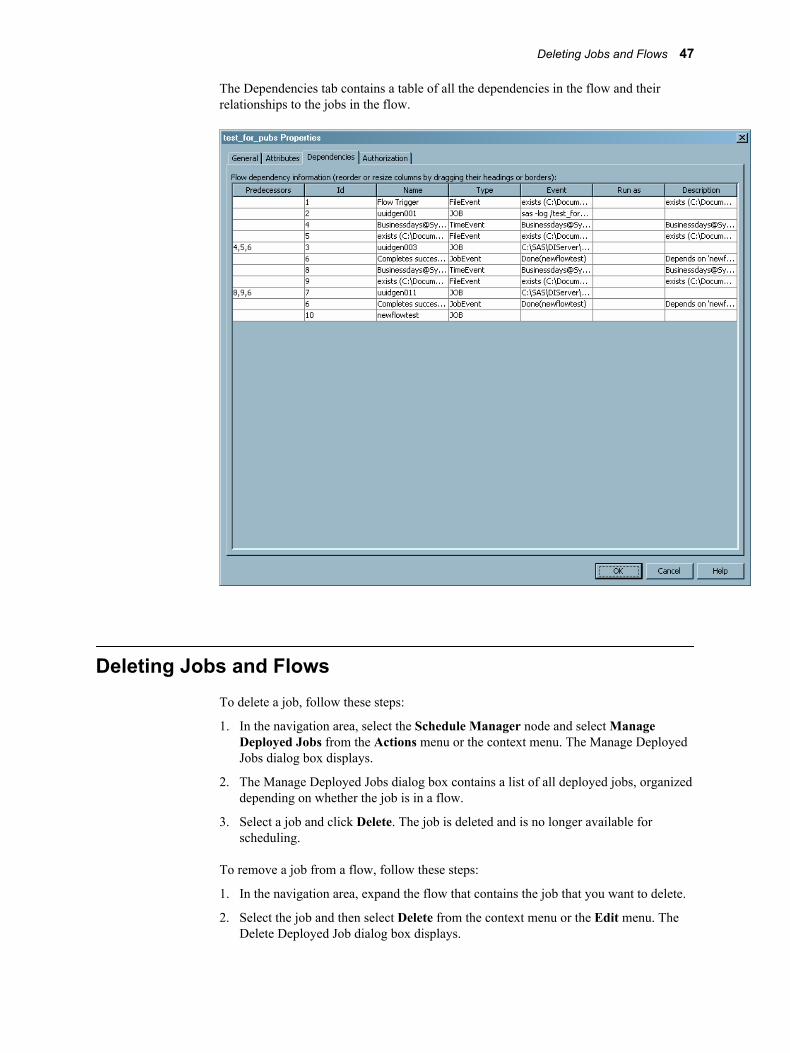
The Dependencies tab contains a table of all the dependencies in the flow and their relationships to the jobs in the flow.
Deleting Jobs and FlowsTo delete a job, follow these steps:
1. In the navigation area, select the Schedule Manager node and select Manage Deployed Jobs from the Actions menu or the context menu. The Manage Deployed Jobs dialog box displays.
2. The Manage Deployed Jobs dialog box contains a list of all deployed jobs, organized depending on whether the job is in a flow.
3. Select a job and click Delete. The job is deleted and is no longer available for scheduling.
To remove a job from a flow, follow these steps:
1. In the navigation area, expand the flow that contains the job that you want to delete.
2. Select the job and then select Delete from the context menu or the Edit menu. The Delete Deployed Job dialog box displays.
Deleting Jobs and Flows 47
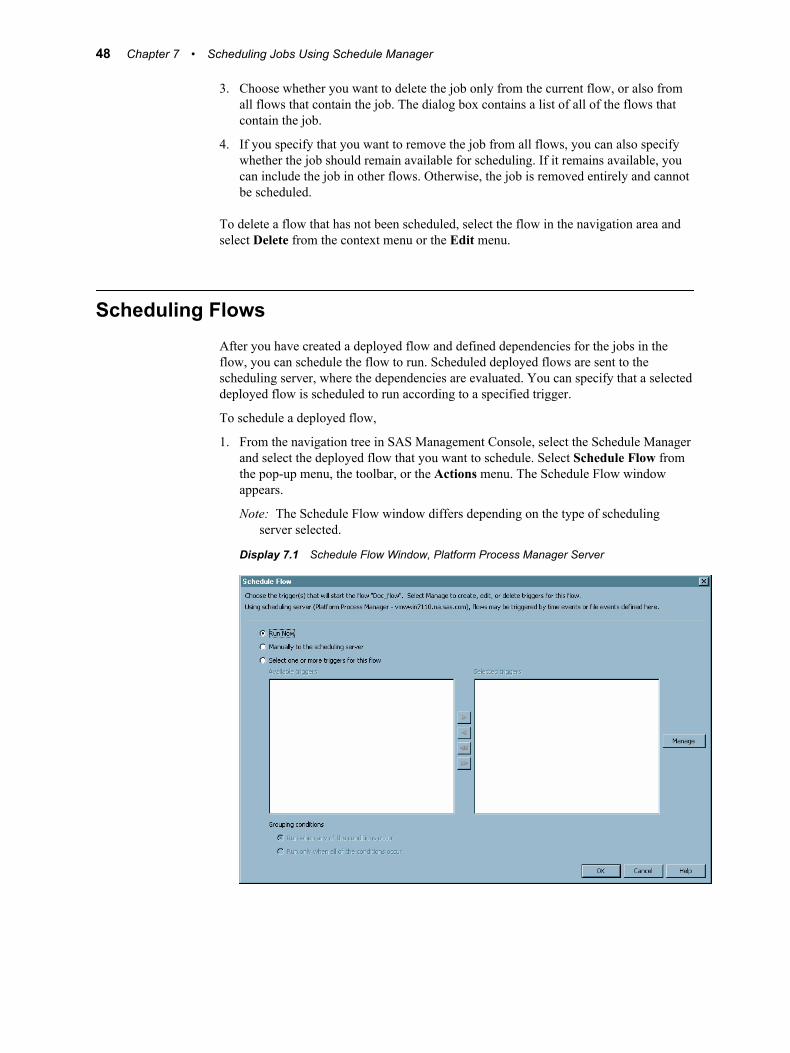
3. Choose whether you want to delete the job only from the current flow, or also from all flows that contain the job. The dialog box contains a list of all of the flows that contain the job.
4. If you specify that you want to remove the job from all flows, you can also specify whether the job should remain available for scheduling. If it remains available, you can include the job in other flows. Otherwise, the job is removed entirely and cannot be scheduled.
To delete a flow that has not been scheduled, select the flow in the navigation area and select Delete from the context menu or the Edit menu.
Scheduling FlowsAfter you have created a deployed flow and defined dependencies for the jobs in the flow, you can schedule the flow to run. Scheduled deployed flows are sent to the scheduling server, where the dependencies are evaluated. You can specify that a selected deployed flow is scheduled to run according to a specified trigger.
To schedule a deployed flow,
1. From the navigation tree in SAS Management Console, select the Schedule Manager and select the deployed flow that you want to schedule. Select Schedule Flow from the pop-up menu, the toolbar, or the Actions menu. The Schedule Flow window appears.
Note: The Schedule Flow window differs depending on the type of scheduling server selected.
Display 7.1 Schedule Flow Window, Platform Process Manager Server
48 Chapter 7 • Scheduling Jobs Using Schedule Manager
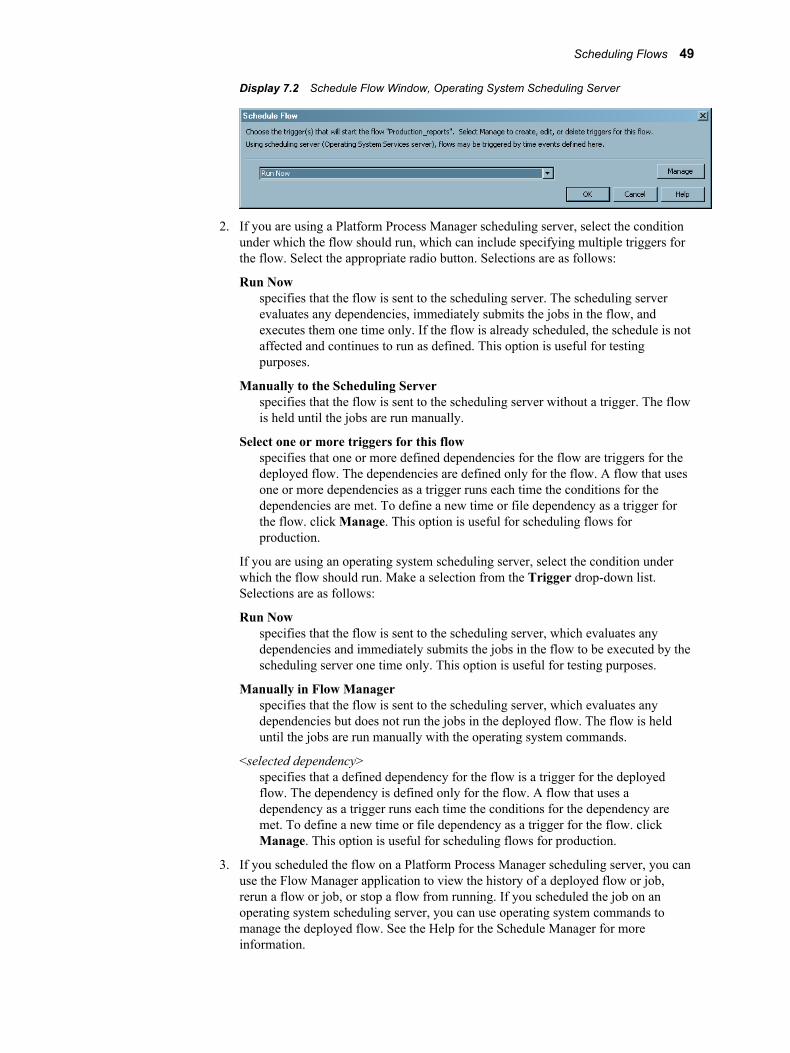
Display 7.2 Schedule Flow Window, Operating System Scheduling Server
2. If you are using a Platform Process Manager scheduling server, select the condition under which the flow should run, which can include specifying multiple triggers for the flow. Select the appropriate radio button. Selections are as follows:
Run Nowspecifies that the flow is sent to the scheduling server. The scheduling server evaluates any dependencies, immediately submits the jobs in the flow, and executes them one time only. If the flow is already scheduled, the schedule is not affected and continues to run as defined. This option is useful for testing purposes.
Manually to the Scheduling Serverspecifies that the flow is sent to the scheduling server without a trigger. The flow is held until the jobs are run manually.
Select one or more triggers for this flowspecifies that one or more defined dependencies for the flow are triggers for the deployed flow. The dependencies are defined only for the flow. A flow that uses one or more dependencies as a trigger runs each time the conditions for the dependencies are met. To define a new time or file dependency as a trigger for the flow. click Manage. This option is useful for scheduling flows for production.
If you are using an operating system scheduling server, select the condition under which the flow should run. Make a selection from the Trigger drop-down list. Selections are as follows:
Run Nowspecifies that the flow is sent to the scheduling server, which evaluates any dependencies and immediately submits the jobs in the flow to be executed by the scheduling server one time only. This option is useful for testing purposes.
Manually in Flow Managerspecifies that the flow is sent to the scheduling server, which evaluates any dependencies but does not run the jobs in the deployed flow. The flow is held until the jobs are run manually with the operating system commands.
<selected dependency>specifies that a defined dependency for the flow is a trigger for the deployed flow. The dependency is defined only for the flow. A flow that uses a dependency as a trigger runs each time the conditions for the dependency are met. To define a new time or file dependency as a trigger for the flow. click Manage. This option is useful for scheduling flows for production.
3. If you scheduled the flow on a Platform Process Manager scheduling server, you can use the Flow Manager application to view the history of a deployed flow or job, rerun a flow or job, or stop a flow from running. If you scheduled the job on an operating system scheduling server, you can use operating system commands to manage the deployed flow. See the Help for the Schedule Manager for more information.
Scheduling Flows 49
Unscheduling FlowsIf you want to stop a scheduled flow from running without deleting the flow, you can unschedule it. Unscheduling prevents a scheduled flow from running, even if the starting trigger is met, until the flow is scheduled again. The flow is removed from the scheduling server, but not from the SAS Metadata Server..
To unschedule a flow, select the flow and select Unschedule Flow from the context menu, the toolbar, or the Actions menu.
50 Chapter 7 • Scheduling Jobs Using Schedule Manager
Chapter 8
Scheduling Jobs from SAS Data Integration Studio
Overview of Scheduling for SAS Data Integration Studio . . . . . . . . . . . . . . . . . . . . 51
Enabling the Scheduling of SAS Data Integration Studio Jobs . . . . . . . . . . . . . . . . 52
Deploying Data Integration Studio Jobs for Scheduling . . . . . . . . . . . . . . . . . . . . . . 52
Troubleshooting the Scheduling of SAS Data Integration Studio Jobs . . . . . . . . . . 53
Overview of Scheduling for SAS Data Integration Studio
To schedule jobs that are created by SAS Data Integration Studio, you can use either Platform Suite for SAS or your operating system scheduler. If you use the operating system scheduler, fewer scheduling features are available.
Scheduling of SAS Data Integration Studio jobs works as follows:
1. Users create jobs by using SAS Data Integration Studio. The job definitions are stored in job objects in the metadata repository.
2. Users deploy jobs for scheduling by using SAS Data Integration Studio. The deployment process does the following:
a. creates a SAS program based on the job metadata
b. places the SAS program in the specified deployment directory on the SAS batch server
c. creates a metadata object for the deployed job
3. An administrator uses Schedule Manager in SAS Management Console to create and schedule a flow that includes the deployed job. Schedule Manager passes the schedule information and the associated commands to the designated scheduling server (either the Process Manager Server or an operating system scheduling server). To construct the commands, Schedule Manager uses the Command Line and Log Directory attributes of the SAS DATA Step Batch server definition.
4. If you are using Platform Suite for SAS, then Platform Process Manager submits the scheduled job to Platform LSF at the designated time (or after the designated dependent event), and the SAS DATA Step Batch server executes the job. Information about the job status is stored on the scheduling server. Administrators can use Platform Flow Manager to view the status of the job.
51
If you are using an operating system scheduling server, then the operating system submits the job at the designated time. Administrators can use operating system tools to view the status of all scheduled flows. Users who are not administrators can view and edit only the flows that they own.
Enabling the Scheduling of SAS Data Integration Studio Jobs
In addition to the scheduling server, a scheduling environment for SAS Data Integration Studio jobs requires the following:
a deployment directoryA deployment directory is a location on the file system of the SAS application server that contains the scheduling server component. The scheduling server must have access to the deployment directory. A corresponding definition for the deployment directory must exist in the metadata repository. When a SAS Data Integration Studio user deploys a job for scheduling, a job is generated and placed in this directory. When the job is executed, the job information is read from this directory.
The initial configuration process should have created a physical deployment directory in the path SAS-config-dir/Lev1/SASApp/SASEnvironment/SASCode/Jobs, and a corresponding deployment directory definition in the metadata repository.
If you need to set up a deployment directory manually, see “Define a Deployment Directory” on page 37 .
a SAS DATA Step Batch ServerA SAS DATA Step Batch server is a metadata object that specifies the command to execute SAS code that is generated by SAS Data Integration Studio jobs. The metadata specifies the location of the command on the scheduling server and where the resulting log files are to be stored on the SAS application server that contains the scheduling server component.
If your configuration plan included the SAS DATA Step Batch server, the initial configuration process should have created a definition for a server called SAS DATA Step Batch server, which is a component of your SAS Application Server (for example, SASApp).
If you need to set up a SAS DATA Step Batch server manually, see “Defining a SAS DATA Step Batch Server” on page 36 .
Deploying Data Integration Studio Jobs for Scheduling
When you have completed the appropriate setup tasks, SAS Data Integration Studio users can deploy jobs for scheduling. The procedure for deploying jobs is as follows:
1. In SAS Data Integration Studio, right-click a job and select Scheduling ð Deploy.
2. In the Deploy a Job for Scheduling dialog box, do the following:
52 Chapter 8 • Scheduling Jobs from SAS Data Integration Studio
a. Select the batch server (for example, SASApp - SAS DATA Step Batch Server) where the job is to be executed.
b. Select the deployment directory where the generated job is to be stored.
c. A default filename for the job is displayed. You can modify the filename, but it cannot contain blanks or other characters that are invalid on the operating system.
d. Click OK.
3. If you are prompted for a user ID and password for the application server, enter the appropriate credentials. The credentials are validated through the application server's workspace server connection.
4. Click OK in the Deploy for Scheduling dialog box.
SAS Data Integration Studio generates SAS code from the job metadata, transfers the file to the deployment directory location on the scheduling server, and creates job metadata for the Schedule Manager to use.
For information about using Schedule Manager to schedule a job, see “Scheduling Jobs Using Schedule Manager” on page 39 .
Troubleshooting the Scheduling of SAS Data Integration Studio Jobs
User credentials play an important role in the scheduling and execution of SAS Data Integration Studio jobs. When SAS Data Integration Studio deploys a job for scheduling, it generates a SAS file as the -sysin value for running SAS in batch mode. Generated SAS programs often contain LIBNAME statements that specify credentials for the data sources in the library. If an issue occurs in scheduling or executing a SAS Data Integration Studio job, check to determine whether one of the following situations has occurred:
• Has a user's password changed? If the password has changed, you will need to either redeploy the job to update the SAS file with the new credentials, or edit the generated SAS file to update the credentials.
• Are the specified credentials valid in the scheduling environment? The user who generated the job might have credentials that are valid in SAS Data Integration Studio but not in the scheduling environment. Typically, the user who runs the scheduled job is also the user who scheduled the job in SAS Management Console, although you can use the Advanced Properties dialog box to specify another user to run the job. If the credentials are not valid, you will need to either redeploy the job with the appropriate credentials, or edit the generated SAS file to update the credentials.
For additional troubleshooting information, see “Resolving Issues Related to Scheduling with Platform Suite for SAS” on page 15 .
Troubleshooting the Scheduling of SAS Data Integration Studio Jobs 53

54 Chapter 8 • Scheduling Jobs from SAS Data Integration Studio
Chapter 9
Enabling the Scheduling of Reports
How Report Scheduling Works . . . . . . . . . . . . . . . . . . . . . . . . . . . . . . . . . . . . . . . . . . 55
Enabling Report Scheduling with In-Process Scheduling . . . . . . . . . . . . . . . . . . . . 56Overview of Tasks . . . . . . . . . . . . . . . . . . . . . . . . . . . . . . . . . . . . . . . . . . . . . . . . . . 56Step 1: Define Servers . . . . . . . . . . . . . . . . . . . . . . . . . . . . . . . . . . . . . . . . . . . . . . . 57Step 2: Identify the Scheduling Server Type . . . . . . . . . . . . . . . . . . . . . . . . . . . . . . 57Step 3: Define Archive Paths . . . . . . . . . . . . . . . . . . . . . . . . . . . . . . . . . . . . . . . . . . 57Step 4: Test the Configuration . . . . . . . . . . . . . . . . . . . . . . . . . . . . . . . . . . . . . . . . . 58
Enabling Report Scheduling with Platform Suite for SAS . . . . . . . . . . . . . . . . . . . . 59Overview of Enabling Report Scheduling . . . . . . . . . . . . . . . . . . . . . . . . . . . . . . . . 59Step 1: Create the Necessary Users, Groups, and Logins . . . . . . . . . . . . . . . . . . . . . 59Step 2: Verify That a SAS Java Batch Server Has Been Defined . . . . . . . . . . . . . . 60Step 3: Identify the Scheduling Server Type . . . . . . . . . . . . . . . . . . . . . . . . . . . . . . 61Step 4: Update the SAS Web Report Studio Configuration . . . . . . . . . . . . . . . . . . . 62Step 5: Update the LSF Password File (Windows Only) . . . . . . . . . . . . . . . . . . . . . 63Step 6: Verify Logging for the Output Generation Tool . . . . . . . . . . . . . . . . . . . . . 63Step 7: Edit the Initialization File for the Output Generation
Tool (Windows Only) . . . . . . . . . . . . . . . . . . . . . . . . . . . . . . . . . . . . . . . . . . . . . . 63Step 8: Define Archive Paths for Publishing Reports to Channels . . . . . . . . . . . . . 64Step 9: Test the Configuration . . . . . . . . . . . . . . . . . . . . . . . . . . . . . . . . . . . . . . . . . 64
Rescheduling a Report . . . . . . . . . . . . . . . . . . . . . . . . . . . . . . . . . . . . . . . . . . . . . . . . . 65
Troubleshooting the Configuration . . . . . . . . . . . . . . . . . . . . . . . . . . . . . . . . . . . . . . . 65
How Report Scheduling WorksYou can schedule SAS reports using either Platform Suite for SAS, an in-process scheduling server (through version 4.4 of SAS Web Report Studio), or a distributed in-process scheduling server (versions of SAS Web Report Studio after 4.4), and by using either SAS Web Report Studio or SAS Management Console.
The scheduling process from SAS Web Report Studio is as follows:
1. Users create reports using SAS Web Report Studio. The report definitions (.srx files) are stored in the WebDAV repository or on a file system, and metadata about the reports (including permissions information) is stored in the metadata repository.
2. Users create schedules for particular reports using SAS Web Report Studio. Information about the scheduled report jobs is stored in the metadata repository. The job information is also passed to the in-process scheduling server or to the Process
55
Manager Server. The command for the job is created using information from the SAS Java Batch server definition.
3. Jobs and flows are automatically created when the report is scheduled in SAS Web Report Studio. Users can use the Schedule Manager in SAS Management Console to reschedule the flow and change the report schedule.
4. Depending on the scheduling server used, either the Platform Process Manager server submits the job for execution or the in-process scheduling server submits the job to SAS Web Report Studio for execution at the designated time (or after the designated dependent event).
5. The Batch Generation Tool, running on the scheduling server, executes the report and places the output in the location designated by the repository (the WebDAV server or the file system). Metadata about the report output is stored in the metadata repository. If you are scheduling using Platform Suite for SAS, information about the job status is stored on the Process Manager Server. Administrators can use Platform Flow Manager to view the status of the job.
If report distribution has been set up, then the report output is also sent to the appropriate destinations when the user bursts the report. For information about report distribution, see “Scheduling and Distributing Pre-generated Reports” in the SAS® 9.4 Intelligence Platform: Web Application Administration Guide.
6. Users can view the static output by using SAS Web Report Studio (or another application, such as the SAS Information Delivery Portal).
To schedule reports, you must install and configure Platform Suite for SAS or configure a SAS in-process scheduling server.
Enabling Report Scheduling with In-Process Scheduling
Overview of TasksTo enable users to use the report scheduling capabilities of SAS Web Report Studio with in-process scheduling, several setup tasks are required. If you implemented scheduling when you installed SAS Web Report Studio, all setup tasks were performed automatically.
If you implement scheduling after installation is complete, you must complete these setup tasks:
1. Verify or define a SAS Java Batch Server with a subtype of Reporting and a SAS In-Process Services Server.
2. Identify the scheduling server type to SAS Web Report Studio.
3. Define archive paths for publishing reports to channels.
4. Test the configuration.
56 Chapter 9 • Enabling the Scheduling of Reports
Step 1: Define ServersA SAS Java Batch Server definition and a SAS In-Process Services Server definition are automatically created by the SAS Deployment Wizard. Verify that Reporting is selected as the value for the SubType field in the SAS Java Batch Server definition.
If you did not implement scheduling when you installed SAS, you might need to define a SAS Java Batch Server or SAS In-Process Services Server manually. Use the Server Manager plug-in in SAS Management Console to create the definitions. See“Defining a SAS Java Batch Server” on page 36 for detailed information. You must select a value of Reporting for the SubType field in the SAS Java Batch Server definition.
Note: Do not define more than one SAS In-Process Services server. Using multiple servers will cause errors when you attempt to schedule a report.
Step 2: Identify the Scheduling Server TypeIn order to ensure that SAS Web Report Studio uses in-process scheduling, you must specify the type of scheduling server that the application uses. This step is particularly important if you have both a SAS In-Process Services server and a Platform Process Manager server defined. Follow these steps:
1. In the SAS Management Console Plug-Ins tab, expand the Configuration Manager plug-in.
2. Right-click on Web Report Studio 4.4 to display the Web Report Studio 4.4 Properties dialog box.
3. Select the Settings tab.
4. In the Application field, select Scheduling.
5. In the Scheduling Enabled field, select Yes.
6. In the Scheduling Server Type field, select SAS In-Process Services.
7. Close the Properties dialog box and restart your Web application server.
Step 3: Define Archive PathsScheduled reports can be distributed to channels that are defined using the SAS Publishing Framework. If users will be distributing reports to channels that use archive locations (persistent stores), then the archive location must be accessible to SAS Web Report Studio.
To specify the appropriate archive path, follow these steps:
1. In SAS Management Console, expand the Publishing Framework node.
2. Expand the appropriate metadata repository node.
3. Expand the Channels node.
4. Right-click the channel to which you will be publishing reports, and select Properties.
5. In the Properties dialog box, select the Persistent Store tab.
6. In the Type of persistent store area, select the Archive radio button.
Enabling Report Scheduling with In-Process Scheduling 57
7. In the Path box, specify the path to a network location that all users who will be creating content can write to.
8. Click OK.
You might also need to update permissions on the physical folder to allow access for the users who will be publishing reports. For information about setting up publication channels, see “Adding SAS Publication Channels” in the SAS® 9.4 Intelligence Platform: Web Application Administration Guide.
Step 4: Test the ConfigurationAfter you have completed all of the configuration steps, use the following procedure to test your configuration. To create a report, you must have the Create Report capability in the Web Report Studio: Report Creation role. To schedule a report, you must have the Schedule Own Report capability from the Web Report Studio: Report Creation role.
1. On a client machine, use SAS Web Report Studio to create and schedule a report as follows:
a. Create and save a simple report.
b. Click View Report to display the report.
c. Select File ð Schedule.
d. On the Schedule Report page, select Now, and click Next.
e. On the next page, click Finish. If the word Running appears in the status field, wait for the job to finish.
2. In SAS Management Console, check the properties of the scheduled report as follows:
a. Select the Folder View tab and expand the folders until you locate the report that you scheduled.
b. Right-click the report, and choose Properties.
c. Select the Content tab. A folder called Batch should be displayed on this tab. The folder contains the output of the scheduled report.
3. If the Batch folder is present on the report's Content tab, as described in the previous step, then return to SAS Web Report Studio and complete these steps:
a. Log off, and then log back in.
b. Open the report. The following message should appear at the top of the report:
To interact with this report, you must first refresh the data.
If this message appears, then a batch copy of the report is displayed and the configuration is correct.
58 Chapter 9 • Enabling the Scheduling of Reports
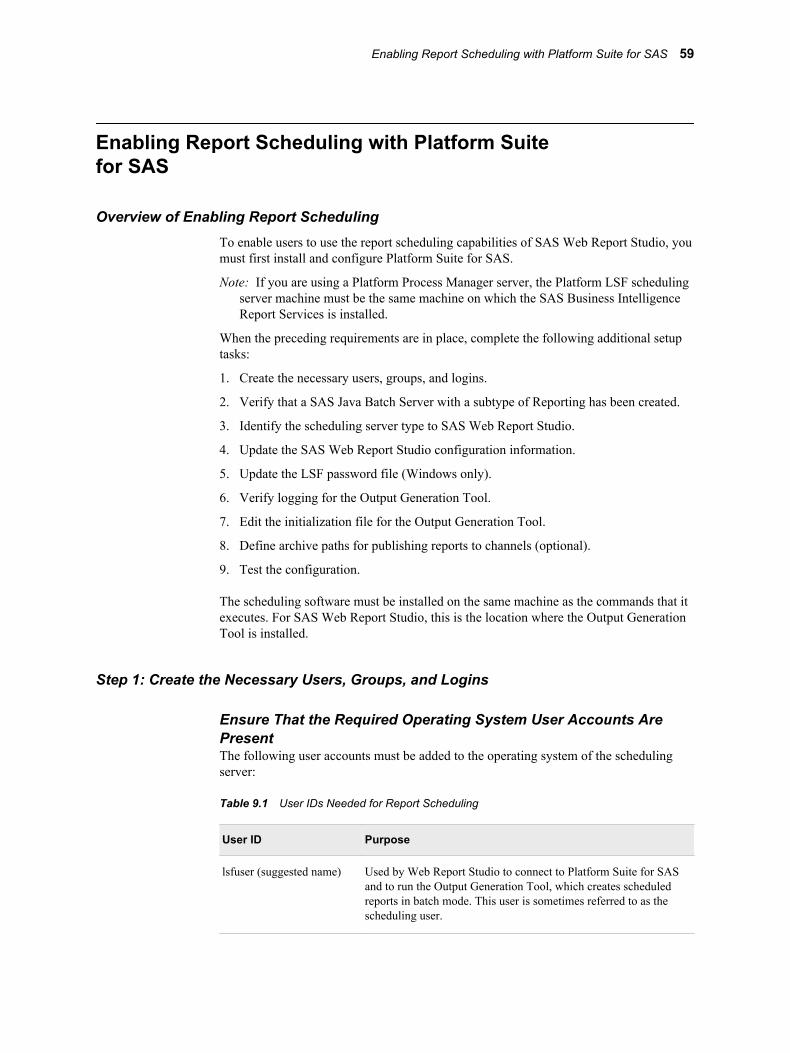
Enabling Report Scheduling with Platform Suite for SAS
Overview of Enabling Report SchedulingTo enable users to use the report scheduling capabilities of SAS Web Report Studio, you must first install and configure Platform Suite for SAS.
Note: If you are using a Platform Process Manager server, the Platform LSF scheduling server machine must be the same machine on which the SAS Business Intelligence Report Services is installed.
When the preceding requirements are in place, complete the following additional setup tasks:
1. Create the necessary users, groups, and logins.
2. Verify that a SAS Java Batch Server with a subtype of Reporting has been created.
3. Identify the scheduling server type to SAS Web Report Studio.
4. Update the SAS Web Report Studio configuration information.
5. Update the LSF password file (Windows only).
6. Verify logging for the Output Generation Tool.
7. Edit the initialization file for the Output Generation Tool.
8. Define archive paths for publishing reports to channels (optional).
9. Test the configuration.
The scheduling software must be installed on the same machine as the commands that it executes. For SAS Web Report Studio, this is the location where the Output Generation Tool is installed.
Step 1: Create the Necessary Users, Groups, and Logins
Ensure That the Required Operating System User Accounts Are PresentThe following user accounts must be added to the operating system of the scheduling server:
Table 9.1 User IDs Needed for Report Scheduling
User ID Purpose
lsfuser (suggested name) Used by Web Report Studio to connect to Platform Suite for SAS and to run the Output Generation Tool, which creates scheduled reports in batch mode. This user is sometimes referred to as the scheduling user.
Enabling Report Scheduling with Platform Suite for SAS 59
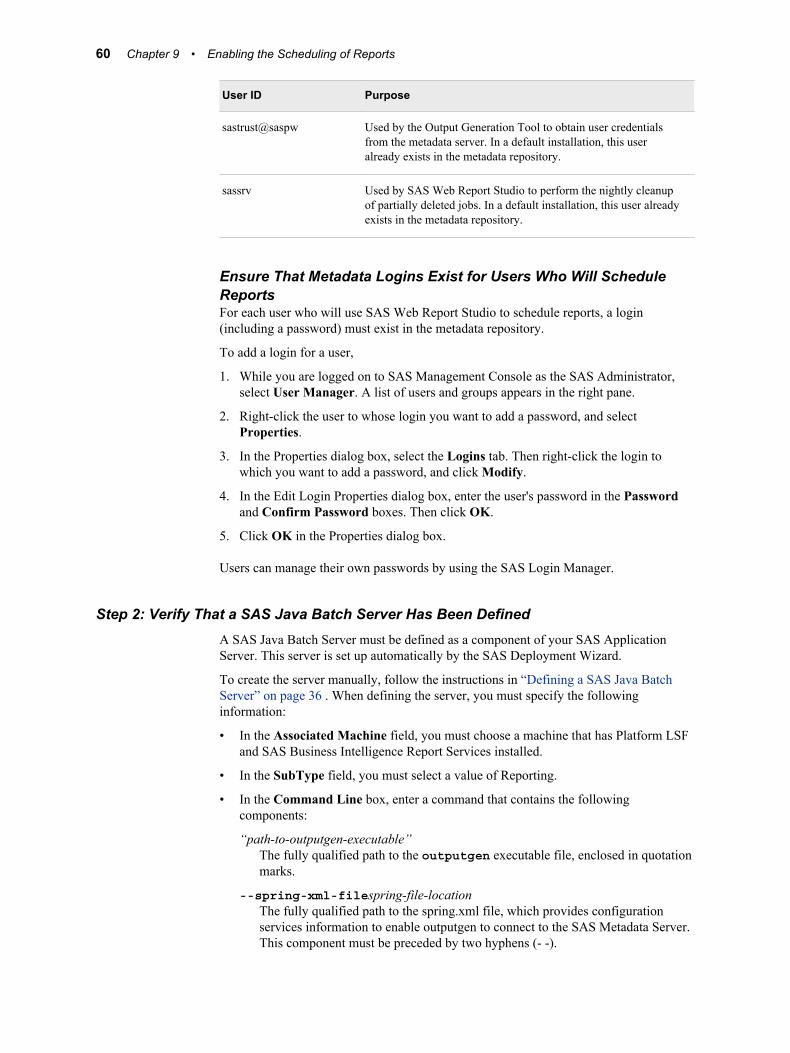
User ID Purpose
sastrust@saspw Used by the Output Generation Tool to obtain user credentials from the metadata server. In a default installation, this user already exists in the metadata repository.
sassrv Used by SAS Web Report Studio to perform the nightly cleanup of partially deleted jobs. In a default installation, this user already exists in the metadata repository.
Ensure That Metadata Logins Exist for Users Who Will Schedule ReportsFor each user who will use SAS Web Report Studio to schedule reports, a login (including a password) must exist in the metadata repository.
To add a login for a user,
1. While you are logged on to SAS Management Console as the SAS Administrator, select User Manager. A list of users and groups appears in the right pane.
2. Right-click the user to whose login you want to add a password, and select Properties.
3. In the Properties dialog box, select the Logins tab. Then right-click the login to which you want to add a password, and click Modify.
4. In the Edit Login Properties dialog box, enter the user's password in the Password and Confirm Password boxes. Then click OK.
5. Click OK in the Properties dialog box.
Users can manage their own passwords by using the SAS Login Manager.
Step 2: Verify That a SAS Java Batch Server Has Been DefinedA SAS Java Batch Server must be defined as a component of your SAS Application Server. This server is set up automatically by the SAS Deployment Wizard.
To create the server manually, follow the instructions in “Defining a SAS Java Batch Server” on page 36 . When defining the server, you must specify the following information:
• In the Associated Machine field, you must choose a machine that has Platform LSF and SAS Business Intelligence Report Services installed.
• In the SubType field, you must select a value of Reporting.
• In the Command Line box, enter a command that contains the following components:
“path-to-outputgen-executable”The fully qualified path to the outputgen executable file, enclosed in quotation marks.
--spring-xml-filespring-file-locationThe fully qualified path to the spring.xml file, which provides configuration services information to enable outputgen to connect to the SAS Metadata Server. This component must be preceded by two hyphens (- -).
60 Chapter 9 • Enabling the Scheduling of Reports
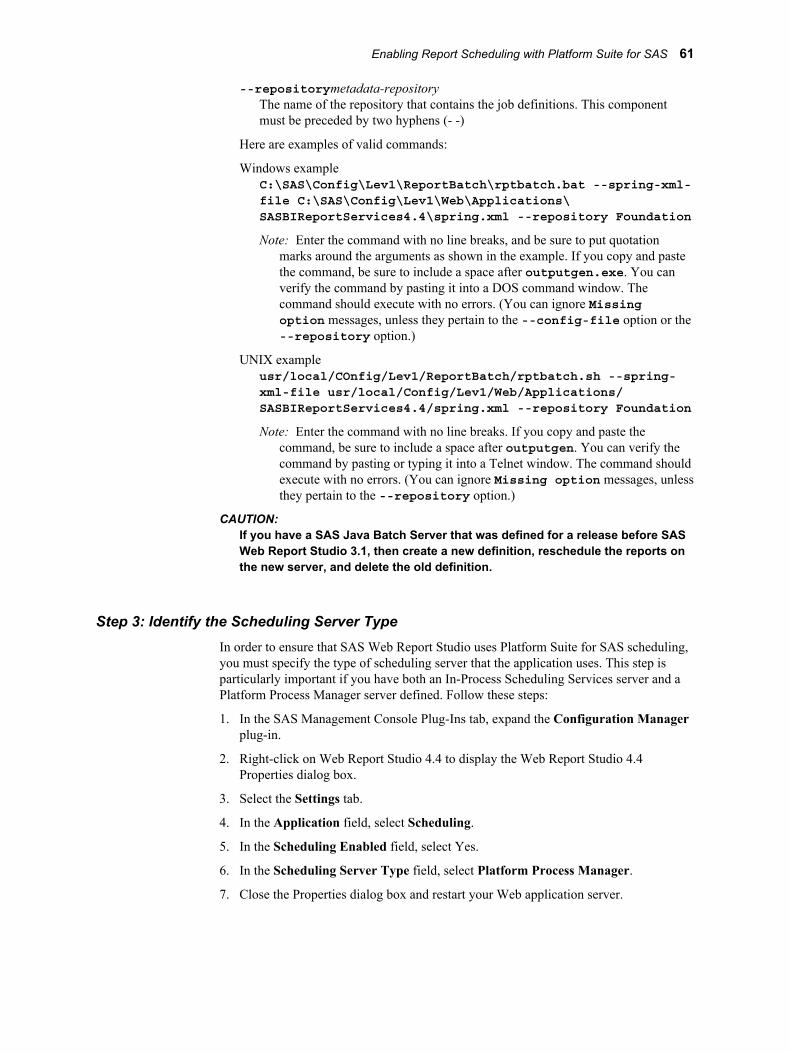
--repositorymetadata-repositoryThe name of the repository that contains the job definitions. This component must be preceded by two hyphens (- -)
Here are examples of valid commands:
Windows exampleC:\SAS\Config\Lev1\ReportBatch\rptbatch.bat --spring-xml-file C:\SAS\Config\Lev1\Web\Applications\ SASBIReportServices4.4\spring.xml --repository Foundation
Note: Enter the command with no line breaks, and be sure to put quotation marks around the arguments as shown in the example. If you copy and paste the command, be sure to include a space after outputgen.exe. You can verify the command by pasting it into a DOS command window. The command should execute with no errors. (You can ignore Missing option messages, unless they pertain to the --config-file option or the --repository option.)
UNIX exampleusr/local/COnfig/Lev1/ReportBatch/rptbatch.sh --spring-xml-file usr/local/Config/Lev1/Web/Applications/ SASBIReportServices4.4/spring.xml --repository Foundation
Note: Enter the command with no line breaks. If you copy and paste the command, be sure to include a space after outputgen. You can verify the command by pasting or typing it into a Telnet window. The command should execute with no errors. (You can ignore Missing option messages, unless they pertain to the --repository option.)
CAUTION:If you have a SAS Java Batch Server that was defined for a release before SAS Web Report Studio 3.1, then create a new definition, reschedule the reports on the new server, and delete the old definition.
Step 3: Identify the Scheduling Server TypeIn order to ensure that SAS Web Report Studio uses Platform Suite for SAS scheduling, you must specify the type of scheduling server that the application uses. This step is particularly important if you have both an In-Process Scheduling Services server and a Platform Process Manager server defined. Follow these steps:
1. In the SAS Management Console Plug-Ins tab, expand the Configuration Manager plug-in.
2. Right-click on Web Report Studio 4.4 to display the Web Report Studio 4.4 Properties dialog box.
3. Select the Settings tab.
4. In the Application field, select Scheduling.
5. In the Scheduling Enabled field, select Yes.
6. In the Scheduling Server Type field, select Platform Process Manager.
7. Close the Properties dialog box and restart your Web application server.
Enabling Report Scheduling with Platform Suite for SAS 61
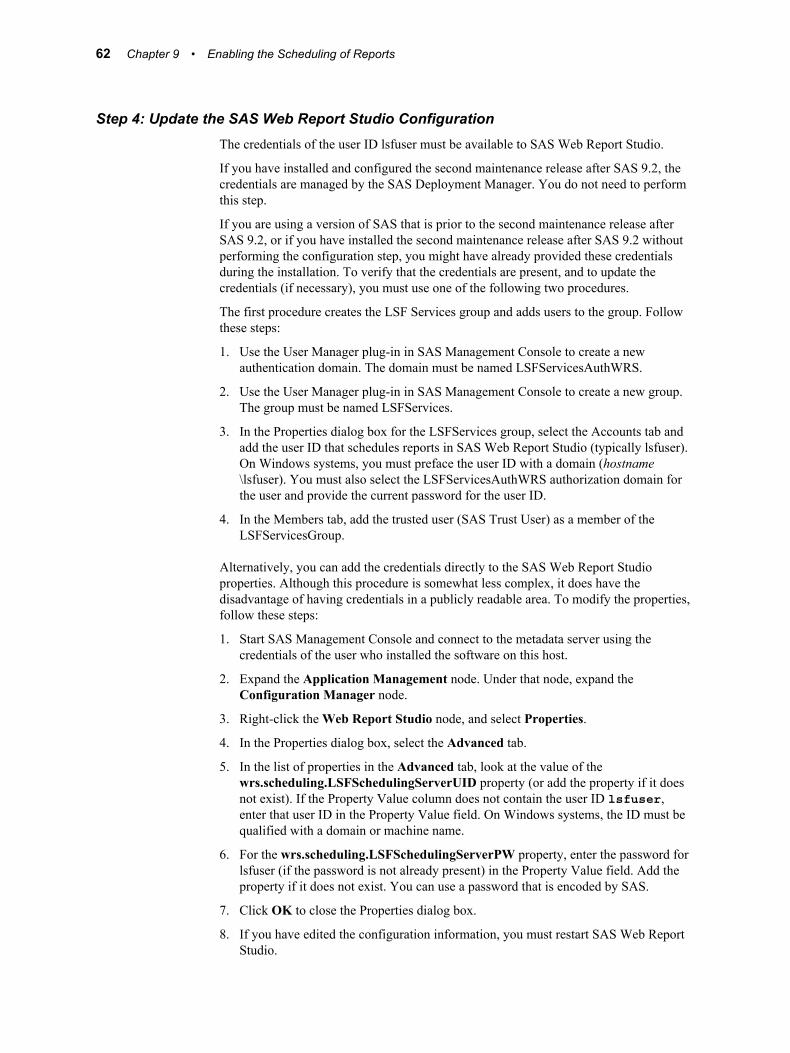
Step 4: Update the SAS Web Report Studio ConfigurationThe credentials of the user ID lsfuser must be available to SAS Web Report Studio.
If you have installed and configured the second maintenance release after SAS 9.2, the credentials are managed by the SAS Deployment Manager. You do not need to perform this step.
If you are using a version of SAS that is prior to the second maintenance release after SAS 9.2, or if you have installed the second maintenance release after SAS 9.2 without performing the configuration step, you might have already provided these credentials during the installation. To verify that the credentials are present, and to update the credentials (if necessary), you must use one of the following two procedures.
The first procedure creates the LSF Services group and adds users to the group. Follow these steps:
1. Use the User Manager plug-in in SAS Management Console to create a new authentication domain. The domain must be named LSFServicesAuthWRS.
2. Use the User Manager plug-in in SAS Management Console to create a new group. The group must be named LSFServices.
3. In the Properties dialog box for the LSFServices group, select the Accounts tab and add the user ID that schedules reports in SAS Web Report Studio (typically lsfuser). On Windows systems, you must preface the user ID with a domain (hostname\lsfuser). You must also select the LSFServicesAuthWRS authorization domain for the user and provide the current password for the user ID.
4. In the Members tab, add the trusted user (SAS Trust User) as a member of the LSFServicesGroup.
Alternatively, you can add the credentials directly to the SAS Web Report Studio properties. Although this procedure is somewhat less complex, it does have the disadvantage of having credentials in a publicly readable area. To modify the properties, follow these steps:
1. Start SAS Management Console and connect to the metadata server using the credentials of the user who installed the software on this host.
2. Expand the Application Management node. Under that node, expand the Configuration Manager node.
3. Right-click the Web Report Studio node, and select Properties.
4. In the Properties dialog box, select the Advanced tab.
5. In the list of properties in the Advanced tab, look at the value of the wrs.scheduling.LSFSchedulingServerUID property (or add the property if it does not exist). If the Property Value column does not contain the user ID lsfuser, enter that user ID in the Property Value field. On Windows systems, the ID must be qualified with a domain or machine name.
6. For the wrs.scheduling.LSFSchedulingServerPW property, enter the password for lsfuser (if the password is not already present) in the Property Value field. Add the property if it does not exist. You can use a password that is encoded by SAS.
7. Click OK to close the Properties dialog box.
8. If you have edited the configuration information, you must restart SAS Web Report Studio.
62 Chapter 9 • Enabling the Scheduling of Reports
Step 5: Update the LSF Password File (Windows Only)If your scheduling server is running on a Windows machine, then you must supply the scheduling server with the credentials for the user ID lsfuser.
The user name and password that you provide in this step must match the ones that you provided in the SAS Web Report Studio configuration, as described in “Step 4: Update the SAS Web Report Studio Configuration” on page 62 .
Follow these steps:
1. On the scheduling server, open a Command Prompt window.
2. Use the program lspasswd to register the credentials for the user ID lsfuser, as follows:
a. Issue a command similar to this:
C:\LSF_7.0\7.0\\bin\lspasswd.exe -u .\lsfuser
The program prompts you for this user's password.
b. Enter the user's password and then confirm it. This completes the registration process.
Step 6: Verify Logging for the Output Generation ToolSAS Web Report Studio uses the Output Generation Tool to create sets of reports in batch mode. When a scheduled report is executed on Windows, the tool records information in a logs directory. (On UNIX systems, the log statements are directed to the console when a scheduled report is executed.) Verify that the directories have been created.
For a default Windows installation, the path is as follows:
C:\SAS\config
\Lev1\Web\Logs\SASBIReportServices4.4.log
For a default UNIX installation, the path is as follows:
SAS-config-dir/levx/Applications/SASBIReportServices44/logs
Step 7: Edit the Initialization File for the Output Generation Tool (Windows Only)
On Windows systems, you must edit the initialization file for the Output Generation Tool to specify the directory location of the logs that are created when a scheduled report is executed. Complete the following steps:
1. Open the outputgen.ini file in a text editor. The file is located in the installation directory for SAS Business Intelligence Report Services.
2. Locate the line that starts with this code:
applogloc=
3. After the equal sign, enter the path to the directory in which you want the tool to create the log file. This should be the same directory that you created in “Step 6: Verify Logging for the Output Generation Tool” on page 63 .
Enabling Report Scheduling with Platform Suite for SAS 63
4. Save your changes.
Step 8: Define Archive Paths for Publishing Reports to ChannelsScheduled reports can be distributed to channels that are defined using the SAS Publishing Framework. If users will be distributing reports to channels that use archive locations (persistent stores), then the archive location must be accessible to both SAS Web Report Studio and the scheduling software. If the scheduling software and SAS Web Report Studio reside on different machines, then the archive location should be specified as a network path rather than a local path. This step is optional.
To specify the appropriate archive path, follow these steps:
1. In SAS Management Console, expand the Publishing Framework node.
2. Expand the appropriate metadata repository node.
3. Expand the Channels node.
4. Right-click the channel to which you will be publishing reports, and select Properties.
5. In the Properties dialog box, select the Persistent Store tab.
6. In the Type of persistent store area, select the Archive radio button.
7. In the Path box, specify the path to a network location that all users who will be creating content can write to.
8. Click OK.
You might also need to update permissions on the physical folder to allow access for the users who will be publishing reports. For information about setting up publication channels, see “Adding SAS Publication Channels” in the SAS® 9.4 Intelligence Platform: Web Application Administration Guide.
Step 9: Test the ConfigurationAfter you have completed steps 1 through 8, use the following procedure to test your configuration:
1. On a client machine, use SAS Web Report Studio to create and schedule a report as follows:
a. Create and save a simple report.
b. Click View Report to display the report.
c. Select File ð Schedule.
d. On the Schedule Report page, select Now, and click Next.
e. On the next page, click Finish. If the word Running appears in the status field, wait for the job to finish.
2. In SAS Management Console, check the properties of the scheduled report as follows:
a. Select the Folder View tab and then expand the folders until you locate the report that you scheduled.
b. Right-click the report, and choose Properties.
64 Chapter 9 • Enabling the Scheduling of Reports
c. Select the Content tab. A folder called Batch should be displayed on this tab. The folder contains the output of the scheduled report.
3. If the Batch folder is present on the report's Content tab, as described in the previous step, then return to SAS Web Report Studio and complete these steps:
a. Log off, and then log back in.
b. Open the report. The following message should appear at the top of the report:
To interact with this report, you must first refresh the data.
If this message appears, then the configuration is correct.
If the configuration is not correct, see “Troubleshooting the Configuration” on page 65 .
Rescheduling a ReportIn some cases (such as migration), you might need to reschedule reports that have been previously scheduled. To reschedule a report, follow these steps:
1. Select File ð Manage Files ð View scheduled and distributed reports to display the Scheduled and Distributed Reports window.
2. Select Actions ð Schedule to update the schedule for the report.
Troubleshooting the ConfigurationIf you experience problems when you test the configuration, first use Platform Flow Manager to check for error messages on the Platform scheduling server. For instructions, see “Check Error Messages in Platform Flow Manager” on page 15 .
Then, check to determine whether any logs were created by the Output Generation Tool. For a default Windows installation, the logs are located in the following path:
C:\Program Files\SASHome\SASBIReportServices\4.4\logs
For a default UNIX installation, the path is as follows:
SAS-config-dir/levx/Applications/SASBIReportServices44/logs
If no logs are present in this path, verify that you have completed these tasks:
• created a logs directory, and assigned the appropriate user rights to the directory. See “Step 6: Verify Logging for the Output Generation Tool” on page 63 .
• verified that the applogloc statement in the outputgen.ini file is correct. See “Step 7: Edit the Initialization File for the Output Generation Tool (Windows Only)” on page 63 .
• accurately entered the command in the Command Line field when you defined the SAS Java Batch Server in SAS Management Console. See “Step 2: Verify That a SAS Java Batch Server Has Been Defined” on page 60 .
Make sure that quotation marks appear around the arguments, as shown in the example. If you copied and pasted the command, make sure that a space appears after outputgen.exe.
Troubleshooting the Configuration 65
On Windows systems, you can verify the command by pasting it into a DOS command window. The command should execute with no errors.
If logs are present in the path, then check for the following error messages:
An error occurred: Unable to login user. Cause: Access denied. or Caused by: com.sas.iom.SASIOMDefs.GenericError: Error authenticating user SAS Trusted User in function LogonUser.
Make sure that the user ID and password for the SAS Trusted User (sastrust) are specified correctly in the OutputManagementConfigTemplate.xml file. You might need to remove the domain, or make sure that the domain is followed by a forward slash (/) rather than a backward slash (\).
An error occurred: Exception while rendering report in batch. Cause: cxp.002.ex.msg: The connection factory requires an identity for the authentication domain "DefaultAuth", but the user context provided for user "SAS Demo User" does not have any identities for that domain. Therefore, the user cannot be authorized to use the connection factory.
Make sure that the SAS Web Report Studio user who is trying to schedule the report has a login (including a password) in the metadata repository. See “Ensure That Metadata Logins Exist for Users Who Will Schedule Reports ” on page 60 .
For additional troubleshooting information, see “Resolving Issues Related to Scheduling with Platform Suite for SAS” on page 15 .
66 Chapter 9 • Enabling the Scheduling of Reports
Chapter 10
Scheduling Jobs from SAS Marketing Automation
Overview of Scheduling for SAS Marketing Automation . . . . . . . . . . . . . . . . . . . . . 67
Enabling the Scheduling of SAS Marketing Automation Jobs . . . . . . . . . . . . . . . . 68Requirements for Scheduling SAS Marketing Automation Jobs . . . . . . . . . . . . . . . 68Define a SAS Java Batch Server . . . . . . . . . . . . . . . . . . . . . . . . . . . . . . . . . . . . . . . 68
Deploying and Scheduling SAS Marketing Automation Jobs . . . . . . . . . . . . . . . . . 69
Overview of Scheduling for SAS Marketing Automation
SAS Marketing Automation campaigns are scheduled using the Platform Computing scheduling server. Depending on the permissions held by the SAS Marketing Automation user, campaigns can be scheduled directly by the user or sent to an administrator for scheduling.
The following is an overview of the process of scheduling campaigns from SAS Marketing Automation:
• Users create campaigns using the Customer Intelligence Studio. Campaigns include a start and end date and specify any recurrence.
• The user executes the campaign. If the user has the appropriate permissions, the job is sent directly to the scheduling server. Otherwise, the job is deployed for scheduling by an administrator.
• If the campaign is to be scheduled by an administrator, the administrator uses the Schedule Manager to create and schedule a flow that includes the deployed campaign. Schedule Manager passes the schedule information and the associated commands to the scheduling server.
• The Platform Scheduling server executes the campaign at the designated time.
67
Enabling the Scheduling of SAS Marketing Automation Jobs
Requirements for Scheduling SAS Marketing Automation JobsIn addition to the scheduling server, a scheduling environment for SAS Marketing Automation jobs includes the following:
a SAS Java Batch serverA SAS Java Batch server is a metadata object that specifies the command to execute SAS code that is generated by SAS Marketing Automation jobs. The initial configuration process should have created a definition for a server called SAS Java Batch Server, which is a component of your SAS Application Server (for example, SASApp). The server must have a subtype of Marketing Automation.
Define a SAS Java Batch ServerA SAS Java Batch server should have been set up during your initial installation and configuration. If you need to set it up manually, follow these steps:
1. In SAS Management Console, expand the Server Manager node.
2. Right-click the application server name with which the SAS Java Batch server is associated (for example, SASApp), and select Add Application Server Component.
3. On the first page of the New SAS Application Server Component Wizard, select SAS Java Batch Server and click Next.
4. On the next wizard page, enter a name (for example, SAS Java Batch Server), and click Next.
5. On the next wizard page, do the following:
• From the Associated Machine drop-down list, select the name of the machine that contains the SAS Application Server.
Note: The machine name attribute is for documentation purposes only. SAS scheduling does not use this machine name to set up or execute the job.
• From the SubType list, select Marketing Automation.
• In the Command box, enter the path to the command that starts a SAS session on the scheduling server.
• Click Next.
6. On the next wizard page, review the information that you have entered. If it is correct, click Finish.
68 Chapter 10 • Scheduling Jobs from SAS Marketing Automation
Deploying and Scheduling SAS Marketing Automation Jobs
When you have completed the appropriate setup tasks, SAS Marketing Automation users can submit jobs for scheduling. The procedure is as follows:
1. In Customer Intelligence Studio, specify the start date, end date, and recurrence of a campaign or communication.
2. In the Checklist pane for the campaign, click Execute to open the Execute window.
3. In the Execute window, select a campaign or communication and select an execution option.
4. If you have the required authorization and you selected Send to the scheduling software, the campaign or communication is scheduled using the information provided in the campaign. If you do not have the required authority, an administrator uses the Schedule Manager to schedule the job.
5. If you selected Send to the scheduling software, a job is created for the campaign or communication. After the job is deployed for scheduling, an administrator can use the Schedule Manager to define dependencies and submit the job for scheduling. See “Scheduling Jobs Using Schedule Manager” on page 39 for more information about using the Schedule Manager.
Deploying and Scheduling SAS Marketing Automation Jobs 69

70 Chapter 10 • Scheduling Jobs from SAS Marketing Automation
Index
Aadministration rights, local 22AIX scheduling issues 16archive paths
defining 57defining for publishing reports to
channels 64
Bbatch servers 2, 7, 35
Ccanceling scheduled flows
UNIX 26Windows 25z/OS 28
canceling scheduled jobsin z/OS under Windows 19
channelspublishing reports to 64
configurationPlatform Suite for SAS 12SAS Web Report Studio, for report
scheduling 62scheduling on z/OS 18testing, for report scheduling 58, 64troubleshooting, for report scheduling
65
Ddependencies 40
file event 40job event 40specifying 41specifying with visual flow editor 42time event 40
deployed flowsadding jobs to 44
setting properties 45deploying jobs
SAS Data Integration Studio 52SAS Marketing Automation 69
deployment directory 52deployment directory definitions 8, 37directory permissions 23
Eerror messages 15exit behavior 17
Ffile event dependencies 40file permissions 16
Load Sharing Facility (LSF) 16operating system scheduling servers 23scheduling servers 16
flow metadata 8flows
adding jobs to deployed flows 44canceling on UNIX 26canceling on Windows 25canceling on Z/OS 28creating 40deleting 47scheduling 48setting deployed flow properties 45submitting on UNIX 26submitting on Windows 25submitting on z/OS 28
Ggroups
creating 60
71
Iin-process scheduling servers 6, 31
enabling report scheduling 58limitations of 31setup tasks 32using 33
initialization filefor Output Generation Tool 63
installationconsiderations for 14Platform Suite for SAS 12
Jjob event dependencies 40job metadata 8job scheduling 39
adding jobs to deployed flows 44creating flows 40deleting jobs and flows 47dependencies 41Schedule Manager for 39scheduling flows 48setting deployed flow properties 45
jobsadding to deployed flows 44canceling, in z/OS under Windows 19deleting 47deploying for SAS Data Integration
Studio 52scheduling from SAS Data Integration
Studio 51
LLoad Sharing Facility (LSF) 12
file permissions 16local administration rights 22logging
for Output Generation Tool 63logins 60LSF password file 63
Mmetadata, scheduling 8
deployment directory definitions 8job and flow metadata 8
metadata logins 60migration 14
Ooperating system scheduling servers 5, 21
assigning to a spawner 24capabilities and limitations of 22
defining 23directory and file permissions 23local administration rights 22summary of setup tasks 22UNIX 27Windows 25z/OS 28
operating system user accounts 59Output Generation Tool
editing initialization file 63logging for 63
Ppassword file 63permissions
directory and file permissions 23for files installed by LSF 16for files installed by scheduling servers
16Platform Calendar Editor 12Platform Flow Manager 11
checking error messages 15Platform Load Sharing Facility (LSF) 12
file permissions 16Platform Process Manager server 5Platform Suite for SAS 11
AIX issues 16configuring 12enabling report scheduling 59error messages 15exit behavior 17installation considerations 14installing 12issues related to scheduling with 17migration considerations 14Windows issues 15with z/OS 19
Process Manager server 11publishing reports to channels 64
Rreport scheduling 55
enabling with in-process scheduling 58enabling with Platform Suite for SAS
59metadata logins for users 60publishing reports to channels 64testing the configuration 58, 64troubleshooting the configuration 65user IDs for 59
SSAS applications 1
72 Index
SAS Data Integration Studio 51deploying jobs for scheduling 52enabling scheduling 52requirements for 52troubleshooting 53
SAS DATA Step Batch server 7, 35defining 37deployment directory definitions 37for SAS Data Integration Studio 52
SAS generic batch server 7, 35defining 38
SAS Java Batch server 7, 35defining 36, 57, 60, 68SAS Marketing Automation and 68
SAS Marketing Automation 67deploying and scheduling jobs 69enabling scheduling 68requirements for 68scheduling for 67
SAS Web Report Studioconfiguring for report scheduling 62
Schedule Manager 1, 6, 39adding jobs to deployed flows 44creating flows 40deleting jobs and flows 47scheduling flows 48setting deployed flow properties 45specifying dependencies 41
scheduled flowscanceling on UNIX 26canceling on Windows 25canceling on z/OS 28
scheduling 1See also report schedulingSee also SAS Data Integration StudioSee also SAS Marketing Automationcomponents for 1flows 48process of 2
scheduling metadataSee metadata, scheduling
scheduling servers 1, 5See also operating system scheduling
serversfile permissions 16in-process scheduling servers 6operating system scheduling servers 5Platform Process Manager server 5
spawnersassigning operating system scheduling
servers to 24
Ttime event dependencies 40troubleshooting
report schedule configuration 65SAS Data Integration Studio 53
UUNIX
limitations of operating system scheduling servers 27
manually canceling scheduled flows 26manually submitting flows for execution
26operating system scheduling servers on
27user accounts 59user credentials 53user definitions 13user IDs 59users
assigning local administration rights to22
creating 60metadata logins for 60
Vvisual flow editor
specifying dependencies 42
WWindows
assigning local administration rights to users 22
canceling scheduled jobs in z/OS under19
initialization file for Output Generation Tool 63
limitations of operating system scheduling servers 25
manually canceling scheduled flows 25manually submitting flows for execution
25operating system scheduling servers on
25scheduling issues 15updating the LSF password file 63
Zz/OS
canceling scheduled flows 28canceling scheduled jobs 19configuring scheduling 18limitations of operating system
scheduling servers 27
Index 73

manually submitting flows for execution28
operating system scheduling servers on28
Platform Suite for SAS with 19
74 Index