sample (chapter 1) - basics of reading writing
TRANSCRIPT

THE BASICS OF READING/WRITING MUSIC (for guitar)
1
THE BASICS OF READING/WRITING MUSIC
1.1) BASIC I
All exercises in this book will be done for a 24 fret guitar, standard E tuning and in the key
of C. (Varying key exercises will be popping up when ALL the theory is covered!)
Let's start out with basic level notation reading! We'll start out by memorising the position of
each string of the guitar – starting the 6th
string (E), 5th
string (A), 4th
string (D), 3rd
string
(G), 2nd
string (B) and 1st string (E).
Proceed to memorise each string's notation placement as in fig 1.1.
Fig 1.1 - Open Strings
Know these 6 notes by heart! (Later, you will know these for all keys). Some people use the
FACE methods and such, but I find that too 'sheepish'! Instead, I will try and remain original.
I will thus be introducing 'the ABC method'.
Basically, the middle stripe is B, the gap above is C and the gap below is A!
Proceed to memorise A, B and C's notation placement as in fig 1.2.
Fig 1.2 - Open Strings
Now, you should be able to identify where A, B, C, D, E and G is. But, where's F, you ask?
Well, F will be shown in the next figure. (Beware: F is REALLLYYY hard! Joke, F is pretty
much the same.)
Proceed to memorise all the following notes in figure 1.3.

THE BASICS OF READING/WRITING MUSIC (for guitar)
2
Fig 1.3 - Main Bar Notes
Now, you should be able to identify all the notes in the main bar. NOTE: can you spot the
ABC method in the bar?
Well, I suppose you know that the main notes go like this: A B C D E F G. Quite easy, so if
notes were missing, you could simply deconstruct the notes and descend, or ascend, to
the correct note, starting from the ABC method.
Well, it all seems easy, but it needs drilling! Before we get to the drills, here are more
background info. Since we're in standard E tuning, the open 6th
string (E) is the lowest note
in the notation. So how do I find out "which" octave of E I'm playing? => By doing the
"ascending/descending" thing I told you about!
Firstly, look at fig 1.4. This figure presents where each E note lies, and where its octaves lie!
Proceed to memorise all the positions of E in the notation in fig 1.4.
Fig 1.4 - E, and its Octaves
I just used some random numbers in fig 1.4 to show what I'm referring to. This legend is in
table 1.1.
Table 1.1 – Fig 1.4's Legend
1 = E's 1st appearance (open on 6th string)
2 = E's 1st octave (2nd on 4rd string, 7th on 5th string, 12th on 6th string)
3 = E's 2nd octave (open on 1st string, 5th on 5th string, 9th on 4th string, 14th on 3rd string, 19th on 2nd string, 24th on 6th string)
4 = E's 3rd octave (12th on 1st string, 17th on 5th string, 21th on 4th string)
5 = E's 4th octave (24th on 1st string)

THE BASICS OF READING/WRITING MUSIC (for guitar)
3
For a standard E tuned, key of C, 24 fret guitars, E is the only note with 4 octaves! Clearly,
figuring out where to play E's 2nd
octave is the most complex, but all the other (especially, E
and its 4th
octave) are MUCH easier to find during sight-reading!
The rest have 3 octaves!
Now, for the crazy sheet, this will include ALL the notes, from the open 6th
string to the 24th
fret on 1st string!
Proceed to figure out fig 1.5!
Fig 1.5 – All the Guitar's Main Notes
Why only the 'main' notes? Well, this figure does not contain the 'accidentals'. Not notes
played by 'accident' (dude van ALL THAT REMAINS!!), but notes in between the main
notes. Such as, what is between F & G? Well F# of course! (Or Gb, same thing).
In order to understand each 'octave level' (E, F, F#, G, G#, A, A#, B, C, C#, D, D#, E, F, F#,
G, G#, A ...etc), one has to know the accidentals! As seen in brackets, the underlined section
is the standard E tuned, key of C guitar's 'full octave level'! The guitar has 4 full octave
levels, and then a single partial octave level (the final note on a 24 fret, the 4th
octave of E!)
Next up, all the guitar's main notes + the accidentals! Well, isn't this just a hoot!
Proceed to memorise all the notes, and their accidentals, in figure 1.6.
Fig 1.6 – All the Guitar's Main Notes + Accidentals
Now, using the knowledge we gained, we will construct the FULL OCTAVE LEVELS.

THE BASICS OF READING/WRITING MUSIC (for guitar)
4
Fig 1.7 – Guitar's 4 octave levels + final E octave
I just used some random numbers in fig 1.7 to show what I'm referring to (similar to table
1.1). This legend is in table 1.2.
Table 1.2 – Fig 1.7's Legend
Now, what's important here is for you to learn ALL these notes by heart. I will provide some
drills, but it's important you make up your own exercises, or go and read sheet music – it is
probably the best way to learn all these notes! Also, don't try and rush through to the more
advanced concepts. Make sure you have a firm grasp on all these notes!
As revision, here is the full revision, with reference to table 1.1 and 1.2 as its legend!
Fig 1.8 – Revision of everything thus far!
1 = 1st E Full Octave Level (All the notes from E till before its 1st octave)
2 = 2nd E Full Octave Level (All the notes from E's 1st octave till its 2nd octave)
3 = 3rd E Full Octave Level (All the notes from E's 2nd octave till its 3rd octave)
4 = 4th , and final, E Full Octave Level (All the notes from E's 3rd octave till its 4th octave)
5 = PARTIAL E Octave Level (Just E's 4th octave)

THE BASICS OF READING/WRITING MUSIC (for guitar)
5
DRILLS OF NOTES!
(Drill for the 6th
string only)
(Drill for the 5th
string only)
(Drill for the 4th
string only)
(Drill for the 3rd
string only)
(Drill for the 2nd
string only)
(Drill for the 1st string only)

THE BASICS OF READING/WRITING MUSIC (for guitar)
6
Notes (single note drills):
• Redraw each drill, then add the notes of each corresponding note!
• Do NOT redraw them in tablature – that eliminates the freedom of using the notation.
Thus the purpose is to just play them from the notation. Do not visualise TABS,
visualise the NOTES on the fretboard. Eg. Think like (OK....say on the 6th
string.....E
E G E A A B A E E(1st octave) etc.... and NOT like.... 0 0 3 0 5 5 7 5 0 12..... etc!)
DRILLS OF NOTES!
(Drills for the 6th
& 5th
strings only)
....................... .........................................
......................................... .........................................
.....................add more in the future!!....................
......................................... .........................................
......................................... .........................................
......................................... .........................................
......................................... .........................................
......................................... .........................................
......................................... .........................................
......................................... .........................................
............................................................

THE BASICS OF READING/WRITING MUSIC (for guitar)
7
[[[[||||ááááààààÉÉÉÉÜÜÜÜ||||vvvvttttÄÄÄÄ \\\\ÇÇÇÇààààxxxxÜÜÜÜ}}}}xxxxvvvvàààà||||ÉÉÉÉÇÇÇÇ I
Example of numeric vihuela tablature from the book "Orphenica Lyra" by Miguel de
Fuenllana (1554). Red numerals (original) mark the vocal part.
Tablature vs. standard staff notation
Tablature is more easily read by a novice fretted string musician than standard notation; all
one needs to do is tune the instrument, place one's fingers on the indicated string and fret, and
sound the note. During the Renaissance, tablature was used by professionals and amateurs
alike to set down music for lute, cittern, bandora, orpharion, four- and five-course early
guitar, and violas da gamba. Repertoire for lute began to change during the 18th century; use
of the lute in orchestras to play basso continuo obliged lutenists to work from parts written in
the staff notation suitable also for keyboard instruments and harps. Tablature continued in use
for solo lute and guitar works, but eventually lost popularity and nearly died out, remaining in
informal use amongst amateurs, aficionados, and within folk idioms such as flamenco.

THE BASICS OF READING/WRITING MUSIC (for guitar)
8
Victorian-era musicologists found themselves in a quandary when it came to publishing
scholarly editions; players of the original instruments were uncommon, whereas most
musicologists did play piano. Editions prior to the early music movement presented the music
transcribed for guitar or piano (or both), leaving lute players at a loss for their own repertoire
as it was originally published. Popular interest in early music created a need for performing
editions of Renaissance repertoire in tablature.
After World War II ended, acoustic and electric guitar became popular, and guitar tablature
was reborn.
Tablature notation has two significant deficiencies. First is an inability to convey the duration
of notes sustained against a melisma. Only the beginning of each note can be shown; which
notes of a chord should be sustained, and for how long, is an artistic decision for the player.
The second problem is one of choice. Historical lute tablature has three major forms (French,
German, Italian); each of these has variants. Modern players usually specialize in just one
form, and it is difficult to become facile at reading all of them. The surviving repertoire is
divided roughly equally, with French and Italian being preferred by modern players over
German (especially facsimile editions, as the originals were published in black letter type
which is unfamiliar to modern readers). Modern publishers have a difficult decision to make
in choosing a form for a modern anthology.
Differences between systems
Direct visual representation
When compared to standard notation, tablature is a closer visual representation of the
instrument's fretboard. It does not require as much training for players to be able to read
tablature; therefore it is often easier and quicker to interpret.
Fingering position determination
Tablature removes the requirement for the player to determine the fretboard position within
which the notated music is to be executed. Notes on the guitar can be played in different fret
hand positions and upon several different strings; for example the note C4 could be played on
the third string at the fifth fret or on the fourth string at the tenth fret. In the case of fretted
instruments such complexity makes the relationship between staff notation and playing
technique less direct than in the case of the piano and many other instruments. Whilst
standard staff notation can remove the string/fret ambiguity by further indicating the playing
position (usually with Roman numerals), tablature does not contain this ambiguity. Tablature
has two additional advantages. First, it clearly identifies the note. Tablature makes explicit all
instances of musica ficta, so that there is no guesswork about whether a note is, for example,
an F or an F♯. Second, tablature can notate music in different tunings and scordaturas.

THE BASICS OF READING/WRITING MUSIC (for guitar)
9
Simple typewriter-font representation
Tablature can be easily (albeit crudely) represented as ASCII tab. This is a plain-text
computer file using numbers, letters, and symbols to construct tablature. This characteristic
makes it easy to distribute tablature electronically, a practice that has become very
widespread; it is now possible to find free tablatures for virtually any popular music on the
Internet, although a considerable number of those tablatures may be inaccurate and also
illegal.
Instrument-specific
Tablature is instrument-specific, while staff notation is generic. Tablature does not provide
any skills transferable to other instrumental or general musical study. Tablature can only be
read easily by a player of one particular instrument, whilst music written in staff notation can
be played on any suitable instrument. Reading solely from tablature compromises
communication with other musicians such as flutists or violinists, who are commonly trained
only in the use of standard notation. Reliance solely upon tablature limits the repertoire of the
player to works published in tablature or transcribed into it. A player who can read both
forms of notation is at a decided advantage.
Inherent harmonic or analytical information
The science of harmony and musical analysis is codified by recourse to standard musical
notation. Standard musical scores enable musicians to utilise advanced tools for such
analysis. These tools cannot be easily applied to, or from, tablature. Therefore the study of
musical theory is hindered by reliance upon tablature.
Rhythmic information
Tablature notation provides limited information on rhythm and timing. Tablature writers
sometimes provide limited rhythmic information by adding note stems, flags and beams
above the fret glyphs but the system is not as well-defined as in standard notation.
Distinction between musical parts
Multiple parts cannot be rhythmically distinguished within tablature notation. This is a
serious limitation when conveying information required for the proper rendition of multiple-
part music on any polyphonic instrument.
Indication of pitch
Tablature notation shows how the notes are fingered; relative pitch is shown and actual pitch
can be calculated by considering the tuning, but it takes experience for a player to sing (or
internalize) the notes by sight. Dynamic mark-up is usually left to the performers artistic
sense. It can be difficult to get a general outline of the music by simply studying the tablature
page without recourse to playing it through or listening to a recorded version beforehand. In
contrast staff notation allows musicians to sing from sight.

THE BASICS OF READING/WRITING MUSIC (for guitar)
10
1.2) BASIC II
Well, you got to be able to read the scales man! For now, let us touch some basic scales for
now. Firstly, the major C scale.
Fig 1.9 – Major C Scale
If you've drilled the notes enough, you should be able to read the notes of the scale. If not, the
notes are C D E F G A B, C D E F..... etc.
The 'major C scale' will be the base of all our chord derivations. But more on chords later
on!
Let's assign numbers to the Major C Scale. Say the scale now goes 1 2 3 4 5 6 7, with 1 = C,
2 = D, 3 = E, 4 = F, 5 = G, 6 = A, B = 7, ....and repeating...., C = 1/8, D = 9, E = 10, F = 11,
G = 12, A = 13.
Yes that's a might load of letters/numbers, but those are the KEY to creating ANY CHORD
or sound.
Q: So, why does the numbers go past 1/8? Aren't those the same notes just an octave higher?
A: Yes, they are, but the designate a different sound. Our ears respond differently when the
frequencies differ sound much (humans tend to pick up stray single frequencies a lot
quicker!)
Thus, we assign unique numbers to them (totally a human thing to do) as to allocate those
"sounds" that we perceive!
So what does this mean? Well, we're going to apply this new found knowledge of the 'major
C scale' to derive some basic chords, and then see what they look like in notation – and of
course, how to read them.
CHORDS
Chords are basically just more than one note played at the same time by the same instrument.
A harmonic mode (hold your horses, this is another mode I'm talking about – vibrations and
noise – you'd be glad you did! – but not related to musical modes) is formed with varying

THE BASICS OF READING/WRITING MUSIC (for guitar)
11
frequencies to form a chord. The chord is basically just the length of the mode from the start
to the finish – the chordal wavelength.
"I don't give a damn bout' yo stupid theory!", said the arrogant boy. Well, a little background
info never hurt anyone you damn boy!
POWER CHORD (5th
Chord):
Going back to our number system, we select our root. Let us choose our chord root to be 1
(C). So, it's a C chord (Still a single note though)! Now, we add a 5 (G) note it. The chord is
now a 1-5! => a C chord with a fifth note. Let us choose C to be the first appearance of C on
the notation bar.
So, how would this look like?
Fig 1.10 – C5 Chord
The chord in fig 1.10 has a name - the C5 chord. Why? Well the C denotes the root of the
chord, 1, and the 5, G, denotes its tonal designation. In layman's terms – the 5 makes it a 5th
chord! This chord is widely used today in rock bands today as it is easy to play, and has a
nice thick sound to it.
It's quite easy then to find other chords of this shape. Let's take for example an F5 chord. So,
let us look at the major F scale in the key of C.
Fig 1.11 – Major F scale in the Key of C
Using the tonal numbering system again, we have a similar 1 2 3 4 5 6 7 8 9 10 11 12 13
again. We want an F5 chord – which is 1-5. The root is the 1, and the tonal designator is the
5. In this case, 1 is F and 5 is C. So, the root is F, with a tonal designator of C. Let's see what
this looks like. As a side note, we choose the F to be the first F to appear in the guitar
notation spectrum.
Fig 1.12 – F5 Chord
THE BASICS OF READING/WRITING MUSIC (for guitar)
12
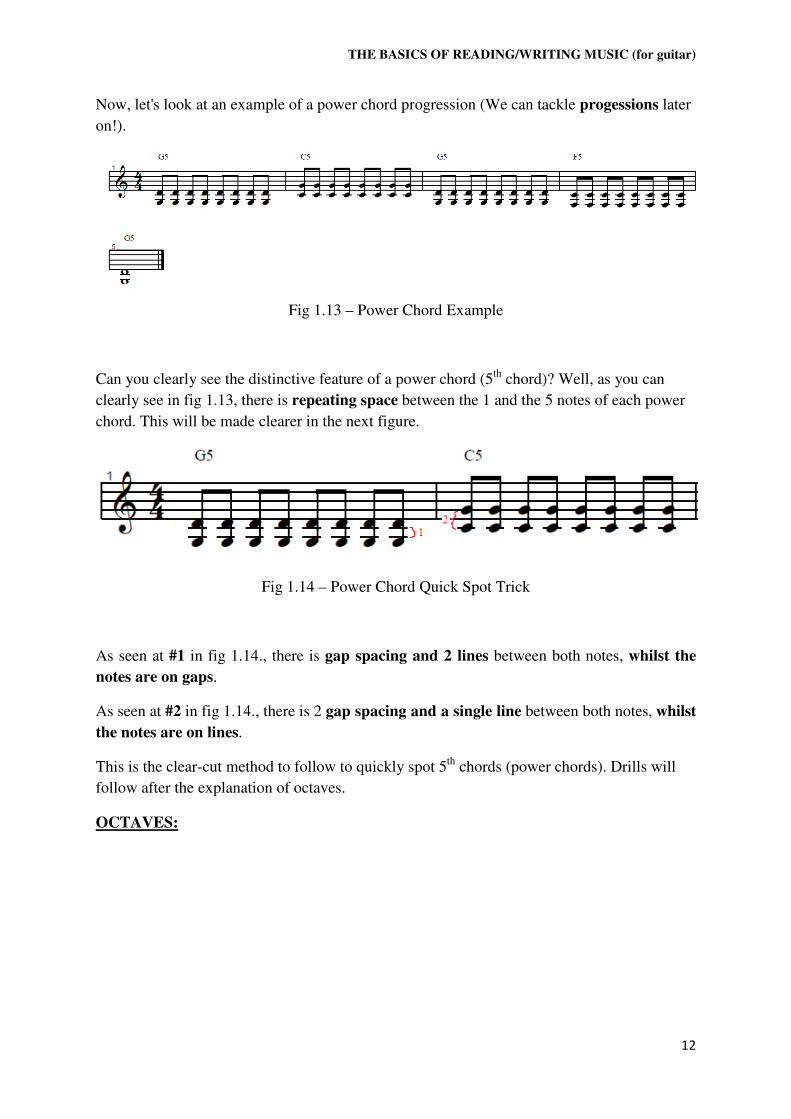
Now, let's look at an example of a power chord progression (We can tackle progessions later
on!).
Fig 1.13 – Power Chord Example
Can you clearly see the distinctive feature of a power chord (5th
chord)? Well, as you can
clearly see in fig 1.13, there is repeating space between the 1 and the 5 notes of each power
chord. This will be made clearer in the next figure.
Fig 1.14 – Power Chord Quick Spot Trick
As seen at #1 in fig 1.14., there is gap spacing and 2 lines between both notes, whilst the
notes are on gaps.
As seen at #2 in fig 1.14., there is 2 gap spacing and a single line between both notes, whilst
the notes are on lines.
This is the clear-cut method to follow to quickly spot 5th
chords (power chords). Drills will
follow after the explanation of octaves.
OCTAVES: