salary planner: salary increase user guide · the uo has used salary planner for annual salary...
TRANSCRIPT

UNIVERSITY OF OREGON
Salary Planner: Salary Increase User Guide
FY20
Human Resources
10/7/2019
Page | 1
Table of Contents
Salary Increase Process Timeline ................................................................... Error! Bookmark not defined.
SALARY PLANNER .......................................................................................................................................... 2
Introduction .............................................................................................................................................. 2
Helpful Tips Before Getting Started .......................................................................................................... 2
Accessing Employee List ........................................................................................................................... 3
Adjustments to Active Employees ............................................................................................................ 4
Salary Change Report ............................................................................................................................ 8
Making Salary Adjustments .................................................................................................................. 9
Leaving Comments .............................................................................................................................. 11
Summary Totals .................................................................................................................................. 12
Locking Salary Planner ............................................................................................................................ 13
SUBMITTING CHANGES ............................................................................................................................... 14
CONTACTS ................................................................................................................................................... 15
HR Contacts: ........................................................................................... Error! Bookmark not defined.
Page | 2
SALARY PLANNER
Introduction The UO has used Salary Planner for annual salary increases since 2015. As a reminder, when Salary Planner is used as part of the budgeting process, data is taken from the employees’ Jobs and Positions in Banner and put into a Scenario in Salary Planner. Data from the Positions went in a summarized version to Budget Development, and all those totals by FOPA and Account Code were loaded into Banner FIS as the Original Permanent Budget. For salary increases, data from the employees’ Jobs in Banner is put it into a new Scenario in Salary Planner. When finished, data from the Jobs in Salary Planner will be loaded back into the Jobs in Banner. The data you put in Salary Planner will be the new salaries for the Jobs as of November 2018. For salary increases use the position filter and look at the “List by Employee”. Helpful Tips Before Getting Started
• Use Internet Explorer or Firefox as your browser when accessing Salary Planner.
• A list of links is provided at the bottom of each Salary Planner screen. Use these links to
navigate to the various screens you wish to access. This navigation method is preferred to using the “Back” button in your browser.
Example of List of Navigation Links:
The “Back” button can be utilized when navigating out of non-data enterable screens.
• To enter salary increases use the “List By Employee” navigation link.
• When entering data into Salary Planner, remember to use the Tab key to move out of a data entry cell, rather than the Enter key.
• Have a good understanding of your Organizational Hierarchy. Many of the functions within Salary Planner rely on the University’s Organizational Hierarchy.
• The Organization sorting function in Salary Planner is based on the Budget Organization. The Budget Organization designates who has budget authority over a particular positon. The Budget Organization is its own field within the Banner system and may not be the same as the Timesheet Organization, Home Organization, or Labor Distribution Organization.

Page | 3
Accessing Employee List Log into DuckWeb, choose the Employee Information menu, then Salary Planner:
• Select Edit Scenario.
• There are 3 Employee Groups Eligible for Merit in FY20: Employee Group Extract ID/Scenario Officer of Administration: FY20_OA_MERIT Tenure Track Faculty: FY20_TTF_MERIT Career Faculty: FY20_CareerNTTF_MERIT
• Leave the default Filter Criteria as “By Position Attributes”. • Select the “Select” button.

Page | 4
Example of Edit Scenario Screen:
Adjustments to Active Employees In the Position Filter Screen:
• Choose the Organization you wish to view/edit. REMEMBER, this selects positions with that Budget Organization code.
• Leave the “Include Subordinate Organizations” box checked if you wish to see all employees that roll up to a particular Budget Organization. If you wish to only view the employees within a single Budget Organization (and not subordinate organizations), deselect the “Include Subordinate Organizations” box.
• We recommend you do not use the Employee Class, Bargaining Unit, and Faculty Rank filter criteria. Leave the default as “ALL” for these sorting criteria.
• Check the box next to “Include Pooled Positions”
• Leave athe “Include Vacant Positions” boxes unchecked.
• Adjust the “Number of Records per Page” drop-down to see more employees on a single page.
• Once your filter criteria is decided, select the “List by Employee” button.
Helpful Tip: You can search for the Budget Organization you wish to select by placing your cursor in the Organizations box and typing the Organization number you wish to query.
After Extract ID and Scenario has been set to “FY19_OA_MERIT” and Filter Criteria is set to “By Position Attributes”, select the “Select” button.

Page | 5
Position Filter Screen Example:
This provides a list of all Jobs (Position #, Employee ID, Job Suffix) with the filter criteria you selected.
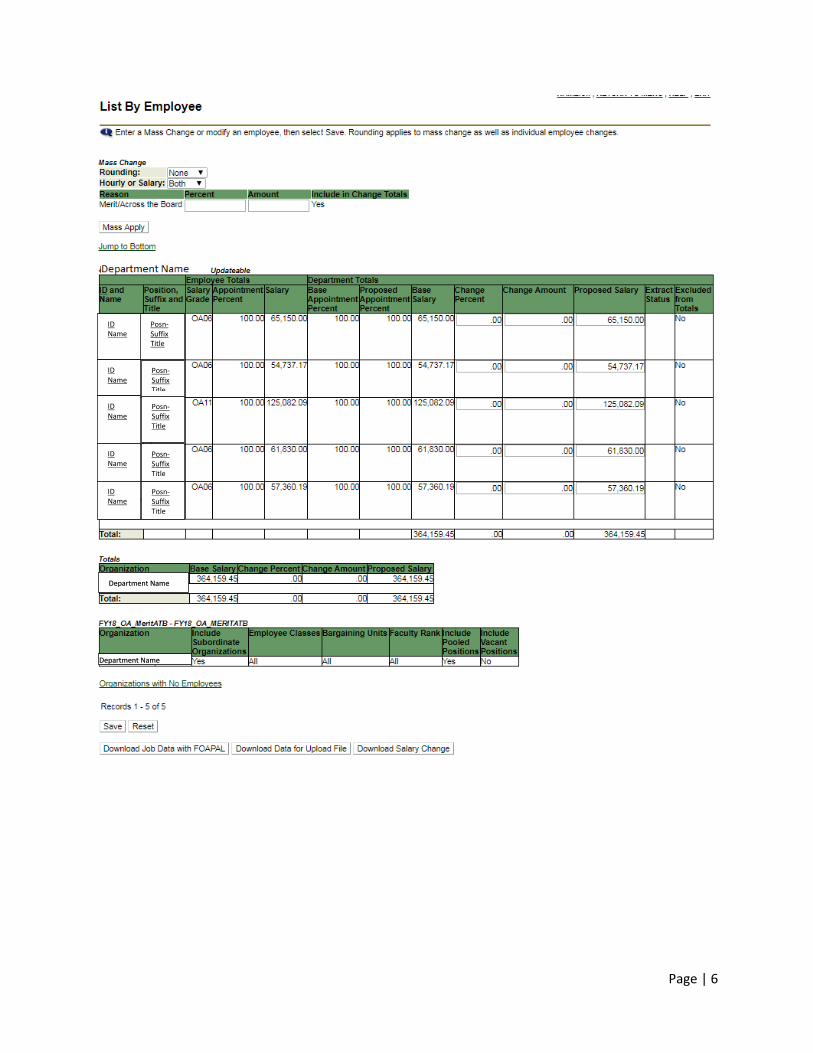
Example of List by Employee screen :
After filter criteria is decided, select the “List By Employee” button.
Page | 6
ID Name
ID Name
ID Name
ID Name
ID Name
Posn-Suffix Title
Posn-Suffix Title
Posn-Suffix Title
Posn-Suffix Title Posn-Suffix Title
Department Name
Department Name

Page | 7
The following is a list of definitions for the fields on the “List By Employee” screen: Field Definition ID and Name Employee ID and Name Position, Suffix and Title Position Number, Job Suffix, and Job Titile Employe Totals – Salary Grade This is the salary grade of the position in banner. You will not make
changes to Employee Totals info. Employee Totals - Appointment Percent
Total Appointment Percent for employee. This is for all appointments for the employee, so it does not have to match Dept. Totals. You will not make changes to Employee Totals info.
Employee Totals - Salary Total Appointment Salary for employee. This is for all appointments for the employee, so it does not have to match Dept. Totals. You will not make changes to Employee Totals info.
Department Totals – Base Appointment Percent
Current Appointment Percent for the Job listed. You will not adjust appointment percent as part of this process.
Dept. Totals – Proposed Appointment Percent
“Proposed” denotes what is being applied after Salary Planner process is complete. For purposes of this exersise, no changes to Appointment Percent will be allowed.
Dept. Totals – Base Salary The current Appointment Salary for the job. This is the amount that is actually going to be paid for the position (not the Annualized Salary). The “Base Salary” is used as the base number for all calculations in this process.
Dept. Totals – Change Percent Used to enter in proposed percent adjustment to the “Base Salary”. If entered, this will update the “Change Amount” and “Proposed Salary” field.
Dept. Totals – Change Amount Used to enter in proposed amount adjustment to the “Base Salary”. If entered, this will update the “Change Percent” and “Proposed Salary” field.
Dept. Totals – Proposed Salary The salary you are proposing after your adjustments. Will equal “Base Salary” until data is entered into “Change Percent” or “Change Amount” fields.
Dept. Totals – Extract Status Provides detail of when Job was included as part of employee extract (blank means part of original extract). Not important for user purposes.
Dept. Totals – Exclude from Totals
Unable to use this field in “List By Employee” Screen.
Warning: When entering data into the “List By Employee” screen, use the TAB key to move out of a field after data has been entered rather than the Enter key.
Page | 8
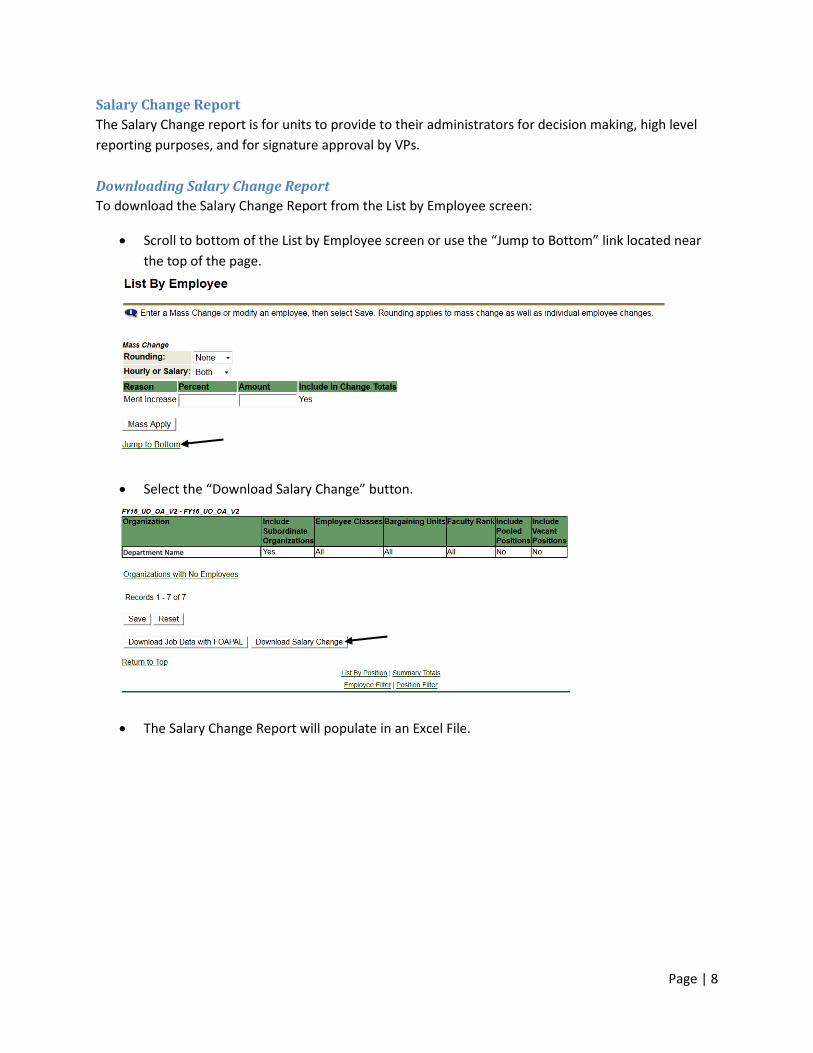
Salary Change Report The Salary Change report is for units to provide to their administrators for decision making, high level reporting purposes, and for signature approval by VPs. Downloading Salary Change Report To download the Salary Change Report from the List by Employee screen:
• Scroll to bottom of the List by Employee screen or use the “Jump to Bottom” link located near the top of the page.
• Select the “Download Salary Change” button.
• The Salary Change Report will populate in an Excel File.
Department Name
Page | 9
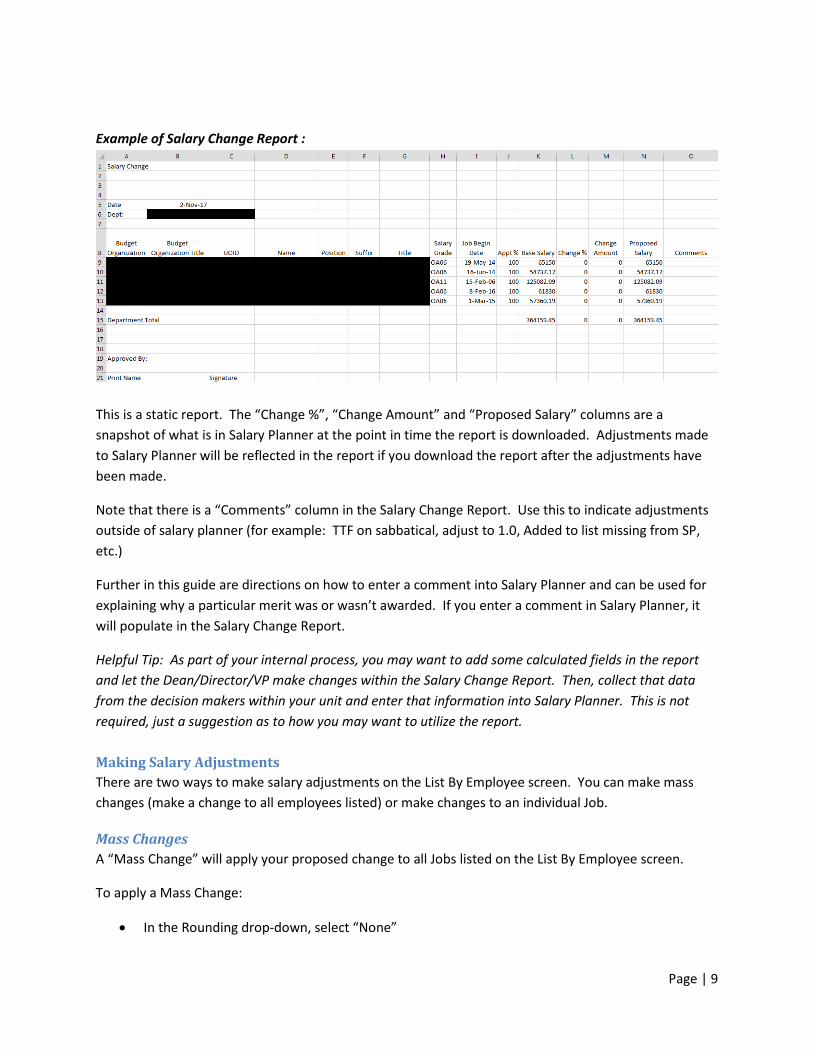
Example of Salary Change Report :
This is a static report. The “Change %”, “Change Amount” and “Proposed Salary” columns are a snapshot of what is in Salary Planner at the point in time the report is downloaded. Adjustments made to Salary Planner will be reflected in the report if you download the report after the adjustments have been made.
Note that there is a “Comments” column in the Salary Change Report. Use this to indicate adjustments outside of salary planner (for example: TTF on sabbatical, adjust to 1.0, Added to list missing from SP, etc.)
Further in this guide are directions on how to enter a comment into Salary Planner and can be used for explaining why a particular merit was or wasn’t awarded. If you enter a comment in Salary Planner, it will populate in the Salary Change Report.
Helpful Tip: As part of your internal process, you may want to add some calculated fields in the report and let the Dean/Director/VP make changes within the Salary Change Report. Then, collect that data from the decision makers within your unit and enter that information into Salary Planner. This is not required, just a suggestion as to how you may want to utilize the report. Making Salary Adjustments There are two ways to make salary adjustments on the List By Employee screen. You can make mass changes (make a change to all employees listed) or make changes to an individual Job.
Mass Changes A “Mass Change” will apply your proposed change to all Jobs listed on the List By Employee screen.
To apply a Mass Change:
• In the Rounding drop-down, select “None”
Page | 10
• In the Hourly or Salary drop-down, select the type of employees you want a salary adjustment applied to (Hourly, Salary, or Both).
o Note: Do not mass apply “Amount” increases to Hourly employees, only Percent increases.
• Enter in the change you wish to have applied to all employees listed in the “Change Percent” or “Change Amount” boxes. Hit the Tab key.
• Select “Mass Apply”.
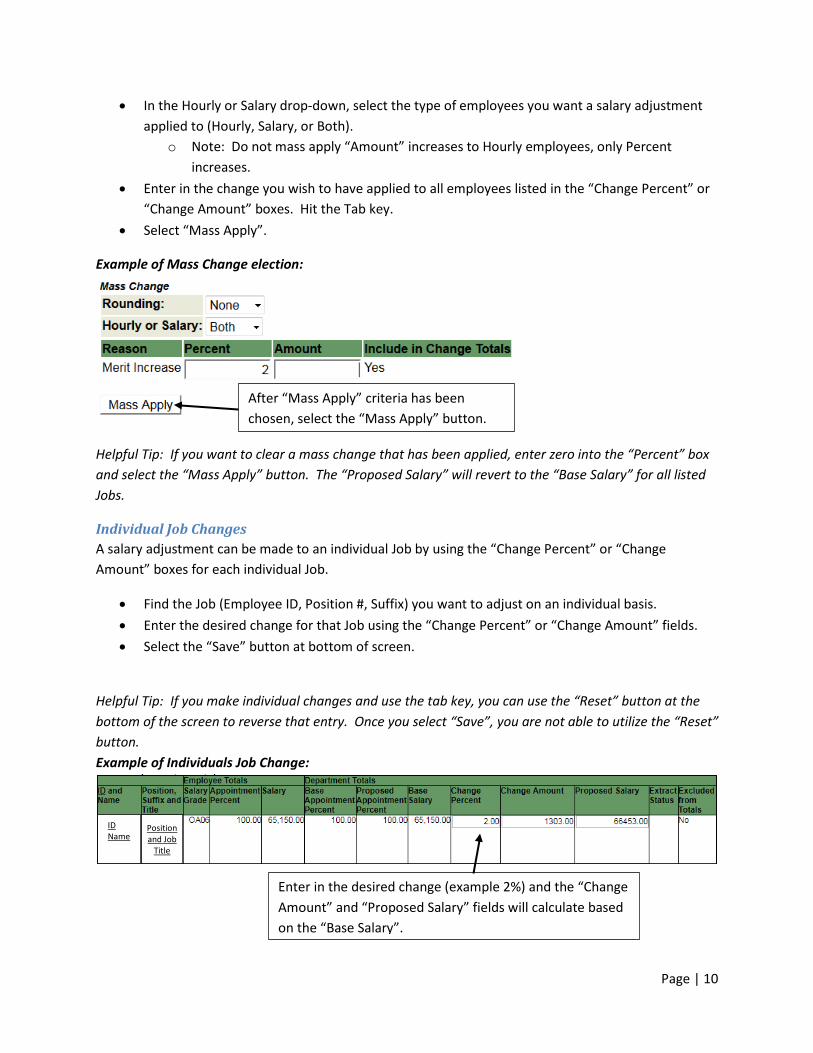
Example of Mass Change election:
Helpful Tip: If you want to clear a mass change that has been applied, enter zero into the “Percent” box and select the “Mass Apply” button. The “Proposed Salary” will revert to the “Base Salary” for all listed Jobs.
Individual Job Changes A salary adjustment can be made to an individual Job by using the “Change Percent” or “Change Amount” boxes for each individual Job.
• Find the Job (Employee ID, Position #, Suffix) you want to adjust on an individual basis. • Enter the desired change for that Job using the “Change Percent” or “Change Amount” fields. • Select the “Save” button at bottom of screen.
Helpful Tip: If you make individual changes and use the tab key, you can use the “Reset” button at the bottom of the screen to reverse that entry. Once you select “Save”, you are not able to utilize the “Reset” button. Example of Individuals Job Change:
Enter in the desired change (example 2%) and the “Change Amount” and “Proposed Salary” fields will calculate based on the “Base Salary”.
ID Name
After “Mass Apply” criteria has been chosen, select the “Mass Apply” button.
Position and Job
Title

Page | 11
Leaving Comments Comments can be added to provide an explanation as to why a change was made to a salary. Comments are added on the Employee Detail screen.
To add a comment from the List by Employee page:
• Select the “Employee ID and Name” link of one employee from the List by Employee page.
• The “ID and Name” link will take you to the Employee Detail screen. Select the “Comments”
link.
• A Comments block will appear. Enter in your comments into the Comments block and select “Save”. You will then select the “Employee Detail” link at bottom of screen.
Example of Job Comments Screen:
ID Name
Select ID and Name link
Pos Suf Ttl
Select “Comments” link
Enter comment into Comments text box. Select “Save”.
After comments have been saved, select the “Employee Detail” link to return to Employee Detail Screen.
Position and Job
Title
Organization

Page | 12
If a comment has been added, an astrics will appear next to the “Comments” link on the Employee Detail screen.
Summary Totals You can check summary totals for the employees listed on the “List by Employee” screen by selecting the “Summary Totals” link at the bottom of the List by Employee screen.
The “Summary Totals” link will provide a summarized version of your changes. This screen provides the ability to drill through the Organizational Hierarchy to see salary change totals by Organization.
Example of Summary Totals Screen:
Pos Suf Ttl
Organizatio
n
Organization
Organization
Select Organization link to drill through the Organizational Hierarchy.
Page | 13
Locking Salary Planner Users have the ability to use the Organizational Lock function so that no changes can be made to Jobs within a particular Budget Organization. To utilize the Organizational Lock Function:
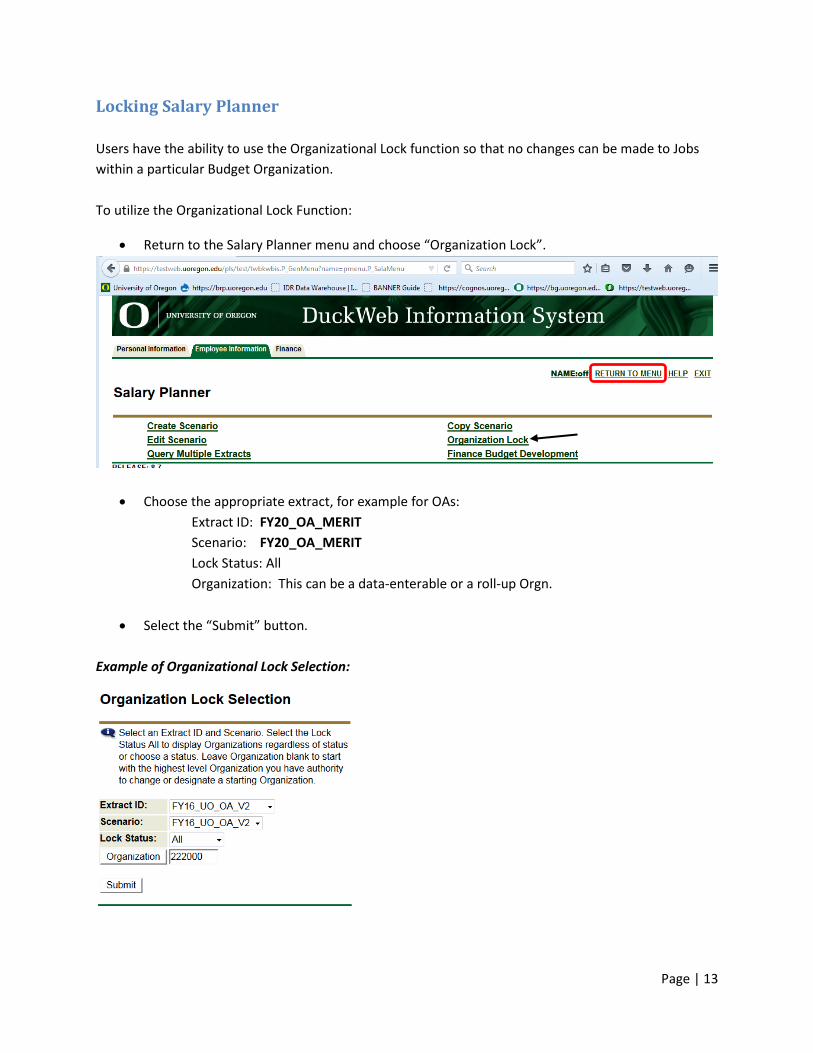
• Return to the Salary Planner menu and choose “Organization Lock”.
• Choose the appropriate extract, for example for OAs: Extract ID: FY20_OA_MERIT
Scenario: FY20_OA_MERIT Lock Status: All Organization: This can be a data-enterable or a roll-up Orgn.
• Select the “Submit” button. Example of Organizational Lock Selection:
Page | 14
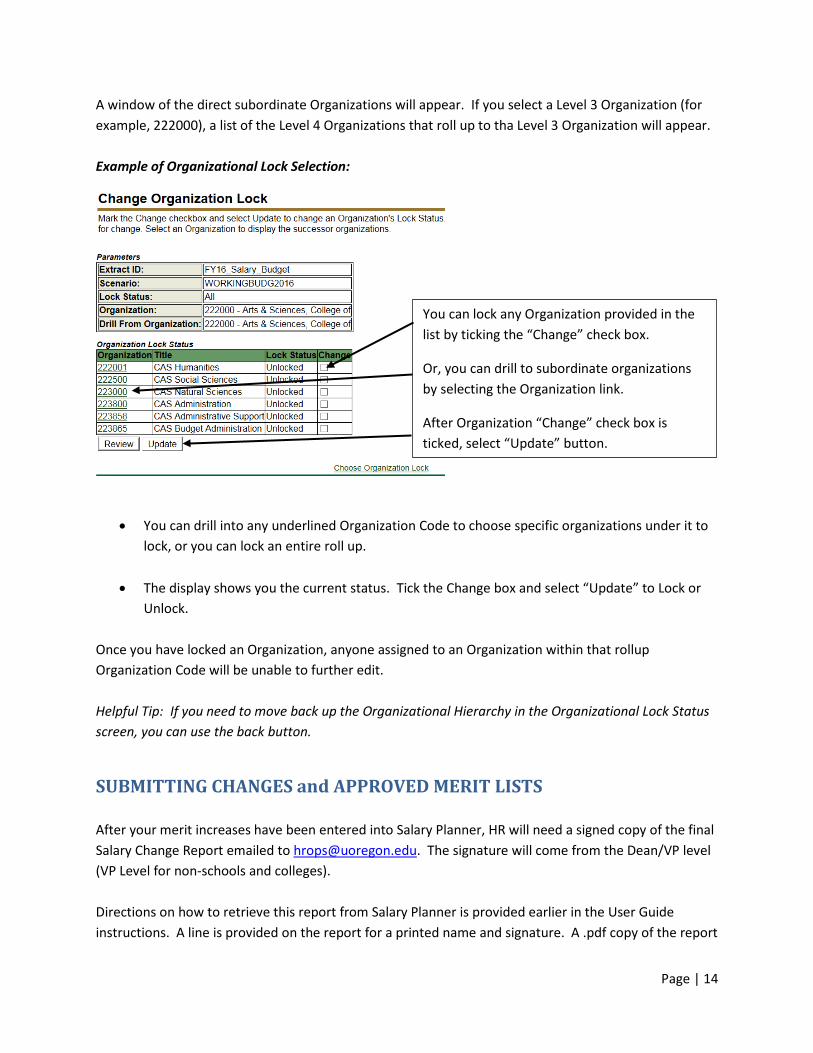
A window of the direct subordinate Organizations will appear. If you select a Level 3 Organization (for example, 222000), a list of the Level 4 Organizations that roll up to tha Level 3 Organization will appear. Example of Organizational Lock Selection:
• You can drill into any underlined Organization Code to choose specific organizations under it to
lock, or you can lock an entire roll up.
• The display shows you the current status. Tick the Change box and select “Update” to Lock or Unlock.
Once you have locked an Organization, anyone assigned to an Organization within that rollup Organization Code will be unable to further edit. Helpful Tip: If you need to move back up the Organizational Hierarchy in the Organizational Lock Status screen, you can use the back button.
SUBMITTING CHANGES and APPROVED MERIT LISTS After your merit increases have been entered into Salary Planner, HR will need a signed copy of the final Salary Change Report emailed to [email protected]. The signature will come from the Dean/VP level (VP Level for non-schools and colleges). Directions on how to retrieve this report from Salary Planner is provided earlier in the User Guide instructions. A line is provided on the report for a printed name and signature. A .pdf copy of the report
You can lock any Organization provided in the list by ticking the “Change” check box.
Or, you can drill to subordinate organizations by selecting the Organization link.
After Organization “Change” check box is ticked, select “Update” button.
Page | 15
must be provided to HR once the necessary signature is obtained, email this report to [email protected].
CONTACTS
If you have any questions regarding the content of the Job lists, process, or increase guidance, please contact Human Resources at [email protected].