safety precautions - vupro · safety precautions please begin by ... • full hd real-time recorder...
TRANSCRIPT

SAFETY PRECAUTIONS
Please begin by recording and reviewing a few sample videos in order to make sure that the image is recorded properly.
Please note that the manufacturer, its subsidiaries, affiliates and distributors are not liable for any damage arising from the malfunction of the main device, its accessories, including the memory card, which may result in an image not being properly recorded or to be recorded in a way that is not readable.
Before using the product, please ensure that you have carefully read the safety precautions listed below. Always make sure that the product is used correctly.
• Use only recommended power sources.• Do not attempt to disassemble, alter or apply heat to the product.• DO NOT use multi cigarette lighter adapters. Using such devices will cause unstable power input
to damage the vehicle video recorder (VVR).• Please always make sure all power connectors are fully secured.• Avoid dropping or subjecting the product to severe impacts.• To avoid the risk of injury, do not touch the interior of the product if it has been dropped or other
wise damaged.• Stop using the product immediately if it emits smoke, a strange smell or otherwise behaves abnormally.
• Do not use organic solvents such as alcohol, benzene or thinner to clean the product.• Do not let the product come into contact with water or other liquids.• Do not allow liquids or foreign objects to enter the VVR.• Do not place the VVR near or in direct flame.• Do not handle the power cord with wet hands.• Do not use the equipment in a manner that exceeds the rated capacity of the electrical outlet or
wiring accessories.• Do not use if the power cord or plug are damaged, or if it is not fully plugged into the outlet.• Do not allow dirt or metal objects (such as pins or keys) to come into contact with the terminals or
plug.• Avoid using, placing or storing the product in humid or dusty areas.
TABLE OF CONTENTS
A. Accessories………………………………………………………………………….. 4 B. Description……………………………………………………………………………. 4 C. Specifications…………………………………………………………..................... 5 D. Installation Guide……………………………………………………………..……... 6 E. Control Panel Functions …………………………………………………………… 8 F. Memory Card Installation………………………………………………………...…. 9 G. Recording and Stop Recording…………………………………………….………. 10 H. Remote Control ..……………………………………………………………………. 10 I. On Screen Display (OSD) Menu Function …………...………………………….. 11 J. VuPro Player…………………………………………………………………………. 12 K. Recording Time Estimation……………………………………..………………….. 21 L. LCD Screen Inspection……………………………………………………………... 21
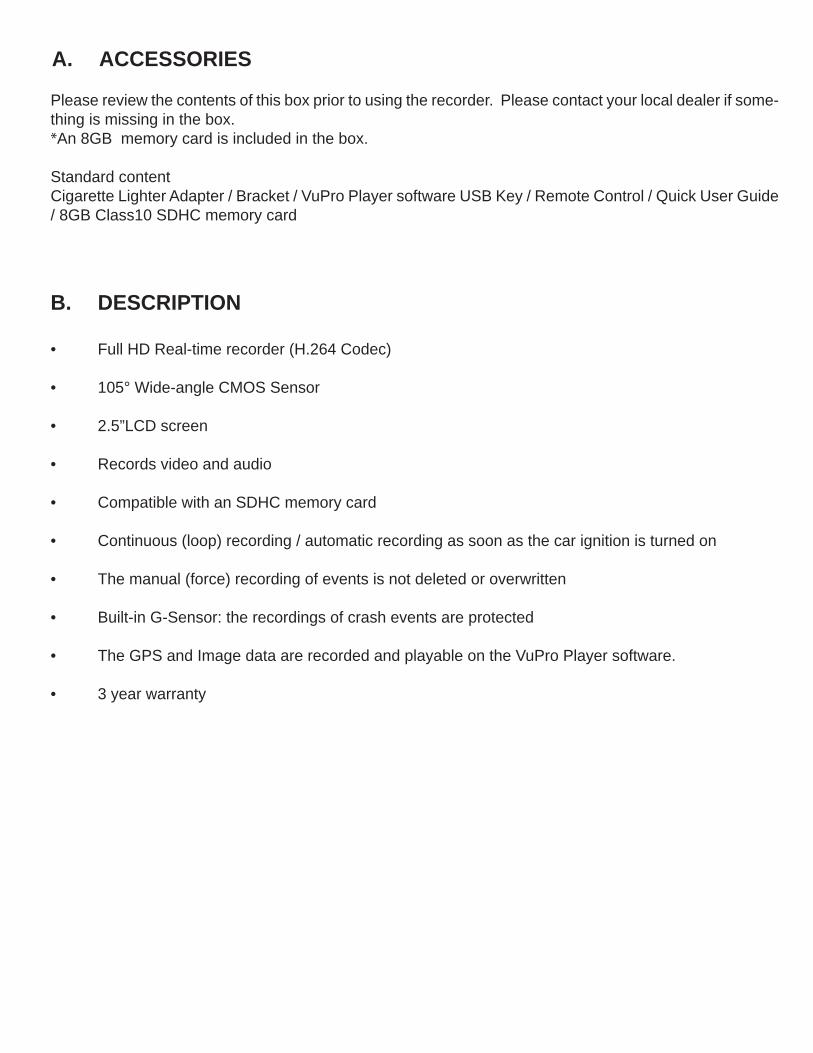
A. ACCESSORIES
Please review the contents of this box prior to using the recorder. Please contact your local dealer if some-thing is missing in the box.*An 8GB memory card is included in the box.
Standard contentCigarette Lighter Adapter / Bracket / VuPro Player software USB Key / Remote Control / Quick User Guide / 8GB Class10 SDHC memory card
B. DESCRIPTION
• Full HD Real-time recorder (H.264 Codec)
• 105° Wide-angle CMOS Sensor
• 2.5”LCD screen
• Records video and audio
• Compatible with an SDHC memory card
• Continuous (loop) recording / automatic recording as soon as the car ignition is turned on
• The manual (force) recording of events is not deleted or overwritten
• Built-in G-Sensor: the recordings of crash events are protected
• The GPS and Image data are recorded and playable on the VuPro Player software.
• 3 year warranty
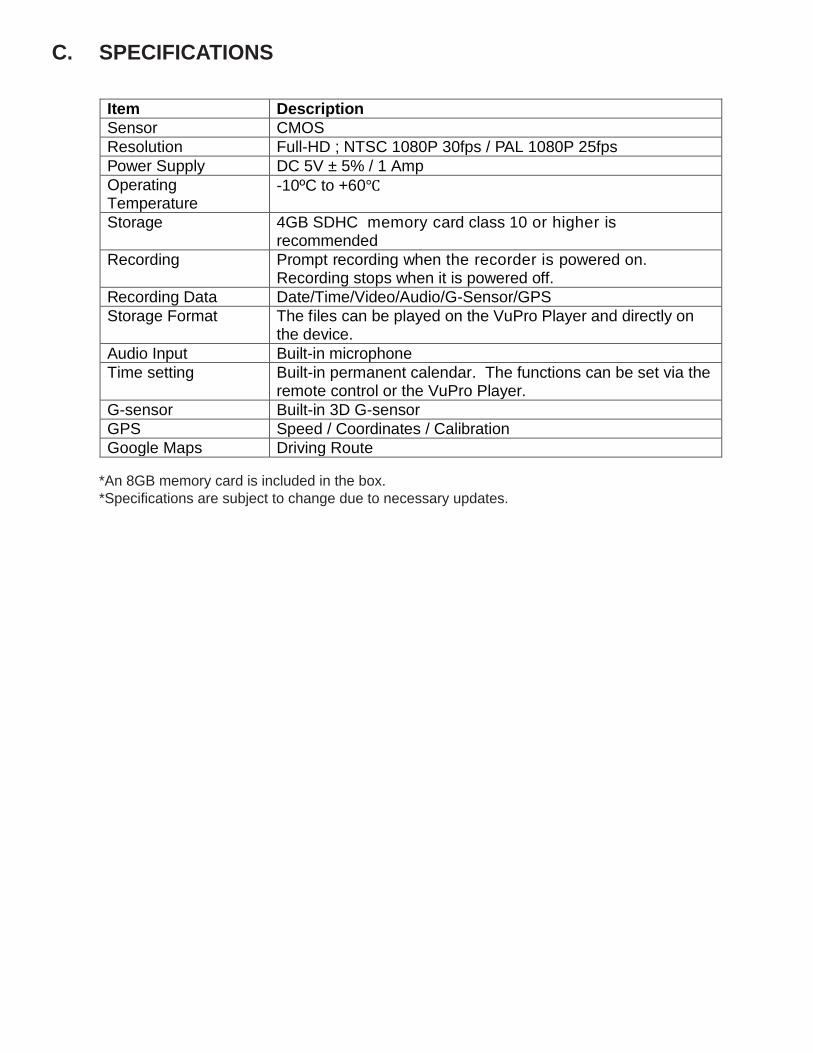
C. SPECIFICATIONS
*An 8GB memory card is included in the box. *Specifications are subject to change due to necessary updates.
Item Description Sensor CMOS Resolution Full-HD ; NTSC 1080P 30fps / PAL 1080P 25fps Power Supply DC 5V ± 5% / 1 Amp Operating Temperature
-10ºC to +60℃
Storage 4GB SDHC memory card class 10 or higher is recommended
Recording Prompt recording when the recorder is powered on. Recording stops when it is powered off.
Recording Data Date/Time/Video/Audio/G-Sensor/GPS Storage Format The files can be played on the VuPro Player and directly on
the device. Audio Input Built-in microphone Time setting Built-in permanent calendar. The functions can be set via the
remote control or the VuPro Player. G-sensor Built-in 3D G-sensor GPS Speed / Coordinates / Calibration Google Maps Driving Route
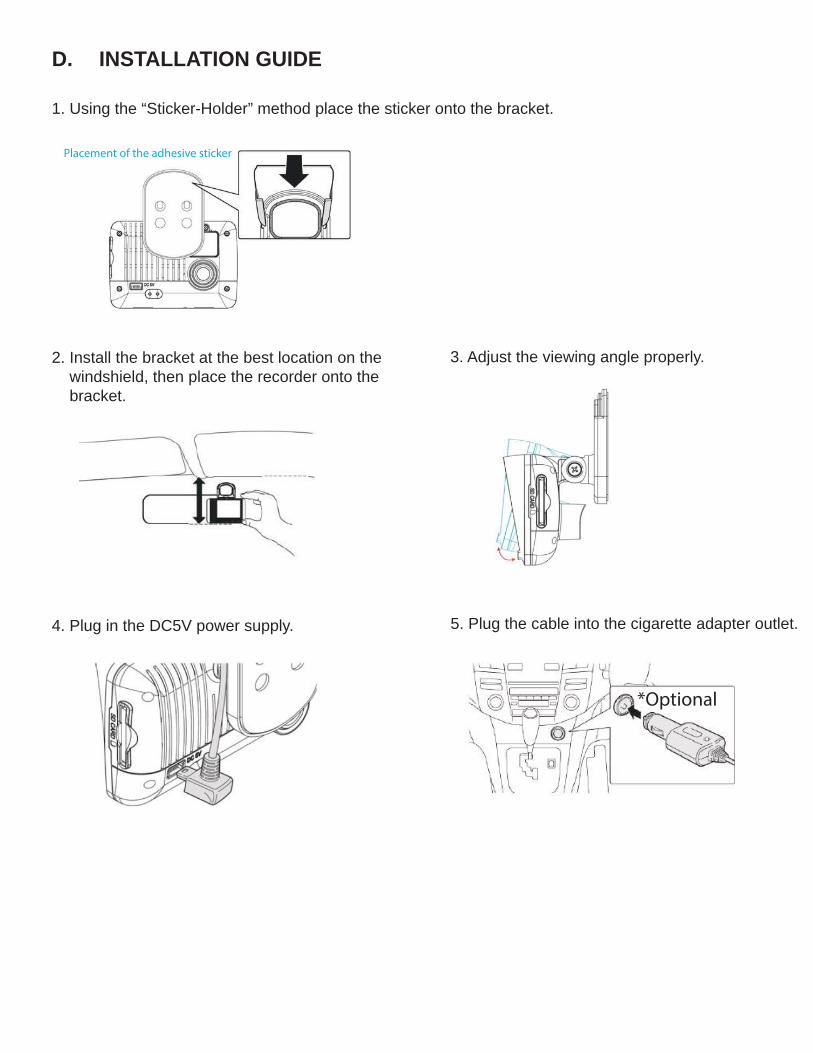
D. INSTALLATION GUIDE
1. Using the “Sticker-Holder” method place the sticker onto the bracket.
2. Install the bracket at the best location on the windshield, then place the recorder onto the bracket.
4. Plug in the DC5V power supply.
Placement of the adhesive sticker
3. Adjust the viewing angle properly.
5. Plug the cable into the cigarette adapter outlet.
*Optional
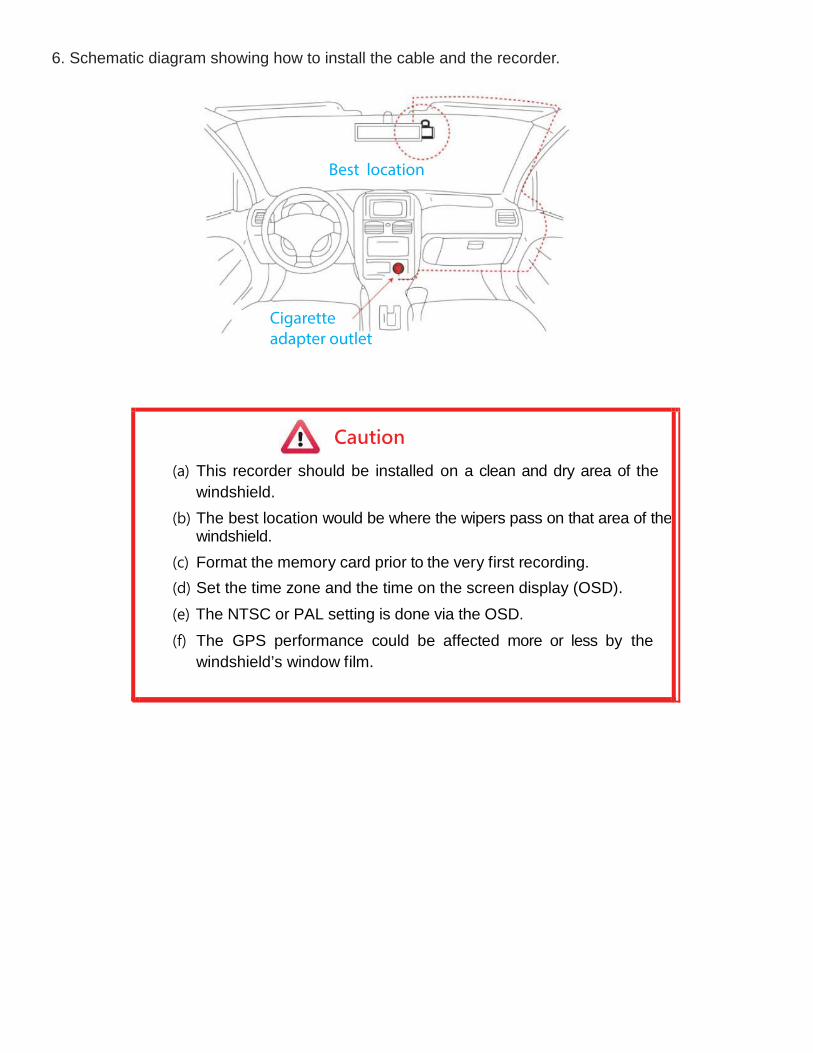
6. Schematic diagram showing how to install the cable and the recorder.
Best location
Cigarette adapter outlet
Caution
(a) This recorder should be installed on a clean and dry area of the windshield.
(b) The best location would be where the wipers pass on that area of the windshield.
(c) Format the memory card prior to the very first recording.
(d) Set the time zone and the time on the screen display (OSD).
(e) The NTSC or PAL setting is done via the OSD.
(f) The GPS performance could be affected more or less by the windshield’s window film.
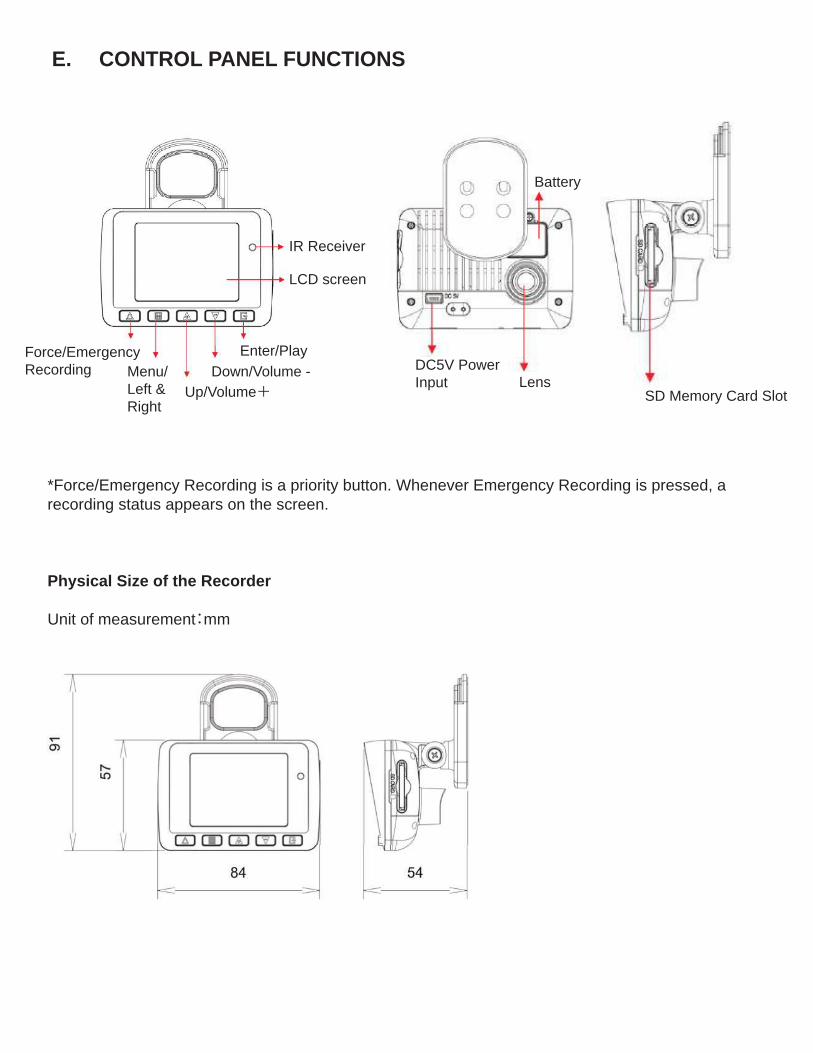
E. CONTROL PANEL FUNCTIONS
*Force/Emergency Recording is a priority button. Whenever Emergency Recording is pressed, a recording status appears on the screen.
Physical Size of the Recorder
Unit of measurement:mm
1
Force/Emergency Recording Menu/
Left & Right
Up/Volume+Down/Volume -
Enter/Play
LCD screen
IR Receiver
DC5V Power Input Lens
Battery
SD Memory Card Slot
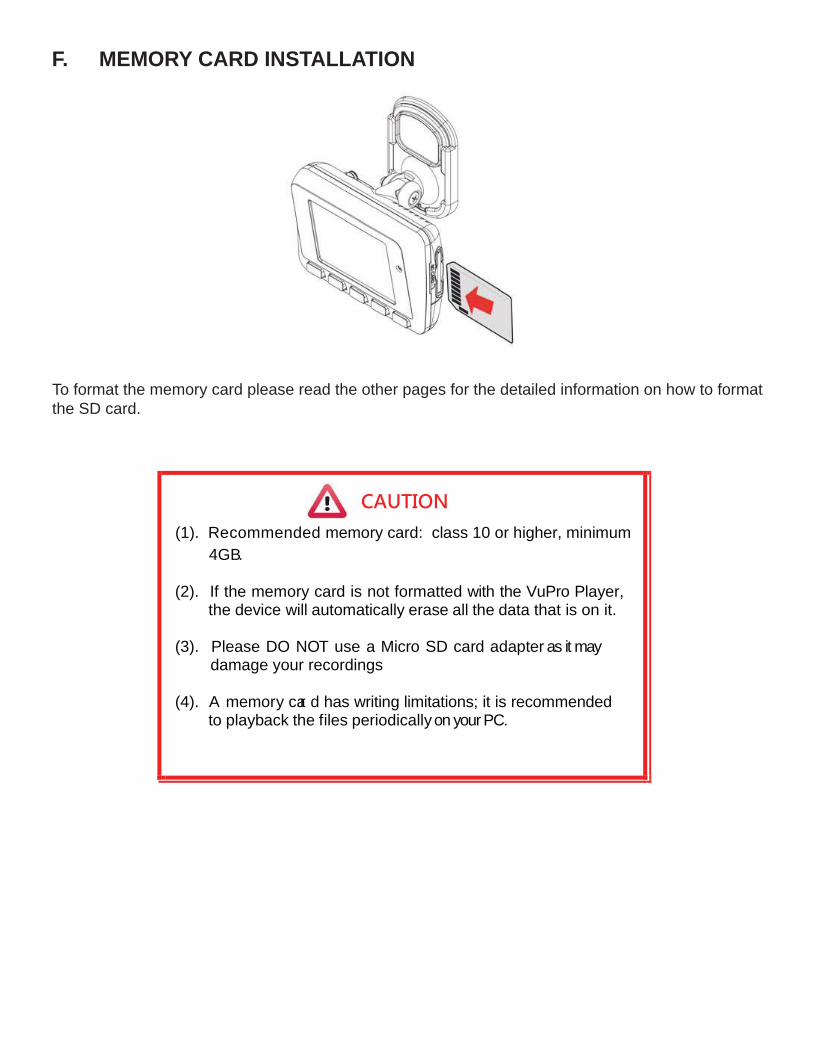
F. MEMORY CARD INSTALLATION
To format the memory card please read the other pages for the detailed information on how to format the SD card.
CAUTION
(1). Recommended memory card: class 10 or higher, minimum 4GB.
(2). If the memory card is not formatted with the VuPro Player,
the device will automatically erase all the data that is on it.
(3). Please DO NOT use a Micro SD card adapter as it may damage your recordings
(4). A memory car d has writing limitations; it is recommended
to playback the files periodically on your PC.
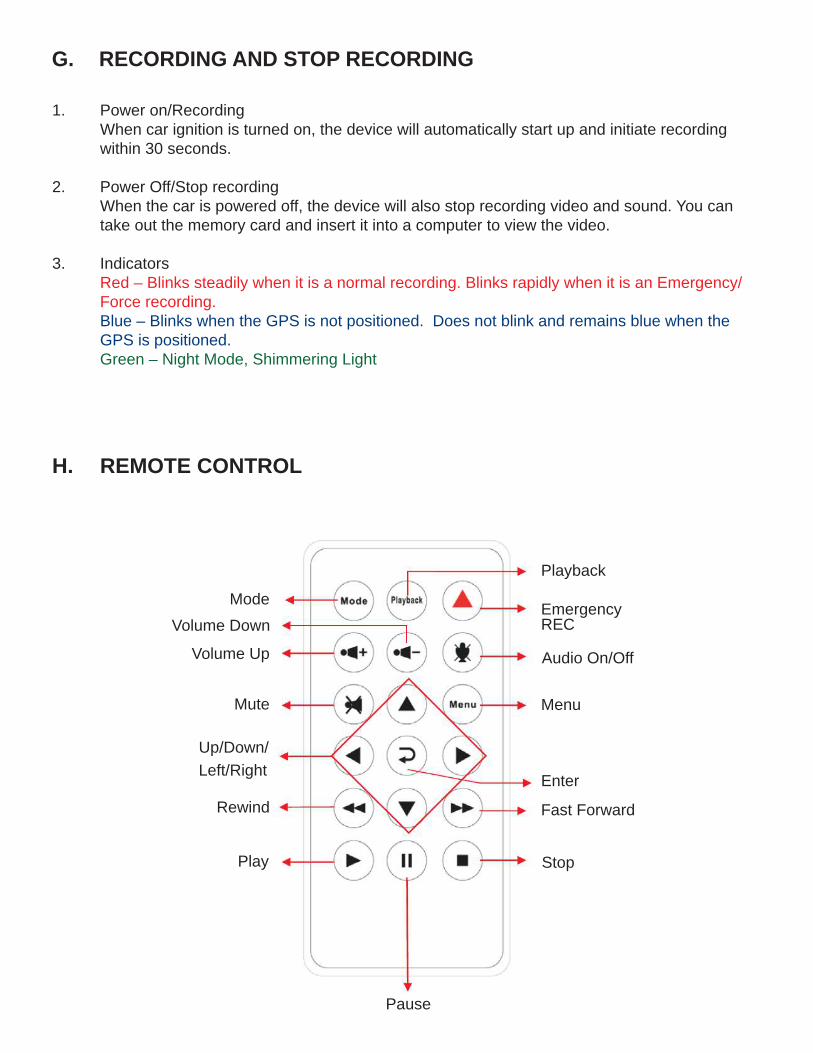
G. RECORDING AND STOP RECORDING
1. Power on/RecordingWhen car ignition is turned on, the device will automatically start up and initiate recording
within 30 seconds.
2. Power Off/Stop recordingWhen the car is powered off, the device will also stop recording video and sound. You can take out the memory card and insert it into a computer to view the video.
3. IndicatorsRed – Blinks steadily when it is a normal recording. Blinks rapidly when it is an Emergency/Force recording.Blue – Blinks when the GPS is not positioned. Does not blink and remains blue when the GPS is positioned.Green – Night Mode, Shimmering Light
H. REMOTE CONTROL
Mode
Volume Down
Volume Up
Mute
Up/Down/Left/Right
Rewind
Play
Pause
Stop
Fast Forward
Enter
Menu
Audio On/Off
Emergency REC
Playback

I. ON SCREEN DISPLAY (OSD) MENU FUNCTIONS
Select Menu to enter the OSD menu as shown below.
1. Select to choose the NTSC or PAL standards.2. Select to setup the calendar.3. Select to setup power saving mode.4. Select for information on the firmware version.
NTSC / PAL
Time Setting
Screen Power Saving Mode
Firmware Version
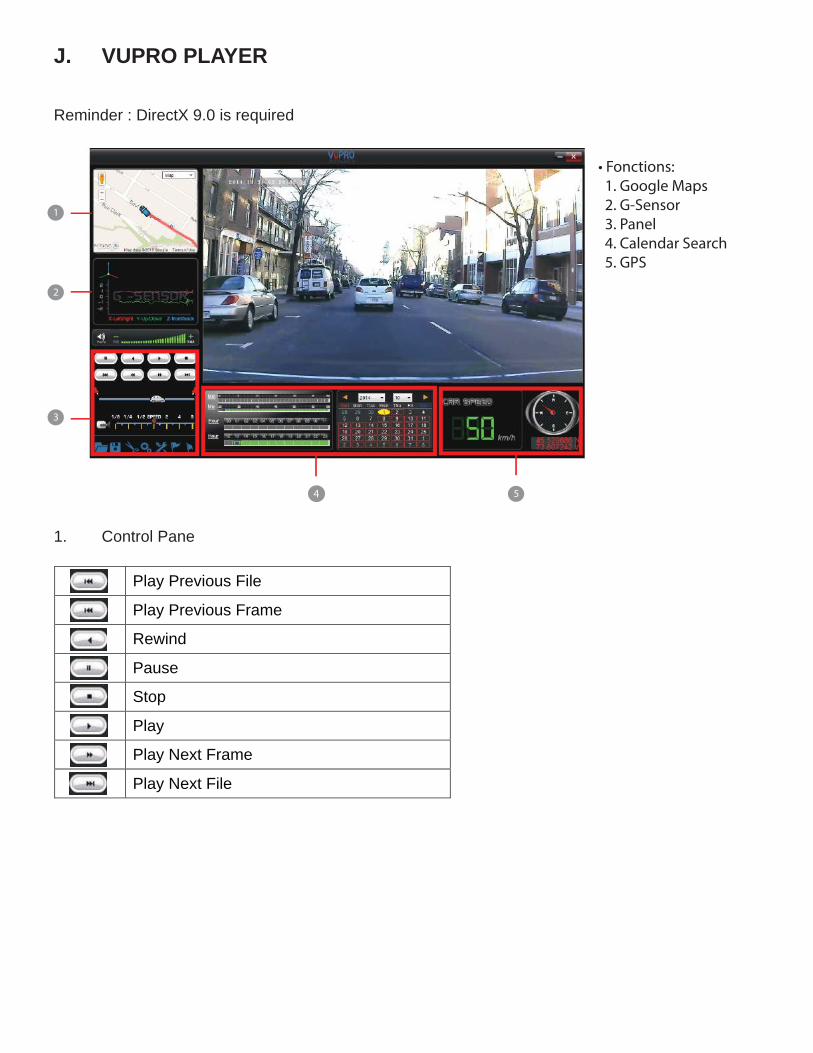
J. VUPRO PLAYER
Reminder : DirectX 9.0 is required
1. Control Pane
Play Previous File
Play Previous Frame
Rewind
Pause
Stop
Play
Play Next Frame
Play Next File
• Fonctions: 1. Google Maps 2. G-Sensor 3. Panel 4. Calendar Search 5. GPS
1
5
2
4
3
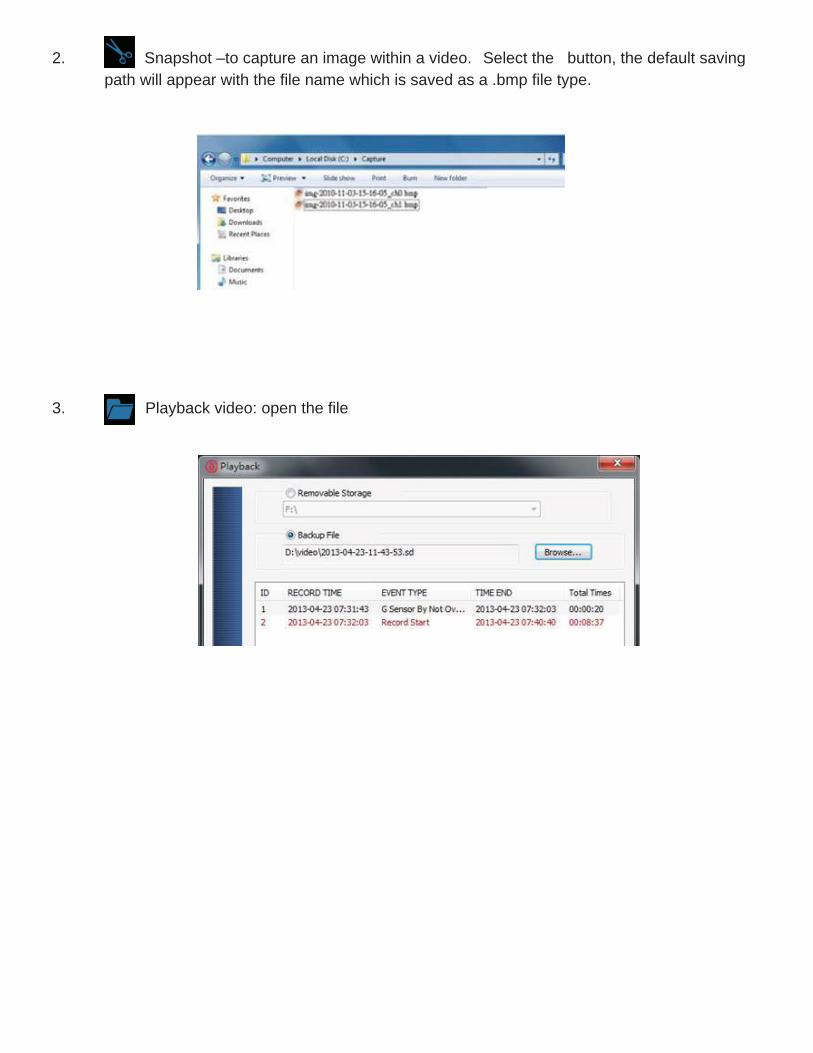
2. Snapshot –to capture an image within a video. Select the button, the default saving path will appear with the file name which is saved as a .bmp file type.
3. Playback video: open the file
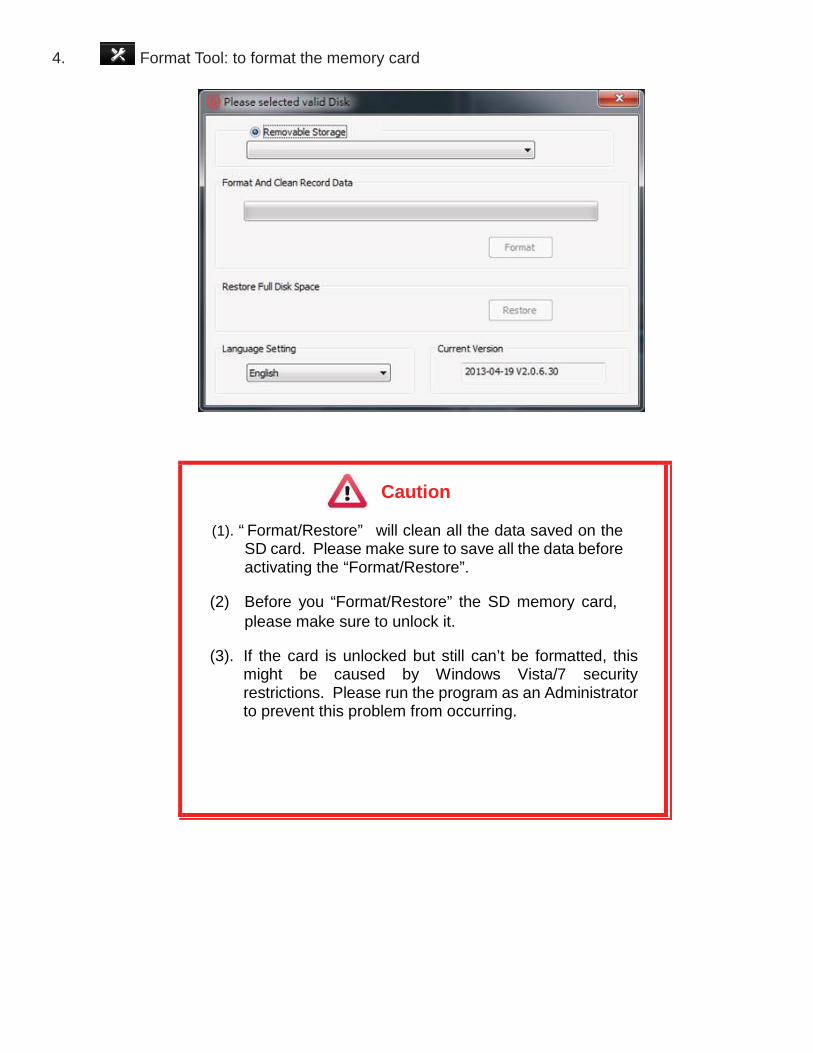
4. Format Tool: to format the memory card
Caution
(1). “ Format/Restore” will clean all the data saved on the SD card. Please make sure to save all the data before activating the “Format/Restore”.
(2) Before you “Format/Restore” the SD memory card,
please make sure to unlock it.
(3). If the card is unlocked but still can’t be formatted, this might be caused by Windows Vista/7 security restrictions. Please run the program as an Administrator to prevent this problem from occurring.
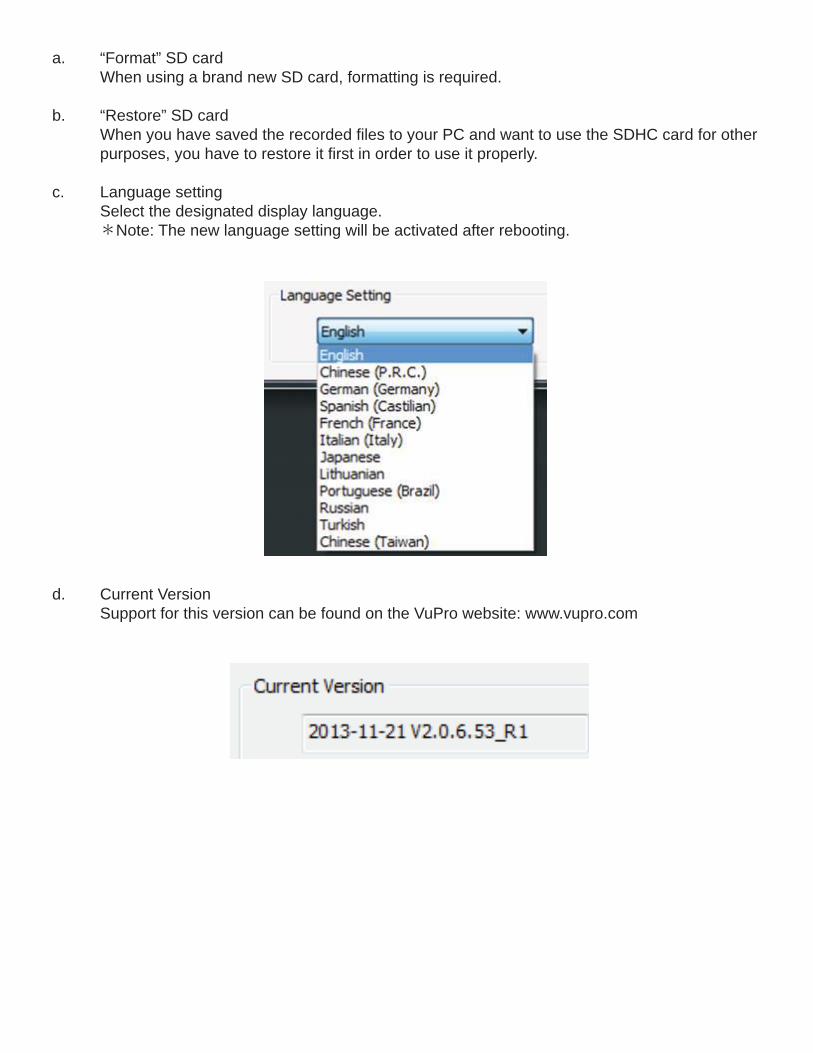
a. “Format” SD cardWhen using a brand new SD card, formatting is required.
b. “Restore” SD cardWhen you have saved the recorded files to your PC and want to use the SDHC card for other purposes, you have to restore it first in order to use it properly.
c. Language setting Select the designated display language.
*Note: The new language setting will be activated after rebooting.
d. Current VersionSupport for this version can be found on the VuPro website: www.vupro.com

5. Configuration: configure the default settingPrior to using your SD card for the first time, put the SD Card into the card reader and put the card reader into the USB slot of your PC in order to format the SD card. Afterwards, you will need to configure the video and display modes. When the configuration is completed, insert the SD card into your vehicle video recorder and start recording.
1 Image quality
The default quality is set to High.
2 fps setting
25(PAL) / 30(NTSC)
3 UI Mode
The resolution can be adjusted.
4 Password This function can encrypt the SD card to prevent illegal retrieving by others. The password should be no more than 15 characters long. For example: 123456789123456 If you set a password, you will need to enter it to playback/configure/ format the SD card. * Note: The password is upper/lower case sensitive; it is thus very important to remember it.
5 Time Zone
Adjust the Time by GMT.
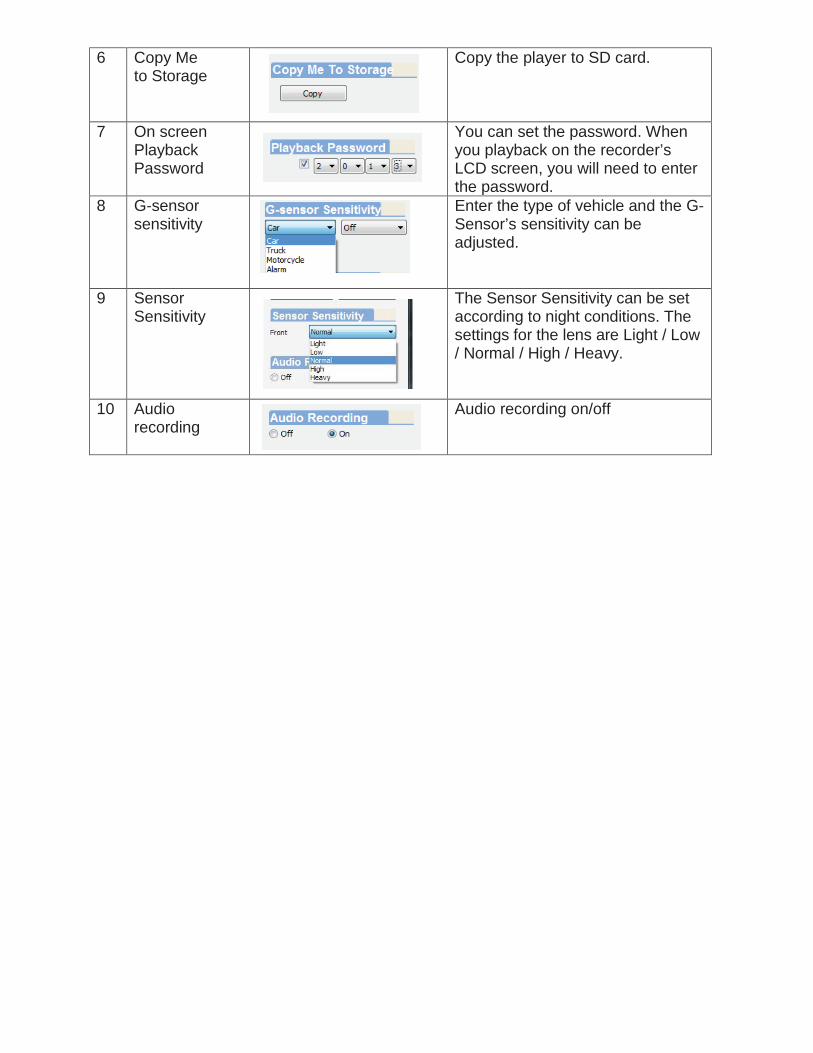
6 Copy Me to Storage
Copy the player to SD card.
7 On screen Playback Password
You can set the password. When you playback on the recorder’s LCD screen, you will need to enter the password.
8 G-sensor sensitivity
Enter the type of vehicle and the G- Sensor’s sensitivity can be adjusted.
9 Sensor Sensitivity
The Sensor Sensitivity can be set according to night conditions. The settings for the lens are Light / Low / Normal / High / Heavy.
10 Audio recording
Audio recording on/off
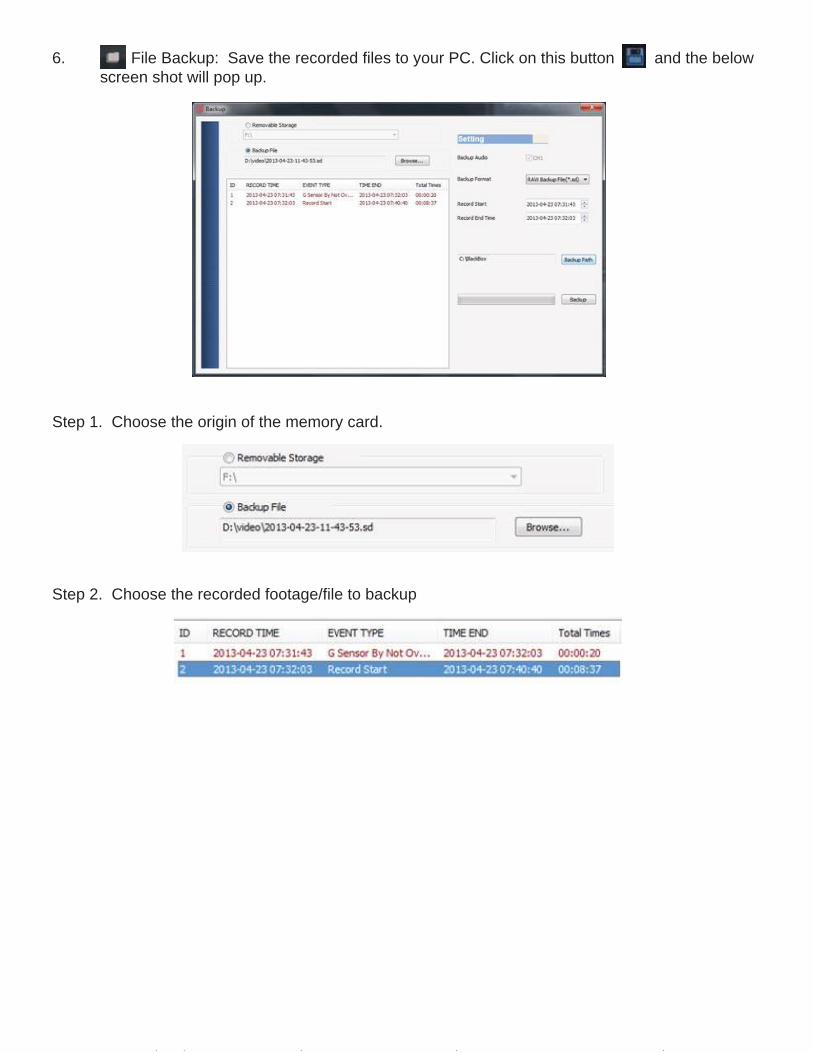
6. File Backup: Save the recorded files to your PC. Click on this button and the below screen shot will pop up.
Step 1. Choose the origin of the memory card.
Step 2. Choose the recorded footage/file to backup
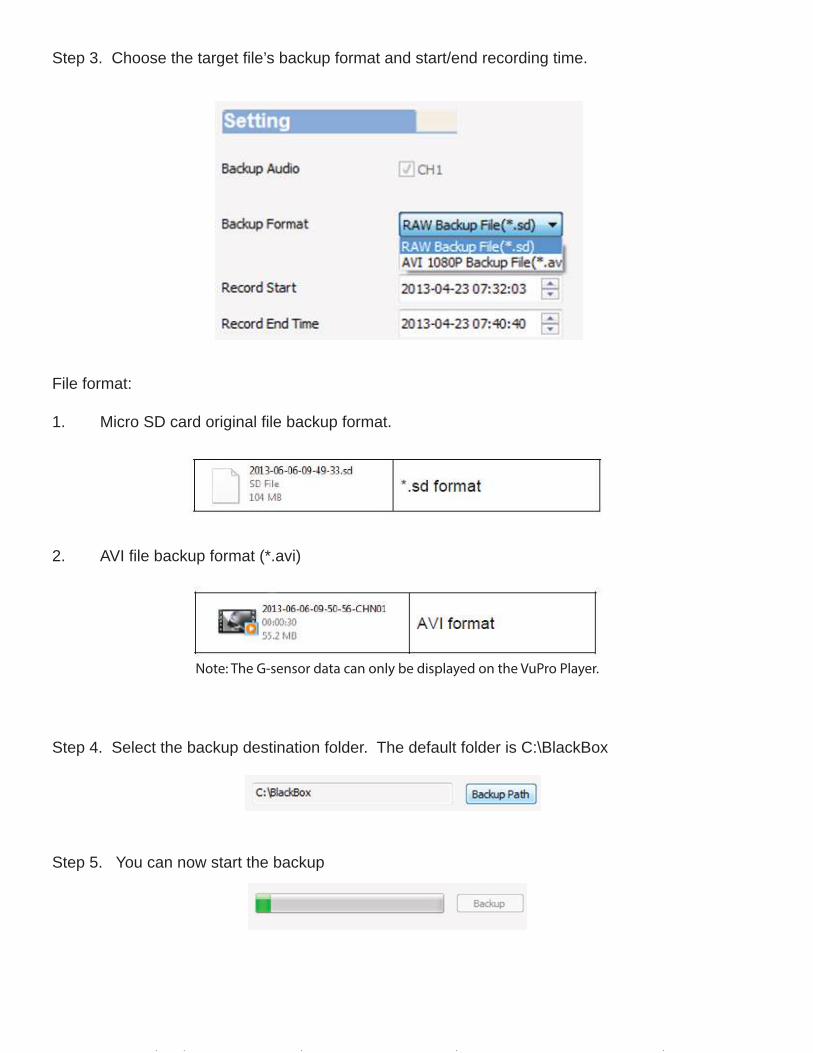
Step 3. Choose the target file’s backup format and start/end recording time.
File format:
1. Micro SD card original file backup format.
2. AVI file backup format (*.avi)
Step 4. Select the backup destination folder. The default folder is C:\BlackBox
Step 5. You can now start the backup
Note: The G-sensor data can only be displayed on the VuPro Player.
7. Play BAR: You can use your mouse to drag the car to a specific moment on the video.
8. Play speed: 4X, 8X, 16X and quick playback; 1/4X, 1/8X,1/16X and slow playback.
9. Volume control: Click + or - to adjust the volume.
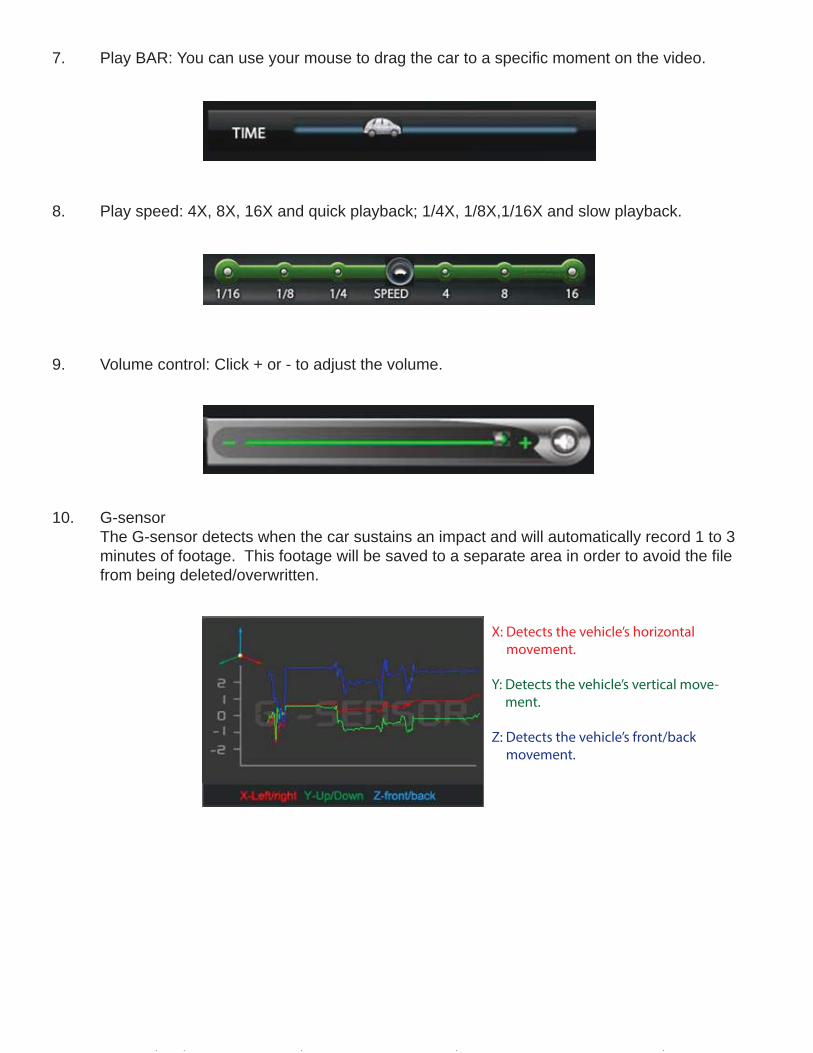
10. G-sensorThe G-sensor detects when the car sustains an impact and will automatically record 1 to 3 minutes of footage. This footage will be saved to a separate area in order to avoid the file from being deleted/overwritten.
X: Detects the vehicle’s horizontal movement.
Y: Detects the vehicle’s vertical move-ment.
Z: Detects the vehicle’s front/back movement.
K. RECORDING TIME ESTIMATION
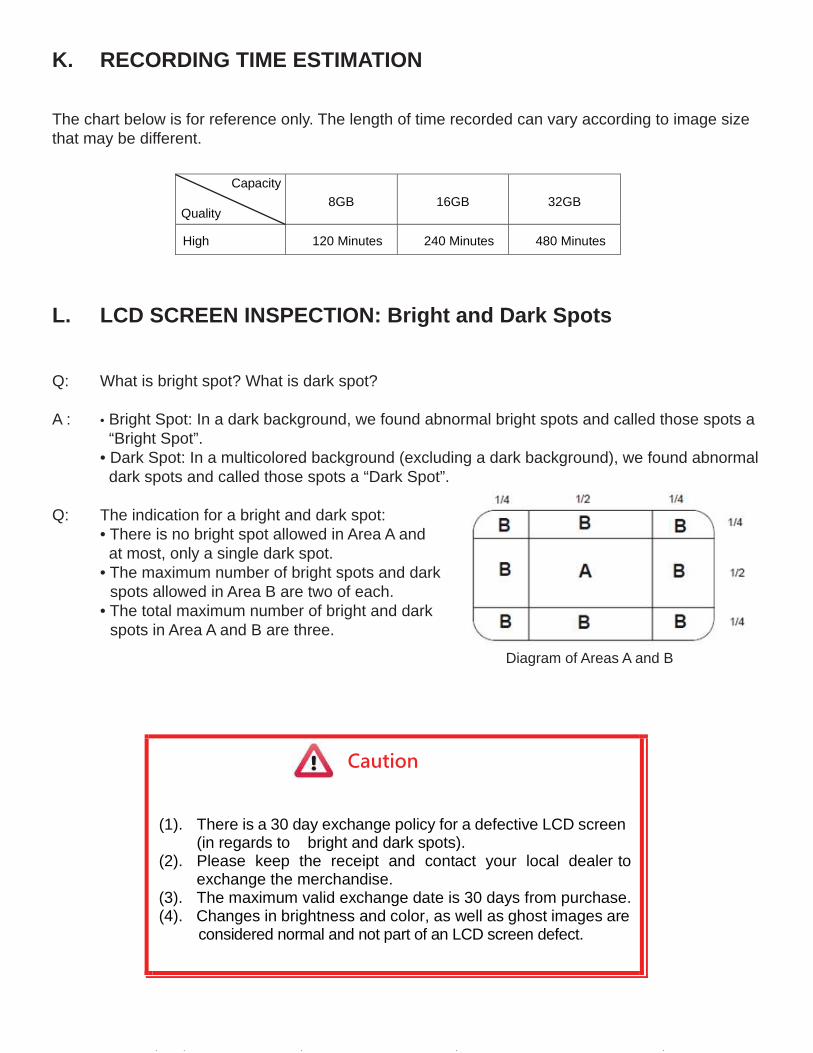
The chart below is for reference only. The length of time recorded can vary according to image size that may be different.
L. LCD SCREEN INSPECTION: Bright and Dark Spots
Q: What is bright spot? What is dark spot?
A : • Bright Spot: In a dark background, we found abnormal bright spots and called those spots a “Bright Spot”.
• Dark Spot: In a multicolored background (excluding a dark background), we found abnormal dark spots and called those spots a “Dark Spot”.
Q: The indication for a bright and dark spot: • There is no bright spot allowed in Area A and
at most, only a single dark spot. • The maximum number of bright spots and dark
spots allowed in Area B are two of each. • The total maximum number of bright and dark
spots in Area A and B are three.
Diagram of Areas A and B
Capacity Quality
8GB 16GB 32GB
High 120 Minutes 240 Minutes 480 Minutes
Caution
(1). There is a 30 day exchange policy for a defective LCD screen
(in regards to bright and dark spots). (2). Please keep the receipt and contact your local dealer to
exchange the merchandise. (3). The maximum valid exchange date is 30 days from purchase. (4). Changes in brightness and color, as well as ghost images are considered normal and not part of an LCD screen defect.