relativity admin guide - 8 - pds- · pdf filerelativity|userguide-2 tableofcontents...
TRANSCRIPT
User GuideVersion 8.1 | 6/16/2014
For the most recent version of this document, visit our documentation website.
Relativity | User Guide - 2
Table of Contents
1 User guide overview 6
1.1 Navigation 6
1.1.1 Logging in 6
1.1.2 User options 6
1.1.3 Core reviewer interface 8
1.1.4 Resetting your password 10
2 History 11
2.1 History view fields 11
2.2 Filters on the History tab 12
2.3 Audited actions 13
3 Indented lists 15
4 Inline tagging 17
4.1 Using Inline tagging 17
4.2 Adding a tag to a transcript 20
4.3 Viewing tags in a transcript 20
4.4 Removing a tag from a transcript 20
5 Markups 21
5.1 Highlights 21
5.1.1 Creating highlights 21
5.2 Redactions 21
5.2.1 Creating basic redactions 21
5.2.2 Creating inverse redactions 22
5.2.3 Creating full-page redactions 22
5.2.4 Creating mass redactions 23
5.3 Editing markups 23
Relativity | User Guide - 3
5.3.1 Working with overlapping markups 24
5.3.2 Editing redaction text 24
5.3.3 Editing font size in text box redactions 24
5.4 Mass deleting markups 25
5.5 Controlling redaction visibility 25
5.6 Viewing markup history 25
5.7 Using the Markup Navigation pane 25
6 Persistent highlight sets 26
6.1 Getting started with persistent highlight sets 26
6.1.1 Selecting persistent highlight sets in the viewer 27
6.1.2 Deselecting persistent highlight sets in the viewer 28
6.1.3 Persistent highlight set behavior across viewer modes 29
6.2 Creating persistent highlight sets 29
6.2.1 Fields 30
6.3 Entering highlight terms 30
6.3.1 Entering multiple variations of a term 31
6.3.2 Color-coding persistent highlights 32
6.3.3 Guidelines for adding terms or phrases 33
6.4 Using the highlight fields source 33
6.4.1 Best practices 35
6.5 Importing search terms for persistent highlighting 36
6.5.1 Relativity component setup 36
6.5.2 Importing terms 37
6.6 Creating efficient searches for persistent highlighting 37
7 Search terms reports 38
7.1 Guidelines for using search terms reports 39
7.2 Creating a search terms report 39
Relativity | User Guide - 4
7.2.1 Fields 39
7.2.2 Adding or editing terms and highlight colors 40
7.2.3 Deleting terms 41
7.3 Running a search terms report 41
7.3.1 Search terms report status 43
7.4 Using tagged search terms in a saved search 44
8 Searching overview 46
8.1 Search conditions 47
8.1.1 Canceled queries 48
8.1.2 Frequently asked searching questions 50
8.2 Creating or editing a saved search 50
8.2.1 Fields 51
8.2.2 Using pop-up pickers 53
8.2.3 Rerunning out-of-date saved searches 54
8.2.4 Copying a saved search to another workspace 54
9 Summary reports 55
9.1 Creating and editing a summary report 55
9.2 Fields 56
10 Tabs 57
10.1 Creating and editing tabs 57
10.2 Fields 58
10.3 Nesting tabs 60
11 Transcripts 61
11.1 Importing transcripts 61
11.2 Word index 61
11.3 Links 62
11.3.1 Adding a link to a transcript 62
Relativity | User Guide - 5
12 Viewer 63
12.1 Viewer toolbars 63
12.1.1 Document view selector options 63
12.1.2 Viewer and Extracted Text icons 64
12.1.3 Image icons 65
12.2 Imaging on the fly 66
12.3 Using the stand-alone document viewer 66
12.4 Related items pane 67
12.5 Using the thumbnail viewer 69
12.5.1 Deleting blank images 70
12.5.2 Using the thumbnail viewer slideshow 70
12.6 Adding information to CaseMap 71
12.6.1 Adding a document to CaseMap 71
12.6.2 Adding a fact to CaseMap 72
12.7 Relativity Compare 74
12.8 Viewer-supported file types 75
12.8.1 Text only designation 76
12.8.2 File ID only designation 76
12.8.3 File identification values in Outside In 8.4.0 76
12.8.4 File types supported in Oracle 8.4.0 79
13 Workspaces 89
13.1 Workspace navigation 91
13.1.1 Browser 91
13.1.2 View bar 94
13.1.3 Item list 95
13.1.4 Document set information bar 97
Relativity | User Guide - 6
1 User guide overviewWhen working with Relativity as a reviewer, it's important to familiarize yourself with the tool’smany implementations.
This guide outlines Relativity’s capabilities and walks you through how you can best use Relativity fordocument review, from logging in to creating a word index inside a workspace.
1.1 NavigationRelativity is a complex application with many screens and functions. This section describes the maincore reviewer interface you use to review documents as well as some of the standard proceduresyou'll need to perform as you use the product.
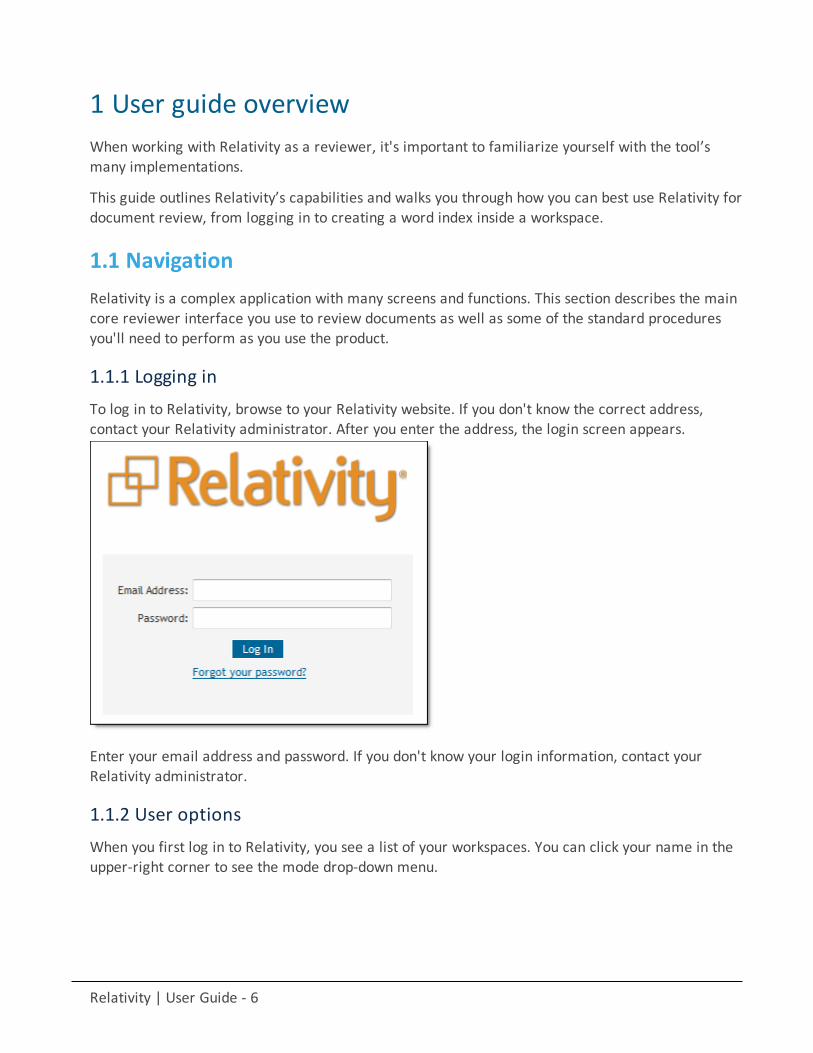
1.1.1 Logging inTo log in to Relativity, browse to your Relativity website. If you don't know the correct address,contact your Relativity administrator. After you enter the address, the login screen appears.
Enter your email address and password. If you don't know your login information, contact yourRelativity administrator.
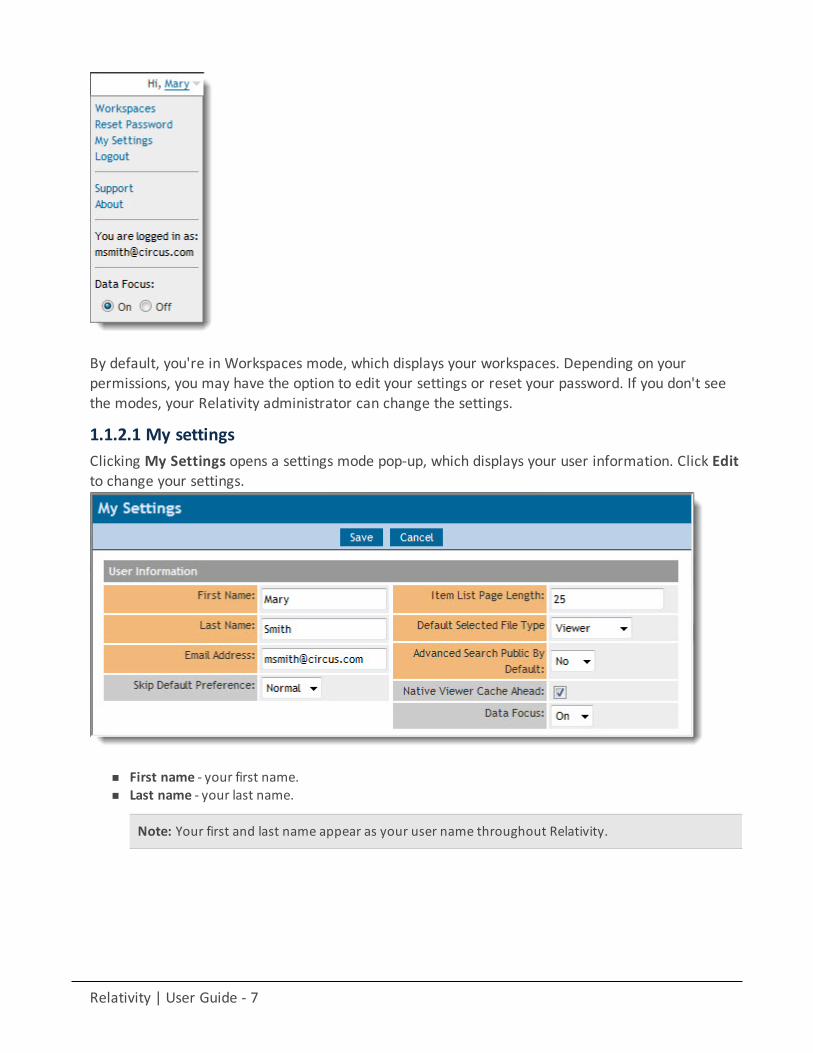
1.1.2 User optionsWhen you first log in to Relativity, you see a list of your workspaces. You can click your name in theupper-right corner to see the mode drop-down menu.
Relativity | User Guide - 7
By default, you're in Workspaces mode, which displays your workspaces. Depending on yourpermissions, you may have the option to edit your settings or reset your password. If you don't seethe modes, your Relativity administrator can change the settings.
1.1.2.1 My settingsClicking My Settings opens a settings mode pop-up, which displays your user information. Click Editto change your settings.
n First name - your first name.n Last name - your last name.
Note: Your first and last name appear as your user name throughout Relativity.
Relativity | User Guide - 8
n Email address - your email address and login.
Note: Changing an email address on theMy Settings popup window is restricted to systemadministrators .
n Skip Default Preference - if changed from Normal to Skip, turns on the skip feature. When reviewingdocuments, skip can prevent a reviewer seeing documents that have already been coded (dependingon the selected view). See Document skip in the Admin guide.
n Item list page length - a numeric field indicating the default list length for all lists in Relativity. It can beset from 1 to 200.
n Default Selected File Type - the default viewer mode (Viewer, Native, Image, Long Text, or Production).See Viewer on page 63 for details.
n Advanced Search Public by Default - determines whether saved searches are public or private bydefault. If set to Yes, the search is public and all users with rights to it can see it. If setting is No, thesearch is private and only you are able to see it.
Note: Depending on your permissions, you may not have rights to edit the Advanced Search Defaultfield.
n Native Viewer Cache Ahead - if checked, pre-loads the next native document in your review queueonce the active document is loaded.
n Data Focus - determines whether your default setting is to show or hide the workspace name in theinterface. Data Focus On hides the workspace name at the top left and allows more space in the win-dow for data information. Data Focus Off shows the workspace name. You can also toggle the DataFocus setting directly from theModemenu.
After changing your settings as needed, click Save.
1.1.3 Core reviewer interfaceTo open a document in the core reviewer interface, click on a document name or identifier on theDocuments tab.
The core reviewer interface screen consists of four panes: persistent highlight sets (if activated),viewer, layouts, and the related items pane.
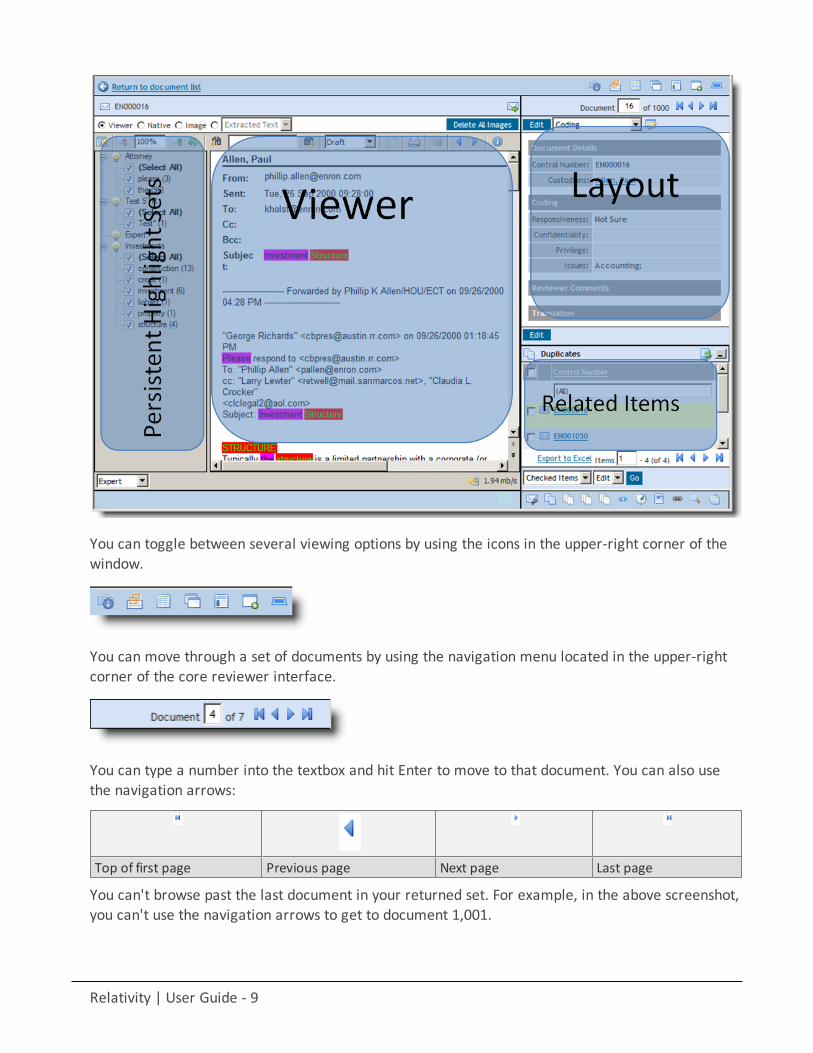
Relativity | User Guide - 9
You can toggle between several viewing options by using the icons in the upper-right corner of thewindow.
You can move through a set of documents by using the navigation menu located in the upper-rightcorner of the core reviewer interface.
You can type a number into the textbox and hit Enter to move to that document. You can also usethe navigation arrows:
Top of first page Previous page Next page Last page
You can't browse past the last document in your returned set. For example, in the above screenshot,you can't use the navigation arrows to get to document 1,001.
Relativity | User Guide - 10
1.1.4 Resetting your passwordThere are two ways you can reset your password if your administrator has given you the appropriatepermissions. You can use the Reset Password option inside Relativity or the Forgot your password?link on the Relativity login screen.
Note: If your password has expired, the Reset Password dialog appears automatically when you log in toRelativity. Your system administrator determines when your password expires and the number of previouspasswords that you can't reuse.
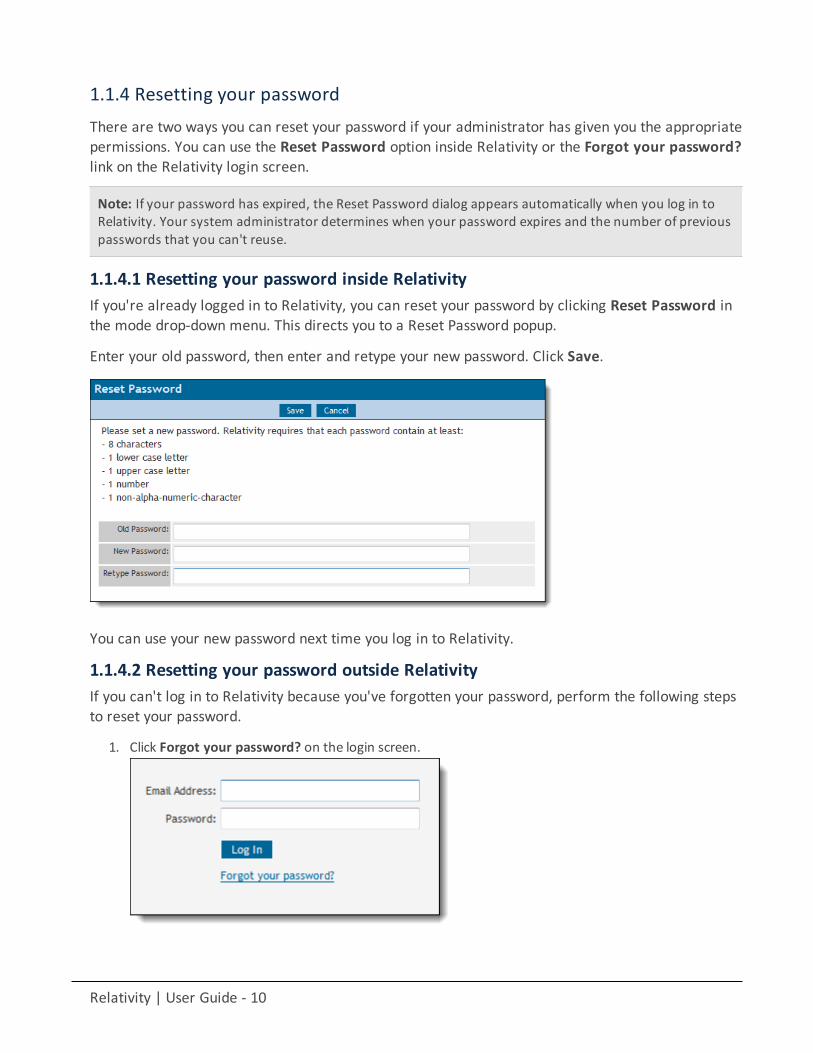
1.1.4.1 Resetting your password inside RelativityIf you're already logged in to Relativity, you can reset your password by clicking Reset Password inthe mode drop-down menu. This directs you to a Reset Password popup.
Enter your old password, then enter and retype your new password. Click Save.
You can use your new password next time you log in to Relativity.
1.1.4.2 Resetting your password outside RelativityIf you can't log in to Relativity because you've forgotten your password, perform the following stepsto reset your password.
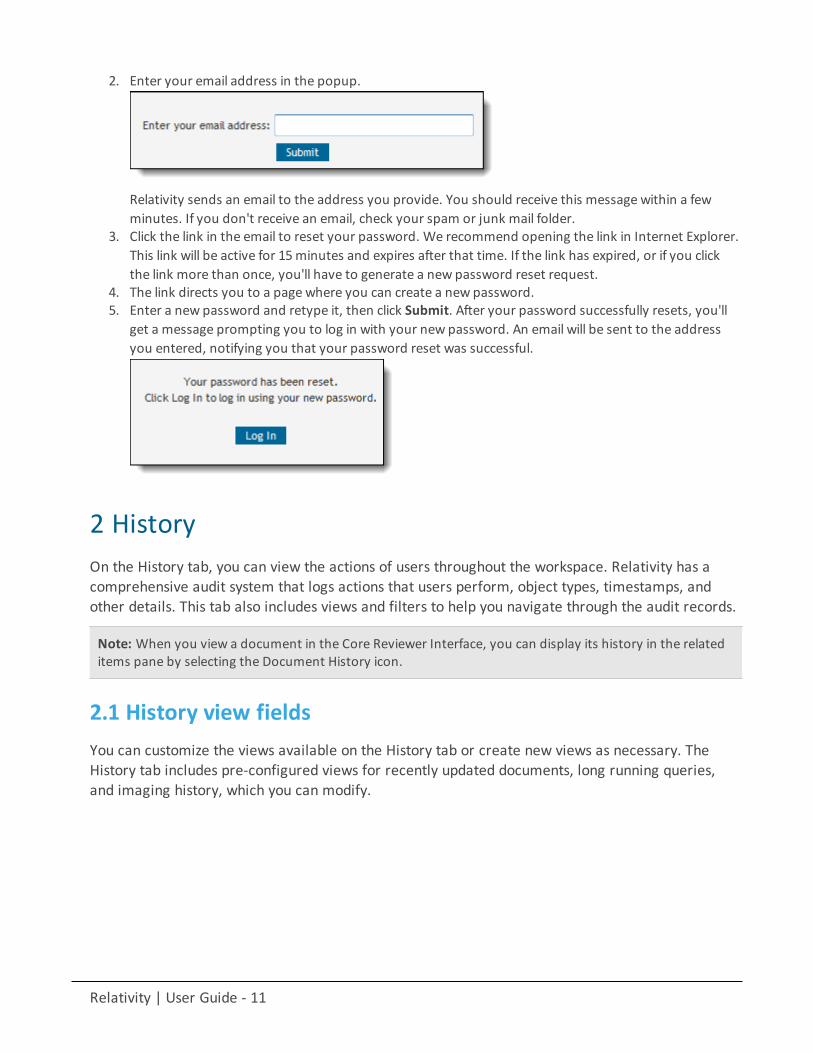
1. Click Forgot your password? on the login screen.
Relativity | User Guide - 11
2. Enter your email address in the popup.
Relativity sends an email to the address you provide. You should receive this message within a fewminutes. If you don't receive an email, check your spam or junk mail folder.
3. Click the link in the email to reset your password. We recommend opening the link in Internet Explorer.This link will be active for 15minutes and expires after that time. If the link has expired, or if you clickthe link more than once, you'll have to generate a new password reset request.
4. The link directs you to a page where you can create a new password.5. Enter a new password and retype it, then click Submit. After your password successfully resets, you'll
get a message prompting you to log in with your new password. An email will be sent to the addressyou entered, notifying you that your password reset was successful.
2 HistoryOn the History tab, you can view the actions of users throughout the workspace. Relativity has acomprehensive audit system that logs actions that users perform, object types, timestamps, andother details. This tab also includes views and filters to help you navigate through the audit records.
Note: When you view a document in the Core Reviewer Interface, you can display its history in the relateditems pane by selecting the Document History icon.
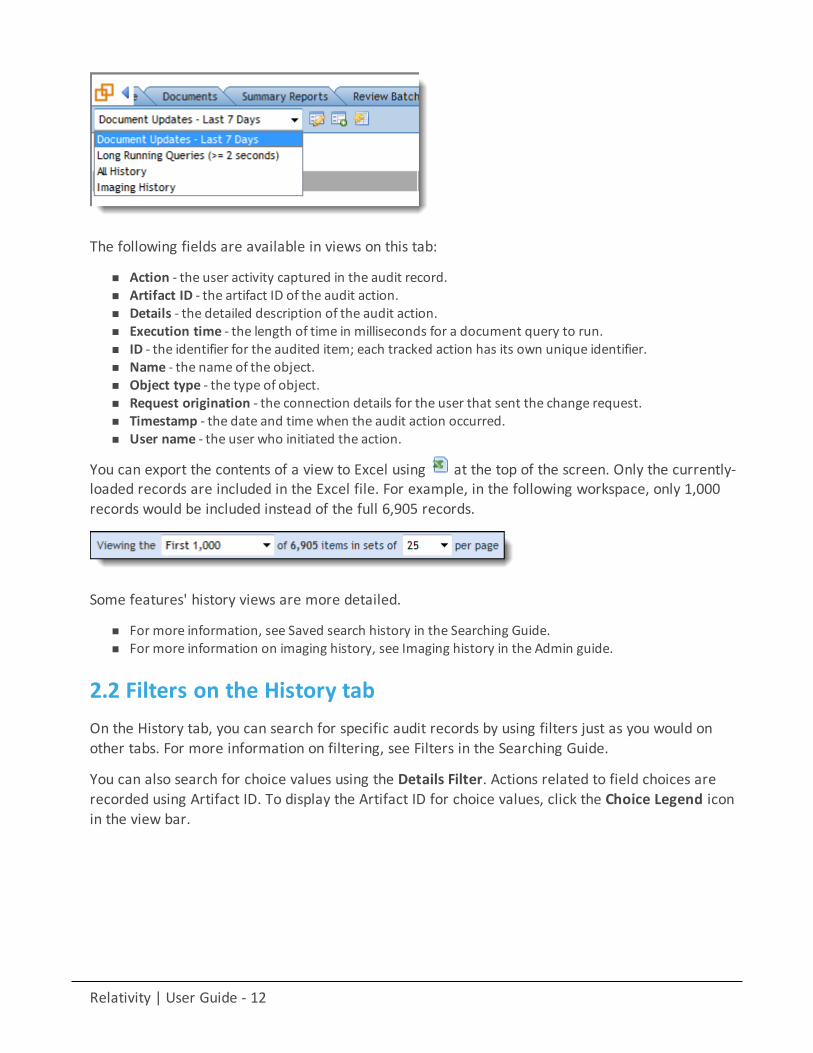
2.1 History view fieldsYou can customize the views available on the History tab or create new views as necessary. TheHistory tab includes pre-configured views for recently updated documents, long running queries,and imaging history, which you can modify.
Relativity | User Guide - 12
The following fields are available in views on this tab:
n Action - the user activity captured in the audit record.n Artifact ID - the artifact ID of the audit action.n Details - the detailed description of the audit action.n Execution time - the length of time in milliseconds for a document query to run.n ID - the identifier for the audited item; each tracked action has its own unique identifier.n Name - the name of the object.n Object type - the type of object.n Request origination - the connection details for the user that sent the change request.n Timestamp - the date and timewhen the audit action occurred.n User name - the user who initiated the action.
You can export the contents of a view to Excel using at the top of the screen. Only the currently-loaded records are included in the Excel file. For example, in the following workspace, only 1,000records would be included instead of the full 6,905 records.
Some features' history views are more detailed.
n For more information, see Saved search history in the Searching Guide.n For more information on imaging history, see Imaging history in the Admin guide.
2.2 Filters on the History tabOn the History tab, you can search for specific audit records by using filters just as you would onother tabs. For more information on filtering, see Filters in the Searching Guide.
You can also search for choice values using the Details Filter. Actions related to field choices arerecorded using Artifact ID. To display the Artifact ID for choice values, click the Choice Legend iconin the view bar.
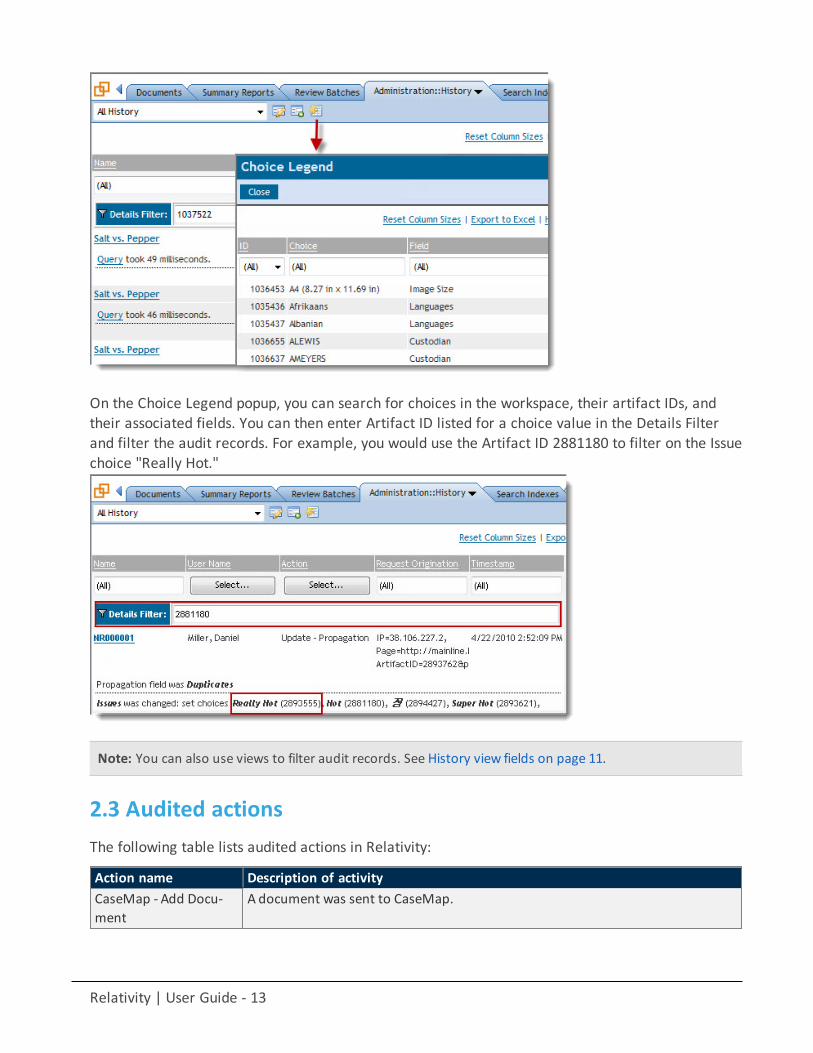
Relativity | User Guide - 13
On the Choice Legend popup, you can search for choices in the workspace, their artifact IDs, andtheir associated fields. You can then enter Artifact ID listed for a choice value in the Details Filterand filter the audit records. For example, you would use the Artifact ID 2881180 to filter on the Issuechoice "Really Hot."
Note: You can also use views to filter audit records. See History view fields on page 11.
2.3 Audited actionsThe following table lists audited actions in Relativity:
Action name Description of activityCaseMap - Add Docu-ment
A document was sent to CaseMap.
Relativity | User Guide - 14
Action name Description of activityCaseMap - Add Fact A selection of text from the viewer was sent to CaseMap as a fact.Create An item was created.Delete An item was deleted.Document Query A query was run on a list of documents, or a document query was canceled. (Ames-
sage indicating that a query was canceled is displayed in the details and on theQuery Text pop-up.)
Export The contents of a production set, saved search, folder, or subfolder were exported.Images - Created Images were created.Images - Created for Pro-duction
Images corresponding to a production outside of Relativity were imported into thesystem.
Images - Deleted Images were deleted.Import Content associated with a load, production, or image file was imported.Markup - Image -Created
Redactions or highlights were added to an image.
Markup - Image -Deleted
Redactions or highlights were removed from an image.
Markup - Image -Modi-fied
Redactions or highlights weremoved, resized or edited on an image.
Markup - Native -Created
Redactions or highlights were added. This audit entry applies to transcripts only.
Markup - Native -Deleted
Redactions or highlights were removed. This audit entry applies to transcripts only.
Markup - Native -Updated
Redactions or highlights weremoved, resized or edited. This audit entry applies totranscripts only.
Move A document was moved from one folder to another.Native - Created A native file was loaded into Relativity.Native - Deleted A native file was removed from Relativity.Pivot Query A Pivot report was run, or a Pivot report was canceled. (Amessage indicating that a
query was canceled is displayed in the details and on the Query Text pop-up.)Print A document was printed.Production - Add Docu-ment
A document was added to a production.
Production - RemoveDocument
A document was removed from a production.
Query A process ran a query (such as categorization), or a query was canceled. (Amessageindicating that a query was canceled is displayed in the details and on the QueryText pop-up.)
RelativityScriptExecution A Relativity script was run.ReportQuery A summary report was run.Run An Imaging Set, Image-on-the-Fly, or Mass Image job was performedSearch Cache Table A search cache table was created. (Search cache tables are created the first time
Relativity | User Guide - 15
Action name Description of activityCreation you search for a term or phrase using dtSearch or Relativity Analytics.)Security Security rights were assigned or changedTally/Sum/Average Themass operation Tally/Sum/Average was run in the workspace.Update Document metadata was updated on a single-document basis.Update -Mass Edit Document metadata was updated on a mass basis.Update -Mass Replace Document metadata was edited using a text mass replacement.Update - Propagation Document metadata was edited according to a propagation rule.View A document was viewed.
Note: No login action exists when you access a workspace. Relativity interprets the login based on anyother auditable action in the workspace. For example, if you view a document in Workspace A, Relativityaudits that view action on the History tab and indicates that a user accessed Workspace A.
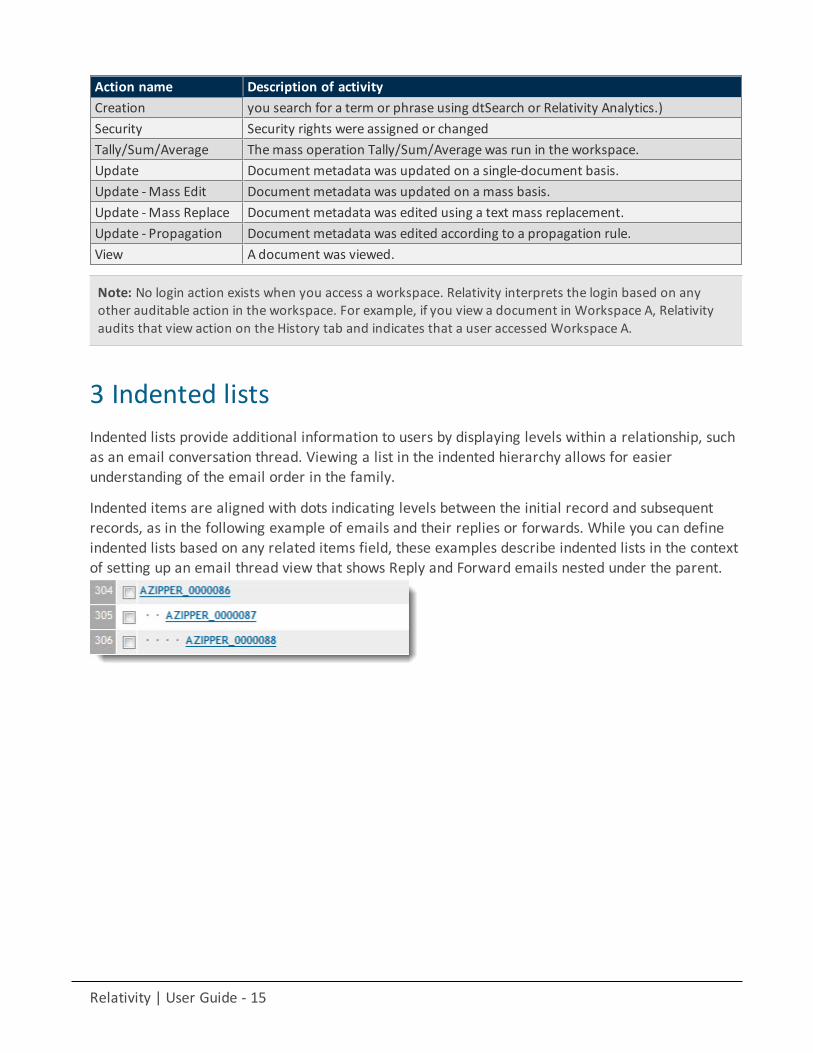
3 Indented listsIndented lists provide additional information to users by displaying levels within a relationship, suchas an email conversation thread. Viewing a list in the indented hierarchy allows for easierunderstanding of the email order in the family.
Indented items are aligned with dots indicating levels between the initial record and subsequentrecords, as in the following example of emails and their replies or forwards. While you can defineindented lists based on any related items field, these examples describe indented lists in the contextof setting up an email thread view that shows Reply and Forward emails nested under the parent.
Relativity | User Guide - 16
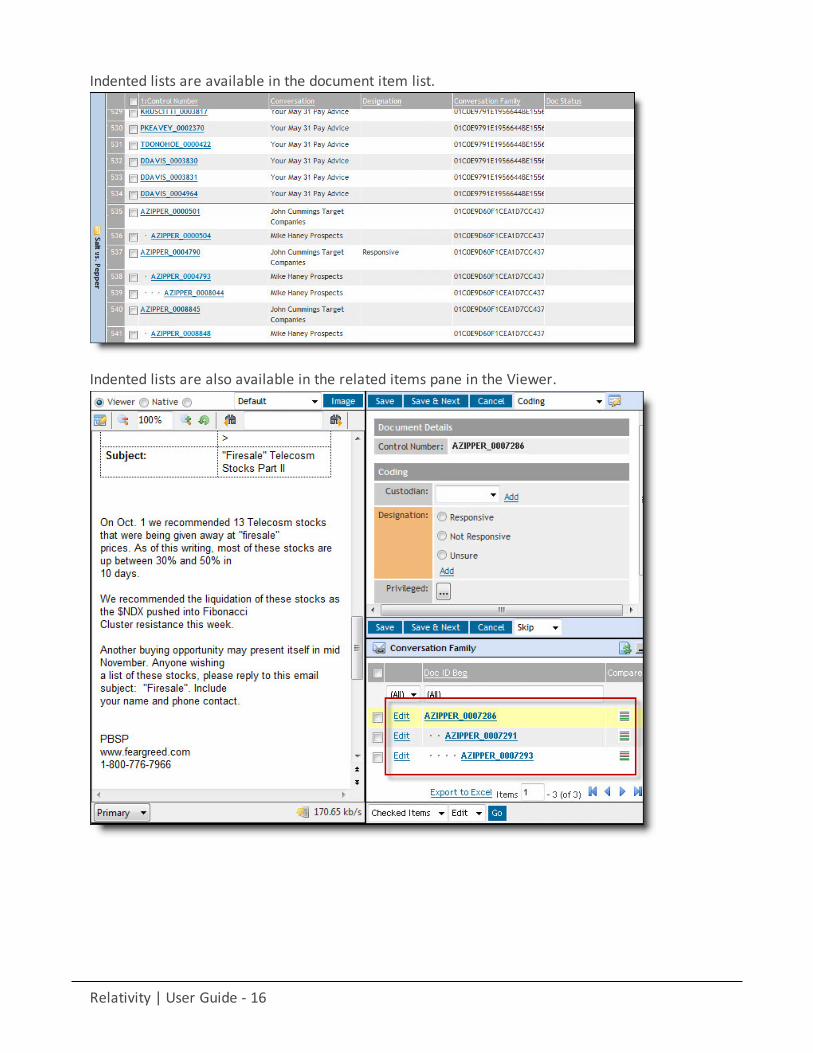
Indented lists are available in the document item list.
Indented lists are also available in the related items pane in the Viewer.
Relativity | User Guide - 17
4 Inline taggingInline tagging is a feature that allows you to tag sections of text within a transcript that you can thenreference through hyperlinks. If a record is large and covers many topics, it may be difficult toidentify which part of the record relates to which issue. For example, issue coding is a common task.With inline tagging, you can create tags named after the issues in your case, and tag specificsections of documents as relating to those issues.
Inline tagging is only available for transcripts. See Transcripts on page 61. For information on usinglayouts to code non-transcript documents, see Layouts in the Admin guide.
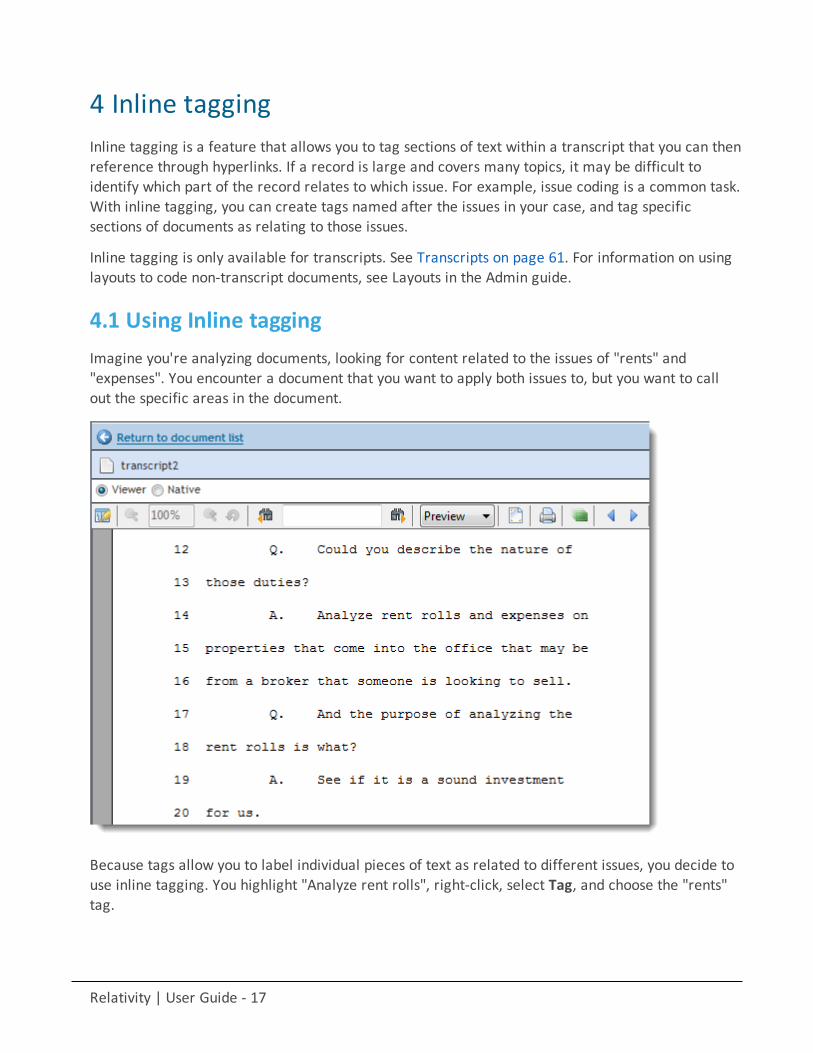
4.1 Using Inline taggingImagine you're analyzing documents, looking for content related to the issues of "rents" and"expenses". You encounter a document that you want to apply both issues to, but you want to callout the specific areas in the document.
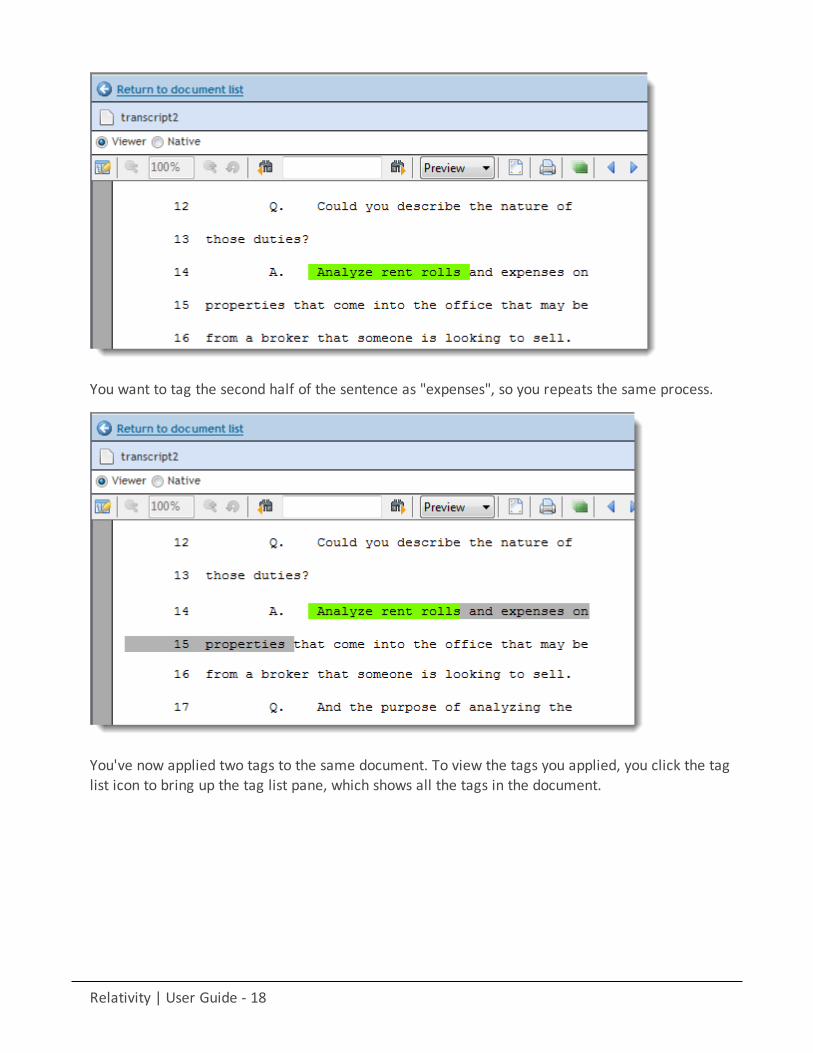
Because tags allow you to label individual pieces of text as related to different issues, you decide touse inline tagging. You highlight "Analyze rent rolls", right-click, select Tag, and choose the "rents"tag.
Relativity | User Guide - 18
You want to tag the second half of the sentence as "expenses", so you repeats the same process.
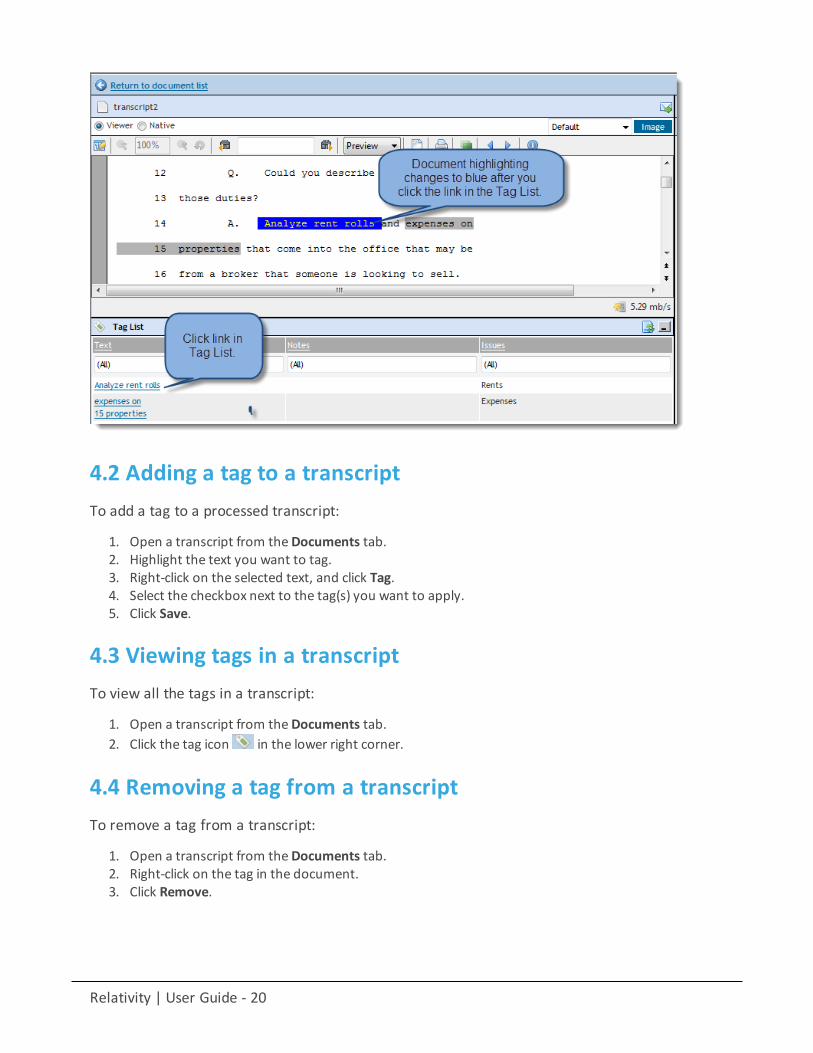
You've now applied two tags to the same document. To view the tags you applied, you click the taglist icon to bring up the tag list pane, which shows all the tags in the document.

Relativity | User Guide - 19
When you click the hyperlinked entries in the pane, the active tag appears in blue in the viewer.
Relativity | User Guide - 20
4.2 Adding a tag to a transcriptTo add a tag to a processed transcript:
1. Open a transcript from theDocuments tab.2. Highlight the text you want to tag.3. Right-click on the selected text, and click Tag.4. Select the checkbox next to the tag(s) you want to apply.5. Click Save.
4.3 Viewing tags in a transcriptTo view all the tags in a transcript:
1. Open a transcript from theDocuments tab.2. Click the tag icon in the lower right corner.
4.4 Removing a tag from a transcriptTo remove a tag from a transcript:
1. Open a transcript from theDocuments tab.2. Right-click on the tag in the document.3. Click Remove.
Relativity | User Guide - 21
5 MarkupsMarkups in Relativity refer to highlights and redactions. You can add markups to documents usingthe Relativity image viewer. When you open a document in the core reviewer interface, selectImage to image the document if necessary and open the document as an image.
Note: If two people edit a markup at the same time, an error occurs.
5.1 HighlightsWhen you create a highlight, a colored box appears in the area you select, just like using ahighlighter.
5.1.1 Creating highlightsTo create a highlight, perform the following steps:
1. Click . Yellow is the default color. Click the drop-down menu to select a different color.2. Draw the highlight across the section(s) of text you want to highlight.
When you create a highlight, it appears in the Markup Navigation Pane. See Using the MarkupNavigation pane on page 25.
5.2 RedactionsA redaction hides text on a page. In Relativity, you can create several different types of redactions:
n Creating basic redactions belown Creating inverse redactions on the next pagen Creating full-page redactions on the next pagen Creating mass redactions on page 23
When you create a redaction, it appears in the Markup Navigation Pane. See Using the MarkupNavigation pane on page 25.
5.2.1 Creating basic redactionsTo apply a basic redaction to a document, perform the following steps:
1. Click . The black redaction tool is the default. Click the drop-down menu to select a different tool.You can select from the following:
n Black - creates a solid black box, like using a black marker. While you draw the box, a gray trans-lucent fill appears.
n Cross - creates a white redaction box black border and a black X from corner to corner.
Relativity | User Guide - 22
n Text - creates a white redaction box with black text. The text will fill the box by default. To change
the font size, keep the redaction box selected and click , then select a new font sizefrom the drop-down menu. You can right-click a text box redaction to apply different text. SeeEditing redaction text on page 24. The Administrator determines which text options are avail-able.
n White - creates a solid white box with a gray border. The gray border won't be printed or pro-duced.
2. Draw the redaction box(es) across the section(s) of the page you want to redact. You can draw in anydirection.
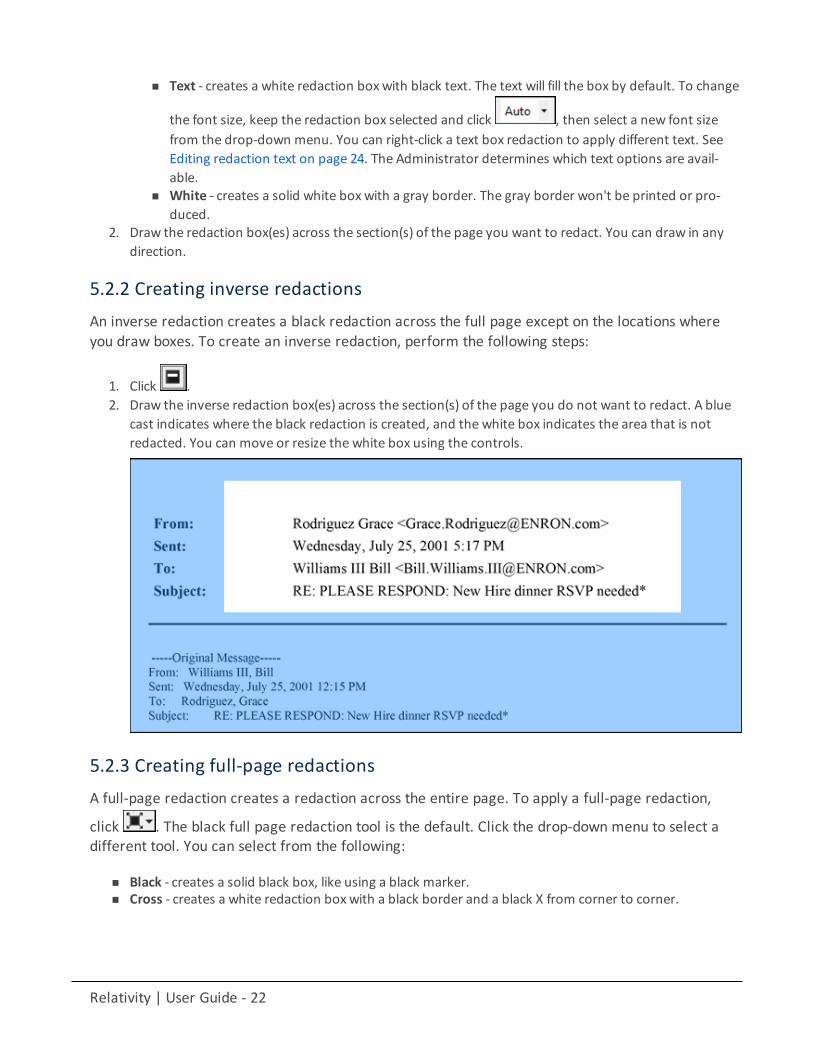
5.2.2 Creating inverse redactionsAn inverse redaction creates a black redaction across the full page except on the locations whereyou draw boxes. To create an inverse redaction, perform the following steps:
1. Click .2. Draw the inverse redaction box(es) across the section(s) of the page you do not want to redact. A blue
cast indicates where the black redaction is created, and the white box indicates the area that is notredacted. You can move or resize the white box using the controls.
5.2.3 Creating full-page redactionsA full-page redaction creates a redaction across the entire page. To apply a full-page redaction,
click . The black full page redaction tool is the default. Click the drop-down menu to select adifferent tool. You can select from the following:
n Black - creates a solid black box, like using a black marker.n Cross - creates a white redaction box with a black border and a black X from corner to corner.
Relativity | User Guide - 23
n Text - creates a white redaction box with black text. You can right-click a text box redaction to applydifferent text. See Editing redaction text on the next page. The Administrator determines which textoptions are available.
n White - creates a solid white box with a gray border. The gray border won't be printed or produced.
You can also create a keyboard shortcut to apply a full-page redaction. See Creating keyboardshortcuts in the Admin guide.
After you apply a full-page redaction, you can resize it to make it smaller than the full page andthen work with it like a normal redaction.
5.2.4 Creating mass redactionsYou can use the mass redact option to apply full-page redactions of any type to a set of pages inyour document. To apply mass redactions, perform the following steps:
1. Click . TheMass Redact Options popup appears.2. Select the type of redaction to apply. You can select from the following:
n Black - creates a solid black box, like using a black marker.n Cross - creates a white redaction box with a black border and a black X from corner to corner.n Text - creates a white redaction box with black text. In the Text Options section, you can select
the font size and text to apply to the redactions. To apply custom text, select <EnterCustom Text> from the Text drop-down menu, then enter the text in the Text field.
n White - creates a solid white box with a gray border. The gray border won't be printed or pro-duced.
3. Specify a range of images to apply the redaction to. Select Pages and enter a set of pages or select Allpages in document to apply the full-page redactions to the entire document.
4. Click OK. The redactions are applied to the set of pages you specified.
5.3 Editing markupsTo resize a single markup, click inside the markup shape. White dot controls will appear on thecorners and edges of the markup. Select any control and drag to resize the markup.
You can move or delete markups individually or as a set. To select multiple markups, click the
selector tool and drag across the markups. Alternatively, press Shift or Ctrl and click to selectindividual markups, or click Ctrl + A to select all markups on an image. Controls will appear on thecorners and edges of all selected markups.
To move, click and drag the selected markups to a new location. You can also move selectedmarkups using the arrow keys. Each time you hit an arrow key, the markups move 10 pixels in thatdirection. For finer control, hold Shift while pressing an arrow key, and the markups move only 1pixel in that direction.
To delete, right-click a selected markup and click Delete, or press the Delete key and click Yes onthe Confirm Delete popup. All selected markups are deleted.
Relativity | User Guide - 24
Note: If you have a full-page redaction applied to an image, then you apply an additional full-pageredaction, the most recently applied full-page redaction appears on top. If you then delete the secondredaction, the first full-page redaction persists.
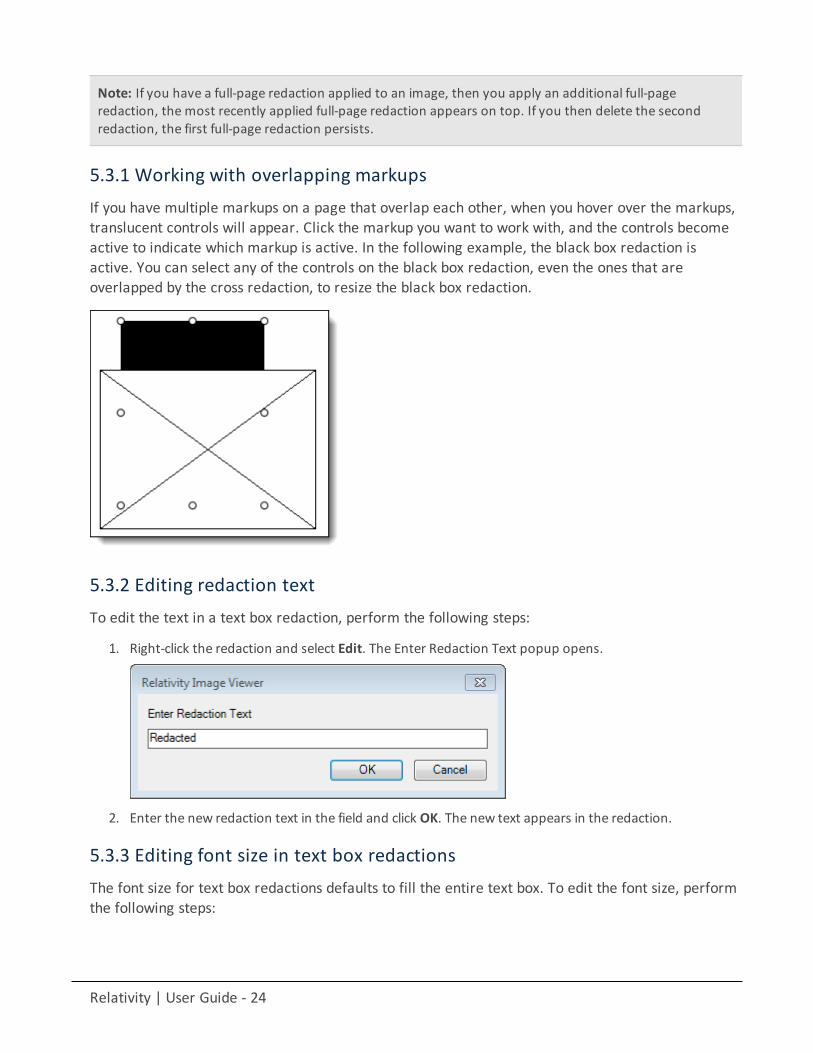
5.3.1 Working with overlapping markupsIf you have multiple markups on a page that overlap each other, when you hover over the markups,translucent controls will appear. Click the markup you want to work with, and the controls becomeactive to indicate which markup is active. In the following example, the black box redaction isactive. You can select any of the controls on the black box redaction, even the ones that areoverlapped by the cross redaction, to resize the black box redaction.
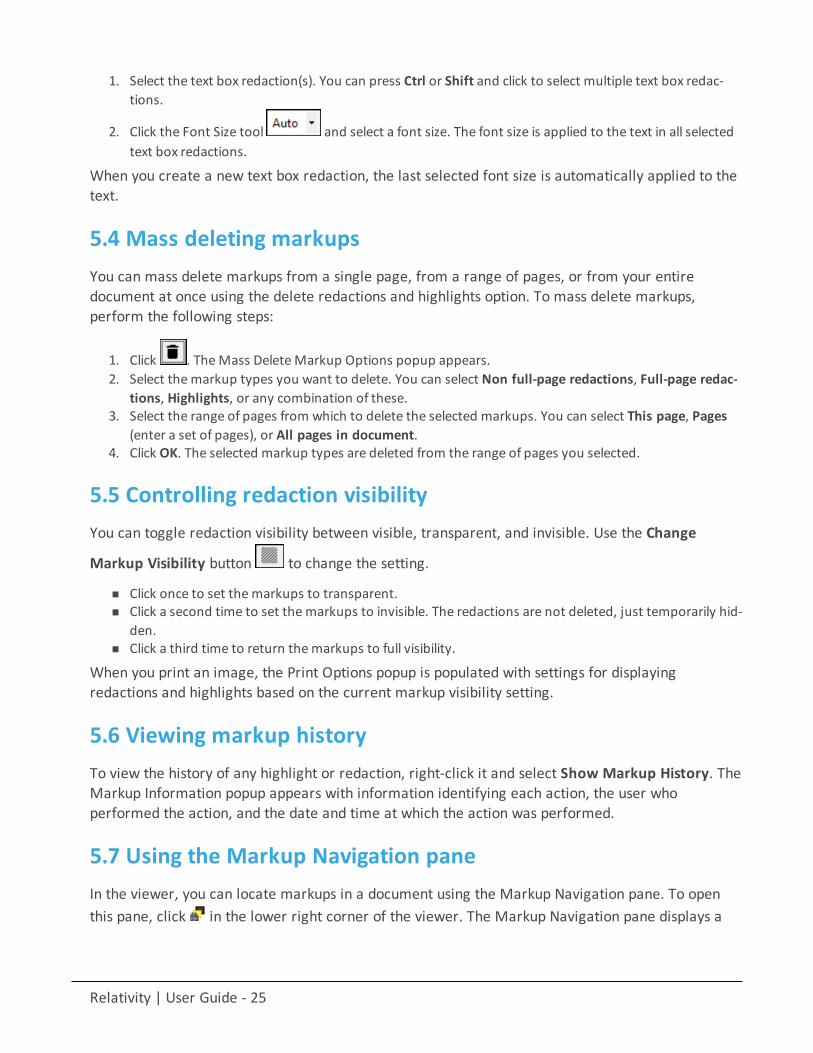
5.3.2 Editing redaction textTo edit the text in a text box redaction, perform the following steps:
1. Right-click the redaction and select Edit. The Enter Redaction Text popup opens.
2. Enter the new redaction text in the field and click OK. The new text appears in the redaction.
5.3.3 Editing font size in text box redactionsThe font size for text box redactions defaults to fill the entire text box. To edit the font size, performthe following steps:
Relativity | User Guide - 25
1. Select the text box redaction(s). You can press Ctrl or Shift and click to select multiple text box redac-tions.
2. Click the Font Size tool and select a font size. The font size is applied to the text in all selectedtext box redactions.
When you create a new text box redaction, the last selected font size is automatically applied to thetext.
5.4 Mass deleting markupsYou can mass delete markups from a single page, from a range of pages, or from your entiredocument at once using the delete redactions and highlights option. To mass delete markups,perform the following steps:
1. Click . TheMass DeleteMarkup Options popup appears.2. Select themarkup types you want to delete. You can select Non full-page redactions, Full-page redac-
tions, Highlights, or any combination of these.3. Select the range of pages from which to delete the selected markups. You can select This page, Pages
(enter a set of pages), or All pages in document.4. Click OK. The selected markup types are deleted from the range of pages you selected.
5.5 Controlling redaction visibilityYou can toggle redaction visibility between visible, transparent, and invisible. Use the Change
Markup Visibility button to change the setting.
n Click once to set themarkups to transparent.n Click a second time to set themarkups to invisible. The redactions are not deleted, just temporarily hid-
den.n Click a third time to return themarkups to full visibility.
When you print an image, the Print Options popup is populated with settings for displayingredactions and highlights based on the current markup visibility setting.
5.6 Viewing markup historyTo view the history of any highlight or redaction, right-click it and select Show Markup History. TheMarkup Information popup appears with information identifying each action, the user whoperformed the action, and the date and time at which the action was performed.
5.7 Using the Markup Navigation paneIn the viewer, you can locate markups in a document using the Markup Navigation pane. To openthis pane, click in the lower right corner of the viewer. The Markup Navigation pane displays a
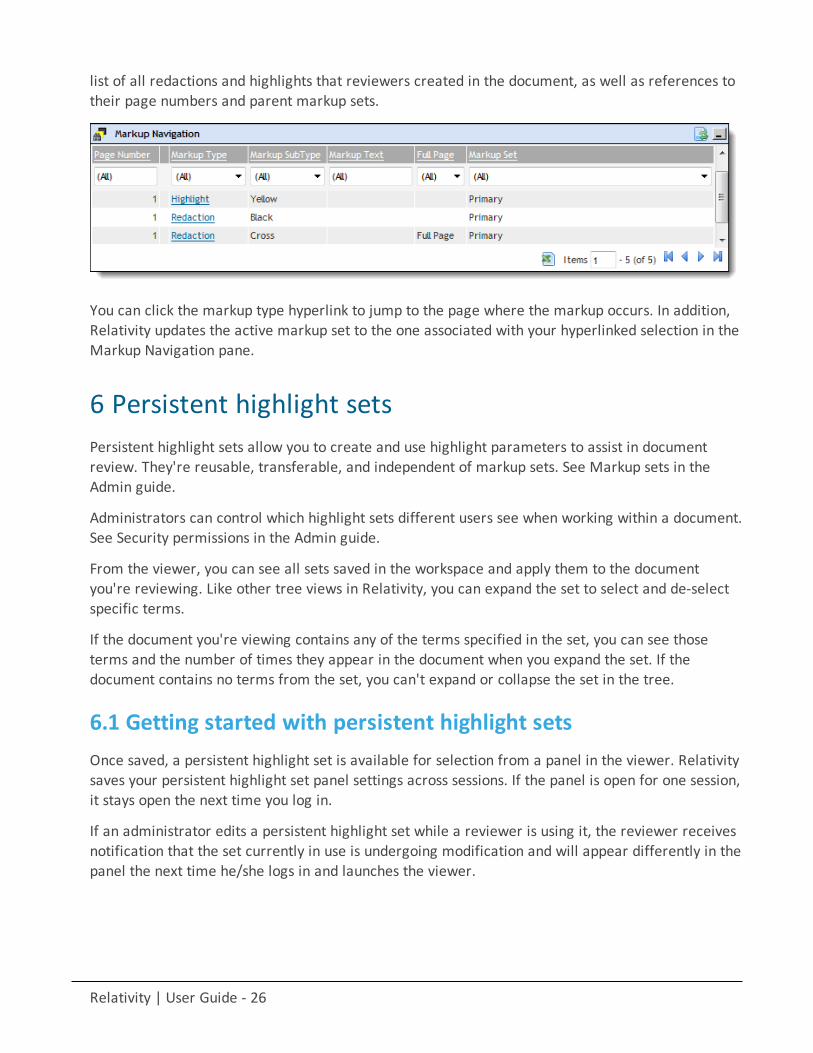
Relativity | User Guide - 26
list of all redactions and highlights that reviewers created in the document, as well as references totheir page numbers and parent markup sets.
You can click the markup type hyperlink to jump to the page where the markup occurs. In addition,Relativity updates the active markup set to the one associated with your hyperlinked selection in theMarkup Navigation pane.
6 Persistent highlight setsPersistent highlight sets allow you to create and use highlight parameters to assist in documentreview. They're reusable, transferable, and independent of markup sets. See Markup sets in theAdmin guide.
Administrators can control which highlight sets different users see when working within a document.See Security permissions in the Admin guide.
From the viewer, you can see all sets saved in the workspace and apply them to the documentyou're reviewing. Like other tree views in Relativity, you can expand the set to select and de-selectspecific terms.
If the document you're viewing contains any of the terms specified in the set, you can see thoseterms and the number of times they appear in the document when you expand the set. If thedocument contains no terms from the set, you can't expand or collapse the set in the tree.
6.1 Getting started with persistent highlight setsOnce saved, a persistent highlight set is available for selection from a panel in the viewer. Relativitysaves your persistent highlight set panel settings across sessions. If the panel is open for one session,it stays open the next time you log in.
If an administrator edits a persistent highlight set while a reviewer is using it, the reviewer receivesnotification that the set currently in use is undergoing modification and will appear differently in thepanel the next time he/she logs in and launches the viewer.
Relativity | User Guide - 27
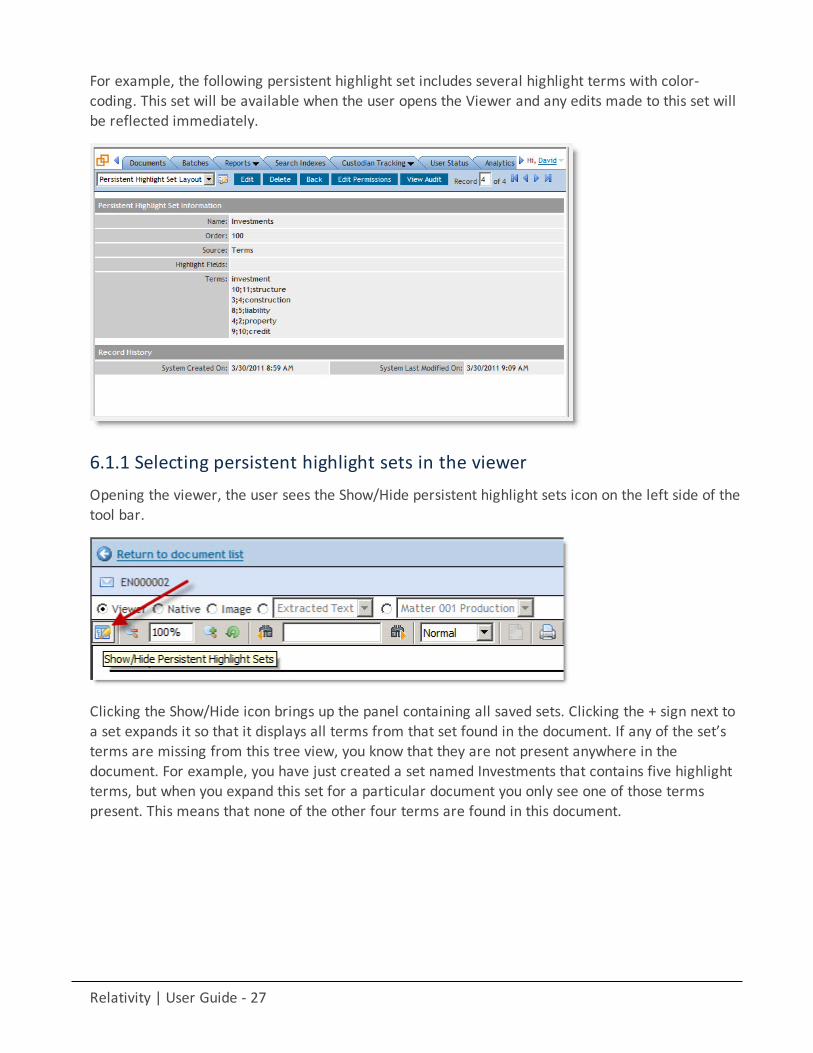
For example, the following persistent highlight set includes several highlight terms with color-coding. This set will be available when the user opens the Viewer and any edits made to this set willbe reflected immediately.
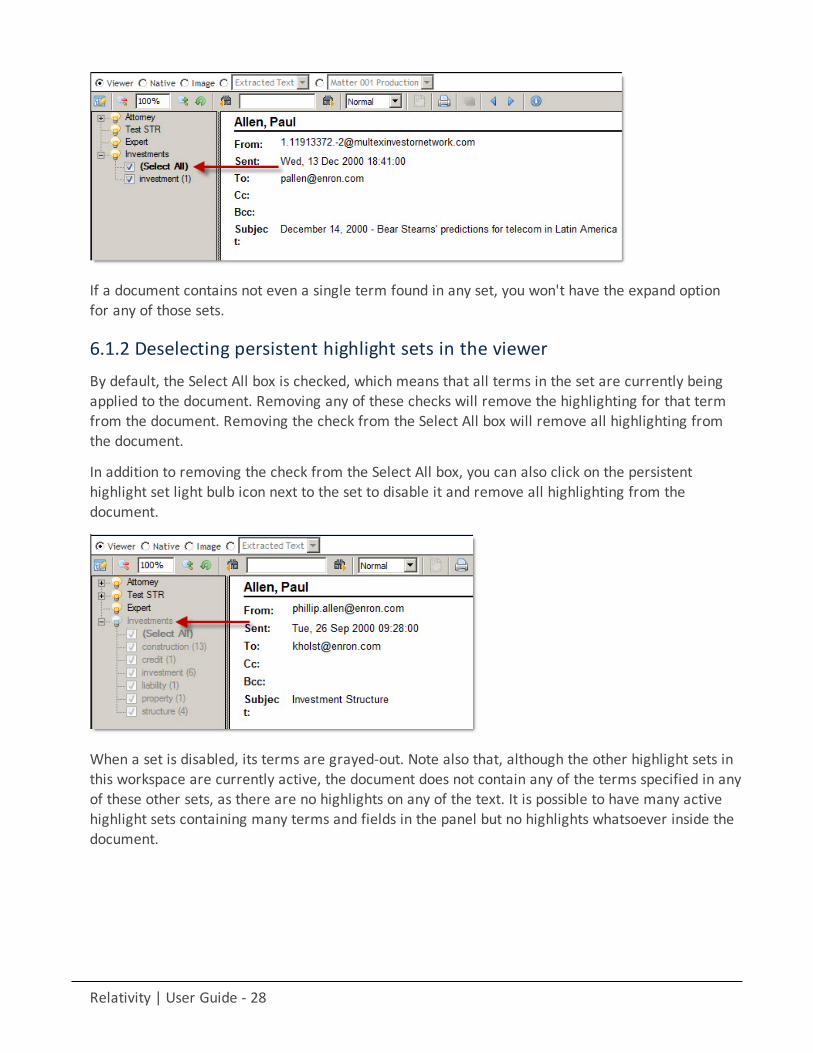
6.1.1 Selecting persistent highlight sets in the viewerOpening the viewer, the user sees the Show/Hide persistent highlight sets icon on the left side of thetool bar.
Clicking the Show/Hide icon brings up the panel containing all saved sets. Clicking the + sign next toa set expands it so that it displays all terms from that set found in the document. If any of the set’sterms are missing from this tree view, you know that they are not present anywhere in thedocument. For example, you have just created a set named Investments that contains five highlightterms, but when you expand this set for a particular document you only see one of those termspresent. This means that none of the other four terms are found in this document.
Relativity | User Guide - 28
If a document contains not even a single term found in any set, you won't have the expand optionfor any of those sets.
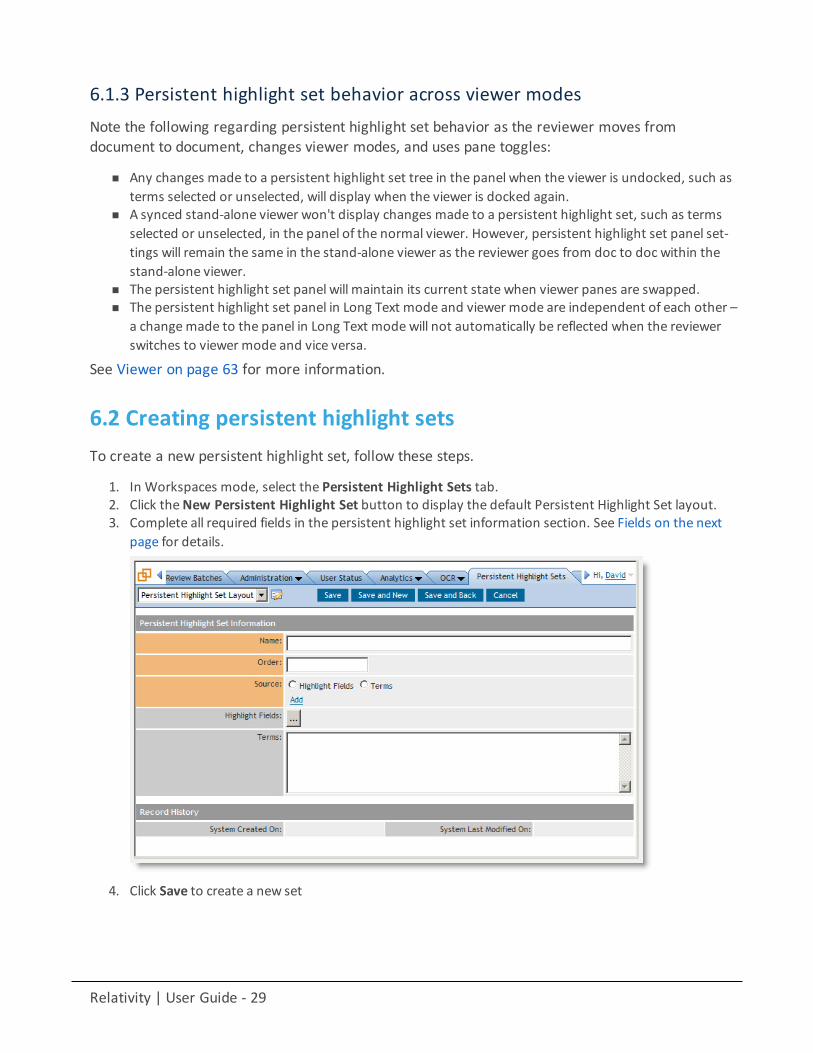
6.1.2 Deselecting persistent highlight sets in the viewerBy default, the Select All box is checked, which means that all terms in the set are currently beingapplied to the document. Removing any of these checks will remove the highlighting for that termfrom the document. Removing the check from the Select All box will remove all highlighting fromthe document.
In addition to removing the check from the Select All box, you can also click on the persistenthighlight set light bulb icon next to the set to disable it and remove all highlighting from thedocument.
When a set is disabled, its terms are grayed-out. Note also that, although the other highlight sets inthis workspace are currently active, the document does not contain any of the terms specified in anyof these other sets, as there are no highlights on any of the text. It is possible to have many activehighlight sets containing many terms and fields in the panel but no highlights whatsoever inside thedocument.
Relativity | User Guide - 29
6.1.3 Persistent highlight set behavior across viewer modesNote the following regarding persistent highlight set behavior as the reviewer moves fromdocument to document, changes viewer modes, and uses pane toggles:
n Any changes made to a persistent highlight set tree in the panel when the viewer is undocked, such asterms selected or unselected, will display when the viewer is docked again.
n A synced stand-alone viewer won't display changes made to a persistent highlight set, such as termsselected or unselected, in the panel of the normal viewer. However, persistent highlight set panel set-tings will remain the same in the stand-alone viewer as the reviewer goes from doc to doc within thestand-alone viewer.
n The persistent highlight set panel will maintain its current state when viewer panes are swapped.n The persistent highlight set panel in Long Text mode and viewer mode are independent of each other –
a changemade to the panel in Long Text modewill not automatically be reflected when the reviewerswitches to viewer mode and vice versa.
See Viewer on page 63 for more information.
6.2 Creating persistent highlight setsTo create a new persistent highlight set, follow these steps.
1. In Workspaces mode, select the Persistent Highlight Sets tab.2. Click theNew Persistent Highlight Set button to display the default Persistent Highlight Set layout.3. Complete all required fields in the persistent highlight set information section. See Fields on the next
page for details.
4. Click Save to create a new set
Relativity | User Guide - 30
Note: Verify that reviewers are not actively reviewing documents when creating Persistent Highlight Sets.Creating Persistent Highlight Sets while reviewers are actively reviewing documents can cause errors.
6.2.1 FieldsPersistent highlight sets include the following fields.
n Name is the descriptive name under which you want this set to appear in the Viewer and item list.n Order is the order in which you want this set to appear.n Source determines the area that will be drawn from when designating characters to be highlighted and
displayed in the Viewer. There are two options:o Fields designates fields as the source of highlighting. Selecting this radio button means you must
select a Highlight Field in order to save this set.o Terms designates terms as the source of highlighting. Selecting this radio button means you
must enter terms into the Terms field below to save this set.
n Highlight Fields allows you to choose the field referencing the list of terms to be highlighted. Clickto bring up the system view called Field Picker on Persistent Highlight Sets, which displays the Nameand Object Type for applicable multiple object fields, including those created by Search Terms Reports.To select the desired Highlight Field, check the field’s box, click Add, and click Set. The field is displayedon the layout. See Using the highlight fields source on page 33.
n Terms allows you to enter terms to be highlighted and the color code with which to distinguish them inthe Viewer. See Entering highlight terms below.
Note: Persistent highlighting created by using search terms reports or other multiple object fieldsrequires version 6.9 or higher of the Relativity web interface and Viewer. Users will receive an errormessage indicating that persistent highlighting is unavailable if they are using an incompatibleversion of the Viewer.
6.3 Entering highlight termsIf you choose Terms as the source of your highlighting, you will have to enter them in the Termsfield text box in order to save the new highlight set. You also have the option of specifying color-coding to these terms to make them appear in your desired colors in the Viewer.
Relativity | User Guide - 31
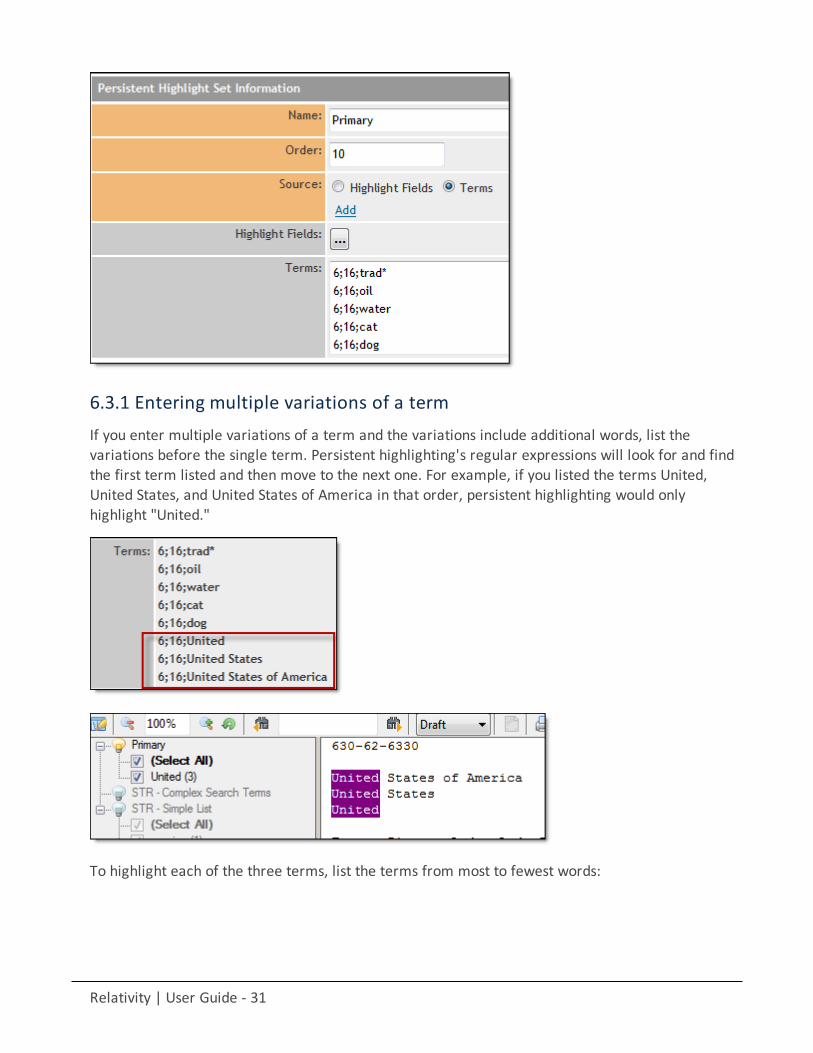
6.3.1 Entering multiple variations of a termIf you enter multiple variations of a term and the variations include additional words, list thevariations before the single term. Persistent highlighting's regular expressions will look for and findthe first term listed and then move to the next one. For example, if you listed the terms United,United States, and United States of America in that order, persistent highlighting would onlyhighlight "United."
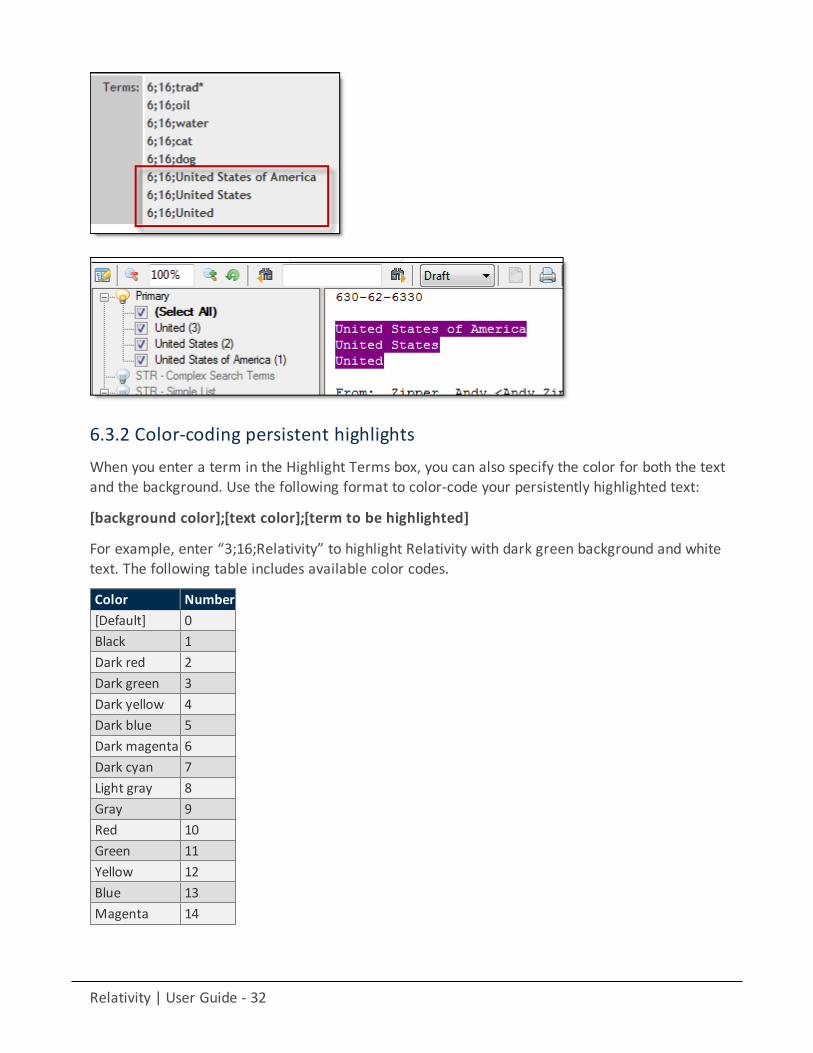
To highlight each of the three terms, list the terms from most to fewest words:
Relativity | User Guide - 32
6.3.2 Color-coding persistent highlightsWhen you enter a term in the Highlight Terms box, you can also specify the color for both the textand the background. Use the following format to color-code your persistently highlighted text:
[background color];[text color];[term to be highlighted]
For example, enter “3;16;Relativity” to highlight Relativity with dark green background and whitetext. The following table includes available color codes.
Color Number[Default] 0Black 1Dark red 2Dark green 3Dark yellow 4Dark blue 5Dark magenta 6Dark cyan 7Light gray 8Gray 9Red 10Green 11Yellow 12Blue 13Magenta 14
Relativity | User Guide - 33
Color NumberCyan 15White 16
If you enter terms with no color-coding, the background will be magenta and the text black.
Note: Default has different implications for text and background. The default background color is white andthe default text color is black.
6.3.3 Guidelines for adding terms or phrasesUse the following guidelines when adding terms or phrases:
n Enter a term that you want highlighted, and press Enter. You can enter multiple terms but each onemust be on a separate line.
n Enter terms for persistent highlighting exactly as they appear in the document. Don't use quotationmarks and connectors.
Note: Quotation marks are not compatible with persistent highlighting, which automaticallysearches for an exact phrase. You don't need to use quotation marks, which will result in slowerdocument loading speeds.
n Keep lists simple. Do not use punctuation, special characters, operators, or dtSearch syntax.
n Non-alphanumeric characters in persistent highlighting are treated as special character wild-cards by Relativity. If you surround search terms with quotation marks, Relativity will match thequotation marks with any special character, such as $, &, ^, %, @, and others. For example, ifyou enter the "The Phrase". Relativity will query on special characters to find matches like %ThePhrase@, or &The Phrase$. The process of finding the special characters dramatically slowsViewer performance.
n Operators including “AND” or “OR”, are not utilized as in keyword searching. If used, Relativitywill look for the exact phrase including “AND” or “OR”. For example, you entered these searchterms: Apple AND Banana. Relativity would highlight the entire phrase “apple and banana” in thedocument. Separate occurrences of apple, and occurrences of banana would NOT be high-lighted.
n Wildcardsmay still be used as in this example: appl*.This search term will highlight apple, applic-ation, applies, and so on. An excessive use of wildcards will affect performance. Leading wild-cards are not recommended such as *itting.
n Do not enter duplicate terms.n Identify and remove terms with large hit counts.n List variations of a term first and enter the root term last.n If the list of terms is large (>100 terms), use Highlight Fields with a Search Terms Report.
6.4 Using the highlight fields sourceUsing the Highlight Fields source in a persistent highlight set allows you to choose a fieldreferencing a list of terms to highlight.
Relativity | User Guide - 34
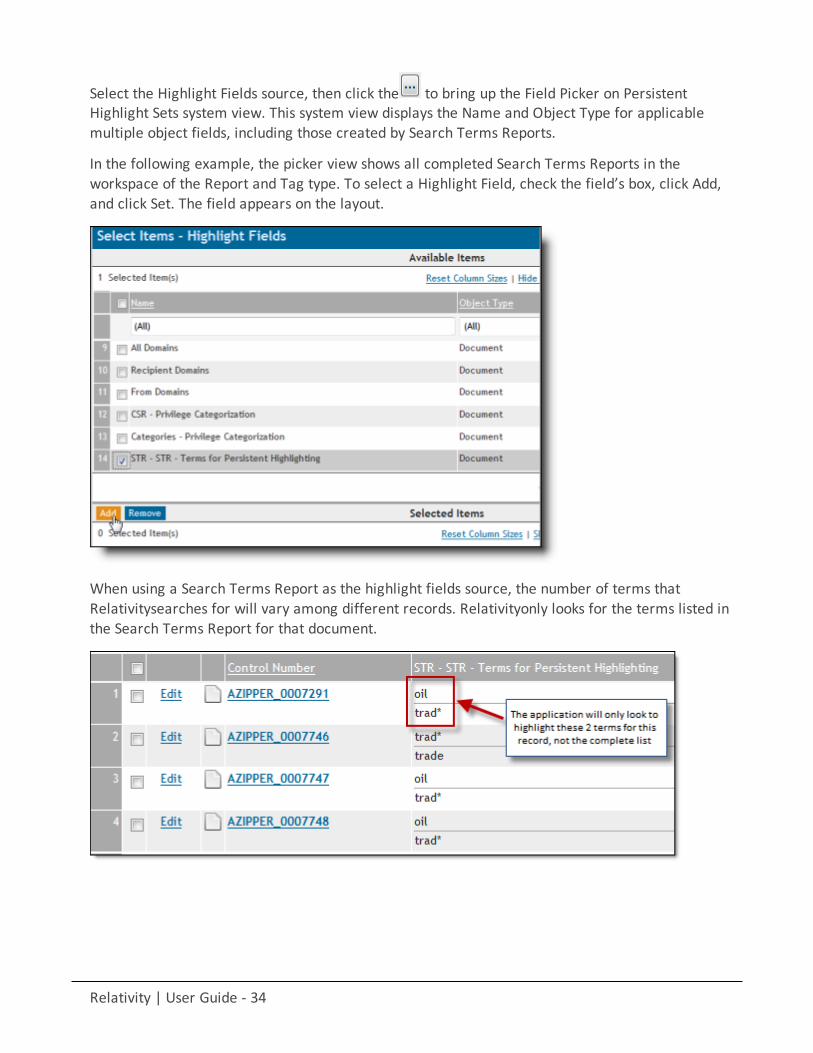
Select the Highlight Fields source, then click the to bring up the Field Picker on PersistentHighlight Sets system view. This system view displays the Name and Object Type for applicablemultiple object fields, including those created by Search Terms Reports.
In the following example, the picker view shows all completed Search Terms Reports in theworkspace of the Report and Tag type. To select a Highlight Field, check the field’s box, click Add,and click Set. The field appears on the layout.
When using a Search Terms Report as the highlight fields source, the number of terms thatRelativitysearches for will vary among different records. Relativityonly looks for the terms listed inthe Search Terms Report for that document.
Relativity | User Guide - 35
Note: Persistent highlighting created by using search terms reports or other multiple object fields requiresversion 6.9 or higher of the Relativity web interface and Viewer. Users will receive an error messageindicating that persistent highlighting is unavailable if they are using an incompatible version of the Viewer.
6.4.1 Best practicesConsider the following guidelines when creating or adding terms using Search Terms Reports as thehighlight fields source:
n Enter terms exactly as they appear in the document.n Do not use quotation marks. In persistent highlighting, Relativity treats non-alphanumeric characters
as special character wildcards. If you surround search terms with quotation marks, Relativity will matchthe quotation marks with any special character, such as $, &, ^, %, @, and others. For example, if youenter "The Phrase," Relativity will query on special characters to find matches like %The Phrase@, or&The Phrase$. The process of finding the special characters dramatically slows performance.
n Do not use operators such as AND and OR. Operators including “AND” or “OR,” are not used inkeyword searching. If used, Relativity will look for the exact phrase including “AND” or “OR.” Forexample, if you entered these search terms: Apple AND Banana, Relativity would highlight the entirephrase “apple and banana” in the document. Separate occurrences of apple, and occurrences ofbanana would NOT be highlighted.
n Wildcards are useful in some cases. For example, the search term appl* will highlight apple, application,applies, and so on. An excessive use of wildcards will affect performance. Leading wildcards such as *it-ting, are not recommended. Using asterisks in themiddle of a term will not count as wildcards.
n Avoid using advanced dtSearch functionality, including proximity, stemming, and fuzziness.o Persistent highlighting does not understand proximity searching. If you enter the phrase “Relativ-
ity w/5 kCura” as a search term, the search term report will use a dtSearch to find and tag all doc-uments that meet those criteria. However, persistent highlighting will function differently thanthe dtSearch, as it will look for the term Relativity, a space, the letter w, any special character(instead of “/”), the number 5, a space, and then the term kCura.
o Persistent highlighting does not understand the stemming character (~). If you enter the term“apply~” as a search term, the search term report will find and tag all documents with the wordapply, or any document that stems from apply, including applied, applies, application, and soon. However, persistent highlighting will look for the term “apply” followed by any special char-acter, so you will not see the expected terms highlighted.
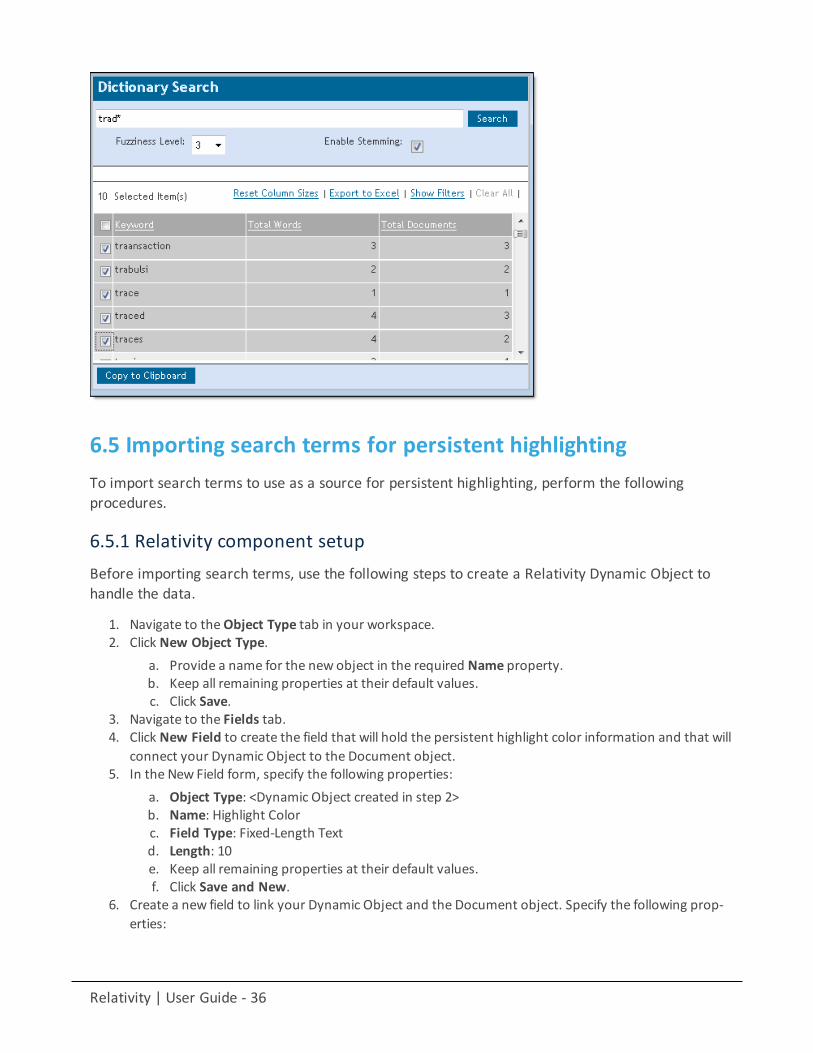
n In Search Terms Reports, you can work around these limitations by using the Dictionary Search func-tion to identify search terms using stemming or fuzziness. Copy the list of terms returned in this search.Paste them in the Add Terms box on the Search Terms Report form. You will enhance your search termlist, while avoiding errors caused by special characters.
Relativity | User Guide - 36
6.5 Importing search terms for persistent highlightingTo import search terms to use as a source for persistent highlighting, perform the followingprocedures.
6.5.1 Relativity component setupBefore importing search terms, use the following steps to create a Relativity Dynamic Object tohandle the data.
1. Navigate to theObject Type tab in your workspace.2. Click New Object Type.
a. Provide a name for the new object in the required Name property.b. Keep all remaining properties at their default values.c. Click Save.
3. Navigate to the Fields tab.4. Click New Field to create the field that will hold the persistent highlight color information and that will
connect your Dynamic Object to the Document object.5. In the New Field form, specify the following properties:
a. Object Type: <Dynamic Object created in step 2>b. Name: Highlight Colorc. Field Type: Fixed-Length Textd. Length: 10e. Keep all remaining properties at their default values.f. Click Save and New.
6. Create a new field to link your Dynamic Object and the Document object. Specify the following prop-erties:

Relativity | User Guide - 37
a. Object Type: Documentb. Name: <User preference>c. Field Type: Multiple Objectd. Associative Object Type: <Dynamic Object created in step 2>e. Keep all remaining properties at their default values.f. Click Save.
7. Navigate to the Persistent Highlight Sets tab in your workspace.8. Click New Persistent Highlight Set.9. Create a new set with the following properties:
a. Name: <User preference>b. Order: <User preference>; this controls the position of this set in the Persistent Highlight Tree in
the Viewer.c. Source: Highlight Fieldsd. Highlight Fields: <The name of the field created in step 6b.>e. Click Save.
6.5.2 Importing termsTo import a CSV or other Relativity-supported load file containing terms, use the followingprocedure.
1. Open the Relativity Desktop Client.2. Select the workspace you are importing into.3. Select the Dynamic Object you created above from the object drop-down menu.4. Select Tools from the top menu.5. Select Import | <Dynamic Object> load file.6. Select your terms load file and corresponding delimiters.7. Map the field in your load file that contains the terms to the Name field in Relativity.
Here you can also import Relativity Highlight Color. You must have this information in the load filecontained in a field in the following format: text color; highlight color (for example, 15;9). If you do nothave this information in the load file, you can manually enter it for terms in Relativity. Because thelatter can be time consuming, we recommend having this information in the load file if possible.
8. Click Import to import the terms.9. Verify that the terms are highlight through the following:
a. Open a document in the workspace.b. Open the Persistent Highlight Tree in the Viewer.c. Note the presence of the newly created Persistent Highlight Set and verify that terms are high-
light in the appropriate colors.
6.6 Creating efficient searches for persistent highlightingCreating efficient searches will improve the performance of persistent highlighting, whether you'reworking with a Terms Search or Highlight Fields. Use the following guidelines to create efficientsearches.
Avoid the following when writing searches for persistent highlighting:
Relativity | User Guide - 38
n Do not use "AND" or "OR" connectors. Persistent highlighting will look for the exact phrase "trade andcomplete" instead of the word "trade" and the word "complete."
n Do not use proximity, fuzziness, and stemming search logic. The system ignores the dtSearch syntax.Your terms will not be highlighted if you use these advanced searching features, even though thesearch terms report Count column lists the number ofmatching terms. For example:
o The search term “oil w/10water” will highlight the term “oil” and the term “water,” even if theyare not within 10 terms of each other.
o If you enter the term “apply~” as a search term, persistent highlighting technology will look forthe term apply followed by any special character, so you will not see expected terms highlighted.
n Avoid using terms with a large number of hits per document because persistent highlighting will high-light each hit. For example, it will take longer to load aWord document containing 1,000 instances of asingle term or an Excel document with a high frequency of the same number.
n Avoid using terms that only occur once in a document. Use search terms reports for those terms sothat they do not strain the system searching each document.
n Avoid long lists of numbers, such as Bates numbers or account numbers. They can bloat the search.n Do not use duplicate terms.
Use the following techniques to optimize your searches:
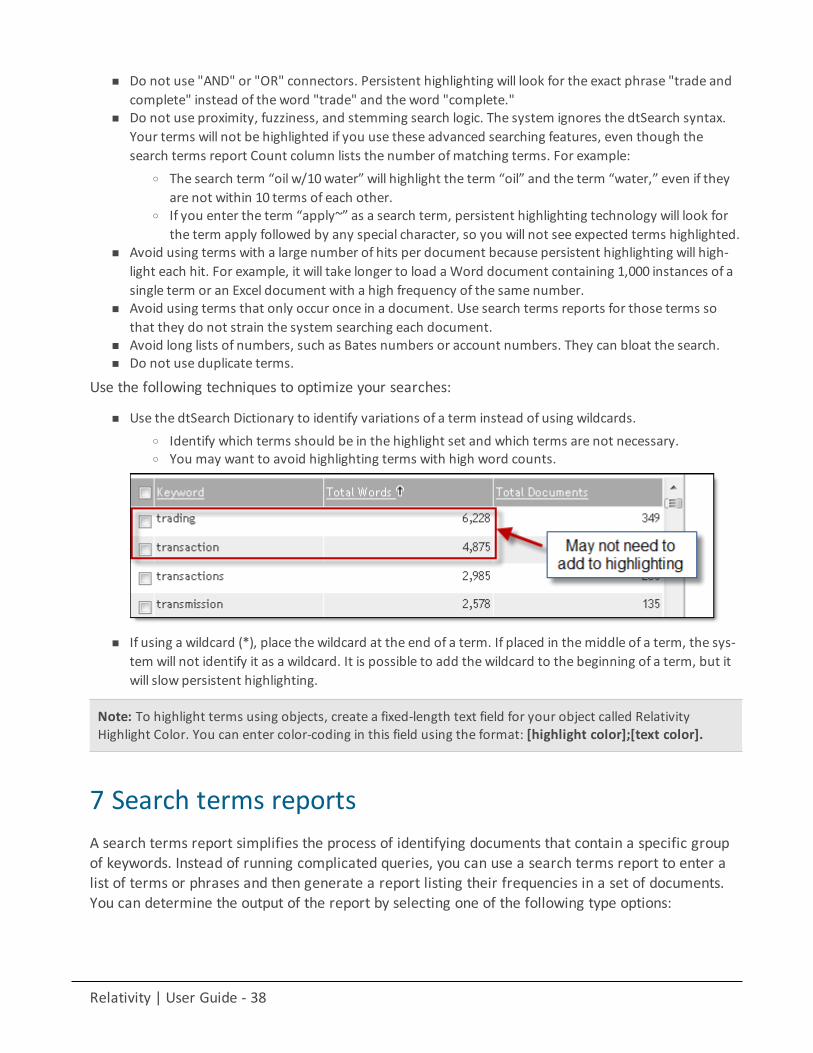
n Use the dtSearch Dictionary to identify variations of a term instead of using wildcards.o Identify which terms should be in the highlight set and which terms are not necessary.o You may want to avoid highlighting terms with high word counts.
n If using a wildcard (*), place the wildcard at the end of a term. If placed in themiddle of a term, the sys-tem will not identify it as a wildcard. It is possible to add the wildcard to the beginning of a term, but itwill slow persistent highlighting.
Note: To highlight terms using objects, create a fixed-length text field for your object called RelativityHighlight Color. You can enter color-coding in this field using the format: [highlight color];[text color].
7 Search terms reportsA search terms report simplifies the process of identifying documents that contain a specific groupof keywords. Instead of running complicated queries, you can use a search terms report to enter alist of terms or phrases and then generate a report listing their frequencies in a set of documents.You can determine the output of the report by selecting one of the following type options:
Relativity | User Guide - 39
n Report Only - Creates a report that includes the number of hits for each term or phrase. (A hit indicatesone or more uses of the term or phrase in a document.)
n Report and Tag - Creates a report that includes the number of hits for each term or phrase, and tagsthe documents that contain them.
You can also use the reports created with the report and tag option in your markup sets. When youselect a search terms report for use with a markup set, the report determines which terms orphrases are highlighted in the documents viewed through the core reviewer interface.
7.1 Guidelines for using search terms reportsUse the following guidelines to ensure that your search terms report properly highlights therequired terms:
n Define a saved search using conditions that return the required group of documents for the SearchableSet. Persistent highlighting applies only to documents in the searchable set. If including relationalgroup, only related items in the searchable set are counted.
n Confirm that the dtSearch used for the search terms report has been used to index all the documentsin the Searchable Set.
n Select Report and Tag in the Type radio button list for the report. If you don't select this option, then amultiple object field isn't created for the search terms report, and you can't select it in theHighlightFields option when creating a persistent highlights set. See Persistent highlight sets on page 26.
n When you use search terms reports for persistent highlights, only the terms in documents associatedwith the current reports appear highlighted. If you add new search terms to the reports, you must runpending terms so that they appear highlighted in documents.
7.2 Creating a search terms reportTo create a new search terms report, follow these steps:
1. Click the Search Terms Report tab.2. Click New Search Terms Report.3. Complete the fields on the form. See Fields below.4. Click Save.
After saving the search terms report, the Search Terms Report Status section and Search TermsReport console appear. As the status section indicates, you must add terms to your new report. SeeAdding or editing terms and highlight colors on the next page.
7.2.1 FieldsSearch terms reports contain the following fields:
n Name - the search terms report’s name.n Index - the index used to create the report. Select only dtSearch indexes.n Searchable set - a saved search that includes the set of documents used to create the report.
Relativity | User Guide - 40
n Type - select one of the following options:o Report and tag - creates a report that includes the number of hits for each term or phrase and
tags the documents that contain them.o Report only - creates a report that includes the number of hits for each term or phrase.
n Calculate unique hits - if set to Yes, this setting includes a Unique hits value for each term in the searchterms results. Unique hits is the count of documents in the searchable set returned by only that par-ticular term. If more than one term returns a particular document, that document is not counted as aunique hit. Unique hits reflect the total number of documents returned by a particular term and onlythat particular term.
Note: Unique hits can help you identify terms in your search terms report that may be overly inclusive.
n Include relational group - includes the "Documents with hits, including group" counts for each term inthe search terms results. This value counts the documents with hits for each term as well as all doc-uments in the same relational group as the documents with hits. Include relational group only includeshits of related items in the searchable set. It will not look outside of the searchable set. Click the ellipsisand select a relational group to include.
7.2.2 Adding or editing terms and highlight colorsTo add or edit terms for your search terms report:
1. You must create a Persistent highlight set for highlighted terms to appear in your documents. See Per-sistent highlight sets for more information.
2. To open the terms management screen, click theModify Terms button.3. To add new terms, enter your terms in the large text box under the New Terms heading so that each
term appears on a separate line.Alternatively, click theDictionary link to display the Dictionary Search pop-up, where you can performsearches using fuzziness levels and stemming. See Running a Dictionary search in the Searching guide.Click Copy to List to add the Dictionary search results to the New Terms text box.
Note: Each line is treated as an individual dtSearch query. For more information about dtSearch, refer to theSearching Guide .
4. To move your new terms to the existing terms list, click Add Terms. A confirmation message displayswith the count of new terms added and duplicate terms ignored.
5. (Optional) To change the background color and text color for one or more of the terms, select the check-box next to the term(s) and select the background color and text color using the drop-down menus.See the preview text to verify that the resulting highlighted text is readable. Click Apply Color.
Note: By default, highlighted terms appear as black text with a magenta background.
6. To return to the search terms report screen, click Done.
Relativity | User Guide - 41
After adding new search terms to an existing report, you must run the terms so that they appearhighlighted in documents. See Running a search terms report below for details.
7.2.3 Deleting termsTo remove terms from the search terms report:
1. To open the terms management screen, click theModify Terms button.2. Under Existing Terms, select the checkbox next to the term(s) you want to remove.3. Click Delete.4. To return to the search terms report screen, click Done.
If you remove search terms from the reports, the terms automatically disappear from the searchterms report results. You must run the report again for accurate totals in the status bar and whenusing View Term Report.
7.3 Running a search terms reportYou generate a search terms report by using the options available in the search terms reportconsole. The console appears after you save a search terms report or when you open an existingreport from the Search Terms Report tab.
The console includes the following options:
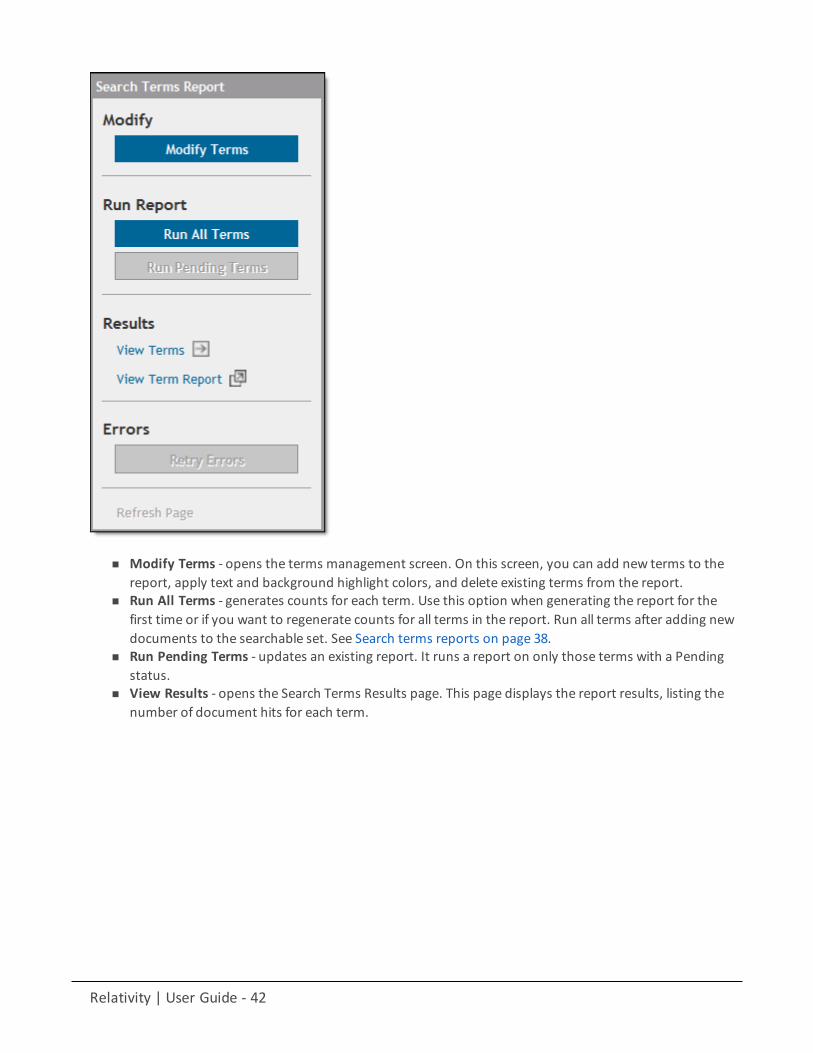
Relativity | User Guide - 42
n Modify Terms - opens the terms management screen. On this screen, you can add new terms to thereport, apply text and background highlight colors, and delete existing terms from the report.
n Run All Terms - generates counts for each term. Use this option when generating the report for thefirst time or if you want to regenerate counts for all terms in the report. Run all terms after adding newdocuments to the searchable set. See Search terms reports on page 38.
n Run Pending Terms - updates an existing report. It runs a report on only those terms with a Pendingstatus.
n View Results - opens the Search Terms Results page. This page displays the report results, listing thenumber of document hits for each term.
Relativity | User Guide - 43
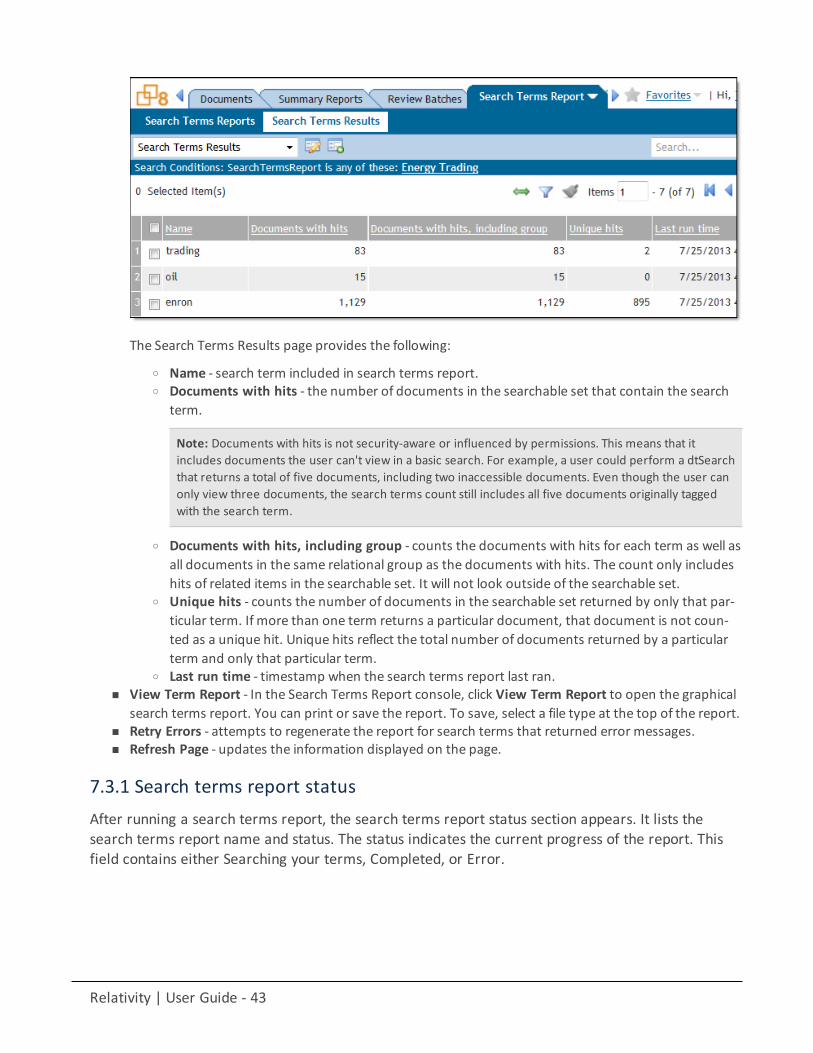
The Search Terms Results page provides the following:
o Name - search term included in search terms report.o Documents with hits - the number of documents in the searchable set that contain the search
term.
Note: Documents with hits is not security-aware or influenced by permissions. This means that itincludes documents the user can't view in a basic search. For example, a user could perform a dtSearchthat returns a total of five documents, including two inaccessible documents. Even though the user canonly view three documents, the search terms count still includes all five documents originally taggedwith the search term.
o Documents with hits, including group - counts the documents with hits for each term as well asall documents in the same relational group as the documents with hits. The count only includeshits of related items in the searchable set. It will not look outside of the searchable set.
o Unique hits - counts the number of documents in the searchable set returned by only that par-ticular term. If more than one term returns a particular document, that document is not coun-ted as a unique hit. Unique hits reflect the total number of documents returned by a particularterm and only that particular term.
o Last run time - timestamp when the search terms report last ran.n View Term Report - In the Search Terms Report console, click View Term Report to open the graphical
search terms report. You can print or save the report. To save, select a file type at the top of the report.n Retry Errors - attempts to regenerate the report for search terms that returned error messages.n Refresh Page - updates the information displayed on the page.
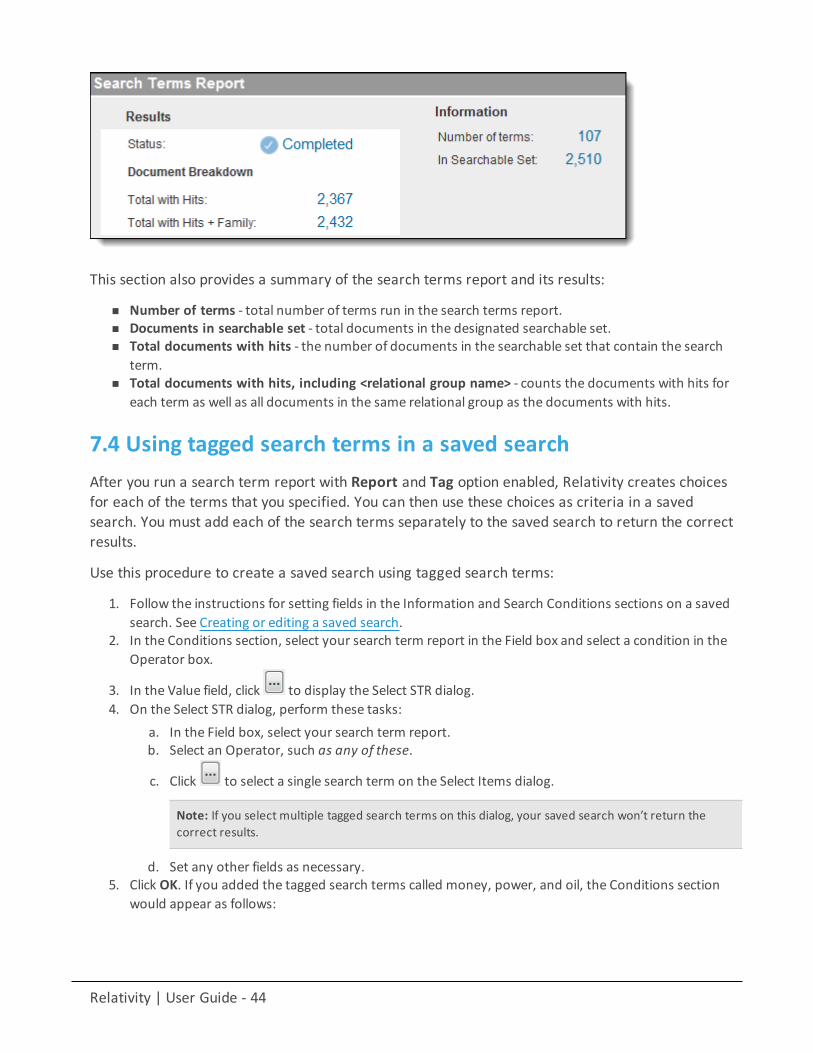
7.3.1 Search terms report statusAfter running a search terms report, the search terms report status section appears. It lists thesearch terms report name and status. The status indicates the current progress of the report. Thisfield contains either Searching your terms, Completed, or Error.
Relativity | User Guide - 44
This section also provides a summary of the search terms report and its results:
n Number of terms - total number of terms run in the search terms report.n Documents in searchable set - total documents in the designated searchable set.n Total documents with hits - the number of documents in the searchable set that contain the search
term.n Total documents with hits, including <relational group name> - counts the documents with hits for
each term as well as all documents in the same relational group as the documents with hits.
7.4 Using tagged search terms in a saved searchAfter you run a search term report with Report and Tag option enabled, Relativity creates choicesfor each of the terms that you specified. You can then use these choices as criteria in a savedsearch. You must add each of the search terms separately to the saved search to return the correctresults.
Use this procedure to create a saved search using tagged search terms:
1. Follow the instructions for setting fields in the Information and Search Conditions sections on a savedsearch. See Creating or editing a saved search.
2. In the Conditions section, select your search term report in the Field box and select a condition in theOperator box.
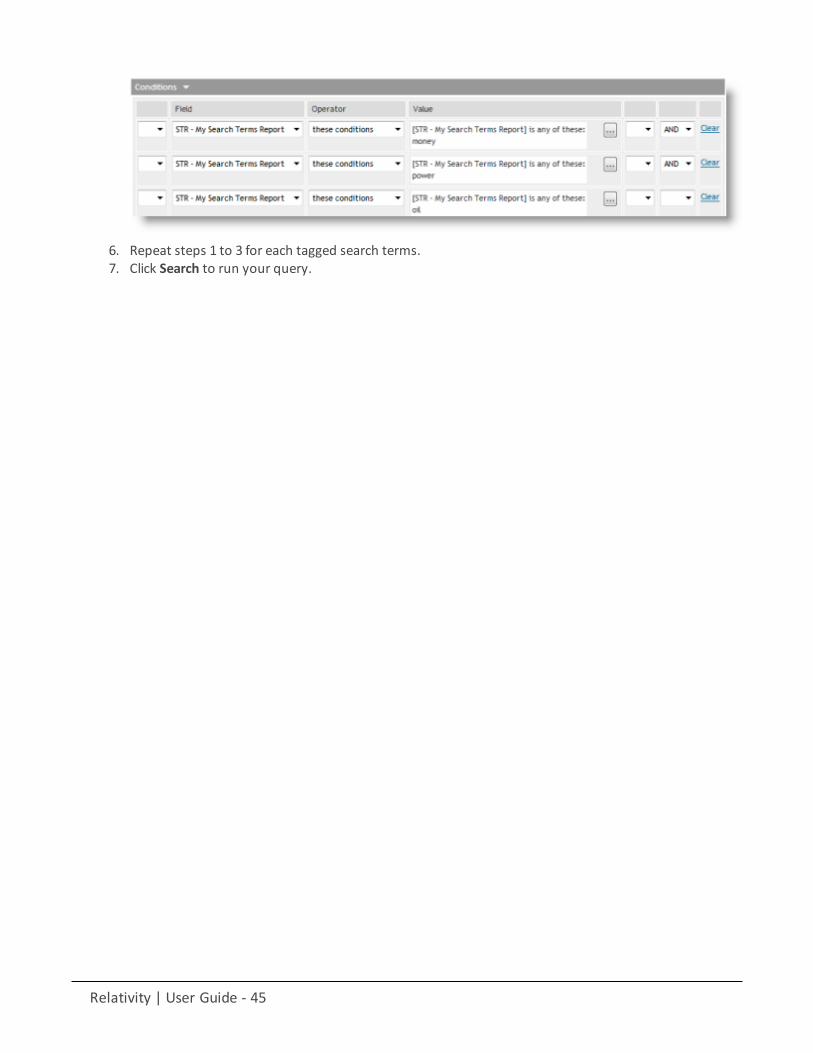
3. In the Value field, click to display the Select STR dialog.4. On the Select STR dialog, perform these tasks:
a. In the Field box, select your search term report.b. Select an Operator, such as any of these.
c. Click to select a single search term on the Select Items dialog.
Note: If you select multiple tagged search terms on this dialog, your saved search won’t return thecorrect results.
d. Set any other fields as necessary.5. Click OK. If you added the tagged search terms called money, power, and oil, the Conditions section
would appear as follows:
Relativity | User Guide - 45
6. Repeat steps 1 to 3 for each tagged search terms.7. Click Search to run your query.
Relativity | User Guide - 46
8 Searching overviewRelativity includes flexible search features designed to facilitate the document review process.These easily accessible features support a range of searching needs from filtering on fields andsimple keyword searches to the development of complex queries. The following list summarizes thesearching features available in Relativity.
Filters
You can use filters to limit the documents or items that appear in item lists on Relativity tabs andpop-ups. When you enable the filters for an item list, you can set criteria on single or multiple fieldsso that only matching documents or items appear in the view. Filters query across the searchableset of documents in the active view to return your results. Relativity supports multiple filter types sothat you can easily choose the best format for different field types. See the Searching Guide formore information.
Keyword searches
You can run keyword searches from the Documents tab and from Dynamic Object tabs. With thesesearches, you can leverage the basic functionality for querying the SQL full-text index populatedwith data from extracted text fields. The keyword search engine supports the use of Booleanoperators and wildcards. As the default search engine in Relativity, keyword search automaticallypopulates with extracted text during data import. See the Searching Guide for more information.
Saved searches
These searches provide you with the functionality to define and store queries for repeated use. Withflexible settings, you can create a saved search based on any Relativity search engine, assignsecurity permissions to it, and define specific columns to display your search results. Saved searchessupport the development of complex queries that you build using a form with search conditionoptions. These queries run dynamically to ensure that updated results appear when you access asaved search. See the Searching Guide for more information.
dtSearches
Available on the Documents tab, you can use the advanced searching functionality to run querieswith proximity, stemming, and fuzziness operators, as well as with basic features such as Booleanoperators and wildcards. Relativity administrators can create a dtSearch index for a specific subsetof documents in a workspace, and then assign security to it. They must manually update indexeswhen the document search sets used to create them are modified. See the Searching Guide formore information.
Analytics
Supporting conceptual searching, Analytics includes documents in a result set when they containsimilar ideas or conceptual relationships, rather than matching specific search terms or conditions.You can create searches with Analytics that categorize your documents based on the conceptscontained in a sample document set. Instead of categorizing documents, you can also perform
Relativity | User Guide - 47
clustering, which uses specific algorithms (system-defined rules) to identify conceptually relateddocuments. See the Searching Guide for more information.
Additional features
Relativity provides additional features that make searching easily accessible from the Documentstab. With the search condition option, you can build queries using the same condition optionsavailable for saved searches. You can click Save as Search on the Documents tab to create savedsearches based on the criteria defined for keyword searches, dtSearches, Analytics, or the searchconditions option. See the Searching Guide for more information.
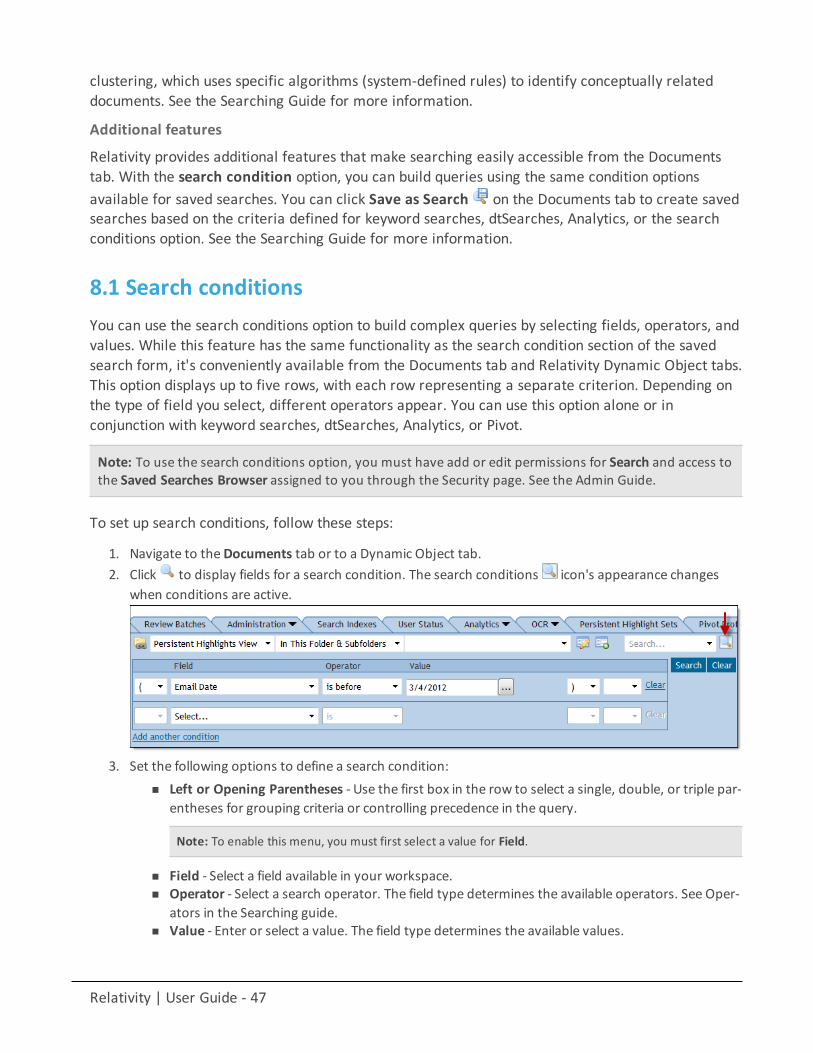
8.1 Search conditionsYou can use the search conditions option to build complex queries by selecting fields, operators, andvalues. While this feature has the same functionality as the search condition section of the savedsearch form, it's conveniently available from the Documents tab and Relativity Dynamic Object tabs.This option displays up to five rows, with each row representing a separate criterion. Depending onthe type of field you select, different operators appear. You can use this option alone or inconjunction with keyword searches, dtSearches, Analytics, or Pivot.
Note: To use the search conditions option, you must have add or edit permissions for Search and access tothe Saved Searches Browser assigned to you through the Security page. See the Admin Guide.
To set up search conditions, follow these steps:
1. Navigate to theDocuments tab or to a Dynamic Object tab.2. Click to display fields for a search condition. The search conditions icon's appearance changes
when conditions are active.
3. Set the following options to define a search condition:n Left or Opening Parentheses - Use the first box in the row to select a single, double, or triple par-
entheses for grouping criteria or controlling precedence in the query.
Note: To enable this menu, you must first select a value for Field.
n Field - Select a field available in your workspace.n Operator - Select a search operator. The field type determines the available operators. See Oper-
ators in the Searching guide.n Value - Enter or select a value. The field type determines the available values.
Relativity | User Guide - 48
Note: With date-based fields, you can enter @today as the value instead of choosing a date if “isbefore” or “is after or on" operator is selected.
n Right or Closing Parentheses - Use the last box in the row to select a single, double, or triple par-entheses to group criteria.
n AND or OR Operators - Use these operators to connect the criterion in each row.To remove your current selections for a condition, click the Clear link for the row.
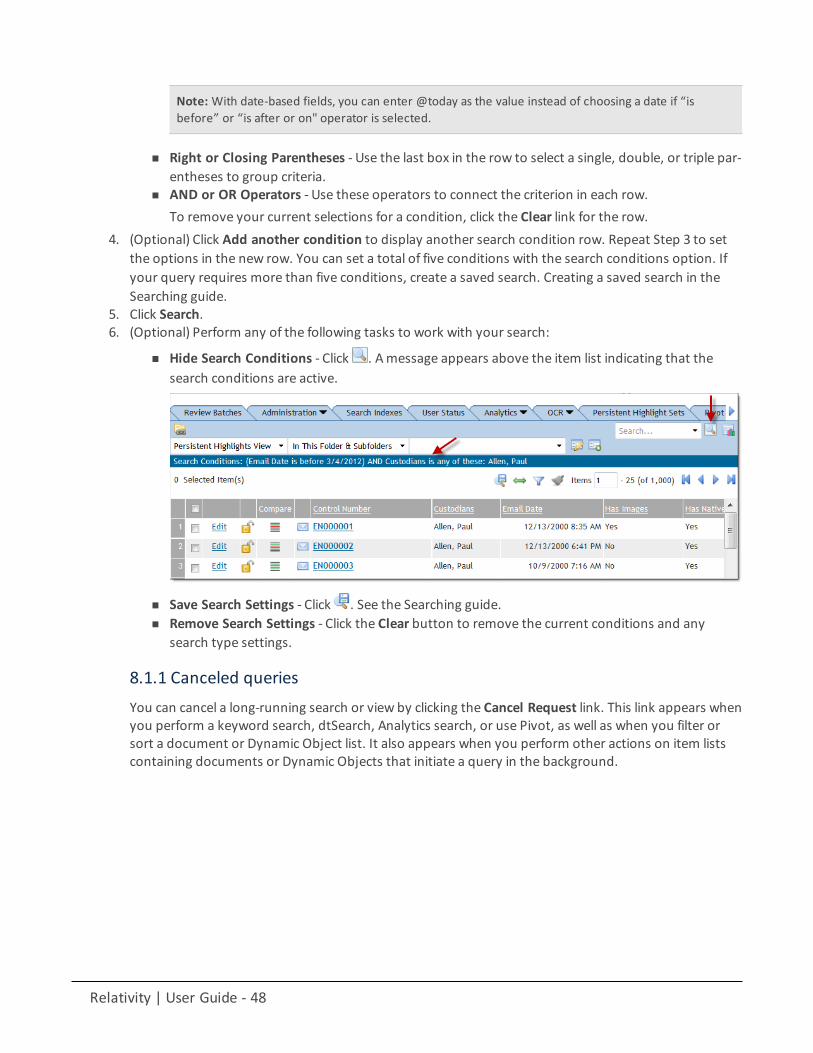
4. (Optional) Click Add another condition to display another search condition row. Repeat Step 3 to setthe options in the new row. You can set a total of five conditions with the search conditions option. Ifyour query requires more than five conditions, create a saved search. Creating a saved search in theSearching guide.
5. Click Search.6. (Optional) Perform any of the following tasks to work with your search:
n Hide Search Conditions - Click . Amessage appears above the item list indicating that thesearch conditions are active.
n Save Search Settings - Click . See the Searching guide.n Remove Search Settings - Click the Clear button to remove the current conditions and any
search type settings.
8.1.1 Canceled queriesYou can cancel a long-running search or view by clicking the Cancel Request link. This link appears whenyou perform a keyword search, dtSearch, Analytics search, or use Pivot, as well as when you filter orsort a document or Dynamic Object list. It also appears when you perform other actions on item listscontaining documents or Dynamic Objects that initiate a query in the background.
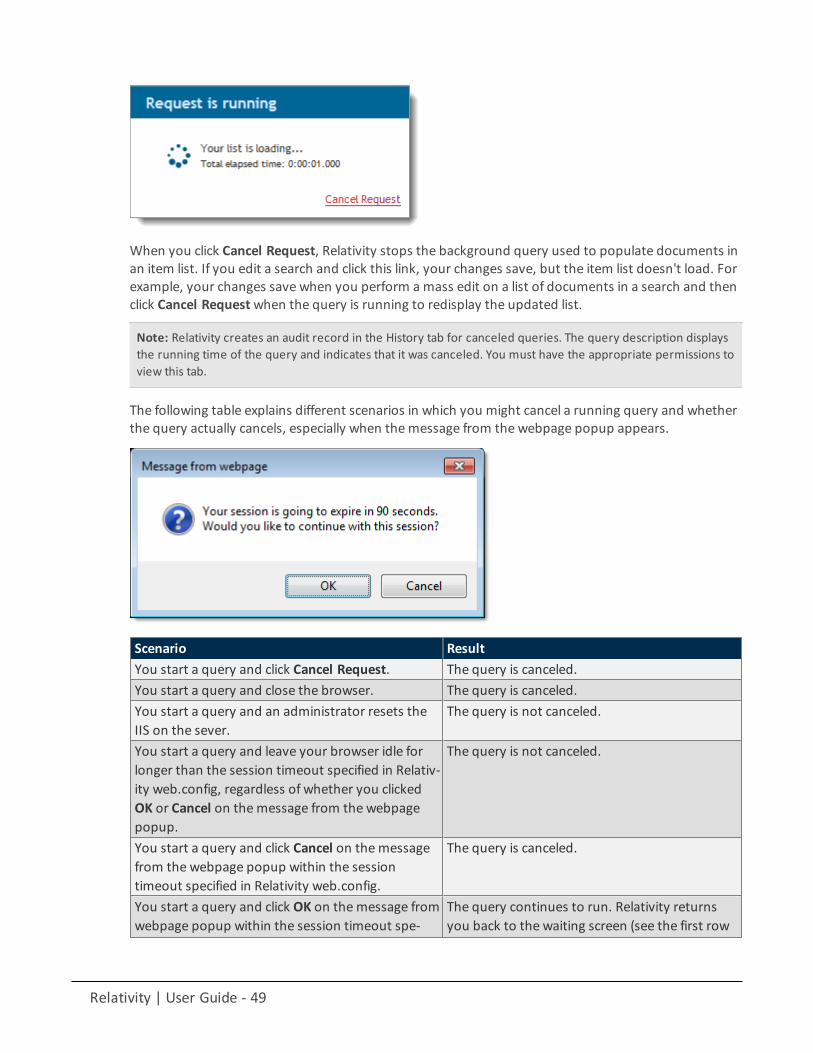
Relativity | User Guide - 49
When you click Cancel Request, Relativity stops the background query used to populate documents inan item list. If you edit a search and click this link, your changes save, but the item list doesn't load. Forexample, your changes save when you perform a mass edit on a list of documents in a search and thenclick Cancel Requestwhen the query is running to redisplay the updated list.
Note: Relativity creates an audit record in the History tab for canceled queries. The query description displaysthe running time of the query and indicates that it was canceled. You must have the appropriate permissions toview this tab.
The following table explains different scenarios in which you might cancel a running query and whetherthe query actually cancels, especially when themessage from the webpage popup appears.
Scenario ResultYou start a query and click Cancel Request. The query is canceled.You start a query and close the browser. The query is canceled.You start a query and an administrator resets theIIS on the sever.
The query is not canceled.
You start a query and leave your browser idle forlonger than the session timeout specified in Relativ-ity web.config, regardless of whether you clickedOK or Cancel on themessage from the webpagepopup.
The query is not canceled.
You start a query and click Cancel on themessagefrom the webpage popup within the sessiontimeout specified in Relativity web.config.
The query is canceled.
You start a query and click OK on themessage fromwebpage popup within the session timeout spe-
The query continues to run. Relativity returnsyou back to the waiting screen (see the first row
Relativity | User Guide - 50
Scenario Resultcified in Relativity web.config. of this table).You start a query and paste a different URL intoyour browser, or you refresh the page.
The query is canceled.
8.1.2 Frequently asked searching questionsThis section includes frequently asked questions from Relativity users.
8.1.2.1 Multiple TermsWhy would I receive an error message saying my query is too complex?
Relativity can't return precise results when a query includes search conditions that are too complex dueto the use ofmultiple search terms. To avoid this error message, simplify your search criteria. Forexample, search for 10 instead of 50 terms in your query. You can save and tag your search results fromeach simpler query. This approach allows you to search on the required terms, while providing betterresults.
8.1.2.2 Proximity SearchesWhy are terms in my proximity search highlighted even when they don't match my defined W/Ncriteria?
Relativity highlights terms that meet the requirements of your proximity search as well as the individualsearch terms. This behavior doesn't affect the results of your proximity search, which returns theappropriate documents. For example, the results of a proximity search for instances of lawwithin threewords of order ( that is "lawW/3 order") includes highlighted terms of "law" and "order" when theyaren't within three words of each other. To accommodate this behavior, focus only on the results thatmatch the proximity search criteria, and disregard the other highlighted terms.
8.1.2.3 Multiple ConditionsWhy do my searches run slowly when I use multiple conditions?
When you add multiple search conditions to a query, Relativity searches on these conditions relative toeach other, which slows down the return of your results. For example, you experience slowperformance when running a query on all email messages received "after June 1" and "before June 30"of the same year. You can improve performance by using as few conditions as possible, such asexcluding the condition "before June 30". Run the query with only the condition "after June 1", andthen sort or filter your results to display messages received between the desired dates.
8.1.2.4 Nesting SearchesCan I nest multiple searches in a saved search?
For performance reasons, we don't recommend nesting multiple searches in a saved search. You canselect a search as a condition, but using multiple searches as conditions slows down the return of yourresults. See the Searching guide for more information.
8.2 Creating or editing a saved searchTo create or edit a saved search, follow these steps:
Relativity | User Guide - 51
1. Click at the bottom of the browser.2. Click New Search button above the document list manager. To edit a search, right-click on the name,
and click Edit.
Note: If you don't see the New Search button, you may have another saved search selected. Click the top-levelfolder in the browser to deselect another search.
3. Fill out the fields on the form. See Fields below.4. Click Save.
8.2.1 FieldsThe Information fields are:
n Name - Enter a title for the search.n Includes - Select an option for returning documents related to hit documents. (Hit documents match
the search criteria.) The related documents will be included in the result set, but they do not need tomatch the search criteria.
o Include Duplicates - Use this setting if you want the result set to include documents with thesameMD5Hash values as the hit documents. (TheMD5Hash value is used as a unique file iden-tifier.)
o Include Family - Use this setting if you want the result set to include documents with the samegroup identifiers as the hit documents.
o Include <Custom Field> - Your organization may use custom related fields. Contact your Relativ-ity administrator for additional information.
n Scope - Select one of these options to designate the document set for the search:o Entire Workspace - All documents in the workspace are searched.o Selected Folders - Select this option, and then click Select Folders. On the Select Folders popup,
choose the checkboxes for the folders that you want to search. Clear the Include Subfolderscheckbox on the popup if you don't want subfolders included.
n Requires Manual Rerun - Select this option if you want to require users to rerun a saved search whenthey return to it after navigating to other features in Relativity. This option ensures that users arealways seeing up-to-date search results. Selecting this option only affects the search that the currentuser is running. It doesn't affect any parent or nested searches tied to the current search. If you have asearch that has Requires Manual Rerun checked and you include it as the criteria for another search, itwill rerun.
The Search Conditions fields are:
n Search With - Select Keyword, dtSearch, or Relativity Analytics index for your search engine.
Note: The Search With option is hidden when only a Keyword Search index exists. Additionally, the SearchText option appears only for Keyword Searches, while other options are available for dtSearches and Analytics.Your selection for the Search With option doesn't affect the availability of Field, Operator, or Value optionsdisplayed in the Conditions section of the form.
n (Keyword Only) Search Text - Enter search terms or conditions.
Relativity | User Guide - 52
n (dtSearch Only) Search Terms, Fuzziness Level, or Enable Stemming - Enter search terms, and selectsettings as necessary.
n (Analytics Only) Keywords, Fuzziness Level, Concepts, Min Concept Rank - Enter terms and select set-tings as necessary. See the Analytics Guide.
n Sort By Rank - Select this option to return results in order by relevance. Themost relevant documentsare listed at the top of the result set.
The Conditions fields are:
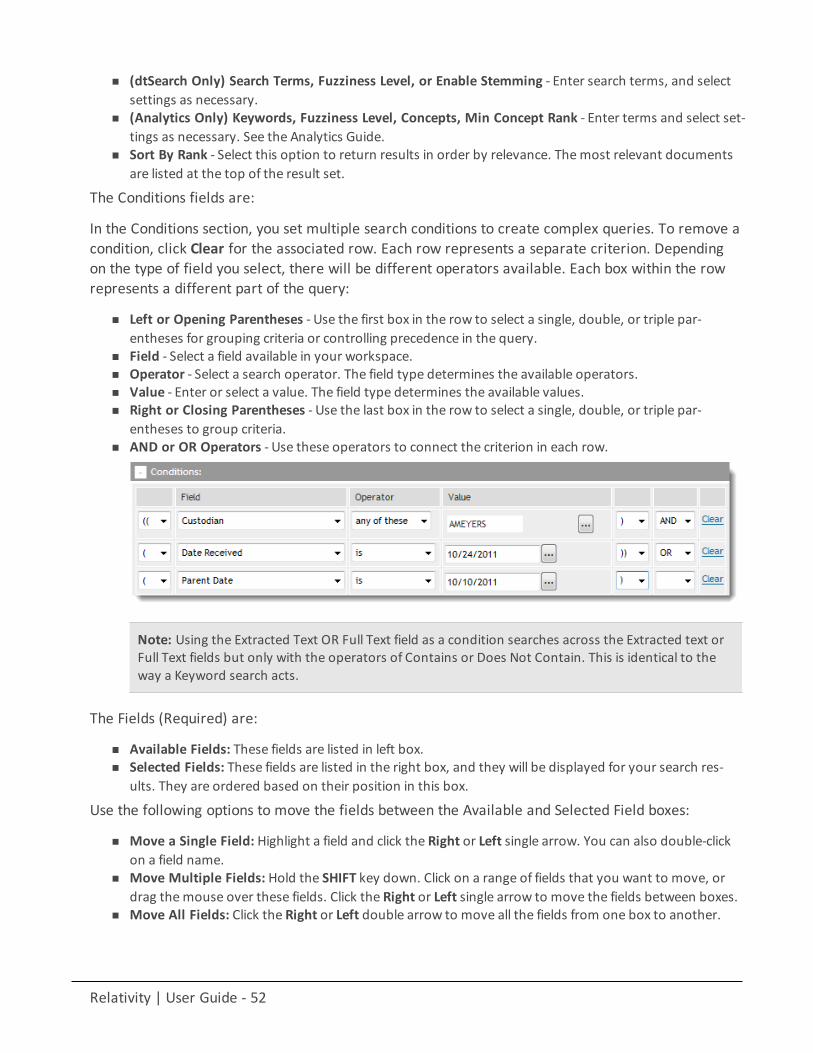
In the Conditions section, you set multiple search conditions to create complex queries. To remove acondition, click Clear for the associated row. Each row represents a separate criterion. Dependingon the type of field you select, there will be different operators available. Each box within the rowrepresents a different part of the query:
n Left or Opening Parentheses - Use the first box in the row to select a single, double, or triple par-entheses for grouping criteria or controlling precedence in the query.
n Field - Select a field available in your workspace.n Operator - Select a search operator. The field type determines the available operators.n Value - Enter or select a value. The field type determines the available values.n Right or Closing Parentheses - Use the last box in the row to select a single, double, or triple par-
entheses to group criteria.n AND or OR Operators - Use these operators to connect the criterion in each row.
Note: Using the Extracted Text OR Full Text field as a condition searches across the Extracted text orFull Text fields but only with the operators of Contains or Does Not Contain. This is identical to theway a Keyword search acts.
The Fields (Required) are:
n Available Fields: These fields are listed in left box.n Selected Fields: These fields are listed in the right box, and they will be displayed for your search res-
ults. They are ordered based on their position in this box.
Use the following options to move the fields between the Available and Selected Field boxes:
n Move a Single Field: Highlight a field and click the Right or Left single arrow. You can also double-clickon a field name.
n Move Multiple Fields: Hold the SHIFT key down. Click on a range of fields that you want to move, ordrag themouse over these fields. Click the Right or Left single arrow to move the fields between boxes.
n Move All Fields: Click the Right or Left double arrow to move all the fields from one box to another.
Relativity | User Guide - 53
n Change the Selected Fields Order: Use theUp and Down arrows to reorder the fields. Topmost fieldsdisplay as a columns on the left of the item list, while fields at the bottom display on the right.
Note: You can edit the default list of selected fields displayed in this option. On the Views tab, click DefaultSearch Views, and then click Edit to update the field list.
The Sort options are:
You can define the default sort order used for the search results. Each row in a sort criterioncontains the following options:
n Sort Field: Select a field from the left drop-down box. You will sort on this field.n Order: Select ascending or descending from the right drop-down box.
You can create a nested sort order by selecting fields in several drop-down boxes.
8.2.2 Using pop-up pickersYou may have the option to select values from a pop-up picker when you choose certain fields oroperators in the Conditions section. For example, popups are available when you select thefollowing operators:
n Any of thesen None of thesen All of these (only for multiple object fields)n Not all of these (only for multiple object fields)
8.2.2.1 Select items pop-up pickerUse the following general steps to select items in the picker:
1. Navigate to the Saved Search form or use the Search Conditions feature.2. Select a Field option for a condition.
3. To display the picker, click in the Value box.4. Select one or more items in the Available Items list. A checkmark indicates an item is selected.5. Click Add. The items are displayed in the Selected Items list.
Note: To remove an item from this list, select it and click Remove. The item is displayed in the Available Itemslist.
6. Click Set. The items are added to the Value box in the search form.
8.2.2.2 System user fieldsSystem user fields include the System Created By and System Last Modified By fields, which you canuse in search conditions.
1. Navigate to the Save Search form or use the Search Conditions feature.2. Select a system user field in the Field option for a condition.
Relativity | User Guide - 54
3. Select an operator, and perform one of the following tasks:
n If you selected any of these or none of these, click the ellipsis in the Value box to displaythe Select Options pop-up. Choose one or more user names, and click OK.
n Enter the user name in the textbox.4. Define any additional search criteria as needed.
8.2.2.3 Folder name fieldYou can select Folder Name as a field in a search condition to create more flexible queries thanusing the Scope section of the Saved Search form. You can combine conditions containing the FolderName and other fields with AND or OR operators refining your search criteria.
1. Navigate to the Save Search form or use the Search Conditions feature.2. Select Folder Name in the Field option for a condition.3. Select an operator, and perform one of the following tasks:
n If you selected any of these or none of these, click in the Value box to display Select Folderpop-up. Choose one or more folders, and click OK.
n Enter the folder name in the textbox.4. Define any additional search criteria as needed.
8.2.3 Rerunning out-of-date saved searchesYou may need to rerun a saved search when you return to it after navigating to other features inRelativity. Instead of seeing your search results, you see a message indicating that your search is outof date.
Note: To enable the Run saved search feature, select the Require Manual Rerun option in the Informationsection of the Saved Search form.
Perform one of these tasks:
n Click Run saved search to reload your search results. You can also click on the saved search in thebrowser to rerun the search.
n Click Edit Search to display the Saved Search form where you modify the search settings.
If you edit an item returned in your saved search, you will also need to rerun it. You must rerun thesearch even when the edited item still meets the search criteria, and the number of documentsreturned is unchanged.
8.2.4 Copying a saved search to another workspaceYou can copy a saved search contained in one workspace to another workspace if the saved searchreferences Keyword Search and is copied to the new workspace as part of a template.
For saved searches that include other saved searches as conditions, these are only copied over aspart of a template if all of the searches referenced use Keyword Search.
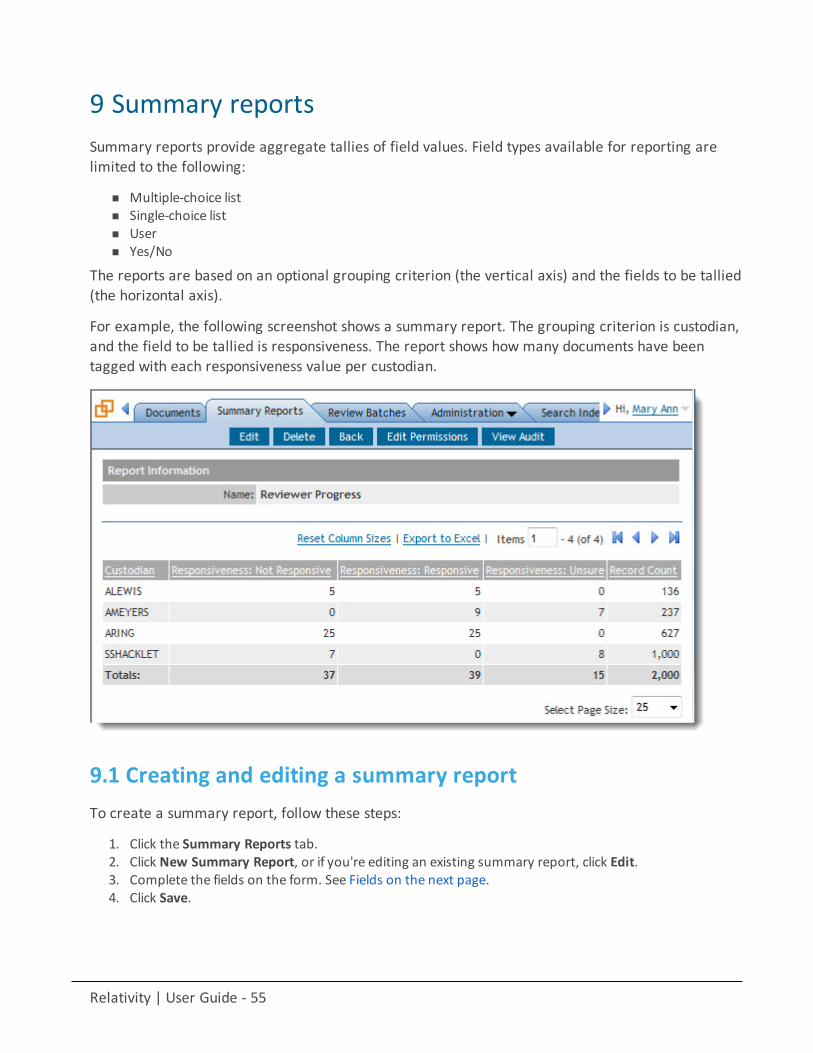
Relativity | User Guide - 55
9 Summary reportsSummary reports provide aggregate tallies of field values. Field types available for reporting arelimited to the following:
n Multiple-choice listn Single-choice listn Usern Yes/No
The reports are based on an optional grouping criterion (the vertical axis) and the fields to be tallied(the horizontal axis).
For example, the following screenshot shows a summary report. The grouping criterion is custodian,and the field to be tallied is responsiveness. The report shows how many documents have beentagged with each responsiveness value per custodian.
9.1 Creating and editing a summary reportTo create a summary report, follow these steps:
1. Click the Summary Reports tab.2. Click New Summary Report, or if you're editing an existing summary report, click Edit.3. Complete the fields on the form. See Fields on the next page.4. Click Save.
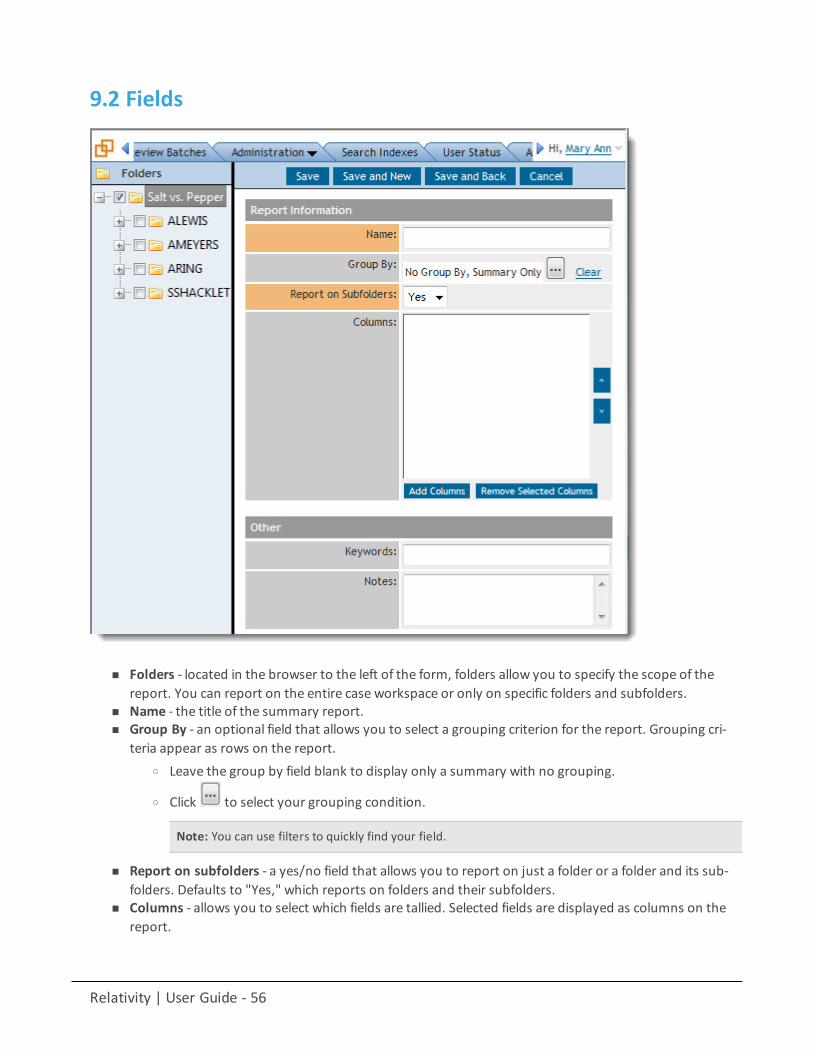
Relativity | User Guide - 56
9.2 Fields
n Folders - located in the browser to the left of the form, folders allow you to specify the scope of thereport. You can report on the entire case workspace or only on specific folders and subfolders.
n Name - the title of the summary report.n Group By - an optional field that allows you to select a grouping criterion for the report. Grouping cri-
teria appear as rows on the report.o Leave the group by field blank to display only a summary with no grouping.
o Click to select your grouping condition.
Note: You can use filters to quickly find your field.
n Report on subfolders - a yes/no field that allows you to report on just a folder or a folder and its sub-folders. Defaults to "Yes," which reports on folders and their subfolders.
n Columns - allows you to select which fields are tallied. Selected fields are displayed as columns on thereport.
Relativity | User Guide - 57
o Add Columns - allows you to add columns to the report. Click the Add Columns button andselect the checkbox for each field you want to tally. You can use filters to quickly find the desiredfields. Only multi-choice list, single-choice list, user, and yes/no fields can be reported on.
o Remove selected columns - allows you to remove fields from your columns section.
10 TabsA workspace contains tabs that provide you with easy access to different Relativity features,including documents, search terms reports, views, and other default functionality. Relativity is ahighly customizable platform. You can apply any template with a tabs arrangement that best servesyour review needs. Some workspace templates also include custom tabs for specializedfunctionality.
You can add custom tabs in workspace or admin mode. Admin mode also displays a Tabs tab. Thefunctionality of this Tabs tab is the same as the workspace mode tab.
In addition, Relativity automatically creates a tab when you add a new object type. If you aredeveloping a custom application, you may want to obtain the globally unique identifier (GUID) for atab. For information about obtaining GUIDs, see Viewing component GUIDs on the Developmentenvironment guidelines page in the Relativity 8.1 on the Developers site.
10.1 Creating and editing tabsTo create or edit a tab, follow these steps:
1. Click the Tabs tab.2. Click New Tab. If you're editing an existing tab, click Edit.3. Complete the fields on the form. See Fields on the next page.4. Click Save.
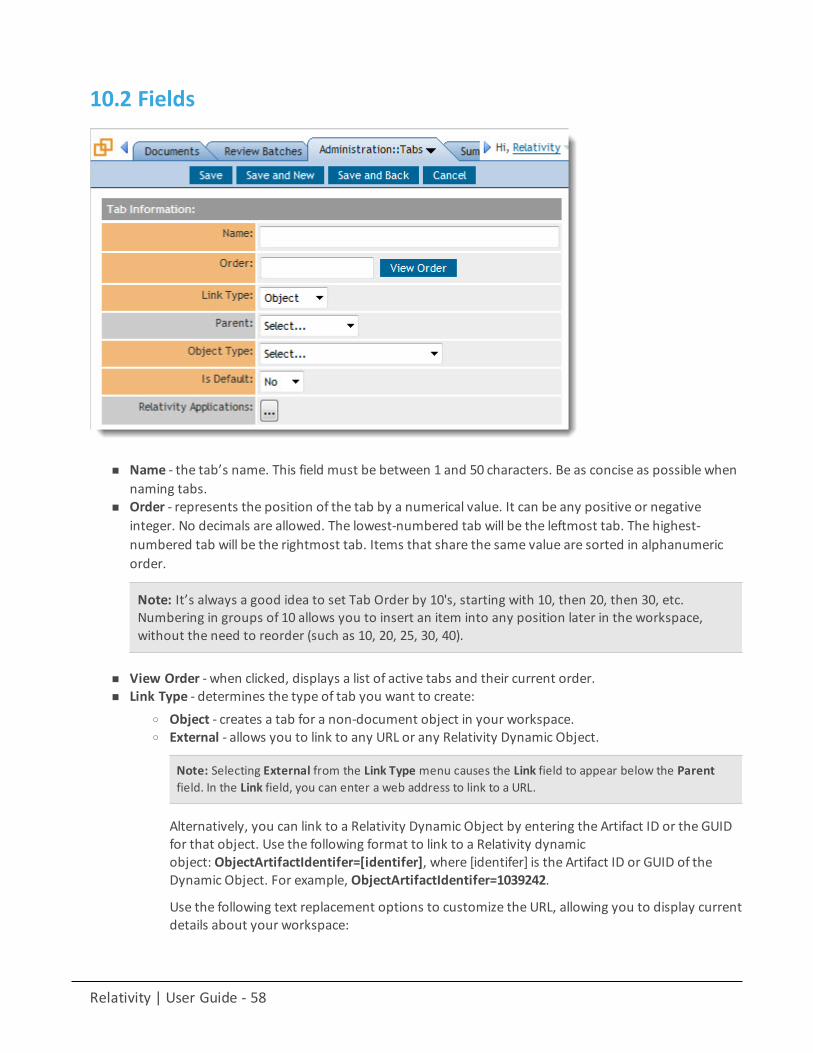
Relativity | User Guide - 58
10.2 Fields
n Name - the tab’s name. This field must be between 1 and 50 characters. Be as concise as possible whennaming tabs.
n Order - represents the position of the tab by a numerical value. It can be any positive or negativeinteger. No decimals are allowed. The lowest-numbered tab will be the leftmost tab. The highest-numbered tab will be the rightmost tab. Items that share the same value are sorted in alphanumericorder.
Note: It’s always a good idea to set Tab Order by 10's, starting with 10, then 20, then 30, etc.Numbering in groups of 10 allows you to insert an item into any position later in the workspace,without the need to reorder (such as 10, 20, 25, 30, 40).
n View Order - when clicked, displays a list of active tabs and their current order.n Link Type - determines the type of tab you want to create:
o Object - creates a tab for a non-document object in your workspace.o External - allows you to link to any URL or any Relativity Dynamic Object.
Note: Selecting External from the Link Type menu causes the Link field to appear below the Parentfield. In the Link field, you can enter a web address to link to a URL.
Alternatively, you can link to a Relativity Dynamic Object by entering the Artifact ID or the GUIDfor that object. Use the following format to link to a Relativity dynamicobject: ObjectArtifactIdentifer=[identifer], where [identifer] is the Artifact ID or GUID of theDynamic Object. For example, ObjectArtifactIdentifer=1039242.
Use the following text replacement options to customize the URL, allowing you to display currentdetails about your workspace:
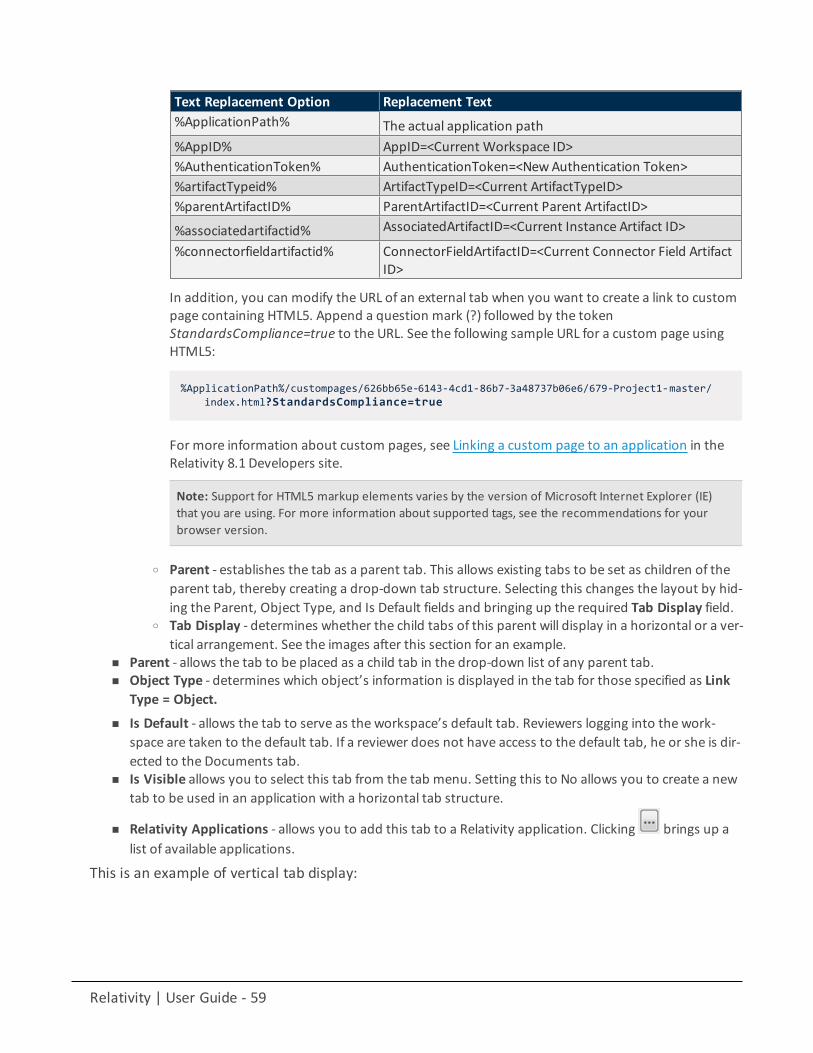
Relativity | User Guide - 59
Text Replacement Option Replacement Text%ApplicationPath% The actual application path%AppID% AppID=<Current Workspace ID>%AuthenticationToken% AuthenticationToken=<NewAuthentication Token>%artifactTypeid% ArtifactTypeID=<Current ArtifactTypeID>%parentArtifactID% ParentArtifactID=<Current Parent ArtifactID>
%associatedartifactid% AssociatedArtifactID=<Current Instance Artifact ID>
%connectorfieldartifactid% ConnectorFieldArtifactID=<Current Connector Field ArtifactID>
In addition, you can modify the URL of an external tab when you want to create a link to custompage containing HTML5. Append a question mark (?) followed by the tokenStandardsCompliance=true to the URL. See the following sample URL for a custom page usingHTML5:
%ApplicationPath%/custompages/626bb65e-6143-4cd1-86b7-3a48737b06e6/679-Project1-master/index.html?StandardsCompliance=true
For more information about custom pages, see Linking a custom page to an application in theRelativity 8.1 Developers site.
Note: Support for HTML5 markup elements varies by the version of Microsoft Internet Explorer (IE)that you are using. For more information about supported tags, see the recommendations for yourbrowser version.
o Parent - establishes the tab as a parent tab. This allows existing tabs to be set as children of theparent tab, thereby creating a drop-down tab structure. Selecting this changes the layout by hid-ing the Parent, Object Type, and Is Default fields and bringing up the required Tab Display field.
o Tab Display - determines whether the child tabs of this parent will display in a horizontal or a ver-tical arrangement. See the images after this section for an example.
n Parent - allows the tab to be placed as a child tab in the drop-down list of any parent tab.n Object Type - determines which object’s information is displayed in the tab for those specified as Link
Type = Object.
n Is Default - allows the tab to serve as the workspace’s default tab. Reviewers logging into the work-space are taken to the default tab. If a reviewer does not have access to the default tab, he or she is dir-ected to the Documents tab.
n Is Visible allows you to select this tab from the tab menu. Setting this to No allows you to create a newtab to be used in an application with a horizontal tab structure.
n Relativity Applications - allows you to add this tab to a Relativity application. Clicking brings up alist of available applications.
This is an example of vertical tab display:
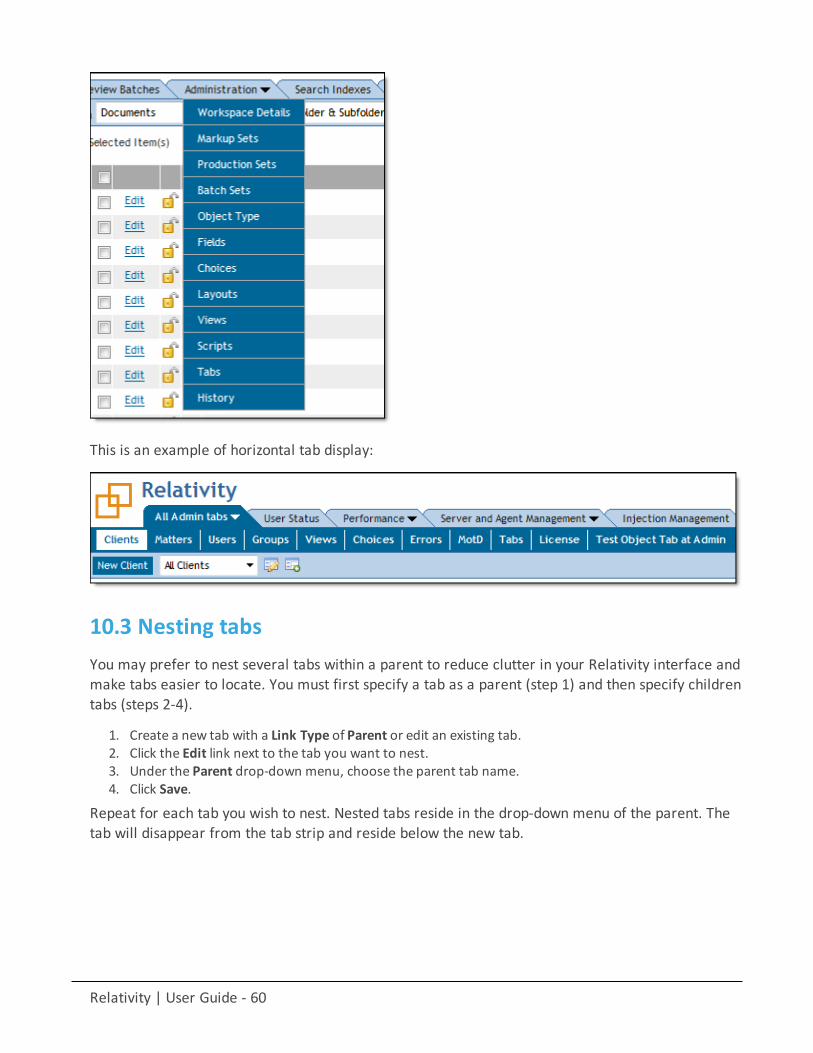
Relativity | User Guide - 60
This is an example of horizontal tab display:
10.3 Nesting tabsYou may prefer to nest several tabs within a parent to reduce clutter in your Relativity interface andmake tabs easier to locate. You must first specify a tab as a parent (step 1) and then specify childrentabs (steps 2-4).
1. Create a new tab with a Link Type of Parent or edit an existing tab.2. Click the Edit link next to the tab you want to nest.3. Under the Parent drop-down menu, choose the parent tab name.4. Click Save.
Repeat for each tab you wish to nest. Nested tabs reside in the drop-down menu of the parent. Thetab will disappear from the tab strip and reside below the new tab.
Relativity | User Guide - 61
11 TranscriptsASCII transcripts are a type of document you can load into Relativity and review just like any othertype of document. Working with transcripts in Relativity allows you to use three unique featuresincluding: creating word indexes of terms in a transcript, linking to related documents in aworkspace from within a transcript, and inline tagging to add identifiable reference terms tospecific content in a transcript. When processing transcripts, you also have the option to add orremove header and footer content to and from your transcripts.
Note: Relativity accepts only ASCII transcripts.
Note: Note: You can perform native redactions on transcripts that appear when you perform basic imagingon a transcript; however, native redactions on transcripts are not respected if you use native imaging toimage a transcript.
11.1 Importing transcriptsImporting transcripts into Relativity is the same process as importing any other type of native file.Use the Relativity Desktop Client to import transcripts with a load file. See Importing documentmetadata, files, and extracted text in the Desktop Client guide.
11.2 Word indexA word index is a list of all non-noise words in the transcript. It includes the page number and linelocation of all occurrences of each word. It also includes the total number of times the word appearsin the transcript. Before you create a word index, you have to process the transcript. See Processtranscripts in the Admin guide.
To access the word index, click the word index icon . The word index is sorted in alphanumericorder, so it begins with numbers. You can filter the columns to rearrange the order.
The index lists the each term location using the <page number>:<line number> syntax. Forexample, 2:15 means the term appears on page 2, line 15.
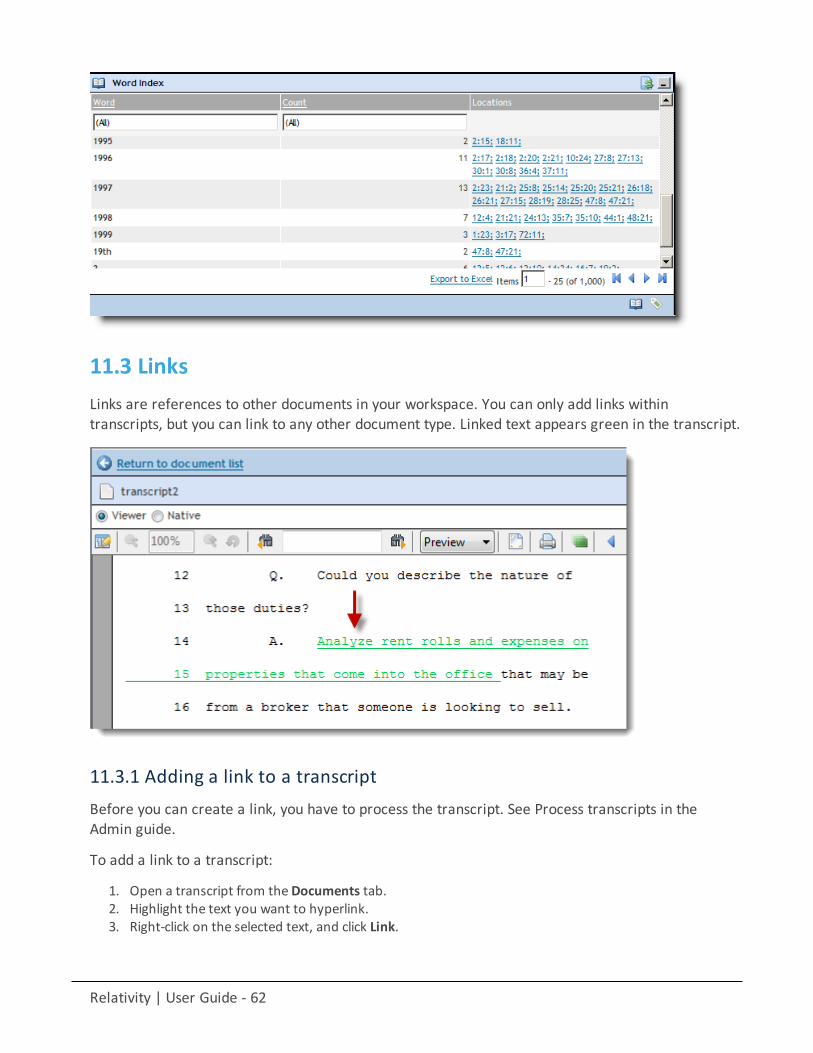
Relativity | User Guide - 62
11.3 LinksLinks are references to other documents in your workspace. You can only add links withintranscripts, but you can link to any other document type. Linked text appears green in the transcript.
11.3.1 Adding a link to a transcriptBefore you can create a link, you have to process the transcript. See Process transcripts in theAdmin guide.
To add a link to a transcript:
1. Open a transcript from theDocuments tab.2. Highlight the text you want to hyperlink.3. Right-click on the selected text, and click Link.

Relativity | User Guide - 63
4. Select the radio button next to the document you want to link to.5. Click Set.
Note: All links on the transcript appear in the related items pane.
12 ViewerRelativity's viewer displays workspace documents. You can use the viewer menu to toggle theloaded formats of documents, such as native, image, extracted text, or production. Using theviewer, you can control the form of document that displays in the interface. If a document hasn'tbeen imaged, you can image documents on the fly in the viewer.
If you don't see a form of the document in the menu, it either hasn't been loaded to the workspaceor you don't have permission to see it.
For information on working with transcripts in the viewer, see Transcripts on page 61.
12.1 Viewer toolbarsThe viewer toolbars include the following options and icons:
12.1.1 Document view selector optionsThe document view selector toolbar contains the following options and features:
n Viewer - opens the document using the Relativity native file viewer. It provides a “quick print” versionthat shows how the file would look in its native application. There are three available modes when ren-dering a document in the Viewer:
o Draft - Displays documents using a single font and size. Does not display embedded graphics.Does not display graphic or table borders. Wraps the text to the size of the viewwindow.
o Normal - Displays all supported formatting. Wraps the text to the size of the viewwindow.o Preview - Displays all supported formatting. Wraps the text as it will be printed.
Note: Some behavior exceptions apply based on file type.
n Native - opens document with the native document application in the browser, if the native applicationis installed. This option is present only if a native document has been loaded. If you do not see thisoption, you may not have sufficient permissions or the Prevent Native Download setting for that par-ticular file type has been set to Yes.
n Image - displays a TIFF or JPEG version of the document. You can highlight and redact images in thismode. It's available only if an image has been loaded or created.
Relativity | User Guide - 64
n Long-Text Mode - displays a drop-down menu of extracted text and all long-text fields that have beenmade available in the viewer on the field edit/creation page. See Creating fields in the Admin guide.
Note: The drop-down menu won't display long-text fields that are empty for the current document or thoseyou don't have permissions to.
n Productions - contains all of the document's produced instances. This view displays the document'ssaved production states, where you can see how the document was produced. It's available only if thedocument has been included in a production.
n Image Profile - displays a drop-down menu of all imaging profiles that you have permissions to use.Imaging profiles include format settings for creating TIFF or JPEG images for a document. Contact yourRelativity administrator for information about available custom profiles.
n Image button - after you select an image profile, click the Image button to create a document image onthe fly. See Imaging on the fly on page 66.
n Delete Images button - click to delete an existing document image.
12.1.2 Viewer and Extracted Text iconsThe viewer contains the following icons:
n Show/hide persistent highlight sets - displays or hides a panel containing all persistent highlightsets in the workspace.
n Zoom out and in - zooms out and in on the current document with a 10 percent to300 percent range.
n Reset zoom - resets the zoom function to 100 percent.
n Find previous and next - searches for terms in the current document andnavigates through the hits.
n Draft/Normal/Preview display modes - drop-down menu for different viewer display modes.
Note: Draft mode doesn't render any embedded objects, including attachments, graphics, graphic borders, ortable borders.
n Fit to window width - fits the document to the window. This function is only available in the pre-viewmode.
n Print - prints the current document.n Show/hide hidden cells - displays or hides all hidden cells in a Microsoft Excel spreadsheet. This
functionality is only available for Excel files and doesn't work on imaged documents because Relativityonly images unhidden cells.
Relativity | User Guide - 65
n Set markup visibility - displays, hides, or renders transparent all redactions or highlights in the doc-ument.
n Go to next/previous highlight - moves through previous highlighted terms in the document.
n About - displays the Relativity Web Client and Outside In versions.The icon is red if a version isout of date.
12.1.3 Image iconsThe viewer displays the following icons for the image version of the document:
n Zoom - zoom in and out of current document with a 10 percent to 2000 percentrange.
n Fit options - Fit actual resizes to 100 percent, Fit width resizes to the width of the page,and Fit page resizes to the height of the page.
n Rotate all document pages clockwise - rotates all pages in a document clockwise 90 degrees.
n Rotate current page clockwise - rotates the current page clockwise 90 degrees.
n Print - prints the current document. If you have permissions, you can select whether to print high-lights and redactions and whether they should be normal or transparent. These options are auto-matically populated based on the current markup visibility.
n Selector - select within a document.
n Highlight - highlights selected text. Select the highlight color you want from the drop-downmenu.
n Redact - enables single redaction tool. Select the type of redaction (black, cross, text, or white) boxto draw from the drop-down menu.
n Redact - Inverse - enables inverse redaction tool.
n Redact - Full page - enables full-page redaction tool. Select the type of full-page redaction (black,cross, text, or white) to draw from the drop-down menu.
n Mass redact - displays a popup where you can select which type of full-page redaction to apply andthe specify the range of pages to which the redaction should be applied.
n Delete redactions and highlights - displays a popup where you can select which redactions andhighlights to delete and specify the range of pages from which the selected markups should be deleted.
n Change markup visibility - changes the visibility mode of themarkups between full visibility, trans-parent and hidden. Themarkup visibility status displays in the lower right corner of the viewer.
Relativity | User Guide - 66
n About image viewer - displays the Relativity Web Client and Outside In versions.The icon is red ifa version is out of date.
12.2 Imaging on the flyYou can image a single document on the fly using the Image button in the viewer.
Note: The Image button disables if the Imaging application isn't installed.
Using this feature, you can select any imaging profile you have permissions to view and use it toimage the document.
After imaging a document on the fly, you can access thumbnail renderings of the imaged pages ofthe document. See Adding information to CaseMap on page 71.
Imaging some file formats in the viewer can cause problems. Consider the following:
n Many PDFs render and image very well. However, you may have problems rendering and imagingsome PDFs due to the variety of their content.
n While most Microsoft Office documents render and image well, you may experience issues when ima-ging documents with embedded files.
n You may have problems rendering and imaging vector-based documents like Visio and CAD.
For more information, see the Viewer-Supported File Types guide.
12.3 Using the stand-alone document viewerTo view the document in a separate browser window, click the stand-alone document viewer icon
in the upper right of the core reviewer interface. This opens another viewer pane with anUnsynced designation at the top of the screen. This means that the stand-alone viewer isn't yet setto synchronize with the core reviewer interface.
Relativity | User Guide - 67
To synchronize the standalone viewer with the core viewer, click Unsynced. This switches the stand-alone viewer setting to Synced where you can view text and images, natives, and productions side-by-side while navigating through the document queue. You can launch more than one stand-aloneviewer per document.
Note: Keyboard shortcuts are available for use in the stand-alone viewer. For example, if you execute theshortcut for Save & Next in the stand-alone viewer, each window performs the operation and moves to thenext document.
If you click the Return to Document List link, the stand-alone viewer disappears.
12.4 Related items paneThe related items pane is located at the bottom-right corner of the core reviewer interface. Relateditems are customizable groups of documents within a workspace. Common examples are familygroups, duplicates or similar documents.
The related items toolbar includes the following:
n Related items - displays a group of documents related to the active document. Optionsvary within the workspace. Hover over each icon to display the name of the item. Examples include fam-ily group, duplicates, and/or similar documents.
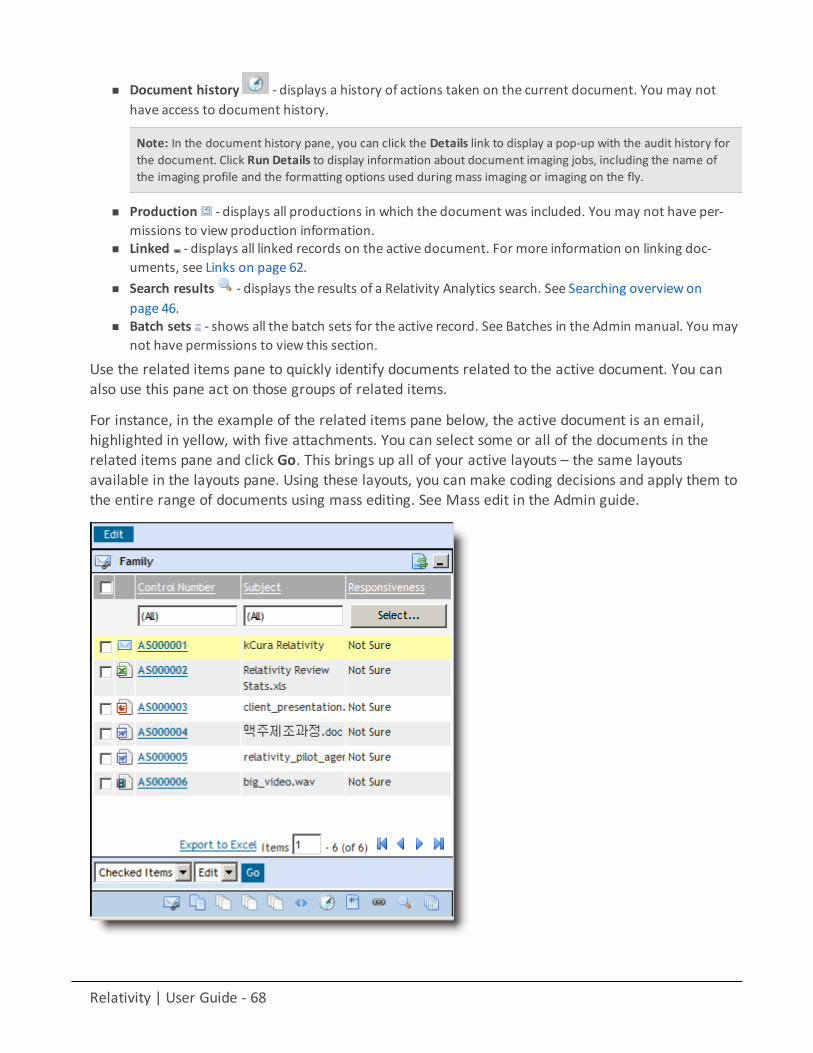
Relativity | User Guide - 68
n Document history - displays a history of actions taken on the current document. You may nothave access to document history.
Note: In the document history pane, you can click the Details link to display a pop-up with the audit history forthe document. Click Run Details to display information about document imaging jobs, including the name ofthe imaging profile and the formatting options used during mass imaging or imaging on the fly.
n Production - displays all productions in which the document was included. You may not have per-missions to view production information.
n Linked - displays all linked records on the active document. For more information on linking doc-uments, see Links on page 62.
n Search results - displays the results of a Relativity Analytics search. See Searching overview onpage 46.
n Batch sets - shows all the batch sets for the active record. See Batches in the Admin manual. You maynot have permissions to view this section.
Use the related items pane to quickly identify documents related to the active document. You canalso use this pane act on those groups of related items.
For instance, in the example of the related items pane below, the active document is an email,highlighted in yellow, with five attachments. You can select some or all of the documents in therelated items pane and click Go. This brings up all of your active layouts – the same layoutsavailable in the layouts pane. Using these layouts, you can make coding decisions and apply them tothe entire range of documents using mass editing. See Mass edit in the Admin guide.
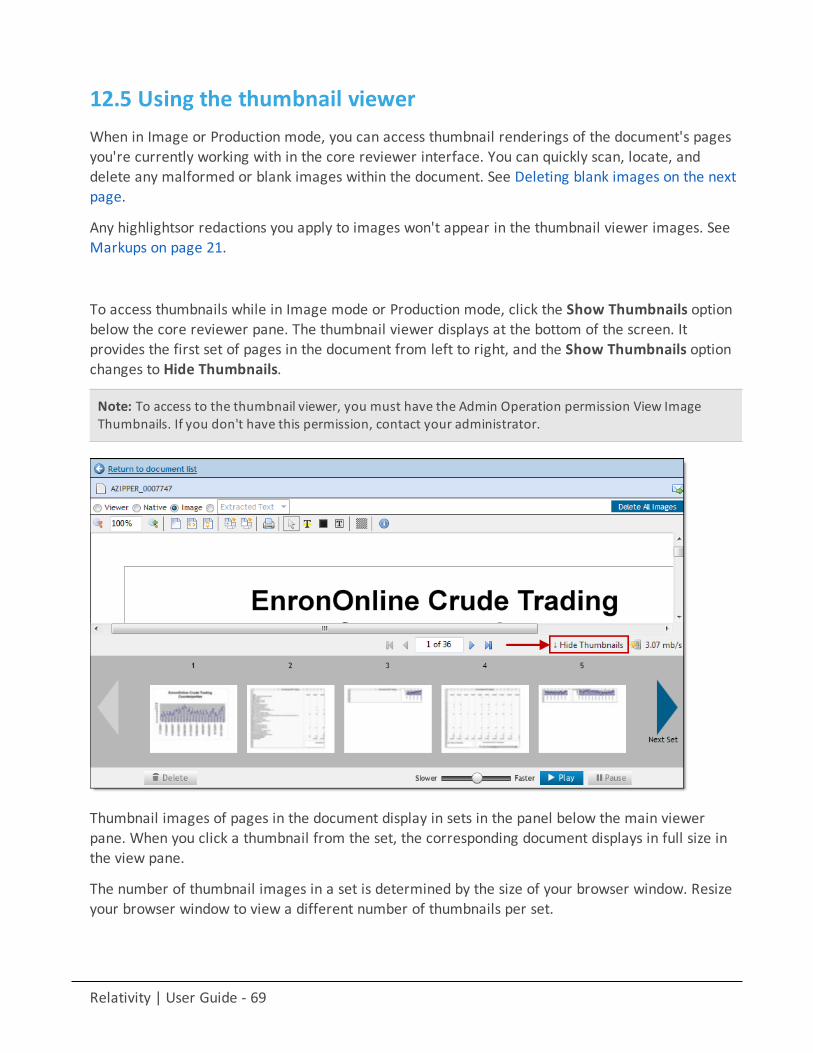
Relativity | User Guide - 69
12.5 Using the thumbnail viewerWhen in Image or Production mode, you can access thumbnail renderings of the document's pagesyou're currently working with in the core reviewer interface. You can quickly scan, locate, anddelete any malformed or blank images within the document. See Deleting blank images on the nextpage.
Any highlightsor redactions you apply to images won't appear in the thumbnail viewer images. SeeMarkups on page 21.
To access thumbnails while in Image mode or Production mode, click the Show Thumbnails optionbelow the core reviewer pane. The thumbnail viewer displays at the bottom of the screen. Itprovides the first set of pages in the document from left to right, and the Show Thumbnails optionchanges to Hide Thumbnails.
Note: To access to the thumbnail viewer, you must have the Admin Operation permission View ImageThumbnails. If you don't have this permission, contact your administrator.
Thumbnail images of pages in the document display in sets in the panel below the main viewerpane. When you click a thumbnail from the set, the corresponding document displays in full size inthe view pane.
The number of thumbnail images in a set is determined by the size of your browser window. Resizeyour browser window to view a different number of thumbnails per set.
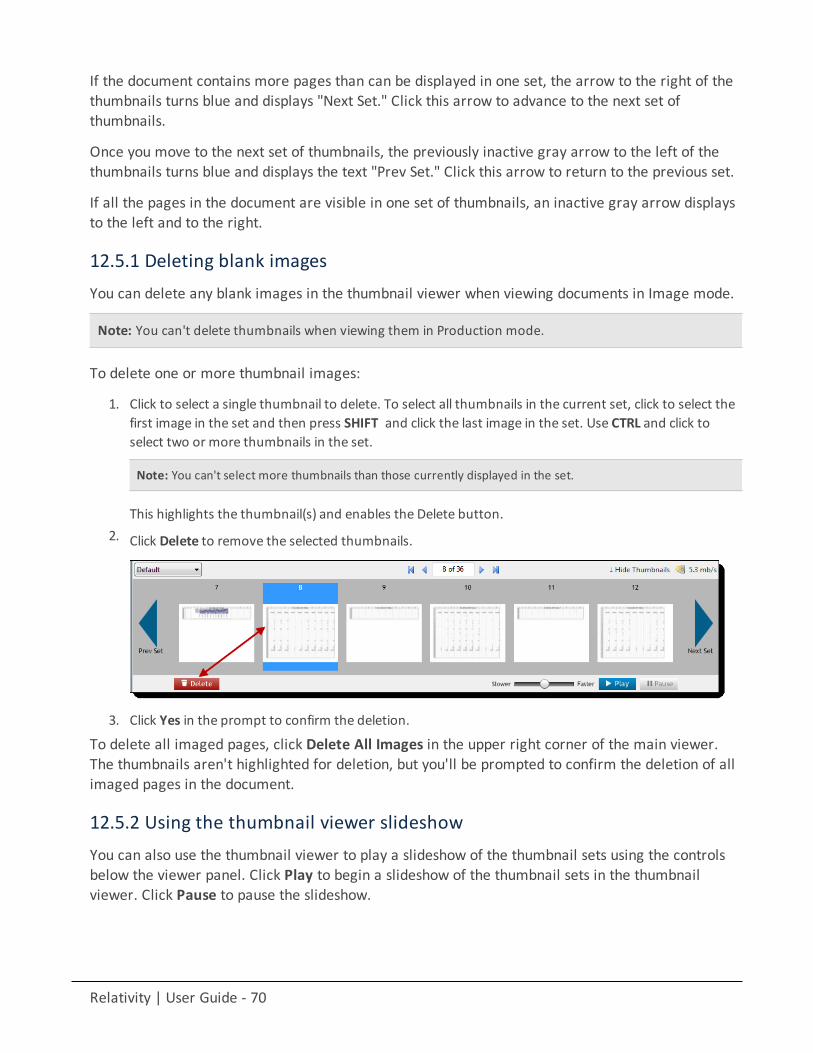
Relativity | User Guide - 70
If the document contains more pages than can be displayed in one set, the arrow to the right of thethumbnails turns blue and displays "Next Set." Click this arrow to advance to the next set ofthumbnails.
Once you move to the next set of thumbnails, the previously inactive gray arrow to the left of thethumbnails turns blue and displays the text "Prev Set." Click this arrow to return to the previous set.
If all the pages in the document are visible in one set of thumbnails, an inactive gray arrow displaysto the left and to the right.
12.5.1 Deleting blank imagesYou can delete any blank images in the thumbnail viewer when viewing documents in Image mode.
Note: You can't delete thumbnails when viewing them in Production mode.
To delete one or more thumbnail images:
1. Click to select a single thumbnail to delete. To select all thumbnails in the current set, click to select thefirst image in the set and then press SHIFT and click the last image in the set. Use CTRL and click toselect two or more thumbnails in the set.
Note: You can't select more thumbnails than those currently displayed in the set.
This highlights the thumbnail(s) and enables the Delete button.2. Click Delete to remove the selected thumbnails.
3. Click Yes in the prompt to confirm the deletion.
To delete all imaged pages, click Delete All Images in the upper right corner of the main viewer.The thumbnails aren't highlighted for deletion, but you'll be prompted to confirm the deletion of allimaged pages in the document.
12.5.2 Using the thumbnail viewer slideshowYou can also use the thumbnail viewer to play a slideshow of the thumbnail sets using the controlsbelow the viewer panel. Click Play to begin a slideshow of the thumbnail sets in the thumbnailviewer. Click Pause to pause the slideshow.
Relativity | User Guide - 71
If you're in Play mode and you click a thumbnail from the current set, the slideshow pauses and thecorresponding document displays in full size in the view pane. Click Play again to continueadvancing image sets.
Thumbnails advance as a set. Using the speed controller, you can adjust the speed with which theviewer advances through each image in the set. The slowest speed is 3 seconds per thumbnailimage; the fastest speed is 0.5 seconds.
You can adjust the speed of the thumbnail viewer slideshow while in Play mode or Pause mode. Ifyou adjust the speed controller in Pause mode, the slideshow advances at the new speed once youclick Play. If you adjust the speed controller in Play mode, the new speed begins with the next set ofthumbnails.
At the end of the slideshow, the Play and Pause buttons are disabled.
12.6 Adding information to CaseMapYou can capture documents and text in the Relativity viewer for analysis in the CaseMap tool. Youcan then use a mass operation to export the data to CaseMap. See Send to CaseMap in the Adminguide for details.
Note: CaseMap is not compatible with Windows 8.
12.6.1 Adding a document to CaseMapTo add a document to a CaseMap database from the viewer, right click the document and selectCase Map > Add to CaseMap.
12.6.1.1 Linking a document to CaseMapNext, you must link the document to CaseMap:
1. Choose the CaseMap category for the document (Document, Pleading, Proceeding, Research Author-ity, or Other).
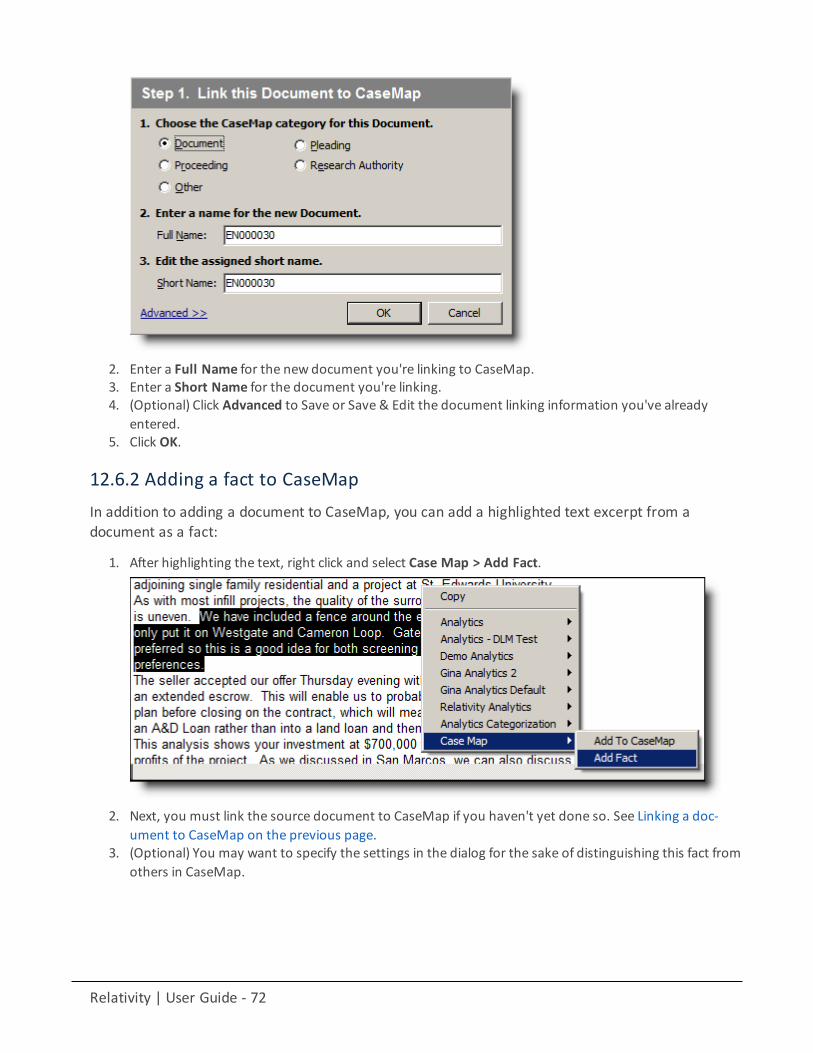
Relativity | User Guide - 72
2. Enter a Full Name for the new document you're linking to CaseMap.3. Enter a Short Name for the document you're linking.4. (Optional) Click Advanced to Save or Save & Edit the document linking information you've already
entered.5. Click OK.
12.6.2 Adding a fact to CaseMapIn addition to adding a document to CaseMap, you can add a highlighted text excerpt from adocument as a fact:
1. After highlighting the text, right click and select Case Map > Add Fact.
2. Next, you must link the source document to CaseMap if you haven't yet done so. See Linking a doc-ument to CaseMap on the previous page.
3. (Optional) You may want to specify the settings in the dialog for the sake of distinguishing this fact fromothers in CaseMap.
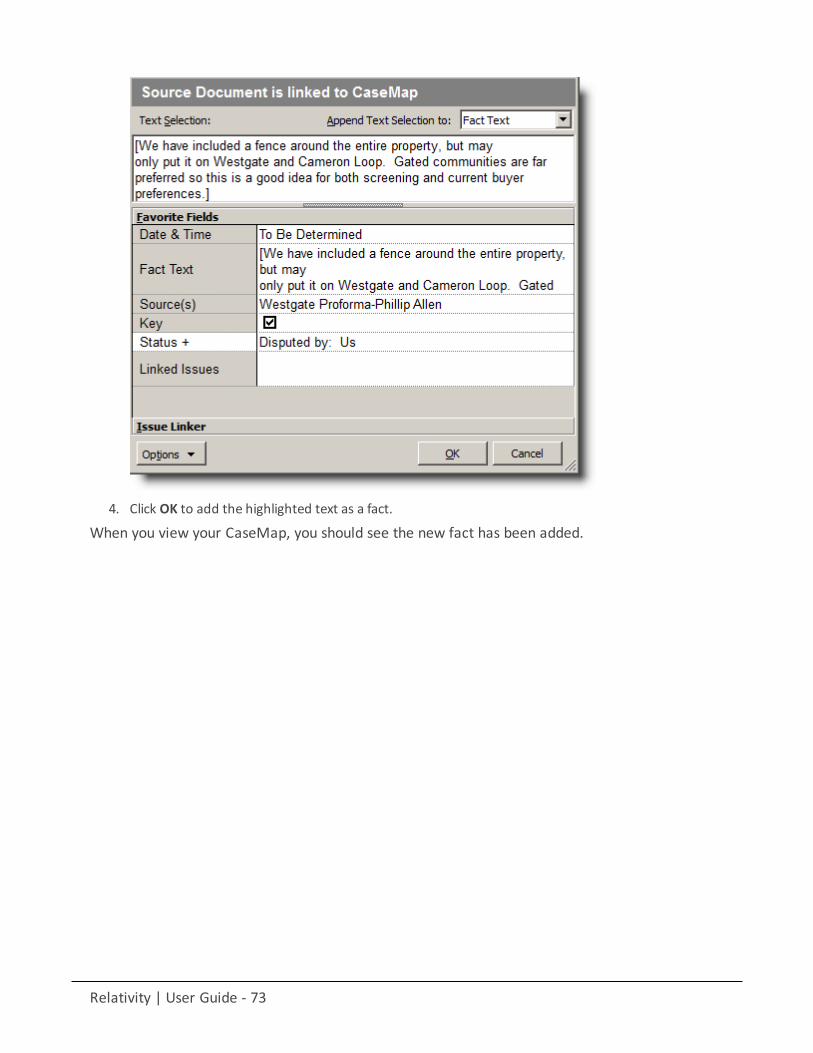
Relativity | User Guide - 73
4. Click OK to add the highlighted text as a fact.
When you view your CaseMap, you should see the new fact has been added.
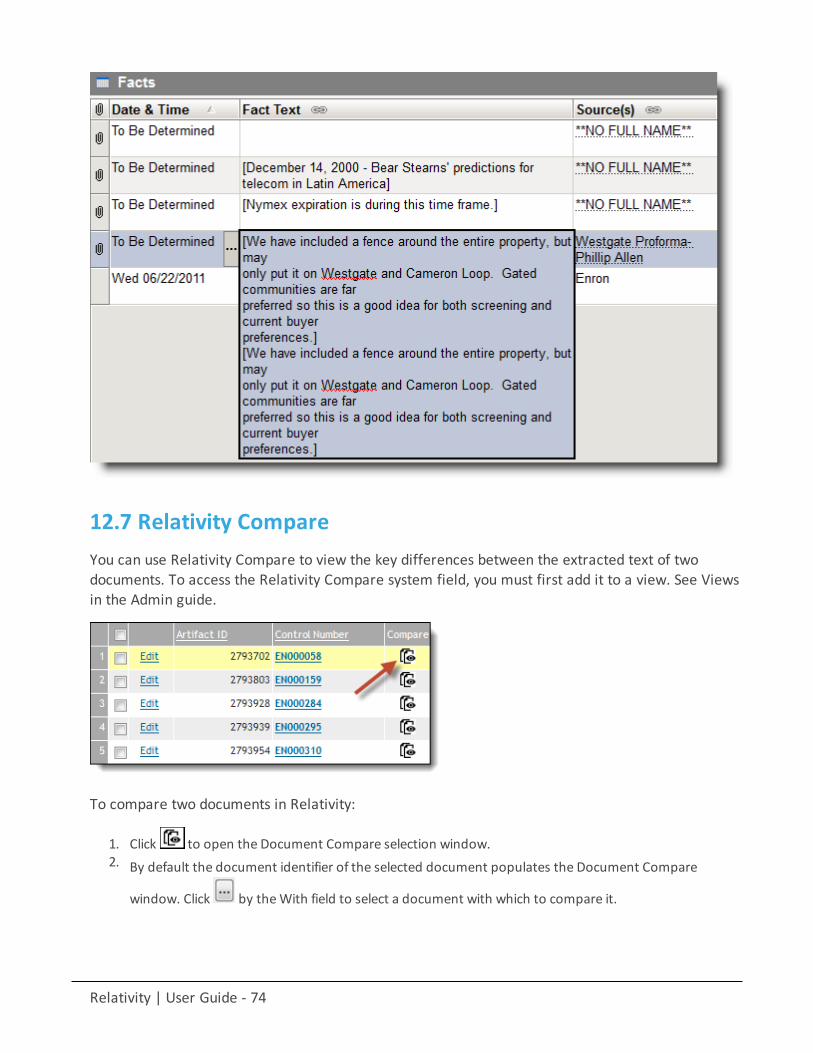
Relativity | User Guide - 74
12.7 Relativity CompareYou can use Relativity Compare to view the key differences between the extracted text of twodocuments. To access the Relativity Compare system field, you must first add it to a view. See Viewsin the Admin guide.
To compare two documents in Relativity:
1. Click to open the Document Compare selection window.2. By default the document identifier of the selected document populates the Document Compare
window. Click by theWith field to select a document with which to compare it.
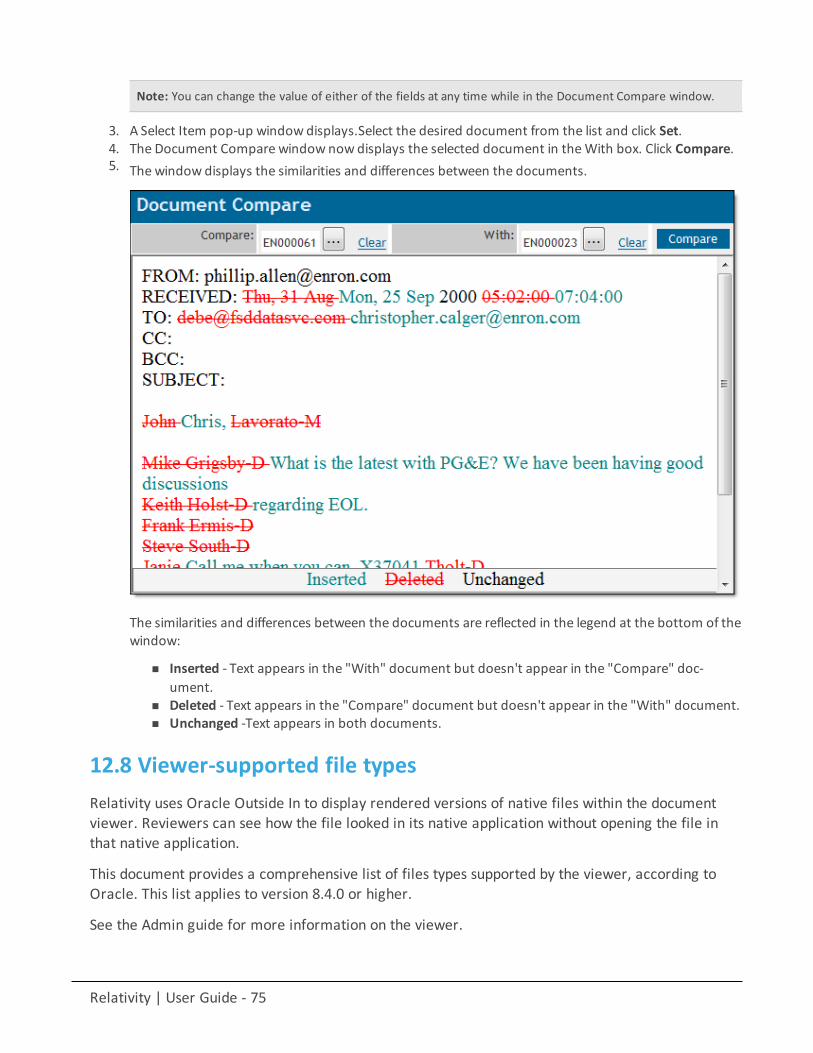
Relativity | User Guide - 75
Note: You can change the value of either of the fields at any time while in the Document Compare window.
3. A Select Item pop-up window displays.Select the desired document from the list and click Set.4. The Document Compare window nowdisplays the selected document in theWith box. Click Compare.5. The window displays the similarities and differences between the documents.
The similarities and differences between the documents are reflected in the legend at the bottom of thewindow:
n Inserted - Text appears in the "With" document but doesn't appear in the "Compare" doc-ument.
n Deleted - Text appears in the "Compare" document but doesn't appear in the "With" document.n Unchanged -Text appears in both documents.
12.8 Viewer-supported file typesRelativity uses Oracle Outside In to display rendered versions of native files within the documentviewer. Reviewers can see how the file looked in its native application without opening the file inthat native application.
This document provides a comprehensive list of files types supported by the viewer, according toOracle. This list applies to version 8.4.0 or higher.
See the Admin guide for more information on the viewer.
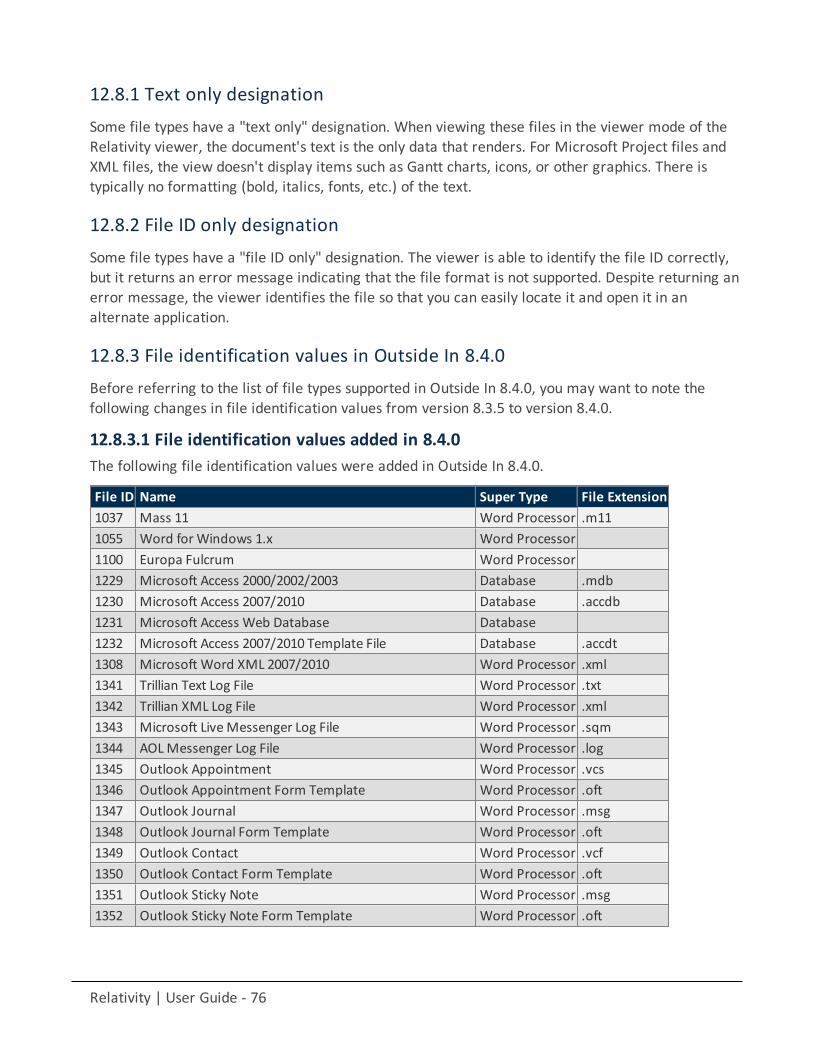
Relativity | User Guide - 76
12.8.1 Text only designationSome file types have a "text only" designation. When viewing these files in the viewer mode of theRelativity viewer, the document's text is the only data that renders. For Microsoft Project files andXML files, the view doesn't display items such as Gantt charts, icons, or other graphics. There istypically no formatting (bold, italics, fonts, etc.) of the text.
12.8.2 File ID only designationSome file types have a "file ID only" designation. The viewer is able to identify the file ID correctly,but it returns an error message indicating that the file format is not supported. Despite returning anerror message, the viewer identifies the file so that you can easily locate it and open it in analternate application.
12.8.3 File identification values in Outside In 8.4.0Before referring to the list of file types supported in Outside In 8.4.0, you may want to note thefollowing changes in file identification values from version 8.3.5 to version 8.4.0.
12.8.3.1 File identification values added in 8.4.0The following file identification values were added in Outside In 8.4.0.
File ID Name Super Type File Extension1037 Mass 11 Word Processor .m111055 Word for Windows 1.x Word Processor1100 Europa Fulcrum Word Processor1229 Microsoft Access 2000/2002/2003 Database .mdb1230 Microsoft Access 2007/2010 Database .accdb1231 Microsoft Access Web Database Database1232 Microsoft Access 2007/2010 Template File Database .accdt1308 Microsoft Word XML 2007/2010 Word Processor .xml1341 Trillian Text Log File Word Processor .txt1342 Trillian XML Log File Word Processor .xml1343 Microsoft LiveMessenger Log File Word Processor .sqm1344 AOLMessenger Log File Word Processor .log1345 Outlook Appointment Word Processor .vcs1346 Outlook Appointment Form Template Word Processor .oft1347 Outlook Journal Word Processor .msg1348 Outlook Journal Form Template Word Processor .oft1349 Outlook Contact Word Processor .vcf1350 Outlook Contact Form Template Word Processor .oft1351 Outlook Sticky Note Word Processor .msg1352 Outlook Sticky Note Form Template Word Processor .oft
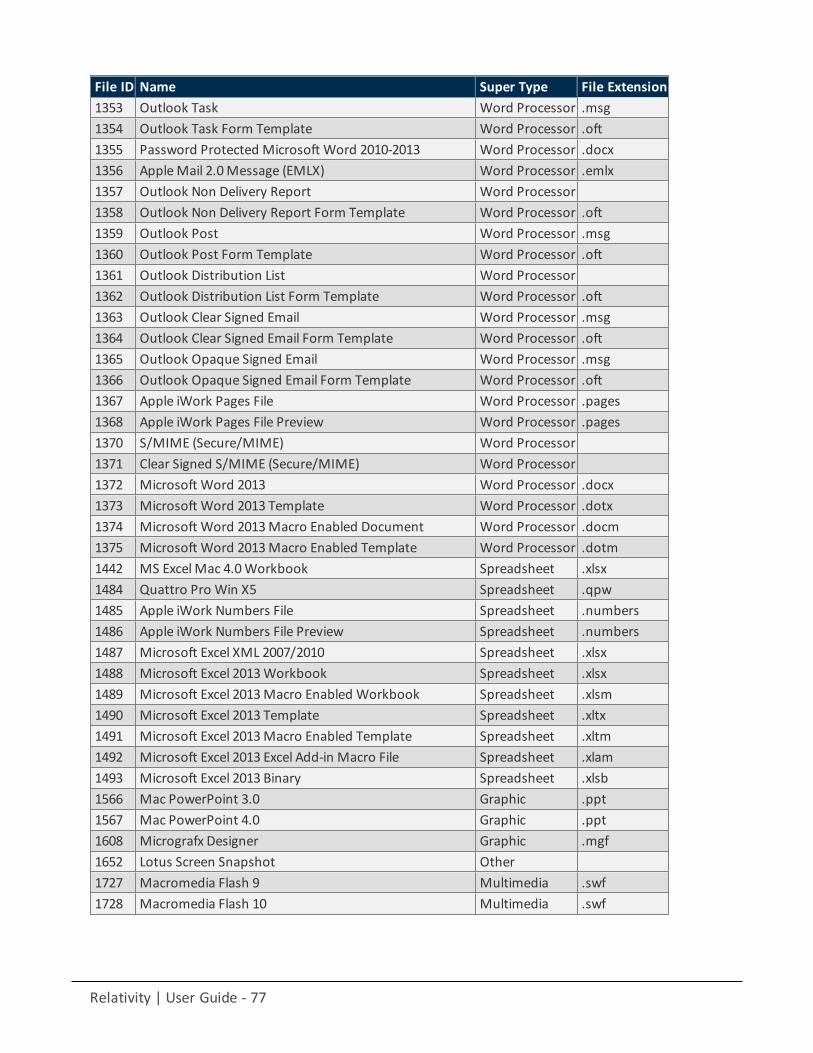
Relativity | User Guide - 77
File ID Name Super Type File Extension1353 Outlook Task Word Processor .msg1354 Outlook Task Form Template Word Processor .oft1355 Password Protected Microsoft Word 2010-2013 Word Processor .docx1356 AppleMail 2.0Message (EMLX) Word Processor .emlx1357 Outlook Non Delivery Report Word Processor1358 Outlook Non Delivery Report Form Template Word Processor .oft1359 Outlook Post Word Processor .msg1360 Outlook Post Form Template Word Processor .oft1361 Outlook Distribution List Word Processor1362 Outlook Distribution List Form Template Word Processor .oft1363 Outlook Clear Signed Email Word Processor .msg1364 Outlook Clear Signed Email Form Template Word Processor .oft1365 Outlook Opaque Signed Email Word Processor .msg1366 Outlook Opaque Signed Email Form Template Word Processor .oft1367 Apple iWork Pages File Word Processor .pages1368 Apple iWork Pages File Preview Word Processor .pages1370 S/MIME (Secure/MIME) Word Processor1371 Clear Signed S/MIME (Secure/MIME) Word Processor1372 Microsoft Word 2013 Word Processor .docx1373 Microsoft Word 2013 Template Word Processor .dotx1374 Microsoft Word 2013Macro Enabled Document Word Processor .docm1375 Microsoft Word 2013Macro Enabled Template Word Processor .dotm1442 MS ExcelMac 4.0Workbook Spreadsheet .xlsx1484 Quattro Pro Win X5 Spreadsheet .qpw1485 Apple iWork Numbers File Spreadsheet .numbers1486 Apple iWork Numbers File Preview Spreadsheet .numbers1487 Microsoft Excel XML 2007/2010 Spreadsheet .xlsx1488 Microsoft Excel 2013Workbook Spreadsheet .xlsx1489 Microsoft Excel 2013Macro Enabled Workbook Spreadsheet .xlsm1490 Microsoft Excel 2013 Template Spreadsheet .xltx1491 Microsoft Excel 2013Macro Enabled Template Spreadsheet .xltm1492 Microsoft Excel 2013 Excel Add-in Macro File Spreadsheet .xlam1493 Microsoft Excel 2013 Binary Spreadsheet .xlsb1566 Mac PowerPoint 3.0 Graphic .ppt1567 Mac PowerPoint 4.0 Graphic .ppt1608 Micrografx Designer Graphic .mgf1652 Lotus Screen Snapshot Other1727 Macromedia Flash 9 Multimedia .swf1728 Macromedia Flash 10 Multimedia .swf
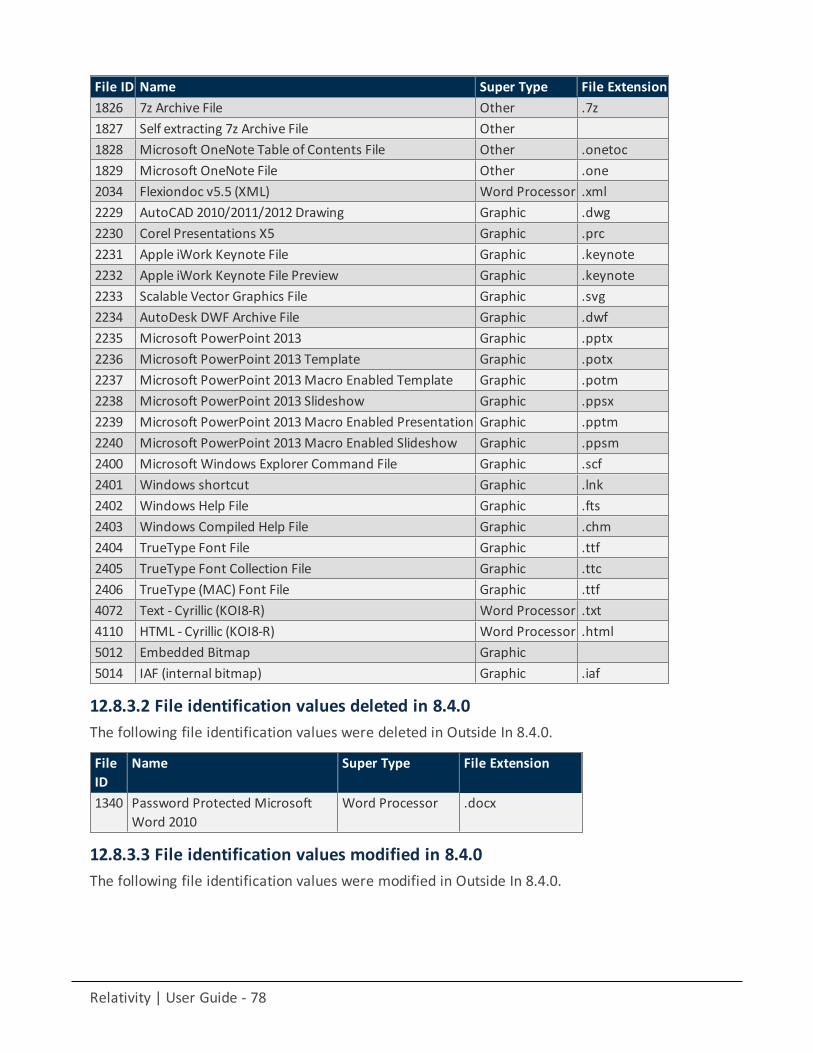
Relativity | User Guide - 78
File ID Name Super Type File Extension1826 7z Archive File Other .7z1827 Self extracting 7z Archive File Other1828 Microsoft OneNote Table of Contents File Other .onetoc1829 Microsoft OneNote File Other .one2034 Flexiondoc v5.5 (XML) Word Processor .xml2229 AutoCAD 2010/2011/2012 Drawing Graphic .dwg2230 Corel Presentations X5 Graphic .prc2231 Apple iWork Keynote File Graphic .keynote2232 Apple iWork Keynote File Preview Graphic .keynote2233 Scalable Vector Graphics File Graphic .svg2234 AutoDesk DWF Archive File Graphic .dwf2235 Microsoft PowerPoint 2013 Graphic .pptx2236 Microsoft PowerPoint 2013 Template Graphic .potx2237 Microsoft PowerPoint 2013Macro Enabled Template Graphic .potm2238 Microsoft PowerPoint 2013 Slideshow Graphic .ppsx2239 Microsoft PowerPoint 2013Macro Enabled Presentation Graphic .pptm2240 Microsoft PowerPoint 2013Macro Enabled Slideshow Graphic .ppsm2400 Microsoft Windows Explorer Command File Graphic .scf2401 Windows shortcut Graphic .lnk2402 Windows Help File Graphic .fts2403 Windows Compiled Help File Graphic .chm2404 TrueType Font File Graphic .ttf2405 TrueType Font Collection File Graphic .ttc2406 TrueType (MAC) Font File Graphic .ttf4072 Text - Cyrillic (KOI8-R) Word Processor .txt4110 HTML - Cyrillic (KOI8-R) Word Processor .html5012 Embedded Bitmap Graphic5014 IAF (internal bitmap) Graphic .iaf
12.8.3.2 File identification values deleted in 8.4.0The following file identification values were deleted in Outside In 8.4.0.
FileID
Name Super Type File Extension
1340 Password Protected MicrosoftWord 2010
Word Processor .docx
12.8.3.3 File identification values modified in 8.4.0The following file identification values were modified in Outside In 8.4.0.
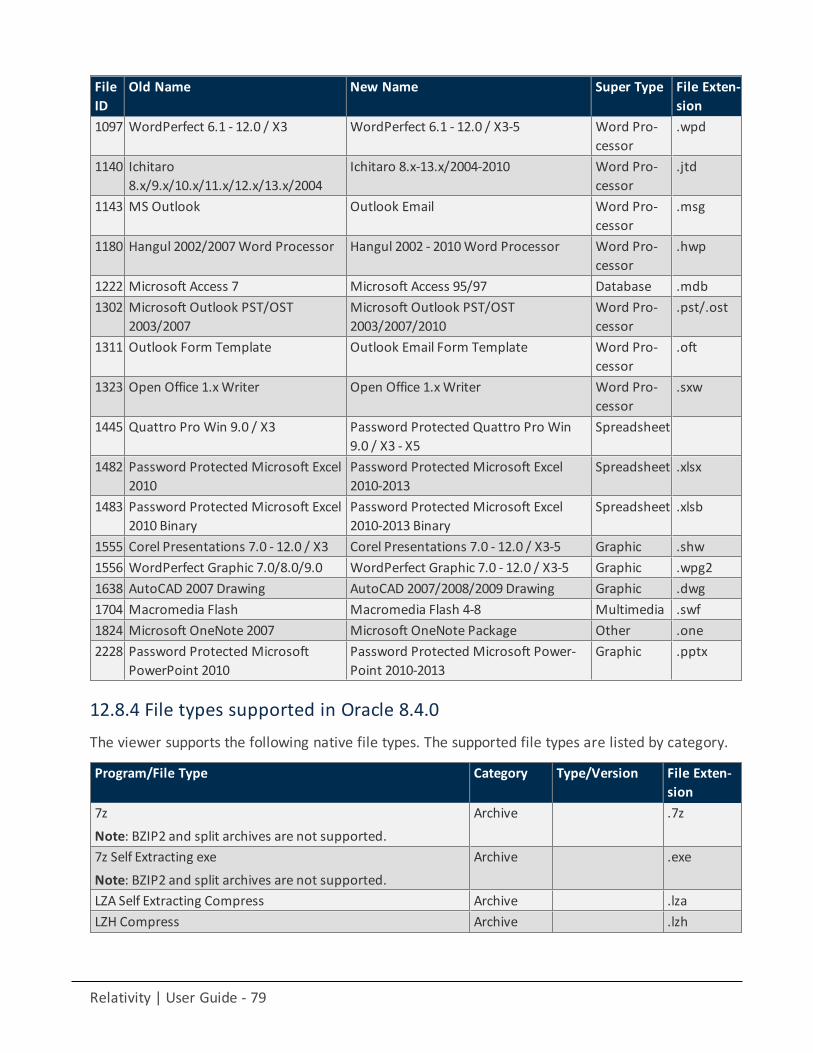
Relativity | User Guide - 79
FileID
Old Name New Name Super Type File Exten-sion
1097 WordPerfect 6.1 - 12.0 / X3 WordPerfect 6.1 - 12.0 / X3-5 Word Pro-cessor
.wpd
1140 Ichitaro8.x/9.x/10.x/11.x/12.x/13.x/2004
Ichitaro 8.x-13.x/2004-2010 Word Pro-cessor
.jtd
1143 MS Outlook Outlook Email Word Pro-cessor
.msg
1180 Hangul 2002/2007Word Processor Hangul 2002 - 2010Word Processor Word Pro-cessor
.hwp
1222 Microsoft Access 7 Microsoft Access 95/97 Database .mdb1302 Microsoft Outlook PST/OST
2003/2007Microsoft Outlook PST/OST2003/2007/2010
Word Pro-cessor
.pst/.ost
1311 Outlook Form Template Outlook Email Form Template Word Pro-cessor
.oft
1323 Open Office 1.xWriter Open Office 1.xWriter Word Pro-cessor
.sxw
1445 Quattro Pro Win 9.0 / X3 Password Protected Quattro Pro Win9.0 / X3 - X5
Spreadsheet
1482 Password Protected Microsoft Excel2010
Password Protected Microsoft Excel2010-2013
Spreadsheet .xlsx
1483 Password Protected Microsoft Excel2010 Binary
Password Protected Microsoft Excel2010-2013 Binary
Spreadsheet .xlsb
1555 Corel Presentations 7.0 - 12.0 / X3 Corel Presentations 7.0 - 12.0 / X3-5 Graphic .shw1556 WordPerfect Graphic 7.0/8.0/9.0 WordPerfect Graphic 7.0 - 12.0 / X3-5 Graphic .wpg21638 AutoCAD 2007 Drawing AutoCAD 2007/2008/2009 Drawing Graphic .dwg1704 Macromedia Flash Macromedia Flash 4-8 Multimedia .swf1824 Microsoft OneNote 2007 Microsoft OneNote Package Other .one2228 Password Protected Microsoft
PowerPoint 2010Password Protected Microsoft Power-Point 2010-2013
Graphic .pptx
12.8.4 File types supported in Oracle 8.4.0The viewer supports the following native file types. The supported file types are listed by category.
Program/File Type Category Type/Version File Exten-sion
7z
Note: BZIP2 and split archives are not supported.
Archive .7z
7z Self Extracting exe
Note: BZIP2 and split archives are not supported.
Archive .exe
LZA Self Extracting Compress Archive .lzaLZH Compress Archive .lzh
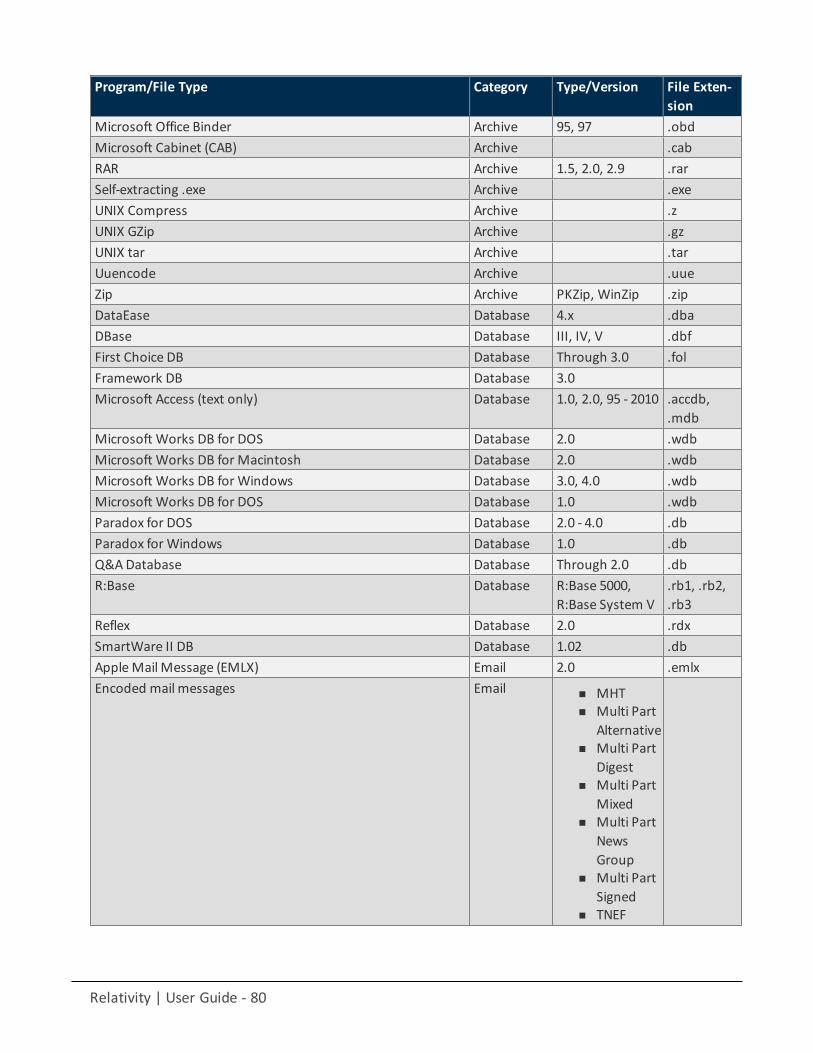
Relativity | User Guide - 80
Program/File Type Category Type/Version File Exten-sion
Microsoft Office Binder Archive 95, 97 .obdMicrosoft Cabinet (CAB) Archive .cabRAR Archive 1.5, 2.0, 2.9 .rarSelf-extracting .exe Archive .exeUNIX Compress Archive .zUNIX GZip Archive .gzUNIX tar Archive .tarUuencode Archive .uueZip Archive PKZip, WinZip .zipDataEase Database 4.x .dbaDBase Database III, IV, V .dbfFirst Choice DB Database Through 3.0 .folFramework DB Database 3.0Microsoft Access (text only) Database 1.0, 2.0, 95 - 2010 .accdb,
.mdbMicrosoft Works DB for DOS Database 2.0 .wdbMicrosoft Works DB for Macintosh Database 2.0 .wdbMicrosoft Works DB for Windows Database 3.0, 4.0 .wdbMicrosoft Works DB for DOS Database 1.0 .wdbParadox for DOS Database 2.0 - 4.0 .dbParadox for Windows Database 1.0 .dbQ&ADatabase Database Through 2.0 .dbR:Base Database R:Base 5000,
R:Base System V.rb1, .rb2,.rb3
Reflex Database 2.0 .rdxSmartWare II DB Database 1.02 .dbAppleMail Message (EMLX) Email 2.0 .emlxEncoded mail messages Email n MHT
n Multi PartAlternative
n Multi PartDigest
n Multi PartMixed
n Multi PartNewsGroup
n Multi PartSigned
n TNEF
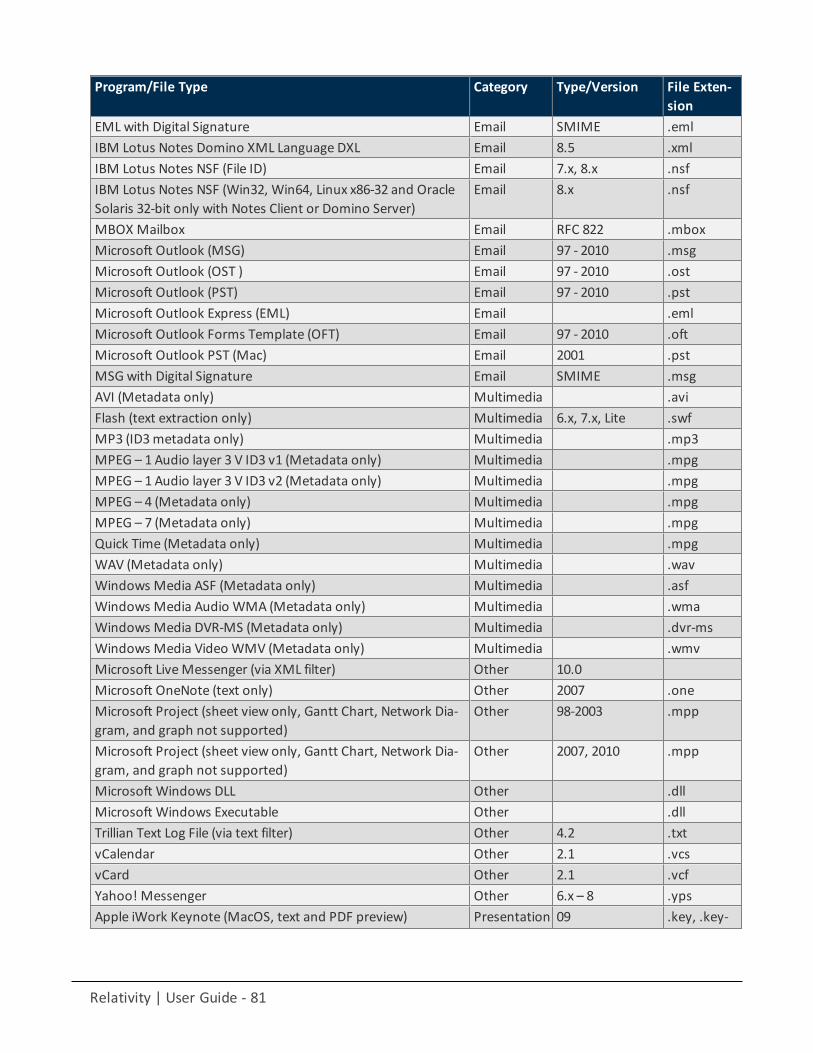
Relativity | User Guide - 81
Program/File Type Category Type/Version File Exten-sion
EML with Digital Signature Email SMIME .emlIBM Lotus Notes Domino XML Language DXL Email 8.5 .xmlIBM Lotus Notes NSF (File ID) Email 7.x, 8.x .nsfIBM Lotus Notes NSF (Win32, Win64, Linux x86-32 and OracleSolaris 32-bit only with Notes Client or Domino Server)
Email 8.x .nsf
MBOX Mailbox Email RFC 822 .mboxMicrosoft Outlook (MSG) Email 97 - 2010 .msgMicrosoft Outlook (OST ) Email 97 - 2010 .ostMicrosoft Outlook (PST) Email 97 - 2010 .pstMicrosoft Outlook Express (EML) Email .emlMicrosoft Outlook Forms Template (OFT) Email 97 - 2010 .oftMicrosoft Outlook PST (Mac) Email 2001 .pstMSG with Digital Signature Email SMIME .msgAVI (Metadata only) Multimedia .aviFlash (text extraction only) Multimedia 6.x, 7.x, Lite .swfMP3 (ID3metadata only) Multimedia .mp3MPEG – 1 Audio layer 3 V ID3 v1 (Metadata only) Multimedia .mpgMPEG – 1 Audio layer 3 V ID3 v2 (Metadata only) Multimedia .mpgMPEG – 4 (Metadata only) Multimedia .mpgMPEG – 7 (Metadata only) Multimedia .mpgQuick Time (Metadata only) Multimedia .mpgWAV (Metadata only) Multimedia .wavWindows Media ASF (Metadata only) Multimedia .asfWindows Media Audio WMA (Metadata only) Multimedia .wmaWindows Media DVR-MS (Metadata only) Multimedia .dvr-msWindows Media Video WMV (Metadata only) Multimedia .wmvMicrosoft LiveMessenger (via XML filter) Other 10.0Microsoft OneNote (text only) Other 2007 .oneMicrosoft Project (sheet view only, Gantt Chart, Network Dia-gram, and graph not supported)
Other 98-2003 .mpp
Microsoft Project (sheet view only, Gantt Chart, Network Dia-gram, and graph not supported)
Other 2007, 2010 .mpp
Microsoft Windows DLL Other .dllMicrosoft Windows Executable Other .dllTrillian Text Log File (via text filter) Other 4.2 .txtvCalendar Other 2.1 .vcsvCard Other 2.1 .vcfYahoo! Messenger Other 6.x – 8 .ypsApple iWork Keynote (MacOS, text and PDF preview) Presentation 09 .key, .key-
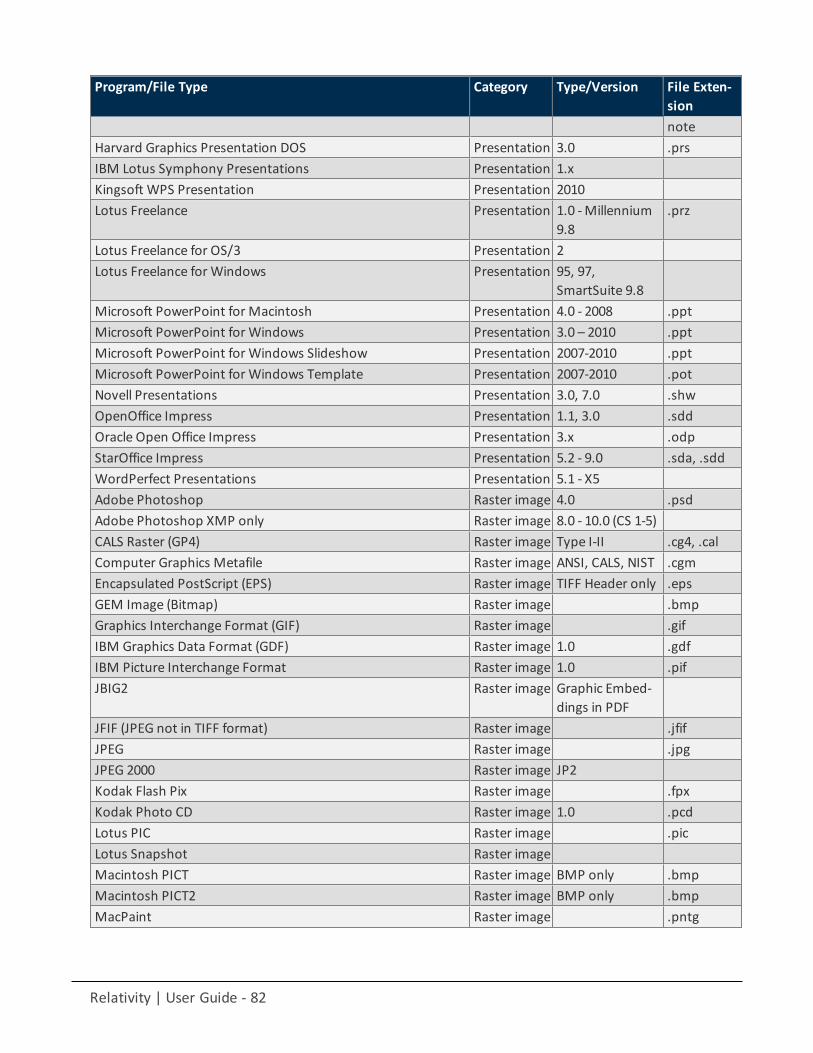
Relativity | User Guide - 82
Program/File Type Category Type/Version File Exten-sionnote
Harvard Graphics Presentation DOS Presentation 3.0 .prsIBM Lotus Symphony Presentations Presentation 1.xKingsoft WPS Presentation Presentation 2010Lotus Freelance Presentation 1.0 -Millennium
9.8.prz
Lotus Freelance for OS/3 Presentation 2Lotus Freelance for Windows Presentation 95, 97,
SmartSuite 9.8Microsoft PowerPoint for Macintosh Presentation 4.0 - 2008 .pptMicrosoft PowerPoint for Windows Presentation 3.0 – 2010 .pptMicrosoft PowerPoint for Windows Slideshow Presentation 2007-2010 .pptMicrosoft PowerPoint for Windows Template Presentation 2007-2010 .potNovell Presentations Presentation 3.0, 7.0 .shwOpenOffice Impress Presentation 1.1, 3.0 .sddOracle Open Office Impress Presentation 3.x .odpStarOffice Impress Presentation 5.2 - 9.0 .sda, .sddWordPerfect Presentations Presentation 5.1 - X5Adobe Photoshop Raster image 4.0 .psdAdobe Photoshop XMP only Raster image 8.0 - 10.0 (CS 1-5)CALS Raster (GP4) Raster image Type I-II .cg4, .calComputer Graphics Metafile Raster image ANSI, CALS, NIST .cgmEncapsulated PostScript (EPS) Raster image TIFF Header only .epsGEM Image (Bitmap) Raster image .bmpGraphics Interchange Format (GIF) Raster image .gifIBM Graphics Data Format (GDF) Raster image 1.0 .gdfIBM Picture Interchange Format Raster image 1.0 .pifJBIG2 Raster image Graphic Embed-
dings in PDFJFIF (JPEG not in TIFF format) Raster image .jfifJPEG Raster image .jpgJPEG 2000 Raster image JP2Kodak Flash Pix Raster image .fpxKodak Photo CD Raster image 1.0 .pcdLotus PIC Raster image .picLotus Snapshot Raster imageMacintosh PICT Raster image BMP only .bmpMacintosh PICT2 Raster image BMP only .bmpMacPaint Raster image .pntg
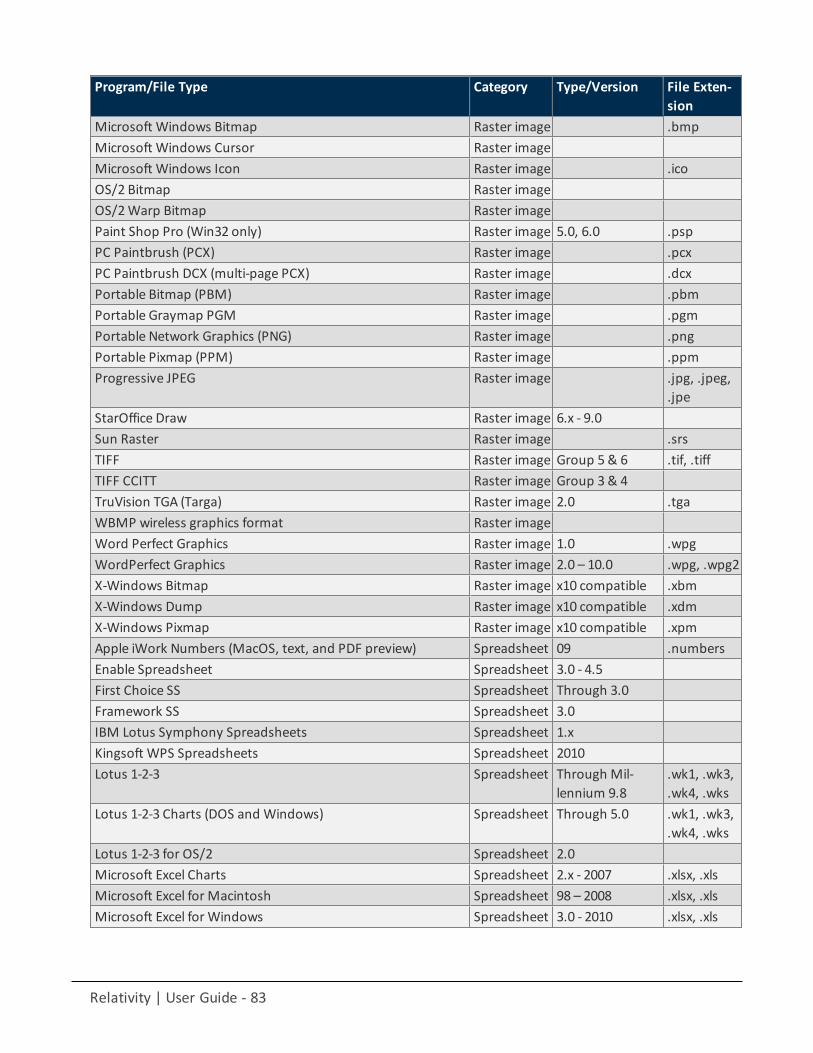
Relativity | User Guide - 83
Program/File Type Category Type/Version File Exten-sion
Microsoft Windows Bitmap Raster image .bmpMicrosoft Windows Cursor Raster imageMicrosoft Windows Icon Raster image .icoOS/2 Bitmap Raster imageOS/2Warp Bitmap Raster imagePaint Shop Pro (Win32 only) Raster image 5.0, 6.0 .pspPC Paintbrush (PCX) Raster image .pcxPC Paintbrush DCX (multi-page PCX) Raster image .dcxPortable Bitmap (PBM) Raster image .pbmPortable Graymap PGM Raster image .pgmPortable Network Graphics (PNG) Raster image .pngPortable Pixmap (PPM) Raster image .ppmProgressive JPEG Raster image .jpg, .jpeg,
.jpeStarOffice Draw Raster image 6.x - 9.0Sun Raster Raster image .srsTIFF Raster image Group 5& 6 .tif, .tiffTIFF CCITT Raster image Group 3& 4TruVision TGA (Targa) Raster image 2.0 .tgaWBMP wireless graphics format Raster imageWord Perfect Graphics Raster image 1.0 .wpgWordPerfect Graphics Raster image 2.0 – 10.0 .wpg, .wpg2X-Windows Bitmap Raster image x10 compatible .xbmX-Windows Dump Raster image x10 compatible .xdmX-Windows Pixmap Raster image x10 compatible .xpmApple iWork Numbers (MacOS, text, and PDF preview) Spreadsheet 09 .numbersEnable Spreadsheet Spreadsheet 3.0 - 4.5First Choice SS Spreadsheet Through 3.0Framework SS Spreadsheet 3.0IBM Lotus Symphony Spreadsheets Spreadsheet 1.xKingsoft WPS Spreadsheets Spreadsheet 2010Lotus 1-2-3 Spreadsheet Through Mil-
lennium 9.8.wk1, .wk3,.wk4, .wks
Lotus 1-2-3 Charts (DOS and Windows) Spreadsheet Through 5.0 .wk1, .wk3,.wk4, .wks
Lotus 1-2-3 for OS/2 Spreadsheet 2.0Microsoft Excel Charts Spreadsheet 2.x - 2007 .xlsx, .xlsMicrosoft Excel for Macintosh Spreadsheet 98 – 2008 .xlsx, .xlsMicrosoft Excel for Windows Spreadsheet 3.0 - 2010 .xlsx, .xls
Relativity | User Guide - 84
Program/File Type Category Type/Version File Exten-sion
Microsoft Excel for Windows (text only) Spreadsheet 2003 XML .xmlMicrosoft Excel for Windows (.xlsb) Spreadsheet 2007-2010 (Bin-
ary).xlsb
Microsoft Works SS for DOS Spreadsheet 2.0 .wksMicrosoft Works SS for Macintosh Spreadsheet 2.0 .wksMicrosoft Works SS for Windows Spreadsheet 3.0, 4.0 .wksMultiplan Spreadsheet 4.0 .sylkNovell PerfectWorks Spreadsheet Spreadsheet 2.0 .wpwOpenOffice Calc Spreadsheet 1.1-3.0 .sdcOracle Open Office Calc Spreasheet 3.x .sdcPFS: Plan Spreadsheet 1.0QuattroPro for DOS Spreadsheet Through 5.0 .wb1QuattroPro for Windows Spreadsheet Through X5 .qpw, .wb3,
.wb2, .wb1SmartWare II SS Spreadsheet 1.02 .defSmartWare Spreadsheet Spreadsheet .defStarOffice Calc Spreadsheet 5.2 – 9.0 .sdcSuperCalc Spreadsheet 5.0 .calSymphony Spreadsheet Through 2.0 .wrkVP-Planner Spreadsheet 1.0ANSI Text Text and
markup7& 8 bit .ans
ASCII Text Text andmarkup
7& 8 bit .asc
DOS character set Text andmarkup
EBCDIC Text andmarkup
HTML (CSS rendering not supported) Text andmarkup
1.0 – 4.0 .html
IBM DCA/RFT Text andmarkup
Macintosh character set Text andmarkup
Rich Text Format (RTF) Text andmarkup
.rtf
Unicode Text Text andmarkup
3.0, 4.0 .txt
UTF-8 Text andmarkup
Relativity | User Guide - 85
Program/File Type Category Type/Version File Exten-sion
Wireless Markup Language Text andmarkup
.wml
XML (text only) Text andmarkup
.xml
Adobe Illustrator Vectorimage
4.0 – 7.0, 9.0 .ai
Adobe Illustrator XMP Vectorimage
11 – 13 (CS 1 - 5)
Adobe InDesign XMP Vectorimage
3.0 – 5.0 (CS 1 - 5)
Adobe InDesign Interchange XMP only Vectorimage
Adobe PDF Vectorimage
1.0 – 1.7 (Acrobat1 - 10)
Adobe PDF Package Vectorimage
1.7 (Acrobat 8 -10)
Adobe PDF Portfolio Vectorimage
1.7 (Acrobat 8 -10)
Ami Draw Vectorimage
SDW .sdw
AutoCAD Drawing Vectorimage
2.5, 2.6, 9.0-14.0,2000i -20012
.dwg
AutoShade Rendering Vectorimage
2 .rnd
Corel Draw Vectorimage
2.0-9.0 .cdr
Corel Draw Clipart Vectorimage
5.0, 7.0 .cmx
Enhanced Metafile (EMF) Vectorimage
.emf
Escher Graphics Vectorimage
.egr
FrameMaker Graphics (FMV) Vectorimage
3.0 – 5.0 .fmv
Gem File (Vector) Vectorimage
.img
Harvard Graphics Chart DOS Vectorimage
2.0 – 3.0 .ch3
Harvard Graphics for Windows Vectorimage
.prs
HP Graphics Language Vector 2.0 .hp, .hpg
Relativity | User Guide - 86
Program/File Type Category Type/Version File Exten-sion
imageIGES Drawing Vector
image5.1 – 5.3 .iges
Micrografx Designer Vectorimage
Version 6 .dsf
Micrografx Designer Vectorimage
Through 3.1 .drw
Micrografx Draw Vectorimage
Through 4.0 .drw
Novell PerfectWorks Draw Vectorimage
2.0
OpenOffice Draw Vectorimage
1.1 – 3.0 .sda
Oracle Open Office Draw Vectorimage
3.x .sda
SVG (processed as XML, not rendered) Vectorimage
.xml
Visio Vectorimage
5.0 – 2007 .vsd
Visio (Page PreviewmodeWMF/EMF) Vectorimage
4.0 .wmf, .emf
Windows Metafile Vectorimage
.vmf
Adobe FrameMaker (MIF only) Word pro-cessing
3.0 - 6.0 .mif
Adobe Illustrator Postscript Word pro-cessing
Level 2 .eps
Ami Word pro-cessing
Ami Pro for OS2 Word pro-cessing
.sam
Ami Pro for Windows Word pro-cessing
2.0, 3.0 .sam
Apple iWork Pages (MacOS, text and PDF preview) Word pro-cessing
09 .pages
DEC DX Word pro-cessing
Through 4.0 .dx
DEC DX Plus Word pro-cessing
4.0, 4.1 .dx, .wpl
EnableWord Processor Word pro-cessing
3.0 - 4.5
Relativity | User Guide - 87
Program/File Type Category Type/Version File Exten-sion
First ChoiceWP Word pro-cessing
1.0, 3.0 .pfx
Framework WP Word pro-cessing
3.0
Hangul Word pro-cessing
97 - 2010 .hwp
IBM DCA/FFT Word pro-cessing
.dca, .fft
IBM DisplayWrite Word pro-cessing
2.0-5.0 .rft, .dca
IBM Writing Assistant Word pro-cessing
1.01 .iwa
Ichitaro Word pro-cessing
5.0, 6.0, 8.0 -13.0, 2004, 2010
.jtd
JustWrite Word pro-cessing
Through 3.0 .jw
Kingsoft WPS Writer Word pro-cessing
2010 .wps
Legacy Word pro-cessing
1.1 .leg
Lotus Manuscript Word pro-cessing
Through 2.0 .manu
Lotus WordPro (text only) Word pro-cessing
9.7, 96 -Mil-lennium 9.8
.lwp, .mwp
MacWrite II Word pro-cessing
1.1 .mcw
Mass 11 Word pro-cessing
Through 8.0 .m11
Microsoft Word for DOS Word pro-cessing
4.0 – 6.0 .doc
Microsoft Word for Macintosh Word pro-cessing
4.0-6.0, 98 - 2008 .doc
Microsoft Word for Windows Word pro-cessing
1.0 – 2010 .doc, .docx
Microsoft WordPad Word pro-cessing
.rtf
Microsoft Works WP for DOS Word pro-cessing
2.0 .wps
Microsoft Works WP for Macintosh Word pro-cessing
2.0 .wps
Relativity | User Guide - 88
Program/File Type Category Type/Version File Exten-sion
Microsoft Works WP for Windows Word pro-cessing
3.0, 4.0 .wps
Microsoft Write for Windows Word pro-cessing
1.0 – 3.0 .wri
MultiMate Word pro-cessing
Through 4.0 .dox
MultiMate Advantage Word pro-cessing
2.0 .dox
Navy DIF Word pro-cessing
.dif
Nota Bene Word pro-cessing
3.0 .nb
Novell PerfectWorks Word Processor Word pro-cessing
2.0 .wpw
OfficeWriter Word pro-cessing
4.0-6.0
OpenOfficeWriter Word pro-cessing
1.1 - 3.0 .sdw
Oracle Open OfficeWriter Word pro-cessing
3.x .sdw
PC File Doc Word pro-cessing
5.0
PFS: Write Word pro-cessing
A, B .pfs
ProfessionalWrite for DOS Word pro-cessing
1.0, 2.0
ProfessionalWrite Plus for Windows Word pro-cessing
1.0
Q&AWrite Word pro-cessing
2.0, 3.0 .jw
SamnaWord IV Word pro-cessing
1.0 – 3.0 .sam
SamnaWord IV+ Word pro-cessing
.sam
Signature Word pro-cessing
1.0
SmartWare II WP Word pro-cessing
1.02 .def
Sprint Word pro-cessing
1.0 .spr
Relativity | User Guide - 89
Program/File Type Category Type/Version File Exten-sion
StarOfficeWriter Word pro-cessing
5.2 – 9.0 .sdw
TotalWord Word pro-cessing
1.2
Wang IWP Word pro-cessing
Through 2.6 .iwp
WordMarc Composer Word pro-cessing
WordMarc Composer+ Word pro-cessing
WordMarcWord Processor Word pro-cessing
WordPerfect for DOS Word pro-cessing
4.2 .wpd
WordPerfect for Macintosh Word pro-cessing
1.02 - 3.1 .wpd
WordPerfect for Windows Word pro-cessing
5.1 – X5 .wpd
Wordstar 2000 for DOS Word pro-cessing
1.0 - 3.0 .wsd
Wordstar for DOS Word pro-cessing
3.0 - 7.0 (nonedefined)
Wordstar for Windows Word pro-cessing
1.0 .ws1
XyWrite Word pro-cessing
Through III+ .xy
13 WorkspacesIn Relativity, a workspace provides a secure data repository for documents used in cases or forapplications developed with Dynamic Objects. You can store all types of documents (such asproductions, witness testimony, and so on) in a workspace to facilitate searching, organizing, andcategorizing content. In addition, you can use granular security settings to grant or deny permissionsto specific content stored in the workspace.
At the workspace level, you can also define views, layouts, fields, and choices. These Relativityfeatures streamline workflows, as well as simplify the processes for organizing and categorizingcontent. Views support filtering on item lists, while layouts, fields, and choices are used forcategorizing documents.
Relativity | User Guide - 90
Relativity | User Guide - 91
13.1 Workspace navigationThe workspace has several key areas that are important to understand as a Relativity user.
13.1.1 BrowserThe browser is located on the left side of the workspace. Depending on your permissions, you maynot see the browser. If you don't have a browser in your workspace, you can skip this section.
If you can see the browser, it contains at least three of the following options for browsing throughyour documents:
n Foldersn Field Treen Saved Searchesn Clusters
No matter which of these options you use, there are several display options you can use tocustomize your workspace.
The browser opens by default. Hide or show the browser by clicking the vertical Hide Browser orShow Browser link directly to the right of the browser. Clicking Hide Browser closes the browserand expands the item list manager to the full width of the Relativity window. The filtered selectionsyou choose in the browser appear on the vertical bar when the browser is hidden. Reopen thedocument browser by clicking the Show Browser link.
You can also resize the document browser. Use the browser resize handle–the thick, black verticalbar to the left of the show/hide browser link–to resize the browser to suit your preference.
13.1.1.1 Browser optionsThe browser menu is located directly below the browser. Click on one of the menu’s options todisplay that mode of the browser:
Icon Name DescriptionFolder browser Navigate the folder hierarchy for your workspace
Field Tree browser Browse your documents according to how they were coded or grouped
Saved Searches browser Create a new search, or browse previously saved searches
Clusters browser Browse your workspace clusters, which are groupings of conceptually cor-related documents.You must have Relativity Analytics to use the cluster browser and defineclusters in your workspace. See the Analytics Guide.
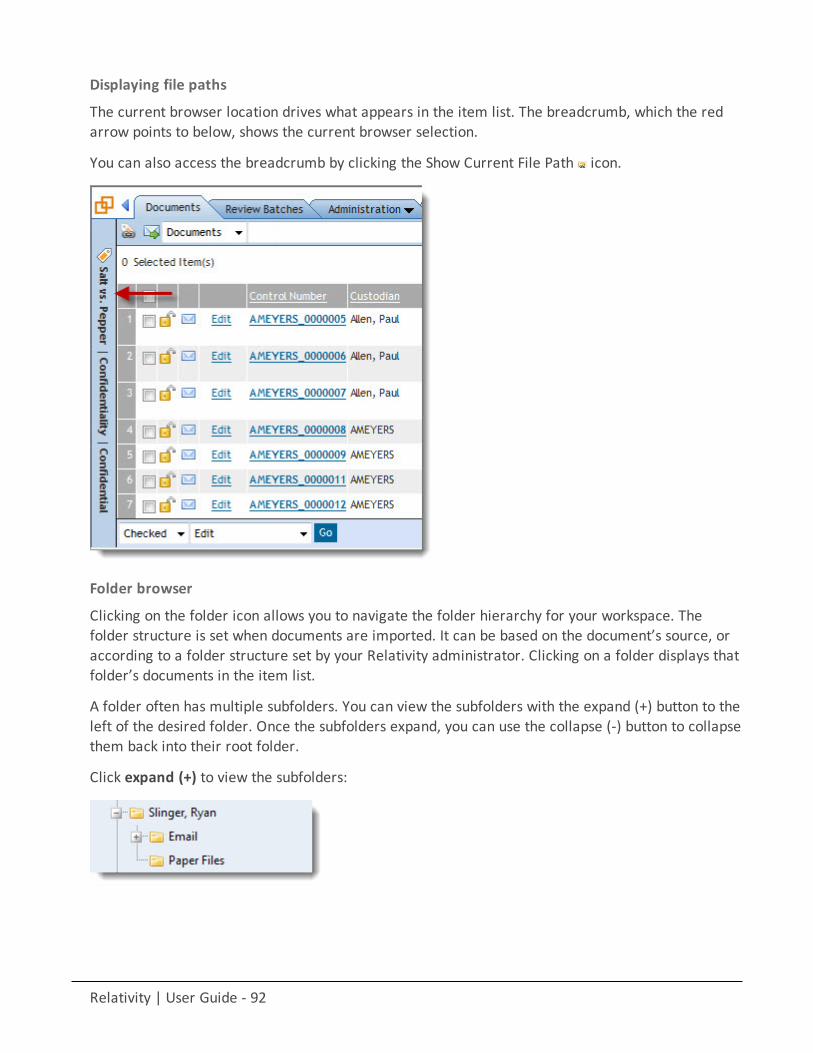
Relativity | User Guide - 92
Displaying file paths
The current browser location drives what appears in the item list. The breadcrumb, which the redarrow points to below, shows the current browser selection.
You can also access the breadcrumb by clicking the Show Current File Path icon.
Folder browser
Clicking on the folder icon allows you to navigate the folder hierarchy for your workspace. Thefolder structure is set when documents are imported. It can be based on the document’s source, oraccording to a folder structure set by your Relativity administrator. Clicking on a folder displays thatfolder’s documents in the item list.
A folder often has multiple subfolders. You can view the subfolders with the expand (+) button to theleft of the desired folder. Once the subfolders expand, you can use the collapse (-) button to collapsethem back into their root folder.
Click expand (+) to view the subfolders:

Relativity | User Guide - 93
Click collapse (-) to get back to the root folder:
Field tree browser
Clicking on the field tree icon displays the field tree in the browser. Selected single- and multiple-choice list fields and their choices appear in a tree structure.
Each single and multiple-choice field has its own choice folder in the field tree. The field’s choicesappear as subfolders. Each field also has a [Not Set] choice, which displays null values for the field.
You can click on a choice in the field tree to display all the documents in the item list manager thathave the selected choice value AND meet the criteria of the active view. In the item list, click thisicon to send a link to the documents currently displayed in it.
Sending email links to choicesYou can send an email message with a link to a choice, a choice folder, or the item list that appearswhen the field tree browser is open. In the field tree browser, right-click on a choice (or a choice
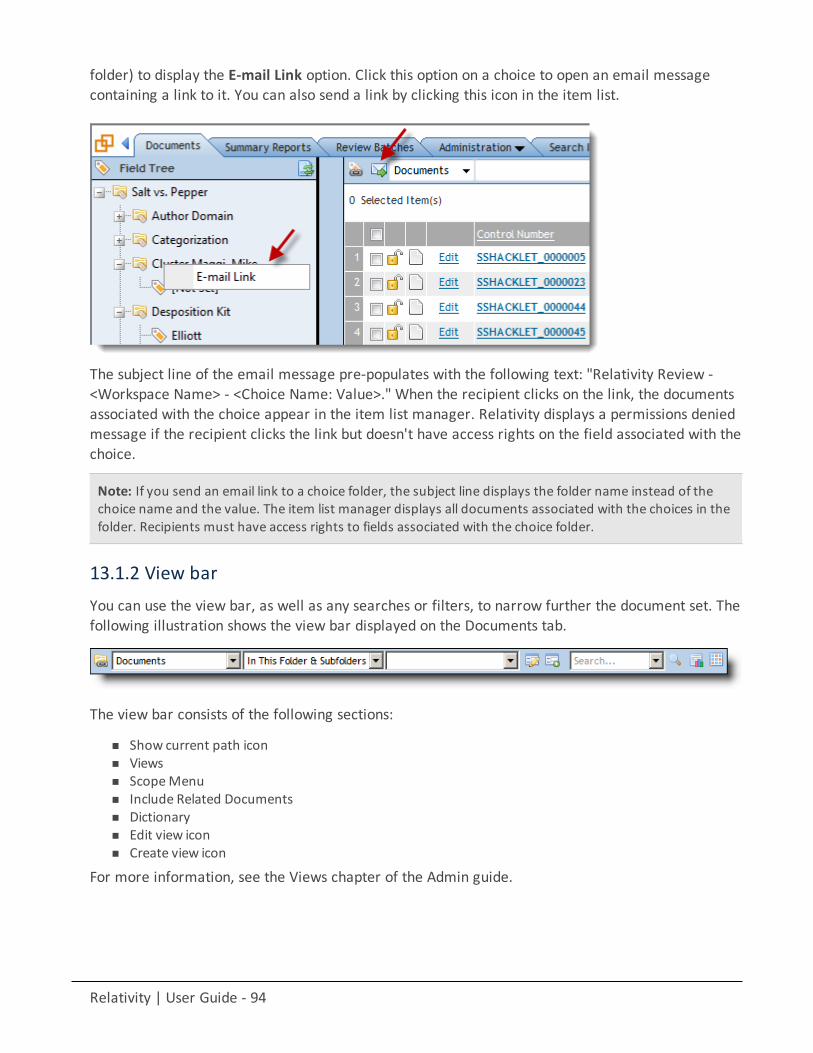
Relativity | User Guide - 94
folder) to display the E-mail Link option. Click this option on a choice to open an email messagecontaining a link to it. You can also send a link by clicking this icon in the item list.
The subject line of the email message pre-populates with the following text: "Relativity Review -<Workspace Name> - <Choice Name: Value>." When the recipient clicks on the link, the documentsassociated with the choice appear in the item list manager. Relativity displays a permissions deniedmessage if the recipient clicks the link but doesn't have access rights on the field associated with thechoice.
Note: If you send an email link to a choice folder, the subject line displays the folder name instead of thechoice name and the value. The item list manager displays all documents associated with the choices in thefolder. Recipients must have access rights to fields associated with the choice folder.
13.1.2 View barYou can use the view bar, as well as any searches or filters, to narrow further the document set. Thefollowing illustration shows the view bar displayed on the Documents tab.
The view bar consists of the following sections:
n Show current path iconn Viewsn ScopeMenun Include Related Documentsn Dictionaryn Edit view iconn Create view icon
For more information, see the Views chapter of the Admin guide.

Relativity | User Guide - 95
13.1.2.1 Scope menu
The scope menu, highlighted in red above, controls the folder scope of the documents returned. Thescope menu contains the following options:
n In This Folder and Subfolders - displays the documents in the currently selected folder AND the doc-uments in all of its subfolders. This is the default option.
n In This Folder - displays ONLY the documents in the currently selected folder in the browser, not its sub-folders.
13.1.2.2 Including related documentsInclude related documents returns documents related to the documents currently in the view. Theoptions vary by workspace, but may include email family groups, duplicates, or similar documents.Learn more about related items in the Related Items Pane section of this document.
13.1.2.3 IconsIn the left hand of the view bar, one icon appears, and at the right end of the view bar, there may beone or two icons, as seen below:
Once you used your browser selection and view bar to select the correct searching set ofdocuments, you can begin working with them in the item list manager.
Icon DescriptionShow the current path. This allows you to copy your current browser location to the clipboard topaste into various locations. Clicking this icon displays the following:
Add a new view. This will only be present if you have permission to add a new view. If it is notpresent, contact your Relativity administrator to add a view.Edit the current view. This will only be present if you have permission to edit the view. If it's notpresent, contact your Relativity administrator to edit the current view.
13.1.3 Item listThe item list manager consists of the item list as well as controls for working with the documents.The fields that appear in the item list are based on the selected view, which is editable.
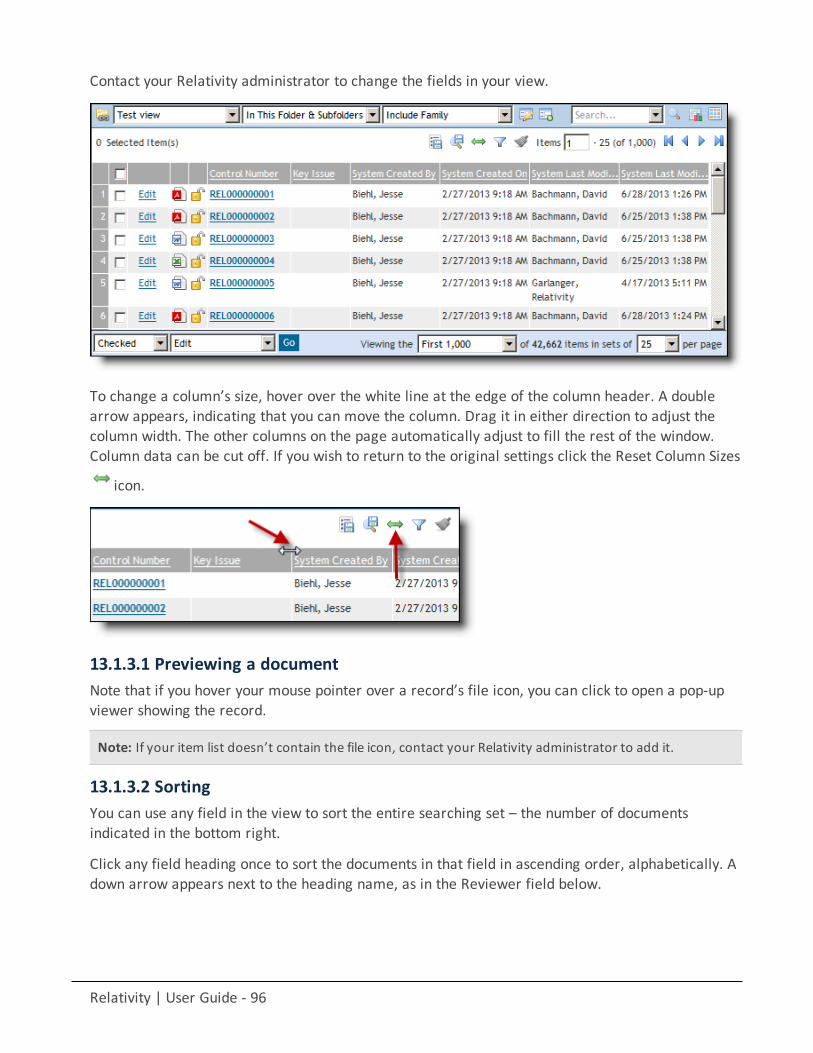
Relativity | User Guide - 96
Contact your Relativity administrator to change the fields in your view.
To change a column’s size, hover over the white line at the edge of the column header. A doublearrow appears, indicating that you can move the column. Drag it in either direction to adjust thecolumn width. The other columns on the page automatically adjust to fill the rest of the window.Column data can be cut off. If you wish to return to the original settings click the Reset Column Sizes
icon.
13.1.3.1 Previewing a documentNote that if you hover your mouse pointer over a record’s file icon, you can click to open a pop-upviewer showing the record.
Note: If your item list doesn’t contain the file icon, contact your Relativity administrator to add it.
13.1.3.2 SortingYou can use any field in the view to sort the entire searching set – the number of documentsindicated in the bottom right.
Click any field heading once to sort the documents in that field in ascending order, alphabetically. Adown arrow appears next to the heading name, as in the Reviewer field below.
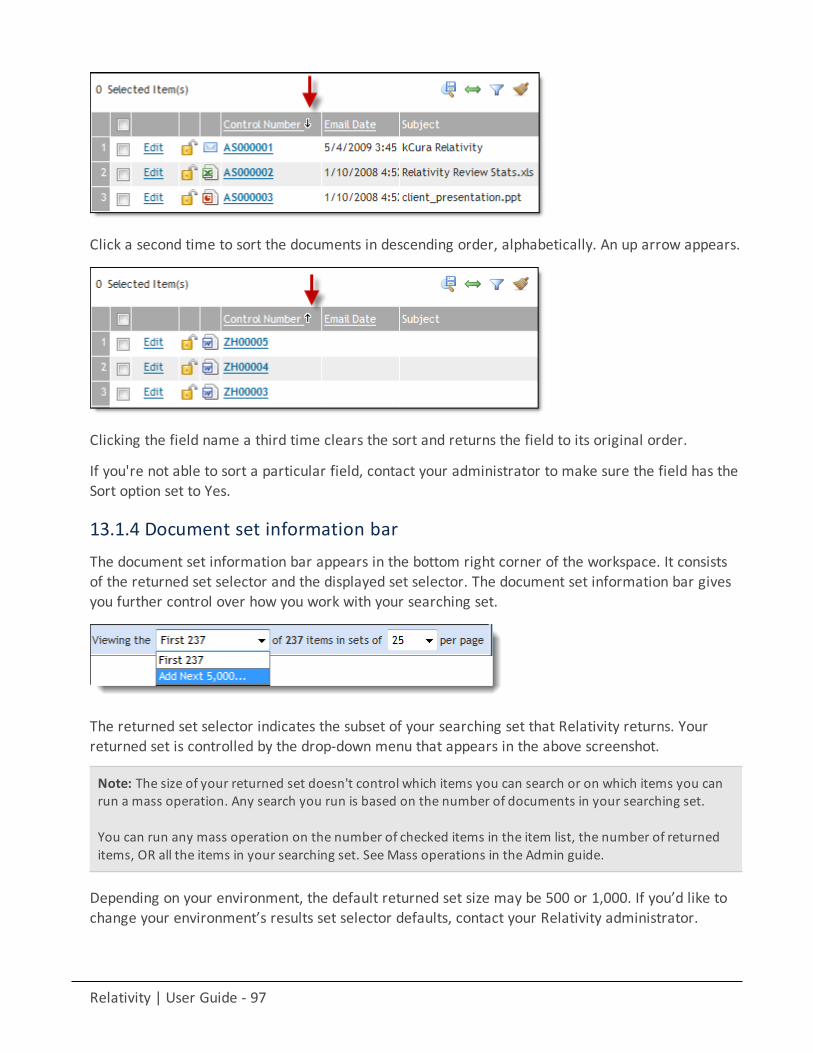
Relativity | User Guide - 97
Click a second time to sort the documents in descending order, alphabetically. An up arrow appears.
Clicking the field name a third time clears the sort and returns the field to its original order.
If you're not able to sort a particular field, contact your administrator to make sure the field has theSort option set to Yes.
13.1.4 Document set information barThe document set information bar appears in the bottom right corner of the workspace. It consistsof the returned set selector and the displayed set selector. The document set information bar givesyou further control over how you work with your searching set.
The returned set selector indicates the subset of your searching set that Relativity returns. Yourreturned set is controlled by the drop-down menu that appears in the above screenshot.
Note: The size of your returned set doesn't control which items you can search or on which items you canrun a mass operation. Any search you run is based on the number of documents in your searching set.
You can run any mass operation on the number of checked items in the item list, the number of returneditems, OR all the items in your searching set. SeeMass operations in the Admin guide.
Depending on your environment, the default returned set size may be 500 or 1,000. If you’d like tochange your environment’s results set selector defaults, contact your Relativity administrator.
Relativity | User Guide - 98
Note that the number of documents in your result set selector is the number of documents you'reable to browse in the core reviewer interface.
For instance, if your result set selector is set to 500 documents, you're able to browse the first 500documents of your searchable set. You can't browse to document 501 in the viewer.
To do so, you can either:
n Add more documentsn Apply filters to return only the documents you want to browse
13.1.4.1 Adding more documentsClick the drop-down menu to add documents to the returned set. Depending on your environment,you may be able to add 500, 1,000, or 5,000 more documents to your returned set. If you want tochange your environment’s results set selector defaults, contact your Relativity administrator.
Relativity | User Guide - 99
Proprietary Rights
This documentation (“Documentation”) and the software to which it relates (“Software”) belongsto kCura Corporation and/or kCura’s third party software vendors. kCura grants written licenseagreements which contain restrictions. All parties accessing the Documentation or Software must:respect proprietary rights of kCura and third parties; comply with your organization’s licenseagreement, including but not limited to license restrictions on use, copying, modifications, reverseengineering, and derivative products; and refrain from any misuse or misappropriation of thisDocumentation or Software in whole or in part. The Software and Documentation is protected bythe Copyright Act of 1976, as amended, and the Software code is protected by the Illinois TradeSecrets Act. Violations can involve substantial civil liabilities, exemplary damages, and criminalpenalties, including fines and possible imprisonment.
©2014. kCura Corporation. All rights reserved. Relativity® and kCura® are registered trademarksof kCura Corporation.