winter 1947 - fantasy flight games · pdf filethe offensive breaks on the german defensive...
TRANSCRIPT
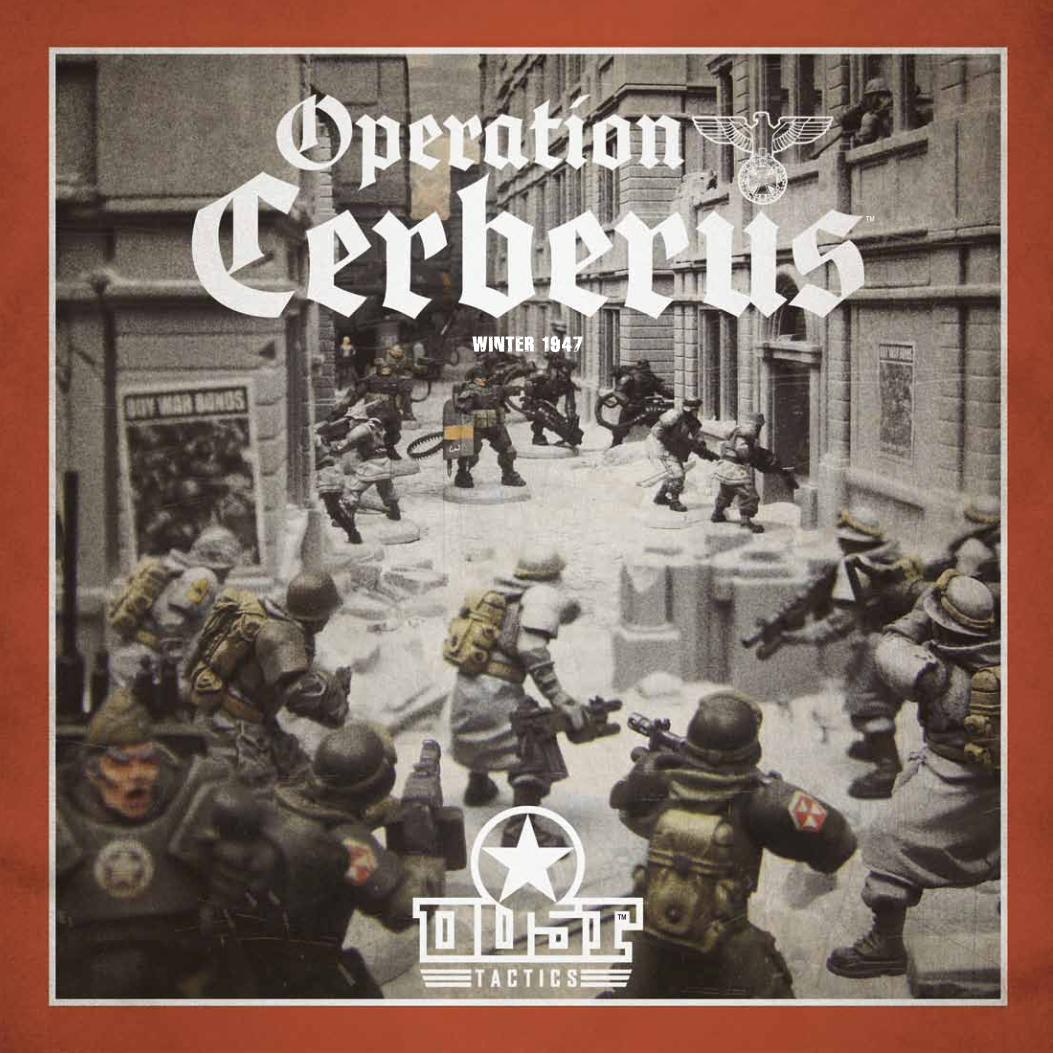
Winter 1947
™
™
RestRicted (foR gaming use only)
R e a d t h i s b o o k t h o R o u g h l y a n d k e e p i t s e c u R e • i t m a y s a v e l i v e s
™
2
OperatiOn “Cerberus”Welcome to Operation “Cerberus,” the name used to describe the fierce urban battles that began shortly after the Axis forces landed along the southern coast of Great Britain. In Southampton, Portsmouth, and Brighton, Allied soldiers battle Axis walkers in close combat. With the help of the Home Guard, these brave soldiers now fight to save their homeland – an event that no one could have imag-ined just a few years ago.
Thanks to its geographic position in Europe, many of the Allied forces in this theater are concentrated in the United Kingdom. North of London, in a remote place, is the Allied Special Operations Command for Europe (ASOCOM “E”). This site houses many of the most formidable warriors of the Free World. With their unique weaponry and skills, these special operations commandos are ready to join the fight. They’re sure to strike fear in hearts of the invading forces!
If Western Europe is to be free again someday, the British Isles must not fall! But first, you can explore a global chro-nology of the events that have happened thus far.
a WOrld in dust: 1936–1947The bitter conflict that has engulfed the world is now in its eleventh year. The most important events of that decade of war are listed below.
The early War: 1936–19411936, July: An alien spaceship crashes in Antarctica.
There is only one survivor, locked in a protective sarcophagus. (Operation “SeeLöwe”)
1937, July: Japanese forces begin the invasion of main-land China; World War II begins in Asia.
1938, March: German military forces discover the crashed spaceship in Queen Maud’s Land. The alien sarcophagus is returned to Germany in a submarine. (Operation “SeeLöwe”)
1938, April: The Blutkreuz Korps is formed in Berlin under Baron Leopold Von Thaler. Its goal is to study alien technology. (Operation “SeeLöwe”)
1939, September: Germany invades Poland; Great Brit-ain, France, Australia, and New Zealand declare war on Germany. World War II begins in Europe.
1940, March: Blutkreuz Korps scientists manage to free the alien from his sarcophagus and wake him. He takes the name Kvasir to honor his hosts. (Operation “Blue Thunder”)
1940, June: Paris falls, and the first Battle of Britain starts the following month. Saigon becomes the new capital of the French Republic.
1940, September: Germany, Italy, and Japan sign the Tripartite Pact. The foundations of the Axis are set.
1940, December: The war begins in North Africa. The following month, English and Australian troops take Tobruk.
1941, June: Operation “Barbarossa” commences. The invasion of the USSR begins.
1941, December: The Japanese navy attacks Pearl Harbor. The United States enters the war.
1941, December: The Battle for Moscow begins. The first Soviet ski troops push back the German Army.
The War ConTinues: 1942–19431942, February: Japanese forces attack Darwin, Aus-
tralia. A few days later, a Japanese submarine fires a few rounds on Santa Barbara, California. Main-land USA is proven vulnerable to attack.
1942, April: The first American raid on Tokyo occurs.
1942, August: The Battle for Guadalcanal occurs. The American offensive in the Pacific begins.
1942, October: The first test of a German V2 rocket occurs.
1942, October: The second Battle of El-Alamein occurs. Allied troops achieve their first victory over the Afrika Korps.
1942, October: The new Panzer KampfLäufer is combat tested in the ruins of Stalingrad. Mass production of these models is slowed by the difficulty Germany has in getting the new VK mineral from Antarctica. (Operation “SeeLöwe”)
1942, November: Operation “Torch” commences. Allied forces land in North Africa.
1942, November: Operation “Uranus,” a massive Rus-sian counterattack around Stalingrad, begins. The German army holds, but casualties are high. The part of town conquered by the Germans is held thanks to the new walkers. (Operation “SeeLöwe”)
1943, February: The German army finally takes Stalin-grad, occupying the west bank of the city. The East-ern Front remains stable in this region for the foresee-able future. But all is not lost for the Soviet army: it captures a brand new Pz. KpfL in perfect condition.
1943, February: The Battle of Kasserine Pass occurs. The US army suffers its first defeat at the hands of a German army in a ground battle.
1943, February: The Soviet army takes back Kharkov, then loses it again, along with 52 divisions of men – either destroyed or captured. The new German walkers are deadly, and the Russians still don’t have anything to counter them.
1943, March: To make up for the huge number of casu-alties, the Blutkreuz Korps start testing the Wieder-belebungsserum on fallen German soldiers. The ex-periment looks promising. (Operation “SeeLöwe”)
1943, April: Adolf Hitler organizes a big victory parade in Berlin to celebrate his birthday and the fall of Stal-ingrad. During the parade, a sniper assassinates
Content List
This box includes:
- A seT of inTerlocking
building pieces, including:
- 15 ouTside corners
- 3 inside corners
- 6 supporT wAlls
- 6 nArrow windows
- 6 wide windows
- 15 wAlls
- 2 doorwAys
- 2 supporT windows
- 3 3x1 floors
- 3 2x1 floors
- 2 heroes & 2 uniT cArds
- smoke Token
- This rulebook
RestRicted (foR gaming use only)
b e c a R e f u l • d o n o t l e t t h i s b o o k f a l l i n t o e n e m y h a n d s
3OpEratiOn CErBErUS
him. A few well-connected people quickly link the killing to the Blutkreuz Korps, but the investigation is terminated prematurely. (Operation “SeeLöwe”)
1943, May: German troops are disorganized on all fronts for a few weeks, as no one really knows who controls the country.
1943, May: What remains of the Afrika Korps and the Italian army surrenders to the Allies in North Africa. The war there is over…for now.
1943, May: After a brief but bloody power struggle in Berlin, Grand Admiral Karl Dönitz is appointed “Protector of the Axis.” Field Marshal Erwin Rom-mel takes control of the entire German Army. Nazis are arrested all over the Reich, and SS troops are disbanded or integrated into the Army. Many are put on trial. (Operation “SeeLöwe”)
1943, June: The Axis Bloc is formed around Germany. The official flag of the new bloc is the black Ritter Kreuz (Knight’s Cross) on a red background.
1943, July: The Battle of Kursk begins.
1943, July: Allied troops land in Sicily.
1943, August: The Battle of Kursk ends. It’s a strate-gic defeat for Germany, whose walkers are not yet effective in open terrain. Still, the front stabilizes itself.
1943, September: Allied forces land in mainland Italy.
1943, October: Secret talks between the Axis and the Allies to negotiate a separate peace on the West-ern Front begin.
1943, November: German troops are now on a defen-sive stance along the Eastern Front. Soviet attacks are deadly but are pushed back.
1943, December: The Western Front peace talks fall apart. When Stalin learns of these secret meetings, he cuts off all relations with the Allies.
The Middle War: 1944–19451944, January: The Battle for Monte Cassino begins.
1944, January: The Soviet winter offensive starts around Leningrad and Novgorod. After a few initial successes, the offensive breaks on the German defensive lines. The Soviet army digs in.
1944, January: In San Juan, Argentina, German scientists
build a new VK-enhanced bomb in a secret labora-tory. During an accident, the bomb explodes, caus-ing an earthquake that kills 10,000. This type of research is forever banned by the Axis.
1944, January: Allied forces land in Anzio, Italy. The bridgehead is attacked day and night for four months, as Allied soldiers fight with German walk-ers in close combat.
1944, June: Allied forces enter Rome, the first Axis capital to fall.
1944, June: Operation “Overlord” commences. Allied forces land in Normandy.
1944, June: The first V1 missile is launched towards London.
1944, June: To counter American troops in the Pacific, Japan asks for Germany’s military help. Whole regiments of walkers are sent via submarine to the Pacific theater, along with German pilots.
1944, July: During a bold amphibious operation, Soviet troops overwhelm the French and British garrison on Madagascar. The USSR is now at war with the Allies.
1944, August: Japan starts the “Steel Samurai” program to develop its own war walkers.
1944, August: Turkey stops all economic and diplomatic relations with Germany and declares its neutrality. Istanbul quickly becomes home to the most danger-ous nest of spies in the world.
1944, August: Allied troops liberate Paris.
1944, December: German offensive in the Belgian Ardennes. Allied forces are slowly pushed back.
1945, January: The second Battle for France occurs. During a covert operation, Joe Brown captures the VK technology from the Axis army.
1945, January: Japanese troops invade Ceylon with the assistance of German walkers. The island falls rapidly.
1945, March: The first Allied base is built in Antarctica. American and British sci-entists quickly find what they were look-ing for.
1945, July: From Ceylon, Japanese forces threaten the supply lines of all Allied armies in Southeast Asia. The United States decides to use a VK-enhanced
nuclear bomb on the island before attacking it. The result is beyond imagination: The entire island is wiped out by the blast. The earth cracks open, and the ocean swallows 90% of the island. (See “The History of ASOCOM” on page 4 for more informa-tion about this event.)
1945, July: The Allies ban the use of nuclear weapons.
1945, August: The Japanese Empire, terrified by these new weapons, formally joins the Axis. Emperor Hirohito now has only a symbolic role.
1945, September: Fighting in France is fierce as Allied forces are slowly pushed back to their starting point in Normandy.
1945, October: Japanese forces land simultaneously on the west coast of Australia and New Zealand. Many Commonwealth regiments are recalled from Europe to defend their homelands.
1945, November: The USSR and Communist China decide to join forces permanently, forming the Sino-Soviet Union (SSU).
1945, December: Axis forces invade Nepal and Tibet. Nobody understands why they are there, and the region was poorly defended by the Allies and the SSU.
RestRicted (foR gaming use only)
R e a d t h i s b o o k t h o R o u g h l y a n d k e e p i t s e c u R e • i t m a y s a v e l i v e s
™
4
The laTe War: 1946–19471946, March: The SSU organizes a series of Marxist rev-
olutions in South America. As soon as the regimes change, Sino-Soviet troops arrive.
1946, May: The Allies are pushed back to the sea on the coast of Normandy. The Allied Army sails back to Great Britain for the second time.
1946, July: Operation “Red Sun” commences. SSU forc-es land in Alaska and Florida on the same night. They manage to take control of a large part of the Alaskan coast before the Allied army joins the fight. In Florida, the Allies react quicker, and the Soviet’s advance is stopped by the 2nd Marine Division in the Everglades. (See “Operation ‘Hard Skin’” on page 5 for more information about this event.)
1946, August: As their situation deteriorates everywhere, all the Western powers join forces to officially form an alliance. The third bloc is born.
1946, August: Operation “High Jump” commences. Allied forces launch a massive assault on Antarctica.
1946, September: The revived Afrika Korps lands on the coast of Libya and the Gulf of Guinea. The war in Africa begins again.
1946, December: The NNO (Neutral Nations Orga-nization) is created in Bangkok, Thailand.
1947, January: The Axis launches a massive offensive on all fronts on all continents.
1947, January: Operation “Blue Thunder” begins in Antarctica.
1947, January: Operation “Cyclone,” Blue Thunder’s aftermath, begins in Antarctica.
1947, January: Operation “SeeLöwe.” The Axis airdrops walkers on Dover. The invasion of England begins. It’s quickly followed by Operation “Cerberus,” the campaign of conquest in Southern England.
asOCOM: the allied speCial OperatiOns COMMandIt may be that the Blutkreuz Korps has changed history. But ASOCOM intends to do the same. It is now the single most powerful organization in the world. Its resources are mas-sive; its personnel are dedicated and competent; its goal is very clear: the war doesn’t just need to end now – it needs to be won. And that is what ASOCOM plans to do.
The hisTory of asoCoMASOCOM was born even before the Allies decided to join their fates together once and for all. It was the first organi-zation truly born from the collective effort of many nations fighting for their freedom.
Early on, political powers in both the US and the UK de-cided to join forces and form a unique agency, combin-ing the American Office of Strategic Studies (OSS) and the British Special Operations Executive (SOE). They were to share resources, data, and manpower to counter the Axis war effort. After a rough start, during which everyone learned how their new allies worked and thought, this deci-sion would prove to be a wise one.
ASOCOM had several early successes, which placed the or-ganization at the center of the Allies’ strategic efforts. ASO-COM is consulted before every major military operation, and ASOCOM units routinely assist regular Allied forces.
Since its creation, the organization has been joined by all of the main Allied powers: the USA and UK as the founders, of course, but also Brazil, France, Australia, New Zealand, Canada, and Mexico. These eight nations form the founda-tion of the Allied bloc and are its most powerful members. ASOCOM claimed an octagon as its symbol, with each side representing one of the eight members. This symbol inspired the architecture for the newly constructed Allied military head-quarters in Kansas, which is known simply as the Octagon.
While it has won many great (and mostly unknown) vic-tories, ASOCOM has also failed several times. Operation “Red Lightning” – the assault on Schloss Adler – was the first major failure. Thought by many to be a sure victory, all of the objectives of ASOCOM were lost. Leopold Von Thaler could not be captured, and no valuable data on the VK or laser weapons were collected. ASOCOM’s PR department managed to convince the world that the assault was a suc-cess, but for those “in the know,” it was a disaster.
The Ceylon Incident, as it is modestly known, was ASO-COM’s second big failure. Shortly after its creation, the or-ganization was quickly put in charge of all development of new technology, as it was already gathering data directly from the battlefield. This made it easier to exploit the new technology directly. The VK-enhanced nuclear bomb was the answer ASOCOM offered after the invasion of Ceylon by Japanese forces. After the bomb cracked the earth, and entirely destroyed the island, the organization’s previously good reputation was irreparably damaged. The entire world was horrified by the incident, and the Japanese Empire was pushed into the arms of the Axis. The ban on the use of nuclear weapons remains something that ASOCOM must overcome. But the political and ideological shock waves of the explosion are still too powerful to this day.
ASOCOM’s third major failure, and probably its worst so far, was its failure to anticipate the invasion of the US main-land by the SSU. The SSU SMERSH organization played the Allies for fools, having carefully planned the invasion of Alaska and Florida so that nothing could thwart their plans. Even though the two fronts were quickly stabilized, the SSU strike was a huge blow to the United States and the Allies as a whole. As is often the case, the invasion strengthened the US resolve: the war-weary Americans discovered a desire for revenge.
Today, ASOCOM fights a secret war against the Blutkreuz Korps and SMERSH, its two most powerful enemies. The Special Operations Command knows that if it can crush these two organizations, the rest of the enemy blocs will soon follow. But for many in the organization, this secret war has become personal. Too many good friends have been lost on all sides.
CurrenT Major operaTionsASOCOM is currently engaged in a number of military operations. These are mostly not “secret operations” per se, but real battle lines. Here, the Special Operations Com-mand provides tactical intelligence, counter-espionage ef-forts, and fire support using its new technologies.
As with all other matters in which ASOCOM takes part, its ruling body – the Council of Eight – determines where

RestRicted (foR gaming use only)
b e c a R e f u l • d o n o t l e t t h i s b o o k f a l l i n t o e n e m y h a n d s
5OpEratiOn CErBErUS
its forces are engaged. The Council of Eight is composed of the heads of the intelligence services from each of the Allies’ major powers.
Operation “Live Free or Die”The Alaska Campaign
After the massive SSU landings in the summer of 1946, a pocket of Allied resistance formed on the Alaskan peninsula. The rest of the continent held firm, defended by an Allied army that was infuriated to have been taken by surprise. But the situation on the peninsula has become much more criti-cal. The Allies had to constantly push back SSU attacks along a 50 kilometer front. Supplies can now only be brought in by air or sea, often in very difficult weather conditions.
The peninsula is currently held by the 3rd Marine Division, whose resistance has been quite heroic in this desert tun-dra scattered with frozen rivers and lakes. To help these desperate soldiers, ASOCOM has deployed its heaviest infantry units. With their massive body armor, they provide firepower against waves of SSU troopers. But even with the help of Special Operations Command, nobody knows how long the peninsula can hold.
Operation “Hard Skin”The Everglades Campaign
At the same time that it launched its attack on Alaska, the SSU activated its forces in Cuba and invaded the Florida peninsula. After overcoming light resistance on the beach-es, the SSU fighters quickly encountered the 2nd Marine Division, who stopped the invaders in their tracks.
Today, fierce fighting continues in the heart of the Everglades. The surrounding terrain is some of the deadliest in the world, and the swamps are responsible for nearly as many casual-ties as the enemy. It is here that ASOCOM is experimenting with modified walkers built on the Medium Combat Walker chassis. These amphibious models mostly carry flamethrow-ers – the most effective weapon for this terrain.
Liberating Florida is one of the main goals of the Allied Army. More troops are sent to this zone every day, but the SSU doesn’t seem to be ready to abandon their foothold. The fighting here may last much longer than expected.
Operation “Headhunter”the lower mongolia campaign
Before the Axis invaded large portions of Nepal and Tibet, Allied forces had nearly cut China in half, up to Mongolia. The Allies still control a large part of these territories, but their forces there are now completely blocked in. The SSU has
gained ground, and the Axis blocks all movement into India.
Formed primarily from Commonwealth and Free French Forces, the 1st Allied Asian Legion was formed around the 4th French Foreign Legion Infantry Regiment. Many mem-bers of the Asian Legion still wear the traditional white kepi of the Foreign Legion.
Even with massive air support coming from India, the Le-gion’s situation is critical. It must control a vast territory while surrounded by powerful enemies. Every day, this ter-ritory shrinks a little – the battles are fierce, but the Allies are slowly pushed back.
Recently, ASOCOM has decided to intervene on this front more directly, committing more resources to this part of the world. New weapons born from VK technology find their way into the hands of proud Legion soldiers, who have centuries of strong military tradition behind them.
asoCoM’s MosT faMousThe world has always needed heroes; the Allies need more than that. In this dire time, the bloc depends on inspiring figures to fight its enemies, strong characters around whom the Allies have built legends. These men and women in-spire all soldiers who fight under the banner of freedom.
These heroes live a dangerous life. Through the years, they have made many powerful enemies and survived many perilous situations. Some of the individuals below may not belong to ASOCOM directly; some are officially in the Army or some other special branch of the military. But they all work for Special Operations in some way. Their pres-ence in these files is more than justified.
Major Jackson Clayborne“Action Jackson” – 3rd Para Brigade Born 1908 in Glasgow, UK
Major Clayborne has been the commanding officer of the 3rd Battalion 3rd Parachute Brigade for over a year now. He joined the British Army in 1926 after attending the Roy-al Military Academy at Sandhurst. He has been fighting in this war since the very first day – so far without a scratch.
Major Clayborne is famous for his audacious attacks. He leads his men from the front lines, always where the ac-tion is thickest. His “Red Devils” (the nickname of the 3rd Battalion) know that when the Major lights up his cigar, everything is about to light up…
Though not an ASOCOM operative, Clayborne is often tasked by its scientists to field test new equipment with the 3rd Battalion. His unit has recently traded its parachutes
for brand-new heavy body armor, which comes with a new deadly technology: phaser weapons.
Even though it’s no longer airborne, the 3rd Battalion Para has kept its red berets and its commando traditions. As with any other paratroopers, its soldiers fight better when surrounded by the enemy.
Captain Joseph Brown“bazooka Joe” – counter attack division, asocom Born 1915 in Brooklyn, NY, USA
Joe Brown is the most famous Allied Ranger serving today. He has an uncanny sense for overcoming dangerous situ-ations. When the men are led by Joe, they know they’ll make it back home in one piece.
Raised on the streets of Brooklyn by an Italian mother and an Irish policeman, Joe learned early on that to survive you have to use your brain. And that having strong legs helps a lot. From his youth during the Great Depression, Joe kept a bitter sense of humor and a strong will.
Joe Brown joined the US Army in early 1942 – a few weeks after the attack on Pearl Harbor. Some say he was motivated by patriotism, while others think it was a clever way to put some distance between himself and some legal troubles coming his way…
RestRicted (foR gaming use only)
R e a d t h i s b o o k t h o R o u g h l y a n d k e e p i t s e c u R e • i t m a y s a v e l i v e s
™
6
He quickly completed officer’s training and has been rising through the ranks ever since. Now he leads the Rangers through their most dangerous missions, always coming out on top. And if he can make a little extra money on the side, why not?
Joe’s most famous feat to date is the capture of VK tech-nology in 1945, during the Second Battle for France. With the help of Rosie, of course. For this, Joe has been heavily decorated, and Rosie hasn’t been forgotten, either. Few know that all of this happened when he was just looking for a few bottles of Champagne to sell while on leave in Paris…
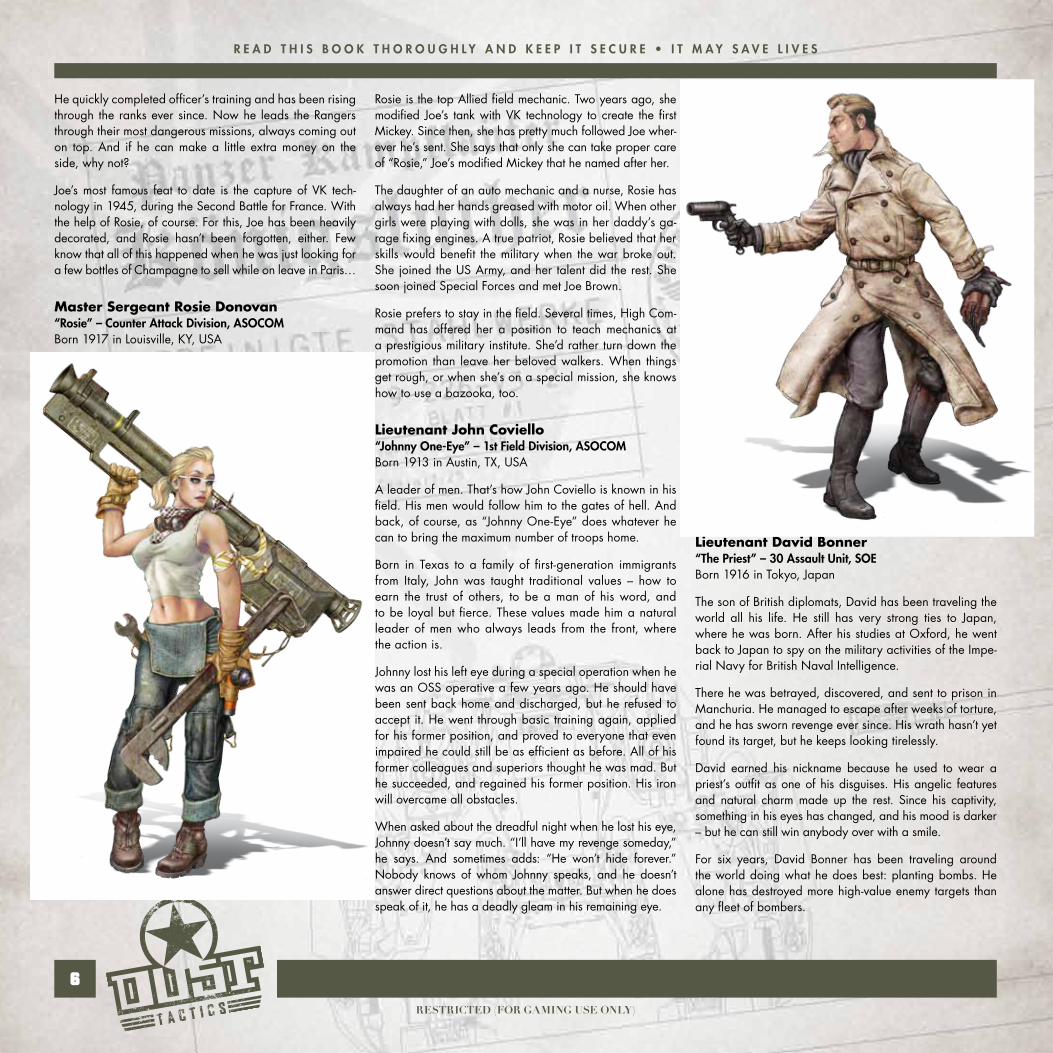
Master Sergeant Rosie Donovan“Rosie” – counter attack division, asocom Born 1917 in Louisville, KY, USA
Rosie is the top Allied field mechanic. Two years ago, she modified Joe’s tank with VK technology to create the first Mickey. Since then, she has pretty much followed Joe wher-ever he’s sent. She says that only she can take proper care of “Rosie,” Joe’s modified Mickey that he named after her.
The daughter of an auto mechanic and a nurse, Rosie has always had her hands greased with motor oil. When other girls were playing with dolls, she was in her daddy’s ga-rage fixing engines. A true patriot, Rosie believed that her skills would benefit the military when the war broke out. She joined the US Army, and her talent did the rest. She soon joined Special Forces and met Joe Brown.
Rosie prefers to stay in the field. Several times, High Com-mand has offered her a position to teach mechanics at a prestigious military institute. She’d rather turn down the promotion than leave her beloved walkers. When things get rough, or when she’s on a special mission, she knows how to use a bazooka, too.
Lieutenant John Coviello“Johnny one-eye” – 1st field division, asocom Born 1913 in Austin, TX, USA
A leader of men. That’s how John Coviello is known in his field. His men would follow him to the gates of hell. And back, of course, as “Johnny One-Eye” does whatever he can to bring the maximum number of troops home.
Born in Texas to a family of first-generation immigrants from Italy, John was taught traditional values – how to earn the trust of others, to be a man of his word, and to be loyal but fierce. These values made him a natural leader of men who always leads from the front, where the action is.
Johnny lost his left eye during a special operation when he was an OSS operative a few years ago. He should have been sent back home and discharged, but he refused to accept it. He went through basic training again, applied for his former position, and proved to everyone that even impaired he could still be as efficient as before. All of his former colleagues and superiors thought he was mad. But he succeeded, and regained his former position. His iron will overcame all obstacles.
When asked about the dreadful night when he lost his eye, Johnny doesn’t say much. “I’ll have my revenge someday,” he says. And sometimes adds: “He won’t hide forever.” Nobody knows of whom Johnny speaks, and he doesn’t answer direct questions about the matter. But when he does speak of it, he has a deadly gleam in his remaining eye.
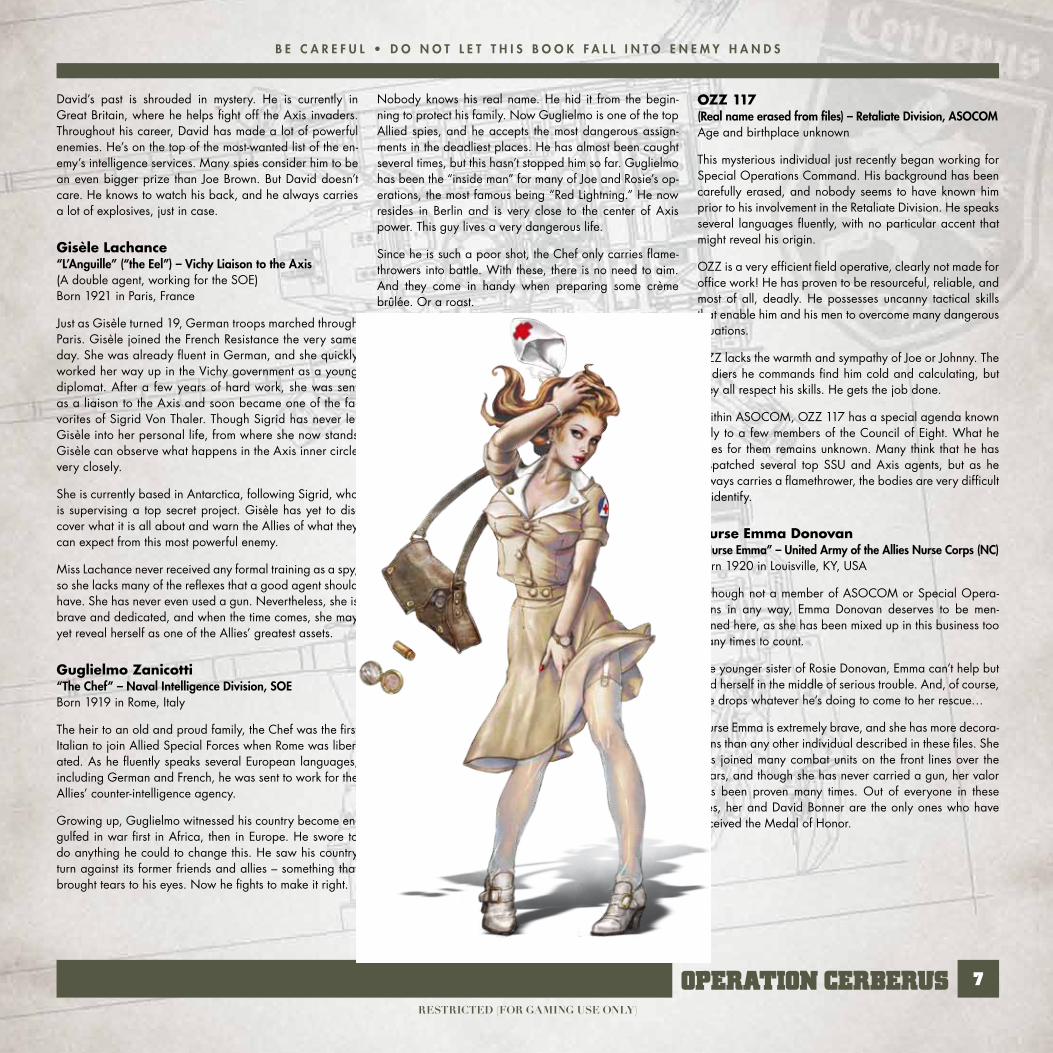
Lieutenant David Bonner“The Priest” – 30 Assault Unit, SOE Born 1916 in Tokyo, Japan
The son of British diplomats, David has been traveling the world all his life. He still has very strong ties to Japan, where he was born. After his studies at Oxford, he went back to Japan to spy on the military activities of the Impe-rial Navy for British Naval Intelligence.
There he was betrayed, discovered, and sent to prison in Manchuria. He managed to escape after weeks of torture, and he has sworn revenge ever since. His wrath hasn’t yet found its target, but he keeps looking tirelessly.
David earned his nickname because he used to wear a priest’s outfit as one of his disguises. His angelic features and natural charm made up the rest. Since his captivity, something in his eyes has changed, and his mood is darker – but he can still win anybody over with a smile.
For six years, David Bonner has been traveling around the world doing what he does best: planting bombs. He alone has destroyed more high-value enemy targets than any fleet of bombers.
RestRicted (foR gaming use only)
b e c a R e f u l • d o n o t l e t t h i s b o o k f a l l i n t o e n e m y h a n d s
7OpEratiOn CErBErUS
David’s past is shrouded in mystery. He is currently in Great Britain, where he helps fight off the Axis invaders. Throughout his career, David has made a lot of powerful enemies. He’s on the top of the most-wanted list of the en-emy’s intelligence services. Many spies consider him to be an even bigger prize than Joe Brown. But David doesn’t care. He knows to watch his back, and he always carries a lot of explosives, just in case.
Gisèle Lachance“l’anguille” (“the eel”) – vichy liaison to the axis (A double agent, working for the SOE) Born 1921 in Paris, France
Just as Gisèle turned 19, German troops marched through Paris. Gisèle joined the French Resistance the very same day. She was already fluent in German, and she quickly worked her way up in the Vichy government as a young diplomat. After a few years of hard work, she was sent as a liaison to the Axis and soon became one of the fa-vorites of Sigrid Von Thaler. Though Sigrid has never let Gisèle into her personal life, from where she now stands Gisèle can observe what happens in the Axis inner circle very closely.
She is currently based in Antarctica, following Sigrid, who is supervising a top secret project. Gisèle has yet to dis-cover what it is all about and warn the Allies of what they can expect from this most powerful enemy.
Miss Lachance never received any formal training as a spy, so she lacks many of the reflexes that a good agent should have. She has never even used a gun. Nevertheless, she is brave and dedicated, and when the time comes, she may yet reveal herself as one of the Allies’ greatest assets.
Guglielmo Zanicotti“The Chef” – Naval Intelligence Division, SOE Born 1919 in Rome, Italy
The heir to an old and proud family, the Chef was the first Italian to join Allied Special Forces when Rome was liber-ated. As he fluently speaks several European languages, including German and French, he was sent to work for the Allies’ counter-intelligence agency.
Growing up, Guglielmo witnessed his country become en-gulfed in war first in Africa, then in Europe. He swore to do anything he could to change this. He saw his country turn against its former friends and allies – something that brought tears to his eyes. Now he fights to make it right.
Nobody knows his real name. He hid it from the begin-ning to protect his family. Now Guglielmo is one of the top Allied spies, and he accepts the most dangerous assign-ments in the deadliest places. He has almost been caught several times, but this hasn’t stopped him so far. Guglielmo has been the “inside man” for many of Joe and Rosie’s op-erations, the most famous being “Red Lightning.” He now resides in Berlin and is very close to the center of Axis power. This guy lives a very dangerous life.
Since he is such a poor shot, the Chef only carries flame-throwers into battle. With these, there is no need to aim. And they come in handy when preparing some crème brûlée. Or a roast.
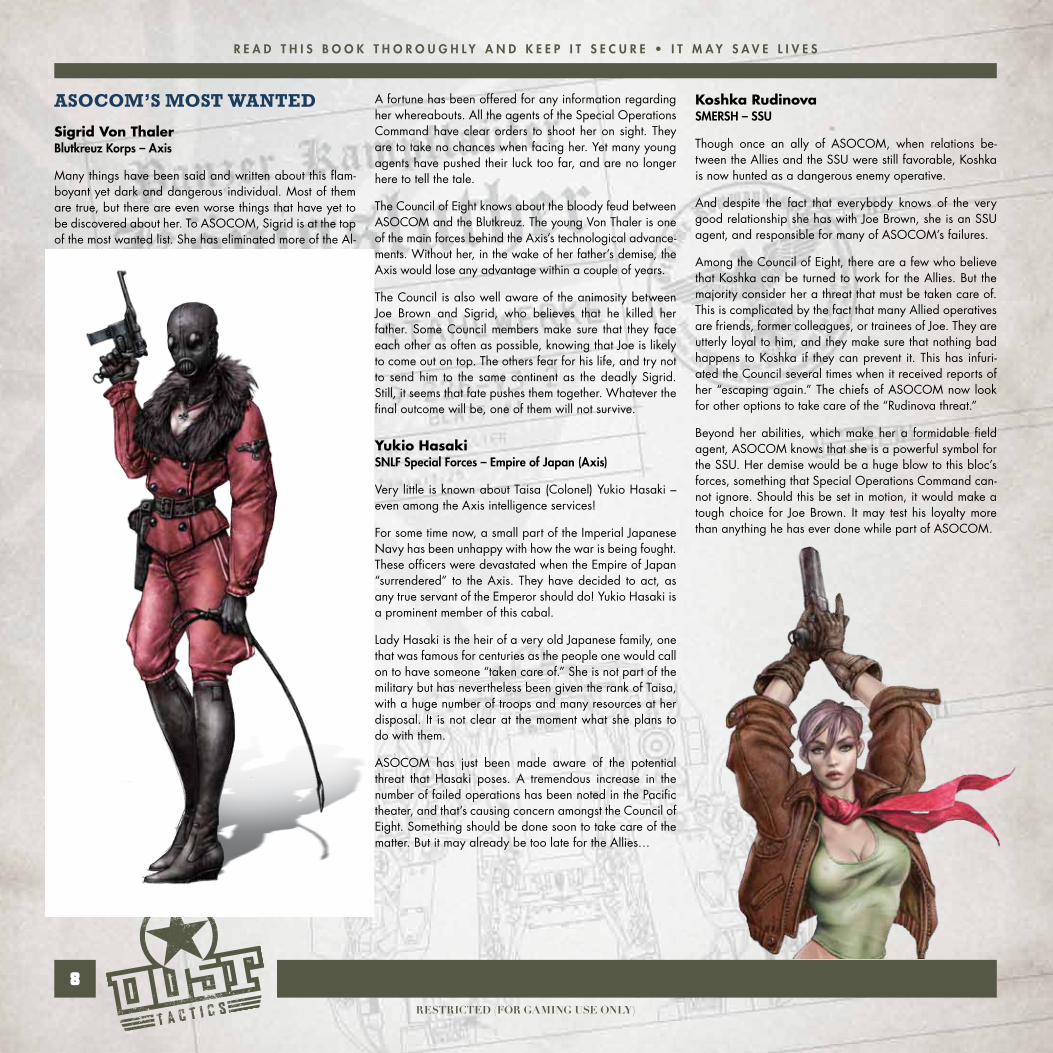
OZZ 117(Real name erased from files) – Retaliate division, asocom Age and birthplace unknown
This mysterious individual just recently began working for Special Operations Command. His background has been carefully erased, and nobody seems to have known him prior to his involvement in the Retaliate Division. He speaks several languages fluently, with no particular accent that might reveal his origin.
OZZ is a very efficient field operative, clearly not made for office work! He has proven to be resourceful, reliable, and most of all, deadly. He possesses uncanny tactical skills that enable him and his men to overcome many dangerous situations.
OZZ lacks the warmth and sympathy of Joe or Johnny. The soldiers he commands find him cold and calculating, but they all respect his skills. He gets the job done.
Within ASOCOM, OZZ 117 has a special agenda known only to a few members of the Council of Eight. What he does for them remains unknown. Many think that he has dispatched several top SSU and Axis agents, but as he always carries a flamethrower, the bodies are very difficult to identify.
Nurse Emma Donovan“Nurse Emma” – United Army of the Allies Nurse Corps (NC) Born 1920 in Louisville, KY, USA
Although not a member of ASOCOM or Special Opera-tions in any way, Emma Donovan deserves to be men-tioned here, as she has been mixed up in this business too many times to count.
The younger sister of Rosie Donovan, Emma can’t help but find herself in the middle of serious trouble. And, of course, Joe drops whatever he’s doing to come to her rescue…
Nurse Emma is extremely brave, and she has more decora-tions than any other individual described in these files. She has joined many combat units on the front lines over the years, and though she has never carried a gun, her valor has been proven many times. Out of everyone in these files, her and David Bonner are the only ones who have received the Medal of Honor.
RestRicted (foR gaming use only)
R e a d t h i s b o o k t h o R o u g h l y a n d k e e p i t s e c u R e • i t m a y s a v e l i v e s
™
8
asoCoM’s MosT WanTed
Sigrid Von Thalerblutkreuz korps – axis
Many things have been said and written about this flam-boyant yet dark and dangerous individual. Most of them are true, but there are even worse things that have yet to be discovered about her. To ASOCOM, Sigrid is at the top of the most wanted list. She has eliminated more of the Al-lies’ agents than any other spy in the game.
A fortune has been offered for any information regarding her whereabouts. All the agents of the Special Operations Command have clear orders to shoot her on sight. They are to take no chances when facing her. Yet many young agents have pushed their luck too far, and are no longer here to tell the tale.
The Council of Eight knows about the bloody feud between ASOCOM and the Blutkreuz. The young Von Thaler is one of the main forces behind the Axis’s technological advance-ments. Without her, in the wake of her father’s demise, the Axis would lose any advantage within a couple of years.
The Council is also well aware of the animosity between Joe Brown and Sigrid, who believes that he killed her father. Some Council members make sure that they face each other as often as possible, knowing that Joe is likely to come out on top. The others fear for his life, and try not to send him to the same continent as the deadly Sigrid. Still, it seems that fate pushes them together. Whatever the final outcome will be, one of them will not survive.
Yukio Hasakisnlf special forces – empire of Japan (axis)
Very little is known about Taisa (Colonel) Yukio Hasaki – even among the Axis intelligence services!
For some time now, a small part of the Imperial Japanese Navy has been unhappy with how the war is being fought. These officers were devastated when the Empire of Japan “surrendered” to the Axis. They have decided to act, as any true servant of the Emperor should do! Yukio Hasaki is a prominent member of this cabal.
Lady Hasaki is the heir of a very old Japanese family, one that was famous for centuries as the people one would call on to have someone “taken care of.” She is not part of the military but has nevertheless been given the rank of Taisa, with a huge number of troops and many resources at her disposal. It is not clear at the moment what she plans to do with them.
ASOCOM has just been made aware of the potential threat that Hasaki poses. A tremendous increase in the number of failed operations has been noted in the Pacific theater, and that’s causing concern amongst the Council of Eight. Something should be done soon to take care of the matter. But it may already be too late for the Allies…
Koshka RudinovasmeRsh – ssu
Though once an ally of ASOCOM, when relations be-tween the Allies and the SSU were still favorable, Koshka is now hunted as a dangerous enemy operative.
And despite the fact that everybody knows of the very good relationship she has with Joe Brown, she is an SSU agent, and responsible for many of ASOCOM’s failures.
Among the Council of Eight, there are a few who believe that Koshka can be turned to work for the Allies. But the majority consider her a threat that must be taken care of. This is complicated by the fact that many Allied operatives are friends, former colleagues, or trainees of Joe. They are utterly loyal to him, and they make sure that nothing bad happens to Koshka if they can prevent it. This has infuri-ated the Council several times when it received reports of her “escaping again.” The chiefs of ASOCOM now look for other options to take care of the “Rudinova threat.”
Beyond her abilities, which make her a formidable field agent, ASOCOM knows that she is a powerful symbol for the SSU. Her demise would be a huge blow to this bloc’s forces, something that Special Operations Command can-not ignore. Should this be set in motion, it would make a tough choice for Joe Brown. It may test his loyalty more than anything he has ever done while part of ASOCOM.
RestRicted (foR gaming use only)
b e c a R e f u l • d o n o t l e t t h i s b o o k f a l l i n t o e n e m y h a n d s
9OpEratiOn CErBErUS
The New RulesIn this rulebook, you will find the following new rules:
New skills, special weapons, and command squad abilities used by the units that fought during Operation “Cerberus”
Rules for fielding large vehicles that occupy more than one space
Instructions on how to use the 3D structures found in this expansion
New skillsThe bitter fighting in the cities and countryside of southern England brought out the best and worst of soldiers on both sides. To represent the unique talents of these brave warriors, Operation “Cerberus” introduces the following new skills:
BadassA unit with this skill consists of seasoned veterans who carry a lot of ammo – because they know that, in a firefight, the guy with more ammo wins. All of the unit’s weapons with limited ammo are considered unlimited, but it can use only up to the limited ammo per activation. A hero with this skill shares it with any squad he joins.
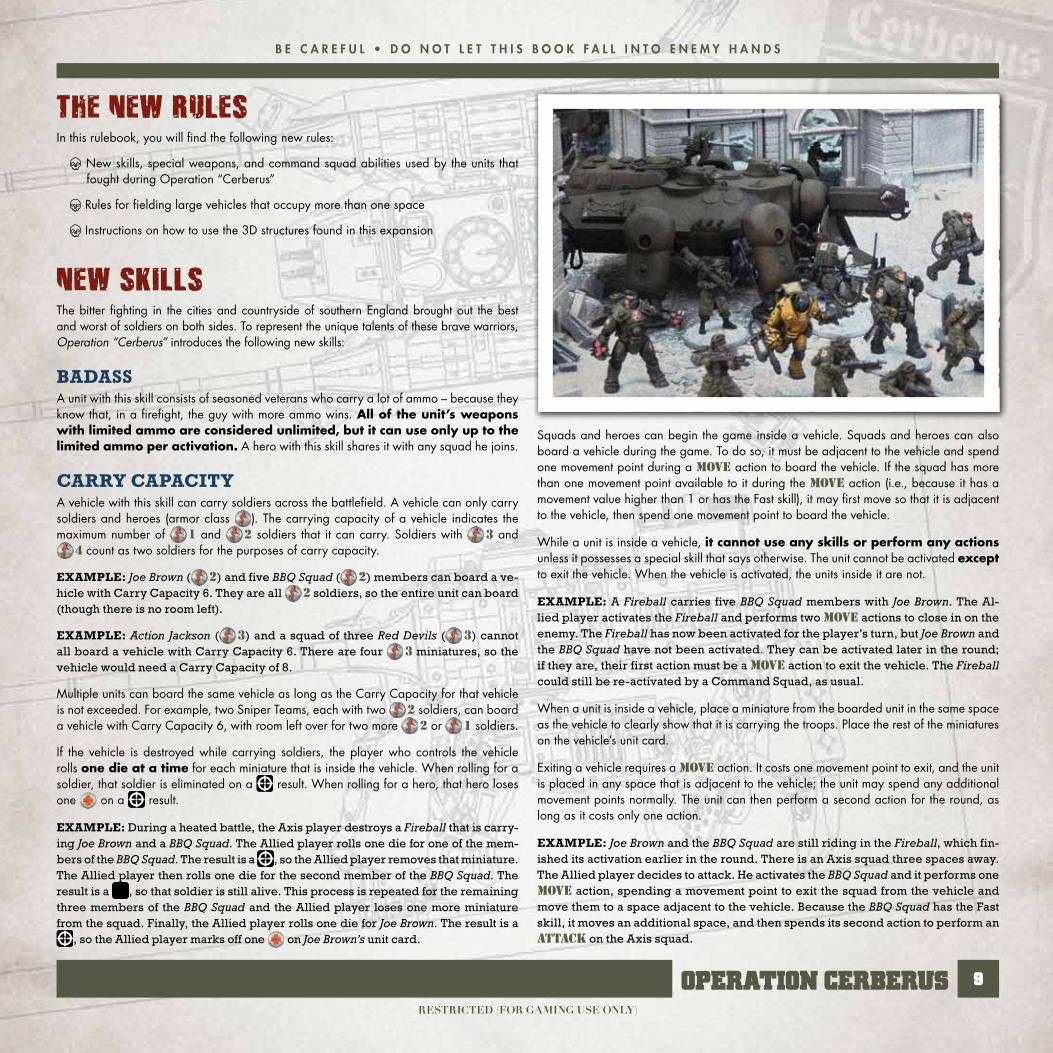
Carry CapaCityA vehicle with this skill can carry soldiers across the battlefield. A vehicle can only carry soldiers and heroes (armor class ). The carrying capacity of a vehicle indicates the maximum number of 1 and 2 soldiers that it can carry. Soldiers with 3 and
4 count as two soldiers for the purposes of carry capacity.
exaMple: Joe Brown ( 2) and five BBQ Squad ( 2) members can board a ve-hicle with Carry Capacity 6. They are all 2 soldiers, so the entire unit can board (though there is no room left).
exaMple: Action Jackson ( 3) and a squad of three Red Devils ( 3) cannot all board a vehicle with Carry Capacity 6. There are four 3 miniatures, so the vehicle would need a Carry Capacity of 8.
Multiple units can board the same vehicle as long as the Carry Capacity for that vehicle is not exceeded. For example, two Sniper Teams, each with two 2 soldiers, can board a vehicle with Carry Capacity 6, with room left over for two more 2 or 1 soldiers.
If the vehicle is destroyed while carrying soldiers, the player who controls the vehicle rolls one die at a time for each miniature that is inside the vehicle. When rolling for a soldier, that soldier is eliminated on a result. When rolling for a hero, that hero loses one on a result.
exaMple: During a heated battle, the Axis player destroys a Fireball that is carry-ing Joe Brown and a BBQ Squad. The Allied player rolls one die for one of the mem-bers of the BBQ Squad. The result is a , so the Allied player removes that miniature. The Allied player then rolls one die for the second member of the BBQ Squad. The result is a , so that soldier is still alive. This process is repeated for the remaining three members of the BBQ Squad and the Allied player loses one more miniature from the squad. Finally, the Allied player rolls one die for Joe Brown. The result is a
, so the Allied player marks off one on Joe Brown’s unit card.
Squads and heroes can begin the game inside a vehicle. Squads and heroes can also board a vehicle during the game. To do so, it must be adjacent to the vehicle and spend one movement point during a MOVE action to board the vehicle. If the squad has more than one movement point available to it during the MOVE action (i.e., because it has a movement value higher than 1 or has the Fast skill), it may first move so that it is adjacent to the vehicle, then spend one movement point to board the vehicle.
While a unit is inside a vehicle, it cannot use any skills or perform any actions unless it possesses a special skill that says otherwise. The unit cannot be activated except to exit the vehicle. When the vehicle is activated, the units inside it are not.
exaMple: A Fireball carries five BBQ Squad members with Joe Brown. The Al-lied player activates the Fireball and performs two MOVE actions to close in on the enemy. The Fireball has now been activated for the player’s turn, but Joe Brown and the BBQ Squad have not been activated. They can be activated later in the round; if they are, their first action must be a MOVE action to exit the vehicle. The Fireball could still be re-activated by a Command Squad, as usual.
When a unit is inside a vehicle, place a miniature from the boarded unit in the same space as the vehicle to clearly show that it is carrying the troops. Place the rest of the miniatures on the vehicle’s unit card.
Exiting a vehicle requires a MOVE action. It costs one movement point to exit, and the unit is placed in any space that is adjacent to the vehicle; the unit may spend any additional movement points normally. The unit can then perform a second action for the round, as long as it costs only one action.
exaMple: Joe Brown and the BBQ Squad are still riding in the Fireball, which fin-ished its activation earlier in the round. There is an Axis squad three spaces away. The Allied player decides to attack. He activates the BBQ Squad and it performs one MOVE action, spending a movement point to exit the squad from the vehicle and move them to a space adjacent to the vehicle. Because the BBQ Squad has the Fast skill, it moves an additional space, and then spends its second action to perform an ATTACK on the Axis squad.
RestRicted (foR gaming use only)
™
10
R e a d t h i s b o o k t h o R o u g h l y a n d k e e p i t s e c u R e • i t m a y s a v e l i v e s
Dozer BlaDeA vehicle with this skill can enter a space with an anti-tank trap. If it does, that cover element is destroyed and removed from the board.
FrenzyA hero with this skill is a cold-blooded killer. Sometimes, he just can’t stop…until there are no more targets in range, of course! When a hero uses this skill, deal damage for each result and then reroll all results. Continue dealing damage and rerolling each result until all dice show results. This skill can only be used when the hero fires on soldiers (armor class ), not vehicles. A hero with this skill does not share it with any squad he joins.
exaMple: Angela performs a SUSTAINED ATTACK against a full squad of Hell Boys. The Axis player rolls three dice and obtains two and one . He then rerolls the two and obtains one . He then rerolls the one and gets one . Up to this point, Angela has inflicted three damage. Now the Axis player rerolls the one (for the Sustained Attack). He obtains a result, which ends the attack. The Allied player removes three miniatures from the Hell Boys as casualties.
Medal of honorA hero with this prestigious medal is one of the most valiant Allied soldiers in the service. This skill allows the hero to reroll one combat die when he attacks. Ignore the first result and apply the new result. A hero can only use this skill once per round. A hero with this skill does not share it with any squad he joins.
nCo CoMMand squadA unit with this skill comes equipped with several tools that allow it to issue orders and provide support in many different ways (see “NCO Command Squads” to the right).
neW speCial WeapOnsBursT WeaponSome weapons fire at an incredible rate, allowing the unit to unleash a barrage of lead toward its target. When firing a burst weapon at a target that has not performed a MOVE action during this round, double the number of dice rolled.
nCO COMMand squadsNCO Command Squads are now available to both Axis and Allied generals who want to expand their control over the battlefield. These highly trained soldiers have been around for years and have always managed to bring their men back.
An NCO Command Squad is a special squad composed of three members: a Field Of-ficer, a Field Mechanic, and a Field Medic. Each member of the squad fulfills a unique function, and each member is equipped with his own radio. These hardened veterans all have brand-new armor, so they enter the battlefield as 3 soldiers. NCO Command Squads have the skill NCO Command Squad on the unit card.
When one of the squad’s miniatures is eliminated, the NCO Command Squad loses the unique specialization associated with that miniature and its equipment.
A player can field only one NCO Command Squad at a time.
Only heroes with the Commander skill can join an NCO Command Squad.
A player can only use one NCO Command Squad skill once per round.
An NCO Command Squad cannot use its skills on the NCO Command Squad itself. Also, Command Squads and NCO Command Squads cannot use their skills on each other. Simply put, any unit with a Command Squad skill (NCO or otherwise) cannot use its skills on any unit that also has a Command Squad skill.
field offiCerThe Field Officer has two different abilities:
Artillery Strike (SKILL)A unit with this skill is considered an observer. It comes equipped with maps and radios that allow it to call in an artillery strike. Perform one SKILL action to immediately activate a friendly artillery unit on the battlefield and perform one indirect shot at a unit to which the observer can trace line of sight. Be sure to check that the target unit is within the artillery weapon’s range. The player who uses this skill will activate two units in a row: the observer that orders the shot and the artillery unit that fires the shot, both during the same turn. See “Artillery Weapons” in either the Revised Core Set or Operation “Cyclone” rulebooks for more information.
Smoke Mortars (SKILL)The Field Officer can call in a special Artillery Strike that uses smoke shells instead of explosives. The Artillery Strike targets one space, and it arrives immediately. Place a Smoke token in the space or use a terrain square with a diamond in its center from Operation “Cyclone” to mark the smoke space. To order the strike, the Field Officer must have line of sight to the space he wants to cover in smoke.
The smoke square blocks line of sight, but units can move onto, move through, or jump over the smoke square like a normal space. A unit that stops in this space cannot be targeted or attacked from a distance; it can only be targeted or attacked from an adjacent space. If the attacking unit is in an adjacent space, it can fire at the unit in the smoke and attack it in close combat.
A unit in the smoke square cannot attack any targets or use abilities that require it to have line of sight to a target, unless the target is in an adjacent space.
RestRicted (foR gaming use only)
b e c a R e f u l • d o n o t l e t t h i s b o o k f a l l i n t o e n e m y h a n d s
11OpEratiOn CErBErUS
ExamplE: A Command Squad is on a space where a smoke shell exploded. It cannot use its Artillery Strike skill on any target that is not in an adjacent space. However, the unit can use its radios to call for reinforcements because it doesn’t require line of sight to do so.
ExamplE: Rosie is on a space covered in smoke. She has line of sight to adjacent spaces so she can use her Tank Head skill on an adjacent Hot Dog to repair it.
Smoke Mortars cannot be fired into a structure, even if the Field Officer has line of sight to the space.
The smoke effect remains in the space until the end of the round after it was launched.
ExamplE: A Command Squad uses Artillery Strike to order smoke shells in Round 2. The smoke effect dissipates at the end of Round 3.
This skill may only be used once per game.
FiEld mEchanicThe Field Mechanic has two different abilities:
Ammo Dump (SKILL)The Field Mechanic can call for an airdrop of ammo to a friendly unit. The unit instantly replenishes all of its limited-ammo weapons. When a player uses this skill, he may choose any unit type (squad, vehicle, or hero) that is within line of sight of the Field Mechanic.
This skill can be used only once per game.
Makeshift Repair (SKILL)The Field Mechanic can use his tools to quickly repair vehicles on the battlefield. Perform one SKILL action to restore one health point to an adjacent vehicle. This skill does not require a die roll and cannot be used on destroyed vehicles.
FiEld mEdicThe Field Medic has two different abilities:
Stimulant Kit (SKILL)The Field Medic can inject a soldier unit (armor class ) in an adjacent space with newly developed combat drugs. These chemicals are still being tested and no one quite knows what the side effects are, but boy do they work! The next time the injected squad is activated, it can perform four actions that round. These actions can be used in any combination: four MOVE actions, two MOVE actions and two ATTACK actions, two SUSTAINED ATTACK actions, etc. There is one limitation: If the squad performs two consecutive ATTACK actions against the same target, it is considered a SUSTAINED ATTACK action. An injected squad can perform two ATTACK actions against the same target as long as the ATTACK actions are not consecutive.
exaMple: A Field Medic injects a squad of Recon Boys. During the Recon Boys’ activation, the unit spends its first two actions to perform a SUSTAINED ATTACK against a squad of Laser Grenadiers. The Recon Boys then spend one MOVE action to move one space closer to the Laser Grenadiers. The Recon Boys then spend their last action to ATTACK the Laser Grenadiers again.
At the end of the injected unit’s activation, lay all of its miniatures on their sides in the space where they ended their movement. These soldiers are now exhausted. While the unit is exhausted, it cannot be reactivated by any Command Squad. It cannot perform any action, and it cannot even fight back if attacked in close combat! The next time this unit is activated, stand the miniatures upright. This costs the unit both of its actions for that round.
exaMple: During the first round of the game, a Field Medic injects a BBQ Squad that needs to move across the battlefield at top speed. On its activation, the BBQ Squad performs four MOVE actions. Since it has the Fast skill, it can move a total of five spaces. At the end of its movement, the BBQ Squad is exhausted and placed on their sides on the space where it ended its movement.
During the second round, the BBQ Squad is exhausted. When they are activated, they stand up, but cannot perform any other actions this round.
During the third round, the BBQ Squad can act normally once again.
This skill may only be used on one squad per game. If the Field Medic injects a squad that is joined with a hero, that hero is also injected. The Field Medic can choose to inject a lone hero instead of a squad, but that will still use all of his stimulants for the game.
Get Up, It Ain’t That Bad (SKILL)The Field Medic can use his equipment to heal soldiers on the battlefield. Perform one SKILL action to either revive one miniature in an adjacent squad or restore one health point to an adjacent hero. The miniature returns to its squad with its special weapons and full ammo for any limited-ammo weapons. This skill cannot be used on an eliminated squad or hero.
RestRicted (foR gaming use only)
™
12
R e a d t h i s b o o k t h o R o u g h l y a n d k e e p i t s e c u R e • i t m a y s a v e l i v e s
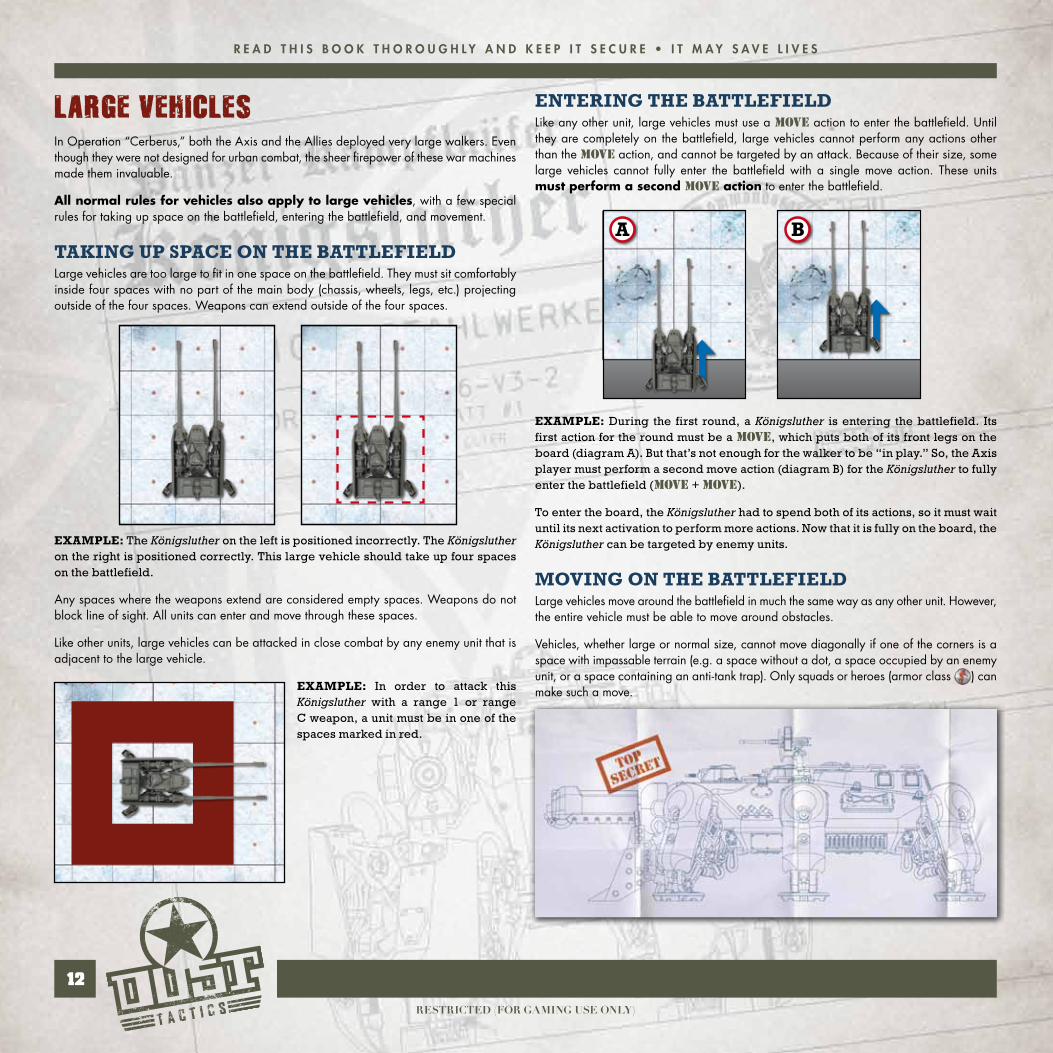
Large VehicLesIn Operation “Cerberus,” both the Axis and the Allies deployed very large walkers. Even though they were not designed for urban combat, the sheer firepower of these war machines made them invaluable.
All normal rules for vehicles also apply to large vehicles, with a few special rules for taking up space on the battlefield, entering the battlefield, and movement.
Taking Up Space on The BaTTlefieldLarge vehicles are too large to fit in one space on the battlefield. They must sit comfortably inside four spaces with no part of the main body (chassis, wheels, legs, etc.) projecting outside of the four spaces. Weapons can extend outside of the four spaces.
example: The Königsluther on the left is positioned incorrectly. The Königsluther on the right is positioned correctly. This large vehicle should take up four spaces on the battlefield.
Any spaces where the weapons extend are considered empty spaces. Weapons do not block line of sight. All units can enter and move through these spaces.
Like other units, large vehicles can be attacked in close combat by any enemy unit that is adjacent to the large vehicle.
example: In order to attack this Königsluther with a range 1 or range C weapon, a unit must be in one of the spaces marked in red.
enTering The BaTTlefieldLike any other unit, large vehicles must use a MOVE action to enter the battlefield. Until they are completely on the battlefield, large vehicles cannot perform any actions other than the MOVE action, and cannot be targeted by an attack. Because of their size, some large vehicles cannot fully enter the battlefield with a single move action. These units must perform a second MOVE action to enter the battlefield.
example: During the first round, a Königsluther is entering the battlefield. Its first action for the round must be a MOVE, which puts both of its front legs on the board (diagram A). But that’s not enough for the walker to be “in play.” So, the Axis player must perform a second move action (diagram B) for the Königsluther to fully enter the battlefield (MOVE + MOVE).
To enter the board, the Königsluther had to spend both of its actions, so it must wait until its next activation to perform more actions. Now that it is fully on the board, the Königsluther can be targeted by enemy units.
moving on The BaTTlefieldLarge vehicles move around the battlefield in much the same way as any other unit. However, the entire vehicle must be able to move around obstacles.
Vehicles, whether large or normal size, cannot move diagonally if one of the corners is a space with impassable terrain (e.g. a space without a dot, a space occupied by an enemy unit, or a space containing an anti-tank trap). Only squads or heroes (armor class ) can make such a move.
a B
RestRicted (foR gaming use only)
b e c a R e f u l • d o n o t l e t t h i s b o o k f a l l i n t o e n e m y h a n d s
13OpEratiOn CErBErUS
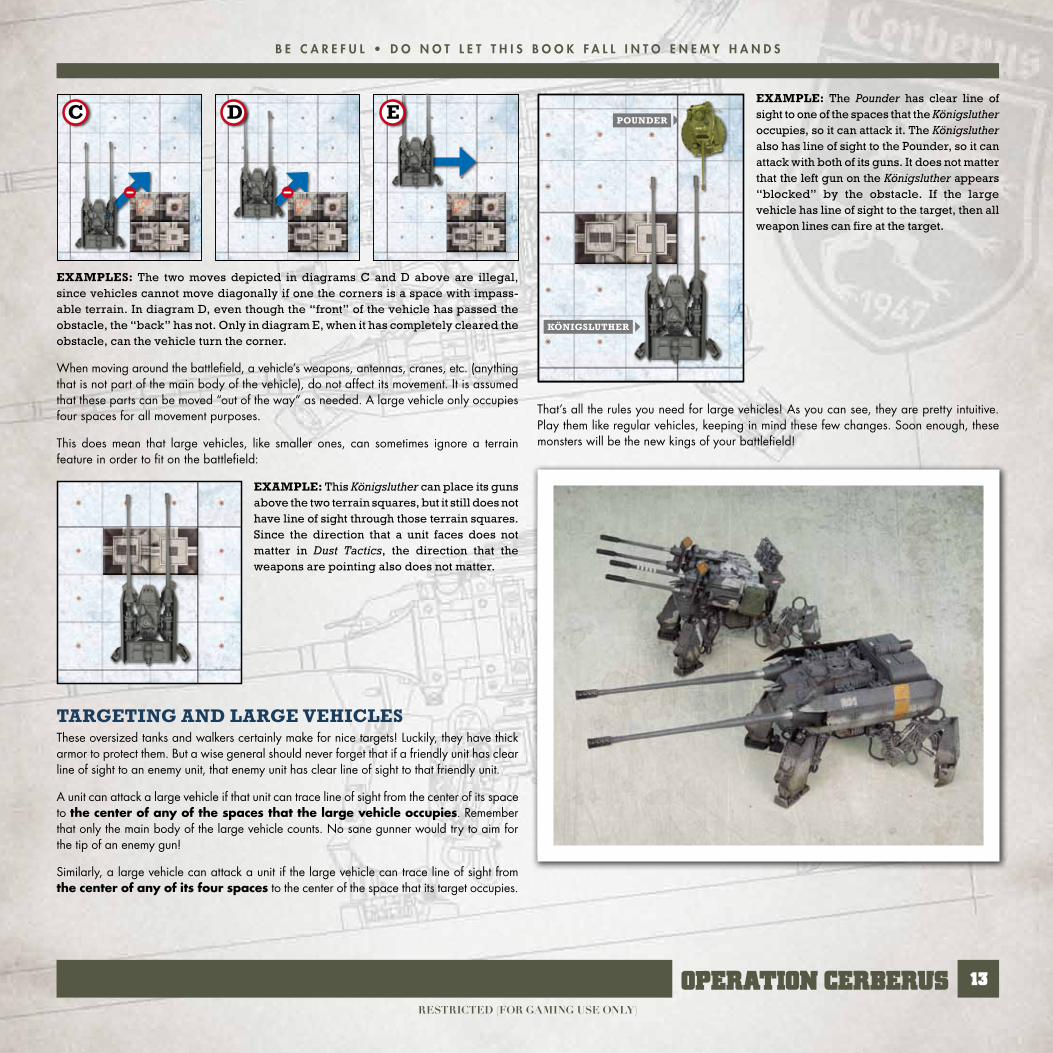
ExamplEs: The two moves depicted in diagrams C and D above are illegal, since vehicles cannot move diagonally if one the corners is a space with impass-able terrain. In diagram D, even though the “front” of the vehicle has passed the obstacle, the “back” has not. Only in diagram E, when it has completely cleared the obstacle, can the vehicle turn the corner.
When moving around the battlefield, a vehicle’s weapons, antennas, cranes, etc. (anything that is not part of the main body of the vehicle), do not affect its movement. It is assumed that these parts can be moved “out of the way” as needed. A large vehicle only occupies four spaces for all movement purposes.
This does mean that large vehicles, like smaller ones, can sometimes ignore a terrain feature in order to fit on the battlefield:
ExamplE: This Königsluther can place its guns above the two terrain squares, but it still does not have line of sight through those terrain squares. Since the direction that a unit faces does not matter in Dust Tactics, the direction that the weapons are pointing also does not matter.
TargETing and largE VEhiclEsThese oversized tanks and walkers certainly make for nice targets! Luckily, they have thick armor to protect them. But a wise general should never forget that if a friendly unit has clear line of sight to an enemy unit, that enemy unit has clear line of sight to that friendly unit.
A unit can attack a large vehicle if that unit can trace line of sight from the center of its space to the center of any of the spaces that the large vehicle occupies. Remember that only the main body of the large vehicle counts. No sane gunner would try to aim for the tip of an enemy gun!
Similarly, a large vehicle can attack a unit if the large vehicle can trace line of sight from the center of any of its four spaces to the center of the space that its target occupies.
ExamplE: The Pounder has clear line of sight to one of the spaces that the Königsluther occupies, so it can attack it. The Königsluther also has line of sight to the Pounder, so it can attack with both of its guns. It does not matter that the left gun on the Königsluther appears “blocked” by the obstacle. If the large vehicle has line of sight to the target, then all weapon lines can fire at the target.
That’s all the rules you need for large vehicles! As you can see, they are pretty intuitive. Play them like regular vehicles, keeping in mind these few changes. Soon enough, these monsters will be the new kings of your battlefield!
pounder
KoniGsluTher
C d e
RestRicted (foR gaming use only)
™
14
R e a d t h i s b o o k t h o R o u g h l y a n d k e e p i t s e c u R e • i t m a y s a v e l i v e s
3D StructureSDust Studio is very proud to introduce this new type of structure to Dust Tactics. 3D structures bring a whole new level of simulation to the battlefields of Dust! Inside this box, there are enough pieces to build a variety of structures, complete with doors and windows.
All the rules that govern fighting in and around these structures and how units interact with structures can be found here.
The rules for structures described in the Operation “SeeLöwe” or Revised Core Set rule-books are very similar to the rules for 3D structures, with a few notable exceptions. Please note, that the system presented in this expansion only allows players to build normal structures (not hangars or bunkers). Of course, no vehicles or walkers can enter these structures; the entrances are too small and the ceilings are too low. Players may use 3D pieces to build bigger structures that vehicles can enter. Just remember to adjust the rules accordingly.
In Dust Tactics, there is no difference (in game terms) between intact structures and damaged rubble. Just use the normal rules below. After all, in combat, there’s not much difference between a building that’s standing and a pile of ruins – they both provide the same amount of cover.
General rulesHere are some general rules that apply to all structures:
All structures have exterior walls. Some structures also have interior walls that separate different rooms. All walls block line of sight.
The interior and exterior walls of any structure cannot be destroyed.
Small entrances are narrower than the width of one space.
Large entrances are as wide as the width of one space.
Squads and heroes (armor class ) can enter through all entrances of the structures included in this expansion.
Vehicles (armor class ) cannot enter through the small entrances of the structures included in this expansion.
Squads and heroes (armor class ) with the Jump skill can jump over any type of structure, regardless of the structure’s height (assuming the unit can move far enough to reach the other side).
Vehicles (armor class ) with the Jump skill cannot jump over any structure.
Units (armor class , , ) cannot land on top of any structure when jumping. The roofs are pitched, slippery, and fragile!
A squad is automatically in Soft Cover when it is inside a structure and it is targeted by an enemy unit that is also inside the same structure.
A squad is automatically in Hard Cover when it is inside a structure and it is targeted by an enemy unit that is outside of that structure.
If a squad is on the roof of a structure, it is considered to be outside of that structure. However, it is automatically in Soft Cover when it is targeted by an enemy unit that is not also on the roof of that same structure.
In order for a unit inside a structure to attack an enemy unit outside a structure, the attacking unit must be on a space that has an entrance in the direction of the attack.
In order for a unit outside a structure to attack an enemy unit inside a structure, the target unit must be on a space that has an entrance in the direction of the attack.
When a unit is inside a structure, it must follow all standard rules for attacking and moving (i.e., targets receive cover from attacks that cross a corner, etc.).
Units that are on separate floors and directly above or below each other are not considered to be adjacent.
Inside a structure, cover combines in the normal way. For example, if a squad is inside a structure and on a space with an ammo crate, that squad has Hard Cover against attacks from other units inside that same structure.
Small entrances do not provide corner cover. Instead, they block diagonal line of sight (see “Entrances and line of sight” on page 15).
Anti-tank traps cannot be placed inside a structure unless that structure has an entrance large enough to allow a vehicle to enter.
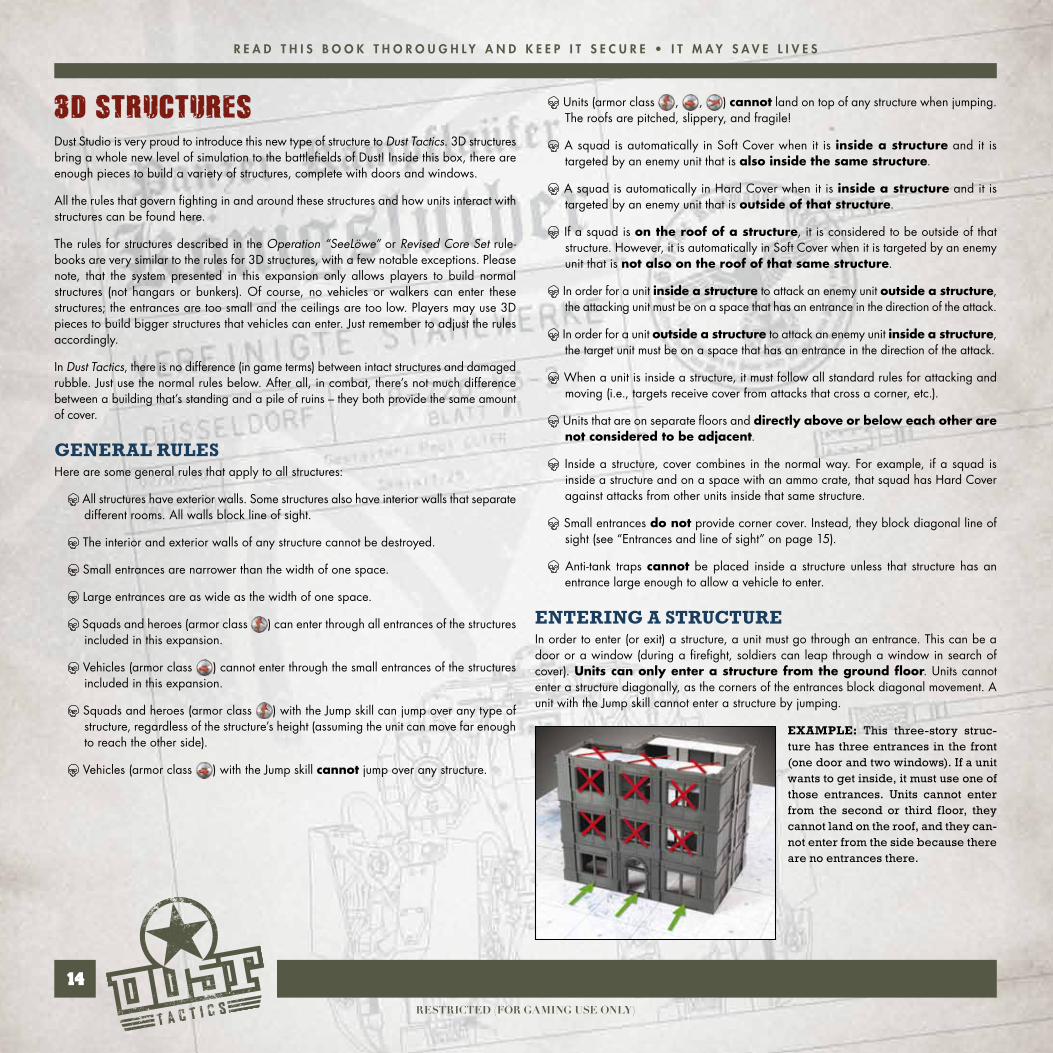
enTerinG a sTruCTureIn order to enter (or exit) a structure, a unit must go through an entrance. This can be a door or a window (during a firefight, soldiers can leap through a window in search of cover). Units can only enter a structure from the ground floor. Units cannot enter a structure diagonally, as the corners of the entrances block diagonal movement. A unit with the Jump skill cannot enter a structure by jumping.
exaMple: This three-story struc-ture has three entrances in the front (one door and two windows). If a unit wants to get inside, it must use one of those entrances. Units cannot enter from the second or third floor, they cannot land on the roof, and they can-not enter from the side because there are no entrances there.
RestRicted (foR gaming use only)
b e c a R e f u l • d o n o t l e t t h i s b o o k f a l l i n t o e n e m y h a n d s
15OpEratiOn CErBErUS
MovinG up and doWn floorsIn Dust Tactics, height is measured in spaces, just like range and movement. A unit can use a MOVE action to move up or down one floor for each movement point spent. For example, if a unit needed to enter a 3D structure and then climb up to the third floor, it would require three MOVE actions (or two MOVE actions if the unit has the Fast skill).
Units may move diagonally both vertically and horizontally. Each space, in any direction, costs one movement point.
Units inside a structure can also move onto the structure’s roof by moving up from the top floor of that structure.
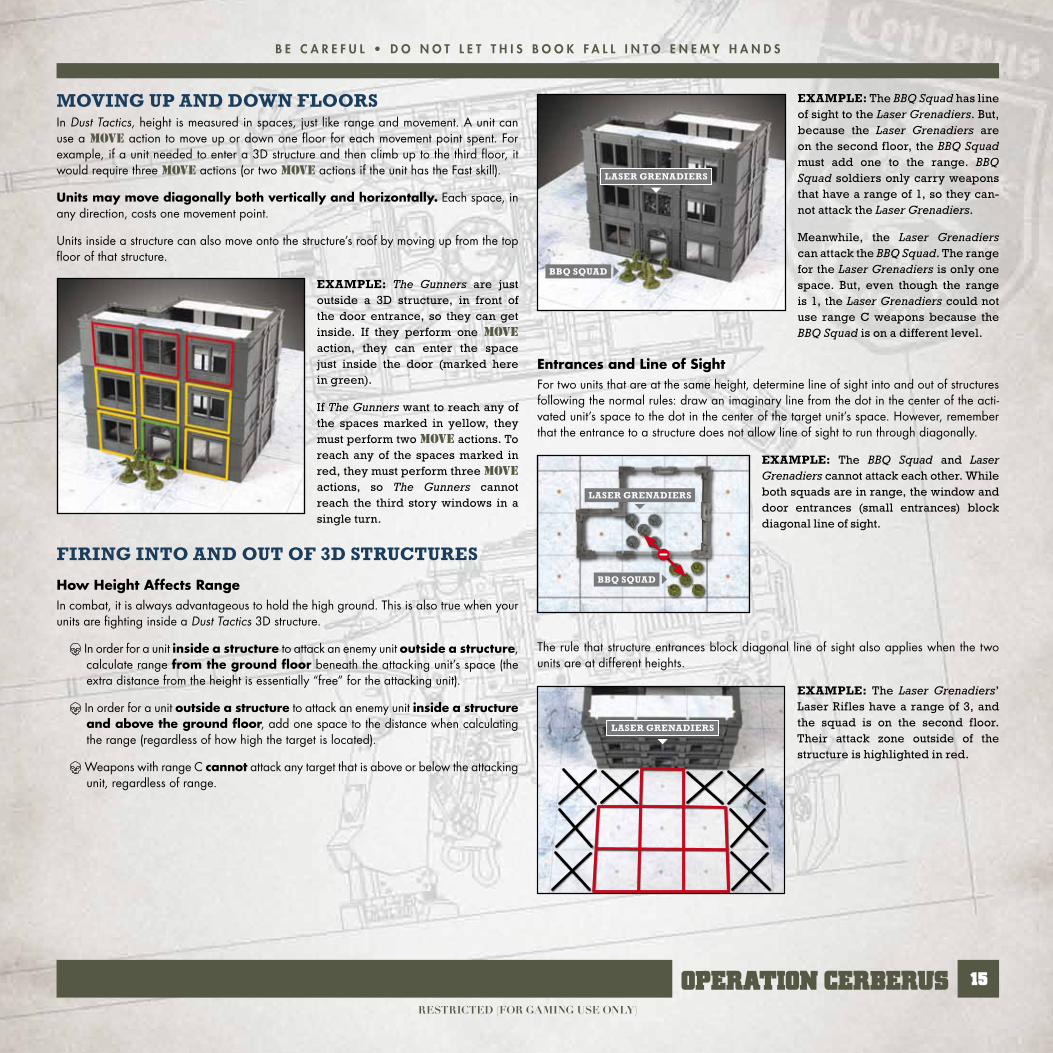
exaMple: The Gunners are just outside a 3D structure, in front of the door entrance, so they can get inside. If they perform one MOVE action, they can enter the space just inside the door (marked here in green).
If The Gunners want to reach any of the spaces marked in yellow, they must perform two MOVE actions. To reach any of the spaces marked in red, they must perform three MOVE actions, so The Gunners cannot reach the third story windows in a single turn.
firinG inTo and ouT of 3d sTruCTures
How Height Affects RangeIn combat, it is always advantageous to hold the high ground. This is also true when your units are fighting inside a Dust Tactics 3D structure.
In order for a unit inside a structure to attack an enemy unit outside a structure, calculate range from the ground floor beneath the attacking unit’s space (the extra distance from the height is essentially “free” for the attacking unit).
In order for a unit outside a structure to attack an enemy unit inside a structure and above the ground floor, add one space to the distance when calculating the range (regardless of how high the target is located).
Weapons with range C cannot attack any target that is above or below the attacking unit, regardless of range.
exaMple: The BBQ Squad has line of sight to the Laser Grenadiers. But, because the Laser Grenadiers are on the second floor, the BBQ Squad must add one to the range. BBQ Squad soldiers only carry weapons that have a range of 1, so they can-not attack the Laser Grenadiers.
Meanwhile, the Laser Grenadiers can attack the BBQ Squad. The range for the Laser Grenadiers is only one space. But, even though the range is 1, the Laser Grenadiers could not use range C weapons because the BBQ Squad is on a different level.
Entrances and Line of SightFor two units that are at the same height, determine line of sight into and out of structures following the normal rules: draw an imaginary line from the dot in the center of the acti-vated unit’s space to the dot in the center of the target unit’s space. However, remember that the entrance to a structure does not allow line of sight to run through diagonally.
exaMple: The BBQ Squad and Laser Grenadiers cannot attack each other. While both squads are in range, the window and door entrances (small entrances) block diagonal line of sight.
The rule that structure entrances block diagonal line of sight also applies when the two units are at different heights.
exaMple: The Laser Grenadiers’ Laser Rifles have a range of 3, and the squad is on the second floor. Their attack zone outside of the structure is highlighted in red.
BBq squad
laser Grenadiers
BBq squad
laser Grenadiers
laser Grenadiers
RestRicted (foR gaming use only)
™
16
R e a d t h i s b o o k t h o R o u g h l y a n d k e e p i t s e c u R e • i t m a y s a v e l i v e s
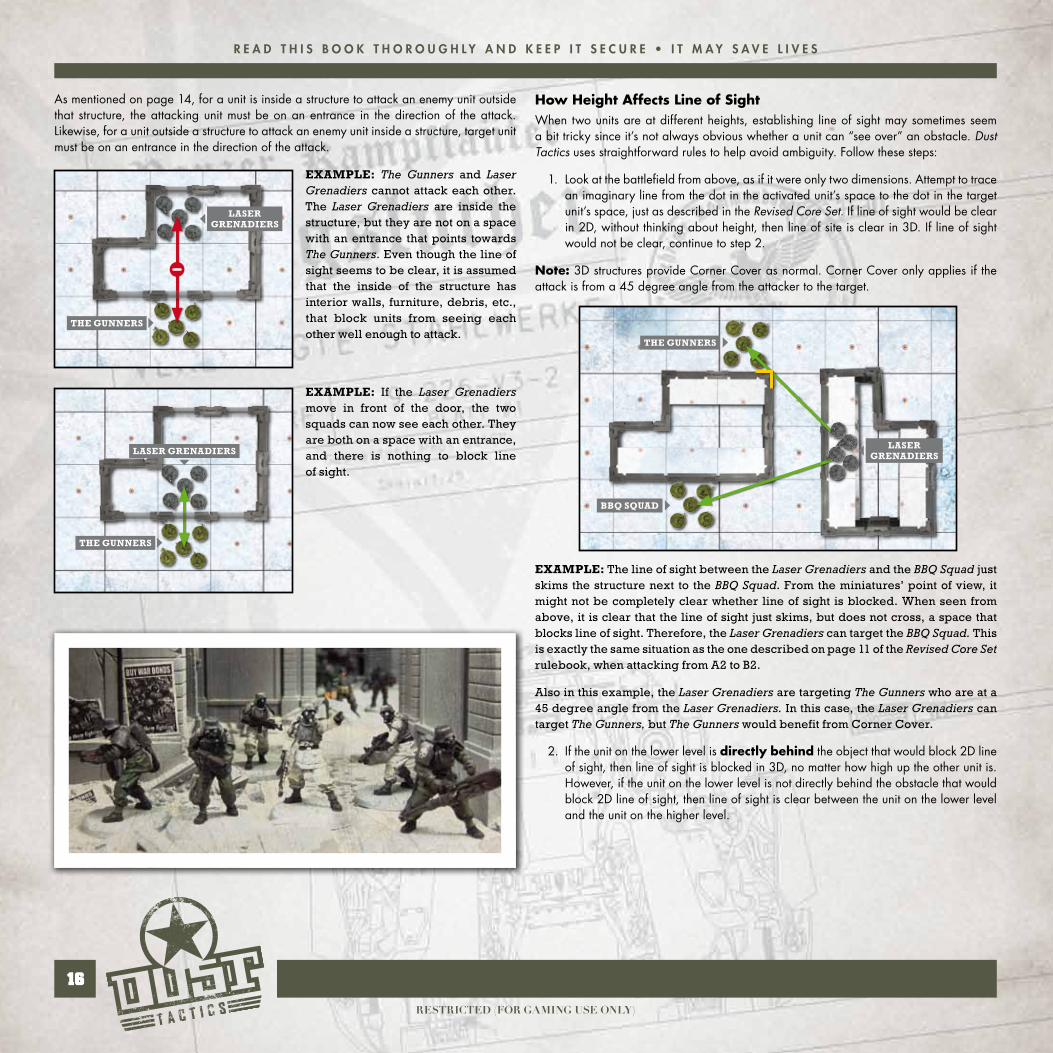
As mentioned on page 14, for a unit is inside a structure to attack an enemy unit outside that structure, the attacking unit must be on an entrance in the direction of the attack. Likewise, for a unit outside a structure to attack an enemy unit inside a structure, target unit must be on an entrance in the direction of the attack.
exaMple: The Gunners and Laser Grenadiers cannot attack each other. The Laser Grenadiers are inside the structure, but they are not on a space with an entrance that points towards The Gunners. Even though the line of sight seems to be clear, it is assumed that the inside of the structure has interior walls, furniture, debris, etc., that block units from seeing each other well enough to attack.
exaMple: If the Laser Grenadiers move in front of the door, the two squads can now see each other. They are both on a space with an entrance, and there is nothing to block line of sight.
How Height Affects Line of SightWhen two units are at different heights, establishing line of sight may sometimes seem a bit tricky since it’s not always obvious whether a unit can “see over” an obstacle. Dust Tactics uses straightforward rules to help avoid ambiguity. Follow these steps:
1. Look at the battlefield from above, as if it were only two dimensions. Attempt to trace an imaginary line from the dot in the activated unit’s space to the dot in the target unit’s space, just as described in the Revised Core Set. If line of sight would be clear in 2D, without thinking about height, then line of site is clear in 3D. If line of sight would not be clear, continue to step 2.
Note: 3D structures provide Corner Cover as normal. Corner Cover only applies if the attack is from a 45 degree angle from the attacker to the target.
exaMple: The line of sight between the Laser Grenadiers and the BBQ Squad just skims the structure next to the BBQ Squad. From the miniatures’ point of view, it might not be completely clear whether line of sight is blocked. When seen from above, it is clear that the line of sight just skims, but does not cross, a space that blocks line of sight. Therefore, the Laser Grenadiers can target the BBQ Squad. This is exactly the same situation as the one described on page 11 of the Revised Core Set rulebook, when attacking from A2 to B2.
Also in this example, the Laser Grenadiers are targeting The Gunners who are at a 45 degree angle from the Laser Grenadiers. In this case, the Laser Grenadiers can target The Gunners, but The Gunners would benefit from Corner Cover.
2. If the unit on the lower level is directly behind the object that would block 2D line of sight, then line of sight is blocked in 3D, no matter how high up the other unit is. However, if the unit on the lower level is not directly behind the obstacle that would block 2D line of sight, then line of sight is clear between the unit on the lower level and the unit on the higher level.
The Gunners
laser Grenadiers
The Gunners
laser Grenadiers
BBq squad
The Gunners
laser Grenadiers
RestRicted (foR gaming use only)
b e c a R e f u l • d o n o t l e t t h i s b o o k f a l l i n t o e n e m y h a n d s
17OpEratiOn CErBErUS
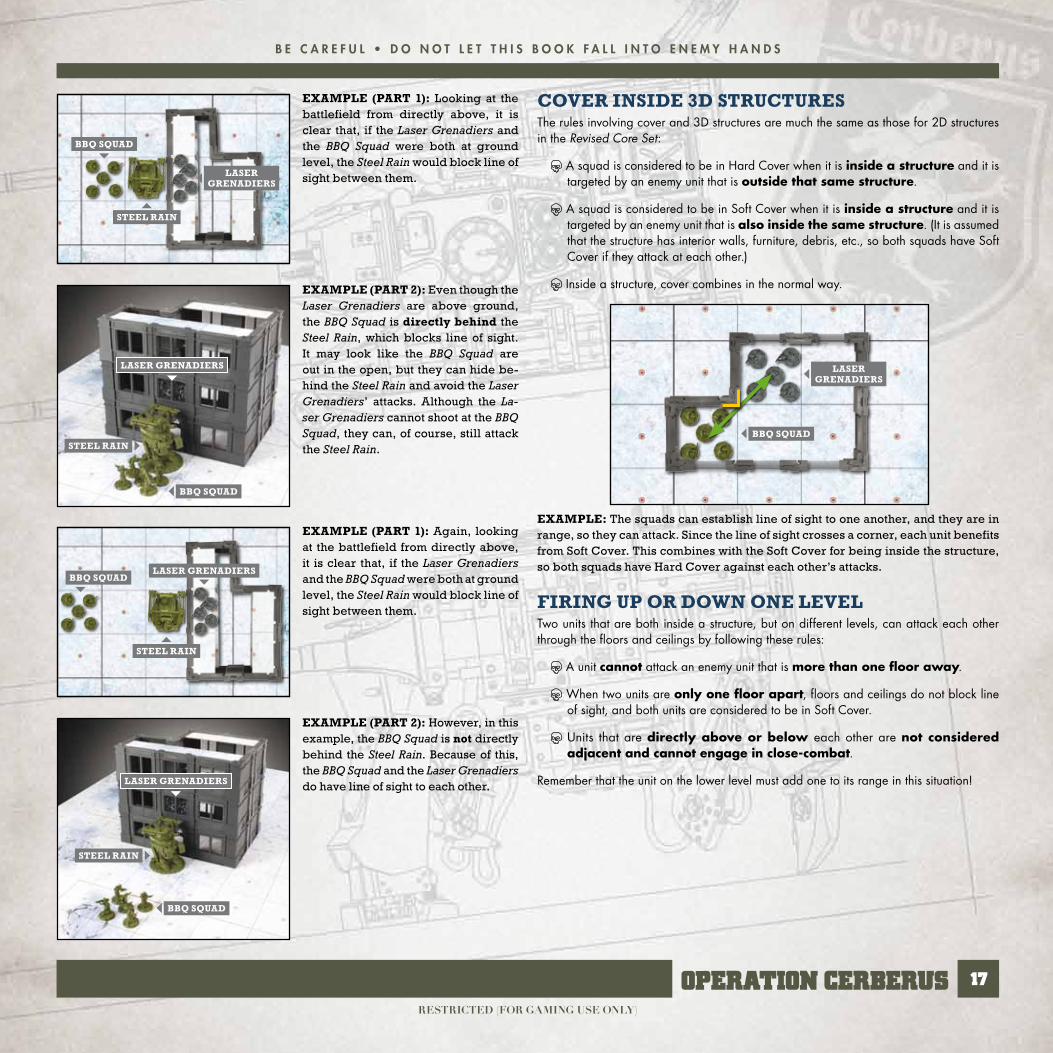
ExamplE (part 1): Looking at the battlefield from directly above, it is clear that, if the Laser Grenadiers and the BBQ Squad were both at ground level, the Steel Rain would block line of sight between them.
ExamplE (part 2): Even though the Laser Grenadiers are above ground, the BBQ Squad is directly behind the Steel Rain, which blocks line of sight. It may look like the BBQ Squad are out in the open, but they can hide be-hind the Steel Rain and avoid the Laser Grenadiers’ attacks. Although the La-ser Grenadiers cannot shoot at the BBQ Squad, they can, of course, still attack the Steel Rain.
ExamplE (part 1): Again, looking at the battlefield from directly above, it is clear that, if the Laser Grenadiers and the BBQ Squad were both at ground level, the Steel Rain would block line of sight between them.
ExamplE (part 2): However, in this example, the BBQ Squad is not directly behind the Steel Rain. Because of this, the BBQ Squad and the Laser Grenadiers do have line of sight to each other.
CovEr InsIdE 3d struCturEsThe rules involving cover and 3D structures are much the same as those for 2D structures in the Revised Core Set:
A squad is considered to be in Hard Cover when it is inside a structure and it is targeted by an enemy unit that is outside that same structure.
A squad is considered to be in Soft Cover when it is inside a structure and it is targeted by an enemy unit that is also inside the same structure. (It is assumed that the structure has interior walls, furniture, debris, etc., so both squads have Soft Cover if they attack at each other.)
Inside a structure, cover combines in the normal way.
ExamplE: The squads can establish line of sight to one another, and they are in range, so they can attack. Since the line of sight crosses a corner, each unit benefits from Soft Cover. This combines with the Soft Cover for being inside the structure, so both squads have Hard Cover against each other’s attacks.
FIrIng up or down onE lEvElTwo units that are both inside a structure, but on different levels, can attack each other through the floors and ceilings by following these rules:
A unit cannot attack an enemy unit that is more than one floor away.
When two units are only one floor apart, floors and ceilings do not block line of sight, and both units are considered to be in Soft Cover.
Units that are directly above or below each other are not considered adjacent and cannot engage in close-combat.
Remember that the unit on the lower level must add one to its range in this situation!
BBq squad
BBq squad
BBq squad
BBq squad
sTeel rain
sTeel rain
sTeel rain
sTeel rain
laser Grenadiers
laser Grenadiers
laser Grenadiers
laser Grenadiers
BBq squad
laser Grenadiers
RestRicted (foR gaming use only)
™
18
R e a d t h i s b o o k t h o R o u g h l y a n d k e e p i t s e c u R e • i t m a y s a v e l i v e s
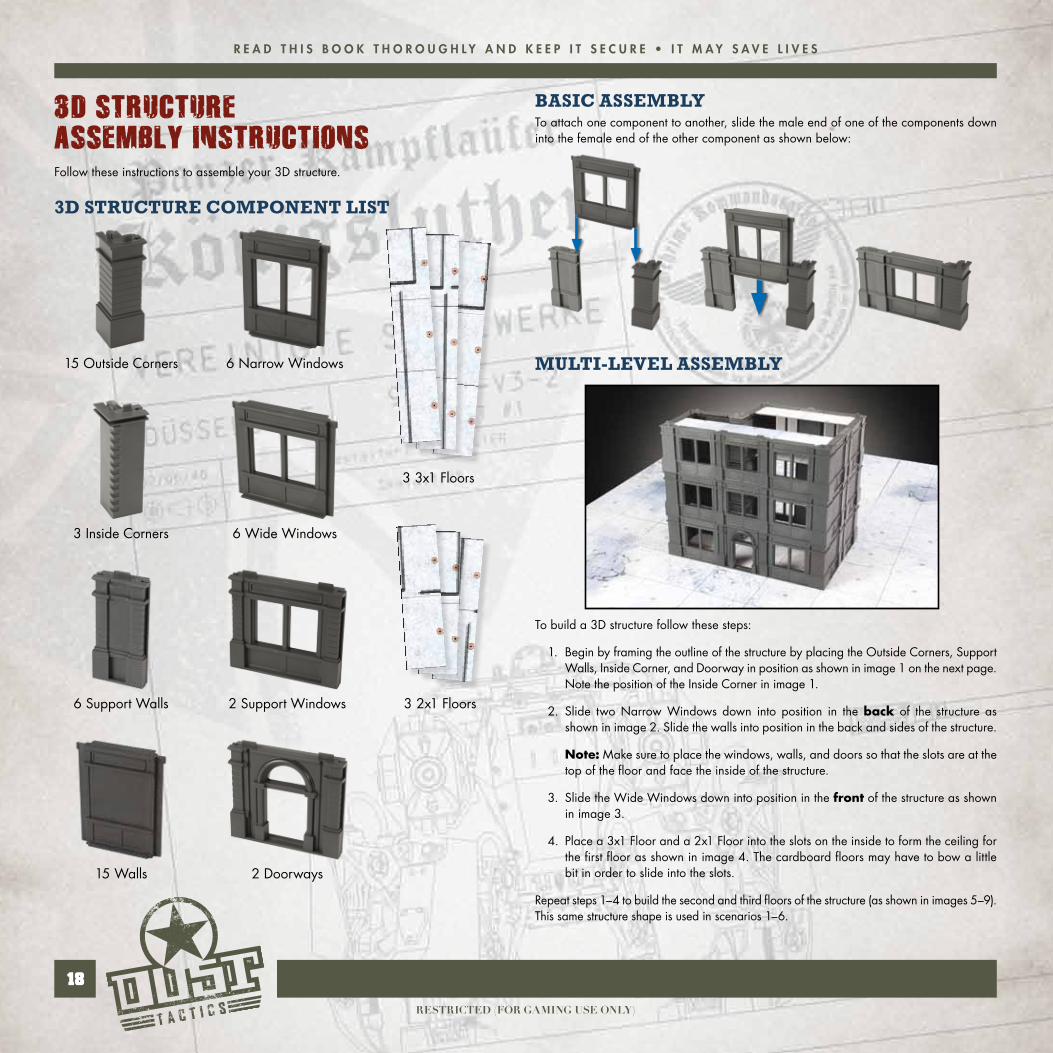
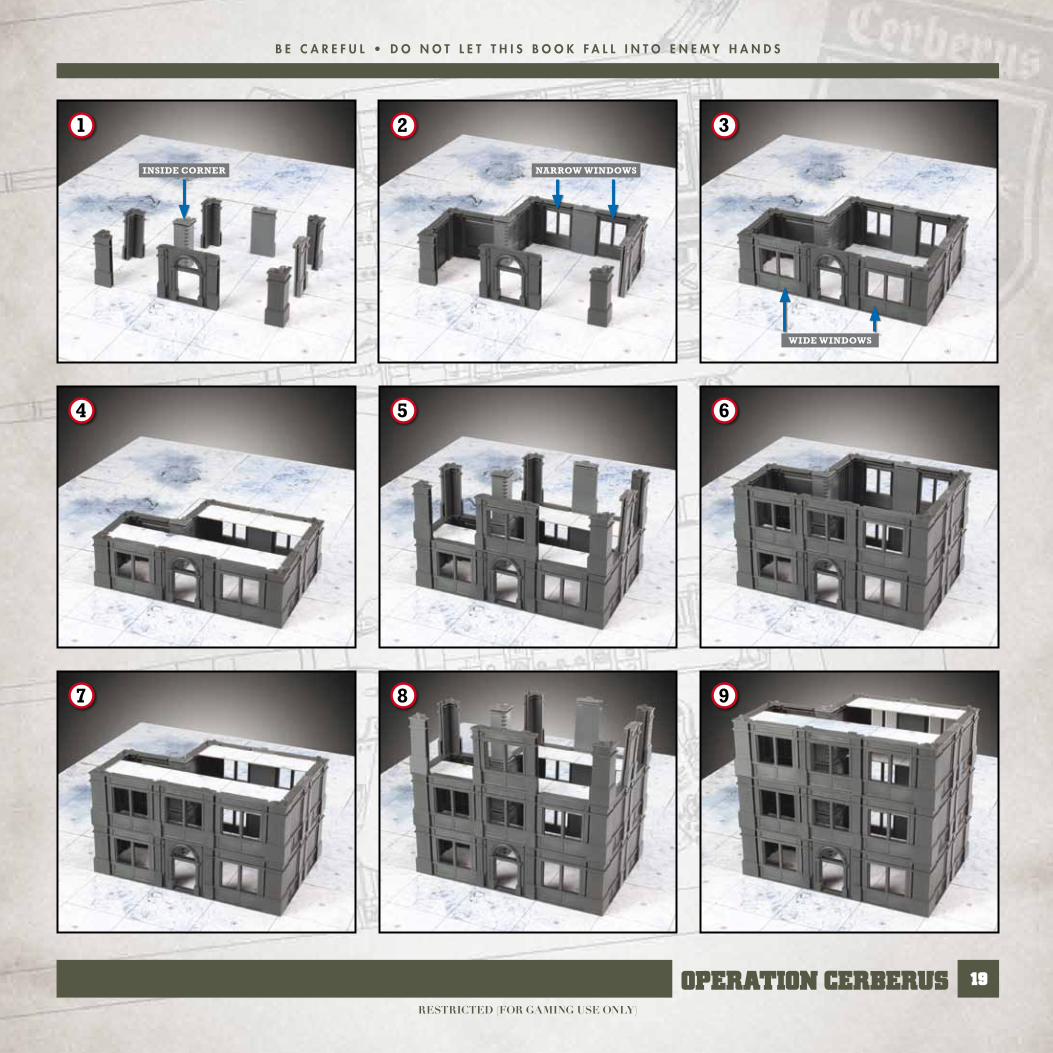
3d struCture asseMbly instruCtiOnsFollow these instructions to assemble your 3D structure.
3d sTruCTure CoMponenT lisT
BasiC asseMBlyTo attach one component to another, slide the male end of one of the components down into the female end of the other component as shown below:
MulTi-level asseMBly
To build a 3D structure follow these steps:
1. Begin by framing the outline of the structure by placing the Outside Corners, Support Walls, Inside Corner, and Doorway in position as shown in image 1 on the next page. Note the position of the Inside Corner in image 1.
2. Slide two Narrow Windows down into position in the back of the structure as shown in image 2. Slide the walls into position in the back and sides of the structure.
Note: Make sure to place the windows, walls, and doors so that the slots are at the top of the floor and face the inside of the structure.
3. Slide the Wide Windows down into position in the front of the structure as shown in image 3.
4. Place a 3x1 Floor and a 2x1 Floor into the slots on the inside to form the ceiling for the first floor as shown in image 4. The cardboard floors may have to bow a little bit in order to slide into the slots.
Repeat steps 1–4 to build the second and third floors of the structure (as shown in images 5–9).This same structure shape is used in scenarios 1–6.
15 Outside Corners 6 Narrow Windows
3 Inside Corners 6 Wide Windows
15 Walls 2 Doorways
6 Support Walls 2 Support Windows 3 2x1 Floors
3 3x1 Floors
RestRicted (foR gaming use only)
b e c a R e f u l • d o n o t l e t t h i s b o o k f a l l i n t o e n e m y h a n d s
19OpEratiOn CErBErUS
1 32
7 98
4 65
narroW WindoWsinside Corner
Wide WindoWs
RestRicted (foR gaming use only)
™
26
R e a d t h i s b o o k t h o R o u g h l y a n d k e e p i t s e c u R e • i t m a y s a v e l i v e s
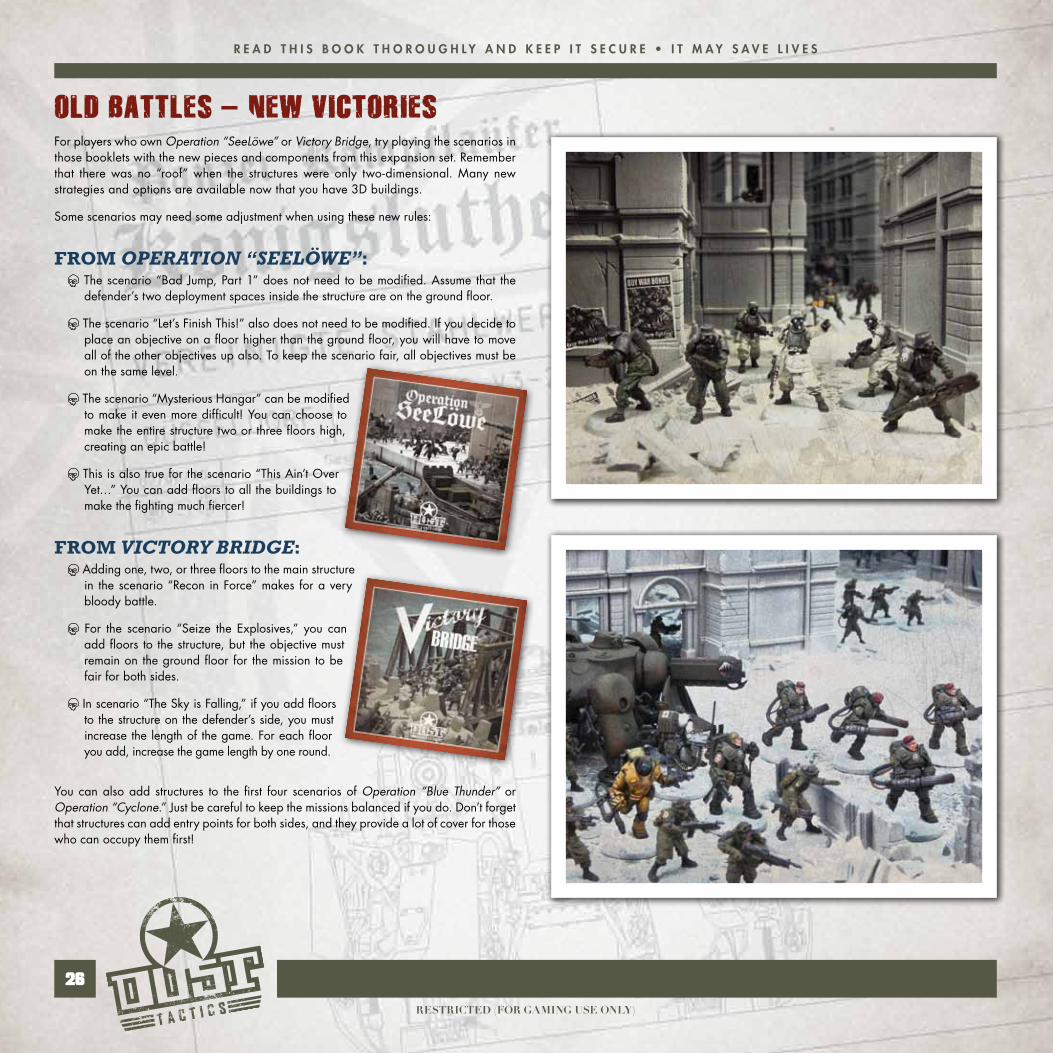
Old Battles – New VictOriesFor players who own Operation “SeeLöwe” or Victory Bridge, try playing the scenarios in those booklets with the new pieces and components from this expansion set. Remember that there was no “roof” when the structures were only two-dimensional. Many new strategies and options are available now that you have 3D buildings.
Some scenarios may need some adjustment when using these new rules:
From OperatiOn “SeeLöwe”: The scenario “Bad Jump, Part 1” does not need to be modified. Assume that the defender’s two deployment spaces inside the structure are on the ground floor.
The scenario “Let’s Finish This!” also does not need to be modified. If you decide to place an objective on a floor higher than the ground floor, you will have to move all of the other objectives up also. To keep the scenario fair, all objectives must be on the same level.
The scenario “Mysterious Hangar” can be modified to make it even more difficult! You can choose to make the entire structure two or three floors high, creating an epic battle!
This is also true for the scenario “This Ain’t Over Yet…” You can add floors to all the buildings to make the fighting much fiercer!
From VictOry Bridge: Adding one, two, or three floors to the main structure in the scenario “Recon in Force” makes for a very bloody battle.
For the scenario “Seize the Explosives,” you can add floors to the structure, but the objective must remain on the ground floor for the mission to be fair for both sides.
In scenario “The Sky is Falling,” if you add floors to the structure on the defender’s side, you must increase the length of the game. For each floor you add, increase the game length by one round.
You can also add structures to the first four scenarios of Operation “Blue Thunder” or Operation “Cyclone.” Just be careful to keep the missions balanced if you do. Don’t forget that structures can add entry points for both sides, and they provide a lot of cover for those who can occupy them first!
RestRicted (foR gaming use only)
b e c a R e f u l • d o n o t l e t t h i s b o o k f a l l i n t o e n e m y h a n d s
27OpEratiOn CErBErUS
New UNitsHere you will find the reports from the intelligence services regarding the new units that have recently reached the battlefield. Study them care-fully; a skilled general must know the enemy.
The figures described here are not included in this expansion.
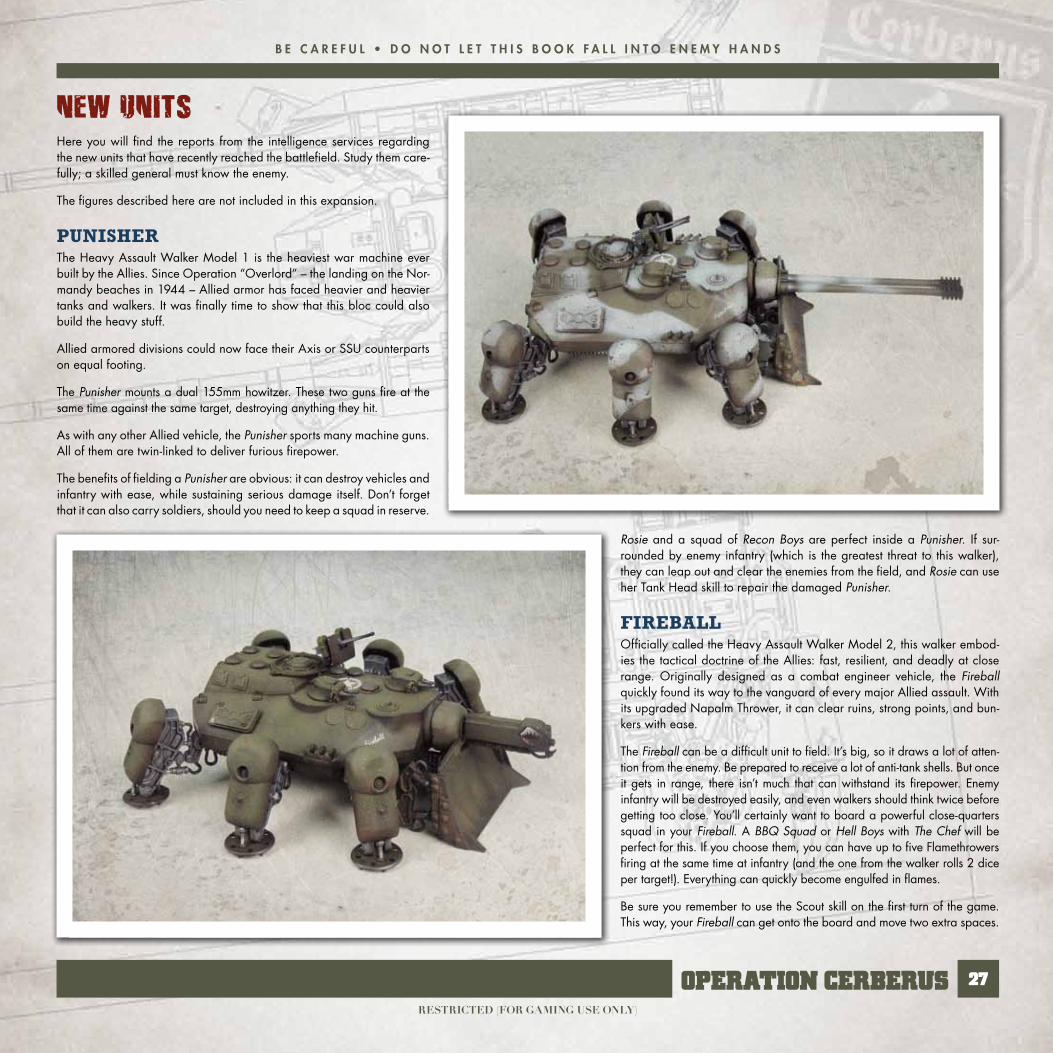
PunisherThe Heavy Assault Walker Model 1 is the heaviest war machine ever built by the Allies. Since Operation “Overlord” – the landing on the Nor-mandy beaches in 1944 – Allied armor has faced heavier and heavier tanks and walkers. It was finally time to show that this bloc could also build the heavy stuff.
Allied armored divisions could now face their Axis or SSU counterparts on equal footing.
The Punisher mounts a dual 155mm howitzer. These two guns fire at the same time against the same target, destroying anything they hit.
As with any other Allied vehicle, the Punisher sports many machine guns. All of them are twin-linked to deliver furious firepower.
The benefits of fielding a Punisher are obvious: it can destroy vehicles and infantry with ease, while sustaining serious damage itself. Don’t forget that it can also carry soldiers, should you need to keep a squad in reserve.
Rosie and a squad of Recon Boys are perfect inside a Punisher. If sur-rounded by enemy infantry (which is the greatest threat to this walker), they can leap out and clear the enemies from the field, and Rosie can use her Tank Head skill to repair the damaged Punisher.
FireballOfficially called the Heavy Assault Walker Model 2, this walker embod-ies the tactical doctrine of the Allies: fast, resilient, and deadly at close range. Originally designed as a combat engineer vehicle, the Fireball quickly found its way to the vanguard of every major Allied assault. With its upgraded Napalm Thrower, it can clear ruins, strong points, and bun-kers with ease.
The Fireball can be a difficult unit to field. It’s big, so it draws a lot of atten-tion from the enemy. Be prepared to receive a lot of anti-tank shells. But once it gets in range, there isn’t much that can withstand its firepower. Enemy infantry will be destroyed easily, and even walkers should think twice before getting too close. You’ll certainly want to board a powerful close-quarters squad in your Fireball. A BBQ Squad or Hell Boys with The Chef will be perfect for this. If you choose them, you can have up to five Flamethrowers firing at the same time at infantry (and the one from the walker rolls 2 dice per target!). Everything can quickly become engulfed in flames.
Be sure you remember to use the Scout skill on the first turn of the game. This way, your Fireball can get onto the board and move two extra spaces.
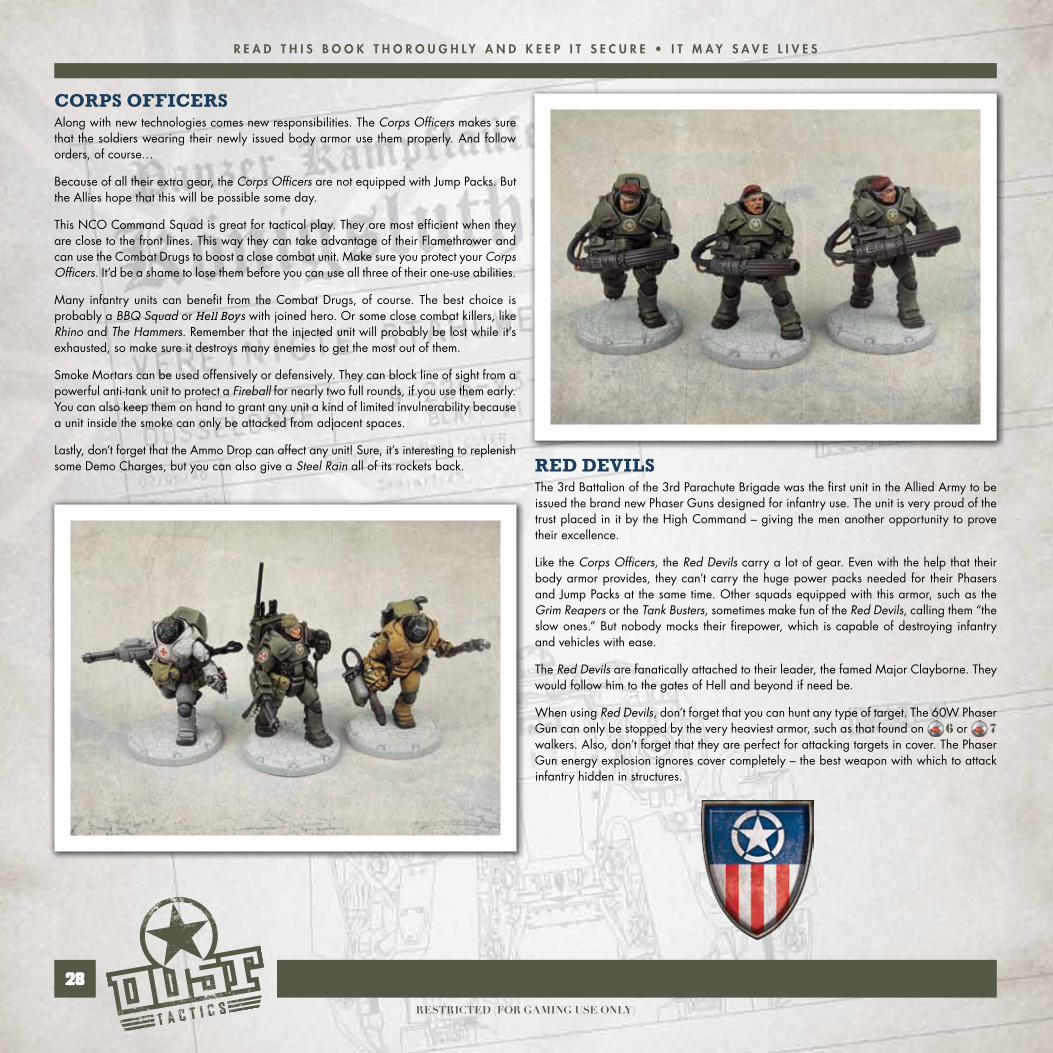
RestRicted (foR gaming use only)
™
28
R e a d t h i s b o o k t h o R o u g h l y a n d k e e p i t s e c u R e • i t m a y s a v e l i v e s
Corps offiCersAlong with new technologies comes new responsibilities. The Corps Officers makes sure that the soldiers wearing their newly issued body armor use them properly. And follow orders, of course…
Because of all their extra gear, the Corps Officers are not equipped with Jump Packs. But the Allies hope that this will be possible some day.
This NCO Command Squad is great for tactical play. They are most efficient when they are close to the front lines. This way they can take advantage of their Flamethrower and can use the Combat Drugs to boost a close combat unit. Make sure you protect your Corps Officers. It’d be a shame to lose them before you can use all three of their one-use abilities.
Many infantry units can benefit from the Combat Drugs, of course. The best choice is probably a BBQ Squad or Hell Boys with joined hero. Or some close combat killers, like Rhino and The Hammers. Remember that the injected unit will probably be lost while it’s exhausted, so make sure it destroys many enemies to get the most out of them.
Smoke Mortars can be used offensively or defensively. They can block line of sight from a powerful anti-tank unit to protect a Fireball for nearly two full rounds, if you use them early. You can also keep them on hand to grant any unit a kind of limited invulnerability because a unit inside the smoke can only be attacked from adjacent spaces.
Lastly, don’t forget that the Ammo Drop can affect any unit! Sure, it’s interesting to replenish some Demo Charges, but you can also give a Steel Rain all of its rockets back. red devils
The 3rd Battalion of the 3rd Parachute Brigade was the first unit in the Allied Army to be issued the brand new Phaser Guns designed for infantry use. The unit is very proud of the trust placed in it by the High Command – giving the men another opportunity to prove their excellence.
Like the Corps Officers, the Red Devils carry a lot of gear. Even with the help that their body armor provides, they can’t carry the huge power packs needed for their Phasers and Jump Packs at the same time. Other squads equipped with this armor, such as the Grim Reapers or the Tank Busters, sometimes make fun of the Red Devils, calling them “the slow ones.” But nobody mocks their firepower, which is capable of destroying infantry and vehicles with ease.
The Red Devils are fanatically attached to their leader, the famed Major Clayborne. They would follow him to the gates of Hell and beyond if need be.
When using Red Devils, don’t forget that you can hunt any type of target. The 60W Phaser Gun can only be stopped by the very heaviest armor, such as that found on 6 or 7 walkers. Also, don’t forget that they are perfect for attacking targets in cover. The Phaser Gun energy explosion ignores cover completely – the best weapon with which to attack infantry hidden in structures.
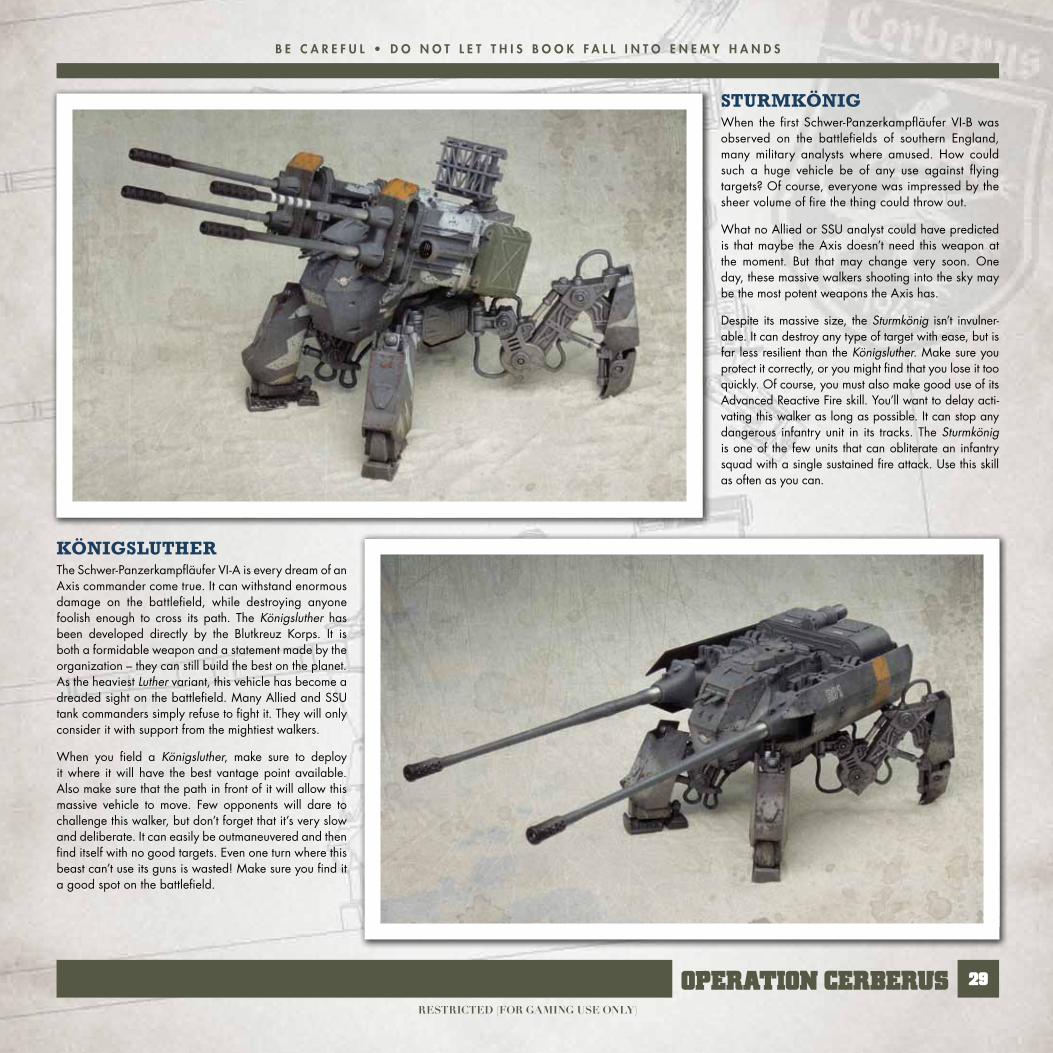
RestRicted (foR gaming use only)
b e c a R e f u l • d o n o t l e t t h i s b o o k f a l l i n t o e n e m y h a n d s
29OpEratiOn CErBErUS
KönigslutherThe Schwer-Panzerkampfläufer VI-A is every dream of an Axis commander come true. It can withstand enormous damage on the battlefield, while destroying anyone foolish enough to cross its path. The Königsluther has been developed directly by the Blutkreuz Korps. It is both a formidable weapon and a statement made by the organization – they can still build the best on the planet. As the heaviest Luther variant, this vehicle has become a dreaded sight on the battlefield. Many Allied and SSU tank commanders simply refuse to fight it. They will only consider it with support from the mightiest walkers.
When you field a Königsluther, make sure to deploy it where it will have the best vantage point available. Also make sure that the path in front of it will allow this massive vehicle to move. Few opponents will dare to challenge this walker, but don’t forget that it’s very slow and deliberate. It can easily be outmaneuvered and then find itself with no good targets. Even one turn where this beast can’t use its guns is wasted! Make sure you find it a good spot on the battlefield.
sturmKönigWhen the first Schwer-Panzerkampfläufer VI-B was observed on the battlefields of southern England, many military analysts where amused. How could such a huge vehicle be of any use against flying targets? Of course, everyone was impressed by the sheer volume of fire the thing could throw out.
What no Allied or SSU analyst could have predicted is that maybe the Axis doesn’t need this weapon at the moment. But that may change very soon. One day, these massive walkers shooting into the sky may be the most potent weapons the Axis has.
Despite its massive size, the Sturmkönig isn’t invulner-able. It can destroy any type of target with ease, but is far less resilient than the Königsluther. Make sure you protect it correctly, or you might find that you lose it too quickly. Of course, you must also make good use of its Advanced Reactive Fire skill. You’ll want to delay acti-vating this walker as long as possible. It can stop any dangerous infantry unit in its tracks. The Sturmkönig is one of the few units that can obliterate an infantry squad with a single sustained fire attack. Use this skill as often as you can.
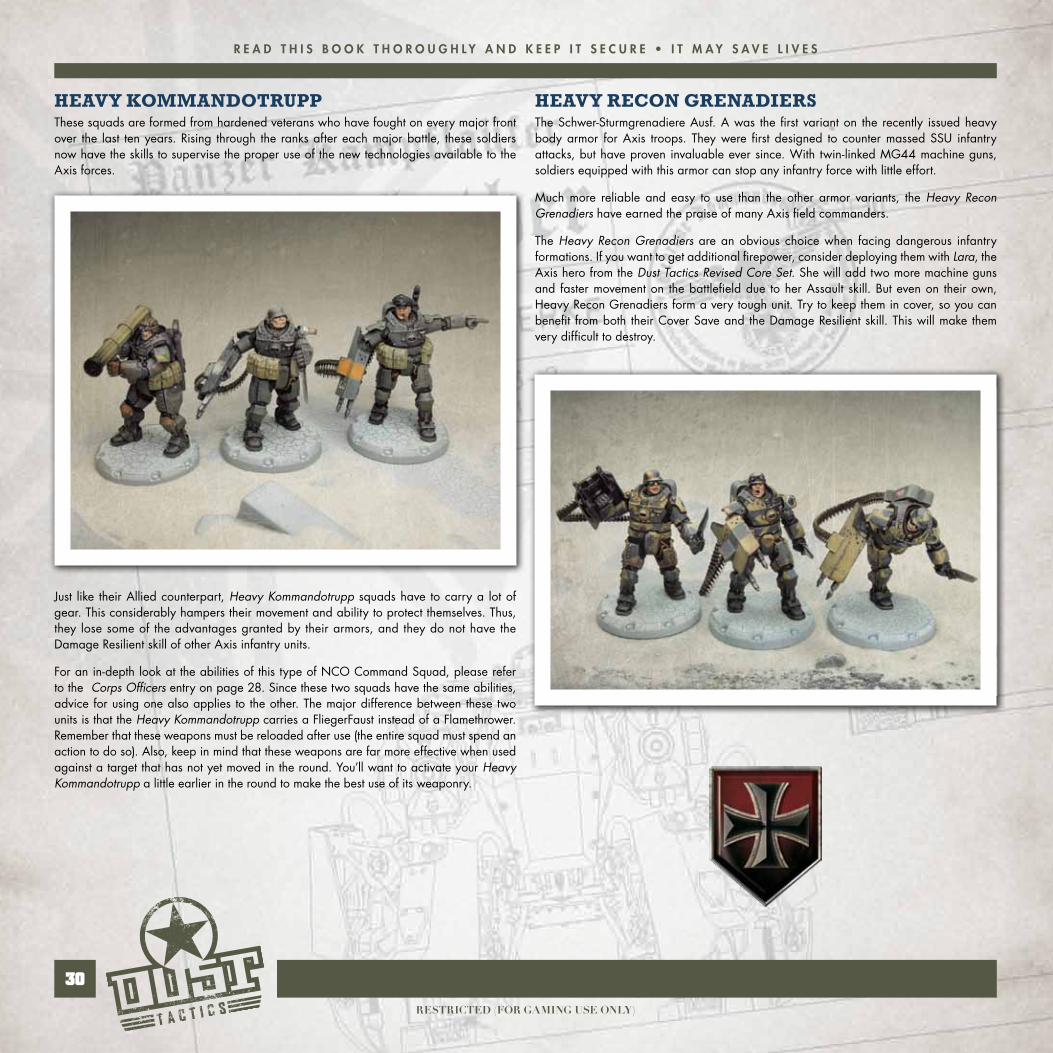
RestRicted (foR gaming use only)
™
30
R e a d t h i s b o o k t h o R o u g h l y a n d k e e p i t s e c u R e • i t m a y s a v e l i v e s
Heavy KommandotruppThese squads are formed from hardened veterans who have fought on every major front over the last ten years. Rising through the ranks after each major battle, these soldiers now have the skills to supervise the proper use of the new technologies available to the Axis forces.
Just like their Allied counterpart, Heavy Kommandotrupp squads have to carry a lot of gear. This considerably hampers their movement and ability to protect themselves. Thus, they lose some of the advantages granted by their armors, and they do not have the Damage Resilient skill of other Axis infantry units.
For an in-depth look at the abilities of this type of NCO Command Squad, please refer to the Corps Officers entry on page 28. Since these two squads have the same abilities, advice for using one also applies to the other. The major difference between these two units is that the Heavy Kommandotrupp carries a FliegerFaust instead of a Flamethrower. Remember that these weapons must be reloaded after use (the entire squad must spend an action to do so). Also, keep in mind that these weapons are far more effective when used against a target that has not yet moved in the round. You’ll want to activate your Heavy Kommandotrupp a little earlier in the round to make the best use of its weaponry.
Heavy recon GrenadiersThe Schwer-Sturmgrenadiere Ausf. A was the first variant on the recently issued heavy body armor for Axis troops. They were first designed to counter massed SSU infantry attacks, but have proven invaluable ever since. With twin-linked MG44 machine guns, soldiers equipped with this armor can stop any infantry force with little effort.
Much more reliable and easy to use than the other armor variants, the Heavy Recon Grenadiers have earned the praise of many Axis field commanders.
The Heavy Recon Grenadiers are an obvious choice when facing dangerous infantry formations. If you want to get additional firepower, consider deploying them with Lara, the Axis hero from the Dust Tactics Revised Core Set. She will add two more machine guns and faster movement on the battlefield due to her Assault skill. But even on their own, Heavy Recon Grenadiers form a very tough unit. Try to keep them in cover, so you can benefit from both their Cover Save and the Damage Resilient skill. This will make them very difficult to destroy.

RestRicted (foR gaming use only)
b e c a R e f u l • d o n o t l e t t h i s b o o k f a l l i n t o e n e m y h a n d s
31OpEratiOn CErBErUS
The ChefYou were introduced to this talented warrior earlier in this book. When it comes to combat, The Chef can count on his two Flamethrowers to deal with most enemies. Be aware that these are lighter versions of the weapon issued to regular infantry units, so they are less effective against vehicles. They are, however, just as deadly against infantry.
Since his Flamethrowers are on separate weapon lines, The Chef can engage two different targets each round. Consider joining him with a BBQ Squad or Hell Boys unit. With the second option, you’ll have four flame weapon shots each turn. Nothing can stand up to that kind of dam-age for long. Try to avoid engaging smaller units, since you will roll fewer dice. Keep your focus on large 2 squads with a hero attached (six dice rolled per Flame-thrower if the enemy has a full-strength squad) or powerful
2 squads (again with a hero attached, giving you four dice per Flamethrower).
The Chef is not as tough as many other Allied heroes: He only has 3 . He won’t be able to soak up as many shots as you might be used to with your heroes. Make sure to protect him until he can get into range.
anGelaAngela Wolf is a famed member of the Blutkreuz Korps and one of the most dangerous assassins on the planet. Some even say that she is the deadliest. The few people who have heard about Operation “Valkyrie” still don’t know who pulled the trigger: Sigrid, or Angela? You can learn more about her past in Operation “SeeLöwe.”
Angela is deadly. Her Frenzy skill works much like a Laser Weapon, but affects only infantry. Nevertheless, it can allow her to wipe out an entire squad or kill a hero with a single action – a feat not many units can achieve! With her long-range rifle, she can destroy heavy weapons specialists long before they are in range to retaliate. With her Sniper skill, she can target heroes, leaving the squads that they joined without their extra and abilities. She can even finish off some vehicles, since her Solothurn gun can damage up to 6!
Angela is a little more fragile than most heroes, having only 3 . The best protection you can give her is to have her join up with a Sniper Team. That way, she can benefit from their great Cover Saves. And thanks to the team’s spotter, she can hit on results! This unit, combined with the lowly ammo crate, can become extremely deadly in a defensive position – any foe within six spaces of them is either very brave or very foolish! Which, admittedly, is sometimes the same thing in combat. Your opponents will quickly learn to attack Angela only with vehicles.
www.FantasyFlightGames.com
www.Dust-Tactics.com
Dust Tactics © DUST STUDIO Ltd. 2011
Dust Tactics uses the Spaces & Tiles (S&T System) game system, copyright DUST STUDIO.
All illustrations, photography, images and miniatures are © DUST Ltd.
Dust Tactics® is a work of fiction.
Dust created by paolo parenTe
sTaffCommander in Chief: Olivier Zamfirescu
Staff officer in charge of artistic operations: Vincent Fontaine
Staff officers in charge of writing out the battle plan: Laurent Duclos and Guglielmo Yau
Staff officers in charge of maps, diagrams, and other illustrations: Davide Fabbri, Matthias Had-dad, Karl Kopinski, Laurent Lecocq and Domenico Neziti
Aides de camps: Livio Emanueli and Loïc Lecoin
Graphic Design: Mathieu Harlaut
Miniatures sculptor: Juan Navarro Perez, Rafal Zelabo
Playtesters: Ludovic Andrieux, Jérémy Belbéoc’h, Yann Cupertini, Livio Emanueli, Guillaume Fontaine, Marco Pelan, Marco Peruccelli, David Preti, Nicolas Vastel & Fabio Zanicotti
Editing: William Niebling
Special thanks to Fabio Zanicotti father of the BlutKreutz
Many thanks to: Clement Boen, Mario Braghieri, Luigi “Ninja” Brigante, José Brito, Alessandro Bruschi, Chan Yuk, Nicolas Couderc, Alexandre Giraud, Catherine & Raphael Guiton, Takao Hasegawa, Jeanne@Album, Kallamity, Vincen-zo Lanna, Giovanni Mazzotta, Minky@Twistory, PF Periquet, David Preti, Ping Ngai, Maestro Nino Pizzichemi, Roberto Scazzuso, Masatsugu Shiwaku, Angel Songannan, Sigrid Thaler, Remy Tremblay, Denka & Anastasiya Tymofyeyev, Anna Undraal, Stephen & Victor Yau, Alessia Zambonin, Filippo Zanicotti
ffGProducer: Christopher Hosch with Steven Kimball
Editing & Proofreading: James Torr with Brady Sadler
Production Manager: Eric Knight
Executive Game Designer: Corey Konieczka
Executive Producer: Michael Hurley
Publisher: Christian T. Petersen

TM
TM
In the year 1947, World War II still rages. In the alternate 1940s reality of Dust Warfare, players control heroes, squads, and fearsome combat walkers as they battle for the fate of the world. Designed by renowned miniatures guru Andy Chambers, Dust Warfare integrates dynamic and engaging new tabletop miniatures game design with the stunning miniatures from Dust Tactics.
Get the walkers. Get the rules. Rewrite history.
www.FantasyFlightgames.comFantasyFlightgamesTM
© 2011 Fantasy Flight Games and Dust Studio. Dust Tactics and Dust Studio are trademarks. All miniatures names, illustrations, and photography are © Fantasy Flight Games or Dust Studio.
TM