truck drivers manual - department of infrastructure and ... · pdf filetruck drivers manual...
TRANSCRIPT

TRUCK DRIVERS MANUAL
Prepared by
JOHN SAUNDERS
and
PETER THOMSON
DEPARTMENT OF TRANSPORT AND COMMUNICATIONS FEDERAL OFFICE OF ROAD SAFETY
DOCUMENT RETRIEVAL INFORMATION
Report No. Date Pages ISBN ISSN CR9 1 June 1990 136 642 51387 2 0810-770X
nile and Subtile Truck Drivers Manual
Author@) John sunders and Peter Thomson
Pertorming Organisafion National Road Transport Industry Training Committee Ltd 75-79 Chetwynd Street North Melbourne Victoria, 3051
Sponsor Federal Office of Road Safety GPO Box 594 CANBERRA ACT 2601
Available from Federal Office of Road Safety GPO Box 594 CANBERRA ACT 2601
Abstract A manual to assist an applicant to get the knowledge and skills necessary to obtain a truck driver's licence and then become an expert professional driver in the road transport industry. The manual is designed to be used to achieve uniform testing and licensing standards throughout Australia. The manual covers topics including vehicle operation and maintenance, safe driving practices, acts and regulations, and a guide to public relations.
Keywords TRUCKSAFElY TRUCK DRIVER MANUAL ROAD SAFE" DRIVER TRAINING COMMERCIAL DRIVERS LICENCE
CONTENTS
PAGE
VEHICLE OPERATION AND MAINTENANCE .................................................................................. 3
Steering, Accelerating, Gear Changing and Braking .......................................................................... 3
i

ii

Defensive Dnvlng 87 The Professional Driver ............................................................................................................. 87 Defensive Dnvlng - A Definlhon 87 Superior Observation Skills ... . . . . . . . . . . . . . . . . . . . . . . . . . . . . . . . . . . . . . . . . . . . . . . . . . . . . . . . . . . . . . . . . . . . . . . . . . . . . . . . . . . . . . . . . . . . . . . . . . . . 88
. . .....................................................................................................................................
. . . . . . . . . . . . . . . . . . . . . . . . . . . . . . . . . . . . . . . . . . . . . . . . . . . . . . . . . . . . . . . . . . . . . . . . . . . . . . . . . . . . . . . . . . . . . . . . .
Space Cushion ............................................................................................................................. 88 ~ Space Ahead ......................................................................................................................... 88
- Space to the Sides ................................................................................................................ 89 - Space Behind ........................................................................................................................ 89 - Space Above ......................................................................................................................... 90 Driver Vlslon 90 The System of Vehicle Control . . . . . . . . . . . . . . . . . . . . . . . . . . . . . . . . . . . . . . . . . . . . . . . . . . . . . . . . . . . . . . . . . . . . . . . . . . . . . . . . . . . . . . . . . . . . . . . . . 90 Night Driving .. . . . . . . . . . . . . . . . . . . . . . . . . . . . . . . . . . . . . . . . . . . . . . . . . . . . . . . . . . . . . . . . . . . . . . . . . . . . . . . . . . . . . . . . . . . . . . . . . . . . . . . . . . . . . . . . . . . . . . . . . . . . . 92 Wet Road Condlhons 92 Knowledge Questions . . . . . . . . . . . . . . . . . . . . . . . . . . . . . . . . . . . . . . . . . . . . . . . . . . . . . . . . . . . . . . . . . . . . . . . . . . . . . . . . . . . . . . . . . . . . . . . . . . . . . . . . . . . . . . . . 93
- To Check your Space Cushion Ahead (Time Lapse Method) ...................................... 89
. . ...............................................................................................................................
. . . . . . . . . . . . . . . . . . . . . . . . . . . . . . . . . . . . . . . . . . . . . . . . . . . . . . . . . . . . . . . . . . . . . . . . . . . . . . . . . . . . . . . . . . . . . . . . . . . . . . . . . . . . . . . . . .
Breakdown and Accidents . . . . . . . . . . . . . . . . . . . . . . . . . . . . . . . . . . . . . . . . . . . . . . . . . . . . . . . . . . . . . . . . . . . . . . . . . . . . . . . . . . . . . . . . . . . . . . . . . . . . . . . . . . . . . . . . . . . . . . 95 Breakdowns ................................................................................................................................. 95 Accidents ... . . . . . . . . . . . . . . . . . . . . . . . . . . . . . . . . . . . . . . . . . . . . . . . . . . . . . . . . . . . . . . . . . . . . . . . . . . . . . . . . . . . . . . . . . . . . . . . . . . . . . . . . . . . . . . . . . . . . . . . . . . . . . . . . . 95
Knowledge Questions ................................................................................................................ 99 . Wheel ChangiLg ......................................................................................................................... 97
... 111
. .
. .
. . . . . . .
Emergency Procedures ........................................................................................................................... 100 Emerrencies ... . . . . . . . . . . . . . . . . . . . . . . . . . . . . . . . . . . . . . . . . . . . . . . . . . . . . . . . . . . . . . . . . . . . . . . . . . . . . . . . . . . . . . . . . . . . . . . . . . . . . . . . . . . . . . . . . . . . . . . . . . . . . 100 Skidding 100 - Drive Wheel Skids ............................................................................................................. 101 - Front Wheel Skids .............................................................................................................. 102 - All Wheel Skids .................................................................................................................. 103 - Trailer Skids ........................................................................................................................ 103 Evasive Steering ........................................................................................................................ 104 Brake Failure .............................................................................................................................. 104 - Loss of Air Pressure .......................................................................................................... 104 - Loss of Hydraulic Pressure .............................................................................................. 104 - Brake Failure on Hills ....................................................................................................... 105 Missed Gear Shift ...................................................................................................................... 105 Leaving the Road ...................................................................................................................... 105 Tyre Failure ................................................................................................................................ 106 Fires ............................................................................................................................................. 107 Dangerous Goods ..................................................................................................................... 108 Safe Driving Practices: A Summary ....................................................................................... 109 Knowledge Questions .............................................................................................................. 111
- .....................................................................................................................................
ACTS AND REGULATIONS ................................................................................................................ 112
. . . .
. . . . . .
Road Laws .................................................................................................................................. 112 Apphcahon of Road Laws ....................................................................................................... 112
Speed Limits 113 Giving Way 112
Level Crossings ......................................................................................................................... 114 Seat Belts .................................................................................................................................... 114 Alcohol and Drugs .................................................................................................................... 114 Following Distance ................................................................................................................... 115
Hours of Driving and Log Books 116 Dangerous Goods 116
Knowledge Questions .............................................................................................................. 117
. . ................................................................................................................................ ..............................................................................................................................
..................................................................................................................... ...........................................................................................
PUBLIC RELATIO.NS ............................................................................................................................. 119
9 Having the Right Attitudes ..................................................................................................... 119 The Changing Image of the Truck Driver ............................................................................. 120 Good P.R. is Good for Drivers .. . . . . . . . . . . . . . . . . . . . . . . . . . . . . . . . . . . . . . . . . . . . . . . . . . . . . . . . . . . . . . . . . . . . . . . . . . . . . . . . . . . . . . . . . . . . . . . 120 The Truck Driver’s Ten Commandments ............................................................................. 121
DICTIONARY OF TRUCKING TERMS .............................................................................................. 122
ANSWERS TO QUESTIONS ................................................................................................................. 134
APPENDIX A ........................................................................................................................................... 136
iv
ACKNOWLEDGEMENTS
The development of a manual for truck drivers was first proposed by Ken Briggs of the South Australian Road Transport Industry Training Committee. Ken saw the manual as an important adjunct to the development of the theory and practical tests for graduated driver's licences.
The work on both the manual and tests has also been supported by the National Road Transport Industry Training Committee, and particularly its former Executive Officer, Cliff Johnston.
The Federal Office of Road Safety provided the bulk of the funds for the project.
We would like to acknowledge the assistance received from the following organisations.
The Road Traffic Authorities of the Commonwealth, States and Territories.
The State Road Transport Industry Training Committees and Councils.
Officers of the WA Police Department's Licensing and Services Branch.
Officers of the Australian Road Transport Federation, Victorian Branch of the TWU, Driver Education Centre of Australia, NRMA of New South Wales, and the Australian Army.
John Saunders
Peter Thomson
May 1989
V

INTRODUCTION
A MANUAL FOR ME PROFESSIONAL DRIVER
This manual is intended to help you get the knowledge and skills necessary to obtain a truck drivefs licence and then become an expert professional driver in the road transport industry.
EFFICIENCY AS WELL AS SAFEPl
The manual can help you become a better truck driver whether you are a novice or old hand and that will benefit both you and your company.
Australian and overseas experience has shown that proper training of truck drivers significantly reduces vehicle maintenance costs (by almost half in some instances) and improves fuel economy.
If you follow the instructions and standards set out in this manual you are sure to become a safer and more efficient heavy vehicle operator.
PROFESSIONAL DRIVING INSTRUCllON
It is not possible in a manual of this size to cover every aspect of driving needed for all makes and types of vehicle. Nor is it possible to learn the required practical skills solely from a book.
We strongly recommend that you also get professional driving instruction for the type of vehicle you expect to be driving.
You can find out about professional driving instruction from the Road Transport Industry Training Council, the licensing authority, and specialised commercial driving schools in your state or territory.
LIMITATIONS OF THIS MANUAL
When using this manual, you need to keep in mind the following points:
This manual is primarily intended for drivers of trucks. It does not attempt to cover the special knowledge and techniques needed for driving other types of heaw vehicles such as buses, coaches, graders, tractors and road sweepers.
The manual does not replace the driving handbooks provided by state and territory
to understand both the manual and the handbook thoroughly. transport authorities which explain basic road rules and driving requirements. You need
Answers to some oi the questions in the knowledge tests are not covered in this manual because they deal with things you should learn when receiving practical driving instruction. If you are unable to answer the questions you should seek training from a professional driving instructor.
1

HOW TO USE THE MANUAL
The manual is divided into sections. At the beginning of each section is an explanation of the knowledge, performance, conditions and standards that are required.
KNOWLEDGE - the information you need to know for the knowledge test.
PERFORMANCE -what you need to be able to do in the practical driving test.
CONDITIONS - how you will be tested.
STANDARDS - how well you will have to perform to pass the tests.
conditions and standards that apply to each section. Where there are differences, the authors I t is not yet possible to gain Australia-wide agreement on the knowledge, performance,
have chosen what they see as the best approximation of the national view. Individual states and territories could well differ even though they are moving towards a national standard.
You must pass two tests on the information contained in the manual:
THE KNOWLEDGE TEST
THE PRACTICAL DRIVING TEST
You should pass the knowledge test first.
WHEN ARE YOU READY TO BE TESTED?
The person who has been training you will be the best judge of when you are ready to take the tests.
You can also see if you are ready by answering the questions at the end of each section. These questions are very similar to the ones you will be answering in the Knowledge Test.
If you find you are getting most of them right, you are probably ready to take the Knowledge Test.
2

VEHICLE OPERATION AND MAINTENANCE
STEERING, ACCELERATING, GEAR CHANGING AND BRAKING
KNOWLEDGE:
You must know and understand the correct procedures for steering, accelerating, changing gears and braking in a truck.
PERFORMANCE:
You must be able to operate a truck competently and safely by using correct steering, acceleration, gear changing and braking skills.
CONDITIONS
Knowledge test : examination conditions
Practical test : on-road and/or off-road. Some performance tasks can be demonstrated in simulated situations.
STANDARDS
You must pass the knowledge test which deals with controlling the vehicle before taking the practical driving test.
During the practical test you must demonstrate an ability to safely and efficiently:
move off from the kerb into a traffic flow
make left and right turns
- between narrow and wide roads
- into and out of laned and divided roads
- at traffic lights and roundabouts
9 move off uphill and downhill
select the appropriate gear for the vehicle speed, traffic situation and road
control the operation of an automatic transmission (if fitted)
operate all braking systems on the vehicle
double de-clutch up and down thrbugh the gears on non-synchromesh
conditions in all circumstances
gearboxes.
When performing these tasks you will be judged on your ability to smoothly co-ordinate your steering, acceleration, gear changing and braking.
3

Steering The steering wheel should normally be held lightly with both hands. Gripping the wheel too tightly can lead to fatigue and prevent smooth movement when steering.
On greasy or slippery surfaces a light grip is particularly important because it enables you to 'feel' the reaction of the front wheels on the road. Manual steering (i.e. not power-assisted) may require a firmer grip, particularly when cornering or braking.
The correct position for your hands on the steering wheel varies according to the size and position of the steering wheel. The most commonly recommended position is 'a quarter to three' where, if the steering wheel is viewed as the face of a clock, the hands are opposite each other at 9 and 3 on the dial (Refer Figure 2.1). Another favoured position is that shown as 'ten to two'.
The 'twenty to four' position (hands at 4 and 8 on the dial) used by drivers of older, heavy-steering vehicles is not recommended for modern easily steered vehicles because it restricts steering movement.
Ten t o two Q u a r t e r t o t h r e e
Figure 2.1 Recommended position of hands on steering wheel
To allow you to exercise maximum steering control at all times you should not rest your elbows on your legs or any part of the vehicle. You should also avoid using a grip which has your thumbs on the inside of the wheel. The steering wheel can kick hard enough to break your
driving on rough or uneven ground. thumbs if the front wheels hit a pothole or some other object. This rule is most important when
4
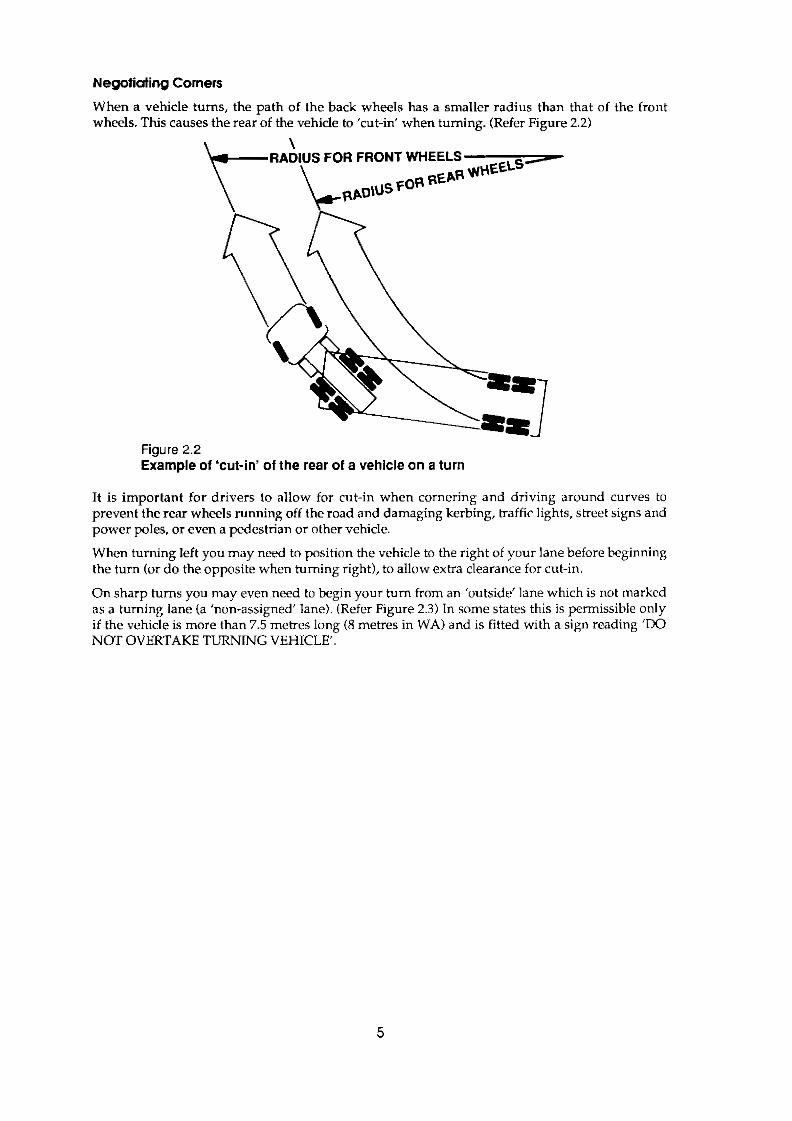
Negotiating Corners When a vehicle turns, the path of the back wheels has a smaller radius than that of the front wheels. This causes the rear of the vehicle to ’cut-in’ when turning. (Refer Figure 2.2)
”.
Example of ‘cut-in’ of the rear of a vehlcle on a turn Figure 2.2
It is important for drivers to allow for cut-in when cornering and driving around curves to prevent the rear wheels running off the road and damaging kerbing, traffic lights, street signs and power poles, or even a pedestrian or other vehicle.
When turning left you may need to position thevehicle to the right of your lane before beginning the turn (or do the opposite when turning right), to allow extra clearance for cut-in.
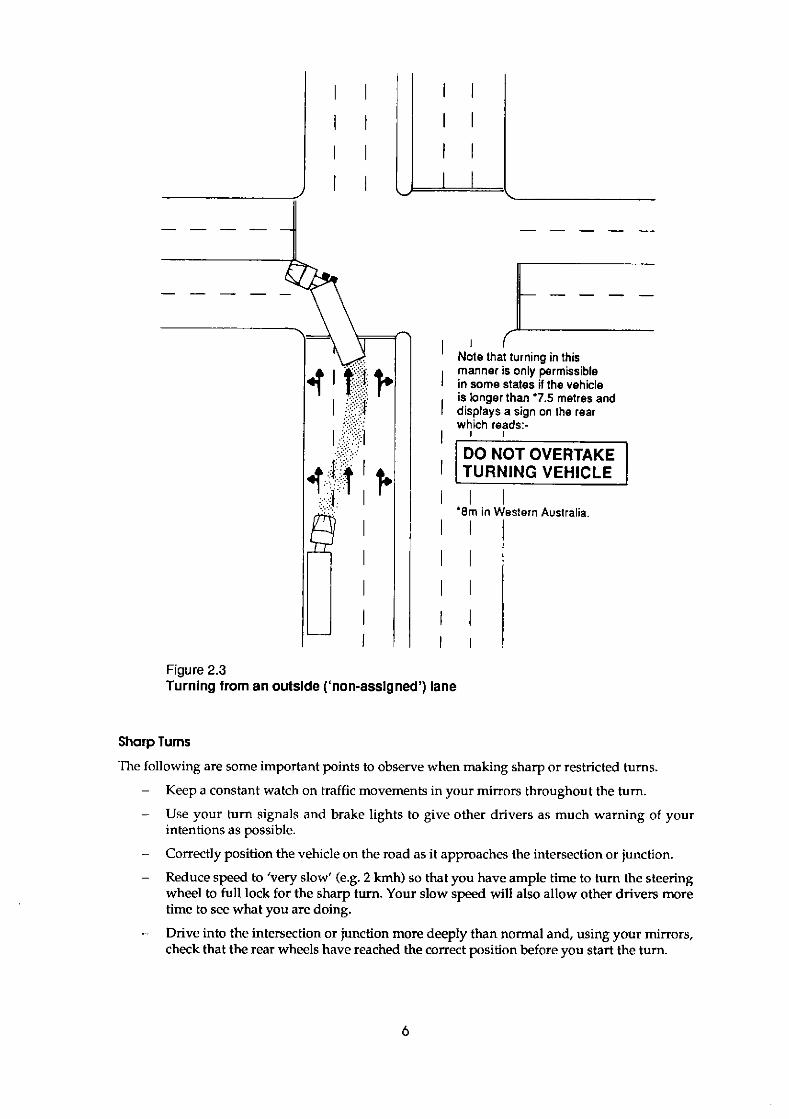
On sharp turns you may even need to begin your turn from an ‘outside’ lane which is not marked as a turning lane (a ’non-assigned‘ lane). (Refer Figure 2.3) In some states this is permissible only
NOT OVERTAKE TURNING VEHICLE. if the vehicle is more than 7.5 metres long (8 metres in WA) and is fitted with a sign reading ‘Do
5
~
I I I I
""_
I ( ' Note that turning in this
I in same states if the vehicle manner is only permissible
I displays a sign on the rear is longer than '7.5 metres and
which reads:.
I 1 I 1 I I I I I I
'Ern in I
I I
estern Australia
Turnlng from an outside ('non-asslgned') lane Figure 2.3
Sharp Turns The following are some important points to observe when making sharp or restricted turns.
- Keep a constant watch on traffic movements in your mirrors throughout the turn.
- Use your turn signals and brake lights to give other drivers as much warning of your intentions as possible.
- Correctly position the vehicle on the road as it approaches the intersection or junction.
- Reduce speed to 'very slow' (e.g. 2 kmh) so that you have ample time to turn the steering wheel to full lock for the sharp turn. Your slow speed will also allow other drivers more time to see what you are doing.
- Drive into the intersection or junction more deeply than normal and, using your mirrors, check that the rear wheels have reached the correct position before you start the turn.
6
- Use your mirrors to make a final check on surrounding traffic before turning and to maintain a check on vehicle clearance (especially as affected by ‘cut-in’) during the turn.
- Watch carefully for drivers who may attempt to overtake on the inside of your vehicle. This is especially important when making a turn from a ’non-assigned‘ lane as previously mentioned.
Negotiating Curves The driver should enter a curve wide (from the outside), and set up a line that will bring him close to the inside and then leave the cuwe wide.
That method increases the radius of the vehicle’s path through the curve and lessens sideways (centrifugal) force on the vehicle. That reduces stress on the vehicle and its load and increases the road-holding safety margin. Entering the curve as close as possible to the outer edge also gives the driver thebest view ahead.
7

Correct line of travel to minlmlse vehlcle stress and increase safety margin Figure 2.4
Ofher Steering Factors Other factors which the truck driver needs to be aware of when negotiating curves and corners include:
resonance roll
roll momentum
weight transfer
load movement (including the effects of live’ loads).
You will need to ask your trainer to explain how these factors interact to affect the vehicle when turning a corner. However a simple example will illustrate the danger they can cause.
8

In Figure 2.5, the driver of a ioaded truck intends to proceed straight through a roundabout. The driver safely negotiates the left-hand bend at point 'A' and the vehicle rolls to the right. The driver then swings to the right at 'B' to travel around the roundabout and the vehicle rolls to the left. But this time i t rolls much further than it did at point 'A' because the directional changes of the vehicle match its roll resonance. At this point the load might even shift, transferring more weight to the left-hand side of the vehicle, increasing the roll still further and possibly overturning the vehicle on to its left side at point 'C' as shown. However, if the vehicle is able to continue past point 'C' and the driver then steers to the left, the vehicle will roll back to the right still more violently and is even more likely to overturn, this time on to its right side at p i n t 'D.'
Overturning of vehicle due to resonance roll and other factors Figure 2.5
This can occur at a surprisingly low speed which may be quite safe for another type of truck even
can present a similar hazard. when fully laden. This danger is not restricted to roundabouts. Sbends and violent lane changes
To prevent it happening to you, ask your trainer for information about the factors mentioned and use this knowledge to work out how lo maintain the stability and safety of your vehicle.
Common Driving Faults Which Affect Steering - Gripping the steering wheel too tightly.
Removing both hands from the steering wheel
- Removing either hand from the steering wheel for an unnecessarily long time (e.g. when gear changing or operating controls).
- Allowing the hands to drop to the lower half of the steering wheel.
- Turning the steering wheel too much or too little, or maintaining a turn too long- resulting in the vehicle following an erratic course.
9

- Making sudden or sharp deviations in course such as cutting out or cutting in too sharply when overtaking. (Can lead to resonance roll)
- Enteringbends and corners too fast.
- Braking in bends and corners.
Accelerating Accelerating a truck requires skill and care because the engine is generally larger and slower revving and tends to be more sluggish in its response than a car.
This places greatcr demands on the driver when using the accelerator and clutch, if precise, well co-ordinated and smooth gear changes are to be achieved.
Many of the components in a fully laden truck are more highly stressed than in a car and the safety margin preventing damage is therefore less.
Moving off from rest and gear changing must be as smooth as possible to avoid damage or excessive wear. For example, a 'kangaroo hop' start in a loaded truck can seriously damage clutch, transmission, driveshaft and axle assemblies.
Accelerating harshly or too early on a comer can cause the drive wheels to spin, especially when they are lightly loaded.
That can cause serious problems for semis or truck trailer combinations. When drive wheels spin,
wheels sideways and jack-knifing the unit as shown in Figure 2.6. You should be especially wary the semi-trailer or trailer can continue forward under its own momentum pushing the drive
of this danger when cornering on a road surface which is wet, slippery or has a negative camber.
To minimise the risk, you should slow the vehicle to the correct cornering speed before entering
accelerating nor decelerating while turning the corner. the corner and then apply only light throttle to 'balance' the vehicle so that it is neither
Figure 2.6 A power jack-knife caused by harsh acceleration when cornering
10

Braking As a professional truck driver you should always be aware of the danger posed by your vehicle should you lose control of its speed or direction.
Your complete understanding of the braking system of your vehicle and skill in using it correctly are essential to your safety and that of the general public. Never drive a vehicle if you are not familiar with its braking system.
There are three types of braking systems found on trucks.
All light and some medium trucks use hydraulic brakes, usually vacuum assisted, which operate in much the same way as car brakes.
Many medium and some heavy trucks use air-over-hydraulic brake systems. The overwhelming majority of those trucks also have exhaust brakes.
Full air brakes are now virtually standard on heavy trucks and some medium trucks and are the most expensive type of system.
The following brief explanations will help you understand the operating principles of the various systems.
Hydraulic Brakes Hydraulic brakes basically consist of a master cylinder which functions as a pump, operated by the brake pedal. The master cylinder is connected to slave cylinders in the wheels.
When the brake pedal is pushed, the piston in the master cylinder forces fluid through the pipes to the slave cylinders forcing their pistons outwards. These press the brake shoes against the brake drums, or the pads against the discs. The more force applied to the brake pedal, the harder the brake shoes or pads are applied.
In many hydraulic brake systems, engine vacuum is used to provide power assistance and so reduce driver effort. The engine must be kept running in order to maintain power assistance to the brakes. If the engine does stop, the vehicle should normally have a vacuum reserve sufficient for 2 or 3 brake applications.
brake fluid in the wheel cylinders boils. That can happen under extreme braking conditions if the One of the more serious problems of hydraulic brake systems is that the brakes can fail if the
boilingpoint of the hydraulic fluid has been lowered through contamination with moisture.
Hydraulic fluid has an affinity to water and gradually becomes pollutcd through condensation. The fluid should be replaced periodically (some manufacturers say annually).
1 1
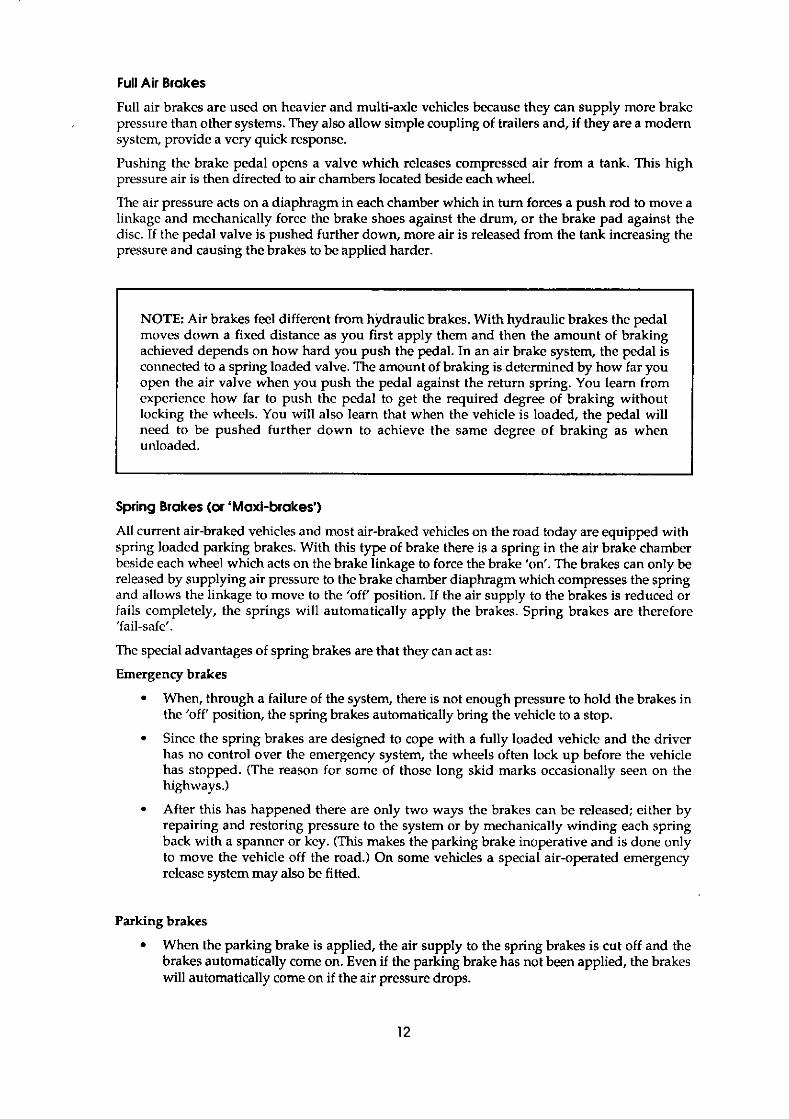
Full Air Brakes Full air brakes are used on heavier and multi-axle vehicles because they can supply more brake pressure than other systems. They also allow simple coupling of trailers and, i f they are a modem system, provide a very quick response.
Pushing the brake pedal opens a valve which releases compressed air from a tank. This high pressure air is then directed to air chambers located beside each wheel.
The air pressure acts on a diaphragm in each chamber which in turn forces a push rod to move a
disc. If the pedal valve is pushed further down, more air is released from the tank increasing the linkage and mechanically force the brake shoes against the drum, or the brake pad against the
pressure and causing the brakes to be applied harder.
NOTE Air brakes feel different from hydraulic brakes. With hydraulic brakes the pedal moves down a fixed distance as you first apply them and then the amount of braking achieved depends on how hard you push the pedal. In an air brake system, the pedal is connected to a spring loaded valve. The amount of braking is determined by how far you open the air valve when you push the pedal against the return spring. You learn from experience how far to push the pedal to get the required degree of braking without locking the wheels. You will also learn that when the vehicle is loaded, the pedal will need to be pushed further down to achieve the same degree of braking as when unloaded.
Spring Brakes ( o r 'Maxi-brakes') All current air-braked vehicles and most air-braked vehicles on the road today are equipped with spring loaded parking brakes. With this type of brake there is a spring in the air brake chamber beside each wheel which acts on the brake linkage to force the brake 'on'. The brakes can only be released by supplying air pressure to the brake chamber diaphragm which compresses the spring and allows the linkage to move to the 'off' position. If the air supply to the brakes is reduced or fails completely, the springs will automatically apply the brakes. Spring brakes are therefore 'fail-safe'.
The special advantages of spring brakes are that they can act as:
Emergency brakes
When, through a failure of the system, there is not enough pressure to hold the brakes in the 'off' position, the spring brakes automatically bring the vehicle to a stop.
Since the spring brakes are designed to cope with a fully loaded vehicle and the driver has no control over the emergency system, the wheels often lock up before the vehicle has stopped. (The reason for some of those long skid marks occasionally seen on the highways.)
After this has happened there are only two ways the brakes can be released; either by repairing and restoring pressure to the system or by mechanically winding each spring back with a spanner or key. (This makes the parking brake inoperative and is done only to move the vehicle off the road.) On some vehicles a special air-operated emergency release system may also be fitted.
Parking brakes
When the parking brake is applied, the air supply to the spring brakes is cut off and the brakes automatically come on. Even if the parking brake has not been applied, the brakes will automatically come on if the air pressure drops.
12
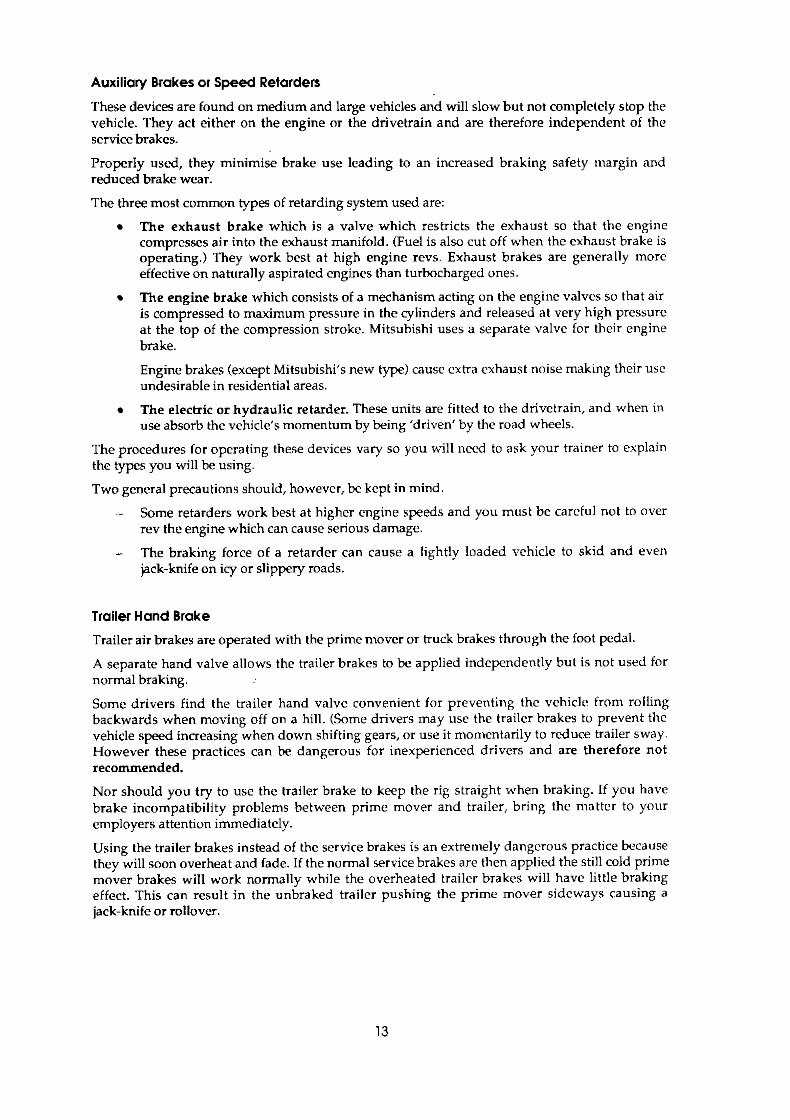
Auxiliary Brakes or Speed Retarders
These devices are found on medium and large vehicles and will slow but not completely stop the vehicle. They act either on the engine or the drivetrain and are therefore independent of the service brakes.
Properly used, they minimise brake use leading to an increased braking safety margin and reduced brake wear.
The three most common types of retarding system used are:
The exhaust brake which is a valve which restricts the exhaust so that the engine compresses air into the exhaust manifold. (Fuel is also cut off when the exhaust brake is operating.) They work best at high engine revs. Exhaust brakes are generally more effective on naturally aspirated engines than turbocharged ones.
The engine brake which consists of a mechanism acting on the engine valves so that air is compressed to maximum pressure in the cylinders and released at very high pressure
brake. at the top of the compression stroke. Mitsubishi uses a separate valve for their engine
Engine brakes (except Mitsubishi's new t y p e ) cause extra exhaust noise making their use undesirable in residential areas.
The electric or hydraulic retarder. These units are fitted to the drivetrain, and when in use absorb the vehicle's momentum by being 'driven' by the road wheels.
The procedures for operating these devices vary so you will need to ask your trainer to explain the types you will be using.
Two general precautions should, however, be kept in mind
- Some retarders work best at higher engine speeds and you must be careful not to over rev the engine which can cause serious damage.
- The braking force of a retarder can cause a lightly loaded vehicle to skid and even jack-knife on icy or slippery roads.
Trailer Hand Brake Trailer air brakes are operated with the prime mover or truck brakes through the foot pedal
A separate hand valve allows the trailer brakes to be applied independently but is not used for normal braking.
Some drivers find the trailer hand valve convenient for preventing the vehicle from rolling backwards when moving off on a hill. (Some drivers may use the trailer brakes to prevent the vehicle speed increasing when down shifting gears, or use it momentarily to reduce trailer sway. However these practices can be dangerous for inexperienced drivers and are therefore not recommended.
Nor should you try to use the trailer brake to keep the rig straight when braking. If you have brake incompatibility problems between prime mover and trailer, bring the matter to your employers attention immediately.
Using the trailer brakes instead of the service brakes is an extremely dangerous practice because
mover brakes will work normally while the overheated trailer brakes will have little braking they will soon overheat and fade. If the normal service brakes are then applied the still cold prime
effect. This can result in the unbraked trailer pushing the prime mover sideways causing a jack-knife or rollover.
13
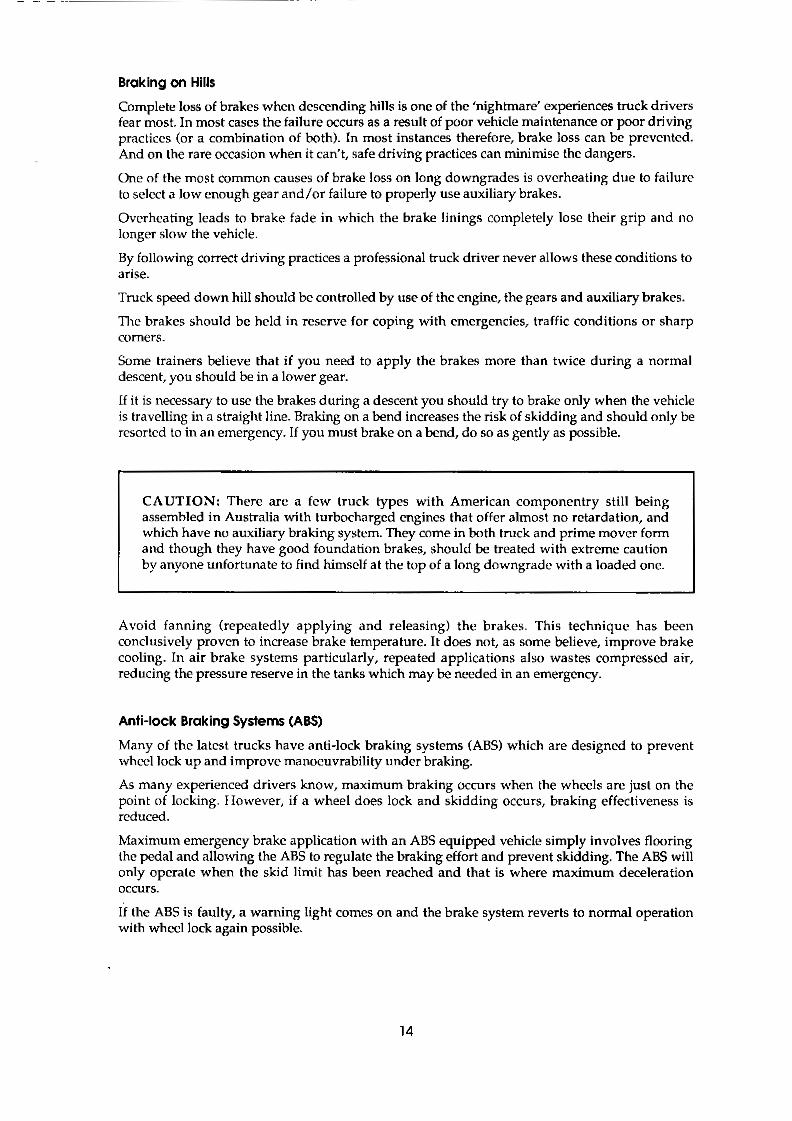
Braking on Hills Complete loss of brakes when descending hills is one of the ‘nightmare’ experiences truck drivers fear most. In most cases the failure occurs as a result of poor vehicle maintenance or poor driving practices (or a combination of both). In most instances therefore, brake loss can be prevented. And on the rare occasion when it can’t, safe driving practices can minimise the dangers.
One of the most common causes of brake loss on long downgrades is overheating due to failure to select a low enough gear and/or failure to properly use auxiliary brakes.
Overheating leads to brake fade in which the brake linings completely lose their grip and no longer slow the vehicle.
arise. By following correct driving practices a professional truck driver never allows these conditions to
Truck speed down hill should be controlled by use of the engine, the gears and auxiliary brakes.
The brakes should be held in reserve for coping with emergencies, traffic conditions or sharp comers.
Some trainers believe that if you need to apply the brakes more than twice during a normal descent, you should be in a lower gear.
If it is necessary to use the brakes during a descent you should try to brake only when the vehicle is travelling in a straight line. Braking on a bend increases the risk of skidding and should only be resorted to in an emergency. If you must brake on a bend, do so as gently as possible.
CAUTION: There are a few truck types with American componentry still being assembled in Australia with turbocharged engines that offer almost no rctardation, and which have no auxiliary braking system. They come in both truck and prime mover form and though they have good foundation brakes, should be treated with extreme caution by anyone unfortunate to find himself at the top of a long downgrade with a loaded one.
Avoid fanning (repeatedly applying and releasing) the brakes. This technique has been conclusively proven to increase brake temperature. It does not, as some believe, improve brake cooling. In air brake systems particularly, repeated applications also wastes compressed air, reducing the pressure reserve in the tanks which may be needed in an emergency.
Anti-lock Braking Systems (ABS)
Many of the latest trucks have anti-lock braking systems (ABS) which are designed to prevent wheel lock up and improve manoeuvrability under braking.
As many experienced drivers know, maximum braking occurs when the wheels are just on the point of locking. However, if a wheel does lock and skidding occurs, braking effectiveness is reduced.
Maximum emergency brake application with an ABS equipped vehicle simply involves flooring
only operate when the skid limit has been reached and that is where maximum deceleration the pedal and allowing the ABS to regulate the braking effort and prevent skidding. The ABS will
occurs.
If the ABS is faulty, a warning light comes on and the brake system reverts to normal operation with wheel lock again possible.
14

Water on the Brakes When brakes are wet they may be unreliable or may not work at all.
You should cautiously apply the brakes as soon as possible after driving through water deep enough to wet them to see if they are working properly. If they pull to one side or do not work efficiently, they must be dried out. That can be accomplished by stopping and giving them a few minutes to dry if they are warm.
The most common practice is to drive slowly along the road with the brakes on until they heat up enough to dry off and restore their effectiveness. Leave lots of stopping room until the brakes are right.
Braking Rules Brake early and gradually
Applying brakes early makes for smoother stops, better control, less wear and tear on the vehicle and cooler brakes. It also makes your actions more predictable and therefore safer.
Brake in a straight line
The more firmly you need to brake, the more important it is that the vehicle is travelling in a straight line. Braking on bends is dangerous due to the risk of skidding or overturning, and should only be done in an emergency, Always brake before you enter a turn, not during the turn.
Allow for the load
The proportional difference in mass between a loaded and unloaded truck is much greater than for a car or bus.
braking. You therefore need to adjust your driving habits for different loads, especially with regard to
When your vehicle is fully loaded it requires far more braking effort to slow down or stop S O
you will have to leave more braking distance.
When your vehicle is empty or lightly loaded, braking stability is reduced, and chances of wheel lock up and skids is increased. Be prepared!
Match your braking to the road surface
Always adjust your braking technique to suit the road surface. Allow extra braking distance
worn smooth). To be able to do this you must constantly watch road surface conditions as and brake more gently if the road surface is unpaved, highly cambered, or slippery (wet, oily,
you drive.
Ease off as the vehicle slows
Ease off the brake pedal as the vehicle slows down because it takes less braking effort to continue slowing at the same rate. If you do not, the vehicle will come to an abrupt or violent stop and could even lock the wheels in slippery conditions. Always aim for a smooth jerk-free stop.
Water on the brakes
Always test the brakes immediately after driving through deep water.
15

Gear Shifting Using the gearbox properly on a truck not only means being able to shift smoothly but knowing the right gear to shift to and exactly when to do it.
Changing gears is one of the fundamental skills every truck driver must master. Correct gear changing is necessary for trouble-free and efficient operation of a truck but is also essential to its
commencing a long descent for example, could have disastrous consequences. Skilful gear safe operation. Failure to select the correct gear or engage a two speed axle ratio before
shifting comes only with practice and is one of the hallmarks of a good professional truck driver.
The Correct Gear The correct gear is the one that enables the engine to operate at its most efficient speed for the task i t is doing.
The correct gear for descending a long hill is one which holds the vehicle speed constant without repeated brake applications or engine over-revving. For the most efficient hill climbing, the correct gear allows the engine to operate at a speed just above maximum torque, yet fast enough to ensure adequate cooling.
Operating below the maximum torque revs at the bottom of the range gives poor pulling power, Most heavy engine manufacturers have a normal engine operating range from 1100 to 2000.
poor fuel efficiency and is hard on the bottom end of the engine. It is called lugging or labouring.
Operating above the revs at which the engine achieves its rated power is inefficient and slower than shifting up a gear. Exceeding the red line, usually when descending hills can cause serious engine damage.
especially in the higher gears. Accelerating or hillclimbing with a load often demands the use of the full operating rev range,
But normal running speeds on fairly flat terrain do not require maximum power and torque and thus allow the use of the "green" or "economy" band for best fuel consumption and least engine wear and tear. The green band usually runs between 1400 and 1800 rpm with the best fuel consumption at 1650 to 1750 revs. -
9 Other gear changing indicators
Some smaller vehicles are not fitted with a tachometer ('rev counter'), and the manufacturer may recommend road speed ranges for each gear.
Experienced truck drivers also become used to the sound and feel of the engine and may use these as guides in gear shifting. However, improved sound-proofing and recent changes in engine design can make that difficult.
The high torque band of a petrol engine is at a higher engine speed range and is not as broad as that of a diesel engine.
This means the petrol engine does not have the same ability to 'hang on' in a gear as a diesel. Gear changes will therefore need to be more frequent and at higher engine speeds.
16

An example of the operating speed ranges of a typical heavy vehicle diesel engine is shown in Figure 2.7.
ENGINE SPEED .‘35
Figure 2.7 Operating speed ranges of a typlcal heavy vehlcle dlesel engine
Progressive Shifting Progressive gearshifting reduces drivetrain stress at low speeds and is smoother, easier, quieter, and more fuel efficient than ”normal” shifting.
Progressive shifting simply means shiftingat low revs inlow gears progressively raising the shift points on the way up through the gears.
This lets the engine‘s torque do the work and that is what modern diesels are all about.
Progressive shifting should be used on all trucks.
Winding the engine to the governor in the lower gears wastes fuel, can lead to overstressing and failure of drivetrain components, and brands the practitioner as a cowboy.
range because the same gears are used in high range at speeds where wind and rolling resistance You should also remember that range change gearboxes have considerable overlap in the low
make the gearsplits critical for achieving good performance. That means the gear ratios were made for high range and revving the engines up in low range is just a waste of time. Shift at low revs at low speed.
Here is an example of progressive shifting.
Gear Shift Shift Point (Engine Speed)
1 to 2 1200 rpm
2 to3 14W rpm
3 to 4 1600 rpm
4 to 5 1800 rpm
5 to 6 1800 rpm
Remaining gears (6 to 10) 1800 rpm
17
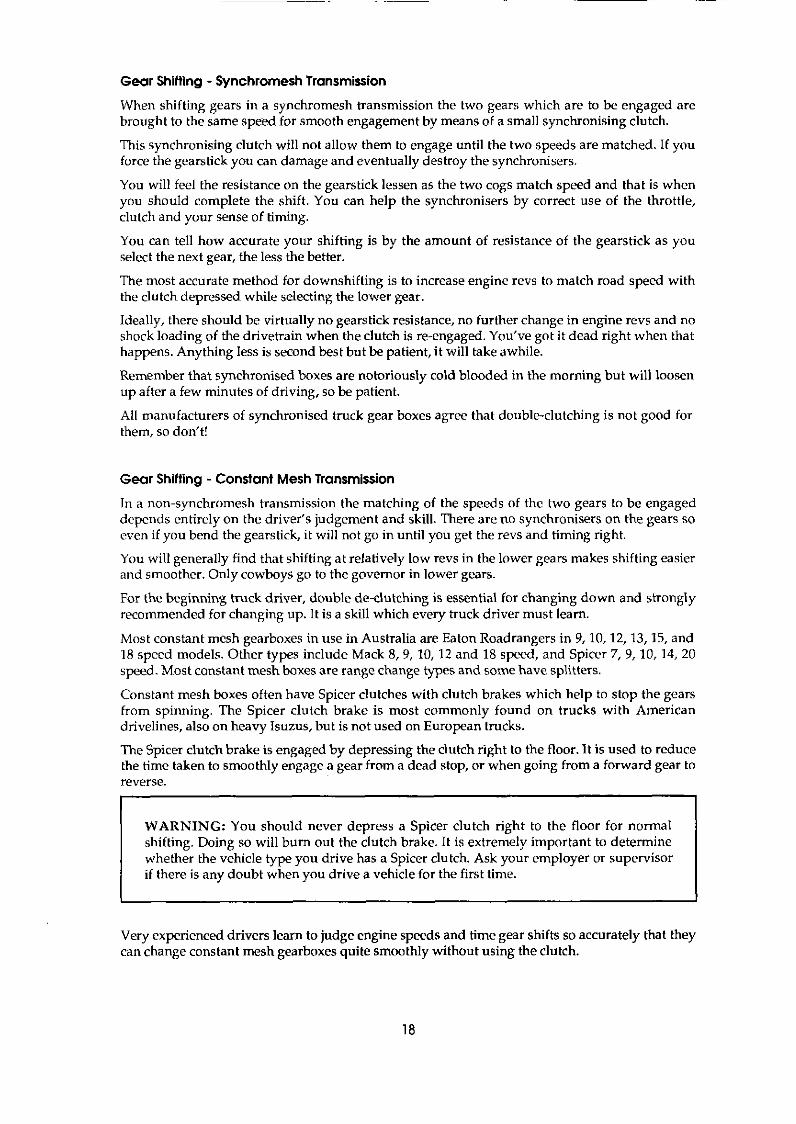
Gear Shifting - Synchrmesh Transmission
brought to the same speed for smooth engagement by means of a small synchronising clutch. When shifting gears in a synchromesh transmission the two gears which are to be engaged are
This synchronising clutch will not allow them to engage until the two speeds are matched. If you force the gearstick you can damage and eventually destroy the synchronisers.
You will feel the resistance on the gearstick lessen as the two cogs match speed and that is whcn you should complete the shift. You can help the synchronisers by correct use of the throttle, clutch and your sense of timing.
You can tell how accurate your shifting is by the amount of resistance of the gearstick as you select the next gear, the less the better.
The most accurate method for downshifting is to increase engine revs to match road speed with the clutch depressed while selecting the lower gear.
Ideally, there should be virtually no gearstick resistance, no further change in engine revs and no
happens. Anything less is second best but be patient, it will take awhile. shock loading of the drivetrain when the clutch is re-engaged. You’ve got it dead right when that
Remember that synchronised boxes are notoriously cold blooded in the morning but will loosen up after a few minutes of driving, so be patient.
All manufacturers of synchronised truck gear boxes agree that double-clutching is not good for them, so don’t!
Gear Shifting - Constant Mesh Transmission
depends entirely on the driver’s judgement and skill. There are no synchronisers on the gears so In a non-synchromesh transmission the matching of the speeds of thc two gears to be engaged
even if you bend the gearstick, it will not go in until you get the revs and timing right.
You will generally find that shifting at relatively low revs in the lower gears makes shifting easier and smoother. Only cowboys go to the governor in lower gears.
For the beginning truck driver, double dedutching is essential for changing down and strongly recommended for changing up. It is a skill which every truck driver must learn.
Most constant mcsh gearboxes in use in Australia are Eaton Roadrangers in 9,10,12,13,15, and
speed. Most constant mesh boxes are range change types and some have splitters. 18 speed models. Other types include Mack 8,9,10,12 and 18 speed, and Spicer 7,9,10,14,20
Constant mesh boxes often have Spicer dutches with clutch brakes which help to stop the gears from spinning. The Spicer clutch brake is most commonly found on trucks with American drivelines, also on heavy Isuzus, but is not used on European trucks.
The Spicer clutch brake is engaged by depressing the clutch right to the floor. It is used to reduce the timc taken to smoothly engage a gear from a dead stop, or when going from a forward gear to reverse.
WARNING: You should never depress a Spicer clutch right to the floor for normal shifting. Doing so will bum out the clutch brake. It is extremely important to determine whether the vehicle type you drive has a Spicer clutch. Ask your employer or supervisor if there is any doubt when you drive a vehicle for the first time.
Very experienced drivers learn to judge engine speeds and time gear shifts so accurately that they can change constant mesh gearboxes quite smoothly without using the clutch.
18

For some makes of transmission this is a fairly common practice, however it can cause serious damage if not performed correctly. Read your operating manual, get used to your vehicle and seek advice from your trainer before you even think about trying it!
Double De-clutching Constant M e s h Geuboxes Double de-clutching (or 'double clutching' as it is also known) is a special gear shifting technique in which the clutch pedal is depressed very briefly, while the gear lever passes through neutral during a shift. This helps to match or synchronise the gears being engaged.
The procedure will be more easily understood if you study the steps in Table 2.1. Note carefully the slight, but very important, differences between the techniques for shifting up and down.
UP -SHlFTING DOWN-SHIFTING
1 Completely release accelerator and
as quickly as possible to match the accelerator to allow the engine to slow
(The accelerator must be held down (You must completely release the time partly releasing the accelerator. depress clutch pedal at the same time.
1 Depress the clutch while at the same
just far enough to increase engine speed to that required for the next
next gear speed.) gear. Holding it down fully may cause
much.) the engine speed to increase too
2 Shift gear lever to neutral. (The 2 Shift gear lever to neutral (The engine engine should now be slowing down.)
should now be speeding up.)
3 When the engine speed has almost
brieflv and then demess it again. higher gear, release the clutch pedal
engine speed has built up to the dropped to that required for the next 3 Release the clutch pedal and when the
required revs for the next gear, depress the pedal again. If the engine
This step helps slow the spinning gears to the speed required for meshing.
- accelerated -quickly the engine will only need to be engaged for a brief moment.
- This step increases the gear speed to that required for meshing.
4 Shift into the required higher gear. 4 Shift into the required lower gear.
5 Engage the clutch quickly and 5 Engage the clutch quickly and smoothly, at the same time
depressing the accelerator to depressing the accelerator to smoothly, at the same time
reapply power. reapply power.
Table 2.1 Double Declutching
Smooth double de-clutching requires practice and familiarity with your vehicle. If you have trouble engaging the desired gear, do not force it, return to neutral and start again at Step 3, using your accelerator to readjust engine speed to match that required for the deired gear.
19

Down-shifting During Descent (Emergency only)
precautions must be taken. If, through unforeseen circumstances, a down shift is necessary during a descent, special
before selecting the required lower gear. The vehicle is then allowed to move off from rest only For a steep descent requiring low gears you should use the brakes to completely stop the vehicle
after the new gear has been selected.
If the gradient is only slight you should use the brakes to slow the vehicle to a speed well below that normally needed for the down shift (e.g. at least 10 kmh slower) before you commence shifting gears. This is necessary because, as you shift gears, the vehicle will gain speed down the hill and you must ensure that the speed gain does not prevent engagement of the lower gear.
EMERGENCY PROCEDURE FOR WSSED GEAR SHIFT
There can be some instances when a missed gear shift can be dangerous. If the gear you wish to engage is necessary to control the vehicle speed (eg . preparing to descend a hill) and you cannot engage it after two attempts - USE THE BRAKES TO STOP THE VEHICLE AND THEN MOVE OFF AGAIN FROM REST.
Do not allow the vehicle to continue coasting while you struggle with the gears. This procedure applies no matter whether you are a learner or an experienced driver. Don’t take chances!
If a down shift which is missed is not necessary for control of vehicle speed (e.g. on a flat road), reengage the higher gear and begin the down shift procedure again.
An Australian Army technique for engaging a missed gear in an emergency is as follows: - leave the clutch pedal out (clutch engaged) - push the gear lever into the gate of the required gear as far as it will go (the gears
- while maintaining pressure on the gear lever, speed up the engine - when the engine and gear speeds match, the gears will slide into mesh.
will be grating as you do this)
THIS PROCEDURE WILL CAUSE ABNORMAL WEAR AND MAY DAMAGE THE TRANSMISSION. IT SHOULD ONLY BE USED IN A N EhfERGENCY
20

Automatic Transmission
There are two ways in which you can control engine speed in a truck equipped with an automatic transmission: with the accelerator and by manually over-riding automatic gear selection.
as the vehicle gains speed. Using too much throttle leads to higher engine rev peaks in each gear The accelerator can increase engine speed through torque converter slip or by delaying up shifts
which causes increased wear to the engine and transmission, and high fuel consumption.
Manual over-ride is used to lock the transmission into a single gear or bracket of gears and should be used as necessary when descending hills to provide the required engine braking, and when ascending hills, to prevent 'hunting' (repeated gear changing between two gears).
When manually over-riding to prevent hunting, always select the lower of the two gears. Use of the manual over-ride also helps to maintain an economical and stress free engine speed and can be used in heavy traffic to reduce unnecessary gear changing when repeatedly accelerating and slowing down.
WARNING ENGINE OVER-REV WITH AUTOMATIC TRANSMISSION
Some automatic transmissions on heavy vehicles will automatically over-ride a locked setting and shift into the next higher gear if the engine is over-revved This feature is
being used to retard vehicle speed down a hill, the unplanned upshift will reduce engine designed to prevent damage to the engine. However if the engine is over-revved while
retardation making it necessary to use the brakes to reduce speed.
If for any reason the brakes cannot cope with this extra load, control of the vehicle will be lost as it continues to gain speed, upshifting to the next gear each time the engine overspeeds.
To prevent this happening: Never al!ow the engine to over rev while descending a hill. This applies to all vehicles but, for the reason outlined, is vitally important if the vehicle has an automatic transmission. If the engine shows any sign of gaining speed during a descent and you need to use the service brakes to control vehicle speed, the gear you have manually selected is too high and you should be in a lower gear.
General Gecn Shifting Rules * Going up hills
However, if you begin to lose speed, you must downshift to prevent the engine from You may have enough speed and power to climb a hill without changing gears.
lugging.
Generally engine revs should not fall below the maximum torque speed, but give the torque a chance to work before you shift down. That's what diesels are all about.
It may be necessary to downshift at slightly higher revs or tw-o gears at a time on steep grades where the truck is decelerating rapidly.
* Before going down a hill
When going down a long or steep hill you need engine compression to help hold the vehicle to a safe speed. Brakes alone may be incapable of doing this as they can overheat and fade (lose their braking power). Attempting to change gears on a descent can result in getting stuck in neutral and losing control of the vehicle. Always reduce speed and downshift to the required gear before you begin the descent.
21
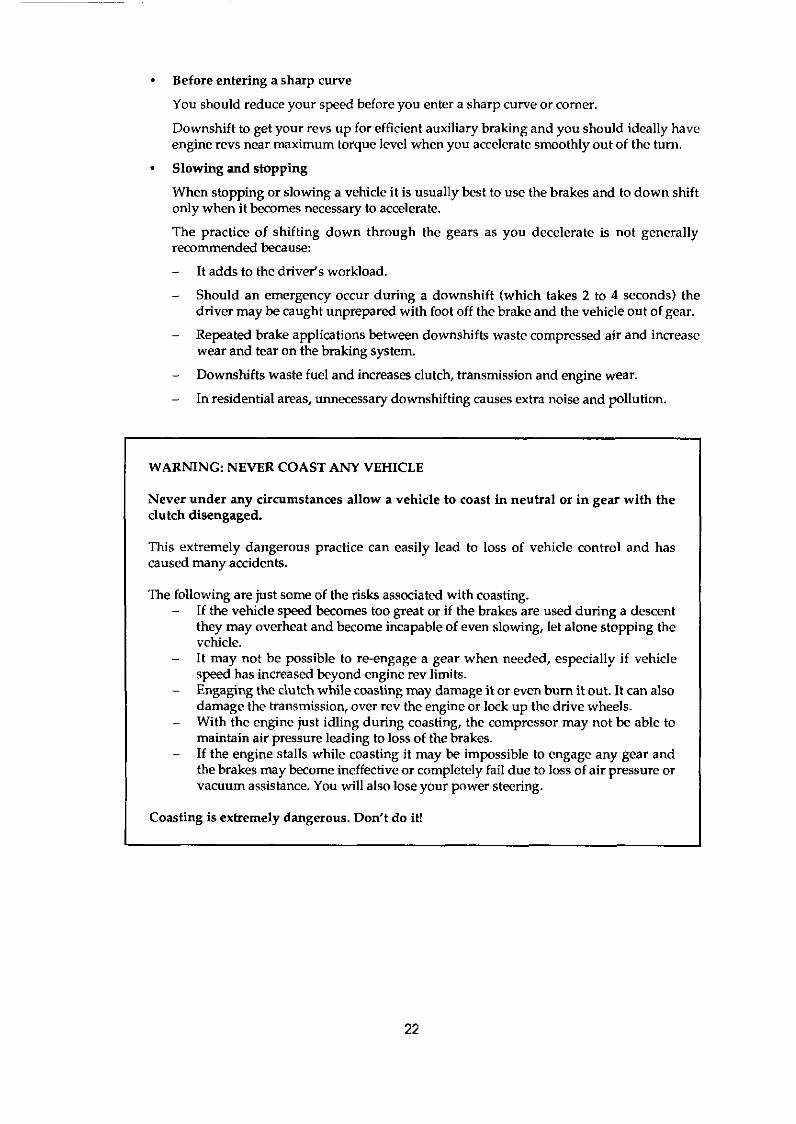
. Before entering a sharp curve
You should reduce your speed before you enter a sharp curve or comer.
engine revs near maximum torque level when you accelerate smoothlyout of the turn. Downshift to get your revs up for efficient auxiliary braking and you should ideally have
Slowing and stopping
When stopping or slowing a vehicle i t is usually best to use the brakes and to down shift only when it becomes necessary to accelerate.
The practice of shifting down through the gears as you decelerate is not generally recommended because:
- It adds to the driver's workload.
- Should an emergency occur during a downshift (which takes 2 to 4 seconds) the driver may be caught unprepared with foot off the brake and the vehicle out of gear.
- Repeated brake applications between downshifts waste compressed air and increase wear and tear on the braking system.
- Downshifts waste fuel and increases clutch, transmission and engine wear. - In residential areas, unnecessary downshifting causes extra noise and pollution.
WARNING: NEVER COAST ANY VEHICLE
Never under any circumstances allow a vehicle to coast in neutral or in gear with the clutch disengaged.
This extremely dangerous practice can easily lead to loss of vehicle control and has caused many accidents.
The following are just some of the risks associated with coasting. - If the vehicle speed becomes too great or if the brakes are used during a descent
they may overheat and become incapable of even slowing, let alone stopping the vehicle.
- It may not be possible to reengage a gear when needed, especially if vehicle speed has increased beyond engine rev limits.
- Engaging the clutch while coasting may damage it or even bum it out. It can also damage the transmission, over rev the engine or lock up the drive wheels.
- With the engine just idling during coasting, the compressor may not be able to maintain air pressure leading to loss of the brakes.
- If the engine stalls while coasting it may be impossible to engage any gear and the brakes may become ineffective or completely fail due to loss of air pressure or vacuum assistance. You will also lose your power steering.
Coasting is extremely dangerous. Don't do it!
22

Other Drive-train Components It is impractical to explain here how to operate all the components, gearbox types and special features found on modem trucks (let alone some of the old ones).
You will receive advice from your instructor about any special features on the training vehicle.
He will probably also give you some general information on components such as splitters, joey boxes, two speed axles, power dividers and diff locks. (Descriptions of some of these components may be found in the Dictionary of Trucking Terms at the back of this Manual.)
National trucking magazines such as Truck, and Truck & Bus also do many easy to read articles on the operation of both current equipment and the latest technical developments.
23

KNOWLEDGE QUESTIONS
STEERING. ACCELERATING, GEAR CHANGING AND BRAKING
1 Which diagram shows one of the recommended positions for the driver's hands under normal straight ahead driving conditions?
@ A B C D
2 You should keep exhaust noise down in residential areas by
A coasting as much as possible.
B staying in a lower gear rather than shifting up.
C gentle and smooth use of the accelerator pedal.
D not passing any other vehicles.
3 Which ONE of the following statements is NOT a rule of braking?
A Brake early and gently.
B Brake firmly only when travelling in a straight line.
C When descending a hill, brake in repeated short firm applications
D Vary the brake pressure according to the conditions of the road surface.
4 Double declutching
A is not necessary on a synchromesh transmission.
B must not be used when shifting gears in a constant mesh transmission.
C cannot be used when 'progressive shifting'.
D can only be used when down shifting.
24
5 Coasting in neutral is a
A recommended way of saving fuel.
B dangerous driving practice.
C recommended way of reducing engine wear.
D recommended way of reducing skidding on a slippery road surface.
back of this manual.) (You can check your answers to these questions in the ANSWERS TO QUESTIONS section a t the
25
PARKING AND REVERSING
KNOWLEDGE
You must know the procedures for parking and reversing as explained in this section of the manual.
PERFORMANCE
You must be able to park and reverse a heavy vehicle competently and safely.
CONDITIONS
Knowledge tests : examination conditions Practical test : on-road and/or off-road; some performance tasks can be demonstrated in simulated situations. For example, backing into a loading bay which is made of poles and cones ('witches hats').
STANDARDS:
You must pass the knowledge test on parking and reversing before taking the practical test.
During the practical test you must:
30cm from the kerb drive forward into a parallel park leaving the vehicle a distance of no more than
reverse along both a straight path and curved path reverse into a parallel park leaving a distance of no more than 45cm from kerb reverse into a loading dock which is no more than 1 metre wider than vehicle (poles and cones can be used for this purpose).
The parking or reversing will be judged for smooth, well-controlled vehicle movement and accurate vehicle placement in each of the above cases.
Drivers will also be assessed on their ability to carry out checks for hazards before parking and reversing, and on their use of rear vision mirrors.
26

Reversing The procedures for reversing a rigid motor vehicle are different from those of an articulated vehicle, or any vehicle with a trailer.
Which Way to Turn the Wheel
In the case of a rigid motor vehicle you should begin by turning the steering wheel so that the top of the wheel moves in the direction you wish to move the rear of the vehicle. With an articulated vehicle or a 'pig' trailer (which does not have steerable front wheels) you should begin by turning the bottom of the steering wheel in the direction you want the rear of the vehicle (i.e. the trailer) to go. Figures 2.8 and 2.9 show the difference.
Figure 2.8 Reverslng a rlgld vehlcle
Figure 2.9 Reversing an atticulated vehicle
In the case of the articulated vehicle, once the trailer is moving in the required direction the steering wheel is turned so that the prime mover follows a similar path to that of the trailer.
Western Australia where eight axled combinations have payload advantages over semis. Truck and dog combinations are fairly unusual in Australia except for tipper work and in
Dog trailers can be extremely difficult to reverse for the uninitiated, unless they have a locking turntable or dolly.
Locking turntables are usually used only on dog trailers with a wheelbase of 4 metres or less because of lateral stresses.
They are used primarily for backing straight and caution should be used when reversing loaded trailers where turning is involved, especially on bitumen where they cannot skid easily.
Empty or lightly loaded dogs can be easily skidded with lockable turntables but the turning radius should always be kept as wide as possible
27
Check First and Warn Others
Before reversing you should walk around your vehicle to check for any hazards. Be sure
your vehicle's weight. to check overhead clearances and that the surface you are about to reverse onto will carry
because the driver usually cannot see the rear of his trailer. It is often possible to arrive Reverse turns to the left are dangerous and should be avoided whenever possible
from a different direction and back around to the right.
You must warn those around you that you are about to reverse, and before moving should sound your horn or other warning device if necessary. If your vehicle is fitted with a reverse warning buzzer, make sure it is operating.
You should reverse slowly so that you can make small corrections in steering if necessary.
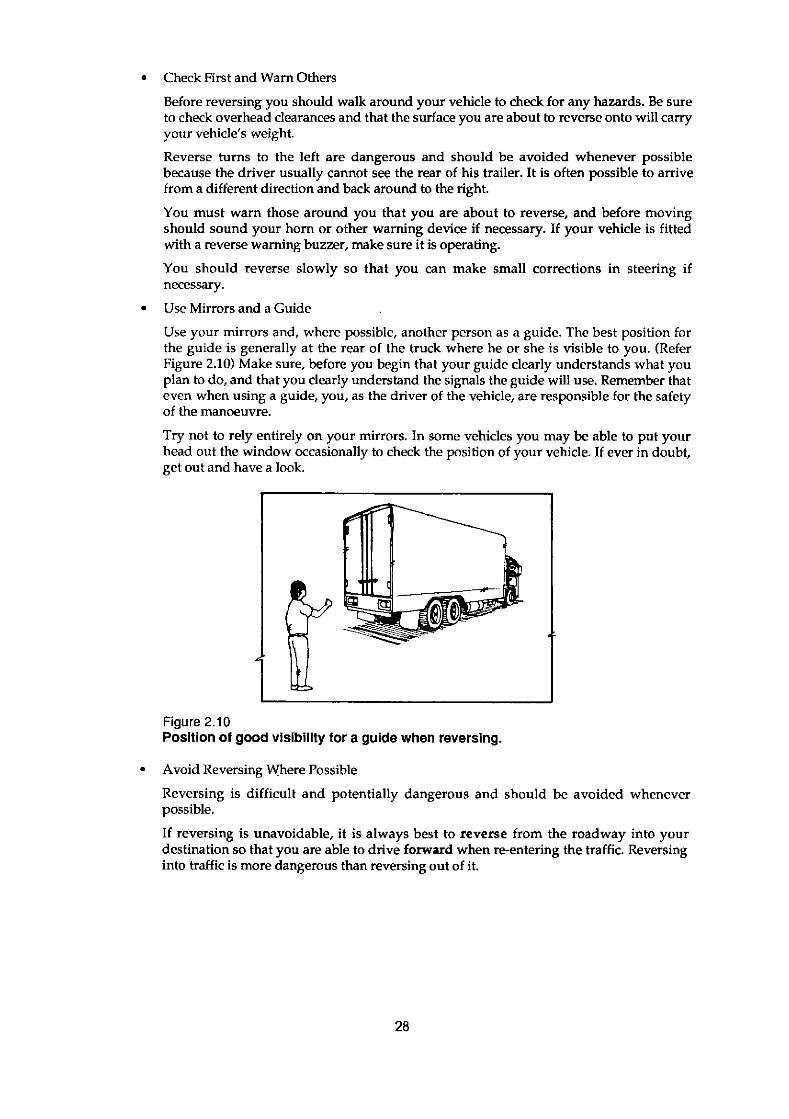
Use Mirrors and a Guide
Use your mirrors and, where possible, another person as a guide. The best position for
Figure 2.10) Make sure, before you begin that your guide clearly understands what you the guide is generally at the rear of the truck where he or she is visible to you. (Refer
even when using a guide, you, as the driver of the vehicle, are responsible for the safety plan to do, and that you clearly understand the signals the guide will use. Remember that
of the manoeuvre.
Try not to rely entirely on your mirrors. In some vehicles you may be able to put your head out the window occasionally to check the position of your vehicle. If ever in doubt, get out and have a look.
. Figure 2.10 Position of good vislbility for a guide when reversing.
Avoid Reversing Where Possible
Reversing is difficult and potentially dangerous and should be avoided whenever possible.
If reversing is unavoidable, it is always best to reverse from the roadway into your destination so that you are able to drive forward when reentering the traffic. Reversing into traffic is more dangerous than reversing out of it.
2a

KNOWLEDGE QUESTIONS
PARKING AND REVERSING
1 The diagrams below show two trucks moving out into the street
Sltuatlon I Sltuatlon I I
Which of the two situations is themore likely to result in an accident?
A Situation I.
B Situation 11.
C Both I and II are equally likely.
D Neither I or II is likely to result in an accident.
2 Which of the following statements is correct?
A reversing turn to the right is
A more dangerous than one to the left.
B less dangerous than one to the left.
C equally dangerous as one to the left.
D less dangerous than where there is no turning involved
29

~~~~ ~~ ~ ~~~ ~ ~~~~
3 The driver of an articulated vehicle wants to reverse from position I to position I1
Which one of the following shows the position to which the front wheels must be turned as the vehicle begins moving?
A a c
4 In reversing, all of the following driving practices are recommended, EXCEPT one, which one?
A Using horn or similar warning device.
B Keeping hand brake partly engaged.
C Walking around vehicle to check for hazards.
D Using rear vision mirrors.
(You can check your answers to these questions in the ANSWERS TO QUESTIONS section at the back of this manual.)
30

OPERATING PROCEDURES
KNOWLEDGE
You must know the correct procedures for operating the various components and systems of your vehicle.
PERFORMANCE
You must be able to correctly start, operate and shut down the engine. You must also be able to prepare the vehicle for overnight parking or for hand-over to another driver.
CONDITIONS
Knowledge test : examination conditions. Practical test : correct demonstration of any procedures from this section nominated by the examiner plus general observance of correct operating procedures during the practical driving test.
STANDARDS
You must be able to pass the knowledge test before taking the practical test.
During the practical test you must be able to correctly: cold-start the engine operate the engine during the driving test shutdown the engine perform an end of shift vehicle check set the controls and secure the complete vehicle for overnight parking.
31

OPERATING PROCEDURES Starting a Truck Engine Starting the engine of a heavy vehicle is simple if you follow the basic steps outlined below.
damage it. Doing it the wrong way can make it difficult or even impossible to start the engine or may even
Check your operating manual for any special steps or other variations applicable to your vehicle.
If it is the first start for the day you should perform an under bonnet check making especially sure to check the oil and coolant levels.
Apply the parking brake.
Ensure gearbox is in neutral.
Make sure engine brake is switched off or the high oil pressure generated by the cold oil may damage the brake mechanism.
Push in the Bowden cable (often marked ’Stop’) if so equipped (Most modem diesels and all petrol engines shut down off the key).
If the engine is cold:
- Diesel: Most small and some medium size diesels have a starting heater or glow plugs. Many now cut out automatically and the dash light goes out. Allow 15 to 50 seconds for the others to heat up (Some vehicles have a light to indicate when they are ready to start).
Direct injection diesels do not have glow plugs. All big diesels are direct injection.
- Petrol: Depress accelerator to floor and if fitted with a manual choke pull out the choke control (amount of choke depends on temperature; lower temperature - more choke). Release the accelerator.
Push the clutch pedal down so as to disconnect the transmission from the engine. If the clutch is left engaged the starter must also turn the gears in the transmission-quite a heavy load when the oil is cold.
Partially open the throttle by depressing the accelerator pedal about one quarter of its travel.
9 Hit the starter. In normal conditions the engine should fire within about 5 seconds. If i t doesn’t, recheck your settings before trying again.
When the engine starts, hold the speed constant at about 800 rpm (fast idle) and check the oil pressure. If oil pressure does not register within 5 seconds of starting, switch the engine off and find out why.
As soon as the engine is running smoothly (usually after 15 to 30 seconds) cautiously release the clutch. (Caution is recommended in case the transmission is not in neutral.)
With some engines it may be necessary to use the hand throttle or fast idle control while the engine warms up. Set the control just high enough to smooth out the idle. While the engine is warming up you can carry out other daily checks on the vehicle.
DANGER: Never run an engine in a confined space (e.g. dosed shed or warehouse). Carbon monoxide in the exhaust gases can cause unconsciousness and death.
32
Shutting Down and Idling a Truck Engine Turbochargers, extreme operating conditions such as sustained hill climbs, heavy loads and high operating temperatures of truck engines require drivers to observe some special procedures when shutting down.
Diesel Engine Safety
Unlike petrol engines which are shut down by turning off the ignition, diesels are usually
compression ignition engines, that is they compress a fuel air mixture until it gets so hot stopped by shutting off the fuel supply to the engine. This is because diesels are
that it ignites spontaneously without the need for a spark plug.
Most modern diesels are shut down off the key by an electric solenoid that cuts off the fuel, while others use a Bowden cable.
CAUTION. Always leave the Bowden cable stop control out when thc truck is parked. A truck with the Stop control in the 'run' position can be accidently bump started i f left in
I gear.
Whether it is petrol or diesel, the engine of a truck works incredibly hard when hauling a full load, even on a flat open highway. When climbing long hills engine parts such as exhaust valves, manifolds and turbochargers get literally red hot.
If an engine is abruptly shut down in that condition it can be seriously damaged by rapid, uneven cooling called thermal stress. Common symptoms are warped valves, cracked manifolds and seized turbochargers.
Turbochargers are especially vulnerable as the turbine takes some minutes to wind down from its 60,oOO or more rpm and there is no oil pressure for the bearings after the engine stops.
Even in moderate operating conditions some of these problems can occur so it is best to idle the engine for 2 to 5 minutes before shut down, depending on how hard it has been worked.
Prolonged idling, however, wastes fuel and can harm any engine. As a general rule, an engine should be shut down if it is to be left standing for more than 10 minutes.
33
End of Duty Procedure At the end of your work day, you should prepare the vehicle for its next shift.
The recommended procedures are listed below. They are a general guide and may not apply in some circumstances.
Refuel the vehicle
If the vehicle is to be left standing overnight, the fuel tanks should be completely filled. This prevents cold, moist air being drawn in to the tank as the temperature drops, leading to water condensing and collecting in the bottom of the tank. Water in the fuel can seriously damage the injection system of a diesel engine.
Select a safe parking place
Position the vehicle in a safe parking place where it will not be a danger to other road users or an annoyance to residents.
Always try to park on level ground where there is no risk of the vehicle moving should it be tampered with or the brakes fail. If it is absolutely necessary to park on a hill, chock all wheels of at least one axle and turn the steering wheel to full lock, so that the front wheels will run into the kerb should the vehicle begin to roll.
Choose a place where the vehicle is easily visible both day and night (a well lit and highly visible area will also lessen the risk of theft or vandalism). You should switch on the parking lights if the vehicle is parked on the road at night. If you are driving a refrigerated van, do not park it in a residential area with the refrigerator unit operating.
Switch off all systems and isolate battery
Switch off the lights (except parking lights if needed), air conditioner, radio, etc.
be left operating, turn it off. If the vehicle is fitted with a battery isolation switch and no electrical components need to
Air tanks should be drained several times per day to eliminate moisture, oil and other contaminants from the system. After you have parked for the night is a good time.
Most modem trucks have drain valves that are operated by pulling a cord or wire. They
contaminants are on the bottom of the tank. work best when the truck is on the level. It only takes a few seconds to drain because the
Most trucks have a "wet tank" that receives air directly from the compressor. That is where the moisture condenses and that is the tank t h a t should be drained most often.
Some trucks have automatic drain valves.
34

Tidy the driving cab
Remove old rubbish, bottles, unnecessary papers, etc. from the driving cab to get it ready for the next day.
Perform a walk-around check
Walk around the vehicle and as you do so check
- the wheels and tyres
- for leaks beneath the vehicle
- that the wheel chocks are in place
- that the load is secure and that the cargo doors are locked
- that the parking lights and reflectors are clean and that the parking lights are switched on if necessary
Fill out log book and report problems
Complete your driving log for the day and complete the vehicle log noting anything unusual which has occurred.
If you have found any vehicle problem which needs attention, makz a special note of i t in the vehicle log and'notify your mechanic or fleet maintenance supervisor in writing.
Lock the vehicle
Close all windows and lock the cab doors.
35

KNOWLEDGE QUESTIONS
OPERATING PROCEDURES -
1 Which of the following is incormt?
A Both petrol and diesel engines should be idled for a few minutes before stopping them.
B Turbocharged engines require longer normalization times than do naturally aspirated engines.
C Diesel engines are stopped by cutting off the fuel supply.
D Long periods of idling can harm a petrol engine but not a diesel engine.
2 Which of the following is not a recommended step in preparing a vehicle to stand overnight?
A Completely fill the fuel tanks.
B Return the stop control of a diesel engine to the operating position after shut down.
C Leave the vehicle parked in gear.
D Drain the air tanks.
3 Which of the following is incorrect?
A Condensed moisture in the fuel can harm a diesel engine.
B Air tanks should be drained at least once a day.
C If possible, the battery should be isolated when the vehicle is left standing overnight.
D Idling a turbocharged engine before shutting it down will damage the turbocharger.
36
COUPLING AND UNCOUPLING SEMI-TRAILERS To have a licence to drive articulated vehicles you must be able to couple and uncouple a semi-trailer. This section outlines the procedure you need to learn and follow.
KNOWLEDGE
You must know the correct steps to be followed to couple and uncouple a semi-trailer safely.
PERFORMANCE
You must be able to demonstrate the coupling and uncoupling of a semi-trailer using the correct procedure.
CONDITIONS:
Knowledge test : examination conditions Practical test : off-road, during the driving test.
STANDARDS:
You must pass the knowledge test before commencing the practical test.
During the practical test you must drop off the semi-trailer, drive the prime mover approximately 50 metres away, then return and couple up again.
You will be assessed on your ability to follow the correct procedure and perfom the set tasks safely.
Introduction Coupling and uncoupling a prime mover and semi-trailer (referred to in the industry as 'picking up' or 'dropping' a trailer) is a task which can lead to serious accidents, injury and vehicle damage if not performed correctly. We strongly recommend you follow the procedures M O W
closely, at least until you know when and where it is safe to vary them.
37
UNCOUPLING (DROPPING OFF) A SEMI-TRAILER Level and firm surface
Before uncoupling make sure your rig is parked in a level area on a surface which is firm enough to support the trailer landing gear and its load.
Prime mover and semi-trailer in a straight line
Apply parking brakes and trailer brakes
Chock the trailer wheels
Parking on flat ground - You should always try to drop your trailer on flat ground.
Chocks should not be necessary on trailers f i t ted with spring brakes (Maxi-brakes) but are a sensible precaution and should be used if available, even on flat ground.
Parking on a grade - ALWAYS USE CHOCKS IF IT IS NECESSARY TO PARK A TRAILER ON A GRADE. It is best to chock the semi-trailel's front axle in case the landing legs collapse and the rear axle(s) lifts.
Precautions for soft ground surface
Place suitably strong timber or other flat supports beneath the landing gear if the ground surface is not firm enough to support the weight of the trailer and its load. (The landing gear is likely to sink into loose dirt, mud, gravel and hot bitumen.)
Lower the landing gear
Lower the landing gear until the supports are firmly in contact with the ground. Continue winding, and as you do so, the rear of the prime mover will rise on its suspension as semi-trailer weight is transferred to the landing gear. You should stop winding when the prime mover ceases rising or you can just see air between the trailer skid plate and the turntable.
Disconnect hoses and cables
prime mover making sure that the connectors are kept free of dust and water and that they Disconnect the air hoses and electrical cables from the trailer. Stow them properly on the
cannot become caught up on the tailshaft.
Release the turntable jaws
gently rocking the prime mover forward and back and then try to release again. If the release handle cannot be moved, the jaws may be under load. Take the pressure off by
Separation
Double check that the trailer brake hoses and electric cable are disconnected and stowed. Then release the prime mover parking brake and slowly drive forward in a straight line making sure the trailer stays put.
~~
WARNING If the front of the trailer starts to go down and the turntable comes up at the front as you are moving forward. STOP! Find out why while the prime mover is still holding up the front of the semi-trailer.
3a
COUPLING (PICKING UP) A SEMI-TRAILER
1 Position the prime mover
Reverse the prime mover into position straight in front of the trailer. The prime mover and trailer should be in a straight line when coupling.
Use the mirrors to help you line up on the trailer, stop the prime mover just in front and apply the parking brake.
WARNING: Backing under a trailer from the side can push the trailer sideways and damage or collapse the landing gear.
2 Inspect the coupling
Check the trailer skid plate, king pin, turntable and jaws for damage.
Make sure the turntable jaws are open.
If the trailer has a block welded to the skid plate about 30cm to the rear of the kingpin, make sure the turntable is the type that turns and is unlocked.
The turntable will need to be locked in position for trailers without the block. Make sure the top of the turntable is well greased when it is used in the locked position.
3 Immobilise the trailer
Place chocks behind at least one wheel. If the trailer is equipped with spring brakes, the parking brakes should already be on.
WARNING: Never try to back a prime mover under a semi-trailer without first ensuring it will stay put. 'Chasing' a trailer which moves during coupling is a dangerous and irresponsible practice. Don't do it!
4 Trailer height
Check that the turntable and king pin are lined up. Check that the height of the trailer skid plate is slightly lower than the centre of the turntable. About 5 centimetres is ideal.
Caution: If the trailer is too low the prime mover chassis or edge of the turntable can hit the trailer front instead of going under. If too high, the turntable may not properly latch on to the kingpin, or the turntable could even pass beneath the kingpin allowing the prime mover cab to hit the trailer.)
Adjust the trailer height or re-position the vehicle if necessary. Check that the air hoses and cables are well clear and will not be caught when the prime mover is reversed into its final position.
39

5 Coupling up
kingpin. You should hear (and possibly feel) this as the jaws close and lock into place. Slowly reverse the prime mover under the trailer until the turntable jaws lock around the
6 Visual check that trailer is locked on
Get out and check that the turntable jaws have locked on to the kingpin. Make sure that the head of the pin is not sitting on top of the jaws.
Make sure the trailer is sitting firmly on the turntable by checking that no gap exists between the turntable and trailer skid plate. If a gap is visible, the trailer may have been set too high. Try lowering the trailer on the landing gear slightly and the gap should close. If not, check to see what the problem is.
7 Check release lever
Check that the coupling release lever is in the 'locked' position.
8 Connect hoses and cables
Connect the air hoses and electrical cables making sure they are properly supported to avoid damage.
9 Activate the trailer brakes
American and some Japanese prime movers require you to supply air to the trailer brakes by switching the tractor protection valve from 'emergency' to 'normal'. Apply and release the trailer brakes to check their operation. You should hear the air release and linkages operate.
If not, switch trailer brake hose connections and try again. If still not, see if the prime mover has manual shut off valves on its trailer brake plumbing.
10 Give trailer a tug test
brakes on. The prime mover should not move. Repeat this check to be absolutely sure. Check that the trailer is locked on by attempting to move off in first gear with the trailer
Caution: Make sure the trailer does not move with the landing legs down or they may be damaged.
11 Secure the vehicle
Apply the parking brakes and turn on emergency flashers and side and tail lights for a trailer light check.
12 Raising landing gear
Raise the landing gear. Keep winding until it is fully raised. Make sure the handle is properly stowed.
13 Clearance checks
Check that there is enough clearance for normal movement between the prime mover (frame and wheels) and the trailer frame. Check also that there is enough clearance between the landing gear and the rear of the truck frame to allow for turning.
14 Air leaks and trailer light check
Run the engine until the air pressure has reached its maximum in the air tanks. Switch off engine, fully apply the trailer brakes and walk around the vehicle listening for air leaks and checking trailer lights.
15 Remove and stow wheel chocks.
40

KNOWLEDGE QUESTIONS
COUPLING AND UNCOUPLING SEMI-TRAILERS
1 Which of the following is INCORRECT?
A uncoupling on a hill should be avoided
B all turntables need to be locked when the semi-trailer skid plate has a block behind the kingpin
C prime mover and semi-trailer should be lined up straight before coupling
D it is best to chock the wheels on the front axle when uncoupling a semi-trailer
2 The last thing to do after the semi-trailer is properly coupled is to
A connect the air lines.
B perform a tug test.
C release the turntable jaws.
D raise the landing gear.
(You can check your answers to the question in the ANSWERS TO QUESTIONS section at the back of this manual.)
41

LOADING THE VEHICLE
KNOWLEDGE
You will need to know the correct principles for arranging and securing various loads on vehicles to ensure that they are transported safely and reach their destination in good condition.
You must also know the mass and dimensional limits applicable to your vehicle and understand the international cargo symbols.
PERFORMANCE:
You must be able to demonstrate correctly to the examiner how you would arrange and secure various forms of cargo.
CONDITIONS:
Knowledge test : examination conditions Practical test : actual or simulated demonstration of the correct procedures to be followed in arranging and securing cargo.
STANDARDS
Drivers must pass the knowledge test before commencing the practical test.
Satisfactory knowledge of the correct loading of two types of cargo as selected by the examiner.
Driver’s Loading Responsibilities You are responsible for getting your cargo to its destination in good condition and without risk to other road users and the general public and that means it must be correctly loaded and secured firmly on your vehicle.
Arranging and Distributing the load Mass limits: When loading your vehicle you must ensure that it does not exceed any of the legal limits for:
Gross Vehicle Mass (GVM): The loaded mass of the vehicle
9 Gross Combination Mass (GCM): The loaded mass of the vehicle plus the loaded mass of any trailers it is towing
9 Axle Mass: Load limits are specified for each axle and group of axles. These limits are determined by the number of and type of tyres on each axle, and the spacing of the axles.
Some of these mass limits vary from state to state although they are moving towards standard limits. If you operate interstate you will need to make sure you know the requirements for other states in which you drive. Always be sure your vehicle is within the limits when you cross state boundaries.
42
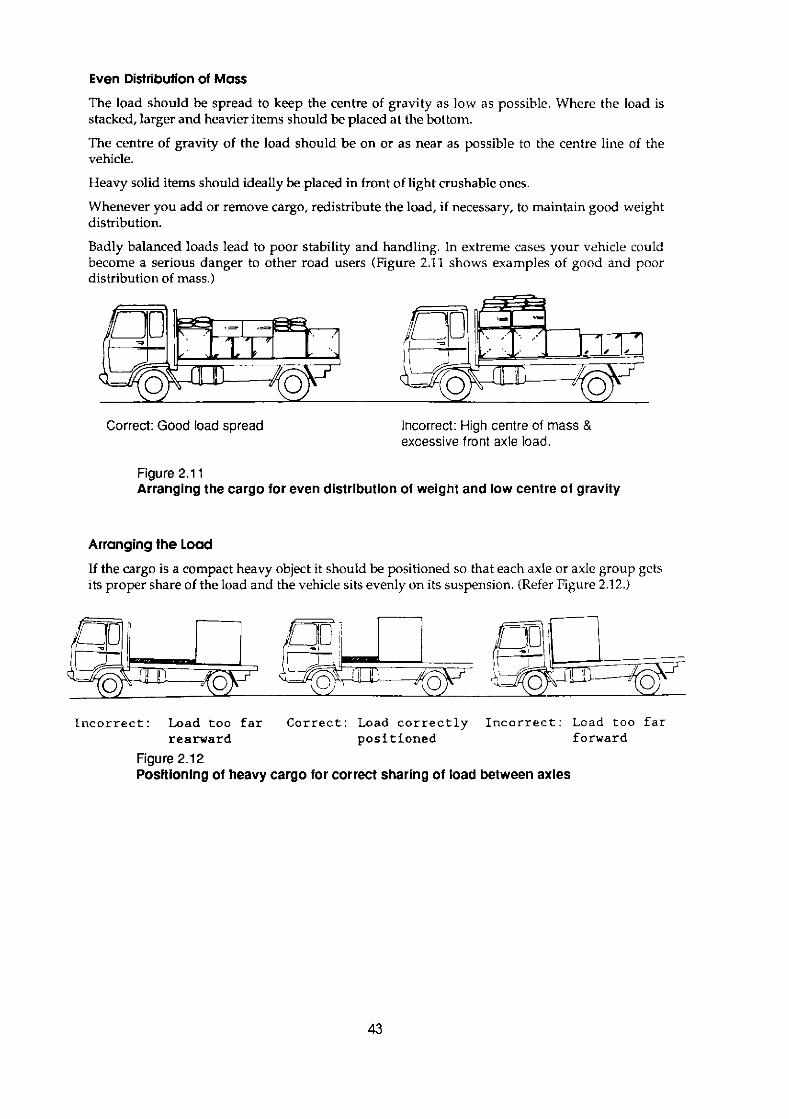
Even Distribution of MOSS
The load should be spread to keep the centre of gravity as low as possible. Where the load is stacked, larger and heavier items should be placed at the bottom.
The centre of gravity of the load should be on or as near as possible to the centre line of the vehicle.
Heavy solid items should ideally be placed in front of light crushable ones.
Whenever you add or remove cargo, redistribute the load, if necessary, to maintain good weight distribution.
Badly balanced loads lead to poor stability and handling. In extreme cases your vehicle could become a serious danger to other road users (Figure 2.11 shows examples of good and poor distribution of mass.)
Correct: Good load SDread Incorrect: High centre of mass & excessive front axle load.
Figure 2.1 1 Arranging the cargo for even dlstrlbutlon of weight and low centre of gravlty
Arronging the Load If the cargo is a compact heavy object it should be positioned so that each axle or axle group gets its proper share of the load and the vehicle sits evenly on its suspension. (Refer Figure 2.12.1
I n c o r r e c t : Load too f a r Cor rec t : Load c o r r e c t l y I n c o r r e c t : Load t o o far rearward posi t ioned forward
Figure 2.12 Posltlonlng of heavy cargo for correct sharing of load between axles
43

The cargo should also be positioned so that the mass is evenly distributed each side of the centre of the vehicle. With the cargo correctly positioned the vehicle should not lean either to the left or the right. (Figure 2.13 shows correct and incorrect examples of this.)
I n c o r r e c t : Load improperly balanced Correct: Load proper ly balanced
Figure 2.13 Correct lateral balance of load
Securing the load Movement of cargo on the back of a truck is likely unless the cargo is secured.
It is necessary to restrain cargo by lashings such as ropes, chains or strapping and devices like gates, bulkheads and chocks.
The capacity of the cargo restraints preventing forward movement must equal the load mass and those preventing rearward and sideways movement equal half the load mass. In most circumstances half the total restraint required should come from lashings. The other half should come from baulking arrangements including headboards, bulkheads, transverse beams, chocks and dunnage and the friction between the load and the deck.
For safe loading, every vehicle should be fitted with a loading rack, headboard or bulkhead fitted to the front of the cargo deck.
Correct vehicle: Before undertaking to transport any cargo you must have a vehicle suitable for the type of cargo to be transported and with enough load capacity.
Maxirnise friction: You cannot depend entirely on friction to prevent load movement but you should maximise the friction between the load and the truck platform by ensuring the contacting surfaces are clean, dry and free of grease and loose material. Metal platforms are usually more slippery than wooden ones and may require extra precautions. Metal on metal provides very little frictional restraint and should be avoided wherever possible.
Use of dunnage: Dunnage is packing material (pieces of timber, mats, plywood, etc.) which may be placed between layers of cargo or between the cargo and the truck platform to provide better frictional restraint (e.g. between metal cargo and metal truck platform). It may also be used to
layers and make sure it is secured so it cannot move. support and level the load. When using dunnage you should use single rather than multiple
A4

Use of baulking: If satisfactory distribution of mass can be achieved and the shape of the load allows it, you should always place the cargo hard against the headboard, front-rack, or bulkhead of the vehicle so it cannot move forward during braking.
Where that is not possible, you should place the load hard against a large baulking object such as a timber which is firmly fixed to the truck platform.
Blocks, wedges and chocks may also be used to prevent cargo movement. If used, they should be of adequate size and strength and must be properly secured to the truck platform.
points which are strong enough to withstand not only the initial lashing but also the far greater Suitable anchorage points: In order to fix the cargo safely to the truck you must use anchorage
forces which can occur when the vehicle is being driven. For this reason, except for light loads, you should only use anchorage points close to the vehicle frame or the platform cross-members. When anchoring to the rails, always attachlashings close to the tie rail supports rather than to the unsupported section of the rail. (Refer Figure 2.14)
INCORRECT WRRECT
Figure 2.14 Anchoring lashlngs to the tle r a i l
Correct choice and application of lashings: The most common types of lashings used are ropes, webbing, chain and cable.
The lashing used must be appropriate for the cargo, strong enough for the job and in good condition.
When using lashings you should ensure:
They are tight enough to prevent movement of the load. but not tight enough to damage it.
Lashings and other restraints should be arranged so that if one component slackens or breaks, it does not affect the rest.
45
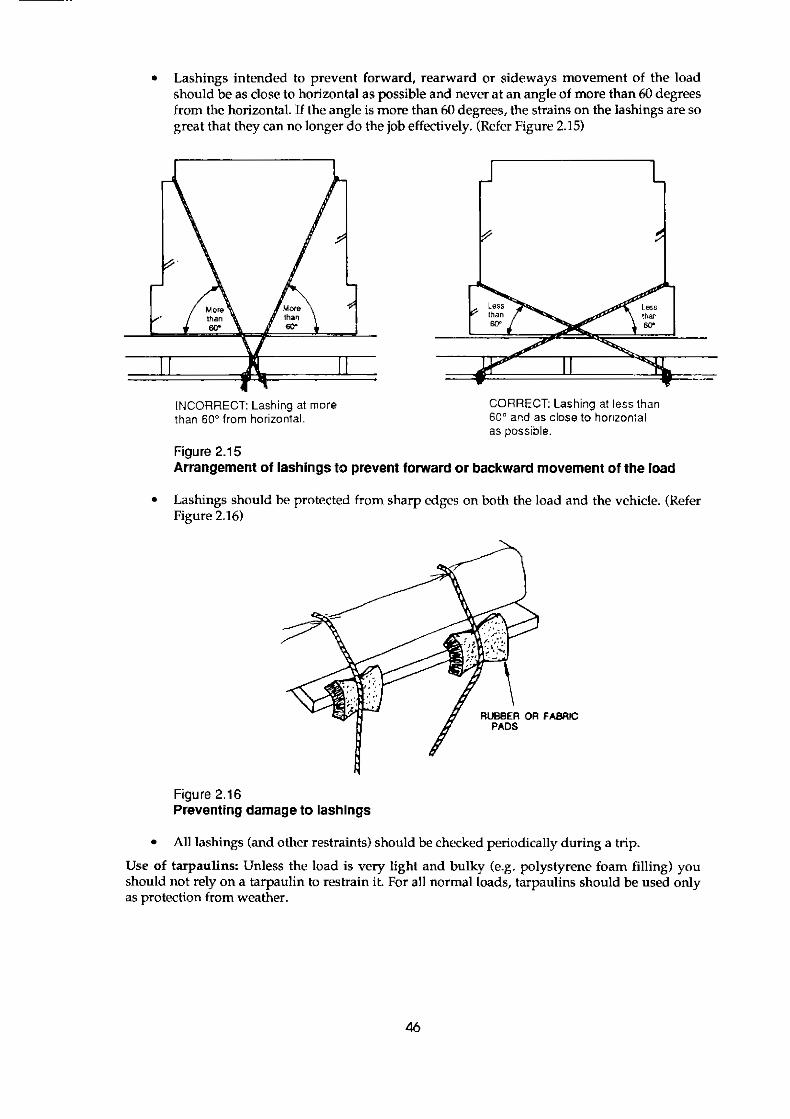
Lashings intended to prevent forward, rearward or sideways movement of the load should be as close to horizontal as possible and never at an angle of more than 60 degrees from the horizontal. If the angle is more than 60 degrees, the strains on the lashings are so great that they can no longer do the job effectively. (Refer Figure 2.15)
than 60" from horizontal. INCORRECT: Lashing at more CORRECT Lashing at less than
Figure 2.15 Arrangement of lashings to prevent forward or backward movement of the load
Lashings should be protected from sharp edges on both the load and the vchicle. (Refer
60" and as close lo horlzonlal as possible.
Figure 2.16)
Figure 2.16 Preventing damage to lashings
All lashings (and other restraints) should be checked periodically during a trip.
Use of tarpaulins: Unless the load is very light and bulky (e.g. polystyrene foam filling) you should not rely on a tarpaulin to restrain it. For all normal loads, tarpaulins should be used only as protection from weather.
46

Special Considerations Cargo on pallets: In general, all of the preceding rules apply to palletised cargo. However there are some additional rules:
Vertical movement and tipping of the pallet should be prevented by placing a lashing or other restraint across the top of the pallet.
Forward and rearward movement should be prevented by passing restraints through the base of the pallet for a cargo fully secured to the pallet. Otherwise a suitable arrangement of lashings over the top of the pallet and its cargo must beused.
9 Whatever system of restraint is used, i t must also prevent sideways movement of the pallet.
Each pallet on the top layer must have at least one cross-lashing. Any pallet which stands above the general load height should have at least two cross-lashings. (Figure 2.17 shows examples of how pallets should k secured.)
Lashings over bad to prevent vertical Lashings over load
Lashings through pallet bases to prevent Lashings lhrough paiiet
Baulking horizontal movement. Baulklng horizontal movement.
Examples of the correct methods to use In securing pallets Figure 2.17
Freight containers:
Most freight containers conform to International Standards dimensions (EO) but some do not. Always check your vehicle height after loading a container-it may be higher than you expect.
In many instances you may be transporting a sealed container and therefore have no control over the way in which the cargo has been packed inside. If after placing it on your truck you find the maximum axle loads are exceeded, or if the truck is dangerously unbalanced, you should refuse to accept the container. If the truck becomes dangerously unbalanced due to cargo movement while on the road, do not continue driving.
41
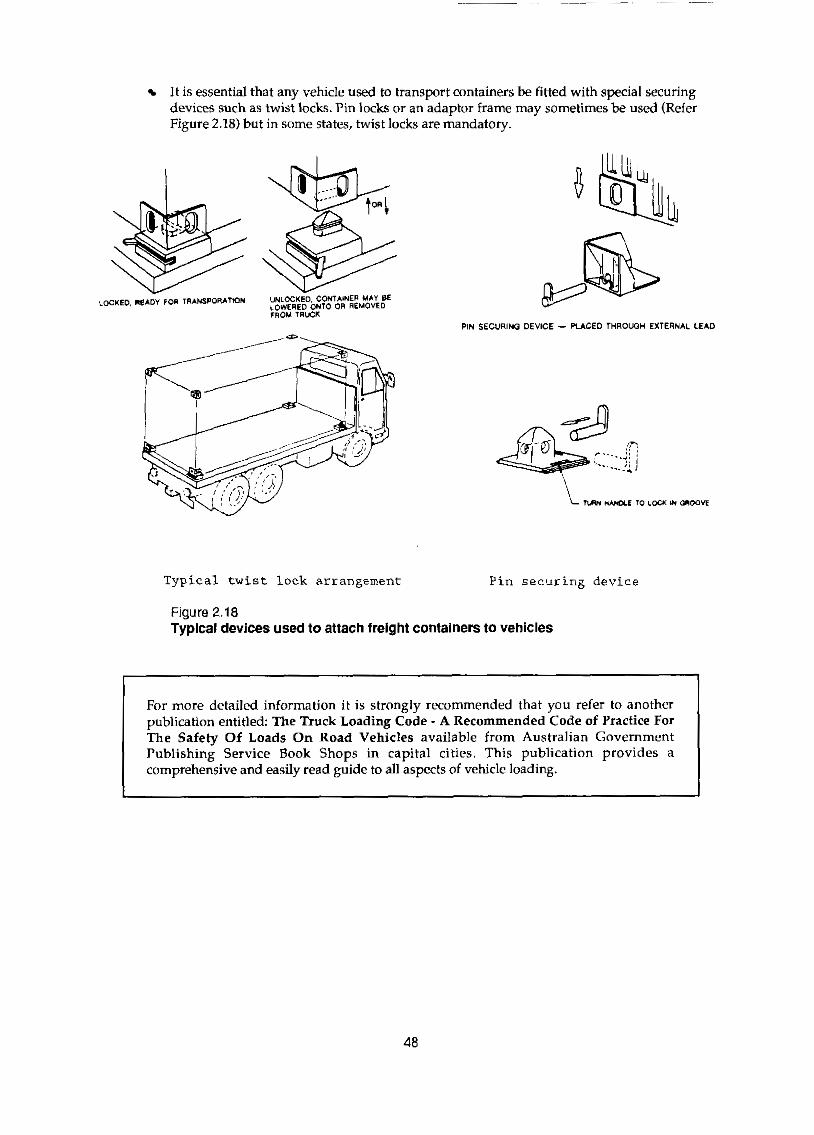
It is essential that any vehicle used to transport containers be fitted with special securing devices such as twist locks. Pin locks or an adaptor frame may sometimes be used (Refer Figure 2.18) but in some states, twist locks are mandatory.
T y p i c a l t w i s t Lock ar rangement P in secur ing device
Figure 2.18 Typical devices used to attach freight containers to vehicles
For more detailed information it is strongly recommended that you refer to another publication entitled: The Truck Loading Code - A Recommended Code of Practice For The Safety Of Loads On Road Vehicles available from Australian Government Publishing Service Book Shops in capital cities. This publication provides a comprehensive and easily read guide to all aspects of vehicle loading.
48

Loading Regulations Each state and territory has dimension and weight regulations, as well as loading safety requirements and special requirements for loads exceeding normal limits.
You should be familiar with these regulations for the states and territories in which you drive. Contact the state authorities listed in Appendix A at the back of this manual for further information.
Dangerous goods and unusual cargo: There are some materials which arc defined by government acts as dangerous goods.
If you are to transport dangerous goods you may need to hold a special permit showing you have passed a one or two day Dangerous Goods course.
Your vehicle, its equipment and the way the cargo is loaded may need to conform to a specified code and the truck may need a Dangerous Goods permit or license. You might also be required to display special marking signs for that particular cargo. You must also observe special precautions in loading and driving.
Before you transport any cargo classified as 'dangerous goods' you should check with the relevant authorities regarding any special requirements.
Dangerous Goods legislation and requirements are stringent and rightfully so. You must know at least enough about Dangerous Goods to know when not to load and what not to do.
Two useful publications arc:
published by the Australian Government Publishing Service forms the basis for virtually The 'Australian Code for the Transport of Dangerous Goods by Road and Rail'
all State Dangerous Goods legislation.
The 'Users Guide to the Australian Dangerous Goods Code' is a clear summary of the Code and how it applies to road transprt drivers. It is available at $8.90 from:
The National Road Transport Industry Training Committee
North Melbourne 3051 75 Chetwynd Street
Tel: (03) 329-0502
Live loads: A live load is one which cannot be completely secured and is able to move about within the load space. Examples of live loads arc: bulk liquids, livestock, hanging meat, wet concrete, pneumatic-tyred earth-moving machinery and passenger vehicles.
If not adequately restrained, a live load can seriously affect the stability of the transporting vehicle because of shifts in the centre of gravity and the momentum generated by the moving load. The danger can be reduced by restricting load movement as much as possible.
For bulk liquids this can be done by baffles in tanks, putting the liquid in several smaller tanks and by ensuring whenever possible, tanks or compartments are either empty or completely full. Livestock needs to be loaded so that the animals arc allowed only the minimum space to move. Pneumatic-tyred carthmoving machinery and passenger vehicles need to be secured firmly to the load platform so that the vehicles cannot bounce excessively on their tyres or suspensions.
49

These are designed to inform persons handling it of the type of cargo and any special handling International cargo symbols: There are seven internationally recognized symbols used on cargo.
procedures. The symbols are shown in Figure 2.19.
THIS HAY UP K E E P AWAY K E E P DRI F R A G I L E - H A N ~ L E U S E NO FROM H E A T W I T H C A R E H O O K S H E R E
S L I N G HEAVY WEIGHT THIS END
Figure 2.19 International cargo symbols
KNOWLEDGE QUESTIONS
LOADING THE VEHICLE
1 Which of the following is INCORREn?
In arranging cargo on your truck you should
A place heavy items at the rear of the load.
B place heavy items close to the centre-line of the vehicle.
C distribute the mass as evenly as possible.
D stack heavy items at the bottom.
2 Which of the following is INCORRECT?
A You should check the balance of the load and redistribute it if necessary whenever you add or remove cargo.
B Friction cannot be relied upon to prevent movement of cargo when driving.
C Keeping the overall load height low reduces stability.
D Braking places higher forces on load restraints than does acceleration,
3 When securing the load to your vehicle you should
A Try to reduce friction between the cargo and the truck platform
B use several layers of dunnage in preference to one layer
C Leave a small space between the cargo and any baulking object used,
D not use tarpaulins as a means of load restraint on anything but very light and bulky loads.
51

4 Match the international cargo symbols with their correct descriptions by writing the corresponding description number in the box beside each symbol.
1 Sling here
3 Fragile - handle with care
4 Keep away from heat
5 Thisway up
back of this manual.) (You can check your answers to these questions in the ANSWERS TO QUESTIONS section at the
52
MAINTAINING THE VEHICLE Pre-trip and other periodical inspections drivers must make of the vehicle.
KNOWLEDGE
before each trip. You must also know how to carry out such checks. You must know the items on your vehicle which should be checked daily, weekly and
PERFORMANCE
You must be able to demonstrate how to carry out the necessary safety checks of your vehicle.
CONDITIONS:
Knowledge test : examination conditions Practical test : performance of a typical daily safety check covering all of the items in the DAILY checklist plus any two items selected by the examiner from the WEEKLY/PRE-TRIP checklist. (DAILY and WEEKLY/PRE-TRIP checklist items are shown on pages 70 and 71.
In carrying out the prescribed checks you should be able to explain to the examiner the procedure being followed and the purpose of the check.
STANDARDS:
Drivers must pass the knowledge test before commencing the practical test. A pass in the practical t e t is 80% of the checks demonstrated correctly.
Introduction A truck driver’s licence permits you to drive vehicles which are large, heavy and sometimes cumbersome. If incorrectly handled, these vehicles are much mom dangerous than a car. As a professional driver you need to appreciate that your safety and the safety of others depends on the proper functioning of your vehicle as well as your care and skill in driving.
This section lists checking procedures which should be followed to ensure your vehicle is roadworthy and prepared for a day’s work or an extended trip.
However, you should do more than just make sure these checks are carried out
As you gain experience in truck driving you will become more familiar with your vehicle. YOU will be able to notice small changes in the operation of the controls, the handling of the vehicle or its appearance. For example, you may notice a change in the ‘feel‘ of the brake pedal or in the position of the steering wheel when driving straight ahead. Perhaps the semi-trai!er may appear to be tracking differently. Sever ignore such changes. They are early warnings of conditions that could cause breakdowns or become dangerous. Be curious and look for the cause. Your action could save lives, including your own!
Record it in your vehicle log and report it to your fleet manager for action. If you arc responsible If, as a result of checks you make, you find something that does not seem right, have i t checked.
your vehicle is unsafe, do not drive it until it has been thoroughly checked. for your own vehicle maintenance, get your mechanic to check it. If you have any suspicion that
53

There are two types of vehicle checks:
1 DAILY CHECKLIST
These are the checks which every heavy vehicle driver must know and be able to carry out. They must be performed each day before driving commences and, on long trips, before recommencing driving after a meal or rest break.
A simple walk-around check should be performed as a matter of habit whenever the truck is stopped.
2 WEEKLY OR PRE-TRIP CHECKLIST
The weekly checklist includes all the daily checks and others which need to be performed regularly to ensure the safety of your vehicle.
In some circumstances these more comprehensive checks may be carried out by persons other than the driver (fleet maintenance staff for example). But if you are a private operator, you may need to perform the checks. You, as the driver, must make sure they are done. If you don’t do them yourself, make sure that those responsible are actually carrying them out.
To assist you to perform the inspections systematically, they are divided into five groups:
- General external inspection
- Engine compartment inspection
- In-cab inspection
- Systems operation - vehicle stationary
- Systems operation - vehicle moving
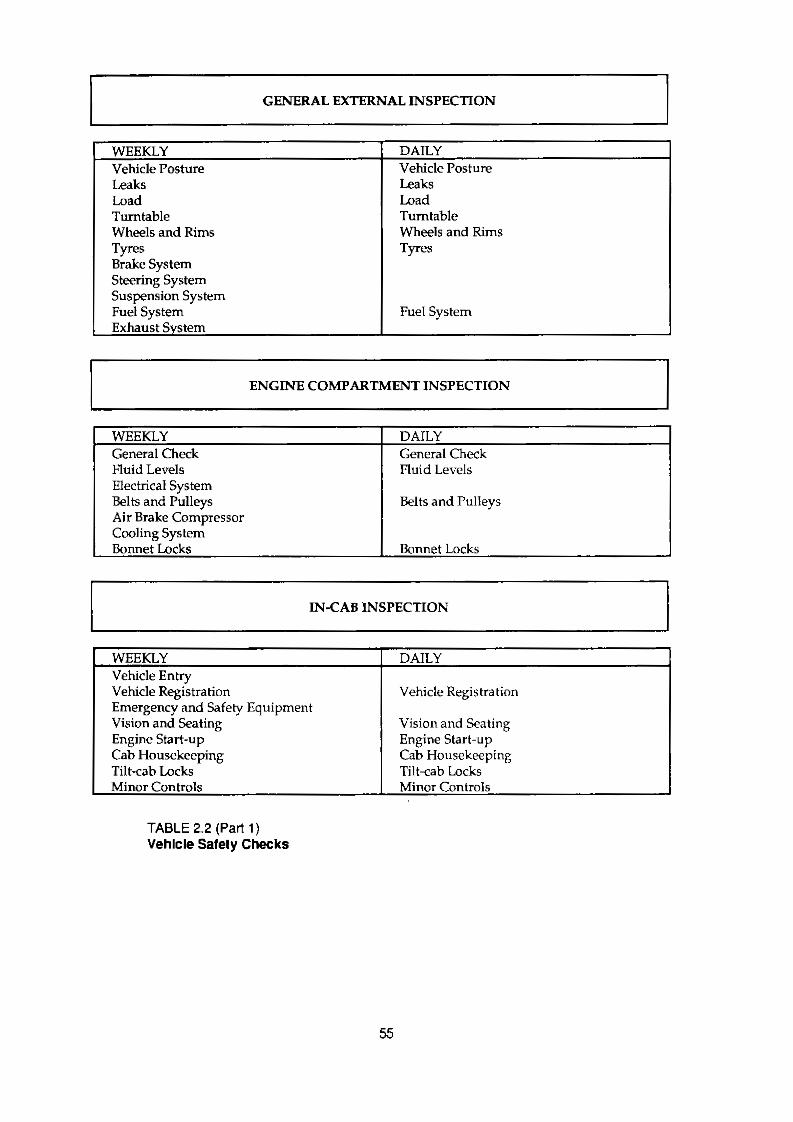
G-AL EXTERNAL INSPECTION
WEEKLY Vehicle Posture Leaks Load Turntable Wheels and Rms Tyres Brake System Steering System Suspension System Fuel System Exhaust System
Vehicle Posture Leaks Load Turntable Wheels and Rims Tyres
Fuel System
ENGINE COMPARTMENT INSPECTION
WEEKLY
Air Brake Compressor Belts and Pulleys Belts and Pulleys
Electrical System Fluid Levels Fluid Levels General Check General Check DAILY
Bonnet Locks Bonnet Locks Cooling System
IN-CAB INSPECTION
WEEKLY Vehicle Entry Vehicle Registration Emergency and Safety Equipment Vision and Seating Engine Start-up Cab Housekeeping Tilt-cab Loch Minor Controls
DAILY
Vehicle Registration
Vision and Seating Engine Start-up Cab Housekeeping Tilt-cab Locks Minor Controls
TABLE 2.2 (Part 1 ) Vehlcle Safely Checks
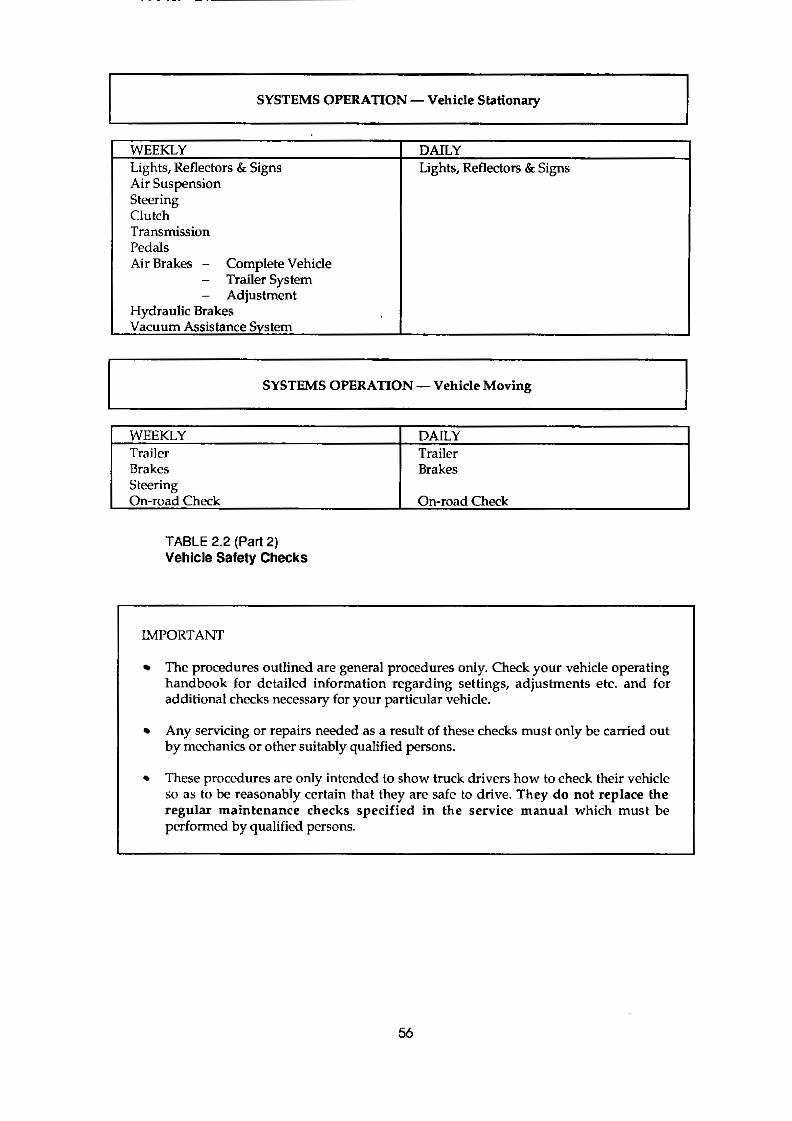
SYSTEMS OPERATION - Vehicle Stationary 1 Air Suspension Steering Clutch Transmission Pedals Air Brakes - Complete Vehicle
- Trailer System
Hydraulic Brakes - Adjustment
Vacuum Assistance System
WEEKLY Lights, Reflectors & Signs Lights, Reflectors & Signs DAILY
-
SYSTEMS OPERATION -Vehicle Moving
WEEKLY Trailer
DAILY
Brakes Trailer Brakes
Steering On-road Check On-road Check
TABLE 2.2 (Part 2) Vehlcle Safety Checks
IMPORTANT
The procedures outlined are general procedures only. Check your vehicle operating handbook for detailed information regarding settings, adjustments etc. and for additional checks necessary for your particular vehicle.
Any servicing or repairs needed as a result of these checks must only be carried out by mechanics or other suitably qualified persons.
These procedures are only intended to show truck drivers how to check their vehicle
regular maintenance checks specified in the service manual which must be so as to be reasonably certain that they are safe to drive. They do not replace the
performed by qualified persons.
56
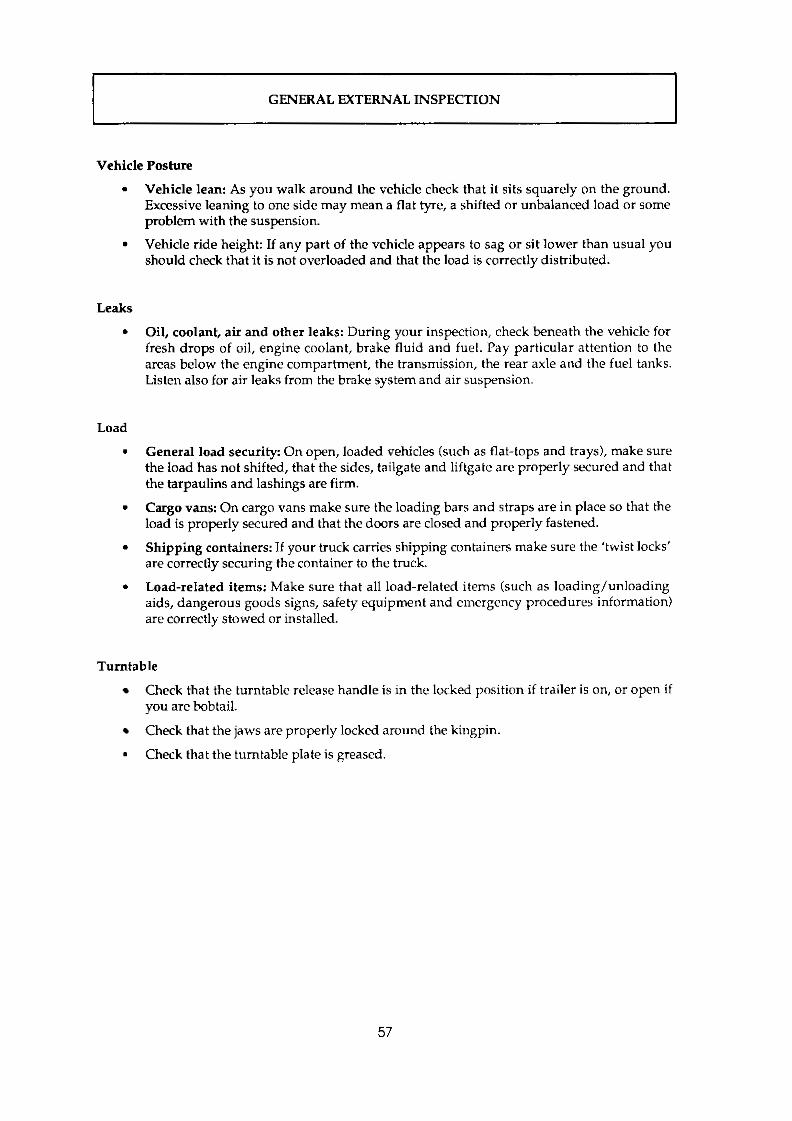
GENERAL EXTERNAL TNSPECTION
Vehicle Posture . .
Leaks .
Load . . . .
Vehicle lean: As you walk around the vehicle check that it sits squarely on the ground. Excessive leaning to one side may mean a flat tyre, a shifted or unbalanced load or some problem with the suspension.
Vehicle ride height: If any part of the vehicle appears to sag or sit lower than usual you should check that it is not overloaded and that the load is correctly distributed.
Oil, coolant, air and other leaks: During your inspection, check beneath the vehicle for fresh drops of oil, engine coolant, brake fluid and fuel. Pay particular attention to the areas below the engine compartment, the transmission, the rear axle and the fuel tanks. Listen also for air leaks from the brake system and air suspension.
General load security: On open, loaded vehicles (such as flat-tops and trays), make sure the load has not shifted, that the sides, tailgate and liftgate are properly secured and that the tarpaulins and lashings are firm.
load is properly secured and that the doors are closed and properly fastened. Cargo vans: On cargo vans make sure the loading bars and straps are in place so that the
Shipping containers: If your truck carries shipping containers make sure the 'twist locks' are correctly securing the container to the truck.
Load-related items: Make sure that all load-related items (such as loading/unloading aids, dangerous goods signs, safety equipment and emergency procedures information) are correctly stowed or installed.
Turntable
Check that the turntable release handle is in the locked position if trailer is on, or open if you are bobtail.
Check that the jaws are properly locked around the kingpin.
Check that the turntable plate is greased.
57

Wheels and Rims
Rim damage: Check that the wheel rims are not bent or damaged. (If a multi-piece rim using lock rings is found to be damaged, the tyre should be deflated before handling. These rims can cause very serious injury if they come apart while the tyre is inflated.)
Tyre fitting: If new tyres have been installed check that they are fitted correctly. Make especially sure that the wheel rims have been correctly assembled (lock rings propcrly installed, etc.). If there is any doubt deflate the tyre before handling.
Wheel nuts and lugs: Check that all wheel nuts and lugs are correctly fitted and properly tightened, (signs of rust around a nut or lug may indicate it is loose). If you suspect a nut to be loose it can only be properly checked for tightness with a wheel-wrench. While checking the wheel nuts and lugs you should also make sure that the wheel spiders have not spun in the rims. If this happens the tyre valve can be torn out or damaged. If the valve is okay, tighten the nuts holding the rims on.
9 Grease or oil leaks: Look for grease or oil leaks from the wheel bearings. Loss of lubricant can damage wheel bearings and prevent the brakes from working. Small amounts of lubricant on brake linings can actually cause a wheel to lock during braking when the brakes are cold (often the first sign of an oil or brake fluid leak in a wheel).
Tyres
Tyre pressures: Check tyre pressures using a pressure gauge that you are sure is accurate. (You can't check tyre pressure properly by kicking or thumping the tyres.)
Low tyre pressure on the front wheels can cause heavy steering and poor vehicle control. Low pressure on rear wheels and trailer wheels is more difficult to detect while driving particularly with dual tyre assemblies. If pressure is low in either or both dual tyres and they are touching, the tyres may overheat and catch fire. Tread wear: Badly worn or bald tyres are more likely to puncture or blow out. Lack of tread depth also reduces grip on slippery surfaces and this can lead to braking skids, poor steering response and jack knifing.
Hydroplaning can also occur on wet roads leading to loss of steering and braking control.
Tyre condition: Check the side walls and the treads of the tyres for cuts, bulges, and signs of wear caused by repeated contact with other parts of the vehicle. Check that the
which have become wedged in the tread and could puncture or damage the tyre. You tread is not separating from the casing. Remove any stones, nails, glass or other objects
should also check that the valve-stems are not damaged or fouling other components.
Dual tyres: When the vehicle is loaded, make sure the side walls of dual tyres are not touching. If they are, overheating, tyre damage and tyre fires can occur. You should also remove any rocks or other objects wedged between the dual tyres or between the wheel and brake drum. Objects wedged between tyres can cause serious tyre damage or failure.
58
Brake System
NOTE: On some vehicles (particularly tilt-cabs) some of these brake checks may be camed out more easily as part of the ENGINE COMPARTMENT inspection.
Brake drums: Where the brake drums can be easily seen, check them for signs of overheating, cracks or damage.
Air systems: Check that brake chambers and other components are securely attached and that the linkages and hoses are properly connected and show no evidence of contact with other components.
Hydraulic systems: Check that the hydraulic hoses are not touching other components or leaking. Look for signs of fluid leakage around the wheel cylinders and at the bottom of the back plate which supports the shoes.
I ~~~~ ~ ~ ~ ~ ~~~~~~~~
NOTE: An operational check of the brakes is carried out later in the inspection after the engine is started.
Steering System
NOTE On some vehicles (particularly tilt-cabs) some of these steering checks may be more easily carried out as part of the ENGINE COMPARTMENT INSPECTION.
Steering gear box: Check the steering gear h x for oil leaks. Check the steering gear box mounting bolts and the steering arm for signs of looseness (sometimes indicated by traces of rust or wear marks).
Steering linkage: Check that all parts of the steering linkage are propcrly attached. (Again look for rust or wear marks as a sign of looseness.) Check also for signs of wear or damage due to contact with other components.
Power steering: Check hoses and other power steering components for signs of leakagc, wear or damage due to contact with other components.
59

Suspension
NOTE: On some vehicles (particularly tilt-cabs) some of the frontsuspension checks may be carried out more easily as part of the ENGINE COMPARTMENT INSPECTION.
Suspension linkages and attachments: Check the spring brackets, spring pins, U-bolts and torque arms for looseness, cracks, bends or missing parts. Check for frame cracks around the attachment points. Check rubber bushings for wear or damage. Check for signs of wear or damage due to contact between suspension components and the frame or body.
Leaf springs: Check leaf springs for leaves which are broken, missing or have shifted. (Missing spring clips will allow leaves to twist out from their proper position.)
or damage. (Leaks will be checked after starting the engine.) Air suspension: Check bellows and air lines for signs of contact with other components
Adjustable axles: If the vehicle has adjustable axles make sure that the locking pins are all properly in place and are correctly secured by the safety clamps.
Shock absorbers: If shock absorbers are fitted, check them for leaks or damage, check the mountings for looseness and the rubber bushings for wear.
Fuel System
Fuel tanks: Make sure the fuel tanks are properly secured and not damaged or leaking. Check that tank caps are properly fitted. Check the fuel level.
Fuel lines and filters: Check that fuel lines are secure, not leaking, and correctly positioned away from the hot exhaust and danger of entanglement with other objects. Check the fuel filters for the presence of excessive water or wax.
Exhaust System
Muffler and pipes: Check that the muffler and exhaust pipes are properly supported and not leaking. Check that all hoses and other attached components are secure and in good condition.
Fire danger: Make sure fuel lines, electrical cables, or any combustible materials are not close enough to the exhaust to cause any risk of fire or damage.

ENGINE COMPARTMENT INSPECTION
In most vehicles an engine compartment inspection will involve lifting the bonnet. However, in some forward control vehicles, access to the engine compartment is gained by tilting the cab forward.
NOTE: On tilt-cab vehicles some of the checks for Brake, Steering and Suspension Systems from the GENERAL EXTERNAL INSPECTION can be performed more easily as part of this ENGINE COMPARTMENT INSPECTION.
General Check
Damaged and missing parts: After opening the engine compartment, carry out a general check for damaged or missing parts and signs of improper servicing such as a cracked fan shroud, missing oil filler cap or loose air cleaner bolt.
Leaks: Check for signs of oil, coolant, fuel or hydraulic fluid leaks. Check also around the manifold and exhaust system for signs of exhaust gas leaks.
Fluid Levels
Oil levels: Check the oil levels in the engine, automatic transmission, power steering, and the air compressor and fuel injection pump (if not lubricated by the engine system).
Other levels: Check the levels of engine coolant in the radiator (and coolant reservoir), electrolyte in the battery and fluid in the windscreen washers. If the vehicle is equipped with hydraulic brakes check the brake fluid level in the master cylinder.
CAUTION Do not check the coolant level while the engine is hot. Release the radiator cap carefully to avoid any risk of scalding.
1 I
Electrical System
Battery: Make sure the battery is properly secured and that the terminals are tight and free of corrosion.
Wiring: Make sure that all cables and wiring are properly secured and that all terminals are firmly connected. If the vehicle has spark plugs, pay particular attention to the high tension wiring and components; they should be kept clean and dry.
61
Belts and Pulleys
Belt condition: Check that all drive belts are in place for the alternator (or generator), water pump, air compressor, power steering pump and air conditioner. (Note: Somc components use twin belts.) Any belts showing signs of cracking or fraying should be replaced.
its belt the belt is too loose and should be adjusted. Belt tension: Check the tension of all belts. If it is possible to turn a pulley around inside
Air Brake Compressor
Air intake screen: Check that the intake filter on the air-brake compressor is not blocked.
Cooling System - Radiator and fan: Check that the radiator is not blocked by insects or grass seeds and
fitted) are not damaged or seized. Check the fan for damaged, bent or loose bladcs and that the radiator shroud is secure and undamaged. Check that the radiator shutters (if
worn bearings. Make sure all other components are clear of the blades.
Hoses: Check all coolant hoses for cracks or weakness and for leaks at the connections.
Bonnet Locks
Check that the bonnet locks are properly secured.
62
IN-CAB INSPECTION
In this part of your vehicle inspection you check the controls for correct functioning and settings, the cab safety and vision, the emergency equipment. You also start the engine.
Vehicle Entry
Check that the ladder, step and grab handles or rails are secure. Check that the doors close properly and latch securely.
Vehicle Registration
Check that the vehicle registration has not expired. (This is especially important if the vehicle is not one you regularly drive.) The penalty for driving an unregistered (and uninsured) vehicle can be disqualification from holding a driver’s licence.
Emergency and Safety Equipment
Check that you have all the necessary emergency and safety equipment and that i t is in good condition. (Some of this equipment may be located elsewhere on the vehicle.) Your equipment should include the following:
- Fire extinguishers: Check that you have the required number and correct type for your particular cargo and that they are fully charged.
- Emergency reflectors and lamps: Check that you have at least three emergency reflectors. If you also have emergency lamps check their condition.
- First aid kit: If a first aid kit is provided, check that i t is complete and correctly stowed.
Spares and tools: Check that you have spare fuses and light globes, and tools for minor repairs such as a jack and wheel wrench.
Vision and Seating
Glass: Clean all windows and mirrors to ensure clear vision. While cleaning also check them for cracks, scratches or pitting.
Windscreen wipers: As you clean the windscreen also clean the wiper blades and check their condition. With the windscreen wet, you can also check wiper operation.
Seating and mirrors: Adjust the seat to the correct driving position and then check and adjust the seat belt. Adjust the driving mirrors to suit your driving position.
63
Engine Start-up
Preparation: Check that the parking brake is on and that the transmission is in neutral. Pressing the clutch pedal down eases the load on the starter. Set the engine shutdown knob or lever to the 'RUN' position.
Starting: If the engine is a diesel equipped with glow plugs and it is cold, allow 15 to 50
allow it to idle until correct oil pressure is registered by the oil pressure gauge. If the oil seconds for the glow plugs to heat up before cranking the engine. Start the engine and
pressure does not register within 5 seconds switch off the engine and try to determine the fault. Do not over rev the engine on start-up or while cold; it takes some time for the oil to reach all components and for the components to warm to their proper working tolerances.
Instruments and gauges: With the engine running, check that all instruments and gauges
oil pressure gauge should begin to register within 5 seconds of starting the engine and then rise to normal pressure
amp gauge should begin to register a charge after a few seconds
are working and that the readings are within normal limits. That is:
- voltmeter should show gradual increase from initial starting voltage to normal operating voltage
- coolant and oil temperature gauges should gradually rise to normal range
- oil, coolant and charge warning lights should switch off within the first few seconds of start-up.
Air brake system: If the vehicle is fitted with air brakes the following should also be checked:
NOTE: The pressures and times quoted below are intended as typical examples only. Check your vehicle operating manual or ask your trainer or the manufacturer what the figures should be for your vehicle.
- low air pressure warning buzzer should operate continuously, until air pressure builds up to at least 410 kPa (60psi).
- air pressure gauge should show a gradual increase. Check the time taken to build up from 350 kPa to 620 kPa (50 psi to 90 psi). If it is greater than 5 minutes the air brake system may need further attention. (This check is dealt with in more detail later in this section.)
- air compressor cut-off should occur when the pressure is within the range 690 kPa to 860 kPa (100 psi to 125 psi). If cut-off occurs below 690 kPa (100 psi) or above 860 kPa (125 psi) some further attention is needed.
Shut down engine: Having allowed the engine to run during the preceding checks it may now be shut down. (To prevent damage to turbocharger bearings due to oil starvation do not shut down a turbocharged engine until it has been running at least 5 minutes after a cold start.) Make sure the parking brake is applied so that the vehicle cannot move.
Air pressure drop: Note the air pressure reading when the engine is switched off. This pressure should be checked again after the vehicle has been standing for about 10 minutes. Do not operate the brakes during this time. Pressure loss after 10 minutes should not be more than 70 kPa (10 psi). Listen for air leaks as you move around the vehicle completing other checks.
Cab Housekeeping
Remove any rubbish from inside the cab which could distract you or interfere with your driving. Make sure all equipment is properly stowed. Check especially that there are no loose items on the floor which could roll around and lodge beneath the pedals or papers and books on top of the dashboard which could reflect in the windscreen.
Tilt-cab Locks
Check that the tilt<ab locks are properly secured.
Minor Controls
NOTE You may find i t most convenient to check the Minor controls at the same time as the Lights, Reflectors and Signs checks in the next section.
Check the following controls, switches and warning lights for correct settings and to make certain they are all functioning:
- windscreen wipers and washers (make sure windscreen is wet whcn wipers are operated)
- horn
- turn indicators -check switch operation, warning light and buzzer
- hazard warning lights - check switch operation
- head and parking lights - check switch operation and high beam indicator light
- heater, demister, air conditioner - check operation of controls and units
warning lights not already chccked (e.g. oil pressure)
65
I SYSTEM OPERATION - VEHICLE STATIONARY I In this part of your inspection you check the operation of the major controls and vehicle systems. For some of the checks an assistant will be needed.
Lights, Reflectors and Signs
Condition and cleanliness: As you check the components listed under this heading, make sure they are clean, securely attached to the vehicle, and clearly visible. Make sure that all required signs and dangerous goods labels are correctly displayed and legible, and that the red and yellow marker plates, if required, are clean and fitted to the rear of the vehicle.
Driving lights and reflectors: Check the headlights on both high and low beam. Check the parking lights, clearance lights, tail lights and number plate lights, and all reflectors. Any faulty light globes or lenses should be replaced.
Brake, turn, reversing and hazard warning lights: Some of these lights may be wired through the ignition, so turn the key to the 'on' position.
It will be easier if you have an assistant to help you with some of these checks. Ask the assistant to apply the brakes while you check the brake lights. Similarly, your assistant can help you as you check the reversing lights (and buzzer, if fitted); the turning indicator lights (and buzzer, if fitted) and finally the hazard warning lights.
If you do not have an assistant you may be able to perform some of these checks using the reflection from windows of a building or car, or directly from a wall if it is close enough.
Remember to turn the ignition key and all switches 'off' afterwards.
Air Suspension
Air bellows: After the air pressure has built up check that the bellows arc supporting the vehicle and that the vehicle is level. Make sure that the bellows are not contacting other components or are damaged. Listen for air leaks in the system.
Steering
Free-play and linkage: Here again it would be helpful to have an assistant. The following points should be observed when undertaking this check
- with the front wheels in the straight-ahead position check the free play by turning the steering wheel to one side until the road wheels just begin to move, then turn in the other direction until the road wheels again move
- the steering wheel movement from one side to the other on a vehicle equipped with power steering should not exceed 10 cm travel at the rimof an average truck steering wheel
for a vehicle without power steering, about 15 cm is acceptable
- as your assistant turns the steering wheel about half a turn towards each lock
check the condition of the steering linkage
check for any sign of looseness in the steering joints and steering arm attaching bolts
- if the vehicle is equipped with power steering these checks may be carried out with the engine running (provided the parking brake is applied and the rear wheels are chocked)
- while carrying out these checks listen for any unusual noises from the power steering Pump.
Clutch
Free-play and disengagement: Check the free-play of the clutch by pushing in the pedal until a slight resistance is felt. Normal free-play is between 2.5 and 5 crn (about 1 to 2 inches).
If there is no free-play, clutch slip and thrust bearing wear can occur. Too much free-play can cause gear clashing. Check that the clutch disengages properly by pushing in the pedal and holding it in while you move the gear lever in and out of reverse gear several times. The gears should not grate after the first engagement. If they do, attention to the clutch may be required. This check is more sensitive (Le. the gears are more likely to grate) if the transmission oil is hot.
Transmission
Shifting action: With the engine running and the clutch pedal held down, check that the gear lever and other transmission controls operate properly.
Pedals
Condition and operation: Check that the rubber pads are properly fitted and in good order. Check that the pedal actions are not excessively loose or stiff. In particular make sure to press the accelerator firmly to the floor (with the engine switched off) checking that it shows no sign of sticking.
67
Air Brakes - Complete Vehicle
The following is a stepby-step procedure which will enable you to carry out a complete weekly or pretrip inspection of your air brake system.
NOTE All pressures and times quoted in this section are intended as typical examples only. Check your vehicle operating manual or ask your trainer or the manufacturer what the figures should be for your vehicle.
NOTE: If your vehicle is an articulated or combination unit, steps 1 to 11 should be carried out with the trailer brakes conn&ted.
1 Immobilise the vehicle: Make sure the vehicle is on firm level ground and that the parking brakes are applied and all wheels on at least one drive axle are securely chocked, front and rear.
NOTE It is essential that the vehicle is on firm level ground and the wheels are chocked because at stages during the inspection all brakes will be released. Do not perform this air brake inspection if these conditions cannot be met.
2 Drain all tanks: Completely empty all air from the tanks by opening the drain valves. This is done in order to remove condensed moisture (water) from the tanks and to allow checking of other components in the system. (Water in the system causes corrosion and decreased brake component service life.) Watch also for signs of oil in the drained water. If more than just a trace of oil is present, the compressor may need servicing. Close all drain cocks and valves after the system has been drained.
I NOTE Brake system manufacturers recommend that air tanks be drained daily.
3 Start engine: Turn the ignition key on. The low pressure warning buzzer and/or light should begin operating continuously. Start the engine and run at fast-idle (approximately 1000 rpm)
items mentioned in steps 4,5 and 6. to build up pressure in the reservoirs. While pressure is building, take careful note of the
4 Low pressure warning cut-off: The low pressure warning device should continue operating until the air pressure reaches at least 410 kPa (60 psi).
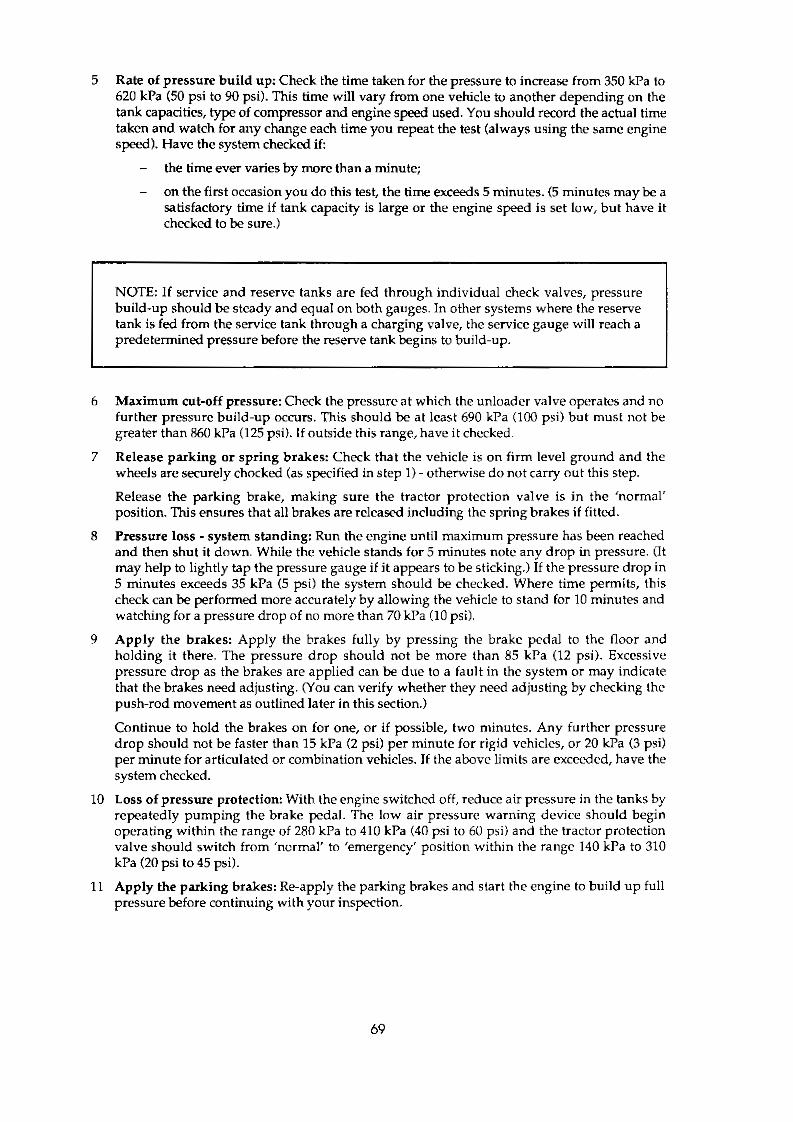
5 Rate of pressure build up: Check the time taken for the pressure to increase from 350 kPa to 620 Wa (50 psi to 90 psi). This time will vary from one vehicle to another depending on the tank capacities, type of compressor and engine sped used. You should record the actual time taken and watch for any change each time you repeat the test (always using the same engine speed). Have the system checked i f
- the time ever varies by more than a minute;
- on the first occasion you do this test, the time exceeds 5 minutes. (5 minutes may be a
checked to be sure.) satisfactory time if tank capacity is large or the engine speed is set low, but have it
NOTE If service and reserve tanks are f e d through individual check valves, pressure build-up should be steady and equal on both gauges. In other systems where the reserve tank is f ed from the service tank through a charging valve, the service gauge will reach a predetermined pressure before the reserve tank begins to build-up.
Maximum cut-off pressure: Check the pressure at which the unloader valve operates and no
greater than 860 kPa (125 psi). If outside this range, have it checked. further pressure build-up occurs. This should be at least 690 kPa (100 psi) but must not be
Release parking or spring brakes: Check that the vehicle is on firm level ground and the wheels are securely chocked (as specified in step 1) -otherwise do not carry out this step.
Release the parking brake, making sure the tractor protection valve is in the 'normal' position. This ensures that all brakes are released including the spring brakes if f i t t ed .
Pressure loss - system standing: Run the engine until maximum pressure has been reached and then shut it down. While the vehicle stands for 5 minutes note any drop in pressure. (It may help to lightly tap the pressure gauge if i t appears to be sticking.) If the pressure drop in 5 minutes exceeds 35 kPa (5 psi) the system should be checked. Where time permits, this check can be performed more accurately by allowing the vehicle to stand for 10 minutes and watching for a pressure drop of no more than 70 kPa (10 psi).
Apply the brakes: Apply the brakes fully by pressing the brake pedal to the floor and holding it there. The pressure drop should not be more than 85 kPa (12 psi). Excessive pressure drop as the brakes arc applied can be due to a fault in the system or may indicate that the brakes need adjusting. (You can verify whether they need adjusting by checking the push-rod movement as outlined later in this section.)
Continue to hold the brakes on for one, or if possible, two minutes. Any further pressure drop should not be faster than 15 kPa (2 psi) per minute for rigid vehicles, or 20 kPa (3 psi) per minute for articulated or combination vehicles. If the above limits arc exceeded, have the system checked.
10 Loss of pressure protection: With the engine switched off, reduce air pressure in the tanks by repeatedly pumping the brake pedal. The low air pressure warning device should begin operating within the range of 280 kPa to 410 kPa (40 psi to 60 psi) and the tractor protection valve should switch from 'ncrmaY to 'emergency' position within the range 140 kPa to 310 kPa (20 psi to 45 psi).
11 Apply the parking brakes: Reapply the parking brakes and start the engine to build up full pressure before continuing with your inspection.
69

Air brakes -Trailer system
brakes connected. The following additional steps should also be carried out with these vehicles. If your vehicle is an articulated unit, steps 1 to 11 should have been carried out with the trailer
12 Breakaway application: After ensuring that
- the vehicle is on firm ground with the wheels chocked (step 1)
- the air tanks are fully pressurised
- the tractor protection valve is in the ’normal’ position
- the trailer brakes are fully released
- disconnect the air hoses between the prime mover and trailer.
CAUTION Take care when disconnecting air couplings under pressure. Protect your eyes from the release of compressed air and hold the coupling components firmly to prevent them flying apart.
The trailer brakes should immediately and automatically apply. This can be verified by checking for movement of the trailer brake linkage. (This emergency application of the brakes should be capable of holding the vehicle for at least 15 minutes.)
13 Check tractor protection valve operation: When the trailer hoses were disconnected, the tractor protection valve should have switched from the ‘normal‘ to the ’emergency‘ position and sealed off the prime mover system so no air could escape through the trailer hoses.
NOTE: Some vehicles are fitted with cut-off valves on the air couplings which also prevent air loss. If these are fitted, the tractor protection valve may not operate.
Fully apply the foot brakes and hold the pedal down. Pressure losses should be no more than those obtained in step 9.
14 Return system to normal: Re-connect the trailer hoses, making sure the air couplings are properly locked. Start the engine and recharge the air tanks. Reset the tractor protection valve to ‘normal’. Apply the parking brakes.
70

Air Brake Adjustment
IMPORTANT The procedure which follows is designed to assist you to check brake adjustment. If adjustment is required it must only be done by a qualified person.
This inspection is carried out by checking the amount of brake cylinder push-rod movement at each wheel. Before you can check this you will need to find out from your vehicle manual or from the equipment manufacturer what are the acceptable limits of movement. You will also need an assistant to help you carry out the checks.
Push-rod movement: With the air tanks fully charged and the parking brakes released, note the movement of the brake chamber push-rod for one of the wheels as your assistant applies and releases the foot brake. Total movement should not be more than the distance specified in the manual.
As a rough guide, the total movement should not exceed 5 cm (2 inches). This measurement should only be used as an approximate check on a vehicle which is unfamiliar to you. If you drive the vehicle regularly find out the correct measurement.
CAUTION Keep your fingers clear of the linkage when carrying out thic check.
Repeat the check for each of the other wheels. If push-rod movement varies greatly from one wheel to another or exceeds specification have the brakes checked to see if they are worn or need adjusting.
Hydraulic Brakes
Pedal travel and firmness: (Note: If the parking brake is not mounted on the transmission it will need to be released for this check so chock the wheels.) With the engine running, release the parking brake (if necessary) and apply the foot-brake normally. If the pedal moves more than half way down, adjustment or bleeding of the system is required. The need to bleed the air from the system may be indicated if the pedal feels soft or 'spongy' rather than firm. Re-apply the parking brake after this check.
Slow application check: Apply the foot brake very slowly taking about 15 seconds to achieve full pedal travel. If the pedal goes all the way to the floor or noticeably further than usual, hydraulic seals in the systemmay be leaking. Have the system checked
Maximum pressure check With the engine running, rapidly pump the pedal 3 times, apply brakes with the maximum force possible and hold the application for about 5 seconds. If the pedal moves further down during this time, service is required.
Note: The preceding three checks do not apply to air over hydraulic systems.
71
Vacuum Assistance System
For vacuum assisted brakes, first inspect the brakes as explained in the previous section, 'Hydraulic Brakes'. Then carry out the following additional checks of the vacuum system:
Build up maximum vacuum: Run the engine until maximum vacuum is reached in the vacuum reservoir.
Vacuum loss - brakes applied: With the engine switched off, fully apply the brakes and note the rate of vacuum loss (tap the gauge if the needle is sticking). If vacuum is lost at a rate of more than 12mm (Hg) per minute the system should be checked.
Warning signal: With the engine switched off, pump the brakes until the low vacuum warning signal operates. If the signal does not operate before the pressure drops below 2M)mm (Hg), the system should be checked.
Hoses and air filter: Check that all hoses are properly secured and in good condition. Check that the air filter on the vacuum assistance unit is not blocked and correctly fitted.
72
SYSTEMS OPERATION -VEHICLE MOVING
In this final part of your vehicle inspection you will be driving the vehicle (although only for a
remove the wheel chocks (if in place), and check that the surrounding area is clear of traffic and short distance and at low speed). Before commencing you should apply the parking brake,
other obstructions.
Trailer (if attached)
Trailer brake: Release all brakes on the vehicle and gently drive the vehicle forward
The vehicle should not move. If it does, check that the air lines are all connected correctly about one metre. Stop the vehicle, apply the trailer brake only and try to move off again.
and repeat the test. If the trailer brakes still do not work, do not drive the vehicle until the fault is repaired. - Turntable (fifth wheel) slackness: With the trailer brakes applied, test the slack in the
back. If there seems to be any abnormal movement i n the coupling, find out why and turntable coupling by gently driving the prime mowr forward and then gently reversing
correct the fault.
Brakes
Parking brakes: With all brakes released, gently drive the vehicle forward about one metre. Stop the vehicle, firmly apply the parking brake and gently try to move off again. The vehicle should not move. If it does, the parking brake should be checked before the vehicle is driven.
Service brakes: Drive the vehicle forward in first gear at about 5 kmh (walking pace) and then apply the foot brakes as hard as you would in an emergency. If the brakes pull to one side, respond sluggishly or feel unusual in any way, they should be checked before driving the vehicle.
Steering
Steering action: Drive the vehicle forward at no more than 5 kmh and turn the steering
anything unusual, particularly any strange noises such as knocks or scrapes which could wheel first to full right lock, then to full left lnck and return to straight ahead. Investigate
indicate a fault. (Note: An empty parking lot is a good place for this check. You will need to turn the wheel quickly if space is limited.)
On-road check
briefly check around the vehicle. For example, you should check the temperatures of the tyres, After driving the first 50 kilometres of a trip, stop in a safe place away from traffic flow and
hubs and brake drums by touching them with your hand. A high temperature could indicate an under-inflated tyre, a binding brake or faulty wheel bearings. Check also for oil, water or other leaks. Make sure the load is still secure.
73

DAILY CHECKLIST
These are the checks you must perform each day before you take a truck out on to the road. Most of them are also checks you should perform whenever you stop your vehicle for an extended break (such as for a meal or test) during a long trip.
The Daily checks listed here are included in the more extensive Weekly/Pre-trip checklist and will not be covered again in depth here.
The purpose of this list is to enable you to carry out the checks in a methodical sequence.
Refer to the Weekly/Pre-trip checklist for detailed instructions for performing any of the Daily Checks.
Table 2.2 shows all of the checks and can be a helpful guide.
74
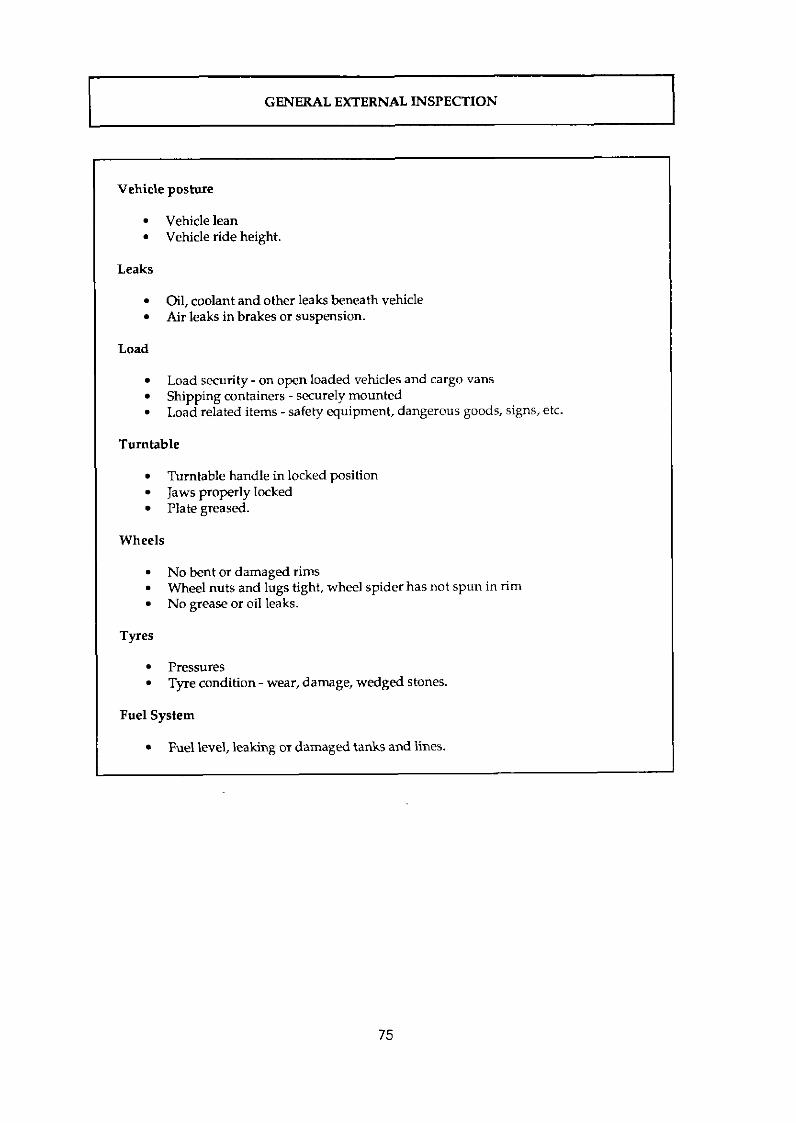
GENERAL EXTERNAL INSPECTlON
Vehicle posture
Vehicle lean Vehicle ride height.
Leaks
Oil, coolant and other leaks beneath vehicle Air leaks in brakes or suspension.
Load
Load security - on open loaded vehicles and cargo vans Shipping containers - securely mounted Load related items -safety equipment, dangerous goods, signs, etc.
Turntable
Turntable handle in locked position Jaws properly locked Plate greased.
Wheels
No bent or damaged rims Wheel nuts and lugs tight, wheel spider has not spun in rim No grease or oil leaks.
Tyres
Pressures Tyre condition - wear, damage, wedged stones.
Fuel System
Fuel level, leaking or damaged tanks and lines.
75

ENGINE COMPARTMENT INSPECTION
General Check
Damaged or missing parts Leaks.
Fluid Levels Oil, coolant, battery, windscreen washers, hydraulic brake fluid.
Belts and Pulleys Belt condition and tension.
Bonnet Locks Bonnet locks properly secured.
76
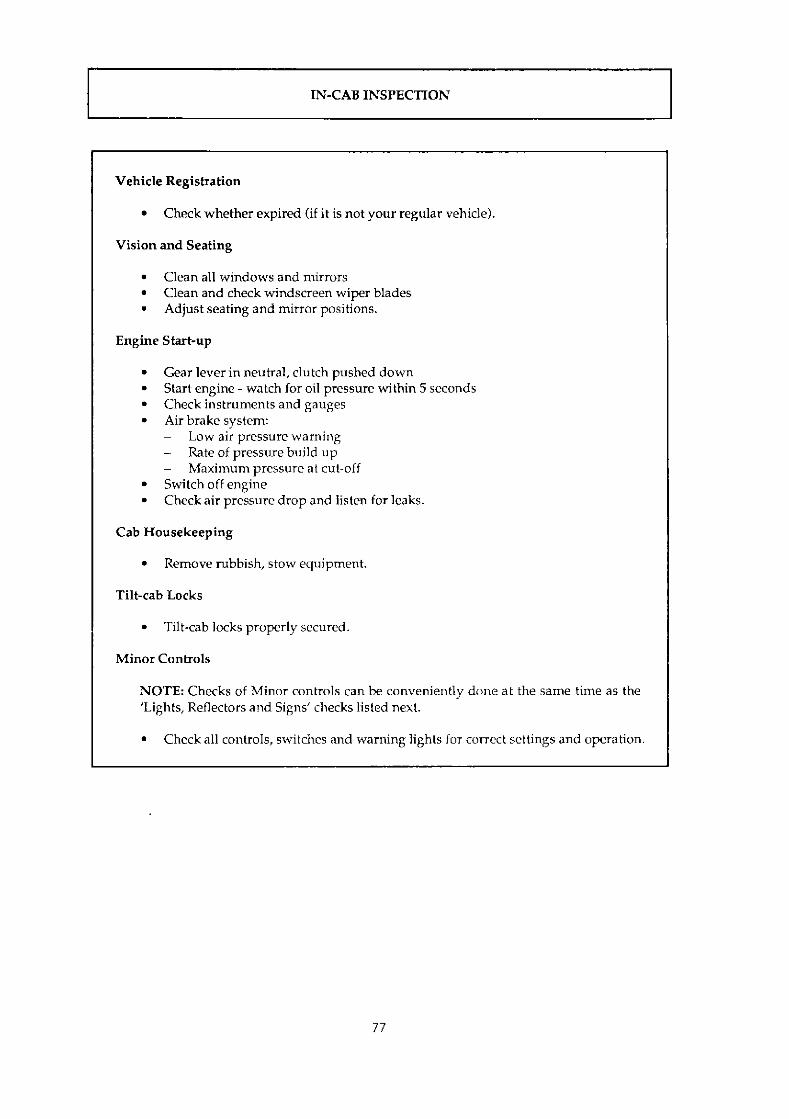
IN-CAB INSPECTION
Vehicle Registration
Check whether expired (if it is not your regular vehicle).
Vision and Seating
Clean all windows and mirrors Clean and check windscreen wiper blades
1 Adjust seating and mirror positions.
Engine Start-up
Gear lever in neutral, clutch pushed down Start engine - watch for oil pressure within 5 seconds Checkinstruments and gauges Air brake system:
~ Low air pressurc warning - Rate of pressure build up - Maximum pressure at cut-off Switch off engine Check air prcssure drop and listen for leaks.
Cab Housekeeping
Remove rubbish, stow equipment.
Tilt-cab Locks
Tilt-cab locks properly secured.
Minor Controls
NOTE: Checks of Minor controls can be conveniently done at the same time as the ‘Lights, Reflectors and Signs’ checks listed next.
Check all controls, switches and warning lights for correct settings and operation.
77

SYSTEMS OPERATION - VEHICLE STATIONARY I Lights, Reflectors and Signs
Check condition and cleanliness of all lights, reflectors and signs Check driving lights and reflectors -undamaged and all working Check brake, turn, reversing, hazard warning lights - undamaged and all working.
SYSTEMS OPERATION - VEHICLE STATIONARY -
Trailer . Check that trailer brakes are working properly. . Check turntable slackness.
Brakes . Check that parking brakes are working properly . Check service brakes at slow speed.
. Stop and externally check vehicle after first 50 km of a trip. On-road Check
7a
KNOWLEDGE QUESTIONS
MAINTAINING THE VEHICLE
1 Which of the following is not a 'daily check' item?
A Tyre pressures.
B Clutch free play.
C Oil levels.
D Lights and reflectors.
2 Which of the following should be the first item checked immediately after engine start-up?
A Battery charge rate.
B Low air pressure warning signals.
C Air pressure build up.
D Engine oil pressure.
3 'Hydroplaning' most commonly occurs
A as a result of hydraulic brake fluid loss.
B on drive wheels.
C on very wet roads.
D with new tyres.
4 In carrying out a weekly or pre-trip inspection of the complete brake system your first step should be to
A start the engine.
B drain all air tanks.
C chock the wheels.
D disconnect the trailer hoses.
5 In checking a hydraulic braking system, a 'soft' or 'spongy' pedal may indicate
A worn brake linings.
B the need to bleed air from the system.
C that the parking brake is still applied.
D loss of vacuum assistance.
79
6 me tractor protection valve should switch to emergency position when the air pressure drops to
A 80 - 620 kPa (70 - 90 psi).
B 450 - 480 kPa (65 - 70 psi).
C 310 - 450 kPa (45 - 65 psi).
D 140 - 310 kl'a (20 - 45 psi).
(You can check your answers to these questions in the ANSWERS TO QUESTIONS section at the back of this manual.)

SAFE DRIVING PRACTICES DRIVER HEALTH AND SAFEW
KNOWLEDGE
You must know how to maintain your health and safety as a driver and understand why this is important to the road transport industry.
PERFORMANCE:
All driving, maintenance and loading must be carried out with drivers taking care of their health and safety.
CONDITIONS:
Practical test Knowledge test : examination conditions
: on-road driving test.
STANDARDS:
NOTE In some states anapproved medical examination may be required before you are granted a truck driver's licence.
Drivers must be fit and healthy to a standard set by the industry. Drivers must have a knowledge of health and safety issues and maintain the standards required by the appropriate state licensing authorities.
General Health and Safety
Driving a truck is demanding work and it requires you to be physically fit and mentally alert so that you perform at your best. By adopting a healthy lifestyle and following safe practices in your driving you can ensure that your driving performance is always of a high standard. The following are some of the important factors affecting driver safety.
Physical Fifness
You must be physically fit to be a professional truck driver. If you have any physical or medical conditions which may affect your ability to drive a heavy vehicle safely such as a spinal complaint, diabetes or a heart complaint, you should discuss your suitability as a truck driver with your doctor.
Eyesight
Sharp eyesight, the ability to judge distances, good peripheral (side) vision and being able to recognize different colours are all extremely important elements of a driver's overall vision requirements.
If you have any problem with your vision you should seek advice regarding your suitability for professional driving. It is usually possible to correct the problem or adjust your driving style to compensate so that you can still drive safely.
81
A common problem experienced by older drivers is a reduction in night vision. One of the most obvious effects of decreased night vision is a reduction in the ability of the eyes to recover from dazzling lights. This can be a serious problem for the truck driver who drives long distances at night.
Posture You should always adjust your driving position so that you are sitting upright with your back and shoulders against the back of the seat and your legs well supported by the front of the seat cushion. A poor driving position will increase fatigue and may aggravate any spinal or muscular problems you have.
Fatigue Professional drivers are often at the wheel for long hours and fatigue can become a serious problem.
Recognizing the symptoms of fatigue and knowing how to combat them will help you become a safer driver.
The symptoms are:
~ frequent yawning
- heavy eyelids
- dryness of the mouth
- sore eyes
- shivering
double vision.
As fatigue increases, driving performance drops rapidly. You will find that you begin making poor judgements and over-reacting to situations. You should stop and rest immediately when you notice any of these symptoms. (Better still, you should not even allow the symptoms to appear.)
The following rules will help you combat fatigue:
Make sure you get adequate sleep.
Stop after every 2 or 3 hours driving, take a break, get out of your vehicle and exercise. Frequent short stops are better than occasional long ones. These breaks are also an ideal time for checking your vehicle (load, tyres, etc).
- Make sure there is plenty of fresh air entering the cabin. Many drivers find it helpful to direct fresh cool air onto their faces.
- Maintain cabin temperature at a comfortable level, preferably a little on the cool side.
- Avoid large, heavy meals before driving. Light meals, plus snacks during driving will help you stay alert.
- Keep your eyes moving, constantly switching your gaze as you drive. If you find yourself tending to stare straight ahead with a fixed gaze, or have difficulty in maintaining focus, you are becoming fatigued. Stop and take a break.
- Always follow the rules regarding the number of hours of driving permitted in any given time period. These rules are for your safety and the safety of others.
a2
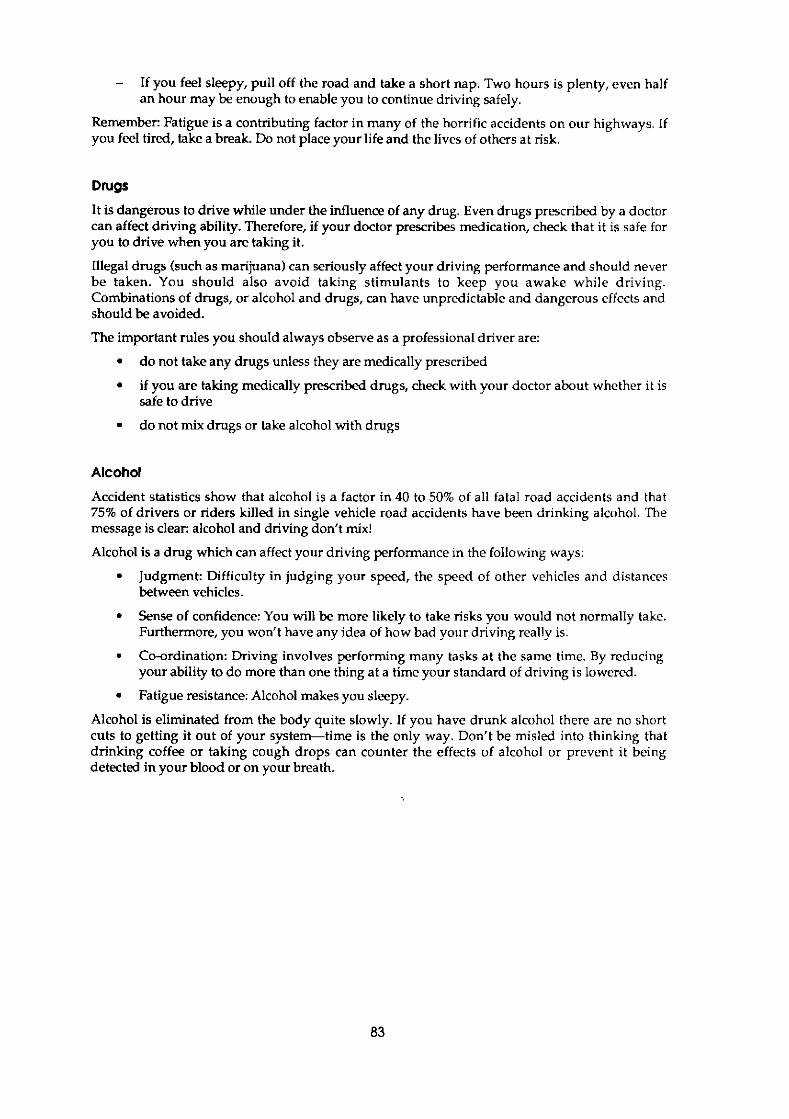
- If you feel sleepy, pull off the road and take a short nap. Two hours is plenty, even half
Remember: Fatigue is a contributing factor in many of the horrific accidents on our highways. If you feel tired, take a break. Do not place your life and the lives of others at risk.
an hour may be enough to enable you to continue driving safely.
DNpS
can affect driving ability. Therefore, if your doctor prescribes medication, check that it is safe for It is dangerous to drive while under the influence of any drug. Even drugs prescribed by a doctor
you to drive when you are taking it.
Illegal drugs (such as marijuana) can seriously affect your driving performance and should never be taken. You should also avoid taking stimulants to keep you awake while driving. Combinations of drugs, or alcohol and drugs, can have unpredictable and dangerous effects and should be avoided.
The important rules you should always observe as a professional driver are:
do not take any drugs unless they are medically prescribed
if you are taking medically prescribed drugs, check with your doctor about whether it is safe to drive
do not mix drugs or take alcohol with drugs
Alcohol Accident statistics show that alcohol is a factor in 40 to 50% of all fatal road accidents and that 75% of drivers or riders killed in single vehicle road accidents have been drinking alcohol. The message is clear: alcohol and driving don’t mix!
Alcohol is a drug which can affect your driving performance in the following ways:
Judgment: Difficulty in judging your speed, the speed of other vehicles and distances between vehicles.
Sense of confidence: You will be more likely to take risks you would not normally take. Furthermore, you won’t have any idea of how bad your driving really is. - Co-ordination: Driving involves performing many tasks at the same time. By reducing your ability to do more than one thing at a time your standard of driving is lowered.
Fatigue resistance: Alcohol makes you sleepy.
Alcohol is eliminated from the body quite slowly. If you have drunk alcohol there are no short cuts to getting it out of your system-time is the only way. Don’t be misled into thinking that drinking coffee or taking cough drops can counter the effects of alcohol or prevent it being detected in your blood or on your breath.
‘Standard Drinks’ all of which contain about the same amount of alcohol Figure 3.1
If 3 of the standard drinks shown in figure 3.1 are consumed on an empty stomach, the Blood Alcohol Concentration (BAC) of an average person is raised to 0.05% in one hour. It takes about three hours for that person’s body to eliminate the alcohol of each standard drink. Thus if the person consumed three drinks, it will be 9 hours before the alcohol has been completely eliminated.
IMPORTANT These figures are given only to illustrate how alcohol is absorbed and eliminated by the body. The actual figure varies from person to person and is dependent on body size, amount of body fat, amount and type of food consumed, the time of day and even the mood of the individual. Particular combinations of these factors could mean that alcohol might have a greater effect on you than for the ’average’ person described.
Warning It is an offence to drive with more than the prescribed concentration of alcohol in your blood.
In some cases it can even be an offence to drive within 24 hours of drinking alcohol regardless of how much you drink (Dangerous Goods Act). The penalties for drink-driving offences are severe and may include loss of licence leading to disqualification from driving in all states and territories in Australia.
The only sure rule for professional drivers is: If you drink, don’t drive, at least until you are certain the alcohol has been eliminated from your system. Depending on how much alcohol you have drunk, the time required to reduce the alcohol in your system to a safe driving level can be up to 12 hours, or even longer in extreme cases.
More detailed information on drinking and driving is readily available from state motoring authorities and associations. It is strongly advised that you obtain and use this information if you plan to become a professional truck driver.
Maximum permissible Blood Alcohol Concentration levels for drivers in the various states and territories are given in Table 4.1 in the section entitled ‘Acts and Regulations’.

Injuries As a truck driver you will frequently be working in situations where your physical safety is at risk. Some of the most common dangers are:
Entering and leaving the driving c a b Always use the steps, foot-holds and grab handles provided. Avoid twisting your back unnecessarily. Climb down from the cab (or trailer deck backwards, never jump down. Minor knee and back injuries are cumulative. They’re called “micro-traumas”. They all add up, and it‘s no joke.
When your truck is parked on the roadside: Always check your mirror before opening the cab door. Beware of passing traffic. If you must check the off side of the truck, always face the oncoming traffic so you don’t get hit from behind. Be especially careful when returning to the cab. Approach your cab door from the front of the truck to minimise exposure time and enable you to face the traffic. Look around the comer of the cab before stepping out on the road because motorists will not see you coming. ( S e e figure 3.2)
Lifting: Always follow safe lifting practices, being especially careful when you are tired. Numerous books and leaflets are available on how to lift objects safely.
Slippery surfaces: Beware of slippery surfaces on the vehicle (load platforms, chassis frame, steps) and around the vehicle (wet or oily surfaces).
Jumping: Do not jump down from your vehicle. Climb down carefully and use steps if provided.
Wheel Changing: If possible, move the vehicle well clear of the roadway to avoid danger from passing traffic. Switch on hazard waming lights and set up waming triangles or lights. If you have a reflective safety vest, wear it. Take extra care when working on the off side of the vehicle. Use the correct jacking and wheel changing procedures in the section called ‘Breakdowns and Accidents’.
I
ADDroach cab door Leave cab by walking towards I horn lront of vehicle. rear of vehcie. -
c
Figure 3.2 Approachlng and leaving a vehicle safely by faclng oncoming traffic
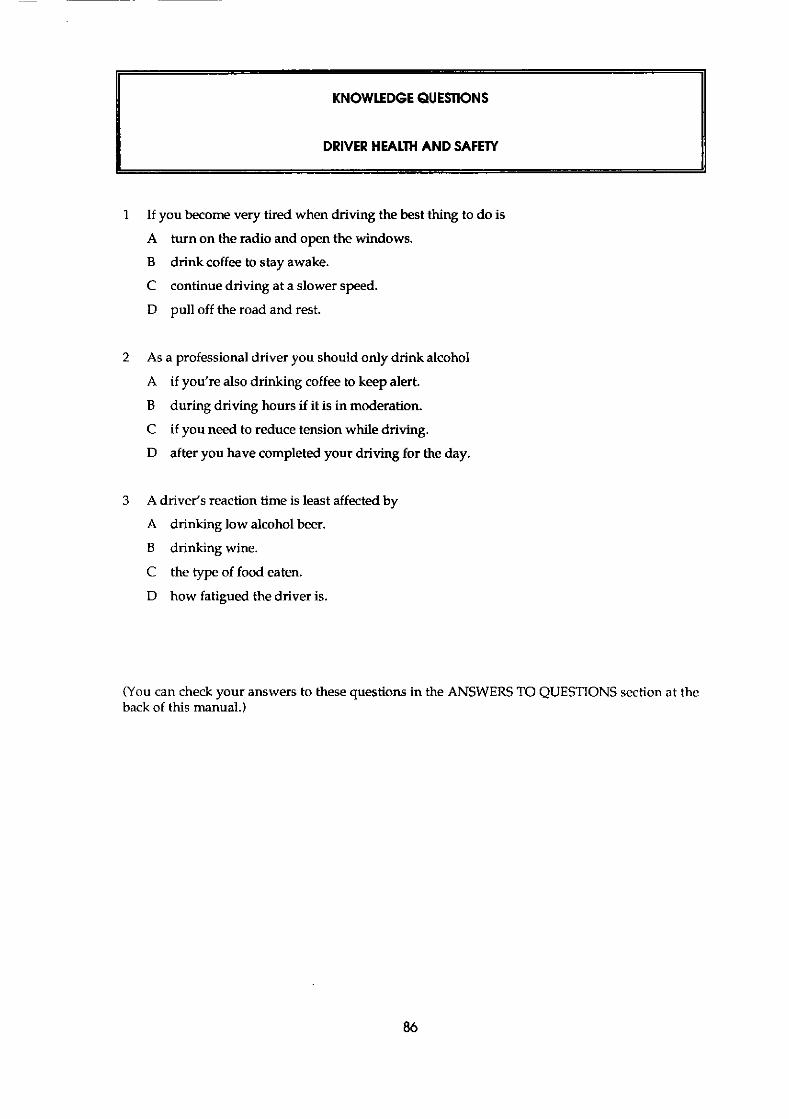
KNOWLEDGE QUESTIONS
DRIVER HEALTH AND SAFETY
1 If you become very tired when driving the best thing to do is
A turn on the radio and open the windows.
B drink coffee to stay awake.
C continue driving at a slower speed.
D pull off the road and rest.
2 As a professional driver you should only drink alcohol
A if you're also drinking coffee to keep alert.
B during driving hours if it is in moderation.
C if you need to reduce tension while driving.
D after you have completed your driving for the day.
3 A driver's reaction time is least affected by
A drinking low alcohol beer.
B drinking wine.
C the type of food eaten.
D how fatigued the driver is.
(You can check your answers to these questions in the ANSWERS TO QUESTIONS section at the back of this manual.)
DEFENSIVE DRIVING
KNOWLEDGE
You must know the principles of defensive driving under all road conditions.
PERFORMANCE:
You must be able to demonstrate the use of defensive driving techniques
CONDITIONS:
Knowledge test : examination conditions Practical test : on-road driving. Some conditions (eg . wet roads) may be simulated in off-road tests.
STANDARDS:
Drivers must pass all the appropriate sections of the knowledge test. During the practical test drivers must show that they drive in a defensive manner under all conditions.
The Professional Driver The majority of other road users you will encounter when driving will be non-professional drivers who will not have had as much training as you.
Courtesy on the road and defensive driving will demonstrate your professionalism and encourage a more tolerant attitude towards truck drivers and the road transport industry.
Defensive Driving - A Definition A defensive driver is one who not only avoids causing accidents, but also avoids becoming involved in accidents caused by other road users.
Defensive drivers know and observe the laws and regulations relating to the road, the vehicles they drive, and the goods they are transporting.
damage that road accidents can cause. The defensive driver is prepared to give way to avoid the Being technically or legally in the right is no compensation for the death, injury or property
possibility of a crash, even if by law, the other motorist is at fault.
The defensive driver minirnises danger and aggravation on the road by driving carefully, systematically and considerately.
07

Superior Observation Skills Defensive driving requires that you develop superior observation skills. To drive safely, you need to know what is happening all around your vehicle.
Failure to observe carefully is a major cause of accidents. Although all drivers look ahead, most don’t look far enough nor do they actively analyse what they see. You should be seeing what is happening at least 12 seconds ahead of your vehicle or you will not be giving yourself sufficient time to take any necessary action.
The superior observation skills you should develop involve scanning, keeping your eyes moving, looking as far ahead as possible, and frequently checking both mirrors. You must know what is happening ahead, to the rear, and on both sides of your vehicle.
Space Cushion Defensive drivers maintain a safe ’space cushion’ all around their vehicle. The space cushion is the distance from your vehicle to the other vehicles around you. This protective space cushion gives you the room to stop, change lanes or take any necessary action without endangering you, your vehicle or other road users.
Space Ahead
- The space ahead is the most important. In good driving conditions your vehicle should be at least 4 seconds behind the vehicle directly in front of you.
Some authorities recommend that you leave 1 second of following interval for every 3 metres of vehicle length. Thus, if your vehicle is 17 metres long, your following interval should be about 6 seconds.
If conditions are poor due to rain, low visibility or a bad road surface, this space should be increased to 8 seconds. If the conditions are very poor it should be increased even further.
Following another vehicle too closely is one of the most common avoidable causes of collisions.
0a
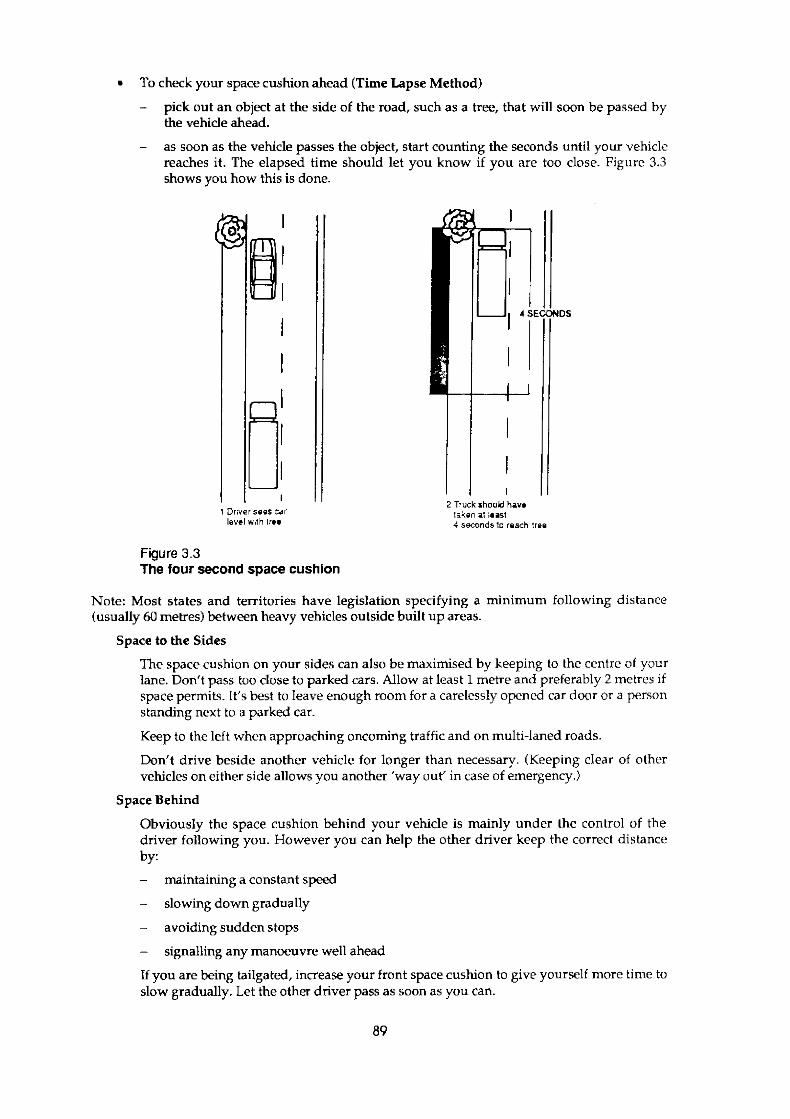
To check your space cushion ahead (Time Lapse Method)
- pick out an object at the side of the road, such as a tree, that will soon be passed by the vehicle ahead.
- as soon as the vehicle passes the object, start counting the seconds until your vehicle reaches it. The elapsed time should let you know if you are too close. Figure 3.3 shows you how this is done.
1 Driver sass c a r level W h Ire.
Figure 3.3 The four second space cushlon
Note: Most states and territories have legislation specifying a minimum following distance (usually 60 metres) between heavy vehicles outside built up areas.
Space to the Sides
The space cushion on your sides can also be maximised by keeping to the centre of your lane. Don't pass too close to parked cars. Allow at least 1 metre and preferably 2 metres if space permits. It's best to leave enough room for a carelessly opened car door or a person standing next to a parked car.
Keep to the left when approaching oncoming traffic and on multi-laned roads.
vehicles on either side allows you another 'way out' in case of emergency.) Don't drive beside another vehicle for longer than necessary. (Keeping clear of other
Space Behind
Obviously the space cushion behind your vehicle is mainly under the control of the driver following you. However you can help the other driver keep the correct distance by:
- maintaining a constant speed
- slowing down gradually
- avoiding sudden stops
- signalling any manoeuvre well ahead
If you are being tailgated, increase your front space cushion to give yourself more time to slow gradually. Let the other driver pass as soon as you can.
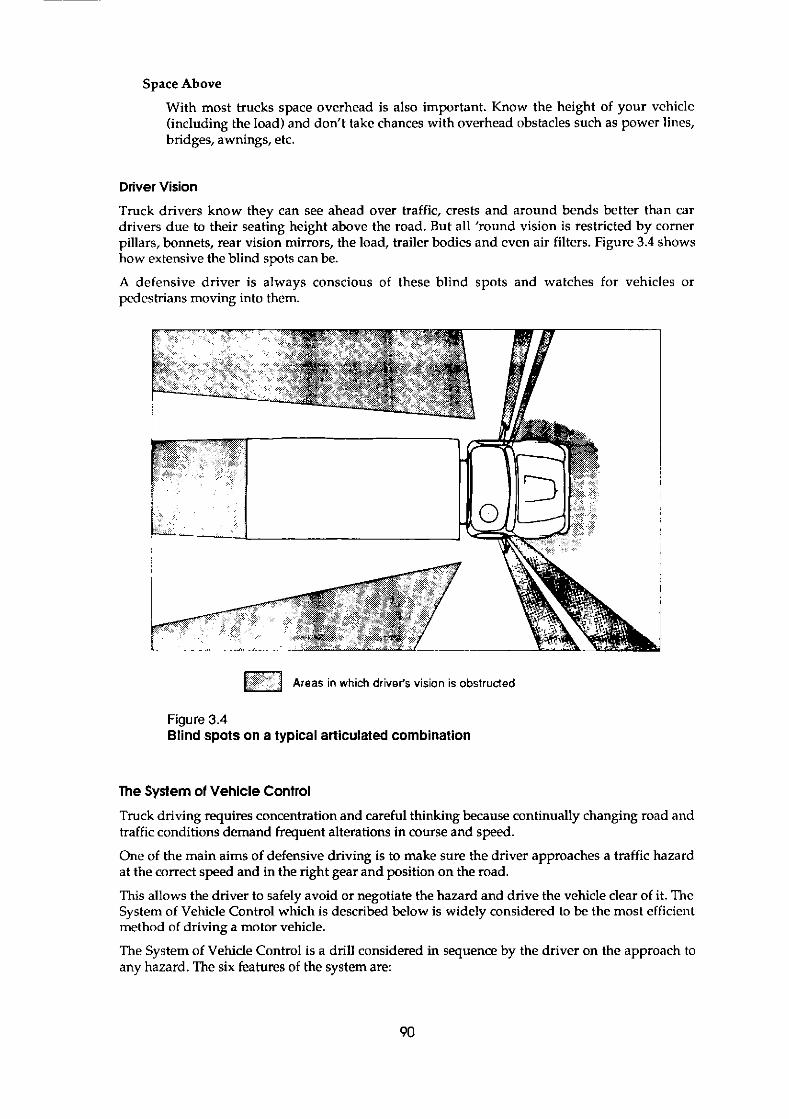
Space Above
With most trucks space overhead is also important. Know the height of your vehicle (including the load) and don't takc chances with overhead obstacles such as power lines, bridges, awnings, etc.
Driver Vision Truck drivers know they can see ahead over traffic, crests and around bends better than car drivers due to their seating height above the road. But all 'round vision is restricted by corner pillars, bonnets, rear vision mirrors, the load, trailer bodies and even air filters. Figure 3.4 shows how extensive the blind spots can be.
A defensive driver is always conscious of these blind spots and watches for vehicles or pedestrians moving into them.
Areas in which driver's vision is obslructed
Figure 3.4 Blind spots on a typical atticulated combination
The Sysfem of Vehicle Control Truck driving requires concentration and careful thinking because continually changing road and traffic conditions demand frequent alterations in course and speed.
One of the main aims of defensive driving is to make sure the driver approaches a traffic hazard at the correct speed and in the right gear and position on the road.
This allows the driver to safely avoid or negotiate the hazard and drive the vehicle clear of it. The System of Vehicle Control which is described below is widely considered to be the most efficient method of driving a motor vehicle.
The System of Vehicle Control is a drill considered in sequence by the driver on the approach to any hazard. The six features of the system are:
90
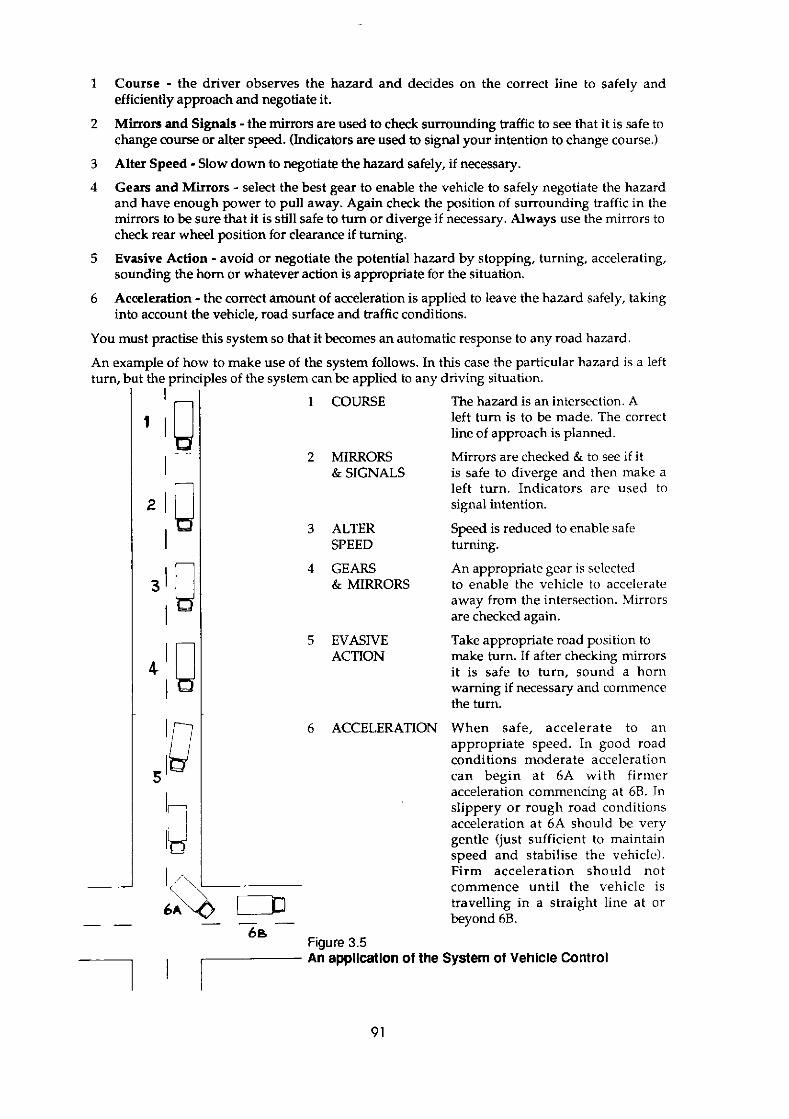
efficiently approach and negotiate it. Course - the driver observes the hazard and decides on the correct line to safely and
Mirrors and Signals -the mirrors are used to check surrounding haffic to see that it is safe to change course or alter speed. (Indicators are used to signal your intention to change course.)
Alter Speed - Slow down to negotiate the hazard safely, if necessary.
Gears and Mirrors - select the best gear to enable the vehicle to safely negotiate the hazard and have enough power to pull away. Again check the position of surrounding traffic in the mirrors to be sure that it is still safe to turn or diverge if necessary. Always use the mirrors to check rear wheel position for clearance if turning.
Evasive Action - avoid or negotiate the potential hazard by stopping, turning, accelerating, sounding the horn or whatever action is appropriate for the situation.
Acceleration - the correct amount of acceleration is applied to leave the hazard safely, taking into account the vehicle, road surface and haffic conditions.
You must practise this system so that it becomes an automatic response to any road hazard
An e turn,
'xan ,but
"
lple of hc : the prinl
I
IB I
2
3
4 1 a I =
to make use of the system follows. In this case the particular hazard is a left e5 of the system canbe applied to any driving situation.
1 COURSE The hazard is an intersection. A left turn is to be made. The correct line of approach is planned.
2 MIRRORS & SIGNALS
Mirrors are checked & to see if it is safe to diverge and then make a left turn. Indicators are used to signal intention.
3 ALTER Speed is reduced to enable safe SPEED turning.
4 GEARS An appropriate gear is selected & MIRRORS
away from the intersection. Mirrors to enable the vehicle to accelerate
are checked again.
5 EVASNE ACTION
Take appropriate road position to make turn. If after checking mirrors i t is safe to turn, sound a horn warning if necessary and commence the turn.
6 ACCELERATION When safe, accelerate to an appropriate speed. In good road conditions moderate acceleration can begin at 6A with firmer acceleration commencing at 6B. In slippery or rough road conditions acceleration a t 6A should be very gentle (just sufficient to maintain speed and stabilise the vehicle). Firm acceleration should not commence until the vehicle is travelling in a straight line at or
' I D "- beyond 6B. 4& Fiqure 3.5
7 ' : A i appllcatlon of the System of Vehlcle Control
91
Night Driving To’be able to see clearly and observe carefully while driving at night, you require a clean windscreen. The dazzle from oncoming vehicles through a dirty windscreen makes it very difficult to see. Having a dirty windscreen strains your eyes and can bring on fatigue.
You should clean the windscreen inside and out and make certain that washers and wipers are in good condition. Don’t forget to clean your mirrors.
Your lights must be in good condition, clean, and adjusted properly.
Dazzle is a constant problem with night driving. Don’t look directly at the lights of oncoming vehicles but look instead at the left side of the road ahead. If oncoming drivers fail to dip their lights, resist the temptation to ”get even.” Switching your lights to high beam only increases the chances of a collision. Two blinded drivers are more dangerous than one.
Do the right thing by dipping your lights for oncoming drivers and for drivers you are following.
Always drive within your headlight beam & that you are able to safely stop within the distance you can clearly see.
Remember also that headlights often leave the sides of the road poorly lit.
When driving at night there is an increased risk of fatigue due to the natural inclination of the body to ’shut down’ in response to its biological rhythms. This risk is greatest in the early hours of the morning. Beware also of ’highway hypnosis’ in which the constant repetition of the white or yellow lines induces a trance-like state leaving the driver effectively asleep at the wheel with his/her eyes open.
Wet Road Conditions
Wet roads reduce tyre grip and make it far more likely that your vehicle will slide when cornering, lock the wheels when braking, or spin the wheels when accelerating-any one of which can result in an accident.
Driving on wet roads requires that you drive at a speed that gives you room to brake gradually to a stop within the distance you can see, no matter what the posted speed limit is.
Your vehicle will take much longer to stop or slow down so allow yourself more room by increasing your space cushion to at least 8 seconds.
Your cornering speed also must be reduced to prevent skidding. Accelerate more gently. Make sure your vehicle is straight before accelerating or braking. Accelerate and brake carefully to avoid wheel spin or skidding.
Always check that your brakes are operating effectively after negotiating deep water such as a ford or creek crossing.
The defensive driver always takes account of road conditions and surroundings and never loses control of the vehicle.
92
KNOWLEDGE QUESTIONS
DEFENSIVE DRIVING
1 When other vehicles are required to give way to you at an intersection you should
A always offer to give way to other trucks.
B signal all other drivers to see if they want to go first.
C give way to any other drivers who look as though they will not give way.
D always take right of way so as not to confuse the other drivers.
2 Which one of the following most closely matches the recommended sequence of actions in the ”System of Vehicle Control” method of approaching a hazard?
A Course -> brake -> mirror -> signal -> gear -> mirror -> accelerate.
B Course -> gear -> signal -> brake -> mirror -> accelerate.
C Course -> mirror -> signal -> brake -> gear -> accelerate.
D Course -> signal -> brake -> mirror -> gear -> accelerate.
3 To maintain a safe ‘space cushion’ around your truck on an open road in good driving conditions, the recommended minimum distance betu.een your vehicle and the one in front is the distance you travel in
A 60 seconds.
B 12 seconds.
C 8 seconds.
D 4 seconds.
4 If you are dazzled by the lights of oncoming vehicles you should
A look slightly to the left of the road ahead rather than directly at the oncoming vehicles.
B look to a point about 12 metres above the oncoming vehicle.
C wear lightly tinted sunglasses.
D switch your lights to high beam to counteract the dazzle.
93

5 Where your visibility is limited due to rain or fog, you should
A follow the vehicle in front more closely than normal so as to keep it in sight
B drive in the right hand rather than left hand lane, if possible, to allow extra clearance for cyclists and pedestrians.
C use your high beam headlights for clearer vision,
D slow down so, if you need to, you can stop within the distance you can see clearly ahead.
(You can check your answers to these questions in the ANSWERS TO QUESTIONS section at the back of this manual.)
94

KNOWLEDGE
You must know the procedures to adopt when your vehicle breaks down or when you are involved in, or come upon an accident.
PERFO-CE
You must be able to carry out the correct procedures in the event of a breakdown or an accident.
CONDITIONS
Knowledge test : examination conditions Practical test: not tested.
STANDARDS
Drivers must pass in the appropriate sections of the knowledge test.
Breakdowns Broken-down vehicles are a hazard to the safety of other road users. They are more dangerous when the vehicle is hard to see due to darkness, weather, or location (like just over the crest of a hill.)
If your vehicle breaks down or becomes unsafe to drive you should:
9 park i t off the road, if possible
switch on your four-way flashers (hazard warning lights)
place reflectors or other warning devices at appropriate places, as required by state regulations
if help is needed, it is best to send someone else for assistance and remain with your vehicle. However if this is not possible, make sure your vehicle and its load are secure before you leave and do not leave it unattended for longer than is absolutely necessary.
Accidents Human error is by far the most common cause of accidents.
When an accident occurs those involved may be distressed, confused or angry. This turmoil may create additional danger and lead to further accidents.
Professional drivers spend much more time on the road than normal motorists and are thus more likely to come upon the scene of an accident. You as a professional should be prepared and able to provide help. Being calm and able to offer the appropriate assistance could save a life, or a t least minimise the danger and inconvenience to those directly involved, and other road users.
95
You should know and understand the state regulations concerning correct accident procedures (including dangerous goods regulations). The essential procedures to bc followed in any accident are:
1 Stop immediately and turn off the engine
2 Switch on your hazard warning lights
3 Provide urgent assistance to the injured k g . remove them from a vehicle on fire)
NOTE: W NOT move injured persons unless they are in immediate danger k g . leaking petrol, risk of being hit by passing traffic) or they are unconscious and need to be placed in the coma position.
4 Place warning devices at appropriate locations to prevent another accident.
5 Seek medical help (use CB radio, ask passing motorists, ask nearby residents, or use a telephone).
6 Continue to assist the injured until help comes and, if required, after emergency services arrive.
7 If transporting dangerous goods, carry out emergency procedures. (This may have to be done earlier if a dangerous situation exists.)
8 Take details of the accident including:
names and addresses of any drivers, passengers, pedestrians, etc
names and addresses of witnesses
other drivers' licence numbers and the registration numbers of other vehicles involved, plus any information which could help identify the owners of those vehicles
names and identification numbers of police at the scene or to whom theaccident has been reported
time, place, weather conditions, speeds, damage etc
You should also be prepared to give the other drivers similar information about your own vehicle and driving licence.
9 If police do not attend, you should report the accident to them as soon as practicable and in any case, within 24 hours.
10 Report the accident to your employer and your insurance company.
Remember professional truck drivers are on the road far more than most other drivers and as a result are likely to witness more accidents. Your assistance could save lives.
BECOME TRAINED IN FIRST AID
(WHAT YOU LEARN COLJD SAVE A LIFE)
First aid courses are conducted by Ambulance authorities in some states
St. John Ambulance Association
AustralianRed Cross Society
Wheel Changing Changing a wheel is one of the less pleasant tasks a truck driver must perform. In many cases i t becomes necessary in difficult or uncomfortable conditions (on the roadside, in hot or rainy weather or at night, for example).
For your own safety and others safety, the following procedure should be observed when changing wheels.
Do not attempt to change a wheel in a dangerous situation. Other road users must be able to see your vehicle clearly as they approach and you must be protccted from passing traffic.
Drive your vehicle, on a flat tyre if necessary, until you can stop in a safe place. The place you select for wheel changing should also be level and firm cnough to allow the jack to be used safely.
If you do stop on or near the road, place your warning devices (reflective triangles or portable lamps) in position on the road and sw-itch on your hazard warning lights.
Apply the parking brake and place chocks in front of, and behind the wheels on any axle other than the one you will be jacking.
Crack (loosen) the wheel nuts (no more than one turn) before you jack the vehicle. Place the jack on a firm surface (using timber to support i t i f necessary) and jack the vehicle high enough to allow the replacement wheel to be fitted without furthcr jacking.
* If possible, place a safety stand under the vehicle.
97

When refitting a wheel, tighten the wheel nuts in a diagonal sequence (SO that YOU do not move from one nut to the one next to it). Following a diagonal sequence helps ensure the wheel will run true. (Refer Figure 3.6)
0 0 0 @ @ I
0 0 @ @ @ 0
0 0 0 0 0 0 @ @ @
0
Typlcal wheel nut tightening sequences Figure 3.6
Fully tighten all wheel nuts after the jack has been lowered and the wheel is on the ground.
the check after another 50 km if any problem was found. Re-check the wheel for movement of the rim and tightness of the nuts after 50 km. Repcat
90
I I KNOWLEDGE QUESTIONS
BREAKDOWNS AND ACCIDENTS
1 If your vehicle is in an unsafe condition as a result of damage or accident you should
A drive i t slowly to the nearest service station by the most direct route.
B not drive it until repairs have been made.
C note the problem in the log book and drive it slowly to the nearest service station.
D drive i t slowly to the nearest service station keeping off main roads as much as possible.
2 If you are involved in a serious road accident, which one of the following should you do first after stopping your vehicle?
A Assist the injured.
B Obtain names and addresses of witnesses.
C Check for leaking fuel.
D Record details of the accident.
3 When parking your disabled vehicle on the shoulder of the road it is most important that you should
A place the transmission in high gear.
B turn on your 'hazard warning lights'.
C stay inside the vehicle until help arrives.
D leave the engine running while you go for help.
(You can check your answers to these questions in the ANSWERS TO QUESTIONS section at the back of this manual.)
~~ ~~ ~~ ~ ~~~~~ ~ ~~ ~~
EMERGENCY PROCEDURES
KNOWLEDGE
You must know the causes of emergencies and the appropriate things to do in cases of emergency. You must also know the regulations that apply to the transport of dangerous goods.
PERFORMANCE:
You must be able to demonstrate an understanding of the procedures and techniques to be used in emergency situations.
CONDITIONS:
Knowledge test : examination conditions Practical test : not tested.
STANDARDS
You must pass the appropriate section of the knowledge test.
Emergencies
As a professional driver you are bound to face an emergency at some stage in your driving career. This could be a problem with a load of dangerous goods, skidding, brake failure, tyre failure or even a fire.
You can drastically reduce the likelihood of such emergencies by:
driving defensively so that you are always in control of your vehicle
making certain, before every journey, that your vehicle is well maintained and in a safe condition
knowing what cargo you are carrying and what to do with it if there is a problem.
Even if you take precautions, you may still be required to deal with any of the following situations during your driving:
Skidding
Rigid trucks behave much like cars when they start to skid but the first warning a semi-trailer or trailer gives could well be seeing it sideways in the rear view mirror.
Most truck skids are due to poor driving techniques like excessive speed, severe braking, coarse steering or harsh acceleration and a defensive driver is unlikely to encounter one except in unusual circumstances (eg. resulting from tyre failure on a bend).
Avoiding a skid is better than doing a save but every driver needs to be aware of the diffcrent types of skids and how to control them.
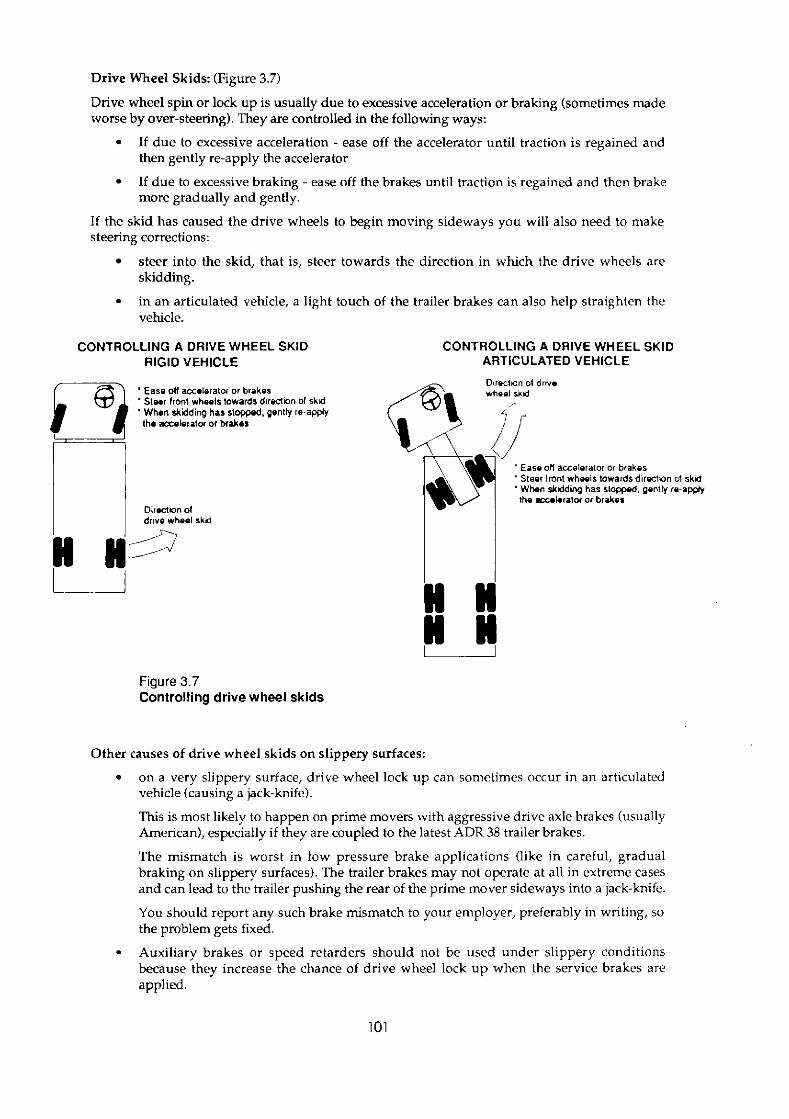
Drive Wheel Skids: (Figure 3.7)
Drive wheel spin or lock up is usually due to excessive acceleration or braking (sometimes made worse by over-steering). They are controlled in the following ways:
If due to excessive acceleration - ease off the accelerator until traction is regained and then gently re-apply the accelerator
If due to excessive braking - ease off the brakes until traction is regained and then brake more gradually and gently.
If the skid has caused the drive wheels to begin moving sideways you will also need to make steering corrections:
steer into the skid, that is, steer towards the direction in which the drive wheels are skidding. - in an articulated vehicle, a light touch of the trailer brakes can also help straighten the vehicle.
-1 I I
0ir.ctan 01 drwo wheel rkd
CONTROLLING A DRIVE WHEEL SKID ARTICULATED VEHICLE
Figure 3.7 Controlling drive wheel sklds
Other causes of drive wheel skids on slippery surfaces:
on a very slippery surface, drive wheel lock up can sometimes occur in an articulated vehicle (causing a jack-knife).
This is most likely to happen on prime movers with aggressive drive axle brakes (usually American), nptcially if they are coupled to the latest ADR 38 trailer brakes.
The mismatch is worst in low pressure brake applications (like in careful, gradual braking on slippery surfaces). The trailer brakes may not operate at all in extreme cases and can lead to the trailer pushing the rear of the prime mover sideways into a jack-knife.
You should report any such brake mismatch to your employer, preferably in writing, so the problem gets fixed. - Auxiliary brakes or speed retarders should not be used under slippery conditions because they increase the chance of drive wheel lock u p when the service brakes are applied.
101

Front Wheel Skids: (Figure 3.8)
This type of skid is more likely to occur when your vehicle is incorrectly loaded and thcrc is insufficient weight on the front wheels. It is also commonly caused by coarse steering and driving too fast.
The correct reaction to a front wheel skid during acceleration is:
ease off the accelerator - straighten the front wheels
use brakes to slow or completely stop the vehicle
when skidding has stopped, start off again if safe to do so, this time accelerating and steering as gently as possible
The correct reaction to a front wheel skid during braking is:
ease off the brakes.
straighten the front wheels.
when skidding has stopped reapply the brakes more gently. Easy does it.
Direction of front wheel skid
If during aceeleration: * Ease off accelerator * Straighten front wheels * Use brakes to slow or stop the vehicle * When skidding has stopped, re commence acceleration and steering more gently
' Ease OH brakes II during braking:
* Straighten front wheels *When skidding has stopped, re commence braking and steering more gently
Figure 3.8 Controlling a front wheel skid
102

All Wheel Skids
road surface. This type of skid is normally caused by excessive speed, harsh or sudden braking, or a slippery
To correct an all wheel skid, release the brakes until the wheels turn without skidding, then resume braking more gently.
An all wheel skid is best avoided by commencing braking early on the approach to a hazard so as to allow the vehicle to be braked more gently while still travelling in a straight line.
Trailer Skids: (Figure 3.9)
Trailer skids are more likely to occur when the trailer is empty, lightly loaded, or loaded incorrectly. They are usually the result of excessive speed or over-braking and are very difficult to detect because no sensation of skidding is felt by the driver until the skid is well developed.
The correct reaction to a trailer skid is to:
ease off the brakes until traction is regained. If it is safe to do so, a slight tap on the accelerator may help to pull the trailer back in line with the prime mover
check the setting of the trailer brake proportioning valve (if f i t ted) after control has becn regained
l r a h wheel lrwlmn Release brakes Io regaln
Lghlly lap acderalw , , , , itsalo~odoso
Figure 3.9 Controlllng a trailer wheel skid.
Evasive Steering As a defensive driver you should keep both hands on the steering wheel as much as possible. A steering movement should be controlled and if a quick turn is to be made safely you must:
not use the brakes as this increases the chances of skidding
only turn the required amount, the quicker and sharper you turn, the greater the chances of skidding or rolling over
be prepared to turn the wheel back to counter the effects of resonance roll and ‘live’ loads and thus prevent the vehicle overturning
Brake Failure
Properly maintained brakes rarely fail. When they do, it is usually because of poor maintenance standards or incorrect use.
Loss o f Air Pressure Loss of air pressure can be caused by air leaks or over-use of the brakes. A warning light or buzzer will indicate low air pressure. When this occurs, stop as quickly as you can by:
Shifting down gears and using the engine to slow the vehicle. This will also force the air compressor to work harder thus increasing air to the system.
When the vehicle is going slowly enough, apply the brakes to make use of whatever air pressure is available. When the air supply drops drastically, the spring brakes on many vehicles will automatically stop the vehicle. This is likely to lock the wheels and you should be prepared to make suitable steering corrections.
If safe, try to be in the emergency lane or at the roadside when the vehicle comes to a stop.
Loss o f Hydraulic Pressure
do not have an emergency braking system. To cope with loss of hydraulic pressure you should: Loss of hydraulic pressure can be even more serious because vehicles with hydraulic brakes often
try pumping the brakes to build up some hydraulic pressure
shift down gears using the engine to slow the vehicle
use the exhaust brake which can be quite effective, especially at high engine revs on light and medium trucks
use the emergency or parking brake. Be sure however, to hold the release button down so that you can control the brake pressure and avoid locking the wheels.
(Note: Most transmission mounted parking brakes are designed to be either fully on, or off. If fully applied in an emergency they may lock up the drive shaft, possibly causing damage to the drive train. If more gently applied they may rapidly overheat and become useless due to brake fade. If the other measures are slowing the truck sufficiently after a loss of hydraulic pressure, apply the parking brake last at as low a speed as possible.)
Do not move the truck again until hydraulic pressure is restored.
1 0 4
Brake Failure on Hills Long downhill grades should be approached with caution. Before commencing a descent you should always be:
in the correct gear
at the correct speed.
If using an auxiliary brake or speed retarder, select a gear so that you are only partially relying on the auxiliary brake to control vehicle speed. This allows you to keep extra retardation in reserve for an emergency.
These precautions will avoid the need to ride the brakes which can lead to overheating and brake failure.
If the brakes fail completely while descending a hill and you cannot control your speed by down shifting, you should attempt to stop the vehicle before it gains more speedeven if i t means damaging the vehicle.
This may mean running off the road into s o f t ground, using hedges, fences, guard rails and light scrub (but not large trees) to slow and stop the vehicle.
Try to sideswipe whatever you are using to slow the truck down instead of going head on into it which is more dangerous for you and damaging for the truck.
Do not try to 'ride out' a brake failure unless you can quite clearly see a safe way of slowing and stopping the vehicle (e.g. a straight road with an uphill gradient ahead and no traffic).
If you regularly use the same route, become familiar with the locations of safety ramps and other avenues of escape when descending hills.
Missed Gear Shift
There are some instances when a missed gear shift can be dangerous. If the gear you wish to engage is necessary to control the vehicle speed (e.g. preparing to descend a hill) and you cannot engage it after two attempts - USE THE BRAKES TO STOP THE VEHICLE. THEN MOVE OFF AGAIN FROM REST. Do not allow the vehicle to continue coasting while you struggle with the gears.
If a missed downshift is not necessary for control of vehicle speed k g . on a flat road), re-engage a higher gear and begin the downshift again.
leaving the Road While driving a truck you will sometimes need to move off the bitumen and onto the road shoulder, especially when passing oncoming traffic on narrow roads or highways.
Most road shoulders can safely support a heavy vehicle when they are dry but you should be especially careful when they are wet.
WARNING: There are tens of thousands of kilometres of roads in Australia where you
a hint from the depth of the tyre marks left by previous vehicles which have pulled over. can go in up to your hubs within two metres of the bitumen in the wet. You can often get
If your nearside front wheel starts to dig in and the steering wheel pulls hard left as you come off the bitumen, pull back onto the roadway while you still have momentum up, if possible.
105

Slow down to reduce the chance of throwing stones at passing traffic and to help keep control while your wheels are in the dirt.
Be especially watchful for any sideways jump as your nearside wheels drop off the bitumen and try to pick a place where the shoulder is the same height as the road.
When passing on narrow roads, try to keep the offside wheels on the bitumen to aid steering, traction and ride.
WARNING: IT IS CUSTOMARY IN ROADTRAIN COUNTRY THAT RIGID TRUCKS OR SEMIS WILL PULL COMPLETELY OFF THE ROAD TO LET ROAD TRAINS BY ON A NARROW BLACKTOP, ESPECIALLY FOR TRIPLES OR STOCK CRATES. FURTHER,
STOCK CRATES, AND DOUBLES GO OFF FOR TRIPLES. THE REASONS SHOULD BE EMPTY TRUCKS GO OFF FOR LOADED ONES, GENERAL FREIGHT GOES OFF FOR
OBVIOUS.
~~~
Avoid heavy braking while one or both sets of tyres are in the dirt
After passing the oncoming traffic, pick a place where the shoulder is close to the same height as the roadway and move back onto the bitumen being careful of any sideways jump.
If you are pulling completely off the road, brake as much as possible on the bitumen as the shoulder is likely to have a loose surface. After leaving the roadway, avoid heavy braking and harsh steering and be prepared for the possibility of skidding.
lyre Failure A front tyre failure on a truck can be quite serious. The steering wheel may be wrenched from the driver's hands and steering control may be lost.
Failure of a drive wheel tyre or trailer tyre on the other hand is usually much less dangerous and may even go unnoticed by drivers.
The following rules will help you prevent a tyre failure. The same procedures can be used to detect punctures or blow-outs.
Visually check your tyres whenever you stop your truck for a break.
Keep a close watch on your tyres in the rear vision mirrors as you drive.
If the steering feels unusually 'heavy' or pulls to one side, stop and check your tyres- especially the front ones.
An unusual vibration or rattling sound may be the only sign of a rear tyre failure. (The vibration is caused by the flat tyre twisting on the rim or disintegrating; the rattle is caused by the loose rim parts.)
If you hear a loud 'bang' which you cannot account for, stop and check all tyres for a blowout.
If a tyre failure occurs you should:
keep a firm grip on the steering wheel.
avoid braking, if possible, until the vehicle has slowed down. If you need to brake, do so gently to avoid skidding.
steer the vehicle carefully and smoothly.
1 0 6
Fires
you should: Fires are often the result of carelessness with the vehicle or its load. To minimise the risk of fires
make regular checks of the vehicle during the trip. Check wheels, tyres and the vehicle body for signs of heat
follow prescribed vehicle operating procedures
check the instruments and mirrors as part of your regular scanning routine
follow recommended procedures when handling flammable goods
In the event of a fire you should
stop the vehicle well away from anything else that may burn such as long grass, petrol stations, and buildings
notify the emergency services via your CB radio or by asking other road users to contact the services
use the correct fire extinguisher. Reading the instructions when you have a fire is too late. Know your equipment and how to use it
if the trailer is on fire, uncouple the prime mover if safe to do so and move i t away
9 if the engine compartment is on fire, turn off the engine. Do not lift the bonnet more than is necessary to fight the fire because the increased air flow could make thc fire flare. If possible, leave the bonnet closed to reduce air flow to the fire and direct extinguishers from underneath or through louvres or the radiator. Be particularly careful with petrol engines.
if the fire is in a closed van or container, open the doors slowly and only far enough to direct water or extinguishers onto the blaze
if a tyre is smouldering or on fire, try to extinguish it with water or a foam extinguisher. Shovelling sand or dirt onto it may help smother the flames if nothing else is available. If a smouldering tyre cannot be extinguished, it may be possible to remove i t from the vehicle.
In some circumstances a tyre fire on a drive wheel or trailer wheel can be prevented from spreading to the vehicle by continuing to drive at a safe speed (e.g. 30 kmh) along the road until the tyre has disintegrated and been thrown from the rim.
The airflow past the burning tyre will keep the flames away from the load and help cool the adjacent tyres.
You should only resort to this method on an open road where there is little traffic and a low risk of starting roadside grass fires.
107
Dangerous Goods If your vehicle is involved in an accident or breaks down while carrying dangerous goods you should:
switch on the hazard warning lights (if batterydoes not need to be disconnected)
set out reflective warning signs
warn any people who may be at risk
follow the instructions given in the Emergency Procedures Guide which should be in a pocket on the inside of the driver's door
notify the police, fire brigade and any other necessary emergency service
provide assistance and information to the emergency services
inform the prime contractor (the person or company for whom you are transporting the goods) what has happened.
108
Safe Driving Practices: A Summary
.
.
.
.
.
.
.
.
.
.
.
Speed should never be greater than the traffic laws permit. Your driving speed should also take road, traffic and weather conditions into account.
Always be prepared to yield to other drivers, even where the rules state that they should yield. Never use the size of your vehicle to force another driver to give way.
Keep to the left except when overtaking slow-moving vehicles or when moving into psition to make a right turn.
Don't follow other heaw vehicles too closely. Leave enough space between you and the heavy vehicle ahead so that faster traffic can pass you and move back into the left lane.
Overtaking should onlybe attempted when the manoeuvre can be accomplished with absolute safety for all vehicles involved.
Use indicators to signal your intention to change lanes when overtaking
Never be impatient to overtake a vehicle which is travelling slowly or erratically. The driver may be lost and looking for directions or be in some sort of difficulty. When you are about to overtake, give the driver plenty of warning by sounding your horn or a quick flash of the headlights.
Never attempt to overtake when approaching the top of a hill, curve, intersection, side road, bridge, railroad crossing or any other place where you do not have a clear view of the road ahead or where you cannot see traffic approaching from a side road.
When being overtaken, you should keep well to the left. If necessary, reduce speed to enable the other driver to pass you quickly. Never speed up to prevent another driver from overtaking.
At night, dip your lights after being overtaken to avoid creating unnecessary glare in the other driver's mirror.
Curves and turns should be taken a t reduced speed taking into account the distance you can see ahead, the sharpness of the curve and traffic conditions at the time.
109

Safe Driving Practices: A Summary (continued)
Always signal your intention to turn. Check traffic conditions before and during the turn.
Watch for the ’cut-in’ of the rear wheels on a turn, especially on long wheel base or articulated vehicles.
Plan your route so that your need for reversing is minimised. Never reverse into traffic if you can avoid it.
Inspect the area you are about to reverse into before you begin the manoeuvre
Be aware of your vehicle’s height. Watch your clearance under trees, road signs,
clearances and alternative routes for high vehicles. traffic signals, underpasses. Keep a look-out for signs specifying overhead
- Keep exhaust noise to a minimum in residential areas, school zones, hospital zones and small towns. This can be done by keeping engine revs down and avoiding the use of engine and exhaust brakes.
110
KNOWLEDGE QUESTIONS
EMERGENCY PROCEDURES
1 Which of the following is INCORRECT?
Drive wheel skids
A may be caused by harsh acceleration.
B may be caused by harsh braking.
C may lead to jack-knifing.
D are controlled by steering away from the direction the vehicle is skidding
2 If your air pressure warning device sounds while you are driving an articulated vehicle or trailer combination, you should
A pump the brakes to restore the pressure.
B place the tractor protection valve in the 'emergency' position.
C shift to neutral and coast until pressure builds up.
D try to stop before the spring brakes apply themselves.
3 When a truck fire occurs, all of the following are true EXCEPT one, which one?
A It is often the result of driver carelessness.
B It may be caused by tyre failure.
C You should never try to separate the prime mover from its trailer.
D The bonnet should not be lifted to fight an engine fire unless absolutely necessary
back of this manual.) (You can check your answers to these questions on the ANSWERS TO QUESTIONS section at the
1 1 1

ACTS AND REGULATIONS ROAD LAWS
KNOWLEDGE
You must know and understand the road laws as they apply to the vehicle that you drive.
PERFORMANCE
You must demonstrate that you can apply your knowledge of the road laws when driving.
CONDITIONS:
Practical test : demonstrate ability to apply road laws during on-road practical test. Knowledge test : examination conditions.
STANDARDS:
You must gain a perfect score for these sections of the knowledge and practical tests that are considered essential. You must gain a pass in the remainder.
Applicalion of Road Laws This manual does not provide detailed information on road laws. That should be contained in State Road Codes and the books produced in each state for those studying for their driver's licence.
The laws are almost the same for all classes of driver. Some of the differences which do exist are explained below.
Remember that road laws are constantly being revised and the latest versions may be obtained from state trafficauthorities.
Giving Way
Knowledge of Give Way rules is essential to your safety and the safety of others.
It is the duty of all drivers to avoid collisions and where necessary to give way to other drivers and pedestrians.
THE LAW DOES NOT GIVE ANYONE INDISPUTABLE 'RIGHT OF WAY' Make sure the other driver is going to yield to you before proceeding: there may be circumstances when the other driver is unaware of your approach or unable to give way.
To 'give way' means that if there is a reasonable likelihood of a collision you must slow down, or stop if necessary, and allow the other driver or pedestrian to proceed safely.
The Give Way rules need to be known for the following situations:
at intersections
at stop signs - at give way signs
112

at 'T junctions
when 'V turning
when about to turn right
at cross-overs on divided roads
at Turn Left Anytime With Care' signs
with trains or trams
from private driveways
when leaving a parking space
when changing lanes
at pedestrian crossings
at school crossings.
Note: Motorists should stop for stationary trams except when they are at safety zones where passengers are protected from passing traffic, or when they are waved past by a uniformed tramway employee or police officer. Motorists may also proceed past at 5 kmh when a tram is standing at a terminus.
Speed Limits A uniform national truck speed limit of 100 kmh was agreed to by the States and came into effect in 1988, except for the Northern Territory where there is no truck speed limit.
The 100 kmh law recognises that it is safest to have all traffic moving at about the same speed because that reduces the need for overtaking.
But New South Wales introduced some truck speed restrictions following several accidents involving heavy vehicles.
An 80 kmh maximum geared road speed is compulsory for road trains Australia-wide.
There are also signed truck speed limits in designated areas where there are special conditions like long downgrades.
Exceeding speed limits risks a fine and accumulation of demerit points which can lead to loss of licence and thus loss of livelihood.
Professional truck drivers are not entitled to any special privileges and should, in fact, be setting an example for the amateurs.
It has been a long time since the days of the 80 kmh truck speed limit which was largely ignored, even by the Police. The current laws are basically reasonable and should be followed.
It i s not worth the risk of trying to beat the system by means of CB radio, radar detectors or jammers (which, incidentally, are only of limited effectiveness).
113

level Crossings Special restrictions apply to some vehicles approaching level railway crossings which are not equipped with warning devices, gates or barriers. Buses, fuel tankers and trucks carrying dangerous goods must stop at these unguarded level crossings and make sure there are no trains coming.
Do not change gears while driving across the railway line after stopping. This reduces the chance of your vehicle stalling or breaking down on the tracks.
Seat Belts If a seat belt is fitted to your vehicle you should wear it whenever you are driving.
Most State seat belt regulations do not apply to heavy vehicles but many unrestrained truck drivers suffer injuries being flung about inside the cabin during accidents.
In some states there are also limited exemptions for delivery drivers who frequently enter and leave vehicles and who travel at low speeds.
Alcohol and Drugs The best advice is not to drive if you have been drinking or taking drugs. Remember-some combinations of alcohol and drugs (including those prescribed by your doctor) can seriously affect your ability to drive even if both are taken within normally 'safe' or prescribed limits.
If you are taking a drug prescribed by a doctor you should ask him if i t can affect your driving ability and if there is any additional risk drinking alcohol while taking the drug. It is your responsibility to ask the question. The doctor or chemist may not remember to tell you, otherwise.
Driving laws relating to alcohol, drugs and breathalysers vary from state to state. You must know these laws because the penalties for breaking them can be severe and even result in automatic loss of licence. You should also be aware that some companies have their own rules regarding alcohol and drugs and thesecan be even stricter than the state laws.
For your information Table 4.1 lists the permissible Blood Alcohol Concentration (BAC) levels for
in any way that it is acceptable industry practice for you to drink even small amounts of alcohol drivers in the various states and territories. Publication of this table should not be taken to imply
before, or during your driving shift. It is strongly recommended that you, as a professional driver, should drive only with zero BAC.
114

LICENCE CATEGORY
F u l l Licence
P roba t ion
Learner
R e s t r i c t i o n
Table 4.1
and licence categories (as at May 1989) Permlsslble blood alcohol concentratlon (gm/lOOml) for various states/territories
Following Distance The road laws for all states and territories require that you follow other vehicles at a safe or reasonable distance. These laws are designed to ensure road safety. Obviously the recommended following distance for a truck should be greater than that of a passenger car. In the section Defensive Driving, the time-lapse method was suggested as a way of determining what this distance should be. ( S e e page 89)
Apart from these general rules, most states and territories also specify a minimum distance between trucks outside built up areas.
The main purpose of this law is to allow other motorists sufficient space to pull back into their driving lane after passing.
The distance specified by each state varies from 60 to 100 metres. You should check these laws for your vehicle in your state or territory (eg. for B-Doubles in at least one state the following distance is 200 metres).
T i - ] - DISTANCE FOLLOWING -
- - - - - - """""
Figure 4.1 Minimum following distance between heavy vehlcles
115
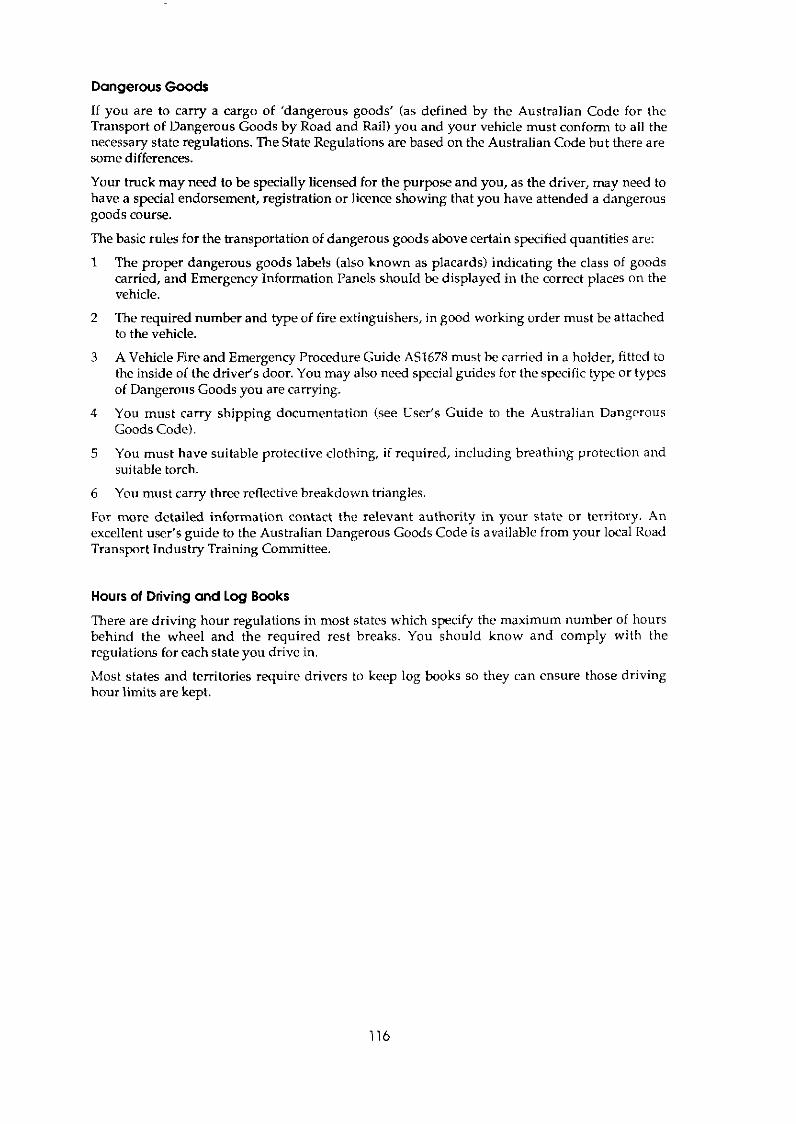
Dangerous Goods
Transport of Dangerous Goods by Road and Rail) you and your vehicle must conform to all the If you are to carry a cargo of ‘dangerous goods’ (as defined by the Australian Code for the
necessary state regulations. The State Regulations are based on the Australian Code but there are some differences.
Your truck may need to be specially licensed for the purpose and you, as the driver, may need to have a special endorsement, registration or licence showing that you have attended a dangerous goods course.
The basic rules for the transportation of dangerous goods above certain specified quantities are:
1 The proper dangerous goods labels (also known as placards) indicating the class of goods carried, and Emergency Information Panels should be displayed in the correct places on the vehicle.
2 The required number and type of fire extinguishers, in good working order must be attached to the vehicle.
3 A Vehicle Fire and Emergency Procedure Guide AS1678 must be carried in a holder, fitted to the inside of the drivefs door. You may also need special guides for the specific type or types of Dangerous Goods you are carrying.
4 You must carry shipping documentation (see User’s Guide to the Australian Dangerous Goods Code).
5 You must have suitable protective clothing, i f required, including breathing protection and suitable torch.
6 You must carry three reflective breakdown triangles.
For more detailed information contact the relevant authority in your state or territory. An excellent user‘s guide to the Australian Dangerous Goods Code is available from your local Road Transport Industry Training Committee.
Hours of Driving and L o g Books
behind the wheel and the required rest breaks. You should know and comply with the There are driving hour regulations in most states which specify the maximum number of hours
regulations for each state you drive in.
Most states and territories require drivers to keep log books so they can ensure those driving hour limits are kept.
116
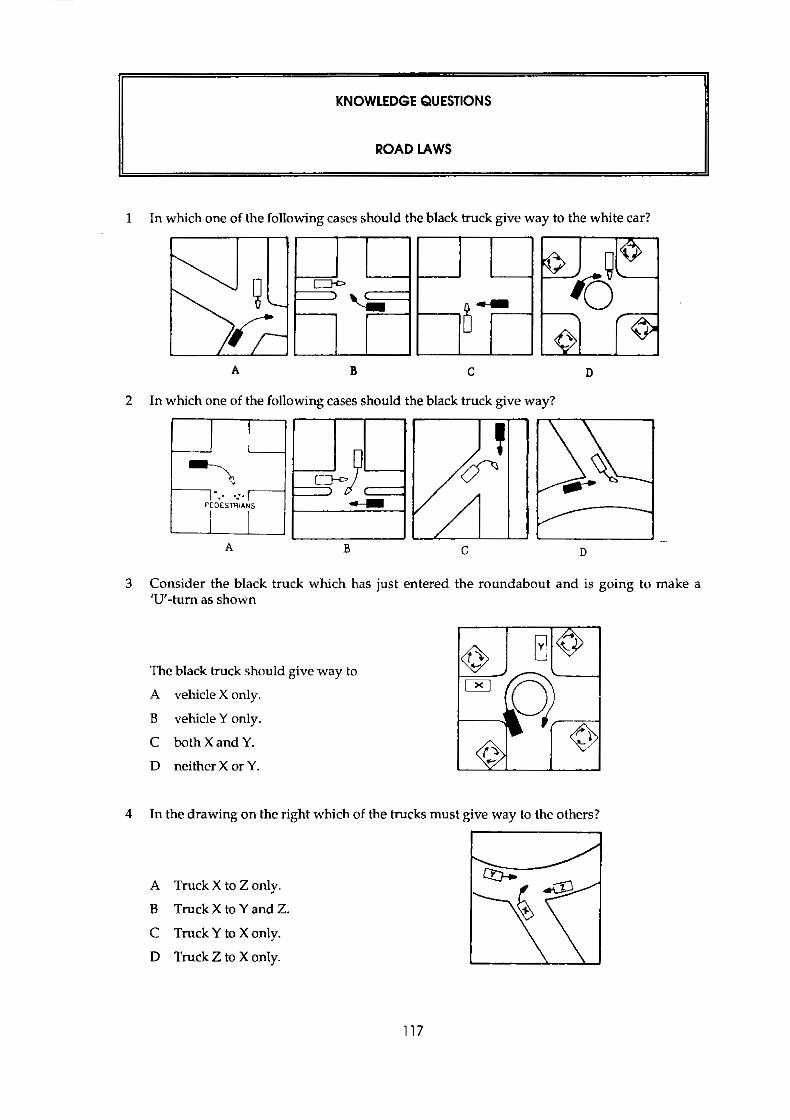
KNOWLEDGE QUESTIONS
ROAD LAWS
1 In which one of the following cases should the black truck give way to the white car?
2
A B C D
In which one of the following cases should the black truck give way? !$-FJRRIF PEDESTWA\NS 4
A B c D
3 Consider the black truck which has just entered the roundabout and is going to make a 'U"tum as shown
The black truck should give way to
A vehicle X only.
B vehicle Y only.
C both X and Y.
D neither X or Y.
A Truck X to Z only.
B Truck X to Y and 2.
C Truck Y to X only.
D Truck 2 to X only.
4 In the drawing on the right which of the trucks must give way to the others?
117

5 What is the maximum permissible speed for a heavy truck if no other limits apply?
A There is no maximum in the road laws.
B 110 km per hour.
C 100 km per hour.
D 90 km per hour.
6 Which one of the following vehicles do NOT have to stop before proceeding across a level crossing without any warning devices, gates or barriers?
A buses
B unloaded fuel tankers
C trucks loaded with poisonous substances
D trucks carrying earth-moving machinery
(YOU can check your answers to these questions in the ANSWERS TO QUESTIONS section a t the back of this manual.)
1 I8
PUBLIC RELATIONS
KNOWLEDGE
You must know and understand the reasons for the importance of public relations in the transport industry.
PERFORMANCE
You must demonstrate the appropriate attitudes which create a good public image for the
behaviourAth on and off the road. company you work for. These attitudes include friendliness, courtesy and non-aggressive
CONDITIONS:
Knowledge test : not tested Practical test : demonstration of appropriate attitudes during driving test
STANDARDS:
The driver must demonstrate a relaxed courteous style of driving and tolerance towards
behaving in different ways. For example, a driver's response may vary between relaxed other road users. During the driving test situations will arise that result in drivers
or tense, courteous or discourteous, aggressive or non-aggressive. The examiner will use a checklist to record responses to the situations when appropriate.
Having the Right Attitudes What makes you a good driver? A simple answer is that the best drivers have the fewest accidents, but there is more to being a good driver than your accident rate. You can have an accident-free driving record, without necessarily being considered a good driver by your industry.
Employers expect more than knowledge and driving skills from their employees. They want them to have certain attitudes towards their job.
Attitudes like courtesy, friendliness and politeness are seen as most important by your company and the public with whom you deal.
Your attitudes will help determine how successful you are in the industry, whether you are an employee or an owner driver.
119
The Changing Image of the Truck Driver The image of the truck driver as cowboy, so beloved by the media is rapidly becoming obsolete.
Many film and advertisement makers lead us to believe that truckies are hard drinking, hard playing men with little regard for road laws and even less for those who enforce them.
Transport operators in todays competitive, high tech industry have different ideas about the drivers they want in control of their vehicles.
Today’s truck drivers need to be well trained and highly skilled professionals, able to get the most from modem, expensive equipment without abusing it.
Drivers still need strength, stamina, good vision and co-ordination but they now also need more intelligence, a broad knowledge of transport regulations and road laws and a level-headed approach towards their work and the people they work with.
Driving a truck with your name or your employer‘s name on the side makes you that company’s representative. When you behave rudely or aggressively the public associate that behaviour with your company and that kind of bad public relations loses business.
Most of the top companies are very concerned with their public image and require their drivers to wear uniforms and be clean and neat on the job as well as being courteous both in and out of the truck.
As a new driver you need to appreciate why these requirements are an important part of the job.
Good P.R. is Good for Drivers Practising good public relations has positive benefits for both your business and you personally.
Driving a heavy vehicle can be very stressful and towards the end of a long drive or shift, i t can be very easy to become frustrated by the mistakes and incompetence of others. The old adage ’count to 10’ can help.
Remember, many other drivers do not possess your level of skill, so resist the temptation to give someone a ’blast.’
It probably won’t solve anything and it almost certainly won’t make them better drivers.
Try to understand that part of a professional driver’s job is to help keep the average amateur driver from killing or injuring himself on the road.
Getting uptight about poor drivers accomplishes nothing and remember that stress and illness go hand in hand.
Calm and relaxed drivers find their jobs more enjoyable and usually live longer and healthier lives.
120

THE TRUCK DRIVER'S TEN COMMANDMENTS
* CHECK BRAKES, LIGHTS, FUEL, OIL, WATER AND OTHER EQUIPMENT BEFORE STARTING OUT, AND DURING EACH LONG TRIP
* PARK YOUR PERSONAL PROBLEMS BEFORE YOU GET BEHIND THE WHEEL
* KNOW AND FOLLOW T H E ROAD LAWS
* WATCH OUT FOR PEDESTRIANS, PARTICULARLY CHILDREN
* DON'T TAILGATE. KEEP ENOUGH DISTANCE BETWEEN YOUR VEHICLE AND THE ONE AHEAD TO ALLOW FASTER VEHICLES TO OVERTAKE. MAKE EVERY EFFORT TO LET FOLLOWING TRAFFIC OVERTAKE, ESPECIALLY ON LONG GRADES WHERE YOU ARE MOVING SLOWLY
* ALWAYS BE PREPARED TO GIVE WAY TO AVOID A POTENTIAL ACCIDENT
* NEVER DRINK ALCOHOL WHILE ON THE ROAD OR BEFORE STARTING A TRIP.
* DON'T FIGHT SLEEP. IF DROWSY, GET OFF THE ROAD AVD TAKE A SHORT REST.
* DON'T HESITATE TO REDUCE YOUR SPEED AND BE READY TO STOP THE INSTANT POTENTIAL DANGER APPEARS.
* GNE OTHER DRIVERS THE BREAKS THAT YOU WISH THEY WOULD GIVE TO YOU.
121
DICTIONARY OF TRUCKING TERMS
ABS - An abbreviation for anti-lock brakes.
ADR -Australian Design Rule. A set of regulations governing vehicle design (e.g. ADR 38 covers heavy vehicle braking systems.)
AlTERCOOLER - See Intercooler
AGGREGATE MASS - The maximum allowable loaded mass of a particular vehicle or combination comprising the GVM or GCM plus the overload tolerance applicable in a given state.
AIR SUSPENSION - A suspension in which the weight of the vehicle is supported by air bags containing compressed air and the axles are held in position longitudinally and laterally by bushed rods.
AIR TRIP - An air-activated release catch on a tipper tailgate which is operated from the cab.
AMMETER - An amp gauge
ANGEL GEAR - Slang term for coasting down hills in neutral, an illegal and dangerous practice. Also called Mexican Overdrive.
ARTICULATED VEHICLE - A vehicle with flexibly connected sections. Usually applied to a prime mover and semi-trailer as opposed to a truck and trailer which is called a combination vehicle.
AUTOMATIC TOW COUPLING -The most common type of heavy trailer hitch in Australia and Europe. The trigger in the coupling automatically releases the spring loaded towing pin when the trailer drawbar eye touches it. Far easier to couple up than the cheaper American type pintle hook. Commonly referred to as a Ringfeder.
AUXILIARY GEARBOX -A secondary gearbox which may be located before or after the main gearbox to provide additional overdrive or reduction ratios. If mounted behind the main gearbox i t is sometimes called a 'jwy box'.
AXLE GROUP - A group of axles (or a single axle) supporting one section of a vehicle. Axle groups in Australia are required to be loadsharing.
AXLE LOAD -The total load transmitted to the road by all the wheels and tyres on that axle.
A-TRAIN - Usually refers to a prime mover and semi-trailer towing a trailer.
BALL COUPLING -See Bartlett Hitch
BALL RACE - A type of turntable on which the top section rotates on the bottom through a series of bearings.
BARTLEIIT HITCH - a ball coupling usually used for attaching a rigid vehicle to a pig trailer. Better able to handle the heavy vertical load of a pig trailer than a Ringfedcr type coupling. See Trailer Hitch.
BAULKING - A solid object, often a large piece of timber placed against the load and fixed securely to the vehicle to prevent movement of the load.
B-DOUBLE -An articulated vehicle with a second semi-trailer attached to the rear of the first semi-trailer by means of a turntable. Called a B-Train in North America.
BOBTAIL - A prime mover without a semi-trailer attached.
BONNEIITED VEHICLE - A vehicle where the driver sits behind the engine which is covered by a bonnet (the Americans call it a hood). Bonnetted heavy trucks are aerodynamically superior to cabovers because of their wedge shape. They are also usually cheaper and lighter than a cabover with the same powertrain, but not as manoeuvrable.
BOG COG - A very low gear which is not used in normal circumstances. Also called a crawlcr, or stump puller.
122

BOGIE DRIVE - A prime mover or truck with two drive axles at the back, a 6x4 or i f twin steer 8x4 vehicle. Bogie drive prime movers are the most common type in Australia. The drive is usually transmitted from one axle to the other by means of a short drive shaft called a jack-shaft.
BOLSTER - A piece of steel or heavy timber firmly attached to the vehicle (often bolted to the chassis) to support the load and/or prevent it moving.
BRAKE REACTIVE SUSPENSION - A suspension in which there is a transfer of vertical loading from one axle to another in the same axle group when the brakes are applied. The front axle of the group tends to lock up, especially on tri-axle trailers.
B-TRAIN - See B-Double.
BULKER - A container that is fitted with loading hatches on the roof and discharge hatches on the doors or front wall. Used for any loose bulkcommodity (e.g. sugar, salt, coal).
BULKHEAD -A term sometimes applied to the gate at the front of a tray body or flat top trailer which is built heavier than side gates. Also called a Loading Rack.
CAB CHASSIS - A truck with only the cab fitted. Docs not include load carrying or attaching components (e.g. body or turntable).
CAB GUARD - A steel structure fitted behind the cab on a prime mover to stop parts of the load striking the cab.
CABOVER OR CAB OVER ENGINE (COE) - A truck with the cab mounted directly above the engine and front axle. Allows shorter overall vehicle length for better manoeuvrability and has better all around view for the driver. COE trucks are dominant in Europe because they allow longer trailers within an overall length limit.
Used in conjunction with Side Curtains. CAP TARPAULIN - A tarpaulin fitted over the top of load and about halfway down the gates.
CENTRE OF A N AXLE GROW -For single axles, the centre-line of that axle. For tandem axles with equal numbers of tyres, a line located midway between those axles. For tandem axles where one axle is fitted with dual and one with single tyres, a line located 1/3 of the way from the dual tyred axle. For twin steer axle groups - a line located midway between the two axles in the group. For tri-axle groups - a line located between the extreme axles of the group.
CHASSIS -A vehicle frame.
CHOCKS - Suitable blocks used primarily to restrain loads which could move during transit. (Also known as Cleats, Scotches or Gluts.) Chocks may also be used ahead of and behind road wheels to prevent movement of the vehicle.
CLEATS - See Chocks.
CLUTCH BRAKE - A device actuated by the last inch of clutch pedal travel which brakes the spinning gears in the transmission. It is used with non-synchronised gearboxes to pick up first or reverse gears when stationary. It can also be used for shifting while going uphill.
COAMING -The side rail of a tray, usually slightly raised.
COG - A gear or gear ratio. Swapping Cogs is shifting gears.
COLLAPSIBLES - Acontainer fitted with fold down front and back bulkheads.
COMBINATION VEHICLE - A rigid truck (or bus) towing one or more trailers.
CONSTANT MESH TRANSMISSION - A transmission in which all gears remain in mesh at all times. Ratio changes are effected by means of dog clutches which lock the required gear to its shaft. The driver shifts the dog clutch between two gears compared with a crash box where he actually shifts the gears. Constant mesh gearboxes are non-synchronised and rely on driver skill in controlling engine revs and good timing to shift properly. Roadrangers are the most common constant mesh boxes in Australia followed by Spiers.
123

CONTAINER - A box used for the transporting of goods in bulk. Usually fitted with receptacles
20 and 40 feet. for twist locks in each comer and provision on the base for forklift handling. Standard lengths are
CONVERTER DOLLY - A unit designed to convert a semi-trailer to a dog trailer. It includes a turntable, a draw bar and an axle group. A dolly can also be a device for spreading the weight of overdimensional loads over more wheels.
CRASH BOX - An older type transmission in which the ratios were changed by sliding the various gears into and out of mesh with each other. They were harder to shift properly than a constant meshbox and are no longer made for trucks.
a Bog Cog or Stump Puller. CRAWLER GEAR - A very low gear which is not used under normal circumstances. Also called
when the driver touches the brakes or accelerator. CRUISE CONTROL - A device which make? the vehicle maintain a preset speed and turns off
CURTAIN-SIDER - A van type body with curtain sides that are held down along the sides by straps attached to the tie rail and pulled tight lengthwise by a ratchet. They are increasingly popular because they can be loaded or unloaded from the sides unlike a normal van and they have faster turnaround times than vans or flat tops which require tarping. Most curtain-siders in Australia are Tautliners.
DECK - The load carrying platform
DIFFERENTIAL - A device which allows drive to be transmitted to each wheel on an axle even when the wheels are turning at different speeds, such as during cornering.
DIFFERENTIAL LOCK - Locks the differential so that each drive wheel receives the same amount of torque which prevents loss of traction through one wheel spinning. Must be used only in slippery conditions, or where a wheel lifts off the ground.
DIRECT DRIVE - A transmission ratio in which the output shaft of the transmission turns at exactly the same speed as the input shaft Le. a ratio of 13). Direct drive transmissions have a 1:l top or high gear.
DOG BOX - See Sleeper Box.
DOG -A device used to tension chains when securing loads.
DOG TRAILER - A trailer w-ith tw-o axle groups, the front group being steered by the drawbar coupled to the towing vehicle. On some units the turntable can be locked to simplify reversing.
DOLLY - See Converter Dolly.
DONALDSON - A brand of paper element air filter which, in different sizes, is fitted to most Australian trucks.
DOUBLE BOTTOM - Combination of a prime mover, semi-trailer and trailer. A two trailer roadtrain.
DOUBLE DE-CLUTCHING, DOUBLE CLUTCHING - A shifting technique used on non-synchronised gearboxes. It involves letting the clutch pedal out briefly while the gearstick passes through neutral and helps ensure that the gears are spinning at the same speed when they come together. Also called a double shuffle.
DOUBLE TRAILER COMBINATION - A vehicle consisting of a prime mover, semi-trailer and a trailer. A two trailer roadtrain.
DRAWBAR LENGTH - The distance from the line of the towing pivot, to the centre-line of the leading axle group of the trailer.
DRAWBAR STAND - A leg that holds a trailer drawbar a t coupling height to make hooking up easier.
DRAWBAR TRAILER - See Dog Trailer.
124

DRIVE AXLE - The axle, differential and wheels that transmit torque to the road.
DRIVE SHAFT - See Tail Shaft.
DRIVELINE -The motor, clutch, gearbox, drive shafts, diff(s) and axleb).
DRIVETRAIN - As for the driveline but usually doesn’t include the engine.
DRY FREIGHT CONTAINER - A normal, fully enclosed container with doors at the back and occasionally on one side.
DUAL WHEELS -A matched pair of wheels attached to each end of an axle.
DUNNAGE - Packing material (e.g. pieces of timber, plywood, mats) placed between the cargo and the truck platform or between items of cargo to level the load and/or increase friction so load is less likely to move during journey. It is also used to leave a gap between load and deck or different parts of the load so forklifts can get under to lift.
DYNATARD -The Mack equivalent of a Jake brake. See Engine Brake.
EGT GAUGE -Exhaust Gas Temperature gauge. See Pyrometer.
ELECTRIC RmARDER - An electric auxiliary brake that works on the drivetrain (also known as a Telmar brake).
ENGINE BRAKE OR MOTOR BRAKE - An auxiliary brake fitted to an engine (also known as Jake brake, Dynatard, C-brake, Cummins brake) that uses the valves to increase engine retardation.
EXHAUST BRAKE - An auxiliary brake that works on the drivetrain by restricting the exhaust gases with a slide or butterfly valve.
FAN CLUTCH - A device which disconnects the drive to the fan when it is not needed for cooling which saves engine power and reduces noise.
FANTAINER - A fully enclosed dry container fitted with a fan and mainly used for transporting onions.
FIFTH WHEEL -The term favoured in the US and Britain for what Australians generally call a turntable which is a device for coupling a prime mover and a semi uailer. See turntable.
FLAT RACK - A steel base for supporting loads fitted with receptacles for twist locks and provision for fork lift operation. (A large steel pallet)
FLAT TOP - A truck, trailer or semi-trailer that has a flat goods carrying area without sides. Weather protection is usually provided by tarpaulins. The traditional trailer type for general use but losing favour because tarps take too long and are too much trouble.
FORWARD CONTROL VEHICLE - A truck with the cab mounted over the engine. Forward control moves the driver forward of his traditional position behind the motor. That allows a shorter overall vehicle length or leaves more of the length for cargo. Most buses and all cabover or COE trucks are forward control.
FREIGHT CONTAINER -See Container.
FRIG PAN - A refrigerated pantechnicon or van, with the body often now made of fibre reinforced plastic (FRP) and usually having a diesel powered refrigeration unit at the front.
load. The front gate is also known as a loading rack, bulkhead or head board and must be strong GATES -Frames used at the front, sides and rear of the load carrying platform to contain the
enough to resist load shifting in accidents or under severe braking.
GLOW PLUGS, HEATERS - Devices used on some diesel engines to assist starting in cold conditions.
GLUTS -See Chocks.
125
GREASY PLATE - A type of turntable, consisting of two large plates lubricated with grease
behind the kingpin. which functions like a ballrace turntable. Usually used with semi-trailers having a trailer block
GROSS COMBINATION MASS OR GCM - The loaded w-eight of an articulated vehicle or combination vehicle.
GROSS ROADTRAIN MASS OR GKTM - The loaded weight of a road train.
GROSS VEHICLE MASS OR GVM - The loaded weight of a rigid vehicle.
mass limits although this is not strictly correct unless the word LIMIT is also added (e.g. GROSS GROSS ..._...._.._.. LIMIT - The three terms listed abwe are often used to define the respective
COMBINATION MASS LIMIT).
HAULING UNIT - A prime mover, or a rigid motor vehicle being used to tow a trailer.
HEAVY TRAILER COMBINATION - A hauling unit and trailer with a GCM over 13.5 tonnes.
HIGH CUBE -Cargo of such low density that the amount that can be transported is limited by the vehicle’s volume rather than its mass, or a vehicle especially designed for maximum cargo space.
HOIST BOX or TURRET - A guard fitted around a hydraulic hoist ram on a tipper body to protect it from damage.
HOPPER - A container designed for discharge of loose dry material through a gate valve a t the bottom of the container. May be mounted on a vehicle or trailer or may form an integral part of a trailer.
HUBODOMETER - A distance recording device usually mounted on drive and trailer wheel hubs.
HUNGRY BOARD - A board fitted around the top of a tip truck to increase capacity. Also known as a Cheat Board.
HYDRAULIC BRAKE SYSTEM - A system that uses hydraulic fluid for transmitting force to the braking units in each wheel.
HYDRAULIC RETARDER - A hydraulic auxiliary brake that works on the drive train (sometimes called a Voith brake).
INTER-AXLE DIFFERENTIAL - A differential which operates between two driven axles to allow one axle to turn at a slightly different speed from the other. This allows for small differences in tyre diameters on the two axles and the different distances they travel on turns.
INTER-AXLE LOCK - Locks u p the inter-axle differential so drive is shared equally by both driven axles to reduce wheelspin and increase traction in slippfry conditions.
INTERCOOLER - A device used for cooling turbocharged air before it enters the engine. The cooling increases air density and engine power and reduces thermal stress to the engine. Intercoolers can be air to air or air to water types and are sometimes called aftercoolers.
ISOLATION SWITCH - A device which completely disconnects the batter); from the electrical system of the vehicle to prevent any possibility of fire due to short circuit.
JACK SHAFT - A short drive shaft especially one transmitting power from one drive axle to another.
JAKE BRAKE -See Engine Brake,
JINKER ~ A trailer designed to transport long logs,
JOEY BOX - An auxiliary gearbox located after the main gearbox to provide additional overdrive or reduction ratios. May be mounted directly on the rear of the main gearbox or separately from it.
KILOPASCAL ( H a ) - A unit of pressure in the metric system. See a150 Pounds pcr square inch (psi).68.89 kPa = 1 psi.
126
KINGPIN - A pin on a semi-trailer skid plate which locks into a prime mover's turntable jaws. Also the pin around which a steerable wheel rotates in the vertical axis.
LABOURING - See Lugging.
LANDING GEAR or LANDING LEGS -Retractable legs that support the front of a semi-trailer when not coupled to a prime mover. Usually raised and lowered with a two speed crank.
LASHINGS -Ropes, chains and straps used to lash down loads.
LAZY AXLE - An unpowered axle which is part of an axle group which includes a drive axle. The lazy is usually behind the drive axle. See also Pusher Axle, Trailing Axle, Tag Axle.
LIFT-UP LAZY - A retractable lazy axle that can lift the wheels clear of the ground when the truck is empty.
LINEHAUL - Operating on fixed long distance routes.
LIVE LOAD - A load which, because i t cannot be completely secured is able to move about within the load space (e.g. bulk liquids, livestock, hanging meat, pneumatic tyred earthmoving machinery).
LOAD CAPACITY - The maximum load which a vehicle is rated to carry by the manufacturer.
LOAD LIMIT - The maximum load which may be carried in, or on any motor vehicle upon the road. This load limit varies from State to State although the trend is to nationwide uniformity.
LOAD SENSING or LOAD PROPORTIONING VALVE - Reduces the proportion of braking effort going to the rear axle(s) to compensate for forward weight transfer and light or no load. Helps prevent rear wheel lock-up under braking.
LOADSHARING SUSPENSION - A suspension which enables all wheels of an axle group to support an equal load. If one axle is dual tyred and another single, each gets its proportional share of the load.
LOADING RACK - The heavy duty gate at the front of a flat top trailer.
LOCKING TURNTABLE - A permanent trailer turntable which can be locked in the
ballrace turntables can also be locked for use with semi-trailers that have no blocks behind the straight-ahead position enabling a dog trailer to be more easily reversed. Greasy plate and
kingpin. See Turntable.
LOG BOOK - Driver's record of hours driven and rest periods taken.
LUGGING or LABOURING - Caused by the combination of overloading the engine and insufficient engine speed. The remedy is to shift to a lower gear. The symptoms of lugging are shuddering or excessive vibration in the engine, vibrations in the driveline and black exhaust smoke due to excessive fuel (all of which can result in engine and driveline damage).
MAXI-BRAKE -See Spring Brake.
MEXICAN OVERDRIVE - Slang term for coasting downhill in neutral, which is illegal and dangerous. Also called Angel Gear.
NORMAL CONTROL VEHICLE - A bonnetted vehicle where the driver sits in the "normal" position behind the engine.
OPEN TOP - A container with sides and doors but no roof.
width, weight or height. (See Over-height Vehicles) OVER-DIMENSIONAL VEHICLE - A vehicle that exceeds the maximum permitted length,
overdrive ratio of 0.81 the engine turns only 8 times for every 10 turns of the tailshaft). Used OVERDRIVE - A gear ratio in which the engine turns more slowly than the tailshaft (e.g. for an
properly, an overdrive allows the engine to turn more slowly at cruising speed which reduces engine wear and fuel consumption.
OVER-HEIGHT VEHICLE - A vehicle that exceeds the maximum permitted height.
127
OVER-REVVING - Occurs when the engine speed exceeds the maximum l imi t specified by the manufacturer. Usually caused by descending hills too fast and in the wrong gear. Can cause serious damage to the engine. The rev limit is usually marked on a rev counter by a red line.
PANTECHNICON, PANTECH OR PAN - A completely enclosed van body on a rigid vehicle, semi-trailer or trailer (e.g. furniture van).
PERMIT - A written order or certificate granting permission to do something, a licence.
PIG TRAILER - A trailer having one non-steerable axle group near the middle of the length of the load carrying platform.
PIN -What locks into the drawbar eye on an automatic tow coupler. Also see Kingpin.
PINTLE HOOK - A type of trailer coupling widely used in the US but usually only on light or military trailers in Australia. Harder to hitch up than Ringfeder typecouplings. See Trailer Hitch
POGO STICK - A spring mounted pole behind the cab for holding up trailer brake hoses and electrical connections. Can also be a spring loaded bar or pole for cargo restraint with ends that f i t into recesses in van side walls.
POINT OF ARTICULATION-The axis of rotation of a turntable. The pivot or ’bending’ point of an articulated vehicle.
POWER DIVIDER - See Inter-axle Lock.
POWER TAKE OFF or PTO -A device attached to a vehicle’s transmission or flywheel cnabling engine power to be used to drive ancillary equipment (e.g. tipper hoist, bulk liquid pump, concrete mixer, garbage compactor, hydraulic hoist).
POWERTRAIN -The group of components which drive the vehicle. Namely; engine, clutch, transmission, tailshaft and rear axle.
PRE-SELECTION (OF GEARS) - A system of gear shifting in which selection and engagement of
shift control (gear lever or shift button) but actual engagement of the gear is achieved by the gears are two distinct operations. The required gear is first selected by operation of the gear
operating the clutch pedal or releasing the accelerator. Two speed axle ratios or transmission range changes may be pre-selected and then shifted in this manner.
PRLME MOVER - A short wheel base truck used to tow a semi-trailer.
PROPELLER SHAFI - See Tailshaft.
POUNDS PER SQUARE INCH (psi) - A unit of pressure in the imperial system. Sce also kilopascal (kPa). 1 psi = 6.89 kl’a.
PUP TRAILER - A trailer having a single non-steering axle near the middle of the length of the load-carrying platform.
PUSHER AXLE - A drive axle when located at the rear of a tandem axle group in which the other axle is unpowered.
PYROMETER or EGT GAUGE - A temperature gauge that measures the temperature of the engine exhaust gases.
RADIATOR SHUTTER - A device now rarely found in Australia. The shutters are
air flow to the radiator and are particularly effective in very cold climates. Mostly used on North thermostatically controlled, mounted on the radiator and resemble a Venetian blind. They control
American trucks.
RANGE CHANGE - A set of transmission gears engaged by a lever or knob which is independent of the normal shift lever. Used to allow the normal transmission ratios to be repeated in another higher (or lower) range thus doubling the number of gear ratios available. Almost all heavy trucks use range change boxes. See also, Splitter.
REAR MARKER or REFLECTOR PLATES - R e d and yellow plates which must be fitted to the rear of heavy vehicles to make them more visible when they aremoving slowlyor parked.
128
REEFER -A dry freight container which is insulated and fitted with a refrigeration unit.
RESONANCE ROLL -A condition in which the vehicle is induced to roll from side to side at its natural roll frequency, usually as a result of steering back and forth from one side to the other. Energy stored in the suspension builds up as it repeatedly transfers from one side to the other, increasing the roll each time until the vehicle may overturn. See also Roll Frequency.
RETARDER -See Speed Retarder.
RETRACTABLE AXLE - An axle which can be raised when not needed.
REV COUNTER - An instrument which tells how fast the motor is turning. Another word for tachometer
RIG -Usually means any combination of truck or prime mover and traileds).
RIGID MOTOR VEHICLE - A vehicle without a trailer.
RINGFEDER - See Automatic Tow coupling.
ROADTRAIN - Either a truck hauling two or more trailers, or a prime mover and semi-trailer hauling one or more trailers. (Note: This is not a B-Double which consists of a prime mover and two semi-trailers.)
ROLL FREQUENCY - The natural frequency at which a vehicle tends to roll from side to side on its suspension. also Resonance Roll.
ROPE RAIL or TIE RAIL - Usually made of pipe and fitted under the coaming rail. Used for tying ropes, chains, and tarps to secure loads.
RPM - Revolutions per minute. Also referred to as revs per minute or revs..
SCOTCHES -See Chocks.
semi-trailer). SEMI or SEMI-TRAILER - common term for an articulated vehicle (prime mover and
is supported by the prime mover which is used to tow it. A full trailer has an axle group at both SEMI-TRAILER - A semi-trailer has one axle group at the rear and is designed so that the front
ends and can support itself.
SERVICE BRAKE - The main brake system acting on all road wheels and controlled by a foot pedal.
SIDE CURTAINS - A tarpaulin that encloses the side of a load. Usually attached to the gates. Can also be the curtains on the sides of a Tautliner type truck or trailer body.
SKELETAL OR SKEL TRAILER - A trailer or semi-trailer that has no tray but has attachments fitted to the frame for the carrying of goods (e.g. twist locks for containers, or bolsters for logs or timber).
incorporating the kingpin (and often a block to keep the skid plate from turning on the upper SKID PLATE - A thick steel plate fixed to the underside of the front of a semi-trailer and
part of greasy plate and ballrace turntables). The front of the plate is usually curved upwards to enable the prime mover to slide more easily under the trailer during coupling.
SLEEPER BOX - A separate sleeping compartment fitted behind but with an opening into the truck cab. Bonnetted longhaul trucks most commonly have sleeper boxes but the trend is for integrated sleepers which cabover trucks have had for years.
SLEEPER CAB - A driving cabin that is fitted with one or two bunks.
SLIDING MESH TRANSMISSION - A simple gearbox for engaging PTOs.
SNOW SHOOTER - An insulated container that is fitted with port holes so that the contents can be snap frozen using liquid nitrogen. (Used for meat, vegetables, etc) It has no on-board refrigeration equipment.
129
SPEED LIMITER -A device which limits the top speed of a truck without limiting engine revs or power in the lower gears.
SPEED RETARDER - A hydraulic or electric auxiliary brake fitted to the driveline which reduces the load on the service brakes.
SPIDER - The cast spoke hub of a wheel upon which the rim is mounted.
SPLITTER or SPLITTER BOX - A two speed, close ratio gear set operated by a lever or knob which is independent of the normal shift lever. A splitter provides a low and high range in each gear thus doubling the number of gears available. (e.g. The upshift sequence for a 4-speed transmission with splitter would be; 1-Low - 1-High -2-Low - 2-High - 3-Low - >High - 4-Low - 4-High.) See also Range Change.
SPREADER BAR - connects sidegates at the top strengthening them and raising the cap tarp in the centre so that water runs off when the load height is lower than that of the gates.
SPREADER CHAINS - Used to restrict and adjust the opening of tipper tailgates to allow a regulated flow of the load (e.g. gravel or sand) for spreading.
SPREAD TANDEM - A tandem axle group on a trailer having the two axles separated by a distance greater than 2 metres. No longer built in Australia.
SPRING BRAKE - A brake which is mechanically applied by a spring and released by air pressure which compresses the spring. Because the brake automatically applies if air pressure is lost, i t is ’fail-safe’. Spring brakes are used for parking and emergency braking on air braked vehicles. Also called a Maxi-brake.
STABILISED TURNTABLE - A greasy plate or ballrace turntable where its upper plate and the semi-trailer skid plate are prevented from turning by a block on the semi-trailer skid plate. The necessary rotation between semi-trailer and prime mover is made between the upper and lower parts of the turntable.
when one is bogged. The bar is usually about 8 feet long so it can be carried crossways on the STIFF BAR - a iigid bar with an eye at each end used to couple roadtrains for pushing or pulling
back of the prime mover.
crates to be up to 4.6 metres high while other trailer types are limited to 4.3. Some states also STOCK CRATE - A truck or trailer body built for carrying livestock. Some States allow stock
allow ”volume loading” of stock crates where a trailer is built to a certain size and then is not required to weigh in. The size is computed to offer the right weight. This rccognises that it is often impossible to find weighbridges where stock is loaded.
SUPER SINGLES - A wide profile wheel and tyre used on a steer axle or in place of a dual wheel assembly on trailers. Properly engineered super singleinstallations on trailers allow wider spring centres and wheelbases for greater stability which is especially important on naturally unstable vehicles like stock crates and tankers. There are also considerable tare weight advantages with super singles, especially when used with aluminium wheels.
SUSPENSION SEAT - An air or spring suspended and dampened seat designed to reduce vibration and road shock.
SWING GATE -The rear gate on a tipper when it has side hinges and swings open to the side for bulky objects that would hit a top hinged tailgate. Must be swung open and secured along the side before tipping or it will strike the ground.
SYNCHROMESH TRANSMISSION ~ A transmission in which the speeds of the gears are matched or ’synchronised by means of in-built synchronising clutches before they are meshed. Easier to shift but is not as quick as a constant mesh transmission and it is necessary to use thc clutch for every shift.
TABLE TOP - Truck with a flat bed or tray body.
130

TACHOGRAPH - A trip recorder incorporating a clock, speedometer and often a rev counter
market in Germany in 1933 and their use is compulsory on heavy vehicles in Europe. The graph that inscribes a record of a journey on a circular paper graph. The first tachograph was put on the
itself has not changed since 1933 but the machine was mechanical and is now electronic.
TACHOMETER - An instrument for measuring engine revolutions, a rev counter.
TAG AXLE - The unpowered axle of a tandem axle group in which only the front axle is driven.
TAILGATE -The opening back of tipper hucks and trailers. Can be pivoted at the top so it opens at the bottom, or be hinged at the side for tipping bulky loads such as scrap metal or large rocks. Some tailgates can be adjusted for top and side pivoting.
TAILSHAFT - A shaft which transmits the drive from the transmission to the rear axle. (Also known as a Driveshaft or Propeller Shaft.)
TANDEM AXLE GROUP - A combination of two axles which are related to each other through a loadsharing system, with centres of axles not less than 1.0 metre part and not more than 2.0 metres apart.
TANDEM DRIVE - See Bogie Drive.
TANK CONTAINER - A flat rack fitted with framework enclosing a tank used for the transport of liquid goods which usually has standard container locks.
TARE MASS -The mass of a vehicle without its load (Le. when unloaded, without fuel, ctc).
TARP or TARPAULIN - A covering, traditionally made of canvas, that protects loads from rain and dust. Commonly used with flat tops and trays but losing out to enclosed bodies because it takes too long and it’s too much work with most loads.
TAUTLINER -The first and still most common type of curtain sider in Australia. See curtain sider
TELESCOPIC HOIST - A hydraulic hoist fitted to tippers
THIRD DIFFERENTIAL - See Inter-axle Differential.
TELMAR BRAKE - See Electric Retarder and Speed Retarder.
TILT CAB - The cab on a cabover or forward control truck which is hinged so it can be tilted forward for access to the engine and transmission.
TIPPER -A truck or trailer which can discharge its load by tilting the cargo body. Also known as a tip-truck or tip-trailer. The Americans call it a dump truck.
TORQUE - The turning force or turning effort of a shaft. Engine torque is the turning force available at the crankshaft.
TOW COUPLING OVERHANG -The horizontal distance from the centre of the axle group at the rear of the towing vehicle to the centreline of the towing pivot.
TRACTOR - American term for prime mover
TRACTOR PROTECTION VALVE - A valve which automatically closes off the air supply to the trailer brakes when pressure drops to an unsafe level k g . when a trailer brake hose bursts or becomes disconnected). This ensures that the tractor (prime mover) brakes remain operational but also means that the trailer spring brakes (if so equipped) will come on due to lack o f air.
TRAILER - An unpowered vehicle built to be towed behind a motor vehicle.
TRAILER BLOCK - A block fitted behind the pin on a semi-trailer skid plate which ensures rotation occurs in the greasy plate and ball race turntable and not between prime mover and semi-trailer. The block must not be used with fixed turntables or they will break it off on the first turn.
TRAILER COUPLING -The device which attaches a trailer to a towing vehicle. There are many different types. See automatic tow coupling, Bartlett hitch, Ringfeder and pintle hook.
131

TRAILER HITCH - See trailer coupling,
TRAILING AXLE - A rear axle.
TRANSFER BOX - A secondary gearbox driven off the main gearbox and having one output shaft to the front to drive the front axle and one to the rear to drive the rear axle(s). It often has a low range for better off-road power and gradeability.
TRANSMISSION OIL COOLER - A radiator used to cool transmission oil on many heavy duty vehicles.
less than 2.0 metres apart and not more than 3.2 metres apart. TRI-AXLE GROUP - A group of 3 loadsharing axles with centres of the front and rear axles not
TRIPLE BOTTOM - A combination of a prime mover, semi-trailer and two trailers. A three trailer roadtrain. Also called triples.
TUG -Slang term for prime mover, especially one used for local work or as a yard shunter.
TURBOCHARGER or TURBO - A device in which a turbine wheel driven at 60,000 to 90,000 rpm by the exhaust gases drives an impeller to pump air into the cylinders under pressure thus increasing engine power and efficiency.
TURNBUCKLE - A device used to tension a rod or wire linkage or chains used in securing loads on trucks or trailers. Not as common as dogs for securing loads because turnbuckles take longer.
TURNTABLE - A device for coupling a prime mover to a semi-trailer. The three basic types are greasy plate, ball race and fixed. The top of the greasy plate and ball race types move with the
skid plate to slide around the kingpin while resting on top of the turntable. trailer and are located by the kingpin and the trailer block. A fixed turntable requires the trailer
TURNTABLE JAWS -The parts of the turntable that lock around the kingpin of the semi-trailer.
TWIN-STEER AXLE GROUP - A combination of two single tyred axles, fitted to the front of a
less than 1.0 metre apart and not more than 2.0 metres apart. (The wheels of both axles turn when truck or prime mover and connected to the same steering mechanism, with centres of axies not
the steering wheel is turned.)
TWIST LOCK - A device welded to the frame of a rigid truck or a trailer and used to secure a freight container to the vehicle. One twist lock is used oneach comer of the container.
TWO-SPEED AXLE - A dual ratio drive axle in which high or low ratios can be engaged by a switch on the gear lever, thus doubling the total gear ratios available.
UNDERBODY HOIST - A hoist used on tip-trucks or tip-trailers with the hydraulic ram mounted below thebody and between the chassis rails.
UNIVERSAL JOINTS AND SPLINES - Devices fitted to tail and jack shafts to allow for suspension movement, vehicle flexing and variations in alignment.
UNLADEN MASS - The mass of the motor vehicle without any load, but including all tools, fixed cranes, oil and fuel in the tanks. The unladen mass of an articulated vehicle is the unladen mass of the prime mover only.
VACUUM SERVO BRAKE - A braking system in which the engine vacuum provides power assistance, reducing driver effort in applying the brakes.
VOITH BRAKE - See Hydraulic Retarder.
VOLUME LOADER - A vehicle whichis designed and registered to be loaded by volume rather than by mass. Load space limitation prevents overloading when loaded with the specified cargo (e.g. a Stock Truck).
132

WAXING - Wax is part of all diesel fuels but can block filters or even fuel lines in cold conditions. Australian refiners have winter blends with low wax levels to minimise the problem.
WET TANK - The tank which receives air direct from the compressor. Most condensation occurs there and the wet tank should be drained as often as possible to protect the air system.
YARD SHUNTER -An old, often unregistered prime mover used for shunting semi-trailers in a terminal or yard.
133
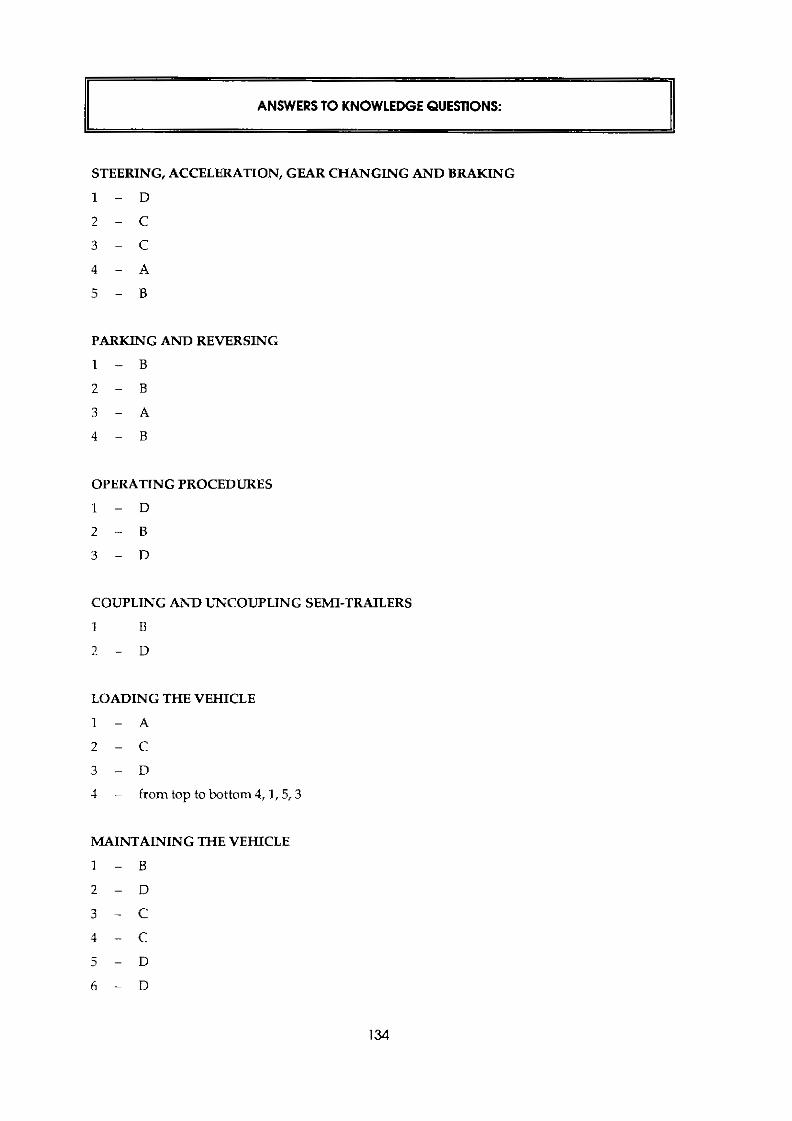
II ANSWERS TO KNOWLEDGE QUESTIONS: I I STEERING, ACCELERATION, GEAR CHANGING AND BRAKING
1 - D
2 - c 3 - c
4 - A
5 - B
PARKING AND REVERSING
I - B
2 - B
3 - A
4 - B
OPERATING PROCEDURES
1 - D
2 - 8
3 - D
COUPLING AND UNCOUPLING SEMI-TRAILERS
1 - B
2 - D
LOADING THE VEHICLE
I - A
- 7 - c 3 - 0
1 - from top to bottom 4, I , 5,3
MAINTAINING THE VEHICLE
1 - B
2 - D
3 - c
4 - c
5 - D
6 - D
1 3 4

DRIVER HEALTH AND SAFETY
1 - D
2 - D
3 - c
DEFENSIVE DRIVING
I - c
2 - c 3 - D
4 - A
5 - D
BREAKDOWNS AND ACCIDENTS
1 - B
2 - A
3 - 8
EMERGENCY PROCEDURE
1 - D
2 - D
3 - c
ROAD LAWS
1 - 8
2 - A
3 - D
4 - 8
5 - c
6 - D
135

Appendix A
VEHICLESAND MASSES OF SAFE LOADING DANGEROUS
LOADS VEHICLES AND REGULATIONS GOODS LOADS REGULATIONS
Roads and Traffic Authority GPO Box 28 SYDNEY, 2021
Roads and Traffic Authority GPO Box 26 SYDNEY. 2W1
Roads and Traffic Authority GPO B o x 26 SYDNM, 2Wl
NSW
VIC
QLD
SA
TAS
WA
ACT
NT
Department of Labour Explosives Branch
and Industry 1 Oxford Street DARLINGTON, 2010
Department of Loel Government State Office Block Phillip Street SYDNEY. 2001
Health Commission 01 NSW
SYDNEY, 2001 GPO Box 4235
Roads Corpora tian
North Building Second Flmr
Lygon st (Cnr
CARLTON, 3053 Princes Street)
Roads Corporation
North Building Second Roor
Lygon St (Cnr
CARLTON, 3053 Princes Street1
MainRoads Departmcnt
spring HlI1 Boundary Sheet
BRISBANE. 4003 (07) 834 2273
Main Koads Depaitmcnt UoundaryStreet Spring liiU BRISBANE. 4coO
Dw~smn of Accidcnt I'Te"e"tio2, 50 Ann Street URISBANE, 4w0 (07) 227 5783 ( 0 7 ) 83.1 2631
(0; ) 834 2273
Main Roads Department Boundary Sheet Spring Hill BRISBANE, 4030
Information: The Seaetariat Road Saiety Division
ADELAIDE, 5021 GPO Box 1443
Permits: Highways Deparhnent Permit sedion PO Box 1 WALKERVILLE 5081
Information: Thesecretariat Road Safety Division GPO Box 1443 ADELAIDE,SWl
Hlghghways Department Permits:
PO B o x I Permit %tion
WALKERVILLE, 3 8 1
Informahor.: Thc Smctariat Roadsafety Diwsmn GPO Box 1443 ADELAIDE, 5cO1
r e n t s :
Permit Seaion IHighwaysDcpartment
PO Box 1 WALKERVILLE, 5U3l
Departmcntof Labour Dangerous Substances
GPO Box 365 BrXlCh
ADELAIDE, 5031
Transport Tasmania 1 Collins Sheet HOBART, 7030
Police Department
22 Mount Street Limnsing k Servirrs
PERTH, 6030
Transport Tasmania 1 Collins Street HOBART, 7wo
Transport Tasmanm 1 Colllns Skeet HOBART, 7w0
M h c s Departmcnt Gordon5 HIU Road KOSNY PARK, 7016
Police Department Police Department Licensing & Servicn 22 Mount S t r e t PERTH, MYM
Mines Dcpartrnent hilneral House 66 Adelaide Tce I'EKTIL 6Mx)
licensing &Services 22MountSheet PERTH, HKxl
ACTAdminishation GPO Box 1 5 8 CANBERRA CITY, 26431
ACTAdministration
CANBERRA CITY, 2601 GPOlW
ACT Administration
CANBERRA CITY, 2601 GPO 158
ACT Administration GPOlW CANBERRA CITY, 26iil
Department of Transport & Works Motor Vehicle Registry Goyder Road GPO Box 533 DARWIN, 0901
Transport & Works Department of
Motor Vehlcle
Goyder Road GPO Box 530 DARWIN, 0 8 0 1
Registry
Transport & W o r k Department of
Motor Vehlcle
Work Health Authority 66 Esplanade GPO Ilox 2010 DARWIN, 0801
Regshy G y d c r Road GPO Box 530 DARWIN. 0801
136