tibco managed file transfer internet server installation€¦ · tibco managed file transfer...
TRANSCRIPT

TIBCO® Managed File Transfer Internet ServerInstallationSoftware Release 8.0.1August 2016
Two-Second Advantage®
Important Information
SOME TIBCO SOFTWARE EMBEDS OR BUNDLES OTHER TIBCO SOFTWARE. USE OF SUCHEMBEDDED OR BUNDLED TIBCO SOFTWARE IS SOLELY TO ENABLE THE FUNCTIONALITY (ORPROVIDE LIMITED ADD-ON FUNCTIONALITY) OF THE LICENSED TIBCO SOFTWARE. THEEMBEDDED OR BUNDLED SOFTWARE IS NOT LICENSED TO BE USED OR ACCESSED BY ANYOTHER TIBCO SOFTWARE OR FOR ANY OTHER PURPOSE.
USE OF TIBCO SOFTWARE AND THIS DOCUMENT IS SUBJECT TO THE TERMS ANDCONDITIONS OF A LICENSE AGREEMENT FOUND IN EITHER A SEPARATELY EXECUTEDSOFTWARE LICENSE AGREEMENT, OR, IF THERE IS NO SUCH SEPARATE AGREEMENT, THECLICKWRAP END USER LICENSE AGREEMENT WHICH IS DISPLAYED DURING DOWNLOADOR INSTALLATION OF THE SOFTWARE (AND WHICH IS DUPLICATED IN THE LICENSE FILE)OR IF THERE IS NO SUCH SOFTWARE LICENSE AGREEMENT OR CLICKWRAP END USERLICENSE AGREEMENT, THE LICENSE(S) LOCATED IN THE “LICENSE” FILE(S) OF THESOFTWARE. USE OF THIS DOCUMENT IS SUBJECT TO THOSE TERMS AND CONDITIONS, ANDYOUR USE HEREOF SHALL CONSTITUTE ACCEPTANCE OF AND AN AGREEMENT TO BEBOUND BY THE SAME.
This document contains confidential information that is subject to U.S. and international copyright lawsand treaties. No part of this document may be reproduced in any form without the writtenauthorization of TIBCO Software Inc.
TIBCO, Two-Second Advantage, TIBCO Managed File Transfer, TIBCO Managed File Transfer InternetServer, TIBCO Managed File Transfer Command Center, TIBCO Managed File Transfer Platform Server,TIBCO Managed File Transfer Platform Server Agent, and TIBCO Slingshot are either registeredtrademarks or trademarks of TIBCO Software Inc. in the United States and/or other countries.
All other product and company names and marks mentioned in this document are the property of theirrespective owners and are mentioned for identification purposes only.
THIS SOFTWARE MAY BE AVAILABLE ON MULTIPLE OPERATING SYSTEMS. HOWEVER, NOTALL OPERATING SYSTEM PLATFORMS FOR A SPECIFIC SOFTWARE VERSION ARE RELEASEDAT THE SAME TIME. SEE THE README FILE FOR THE AVAILABILITY OF THIS SOFTWAREVERSION ON A SPECIFIC OPERATING SYSTEM PLATFORM.
THIS DOCUMENT IS PROVIDED “AS IS” WITHOUT WARRANTY OF ANY KIND, EITHER EXPRESSOR IMPLIED, INCLUDING, BUT NOT LIMITED TO, THE IMPLIED WARRANTIES OFMERCHANTABILITY, FITNESS FOR A PARTICULAR PURPOSE, OR NON-INFRINGEMENT.
THIS DOCUMENT COULD INCLUDE TECHNICAL INACCURACIES OR TYPOGRAPHICALERRORS. CHANGES ARE PERIODICALLY ADDED TO THE INFORMATION HEREIN; THESECHANGES WILL BE INCORPORATED IN NEW EDITIONS OF THIS DOCUMENT. TIBCOSOFTWARE INC. MAY MAKE IMPROVEMENTS AND/OR CHANGES IN THE PRODUCT(S)AND/OR THE PROGRAM(S) DESCRIBED IN THIS DOCUMENT AT ANY TIME.
THE CONTENTS OF THIS DOCUMENT MAY BE MODIFIED AND/OR QUALIFIED, DIRECTLY ORINDIRECTLY, BY OTHER DOCUMENTATION WHICH ACCOMPANIES THIS SOFTWARE,INCLUDING BUT NOT LIMITED TO ANY RELEASE NOTES AND "READ ME" FILES.
Copyright © 2003-2016 TIBCO Software Inc. All rights reserved.
TIBCO Software Inc. Confidential Information
2
TIBCO® Managed File Transfer Internet Server Installation
Contents
TIBCO Documentation and Support Services . . . . . . . . . . . . . . . . . . . . . . . . . . . . . . . . . . . . . . . . . . . . . . . . . . . . . . . . .5
Installation Requirements . . . . . . . . . . . . . . . . . . . . . . . . . . . . . . . . . . . . . . . . . . . . . . . . . . . . . . . . . . . . . . . . . . . . . . . . . . .6
Database Guidelines . . . . . . . . . . . . . . . . . . . . . . . . . . . . . . . . . . . . . . . . . . . . . . . . . . . . . . . . . . . . . . . . . . . . . . . . . . . . . . . . . . . . . . . . . . . . . . . . . . 7
Creating an IBM DB2 Database . . . . . . . . . . . . . . . . . . . . . . . . . . . . . . . . . . . . . . . . . . . . . . . . . . . . . . . . . . . . . . . . . . . . . . . . . . . . . . . . . . . 7
Configuring Java on Windows or UNIX . . . . . . . . . . . . . . . . . . . . . . . . . . . . . . . . . . . . . . . . . . . . . . . . . . . . . . . . . . . . . . .9
Installing MFTIS in Console Mode . . . . . . . . . . . . . . . . . . . . . . . . . . . . . . . . . . . . . . . . . . . . . . . . . . . . . . . . . . . . . . . . . . 10
Starting Automated Installation . . . . . . . . . . . . . . . . . . . . . . . . . . . . . . . . . . . . . . . . . . . . . . . . . . . . . . . . . . . . . . . . . . . . . . . . . . . . . . . . . . . . . . . 10
Installing MFTIS . . . . . . . . . . . . . . . . . . . . . . . . . . . . . . . . . . . . . . . . . . . . . . . . . . . . . . . . . . . . . . . . . . . . . . . . . . . . . . . . . . . . . . . . . . . . . . . . . . . . . . 11
Installing MFTIS in Silent Mode . . . . . . . . . . . . . . . . . . . . . . . . . . . . . . . . . . . . . . . . . . . . . . . . . . . . . . . . . . . . . . . . . . . . .18
SilentInstall.xml File Parameters . . . . . . . . . . . . . . . . . . . . . . . . . . . . . . . . . . . . . . . . . . . . . . . . . . . . . . . . . . . . . . . . . . . . . . . . . . . . . . . . . . . . . . 18
Installing Connection Manager Agent . . . . . . . . . . . . . . . . . . . . . . . . . . . . . . . . . . . . . . . . . . . . . . . . . . . . . . . . . . . . . . .22
Starting CMA Automated Installation . . . . . . . . . . . . . . . . . . . . . . . . . . . . . . . . . . . . . . . . . . . . . . . . . . . . . . . . . . . . . . . . . . . . . . . . . . . . . . . . . . 24
Starting the CMA Service Automatically . . . . . . . . . . . . . . . . . . . . . . . . . . . . . . . . . . . . . . . . . . . . . . . . . . . . . . . . . . . . . . . . . . . . . . . . . . . . . . .25
Removing the CMA Service . . . . . . . . . . . . . . . . . . . . . . . . . . . . . . . . . . . . . . . . . . . . . . . . . . . . . . . . . . . . . . . . . . . . . . . . . . . . . . . . . . . . . . . . . . 25
Upgrading MFTIS . . . . . . . . . . . . . . . . . . . . . . . . . . . . . . . . . . . . . . . . . . . . . . . . . . . . . . . . . . . . . . . . . . . . . . . . . . . . . . . . . 26
Upgrading from Version 7.2.5 . . . . . . . . . . . . . . . . . . . . . . . . . . . . . . . . . . . . . . . . . . . . . . . . . . . . . . . . . . . . . . . . . . . . . . . . . . . . . . . . . . . . . . . . . 26
Upgrading Java JDK . . . . . . . . . . . . . . . . . . . . . . . . . . . . . . . . . . . . . . . . . . . . . . . . . . . . . . . . . . . . . . . . . . . . . . . . . . . . . . . . . . . . . . . . . . . . . . . . . 27
Configuring FIPS 140-2 . . . . . . . . . . . . . . . . . . . . . . . . . . . . . . . . . . . . . . . . . . . . . . . . . . . . . . . . . . . . . . . . . . . . . . . . . . . 28
Enabling FIPS Mode Manually . . . . . . . . . . . . . . . . . . . . . . . . . . . . . . . . . . . . . . . . . . . . . . . . . . . . . . . . . . . . . . . . . . . . . . . . . . . . . . . . . . . . . . . . 28
Enabling Transport Layer Security . . . . . . . . . . . . . . . . . . . . . . . . . . . . . . . . . . . . . . . . . . . . . . . . . . . . . . . . . . . . . . . . . . . . . . . . . . . . . . . . 28
Setting IBM Java Security to Use FIPS Certified Cryptographic Security Provider . . . . . . . . . . . . . . . . . . . . . . . . . . . . . . . . . .28
Setting the MFTIS Environment Variable . . . . . . . . . . . . . . . . . . . . . . . . . . . . . . . . . . . . . . . . . . . . . . . . . . . . . . . . . . . . . . . . . . . . . . . . . .29
Taking MFTIS Out of FIPS Mode . . . . . . . . . . . . . . . . . . . . . . . . . . . . . . . . . . . . . . . . . . . . . . . . . . . . . . . . . . . . . . . . . . . . . . . . . . . . . . . . . . . . . .29
Changing the Default Logos . . . . . . . . . . . . . . . . . . . . . . . . . . . . . . . . . . . . . . . . . . . . . . . . . . . . . . . . . . . . . . . . . . . . . . . 31
Uninstalling MFTIS . . . . . . . . . . . . . . . . . . . . . . . . . . . . . . . . . . . . . . . . . . . . . . . . . . . . . . . . . . . . . . . . . . . . . . . . . . . . . . . . 33
Uninstalling Connection Manager Agent . . . . . . . . . . . . . . . . . . . . . . . . . . . . . . . . . . . . . . . . . . . . . . . . . . . . . . . . . . . . 34
Appendix A. Installation Worksheet . . . . . . . . . . . . . . . . . . . . . . . . . . . . . . . . . . . . . . . . . . . . . . . . . . . . . . . . . . . . . . . . 35
Appendix B. Updating Certificates . . . . . . . . . . . . . . . . . . . . . . . . . . . . . . . . . . . . . . . . . . . . . . . . . . . . . . . . . . . . . . . . . .36
Updating the HTTPS Certificate . . . . . . . . . . . . . . . . . . . . . . . . . . . . . . . . . . . . . . . . . . . . . . . . . . . . . . . . . . . . . . . . . . . . . . . . . . . . . . . . . . . . . . 36
Updating the Applet Certificate . . . . . . . . . . . . . . . . . . . . . . . . . . . . . . . . . . . . . . . . . . . . . . . . . . . . . . . . . . . . . . . . . . . . . . . . . . . . . . . . . . . . . . . 37
Appendix C. Starting or Removing the MFTIS Service . . . . . . . . . . . . . . . . . . . . . . . . . . . . . . . . . . . . . . . . . . . . . . . .39
Starting the MFTIS Service on Windows Automatically . . . . . . . . . . . . . . . . . . . . . . . . . . . . . . . . . . . . . . . . . . . . . . . . . . . . . . . . . . . . . . . .39
Starting the MFTIS Service on UNIX Automatically . . . . . . . . . . . . . . . . . . . . . . . . . . . . . . . . . . . . . . . . . . . . . . . . . . . . . . . . . . . . . . . . . . . 40
Removing the MFTIS Service on Windows . . . . . . . . . . . . . . . . . . . . . . . . . . . . . . . . . . . . . . . . . . . . . . . . . . . . . . . . . . . . . . . . . . . . . . . . . . . 40
Appendix D. Setting Ciphers and Hashes . . . . . . . . . . . . . . . . . . . . . . . . . . . . . . . . . . . . . . . . . . . . . . . . . . . . . . . . . . . 41
Setting FTP and SFTP Ciphers and Hashes . . . . . . . . . . . . . . . . . . . . . . . . . . . . . . . . . . . . . . . . . . . . . . . . . . . . . . . . . . . . . . . . . . . . . . . . . . 41
3
TIBCO® Managed File Transfer Internet Server Installation

Setting HTTP SSL Ciphers . . . . . . . . . . . . . . . . . . . . . . . . . . . . . . . . . . . . . . . . . . . . . . . . . . . . . . . . . . . . . . . . . . . . . . . . . . . . . . . . . . . . . . . . . . .42
Appendix E. Installing the Desktop Client . . . . . . . . . . . . . . . . . . . . . . . . . . . . . . . . . . . . . . . . . . . . . . . . . . . . . . . . . . . 44
Pre-requisites . . . . . . . . . . . . . . . . . . . . . . . . . . . . . . . . . . . . . . . . . . . . . . . . . . . . . . . . . . . . . . . . . . . . . . . . . . . . . . . . . . . . . . . . . . . . . . . . . . . . . . . . 44
Customizing the Desktop Client . . . . . . . . . . . . . . . . . . . . . . . . . . . . . . . . . . . . . . . . . . . . . . . . . . . . . . . . . . . . . . . . . . . . . . . . . . . . . . . . . . . . . . 45
Generating a Self-Signed Certificate . . . . . . . . . . . . . . . . . . . . . . . . . . . . . . . . . . . . . . . . . . . . . . . . . . . . . . . . . . . . . . . . . . . . . . . . . . . . . 46
Installing the Desktop Client Program . . . . . . . . . . . . . . . . . . . . . . . . . . . . . . . . . . . . . . . . . . . . . . . . . . . . . . . . . . . . . . . . . . . . . . . . . . . . . . . . . 48
Installing a Certificate . . . . . . . . . . . . . . . . . . . . . . . . . . . . . . . . . . . . . . . . . . . . . . . . . . . . . . . . . . . . . . . . . . . . . . . . . . . . . . . . . . . . . . . . . . . . 49
Installing the Browser Based Desktop Client . . . . . . . . . . . . . . . . . . . . . . . . . . . . . . . . . . . . . . . . . . . . . . . . . . . . . . . . . . . . . . . . . . . . . . . . . .49
Appendix F. Required Java JRE for the Java Client . . . . . . . . . . . . . . . . . . . . . . . . . . . . . . . . . . . . . . . . . . . . . . . . . . 50
Appendix G. Configuring Web SSO . . . . . . . . . . . . . . . . . . . . . . . . . . . . . . . . . . . . . . . . . . . . . . . . . . . . . . . . . . . . . . . . . 51
Appendix H. Configuring MFT for SAML SSO . . . . . . . . . . . . . . . . . . . . . . . . . . . . . . . . . . . . . . . . . . . . . . . . . . . . . . . .52
Creating SAML Private Keys . . . . . . . . . . . . . . . . . . . . . . . . . . . . . . . . . . . . . . . . . . . . . . . . . . . . . . . . . . . . . . . . . . . . . . . . . . . . . . . . . . . . . . . . . .53
Importing SAML Identity Provider Metadata . . . . . . . . . . . . . . . . . . . . . . . . . . . . . . . . . . . . . . . . . . . . . . . . . . . . . . . . . . . . . . . . . . . . . . . . . . . 53
Configuring SAML Service Provider Metadata . . . . . . . . . . . . . . . . . . . . . . . . . . . . . . . . . . . . . . . . . . . . . . . . . . . . . . . . . . . . . . . . . . . . . . . . .54
Generating SAML Service Provider Metadata . . . . . . . . . . . . . . . . . . . . . . . . . . . . . . . . . . . . . . . . . . . . . . . . . . . . . . . . . . . . . . . . . . . . . . . . . 55
Sending SAML Service Provider Metadata to the Identity Provider . . . . . . . . . . . . . . . . . . . . . . . . . . . . . . . . . . . . . . . . . . . . . . . . . . . . . 56
Restarting the MFT Server . . . . . . . . . . . . . . . . . . . . . . . . . . . . . . . . . . . . . . . . . . . . . . . . . . . . . . . . . . . . . . . . . . . . . . . . . . . . . . . . . . . . . . . . . . . .56
Updating MFT Shortcuts . . . . . . . . . . . . . . . . . . . . . . . . . . . . . . . . . . . . . . . . . . . . . . . . . . . . . . . . . . . . . . . . . . . . . . . . . . . . . . . . . . . . . . . . . . . . . .56
Appendix I. Customizing Translation Tables . . . . . . . . . . . . . . . . . . . . . . . . . . . . . . . . . . . . . . . . . . . . . . . . . . . . . . . . 58
Appendix J. Security Best Practices . . . . . . . . . . . . . . . . . . . . . . . . . . . . . . . . . . . . . . . . . . . . . . . . . . . . . . . . . . . . . . . 61
Installation . . . . . . . . . . . . . . . . . . . . . . . . . . . . . . . . . . . . . . . . . . . . . . . . . . . . . . . . . . . . . . . . . . . . . . . . . . . . . . . . . . . . . . . . . . . . . . . . . . . . . . . . . . . 61
Web.xml Parameters . . . . . . . . . . . . . . . . . . . . . . . . . . . . . . . . . . . . . . . . . . . . . . . . . . . . . . . . . . . . . . . . . . . . . . . . . . . . . . . . . . . . . . . . . . . . . . . . . 61
Server Configurations . . . . . . . . . . . . . . . . . . . . . . . . . . . . . . . . . . . . . . . . . . . . . . . . . . . . . . . . . . . . . . . . . . . . . . . . . . . . . . . . . . . . . . . . . . . . . . . . 63
General Suggestions . . . . . . . . . . . . . . . . . . . . . . . . . . . . . . . . . . . . . . . . . . . . . . . . . . . . . . . . . . . . . . . . . . . . . . . . . . . . . . . . . . . . . . . . . . . . . . . . . 64
4
TIBCO® Managed File Transfer Internet Server Installation
TIBCO Documentation and Support Services
Documentation for this and other TIBCO products is available on the TIBCO Documentation site. Thissite is updated more frequently than any documentation that might be included with the product. Toensure that you are accessing the latest available help topics, please visit:
https://docs.tibco.com
Product-Specific Documentation
Documentation for TIBCO products is not bundled with the software. Instead, it is available on theTIBCO Documentation site at https://docs.tibco.com/products/tibco-managed-file-transfer-internet-server.
The following documents for this product can be found on the TIBCO Documentation site:
● TIBCO Managed File Transfer Internet Server Installation
● TIBCO Managed File Transfer Internet Server Quick Start Guide
● TIBCO Managed File Transfer Internet Server User‘s Guide
● TIBCO Managed File Transfer Internet Server Transfer and File Share Clients User's Guide
● TIBCO Managed File Transfer Internet Server Desktop Client User's Guide
● TIBCO Managed File Transfer Internet Server Command Line Utilities Guide
● TIBCO Managed File Transfer Internet Server Release Notes
How to Contact TIBCO Support
For comments or problems with this manual or the software it addresses, contact TIBCO Support:
● For an overview of TIBCO Support, and information about getting started with TIBCO Support,visit this site:
http://www.tibco.com/services/support
● If you already have a valid maintenance or support contract, visit this site:
https://support.tibco.com
Entry to this site requires a user name and password. If you do not have a user name, you canrequest one.
How to Join TIBCOmmunity
TIBCOmmunity is an online destination for TIBCO customers, partners, and resident experts. It is aplace to share and access the collective experience of the TIBCO community. TIBCOmmunity offersforums, blogs, and access to a variety of resources. To register, go to the following web address:
https://www.tibcommunity.com
5
TIBCO® Managed File Transfer Internet Server Installation
Installation Requirements
Before you run the installation, ensure that your system meets all the necessary hardware and softwarerequirements, and that you have the appropriate privileges to install TIBCO® Managed File TransferInternet Server.
In TIBCO Managed File Transfer (MFT) Internet Server documentation set, MFT is used to representTIBCO® Managed File Transfer and MFTIS is used to represent TIBCO MFT Internet Server.
Installation Account
On Windows, if MFTIS will be installed as a Windows service, you must be an administrator.Otherwise, no special privileges are required.
On UNIX, we strongly suggest that MFTIS should be installed under a non-root user.
System Requirement
For information about the hardware and software requirements, as well as supported platforms, see thereadme.txt file.
Network
As with any enterprise application, changes may need to be made to firewall and other securitysystems in a production environment. The following table list default ports for services required andused within MFTIS.
Supported Database Default Port
MS SQL Server 1433
Oracle 2484(SSL)/1521/1522
MySQL 3306
IBM DB2 50000
These are the default ports. You will need to check with the system administrator to ensure that theseports are used in your enterprise.
Either the HTTP or HTTPS protocol can be used for soap calls. By default, MFTIS uses ports 7080 and7443 for the HTTP and HTTPS protocols respectively. These default values can be changed during theinstallation process.
For example, if you define ports 7443 for the HTTPS protocol and 7080 for the HTTP protocol, you canrun the following iptables commands to reroute requests for ports 443 and 80 to ports 7443 and 7080.
When using the iptables command to reroute requests from ports below 1025, the iptablescommand must be executed by a root user.iptables -A PREROUTING -t nat -i eth0 -p tcp --dport 443 -j REDIRECT --to-port 7443iptables -A PREROUTING -t nat -i eth0 -p tcp --dport 80 -j REDIRECT --to-port 7080
In addition to the port numbers above, the iptables command may need to also redirect SSH, FTPS,and FTP ports as well.
6
TIBCO® Managed File Transfer Internet Server Installation
Database GuidelinesMFTIS provides a utility that will create and populate the required database tables. However, beforerunning the installation, you must create an MFTIS database in whichever database application youhave chosen to use.
MFTIS supports the following database:
● MS SQL Server● Oracle● MySQL● IBM DB2Have your database administrator create a database as well as a user name and password on the serverthat will host the MFTIS database tables.
It is recommended that the database and user name be named cfcc, but this is not required. This username must have the ability to read, write, and create tables in the MFTIS database. The exact steps toaccomplish this step vary significantly depending on the database application you are using; consultthe documentation provided by your database vendor on how to perform this step.
Follow the guidelines when creating the database:
● Database password must not contain an equal sign (=).● MS SQL Server properties can be configured in the Security tab to do authentication via SQL Server
or Windows. The default is Windows only.● If you are using an IBM DB2 database, see Creating an IBM DB2 Database.● If you are using an Oracle 10i or later, using Cost Based Optimization (CBO), it is strongly
recommended that the optimization is tuned for first_rows for the MFTIS database. To enable this,the following command should be issued from SQL*Plus as SYSDBA, after creating the database:
alter system set optimizer_mode=first_rows_100;
The database user account used for the MFTIS installation must not have the DBA roleassigned because this will cause the installation to fail. The database user needs only thefollowing right granted:
GRANT CONNECT, RESOURCE TO <schema>
Creating an IBM DB2 DatabaseIf you are using an IBM DB2 database, you must make some changes to the database through the IBMDB2 Control Center or an equivalent tool.
The database, buffer pool and table space names defined below are suggested values. You cansubstitute names that follow your naming standards if necessary.
Procedure
1. Create a DB2 database.The only required value is the database name. For example, you can assign a database name such asMFTISDB.
2. Create a DB2 buffer pool with a page size of 32KB.Give this buffer pool a name. For example, MFTISBP.
3. Create a DB2 table space.Give this table space a name. For example, MFTISTS. This table spaces should be defined as typeRegular and use the buffer pool defined in step 2. Create a DB2 container with a unique name, for
7
TIBCO® Managed File Transfer Internet Server Installation
example, C:\DB2Container\MFTISTS. This directory will be automatically created by DB2 whenthe table space definition is completed.
4. Create a second DB2 table space.Give this table space a name. For example, MFTISCTTS. This table space should be defined as typeSystem Temporary and use the buffer pool defined in step 2. Create a DB2 container with a uniquename, for example, C:\DB2Container\MFTISTTS. This directory will be automatically created byDB2 when the table space definition is completed.
8
TIBCO® Managed File Transfer Internet Server Installation
Configuring Java on Windows or UNIX
Before installing MFTIS, you have to configure Java on Windows or UNIX.
MFTIS installation and configuration requires the bin directory of the JDK to be in your PATHenvironment variable.
If you intend to run the application server as a Windows service, you must set the JAVA_HOMEenvironment variable for the system. See Appendix C. Starting or Removing the MFTIS Service formore information.
Prerequisites
Ensure that you have installed the Java JDK (Software Development Kit).
Procedure
1. Set the JAVA_HOME environment variable.See the following examples:
● Windows: set JAVA_HOME=C:\Program Files\Java\jdk1.8.0_66.
● UNIX: export JAVA_HOME=/usr/java/jdk1.8.0_66.
2. Set the PATH environment variable to point to the Java\bin directory.See the following examples:
● Windows: set PATH=%JAVA_HOME%\bin:%PATH% or PATH=C:\Program Files\Java\jdk1.8.0_66\bin;%PATH%.
● UNIX: export PATH=$JAVA_HOME/bin:$PATH or PATH=/usr/java/jdk1.8.0_66/bin:$PATH.
3. Verify that the path was correctly set by issuing the following command:java –version
See the following example output:java version "1.8.0_66"Java(TM) SE Runtime Environment (build 1.8.0_66-b26)Java HotSpot(TM) 64-Bit Server VM (build 25.40-b25, mixed mode)
9
TIBCO® Managed File Transfer Internet Server Installation

Installing MFTIS in Console Mode
You can install MFTIS in console mode.
Starting Automated InstallationTo install MFTIS in console mode, first you have to start the automatic installation.
Prerequisites
Ensure the following pre-requisites are met:
● You have configured Java on Windows or UNIX. For more information, see Configuring Java onWindows or UNIX.
● Download the JCE Unlimited Strength Jurisdiction Policy Files from the following website and savethe files in the JRE lib\security directory. For example, C:\Program Files\Java\jdk1.8.0_66\jre\lib\security.
http://www.oracle.com/technetwork/java/index.html● The MFTIS install scripts must be located in the same directory as the cfcc.jar file.● If you are executing on UNIX, ensure that the install.sh script have the execute attribute.● If you are installing MFTIS on one of the supported UNIX platforms and have uploaded the files
needed for installing on UNIX, the default permissions should be set to the following:cfcc.jar -r-- r-- r-- 444CMSInstall.jar -r-- r-- r-- 444connmgr.jar -r-- r-- r-- 444EULA.txt -r-- r-- r-- 444install-config.xml -r-- r-- r-- 444installer.jar -r-- r-- r-- 444install.sh -r-x r-x r-x 555server.jar -r-- r-- r-- 444
Procedure
1. To start the automated installation, run the following command on a command line:
● Windows: install● UNIX:./install.sh MFT Installer Release 8.0.1 (supports all 8.0 versions)
Please note that this install will perform multiple App Server restarts.For this install, press the ENTER key to accept defaults and continue.You must read the license agreement before proceeding with the installation.Press enter to display the agreement.
2. Press Enter to go through the End User License Agreement (EULA), and type yes to accept thelicense agreement.You can type s to skip to the end of the agreement.
3. Press Enter to continue without installing Connection Manager Agent (CMA) for this MFTIS.You can install CMA now or at a later time. For more details on the CMA installation, see InstallingConnection Manager Agent.
If you have added the JAVA_HOME variable and set the PATH variable as described in ConfiguringJava on Windows or UNIX, the product will detect the version at this point.END USER LICENSE AGREEMENT...
10
TIBCO® Managed File Transfer Internet Server Installation
Press enter to continue or S to skip to the end of the agreementDo you accept the license agreement? Enter yes or noyesThe Connection Manager should be installed in DMZ installations where firewallrules do not allow connections to be initiated from the DMZ to the internalNetwork.The MFT Connection Manager consists of two components:: MFT Connection Manager Agent(CMA): Distributed with MFT Internet Server: MFT Connection Manager Server(CMS): Distributed with MFT Command CenterBefore installing the Connection Manager Agent, the Connection ManagerServer (CMS) should be installed in the internal network.Do you want to Install and Configure the Connection Manager Agent (CMA) forthis Internet Server?Reply Y to install and configure the Connection Manager Agent (CMA)...[n]:MFT Internet Server will be installed without the Connection Manager Agent.Press <ENTER> to continue with the MFT Internet Server installationDetected Java version: 1.8.0_66.Detected JAVA_HOME environment variable.Using C:\Program Files\Java\jdk1.8.0_66 as path to JAVA JDK
It is required that Java Cryptography Extension (JCE) Unlimited Strength Jurisdiction Policy Filesbe installed before the installation. If they have not been installed, the following message will bedisplayed and the installation will stop:In order to use 256 bit secure keys you must download the JCE Unlimited StrengthJurisdiction Policy Files from http://www.oracle.com/technetwork/java/index.html. After downloading, place the files into C:\Program Files\Java\jdk1.8.0_66\jre\lib\security.Installation failed! Details are in the install.log file.
Installing MFTISAfter starting the automated installation, you must complete all installation steps to complete theinstallation.
If you are installing MFTIS on Windows, a Java window labeled MFT Server will be displayed duringand after a successful installation.
You may stop and start the MFT Server by running the startup and shutdown scripts for theappropriate system in the MFTIS_Install/server/bin directory.
This window must be kept open for MFTIS to continue running. Closing the MFT Server window willshut down the web application.
Procedure
1. This step will extract the distribution file called cfcc.jar and set up the Java Mail if it is not alreadyconfigured.This step will install and configure the application server, detect the java environment variables, andinstall the MFTIS windows service if requiredStep 1 Extracting distributionFound distribution file c:\MFTIS\cfcc.jarUse C:\MFTCC\cfcc.jar as the distribution? y/n [y]:Extracting distribution file: C:\MFTIS\cfcc.jar................................................................................Distribution extracted successfully!
Is the application server installed as a Windows service or do you want to run it as a Windows service? y/n/? [y]:
Installing application server to C:\MFTIS\server..............................................................................................
Using C:\MFTIS\server as path to the application server installation.C:\MFTIS\server\conf\Catalina\localhost
11
TIBCO® Managed File Transfer Internet Server Installation
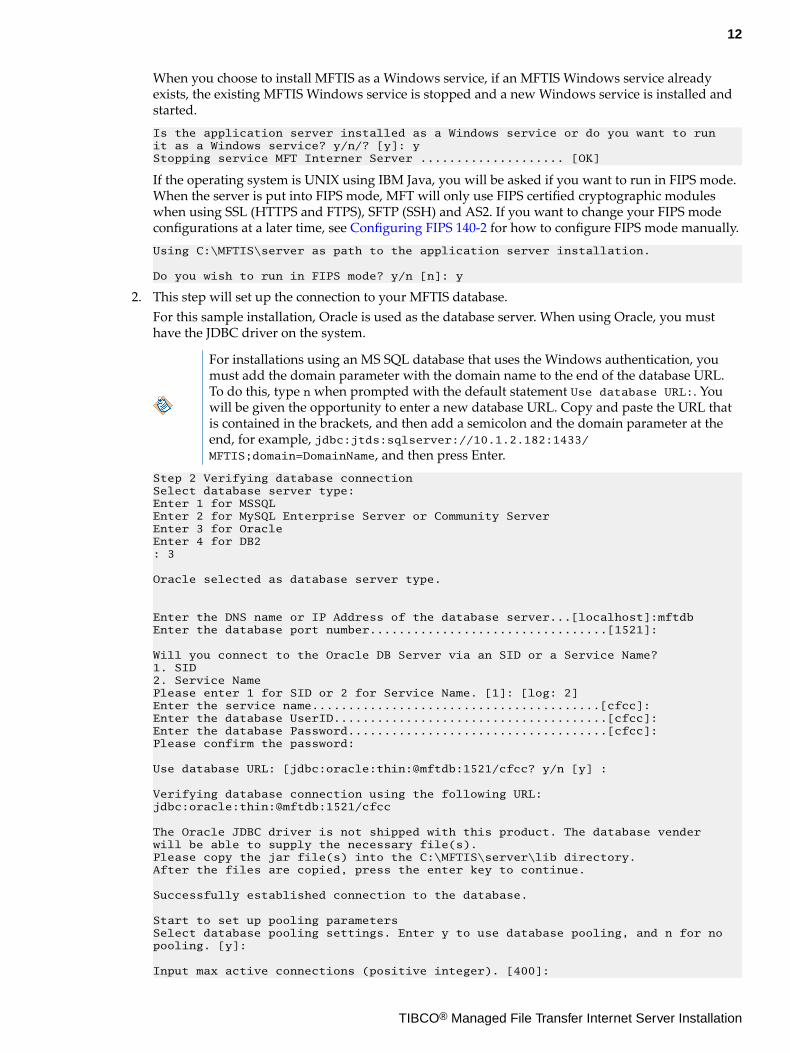
When you choose to install MFTIS as a Windows service, if an MFTIS Windows service alreadyexists, the existing MFTIS Windows service is stopped and a new Windows service is installed andstarted.Is the application server installed as a Windows service or do you want to run it as a Windows service? y/n/? [y]: yStopping service MFT Interner Server .................... [OK]
If the operating system is UNIX using IBM Java, you will be asked if you want to run in FIPS mode.When the server is put into FIPS mode, MFT will only use FIPS certified cryptographic moduleswhen using SSL (HTTPS and FTPS), SFTP (SSH) and AS2. If you want to change your FIPS modeconfigurations at a later time, see Configuring FIPS 140-2 for how to configure FIPS mode manually.Using C:\MFTIS\server as path to the application server installation.
Do you wish to run in FIPS mode? y/n [n]: y
2. This step will set up the connection to your MFTIS database.For this sample installation, Oracle is used as the database server. When using Oracle, you musthave the JDBC driver on the system.
For installations using an MS SQL database that uses the Windows authentication, youmust add the domain parameter with the domain name to the end of the database URL.To do this, type n when prompted with the default statement Use database URL:. Youwill be given the opportunity to enter a new database URL. Copy and paste the URL thatis contained in the brackets, and then add a semicolon and the domain parameter at theend, for example, jdbc:jtds:sqlserver://10.1.2.182:1433/MFTIS;domain=DomainName, and then press Enter.
Step 2 Verifying database connectionSelect database server type:Enter 1 for MSSQLEnter 2 for MySQL Enterprise Server or Community ServerEnter 3 for OracleEnter 4 for DB2: 3
Oracle selected as database server type.
Enter the DNS name or IP Address of the database server...[localhost]:mftdbEnter the database port number.................................[1521]:
Will you connect to the Oracle DB Server via an SID or a Service Name?1. SID2. Service NamePlease enter 1 for SID or 2 for Service Name. [1]: [log: 2]Enter the service name........................................[cfcc]:Enter the database UserID......................................[cfcc]:Enter the database Password....................................[cfcc]:Please confirm the password:
Use database URL: [jdbc:oracle:thin:@mftdb:1521/cfcc? y/n [y] :
Verifying database connection using the following URL:jdbc:oracle:thin:@mftdb:1521/cfcc
The Oracle JDBC driver is not shipped with this product. The database vender will be able to supply the necessary file(s).Please copy the jar file(s) into the C:\MFTIS\server\lib directory.After the files are copied, press the enter key to continue.
Successfully established connection to the database.
Start to set up pooling parametersSelect database pooling settings. Enter y to use database pooling, and n for nopooling. [y]:
Input max active connections (positive integer). [400]:
12
TIBCO® Managed File Transfer Internet Server Installation
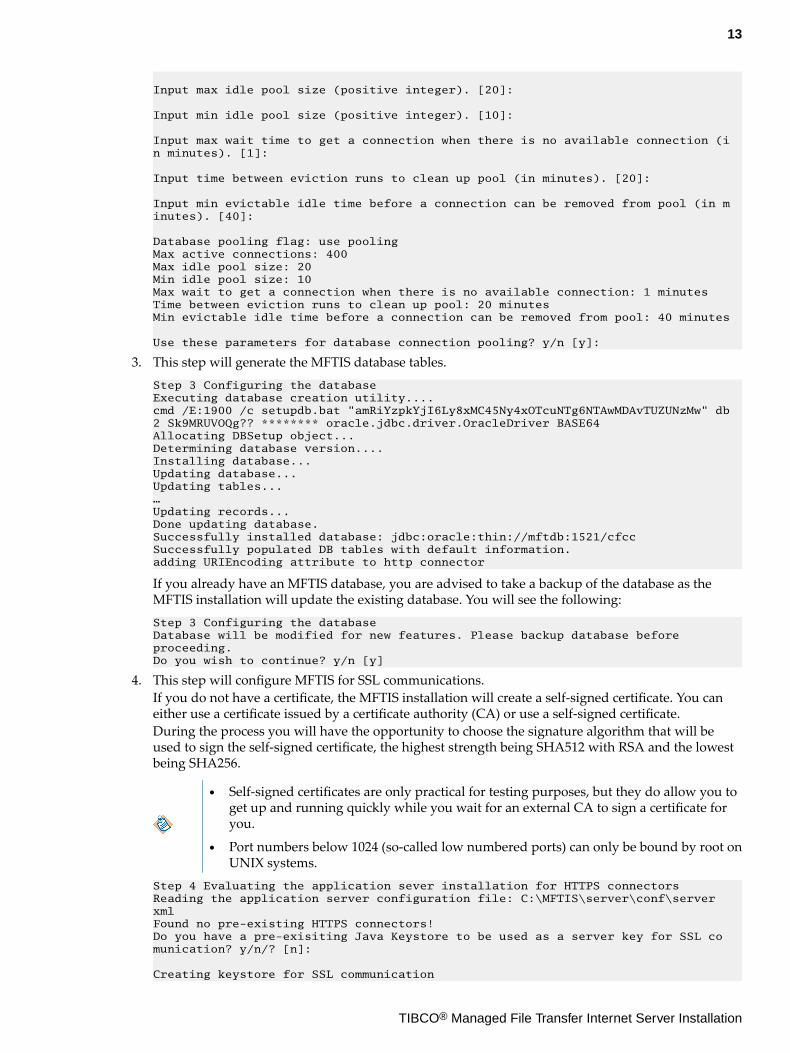
Input max idle pool size (positive integer). [20]:
Input min idle pool size (positive integer). [10]:
Input max wait time to get a connection when there is no available connection (in minutes). [1]:
Input time between eviction runs to clean up pool (in minutes). [20]:
Input min evictable idle time before a connection can be removed from pool (in minutes). [40]:
Database pooling flag: use poolingMax active connections: 400Max idle pool size: 20Min idle pool size: 10Max wait to get a connection when there is no available connection: 1 minutesTime between eviction runs to clean up pool: 20 minutesMin evictable idle time before a connection can be removed from pool: 40 minutes
Use these parameters for database connection pooling? y/n [y]:
3. This step will generate the MFTIS database tables.Step 3 Configuring the databaseExecuting database creation utility....cmd /E:1900 /c setupdb.bat "amRiYzpkYjI6Ly8xMC45Ny4xOTcuNTg6NTAwMDAvTUZUNzMw" db2 Sk9MRUVOQg?? ******** oracle.jdbc.driver.OracleDriver BASE64Allocating DBSetup object...Determining database version....Installing database...Updating database...Updating tables...…Updating records...Done updating database.Successfully installed database: jdbc:oracle:thin://mftdb:1521/cfccSuccessfully populated DB tables with default information.adding URIEncoding attribute to http connector
If you already have an MFTIS database, you are advised to take a backup of the database as theMFTIS installation will update the existing database. You will see the following:Step 3 Configuring the databaseDatabase will be modified for new features. Please backup database before proceeding.Do you wish to continue? y/n [y]
4. This step will configure MFTIS for SSL communications.If you do not have a certificate, the MFTIS installation will create a self-signed certificate. You caneither use a certificate issued by a certificate authority (CA) or use a self-signed certificate.During the process you will have the opportunity to choose the signature algorithm that will beused to sign the self-signed certificate, the highest strength being SHA512 with RSA and the lowestbeing SHA256.
● Self-signed certificates are only practical for testing purposes, but they do allow you toget up and running quickly while you wait for an external CA to sign a certificate foryou.
● Port numbers below 1024 (so-called low numbered ports) can only be bound by root onUNIX systems.
Step 4 Evaluating the application sever installation for HTTPS connectorsReading the application server configuration file: C:\MFTIS\server\conf\serverxmlFound no pre-existing HTTPS connectors!Do you have a pre-exisiting Java Keystore to be used as a server key for SSL comunication? y/n/? [n]:
Creating keystore for SSL communication
13
TIBCO® Managed File Transfer Internet Server Installation

Enter the keystore path and filename..[C:\MFTIS\keystore\keystore.jks]:Directory C:\MFTIS\keystore does not exist! Create? y/n [y]:Enter the keystore password (at least 6 characters)..[changeit]:Enter the alias of your private key......................[cfcc]:Enter the DNS Name or IP Address of your server............:10.97.142.191Select the signature and key algorithms you wish to use........:1. SHA256 with RSA2. SHA384 with RSA3. SHA512 with RSAPlease enter your selection. [1]:Enter your Company Name..............................[Optional]:TIBCOEnter your Organizational Unit Name..................[Optional]:Web DebtEnter the City where your company is located.........[Optional]:Palo AltoEnter the State where your company is located........[Optional]:CAEnter the two-letter country code for this unit......[Optional]:US
Keystore filename : C:\MFTIS\keystore\keystore.jksKeystore password : ********Key alias : cfccServer address : 10.97.142.191Signature and key alg: SHA256withRSAOrganization : TIBCOOrganizational Unit : Web DebtLocality : Palo AltoState : CACountry : USCreate a keystore with the above information? y/n [y]:
Creating keystore......C:\Program Files\Java\jdk1.6.0_29\bin\keytool -genkey -keystore C:\MFTIS\keysore\keystore.jks -storepass ******** -keypass ******** -keyalg RSA -sigalg SHA256withRSA -alias cfcc -keySize 2048 -validity 3650 -dname CN=10.97.142.191, O=TICO, OU=Web Dept, L=Palo Alto, ST=CA, C=US
Enter the HTTPS Port to listen for connections… [7443]:
5. This step will configure the MFTIS components and ports on the application server.To provide the most secure environment, the connector is set to only allow secure ciphers bydefault. To view those ciphers, type v for them to be displayed. If all ciphers that Java will allow ispreferred, select option 2. The AJP port is used for forwarding requests from an HTTP server.Step 5 Updating the application server Connector ConfigurationDefault HTTPS Connector parameters for port 7443:The Default Verbosity Level - 2The Default Debug Level - 2The Default Buffer size - 2048The Default Connection Timeout - 60000The Default DNS Lookup set to - trueThe Default Max active requests - 128The Default Min Processors - 5The Default Max Processors - 100
Accept these parameters? y/n [y]:Select the SSL ciphers you wish to the server to support.1. Secure ciphers2. All ciphersPlease enter your selection or v to view secure ciphers. [1]:
Enter the HTTP port to listen for connections... [7080] :
Enter the port to listen for shutdown requests... [7005] :
Enter the AJP port... [7009] :
6. This step will configure the context root that will be used in the URL.The context name should be set to an alphanumeric name. Using special characters within a contextname can cause unpredictable results and is not recommended.Step 6 Evaluating the application server installation for contextsEnter the context root for this installation ........[cfcc]
Reading context configuration file: C:\MFTIS\server\conf\Catalina\localhost
14
TIBCO® Managed File Transfer Internet Server Installation
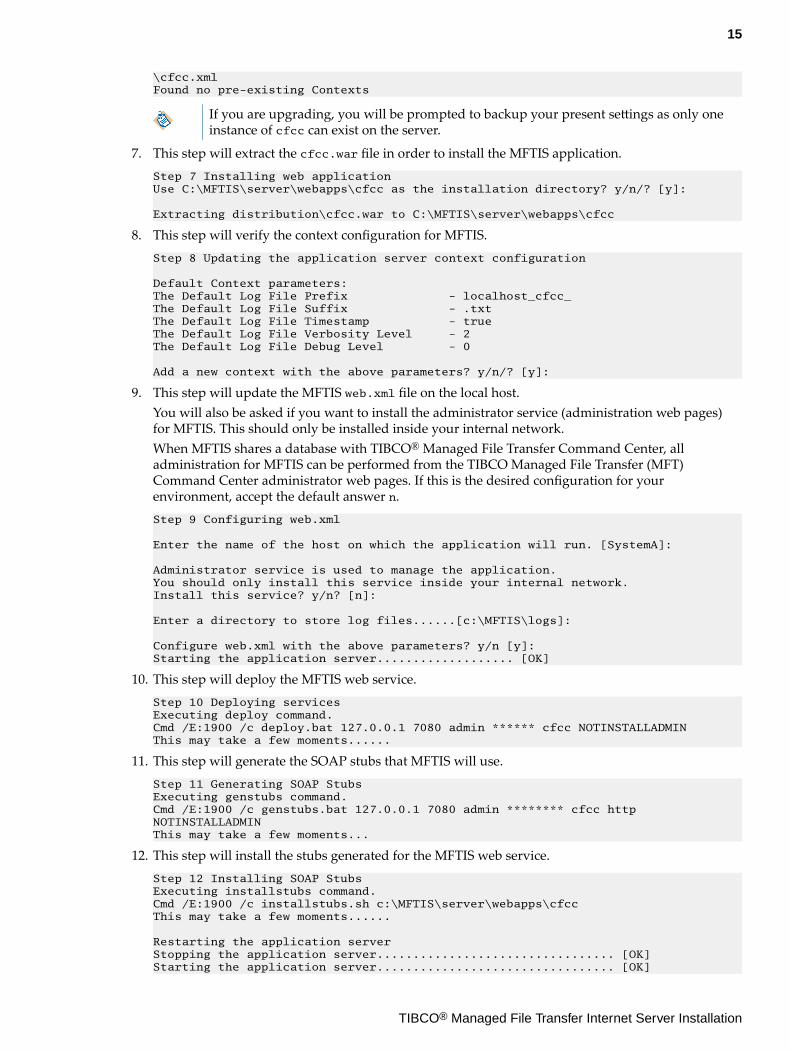
\cfcc.xmlFound no pre-existing Contexts
If you are upgrading, you will be prompted to backup your present settings as only oneinstance of cfcc can exist on the server.
7. This step will extract the cfcc.war file in order to install the MFTIS application.Step 7 Installing web applicationUse C:\MFTIS\server\webapps\cfcc as the installation directory? y/n/? [y]:
Extracting distribution\cfcc.war to C:\MFTIS\server\webapps\cfcc
8. This step will verify the context configuration for MFTIS.Step 8 Updating the application server context configuration
Default Context parameters:The Default Log File Prefix - localhost_cfcc_The Default Log File Suffix - .txtThe Default Log File Timestamp - trueThe Default Log File Verbosity Level - 2The Default Log File Debug Level - 0
Add a new context with the above parameters? y/n/? [y]:
9. This step will update the MFTIS web.xml file on the local host.You will also be asked if you want to install the administrator service (administration web pages)for MFTIS. This should only be installed inside your internal network.When MFTIS shares a database with TIBCO® Managed File Transfer Command Center, alladministration for MFTIS can be performed from the TIBCO Managed File Transfer (MFT)Command Center administrator web pages. If this is the desired configuration for yourenvironment, accept the default answer n.Step 9 Configuring web.xml
Enter the name of the host on which the application will run. [SystemA]:
Administrator service is used to manage the application.You should only install this service inside your internal network.Install this service? y/n? [n]:
Enter a directory to store log files......[c:\MFTIS\logs]:
Configure web.xml with the above parameters? y/n [y]:Starting the application server................... [OK]
10. This step will deploy the MFTIS web service.Step 10 Deploying servicesExecuting deploy command.Cmd /E:1900 /c deploy.bat 127.0.0.1 7080 admin ****** cfcc NOTINSTALLADMINThis may take a few moments......
11. This step will generate the SOAP stubs that MFTIS will use.Step 11 Generating SOAP StubsExecuting genstubs command.Cmd /E:1900 /c genstubs.bat 127.0.0.1 7080 admin ******** cfcc http NOTINSTALLADMINThis may take a few moments...
12. This step will install the stubs generated for the MFTIS web service.Step 12 Installing SOAP StubsExecuting installstubs command.Cmd /E:1900 /c installstubs.sh c:\MFTIS\server\webapps\cfccThis may take a few moments......
Restarting the application serverStopping the application server................................. [OK]Starting the application server................................. [OK]
15
TIBCO® Managed File Transfer Internet Server Installation

13. This step will install the TIBCO Accelerator protocol.If installing MFTIS on Windows, you need to install Microsoft Visual C++ Redistributable Packageto use TIBCO Accelerator for accelerated transfers over high latency lines.Step 13 Install the Visual C++ Redistributable Package
Will you be using the TIBCO Accelerator to accelerate data transfersusing the Internet Server Desktop Client? y/n [n]: y
If you have not already done so, you must install the Microsoft VisualC++ 2008 Redistributable Package that is needed to run the TIBCO Accelerator.The Microsoft Visual C++ 2008 Redistributable Package (x86) installs runtimecomponents of Visual C++ Libraries required to run applications developed withVisual C++ on a computer that does not have Visual C++ 2008 installed.
Go to the distribution\vcredist directory and click on the vcredist_x86.exe fileto begin the installation.................................. [OK]
14. This step will copy the JMS jar files.When MFTIS shares a database with TIBCO MFT Command Center, transfers among othersupported features can be performed to or from JMS queues.To use JMS in conjunction with MFTIS, you must copy the JMS jar files for your JMS serverinstallation to the MFTIS_install\server\webapps\cfcc\WEB-INF\libs directory as noted in themessage that will be displayed. The jar files used must be the same JMS jar files that TIBCO MFTCommand Center installation is configured with.Step 14 Copy JMS files
If you are using the JMS interface, you must copy the JMS jar files to thefollowing location:C:\MFTIS\server\webapps\cfcc\WEB-INF\libThese jar files are typically found in the JMS Server installation.Restart the MFT server after copying the jar files.You can configure and test the JMS settings through the Command Center.Go to the Management > Manage Services > Configure JMS Service page.On that page you can click on help for a list of the provider specific jar files.
Press the enter key to continue.
Installation completed! Details are in the install.log file.
Result
The MFTIS automated installation is completed.
What to do next
If the Administrator service is installed, you can access MFTIS using the following URLs:
● MFTIS administrator web pages
— https://[DNS_HostName]:[httpsPort]/[context]/control?view=view/admin/start.jsp— https://[DNS_HostName]:[httpsPort]/admin
● MFT transfer client
— https://[DNS_HostName]:[httpsPort]If the default context was not used during installation, the redirector file for this shortcut as well asothers mentioned later in this manual will need to be updated to redirect to the non-standard context.Follow the instructions below to make these changes:
The redirection files can be found in the MFTIS_Install\server\webapps\ROOT directory. Use a texteditor to open and change the cfcc context in these files to the new context chosen during the install.When your changes have been made, save and close the files.
16
TIBCO® Managed File Transfer Internet Server Installation
When you are prompted for a user ID and password, you must log in with the administratorcredentials of admin/changeit.
17
TIBCO® Managed File Transfer Internet Server Installation
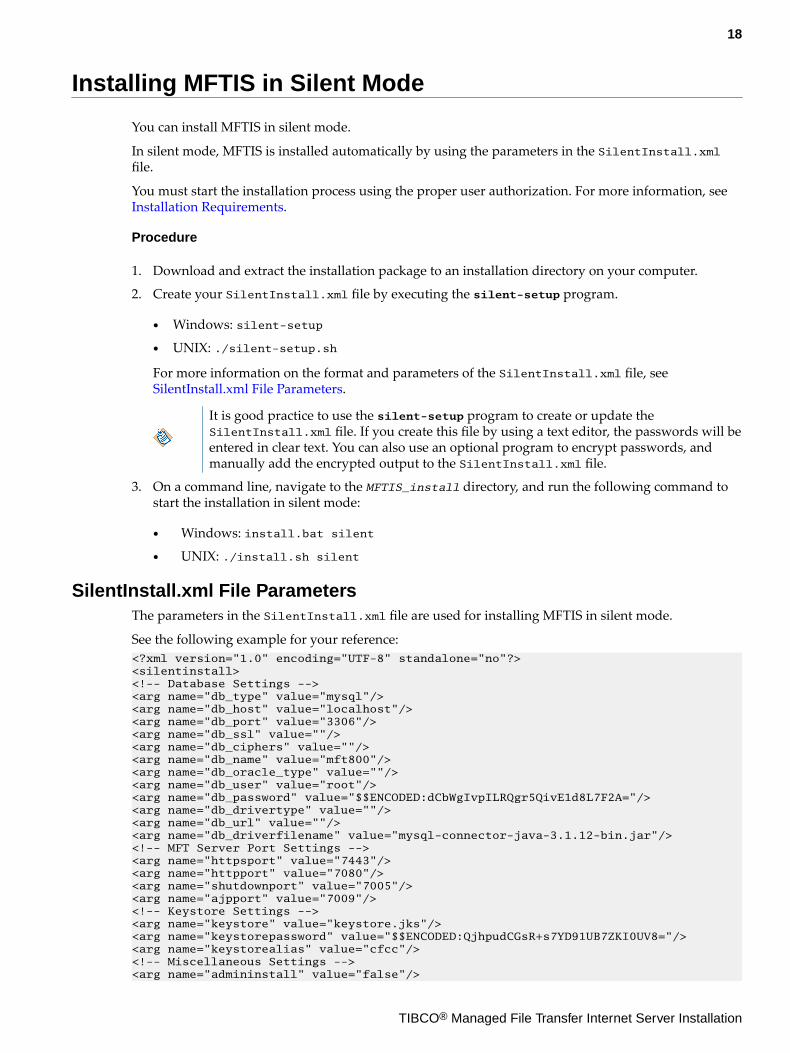
Installing MFTIS in Silent Mode
You can install MFTIS in silent mode.
In silent mode, MFTIS is installed automatically by using the parameters in the SilentInstall.xmlfile.
You must start the installation process using the proper user authorization. For more information, see Installation Requirements.
Procedure
1. Download and extract the installation package to an installation directory on your computer.
2. Create your SilentInstall.xml file by executing the silent-setup program.
● Windows: silent-setup
● UNIX: ./silent-setup.sh
For more information on the format and parameters of the SilentInstall.xml file, see SilentInstall.xml File Parameters.
It is good practice to use the silent-setup program to create or update theSilentInstall.xml file. If you create this file by using a text editor, the passwords will beentered in clear text. You can also use an optional program to encrypt passwords, andmanually add the encrypted output to the SilentInstall.xml file.
3. On a command line, navigate to the MFTIS_install directory, and run the following command tostart the installation in silent mode:
● Windows: install.bat silent
● UNIX: ./install.sh silent
SilentInstall.xml File ParametersThe parameters in the SilentInstall.xml file are used for installing MFTIS in silent mode.
See the following example for your reference:<?xml version="1.0" encoding="UTF-8" standalone="no"?><silentinstall><!-- Database Settings --><arg name="db_type" value="mysql"/><arg name="db_host" value="localhost"/><arg name="db_port" value="3306"/><arg name="db_ssl" value=""/><arg name="db_ciphers" value=""/><arg name="db_name" value="mft800"/><arg name="db_oracle_type" value=""/><arg name="db_user" value="root"/><arg name="db_password" value="$$ENCODED:dCbWgIvpILRQgr5QivE1d8L7F2A="/><arg name="db_drivertype" value=""/><arg name="db_url" value=""/><arg name="db_driverfilename" value="mysql-connector-java-3.1.12-bin.jar"/><!-- MFT Server Port Settings --><arg name="httpsport" value="7443"/><arg name="httpport" value="7080"/><arg name="shutdownport" value="7005"/><arg name="ajpport" value="7009"/><!-- Keystore Settings --><arg name="keystore" value="keystore.jks"/><arg name="keystorepassword" value="$$ENCODED:QjhpudCGsR+s7YD91UB7ZKI0UV8="/><arg name="keystorealias" value="cfcc"/><!-- Miscellaneous Settings --><arg name="admininstall" value="false"/>
18
TIBCO® Managed File Transfer Internet Server Installation
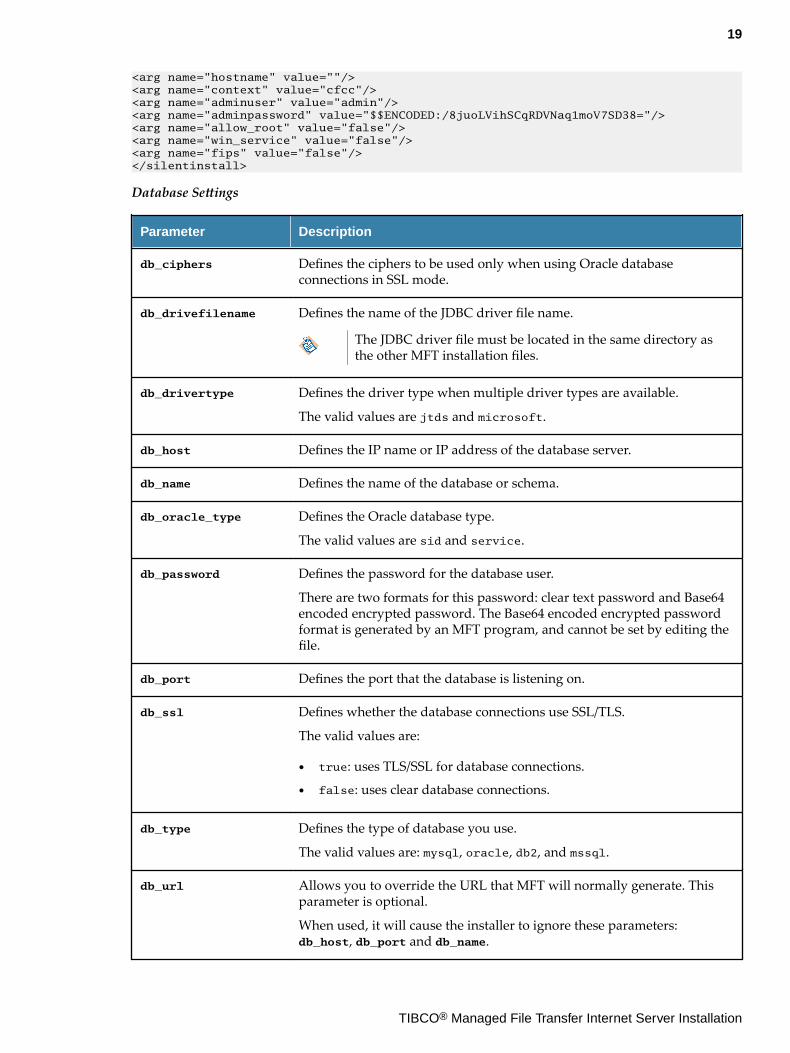
<arg name="hostname" value=""/><arg name="context" value="cfcc"/><arg name="adminuser" value="admin"/><arg name="adminpassword" value="$$ENCODED:/8juoLVihSCqRDVNaq1moV7SD38="/><arg name="allow_root" value="false"/><arg name="win_service" value="false"/><arg name="fips" value="false"/></silentinstall>
Database Settings
Parameter Description
db_ciphers Defines the ciphers to be used only when using Oracle databaseconnections in SSL mode.
db_drivefilename Defines the name of the JDBC driver file name.
The JDBC driver file must be located in the same directory asthe other MFT installation files.
db_drivertype Defines the driver type when multiple driver types are available.
The valid values are jtds and microsoft.
db_host Defines the IP name or IP address of the database server.
db_name Defines the name of the database or schema.
db_oracle_type Defines the Oracle database type.
The valid values are sid and service.
db_password Defines the password for the database user.
There are two formats for this password: clear text password and Base64encoded encrypted password. The Base64 encoded encrypted passwordformat is generated by an MFT program, and cannot be set by editing thefile.
db_port Defines the port that the database is listening on.
db_ssl Defines whether the database connections use SSL/TLS.
The valid values are:
● true: uses TLS/SSL for database connections.
● false: uses clear database connections.
db_type Defines the type of database you use.
The valid values are: mysql, oracle, db2, and mssql.
db_url Allows you to override the URL that MFT will normally generate. Thisparameter is optional.
When used, it will cause the installer to ignore these parameters:db_host, db_port and db_name.
19
TIBCO® Managed File Transfer Internet Server Installation

Parameter Description
db_user Defines the user name that has access to the defined database.
Server Port Settings
Parameter Description
ajpport Defines the server AJP port number.
httpport Defines the HTTP port number.
httpsport Defines the HTTPS port number.
shutdownport Defines the server shutdown port number.
Keystore Settings
Parameter Description
keystore Defines the name of the keystore file used by the HTTPS connector.
The keystore file must be located in the same directory as theother MFT installation files.
keystorealias Defines the keystore key alias used by the HTTPS connector.
keystorepassword Defines the password for the keystore. There are two formats for thispassword: clear text password and Base64 encoded encrypted password.The Base64 encoded encrypted password format is generated by an MFTprogram, and cannot be set by editing the file.
Miscellaneous Settings
Parameter Description
admininstall Defines whether the admin service will be installed. This parameter isignored for Command Center installations.
The valid values are:
● true: installs the admin service.
● false: does not install the admin service.
adminpassword Defines the credentials for the admin user.
adminuser Defines the admin user that is used to connect to the MFT server tovalidate that it is operational.
allow_root Defines whether the MFT application can be installed by a root user.
The valid values are true or false.
20
TIBCO® Managed File Transfer Internet Server Installation
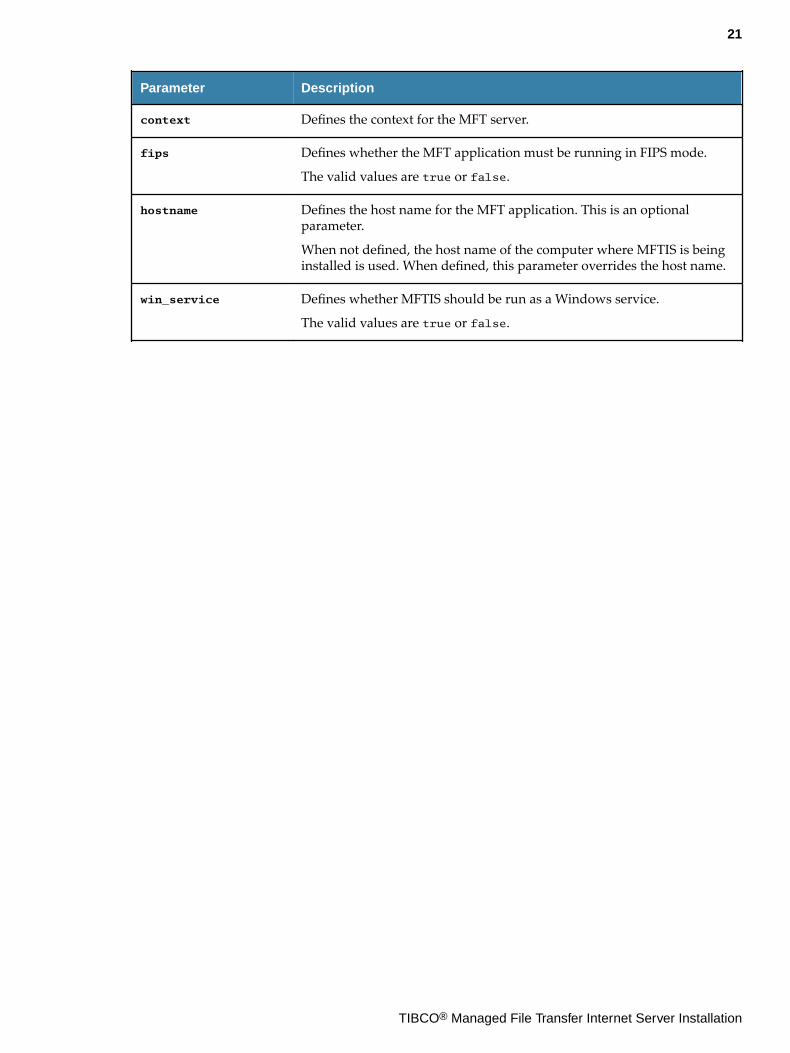
Parameter Description
context Defines the context for the MFT server.
fips Defines whether the MFT application must be running in FIPS mode.
The valid values are true or false.
hostname Defines the host name for the MFT application. This is an optionalparameter.
When not defined, the host name of the computer where MFTIS is beinginstalled is used. When defined, this parameter overrides the host name.
win_service Defines whether MFTIS should be run as a Windows service.
The valid values are true or false.
21
TIBCO® Managed File Transfer Internet Server Installation
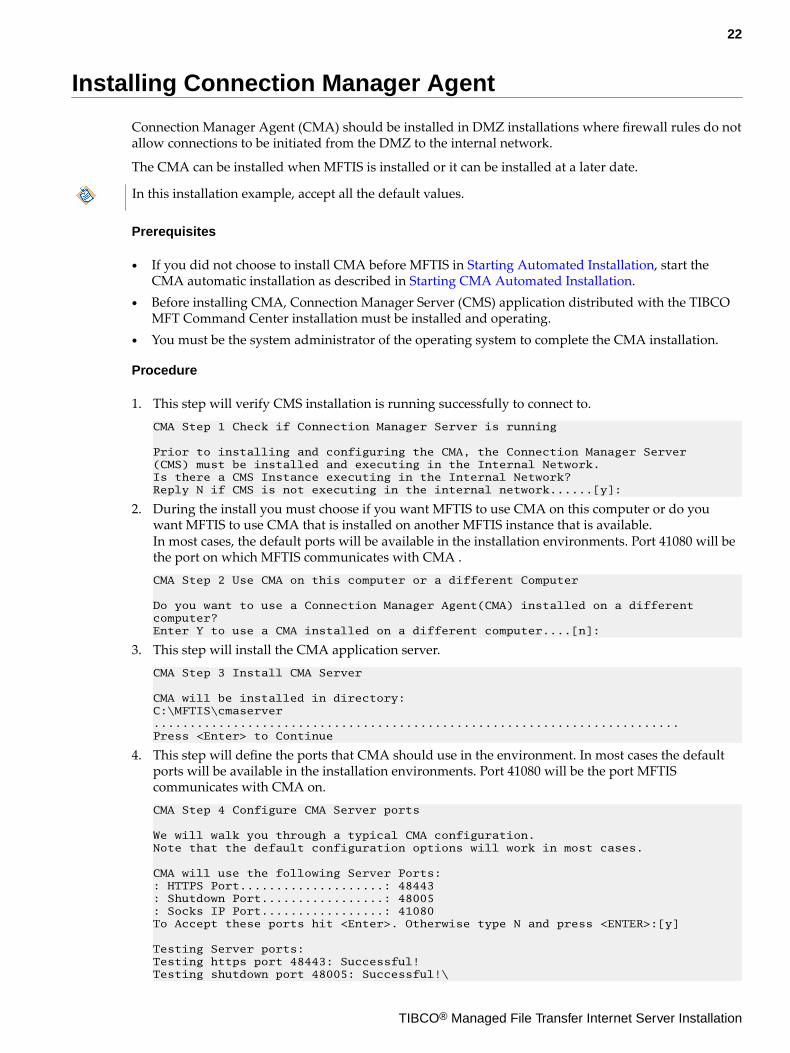
Installing Connection Manager Agent
Connection Manager Agent (CMA) should be installed in DMZ installations where firewall rules do notallow connections to be initiated from the DMZ to the internal network.
The CMA can be installed when MFTIS is installed or it can be installed at a later date.
In this installation example, accept all the default values.
Prerequisites
● If you did not choose to install CMA before MFTIS in Starting Automated Installation, start theCMA automatic installation as described in Starting CMA Automated Installation.
● Before installing CMA, Connection Manager Server (CMS) application distributed with the TIBCOMFT Command Center installation must be installed and operating.
● You must be the system administrator of the operating system to complete the CMA installation.
Procedure
1. This step will verify CMS installation is running successfully to connect to.CMA Step 1 Check if Connection Manager Server is running
Prior to installing and configuring the CMA, the Connection Manager Server(CMS) must be installed and executing in the Internal Network.Is there a CMS Instance executing in the Internal Network?Reply N if CMS is not executing in the internal network......[y]:
2. During the install you must choose if you want MFTIS to use CMA on this computer or do youwant MFTIS to use CMA that is installed on another MFTIS instance that is available.In most cases, the default ports will be available in the installation environments. Port 41080 will bethe port on which MFTIS communicates with CMA .CMA Step 2 Use CMA on this computer or a different Computer
Do you want to use a Connection Manager Agent(CMA) installed on a differentcomputer?Enter Y to use a CMA installed on a different computer....[n]:
3. This step will install the CMA application server.CMA Step 3 Install CMA Server
CMA will be installed in directory:C:\MFTIS\cmaserver.........................................................................Press <Enter> to Continue
4. This step will define the ports that CMA should use in the environment. In most cases the defaultports will be available in the installation environments. Port 41080 will be the port MFTIScommunicates with CMA on.CMA Step 4 Configure CMA Server ports
We will walk you through a typical CMA configuration.Note that the default configuration options will work in most cases.
CMA will use the following Server Ports:: HTTPS Port....................: 48443: Shutdown Port.................: 48005: Socks IP Port.................: 41080To Accept these ports hit <Enter>. Otherwise type N and press <ENTER>:[y]
Testing Server ports:Testing https port 48443: Successful!Testing shutdown port 48005: Successful!\
22
TIBCO® Managed File Transfer Internet Server Installation

Testing Server ports (Socks IP Port) :41080Testing Socks IP Port 41080: Successful!
Server Port tests successful. Press <Enter> to Continue
5. This step will define and test the ports that CMA and CMS will communicate on. The default portsin most cases will be available in the installation environment.CMA Step 5 Configure CMA Ports configured by CMS
CMA will use the following ports to communicate with CMS.These ports were configured during CMS installation.These ports MUST match the ports configured on the CMS.Note: The default values will work in most environments.
CMA will use the following Command and Data ports.CMA Command IP Port...............: 48000CMA Data IP Port..................: 48001To Accept these ports hit <Enter>.Otherwise type N and press <ENTER>...........:[y]
Testing CMA Ports:
Testing command channel port: 48000 ...Testing command channel port 48000: Successful!
Testing data channel port: 48001 ...Testing data channel port 48001: Successful!
Server Port tests Successful. Press <Enter> to Continue
6. This step will verify the IP network that CMA will accept connections from.CMA Step 6 Configure Command Center management hosts
By Default, CMA will accept Command Center Management requests from IPNetworks 10.0.0.0 and 192.168.0.0.Actual Value :[10.0.0.0/8;192.168.0.0/16]These addresses will work in most environments.Type Y to Override IP addresses for Command Center......[n]:
7. This step will verify the IP network that CMA will accept connections from CMS from.CMA Step 7 Configure CMS IP addresses accepted
CMA will accept incoming connections from the Internal Network from IPNetworks 10.0.0.0 and 192.168.0.0.Actual Value :[10.0.0.0/8;192.168.0.0/16]These addresses will work in most environments.Type Y to Override IP addresses for incoming connections......[n]:
8. This step will define the IP address range that CMA will use in the environment.CMA Step 8 Configure IP Addresses that will use Connection Manager Agent.
By default, Internet Server will use the CMA for connections to IP Addresses: 10.0.0.0 and 192.168.0.0.Actual Value :[10.0.0.0/8;192.168.0.0/16]These addresses will work in most environments.Type Y to Override IP addresses that use CMA......[n]:
9. To administer CMA through TIBCO MFT Command Center, you must configure a password.By default, the password will be set to changeit if another one is not selected at this time. You canchange the password later through TIBCO MFT Command Center if needed.CMA Step 9 Configure the password used by Command Center to configure CMA.
Command Center requires a password to configure CMA.Enter the password used by Command Center to configure CMS.....[changeit]:Default password:[changeit] will be usedEnter 'y' to confirm, Enter 'n' to re-enter password...[y]
23
TIBCO® Managed File Transfer Internet Server Installation

10. This step will start CMA.CMA Step 10 Starting CMA Server
The Connection Manager Agent is starting
Try 0 to contact to the application serverConnection Manager test successful
11. This step will test the connection to a server in the internal network behind the firewall.For example, it may be the database that is being used for the TIBCO MFT Command Center andTIBCO MFT Internet Server installation or it could be remote Platform Server that is running andlistening on port 46464. Enter the IP/hostname, and then port number to verify we are able toconnect through the CMS server.CMA Step 11 Testing CMA Server
We will now test a connection to an internal network server. You need toenter an IP Address/hostname and an IP Port of a service that is currentlyactive in the Internal Network and is listening on a TCP Port. We will thentest the connection through Connection manager to make sure that it is working.
Example: Enter the Database Server Hostname and port.Enter an Internal Network hostname or IP Address.......:10.97.197.58Enter the TCP Port that the application is listening on.......:50000Enter 'y' to use host: 10.97.197.58, and port: 50000 for the testing, or 'n' tochange these values. [y]:
Verifying CMA connections with 10.97.197.58:50000...Connection verified successfully.
12. This step will fully configure CMA. To make any changes to your CMA settings, you would AddConnection Manager Node in to your TIBCO MFT Command Center and manage the server fromthere.For more information about configuring the connection, see TIBCO Managed File Transfer InternetServer User's Guide.CMA Step 12 CMA Configuration complete
Most of these configuration options can be changed through the Command Centeradmin pages: To configure this CMA through Command Center, do the following:: Management ==> Connection Manager ==> Add Connection Manager Node: Set a unique name for this CM Node: Set the Connection Manager Type to Connection Manager Agent: Set the IP Address to the IP Address or Host Name of this machine: Set the IP Port to HTTPS Port 48443: Set the Password in the Server credentials to the password you just entered
Connection Manager Agent installation completed successfully!!Installation details are in the cmainstall.log file.
Press <ENTER> to continue with the MFT Internet Server installation.
Starting CMA Automated InstallationIf you did not choose to install CMA before MFTIS, start the CMA automated installation to installCMA.
Procedure
1. On a command line, navigate to the MFTIS_Install directory and extract CMAInstall.jar withthe following command:jar –xvf CMAInstall.jar
24
TIBCO® Managed File Transfer Internet Server Installation
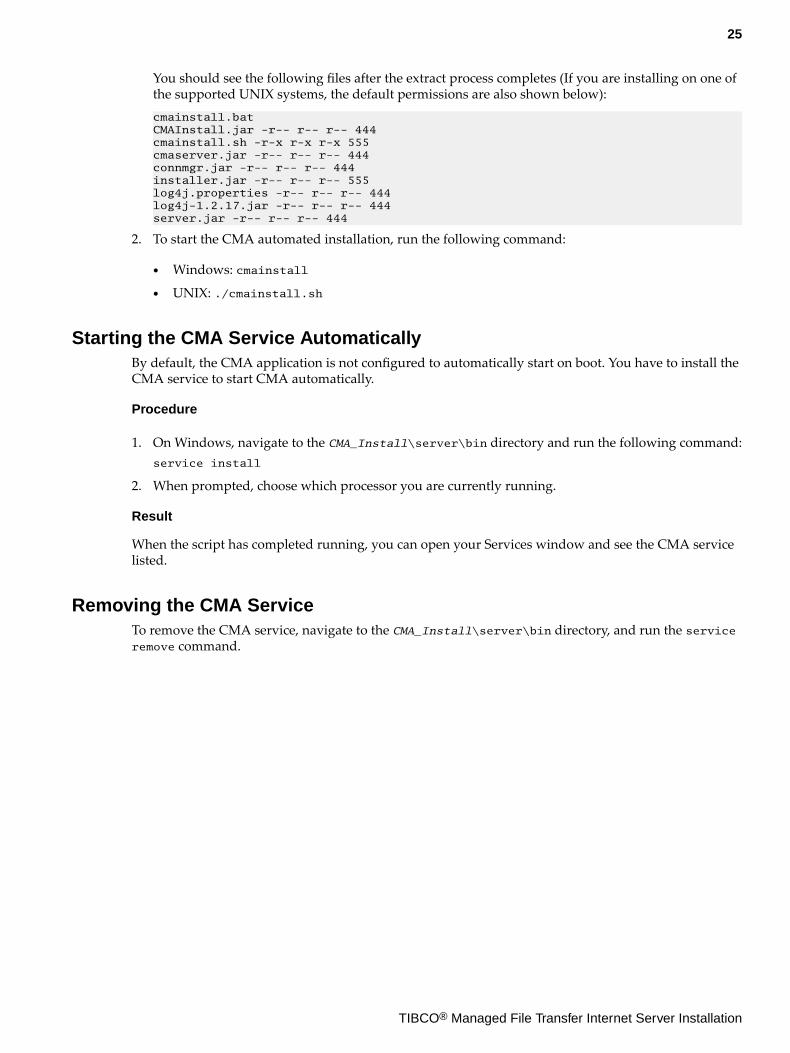
You should see the following files after the extract process completes (If you are installing on one ofthe supported UNIX systems, the default permissions are also shown below):cmainstall.batCMAInstall.jar -r-- r-- r-- 444cmainstall.sh -r-x r-x r-x 555cmaserver.jar -r-- r-- r-- 444connmgr.jar -r-- r-- r-- 444installer.jar -r-- r-- r-- 555log4j.properties -r-- r-- r-- 444log4j-1.2.17.jar -r-- r-- r-- 444server.jar -r-- r-- r-- 444
2. To start the CMA automated installation, run the following command:
● Windows: cmainstall
● UNIX: ./cmainstall.sh
Starting the CMA Service AutomaticallyBy default, the CMA application is not configured to automatically start on boot. You have to install theCMA service to start CMA automatically.
Procedure
1. On Windows, navigate to the CMA_Install\server\bin directory and run the following command:service install
2. When prompted, choose which processor you are currently running.
Result
When the script has completed running, you can open your Services window and see the CMA servicelisted.
Removing the CMA ServiceTo remove the CMA service, navigate to the CMA_Install\server\bin directory, and run the serviceremove command.
25
TIBCO® Managed File Transfer Internet Server Installation
Upgrading MFTIS
You can upgrade MFTIS from a previous version.
Some steps in the upgrading process will differ, depending on the version of the former MFTIS that youhave installed presently.
Both TIBCO MFT Command Center and TIBCO MFT Internet Server can be installed on the sameserver sharing a database as long as different ports are used. By default, TIBCO MFT Command Centeruses ports 8080 and 8443 for the HTTP and HTTPS protocols and TIBCO MFT Internet Server uses ports7080 and 7443 for the HTTP and HTTPS protocols respectively.
The database should always be backed up before upgrading. Before upgrading the final instance ofTIBCO MFT Internet Server or TIBCO MFT Command Center from 7.2.x, 7.3.x or 8.0.0 to 8.0.1, youmust take an additional backup of the database. You will need to use this backup if you ever need torevert to a earlier version of MFT.
If you use DB2 database and upgrade MFTIS from a previous version to version 8.0.1, the database usermust have the database administrator right.
See the following introductions on how to upgrade MFTIS from a previous version:
● Upgrading from Version 7.2.0 - 7.2.4
For those upgrading from version 7.2.0 and above, you must upgrade to version 7.2.5 beforeupgrading to version 8.0.1. Follow the instructions given in TIBCO Managed File Transfer InternetServer Installation Guide of version 7.2.5.
● Upgrading from Version 7.2.5
For more information, see Upgrading from Version 7.2.5.
Upgrading from Version 7.2.5You can upgrade MFTIS from version 7.2.5 to 8.0.1.
Procedure
1. Create a new installation directory to hold the MFTIS 8.0.1 installation files on the server whereversion 7.2.5 is installed and running.
2. Stop the application or service.
3. Uninstall MFTIS.If it is running on Windows, see Removing the MFTIS Service on Windows for information on howto uninstall MFTIS.
4. Verify all the prerequisites are met by reading through the MFTIS Readme file.
5. Follow the instructions in Installing MFTIS.
Result
When the installation is finished and you no longer want to keep the version 7.2.5 installation on yourserver, you can delete the old installation directory.
26
TIBCO® Managed File Transfer Internet Server Installation
Upgrading Java JDKWhen upgrading the Java JDK that is being used by MFTIS, you will need to update a few items beforeMFTIS will start to use the new Java JDK.
Prerequisites
If MFTIS is running on a Windows system and is running as a service, stop the MFTIS service.
Procedure
1. Navigate to MFT_Install\server\bin directory, run the following command, and answer thequestions to uninstall the service:service remove
2. Update the JAVA_HOME environment variable to point to the new JDK directory. Then, verify thesystem is pointing to the new Java JDK by running the following command:java –version
3. Update JCE Unlimited Strength Jurisdiction Policy Files. For more details, see Starting AutomatedInstallation .
4. If MFTIS is installed on Windows, you navigate to MFTIS_Install\server\bin directory, run thefollowing command, and answer the questions to install MFT to run as a service:service install
5. Start MFTIS.
27
TIBCO® Managed File Transfer Internet Server Installation
Configuring FIPS 140-2
This section will guide you through the required configuration steps to enable MFTIS’s FIPS 140-2compliant processing.
Enabling FIPS Mode ManuallyThe following steps are only necessary if you did not enable FIPS mode during installation. If youenabled FIPS mode during installation, the installer automatically configured FIPS mode and no furtheraction is necessary.
Prerequisites
To enable FIPS mode, your environment must support FIPS mode and have an IBM Java that isconfigured to run in FIPS mode.
Procedure
1. Enabling Transport Layer Security
2. Setting IBM Java Security to Use FIPS Certified Cryptographic Security Provider
3. Setting the MFTIS Environment Variable
Result
MFTIS will now operate in FIPS mode.
Enabling Transport Layer SecurityAll browsers used to access MFTIS must be set to use Transport Layer Security (TLS) to make a secureconnection and login after putting the application server into FIPS mode.
Procedure
1. Open your browser and click the Tools menu and click Internet Options.
2. Click the Advanced tab.
3. In the Security section, and select the Use TLS version_number check box.
4. Click Ok and refresh your page.
Result
You should now be able to log into your MFTIS.
Setting IBM Java Security to Use FIPS Certified Cryptographic Security ProviderYou must set the java.security file to use FIPS certified cryptographic security provider.
Procedure
1. Stop the application server.
For information on starting and stopping the application server, see the end of InstallingMFTIS.
2. Navigate to the JAVA_HOME\jre\lib\security directory and open your java.security file withany available text editor.
28
TIBCO® Managed File Transfer Internet Server Installation

3. Uncomment the following value by removing the pound sign (#) from the front of the statement.
If you do not see the statement shown below in your file, you must add it to the top of thelist as number 1.
#security.provider.1=com.ibm.crypto.fips.provider.IBMJCEFIPS
4. Reset the security provider number values for the other security providers, so they are in numberorder from 1 through 11.
5. When you finish editing the file, save your changes and exit the file.
6. Navigate to the following directory and open the web.xml file to edit using an available text editor.MFTIS_Install/server/webapps/CONTEXT_NAME/WEB-INF/
7. Search for the SSHSecurityProvider parameter and configure it as follows:<context-param><param-name>SSHSecurityProvider</param-name><param-value>com.ibm.crypto.fips.provider.IBMJCEFIPS</param-value></context-param>
8. When you have finished, save the file.
What to do next
Set the MFTIS environment variable, and then restart the MFT server. See Setting the MFTISEnvironment Variable.
Setting the MFTIS Environment VariableThe setenv.sh file is located in the MFTIS_Install/server/bin directory. This script setsenvironment variables needed by the MFT server.
The file should look like the following:#!/bin/shCATALINA_OPTS="-Xms512m -Xmx4096m"FIPS_MODE="false"
Procedure
1. Change the value to FIPS_MODE="true".
2. When you are done, save and exit the file.
3. Start your application server.
Taking MFTIS Out of FIPS ModeYou can manually take MFTIS out of FIPS mode if you have enabled it.
If you manually enabled FIPS mode, you will have to undo the changes you made when putting MFTinto FIPS mode. If FIPS was automatically configured during installation, see Configuring FIPS 140-2for more details on which files to edit.
Procedure
1. Remove FIPS certified cryptographic provider from the list of providers in the java.security file.
When removing the cryptographic provider from the java.security file, you can eithercomment out the line with the pound sign (#) or delete the line. You must fix the order ofthe providers after that.
2. Set the MFT environment variable FIPS_MODE to false in the setenv.sh file.
29
TIBCO® Managed File Transfer Internet Server Installation
3. Remove the provider name from SSHSecurityProvider parameter in the web.xml file.
4. Restart the server.
30
TIBCO® Managed File Transfer Internet Server Installation
Changing the Default Logos
You can customize MFTIS logos in the <MFTIS_Install>\server\webapps\cfcc\view\images and<MFTIS_Install>\server\webapps\cfcc\login\images directories.
● The following logo is used by the MFT transfer client. It is named as ft_logo.gif with a size of245x89.
● The following logo is used by the MFTIS administrator login. It is named as corporate_logo.pngwith a size of 95x30.
● The following logo is used by the MFTIS administrator login help pages. It is named asmft_logo.png with a size of 268x64.
● The following logo is used by the MFTIS administrator. It is named as mft-is-logo.png with a sizeof 204x88.
● The following logo is used by the MFTIS administrator login. It is named as product_logo_is.pngwith a size of 663x144.
● The following logo is used by the MFTIS administrator. It is named as tibco-logo-117-24.jpgwith a size of 117x24.
● The following logo is used by the desktop client. It is named as about-company-logo.png with asize of 74x74.
31
TIBCO® Managed File Transfer Internet Server Installation
Procedure
1. Navigate to the directory where the logo is located.
2. Rename the logo that is being replaced by adding .OLD after the file extension. For example,logo.png.old.
3. Copy your new logos into the directory and make sure the file names, type, and sizes match theoriginal file names in the directory.
4. Refresh your browser.
32
TIBCO® Managed File Transfer Internet Server Installation
Uninstalling MFTIS
To remove MFTIS from the Windows or UNIX server, delete the MFTIS_Install directory.
If MFTIS has been installed as a Windows service, you have to remove the service. For moreinformation, see Removing the MFTIS Service on Windows.
33
TIBCO® Managed File Transfer Internet Server Installation
Uninstalling Connection Manager Agent
To remove CMA from the Windows or UNIX server, delete the CMA_Install directory.
If CMA has been installed as a Windows service, it should be removed. For more information, see Removing the CMA Service.
34
TIBCO® Managed File Transfer Internet Server Installation
Appendix A. Installation Worksheet
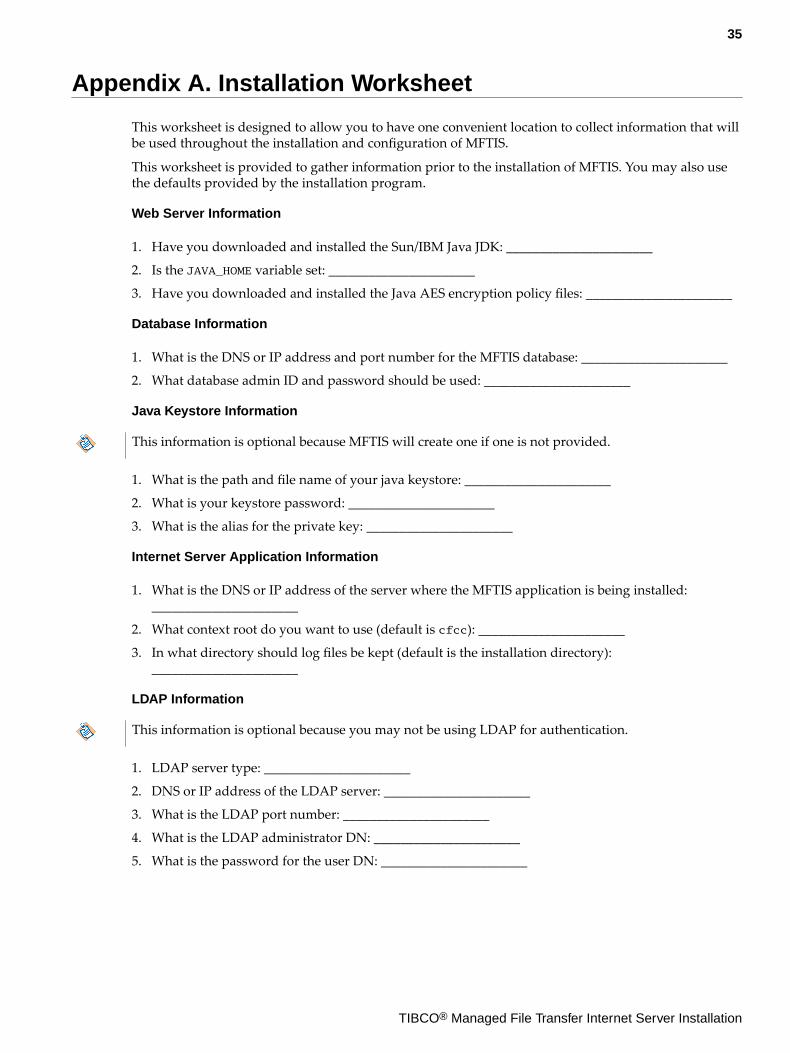
This worksheet is designed to allow you to have one convenient location to collect information that willbe used throughout the installation and configuration of MFTIS.
This worksheet is provided to gather information prior to the installation of MFTIS. You may also usethe defaults provided by the installation program.
Web Server Information
1. Have you downloaded and installed the Sun/IBM Java JDK: ______________________
2. Is the JAVA_HOME variable set: ______________________
3. Have you downloaded and installed the Java AES encryption policy files: ______________________
Database Information
1. What is the DNS or IP address and port number for the MFTIS database: ______________________
2. What database admin ID and password should be used: ______________________
Java Keystore Information
This information is optional because MFTIS will create one if one is not provided.
1. What is the path and file name of your java keystore: ______________________
2. What is your keystore password: ______________________
3. What is the alias for the private key: ______________________
Internet Server Application Information
1. What is the DNS or IP address of the server where the MFTIS application is being installed:______________________
2. What context root do you want to use (default is cfcc): ______________________
3. In what directory should log files be kept (default is the installation directory):______________________
LDAP Information
This information is optional because you may not be using LDAP for authentication.
1. LDAP server type: ______________________
2. DNS or IP address of the LDAP server: ______________________
3. What is the LDAP port number: ______________________
4. What is the LDAP administrator DN: ______________________
5. What is the password for the user DN: ______________________
35
TIBCO® Managed File Transfer Internet Server Installation
Appendix B. Updating Certificates
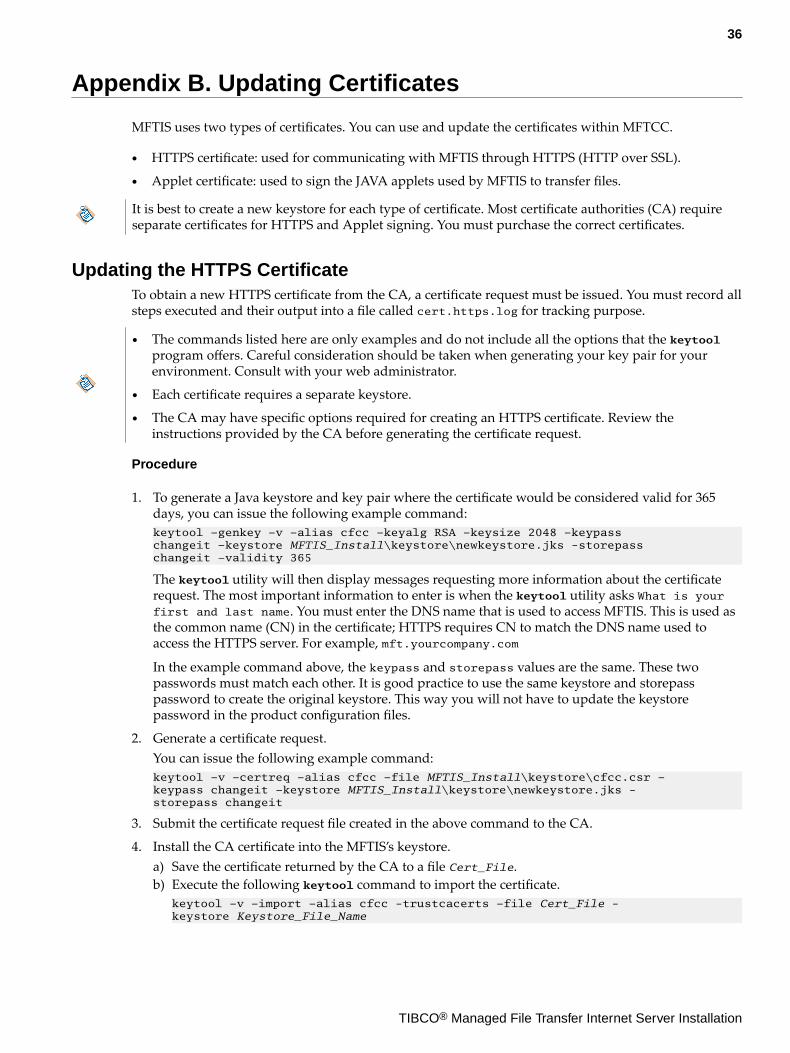
MFTIS uses two types of certificates. You can use and update the certificates within MFTCC.
● HTTPS certificate: used for communicating with MFTIS through HTTPS (HTTP over SSL).
● Applet certificate: used to sign the JAVA applets used by MFTIS to transfer files.
It is best to create a new keystore for each type of certificate. Most certificate authorities (CA) requireseparate certificates for HTTPS and Applet signing. You must purchase the correct certificates.
Updating the HTTPS CertificateTo obtain a new HTTPS certificate from the CA, a certificate request must be issued. You must record allsteps executed and their output into a file called cert.https.log for tracking purpose.
● The commands listed here are only examples and do not include all the options that the keytoolprogram offers. Careful consideration should be taken when generating your key pair for yourenvironment. Consult with your web administrator.
● Each certificate requires a separate keystore.
● The CA may have specific options required for creating an HTTPS certificate. Review theinstructions provided by the CA before generating the certificate request.
Procedure
1. To generate a Java keystore and key pair where the certificate would be considered valid for 365days, you can issue the following example command:keytool –genkey –v –alias cfcc –keyalg RSA –keysize 2048 –keypass changeit –keystore MFTIS_Install\keystore\newkeystore.jks -storepass changeit –validity 365
The keytool utility will then display messages requesting more information about the certificaterequest. The most important information to enter is when the keytool utility asks What is yourfirst and last name. You must enter the DNS name that is used to access MFTIS. This is used asthe common name (CN) in the certificate; HTTPS requires CN to match the DNS name used toaccess the HTTPS server. For example, mft.yourcompany.com
In the example command above, the keypass and storepass values are the same. These twopasswords must match each other. It is good practice to use the same keystore and storepasspassword to create the original keystore. This way you will not have to update the keystorepassword in the product configuration files.
2. Generate a certificate request.You can issue the following example command:keytool –v –certreq –alias cfcc –file MFTIS_Install\keystore\cfcc.csr –keypass changeit –keystore MFTIS_Install\keystore\newkeystore.jks -storepass changeit
3. Submit the certificate request file created in the above command to the CA.
4. Install the CA certificate into the MFTIS’s keystore.a) Save the certificate returned by the CA to a file Cert_File.b) Execute the following keytool command to import the certificate.
keytool –v –import –alias cfcc -trustcacerts –file Cert_File -keystore Keystore_File_Name
36
TIBCO® Managed File Transfer Internet Server Installation
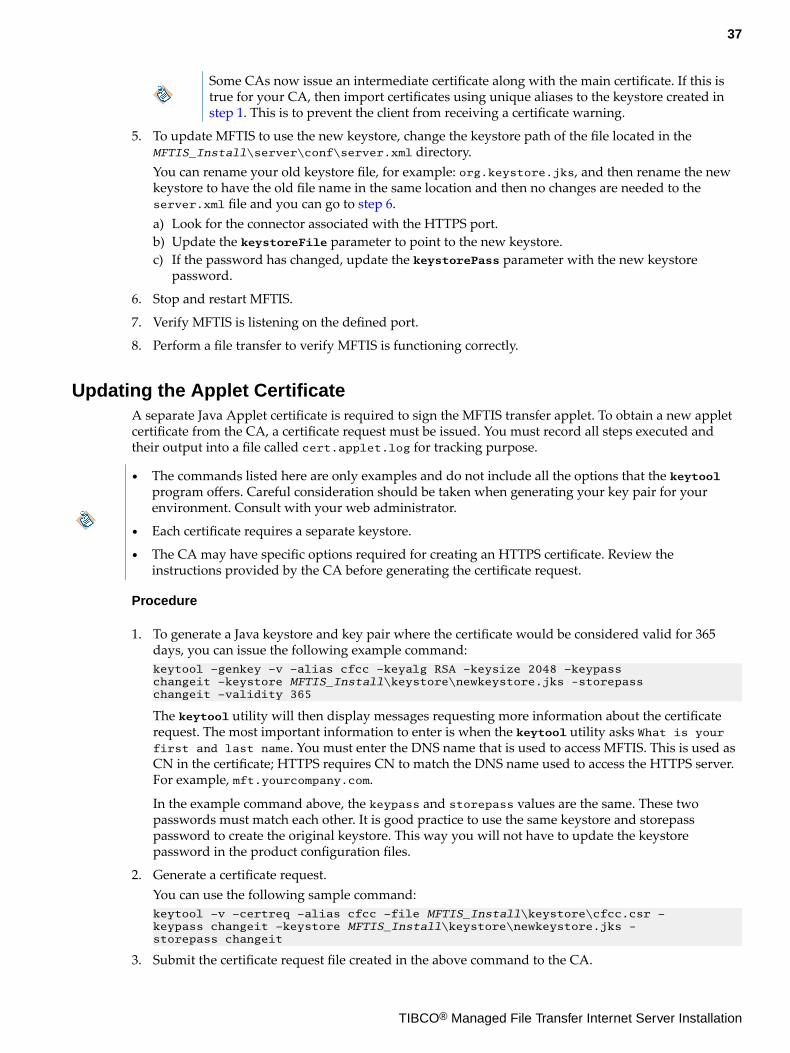
Some CAs now issue an intermediate certificate along with the main certificate. If this istrue for your CA, then import certificates using unique aliases to the keystore created in step 1. This is to prevent the client from receiving a certificate warning.
5. To update MFTIS to use the new keystore, change the keystore path of the file located in theMFTIS_Install\server\conf\server.xml directory.You can rename your old keystore file, for example: org.keystore.jks, and then rename the newkeystore to have the old file name in the same location and then no changes are needed to theserver.xml file and you can go to step 6.a) Look for the connector associated with the HTTPS port.b) Update the keystoreFile parameter to point to the new keystore.c) If the password has changed, update the keystorePass parameter with the new keystore
password.
6. Stop and restart MFTIS.
7. Verify MFTIS is listening on the defined port.
8. Perform a file transfer to verify MFTIS is functioning correctly.
Updating the Applet CertificateA separate Java Applet certificate is required to sign the MFTIS transfer applet. To obtain a new appletcertificate from the CA, a certificate request must be issued. You must record all steps executed andtheir output into a file called cert.applet.log for tracking purpose.
● The commands listed here are only examples and do not include all the options that the keytoolprogram offers. Careful consideration should be taken when generating your key pair for yourenvironment. Consult with your web administrator.
● Each certificate requires a separate keystore.
● The CA may have specific options required for creating an HTTPS certificate. Review theinstructions provided by the CA before generating the certificate request.
Procedure
1. To generate a Java keystore and key pair where the certificate would be considered valid for 365days, you can issue the following example command:keytool –genkey –v –alias cfcc –keyalg RSA –keysize 2048 –keypass changeit –keystore MFTIS_Install\keystore\newkeystore.jks -storepass changeit –validity 365
The keytool utility will then display messages requesting more information about the certificaterequest. The most important information to enter is when the keytool utility asks What is yourfirst and last name. You must enter the DNS name that is used to access MFTIS. This is used asCN in the certificate; HTTPS requires CN to match the DNS name used to access the HTTPS server.For example, mft.yourcompany.com.
In the example command above, the keypass and storepass values are the same. These twopasswords must match each other. It is good practice to use the same keystore and storepasspassword to create the original keystore. This way you will not have to update the keystorepassword in the product configuration files.
2. Generate a certificate request.You can use the following sample command:keytool –v –certreq –alias cfcc –file MFTIS_Install\keystore\cfcc.csr –keypass changeit –keystore MFTIS_Install\keystore\newkeystore.jks -storepass changeit
3. Submit the certificate request file created in the above command to the CA.
37
TIBCO® Managed File Transfer Internet Server Installation
4. Install the CA certificate into the Internet Server’s keystore.a) Save the certificate returned by the CA to a file Cert_File.b) Issue the following keytool command to import the certificate.
keytool –v –import –alias cfcc -trustcacerts –file Cert_File -keystore Keystore_File_Name
Some CAs now issue an intermediate certificate along with the main certificate. If this istrue for your CA, then import certificates using unique aliases to the keystore created in step 1. This is to prevent the client from receiving a certificate warning.
5. Install the Applet certificate into the keystore.a) Save the certificate returned by the CA to a file Cert_File.b) Issue the following keytool command to import the certificate.
keytool –v –import –alias cfcc -trustcacerts –file Cert_File -keystore Keystore_File_Name
6. To sign the Java Applets, run the following command from the MFTIS_Install\distribution\setup directory.signjars.bat [javakeystore] [keystore password] [keystore alias] [path to the MFT cfcc directory]
Where:
● java keystore: the name of the java keystore to be used for signing.
This applet certificate should be in a different keystore than the HTTPS certificate. Ifthe keystore location contains spaces, enclose it in quotation marks.
● keystore password: the password for the keystore.
● keystore alias: the alias for the key to be used.
● path to cfcc directory: the path to the MFTIS’s cfcc web context MFTIS_Install\server\webapps\cfcc. If the directory contains spaces, enclose it in quotation marks.
You can also use the same signjar command that was used in the MFTIS installation(install.log) as your example. The permissions for the UNIX signjars script must bechanged so that it has execute rights.
It is recommended that you use the same alias as you used in the self-signed step (default value iscfcc. Refer to the install.log file to verify) to ensure there is only one signature per jar.
7. Stop and restart MFTIS.
8. Perform a file transfer. Verify that the certificate associated with the File Transfer Applet points tothe new certificate.
You may need to clear your browser cache to see the new certificate.
38
TIBCO® Managed File Transfer Internet Server Installation
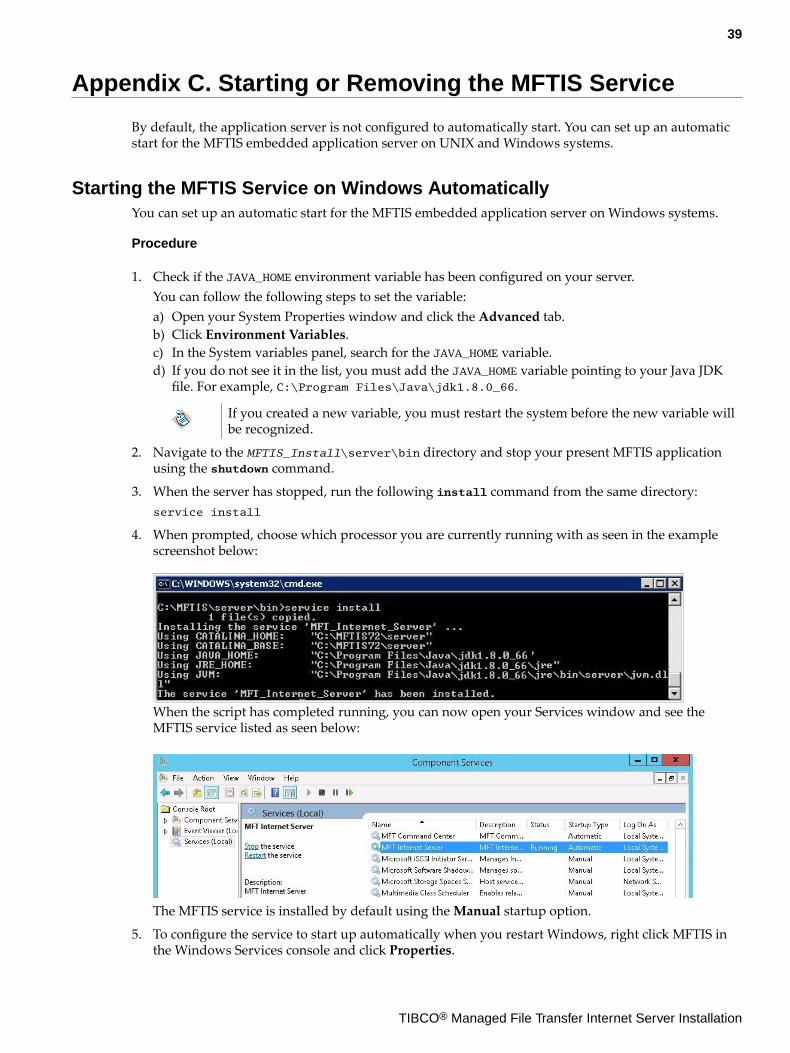
Appendix C. Starting or Removing the MFTIS Service
By default, the application server is not configured to automatically start. You can set up an automaticstart for the MFTIS embedded application server on UNIX and Windows systems.
Starting the MFTIS Service on Windows AutomaticallyYou can set up an automatic start for the MFTIS embedded application server on Windows systems.
Procedure
1. Check if the JAVA_HOME environment variable has been configured on your server.You can follow the following steps to set the variable:a) Open your System Properties window and click the Advanced tab.b) Click Environment Variables.c) In the System variables panel, search for the JAVA_HOME variable.d) If you do not see it in the list, you must add the JAVA_HOME variable pointing to your Java JDKfile. For example, C:\Program Files\Java\jdk1.8.0_66.
If you created a new variable, you must restart the system before the new variable willbe recognized.
2. Navigate to the MFTIS_Install\server\bin directory and stop your present MFTIS applicationusing the shutdown command.
3. When the server has stopped, run the following install command from the same directory:service install
4. When prompted, choose which processor you are currently running with as seen in the examplescreenshot below:
When the script has completed running, you can now open your Services window and see theMFTIS service listed as seen below:
The MFTIS service is installed by default using the Manual startup option.
5. To configure the service to start up automatically when you restart Windows, right click MFTIS inthe Windows Services console and click Properties.
39
TIBCO® Managed File Transfer Internet Server Installation

6. Set Startup Type to Automatic and click OK.
Starting the MFTIS Service on UNIX AutomaticallyThere are a number of methods that different UNIX/Linux operating systems use to automatically startprocesses at boot time. This example has been developed specifically for the Red Hat Linux Enterpriseoperating system, but has been tested successfully on many other UNIX and Linux distributions.The instructions for setting automatic start on Red Hat Linux are:
Procedure
1. Add the JAVA_HOME variable to the MFTIS_Install/server/bin/setenv.sh file:
2. Add the startup.sh shell script to the /etc/rc.local file.For example, /opt/MFTIS/server/bin/startup.sh.
Removing the MFTIS Service on WindowsYou can remove the automatic start feature of MFTIS service.
Procedure
1. Stop the MFTIS service.
2. Navigate to the MFTIS_Install\server\bin directory and run the following command:service remove
The following message will be displayed:
The service 'MFT_Internet_Server' has been removed
40
TIBCO® Managed File Transfer Internet Server Installation
Appendix D. Setting Ciphers and Hashes
MFTIS’s SSH and FTP components support several different encryption algorithms (ciphers). You canoptionally restrict the ciphers MFTIS will support by modifying MFTIS’s web.xml file.
Setting FTP and SFTP Ciphers and HashesYou can set the supported ciphers and hashes by editing the web.xml file.
Procedure
1. To view a list of the ciphers MFTIS will support in your environment, navigate to your web server’sstandard out log, stdout.log located in the MFTIS_Install/server/logs directory.
On Windows installations that have not set up the automatic start, the standard outmessages will be written to your MFT server command prompt window being used asyour console. If you are using a UNIX system, the message will be written to thecatalina.out log.
a) Start the MFT FTP or SSH servers if they are not already running.For information on starting and stopping the MFT FTP/SSH servers, see TIBCO Managed FileTransfer Internet Server User's' Guide.
b) Go to your web server standard output log and open it with any available text editor.c) Search for one of the following text strings:
i. FTP Server – supported ciphersii. SSH Server – supported ciphersiii. SSH Server – supported hash
2. By default, MFTIS supports all ciphers contained in the log file. Once you have viewed thesupported ciphers listed in your log file, you can limit which ciphers or hash algorithms will beused by MFTIS by performing the following steps:a) Stop your application server.b) Navigate to this directory: MFTIS_Install/server/webapps/cfcc/WEB-INF/.c) Open the web.xml file using any available text editor.d) At the top of the file, you will see the following parameters sections:
<context-param> <param-name>TLSCipherSuite</param-name> <param-value/> </context-param> <context-param> <param-name>SSHCipherSuite</param-name> <param-value/> </context-param>
<context-param> <param-name>SSHDigestSuite</param-name> <param-value/> </context-param>
The following example limits the ciphers and hash algorithms that will be used by MFTIS.Multiple ciphers and hash algorithms can defined by separating each ciphers or hash algorithmswith a comma:<context-param> <param-name>TLSCipherSuite</param-name> <param-value>SSL_RSA_WITH_AES_128_CBC_SHA, SSL_RSA_WITH_AES_256_CBC_SHA</param-value> </context-param> <context-param> <param-name>SSHCipherSuite</param-name>
41
TIBCO® Managed File Transfer Internet Server Installation
<param-value>aes192-cbc,aes256-cbc</param-value> </context-param>
<context-param> <param-name>SSHDigestSuite</param-name> <param-value>hmac-sha1</param-value> </context-param>
3. Restart your application server.
Setting HTTP SSL CiphersFor an increased level of HTTP SSL security in MFTIS, running the server in FIPS mode isrecommended.If you do not have your MFT server running in FIPS mode however, and however higher HTTP SSLcipher strengths are required for client connections.
By default ciphers are set to the TLS protocol using 128-bit encryption or higher.
Procedure
1. Edit the following MFT configuration file to enforce certain SSL ciphers.MFTIS_Install/server/conf/server.xml
Within this file is a default HTTP connector, as seen in the example below:Connector SSLEnabled="true" URIEncoding="UTF-8" acceptCount="128"ciphers="TLS_ECDHE_ECDSA_WITH_AES_256_CBC_SHA384,TLS_ECDHE_RSA_WITH_AES_25 6_CBC_SHA384,TLS_RSA_WITH_AES_256_CBC_SHA256,TLS_ECDH_ECDSA_WITH_AES_256_ CBC_SHA384,TLS_ECDH_RSA_WITH_AES_256_CBC_SHA384,TLS_DHE_RSA_WITH_AES_256_ CBC_SHA256,TLS_DHE_DSS_WITH_AES_256_CBC_SHA256,TLS_ECDHE_ECDSA_WITH_AES_ 256_CBC_SHA,TLS_ECDHE_RSA_WITH_AES_256_CBC_SHA,TLS_RSA_WITH_AES_256_CBC_S HA,TLS_ECDH_ECDSA_WITH_AES_256_CBC_SHA,TLS_ECDH_RSA_WITH_AES_256_CBC_SHA,TLS_DHE_RSA_WITH_AES_256_CBC_SHA,TLS_DHE_DSS_WITH_AES_256_CBC_SHA,TLS_EC DHE_ECDSA_WITH_AES_128_CBC_SHA256,TLS_ECDHE_RSA_WITH_AES_128_CBC_SHA256,T LS_RSA_WITH_AES_128_CBC_SHA256,TLS_ECDH_ECDSA_WITH_AES_128_CBC_SHA256,TLS_ECDH_RSA_WITH_AES_128_CBC_SHA256,TLS_DHE_RSA_WITH_AES_128_CBC_SHA256,TLS_DHE_DSS_WITH_AES_128_CBC_SHA256,TLS_ECDHE_ECDSA_WITH_AES_128_CBC_SHA,TL S_ECDHE_RSA_WITH_AES_128_CBC_SHA,TLS_RSA_WITH_AES_128_CBC_SHA,TLS_ECDH_E CDSA_WITH_AES_128_CBC_SHA,TLS_ECDH_RSA_WITH_AES_128_CBC_SHA,TLS_DHE_RSA_ WITH_AES_128_CBC_SHA,TLS_DHE_DSS_WITH_AES_128_CBC_SHA,TLS_ECDHE_ECDSA_WI TH_AES_256_GCM_SHA384,TLS_ECDHE_ECDSA_WITH_AES_128_GCM_SHA256,TLS_ECDHE_ RSA_WITH_AES_256_GCM_SHA384,TLS_RSA_WITH_AES_256_GCM_SHA384,TLS_ECDH_ECD SA_WITH_AES_256_GCM_SHA384,TLS_ECDH_RSA_WITH_AES_256_GCM_SHA384,TLS_DHE_ RSA_WITH_AES_256_GCM_SHA384,TLS_DHE_DSS_WITH_AES_256_GCM_SHA384,TLS_ECDH E_RSA_WITH_AES_128_GCM_SHA256,TLS_RSA_WITH_AES_128_GCM_SHA256,TLS_ECDH_E CDSA_WITH_AES_128_GCM_SHA256,TLS_ECDH_RSA_WITH_AES_128_GCM_SHA256,TLS_DH E_RSA_WITH_AES_128_GCM_SHA256,TLS_DHE_DSS_WITH_AES_128_GCM_SHA256"clientAuth="false" compression="off" connectionLinger="-1" connectionTimeout="60000" disableUploadTimeout="true" enableLookups="true" keystoreFile="C:\MFTIS\keystore\keystore.jks" keystorePass="changeit" keystoreType="JKS" maxKeepAliveRequests="100" maxThreads="150" port="443" protocol="org.apache.coyote.http11.Http11Protocol" proxyPort="0" redirectPort="-1" scheme="https" secure="true" server="MFTServer" socket.txBufSize="131072" sslEnabledProtocols="TLSv1, TLSv1.1, TLSv1.2" sslProtocol="TLS" tcpNtrustManagerClassName="com.proginet.sift.tomcat.ssldap.TrustAllMgr"/>
Below is an example that will force client connections to maintain cipher strengths of 128 bit orgreater.
The ciphers in this example are from Oracle Java 8 update 40.
ciphers="TLS_ECDHE_ECDSA_WITH_AES_256_CBC_SHA384,TLS_ECDHE_RSA_WITH_AES_256_CBC_SHA384,TLS_RSA_WITH_AES_256_CBC_SHA256,TLS_ECDH_ECDSA_WITH_AES_256_ CBC_SHA384,TLS_ECDH_RSA_WITH_AES_256_CBC_SHA384,TLS_DHE_RSA_WITH_AES_256_
42
TIBCO® Managed File Transfer Internet Server Installation
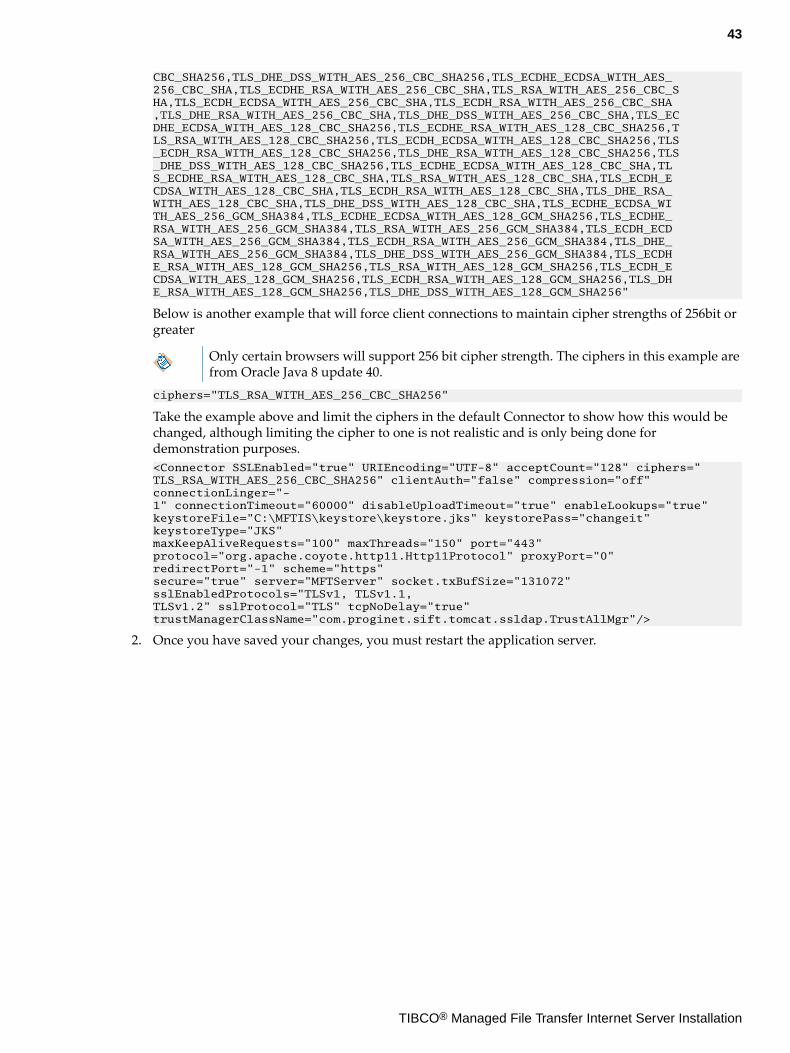
CBC_SHA256,TLS_DHE_DSS_WITH_AES_256_CBC_SHA256,TLS_ECDHE_ECDSA_WITH_AES_ 256_CBC_SHA,TLS_ECDHE_RSA_WITH_AES_256_CBC_SHA,TLS_RSA_WITH_AES_256_CBC_S HA,TLS_ECDH_ECDSA_WITH_AES_256_CBC_SHA,TLS_ECDH_RSA_WITH_AES_256_CBC_SHA,TLS_DHE_RSA_WITH_AES_256_CBC_SHA,TLS_DHE_DSS_WITH_AES_256_CBC_SHA,TLS_EC DHE_ECDSA_WITH_AES_128_CBC_SHA256,TLS_ECDHE_RSA_WITH_AES_128_CBC_SHA256,T LS_RSA_WITH_AES_128_CBC_SHA256,TLS_ECDH_ECDSA_WITH_AES_128_CBC_SHA256,TLS_ECDH_RSA_WITH_AES_128_CBC_SHA256,TLS_DHE_RSA_WITH_AES_128_CBC_SHA256,TLS_DHE_DSS_WITH_AES_128_CBC_SHA256,TLS_ECDHE_ECDSA_WITH_AES_128_CBC_SHA,TL S_ECDHE_RSA_WITH_AES_128_CBC_SHA,TLS_RSA_WITH_AES_128_CBC_SHA,TLS_ECDH_ECDSA_WITH_AES_128_CBC_SHA,TLS_ECDH_RSA_WITH_AES_128_CBC_SHA,TLS_DHE_RSA_WITH_AES_128_CBC_SHA,TLS_DHE_DSS_WITH_AES_128_CBC_SHA,TLS_ECDHE_ECDSA_WI TH_AES_256_GCM_SHA384,TLS_ECDHE_ECDSA_WITH_AES_128_GCM_SHA256,TLS_ECDHE_ RSA_WITH_AES_256_GCM_SHA384,TLS_RSA_WITH_AES_256_GCM_SHA384,TLS_ECDH_ECD SA_WITH_AES_256_GCM_SHA384,TLS_ECDH_RSA_WITH_AES_256_GCM_SHA384,TLS_DHE_ RSA_WITH_AES_256_GCM_SHA384,TLS_DHE_DSS_WITH_AES_256_GCM_SHA384,TLS_ECDH E_RSA_WITH_AES_128_GCM_SHA256,TLS_RSA_WITH_AES_128_GCM_SHA256,TLS_ECDH_E CDSA_WITH_AES_128_GCM_SHA256,TLS_ECDH_RSA_WITH_AES_128_GCM_SHA256,TLS_DH E_RSA_WITH_AES_128_GCM_SHA256,TLS_DHE_DSS_WITH_AES_128_GCM_SHA256"
Below is another example that will force client connections to maintain cipher strengths of 256bit orgreater
Only certain browsers will support 256 bit cipher strength. The ciphers in this example arefrom Oracle Java 8 update 40.
ciphers="TLS_RSA_WITH_AES_256_CBC_SHA256"
Take the example above and limit the ciphers in the default Connector to show how this would bechanged, although limiting the cipher to one is not realistic and is only being done fordemonstration purposes.<Connector SSLEnabled="true" URIEncoding="UTF-8" acceptCount="128" ciphers=" TLS_RSA_WITH_AES_256_CBC_SHA256" clientAuth="false" compression="off" connectionLinger="-1" connectionTimeout="60000" disableUploadTimeout="true" enableLookups="true" keystoreFile="C:\MFTIS\keystore\keystore.jks" keystorePass="changeit" keystoreType="JKS" maxKeepAliveRequests="100" maxThreads="150" port="443" protocol="org.apache.coyote.http11.Http11Protocol" proxyPort="0" redirectPort="-1" scheme="https" secure="true" server="MFTServer" socket.txBufSize="131072" sslEnabledProtocols="TLSv1, TLSv1.1, TLSv1.2" sslProtocol="TLS" tcpNoDelay="true" trustManagerClassName="com.proginet.sift.tomcat.ssldap.TrustAllMgr"/>
2. Once you have saved your changes, you must restart the application server.
43
TIBCO® Managed File Transfer Internet Server Installation
Appendix E. Installing the Desktop Client
MFTIS comes with the new MFT desktop client ClickOnce application. By utilizing the MicrosoftClickOnce technology within the MFT desktop client, you can install, update and run the MFT desktopclient with minimal interaction and no administrator requirements.
There are two types of installations offered. The first is full installation where you will install thedesktop client program on to your desktop. The other is a cached installation where the desktop clientwould be initiated each time from your browser. You must choose the one that will work best for yourenvironment.
Pre-requisitesBefore you can install the MFT desktop client, you have to ensure the pre-requisites are met.
See the following list of requirements:
● .NET Client profile 4.0 or greater is installed on any workstation that will use the MFT desktopclient.
● Windows Software Developers Kit (SDK) with .NET Framework 3.5 or greater is installed on aserver that will be used to customize the desktop client for the environment.
The Windows SDK may come with a version of the .NET Framework greater than version3.5. Due to Microsoft packaging issues however, .NET Framework 3.5 is required toconfigure and customize the MFT desktop client.
In the examples, .NET Framework 4.1.5 is installed from a prior date and then installed MicrosoftWindows SDK for Windows 8.1. Even though the name of this SDK says Windows 8.1, this SDK isalso supported on these Operating Systems: Windows 8.1 as well as Windows 8, Windows 7,Windows Vista, Windows Server 2012, Windows Server 2008 R2, and Windows Server 2008. As ofJune 19, 2015, the URL to this download was: https://msdn.microsoft.com/en-us/windows/desktop/bg162891.aspx
● MFTIS 8.0.1 is installed and operating.● Oracle Java SE 7 and above or IBM Java SE version 7 is installed.● A code-signing certificate in .pfx format to sign the desktop client manifest files.
A self-signed code signing certificate is provided for testing purposes or you can followthe provided instructions on how to generate a self-signed certificate yourself for testingpurposes.
● The bin directory of the Windows SDK is added to your PATH statement.● The bin directory of the JDK is added to your PATH statement.● The path to the directory where mage.exe is located is added to your PATH statement.
For some installations, this file was found in the following default directory which was differentthan some of the other SDK files.
C:\Program Files (x86)\Microsoft SDKs\Windows\v8.1A\bin\NETFX 4.5.1 Tools
If you are running desktop client version 7.0 or below, you have to uninstall the oldversion before installing the new ClickOnce MFT desktop client version 8.0.1 and above.When you remove the old version, the configuration information will remain intact onyour computers. If the default URL to connect to MFTIS is changing, you need the fullURL to edit your old configuration. See TIBCO Managed File Transfer Desktop Client User'sGuide for more information.
● To install the MFT desktop client application when using a Firefox browser, you will need to installthe ClickOnce add-on. Go to https://addons.mozilla.org/en-US/firefox/tag/ClickOnce, download andinstall the add-on.
44
TIBCO® Managed File Transfer Internet Server Installation
Customizing the Desktop ClientIn this section we will instruct you on how to customize the Desktop Client for your environment.
Prerequisites
Before you can customize the Desktop Client, you need to have a code-signing certificate in .pfxformat.
We have provided a self-signed code signing certificate named test.pfx with the password testassigned to it. If you will be using this provided certificate, you can skip to step 2.
Procedure
1. Generating a Self-Signed Certificate.
2. Copy the MFTClickOnce.zip file found in the MFTIS_Install\distribution\clickoncedirectory. Paste and extract this file to an empty directory on the Windows SDK server.
3. Open a command prompt and add the bin directory from the Windows SDK as well as the bindirectory to the JDK if this has not been set already. Navigate to the directory you extracted theMFTClickOnce.zip file and run the following script:build.bat
Below is an example of the output that will be displayed from the build.bat script along withsome additional information:This script will prepare the ClickOnce files for installation.This will be done in two steps. Step 1 will ask a seriesof questions regarding how MFT Command Center or Internet Serverusers will be connecting in order to perform transfers.Step 2 will ask a series of similar questions regardingthe MFT Command Center or Internet Server that will be used todistribute MFT Desktop Client.
The ClickOnce manifests must be signed with a code-signingcertificate in the pfx format. We have provided a self signedcode-signing certificate to test with [C:\DesktopClientSetup\153\test.pfx].It is recommended that you obtain a code-signing certificatefrom a certificate authority before using in production.
Do not use quotes around path or file names that contain space(s).
To accept default values presented press the ENTER key.
-----------------------------------------------------------
Step 1: MFT Desktop Client File Transfer Server
Please enter the IP address or DNS name of the MFT Command Center or Internet Server. [localhost] 10.1.2.84Do you use the HTTP or HTTPS protocol to connect to the MFT Command Center or Internet Server? [https]Please enter the TCP port for . [443]Please enter the application context. [cfcc] mftis
Step 2: MFT Desktop Client Distribution Server
Please enter the IP address or DNS name of the MFT Command Center or Internet Server which will store the ClickOnce files. [localhost] 10.1.2.167Do you want to use the HTTP or HTTPS protocol when installing MFT Desktop Client? [http] Please enter the TCP port for https. [80] Please enter the application context. [cfcc] mftisPlease enter the absolute path to your code-signing certificate. [C:\DesktopClientSetup\153\test.pfx]
45
TIBCO® Managed File Transfer Internet Server Installation
Please enter the password for your code-signing certificate. testcfcc.exe.manifest successfully updatedcfcc.exe.manifest successfully signed
End users can be forced to upgrade to a new version of Desktop Client when one is available when they connect to the server. If you do not want to force them and allow them to choose whether to upgrade or not choose option 1 and the end user will be given a choice. The option will only be displayed once to upgrade.
Do you want to give end users the option to upgrade to this new version? (Choose No to force the upgrade.)1. Yes.2. No.Please enter your selection. [1]cfcc.exe.manifest successfully updatedcfcc.exe.manifest successfully signed
You can store the clickonce application on either an HTTP Server such as the MFT Command Center, MFT Internet Server or an IIS server. It can also be stored on a Windows File Share. When you choose option 2 you will be prompted for the share file name (Note: The share must be pre-existing and if you are building the clickonce application on a server other than server that has the share defined on it you may need to map a drive to that share before it will be found).
Where will the application installation files be deployed?1. HTTP Server.2. Windows File Share.Please enter your selection. [1]
cfcc-in.application successfully updatedcfcc-in.application successfully signedcfcc-ca.application successfully updatedcfcc-ca.application successfully signed.........Build completed successfully.
Now that your build is complete you must do the following:1) Create a new directory under the MFT_HOME install directory of the MFT Command Center or Internet Server.2) Copy the C:\DesktopClientSetup\153\clickonce.jar file to the new directory on MFT Command Center or Internet Server. Note: Your directory displayed may be different.3) Unjar the clickonce.jar file using the following command from your command prompt window: jar xvf clickonce.jar4) From the clickonce directory run either the install.bat script for Windows platforms or install.sh script for UNIX platforms to start the installation.
4. Follow all the instructions displayed on screen to complete building your customized MFT desktopclient.
If your MFTIS is installed on a UNIX platform, you must copy the clickonce.jar file toyour system in binary format.
Result
Once you have installed the customized desktop client, it is ready for you to connect to the system anddownload it to install on your system.
Generating a Self-Signed CertificateTo generate a self signed code-signing certificate, you can use the makecert.exe program which is partof your Windows SDK program.Self signed certificates are only practical for testing purposes while you wait for an external CA to signa certificate for you.
46
TIBCO® Managed File Transfer Internet Server Installation

Procedure
1. Issue the following command to generate your key pair, which is your private key and certificate:makecert -sv yourprivatekeyfile.pvk -n "cert name" yourcertfile.cer -b mm/dd/yyyy -e mm/dd/yyyy –r
See the following table for the description of the above parameters:
Parameter Description
-sv yourprivatekeyfile.pvk The name of the file containing the private key.
-n "cert name" The name that will appear on the certificate and in thecertificate store.
The same IP or host name that was used forthe CN when a certificate was generated forthe MFTIS installation should be used.
yourcertfile.cer The name of the certificate file.
-b mm/dd/yyyy The date when the certificate becomes valid.
-e mm/dd/yyyy The date when the certificate expires.
–r It indicates that this will be a self-signed certificate.
2. When you have issued the command, a window will open that will prompt you to enter thepassword to be used for the private key.
You must set a password in order for the MFT desktop client customization to completesuccessfully. Do not select None.
3. Once you have set the password and clicked OK. Then another window will open for you to enterthat password in order to sign the actual certificate file.Once you have clicked Ok, you should see a message saying “Succeeded”. See the example below:
4. Enter the following command youth create the .pfx file that will be used to sign your desktop clientmanifest files:The pvk2pfxt.exe program is part of your Windows SDK program.pvk2pfx –pvk yourprivatekeyfile.pvk –spc yourcertfile.cer –pfx yourpfxfile.pfx –po yourpfxpassword
See the following table for the description of the above parameters:
Parameter Description
–pvk yourprivatekeyfile.pvk The private key file that you created in step 1.
–spc yourcertfile.cer The certificate file that you created in step 1.
47
TIBCO® Managed File Transfer Internet Server Installation
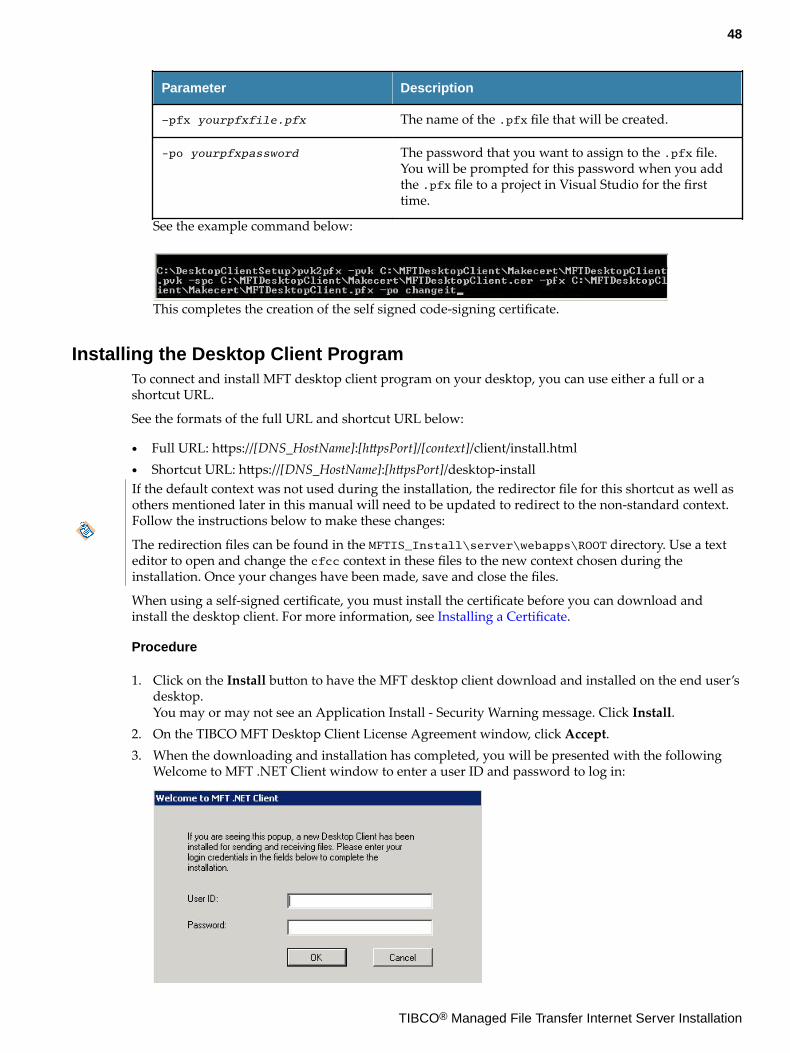
Parameter Description
–pfx yourpfxfile.pfx The name of the .pfx file that will be created.
-po yourpfxpassword The password that you want to assign to the .pfx file.You will be prompted for this password when you addthe .pfx file to a project in Visual Studio for the firsttime.
See the example command below:
This completes the creation of the self signed code-signing certificate.
Installing the Desktop Client ProgramTo connect and install MFT desktop client program on your desktop, you can use either a full or ashortcut URL.
See the formats of the full URL and shortcut URL below:
● Full URL: https://[DNS_HostName]:[httpsPort]/[context]/client/install.html● Shortcut URL: https://[DNS_HostName]:[httpsPort]/desktop-installIf the default context was not used during the installation, the redirector file for this shortcut as well asothers mentioned later in this manual will need to be updated to redirect to the non-standard context.Follow the instructions below to make these changes:
The redirection files can be found in the MFTIS_Install\server\webapps\ROOT directory. Use a texteditor to open and change the cfcc context in these files to the new context chosen during theinstallation. Once your changes have been made, save and close the files.
When using a self-signed certificate, you must install the certificate before you can download andinstall the desktop client. For more information, see Installing a Certificate.
Procedure
1. Click on the Install button to have the MFT desktop client download and installed on the end user’sdesktop.You may or may not see an Application Install - Security Warning message. Click Install.
2. On the TIBCO MFT Desktop Client License Agreement window, click Accept.3. When the downloading and installation has completed, you will be presented with the following
Welcome to MFT .NET Client window to enter a user ID and password to log in:
48
TIBCO® Managed File Transfer Internet Server Installation

If you do not want to log in at this time, you can click Cancel and try again later by clicking yourstart menu and navigating to Start > All Programs > MFT Desktop Client .
Installing a CertificateWhen using a self-signed certificate, you will receive a certificate error when you connect to the server.You must install the certificate before you can download and install the desktop client.
Procedure
1. Click Continue to this website (not recommended). When you arrive at the MFT desktop clientinstall web page, do not click install before completing the steps below.
2. Click Certificate Error at the top of your browser.
3. The Untrusted Certificate error window will be displayed. Click View certificates at the bottom ofthe window.
4. The Certificate window will open. Click Install Certificate.
5. On the Certificate Import Wizard window, click Next.
6. On the next window, click Place all certificates in the following store, and then click Browse.
7. On the Select Certificate Store window, select Trusted Root Certification Authorities folder, andthen click OK.
8. On the Certificate Import Wizard screen, click Next.
9. On the Certificate Import Wizard screen, click Finish.
10. A Security Warning window should open. Click Yes to accept the certificate.
11. A Certificate Import Wizard window will open with a successful message. Click OK.
12. On the Certificate window, click OK.
Result
The certificate is now installed.
Installing the Browser Based Desktop ClientLike the MFT desktop client program, the cached version of the MFT desktop client can be installed byusing either a full or a shortcut URL.See the formats of the full URL and shortcut URL below:
● Full URL: https://[DNS_HostName]:[httpsPort]/[context]/client/cache.html
● Shortcut URL: https://[DNS_HostName]:[httpsPort]/desktop
If the default context was not used during the installation, the redirector file for this shortcut as well asothers mentioned later in this manual will need to be updated to redirect to the non-standard context.Follow the instructions below to make these changes:
The redirection files can be found in the MFTIS_Install\server\webapps\ROOT directory. Use a texteditor to open and change the cfcc context in these files to the new context chosen during theinstallation. Once your changes have been made, save and close the files.
49
TIBCO® Managed File Transfer Internet Server Installation

Appendix F. Required Java JRE for the Java Client
MFTIS provides a browser based transfer client called the Java client. To use the Java client, Java JRE isrequired to be installed. This section will discuss setting the Java JRE requirement.
We suggest using the Browser based client if you have not already started to use it. Many browsers aredropping support for Java and are making it increasingly difficult to use Java.
Below is the shortcut available for the Java client:
https://[DNS_HostName]:[httpsPort]/java
web.xml Parameter MinimumJREVersion
The MFTIS web application allows you to perform file transfers through a browser based client calledJava client. For more information about the Java client, see TIBCO Managed File Transfer Internet ServerTransfer and File Share Clients User's Guide). The Java client requires a Java JRE to be installed on yourworkstation before you will be able to perform any file transfers using the Java client.
The default minimum JRE is version 1.8.0. If your environment requires a later version of a Java JRE tobe installed, the web.xml parameter MinimumJREVersion may be updated.
Navigate to this directory: MFTIS_Install/server/webapps/CONTEXT_NAME/WEB-INF/, and open theweb.xml file using an available text editor. Run a search for the parameter MinimumJREVersion. Youwill see the following:<context-param> <param-name>MinimumJREVersion</param-name> <param-value>1.8.0+</param-value> </context-param>
Below are is an example of how you may edit the required JRE version for your environment:<context-param> <param-name>MinimumJREVersion</param-name> <param-value>1.8.0_26+</param-value> </context-param>
If you are running Java JRE with version 1.8.0_18 or below, and attempting to connect to MFTIS usingthe Java client through Internet Explorer, the java script may not be able to detect the sub level version.The sub level is 18 in version 1.8.0_18. As a result, you will not be forced to upgrade to a newer JREversion.
50
TIBCO® Managed File Transfer Internet Server Installation
Appendix G. Configuring Web SSO
MFTIS will work in a Web SSO environment.
In Web SSO environments, there is typically a software component that performs all authentications.Then the SSO software will forward all requests to the MFT software. The SSO software will pass datain the HTTP request or the HTTP session to define the user that has been authenticated. MFT willextract and validate this information.
MFTIS packages an XML file called httpssocustomization.xml that can be used to customize theMFTIS authentication method for Web SSO. This file contains detailed information about how toconfigure the MFT server for Web SSO. It also defines the parameters that should be sent by the SSOserver and the validation that should be performed by MFT.
This file is located in the following directory:
MFTIS_Install\server\webapps\context\WEB-INF
Use a text editor such as Notepad to open the XML file to read instructions to configure the MFTIS webapplication for your SSO environment.
51
TIBCO® Managed File Transfer Internet Server Installation
Appendix H. Configuring MFT for SAML SSO
TIBCO MFT Internet Server and TIBCO MFT Command Center support Single Sign On (SSO) whenusing SAML (Security Assertion Markup Language). When using SAML for SSO, TIBCO MFT InternetServer and TIBCO MFT Command Center perform the role of service provider (SP).
Prerequisites
You must install and configure a SAML identity provider (IdP) before configuring SAML for the MFTserver.
Each SAML implementation is different and often requires significant work to integrate MFT into theSAML infrastructure. Typical SAML implementations will require TIBCO Professional Services to workin conjunction with your SAML support staff to ensure a smooth SAML implementation.
To configure TIBCO MFT Internet Server and TIBCO MFT Command Center SAML integration, youmust perform the following operations:
1. Creating SAML Private Keys
2. Importing SAML Identity Provider Metadata
3. Configuring SAML Service Provider Metadata
4. Generating SAML Service Provider Metadata
5. Sending SAML Service Provider Metadata to the Identity Provider
6. Restarting the MFT Server
7. Updating MFT Shortcuts
SAML is configured on a server by server basis. Each MFT server that needs to use SAML must beconfigured independently of the other MFT servers.
For detailed descriptions of individual SAML fields, see the help information for the SAMLadministrator pages.
After the SAML configuration is updated, you must restart the MFT Server. The SAML information isloaded at startup time and cannot be refreshed.
52
TIBCO® Managed File Transfer Internet Server Installation
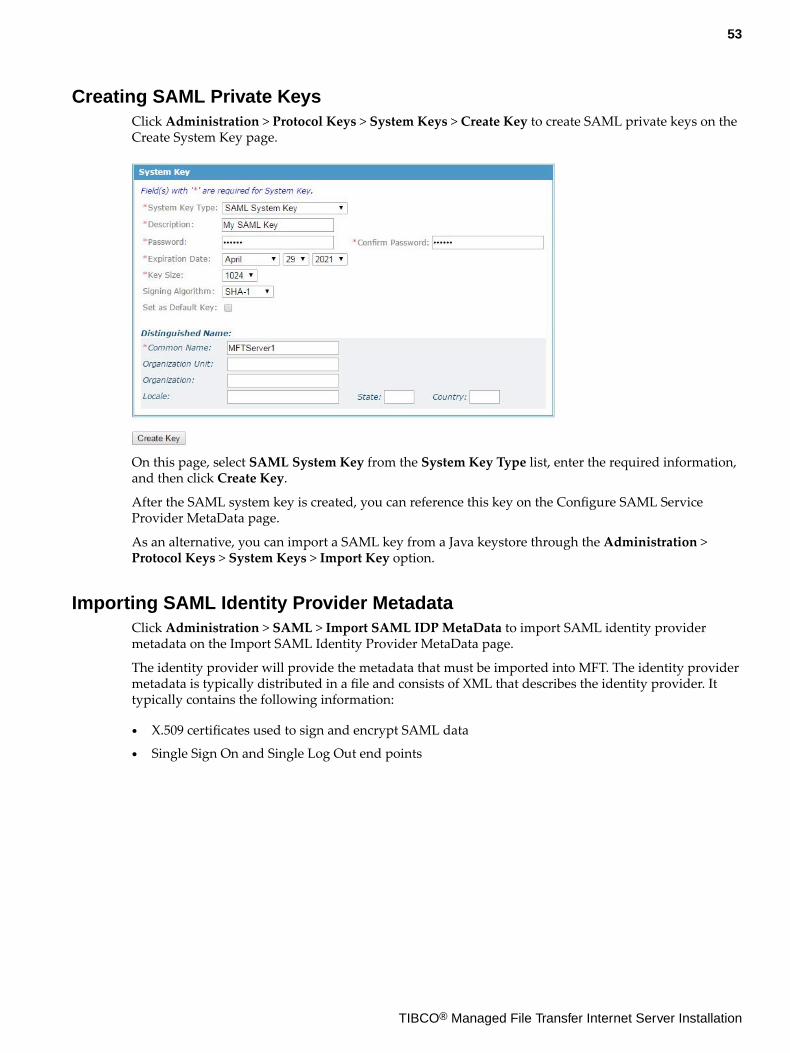
Creating SAML Private KeysClick Administration > Protocol Keys > System Keys > Create Key to create SAML private keys on theCreate System Key page.
On this page, select SAML System Key from the System Key Type list, enter the required information,and then click Create Key.
After the SAML system key is created, you can reference this key on the Configure SAML ServiceProvider MetaData page.
As an alternative, you can import a SAML key from a Java keystore through the Administration >Protocol Keys > System Keys > Import Key option.
Importing SAML Identity Provider MetadataClick Administration > SAML > Import SAML IDP MetaData to import SAML identity providermetadata on the Import SAML Identity Provider MetaData page.
The identity provider will provide the metadata that must be imported into MFT. The identity providermetadata is typically distributed in a file and consists of XML that describes the identity provider. Ittypically contains the following information:
● X.509 certificates used to sign and encrypt SAML data
● Single Sign On and Single Log Out end points
53
TIBCO® Managed File Transfer Internet Server Installation
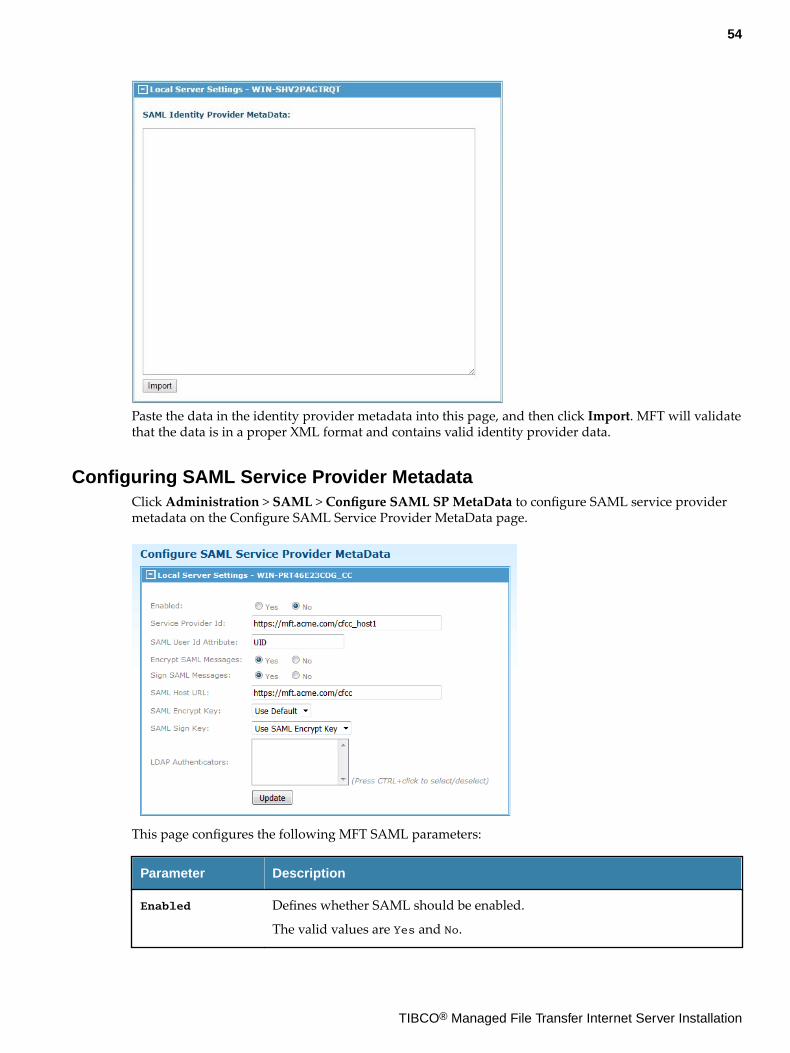
Paste the data in the identity provider metadata into this page, and then click Import. MFT will validatethat the data is in a proper XML format and contains valid identity provider data.
Configuring SAML Service Provider MetadataClick Administration > SAML > Configure SAML SP MetaData to configure SAML service providermetadata on the Configure SAML Service Provider MetaData page.
This page configures the following MFT SAML parameters:
Parameter Description
Enabled Defines whether SAML should be enabled.
The valid values are Yes and No.
54
TIBCO® Managed File Transfer Internet Server Installation
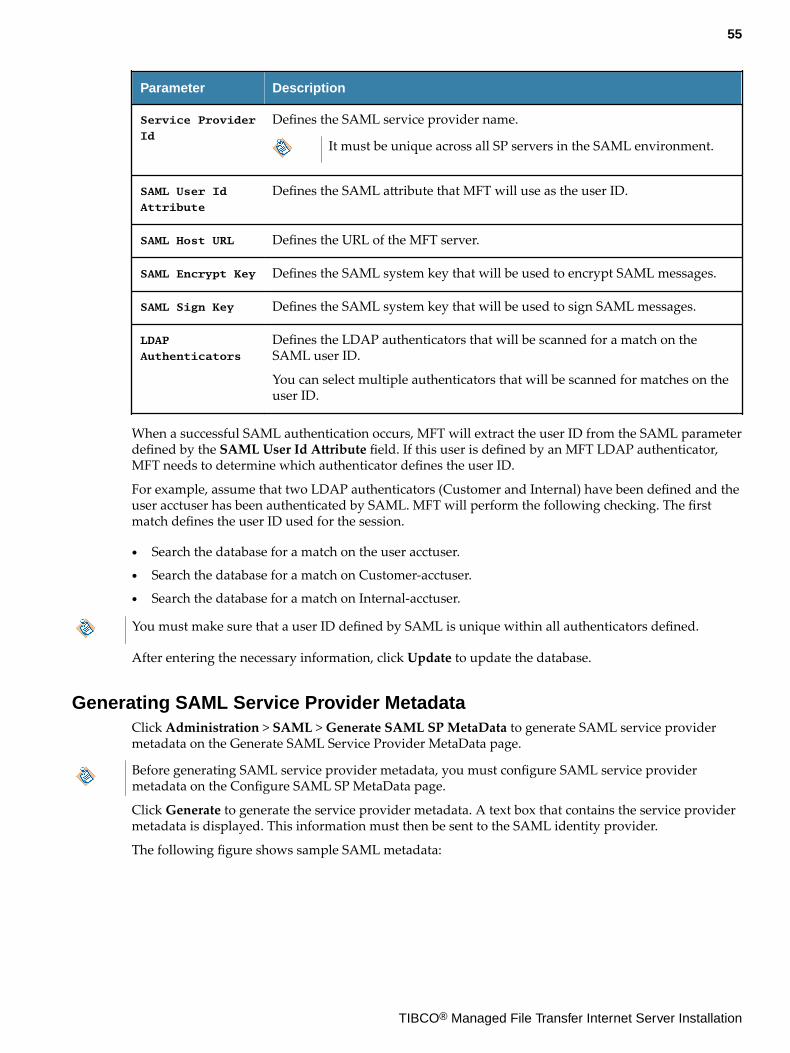
Parameter Description
Service Provider
Id
Defines the SAML service provider name.
It must be unique across all SP servers in the SAML environment.
SAML User Id
Attribute
Defines the SAML attribute that MFT will use as the user ID.
SAML Host URL Defines the URL of the MFT server.
SAML Encrypt Key Defines the SAML system key that will be used to encrypt SAML messages.
SAML Sign Key Defines the SAML system key that will be used to sign SAML messages.
LDAP
Authenticators
Defines the LDAP authenticators that will be scanned for a match on theSAML user ID.
You can select multiple authenticators that will be scanned for matches on theuser ID.
When a successful SAML authentication occurs, MFT will extract the user ID from the SAML parameterdefined by the SAML User Id Attribute field. If this user is defined by an MFT LDAP authenticator,MFT needs to determine which authenticator defines the user ID.
For example, assume that two LDAP authenticators (Customer and Internal) have been defined and theuser acctuser has been authenticated by SAML. MFT will perform the following checking. The firstmatch defines the user ID used for the session.
● Search the database for a match on the user acctuser.
● Search the database for a match on Customer-acctuser.
● Search the database for a match on Internal-acctuser.
You must make sure that a user ID defined by SAML is unique within all authenticators defined.
After entering the necessary information, click Update to update the database.
Generating SAML Service Provider MetadataClick Administration > SAML > Generate SAML SP MetaData to generate SAML service providermetadata on the Generate SAML Service Provider MetaData page.
Before generating SAML service provider metadata, you must configure SAML service providermetadata on the Configure SAML SP MetaData page.
Click Generate to generate the service provider metadata. A text box that contains the service providermetadata is displayed. This information must then be sent to the SAML identity provider.
The following figure shows sample SAML metadata:
55
TIBCO® Managed File Transfer Internet Server Installation
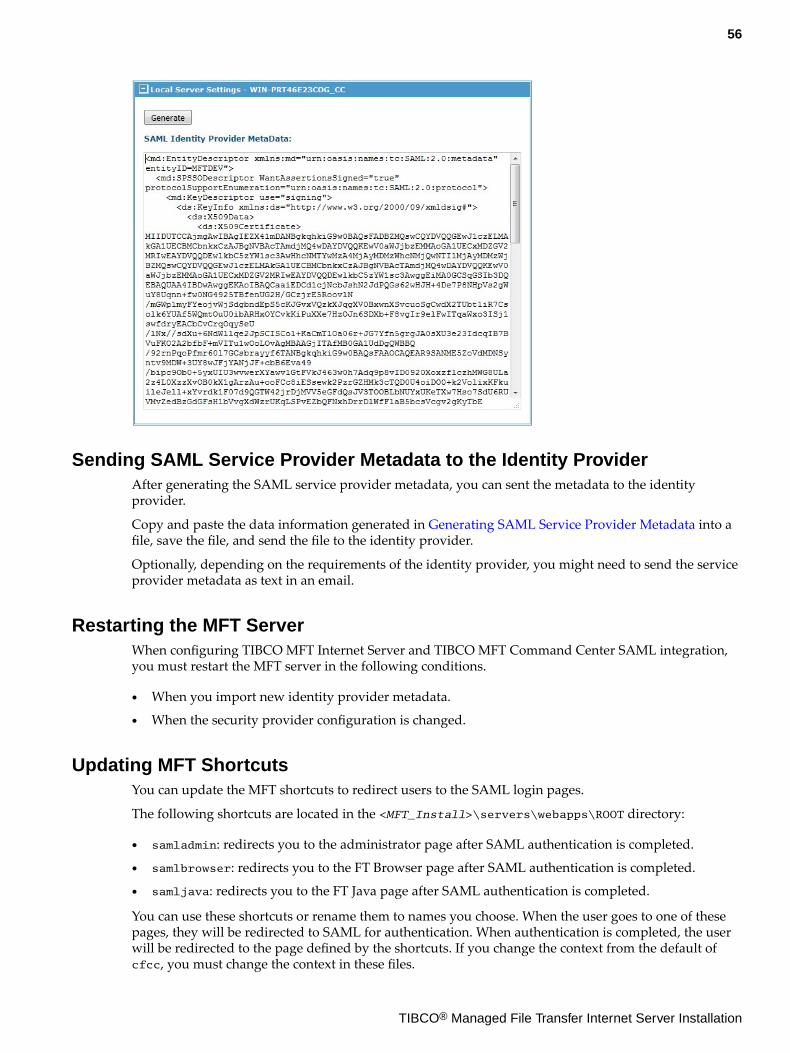
Sending SAML Service Provider Metadata to the Identity ProviderAfter generating the SAML service provider metadata, you can sent the metadata to the identityprovider.
Copy and paste the data information generated in Generating SAML Service Provider Metadata into afile, save the file, and send the file to the identity provider.
Optionally, depending on the requirements of the identity provider, you might need to send the serviceprovider metadata as text in an email.
Restarting the MFT ServerWhen configuring TIBCO MFT Internet Server and TIBCO MFT Command Center SAML integration,you must restart the MFT server in the following conditions.
● When you import new identity provider metadata.
● When the security provider configuration is changed.
Updating MFT ShortcutsYou can update the MFT shortcuts to redirect users to the SAML login pages.
The following shortcuts are located in the <MFT_Install>\servers\webapps\ROOT directory:
● samladmin: redirects you to the administrator page after SAML authentication is completed.
● samlbrowser: redirects you to the FT Browser page after SAML authentication is completed.
● samljava: redirects you to the FT Java page after SAML authentication is completed.
You can use these shortcuts or rename them to names you choose. When the user goes to one of thesepages, they will be redirected to SAML for authentication. When authentication is completed, the userwill be redirected to the page defined by the shortcuts. If you change the context from the default ofcfcc, you must change the context in these files.
56
TIBCO® Managed File Transfer Internet Server Installation
The following shortcuts are located in the <MFT_Install>\servers\webapps\context\logindirectory:
● ssoadmin: redirects you to the administrator page after SAML authentication is completed.
● ssobrowser: redirects you to the FT Browser page after SAML authentication is completed.
● ssojava: redirects you to the FT Java page after SAML authentication is completed.
These file names are hardcoded in the MFT code. When the user is authenticated by SAML, the usergenerally specifies the client that they want to use. When authentication is completed, the user will beredirected to the desired client based on the URLs in these files. If you change the context from thedefault of cfcc, you must change the context in these files.
57
TIBCO® Managed File Transfer Internet Server Installation
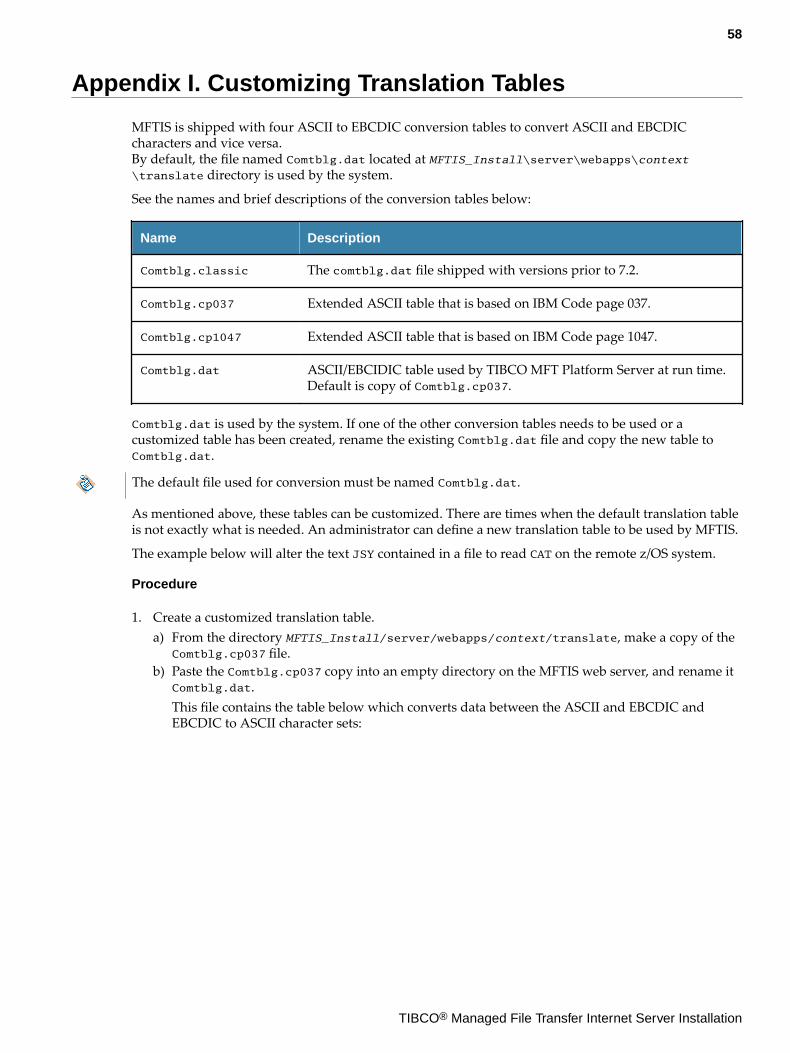
Appendix I. Customizing Translation Tables
MFTIS is shipped with four ASCII to EBCDIC conversion tables to convert ASCII and EBCDICcharacters and vice versa.By default, the file named Comtblg.dat located at MFTIS_Install\server\webapps\context\translate directory is used by the system.
See the names and brief descriptions of the conversion tables below:
Name Description
Comtblg.classic The comtblg.dat file shipped with versions prior to 7.2.
Comtblg.cp037 Extended ASCII table that is based on IBM Code page 037.
Comtblg.cp1047 Extended ASCII table that is based on IBM Code page 1047.
Comtblg.dat ASCII/EBCIDIC table used by TIBCO MFT Platform Server at run time.Default is copy of Comtblg.cp037.
Comtblg.dat is used by the system. If one of the other conversion tables needs to be used or acustomized table has been created, rename the existing Comtblg.dat file and copy the new table toComtblg.dat.
The default file used for conversion must be named Comtblg.dat.
As mentioned above, these tables can be customized. There are times when the default translation tableis not exactly what is needed. An administrator can define a new translation table to be used by MFTIS.
The example below will alter the text JSY contained in a file to read CAT on the remote z/OS system.
Procedure
1. Create a customized translation table.a) From the directory MFTIS_Install/server/webapps/context/translate, make a copy of the
Comtblg.cp037 file.b) Paste the Comtblg.cp037 copy into an empty directory on the MFTIS web server, and rename it
Comtblg.dat.This file contains the table below which converts data between the ASCII and EBCDIC andEBCDIC to ASCII character sets:
58
TIBCO® Managed File Transfer Internet Server Installation
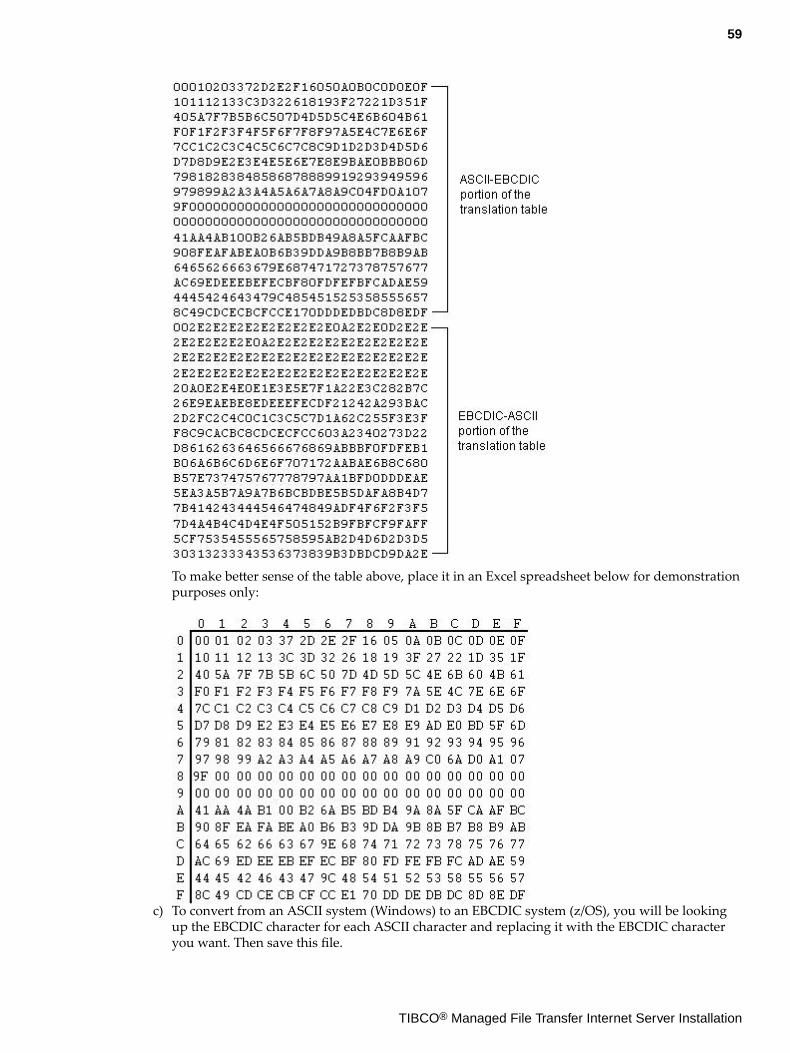
To make better sense of the table above, place it in an Excel spreadsheet below for demonstrationpurposes only:
c) To convert from an ASCII system (Windows) to an EBCDIC system (z/OS), you will be lookingup the EBCDIC character for each ASCII character and replacing it with the EBCDIC characteryou want. Then save this file.
59
TIBCO® Managed File Transfer Internet Server Installation
The ASCII value for J is 4A, so you will go to the chart above and locate 4 going down and slideyour finger to the right until you are in the A column. You will see the EBCDIC value D1 for J.You want this to translate to a C, so you will replace the D1 with C3 which is the EBCDIC valuefor C.Do the same to have S translated to A and Y to T.
2. Replace the existing Comtblg.dat.From the directory MFTIS_Install/server/webapps/context/translate, rename the existingComtblg.dat file to org.Comtblg.dat. Now copy and paste the new Comtblg.dat file that wascustomized in step 1 into this folder.This file will now be your default conversion table used by the system.
60
TIBCO® Managed File Transfer Internet Server Installation
Appendix J. Security Best Practices
You can follow the following recommendations for securing MFTIS.
InstallationThe following are recommendations for securing MFTIS at installation.
Installation User on UNIX
Install as a non-root or unprivileged user. When you want to use ports below 1025, use the UNIXiptables command to redirect these ports to ports 7443 and 7080. See Installation Requirements formore details.
Provide only the necessary rights to update the MFTIS_ Install directory and any directories where*LOCAL data will be saved.
Installation User on Windows
Install as a normal user (non admin). Normal users should be able to use ports below 1024. Provideonly the necessary rights to update the MFTIS_ Install directory and any directories where *LOCALdata will be saved.
Securing the JDBC connection
If possible, configure the JDBC driver to use SSL/TLS. Contact your database admin for instructions onhow to do this.
Using Secure Ciphers
During the installation procedure, you will be prompted to use only secure ciphers. Use the defaultvalue of secure ciphers.
This will ensure that only secure ciphers will be accepted during SSL negotiation. This applies to theHTTPS connections as well as the FTPS and Platform Server SSL connections.
Admin Service
Do not install the MFT Admin Service on computers located in the DMZ. Only install the MFT AdminService on computers in the internal network.
HTTPS Certificate
Purchase an HTTPS SSL certificate from a well known certificate authority. The default certificate is aself-signed certificate and will prompt browser users a warning that the certificate is not trusted. Whencreating a keystore, use a strong password. Do not use the default password.
The MFT Java Applet is now signed with a TIBCO Certificate so that you no do not need to sign theMFT Java Applet.
Web.xml ParametersThe following are recommendations for securing MFTIS via web.xml parameters.
TLSCipherSuite
This parameter defines the ciphers used by MFT in any SSL/TLS connection. If during the installation,you select Use Secure Ciphers Only, then this parameter will be filled in with secure ciphers.
61
TIBCO® Managed File Transfer Internet Server Installation
When the FTP service is started, it will display all secure ciphers allowed. You can select any ciphersfrom this list to be added to this parameter. Multiple ciphers should be delimited with a comma. Thisparameter applies to FTPS (FTP over SSL) and Platform Server SSL connections only. HTTPSconnections use the parameters in the server.xml ciphers parameter.
TLSProtocols
This parameter allows you to define the TLS protocols that will be supported by FTPS and PlatformServer SSL. The valid values are: TLSv1, TLSv1.1, and TLSv1.2.
By default, any TLS protocol is allowed. Before changing this parameter, make sure that all FTPS andPlatform Server clients and servers support the defined TLS protocol. This parameter applies to FTPS(FTP over SSL) and Platform Server SSL connections only. HTTPS connections use the parameters in theserver.xml SSLEnabledProtocols parameter.
SSHCipherSuite
Allows you to define the ciphers supported by MFT SFTP client and servers. When the MFT SFTPservice is started, it will display all SSH ciphers allowed. You can select the ciphers that you want tosupport. Multiple ciphers should be delimited with a comma.
SSHKeyExchange
Allows you to define the SSH key exchange algorithms supported by MFT SFTP client and servers.When the MFT SFTP service is started, it will display all SSH key exchange algorithms allowed. Youcan select the key exchange algorithms that you want to support. Multiple key exchange algorithmsshould be delimited with a comma.
By default the diffie-hellman-group1-sha1 protocol has been removed by MFT, since it was vulnerableto the Logjam attack. Some old SFTP clients and servers require this parameter, so there are times whenyou need to update this parameter to include this key exchange algorithm. You must include all keyexchange algorithms that should be supported.
SSHDigestSuite
Allows you to define the digest (hash) suites supported by MFT SFTP client and servers. When the MFTSFTP service is started, it will display all SSH digests allowed. You can select the digests that you wantto support. Multiple digests should be delimited with a comma.
PasswordHashNew
Allows you to define the password digest used by MFT. You should use the defined value SHA=256.
UnsecuredHTTPSupport
The default value No will not allow HTTP support. Only HTTPS will be accepted. Set this value to Yesonly if you require HTTP support.
When using HTTP, there will be no encryption of credentials or data.
AllowedReferersForXferNavigation
This parameter adds HTTP referrer checking to the JSP pages that are used to navigate the directorytree structure. In addition to the URL, you should also add the loopback address. This parameter isdefined in the web.xml file. This parameter only needs to be set in MFTIS instances. It is ignored inCommand Center.
62
TIBCO® Managed File Transfer Internet Server Installation
AllowedReferersAdminJSP
This parameter adds HTTP referrer checking to the admin JSP pages. In addition to the URL, youshould also add the loopback address. This parameter only needs to be set in Command Centerinstances and in MFTIS instances where the admin service is installed.
DisplayFTPBanner
This parameter defined whether MFT will display FTP and SFTP banners. If this parameter is set toYes, the admin Configure SSH Server and Configure FTP Server pages allows you to define the bannersor welcome message displayed.
Anonymous
This parameter allows you to define whether user anonymous can be used without authenticating thepassword. If you enter the value anonymous in this parameter, you must also create a user calledanonymous. Since the password is not validated, you should not give user anonymous access to anysecure file or folders.
Redirect HTTP to HTTPS
Uncomment the following parameter from the web.xml file. This will automatically redirect HTTPrequests to the HTTPS port.<!-user-data-constraint> <transport-guarantee>CONFIDENTIAL</transport-guarantee> </user-data-constraint->
SecurityFilter
This parameter helps to prevent framing and Clickjacking attacks. It indicates whether or not a browsershould be allowed to render a page in a frame, iframe or object.
The value SAMEORIGIN will allow the browser to use the page in a frame as long as the server includingit in a frame is the same as the one serving the page. By setting SecurityFilter to DENY, all attempts toload the page in a frame will fail. The default is SAMEORIGIN.
Server ConfigurationsThe following are recommendations for securing MFTIS through configuration.
Configuration in Admin Client
● Remove unnecessary default users or remove unnecessary rights from these users.
● Assign only necessary rights to users.
● Use LDAP for authentication.
● Enable Global Password rules.
● Enable Global Lockout.
● Allow users to reset their passwords.
● Use the MFT Delegated Admin feature when possible.
● AdministratorRight should be limited to a selected few people.
● Assign the minimum right that a user needs to access the system.
● Be cautious executing commands or Java class on an alert or scheduled job. Commands and Javaprograms will execute under the rights of the MFT Server process.
63
TIBCO® Managed File Transfer Internet Server Installation
● Configure the time of day and days of the week that transfers can be executed.
User the Server Option: Server File Name Prefix
When defining a server, you can use the server option: Server File Name Prefix.
This parameter defines the directory that is prefixed to the server file name defined in the transferdefinition. This allows you to restrict user access to a particular directory.
This ensures that when a transfer definition is created, the transfer definition can not access dataoutside of this defined directory. This parameter can be used for all server types, but it is particularlyimportant when defining a server type of *Local.
Set the SFTP and FTP banners
MFT will display banner pages when users log on to the MFT SFTP and FTP servers. It is recommendedthat you create a generic banner page that does not include the name of the software running or therelease.
General SuggestionsThe following are general suggestions for securing MFTIS.
JAVA System Security
Use the newest Java Server JRE that is supported by the product. While the products will work with aJava JDK, you are recommended to use Java Server JRE. Do not use the GNU Java that is shipped withsome Linux instances. Use the Oracle or IBM Java that is appropriate for your MFT instance.
Setting Cookies to HTTPOnly
By default, HTTPOnly is not set for MFT generated cookies. This is because the MFT Java client will notwork when a cookie is set to HTTPOnly. If you do not use the MFT Java client, then you can set thecookies to HTTPOnly. Here is how this is done:
Locate the usehttponly parameter in the following file:
MFTIS_Install/server/conf/catalina/localhost/web.xml
Set usehttponly="true"
Setting the HTTPOnly attribute will cause the MFT Java client to fail.
Configuring the Session Timeout
The session timeout is set to 30 minutes by default. This is good for most installations. If you need tochange this, you must make the following two changes:
● The session-timeout parameter in MFTIS_install/server/conf/web.xml
● The SessionTimeOut parameter in MFTIS_install/webapps/cfcc/WEB-INF/web.xml
Certificate Authentication
MFT Supports certificate authentication for the following protocols:
● Platform Server SSL
● SFTP
● FTPS
● HTTPS
64
TIBCO® Managed File Transfer Internet Server Installation
Whenever possible, use Certificate Authentication. Certificate Authentication is relatively simple to setup on SFTP, Platform Server and FTPS.
It is much more complicated on HTTPS, because you need to update the certificate manager and selecta certificate for the browser. Because of the difficulty in implementing HTTPS certificate authentication,you are not recommended to use this.
Two Factor Authentication
MFT supports the Radius protocol. Some token providers allow access to their servers through theRadius protocol. MFT can be configured through the web.xml file to support Radius. When Radius isturned on, all password validation that the MFT instance uses is sent to the Radius sever.
You can define users that are excluded from Radius password checking; these users will beauthenticated through standard DB or LDAP authentication.
Users/Passwords
● As soon as the product is installed, change the password for the admin and for other predefinedusers.
● Disable any predefined users that you will not be using.
● You can configure the time of day and days of the week that users can access the system.
● You can configure an IP address for a user that will limit the user to log on to MFT only from that IPaddress.
Anonymous Access
Use anonymous access with great care. Anonymous users should not be given rights to upload ordownload sensitive data.
End User Education
● When the browser offers to save MFT password, users should say no.
● After using MFT, users should log off and close the browser.
● Users should not use MFT and browse other web sites at the same time.
65
TIBCO® Managed File Transfer Internet Server Installation