sace stage 2 biology - south australian science … · sace stage 2 biology practical manual and...
TRANSCRIPT

SACE STAGE 2 BIOLOGY
Practical Manual and e-manual
Teaching Notes - Version 16
Trichoglossus rubritorquis (Rainbow lorikeet)
Source: Wikimedia Commons
TABLE OF CONTENTS MATERIALS OVERVIEW 3
M1 TESTING FOR MACROMOLECULES 4
M2 NUCLEIC ACIDS 5
M3 CATALASE ACTIVITY 8
M4 RENNIN ACTIVITY 8
C1 CELL STRUCTURES 9
C2 MITOSIS 9
C3 RATE OF DIFFUSION 10
C4 RATE OF OSMOSIS 10
O1 KIDNEY STRUCTURE AND FUNCTION 11
O2 CHEMORECEPTORS 11
O3 RATE OF PHOTOSYNTHESIS 12
O4 RATE OF FERMENTATION 13
E1 NATURAL SELECTION 13
E2 SUCCESSION (second hand data) 15
E3 FACTORS AFFECTING GERMINATION 17
E4 ANTIBIOTIC RESISTANCE 18
Appendix 1 - Suggested marking of Exemplar Practical Report 19
Appendix 2 - Suggested answers for the Practical Question 21

2
Publishing Information This Practical Manual, was first published in 1995 and has had annual revisions since then. It is
designed to support the teaching and learning of Stage 2 Biology as part of the South Australian
Certificate of Education. These accompanying Teaching Notes are an integral part of this Manual
and e-manual and are only available in pdf format from the SASTA website <www.sasta.asn.au>
This e-booklet is published by: ‘Science Teaching And Resources’ (S.T.A.R.)
(ABN 29474198897) whose office can be contacted as follows.
Email [email protected] Phone 0418 895 560
This e-booklet is distributed by: SASTA, 249 Henley Beach road, Torrensville, Adelaide 5007
Ph. 08 83540006, Fax. 08083540008, email. [email protected], www.sasta.asn.au
Library catalogue: 1. Biology 2. Practical Manual Teaching Notes
Authors: Crierie A. and Greig D.
ISBN 978-0-9804362-9-7
The authors Alan Crierie is currently a senior Biology Teacher and a Deputy Principal at St Michael’s College
in Adelaide. As past Chairman of the Biology Subject Advisory Committee of SACE (formerly
SSABSA), he has been very closely involved with the design and implementation of the current
SACE Biology course.
David Greig is no longer teaching in the classroom but most recently worked as a Key Teacher in
Biology at Brighton Secondary School in Adelaide. Through his business ‘Science Teaching And
Resources (S.T.A.R.)’ he is working as a consultant, author, project manager and editor on a
number of science publishing projects at state, national and international level.
Copyright information The copyright of the contents of this book remains the property of the authors Alan Crierie and David Greig.
All rights reserved except under the conditions described in the Copyright Act 1968 of Australia and subsequent amendments.
While every care has been taken to trace and acknowledge copyright, the publishers tender their apologies for any accidental
infringement where copyright has proved untraceable. They would be pleased to come to a suitable arrangement with the rightful
owner in each case.
Acknowledgements The production of these materials could not have been done without the assistance of many people
and organisations.
In particular we wish to thank the following for their contributions:
Greg Cole and Rebecca van Schuilenburg at SASTA for their active involvement
Peter Warnes for his helpful and constructive suggestions
Colin Flashman at colecandoo.com.au for the cover designs and other help
Mike Badenoch for the hand drawings
Jenna Crierie for help with proofreading and corrections
Sophie Andonopoulos for her practical advice.
Sue Lace for her practical advice
The SACE Board of SA for permission to use extracts from the Stage 2 Biology subject
outline (© 2012) in this Manual and the Teaching Notes.

SACE Stage 2 Biology Practical Manual Version 16 Teaching Notes © S.T.A.R. 2014 3
MATERIALS OVERVIEW This table has been provided to assist the teacher or laboratory manager by providing, at a
glance, most of the materials that may need to be prepared in advance for these Practicals.
Please refer to the Materials listed for each Practical in the Manual for more details.
Practical Weeks before Days before Prior to lesson
M1 ● iodine solution
● potato tissue
● ethanol/onion epidermis
● aceto-orcein
● margarine, olive oil
● sodium hydroxide
● microscopes
● slides/coverslips
● rubber gloves?
● Sharp blades
● Cutting boards
● Paper towelling
M2
● onions
● meat tenderizer (6% papain)
● 95% ethanol
● photocopy of pattern sheets
● sheets of newspaper
● stirring rods/ pipettes
● test-tubes/ wire-loop
● onion extract(early in day)
● glue/scissors/Poster paper
● salt and shampoo
M3
0.1% hydrogen peroxide
pH solutions
fine sand
fresh liver
mortar and pestle
M4 ● junket tablets containing rennin
● fresh cows milk
● possibly other ‘milks’
● Beakers
● paper towel
● electronic balance
● thermometers
● water baths
C1 ● mini-grids/ocular grids
● prepared slides
● onion tissue
● geranium tissue
● algae tissue
● aceto-orcein
● methylene blue
● microscopes/slides
● newspaper
● teat pipettes
● sharp blades
● prepared slides
C2
● onion roots
● prepared mitosis slides
● aceto-orcein stain
● overnight staining of root tips
● microscope slides
● other as listed
C3 ● pink agar
● 0.1M sulfuric acid
● spoon/ paper towel
● beakers/ balance
● other as listed
C4
● approx 1 potato per group
● potato peelers ● spoon/ paper towel
● beakers/ balance
O1
● kidneys ● dissecting board/ scalpel
● antiseptic solution
● stereo-microscope
● paper/ textas
O2
● various sucrose solutions as specified
● salty, sweet, sour and bitter solutions
as required
● paper cups
● cotton buds
O3 ● 50mL syringes ● solutions of sodium hydrogen
carbonate
● Buchner flask
● leaves/ cork borer
● OH projector
● Sheets of tracing paper
● stop watch/beakers
● sieve / forceps
O4
● ● yeast suspension
● glucose solution
● beaker/test tubes
● delivery tubes
● retort stands/ stop watches
E1
● photocopied sheets of frogs: red,
green, yellow
● scissors
● dice
E2 second hand data only
E3 ● seeds e.g. bean / pea ● buckets / containers
● nutrient solutions
● alfoil
● paper toweling
E4
Antibiotic multo-disks
Bacterial cultures
Agar powder
bacterial cultures
agar plates
cotton buds
methylated spirits
forceps
adhesive tape

SACE Stage 2 Biology Practical Manual Version 16 Teaching Notes © S.T.A.R. 2014 4
M1 TESTING FOR MACROMOLECULES This Practical is a very good opportunity to revise and emphasize laboratory rules and safety
procedures.
Materials required Part A
iodine solution
potatoes
Part B
Methylene blue stain
Part C
aceto-orcein
onions
Part D
margarine
olive oil
ethanol
Generally
sharp blades
rubber gloves
microscopes slides and coverslips
A. Carbohydrates
This is a standard and well known test, the positive test is blue black colour. If iodine solution
does not react strongly enough, you can make some fresh solution by dissolving about 0.5g of
iodine crystals and 1g potassium iodide in 100mL distilled water. Emphasize care here, iodine
will stain most things, including skin and paper!
B. Protein
Methylene Blue stain works well but again emphasize that it stains things!
C. Nucleic acids
Aceto-orcein solution can be purchased or made by dissolving 3.3g orcein in 100mL glacial
acetic acid under reflux in a fume hood. This can be used as a 50:50 dilution with distilled
water. The positive test is a red colour. Suggest using fingers rather than pegs when gently
warming the slide or the slides will get too hot and crack.
D. Lipids
Although margarine and olive oil are suggested, other materials will suffice. Students should
notice a cloudy white suspension which is insoluble lipid in the alcohol. The ‘whiteness’ is
quantitative. Emphasize that ethanol is flammable and toxic! Can use methylated spirits instead
if you wish.

SACE Stage 2 Biology Practical Manual Version 16 Teaching Notes © S.T.A.R. 2014 5
M2 NUCLEIC ACIDS
Part A EXTRACTING DNA There are several cheap and simple techniques available to schools which yield impure but
nonetheless useful samples of DNA. We have chosen to use plant material to avoid the health
and ethical problems associated with the use of fresh animal tissue. We have also chosen a
technique that does not require the use of hazardous chemicals such as phenol or expensive
equipment such as a centrifuge.
STAGE 1 Preparing the onion extract
Materials required 1 large onion (about the size of a tennis ball)
clear, good quality shampoo
1 knife and chopping board
1 coffee filter bag or cheese cloth 2 Pasteur pipettes
1 large plastic filter funnel 1 litre beaker
water bath set at 600C ice bath
table salt (3g) large mixing spoon
100mL distilled water 250mL conical flask
blender (optional) thermometer
Method 1. Dissolve 3g of table salt in 70ml of distilled water. Add 10mL of shampoo and make up to
100mL with distilled water.
2. Remove the dead outer layers and then cut the onion into quarters and then chop into 1 cm
slices.
3. Put these pieces of onion into the salty shampoo solution from step1.
4. Put the beaker in a water bath at 600C for 15 minutes and stir occasionally.
5. Cool the mixture by standing the beaker in an ice bath for 5 minutes while stirring frequently.
6. Pour the mixture into a blender and blend in several short bursts of about a second with a total
of no more than 5 seconds. (Note that an alternative technique is available which does not
require a blender. Simply press the chopped pieces of onion against the side of the beaker
with the back of a spoon during steps 4 and 5).
7. Filter the mixture through the coffee filter or several layers of cheesecloth into a 250 mL flask
and keep it cold until it is dispensed to students in 10mL amounts in test tubes (see student
method).
More information about this and similar topics may be found by doing an Internet Search.
The main points are:
● The detergent dissolves the fatty molecules that are present in the cell membranes, which
releases the DNA into solution.
● The heat treatment causes the lipids and proteins to precipitate.
● The salt improves the cohesion between the DNA strands.
● Filtration is necessary to remove larger particles whilst leaving soluble and suspended
materials in the filtrate.
● Most meat tenderisers contain papain (check the packaging information if unsure) which is a
protease and will digest the histones which are associated with the DNA when gently mixed.
● DNA will precipitate in very cold and concentrated ethanol.
● Spooling is rotating rather than stirring, and it is useful to score the glass or wire with a
diamond pencil (if available) to allow the DNA to adhere initially.

SACE Stage 2 Biology Practical Manual Version 16 Teaching Notes © S.T.A.R. 2014 6
This technique is rather sensitive with some variables that are difficult to control (e.g. shampoo),
some trial and error may be necessary.
The DNA may be dried using a hair drier forming a white film. So far as the further
investigations go, forcing DNA through a syringe will shear some of the molecules and reduce
viscosity.
It is recommended that Part 1 of this preparation be performed by the laboratory
technician early in the day, our trials indicated that the extract did not keep well overnight.
These materials and this technique will produce about 60mL of solution, which is enough for 6
groups. Quantities can be varied according to class size.
Part B MODELS OF NUCLEIC ACIDS
We have developed, carefully trialled and can recommend these patterns and the idea of students
making posters. The patterns should be photocopied and given to students in advance to save
time in lesson. It may also be useful to do one as a transparency for use on an OHP.
The bases can be glued or stapled to TAB 1 on the DNA and RNA models and to TAB 3 on the
transfer RNA models. The tRNA molecules should be given the same number as their specific
amino acid and then clipped together with a paper clip. You can work out the actual amino acid
that is carried by the particular tRNA, by referring to a table of mRNA codons that lists the
corresponding amino acids that are coded for. The peptide bonds can be represented by gluing or
stapling TABS 4 together.
Posters which are well done, particularly using colour, can be used for display in the classroom
or laboratory.
Transfer RNA number_____
Amino acid____________
TAB 3
T2 T2 T2
Transfer RNA number_____
Amino acid____________
TAB 3
T2 T2 T2
Transfer RNA number_____
Amino acid____________
TAB 3
T2 T2 T2
T4 Amino acid___________________ T4
T4 Amino acid___________________ T4
T4 Amino acid___________________ T4

SACE Stage 2 Biology Practical Manual Version 16 Teaching Notes © S.T.A.R. 2014 7
A
G C
G C
G C
G C
G C
TAB 1 Sugar
TAB 1 Sugar
TAB 1 Sugar
TAB 1 Sugar
TAB 1 Sugar
TAB 1 Sugar
TAB 1 Sugar
TAB 1 Sugar
TAB 1 Sugar
TAB 1 Sugar
TAB 1 Sugar
TAB 1 Sugar
TAB 1 Sugar
TAB 1 Sugar
TAB 1 Sugar
TAB 1 Sugar
TAB 1 Sugar
TAB 1 Sugar
A T/U
A T/U
A T/U
A T/U
A T/U

SACE Stage 2 Biology Practical Manual Version 16 Teaching Notes © S.T.A.R. 2014 8
M3 CATALASE ACTIVITY Fresh ‘stock’ hydrogen peroxide is usually 6% by volume. To make 1% simply add 17 mL of
this solution to 83 mL of distilled water. Then simply do a serial dilution of this to make the
0.1% solution. Remember that hydrogen peroxide will deteriorate in the presence of both light
and heat. Consequently it is strongly advised that Staff do a ‘trial run’ to ensure that the substrate
concentration is suitable.
Fresh liver from a butcher is ideal although other sources of catalase (yeast, blood cells, potatoes
and other vegetables) can be used if more convenient. Good idea to use plastic gloves, if not
wash thoroughly with hot soap and water or anti-bacterial gel.
A guide to making up substrate solutions of various pHs. It is suggested that at least 4 different pH levels should be tested.
The following method is suggested to make 100 mL of stock solutions (scale up as necessary)
Use a pH meter if possible, pH papers give less reliable results.
CAUTION: It is wise to use eye protection when making up or using strong acid or strong
alkali solutions.
pH 1 60 mL of 6% H2O2, 40 mL of bench strength (dilute) Hydrochloric Acid.
pH 3 To 60 mL H2O2 add 38 mL of distilled water. Test the pH. It will be approx 5. Add
drops of HCl until the pH is 3 and then top up to 100 mL with distilled water.
pH 6, 7, 8, 10 Take 10 mL of bench strength dilute sodium hydroxide and make it up to 100 mL
with distilled water. Reserve this solution.
Take 60 mL of H2O2 and add 30 mL of distilled water. Add the NaOH solution until the
required pH’s are reached and then make the solution up to 100 mL with distilled water.
pH 12 To 60 mL of H2O2 add 35 mL of the diluted NaOH solution and measure the pH. If it is
approximately 12, add distilled water to make it up to 100mL. If not, add drops of bench NaOH
before making up to 100 mL.
pH 13 To 60 mL of H2O2 add 40 mL of bench strength NaOH.
DYO possibilities Some of the obvious variables for the ‘Design Your Own’ (DYO) Practicals are temperature, pH
(above), surface area and source of catalase. In addition internet references indicate that sodium
azide and ammonia are competitive inhibitors for the enzyme although the authors have not
verified this.
M4 RENNIN ACTIVITY The materials required by each group in Part A are 50 mL and 250 mL beakers and pipettes.
Thermostatically controlled hot plates are very useful and safer for the higher temperatures. As
expected you will find an optimum temperature of around 370C. It is possible to have different
groups doing different temperatures and pool results.
It may also be possible to use dataloggers and manipulate data in spreadsheets.
DYO possibilities The usual variations in pH and temperature and possible use of inhibitors.
It is also very important to note that different types of milk contain different amounts of the
soluble protein substrate caseinogen which is converted to the insoluble casein in the reaction.
For this reason long-life milk and vegetable ‘milk’ such as from soya beans will not provide
positive results whereas low fat milks usually will.

SACE Stage 2 Biology Practical Manual Version 16 Teaching Notes © S.T.A.R. 2014 9
C1 CELL STRUCTURES It is important that students use microscopes to gain an appreciation of the structures such as
cells that are discussed in class. Viewing cells helps students to visualise their size, and, by using
stains, links can be made to molecular composition. This practical links to Practical M1 (Testing
for Macromolecules), in particular looking at nucleic acids and protein.
In practical C1 we suggest that ocular scales (or ocular micrometers) may be used in addition to
mini-grids so that more accurate measurements can be made. It is also important that students
work with the one microscope to become familiar with it and calibrate it for its field of view. A
video-microscope is a useful tool when teaching skills in this area.
We have suggested onion cells for plant issue, but the possibility of using leaf tissue, for
example Geranium, would also enable students to observe chloroplasts. Likewise, if students
were to examine human cheek cells the nucleus would be visible, whereas this will not be the
case in the red blood cells. The electron micrographs included should enable students to see the
internal structure and detail not seen with the light microscopes in a school laboratory. Part C in
order: A - mitchondria, B - chloroplast, C - rough ER, D - Golgi body nucleus, E - cell wall, and
D - cell membrane.
C2 MITOSIS In this practical we recommend that garlic root tips be used for the source of tissue to make the
squash preparations. It seems best to grow the garlic from bulbs that have had the base trimmed
off with a sharp razor blade. Place the bulb on top of a small beaker or a conical flask so that the
base is suspended in water. Some schools have indicated that other plants like onions and leeks
also work well.
Tooth picks can be used to hold the bulb(s) in place. Each bulb should give a minimum of 5-6
roots after a period of about a week or two so you can plan according to your class size.
Preparation of the aceto-orcein stain: (1% orcein stain in 45% acetic acid) Add 5 g of synthetic orcein powder to 250 mL of boiling conc. acetic acid. It is best to add glass
beads to the flask to prevent bumping when boiling. Boil for approximately one minute and then
cool the solution and make up to 500 mL by the addition of distilled water. It is suggested that
this step be conducted in a fume cupboard. Let it stand overnight and filter the solution before
use.
Practical Tips
Obtaining a slide showing the different stages of cell division is a difficult task, however, if the
students follow these instructions carefully, they will be rewarded with good slides showing
stained nuclei for each phase as required.
In assessing their slide preparations you can assess how well they have followed instructions by
observing some of the following:
● cells that are smaller and cuboidal have come from the growing tip whereas larger, elongated
cells have been taken too far from the tip.
● if the cells are all crushed and fragmented it probably indicates rough handling.
● the depth of stain is a reasonable indication of how well the staining procedures were
followed.
Refer to the Key Ideas Textbook and Essentials Workbook for a diagram of the Cell Cycle.

SACE Stage 2 Biology Practical Manual Version 16 Teaching Notes © S.T.A.R. 2014 10
C3 RATE OF DIFFUSION This practical is quite easy to do and provides some quantitative data that can be easily analyzed
and used to reach a conclusion about the importance of the surface area to volume ratio.
The ‘recipe’ for pink agar is as follows:
1. Dissolve 18 grams of plain agar in cold water
2. Add boiling water to 900 mL, boil to dissolve and then cool to 600C.
3. Add 4 gm NaOH dissolved in 100mL water
4. Add phenolphthalein powder or liquid until it is a deep pink colour.
5. Pour into a straight sided container to a depth of 3cm and allow to set
6. Do not store it in the fridge as the colour will fade, it will last for several days
If you have been able to pour a ‘slab’ exactly 3cm deep it will make cutting cubes a lot easier.
Emphasize to students the need to be careful and as accurate as possible when cutting the cubes,
using a sharp knife and a ruler. Suggest that the cubes are lifted out of the acid with a plastic
spoon and dried on paper towelling. It is recommended that students wear eye protection but it is
not necessary to wear gloves but caution students about touching their face and advise then to
wash their hands afterwards.
The data should be plotted on the graph with SA/V on the X axis and % decoloured on the Y
axis.
DYO Possibilities The obvious variables here are acid concentration and temperature but another possible
extension of this practical can be done by carving and using different cell shapes e.g. flat,
spherical, biconcave disc etc
C4 RATE OF OSMOSIS What really appeals to us about using potato tissue is that they are very cheap, clean and safe to
use. It is obviously important to remove excess water each time before weighing the potato
cubes.
DYO possibilities ● predicting and testing the salt concentration which will result in no change in mass due to
osmosis (this isotonic point is about 1%)
● predicting and testing whether particular materials pass through the membrane.
● Predicting and testing the effect of smaller and larger size cubes of potato with different
surface area/volume ratios
● Predicting and testing the effect of changing the shape of the potato pieces to change SA/V
ratios and model different cell types.
● predicting and testing whether temperature will affect the rate of osmosis.

SACE Stage 2 Biology Practical Manual Version 16 Teaching Notes © S.T.A.R. 2014 11
O1 KIDNEY STRUCTURE AND FUNCTION
Part A: Kidney dissection
Kidneys are easily available from either your butcher or the local supermarket. If ordering from
your butcher you may be able to put in a special request to try to better preserve a little more of
the blood vessels and ureter. In this activity you could ask your students, using toothpicks and
sticky labels, to mark the various parts for identification so that you can give them feedback on
the accuracy of their identification of the kidney parts. Using a good stereo - microscope will
enable close identification of important structures, but to examine nephron details, a more
sophisticated sectioning of kidney tissue would be required. Students should be encouraged to
use good hygiene, disposing of the kidneys as required and to wash their hands and the bench
area with disinfectant.
Part B: Modelling of filtration and re-absorption
This should be a good opportunity to provide students with a task in which they can work
together with other students to investigate more about the functions of the nephrons. It is also a
good opportunity for you to give students some formative practice in oral communication skills
while they explain the processes of filtration and re- absorption on their model.
For an alternative method of communication, a poster would work very well.
O2 CHEMORECEPTORS The aim of this practical exercise is to introduce students to the function and role of the taste
receptors in the mouth.
The recommended solutions to use for each taste sensation are as follows:
Salty: Sodium Chloride
Sweet: Sucrose
Sour: Acetic acid
Bitter: Quinine sulfate
Cheap cotton buds can be made by twisting some cotton wool around the end of a toothpick.
To make up the suggested solutions simply measure the required number of grams of solute and
dissolve in distilled water to make up to 100 mL of solution.
eg. To make up a 10% solution of sodium chloride dissolve 10 grams of sodium chloride in
distilled water adding sufficient water to make up the total volume to 100 mL.
It is suggested that students conduct a ‘validation of the technique’, using sucrose to become
familiar with the procedure and understand the concept of the taste threshold.
This is a good activity for the students to work together in small groups – especially when tasting
the unknown concentrations.
DYO Possibilities
Quite a good list of possibilities is given from which students should be able to design simple
investigations or experiments to test a hypothesis. When using human subjects the students may
gain an appreciation of such factors as the importance of:
● The variable results that may be obtained between different subjects
● Having a reasonably large sample size to help reduce the effects of random errors.
● The importance of repetition to validate their results
● The necessity to carefully design a controlled experiment where only 1 factor is being tested
● Make sure that informed consent is obtained according to the policy of your school

SACE Stage 2 Biology Practical Manual Version 16 Teaching Notes © S.T.A.R. 2014 12
O3 RATE OF PHOTOSYNTHESIS We found that this exercise works a lot better with leaves that were not too fibrous and those that
had been freshly picked a few minutes before the lesson. Ivy with dark green leaves is ideal.
Smaller discs work better than larger ones.
A 10% bicarbonate solution can be made by dissolving 100g NaHCO3 in 1 litre of distilled
water and then other concentrations can be made by diluting this as required.
It is important to ensure that the first discs that are loaded in the bicarbonate are not exposed to
more light than the last ones to be loaded. A solution to this problem is to put the beakers in a
dark place as they are loaded and then put them on the OHP at the same time.
Traditionally this Practical has been done using a vacuum pump which is attached to a water tap
and a Buchner flask. However this is rather unsatisfactory for a number of reasons and a much
simpler method has been developed. This technique makes use of disposable plastic or glass
syringes (without the needles). The technique is described in detail in the text of the Practical
but it is probably a good idea to try it beforehand.
If the finger over the end is a bit too painful you may try some small plastic hose with a kink in
it, or a rubber stopper. If some students have difficulty pulling out the plunger it may be
necessary for two students to work together. These syringes can usually be obtained from
medical clinics or hospitals provided that they have not been used for blood products. Otherwise
they may be purchased from medical suppliers for about $1.20 each.
A problem that you may encounter is that the discs may not sink in the bicarbonate solution even
though they do in water. Although this is quite a good problem-solving exercise for the students
if time permits, the simplest solutions are to use a softer leaf type or tap the disc(s) gently to
dislodge any small air bubbles which may be adhering to the surface. Also ensure that they are
vacuumed in the syringe until they sink quickly in the water, rather than drift down slowly.
When varying the amount of light as suggested using sheets of tracing paper, it is vital to restrict
light from other directions.
DYO possibilities Other variables include the type of leaf, the part of a variegated leaf, light colour, bicarbonate
concentration, temperature and pH.

SACE Stage 2 Biology Practical Manual Version 16 Teaching Notes © S.T.A.R. 2014 13
O4 RATE OF FERMENTATION This is essentially a simple practical which lends itself to many investigations and variations.
The following concentrations are suggested:
● 10% glucose can be made up by dissolving 10g glucose in 100mL distilled water or varied as
you wish.
● Yeast suspension can be made by mixing 25g compressed yeast with 100mL water. Allow
this to stand for 10 minutes or so before use. It is also a good idea to add a small amount of
ammonium phosphate (NH4PO4) to the mixture.
Collecting the total volume of CO2 is only one technique. You may also be able to count
bubbles/minute at various intervals as an indication of rate.
Another technique is to put glucose and yeast into a syringe and admit some air so the level of
the liquid is below the outlet when it is horizontal and then placed it into a container of warm
water (35-400C) and count the bubble rate (see diagram below).
If your school has electronic sensing equipment it may be possible to use heat production as your
dependent variable. To do this you will need insulated containers like thermos flasks and
temperature sensors. Physics students may even be able to do calculations of kJ.
Be careful when inserting or removing glass tubing from rubber stoppers.
DYO possibilities The obvious variables are temperature, yeast concentration and sugar concentration. The less
obvious variables, probably for better students, include age of yeast, type of sugar, presence of
phosphate in yeast suspension and you can probably think of more. As a matter of interest,
lactose does not react at all and sucrose is first digested by extra-cellular enzymes before glucose
is absorbed and respired. Most yeast species are very temperature sensitive.
E1 NATURAL SELECTION This activity is suggested as a formative exercise. Simulating the process of natural selection and
evolution can be a good learning activity that can illustrate clearly to students the principles
involved. There are several good computer simulations in the marketplace, but this activity can
achieve its goals with minimal materials and costs in a short period of time. The authors have
found that the exercise can be completed quite comfortably in a double lesson.
The investigation could be a good starting point for teaching the concepts of variation, natural
selection, geographical and reproductive isolation and ultimately speciation. The discussion
questions lead students to compare real life selection and this model, so that a better
understanding of the processes operating in natural populations can be appreciated.
Photocopying the frog template (page 14) on to red, green and yellow card and then cutting out
the individual frogs has been found to work well.
Yeast and sugar
Syringe

SACE Stage 2 Biology Practical Manual Version 16 Teaching Notes © S.T.A.R. 2014 14
SACE Stage 2 Biology Practical Manual Version 16 Teaching Notes © S.T.A.R. 2014 15
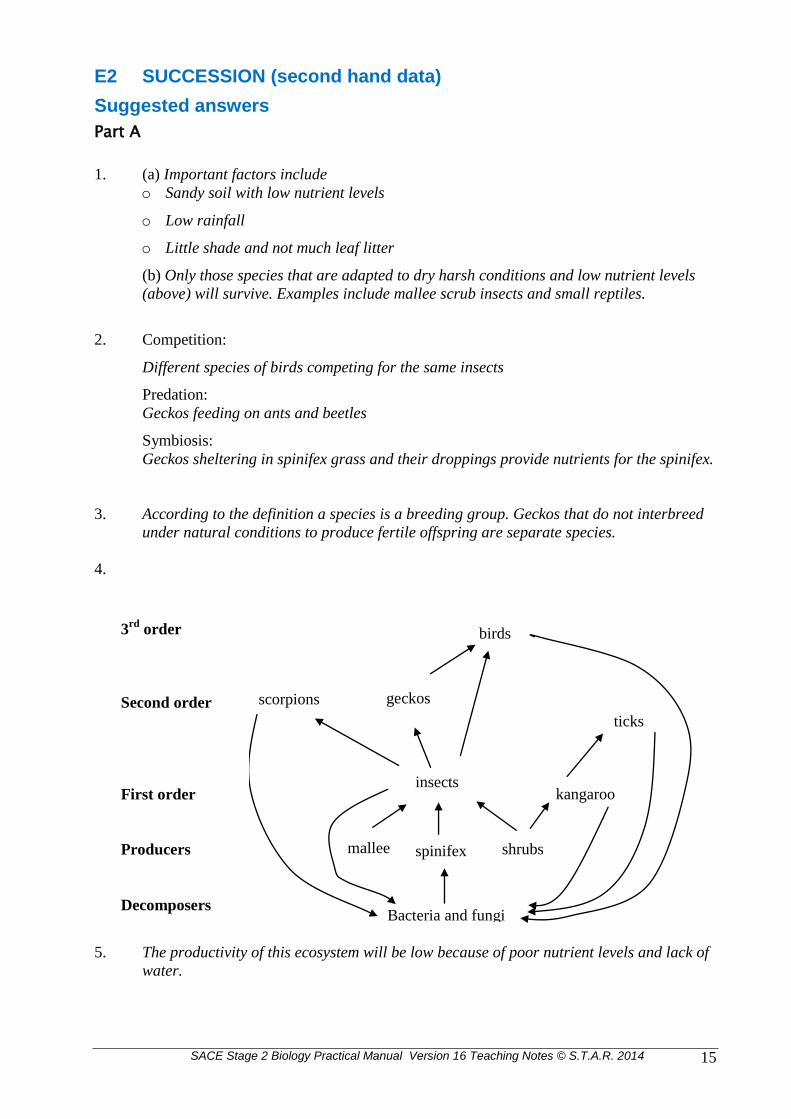
E2 SUCCESSION (second hand data)
Suggested answers
Part A
1. (a) Important factors include
o Sandy soil with low nutrient levels
o Low rainfall
o Little shade and not much leaf litter
(b) Only those species that are adapted to dry harsh conditions and low nutrient levels
(above) will survive. Examples include mallee scrub insects and small reptiles.
2. Competition:
Different species of birds competing for the same insects
Predation:
Geckos feeding on ants and beetles
Symbiosis:
Geckos sheltering in spinifex grass and their droppings provide nutrients for the spinifex.
3. According to the definition a species is a breeding group. Geckos that do not interbreed
under natural conditions to produce fertile offspring are separate species.
4.
5. The productivity of this ecosystem will be low because of poor nutrient levels and lack of
water.
mallee shrubs spinifex
insects kangaroo
ticks
scorpions geckos
birds
Bacteria and fungi
3rd
order
Second order
First order
Producers
Decomposers

SACE Stage 2 Biology Practical Manual Version 16 Teaching Notes © S.T.A.R. 2014 16
Part B
1. C cristatus would seem to need the accumulation of fallen logs etc. hence it will tend to
be found in greater numbers a long time after the fire. C fordi/N stellatus on the other
hand are at an advantage just after a fire as they can burrow in recently burnt area and
possibly feed on colonizing insects.
2. No fires for decades would lead to low numbers of early successional species i.e. those
that can survive just after a fire. Late successional species have a lower survival rate just
after a fire and may not survive and reproduce.
3. Faster reproducing birds increase in number quickly after a fire as they feed on new
insects. As new insect and beetle numbers fall due to heavy predation bird numbers will
also fall. Over time the slower reproducing birds (K strategists) will tend to predominate.
4. Generally productivity is greater in the early stages because the colonizing species (r
strategists) grow and breed more quickly.
5. Less biodiversity e.g. reduced spinifex plants would reduce the number of geckos that
could shelter there. This has the potential to alter significantly the mix of species in the
post burn fragment.
Less mallee trees and shrubs will reduce leaf litter and reduce the number of insects
geckos which in turn will lead to little food supply for birds and a decrease in their
number also.
Part C
1. (a) Fires will destroy leaf litter thereby reducing shelter and food source. If the fire is
severe some species may be destroyed and the community may take many more years to
regenerate.
(b) The fire could clear undergrowth and allow new plants to germinate and grow
(r strategists)
2. Fires are normal events in natural ecosystems such as mallee. To actively reduce fires
may lead to an increase in fuel and a more serious fire at a later stage which will cause
more serious damage and possibly the risk of extinction of some species. If scientists can
study patterns of recolonization they can make better recommendation about fire
management policies.

SACE Stage 2 Biology Practical Manual Version 16 Teaching Notes © S.T.A.R. 2014 17
E3 FACTORS AFFECTING GERMINATION This practical fits in well with the ecosystem theme. It enables testing of the ideas of resources
and/or pollution as for example in the human awareness strand.
The idea is a simple but effective way to allow seeds to germinate, and then facilitate an easy and
uncomplicated way to collect data on the growth of the plumule and radicle. A variety of seeds
can be used, but it is probably best to choose ones like radish, bean, pea or similar, which
germinate relatively easily and quickly. When building your "seed tube" there are a couple of
hints to improve your success. The main advantage of the tube over conventional petri-dishes
and cotton wool, is that each seed is isolated from the others, and when the tube is rolled, the
plumule and radicle should be growing separately from others and straight up and down for easy
measurement.
Use three sheets of paper towel rolled together to provide a more substantial base of moisture
for the germination. The alfoil will provide support so that your tubes can stand upright.
Try to avoid putting the seeds too close to each other, if kept separate from each other
measurement will be easier.
It the paper towel dries out, you may need to apply more of your particular solution to ensure
that the seeds are continually kept moist. It is most important, however, to ensure that the
seeds are not saturated with water, as they may swell too much, not receive sufficient
oxygen, or become infected.
As the seeds are in darkness, chlorophyll will not develop and the seedlings will have a
limited life unless they are transplanted out to pots.
The authors have tested totally sealed alfoil tubes and tubes open at the ends. When open at the
end, the authors stood the tubes in a small amount of solution in the container.
The technique should provide students with an easy procedure that allows for replication in their
experimental design, to help meet experimental skill requirements.
Students should be advised to be specific in the choice of the topic, and not try to be too
ambitious, thinking that they will gain more marks. Some suggested topics are listed in the
Practical Manual.
Ion concentrations suitable for plant growth can be obtained from different sources but a few
suggestions are given here.
To provide calcium, nitrate, zinc and sulfate ions:
Calcium nitrate: add 11.8g of calcium nitrate to 500 ml of distilled water. Add approximately
5ml/litre to the solutions used.
Zinc sulfate: add 0.36g zinc sulfate to 250ml of distilled water. Add approximately 0.5ml/litre to
the solutions used.
Testing for boron tolerance could provide an interesting investigation, one of the objectives of
the wheat and barley breeding programs at the Waite institute and Roseworthy college involves
working in this area. Tolerance to boron varies both between species and within a species. Good
seeds to work with might be peas, beans, corn, wheat or barley.
Boric acid solution:
Add 30.9 g of boric acid to 1 litre of distilled water. This is equivalent to a 5,000ppm boron
solution. To use a 50 ppm boron solution add 10ml/litre of the stock solution.
DYO Possibilities An extensive list is given but be warned that any of these experiments will take several weeks
and should not be attempted late in Term 3 or in Term 4!

SACE Stage 2 Biology Practical Manual Version 16 Teaching Notes © S.T.A.R. 2014 18
E4 ANTIBIOTIC RESISTANCE
Most standard texts will provide information about aseptic techniques which are probably
well known anyway but here are a few tips:
Together with many other living resources, cultures of non-pathogenic bacteria (e.g.
Sarcina lutea, E. coli, Staph albus, Bacillus subtilise and Rhodospirillum rubrum) are
available from The Nature Education Centre which is now located at:
Urrbrae Agricultural High School, 505 Fullarton Rd., Netherby 5062.
Phone (08) 83573413
URL: www.nature.sa.edu.au (this shows their catalogue)
email: [email protected]
Cultures cost $10 each and are available as broths or slopes. Slopes only can be sent
through the mail. Antibiotic test rings or multodiscs are available from the Scientific
Equipment scheme and listed in the catalogue at a cost of $102 for 50.
It is a good idea to put several drops of distilled water or sterile isotonic saline in the
middle of the agar and then to put the bacteria in this before trying to spread them around
the plate.
students find it easier to spread a culture of bacteria evenly using a sterile cotton bud than
with the traditional wire inoculating loop which tends to dig into the agar. This will
provide a more even 'lawn' which will make observation a lot easier later.
other possible antimicrobial agents may include soaps, antiseptics, disinfectants, chlorine,
methylated spirits, salt, toothpaste, herbal remedies and no doubt many more.
a well known and quite successful technique is to soak filter paper discs in test solutions
and then place them on the agar at a spacing of several cm and clearly labelled so that
they are not confused.
to preserve aseptic conditions as far as possible, the hole punch should be sterilised
possibly in boiling water and the filter paper taken from a new pack (using rubber gloves
if you like).
ensure that the plates are labelled on the bottom, sealed, stored upside down and then
disposed of properly by your lab manager. They must not be re-opened.
Other DYO possibilities Could include testing other antimicrobial agents such as household disinfectants and antiseptics.

SACE Stage 2 Biology Practical Manual Version 16 Teaching Notes © S.T.A.R. 2014 19
Appendix 1 - Suggested marking of Exemplar Practical Report
Specific features Comment/evidence with regard to meeting
Performance Standard
Grade
Inve
stig
atio
n
I1 Design of biological investigations.
Logical and detailed A
I3 Manipulation of apparatus and
technological tools to implement safe and
ethical investigation procedures.
Carefully and highly
effectively
A
I4 The obtaining, recording, and display of
findings of investigations using appropriate
conventions and formats.
Clear and highly
effective
A
An
alys
is a
nd
Eva
luat
ion
AE1 Analysis of data and concepts and their
connections, to formulate conclusions and
make relevant predictions.
Clear and critical
analysis
A
AE2 Evaluation of procedures, with suggestions
for improvement.
Critical and logical
with clear suggestions
for improvement
A
Ap
plic
atio
n
A2 Use of appropriate biological terms,
conventions, formulae, and equations.
Highly accurate use of
terms and conventions
A
A3 Demonstration of skills in individual and
collaborative work.
Good group allocation
of tasks with a focus on
conducting the
experiment effectively
A
Kn
ow
led
ge
&
Un
der
stan
din
g
KU1 Demonstration of knowledge and
understanding of biological concepts.
Deep and broad
knowledge and
understanding shown
A
KU3 Communication of knowledge and
understanding of biology in different formats
© S.T.A.R. 2014. Unauthorized copying prohibited.
Graphical, tabular and
descriptive formats all
highly effective
A

SACE Stage 2 Biology Practical Manual Version 16 Teaching Notes © S.T.A.R. 2014 20
Biology Practical Manual - Exemplar Practical Report – Suggested allocation of Performance Standards
Investigation Analysis and Evaluation Application Knowledge and Understanding
A Designs a logical, coherent, and detailed biological investigation.
Critically and logically selects and consistently and appropriately acknowledges information about biology and issues in biology from a range of sources. (NA)
Manipulates apparatus and technological tools carefully and highly effectively to implement well-organised safe and ethical investigation procedures.
Obtains, records, and displays findings of investigations using appropriate conventions and formats accurately and highly effectively.
Critically and systematically analyses data and their connections with concepts, to formulate logical and perceptive conclusions and make relevant predictions.
Critically and logically evaluates procedures and suggests a range of appropriate improvements.
Applies biological concepts and evidence from investigations to suggest solutions to complex problems in new and familiar contexts. (NA)
Uses appropriate biological terms, conventions, formulae, and equations highly effectively.
Demonstrates initiative in applying constructive and focused individual and collaborative work skills.
Consistently demonstrates a deep and broad knowledge and understanding of a range of biological concepts.
Uses knowledge of biology perceptively and logically to understand and explain social or environmental issues. (NA)
Uses a variety of formats to communicate knowledge and understanding of biology coherently and highly effectively.
B Designs a well-considered and clear biological investigation. Logically selects and appropriately acknowledges information about biology and issues in biology from different sources. Manipulates apparatus and technological tools carefully and mostly effectively to implement organised safe and ethical investigation procedures. Obtains, records, and displays findings of investigations using appropriate conventions and formats mostly accurately and effectively.
Uses clear and well-organised analytical skills to examine connections between data, concepts, and issues in biology. Evaluates procedures and suggests some appropriate improvements. Uses mostly logical analysis and evaluation of data and other evidence to formulate consistent and relevant conclusions.
Applies biological concepts and evidence from investigations to suggest solutions to problems in new and familiar contexts. Uses appropriate biological terms, conventions, formulae, and equations effectively. Applies mostly constructive and focused individual and collaborative work skills.
Demonstrates some depth and breadth of knowledge and understanding of a range of biological concepts. Uses knowledge of biology logically to understand and explain social or environmental issues. Uses a variety of formats to communicate knowledge and understanding of biology coherently and effectively.
C Designs a considered and generally clear biological investigation. Selects with some focus, and mostly appropriately acknowledges, information about biology and issues in biology from different sources. Manipulates apparatus and technological tools generally carefully and effectively to implement safe and ethical investigation procedures. Obtains, records, and displays findings of investigations using generally appropriate conventions and formats with some errors but generally accurately and effectively.
Uses generally organised analytical skills to examine connections between data, concepts, and issues in biology. Evaluates some procedures in biology and suggests some improvements that are generally appropriate. Analyses and evaluates data and other evidence to formulate simple and generally relevant conclusions.
Applies biological concepts and evidence from investigations to suggest some solutions to basic problems in new or familiar contexts. Uses generally appropriate biological terms, conventions, formulae, and equations with some general effectiveness. Applies generally constructive individual and collaborative work skills.
Demonstrates knowledge and understanding of a general range of biological concepts. Uses knowledge of biology with some logic to understand and explain one or more social or environmental issues. Uses different formats to communicate knowledge and understanding of biology with some general effectiveness.
D Prepares the outline of a biological investigation. Selects and may partly acknowledge one or more sources of information about biology or an issue in biology. Uses apparatus and technological tools with inconsistent care and effectiveness and attempts to implement safe and ethical investigation procedures. Obtains, records, and displays findings of investigations using conventions and formats inconsistently, with occasional accuracy and effectiveness.
Describes basic connections between some data, concepts, and issues in biology. For some procedures, identifies improvements that may be made. Attempts to extract meaning from data and other observations and to formulate a simple conclusion that may be relevant.
Applies some evidence to describe some basic problems and identify one or more simple solutions, in familiar contexts. Attempts to use some biological terms, conventions, formulae, and equations that may be appropriate. Attempts individual work inconsistently, and contributes superficially to aspects of collaborative work.
Demonstrates some basic knowledge and partial understanding of biological concepts. Identifies and explains some biological information that is relevant to one or more social or environmental issues. Communicates basic information to others using one or more formats.
E Identifies a simple procedure for a biological investigation. Identifies a source of information about biology or an issue in biology. Attempts to use apparatus and technological tools with limited effectiveness or attention to safe or ethical investigation procedures. Attempts to record and display some descriptive information about an investigation, with limited accuracy or effectiveness.
Acknowledges that connections exist between data, concepts, and/or issues in biology. Acknowledges the need for improvements in one or more procedures. Attempts to organise some limited data or observations.
Identifies a basic problem and attempts to identify a solution in a familiar context. Uses some biological terms or formulae. Shows emerging skills in individual and collaborative work.
Demonstrates some limited recognition and awareness of biological concepts. Shows an emerging understanding that some biological information is relevant to social or environmental issues. Attempts to communicate information about biology.
Performance Standards (© SACE Board 2011)

SACE Stage 2 Biology Practical Manual Version 16 Teaching Notes © S.T.A.R. 2014 21
Appendix 2 - Suggested answers for the Practical Question
1. Catalase is an enzyme found in most living tissue that releases oxygen from hydrogen
peroxide. Four groups of students investigated the effect of increasing the temperature on
the activity of catalase. The apparatus below shows the set-up that was used.
The results are shown in the table below Volume of oxygen (cm
3) collected in 3 minutes
Group Temperature
5 10 20 30 40 50
1 8 16 24 32 58 27
2 7 13 26 41 62 13
3 6 12 26 20 41 28
4 4 14 22 37 49 19
Average 6 14 25 33 53 22
(a) Draw a graph of the average data to represent the effect of temperature on the rate of
catalase activity.
(6 marks)
10
20
30
40
oxygen
measuring cylinder
water
flexible tubing
test tube
water bath
cube of liver
hydrogen peroxide
0 5 10 15 20 25 30 35 40 45 50 (Temp C)
10
2
0 3
0 4
0 5
0 (
O2 c
m3)

SACE Stage 2 Biology Practical Manual Version 16 Teaching Notes © S.T.A.R. 2014 22
(b) State a hypothesis that could be tested here
The optimum temperature for the enzyme catalase is approximately 400C
(2 marks)
(c) Describe one random error that may have given rise to some inaccurate data in this
experiment.
Possibilities include:
Some gas escaping
Fluctuation in temperature of water bath over the 3 minutes
Different sizes of liver cubes
(2 marks)
(d) Describe the pattern of results observed from the data
As the temperature increases up to an optimum of about 40 C the rate of catalase
activity increases. At temperatures greater than about 40 C the rate decreases.
(4 marks)
(e) Use your knowledge of enzymes to explain the likely biological explanation of the
observed results.
At low temperatures there is little kinetic activity and only a small number of
enzyme-substrate collisions. At temperatures of 40-50 C the heat denatures the
enzyme.
(4 marks)
=========================================================
Please feel free to contact us directly with any questions or comments, as follows:
David Greig ([email protected] Ph 0418 895 560) or
Alan Crierie ([email protected] Ph 8298 1619)
Alan Crierie and David Greig September 2014