powerpoint 2007 tutorial - sahsinfotech -...
TRANSCRIPT
PowerPoint 2007 Tutorial
© 2010 by The McGraw-Hill Companies. All rights reserved.
PowerPoint 2007 Tutorial
PowerPoint 2007 Tutorial Page 1 © 2010 by The McGraw-Hill Companies. All rights reserved.
Table of Contents
Overview ..................................................................................................................................................................................................... 2 Getting Started ............................................................................................................................................................................................ 2
Screen Elements ..................................................................................................................................................................................... 2 Tabs and the Ribbon ............................................................................................................................................................................... 4 Create a New Presentation ...................................................................................................................................................................... 8 Design a Presentation ............................................................................................................................................................................. 9 Insert a New Slide ................................................................................................................................................................................... 9 Save the Presentation ............................................................................................................................................................................10
Text, Images, and Media ............................................................................................................................................................................ 11 Text ........................................................................................................................................................................................................ 11 Images .................................................................................................................................................................................................... 16 Audio ...................................................................................................................................................................................................... 19 Video ..................................................................................................................................................................................................... 20 Tables ..................................................................................................................................................................................................... 21 Charts .................................................................................................................................................................................................... 22
Organize and Animate a Presentation ...................................................................................................................................................... 24 Organize a Presentation ........................................................................................................................................................................ 24 Animation ............................................................................................................................................................................................. 25
Preview and Show a Presentation ............................................................................................................................................................. 27 Design Tips ............................................................................................................................................................................................... 28
Choose the Right Theme ....................................................................................................................................................................... 28 Maximize Legibility................................................................................................................................................................................ 31 Be Text Savvy ........................................................................................................................................................................................ 33 Use Images Wisely ................................................................................................................................................................................ 34 Keep Animations Simple ...................................................................................................................................................................... 37 Strive for Visual Balance ....................................................................................................................................................................... 37 Final Design Notes ................................................................................................................................................................................ 38
References ................................................................................................................................................................................................. 39
PowerPoint 2007 Tutorial Page 2 © 2010 by The McGraw-Hill Companies. All rights reserved.
Overview
The goal of this tutorial is to introduce you to the fundamentals of PowerPoint 2007. This tutorial includes step-by-step instructions for creating a presentation; adding and formatting text, images, and media; organizing and animating slides; and showing a presentation. In addition, a special section covering PowerPoint design tips concludes the tutorial. This tutorial is intended to supplement the discussion of visual aids in your textbook.
Getting Started
Screen Elements
Before jumping into the technical instructions on how to create a PowerPoint presentation, first let’s get familiar with the most important features of a standard PowerPoint window.
PowerPoint 2007 Tutorial Page 3 © 2010 by The McGraw-Hill Companies. All rights reserved.
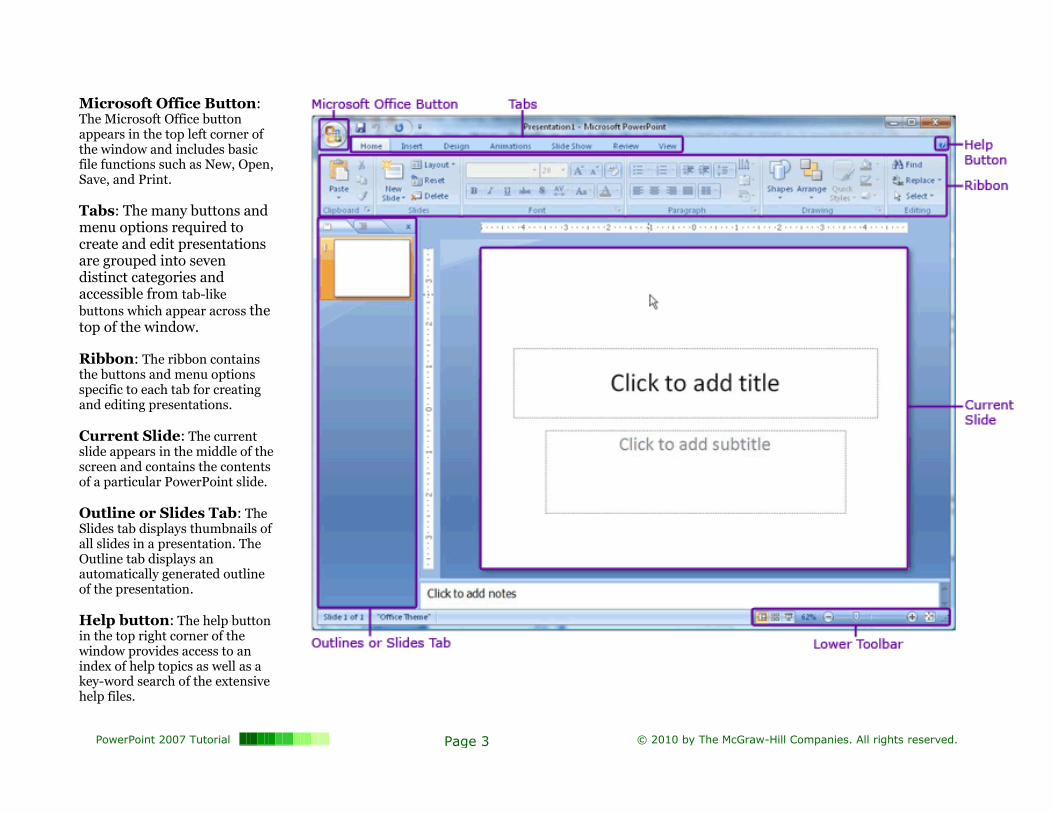
Microsoft Office Button: The Microsoft Office button appears in the top left corner of the window and includes basic file functions such as New, Open, Save, and Print.
Tabs: The many buttons and menu options required to create and edit presentations are grouped into seven distinct categories and accessible from tab-like
buttons which appear across the top of the window.
Ribbon: The ribbon contains the buttons and menu options specific to each tab for creating and editing presentations.
Current Slide: The current slide appears in the middle of the screen and contains the contents of a particular PowerPoint slide.
Outline or Slides Tab: The Slides tab displays thumbnails of all slides in a presentation. The Outline tab displays an automatically generated outline of the presentation.
Help button: The help button in the top right corner of the window provides access to an index of help topics as well as a key-word search of the extensive help files.
PowerPoint 2007 Tutorial Page 4 © 2010 by The McGraw-Hill Companies. All rights reserved.
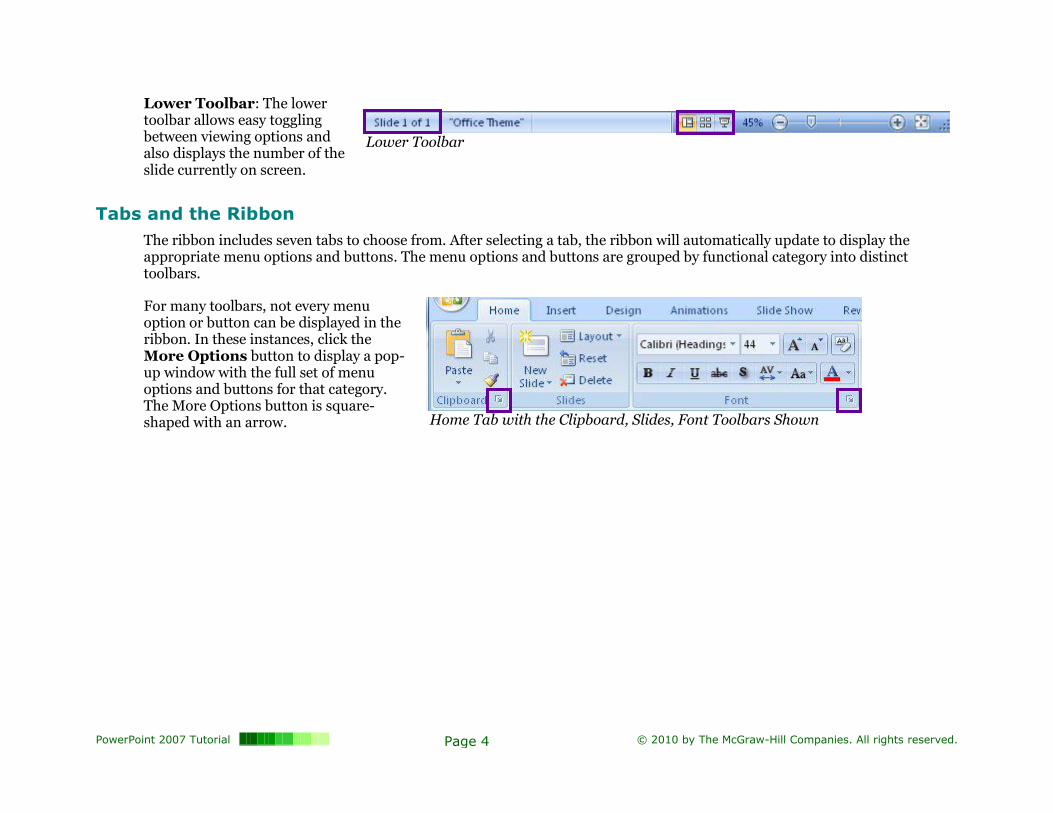
Lower Toolbar: The lower toolbar allows easy toggling between viewing options and also displays the number of the slide currently on screen.
Lower Toolbar
Tabs and the Ribbon
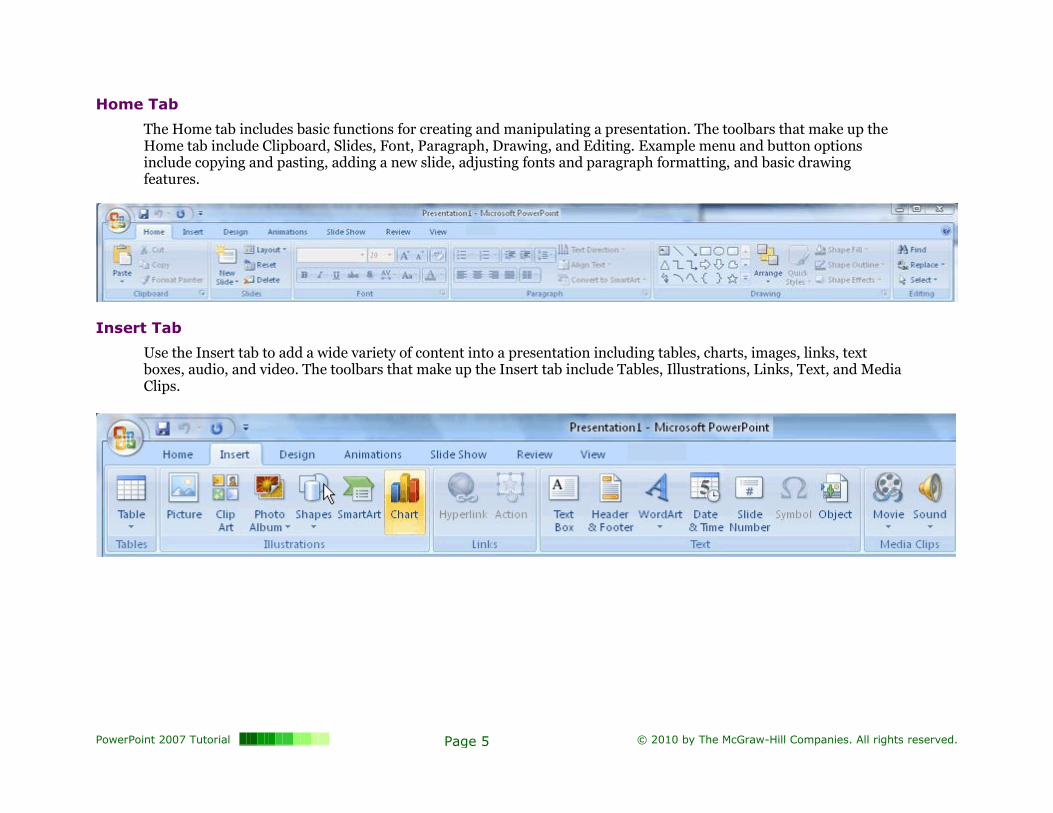
The ribbon includes seven tabs to choose from. After selecting a tab, the ribbon will automatically update to display the appropriate menu options and buttons. The menu options and buttons are grouped by functional category into distinct toolbars.
For many toolbars, not every menu option or button can be displayed in the ribbon. In these instances, click the More Options button to display a pop-up window with the full set of menu options and buttons for that category. The More Options button is square-shaped with an arrow.
Home Tab with the Clipboard, Slides, Font Toolbars Shown
PowerPoint 2007 Tutorial Page 5 © 2010 by The McGraw-Hill Companies. All rights reserved.
Home Tab
The Home tab includes basic functions for creating and manipulating a presentation. The toolbars that make up the Home tab include Clipboard, Slides, Font, Paragraph, Drawing, and Editing. Example menu and button options include copying and pasting, adding a new slide, adjusting fonts and paragraph formatting, and basic drawing features.
Insert Tab
Use the Insert tab to add a wide variety of content into a presentation including tables, charts, images, links, text boxes, audio, and video. The toolbars that make up the Insert tab include Tables, Illustrations, Links, Text, and Media Clips.
PowerPoint 2007 Tutorial Page 6 © 2010 by The McGraw-Hill Companies. All rights reserved.
Design Tab
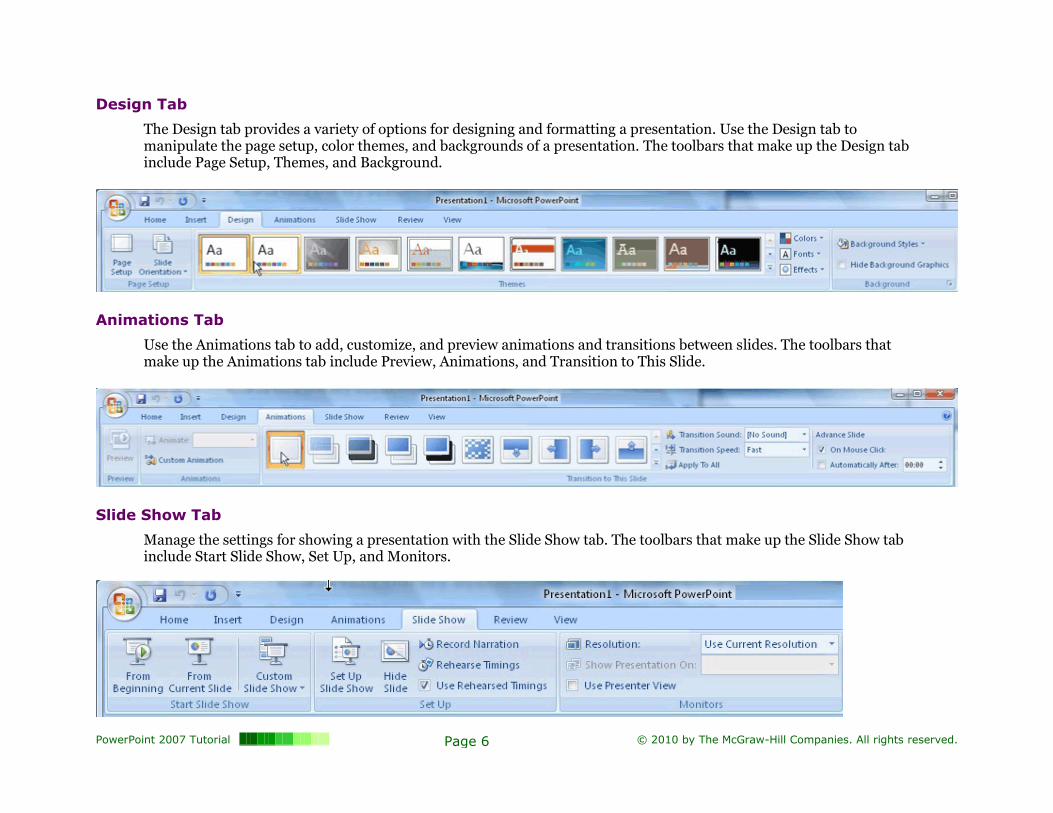
The Design tab provides a variety of options for designing and formatting a presentation. Use the Design tab to manipulate the page setup, color themes, and backgrounds of a presentation. The toolbars that make up the Design tab include Page Setup, Themes, and Background.
Animations Tab
Use the Animations tab to add, customize, and preview animations and transitions between slides. The toolbars that make up the Animations tab include Preview, Animations, and Transition to This Slide.
Slide Show Tab
Manage the settings for showing a presentation with the Slide Show tab. The toolbars that make up the Slide Show tab include Start Slide Show, Set Up, and Monitors.
PowerPoint 2007 Tutorial Page 7 © 2010 by The McGraw-Hill Companies. All rights reserved.
Review Tab
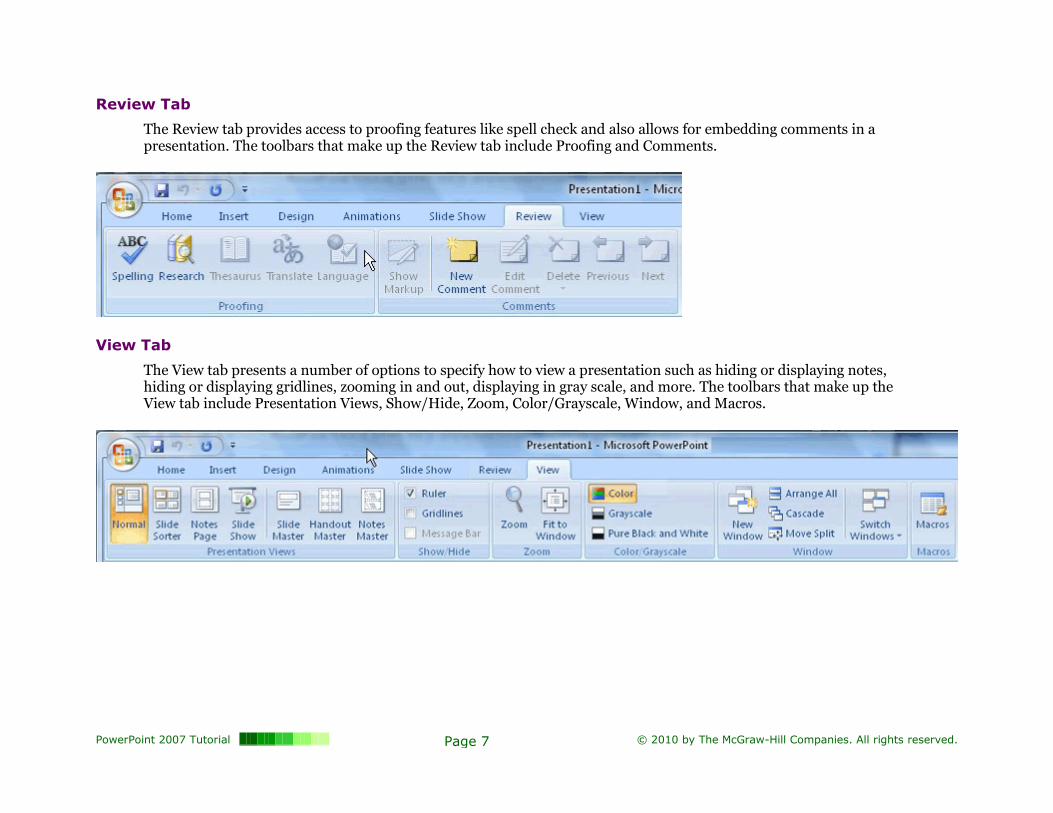
The Review tab provides access to proofing features like spell check and also allows for embedding comments in a presentation. The toolbars that make up the Review tab include Proofing and Comments.
View Tab
The View tab presents a number of options to specify how to view a presentation such as hiding or displaying notes, hiding or displaying gridlines, zooming in and out, displaying in gray scale, and more. The toolbars that make up the View tab include Presentation Views, Show/Hide, Zoom, Color/Grayscale, Window, and Macros.
PowerPoint 2007 Tutorial Page 8 © 2010 by The McGraw-Hill Companies. All rights reserved.
Create a New Presentation
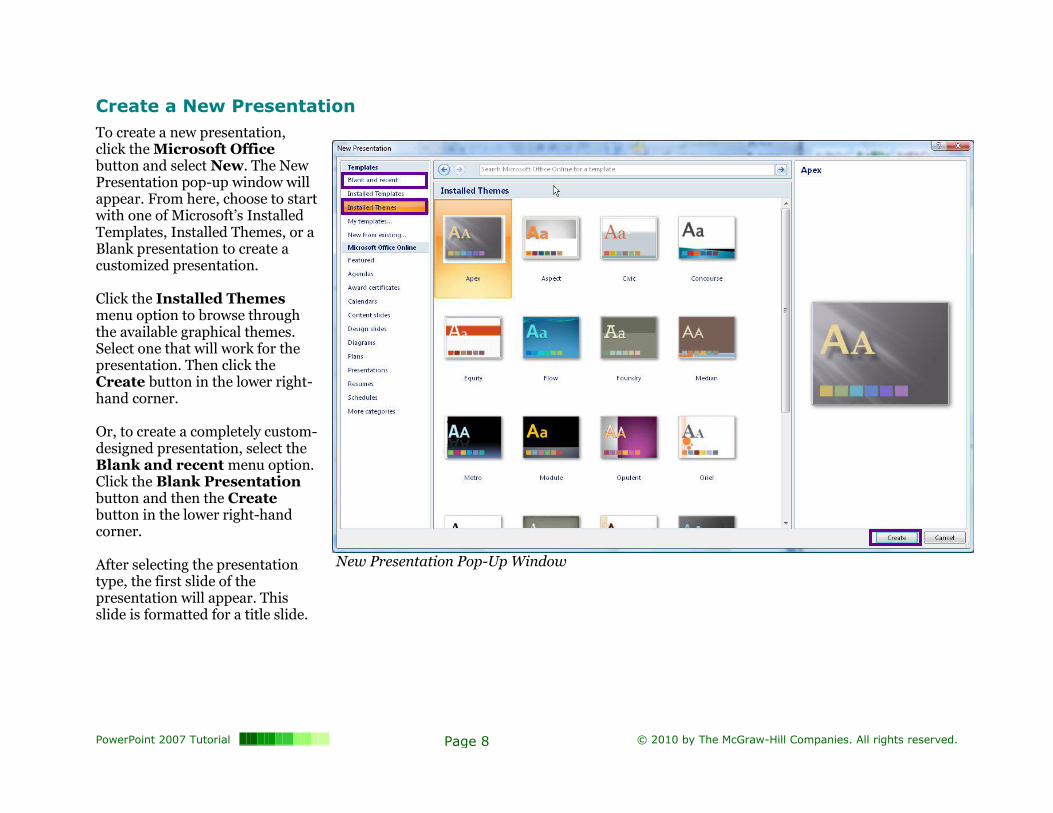
To create a new presentation, click the Microsoft Office button and select New. The New Presentation pop-up window will appear. From here, choose to start with one of Microsoft’s Installed Templates, Installed Themes, or a Blank presentation to create a customized presentation. Click the Installed Themes menu option to browse through the available graphical themes. Select one that will work for the presentation. Then click the Create button in the lower right-hand corner. Or, to create a completely custom-designed presentation, select the Blank and recent menu option. Click the Blank Presentation button and then the Create button in the lower right-hand corner. After selecting the presentation type, the first slide of the presentation will appear. This slide is formatted for a title slide.
New Presentation Pop-Up Window
PowerPoint 2007 Tutorial Page 9 © 2010 by The McGraw-Hill Companies. All rights reserved.
Design a Presentation
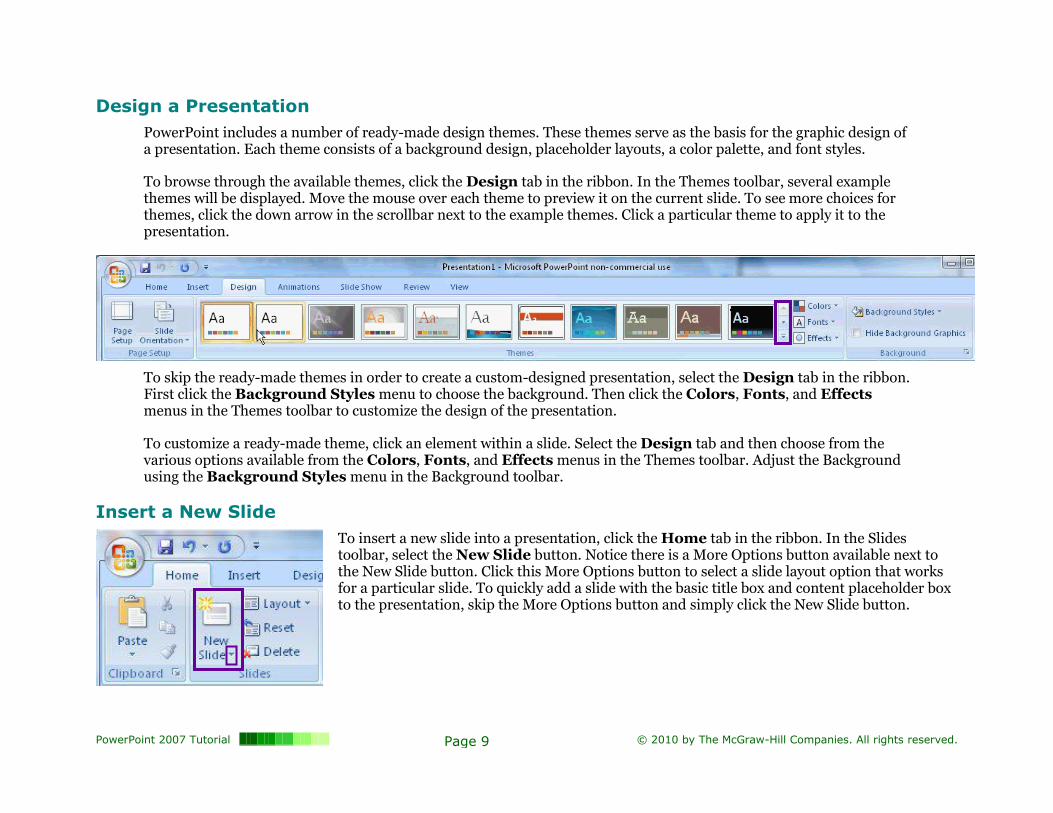
PowerPoint includes a number of ready-made design themes. These themes serve as the basis for the graphic design of a presentation. Each theme consists of a background design, placeholder layouts, a color palette, and font styles.
To browse through the available themes, click the Design tab in the ribbon. In the Themes toolbar, several example themes will be displayed. Move the mouse over each theme to preview it on the current slide. To see more choices for themes, click the down arrow in the scrollbar next to the example themes. Click a particular theme to apply it to the presentation.
To skip the ready-made themes in order to create a custom-designed presentation, select the Design tab in the ribbon. First click the Background Styles menu to choose the background. Then click the Colors, Fonts, and Effects menus in the Themes toolbar to customize the design of the presentation.
To customize a ready-made theme, click an element within a slide. Select the Design tab and then choose from the various options available from the Colors, Fonts, and Effects menus in the Themes toolbar. Adjust the Background using the Background Styles menu in the Background toolbar.
Insert a New Slide
To insert a new slide into a presentation, click the Home tab in the ribbon. In the Slides toolbar, select the New Slide button. Notice there is a More Options button available next to the New Slide button. Click this More Options button to select a slide layout option that works for a particular slide. To quickly add a slide with the basic title box and content placeholder box to the presentation, skip the More Options button and simply click the New Slide button.
PowerPoint 2007 Tutorial Page 10 © 2010 by The McGraw-Hill Companies. All rights reserved.
Save the Presentation
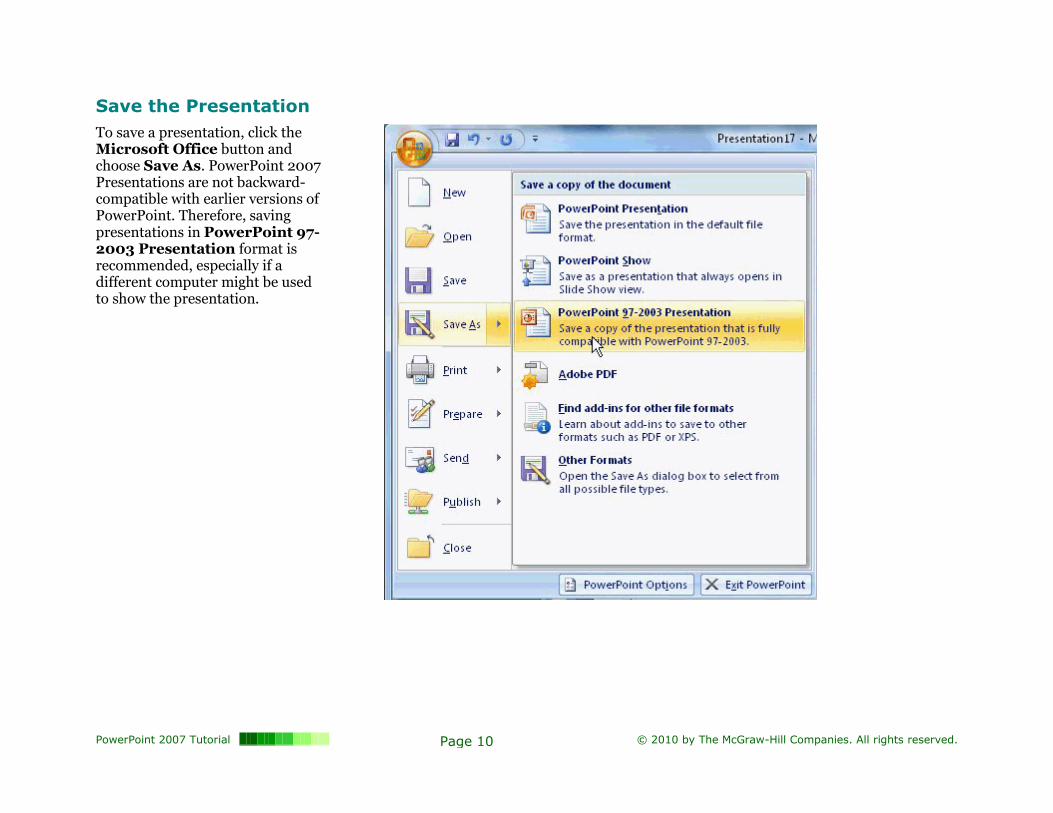
To save a presentation, click the Microsoft Office button and choose Save As. PowerPoint 2007 Presentations are not backward-compatible with earlier versions of PowerPoint. Therefore, saving presentations in PowerPoint 97-2003 Presentation format is recommended, especially if a different computer might be used to show the presentation.
PowerPoint 2007 Tutorial Page 11 © 2010 by The McGraw-Hill Companies. All rights reserved.
Text, Images, and Media
Text
Add Text
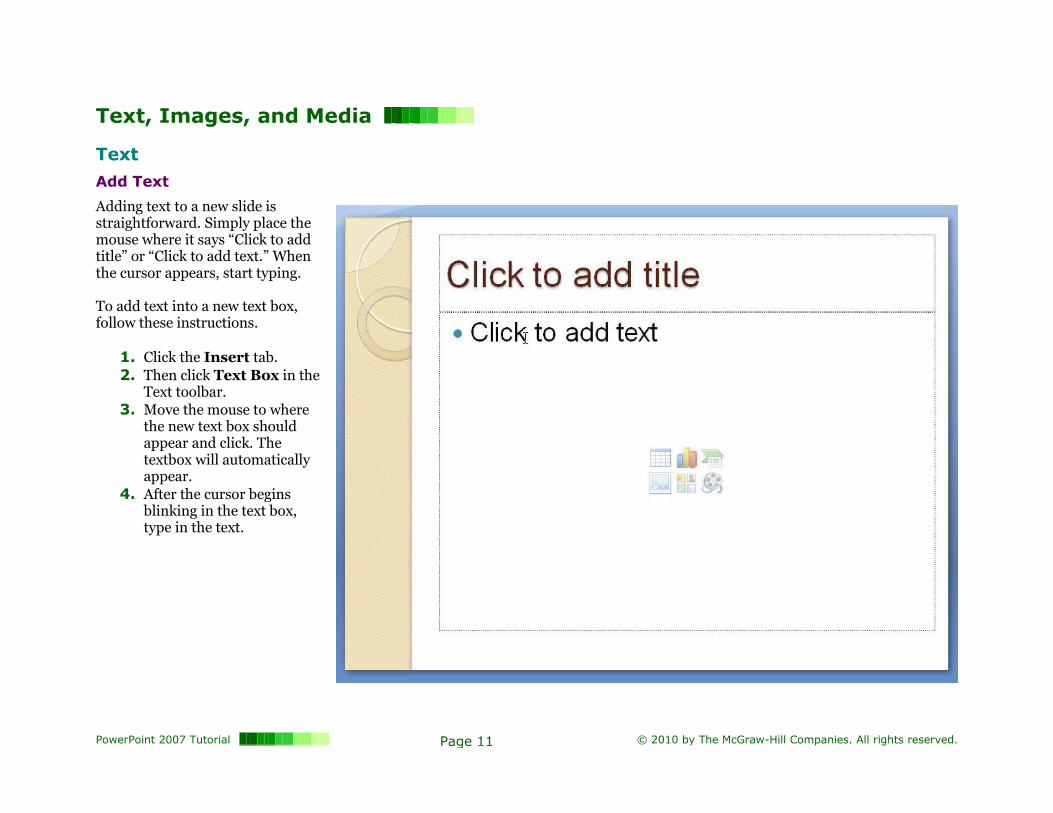
Adding text to a new slide is straightforward. Simply place the mouse where it says “Click to add title” or “Click to add text.” When the cursor appears, start typing. To add text into a new text box, follow these instructions.
1. Click the Insert tab.
2. Then click Text Box in the Text toolbar.
3. Move the mouse to where the new text box should appear and click. The textbox will automatically appear.
4. After the cursor begins blinking in the text box, type in the text.
PowerPoint 2007 Tutorial Page 12 © 2010 by The McGraw-Hill Companies. All rights reserved.
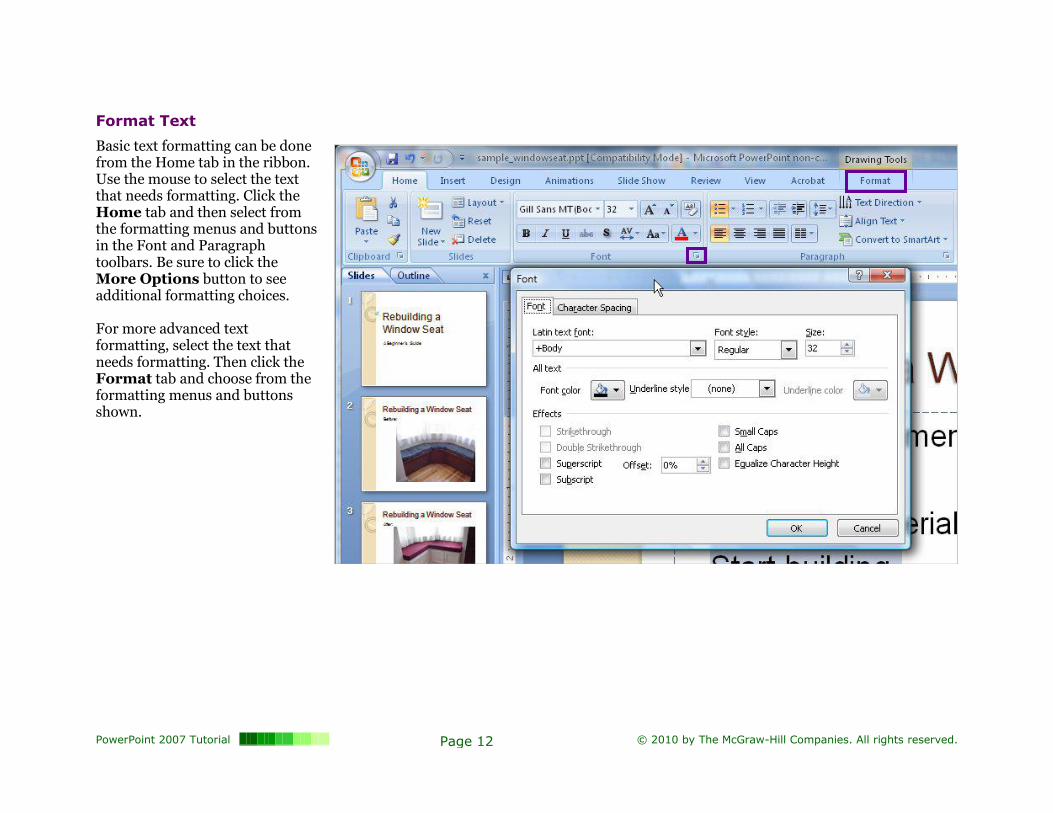
Format Text
Basic text formatting can be done from the Home tab in the ribbon. Use the mouse to select the text that needs formatting. Click the Home tab and then select from the formatting menus and buttons in the Font and Paragraph toolbars. Be sure to click the More Options button to see additional formatting choices. For more advanced text formatting, select the text that needs formatting. Then click the Format tab and choose from the formatting menus and buttons shown.
PowerPoint 2007 Tutorial Page 13 © 2010 by The McGraw-Hill Companies. All rights reserved.
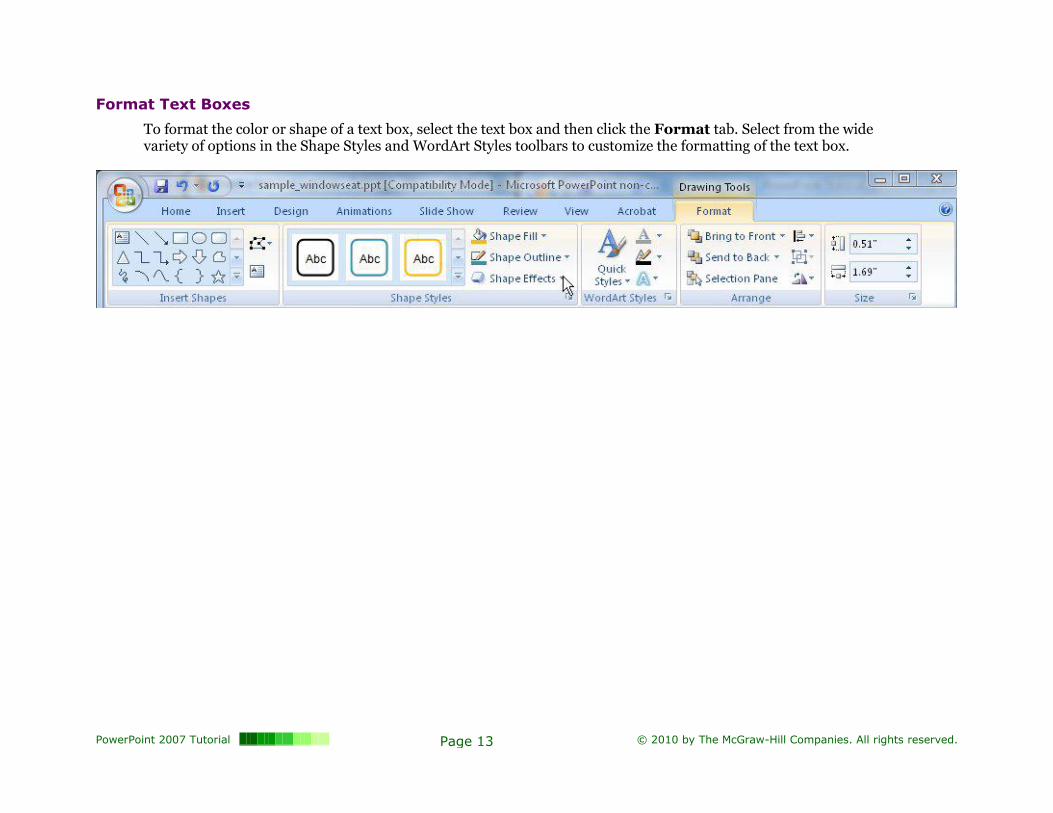
Format Text Boxes
To format the color or shape of a text box, select the text box and then click the Format tab. Select from the wide variety of options in the Shape Styles and WordArt Styles toolbars to customize the formatting of the text box.
PowerPoint 2007 Tutorial Page 14 © 2010 by The McGraw-Hill Companies. All rights reserved.
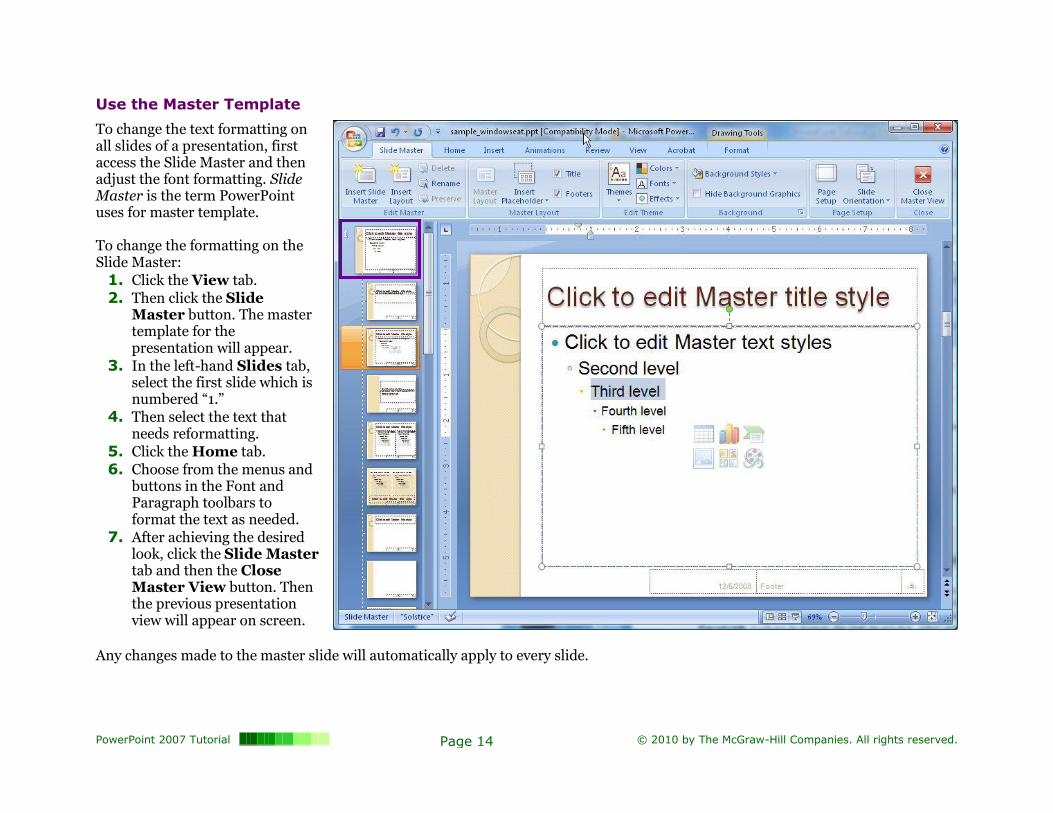
Use the Master Template
To change the text formatting on all slides of a presentation, first access the Slide Master and then adjust the font formatting. Slide Master is the term PowerPoint uses for master template. To change the formatting on the Slide Master:
1. Click the View tab.
2. Then click the Slide Master button. The master template for the presentation will appear.
3. In the left-hand Slides tab, select the first slide which is numbered “1.”
4. Then select the text that needs reformatting.
5. Click the Home tab.
6. Choose from the menus and buttons in the Font and Paragraph toolbars to format the text as needed.
7. After achieving the desired look, click the Slide Master tab and then the Close Master View button. Then the previous presentation view will appear on screen.
Any changes made to the master slide will automatically apply to every slide.
PowerPoint 2007 Tutorial Page 15 © 2010 by The McGraw-Hill Companies. All rights reserved.
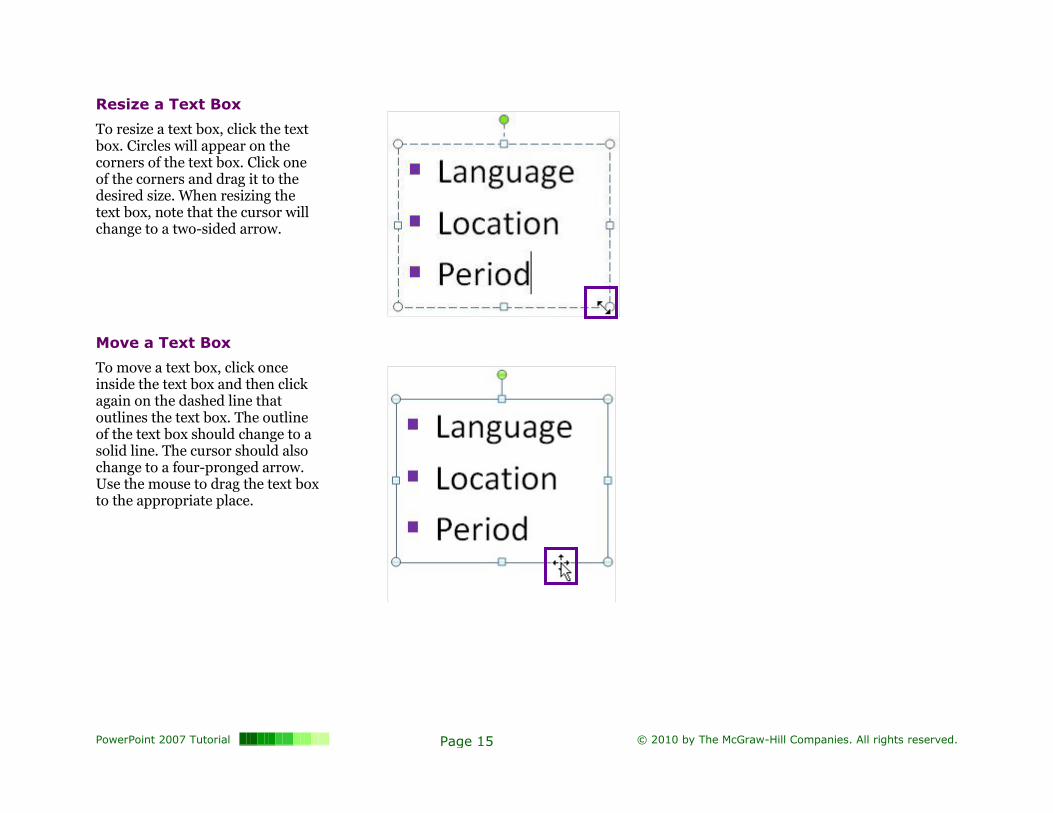
Resize a Text Box
To resize a text box, click the text box. Circles will appear on the corners of the text box. Click one of the corners and drag it to the desired size. When resizing the text box, note that the cursor will change to a two-sided arrow.
Move a Text Box
To move a text box, click once inside the text box and then click again on the dashed line that outlines the text box. The outline of the text box should change to a solid line. The cursor should also change to a four-pronged arrow. Use the mouse to drag the text box to the appropriate place.
PowerPoint 2007 Tutorial Page 16 © 2010 by The McGraw-Hill Companies. All rights reserved.
Images
Add an Image
Adding images to a new slide can be achieved in two different ways.
When working from a new slide with an empty content placeholder box, click the Insert Picture or Clip Art button that appears in the center of the empty content placeholder box. From here, navigate to the appropriate image and select it. The image will automatically be inserted into this content placeholder box. An alternative way to add an image to a slide is to click the Insert tab and then click the Picture, Clip Art, or Photo Album button from the Illustrations toolbar. Then select the appropriate image. The image will automatically appear on the slide.
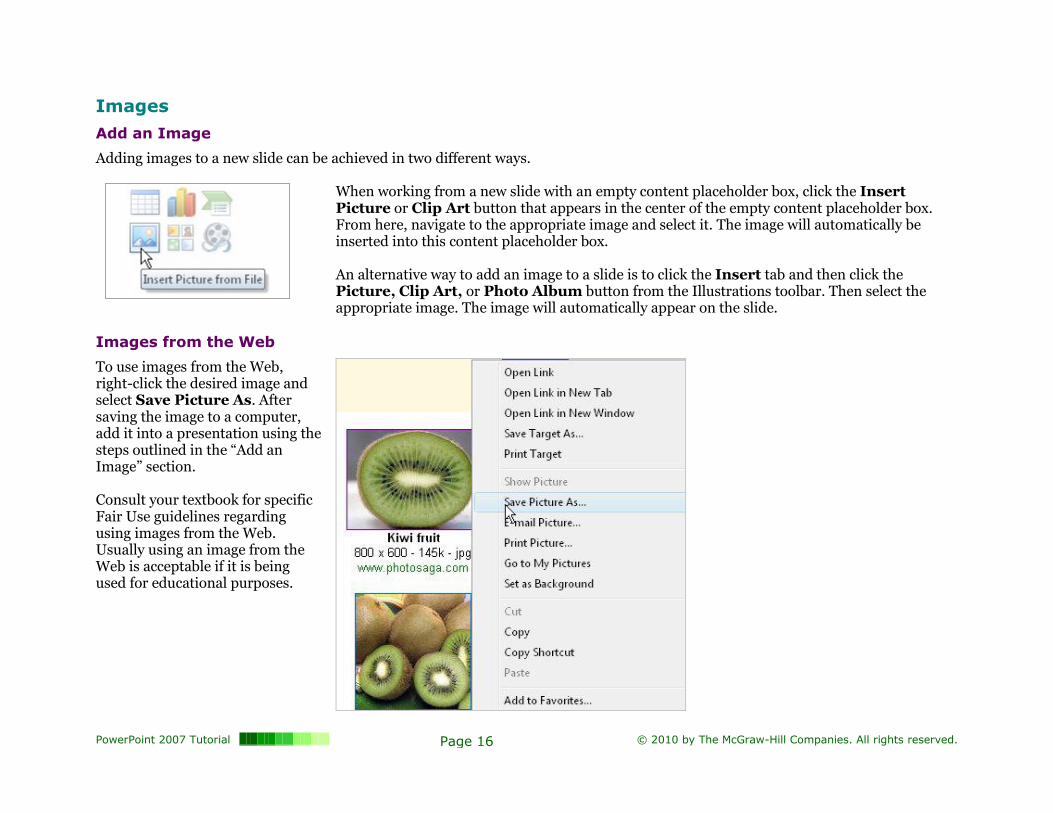
Images from the Web
To use images from the Web, right-click the desired image and select Save Picture As. After saving the image to a computer, add it into a presentation using the steps outlined in the “Add an Image” section. Consult your textbook for specific Fair Use guidelines regarding using images from the Web. Usually using an image from the Web is acceptable if it is being used for educational purposes.
PowerPoint 2007 Tutorial Page 17 © 2010 by The McGraw-Hill Companies. All rights reserved.
Format an Image
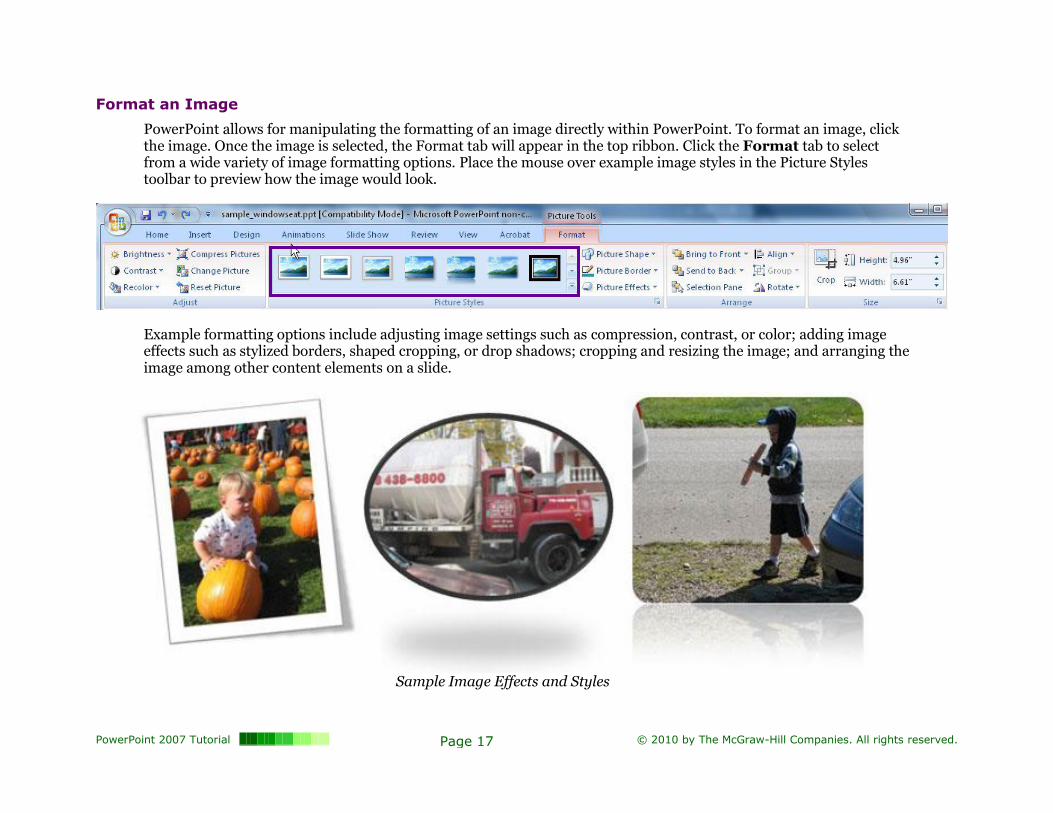
PowerPoint allows for manipulating the formatting of an image directly within PowerPoint. To format an image, click the image. Once the image is selected, the Format tab will appear in the top ribbon. Click the Format tab to select from a wide variety of image formatting options. Place the mouse over example image styles in the Picture Styles toolbar to preview how the image would look.
Example formatting options include adjusting image settings such as compression, contrast, or color; adding image effects such as stylized borders, shaped cropping, or drop shadows; cropping and resizing the image; and arranging the image among other content elements on a slide.
Sample Image Effects and Styles
PowerPoint 2007 Tutorial Page 18 © 2010 by The McGraw-Hill Companies. All rights reserved.
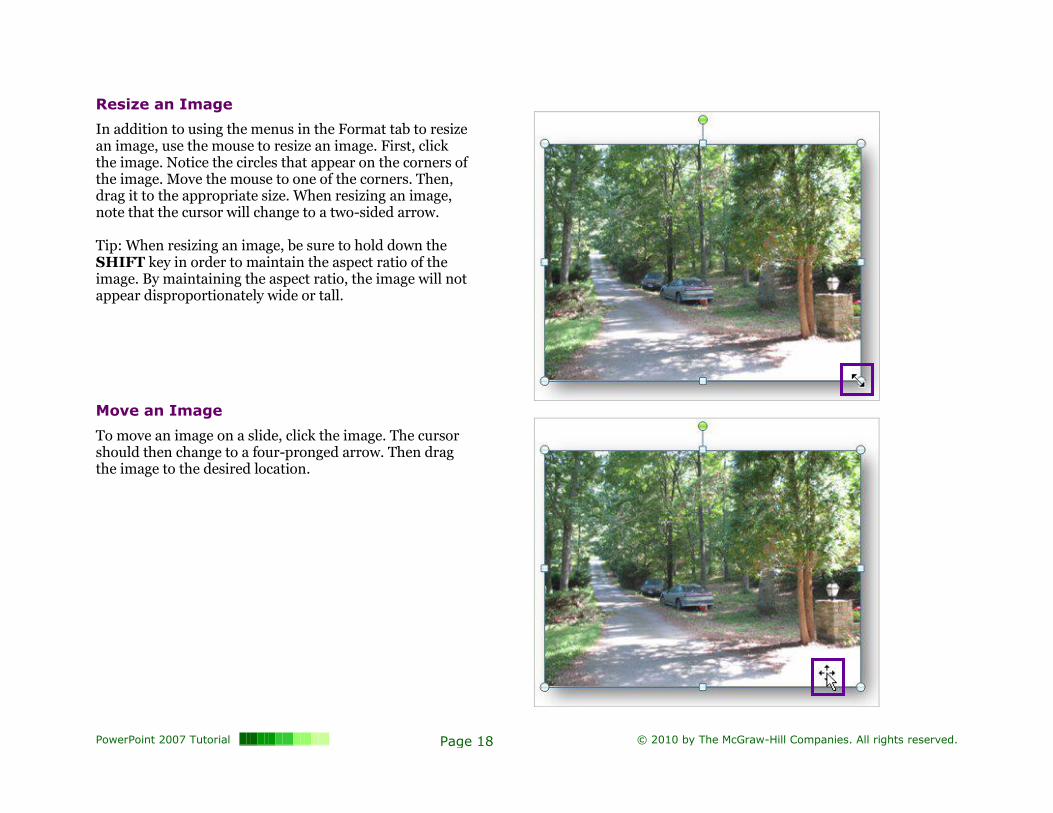
Resize an Image
In addition to using the menus in the Format tab to resize an image, use the mouse to resize an image. First, click the image. Notice the circles that appear on the corners of the image. Move the mouse to one of the corners. Then, drag it to the appropriate size. When resizing an image, note that the cursor will change to a two-sided arrow. Tip: When resizing an image, be sure to hold down the SHIFT key in order to maintain the aspect ratio of the image. By maintaining the aspect ratio, the image will not appear disproportionately wide or tall.
Move an Image
To move an image on a slide, click the image. The cursor should then change to a four-pronged arrow. Then drag the image to the desired location.
PowerPoint 2007 Tutorial Page 19 © 2010 by The McGraw-Hill Companies. All rights reserved.
Audio
Add Audio
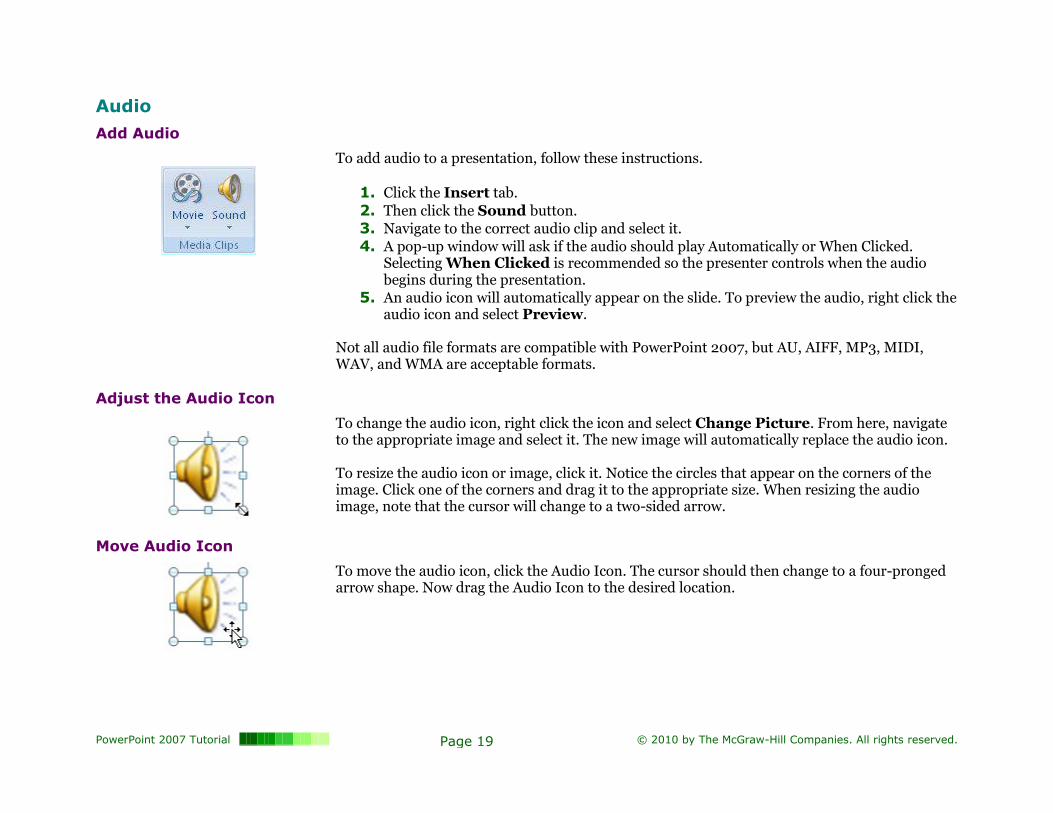
To add audio to a presentation, follow these instructions.
1. Click the Insert tab.
2. Then click the Sound button.
3. Navigate to the correct audio clip and select it.
4. A pop-up window will ask if the audio should play Automatically or When Clicked. Selecting When Clicked is recommended so the presenter controls when the audio begins during the presentation.
5. An audio icon will automatically appear on the slide. To preview the audio, right click the audio icon and select Preview.
Not all audio file formats are compatible with PowerPoint 2007, but AU, AIFF, MP3, MIDI, WAV, and WMA are acceptable formats.
Adjust the Audio Icon
To change the audio icon, right click the icon and select Change Picture. From here, navigate to the appropriate image and select it. The new image will automatically replace the audio icon. To resize the audio icon or image, click it. Notice the circles that appear on the corners of the image. Click one of the corners and drag it to the appropriate size. When resizing the audio image, note that the cursor will change to a two-sided arrow.
Move Audio Icon
To move the audio icon, click the Audio Icon. The cursor should then change to a four-pronged arrow shape. Now drag the Audio Icon to the desired location.
PowerPoint 2007 Tutorial Page 20 © 2010 by The McGraw-Hill Companies. All rights reserved.
Video
Add Video
To add video to a presentation, follow these instructions.
1. Click the Insert tab.
2. Then click the Movie button.
3. Navigate to the correct movie file and select it.
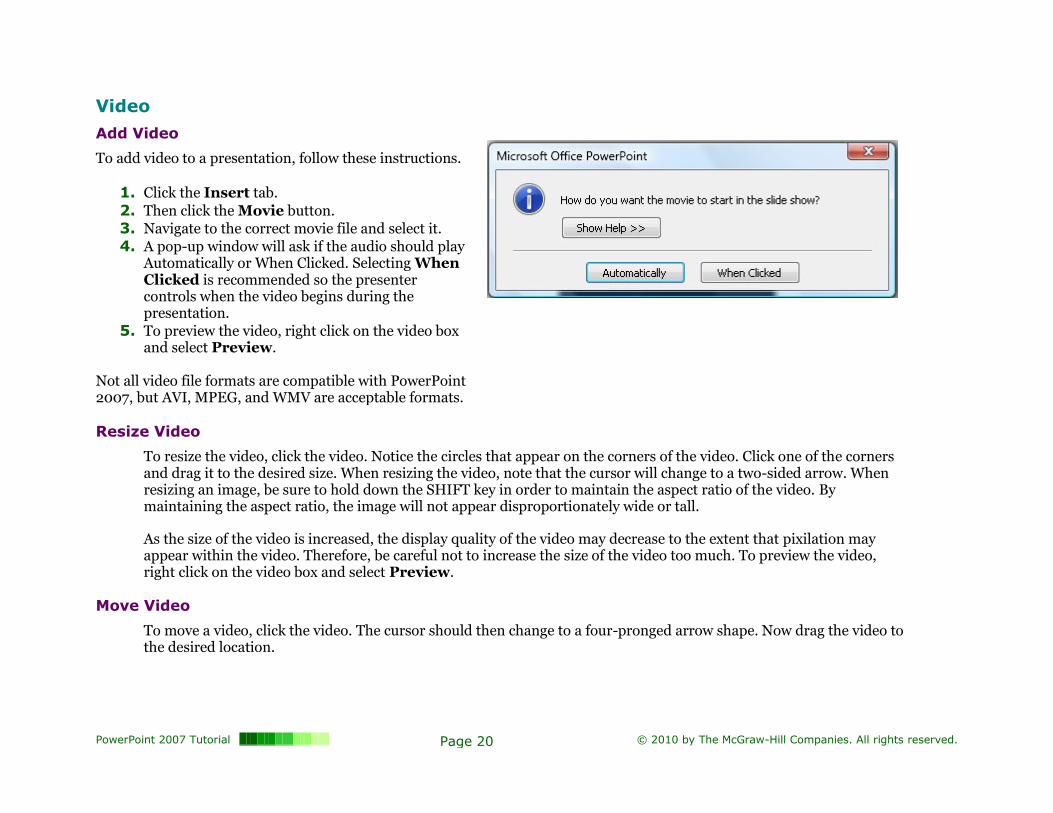
4. A pop-up window will ask if the audio should play Automatically or When Clicked. Selecting When Clicked is recommended so the presenter controls when the video begins during the presentation.
5. To preview the video, right click on the video box and select Preview.
Not all video file formats are compatible with PowerPoint 2007, but AVI, MPEG, and WMV are acceptable formats.
Resize Video
To resize the video, click the video. Notice the circles that appear on the corners of the video. Click one of the corners and drag it to the desired size. When resizing the video, note that the cursor will change to a two-sided arrow. When resizing an image, be sure to hold down the SHIFT key in order to maintain the aspect ratio of the video. By maintaining the aspect ratio, the image will not appear disproportionately wide or tall.
As the size of the video is increased, the display quality of the video may decrease to the extent that pixilation may appear within the video. Therefore, be careful not to increase the size of the video too much. To preview the video, right click on the video box and select Preview.
Move Video
To move a video, click the video. The cursor should then change to a four-pronged arrow shape. Now drag the video to the desired location.
PowerPoint 2007 Tutorial Page 21 © 2010 by The McGraw-Hill Companies. All rights reserved.
Tables
Add a Table
To add a table to a presentation, follow these instructions.
1. Click the Insert tab.
2. Then click the Table button.
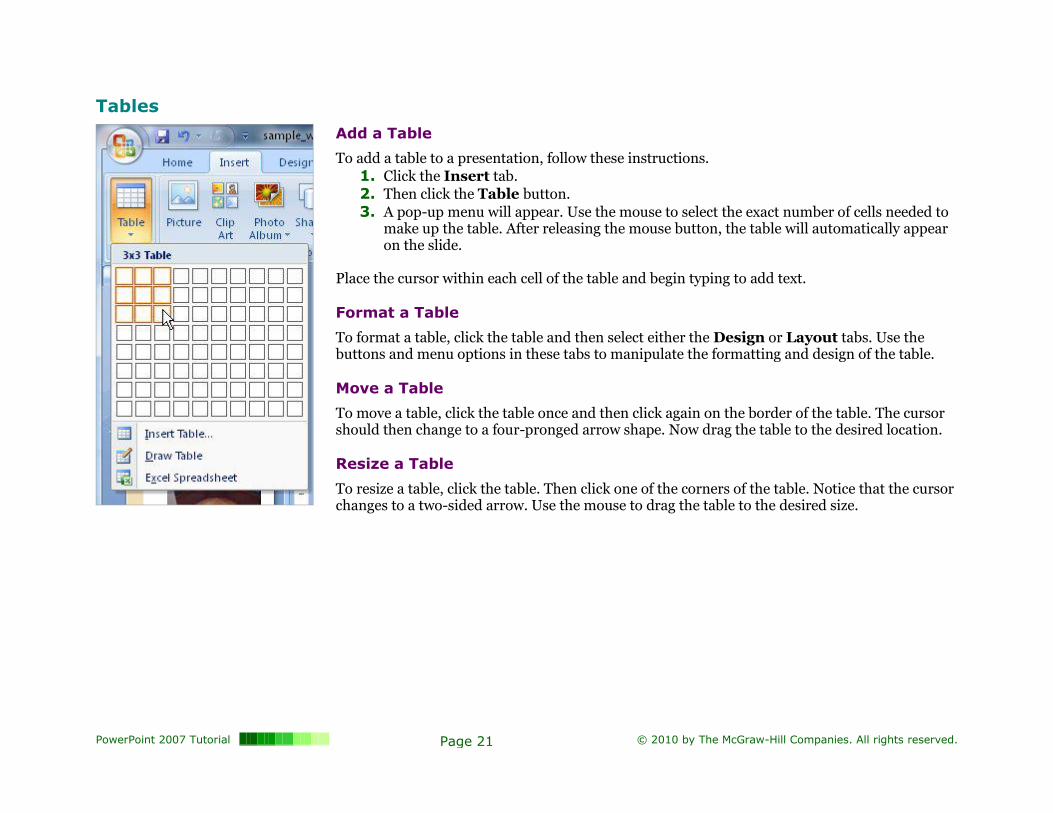
3. A pop-up menu will appear. Use the mouse to select the exact number of cells needed to make up the table. After releasing the mouse button, the table will automatically appear on the slide.
Place the cursor within each cell of the table and begin typing to add text. Format a Table
To format a table, click the table and then select either the Design or Layout tabs. Use the buttons and menu options in these tabs to manipulate the formatting and design of the table.
Move a Table
To move a table, click the table once and then click again on the border of the table. The cursor should then change to a four-pronged arrow shape. Now drag the table to the desired location. Resize a Table
To resize a table, click the table. Then click one of the corners of the table. Notice that the cursor changes to a two-sided arrow. Use the mouse to drag the table to the desired size.
PowerPoint 2007 Tutorial Page 22 © 2010 by The McGraw-Hill Companies. All rights reserved.
Charts
Add a Chart
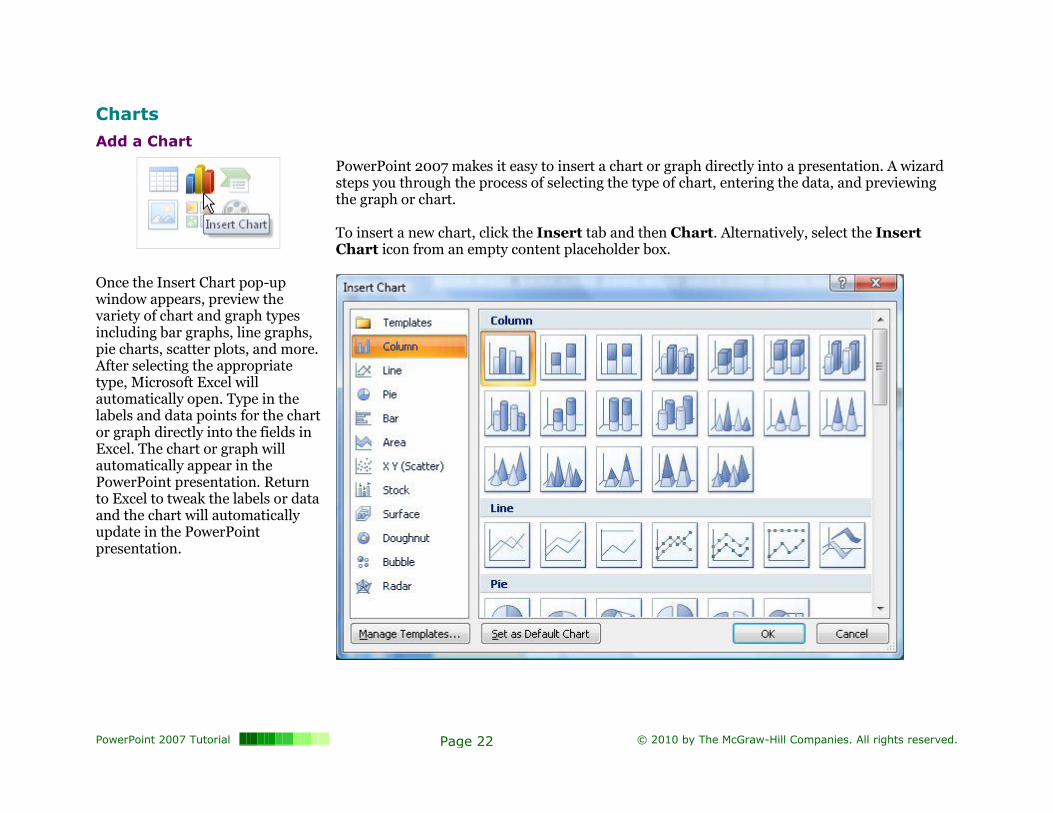
PowerPoint 2007 makes it easy to insert a chart or graph directly into a presentation. A wizard steps you through the process of selecting the type of chart, entering the data, and previewing the graph or chart. To insert a new chart, click the Insert tab and then Chart. Alternatively, select the Insert Chart icon from an empty content placeholder box.
Once the Insert Chart pop-up window appears, preview the variety of chart and graph types including bar graphs, line graphs, pie charts, scatter plots, and more. After selecting the appropriate type, Microsoft Excel will automatically open. Type in the labels and data points for the chart or graph directly into the fields in Excel. The chart or graph will automatically appear in the PowerPoint presentation. Return to Excel to tweak the labels or data and the chart will automatically update in the PowerPoint presentation.
PowerPoint 2007 Tutorial Page 23 © 2010 by The McGraw-Hill Companies. All rights reserved.
Format a Chart
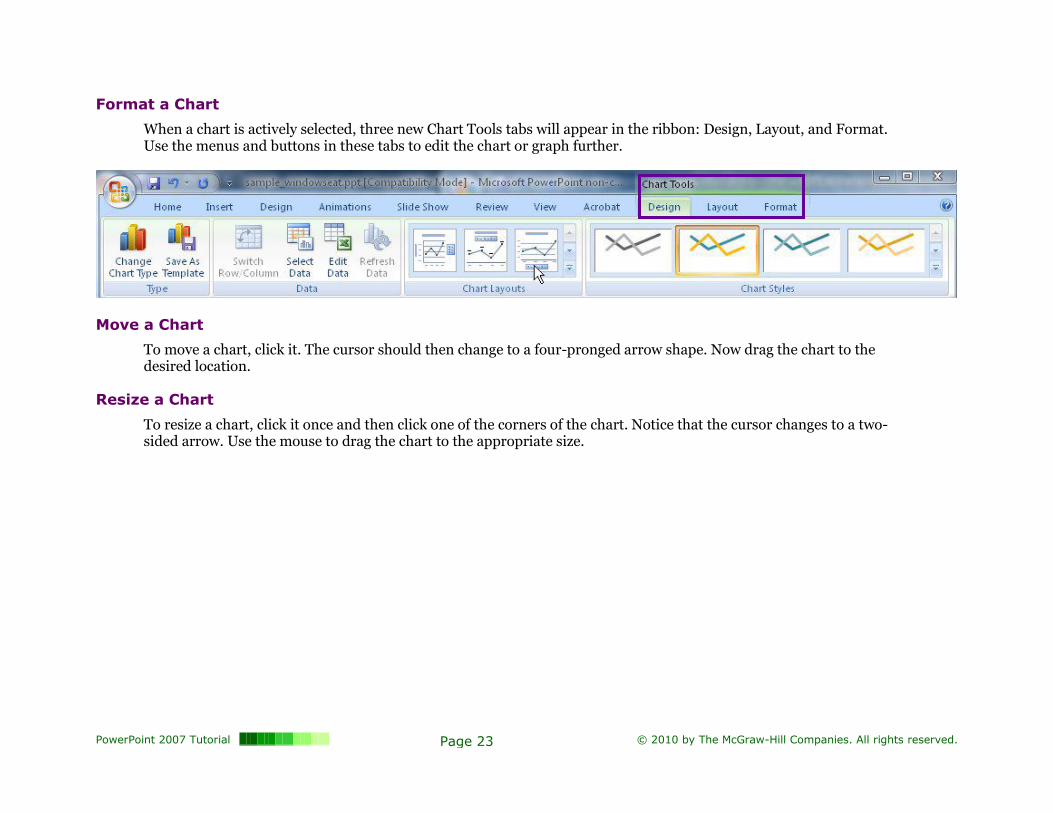
When a chart is actively selected, three new Chart Tools tabs will appear in the ribbon: Design, Layout, and Format. Use the menus and buttons in these tabs to edit the chart or graph further.
Move a Chart
To move a chart, click it. The cursor should then change to a four-pronged arrow shape. Now drag the chart to the desired location.
Resize a Chart
To resize a chart, click it once and then click one of the corners of the chart. Notice that the cursor changes to a two-sided arrow. Use the mouse to drag the chart to the appropriate size.
PowerPoint 2007 Tutorial Page 24 © 2010 by The McGraw-Hill Companies. All rights reserved.
Organize and Animate a Presentation
Organize a Presentation
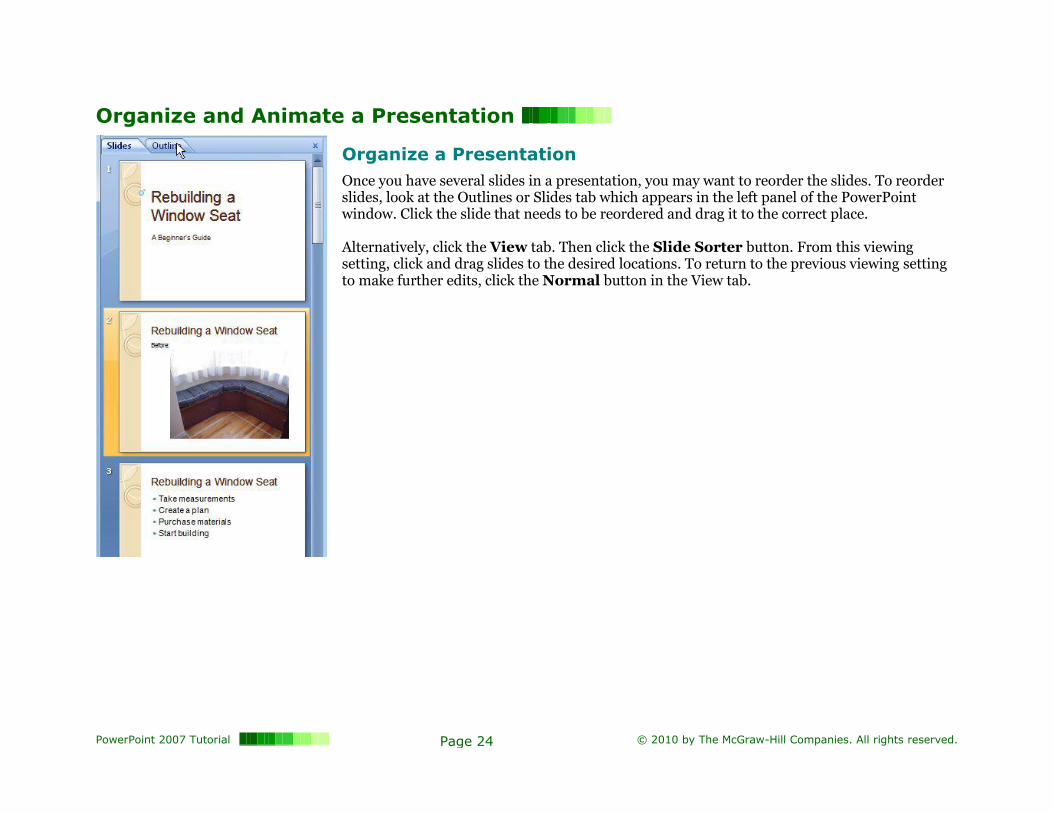
Once you have several slides in a presentation, you may want to reorder the slides. To reorder slides, look at the Outlines or Slides tab which appears in the left panel of the PowerPoint window. Click the slide that needs to be reordered and drag it to the correct place. Alternatively, click the View tab. Then click the Slide Sorter button. From this viewing setting, click and drag slides to the desired locations. To return to the previous viewing setting to make further edits, click the Normal button in the View tab.
PowerPoint 2007 Tutorial Page 25 © 2010 by The McGraw-Hill Companies. All rights reserved.
Animation
PowerPoint allows you to animate objects or specific content within a slide and also to add animated transitions between slides. Transitions are a common and easy way to liven up a presentation.
Add Transitions
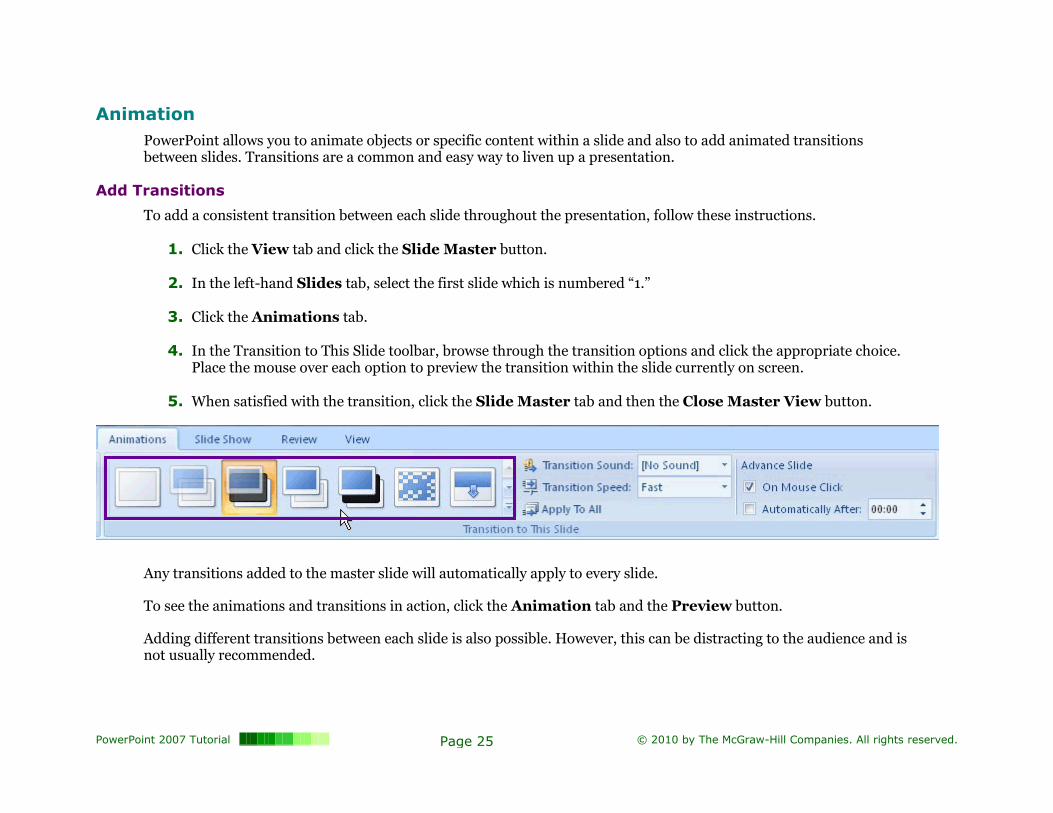
To add a consistent transition between each slide throughout the presentation, follow these instructions.
1. Click the View tab and click the Slide Master button.
2. In the left-hand Slides tab, select the first slide which is numbered “1.”
3. Click the Animations tab.
4. In the Transition to This Slide toolbar, browse through the transition options and click the appropriate choice. Place the mouse over each option to preview the transition within the slide currently on screen.
5. When satisfied with the transition, click the Slide Master tab and then the Close Master View button.
Any transitions added to the master slide will automatically apply to every slide.
To see the animations and transitions in action, click the Animation tab and the Preview button.
Adding different transitions between each slide is also possible. However, this can be distracting to the audience and is not usually recommended.
PowerPoint 2007 Tutorial Page 26 © 2010 by The McGraw-Hill Companies. All rights reserved.
Add Animation
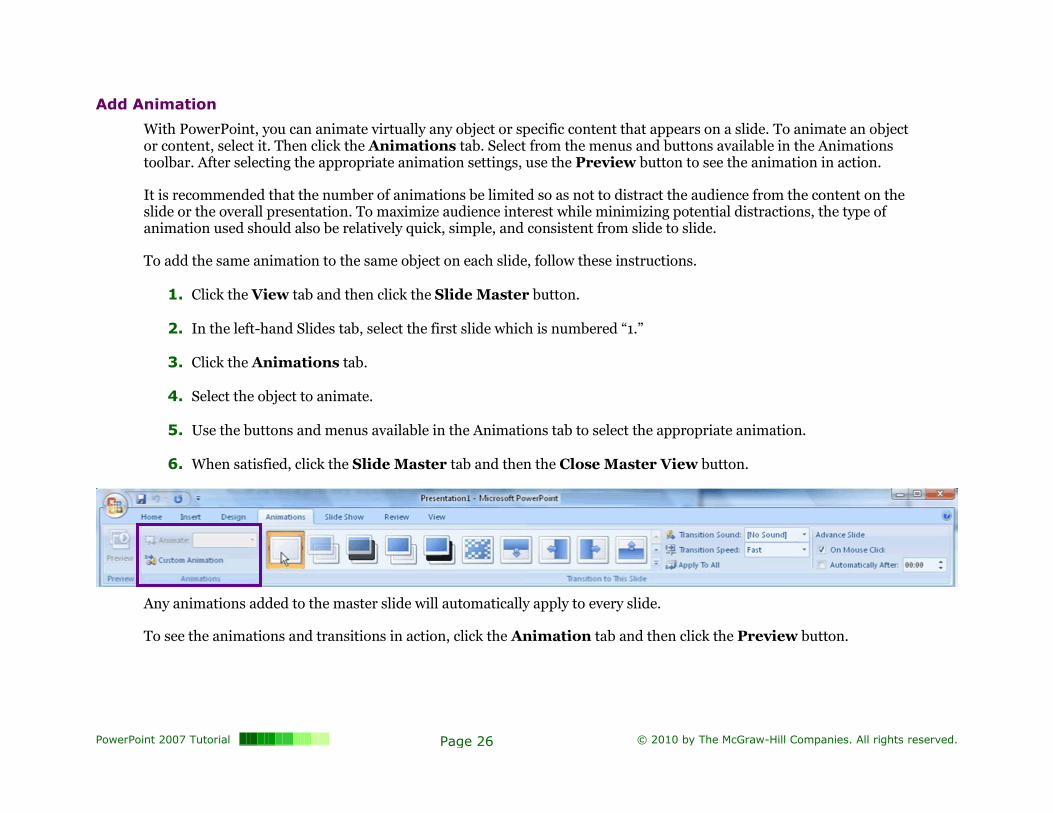
With PowerPoint, you can animate virtually any object or specific content that appears on a slide. To animate an object or content, select it. Then click the Animations tab. Select from the menus and buttons available in the Animations toolbar. After selecting the appropriate animation settings, use the Preview button to see the animation in action.
It is recommended that the number of animations be limited so as not to distract the audience from the content on the slide or the overall presentation. To maximize audience interest while minimizing potential distractions, the type of animation used should also be relatively quick, simple, and consistent from slide to slide.
To add the same animation to the same object on each slide, follow these instructions.
1. Click the View tab and then click the Slide Master button.
2. In the left-hand Slides tab, select the first slide which is numbered “1.”
3. Click the Animations tab.
4. Select the object to animate.
5. Use the buttons and menus available in the Animations tab to select the appropriate animation.
6. When satisfied, click the Slide Master tab and then the Close Master View button.
Any animations added to the master slide will automatically apply to every slide.
To see the animations and transitions in action, click the Animation tab and then click the Preview button.
PowerPoint 2007 Tutorial Page 27 © 2010 by The McGraw-Hill Companies. All rights reserved.
Preview and Show a Presentation
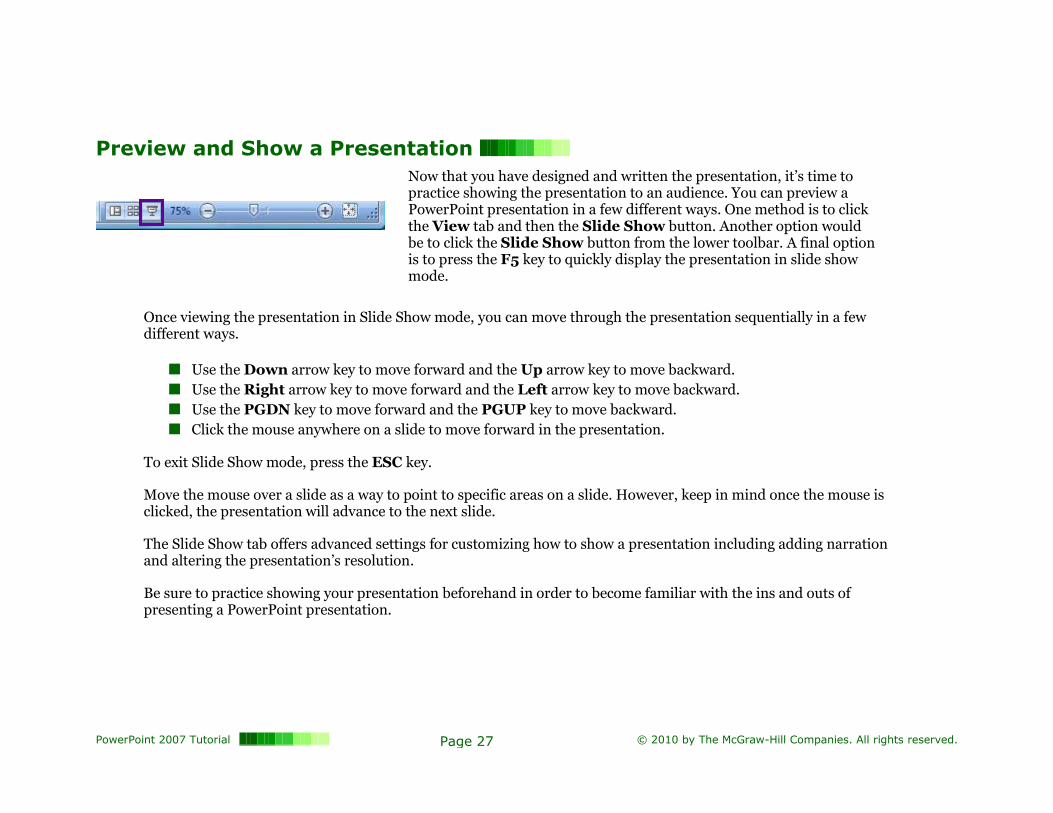
Now that you have designed and written the presentation, it’s time to practice showing the presentation to an audience. You can preview a PowerPoint presentation in a few different ways. One method is to click the View tab and then the Slide Show button. Another option would be to click the Slide Show button from the lower toolbar. A final option is to press the F5 key to quickly display the presentation in slide show mode.
Once viewing the presentation in Slide Show mode, you can move through the presentation sequentially in a few different ways.
Use the Down arrow key to move forward and the Up arrow key to move backward.
Use the Right arrow key to move forward and the Left arrow key to move backward.
Use the PGDN key to move forward and the PGUP key to move backward.
Click the mouse anywhere on a slide to move forward in the presentation.
To exit Slide Show mode, press the ESC key.
Move the mouse over a slide as a way to point to specific areas on a slide. However, keep in mind once the mouse is clicked, the presentation will advance to the next slide.
The Slide Show tab offers advanced settings for customizing how to show a presentation including adding narration and altering the presentation’s resolution.
Be sure to practice showing your presentation beforehand in order to become familiar with the ins and outs of presenting a PowerPoint presentation.
PowerPoint 2007 Tutorial Page 28 © 2010 by The McGraw-Hill Companies. All rights reserved.
Design Tips
PowerPoint presentations are a great way to present information clearly to an audience, if used appropriately. Follow these design guidelines to ensure your PowerPoint presentations effectively convey the message you are trying to communicate.
Not Recommended: Technic Theme
Choose the Right Theme
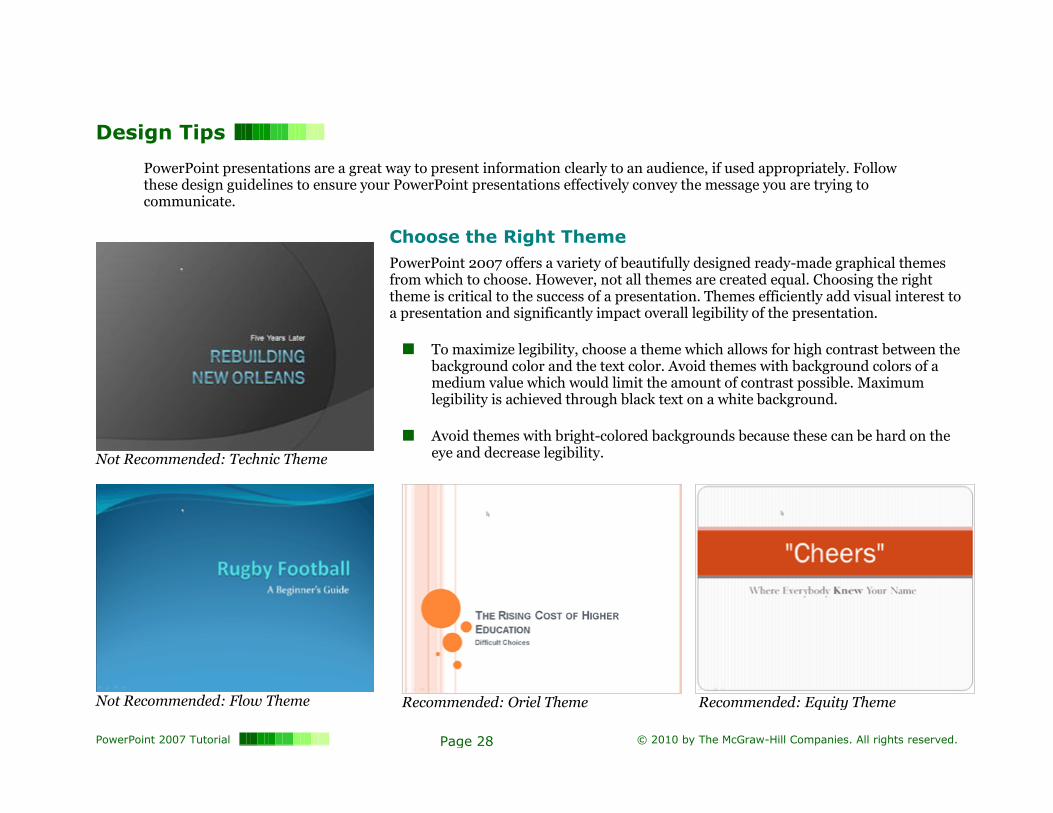
PowerPoint 2007 offers a variety of beautifully designed ready-made graphical themes from which to choose. However, not all themes are created equal. Choosing the right theme is critical to the success of a presentation. Themes efficiently add visual interest to a presentation and significantly impact overall legibility of the presentation.
To maximize legibility, choose a theme which allows for high contrast between the background color and the text color. Avoid themes with background colors of a medium value which would limit the amount of contrast possible. Maximum legibility is achieved through black text on a white background.
Avoid themes with bright-colored backgrounds because these can be hard on the eye and decrease legibility.
Not Recommended: Flow Theme
Recommended: Oriel Theme Recommended: Equity Theme
PowerPoint 2007 Tutorial Page 29 © 2010 by The McGraw-Hill Companies. All rights reserved.
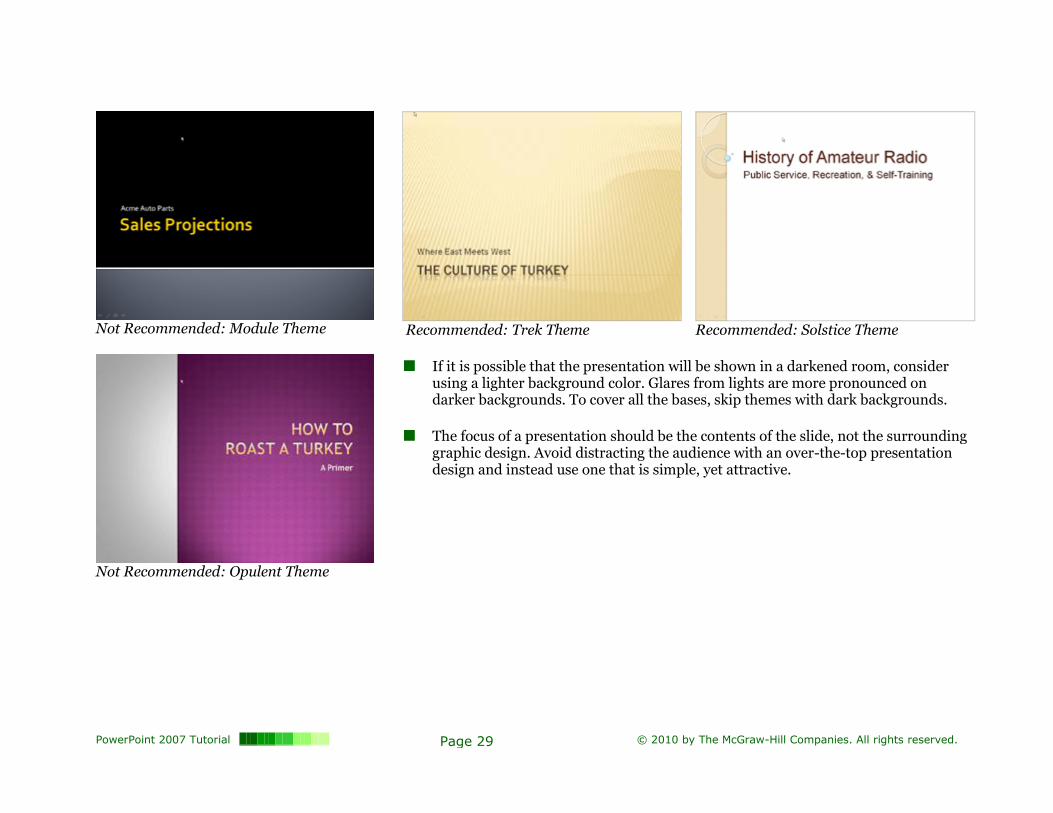
Not Recommended: Module Theme
Recommended: Trek Theme
Recommended: Solstice Theme
If it is possible that the presentation will be shown in a darkened room, consider using a lighter background color. Glares from lights are more pronounced on darker backgrounds. To cover all the bases, skip themes with dark backgrounds.
The focus of a presentation should be the contents of the slide, not the surrounding graphic design. Avoid distracting the audience with an over-the-top presentation design and instead use one that is simple, yet attractive.
Not Recommended: Opulent Theme
PowerPoint 2007 Tutorial Page 30 © 2010 by The McGraw-Hill Companies. All rights reserved.
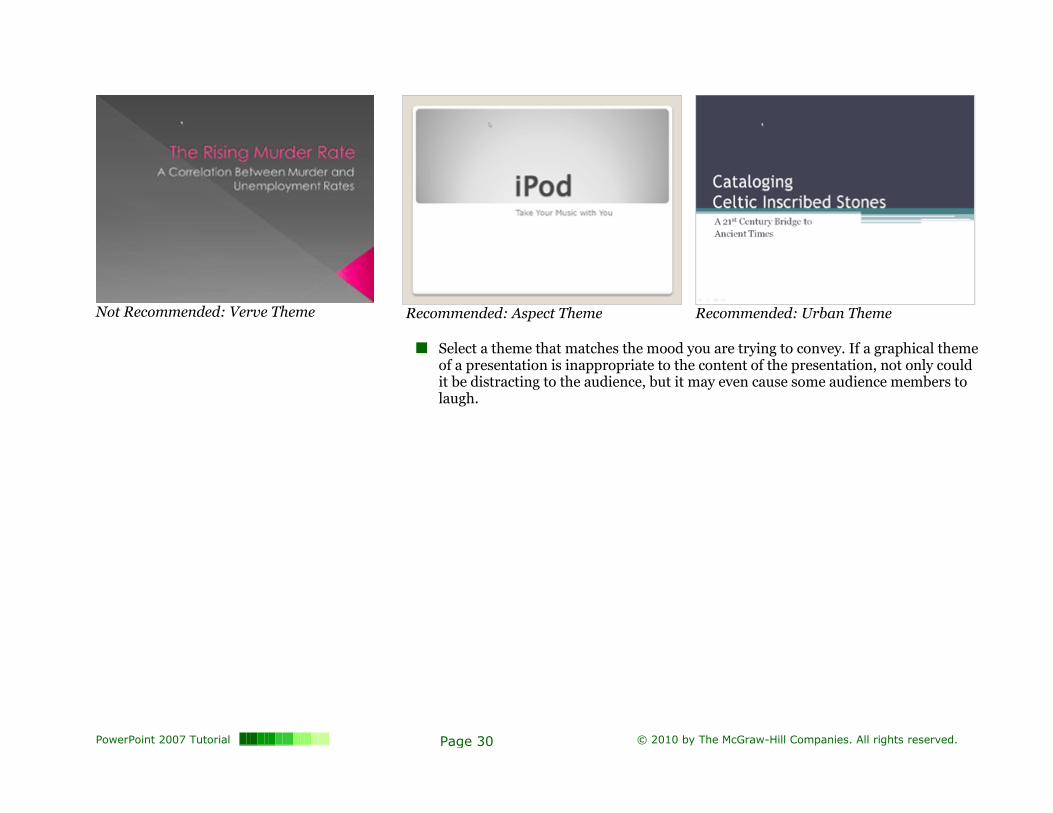
Not Recommended: Verve Theme
Recommended: Aspect Theme
Recommended: Urban Theme
Select a theme that matches the mood you are trying to convey. If a graphical theme of a presentation is inappropriate to the content of the presentation, not only could it be distracting to the audience, but it may even cause some audience members to laugh.

PowerPoint 2007 Tutorial Page 31 © 2010 by The McGraw-Hill Companies. All rights reserved.
Not Recommended: Low-contrast Colors
Maximize Legibility
The legibility of a presentation is critical. The audience must be able to read the presentation easily. If a presentation is too difficult to read, the audience will become distracted and focus on trying to read the presentation instead of listening to the speaker. Use High Contrast Colors
To ensure a presentation is legible, use high-contrast colors. Dark text on a light background is ideal. However, if the presentation will be shown on a well-lit room, light text on a dark background can also work. Use high-contrast colors within all aspects of a presentation, including within text boxes and shapes, and all other graphical elements.
Not Recommended: Low-contrast and Bright Colors
Recommended: Dark Text on White Recommended: White Text on Dark
PowerPoint 2007 Tutorial Page 32 © 2010 by The McGraw-Hill Companies. All rights reserved.
Serif Fonts
Times New Roman Garamond
Georgia Sans Serif Fonts
Arial
Verdana Tahoma
Use Sans Serif Fonts
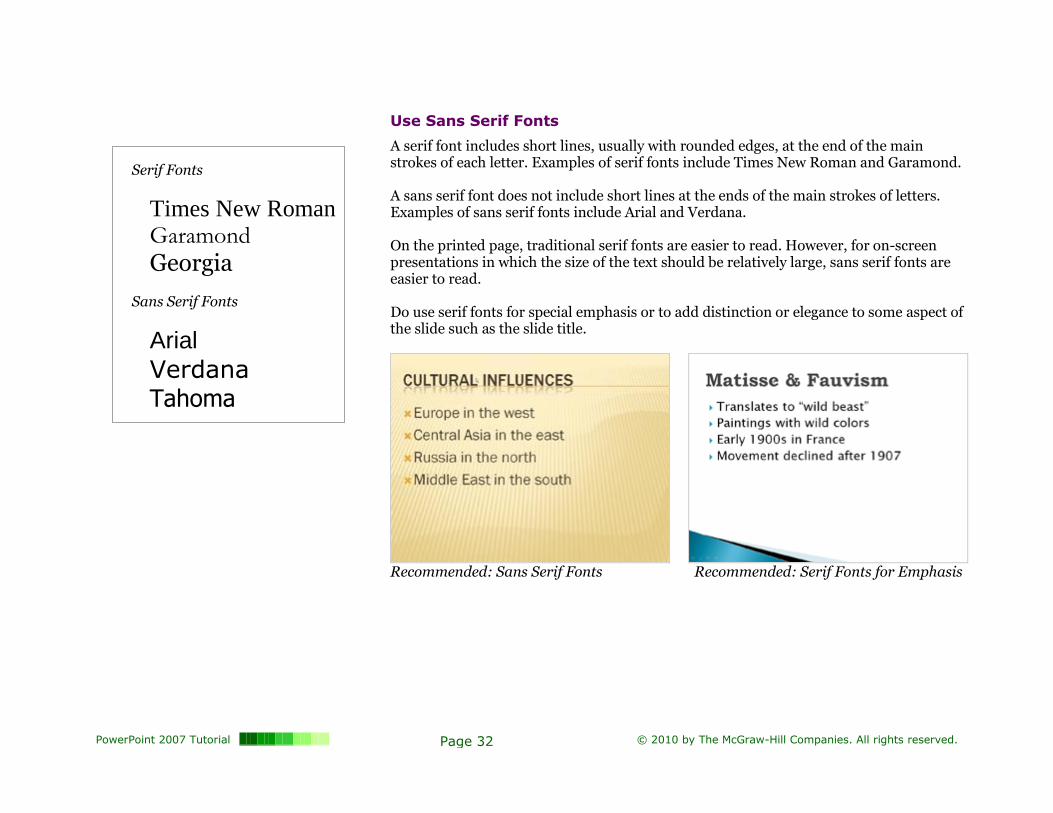
A serif font includes short lines, usually with rounded edges, at the end of the main strokes of each letter. Examples of serif fonts include Times New Roman and Garamond. A sans serif font does not include short lines at the ends of the main strokes of letters. Examples of sans serif fonts include Arial and Verdana. On the printed page, traditional serif fonts are easier to read. However, for on-screen presentations in which the size of the text should be relatively large, sans serif fonts are easier to read. Do use serif fonts for special emphasis or to add distinction or elegance to some aspect of the slide such as the slide title.
Recommended: Sans Serif Fonts Recommended: Serif Fonts for Emphasis
PowerPoint 2007 Tutorial Page 33 © 2010 by The McGraw-Hill Companies. All rights reserved.
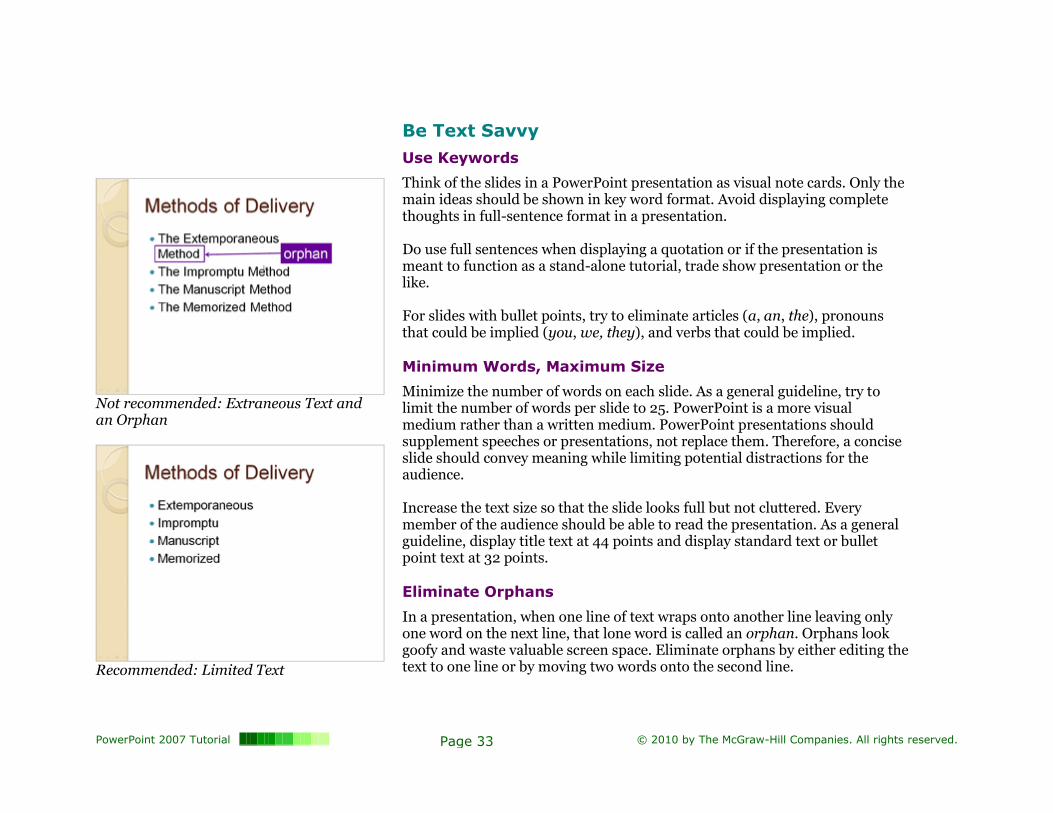
Not recommended: Extraneous Text and an Orphan
Recommended: Limited Text
Be Text Savvy
Use Keywords
Think of the slides in a PowerPoint presentation as visual note cards. Only the main ideas should be shown in key word format. Avoid displaying complete thoughts in full-sentence format in a presentation. Do use full sentences when displaying a quotation or if the presentation is meant to function as a stand-alone tutorial, trade show presentation or the like. For slides with bullet points, try to eliminate articles (a, an, the), pronouns that could be implied (you, we, they), and verbs that could be implied. Minimum Words, Maximum Size
Minimize the number of words on each slide. As a general guideline, try to limit the number of words per slide to 25. PowerPoint is a more visual medium rather than a written medium. PowerPoint presentations should supplement speeches or presentations, not replace them. Therefore, a concise slide should convey meaning while limiting potential distractions for the audience. Increase the text size so that the slide looks full but not cluttered. Every member of the audience should be able to read the presentation. As a general guideline, display title text at 44 points and display standard text or bullet point text at 32 points. Eliminate Orphans
In a presentation, when one line of text wraps onto another line leaving only one word on the next line, that lone word is called an orphan. Orphans look goofy and waste valuable screen space. Eliminate orphans by either editing the text to one line or by moving two words onto the second line.
PowerPoint 2007 Tutorial Page 34 © 2010 by The McGraw-Hill Companies. All rights reserved.
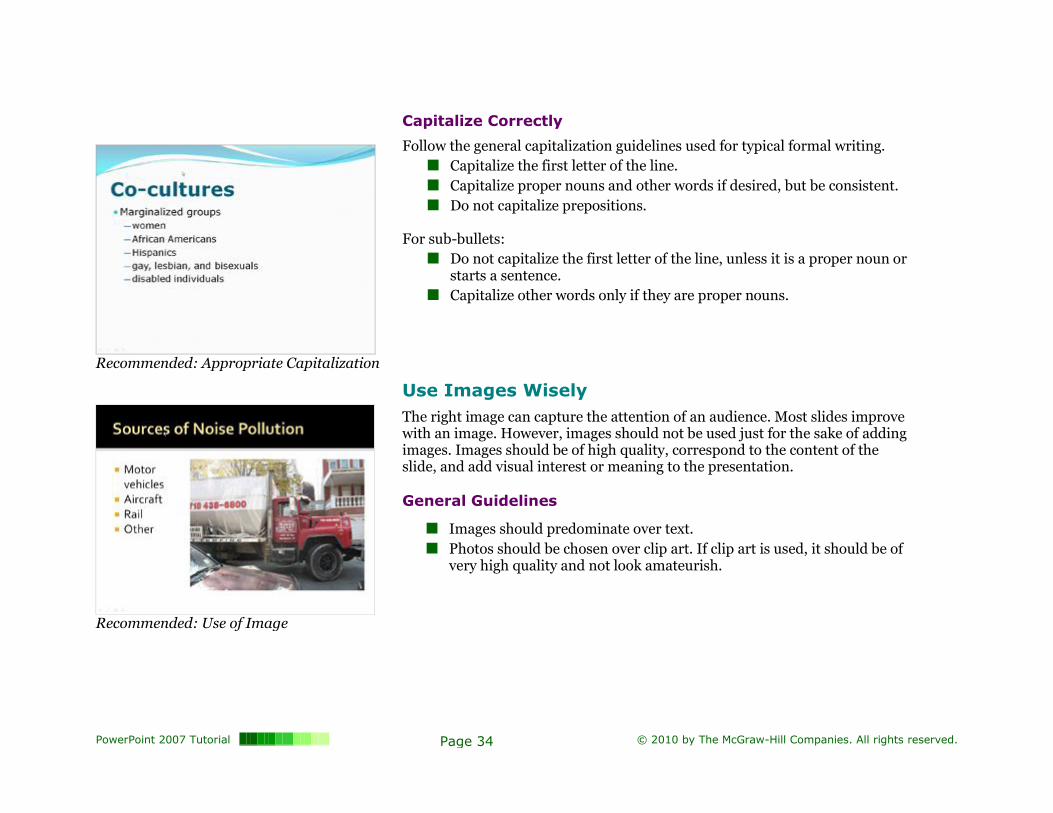
Recommended: Appropriate Capitalization
Capitalize Correctly
Follow the general capitalization guidelines used for typical formal writing.
Capitalize the first letter of the line.
Capitalize proper nouns and other words if desired, but be consistent.
Do not capitalize prepositions.
For sub-bullets:
Do not capitalize the first letter of the line, unless it is a proper noun or starts a sentence.
Capitalize other words only if they are proper nouns.
Recommended: Use of Image
Use Images Wisely
The right image can capture the attention of an audience. Most slides improve with an image. However, images should not be used just for the sake of adding images. Images should be of high quality, correspond to the content of the slide, and add visual interest or meaning to the presentation.
General Guidelines
Images should predominate over text.
Photos should be chosen over clip art. If clip art is used, it should be of very high quality and not look amateurish.

PowerPoint 2007 Tutorial Page 35 © 2010 by The McGraw-Hill Companies. All rights reserved.
Not Recommended: No Border
Recommended: Border Added
Borders and Images
Images of an irregular shape should not have a border. Usually these images are meant to blend into the background. Images with straight edges and of a regular shape may be enhanced with a border. To add a border to an image, click the image. Then click the Home tab. In the Drawing toolbar, select from the menu options and buttons available from the Quick Styles and Shape Outline buttons.
Not Recommended: Recommended: No Border Distracting Border
PowerPoint 2007 Tutorial Page 36 © 2010 by The McGraw-Hill Companies. All rights reserved.
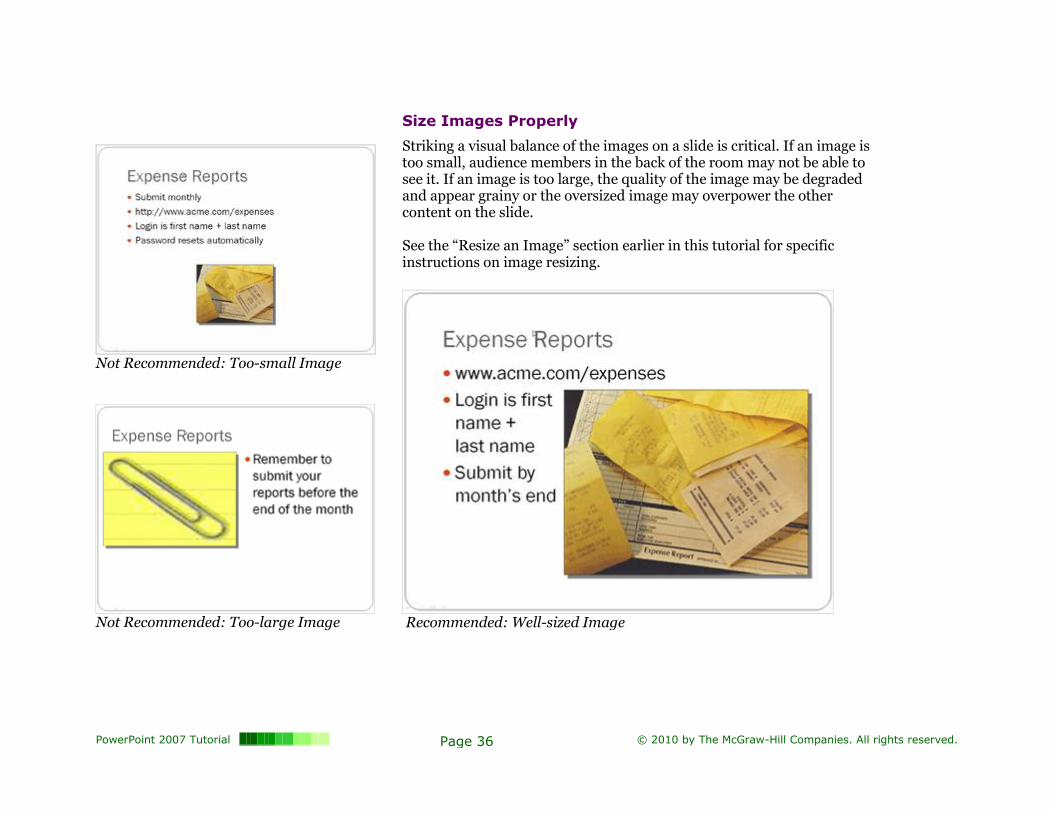
Not Recommended: Too-small Image
Not Recommended: Too-large Image
Size Images Properly
Striking a visual balance of the images on a slide is critical. If an image is too small, audience members in the back of the room may not be able to see it. If an image is too large, the quality of the image may be degraded and appear grainy or the oversized image may overpower the other content on the slide. See the “Resize an Image” section earlier in this tutorial for specific instructions on image resizing.
Recommended: Well-sized Image
PowerPoint 2007 Tutorial Page 37 © 2010 by The McGraw-Hill Companies. All rights reserved.
Keep Animations Simple
The common phrase “less is more” applies perfectly to the use of animation in PowerPoint presentations. PowerPoint has the capacity to show a different animation type for every single object within a presentation. However, a presentation with objects flying onto the screen in different ways and at different times would distract and possibly overwhelm the audience. Instead, limit the number of objects which animate to a maximum of two. Also, choose one animation style and stick with it.
Transitions between slides are a nice and easy way to spice up a presentation. Select an animation style from the Animations tab and use it as a transition between each slide. See the “Animation” section earlier in this tutorial for specific instructions on adding animations and transitions.
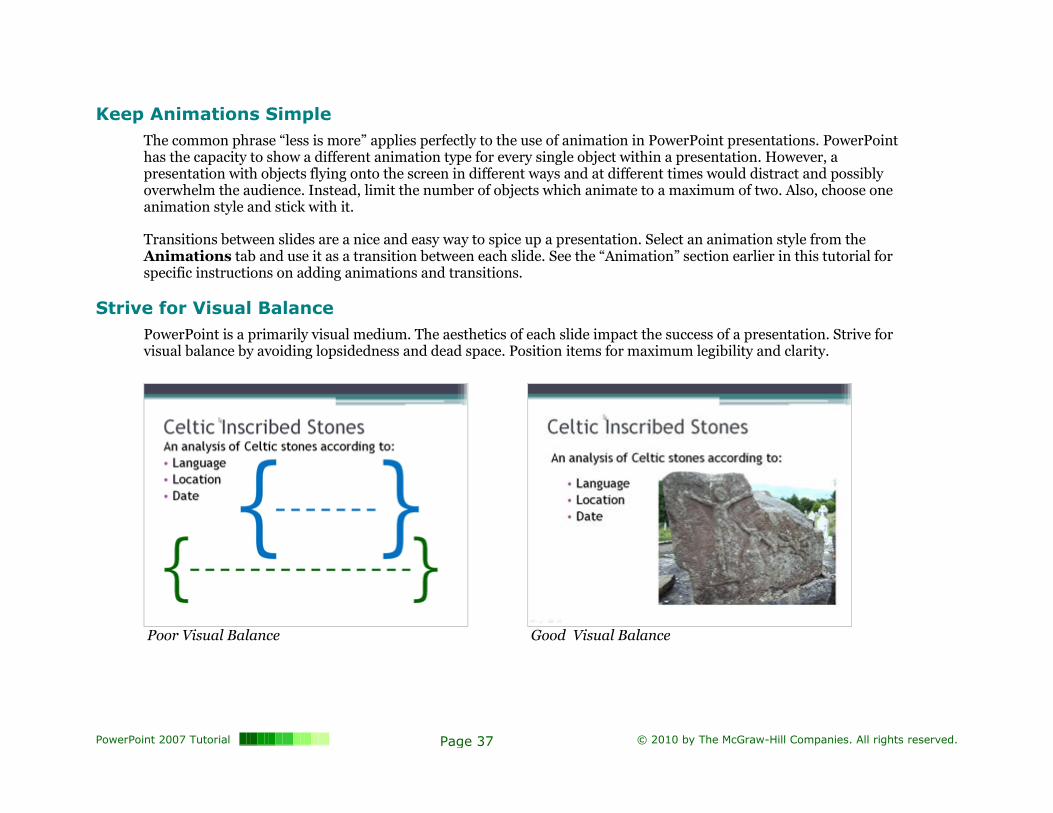
Strive for Visual Balance
PowerPoint is a primarily visual medium. The aesthetics of each slide impact the success of a presentation. Strive for visual balance by avoiding lopsidedness and dead space. Position items for maximum legibility and clarity.
Poor Visual Balance Good Visual Balance
PowerPoint 2007 Tutorial Page 38 © 2010 by The McGraw-Hill Companies. All rights reserved.
Final Design Notes
Have a purpose for every element on a slide. The location and graphical treatment of each element should be intentional and purposeful.
Disregard any of these design tips if there is a good reason to do so.
Remember to observe copyright laws on photos and artwork.
PowerPoint 2007 Tutorial Page 39 © 2010 by The McGraw-Hill Companies. All rights reserved.
References
“Up to speed with PowerPoint 2007.” http://office.microsoft.com/training/training.aspx?AssetID=RC100687671033. Microsoft. Web. 5 December 2008.
“PowerPoint 2003 Tutorial.” Student CD-ROM for Communication Works, Ninth Edition, 2008. The McGraw-Hill Companies.