rdm connect™ installation guide - unilink inc. rdm connect™ installation guide rev. a revised:...
TRANSCRIPT
ation GuideRevision A
RDM Connect™ Install
RDM Connect™ InRevised: September 29, 2010
© 2010 RDM Corporation.
This manual, the RDM Connect™ Ins
Trademarks
RDM Connect is a trademark of RDM r brand names and trademarks appearing in this guide are the property of their respect
All rights reserved. No part of this doc
Part Number
302935
RDM Corporationwww.rdmcorp.com
stallation Guide Rev. A
tallation Guide, is intended for all units belonging to the Connect family of products.
Corporation. RDM and the RDM logo are registered trademarks of RDM Corporation. All otheive holders.
ument may be reproduced in any form without the written consent of RDM Corporation.
i
................................................ iii
................................................ 1
................................................ 2
................................................ 3
.............................................. 14
.............................................. 19
.............................................. 21
.............................................. 22
.............................................. 25
© 2010 RDM Corporation
ContentsCompliance Statements ..................................................................................Introduction ......................................................................................................RDM Connect Models and Features ...............................................................Setting Up the RDM Connect Scanner ............................................................Operating the Scanner ....................................................................................Maintaining the RDM Connect Scanner ..........................................................Troubleshooting ...............................................................................................Specifications ..................................................................................................Warranty Information .......................................................................................

© 2010 RDM Corporation
ii
iii
art 15 of the FCC Rules. These limits quipment generates, uses, and can cause harmful interference to radio f this equipment does cause harmful e user is encouraged to try to correct
any RDM product, they should be e contact RDM Corporation, gent below.
© 2010 RDM Corporation
Compliance StatementsFCC Compliance Statement
This equipment has been tested and found to comply with the limits for a Class B digital device, pursuant to Pare designed to provide reasonable protection against harmful interference in a residential installation. This eradiate radio frequency energy and, if not installed and used in accordance with the instruction manual, may communications. However, there is no guarantee that interference will not occur in a particular installation. Iinterference to radio or television reception, which can be determined by turning the equipment off and on, ththe interference by one or more of the following measures:• Reorient or relocate the receiving antenna.• Increase the separation between the equipment and receiver.• Connect the equipment into an outlet on a circuit different from that to which the receiver is connected.• Consult the dealer or an experienced radio/TV technician for help.All units covered by this manual have no user-serviceable parts inside. In the event repairs are ever needed toperformed by RDM Corporation or an authorized representative of RDM Corporation. For information pleas4-608 Weber Street North, Waterloo, Ontario, Canada N2V 1K4, at 1-800-567-6227, or RDM’s US service aUS Service AgentJason S. Miller(812) [email protected]

© 2010 RDM Corporation
iv
1
sing solution. Using RDM’s industry or Check Electronification, Check eposit Capture features as well as
igh humidity.ry other than the areas specified in this
anufacturer. Record all distributor
location.f the LED. Do not put the unit close to ence, such as a computer monitor or
© 2010 RDM Corporation
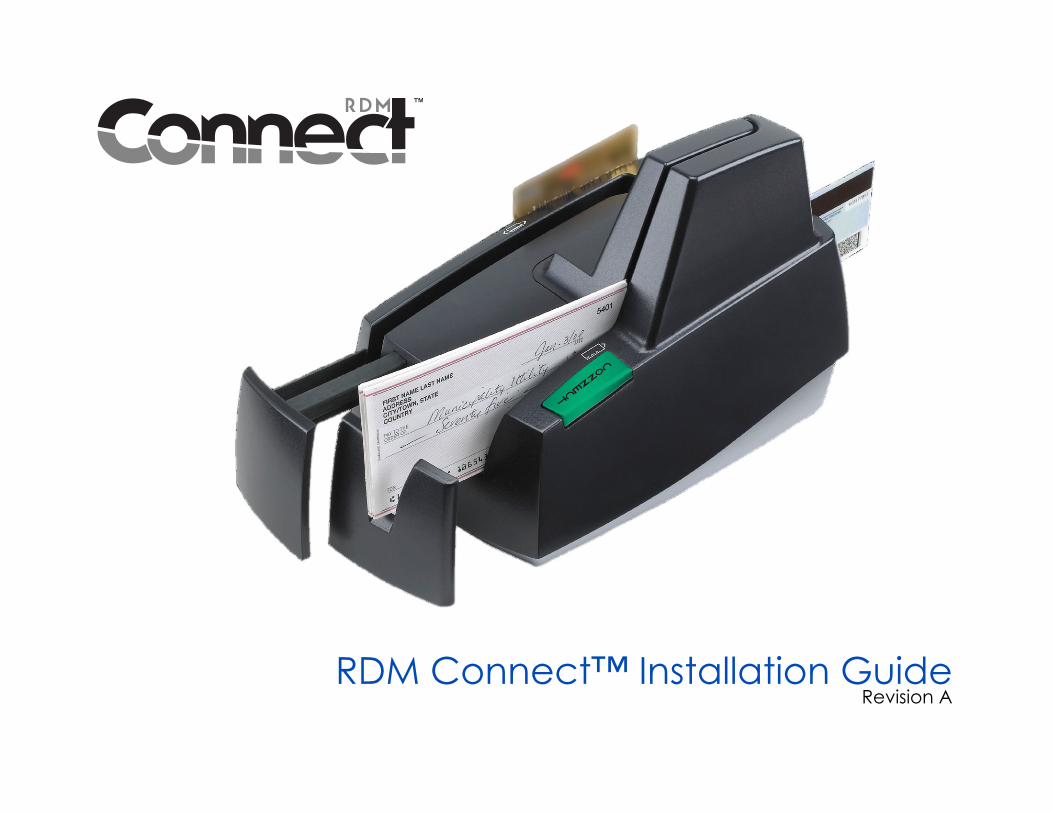
IntroductionThe RDM Connect™ scanner is a cost-effective, feature-rich, source item image and card procesleading progressive MICR method and imaging technology, the RDM Connect scanner is ideal fCashing, and Walk-in Bill Payment applications. The RDM Connect scanner provides Remote Dfeatures that are suitable for card-based processing.
Requirements• The RDM Connect unit is for indoor use only. Keep the RDM Connect dry; avoid areas of h• Do not remove any cabinetry other than the areas specified in this guide. Removing cabinet
guide will void the warranty.
Recommendations• This unit may be installed and configured by a distributor (reseller) other than the original m
contact information for future reference.• Save the original box and packing material. Reuse them if the unit must be shipped to a new• Position the unit so that the operator has easy access to the document path and a clear view o
a heat source, in direct sunlight, or close to any device that can emit electromagnetic interferpower adapter.
© 2010 RDM Corporation
aturesf features. Compare your model to the
nd MSR
2
RDM Connect Models and FeThe RDM Connect scanner comes in several different models. Each model includes a certain set ofollowing list to determine which features are included with your scanner.
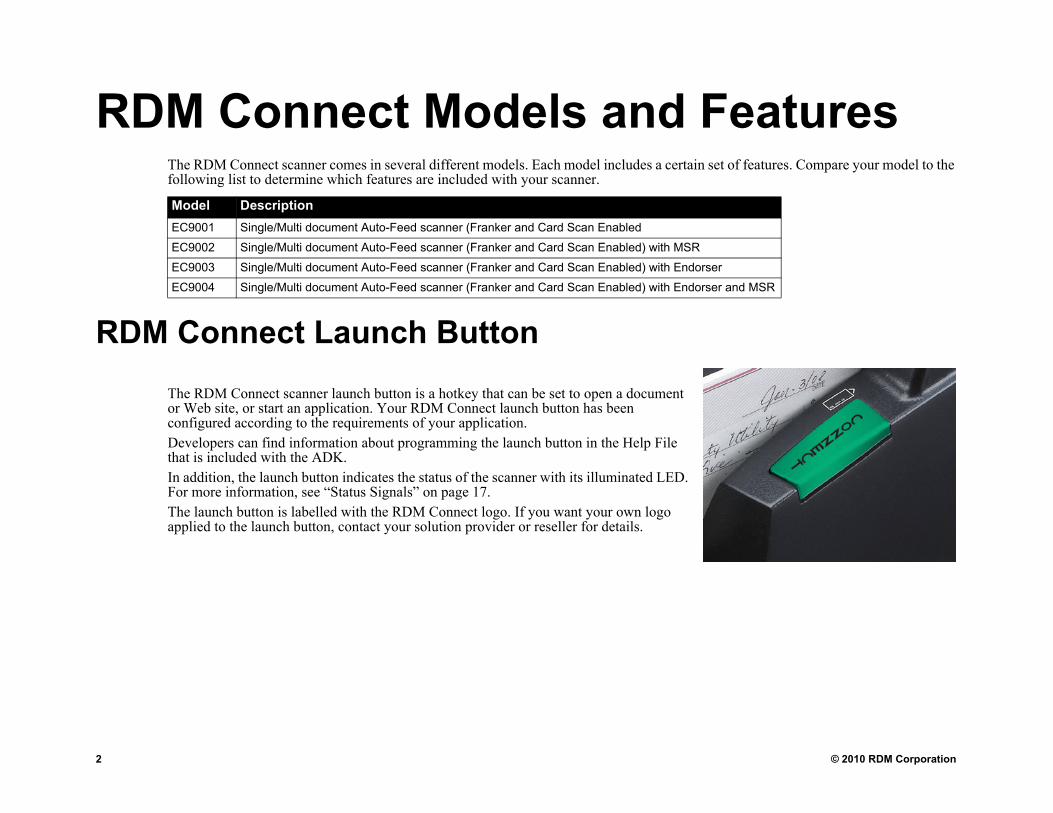
RDM Connect Launch ButtonThe RDM Connect scanner launch button is a hotkey that can be set to open a document or Web site, or start an application. Your RDM Connect launch button has been configured according to the requirements of your application.Developers can find information about programming the launch button in the Help File that is included with the ADK.In addition, the launch button indicates the status of the scanner with its illuminated LED. For more information, see “Status Signals” on page 17.The launch button is labelled with the RDM Connect logo. If you want your own logo applied to the launch button, contact your solution provider or reseller for details.
Model DescriptionEC9001 Single/Multi document Auto-Feed scanner (Franker and Card Scan Enabled
EC9002 Single/Multi document Auto-Feed scanner (Franker and Card Scan Enabled) with MSR
EC9003 Single/Multi document Auto-Feed scanner (Franker and Card Scan Enabled) with Endorser
EC9004 Single/Multi document Auto-Feed scanner (Franker and Card Scan Enabled) with Endorser a
3
t Scannerclude the following items:
d acknowledgement printerge
© 2010 RDM Corporation
Setting Up the RDM ConnecTo set up the RDM Connect scanner, do the following:• Choose a Location• Unpack the Shipping Box• Inspect the Unit’s Features• Insert the Franking Acknowledgement Printer and Endorser
Inkjet Printer Cartridges, if they are included on your scanner.
Choose a LocationLocate your scanner in a place that:• Has a flat surface, such as a counter top or table.• Is convenient for the scanner operator.• Offers adequate ventilation and protection from elements such as heat, dust, oil, or moisture.• Is close to the hosting PC (USB 2.0 high speed connection required).• Is close to a power supply.
Unpack the Shipping Box1. Open the top of the box.2. Remove and unwrap the items.3. Save the box and packing material for future use.
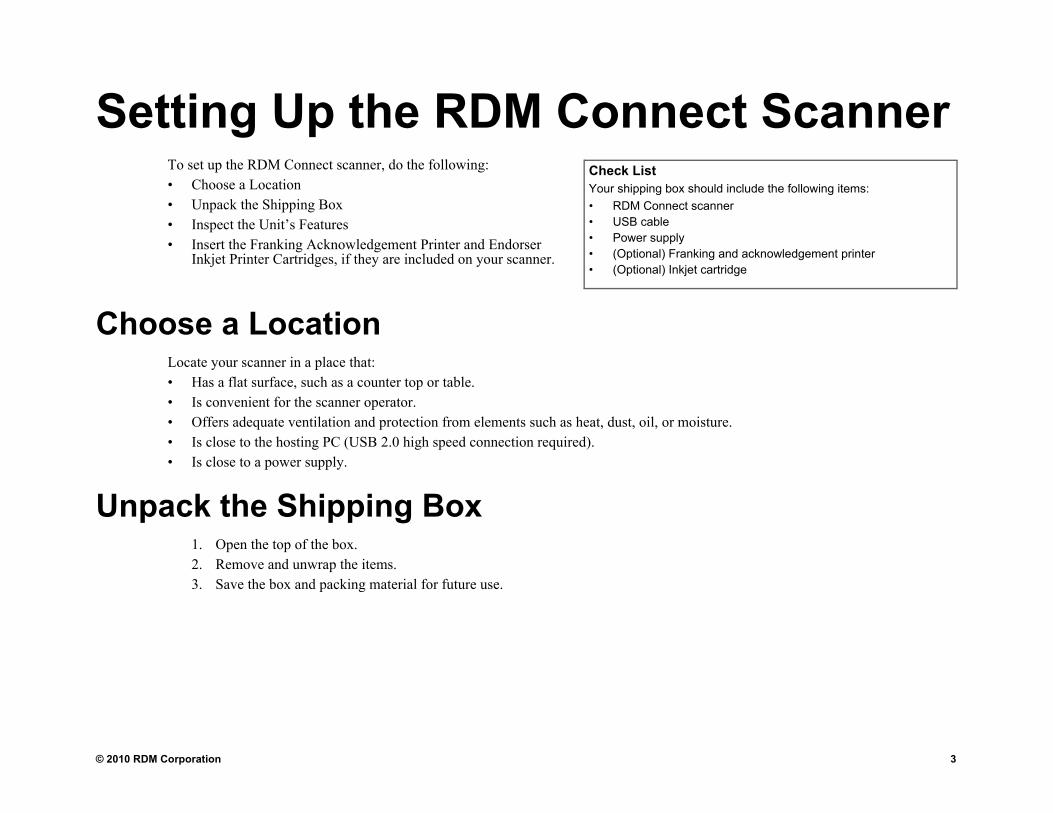
Check ListYour shipping box should in• RDM Connect scanner• USB cable• Power supply• (Optional) Franking an• (Optional) Inkjet cartrid

© 2010 RDM Corporation
Driver’s License or ID Card Entry Imaging Slot
Launch Scanner ED
4
Inspect the Unit’s Features
Insertion Hopper
Exit Pocket
ApplicationButton and
Status L
3-Track Bi-directional Magnetic Stripe Reader
Insertion Extension
Exit Extension
5
Image Sensor (Closed)
Driver’s License or ID Card Entry Imaging Slot
© 2010 RDM Corporation
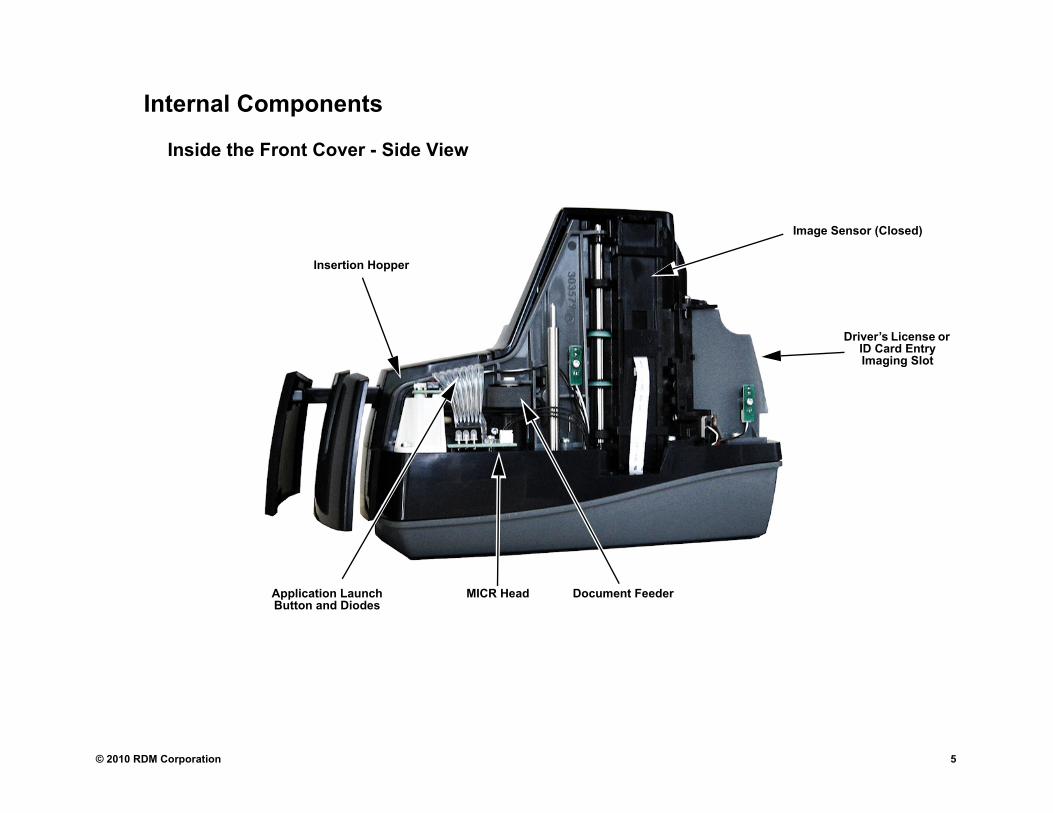
Internal Components
Inside the Front Cover - Side View
Application Launch Button and Diodes
Document Feeder
Insertion Hopper
MICR Head
© 2010 RDM Corporation
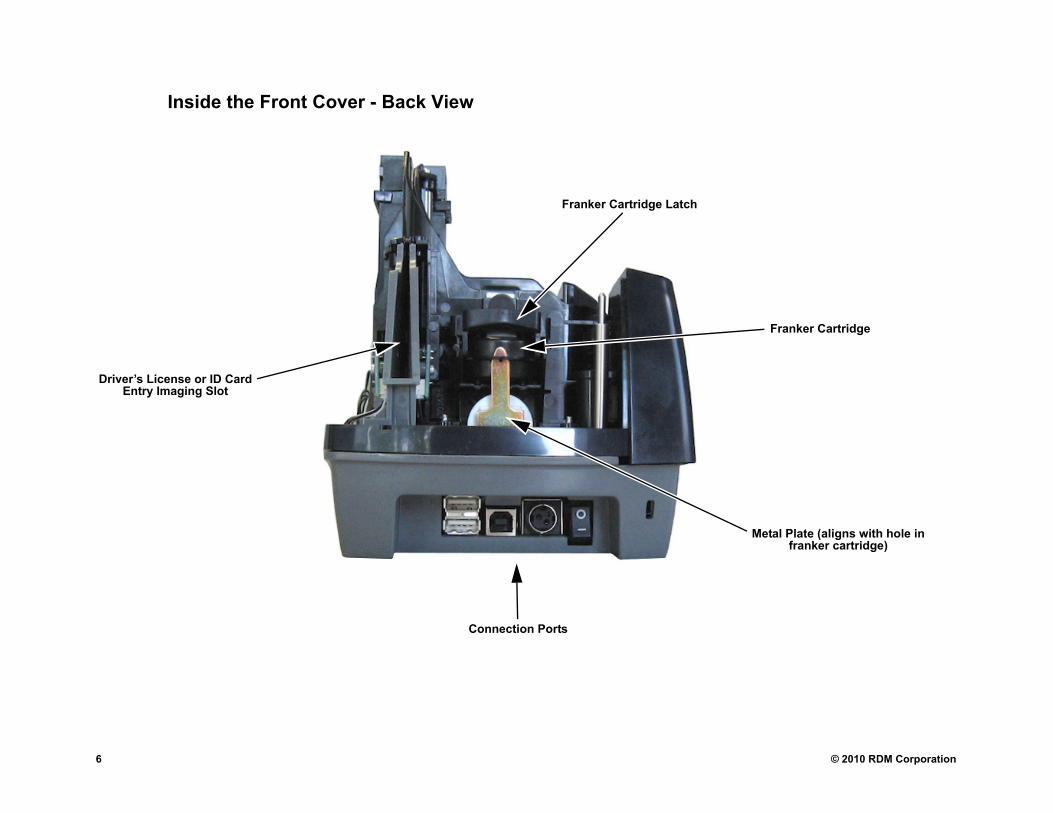
Metal Plate (aligns with hole in franker cartridge)
Franker Cartridge
6
Inside the Front Cover - Back View
Driver’s License or ID Card Entry Imaging Slot
Connection Ports
Franker Cartridge Latch
7
w
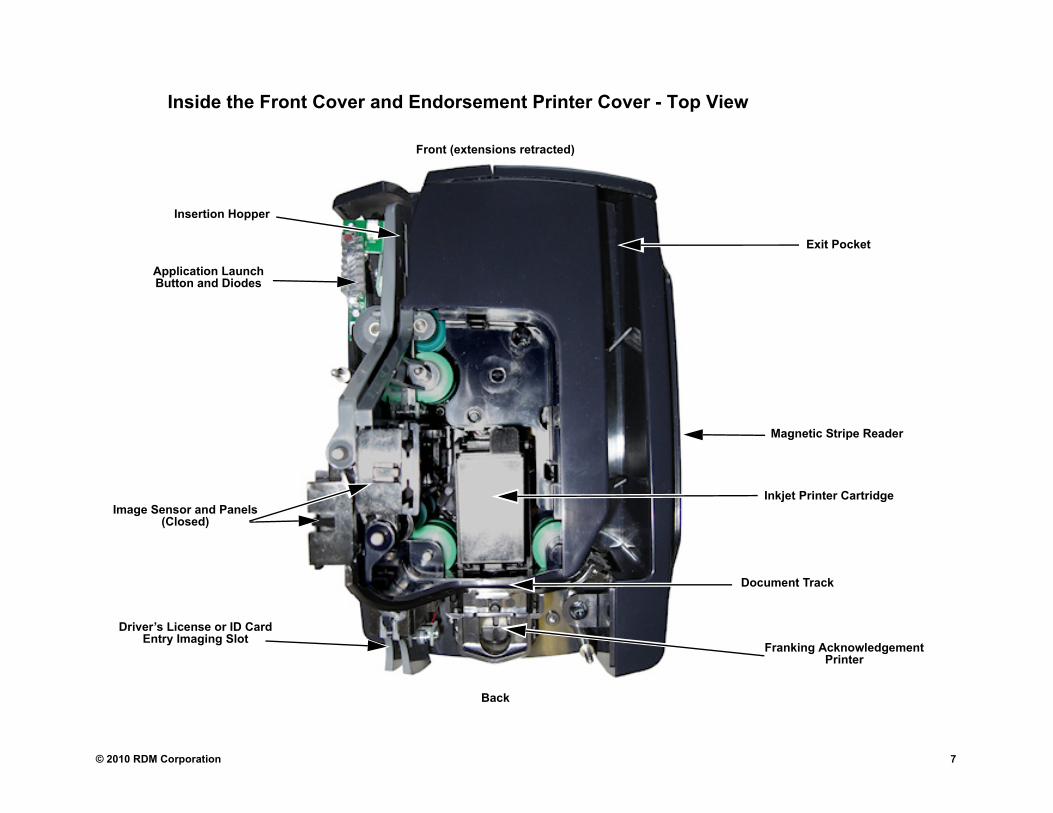
Magnetic Stripe Reader
Exit Pocket
Document Track
Franking Acknowledgement Printer
Inkjet Printer Cartridge
© 2010 RDM Corporation
Inside the Front Cover and Endorsement Printer Cover - Top Vie
Driver’s License or ID Card Entry Imaging Slot
Image Sensor and Panels (Closed)
Application Launch Button and Diodes
Front (extensions retracted)
Back
Insertion Hopper
© 2010 RDM Corporation
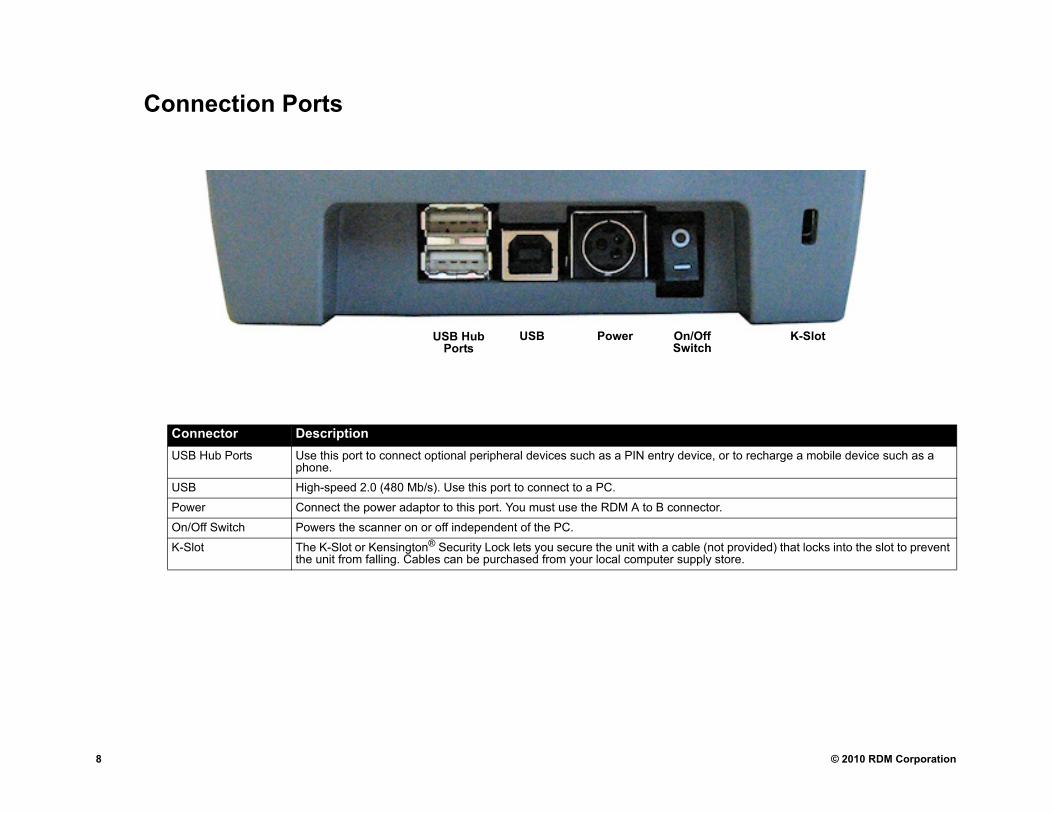
K-Slot
to recharge a mobile device such as a
rovided) that locks into the slot to prevent re.
8
Connection Ports
USB Hub Ports
USB Power On/Off Switch
Connector DescriptionUSB Hub Ports Use this port to connect optional peripheral devices such as a PIN entry device, or
phone.
USB High-speed 2.0 (480 Mb/s). Use this port to connect to a PC.
Power Connect the power adaptor to this port. You must use the RDM A to B connector.
On/Off Switch Powers the scanner on or off independent of the PC.
K-Slot The K-Slot or Kensington® Security Lock lets you secure the unit with a cable (not pthe unit from falling. Cables can be purchased from your local computer supply sto

9
place cartridges, or clear paper jams.
erlapping the assembly correctly.
© 2010 RDM Corporation
Removing the CoversRDM Connect scanner has two covers that can be removed in order to clean the image sensor, re
Front CoverRemove the front cover when you need to clear paper jams, replace the franker cartridge, or to clean the image sensor.
1. Pull the extension forward.2. Grasp the front and the back end of the front cover.3. Gently pull the cover upwards until it detaches from the scanner.
To replace the front cover:1. Make sure the extension is pulled out.2. Carefully place the front cover over the scanner assembly; make sure that the cover is ov3. Gently push the cover down until it snaps into place.
Endorsement Printer CoverRemove the endorsement printer cover when you need to clear paper jams, to insert or replace the Endorser Inkjet Printer Cartridge, or to clean the image sensore.
1. Grasp the top of the endorsement printer cover.2. Gently pull the cover upwards until it detaches from the scanner.
To replace the endorsement printer cover:1. Carefully place the endorsement printer cover over the scanner
assembly; make sure that the cover is overlapping the assembly correctly.
2. Gently push the cover down until it snaps into place.
Caution:Before you replace the front cover, make sure the extension is pulled forward; otherwise, you might damage the front cover.

© 2010 RDM Corporation
ter and
eck with a “Electronically Presented” ased as a separate consumable.The Endorsement Inkjet Printer is an nts can be purchased by contacting
artridge
metal plate.h can close over it. ly over the franker cartridge tab.naps into the closed position.
DM.
10
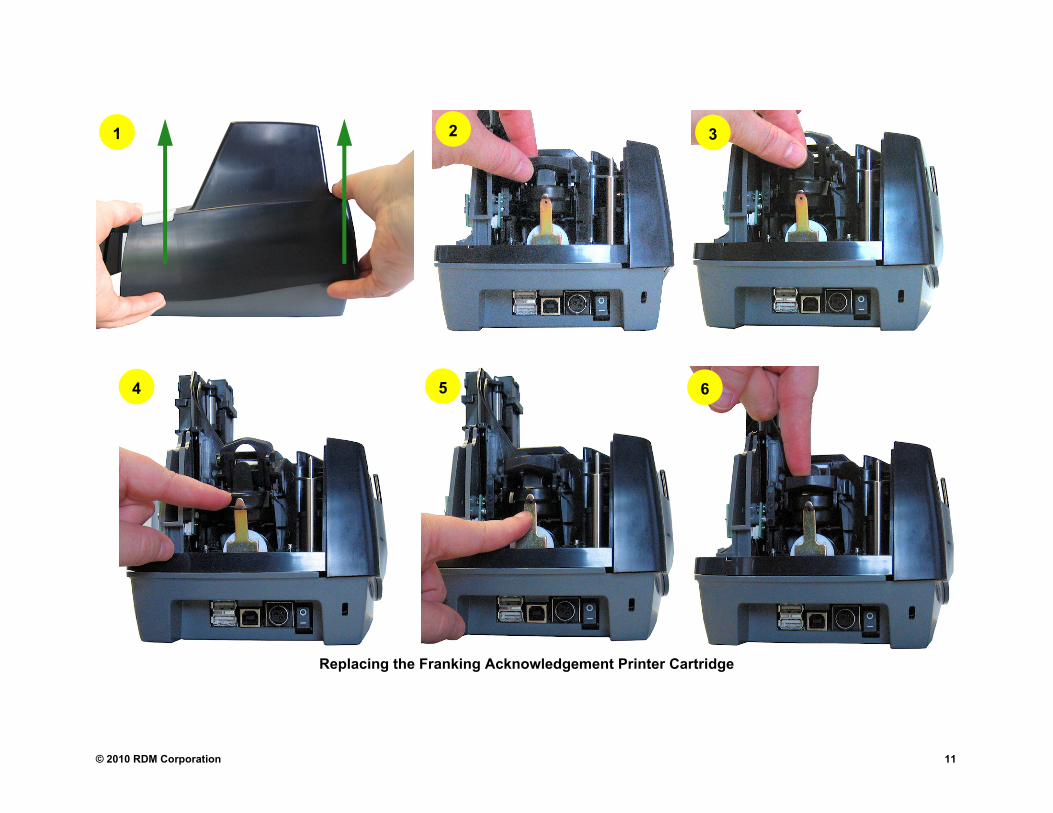
Insert the Franking Acknowledgement PrinEndorser Inkjet Printer Cartridges
The Franking Acknowledgement Printer Cartridge is an ink stamp that defaces the front of each chmessage. All models are franking-enabled; the franking acknowledgement printer must be purchThe Endorsement Inkjet Printer places user-defined text on the rear of the source item or check. optional feature. The Endorsement Inkjet Printer Cartridge is included with your unit. Replacemeyour solution provider or reseller. Follow the directions to insert the cartridges into the scanner unit.
Replacing the Franking Acknowledgement Printer C1. Remove the front cover.2. Lift the franker latch.3. Grasp the tab on the franker cartridge and lift it up and out.4. Insert the new franker cartridge by aligning the hole on the back of the cartridge with the5. Make sure that the franker cartridge is in an upright level position so that the franker latc
You might have to push the metal tab in gently to allow the franker latch to swing proper6. Lower the latch over the franker cartridge, and then gently press the latch down until it s7. Replace the front cover.
Caution:• Ink may be harmful if swallowed.• Avoid contact with eyes.• Damage to the unit or the cartridge resulting from modifying the cartridge is not the responsibility of R• The ink cartridge is not refillable.• Not licensed for modifications.• RDM can change product designs, features, or specifications at any time.
11
© 2010 RDM CorporationReplacing the Franking Acknowledgement Printer Cartridge
1 2 3
4 5 6

© 2010 RDM Corporation
escribed in the following steps. If you
wer than the front of the cartridge.naps into place.
tridge at an angle
12
Replacing the Endorser Inkjet Printer CartridgeWhen you place the new inkjet cartridge into the holder, make sure that you insert it at the angle ddo not insert the cartridge properly, it might not make contact with the item when it is scanned.
1. Remove the endorsement printer cover.2. With one hand, gently pull the inkjet latch forward.3. With the other hand, remove the inkjet cartridge.4. To insert the new inkjet cartridge, pull the inkjet latch back.5. Place the inkjet cartridge into the holder at an angle so that the back of the cartridge is lo6. Holding the inkjet cartridge at an angle, push it down into the holder until the cartridge s7. Make sure there is no gap between the inkjet cartridge and the endorsement channel.8. Replace the endorsement printer cover.
Inkjet Latch Insert the inkjet printer car

13
e power connector from being pulled
unit until it is disconnected.
applications that support the
purchased your scanner, your bank, or
© 2010 RDM Corporation
Connecting the Power Cord1. Align the flat side of the power connector so that it is facing up.2. Insert the round end of the power cord into the power port on the back of the scanner.
Make sure that the connector is pushed in completely; it should click into place.3. Plug the power connector into the power adapter.4. Plug the metal-pronged end of the power adapter into an electrical power outlet.
The LED lights up, and cycles through red and green. When the LED is solid green, your unit is powered on.
Disconnecting the Power Cord
The power connector has a sleeve on it that secures it to the unit. The security sleeve prevents thout of the unit accidently.
1. Hold the unit in place with one hand to prevent the unit from falling.2. With your other hand, slide the security sleeve on the power connector back.3. While you hold the security sleeve back, firmly pull the power connector away from the
DriversThe drivers for your scanner are installed when you install your PC application. There are many RDM Connect scanner; most are available from third-party vendors. If you are not sure where to acquire your PC application, check with the reseller from whom you your service provider.
Caution:Disconnecting the power source while the terminal is processing a transaction might cause data loss.
© 2010 RDM Corporation
e scanner.
PC application.
opper.
a document.
s that are larger than a personal check, are pulled out. Documents can be not pulled out.
14
Operating the Scanner
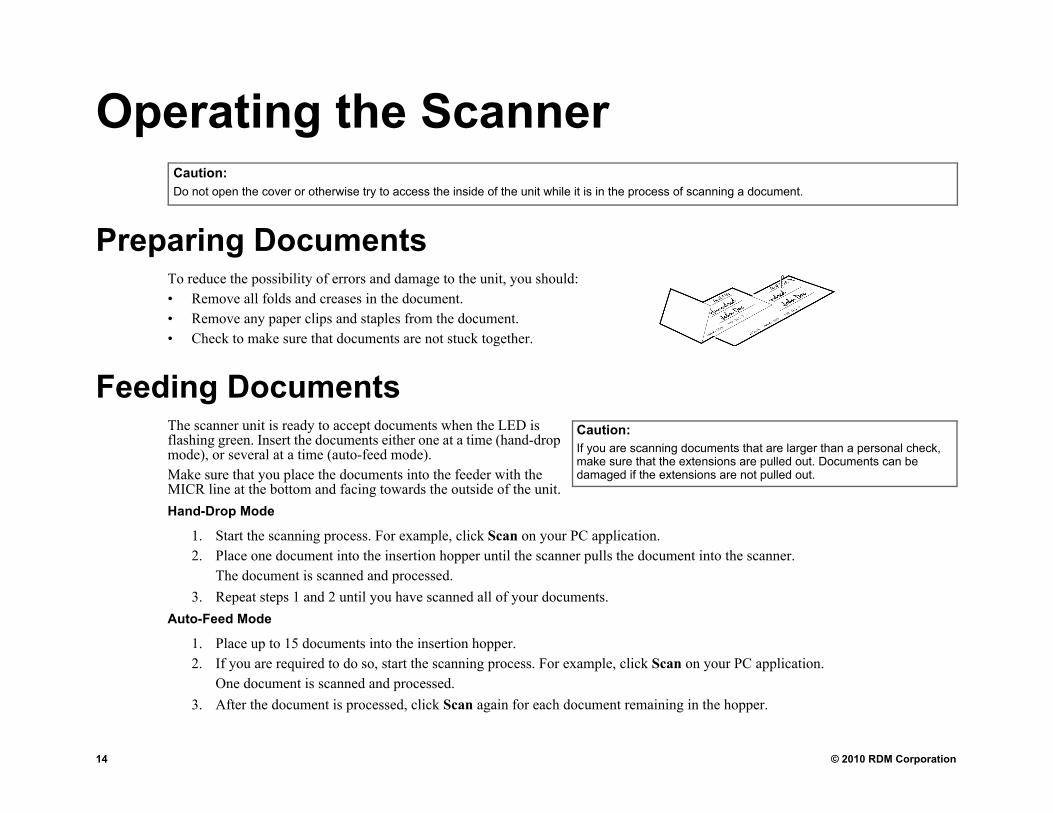
Preparing DocumentsTo reduce the possibility of errors and damage to the unit, you should: • Remove all folds and creases in the document.• Remove any paper clips and staples from the document.• Check to make sure that documents are not stuck together.
Feeding DocumentsThe scanner unit is ready to accept documents when the LED is flashing green. Insert the documents either one at a time (hand-drop mode), or several at a time (auto-feed mode).Make sure that you place the documents into the feeder with the MICR line at the bottom and facing towards the outside of the unit.Hand-Drop Mode
1. Start the scanning process. For example, click Scan on your PC application.2. Place one document into the insertion hopper until the scanner pulls the document into th
The document is scanned and processed.3. Repeat steps 1 and 2 until you have scanned all of your documents.
Auto-Feed Mode
1. Place up to 15 documents into the insertion hopper.2. If you are required to do so, start the scanning process. For example, click Scan on your
One document is scanned and processed.3. After the document is processed, click Scan again for each document remaining in the h
Caution: Do not open the cover or otherwise try to access the inside of the unit while it is in the process of scanning
Caution:If you are scanning documentmake sure that the extensionsdamaged if the extensions are
15
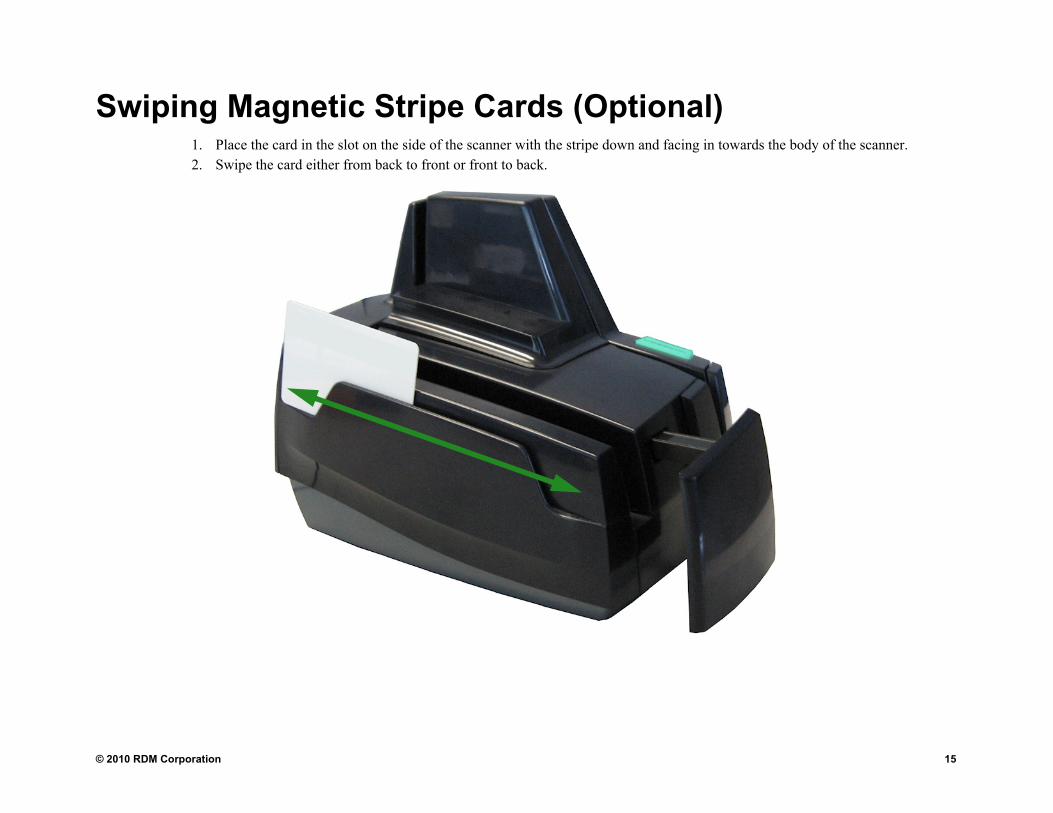
ards the body of the scanner.
© 2010 RDM Corporation
Swiping Magnetic Stripe Cards (Optional)1. Place the card in the slot on the side of the scanner with the stripe down and facing in tow2. Swipe the card either from back to front or front to back.

© 2010 RDM Corporation
back of the identification card, so it
16
Imaging Identification CardsThe ID imager uses same track as the document scanner. The ID imager scans both the front anddoes not matter which way the card is facing.
1. Insert the identification card into the back of the scanner track.The card is pulled through the track and exits out the front.
2. Remove the card from the front of the scanner track.

17
ht on the top, front, right-hand side of
the PC.
t is busy processing the document, o finish.structions / refer to your local (reseller).structions / refer to your local (reseller).
ine.
© 2010 RDM Corporation
Status SignalsThe scanner comes equipped with the default light and sound signals described below.
Default Light SignalsThe unit’s status is shown through a single, multistate LED (light-emitting diode), which is the ligthe unit. The table below describes typical status signals and their meanings.
Default Sound SignalsSeveral conditions are also signaled by a pattern of tones in addition to the LED display.
LED Meaning What to DoRed / Green The unit is starting up or performing
diagnostics.Wait.
Green Solid The unit has established communication with the PC that is connected to the scanner.
Start the software application on
Green Flashing The unit is ready to accept a document. Insert a document. When the unithe light is off; wait for the job t
Red Solid The unit failed during a self-test. Check the terminal display for inprocedures / call you distributor
Red Flashing An error occurred during processing. Check the terminal display for inprocedures / call your distributor
Tone MeaningOne short beep - LED is flashing green The unit was successful in reading the MICR line.Three short beeps - LED is flashing red The unit was not successful in reading the MICR lOne long beep - LED is flashing red An error occurred during processing.
© 2010 RDM Corporation
ed.
18
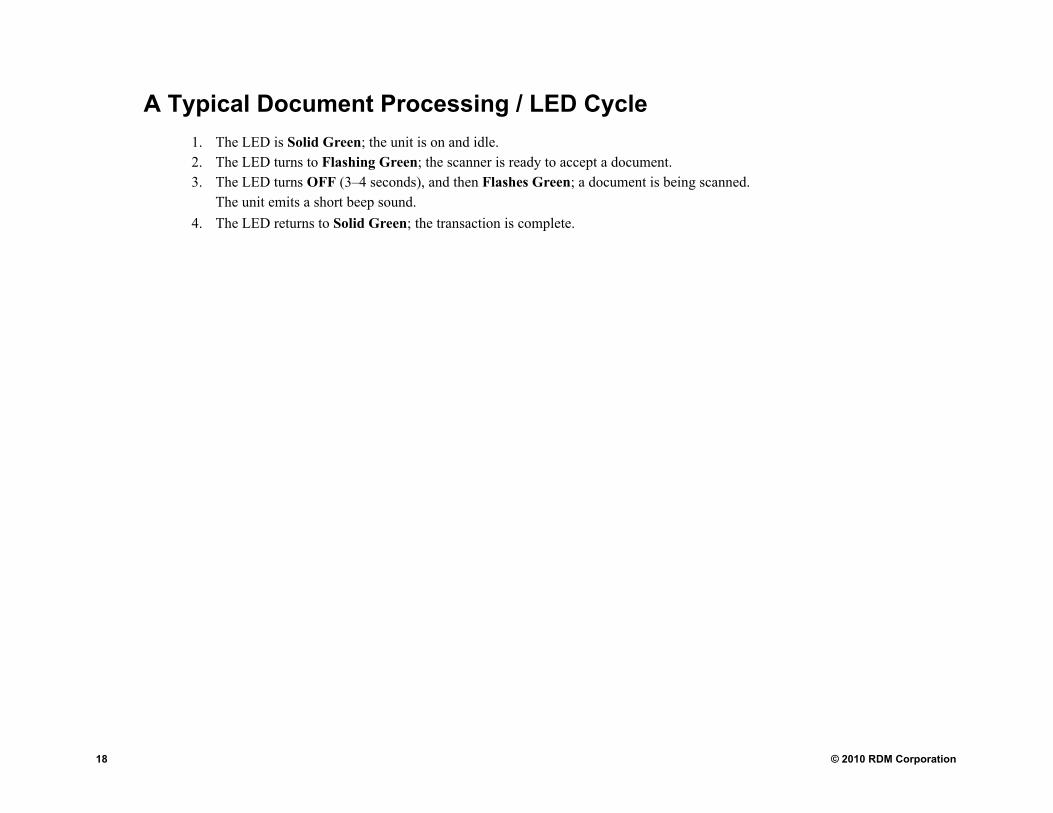
A Typical Document Processing / LED Cycle1. The LED is Solid Green; the unit is on and idle.2. The LED turns to Flashing Green; the scanner is ready to accept a document.3. The LED turns OFF (3–4 seconds), and then Flashes Green; a document is being scann
The unit emits a short beep sound.4. The LED returns to Solid Green; the transaction is complete.

19
ct
n material.
to clean inside the scanner.
© 2010 RDM Corporation
Maintaining the RDM ConneScanner
The RDM Connect scanner performs best when all working surfaces are clean and free of foreig
Cleaning the Scanner
Cleaning the Outside Cabinetry1. Use a damp cloth and mild soap.
Cleaning the Inside of the Scanner UnitYou might need to remove dust and debris from inside the scanner unit.
1. Remove the front cover and the endorsement printer cover.2. Use a dusting brush designed for use on electronic equipment or a compressed air duster3. Replace the covers.
Caution:• Always disconnect the power to the scanner before cleaning it.• Solvents or harsh cleaners might damage or discolor the cabinetry.
© 2010 RDM Corporation
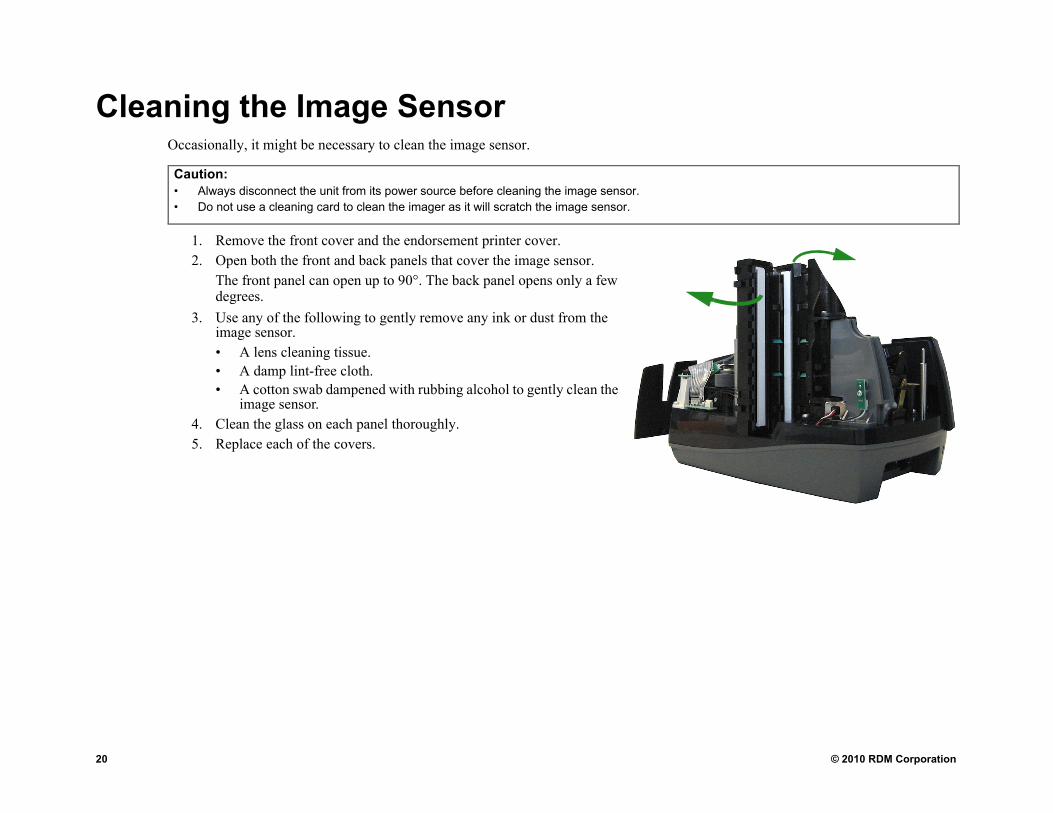
20Cleaning the Image SensorOccasionally, it might be necessary to clean the image sensor.
1. Remove the front cover and the endorsement printer cover.2. Open both the front and back panels that cover the image sensor.
The front panel can open up to 90°. The back panel opens only a few degrees.
3. Use any of the following to gently remove any ink or dust from the image sensor.• A lens cleaning tissue.• A damp lint-free cloth.• A cotton swab dampened with rubbing alcohol to gently clean the
image sensor.4. Clean the glass on each panel thoroughly.5. Replace each of the covers.
Caution:• Always disconnect the unit from its power source before cleaning the image sensor.• Do not use a cleaning card to clean the imager as it will scratch the image sensor.

21
ect scanner unit. Before calling for
of the unit (according to instructions
necessary.
rly
© 2010 RDM Corporation
TroubleshootingIn the course of everyday operations, you might encounter minor malfunctions in the RDM Connservice, review the troubleshooting steps below.
Device Does Not Respond1. Ensure that the scanner’s cable is still properly connected to the correct port on the back
provided by your distributor).2. If the problem persists, contact your solution provider or help desk.3. Make sure that the correct power adaptor is connected to the unit. Change the adaptor, if
Card Transactions Do Not Function PropeTest the card swipe mechanism.
1. Ensure that you are swiping the card properly. The black magnetic stripe on the back of the card must face downward and to the right.
2. Try using another card to ensure the first card was not defective.3. If the problem persists, contact your solution provider or help desk.
© 2010 RDM Corporation
r group of multiple items
ts
ition of OCR code-lines for applications
R Method for optimum MICR read
rectly to a Web site (some abilities require n also provides the units status with its
ctronically Presented” messages printed
p a fixed text message on the face of the
compression—bi-level with CCITT Group
bpp)eader description tags of check images cription tags of bill stubsat, DPI and compression, typically 10 kB
22
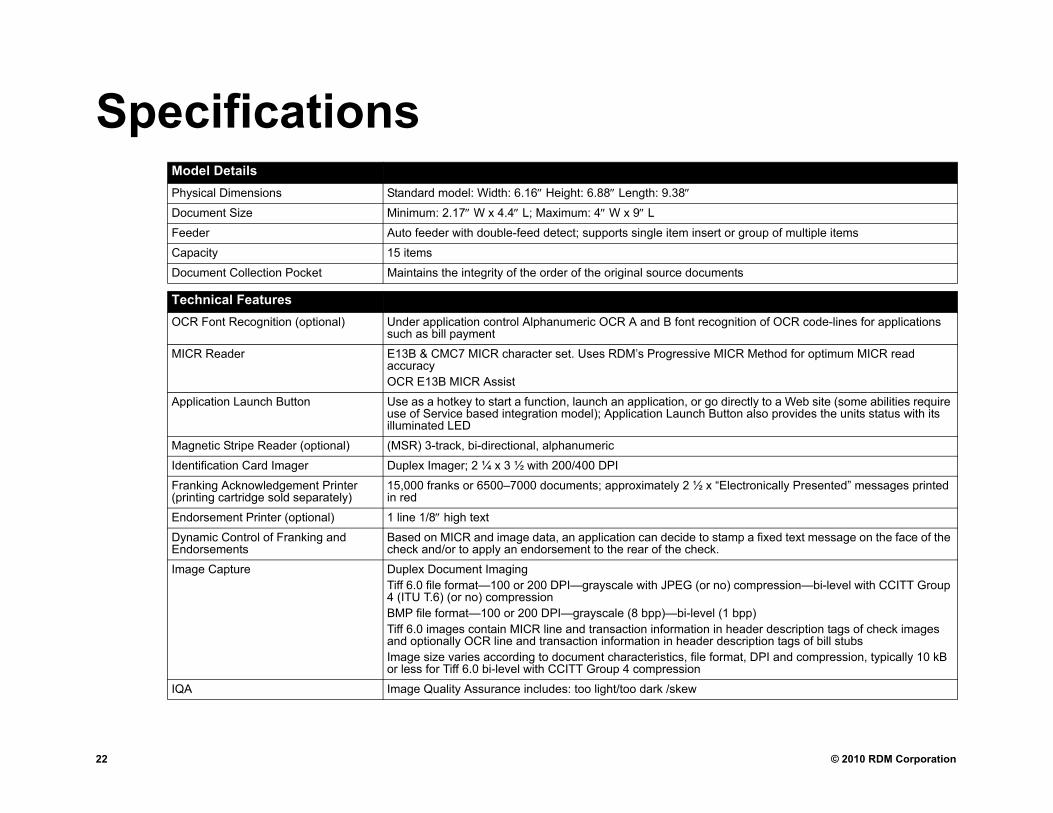
SpecificationsModel DetailsPhysical Dimensions Standard model: Width: 6.16″ Height: 6.88″ Length: 9.38″
Document Size Minimum: 2.17″ W x 4.4″ L; Maximum: 4″ W x 9″ L
Feeder Auto feeder with double-feed detect; supports single item insert o
Capacity 15 items
Document Collection Pocket Maintains the integrity of the order of the original source documen
Technical FeaturesOCR Font Recognition (optional) Under application control Alphanumeric OCR A and B font recogn
such as bill payment
MICR Reader E13B & CMC7 MICR character set. Uses RDM’s Progressive MICaccuracyOCR E13B MICR Assist
Application Launch Button Use as a hotkey to start a function, launch an application, or go diuse of Service based integration model); Application Launch Buttoilluminated LED
Magnetic Stripe Reader (optional) (MSR) 3-track, bi-directional, alphanumeric
Identification Card Imager Duplex Imager; 2 ¼ x 3 ½ with 200/400 DPI
Franking Acknowledgement Printer (printing cartridge sold separately)
15,000 franks or 6500–7000 documents; approximately 2 ½ x “Elein red
Endorsement Printer (optional) 1 line 1/8″ high text
Dynamic Control of Franking and Endorsements
Based on MICR and image data, an application can decide to stamcheck and/or to apply an endorsement to the rear of the check.
Image Capture Duplex Document ImagingTiff 6.0 file format—100 or 200 DPI—grayscale with JPEG (or no)4 (ITU T.6) (or no) compressionBMP file format—100 or 200 DPI—grayscale (8 bpp)—bi-level (1 Tiff 6.0 images contain MICR line and transaction information in hand optionally OCR line and transaction information in header desImage size varies according to document characteristics, file formor less for Tiff 6.0 bi-level with CCITT Group 4 compression
IQA Image Quality Assurance includes: too light/too dark /skew
23
llation
C B (home office /residential)
© 2010 RDM Corporation
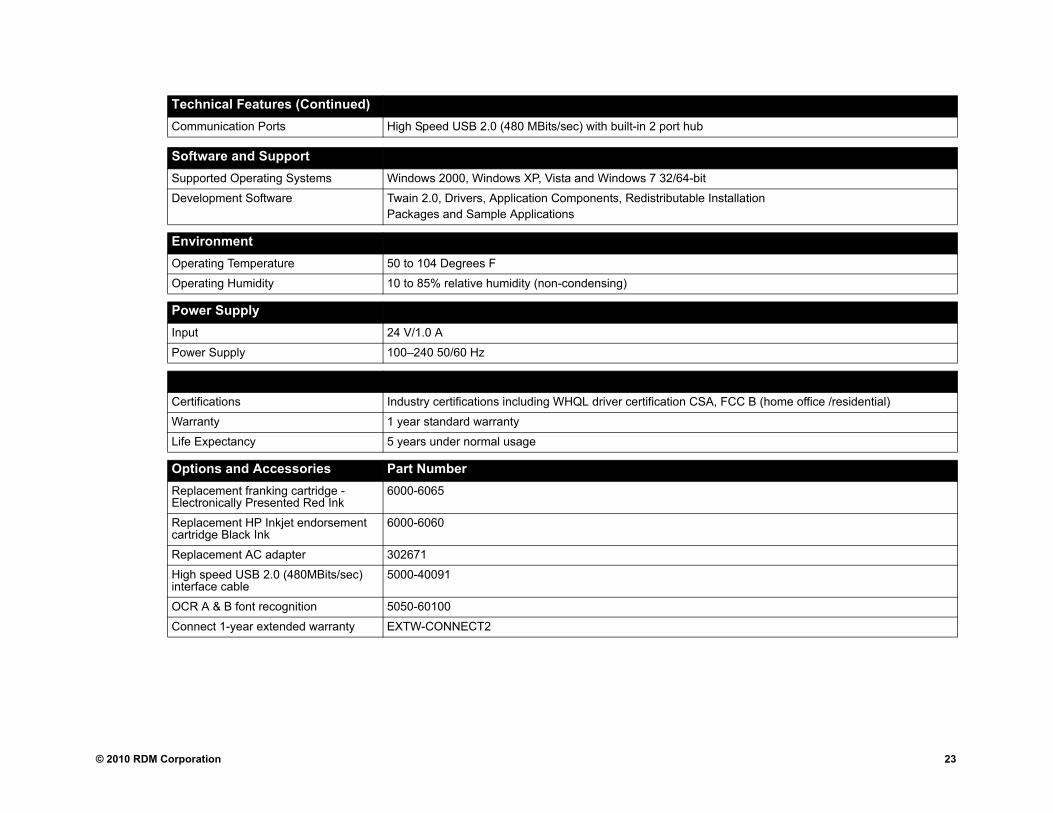
Communication Ports High Speed USB 2.0 (480 MBits/sec) with built-in 2 port hub
Software and SupportSupported Operating Systems Windows 2000, Windows XP, Vista and Windows 7 32/64-bit
Development Software Twain 2.0, Drivers, Application Components, Redistributable InstaPackages and Sample Applications
EnvironmentOperating Temperature 50 to 104 Degrees F
Operating Humidity 10 to 85% relative humidity (non-condensing)
Power SupplyInput 24 V/1.0 A
Power Supply 100–240 50/60 Hz
Certifications Industry certifications including WHQL driver certification CSA, FC
Warranty 1 year standard warranty
Life Expectancy 5 years under normal usage
Options and Accessories Part NumberReplacement franking cartridge - Electronically Presented Red Ink
6000-6065
Replacement HP Inkjet endorsement cartridge Black Ink
6000-6060
Replacement AC adapter 302671
High speed USB 2.0 (480MBits/sec) interface cable
5000-40091
OCR A & B font recognition 5050-60100
Connect 1-year extended warranty EXTW-CONNECT2
Technical Features (Continued)

© 2010 RDM Corporation
24
25
for a period of one year after the date t be offered by your solution provider.
manufacturers of auxiliary equipment turn of the price paid, or (b) repair or to the Corporation with a purchase r this warranty.
cation. Any replacement RDM
cturers will be liable for any damages s, business interruption, loss of ECT, even if the Corporation, such
e RDM CONNECT shall be limited to facturers disclaim all other warranties, icular purpose with regard to the
© 2010 RDM Corporation
Warranty InformationLIMITED WARRANTY:
RDM CONNECT™ is warranted against defects in materials and workmanship under normal use and serviceof receipt by you. This warranty is extended only to the original purchaser. Extended warranty programs mighThe entire liability of RDM Corporation (the Corporation), distributors of the RDM CONNECT terminal andused with the RDM CONNECT and your exclusive remedy shall be, at the Corporation’s option either (a) rereplacement of the RDM CONNECT terminal that does not meet the limited warranty and which is returned receipt or other proof of date of original purchase which will be required in order to exercise your rights undeThe limited warranty is void if failure of the RDM CONNECT has resulted from accident, abuse or misappliCONNECT will be warranted for the remainder of the original warranty period.The equipment is sold with the understanding that neither the Corporation, such distributors nor such manufawhatsoever (include, without limitation, direct or indirect damages for personal injury, loss of business profitbusiness information, or any other pecuniary loss) arising out of the use of or inability to use the RDM CONNdistributors and/or such manufacturers have been advised of the possibility of such damages.In any case, the entire liability of the Corporation, such distributors and such manufacturers with respect to ththe amount actually paid by you for the RDM CONNECT. The Corporation, such distributors and such manuexpress or implied, including, without limitation, implied warranties of merchantability and fitness for a partRDM CONNECT and the accompanying written materials.

© 2010 RDM Corporation
e.
r preventative maintenance measures,
mables or accessories such as cables., Owner Code, Merchant ID, etc.) are of the unit has been opened or
ers. All stored images in the terminal rchiving or e-mailed to them prior to
26
WARRANTY SPECIFICS:
This warranty only covers failures due to defects in materials or workmanship, which occur during normal usIt does not cover the following:
- Damage, which occurs in shipment;- Failures which are caused by products not supplied by RDM;- Failures which result from accident, misuse, abuse, neglect, excessive dirt or dust cause by lack o
mishandling, misapplication, alteration or modification;- Service by anyone other than RDM;- Damage that is attributable to acts of nature including but not limited to:
- Flood, lightning, power surge or static electricity, water damage, fall, theft, or vandalism;- Spillage of liquid or objects that have fallen into the equipment;- Equipment that has been exposed to excessive heat or unstable environmental conditions;- Consumables such as Franker Roller or Franker Assembly, or other RDM CONNECT consu
RDM CONNECT units with problems found to be caused by incorrectly set configuration parameters (IRN#not considered defective and will not be serviced under warranty. Warranty is void if any of the external caseremoved or the unit has, in RDM’s opinion, been damaged through misuse or improper care.Units returned to RDM for warranty repair will be reconfigured with factory defaults and returned to customwill be cleared. Customers will have the option of having the images uploaded to RDM’s ITMS system for abeing cleared from the terminal.


Print on
Copyright© RDM Corporation, 2010
All rights reserved. No part of this document may be reproduced in any formwithout the written consent of RDM Corporation.
Part Number: 302935Revision: A
Waterloo, OntarioCanada
100% Recyclable Paper