quick step by step flash tutorial
DESCRIPTION
This is a handout from a Flash workshop I recently conducted at the National University of Singapore. It contains step by step instructions covering Flash basics, ActionScript and also Flash-PHP communication. Feel free to contact me if you find any bugs! :)TRANSCRIPT
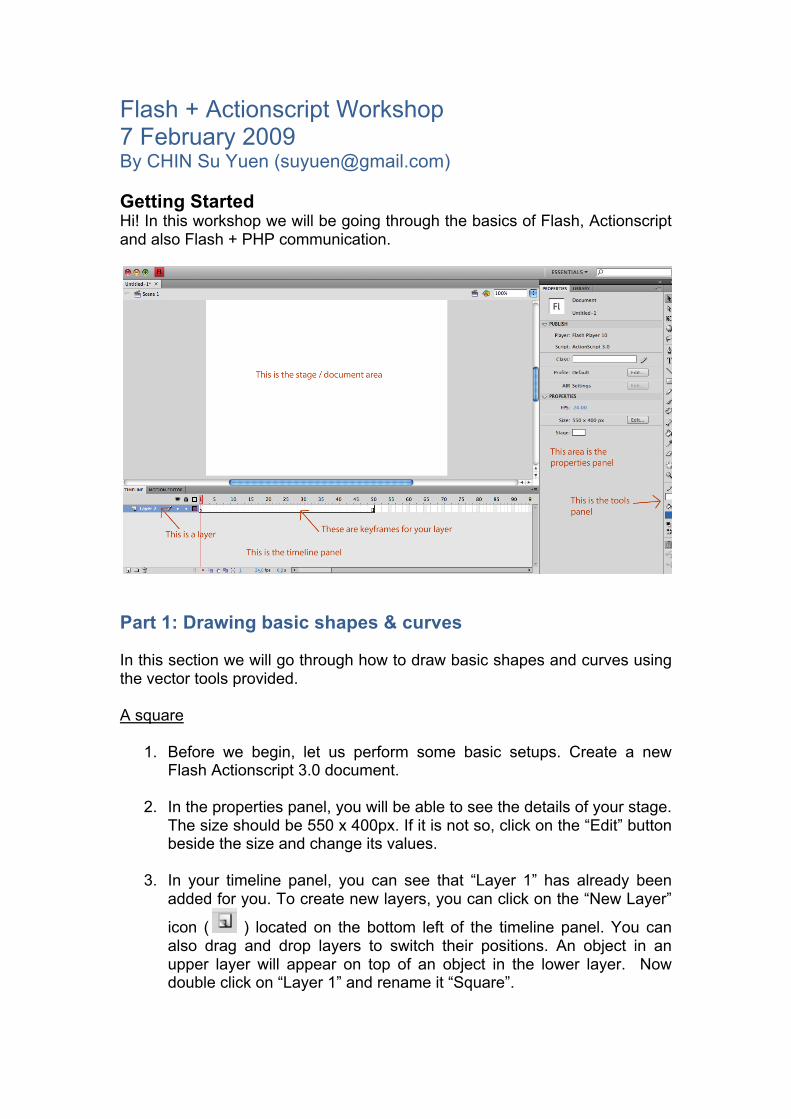
Flash + Actionscript Workshop 7 February 2009 By CHIN Su Yuen ([email protected]) Getting Started Hi! In this workshop we will be going through the basics of Flash, Actionscript and also Flash + PHP communication.
Part 1: Drawing basic shapes & curves In this section we will go through how to draw basic shapes and curves using the vector tools provided. A square
1. Before we begin, let us perform some basic setups. Create a new Flash Actionscript 3.0 document.
2. In the properties panel, you will be able to see the details of your stage. The size should be 550 x 400px. If it is not so, click on the “Edit” button beside the size and change its values.
3. In your timeline panel, you can see that “Layer 1” has already been
added for you. To create new layers, you can click on the “New Layer”
icon ( ) located on the bottom left of the timeline panel. You can also drag and drop layers to switch their positions. An object in an upper layer will appear on top of an object in the lower layer. Now double click on “Layer 1” and rename it “Square”.
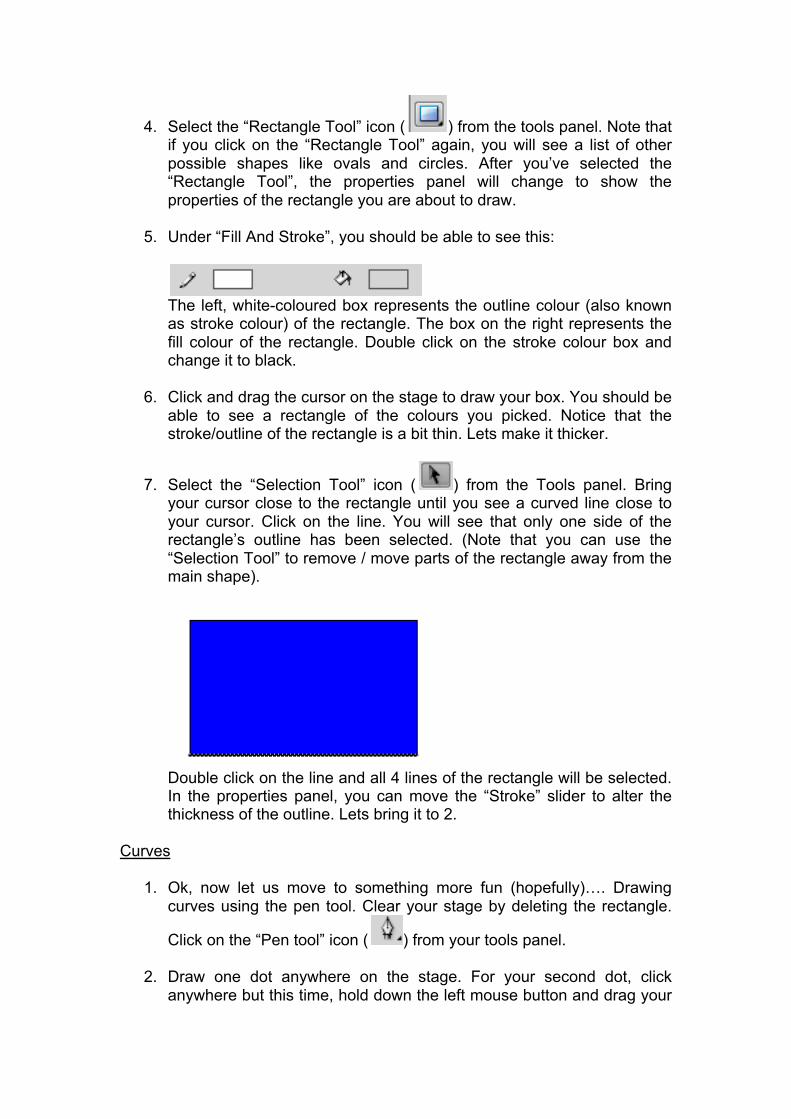
4. Select the “Rectangle Tool” icon ( ) from the tools panel. Note that if you click on the “Rectangle Tool” again, you will see a list of other possible shapes like ovals and circles. After you’ve selected the “Rectangle Tool”, the properties panel will change to show the properties of the rectangle you are about to draw.
5. Under “Fill And Stroke”, you should be able to see this:
The left, white-coloured box represents the outline colour (also known as stroke colour) of the rectangle. The box on the right represents the fill colour of the rectangle. Double click on the stroke colour box and change it to black.
6. Click and drag the cursor on the stage to draw your box. You should be able to see a rectangle of the colours you picked. Notice that the stroke/outline of the rectangle is a bit thin. Lets make it thicker.
7. Select the “Selection Tool” icon ( ) from the Tools panel. Bring your cursor close to the rectangle until you see a curved line close to your cursor. Click on the line. You will see that only one side of the rectangle’s outline has been selected. (Note that you can use the “Selection Tool” to remove / move parts of the rectangle away from the main shape).
Double click on the line and all 4 lines of the rectangle will be selected. In the properties panel, you can move the “Stroke” slider to alter the thickness of the outline. Lets bring it to 2.
Curves
1. Ok, now let us move to something more fun (hopefully)…. Drawing curves using the pen tool. Clear your stage by deleting the rectangle.
Click on the “Pen tool” icon ( ) from your tools panel.
2. Draw one dot anywhere on the stage. For your second dot, click anywhere but this time, hold down the left mouse button and drag your
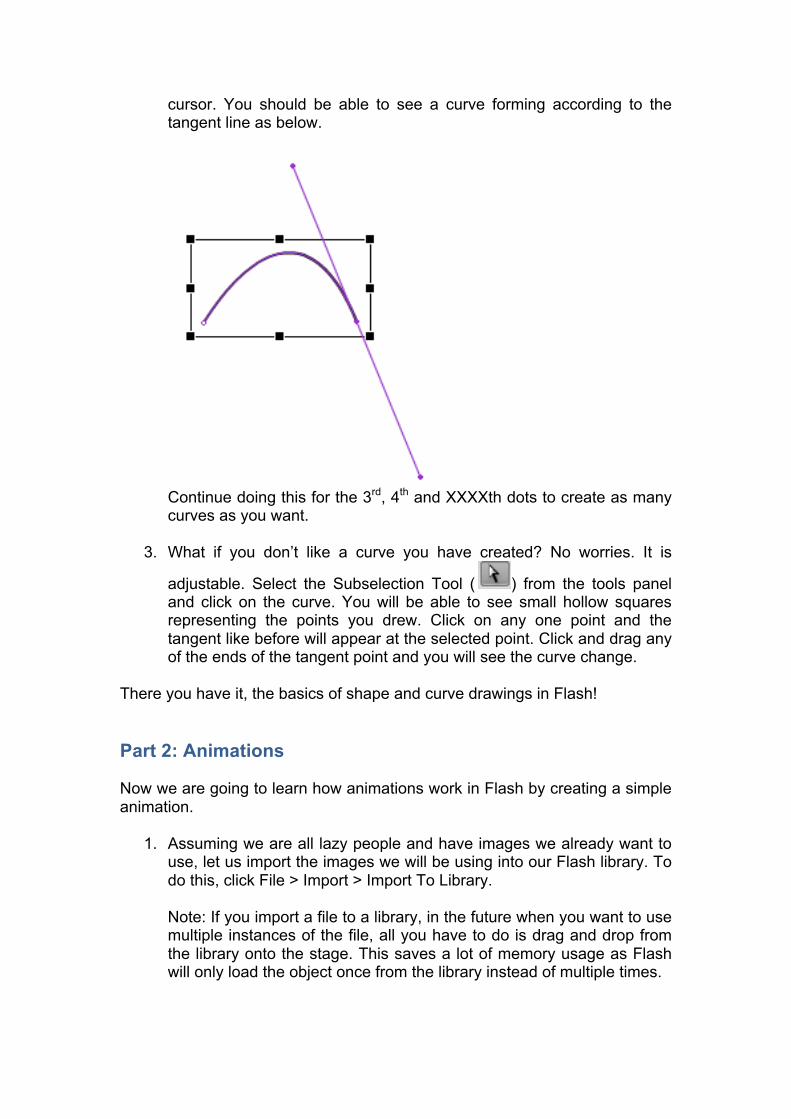
cursor. You should be able to see a curve forming according to the tangent line as below.
Continue doing this for the 3rd, 4th and XXXXth dots to create as many curves as you want.
3. What if you don’t like a curve you have created? No worries. It is
adjustable. Select the Subselection Tool ( ) from the tools panel and click on the curve. You will be able to see small hollow squares representing the points you drew. Click on any one point and the tangent like before will appear at the selected point. Click and drag any of the ends of the tangent point and you will see the curve change.
There you have it, the basics of shape and curve drawings in Flash! Part 2: Animations Now we are going to learn how animations work in Flash by creating a simple animation.
1. Assuming we are all lazy people and have images we already want to use, let us import the images we will be using into our Flash library. To do this, click File > Import > Import To Library. Note: If you import a file to a library, in the future when you want to use multiple instances of the file, all you have to do is drag and drop from the library onto the stage. This saves a lot of memory usage as Flash will only load the object once from the library instead of multiple times.
2. After importing, click on the Library Panel tab (located beside the Properties panel tab). You should be able to see your imported image there. Click and drag it onto the stage. You should know see your image on the stage.
3. Right click on your image and select “Convert to Symbol”. Name your symbol anything you want. In this case, I picked “Image1” and for Type, select “Graphic”. You should be able to see your newly created symbol in the Library panel as well.
4. In the timeline, right click on the first keyframe of the layer where your
symbol is placed. (There should be only one layer unless you created new layers). Select “Create Motion Tween” and you should see the timeline filled with blue frames.
5. Left click on Frame 10. Move your image onto any other location of
your choice. Left click on Frame 25. Move the image to another location. If you move the red slider in the timeline back and forth, you will be able to see your image playing. To see the actual .swf playing, click Control > Test Movie.
6. Feel that your animation is playing too fast? Move close to the end of
the last keyframe and you should see your cursor convert into a double arrow. Drag it to Frame 50. Try playing the animation now.
7. If you notice, it is repeating non-stop. Lets make it stop at the last
keyframe. Create a new layer and name it “Actions”. This will be the layer where we will put all our keyframe actions. Right click on Frame 50 and select “Insert Keyframe”. We are inserting a keyframe here because we want it to stop at only frame 50.
8. Right click on the keyframe you’ve just added and select “Actions”. You should see an “Actions” box pop up. Type in “stop()” which is the action script for stopping a movie.
9. Once you’re done, save your file and try playing the animation again.
Your animation should now stop at the end
10. Now lets try creating an animation that will jump to another frame and play from there. In the “Actions” layer, insert a keyframe into frame number 40. Right click on it and select “Actions”. In the “Actions” box pop up, type in “gotoAndPlay(20)”. Now retry your animation. Notice that everytime it reaches frame 20 it will jump to frame 20 and play from there.
There you have it, your simple animation in Flash! Now let us try toying around with some other effects.
Part 3: ActionScript Basics ActionScript is an Object Oriented Programming language (I assume all of you know what OOP is). Here we will go through some very simple basics of ActionScript and its syntaxes.
1. Create a new Flash ActionScript 3.0 document. This is the Flash file where we will be seeing the output of our work. Save it as any name you want.
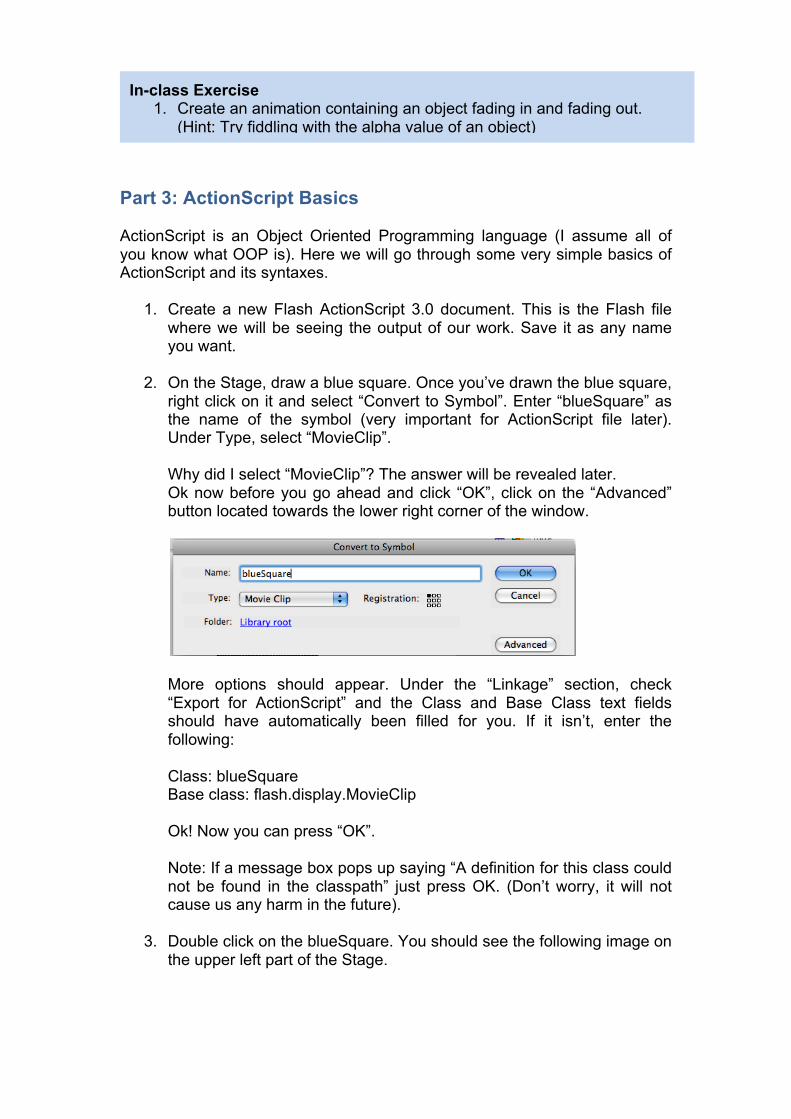
2. On the Stage, draw a blue square. Once you’ve drawn the blue square, right click on it and select “Convert to Symbol”. Enter “blueSquare” as the name of the symbol (very important for ActionScript file later). Under Type, select “MovieClip”.
Why did I select “MovieClip”? The answer will be revealed later. Ok now before you go ahead and click “OK”, click on the “Advanced” button located towards the lower right corner of the window.
More options should appear. Under the “Linkage” section, check “Export for ActionScript” and the Class and Base Class text fields should have automatically been filled for you. If it isn’t, enter the following: Class: blueSquare Base class: flash.display.MovieClip Ok! Now you can press “OK”. Note: If a message box pops up saying “A definition for this class could not be found in the classpath” just press OK. (Don’t worry, it will not cause us any harm in the future).
3. Double click on the blueSquare. You should see the following image on the upper left part of the Stage.
In-class Exercise 1. Create an animation containing an object fading in and fading out.
(Hint: Try fiddling with the alpha value of an object)
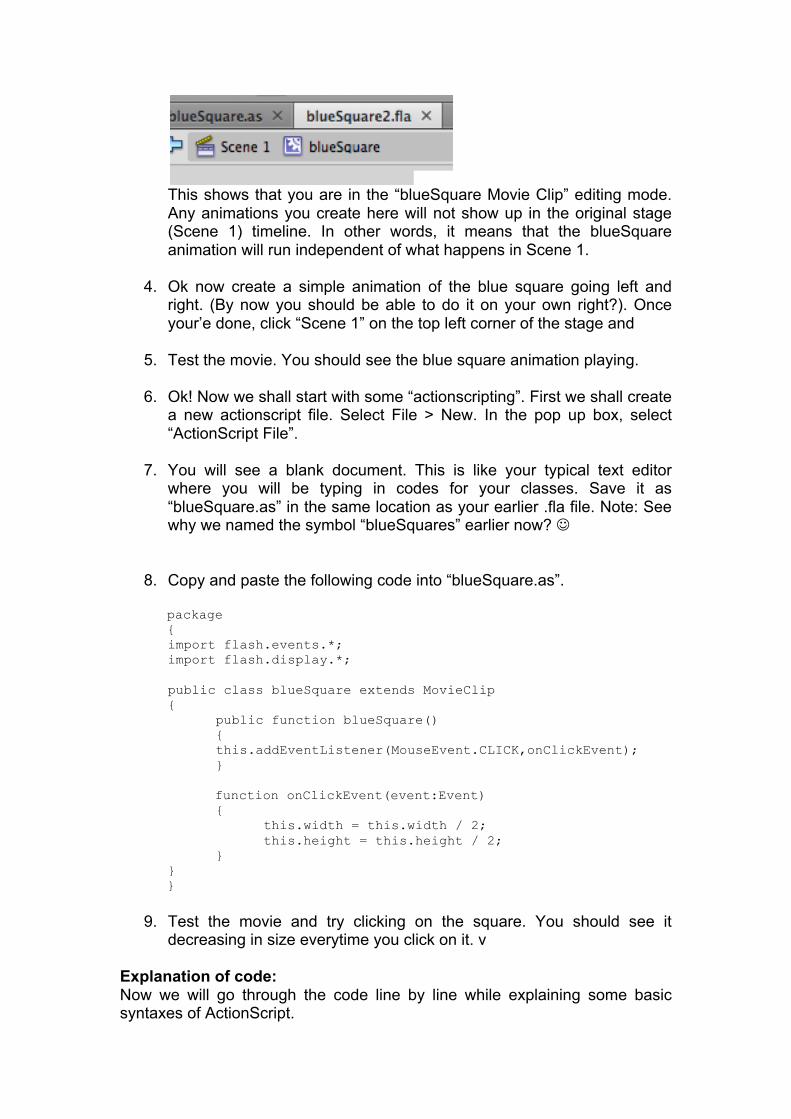
This shows that you are in the “blueSquare Movie Clip” editing mode. Any animations you create here will not show up in the original stage (Scene 1) timeline. In other words, it means that the blueSquare animation will run independent of what happens in Scene 1.
4. Ok now create a simple animation of the blue square going left and right. (By now you should be able to do it on your own right?). Once your’e done, click “Scene 1” on the top left corner of the stage and
5. Test the movie. You should see the blue square animation playing.
6. Ok! Now we shall start with some “actionscripting”. First we shall create
a new actionscript file. Select File > New. In the pop up box, select “ActionScript File”.
7. You will see a blank document. This is like your typical text editor
where you will be typing in codes for your classes. Save it as “blueSquare.as” in the same location as your earlier .fla file. Note: See why we named the symbol “blueSquares” earlier now?
8. Copy and paste the following code into “blueSquare.as”.
package { import flash.events.*; import flash.display.*; public class blueSquare extends MovieClip { public function blueSquare() {
this.addEventListener(MouseEvent.CLICK,onClickEvent); }
function onClickEvent(event:Event) { this.width = this.width / 2; this.height = this.height / 2; } } }
9. Test the movie and try clicking on the square. You should see it
decreasing in size everytime you click on it. v
Explanation of code: Now we will go through the code line by line while explaining some basic syntaxes of ActionScript.
As you can see, we started the code with the word “package”. This is the package of your object that contains the class definition and functions.
import flash.events.*; import flash.display.*; The 2 lines above are importing libraries from Flash to be used in your ActionScript file. Here we are importing the display and events library. public class blueSquare extends MovieClip This is the class definition. You might be wondering where MovieClip is coming from. As earlier we’ve imported the flash.display library, we used a .* at the end. This means that we have imported all the components in that library and hence can use it without typing the full flash.display.MovieClip. public function blueSquare() This is the constructor of your class. this.addEventListener(MouseEvent.CLICK,onClickEvent); This adds an event listener to your blueSquare object. In thise case, it is a mouse click event. The syntax is this.addEventListener(eventType, functionToCall). In this case, I named my function that will be called when a mouse is clicked on the box “onClickEvent”. function onClickEvent(event:Event) {
this.width = this.width / 2; this.height = this.height / 2; } To define a function in ActionScript, you start with the word “function”. The syntaxes are: function nameofFunction(typeOfInput). In this case, as it is a mouse event, it is of the Event type. Hence, the event:Event. The “this” in the function refers to the blueSquare object. Here, I am halving the blueSquare’s size by half everytime it is clicked on.
Note that there are many types of events predefined in ActionScript and also mouseEvents which you can experiment with.
In-Class Exercise 1. Create an object which users can drag around the stage.
(Hint: Use the startDrag() and stopDrag() functions)
2. Create an object and remove it from the stage when it is clicked. (Hint: Use the removeChild() function. Note that you have to call the parent to remove the child)
Refer to http://labs.adobe.com/wiki/index.php/ActionScript_3 which contains an official documentation of AS3 from Adobe. Ok, what about defining variables and setting their values? Now lets create something simple to understand how variables work in ActionScript.
1. Create a new Flash file and name it anything you want. Save it. 2. Create a new ActionScript File and name it ObjectName. Copy and
paste the following code into it: package {
private var ObjectName2;
public function setName(tempName:String):void {
ObjectName2 = tempName; }
public function getName():String {
return ObjectName2; }
} The code above declares a variable ObjectName. Notice that the first word “private” is the accessor. “var” tells Actionscript that we are defining a variable.
Notice that in the SetName function definition we have some new syntaxes.
“tempName:String” says that the function takes in a variable of type String. In this case, we named the variable “tempName”. The “:void” says that the function does not return any value.
In the getName function definition, we put “:String” as the function returns a value of type String.
Ok so we have defined these in the ActionScript file. What next? We have to call these functions or else we will not be able to see them in action. Lets use the Flash file we created earlier.
3. In the Flash file you’ve created earlier, right click on the first keyframe and select “Actions”. Enter the following code:
var name1:ObjectName = new ObjectName(); name1.setName(“Facebook”); trace(name1.getName());
In the first line, we declared creating a variable. The syntax is: var variableName:typeName. In this case, the variable name is “name1” and the type is “ObjectName” which we defined earlier. We then used the constructor in “new ObjectName()” to create a new object. In the second line, we are setting the object’s name to “Facebook” using the setName() function we defined earlier. Lastly, we use a “trace” command which in Flash, will return you results in the “Output” panel shown below. You can use this method from time to time to trace values being passed around in between your functions when testing movies :D
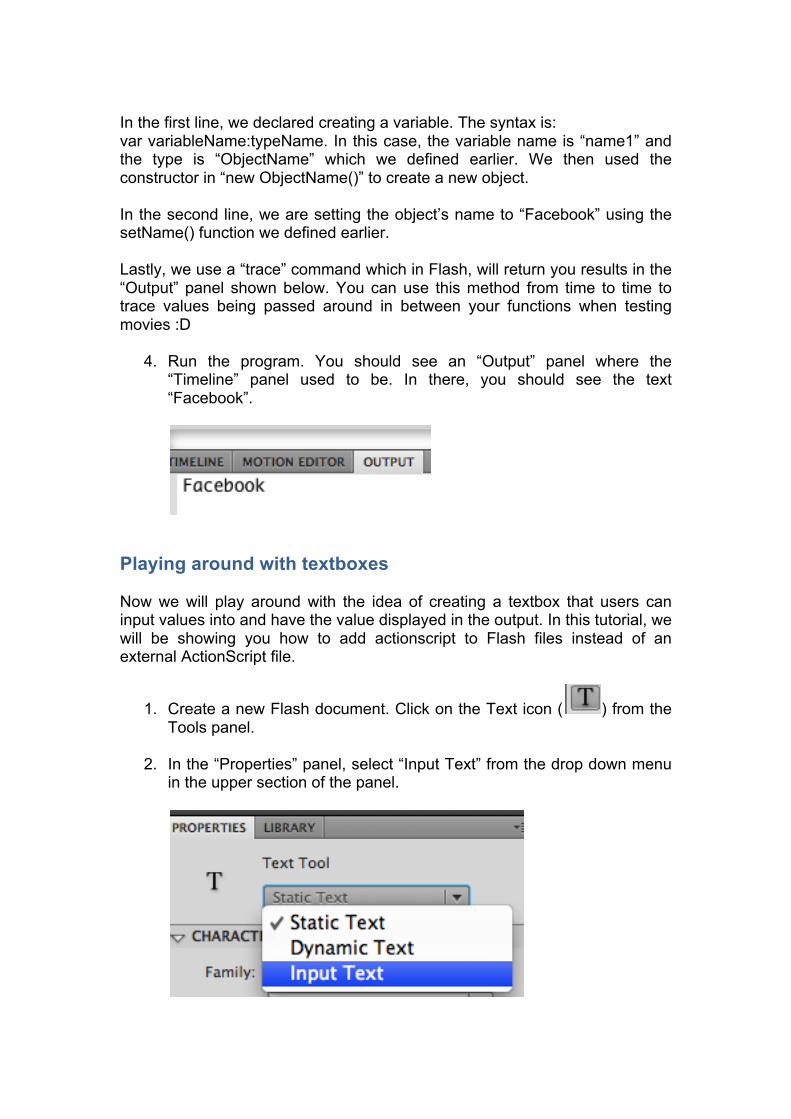
4. Run the program. You should see an “Output” panel where the “Timeline” panel used to be. In there, you should see the text “Facebook”.
Playing around with textboxes Now we will play around with the idea of creating a textbox that users can input values into and have the value displayed in the output. In this tutorial, we will be showing you how to add actionscript to Flash files instead of an external ActionScript file.
1. Create a new Flash document. Click on the Text icon ( ) from the Tools panel.
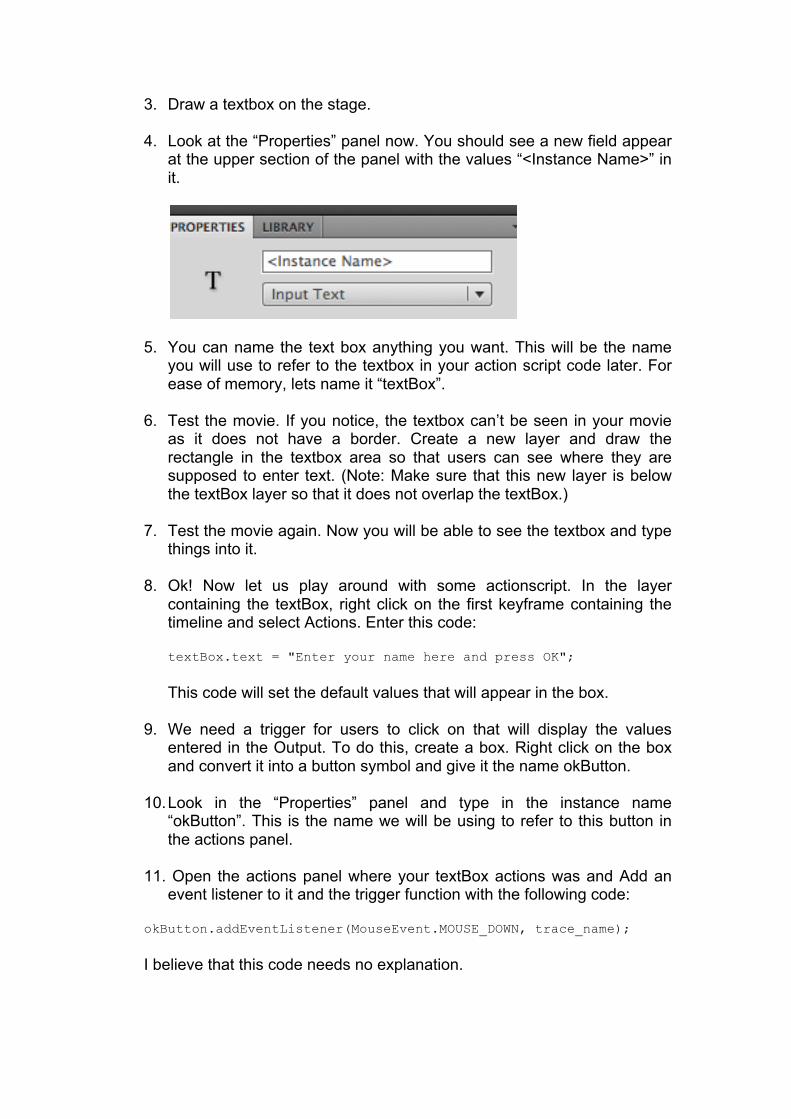
2. In the “Properties” panel, select “Input Text” from the drop down menu in the upper section of the panel.
3. Draw a textbox on the stage.
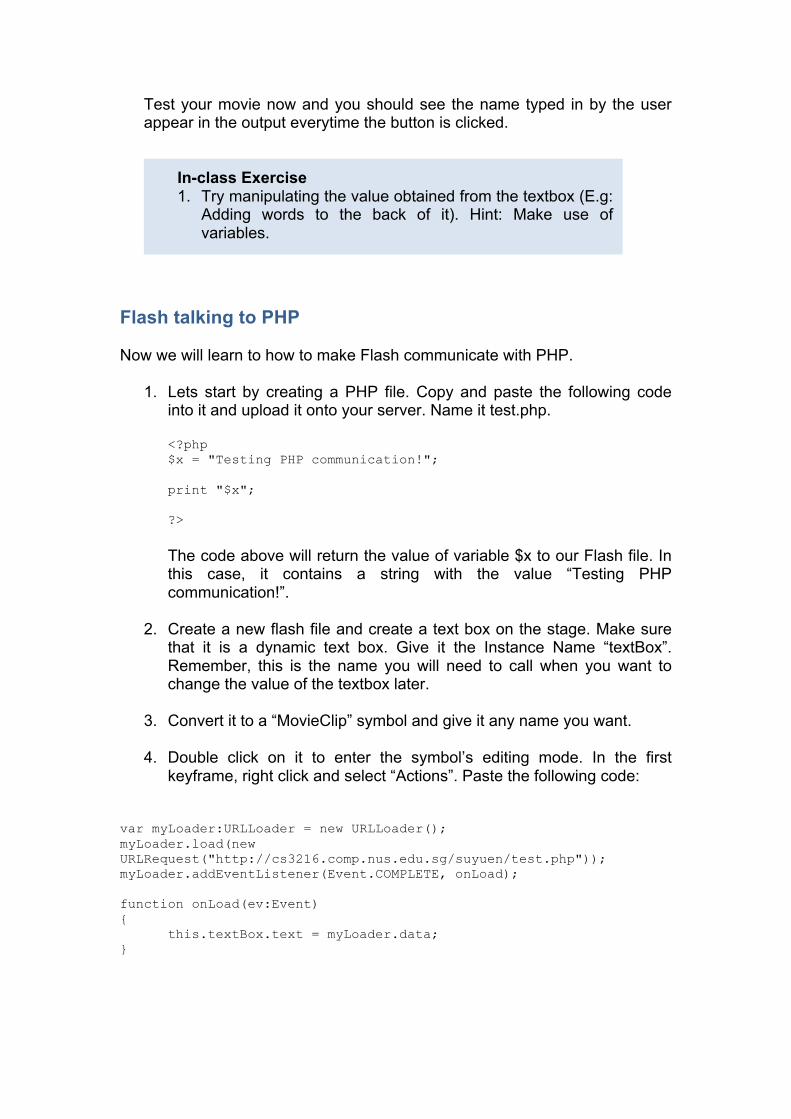
4. Look at the “Properties” panel now. You should see a new field appear at the upper section of the panel with the values “<Instance Name>” in it.
5. You can name the text box anything you want. This will be the name you will use to refer to the textbox in your action script code later. For ease of memory, lets name it “textBox”.
6. Test the movie. If you notice, the textbox can’t be seen in your movie as it does not have a border. Create a new layer and draw the rectangle in the textbox area so that users can see where they are supposed to enter text. (Note: Make sure that this new layer is below the textBox layer so that it does not overlap the textBox.)
7. Test the movie again. Now you will be able to see the textbox and type
things into it.
8. Ok! Now let us play around with some actionscript. In the layer containing the textBox, right click on the first keyframe containing the timeline and select Actions. Enter this code: textBox.text = "Enter your name here and press OK"; This code will set the default values that will appear in the box.
9. We need a trigger for users to click on that will display the values
entered in the Output. To do this, create a box. Right click on the box and convert it into a button symbol and give it the name okButton.
10. Look in the “Properties” panel and type in the instance name “okButton”. This is the name we will be using to refer to this button in the actions panel.
11. Open the actions panel where your textBox actions was and Add an event listener to it and the trigger function with the following code:
okButton.addEventListener(MouseEvent.MOUSE_DOWN, trace_name);
I believe that this code needs no explanation.
Test your movie now and you should see the name typed in by the user appear in the output everytime the button is clicked.
Flash talking to PHP Now we will learn to how to make Flash communicate with PHP.
1. Lets start by creating a PHP file. Copy and paste the following code into it and upload it onto your server. Name it test.php. <?php $x = "Testing PHP communication!"; print "$x"; ?>
The code above will return the value of variable $x to our Flash file. In this case, it contains a string with the value “Testing PHP communication!”.
2. Create a new flash file and create a text box on the stage. Make sure
that it is a dynamic text box. Give it the Instance Name “textBox”. Remember, this is the name you will need to call when you want to change the value of the textbox later.
3. Convert it to a “MovieClip” symbol and give it any name you want.
4. Double click on it to enter the symbol’s editing mode. In the first keyframe, right click and select “Actions”. Paste the following code:
var myLoader:URLLoader = new URLLoader(); myLoader.load(new URLRequest("http://cs3216.comp.nus.edu.sg/suyuen/test.php")); myLoader.addEventListener(Event.COMPLETE, onLoad);
function onLoad(ev:Event) {
this.textBox.text = myLoader.data; }
In-class Exercise 1. Try manipulating the value obtained from the textbox (E.g:
Adding words to the back of it). Hint: Make use of variables.
function trace_name(event:Event) { trace(textBox.value); }
Note: Change the website address in the code above to the location of your “test.php” file. 5. Test the movie and you should see the text “Testing PHP
Communication!” in your text box. :D Explanation of code: var myLoader:URLLoader = new URLLoader(); URLLoader is a variable type required to perform URLRequest functions. Here, we are declaring the variable “myLoader” as the type URLLoader. myLoader.load(new URLRequest("http://cs3216.comp.nus.edu.sg/suyuen/test.php"));
Here, we are loading the values returned by the “test.php” file into the myLoader variable. myLoader.addEventListener(Event.COMPLETE, onLoad); We only want to show data in the textbox after all the data from the “test.php” file has been loaded into the myLoader variable. Hence, we add an event listener to only trigger the function when the process is complete. function onLoad(event:Event) {
this.textBox.text = myLoader.data; stop();
} The function triggered to display text in the textbox. So now we have seen how to obtain a value from a PHP file. What about sending a value over? In the current Flash file, open up the Actions panel and replace the code with the following. var myRequest:URLRequest = new URLRequest("http://cs3216.comp.nus.edu.sg/suyuen/test2.php"); var myLoader:URLLoader = new URLLoader(); var myVariables:URLVariables = new URLVariables(); myVariables.name1 = "Su Yuen"; myRequest.method = URLRequestMethod.GET; myRequest.data = myVariables; function onLoaded(event:Event):void { this.textBox.text = myLoader.data; } myLoader.addEventListener(Event.COMPLETE, onLoaded); myLoader.load(myRequest);
Next, create a new PHP file called “test2.php” and copy and paste this code into it. <?php $first_name = $_GET['name1']; echo $first_name." is happy!"; ?> Explanation of code: var myVariables:URLVariables = new URLVariables(); URLVariables is a class type that is needed for variables that will be sending values to a URL. This is because it will ensure that the values are URL Encoded before they are sent to your PHP file. myVariables.name1 = "Su Yuen"; Here we are defining a property (name1) of myVariables and assigning a value to it. Note that this is required as URLVariables abstracts the name/value pairs you want to send to the server. myRequest.method = URLRequestMethod.GET; myRequest.data = myVariables; Here we set the request method to GET and assign the value of the variable to myRequest’s data property. Ok! So now you know how Flash can communicate with PHP. What about Facebook? It is the exact same principle. However, in your PHP file when embedding the SWF, take note to add this line of code to it: <fb:swf swfsrc='http://cs3216.comp.nus.edu.sg/flash/test.swf' width='600' height='600' >
The web address is the location of your .swf file. Take note that this URL MUST be the absolute URL else it will not work. Get your PHP file to echo any values you retrieve and it will appear in the Flash file just as shown above.
AND WE ARE DONE!
In-class Exercise 1. Now that you have learnt the basics of sending and requesting data between Flash and PHP, try loading an image into Flash based on a website address of the online image location returned by PHP. (Hint: GOOGLE has tutorials)
References you might want to check out!
1. Kirupa Flash & Actionscript Tutorials http://www.kirupa.com/developer/flash/index.htm
2. Detailed explanation about Flash + PHP Communication functions
http://www.peterelst.com/blog/2007/11/28/actionscript-30-wheres-my-loadvars/
3. Alternativa Platform (Open source, 3D flash engine)
http://alternativaplatform.com/en/
4. Swift 3D (Program for 3D Flash Object modeling) http://www.erain.com/
5. Integrating your Flash game into Facebook
http://www.emanueleferonato.com/2008/05/30/integrate-your-flash-game-on-facebook/
6. Actionscript 3 Overview by Adobe
http://labs.adobe.com/wiki/index.php/ActionScript_3
7. Lots of tutorials on how to do cool Flash CS4 stuff http://www.flashandmath.com/