quick start guide - nektar & download 17 ... it’s now time to connect the ... quick start...
TRANSCRIPT
www.nektartech.com Nektar Panorama P4/P6: Quick Start Guide
Quick Start Guide
2 Nektar Panorama P4/P6: Quick Start Guide www.nektartech.com
INDEX
INDEX 2
PANORAMA PHILOSOPHY 3
WHAT'S IN THE BOX 4
WHAT'S ONLINE 4
PANORAMA OVERVIEW 5
POWER & SETUP 8
Connecting to a computer 8
Using an external power supply 8
INTERNAL MODE 9
Getting around 9
Global Settings 11
Assigning Controls 12
Motorized fader 14
Pads 15
REASON 17
Driver & download 17
Getting around 19
Mixer mode 21
Instrument mode 22
Transport mode 23
Remote override 24
Motorized fader 25
Using pads 25
CLEANING & MAINTENANCE 26
FACTORY RESET 26
ABOUT 26
www.nektartech.com Nektar Panorama P4/P6: Quick Start Guide 3
PANORAMA PHILOSOPHY
Thank you for buying our Panorama controller keyboard. Panorama is a very powerful instrument and
controller keyboard that, combined with your DAW, will make you experience musical creativity in a new
way.
What makes Panorama different is our intense attention to workflow and insistence that a controller
keyboard should be as easy to use as integrated hardware systems. Our commitment to simplicity and
efficiency makes Panorama highly transparent to use regardless of whether you operate it as a
traditional MIDI controller, programming zones and MIDI messages, or use our dedicated communication
protocols to control supported software such as Reason by Propellerhead Software.
And while controller hardware can never be as flexible as the software it controls, we provide a well
thought-out set of controls and buttons in a logical layout that makes it easy to find exactly what you
need. Our ultimate goal with Panorama is to make your experience in the studio and in live performance
as intuitive and expressive as possible.
In addition, Panorama is field-updatable via USB. This means we can adapt it as software is updated or
changed. Future versions of our firmware and drivers will be available to registered users. So remember
to register your product!
We hope you will enjoy playing, using and being creative with Panorama as much as we have enjoyed
creating it.
The Nektar Team
4 Nektar Panorama P4/P6: Quick Start Guide www.nektartech.com
WHAT’S IN THE BOX
Please take a moment to check the items we supplied in the box, just to make sure it’s all there. Here is
what you should have found:
Panorama keyboard x 1
Printed version of this Quick Start Guide x 1
USB cable (standard) x 1
USB Standard-A to Micro-B cable x 1
Cotton cleaning cloth x 1
If any of the above was not included please let us know via email: [email protected]
WHAT’S ONLINE
Additional documentation, drivers, and support software are available online, which is also where you
will find any future firmware updates. If you plan to operate Panorama with a computer, make sure to
register Panorama to get access to the extra material. If you plan to use Panorama without a computer,
we still recommend you register Panorama so you can be kept up to date with new firmware releases.
Here is the internet address to our product registration page:
http://www.nektartech.com/registration
www.nektartech.com Nektar Panorama P4/P6: Quick Start Guide 5
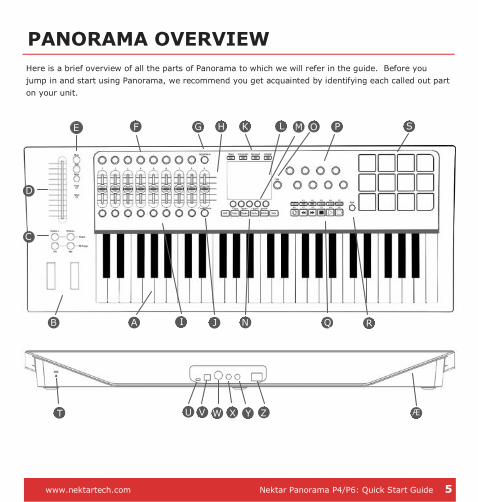
PANORAMA OVERVIEW
Here is a brief overview of all the parts of Panorama to which we will refer in the guide. Before you
jump in and start using Panorama, we recommend you get acquainted by identifying each called out part
on your unit.
A B
C
D
E F G H K L M O P S
T U V W X Y Z
I J N Q R
Æ
6 Nektar Panorama P4/P6: Quick Start Guide www.nektartech.com
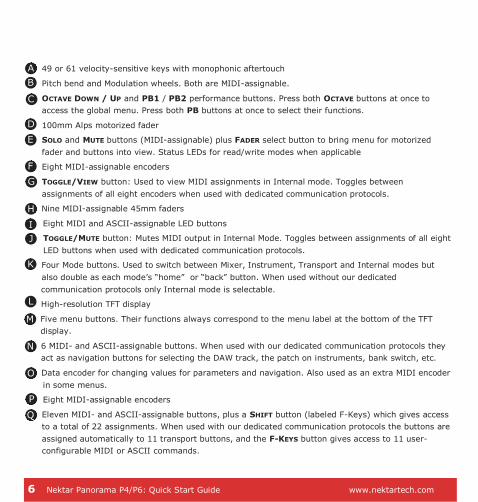
49 or 61 velocity-sensitive keys with monophonic aftertouch
Pitch bend and Modulation wheels. Both are MIDI-assignable.
OCTAVE DOWN / UP and PB1 / PB2 performance buttons. Press both OCTAVE buttons at once to
access the global menu. Press both PB buttons at once to select their functions.
100mm Alps motorized fader
SOLO and MUTE buttons (MIDI-assignable) plus FADER select button to bring menu for motorized
fader and buttons into view. Status LEDs for read/write modes when applicable
Eight MIDI-assignable encoders
TOGGLE/VIEW button: Used to view MIDI assignments in Internal mode. Toggles between
assignments of all eight encoders when used with dedicated communication protocols.
Nine MIDI-assignable 45mm faders
Eight MIDI and ASCII-assignable LED buttons
TOGGLE/MUTE button: Mutes MIDI output in Internal Mode. Toggles between assignments of all eight
LED buttons when used with dedicated communication protocols.
Four Mode buttons. Used to switch between Mixer, Instrument, Transport and Internal modes but
also double as each mode’s “home” or “back” button. When used without our dedicated
communication protocols only Internal mode is selectable.
High-resolution TFT display
Five menu buttons. Their functions always correspond to the menu label at the bottom of the TFT
display.
6 MIDI- and ASCII-assignable buttons. When used with our dedicated communication protocols they
act as navigation buttons for selecting the DAW track, the patch on instruments, bank switch, etc.
Data encoder for changing values for parameters and navigation. Also used as an extra MIDI encoder
in some menus.
Eight MIDI-assignable encoders
Eleven MIDI- and ASCII-assignable buttons, plus a SHIFT button (labeled F-Keys) which gives access
to a total of 22 assignments. When used with our dedicated communication protocols the buttons are
assigned automatically to 11 transport buttons, and the F-KEYS button gives access to 11 user-
configurable MIDI or ASCII commands.
A
B
C
D
E
F
G
H
I
J
K
L
M
N
O
P
Q
www.nektartech.com Nektar Panorama P4/P6: Quick Start Guide 7
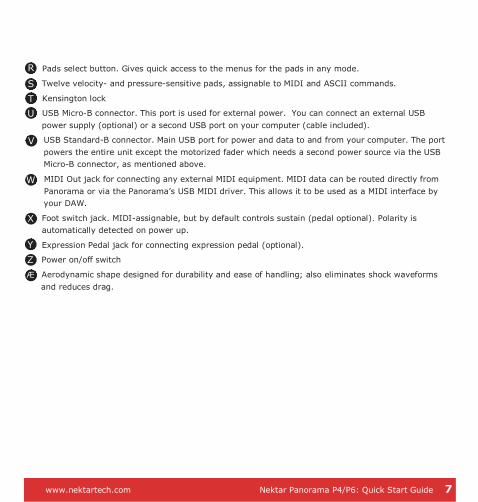
Pads select button. Gives quick access to the menus for the pads in any mode.
Twelve velocity- and pressure-sensitive pads, assignable to MIDI and ASCII commands.
Kensington lock
USB Micro-B connector. This port is used for external power. You can connect an external USB
power supply (optional) or a second USB port on your computer (cable included).
USB Standard-B connector. Main USB port for power and data to and from your computer. The port
powers the entire unit except the motorized fader which needs a second power source via the USB
Micro-B connector, as mentioned above.
MIDI Out jack for connecting any external MIDI equipment. MIDI data can be routed directly from
Panorama or via the Panorama’s USB MIDI driver. This allows it to be used as a MIDI interface by
your DAW.
Foot switch jack. MIDI-assignable, but by default controls sustain (pedal optional). Polarity is
automatically detected on power up.
Expression Pedal jack for connecting expression pedal (optional).
Power on/off switch
Aerodynamic shape designed for durability and ease of handling; also eliminates shock waveforms
and reduces drag.
N
R
S
T
U
V
W
X
Y
Z
Æ
8 Nektar Panorama P4/P6: Quick Start Guide www.nektartech.com
POWER & SETUP
With Panorama unpacked and securely seated on a desk or keyboard stand, it’s now time to connect the
unit and get going. Let’s start with power.
Connecting to a Computer
Panorama is USB bus-powered which means you can power it from a connected computer. You will need
two USB ports if you want to power the entire unit. Here is how:
Plug in the USB cable (standard) to the USB jack on the back of Panorama (V) and plug the other
end into a USB port on your computer.
Plug in the USB cable with the Micro-B connector to the USB Aux Power In jack (U) on the back of
Panorama and plug the other end into a USB port on your computer.
Switch the power button on the back of Panorama to its On position (Z).
Note: You can power Panorama via a battery powered laptop but we recommend the use of your
laptop’s AC power supply during extended work sessions with Panorama.
With your computer switched on, Panorama will now go through its startup routine which includes
calibrating the motorized fader.
Your computer’s operating system will install the USB class driver, which will show up as three sets of
MIDI ports inside most MIDI applications. If you plan to use Panorama as a regular USB MIDI controller,
you will need to select the inputs and outputs labeled PANORAMA P4 in your application. For now, you
can ignore the other two sets of MIDI ports.
Note: You can power all of Panorama via a single USB port except for the motorized fader. If you are
short on USB ports you can use an external power supply (see below) or a USB hub, but make sure it’s
powered. Non-powered hubs are not recommended for use with Panorama.
Using an External Power Supply
If you have a standard USB power supply from any device that uses a USB Micro B connector, you can
also power the unit by connecting the Micro-B USB cable to the USB Aux Power In jack (U) and the other
end to the USB port on the power supply. This is the method to use if you need to operate Panorama
without a computer.
www.nektartech.com Nektar Panorama P4/P6: Quick Start Guide 9
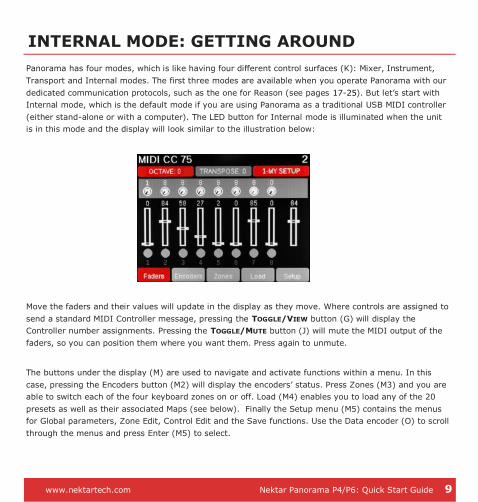
INTERNAL MODE: GETTING AROUND
Panorama has four modes, which is like having four different control surfaces (K): Mixer, Instrument,
Transport and Internal modes. The first three modes are available when you operate Panorama with our
dedicated communication protocols, such as the one for Reason (see pages 17-25). But let’s start with
Internal mode, which is the default mode if you are using Panorama as a traditional USB MIDI controller
(either stand-alone or with a computer). The LED button for Internal mode is illuminated when the unit
is in this mode and the display will look similar to the illustration below:
Move the faders and their values will update in the display as they move. Where controls are assigned to
send a standard MIDI Controller message, pressing the TOGGLE/VIEW button (G) will display the
Controller number assignments. Pressing the TOGGLE/MUTE button (J) will mute the MIDI output of the
faders, so you can position them where you want them. Press again to unmute.
The buttons under the display (M) are used to navigate and activate functions within a menu. In this
case, pressing the Encoders button (M2) will display the encoders’ status. Press Zones (M3) and you are
able to switch each of the four keyboard zones on or off. Load (M4) enables you to load any of the 20
presets as well as their associated Maps (see below). Finally the Setup menu (M5) contains the menus
for Global parameters, Zone Edit, Control Edit and the Save functions. Use the Data encoder (O) to scroll
through the menus and press Enter (M5) to select.
10 Nektar Panorama P4/P6: Quick Start Guide www.nektartech.com
INTERNAL MODE: GETTING AROUND
There is also a FADER button (E3) to select the menu options for the motorized fader and a PADS button
(R). For more extensive details about these menus, please check the Support tab on our website. You
need to register and log in as described earlier to gain access.
Above the pitch bend and modulation wheels you find the OCTAVE and PB1/PB2 buttons (C).
The OCTAVE buttons allow you to shift the keyboard up +4 octaves or down -3 octaves. Pressing them
both simultaneously will take you to the Global menu. This means you always have quick access to the
most important setup functions at any time, in any mode. While the Global menu is open, parameter
values can be changed using the Octave up/down buttons as well as the Data encoder (O).
Pressing the PB1 and PB2 buttons simultaneously activates the PB Assign menu. You can read more
about that in the Panorama support pages on our website.
Regarding Maps: Panorama’s preset structure is split into memory parts called Maps for keyboard,
pads and F-keys individually, so it’s possible to save or load each part separately or linked to an overall
preset. You will see how powerful this can be when you want only one part of Panorama to change while
you are working or performing.
www.nektartech.com Nektar Panorama P4/P6: Quick Start Guide 11
QUICK TIPS: GLOBAL SETTINGS
About Quick Tips
In this section we aim to provide you with a set of quick tips for the most common operations of a MIDI
controller. If you have experience with MIDI and controller keyboards, chances are that this is all you
need to know to get going.
Global Settings: Keyboard Velocity Curve
Simultaneously press the Octave up/down buttons (C) to enter or exit the Global menu. The default
selection is Transpose so it’s quick to change the Transpose setting while you play.
Use the menu arrow display buttons (M1-2) to locate the Keyboard Curve menu. Using the Data encoder
(O) you can choose any of the 5 curves: Soft2, Soft1, Standard, Hard1, Hard2.
Soft2 requires the most force to reach the highest velocity value 127 and has an emphasis on the lower
velocity values. By contrast, Hard2 requires the least force to reach velocity value 127. Soft1, Standard
and Hard1 give you options in between each of these extremes. Select the curve that suits your playing
style the best.
Global Settings: Encoder Curve
Next select the menu Encoder Curve. This setting determines how quickly Panorama’s encoders scroll
through parameter values; the options are Slow, Standard and Fast. You may like Fast if you want to be
able to go from 0-127 in less than 1 rotation. Standard allows you to do it in about 1 rotation and Slow
requires more than one rotation. Select the curve you think might work best for you.
Global Settings: MIDI Jack Source
Finally, select the MIDI Jack Source (Src). Here you can choose between USB and Internal. The USB
option allows you to use the MIDI Out jack(W) as a USB MIDI interface, routing MIDI data from the
Panorama P4 USB MIDI input driver to the MIDI output jack.
The Internal setting will route MIDI data straight from Panorama to the MIDI out jack(W).
When done, press the back arrow display button (M5) to exit or press the Internal mode button (K4).
12 Nektar Panorama P4/P6: Quick Start Guide www.nektartech.com
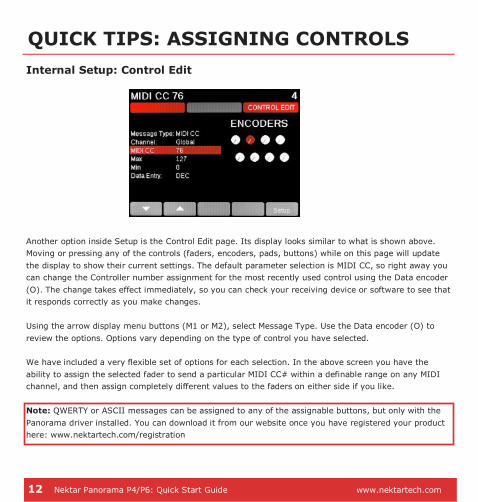
QUICK TIPS: ASSIGNING CONTROLS
Internal Setup: Control Edit
Another option inside Setup is the Control Edit page. Its display looks similar to what is shown above.
Moving or pressing any of the controls (faders, encoders, pads, buttons) while on this page will update
the display to show their current settings. The default parameter selection is MIDI CC, so right away you
can change the Controller number assignment for the most recently used control using the Data encoder
(O). The change takes effect immediately, so you can check your receiving device or software to see that
it responds correctly as you make changes.
Using the arrow display menu buttons (M1 or M2), select Message Type. Use the Data encoder (O) to
review the options. Options vary depending on the type of control you have selected.
We have included a very flexible set of options for each selection. In the above screen you have the
ability to assign the selected fader to send a particular MIDI CC# within a definable range on any MIDI
channel, and then assign completely different values to the faders on either side if you like.
Note: QWERTY or ASCII messages can be assigned to any of the assignable buttons, but only with the
Panorama driver installed. You can download it from our website once you have registered your product
here: www.nektartech.com/registration
www.nektartech.com Nektar Panorama P4/P6: Quick Start Guide 13
QUICK TIPS: ZONES
About Zones
The Panorama keyboard can be programmed in up to four zones. Each zone can cover anything from the
entire MIDI note span to just one note. Zones can overlap to create up to four layers, each sending on a
unique MIDI channel. Octave, Transpose and Program number can be programmed per zone, along with
options to enable or disable Pitch bend, Modulation, Aftertouch, Sustain and Expression. Zones are
stored as part of Panorama’s five Keyboard Maps so you can load a setup at any time.
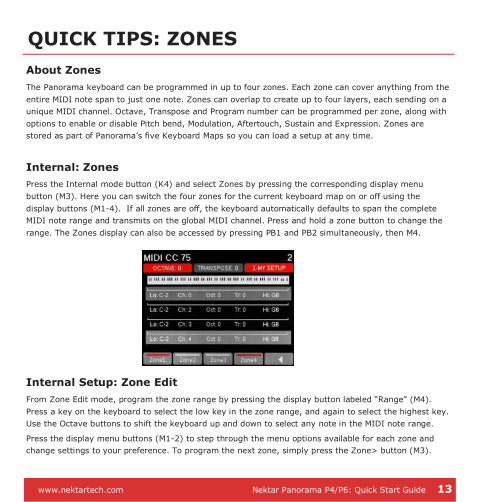
Internal: Zones
Press the Internal mode button (K4) and select Zones by pressing the corresponding display menu
button (M3). Here you can switch the four zones for the current keyboard map on or off using the
display buttons (M1-4). If all zones are off, the keyboard automatically defaults to span the complete
MIDI note range and transmits on the global MIDI channel. Press and hold a zone button to change the
range. The Zones display can also be accessed by pressing PB1 and PB2 simultaneously, then M4.
Internal Setup: Zone Edit
From Zone Edit mode, program the zone range by pressing the display button labeled “Range” (M4).
Press a key on the keyboard to select the low key in the zone range, and again to select the highest key.
Use the Octave buttons to shift the keyboard up and down to select any note in the MIDI note range.
Press the display menu buttons (M1-2) to step through the menu options available for each zone and
change settings to your preference. To program the next zone, simply press the Zone> button (M3).
14 Nektar Panorama P4/P6: Quick Start Guide www.nektartech.com
QUICK TIPS: MOTORIZED FADER
About the Motorized Fader
The motorized fader section is designed to work with our dedicated communication protocols, where it
gives immediate access to channel strip functions for the current sequencer track. The fader motor itself
does not function in Internal mode; however, while Panorama is in Internal mode the fader may still be
used manually as an assignable MIDI controller. The SOLO and MUTE buttons are also MIDI-assignable as
described below.
Motor Requirements
To take full advantage of Panorama’s motorized fader you need two things:
Parameter feedback provided by our dedicated communication protocols.
Enough power to drive the fader’s motor as described on page 8 in Power & Setup
Without both of these criteria satisfied, the motorized fader will act as a traditional manual fader, which
is still very useful.
Fader Menu
Press the FADER button (E3) to enter the Fader menu. Used in Internal mode, this menu works like a
General MIDI Level 2 (GM2) channel strip.
By default, the fader controls the volume (MIDI CC #7). And while on this page you can use the Data
encoder (O) to select GM2 parameters such as Pan, Send 1 (Reverb CC#91) and Send 2 (Chorus
CC#93). Use the display menu buttons (M1-2) to select which parameter is being controlled by the Data
encoder.
The MIDI channel on which the fader and the GM2 controls transmit may be selected by pressing one of
the Channel up/down buttons (M3-4). MUTE and SOLO are not part of the GM2 specifications so you may
have to assign them according to the requirements of the software you use.
To change the MIDI CC# assignments for these controls, as with any other, access the Control Edit page
from the Internal mode Setup menu. Then move the fader or press one of the buttons to call up the
page you want.
www.nektartech.com Nektar Panorama P4/P6: Quick Start Guide 15
QUICK TIPS: PADS
About Pads
Panorama’s twelve pads and associated menus are designed as a powerful percussive performance
instrument to complement the keybed. Pad assignments are either automatic (using our dedicated
communication protocols) or set up quickly through the “Learn” function and the intuitive menus. With
features such as Scale, Octave and Transpose we encourage you to try new combinations of note
assignments “on the fly” or simply play percussive melody lines on the pads. In addition, you can save
and load to any of the 20 Pad Map memory locations.
Changing Velocity Response
The pads have seven velocity response options: Soft, Standard, Hard, 2-Level, 3-Level, 4-Level and
Fixed. Assignments are for all 12 pads so you can quickly change their response in real time. To do that,
press the Pads button (R) and scroll through the options using the Data encoder (O).
Assigning Notes to Pads
Press the Pads button (R) to enter the pads menu, then select Pad-Map with the associated display
menu button (M1). Next select Note-learn (M1) and tap on the pad for which you want to assign a note.
The display highlights the selected pad in red. Now just play the key on the keyboard that you want to
assign to the pad. Select a new pad followed by a note on the keyboard and keep going until you are
done assigning. Then simply switch the Note-learn function off (M1).
Note: Pressure is automatically switched off when using the Note-learn function.
Scale
The Scale menu is a great way to try different combinations of MIDI notes from a set of percussion
sounds that are spread out over the keyboard, to playing a melodic part on pitched percussion using the
pads. Press Pads (R), followed by the Scale display menu button (M2). Use the Data encoder to select
the scale you want (O). You will see the center of the Info-bar update from Chromatic (default) to the
names of other scales as you select them. The pads update in real time so you can try out the selected
scale immediately.
Select a new root note (the starting point of your scale) by pressing the menu button labeled “Root
Learn” (M1) and press a key on the keyboard. You can also use the Octave and Transpose functions.
16 Nektar Panorama P4/P6: Quick Start Guide www.nektartech.com
QUICK TIPS: PADS
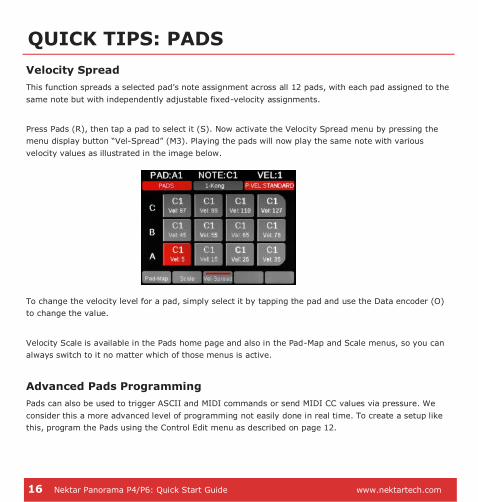
Velocity Spread
This function spreads a selected pad’s note assignment across all 12 pads, with each pad assigned to the
same note but with independently adjustable fixed-velocity assignments.
Press Pads (R), then tap a pad to select it (S). Now activate the Velocity Spread menu by pressing the
menu display button “Vel-Spread” (M3). Playing the pads will now play the same note with various
velocity values as illustrated in the image below.
To change the velocity level for a pad, simply select it by tapping the pad and use the Data encoder (O)
to change the value.
Velocity Scale is available in the Pads home page and also in the Pad-Map and Scale menus, so you can
always switch to it no matter which of those menus is active.
Advanced Pads Programming
Pads can also be used to trigger ASCII and MIDI commands or send MIDI CC values via pressure. We
consider this a more advanced level of programming not easily done in real time. To create a setup like
this, program the Pads using the Control Edit menu as described on page 12.
www.nektartech.com Nektar Panorama P4/P6: Quick Start Guide 17
REASON: DRIVER & DOWNLOAD
About the Panorama Driver
The Panorama driver is required to use our dedicated communication protocol for Reason. If Reason is
not already installed on your computer, we recommend you install Reason first and our driver second.
If you don’t own Reason, you can try a demo of the full version by visiting Propellerhead Software’s
website: http://www.propellerheads.se/download/
Once installed, you can run the program in demo mode and see for yourself how well Reason and
Panorama interact.
Note: Panorama’s dedicated communication protocol is compatible with Record 1.5, Reason 5, Reason 6
and up. Older versions are not supported.
Downloading the Reason Driver
The Reason driver for Panorama can be downloaded from http://www.nektartech.com/registration
Follow the online instructions to register, download and install the Panorama driver.
18 Nektar Panorama P4/P6: Quick Start Guide www.nektartech.com
REASON: SETUP
With Reason and the Panorama driver installed, connect the Panorama keyboard to your computer via
USB and set its power switch to On. Wait until the OS has recognized Panorama, then follow these steps:
Launch Reason
Select the Preference menu in Reason and click on the Control Surfaces tab
Click the button labeled “Auto-detect surfaces”
Once complete Reason should have found two control surfaces: Nektar Panorama and Nektar Panorama
Mixer Mode.
Note: If you are installing Reason for the first time, Reason will request permission to search
automatically for a Master Keyboard. If you do this, Reason will find only Nektar Panorama because our
Mixer Mode control surface does not contain a keyboard. You must follow the steps above to ensure
both control surfaces are found.
Reason and Panorama are now connected. You will see the following message on Panorama’s display:
“To use Mixer Mode, please lock Panorama Mixer Control Surface to a Mixer device.
Locking to the Master Section is most useful. You can also lock to any Mixer device in the rack and the
ReGroove Mixer. Alternatively, select Instrument, Transport or Internal mode.”
To lock to the Reason 6 mixer, navigate to the Options menu and select “Surface Locking…”. For the
Surface select “Nektar Panorama Mixer”, and for “Lock to Device” select “Master Section”.
If you are using Reason 5, you can lock Mixer mode to the 14:2 mixer and control it the same way as
the larger mixer in Reason 6. The rest of this guide assumes you are using Reason 6.
That’s it; you are now ready to experience Panorama communicating with the power of Reason.
Note: The “Lock Nektar Panorama Mixer Mode to this device” setting is stored with your song so you
don’t have to set this up every time if you save the setting you prefer in your default song.
www.nektartech.com Nektar Panorama P4/P6: Quick Start Guide 19
REASON: GETTING AROUND
About Panorama’s Reason Implementation
Panorama’s dedicated communication protocol for Reason is extremely comprehensive. And if you know
Reason, it’s easy to understand how it all works...because you already know how Reason works! In the
following we’ll give you a starting point for exploring Panorama, which may be all you need.
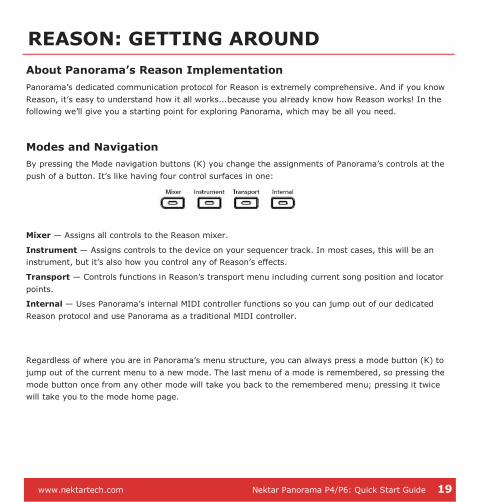
Modes and Navigation
By pressing the Mode navigation buttons (K) you change the assignments of Panorama’s controls at the
push of a button. It’s like having four control surfaces in one:
Mixer — Assigns all controls to the Reason mixer.
Instrument — Assigns controls to the device on your sequencer track. In most cases, this will be an
instrument, but it’s also how you control any of Reason’s effects.
Transport — Controls functions in Reason’s transport menu including current song position and locator
points.
Internal — Uses Panorama’s internal MIDI controller functions so you can jump out of our dedicated
Reason protocol and use Panorama as a traditional MIDI controller.
Regardless of where you are in Panorama’s menu structure, you can always press a mode button (K) to
jump out of the current menu to a new mode. The last menu of a mode is remembered, so pressing the
mode button once from any other mode will take you back to the remembered menu; pressing it twice
will take you to the mode home page.
20 Nektar Panorama P4/P6: Quick Start Guide www.nektartech.com
REASON: GETTING AROUND
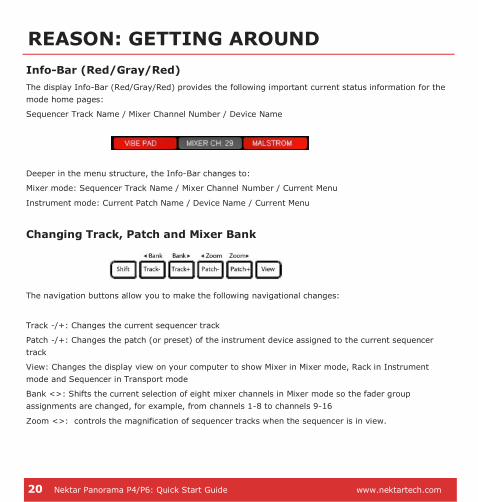
Info-Bar (Red/Gray/Red)
The display Info-Bar (Red/Gray/Red) provides the following important current status information for the
mode home pages:
Sequencer Track Name / Mixer Channel Number / Device Name
Deeper in the menu structure, the Info-Bar changes to:
Mixer mode: Sequencer Track Name / Mixer Channel Number / Current Menu
Instrument mode: Current Patch Name / Device Name / Current Menu
Changing Track, Patch and Mixer Bank
The navigation buttons allow you to make the following navigational changes:
Track -/+: Changes the current sequencer track
Patch -/+: Changes the patch (or preset) of the instrument device assigned to the current sequencer
track
View: Changes the display view on your computer to show Mixer in Mixer mode, Rack in Instrument
mode and Sequencer in Transport mode
Bank <>: Shifts the current selection of eight mixer channels in Mixer mode so the fader group
assignments are changed, for example, from channels 1-8 to channels 9-16
Zoom <>: controls the magnification of sequencer tracks when the sequencer is in view.
www.nektartech.com Nektar Panorama P4/P6: Quick Start Guide 21
REASON: MIXER MODE
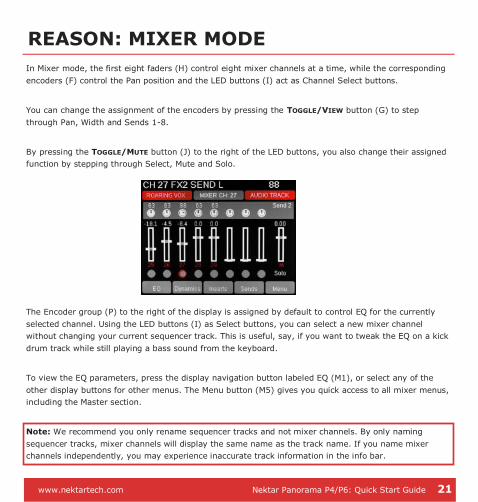
In Mixer mode, the first eight faders (H) control eight mixer channels at a time, while the corresponding
encoders (F) control the Pan position and the LED buttons (I) act as Channel Select buttons.
You can change the assignment of the encoders by pressing the TOGGLE/VIEW button (G) to step
through Pan, Width and Sends 1-8.
By pressing the TOGGLE/MUTE button (J) to the right of the LED buttons, you also change their assigned
function by stepping through Select, Mute and Solo.
The Encoder group (P) to the right of the display is assigned by default to control EQ for the currently
selected channel. Using the LED buttons (I) as Select buttons, you can select a new mixer channel
without changing your current sequencer track. This is useful, say, if you want to tweak the EQ on a kick
drum track while still playing a bass sound from the keyboard.
To view the EQ parameters, press the display navigation button labeled EQ (M1), or select any of the
other display buttons for other menus. The Menu button (M5) gives you quick access to all mixer menus,
including the Master section.
Note: We recommend you only rename sequencer tracks and not mixer channels. By only naming
sequencer tracks, mixer channels will display the same name as the track name. If you name mixer
channels independently, you may experience inaccurate track information in the info bar.
22 Nektar Panorama P4/P6: Quick Start Guide www.nektartech.com
REASON: INSTRUMENT MODE
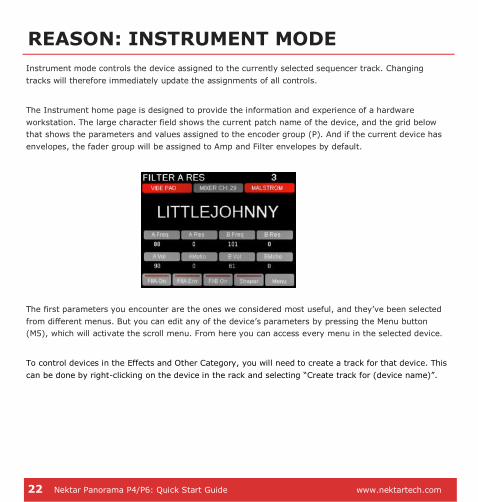
Instrument mode controls the device assigned to the currently selected sequencer track. Changing
tracks will therefore immediately update the assignments of all controls.
The Instrument home page is designed to provide the information and experience of a hardware
workstation. The large character field shows the current patch name of the device, and the grid below
that shows the parameters and values assigned to the encoder group (P). And if the current device has
envelopes, the fader group will be assigned to Amp and Filter envelopes by default.
The first parameters you encounter are the ones we considered most useful, and they’ve been selected
from different menus. But you can edit any of the device’s parameters by pressing the Menu button
(M5), which will activate the scroll menu. From here you can access every menu in the selected device.
To control devices in the Effects and Other Category, you will need to create a track for that device. This
can be done by right-clicking on the device in the rack and selecting “Create track for (device name)”.
www.nektartech.com Nektar Panorama P4/P6: Quick Start Guide 23
REASON: TRANSPORT MODE
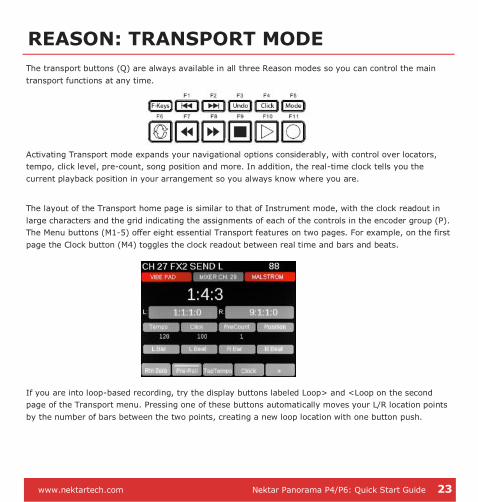
The transport buttons (Q) are always available in all three Reason modes so you can control the main
transport functions at any time.
Activating Transport mode expands your navigational options considerably, with control over locators,
tempo, click level, pre-count, song position and more. In addition, the real-time clock tells you the
current playback position in your arrangement so you always know where you are.
The layout of the Transport home page is similar to that of Instrument mode, with the clock readout in
large characters and the grid indicating the assignments of each of the controls in the encoder group (P).
The Menu buttons (M1-5) offer eight essential Transport features on two pages. For example, on the first
page the Clock button (M4) toggles the clock readout between real time and bars and beats.
If you are into loop-based recording, try the display buttons labeled Loop> and <Loop on the second
page of the Transport menu. Pressing one of these buttons automatically moves your L/R location points
by the number of bars between the two points, creating a new loop location with one button push.
24 Nektar Panorama P4/P6: Quick Start Guide www.nektartech.com
REASON: REMOTE OVERRIDE
Transport mode does not use the faders, encoders or buttons to the left of the display, so they are
conveniently available for you to assign any parameter you want using Reason’s Edit Remote Override
Mapping function. This is great if you want parameters for different devices accessible as one group of
controls, at any time. And it’s easy to set up, too:
1. Enter Transport mode
2. Right-click on the parameter on the Reason device you want to control
3. Select “Edit Remote Override Mapping”
4. In the popup menu, make sure “Learn from control surface input” is ticked
5. Move a control, such as encoder 1 (F1)
6. Click OK in the dialogue box.
The use of Remote Override Mapping does not affect the assignments in Panorama and can be different
from song to song.
Note: We recommend that you don’t use Remote Override Mapping in Mixer or Instrument mode.
www.nektartech.com Nektar Panorama P4/P6: Quick Start Guide 25
REASON: MOTORIZED FADER
Panorama’s motorized fader is assigned by default to the mixer volume of the currently selected track.
When you change sequencer tracks, the mixer channel selection also changes, and the motorized fader
section and its controls follow that selection. This means you always have access to volume control, solo
and mute functions for the selected track on the left hand side, no matter which of the three Reason
modes is active on Panorama.
Pressing the Fader button (E) gives you more options, such as assigning and locking the motorized fader
to a specific mixer channel, plus the ability to change pan position or the various send levels using the
data encoder (O), which is done by using the Param button (M2) to step through the available options.
Other menu buttons located under the Fader button will allow you to select and control parameters
within the Master or Control Room sections.
Note: In Reason, it is possible to have tracks in the sequencer that do not have corresponding mixer
channels (for example, when you create a track for an effect). When such a track is selected, the
motorized fader does not change its target channel.
The pads are a great way not only to play drum and percussion sounds, but also to compose interesting
new phrases for synths and traditional instruments.
We already described how the pads work in Quick Tips, and you can use this functionality in any of the
Reason modes. For your convenience, though, we’ve also pre-mapped instrument devices such as Kong,
ReDrum and Dr. Octo Rex to the pads by default. In some of the menus the pads are also used to
change parameters such as Solo and Mute. When controlling devices that have built-in sequencers, the
pads can be used to select Sequences and program Beats/Steps. However, if you prefer to use the pads’
internal functionality, simply press the Pads button (R) in any mode.
REASON: USING PADS
26 Nektar Panorama P4/P6: Quick Start Guide www.nektartech.com
CLEANING & MAINTENANCE
If you want to keep Panorama pristine, you’ll need to clean it occasionally. We recommend you use a
moisture-free air duster or electronics spray to clear away any surface dust. Then use electronics dry
cloth or the included lint-free cloth to polish the surface and remove any finger marks.
Note: Do not use any abrasive materials to clean the surface as this may leave scratch marks.
Performing a complete factory reset will erase all presets and maps and return the unit to its default
factory state. Make sure to back up your presets and maps first! For details on backup, make sure to
register your product to gain access to our online documentation.
Here is how you perform a factory reset:
Make sure Panorama’s power switch (Z) is set to the Off position
Press and hold the Patch– and Patch+ buttons (N) and set the power switch to On.
The About page tells you what firmware and hardware versions are currently in your unit.
To activate, select Internal mode and press the two display buttons M1 and M2 simultaneously.
To exit, press M5.
FACTORY RESET
ABOUT
www.nektartech.com Nektar Panorama P4/P6: Quick Start Guide 27
Note: This equipment has been tested and found to comply with the limits for a Class B digital device, pursuant to part 15 of
the FCC Rules. These limits are designed to provide reasonable protection against harmful interference in a residential instal-
lation. This equipment generates, uses and can radiate radio frequency energy and, if not installed and used in accordance
with the instructions, may cause harmful interference to radio communications. However, there is no guarantee that interfer-
ence will not occur in a particular installation. If this equipment does cause harmful interference to radio or television recep-
tion, which can be determined by turning the equipment off and on, the user is encouraged to try to correct the interference
by one or more of the following measures:
—Reorient or relocate the receiving antenna. —Increase the separation between the equipment and receiver. —Connect the equipment into an outlet on a circuit different from that to which the receiver is connected.
—Consult the dealer or an experienced radio/TV technician for help.
WARNING: Dispose of product securely, avoiding exposure to food sources and ground water. Only use
the product in accordance with the instructions.
Prop 65 Notice
The state of California wants you to know the following:
"WARNING: This product contains a chemical known to the State of California to cause cancer, birth
defects or other reproductive harm."
Dispose of the product in an environmentally safe way to avoid exposure to drinking water or food
sources. The product is safe in regular use but take precautions during service.
Panorama firmware, software and documentation are the property of Nektar Technology, Inc and subject to a License Agreement.
© 2012 Nektar Technology, Inc. All specifications subject to change without notice. Nektar is a trademark of Nektar
Technology, Inc. Reason is a trademark of Propellerhead Software AB.
28 Nektar Panorama P4/P6: Quick Start Guide www.nektartech.com
www.nektartech.com