programming guide for the bbc micro:bit robot kit · robot kit instructions for the bbc micro:bit...
TRANSCRIPT
Robot Kit Instructions for the BBC Micro:bit from catshill.com
1 v1.1
Programming Guide for the BBC Micro:bit Robot Kit
What you will need
A BBC Micro:bit with batteries and USB lead A BBC Micro:bit Robot with batteries A computer, tablet or smartphone able to access http://microbit.org or with the the Microbit app installed
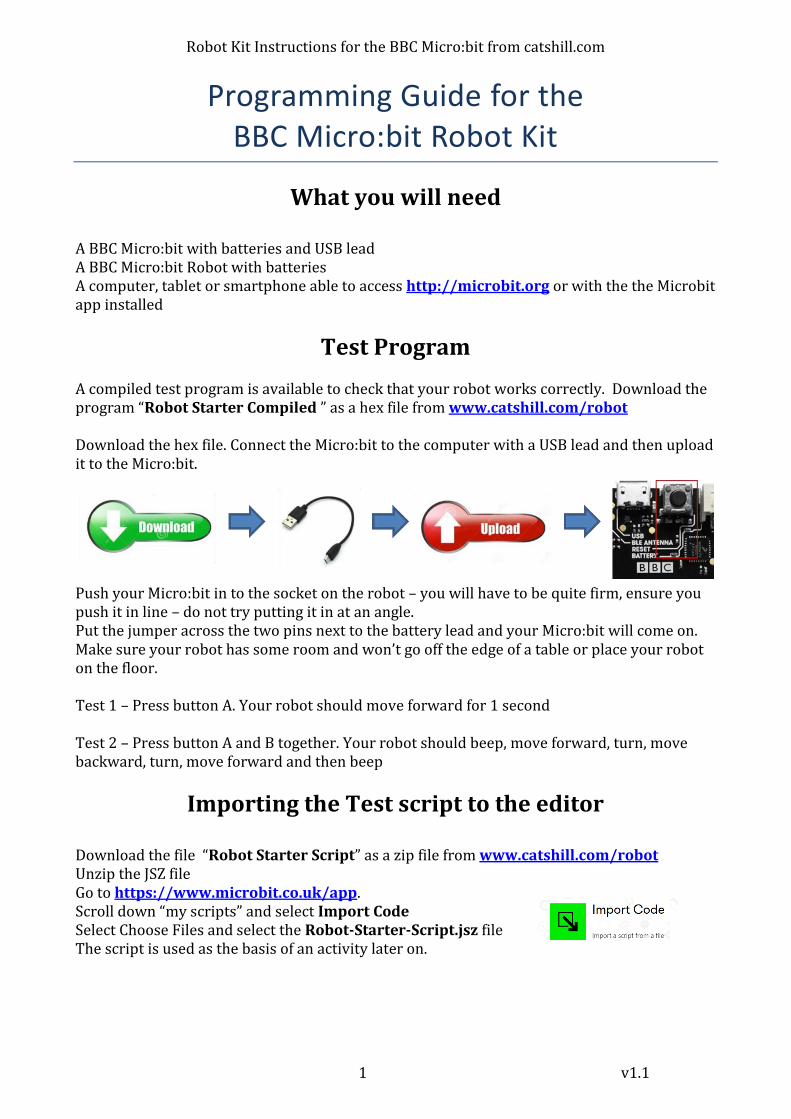
Test Program A compiled test program is available to check that your robot works correctly. Download the program “Robot Starter Compiled ” as a hex file from www.catshill.com/robot Download the hex file. Connect the Micro:bit to the computer with a USB lead and then upload it to the Micro:bit.
Push your Micro:bit in to the socket on the robot – you will have to be quite firm, ensure you push it in line – do not try putting it in at an angle. Put the jumper across the two pins next to the battery lead and your Micro:bit will come on. Make sure your robot has some room and won’t go off the edge of a table or place your robot on the floor. Test 1 – Press button A. Your robot should move forward for 1 second Test 2 – Press button A and B together. Your robot should beep, move forward, turn, move backward, turn, move forward and then beep
Importing the Test script to the editor
Download the file “Robot Starter Script” as a zip file from www.catshill.com/robot Unzip the JSZ file Go to https://www.microbit.co.uk/app. Scroll down “my scripts” and select Import Code Select Choose Files and select the Robot-Starter-Script.jsz file The script is used as the basis of an activity later on.
Robot Kit Instructions for the BBC Micro:bit from catshill.com
2 v1.1
Flashing a light & sounding a buzzer Go to https://www.microbit.co.uk/app, click a Create Code link and fire up the Block Editor.
Flashing an LED is a bit of a no brainer on the Micro:bit – the only hard thing is choosing which of the 25 LEDs to use!
It gets interesting with the Robot Micro:bit driver board because there is a small piezo mini-speaker on the board. We can use the music commands to play notes on it.
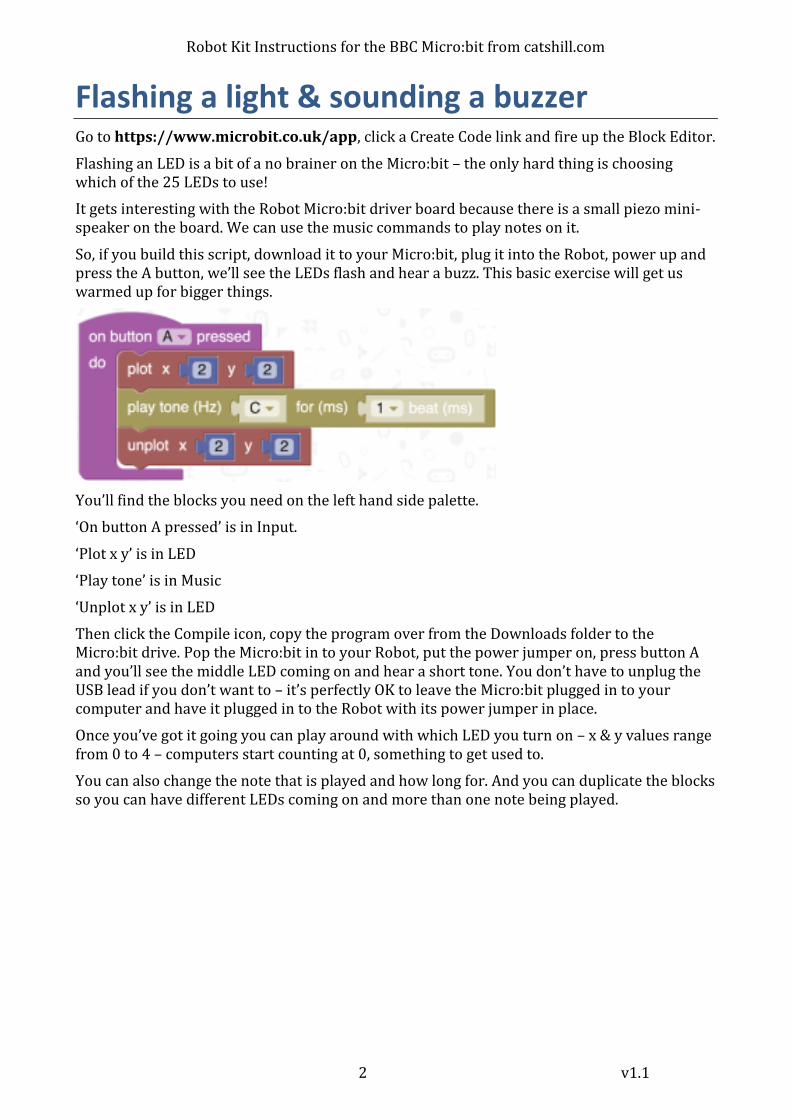
So, if you build this script, download it to your Micro:bit, plug it into the Robot, power up and press the A button, we’ll see the LEDs flash and hear a buzz. This basic exercise will get us warmed up for bigger things.
You’ll find the blocks you need on the left hand side palette.
‘On button A pressed’ is in Input.
‘Plot x y’ is in LED
‘Play tone’ is in Music
‘Unplot x y’ is in LED
Then click the Compile icon, copy the program over from the Downloads folder to the Micro:bit drive. Pop the Micro:bit in to your Robot, put the power jumper on, press button A and you’ll see the middle LED coming on and hear a short tone. You don’t have to unplug the USB lead if you don’t want to – it’s perfectly OK to leave the Micro:bit plugged in to your computer and have it plugged in to the Robot with its power jumper in place.
Once you’ve got it going you can play around with which LED you turn on – x & y values range from 0 to 4 – computers start counting at 0, something to get used to.
You can also change the note that is played and how long for. And you can duplicate the blocks so you can have different LEDs coming on and more than one note being played.

Robot Kit Instructions for the BBC Micro:bit from catshill.com
3 v1.1
Get moving – small steps at first Let’s get those wheels turning!
The Micro:bit has three pins numbered 0, 1 & 2 that you can see on the copper edge. But it also has three other pins, P8, P12 & P16, that we can connect to when the Micro:bit is plugged into the robot driver board.
P0 is connected to the piezo but can be used as an input or output, analog or digital, if you remove the jumper next to the piezo. P1 is available in the same way but doesn’t need any jumper removing. The A & B buttons can be connected up to switches if you want but they can only do digital – on or off. Pin P2 along with the ‘hidden’ three pins, P8, P12 & P16 are connected to the chip on the driver board that allows us to control two motors. We can program them individually and we can choose if they should go forward or backward or be stopped. By sending one motor forward whilst the other one is stopped, the Robot will turn. If you have one motor going forward and the other going backward, the Robot will turn on the spot.
Tip: If you find one or both of your wheels goes backward instead of forward, swap the wires in either M1 or M2 so that they go the right way round at your command.
Create this Block Editor program:
You’ll find the digital write block in the Pins section and the pause is in the Basic section. Compile and download to your Micro:bit, plug it into the Robot. if it’s not already, put the power jumper on and press the A button. The Robot will move forward (wheels are at the front) for 1 second. Follow the tip above if one or more of the wheels goes the wrong way. The first two digital writes turn on the motors, P8 turns on the right hand motor, P2 turns on the left hand motor. By sending a 1 to the pin, it turns it on, so you’ll quickly figure that sending a 0 turns off the motor. For this very simple program, we only have control of the motors going forward. You can change the pause to be longer or shorter. By duplicating or adding blocks you can have it stop for a time then move off again. To turn, just turn on one motor for an amount of time. You’ll need to figure out how long the pause needs to be to move forward or turn a certain amount. You’ll also have to figure out which motor makes the Robot turn in a particular direction.
Robot Kit Instructions for the BBC Micro:bit from catshill.com
4 v1.1
Playing a little song Before we have the Robot racing around the room, let’s give it a little more voice.
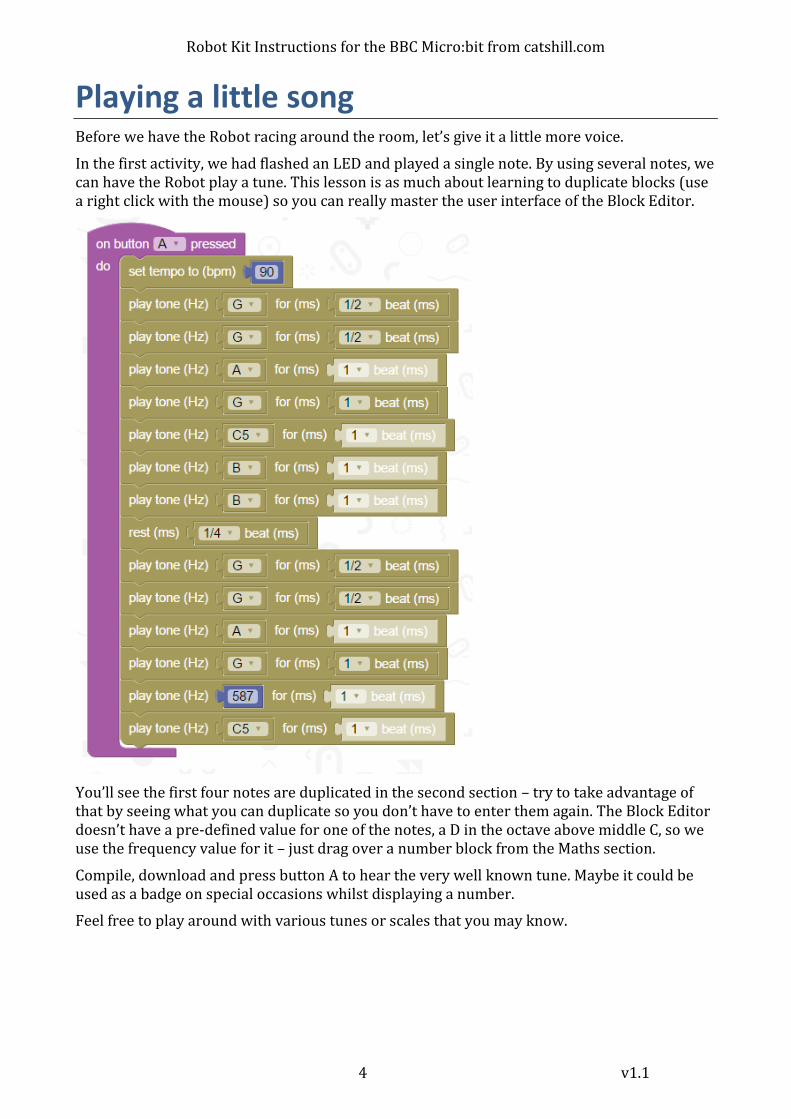
In the first activity, we had flashed an LED and played a single note. By using several notes, we can have the Robot play a tune. This lesson is as much about learning to duplicate blocks (use a right click with the mouse) so you can really master the user interface of the Block Editor.
You’ll see the first four notes are duplicated in the second section – try to take advantage of that by seeing what you can duplicate so you don’t have to enter them again. The Block Editor doesn’t have a pre-defined value for one of the notes, a D in the octave above middle C, so we use the frequency value for it – just drag over a number block from the Maths section.
Compile, download and press button A to hear the very well known tune. Maybe it could be used as a badge on special occasions whilst displaying a number.
Feel free to play around with various tunes or scales that you may know.
Robot Kit Instructions for the BBC Micro:bit from catshill.com
5 v1.1
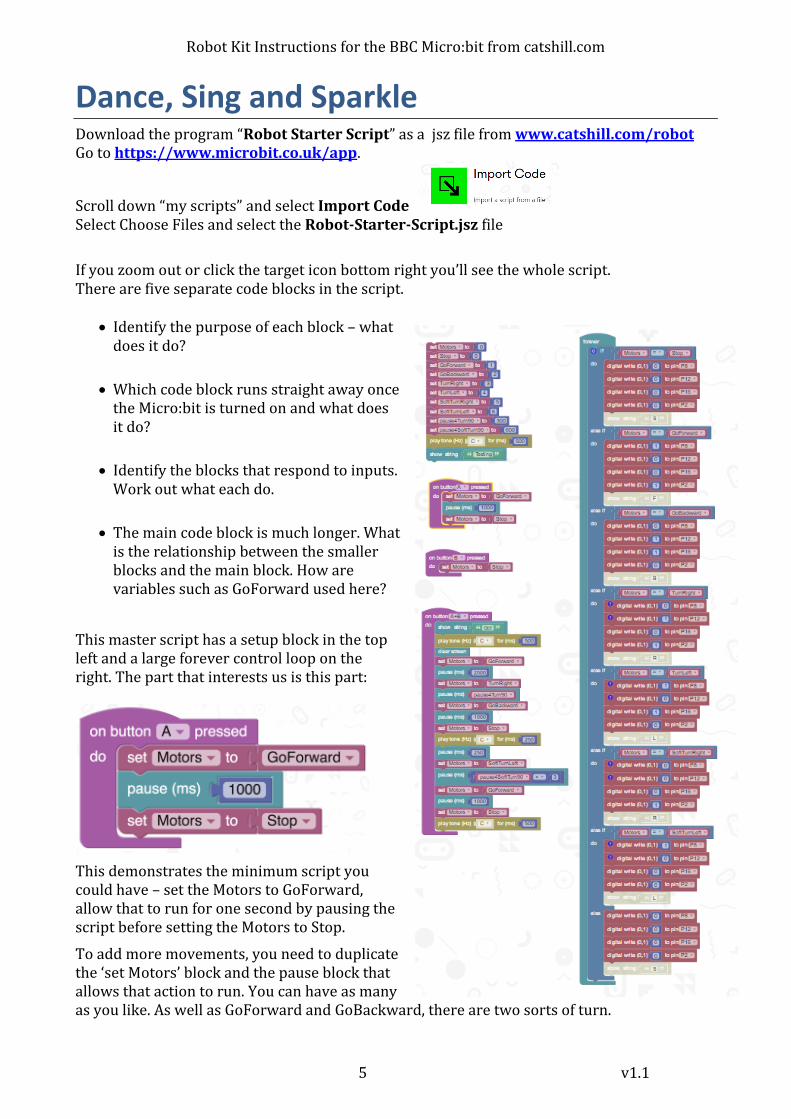
Dance, Sing and Sparkle Download the program “Robot Starter Script” as a jsz file from www.catshill.com/robot Go to https://www.microbit.co.uk/app.
Scroll down “my scripts” and select Import Code Select Choose Files and select the Robot-Starter-Script.jsz file
If you zoom out or click the target icon bottom right you’ll see the whole script. There are five separate code blocks in the script.
Identify the purpose of each block – what does it do?
Which code block runs straight away once
the Micro:bit is turned on and what does it do?
Identify the blocks that respond to inputs.
Work out what each do.
The main code block is much longer. What
is the relationship between the smaller blocks and the main block. How are variables such as GoForward used here?
This master script has a setup block in the top left and a large forever control loop on the right. The part that interests us is this part:
This demonstrates the minimum script you could have – set the Motors to GoForward, allow that to run for one second by pausing the script before setting the Motors to Stop.
To add more movements, you need to duplicate the ‘set Motors’ block and the pause block that allows that action to run. You can have as many as you like. As well as GoForward and GoBackward, there are two sorts of turn.
Robot Kit Instructions for the BBC Micro:bit from catshill.com
6 v1.1
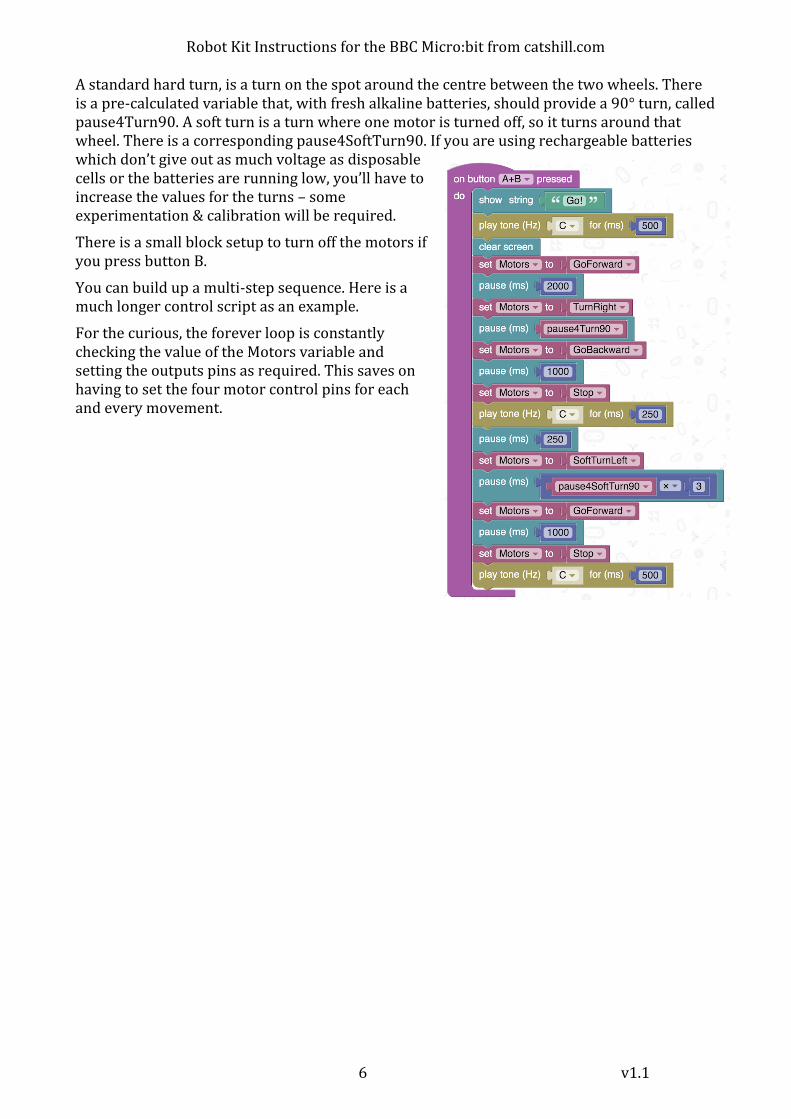
A standard hard turn, is a turn on the spot around the centre between the two wheels. There is a pre-calculated variable that, with fresh alkaline batteries, should provide a 90° turn, called pause4Turn90. A soft turn is a turn where one motor is turned off, so it turns around that wheel. There is a corresponding pause4SoftTurn90. If you are using rechargeable batteries which don’t give out as much voltage as disposable cells or the batteries are running low, you’ll have to increase the values for the turns – some experimentation & calibration will be required.
There is a small block setup to turn off the motors if you press button B.
You can build up a multi-step sequence. Here is a much longer control script as an example.
For the curious, the forever loop is constantly checking the value of the Motors variable and setting the outputs pins as required. This saves on having to set the four motor control pins for each and every movement.
Robot Kit Instructions for the BBC Micro:bit from catshill.com
7 v1.1
Ideas and Challenges
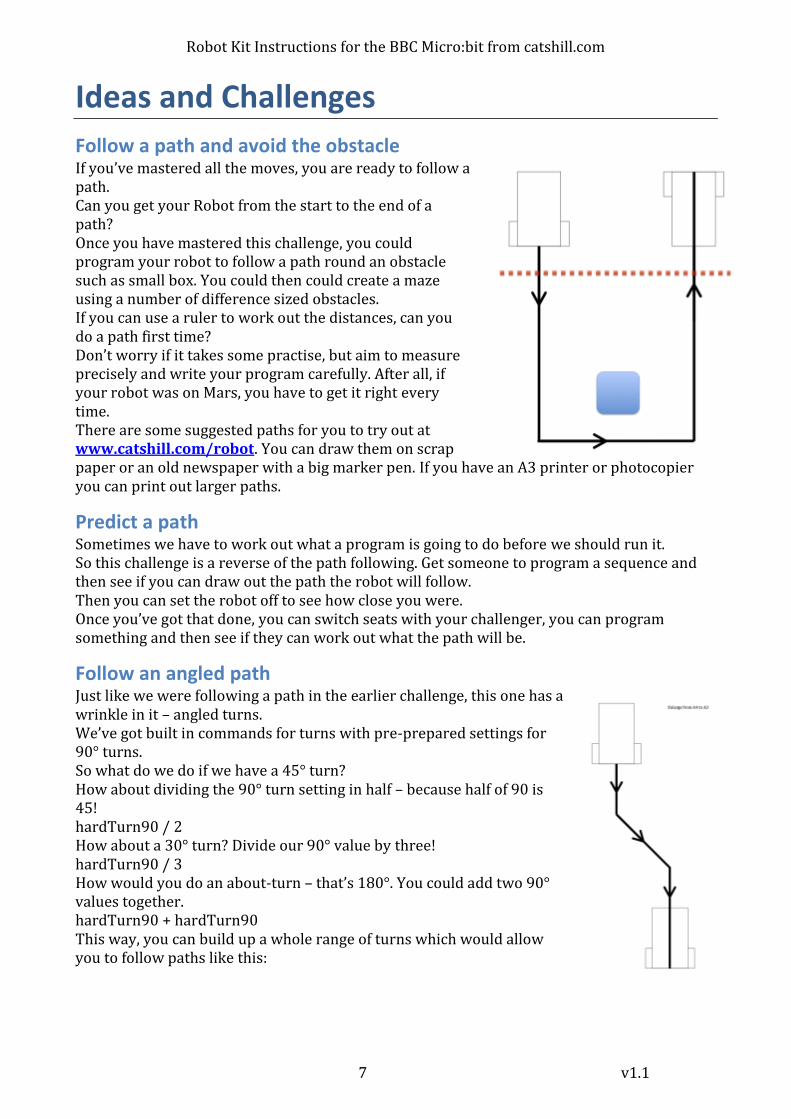
Follow a path and avoid the obstacle If you’ve mastered all the moves, you are ready to follow a path. Can you get your Robot from the start to the end of a path? Once you have mastered this challenge, you could program your robot to follow a path round an obstacle such as small box. You could then could create a maze using a number of difference sized obstacles. If you can use a ruler to work out the distances, can you do a path first time? Don’t worry if it takes some practise, but aim to measure precisely and write your program carefully. After all, if your robot was on Mars, you have to get it right every time. There are some suggested paths for you to try out at www.catshill.com/robot. You can draw them on scrap paper or an old newspaper with a big marker pen. If you have an A3 printer or photocopier you can print out larger paths.
Predict a path Sometimes we have to work out what a program is going to do before we should run it. So this challenge is a reverse of the path following. Get someone to program a sequence and then see if you can draw out the path the robot will follow. Then you can set the robot off to see how close you were. Once you’ve got that done, you can switch seats with your challenger, you can program something and then see if they can work out what the path will be.
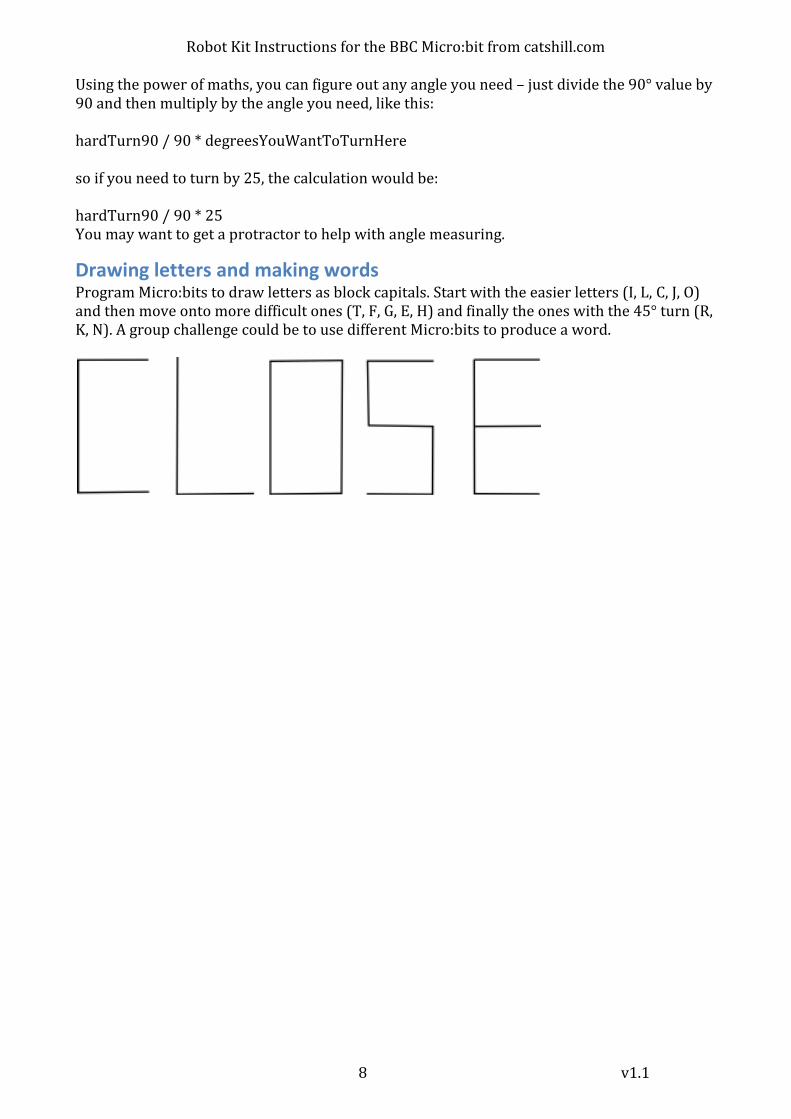
Follow an angled path Just like we were following a path in the earlier challenge, this one has a wrinkle in it – angled turns. We’ve got built in commands for turns with pre-prepared settings for 90° turns. So what do we do if we have a 45° turn? How about dividing the 90° turn setting in half – because half of 90 is 45! hardTurn90 / 2 How about a 30° turn? Divide our 90° value by three! hardTurn90 / 3 How would you do an about-turn – that’s 180°. You could add two 90° values together. hardTurn90 + hardTurn90 This way, you can build up a whole range of turns which would allow you to follow paths like this:
Robot Kit Instructions for the BBC Micro:bit from catshill.com
8 v1.1
Using the power of maths, you can figure out any angle you need – just divide the 90° value by 90 and then multiply by the angle you need, like this: hardTurn90 / 90 * degreesYouWantToTurnHere so if you need to turn by 25, the calculation would be: hardTurn90 / 90 * 25 You may want to get a protractor to help with angle measuring.
Drawing letters and making words Program Micro:bits to draw letters as block capitals. Start with the easier letters (I, L, C, J, O) and then move onto more difficult ones (T, F, G, E, H) and finally the ones with the 45° turn (R, K, N). A group challenge could be to use different Micro:bits to produce a word.