product security guide - dell emc · emc avamar 7.2 product security guide 11. special notice...
TRANSCRIPT
EMC® Avamar®
Version 7.2
Product Security Guide302-001-932
REV 02
Copyright © 2001-2015 EMC Corporation. All rights reserved. Published in USA.
Published August, 2015
EMC believes the information in this publication is accurate as of its publication date. The information is subject to changewithout notice.
The information in this publication is provided as is. EMC Corporation makes no representations or warranties of any kind withrespect to the information in this publication, and specifically disclaims implied warranties of merchantability or fitness for aparticular purpose. Use, copying, and distribution of any EMC software described in this publication requires an applicablesoftware license.
EMC², EMC, and the EMC logo are registered trademarks or trademarks of EMC Corporation in the United States and othercountries. All other trademarks used herein are the property of their respective owners.
For the most up-to-date regulatory document for your product line, go to EMC Online Support (https://support.emc.com).
EMC CorporationHopkinton, Massachusetts 01748-91031-508-435-1000 In North America 1-866-464-7381www.EMC.com
2 EMC Avamar 7.2 Product Security Guide
7
9
11
Introduction 15
Security patches........................................................................................... 16Periodic security updates for multiple components.......................... 16Remedying security patch compatibility issues................................ 16
Email home notification using ConnectEMC...................................................16Remote access.............................................................................................. 17Avamar security features............................................................................... 17
User Authentication and Authorization 19
Overview of Avamar user accounts................................................................ 20Authentication systems.................................................................................20
Avamar internal authentication........................................................ 21Directory service authentication....................................................... 21How Avamar authenticates users and assigns roles......................... 21
Roles.............................................................................................................22Administrator roles.......................................................................... 22Operator roles..................................................................................23User roles.........................................................................................24
Default user accounts....................................................................................25Changing server passwords and OpenSSH keys............................... 26
Client/Server Access and Authentication 29
Network access control................................................................................. 30Client/server authentication..........................................................................30
Certificate acceptance workflow....................................................... 31One-way authentication................................................................................ 32
Requesting signed certificates using a Certificate Signing Request...32Requesting signed certificates using an enrollment form..................33Using a private CA to sign Avamar node certificates..........................34Installing certificates in the Avamar system......................................40Configuring Avamar to use server authentication..............................41Importing a CA root certificate to Unix-like clients.............................41Importing a CA root certificate to Windows clients............................ 42Enforcing encrypted client/server communications.......................... 43
Two-way authentication................................................................................ 43Requesting client certificates using a Certificate Signing Request.....44Requesting client certificates using an enrollment form....................45Using a private CA to sign client certificates..................................... 46Configuring Avamar to use client authentication...............................50Installing a client certificate on a UNIX-like client............................. 51
Figures
Tables
Preface
Chapter 1
Chapter 2
Chapter 3
CONTENTS
EMC Avamar 7.2 Product Security Guide 3
Installing a client certificate on a Windows client............................. 51Verify client/server authentication.................................................................52Server authentication using Apache.............................................................. 52
Support for Subject Alternative Names.............................................53Create a private key for Apache........................................................ 53Generating a certificate signing request for Apache.......................... 54Obtain a public key certificate for Apache........................................ 56Configuring Apache to use a key and a root CA certificate.................57
Data Security and Integrity 59
Data-in-flight encryption................................................................................60Data-in-flight encryption in Avamar version 6.0 through Avamarversion 7.0 ......................................................................................60Avamar data-in-flight encryption...................................................... 61Unencrypted data-in-flight on new installs of Avamar....................... 61Client/server encryption behavior.................................................... 63Increasing Avamar server cipher strength ........................................ 63
Data-at-rest encryption..................................................................................64Internal data-at-rest encryption key management.............................64Avamar Key Manager........................................................................65
Data integrity................................................................................................ 70Data erasure................................................................................................. 71
Requirements for securely deleting backups.................................... 71Securely deleting a backup.............................................................. 72
System Monitoring, Auditing, and Logging 75
Client activity monitoring...............................................................................76Server monitoring..........................................................................................76
Monitoring server status.................................................................. 76Monitoring system events................................................................ 76Event notification profiles................................................................ 78Email home notification................................................................... 78Auditing........................................................................................... 78Logs.................................................................................................79
Server Security Hardening 85
Overview....................................................................................................... 86STIG compliance.............................................................................. 86Server security hardening levels.......................................................86
Level-1 security hardening............................................................................ 86Advanced Intrusion Detection Environment (AIDE)............................86The auditd service............................................................................87sudo implementation.......................................................................87Command logging............................................................................ 88Locking down single-user mode on RHEL servers..............................88Disabling Samba..............................................................................89Web server cipher suite hardening on pre-7.1 Avamar systems........ 90Web server cipher suite hardening on Avamar server version 7.1......93Removing suid bit from non-essential system binaries on RHEL........95Preventing unauthorized access to GRUB configuration....................95
Level-2 security hardening............................................................................ 96Additional operating system hardening............................................97Additional password hardening........................................................98
Chapter 4
Chapter 5
Chapter 6
CONTENTS
4 EMC Avamar 7.2 Product Security Guide
Additional firewall hardening (avfirewall)....................................... 100Installing level-2 security hardening features................................. 100
Level-3 security hardening.......................................................................... 104Disabling Apache web server......................................................... 105Stopping the EMT...........................................................................105Disabling Dell OpenManage web server......................................... 105Disabling SSLv2 and weak ciphers................................................. 106Updating OpenSSH........................................................................ 109Disabling SNMP............................................................................. 110Disabling RPC.................................................................................111Configuring the firewall to block access to port 9443..................... 112Changing file permissions..............................................................112Preparing for a system upgrade......................................................113
Intelligent Platform Management Interface 115
IPMI subsystem security..............................................................................116Finding all LAN channels............................................................................. 117Disabling privileges for Cipher Suite 0......................................................... 118Securing anonymous logins........................................................................ 119Creating strong passwords for BMC accounts.............................................. 120Additional BMC security tasks..................................................................... 120
Port Requirements 123
Terminology................................................................................................ 124Avamar firewall........................................................................................... 125
Controlling the firewall daemon..................................................... 125Utility node ports.........................................................................................125
Utility node required inbound ports................................................126Utility node optional inbound ports................................................129Utility node required outbound ports............................................. 129
Storage node ports......................................................................................132Storage node required inbound ports.............................................132Storage node required outbound ports...........................................133
Avamar client ports..................................................................................... 133Avamar client required inbound ports............................................ 133Avamar client required outbound ports.......................................... 134
Avamar Downloader Service host ports....................................................... 135Avamar Downloader Service host required inbound port................ 135Avamar Downloader Service host required outbound ports............ 135
Ports when using a Data Domain system..................................................... 136Required ports when using a Data Domain system......................... 136
IAO Information 137
System-level accounts................................................................................ 138Files with SUID bit and SGID bit................................................................... 138Permissions within /var folder.....................................................................139
Enterprise Authentication 141
Enterprise authentication............................................................................ 142Supported components and systems............................................. 142
Configuring Enterprise authentication......................................................... 143
Chapter 7
Appendix A
Appendix B
Appendix C
CONTENTS
EMC Avamar 7.2 Product Security Guide 5

Configuring an LDAP interface........................................................ 144Configuring an NIS interface...........................................................146
CONTENTS
6 EMC Avamar 7.2 Product Security Guide

Users in Avamar domains.............................................................................................. 201
FIGURES
EMC Avamar 7.2 Product Security Guide 7

FIGURES
8 EMC Avamar 7.2 Product Security Guide
Revision history............................................................................................................. 11Typographical conventions............................................................................................ 12Avamar user account information.................................................................................. 20Administrator roles........................................................................................................ 23Operator roles............................................................................................................... 23User roles...................................................................................................................... 24Avamar server Linux OS default user accounts............................................................... 25Avamar server software default user account................................................................. 25MCS default user accounts............................................................................................ 25MCS PostgreSQL database default user accounts.......................................................... 26Proxy virtual machine Linux OS default user account..................................................... 26Cipher levels and associated OpenSSL suites................................................................ 61Options for installAKM.sh.............................................................................................. 67Error messages for installAKM.sh...................................................................................67Critical files used by Avamar Key Manager..................................................................... 69Component log files on a single-node Avamar system....................................................79Component log files on a utility node.............................................................................81Component log files on a storage node.......................................................................... 82Component log file on a spare node...............................................................................83Component log files for the NDMP Accelerator............................................................... 83Component log files on an access node......................................................................... 83Component log files on an Avamar Administrator client................................................. 83Component log files for an Avamar backup client...........................................................84STIG requirements satisfied by AIDE.............................................................................. 86STIG requirements satisfied by the auditd service..........................................................87STIG requirements satisfied by the implementation of sudo...........................................87STIG requirements satisfied by the additional OS hardening package............................ 97STIG requirements satisfied by additional password hardening..................................... 98Cipher levels and associated OpenSSL suites..............................................................107Descriptions of security tasks for the IPMI subsystem.................................................. 116Required inbound ports on the utility node.................................................................. 126Optional inbound ports on the utility node...................................................................129Required outbound ports for the utility node................................................................129Required inbound ports on each storage node.............................................................132Required outbound ports for each storage node.......................................................... 133Required inbound ports on an Avamar client................................................................134Required outbound ports for an Avamar client............................................................. 134Required inbound port on an Avamar Downloader Service host................................... 135Required outbound ports for an Avamar Downloader Service host............................... 135Required ports when using a Data Domain system.......................................................136Supported external authentication systems.................................................................142
1234567891011121314151617181920212223242526272829303132333435363738394041
TABLES
EMC Avamar 7.2 Product Security Guide 9

TABLES
10 EMC Avamar 7.2 Product Security Guide
PREFACE
As part of an effort to improve its product lines, EMC periodically releases revisions of itssoftware and hardware. Some versions of the software or hardware currently in use donot support every function that this document describes. The product release notesprovide the most up-to-date information on product features.
If a product does not function correctly or does not function as described in thisdocument contact an EMC technical support professional.
Note
This document was accurate at publication time. Go to EMC Online Support (https://support.EMC.com) to find the latest version of this document.
PurposeThis publication discusses various aspects of EMC Avamar product security.
AudienceThis publication is primarily intended for EMC Field Engineers, contractedrepresentatives, and business partners who are responsible for configuring,troubleshooting, and upgrading Avamar systems at customer sites, as well as systemadministrators or application integrators who are responsible for installing software,maintaining servers and clients on a network, and ensuring network security.
Revision historyThe following table presents the revision history of this document.
Table 1 Revision history
Revision Date Description
01 June, 2015 Initial release of Avamar 7.2.
02 August, 2015 GA release of Avamar 7.2. Includes new chapter: "Intelligent PlatformManagement Interface".
Related documentationThe following EMC publications provide additional information:
l EMC Avamar Release Notes
l EMC Avamar Administration Guide
l EMC Avamar Operational Best Practices Guide
The following other publications also provide information:
l US Department of Defense (DoD) Security Technical Implementation Guide (STIG) for Unix
EMC Avamar 7.2 Product Security Guide 11
Special notice conventions used in this documentEMC uses the following conventions to alert the reader to particular information.
NOTICE
The Notice convention emphasizes important information about the current topic.
Note
The Note convention addresses specific information that is related to the current topic.
Typographical conventionsIn this document, EMC uses the typographical conventions that are shown in thefollowing table.
Table 2 Typographical conventions
Convention Example Description
Bold typeface Click More Options. Use for names of interface elements,such as names of windows, dialogboxes, buttons, fields, tab names, keynames, and menu paths (what a userspecifically selects or clicks).
Italic typeface EMC Avamar Administration Guide Use for full titles of publications thatare referenced in text.
Monospace font Event Type =INFORMATIONEvent Severity = OKEvent Summary = Newgroup created
Use for:
l System code
l System output, such as an errormessage or script
l Pathnames, file names, prompts,and syntax
l Commands and options
Monospace fontwith italictypeface
Type Avamar_server, where
Avamar_server is the DNS name or IPaddress of the Avamar server.
Use for variables.
Monospace fontwith bold typeface
Type yes. Use for user input.
Square brackets [--domain=String(/)] --name=String
Square brackets enclose optionalvalues.
Vertical bar [--domain=String(/)] | --name=String
Vertical bar indicates alternateselections - the bar means “or”.
Braces {[--domain=String(/)] | --name=String}
Braces enclose content that the usermust specify.
Ellipses valid hfs ... Ellipses indicate nonessentialinformation that is omitted from theexample.
PREFACE
12 EMC Avamar 7.2 Product Security Guide
Where to get helpThe Avamar support page provides access to licensing information, productdocumentation, advisories, and downloads, as well as how-to and troubleshootinginformation. This information may enable you to resolve a product issue before youcontact EMC Customer Support.
To access the Avamar support page:
1. Go to https://support.EMC.com/products.
2. Type a product name in the Find a Product box.
3. Select the product from the list that appears.
4. Click the arrow next to the Find a Product box.
5. (Optional) Add the product to the My Products list by clicking Add to my products inthe upper right corner of the Support by Product page.
DocumentationThe Avamar product documentation provides a comprehensive set of feature overview,operational task, and technical reference information. Review the following documents tosupplement the information in product administration and user guides:
l Release notes provide an overview of new features and known limitations for arelease.
l Technical notes provide technical details about specific product features, includingstep-by-step tasks, where necessary.
l White papers provide an in-depth technical perspective of a product or products asapplied to critical business issues or requirements.
KnowledgebaseThe EMC Knowledgebase contains applicable solutions that you can search for either bysolution number (for example, esgxxxxxx) or by keyword.
To search the EMC Knowledgebase:
1. Click Search at the top of the page.
2. Type either the solution number or keywords in the search box.
3. (Optional) Limit the search to specific products by typing a product name in theScope by product box and then selecting the product from the list that appears.
4. Select Knowledgebase from the Scope by resource list.
5. (Optional) Specify advanced options by clicking Advanced options and specifyingvalues in the available fields.
6. Click Search.
Online communitiesGo to EMC Community Network at http://community.EMC.com for peer contacts,conversations, and content on product support and solutions. Interactively engage onlinewith customers, partners, and certified professionals for all EMC products.
Live chatTo engage EMC Customer Support by using live interactive chat, click Join Live Chat onthe Service Center panel of the Avamar support page.
Service RequestsFor in-depth help from EMC Customer Support, submit a service request by clickingCreate Service Requests on the Service Center panel of the Avamar support page.
PREFACE
EMC Avamar 7.2 Product Security Guide 13
Note
To open a service request, you must have a valid support agreement. Contact an EMCsales representative for details about obtaining a valid support agreement or withquestions about an account.
To review an open service request, click the Service Center link on the Service Centerpanel, and then click View and manage service requests.
Enhancing supportEMC recommends that you enable ConnectEMC and Email Home on all Avamar systems:
l ConnectEMC automatically generates service requests for high priority events.
l Email Home sends configuration, capacity, and general system information to EMCCustomer Support.
Comments and suggestionsComments and suggestions help EMC to continue to improve the accuracy, organization,and overall quality of the user publications. Send comments and suggestions about thisdocument to [email protected].
Please include the following information:
l Product name and version
l Document name, part number, and revision (for example, 01)
l Page numbers
l Other details to help address documentation issues
PREFACE
14 EMC Avamar 7.2 Product Security Guide

CHAPTER 1
Introduction
This chapter includes the following topics:
l Security patches....................................................................................................16l Email home notification using ConnectEMC...........................................................16l Remote access...................................................................................................... 17l Avamar security features....................................................................................... 17
Introduction 15
Security patchesEach Avamar release is available with a set of up-to-date security patches.
Periodic security updates for multiple componentsEMC periodically provides a security update for components of the Avamar system’s hostoperating system. These periodic updates combine patches and updates that theoperating system’s company (Red Hat or SUSE) released since the previous Avamarperiodic security update. The updates also include relevant kernel-level and OS-levelsecurity patches and changes.
The periodic updates are cumulative. Install each periodic update that is issued for theAvamar system in order of release, starting with the first periodic update issued after therelease of the Avamar system software.
EMC announces each periodic update through an EMC Security Advisory (ESA). The ESAprovides details about the contents of the periodic update and installation instructions.Go to https://support.emc.com/products/759_Avamar-Server to view these advisoriesand to register for email notifications.
EMC provides the periodic updates as Avamar update packages that can normally beinstalled through Avamar Installation Manager.
Remedying security patch compatibility issuesIf you separately install other security patches or security applications that are found tobe incompatible with Avamar:
1. Remove the separately installed patches or applications.
2. Restore the Avamar system to its previous working configuration.
3. File a support case with EMC support that includes a specific description of theseparately installed patches or applications.
Note
It is the responsibility of the customer to ensure that the Avamar system is configured toprotect against unauthorized access. Back up all important files before you apply newsecurity patches, applications, or updates.
Email home notification using ConnectEMCWhen configured and enabled, the “email home” feature automatically emailsconfiguration, capacity, and general system information to EMC Customer Support usingConnectEMC. Summary emails are sent once daily; critical alerts are sent in near-real timeon an as needed basis.
The EMC Avamar Administration Guide provides details on how to enable the email homefeature.
Introduction
16 EMC Avamar 7.2 Product Security Guide
Remote accessIf EMC Customer Support must connect to a customer system to perform analysis ormaintenance, the customer can initiate a web conference using a web-basedconferencing application such as WebEx.
Additionally, beginning with version 6.0, customers can install an EMC Secure RemoteSupport (ESRS) gateway to allow EMC Customer Support to access their systems withoutWebEx.
Avamar security featuresInstallation of Avamar software, or upgrade to Avamar server version 7.1 or newer,installs hardening and firewall packages that improve security capabilities on the Avamarserver.
Installation of these packages does not restrict supported server functionality, and theycannot be uninstalled. For some tasks, EMC Support provides the steps and tools that arerequired to complete the task (for instance, FTP capabilities for downloading packages tothe server).
Introduction
Remote access 17

Introduction
18 EMC Avamar 7.2 Product Security Guide
CHAPTER 2
User Authentication and Authorization
This chapter includes the following topics:
l Overview of Avamar user accounts........................................................................ 20l Authentication systems.........................................................................................20l Roles.....................................................................................................................22l Default user accounts............................................................................................25
User Authentication and Authorization 19
Overview of Avamar user accountsA user account in Avamar can administer a domain or client. The user account defines theauthentication system that is used to grant users access to the Avamar server. It alsodefines the role for the user, which controls the operations that a user can perform.
You can add user accounts to domains or individual clients. When you add a useraccount to a domain, the account can administer that domain and any subdomainsbeneath it. When you add a user account to an individual client, the account can performbackups and restores of that client, and access backups belonging to that client in thesystem.
In Avamar, users are entries in a domain or client access list. When you add a useraccount to the Avamar system, you are adding an entry to a domain or client user accesslist.
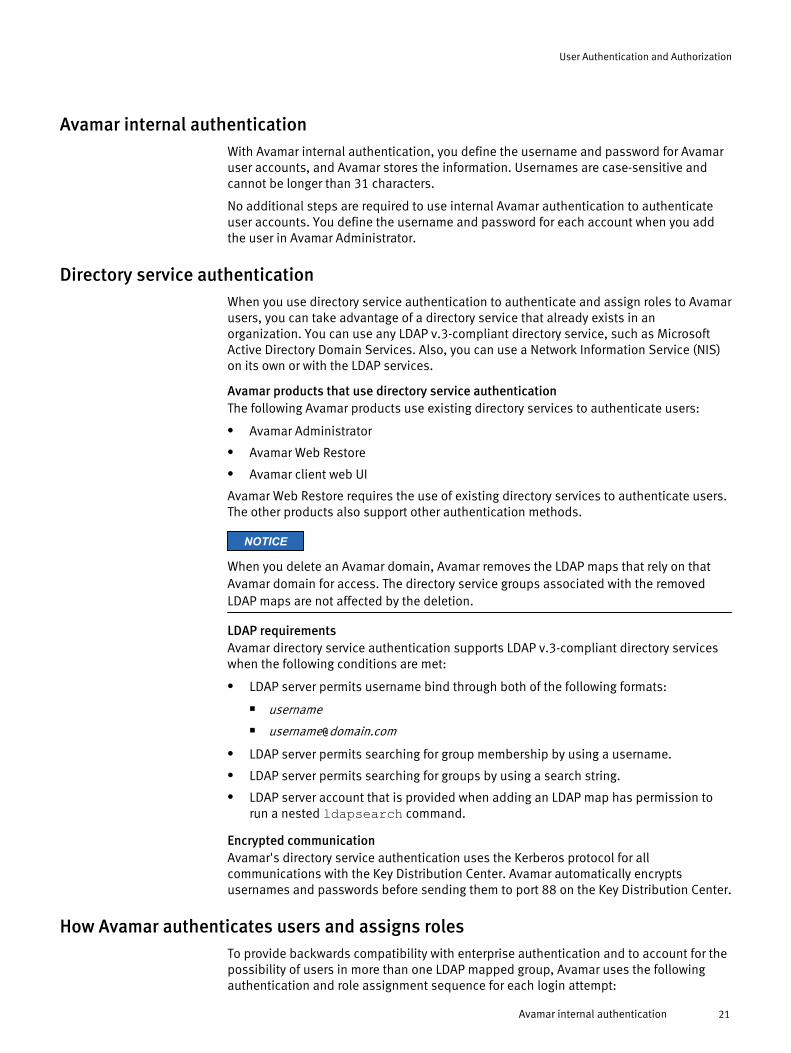
In the following example, the user “Gretchen” has been added to both the Accountingdomain and a computer. However, the authentication system and role are completelyseparate user accounts that happen to have the same username.
Figure 1 Users in Avamar domains
The following table describes the information that comprises an Avamar user account.
Table 3 Avamar user account information
Information Description
Username The username depends on the authentication system and must be in theformat that the authentication system accepts. For example, the internalauthentication system uses case-sensitive usernames, whereas WindowsActive Directory usernames are case-insensitive. Usernames cannot belonger than 31 characters.
Authenticationsystem
An authentication system is a username/password system that is used togrant users access to the Avamar server.
Role Roles define the allowable operations for each user account.
Authentication systemsAn authentication system is a username/password system that is used to grant domainand client users access to the Avamar server. Avamar supports its own internalauthentication system (“Avamar authentication” or “avs”), as well as directory serviceauthentication. Directory service authentication uses an existing LDAP v.3 directoryservice or an existing Network Information Service (NIS) to provide authentication.
User Authentication and Authorization
20 EMC Avamar 7.2 Product Security Guide
Avamar internal authenticationWith Avamar internal authentication, you define the username and password for Avamaruser accounts, and Avamar stores the information. Usernames are case-sensitive andcannot be longer than 31 characters.
No additional steps are required to use internal Avamar authentication to authenticateuser accounts. You define the username and password for each account when you addthe user in Avamar Administrator.
Directory service authenticationWhen you use directory service authentication to authenticate and assign roles to Avamarusers, you can take advantage of a directory service that already exists in anorganization. You can use any LDAP v.3-compliant directory service, such as MicrosoftActive Directory Domain Services. Also, you can use a Network Information Service (NIS)on its own or with the LDAP services.
Avamar products that use directory service authenticationThe following Avamar products use existing directory services to authenticate users:
l Avamar Administrator
l Avamar Web Restore
l Avamar client web UI
Avamar Web Restore requires the use of existing directory services to authenticate users.The other products also support other authentication methods.
NOTICE
When you delete an Avamar domain, Avamar removes the LDAP maps that rely on thatAvamar domain for access. The directory service groups associated with the removedLDAP maps are not affected by the deletion.
LDAP requirementsAvamar directory service authentication supports LDAP v.3-compliant directory serviceswhen the following conditions are met:
l LDAP server permits username bind through both of the following formats:
n username
l LDAP server permits searching for group membership by using a username.
l LDAP server permits searching for groups by using a search string.
l LDAP server account that is provided when adding an LDAP map has permission torun a nested ldapsearch command.
Encrypted communicationAvamar's directory service authentication uses the Kerberos protocol for allcommunications with the Key Distribution Center. Avamar automatically encryptsusernames and passwords before sending them to port 88 on the Key Distribution Center.
How Avamar authenticates users and assigns rolesTo provide backwards compatibility with enterprise authentication and to account for thepossibility of users in more than one LDAP mapped group, Avamar uses the followingauthentication and role assignment sequence for each login attempt:
User Authentication and Authorization
Avamar internal authentication 21
1. When the username is in the format user, where user is a username without @serverappended, then Avamar checks the internal Avamar authentication database.If the username, password, and domain match, then the login is successful andAvamar assigns the user a role in the Avamar database. If they do not match, then thelogin fails.
2. When the username is in the format user@server, where user is a username and serveris the fully qualified domain name of the authentication server, then Avamar checksthe login information by using enterprise authentication.If the username, password, and domain match, then the login is successful andAvamar assigns the user a role in the Avamar database. If there is no match, then theevaluation continues.
3. When the username is in the format user@server and authentication by usingenterprise authentication fails, then Avamar checks the LDAP mapping system.The login attempt is checked against all mapped groups for a match of each of thefollowing identifiers:
l Username, the portion of the User Name field entry before the @ symbol.
l Password, as entered in the Password field.
l Avamar domain, as entered in the Domain Name field.
l Directory service domain, the portion of the User Name field entry after the @symbol.
When all identifiers match, the login is successful and Avamar assigns the user a rolefrom the mapped group.
A user can be the member of mapped groups in different directory service domains.The role of the mapped group that matches the directory service domain providedduring login is assigned to the user for that session.
When the user is a member of more than one mapped group in the same directoryservice domain, the role with the greatest authority is assigned.
4. When the login information does not meet the requirements of any of the previoussteps, then the login fails and a failure message appears.
RolesRoles define the allowable operations for each user account.
There are three types of roles:
l Administrator roles
l Operator roles
l User roles
Administrator rolesAdministrators are responsible for maintaining the system.
You can only assign the role of administrator to user accounts at a domain level. Domainlevel includes the top-level (root) domain and any other domain or subdomain. Youcannot assign the administrator role to user accounts at a client level.
You can assign the administrator role to users at the top-level (root) domain or to aspecific domain or subdomain.
User Authentication and Authorization
22 EMC Avamar 7.2 Product Security Guide
Table 4 Administrator roles
Administrator type Description
Root administrators Administrators at the top-level (root) domain have full control of the system. They are sometimesreferred to as “root administrators.”
Domain administrators Administrators at domains other than root generally have access to most of the features that aredescribed in this guide. Administrators typically can only view or operate on objects in the domain. Anyactivity that would allow a domain administrator to view data outside the domain is disallowed. Accessto server features of a global nature (for example, suspending or resuming scheduled operations orchanging runtimes for maintenance activities) is disallowed. Domain administrators:
l Cannot add or edit other subdomain administrators.
l Cannot change their assigned role.
l Can change their password.
Operator rolesOperator roles are generally implemented to allow certain users limited access to certainareas of the system to perform backups and restores, or obtain status and run reports.These roles allow greater freedom in assigning backup, restore, and reporting tasks topersons other than administrators.
You can only assign operator roles to user accounts at the domain level. You cannotassign these roles to user accounts at the client level. To add the user account tosubdomains, you must have administrator privileges on the parent domain or above.
Users with an operator role do not have access to all features in Avamar Administrator.Instead, after login, they are presented with a single window that provides access to thefeatures that they are allowed to use.
The following table describes the four operator roles.
Table 5 Operator roles
Operator type Description
Restore only operator Restore only operators are generally only allowed to perform restores and to monitor those activities todetermine when they complete and if they completed without errors. Restore only operators at the top-level (root) domain can perform restores for any client in the system. Restore only operators at a domainother than root can only perform restores for clients in that domain. Restore only operators can restorebackup data and monitor activities in the assigned domain. By default, restore only operators cannotbrowse backups from the command line or the Avamar Web Restore interface. To enable these activitiesfor a restore only operator, add the noticketrequired privilege by using the avmgr chgvcommand:avmgr chgv --acnt=location --u=name --ud=auth \ --pv="enabled,read,mclogin,noticketrequired" where location is the subdomain of the
operator, name is the Avamar username of the user, and auth is the external authentication system usedto authenticate the user.
Back up only operator Back up only operators are generally only allowed to perform backups and to monitor those activities todetermine when they complete and if they completed without errors. Back up only operators at the top-level (root) domain can perform backups for any client or group in the system. Back up only operators atdomains other than root can only perform backups for clients or groups in that domain. Back up onlyoperators can perform on-demand backups of a client or a group, as well as monitor activities in theassigned domain. By default, back up only operators cannot perform backups from the command line.
User Authentication and Authorization
Operator roles 23
Table 5 Operator roles (continued)
Operator type Description
To enable command line backups for a back up only operator, add the noticketrequired privilege
by using the avmgr chgv avmgr chgv --acnt=location --u=name --ud=auth \ --pv="enabled,read,mclogin,backup,noticketrequired"command: where location is the
subdomain of the operator, name is the Avamar username of the user, and auth is the externalauthentication system used to authenticate the user.
Back up/restoreoperator
Back up/restore operators are generally only allowed to perform backups or restores and to monitorthose activities to determine when they complete and if they completed without errors. As with rolesassigned to other domain user accounts, back up/restore operators at the top-level (root) domain canperform backups and restores for any client or group in the system. Back up/restore operators atdomains other than root can only perform backups and restores for clients or groups in that domain.Back up/restore operators can perform the following tasks in the assigned domain:
l Perform on-demand backups for a client or group.
l Perform restores.
l Monitor activities.
By default, back up/restore operators cannot browse backups from the command line or by using theAvamar Web Restore interface, and cannot perform backups from the command line. To enable theseactivities, add the noticketrequired privilege by using the avmgr chgv command: avmgr chgv--acnt=location --u=name --ud=auth \ --pv="enabled,read,mclogin,backup,noticketrequired" where location is the subdomain
of the operator, name is the Avamar username of the user, and auth is the external authenticationsystem used to authenticate the user.
Activity operator Activity operators are generally only allowed to monitor backup and restore activities and to createcertain reports. Activity operators at the top-level (root) domain can view or create reports for backupand restore activities in all domains and subdomains. Activity operators at domains other than root canonly view or create reports for backup and restore activities in that domain. Activity operators canperform the following tasks in the assigned domain:
l Monitor activities.
l View the group status summary.
l View the Activity Report.
l View the Replication Report.
User rolesUser roles limit the operations that are allowed for a user account to a specific client.
Users who are assigned to one of the user roles cannot log in to Avamar Administrator,Avamar Client Manager, or the Avamar client web UI.
The following table describes the four user roles.
Table 6 User roles
User type Description
Back Up Only User Users assigned this role can start backups directly from the client by using the avtar command line.
User Authentication and Authorization
24 EMC Avamar 7.2 Product Security Guide
Table 6 User roles (continued)
User type Description
Restore (Read) OnlyUser
Users assigned this role can start restores directly from the client by using the avtar command line or
MCS web services.
Back Up/Restore User Users assigned this role can start backups and restores directly from the client by using the avtarcommand line or MCS web services.
Restore (Read) Only/Ignore File Permissions
Similar to the Restore (Read) Only User role except that operating system file permissions are ignoredduring restores. This user is allowed to restore any file that is stored for an Avamar client. This role isonly available when users are authenticated by using Avamar internal authentication. To ensure trouble-free restores, Windows client user accounts should be assigned this role only when both of thefollowing are true:
l Users are authenticated using Avamar internal authentication.
l Users do not require access to the Avamar client web UI.
Default user accountsThe Avamar system uses the following default user accounts and default passwords.
Table 7 Avamar server Linux OS default user accounts
User account Default password Description
root changeme Linux OS root account on all Avamar nodes.
admin changeme Linux OS account for Avamar administrative user.
dpn changeme Linux OS account for Avamar maintenance user.
Table 8 Avamar server software default user account
User account Default password Description
root 8RttoTriz Avamar server software root user account.
Table 9 MCS default user accounts
User account Default password Description
MCUser MCUser1 Default Avamar Administrator administrative user account.
backuponly backuponly1 Account for internal use by the MCS.
restoreonly restoreonly1 Account for internal use by the MCS.
backuprestore backuprestore1 Account for internal use by the MCS.
repluser 9RttoTriz Account for internal use by the MCS for replication.
User Authentication and Authorization
Default user accounts 25
Table 10 MCS PostgreSQL database default user accounts
User account Default password Description
admin No password, logged in on local node only.
viewuser viewuser1 Administrator server database view account.
Table 11 Proxy virtual machine Linux OS default user account
User account Defaultpassword
Description
root avam@r Linux OS root account on all proxies deployed using theAvamar proxy appliance. This account is for internal useonly.
Changing server passwords and OpenSSH keysUse the change-passwords utility to change the passwords for operating system useraccounts and Avamar server user accounts. Also use change-passwords to create andmodify SSH keys for those accounts.
The change-passwords utility guides you through the following operations:
l Changing passwords for the operating system accounts: admin, dpn, and root
l Changing passwords for the internal Avamar server accounts: root, MCUser, repluser,and viewuser
l Creating and changing SSH keys
Procedure
1. Suspend all scheduled operations:
a. In Avamar Administrator, select Tools > Manage Schedules.
b. On the Manage All Schedules window, click Suspend All.
2. Open a command shell and log in using one of the following methods:
l To log in to a single-node server, log in to the server as dpn.
l To log in to a multi-node server, log in to the utility node as dpn.
3. Start the utility by typing change-passwords.
On a multi-node server, the output prompts you to specify whether to changepasswords on all nodes or selected nodes.
4. Type y to change passwords on all nodes or n to change passwords on selectednodes, and then press Enter.
The output prompts you to indicate whether you plan to specify SSH private keys thatare authorized for root operations.
5. Type n and press Enter.
The output prompts you to specify whether to change admin, dpn, or root operatingsystem user account passwords.
6. Type y to change the passwords or n to skip the process of changing the passwords,and then press Enter.
User Authentication and Authorization
26 EMC Avamar 7.2 Product Security Guide
7. If you typed y in the previous step, then follow the system prompts to change thepasswords for one or more of the admin, dpn, or root operating system user accounts.
The output prompts you to specify whether to change SSH keys.
8. Type y to change or create an SSH key, or type n, and then press Enter.
9. If you typed y in the previous step, then follow the system prompts to change orcreate the keys.
The output prompts you to specify whether to change Avamar server passwords.
10.When prompted, type y to change the MCUser, Avamar root, repluser, and viewuserpasswords, or if you do not want to change the passwords, type n, and then pressEnter.
11.If you typed y in the previous step, then follow the system prompts to change thepasswords.
The output prompts you to accept or reject the changes that are made to passwords orSSH keys during this utility session.
12.Type y to accept the changes or type n to exit this utility session without changes, andthen press Enter.
The output provides the status of the operation.
13.When the operation completes, resume scheduled operations:
a. In Avamar Administrator, select Tools > Manage Schedules.
b. On the Manage All Schedules window, click Resume All.
User Authentication and Authorization
Changing server passwords and OpenSSH keys 27

User Authentication and Authorization
28 EMC Avamar 7.2 Product Security Guide
CHAPTER 3
Client/Server Access and Authentication
This chapter includes the following topics:
l Network access control......................................................................................... 30l Client/server authentication..................................................................................30l One-way authentication........................................................................................ 32l Two-way authentication.........................................................................................43l Verify client/server authentication.........................................................................52l Server authentication using Apache...................................................................... 52
Client/Server Access and Authentication 29
Network access controlControl of networking in the Avamar environment starts with awareness of several partsof the network.
Subnet and gateway assignmentsAvamar client machines must be able to connect to every node in the Avamarenvironment directly, and each node in the environment must be able to connect to theclient machines.
Assign a default gateway to the router in the Avamar environment.
DNS requirementsThe Avamar environment requires a Domain Name System (DNS) server. Within the DNSdomain, assign forward mapping to the Avamar utility node, or to the single-node Avamarserver. Optionally, also assign reverse mapping to the utility node or single-node server.
For example, use the following forward mapping entry in a BIND environment:
avamar-1 A 10.0.5.5
Continuing the example, use the following optional reverse mapping for a zone servingthe 5.0.10.in-addr.arpa subnet:
5 PTR avamar-1.example.com.
Remote access controlProtect all nodes and the switch in the Avamar server against unauthorized access. Use aVirtual Private Network (VPN) system when accessing the Avamar system from a remotelocation.
SNMPAvamar provides support for system monitoring and event notification through theSimple Network Management Protocol (SNMP).
Client/server authenticationAvamar clients and Avamar servers use Transport Layer Security (TLS) certificates andPublic Key Infrastructure (PKI) for authentication and optional data-in-flight encryption.
Avamar supports the X.509 v3 standard for formatting digital certificates. To sign thecertificates, you can:
l Use a commercial certification authority (CA), such as Verisign.
l Generate a root certificate and set up a private CA.
l Use a self-signed certificate (not recommended in production environments and notdiscussed in detail in this guide).
NOTICE
Installing Avamar server automatically generates a public/private key pair and a self-signed certificate in the /data01/home/admin directory on each Avamar serverstorage node and in the /usr/local/avamar/etc directory on the utility node. Usethese self-signed certificates only for installation and testing. EMC does not recommendthe use of self-signed certificates in production environments.
Client/Server Access and Authentication
30 EMC Avamar 7.2 Product Security Guide
Configure the Avamar environment for one-way or two-way authentication betweenAvamar clients and the Avamar server:
l Use one-way authentication to have the Avamar client request authentication fromthe Avamar server, and the server send a certificate to the client. The client thenvalidates the certificate. One-way authentication is also called server-to-clientauthentication in this guide.
l Use two-way authentication to have the client request authentication from theAvamar server, and have the Avamar server request authentication from the client.This client-to-server authentication combined with server-to-client authenticationprovides a stronger level of security.
In most cases, one-way authentication provides sufficient security. However, to providemore security, set up two-way authentication. Both configurations provide the capabilityof data-in-flight encryption.
Certificate acceptance workflowAvamar uses a specific workflow when a client validates a server certificate, and when aserver validates a client certificate.
Avamar uses the following workflow when determining whether to accept a certificate:
1. Obtain the fully qualified domain name (FQDN) of the computer.
When connected to a computer through an IP address, use reverse-DNS to determinethe FQDN of the computer.
2. Compare the FQDN to the value specified in the Common Name (CN) field of thecertificate.
l When the FQDN matches the value specified in the CN field, accept that thecertificate validates the computer.
l When the FQDN does not match, continue the workflow.
3. If the certificate has a wildcard character (*) in the hostname portion of the valuespecified in the CN field, perform a simple wildcard match of the FQDN to the CN.
l When the wildcard match is successful, accept that the certificate validates thecomputer.
l When the match is unsuccessful, continue the workflow.
For example, the value “r*.example.com” in the CN field of the certificate wouldmatch an FQDN such as: “real.example.com”, “right.example.com”, or“reality.example.com”; but would not match “alright.example.com”.
4. Compare the IP address of the computer to each IP address listed in the SubjectAlternative Name (SAN) field of the certificate.
l When the IP address of the computer matches an IP address in the SAN field,accept that the certificate validates the computer.
l When the match is unsuccessful, reject the certificate and terminate theconnection.
Client/Server Access and Authentication
Certificate acceptance workflow 31
One-way authenticationWith one-way authentication, the Avamar client requests authentication from the Avamarserver, and the server sends the appropriate certificate to the client. The client thenvalidates the certificate, using the certificate acceptance workflow.
Obtain the certificates required by one-way authentication through one of the followingalternative methods:
l Requesting signed certificates using a Certificate Signing Request
This method does not normally result in a certificate that contains multiple IPaddresses in the SAN field. To obtain certificates that include the SAN field, use oneof the other methods.
l Requesting signed certificates using an enrollment form
l Signed certificates from a private CA
After obtaining signed certificates, complete the following tasks:
l Installing certificates in Avamar
l Configuring Avamar to use server authentication
l Importing a CA root certificate to Unix-like clients
l Importing a CA root certificate to Windows clients
l Enforcing encrypted client/server communications
Requesting signed certificates using a Certificate Signing RequestA Certificate Signing Request (CSR) contains the basic information that a commercial CAuses to issue a certificate. Create separate CSRs for the utility node and for each storagenode. Alternatively, create a single CSR that references several nodes through the CNfield.
Procedure
1. Download and install OpenSSL on the system that generates the CSRs.
OpenSSL is available for Linux, Windows, OpenBSD, and other operating systems. Formaximum security, use the OpenBSD operating system as the host for the OpenSSLkey and certificate utilities.
2. Using an account with write permission for the current working directory, type thefollowing on a single command line:
openssl req -new -newkey rsa:3072 -keyform PEM -keyoutavamar-1key.pem -nodes -outform PEM -out avamar-1req.pem
where:
l avamar-1 is the Avamar server name.
l avamar-1key.pem is the file name for the key.
l avamar-1req.pem is the file name for the CSR.
Note
The OpenSSL web site at www.openssl.org provides information about the opensslreq command.
Client/Server Access and Authentication
32 EMC Avamar 7.2 Product Security Guide
3. At each prompt, type the information described in the following table. Press Enterafter each entry.
For optional fields, you can provide an empty value by typing a period (.) and pressingEnter.
Field Description
Country Name The two-letter ISO abbreviation for the country. The list ofabbreviations is available on the ISO web site at www.iso.org.
State or ProvinceName
In countries where it is applicable, the state or provincewhere the organization is located. This entry cannot beabbreviated.
Locality Name City where the organization is located.
Organization Name The exact legal name of the company. This entry cannot beabbreviated.
Organizational UnitName
Optional entry for more information about the organization,such as a department name.
Common Name (CN) FQDN of the computer, or a wildcard FQDN for severalcomputers. The wildcard character (*) must only appear once,and only in the hostname portion of the FQDN value. Examplefor single computer: corp-1.example.com. Examplewildcard FQDN for several computers: corp-*.example.com.
Email Address Email address of the primary administrator of the computer orcomputers.
Challenge password A password that must be provided before revoking thecertificate. The password is only required if your certificate iscompromised. Optional field.
Company name Name for your company. The exact legal name is not required.Optional field.
OpenSSL creates the CSR and key in the current working directory.
4. Repeat these steps for another Avamar server node, or group of nodes sharing the CNfield.
5. Submit the resulting CSRs to a commercial CA for signing.
Requesting signed certificates using an enrollment formMany commercial CAs provide signed certificates that include x509 v3 extensions, suchas the Subject Alternative Name (SAN) field. The SAN extension permits the issuance of acertificate that applies to multiple IP addresses. Normally an enrollment form is used torequest this type of certificate from these CAs.
When several IP addresses are included in the SAN field of a certificate, Avamar can usethat certificate to authenticate:
l A multi-homed server, by using any one of its IP addresses.
l Several servers that share the certificate, by parsing the list of IP addresses.
Client/Server Access and Authentication
Requesting signed certificates using an enrollment form 33

Procedure
1. Determine the FQDN of the multi-homed computer, or the wildcard FQDN thatrepresents several computers.
2. Determine the IP addresses covered by the certificate.
3. Select a commercial CA and complete the certificate enrollment process.
The certificate request procedures used by commercial CAs vary. The certificate mustmeet the requirements in the following table.
Attribute Requirement
Key format RSA
Key size 3072 bits
Output format PEM
Private key format (keyout) PEM
Private key format (nodes) Not encrypted
File Name extension .pem
Common Name (CN) FQDN of the computer, or wildcard FQDN for severalcomputers. The wildcard character (*) must only appearonce, and only in the hostname portion of the FQDNvalue.
Subject Alternative Name(SAN)
List of several IP addresses for a multi-homedcomputer, or a list of IP addresses for severalcomputers sharing the certificate. A CIDR notation valuecan be used to refer to a range of IP addresses.
Using a private CA to sign Avamar node certificatesCreate a private certification authority (private CA) within your company and use theprivate CA to sign the certificates for your Avamar nodes.
When creating and signing certificates, EMC recommends that you:
l Properly secure the private key associated with the root certificate.
l In a high-risk environment, use an air-gapped network for signing operations andcreating keys, CSRs, and other security-related artifacts. (An air-gapped network iscompletely physically, electrically, and electromagnetically isolated.)
l Use a hardware Random-number Generator (RNG) to efficiently and quickly generaterandom numbers with adequate characteristics for cryptographic use.
l For maximum security, use the OpenBSD operating system as the host for theOpenSSL key and certificate utilities.
Creating a private CA, and using the private CA to sign certificates for your Avamar nodes,requires the completion of several tasks. The following steps identify those tasks and theorder in which to perform them. Many of the tasks describe the use of the OpenSSLsoftware. Alternatively, other implementations of the SSL/TLS protocols can be used.
Procedure
1. Generate a private CA root certificate and key.
Client/Server Access and Authentication
34 EMC Avamar 7.2 Product Security Guide
2. Create a custom OpenSSL configuration file.
3. Create a CSR for each Avamar node.
4. Use the private CA to sign the certificates.
Generating a private CA root certificate and keyGenerate a private CA root certificate and key by using OpenSSL.
Complete this task to begin the process of using a private CA to sign certificates.
Procedure
1. Download and install OpenSSL on the system that generates the CSRs.
OpenSSL is available for Linux, Windows, OpenBSD, and other operating systems. Formaximum security, use the OpenBSD operating system as the host for the OpenSSLkey and certificate utilities.
2. Log in to the private CA computer as root.
3. Change the working directory to the location where you want to store the private CAroot certificate and key.
For example, you could store the private CA root certificate and key in /etc/ssl/private.
4. Type the following on a single command line:
openssl req -new -x509 -newkey rsa:3072 -keyform PEM -keyoutprivateCAkey.pem -extensions v3_ca -outform PEM -out privateCAcert.pem -days 3654
where:
l privateCAkey.pem is the file name of the private CA key
l privateCAcert.pem is the file name of the private CA certificate
l 3654 is the number of days the certificate is valid, here it is 3,654 days
Note
Additional details on the openssl req command can be found on the OpenSSL website at www.openssl.org.
The program prompts for a passphrase.
5. Enter a passphrase for the key.
The passphrase should be memorable. It cannot be retrieved.
The program prompts for the same passphrase.
6. Re-enter the passphrase for the key.
7. At each prompt, type the information described in the following table. Press Enterafter each entry.
For optional fields, you can provide an empty value by typing a period (.) and pressingEnter.
Client/Server Access and Authentication
Using a private CA to sign Avamar node certificates 35
Field Description
Country Name The two-letter ISO abbreviation for the country. The list ofabbreviations is available on the ISO web site atwww.iso.org.
State or Province Name In countries where it is applicable, the state or provincewhere the organization is located. This entry cannot beabbreviated.
Locality Name Name of the city where the organization is located.
Organization Name The exact legal name of the company. This entry cannotbe abbreviated.
Organizational UnitName
Optional entry for additional organization information,such as a department name.
Common Name (CN) The display name for the root certificate
Email Address Contact email address for all CA-related issues.
OpenSSL creates the private CA certificate and key in the current working directory.
8. Create back up copies of privateCAcert.pem and privateCAkey.pem.
After you finish
Create a custom OpenSSL configuration file.
Creating a custom OpenSSL configuration fileModify the OpenSSL configuration file, openssl.cnf, to meet the requirements of yourorganization for server certificates.
Before you begin
Generate a private CA root certificate and key.
Use the OpenSSL configuration file to provide the additional information that is requiredto create a server certificate that includes:
l FQDN that uses a wildcard
l Multiple IP addresses
Use this capability to create a single-server certificate to use with all of the nodes in anAvamar system.
Procedure
1. Log in to the private CA computer as root.
2. Open /etc/ssl/openssl.cnf in a plain text editor.
3. For server and server-as-client certificates, add the following to the end ofopenssl.cnf:
[ server_ext ]basicConstraints = CA:falsekeyUsage = critical, digitalSignature, keyEnciphermentnsCertType = server,clientextendedKeyUsage = serverAuth, clientAuthnsComment = "OpenSSL-generated server certificate"subjectKeyIdentifier = hashauthorityKeyIdentifier = keyid:always, issuer:always
Client/Server Access and Authentication
36 EMC Avamar 7.2 Product Security Guide
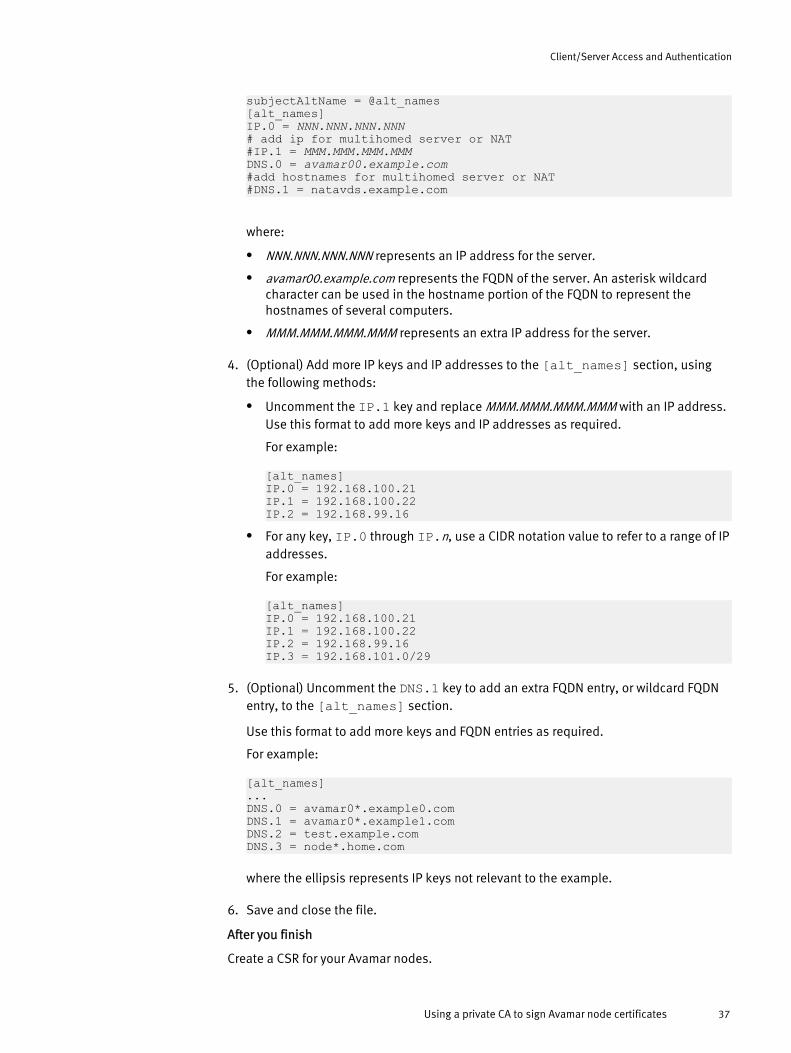
subjectAltName = @alt_names[alt_names]IP.0 = NNN.NNN.NNN.NNN# add ip for multihomed server or NAT#IP.1 = MMM.MMM.MMM.MMMDNS.0 = avamar00.example.com#add hostnames for multihomed server or NAT#DNS.1 = natavds.example.com
where:
l NNN.NNN.NNN.NNN represents an IP address for the server.
l avamar00.example.com represents the FQDN of the server. An asterisk wildcardcharacter can be used in the hostname portion of the FQDN to represent thehostnames of several computers.
l MMM.MMM.MMM.MMM represents an extra IP address for the server.
4. (Optional) Add more IP keys and IP addresses to the [alt_names] section, usingthe following methods:
l Uncomment the IP.1 key and replace MMM.MMM.MMM.MMM with an IP address.Use this format to add more keys and IP addresses as required.
For example:
[alt_names]IP.0 = 192.168.100.21IP.1 = 192.168.100.22IP.2 = 192.168.99.16
l For any key, IP.0 through IP.n, use a CIDR notation value to refer to a range of IPaddresses.
For example:
[alt_names]IP.0 = 192.168.100.21IP.1 = 192.168.100.22IP.2 = 192.168.99.16IP.3 = 192.168.101.0/29
5. (Optional) Uncomment the DNS.1 key to add an extra FQDN entry, or wildcard FQDNentry, to the [alt_names] section.
Use this format to add more keys and FQDN entries as required.
For example:
[alt_names]...DNS.0 = avamar0*.example0.comDNS.1 = avamar0*.example1.comDNS.2 = test.example.comDNS.3 = node*.home.com
where the ellipsis represents IP keys not relevant to the example.
6. Save and close the file.
After you finish
Create a CSR for your Avamar nodes.
Client/Server Access and Authentication
Using a private CA to sign Avamar node certificates 37
Creating a CSR for Avamar nodesThe Certificate Signing Request (CSR) provides the basic information required to create acertificate for an Avamar node.
Before you begin
Create a custom OpenSSL configuration file for Avamar nodes.
Create a CSR for the utility node, and a separate CSR for each storage node. Alternatively,create a single CSR that references several nodes through the CN field, the SAN field, orboth fields.
Procedure
1. Log in to the private CA computer as root.
2. Change the working directory to the location where you want to store the CSRs.
For example, /etc/ssl/private.
3. Type the following, on a single command line:
openssl req -new -newkey rsa:3072 -keyform PEM -keyoutavamar-1key.pem -nodes -outform PEM -out avamar-1req.pem
where:
l avamar-1 is the Avamar server name
l avamar-1key.pem is the file name for the key
l avamar-1req.pem is the file name for the CSR
4. At each prompt, type the information described in the following table. Press Enterafter each entry.
For optional fields, you can provide an empty value by typing a period (.) and pressingEnter.
Field Description
Country Name The two-letter ISO abbreviation for the country. The list ofabbreviations is available on the ISO web site at www.iso.org.
State or ProvinceName
In countries where it is applicable, the state or provincewhere the organization is located. This entry cannot beabbreviated.
Locality Name City where the organization is located.
Organization Name The exact legal name of the company. This entry cannot beabbreviated.
Organizational UnitName
Optional entry for more information about the organization,such as a department name.
Common Name (CN) FQDN of the computer, or a wildcard FQDN for severalcomputers. The wildcard character (*) must only appear once,and only in the hostname portion of the FQDN value. Examplefor single computer: corp-1.example.com. Examplewildcard FQDN for several computers: corp-*.example.com.
Client/Server Access and Authentication
38 EMC Avamar 7.2 Product Security Guide
Field Description
Email Address Email address of the primary administrator of the computer orcomputers.
Challenge password A password that must be provided before revoking thecertificate. The password is only required if your certificate iscompromised. Optional field.
Company name Name for your company. The exact legal name is not required.Optional field.
OpenSSL creates the CSR and key in the current working directory.
5. Repeat these steps to create a CSR for another Avamar server node, or group of nodes.
After you finish
Use the private CA to sign certificates for the Avamar nodes.
Signing Avamar node certificates by using a private CAUse a private CA to sign X.509-compliant certificates for your Avamar nodes.
Before you begin
Create at least one CSR for your Avamar nodes.
The procedure assumes the following:
l The CA certificate is in a file named privateCAcert.pem.
l The key for the CA certificate is in a file named privateCAkey.pem.
l A serial number seed file named privateCA.srl does not already exist.
l The default openssl.cnf file that is provided with OpenSSL is modified to includeinformation specific to your organization.
Procedure
1. Log in to the private CA computer as root.
2. Type the following on a single command line:
openssl x509 -CA privateCAcert.pem -CAkey privateCAkey.pem -req -inavamar-1req.pem -extensions server_ext -extfile openssl.cnf -outform PEM-out avamar-1cert.pem -days 3654 -CAserial privateCA.srl -CAcreateserial
where:
l privateCAcert.pem is the full or relative path to the private CA certificate
l privateCAkey.pem is the full or relative path to the private CA certificate key
l avamar-1req.pem is the file name of the CSR
l openssl.cnf is the full or relative path to the OpenSSL configuration file
l avamar-1cert.pem is the file name of the resulting signed certificate
l 3654 is the number of days the certificate is valid, here it is 3,654 days
l privateCA.srl is a temporary serial number seed file
The program prompts for a passphrase for the private CA certificate key.
Client/Server Access and Authentication
Using a private CA to sign Avamar node certificates 39
3. Type the passphrase for the certificate key.
OpenSSL creates the signed certificate in the current working directory.
4. Repeat these steps for each CSR.
5. (Optional) Display the certificate content in text format by typing:
openssl x509 -in avamar-1cert.pem -noout -text
After you finish
Install the certificates in the Avamar system.
Installing certificates in the Avamar systemInstall certificates in the Avamar system by copying the certificates to the correct locationon each node.
Before you begin
Obtain certificates from a commercial CA or from your private CA.
Procedure
1. Open a command shell and log in by using one of the following methods:
l For a single-node server, log in to the server as admin.
l For a multi-node server, log in to the utility node as admin.
2. Copy the certificate to the locations specified for the type of Avamar system.
l Single-node system
n Copy the certificate to: /data01/home/admin/cert.pem.
n Copy the certificate to: /usr/local/avamar/etc/cert.pem.
l Multi-node system
n On each storage node, copy the certificate generated for that node to: /data01/home/admin/cert.pem.
n On the utility node, copy the certificate generated for that node to: /usr/local/avamar/etc/cert.pem.
3. Copy the key associated with the certificate to the locations specified for the type ofAvamar system.
l Single-node system
n Copy to the key to: /data01/home/admin/key.pem.
n Copy to the key to: /usr/local/avamar/etc/key.pem.
l Multi-node system
n On each storage node, copy the key generated for that node to: /data01/home/admin/key.pem.
n On the utility node, copy the key generated for that node to: /usr/local/avamar/etc/key.pem.
4. Stop and restart the Avamar server by typing the following commands:
dpnctl stop gsandpnctl start
Client/Server Access and Authentication
40 EMC Avamar 7.2 Product Security Guide

After you finish
Configure the Avamar system to use server authentication.
Configuring Avamar to use server authenticationConfigure the Management Console Server (MCS) to use server authentication.
Before you begin
Obtain certificates from a commercial CA or from your private CA, and install thecertificates in the Avamar system.
Procedure
1. Open a command shell and log in by using one of the following methods:
l For a single-node server, log in to the server as admin.
l For a multi-node server, log in to the utility node as admin.
2. Open /usr/local/avamar/var/mc/server_data/prefs/mcserver.xmlin a plain text editor.
3. In mcserver.xml, locate the encrypt_server_authenticate preference andchange it as follows:
encrypt_server_authenticate=true
4. Save and close the file.
5. Stop and restart the MCS by typing:
dpnctl stop mcsdpnctl start mcs
6. Use the following methods to enforce server authentication for all future clientcommunications:
l When using Avamar Administrator to create or edit a group, always select Mediumor High from the Encryption method list.
Note
When you need to override this setting, refer to the EMC Avamar AdministrationGuide. That guide describes how to override the group encryption method for aspecific client, for a specific backup, and for a specific restore.
l When using the avtar command, always include the --encrypt=tls-saoption, and either the --encrypt-strength=medium option or theencrypt-strength=high option.
After you finish
Configure all Avamar clients to accept the server certificates.
Importing a CA root certificate to Unix-like clientsAllow a UNIX-like client to authenticate an Avamar server’s certificate by copying the rootcertificate of the CA that signed the Avamar server’s certificate to the UNIX-like client.
Before you begin
Do the following:
Client/Server Access and Authentication
Configuring Avamar to use server authentication 41
l Install server certificates in the Avamar system and configure the Avamar system touse server authentication.
l Determine the value of the --sysdir argument used when starting avagent on theclient.
Procedure
1. Create the file chain.pem by using the correct method for the number of files in theroot certificate:
l When the root certificate is several files that form a certificate chain, use cat withthe redirect and append operators to combine the certificates, by typing:
cat chain-cert-1 > chain.pemcat chain-cert-2 >> chain.pemcat chain-cert-3 >> chain.pem
where chain-cert-1, chain-cert-2, and chain-cert-3 represent the path to eachcertificate in the certificate chain.
The resulting combined file must be named chain.pem.
l When the root certificate is a single file, copy the root certificate to a file namedchain.pem.
2. Copy chain.pem to the following location on the Unix-like client:
/path/chain.pem
where /path is the value of the --sysdir argument. The default value is: /usr/local/avamar/etc.
For example, when the value of the --sysdir argument is the default, copychain.pem to /usr/local/avamar/etc/chain.pem.
After you finish
Enforce encrypted communication between the Avamar server and its clients.
Importing a CA root certificate to Windows clientsAllow a Windows client to trust the Avamar server's certificate by making the rootcertificate of the CA that signed the Avamar server’s certificate available on the Windowsclient.
Before you begin
Install server certificates in the Avamar system and configure the Avamar system to useserver authentication.
Client computers validate a server certificate based on a chain of trust between the servercertificate and a trusted certificate installed on the client. A server certificate issued by acommercial CA is normally accepted by a Windows client because a chain of trust existsbetween the server certificate and trusted certificates pre-installed on the Windowsclient. When a public key certificate issued by a commercial CA is not trusted by aWindows client, or when the server certificate is issued by a private CA, import the CA'sroot certificate.
Procedure
1. Copy the root certificate to the Windows client.
Client/Server Access and Authentication
42 EMC Avamar 7.2 Product Security Guide
2. Determine if the following file exists on the Windows client: C:\Program Files\avs\etc\chain.pem.
3. Depending on whether chain.pem exists, do one of the following:
Condition Action
chain.pem exists Append the information in the root certificate to theexisting content of chain.pem.
chain.pem does notexist
Rename the root certificate to chain.pem and copy it to:C:\Program Files\avs\etc\chain.pem.
After you finish
Enforce encrypted communication between the Avamar server and its clients.
Enforcing encrypted client/server communicationsConfigure the MCS to refuse plain-text communication from Avamar clients.
Completing this task forces Avamar clients to use the Avamar server's trusted public keyto encrypt all communication sent to the Avamar server.
Procedure
1. Open a command shell and log in by using one of the following methods:
l For a single-node server, log in to the server as admin.
l For a multi-node server, log in to the utility node as admin.
2. Open /usr/local/avamar/var/mc/server_data/prefs/mcserver.xmlin a plain text editor.
3. Locate the enforce_client_msg_encryption preference and change it to thefollowing:
enforce_client_msg_encryption=true
4. Save and close the file.
5. Restart the MCS by typing the following commands:
dpnctl stop mcsdpnctl start mcs
Two-way authenticationWhen two-way authentication is enabled, the Avamar server provides authentication tothe Avamar client and the Avamar client provides authentication to the Avamar server.
With two-way authentication, both of the following occur:
l The Avamar client requests authentication from the Avamar server, and the serversends the appropriate certificate to the client. The client then validates the certificate,using the certificate acceptance workflow.
l The Avamar server requests authentication from the Avamar client, and the clientsends the appropriate certificate to the server. The server then validates thecertificate, using the certificate acceptance workflow.
Client/Server Access and Authentication
Enforcing encrypted client/server communications 43
NOTICE
Before beginning these tasks, enable one-way authentication.
Obtain the client certificates required for two-way authentication through one of thefollowing alternative methods:
l Requesting client certificates using a Certificate Signing Request
This method does not result in a certificate that contains multiple IP addresses in theSAN field. To obtain certificates that include the SAN field, use one of the othermethods.
l Requesting client certificates using an enrollment form
l Use a private CA to sign client certificates
After obtaining signed certificates, complete the following tasks:
l Configuring Avamar for client authentication
l Installing a client certificate on a UNIX-like client
l Installing a client certificate on a Windows client
Requesting client certificates using a Certificate Signing RequestA Certificate Signing Request (CSR) contains the basic information that a commercial CAuses to issue a client certificate. Create a blanket CSR for all clients by using a wildcardFQDN in the CN field. To enhance security, create separate CSRs for each client.
Procedure
1. Download and install OpenSSL on the system that generates the CSRs.
OpenSSL is available for Linux, Windows, OpenBSD, and other operating systems. Formaximum security, use the OpenBSD operating system as the host for the OpenSSLkey and certificate utilities.
2. Using an account with write permission for the current working directory, type thefollowing on a single command line:
openssl req -new -newkey rsa:3072 -keyform PEM -keyoutavamarclientkey.pem -nodes -outform PEM -out avamarclientreq.pem
where:
l avamarclientkey.pem is the file name for the key.
l avamarclientreq.pem is the file name for the CSR.
3. At each prompt, type the information described in the following table. Press Enterafter each entry.
For optional fields, you can provide an empty value by typing a period (.) and pressingEnter.
Field Description
Country Name The two-letter ISO abbreviation for the country. The list ofabbreviations is available on the ISO web site at www.iso.org.
Client/Server Access and Authentication
44 EMC Avamar 7.2 Product Security Guide
Field Description
State or ProvinceName
In countries where it is applicable, the state or provincewhere the organization is located. This entry cannot beabbreviated.
Locality Name City where the organization is located.
Organization Name The exact legal name of the company. This entry cannot beabbreviated.
Organizational UnitName
Optional entry for more information about the organization,such as a department name.
Common Name (CN) FQDN of the computer, or a wildcard FQDN for severalcomputers. The wildcard character (*) must only appear once,and only in the hostname portion of the FQDN value. Examplefor single computer: corp-1.example.com. Examplewildcard FQDN for several computers: corp-*.example.com.
Email Address Email address of the primary administrator of the computer orcomputers.
Challenge password A password that must be provided before revoking thecertificate. The password is only required if your certificate iscompromised. Optional field.
Company name Name for your company. The exact legal name is not required.Optional field.
OpenSSL creates the CSR and key in the current working directory.
4. (Optional) When obtaining separate certificates for several groups of clients, or forseveral clients, repeat these steps for each required certificate.
5. Submit the resulting CSRs to a commercial CA for signing.
Requesting client certificates using an enrollment formMany commercial CAs provide signed certificates that include x509 v3 extensions, suchas the Subject Alternative Name (SAN) field. The SAN extension permits the issuance of acertificate that applies to multiple IP addresses. Normally an enrollment form is used torequest this type of certificate from these CAs.
When several IP addresses are included in the SAN field of a certificate, Avamar can usethat certificate to authenticate:
l A multi-homed client, by using any one of its IP addresses.
l Several clients that share the certificate, by parsing the list of IP addresses.
Procedure
1. Determine the FQDN of the multi-homed computer, or the wildcard FQDN thatrepresents several computers.
2. Determine the IP addresses covered by the certificate.
3. Select a commercial CA and complete the certificate enrollment process.
The certificate request procedures used by commercial CAs vary. The certificate mustmeet the requirements in the following table.
Client/Server Access and Authentication
Requesting client certificates using an enrollment form 45
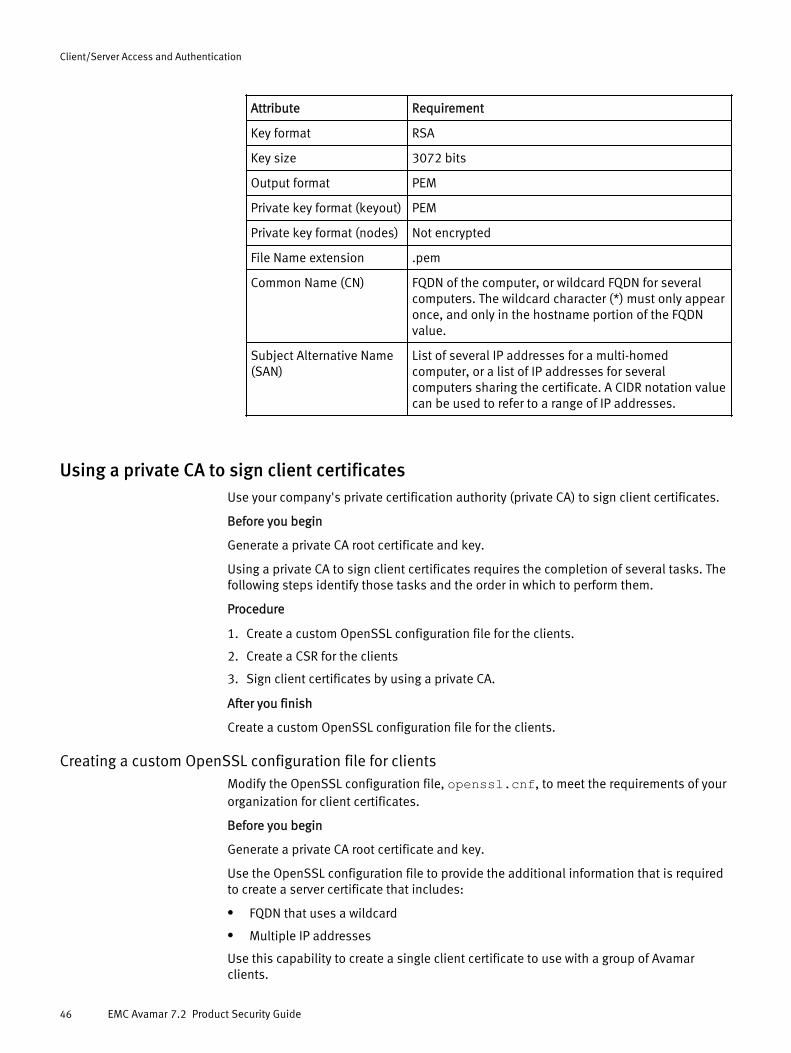
Attribute Requirement
Key format RSA
Key size 3072 bits
Output format PEM
Private key format (keyout) PEM
Private key format (nodes) Not encrypted
File Name extension .pem
Common Name (CN) FQDN of the computer, or wildcard FQDN for severalcomputers. The wildcard character (*) must only appearonce, and only in the hostname portion of the FQDNvalue.
Subject Alternative Name(SAN)
List of several IP addresses for a multi-homedcomputer, or a list of IP addresses for severalcomputers sharing the certificate. A CIDR notation valuecan be used to refer to a range of IP addresses.
Using a private CA to sign client certificatesUse your company's private certification authority (private CA) to sign client certificates.
Before you begin
Generate a private CA root certificate and key.
Using a private CA to sign client certificates requires the completion of several tasks. Thefollowing steps identify those tasks and the order in which to perform them.
Procedure
1. Create a custom OpenSSL configuration file for the clients.
2. Create a CSR for the clients
3. Sign client certificates by using a private CA.
After you finish
Create a custom OpenSSL configuration file for the clients.
Creating a custom OpenSSL configuration file for clientsModify the OpenSSL configuration file, openssl.cnf, to meet the requirements of yourorganization for client certificates.
Before you begin
Generate a private CA root certificate and key.
Use the OpenSSL configuration file to provide the additional information that is requiredto create a server certificate that includes:
l FQDN that uses a wildcard
l Multiple IP addresses
Use this capability to create a single client certificate to use with a group of Avamarclients.
Client/Server Access and Authentication
46 EMC Avamar 7.2 Product Security Guide
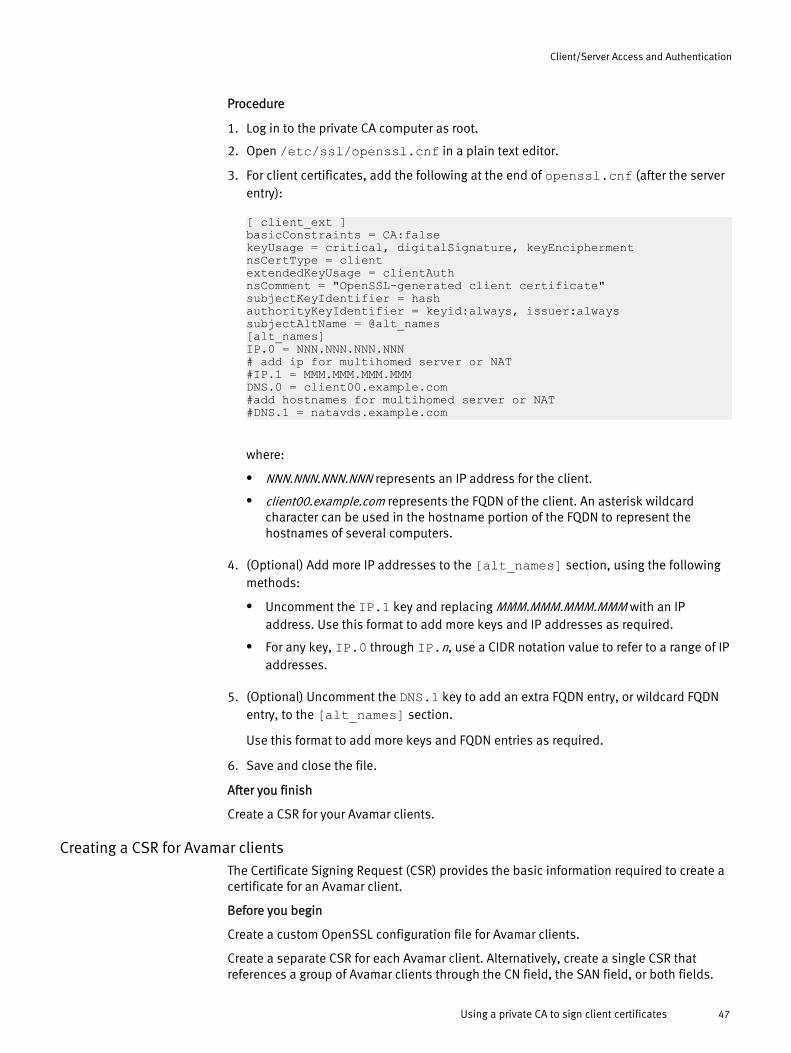
Procedure
1. Log in to the private CA computer as root.
2. Open /etc/ssl/openssl.cnf in a plain text editor.
3. For client certificates, add the following at the end of openssl.cnf (after the serverentry):
[ client_ext ]basicConstraints = CA:falsekeyUsage = critical, digitalSignature, keyEnciphermentnsCertType = clientextendedKeyUsage = clientAuthnsComment = "OpenSSL-generated client certificate"subjectKeyIdentifier = hashauthorityKeyIdentifier = keyid:always, issuer:alwayssubjectAltName = @alt_names[alt_names]IP.0 = NNN.NNN.NNN.NNN# add ip for multihomed server or NAT#IP.1 = MMM.MMM.MMM.MMMDNS.0 = client00.example.com#add hostnames for multihomed server or NAT#DNS.1 = natavds.example.com
where:
l NNN.NNN.NNN.NNN represents an IP address for the client.
l client00.example.com represents the FQDN of the client. An asterisk wildcardcharacter can be used in the hostname portion of the FQDN to represent thehostnames of several computers.
4. (Optional) Add more IP addresses to the [alt_names] section, using the followingmethods:
l Uncomment the IP.1 key and replacing MMM.MMM.MMM.MMM with an IPaddress. Use this format to add more keys and IP addresses as required.
l For any key, IP.0 through IP.n, use a CIDR notation value to refer to a range of IPaddresses.
5. (Optional) Uncomment the DNS.1 key to add an extra FQDN entry, or wildcard FQDNentry, to the [alt_names] section.
Use this format to add more keys and FQDN entries as required.
6. Save and close the file.
After you finish
Create a CSR for your Avamar clients.
Creating a CSR for Avamar clientsThe Certificate Signing Request (CSR) provides the basic information required to create acertificate for an Avamar client.
Before you begin
Create a custom OpenSSL configuration file for Avamar clients.
Create a separate CSR for each Avamar client. Alternatively, create a single CSR thatreferences a group of Avamar clients through the CN field, the SAN field, or both fields.
Client/Server Access and Authentication
Using a private CA to sign client certificates 47
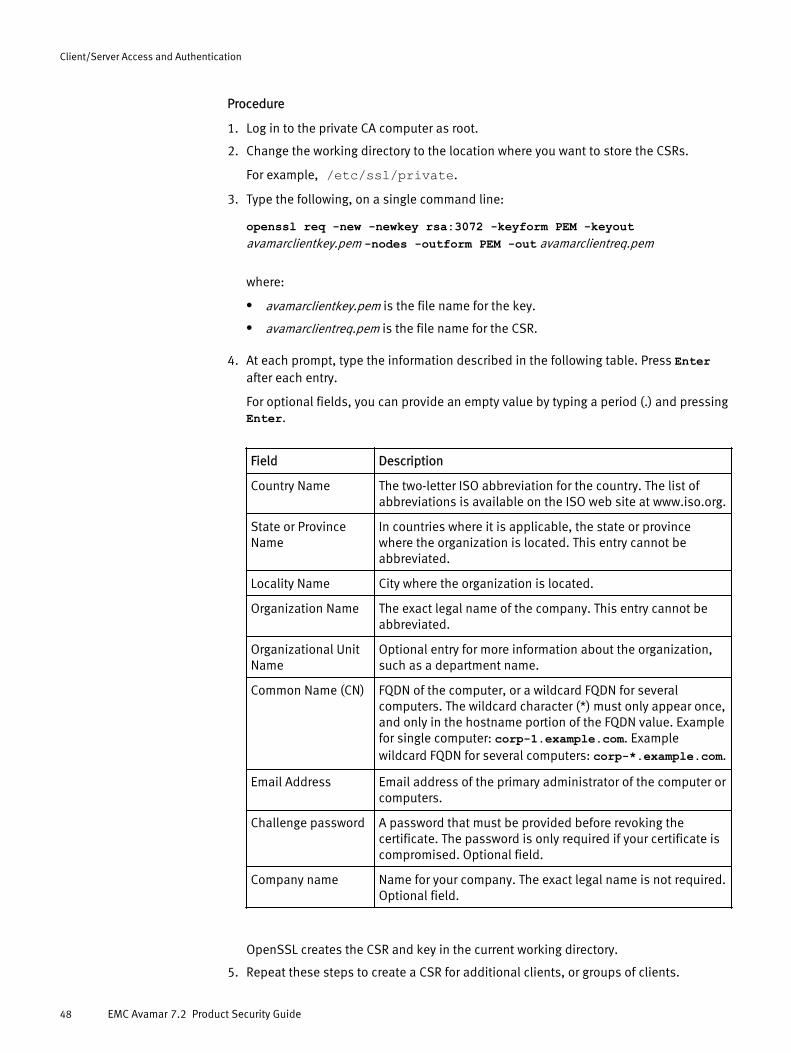
Procedure
1. Log in to the private CA computer as root.
2. Change the working directory to the location where you want to store the CSRs.
For example, /etc/ssl/private.
3. Type the following, on a single command line:
openssl req -new -newkey rsa:3072 -keyform PEM -keyoutavamarclientkey.pem -nodes -outform PEM -out avamarclientreq.pem
where:
l avamarclientkey.pem is the file name for the key.
l avamarclientreq.pem is the file name for the CSR.
4. At each prompt, type the information described in the following table. Press Enterafter each entry.
For optional fields, you can provide an empty value by typing a period (.) and pressingEnter.
Field Description
Country Name The two-letter ISO abbreviation for the country. The list ofabbreviations is available on the ISO web site at www.iso.org.
State or ProvinceName
In countries where it is applicable, the state or provincewhere the organization is located. This entry cannot beabbreviated.
Locality Name City where the organization is located.
Organization Name The exact legal name of the company. This entry cannot beabbreviated.
Organizational UnitName
Optional entry for more information about the organization,such as a department name.
Common Name (CN) FQDN of the computer, or a wildcard FQDN for severalcomputers. The wildcard character (*) must only appear once,and only in the hostname portion of the FQDN value. Examplefor single computer: corp-1.example.com. Examplewildcard FQDN for several computers: corp-*.example.com.
Email Address Email address of the primary administrator of the computer orcomputers.
Challenge password A password that must be provided before revoking thecertificate. The password is only required if your certificate iscompromised. Optional field.
Company name Name for your company. The exact legal name is not required.Optional field.
OpenSSL creates the CSR and key in the current working directory.
5. Repeat these steps to create a CSR for additional clients, or groups of clients.
Client/Server Access and Authentication
48 EMC Avamar 7.2 Product Security Guide
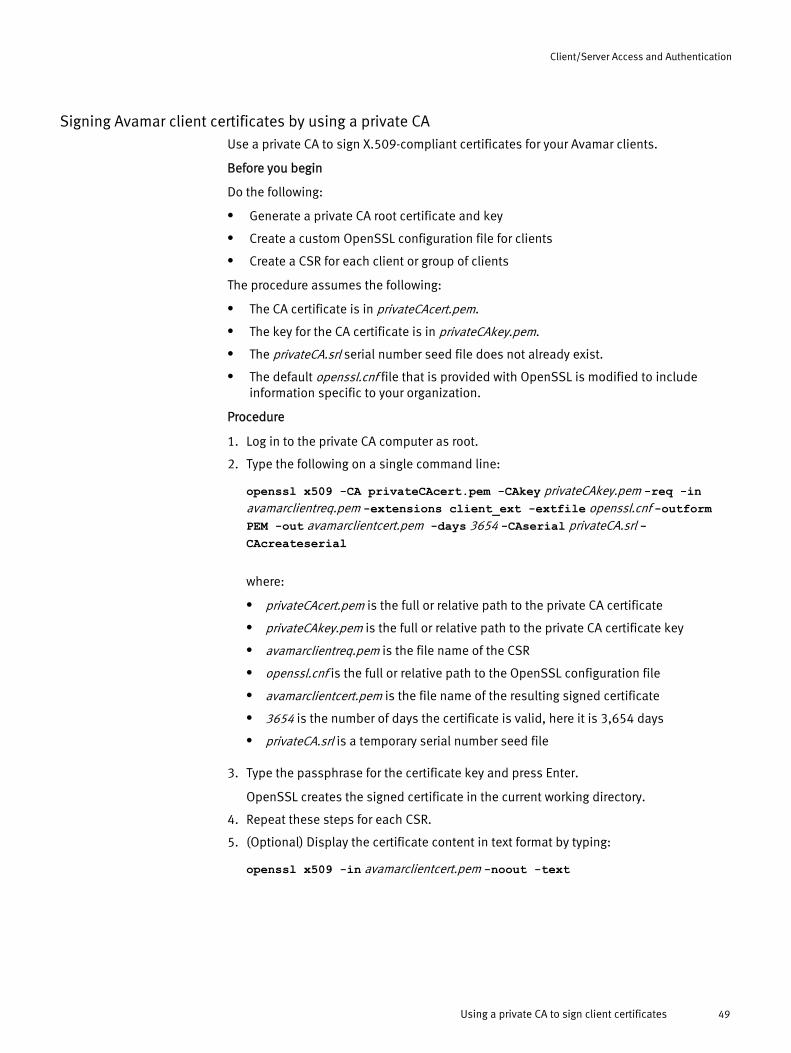
Signing Avamar client certificates by using a private CAUse a private CA to sign X.509-compliant certificates for your Avamar clients.
Before you begin
Do the following:
l Generate a private CA root certificate and key
l Create a custom OpenSSL configuration file for clients
l Create a CSR for each client or group of clients
The procedure assumes the following:
l The CA certificate is in privateCAcert.pem.
l The key for the CA certificate is in privateCAkey.pem.
l The privateCA.srl serial number seed file does not already exist.
l The default openssl.cnf file that is provided with OpenSSL is modified to includeinformation specific to your organization.
Procedure
1. Log in to the private CA computer as root.
2. Type the following on a single command line:
openssl x509 -CA privateCAcert.pem -CAkey privateCAkey.pem -req -inavamarclientreq.pem -extensions client_ext -extfile openssl.cnf -outformPEM -out avamarclientcert.pem -days 3654 -CAserial privateCA.srl -CAcreateserial
where:
l privateCAcert.pem is the full or relative path to the private CA certificate
l privateCAkey.pem is the full or relative path to the private CA certificate key
l avamarclientreq.pem is the file name of the CSR
l openssl.cnf is the full or relative path to the OpenSSL configuration file
l avamarclientcert.pem is the file name of the resulting signed certificate
l 3654 is the number of days the certificate is valid, here it is 3,654 days
l privateCA.srl is a temporary serial number seed file
3. Type the passphrase for the certificate key and press Enter.
OpenSSL creates the signed certificate in the current working directory.
4. Repeat these steps for each CSR.
5. (Optional) Display the certificate content in text format by typing:
openssl x509 -in avamarclientcert.pem -noout -text
Client/Server Access and Authentication
Using a private CA to sign client certificates 49
Configuring Avamar to use client authenticationConfigure the Avamar system to authenticate client certificates.
Before you begin
Obtain signed client certificates, and the signing authority’s root certificate. The rootcertificate comes from either a commercial CA or your private CA.
Procedure
1. Open a command shell and log in by using one of the following methods:
l For a single-node server:
a. Log in to the server as admin.
b. Switch user to root by typing su -.
l For a multi-node server:
a. Log in to the utility node as admin.
b. Load the dpnid OpenSSH key by typing:
ssh-agent bashssh-add ~admin/.ssh/dpnid
c. When prompted, type the dpnid passphrase and press Enter.
2. Stop the Avamar server by typing:
dpnctl stop gsan
3. Determine if the file chain.pem exists in the following locations:
l Single-node system
/data01/home/admin/chain.pem/usr/local/avamar/etc/chain.pem
l Multi-node system
n On each storage node:
/data01/home/admin/chain.pemn On the utility node:
/usr/local/avamar/etc/chain.pem
4. Depending on whether chain.pem exists, do one of the following:
Condition Action
chain.pem exists Append the contents of the signing authority’s rootcertificate to the contents of chain.pem in each location.
chain.pem does notexist
Copy the signing authority’s root certificate to chain.pemin the each of the locations specified in the previous step.
5. Restart the Avamar server by typing:
dpnctl start
Client/Server Access and Authentication
50 EMC Avamar 7.2 Product Security Guide
6. Enable client authentication by typing:
avmaint config verifypeer=yes --avamaronly
Installing a client certificate on a UNIX-like clientInstall a client certificate on a UNIX-like client. The Avamar server uses this certificate toauthenticate the client when two-way authentication is enabled.
Before you begin
Do the following:
l Configure the Avamar server for client authentication.
l Determine the value of the --sysdir argument used when starting avagent on theclient.
Procedure
1. Obtain a signed certificate and private key file for the client.
2. Copy the client’s certificate to the following location:
/path/cert.pem
where /path is the value of the --sysdir argument. The default value is: /usr/local/avamar/etc.
For example, when the value of the --sysdir argument is the default, copycert.pem to /usr/local/avamar/etc/cert.pem.
The certificate file must be named cert.pem.
3. Copy the private key file for the client’s certificate to the following location:
/path/key.pem
where /path is the value of the --sysdir argument. The default value is: /usr/local/avamar/etc.
The key file must be named key.pem.
Installing a client certificate on a Windows clientInstall a client certificate on a Windows client. The Avamar server uses this certificate toauthenticate the client when two-way authentication is enabled.
Before you begin
Configure the Avamar server for client authentication.
Procedure
1. Obtain a signed certificate and private key file for the client.
2. Copy the client’s certificate to C:\Program Files\avs\etc\cert.pem.
The certificate file must be named cert.pem.
3. Copy the private key file for the client’s certificate to C:\Program Files\avs\etc\key.pem.
Client/Server Access and Authentication
Installing a client certificate on a UNIX-like client 51
The key file must be named key.pem.
Verify client/server authenticationVerify an implementation of client/server authentication by running a test backup withserver authentication enabled.
The test backup can be run by using either avtar from the command line or by usingAvamar Administrator.
Verify authentication with the avtar commandUse the avtar command to verify client/server authentication by running a backup andincluding the server authentication option --encrypt=tls-sa.
The server authentication option requires authentication of the Avamar server based onthe trusted certificates installed on the Avamar client.
Verify authentication with Avamar AdministratorTo verify client/server authentication with Avamar Administrator, run a backup and selectmedium or high from the Encryption method list. The Encryption method list appears onboth the On Demand Backup Options dialog box and the Restore Options dialog box.
The EMC Avamar Administration Guide provides more information on how to run a backupwith the Avamar Administrator.
Server authentication using ApacheSeveral Avamar web-based services use the Apache HTTP server (Apache) to supply asecure web browser-based user interface. Web browser connections with theseapplications use secure socket layer/transport layer security (SSL/TLS) to provideauthentication and data security.
Apache handles the SSL/TLS sockets for Avamar web-based services when a connectionis made on the default HTTP port. Apache redirects the connection request to an SSL/TLSsocket and handles the encryption and authentication for that socket.
Web browser authentication warningWhen a web browser accesses a secure web page from an unauthenticated web server,the SSL/TLS protocol causes it to display an authentication warning. An unauthenticatedweb server is one that does not authenticate itself using a trusted public key certificate.
The Apache HTTP server provided with Avamar is installed with a self-signed certificate,not a trusted public key certificate. The self-signed certificate is sufficient to establish anencrypted channel between web browsers and the server, but it cannot be used forauthentication.
To enable Apache to provide authentication, and prevent web browser authenticationwarnings, complete the following tasks:
l Create a private key for Apache
l Generate a certificate signing request for Apache
l Obtain a public key certificate for Apache
l Configure Apache to provide public key authentication
The tools that are used to perform these tasks are part of the OpenSSL toolkit. OpenSSLis provided with Avamar.
Client/Server Access and Authentication
52 EMC Avamar 7.2 Product Security Guide
Support for Subject Alternative NamesOn an Avamar system, the Apache HTTP server (Apache), and each Apache Tomcat(Tomcat) web server, supports the X509 Version 3 (RFC 2459, section 4.2.1.7) extension.This extension provides support for certificates that include the Subject Alternative Name(SAN) field.
Apache and Tomcat can use a certificate with several IP addresses in the SAN field toprovide authentication for:
l A multi-homed server, by using any one of its IP addresses.
l Several servers that share the certificate, by parsing the list of IP addresses.
Not all combinations of browser and OS support Subject Alternative Names. Test a SANcertificate with the browser and OS combinations used by your company before installingthe certificate on a production system.
Create a private key for ApacheThe public key infrastructure (PKI) private key for an Avamar system's Apache HTTP server(Apache) can be generated using various levels of security.
Use the private key generation method that is appropriate for the level of securityrequired by your organization.
The methods for generating a private key are:
l Create a private key without randomness and without a passphrase
l Create a private key with randomness and without passphrase
l Create a private key with passphrase and without randomness
l Create a private key with randomness and with a passphrase
When a passphrase-protected private key is used, Apache prompts for the passphraseevery time the Apache process starts. The Apache configuration settingSSLPassPhraseDialog can be used to obtain the passphrase from a script. For moreinformation, refer to Apache documentation available through the Apache web site atwww.apache.org.
Creating a private key for ApacheCreate a public key infrastructure (PKI) private key for the Avamar system's Apache HTTPserver (Apache).
Procedure
1. Open a command shell and log in by using one of the following methods:
l For a single-node server:
a. Log in to the server as admin.
b. Switch user to root by typing su -.
l For a multi-node server:
a. Log in to the utility node as admin.
b. Load the dpnid OpenSSH key by typing:
ssh-agent bashssh-add ~admin/.ssh/dpnid
Client/Server Access and Authentication
Support for Subject Alternative Names 53
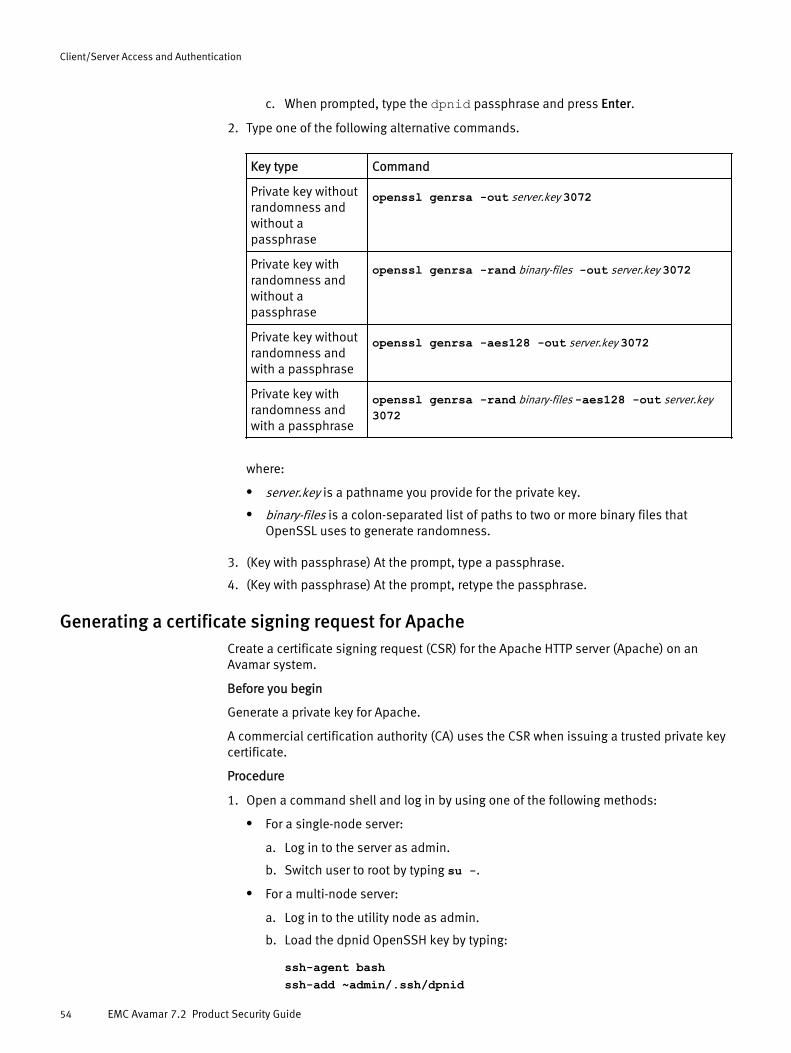
c. When prompted, type the dpnid passphrase and press Enter.
2. Type one of the following alternative commands.
Key type Command
Private key withoutrandomness andwithout apassphrase
openssl genrsa -out server.key 3072
Private key withrandomness andwithout apassphrase
openssl genrsa -rand binary-files -out server.key 3072
Private key withoutrandomness andwith a passphrase
openssl genrsa -aes128 -out server.key 3072
Private key withrandomness andwith a passphrase
openssl genrsa -rand binary-files -aes128 -out server.key3072
where:
l server.key is a pathname you provide for the private key.
l binary-files is a colon-separated list of paths to two or more binary files thatOpenSSL uses to generate randomness.
3. (Key with passphrase) At the prompt, type a passphrase.
4. (Key with passphrase) At the prompt, retype the passphrase.
Generating a certificate signing request for ApacheCreate a certificate signing request (CSR) for the Apache HTTP server (Apache) on anAvamar system.
Before you begin
Generate a private key for Apache.
A commercial certification authority (CA) uses the CSR when issuing a trusted private keycertificate.
Procedure
1. Open a command shell and log in by using one of the following methods:
l For a single-node server:
a. Log in to the server as admin.
b. Switch user to root by typing su -.
l For a multi-node server:
a. Log in to the utility node as admin.
b. Load the dpnid OpenSSH key by typing:
ssh-agent bashssh-add ~admin/.ssh/dpnid
Client/Server Access and Authentication
54 EMC Avamar 7.2 Product Security Guide
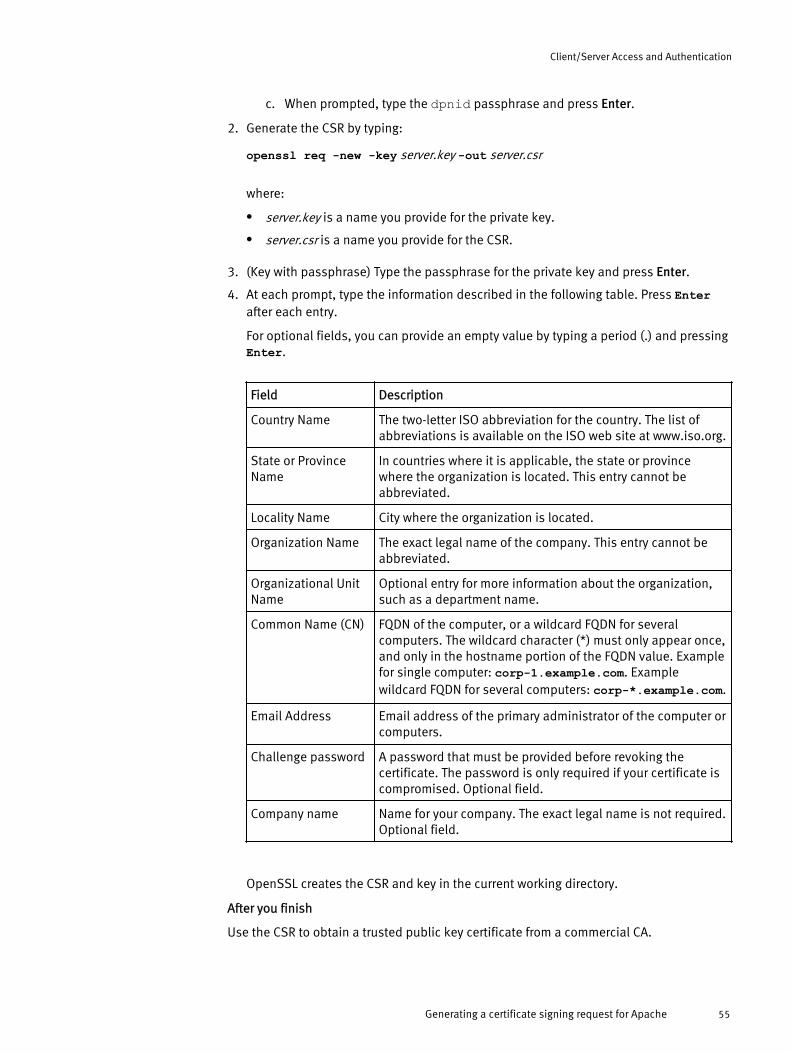
c. When prompted, type the dpnid passphrase and press Enter.
2. Generate the CSR by typing:
openssl req -new -key server.key -out server.csr
where:
l server.key is a name you provide for the private key.
l server.csr is a name you provide for the CSR.
3. (Key with passphrase) Type the passphrase for the private key and press Enter.
4. At each prompt, type the information described in the following table. Press Enterafter each entry.
For optional fields, you can provide an empty value by typing a period (.) and pressingEnter.
Field Description
Country Name The two-letter ISO abbreviation for the country. The list ofabbreviations is available on the ISO web site at www.iso.org.
State or ProvinceName
In countries where it is applicable, the state or provincewhere the organization is located. This entry cannot beabbreviated.
Locality Name City where the organization is located.
Organization Name The exact legal name of the company. This entry cannot beabbreviated.
Organizational UnitName
Optional entry for more information about the organization,such as a department name.
Common Name (CN) FQDN of the computer, or a wildcard FQDN for severalcomputers. The wildcard character (*) must only appear once,and only in the hostname portion of the FQDN value. Examplefor single computer: corp-1.example.com. Examplewildcard FQDN for several computers: corp-*.example.com.
Email Address Email address of the primary administrator of the computer orcomputers.
Challenge password A password that must be provided before revoking thecertificate. The password is only required if your certificate iscompromised. Optional field.
Company name Name for your company. The exact legal name is not required.Optional field.
OpenSSL creates the CSR and key in the current working directory.
After you finish
Use the CSR to obtain a trusted public key certificate from a commercial CA.
Client/Server Access and Authentication
Generating a certificate signing request for Apache 55
Obtain a public key certificate for ApacheObtain a public key certificate for the Avamar system's Apache HTTP server (Apache) froma commercial CA.
Provide a commercial CA with the CSR that was generated for Apache and complete anyother requirements specific to that CA. After its requirements are met, the CA provides apublic key certificate for Apache in the form of an electronic file, usually with the .crtfilename extension.
The CA may also provide a certificate chain. A certificate chain is a series of certificatesthat link the public key certificate you receive to a trusted root CA certificate. Combine thecertificate chain into a single file.
Combining a multiple file certificate chainCommercial certification authorities sometime provide a multiple file certificate chainthat links the private key certificate to a trusted root CA certificate. Use this procedure tocombine those files into a single file.
Before you begin
From a commercial CA, obtain a multiple file trusted root CA certificate chain.
Procedure
1. Open a command shell and log in by using one of the following methods:
l For a single-node server:
a. Log in to the server as admin.
b. Switch user to root by typing su -.
l For a multi-node server:
a. Log in to the utility node as admin.
b. Load the dpnid OpenSSH key by typing:
ssh-agent bashssh-add ~admin/.ssh/dpnid
c. When prompted, type the dpnid passphrase and press Enter.
2. Use cat with the redirect and append operators to combine the certificates bytyping:
cat chain-cert-1 > cachain.crtcat chain-cert-2 >> cachain.crtcat chain-cert-3 >> cachain.crtcat chain-cert-4 >> cachain.crtcat chain-cert-5 >> cachain.crt
where chain-cert-1 through chain-cert-5 represent the path to each certificate in thecertificate chain and cachain.crt is a name you provide for the combined file.
Results
The cat command with the redirect and append operators combines all of the files intoa single file.
Client/Server Access and Authentication
56 EMC Avamar 7.2 Product Security Guide
Configuring Apache to use a key and a root CA certificateConfigure the Avamar system's Apache HTTP server (Apache) to use a private key, apublic key certificate, and a trusted root CA certificate.
Before you begin
Place in a temporary directory on the Avamar system's utility node the following:
l Private key for Apache
l Public key certificate for Apache
l Trusted root CA certificate for the public key certificate used by Apache
Procedure
1. Open a command shell and log in by using one of the following methods:
l For a single-node server:
a. Log in to the server as admin.
b. Switch user to root by typing su -.
l For a multi-node server:
a. Log in to the utility node as admin.
b. Load the dpnid OpenSSH key by typing:
ssh-agent bashssh-add ~admin/.ssh/dpnid
c. When prompted, type the dpnid passphrase and press Enter.
2. Change the working directory to the temporary location of the certificate, key, andcertificate chain file.
3. Use the correct command sequence to move the certificate, key, and certificate chainfile to the OS-specific default locations.
l On Red Hat Enterprise Linux:
mv server.crt /etc/httpd/conf/ssl.crt/server.crtmv server.key /etc/httpd/conf/ssl.key/server.keymv cachain.crt /etc/httpd/conf/ssl.crt/ca.crt
l On SUSE Linux Enterprise Server:
mv server.crt /etc/apache2/ssl.crt/server.crtmv server.key /etc/apache2/ssl.key/server.keymv cachain.crt /etc/apache2/ssl.crt/ca.crt
NOTICE
Custom locations can be specified for these files by changing the Apache SSLconfiguration file. However, the Apache SSL configuration file is overwritten duringAvamar system upgrades. Restore that file after a system upgrade.
4. Restart Apache by typing:
website restart
Client/Server Access and Authentication
Configuring Apache to use a key and a root CA certificate 57
Restoring the Apache SSL configuration fileThe Apache SSL configuration file is overwritten during Avamar system upgrades. Thisalso overwrites custom paths for the certificate, key, and certificate chain file. To usecustom paths restore the Apache SSL configuration file from the backup copy madeduring the upgrade.
Procedure
1. Open a command shell and log in by using one of the following methods:
l For a single-node server:
a. Log in to the server as admin.
b. Switch user to root by typing su -.
l For a multi-node server:
a. Log in to the utility node as admin.
b. Load the dpnid OpenSSH key by typing:
ssh-agent bashssh-add ~admin/.ssh/dpnid
c. When prompted, type the dpnid passphrase and press Enter.
2. Back up the latest version of the Apache SSL configuration file.
l On Red Hat Enterprise Linux:
cd /etc/httpd/conf.d/cp ssl.conf ssl.conf.orig
l On SUSE Linux Enterprise Server:
cd /etc/apache2/vhosts.d/cp vhost-ssl.conf vhost-ssl.conf.orig
3. Change the current working directory.
cd /usr/local/avamar/var/avi/server_data/package_data/UPGRADE_FROM_VERSION/ConfigureApacheSsl/
where UPGRADE_FROM_VERSION is the name of the directory created during the latestupgrade.
4. Extract the previous version backup copy of the Apache SSL configuration file, bytyping:
tar -xzf node_0.s_*.*.*.tgz -C /
5. Restart Apache, by typing:
website restart
Client/Server Access and Authentication
58 EMC Avamar 7.2 Product Security Guide
CHAPTER 4
Data Security and Integrity
This chapter includes the following topics:
l Data-in-flight encryption........................................................................................60l Data-at-rest encryption..........................................................................................64l Data integrity.........................................................................................................70l Data erasure..........................................................................................................71
Data Security and Integrity 59
Data-in-flight encryptionAvamar can encrypt all data sent between Avamar clients and the Avamar server duringtransmission (data-in-flight encryption). Encryption methodology and levels are differentdepending on the Avamar system version.
You specify the default encryption method to use for client/server data transfers whenyou create and edit groups. You also can override the group encryption method for aspecific client on the Client Properties tab of the Edit Client dialog box, for a specificbackup on the On Demand Backup Options dialog box, or for a specific restore on theRestore Options dialog box. The EMC Avamar Administration Guide provides details.
To enable encryption of data in transit, the Avamar server data nodes each require aunique public/private key pair and a signed X.509 certificate that is associated with thepublic key.
When the Avamar server is installed, a public/private key pair and a self-signedcertificate are generated automatically in the /data01/home/admin directory on eachAvamar server storage node and in the /usr/local/avamar/etc directory on theutility node. However, because self-signing is not recommended in productionenvironments, you should generate and install a key and signed certificate from either acommercial or private CA.
You can also configure Avamar for two-way authentication, where the client requestsauthentication from the Avamar server, and then the Avamar server also requestsauthentication from the client. One-way, or server-to-client, authentication typicallyprovides sufficient security. However, in some cases, two-way authentication is requiredor preferred.
The following steps detail the encryption and authentication process for client/serverdata transfers in a server-to-client authentication environment:
1. The Avamar client requests authentication from the Avamar server.
2. The server sends the appropriate certificate to the client. The certificate contains thepublic key.
3. The client verifies the server certificate and generates a random key, which isencrypted using the public key, and sends the encrypted message to the server.
4. The server decrypts the message by using its private key and reads the key generatedby the client.
5. This random key is then used by both sides to negotiate on a set of temporarysymmetric keys to perform the encryption. The set of temporary encryption keys isrefreshed at a regular interval during the backup session.
Note
Higher cipher levels result in slower Avamar system performance.
Data-in-flight encryption in Avamar version 6.0 through Avamar version 7.0
To provide enhanced security during client/server data transfers, Avamar systems, withAvamar server version 6.0 through Avamar server version 7.0, support two levels of data-in-flight encryption: Medium and High. The exact encryption technology and bit strengththat is used for a client/server connection depends on a number of factors, including theclient platform and specific server version.
When you store Avamar version 6.0 through Avamar version 7.0 client backups on a DataDomain system, the connection between the Avamar client and the Data Domain system
Data Security and Integrity
60 EMC Avamar 7.2 Product Security Guide
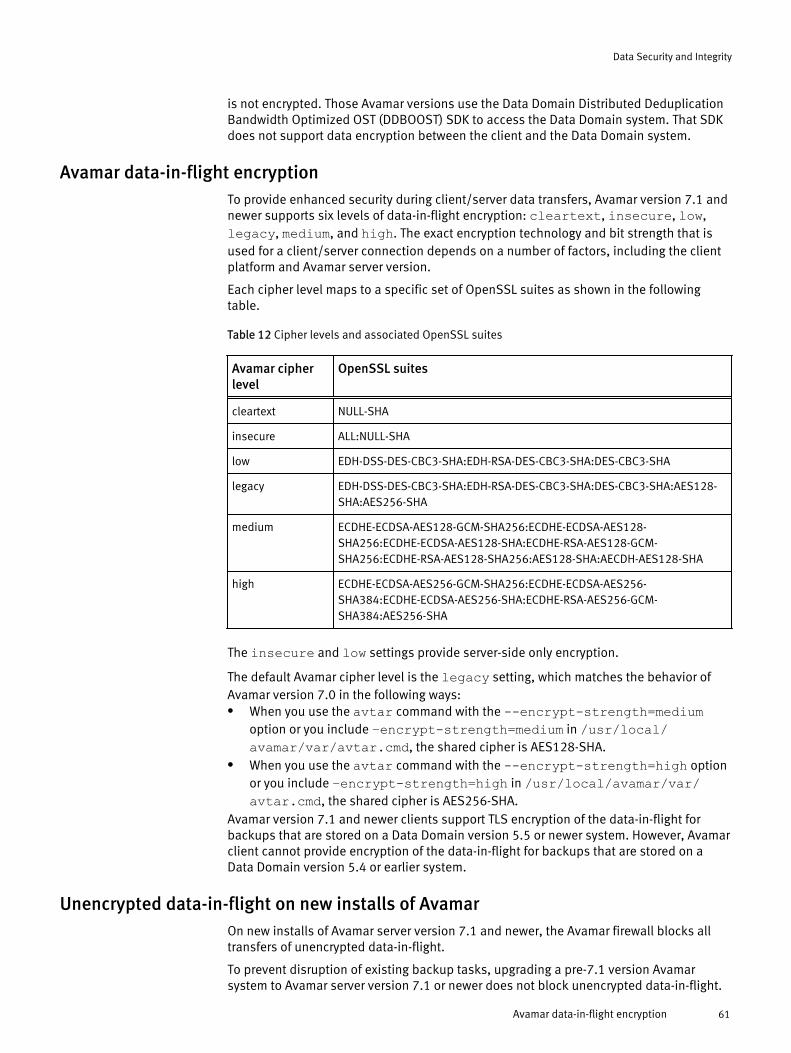
is not encrypted. Those Avamar versions use the Data Domain Distributed DeduplicationBandwidth Optimized OST (DDBOOST) SDK to access the Data Domain system. That SDKdoes not support data encryption between the client and the Data Domain system.
Avamar data-in-flight encryptionTo provide enhanced security during client/server data transfers, Avamar version 7.1 andnewer supports six levels of data-in-flight encryption: cleartext, insecure, low,legacy, medium, and high. The exact encryption technology and bit strength that isused for a client/server connection depends on a number of factors, including the clientplatform and Avamar server version.
Each cipher level maps to a specific set of OpenSSL suites as shown in the followingtable.
Table 12 Cipher levels and associated OpenSSL suites
Avamar cipherlevel
OpenSSL suites
cleartext NULL-SHA
insecure ALL:NULL-SHA
low EDH-DSS-DES-CBC3-SHA:EDH-RSA-DES-CBC3-SHA:DES-CBC3-SHA
legacy EDH-DSS-DES-CBC3-SHA:EDH-RSA-DES-CBC3-SHA:DES-CBC3-SHA:AES128-SHA:AES256-SHA
medium ECDHE-ECDSA-AES128-GCM-SHA256:ECDHE-ECDSA-AES128-SHA256:ECDHE-ECDSA-AES128-SHA:ECDHE-RSA-AES128-GCM-SHA256:ECDHE-RSA-AES128-SHA256:AES128-SHA:AECDH-AES128-SHA
high ECDHE-ECDSA-AES256-GCM-SHA256:ECDHE-ECDSA-AES256-SHA384:ECDHE-ECDSA-AES256-SHA:ECDHE-RSA-AES256-GCM-SHA384:AES256-SHA
The insecure and low settings provide server-side only encryption.
The default Avamar cipher level is the legacy setting, which matches the behavior ofAvamar version 7.0 in the following ways:l When you use the avtar command with the --encrypt-strength=medium
option or you include –encrypt-strength=medium in /usr/local/avamar/var/avtar.cmd, the shared cipher is AES128-SHA.
l When you use the avtar command with the --encrypt-strength=high optionor you include –encrypt-strength=high in /usr/local/avamar/var/avtar.cmd, the shared cipher is AES256-SHA.
Avamar version 7.1 and newer clients support TLS encryption of the data-in-flight forbackups that are stored on a Data Domain version 5.5 or newer system. However, Avamarclient cannot provide encryption of the data-in-flight for backups that are stored on aData Domain version 5.4 or earlier system.
Unencrypted data-in-flight on new installs of AvamarOn new installs of Avamar server version 7.1 and newer, the Avamar firewall blocks alltransfers of unencrypted data-in-flight.
To prevent disruption of existing backup tasks, upgrading a pre-7.1 version Avamarsystem to Avamar server version 7.1 or newer does not block unencrypted data-in-flight.
Data Security and Integrity
Avamar data-in-flight encryption 61
Upgrading to Avamar server version 7.1 or newer does not block existing backup policiesthat include transfer of unencrypted data-in-flight.
However, new installs of Avamar server version 7.1 and newer include firewall settingsthat block unencrypted data-in-flight. This firewall policy increases data security. To allowunencrypted data-in-flight on new installs of Avamar 7.1 and newer, manually change thefirewall settings.
Permitting unencrypted data-in-flightChange the Avamar firewall settings to permit unencrypted data-in-flight on new installsof Avamar 7.1 and newer.
NOTICE
This task reduces the security of data-in-flight. Only perform this task to meet a specificbusiness requirement.
Procedure
1. Open a command shell and log in by using one of the following methods:
l For a single-node server:
a. Log in to the server as admin.
b. Switch user to root by typing su -.
l For a multi-node server:
a. Log in to the utility node as admin.
b. Load the dpnid OpenSSH key by typing:
ssh-agent bashssh-add ~admin/.ssh/dpnid
c. When prompted, type the dpnid passphrase and press Enter.
2. Open in a plain text editor a new file named /usr/local/avamar/lib/admin/security/gsan-port.
3. Add the following line to the new file:
GSAN_PLAIN_TEXT='27000,'
4. Save and close the file.
5. (Multi-node systems only) Use mapall to copy the file to the storage nodes, bytyping:
mapall --user=root copy /usr/local/avamar/lib/admin/security/gsan-port
6. (Multi-node systems only) Use mapall to move the file, by typing:
mapall --user=root mv gsan-port /usr/local/avamar/lib/admin/security/
7. Restart the Avamar firewall service.
l For a single-node server, type: service avfirewall restartl For a multi-node server, type: mapall --noerror --all+ --user=root
'service avfirewall restart'
Data Security and Integrity
62 EMC Avamar 7.2 Product Security Guide
Client/server encryption behaviorClient/server encryption functional behavior in any given circumstance is dependent on anumber of factors, including the mcserver.xml encrypt_server_authenticatevalue, and the avtar encryption settings used during that activity.
The encrypt_server_authenticate value is set to true when you configure server-to-client authentication.
During backup and restore activities, you control client/server encryption by specifyingan option flag pair: --encrypt and --encrypt-strength. The --encrypt-strength option takes one of three values: None, Medium, or High.
Increasing Avamar server cipher strengthBy default, the Management Console server supports cipher strengths up to 128-bit. Youcan increase the cipher strength that is used by this server to 256-bit for communicationson the following ports:
l Ports 7778 and 7779 for the Management Console Server (MCS)
l Port 9443 for the Management Console Web Services
Increasing cipher strength for the MCSProcedure
1. Open a command shell and log in by using one of the following methods:
l For a single-node server, log in to the server as admin.
l For a multi-node server, log in to the utility node as admin.
2. Open /usr/local/avamar/var/mc/server_data/prefs/mcserver.xmlin a plain text editor.
3. Locate the rmi_cipher_strength setting and change it to high.
rmi_cipher_strength=high4. Close mcserver.xml and save your changes.
5. Download and install the Java Cryptography Extension (JCE) Unlimited StrengthJurisdiction Policy Files 6:
a. In a web browser, go to http://java.sun.com.
b. Search for “Java Cryptography Extension.”
c. Download the file associated with Java Cryptography Extension (JCE) UnlimitedStrength Jurisdiction Policy Files 6 (jce_policy-6.zip).
d. Unzip the jce_policy-6.zip file in a temporary folder and follow the instructions inthe README.txt file to install.
6. Restart the MCS and the scheduler by typing:
dpnctl stop mcsdpnctl start mcsdpnctl start sched
Data Security and Integrity
Client/server encryption behavior 63
Data-at-rest encryptionAn Avamar server can be configured to encrypt the data that is stored on it. Thisconfiguration is called data-at-rest encryption.
Avamar provides two choices for managing data-at-rest encryption keys:
l Internal key management using the avmaint command
l External key management using the Avamar Key Manager program
Internal data-at-rest encryption key managementWhen you enable data-at-rest encryption with Avamar’s internal key management theserver accepts a user-defined salt that is then used to generate an encryption key. Thesalt is stored on the Avamar server for subsequent encryption/decryption activities.
The internal key management is completely automatic:
l Old encryption keys are automatically stored in a secure manner so that data stripesencrypted with previous keys can always be decrypted and read.
l During server maintenance, crunched stripes are, over time, converted to use thecurrent key.
Note that since any reads/writes from disk require encryption processing with this featureenabled, there is a performance impact to the Avamar server of approximately 33percent.
Note
Avamar server version 7.1 and newer systems perform encryption using the AES 256 CFBblock cipher mode. Avamar server version 7.0 and earlier systems can continue to useanother block cipher mode until the salt is changed.
Enabling data-at-rest encryption using internal key managementNormally you enable data-at-rest encryption using internal key management during theinstallation or upgrade workflow. Alternatively, enable it from the utility node commandline after you complete an installation or upgrade. Also, use this method to rotate in anew data-at-rest encryption key.
Note
Do not enable data-at-rest encryption during the maintenance window or when backupsare running. For best results, perform this task during the backup window with thescheduler disabled.
Procedure
1. Open a command shell and log in by using one of the following methods:
l For a single-node server, log in to the server as admin.
l For a multi-node server, log in to the utility node as admin.
2. Type the following commands:
avmaint atrestencryption --restpassword='password' --avamaronlyavmaint atrestencryption --restsalt='salt' --avamaronly
where:
Data Security and Integrity
64 EMC Avamar 7.2 Product Security Guide

l password is a new data-at-rest encryption password.
l salt is a user-defined character string (salt), which is used to create secureencryption key. salt can contain any character (ASCII as well as multibyte charactersets are supported) and should be enclosed in single quotes. Empty strings arenot allowed.
3. Wait for these commands to complete.
4. Verify success by typing:
avmaint nodelist --xmlperline=9999 | grep atrestencryption
Information similar to the following appears in the command shell:
<atrestencryption-status enabled="true" nr-salts="1"/>
where:
l enabled="true" nr-salts="1" indicates that data-at-rest encryption isenabled.
l enabled="false" nr-salts="0" indicates that data-at-rest encryption isnot enabled.
Changing the salt table passwordThe Avamar system uses a password to access the salt table in the persistent store. Usethe utility node command line to supply a new password.
Procedure
1. Open a command shell and log in by using one of the following methods:
l For a single-node server, log in to the server as admin.
l For a multi-node server, log in to the utility node as admin.
2. Type the following command:
avmaint atrestencryption --restpassword=’password’ --avamaronly
where password is the new salt table password. password can contain any character(ASCII as well as multibyte character sets are supported) and should be enclosed insingle quotes. Empty strings are not allowed.
Avamar Key ManagerAn alternative to internal key management for data-at-rest encryption is to use externalkey management by enabling Avamar Key Manager. Avamar Key Manager acts as a clientof RSA Data Protection Manager to allow external key management through RSA DataProtection Manager.
When you install Avamar Key Manager it configures data-at-rest encryption on all Avamarnodes and registers with RSA Data Protection Manager. Avamar Key Manager then acts asa client of RSA Data Protection Manager and permits RSA Data Protection Manager tohandle all key management tasks for Avamar data-at-rest encryption.
Avamar Key Manager uses public-key cryptography to secure all communications withRSA Data Protection Manager. As preparation for using external key management, youinstall a private key for Avamar Key Manager and a public key certificate for RSA DataProtection Manager on the Avamar system. Also the RSA Data Protection Manageradministrator installs the public key for Avamar Key Manager on RSA Data ProtectionManager.
Data Security and Integrity
Avamar Key Manager 65
Note
Data-at-rest encryption through Avamar Key Manager cannot be reversed. Data encryptedby this process can only be read using Avamar Key Manager’s decryption algorithms andthrough keys that are stored in the RSA Data Protection Manager database. Avamar filesthat are required by this process are stored in /usr/local/avamar/etc/akm. Do not
delete these files. The RSA Data Protection Manager database must be backed up asdescribed in that product’s documentation.
Preparing the server for external key managementAvamar Key Manager uses public-key cryptography to secure all communications withRSA Data Protection Manager. Create and install certificates for this cryptographymethod.
Procedure
1. Obtain the certificate of a certification authority (CA) to use when generating andsigning a public/private key pair.
The certificate must be in a Base64 encoded file. The certification authority can becommercial or private.
2. Generate a public/private key pair for the Avamar system.
The resulting files must be:
l Private key and certificate that is contained in a PKCS#12 file namedclient.p12
l Public key certificate that is contained in a Base64 encoded file namedclient.pem
3. Change the file name of the CA certificate to rt.pem.
4. Copy client.p12 and rt.pem to the /usr/local/avamar/etc/akm directory on theAvamar utility node or single-node server.
5. Set the permissions of these files to read-only, 0444 (-r--r--r--).
6. Use the Appliance Management Console of RSA Data Protection Manager to addclient.pem and rt.pem into an Identity.
7. In RSA Data Protection Manager, associate the Identity for the Avamar system with theIdentity group and Keyclass assigned to the Avamar system.
Switching from internal to external key management
You can switch data-at-rest encryption from internal key management to external keymanagement. During server maintenance, crunched stripes are converted to use the newexternal key.
Note
Before enabling external key management using Avamar Key Manager, ensure that oldinternal encryption keys are automatically stored in a secure manner so that data stripesencrypted with previous keys can always be decrypted and read.
Data Security and Integrity
66 EMC Avamar 7.2 Product Security Guide
installAKM.shThe installAKM.sh script installs, configures, and starts Avamar Key Manager.
General informationYou can install Avamar Key Manager on an Avamar system when the internal keymanaged data-at-rest encryption is already enabled. The installation of Avamar KeyManager changes the data-at-rest encryption key to one that is managed through RSAData Protection Manager.
UsageThe following table lists the options that are available for installAKM.sh.
Note
Enclose options that include a space character within quotes.
Table 13 Options for installAKM.sh
Option Description
-h
--help
Displays command line help.
-i dpm-server
--ip=dpm-server
Identifies the fully qualified domain name (FQDN) or IP address of theRSA Data Protection Manager computer, where dpm-server representsthe fully qualified domain name, or IP address in dotted-quad format.This option is required.
-k keyclass
--keyclass=keyclass
Provides the RSA Data Protection Manager key class to use, wherekeyclass represents the name that identifies the key class in RSA DataProtection Manager. The key class value must be in quotes when thename includes a space character. Providing a key class value isoptional. The default key class is Avamar AES 256 CFB.
--updatepassword Replaces the private key certificate password that Avamar Key Managerstores with a new one. When the password of the private key certificatefor the Avamar server is changed, use this option to provide Avamar KeyManager with the new password.
Error messagesThe following table provides information about error messages that can appear when yourun installAKM.sh.
Table 14 Error messages for installAKM.sh
Message Description
Error: No version(s) ofdpnakm are installed
The Avamar Key Manager rpm is not installed. Install the requiredrpm by installing or upgrading to Avamar server version 7.1.0 orlater.
Error: avmaint is notexecutable
The avmaint utility cannot be started, where avmaint is the full
path to the expected location. The default location is /usr/local/avamar/bin/avmaint.
Data Security and Integrity
Avamar Key Manager 67
Table 14 Error messages for installAKM.sh (continued)
Message Description
Error: akm.xml is notwritable
The akm.xml file cannot be opened for write access, where
akm.xml is the full path to the expected location. The defaultlocation is /usr/local/avamar/etc/akm/akm.xml.
Error: hosts is not readable The hosts file cannot be read, where hosts is the full path to the
expected location. The default location is /etc/hosts.
Error: mapall is notexecutable
The mapall utility cannot be started, where mapall is the full path
to the expected location. The default location is /usr/local/avamar/bin/mapall.
Error: probe.xml is notreadable
The probe.xml file cannot be opened for reading, where
probe.xml is the full path to the expected location. The defaultlocation is /usr/local/avamar/var/probe.xml.
Error: akm_appreg.cfg is notreadable
The akm_appreg.cfg file cannot be opened for reading, where
akm_appreg.cfg is the full path to the expected location. The defaultlocation is /usr/local/avamar/bin/akm_appreg.cfg.
Error: akm_appreg.cfg.org isnot readable
The akm_appreg.cfg.org file cannot be opened for reading,
where akm_appreg.cfg.org is the full path to the expected location.The default location is /usr/local/avamar/bin/akm_appreg.cfg.org.
Enabling data-at-rest encryption using Avamar Key ManagerRun installAKM.sh to enable data-at-rest encryption using Avamar Key Manager.
Before you begin
Install RSA Data Protection Manager on a separate computer and ensure that the Avamarutility node can communicate with that computer. By default, Avamar firewall opens therequired ports on the utility node and on the storage nodes.
Procedure
1. Open a command shell and log in by using one of the following methods:
l For a single-node server, log in to the server as admin.
l For a multi-node server:
a. Log in to the utility node as admin.
b. Load the admin OpenSSH key by typing:
ssh-agent bashssh-add ~admin/.ssh/admin_key
c. When prompted, type the admin_key passphrase and press Enter.
2. Change the working directory by typing cd /usr/local/avamar/bin.
3. Type the following command:
./installAKM.sh -i dpm-server -k keyclass
where:
Data Security and Integrity
68 EMC Avamar 7.2 Product Security Guide
l dpm-server is the fully qualified domain name , or the IP address, of the RSA DataProtection Manager computer.
l keyclass is the name of the key class in RSA Data Protection Manager.
Note
The key class name must be the valid name of an existing RSA Data ProtectionManager key class.
4. At the Please enter the DPM Password prompt, type the password for theAvamar system’s private key certificate.
Results
The script starts the Avamar Key Manager service, registers as a client of RSA DataProtection Manager, and enables data-at-rest encryption.
Backing up critical Avamar Key Manager files
Avamar Key Manager relies on files stored in /usr/local/avamar/etc/akm. Withoutthese files Avamar Key Manager cannot function normally and data cannot be encryptedor decrypted.
To protect these files, back them up after the first time you run installAKM.sh. Inmost cases, a backup is made automatically. The following table describes the possibleconfigurations and the associated backup considerations.
Table 15 Critical files used by Avamar Key Manager
Configuration Backup considerations
Multi-node Avamar server Required files are automatically backed up to the storagenodes by the installAKM.sh script.
Single-node Avamar server withData Domain
Required files are automatically backed up to the Data Domainsystem through the Checkpoint Backup feature (cpbackup).
Single-node Avamar serverwithout Data Domain
Required files are not automatically backed up. Manually backup all files in /usr/local/avamar/etc/akm.
Note
The RSA Data Protection Manager database stores the keys used to encrypt Avamar’s atrest data. Back up this database to assure continued access to Avamar’s at restencrypted data. If an encryption key is lost then the encrypted data cannot be decrypted.
Avamar Key Manager unavailability
After enabling data-at-rest encryption using Avamar Key Manager, Avamar server relies oncommunication with RSA Data Protection Manager to perform the following:
l Restart the gsan process on any node
l Restart the gsan process during a restart of the Avamar server
l Rotate in a new data-at-rest encryption external key
l Run an HFS check
Data Security and Integrity
Avamar Key Manager 69
When Avamar Key Manager cannot contact RSA Data Protection Manager, running thesetasks fails and the Avamar server logs the events.
Changing the private key certificate passwordIf you change the private key certificate password, provide Avamar Key Manager with thenew password.
Note
Do not update the private key certificate password during the maintenance window orwhen backups are running. For best results, perform this task during the backup windowwith the scheduler disabled.
Procedure
1. Open a command shell and log in by using one of the following methods:
l For a single-node server, log in to the server as admin.
l For a multi-node server:
a. Log in to the utility node as admin.
b. Load the admin OpenSSH key by typing:
ssh-agent bashssh-add ~admin/.ssh/admin_key
c. When prompted, type the admin_key passphrase and press Enter.
2. Change the working directory by typing cd /usr/local/avamar/bin.
3. Type the following command:
./installAKM.sh --updatepassword -i dpm-server
where dpm-server is the fully qualified domain name , or the IP address, of the RSAData Protection Manager computer.
4. Ensure that the storage server (also known as GSAN) is idle.
The GSAN is idle when it is not doing any of the following: backups, restores, andmaintenance activities.
5. Type y and then press Enter to confirm that the storage server is idle.
6. At the Please enter the DPM Password prompt, type the new private keycertificate password, and then press Enter.
Results
The password update is complete and Avamar Key Manager stores the new password.
Data integrityCheckpoints are server backups taken for the express purpose of assisting with disasterrecovery. Checkpoints are typically scheduled twice daily and validated once daily(during the maintenance window). You also can create and validate additional servercheckpoints on an on-demand basis. The EMC Avamar Administration Guide providesdetails on creating, validating, and deleting server checkpoints.EMC AvamarAdministration Guide
Checkpoint validation, which is also called an Avamar Hash Filesystem check (HFScheck), is an internal operation that validates the integrity of a specific checkpoint. Once
Data Security and Integrity
70 EMC Avamar 7.2 Product Security Guide

a checkpoint has passed an HFS check, it can be considered reliable enough to be usedfor a system rollback.
The actual process that performs HFS checks is hfscheck; it is similar to the UNIX fsckcommand.
You can schedule HFS checks by using Avamar Administrator. You also can manuallyinitiate an HFS check by running avmaint hfscheck directly from a command shell.
An HFS check might take several hours depending on the amount of data on the Avamarserver. For this reason, each validation operation can be individually configured toperform all checks (full validation) or perform a partial rolling check which fully validatesall new and modified stripes, then partially checks a subset of unmodified stripes.
Initiating an HFS check requires significant amounts of system resources. To reducecontention with normal server operation, an HFS check can be throttled.
Additionally, during this time, the server is placed in read-only mode. Once the check hasbeen initiated, normal server access is resumed. You can also optionally suspendcommand dispatches during this time, although this is not typically done.
If HFS check detects errors in one or more stripes, it automatically attempts to repairthem.
Data erasureWhen you manually delete a backup using Avamar Administrator or you automaticallydelete a backup when its retention policy expires and garbage collection runs, data ismarked as deleted but is left on disk.
You can permanently and securely delete backups from an Avamar server in a mannerthat satisfies stringent security requirements by overwriting the data that is unique to abackup with random data.
Requirements for securely deleting backups
Avamar requirements
l All nodes must be in the ONLINE state, and no stripes should be in the OFFLINE state.This can be checked using the status.dpn command.
l The most recent checkpoint must have been successfully validated.
l Pending garbage collection operations can increase the time needed to complete thesecure deletion process, or can cause extra data to be overwritten. Therefore, youshould run garbage collection until all pending non-secure deletions havesuccessfully completed. No errors should be reported by the garbage collectionprocess.
l The server should be idle:
n There should be no backups in progress, nor should the server be runninggarbage collection or HFS checks.
n The backup scheduler and maintenance windows scheduler should be stoppedfor the duration of the secure deletion process, so that no new backups ormaintenance activities are initiated.
l Avamar storage node ext3 file systems should not be configured to operate indata=journal mode. If this is the case, data might persist on the disk after thesecure deletion process has completed.
Data Security and Integrity
Data erasure 71
Other requirements
l You must be familiar with basic- to intermediate-level Avamar server terminology andcommand-line administration.
l Some steps to securely delete backups might require the use of third party tools suchas the open-source srm or GNU shred utilities. The documentation for those utilitiesprovides additional information regarding proper use, capabilities, and limitations ofthose utilities.
l Use of any non-certified storage hardware, including RAID controllers and diskstorage arrays, might impact the effectiveness of the secure backup deletion. Consultthe manufacturers of those devices for information about disabling or clearing writecaches, or about any other features that impact data transfer to the storage media.
Securely deleting a backupThe securedelete program enables you to securely erase a backup on the Avamarserver.
This procedure can be used in conjunction with the existing procedures at a company tosecurely delete data from other parts of the operating system or hardware. Contact EMCCustomer Support for any questions regarding the effect of company procedures on theAvamar server software.
Procedure
1. Open a command shell and log in by using one of the following methods:
l For a single-node server, log in to the server as admin.
l For a multi-node server:
a. Log in to the utility node as admin.
b. Load the admin OpenSSH key by typing:
ssh-agent bashssh-add ~admin/.ssh/admin_key
c. When prompted, type the admin_key passphrase and press Enter.
2. Locate the backups to securely delete by typing the following command:
securedelete getb --id=user@auth --password=password --account=domain/client
where:
l user is the Avamar username.
l auth is is the authentication system used by that user (the default internalauthentication domain is avamar).
l password is the password for the user@auth account.
l domain/client is the full location of the client machine.
3. Locate the backup to delete in the list, and then note the date in the created field.
4. Securely delete the backup by typing the following command:
securedelete delb --account=location --date=date --id=user@auth --password=password
where:
Data Security and Integrity
72 EMC Avamar 7.2 Product Security Guide
l location is is the location of the backup, expressed as a file path relative to thecurrent working directory. However, if the first character is a slash (/), the value istreated as an absolute file path.
l date is the backup date noted in the previous step.
l user is the Avamar username.
l auth is is the authentication system used by that user (the default internalauthentication domain is avamar).
l password is the password for the user@auth account.
This operation typically takes several minutes to complete while the server securelyoverwrites data.
Note
Do not interrupt securedelete delb command. If interrupted, all data will not be
securely deleted.
If successful, the securedelete delb command returns the following response:
1 Request succeeded
If unsuccessful, the securedelete delb command returns the followingresponse:
0 ERROR! Exit code 0: Request failed.5. If an error is encountered:
l Search the knowledge base on EMC Online Support, for the specific error code.
l If the required information is not found, engage EMC Customer Support using LiveChat, or create a Service Request.
6. Check the server logs for any ERROR or WARN messages that might indicate a failureof the secure deletion operation by typing:
mapall --noerror 'grep "ERROR\|WARN" /data01/cur/gsan.log*'
7. If any such messages are present:
l Search the knowledge base on EMC Online Support, for the specific error code.
l If the required information is not found, engage EMC Customer Support using LiveChat, or create a Service Request.
8. If any stripes on the system have been repaired or rebuilt due to data corruption, thenthe bad versions remain on disk. Overwrite or securely delete these files by using anappropriate third-party tool.
Locate these stripes by typing:
mapall --noerror 'ls /data??/cur/*.bad*'
Information similar to the following appears in the command shell:
/data06/cur/0000000300000016.0000000300000016.bad1240015157/data06/cur/0000000300000016.cdt.bad1240015157/data06/cur/0000000300000016.chd.bad1240015157/data06/cur/0000000300000016.wlg.bad1240015157
Data Security and Integrity
Securely deleting a backup 73

9. If backups were performed before the most recent checkpoint was taken, roll theserver back to the most recent checkpoint, and then attempt to securely delete thebackup again.
10.Repeat the previous step for all applicable checkpoints.
11.Repeat this entire procedure on all other Avamar servers to which this Avamar serverreplicates backups.
Data Security and Integrity
74 EMC Avamar 7.2 Product Security Guide
CHAPTER 5
System Monitoring, Auditing, and Logging
This chapter includes the following topics:
l Client activity monitoring.......................................................................................76l Server monitoring..................................................................................................76
System Monitoring, Auditing, and Logging 75
Client activity monitoringYou can monitor client backup, restore, and validation activity to verify that backups aresuccessfully completing and that no abnormal activity is occurring.
The Activity Monitor tab on the Activity window in Avamar Administrator provides detailson client activity, including the type, status, start, and end time, error code (if applicable),and other details for each client activity.
The EMC Avamar Administration Guide provides details on how to access the ActivityMonitor tab and filter the activities that appear in the tab.
Server monitoringThere are several features available to assist you in monitoring the Avamar environment,including server status and system events.
Monitoring server statusAvamar systems provide monitoring of several items on the Avamar server.
You can monitor the status of the following items on the Avamar server:
l Overall Avamar server statusl Capacity usagel Modulesl Nodesl Partitionsl Checkpointsl Garbage collectionl Maintenance activities
If you use a Data Domain system as storage for Avamar client backups, you also canmonitor CPU, disk activity, and network activity for each node on the Data Domainsystem.
This status information is provided on the tabs in the Avamar Server window in AvamarAdministrator. The EMC Avamar Administration Guide provides details on how to accessthe Avamar Server window and the information available on each tab.
Monitoring system eventsAll Avamar system activity and operational status is reported as various events to theMCS. Examples of various Avamar events include client registration and activation,successful and failed backups, hard disk status, and others.
Events are listed in the Event Management tab in the Administration window of AvamarAdministrator. The EMC Avamar Administration Guide provides details on how to accessthe Event Management tab and filter the events that appear in the tab.
You can also configure Avamar to notify you when events occur. There are severalfeatures and functions available.
Pop-up alertsEvents can be configured on an event-by-event basis to generate a graphical pop-up alerteach time one of these events occurs. One significant limitation of this feature is that
System Monitoring, Auditing, and Logging
76 EMC Avamar 7.2 Product Security Guide
Avamar Administrator software must be running in order for the pop-up alerts to bedisplayed.
Acknowledgment required listEvents can be configured on an event-by-event basis such that when events of this typeoccur, an entry is added to a list of events that requires interactive acknowledgment bythe Avamar system administrator.
Email messagesEvents can be configured on an event-by-event basis to send an email message to adesignated list of recipients. Email notifications can be sent immediately or in batches atregularly scheduled times.
Syslog supportEvents can be configured on an event-by-event basis to log information to local or remotesyslog files that are based on filtering rules that are configured for the syslog daemonreceiving the events.
Third-party monitoring tools and utilities capable of examining log entries can access thesyslog files and process them to integrate Avamar event information into larger siteactivity and status reports.
NOTICE
For maximum security, EMC recommends implementing remote syslog monitoring asdescribed in the EMC Avamar Administration Guide.
SNMP supportSimple Network Management Protocol (SNMP) is a protocol for communicatingmonitoring and event notification information between an application, hardware deviceor software application, and any number of monitoring applications or devices.
The Avamar SNMP implementation provides two distinct ways to access Avamar serverevents and activity completion status:
l SNMP requests provide a mechanism for SNMP management applications to "pull"information from a remote SNMP-enabled client (in this case, the Avamar server).
l SNMP traps provide a mechanism for the Avamar server to "push" information toSNMP management applications whenever designated Avamar events occur. Eventscan be configured on an event-by-event basis to output SNMP traps.
Avamar also can collect and display data for health monitoring, system alerts, andcapacity reporting on a configured Data Domain system by using SNMP. The EMC Avamarand EMC Data Domain System Integration Guide provides details on how to configure SNMPfor Avamar with Data Domain.
ConnectEMC supportEvents can be configured on an event-by-event basis to send a notification messagedirectly to EMC Customer Support using ConnectEMC.
The EMC Avamar Administration Guide provides details on how to configure each of thesenotification mechanisms.
System Monitoring, Auditing, and Logging
Monitoring system events 77
Event notification profilesProfiles are a notification management feature that are used to logically group certainevent codes together and specify which notifications should be generated when theseevents occur.
You can create custom profiles to organize system events and generate the selectednotifications when any of those events occur. The EMC Avamar Administration Guideprovides details on how to create and manage profiles.
Email home notificationAvamar systems provide an email home feature.
When fully configured and enabled, the email home feature automatically emails thefollowing information to EMC Customer Support twice daily:
l Status of the daily data integrity check
l Selected Avamar server warnings and information messages
l Any Avamar server errors
l Any RAID errors (single-node servers only)
By default, these email messages are sent at 6 a.m. and 3 p.m. each day (based on thelocal time on the Avamar server). The timing of these messages is controlled by theNotification Schedule.
TheEMC Avamar Administration Guide provides details on how to enable and schedule theemail home feature.
AuditingThe Avamar Audit Log provides details on the operations that users start in the Avamarsystem.
The data in this log allows enterprises that deploy Avamar to enforce security policies,detect security breaches or deviation from policies, and hold appropriate usersaccountable for those actions. The audit log includes the following information for eachoperation:
l The date and time the action occurred
l The event code number that is associated with the action
l The ID and role of the user that started the action
l The product and component from which the action was started
l The severity of the action
l The domain in which the action occurred
The Audit Log is available in Avamar Administrator as a subtab of the Event Managementtab in the Administration window. The EMC Avamar Administration Guide provides detailson how to access the Audit Log and filter the events that appear in the log.
Gen4 and later Avamar Data Stores running the SUSE Linux Enterprise Server (SLES)operating system implement improved auditing features, such as Advanced IntrusionDetection Environment (AIDE) and the auditd service.
System Monitoring, Auditing, and Logging
78 EMC Avamar 7.2 Product Security Guide
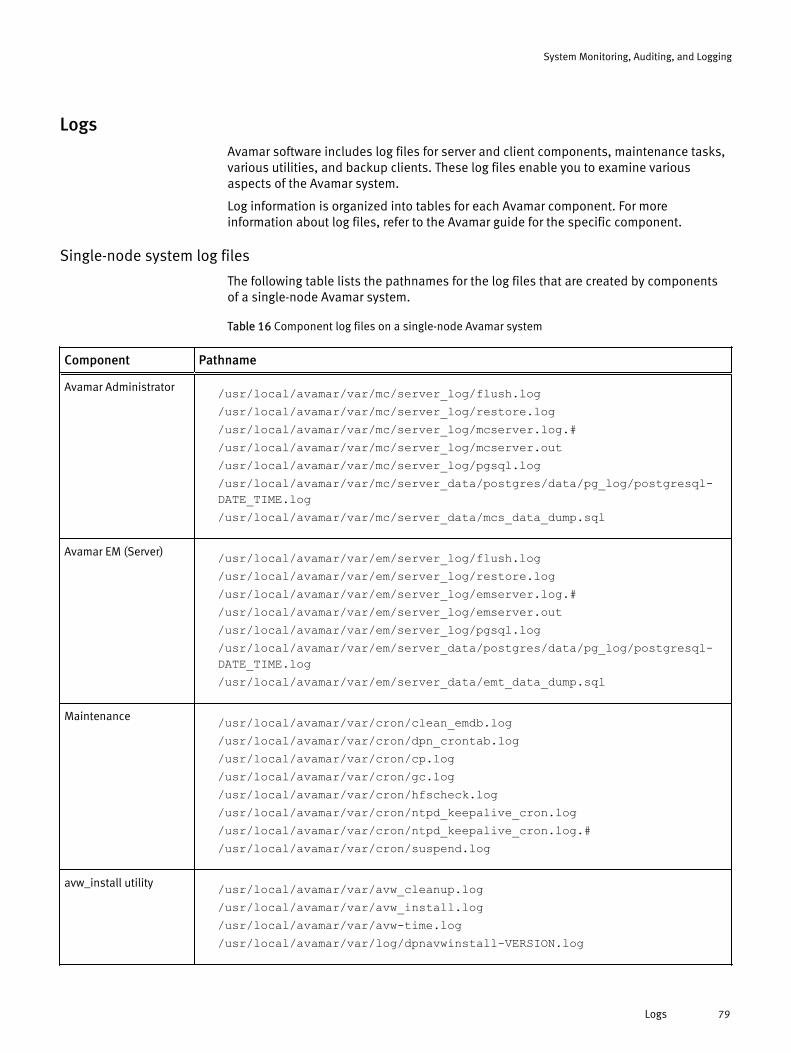
LogsAvamar software includes log files for server and client components, maintenance tasks,various utilities, and backup clients. These log files enable you to examine variousaspects of the Avamar system.
Log information is organized into tables for each Avamar component. For moreinformation about log files, refer to the Avamar guide for the specific component.
Single-node system log files
The following table lists the pathnames for the log files that are created by componentsof a single-node Avamar system.
Table 16 Component log files on a single-node Avamar system
Component Pathname
Avamar Administrator /usr/local/avamar/var/mc/server_log/flush.log/usr/local/avamar/var/mc/server_log/restore.log/usr/local/avamar/var/mc/server_log/mcserver.log.#/usr/local/avamar/var/mc/server_log/mcserver.out/usr/local/avamar/var/mc/server_log/pgsql.log/usr/local/avamar/var/mc/server_data/postgres/data/pg_log/postgresql-DATE_TIME.log/usr/local/avamar/var/mc/server_data/mcs_data_dump.sql
Avamar EM (Server) /usr/local/avamar/var/em/server_log/flush.log/usr/local/avamar/var/em/server_log/restore.log/usr/local/avamar/var/em/server_log/emserver.log.#/usr/local/avamar/var/em/server_log/emserver.out/usr/local/avamar/var/em/server_log/pgsql.log/usr/local/avamar/var/em/server_data/postgres/data/pg_log/postgresql-DATE_TIME.log/usr/local/avamar/var/em/server_data/emt_data_dump.sql
Maintenance /usr/local/avamar/var/cron/clean_emdb.log/usr/local/avamar/var/cron/dpn_crontab.log/usr/local/avamar/var/cron/cp.log/usr/local/avamar/var/cron/gc.log/usr/local/avamar/var/cron/hfscheck.log/usr/local/avamar/var/cron/ntpd_keepalive_cron.log/usr/local/avamar/var/cron/ntpd_keepalive_cron.log.#/usr/local/avamar/var/cron/suspend.log
avw_install utility /usr/local/avamar/var/avw_cleanup.log/usr/local/avamar/var/avw_install.log/usr/local/avamar/var/avw-time.log/usr/local/avamar/var/log/dpnavwinstall-VERSION.log
System Monitoring, Auditing, and Logging
Logs 79

Table 16 Component log files on a single-node Avamar system (continued)
Component Pathname
axion_install utility /usr/local/avamar/var/axion_install_DATE_TIME.log
Avamar File System(AvFS)
/usr/local/avamar/var/axionfs.log
change-passwordsutility
/usr/local/avamar/var/change-passwords.log
ddrmaint utility /usr/local/avamar/var/log/ddrmaint.log
dpnctl utility /usr/local/avamar/var/log/dpnctl.log
dpnnetutil utility /usr/local/avamar/var/log/dpnnetutil-version.log/usr/local/avamar/var/log/dpnnetutil.log*/usr/local/avamar/var/log/dpnnetutilbgaux.log/usr/local/avamar/var/log/dpnnetutilbgaux-stdout-stderr.log
permctl utility /usr/local/avamar/var/log/permctl.log
resite utility /usr/local/avamar/var/dpnresite-version.log/usr/local/avamar/var/mcspref.log/usr/local/avamar/var/nataddr.log/usr/local/avamar/var/smtphost.log
timedist utility /usr/local/avamar/var/timedist.log
timesyncmon program /usr/local/avamar/var/timesysncmon.log
Avamar Replicator /usr/local/avamar/var/cron/replicate.log
Avamar license server /usr/local/avamar/var/ascd-PORT.log
Storage server /data01/cur/err.log/data01/cur/gsan.log
Utility node log files
The following table lists the pathnames for the log files that are created by componentsof the utility node.
System Monitoring, Auditing, and Logging
80 EMC Avamar 7.2 Product Security Guide
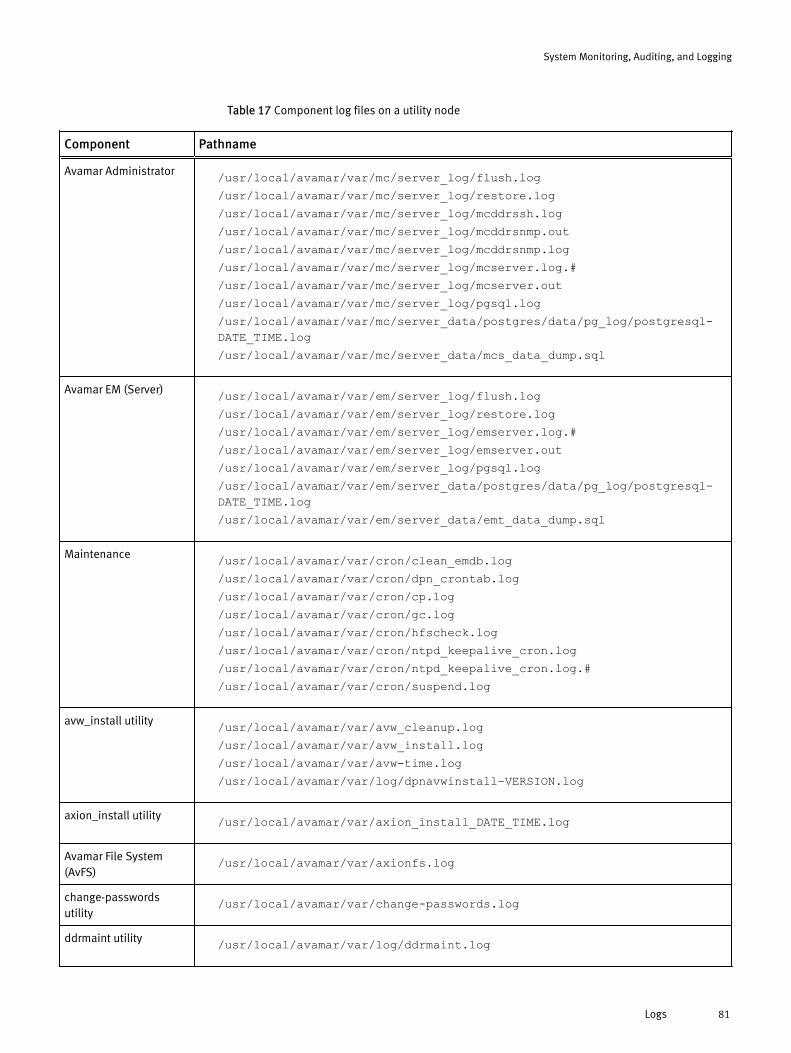
Table 17 Component log files on a utility node
Component Pathname
Avamar Administrator /usr/local/avamar/var/mc/server_log/flush.log/usr/local/avamar/var/mc/server_log/restore.log/usr/local/avamar/var/mc/server_log/mcddrssh.log/usr/local/avamar/var/mc/server_log/mcddrsnmp.out/usr/local/avamar/var/mc/server_log/mcddrsnmp.log/usr/local/avamar/var/mc/server_log/mcserver.log.#/usr/local/avamar/var/mc/server_log/mcserver.out/usr/local/avamar/var/mc/server_log/pgsql.log/usr/local/avamar/var/mc/server_data/postgres/data/pg_log/postgresql-DATE_TIME.log/usr/local/avamar/var/mc/server_data/mcs_data_dump.sql
Avamar EM (Server) /usr/local/avamar/var/em/server_log/flush.log/usr/local/avamar/var/em/server_log/restore.log/usr/local/avamar/var/em/server_log/emserver.log.#/usr/local/avamar/var/em/server_log/emserver.out/usr/local/avamar/var/em/server_log/pgsql.log/usr/local/avamar/var/em/server_data/postgres/data/pg_log/postgresql-DATE_TIME.log/usr/local/avamar/var/em/server_data/emt_data_dump.sql
Maintenance /usr/local/avamar/var/cron/clean_emdb.log/usr/local/avamar/var/cron/dpn_crontab.log/usr/local/avamar/var/cron/cp.log/usr/local/avamar/var/cron/gc.log/usr/local/avamar/var/cron/hfscheck.log/usr/local/avamar/var/cron/ntpd_keepalive_cron.log/usr/local/avamar/var/cron/ntpd_keepalive_cron.log.#/usr/local/avamar/var/cron/suspend.log
avw_install utility /usr/local/avamar/var/avw_cleanup.log/usr/local/avamar/var/avw_install.log/usr/local/avamar/var/avw-time.log/usr/local/avamar/var/log/dpnavwinstall-VERSION.log
axion_install utility /usr/local/avamar/var/axion_install_DATE_TIME.log
Avamar File System(AvFS)
/usr/local/avamar/var/axionfs.log
change-passwordsutility
/usr/local/avamar/var/change-passwords.log
ddrmaint utility /usr/local/avamar/var/log/ddrmaint.log
System Monitoring, Auditing, and Logging
Logs 81
Table 17 Component log files on a utility node (continued)
Component Pathname
dpnctl utility /usr/local/avamar/var/log/dpnctl.log
dpnnetutil utility /usr/local/avamar/var/log/dpnnetutil-version.log/usr/local/avamar/var/log/dpnnetutil.log*/usr/local/avamar/var/log/dpnnetutilbgaux.log/usr/local/avamar/var/log/dpnnetutilbgaux-stdout-stderr.log
permctl utility /usr/local/avamar/var/log/permctl.log
timedist utility /usr/local/avamar/var/timedist.log
timesyncmon program /usr/local/avamar/var/timesyncmon.log
Avamar Replicator /usr/local/avamar/var/cron/replicate.log
Avamar license server /usr/local/avamar/var/ascd-PORT.log
switch_monitoringutility
/usr/local/avamar/var/log/switch_monitoring.log
Storage node log files
The following table lists the pathnames for the log files that an Avamar storage nodecreates.
Table 18 Component log files on a storage node
Component Pathname
Storage server log /data01/cur/err.log/data01/cur/gsan.log
dpnnetutil utility /usr/local/avamar/var/log/dpnnetutilbgaux-stdout-stderr.log/usr/local/avamar/var/log/dpnnetutilbgaux.log
Maintenance task /usr/local/avamar/var/ntpd_keepalive_cron.log*
timesyncmon program /usr/local/avamar/var/timesyncmon.log*
Spare node log file
The following table lists the pathname for the spare node log file.
System Monitoring, Auditing, and Logging
82 EMC Avamar 7.2 Product Security Guide
Table 19 Component log file on a spare node
Component Pathname
dpnnetutil utility /usr/local/avamar/var/log/dpnnetutilbgaux-stdout-stderr.log/usr/local/avamar/var/log/dpnnetutibgaux.log
Avamar NDMP Accelerator log files
The following tables list the pathnames for the log files created by the Avamar NDMPAccelerator.
Table 20 Component log files for the NDMP Accelerator
Component Pathname
avndmp log /usr/local/avamar/var/{FILER-NAME}/*.avdnmp.log
dpnnetutil utility /usr/local/avamar/var/log/dpnnetutilbgaux-stdout-stderr.log/usr/local/avamar/var/log/dpnnetutilbgaux.log
Access node log files
The following table lists the pathname for the log files created by an access node.
Table 21 Component log files on an access node
Component Pathname
dpnnetutil utility /usr/local/avamar/var/log/dpnnetutilbgaux-stdout-stderr.log/usr/local/avamar/var/log/dpnnetutilbgaux.log
Avamar Administrator client log files
The following tables list the pathnames for the log files created by the AvamarAdministrator client.
Table 22 Component log files on an Avamar Administrator client
Component Operating system Pathname
Avamar Administrator managementconsole
Windows 7
Windows Vista Windows XP
Linux
C:\Users\USERNAME\.avamardata\var\mc\gui_logC:\Documents and Settings\USERNAME\.avamardata\var\mc\gui_log$HOME/.avamardata/var/mc/gui_log/mcclient.log.0
System Monitoring, Auditing, and Logging
Logs 83
Table 22 Component log files on an Avamar Administrator client (continued)
Component Operating system Pathname
Avamar Administrator managementconsole command line interface
UNIX $HOME/.avamardata/var/mc/gui_log/mccli.log.0
Backup client log files
The following table lists the pathnames for the log files created by Avamar componentson an Avamar backup client.
Table 23 Component log files for an Avamar backup client
Component Pathname
Client avagent process(all clients)
C:\Program Files\avs\var\avagent.log
Client avtar process (allclients)
C:\Program Files\avs\var\clientlogs\{WORKORDER-ID}.algC:\Program Files\avs\var\clientlogs\{WORKORDER-ID}.log
Avamar Client forWindows tray applet
C:\Program Files\avs\var\avscc.log
Avamar Plug-in for DB2 /usr/local/avamar/var/client/{WORKORDER-ID}.log
Avamar Exchange Client /usr/local/avamar/var/client/{WORKORDER-ID}.log
Avamar NDMPAccelerator
/usr/local/avamar/var/client/{WORKORDER-ID}.log
Avamar Client forNetWare
/usr/local/avamar/var/client/{WORKORDER-ID}.log
Avamar Plug-in forOracle
/usr/local/avamar/var/client/{WORKORDER-ID}.log
Avamar Plug-in for SQLServer
/usr/local/avamar/var/client/{WORKORDER-ID}.log
System Monitoring, Auditing, and Logging
84 EMC Avamar 7.2 Product Security Guide
CHAPTER 6
Server Security Hardening
This chapter includes the following topics:
l Overview............................................................................................................... 86l Level-1 security hardening.................................................................................... 86l Level-2 security hardening.................................................................................... 96l Level-3 security hardening.................................................................................. 104
Server Security Hardening 85
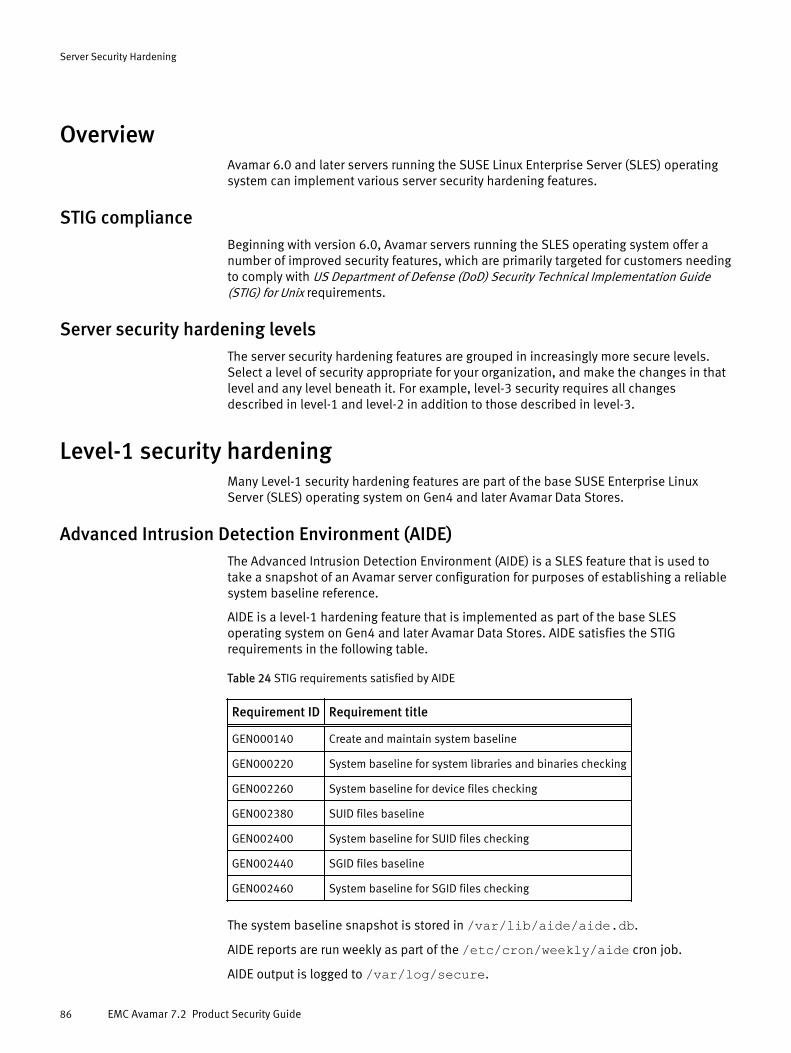
OverviewAvamar 6.0 and later servers running the SUSE Linux Enterprise Server (SLES) operatingsystem can implement various server security hardening features.
STIG complianceBeginning with version 6.0, Avamar servers running the SLES operating system offer anumber of improved security features, which are primarily targeted for customers needingto comply with US Department of Defense (DoD) Security Technical Implementation Guide(STIG) for Unix requirements.
Server security hardening levelsThe server security hardening features are grouped in increasingly more secure levels.Select a level of security appropriate for your organization, and make the changes in thatlevel and any level beneath it. For example, level-3 security requires all changesdescribed in level-1 and level-2 in addition to those described in level-3.
Level-1 security hardeningMany Level-1 security hardening features are part of the base SUSE Enterprise LinuxServer (SLES) operating system on Gen4 and later Avamar Data Stores.
Advanced Intrusion Detection Environment (AIDE)The Advanced Intrusion Detection Environment (AIDE) is a SLES feature that is used totake a snapshot of an Avamar server configuration for purposes of establishing a reliablesystem baseline reference.
AIDE is a level-1 hardening feature that is implemented as part of the base SLESoperating system on Gen4 and later Avamar Data Stores. AIDE satisfies the STIGrequirements in the following table.
Table 24 STIG requirements satisfied by AIDE
Requirement ID Requirement title
GEN000140 Create and maintain system baseline
GEN000220 System baseline for system libraries and binaries checking
GEN002260 System baseline for device files checking
GEN002380 SUID files baseline
GEN002400 System baseline for SUID files checking
GEN002440 SGID files baseline
GEN002460 System baseline for SGID files checking
The system baseline snapshot is stored in /var/lib/aide/aide.db.
AIDE reports are run weekly as part of the /etc/cron/weekly/aide cron job.
AIDE output is logged to /var/log/secure.
Server Security Hardening
86 EMC Avamar 7.2 Product Security Guide
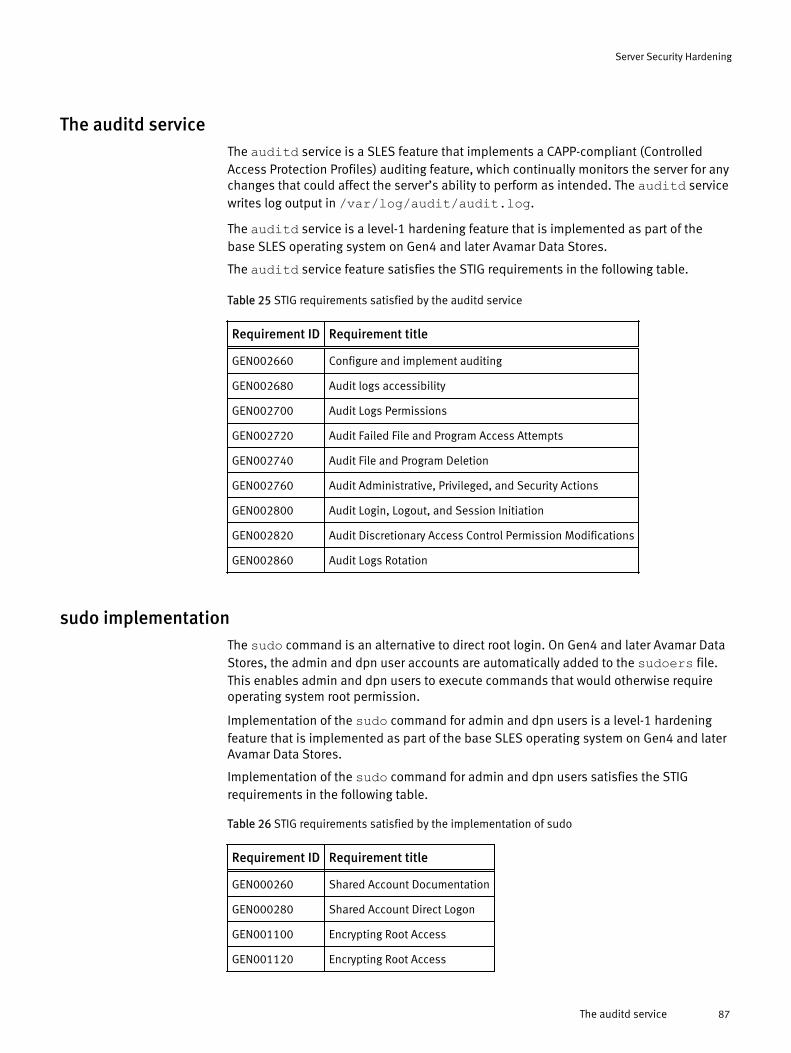
The auditd serviceThe auditd service is a SLES feature that implements a CAPP-compliant (ControlledAccess Protection Profiles) auditing feature, which continually monitors the server for anychanges that could affect the server’s ability to perform as intended. The auditd servicewrites log output in /var/log/audit/audit.log.
The auditd service is a level-1 hardening feature that is implemented as part of thebase SLES operating system on Gen4 and later Avamar Data Stores.
The auditd service feature satisfies the STIG requirements in the following table.
Table 25 STIG requirements satisfied by the auditd service
Requirement ID Requirement title
GEN002660 Configure and implement auditing
GEN002680 Audit logs accessibility
GEN002700 Audit Logs Permissions
GEN002720 Audit Failed File and Program Access Attempts
GEN002740 Audit File and Program Deletion
GEN002760 Audit Administrative, Privileged, and Security Actions
GEN002800 Audit Login, Logout, and Session Initiation
GEN002820 Audit Discretionary Access Control Permission Modifications
GEN002860 Audit Logs Rotation
sudo implementationThe sudo command is an alternative to direct root login. On Gen4 and later Avamar DataStores, the admin and dpn user accounts are automatically added to the sudoers file.This enables admin and dpn users to execute commands that would otherwise requireoperating system root permission.
Implementation of the sudo command for admin and dpn users is a level-1 hardeningfeature that is implemented as part of the base SLES operating system on Gen4 and laterAvamar Data Stores.
Implementation of the sudo command for admin and dpn users satisfies the STIGrequirements in the following table.
Table 26 STIG requirements satisfied by the implementation of sudo
Requirement ID Requirement title
GEN000260 Shared Account Documentation
GEN000280 Shared Account Direct Logon
GEN001100 Encrypting Root Access
GEN001120 Encrypting Root Access
Server Security Hardening
The auditd service 87
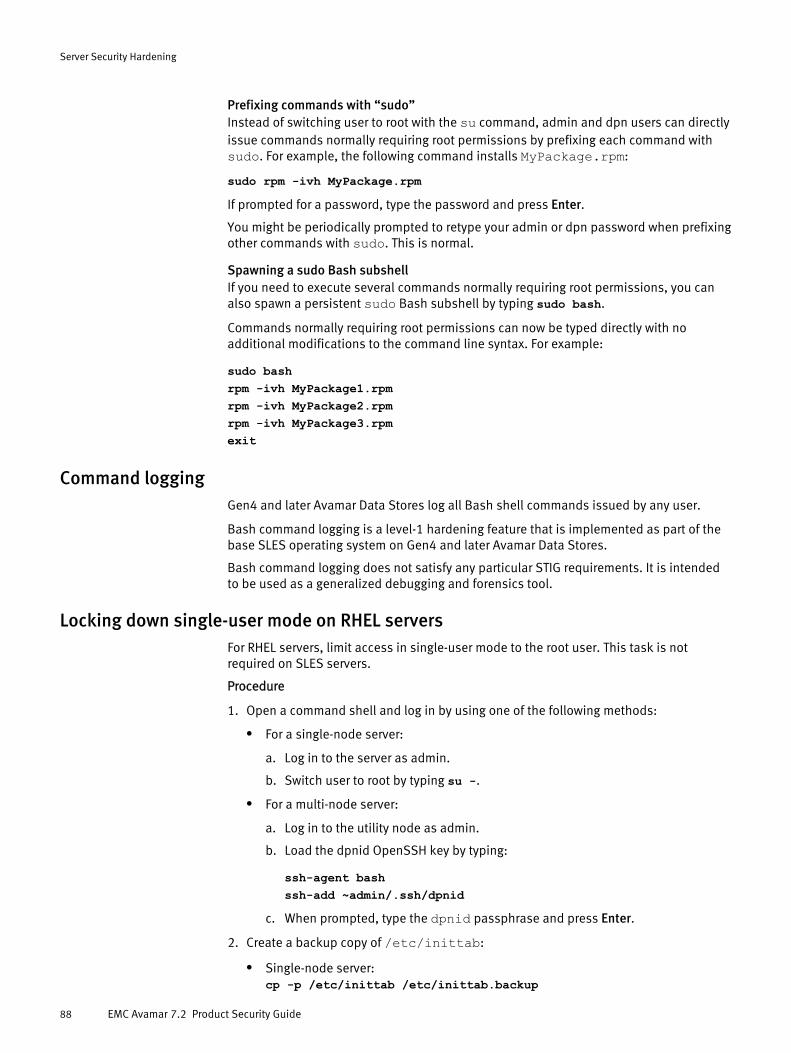
Prefixing commands with “sudo”Instead of switching user to root with the su command, admin and dpn users can directlyissue commands normally requiring root permissions by prefixing each command withsudo. For example, the following command installs MyPackage.rpm:
sudo rpm -ivh MyPackage.rpmIf prompted for a password, type the password and press Enter.
You might be periodically prompted to retype your admin or dpn password when prefixingother commands with sudo. This is normal.
Spawning a sudo Bash subshellIf you need to execute several commands normally requiring root permissions, you canalso spawn a persistent sudo Bash subshell by typing sudo bash.
Commands normally requiring root permissions can now be typed directly with noadditional modifications to the command line syntax. For example:
sudo bashrpm -ivh MyPackage1.rpmrpm -ivh MyPackage2.rpmrpm -ivh MyPackage3.rpmexit
Command loggingGen4 and later Avamar Data Stores log all Bash shell commands issued by any user.
Bash command logging is a level-1 hardening feature that is implemented as part of thebase SLES operating system on Gen4 and later Avamar Data Stores.
Bash command logging does not satisfy any particular STIG requirements. It is intendedto be used as a generalized debugging and forensics tool.
Locking down single-user mode on RHEL serversFor RHEL servers, limit access in single-user mode to the root user. This task is notrequired on SLES servers.
Procedure
1. Open a command shell and log in by using one of the following methods:
l For a single-node server:
a. Log in to the server as admin.
b. Switch user to root by typing su -.
l For a multi-node server:
a. Log in to the utility node as admin.
b. Load the dpnid OpenSSH key by typing:
ssh-agent bashssh-add ~admin/.ssh/dpnid
c. When prompted, type the dpnid passphrase and press Enter.
2. Create a backup copy of /etc/inittab:
l Single-node server:cp -p /etc/inittab /etc/inittab.backup
Server Security Hardening
88 EMC Avamar 7.2 Product Security Guide

l Multi-node server:mapall --all --user=root "cp /etc/inittab /etc/inittab.backup"
3. Open /etc/inittab in a plain text editor.
4. Add the following entry:
Change:
# System initializationsi::sysinit:/etc/rc.d/rc.sysinit
To:
# System initializationsi::sysinit:/etc/rc.d/rc.sysinitss:S:respawn:/sbin/sulogin
5. Close inittab and save your changes.
6. (Multi-node system only) Copy the changes made to /etc/inittab to all nodes bytyping:
cd /etcmapall --all --user=root copy inittabmapall --all --user=root "cp /root/inittab /etc/inittab"mapall --all --user=root "rm -f /root/inittab"
Disabling SambaFor RHEL servers, and SLES servers with the optional Samba packages installed,disabling Samba prevents the use of Samba commands to obtain valid local and domainusernames and to obtain the Avamar server’s browse list. The browse list is a list of thecomputers nearest to the Avamar server.
Procedure
1. Open a command shell and log in by using one of the following methods:
l For a single-node server:
a. Log in to the server as admin.
b. Switch user to root by typing su -.
l For a multi-node server:
a. Log in to the utility node as admin.
b. Load the dpnid OpenSSH key by typing:
ssh-agent bashssh-add ~admin/.ssh/dpnid
c. When prompted, type the dpnid passphrase and press Enter.
2. Disable Samba:
l Single-node server:
service smb stopchkconfig smb off
Server Security Hardening
Disabling Samba 89
l Multi-node server:
mapall --all --user=root "service smb stop"mapall --all --user=root "chkconfig smb off"
Results
Samba is disabled and will not start when the Avamar system boots.
Web server cipher suite hardening on pre-7.1 Avamar systemsHarden the cipher suite used by the web servers on pre-7.1 Avamar systems to preventintrusions.
NOTICE
The tasks listed in this section only apply to pre-7.1 Avamar server versions.
To help prevent security intrusions that take advantage of weaker default cipher suites onpre-7.1 Avamar server versions, complete the following tasks:
l Force strong ciphers for Apache on pre-7.1 Avamar server versions
l Force strong ciphers for Java on pre-7.1 Avamar server versions
l Force strong ciphers for Tomcat on pre-7.1 Avamar server versions
l Configure IE8 to use strong encryption
Forcing strong ciphers for Apache on pre-7.1 Avamar server versionsHarden the cipher suite used by the Apache HTTP server (Apache) on pre-7.1 Avamarsystems.
Procedure
1. Open a command shell and log in by using one of the following methods:
l For a single-node server:
a. Log in to the server as admin.
b. Switch user to root by typing su -.
l For a multi-node server:
a. Log in to the utility node as admin.
b. Load the dpnid OpenSSH key by typing:
ssh-agent bashssh-add ~admin/.ssh/dpnid
c. When prompted, type the dpnid passphrase and press Enter.
2. Make a backup copy of the SSL configuration file for Apache.
l On SLES, make a copy of /etc/apache2/vhosts.d/vhost-ssl.conf.
l On RHEL, make a copy of /etc/httpd/conf.d/ssl.conf.
3. Open the SSL configuration file in a plain text editor.
l On SLES, open /etc/apache2/vhosts.d/vhost-ssl.conf.
l On RHEL, open /etc/httpd/conf.d/ssl.conf.
Server Security Hardening
90 EMC Avamar 7.2 Product Security Guide

4. In the SSL configuration file, move the line that reads SSLHonorCipherOrder Onbefore the line that starts with SSLCipherSuite.
5. In the SSL configuration file, replace the existing SSLCipherSuite line with thefollowing:
SSLCipherSuite DHE-RSA-AES256-SHA:DHE-RSA-AES128-SHA:AES256-SHA:AES128-SHA:DES-CBC3-SHA
6. Save the changes and close the SSL configuration file.
7. Restart the Apache web server by typing:
l On SLES:
/etc/init.d/apache2 stop/etc/init.d/apache2 start
l On RHEL:
/etc/init.d/httpd stop/etc/init.d/httpd start
Forcing strong ciphers for Java on pre-7.1 Avamar server versionsHarden the cipher suite used by the Java on pre-7.1 Avamar systems.
Procedure
1. Open a command shell and log in by using one of the following methods:
l For a single-node server, log in to the server as admin.
l For a multi-node server, log in to the utility node as admin.
2. Stop the MCS by typing dpnctl stop mcs.
3. Open /usr/local/avamar/var/mc/server_data/prefs/mcserver.xmlin a plain text editor.
4. Replace the existing cipher_suite_128 line with the following :
<entry key="cipher_suite_128"value="TLS_RSA_WITH_AES_128_CBC_SHA,TLS_DHE_RSA_WITH_AES_128_CBC_SHA,TLS_DHE_DSS_WITH_AES_128_CBC_SHA"/>
5. Save the changes, and close mcserver.xml.
6. Start the MCS and the scheduler by typing:
dpnctl start mcsdpnctl start sched
Forcing strong ciphers for Tomcat on pre-7.1 Avamar server versionsHarden the cipher suite used by the Apache Tomcat (Tomcat) servers on pre-7.1 Avamarsystems.
Procedure
1. Open a command shell and log in by using one of the following methods:
l For a single-node server:
a. Log in to the server as admin.
Server Security Hardening
Web server cipher suite hardening on pre-7.1 Avamar systems 91
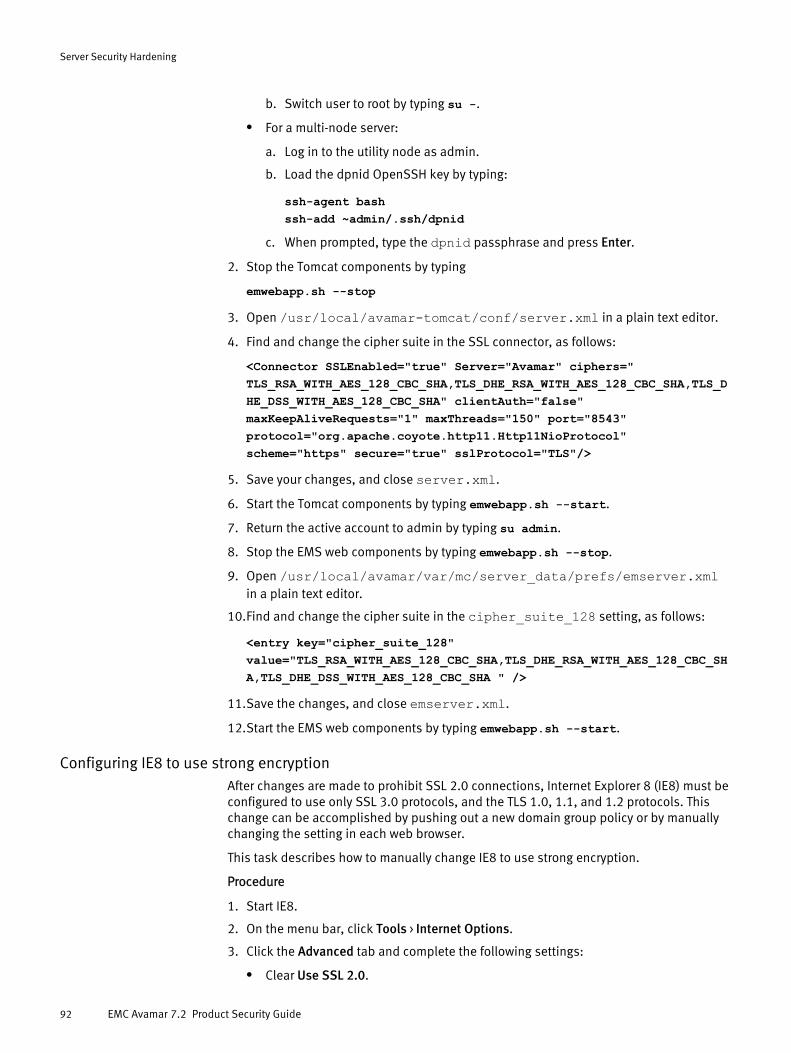
b. Switch user to root by typing su -.
l For a multi-node server:
a. Log in to the utility node as admin.
b. Load the dpnid OpenSSH key by typing:
ssh-agent bashssh-add ~admin/.ssh/dpnid
c. When prompted, type the dpnid passphrase and press Enter.
2. Stop the Tomcat components by typing
emwebapp.sh --stop
3. Open /usr/local/avamar-tomcat/conf/server.xml in a plain text editor.
4. Find and change the cipher suite in the SSL connector, as follows:
<Connector SSLEnabled="true" Server="Avamar" ciphers="TLS_RSA_WITH_AES_128_CBC_SHA,TLS_DHE_RSA_WITH_AES_128_CBC_SHA,TLS_DHE_DSS_WITH_AES_128_CBC_SHA" clientAuth="false"maxKeepAliveRequests="1" maxThreads="150" port="8543"protocol="org.apache.coyote.http11.Http11NioProtocol"scheme="https" secure="true" sslProtocol="TLS"/>
5. Save your changes, and close server.xml.
6. Start the Tomcat components by typing emwebapp.sh --start.
7. Return the active account to admin by typing su admin.
8. Stop the EMS web components by typing emwebapp.sh --stop.
9. Open /usr/local/avamar/var/mc/server_data/prefs/emserver.xmlin a plain text editor.
10.Find and change the cipher suite in the cipher_suite_128 setting, as follows:
<entry key="cipher_suite_128"value="TLS_RSA_WITH_AES_128_CBC_SHA,TLS_DHE_RSA_WITH_AES_128_CBC_SHA,TLS_DHE_DSS_WITH_AES_128_CBC_SHA " />
11.Save the changes, and close emserver.xml.
12.Start the EMS web components by typing emwebapp.sh --start.
Configuring IE8 to use strong encryptionAfter changes are made to prohibit SSL 2.0 connections, Internet Explorer 8 (IE8) must beconfigured to use only SSL 3.0 protocols, and the TLS 1.0, 1.1, and 1.2 protocols. Thischange can be accomplished by pushing out a new domain group policy or by manuallychanging the setting in each web browser.
This task describes how to manually change IE8 to use strong encryption.
Procedure
1. Start IE8.
2. On the menu bar, click Tools > Internet Options.
3. Click the Advanced tab and complete the following settings:
l Clear Use SSL 2.0.
Server Security Hardening
92 EMC Avamar 7.2 Product Security Guide

l Select Use SSL 3.0.
l Select Use TLS 1.0.
l Select Use TLS 1.1.
l Select Use TLS 1.2.
Click OK.
Web server cipher suite hardening on Avamar server version 7.1Harden the cipher suite used by the web servers on an Avamar version 7.1 system toprevent Browser Exploit Against SSL/TLS (BEAST) attacks and other intrusions.
NOTICE
Installing or upgrading to Avamar server version 7.1.1 and newer automatically installshardened cipher suites for the system's web servers. The tasks listed in this section arenot required for Avamar server version 7.1.1 and newer systems.
To help prevent security intrusions that take advantage of weaker default cipher suites onAvamar server version 7.1, complete the following tasks:
l Force strong ciphers for Apache on Avamar server version 7.1
l Force strong ciphers for Tomcat on Avamar server version 7.1
Forcing strong ciphers for Apache on Avamar server version 7.1Modify the cipher suite that is used by the Apache HTTP server (Apache) to force the useof strong ciphers on Avamar server version 7.1 systems.
Procedure
1. Open a command shell and log in by using one of the following methods:
l For a single-node server:
a. Log in to the server as admin.
b. Switch user to root by typing su -.
l For a multi-node server:
a. Log in to the utility node as admin.
b. Load the dpnid OpenSSH key by typing:
ssh-agent bashssh-add ~admin/.ssh/dpnid
c. When prompted, type the dpnid passphrase and press Enter.
2. Make a backup copy of the SSL configuration file for Apache.
l On SLES, make a copy of /etc/apache2/vhosts.d/vhost-ssl.conf.
l On RHEL, make a copy of /etc/httpd/conf.d/ssl.conf.
3. Open the SSL configuration file in a plain text editor.
l On SLES, open /etc/apache2/vhosts.d/vhost-ssl.conf.
l On RHEL, open /etc/httpd/conf.d/ssl.conf.
4. In the SSL configuration file, move the line that reads SSLHonorCipherOrder Onbefore the line that starts with SSLCipherSuite.
Server Security Hardening
Web server cipher suite hardening on Avamar server version 7.1 93
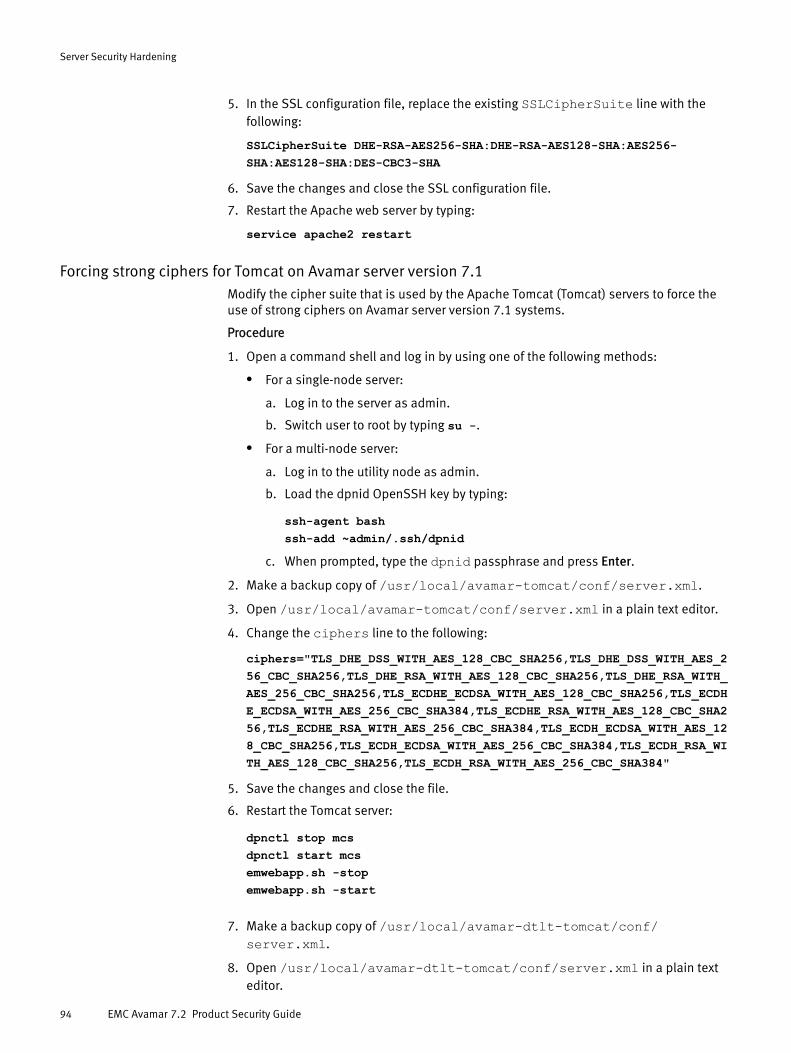
5. In the SSL configuration file, replace the existing SSLCipherSuite line with thefollowing:
SSLCipherSuite DHE-RSA-AES256-SHA:DHE-RSA-AES128-SHA:AES256-SHA:AES128-SHA:DES-CBC3-SHA
6. Save the changes and close the SSL configuration file.
7. Restart the Apache web server by typing:
service apache2 restart
Forcing strong ciphers for Tomcat on Avamar server version 7.1Modify the cipher suite that is used by the Apache Tomcat (Tomcat) servers to force theuse of strong ciphers on Avamar server version 7.1 systems.
Procedure
1. Open a command shell and log in by using one of the following methods:
l For a single-node server:
a. Log in to the server as admin.
b. Switch user to root by typing su -.
l For a multi-node server:
a. Log in to the utility node as admin.
b. Load the dpnid OpenSSH key by typing:
ssh-agent bashssh-add ~admin/.ssh/dpnid
c. When prompted, type the dpnid passphrase and press Enter.
2. Make a backup copy of /usr/local/avamar-tomcat/conf/server.xml.
3. Open /usr/local/avamar-tomcat/conf/server.xml in a plain text editor.
4. Change the ciphers line to the following:
ciphers="TLS_DHE_DSS_WITH_AES_128_CBC_SHA256,TLS_DHE_DSS_WITH_AES_256_CBC_SHA256,TLS_DHE_RSA_WITH_AES_128_CBC_SHA256,TLS_DHE_RSA_WITH_AES_256_CBC_SHA256,TLS_ECDHE_ECDSA_WITH_AES_128_CBC_SHA256,TLS_ECDHE_ECDSA_WITH_AES_256_CBC_SHA384,TLS_ECDHE_RSA_WITH_AES_128_CBC_SHA256,TLS_ECDHE_RSA_WITH_AES_256_CBC_SHA384,TLS_ECDH_ECDSA_WITH_AES_128_CBC_SHA256,TLS_ECDH_ECDSA_WITH_AES_256_CBC_SHA384,TLS_ECDH_RSA_WITH_AES_128_CBC_SHA256,TLS_ECDH_RSA_WITH_AES_256_CBC_SHA384"
5. Save the changes and close the file.
6. Restart the Tomcat server:
dpnctl stop mcsdpnctl start mcsemwebapp.sh -stopemwebapp.sh -start
7. Make a backup copy of /usr/local/avamar-dtlt-tomcat/conf/server.xml.
8. Open /usr/local/avamar-dtlt-tomcat/conf/server.xml in a plain texteditor.
Server Security Hardening
94 EMC Avamar 7.2 Product Security Guide

9. Change the ciphers line to the following:
ciphers="TLS_DHE_DSS_WITH_AES_128_CBC_SHA256,TLS_DHE_DSS_WITH_AES_256_CBC_SHA256,TLS_DHE_RSA_WITH_AES_128_CBC_SHA256,TLS_DHE_RSA_WITH_AES_256_CBC_SHA256,TLS_ECDHE_ECDSA_WITH_AES_128_CBC_SHA256,TLS_ECDHE_ECDSA_WITH_AES_256_CBC_SHA384,TLS_ECDHE_RSA_WITH_AES_128_CBC_SHA256,TLS_ECDHE_RSA_WITH_AES_256_CBC_SHA384,TLS_ECDH_ECDSA_WITH_AES_128_CBC_SHA256,TLS_ECDH_ECDSA_WITH_AES_256_CBC_SHA384,TLS_ECDH_RSA_WITH_AES_128_CBC_SHA256,TLS_ECDH_RSA_WITH_AES_256_CBC_SHA384"
10.Save the changes and close the file.
11.Restart the Desktop/Laptop Tomcat server, by restarting the DTLT service:
dpnctl stop dtltdpnctl start dtlt
Removing suid bit from non-essential system binaries on RHELOn RHEL systems, remove the suid bit from non-essential system binaries to preventthem from running with elevated permissions.
Procedure
1. Open a command shell and log in by using one of the following methods:
l For a single-node server:
a. Log in to the server as admin.
b. Switch user to root by typing su -.
l For a multi-node server:
a. Log in to the utility node as admin.
b. Load the dpnid OpenSSH key by typing:
ssh-agent bashssh-add ~admin/.ssh/dpnid
c. When prompted, type the dpnid passphrase and press Enter.
2. Type the following commands:
chmod u-s /sbin/pam_timestamp_checkchmod u-s /opt/dell/srvadmin/oma/bin/omcliproxychmod u-s /usr/lib64/squid/pam_auth
Preventing unauthorized access to GRUB configurationChanges to the configuration file of GNU GRUB bootloader (GRUB) can change the startupconfiguration of the Avamar system. Install an encrypted password to preventunauthorized changes to this file.
Procedure
1. Open a command shell and log in by using one of the following methods:
l For a single-node server:
a. Log in to the server as admin.
Server Security Hardening
Removing suid bit from non-essential system binaries on RHEL 95
b. Switch user to root by typing su -.
l For a multi-node server:
a. Log in to the utility node as admin.
b. Load the dpnid OpenSSH key by typing:
ssh-agent bashssh-add ~admin/.ssh/dpnid
c. When prompted, type the dpnid passphrase and press Enter.
2. Start the encryption application.
l On SLES, type /usr/sbin/grub-md5-crypt.
l On RHEL, type /sbin/grub-md5-crypt.
3. When prompted, type the GRUB password.
The MD5 hash of the password appears.
4. Copy and save the MD5 hash.
5. Open /boot/grub/menu.1st in a plain text editor.
6. Add the following entry below the timeout entry:
password --md5 hash
where hash is the MD5 hash.
7. Close menu.1st and save your changes.
8. (Multi-node system only) Push the change to the storage nodes by typing thefollowing commands:
cd /boot/grubmapall --all --user=root copy menu.1stmapall --all --user=root "cp /root/menu.1st /boot/grub/menu.1st"mapall --all --user=root "rm -f /root/menu.1st"
Level-2 security hardeningLevel-2 security hardening features can be installed on a feature-by-feature basis.
All level-2 security hardening features can be installed on Avamar server version 6.0 andnewer systems on supported versions of SLES.
Password hardening and firewall hardening features can be installed on supportedversions of Red Hat Enterprise Linux (RHEL).
Note
Installation of Avamar software, or upgrade to Avamar server version 7.1 or newer,installs hardening and firewall packages that improve security capabilities on the Avamarserver. Installation of these packages does not restrict supported server functionality,and they cannot be uninstalled. For some tasks, EMC Support provides the steps andtools that are required to complete the task (for instance, FTP capabilities fordownloading packages to the server).
Server Security Hardening
96 EMC Avamar 7.2 Product Security Guide
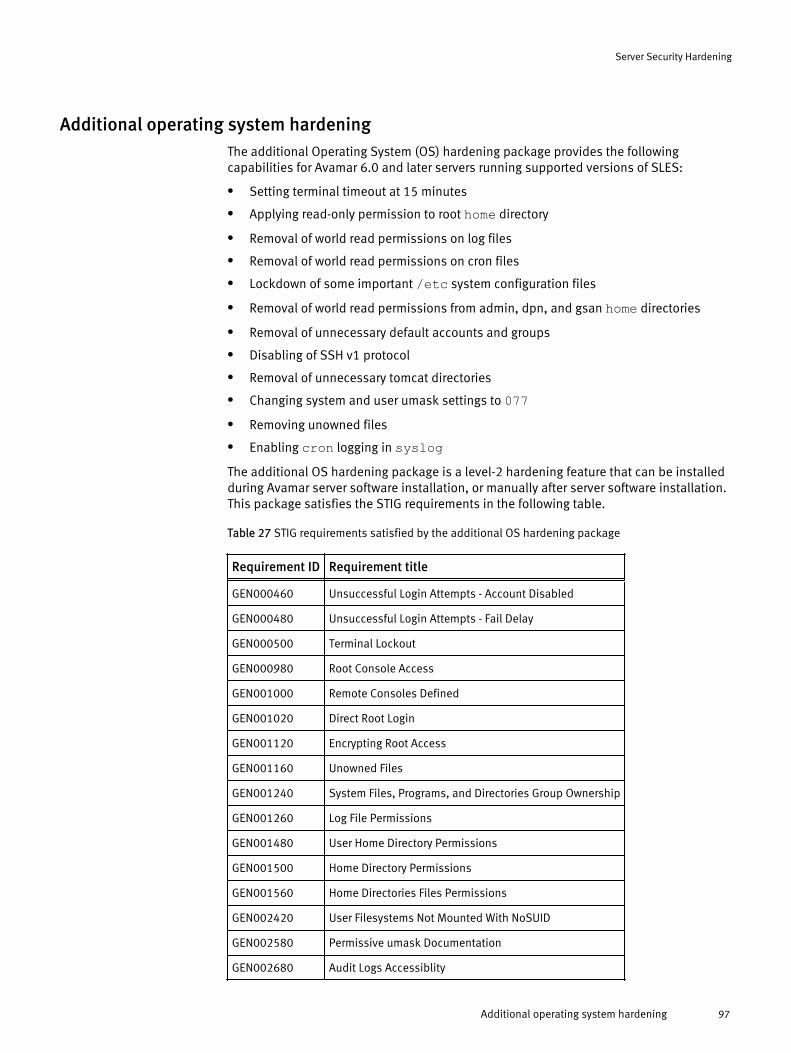
Additional operating system hardeningThe additional Operating System (OS) hardening package provides the followingcapabilities for Avamar 6.0 and later servers running supported versions of SLES:
l Setting terminal timeout at 15 minutes
l Applying read-only permission to root home directory
l Removal of world read permissions on log files
l Removal of world read permissions on cron files
l Lockdown of some important /etc system configuration files
l Removal of world read permissions from admin, dpn, and gsan home directories
l Removal of unnecessary default accounts and groups
l Disabling of SSH v1 protocol
l Removal of unnecessary tomcat directories
l Changing system and user umask settings to 077l Removing unowned files
l Enabling cron logging in syslogThe additional OS hardening package is a level-2 hardening feature that can be installedduring Avamar server software installation, or manually after server software installation.This package satisfies the STIG requirements in the following table.
Table 27 STIG requirements satisfied by the additional OS hardening package
Requirement ID Requirement title
GEN000460 Unsuccessful Login Attempts - Account Disabled
GEN000480 Unsuccessful Login Attempts - Fail Delay
GEN000500 Terminal Lockout
GEN000980 Root Console Access
GEN001000 Remote Consoles Defined
GEN001020 Direct Root Login
GEN001120 Encrypting Root Access
GEN001160 Unowned Files
GEN001240 System Files, Programs, and Directories Group Ownership
GEN001260 Log File Permissions
GEN001480 User Home Directory Permissions
GEN001500 Home Directory Permissions
GEN001560 Home Directories Files Permissions
GEN002420 User Filesystems Not Mounted With NoSUID
GEN002580 Permissive umask Documentation
GEN002680 Audit Logs Accessiblity
Server Security Hardening
Additional operating system hardening 97
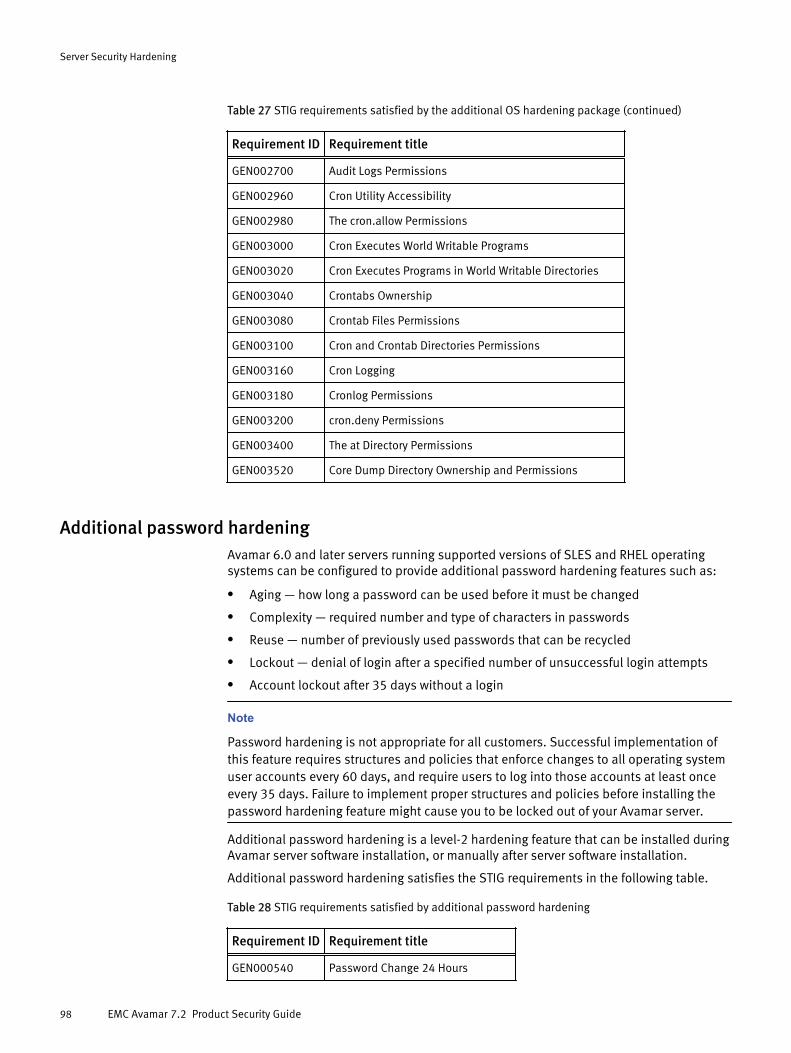
Table 27 STIG requirements satisfied by the additional OS hardening package (continued)
Requirement ID Requirement title
GEN002700 Audit Logs Permissions
GEN002960 Cron Utility Accessibility
GEN002980 The cron.allow Permissions
GEN003000 Cron Executes World Writable Programs
GEN003020 Cron Executes Programs in World Writable Directories
GEN003040 Crontabs Ownership
GEN003080 Crontab Files Permissions
GEN003100 Cron and Crontab Directories Permissions
GEN003160 Cron Logging
GEN003180 Cronlog Permissions
GEN003200 cron.deny Permissions
GEN003400 The at Directory Permissions
GEN003520 Core Dump Directory Ownership and Permissions
Additional password hardeningAvamar 6.0 and later servers running supported versions of SLES and RHEL operatingsystems can be configured to provide additional password hardening features such as:
l Aging — how long a password can be used before it must be changed
l Complexity — required number and type of characters in passwords
l Reuse — number of previously used passwords that can be recycled
l Lockout — denial of login after a specified number of unsuccessful login attempts
l Account lockout after 35 days without a login
Note
Password hardening is not appropriate for all customers. Successful implementation ofthis feature requires structures and policies that enforce changes to all operating systemuser accounts every 60 days, and require users to log into those accounts at least onceevery 35 days. Failure to implement proper structures and policies before installing thepassword hardening feature might cause you to be locked out of your Avamar server.
Additional password hardening is a level-2 hardening feature that can be installed duringAvamar server software installation, or manually after server software installation.
Additional password hardening satisfies the STIG requirements in the following table.
Table 28 STIG requirements satisfied by additional password hardening
Requirement ID Requirement title
GEN000540 Password Change 24 Hours
Server Security Hardening
98 EMC Avamar 7.2 Product Security Guide
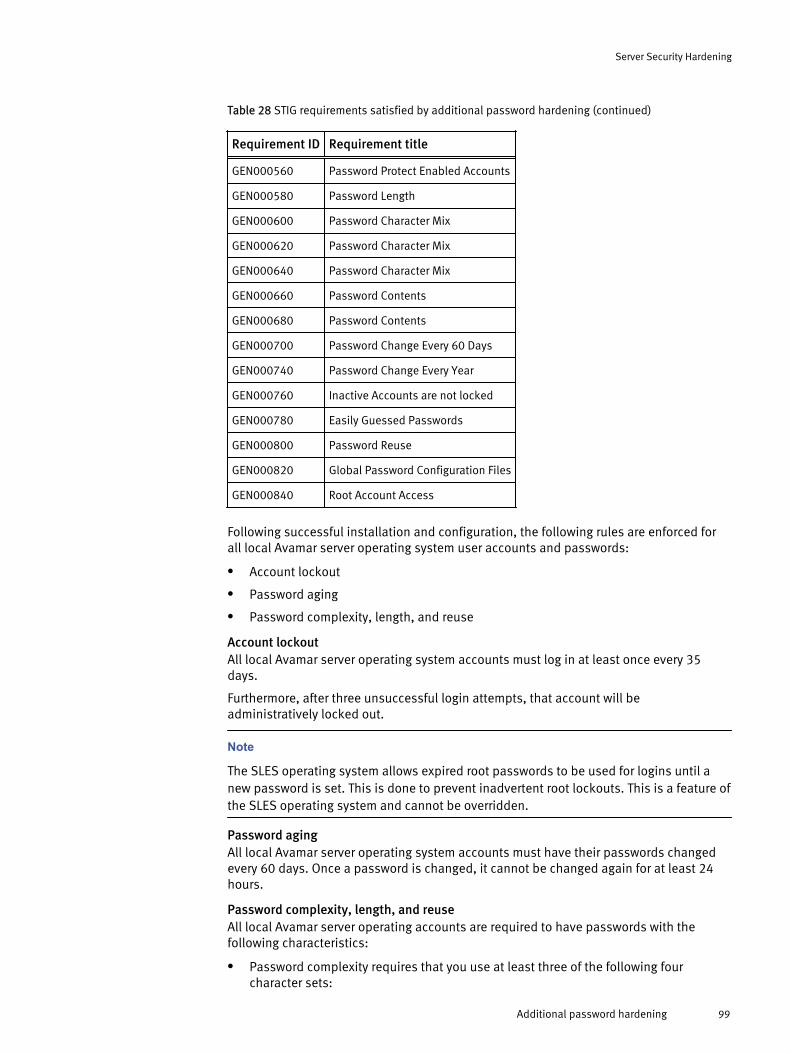
Table 28 STIG requirements satisfied by additional password hardening (continued)
Requirement ID Requirement title
GEN000560 Password Protect Enabled Accounts
GEN000580 Password Length
GEN000600 Password Character Mix
GEN000620 Password Character Mix
GEN000640 Password Character Mix
GEN000660 Password Contents
GEN000680 Password Contents
GEN000700 Password Change Every 60 Days
GEN000740 Password Change Every Year
GEN000760 Inactive Accounts are not locked
GEN000780 Easily Guessed Passwords
GEN000800 Password Reuse
GEN000820 Global Password Configuration Files
GEN000840 Root Account Access
Following successful installation and configuration, the following rules are enforced forall local Avamar server operating system user accounts and passwords:
l Account lockout
l Password aging
l Password complexity, length, and reuse
Account lockoutAll local Avamar server operating system accounts must log in at least once every 35days.
Furthermore, after three unsuccessful login attempts, that account will beadministratively locked out.
Note
The SLES operating system allows expired root passwords to be used for logins until anew password is set. This is done to prevent inadvertent root lockouts. This is a feature ofthe SLES operating system and cannot be overridden.
Password agingAll local Avamar server operating system accounts must have their passwords changedevery 60 days. Once a password is changed, it cannot be changed again for at least 24hours.
Password complexity, length, and reuseAll local Avamar server operating accounts are required to have passwords with thefollowing characteristics:
l Password complexity requires that you use at least three of the following fourcharacter sets:
Server Security Hardening
Additional password hardening 99
n Two or more lowercase characters.
n Two or more uppercase characters.
n Two or more numeric characters.
n Two or more special (non-alphanumeric) characters.
l Minimum length is determined by complexity:
n If you use any three character sets, the password must be at least 14 characters.
n If you use all four character sets, the password must be at least 11 characters.
l Passwords must contain at least three characters that are different from the lastpassword.
l The previous 10 passwords cannot be reused.
Additional firewall hardening (avfirewall)Avamar 6.0 and later servers running supported versions of SLES and RHEL operatingsystems can be configured to use Linux IPTABLES.
Additional firewall hardening is a level-2 hardening feature that can be installed duringAvamar server software installation, or manually after server software installation.
Additional server firewall hardening satisfies the GEN006580 - Access Control ProgramSTIG requirement.
This feature is implemented by way of the avfirewall service.
The output for avfirewall is logged to /var/log/firewall on SLES servers only.The /var/log/firewall file is not available on RHEL servers. However, firewalllogging can be implemented using syslog on RHEL servers. The EMC AvamarAdministration Guide provides details about implementing syslog.
Note
If you are backing up a Hyper-V or Microsoft SQL plug-in to a server running theavfirewall service and the encryption method for the backup is set to None, the
backup will fail with errors indicating a problem connecting to the server. Set theencryption method to Medium or High.
Installing level-2 security hardening features
Level-2 security hardening features can be installed during Avamar server softwareinstallation. The Avamar SLES Installation Workflow Guide provides information aboutinstalling and enabling security hardening features. This guide is available duringinstallation when you click the help icon in Avamar Installation Manager. If you did notinstall level-2 security hardening features during Avamar server software installation, youcan manually install them after server software installation is complete.
Manually installing level-2 hardening packages on SLES
Note
This topic is applicable to Avamar 7.0.x and earlier servers.
Procedure
1. Open a command shell and log in by using one of the following methods:
Server Security Hardening
100 EMC Avamar 7.2 Product Security Guide
l For a single-node server:
a. Log in to the server as admin.
b. Switch user to root by typing su -.
l For a multi-node server:
a. Log in to the utility node as admin.
b. Load the dpnid OpenSSH key by typing:
ssh-agent bashssh-add ~admin/.ssh/dpnid
c. When prompted, type the dpnid passphrase and press Enter.
2. Change directory to where the install packages reside by typing:
cd /usr/local/avamar/src/SLES11_64/
3. If installing on a multi-node server, copy one or more level-2 hardening packages toall other server nodes by typing the following commands:
mapall --all+ --user=root copy avhardening-version.x86_64.rpmmapall --all+ --user=root copy avpasswd-version.x86_64.rpm
where version is the specific version you are installing.
If you are not installing a particular level-2 hardening feature, omit the command tocopy that install package.
4. Install the hardening packages by doing one of the following:
l If installing on a single-node server, type:
rpm -Uvh avhardening-version.x86_64.rpmrpm -Uvh avpasswd-version.x86_64.rpmrpm -Uvh avfwb-version.x86_64.rpm
l If installing on a multi-node server, type:
mapall --all+ --user=root "rpm -Uvh avhardening-version.x86_64.rpm"mapall --all+ --user=root "rpm -Uvh avpasswd-version.x86_64.rpm"mapall --all+ --user=root "rpm -Uvh avfwb-version.x86_64.rpm"
where version is the specific version you are installing.
If you are not installing a particular level-2 hardening feature, omit the command tocopy that install package.
5. If installing on a multi-node server, delete the install packages by typing:
mapall --user=root "rm -f avhardening*"mapall --user=root "rm -f avpasswd*"mapall --user=root "rm -f avfwb*"
If you did not copy a particular install package, omit the command to delete thatpackage.
Server Security Hardening
Installing level-2 security hardening features 101
Manually installing level-2 hardening packages on RHELProcedure
1. Open a command shell and log in by using one of the following methods:
l For a single-node server:
a. Log in to the server as admin.
b. Switch user to root by typing su -.
l For a multi-node server:
a. Log in to the utility node as admin.
b. Load the dpnid OpenSSH key by typing:
ssh-agent bashssh-add ~admin/.ssh/dpnid
c. When prompted, type the dpnid passphrase and press Enter.
2. Change directory to where the install packages reside by typing:
cd /usr/local/avamar/src/RHEL4_64/
3. If installing on a multi-node server, copy one or more level-2 hardening packages toall other server nodes by typing:
mapall --all+ --user=root copy avpasswd-version.x86_64.rpmmapall --all+ --user=root copy avfwb-version.x86_64.rpm
where version is the specific version you are installing.
4. Install the hardening packages by doing one of the following:
l If installing on a single-node server, type:
rpm -Uvh avpasswd-version.x86_64.rpmrpm -Uvh avfwb-version.x86_64.rpm
l If installing on a multi-node server, type:
mapall --all+ --user=root "rpm -Uvh avpasswd-version.x86_64.rpm"mapall --all+ --user=root "rpm -Uvh avfwb-version.x86_64.rpm"
where version is the specific version you are installing.
If you are not installing a particular level-2 hardening feature, omit the command tocopy that install package.
5. If installing on a multi-node server, delete the install packages by typing:
mapall --user=root "rm -f avpasswd*"mapall --user=root "rm -f avfwb*"
If you did not copy a particular install package, omit the command to delete thatpackage.
Server Security Hardening
102 EMC Avamar 7.2 Product Security Guide
Configuring replication for level-2 firewall hardeningImplementing level-2 firewall hardening can cause replication to fail unless TLSencryption is enabled on the destination server.
Configuring policy-based replication for level-2 firewall hardening
Installing the level-2 firewall hardening package might cause policy-based replication tofail. If this occurs, enable TLS encryption on the destination server by including the --dstencrypt=tls option with each avrepl command.
The EMC Avamar Administration Guide provides additional information about policy-basedreplication and the avrepl command.
Configuring cron-based replication for level-2 firewall hardening
Installing the level-2 firewall hardening package might cause cron-based replication tofail. If this occurs, modify the repl_cron.cfg file to enable TLS encryption on thedestination server.
Procedure
1. Open a command shell and log in by using one of the following methods:
l For a single-node server, log in to the server as admin.
l For a multi-node server, log in to the utility node as admin.
2. Open /usr/local/avamar/etc/repl_cron.cfg in a plain text editor.
3. Add the following entry:
--dstencrypt=tls
4. Close repl_cron.cfg and save your changes.
Configuring a pre-7.1 Avamar server to permit Avamar Client Manager managementInstalling the level-2 firewall hardening package on a pre-7.1 Avamar server preventsAvamar Client Manager from managing clients that are associated with the server. Toremedy this problem, allow a range of IP addresses to access the server through port5555.
Specify a limited range of IP addresses that includes the IP addresses of the Avamarsystem that is running Avamar Client Manager.
Procedure
1. Open a command shell and log in by using one of the following methods:
l For a single-node server:
a. Log in to the server as admin.
b. Switch user to root by typing su -.
l For a multi-node server:
a. Log in to the utility node as admin.
b. Load the dpnid OpenSSH key by typing:
ssh-agent bashssh-add ~admin/.ssh/dpnid
c. When prompted, type the dpnid passphrase and press Enter.
Server Security Hardening
Installing level-2 security hardening features 103
2. Open /etc/firewall.base in a plain text editor.
3. Define one or more IP addresses as M_SUBNET by typing the following entry after theBEGIN UTILITY NODE SPECIFIC RULES comment line and before the ENDUTILITY NODE SPECIFIC RULES comment line:
M_SUBNET=IP-address-range
where IP-address-range is range of IP addresses that are allowed to access port 5555,in one of the following formats:
l A single IP address. For example:192.25.113.29
l A comma-separated list of IP addresses. For example:192.25.113.29,192.25.113.50
l A CIDR notation address range. For example:192.25.113.0/24
4. Beneath the entry defining the value ofM_SUBNET, type the following if/thenstatement to allow the IP addresses defined by M_SUBNET to have access to port5555.
if [ $THISNODE == "$UTILITY" ]; then$IPT -A INPUT -p tcp -m multiport --dport 5555 -s $M_SUBNET -jACCEPTfi
5. Close firewall.base and save the changes.
6. Restart the avfirewall service by typing the following commands:
service avfirewall stopservice avfirewall start
7. (Multi-node servers only) Perform the following steps on each server storage node:
a. Open a command shell and log in to the storage node as admin.
b. Switch user to root by typing su -.
c. Modifying /etc/firewall.base as described previously.
d. Restart the avfirewall service as described previously.
Level-3 security hardeningLevel-3 security hardening disables all web-based services and reduces other services tothe minimum required to manage and use the Avamar system.
Level-3 security hardening features can be applied to a running, fully functional Avamarserver
Note
Level-1 and level-2 security hardening must be completely implemented prior toimplementing level-3 security hardening.
Server Security Hardening
104 EMC Avamar 7.2 Product Security Guide
Disabling Apache web serverProcedure
1. Open a command shell and log in by using one of the following methods:
l For a single-node server:
a. Log in to the server as admin.
b. Switch user to root by typing su -.
l For a multi-node server:
a. Log in to the utility node as admin.
b. Load the dpnid OpenSSH key by typing:
ssh-agent bashssh-add ~admin/.ssh/dpnid
c. When prompted, type the dpnid passphrase and press Enter.
2. Turn off the Apache web server by typing website stop.
3. Disable the Apache web server by typing chkconfig apache2 off.
Results
The Apache web server is disabled and will not automatically run when the Avamar serveris restarted.
Stopping the EMTProcedure
1. Open a command shell and log in by using one of the following methods:
l For a single-node server, log in to the server as admin.
l For a multi-node server, log in to the utility node as admin.
2. Stop the EM Tomcat server by typing dpnctl stop emt.
Results
Although the EMT is stopped, it restarts when the server is restarted. Repeat this taskeach time the Avamar server is restarted.
Disabling Dell OpenManage web serverDisabling the web server for Dell OpenManage prevents web browser access to thatservice. The Dell OpenManage services remain available at the console.
Procedure
1. Open a command shell and log in by using one of the following methods:
l For a single-node server:
a. Log in to the server as admin.
b. Switch user to root by typing su -.
l For a multi-node server:
a. Log in to the utility node as admin.
Server Security Hardening
Disabling Apache web server 105
b. Load the dpnid OpenSSH key by typing:
ssh-agent bashssh-add ~admin/.ssh/dpnid
c. When prompted, type the dpnid passphrase and press Enter.
2. Stop the Dell OpenManage web server.
l On multi-node servers, type:mapall --all+ --user=root "service dsm_om_connsvc stop"
l On single-node servers, type:service dsm_om_connsvc stop
3. Disable the Dell OpenManage web server.
l On multi-node servers, type:mapall --all+ --user=root "chkconfig dsm_om_connsvc off"
l On single-node servers, type:chkconfig dsm_om_connsvc off
4. (Optional) Verify that the Dell OpenManage web server is not running.
l On multi-node servers, type:mapall --all+ --user=root "chkconfig dsm_om_connsvc --list"
l On single-node servers, type:chkconfig dsm_om_connsvc -list
Disabling SSLv2 and weak ciphersConfigure the Avamar server to disallow the use of SSL v.2 and weak ciphers incommunication between server nodes and backup clients.
Note
Enforcing the use of strong ciphers prevents clients that do not support strong ciphersfrom connecting with Avamar server. For example, clients running any of the following OSversions that do not support strong ciphers are blocked by this configuration: MicrosoftWindows NT, Microsoft Windows 2000, and Microsoft Windows 2003 (without strongcipher patches).
Configuring Avamar servers to use strong ciphers
Complete this task to enforce the use of strong ciphers on Avamar systems with Avamarserver version 7.1 or newer.
Procedure
1. Open a command shell and log in by using one of the following methods:
l For a single-node server:
a. Log in to the server as admin.
b. Switch user to root by typing su -.
l For a multi-node server:
a. Log in to the utility node as admin.
b. Load the dpnid OpenSSH key by typing:
Server Security Hardening
106 EMC Avamar 7.2 Product Security Guide
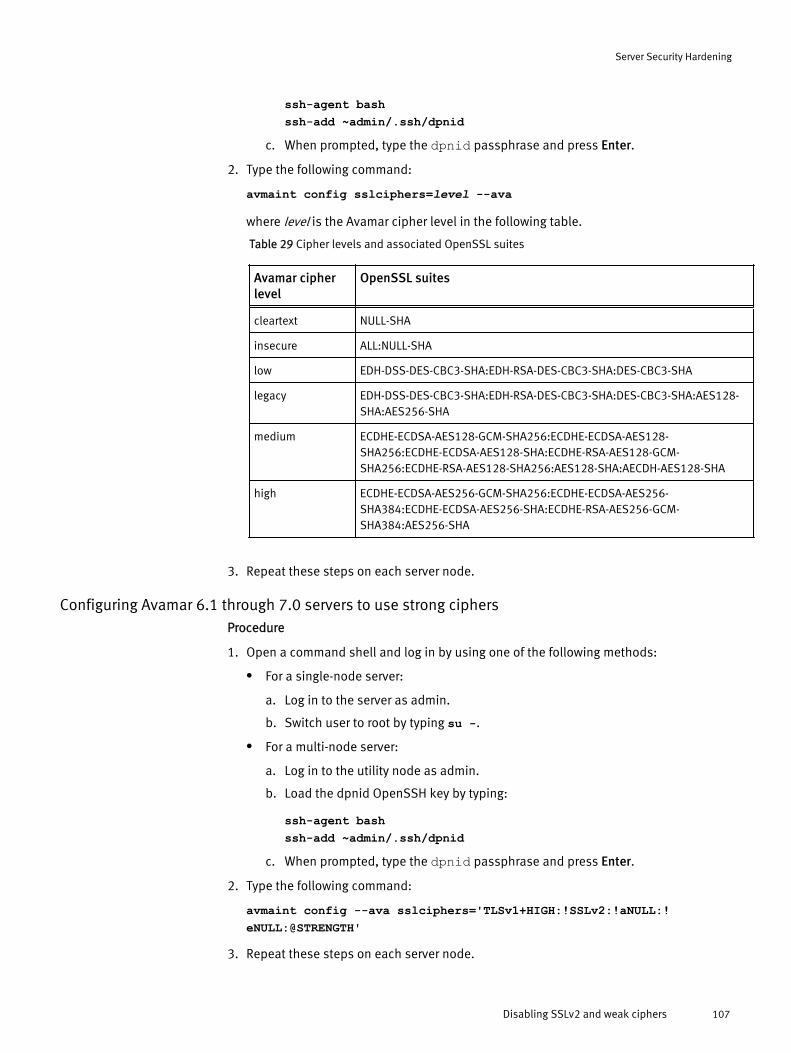
ssh-agent bashssh-add ~admin/.ssh/dpnid
c. When prompted, type the dpnid passphrase and press Enter.
2. Type the following command:
avmaint config sslciphers=level --ava
where level is the Avamar cipher level in the following table.
Table 29 Cipher levels and associated OpenSSL suites
Avamar cipherlevel
OpenSSL suites
cleartext NULL-SHA
insecure ALL:NULL-SHA
low EDH-DSS-DES-CBC3-SHA:EDH-RSA-DES-CBC3-SHA:DES-CBC3-SHA
legacy EDH-DSS-DES-CBC3-SHA:EDH-RSA-DES-CBC3-SHA:DES-CBC3-SHA:AES128-SHA:AES256-SHA
medium ECDHE-ECDSA-AES128-GCM-SHA256:ECDHE-ECDSA-AES128-SHA256:ECDHE-ECDSA-AES128-SHA:ECDHE-RSA-AES128-GCM-SHA256:ECDHE-RSA-AES128-SHA256:AES128-SHA:AECDH-AES128-SHA
high ECDHE-ECDSA-AES256-GCM-SHA256:ECDHE-ECDSA-AES256-SHA384:ECDHE-ECDSA-AES256-SHA:ECDHE-RSA-AES256-GCM-SHA384:AES256-SHA
3. Repeat these steps on each server node.
Configuring Avamar 6.1 through 7.0 servers to use strong ciphersProcedure
1. Open a command shell and log in by using one of the following methods:
l For a single-node server:
a. Log in to the server as admin.
b. Switch user to root by typing su -.
l For a multi-node server:
a. Log in to the utility node as admin.
b. Load the dpnid OpenSSH key by typing:
ssh-agent bashssh-add ~admin/.ssh/dpnid
c. When prompted, type the dpnid passphrase and press Enter.
2. Type the following command:
avmaint config --ava sslciphers='TLSv1+HIGH:!SSLv2:!aNULL:!eNULL:@STRENGTH'
3. Repeat these steps on each server node.
Server Security Hardening
Disabling SSLv2 and weak ciphers 107
Configuring Avamar 6.0.x servers to use strong ciphersProcedure
1. Open a command shell and log in by using one of the following methods:
l For a single-node server:
a. Log in to the server as admin.
b. Switch user to root by typing su -.
l For a multi-node server:
a. Log in to the utility node as admin.
b. Load the dpnid OpenSSH key by typing:
ssh-agent bashssh-add ~admin/.ssh/dpnid
c. When prompted, type the dpnid passphrase and press Enter.
2. Open /usr/local/avamar/etc/stunnel/stunnel.conf in a plain texteditor.
3. Add the following entries:
Change:
foreground = noclient = nocert = /usr/local/avamar/etc/stunnel/stunnel.pempid = /usr/local/avamar/var/stunnel.pid[axionssl]accept = 29000connect = 27000
To:
foreground = noclient = nocert = /usr/local/avamar/etc/stunnel/stunnel.pempid = /usr/local/avamar/var/stunnel.pidoptions = NO_SSLv2ciphers = ALL:+HIGH:!LOW:!EXP[axionssl]accept = 29000connect = 27000
4. Close stunnel.conf and save your changes.
5. Stop and start stunnel by typing:
stunctl stopstunctl start
Server Security Hardening
108 EMC Avamar 7.2 Product Security Guide
Configuring the NDMP accelerator to use strong ciphersProcedure
1. Open a command shell and log in to the accelerator as admin.
2. Switch user to root by typing su -.
3. Open /usr/local/avamar/var/avtar.cmd in a plain text editor.
4. Add the following entries:
--encrypt=tls--encrypt-strength=high
5. Close avtar.cmd and save your changes.
Configuring replication to use strong ciphersProcedure
1. Open a command shell and log in by using one of the following methods:
l For a single-node server, log in to the server as admin.
l For a multi-node server, log in to the utility node as admin.
2. Switch user to root by typing su -.
3. Open /usr/local/avamar/etc/repl_cron.cfg in a plain text editor.
4. Add the following entries:
--avtar=--encrypt=tls--avtar=--encrypt:1=tls--dstavmgr=--encrypt=tls--dstavmaint=--encrypt=tls--encrypt-strength=high
5. Close repl_cron.cfg and save your changes.
Updating OpenSSHBefore you begin
Contact your EMC Customer Support professional to obtain and install the latest Avamarplatform security rollup package. The platform security rollup package installs the latestversion of OpenSSH.
Updating to the latest version of OpenSSH and performing this task configures OpenSSHto:
l Deny empty passwords
l Log at INFO level
l Use protocol 2
l Harden for security audit vulnerabilities
Procedure
1. Open a command shell and log in by using one of the following methods:
l For a single-node server:
Server Security Hardening
Updating OpenSSH 109
a. Log in to the server as admin.
b. Switch user to root by typing su -.
l For a multi-node server:
a. Log in to the utility node as admin.
b. Load the dpnid OpenSSH key by typing:
ssh-agent bashssh-add ~admin/.ssh/dpnid
c. When prompted, type the dpnid passphrase and press Enter.
2. Open /etc/ssh/sshd_config in a plain text editor.
3. Add the following entries:
PermitEmptyPasswords noLogLevel INFOProtocol 2Ciphers cipher_suite
where cipher_suite is one of the following:
l For SLES:
aes128-ctr,aes192-ctr,aes256-ctr,arcfour256,arcfourl For RHEL:
arcfour,aes128-ctr,aes192-ctr,aes256-ctr
4. Close sshd_config and save your changes.
5. Restart the sshd service by typing service sshd restart.
Restarting the sshd service can cause current SSH sessions to terminate.
Disabling SNMPProcedure
1. Open a command shell and log in by using one of the following methods:
l For a single-node server:
a. Log in to the server as admin.
b. Switch user to root by typing su -.
l For a multi-node server:
a. Log in to the utility node as admin.
b. Load the dpnid OpenSSH key by typing:
ssh-agent bashssh-add ~admin/.ssh/dpnid
c. When prompted, type the dpnid passphrase and press Enter.
2. Stop the snmpd service by typing service snmpd stop.
3. Disable the snmpd service on startup by typing chckonfig snmpd off.
4. Open /etc/init.d/dataeng in a plain text editor.
Server Security Hardening
110 EMC Avamar 7.2 Product Security Guide
5. Edit the following entry:
Change:
OS_SNMP_SVCNAME="snmpd"
To:
OS_SNMP_SVCNAME=""6. Close dataeng and save your changes.
7. Reboot the server by typing reboot.
8. (Optional) After the system is up, search /var/log/messages for the followingwarning:
dataeng: warning: not started. must be started to managethis system using SNMP
This warning means that snmpd is disabled.
Disabling RPCProcedure
1. Open a command shell and log in by using one of the following methods:
l For a single-node server:
a. Log in to the server as admin.
b. Switch user to root by typing su -.
l For a multi-node server:
a. Log in to the utility node as admin.
b. Load the dpnid OpenSSH key by typing:
ssh-agent bashssh-add ~admin/.ssh/dpnid
c. When prompted, type the dpnid passphrase and press Enter.
2. Stop the RPC service.
l On SLES, type service rpcbind stop.
l On RHEL, type service portmap stop.
3. Disable the RPC service at startup.
l On SLES, type:
chkconfig nfs offchkconfig rpcbind off
l On RHEL, type chkconfig portmap off.
4. Repeat these steps on each server node.
Server Security Hardening
Disabling RPC 111
Configuring the firewall to block access to port 9443Avamar Management Console Web Services normally use Port 9443 for Java RemoteMethod Invocation (RMI). Configure iptables to block port 9443.
Procedure
1. Open a command shell and log in by using one of the following methods:
l For a single-node server:
a. Log in to the server as admin.
b. Switch user to root by typing su -.
l For a multi-node server:
a. Log in to the utility node as admin.
b. Load the dpnid OpenSSH key by typing:
ssh-agent bashssh-add ~admin/.ssh/dpnid
c. When prompted, type the dpnid passphrase and press Enter.
2. Open /etc/firewall.default in a plain text editor.
3. Add the following entries:
$IPT -A INPUT -p tcp -m tcp --dport 9443 -j DROP$IPT -A INPUT -p udp -m udp --dport 9443 -j DROP
4. Close firewall.default and save your changes.
5. Restart the avfirewall service by typing the following commands:
service avfirewall stopservice avfirewall start
Changing file permissionsUse the chmod o-w command to prevent users in the Others group from writing tospecific folders and files.
Procedure
1. Open a command shell and log in by using one of the following methods:
l For a single-node server:
a. Log in to the server as admin.
b. Switch user to root by typing su -.
l For a multi-node server:
a. Log in to the utility node as admin.
b. Load the dpnid OpenSSH key by typing:
ssh-agent bashssh-add ~admin/.ssh/dpnid
c. When prompted, type the dpnid passphrase and press Enter.
Server Security Hardening
112 EMC Avamar 7.2 Product Security Guide
2. Type the following commands:
chmod o-w -R /etc/openldapchmod o-w -R /root/chmod o-w /data01/avamar/varchmod o-w /data01/avamar/var/change-passwords.logchmod o-w /data01/avamar/var/localchmod o-w /data01/avamar/var/local/ziptempchmod o-w /data01/avamar/var/p_*datchmod o-w /opt/dell/srvadmin/iws/config/keystore.db.bakchmod o-w /tmp/replicatechmod o-w /usr/local/avamar/bin/benchmarkchmod o-w /.avamardata/var/mc/cli_data/prefs/mcclimcs.xmlchmod o-w /.avamardata/var/mc/cli_data/prefs/mccli_logging.propertieschmod o-w /.avamardata/var/mc/cli_data/prefs/prefs.tmpchmod o-w /.avamardata/var/mc/cli_data/prefs/mccli.xmlchmod o-w /data01/home/admin/.avamardata/var/mc/cli_data/prefs/mccli.xmlchmod o-w /data01/home/admin/.avamardata/var/mc/cli_data/prefs/mcclimcs.xmlchmod o-w /data01/home/admin/.avamardata/var/mc/cli_data/prefs/mccli_logging.propertieschmod o-w /data01/home/admin/.avamardata/var/mc/cli_data/prefs/prefs.tmpchmod o-w /data01/home/dpn/.avamardata/var/mc/cli_data/prefs/mccli.xmlchmod o-w /data01/home/dpn/.avamardata/var/mc/cli_data/prefs/mcclimcs.xmlchmod o-w /data01/home/dpn/.avamardata/var/mc/cli_data/prefs/mccli_logging.propertieschmod o-w /data01/home/dpn/.avamardata/var/mc/cli_data/prefs/prefs.tmpchmod o-w /data01/avamar/var/mc/server_log/mcddrsnmp.out
Preparing for a system upgradeTo permit a successful system upgrade, some of the level-3 security hardening changesmust be temporarily reversed. After the system upgrade is complete, reapply thosechanges.
Enabling the Apache web serverProcedure
1. Open a command shell and log in by using one of the following methods:
l For a single-node server:
a. Log in to the server as admin.
b. Switch user to root by typing su -.
l For a multi-node server:
a. Log in to the utility node as admin.
Server Security Hardening
Preparing for a system upgrade 113
b. Load the dpnid OpenSSH key by typing:
ssh-agent bashssh-add ~admin/.ssh/dpnid
c. When prompted, type the dpnid passphrase and press Enter.
2. Enable the Apache web server by typing the following command:
chkconfig --add apache2
3. Start the Apache web server by typing the following command:
website start
Starting the EMTProcedure
1. Open a command shell and log in by using one of the following methods:
l For a single-node server, log in to the server as admin.
l For a multi-node server, log in to the utility node as admin.
2. Start the EM Tomcat server by typing dpnctl start emt.
Server Security Hardening
114 EMC Avamar 7.2 Product Security Guide
CHAPTER 7
Intelligent Platform Management Interface
This chapter includes the following topics:
l IPMI subsystem security......................................................................................116l Finding all LAN channels..................................................................................... 117l Disabling privileges for Cipher Suite 0................................................................. 118l Securing anonymous logins................................................................................ 119l Creating strong passwords for BMC accounts...................................................... 120l Additional BMC security tasks............................................................................. 120
Intelligent Platform Management Interface 115
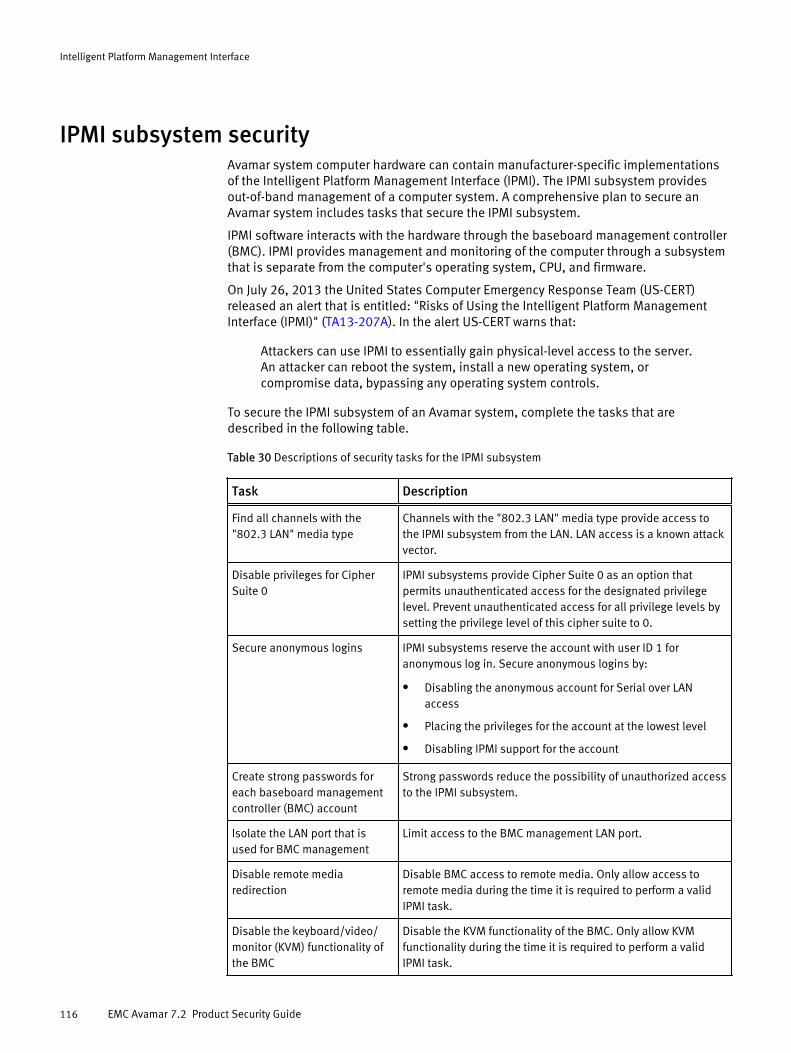
IPMI subsystem securityAvamar system computer hardware can contain manufacturer-specific implementationsof the Intelligent Platform Management Interface (IPMI). The IPMI subsystem providesout-of-band management of a computer system. A comprehensive plan to secure anAvamar system includes tasks that secure the IPMI subsystem.
IPMI software interacts with the hardware through the baseboard management controller(BMC). IPMI provides management and monitoring of the computer through a subsystemthat is separate from the computer's operating system, CPU, and firmware.
On July 26, 2013 the United States Computer Emergency Response Team (US-CERT)released an alert that is entitled: "Risks of Using the Intelligent Platform ManagementInterface (IPMI)" (TA13-207A). In the alert US-CERT warns that:
Attackers can use IPMI to essentially gain physical-level access to the server.An attacker can reboot the system, install a new operating system, orcompromise data, bypassing any operating system controls.
To secure the IPMI subsystem of an Avamar system, complete the tasks that aredescribed in the following table.
Table 30 Descriptions of security tasks for the IPMI subsystem
Task Description
Find all channels with the"802.3 LAN" media type
Channels with the "802.3 LAN" media type provide access tothe IPMI subsystem from the LAN. LAN access is a known attackvector.
Disable privileges for CipherSuite 0
IPMI subsystems provide Cipher Suite 0 as an option thatpermits unauthenticated access for the designated privilegelevel. Prevent unauthenticated access for all privilege levels bysetting the privilege level of this cipher suite to 0.
Secure anonymous logins IPMI subsystems reserve the account with user ID 1 foranonymous log in. Secure anonymous logins by:
l Disabling the anonymous account for Serial over LANaccess
l Placing the privileges for the account at the lowest level
l Disabling IPMI support for the account
Create strong passwords foreach baseboard managementcontroller (BMC) account
Strong passwords reduce the possibility of unauthorized accessto the IPMI subsystem.
Isolate the LAN port that isused for BMC management
Limit access to the BMC management LAN port.
Disable remote mediaredirection
Disable BMC access to remote media. Only allow access toremote media during the time it is required to perform a validIPMI task.
Disable the keyboard/video/monitor (KVM) functionality ofthe BMC
Disable the KVM functionality of the BMC. Only allow KVMfunctionality during the time it is required to perform a validIPMI task.
Intelligent Platform Management Interface
116 EMC Avamar 7.2 Product Security Guide
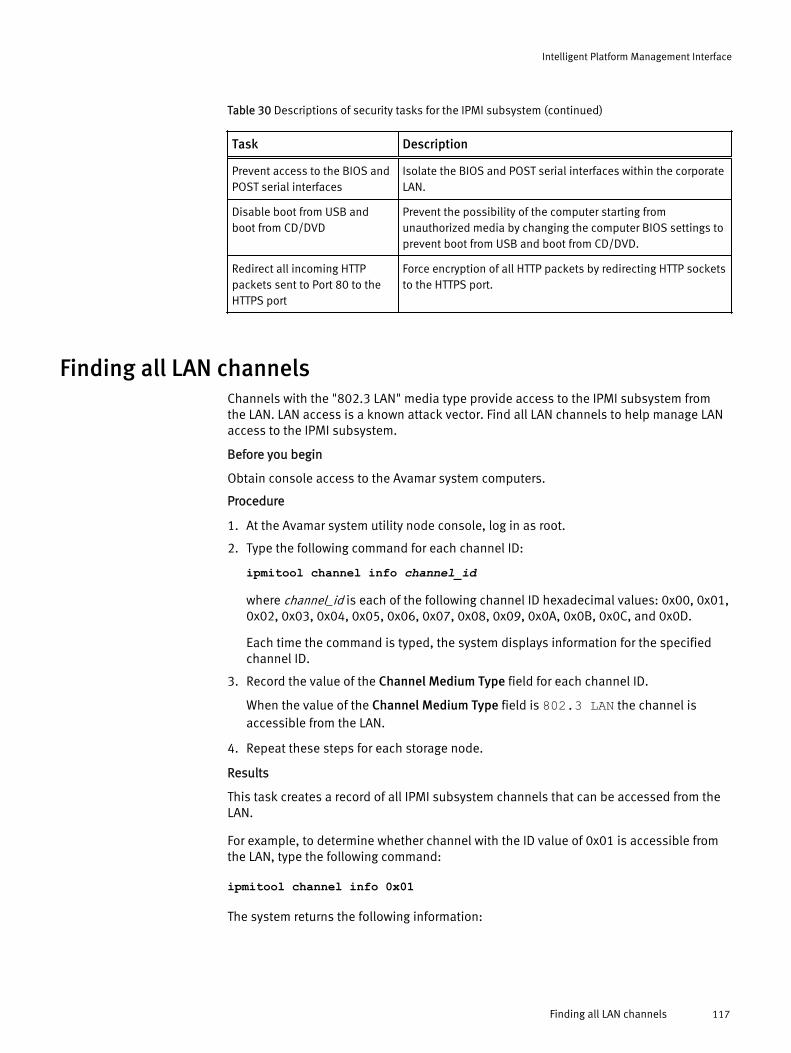
Table 30 Descriptions of security tasks for the IPMI subsystem (continued)
Task Description
Prevent access to the BIOS andPOST serial interfaces
Isolate the BIOS and POST serial interfaces within the corporateLAN.
Disable boot from USB andboot from CD/DVD
Prevent the possibility of the computer starting fromunauthorized media by changing the computer BIOS settings toprevent boot from USB and boot from CD/DVD.
Redirect all incoming HTTPpackets sent to Port 80 to theHTTPS port
Force encryption of all HTTP packets by redirecting HTTP socketsto the HTTPS port.
Finding all LAN channelsChannels with the "802.3 LAN" media type provide access to the IPMI subsystem fromthe LAN. LAN access is a known attack vector. Find all LAN channels to help manage LANaccess to the IPMI subsystem.
Before you begin
Obtain console access to the Avamar system computers.
Procedure
1. At the Avamar system utility node console, log in as root.
2. Type the following command for each channel ID:
ipmitool channel info channel_id
where channel_id is each of the following channel ID hexadecimal values: 0x00, 0x01,0x02, 0x03, 0x04, 0x05, 0x06, 0x07, 0x08, 0x09, 0x0A, 0x0B, 0x0C, and 0x0D.
Each time the command is typed, the system displays information for the specifiedchannel ID.
3. Record the value of the Channel Medium Type field for each channel ID.
When the value of the Channel Medium Type field is 802.3 LAN the channel isaccessible from the LAN.
4. Repeat these steps for each storage node.
Results
This task creates a record of all IPMI subsystem channels that can be accessed from theLAN.
For example, to determine whether channel with the ID value of 0x01 is accessible fromthe LAN, type the following command:
ipmitool channel info 0x01
The system returns the following information:
Intelligent Platform Management Interface
Finding all LAN channels 117
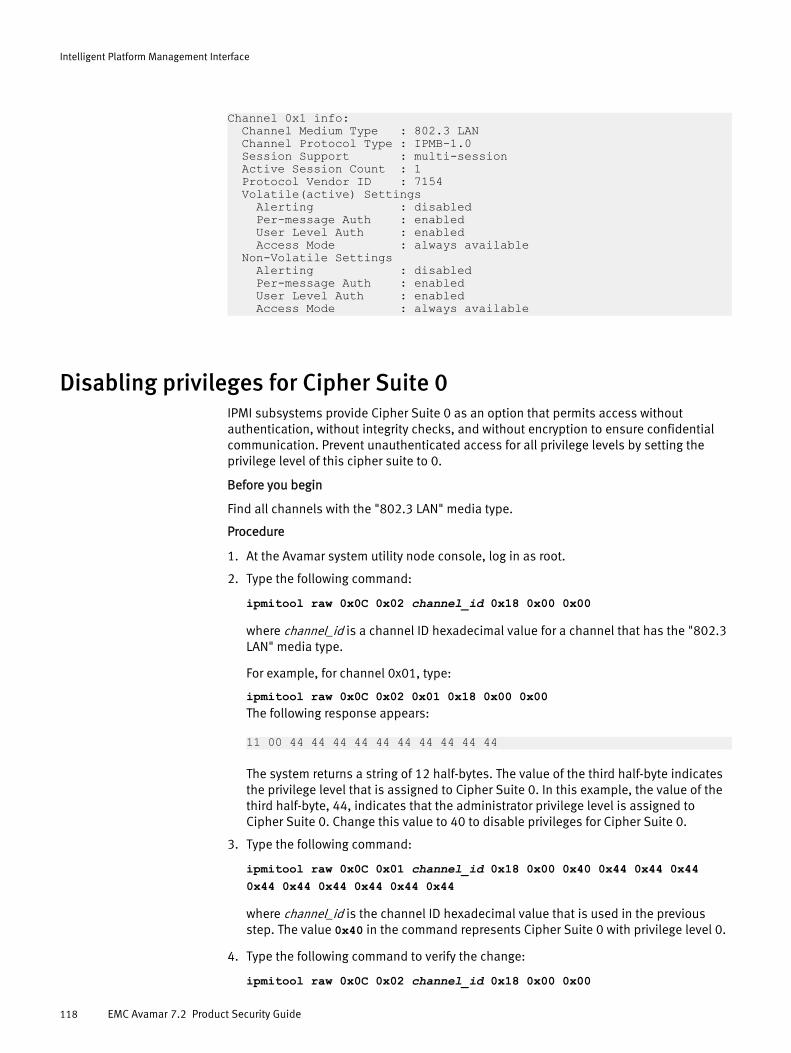
Channel 0x1 info: Channel Medium Type : 802.3 LAN Channel Protocol Type : IPMB-1.0 Session Support : multi-session Active Session Count : 1 Protocol Vendor ID : 7154 Volatile(active) Settings Alerting : disabled Per-message Auth : enabled User Level Auth : enabled Access Mode : always available Non-Volatile Settings Alerting : disabled Per-message Auth : enabled User Level Auth : enabled Access Mode : always available
Disabling privileges for Cipher Suite 0IPMI subsystems provide Cipher Suite 0 as an option that permits access withoutauthentication, without integrity checks, and without encryption to ensure confidentialcommunication. Prevent unauthenticated access for all privilege levels by setting theprivilege level of this cipher suite to 0.
Before you begin
Find all channels with the "802.3 LAN" media type.
Procedure
1. At the Avamar system utility node console, log in as root.
2. Type the following command:
ipmitool raw 0x0C 0x02 channel_id 0x18 0x00 0x00
where channel_id is a channel ID hexadecimal value for a channel that has the "802.3LAN" media type.
For example, for channel 0x01, type:
ipmitool raw 0x0C 0x02 0x01 0x18 0x00 0x00The following response appears:
11 00 44 44 44 44 44 44 44 44 44 44
The system returns a string of 12 half-bytes. The value of the third half-byte indicatesthe privilege level that is assigned to Cipher Suite 0. In this example, the value of thethird half-byte, 44, indicates that the administrator privilege level is assigned toCipher Suite 0. Change this value to 40 to disable privileges for Cipher Suite 0.
3. Type the following command:
ipmitool raw 0x0C 0x01 channel_id 0x18 0x00 0x40 0x44 0x44 0x440x44 0x44 0x44 0x44 0x44 0x44
where channel_id is the channel ID hexadecimal value that is used in the previousstep. The value 0x40 in the command represents Cipher Suite 0 with privilege level 0.
4. Type the following command to verify the change:
ipmitool raw 0x0C 0x02 channel_id 0x18 0x00 0x00
Intelligent Platform Management Interface
118 EMC Avamar 7.2 Product Security Guide
For example, for channel 0x01, type:
ipmitool raw 0x0C 0x02 0x01 0x18 0x00 0x00The following response appears:
11 00 40 44 44 44 44 44 44 44 44 44
The value of the third half-byte is 40 which means that the Cipher Suite 0 privilegelevel is set to 0 (no privileges) for the specified channel.
5. Repeat these steps for each channel that has the "802.3 LAN" media type.
6. Repeat these steps for each Avamar storage node.
Results
The IPMI subsystem prohibits unauthenticated LAN access.
Securing anonymous loginsIPMI subsystems reserve the account with user ID 1 for anonymous log in. Secureanonymous logins by disabling the anonymous account for Serial over LAN access,placing the privileges for the account at the lowest level, and disabling IPMI support forthe account.
Before you begin
Find all channels with the "802.3 LAN" media type.
Procedure
1. At the Avamar system utility node console, log in as root.
2. Type the following command:
ipmitool sol payload disable channel_id 1
where channel_id is a channel ID hexadecimal value for a channel that has the "802.3LAN" media type.
The ipmitool disables anonymous user logins through Serial over LAN for the specifiedchannel.
3. Repeat the previous step for each channel that has the "802.3 LAN" media type.
4. Type the following command:
ipmitool channel setaccess channel_id 1 callin=off ipmi=offlink=off privilege=1
where channel_id is a channel ID hexadecimal value for a channel that has the "802.3LAN" media type.
The ipmitool puts the anonymous user at the lowest privilege level for the specifiedchannel.
5. Repeat the previous step for each channel that has the "802.3 LAN" media type.
6. Type the following command:
ipmitool user disable 1
The ipmitool disables support for the BMC anonymous user account.
7. Repeat these steps for each Avamar storage node.
Intelligent Platform Management Interface
Securing anonymous logins 119
Results
The IPMI subsystem secures anonymous logins.
Creating strong passwords for BMC accountsIdentify the existing baseboard management controller (BMC) accounts and create astrong password for each account. Strong passwords reduce the possibility ofunauthorized access to the IPMI subsystem.
Procedure
1. At the Avamar system utility node console, log in as root.
2. Type the following command:
ipmitool user list
The system displays a list that has columns of information about each BMC useraccount.
3. For each user account, type the following command:
ipmitool user set password user_ID new_password
where user_ID is the integer value that is listed in the ID column for the user accountand new_password is the new strong password for the account.
4. Repeat these steps for each Avamar storage node.
Results
The BMC requires the strong passwords for BMC account access.
For example, type:
ipmitool user listThe following response appears:
ID Name Callin Link Auth IPMI Msg Channel Priv Limit2 root false false true ADMINISTRATOR3 admin true true true ADMINISTRATOR
Change the password for the root account, by typing the following:
ipmitool user set password 2 new_passwordChange the password for the admin account by typing the following:
ipmitool user set password 3 new_password
Additional BMC security tasksLimit access to the baseboard management controller (BMC) by completing theseadditional tasks.
Refer to the hardware manufacturer's documentation for information about the additionalsecurity tasks that are described in the following sections.
Isolate the BMC management LAN portThe BMC provides a management interface through a dedicated NIC that opens a LANport on channel 4. Restrict access to this port by the following:
Intelligent Platform Management Interface
120 EMC Avamar 7.2 Product Security Guide
l Never expose the port to internet access
l Never expose the port to access from outside of the corporate LAN
l Assign a static private address to the port
l Only allow access to the port from the subnet
Disable remote media redirectionBy default, Avamar systems have remote media redirection disabled. Only enable thisBMC feature when it is required.
Disable the KVM functionalityBy default, Avamar systems have keyboard/video/monitor (KVM) functionality of the BMCdisabled. Only enable this BMC feature when it is required, and only with authenticationand strong passwords.
Prevent access to the BIOS and POST serial interfacesThe BMC management port provides BIOS and POST serial interfaces. Do not connect themanagement port to a device that permits BIOS and POST serial access from outside ofthe corporate LAN.
Disable boot from USB and boot from CD/DVDDisable boot from USB and boot from CD/DVD in the BIOS settings of the Avamar systemcomputers to prevent starting the computers from remote media. Do not put the USBinterface in the boot path.
Redirect HTTP packets to the HTTPS portHelp secure the BMC management web UI by redirecting traffic sent to the web UI fromport 80 (HTTP) to port 443 (HTTPS). Also, improve authentication by configuring the BMCmanagement web UI to use a certification authority-issued trusted public key certificate.
Intelligent Platform Management Interface
Additional BMC security tasks 121

Intelligent Platform Management Interface
122 EMC Avamar 7.2 Product Security Guide
APPENDIX A
Port Requirements
This appendix includes the following topics:
l Terminology........................................................................................................ 124l Avamar firewall................................................................................................... 125l Utility node ports.................................................................................................125l Storage node ports..............................................................................................132l Avamar client ports............................................................................................. 133l Avamar Downloader Service host ports............................................................... 135l Ports when using a Data Domain system............................................................. 136
Port Requirements 123
TerminologyThis appendix uses specific terms to refer to network concepts that concern Avamarsystems.
The following terms are used in this appendix.
SourceComputer that originates a network transmission. The source computer transmitsnetwork packets through a network interface, over a network connection, and to aspecific port on a target computer.
TargetComputer that receives a network transmission. The target computer receivestransmitted network packets on the port that the source computer specified. Aservice on the target computer that is listening on the specified port processes thepackets. Processing may include a response sent to the source computer or theestablishment of two-way communication with the source computer.
InboundDirection of travel of network packets that are sent from another computer to areferenced Avamar computer. The referenced Avamar computer is the target and theother computer is the source. The referenced Avamar computer receives inboundnetwork packets on an inbound port. The inbound port is a port on the referencedAvamar computer with a specific service for receiving and handling those networkpackets. The inbound port is also known as a listening port.
OutboundDirection of travel of network packets that an Avamar computer sends to adestination computer. The referenced Avamar computer is the source and the othercomputer is the target. The outbound port is the port on which the other computerlistens for the transmissions from the referenced Avamar computer.
Required portsInbound and outbound ports that must be open to allow the Avamar system toperform its core functions. Relevant routers, switches, and firewalls must allow thenetwork packets to reach these required ports. Core functionality is reduced when aprocess listening on a required target port cannot receive packets from a sourcecomputer.
Note
When an Avamar server undergoes security hardening some of the required ports areintentionally closed. Security hardening provides an increase in security in exchangefor a loss of some functionality.
Optional portsInbound and outbound ports that are used by the Avamar system to provideadditional functionality. Closing these ports reduces or eliminates the additionalfunctionality but does not prevent the Avamar system from performing its corefunctions.
Port Requirements
124 EMC Avamar 7.2 Product Security Guide
Avamar firewallThe Avamar firewall daemon runs on every Avamar node. The Avamar firewall daemoncontrols access to all inbound ports on each node and controls transmissions sent fromeach node.
The Avamar firewall daemon is called avfirewall. When a change is made to a firewallrule, restart avfirewall to load the new configuration.
The Avamar firewall daemon uses the rules in /etc/firewall.base. Use thesymlink: /ect/firewall.default to access the rules file.
Controlling the firewall daemonStop, start, restart, and check the status of the Avamar firewall daemon.
Procedure
1. Open a command shell and log in by using one of the following methods:
l For a single-node server:
a. Log in to the server as admin.
b. Switch user to root by typing su -.
l For a multi-node server:
a. Log in to the utility node as admin.
b. Load the dpnid OpenSSH key by typing:
ssh-agent bashssh-add ~admin/.ssh/dpnid
c. When prompted, type the dpnid passphrase and press Enter.
2. Stop the firewall daemon by typing:
service avfirewall stop
3. Start the firewall daemon by typing:
service avfirewall start
4. Restart the firewall daemon by typing:
service avfirewall restart
5. Check the status of the firewall daemon by typing:
service avfirewall status
Utility node portsThe Avamar utility node has specific port requirements both for inbound and outboundports.
The tables in this section list the following port requirements for the utility node:
l Required inbound ports
Ports on the utility node that must be open to network transmissions from specifiedsource computers.
Port Requirements
Avamar firewall 125
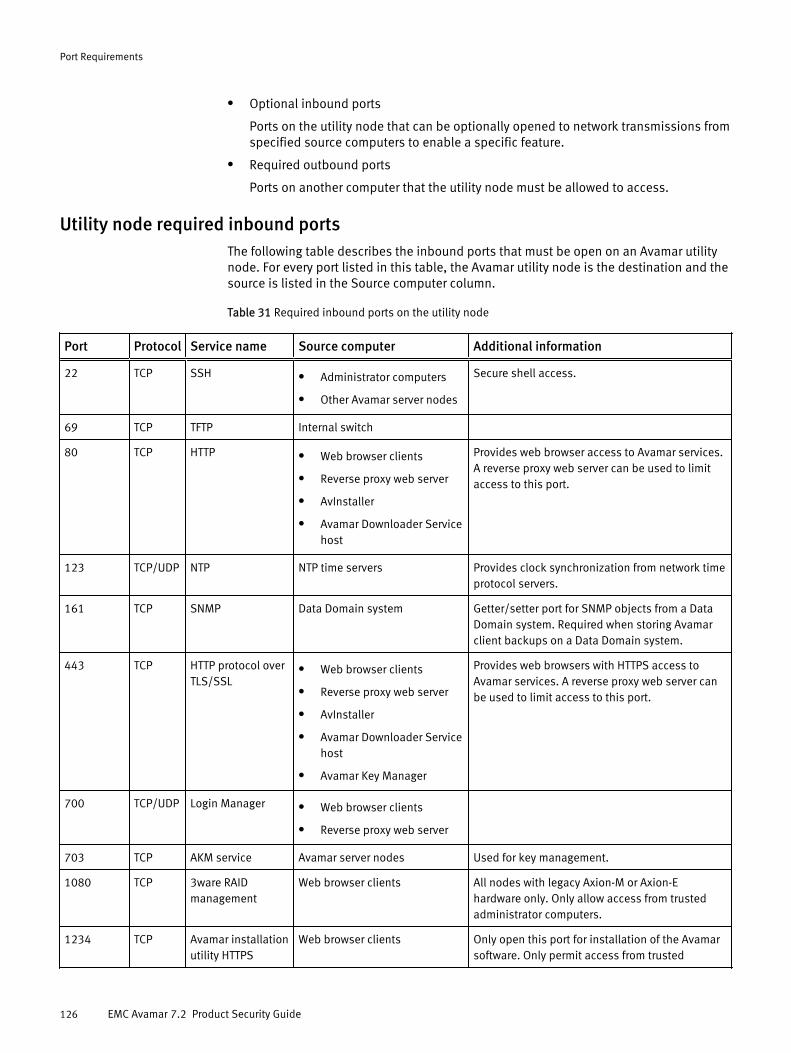
l Optional inbound ports
Ports on the utility node that can be optionally opened to network transmissions fromspecified source computers to enable a specific feature.
l Required outbound ports
Ports on another computer that the utility node must be allowed to access.
Utility node required inbound portsThe following table describes the inbound ports that must be open on an Avamar utilitynode. For every port listed in this table, the Avamar utility node is the destination and thesource is listed in the Source computer column.
Table 31 Required inbound ports on the utility node
Port Protocol Service name Source computer Additional information
22 TCP SSH l Administrator computers
l Other Avamar server nodes
Secure shell access.
69 TCP TFTP Internal switch
80 TCP HTTP l Web browser clients
l Reverse proxy web server
l AvInstaller
l Avamar Downloader Servicehost
Provides web browser access to Avamar services.A reverse proxy web server can be used to limitaccess to this port.
123 TCP/UDP NTP NTP time servers Provides clock synchronization from network timeprotocol servers.
161 TCP SNMP Data Domain system Getter/setter port for SNMP objects from a DataDomain system. Required when storing Avamarclient backups on a Data Domain system.
443 TCP HTTP protocol overTLS/SSL
l Web browser clients
l Reverse proxy web server
l AvInstaller
l Avamar Downloader Servicehost
l Avamar Key Manager
Provides web browsers with HTTPS access toAvamar services. A reverse proxy web server canbe used to limit access to this port.
700 TCP/UDP Login Manager l Web browser clients
l Reverse proxy web server
703 TCP AKM service Avamar server nodes Used for key management.
1080 TCP 3ware RAIDmanagement
Web browser clients All nodes with legacy Axion-M or Axion-Ehardware only. Only allow access from trustedadministrator computers.
1234 TCP Avamar installationutility HTTPS
Web browser clients Only open this port for installation of the Avamarsoftware. Only permit access from trusted
Port Requirements
126 EMC Avamar 7.2 Product Security Guide
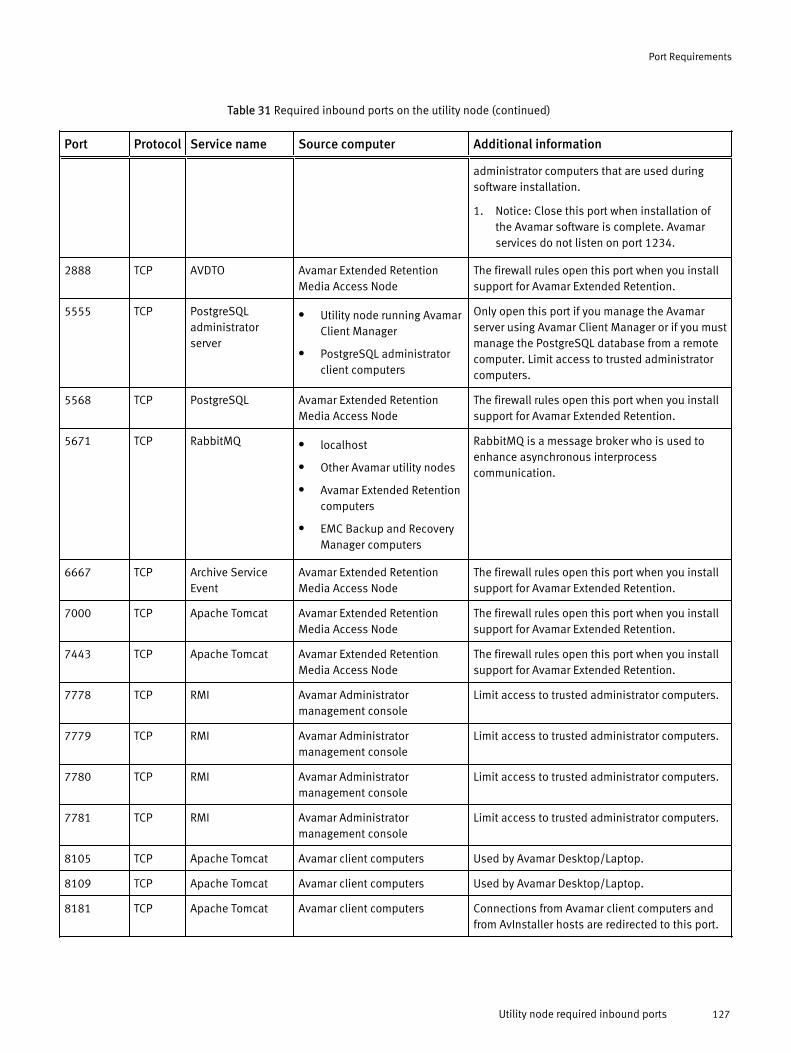
Table 31 Required inbound ports on the utility node (continued)
Port Protocol Service name Source computer Additional information
administrator computers that are used duringsoftware installation.
1. Notice: Close this port when installation ofthe Avamar software is complete. Avamarservices do not listen on port 1234.
2888 TCP AVDTO Avamar Extended RetentionMedia Access Node
The firewall rules open this port when you installsupport for Avamar Extended Retention.
5555 TCP PostgreSQLadministratorserver
l Utility node running AvamarClient Manager
l PostgreSQL administratorclient computers
Only open this port if you manage the Avamarserver using Avamar Client Manager or if you mustmanage the PostgreSQL database from a remotecomputer. Limit access to trusted administratorcomputers.
5568 TCP PostgreSQL Avamar Extended RetentionMedia Access Node
The firewall rules open this port when you installsupport for Avamar Extended Retention.
5671 TCP RabbitMQ l localhost
l Other Avamar utility nodes
l Avamar Extended Retentioncomputers
l EMC Backup and RecoveryManager computers
RabbitMQ is a message broker who is used toenhance asynchronous interprocesscommunication.
6667 TCP Archive ServiceEvent
Avamar Extended RetentionMedia Access Node
The firewall rules open this port when you installsupport for Avamar Extended Retention.
7000 TCP Apache Tomcat Avamar Extended RetentionMedia Access Node
The firewall rules open this port when you installsupport for Avamar Extended Retention.
7443 TCP Apache Tomcat Avamar Extended RetentionMedia Access Node
The firewall rules open this port when you installsupport for Avamar Extended Retention.
7778 TCP RMI Avamar Administratormanagement console
Limit access to trusted administrator computers.
7779 TCP RMI Avamar Administratormanagement console
Limit access to trusted administrator computers.
7780 TCP RMI Avamar Administratormanagement console
Limit access to trusted administrator computers.
7781 TCP RMI Avamar Administratormanagement console
Limit access to trusted administrator computers.
8105 TCP Apache Tomcat Avamar client computers Used by Avamar Desktop/Laptop.
8109 TCP Apache Tomcat Avamar client computers Used by Avamar Desktop/Laptop.
8181 TCP Apache Tomcat Avamar client computers Connections from Avamar client computers andfrom AvInstaller hosts are redirected to this port.
Port Requirements
Utility node required inbound ports 127
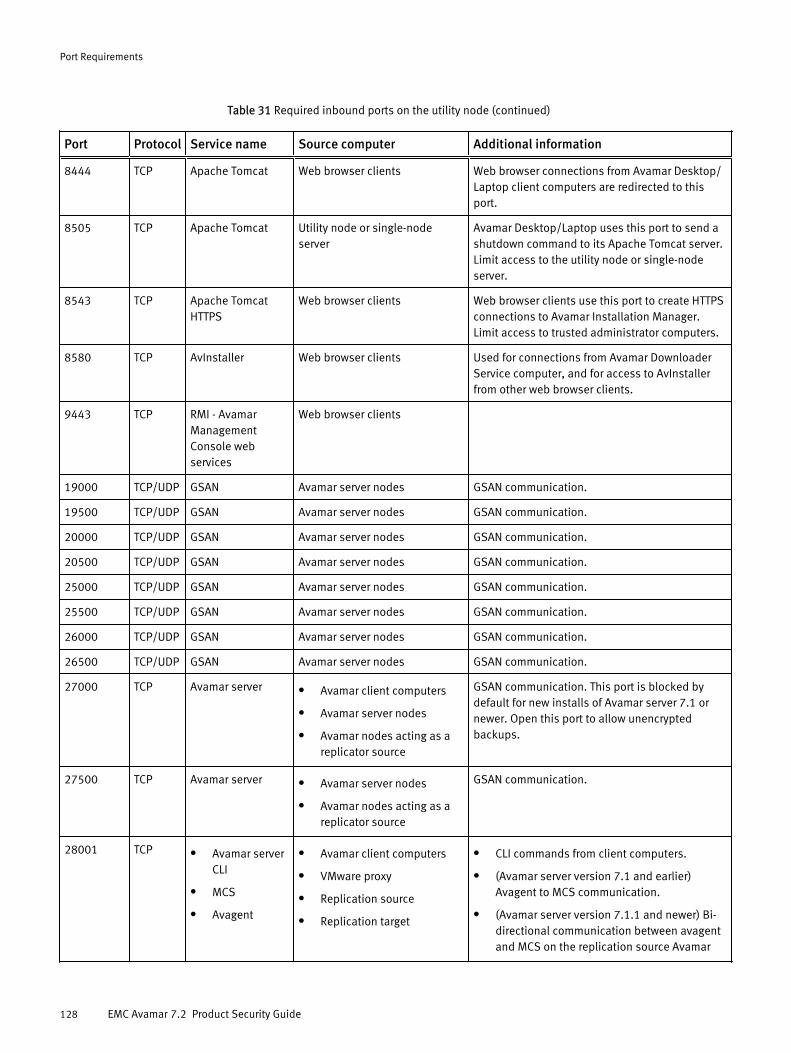
Table 31 Required inbound ports on the utility node (continued)
Port Protocol Service name Source computer Additional information
8444 TCP Apache Tomcat Web browser clients Web browser connections from Avamar Desktop/Laptop client computers are redirected to thisport.
8505 TCP Apache Tomcat Utility node or single-nodeserver
Avamar Desktop/Laptop uses this port to send ashutdown command to its Apache Tomcat server.Limit access to the utility node or single-nodeserver.
8543 TCP Apache TomcatHTTPS
Web browser clients Web browser clients use this port to create HTTPSconnections to Avamar Installation Manager.Limit access to trusted administrator computers.
8580 TCP AvInstaller Web browser clients Used for connections from Avamar DownloaderService computer, and for access to AvInstallerfrom other web browser clients.
9443 TCP RMI - AvamarManagementConsole webservices
Web browser clients
19000 TCP/UDP GSAN Avamar server nodes GSAN communication.
19500 TCP/UDP GSAN Avamar server nodes GSAN communication.
20000 TCP/UDP GSAN Avamar server nodes GSAN communication.
20500 TCP/UDP GSAN Avamar server nodes GSAN communication.
25000 TCP/UDP GSAN Avamar server nodes GSAN communication.
25500 TCP/UDP GSAN Avamar server nodes GSAN communication.
26000 TCP/UDP GSAN Avamar server nodes GSAN communication.
26500 TCP/UDP GSAN Avamar server nodes GSAN communication.
27000 TCP Avamar server l Avamar client computers
l Avamar server nodes
l Avamar nodes acting as areplicator source
GSAN communication. This port is blocked bydefault for new installs of Avamar server 7.1 ornewer. Open this port to allow unencryptedbackups.
27500 TCP Avamar server l Avamar server nodes
l Avamar nodes acting as areplicator source
GSAN communication.
28001 TCP l Avamar serverCLI
l MCS
l Avagent
l Avamar client computers
l VMware proxy
l Replication source
l Replication target
l CLI commands from client computers.
l (Avamar server version 7.1 and earlier)Avagent to MCS communication.
l (Avamar server version 7.1.1 and newer) Bi-directional communication between avagentand MCS on the replication source Avamar
Port Requirements
128 EMC Avamar 7.2 Product Security Guide
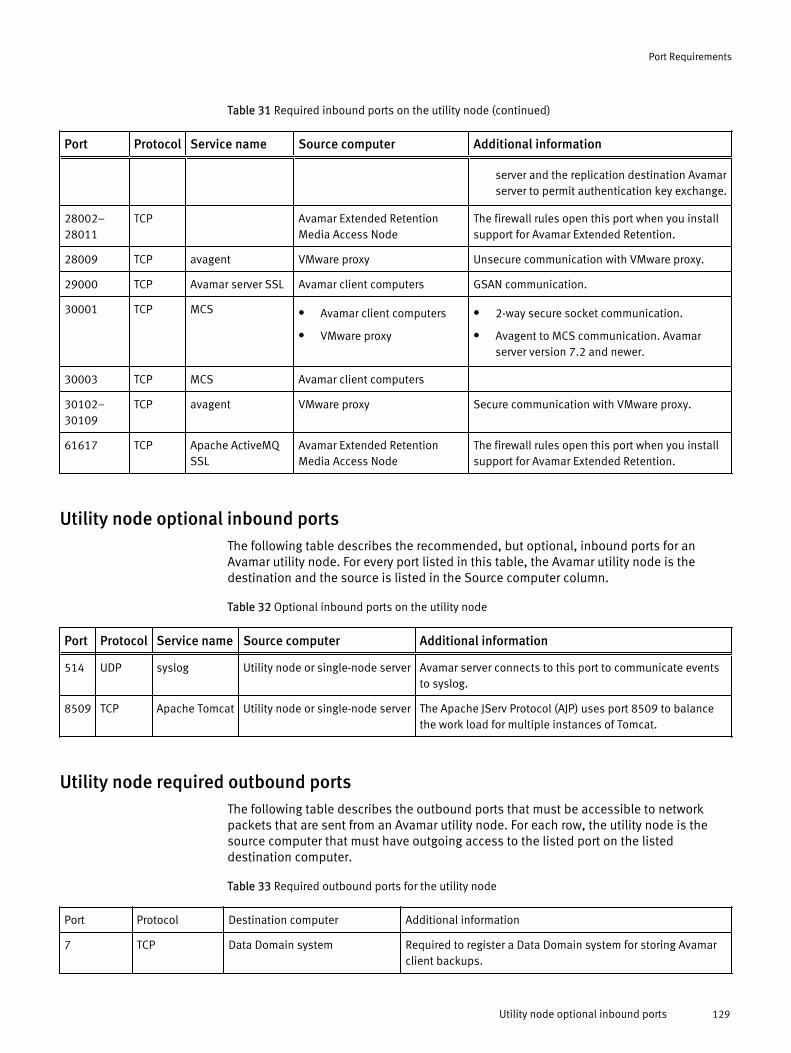
Table 31 Required inbound ports on the utility node (continued)
Port Protocol Service name Source computer Additional information
server and the replication destination Avamarserver to permit authentication key exchange.
28002–28011
TCP Avamar Extended RetentionMedia Access Node
The firewall rules open this port when you installsupport for Avamar Extended Retention.
28009 TCP avagent VMware proxy Unsecure communication with VMware proxy.
29000 TCP Avamar server SSL Avamar client computers GSAN communication.
30001 TCP MCS l Avamar client computers
l VMware proxy
l 2-way secure socket communication.
l Avagent to MCS communication. Avamarserver version 7.2 and newer.
30003 TCP MCS Avamar client computers
30102–30109
TCP avagent VMware proxy Secure communication with VMware proxy.
61617 TCP Apache ActiveMQSSL
Avamar Extended RetentionMedia Access Node
The firewall rules open this port when you installsupport for Avamar Extended Retention.
Utility node optional inbound portsThe following table describes the recommended, but optional, inbound ports for anAvamar utility node. For every port listed in this table, the Avamar utility node is thedestination and the source is listed in the Source computer column.
Table 32 Optional inbound ports on the utility node
Port Protocol Service name Source computer Additional information
514 UDP syslog Utility node or single-node server Avamar server connects to this port to communicate eventsto syslog.
8509 TCP Apache Tomcat Utility node or single-node server The Apache JServ Protocol (AJP) uses port 8509 to balancethe work load for multiple instances of Tomcat.
Utility node required outbound portsThe following table describes the outbound ports that must be accessible to networkpackets that are sent from an Avamar utility node. For each row, the utility node is thesource computer that must have outgoing access to the listed port on the listeddestination computer.
Table 33 Required outbound ports for the utility node
Port Protocol Destination computer Additional information
7 TCP Data Domain system Required to register a Data Domain system for storing Avamarclient backups.
Port Requirements
Utility node optional inbound ports 129
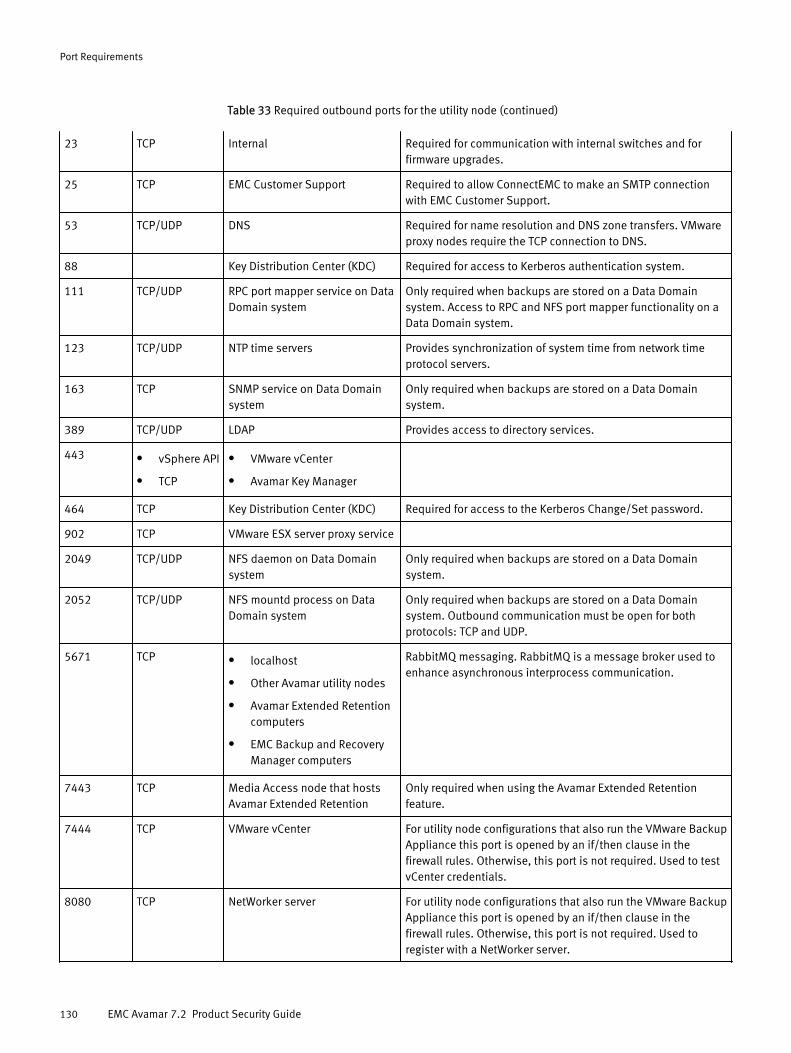
Table 33 Required outbound ports for the utility node (continued)
23 TCP Internal Required for communication with internal switches and forfirmware upgrades.
25 TCP EMC Customer Support Required to allow ConnectEMC to make an SMTP connectionwith EMC Customer Support.
53 TCP/UDP DNS Required for name resolution and DNS zone transfers. VMwareproxy nodes require the TCP connection to DNS.
88 Key Distribution Center (KDC) Required for access to Kerberos authentication system.
111 TCP/UDP RPC port mapper service on DataDomain system
Only required when backups are stored on a Data Domainsystem. Access to RPC and NFS port mapper functionality on aData Domain system.
123 TCP/UDP NTP time servers Provides synchronization of system time from network timeprotocol servers.
163 TCP SNMP service on Data Domainsystem
Only required when backups are stored on a Data Domainsystem.
389 TCP/UDP LDAP Provides access to directory services.
443 l vSphere API
l TCP
l VMware vCenter
l Avamar Key Manager
464 TCP Key Distribution Center (KDC) Required for access to the Kerberos Change/Set password.
902 TCP VMware ESX server proxy service
2049 TCP/UDP NFS daemon on Data Domainsystem
Only required when backups are stored on a Data Domainsystem.
2052 TCP/UDP NFS mountd process on DataDomain system
Only required when backups are stored on a Data Domainsystem. Outbound communication must be open for bothprotocols: TCP and UDP.
5671 TCP l localhost
l Other Avamar utility nodes
l Avamar Extended Retentioncomputers
l EMC Backup and RecoveryManager computers
RabbitMQ messaging. RabbitMQ is a message broker used toenhance asynchronous interprocess communication.
7443 TCP Media Access node that hostsAvamar Extended Retention
Only required when using the Avamar Extended Retentionfeature.
7444 TCP VMware vCenter For utility node configurations that also run the VMware BackupAppliance this port is opened by an if/then clause in thefirewall rules. Otherwise, this port is not required. Used to testvCenter credentials.
8080 TCP NetWorker server For utility node configurations that also run the VMware BackupAppliance this port is opened by an if/then clause in thefirewall rules. Otherwise, this port is not required. Used toregister with a NetWorker server.
Port Requirements
130 EMC Avamar 7.2 Product Security Guide
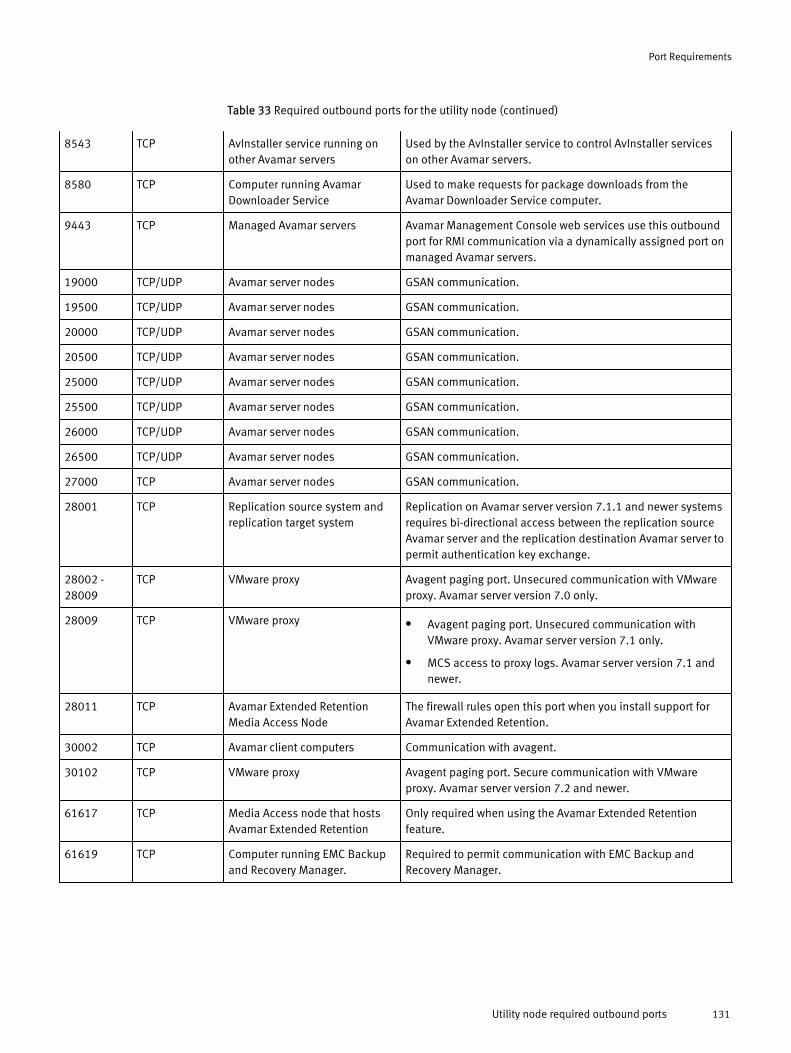
Table 33 Required outbound ports for the utility node (continued)
8543 TCP AvInstaller service running onother Avamar servers
Used by the AvInstaller service to control AvInstaller serviceson other Avamar servers.
8580 TCP Computer running AvamarDownloader Service
Used to make requests for package downloads from theAvamar Downloader Service computer.
9443 TCP Managed Avamar servers Avamar Management Console web services use this outboundport for RMI communication via a dynamically assigned port onmanaged Avamar servers.
19000 TCP/UDP Avamar server nodes GSAN communication.
19500 TCP/UDP Avamar server nodes GSAN communication.
20000 TCP/UDP Avamar server nodes GSAN communication.
20500 TCP/UDP Avamar server nodes GSAN communication.
25000 TCP/UDP Avamar server nodes GSAN communication.
25500 TCP/UDP Avamar server nodes GSAN communication.
26000 TCP/UDP Avamar server nodes GSAN communication.
26500 TCP/UDP Avamar server nodes GSAN communication.
27000 TCP Avamar server nodes GSAN communication.
28001 TCP Replication source system andreplication target system
Replication on Avamar server version 7.1.1 and newer systemsrequires bi-directional access between the replication sourceAvamar server and the replication destination Avamar server topermit authentication key exchange.
28002 -28009
TCP VMware proxy Avagent paging port. Unsecured communication with VMwareproxy. Avamar server version 7.0 only.
28009 TCP VMware proxy l Avagent paging port. Unsecured communication withVMware proxy. Avamar server version 7.1 only.
l MCS access to proxy logs. Avamar server version 7.1 andnewer.
28011 TCP Avamar Extended RetentionMedia Access Node
The firewall rules open this port when you install support forAvamar Extended Retention.
30002 TCP Avamar client computers Communication with avagent.
30102 TCP VMware proxy Avagent paging port. Secure communication with VMwareproxy. Avamar server version 7.2 and newer.
61617 TCP Media Access node that hostsAvamar Extended Retention
Only required when using the Avamar Extended Retentionfeature.
61619 TCP Computer running EMC Backupand Recovery Manager.
Required to permit communication with EMC Backup andRecovery Manager.
Port Requirements
Utility node required outbound ports 131
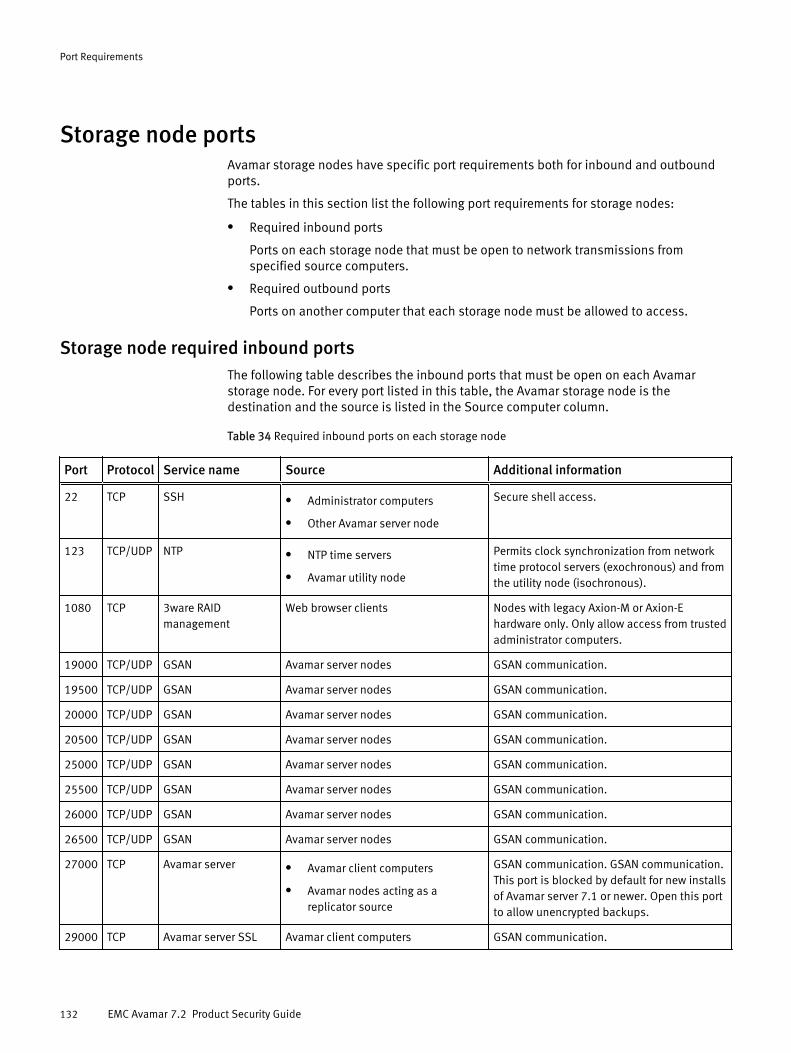
Storage node portsAvamar storage nodes have specific port requirements both for inbound and outboundports.
The tables in this section list the following port requirements for storage nodes:
l Required inbound ports
Ports on each storage node that must be open to network transmissions fromspecified source computers.
l Required outbound ports
Ports on another computer that each storage node must be allowed to access.
Storage node required inbound portsThe following table describes the inbound ports that must be open on each Avamarstorage node. For every port listed in this table, the Avamar storage node is thedestination and the source is listed in the Source computer column.
Table 34 Required inbound ports on each storage node
Port Protocol Service name Source Additional information
22 TCP SSH l Administrator computers
l Other Avamar server node
Secure shell access.
123 TCP/UDP NTP l NTP time servers
l Avamar utility node
Permits clock synchronization from networktime protocol servers (exochronous) and fromthe utility node (isochronous).
1080 TCP 3ware RAIDmanagement
Web browser clients Nodes with legacy Axion-M or Axion-Ehardware only. Only allow access from trustedadministrator computers.
19000 TCP/UDP GSAN Avamar server nodes GSAN communication.
19500 TCP/UDP GSAN Avamar server nodes GSAN communication.
20000 TCP/UDP GSAN Avamar server nodes GSAN communication.
20500 TCP/UDP GSAN Avamar server nodes GSAN communication.
25000 TCP/UDP GSAN Avamar server nodes GSAN communication.
25500 TCP/UDP GSAN Avamar server nodes GSAN communication.
26000 TCP/UDP GSAN Avamar server nodes GSAN communication.
26500 TCP/UDP GSAN Avamar server nodes GSAN communication.
27000 TCP Avamar server l Avamar client computers
l Avamar nodes acting as areplicator source
GSAN communication. GSAN communication.This port is blocked by default for new installsof Avamar server 7.1 or newer. Open this portto allow unencrypted backups.
29000 TCP Avamar server SSL Avamar client computers GSAN communication.
Port Requirements
132 EMC Avamar 7.2 Product Security Guide
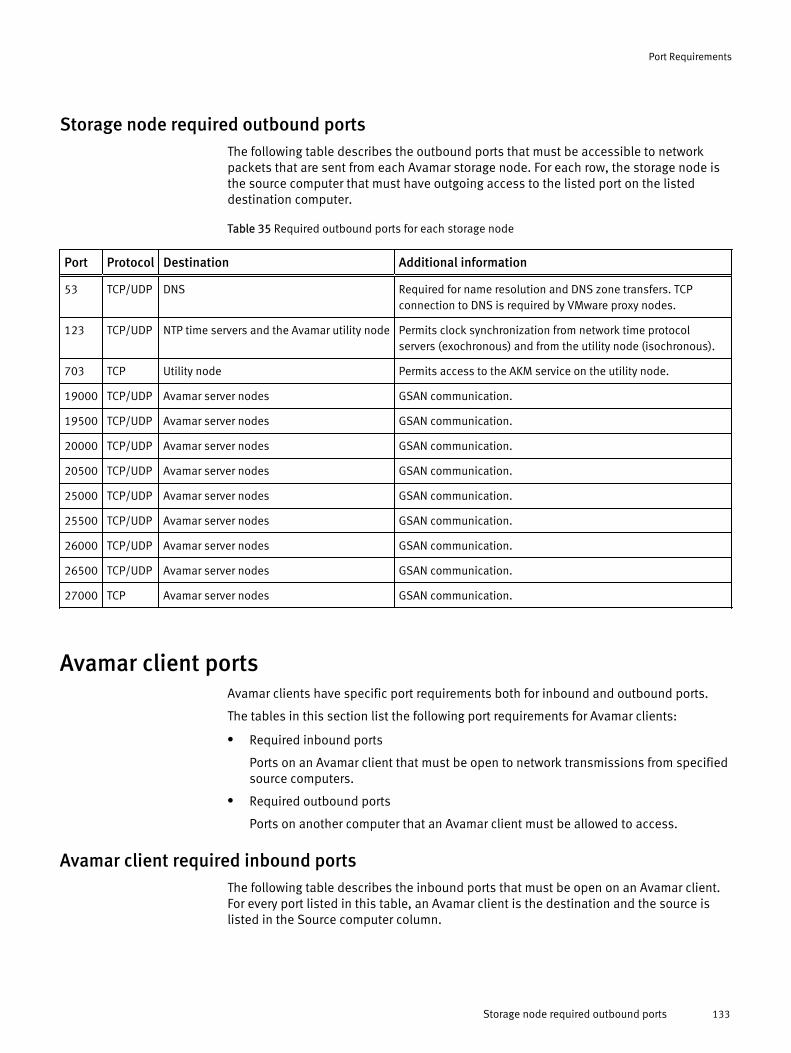
Storage node required outbound portsThe following table describes the outbound ports that must be accessible to networkpackets that are sent from each Avamar storage node. For each row, the storage node isthe source computer that must have outgoing access to the listed port on the listeddestination computer.
Table 35 Required outbound ports for each storage node
Port Protocol Destination Additional information
53 TCP/UDP DNS Required for name resolution and DNS zone transfers. TCPconnection to DNS is required by VMware proxy nodes.
123 TCP/UDP NTP time servers and the Avamar utility node Permits clock synchronization from network time protocolservers (exochronous) and from the utility node (isochronous).
703 TCP Utility node Permits access to the AKM service on the utility node.
19000 TCP/UDP Avamar server nodes GSAN communication.
19500 TCP/UDP Avamar server nodes GSAN communication.
20000 TCP/UDP Avamar server nodes GSAN communication.
20500 TCP/UDP Avamar server nodes GSAN communication.
25000 TCP/UDP Avamar server nodes GSAN communication.
25500 TCP/UDP Avamar server nodes GSAN communication.
26000 TCP/UDP Avamar server nodes GSAN communication.
26500 TCP/UDP Avamar server nodes GSAN communication.
27000 TCP Avamar server nodes GSAN communication.
Avamar client portsAvamar clients have specific port requirements both for inbound and outbound ports.
The tables in this section list the following port requirements for Avamar clients:
l Required inbound ports
Ports on an Avamar client that must be open to network transmissions from specifiedsource computers.
l Required outbound ports
Ports on another computer that an Avamar client must be allowed to access.
Avamar client required inbound portsThe following table describes the inbound ports that must be open on an Avamar client.For every port listed in this table, an Avamar client is the destination and the source islisted in the Source computer column.
Port Requirements
Storage node required outbound ports 133
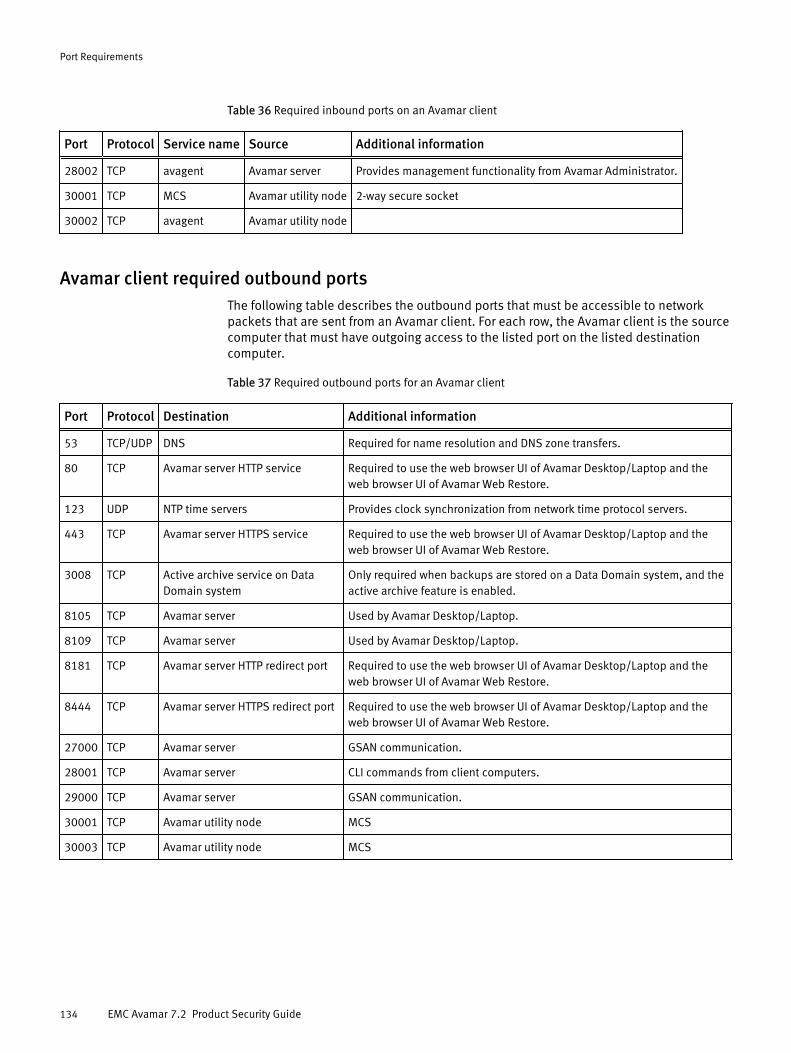
Table 36 Required inbound ports on an Avamar client
Port Protocol Service name Source Additional information
28002 TCP avagent Avamar server Provides management functionality from Avamar Administrator.
30001 TCP MCS Avamar utility node 2-way secure socket
30002 TCP avagent Avamar utility node
Avamar client required outbound portsThe following table describes the outbound ports that must be accessible to networkpackets that are sent from an Avamar client. For each row, the Avamar client is the sourcecomputer that must have outgoing access to the listed port on the listed destinationcomputer.
Table 37 Required outbound ports for an Avamar client
Port Protocol Destination Additional information
53 TCP/UDP DNS Required for name resolution and DNS zone transfers.
80 TCP Avamar server HTTP service Required to use the web browser UI of Avamar Desktop/Laptop and theweb browser UI of Avamar Web Restore.
123 UDP NTP time servers Provides clock synchronization from network time protocol servers.
443 TCP Avamar server HTTPS service Required to use the web browser UI of Avamar Desktop/Laptop and theweb browser UI of Avamar Web Restore.
3008 TCP Active archive service on DataDomain system
Only required when backups are stored on a Data Domain system, and theactive archive feature is enabled.
8105 TCP Avamar server Used by Avamar Desktop/Laptop.
8109 TCP Avamar server Used by Avamar Desktop/Laptop.
8181 TCP Avamar server HTTP redirect port Required to use the web browser UI of Avamar Desktop/Laptop and theweb browser UI of Avamar Web Restore.
8444 TCP Avamar server HTTPS redirect port Required to use the web browser UI of Avamar Desktop/Laptop and theweb browser UI of Avamar Web Restore.
27000 TCP Avamar server GSAN communication.
28001 TCP Avamar server CLI commands from client computers.
29000 TCP Avamar server GSAN communication.
30001 TCP Avamar utility node MCS
30003 TCP Avamar utility node MCS
Port Requirements
134 EMC Avamar 7.2 Product Security Guide
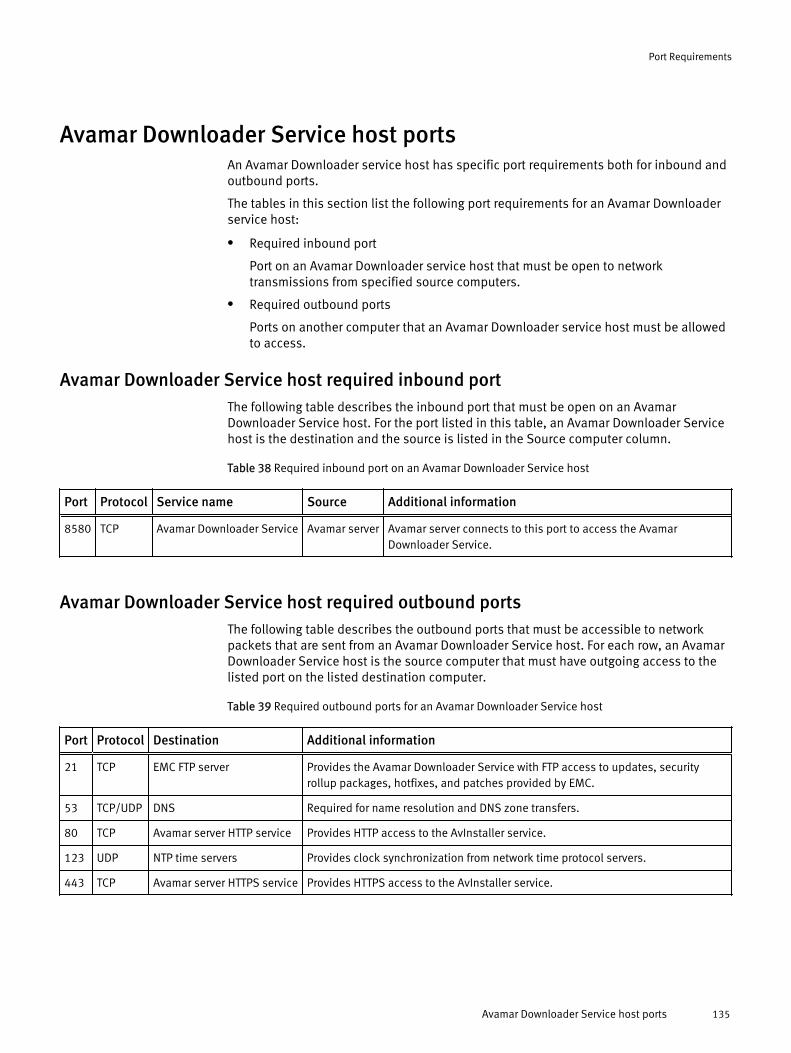
Avamar Downloader Service host portsAn Avamar Downloader service host has specific port requirements both for inbound andoutbound ports.
The tables in this section list the following port requirements for an Avamar Downloaderservice host:
l Required inbound port
Port on an Avamar Downloader service host that must be open to networktransmissions from specified source computers.
l Required outbound ports
Ports on another computer that an Avamar Downloader service host must be allowedto access.
Avamar Downloader Service host required inbound portThe following table describes the inbound port that must be open on an AvamarDownloader Service host. For the port listed in this table, an Avamar Downloader Servicehost is the destination and the source is listed in the Source computer column.
Table 38 Required inbound port on an Avamar Downloader Service host
Port Protocol Service name Source Additional information
8580 TCP Avamar Downloader Service Avamar server Avamar server connects to this port to access the AvamarDownloader Service.
Avamar Downloader Service host required outbound portsThe following table describes the outbound ports that must be accessible to networkpackets that are sent from an Avamar Downloader Service host. For each row, an AvamarDownloader Service host is the source computer that must have outgoing access to thelisted port on the listed destination computer.
Table 39 Required outbound ports for an Avamar Downloader Service host
Port Protocol Destination Additional information
21 TCP EMC FTP server Provides the Avamar Downloader Service with FTP access to updates, securityrollup packages, hotfixes, and patches provided by EMC.
53 TCP/UDP DNS Required for name resolution and DNS zone transfers.
80 TCP Avamar server HTTP service Provides HTTP access to the AvInstaller service.
123 UDP NTP time servers Provides clock synchronization from network time protocol servers.
443 TCP Avamar server HTTPS service Provides HTTPS access to the AvInstaller service.
Port Requirements
Avamar Downloader Service host ports 135
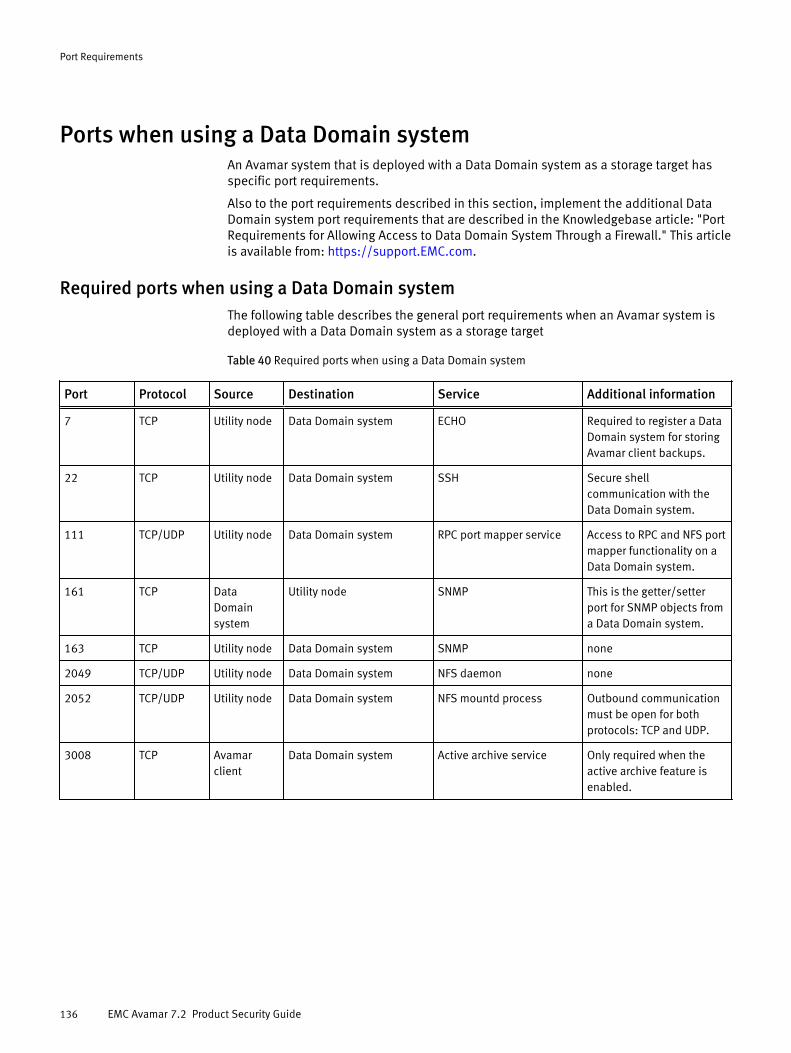
Ports when using a Data Domain systemAn Avamar system that is deployed with a Data Domain system as a storage target hasspecific port requirements.
Also to the port requirements described in this section, implement the additional DataDomain system port requirements that are described in the Knowledgebase article: "PortRequirements for Allowing Access to Data Domain System Through a Firewall." This articleis available from: https://support.EMC.com.
Required ports when using a Data Domain systemThe following table describes the general port requirements when an Avamar system isdeployed with a Data Domain system as a storage target
Table 40 Required ports when using a Data Domain system
Port Protocol Source Destination Service Additional information
7 TCP Utility node Data Domain system ECHO Required to register a DataDomain system for storingAvamar client backups.
22 TCP Utility node Data Domain system SSH Secure shellcommunication with theData Domain system.
111 TCP/UDP Utility node Data Domain system RPC port mapper service Access to RPC and NFS portmapper functionality on aData Domain system.
161 TCP DataDomainsystem
Utility node SNMP This is the getter/setterport for SNMP objects froma Data Domain system.
163 TCP Utility node Data Domain system SNMP none
2049 TCP/UDP Utility node Data Domain system NFS daemon none
2052 TCP/UDP Utility node Data Domain system NFS mountd process Outbound communicationmust be open for bothprotocols: TCP and UDP.
3008 TCP Avamarclient
Data Domain system Active archive service Only required when theactive archive feature isenabled.
Port Requirements
136 EMC Avamar 7.2 Product Security Guide
APPENDIX B
IAO Information
US Department of Defense (DoD) Security Technical Implementation Guide (STIG) for UNIXmandates information that should be disclosed to an Information Assurance Officer(IAO).
This appendix includes the following topics:
l System-level accounts.........................................................................................138l Files with SUID bit and SGID bit........................................................................... 138l Permissions within /var folder.............................................................................139
IAO Information 137
System-level accountsPursuant to the disclosure requirements of STIG compliance rule GEN000360, thefollowing lists contains the names of accounts that are system-level, and are notprivileged-user-level:
atmysqladmindnsmasqmessagebuspolkitusersuse-nccuuiddwwwrunstunnel
Files with SUID bit and SGID bitPursuant to the disclosure requirements of STIG compliance rule GEN002440, thefollowing list contains the pathnames for files that have the set user ID (SUID) bit and theset group ID (SGID) attributes enabled:
/data01/connectemc/archive/data01/connectemc/failed/data01/connectemc/history/data01/connectemc/logs/data01/connectemc/output/data01/connectemc/poll/data01/connectemc/queue/data01/connectemc/recycle/lib64/dbus-1/dbus-daemon-launch-helper/opt/dell/srvadmin/oma/bin/omcliproxy/usr/bin/lockfile/usr/bin/slocate/usr/bin/ssh-agent/usr/bin/vlock/usr/bin/wall/usr/bin/write/usr/lib/PolicyKit/polkit-explicit-grant-helper/usr/lib/PolicyKit/polkit-grant-helper/usr/lib/PolicyKit/polkit-grant-helper-pam/usr/lib/PolicyKit/polkit-read-auth-helper/usr/lib/PolicyKit/polkit-revoke-helper/usr/lib/PolicyKit/polkit-set-default-helper/usr/lib/vte/gnome-pty-helper/usr/sbin/lockdev/usr/sbin/postdrop/usr/sbin/postqueue
IAO Information
138 EMC Avamar 7.2 Product Security Guide
/usr/sbin/sendmail.sendmail/usr/sbin/utempter/usr/sbin/zypp-refresh-wrapper
Permissions within /var folderMany components of the Avamar system write to the /var folder.
Permissions on the /var folder of an Avamar node are world writeable because manycomponents of the Avamar system write files such as logs there. On physical Avamarservers, the folder in question is /usr/local/avamar/var; on virtual Avamar servers, it is /space/avamar/var. This security exception is necessary for the operation of the product.
IAO Information
Permissions within /var folder 139

IAO Information
140 EMC Avamar 7.2 Product Security Guide
APPENDIX C
Enterprise Authentication
This appendix includes the following topics:
l Enterprise authentication.................................................................................... 142l Configuring Enterprise authentication................................................................. 143
Enterprise Authentication 141
Enterprise authenticationEnterprise (or external) authentication enables users to use the same user ID andpassword to log in to multiple systems.
NOTICE
For backward compatibility, this appendix preserves information about the deprecatedEnterprise authentication method. The functionality of this method is replaced, andimproved on, by the directory service authentication method. Information about thedirectory service authentication method is available in the EMC Avamar AdministrationGuide.
The Avamar Enterprise authentication feature is not a single user ID/password login, fullyintegrated into an external authentication system on which users are created andmanaged. Instead, the same user ID must be created on both Avamar and externalsystems while the password is set and managed externally.
Avamar Login Manager provides access to the external authentication databases throughthe standard Pluggable Authentication Module (PAM) library of the Linux operatingsystem.
Login Manager runs on the utility node and is installed and started during Avamar serverinstallation and upgrade. It uses the domains configuration file to identify the supporteddomains.
Supported components and systemsEnterprise authentication is only available for specific Avamar components. Enterpriseauthentication supports two external authentication systems.
Avamar componentsAvamar Administrator and Avamar Web Access support the use of Enterpriseauthentication for user accounts.
Enterprise authentication is not available for Avamar server-level administration useraccounts, including:
l Operating system user accounts: root, admin, and dpn.
l Special Avamar system administrative user accounts, for example MCUser and root.
External systemsAvamar supports the external authentication systems that are described in the followingtable.
Table 41 Supported external authentication systems
Category Description
Lightweight Directory AccessProtocol (LDAP)
Hierarchical directory structure, X.500-standard, system suchas:
l Microsoft Active Directory Service (MS ADS)
l Novell NDS and eDirectory
Enterprise Authentication
142 EMC Avamar 7.2 Product Security Guide
Table 41 Supported external authentication systems (continued)
Category Description
Network Information Service(NIS) SUN Yellow Pages (YP)
Flat, workgroup-based, database structure of user IDs,passwords, and other system parameters comparable toMicrosoft Windows NT such as:
l Master NIS Server - Primary Domain Controller (PDC)
l Slave NIS Servers - Backup Domain Controllers (BDC)
Configuring Enterprise authenticationConfiguring Enterprise authentication involves the completion of a series of tasks,including configuring either an LDAP or an NIS interface.
Complete the sequence of tasks outlined below to complete Enterprise authenticationconfiguration.
Procedure
1. Back up the current configuration files.
2. Configure an LDAP or an NIS interface.
Complete the steps described in either Configuring an LDAP interface on page 144 or Configuring an NIS interface on page 146.
3. Use Avamar Administrator to create the users who require login access to Avamar. TheEMC Avamar Administration Guide provides detailed instructions.
The username must match exactly the user ID on the LDAP or NIS server. Createexternal users in the proper LDAP or NIS server domain location (for example, the root"/" or other directory like "/clients/"). When creating users, the external domainappears in the Authentication System list.
4. Confirm the ability of the external users to log in to Avamar Administrator.
Log in according to the following rules:
a. User ID followed by @DOMAIN.
where DOMAIN is the LDAP or NIS server domain that you specified when youedited the /etc/avamar/domain.cfg file while configuring the LDAP or NISinterface.For example: [email protected].
b. User password as used in the external LDAP or NIS system.
c. Domain path where external users reside (for example, "/clients/").
5. Back up the configuration files again.
As a best practice, back up configuration files before installing software upgrades toprevent the possibility of configuration files being overwritten with default values.
Enterprise Authentication
Configuring Enterprise authentication 143
Configuring an LDAP interfaceConfigure an LDAP interface on the Avamar system to use with Enterprise authentication.
Before you begin
Gather the following information:
l LDAP information: LDAP domain name, IP address or FQDN of LDAP authenticationserver, and distinguished name (DN) of the account to use for LDAP queries.
l Avamar system information: OS root password, OS admin password, and Avamarsystem admin password.
Procedure
1. Open a command shell and log in by using one of the following methods:
l For a single-node server:
a. Log in to the server as admin.
b. Switch user to root by typing su -.
l For a multi-node server:
a. Log in to the utility node as admin.
b. Load the dpnid OpenSSH key by typing:
ssh-agent bashssh-add ~admin/.ssh/dpnid
c. When prompted, type the dpnid passphrase and press Enter.
2. Open /etc/avamar/domain.cfg in a plain text editor.
3. Add the following entry in the Customer Specific Domains section, and then save thefile:
DOMAIN=IDwhere:
l DOMAIN (format: example.com) is a unique customer-specific LDAP domain that isused for addressing PAM.
l ID is an integer larger than 1. IDs 0 and 1 are reserved for Avamar internal use.
Note
The next step creates a symbolic link for this entry. However, the Avamar systemprovides an existing symbolic link when you uncomment the line:ldap=3
If you use ldap=3, skip the next step.The DOMAIN part of the entry (either ldap or a unique LDAP domain) appears in theAvamar Administrator Authentication System list. Typing a unique DOMAIN can helpclarify which LDAP domain is used for external authentication.
4. Create a unique lm_ldap file and symbolically link to it by typing:
ln -sf /etc/pam.d/lm_ldap /etc/pam.d/lm_NUMBER
where NUMBER is the LDAP domain ID used in the previous step.
Enterprise Authentication
144 EMC Avamar 7.2 Product Security Guide
5. Log in to the server as admin.
6. Load the admin OpenSSH key by typing:
ssh-agent bash
ssh-add ~admin/ .ssh/admin_key
7. When prompted, type the admin user account passphrase and press Enter.
8. Confirm that the system name and lmaddr are set up correctly by typing:
avmaint config --avamaronly | grep systemname
avmaint config --avamaronly | grep lmaddr
These commands display the hostname and IP address of the utility node,respectively.
9. As root, create a symbolic link from ldap.conf to ldap.conf.winad by typing:
ln -sf /etc/ldap.conf.winad /etc/ldap.conf
10.Set correct group ownership and file permissions for ldap.conf by typing:
chown root:root /etc/ldap.conf
chmod 0600 /etc/ldap.conf
11.Confirm the symbolic link by typing:
ls -l /etc/ldap.conf
The following information appears in the command shell:/etc/ldap.conf -> /etc/ldap.conf.winad
12.In a UNIX text editor, open /etc/ldap.con.
13.Modify the following entries, and then save the file:
host HN-IPADDwhere HN-IPADD is the fully qualified hostname or IP address of the LDAP server.
base dc=DOMAIN, dc=comwhere DOMAIN is the first part of the LDAP domain name. For example: example.comwould be displayed as dc=example, dc=com.
binddn cn=PROXYUSER, ou=PROXYUNIT, ou=PROXYORG, dc=DOMAIN, dc=comwhere PROXYUSER, PROXYUNIT, PROXYORG, and DOMAIN comprise parts of thedistinguished name of the user account that is used to bind with the LDAP server.Components include:
l cn - common name
l ou - organizational or unit name
l dc - domain
For example: Distinguished name avamaruser.users.avamar.emc.com
Components: cn=avamaruser, ou=users, ou=avamar, dc=emc, dc=com
bindpw PWDwhere PWD is the password of the user account that is used to bind with the LDAPserver.
14.Restart Login Manager by typing:
Enterprise Authentication
Configuring an LDAP interface 145
service lm restart
15.Confirm acceptance of the configuration changes, by typing:
avmgr lstd
All of the Avamar authentication domains are listed.
16.Confirm that the LDAP server can be queried by typing the following command:
ldapsearch -x -w -hHOSTNAME -b dc=DISTINGUISHED_NAME -D cn=VALID_USERNAME, cn=users,dc=DISTINGUISHED_NAME
where:
l HOSTNAME is the hostname or IP address of the LDAP server.
l dc=DISTINGUISHED_NAME is the domain part of the distinguished name (the two"dc" components).
l VALID_USERNAME is a valid user in the LDAP server domain.
A success message or referral result appears.
For example:
ldapsearch -x -w -h 10.0.100.21 -b dc=aelab01, dc=com -Dcn=administrator, cn=users, dc=aelab01, dc=com
After you finish
Confirm the ability to log in to Avamar Administrator as an external user.
Configuring an NIS interfaceConfigure an NIS interface on the Avamar system to use with Enterprise authentication.
Procedure
1. Open a command shell and log in:
l If logging in to a single-node server, log in to the server as root.
l If logging in to a multi-node server, log in to the utility node as root.
2. Open /etc/avamar/domains.cfg in a UNIX text editor.
3. Add the following entry in the Customer Specific Domains section, and then save thefile:
DOMAIN=IDwhere:
l DOMAIN (format: example.com) is a unique customer-specific NIS domain that isused for addressing PAM.
l ID is an integer larger than 1. IDs 0 and 1 are reserved for Avamar internal use.
Enterprise Authentication
146 EMC Avamar 7.2 Product Security Guide
Note
The next step creates a symbolic link for this entry. However, the Avamar systemprovides an existing symbolic link when you uncomment the line:nis=2
If you use nis=2, skip the next step.The DOMAIN part of the entry (either nis or a unique NIS domain) appears in theAvamar Administrator Authentication System list. Typing a unique DOMAIN can helpclarify which NIS domain is used for external authentication.
4. Create a unique lm_nis file and symbolically link to it by typing:
ls -sf /etc/pamd/lm_nis /etc/pam.d/lm_NUMBER
where NUMBER is the NIS domain ID used in the previous step.
5. Set correct group ownership and file permissions for the lm_nis file by typing:
chown root:root /etc/pam.d/lm_NUMBERchmod 0600 /etc/pam.d/lm_NUMBER
where NUMBER is the NIS domain ID.
6. Confirm the symbolic link by typing:
ls -l /etc/pam.d/lm_NUMBER
where lm_NUMBER is the file that is created earlier.
The following information appears in the command shell:/etc/pam.d/lm_NUMBER -> lm_nis
7. In a UNIX text editor, open lm_NUMBER.
8. Modify the following entries, and then save the file:
auth required /lib/security/pam_nis.so domain=NISDOMAINaccount required /lib/security/pam_nis.so domain=NISDOMAIN
9. Log in to the server as admin.
10.Load the admin OpenSSH key by typing:
ssh-agent bashssh-add ~admin/ .ssh/admin_key
11.When prompted, type the admin user account passphrase and press Enter.
12.Confirm that the system name and lmaddr are set up correctly by typing:
avmaint confi --avamaronly | grep systemnameavmaint config --avamaronly | grep lmaddr
These commands display the hostname and IP address of the utility node,respectively.
13.As root, restart Login Manager by typing:
service lm restart
14.With keys loaded, confirm acceptance of the configuration changes by typing:
avmgr lstd
Enterprise Authentication
Configuring an NIS interface 147
All Avamar authentication domains are listed.
15.Open /etc/sysconfig/network in a UNIX text editor.
16.Add the following entry, and then save the file:
NISDOMAIN=DOMAINNAME
where DOMAINNAME is the NIS domain.
17.Open /etc/yp.conf in a UNIX text editor.
18.Add the following entry:
domain NISDOMAIN server NISSERVERNAME_IP
where:
l NISDOMAIN is the NIS domain.
l NISSERVERNAME_IP is the NIS server hostname or IP address.
Examples:domain hq server 122.138.190.3domain hq server unit.example.com
19.Set ypbind to start automatically by typing:
/sbin/chkconfig ypbind on
20.Confirm the previous settings by typing:
/sbin/chkconfig --list ypbind
The following information appears in the command shell:
ypbind 0:off 1:off 2:off 3:on 4:on 5:on 6:off
Numbers 3, 4, and 5 should be "on." If not, type:
/sbin/chkconfig --level NUMBERS ypbind onwhere NUMBERS is a comma-separated list of the numbers to set "on" (for example, /sbin/chkconfig --level 3,4, ypbind on).
21.Start the ypbind daemon by typing:
service ypbind restart
The following information appears in the command shell:
Shutting down NIS services: [ OK or FAIL ]Binding to the NIS domain: [ OK ]Listening for NIS domain server:
Note
If NIS services has not started, shutting down NIS services can fail. In that case,listening for the NIS domain server should fail because the default NIS domain hasnot yet been set up.A delay in the start() section is usually required between the ypbind and ypwhich (inthe next step) commands.
Enterprise Authentication
148 EMC Avamar 7.2 Product Security Guide
22.Confirm NIS configuration by typing:
ypwich
This command displays the IP address or the fully qualified domain name of the NISserver.ypcat -d NISDOMAIN password | grep USER-IDwhere:
l NISDOMAIN is the NIS domain.
l USER-ID is the partial or whole name of a user who is registered in the externalauthentication system.
These commands verify that data can be retrieved from the NIS domain server byreturning user login data from the NIS server.
After you finish
Confirm the ability to log in to Avamar Administrator as an external user.
Enterprise Authentication
Configuring an NIS interface 149

Enterprise Authentication
150 EMC Avamar 7.2 Product Security Guide