prince2 practitioner - awss3-eu-west-1.amazonaws.com/.../global/prince2_practitioner...v1.3.pdf ·...
TRANSCRIPT
PRINCE2® Practitioner
User Guide
COPYRIGHT NOTICE
This document is the copyrighted intellectual property
of ILX Group plc and may not be copied,
disassembled or in any way modified
without the express and written permission of ILX Group plc.
Version: 1.3
250614
PRINCE2® is a Registered Trade Mark of AXELOS Limited.
Session1 - Introduction to PRINCE2 Practitioner
S1P1
Welcome to the Practitioner section of this PRINCE2 e-learning course.
This section of the course is intended to help you apply your knowledge of PRINCE2 in practical terms using, amongst other things, activities, exercises and simulations.
By this point you should have completed all the lessons in the Foundation section of the course and you should be feeling confident about your knowledge of PRINCE2.
If you haven’t already completed your Foundation exam, we recommend that you periodically practice in the Foundation Exam Simulator, to top up your knowledge and further familiarise yourself with the style of the Foundation exam questions.
You will have noticed that this section of the course contains several lessons intended to help you with your Practitioner studies. So we’ll take a few moments to describe each in a little more detail.
S1P2
An Advanced PRINCE2 process model walkthrough.
This lesson takes a detailed step-by-step look at what is considered by many, as the heart of the PRINCE2 method, the Process Model. The lesson looks at the processes, inputs, outputs and main decision points which form the cornerstones of the PRINCE2 method.
PRINCE2 Practitioner Simulations
Putting PRINCE2 in to practice is the subject here. This group of simulations shows how the method is applied in practical terms whilst testing your understanding.
Based on a typical project scenario, this suite of six simulation based exercises is intended to test and extend your knowledge of PRINCE2 and to provide a level of understanding required to pass the Practitioner exam.
The exercises are based on a variety of topics including PRINCE2 Processes, the preparation of a Business Case, Risk Analysis, Quality, Product Breakdown Structures and Product Descriptions. Each exercise is stand alone, and once completed, provides useful feedback and pointers on further revision and study.
Marking Up the Manual
This session explains how to highlight all the key PRINCE2 manual references. Key information becomes easier to find, making the best use of your time in the Practitioner exam.
S1P3
Our next session is entitled Practical Practitioner Exercises.
This suite of six exercises is intended to test and extend your knowledge of PRINCE2. The exercises are based on a variety of topics including PRINCE2 Processes, the preparation of a Business Case, Risk Analysis, Quality, Product Breakdown Structures and Product Descriptions.
Each exercise is stand alone and provides useful feedback.
Practitioner Exam Technique.
This session begins by outlining the PRINCE2 qualification structure and the awarding bodies and associated accrediting organisations. It goes on to take a detailed look at the make-up of the Practitioner examination questions, the paper based documents used in the examination and provides practical guidance on how to approach and answer the Practitioner level examination questions.
And finally a PRINCE2 Practitioner Exam Simulator.
We’ve also included a full electronic version of the PRINCE2 Practitioner exam to help familiarise you with the style and nature of the exam proper.
The exam simulator is timed and scored, just like the real exam, providing you with as near to exam conditions as possible.
This concludes this brief introduction.
Session2 - PRINCE2 Walkthrough
S2P1
Welcome to this chronological walkthrough of a project managed using the PRINCE2 method.
We will begin by introducing the major processes identified in PRINCE2. The second part of the walkthrough will cover the main management products ‘input to’ and ‘output from’ each of the processes.
In a nutshell, this is a summary of the context diagrams of the sub processes in the PRINCE2 manual. We call our map ‘PRINCE2 on a Page!’
Although there is much more detail of the sub processes and the appropriate Management Products in the PRINCE2 manual, our process map is analogous to a jigsaw puzzle which could be printed on the front of the PRINCE2 manual. It explains the individual pieces of the PRINCE2 method and how they link together as a composite picture when applied to running projects.
Before we start, we will explain the symbols used on the process map and the significance of the colour scheme. So let’s do that now...
S2P2
We have called the beginning ‘getting going’ and it is represented with green.
The middle section of the project, ‘producing products’, is represented with blue. This covers the building of the products which make up the outcome and is the subject of the project plan.
The end or ‘finishing off’ section of a project is represented with orange. As part of the final management stage, it is necessary to complete the activities of the project, obtain customer acceptance, and tie up all loose ends by bringing the project to an end in a professional manner.
S2P3
Before we get started, we’ll take a few moments to explain the interface for the walkthrough. The first thing you will have noticed is that the page is wider than usual, this is deliberate and is intended to provide the maximum amount of viewable space for the presentation. As a consequence the subtitle function has been disabled. If you would like a printed version of the session subtitles, you can print a copy by clicking here. A hard copy of the process map can be printed by clicking here.
You may have noticed that the page control functions have been nested to save space. To view these controls click here. The controls can be re-nested at any time.
The presentation is extremely comprehensive and lasts approximately 30 to 40 minutes. If you are re-visiting the presentation and wish to jump to a particular process, you can do so by selecting the process title from this drop down list. That concludes the introduction so let’s begin building the PRINCE2 map.
S2P4 - Process Map Walkthrough
P1 - Corporate / Programme Management
The first element to introduce is Corporate or Programme Management. This is the PRINCE2 term for the senior management team of an organization responsible for planning and implementing projects. Projects may be stand alone or contribute to a program of linked projects.
Although not part of the project management team, Corporate or Programme Management starts up a PRINCE2 project and will also need to be informed when it is finished They will also need to be kept appraised of progress throughout the project by the executive on the Project Board.
We will now introduce the 7 main processes.
P2 – Processes – Starting Up a Project
The first process is Starting Up a Project. This includes the activities required to start the project on a strong, viable and worthwhile footing.
An Executive and Project Manager are appointed along with an appropriate team to run the project. Any previous lessons about similar projects are captured. An outline Business Case is prepared based on the project mandate and the expected benefits documented. An appropriate project approach is decided and a Stage Plan to complete the initiation stage is compiled.
Planning is carried out at various times throughout a project. The Plans Theme provides a framework to design, develop and maintain all the Project’s Plans. This framework supports all three levels of plan whether at Project, Stage, Team and any Exception Plans at stage or project level.
P3 – The Plans Theme
During Starting up a Project, the Project Manager will use the planning steps to create the Stage Plan for the initiation stage and then during initiation the Project Plan and similarly, near the end of each subsequent management stage, to plan the next management stage.
So let’s take a look at planning in a little more detail. There are seven steps in the planning procedure and they are used on an iterative basis, as often as required, to form original plans or amend plans as circumstances dictate. The Plans Theme is called from many other processes throughout the life of the project.
There are seven steps in the in planning procedure. The steps involved are the same for all three levels of plan, i.e. the Project Plan, Stage Plan and optional Team Plan. Several iterations are
normally needed to produce an acceptable plan, so each step is used as much or as little as required to achieve a working plan.
P4 – Plans Themes – Design the Plan
‘Design the plan’ is the first step, where decisions on the presentation and layout of plans, planning tools, levels of plan, allowances and monitoring methods are established before any planning takes place.
P5 – Plans Themes – Define and analyse the Products
It is within the ‘define and analyse the products’ step that the product based planning technique may be used to produce four distinct management products. These are:
• a Project Product Description of the final product or Output, • a Product Breakdown Structure for the project, breaking the project into its constituent
products, • Product Descriptions for each product as necessary • and a product flow diagram showing the order of creation of the products in order to
complete the project.(or stage)
P6 – Plans Themes – Identify Activities and Dependencies
The step ‘Identify activities and dependencies’ uses the Product Flow Diagram to identify the activities required to create each product in the correct order. Dependencies between activities are established in order to schedule and control the work. The output of this step can be displayed as an activity or precedence network.
P7 – Plans Themes – Prepare Estimates
‘Prepare estimates’ identifies resource types and estimates the effort required for the activities. Elapsed times can be estimated within this step. The output of this step can be displayed as a critical path network showing the timescale of the plan and float of each activity.
P8 – Plans Themes – Prepare the Schedule
‘Prepare the schedule’ is the application of resources to the activities. Resource smoothing and levelling can be applied here to produce a suitable schedule. It is often displayed as a Gantt Chart.
P9 – Plans Themes – Analyse the Risks
The ‘Analyse the risks’ step will typically run in parallel with the other steps of planning. Once a plan has been produced, it should be considered a draft until any risks inherent in the plan have been identified and assessed. If necessary the plan should be modified.
P10 – Plans Themes – Document the Plan
‘Document the plan’ is the final step to complete in planning. Narrative needs to be added to explain a plan. This includes any constraints, external dependencies, assumptions risks and any applicable tolerances.
P11 – Processes – Directing a Project
The Directing a Project process is owned by the Project Board. This group of decision makers represent the Customer, Supplier and the Business interests in the project. The Project Board manages by exception, monitors via reports, and controls the project at key decision points, delegating the ‘day to day’ project management to the Project Manager.
P12 – Processes – Initiating a Project
The Initiation Stage involves the definition and planning of the project. Before any work can be done to produce the output, a solid baseline on which to judge progress should be created before

committing to significant spend. The key product of this process is the Project Initiation Documentation which defines the what, why, where, who, how, when and how much.
P13 – Processes – Managing a Stage Boundary
The Managing a Stage Boundary process in which the Project Manager produces the information on which the Project Board will take any decisions, including whether to continue the project or not. This process is carried out towards the end of the initiation stage and each subsequent management stage.
Based on the size and risk of a project and commitment to resources, the Project Board will break a PRINCE2 project down into a suitable number of stages – initiation and one or more management stages. The project manager will contribute to these decisions.
P14 – Processes – Controlling a Stage
Controlling a Stage is the set of activities which enables the Project Manager to execute day to day management and control of each of the management stages of the project in order to keep them within tolerance. In essence this is controlling the teams who are the specialists producing the projects products.
P15 – Processes – Managing Product Delivery
Managing Product Delivery is the process executed by the teams to create and deliver the planned products. Most of the project work is done here to ensure that products are delivered to the right quality and within the constraints of cost and time.
P16 – Processes – Closing a Project
Closing a Project is the final process in the method. It exists to bring about a professional and controlled close to any project, whether the natural end or as a result of a premature closure. The Project Board should be assured that all loose ends have been tied up and the project is finished off correctly. It provides a fixed point at which acceptance of the project output is confirmed.
That concludes our overview of the seven PRINCE2 processes. We will now build the main inputs and outputs relevant to each of these processes and activities.
P17 – The Project Begins
A project begins when Corporate or Programme Management appoints an Executive and hands over the project mandate. The Executive will appoint a Project Manager who will create the Daily Log.
The Project manager and the Executive will review previous lessons and enter these into the Lessons Log. These may help with the delivery of the project – for example there may be lessons from previous projects which would help the Executive to develop a more robust Business Case, or affect the Project Plan.
P18 – Starting Up a Project Activities
The Executive, assisted by the Project Manager are jointly responsible for the design and appointment of the rest of the project team.
In parallel with these activities, the Project Manager will expand the Project Mandate. An outline Business Case is prepared along with the Project Product Description along with the project approach.
Once these are understood the project definition can be finalised and the Project Brief assembled.

The project Brief contains the project definition, the outline Business Case, the Project Product Description, project team structure and the project approach.
The final activity that the Project Manager will perform during Starting Up a Project is to produce an Initiation Stage Plan.
In order to accomplish this, the Project Manager will use the 7 planning steps , as required, to design the Initiation Stage Plan.
P19 – Business Case
In PRINCE2 projects, the Executive owns the Business Case. Therefore, during Starting up a Project, the Project Manager will liaise closely with the Executive on its development. The Project Manager will also work with the Senior User on the definition of requirements and business benefits, and with the Senior Supplier to define the project approach.
P20 – Outputs of Starting Up a Project
So, the outputs of Starting Up a Project are;
A Lessons Log, the Stage Plan for initiation, the Project Brief, including a project management team structure, Project product description, project approach, outline Business Case. Remember, any issues or risks will be recorded in the Daily Log during Starting up a project and transferred into the appropriate register if the project is approved to go into the initiation stage.
The Project Manager will present the Project Brief and Stage Plan with a trigger ‘Request to initiate the project’ at the first meeting with the Project Board. It is at this meeting that the Project Board will decide if the investment required to complete initiation is worthwhile.
Assuming the answer is yes then the Project Board will issue the trigger ‘authority to initiate a project’ and advise the corporate body via the trigger ‘initiation notification’
The Project Manager will commence the initiation stage, the first management stage of a PRINCE2 project.
During Initiation, The Project Manager will expand the information established in Starting Up a Project and create the Project Initiation Documentation.
P21 – Initiating a Project
During Initiation, it is necessary to clearly establish strategies for Risk, Configuration Management, Quality and Communication. These could be regarded as four sets of rules for this project. The project controls will also be established and a Project Plan will be created using the Plans theme guidance. The Business Case will be refined with the costs, time and risks from the project Plan and any other relevant details to enable ongoing viability questions to be answered.
The activities of Initiating a Project should be started when appropriate and it is likely that they will have to be revisited as the Project Plan strategies and Business Case are developed.
However, it makes sense to at least develop the four strategies first as these will affect the Project Plan and Business Case.
So let’s get on with it and develop the Risk Management Strategy and create the Risk Register.
The Configuration Management Strategy can then be created which will include defining the authority levels for approval of change and establishing whether or not a change budget will be used. The Issue register will also be created.

The Quality Management Strategy and Quality Register are developed which will lead us to the Communications Management Strategy. This will include any stakeholder analysis and consultation about their information requirements.
P22 – Initiating a Project Activities
Using the planning steps the Project Plan is prepared. This is usually done as a group activity with the team and with information from the Project Brief, Lessons Log, Risk Register, Issue Register and strategies which will all affect the plan.
In conjunction with the team the Project Manager will develop the Project plan. This will involve the Plans theme and in particular the product based planning technique. As the plan is developed the method of controlling it will also become clear, for example the number of stages to be used, the type and frequency of communication between the team, issue management and so forth.
The controls will be documented as part of the Project Initiation Documentation as will the Project Plan.
P23 – Project Initiation Document
Now that the Project Plan has been developed the contents of the Business Case can be refined based on the work completed in ‘Starting up a Project’ and the costs and timescales from the Project Plan. A very important part of this activity is to develop the Benefits Review Plan.
The final activity now is to assemble the Project Initiation Documentation
This requires all the work of initiation to be compiled. Not that this relates to a single document rather it is a set of information upon which the Project Board and Project Manager will make decisions. Each part will be kept under configuration management and updated at least at the end of each stage.
P24 – Managing Stage Boundary
As we near the end of the stage a trigger ‘Stage Boundary Approaching’ is generated and this prompts the Project Manager to produce the Stage Plan for the next stage using the process ‘Managing a Stage Boundary’. This will also include the production of an End Stage Report if necessary. We’ll have a look at the work of ‘Managing a Stage Boundary in more detail later.
When this is all completed the Project Initiation Documentation, Stage Plan and Benefits Review Plan along with the trigger ‘request to deliver a project’ will be sent to the Project Board where they will make a decision in the activity ‘authorize the project’ and ‘authorize a Stage or Exception Plan’
Assuming all is well the Project Board will authorize the project and the Stage Plan for the next delivery stage. They will also keep the ‘Corporate body’ advised of the decision.
In the event of problems the Project Board can direct the Project Manager to close the project prematurely. We’ll look at this a little later.
P25 – Directing a Project Activities
Once the Project Board have given the authority to proceed with the initiation stage a very important activity comes into play called ‘Give ad hoc direction’. This enables the Project Manager and the Project Board the mechanism to communicate on both a formal and informal manner through the trigger ‘Project manager request for advice’, and also enables the corporate level to advise the Board of new matters through the trigger ‘Corporate advice and decisions’.
This completes the ‘Getting Going’ section of the project denoted by green in our process map.

P26 – Building the Products
So, following authorizations from the Project Board to proceed with the project and the first delivery stage the exciting part of managing a project begins – getting the work done and building the products that form the project outcome.
The team must be fully focused on the delivery of the products within the stated tolerances of cost, time and quality. This involves using three processes:
The ‘Controlling a Stage’ process, which forms the main part of the Project Manager’s work and provides the direction for the day-to-day management of the stage and the overall project.
Managing Product Delivery’, which is where the teams will undertake the work itself, and
‘Managing a Stage Boundary’, this prepares for the End Stage Assessment with the Project Board.
P27 – Controlling a Stage
Controlling a Stage consists of eight activities which are bound into a cycle of Work Packages, Monitoring and Reporting and Issues.
Let’s consider the interaction between Controlling a Stage and Managing Product Delivery in a little more detail.
Firstly, the work packages group has three activities – ‘Authorize a Work Package’, ‘Review Work Package Status’ and ‘Receive Completed Work Packages’. Basically, the Team Manager and the Project Manager will discuss the content of the Work Package and the Team Manager agrees to undertake the work in the manner described in the Work Package. This is the first activity in ‘Managing Product Delivery’, namely ‘Accepting a Work Package’.
P28 – Controlling a Stage Activities
As the work progresses in ‘Execute a Work Package’ the Team Manager will send Checkpoint Reports to the Project Manager who will review these in ‘Review Work Package Status’.
Another important activity that takes place during ‘Executing a Work Package’ is quality checking. As the products are built they will be checked in accordance with the Product Description and the Quality Register.
When the work is completed the Team Manager will advise the Project Manager via the trigger ‘Completed Work Package’.
The Project Manager will consider this in the ‘Receive Completed Work Packages’ activity and will ensure all the work has been completed prior to signing off the Work Package.
P29 – Day-to-day Activities
Whilst all this activity is proceeding the day-to-day monitoring and reporting must be considered via two activities – ‘Review Stage Status’ and ‘Report Highlights’. ‘Review Stage Status’ requires the Project Manager to look at the ‘big picture’ of the project. This means looking at what has happened versus what was expected, reviewing the next chunk of work and making sure that risks and issues are under control and, if necessary, triggering corrective action.
Periodically, the Project Board will need to be informed of progress. At the frequency defined by the Board, the Project Manager will issue a Highlight Report as described in the ‘Report Highlights’ activity.
The final activity group associated with issues involves capturing the issue or risk. Issues that can be managed informally should be noted in the Daily Log. Otherwise they should be entered into the Issue Register and analyzed further.
Risks should be entered into the Risk Register.
P30 – Take Corrective Action
Any action required to maintain the project schedule within tolerance is taken via the ‘take corrective action’ activity. This can involve modifying an existing Work Package or creating a new one.
If the issue or risk cannot be resolved within tolerance then it will need to be escalated to the Project Board via an Exception Report using the ‘Escalate Issues and Risks’ activity and the trigger ‘exception raised’.
P31 – Stage Boundary Approaching
At some time in the Stage the Project Manager will be aware that the end of the stage is approaching – this will generate the trigger ’stage boundary approaching’
By controlling the start and finish of each stage, specific attention can be given to whether the stage’s products have all been completed within tolerance, whether the remaining products are still required and whether the Business Case remains valid. This is a key control process for the Project Board and incorporates all the key aspects of ‘Directing a Project’. The Project Board undertakes this work in ‘Directing a Project’ and in order to prepare for the End Stage Assessment the ‘Managing A Stage Boundary’ process is triggered by ’stage boundary approaching’.
P32 – Managing a Stage Boundary Objectives
The objectives of the process are to:
Assure the Project Board that all products in the current Stage Plan have been completed as defined.
Provide the information needed for the Project Board to assess the continuing viability of the project.
If a phased handover of products occurred during the stage, confirm that user, operational and maintenance acceptance has occurred and follow-on actions/ recommendations for these products are in place.
In the normal course of events four activities will be completed leading to the main outputs which are an End-Stage Report, a Stage Plan for the next stage, updated Project Initiation Documentation and Benefits Review Plan and a Request to approve next Stage Plan.
In the event that a stage or project is in exception then it is likely that the Project Board will ask for an Exception Plan to be produced. This will be in response to the Exception Report and will be triggered by an Exception Plan request.
P33 – Managing a Stage Boundary Activities
The Project Manager will produce an Exception Plan’ and update the Project Initiation Documentation as appropriate.
The outputs of ‘Managing Stage Boundaries’ feed into the ‘Directing a Project’ process, in particular ‘Authorize a Stage or Exception Plan’.

The project Board will approve the next stage or Exception Plan and from now until the end of the stage the management of the project will involve cycling through the ‘Controlling a Stage’ and ‘Managing Product Delivery’ processes as work packages are authorized and work is undertaken by the Team Managers and their teams.
As the work in the final stage of production nears completion a trigger called ’Project End Approaching‘ is issued from ‘Controlling a Stage’ and the ‘Closing a Project’ process will begin.
P34 – Closing a Project Objectives
The products are handed to the customer and the operational support team. The benefits review plan is checked to make sure it contains sufficient detail to enable the benefits to be measured and realized after the project is closed.
Lessons will be examined and a Lessons Report will be included in the End Project Report.
Any outstanding work will be included in the End Project Report as a follow-on action recommendation.
The Project Initiation Documentation with the updated Business Case, the End Project Report and the Benefits Review Plan will be sent to the Project Board along with a ‘Closure recommendation’.
The Project Board will confirm that the project can be closed and approve and issue the reports to interested parties, finally issuing a ‘Closure notification’.
In the event of a premature close the Project Board will issue a trigger ’premature close’. The activities within ‘Closing a Project’ are still undertaken with the exception that ’Prepare planned closure’ is replace by the activity ‘Prepare premature closure’.
P35 – The PRINCE2 Process Map
I hope you have found this walk through useful and that it goes some way to help you understand the PRINCE2 method when applying it pragmatically in the workplace. Remember though, that successful use of PRINCE2 requires a common sense approach, tailoring the method to suit the projects in your organisation.
This concludes our walk through the PRINCE2 Process Map.
Session3 - PRINCE2 Simulations
S3P1 - 2
Hello and welcome to the PRINCE2 Practitioner Simulation.
At the centre of this multifaceted simulation is a project scenario typical of those you’ll encounter in the PRINCE2 Practitioner examination. The scenario introduces you to an organisation intent on improving its operational efficiency and increasing its range of customer services. You will take the role of a consultant project manager hired to advise the organisation on its facilities project.
You can view the scenario as a multimedia presentation by clicking here. You can also print the scenario in pdf form as a handy reference.
The simulator also contains several complex activities on some key practitioner-level subject areas, including Business Case, Management of Risk, Organisation, Product Based Planning and Quality.
Each activity is stand alone and provides valuable feedback on your given answers.
You should reference the scenario and any supporting documents whenever you see fit. Feel free to attempt the scenarios in any order. Once you have completed they are highlighted on the menu like so.
Organisation Simulation
ORG1 – Introduction
Establishing an effective organizational structure for the project is crucial to its success. Every project has need for direction, management, control and communication. PRINCE2 offers an approach that provides these elements and is sufficiently flexible to be mapped to any environment.
The objective of this simulation is to familiarise you with the Organization theme of PRINCE2. You will be introduced to a group of potential candidates for various project management team roles. Your objective here is, using your skill and judgment, you must appoint the candidate you think is most suited to each role. Feedback is provided for each of your choices.
You can find further useful information on the Organization theme in this section of the PRINCE2 manual. You will find many useful references in the Marking Up section of the course accessible from the Main Menu.
ORG2 – Meeting the candidates
Our first task is to introduce you to the potential candidates for the project management team roles. Click on a candidate to find out more about them. You can print a summary document of all the candidates by clicking here.
Once you’re happy that you have all the necessary information then move on to the next page.
(Click the ‘Print Summary’ button for voice transcripts)
ORG3 – Appoint the Team Roles Okay, you have been introduced to all the possible candidates for the project management team roles.
You are now in the ‘Starting Up a Project’ or ‘SU’ process of the project. From the information you have to hand, use your skill and judgement to appoint the Executive and Project Manager from the selection of candidates.
Make your selections by moving the candidates to the relevant roles in the project management team structure.
Once you are happy with your choices, click the Submit button.
ORG3 – Appoint the Senior User and Senior Supplier The Executive and Project Manager are now in place. From the selection of candidates select appropriate candidates for the Senior Supplier and Senior User roles.
Again, once you have made your selections, move the candidates to the relevant roles in the project management team structure and click the Submit button to review your answers.
ORG3 – Project Assurance Roles This time you are tasked with selecting the most suitable candidates for the Business, User and Supplier project Assurance roles. Submit your choices for review in the same way.
ORG3 – Team Managers and Project Support

Finally, select three suitable candidates to fill the Project Support and Team Manager roles. Once you are happy with your selections, submit your choices for review.
Feedback options dependant on selections. Angela Brown – No role on PMT- Feedback
Angela is from corporate management. Whilst that does not prevent her from being on the project team it is better to leave her to focus on strategic aspects of the organisation and delegate the Executive role to someone who will be accountable to her. In addition she may not be with the project for its entire life as she is retiring next year.
(See Section 5.3.1 of the PRINCE2 manual)
Debbie Davies – Executive - Feedback
As head of finance Debbie could properly discharge the responsibilities of the Executive by representing the business interests.
In this project it would also be appropriate for Debbie, along with the other Project Board members, to be the Change Authority.
(See Section 5.3.2.4 and C8 of the PRINCE2 manual) (See Appendix C.2 of the PRINCE2 manual)
Brian Hardman – Senior Supplier - Feedback
During the Project Start-up and Initiation stage Brian could represent the interests of the external suppliers who will be tendering for the building contract and the internal suppliers who will undertake other specialist work. Therefore, Brian is a good choice for the Senior Supplier role. He is a strategist and as such does not involve himself with day to day detail.
(See Appendix C.4 of the PRINCE2 manual)
Steven Chang – Senior User - Feedback
Steven could discharge the Senior User responsibilities, since it is his part of the business that is being changed and his processes and people will be affected.
(See Appendix C.3 of the PRINCE2 manual)
Amrit Sond – Project Assurance for Executive - Feedback
Amrit is most suited to Project Assurance for the Executive – he can work on the validity of the Business Case in particular and check that the spend pattern is correct.
(See Appendix C.7 – Project Assurance responsibilities of the PRINCE2 manual)
Jo Simmons – No role on PMT - Feedback
Joe has no role to play on the Project Management Team as his work is of a poor standard.
Emily Duncan – Project Support - Feedback
Emily could play an important role in Project Support – she is a good organiser and pays attention to detail. She is PRINCE2 trained. Specifically, Emily may be appointed as the Configuration Librarian. (See Appendix C.9 of the PRINCE2 manual)
George Goldman – Project Assurance for Senior Supplier - Feedback
George is most suited to Project Assurance for the Senior Supplier. He could ensure that proposals are realistic, that resources are available and that the appropriate standards are being applied. (See Appendix C.7 – Project Assurance)
Team Manager for the mechanical team is our suggestion for Jeff. He’s able to understand the technical aspects of the project work and manages a team of people who produce the specialist products required. Jeff is likely to use the input of Jenny Doverville (Surveyor).
(See Appendix C.6 of the PRINCE2 manual)
Monica Shapiro – Team Manager - Feedback
Monica would make an ideal Team Manager for the electrical team as she is able to understand the technical aspects of the project work and can plan and monitor team performance. She is likely to use the input of Jenny Doverville (Surveyor). (See Appendix C.6 of the PRINCE2 manual)
Stacey – Project Manager - Feedback
Stacey is an ideal candidate for the role of Project Manager – she is experienced in project work and has the PRINCE2 qualification. She is able to ensure the project produces the required products. (See Appendix C.5 of the PRINCE2 manual)
Michael Hanes – Project Assurance for Senior User - Feedback
Michael is most suited to Project Assurance for Senior User as he is able to understand the needs of both Service Delivery personnel and clients and how service delivery will be impacted by the office design and layout. (See Appendix C.7 – Project Assurance responsibilities)
Richard Gamble – No role on PMT - Feedback
Richard is not suited to any role on the project management team as he cuts corners and, therefore, takes too many risks.
ORG3 – Summary This concludes the Organisation simulation. Over the previous few pages you have:
• Been introduced to the PRINCE2 project management structure.
• Gained some practical experience in identifying suitable candidates for various PRINCE2 project management team roles.
Business Case Simulation BC1 - Introduction The Business Case for a project is owned by the Executive and documents the justification for undertaking the project, based on the estimated costs of the project, the risks and expected benefits and savings. It is maintained throughout the life of the project and is reviewed by the Project Board at each key decision point such as end stage assessments.
The objective of this simulation is to familiarise you with the structure of a Business Case as defined in Appendix A of the PRINCE2 manual.
You will be tasked with constructing a Business Case document and populating it with appropriate information.
You can find further useful information in the Business Case section of the PRINCE2 manual. You will find many useful references in the Marking Up section of the course accessible from the main menu.
BC2 – Build a Business Case – Part 1 The Business Case for a project is owned by the Executive and documents the justification for undertaking the project, based on the estimated costs of the project, the risks and expected benefits and savings. It is maintained throughout the life of the project and is reviewed by the Project Board at each key decision point such as end stage assessments.
The objective of this simulation is to familiarise you with the structure of a Business Case as defined in Appendix A of the PRINCE2 manual.
You will be tasked with constructing a Business Case document and populating it with appropriate information.
You can find further useful information in the Business Case section of the PRINCE2 manual. You will find many useful references in the Marking Up section of the course accessible from the main menu.
Feedback options dependant on selections. [Answer – all correct]
Yes, all correct. Let’s move on to the next part of the exercise.
[Answer – have another go]
No, you’re not quite right. Try making some changes and re-submitting your answers.
[Answer – incorrect]
No, the correct titles are: Costs, Reasons, Business options, Major risks, Expected benefits, timescale, Investment Appraisal, Expected Dis-benefits and Executive summary.
The ‘Recommendation’ for the chosen option is stated within the ‘Business Options’ heading of the Business Case.
‘Constraints’ are stated in the ‘Project Definition’ section of the Project Brief and become part of the ‘Project Definition’ section of the PID.
‘Interfaces’ are stated in the ‘Project Definition’ section of the Project Brief and become part of the ‘Project Definition’ section of the PID.
‘Return on Investment’ is an Investment Appraisal technique and would be included within the ‘Investment Appraisal’ section of the Business Case.
Let’s move on to the next part of the exercise.
BC2 – Build a Business Case – Part 2 The second task in this exercise is to arrange the headings into the correct order. Use your mouse to drag the headings shown on screen into their usual order in a draft Business Case document.
Once you’re happy with your selection click here to listen to feedback.
Feedback options dependant on selections. [correct answer]
Yes, we agree with all your choices, well done.
[Second attempt]
No, we don’t fully agree. Try making some changes and re-submitting your answers.
[Incorrect Answer]
No, we still don’t agree. Appendix A of the PRINCE2 manual lists the titles of a Business Case in the following order:
Executive summary, reasons, business options, expected benefits, expected dis-benefits, timescale, costs, investment appraisal, major risks.
You might want to take a look at this now.
BC3 – Categorise the Statements
Here you have the opportunity to listen to an interview with the organisations chief executive, Angela Brown. Angela discusses the Facilities Rationalisation Project.
You can listen to the interview by clicking here. Alternatively you can print a transcript of the interview by clicking here.
Start Simulation
OK. We have listened to Angela’s vision for the organisation and the Facilities Rationalisation Project in particular.
We will present important statements from Angela’s interview on screen. Use your skill and judgement to categorise each statement under the most appropriate business case heading. The choices available are Reasons, Options, Benefits, Risks, Cost or Time. Drag the statement title on screen to the relevant location in the Business Case document, like so.
Alternatively, if you think the statement has no bearing on the project Business Case then drag it to the waste bin, like so.
Once you are happy with your choices click here to find out how you did.
Feedback options dependant on selections. Statements are randomly arranged each time you run this activity, so the order of the answered statements is not always the same.
Statement – is a benefit. The sale of this asset is a genuine benefit for this project. The sale will offset the project costs.

Statement - both form a strong basis to answer the question ‘Why are we running this project?’
Statement - neither of the points made here are relevant to our project’s Business Case. Statement - is a valid reason for running this project. If solved, it would overcome the problem of where people are at anytime. Coupled with
Statement - This is an area of uncertainty and therefore risk. Remember that it is important to note that they are stated as “cause” and “effect”. The cause needs to be identified so that the correct action can be identified and implemented.
Statement - is measurable and therefore of use to justify the project expenditure.
Statement - is a straightforward statement of elapsed time for the project. It is likely that this would be further expanded into timings for major elements such as 12 months for the build and 6 months for the fit out.
Statement - are all ‘Business Options’ that were considered during the feasibility study. They are briefly described in the Business Case to ensure that the reader has confidence that various options were considered.
A ‘do nothing’ option should always be included to make sure that what we eventually do is appropriate and will attract the desired benefits.
The chosen option and the reasons for its choice are also indicated in the Business Case. Statement - is an area of uncertainty and therefore risk. It is important to note that they are stated as “cause” and “effect”. This is a very powerful way of stating a risk. Beware of statements such as “we might be late” which are just statements of uncertainty. The cause needs to be identified so that the correct action can be identified and implemented. Statement - is relevant to the programme, but not to our Business Case. Statement - This £50,000 is the calculated benefit gained through integrating the work of both offices.
Statement - is a benefit of another project in the programme (the Accounts project) and should not be included in our Business Case.
Statement - This is an area of uncertainty and therefore risk. Remember that it is important to note that they are stated as “cause” and “effect”. The cause needs to be identified so that the correct action can be identified and implemented.
Statement – Projected savings on expenses are a benefit and must be measurable.
Statement - is a useful statement to include, as intangible benefits do add weight to a Business Case. We could however indirectly measure these by running a staff survey of appropriate questions, both before and after our project. This would quantify any improvements.
Statement - is a convincing reason for running this project.’
Statement - is a straightforward statement of the project costs. In a live environment it is likely that these costs will be split down into major cost areas. An example of this would be £3m for building and £1m for fitting out the building.
BC4 – Summary This concludes the Business Case simulation. Over the previous few pages you have:
• Been introduced to the format of a typical Business Case.
• Gained some practical experience in identifying appropriate justification for undertaking a project in the first place.
Product Based Planning Simulation PBP1 - Introduction
Product based planning is a key technique in PRINCE2. It has four elements: producing a Product Description of the final product of the project, producing a hierarchical breakdown of all the products the project will build, buy or develop (the Product Breakdown Structure), writing Product Descriptions for these products and putting the products into the sequence of their development (the Product Flow Diagram). This key technique is used as a basis of all the plans – project, stage and team. It is a precursor to identifying the activities, estimating, risk analysis and scheduling.
The objective of this simulation is to familiarise you with the structure of a Product Breakdown Structure and Flow Diagram as described in the PRINCE2 manual. You will also to asked to identify the products for the New Building project and produce a Product Breakdown Structure and a Product Flow Diagram.
You can find further useful information on Product Based Planning on these pages in the PRINCE2 manual. You will find many useful references in the Marking Up section of the course accessible from the Main Menu.
PBP2 – The Planning Workshop A planning workshop for the new building project was held recently. The workshop was hosted by Stacey Brewins, the appointed Project Manager.
You can listen to the workshop by clicking here. Alternatively you can view and print a transcript of the workshop by clicking here. You will need to refer to this in the simulation activities.
PBP2 – Start Simulation – Part 1
We have now heard the transcript of the planning workshop. From the table shown can you identify the project products? To make a selection, just click on the product title in the table. Once you are happy with your choices, click here.
Feedback options dependant on selections. [Answer - All correct]
Yes, all correct.
‘Furniture items’, ‘Building Works’ and ‘IT’ are all ‘grouping’ products.
‘Evaluate the replies,’ ‘Testing,’ ‘Place an advert’ and ‘Move the staff’ are all activities.
‘Contracts Manager’ and ‘Removal Company’ are ‘sources’ or ‘resources’ on the project.
And ‘Old Building’ is not a product for this project. It is the sale of the ‘Old Building’ that is important.
[Answer - Have another go]
We don’t agree with all of your choices. Try making some changes and resubmitting your answers.
[Answer – incorrect]
No, we still don’t agree. The correct answers are now being shown.
‘Furniture items’, ‘Building Works’ and ‘IT’ are all ‘grouping’ products.
‘Evaluate the replies,’ ‘Testing,’ ‘Place an advert’ and ‘Move the staff’ are all activities.
‘Contracts Manager’ and ‘Removal Company’ are ‘sources’ or ‘resources’ on the project.
And ‘Old Building’ is not a product for this project. It is the sale of the ‘Old Building’ that is important.
PBP2 – Simulation – Part 2
OK, we have now identified the project products. We will now draw our attention to building the Product Breakdown Structure for the project. The first activity is to identify the outcome from the list shown.
[Answer - correct]
Yes the project outcome is the ‘New Building’. Let’s add that to our Product Breakdown Structure.
[Answer - incorrect]
No, the project outcome is the ‘New Building’. Let’s add that to our Product Breakdown Structure.
PBP2 – Simulation – Part 3
The next activity is to choose suitable groupings for the products we identified earlier. Our table has four titles which we feel are appropriate for the project. Remember that in a live project, how you group products is entirely up to you. There are no hard and fast rules here. It’s a matter of personal choice.
[Answer - correct]
Yes, we agree. From the list shown we consider the most appropriate group titles are; ‘furniture and flooring,’ ‘infrastructure,’ ‘sales’ and ‘IT.’ But remember how you group products is really up to you.
[Answer - incorrect]
No, we don’t fully agree from the list shown we think the most appropriate group titles are ‘furniture and flooring’, ‘infrastructure’, ‘sales’ and ‘IT’. But remember how you group products is really up to you.
PB3 – Categorising products You should be aware that different ‘types’ of products in a Product Breakdown Structure can be represented with different symbols. For example simple products are represented with a rectangle, groupings with a rhomboid and external products with an ellipse.
The activity here is to categorise the products in our list into either simple products, or external products. To do this drag your choice of symbol from the symbol pallet and place it on the product title in the table.
Once you have completed the exercise, click here.
[Answer - Have another go]
We don’t agree, try making some changes and resubmitting your answers.
[Answer - correct]
Yes, we agree on all your choices. We have two external products, ‘planning permission’ and ‘replies’. The remaining products are all simple products.
[Answer - incorrect]
No, we don’t fully agree with all your choices. We have two external products, ‘planning permission’ and ‘replies’. The remaining products are all simple products.
PBP4 - Build the PBS We have now categorised all of our products and we can now build our PBS. Using your skill and judgement, drag the products from the table to the most appropriate location in the PBS diagram. Once you are happy with your choices, click here.
[Answer - correct]
Yes, we agree with all your choices. We have now completed our Product Breakdown Structure. You can print a copy of this document by clicking here. You will find it helpful for our next activity.
[Answer – Have another go]
No, we don’t fully agree, try making some changes and resubmitting your answers.
[Answer - incorrect]
No, we still don’t fully agree. Click here to see our model answer. You can print a copy of this document by clicking here. You will find it helpful for our next activity.
PBP5 - Build a Product Flow Diagram – Part 1 Every planner needs to know the answer to the question: ‘What comes next?’ This is the purpose of the Product Flow Diagram and is the final task in product based planning. It is created from the Product Breakdown Structure and illustrates the sequence in which the plan’s products will be created.
The PFD begins with those products that are available at the start. In our example we will begin with ‘Plans’, which is a product in our ‘infrastructure group’. We will consider each of the collective groupings in turn and consider the logical sequence of events required to create each product. We’ll begin with the ‘furniture/flooring’ grouping as an example.
We have identified that Plans will be our starting point. The next logical product to produce will be the décor plan, which will contain information on the chosen paint colours, floor coverings and furnishings.
The décor plan will also show any specific requirements for furniture from the old office and this may have an effect on the removal contract. Therefore, once the décor plan is complete we can arrange the installation of the carpets and floorings. The furnishings can then be installed, including the chairs, storage units and desks.
PBP5 – Start Simulation – Activity 1
The objective here is to consider the other products in the Infrastructure Group. Again ‘Plans’ will be our starting point.
Using your mouse, drag the products to the time bar on screen, left to right. If you have products which have no dependency, then place them side by side. Once you are happy with your selection, click here.
[Answer - correct]
Yes, we agree with all your choices.
[Answer – incorrect]
No, we don’t fully agree. The first product to be produced will be the Invitation toTender, followed by the Replies which will need to be considered before the building Contract can be awarded. Planning Permission will also need to be granted prior to the contract being awarded. The building work will begin with the laying of the Foundations followed by the Walls and finally the Roof.
PBP5 – Start Simulation – Activity 2
Now let’s repeat the process for the IT group. Remember products with no dependency can be placed side by side on the diagram.
[Answer - correct]
Yes, the first product in the sequence would be the Cables followed by the PC’s, Printers, and Servers which have no dependency on each other and can be shown side by side, like so.
[Answer – incorrect]
No, we don’t fully agree. The first product in the sequence would be the Cables followed by the PC’s, Printers, and Servers which have no dependency on each other and can be shown side by side, like so.
PBP5 – Start Simulation – Activity 3
Finally let’s think about the sequence for the Sale group.
[Answer - correct]
Yes, that’s correct. The first products to be produced would be the Removal Contract and the Advertisement, which have no dependency on each other and so can be shown side by side, like so.
[Answer – incorrect]

No, we don’t fully agree. The first products to be produced would be the Removal Contract and the Advertisement, which have no dependency on each other and so can be shown side by side, like so.
PBP6 – Build a Product Flow Diagram – Part 2
We have now considered all the products required for the project and we have looked at the sequence in which the plan’s products will be created.
Here we will look at some of the other dependencies which exist between the products, and build our final Product Flow Diagram. Let’s start with the products in the Infrastructure group, like so. Once this sequence of products is complete we have a completed building ready for decoration. There is an obvious dependency between the completion of the building and the installation of the Carpets and Flooring from the Furniture/Flooring group. The Décor Plan is dependent on the Plans product and so will be linked, like so. The remaining products in the Furniture/Flooring Group can be shown like so.
Once the Carpets and Flooring have been completed then the Cables from the IT group can be put in place with the dependency, like so. This can be followed by the remaining IT group products.
Finally the Advert from the Sale group is again dependent on the original Plans product and the Agreed Sale is dependent on the Advert. The Contract with the removal company can be agreed once the Décor Plan has been finalised Once all these products have been created we will have achieved the ‘outcome’, the completed ‘new building’.
PBP6 – Summary
This concludes the Product Based Planning simulation. Over the previous few pages:
• You have learnt how to identify a project’s products.
• We have considered the use of groupings and the categorisation of products when developing a Product Breakdown Structure.
• Finally we looked at a simple Product Flow Diagram and considered the logical sequence in which the plan’s products are created.
Management of Risk Simulation MOR1 - Introduction A risk is defined as an uncertainty of outcome, whether positive opportunity or negative threat, in other words, something which may or may not happen. Events which have no uncertainty, either because they have happened, or will definitely happen are recorded as project issues. A risk is evaluated in terms of its probability of occurring and its impact on the project’s objectives if it were to occur. When the risk is likely to occur is also considered – this is the risk’s proximity.
The objective of risk management is to identify the risks faced by a project and mitigate them to an acceptable level. This recognises that some risk taking in a project is inevitable.
In this simulation you will practice differentiating between risks and issues. You will go on to evaluate risks and devise mitigating actions for them.
You can find further useful information on the Management of Risk in this chapter of the PRINCE2 manual. You will find many useful references in the Marking Up section of the course accessible from the main menu.
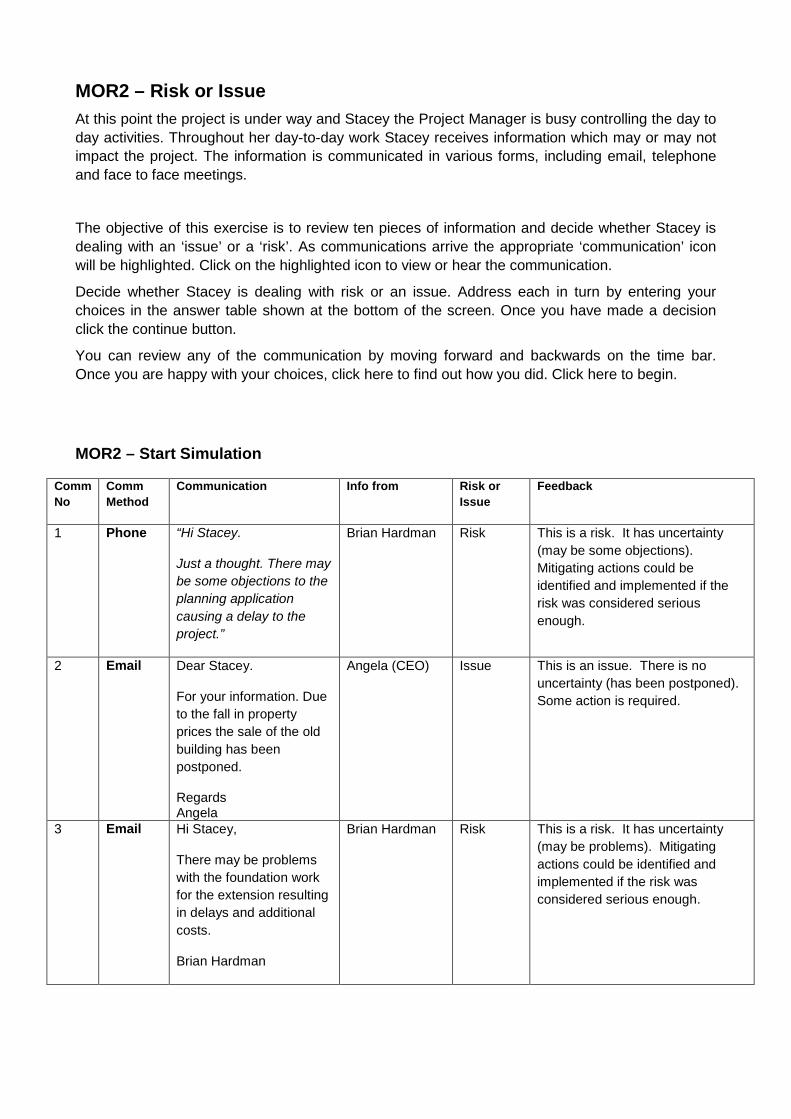
MOR2 – Risk or Issue At this point the project is under way and Stacey the Project Manager is busy controlling the day to day activities. Throughout her day-to-day work Stacey receives information which may or may not impact the project. The information is communicated in various forms, including email, telephone and face to face meetings.
The objective of this exercise is to review ten pieces of information and decide whether Stacey is dealing with an ‘issue’ or a ‘risk’. As communications arrive the appropriate ‘communication’ icon will be highlighted. Click on the highlighted icon to view or hear the communication.
Decide whether Stacey is dealing with risk or an issue. Address each in turn by entering your choices in the answer table shown at the bottom of the screen. Once you have made a decision click the continue button.
You can review any of the communication by moving forward and backwards on the time bar. Once you are happy with your choices, click here to find out how you did. Click here to begin.
MOR2 – Start Simulation
Comm No
Comm Method
Communication Info from Risk or Issue
Feedback
1 Phone “Hi Stacey.
Just a thought. There may be some objections to the planning application causing a delay to the project.”
Brian Hardman Risk This is a risk. It has uncertainty (may be some objections). Mitigating actions could be identified and implemented if the risk was considered serious enough.
2 Email Dear Stacey.
For your information. Due to the fall in property prices the sale of the old building has been postponed.
Regards Angela
Angela (CEO) Issue This is an issue. There is no uncertainty (has been postponed). Some action is required.
3 Email Hi Stacey,
There may be problems with the foundation work for the extension resulting in delays and additional costs.
Brian Hardman
Brian Hardman Risk This is a risk. It has uncertainty (may be problems). Mitigating actions could be identified and implemented if the risk was considered serious enough.
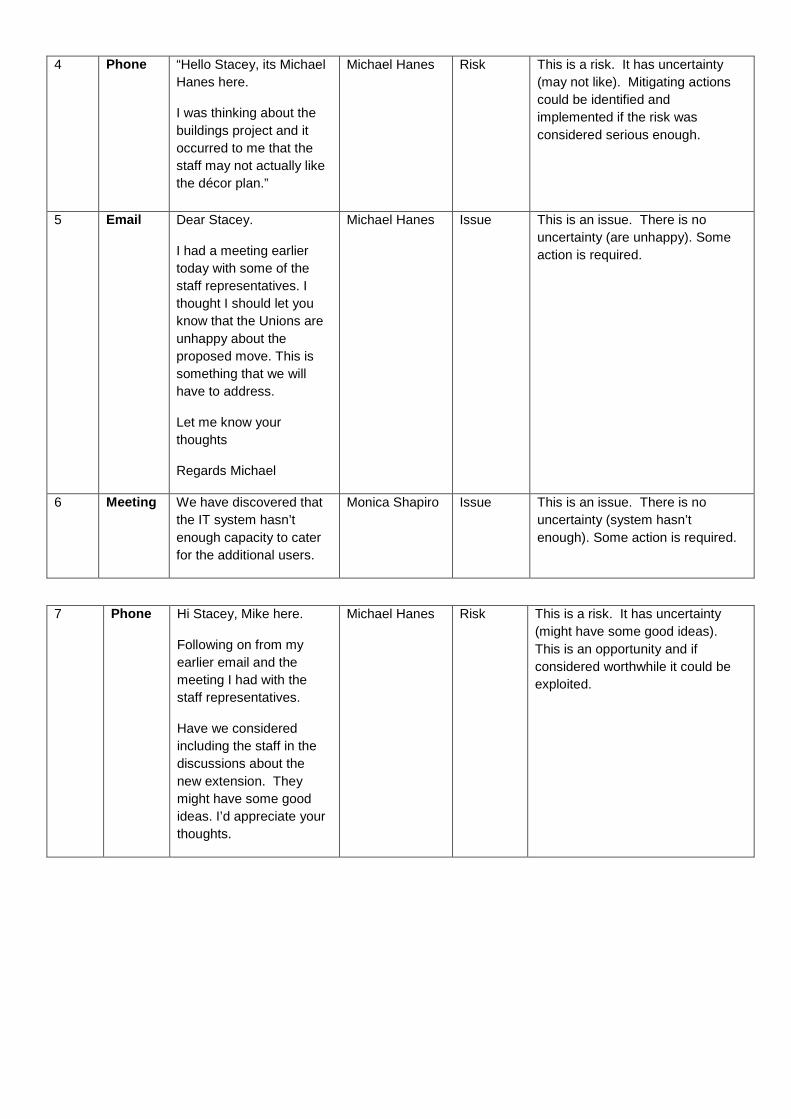
4 Phone “Hello Stacey, its Michael Hanes here.
I was thinking about the buildings project and it occurred to me that the staff may not actually like the décor plan.”
Michael Hanes Risk This is a risk. It has uncertainty (may not like). Mitigating actions could be identified and implemented if the risk was considered serious enough.
5 Email Dear Stacey.
I had a meeting earlier today with some of the staff representatives. I thought I should let you know that the Unions are unhappy about the proposed move. This is something that we will have to address.
Let me know your thoughts
Regards Michael
Michael Hanes Issue This is an issue. There is no uncertainty (are unhappy). Some action is required.
6 Meeting We have discovered that the IT system hasn’t enough capacity to cater for the additional users.
Monica Shapiro Issue This is an issue. There is no uncertainty (system hasn’t enough). Some action is required.
7 Phone Hi Stacey, Mike here.
Following on from my earlier email and the meeting I had with the staff representatives.
Have we considered including the staff in the discussions about the new extension. They might have some good ideas. I’d appreciate your thoughts.
Michael Hanes Risk This is a risk. It has uncertainty (might have some good ideas). This is an opportunity and if considered worthwhile it could be exploited.
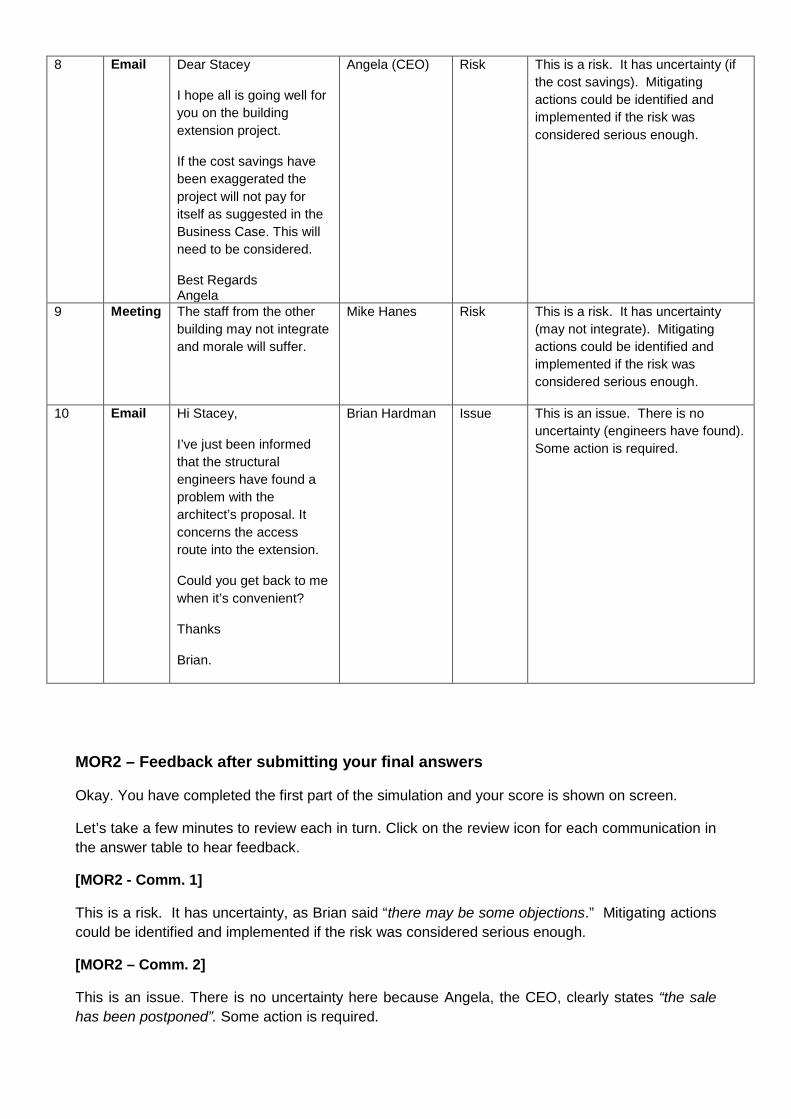
8 Email Dear Stacey
I hope all is going well for you on the building extension project.
If the cost savings have been exaggerated the project will not pay for itself as suggested in the Business Case. This will need to be considered.
Best Regards Angela
Angela (CEO) Risk This is a risk. It has uncertainty (if the cost savings). Mitigating actions could be identified and implemented if the risk was considered serious enough.
9 Meeting The staff from the other building may not integrate and morale will suffer.
Mike Hanes Risk This is a risk. It has uncertainty (may not integrate). Mitigating actions could be identified and implemented if the risk was considered serious enough.
10 Email Hi Stacey,
I’ve just been informed that the structural engineers have found a problem with the architect’s proposal. It concerns the access route into the extension.
Could you get back to me when it’s convenient?
Thanks
Brian.
Brian Hardman Issue This is an issue. There is no uncertainty (engineers have found). Some action is required.
MOR2 – Feedback after submitting your final answers
Okay. You have completed the first part of the simulation and your score is shown on screen.
Let’s take a few minutes to review each in turn. Click on the review icon for each communication in the answer table to hear feedback.
[MOR2 - Comm. 1]
This is a risk. It has uncertainty, as Brian said “there may be some objections.” Mitigating actions could be identified and implemented if the risk was considered serious enough.
[MOR2 – Comm. 2]
This is an issue. There is no uncertainty here because Angela, the CEO, clearly states “the sale has been postponed”. Some action is required.
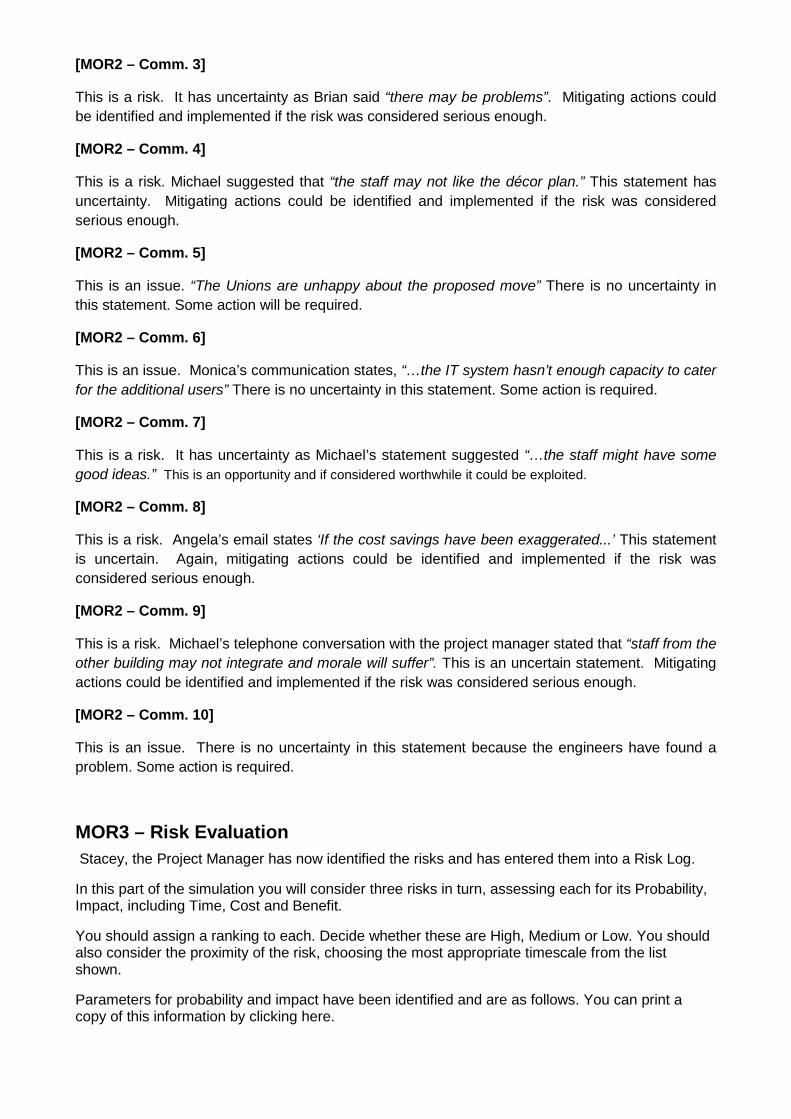
[MOR2 – Comm. 3]
This is a risk. It has uncertainty as Brian said “there may be problems”. Mitigating actions could be identified and implemented if the risk was considered serious enough.
[MOR2 – Comm. 4]
This is a risk. Michael suggested that “the staff may not like the décor plan.” This statement has uncertainty. Mitigating actions could be identified and implemented if the risk was considered serious enough.
[MOR2 – Comm. 5]
This is an issue. “The Unions are unhappy about the proposed move” There is no uncertainty in this statement. Some action will be required.
[MOR2 – Comm. 6]
This is an issue. Monica’s communication states, “…the IT system hasn’t enough capacity to cater for the additional users” There is no uncertainty in this statement. Some action is required.
[MOR2 – Comm. 7]
This is a risk. It has uncertainty as Michael’s statement suggested “…the staff might have some good ideas.” This is an opportunity and if considered worthwhile it could be exploited.
[MOR2 – Comm. 8]
This is a risk. Angela’s email states ‘If the cost savings have been exaggerated...’ This statement is uncertain. Again, mitigating actions could be identified and implemented if the risk was considered serious enough.
[MOR2 – Comm. 9]
This is a risk. Michael’s telephone conversation with the project manager stated that “staff from the other building may not integrate and morale will suffer”. This is an uncertain statement. Mitigating actions could be identified and implemented if the risk was considered serious enough.
[MOR2 – Comm. 10]
This is an issue. There is no uncertainty in this statement because the engineers have found a problem. Some action is required.
MOR3 – Risk Evaluation Stacey, the Project Manager has now identified the risks and has entered them into a Risk Log.
In this part of the simulation you will consider three risks in turn, assessing each for its Probability, Impact, including Time, Cost and Benefit.
You should assign a ranking to each. Decide whether these are High, Medium or Low. You should also consider the proximity of the risk, choosing the most appropriate timescale from the list shown.
Parameters for probability and impact have been identified and are as follows. You can print a copy of this information by clicking here.
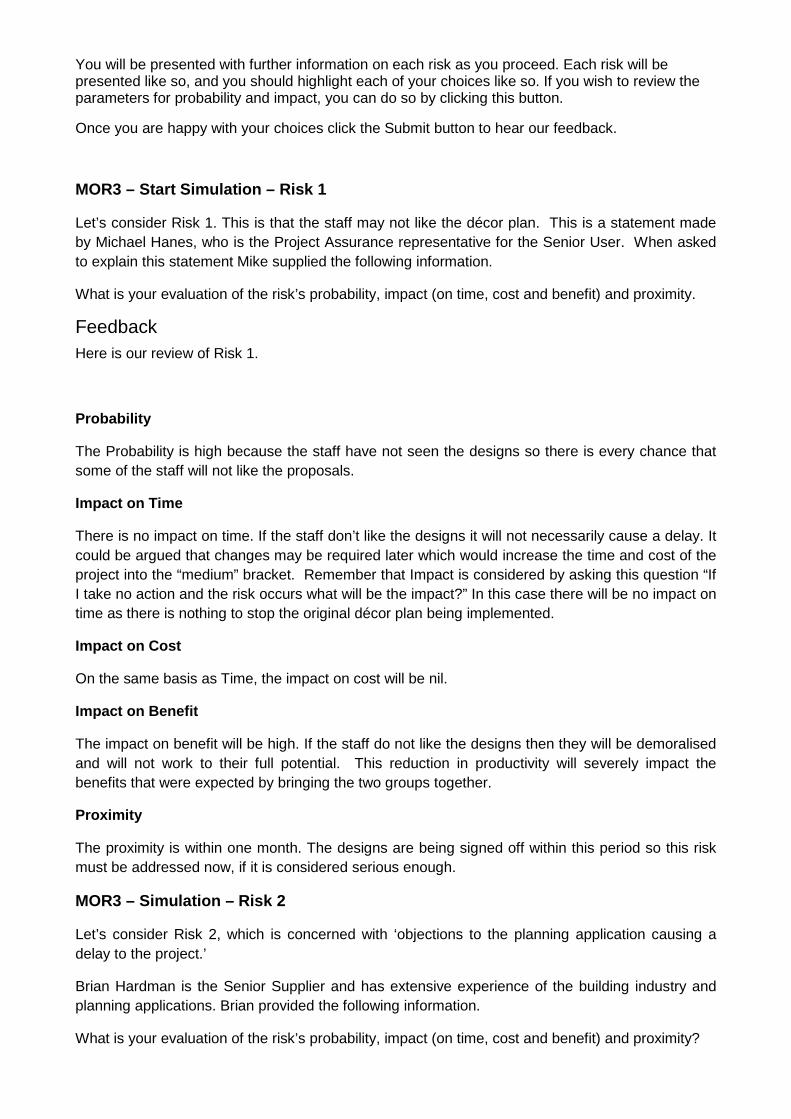
You will be presented with further information on each risk as you proceed. Each risk will be presented like so, and you should highlight each of your choices like so. If you wish to review the parameters for probability and impact, you can do so by clicking this button.
Once you are happy with your choices click the Submit button to hear our feedback.
MOR3 – Start Simulation – Risk 1
Let’s consider Risk 1. This is that the staff may not like the décor plan. This is a statement made by Michael Hanes, who is the Project Assurance representative for the Senior User. When asked to explain this statement Mike supplied the following information.
What is your evaluation of the risk’s probability, impact (on time, cost and benefit) and proximity.
Feedback Here is our review of Risk 1.
Probability
The Probability is high because the staff have not seen the designs so there is every chance that some of the staff will not like the proposals.
Impact on Time
There is no impact on time. If the staff don’t like the designs it will not necessarily cause a delay. It could be argued that changes may be required later which would increase the time and cost of the project into the “medium” bracket. Remember that Impact is considered by asking this question “If I take no action and the risk occurs what will be the impact?” In this case there will be no impact on time as there is nothing to stop the original décor plan being implemented.
Impact on Cost
On the same basis as Time, the impact on cost will be nil.
Impact on Benefit
The impact on benefit will be high. If the staff do not like the designs then they will be demoralised and will not work to their full potential. This reduction in productivity will severely impact the benefits that were expected by bringing the two groups together.
Proximity
The proximity is within one month. The designs are being signed off within this period so this risk must be addressed now, if it is considered serious enough.
MOR3 – Simulation – Risk 2
Let’s consider Risk 2, which is concerned with ‘objections to the planning application causing a delay to the project.’
Brian Hardman is the Senior Supplier and has extensive experience of the building industry and planning applications. Brian provided the following information.
What is your evaluation of the risk’s probability, impact (on time, cost and benefit) and proximity?

Feedback
Here is our review of Risk 2.
Probability
The Probability is high because Brian’s experience indicates that planning applications are often returned for more information and/or objections are made.
Impact on Time
Brian indicates that the delay is about six weeks, which puts it into the top end of the medium category.
Impact on Cost
Impact on cost is low. Brian is confident that any changes wouldn’t affect the costs significantly.
Impact on Benefit
Impact on benefit is low. Whilst the changes affect the project’s timescales the amount of benefit is not going to be reduced, just delayed by around six weeks.
Proximity
The proximity is around six to twelve weeks. The plans will be submitted in six weeks and in the following six weeks objections/queries are likely to be raised.
MOR3 – Simulation – Risk 3
Let’s consider Risk 3. This concerns problems with the foundation work for the extension resulting in delays and additional costs.
Brian Hardman is the Senior Supplier and has extensive experience of the building industry and extension works. He provided the following information.
Feedback Here is our review of Risk 3.
Probability
The Probability is low because Brian’s research indicates that problems are unlikely.
Impact on Time and Cost
Impact on time and cost will be high because the delays and increase in costs will affect the size of benefits and delay their realisation.
Proximity
The proximity is around twelve to sixteen weeks. Planning permission will take about twelve to sixteen weeks and we could expect the contractors to start work within the next month.
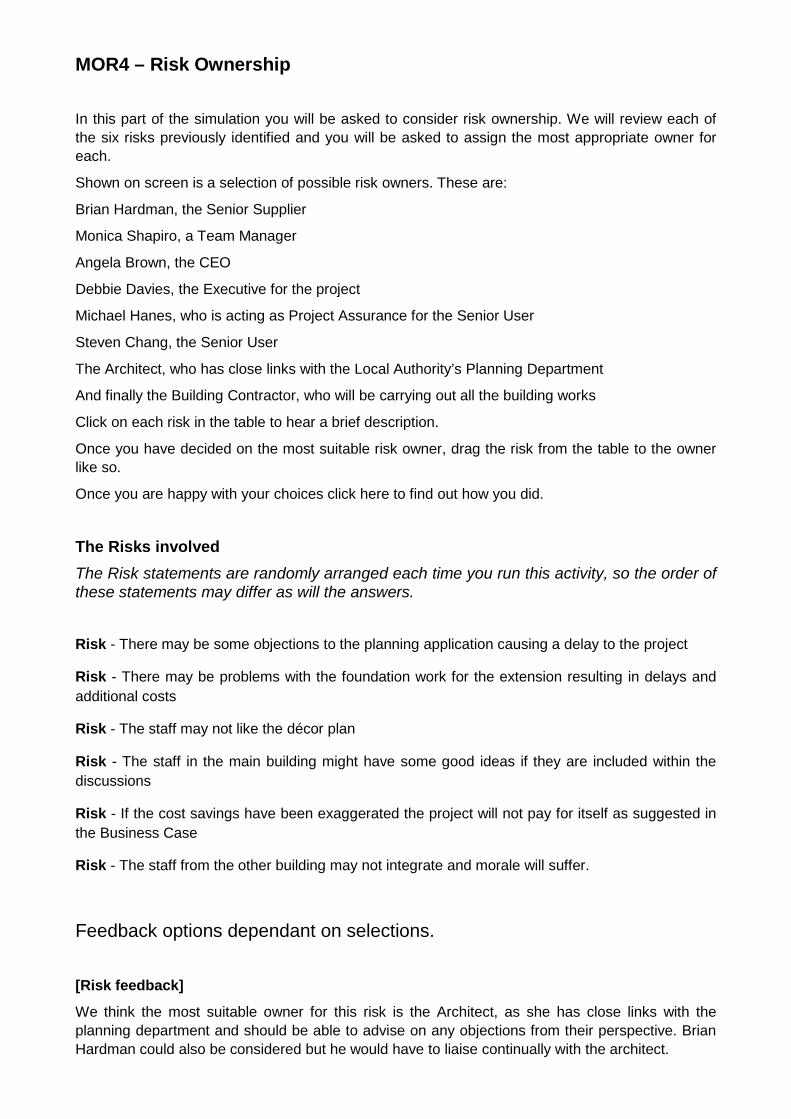
MOR4 – Risk Ownership In this part of the simulation you will be asked to consider risk ownership. We will review each of the six risks previously identified and you will be asked to assign the most appropriate owner for each.
Shown on screen is a selection of possible risk owners. These are:
Brian Hardman, the Senior Supplier
Monica Shapiro, a Team Manager
Angela Brown, the CEO
Debbie Davies, the Executive for the project
Michael Hanes, who is acting as Project Assurance for the Senior User
Steven Chang, the Senior User
The Architect, who has close links with the Local Authority’s Planning Department
And finally the Building Contractor, who will be carrying out all the building works
Click on each risk in the table to hear a brief description.
Once you have decided on the most suitable risk owner, drag the risk from the table to the owner like so.
Once you are happy with your choices click here to find out how you did.
The Risks involved The Risk statements are randomly arranged each time you run this activity, so the order of these statements may differ as will the answers.
Risk - There may be some objections to the planning application causing a delay to the project
Risk - There may be problems with the foundation work for the extension resulting in delays and additional costs
Risk - The staff may not like the décor plan
Risk - The staff in the main building might have some good ideas if they are included within the discussions
Risk - If the cost savings have been exaggerated the project will not pay for itself as suggested in the Business Case
Risk - The staff from the other building may not integrate and morale will suffer.
Feedback options dependant on selections. [Risk feedback]
We think the most suitable owner for this risk is the Architect, as she has close links with the planning department and should be able to advise on any objections from their perspective. Brian Hardman could also be considered but he would have to liaise continually with the architect.
[Risk feedback]
We think the Building Contractor would be the most suitable owner for this risk. He will be able to advise immediately if early investigations of the site indicate that there might be problems with the foundations.
[Risk feedback]
We think Steven Chang or Michael Hanes would be suitable owners for this risk as they are both close to the user community. Michael may be the better choice as he is likely to have more day-to-day involvement with the users.
[Risk feedback]
Michael or Steven would be suitable owners for this risk as they are both close to the user community. As he is likely to have more day-to-day involvement with the users Michael may be the best choice here.
[Risk feedback]
Debbie Davies is the most suitable owner of this risk. As Executive, the Business Case will be her main concern and she will be in regular contact with Angela (who will be taking a corporate role).
[Risk feedback]
Steven Chang or Michael Hanes would be suitable risk owners here as both are close to the user community. Mike’s day-to-day involvement with the users could make him the preferred choice.
MOR5 – Risk Response
In this part of the simulation we will consider Risk Response.
The Risk Response process should involve identifying and evaluating a range of options for treating risks, and preparing and implementing risk management plans.
The project team have met to consider three of the risks and have some suggested responses which we need to consider. There are multiple responses to each risk.
Listen to each and decide whether the response type is, Prevention, Reduction, Transference, Acceptance or Contingency.
Indicate your answers by checking the appropriate box in the ‘answer table’. Once you’re happy, check your answers by clicking the Submit button.
MOR5 – Start Simulation – Risk 1
Consider the risk on screen, listen to the suggested responses then indicate your answers in the answer table.
Feedback options dependant on selections. [MOR5 – R1R1]
The architect suggested that we ‘ask the staff to review the plans once they are completed as this would limit the number of changes.’ This is an example of risk ‘reduction’.
[MOR5 – R1R2]
Steve Chang, the Senior User suggested a risk ‘prevention’ approach by proposing that ‘staff should discuss the plans with the architect, before they are drawn up.’ It could be argued that this is "reduction" as it is not guaranteed to fully remove the risk.
MOR5 – Simulation – Risk 2
Now let’s think about responses to this risk. Again, listen to the suggested responses then mark your answers in the answer table.
Feedback
[MOR5 – R2R1]
Jeff Wall, one of the Team Managers on the project, suggested that ‘if there are any objections to the planning application, the project team should just deal with them as they occur.’ This is an example of risk ‘acceptance’.
[MOR5 – R2R2]
Brian Hardman suggested a risk ‘prevention’ approach by recommending that ‘the planning application be discussed with the owners of the adjoining buildings.’
[MOR5 – R2R2]
‘Discuss the application with the Local Authority’ was the architect’s suggestion to this risk. This is an example of risk ‘reduction’.
MOR5 – Simulation – Risk 3
Finally, let’s consider the responses to this risk and mark your answers in the usual way.
Feedback
[MOR5 – R3R1]
By proposing that ‘we do nothing,’ Brian suggests that we ‘accept’ the risk.
[MOR5 – R3R2]
Brian’s suggestion of asking the contractor, ‘to confirm that the project will be delivered on time and within budget and asking them to own this risk,’ is an example of risk transference.
[MOR5 – R3R32]
By asking the contractor to ‘prepare a set of options that can be invoked if there are problems with the foundations’, the architect suggested a risk contingency.

MOR6 – Summary During this exercise we have looked at different types of risks within a project and ways in which they are evaluated and the mitigating actions that might be implemented.
It is important to remember that most of risk analysis is subjective. All risk actions, apart from acceptance, will incur cost and you need to be sure the risks are sufficiently serious before this additional money is spent. This is why the Project Board decides whether to implement the responses that the project manager suggests.
QUALITY QUAL1 – Introduction Quality is broadly defined as “fitness for purpose” or “meeting the customer’s need”. Typically many people refer to quality in a subjective way such as it must work all the time, when they mean it must work between 9am and 5pm, Monday to Friday, or it must be a warm room, when they actually mean the ambient temperature must be between 18 and 22 degrees.
Within PRINCE2 these subjective statements are referenced as Customer’s Quality Expectations and they are translated into measureable Acceptance Criteria.
The way in which these Acceptance Criteria are delivered is described in the PRINCE2 approach to Quality Management. Key elements of this approach include the Quality Management Strategy, which describes the overall approach to quality in the project, and Product Descriptions which inform the team what each product comprises and its associated quality criteria.
In this simulation you will be asked to populate a Product Description for one of the products of this project.
You can find further useful information on Quality in a Project Environment in Chapter 6 of the PRINCE2 manual.
You will also find many useful references in the Marking Up section of the course accessible from the Main Menu.
QUAL2 – Build a Product Description
Your first task is to build the framework for a Product Description. Using your knowledge of PRINCE2, identify the correct titles to be included in the document.
Use your mouse to highlight the correct titles from the table on screen. Once you’re happy with your selection click here to score your answers.
Feedback QUAL2 – Activity 1
[Answer – All correct]
Yes, all correct. Let’s move on to the next part of the exercise.
[Answer – Incorrect]
No, we don’t still fully agree, the correct titles are:
• Quality- skills required
• Quality tolerance
• Identifier
• Quality responsibilities
• Development skills required
• Quality method
• Format and presentation
• Composition
• Purpose
• Title
• Derivation
• Quality criteria
Major risks and Timescales would typically be found in a Business Case. Period Covered can be found in several PRINCE2 outline documents including Highlight Reports. Finally Priority can be found in documents associated with issue handling, including the Issue Register.
Let’s move on to the next part of the exercise.
QUAL2 – Activity 2
The second task in this exercise is to arrange the headings into the correct order. Use your mouse to drag the headings shown on screen into their usual order in a Product Description document.
Once you’re happy with your selection click here to listen to feedback.
Feedback
[Answer – all correct]
Yes, we agree with all your choices, well done.
[Answer – have another go]
No, we don’t fully agree. Try making some changes and re-submitting your answers.
[Answer - Incorrect]
No, we still don’t agree. Appendix A of the PRINCE2 manual lists the titles of a Product Description in the following order:
• Identifier
• Title
• Purpose
• Composition
• Derivation
• Format and presentation
• Development skills required
• Quality criteria
• Quality tolerance
• Quality method
• Quality-skills required
• Quality responsibilities
You might want to take a look at this now.
QUAL3 – Project Meetings
Here you have the opportunity to listen to a meeting between Stacey Brewins the Project Manager for the extension project and Claire Pope. Claire is the manager of the interior decorating company contracted to complete the decoration of the new extension.
You can listen to the meeting by clicking here. Alternatively you can print a transcript of the meeting by clicking here.
QUAL3 – Start Simulation – Product description - Exercise 1
Okay. We have reviewed the meeting between Stacey the Project Manager and Claire the manager of the decorating company.
We will present important statements from Stacey’s interview on screen. Use your skill and judgement to categorise each statement under the most appropriate Product Description heading.
The choices available are Purpose, Composition, Derivation, Format and Presentation, Development Skills Required, Quality Criteria, Quality Method, Quality Tolerance and Quality-Skills Required.
Drag the statement title on screen to the relevant location in the Product Description document, like so.
Alternatively, if you think the statement has no bearing on the Product Description then drag it to the waste bin, like so.
Once you are happy with your choices click here to find out how you did.
Feedback options dependant on selections. The statements are randomly arranged each time you run this activity, so the order of these statements may differ as will the answers.
[Answer – all correct]
Yes, we agree with all your choices, well done.
[Answer – have another go]
No, we don’t fully agree. Try making some changes and re-submitting your answers.
[Answer - Incorrect]
No, we still don’t fully agree
Claire will be producing the décor plan. Statement 1 will be entered under the ‘Development skills required’ heading.
This will ensure that everybody understands what the décor plan is for and in the longer term will make sure that everybody is pleased with the scheme before the work starts. Therefore statement 2 should be entered under ‘Purpose’.
Knowing what is required where and in what amounts is key for the decorator and is one of the reasons for having the plan. Statement 3 should be entered under ‘Purpose’.
Keeping the cost down is a by-product of having the plan, it is not its purpose, which is more correctly described in statement 3. Therefore statement 4 has no place in our Product Description.
The scheme will be part of the décor plan and hence should be under the ‘Composition’ or ‘what it’s made up of’ heading.
We were told that the architect is supplying the colour scheme. As such statement 6 would be entered under ‘Derivation’.
The set of drawings will show the decorator where each colour is going and therefore is part of the décor plan. Therefore statement 7 should be entered under ‘Composition’.
The relationship between the colours is a result of having the drawings and the colour scheme and is not a deliverable in its own right.
Statement 8 has no place in our Product Description.
The RAL colours, swatches and artists impressions outlined in statement 9 will be required as part of the décor plan and should therefore be part of the ‘Composition’.
In Statement 10, Stacey says the artist’s impressions are not absolutely necessary. This statement would form part of ‘Quality Tolerance’.
RAL numbers and artist’s impressions have been specified by Claire. Statement 11 should be entered under ‘Derivation’.
Statement 12 should be entered under ‘Derivation’, as Claire has agreed to provide the swatches.
There has been no reference to a interior designer although it is likely that the architect employs one. There’s no place for statement 13 in our Product Description.
In statement 14, Standard Format has been requested and should be entered under ‘Format and Presentation’. It is also possible for this statement to be entered under ‘Quality Criteria’.
The Architect, Senior User and Staff from departments are able to check that everything is included in the décor plan as specified and will gain buy-in from the users. Statement 15 would appear under ‘Quality-Skills required’.
Statement 16 consists of a list of measurable criteria which can be applied to the décor plan. As such they form part of the ‘Quality Criteria’.
Quality review is a specific technique in PRINCE2 used to review documentation. Statement 17 should appear under ‘Quality Method’.
Claire has stated that it is her responsibility to produce the décor plan. So statement 18 has no place in our Product Description.
The actual paint is not part of the décor plan and as such statement 19 has no place in our Product Description.
QUAL4 – Summary
This concludes the Quality simulation. Over the last few pages you have:
• Been introduced to the format of a typical Product Description, and
• Gained some practical experience in identifying relevant information for inclusion in a Product Description.
Session4 – Marking Up the PRINCE2 Manual S4P1 – Introduction Hello and welcome to the PRINCE2 manual ‘Marking Up’ exercise.
The purpose of the exercise is to provide you with a detailed insight into the structure of the PRINCE2 manual, and specifically to highlight many of the key statements. Our intention is also to breakaway from the e-learning course and to absorb you in the manual.
Candidates may take a copy of the PRINCE2 manual into the Practitioner exam. If candidates are not familiar with the contents of the manual, valuable time can be lost in retrieving the relevant information.
Highlighting the manual will provide you with ready access to areas of the manual frequently referenced in the Practitioner exam. So let’s find out a little more.
S4P2 –Time and Materials This exercise is very useful, but typically is quite time consuming. As such you should allow 4 to 5 hours to complete it. You will need a copy of the PRINCE2 manual, highlighter pens, a pencil or pen and a selection of small post-it notes in order to complete the exercise.
As you work through the exercise we suggest that you refer to the PRINCE2 Foundation e-learning course on a section by section basis, and then refer to the manual and highlight the appropriate
elements as suggested in the exercise document. This will help emphasise the context of the information and, through reading the supporting text, facilitate further learning, familiarisation and appreciation of the PRINCE2 method.
You’ll notice in many cases, the context of the statement to be highlighted has been left deliberately vague. This is to ensure that you read and understand the full text involved and also read the text associated with the highlighted element.
S4P3 –How to go about it The exercise asks you to highlight important points in the manual and identifies six different ways of doing so. These can be either a sentence, marked with a ‘S’, a paragraph marked with a ‘P’, bullet points, indicated with a ‘B’, a diagram marked with a ‘D’, a heading which is marked with an ‘H’ and a text box marked with a ‘TB’.
Click here to view an example of each.
The PRINCE2 manual’s table of contents is comprehensive, but practical experience has shown that annotating the manual with tabs, means students can reference the information much more quickly. So the first part of this exercise is to apply small post-it notes to the manual, adding one per Process and one per Theme along the long edge, and one for the Tailoring chapter and Appendices along the short edge. Once you have completed this, you’re now ready to begin the rest of the exercise.
This concludes this overview of the Marking Up exercise. Remember you can access the exercise in PDF form by clicking here.
Session5 – Practical Practitioner Exercises S5P1 – Introduction Hello. This section of the course contains a selection of Practitioner based exercises. These are intended to extend your ability to apply PRINCE2 in a practical manner.
Each exercise is stand alone and is intended to increase your knowledge in specific areas of the PRINCE2 manual. Subjects include Risk Analysis, Organisation and the Business Case.
Feel free to attempt the exercises in any order. You may find they provide a useful departure from the e-learning course. The exercises are provided in pdf form for your convenience. You can view or print each document by clicking its title in the table.
Once you have completed each exercise, you can view or print a suggested answer sheet from this table.
The suggested answers are intended to provide you with valuable feedback on how you should have approached each activity and why.
Session6 – Practitioner Exam Technique S6P1 – Introduction Hello and welcome to the lesson on PRINCE2 Exam Technique. The objective of this lesson is to provide you with a thorough understanding of; the structure of the PRINCE2 Practitioner examination and the level of competence required to pass the Practitioner exam
We will go on to look at the nature of the practitioner examination itself and take a detailed look at the documents you’ll encounter in the examination, including the Scenario, Question and Answer booklets.
Finally we will look at the format of the examination itself, and look in some detail at the format of the questions. We conclude the lesson by looking at the guidelines provided to candidates when answering questions and how best to manage your time in the exam.
S6P2 – Examination Overview The Practitioner examination is the second of the two exams that must be passed if you are to become a PRINCE2 Practitioner. In this session we will look at the make-up of the examination and provide some useful tips in approaching the exam proper.
In order to pass the Practitioner examination, candidates must exhibit the competence required for the Foundation paper, and show that they can apply and tune PRINCE2 to address the needs and problems of a specific project scenario.
Specifically, candidates must be able to:
• Know or be able to comment on detailed explanations of all processes, themes and techniques, and worked examples of all PRINCE2 management products as they might be applied to address the particular circumstances of a given project scenario
• Demonstrate that they understand the relationships between processes, themes,
techniques and PRINCE2 management products and can apply this understanding
• Show that they understand the reasons behind the processes, themes and techniques in PRINCE2
We will be looking later at the detailed format of Practitioner papers, but in summary, each exam is based on a single project scenario against which the candidate is asked 8 multiple choice questions, each consisting of many parts. A total of 80 marks are available.
Candidates have two and a half hours in which to answer all eight questions.
Unlike the Foundation examination, candidates may take a copy of the PRINCE2 manual into the exam and this can be used as reference material when answering the questions. It is not permitted to take any other paper-based or electronic material, for instance laptop computers, into the examination.
S6P3 – Examination Overview The APM Group Limited is accredited by UKAS, a supervising organisation who accredit such certification bodies.
A requirement of this accreditation, which was introduced in October 2000, is continuous assessment and as such, it was determined that all PRINCE2 Practitioners should be re-registered within 5 years of their original certificate and every five years thereafter.
This re-registration comprises a 1-hour examination, set at the same standard as the Practitioner exam.
All people taking the Practitioner exam do so, on the basis that they agree to this re-registration requirement and are designated “Registered Practitioners” to differentiate them from “Practitioners” who took the exam before October 2000 and have not re-registered.
The Re-registration exam can be taken in paper or a computer-based format.
S6P4 – The Practitioner Exam The Practitioner examination is designed to test your ability to identify the principles of the method in a given scenario, by answering specific questions.
Practitioner candidates are presented with three examination booklets. The physical format of the paper booklets look something like this:
The three booklets are as follows;
A Scenario Booklet, a Question Booklet and an Answer Booklet
We will take a few moments to look at each of these in more detail here.
S6P5 – The Practitioner Exam - Scenario Booklet The Scenario Booklet forms the basis of the PRINCE2 practitioner examination. All the multiple choice questions are based on this single project scenario. The Scenario booklet also contains any additional information required for any specific questions. Any additional information is only to be used for the relevant question and this is clearly indicated in the Scenario Booklet.
Candidates are expected to study and understand the contents of the Scenario Booklet at the beginning of the Practitioner examination. Typically the contents consist of one or two pages containing a high level project overview.
The front cover of the Scenario Booklet provides an overview of the examination procedure and associated marking scheme. Clear instructions are provided on how to use the accompanying Question Booklet and the way in which you should document your answers.
S6P6 – The Practitioner Exam - Question Booklet Practitioner candidates are also presented with a Question Booklet containing eight multiple choice questions. The booklet looks something like this. The inside page contains a list of syllabus areas covered, while the remainder of the booklet is made up of the eight questions and answer options.
Each of the eight questions has a potential 10 marks available, and is broken down into a number of sections. One mark is assigned to each sub-part. Each question has a suggested duration of 15 minutes. It is suggested that candidates allow 5 minutes to familiarise themselves with the project scenario, which leaves 10 minutes from the 150 minutes allowed, to review your answers at the end of the examination.
Each question also includes the following information;
• the syllabus area being covered, • and the question number and sub - part
Where appropriate, each question contains additional scenario based information specific to the syllabus area being covered. Where additional information should be referenced, this is clearly stated in the relevant question.
Information provided within a question must only be applied to that question and not referenced elsewhere in the booklet.
S6P7 – The Practitioner Exam - Question Booklet
The practitioner multiple choice questions are presented in two or three different forms. Here are a couple of examples.
On the left, is a typical column type question where candidates are asked to match statements in column 1 with possible answer choices from column 2. There may be multiple correct answers to some questions, and this is indicated in the question.
On the right, is an example of an ‘assertion – reason’ style question. Candidates are asked to establish whether the assertion and associated reason are true or false. Candidates are presented with a selection of answer permutations like so, and must select the appropriate answer option, entering them in the Answer booklet.
We have collated information on the types of questions used in the Practitioner exam into a simple document called ‘Question Styles’. We recommend that you study this document prior to attempting the mock exams.
You can print a copy of this document by clicking here.
S6P8 – The Practitioner Exam - Answer Booklet
Regardless of the style of questions asked, candidates must submit all given answers in the Answer Booklet provided. The answer booklet takes a common format and looks something like this.
It consists of a matrix of question numbers and answer options. You should work through the Question and Answer booklets simultaneously, entering your chosen answer in the matrix as you go.
The following guidelines are provided when completing the Answer Booklet.
Answers should be indicated in pencil
Do not use coloured pens or highlighters
Do not use white fluid
If you wish to change an answer, erase your original mark and place your mark in your preferred answer.
S6P9 – The Practitioner Exam - Timing
As with any examination, timing your activity can be the difference between a pass and fail, and the practitioner examination is no exception. Each question is expected to take fifteen minutes to

complete, and you should attempt to answer all eight of the questions in the two and a half hours allowed.
Be aware of the time, and don’t dwell too long on any one question, if you’re not sure, mark the question in the Question Booklet, and move on to the next question. Don’t be tempted to mark the Answer Booklet, as it may cause confusion with the computerised marking device.
If you have sufficient time at the end of the exam, you can return to your marks in the Question Booklet, to review any unanswered questions later.
Another important point to remember is that all questions have just one answer unless it is specifically stated in the question. If you mark more than the required number of answers, the question will score zero.
This concludes this overview of the PRINCE2™ Practitioner examination.
If you would like to try your hand at our electronic exam simulator, you can do so by selecting the Practitioner exam simulator from the main menu. Alternatively, if you would like try your hand at a paper based question, you can access some sample questions in session 8.
This concludes this lesson on PRINCE2 Practitioner examination technique.
Session7 – PRINCE2 Practitioner Exam Simulator S7P1 – Introduction Welcome to the PRINCE2 Practitioner exam simulator. In order to help with your study and provide you with the best chance of passing the Practitioner examination, this course includes two electronic Practitioner examination questions in modular, question by question format. Each question contains valuable feedback on each answer option. Before you begin, it’s worthwhile spending a few minutes studying this tutorial which has been designed to help you get the best from the exam simulator. If you have completed this tutorial previously and would like to skip to either of the papers, you can do so by selecting either paper’s menu tab.
S7P2 – Exam Simulator The syllabus for the PRINCE2 Practitioner exam assumes knowledge of 15 different subject areas. The Practitioner exam itself will include a selection of 8 questions from the syllabus areas. To provide users with a flexible approach, each of the 2 paper’s questions can be attempted individually. A maximum of 10 marks is available for each. Feedback will be provided on your score once you have submitted your answers for marking. Each paper contains a single scenario. All the questions in each paper are based on their associated scenario. You should familiarise yourself with the contents of this document before attempting any of the questions in each paper. You can print a copy of this document by clicking here. If you need assistance with the style of questions you can view and print our ‘Questions Style’ document by clicking here. To attempt the question, then select the question in the question menu.
S7P3 – Exam Simulator Tutorial Once you select a question, then the simulator screen looks like this. The ‘scenario’ on which all the questions are based, is displayed on the right side of the screen. Any supporting information relevant to a specific question can also be accessed here. The questions are shown in the upper left portion of the screen. The questions are frequently broken into sub parts and these can be accessed here. The electronic answer table is positioned in the lower left. To answer a question, simply select the corresponding letter in the table.
S7P4 – Exam Simulator Tutorial To make the best use of the available space, the frame between all sections is moveable. By clicking on the frame edges, you can adjust the size of the frames, like so. You may need to scroll the question pane up and down, to do this use the scroll bar positioned here. To select an answer option, just click on the letter in the electronic answer table. You’ll notice that once you have answered a question that its colour changes. This provides a useful visual indicator as to which questions remain unanswered. Don’t be concerned about changing your answers. Your answers won’t be scored until you are happy with your choices. To submit your answers for marking, click the submit button shown here.
Once you have completed the exam, you will have the opportunity to review your answers. Finally the time remaining is shown at the bottom of the screen.
Session8 – PRINCE2 Practitioner Sample Exam Paper S8P1 – Introduction The objective of this session is to provide you with practical ‘hands on’ experience of the Practitioner examination and the associated paper-based documents. At this point you should have completed the session on Practitioner Exam Technique’, and you should be familiar with the format of the paper-based documents. If you haven’t completed this session already, then you might want to look at this now. The session contains 2 sample Practitioner papers in printable form. Included in each paper are, the scenario, questions and associated rationale. We have also provided a printable answer booklet. If time is limited, you may find it useful to try your hand at just one or two questions. Before attempting the questions, take the time to familiarise yourself with the relevant scenario document. Once you are ready to attempt a question, then allow no more than 15 to 20 minutes for each. Please note that the questions included here are also included in electronic form, in the Practitioner exam simulator.
Once you have completed your questions, take the time to compare your answers to the rationale, particularly those questions which you answered incorrectly, as these can provide useful pointers on where you should focus further study prior to taking the exam proper.